Embed Size (px)
Citation preview

VMware AirWatch Windows 7 Platform GuideDeploying and managing Windows 7 devices.AirWatch v9.2
Have documentation feedback? Submit a Documentation Feedback support ticket using the Support Wizard onsupport.air-watch.com.Copyright©2017 VMware, Inc. All rights reserved. This product is protected by copyright and intellectual property laws in the United States and other countries as well as byinternational treaties. VMware products are covered by one ormore patents listed at http://www.vmware.com/go/patents.
VMware is a registered trademark or trademark of VMware, Inc. in the United States and other jurisdictions. All othermarks and names mentioned hereinmay be trademarks of theirrespective companies.
VMware AirWatchWindows 7 Platform Guide | v.2017.09 | September 2017
Copyright©2017 VMware, Inc. All rights reserved.
1

Revision TableThe following table displays revisions to this guide since the release of AirWatch v9.2.
Date Reason
September 2017 Initial upload.
2
VMware AirWatchWindows 7 Platform Guide | v.2017.09 | September 2017
Copyright©2017 VMware, Inc. All rights reserved.

Table of ContentsChapter 1: Overview 5
Introduction toWindows 7 6Windows 7 Requirements 6
Chapter 2: Windows 7 Enrollment 8
Windows 7 Enrollment Overview 9Windows Desktop andWindows 7 Devices 9AirWatch Agent forWindows Enrollment 10Enroll Windows 7 Devices with the AirWatch Agent 10Install the AirWatch Agent on a Base Operating System Image 11Enroll Windows 7 Devices Through a Proxy 11Windows 7 Silent Enrollment 13Enroll Windows 7 Devices Silently 13Silent Enrollment Parameters and Values 13
Chapter 3: Windows 7 Device Profiles 16
Windows 7 Profiles Overview 17Configure aWi-Fi Profile (Windows 7) 17Enforce a VPN Profile (Windows 7) 18Credentials Profile (Windows 7) 19Create a Credentials Profile (Windows 7) 19Configure a Shortcuts Profile (Windows 7) 20Create an Exchange Web Services Profile (Windows 7) 21Encryption Profile (Windows 7) 21Configure an Encryption Profile (Windows 7) 23Configure a Passcode Profile (Windows 7) 24Configure an Automatic Updates Profile (Windows 7) 26Configure a Firewall Profile (Windows 7) 27
Chapter 4: Compliance Policies 29
Compliance Policy Overview 30
3
VMware AirWatchWindows 7 Platform Guide | v.2017.09 | September 2017
Copyright©2017 VMware, Inc. All rights reserved.
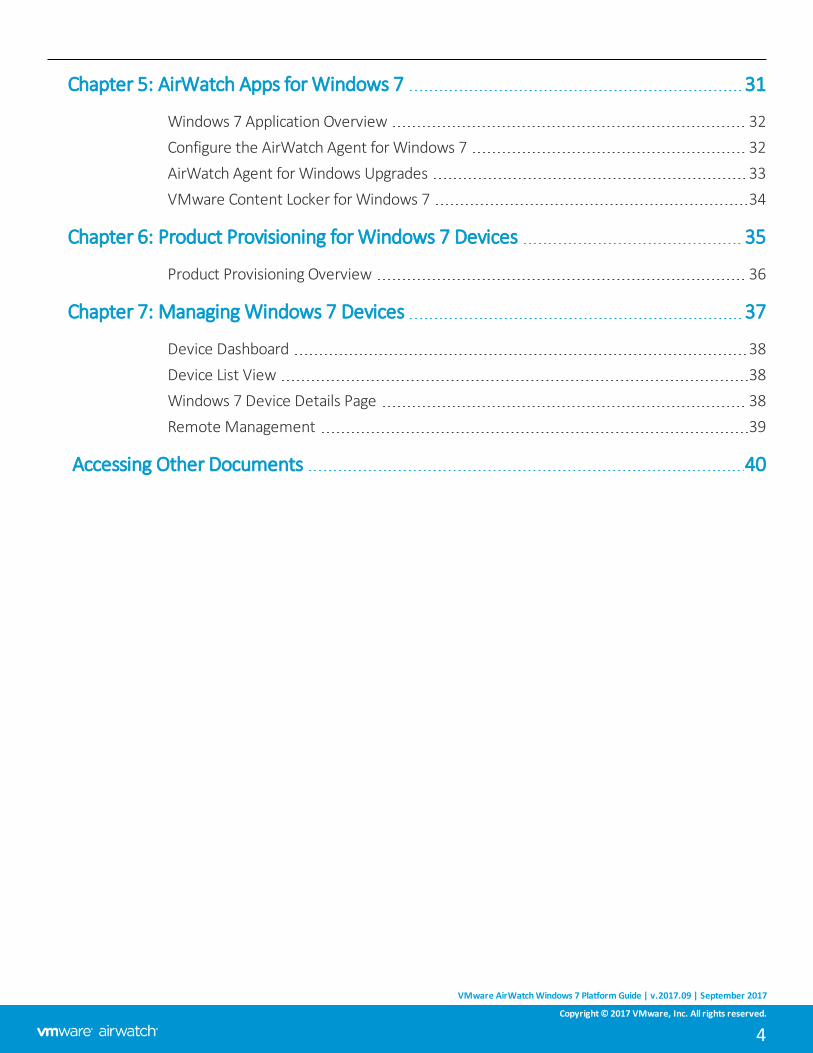
Chapter 5: AirWatch Apps forWindows 7 31
Windows 7 Application Overview 32Configure the AirWatch Agent forWindows 7 32AirWatch Agent forWindows Upgrades 33VMware Content Locker forWindows 7 34
Chapter 6: Product Provisioning forWindows 7 Devices 35
Product Provisioning Overview 36
Chapter 7: ManagingWindows 7 Devices 37
Device Dashboard 38Device List View 38Windows 7 Device Details Page 38Remote Management 39
Accessing Other Documents 40
4
VMware AirWatchWindows 7 Platform Guide | v.2017.09 | September 2017
Copyright©2017 VMware, Inc. All rights reserved.

Chapter 1:OverviewIntroduction toWindows 7 6
Windows 7 Requirements 6
5
VMware AirWatchWindows 7 Platform Guide | v.2017.09 | September 2017
Copyright©2017 VMware, Inc. All rights reserved.

Introduction to Windows 7AirWatch provides you with a robust set ofmobility management solutions for enrolling, securing, configuring, andmanaging yourWindows 7 device deployment. Use AirWatch to ensure that your device fleet remains secured.
Through the AirWatch Console, you have several tools and features for managing the entire lifecycle of corporate andemployee-owned devices. You can also enable end users to perform tasks themselves, for example, through the Self-Service Portal and user self-enrollment, which saves you vital time and resources. AirWatch provides completemanagement solutions for enterprise-managed Windows laptop devices running Windows 7, 8, and 10.
AirWatch allows you to enroll both corporate and employee-owned devices to configure and secure your enterprise dataand content. By using of our device profiles, you can properly configure and secure yourWindows devices.
Windows 7 RequirementsBefore reading this guide, gather and prepare the requirements AirWatch requires for Windows 7 devices.
Platforms Supported
Windows 7 interchangeably refers to the following supported Windows Operating Systems:
Microsoft Windows
Operating System
32-bit Windows 7, Windows 8, or Windows 10
64-bit Windows 7, Windows 8, or Windows 10
Silent Enrollment Agent Requirements
Win32Agent_installer.exe file version 3.8.2 to 6.0.4 or AirwatchAgent.msi version 7.0.0 or later must be downloaded oraccessible to theWindows device.
Encryption
l Supported OS:Windows 7 Enterprise and Ultimate, 32-bit or 64-bit with .NET 4.5 framework.
l Levels of Encryption: System partition and complete hard disk.
l Default Encryption Type: BitLocker native encryption.
Enrollment Requirements for All Windows 7 Devices
l Enrollment URL – The web address entered into the Internet browser to begin the enrollment procedure. Thislocation is specific to your company's enrollment environment.
l Group ID – The unique identifier specific to the organization group within the environment which defines allconfigurations that devices receive.
Chapter 1: Overview
6
VMware AirWatchWindows 7 Platform Guide | v.2017.09 | September 2017
Copyright©2017 VMware, Inc. All rights reserved.

l Credentials – The username and password used to authenticate the end-user’s account and to access the AirWatchenvironment. These credentials can be identical to the end-user's directory services credentials or specific toAirWatch.
l Local Administrator Privileges – End users must have Admin Rights or be part of the Administrator Group toproperly run the AirWatch Agent EXE on their device.
AirWatch Agent Prerequisites
Before using the AirWatch Agent for Windows 7, you must download the following:
l Microsoft Visual C++ 2015 Redistributable (x86)
l Microsoft Visual C++ 2015 Redistributable (x64)
If you do not have .NET 4.5 or above installed before beginning the device enrollment process, the AirWatch Agentprompts you to install it before continuing enrollment.
Chapter 1: Overview
7
VMware AirWatchWindows 7 Platform Guide | v.2017.09 | September 2017
Copyright©2017 VMware, Inc. All rights reserved.

Chapter 2:Windows 7 EnrollmentWindows 7 Enrollment Overview 9
Windows Desktop andWindows 7 Devices 9
AirWatch Agent forWindows Enrollment 10
Enroll Windows 7 Devices with the AirWatch Agent 10
Install the AirWatch Agent on a Base Operating SystemImage 11
Enroll Windows 7 Devices Through a Proxy 11
Windows 7 Silent Enrollment 13
Enroll Windows 7 Devices Silently 13
Silent Enrollment Parameters and Values 13
8
VMware AirWatchWindows 7 Platform Guide | v.2017.09 | September 2017
Copyright©2017 VMware, Inc. All rights reserved.
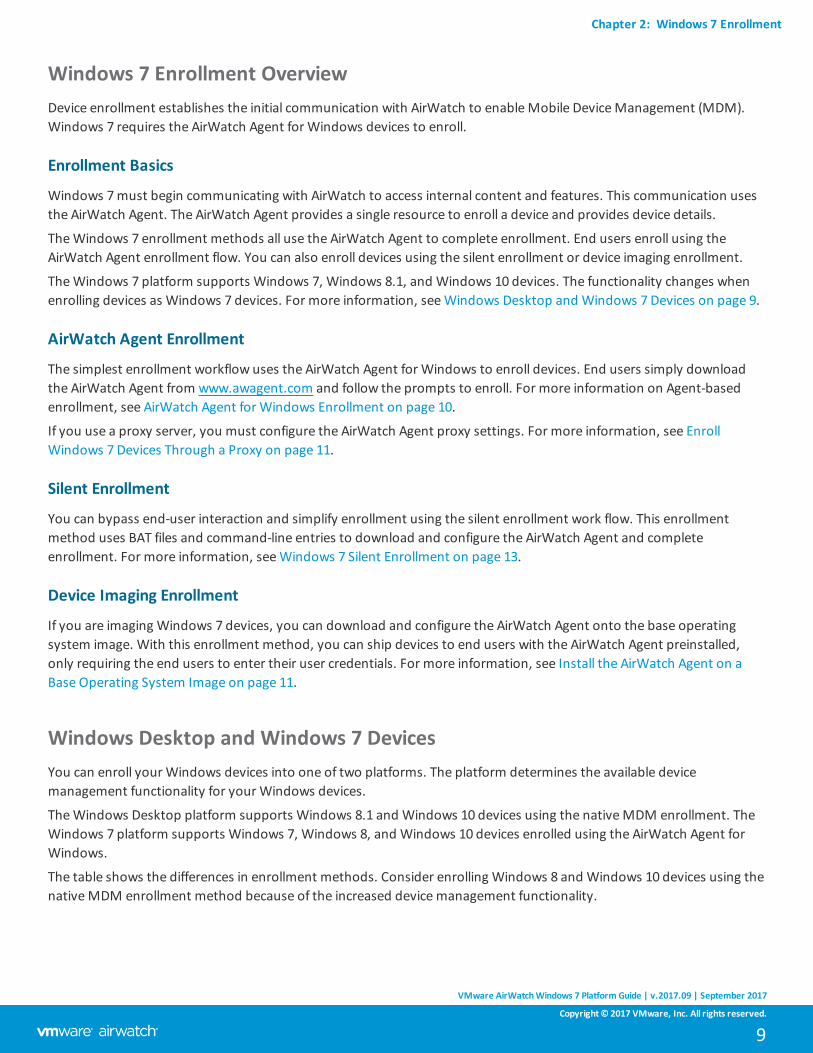
Windows 7 Enrollment OverviewDevice enrollment establishes the initial communication with AirWatch to enableMobile DeviceManagement (MDM).Windows 7 requires the AirWatch Agent for Windows devices to enroll.
Enrollment Basics
Windows 7must begin communicating with AirWatch to access internal content and features. This communication usesthe AirWatch Agent. The AirWatch Agent provides a single resource to enroll a device and provides device details.
TheWindows 7 enrollment methods all use the AirWatch Agent to complete enrollment. End users enroll using theAirWatch Agent enrollment flow. You can also enroll devices using the silent enrollment or device imaging enrollment.
TheWindows 7 platform supports Windows 7, Windows 8.1, and Windows 10 devices. The functionality changes whenenrolling devices as Windows 7 devices. For more information, seeWindows Desktop and Windows 7 Devices on page 9.
AirWatch Agent Enrollment
The simplest enrollment workflow uses the AirWatch Agent for Windows to enroll devices. End users simply downloadthe AirWatch Agent from www.awagent.com and follow the prompts to enroll. For more information on Agent-basedenrollment, see AirWatch Agent for Windows Enrollment on page 10.
If you use a proxy server, you must configure the AirWatch Agent proxy settings. For more information, see EnrollWindows 7 Devices Through a Proxy on page 11.
Silent Enrollment
You can bypass end-user interaction and simplify enrollment using the silent enrollment work flow. This enrollmentmethod uses BAT files and command-line entries to download and configure the AirWatch Agent and completeenrollment. For more information, seeWindows 7 Silent Enrollment on page 13.
Device Imaging Enrollment
If you are imaging Windows 7 devices, you can download and configure the AirWatch Agent onto the base operatingsystem image. With this enrollment method, you can ship devices to end users with the AirWatch Agent preinstalled,only requiring the end users to enter their user credentials. For more information, see Install the AirWatch Agent on aBase Operating System Image on page 11.
Windows Desktop and Windows 7 DevicesYou can enroll your Windows devices into one of two platforms. The platform determines the available devicemanagement functionality for your Windows devices.
TheWindows Desktop platform supports Windows 8.1 and Windows 10 devices using the nativeMDM enrollment. TheWindows 7 platform supports Windows 7, Windows 8, and Windows 10 devices enrolled using the AirWatch Agent forWindows.
The table shows the differences in enrollment methods. Consider enrolling Windows 8 and Windows 10 devices using thenativeMDM enrollment method because of the increased devicemanagement functionality.
Chapter 2: Windows 7 Enrollment
9
VMware AirWatchWindows 7 Platform Guide | v.2017.09 | September 2017
Copyright©2017 VMware, Inc. All rights reserved.

Functionality Windows 7 Windows Desktop
NativeMDM Enrollment Method ✓
AirWatch Agent Enrollment ✓
AirWatch Protection Agent Support ✓ ✓
Supports Full Windows 10 functionality ✓
Supports SCCM Managed Devices ✓ ✓
Supports Windows 7 Devices ✓
AirWatch Agent for Windows EnrollmentThe AirWatch Agent, available through theWindows Store, provides a single resource for enrollment and facilitatescommunication between the device and the AirWatch Console. Use the AirWatch Agent to simplify enrollment andenable full MDM functionality.
Consider using the AirWatch Agent for Windows to enroll your Windows 7 devices as the agent provides the simplestenrollment flow for users. You may also consider awagent.com to start enrollment.
The same AirWatch Agent works for both Windows Desktop and Windows 7 devices. When the AirWatch Agent installerruns on a device, the agent checks the enrollment status of the device. If the device is enrolled through WindowsDesktop, the agent acts as the AirWatch Protection Agent and installs onto the device. If the device is not enrolled, theAirWatch Agent begins the enrollment process to enroll the device as a Windows 7 device.
Note: If the enrollment process is interrupted, launching the AirWatch Agent again automatically reinitiates theenrollment process. To relaunch the agent, double-click the icon.
Enroll Windows 7 Devices with the AirWatch AgentUse the AirWatch Agent to start enrollment of your Windows Desktop devices. The AirWatch Agent provides a simplifiedenrollment flow for end users that is quick and easy to follow.
To enroll Windows 7 devices using the AirWatch Agent:
1. Navigate to www.awagent.com. The AirWatch Agent Installer begins downloading.
2. Start the installer once the download completes.
3. Select Run to begin the installation.
4. Select Email if you have AirWatch Auto-Discovery enabled, otherwise select Server Detail.
5. Complete the settings required based on the authentication type selected:
l Enter the email address to auto-fill the server details screen. Select Next and the details are entered.
l Enter the Server Name and Group ID if you are not using AirWatch Auto-Discovery to complete the settings.Select Next.
Chapter 2: Windows 7 Enrollment
10
VMware AirWatchWindows 7 Platform Guide | v.2017.09 | September 2017
Copyright©2017 VMware, Inc. All rights reserved.

6. Enter theUsername and Password and select Next (Windows 7 images only).
7. Complete any optional screens.
8. Select Finish to complete the enrollment.
Once completed, AirWatch pushes profiles and products to the device.
Install the AirWatch Agent on a Base Operating System ImageDownload the AirWatch Agent onto a device and configure the AirWatch Agent for use on a base operating system imagefor deployment. This enrollment flow allows you to ship devices to users with the Agent preinstalled, only requiring endusers to enter their user credentials.
To begin the enrollment process on the behalf of the end user:
1. Navigate to awagent.com. The agent downloads immediately.
2. Run the Agent installer (AirWatchAgent.msi) and, if prompted, accept any security warnings.
3. Click Run to begin the AirWatch Agent installation wizard.
4. After installation and the AirWatch Agent starts, select the Settings icon ( ).
5. Select the operating system the image uses.
If you are enrolling a Windows 8.1 or Windows 10 device using the AirWatch Agent for Windows, you must selectThis is for Windows 7 Image. If you select This is for Windows 8.1/10, the devicemust be enrolled using MDMenrollment.
6. Enter the Server URL and Group ID.
7. Select Save.
The AirWatch Agent is now installed into the system image and starts on any imaged device so end users can enter theircredentials.
Enroll Windows 7 Devices Through a ProxyAWindows 7might be behind a proxy server that may prevent you from enrolling devices. if you use a proxy server,configure the proxy settings for the AirWatch Agent.
If you upgrade to the AirWatch Agent version 6.0.1+ from an older agent, any existing proxy settings automaticallyconfigure the proxy settings in the new agent.
To set up the Proxy configuration:
1. Start the AirWatch Agent.
2. Select the Settings icon ( ).
Chapter 2: Windows 7 Enrollment
11
VMware AirWatchWindows 7 Platform Guide | v.2017.09 | September 2017
Copyright©2017 VMware, Inc. All rights reserved.

3. Select the appropriate Proxy Settings:
Settings Descriptions
Auto-detect Select to have the AirWatch Agent automatically detect the proxy settings configured on thedevice browser and use those settings for communication with the AirWatch Console.
Manual Select to configure the proxy settings manually for the AirWatch Agent.
Proxy Type Displays HTTP as the proxy type.
Server Enter the proxy server URL and port number.
Proxy ServerRequires aPassword
Enable to enter the Username and Password for the proxy server.
4. Select Save to apply the Proxy Settings.
Use Test Settings before saving and applying the proxy settings.
5. Select Finish to apply the settings and close the AirWatch Agent.
Chapter 2: Windows 7 Enrollment
12
VMware AirWatchWindows 7 Platform Guide | v.2017.09 | September 2017
Copyright©2017 VMware, Inc. All rights reserved.
Windows 7 Silent EnrollmentYou can silently download the AirWatch Agent onto devices using BAT files and command-line entries. This enrollmentmethod bypasses end-users interactions and simplifies enrollment.
Running a command-line installation eliminates all InstallShield prompts so the admin does not need to selectacknowledgment buttons continuously. This installation method reduces the time it takes to install the AirWatch Agentand simplifies the process.
Installation of AirWatch Agent using silent enrollment assumes that the user accepts the EULA by default since allacknowledgment screens are automatically bypassed. The EULA is automatically accepted and not displayed.
Silent enrollment supports the following use cases:
l On a base OS image without enrolling the device.
l On a PC using command line switches to complete silent enrollment.
Important: Devices behind a proxy cannot be enrolled through Silent Enrollment.
Enroll Windows 7 Devices SilentlyDownload and install the AirWatch Agent onto a device without requiring end-user interaction. This enrollment flowallows you to bypass end users and enroll devices quickly and easily.
Note: If you are storing the AirWatch Agent on a network drive for later use, ensure that you are downloading thelatest version of the AirWatch Agent from awagent.com. Also, you can refer to Silent Enrollment Agent Requirementson page 6.
To enroll silently:
1. Navigate to awagent.com to download the AirWatch Agent.
Only download the AirWatch Agent. Do not start the executable or select Run as that initiates a standard enrollmentprocess and defeats the purpose of silent enrollment.
If necessary, move the AirWatch Agent from the download folder to a local or network drive folder.
2. Open a command line or create a BAT file and enter all the necessary paths, parameters, and values usinginformation shown in Silent Enrollment Parameters and Values on page 13.
3. Run the command. For examples of typical syntax, see Examples of Silent Enrollment on page 15.
The AirWatch Agent is installed on theWindows device without requesting you to select any acknowledgment buttons.
Silent Enrollment Parameters and ValuesSilent enrollment requires command-line entries or a BAT file to control how the AirWatch Agent downloads and installsonto the device.
Chapter 2: Windows 7 Enrollment
13
VMware AirWatchWindows 7 Platform Guide | v.2017.09 | September 2017
Copyright©2017 VMware, Inc. All rights reserved.

The following table lists all the possible enrollment parameters you can enter into a command line or into a BAT file, andthe respective values for each parameter. Parameters highlighted in blue and green are theminimum parametersrequired for enrollment. Blue designates image only. Blue plus green designates user enrollment.
Enrollment Parameters Values to Add to Parameter
/ENROLL Select 'Y' to enroll.
Select 'N' for image only.
/IMAGE Select 'Y' for image.
Select 'N' for enrollment.
/SERVER Enter the enrollment URL.
/LGName Enter organization group name.
/USERNAME Enter the user name for the user being enrolled or thestaging user name if staging the device on the behalf of auser.
/PASSWORD Enter the password for the user being enrolled or thestaging user password if staging the device on the behalfof a user.
/STAGEUSERNAME Enter user name for the enrolling user.
/SECURITYTYPE Needed if user account is added to AirWatch consoleduring enrollment process:
l Select 'D' for Directory.
l Select 'B' for Basic User type.
/STAGEEMAILUSRNAME* Enter the email user name for the user being enrolled.
/STAGEPASSWORD Enter the password for the user being enrolled.
/STAGEEMAIL* Enter the email address for the user being enrolled.
/DEVICEOWNERSHIPTYPE* Select 'CD' for Corporate Dedicated.
Select 'CS' for Corporate Shared.
Select 'EO' for Employee Owned.
Select 'N' for None.
/INSTALLDIR* Enter the directory path if you want to change installationpath.
Note: If this parameter is not present, the AirWatchAgent uses the default path: C:\Program Files(x86)\AirWatch.
Items denoted with an asterisk (*) are optional.
Chapter 2: Windows 7 Enrollment
14
VMware AirWatchWindows 7 Platform Guide | v.2017.09 | September 2017
Copyright©2017 VMware, Inc. All rights reserved.

Examples of Silent Enrollment
Below are examples of various use cases using enrollment parameters and the values that you can enter into a commandline or use to create a BAT file. Initiating any one of these examples silently enrolls theWindows device withoutprompting the user to select any of the acknowledgment buttons.
Agent Install for Image Only Without Enrollment
The following is an example of installing the agent for image only without enrollment using minimum parametersrequired for image only.
AirwatchAgent.msi /quiet ENROLL=N IMAGE=Y
Basic User Enrollment
The following is an example of using minimum parameters required for basic enrollment only:
AirwatchAgent.msi /quiet ENROLL=YIMAGE=n SERVER=companyURL.com LGName=locationgroupidUSERNAME=TestUsr PASSWORD=test
AirWatch Agent Installed Elsewhere
The following is an example of the AirwatchAgent.msi located in a different location:
C:\AirwatchAgent.msi /quiet ENROLL=Y IMAGE=n SERVER=companyURL.com LGName=locationgroupidUSERNAME=TestUsr PASSWORD=test
Installation Directory and AirWatch Agent on Network Drive
The following is an example of the installation directory parameter with the AirWatch Agent on a network drive.
Important: Add extra quotes for the INSTALLDIR parameter when there is space within the parameter.
Q:\AirwatchAgent.msi /quiet INSTALLDIR=\"E:\Install Win32\" ENROLL=Y IMAGE=n SERVER=companyURL.comLGName=locationgroupid USERNAME=TestUsr PASSWORD=test
All Available Parameters and Values
The following is an example of the syntax using all available parameters and values shown in the previous table.
<AirwatchAgent.msi> /quiet INSTALLDIR=\"<Directory Path>" ENROLL=<Y/N> IMAGE=<Y/N> SERVER=<CompanyURL>LGNAME=<Location Group ID>USERNAME=<Username> PASSWORD=<Username Password>STAGEUSERNAME=<Stager Username> SECURITYTYPE=<D/B> STAGEEMAILUSRNAME=<User Enrolling>STAGEPASSWORD=<Password for User Enrolling> STAGEEMAIL=<Email Address for User Enrolling>DEVICEOWNERSHIPTYPE=<CD/CS/EO/N>
Chapter 2: Windows 7 Enrollment
15
VMware AirWatchWindows 7 Platform Guide | v.2017.09 | September 2017
Copyright©2017 VMware, Inc. All rights reserved.

Chapter 3:Windows 7 Device Profiles
Windows 7 Profiles Overview 17
Configure aWi-Fi Profile (Windows 7) 17
Enforce a VPN Profile (Windows 7) 18
Credentials Profile (Windows 7) 19
Create a Credentials Profile (Windows 7) 19
Configure a Shortcuts Profile (Windows 7) 20
Create an Exchange Web Services Profile (Windows 7) 21
Encryption Profile (Windows 7) 21
Configure an Encryption Profile (Windows 7) 23
Configure a Passcode Profile (Windows 7) 24
Configure an Automatic Updates Profile (Windows 7) 26
Configure a Firewall Profile (Windows 7) 27
16
VMware AirWatchWindows 7 Platform Guide | v.2017.09 | September 2017
Copyright©2017 VMware, Inc. All rights reserved.

Windows 7 Profiles OverviewProfiles are the primary means to manage devices. Configure profiles so yourWindows 7 devices remain secure andconfigured to your settings.
Overview
You can think of profiles as the settings and rules that, when combined with compliance policies, help you enforcecorporate rules and procedures. They contain the settings, configurations, and restrictions that you want to enforce ondevices.
The individual settings you configure, such as the settings for Wi-Fi, VPN, and passcodes, are payloads. Considerassociating only one payload per profile. Createmultiple profiles for the different settings you want to establish.
Device Security
Ensure that yourWindows 7 devices remain secure through device profiles. These profiles configure the nativeWindowssecurity features or configure corporate security settings on a device through AirWatch.
Some examples of device security profiles include:
l Use aWi-Fi profile to connect enrolled devices to your corporateWi-Fi without sending the network credentials tousers. For more information, see Configure aWi-Fi Profile (Windows 7) on page 17.
l Ensure access to internal resources for your devices with the VPN profile. For more information, seeEnforce a VPNProfile (Windows 7) on page 18.
l Secure a device with a Passcode profile. For more information, see Configure a Passcode Profile (Windows 7) on page24.
Device Configuration
Configure the various settings of your Windows 7 devices with the configuration profiles. These profiles configure thedevice settings to meet your business needs.
Some examples of device configuration profiles include:
l Set up an Exchange account on a device with an Exchange ActiveSync profile. For more information, see Create anExchange Web Services Profile (Windows 7) on page 21.
l Ensure that the devices remain up to date with theWindows Updates profile. For more information, see Configurean Automatic Updates Profile (Windows 7) on page 26.
l Keep your data secure with the Encryption profile. For more information, see Encryption Profile (Windows 7) on page21.
Configure a Wi-Fi Profile (Windows 7)Create aWi-Fi profile to connect devices to hidden, encrypted, or password-protected corporate networks. Wi-Fi profilesare useful for end users who travel to various office locations that have unique wireless networks or for automaticallyconfiguring devices to connect to the appropriate wireless network.
To configure aWi-Fi profile:
Chapter 3: Windows 7 Device Profiles
17
VMware AirWatchWindows 7 Platform Guide | v.2017.09 | September 2017
Copyright©2017 VMware, Inc. All rights reserved.

1. Navigate to Devices > Profiles > List View > Add and select Add Profile.
2. SelectWindows and then selectWindows 7.
3. Configure the profileGeneral settings.
These settings determine how the profile is deployed and who receives it. For more information on General settings,refer to the VMware AirWatch Mobile Device Management Guide, available on AirWatch Resources.
4. Select theWi-Fi profile.
5. Configure theWi-Fi settings:
Settings Descriptions
Wi-Fi Network Name Enter the name (SSID) of the desired Wi-Fi network.
Connection Type Use the drop-down menu to select theWi-Fi connection type as Ad Hoc orInfrastructure.
Connection Mode Use the drop-down menu to specify automatic or manual joining of the network.
Security Type Use the drop-down menu to select the security type for theWi-Fi network.
Encryption Use the drop-down menu to select the encryption method for the connection.
Choosing WPA orWPA2 Enterprise adds the Authentication section that must becompleted.
Password Enter the password required to join theWi-Fi network.
Select Show Characters to disable hidden characters within the text box.
Authentication Iif needed, choose the Root Certificate and enable AD authentication.
Displays only if Security Type is set toWPA Enterprise orWPA2 Enterprise.
Enable ADAuthentication
Select to use user AD credentials to authenticate instead of using a certificate.
Displays only if Security Type is set toWPA Enterprise orWPA2 Enterprise.
Root Certificate Select the certificate used to authenticate.
6. Select Save & Publishwhen you are finished to push the profile to devices.
Enforce a VPN Profile (Windows 7)Create a VPN Profile to deploy corporate VPN settings directly to managed devices. This profile allows end users to accesscorporate infrastructure remotely and securely.
To enforce a VPN profile:
1. Navigate to Devices > Profiles > List View > Add and select Add Profile.
2. SelectWindows and then selectWindows 7.
3. Configure the profileGeneral settings.
These settings determine how the profile is deployed and who receives it. For more information on General settings,refer to the VMware AirWatch Mobile Device Management Guide, available on AirWatch Resources.
Chapter 3: Windows 7 Device Profiles
18
VMware AirWatchWindows 7 Platform Guide | v.2017.09 | September 2017
Copyright©2017 VMware, Inc. All rights reserved.

4. Select the VPN profile.
5. Select Enable VPN to configure the VPN settings, including:
Settings Descriptions
ConnectionType
Use the drop-down menu to select the network connection method.
ConnectionName
Enter the name of the connection.
Server Enter the hostname or IP address of the server to which to connect.
Username Enter the user name required for VPN authentication.
Domain Enter the name of the domain to which the VPN connects.
Password Enter the password required to join the VPN. Select Show Characters to disable hidden characterswithin the text box.
6. Select Save & Publishwhen you are finished to push the profile to devices.
Credentials Profile (Windows 7)A Credentials profile allows you to push Root, Intermediate, and Client certificates to support any Public KeyInfrastructure (PKI) and certificate authentication use case. The profile pushes configured credentials to the propercredentials store on theWindows 7 device.
Even with strong passcodes and other restrictions, your infrastructure remains vulnerable to brute force, dictionaryattacks, and employee error. For greater security, you can implement digital certificates to protect corporate assets. Touse certificates in this way, you must first configure a Credentials payload with a certificate authority, and then configureyourWi-Fi and VPN payloads. Each of these payloads has settings for associating the certificate authority defined in theCredentials payload.
Create a Credentials Profile (Windows 7)A Credentials profile pushes certificates to devices for use in authentication. With AirWatch, you can configure credentialsfor personal, intermediate, trusted root, trusted publisher, and trusted people certificate stores.
To configure a Credentials payload:
1. Navigate to Devices > Profiles > List View > Add and select Add Profile.
2. SelectWindows and then selectWindows 7.
3. Configure the profileGeneral settings.
These settings determine how the profile is deployed and who receives it. For more information on General settings,refer to the VMware AirWatch Mobile Device Management Guide, available on AirWatch Resources.
4. Select the Credentials profile.
Chapter 3: Windows 7 Device Profiles
19
VMware AirWatchWindows 7 Platform Guide | v.2017.09 | September 2017
Copyright©2017 VMware, Inc. All rights reserved.

5. Configure the Credentials settings:
Settings Description
CredentialSource
Use the drop-down menu to select either Upload or Defined Certificate Authority.
CredentialName
Enter a name for the credentials certificate.
Displays if the Credential Source is Upload.
Certificate Click Upload, navigate to the desired credential certificate file, and then select Save.
Displays if the Credential Source is Upload.
CertificateAuthority
Use the drop-down menu to select a predefined certificate authority.
Displays if the Credential Source is Define Certificate Authority.
CertificateTemplate
Use the drop-down menu to select a predefined certificate template specific to the selectedcertificate authority.
Displays if the Credential Source is Define Certificate Authority.
StoreLocation
Use the drop-down menu to choose to save the certificate on the specific User account level or onthe Computer Store for all users of a computer.
CertificateStore
Select the certificate store folder location from the drop-down menu.
l Personal (Default) l Trusted Publishers
l Trusted Root Certification Authorities l Untrusted Certificates
l Intermediate Certificate Authorities l Trusted People
6. Select Save & Publishwhen you are finished to push the profile to devices.
Configure a Shortcuts Profile (Windows 7)A Shortcuts profile allows you to save URLs for your end users to access. Use the Shortcuts profile when you want topush specific URLs such as an internal website to your end users.
1. Navigate to Devices > Profiles > List View > Add and select Add Profile.
2. SelectWindows and then selectWindows 7.
3. Configure the profileGeneral settings.
These settings determine how the profile is deployed and who receives it. For more information on General settings,refer to the VMware AirWatch Mobile Device Management Guide, available on AirWatch Resources.
4. Select the Shortcuts profile.
Chapter 3: Windows 7 Device Profiles
20
VMware AirWatchWindows 7 Platform Guide | v.2017.09 | September 2017
Copyright©2017 VMware, Inc. All rights reserved.

5. Configure the Shortcuts settings:
Settings Descriptions
Label Enter a descriptive name for the shortcut.
URL Enter the target Web address for the shortcut to use.
Icon Upload an image to serve as a visual representation for the shortcut on the desktop.
The file typemust be .ico.
6. Select Save & Publishwhen you are finished to push the profile to devices.
Create an Exchange Web Services Profile (Windows 7)Create an ExchangeWeb Services profile to allow the end user to access corporate email infrastructures and MicrosoftOutlook accounts from the device.
Important During initial configuration, the devicemust have access to the Internal Exchange Server.
To create an ExchangeWeb Services profile:
1. Navigate to Devices > Profiles > List View > Add and select Add Profile.
2. SelectWindows and then selectWindows 7.
3. Configure the profileGeneral settings.
These settings determine how the profile is deployed and who receives it. For more information on General settings,refer to the VMware AirWatch Mobile Device Management Guide, available on AirWatch Resources.
4. Select the Exchange Web Services profile.
5. Configure the ExchangeWeb Services settings:
Settings Descriptions
Domain Enter the name of the email domain to which the end user belongs.
Email Server Enter the name of the Exchange server.
Email Address Enter the address for the email account.
6. Select Save & Publishwhen you are finished to push the profile to devices.
Removing an ExchangeWeb Services profile removes all Outlook accounts from the device.
Encryption Profile (Windows 7)Secure your organization data on Windows 7 devices using the native BitLocker encryption with the Encryption profile.BitLocker encryption policy is only available on Windows 7 Ultimate and Enterprise, Windows 8 Enterprise and Pro, andWindows 10 Enterprise, Education, and Pro devices.
Chapter 3: Windows 7 Device Profiles
21
VMware AirWatchWindows 7 Platform Guide | v.2017.09 | September 2017
Copyright©2017 VMware, Inc. All rights reserved.

Because laptops and tablets aremobile devices by design, they risk your organization data being lost or stolen. Byenforcing a BitLocker encryption policy through AirWatch, you can protect data on the hard drive. BitLocker is the nativeWindows encryption that AirWatch supports. The Encryption profile continually checks the encryption status of thedevice. If the profile finds that the device is not encrypted, it automatically encrypts the device.
If you decide to encrypt with BitLocker, a recovery created during encryption is stored in the AirWatch Console.
Note: The BitLocker Encryption profile requires the AirWatch Protection Agent to be installed on the device.
Deploying an Encryption Profile
TheWindows native BitLocker encryption secures data on Windows 7. Deploying the encryption profile requires moreactions from the end user.
Note: For BitLocker encryption to take place, the devicemust have Trusted Platform Module (TPM) enabled. Theexact process to enable and activate TPM may vary from one system to another but is typically done by restartingthe device and accessing the BIOS security settings.
Pushing BitLocker Profiles
The BitLocker encryption uses a wizard to enable and activate the encryption on end-user devices. Note the followingimportant points when pushing BitLocker to end users:
l If Enforce Encryption PIN to Login is enabled, end users are prompted to create a 4–20 digit PIN that is used everytime themachine is restarted.
o This PIN is required even during restarts required by encrypting and decrypting the drive.
l The end users are prompted to select a local recovery key storage path. The recovery key is saved as a TXT file at theselected path.
l If TPM is not enabled, BitLocker encryption cannot take place. If TPM is enabled but not active, the wizard restartsthe device to activate it. This reboot requires the end user to accept the change.
BitLocker and the AirWatch Console
If BitLocker is enabled and in use, you can see encryption status reports in the following areas:
l AirWatch Dashboard
o Device Details displays recovery key information.
o Encryption progress (percentage) or completion at the time of the device sample displays.
o BitLocker protection displays as enabled.
l AirWatch Self-Service Portal (SSP)
o Self-Service Portal displays that the recovery key is stored in AirWatch, but does not display recovery key details.
o Encryption progress (percentage) or completion displays.
o BitLocker protection displays as enabled.
Chapter 3: Windows 7 Device Profiles
22
VMware AirWatchWindows 7 Platform Guide | v.2017.09 | September 2017
Copyright©2017 VMware, Inc. All rights reserved.
Note: During device encryption, the profile may display as Not Installed in the AirWatch Console. Once encryption ofthe device reaches 100%, the profile displays as installed.
Removal Behavior
If the profile is removed from the AirWatch Console, AirWatch no longer enforces the encryption and the end user is freeto decrypt. Enterprise wiping or manually uninstalling the AirWatch Protection Agent from the Control Panel does notturn off BitLocker. The device end user must decrypt from the Control Panel.
If the end user decides to unenroll during the BitLocker encryption process, the encryption process continues unless it isturned offmanually from the Control Panel.
Encryption Warnings
Only manage BitLocker encryption with the Encryption profile, or the devicemay report incorrect information andbecome unmanageable. Some sample scenarios include:
l If the user decrypts BitLocker from the entire system or any drives using the Control Panel, the device becomesunmanageable as the status may not display correctly. A device is encrypted with BitLocker from the AirWatchConsole, it must be decrypted from the AirWatch Console as well.
l Once the user initiates the encryption or decryption process, do not change the TPM settings as it may causeinstability and unwanted behavior.
Configure an Encryption Profile (Windows 7)Create an Encryption profile to secure your data on Windows Desktop devices using the native BitLocker encryption.
To create an Encryption profile:
1. Navigate to Devices > Profiles > List View > Add and select Add Profile.
2. SelectWindows and then selectWindows 7.
3. Configure the profileGeneral settings.
These settings determine how the profile is deployed and who receives it. For more information on General settings,refer to the VMware AirWatch Mobile Device Management Guide, available on AirWatch Resources.
Chapter 3: Windows 7 Device Profiles
23
VMware AirWatchWindows 7 Platform Guide | v.2017.09 | September 2017
Copyright©2017 VMware, Inc. All rights reserved.

4. Configure the Encryption settings:
Settings Descriptions
EncryptedVolume
Use the drop-down menu to select the type of encryption as follows:
l System Partition – Encrypts a partition or drive in the same location whereWindows is installedand from which it boots.
l Complete Hard Disk – Encrypts the entire hard disk on the device, including the SystemPartition where the OS is installed. This option also encrypts any attached drives such as USBdrives.
Note: If any additional devices are included during encryption, you must decrypt theadditional drives and the complete hard disk. If you decrypt the hard disk without includingthe additional drives, you will be unable to decrypt the additional drives.
EnforceEncryptionPIN onLogin
Select to require users to enter a PIN upon starting the device.
5. Select Save & Publishwhen you are finished to push the profile to devices.
Configure a Passcode Profile (Windows 7)Enforce a Passcode profile to protect devices with passcodes each time they return from an idle state. A passcodeensures that all sensitive corporate information on managed devices remains protected.
Passcodes set using this payload only take effect if the passcode is stricter than existing passcodes. For example, if theexisting Microsoft Account passcode requires stricter settings than the Passcode payload requirements, the devicecontinues to use theMicrosoft Account passcode.
Prerequisites
To push the Passcode profile to devices, you must first enable it in the Agent Settings. Navigate to Devices & Users >Windows > Windows 7 > Agent Settings and select Enforce Passcode.
Procedure
To configure the Passcode profile:
1. Navigate to Devices > Profiles > List View > Add and select Add Profile.
2. SelectWindows and then selectWindows 7.
3. Configure the profileGeneral settings.
These settings determine how the profile is deployed and who receives it. For more information on General settings,refer to the VMware AirWatch Mobile Device Management Guide, available on AirWatch Resources.
Chapter 3: Windows 7 Device Profiles
24
VMware AirWatchWindows 7 Platform Guide | v.2017.09 | September 2017
Copyright©2017 VMware, Inc. All rights reserved.

4. Select the Passcode profile.
5. Select Require Passcode on device and configure the Passcode settings:
Settings Descriptions
Allow Simple Value Select to allow simple passcodes instead ofcomplex passcodes requiring multiplecharacters and numbers.
Enforce Passcode History Enter a value to force end users to select apasscode they have not used before.
The value entered (0-24) is the number ofpasscodes kept in the history that an end userhas used before. You cannot use Previouspasscodes again until it is no longer kept in thehistory.
Maximum Passcode Age (days) Enter the number of days a passcode can beused before it must be changed.
Minimum Passcode Age (days) Enter the number of days that must passbefore an end user may change theirpasscode. If the value is 0, then PasscodeHistory is not effective.
Minimum Passcode Length Enter theminimum number of characters apasscodemust have.
Setup Account Lockout
Account Lockout Duration(mins.)
Enter the number ofminutes a device islocked out after entering the passcodeincorrectly too many times.
Account Lockout Threshold Enter the number of passcode attemptsallowed before the device is locked out.
Rest Account Lockout CountAfter (mins.)
Enter the number ofminutes that must passafter a failed login attempt before the failedlogin attempt-counter is reset. This valuemustbe less than or equal to Account LockoutDuration.
Enable Screen Lockout
Inactivity Period Before LockingScreen (mins.)
Enter the number ofminutes of inactivity thatmust pass before the screen is automaticallylocked.
Chapter 3: Windows 7 Device Profiles
25
VMware AirWatchWindows 7 Platform Guide | v.2017.09 | September 2017
Copyright©2017 VMware, Inc. All rights reserved.

Settings Descriptions
Enterprise Wipe
Reset Password and AccountLockout Policies upon EnterpriseWipe
Enabled by default
Enable to reset password and account lockoutpolices to simple values with no enforcementafter an EnterpriseWipe command is sent tothe device.
6. Select Save & Publishwhen you are finished to push the profile to devices.
Configure an Automatic Updates Profile (Windows 7)Create aWindows Updates profile to manage theWindows Updates settings for Windows Desktop devices. The profileensures that all your devices are up-to-date, which improves device and network security.
Important: TheWindows Automatic profile only affects non-domain joined Windows 7 devices.
1. Navigate to Devices > Profiles > List View > Add and select Add Profile.
2. SelectWindows and then selectWindows 7.
3. Configure the profileGeneral settings.
These settings determine how the profile is deployed and who receives it. For more information on General settings,refer to the VMware AirWatch Mobile Device Management Guide, available on AirWatch Resources.
4. Select the Automatic Updates profile.
Chapter 3: Windows 7 Device Profiles
26
VMware AirWatchWindows 7 Platform Guide | v.2017.09 | September 2017
Copyright©2017 VMware, Inc. All rights reserved.

5. Configure theWindows Automatic Updates settings:
Settings Descriptions
Windows Update Source Select the source for Windows Updates:
l Microsoft Default – Select to use the default Microsoft Update Server.
l CorporateWSUS – Select to use a corporate server and enter theWSUSServer URL andWSUS Group.
Note: Choosing CorporateWSUS as a source allows your IT Admin toview updates installed and device status of devices in theWSUS Group.
Important Updates Select the rules to use for Important Updates.
Install Recommended Updates theSameWay as Important Updates
Enable to install Recommended Updates using the same rules ImportantUpdates use.
Update Other Microsoft ProductsWhen Updating Windows
Enable to allow other Microsoft Products to update when Windows isupdated.
6. Select Save & Publishwhen you are finished to push the profile to devices.
Configure a Firewall Profile (Windows 7)The Firewall profile for Windows Desktop devices allows you to configure theWindows Firewall settings for devices. Withdevices all having theWindows Firewall configured and enabled, you greatly increase your network security.
The Firewall profile only affects non-domain joined Windows 7 devices.
To configure a Firewall profile:
1. Navigate to Devices > Profiles > List View > Add and select Add Profile.
2. SelectWindows and thenWindows 7.
3. Configure the profileGeneral settings.
These settings determine how the profile is deployed and who receives it. For more information on General settings,refer to the VMware AirWatch Mobile Device Management Guide, available on AirWatch Resources.
4. Select the Firewall profile.
Chapter 3: Windows 7 Device Profiles
27
VMware AirWatchWindows 7 Platform Guide | v.2017.09 | September 2017
Copyright©2017 VMware, Inc. All rights reserved.

5. Configure the Firewall settings, including:
Settings Description
Use Windows Recommended Settings Enable this setting to use theWindows Recommended Settings anddisable all other options available for this profile.
Private Network
Enable Firewall Enable to ensure that the firewall is running on devices.
Block all connections to apps that are noton the list of allowed apps
Enable to restrict all access for non-whitelisted apps.
Block all incoming connections includingthose in the list of allowed apps
Enable to block all incoming connections while allowing outboundconnections.
Notify User when Windows Firewallblocks a new app
Enable to allow notifications to display when theWindows Firewallblocks a new app.
Public Network
Enable Firewall Enable to ensure that the firewall is running on devices.
Block all connections to apps that are noton the list of allowed apps
Enable to restrict all access for non-whitelisted apps.
Block all incoming connections includingthose in the list of allowed apps
Enable to block all incoming connections while allowing outboundconnections.
Notify User when Windows Firewallblocks a new app
Enable to allow notifications to display when theWindows Firewallblocks a new app.
6. Select Save & Publishwhen you are finished to push the profile to devices.
Chapter 3: Windows 7 Device Profiles
28
VMware AirWatchWindows 7 Platform Guide | v.2017.09 | September 2017
Copyright©2017 VMware, Inc. All rights reserved.

Chapter 4:Compliance Policies
Compliance Policy Overview 30
29
VMware AirWatchWindows 7 Platform Guide | v.2017.09 | September 2017
Copyright©2017 VMware, Inc. All rights reserved.
Compliance Policy OverviewThe compliance engine is an automated tool by AirWatch that ensures all devices abide by your policies. These policiesmay include basic security settings such as requiring a passcode and having a minimum device lock period. For certainplatforms, you may also decide to set and enforce certain precautions. These precautions include setting passwordstrength, blacklisting certain apps, and requiring device check-in intervals to ensure that devices are safe and in-contactwith AirWatch.
Once devices are determined to be out of compliance, the compliance engine warns users to address compliance errorsto prevent disciplinary action on the device. For example, the compliance engine can trigger a message to notify the userthat their device is out of compliance.
In addition, devices not in compliance cannot have device profiles assigned to it and cannot have apps installed on thedevice. If corrections are not made in the amount of time specified, the device loses access to certain content andfunctions that you define. The available compliance policies and actions vary by platform.
For more information about compliance policies, including which policies and actions are supported for a particularplatform, refer to the VMware AirWatch Mobile Device Management Guide, available on AirWatch Resources.
Chapter 4: Compliance Policies
30
VMware AirWatchWindows 7 Platform Guide | v.2017.09 | September 2017
Copyright©2017 VMware, Inc. All rights reserved.

Chapter 5:AirWatch Apps for Windows 7
Windows 7 Application Overview 32
Configure the AirWatch Agent forWindows 7 32
AirWatch Agent forWindows Upgrades 33
VMware Content Locker forWindows 7 34
31
VMware AirWatchWindows 7 Platform Guide | v.2017.09 | September 2017
Copyright©2017 VMware, Inc. All rights reserved.

Windows 7 Application OverviewYou can use AirWatch applications in addition to AirWatch MDM features to further secure devices and configure themwith added functionality.
Use the VMware Content Locker to safeguard corporate content on mobile devices. Download the AirWatch Agent forWindows to monitor your devices on a more granular level.
Configure the AirWatch Agent for Windows 7The AirWatch Agent for Windows devices is pre-configured with AirWatch. Change these settings when you need theAirWatch Agent to meet certain business needs.
The AirWatch Agent for Windows adds features and functionality for managing and configuring Windows 7 devices.Besides enrollment, the AirWatch Agent reports the device status to the AirWatch Console and allows for advancedprofiles such as Firewall and Windows Updates.
The AirWatch Agent for Windows can be found on the Resource Portal and at awagent.com.
Configuring the AirWatch Agent
Navigate to Groups & Settings > All Settings > Devices & Users > Windows > Windows 7 > Agent Settings to changethe following settings:
Setting Description
Beacon Interval (min) Enter the time interval (in minutes) at which the agent will check in with the AirWatchConsole.
Data Sample Interval (min) Enter the time interval (in minutes) at which the agent will collect a data sample from thedevice.
Data Transmit Interval(min)
Enter the time interval (in minutes) at which the agent will transmit the collected datasample to the console.
This settings also controls how often the AirWatch Agent checks for a new automaticupgrade if enabled.
Block Enrollment ifWindows Genuinevalidation fails
Enable to block devices with non-genuine copies ofWindows Operating Systems fromenrolling into AirWatch.
l If a device is enrolled and the agent detects theWindows copy is not genuine, theagent will send an EnterpriseWipe command to the device.
l If a device attempts to enroll and the copy ofWindows is not genuine, a Non-Compliancemessage will display and immediately unenroll a device.
Enforce Passcode Profile Enable to force the agent to prompt end users for password changes when a passcodeprofile is installed or updated. This option does not apply to domain-joined devices.
Windows Agent AutomaticUpdates
Enable to automatically update the AirWatch Agent when an update becomes available.
Chapter 5: AirWatch Apps for Windows 7
32
VMware AirWatchWindows 7 Platform Guide | v.2017.09 | September 2017
Copyright©2017 VMware, Inc. All rights reserved.

Remote Management
Setting Description
Seek Permission Enable Seek Permission if you want to prompt the end user to accept or decline the remotemanagement request from the admin.
l Enter a Seek Permission Message that the end user sees when a remote request is sent.
l Enter the Yes Captionmessage for the accept button the end user sees on the SeekPermission request.
l Enter theNo Captionmessage for the decline button the end user sees on the SeekPermission request.
Advanced Choose extra configuration options by opening this menu.
RemoteManagementPort
Enter the port used to communicate between the RemoteManagement Agent and the TunnelAgent on the end-user device.
This port is responsible for caching the different frames on the device for use with the screensharing function. The default port is 7775. Consider leaving the default setting unless port 7775 is inuse for other uses in your organization.
Device Log Level Set the Device Log Level to control the verbosity of the remotemanagement application on thedevice.
Log Folder Path Define the Log Folder Path where the application saves the remotemanagement log file on thedevice.
Display Tray Icon Enable Display Tray Icon to show the remotemanagement applet on the device.
Max Sessions Enter themaximum number of concurrent sessions allowed on a device.
Number ofRetries
Enter the number of retries allowed before communication attempts stop.
Retry Frequency(Seconds)
Enter the amount of time between attempts to communicate.
Heart BeatInterval(Seconds)
Enter the amount of time (in seconds) that passes between status updates that are sent from thedevice.
Connection LossRetry Frequency(Seconds)
Enter the amount of time (in seconds) that passes between attempts to reestablish theconnection.
AirWatch Agent for Windows UpgradesWhen you update the AirWatch Agent for Windows on aWindows 7 device, you must ensure that you use specific filenames. Ensure that the file name is correct when downloading the agent.
Chapter 5: AirWatch Apps for Windows 7
33
VMware AirWatchWindows 7 Platform Guide | v.2017.09 | September 2017
Copyright©2017 VMware, Inc. All rights reserved.
The AirWatch Agent download file is AirwatchAgent.msi. The file namemust be exactly AirwatchAgent.msi or theautomatic upgrade fails. For example, if you download a second copy of the file, it is labeled as AirwatchAgent.msi(1).Attempts to use this numbered copy fail to upgrade.
If you enable theWindows Agent Automatic Updates option, the AirWatch Agent for Windows automatically updateswithout end-user interaction. If you are using any version before AirWatch Agent for Windows v7.0.0, you must upgradethe agent manually to v7.0.0+.
Important: During the upgrade process for end users, an alert displays if the upgrade fails three times. If an end usercontacts you about this message, perform an enterprise wipe and instruct your end users to reinstall the AirWatchAgent.
VMware Content Locker for Windows 7VMware Content Locker is an application that enables your end users to access important content on their devices whileensuring file safety for your organization.
From the VMware Content Locker, end users can access content you upload in the Admin Console, content from syncedcorporate repositories, or their own personal content.
Use the AirWatch Console to add content, sync repositories and configure the actions that end users can take on contentopened within the application. These configurations prevent content from being copied, shared, or saved withoutapproval. For more information about configuring and deploying the VMware Content Locker, see theMobile ContentManagement (MCM) Guide available in the Resources Portal.
Chapter 5: AirWatch Apps for Windows 7
34
VMware AirWatchWindows 7 Platform Guide | v.2017.09 | September 2017
Copyright©2017 VMware, Inc. All rights reserved.

Chapter 6:Product Provisioning for Windows 7Devices
Product Provisioning Overview 36
35
VMware AirWatchWindows 7 Platform Guide | v.2017.09 | September 2017
Copyright©2017 VMware, Inc. All rights reserved.

Product Provisioning OverviewProduct provisioning allows you to create, through AirWatch, products containing profiles, applications, and files/actions(depending on the platform you use). These products follow a set of rules, schedules, and dependencies as guidelines forensuring your devices remain up to date with the content they need.
Product provisioning also encompasses the use of relay servers. These servers are FTP(S) servers designed to work as ago-between for devices and the AirWatch Console. Create these servers for each store or warehouse to store productcontent for distribution to your devices.
Chapter 6: Product Provisioning for Windows 7 Devices
36
VMware AirWatchWindows 7 Platform Guide | v.2017.09 | September 2017
Copyright©2017 VMware, Inc. All rights reserved.

Chapter 7:Managing Windows 7 Devices
Device Dashboard 38
Device List View 38
Windows 7 Device Details Page 38
Remote Management 39
37
VMware AirWatchWindows 7 Platform Guide | v.2017.09 | September 2017
Copyright©2017 VMware, Inc. All rights reserved.

Device DashboardAs devices are enrolled, you can manage them from the AirWatch Device Dashboard. TheDevice Dashboard provides ahigh-level view of your entire fleet and allows you to act on individual devices quickly.
You can view graphical representations of relevant device information for your fleet, such as device ownership type,compliance statistics, and platform and OS breakdowns. You can access each set of devices in the presented categoriesby selecting any of the available data views from theDevice Dashboard.
From the List View, you can take administrative action: send messages, lock devices, delete devices, and change groupsassociated with the device.
Device List ViewSelect Devices > List View to see a full listing of all devices.
The Last Seen column displays an indicator showing the number ofminutes elapsed since the device has checked-in.
Select a device in theGeneral Info column at any time to open the details page for that device.
Sort by columns and configure information filters to review device activity based on specific information. For example,sort by the Compliance Status column to view only devices that are currently out-of-compliance and target only thosedevices. Search all devices for a friendly name or user name to isolate one device or user.
Customize Device List View Layout
Display the full listing of visible columns in theDevice List view by selecting the Layout button and choose the Customoption. This view enables you to display or hide Device List columns per your preferences.
There is also an option to apply your customized column view to all administrators. For instance, you can hide 'AssetNumber' from theDevice List.
Once all your customizations are complete, select the Accept button to save your column preferences and apply this newcolumn view. You may return to the Layout button settings at any time to tweak your column display preferences.
Search in Device List View
You can search for a single device for quick access to its information and take remote action on the device.
To run a search, navigate to Devices > List View, select the Search List bar and enter a user name, device friendly name,or other device-identifying element. This action initiates a search across all devices, using your search parameter.
Windows 7 Device Details PageUse the Device Details page to track detailed device information and quickly access user and devicemanagement actions.
You can access Device Details by selecting a device Friendly Name from the Device List View, using one of the Dashboards,or with any of the search tools.
From the Device Details page, you can access specific device information broken into different menu tabs. Each menu tabcontains related device information depending on your AirWatch deployment.
Chapter 7: ManagingWindows 7 Devices
38
VMware AirWatchWindows 7 Platform Guide | v.2017.09 | September 2017
Copyright©2017 VMware, Inc. All rights reserved.

Remote Actions
TheMore drop-down on the Device Details page enables you to perform remote actions over the air to the selecteddevice.
The actions vary depending on factors such as the device platform, AirWatch Console settings, and enrollment status:
l Add Tag – Assign a customizable Tag to a device, which can be used to identify a special device in your fleet.
l Change Organization Group – Change the device's home organization group to another pre-existing OG. Includes anoption to select a static or dynamic OG.
l Delete Device – Delete and unenroll a device from the Admin Console. This action does not remove any data fromthe device itself, only its representation in the console.
l Edit Device – Edit device information such as Friendly Name, Asset Number, Device Ownership, Device Group andDevice Category.
l Enterprise Wipe – EnterpriseWipe a device to unenroll and remove all managed enterprise resources includingapplications and profiles. This action cannot be undone and re-enrollment will be required for VMware AirWatch tomanage this device again. Includes options to prevent future re-enrollment and a Note Description field for you toadd any noteworthy details about the action.
o EnterpriseWipe is not supported for cloud domain-joined devices.
l Lock Device – Lock the screen of a selected device, rendering it unusable until it is unlocked. Includes optional fieldsfor a customMessage, Phone Number, and Note Description.
l Query All – Send a query command to the device to return a list of installed apps (including VMware AirWatch Agent,where applicable), books, certificates, device information, profiles and security measures.
l Remote Management – Take control of a supported device remotely using this action, which launches a consoleapplication that enables you to perform support and troubleshoot on the device.
l Send Message – Send a message to the user of the selected device. Choose between Email, Push Notification andSMS.
Remote ManagementThe RemoteManagement Service allows you to remotely connect to end-user devices so you can assist introubleshooting and maintenance. The RemoteManagement Service requires your computer and the end user device toconnect to the RemoteManagement Server to facilitate communication between the AirWatch Console and the end userdevice.
For more information on installing, configuring, and using the RemoteManagement Service, please see the VMwareAirWatch Remote Management Guide, available on AirWatch Resources.
Chapter 7: ManagingWindows 7 Devices
39
VMware AirWatchWindows 7 Platform Guide | v.2017.09 | September 2017
Copyright©2017 VMware, Inc. All rights reserved.

Accessing Other DocumentsWhile reading this documentation you may encounter references to documents that are not included here.
The quickest and easiest way to find a particular document is to navigate to https://my.air-watch.com/help/9.2/en/Content/Release_Notes/Doc_List_PDFs.htm and search for the document you need. Eachrelease-specific document has a link to its PDF copy on AirWatch Resources.
Alternatively, you can navigate to AirWatch Resources on myAirWatch (resources.air-watch.com) and search. Whensearching for documentation on Resources, be sure to select your AirWatch version. You can use the filters to sort byPDF file type and AirWatch v9.2.
Accessing Other Documents
40
VMware AirWatchWindows 7 Platform Guide | v.2017.09 | September 2017
Copyright©2017 VMware, Inc. All rights reserved.