Embed Size (px)
Citation preview
REVIEWER’S GUIDE – JUNE 2017
VMWARE AIRWATCH WINDOWS 10 UNIFIED ENDPOINT MANAGEMENT REVIEWER’S GUIDE VMware AirWatch 9.1
R E V I E W E R ’ S G U I D E | 2
VMWARE AIRWATCH WINDOWS 10 UNIFIED ENDPOINT MANAGEMENT REVIEWER’S GUIDE
Table of Contents
Introduction . . . . . . . . . . . . . . . . . . . . . . . . . . . . . . . . . . . . . . . . . . . . . . . . . . . . . . . . . . . . . . . . . . . . . . . . . . . . . . .5
Audience . . . . . . . . . . . . . . . . . . . . . . . . . . . . . . . . . . . . . . . . . . . . . . . . . . . . . . . . . . . . . . . . . . . . . . . . . . . . . . . 5
What Is VMware AirWatch Enterprise Mobility Management? . . . . . . . . . . . . . . . . . . . . . . . . . . . . . . . 6
Prerequisites . . . . . . . . . . . . . . . . . . . . . . . . . . . . . . . . . . . . . . . . . . . . . . . . . . . . . . . . . . . . . . . . . . . . . . . . . . . . 6
Device Use Cases for Windows 10 . . . . . . . . . . . . . . . . . . . . . . . . . . . . . . . . . . . . . . . . . . . . . . . . . . . . . . . . 7
How to Use This Reviewer’s Guide . . . . . . . . . . . . . . . . . . . . . . . . . . . . . . . . . . . . . . . . . . . . . . . . . . . . . . . . 8
Editions of Windows 10 Devices . . . . . . . . . . . . . . . . . . . . . . . . . . . . . . . . . . . . . . . . . . . . . . . . . . . . . . . . . . 8
VMware AirWatch Unified Endpoint Management for Windows 10 . . . . . . . . . . . . . . . . . . . . . . . . . . . . . 9
User Trust . . . . . . . . . . . . . . . . . . . . . . . . . . . . . . . . . . . . . . . . . . . . . . . . . . . . . . . . . . . . . . . . . . . . . . . . . . . . . . . 9
AWAgent.com Onboarding Workflow . . . . . . . . . . . . . . . . . . . . . . . . . . . . . . . . . . . . . . . . . . . . . . . . . . . 11
Azure AD Enrollment Workflows . . . . . . . . . . . . . . . . . . . . . . . . . . . . . . . . . . . . . . . . . . . . . . . . . . . . . . . . 11
Runtime Provisioning Enrollment Workflow . . . . . . . . . . . . . . . . . . . . . . . . . . . . . . . . . . . . . . . . . . . . . .13
Staged Provisioning Workflow . . . . . . . . . . . . . . . . . . . . . . . . . . . . . . . . . . . . . . . . . . . . . . . . . . . . . . . . . .13
SCCM Integration Client + AirWatch Agent . . . . . . . . . . . . . . . . . . . . . . . . . . . . . . . . . . . . . . . . . . . . . .13
Device Posture . . . . . . . . . . . . . . . . . . . . . . . . . . . . . . . . . . . . . . . . . . . . . . . . . . . . . . . . . . . . . . . . . . . . . . . . . 14
Conditional Access . . . . . . . . . . . . . . . . . . . . . . . . . . . . . . . . . . . . . . . . . . . . . . . . . . . . . . . . . . . . . . . . . . . . . 15
Data Loss Prevention . . . . . . . . . . . . . . . . . . . . . . . . . . . . . . . . . . . . . . . . . . . . . . . . . . . . . . . . . . . . . . . . . . . 16
Privileged Applications . . . . . . . . . . . . . . . . . . . . . . . . . . . . . . . . . . . . . . . . . . . . . . . . . . . . . . . . . . . . . . . . 16
Per-App VPN . . . . . . . . . . . . . . . . . . . . . . . . . . . . . . . . . . . . . . . . . . . . . . . . . . . . . . . . . . . . . . . . . . . . . . . . . 16
Enterprise Boundaries . . . . . . . . . . . . . . . . . . . . . . . . . . . . . . . . . . . . . . . . . . . . . . . . . . . . . . . . . . . . . . . . . .17
Levels of Protection . . . . . . . . . . . . . . . . . . . . . . . . . . . . . . . . . . . . . . . . . . . . . . . . . . . . . . . . . . . . . . . . . . . 18
Sharing Data to the Cloud . . . . . . . . . . . . . . . . . . . . . . . . . . . . . . . . . . . . . . . . . . . . . . . . . . . . . . . . . . . . . 18
Architecture and Components of Windows 10 Management . . . . . . . . . . . . . . . . . . . . . . . . . . . . . . . . . . 19
AirWatch Protection Agent . . . . . . . . . . . . . . . . . . . . . . . . . . . . . . . . . . . . . . . . . . . . . . . . . . . . . . . . . . . . . . 19
AirWatch Cloud Connector . . . . . . . . . . . . . . . . . . . . . . . . . . . . . . . . . . . . . . . . . . . . . . . . . . . . . . . . . . . . . . 19
Workspace ONE . . . . . . . . . . . . . . . . . . . . . . . . . . . . . . . . . . . . . . . . . . . . . . . . . . . . . . . . . . . . . . . . . . . . . . . . 19
Unified Access Gateway and Tunnel Client . . . . . . . . . . . . . . . . . . . . . . . . . . . . . . . . . . . . . . . . . . . . . . . 20
VPN Server . . . . . . . . . . . . . . . . . . . . . . . . . . . . . . . . . . . . . . . . . . . . . . . . . . . . . . . . . . . . . . . . . . . . . . . . . . . . 20
AirWatch Cloud Messaging . . . . . . . . . . . . . . . . . . . . . . . . . . . . . . . . . . . . . . . . . . . . . . . . . . . . . . . . . . . . . 20
Windows Notification Service . . . . . . . . . . . . . . . . . . . . . . . . . . . . . . . . . . . . . . . . . . . . . . . . . . . . . . . . . . . 20
Certificate Authority . . . . . . . . . . . . . . . . . . . . . . . . . . . . . . . . . . . . . . . . . . . . . . . . . . . . . . . . . . . . . . . . . . . . 20
Windows Auto-Discovery Service . . . . . . . . . . . . . . . . . . . . . . . . . . . . . . . . . . . . . . . . . . . . . . . . . . . . . . . 20
R E V I E W E R ’ S G U I D E | 3
VMWARE AIRWATCH WINDOWS 10 UNIFIED ENDPOINT MANAGEMENT REVIEWER’S GUIDE
File and Application Delivery with VMware AirWatch . . . . . . . . . . . . . . . . . . . . . . . . . . . . . . . . . . . . . . . . . 21
Software Distribution for Win32 Application Delivery . . . . . . . . . . . . . . . . . . . . . . . . . . . . . . . . . . . . . 22
Business Store Portal Integration for Automated Win32 Application Delivery . . . . . . . . . . . . . . . 23
VMware AirWatch Product Provisioning for Windows 10 . . . . . . . . . . . . . . . . . . . . . . . . . . . . . . . . . . . 24
Patch Management for Windows 10 with VMware AirWatch . . . . . . . . . . . . . . . . . . . . . . . . . . . . . . . . . 25
Configuring Devices for Management with VMware AirWatch . . . . . . . . . . . . . . . . . . . . . . . . . . . . . . . . 26
Configuration Best Practices . . . . . . . . . . . . . . . . . . . . . . . . . . . . . . . . . . . . . . . . . . . . . . . . . . . . . . . . . . . . 26
VMware AirWatch Profiles . . . . . . . . . . . . . . . . . . . . . . . . . . . . . . . . . . . . . . . . . . . . . . . . . . . . . . . . . . . . . . . 26
Windows 10 Email Profiles . . . . . . . . . . . . . . . . . . . . . . . . . . . . . . . . . . . . . . . . . . . . . . . . . . . . . . . . . . . . 28
Exchange ActiveSync Profile . . . . . . . . . . . . . . . . . . . . . . . . . . . . . . . . . . . . . . . . . . . . . . . . . . . . . . . . . . 28
Exchange Web Services Profile for Windows 10 . . . . . . . . . . . . . . . . . . . . . . . . . . . . . . . . . . . . . . . . . 28
Credentials Profile for Windows 10 . . . . . . . . . . . . . . . . . . . . . . . . . . . . . . . . . . . . . . . . . . . . . . . . . . . . . 28
Wi-Fi Profile for Windows 10 . . . . . . . . . . . . . . . . . . . . . . . . . . . . . . . . . . . . . . . . . . . . . . . . . . . . . . . . . . . 28
Restriction Profile for Windows 10 . . . . . . . . . . . . . . . . . . . . . . . . . . . . . . . . . . . . . . . . . . . . . . . . . . . . . . 29
Configure a Passcode Profile for Windows 10 . . . . . . . . . . . . . . . . . . . . . . . . . . . . . . . . . . . . . . . . . . . .30
Configure a Windows 10 Exchange Web Services Outlook Mail Client Profile . . . . . . . . . . . . . . . . 31
Configure a Windows 10 Restrictions Profile . . . . . . . . . . . . . . . . . . . . . . . . . . . . . . . . . . . . . . . . . . . . . 32
Configure a Windows 10 Wi-Fi Profile . . . . . . . . . . . . . . . . . . . . . . . . . . . . . . . . . . . . . . . . . . . . . . . . . . . 33
Configure a Credentials Profile. . . . . . . . . . . . . . . . . . . . . . . . . . . . . . . . . . . . . . . . . . . . . . . . . . . . . . . . . . . 34
Configure Patch Management Settings with a Windows Updates Profile . . . . . . . . . . . . . . . . . . . 35
Configure an Application Control Profile . . . . . . . . . . . . . . . . . . . . . . . . . . . . . . . . . . . . . . . . . . . . . . . . .40
Deliver Win32 Applications Using Software Distribution . . . . . . . . . . . . . . . . . . . . . . . . . . . . . . . . . . .40
Deploy Office 2016 . . . . . . . . . . . . . . . . . . . . . . . . . . . . . . . . . . . . . . . . . . . . . . . . . . . . . . . . . . . . . . . . . . . .40
Deploy a Standard MSI Application File . . . . . . . . . . . . . . . . . . . . . . . . . . . . . . . . . . . . . . . . . . . . . . . . .46
Get the Uninstall Command for Win32 Applications . . . . . . . . . . . . . . . . . . . . . . . . . . . . . . . . . . . . . 47
Get the Exit Code for Win32 Applications . . . . . . . . . . . . . . . . . . . . . . . . . . . . . . . . . . . . . . . . . . . . . .48
Monitor Win32 Applications . . . . . . . . . . . . . . . . . . . . . . . . . . . . . . . . . . . . . . . . . . . . . . . . . . . . . . . . . . .48
Add Versions for Internal Applications . . . . . . . . . . . . . . . . . . . . . . . . . . . . . . . . . . . . . . . . . . . . . . . . .48
Delete Win32 Application Files . . . . . . . . . . . . . . . . . . . . . . . . . . . . . . . . . . . . . . . . . . . . . . . . . . . . . . . .48
Use Product Provisioning to Change the Desktop Background . . . . . . . . . . . . . . . . . . . . . . . . . . . . . 49
Create a Files/Actions Component for Changing the Desktop Background . . . . . . . . . . . . . . . . 49
Create a Product That Changes the Desktop Background . . . . . . . . . . . . . . . . . . . . . . . . . . . . . . . . 51
R E V I E W E R ’ S G U I D E | 4
VMWARE AIRWATCH WINDOWS 10 UNIFIED ENDPOINT MANAGEMENT REVIEWER’S GUIDE
Configure a VPN Profile . . . . . . . . . . . . . . . . . . . . . . . . . . . . . . . . . . . . . . . . . . . . . . . . . . . . . . . . . . . . . . . . . 52
Configure Compliance Policies to Enforce Device Posture . . . . . . . . . . . . . . . . . . . . . . . . . . . . . . . . . 57
Workspace ONE Configuration Steps . . . . . . . . . . . . . . . . . . . . . . . . . . . . . . . . . . . . . . . . . . . . . . . . . . . . 57
AWAgent.com Onboarding Method . . . . . . . . . . . . . . . . . . . . . . . . . . . . . . . . . . . . . . . . . . . . . . . . . . . . . . 57
Configure the Azure Onboarding Method . . . . . . . . . . . . . . . . . . . . . . . . . . . . . . . . . . . . . . . . . . . . . . . . 57
Create the PPKG File to Configure Runtime Provisioning. . . . . . . . . . . . . . . . . . . . . . . . . . . . . . . . . . . 61
Configure Staged Provisioning . . . . . . . . . . . . . . . . . . . . . . . . . . . . . . . . . . . . . . . . . . . . . . . . . . . . . . . . . . 65
Configure the SCCM Integration Client and AirWatch Agent . . . . . . . . . . . . . . . . . . . . . . . . . . . . . . 66
Summary . . . . . . . . . . . . . . . . . . . . . . . . . . . . . . . . . . . . . . . . . . . . . . . . . . . . . . . . . . . . . . . . . . . . . . . . . . . . . . . . 67
Appendix A: Terminology Used in This Guide . . . . . . . . . . . . . . . . . . . . . . . . . . . . . . . . . . . . . . . . . . . . . . . 68
Appendix B: Windows 10 Onboarding Decision Tree . . . . . . . . . . . . . . . . . . . . . . . . . . . . . . . . . . . . . . . . . 71
Command-Line Enrollment . . . . . . . . . . . . . . . . . . . . . . . . . . . . . . . . . . . . . . . . . . . . . . . . . . . . . . . . . . . . . . 71
Work Access . . . . . . . . . . . . . . . . . . . . . . . . . . . . . . . . . . . . . . . . . . . . . . . . . . . . . . . . . . . . . . . . . . . . . . . . . . . 71
Image-Based Provisioning . . . . . . . . . . . . . . . . . . . . . . . . . . . . . . . . . . . . . . . . . . . . . . . . . . . . . . . . . . . . . . . 72
Automated Agent Registration . . . . . . . . . . . . . . . . . . . . . . . . . . . . . . . . . . . . . . . . . . . . . . . . . . . . . . . . . . 72
About the Authors and Contributors . . . . . . . . . . . . . . . . . . . . . . . . . . . . . . . . . . . . . . . . . . . . . . . . . . . . . . . 73

R E V I E W E R ’ S G U I D E | 5
VMWARE AIRWATCH WINDOWS 10 UNIFIED ENDPOINT MANAGEMENT REVIEWER’S GUIDE
IntroductionThe VMware AirWatch® 9.1 Enterprise Mobility Management™ capabilities for Windows 10 introduce smarter ways to deploy, control, and manage an organization’s PC fleet. Traditional approaches use multiple administrative tools to manage the PC life cycle. In contrast, VMware AirWatch unifies enterprise mobility management in a single admin console.
Staging and imaging
Managing OS updates
Maintaining drivers
Configuring firewall, antivirus,and encryption policies
Figure 1: Pain Points of Traditional Management Solutions
The VMware AirWatch simplified approach to PC management promotes security. You can control and secure devices for end users with security profiles, compliance settings, and device restrictions. Minimize the risk of data loss by restricting internal resources to managed devices that meet company-defined compliance polices.
The VMware AirWatch Windows 10 Unified Endpoint Management Reviewer’s Guide provides exercises to help you evaluate VMware AirWatch Windows 10 management. It describes the benefits, features, typical use cases, and best practices to configure your Windows 10 deployments.
This guide is for evaluation purposes only, using the minimum required resources for a basic deployment. It does not explore all possible features. To deploy a production environment, see the VMware AirWatch documentation.
AudienceThis guide targets existing VMware AirWatch Enterprise Mobility Management IT administrators and product evaluators who want to add Windows 10 devices to an existing fleet of managed devices. Review the concepts in this document, and follow the procedures to learn how to begin managing Windows 10 devices with VMware AirWatch Unified Endpoint Management.
This guide can also serve as an introduction if you want to learn more about Windows 10 management with VMware AirWatch. If you do not have previous mobile device or enterprise mobility management experience, reference materials are mentioned throughout the guide. Familiarity with VMware AirWatch 9.1 is assumed, as well as other technologies, including Active Directory, identity management, directory services, and Simple Mail Transfer Protocol.
R E V I E W E R ’ S G U I D E | 6
VMWARE AIRWATCH WINDOWS 10 UNIFIED ENDPOINT MANAGEMENT REVIEWER’S GUIDE
What Is VMware AirWatch Enterprise Mobility Management?VMware AirWatch Enterprise Mobility Management enables and secures the workspace for today’s mobile operating systems. The AirWatch Console aggregates mobile endpoints of every platform, operating system, and type into a single management space.
Unified endpoint management with VMware AirWatch provides enterprise mobility management (EMM) functionality, such as device restrictions, platform-specific features, and application security. VMware AirWatch also offers additional security options, including device encryption, access control for corporate resources, and data loss prevention.
VMware AirWatch Enterprise Mobility Management
• Secures endpoints, apps, and data on any network
• Provides an enterprise app storefront for all device types
• Streamlines deployment options
• Simplifies over-the-air configurations
• Enables an interoperable framework for enterprise security with VMware NSX® integration, customer-accessible APIs, and a broad ecosystem of partner integrations through the Mobile Security Alliance
PrerequisitesThe recommendations and configuration guidelines in this document apply to an implementation of VMware AirWatch that meets the following specifications:
• Software-as-a-service (SaaS) VMware AirWatch deployment model
• AirWatch Console 9.1 or later
• On-premises Active Directory, with user accounts available for integration in the AirWatch Console
• VMware AirWatch Cloud Connector, set to auto-update
• Azure Active Directory tenant if you are leveraging the out-of-box experience (OOBE), Azure Enrollment, or Windows Store for Business Integration Important: Using Azure-based enrollment methods might require additional licenses from Microsoft.
• AirWatch Protection Agent deployed (recommended to publish this agent for all use cases)
• VMware Workspace™ ONE™ catalog preconfigured with SaaS apps and authentication policies
• Third-party providers integrated into VMware AirWatch; VPN, certificate authorities, and so on where needed

R E V I E W E R ’ S G U I D E | 7
VMWARE AIRWATCH WINDOWS 10 UNIFIED ENDPOINT MANAGEMENT REVIEWER’S GUIDE
Device Use Cases for Windows 10 VMware AirWatch Unified Endpoint Management modernizes Windows management and security across any use case.
Remote-WorkerDevices
Employee-OwnedMachines
Corporate BranchO�ce Deployments
Figure 2: Supported Windows 10 Unified Endpoint Management Use Cases
Most use cases for a Windows 10 deployment fall into one of three areas. This guide addresses the required components and recommended configurations for the most common Windows 10 use cases shown in Table 1.
TYPE OF DEVICE USE CASE NAME
PRIMARY END USER
EMM PRIORITY
DOMAIN JOINED
APP FOOTPRINT
SCCM MANAGED
Employee-Owned Machines
BYOD Varied User privacy No Light No
Remote Employee Devices
Remote Mobile Enablement Maybe Light No
Corporate Office Devices
Enterprise Static Security Yes Heavy Maybe
Table 1: Common Windows 10 Device Use Cases
R E V I E W E R ’ S G U I D E | 8
VMWARE AIRWATCH WINDOWS 10 UNIFIED ENDPOINT MANAGEMENT REVIEWER’S GUIDE
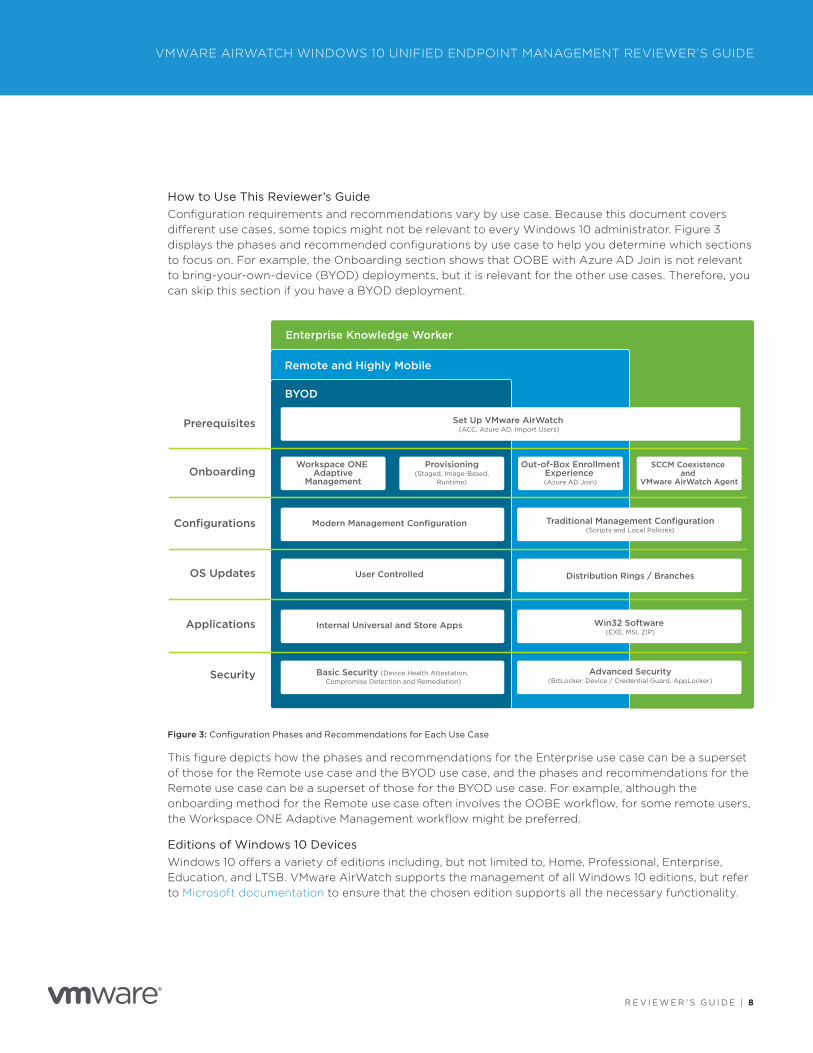
How to Use This Reviewer’s GuideConfiguration requirements and recommendations vary by use case. Because this document covers different use cases, some topics might not be relevant to every Windows 10 administrator. Figure 3 displays the phases and recommended configurations by use case to help you determine which sections to focus on. For example, the Onboarding section shows that OOBE with Azure AD Join is not relevant to bring-your-own-device (BYOD) deployments, but it is relevant for the other use cases. Therefore, you can skip this section if you have a BYOD deployment.
Workspace ONE Adaptive
Management
Provisioning(Staged, Image-Based,
Runtime)
Out-of-Box EnrollmentExperience (Azure AD Join)
SCCM Coexistence and
VMware AirWatch Agent
Modern Management Configuration
Set Up VMware AirWatch (ACC, Azure AD, Import Users)
BYOD
Prerequisites
Onboarding
Configurations
OS Updates
Applications
Security
Remote and Highly Mobile
Enterprise Knowledge Worker
Traditional Management Configuration(Scripts and Local Policies)
User Controlled Distribution Rings / Branches
Internal Universal and Store Apps Win32 Software (EXE, MSI, ZIP)
Basic Security (Device Health Attestation, Compromise Detection and Remediation)
Advanced Security(BitLocker, Device / Credential Guard, AppLocker)
Figure 3: Configuration Phases and Recommendations for Each Use Case
This figure depicts how the phases and recommendations for the Enterprise use case can be a superset of those for the Remote use case and the BYOD use case, and the phases and recommendations for the Remote use case can be a superset of those for the BYOD use case. For example, although the onboarding method for the Remote use case often involves the OOBE workflow, for some remote users, the Workspace ONE Adaptive Management workflow might be preferred.
Editions of Windows 10 DevicesWindows 10 offers a variety of editions including, but not limited to, Home, Professional, Enterprise, Education, and LTSB. VMware AirWatch supports the management of all Windows 10 editions, but refer to Microsoft documentation to ensure that the chosen edition supports all the necessary functionality.
R E V I E W E R ’ S G U I D E | 9
VMWARE AIRWATCH WINDOWS 10 UNIFIED ENDPOINT MANAGEMENT REVIEWER’S GUIDE
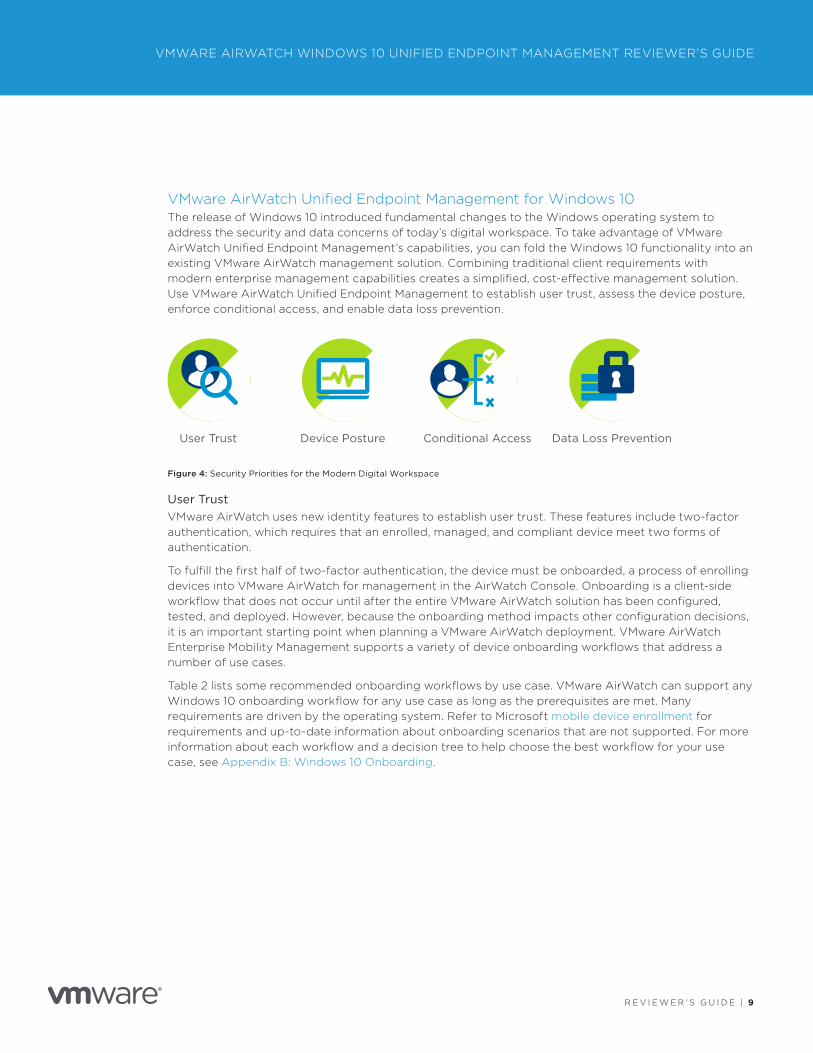
VMware AirWatch Unified Endpoint Management for Windows 10The release of Windows 10 introduced fundamental changes to the Windows operating system to address the security and data concerns of today’s digital workspace. To take advantage of VMware AirWatch Unified Endpoint Management’s capabilities, you can fold the Windows 10 functionality into an existing VMware AirWatch management solution. Combining traditional client requirements with modern enterprise management capabilities creates a simplified, cost-effective management solution. Use VMware AirWatch Unified Endpoint Management to establish user trust, assess the device posture, enforce conditional access, and enable data loss prevention.
User Trust Device Posture Conditional Access Data Loss Prevention
Figure 4: Security Priorities for the Modern Digital Workspace
User TrustVMware AirWatch uses new identity features to establish user trust. These features include two-factor authentication, which requires that an enrolled, managed, and compliant device meet two forms of authentication.
To fulfill the first half of two-factor authentication, the device must be onboarded, a process of enrolling devices into VMware AirWatch for management in the AirWatch Console. Onboarding is a client-side workflow that does not occur until after the entire VMware AirWatch solution has been configured, tested, and deployed. However, because the onboarding method impacts other configuration decisions, it is an important starting point when planning a VMware AirWatch deployment. VMware AirWatch Enterprise Mobility Management supports a variety of device onboarding workflows that address a number of use cases.
Table 2 lists some recommended onboarding workflows by use case. VMware AirWatch can support any Windows 10 onboarding workflow for any use case as long as the prerequisites are met. Many requirements are driven by the operating system. Refer to Microsoft mobile device enrollment for requirements and up-to-date information about onboarding scenarios that are not supported. For more information about each workflow and a decision tree to help choose the best workflow for your use case, see Appendix B: Windows 10 Onboarding.
R E V I E W E R ’ S G U I D E | 1 0
VMWARE AIRWATCH WINDOWS 10 UNIFIED ENDPOINT MANAGEMENT REVIEWER’S GUIDE
For the second authentication factor, customers with Azure AD can use Windows Hello capabilities like biometric access and PIN authentication. VMware AirWatch enforces the PIN strength requirements and can allow or disable the biometric feature for end users’ devices. Workspace ONE also integrates with Windows Hello for biometric authentication while providing certificate authentication (or another authentication type) into the apps and corporate resources, thus providing a layered authentication model for added security.
ONBOARDING METHOD BYOD REMOTE ENTERPRISE REQUIREMENTS
Workspace ONE Adaptive Management •AWAgent.com • • • Admin privileges for the end user
• Non-domain-joined device
Out-of-Box Experience • • • Azure Active Directory Premium license
• Admin privileges for the end user
• Existing device, non-domain-joined
Azure Active Directory join • • • Azure Active Directory
Premium license
• New device, non-domain-joined
Azure Connect • • • Azure Active Directory Premium license
• Admin privileges for the end user
• Existing device, non-domain-joined
• Best for customers with existing Azure licenses who do not want to join the cloud domain
Runtime provisioning • • Admin privileges for the end user
• Prepopulate serial number in admin console
Staged provisioning • • Admin privileges for the end user
• Uses login scripts
• Domain-joined device
SCCM Integration Client + AirWatch Agent • • Existing SCCM-managed devices
• SCCM package
• Recommended • Supported
Table 2: Onboarding Requirements by Use Case
R E V I E W E R ’ S G U I D E | 1 1
VMWARE AIRWATCH WINDOWS 10 UNIFIED ENDPOINT MANAGEMENT REVIEWER’S GUIDE
AWAgent.com Onboarding Workflow
The primary use case for AWAgent.com is existing company-owned devices that the end user self-onboards. The workflow is similar to the standard onboarding workflows for iOS and Android devices.
1. End users go to https://awagent.com on their Windows 10 devices.
2. End users download the VMware AirWatch Agent™.
3. When prompted, end users enter a corporate email address and authenticate to register the device with VMware AirWatch.
4. The AirWatch Agent installs the required software and services to enable advanced management capabilities on the device.
Azure AD Enrollment Workflows
VMware AirWatch integrates with Azure AD, providing a robust selection of onboarding workflows that apply to a wide range of Windows 10 use cases. However, Azure licensing requirements stipulate that customers must purchase an additional Azure AD Premium license to complete this integration.
Customers leveraging Azure AD typically use one of the following onboarding options.
Azure AD Join Enrollment Workflow This enrollment workflow is triggered from the device settings. Also referred to as cloud-domain join, this workflow is typically used for existing company-owned devices that are not already joined to an on-premises domain. End users must have admin privileges and will use their corporate credentials to join the device to the Azure cloud domain.
1. From System Settings, end users:
a. Enter their corporate credentials.
b. First-time Azure account users are prompted to provide a phone number for account recovery.
c. Register for Windows Hello for Business by creating a unique PIN.
Note: Configure a Passport for Work profile to specify this PIN’s complexity.
2. Devices join the Azure cloud domain, and register with VMware AirWatch for management.
Out-of-Box-Experience Enrollment Workflow Primarily used for new company-owned devices that are not domain joined, this enrollment workflow is triggered the first time an end user powers on a device. The user joins the device to the Azure cloud domain as part of the initial setup process. This workflow does not require end users to have admin privileges.
1. When end users power on a device for the first time, they respond to these device prompts.
a. Enter their corporate credentials.
b. Set up multi-factor authentication.
In most cases, end users are prompted to provide a phone number for a call or text. However, Windows Hello for Business provides more advanced options, such as facial recognition, retinal scanning, or creating a unique PIN.
R E V I E W E R ’ S G U I D E | 1 2
VMWARE AIRWATCH WINDOWS 10 UNIFIED ENDPOINT MANAGEMENT REVIEWER’S GUIDE
2. Devices join the Azure cloud domain, and register with VMware AirWatch for management.
Watch a demo of Out-of-Box Experience Enrollment.
Figure 5: Authenticate Users, Configure Devices with Corporate Resources, and Get Up and Running Quickly with Zero IT Involvement
Azure Connect Enrollment Workflow Primarily used for existing company-owned devices that are not domain joined, this enrollment workflow is triggered when end users open a Microsoft Office app for the first time. End users must have admin privileges and connect their Azure accounts to the device. Use this workflow if you already have Azure AD Premium licenses and do not want to join the device to the Azure cloud domain.
1. End users open a Universal Windows Platform version of any Office 365 app, which connects their Azure account to the device.
2. Enrollment begins.
Watch a demo of Enrollment via Office App.
Figure 6: Intuitive, Self-Service Enrollment via App
R E V I E W E R ’ S G U I D E | 1 3
VMWARE AIRWATCH WINDOWS 10 UNIFIED ENDPOINT MANAGEMENT REVIEWER’S GUIDE
Runtime Provisioning Enrollment Workflow
This workflow is primarily used for new, company-owned devices as an alternative to imaging. Runtime provisioning is an efficient way to set up a large number of devices for VMware AirWatch onboarding without imaging or re-imaging the devices.
1. IT admins use Configuration Designer to create the Runtime Provisioning Package .ppkg file.
2. In the AirWatch Console, pre-register device serial numbers to associate end users with the devices and imbed the staging user in the package.
3. IT admins distribute the package file to end users through USB device, SD card, or email.
4. End users onboard the device into VMware AirWatch during initial setup or after the initial setup completes. Standard users receive a prompt to enter admin user credentials.
a. If the package was emailed, launch the package from the device’s mail client.
b. If the package file was saved to a local file path, double-click the file.
Staged Provisioning Workflow
This workflow is primarily used for new company-owned, domain-joined devices that the IT admin pre-registers with the AirWatch Agent and then ships to the end user.
1. IT admins use device staging to register devices with the AirWatch Agent, install device-assigned profiles, and onboard Windows 10 devices into VMware AirWatch.
2. IT admins ship the fully onboarded and configured devices to end users.
3. End users sign in to the device.
4. The agent listener reads the user UPN and email from the device registry. This information is sent to the AirWatch Console.
5. The VMware AirWatch device registry updates and reassigns the device to the end user.
6. VMware AirWatch pushes user-assigned profiles to the device.
SCCM Integration Client + AirWatch Agent
This workflow is primarily used for new and existing company-owned, domain-joined devices already under System Center Configuration Management (SCCM). This method allows VMware AirWatch and SCCM to coexist and enables enterprise mobility management capabilities. IT admins deploy the SCCM Integration Client to register the devices it manages with VMware AirWatch.
R E V I E W E R ’ S G U I D E | 1 4
VMWARE AIRWATCH WINDOWS 10 UNIFIED ENDPOINT MANAGEMENT REVIEWER’S GUIDE
Device PostureVMware AirWatch assesses device posture by evaluating, locally enforcing, and remediating devices using the compliance engine, a VMware AirWatch tool that ensures that all devices abide by specified policies. A policy can include basic security settings or more critical security configurations.
For example, configure compliance policies to enforce the following settings for Windows 10:
• Encryption – Enforce native encryption capabilities by configuring a VMware AirWatch BitLocker Encryption profile.
• Antivirus – Monitor Windows Defender for antivirus and malware protection by configuring an Antivirus profile. The AirWatch Console exposes most device-side antivirus settings for configuration.
• Password/Passcode – Protect end-user devices by configuring a Passcode profile that requires users to enter a passcode to return from an idle state. A passcode helps ensure that all sensitive corporate information on managed devices remains protected. You can enforce passwords and their complexity, length, age, and other requirements.
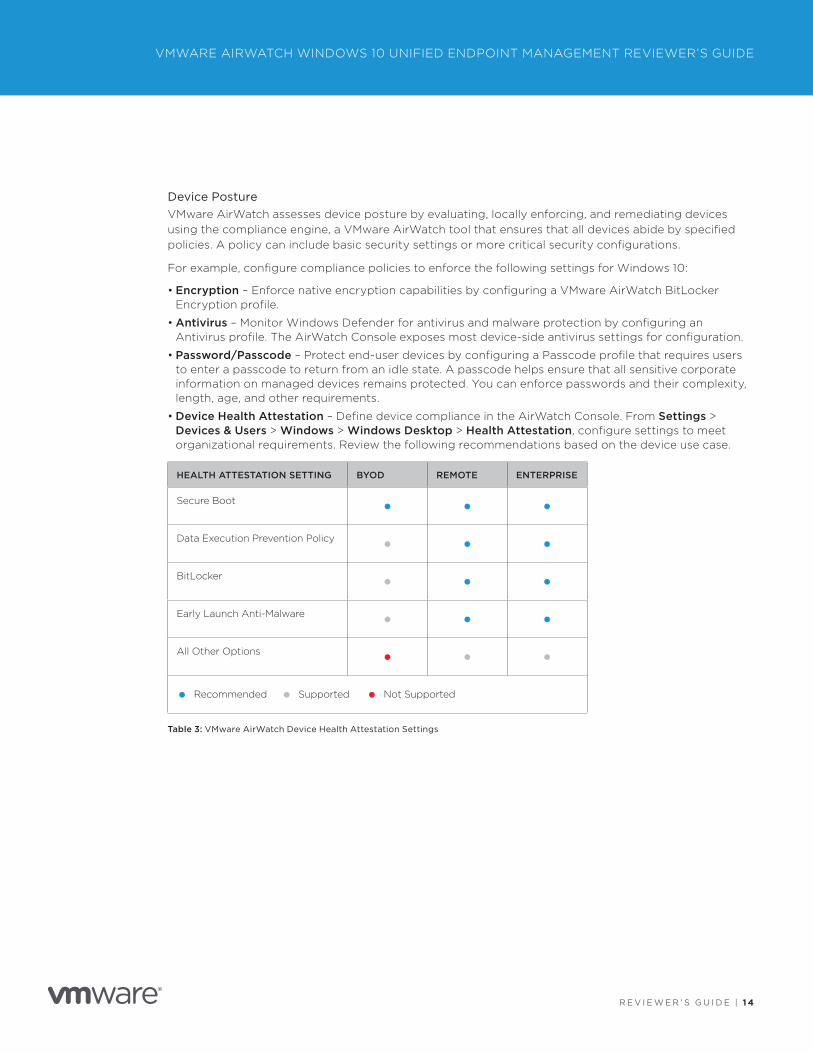
• Device Health Attestation – Define device compliance in the AirWatch Console. From Settings > Devices & Users > Windows > Windows Desktop > Health Attestation, configure settings to meet organizational requirements. Review the following recommendations based on the device use case.
HEALTH ATTESTATION SETTING BYOD REMOTE ENTERPRISE
Secure Boot • • •Data Execution Prevention Policy • • •BitLocker • • •Early Launch Anti-Malware • • •All Other Options • • •
• Recommended • Supported • Not Supported
Table 3: VMware AirWatch Device Health Attestation Settings
R E V I E W E R ’ S G U I D E | 1 5
VMWARE AIRWATCH WINDOWS 10 UNIFIED ENDPOINT MANAGEMENT REVIEWER’S GUIDE
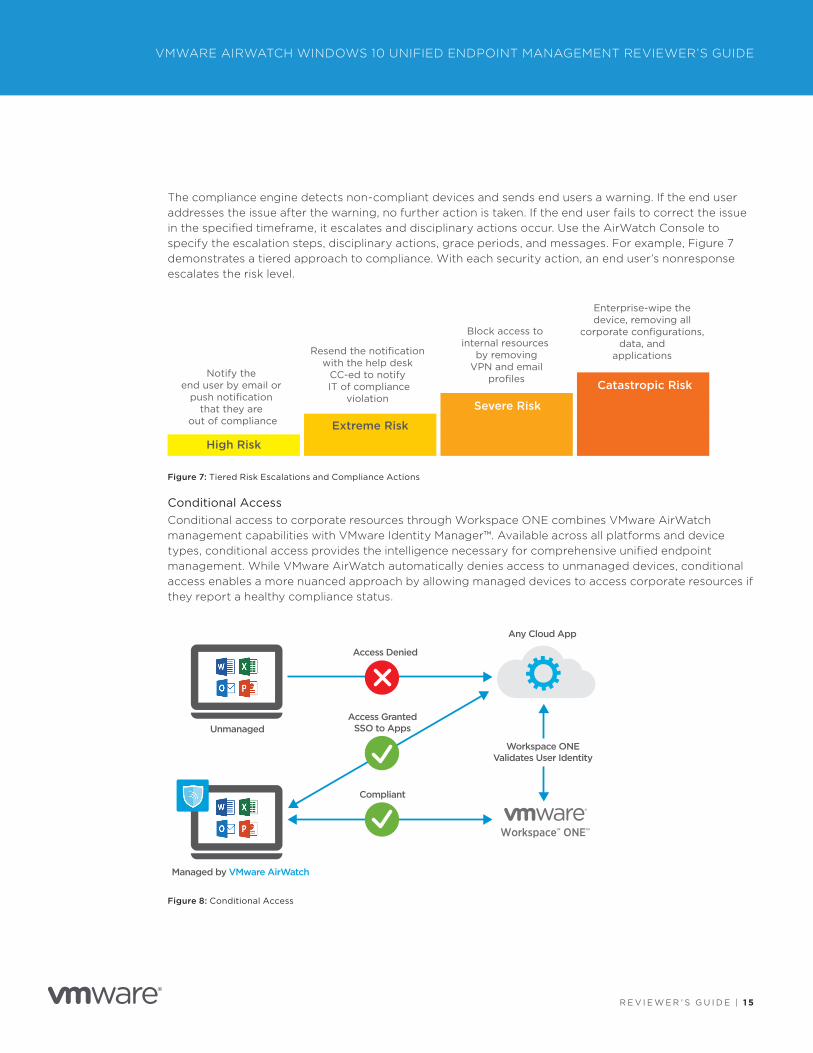
The compliance engine detects non-compliant devices and sends end users a warning. If the end user addresses the issue after the warning, no further action is taken. If the end user fails to correct the issue in the specified timeframe, it escalates and disciplinary actions occur. Use the AirWatch Console to specify the escalation steps, disciplinary actions, grace periods, and messages. For example, Figure 7 demonstrates a tiered approach to compliance. With each security action, an end user’s nonresponse escalates the risk level.
Notify the end user by email or
push notification that they are
out of compliance
Resend the notificationwith the help desk
CC-ed to notify IT of compliance
violation
Block access to internal resources
by removingVPN and email
profiles
Enterprise-wipe thedevice, removing all
corporate configurations,data, and
applications
High Risk
Extreme Risk
Catastropic Risk
Severe Risk
Figure 7: Tiered Risk Escalations and Compliance Actions
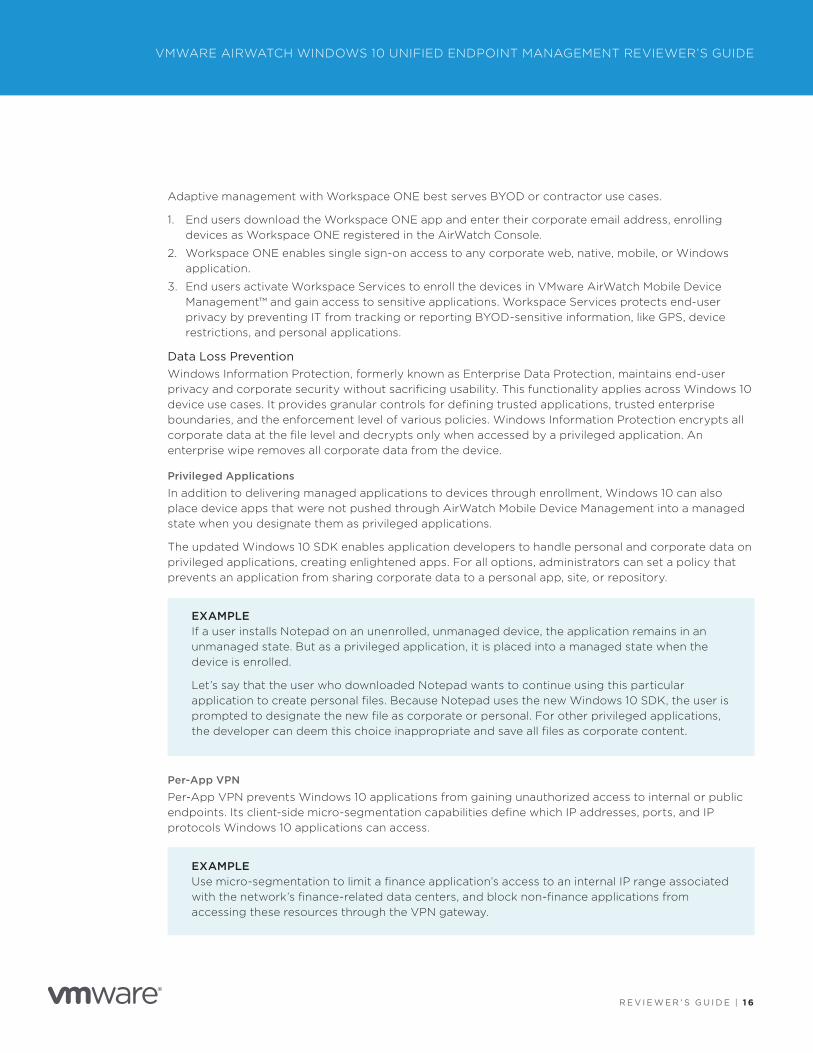
Conditional AccessConditional access to corporate resources through Workspace ONE combines VMware AirWatch management capabilities with VMware Identity Manager™. Available across all platforms and device types, conditional access provides the intelligence necessary for comprehensive unified endpoint management. While VMware AirWatch automatically denies access to unmanaged devices, conditional access enables a more nuanced approach by allowing managed devices to access corporate resources if they report a healthy compliance status.
Unmanaged
Access Denied
Any Cloud App
Workspace ONEValidates User Identity
Access GrantedSSO to Apps
Compliant
Managed by VMware AirWatch
Figure 8: Conditional Access
R E V I E W E R ’ S G U I D E | 1 6
VMWARE AIRWATCH WINDOWS 10 UNIFIED ENDPOINT MANAGEMENT REVIEWER’S GUIDE
Adaptive management with Workspace ONE best serves BYOD or contractor use cases.
1. End users download the Workspace ONE app and enter their corporate email address, enrolling devices as Workspace ONE registered in the AirWatch Console.
2. Workspace ONE enables single sign-on access to any corporate web, native, mobile, or Windows application.
3. End users activate Workspace Services to enroll the devices in VMware AirWatch Mobile Device Management™ and gain access to sensitive applications. Workspace Services protects end-user privacy by preventing IT from tracking or reporting BYOD-sensitive information, like GPS, device restrictions, and personal applications.
Data Loss PreventionWindows Information Protection, formerly known as Enterprise Data Protection, maintains end-user privacy and corporate security without sacrificing usability. This functionality applies across Windows 10 device use cases. It provides granular controls for defining trusted applications, trusted enterprise boundaries, and the enforcement level of various policies. Windows Information Protection encrypts all corporate data at the file level and decrypts only when accessed by a privileged application. An enterprise wipe removes all corporate data from the device.
Privileged Applications
In addition to delivering managed applications to devices through enrollment, Windows 10 can also place device apps that were not pushed through AirWatch Mobile Device Management into a managed state when you designate them as privileged applications.
The updated Windows 10 SDK enables application developers to handle personal and corporate data on privileged applications, creating enlightened apps. For all options, administrators can set a policy that prevents an application from sharing corporate data to a personal app, site, or repository.
EXAMPLE If a user installs Notepad on an unenrolled, unmanaged device, the application remains in an unmanaged state. But as a privileged application, it is placed into a managed state when the device is enrolled.
Let’s say that the user who downloaded Notepad wants to continue using this particular application to create personal files. Because Notepad uses the new Windows 10 SDK, the user is prompted to designate the new file as corporate or personal. For other privileged applications, the developer can deem this choice inappropriate and save all files as corporate content.
Per-App VPN
Per-App VPN prevents Windows 10 applications from gaining unauthorized access to internal or public endpoints. Its client-side micro-segmentation capabilities define which IP addresses, ports, and IP protocols Windows 10 applications can access.
EXAMPLE Use micro-segmentation to limit a finance application’s access to an internal IP range associated with the network’s finance-related data centers, and block non-finance applications from accessing these resources through the VPN gateway.
R E V I E W E R ’ S G U I D E | 1 7
VMWARE AIRWATCH WINDOWS 10 UNIFIED ENDPOINT MANAGEMENT REVIEWER’S GUIDE
You can also use privileged applications to simplify per-app VPN configurations. Depending on the needs of the organization, use one or both of the following options:
• Every privileged application can have a unique VPN configuration.
• All privileged applications can use the same VPN configuration.
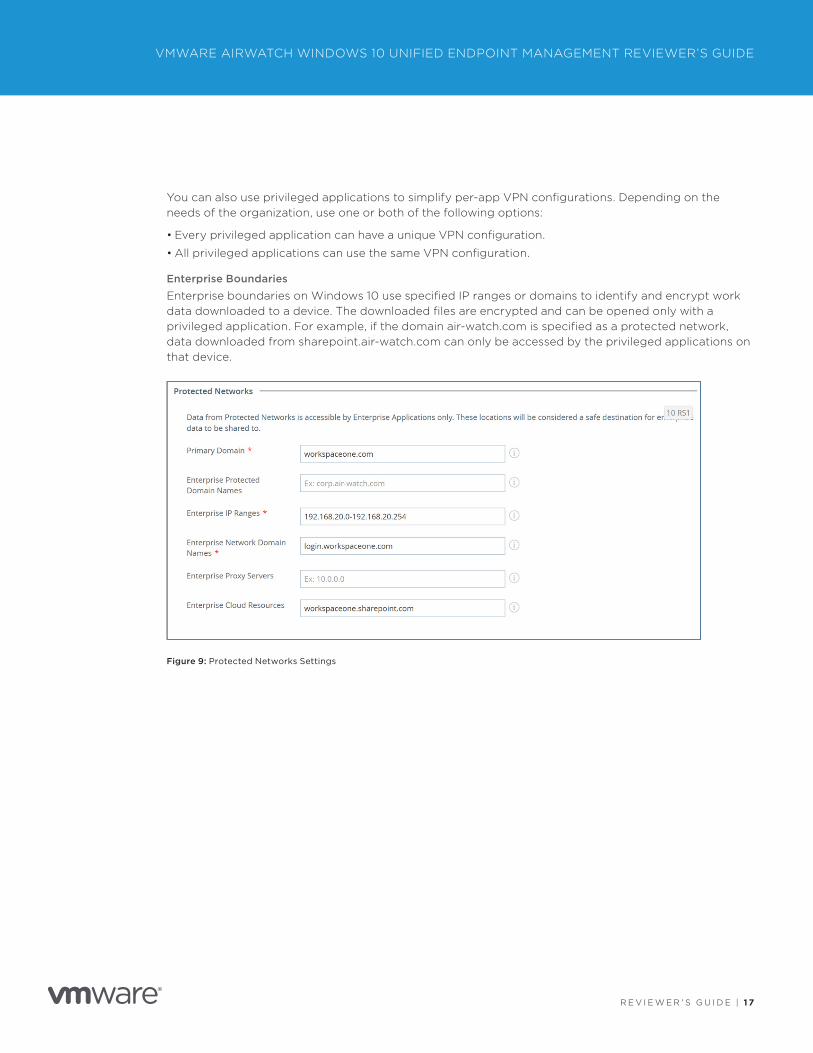
Enterprise Boundaries
Enterprise boundaries on Windows 10 use specified IP ranges or domains to identify and encrypt work data downloaded to a device. The downloaded files are encrypted and can be opened only with a privileged application. For example, if the domain air-watch.com is specified as a protected network, data downloaded from sharepoint.air-watch.com can only be accessed by the privileged applications on that device.
Figure 9: Protected Networks Settings
R E V I E W E R ’ S G U I D E | 1 8
VMWARE AIRWATCH WINDOWS 10 UNIFIED ENDPOINT MANAGEMENT REVIEWER’S GUIDE
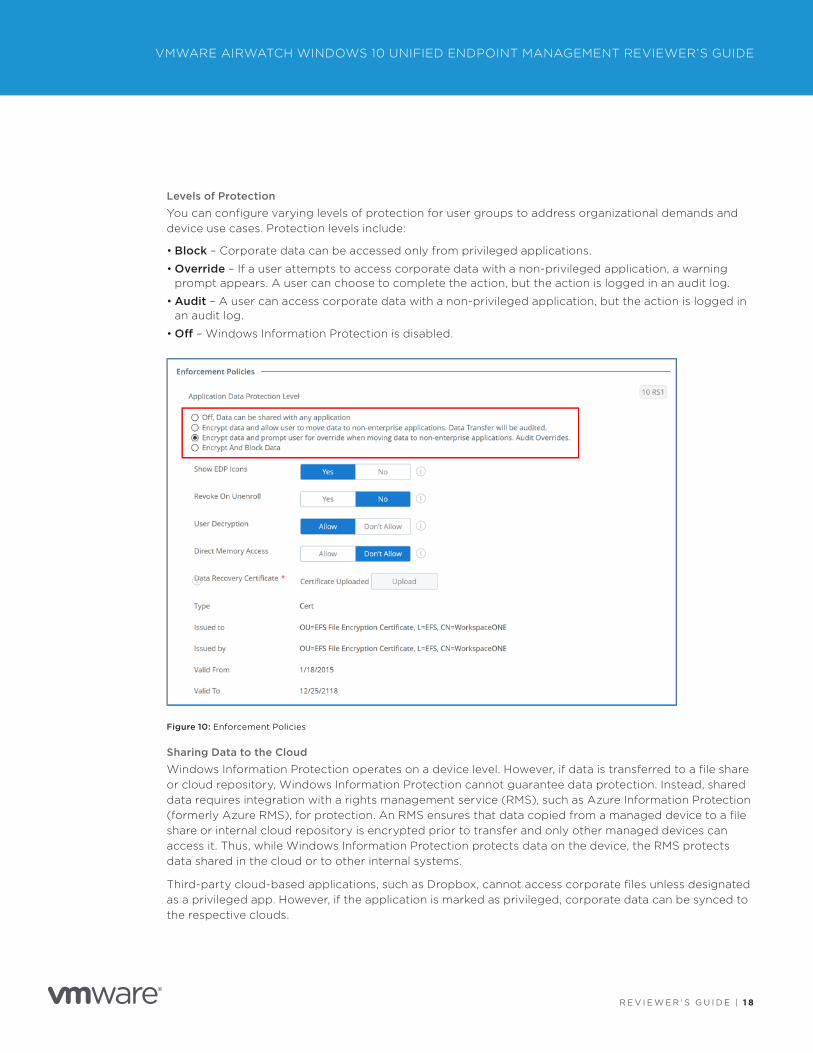
Levels of Protection
You can configure varying levels of protection for user groups to address organizational demands and device use cases. Protection levels include:
• Block – Corporate data can be accessed only from privileged applications.
• Override – If a user attempts to access corporate data with a non-privileged application, a warning prompt appears. A user can choose to complete the action, but the action is logged in an audit log.
• Audit – A user can access corporate data with a non-privileged application, but the action is logged in an audit log.
• Off – Windows Information Protection is disabled.
Figure 10: Enforcement Policies
Sharing Data to the Cloud
Windows Information Protection operates on a device level. However, if data is transferred to a file share or cloud repository, Windows Information Protection cannot guarantee data protection. Instead, shared data requires integration with a rights management service (RMS), such as Azure Information Protection (formerly Azure RMS), for protection. An RMS ensures that data copied from a managed device to a file share or internal cloud repository is encrypted prior to transfer and only other managed devices can access it. Thus, while Windows Information Protection protects data on the device, the RMS protects data shared in the cloud or to other internal systems.
Third-party cloud-based applications, such as Dropbox, cannot access corporate files unless designated as a privileged app. However, if the application is marked as privileged, corporate data can be synced to the respective clouds.
R E V I E W E R ’ S G U I D E | 1 9
VMWARE AIRWATCH WINDOWS 10 UNIFIED ENDPOINT MANAGEMENT REVIEWER’S GUIDE
Architecture and Components of Windows 10 ManagementManaging Windows 10 devices with VMware AirWatch consists of a number of components and integrations that provide Windows 10 management capabilities:
• AirWatch Protection Agent
• AirWatch Cloud Connector
• Workspace ONE (integration required)
• VMware Unified Access Gateway™ and Tunnel
• VPN server
• AirWatch Cloud Messaging
• Windows Notification Service
• Certificate Authority (integration required if not already integrated)
• Windows Auto-Discovery Service
AirWatch Protection AgentThe AirWatch Protection Agent integrates native Windows features with VMware AirWatch Enterprise Mobility Management to ensure that Windows desktop endpoints remain secure. Configure native functionality like BitLocker, Windows Firewall, and Windows Automatic Updates as profiles in the AirWatch Console, and use the AirWatch Protection Agent to enforce these security configurations. After enrollment, the AirWatch Protection Agent installs on devices without end-user interaction. For more information, see VMware AirWatch Windows Desktop Platform Guide.
AirWatch Cloud ConnectorAirWatch Cloud Connector™ (ACC) has been combined, in VMware AirWatch 9.1, with the VMware Identity Manager Connector to create the VMware Enterprise Systems Connector™. This installer serves as the unified connector package for Workspace ONE, VMware AirWatch, and VMware Identity Manager. It comprises two components, ACC and the VMware Identity Manager Connector.
The Enterprise Systems Connector contains two Windows services that you can install on a physical or virtual server running Windows 2008 R2 or later. It operates from within your internal network and can be configured behind any existing web application firewalls or load balancers. By initiating a secure HTTPS connection from Enterprise Systems Connector to messaging services built into VMware AirWatch and VMware Identity Manager, Enterprise Systems Connector can periodically transmit information from your internal resources such as AD and LDAP to the product without firewall changes. If you plan on sending traffic through an outbound proxy, you can use settings in the connector configuration that allow proxyed traffic.
For more information, see the VMware Enterprise Systems Connector Installation and Configuration Guide.
Workspace ONEA simple and secure enterprise platform that delivers and manages any app on any device by integrating identity, application, and enterprise mobility management. For more information, see the resources listed on the Workspace ONE product page.
R E V I E W E R ’ S G U I D E | 2 0
VMWARE AIRWATCH WINDOWS 10 UNIFIED ENDPOINT MANAGEMENT REVIEWER’S GUIDE
Unified Access Gateway and Tunnel Client The VMware Unified Access Gateway virtual appliance ensures that only traffic on behalf of a strongly authenticated remote user enters the corporate data center. Typically installed in a demilitarized zone (DMZ), Unified Access Gateway directs authentication requests to the appropriate server and discards unauthenticated requests. Accurately controlling access involves specific inspection of desktop protocols and the coordination of potentially rapidly changing policies and network addresses.
Unified Access Gateway acts as a proxy host for connections inside your company’s trusted network. This design provides an extra layer of security by shielding virtual desktops, application hosts, and servers from the public-facing Internet. For more information, see the VMware Product Documentation.
VPN ServerIf you have a VPN, you can use a VPN profile in VMware AirWatch to configure device VPN settings so that end users can remotely and securely access your organization’s internal network. VMware AirWatch supports specific VPN connection types for various third-party VPN providers. For more information, see the VMware AirWatch Product Documentation.
AirWatch Cloud Messaging AirWatch Cloud Messaging (AWCM) enables real-time policy and command delivery to the AirWatch Protection Agent. Without AWCM, the AirWatch Protection Agent receives policy and command delivery only during the check-in intervals set in the AirWatch Console. We recommend using AWCM for real-time policy and command delivery to Windows 8.1 and Windows 10 devices. For more information, see the VMware AirWatch Cloud Messaging Service (AWCM) Guide.
Windows Notification ServiceWindows Notification Service (WNS) enables real-time policy and command delivery to Windows devices, similar to Google Cloud Messaging or Apple Push Notification Service. Without WNS, the Windows devices receive policies and commands only during the configured check-in intervals.
Certificate AuthorityA certificate authority (CA) is required to allow VMware AirWatch to manage the complete life cycle of provisioned certificates. VMware AirWatch integrates with many different third-party CAs. For more information, see the VMware AirWatch Product Documentation.
Windows Auto-Discovery ServiceWindows Auto-Discovery Services (WADS) supports an on-premises installation and cloud-based VMware AirWatch hosted configuration. WADS is a lightweight web service that takes the user’s email address and redirects the user to the VMware AirWatch environment along with the Group ID, thus simplifying the onboarding experience. For more information, see the VMware AirWatch Product Documentation.

R E V I E W E R ’ S G U I D E | 2 1
VMWARE AIRWATCH WINDOWS 10 UNIFIED ENDPOINT MANAGEMENT REVIEWER’S GUIDE
File and Application Delivery with VMware AirWatchMany issues in PC management arise from the delivery, integration, and support of applications. As end-user demand drives organizations to adopt more applications, these issues only grow in complexity and number. Today’s sophisticated user requires control over apps on both personal and corporate-owned devices. Windows 10 introduces features and tools to simplify application integration and management.
Figure 11 summarizes the capabilities of VMware AirWatch application control policies.
Figure 11: Application Control Policy Capabilities
The recommended application delivery methods are based on the device use case.
SOFTWARE DISTRIBUTION
BUSINESS STORE PORTAL
Use Case BYOD a
Remote a
Enterprise a
Application Type Internal a
Public a
Table 4: Recommend Application Delivery Methods Based on Device
R E V I E W E R ’ S G U I D E | 2 2
VMWARE AIRWATCH WINDOWS 10 UNIFIED ENDPOINT MANAGEMENT REVIEWER’S GUIDE
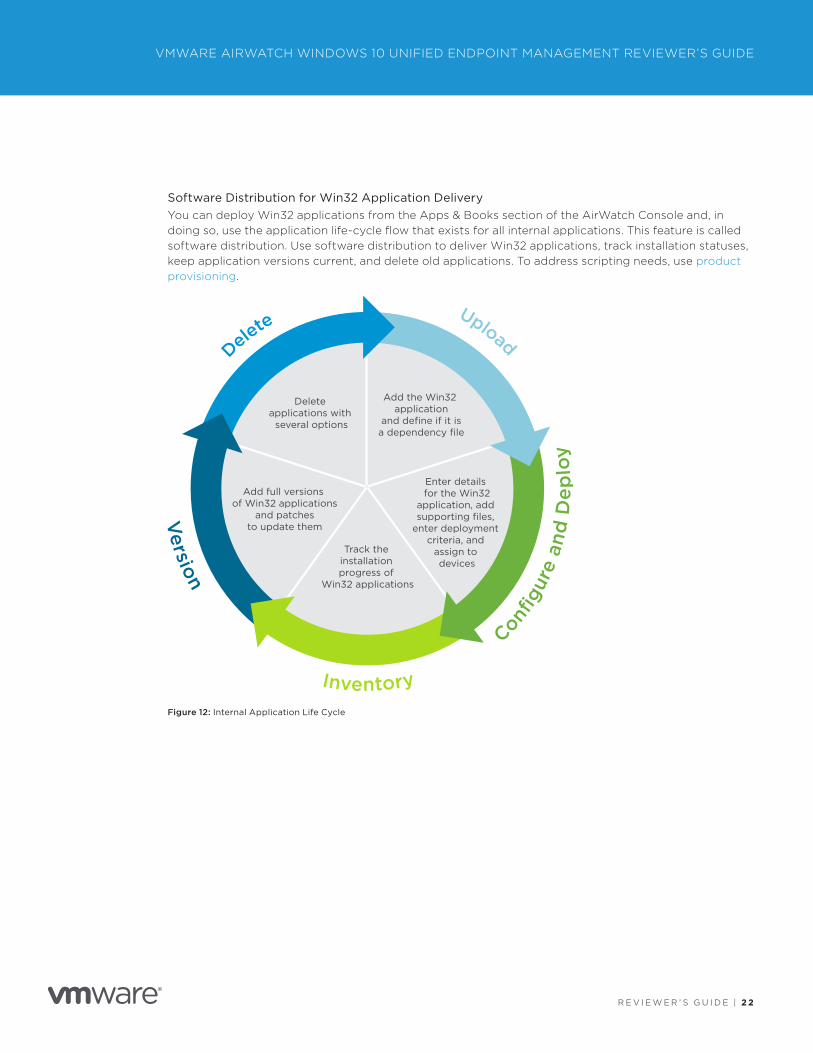
Software Distribution for Win32 Application DeliveryYou can deploy Win32 applications from the Apps & Books section of the AirWatch Console and, in doing so, use the application life-cycle flow that exists for all internal applications. This feature is called software distribution. Use software distribution to deliver Win32 applications, track installation statuses, keep application versions current, and delete old applications. To address scripting needs, use product provisioning.
Delete applications with
several options
Add the Win32 application
and define if it is a dependency file
Enter details for the Win32
application, add supporting files,
enter deployment criteria, and
assign to devices
Track the installation progress of
Win32 applications
Add full versions of Win32 applications
and patches to update them
Figure 12: Internal Application Life Cycle
R E V I E W E R ’ S G U I D E | 2 3
VMWARE AIRWATCH WINDOWS 10 UNIFIED ENDPOINT MANAGEMENT REVIEWER’S GUIDE
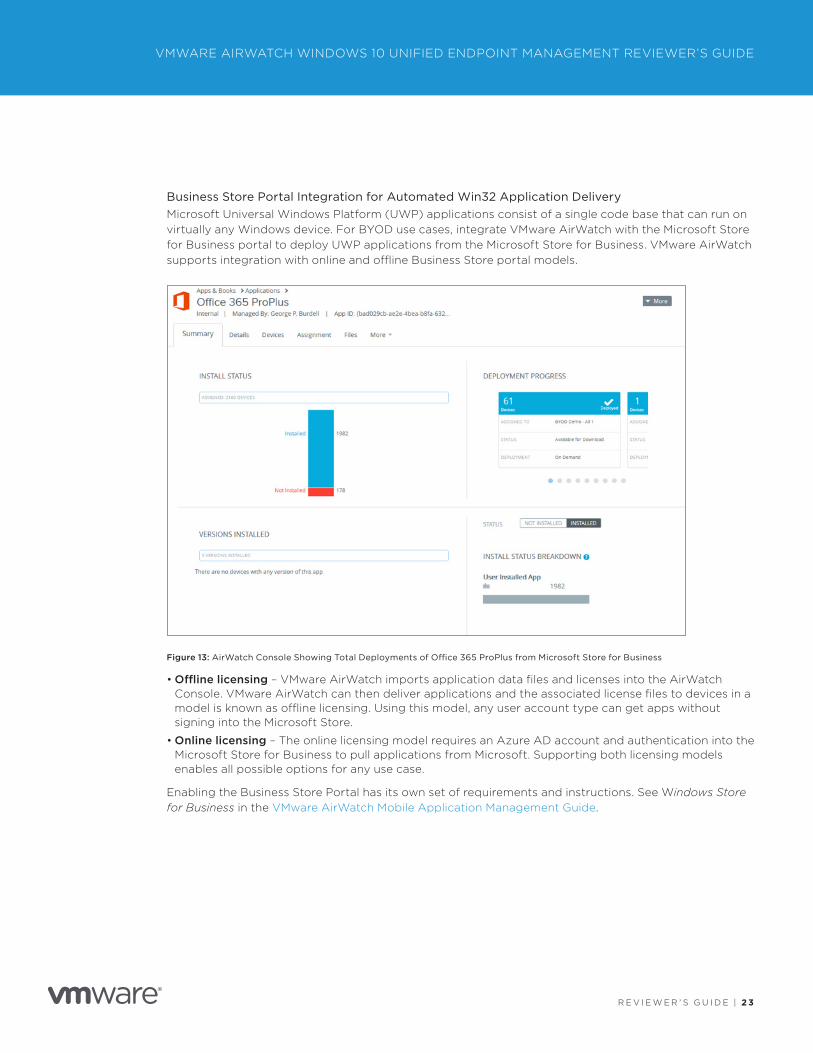
Business Store Portal Integration for Automated Win32 Application DeliveryMicrosoft Universal Windows Platform (UWP) applications consist of a single code base that can run on virtually any Windows device. For BYOD use cases, integrate VMware AirWatch with the Microsoft Store for Business portal to deploy UWP applications from the Microsoft Store for Business. VMware AirWatch supports integration with online and offline Business Store portal models.
Figure 13: AirWatch Console Showing Total Deployments of Office 365 ProPlus from Microsoft Store for Business
• Offline licensing – VMware AirWatch imports application data files and licenses into the AirWatch Console. VMware AirWatch can then deliver applications and the associated license files to devices in a model is known as offline licensing. Using this model, any user account type can get apps without signing into the Microsoft Store.
• Online licensing – The online licensing model requires an Azure AD account and authentication into the Microsoft Store for Business to pull applications from Microsoft. Supporting both licensing models enables all possible options for any use case.
Enabling the Business Store Portal has its own set of requirements and instructions. See Windows Store for Business in the VMware AirWatch Mobile Application Management Guide.
R E V I E W E R ’ S G U I D E | 2 4
VMWARE AIRWATCH WINDOWS 10 UNIFIED ENDPOINT MANAGEMENT REVIEWER’S GUIDE
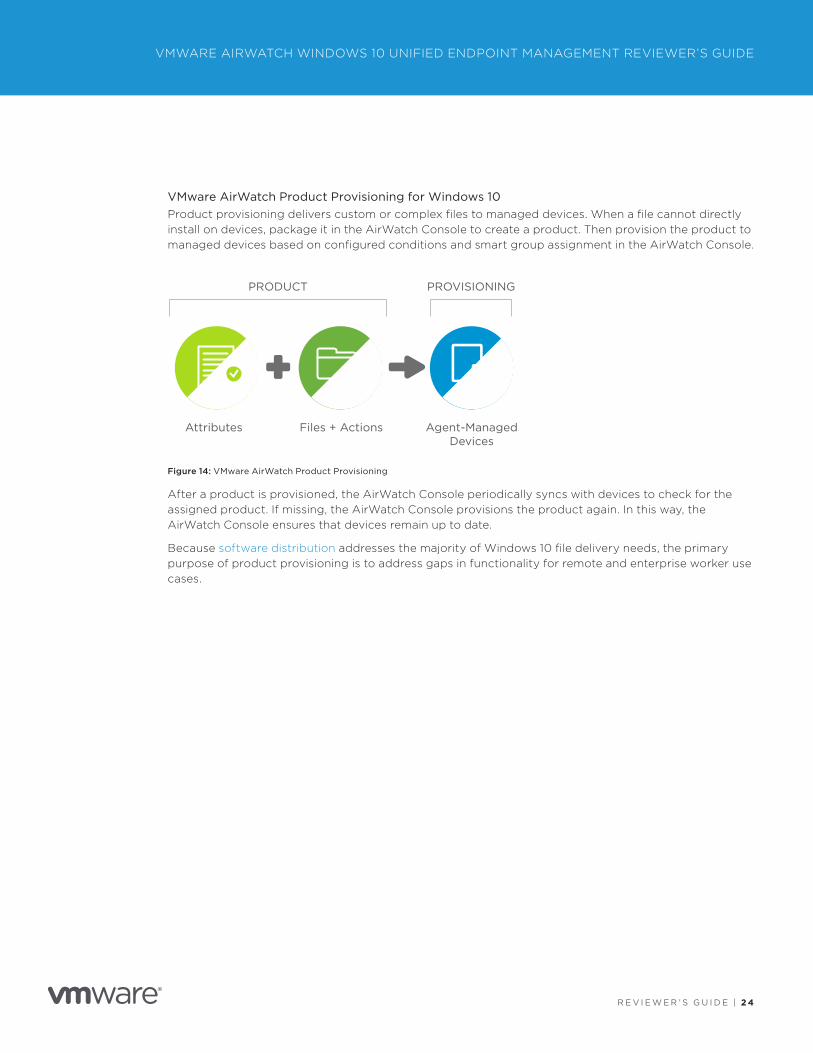
VMware AirWatch Product Provisioning for Windows 10Product provisioning delivers custom or complex files to managed devices. When a file cannot directly install on devices, package it in the AirWatch Console to create a product. Then provision the product to managed devices based on configured conditions and smart group assignment in the AirWatch Console.
Attributes Files + Actions Agent-ManagedDevices
PRODUCT PROVISIONING
Figure 14: VMware AirWatch Product Provisioning
After a product is provisioned, the AirWatch Console periodically syncs with devices to check for the assigned product. If missing, the AirWatch Console provisions the product again. In this way, the AirWatch Console ensures that devices remain up to date.
Because software distribution addresses the majority of Windows 10 file delivery needs, the primary purpose of product provisioning is to address gaps in functionality for remote and enterprise worker use cases.

R E V I E W E R ’ S G U I D E | 2 5
VMWARE AIRWATCH WINDOWS 10 UNIFIED ENDPOINT MANAGEMENT REVIEWER’S GUIDE
Patch Management for Windows 10 with VMware AirWatchThe AirWatch Enterprise Mobility Management update service for Windows 10 provides tailored functionality to address the unique constraints of mobility and the cloud. Traditional, operating system upgrades use a wipe and replace model. In contrast, the update-as-a-service model pushes periodic operating system and feature updates. Windows 10 updates occur on a frequent and dynamic basis to ensure that end users always have access to up-to-date operating system features.
Deploying Windows 10 fixes, patches, and updates on a variety of client servicing plans creates overhead. By using branches, you can create a customized deployment schedule based on preference and update sensitivity. Review the following descriptions to understand the available patch management options.
BRANCH DESCRIPTION REQUIREMENT TIMELINE USE CASE
Current Branch Immediately delivers updates and new features in the same package.
Public access to Microsoft Update Services endpoints for devices.
Windows as a Service provides 4+ months to pilot the Current Branch release.
Best for early or fast adopters of new functionality, and is most valuable to consumers.
Current Branch for Business
Immediately delivers updates, but delays new feature delivery. Allows time for pre-production testing of new features, improving interoperability with existing applications and infrastructures.
Public access to Microsoft Update Services endpoints for devices.
Windows as a Service provides 12+ months to deploy the Current Branch for Business release with a 60-day grace period.
Best for most organizations. Highly recommended for BYOD deployments.
Long-Term Servicing Branch
Immediately delivers updates, but does not deliver new features. Instead, new features get packaged as a Long-Term Servicing Branch update, which enables long-term support for builds, and guarantees image stability.
Public access to Microsoft Update Services endpoints for devices.
Organizations deploy Long-Term Servicing Branch updates at their own schedule.
Best for deployments that require stable device performance, such as medical, financial, and kiosk type of deployments.
Windows Server Update Services
Uses an on-premises instance of Windows Server Update Services to control updates.
Working instance of Windows Server Update Services with device access to the configured URL.
Organizations deploy updates at their own schedule.
Best for deployments that cannot grant devices public access to the Microsoft Update Services endpoints and want to continue using on-premises Windows Server Update Services to control updates.
Table 5: Windows 10 Patch Management Options
R E V I E W E R ’ S G U I D E | 2 6
VMWARE AIRWATCH WINDOWS 10 UNIFIED ENDPOINT MANAGEMENT REVIEWER’S GUIDE
Configuring Devices for Management with VMware AirWatchYou use the AirWatch Console to configure Windows 10 devices for management:
1. Configure enrollment
2. Configure device profiles
3. Deploy compliance policies and remediate vulnerabilities
4. Install required software using product provisioning or software distribution
5. Manage patches across devices
Configuration Best PracticesKeep the following best practices in mind when configuring Windows 10 devices.
• For settings with different security levels, the most secure policy takes precedence.
• For settings with equal security levels, the last write is used according to priority of the source, in the following order: Group Policy > MDM Policy > Enterprise provisioning package > OEM provisioning package > Microsoft provisioning package.
VMware AirWatch ProfilesProfiles provide the primary mechanism for managing devices. A profile consists of settings, configurations, and restrictions. When combined with compliance policies, the profile enforces corporate rules and procedures. To create a profile, you first specify the General settings and then configure a payload. General settings, as shown in Table 6, determine how the profile is deployed and who receives it. The payload settings, shown in Table 7, apply to the device when the profile is installed. For optimal device and console management, configure one payload per profile.
The General settings include the following options.
SETTING DESCRIPTION
Name Profile name to display in the AirWatch Console.
Version Read only. Version of the profile.
Description Brief description of the profile’s purpose.
Deployment If set to Managed, the profile is automatically removed if the device is unenrolled. If set to Manual, the user must manually remove the profile after the device is unenrolled.
Assignment Type
Specify how the profile is to be deployed to devices.• Auto – The profile is deployed to all devices automatically.
• Optional – An end user can install the profile from the Self-Service Portal, or the administrator can choose which individual devices will receive the profile.
End users can also install profiles representing web applications using a Web Clip or Bookmark payload. If you configure the payload to appear in the App Catalog, you can install it from the App Catalog.• Compliance – The profile is applied to the device by the compliance engine when users fail
to take corrective action to make their device compliant. For more information, see Compliance Profiles Overview.
R E V I E W E R ’ S G U I D E | 2 7
VMWARE AIRWATCH WINDOWS 10 UNIFIED ENDPOINT MANAGEMENT REVIEWER’S GUIDE
SETTING DESCRIPTION
Allow Removal Specify whether the end user can remove the profile.• Always – The end user can remove the profile at any time.
• With Authorization – The end user can remove the profile with the authorization of the administrator. This option adds a Password text box.
• Never – The end user cannot remove the profile from the device.
Managed By The organization group with administrative access to the profile.
Assigned Groups
Specify smart groups to configure granular profile assignment. Enter an existing smart group, or click Create a new smart group. The platform specified in the device profile or compliance policy takes precedence over the smart group’s platform. For example, a Windows Desktop profile is always assigned to Windows Desktops devices, even if the smart group includes other platforms.
Exclusions To exclude selected smart groups from profiles and policies, select Yes.In the Excluded Groups option that appears, select the groups to exclude from this profile or policy. If you need to create a new group, click the Create Assignment Group button.If the same group is selected in Assigned Groups and Excluded Groups, you cannot save the profile or policy.
View Device Assignment
Preview the assigned devices, smart groups, and exclusions.
Additional Assignment Criteria
Select Enable Scheduling and install only during selected time periods to configure a time frame in which devices can receive the profile. In the Assigned Schedules text box, enter the name of a configured time schedule.To configure a time schedule, navigate to Devices > Profiles & Resources > Profiles Settings > Time Schedules > Add Schedule > Add Schedule.
Removal Date Specify a future date formatted as MM/DD/YYYY to schedule the profile’s device-side removal.
Table 6: VMware AirWatch Profile General Settings
The following payloads are the most relevant in a Windows 10 deployment.
PROFILE NAME BYOD REMOTE ENTERPRISE
Passcode • • •EWS (Outlook) • • •Wi-Fi • • •Credentials • • •Restrictions • • •
• Always • Depends • Never
Table 7: VMware AirWatch Profile Payload Settings Relevant to Windows 10
R E V I E W E R ’ S G U I D E | 2 8
VMWARE AIRWATCH WINDOWS 10 UNIFIED ENDPOINT MANAGEMENT REVIEWER’S GUIDE
Windows 10 Email Profiles
Email profiles enable corporate email access on end-user devices. For Windows 10 devices, the available licensing for Microsoft Office applications determines which email payload to configure.
• Device does NOT have Microsoft Office license – Configure Exchange ActiveSync with the native mail client.
• Device HAS Microsoft Office licenses – Configure Exchange Web Services with the Outlook web client, providing end users a familiar mobile email experience.
Exchange ActiveSync Profile
The Exchange ActiveSync payload enables end users to access corporate email on their devices using the native mail client. When published, this profile relies on the VMware AirWatch Mobile Email Management™ infrastructure to block access to corporate email and requires integration with Secure Email Gateway or PowerShell. For more information, see the VMware AirWatch Mobile Email Management Guide, available from VMware AirWatch documentation.
Exchange Web Services Profile for Windows 10
The Exchange Web Services payload enables end users to access corporate email on their devices using the Outlook web client. When published, this profile uses granular conditional access policies through Workspace ONE adaptive management to grant or deny access to Outlook and the Microsoft Office suite. Office 2016 supports modern authentication—that is, Active Directory Authentication Library (ADAL)-based sign-in—but earlier versions do not. Earlier versions use the source network, user or group, protocols, or user agent or client type to control access.
Credentials Profile for Windows 10
A credentials profile pushes root, intermediate, and client certificates to support Public Key Infrastructure and certificate authentication use cases. The profile pushes configured credentials to the required credentials store on the Windows desktop. The certificate handles authentication into Wi-Fi, VPN, and other corporate endpoints, providing end users with a seamless experience.
To use certificates:
1. Configure a Credentials payload with a certificate authority.
2. Configure the Wi-Fi and VPN payloads.
3. Associate the certificate authority defined in the Credentials payload when configuring the Wi-Fi and VPN payloads.
Wi-Fi Profile for Windows 10
A Wi-Fi profile auto-connects devices to corporate Wi-Fi, even if the network is hidden, encrypted, or password-protected. This payload is useful to end users who travel and use their own wireless network or are in an office setting where they can connect their devices to a wireless network onsite.
R E V I E W E R ’ S G U I D E | 2 9
VMWARE AIRWATCH WINDOWS 10 UNIFIED ENDPOINT MANAGEMENT REVIEWER’S GUIDE
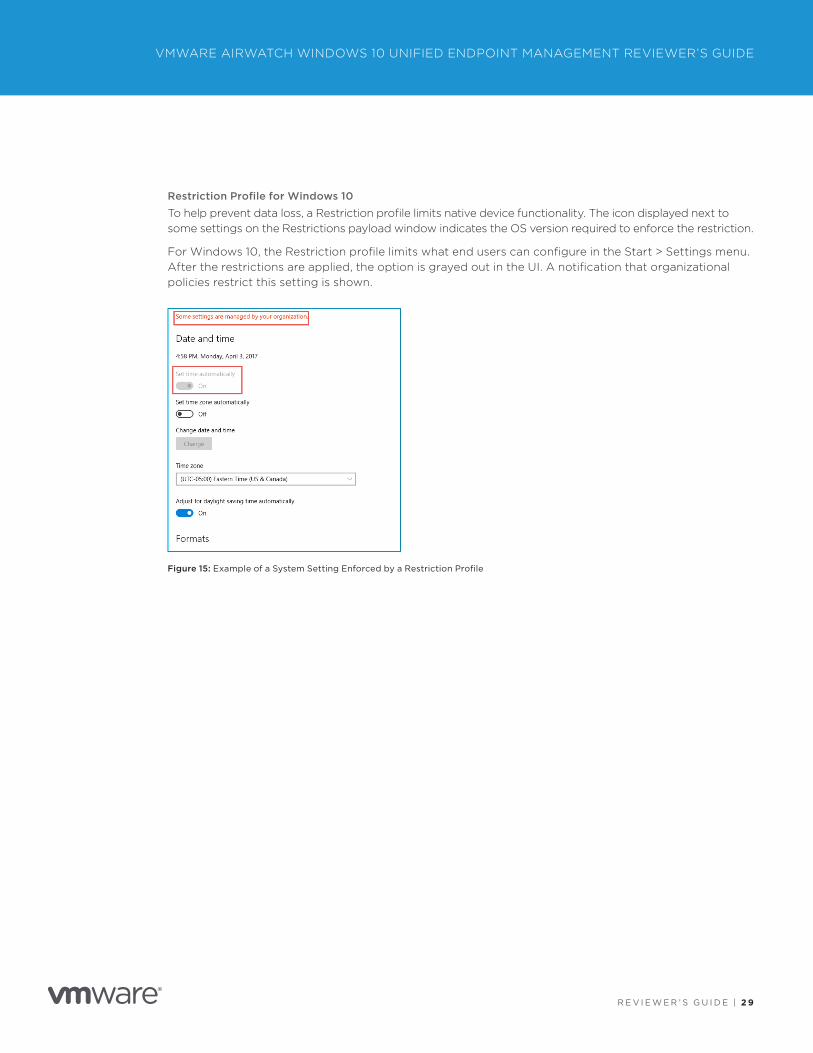
Restriction Profile for Windows 10
To help prevent data loss, a Restriction profile limits native device functionality. The icon displayed next to some settings on the Restrictions payload window indicates the OS version required to enforce the restriction.
For Windows 10, the Restriction profile limits what end users can configure in the Start > Settings menu. After the restrictions are applied, the option is grayed out in the UI. A notification that organizational policies restrict this setting is shown.
Figure 15: Example of a System Setting Enforced by a Restriction Profile
R E V I E W E R ’ S G U I D E | 3 0
VMWARE AIRWATCH WINDOWS 10 UNIFIED ENDPOINT MANAGEMENT REVIEWER’S GUIDE
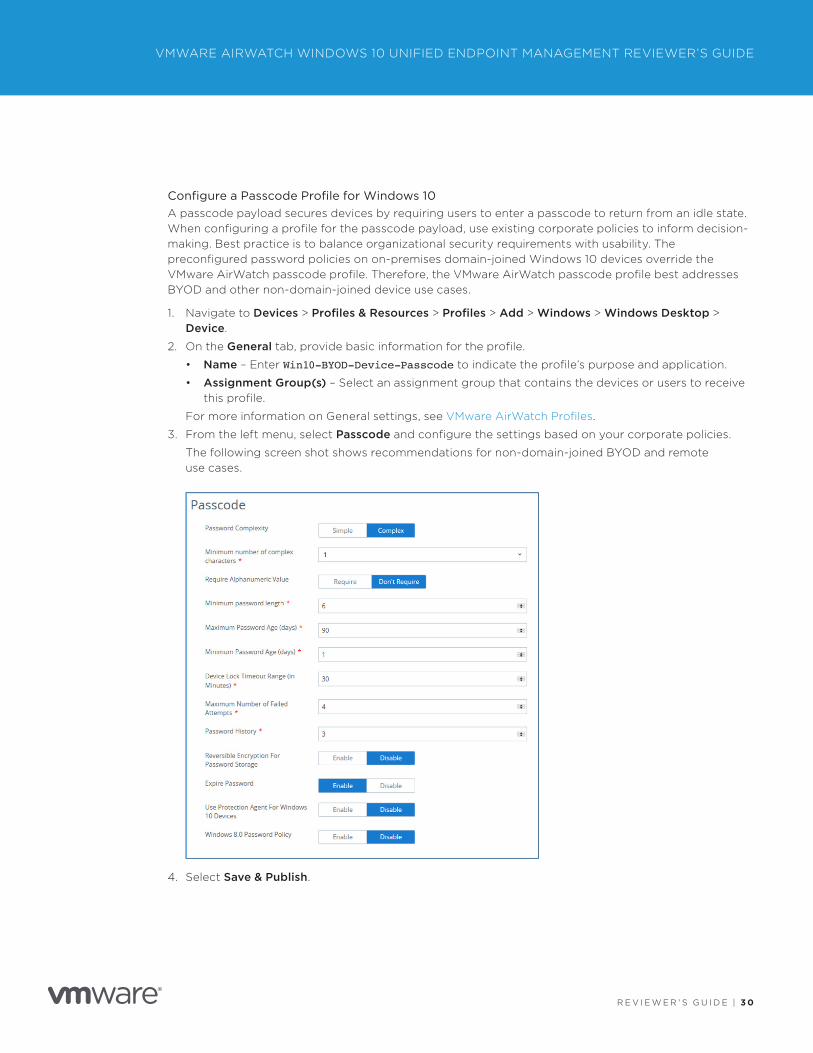
Configure a Passcode Profile for Windows 10 A passcode payload secures devices by requiring users to enter a passcode to return from an idle state. When configuring a profile for the passcode payload, use existing corporate policies to inform decision-making. Best practice is to balance organizational security requirements with usability. The preconfigured password policies on on-premises domain-joined Windows 10 devices override the VMware AirWatch passcode profile. Therefore, the VMware AirWatch passcode profile best addresses BYOD and other non-domain-joined device use cases.
1. Navigate to Devices > Profiles & Resources > Profiles > Add > Windows > Windows Desktop > Device.
2. On the General tab, provide basic information for the profile.
• Name – Enter Win10-BYOD-Device-Passcode to indicate the profile’s purpose and application.
• Assignment Group(s) – Select an assignment group that contains the devices or users to receive this profile.
For more information on General settings, see VMware AirWatch Profiles.
3. From the left menu, select Passcode and configure the settings based on your corporate policies.
The following screen shot shows recommendations for non-domain-joined BYOD and remote use cases.
4. Select Save & Publish.
R E V I E W E R ’ S G U I D E | 3 1
VMWARE AIRWATCH WINDOWS 10 UNIFIED ENDPOINT MANAGEMENT REVIEWER’S GUIDE
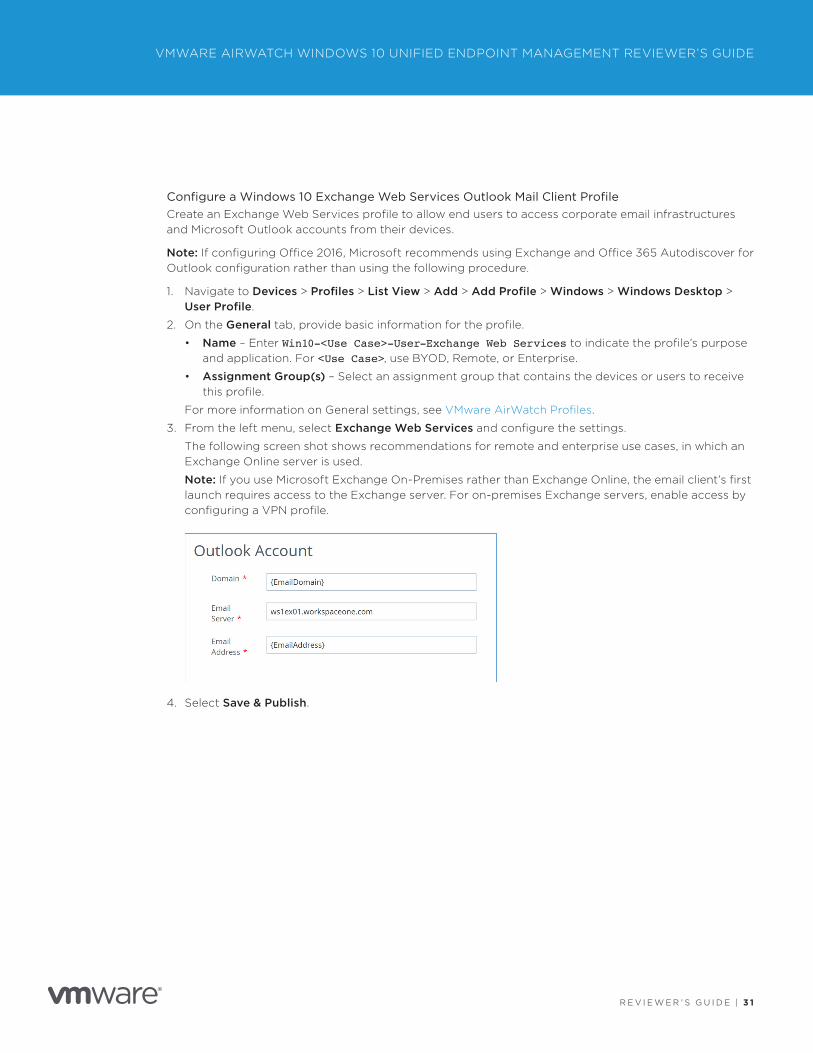
Configure a Windows 10 Exchange Web Services Outlook Mail Client ProfileCreate an Exchange Web Services profile to allow end users to access corporate email infrastructures and Microsoft Outlook accounts from their devices.
Note: If configuring Office 2016, Microsoft recommends using Exchange and Office 365 Autodiscover for Outlook configuration rather than using the following procedure.
1. Navigate to Devices > Profiles > List View > Add > Add Profile > Windows > Windows Desktop > User Profile.
2. On the General tab, provide basic information for the profile.
• Name – Enter Win10-<Use Case>-User-Exchange Web Services to indicate the profile’s purpose and application. For <Use Case>, use BYOD, Remote, or Enterprise.
• Assignment Group(s) – Select an assignment group that contains the devices or users to receive this profile.
For more information on General settings, see VMware AirWatch Profiles.
3. From the left menu, select Exchange Web Services and configure the settings.
The following screen shot shows recommendations for remote and enterprise use cases, in which an Exchange Online server is used.
Note: If you use Microsoft Exchange On-Premises rather than Exchange Online, the email client’s first launch requires access to the Exchange server. For on-premises Exchange servers, enable access by configuring a VPN profile.
4. Select Save & Publish.
R E V I E W E R ’ S G U I D E | 3 2
VMWARE AIRWATCH WINDOWS 10 UNIFIED ENDPOINT MANAGEMENT REVIEWER’S GUIDE
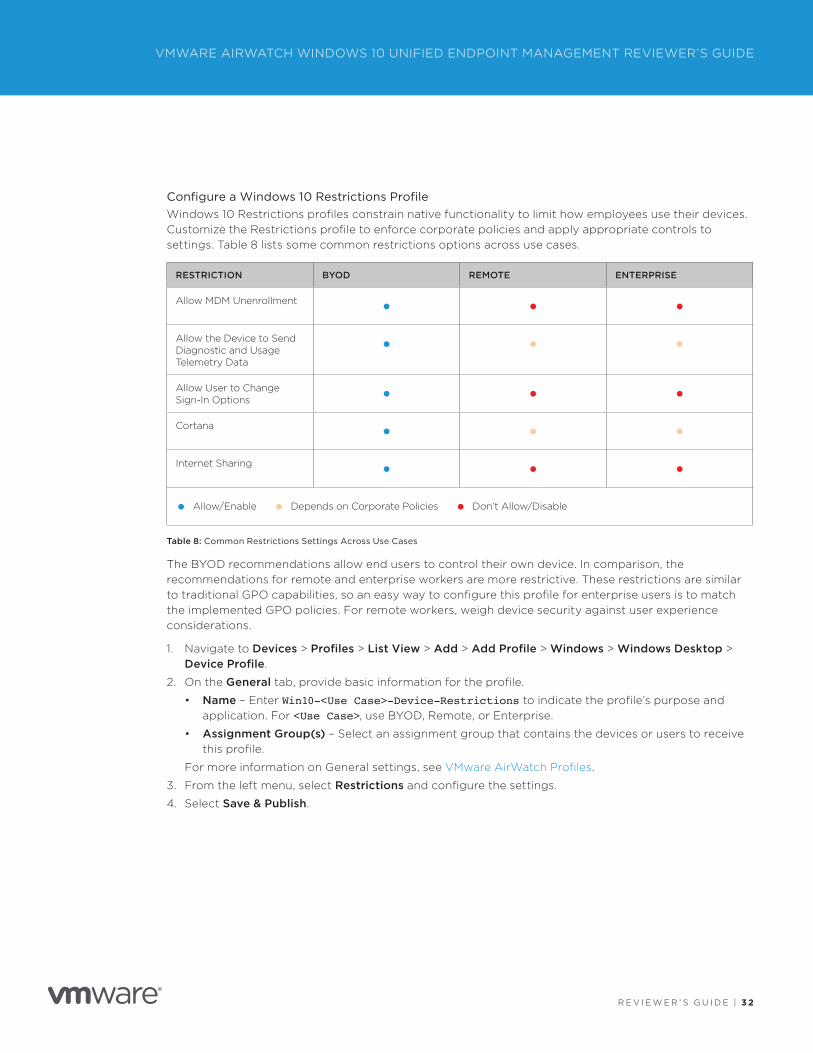
Configure a Windows 10 Restrictions Profile Windows 10 Restrictions profiles constrain native functionality to limit how employees use their devices. Customize the Restrictions profile to enforce corporate policies and apply appropriate controls to settings. Table 8 lists some common restrictions options across use cases.
RESTRICTION BYOD REMOTE ENTERPRISE
Allow MDM Unenrollment • • •Allow the Device to Send Diagnostic and Usage Telemetry Data
• • •
Allow User to Change Sign-In Options • • •Cortana • • •Internet Sharing • • •
• Allow/Enable • Depends on Corporate Policies • Don’t Allow/Disable
Table 8: Common Restrictions Settings Across Use Cases
The BYOD recommendations allow end users to control their own device. In comparison, the recommendations for remote and enterprise workers are more restrictive. These restrictions are similar to traditional GPO capabilities, so an easy way to configure this profile for enterprise users is to match the implemented GPO policies. For remote workers, weigh device security against user experience considerations.
1. Navigate to Devices > Profiles > List View > Add > Add Profile > Windows > Windows Desktop > Device Profile.
2. On the General tab, provide basic information for the profile.
• Name – Enter Win10-<Use Case>-Device-Restrictions to indicate the profile’s purpose and application. For <Use Case>, use BYOD, Remote, or Enterprise.
• Assignment Group(s) – Select an assignment group that contains the devices or users to receive this profile.
For more information on General settings, see VMware AirWatch Profiles.
3. From the left menu, select Restrictions and configure the settings.
4. Select Save & Publish.
R E V I E W E R ’ S G U I D E | 3 3
VMWARE AIRWATCH WINDOWS 10 UNIFIED ENDPOINT MANAGEMENT REVIEWER’S GUIDE
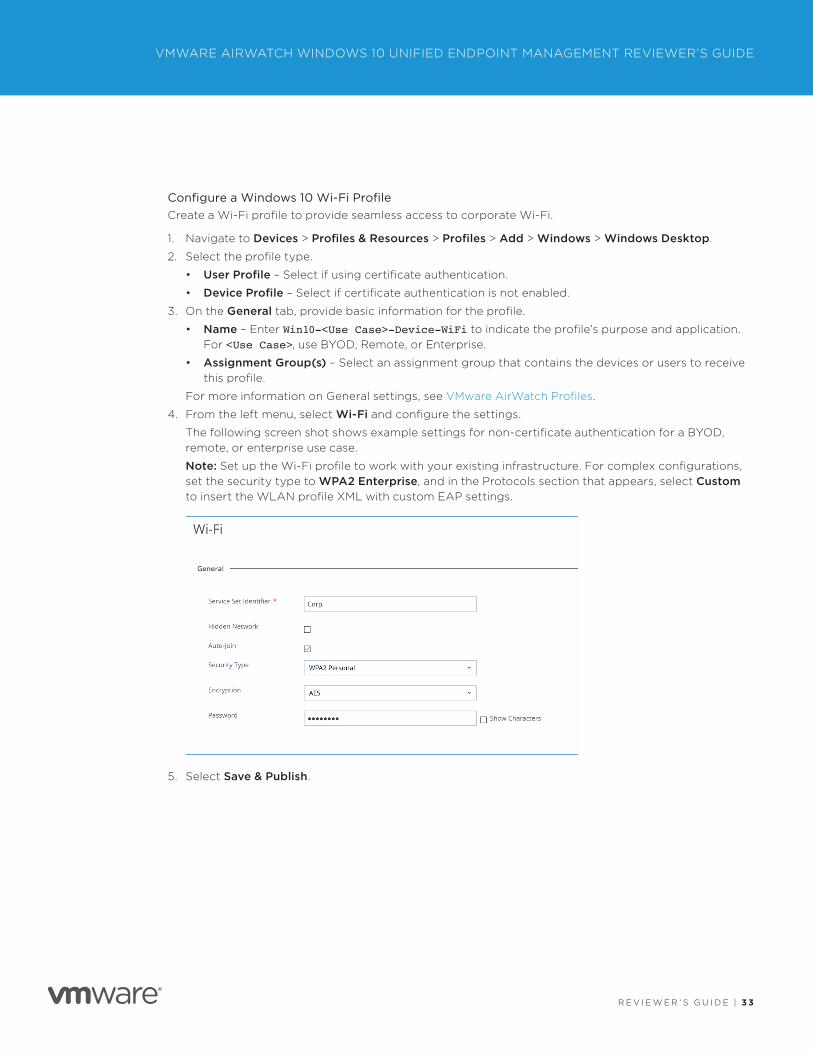
Configure a Windows 10 Wi-Fi Profile Create a Wi-Fi profile to provide seamless access to corporate Wi-Fi.
1. Navigate to Devices > Profiles & Resources > Profiles > Add > Windows > Windows Desktop.
2. Select the profile type.
• User Profile – Select if using certificate authentication.
• Device Profile – Select if certificate authentication is not enabled.
3. On the General tab, provide basic information for the profile.
• Name – Enter Win10-<Use Case>-Device-WiFi to indicate the profile’s purpose and application. For <Use Case>, use BYOD, Remote, or Enterprise.
• Assignment Group(s) – Select an assignment group that contains the devices or users to receive this profile.
For more information on General settings, see VMware AirWatch Profiles.
4. From the left menu, select Wi-Fi and configure the settings.
The following screen shot shows example settings for non-certificate authentication for a BYOD, remote, or enterprise use case.
Note: Set up the Wi-Fi profile to work with your existing infrastructure. For complex configurations, set the security type to WPA2 Enterprise, and in the Protocols section that appears, select Custom to insert the WLAN profile XML with custom EAP settings.
5. Select Save & Publish.
R E V I E W E R ’ S G U I D E | 3 4
VMWARE AIRWATCH WINDOWS 10 UNIFIED ENDPOINT MANAGEMENT REVIEWER’S GUIDE
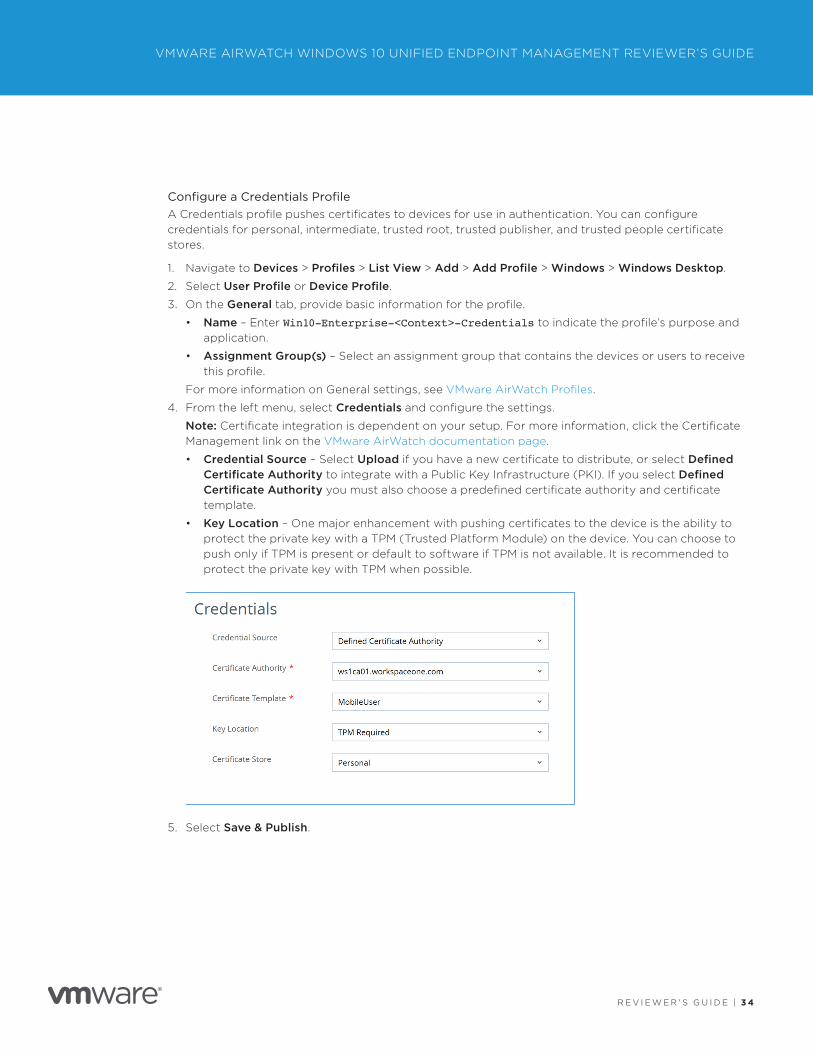
Configure a Credentials ProfileA Credentials profile pushes certificates to devices for use in authentication. You can configure credentials for personal, intermediate, trusted root, trusted publisher, and trusted people certificate stores.
1. Navigate to Devices > Profiles > List View > Add > Add Profile > Windows > Windows Desktop.
2. Select User Profile or Device Profile.
3. On the General tab, provide basic information for the profile.
• Name – Enter Win10-Enterprise-<Context>-Credentials to indicate the profile’s purpose and application.
• Assignment Group(s) – Select an assignment group that contains the devices or users to receive this profile.
For more information on General settings, see VMware AirWatch Profiles.
4. From the left menu, select Credentials and configure the settings.
Note: Certificate integration is dependent on your setup. For more information, click the Certificate Management link on the VMware AirWatch documentation page.
• Credential Source – Select Upload if you have a new certificate to distribute, or select Defined Certificate Authority to integrate with a Public Key Infrastructure (PKI). If you select Defined Certificate Authority you must also choose a predefined certificate authority and certificate template.
• Key Location – One major enhancement with pushing certificates to the device is the ability to protect the private key with a TPM (Trusted Platform Module) on the device. You can choose to push only if TPM is present or default to software if TPM is not available. It is recommended to protect the private key with TPM when possible.
5. Select Save & Publish.
R E V I E W E R ’ S G U I D E | 3 5
VMWARE AIRWATCH WINDOWS 10 UNIFIED ENDPOINT MANAGEMENT REVIEWER’S GUIDE
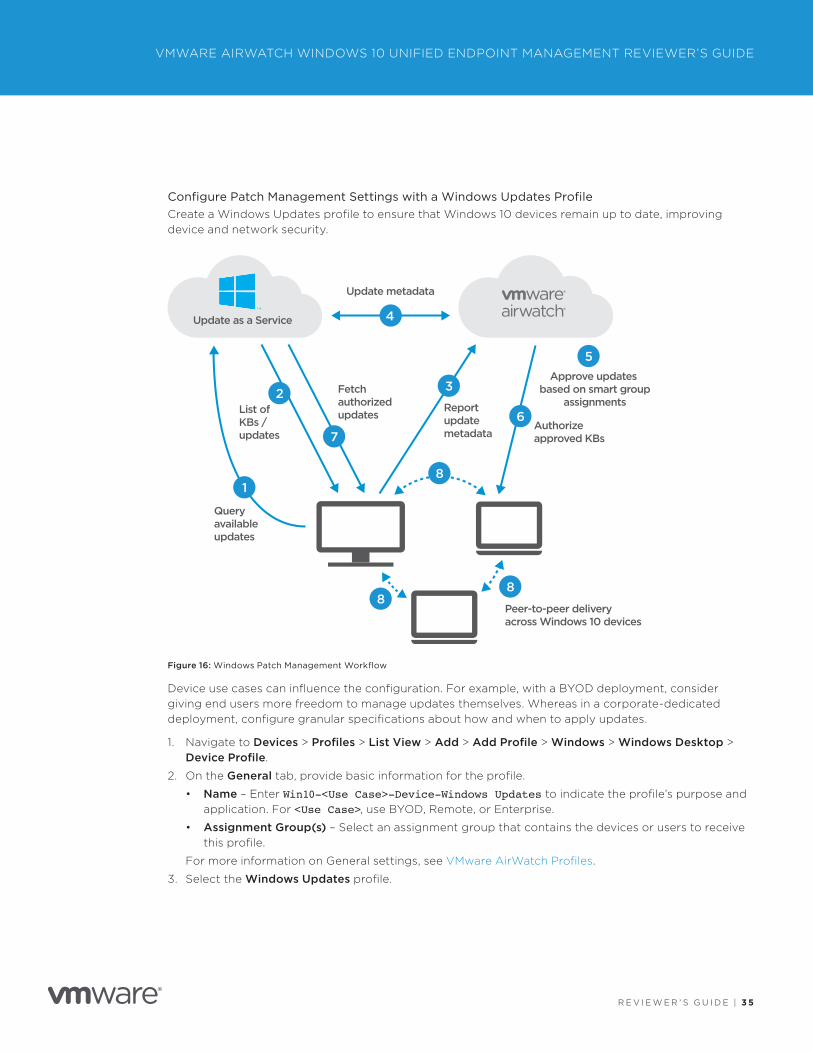
Configure Patch Management Settings with a Windows Updates Profile Create a Windows Updates profile to ensure that Windows 10 devices remain up to date, improving device and network security.
Update as a Service
Peer-to-peer deliveryacross Windows 10 devices
Query available updates
List ofKBs / updates
Fetch authorized updates
Update metadata
Report update metadata
88
81
2
7
4
3
Authorize approved KBs
Approve updates based on smart group
assignments6
5
Figure 16: Windows Patch Management Workflow
Device use cases can influence the configuration. For example, with a BYOD deployment, consider giving end users more freedom to manage updates themselves. Whereas in a corporate-dedicated deployment, configure granular specifications about how and when to apply updates.
1. Navigate to Devices > Profiles > List View > Add > Add Profile > Windows > Windows Desktop > Device Profile.
2. On the General tab, provide basic information for the profile.
• Name – Enter Win10-<Use Case>-Device-Windows Updates to indicate the profile’s purpose and application. For <Use Case>, use BYOD, Remote, or Enterprise.
• Assignment Group(s) – Select an assignment group that contains the devices or users to receive this profile.
For more information on General settings, see VMware AirWatch Profiles.
3. Select the Windows Updates profile.
R E V I E W E R ’ S G U I D E | 3 6
VMWARE AIRWATCH WINDOWS 10 UNIFIED ENDPOINT MANAGEMENT REVIEWER’S GUIDE
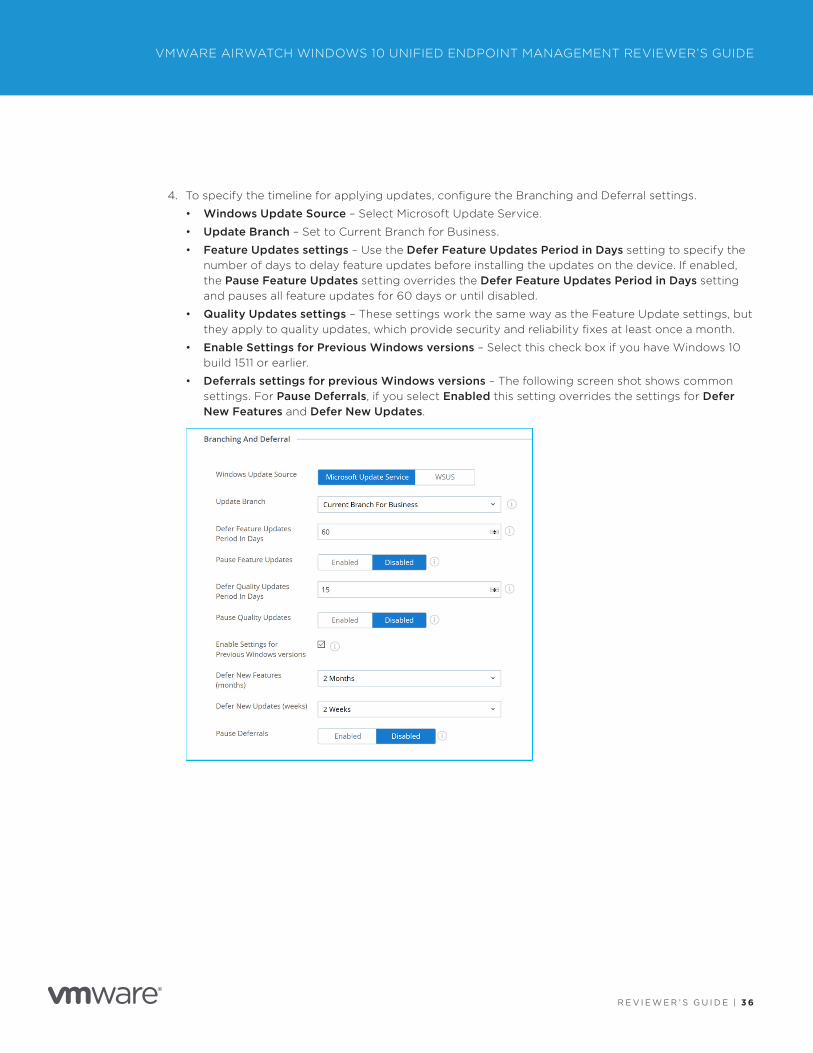
4. To specify the timeline for applying updates, configure the Branching and Deferral settings.
• Windows Update Source – Select Microsoft Update Service.
• Update Branch – Set to Current Branch for Business.
• Feature Updates settings – Use the Defer Feature Updates Period in Days setting to specify the number of days to delay feature updates before installing the updates on the device. If enabled, the Pause Feature Updates setting overrides the Defer Feature Updates Period in Days setting and pauses all feature updates for 60 days or until disabled.
• Quality Updates settings – These settings work the same way as the Feature Update settings, but they apply to quality updates, which provide security and reliability fixes at least once a month.
• Enable Settings for Previous Windows versions – Select this check box if you have Windows 10 build 1511 or earlier.
• Deferrals settings for previous Windows versions – The following screen shot shows common settings. For Pause Deferrals, if you select Enabled this setting overrides the settings for Defer New Features and Defer New Updates.
R E V I E W E R ’ S G U I D E | 3 7
VMWARE AIRWATCH WINDOWS 10 UNIFIED ENDPOINT MANAGEMENT REVIEWER’S GUIDE
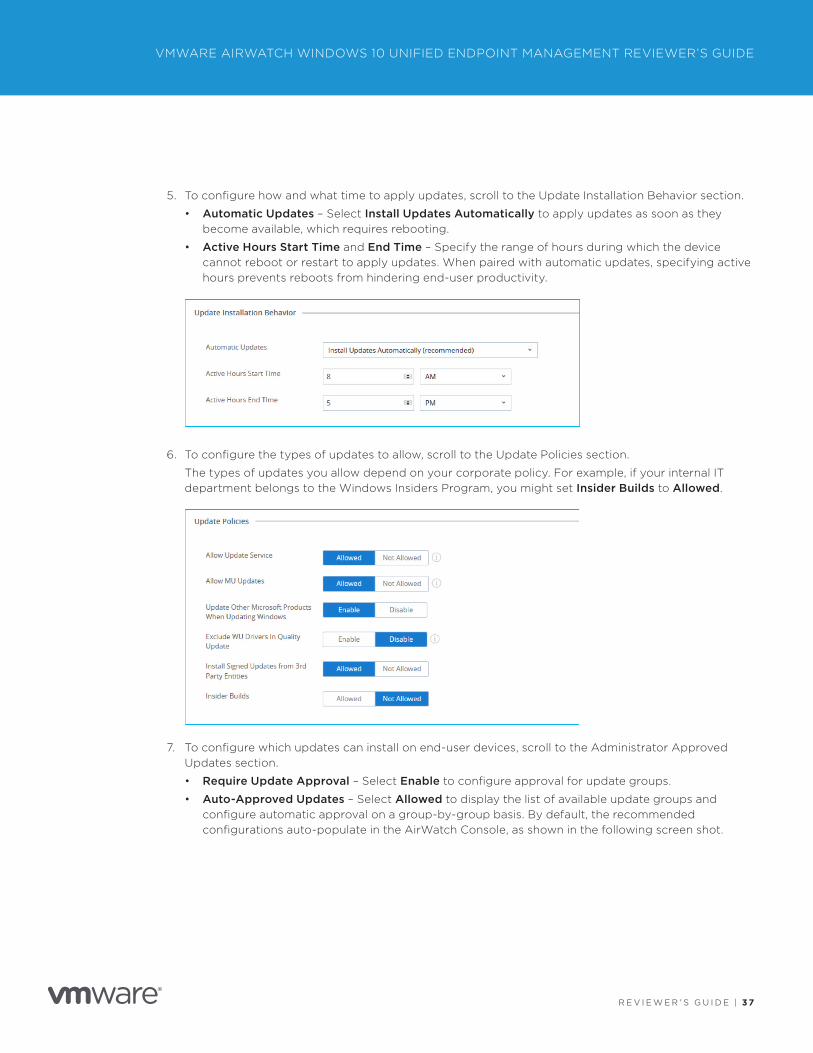
5. To configure how and what time to apply updates, scroll to the Update Installation Behavior section.
• Automatic Updates – Select Install Updates Automatically to apply updates as soon as they become available, which requires rebooting.
• Active Hours Start Time and End Time – Specify the range of hours during which the device cannot reboot or restart to apply updates. When paired with automatic updates, specifying active hours prevents reboots from hindering end-user productivity.
6. To configure the types of updates to allow, scroll to the Update Policies section.
The types of updates you allow depend on your corporate policy. For example, if your internal IT department belongs to the Windows Insiders Program, you might set Insider Builds to Allowed.
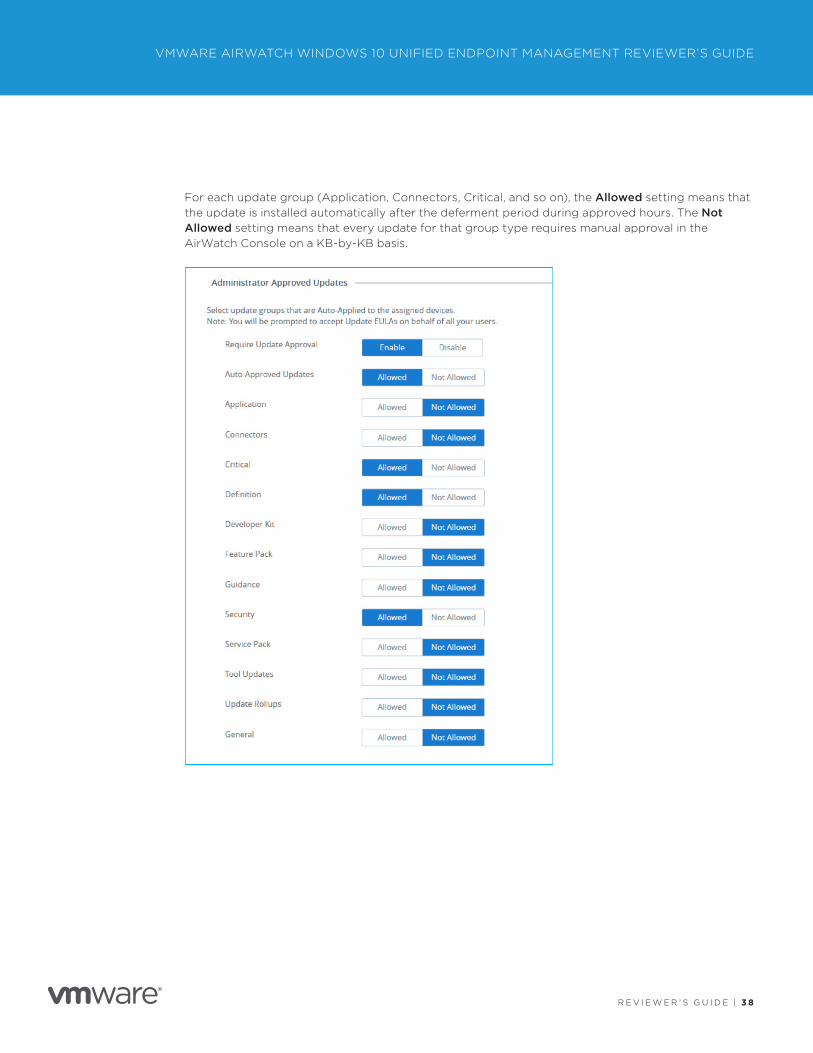
7. To configure which updates can install on end-user devices, scroll to the Administrator Approved Updates section.
• Require Update Approval – Select Enable to configure approval for update groups.
• Auto-Approved Updates – Select Allowed to display the list of available update groups and configure automatic approval on a group-by-group basis. By default, the recommended configurations auto-populate in the AirWatch Console, as shown in the following screen shot.
R E V I E W E R ’ S G U I D E | 3 8
VMWARE AIRWATCH WINDOWS 10 UNIFIED ENDPOINT MANAGEMENT REVIEWER’S GUIDE
For each update group (Application, Connectors, Critical, and so on), the Allowed setting means that the update is installed automatically after the deferment period during approved hours. The Not Allowed setting means that every update for that group type requires manual approval in the AirWatch Console on a KB-by-KB basis.
R E V I E W E R ’ S G U I D E | 3 9
VMWARE AIRWATCH WINDOWS 10 UNIFIED ENDPOINT MANAGEMENT REVIEWER’S GUIDE
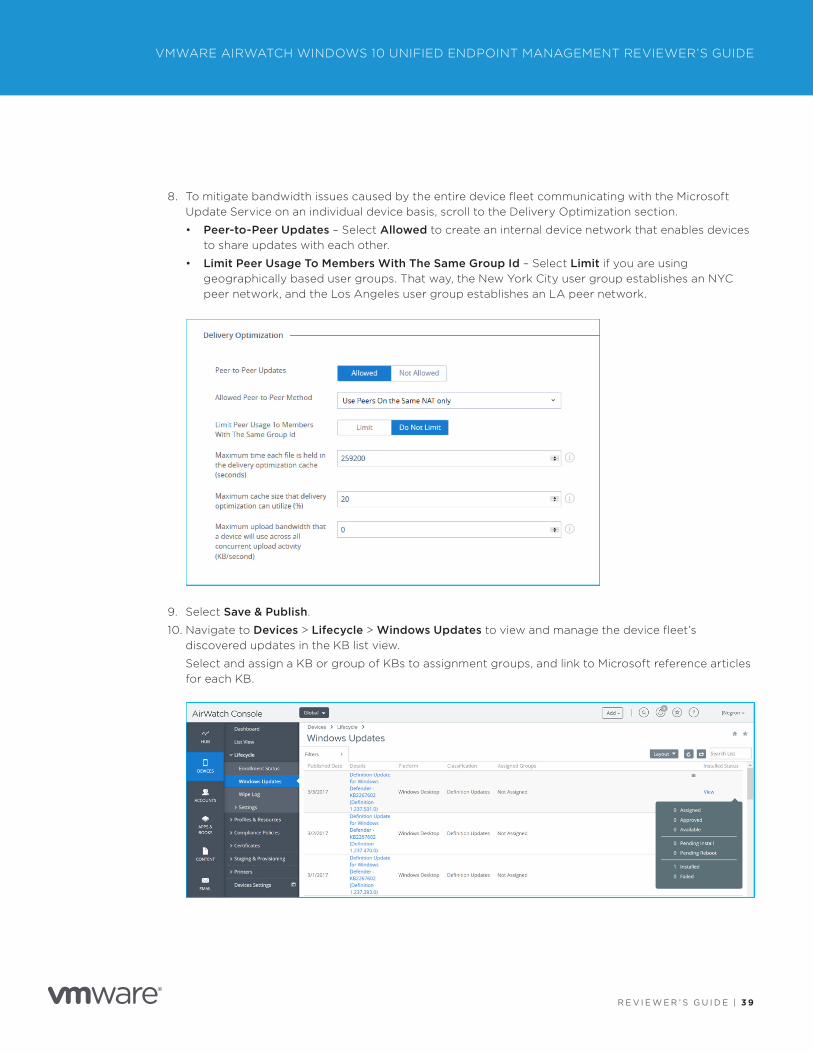
8. To mitigate bandwidth issues caused by the entire device fleet communicating with the Microsoft Update Service on an individual device basis, scroll to the Delivery Optimization section.
• Peer-to-Peer Updates – Select Allowed to create an internal device network that enables devices to share updates with each other.
• Limit Peer Usage To Members With The Same Group Id – Select Limit if you are using geographically based user groups. That way, the New York City user group establishes an NYC peer network, and the Los Angeles user group establishes an LA peer network.
9. Select Save & Publish.
10. Navigate to Devices > Lifecycle > Windows Updates to view and manage the device fleet’s discovered updates in the KB list view.
Select and assign a KB or group of KBs to assignment groups, and link to Microsoft reference articles for each KB.
R E V I E W E R ’ S G U I D E | 4 0
VMWARE AIRWATCH WINDOWS 10 UNIFIED ENDPOINT MANAGEMENT REVIEWER’S GUIDE
Configure an Application Control Profile1. On an endpoint device, create an AppLocker configuration XML file.
For instructions, see Configure an Application Control Profile (Windows Desktop).
2. In the AirWatch Console, navigate to Devices > Profiles > List View > Add > Add Profile > Windows > Windows Desktop > Device Profile.
3. On the General tab, provide basic information for the profile.
• Name – Enter Win10-<Use Case>-Device-Application Control to indicate the profile’s purpose and application. For <Use Case>, use BYOD, Remote, or Enterprise.
• Assignment Group(s) – Select an assignment group that contains the devices or users to receive this profile.
For more information on General settings, see VMware AirWatch Profiles.
4. Select the Application Control payload.
5. Select Import Sample Device Configuration and select Upload to add your Policy Configuration File (AppLocker configuration XML file).
6. Select Save & Publish.
Deliver Win32 Applications Using Software DistributionYou can use the VMware AirWatch software distribution feature to deliver Win32 applications, track installation statuses, keep application versions current, and delete old applications.
Deploy Office 2016
In this exercise, you package Office 2016 with a configuration file for click-to-run delivery to remote and enterprise worker devices. You then configure, assign, and deliver the application to smart groups with the flexible deployment feature.
1. Package a ZIP file with the required data files for installation. At a minimum, include the following:
• setup.exe – The executable file
• customization.xml – The customization file
2. Navigate to Apps & Books > Applications > List View > Internal > Add Application > Upload > Local File.
3. Click Upload and select the Office.zip file.
When asked whether the file is a dependency file, select No. Selecting Yes associates a dependency file to Win32 applications. Dependency files are libraries and frameworks that the app requires to function. Examples include Java, Silverlight, or .NET libraries.
4. Click Continue.
R E V I E W E R ’ S G U I D E | 4 1
VMWARE AIRWATCH WINDOWS 10 UNIFIED ENDPOINT MANAGEMENT REVIEWER’S GUIDE
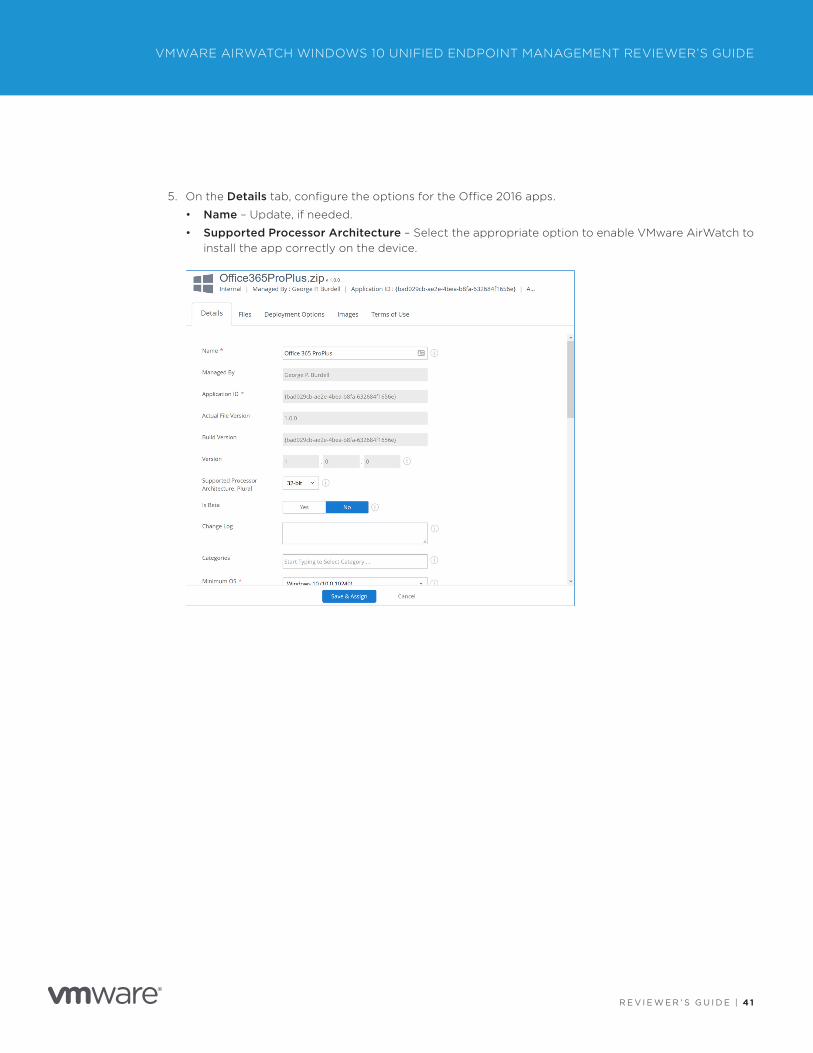
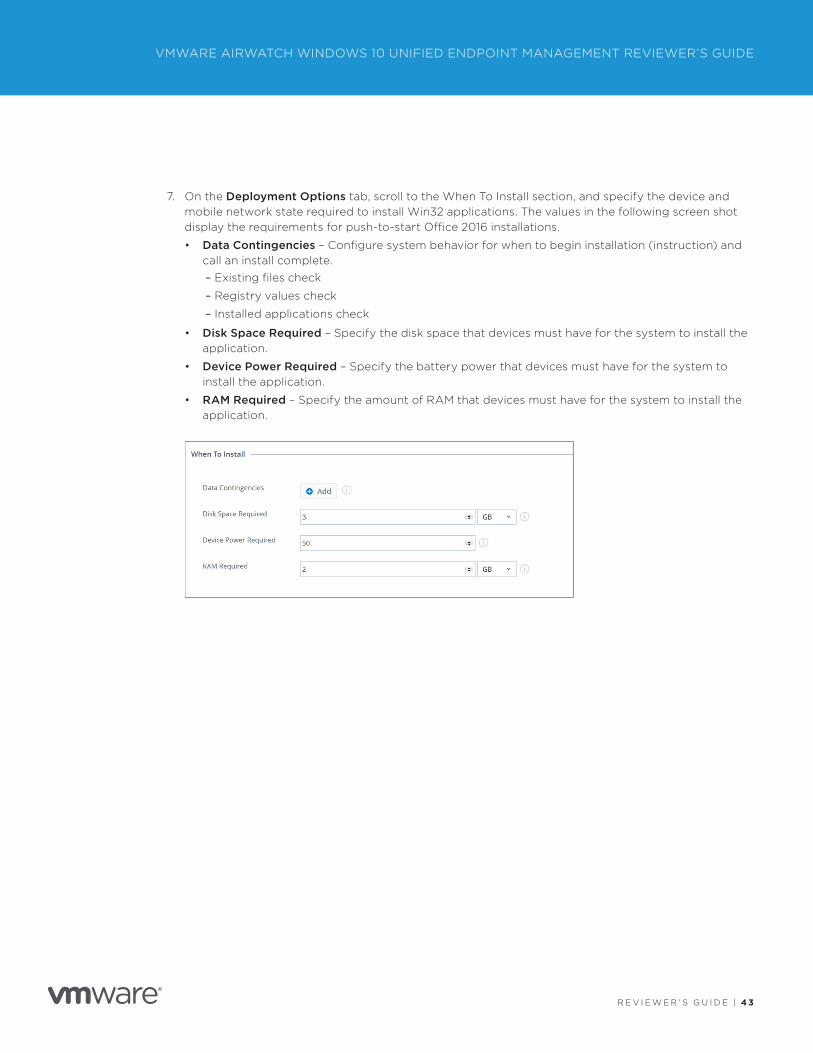
5. On the Details tab, configure the options for the Office 2016 apps.
• Name – Update, if needed.
• Supported Processor Architecture – Select the appropriate option to enable VMware AirWatch to install the app correctly on the device.
R E V I E W E R ’ S G U I D E | 4 2
VMWARE AIRWATCH WINDOWS 10 UNIFIED ENDPOINT MANAGEMENT REVIEWER’S GUIDE
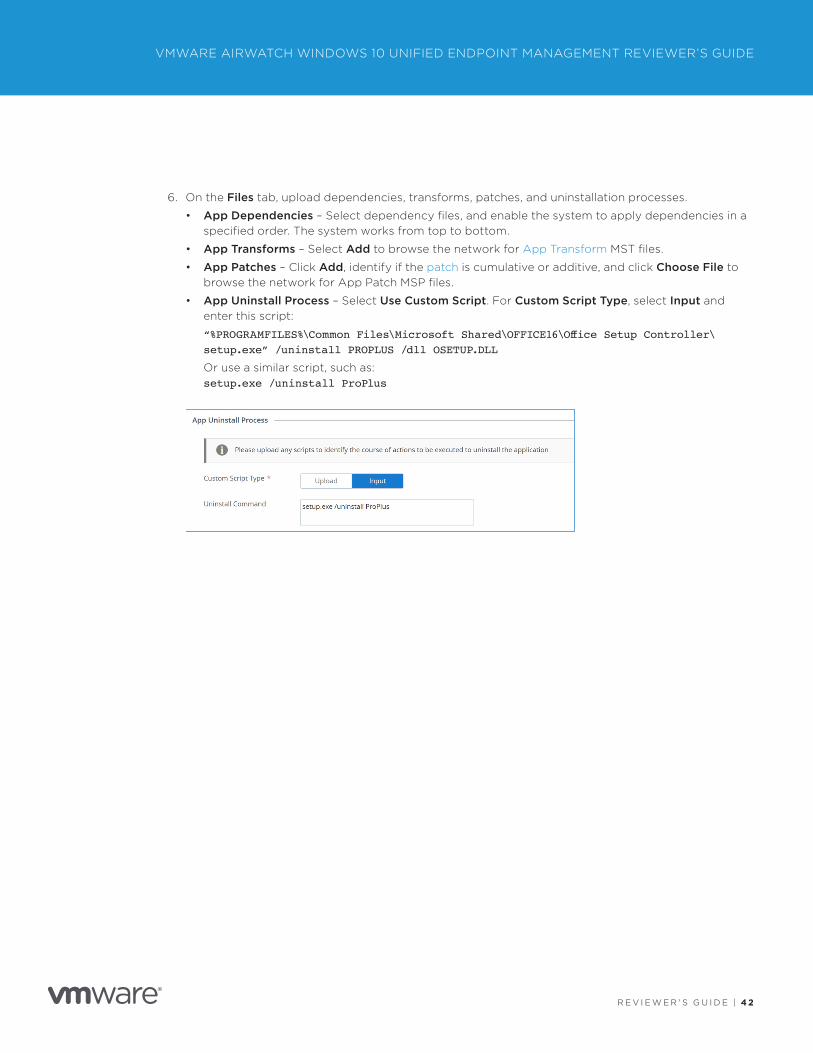
6. On the Files tab, upload dependencies, transforms, patches, and uninstallation processes.
• App Dependencies – Select dependency files, and enable the system to apply dependencies in a specified order. The system works from top to bottom.
• App Transforms – Select Add to browse the network for App Transform MST files.
• App Patches – Click Add, identify if the patch is cumulative or additive, and click Choose File to browse the network for App Patch MSP files.
• App Uninstall Process – Select Use Custom Script. For Custom Script Type, select Input and enter this script:
“%PROGRAMFILES%\Common Files\Microsoft Shared\OFFICE16\Office Setup Controller\setup.exe” /uninstall PROPLUS /dll OSETUP.DLL
Or use a similar script, such as: setup.exe /uninstall ProPlus
R E V I E W E R ’ S G U I D E | 4 3
VMWARE AIRWATCH WINDOWS 10 UNIFIED ENDPOINT MANAGEMENT REVIEWER’S GUIDE
7. On the Deployment Options tab, scroll to the When To Install section, and specify the device and mobile network state required to install Win32 applications. The values in the following screen shot display the requirements for push-to-start Office 2016 installations.
• Data Contingencies – Configure system behavior for when to begin installation (instruction) and call an install complete.
– Existing files check
– Registry values check
– Installed applications check
• Disk Space Required – Specify the disk space that devices must have for the system to install the application.
• Device Power Required – Specify the battery power that devices must have for the system to install the application.
• RAM Required – Specify the amount of RAM that devices must have for the system to install the application.
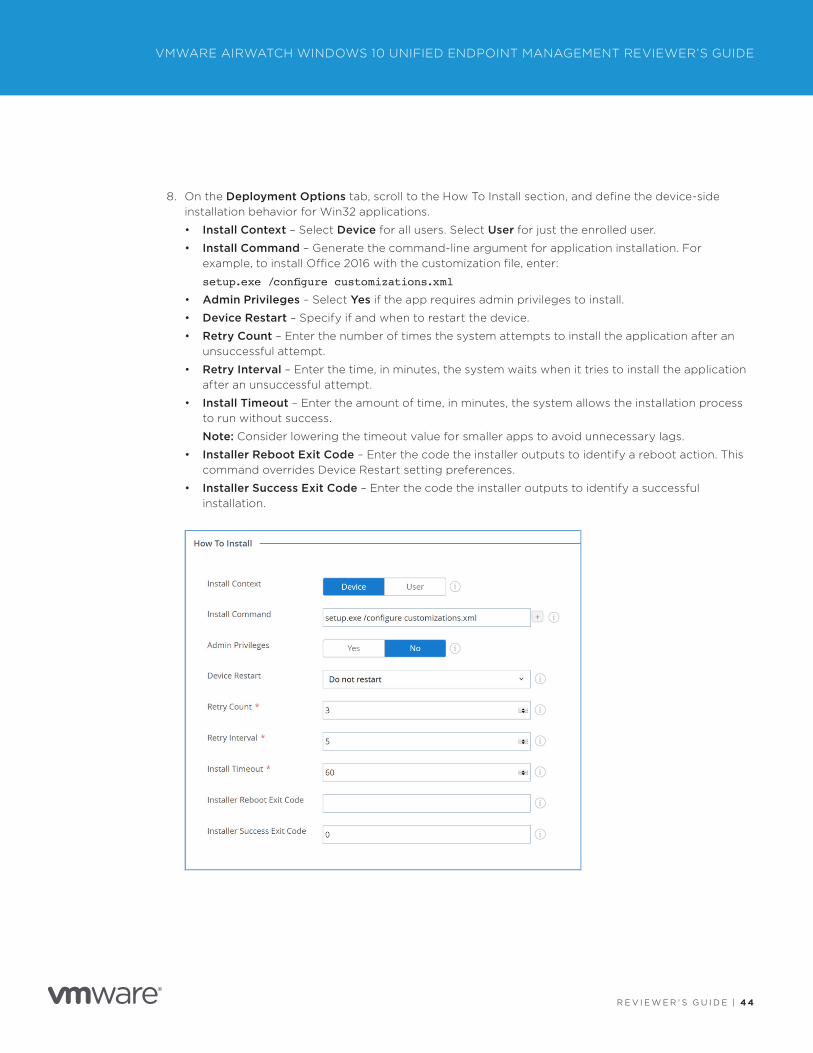
R E V I E W E R ’ S G U I D E | 4 4
VMWARE AIRWATCH WINDOWS 10 UNIFIED ENDPOINT MANAGEMENT REVIEWER’S GUIDE
8. On the Deployment Options tab, scroll to the How To Install section, and define the device-side installation behavior for Win32 applications.
• Install Context – Select Device for all users. Select User for just the enrolled user.
• Install Command – Generate the command-line argument for application installation. For example, to install Office 2016 with the customization file, enter:
setup.exe /configure customizations.xml
• Admin Privileges – Select Yes if the app requires admin privileges to install.
• Device Restart – Specify if and when to restart the device.
• Retry Count – Enter the number of times the system attempts to install the application after an unsuccessful attempt.
• Retry Interval – Enter the time, in minutes, the system waits when it tries to install the application after an unsuccessful attempt.
• Install Timeout – Enter the amount of time, in minutes, the system allows the installation process to run without success.
Note: Consider lowering the timeout value for smaller apps to avoid unnecessary lags.
• Installer Reboot Exit Code – Enter the code the installer outputs to identify a reboot action. This command overrides Device Restart setting preferences.
• Installer Success Exit Code – Enter the code the installer outputs to identify a successful installation.
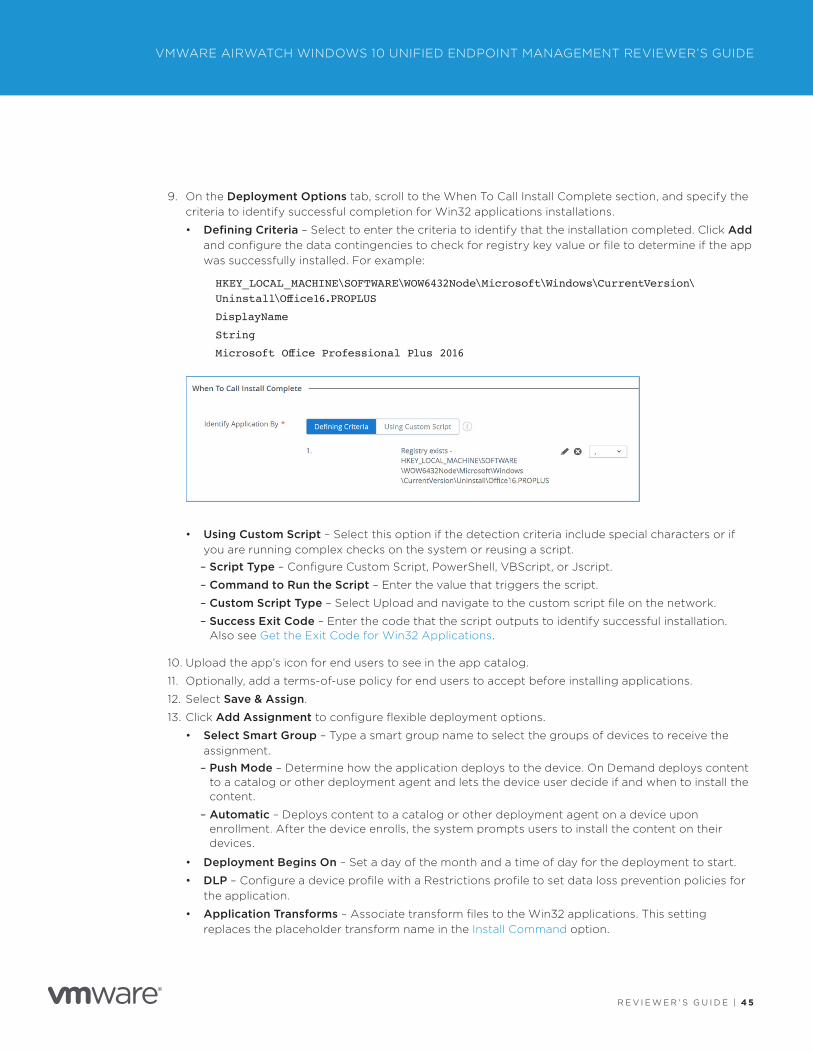
R E V I E W E R ’ S G U I D E | 4 5
VMWARE AIRWATCH WINDOWS 10 UNIFIED ENDPOINT MANAGEMENT REVIEWER’S GUIDE
9. On the Deployment Options tab, scroll to the When To Call Install Complete section, and specify the criteria to identify successful completion for Win32 applications installations.
• Defining Criteria – Select to enter the criteria to identify that the installation completed. Click Add and configure the data contingencies to check for registry key value or file to determine if the app was successfully installed. For example:
HKEY_LOCAL_MACHINE\SOFTWARE\WOW6432Node\Microsoft\Windows\CurrentVersion\Uninstall\Office16.PROPLUS
DisplayName
String
Microsoft Office Professional Plus 2016
• Using Custom Script – Select this option if the detection criteria include special characters or if you are running complex checks on the system or reusing a script.
– Script Type – Configure Custom Script, PowerShell, VBScript, or Jscript.
– Command to Run the Script – Enter the value that triggers the script.
– Custom Script Type – Select Upload and navigate to the custom script file on the network.
– Success Exit Code – Enter the code that the script outputs to identify successful installation. Also see Get the Exit Code for Win32 Applications.
10. Upload the app’s icon for end users to see in the app catalog.
11. Optionally, add a terms-of-use policy for end users to accept before installing applications.
12. Select Save & Assign.
13. Click Add Assignment to configure flexible deployment options.
• Select Smart Group – Type a smart group name to select the groups of devices to receive the assignment.
– Push Mode – Determine how the application deploys to the device. On Demand deploys content to a catalog or other deployment agent and lets the device user decide if and when to install the content.
– Automatic – Deploys content to a catalog or other deployment agent on a device upon enrollment. After the device enrolls, the system prompts users to install the content on their devices.
• Deployment Begins On – Set a day of the month and a time of day for the deployment to start.
• DLP – Configure a device profile with a Restrictions profile to set data loss prevention policies for the application.
• Application Transforms – Associate transform files to the Win32 applications. This setting replaces the placeholder transform name in the Install Command option.

R E V I E W E R ’ S G U I D E | 4 6
VMWARE AIRWATCH WINDOWS 10 UNIFIED ENDPOINT MANAGEMENT REVIEWER’S GUIDE
14. Select Add and then Save & Publish.
When deploying numerous apps to end-user devices, it can take some time to install all the device applications. After device onboarding completes, apps queue up in a random order for the device to install per Windows operating system specifications, configured timeout values, and retry logic. Dependency files are installed prior to the main application.
Deploy a Standard MSI Application FileThis workflow demonstrates the automated procedure for delivering an MSI application to remote and enterprise worker devices.
1. Navigate to Apps & Books > Applications > List View > Internal > Add Application > Upload > Local File.
2. Click Upload and select the AppName.msi file for any sample MSI application.
When asked whether the file is a dependency file, select No. Selecting Yes associates a dependency file to Win32 applications. Dependency files are libraries and frameworks, such as Java, Silverlight, or .NET libraries.
3. Click Continue.
4. On the Details tab, review the automatically populated fields.
5. On the Files tab, if necessary, customize the auto-populated command line for the uninstallation process:
MSIEXEC /X Product Code
If desired, you can upload an uninstall script to perform additional actions while removing the application.
6. On the Deployment Options tab, review the auto-populated information.
7. Upload the app’s icon for end users to see in the app catalog.
8. Optionally, add a terms-of-use policy for end users to accept before installing applications.
9. Select Save & Assign.
R E V I E W E R ’ S G U I D E | 47
VMWARE AIRWATCH WINDOWS 10 UNIFIED ENDPOINT MANAGEMENT REVIEWER’S GUIDE
10. Click Add Assignment to configure flexible deployment options.
• Select Smart Group – Type a smart group name to select the groups of devices to receive the assignment.
– Push Mode – Determine how the application deploys to the device. On Demand deploys content to a catalog or other deployment agent and lets the device user decide if and when to install the content.
– Automatic – Deploys content to a catalog or other deployment agent on a device upon enrollment. After the device enrolls, the system prompts users to install the content on their devices.
• Deployment Begins On – Specify a day of the month and a time of day for the deployment to start.
• DLP – Configure a device profile with a Restrictions profile to set data loss prevention policies for the application.
• Application Transforms – Associate transform files to the Win32 applications. This setting replaces the placeholder transform name in the Install Command option.
11. Select Add and then click Save & Publish.
Get the Uninstall Command for Win32 Applications
In this exercise, you use command-line options to determine the uninstall command you might use when creating an uninstall script. You can then upload the script on the Files tab when deploying an app.
1. In a command-line session, use the /? or /help parameters to display supported actions.
CATEGORY EXAMPLE
Click-to-Run Office Installer setup.exe /?
If the EXE contains an underlying MSI, use the msiexec uninstall command: msiexec /x setup.exe
Standard MSI application setup.exe /?
2. Install the app on a reference device.
3. When installation completes, look at the HKEYs on the device’s listed registries.
• HKEY_LOCAL_MACHINE\Software\Microsoft\Windows\CurrentVersion\Uninstall
• HKLM\SOFTWARE\Wow6432Node\Microsoft\Windows\CurrentVersion\Uninstall\
• HKEY_CURRENT_USER\Software\Microsoft\Windows\CurrentVersion\Uninstall
• HKCU\SOFTWARE\Wow6432Node\Microsoft\Windows\CurrentVersion\Uninstall\
R E V I E W E R ’ S G U I D E | 4 8
VMWARE AIRWATCH WINDOWS 10 UNIFIED ENDPOINT MANAGEMENT REVIEWER’S GUIDE
Get the Exit Code for Win32 Applications
In this exercise, you determine the exit codes you might use if you select Using Custom Script on the Deployment Options tab.
Use the environmental variable %errorlevel% to get exit codes. Use it in conjunction with built-in DOS commands like ECHO, IF, and SET to preserve the existing %errorlevel% value.
1. In a command-line session, run the install command for the Win32 application.
2. Run ECHO %errorlevel%.
3. If the Win32 application requires a reboot for installation, the variable returns the reboot exit code.
Monitor Win32 Applications
You can monitor Win32 applications deployed through software distribution with the statistics on the Details view and by reviewing installation status codes.
1. Navigate to Apps & Books > Applications > List View and select the Internal tab.
2. Search for the application that you want to view.
3. On the Summary tab, review the application information.
4. On the Devices tab, use the reason codes to track the progression of an installation.
Add Versions for Internal Applications
You can control the versions of internal applications available to end users.
1. Navigate to Apps & Books > Applications > List View and select the Internal tab.
2. Select the application and then select Add Version from the actions menu.
3. Upload the updated file.
4. On the Details tab, select Retire Previous Versions.
5. Select Save & Assign to use the flexible deployment feature.
Delete Win32 Application Files
VMware AirWatch includes several methods to remove applications from devices.
To delete an application from devices in smart groups assigned to the application:
1. Navigate to Apps & Books > Applications > List View and select the Internal tab.
2. Search for the application that you want to delete.
3. On the Details tab, select Delete Application.
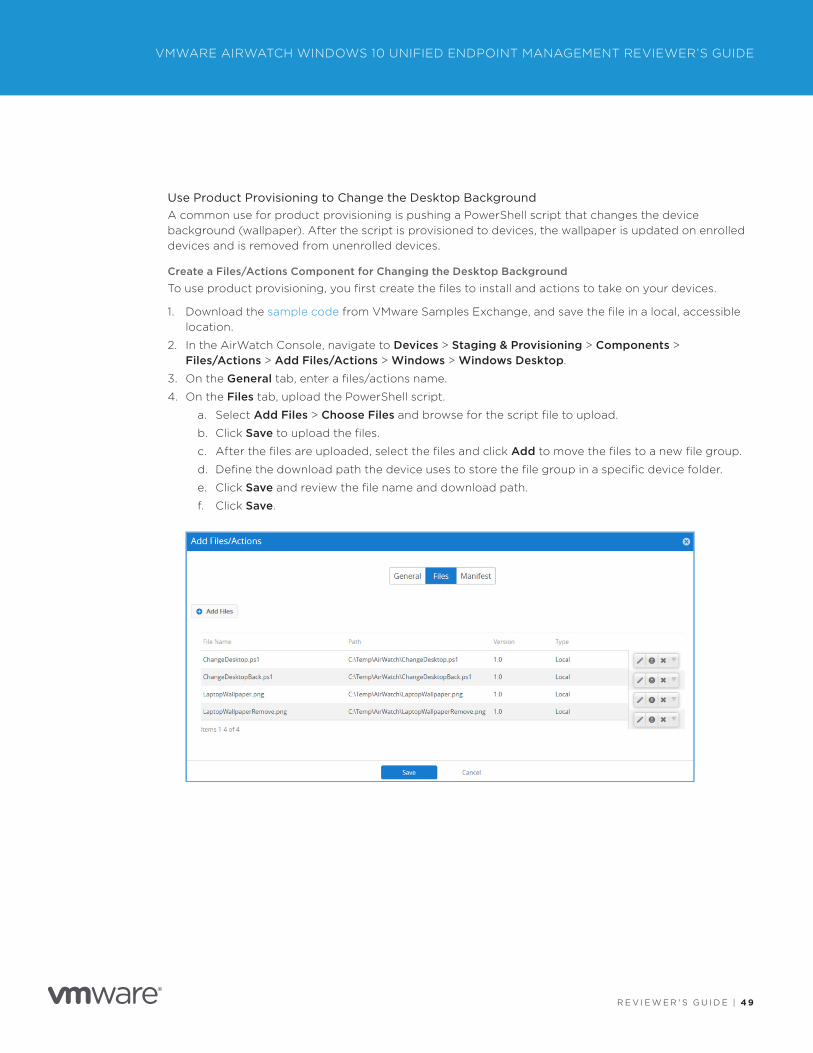
R E V I E W E R ’ S G U I D E | 4 9
VMWARE AIRWATCH WINDOWS 10 UNIFIED ENDPOINT MANAGEMENT REVIEWER’S GUIDE
Use Product Provisioning to Change the Desktop BackgroundA common use for product provisioning is pushing a PowerShell script that changes the device background (wallpaper). After the script is provisioned to devices, the wallpaper is updated on enrolled devices and is removed from unenrolled devices.
Create a Files/Actions Component for Changing the Desktop Background
To use product provisioning, you first create the files to install and actions to take on your devices.
1. Download the sample code from VMware Samples Exchange, and save the file in a local, accessible location.
2. In the AirWatch Console, navigate to Devices > Staging & Provisioning > Components > Files/Actions > Add Files/Actions > Windows > Windows Desktop.
3. On the General tab, enter a files/actions name.
4. On the Files tab, upload the PowerShell script.
a. Select Add Files > Choose Files and browse for the script file to upload.
b. Click Save to upload the files.
c. After the files are uploaded, select the files and click Add to move the files to a new file group.
d. Define the download path the device uses to store the file group in a specific device folder.
e. Click Save and review the file name and download path.
f. Click Save.
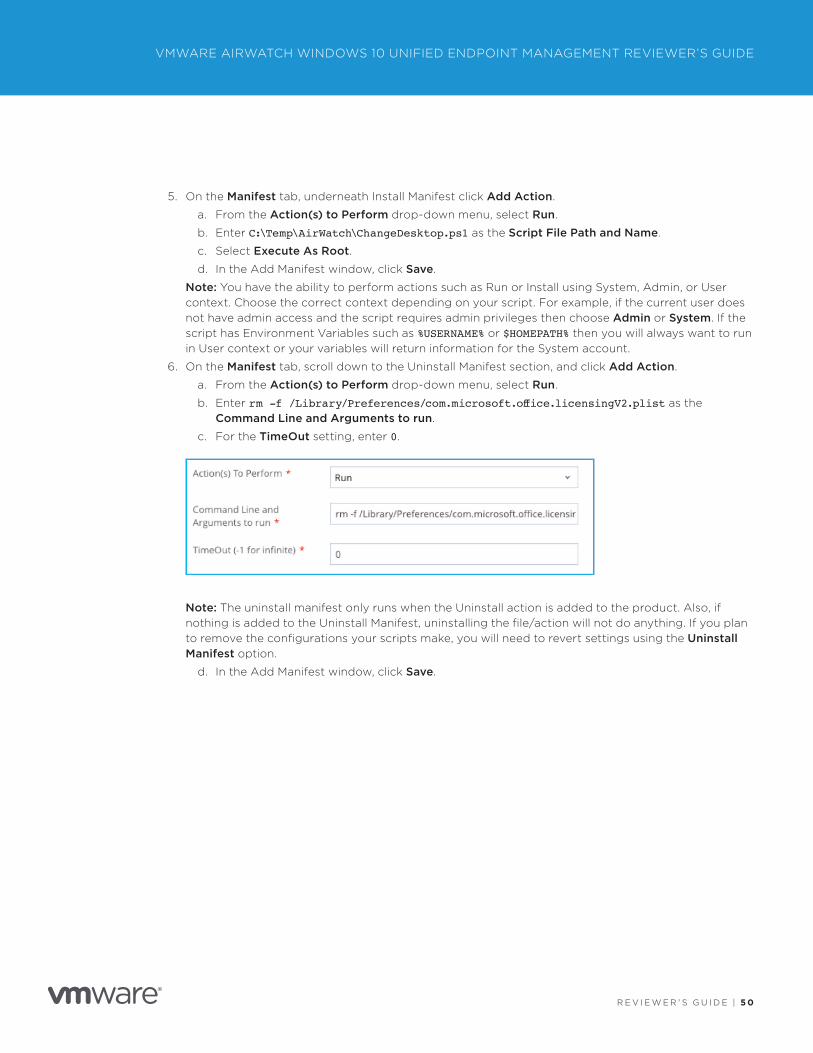
R E V I E W E R ’ S G U I D E | 5 0
VMWARE AIRWATCH WINDOWS 10 UNIFIED ENDPOINT MANAGEMENT REVIEWER’S GUIDE
5. On the Manifest tab, underneath Install Manifest click Add Action.
a. From the Action(s) to Perform drop-down menu, select Run.
b. Enter C:\Temp\AirWatch\ChangeDesktop.ps1 as the Script File Path and Name.
c. Select Execute As Root.
d. In the Add Manifest window, click Save.
Note: You have the ability to perform actions such as Run or Install using System, Admin, or User context. Choose the correct context depending on your script. For example, if the current user does not have admin access and the script requires admin privileges then choose Admin or System. If the script has Environment Variables such as %USERNAME% or $HOMEPATH% then you will always want to run in User context or your variables will return information for the System account.
6. On the Manifest tab, scroll down to the Uninstall Manifest section, and click Add Action.
a. From the Action(s) to Perform drop-down menu, select Run.
b. Enter rm -f /Library/Preferences/com.microsoft.office.licensingV2.plist as the Command Line and Arguments to run.
c. For the TimeOut setting, enter 0.
Note: The uninstall manifest only runs when the Uninstall action is added to the product. Also, if nothing is added to the Uninstall Manifest, uninstalling the file/action will not do anything. If you plan to remove the configurations your scripts make, you will need to revert settings using the Uninstall Manifest option.
d. In the Add Manifest window, click Save.
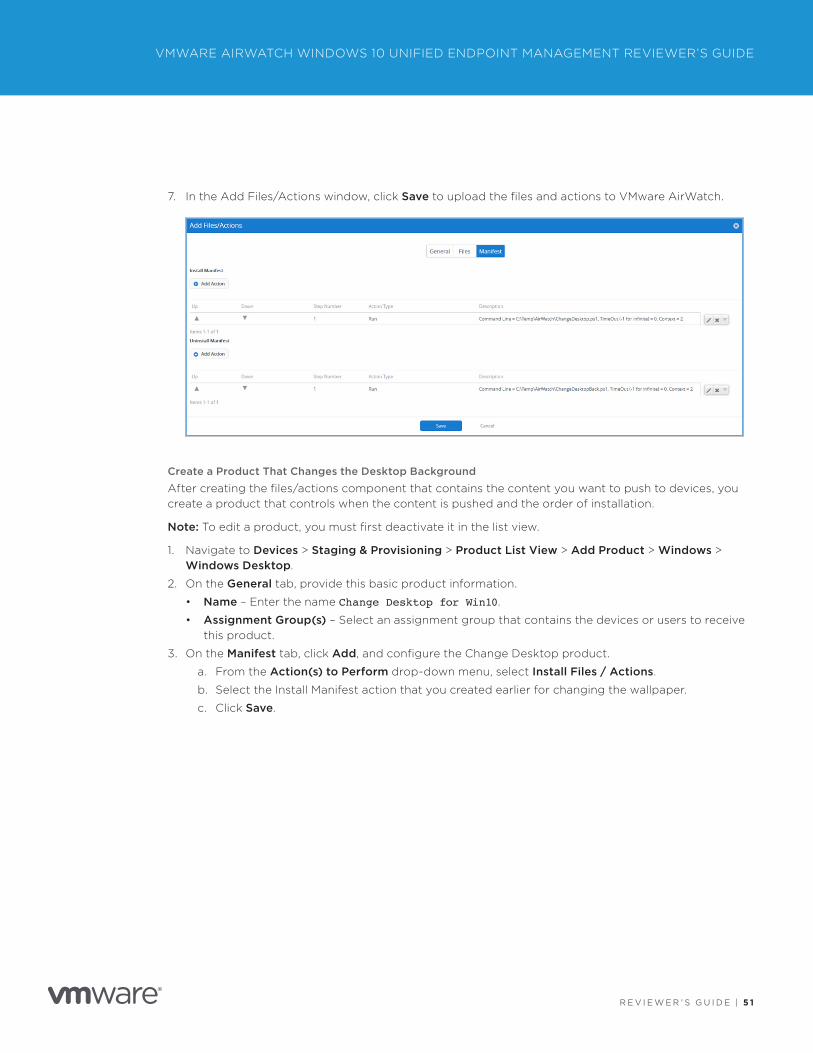
R E V I E W E R ’ S G U I D E | 5 1
VMWARE AIRWATCH WINDOWS 10 UNIFIED ENDPOINT MANAGEMENT REVIEWER’S GUIDE
7. In the Add Files/Actions window, click Save to upload the files and actions to VMware AirWatch.
Create a Product That Changes the Desktop Background
After creating the files/actions component that contains the content you want to push to devices, you create a product that controls when the content is pushed and the order of installation.
Note: To edit a product, you must first deactivate it in the list view.
1. Navigate to Devices > Staging & Provisioning > Product List View > Add Product > Windows > Windows Desktop.
2. On the General tab, provide this basic product information.
• Name – Enter the name Change Desktop for Win10.
• Assignment Group(s) – Select an assignment group that contains the devices or users to receive this product.
3. On the Manifest tab, click Add, and configure the Change Desktop product.
a. From the Action(s) to Perform drop-down menu, select Install Files / Actions.
b. Select the Install Manifest action that you created earlier for changing the wallpaper.
c. Click Save.
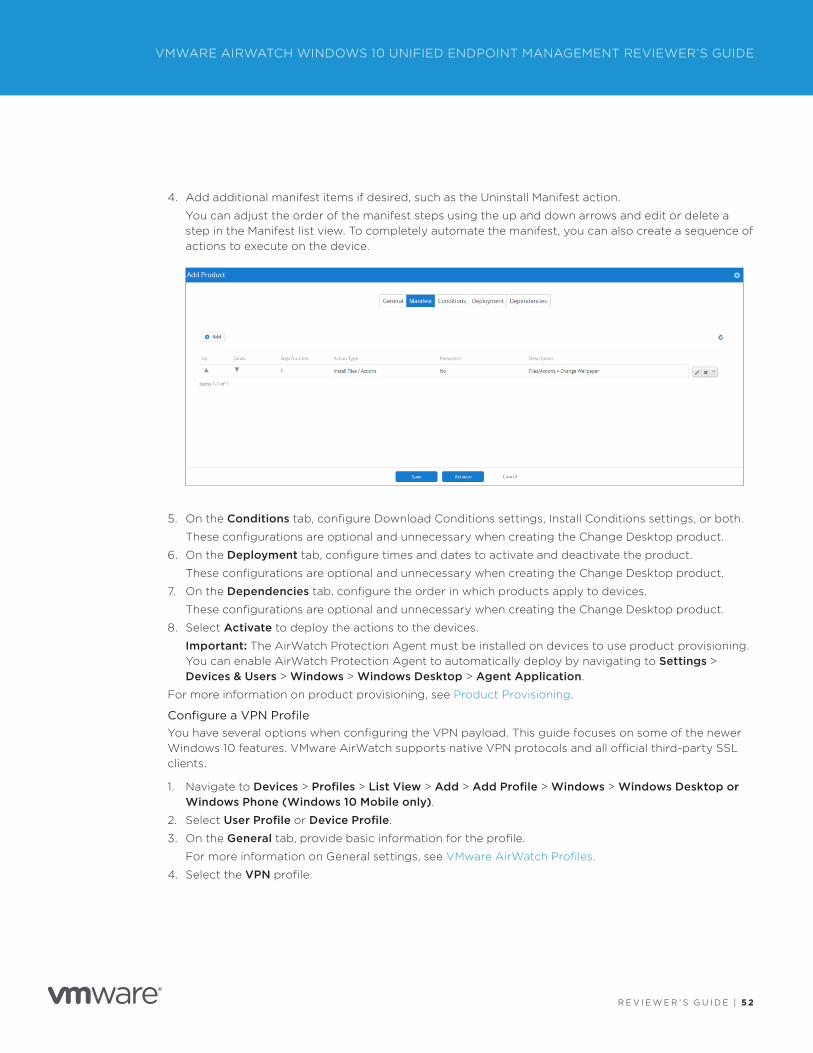
R E V I E W E R ’ S G U I D E | 5 2
VMWARE AIRWATCH WINDOWS 10 UNIFIED ENDPOINT MANAGEMENT REVIEWER’S GUIDE
4. Add additional manifest items if desired, such as the Uninstall Manifest action.
You can adjust the order of the manifest steps using the up and down arrows and edit or delete a step in the Manifest list view. To completely automate the manifest, you can also create a sequence of actions to execute on the device.
5. On the Conditions tab, configure Download Conditions settings, Install Conditions settings, or both.
These configurations are optional and unnecessary when creating the Change Desktop product.
6. On the Deployment tab, configure times and dates to activate and deactivate the product.
These configurations are optional and unnecessary when creating the Change Desktop product.
7. On the Dependencies tab, configure the order in which products apply to devices.
These configurations are optional and unnecessary when creating the Change Desktop product.
8. Select Activate to deploy the actions to the devices.
Important: The AirWatch Protection Agent must be installed on devices to use product provisioning. You can enable AirWatch Protection Agent to automatically deploy by navigating to Settings > Devices & Users > Windows > Windows Desktop > Agent Application.
For more information on product provisioning, see Product Provisioning.
Configure a VPN ProfileYou have several options when configuring the VPN payload. This guide focuses on some of the newer Windows 10 features. VMware AirWatch supports native VPN protocols and all official third-party SSL clients.
1. Navigate to Devices > Profiles > List View > Add > Add Profile > Windows > Windows Desktop or Windows Phone (Windows 10 Mobile only).
2. Select User Profile or Device Profile.
3. On the General tab, provide basic information for the profile.
For more information on General settings, see VMware AirWatch Profiles.
4. Select the VPN profile.
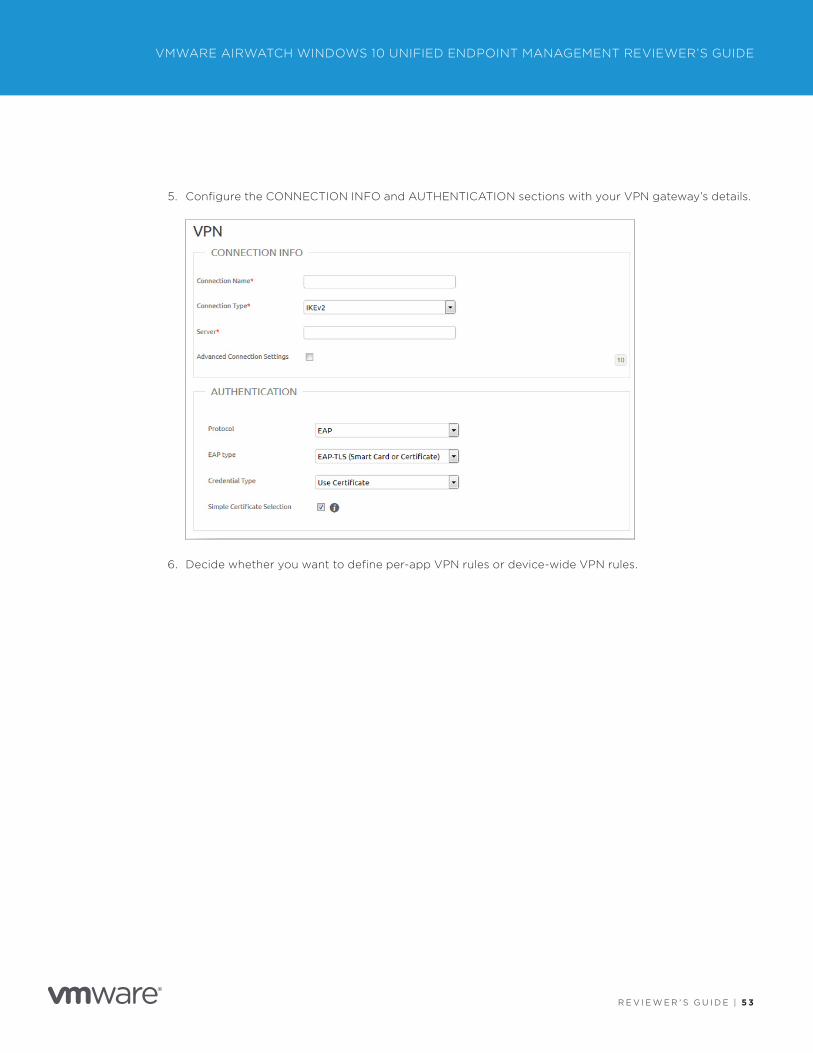
R E V I E W E R ’ S G U I D E | 5 3
VMWARE AIRWATCH WINDOWS 10 UNIFIED ENDPOINT MANAGEMENT REVIEWER’S GUIDE
5. Configure the CONNECTION INFO and AUTHENTICATION sections with your VPN gateway’s details.
6. Decide whether you want to define per-app VPN rules or device-wide VPN rules.
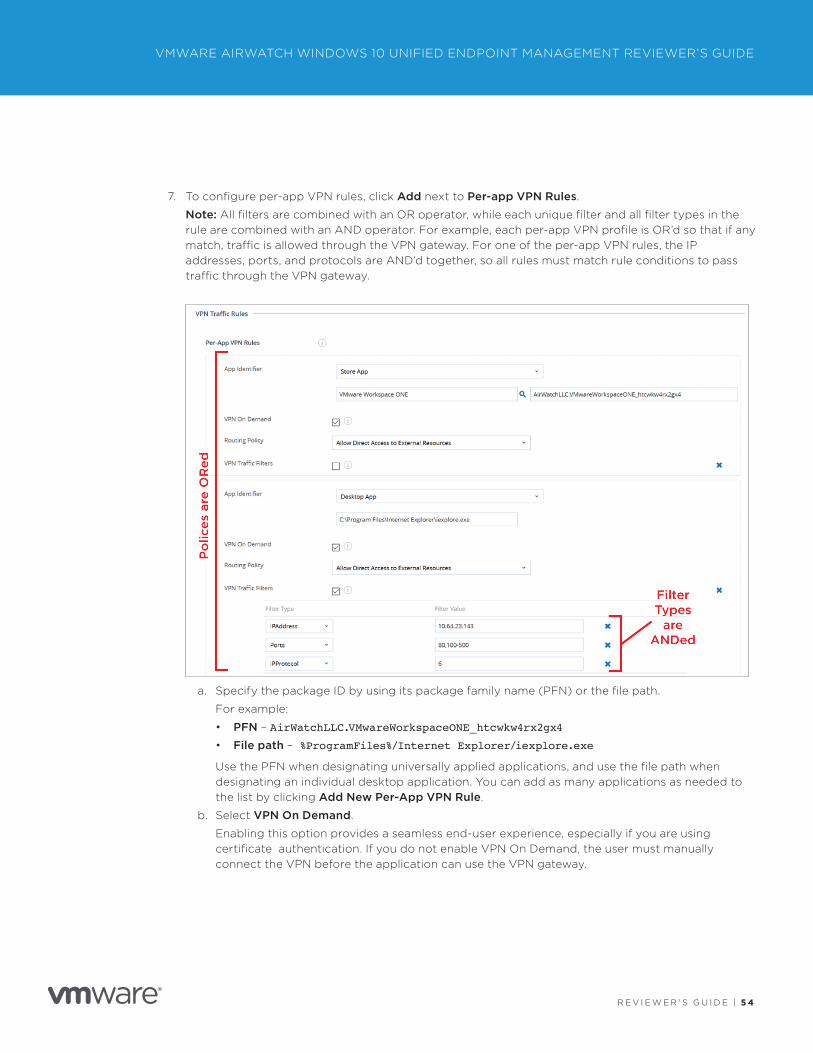
R E V I E W E R ’ S G U I D E | 5 4
VMWARE AIRWATCH WINDOWS 10 UNIFIED ENDPOINT MANAGEMENT REVIEWER’S GUIDE
7. To configure per-app VPN rules, click Add next to Per-app VPN Rules.
Note: All filters are combined with an OR operator, while each unique filter and all filter types in the rule are combined with an AND operator. For example, each per-app VPN profile is OR’d so that if any match, traffic is allowed through the VPN gateway. For one of the per-app VPN rules, the IP addresses, ports, and protocols are AND’d together, so all rules must match rule conditions to pass traffic through the VPN gateway.
a. Specify the package ID by using its package family name (PFN) or the file path.
For example:
• PFN – AirWatchLLC.VMwareWorkspaceONE_htcwkw4rx2gx4
• File path – %ProgramFiles%/Internet Explorer/iexplore.exe
Use the PFN when designating universally applied applications, and use the file path when designating an individual desktop application. You can add as many applications as needed to the list by clicking Add New Per-App VPN Rule.
b. Select VPN On Demand.
Enabling this option provides a seamless end-user experience, especially if you are using certificate authentication. If you do not enable VPN On Demand, the user must manually connect the VPN before the application can use the VPN gateway.
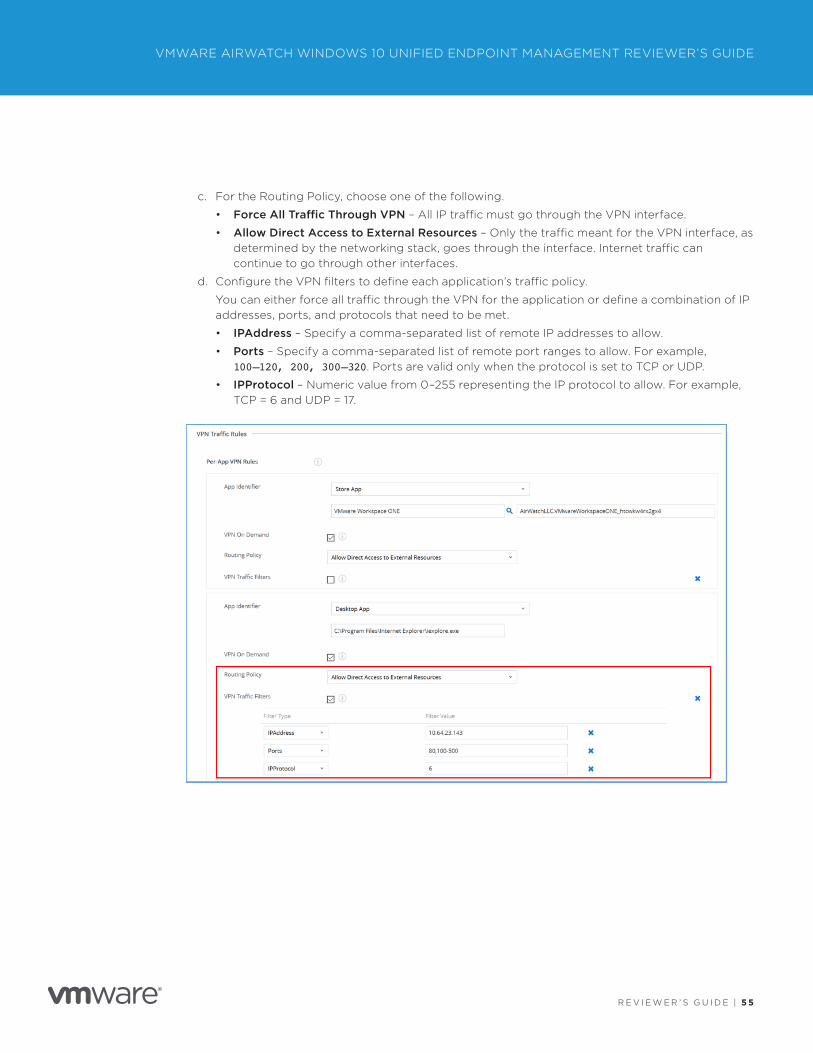
R E V I E W E R ’ S G U I D E | 5 5
VMWARE AIRWATCH WINDOWS 10 UNIFIED ENDPOINT MANAGEMENT REVIEWER’S GUIDE
c. For the Routing Policy, choose one of the following.
• Force All Traffic Through VPN – All IP traffic must go through the VPN interface.
• Allow Direct Access to External Resources – Only the traffic meant for the VPN interface, as determined by the networking stack, goes through the interface. Internet traffic can continue to go through other interfaces.
d. Configure the VPN filters to define each application’s traffic policy.
You can either force all traffic through the VPN for the application or define a combination of IP addresses, ports, and protocols that need to be met.
• IPAddress – Specify a comma-separated list of remote IP addresses to allow.
• Ports – Specify a comma-separated list of remote port ranges to allow. For example, 100–120, 200, 300–320. Ports are valid only when the protocol is set to TCP or UDP.
• IPProtocol – Numeric value from 0–255 representing the IP protocol to allow. For example, TCP = 6 and UDP = 17.
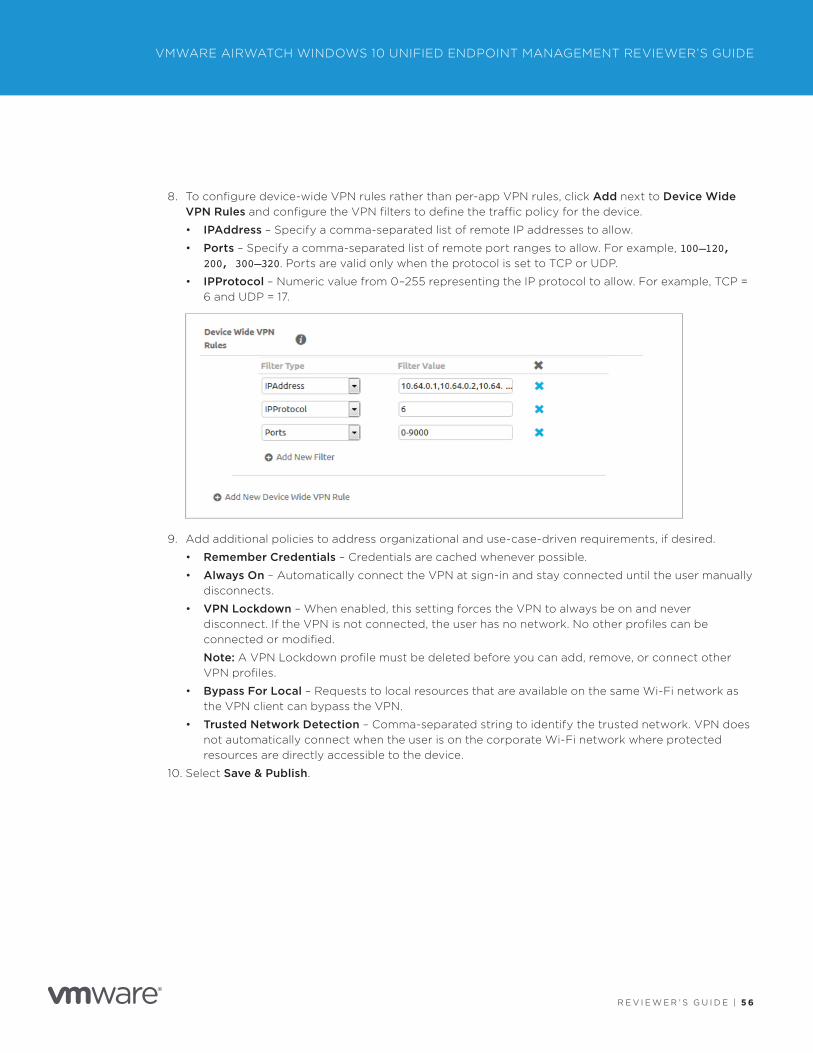
R E V I E W E R ’ S G U I D E | 5 6
VMWARE AIRWATCH WINDOWS 10 UNIFIED ENDPOINT MANAGEMENT REVIEWER’S GUIDE
8. To configure device-wide VPN rules rather than per-app VPN rules, click Add next to Device Wide VPN Rules and configure the VPN filters to define the traffic policy for the device.
• IPAddress – Specify a comma-separated list of remote IP addresses to allow.
• Ports – Specify a comma-separated list of remote port ranges to allow. For example, 100–120, 200, 300–320. Ports are valid only when the protocol is set to TCP or UDP.
• IPProtocol – Numeric value from 0–255 representing the IP protocol to allow. For example, TCP = 6 and UDP = 17.
9. Add additional policies to address organizational and use-case-driven requirements, if desired.
• Remember Credentials – Credentials are cached whenever possible.
• Always On – Automatically connect the VPN at sign-in and stay connected until the user manually disconnects.
• VPN Lockdown – When enabled, this setting forces the VPN to always be on and never disconnect. If the VPN is not connected, the user has no network. No other profiles can be connected or modified.
Note: A VPN Lockdown profile must be deleted before you can add, remove, or connect other VPN profiles.
• Bypass For Local – Requests to local resources that are available on the same Wi-Fi network as the VPN client can bypass the VPN.
• Trusted Network Detection – Comma-separated string to identify the trusted network. VPN does not automatically connect when the user is on the corporate Wi-Fi network where protected resources are directly accessible to the device.
10. Select Save & Publish.
R E V I E W E R ’ S G U I D E | 5 7
VMWARE AIRWATCH WINDOWS 10 UNIFIED ENDPOINT MANAGEMENT REVIEWER’S GUIDE
Configure Compliance Policies to Enforce Device Posture Configuring mobile security policies involves these steps.
1. Choose your platform – Determine on which platform you want to enforce compliance.
2. Build your policies – Customize your policy to cover everything from an application list, compromised status, encryption, manufacturer, model and OS version, passcode, and roaming.
3. Define escalation – Configure time-based actions in minutes, hours, or days, and take a tiered approach to those actions.
4. Specify actions – Send SMS, email, or push notifications to the user device, or send an email only to an administrator. Request device check-in, remove or block specific profiles, install compliance profiles, remove or block apps, and perform an enterprise wipe.
5. Configure assignments – Assign your compliance policy by organization group or smart group and then confirm the assignment by device.
Workspace ONE Configuration StepsFor more information about configuring adaptive management for all platforms, search for the VMware AirWatch Mobile Application Management Guide on AirWatch Resources.
AWAgent .com Onboarding MethodVMware AirWatch hosts this endpoint. No configuration steps are required to use this onboarding method. Simply have your end users go to https://awagent.com to get started.
Configure the Azure Onboarding MethodTo configure this method, you must first ensure that your directory is licensed for Azure AD Premium for onboarding capabilities. If you want only Windows Store for Business (Business Store Portal) integration, this step is not required. See Business Store Portal Integration for Automated Win32 Application Delivery.
Microsoft recently updated the Azure Portal UI. The following screenshots are from the Microsoft Azure tenant available at the time this document was written.
Important: If your VMware AirWatch instance is on-premises, use the on-premises configuration section in the VMware AirWatch Windows Desktop Platform Guide.
1. Log in to the Microsoft Azure tenant.
2. In the left menu, click Active Directory.
3. Select the directory from which the users onboard into VMware AirWatch.
a. Assign the AirWatch admin account a premium license.
b. Assign premium licenses to the end users enrolling into VMware AirWatch.
4. Navigate to the Applications tab.
a. From the options at the bottom of the window, click Add.
b. Click Add an application from the gallery.
c. In the left menu, select Mobile Device Management.
d. Search for AirWatch by VMware.
e. Click the check mark in the bottom-right corner of the screen to confirm the selection.
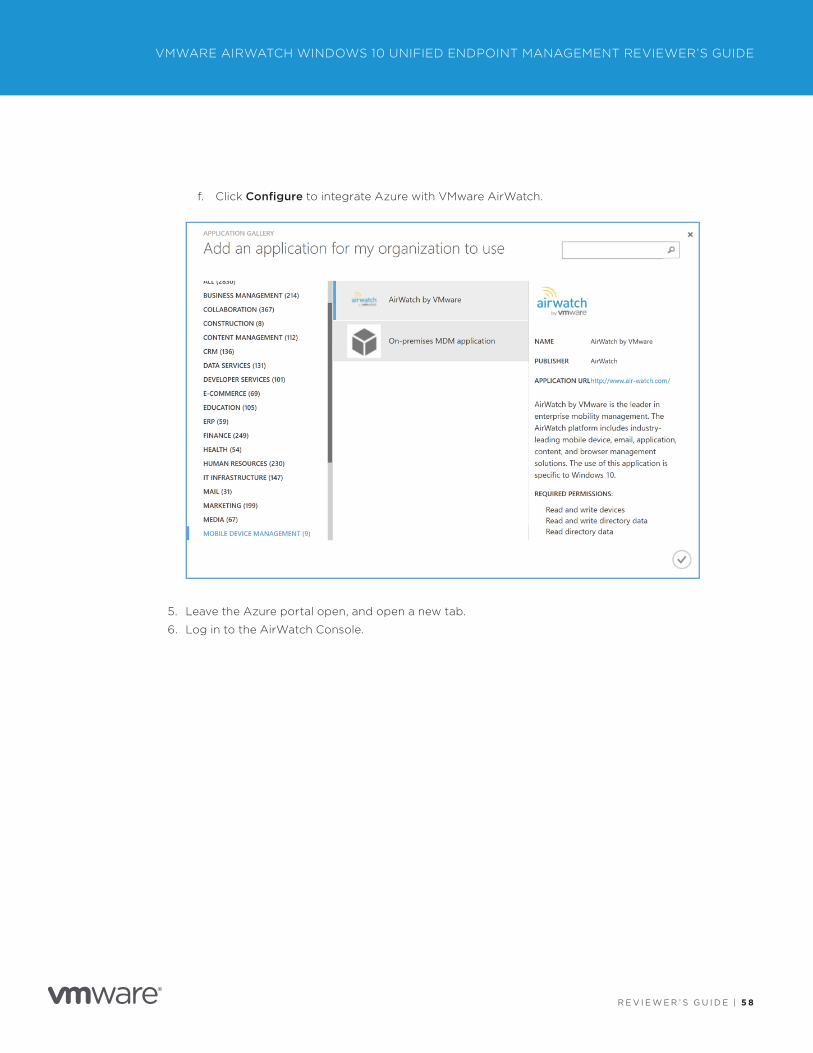
R E V I E W E R ’ S G U I D E | 5 8
VMWARE AIRWATCH WINDOWS 10 UNIFIED ENDPOINT MANAGEMENT REVIEWER’S GUIDE
f. Click Configure to integrate Azure with VMware AirWatch.
5. Leave the Azure portal open, and open a new tab.
6. Log in to the AirWatch Console.
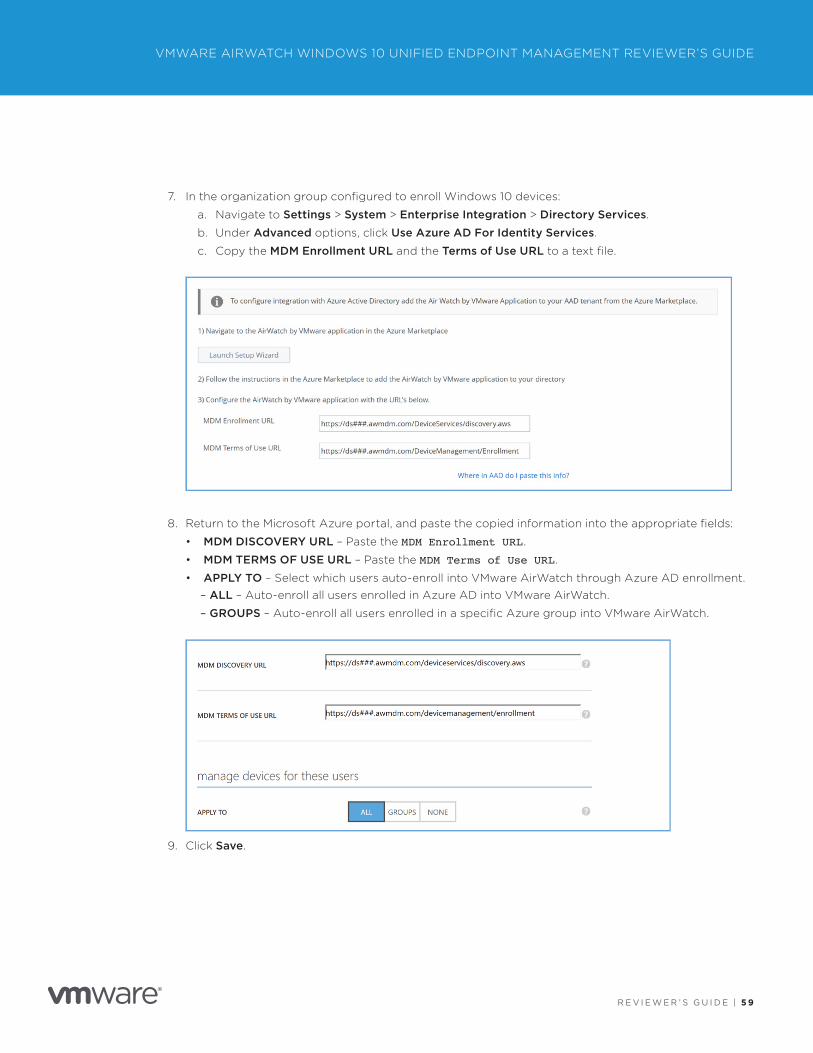
R E V I E W E R ’ S G U I D E | 5 9
VMWARE AIRWATCH WINDOWS 10 UNIFIED ENDPOINT MANAGEMENT REVIEWER’S GUIDE
7. In the organization group configured to enroll Windows 10 devices:
a. Navigate to Settings > System > Enterprise Integration > Directory Services.
b. Under Advanced options, click Use Azure AD For Identity Services.
c. Copy the MDM Enrollment URL and the Terms of Use URL to a text file.
8. Return to the Microsoft Azure portal, and paste the copied information into the appropriate fields:
• MDM DISCOVERY URL – Paste the MDM Enrollment URL.
• MDM TERMS OF USE URL – Paste the MDM Terms of Use URL.
• APPLY TO – Select which users auto-enroll into VMware AirWatch through Azure AD enrollment.
– ALL – Auto-enroll all users enrolled in Azure AD into VMware AirWatch.
– GROUPS – Auto-enroll all users enrolled in a specific Azure group into VMware AirWatch.
9. Click Save.
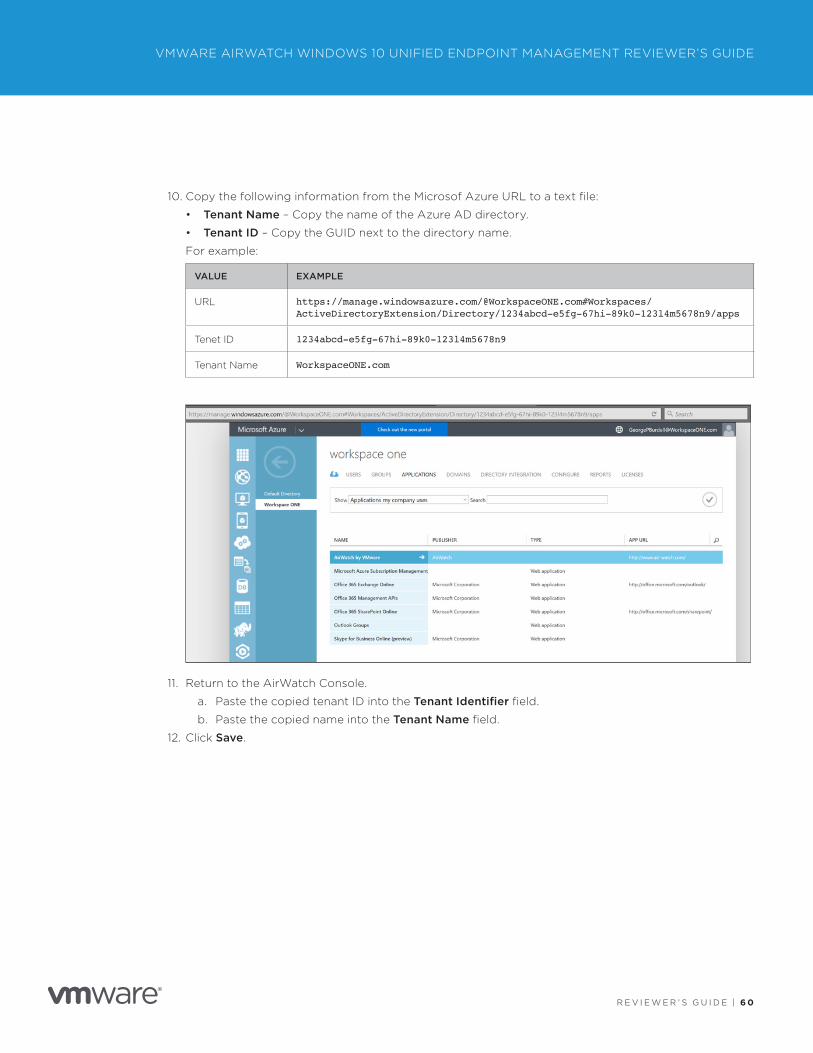
R E V I E W E R ’ S G U I D E | 6 0
VMWARE AIRWATCH WINDOWS 10 UNIFIED ENDPOINT MANAGEMENT REVIEWER’S GUIDE
10. Copy the following information from the Microsof Azure URL to a text file:
• Tenant Name – Copy the name of the Azure AD directory.
• Tenant ID – Copy the GUID next to the directory name.
For example:
VALUE EXAMPLE
URL https://manage.windowsazure.com/@WorkspaceONE.com#Workspaces/ActiveDirectoryExtension/Directory/1234abcd-e5fg-67hi-89k0-123l4m5678n9/apps
Tenet ID 1234abcd-e5fg-67hi-89k0-123l4m5678n9
Tenant Name WorkspaceONE.com
11. Return to the AirWatch Console.
a. Paste the copied tenant ID into the Tenant Identifier field.
b. Paste the copied name into the Tenant Name field.
12. Click Save.
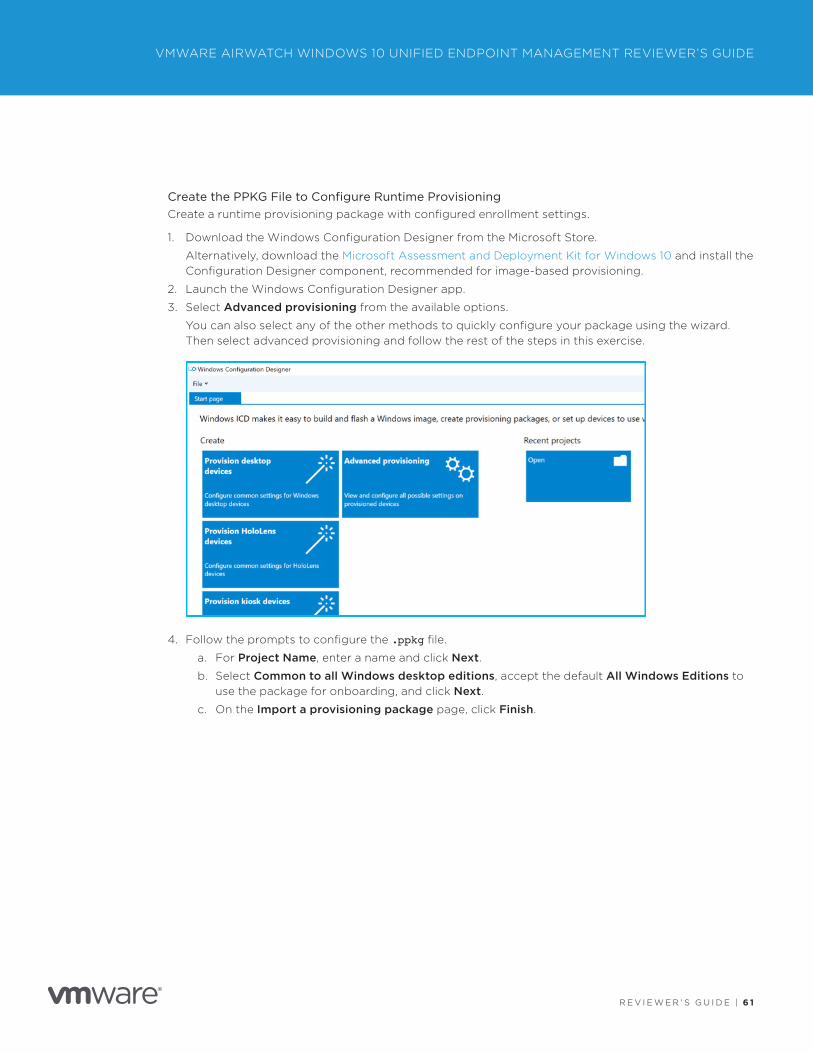
R E V I E W E R ’ S G U I D E | 6 1
VMWARE AIRWATCH WINDOWS 10 UNIFIED ENDPOINT MANAGEMENT REVIEWER’S GUIDE
Create the PPKG File to Configure Runtime ProvisioningCreate a runtime provisioning package with configured enrollment settings.
1. Download the Windows Configuration Designer from the Microsoft Store.
Alternatively, download the Microsoft Assessment and Deployment Kit for Windows 10 and install the Configuration Designer component, recommended for image-based provisioning.
2. Launch the Windows Configuration Designer app.
3. Select Advanced provisioning from the available options.
You can also select any of the other methods to quickly configure your package using the wizard. Then select advanced provisioning and follow the rest of the steps in this exercise.
4. Follow the prompts to configure the .ppkg file.
a. For Project Name, enter a name and click Next.
b. Select Common to all Windows desktop editions, accept the default All Windows Editions to use the package for onboarding, and click Next.
c. On the Import a provisioning package page, click Finish.
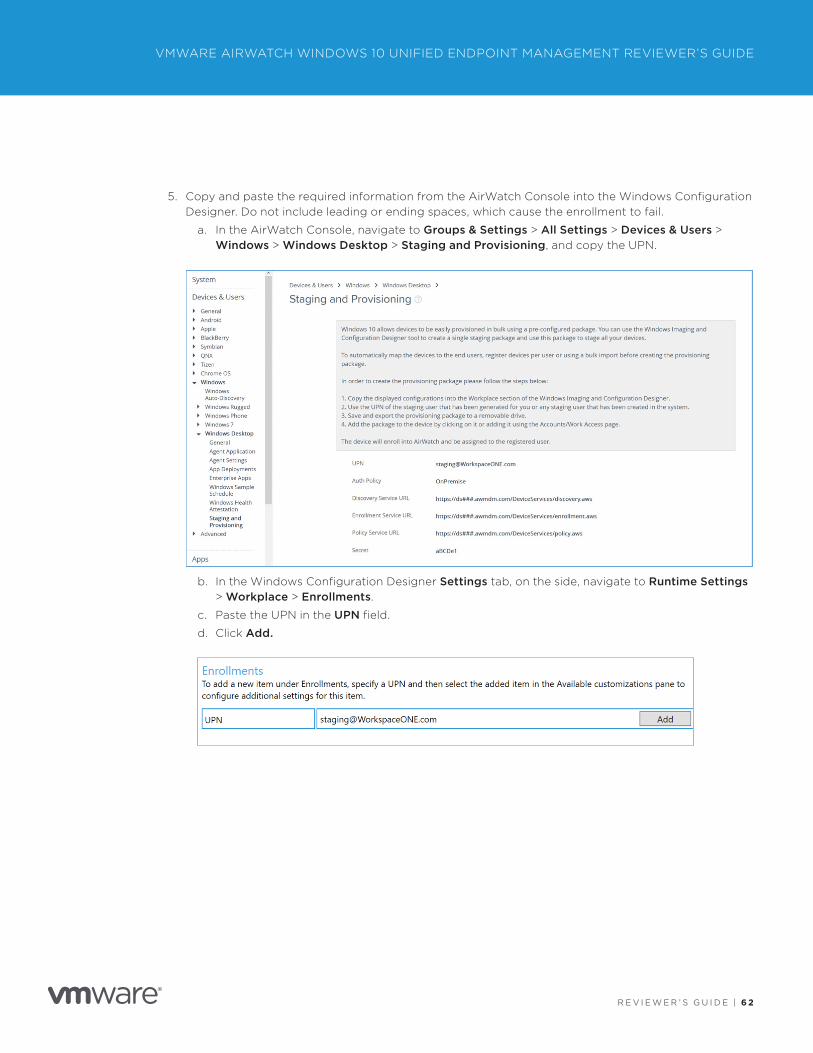
R E V I E W E R ’ S G U I D E | 6 2
VMWARE AIRWATCH WINDOWS 10 UNIFIED ENDPOINT MANAGEMENT REVIEWER’S GUIDE
5. Copy and paste the required information from the AirWatch Console into the Windows Configuration Designer. Do not include leading or ending spaces, which cause the enrollment to fail.
a. In the AirWatch Console, navigate to Groups & Settings > All Settings > Devices & Users > Windows > Windows Desktop > Staging and Provisioning, and copy the UPN.
b. In the Windows Configuration Designer Settings tab, on the side, navigate to Runtime Settings > Workplace > Enrollments.
c. Paste the UPN in the UPN field.
d. Click Add.
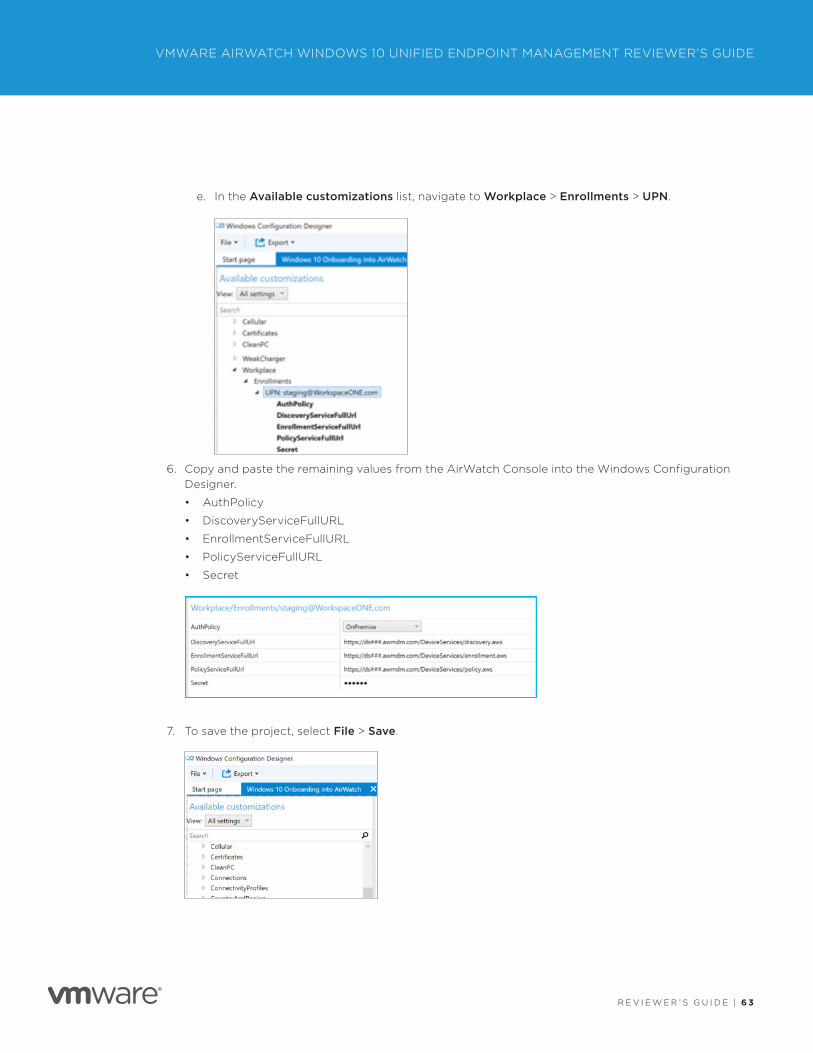
R E V I E W E R ’ S G U I D E | 6 3
VMWARE AIRWATCH WINDOWS 10 UNIFIED ENDPOINT MANAGEMENT REVIEWER’S GUIDE
e. In the Available customizations list, navigate to Workplace > Enrollments > UPN.
6. Copy and paste the remaining values from the AirWatch Console into the Windows Configuration Designer.
• AuthPolicy
• DiscoveryServiceFullURL
• EnrollmentServiceFullURL
• PolicyServiceFullURL
• Secret
7. To save the project, select File > Save.
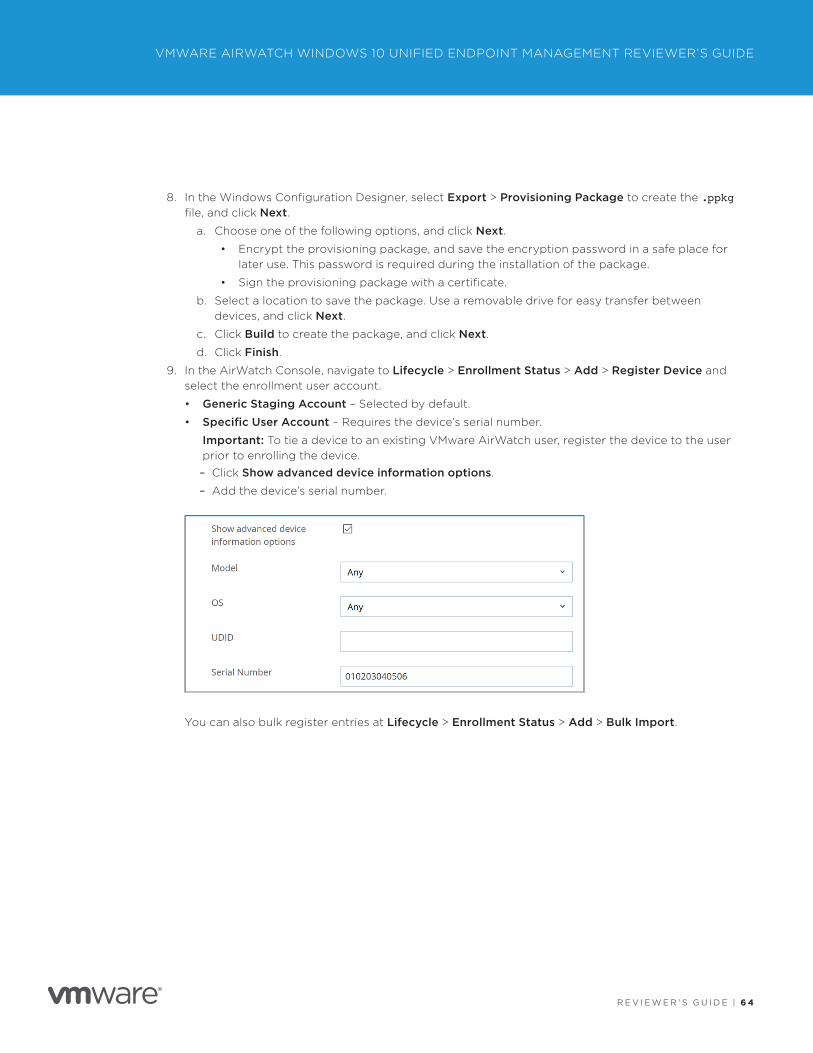
R E V I E W E R ’ S G U I D E | 6 4
VMWARE AIRWATCH WINDOWS 10 UNIFIED ENDPOINT MANAGEMENT REVIEWER’S GUIDE
8. In the Windows Configuration Designer, select Export > Provisioning Package to create the .ppkg file, and click Next.
a. Choose one of the following options, and click Next.
• Encrypt the provisioning package, and save the encryption password in a safe place for later use. This password is required during the installation of the package.
• Sign the provisioning package with a certificate.
b. Select a location to save the package. Use a removable drive for easy transfer between devices, and click Next.
c. Click Build to create the package, and click Next.
d. Click Finish.
9. In the AirWatch Console, navigate to Lifecycle > Enrollment Status > Add > Register Device and select the enrollment user account.
• Generic Staging Account – Selected by default.
• Specific User Account – Requires the device’s serial number.
Important: To tie a device to an existing VMware AirWatch user, register the device to the user prior to enrolling the device.
– Click Show advanced device information options.
– Add the device’s serial number.
You can also bulk register entries at Lifecycle > Enrollment Status > Add > Bulk Import.
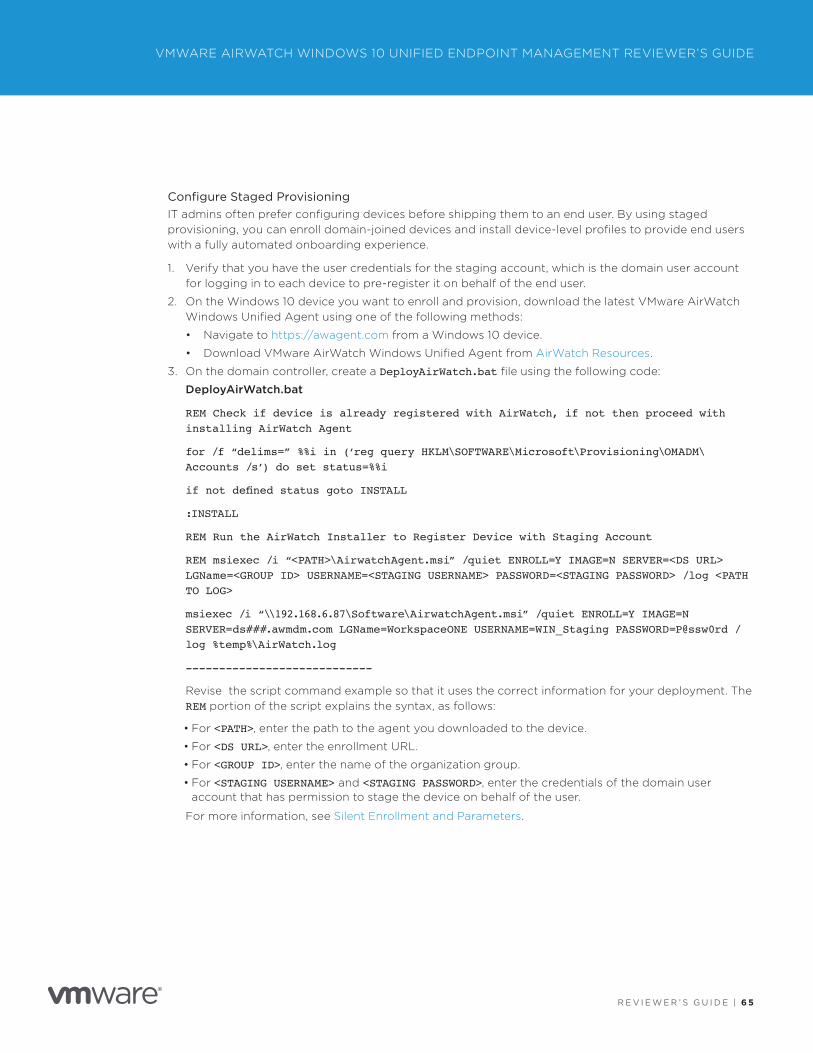
R E V I E W E R ’ S G U I D E | 6 5
VMWARE AIRWATCH WINDOWS 10 UNIFIED ENDPOINT MANAGEMENT REVIEWER’S GUIDE
Configure Staged Provisioning IT admins often prefer configuring devices before shipping them to an end user. By using staged provisioning, you can enroll domain-joined devices and install device-level profiles to provide end users with a fully automated onboarding experience.
1. Verify that you have the user credentials for the staging account, which is the domain user account for logging in to each device to pre-register it on behalf of the end user.
2. On the Windows 10 device you want to enroll and provision, download the latest VMware AirWatch Windows Unified Agent using one of the following methods:
• Navigate to https://awagent.com from a Windows 10 device.
• Download VMware AirWatch Windows Unified Agent from AirWatch Resources.
3. On the domain controller, create a DeployAirWatch.bat file using the following code:
DeployAirWatch.bat
REM Check if device is already registered with AirWatch, if not then proceed with installing AirWatch Agent
for /f “delims=” %%i in (‘reg query HKLM\SOFTWARE\Microsoft\Provisioning\OMADM\Accounts /s’) do set status=%%i
if not defined status goto INSTALL
:INSTALL
REM Run the AirWatch Installer to Register Device with Staging Account
REM msiexec /i “<PATH>\AirwatchAgent.msi” /quiet ENROLL=Y IMAGE=N SERVER=<DS URL> LGName=<GROUP ID> USERNAME=<STAGING USERNAME> PASSWORD=<STAGING PASSWORD> /log <PATH TO LOG>
msiexec /i “\\192.168.6.87\Software\AirwatchAgent.msi” /quiet ENROLL=Y IMAGE=N SERVER=ds###.awmdm.com LGName=WorkspaceONE USERNAME=WIN_Staging PASSWORD=P@ssw0rd /log %temp%\AirWatch.log
----------------------------
Revise the script command example so that it uses the correct information for your deployment. The REM portion of the script explains the syntax, as follows:
• For <PATH>, enter the path to the agent you downloaded to the device.
• For <DS URL>, enter the enrollment URL.
• For <GROUP ID>, enter the name of the organization group.
• For <STAGING USERNAME> and <STAGING PASSWORD>, enter the credentials of the domain user account that has permission to stage the device on behalf of the user.
For more information, see Silent Enrollment and Parameters.
R E V I E W E R ’ S G U I D E | 6 6
VMWARE AIRWATCH WINDOWS 10 UNIFIED ENDPOINT MANAGEMENT REVIEWER’S GUIDE
4. On the domain controller, open Group Policy Management, create a new Group Policy Object, and link it to your devices and users.
5. In the Group Policy Management Editor:
a. Navigate to User Configuration > Policies > Windows Settings > Scripts (Logon/Logoff).
b. Click Show Files.
c. Transfer the Deploy AirWath.bat script to the location which opens.
d. Click Add and select the DeployAirWatch.bat script.
e. Confirm that the Group Policy Object is assigned to the domain user account that logs in to each device; that is, the staging account.
6. On the device, log in as the staging admin.
VMware AirWatch onboards and provisions the device profiles.
7. When complete, shut down and provide the device to the end user.
When the end user logs into the device, the agent listener reads the user UPN and email from the device registry and sends the information to the AirWatch Console. The device registry is updated to register the device to the user.
Configure the SCCM Integration Client and AirWatch Agent Deploy the AirWatch Agent using a SCCM package to automate Windows 10 device onboarding.
1. Search for and download the VMware AirWatch SCCM Integration Client from AirWatch Resources.
• For production environments, download the file to a location appropriate for deployment using SCCM or group policies.
• For proof-of-concept environments, you can download the client directly onto SCCM-managed Windows 10 devices and install the client.
2. In a production environment, use SCCM or domain group policies to push the MSI file to managed devices and install the client.
For help using SCCM, refer to Microsoft support and documentation.
3. After installation, end users can enroll Windows 10 devices using any onboarding method.
R E V I E W E R ’ S G U I D E | 6 7
VMWARE AIRWATCH WINDOWS 10 UNIFIED ENDPOINT MANAGEMENT REVIEWER’S GUIDE
SummaryThe VMware AirWatch Windows 10 Unified Endpoint Management Reviewer’s Guide introduces you to how VMware AirWatch manages Windows 10 through a product discussion and practical exercises.
The three use cases show how to best configure VMware AirWatch to manage and deploy Windows 10 devices in your organization, starting with selecting the onboarding method that best fits your use case, to creating configuration changes on the device to leverage enterprise mobility management and legacy management technologies within the same platform. It describes how to manage Office 365 Professional Plus and enable your end users with a unified app catalog that provides SSO and multiple layers of security and access control policies. It also addresses how to enable and manage new Windows 10 security features and how to tie it all together with the real-time automated remediation and compliance engine to ensure that your devices stay up to date and secure.
R E V I E W E R ’ S G U I D E | 6 8
VMWARE AIRWATCH WINDOWS 10 UNIFIED ENDPOINT MANAGEMENT REVIEWER’S GUIDE
Appendix A: Terminology Used in This GuideThe following terms are used in this guide:
Adaptive access The ability to control access and authentication methods to sensitive apps based on a device’s managed status.
Additive Includes only changes developed after the latest version of the application or the last additive patch.
App dependencies Applications required by the environment and devices to run the Win32 application.
Application store The UI framework that provides access to a self-service catalog, public examples of which include the Apple App Store, the Google Play Store, and the Microsoft Store.
App patches Files that apply additive or cumulative fixes, updates, or new features to applications.
App transforms Files that control application installation and can add or prevent components, configurations, and processes during the process.
App uninstall process Scripts that instruct the system to uninstall an application under specific circumstances.
BitLocker Full disk encryption available for Windows, focused on addressing data leakage or data theft scenarios from stolen, lost, or incorrectly decommissioned devices.
Bring your own device (BYOD) The process of providing secure access to corporate data, apps, and content on an employee-owned device without invading employee privacy to their personal data, apps, or content.
Business mobility The concept of being able to provide secure access to your business services, infrastructure, and content to enable your workforce to work remotely.
Catalog The VMware Workspace ONE UI that displays desktops and applications available to a user or group of users.
Cloud A set of securely accessed Internet-hosted services.
R E V I E W E R ’ S G U I D E | 6 9
VMWARE AIRWATCH WINDOWS 10 UNIFIED ENDPOINT MANAGEMENT REVIEWER’S GUIDE
Conditional access Provision access to a resource or service based on user entitlements or roles.
Container The separation of corporate and personal data on employee-owned devices, allowing IT administrators to manage corporate applications and profiles without invading employee privacy or personal apps and content.
Cumulative Includes the entire application including any changes since the latest version of the application or the last patches.
Data leakage protection Software-controlled policies that determine how and where data can be transferred or shared to.
Device Health Attestation Module that gatherers device health measurements and reports these measurements to the Health Attestation Service for evaluation.
Enrollment Process of allowing your device to be managed by the software-defined policies of the chosen enterprise mobility management provider.
Enterprise mobility management Concept of using software and policies to both secure and provide access controls for mobile devices.
Files and actions The combination of the files delivered to a device and the actions that file performs on the device. Files and actions cannot be assigned directly to a device. Instead, assign files and actions to a product which then provisions to devices.
Health Attestation Service Cloud service that evaluates health measurements from the device to determine the health state.
Identity-as-a-service Identity and access management services through the cloud to provide SSO, identity federation, and user-access provisioning.
Mobile application management The concept of managing access, deployment, and restrictions of mobile applications using software and services.
Mobile device management The concept of managing mobile devices using software to define policies and access control.
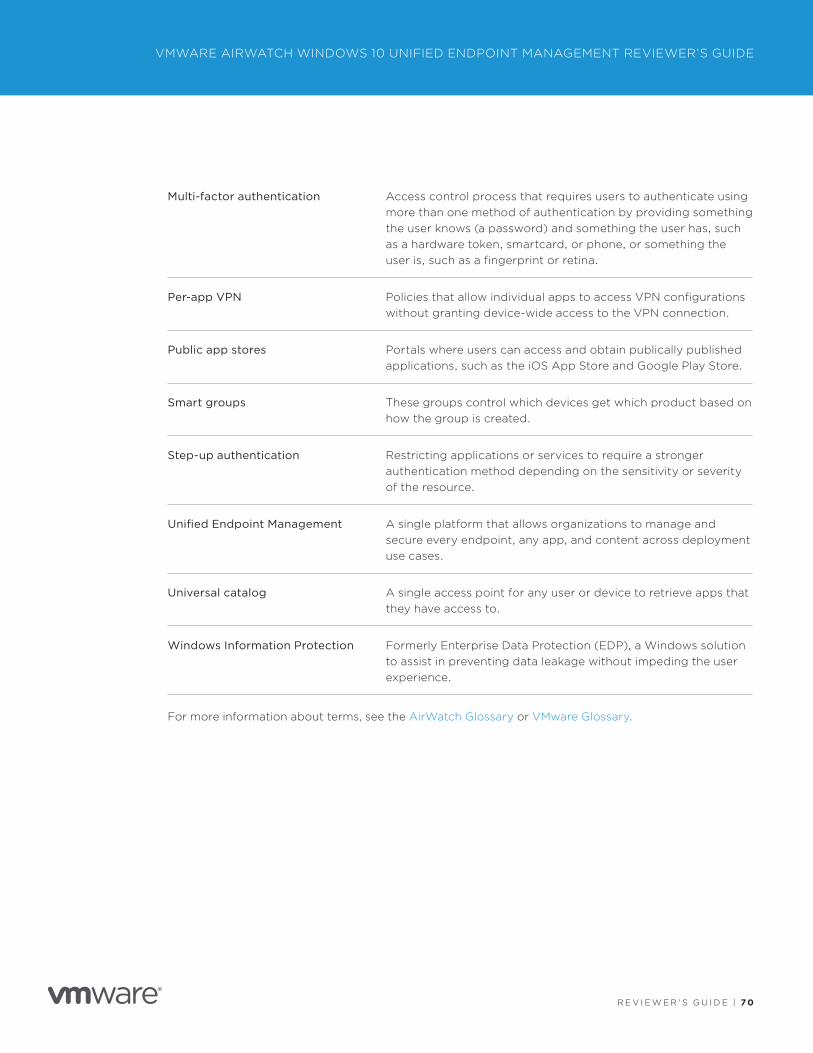
R E V I E W E R ’ S G U I D E | 7 0
VMWARE AIRWATCH WINDOWS 10 UNIFIED ENDPOINT MANAGEMENT REVIEWER’S GUIDE
Multi-factor authentication Access control process that requires users to authenticate using more than one method of authentication by providing something the user knows (a password) and something the user has, such as a hardware token, smartcard, or phone, or something the user is, such as a fingerprint or retina.
Per-app VPN Policies that allow individual apps to access VPN configurations without granting device-wide access to the VPN connection.
Public app stores Portals where users can access and obtain publically published applications, such as the iOS App Store and Google Play Store.
Smart groups These groups control which devices get which product based on how the group is created.
Step-up authentication Restricting applications or services to require a stronger authentication method depending on the sensitivity or severity of the resource.
Unified Endpoint Management A single platform that allows organizations to manage and secure every endpoint, any app, and content across deployment use cases.
Universal catalog A single access point for any user or device to retrieve apps that they have access to.
Windows Information Protection Formerly Enterprise Data Protection (EDP), a Windows solution to assist in preventing data leakage without impeding the user experience.
For more information about terms, see the AirWatch Glossary or VMware Glossary.
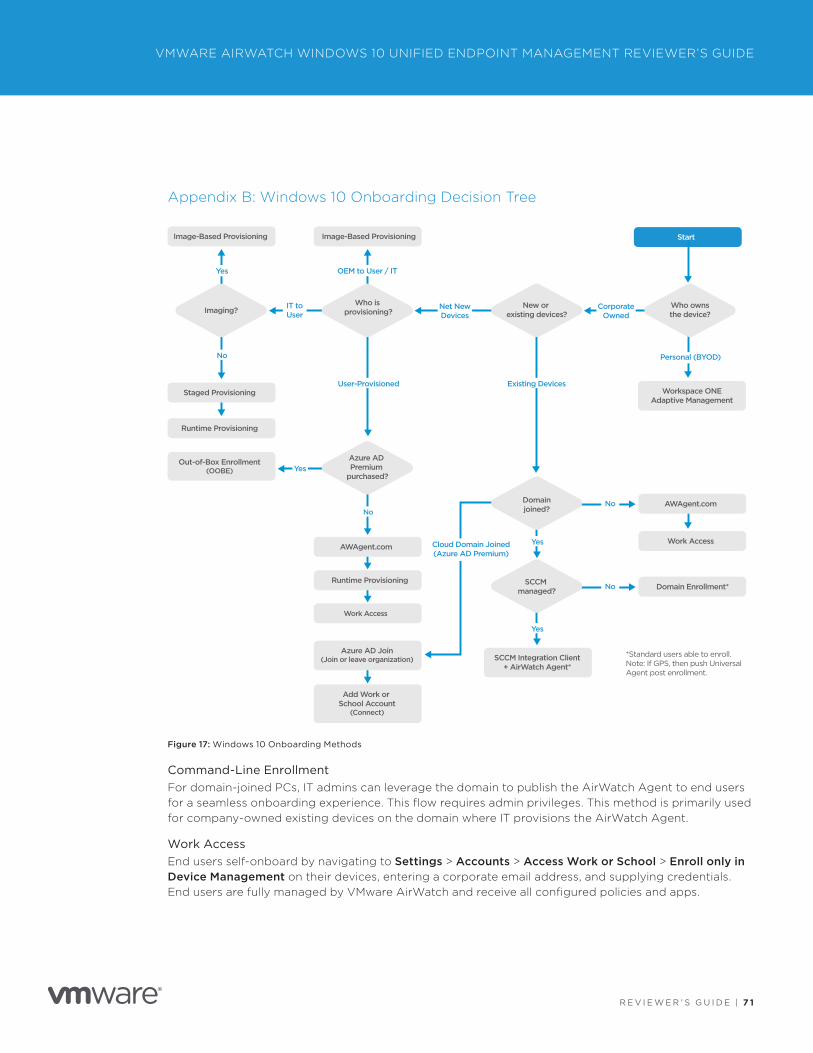
R E V I E W E R ’ S G U I D E | 7 1
VMWARE AIRWATCH WINDOWS 10 UNIFIED ENDPOINT MANAGEMENT REVIEWER’S GUIDE
Appendix B: Windows 10 Onboarding Decision Tree
Yes
Work Access
Azure AD Join(Join or leave organization)
Add Work or School Account
(Connect)
SCCM Integration Client+ AirWatch Agent*
No
No
Yes
User-Provisioned Existing Devices
Image-Based Provisioning
Imaging?
Yes
Staged Provisioning Workspace ONEAdaptive Management
Runtime Provisioning
Out-of-Box Enrollment(OOBE)
*Standard users able to enroll. Note: If GPS, then push Universal Agent post enrollment.
Image-Based Provisioning Start
AWAgent.com
AWAgent.com
Work Access
Runtime Provisioning
Who is provisioning?
IT to User
Net New Devices
CorporateOwned
Personal (BYOD)
YesAzure AD Premium
purchased?
Domainjoined?
New or existing devices?
Who ownsthe device?
SCCM managed?
Cloud Domain Joined(Azure AD Premium)
OEM to User / IT
No
Domain Enrollment*No
Figure 17: Windows 10 Onboarding Methods
Command-Line EnrollmentFor domain-joined PCs, IT admins can leverage the domain to publish the AirWatch Agent to end users for a seamless onboarding experience. This flow requires admin privileges. This method is primarily used for company-owned existing devices on the domain where IT provisions the AirWatch Agent.
Work AccessEnd users self-onboard by navigating to Settings > Accounts > Access Work or School > Enroll only in Device Management on their devices, entering a corporate email address, and supplying credentials. End users are fully managed by VMware AirWatch and receive all configured policies and apps.
R E V I E W E R ’ S G U I D E | 7 2
VMWARE AIRWATCH WINDOWS 10 UNIFIED ENDPOINT MANAGEMENT REVIEWER’S GUIDE
This method is primarily used for company-owned, new or pre-existing devices on which the end user self-onboards. Similar to standard iOS and Android onboarding workflows. AWAgent.com is preferred over Work Access, especially if network bandwidth is a concern.
Image-Based ProvisioningImage-based provisioning is an efficient way to onboard a large number of devices into VMware AirWatch. IT admins or OEMs can create the Runtime Provisioning Package (PPKG file), which is similar to Apple Configurator. They then can seed the PPKG file into the Windows 10 image (WIM) using Windows Imaging and Configuration Designer (WICD). The package is executed when the device boots up during out-of-box-experience (OOBE). The end user does not need VMware AirWatch prompts or credentials. The VMware AirWatch admin can associate an end user with the device by pre-registering the device’s serial number in VMware AirWatch or, for domain-joined devices, re-assigning enrollment to the next user who logs in to the Windows device.
This method is primarily used for company-owned new devices where IT or OEMs seed the package into the image and then provide the device to the end user for a seamless zero-touch onboarding experience.
Automated Agent Registration Automated agent registration enables an organization to efficiently deploy a large number of devices by installing the AirWatch Agent on the device (image) before shipping the device to the end user. Pre-loading can also reduce network congestion. The AirWatch Agent listens in the background. When the domain user logs in, the AirWatch Agent transfers registration of the device to that end user.
R E V I E W E R ’ S G U I D E | 7 3
VMWARE AIRWATCH WINDOWS 10 UNIFIED ENDPOINT MANAGEMENT REVIEWER’S GUIDE
About the Authors and ContributorsThe VMware AirWatch Windows 10 Unified Endpoint Management Reviewer’s Guide was written by Josué Negrón, Sr. Solutions Architect, End-User-Computing Technical Marketing, VMware, and Hannah Jernigan, Technical Writer, End-User-Computing Technical Marketing, VMware, with appreciation and acknowledgement for considerable contributions from the following subject matter experts:
• Pedro Bravo, Deployments Subject Matter Expert, VMware AirWatch
• Ajay Padmakumar, T3 Support Subject Matter Expert, VMware AirWatch
• Varun Murthy, Product Line Manager, VMware AirWatch
• Nigitha Alugubelli, Sr. Product Manager, VMware AirWatch
• Jason Roszak, Director Product Management, VMware AirWatch
• Darren Weatherly, Sales Engineer, VMware AirWatch
• Robert Terakedis, Sr. Solutions Architect, EUC Technical Marketing, VMware
• Aditya Kunduri, Product Marketing Manager, EUC Mobile Marketing, VMware
To comment on this paper, contact VMware End-User-Computing Technical Marketing at [email protected].

VMware, Inc. 3401 Hillview Avenue Palo Alto CA 94304 USA Tel 877-486-9273 Fax 650-427-5001 www.vmware.comCopyright © 2017 VMware, Inc. All rights reserved. This product is protected by U.S. and international copyright and intellectual property laws. VMware products are covered by one or more patents listed at http://www.vmware.com/go/patents. VMware is a registered trademark or trademark of VMware, Inc. in the United States and/or other jurisdictions. All other marks and names mentioned herein may be trademarks of their respective companies. Item No: VMW-RG-AWWIN10UNTENDPTMGMT-USLTR-20170615 -WEB 6/17