Embed Size (px)
Citation preview

VM−FEX with Hyper−V Configuration Example
Document ID: 116374
Contributed by Shankar Prasath R, Cisco TAC Engineer.Aug 25, 2014
Contents
IntroductionPrerequisites Requirements Components usedBackground information VM−FEX SR−IOVConfigureVerifyTroubleshootRelated Information
Introduction
This beginner−level document describes the minimum settings required in order to configure the CiscoVirtual Machine Fabric Extender (VM−FEX) with Hyper−V on Windows Server 2012 with UnifiedComputing System (UCS) Release 2.1. It does not explain all the options in detail. Refer to the Cisco UCSManager VM−FEX for Hyper−V GUI Configuration Guide, Release 2.1 for more information.
In order to configure VM−FEX with Hyper−V on UCS Release 2.2, refer to Cisco UCS Manager VM−FEXfor Hyper−V GUI Configuration Guide, Release 2.2.
Prerequisites
Requirements
Cisco recommends that you have a working knowledge of these topics:
Cisco UCS and UCS Manager (UCSM)• Windows Server 2012 and Hyper−V Version 3.0•
Components used
These are the minimum prerequisites needed in order to configure VM−FEX with Hyper−V:
UCS Version 2.1(1a) or later• Server that Contains a Cisco VIC Adapter• Windows Server 2012 or later•
The information in this document was created from the devices in a specific lab environment. All of thedevices used in this document started with a cleared (default) configuration. If your network is live, make surethat you understand the potential impact of any command.

Background information
VM−FEX
Cisco VM−FEX technology allows you to extend the switching fabric to the virtual machine level. Theregular software−based switching done at the hypervisor layer for the virtual machine is bypassed, and theswitching is performed directly in the fabric interconnect. VM−FEX is implemented in a Windows Hyper−Venvironment with the use of Single Root I/O Virtualization (SR−IOV) and Intel Virtualization Technology forDirected I/O (VT−d) technologies.
SR−IOV
SR−IOV allows multiple Virtual Machines (VMs) to share a single Peripheral Component InterconnectExpress (PCIe) network adapter inside a host. SR−IOV defines these functions:
Physical function (PF) − PFs are full PCIe functions that include the SR−IOV capabilities. Theseappear as regular static Virtual Network Interface Controllers (vNICs) on the UCS.
•
Virtual function (VF) − VFs are lightweight PCIe functions that help in data transfer. A VF is derivedfrom, and managed through, a VF.
•
Configure
Create a Dynamic vNIC connection policy.Navigate to LAN > Policies.♦ Create a Dynamic vNIC connection Policy with the required number of dynamic vNICs(VF).
♦
Use the predefined Windows adapter policy.♦
1.
Create a service profile to be used for VM−FEX.Create a Service profile from Servers > Service Profiles. Choose the Create Service Profile(expert) option.
♦
When you create the static vNICs (PF):Choose the predefined SRIOV adapter policy.◊ Choose the Dynamic vNIC connection policy that you created in Step 1.◊
♦
2.

Choose the predefined SRIOV BIOS policy. This mandatory step enables these settings underthe BIOS settings:
Virtualization Technology (VT) and Direct Cache Access enabled under Advanced >Processor.
◊
Interrupt Remap and VT for Directed I/O enabled under Advanced > Intel DirectedIO.
◊
♦
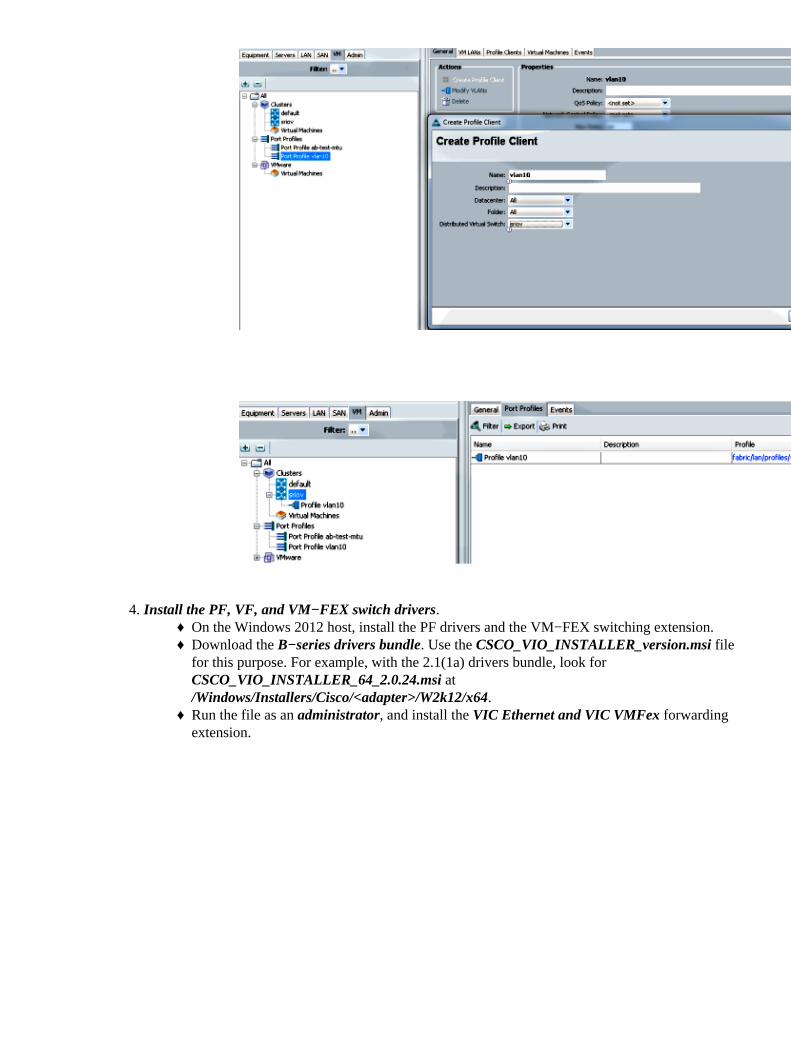
Create a port−profile, cluster, and a port−profile client.Navigate to VM > Port Profiles.♦
3.

Create a Port Profile. This defines the configuration for the port that connects to the VM.♦
Create a separate cluster to be used with Hyper−V (recommended step).♦
Associate the required port−profiles to this cluster.Right−click the port−profile, and choose the Create Profile Client.◊ Choose the cluster that you created for the Distributed Virtual Switch. Theport−profile appears under the cluster.
◊
♦
Install the PF, VF, and VM−FEX switch drivers.On the Windows 2012 host, install the PF drivers and the VM−FEX switching extension.♦ Download the B−series drivers bundle. Use the CSCO_VIO_INSTALLER_version.msi filefor this purpose. For example, with the 2.1(1a) drivers bundle, look forCSCO_VIO_INSTALLER_64_2.0.24.msi at/Windows/Installers/Cisco/<adapter>/W2k12/x64.
♦
Run the file as an administrator, and install the VIC Ethernet and VIC VMFex forwardingextension.
♦
4.

Use the same msi file on the VM, and install the VIC VMNic Ethernet driver.♦

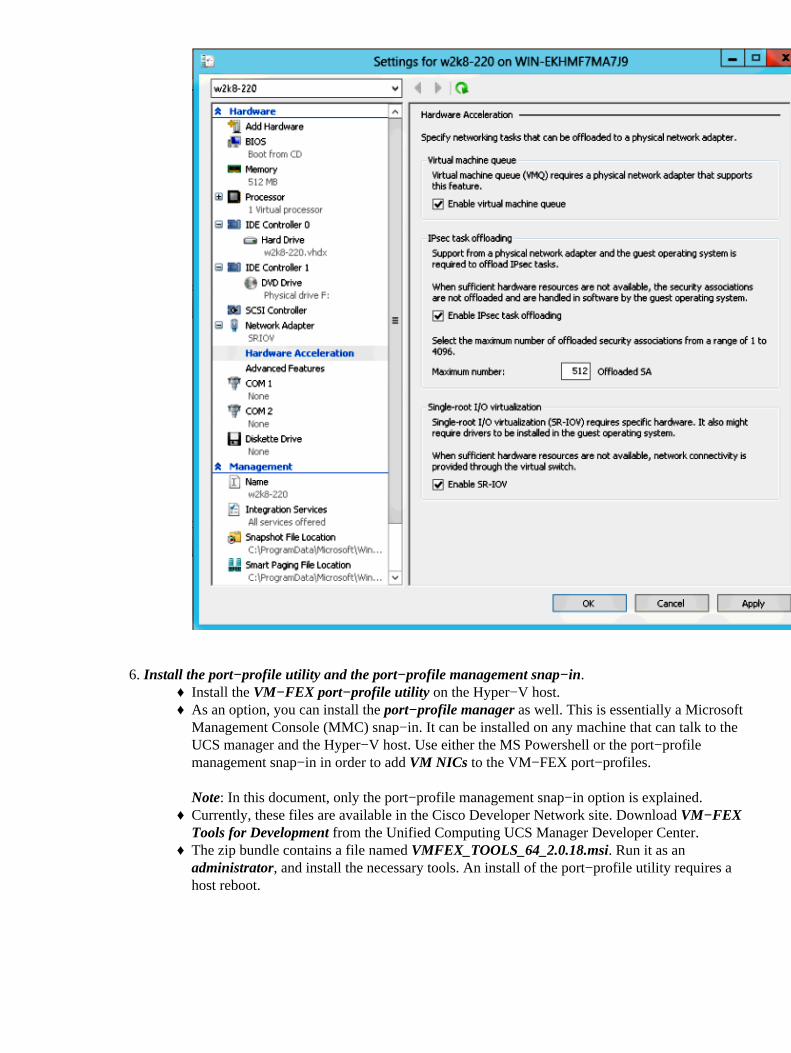
Create the Virtual Switch with the Hyper−V manager.On the Windows 2012 host, create a virtual switch with the Virtual Switch manager. Thisswitch is used for SR−IOV.
♦
When you create the switch, choose Enable single−root I/O virtualization (SR−IOV). Thissetting is enabled only when you create the virtual switch.
♦
5.

From the Extensions section, enable the Cisco VMFex Switch forwarding extension.♦

Attach the network adapter of the VM that is going to be on VM−FEX to this newly−createdvirtual switch. Also, from the Hardware Acceleration section, check the Enable SR−IOVcheck box.
♦
Install the port−profile utility and the port−profile management snap−in.Install the VM−FEX port−profile utility on the Hyper−V host.♦ As an option, you can install the port−profile manager as well. This is essentially a MicrosoftManagement Console (MMC) snap−in. It can be installed on any machine that can talk to theUCS manager and the Hyper−V host. Use either the MS Powershell or the port−profilemanagement snap−in in order to add VM NICs to the VM−FEX port−profiles.
Note: In this document, only the port−profile management snap−in option is explained.
♦
Currently, these files are available in the Cisco Developer Network site. Download VM−FEXTools for Development from the Unified Computing UCS Manager Developer Center.
♦
The zip bundle contains a file named VMFEX_TOOLS_64_2.0.18.msi. Run it as anadministrator, and install the necessary tools. An install of the port−profile utility requires ahost reboot.
♦
6.

Attach the VM to VM−FEX (with the port−profile management snap−in here).Open Cisco Vmfex Port−Profile Manager from the shortcut on the desktop or from\Program Files\Cisco Systems\VIO Software\Utilities\Ethernet Utilities\VmfexUtilities\Snapin as well.
♦
In order to attach it to the UCSM, click Add UCSM, and enter the IP address, username, andpassword. Once added, it lists the available clusters and the port−profiles under each cluster.
♦
7.

Add the Hyper−V host with Add Host, which gives you the option to add a local computer ora remote computer.
When you add a remote computer, the host name can be used if the machine that runsthe port−profile manager snap−in and the Hyper−V host are in the same domain.
◊
If not, add it with the IP address. The credentials entered here should be in the formof username@domain for domain users and hostname\user for local users.
◊
Once added, all virtual switches that have SR−IOV enabled in the host are displayedas well.
◊
♦
Attach the port−profile to a cluster with the Attach to Cluster option. Once attached, thecluster name appears next to the port−profile name. The cluster name is not displayed in thecase of the default cluster.
♦

In order to attach a VM, select the VM (VM NIC) that appears in the middle pane, andclick Attach/Modify Port profile. The available port−profiles under the cluster are displayed.Choose the appropriate port−profile.
♦
Once added, the display turns from Red to Green for the Network Adapter. Also, the VMshows as attached from the UCSM GUI.
♦

Verify
There is currently no verification procedure available for this configuration.
Troubleshoot
Here is a list of common issues encountered when you configure VM−FEX with Hyper−V:
The virtual switch does not show up when you add the host with the port−profile managementsnap−in: SR−IOV is not enabled for the virtual switch inside Hyper−V.
•
The cluster name does not appear next to the virtual switch after you add it to the cluster: If thecluster name is >38 characters (including hyphen), Cisco bug ID CSCue71661 can cause thisproblem.
•
You are not able to add UCSM with the management snap−in: Verify that the UCSM is reachablefrom the snap−in client and that HTTPS is enabled on the UCS. You can verify this on the GUI fromAdmin > Communication Management > Communication Services.
•

Related Information
Cisco UCS Manager VM−FEX for Hyper−V GUI Configuration Guide, Release 2.1• PCI−SIG SR−IOV Primer: An Introduction to SR−IOV Technology • Everything you wanted to know about SR−IOV in Hyper−V. Part 1 • Technical Support & Documentation − Cisco Systems•
Updated: Aug 25, 2014 Document ID: 116374