Embed Size (px)
Citation preview

© October 1, 2015 Dr. Lynn Fuller
Rochester Institute of Technology
Microelectronic Engineering
VLSI-CAD
Page 1
ROCHESTER INSTITUTE OF TECHNOLOGY MICROELECTRONIC ENGINEERING
VLSI Computer Aided Design (CAD)
Dr. Lynn Fuller Webpage: http://www.rit.edu/~lffeee
Microelectronic Engineering Rochester Institute of Technology
82 Lomb Memorial Drive Rochester, NY 14623-5604
Tel (585) 475-2035 Fax (585) 475-5041
Email: [email protected] MicroE Webpage: http://www.microe.rit.edu
10-1-2015 VLSI-CAD.ppt

© October 1, 2015 Dr. Lynn Fuller
Rochester Institute of Technology
Microelectronic Engineering
VLSI-CAD
Page 2
ADOBE PRESENTER
This PowerPoint module has been published using Adobe Presenter. Please click on the Notes tab in the left panel to read the instructors comments for each slide. Manually advance the slide by clicking on the play arrow or pressing the page down key.

© October 1, 2015 Dr. Lynn Fuller
Rochester Institute of Technology
Microelectronic Engineering
VLSI-CAD
Page 3
OUTLINE
The Design Process Introduction Schematic Level Design Simulation Technology Selection Design Rules Physical Design References Homework

© October 1, 2015 Dr. Lynn Fuller
Rochester Institute of Technology
Microelectronic Engineering
VLSI-CAD
Page 4
STAGES IN THE DESIGN PROCESS
Problem Specification -> Behavioral Design or Truth Table
Logic Design –> Gate Level Schematic
Circuit Design –> Transistor Level Schematic
Simulation –> Output File
Technology Selection -> Design Rules, Layout Layers
Physical Design -> Layout
Maskmaking – Fabrication – Testing - Packaging

© October 1, 2015 Dr. Lynn Fuller
Rochester Institute of Technology
Microelectronic Engineering
VLSI-CAD
Page 5
INTRODUCTION
This document is intended to lead the student through a simple digital circuit design with emphasis on the physical design (layout).

© October 1, 2015 Dr. Lynn Fuller
Rochester Institute of Technology
Microelectronic Engineering
VLSI-CAD
Page 6
EXCLUSIVE OR (XOR) DESIGN EXAMPLE
Functional Description – This digital logic circuit returns a true
(high) value when one of two inputs is high and returns a false
(zero) otherwise.
Truth Table
Gate Level Design
VOUT VB
0 0 0
0 1 1
1 0 1
1 1 0
VA Exclusive OR
XOR
A
COUT
B

© October 1, 2015 Dr. Lynn Fuller
Rochester Institute of Technology
Microelectronic Engineering
VLSI-CAD
Page 7
GATE LEVEL SIMULATION OF XOR – AND/OR

© October 1, 2015 Dr. Lynn Fuller
Rochester Institute of Technology
Microelectronic Engineering
VLSI-CAD
Page 8
NOR CIRCUIT REALIZATION FOR XOR
VOUT VB
0 0 0
0 1 1
1 0 1
1 1 0
VA Exclusive OR
XOR OUT
B A

© October 1, 2015 Dr. Lynn Fuller
Rochester Institute of Technology
Microelectronic Engineering
VLSI-CAD
Page 9
GATE LEVEL SIMULATION OF XOR – ALL/NOR

© October 1, 2015 Dr. Lynn Fuller
Rochester Institute of Technology
Microelectronic Engineering
VLSI-CAD
Page 10
TRANSISTOR LEVEL SIMULATION OF XOR – ALL/NOR

© October 1, 2015 Dr. Lynn Fuller
Rochester Institute of Technology
Microelectronic Engineering
VLSI-CAD
Page 11
RIT SUBµ CMOS – TECHNOLOGY SELECTION
RIT Subµ CMOS 150 mm wafers Nsub = 1E15 cm-3 Nn-well = 3E16 cm-3 Xj = 2.5 µm Np-well = 1E16 cm-3 Xj = 3.0 µm LOCOS Field Ox = 6000 Å Xox = 150 Å Lmin= 1.0 µm LDD/Side Wall Spacers 2 Layers Aluminum
L
Long Channel Behavior
3.3 Volt Technology VT’s = +/- 0.75 Volt Robust Process (always works) Fully Characterized (SPICE)

© October 1, 2015 Dr. Lynn Fuller
Rochester Institute of Technology
Microelectronic Engineering
VLSI-CAD
Page 12
MOSIS TSMC 0.35 2-POLY 4-METAL LAYERS
MASK LAYER NAME
MENTOR NAME
GDS #
COMMENT
N WELL N_well.i 42
ACTIVE Active.i 43
POLY Poly.i 46
N PLUS N_plus_select.i 45
P PLUS P_plus_select.i 44
CONTACT Contact.i 25 Active_contact.i 48
poly_contact.i 47
METAL1 Metal1.i 49
VIA Via.i 50
METAL2 Metal2.i 51
VIA2 Via2.i 61 Under Bump Metal
METAL3 Metal3.i 62 Solder Bump
These are the main design layers up through metal two

© October 1, 2015 Dr. Lynn Fuller
Rochester Institute of Technology
Microelectronic Engineering
VLSI-CAD
Page 13
MORE LAYERS USED IN MASK MAKING
LAYER NAME GDS COMMENT
cell_outline.i 70 Not used
alignment 81 Placed on first level mask
nw_res 82 Placed on nwell level mask
active_lettering 83 Placed on active mask
channel_stop 84 Overlay/Resolution for Stop Mask
pmos_vt 85 Overlay/Resolution for Vt Mask
LDD 86 Overlay/Resolution for LDD Masks
p plus 87 Overlay/Resolution for P+ Mask
n plus 88 Overlay/Resolution for N+ Mask
tile_exclusion 89 Areas for no STI tiling
These are the additional layers used in layout and mask making

© October 1, 2015 Dr. Lynn Fuller
Rochester Institute of Technology
Microelectronic Engineering
VLSI-CAD
Page 14
MOSIS LAMBDA BASED DESIGN RULES
10 6
9
Well
Same
Potential
Diff
Potential
3
3
3
Active in p-well
n+ p+
n+
well edge
n-Substrate
(Outside well)
5
Poly
2
2
3
2
1
Poly
Poly
Active
1
p select
active
2
3 contact to poly
2
2
2
2
metal
2
1
2
3
3
1
1
If l = 1 µm then contact is 2 µm x 2 µm
p+
5
n+
3
http://www.mosis.com/design/rules/

© October 1, 2015 Dr. Lynn Fuller
Rochester Institute of Technology
Microelectronic Engineering
VLSI-CAD
Page 15
MOSIS LAMBDA BASED DESIGN RULES
metal two 2
1
2
4
3
1
1
http://www.mosis.com/design/rules/
MOSIS Educational Program Instructional Processes Include: AMI l = 0.8 µm SCMOS Rules AMI l = 0.35 µm SCMOS Rules Research Processes: go down to poly length of 65nm

© October 1, 2015 Dr. Lynn Fuller
Rochester Institute of Technology
Microelectronic Engineering
VLSI-CAD
Page 16
VLSI DESIGN LAB

© October 1, 2015 Dr. Lynn Fuller
Rochester Institute of Technology
Microelectronic Engineering
VLSI-CAD
Page 17
USING THE VLSI LAB WORKSTATIONS AND MENTOR GRAPHICS CAD TOOLS
Usually the workstation screen will be blank, press any key to view a login window. Login or switch user and then login. Login: username (RIT computer account) Password: ******** The screen background will change and your desktop will appear. On the top of the screen click on Applications then System Tools then Terminal. A window will appear that has a Unix prompt inside. Type source /tools/env.d/mentor.sh ENTER response is grumpy cat is grumpy Type ic <RET>, it will take a few seconds, then the Pyxis Layout user interface will appear. Maximize the Pyxis Layout window.

© October 1, 2015 Dr. Lynn Fuller
Rochester Institute of Technology
Microelectronic Engineering
VLSI-CAD
Page 18
SHARED FOLDERS
We have set up a shared folder for this course that has primitive
cells which you can open, add or copy for your designs.
/tools/ritpub/mcee550/
Students and faculty for this course have their own personal
accounts where they can keep their designs.
/home/username/filename/
All users have access to some public folders that have files for
processes, design rules, etc.
/tools/ritpub/process/fuller

© October 1, 2015 Dr. Lynn Fuller
Rochester Institute of Technology
Microelectronic Engineering
VLSI-CAD
Page 19
PYXIS WORKSPACE
It is convenient to show the Layer Palette and Session banners on the right side of the workspace. If they are not visible go to Setup > Windows> and check Layer Palette and Session. You should also check Command Shell, Message Area and Status Line.

© October 1, 2015 Dr. Lynn Fuller
Rochester Institute of Technology
Microelectronic Engineering
VLSI-CAD
Page 20
USING THE HP WORKSTATIONS AND MENTOR GRAPHICS CAD TOOLS - PROCESS AND GRID
In the session menu palette on the right hand side of the screen, under Layout, select New, using the left mouse button. (also under file on top banner) For cell name type name-device. Set the process by typing (or browse) /tools/ritpub/process/fuller in the process field. Leave the Rules field blank. Click OK At the top left of the window check that the process is fuller not Default. If not correct go to top banner click on Context>Process>Set Process The Layer Palette should now show the layers you expect to used for your device layout. On top banner select Setup>Preferences>Display>Rulers/Grid Set Snap to 1 and 1 as shown. (or other values as necessary)

© October 1, 2015 Dr. Lynn Fuller
Rochester Institute of Technology
Microelectronic Engineering
VLSI-CAD
Page 21
USING THE HP WORKSTATIONS AND MENTOR GRAPHICS CAD TOOLS – WORKSPACE, LOCATION
The plus mark + is
(0,0) the small dots
are the 1 um grid the
large dots are the
10um grid. The
mouse curser is
shown by the
diamond and is at
(-3um,+3um) as
indicated by the
cursor position at the
top of the workspace.

© October 1, 2015 Dr. Lynn Fuller
Rochester Institute of Technology
Microelectronic Engineering
VLSI-CAD
Page 22
ADDING PAD CELL AND LETTERS
To add a cell to a design select Add > Instance and type Q
The window shown should pop up
You can browse to the cell you want to add then
Select OK
Shortcut keystrokes
M = move
C = copy
D = delete
Q = add cell or edit object
U = undo

© October 1, 2015 Dr. Lynn Fuller
Rochester Institute of Technology
Microelectronic Engineering
VLSI-CAD
Page 23
COPYING CELL FROM SHARED FOLDER
Selected
Shared Folder Cell Your Cell Design

© October 1, 2015 Dr. Lynn Fuller
Rochester Institute of Technology
Microelectronic Engineering
VLSI-CAD
Page 24
PASTING PRIMITIVE CELLS INTO YOUR CELL DESIGN
© October 1, 2015 Dr. Lynn Fuller
Rochester Institute of Technology
Microelectronic Engineering
VLSI-CAD
Page 25
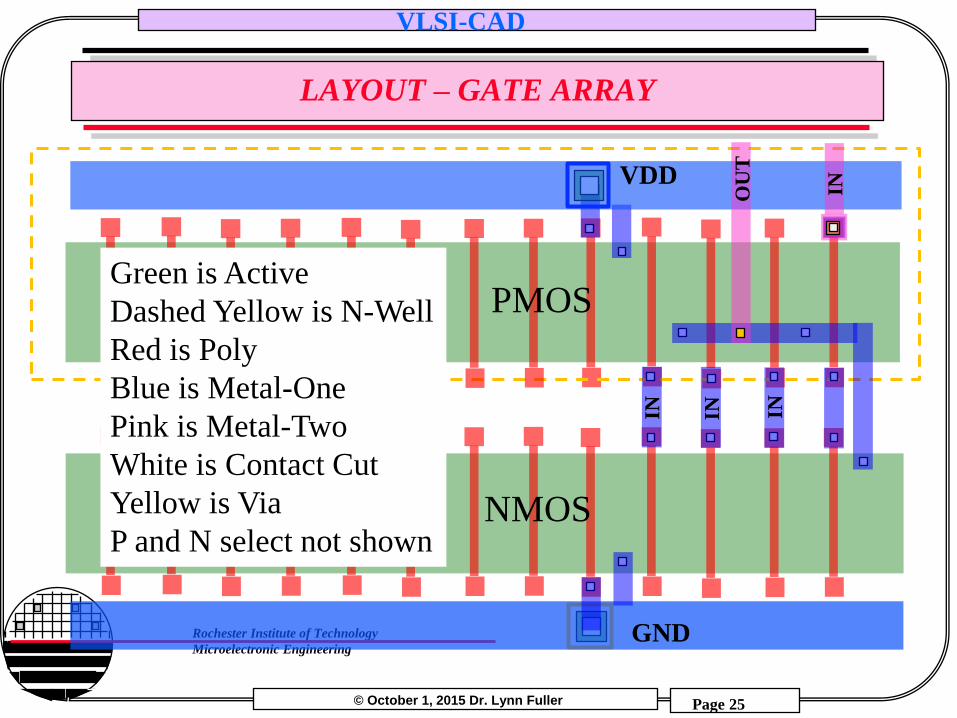
LAYOUT – GATE ARRAY
GND
IN
IN
IN
NMOS
PMOS Green is Active
Dashed Yellow is N-Well
Red is Poly
Blue is Metal-One
Pink is Metal-Two
White is Contact Cut
Yellow is Via
P and N select not shown
IN
OU
T
VDD

© October 1, 2015 Dr. Lynn Fuller
Rochester Institute of Technology
Microelectronic Engineering
VLSI-CAD
Page 26
LAYOUT DETAILS FOR GATE ARRAY
1. Cells are separated from adjacent cells by off transistors
2. Well contacts are made at each of the off transistors
3. Metal-two connects thru Via to Metal-one
4. Metal-one connects thru Contact Cuts to active and Poly
5. Inputs and Outputs connections are made vertically with Metal-
two
6. Routing channels exist above and below the gate array and contain
horizontal metal-one interconnects between cells, with Via to Metal-
two.
7. The NULL cell at the end of the gate array row satisfy design
rules for extension of well beyond active, etc. It also provides a
vertical routing channel which may be useful in constructing macro
cells.

© October 1, 2015 Dr. Lynn Fuller
Rochester Institute of Technology
Microelectronic Engineering
VLSI-CAD
Page 27
INTERCONNECTING PRIMITIVE CELLS
The primitive cells are interconnected using Metal-1 and Metal-2 in the routing channels above and below the primitive cells. First place horizontal metal lines in the routing channels by creating a shape with the following command (type anywhere in the drawing window) This will draw a box with lower left corner at x=0, y=166 and upper right corner at x=368um, y=172um, with layer number 49 (metal-1). This should be a horizontal metal-1 interconnect line at the top of your cell if you placed the lower left corner of your cell at (0,0) Both M1 and M2 will need some type of contact cut or Via. See next page for examples
$add_shape([[0,166],[368,172]],49)

© October 1, 2015 Dr. Lynn Fuller
Rochester Institute of Technology
Microelectronic Engineering
VLSI-CAD
Page 28
M1 AND M2 INTERCONNECTS
At this level of zoom you can not
see the Vias between M1 and M2

© October 1, 2015 Dr. Lynn Fuller
Rochester Institute of Technology
Microelectronic Engineering
VLSI-CAD
Page 29
CONNECTIONS BETWEEN M1 AND M2
6um wide metal lines for M1 and M2
with 2umx2umVias

© October 1, 2015 Dr. Lynn Fuller
Rochester Institute of Technology
Microelectronic Engineering
VLSI-CAD
Page 30
CONNECTIONS TO ACTIVE AND POLY
Metal-2 to Via to Metal-1
to CC to Active
Metal-2 to Via to Metal-1
to CC to Poly

© October 1, 2015 Dr. Lynn Fuller
Rochester Institute of Technology
Microelectronic Engineering
VLSI-CAD
Page 31
USING THE HP WORKSTATIONS AND MENTOR GRAPHICS CAD TOOLS – SELECTING OBJECTS
Select easy edit, Select Shape. Draw boxes by click and drag of mouse. Unselect by pressing
F2 function key. The highlighted layer in the layer palette is selected prior to drawing.
Unselect by pressing F2. Exit drawing by pressing ESC.
Selecting multiple objects is defined in
Setup>Selection
Unclick Surrounding the select
rectangle to not select the cell outline

© October 1, 2015 Dr. Lynn Fuller
Rochester Institute of Technology
Microelectronic Engineering
VLSI-CAD
Page 32
DRAWING BOXES AND OTHER SHAPES
Select easy edit, right click and select Show Scroll Bars, scroll through the various edit
commands.
DRAW BOXES by click and drag of mouse. Unselect by pressing F2 function key. The
following command will draw a 3000 µm by 3000 µm box with layer 4 color/shading. Put
the curser in the workspace and start typing. A text line window will pop up. If the
command has a typo just start typing again and use the up arrow to recall previous text.
$add_shape([[0,0],[3000,3000]],4)
The Notch command is useful to change the size of a selected box or alter rectangular
shapes into more complex shapes.
Location of lower
left corner
Location of upper
right corner Box Color

© October 1, 2015 Dr. Lynn Fuller
Rochester Institute of Technology
Microelectronic Engineering
VLSI-CAD
Page 33
DRAWING CIRCLES
DRAW CIRCLES by typing $set_location_mode(@arc) return. The following command will draw a 100µm radius circle centered at (0,0) using 300 straight line segments. $add_shape($get_circle([0,0],[100,0],300),3) To reset to rectangles type $set_location_mode(@line) return. MOVE, COPY, DELETE, NOTCH, etc: Selected objects will appear to have a bright outline. Selected objects can be moved (Move), copied (Copy), deleted (Del), notched (Notc). When done unselect objects, press F2. Change an Object to another layer: Selected object(s) click on Edit on the top banner, select Change Attributes, change layer name to the name you want. When done press F2 to unselect
© October 1, 2015 Dr. Lynn Fuller
Rochester Institute of Technology
Microelectronic Engineering
VLSI-CAD
Page 34
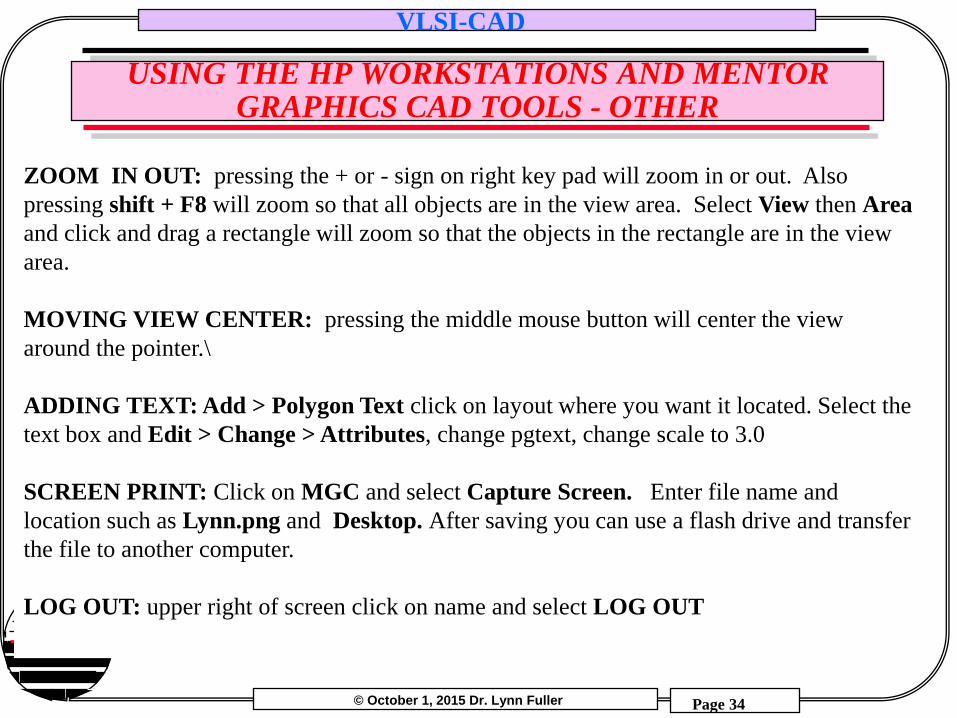
USING THE HP WORKSTATIONS AND MENTOR GRAPHICS CAD TOOLS - OTHER
ZOOM IN OUT: pressing the + or - sign on right key pad will zoom in or out. Also
pressing shift + F8 will zoom so that all objects are in the view area. Select View then Area
and click and drag a rectangle will zoom so that the objects in the rectangle are in the view
area.
MOVING VIEW CENTER: pressing the middle mouse button will center the view
around the pointer.\
ADDING TEXT: Add > Polygon Text click on layout where you want it located. Select the
text box and Edit > Change > Attributes, change pgtext, change scale to 3.0
SCREEN PRINT: Click on MGC and select Capture Screen. Enter file name and
location such as Lynn.png and Desktop. After saving you can use a flash drive and transfer
the file to another computer.
LOG OUT: upper right of screen click on name and select LOG OUT

© October 1, 2015 Dr. Lynn Fuller
Rochester Institute of Technology
Microelectronic Engineering
VLSI-CAD
Page 35
BASIC UNIX COMMANDS
Command Description
ls list the files and directories in the current directory
cd change directory
cd .. go up one directory
mv move a file (rename a file)
rm remove a file (delete a file)
pwd display path of current directory
mkdir create a new directory
rmdir remove a directory
yppasswd change your password
It is important to remember that since this is a UNIX operating system, the
commands are case sensitive.

© October 1, 2015 Dr. Lynn Fuller
Rochester Institute of Technology
Microelectronic Engineering
VLSI-CAD
Page 36
GDS FILE GENERATION
Once the cell design is completed export the GDS file for maskmaking. Select Translate on the top banner and then Write GDSII Output file needs full path name and .gds extension.
Cell layout name
Save to your desktop

© October 1, 2015 Dr. Lynn Fuller
Rochester Institute of Technology
Microelectronic Engineering
VLSI-CAD
Page 37
EXPORT CELL DESIGN AS GDS II FILE
Export as filename.gds
Email to Dr. Fuller
Cell layout name
Save to your desktop

© October 1, 2015 Dr. Lynn Fuller
Rochester Institute of Technology
Microelectronic Engineering
VLSI-CAD
Page 38
MASK ORDER FORM
x
mems-2014-final.gds 7 16.5mm x 16.5mm mems-2014-final
Dr Fuller RIT

© October 1, 2015 Dr. Lynn Fuller
Rochester Institute of Technology
Microelectronic Engineering
VLSI-CAD
Page 39
INVERTER
Vin Vout
Vin
CMOS
+V
Vout
Idd
TRUTH TABLE
VOUT VIN
0 1
1 0
PMOS
NMOS
W = 40 µm
Ldrawn = 2.5µm
Lpoly = 1.0µm
Leff = 0.35 µm

© October 1, 2015 Dr. Lynn Fuller
Rochester Institute of Technology
Microelectronic Engineering
VLSI-CAD
Page 40
PRIMITIVE CELLS

© October 1, 2015 Dr. Lynn Fuller
Rochester Institute of Technology
Microelectronic Engineering
VLSI-CAD
Page 41
MEBES - Manufacturing Electron Beam Exposure System
Maskmaking Tool

© October 1, 2015 Dr. Lynn Fuller
Rochester Institute of Technology
Microelectronic Engineering
VLSI-CAD
Page 42
FILE FORMATS
Mentor- ICGraph files (filename.iccel), all layers, polygons
with up to 200 vertices
GDS2- CALMA files (old IC design tool) (filename.gds), all
layers, polygons
MEBES- files for electron beam maskmaking tool, each file
one layer, trapezoids only

© October 1, 2015 Dr. Lynn Fuller
Rochester Institute of Technology
Microelectronic Engineering
VLSI-CAD
Page 43
REFERENCES
1. Principles of CMOS VLSI Design, 2nd Ed., Neil H.E.Weste,
Kmran Eshraghian, Addison Wesley, 1993.
2. Physical Design Automation of VLSI Systems, Bryan Preas,
Michael Lorenzeti, Benjamin/Cummings, 1988.
3. VLSI Engineering, Thomas Dillinger, Prentice Hall, 1988.

© October 1, 2015 Dr. Lynn Fuller
Rochester Institute of Technology
Microelectronic Engineering
VLSI-CAD
Page 44
HOMEWORK VLSI-CAD
This assignment can be done using the tools in the VLSI lab. Ideally the switch level simulation and SPICE simulations are also done with the tools in the VLSI Lab. Design a 4 to 1 multiplexer. Two inputs (Input A and Input B) select which one of four other digital inputs (I1 I2 I3 I4) is output (Vout) Document the following items, Truth Table, Gate Level Schematic, Gate Level Simulation, Transistor Level Schematic, Transistor Level Simulation, Layout using Gate Array, Including connections to 12-pad Pad Frame.

© October 1, 2015 Dr. Lynn Fuller
Rochester Institute of Technology
Microelectronic Engineering
VLSI-CAD
Page 45
4 TO 1 MULTIPLEXER
I0
I1
I2
I3
Q
A
B

© October 1, 2015 Dr. Lynn Fuller
Rochester Institute of Technology
Microelectronic Engineering
VLSI-CAD
Page 46
4 TO 1 MUX - GATE LEVEL SIMULATION

© October 1, 2015 Dr. Lynn Fuller
Rochester Institute of Technology
Microelectronic Engineering
VLSI-CAD
Page 47
4 TO 1 MUX – TRANSISTOR LEVEL SIMULATION

© October 1, 2015 Dr. Lynn Fuller
Rochester Institute of Technology
Microelectronic Engineering
VLSI-CAD
Page 48
4 TO 1 MUX – LAYOUT

© October 1, 2015 Dr. Lynn Fuller
Rochester Institute of Technology
Microelectronic Engineering
VLSI-CAD
Page 49
4 TO 1 MUX – PEEKED AND ZOOM