Embed Size (px)
Citation preview

1/9/2014
1
VISUAL BASIC
LAB ASSIGNMENT #1
First Visual Basic® Lab
Paycheck-V1.0
Copyright © 2013 Dan McElroy
Paycheck-V1.0
The purpose of this lab assignment is to enter a Visual Basic project into Visual Studio and make it work.
All of the Visual Basic program code is already provided for you. You only need to create the VB form, enter the code, test the program and write the lab report. As the course progresses, you will be required to create the entire project.

1/9/2014
2
Design Mode vs. Run Mode
Think of each Visual Basic project as though you were two different people
• The Designer – You will design the layout of the Visual Basic program and place objects on the form. All user input TextBoxes should be empty (unless you provide a default value)
• The User – The user is the person who fills in the input values, presses a ‘Compute’ button and sees the results.
Paycheck-V1.0
This presentation is in four parts:
1) Project Definition – Discussion of the project and what is to be done.
2) Implementation in Visual Basic – Detailed description on how to enter your first program on the computer using Visual Basic and make it work.
3) Project Documentation – Description of how to submit your lab report.
4) Submit your work using Moodle

1/9/2014
3
1 - Project Definition
Design a Windows Form Application in Visual Basic that does the following:
1) Read the number of hours worked and the pay rate
2) Compute the pay including overtime at time-and-a-half
3) Display the gross pay, not including taxes or any other deductions.
2 - Paycheck – Develop Algorithm Develop an algorithm in pseudo-code. Use a HIPO (Hierarchical Input Process Output) chart to define the input, process and output for the program.
INPUT PROCESS OUTPUT
Hours PayRate
Read Hours from textBox, convert to Decimal
Read PayRate from textBox, convert to Decimal
Determine RegularHours (up to 40)
Determine OvertimeHours (hours over 40)
RegularPay = RegularHours * PayRate
OvertimePay = OvertimeHours * PayRate * 1.5
GrossPay = RegularPay + OvertimePay
Display GrossPay
GrossPay

1/9/2014
4
3 – Outline the VB Paycheck Form
4 – Convert the Algorithm into Code
The line that starts with Private Sub may be different depending on the version of Visual Basic that is installed on your computer. Do not change the line with Private Sub from the one that Visual Basic created.

1/9/2014
5
5 – Test the Program
Since this program can process a paycheck that does not have overtime (40 hours or less), and also a paycheck that has overtime (more than 40 hours), it is important to test both conditions.
It also important to test the program at 40 hours. For example, use these values:
6 – Document the Project
A text document for the lab report is provided. Most of the lab report for this first project is already filled in.
You need to complete the rest of the report.

1/9/2014
6
Implementation in Visual Basic
O Start Visual Basic
O Place all of the objects on the form
O Open the Code Window
O Enter the Title on your program
O Enter the Variables and the code
O Test the program with multiple inputs
Your First Visual Basic Program
Although it may seem difficult to get the first Visual Basic program to work, it becomes much easier after you have done it a few times. Since this is your first Visual Basic program, the steps are very detailed. Make sure you read each of the directions carefully and don’t move to the next step until you have completed the current step. Congratulate yourself and give yourself a pat on the back when you get this first program to work. Show it off and tell people, “Look what I did!”

1/9/2014
7
Start Visual Basic
Start Visual Basic and select “New Project”
Select Project Name Select “Visual Basic” and “Windows Forms Application”
Set the project name to “Paycheck-v1.0” or another descriptive name of your choosing. Make sure that you do NOT use spaces or any special characters in the project name. Click the “OK” button.

1/9/2014
8
View Toolbox & Properties
If the Toolbox and Properties windows are not visible, click the “View” tab and select Toolbox and Properties. You may need to click “Other Windows” on the pull-down menu for View to see these selections.
1) You can close the other windows that are part of Visual Basic.
2) Make sure you display “Properties” NOT “Property Manager”
View Toolbox & Properties
The list of properties can either be displayed by category or alphabetically. Select the alphabetic display to make it easier to follow the instructions in this lab assignment.

1/9/2014
9
Set Form Size and Name
Drag the lower-right corner of the form to create more space on the form. Set the Property “Text” field to “Paycheck ver 1.0”. The name will then show on the title bar of your form.
Place the “Title” Label on the Form
1) Select the “Label” tool 2) Draw a rectangle area on the form for the label that will be used for the Title 3) Enter “Paycheck Calculator” in the Text Property field. Use your name, not mine 4) Click the “Font” property, and then click the small box with three dots in the Font property This will bring up the Font dialog box 5) Set the Font to Bold, size = 20

1/9/2014
10
Place the “Hours” Label on the Form
1) Select the “Label” tool 2) Draw a rectangle area on the form for the label that will be used for the Hours prompt. A prompt is an indication to the user that they need to enter something. 3) Enter “Hours” in the Text Property field
Place the “Hours” Textbox on the Form
1) Select the “Textbox” tool 2) Draw a rectangular area on the Form. The Textbox provides an area for the user to enter some data when the program runs.

1/9/2014
11
Place the “Pay Rate” Label and Textbox on the Form
1) Repeat the previous two steps to create the Label and Textbox for Pay Rate. NOTE: You can use spaces in the Text property but you can NOT use spaces when you name the project or any of its objects.
Place the “Compute” Button on the Form
1) Select the “Button” tool 2) Draw a rectangle area on the form for the Button. 3) Enter “Compute” in the Text Property field

1/9/2014
12
Place the “Paycheck” Label on the Form
1) Select the “Label” tool 2) Draw a rectangle area on the form for the Label. 3) Clear the Text Property field (no text)
Set the “Paycheck” Label Properties
4) Set the AutoSize property to False 5) Set the BorderStyle property to Fixed3D
NOTE: The “Paycheck” Label will be used by the program to display the amount of the paycheck. Although setting the AutoSize and BorderStyle properties as requested may make this object look like a TextBox, a Label should be used to prevent the user from entering text in this object when the program is running. Only the program should make changes to this part of the display.

1/9/2014
13
Give Each Object a Meaningful Name Visual Basic gives default names when creating objects. Names like Label1, Label2, Textbox1 and Textbox2 do not convey the purpose of these objects. It is important to give each object a name that represents their use by the program.
Use the first three letters of the name to indicate the object type (Label, Textbox, Button). The first three letters should be lower case. The next letter should be capitalized. This helps identify the difference between the Label and Textbox for lblHours and txtHours
Remember, object names can NOT have spaces or special characters
Give Each Object a Meaningful Name 1/2
1) Select the form by clicking on any unused part of the form. The three little circles for resizing the form will be displayed when the form is selected. 2) Scroll the Properties window to the top to see the “Name” property 3) Change the Name from “Form1” to “frmPaycheck”
Property window scroll bar
1/9/2014
14
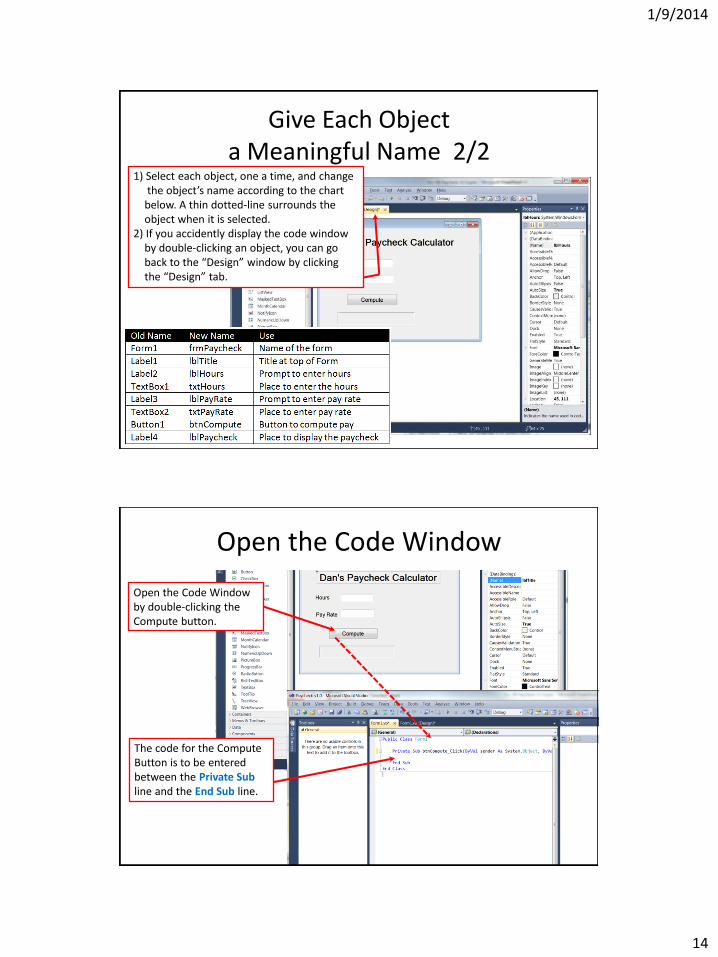
Give Each Object a Meaningful Name 2/2
1) Select each object, one a time, and change the object’s name according to the chart below. A thin dotted-line surrounds the object when it is selected. 2) If you accidently display the code window by double-clicking an object, you can go back to the “Design” window by clicking the “Design” tab.
Open the Code Window
Open the Code Window by double-clicking the Compute button.
The code for the Compute Button is to be entered between the Private Sub line and the End Sub line.

1/9/2014
15
Enter the VB Program Code
The code for the Compute Button is to be entered between the Private Sub line and the End Sub line. Do not modify any other text on the code window. The program code may be easier to read on the next part of the lab assignment.
Put your name and date here
Program Code – Part 1

1/9/2014
16
Program Code – Part 2
Fix Any Typing Errors
Variable names must match exactly how they were declared at the top of the program. Object names must match exactly how they were entered.

1/9/2014
17
Run (Debug) the Program
You can either click the “Debug” tab and select “Start Debugging”
- or -
Press the F5 key
Verify That the Program Produces Correct Results
with and without Overtime

1/9/2014
18
Project Documentation and Lab Report
A text document for the lab report is provided.
Most of the lab report for this first project is
already filled in.
The lab report is a two page document.
You need to complete the rest of the report
that is shown in red text.
Lab Report Document
On Moodle, click the link: Paycheck V1.0 – Lab Project
and Report
The lab report document is named VB-Paycheck-Lab.doc Complete the lab report by replacing the red text with your report. Save the file with a new name. Submit your own lab report, not a copy of someone else’s report.
Page 2
Page 1

1/9/2014
19
Submit Your Work on Moodle
All of your lab assignments should be submitted
using Moodle. Make sure you click the correct
link on the class Moodle page for your
assignment, select the file you want to upload,
click the Upload button and verify that the file
was sent.
Detailed instructions follow.
1. Find the Correct Submit Link
In this example, submit the Visual Basic Payroll lab report. Click the link, Submit the
Paycheck V1.0 Lab Report

1/9/2014
20
2. Submit Your Assignment
Moodle will load a new screen with instructions, a due date and the “Add submission” button. Verify that you will be submitting your report to the correct location then click the “Add submission” button.
3. Choose to File to Be Submitted Moodle then displays the “File submissions” screen. You can either: 1) Use the mouse to drag your completed lab report on top of the big blue arrow (works with most browsers), or 2) Click the “Files” link and find the file on your computer. After you have selected the file, click the “Save changes” button

1/9/2014
21
4. Verify That the File Was Uploaded If your file name shows up here, then the instructor can see the file.
If you want to view the status of your submission, go back to the “Submit your Report” link on the Moodle class web page.
If you want to update and resubmit your lab report before it has been graded, click the “Edit submissions” button. Your old submission will be deleted an be replaced with the updated version.
Congratulations !
Congratulations on completing your first Visual
Basic assignment.
Refer back to this lab assignment when working
on future labs for instructions on creating a Visual
Basic program, and instructions on how to upload
a file to Moodle.

1/9/2014
22
ACKNOWLEDGEMENTS
COMPILER SCREEN SHOTS
Microsoft® Visual Basic®
VIDEO EDITING SOFTWARE
Roxio® CreatorTM NXT Pro 2