Embed Size (px)
Citation preview
Version 1.0
digitaloffice.intel.com
Intel® vPro™ Technology
Intel® Active Management TechnologySetup and Configuration
Lenovo M57p Desktop Small Business Mode

Version 1.0digitaloffice.intel.com 2
Legal Disclaimer
Intel Confidential – Intel Internal Use Only
Copyright © 2008 Intel Corporation. All rights reserved.
Intel, the Intel logo, Intel. Leap ahead., the Intel. Leap ahead. logo, Intel vPro, Intel Active Management Technology, and Intel Core 2 Duo are trademarks or registered trademarks of Intel Corporation or its subsidiaries in the United States and other countries.
Other names and brands may be claimed as the property of their respective owners.

Version 1.0digitaloffice.intel.com 3
Table of Contents
•Client Information
•Setup and Configuration

Version 1.0digitaloffice.intel.com 4
Client Information
The following Setup and Configuration instruction as based on an Intel® Desktop Board.
Product Details– Lenovo M57p
Depending on your motherboard manufacturer and firmware version, you may have a different interface or experience then what is listed in this presentation.
Regardless, the following information should give you the basic steps for configuring any Intel® vPro™ client in Small Business mode.

Version 1.0digitaloffice.intel.com 5
What is Setup and Configuration?
Setup and Configuration is the process that makes Intel® Active Management Technology features accessible to management applications.
Before management applications can access an Intel® Active Management Technology device, the device must be populated with various configuration settings such as usernames, passwords, network parameters, Transport Layer Security (TLS) certificates (applies to Enterprise Mode), and keys necessary for secure communications.
Version 1.0digitaloffice.intel.com 6
Setup and Configuration

Version 1.0digitaloffice.intel.com 7
• Power on the Intel® vPro™ client
• Press Enter to move to the Interrupt Startup menu
Setup and Configuration
Version 1.0digitaloffice.intel.com 8
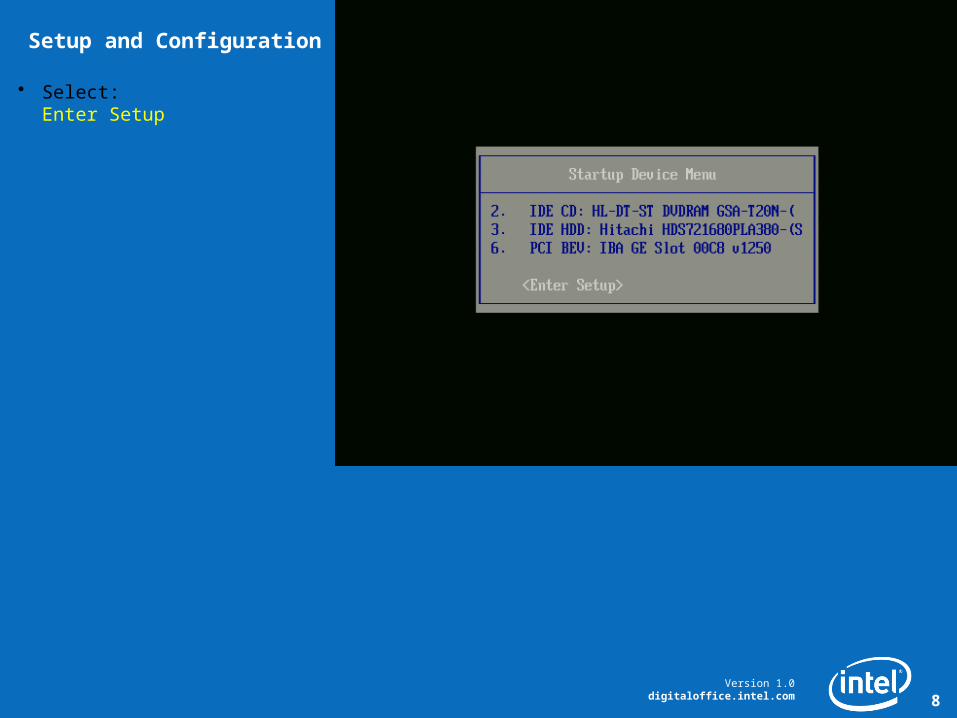
• Select:Enter Setup
Setup and Configuration
Version 1.0digitaloffice.intel.com 9
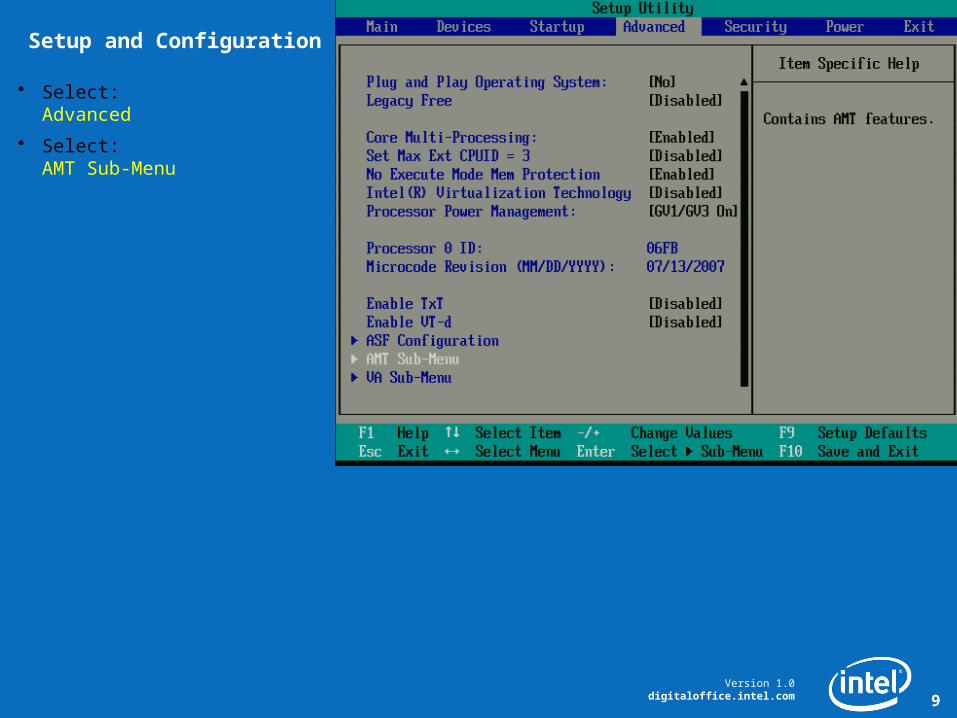
• Select:Advanced
• Select:AMT Sub-Menu
Setup and Configuration

Version 1.0digitaloffice.intel.com 10
• For Console Type, select:PC ANSI
• For Continue C.R. after POST, select:ON
• To Save and Exit, Press:F10
• Confirm “Save configuration changes and exit now?” by selecting:YES
Setup and Configuration

Version 1.0digitaloffice.intel.com 11
• The system will reboot, be prepared to press
<CTRL-P>
On the next screen
Setup and Configuration

Version 1.0digitaloffice.intel.com 12
• Press: <CTRL-P>
Setup and Configuration

Version 1.0digitaloffice.intel.com 13
• You are required to change the Intel® Management Engine Password
• This is only required for initial setup and Configuration
Setup and Configuration
Version 1.0digitaloffice.intel.com 14
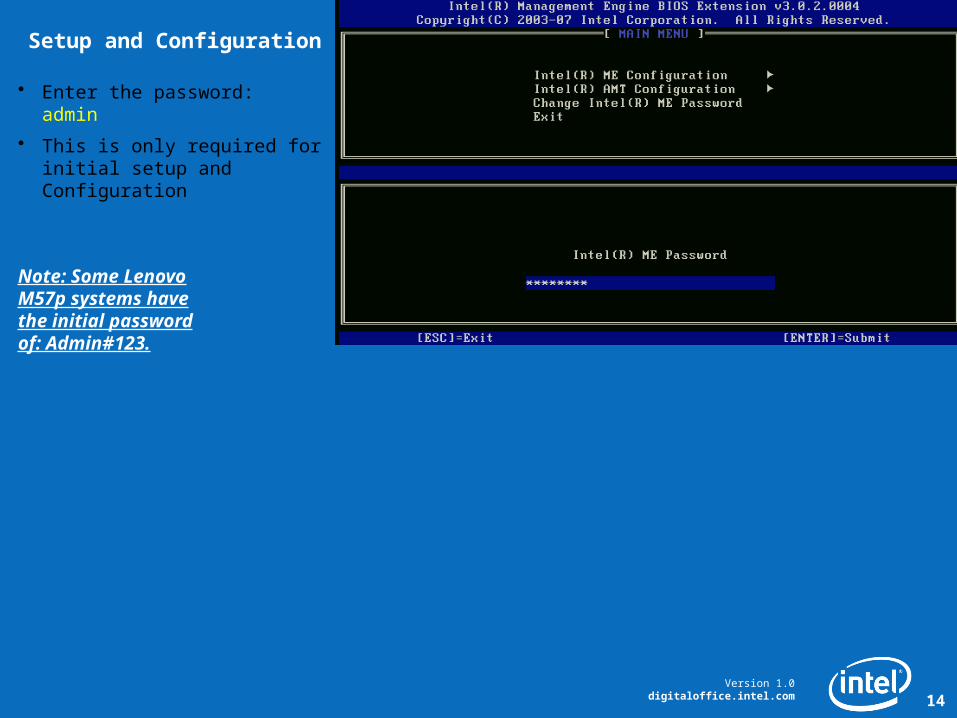
• Enter the password:admin
• This is only required for initial setup and Configuration
Note: Some LenovoM57p systems havethe initial passwordof: Admin#123.
Setup and Configuration
Version 1.0digitaloffice.intel.com 15
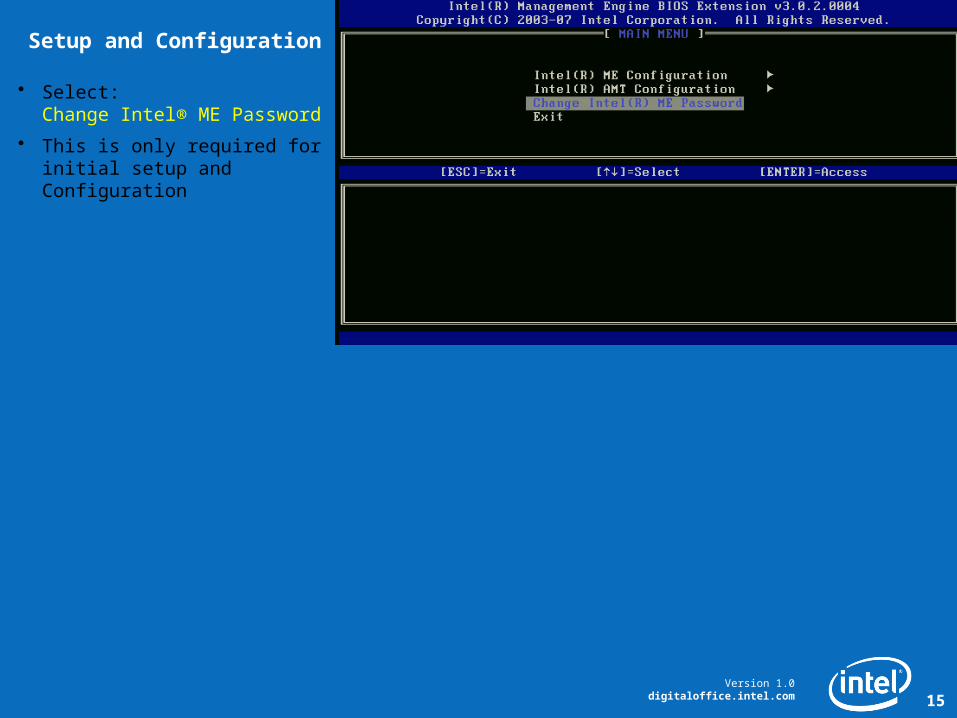
• Select:Change Intel® ME Password
• This is only required for initial setup and Configuration
Setup and Configuration
Version 1.0digitaloffice.intel.com 16
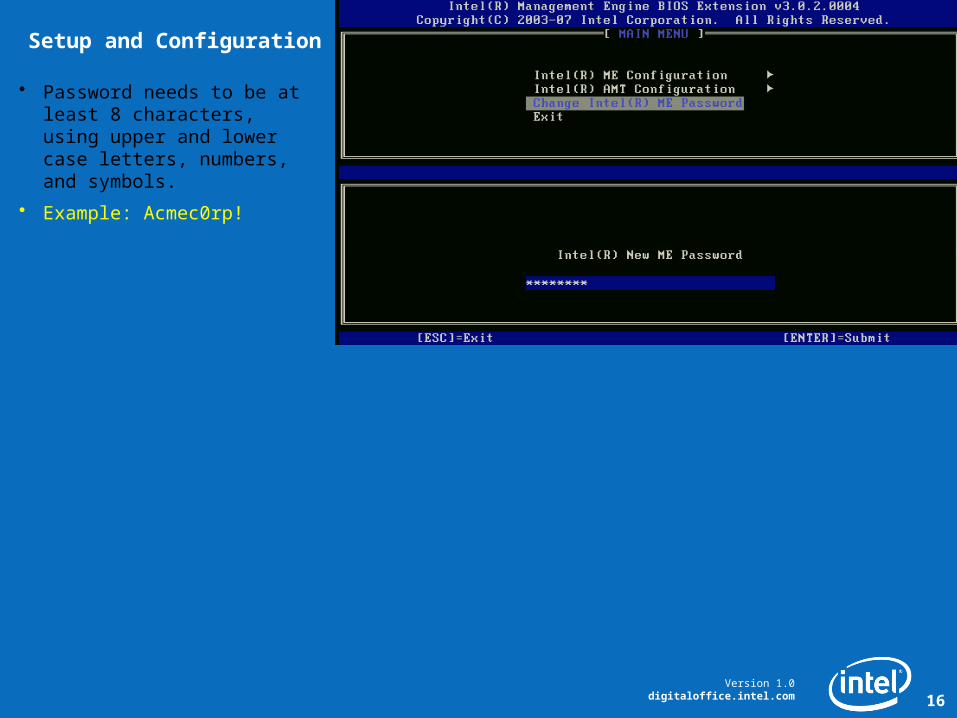
• Password needs to be at least 8 characters, using upper and lower case letters, numbers, and symbols.
• Example: Acmec0rp!
Setup and Configuration

Version 1.0digitaloffice.intel.com 17
• Type your password to Verify.
Setup and Configuration

Version 1.0digitaloffice.intel.com 18
• This is the Intel® Management Engine main screen where you can make changes to the:
• Intel® Management Engine Configuration
• Intel® Active Management Technology Configuration
• Change Intel® Management Engine Password
Setup and Configuration

Version 1.0digitaloffice.intel.com 19
• Select:Intel® ME Configuration
Setup and Configuration

Version 1.0digitaloffice.intel.com 20
• Press Y to Continue
Setup and Configuration
Version 1.0digitaloffice.intel.com 21
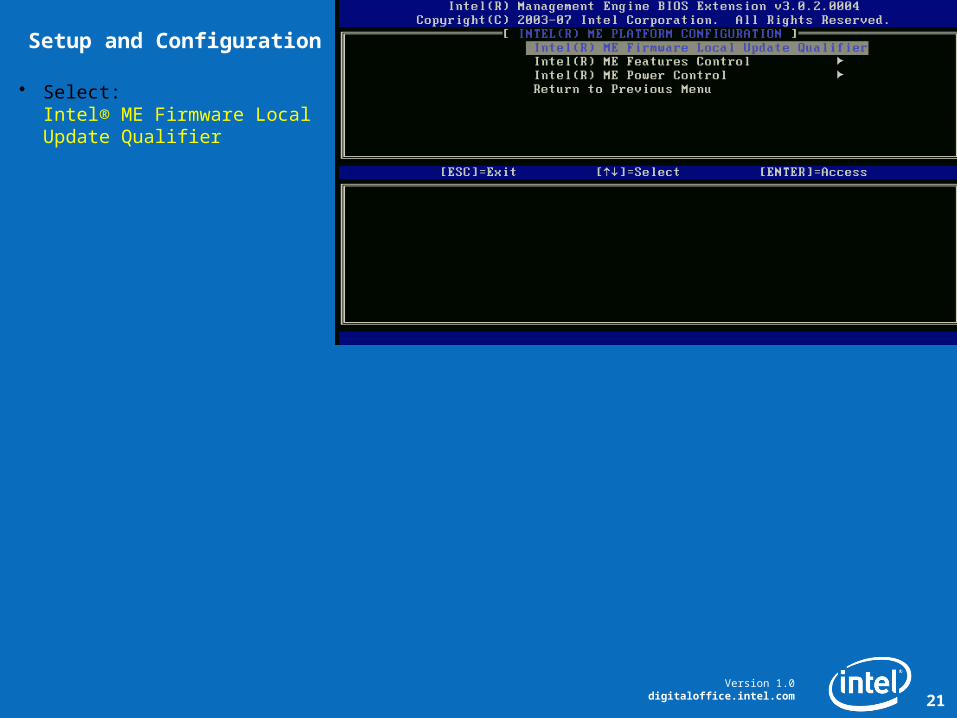
• Select:Intel® ME Firmware Local Update Qualifier
Setup and Configuration

Version 1.0digitaloffice.intel.com 22
• Set to:[*] ALWAYS OPEN
Setup and Configuration

Version 1.0digitaloffice.intel.com 23
• Select:Intel® ME Features Control
Setup and Configuration
Version 1.0digitaloffice.intel.com 24
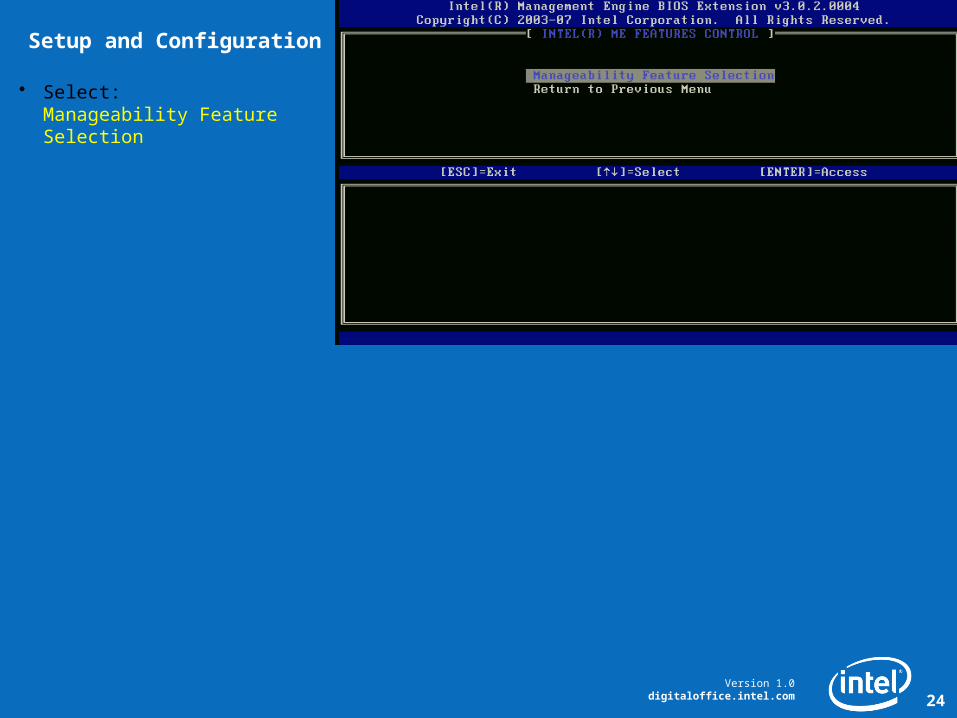
• Select:Manageability Feature Selection
Setup and Configuration

Version 1.0digitaloffice.intel.com 25
• Set to:[*] Intel® AMT
Setup and Configuration

Version 1.0digitaloffice.intel.com 26
• Select:Return to Previous Menu
Setup and Configuration

Version 1.0digitaloffice.intel.com 27
• Select:Intel® ME Power Control
Setup and Configuration

Version 1.0digitaloffice.intel.com 28
• Select:Intel® ME ON in Host Sleep States
Setup and Configuration

Version 1.0digitaloffice.intel.com 29
• Set to:[*] Desktop: ON in xxx
Select the desired mode
Setup and Configuration

Version 1.0digitaloffice.intel.com 30
• Select:Return to Previous Menu
• Note:
• Depending on the changes made, your system may restart.
• If this occurs, please re-enter the setup by pressing <CTRL+P> when the system completes the restart.
Setup and Configuration
Version 1.0digitaloffice.intel.com 31
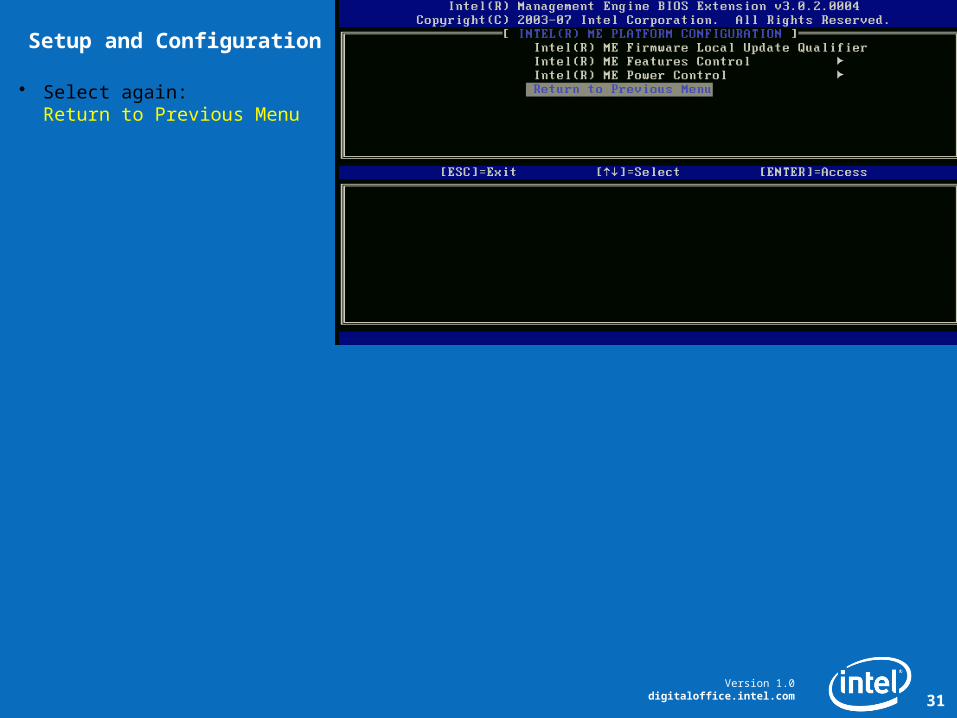
• Select again:Return to Previous Menu
Setup and Configuration

Version 1.0digitaloffice.intel.com 32
• Select:Intel® AMT Configuration
Setup and Configuration

Version 1.0digitaloffice.intel.com 33
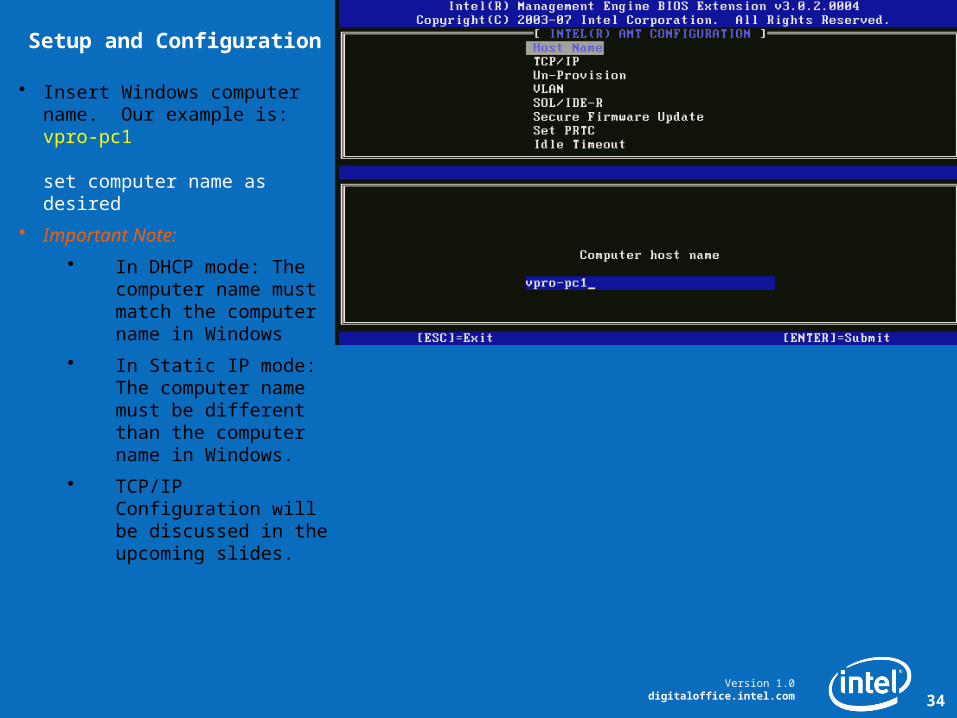
• Select:Host Name
Setup and Configuration
Version 1.0digitaloffice.intel.com 34
• Insert Windows computer name. Our example is:vpro-pc1
set computer name as desired
• Important Note:
• In DHCP mode: The computer name must match the computer name in Windows
• In Static IP mode: The computer name must be different than the computer name in Windows.
• TCP/IP Configuration will be discussed in the upcoming slides.
Setup and Configuration
Version 1.0digitaloffice.intel.com 35
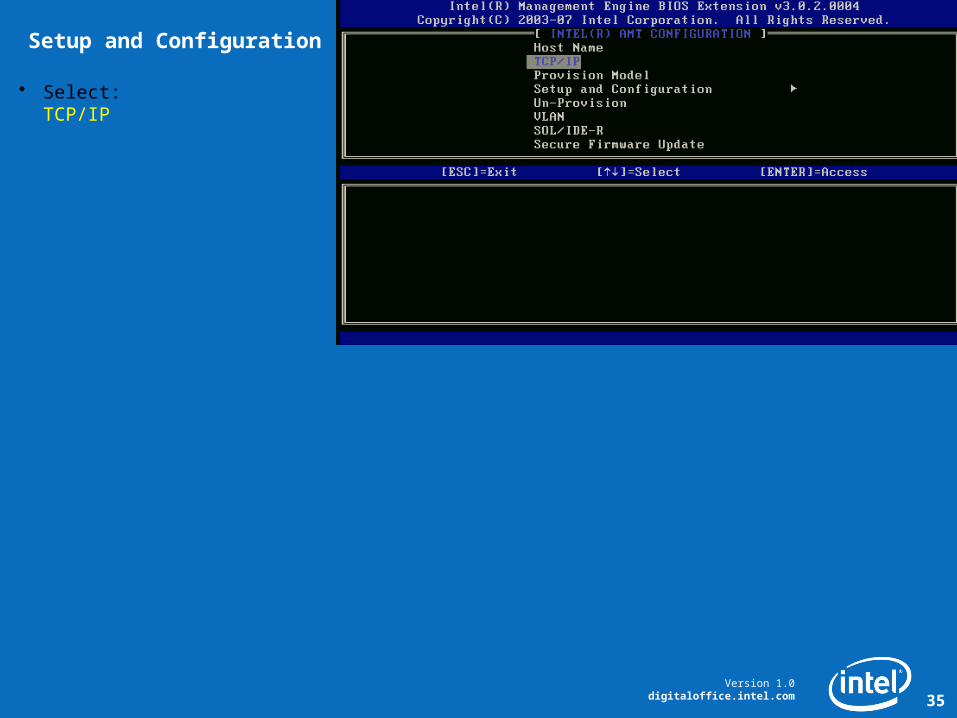
• Select:TCP/IP
Setup and Configuration
Version 1.0digitaloffice.intel.com 36
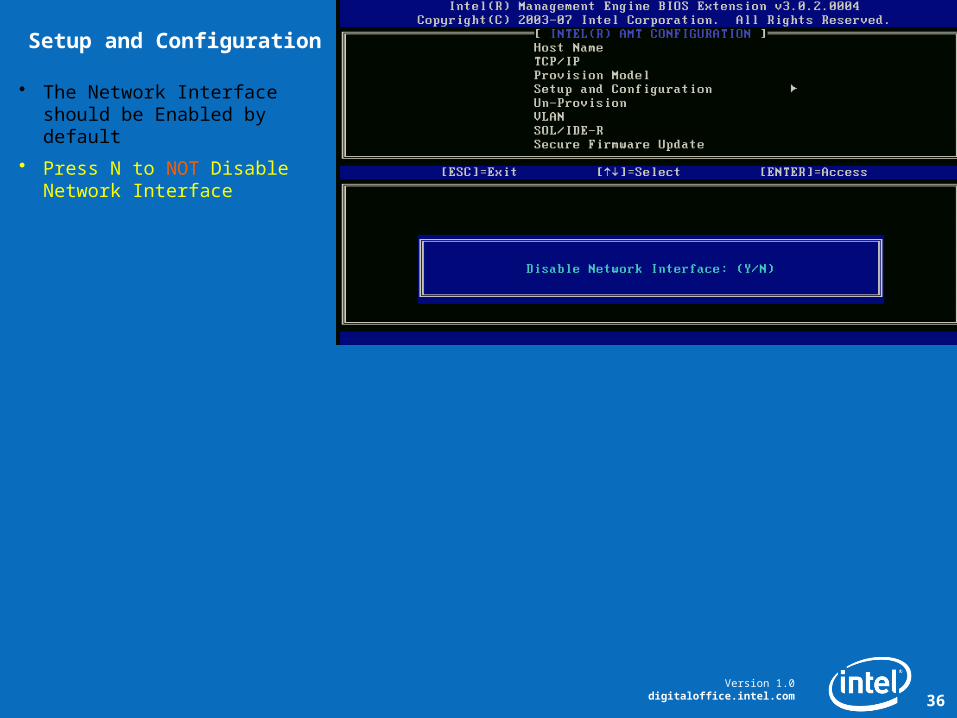
• The Network Interface should be Enabled by default
• Press N to NOT Disable Network Interface
Setup and Configuration

Version 1.0digitaloffice.intel.com 37
• DHCP should be Enabled by default
• Press N to NOT Disable DHCP
Setup and Configuration

Version 1.0digitaloffice.intel.com 38
• Set the Domain name. Our example is:vprodemo.com
Setup and Configuration
Version 1.0digitaloffice.intel.com 39
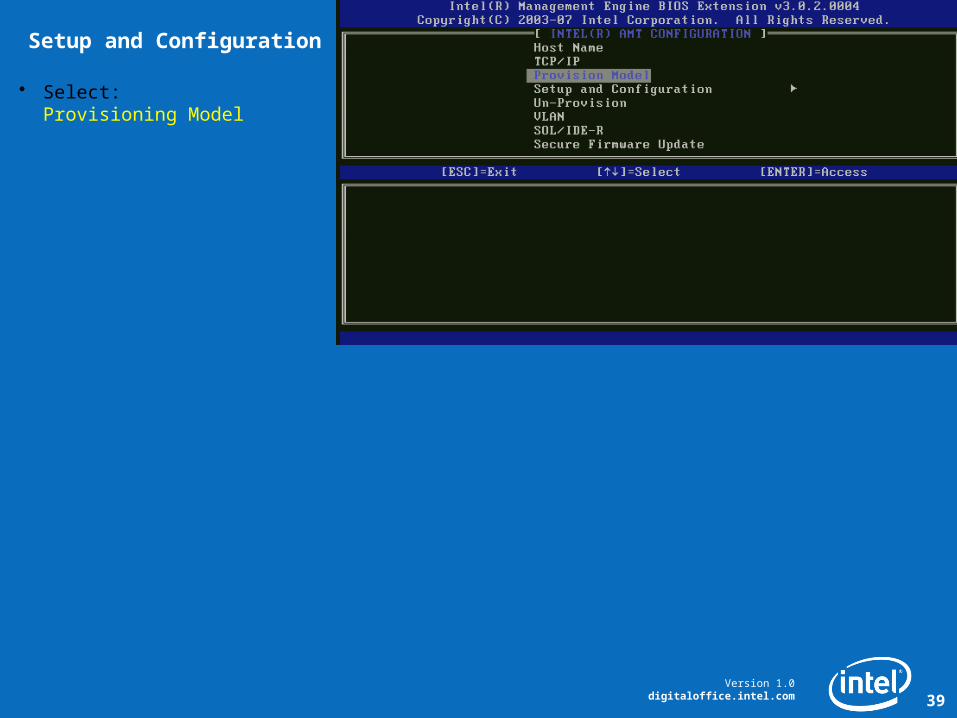
• Select:Provisioning Model
Setup and Configuration

Version 1.0digitaloffice.intel.com 40
• By Default should be set to:Intel® AMT 3.0 Mode
• Press N to NOT Change to Intel® AMT 1.0 Mode
Setup and Configuration

Version 1.0digitaloffice.intel.com 41
• By Default should be set to:Enterprise
• Press Y to Change to Small Business
Setup and Configuration

Version 1.0digitaloffice.intel.com 42
• After Provisioning to Small Business the Intel® AMT Configuration menu will change
Setup and Configuration

Version 1.0digitaloffice.intel.com 43
• Select:VLAN
Setup and Configuration

Version 1.0digitaloffice.intel.com 44
• By default VLAN is set to Disabled
• Press N to NOT Enable VLAN
Setup and Configuration

Version 1.0digitaloffice.intel.com 45
• Select:SOL/IDE-R
Setup and Configuration

Version 1.0digitaloffice.intel.com 46
• Press Y to Continue
Setup and Configuration

Version 1.0digitaloffice.intel.com 47
• Set Username & Password to:[*] Enabled
Setup and Configuration
Version 1.0digitaloffice.intel.com 48
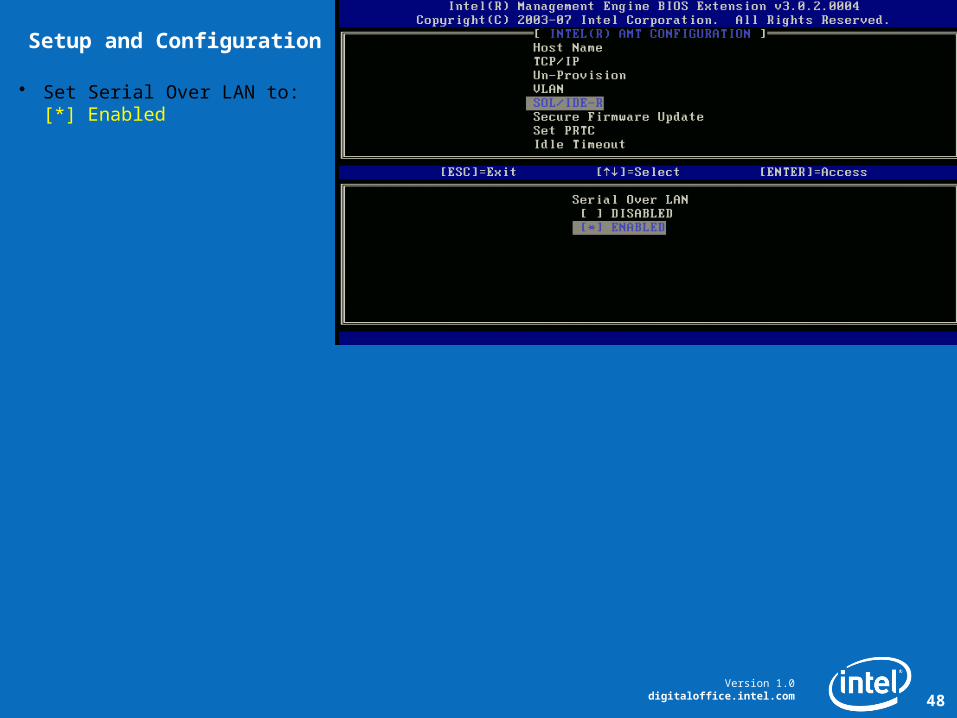
• Set Serial Over LAN to:[*] Enabled
Setup and Configuration

Version 1.0digitaloffice.intel.com 49
• Set IDE Redirection to:[*] Enabled
Setup and Configuration

Version 1.0digitaloffice.intel.com 50
• Select:Secure Firmware Update
Setup and Configuration

Version 1.0digitaloffice.intel.com 51
• Set to:[*] ENABLED
Setup and Configuration
Version 1.0digitaloffice.intel.com 52
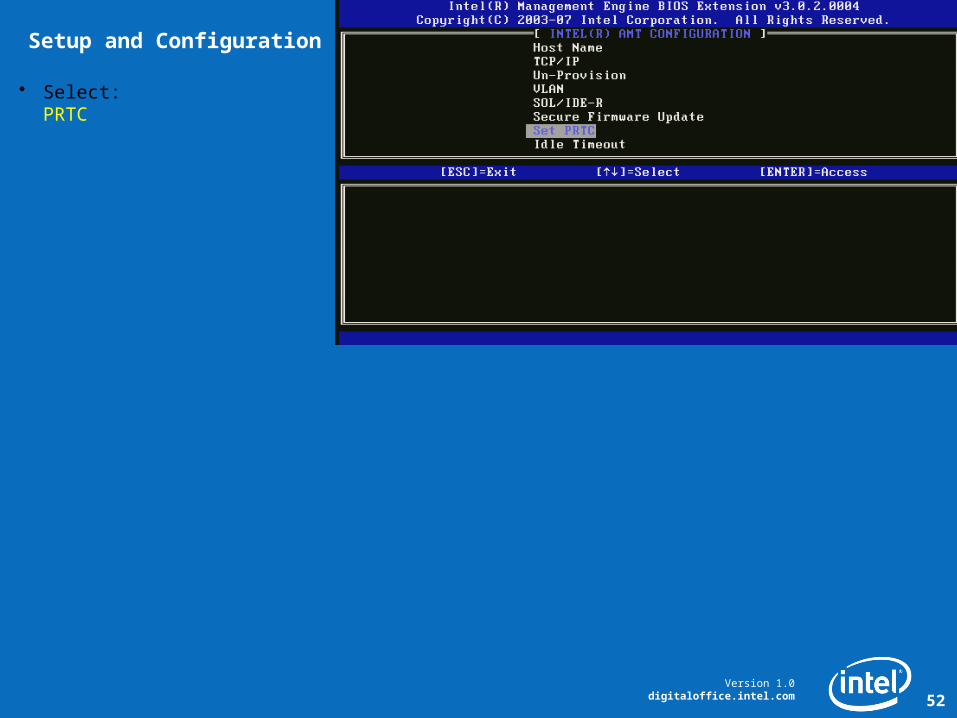
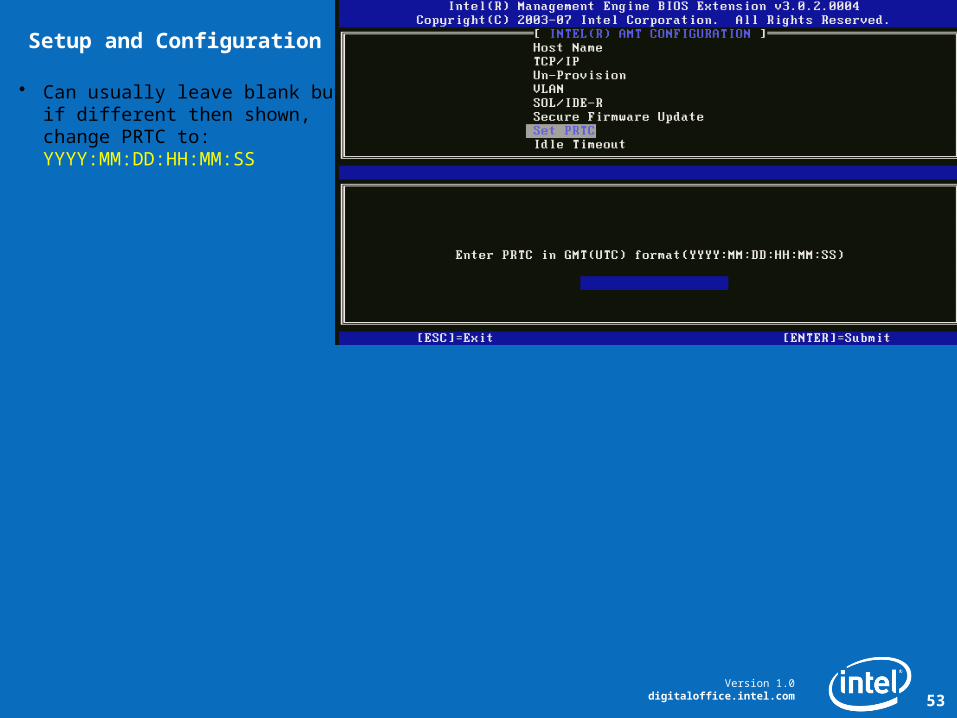
• Select:PRTC
Setup and Configuration
Version 1.0digitaloffice.intel.com 53
• Can usually leave blank but if different then shown, change PRTC to:YYYY:MM:DD:HH:MM:SS
Setup and Configuration
Version 1.0digitaloffice.intel.com 54
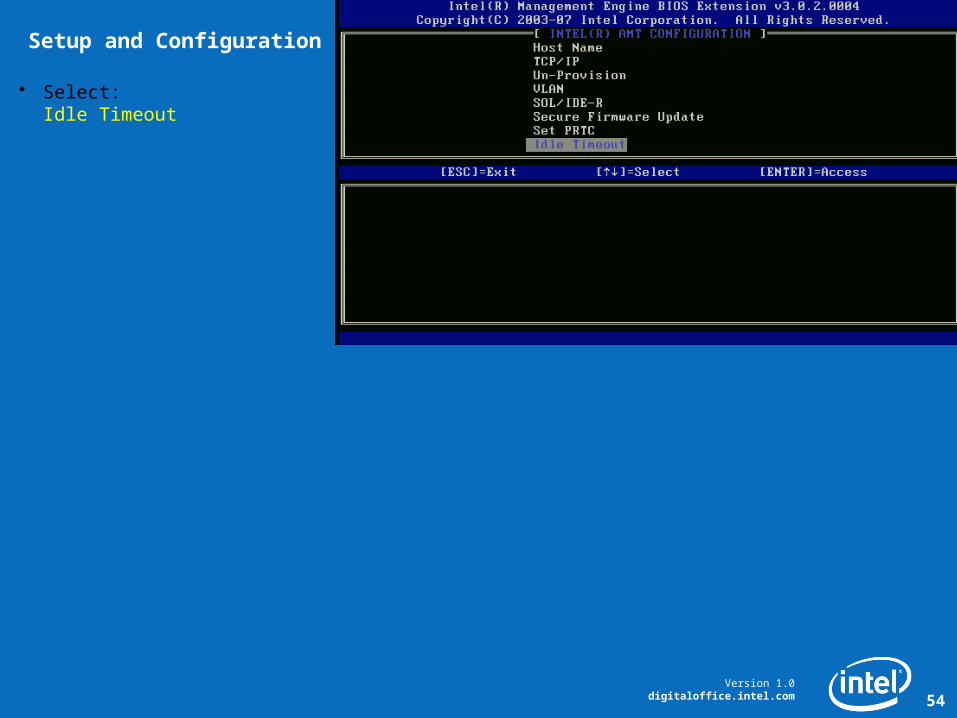
• Select:Idle Timeout
Setup and Configuration
Version 1.0digitaloffice.intel.com 55
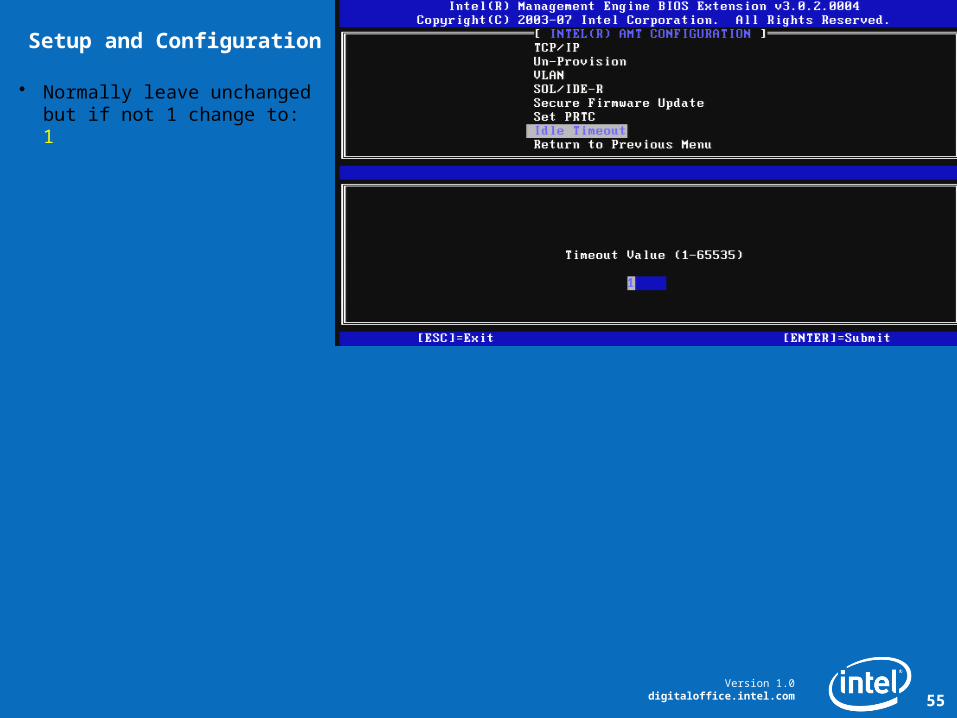
• Normally leave unchanged but if not 1 change to:1
Setup and Configuration

Version 1.0digitaloffice.intel.com 56
• Scroll Down and Select:Return to Previous Menu
Setup and Configuration

Version 1.0digitaloffice.intel.com 57
• To Exit the Main Menu Select:Exit
Setup and Configuration
Version 1.0digitaloffice.intel.com 58
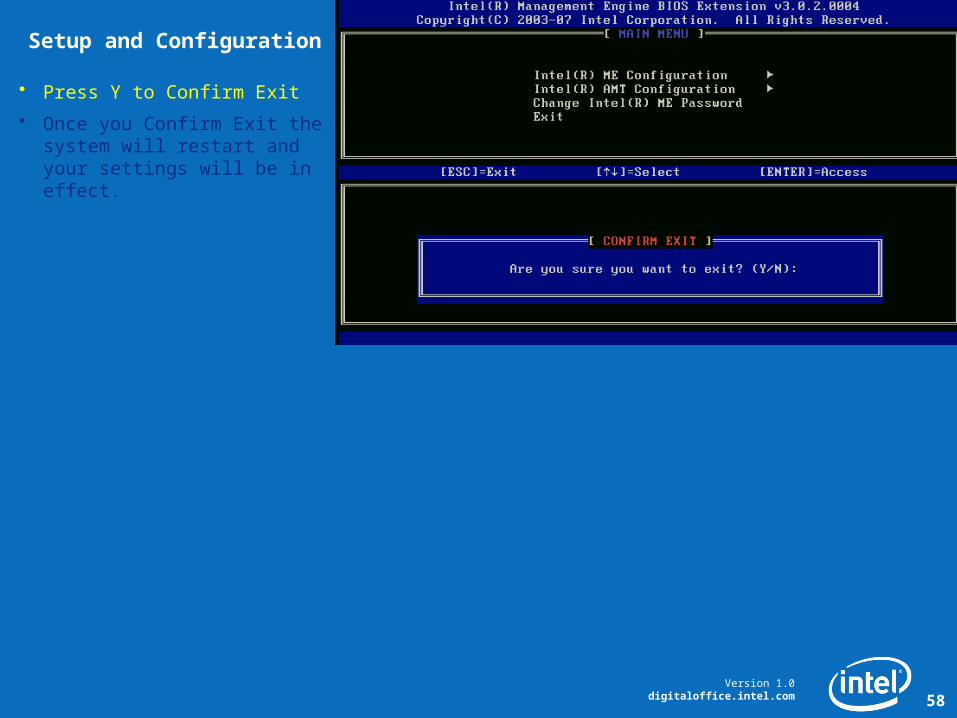
• Press Y to Confirm Exit
• Once you Confirm Exit the system will restart and your settings will be in effect.
Setup and Configuration