Embed Size (px)
Citation preview

© Hart InterCivic Inc.
Verity Central 66XX-XXX A Verity_1.0_CoursePack_Central

Getting Started Module 1

objectives
In this course, election officials and staff will: • Run voted paper ballots through the Verity Central
scanner
• Resolve unresolved ballots
• Write the scanned cast vote records to the vDrive
• Prepare the cast vote record (CVR) for Verity Count vote-tabulating software.

benefits of Verity Central
Efficiency - Every aspect of Verity Central has been designed for fast throughput and an efficient workflow. No pre-sorting of ballots is required before scanning, so batches can include multiple ballot styles and languages in any orientation. Fewer bottlenecks - Verity Central scans without tabulating, so you can start scanning weeks before the close of polls on Election Day, as often as you want. No more late nights to finish scanning by-mail ballots.

benefits of Verity Central
On-Screen Adjudication & robust filtering - Digital scanning allows color-coded on-screen adjudication of ballot images, so you can digitally segregate ballots containing overvotes, undervotes, write-ins, and a vast array of other important variables; with digital ballot management, there’s no need to out-stack and re-scan ballots, and your ballots are preserved in their original form, with minimal handling.

benefits of Verity Central
Cost-effective scalability with commercial-off-the-shelf (COTS) technology - Verity Central works with multiple scanners at different price points, so there’s a good option for any size jurisdiction. This scanning solution also allows the use of multiple networked scanners, so you can add scanning capacity as needed, with no single point of failure. Transparency and easy auditability - Verity Central’s robust image filters allow you to identify, manage, and print images of exactly the ballots you want, with plain-language processing notes so you and any observers can easily understand exactly how voter selections are recorded.

Ballots
Polling Place
Touch Writer Scan
vDrive
vDrive
vDrive
Ballots
Scanner
Verity system overview

Verity system overview
Using Verity Touch Writer, voters mark digital ballots via a touch screen. After the voter has confirmed their selections, the marked ballot prints. The voter then retrieves and casts their ballot.

Verity system overview
Verity Touch Writer is compatible with Verity Access, which provides the following voter input options (in addition to the touch screen): buttons with scrolling wheel, headphones, and tactile button or sip-and-puff devices. The Verity Access can be docked within the Verity Touch Writer or held in hand.

Verity system overview
Verity Scan is a polling-place-based digital scanner for voted ballots. I can be used with manually marked ballots or those printed via the Verity Touch Writer. If a voter marks contests incorrectly on their ballot, Verity Scan gives the voter the opportunity to check and/or correct their ballot before casting. Verity scan deposits scanned paper ballots into its secure ballot box for locked storage.

Verity system overview
In the Verity system, vDrives are used to transfer ballots from software to device for voting, and to transfer voted ballots to software for tabulation.
vDrives also carry the audit log for their associated device to ensure voting remains fair.

Verity security features
Verity Key, is a small security device that is programmed for each election. Verity Key is inserted into a USB port. Verity Key is part of Verity’s two-factor authentication process. Two-factor authentication requires each user to have something (a programmed Verity Key) and to know something (the passcode associated with the Verity Key). Both the user passcode and the Verity Key must be authenticated together. Certain operations within the Verity Voting system require the Verity Key to be inserted and the passcode to be entered. Only when the Verity system authenticates the Verity key and password will it allow the operation to continue. If Verity fails to authenticate a Verity Key or password, the Verity Key may not have been programmed properly for the current election.
Verity Key

Verity security features
Verity Security Features • Verity Voting utilizes the AAA (authentication, authorization, and
audit) security framework • All Verity software has been tested by an independent voting
system test lab and the Election Assistance Commission to ensure proper security.
• Verity uses a multi-layered authentication process • Verity software is tamper evident • Comprehensive audit logs are generated for all login attempts, data
transfers, configuration changes, and errors. Logs are stored redundantly and securely.
• Vote records are stored redundantly for security and auditability. • The integrity of the data is protected from power outage, power
surge, magnets, and rough handling.
managing users
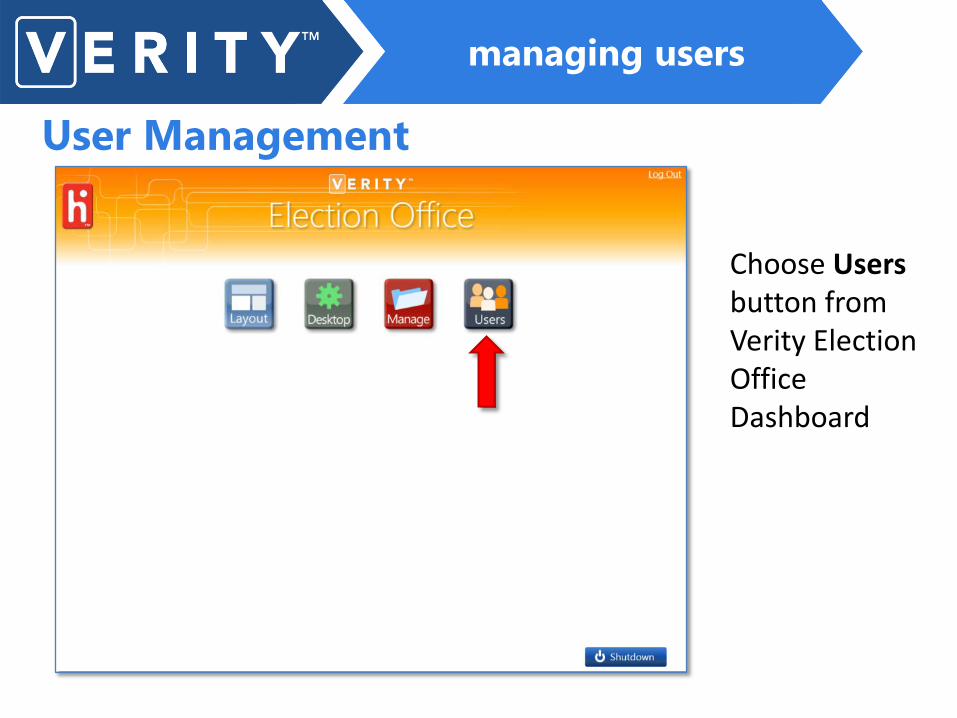
User Management
Choose Users button from Verity Election Office Dashboard

managing users
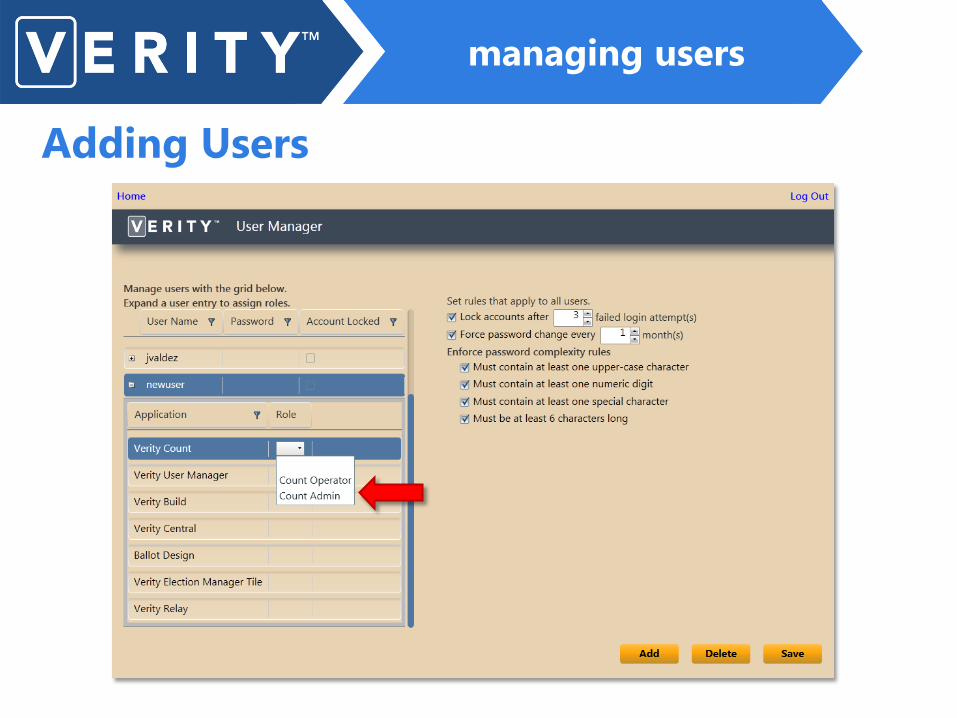
Adding Users
• Click Add to add a new user
• Set rules for all users on the right

managing users
Adding Users
• Type the new User Name
• Click the + to view and assign roles

managing users
Adding Users
• Assign roles for each Application
managing users
Adding Users

managing users
Adding Users

managing users
Deleting Users
• Click Delete to remove a selected user

managing users
Password Tips
• Passwords must be at least 6 characters
• Passwords should contain a numbers and letters
• Passwords should contain uppercase and lowercase letters

managing users
Audit Logs and System Logs
Through the Verity audit and system logs, you can:
• Track every action performed in plain language
• Easily view which user performed each action
• View at what time each action was performed

managing elections
Election Management
Choose Manage button from Verity Election Office Dashboard

managing elections
Election Management Overview
An election is highlighted when selected

managing elections
Actions Button
Add, Copy, Rename, Delete, Import, Archive or Restore an Election
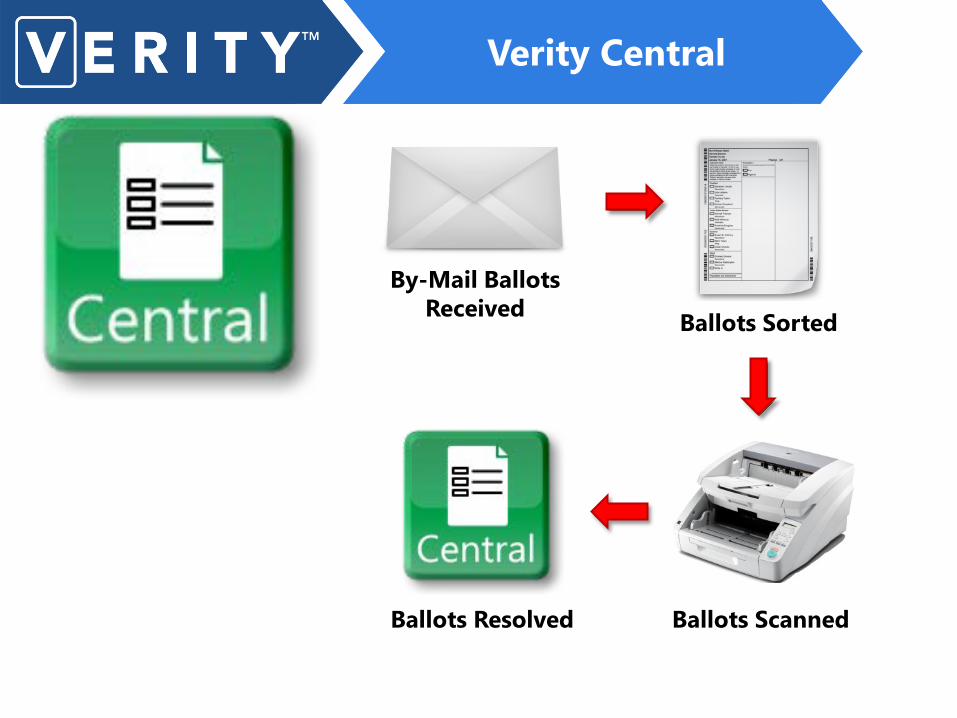
Verity Central
By-Mail Ballots Received
Ballots Scanned
Ballots Sorted
Ballots Resolved

Verity Central
Overview of sequential steps
• The sequence of steps follows the chevrons along the top of the screen in order from left to right
• Within each chevron, the tasks along the left side of the screen are completed in order from top to bottom
1 2

getting started
Exercise 1.1
Open Verity Central and create users for the application. Delete unnecessary users, if needed.
Activities in the Elections Tab Module 2
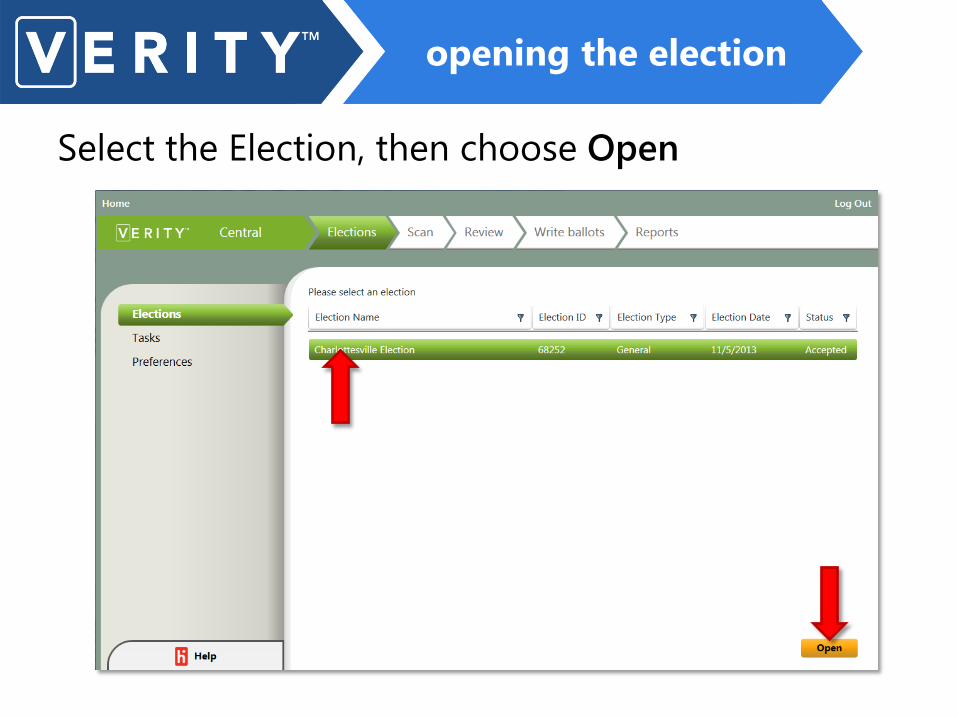
opening the election
Select the Election, then choose Open

creating tasks
What is a Task?
A task is a new instance of a particular election. Each task can be created in Test or Election mode. For example for General Election 2014 you may have the following tasks:
• General Election 2014 LAT1 – Test mode • General Election 2014 LAT2 – Test mode • General Election 2014 Official – Election mode • General Election 2014 LAT3 – Test mode
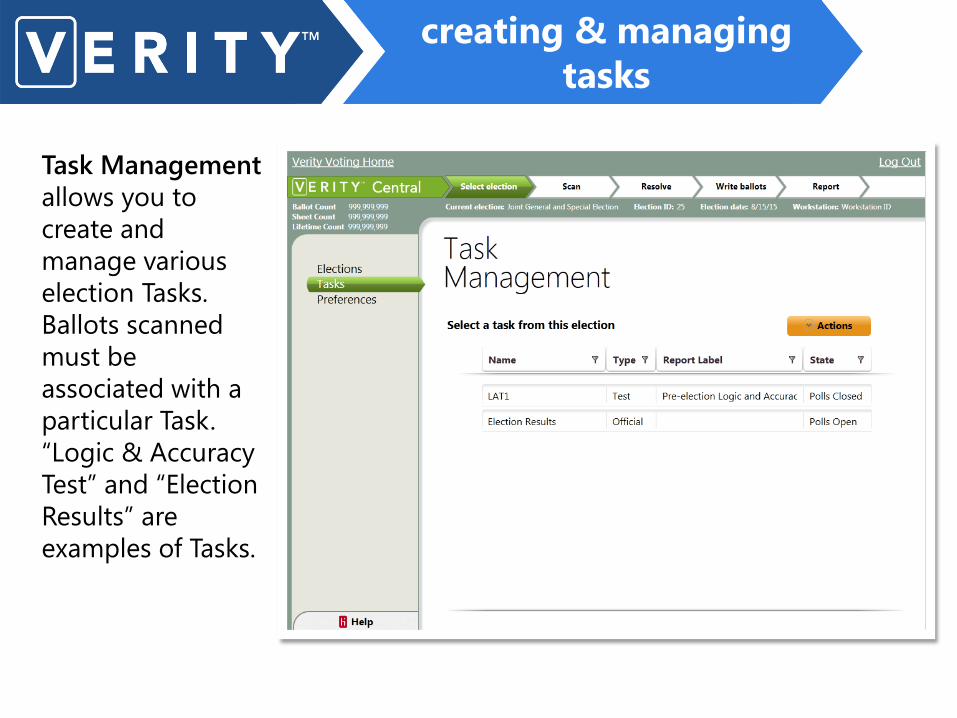
creating & managing tasks
Task Management allows you to create and manage various election Tasks. Ballots scanned must be associated with a particular Task. “Logic & Accuracy Test” and “Election Results” are examples of Tasks.

creating & managing tasks
By choosing New under the Actions drop-down menu, the user can create a task, assign a task type, define a reporting label, and determine how Write-Ins will be handled

setting preferences
In the Preferences menu, the user can define default settings for Verity Central

activities in the elections tab
Exercise 2.1
Load and open training election that was created in Verity Build.
activities in the elections tab
Exercise 2.2
Create a Task, set the type, and report label as appropriate to the training.

activities in the elections tab
Exercise 2.3
Set database preferences.

activities in the elections tab
Exercise 2.4
Note file path of ElectionData.zip and practice backup procedures.

Activities in the Scan Tab Module 3
scan
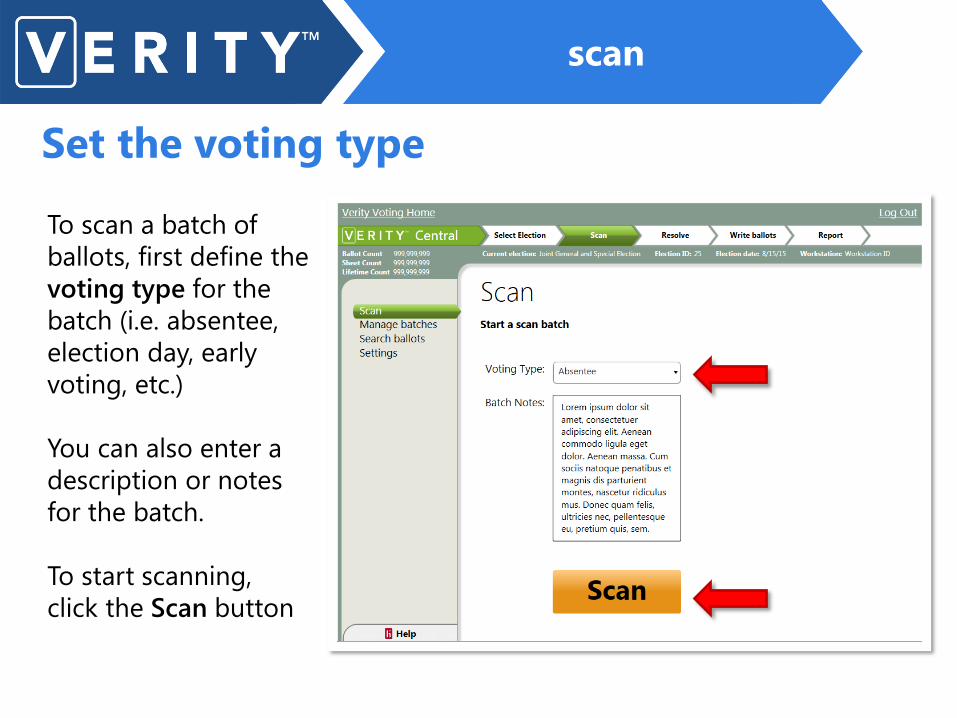
Set the voting type
To scan a batch of ballots, first define the voting type for the batch (i.e. absentee, election day, early voting, etc.) You can also enter a description or notes for the batch. To start scanning, click the Scan button

scan
Scanning Ballots
After clicking Scan, a preview of the scanned ballot(s) will appear on the right

manage batches
Managing Batches Under Manage Batches, the Actions drop-down menu allows you to select scanned batches, view reports, change the voting type, edit notes, and delete batches

search ballots
Entering Search Criteria
The Search Ballots menu allows you to search for ballots within a scanned batch by one or more criteria

search ballots
Viewing Search Results
Under Search Ballots, The Actions drop-down menu allows to view or delete individual ballots displayed in the search results
search ballots
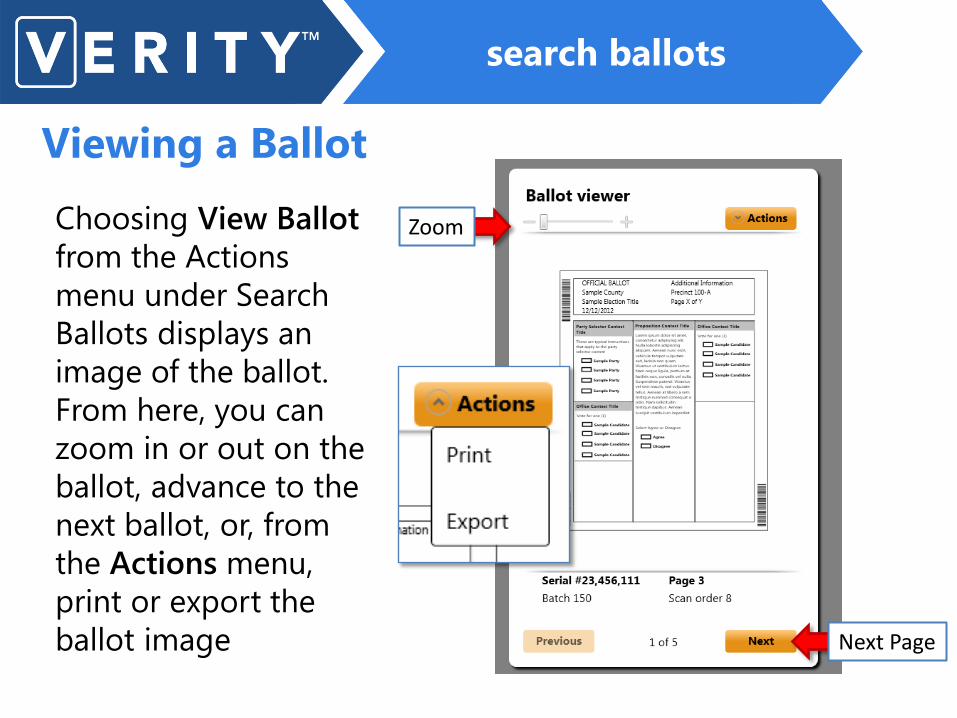
Viewing a Ballot
Choosing View Ballot from the Actions menu under Search Ballots displays an image of the ballot. From here, you can zoom in or out on the ballot, advance to the next ballot, or, from the Actions menu, print or export the ballot image
Zoom
Next Page

settings
Setting up the Scanner
The Settings menu allows you to set up your scanner and perform a test scan, as well as set scanning preferences

activities in the scan tab
Exercise 3.1
Select the appropriate scanner and conduct Test Scan in the Settings tab.

activities in the scan tab
Exercise 3.2
Set scanner serial numbering, write-in deferment, and duplicate/incomplete settings as appropriate for the implementation.

activities in the scan tab
Exercise 3.3
Vote printed ballots to be scanned with a mix of overvotes, undervotes, write-ins, damaged contests, as well as without issues, as appropriate for the implementation. Organize the ballots for scanning.

activities in the scan tab
Exercise 3.4
Set the voting type and scan all voted ballots. Add batch notes.

Activities in the Scan Tab
Exercise 3.5
Search for one scanned ballot serial number in the Search Ballot tab, if using serial numbers.

Activities in the Scan Tab
Exercise 3.6
Change batch notes and voting type then, print a Batch Report for each batch scanned. Keep these reports with their corresponding scanned batches.

Activities in the Review Tab Module 4

reviewing images
Overview
The Review Images menu allows you to, filter ballots by criteria, view ballot pages and contests to determine voter intent, and resolve pages contests

reviewing images
Filters
Clear Filters removes all applied filters from the batch.
Add Filter lets you add or manage existing filters

reviewing images
Using Filters Clicking Add Filter brings up the Add Filters menu, where you can add or remove filters and view all of the currently
applied filters

reviewing images
Reviewing Ballots On the right side of the window, the batches available for review are displayed. Each batch can be expanded to show the ballot(s) within that batch.

reviewing images
The batches and ballots available for review are color coded to indicate whether they require review, are checked out for
review by another user, or are locked for review.
There is a legend
located in the bottom right of the
window.

reviewing images
Reviewing Ballots After selecting a ballot, the Actions menu will allow you to
Review a Ballot, Accept a ballot, Revert the ballot to its original scanned state, Export ballot images, and Print a
ballot detail report.

reviewing images
Ballot Review
Choosing Review Ballot brings up the Ballot Review window, where you can view and resolve ballot pages and contests

reviewing images
Ballot Review: View Legend When viewing a
ballot page, individual contests are color coded by the type of review needed. The View
Legend button allows you to view
the meaning of each color coding

reviewing images
Ballot Review The upper left side of the
Ballot Review window displays the ballot
information, a field for notes, and thumbnails of
the other pages in the batch.

reviewing images
Ballot Review: Page Actions When viewing an
entire ballot page, the Actions menu
allows you to Print the ballot image, Hide/View notes, Lock the page for
review, Accept the entire page, or Revert
the page to its original scanned state. The zoom
slider allows you to zoom in on the page.

Clicking on a particular contest opens the Contest View. The current active page now appears as a thumbnail in the lower left corner; the maximize button will return to the full page view
reviewing images
Ballot Review: Contest View
Select Contest
Page thumbnail
Maximize button
reviewing images
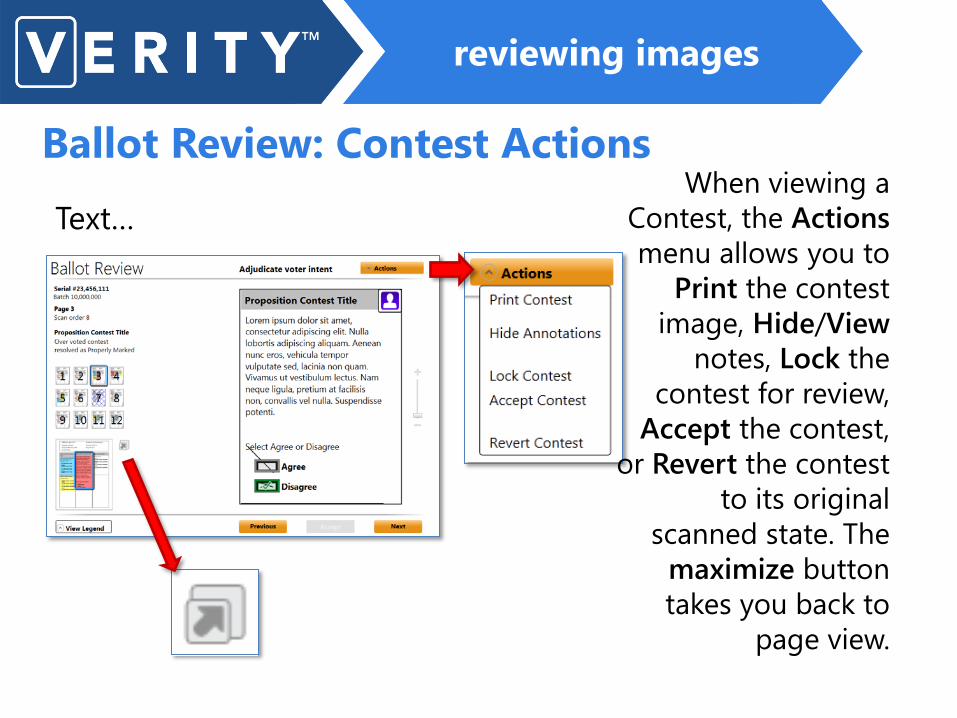
Ballot Review: Contest Actions
Text… When viewing a
Contest, the Actions menu allows you to
Print the contest image, Hide/View
notes, Lock the contest for review,
Accept the contest, or Revert the contest
to its original scanned state. The
maximize button takes you back to
page view.

reviewing images
Resolving/Adjudicating Voter Intent The icon at the top right of the contest shows the status of the contest. Hovering the mouse over this icon will give further details.
Possible contest statuses are:

reviewing images
Resolving/Adjudicating Ballots
To resolve a contest, you can mark or unmark a selection box by clicking on the box. An unmarked box is gray, a
marked box is green.

reviewing images
Resolving Write-Ins To resolve a write-in, you can mark or unmark the selection box by clicking on the box. Clicking the write-in name will allow you to chose from the list of certified write-ins, or to enter a new write-in name.
Joe Plana

adding write-in candidates
The Write-in Candidates menu allows you to view, add or delete certified write-in candidates
Expanded

activities in the review tab
Exercise 4.1
Add at least one certified write-in candidate name, if write-ins are not already deferred to Count.

activities in the review tab
Exercise 4.2
Resolve all scanned ballots with issues.

activities in the review tab
Exercise 4.3
Add notes to at least one ballot page.

activities in the review tab
Exercise 4.4
Select a resolved ballot and print ballot page with annotations included.

Activities in the Write Ballots Tab Module 5
write ballots
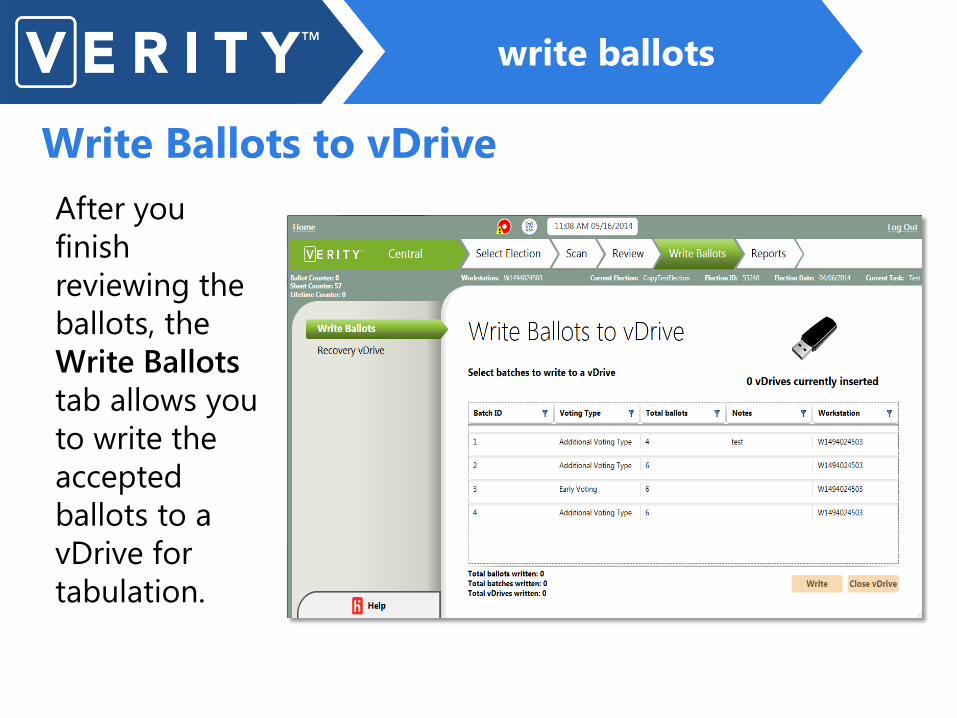
Write Ballots to vDrive After you finish reviewing the ballots, the Write Ballots tab allows you to write the accepted ballots to a vDrive for tabulation.

recovery vDrives
The Recovery vDrive menu allows you to create a recovery vDrive from a backup of a previously created vDrive.

activities in the write ballots tab
Exercise 5.1
Write all ballots/batches to one vDrive. Note the total number of ballots written.

Activities in the Reports Tab
Module 6

reports
The Reports menu allows you to create reports for batches, precincts and more.

Proofing the Ballot
Audit Log and System Log reports
Audit Log and System Log reports are available in the reports section for each application. For Central, these reports are located under the Report tab, under Reports. Audit Log Report • Logs all activity for the Central application. • Records user identities and actions performed.
System Log Report • Logs all workstation logins and other actions performed on the
network that are independent of the specific applications. • Records user identities and actions performed
reports

exports
The Exports menu allows you to export Provisional Ballot Status, Registered Voter information, and more.

activities in the reports tab
Exercise 6.1
View each report from the reports window.

activities in the reports tab
Exercise 6.2
Export the Scanned ballot information export, save to desktop, and review.

activities in the reports tab
Exercise 6.3
Export all scanned ballot images resolved in training with annotations included.

Review and Conclusion Module 7

review
Review
• Creating Tasks • Scanning Ballots • Reviewing and Adjudicating • Writing Ballots • Reporting

paper ballot processing tips
Best practices for scanning start with ballot creation • Managing print files from Build (observing proper naming
conventions for ballot files, print/distiller settings, whether delivering to a ballot printer or printing directly to an in-house printer)
• Proper folding techniques (for mailing ballots): Don’t fold through option boxes or barcodes, avoid folding against the grain of the paper
• Proper unfolding/flattening • Assessing and planning the workspace for efficiently and
securely delivering voted ballots to and from a scanning station
• Properly fanning ballots prior to scanning to eliminate excess paper dust from gumming up the scanner
scanner tips
Best Practices in Scanner Maintenance
• Regular cleaning of scanner path using iopropyl alcohol and lint-free wipes
• Regular preventative maintenance by a technician certified by the scanner manufacturer

database archival
Back up election data onto recordable CD-Rs or DVD-Rs using the disc-burning software installed on all Verity computers. When backing up data: • Create at least two copies of each CD or DVD. Store one copy offsite. • Label the surface of the disc—not the jewel case—with a permanent
marker. • Label each disc clearly to avoid confusion. On the disc, write:
o Application being backed up o Name and date of the election o What mode or state the database is in o Time/date-stamped folder name (if applicable) o Date and time of the backup
• Store discs away from direct sunlight, and in a climate controlled room. • Do not back up data solely to a hard disk drive (internal or external). Hard
disk drives can be used for short term data storage during the election event, but should not be used as a long-term archive.

reloading an election
Previously created elections can be reloaded into Verity, for example: • Reloading an election from an archive to review,
module by module, how it was created
• In the event of computer loss, reloading an election onto a new PC/installation

Q&A
Questions?
Review/Appendices
Exercise 7.1
Discuss archival of election data and reloading elections in Verity Central.