Embed Size (px)
Citation preview
State of Ohio
Vendor Portal User Instructions for IT and Non-IT Contracts
Vendor Portal User Manual
V1.8 1/11/2017
1
Contents
Introduction 2
Internet Browsers 2
1.0 Logging into Vendor Portal 2
2.0 Page Features – Overview 5
3.0 Reporting Revenue 7
4.0 Downloading price list template for IT Contracts only 10
5.0 Uploading price lists for IT Contracts only 10
6.0 Uploading your IT-Price List Certification Letter 14
7.0 Quarterly Sales Report 14
Vendor Portal User Manual
V1.8 1/11/2017
2
Introduction The State of Ohio Vendor Portal is intended to provide all the functionality a State Contractor will need
to report both State and Local government generated revenue on a quarterly basis. If you are an IT
(Information Technology) Vendor then use this site to upload your most current price list. If you are a
non-IT Vendor, then please do NOT upload your price list on this web portal. If you experience any
issues with this online application, then please contact and inform your analyst listed below.
IT Contracts please contact Rose Perkins at 614-466-3605 or [email protected]
Non-IT Contracts please contact Angie Stasiak at 614-466-4764 or
Internet Browsers The Vendor Portal will operate best with the following internet browser versions
IE - v10.0 or higher
Edge - v25.1 or higher
Chrome - v52.0 or higher
Firefox / Mozilla - v47.0.1 or higher
Safari - v9.1.2 or higher
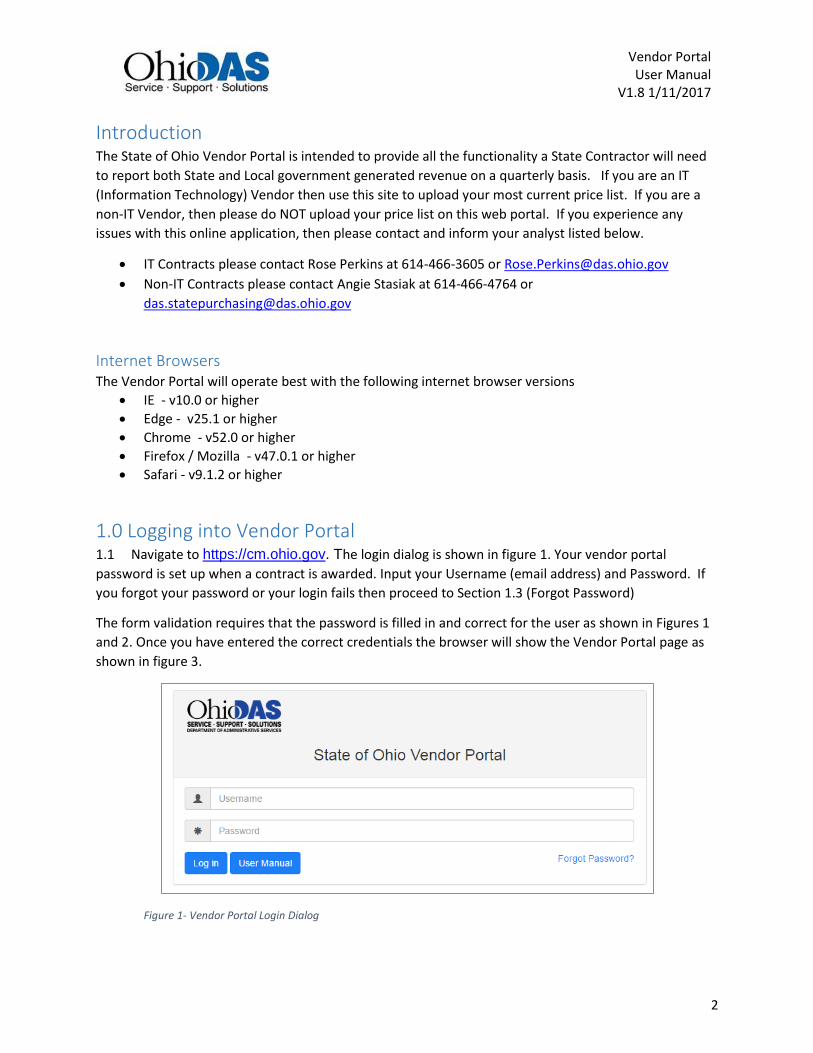
1.0 Logging into Vendor Portal 1.1 Navigate to https://cm.ohio.gov. The login dialog is shown in figure 1. Your vendor portal
password is set up when a contract is awarded. Input your Username (email address) and Password. If
you forgot your password or your login fails then proceed to Section 1.3 (Forgot Password)
The form validation requires that the password is filled in and correct for the user as shown in Figures 1
and 2. Once you have entered the correct credentials the browser will show the Vendor Portal page as
shown in figure 3.
Figure 1- Vendor Portal Login Dialog
Vendor Portal User Manual
V1.8 1/11/2017
3
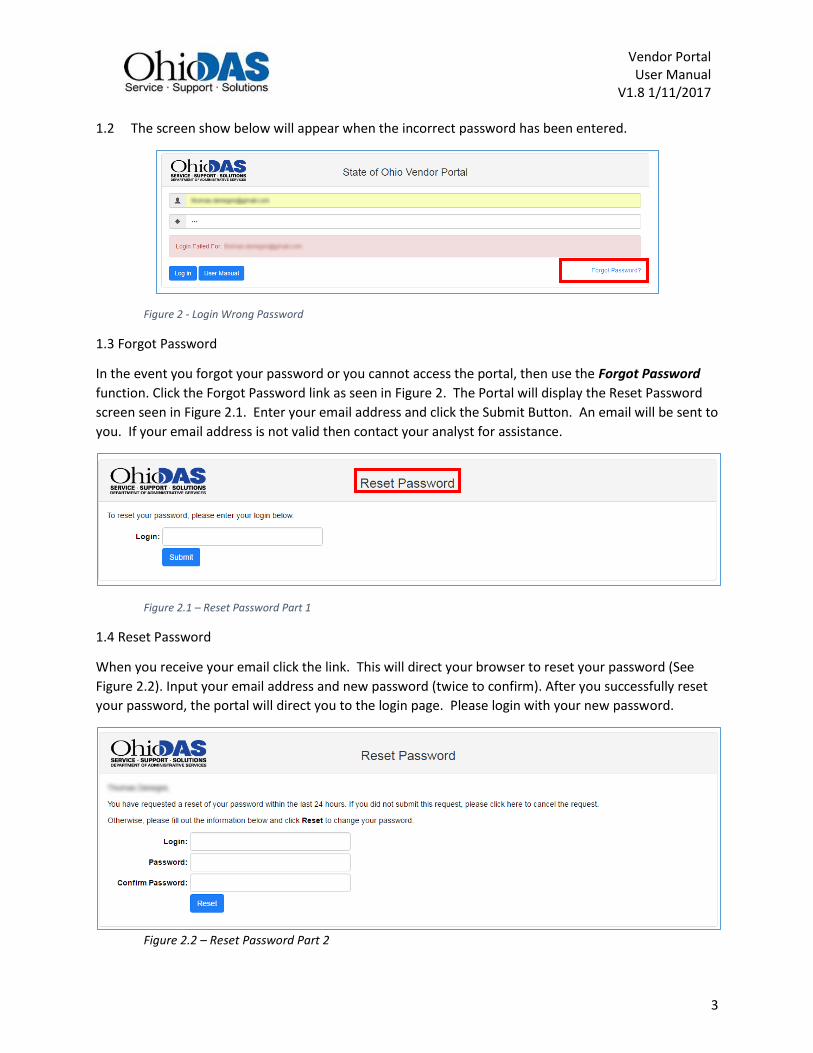
1.2 The screen show below will appear when the incorrect password has been entered.
Figure 2 - Login Wrong Password
1.3 Forgot Password
In the event you forgot your password or you cannot access the portal, then use the Forgot Password
function. Click the Forgot Password link as seen in Figure 2. The Portal will display the Reset Password
screen seen in Figure 2.1. Enter your email address and click the Submit Button. An email will be sent to
you. If your email address is not valid then contact your analyst for assistance.
Figure 2.1 – Reset Password Part 1
1.4 Reset Password
When you receive your email click the link. This will direct your browser to reset your password (See
Figure 2.2). Input your email address and new password (twice to confirm). After you successfully reset
your password, the portal will direct you to the login page. Please login with your new password.
Figure 2.2 – Reset Password Part 2
Vendor Portal User Manual
V1.8 1/11/2017
4
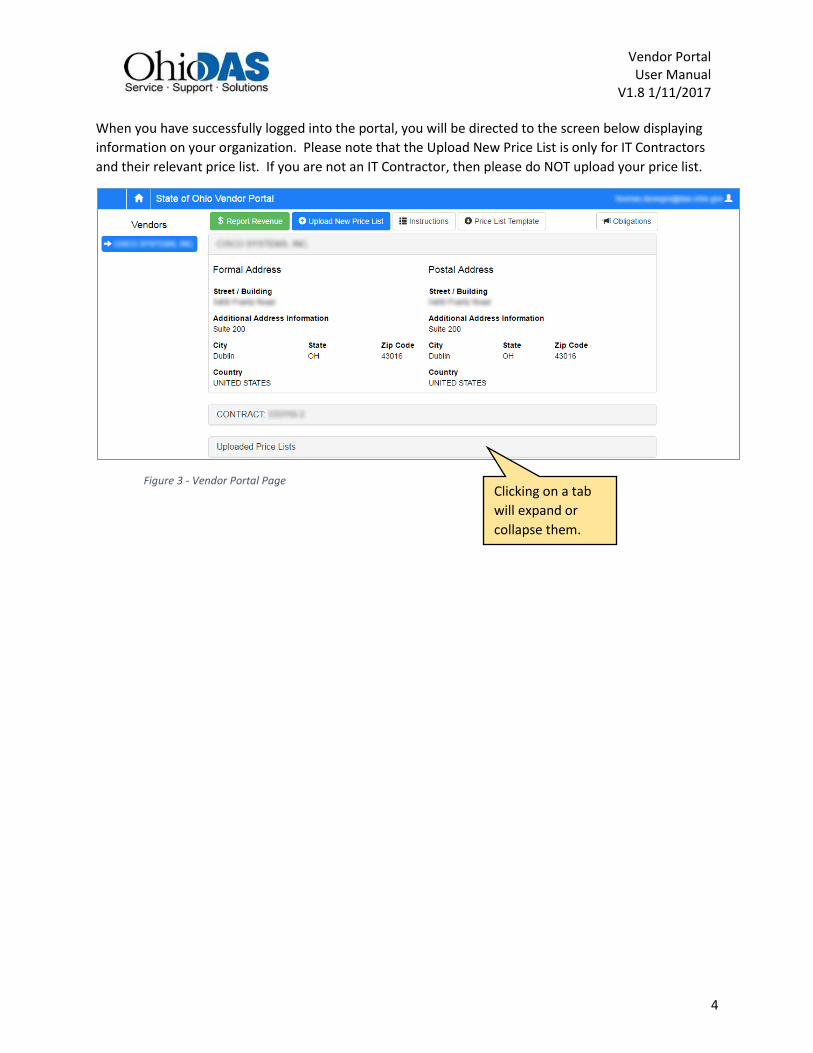
When you have successfully logged into the portal, you will be directed to the screen below displaying
information on your organization. Please note that the Upload New Price List is only for IT Contractors
and their relevant price list. If you are not an IT Contractor, then please do NOT upload your price list.
Figure 3 - Vendor Portal Page
Clicking on a tab
will expand or
collapse them.
Vendor Portal User Manual
V1.8 1/11/2017
5
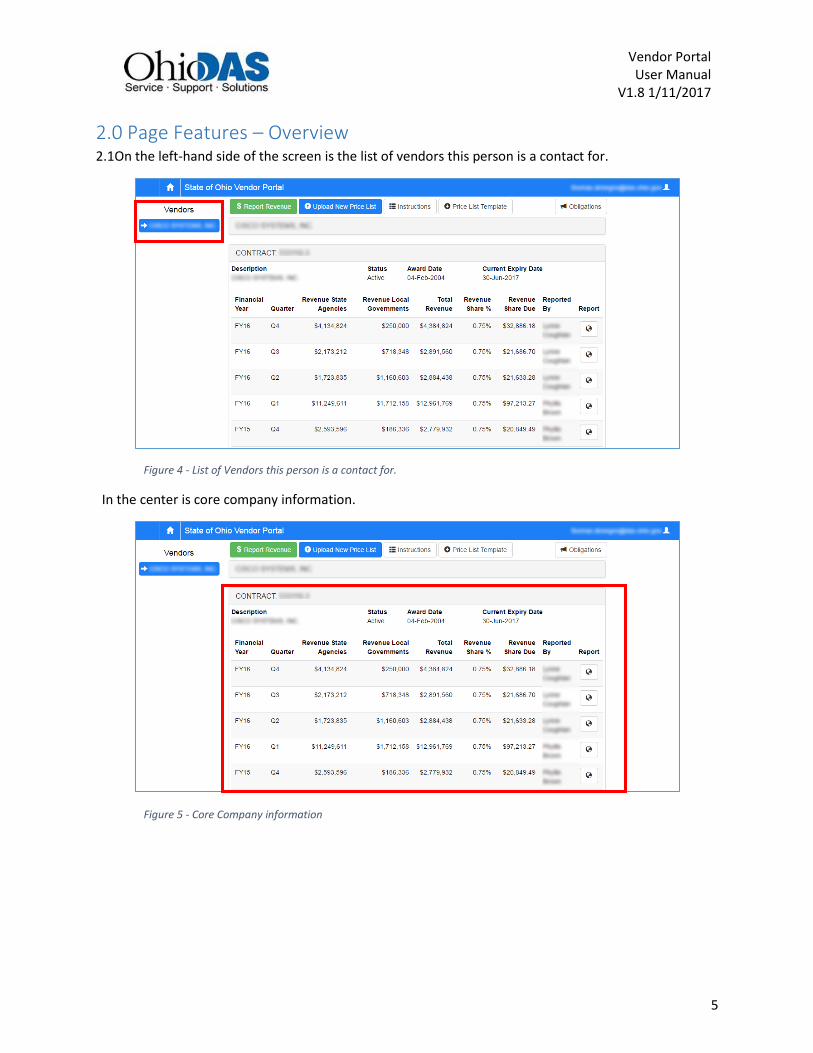
2.0 Page Features – Overview 2.1On the left-hand side of the screen is the list of vendors this person is a contact for.
Figure 4 - List of Vendors this person is a contact for.
In the center is core company information.
Figure 5 - Core Company information
Vendor Portal User Manual
V1.8 1/11/2017
6
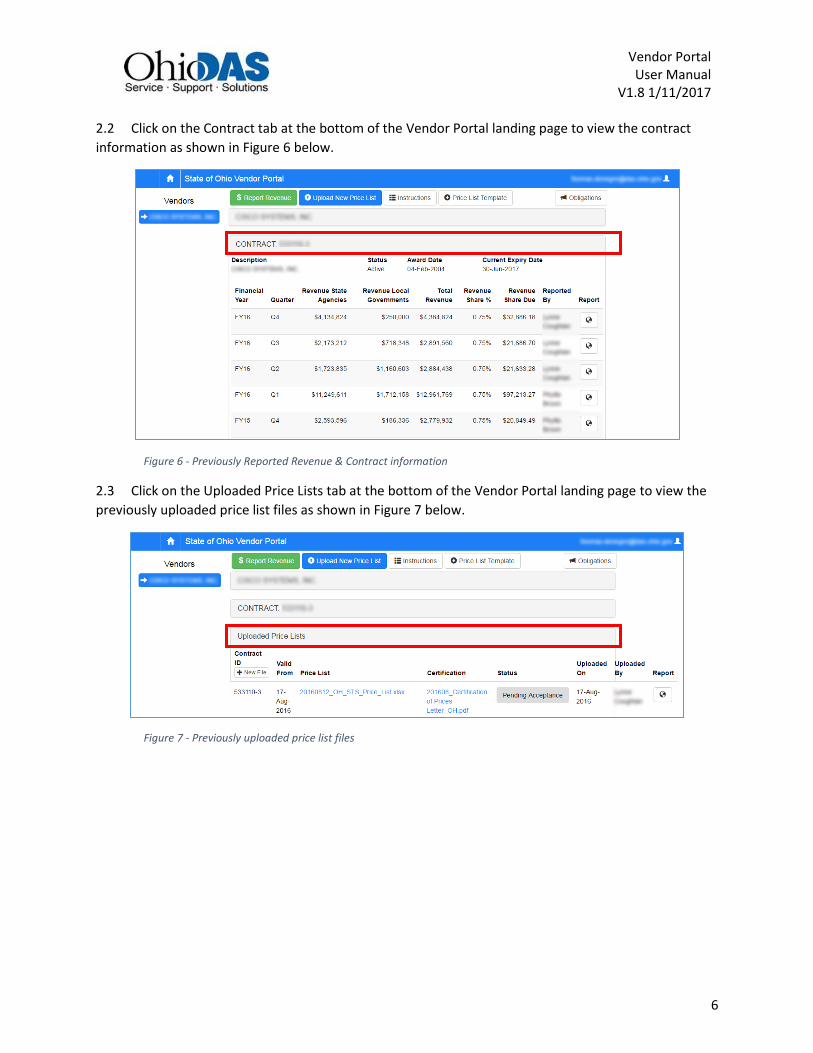
2.2 Click on the Contract tab at the bottom of the Vendor Portal landing page to view the contract
information as shown in Figure 6 below.
Figure 6 - Previously Reported Revenue & Contract information
2.3 Click on the Uploaded Price Lists tab at the bottom of the Vendor Portal landing page to view the
previously uploaded price list files as shown in Figure 7 below.
Figure 7 - Previously uploaded price list files
Vendor Portal User Manual
V1.8 1/11/2017
7
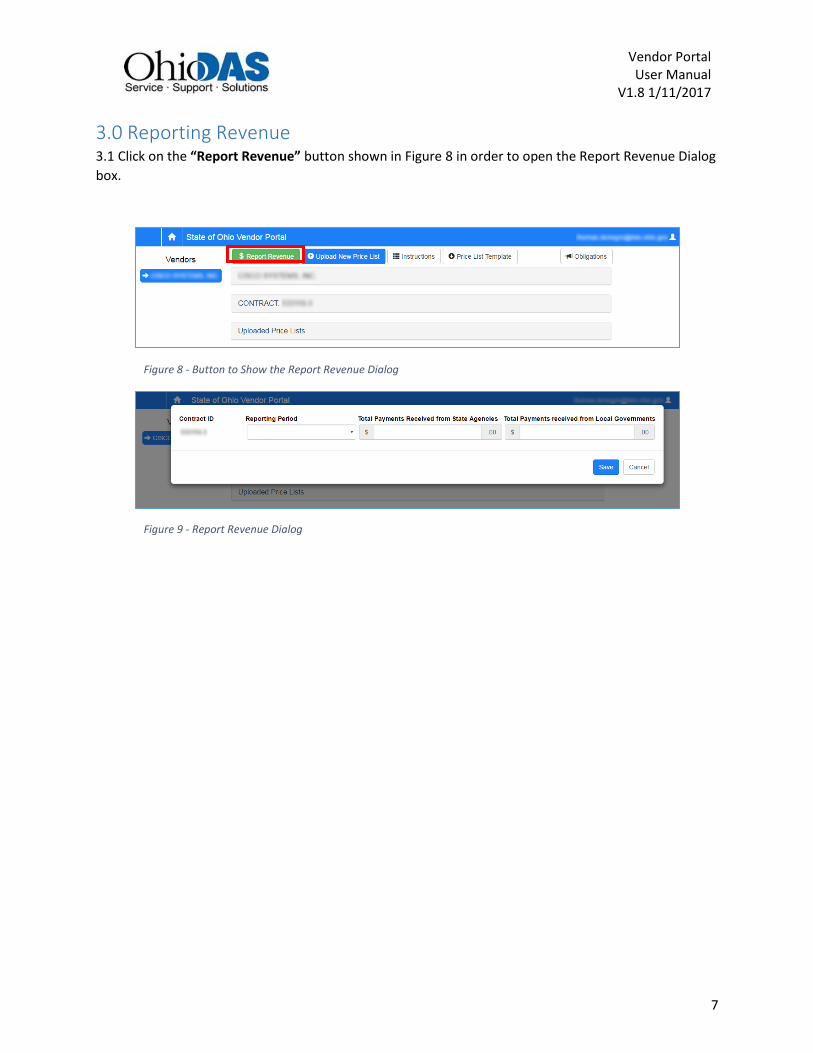
3.0 Reporting Revenue 3.1 Click on the “Report Revenue” button shown in Figure 8 in order to open the Report Revenue Dialog
box.
Figure 8 - Button to Show the Report Revenue Dialog
Figure 9 - Report Revenue Dialog
Vendor Portal User Manual
V1.8 1/11/2017
8
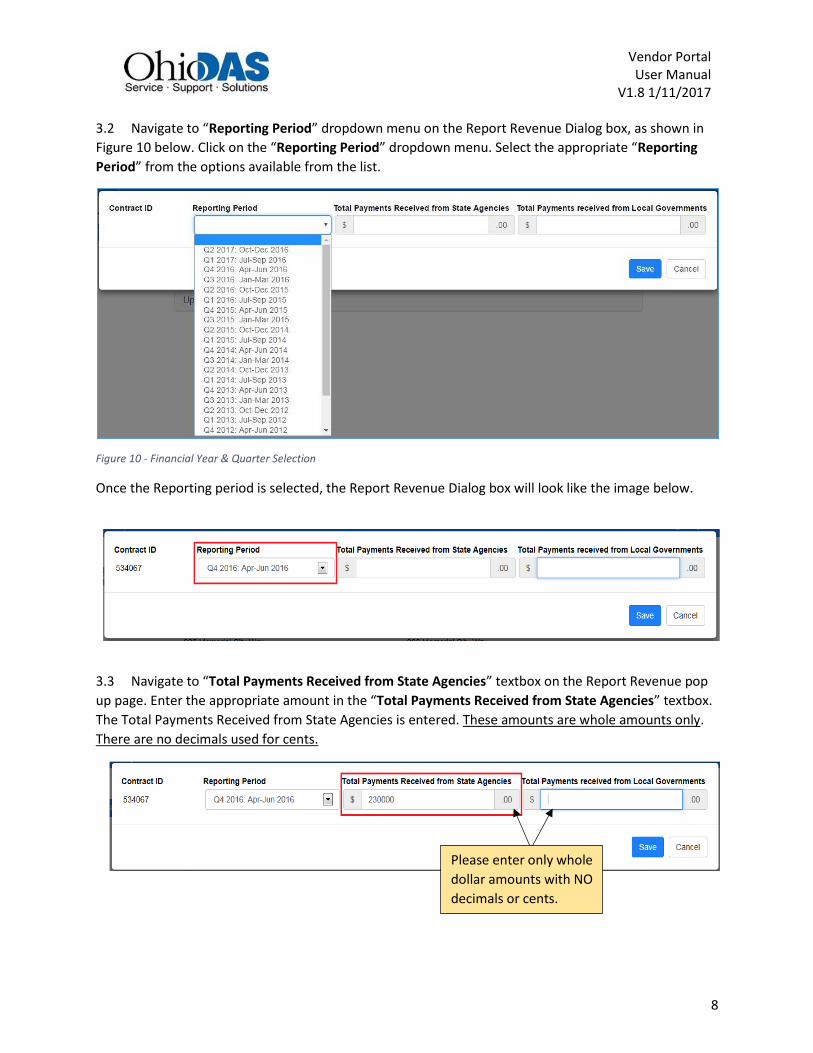
3.2 Navigate to “Reporting Period” dropdown menu on the Report Revenue Dialog box, as shown in
Figure 10 below. Click on the “Reporting Period” dropdown menu. Select the appropriate “Reporting
Period” from the options available from the list.
Figure 10 - Financial Year & Quarter Selection
Once the Reporting period is selected, the Report Revenue Dialog box will look like the image below.
3.3 Navigate to “Total Payments Received from State Agencies” textbox on the Report Revenue pop
up page. Enter the appropriate amount in the “Total Payments Received from State Agencies” textbox.
The Total Payments Received from State Agencies is entered. These amounts are whole amounts only.
There are no decimals used for cents.
Please enter only whole
dollar amounts with NO
decimals or cents.
Vendor Portal User Manual
V1.8 1/11/2017
9
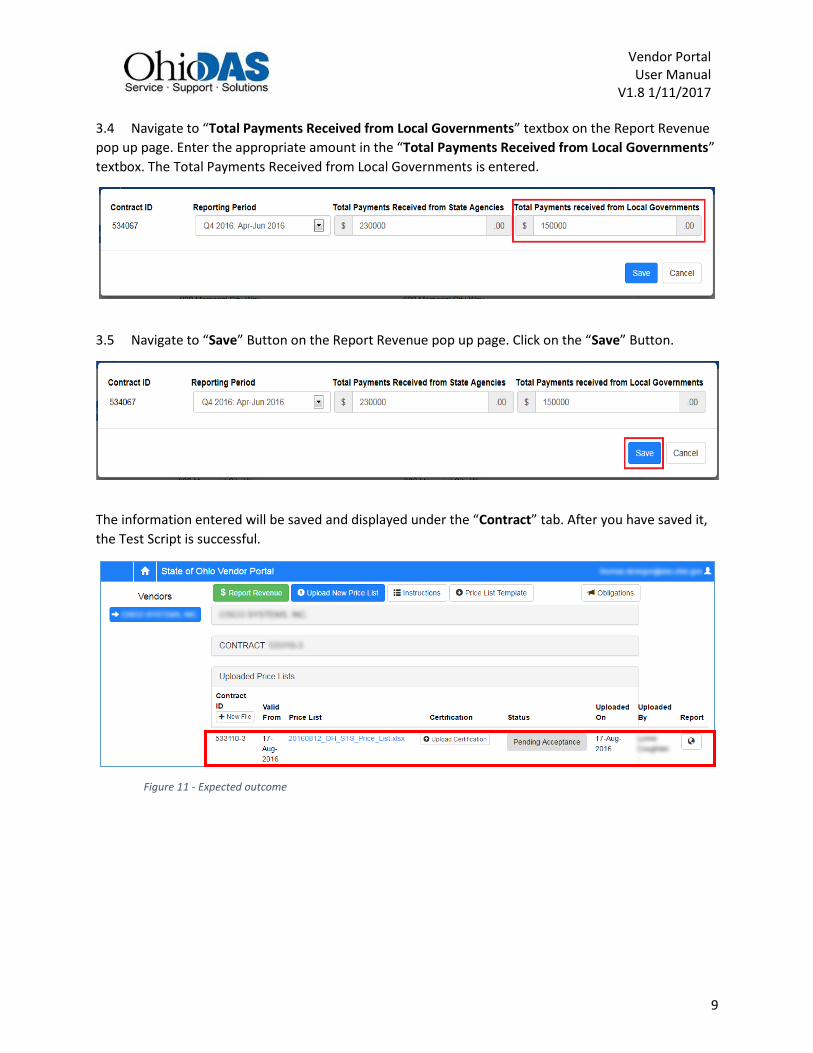
3.4 Navigate to “Total Payments Received from Local Governments” textbox on the Report Revenue
pop up page. Enter the appropriate amount in the “Total Payments Received from Local Governments”
textbox. The Total Payments Received from Local Governments is entered.
3.5 Navigate to “Save” Button on the Report Revenue pop up page. Click on the “Save” Button.
The information entered will be saved and displayed under the “Contract” tab. After you have saved it,
the Test Script is successful.
Figure 11 - Expected outcome
Vendor Portal User Manual
V1.8 1/11/2017
10
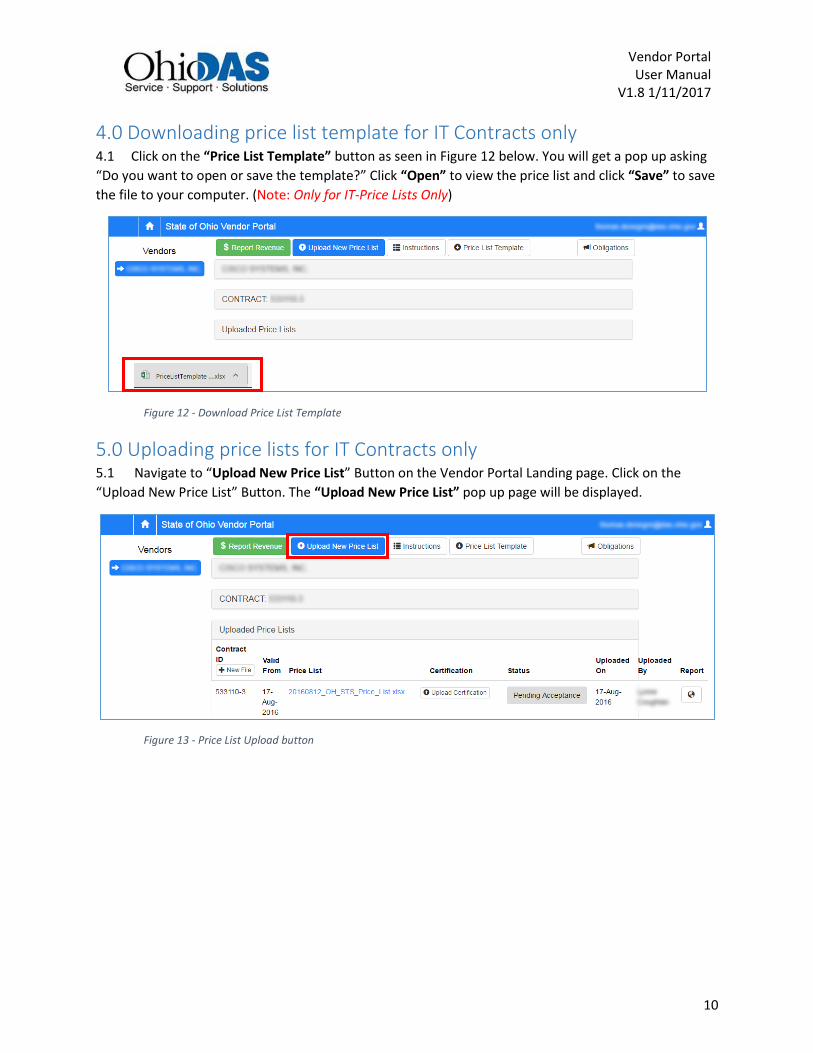
4.0 Downloading price list template for IT Contracts only 4.1 Click on the “Price List Template” button as seen in Figure 12 below. You will get a pop up asking
“Do you want to open or save the template?” Click “Open” to view the price list and click “Save” to save
the file to your computer. (Note: Only for IT-Price Lists Only)
Figure 12 - Download Price List Template
5.0 Uploading price lists for IT Contracts only 5.1 Navigate to “Upload New Price List” Button on the Vendor Portal Landing page. Click on the
“Upload New Price List” Button. The “Upload New Price List” pop up page will be displayed.
Figure 13 - Price List Upload button
Vendor Portal User Manual
V1.8 1/11/2017
11
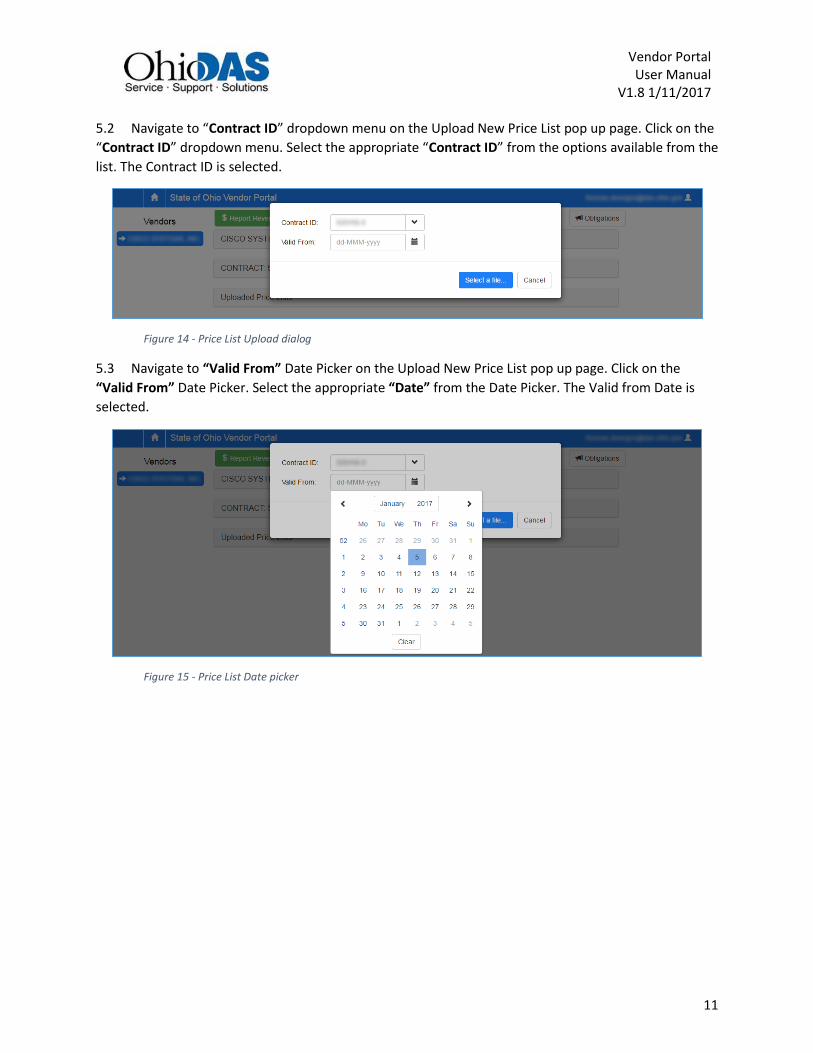
5.2 Navigate to “Contract ID” dropdown menu on the Upload New Price List pop up page. Click on the
“Contract ID” dropdown menu. Select the appropriate “Contract ID” from the options available from the
list. The Contract ID is selected.
Figure 14 - Price List Upload dialog
5.3 Navigate to “Valid From” Date Picker on the Upload New Price List pop up page. Click on the
“Valid From” Date Picker. Select the appropriate “Date” from the Date Picker. The Valid from Date is
selected.
Figure 15 - Price List Date picker
Vendor Portal User Manual
V1.8 1/11/2017
12
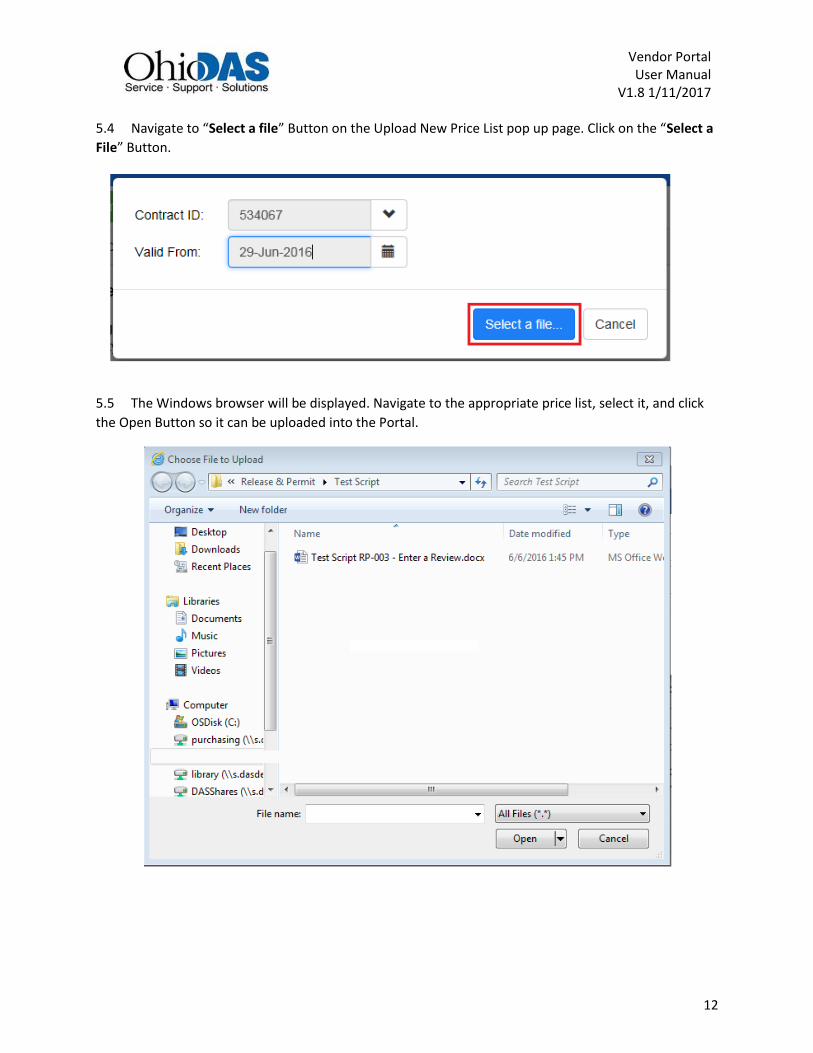
5.4 Navigate to “Select a file” Button on the Upload New Price List pop up page. Click on the “Select a
File” Button.
5.5 The Windows browser will be displayed. Navigate to the appropriate price list, select it, and click
the Open Button so it can be uploaded into the Portal.
Vendor Portal User Manual
V1.8 1/11/2017
13
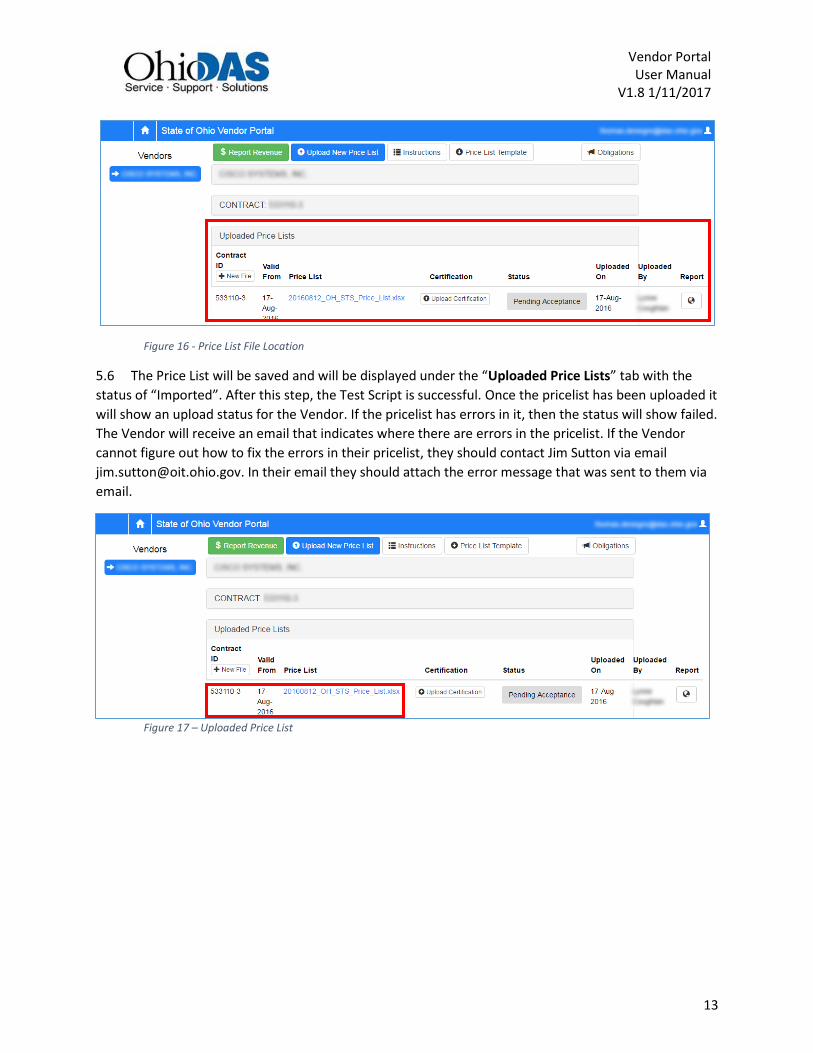
Figure 16 - Price List File Location
5.6 The Price List will be saved and will be displayed under the “Uploaded Price Lists” tab with the
status of “Imported”. After this step, the Test Script is successful. Once the pricelist has been uploaded it
will show an upload status for the Vendor. If the pricelist has errors in it, then the status will show failed.
The Vendor will receive an email that indicates where there are errors in the pricelist. If the Vendor
cannot figure out how to fix the errors in their pricelist, they should contact Jim Sutton via email
[email protected]. In their email they should attach the error message that was sent to them via
email.
Figure 17 – Uploaded Price List
Vendor Portal User Manual
V1.8 1/11/2017
14
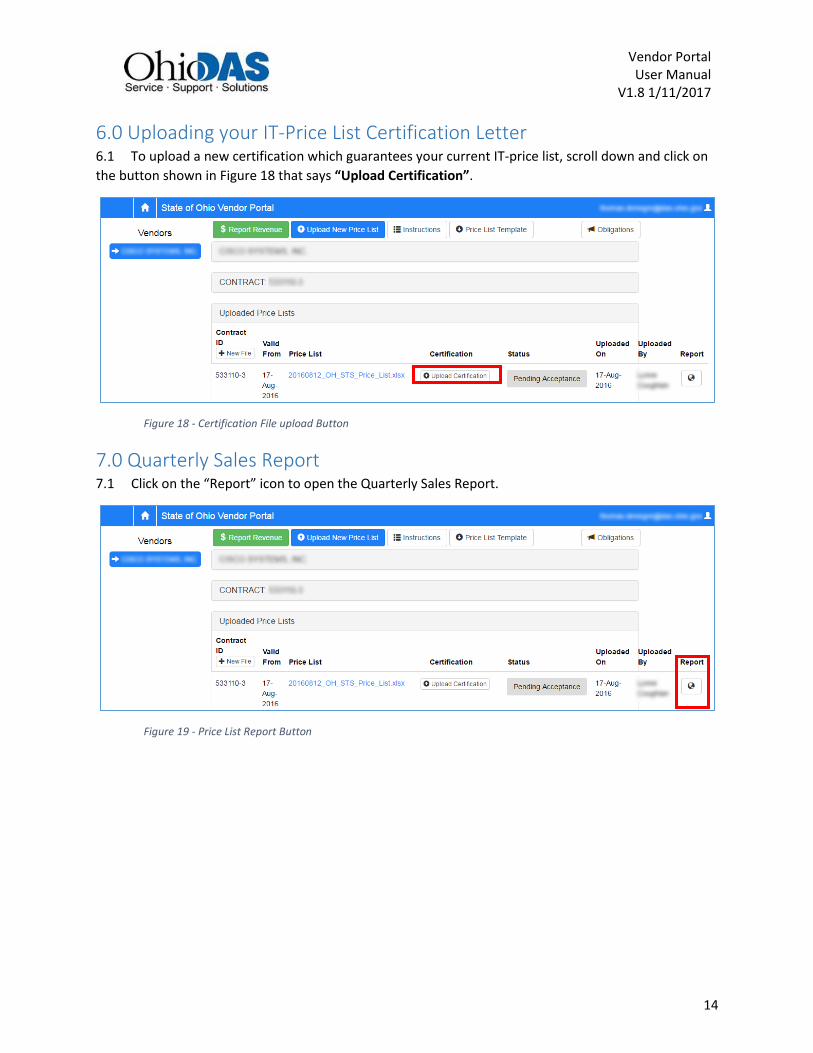
6.0 Uploading your IT-Price List Certification Letter 6.1 To upload a new certification which guarantees your current IT-price list, scroll down and click on
the button shown in Figure 18 that says “Upload Certification”.
Figure 18 - Certification File upload Button
7.0 Quarterly Sales Report 7.1 Click on the “Report” icon to open the Quarterly Sales Report.
Figure 19 - Price List Report Button
Vendor Portal User Manual
V1.8 1/11/2017
15
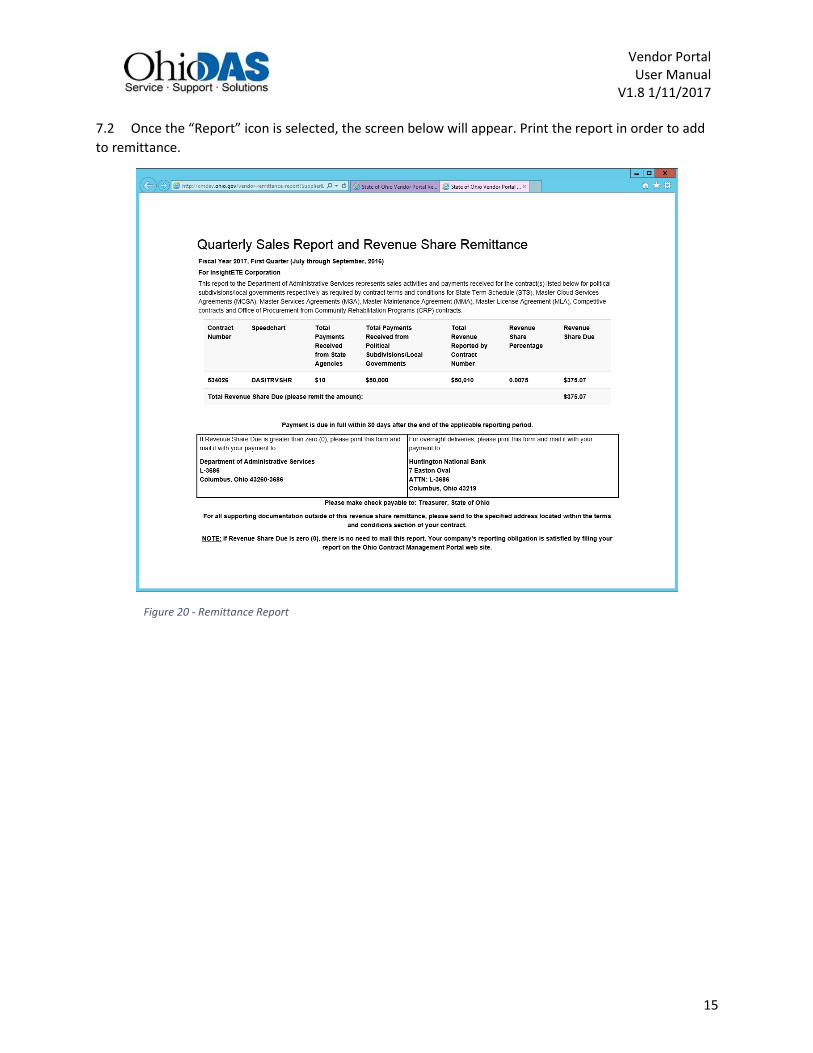
7.2 Once the “Report” icon is selected, the screen below will appear. Print the report in order to add
to remittance.
Figure 20 - Remittance Report