Embed Size (px)
Citation preview
V-Belt Installation, Maintenance & Storage
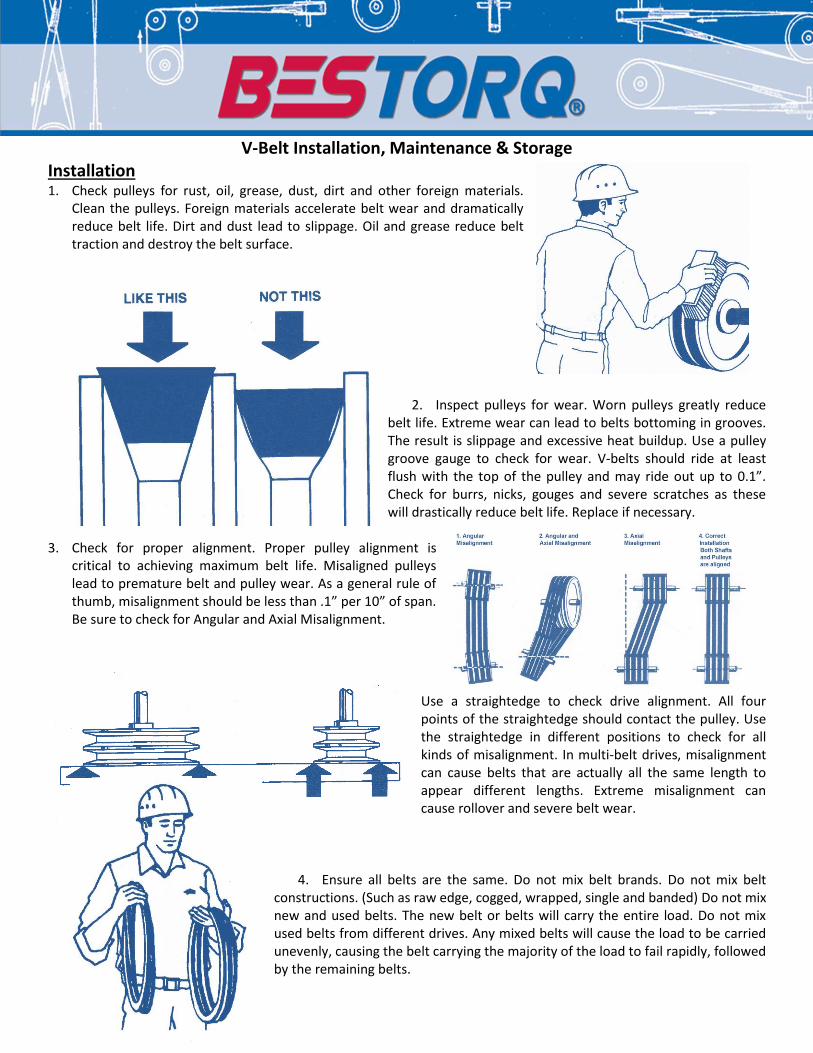
Installation 1. Check pulleys for rust, oil, grease, dust, dirt and other foreign materials.
Clean the pulleys. Foreign materials accelerate belt wear and dramatically reduce belt life. Dirt and dust lead to slippage. Oil and grease reduce belt traction and destroy the belt surface.
2. Inspect pulleys for wear. Worn pulleys greatly reduce belt life. Extreme wear can lead to belts bottoming in grooves. The result is slippage and excessive heat buildup. Use a pulley groove gauge to check for wear. V-belts should ride at least flush with the top of the pulley and may ride out up to 0.1”. Check for burrs, nicks, gouges and severe scratches as these will drastically reduce belt life. Replace if necessary.
3. Check for proper alignment. Proper pulley alignment is critical to achieving maximum belt life. Misaligned pulleys lead to premature belt and pulley wear. As a general rule of thumb, misalignment should be less than .1” per 10” of span. Be sure to check for Angular and Axial Misalignment.
Use a straightedge to check drive alignment. All four points of the straightedge should contact the pulley. Use the straightedge in different positions to check for all kinds of misalignment. In multi-belt drives, misalignment can cause belts that are actually all the same length to appear different lengths. Extreme misalignment can cause rollover and severe belt wear.
4. Ensure all belts are the same. Do not mix belt brands. Do not mix belt constructions. (Such as raw edge, cogged, wrapped, single and banded) Do not mix new and used belts. The new belt or belts will carry the entire load. Do not mix used belts from different drives. Any mixed belts will cause the load to be carried unevenly, causing the belt carrying the majority of the load to fail rapidly, followed by the remaining belts.
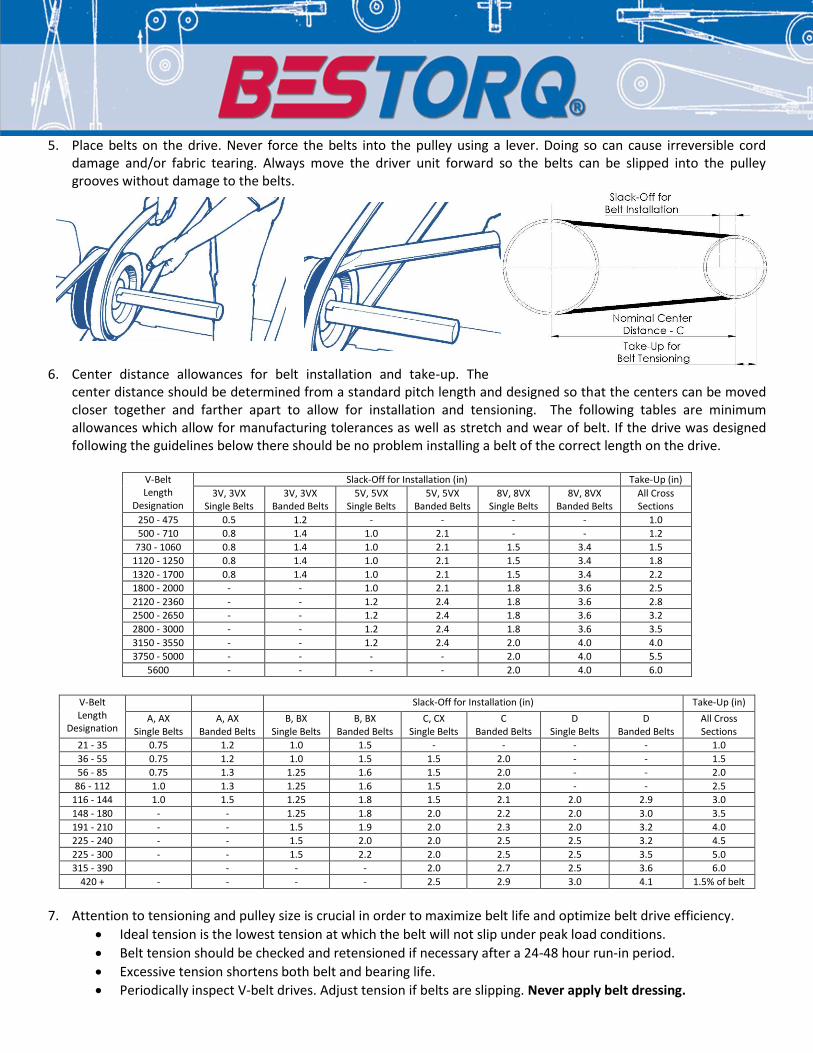
5. Place belts on the drive. Never force the belts into the pulley using a lever. Doing so can cause irreversible cord
damage and/or fabric tearing. Always move the driver unit forward so the belts can be slipped into the pulley grooves without damage to the belts.
6. Center distance allowances for belt installation and take-up. The
center distance should be determined from a standard pitch length and designed so that the centers can be moved closer together and farther apart to allow for installation and tensioning. The following tables are minimum allowances which allow for manufacturing tolerances as well as stretch and wear of belt. If the drive was designed following the guidelines below there should be no problem installing a belt of the correct length on the drive.
V-Belt Length
Designation
Slack-Off for Installation (in) Take-Up (in)
3V, 3VX Single Belts
3V, 3VX Banded Belts
5V, 5VX Single Belts
5V, 5VX Banded Belts
8V, 8VX Single Belts
8V, 8VX Banded Belts
All Cross Sections
250 - 475 0.5 1.2 - - - - 1.0
500 - 710 0.8 1.4 1.0 2.1 - - 1.2
730 - 1060 0.8 1.4 1.0 2.1 1.5 3.4 1.5
1120 - 1250 0.8 1.4 1.0 2.1 1.5 3.4 1.8
1320 - 1700 0.8 1.4 1.0 2.1 1.5 3.4 2.2
1800 - 2000 - - 1.0 2.1 1.8 3.6 2.5
2120 - 2360 - - 1.2 2.4 1.8 3.6 2.8
2500 - 2650 - - 1.2 2.4 1.8 3.6 3.2
2800 - 3000 - - 1.2 2.4 1.8 3.6 3.5
3150 - 3550 - - 1.2 2.4 2.0 4.0 4.0
3750 - 5000 - - - - 2.0 4.0 5.5
5600 - - - - 2.0 4.0 6.0
V-Belt Length
Designation
Slack-Off for Installation (in) Take-Up (in)
A, AX Single Belts
A, AX Banded Belts
B, BX Single Belts
B, BX Banded Belts
C, CX Single Belts
C Banded Belts
D Single Belts
D Banded Belts
All Cross Sections
21 - 35 0.75 1.2 1.0 1.5 - - - - 1.0
36 - 55 0.75 1.2 1.0 1.5 1.5 2.0 - - 1.5
56 - 85 0.75 1.3 1.25 1.6 1.5 2.0 - - 2.0
86 - 112 1.0 1.3 1.25 1.6 1.5 2.0 - - 2.5
116 - 144 1.0 1.5 1.25 1.8 1.5 2.1 2.0 2.9 3.0
148 - 180 - - 1.25 1.8 2.0 2.2 2.0 3.0 3.5
191 - 210 - - 1.5 1.9 2.0 2.3 2.0 3.2 4.0
225 - 240 - - 1.5 2.0 2.0 2.5 2.5 3.2 4.5
225 - 300 - - 1.5 2.2 2.0 2.5 2.5 3.5 5.0
315 - 390 - - - 2.0 2.7 2.5 3.6 6.0
420 + - - - - 2.5 2.9 3.0 4.1 1.5% of belt
7. Attention to tensioning and pulley size is crucial in order to maximize belt life and optimize belt drive efficiency.
Ideal tension is the lowest tension at which the belt will not slip under peak load conditions.
Belt tension should be checked and retensioned if necessary after a 24-48 hour run-in period.
Excessive tension shortens both belt and bearing life.
Periodically inspect V-belt drives. Adjust tension if belts are slipping. Never apply belt dressing.
Used Belt New Belt Used Belt New Belt
1000 - 2500 3.6 5.2 4.0 6.0
2501 - 4000 2.8 4.0 3.2 4.8
1000 - 2500 7.2 10.8 8.0 12.0
2501 - 4000 5.6 8.2 6.6 9.8
1000 - 2500 8.8 13.2 9.8 14.6
2501 - 4000 7.4 11.4 8.6 12.8
1000 - 2500 10.6 15.6 11.4 18.4
2501 - 4000 9.2 13.6 10.2 15.2
860 - 2500 9.6 14.4
2501 - 4000 8.2 12.4
860 - 2500 10.4 15.8 14.2 21.0
2501 - 4000 9.0 13.2 14.2 18.2
860 - 2500 12.4 18.8 16.8 24.8
2501 - 4000 12.0 13.6 14.6 21.4
500 - 1740 22.6 34.0 29.4 43.8
1741 - 3000 18.8 27.2 23.8 35.0
500 - 1740 28.0 41.6 31.6 47.0
1741 - 3000 25.0 36.6 29.0 43.2
200 - 850 49.4 74.2
851 - 1500 42.2 62.8
200 - 850 60.8 90.4
851 - 1500 51.2 76.0
1000 - 2500 0.0 0.0 6.6 9.8
2501 - 4000 0.0 0.0 5.8 8.6
1000 - 2500 7.4 10.2 8.4 12.4
2501 - 4000 6.0 9.0 7.6 11.2
1000 - 2500 9.8 14.6 10.6 15.6
2501 - 4000 8.6 13.2 9.6 14.6
500 - 1749 0.0 0.0 20.0 30.4
1750 - 3000 0.0 0.0 17.8 26.4
3001 - 4000 0.0 0.0 11.2 17.0
500 - 1740 25.2 37.8 29.6 44.2
1741 - 3000 22.4 33.0 27.4 40.2
500 - 1740 31.0 46.8 34.2 51.0
1741 - 3000 29.0 43.6 33.6 50.0
200 - 850 66.0 99.0
851 - 2100 54.0 79.8
200 - 850 79.0 118.0
851 - 1500 70.2 105.6
750 - 2500 11.1 16.7
2501 - 4000 9.0 13.5
1000 - 2500 14.7 22.1
2501 - 4000 12.9 19.4
200 - 500 42.0 63.0
500 - 1250 36.0 54.0
1251 - 1900 33.6 50.4
1901 - 3000 32.0 48.0
200 - 740 53.2 79.8
741 - 1250 46.5 69.8
1251 - 2250 43.5 65.3
200 - 550 89.6 134.4
551 - 800 78.0 117.0
851 - 1150 71.2 106.8
1151 - 2100 67.2 100.8
200-550 132.0 198.0
551-850 124.0 186.0
851 - 2100 115.0 172.5
Deflection= 1/32 of belt spanBelt
Cross
Section
Smallest
Pulley
Diameter
Range
RPM Range
Belt Deflection Setting
Uncogged Single V-Belts
and Uncogged Banded V-
Belts
Cogged V-Belts and
Cogged Banded V-Belts
5L, B, BX
3.4 - 4.2
4.4 - 5.6
5.8 - 8.6
3.0 - 3.6
3.8 - 4.8
5.0 - 7.0
3V, 3VX
2.2 - 2.4
2.65 - 3.65
4.12 - 6.90
C, CX
7.0 - 9.0
9.5 - 16.l0
D
12.0 - 16.0
18.0 - 20.0
18.0 - 22.4
3VK
2.65 - 3.65
4.12 - 6.90
5V, 5VX
4.4 - 6.7
7.1 - 10.9
11.8 - 16.0
2.0 - 2.9
4L, A, AX
5VK
7.1 - 10.9
11.8 - 16.0
8VK
12.5 - 20.0
21.2 - 22.4
8V
12.5 - 17.0
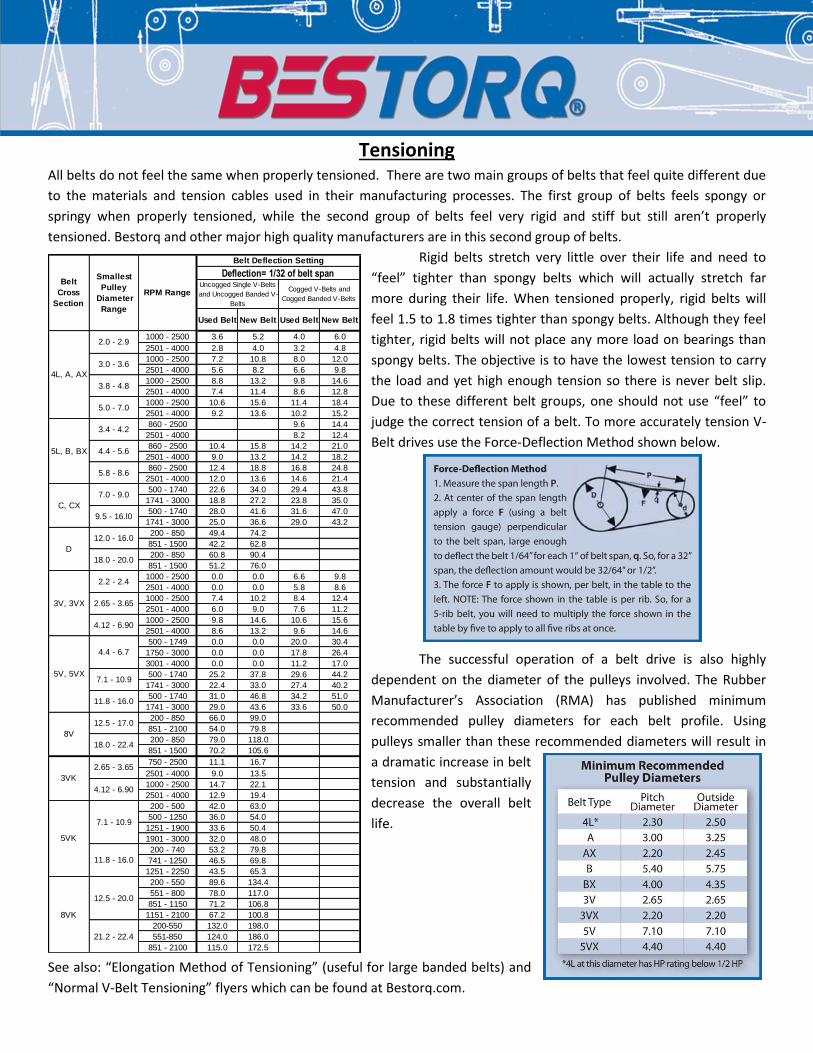
Tensioning All belts do not feel the same when properly tensioned. There are two main groups of belts that feel quite different due
to the materials and tension cables used in their manufacturing processes. The first group of belts feels spongy or
springy when properly tensioned, while the second group of belts feel very rigid and stiff but still aren’t properly
tensioned. Bestorq and other major high quality manufacturers are in this second group of belts.
Rigid belts stretch very little over their life and need to
“feel” tighter than spongy belts which will actually stretch far
more during their life. When tensioned properly, rigid belts will
feel 1.5 to 1.8 times tighter than spongy belts. Although they feel
tighter, rigid belts will not place any more load on bearings than
spongy belts. The objective is to have the lowest tension to carry
the load and yet high enough tension so there is never belt slip.
Due to these different belt groups, one should not use “feel” to
judge the correct tension of a belt. To more accurately tension V-
Belt drives use the Force-Deflection Method shown below.
The successful operation of a belt drive is also highly
dependent on the diameter of the pulleys involved. The Rubber
Manufacturer’s Association (RMA) has published minimum
recommended pulley diameters for each belt profile. Using
pulleys smaller than these recommended diameters will result in
a dramatic increase in belt
tension and substantially
decrease the overall belt
life.
See also: “Elongation Method of Tensioning” (useful for large banded belts) and
“Normal V-Belt Tensioning” flyers which can be found at Bestorq.com.
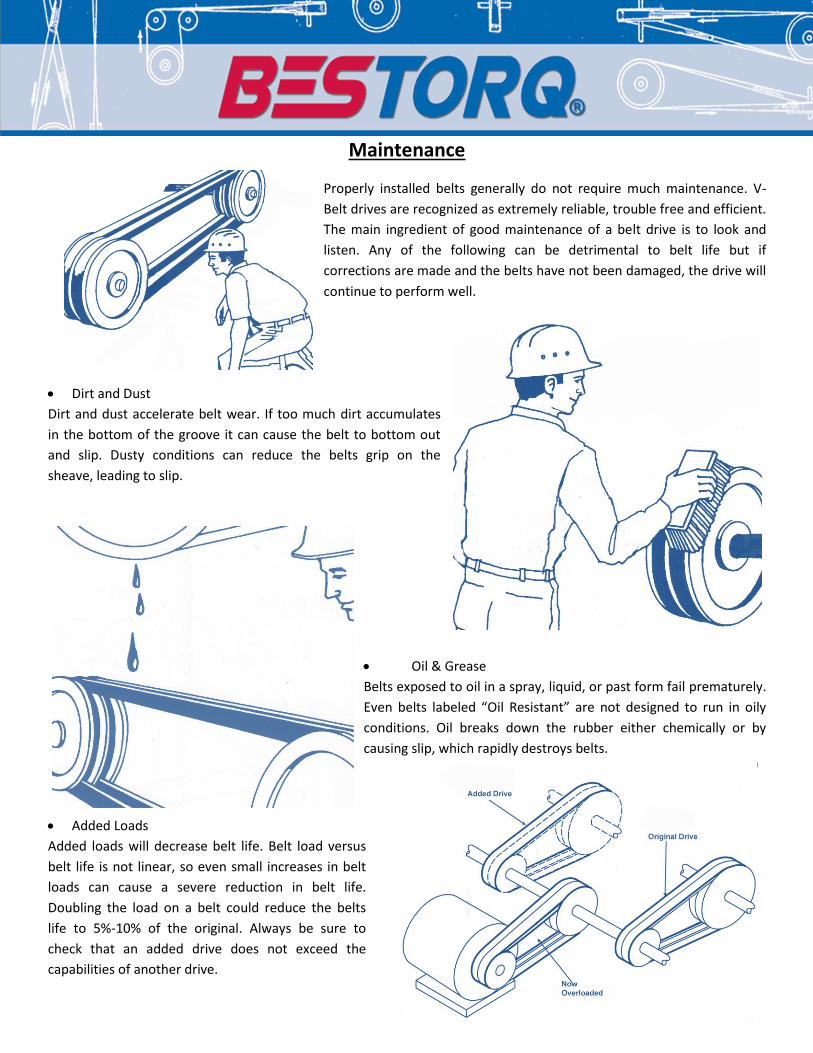
Maintenance
Properly installed belts generally do not require much maintenance. V-
Belt drives are recognized as extremely reliable, trouble free and efficient.
The main ingredient of good maintenance of a belt drive is to look and
listen. Any of the following can be detrimental to belt life but if
corrections are made and the belts have not been damaged, the drive will
continue to perform well.
Dirt and Dust
Dirt and dust accelerate belt wear. If too much dirt accumulates
in the bottom of the groove it can cause the belt to bottom out
and slip. Dusty conditions can reduce the belts grip on the
sheave, leading to slip.
Oil & Grease
Belts exposed to oil in a spray, liquid, or past form fail prematurely.
Even belts labeled “Oil Resistant” are not designed to run in oily
conditions. Oil breaks down the rubber either chemically or by
causing slip, which rapidly destroys belts.
Added Loads
Added loads will decrease belt life. Belt load versus
belt life is not linear, so even small increases in belt
loads can cause a severe reduction in belt life.
Doubling the load on a belt could reduce the belts
life to 5%-10% of the original. Always be sure to
check that an added drive does not exceed the
capabilities of another drive.
Squeal & Chirp
A squealing noise is an indication of belt slip and is most often due to insufficient belt
tension. If the drive is properly tensioned (according to the table), the squealing could be
due to dirt, oil, grease, misalignment or belt overload. If the cause of belt squeal is not
found and eliminated, belt life will be dramatically reduced. A belt “chirp” sounds
somewhat like a chirping bird, hence the name, and is often caused by misalignment. Dust
can also be a contributing factor. Extremely wet or dry conditions can also cause chirp.
Adding belt dressing will not fix the problem; it will only degrade the surface of the belt
and shorten belt life. Chirps are often annoying but do not
significantly shorten belt life.
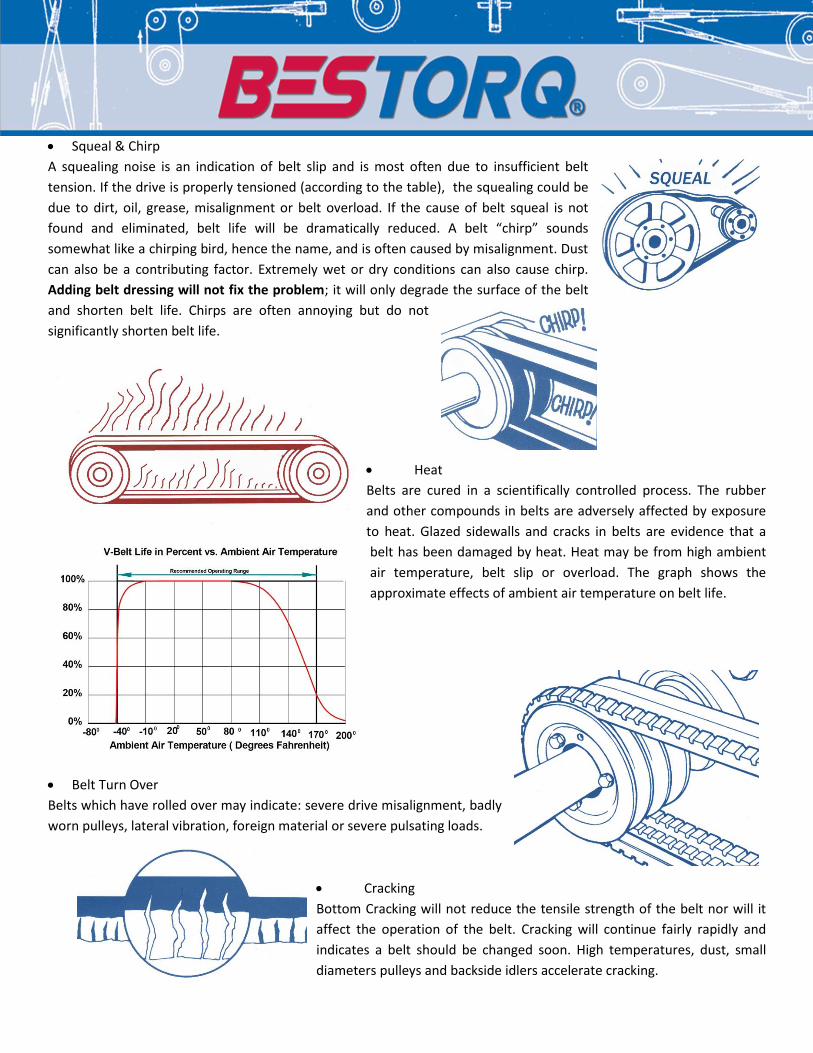
Heat
Belts are cured in a scientifically controlled process. The rubber
and other compounds in belts are adversely affected by exposure
to heat. Glazed sidewalls and cracks in belts are evidence that a
belt has been damaged by heat. Heat may be from high ambient
air temperature, belt slip or overload. The graph shows the
approximate effects of ambient air temperature on belt life.
Belt Turn Over
Belts which have rolled over may indicate: severe drive misalignment, badly
worn pulleys, lateral vibration, foreign material or severe pulsating loads.
Cracking
Bottom Cracking will not reduce the tensile strength of the belt nor will it
affect the operation of the belt. Cracking will continue fairly rapidly and
indicates a belt should be changed soon. High temperatures, dust, small
diameters pulleys and backside idlers accelerate cracking.
Foreign Matter
The presence of foreign material in the drive can cause
broken belts, rollover or excessive wear on both pulleys and
belts.
Belt Dressing
As stated in the installation notes, NEVER use any king of belt dressing. Belt dressing
chemically attacks the surface of the belt to make it tacky and dramatically reduces belt life.
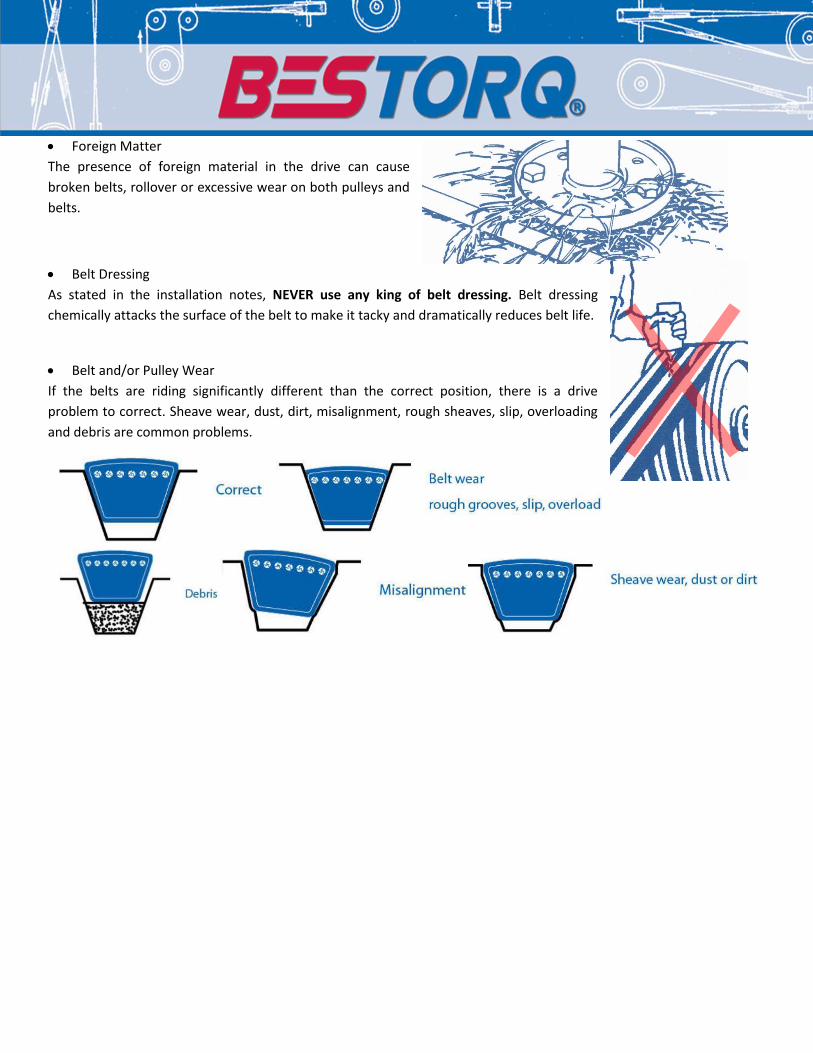
Belt and/or Pulley Wear
If the belts are riding significantly different than the correct position, there is a drive
problem to correct. Sheave wear, dust, dirt, misalignment, rough sheaves, slip, overloading
and debris are common problems.
Proper Storage Proper care of a belt is not limited to the time during which the belt is operating on equipment; it also includes
proper storage techniques. In order to prevent reduced belt life, proper storage techniques must be followed for all types of belts. Do’s
Belts should be stored in a cool and dry environment out of direct sunlight. Ideally, belts should be stored in conditions less than 85°F and 75% relative humidity. Adding 15°F to the storage temperature decreases belt life by approximately 50%. Do not store belts at a temperature above 115°F
Store on shelves in boxes or containers.
If V-Belts are stored on a wall rack, use a saddle with a diameter at least as large as the minimum recommended sheave diameter for that cross section.
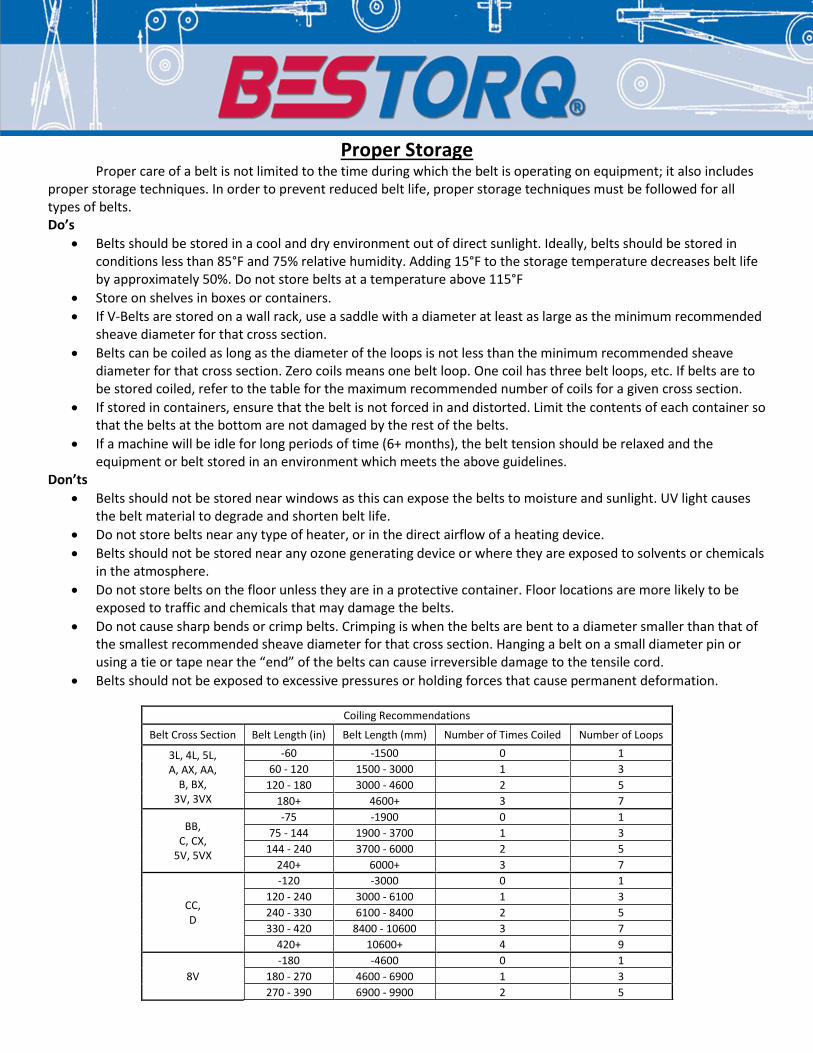
Belts can be coiled as long as the diameter of the loops is not less than the minimum recommended sheave diameter for that cross section. Zero coils means one belt loop. One coil has three belt loops, etc. If belts are to be stored coiled, refer to the table for the maximum recommended number of coils for a given cross section.
If stored in containers, ensure that the belt is not forced in and distorted. Limit the contents of each container so that the belts at the bottom are not damaged by the rest of the belts.
If a machine will be idle for long periods of time (6+ months), the belt tension should be relaxed and the equipment or belt stored in an environment which meets the above guidelines.
Don’ts
Belts should not be stored near windows as this can expose the belts to moisture and sunlight. UV light causes the belt material to degrade and shorten belt life.
Do not store belts near any type of heater, or in the direct airflow of a heating device.
Belts should not be stored near any ozone generating device or where they are exposed to solvents or chemicals in the atmosphere.
Do not store belts on the floor unless they are in a protective container. Floor locations are more likely to be exposed to traffic and chemicals that may damage the belts.
Do not cause sharp bends or crimp belts. Crimping is when the belts are bent to a diameter smaller than that of the smallest recommended sheave diameter for that cross section. Hanging a belt on a small diameter pin or using a tie or tape near the “end” of the belts can cause irreversible damage to the tensile cord.
Belts should not be exposed to excessive pressures or holding forces that cause permanent deformation.
Coiling Recommendations
Belt Cross Section Belt Length (in) Belt Length (mm) Number of Times Coiled Number of Loops
3L, 4L, 5L, A, AX, AA,
B, BX, 3V, 3VX
-60 -1500 0 1
60 - 120 1500 - 3000 1 3
120 - 180 3000 - 4600 2 5
180+ 4600+ 3 7
BB, C, CX,
5V, 5VX
-75 -1900 0 1
75 - 144 1900 - 3700 1 3
144 - 240 3700 - 6000 2 5
240+ 6000+ 3 7
CC, D
-120 -3000 0 1
120 - 240 3000 - 6100 1 3
240 - 330 6100 - 8400 2 5
330 - 420 8400 - 10600 3 7
420+ 10600+ 4 9
8V
-180 -4600 0 1
180 - 270 4600 - 6900 1 3
270 - 390 6900 - 9900 2 5

390 - 480 9900 - 12200 3 7
480+ 12200+ 4 9