Embed Size (px)
Citation preview
UTILITY UNDERCAR CONVEYOR
12" & 16" SELF-POWERED12" & 16" AUXILIARY POWERED
OWNER'S MANUAL
19014000 (08/06/98)
Contents
Introduction . . . . . . . . . . . . . . . . . . . . . . . . . . . . . . . . . . . . . . . . . . 1Warnings . . . . . . . . . . . . . . . . . . . . . . . . . . . . . . . . . . . . . . . . . . . 1Statement of Responsibility . . . . . . . . . . . . . . . . . . . . . . . . . . . . . 2Safety Precautions . . . . . . . . . . . . . . . . . . . . . . . . . . . . . . . . . . . . 3Specifications . . . . . . . . . . . . . . . . . . . . . . . . . . . . . . . . . . . . . . . . 4Dimensional Drawing . . . . . . . . . . . . . . . . . . . . . . . . . . . . . . . . . . 5Lubrication and Maintenance . . . . . . . . . . . . . . . . . . . . . . . . . . . . 6
Repair Parts:12" Self-Powered & Quick Tatch Kits . . . . . . . . . . . . . . . . . . . . 8-916" Self-Powered & Quick Tatch Kits . . . . . . . . . . . . . . . . . . 10-1112" Auxiliary Powered & Quick Tatch Kits . . . . . . . . . . . . . . 12-1316" Auxiliary Powered & Quick Tatch Kits . . . . . . . . . . . . . . 14-15Pan Extensions . . . . . . . . . . . . . . . . . . . . . . . . . . . . . . . . . . . 16-17
Assembly Instructions . . . . . . . . . . . . . . . . . . . . . . . . . . . . . . 18-23
1
Introduction
Read this manual carefully. It will instruct you on how to operate andservice your machine safely and correctly. Failure to do so could resultin personal injury and/or equipment damage.
WARNINGS!!!
1. DO NOT service utility undercar before stopping all motors andlocking out power source.
2. DO NOT operate utility undercar before checking for properclearance for operation and clearing the area ofpeople.
3. DO NOT operate the utility undercar without familiarizingyourself with the operator's manual.
4. DO NOT operate the utility undercar if guards or shields havebeen removed.
2
Owner's and User'sStatement of Responsibility
Utility Undercar Conveyor
I have had explained to me and accept responsibility for the following:
I understand this utility undercar conveyor is a heavy, powerful, and bulkyunit of equipment capable of causing injury or death when usedimproperly. I accept the responsibility associated therewith.
I understand the danger of high voltage power lines in relation to highprofile equipment and accept responsibility for its safe use in dangeroussurroundings.
I understand that neither I, any of my workers, nor anyone else should beallowed to work around the utility undercar conveyor area while it is inoperation, or unstabilized for any reason.
I understand the utility undercar can cause serious injury or deathinstantly. Therefore, I accept responsibility to avoid, and to cause myworkers to avoid, working in an area or manner that would causeunnecessary risk of injury or death.
I hereby acknowledge that I have been adequately instructed in the safeoperation of this utility undercar conveyor and accept responsibility forsame.
I recognize that this list of potential risk and dangers is not necessarilycomplete and agree to exercise good common sense and judgement inthe use of this utility undercar conveyor.
Owner
Date

3
Safety Precautions
1. Operator should read and understand operator's manualbefore operating utility undercar.
2. Never stand or climb on the undercar conveyor beforedisconnecting and locking out power source.
3. Disconnect and lock out power source before adjusting andservicing undercar conveyor.
4. Do not operate without guards and shields in place.
5. Stay away from hopper inlet when operating.
6. Stay away from moving belt when operating.
7. Keep area clean.
8. Operator should be familiar with controls and operationsequence prior to start up.
9. Read and understand all material safety data sheets (MSDS)for any chemical or material you are handling.
10. All electrical components should be wired by a qualifiedelectrician. All federal, state, and local codes should befollowed.
4
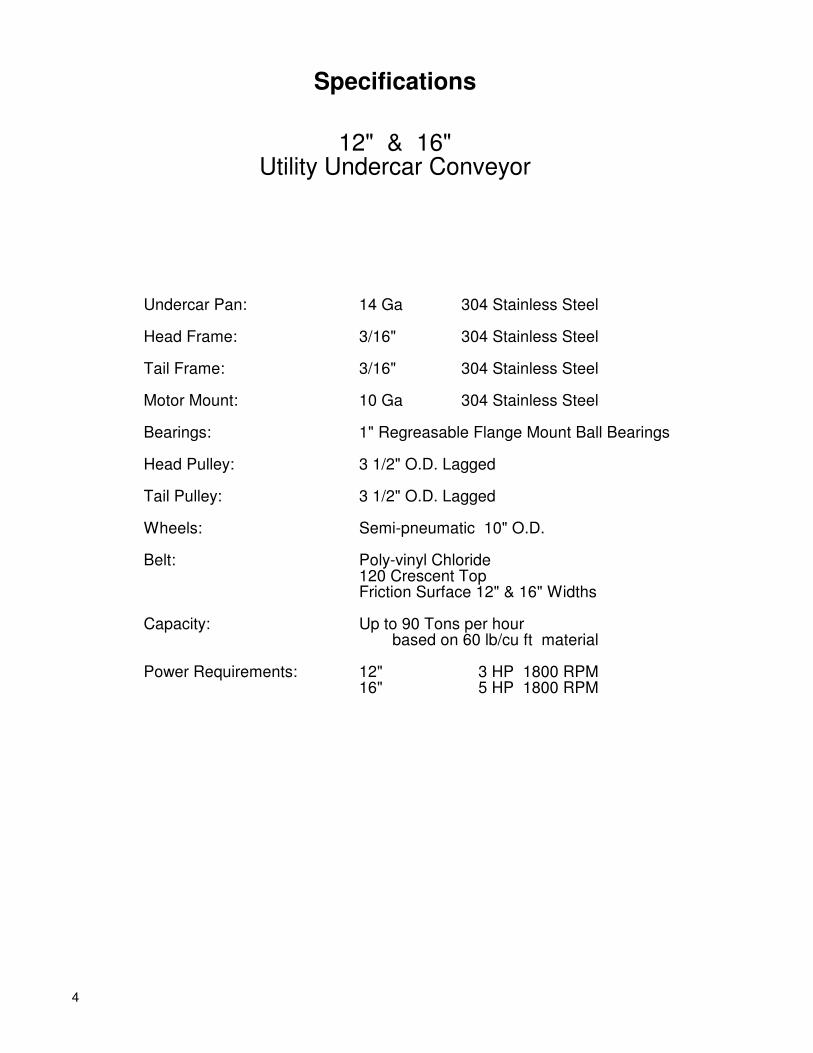
Specifications
12" & 16"Utility Undercar Conveyor
Undercar Pan: 14 Ga 304 Stainless Steel
Head Frame: 3/16" 304 Stainless Steel
Tail Frame: 3/16" 304 Stainless Steel
Motor Mount: 10 Ga 304 Stainless Steel
Bearings: 1" Regreasable Flange Mount Ball Bearings
Head Pulley: 3 1/2" O.D. Lagged
Tail Pulley: 3 1/2" O.D. Lagged
Wheels: Semi-pneumatic 10" O.D.
Belt: Poly-vinyl Chloride 120 Crescent TopFriction Surface 12" & 16" Widths
Capacity: Up to 90 Tons per hourbased on 60 lb/cu ft material
Power Requirements: 12" 3 HP 1800 RPM16" 5 HP 1800 RPM
5
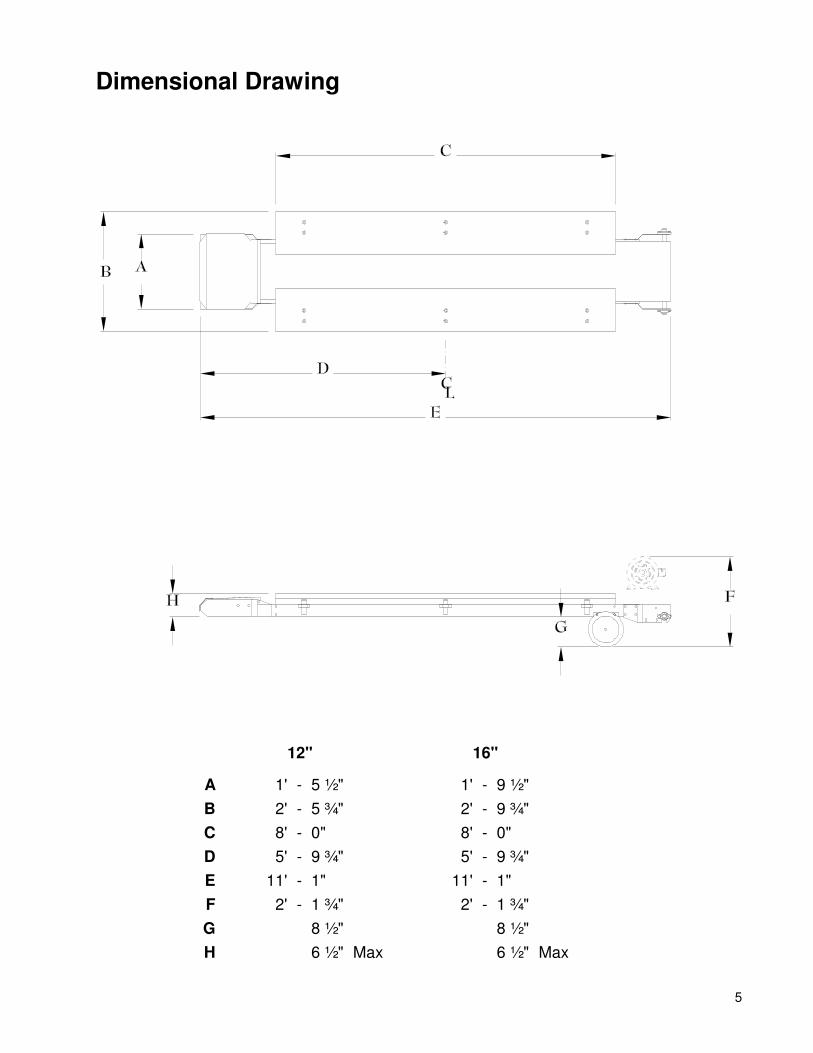
Dimensional Drawing
12" 16"
A 1' - 5 ½" 1' - 9 ½"B 2' - 5 ¾" 2' - 9 ¾"C 8' - 0" 8' - 0" D 5' - 9 ¾" 5' - 9 ¾"E 11' - 1" 11' - 1" F 2' - 1 ¾" 2' - 1 ¾"G 8 ½" 8 ½"H 6 ½" Max 6 ½" Max
6
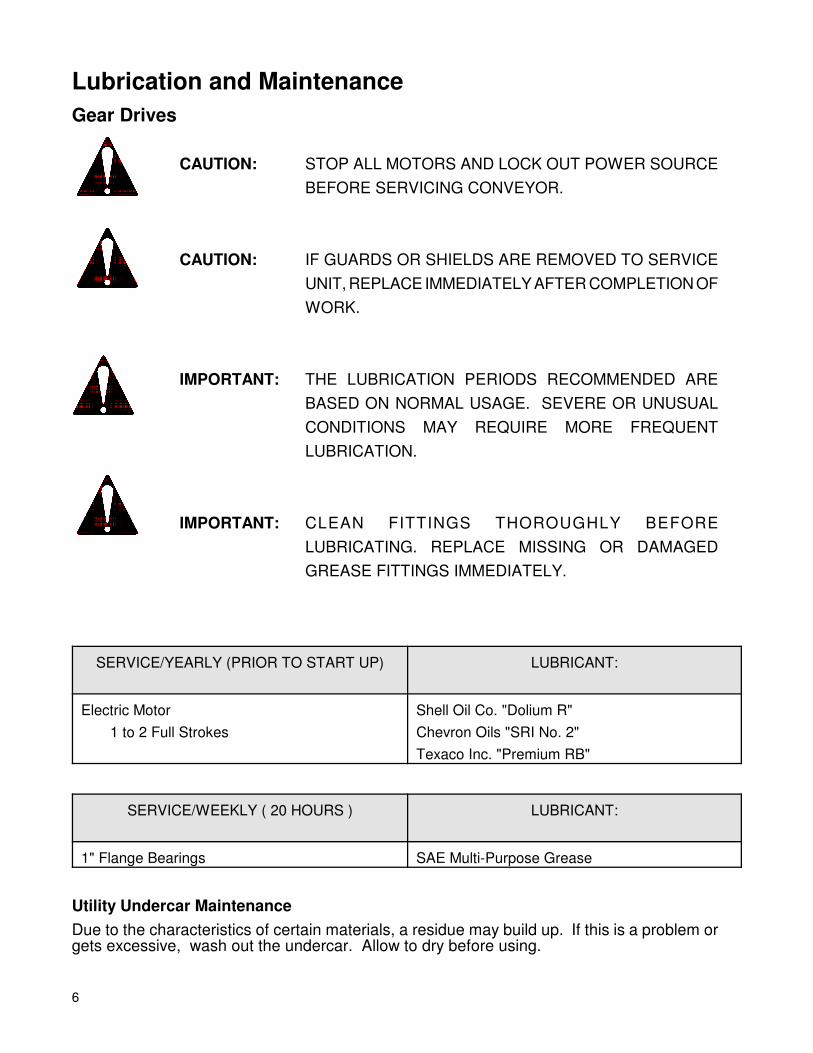
Lubrication and MaintenanceGear Drives
CAUTION: STOP ALL MOTORS AND LOCK OUT POWER SOURCEBEFORE SERVICING CONVEYOR.
CAUTION: IF GUARDS OR SHIELDS ARE REMOVED TO SERVICEUNIT, REPLACE IMMEDIATELY AFTER COMPLETION OFWORK.
IMPORTANT: THE LUBRICATION PERIODS RECOMMENDED AREBASED ON NORMAL USAGE. SEVERE OR UNUSUALCONDITIONS MAY REQUIRE MORE FREQUENTLUBRICATION.
IMPORTANT: CLEAN FITTINGS THOROUGHLY BEFORELUBRICATING. REPLACE MISSING OR DAMAGEDGREASE FITTINGS IMMEDIATELY.
SERVICE/YEARLY (PRIOR TO START UP) LUBRICANT:
Electric Motor 1 to 2 Full Strokes
Shell Oil Co. "Dolium R"Chevron Oils "SRI No. 2"Texaco Inc. "Premium RB"
SERVICE/WEEKLY ( 20 HOURS ) LUBRICANT:
1" Flange Bearings SAE Multi-Purpose Grease
Utility Undercar MaintenanceDue to the characteristics of certain materials, a residue may build up. If this is a problem orgets excessive, wash out the undercar. Allow to dry before using.

7
Notes
8
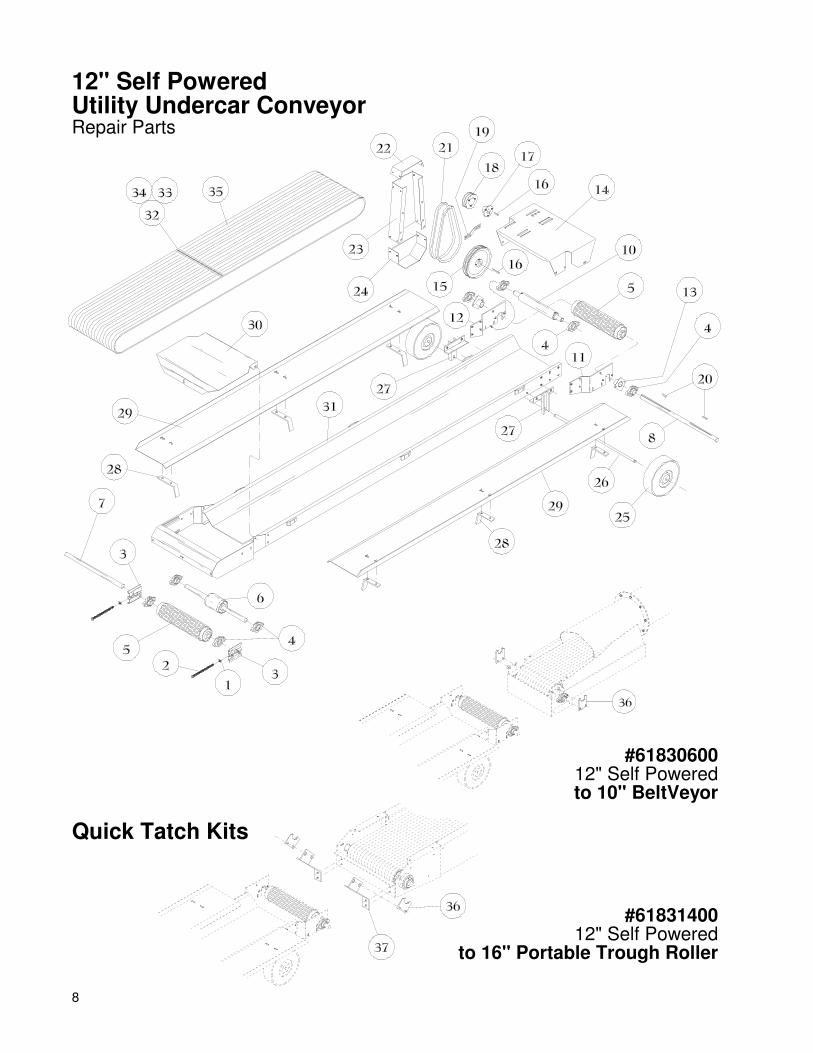
12" Self PoweredUtility Undercar ConveyorRepair Parts
#6183060012" Self Poweredto 10" BeltVeyor
Quick Tatch Kits
#6183140012" Self Powered
to 16" Portable Trough Roller
9
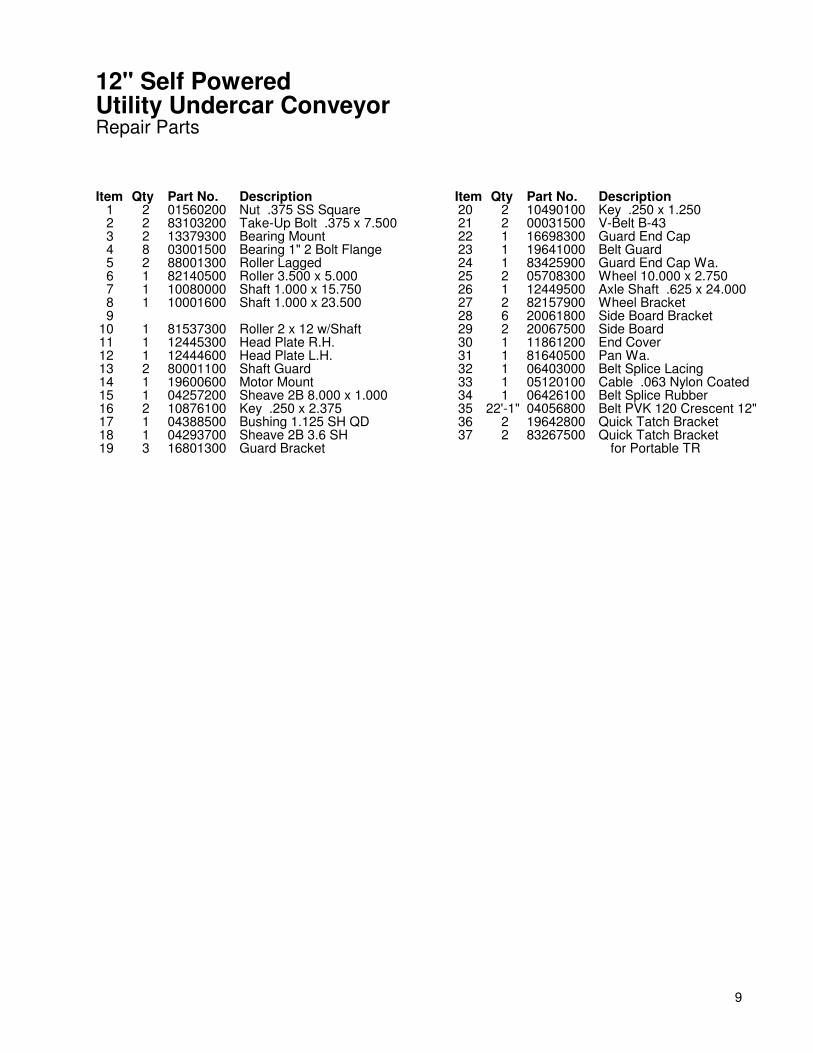
12" Self PoweredUtility Undercar ConveyorRepair Parts
Item Qty Part No. Description1 2 01560200 Nut .375 SS Square 2 2 83103200 Take-Up Bolt .375 x 7.5003 2 13379300 Bearing Mount4 8 03001500 Bearing 1" 2 Bolt Flange5 2 88001300 Roller Lagged6 1 82140500 Roller 3.500 x 5.0007 1 10080000 Shaft 1.000 x 15.7508 1 10001600 Shaft 1.000 x 23.5009
10 1 81537300 Roller 2 x 12 w/Shaft11 1 12445300 Head Plate R.H.12 1 12444600 Head Plate L.H.13 2 80001100 Shaft Guard14 1 19600600 Motor Mount15 1 04257200 Sheave 2B 8.000 x 1.00016 2 10876100 Key .250 x 2.37517 1 04388500 Bushing 1.125 SH QD18 1 04293700 Sheave 2B 3.6 SH19 3 16801300 Guard Bracket
Item Qty Part No. Description20 2 10490100 Key .250 x 1.25021 2 00031500 V-Belt B-4322 1 16698300 Guard End Cap23 1 19641000 Belt Guard24 1 83425900 Guard End Cap Wa.25 2 05708300 Wheel 10.000 x 2.75026 1 12449500 Axle Shaft .625 x 24.00027 2 82157900 Wheel Bracket28 6 20061800 Side Board Bracket29 2 20067500 Side Board30 1 11861200 End Cover31 1 81640500 Pan Wa.32 1 06403000 Belt Splice Lacing33 1 05120100 Cable .063 Nylon Coated34 1 06426100 Belt Splice Rubber35 22'-1" 04056800 Belt PVK 120 Crescent 12"36 2 19642800 Quick Tatch Bracket37 2 83267500 Quick Tatch Bracket
for Portable TR
10
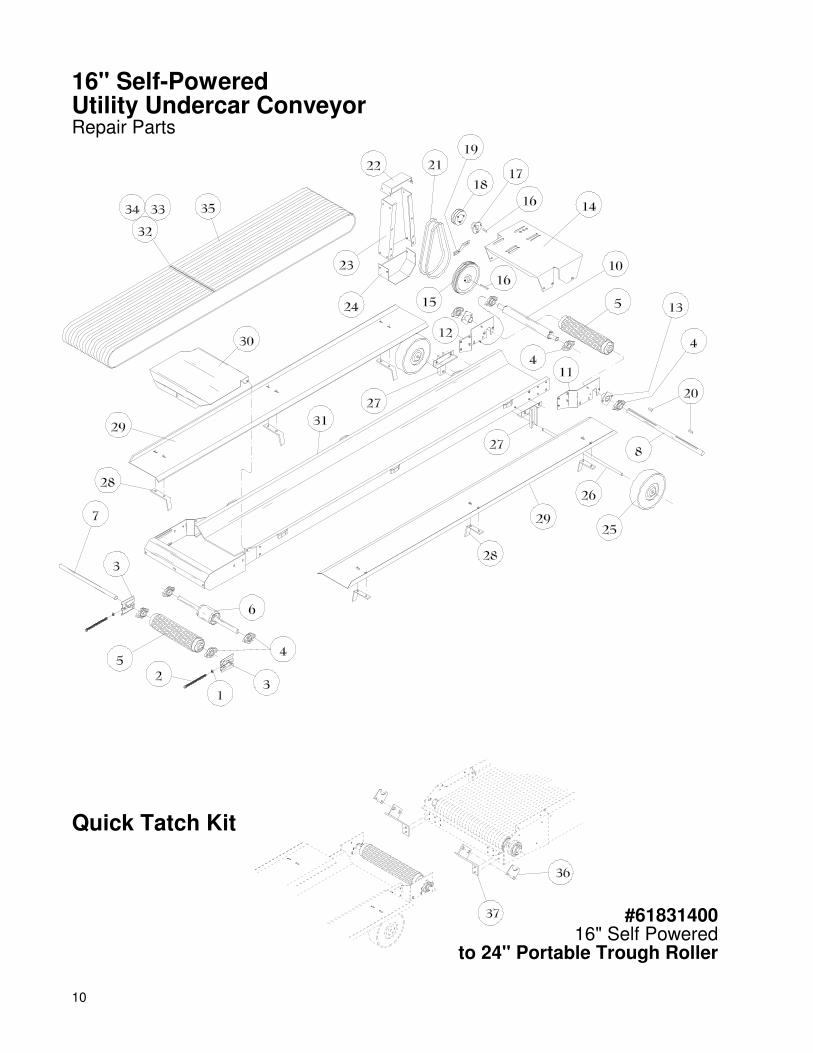
16" Self-PoweredUtility Undercar ConveyorRepair Parts
Quick Tatch Kit
#6183140016" Self Powered
to 24" Portable Trough Roller
11
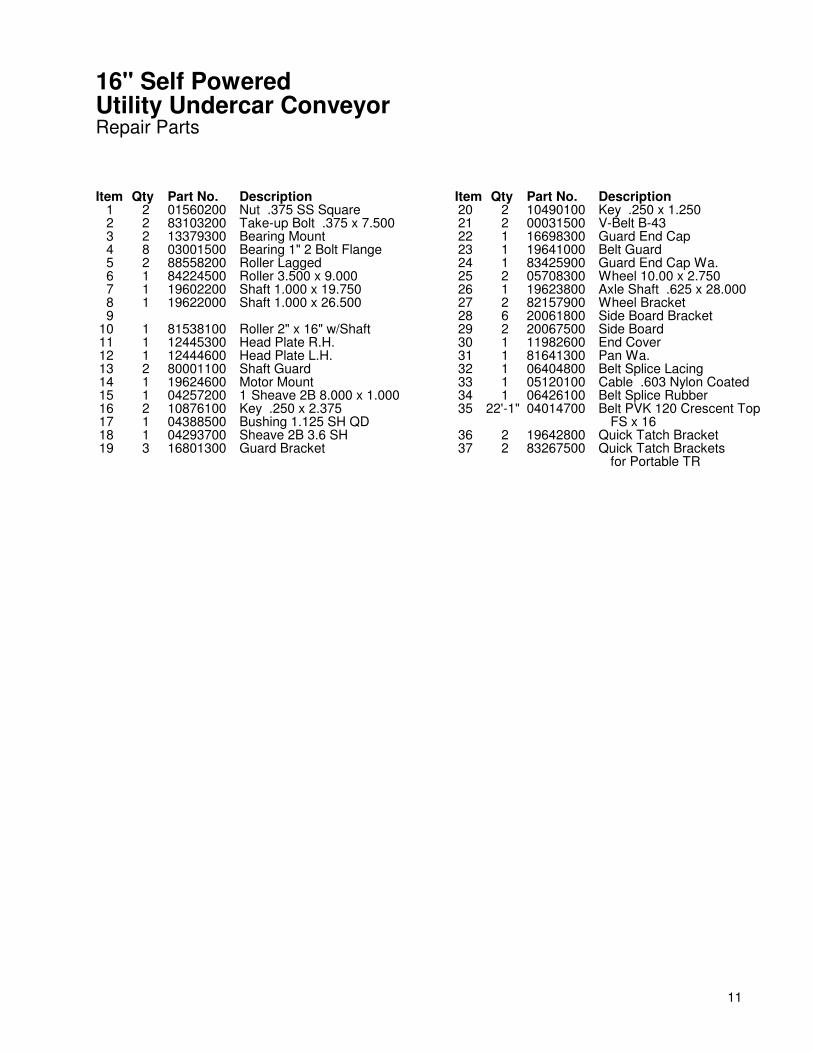
16" Self PoweredUtility Undercar ConveyorRepair Parts
Item Qty Part No. Description1 2 01560200 Nut .375 SS Square2 2 83103200 Take-up Bolt .375 x 7.5003 2 13379300 Bearing Mount4 8 03001500 Bearing 1" 2 Bolt Flange5 2 88558200 Roller Lagged6 1 84224500 Roller 3.500 x 9.0007 1 19602200 Shaft 1.000 x 19.7508 1 19622000 Shaft 1.000 x 26.5009
10 1 81538100 Roller 2" x 16" w/Shaft11 1 12445300 Head Plate R.H.12 1 12444600 Head Plate L.H.13 2 80001100 Shaft Guard14 1 19624600 Motor Mount15 1 04257200 1 Sheave 2B 8.000 x 1.00016 2 10876100 Key .250 x 2.37517 1 04388500 Bushing 1.125 SH QD18 1 04293700 Sheave 2B 3.6 SH19 3 16801300 Guard Bracket
Item Qty Part No. Description20 2 10490100 Key .250 x 1.25021 2 00031500 V-Belt B-4322 1 16698300 Guard End Cap23 1 19641000 Belt Guard24 1 83425900 Guard End Cap Wa.25 2 05708300 Wheel 10.00 x 2.75026 1 19623800 Axle Shaft .625 x 28.00027 2 82157900 Wheel Bracket28 6 20061800 Side Board Bracket29 2 20067500 Side Board30 1 11982600 End Cover31 1 81641300 Pan Wa.32 1 06404800 Belt Splice Lacing33 1 05120100 Cable .603 Nylon Coated34 1 06426100 Belt Splice Rubber35 22'-1" 04014700 Belt PVK 120 Crescent Top
FS x 1636 2 19642800 Quick Tatch Bracket37 2 83267500 Quick Tatch Brackets
for Portable TR

12
12" Auxiliary PoweredUtility Undercar ConveyorRepair Parts
Item Qty Part No. Description1 2 01560200 Nut .375 SS Square2 2 83103200 Take-Up Bolt .375 x 7.53 2 13379300 Bearing Mount4 8 03001500 Bearing 1" 2-Bolt Flange5 2 88001300 Roller Lagged6 1 82140500 Roller 3.500 x 5.0007 1 10080000 Shaft 1.000 x 15.7508 1 10001600 Shaft 1.000 x 23.5009 1 81537300 Roller 2" x 12" w/Shaft
10 1 12445300 Head Plate R.H.11 1 12444600 Head Plate L.H.12 1 80001100 Shaft Guard
Item Qty Part No. Description13 2 05708300 Wheel 10.000 x 2.75014 1 12449500 Axle Shaft .625 x 2415 2 82157900 Wheel Bracket16 6 20061800 Side Board Bracket17 2 20067500 Side Board18 1 11861200 End Cover19 1 81640500 Pan Wa.20 1 06403000 Belt Splice Lacing21 1 05120100 Cable .603 Nylon Coated22 1 06426100 Belt Splice Rubber23 22'-1' 04056800 Belt PVK 120
Crescent Top FS x 12"
13
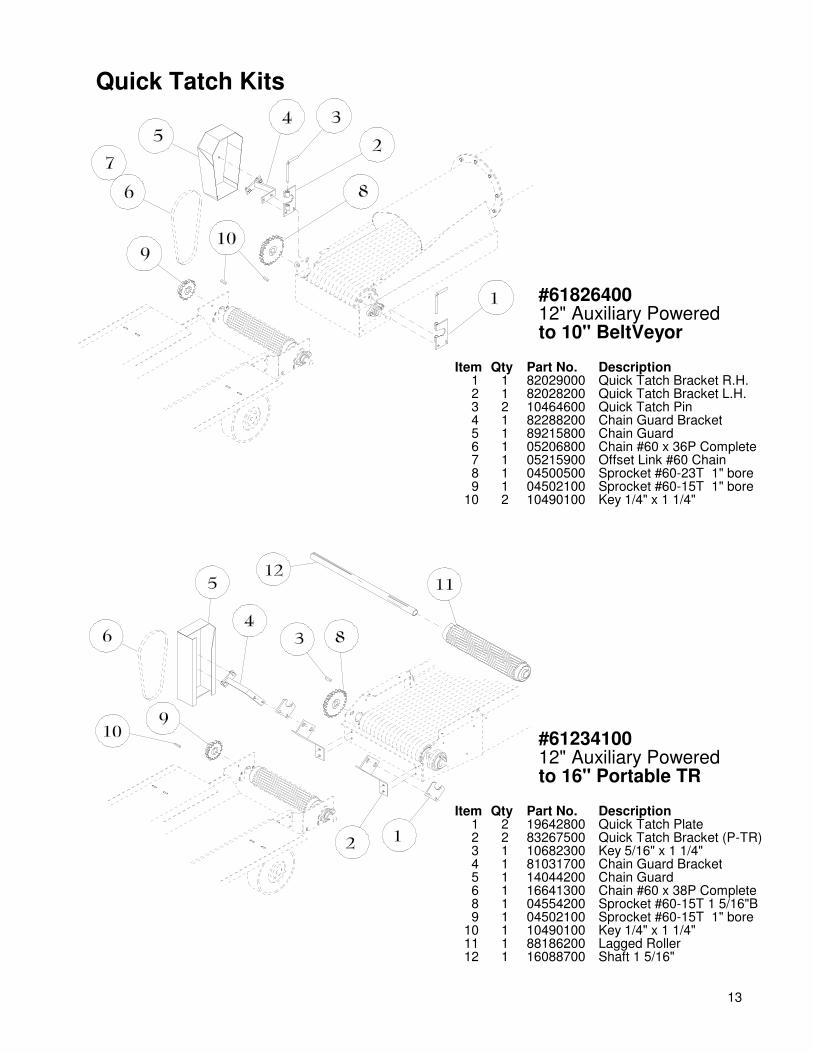
Quick Tatch Kits
#6182640012" Auxiliary Poweredto 10" BeltVeyor
Item Qty Part No. Description1 1 82029000 Quick Tatch Bracket R.H.2 1 82028200 Quick Tatch Bracket L.H.3 2 10464600 Quick Tatch Pin4 1 82288200 Chain Guard Bracket5 1 89215800 Chain Guard6 1 05206800 Chain #60 x 36P Complete7 1 05215900 Offset Link #60 Chain8 1 04500500 Sprocket #60-23T 1" bore9 1 04502100 Sprocket #60-15T 1" bore
10 2 10490100 Key 1/4" x 1 1/4"
#6123410012" Auxiliary Poweredto 16" Portable TR
Item Qty Part No. Description1 2 19642800 Quick Tatch Plate2 2 83267500 Quick Tatch Bracket (P-TR)3 1 10682300 Key 5/16" x 1 1/4"4 1 81031700 Chain Guard Bracket5 1 14044200 Chain Guard6 1 16641300 Chain #60 x 38P Complete8 1 04554200 Sprocket #60-15T 1 5/16"B9 1 04502100 Sprocket #60-15T 1" bore
10 1 10490100 Key 1/4" x 1 1/4"11 1 88186200 Lagged Roller12 1 16088700 Shaft 1 5/16"
14
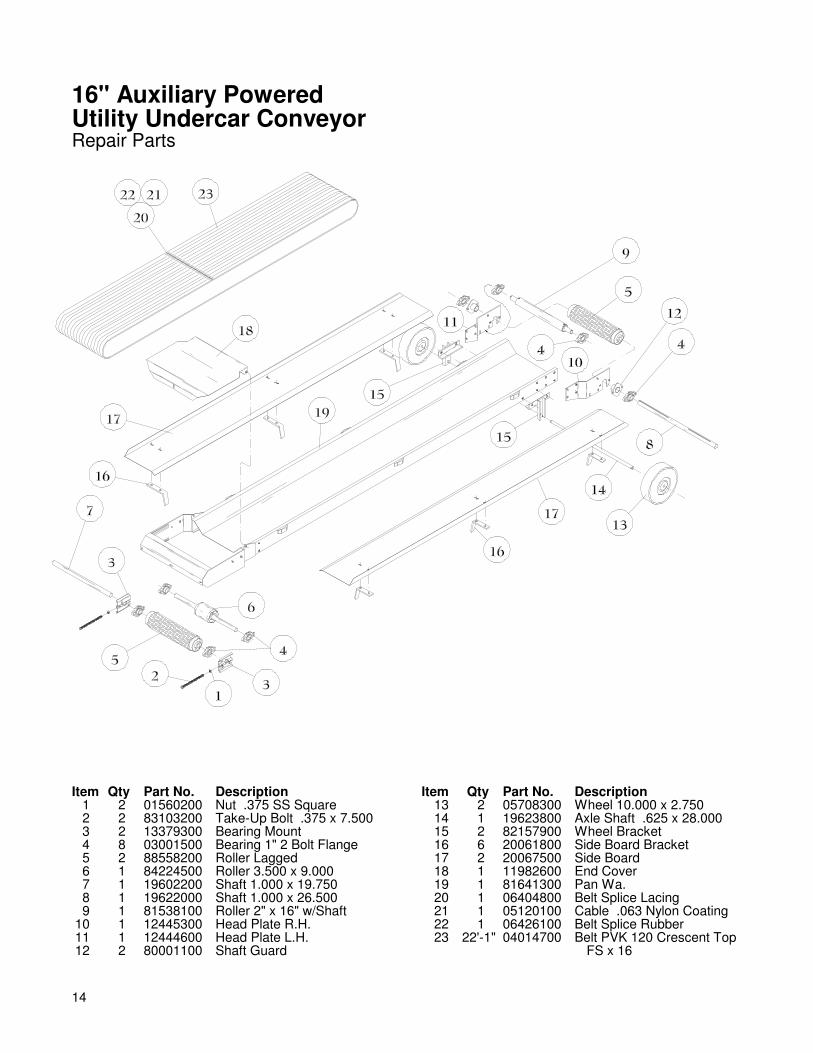
16" Auxiliary PoweredUtility Undercar ConveyorRepair Parts
Item Qty Part No. Description1 2 01560200 Nut .375 SS Square2 2 83103200 Take-Up Bolt .375 x 7.5003 2 13379300 Bearing Mount4 8 03001500 Bearing 1" 2 Bolt Flange5 2 88558200 Roller Lagged6 1 84224500 Roller 3.500 x 9.0007 1 19602200 Shaft 1.000 x 19.7508 1 19622000 Shaft 1.000 x 26.5009 1 81538100 Roller 2" x 16" w/Shaft
10 1 12445300 Head Plate R.H.11 1 12444600 Head Plate L.H.12 2 80001100 Shaft Guard
Item Qty Part No. Description13 2 05708300 Wheel 10.000 x 2.75014 1 19623800 Axle Shaft .625 x 28.00015 2 82157900 Wheel Bracket16 6 20061800 Side Board Bracket17 2 20067500 Side Board18 1 11982600 End Cover19 1 81641300 Pan Wa.20 1 06404800 Belt Splice Lacing21 1 05120100 Cable .063 Nylon Coating22 1 06426100 Belt Splice Rubber23 22'-1" 04014700 Belt PVK 120 Crescent Top
FS x 16
15
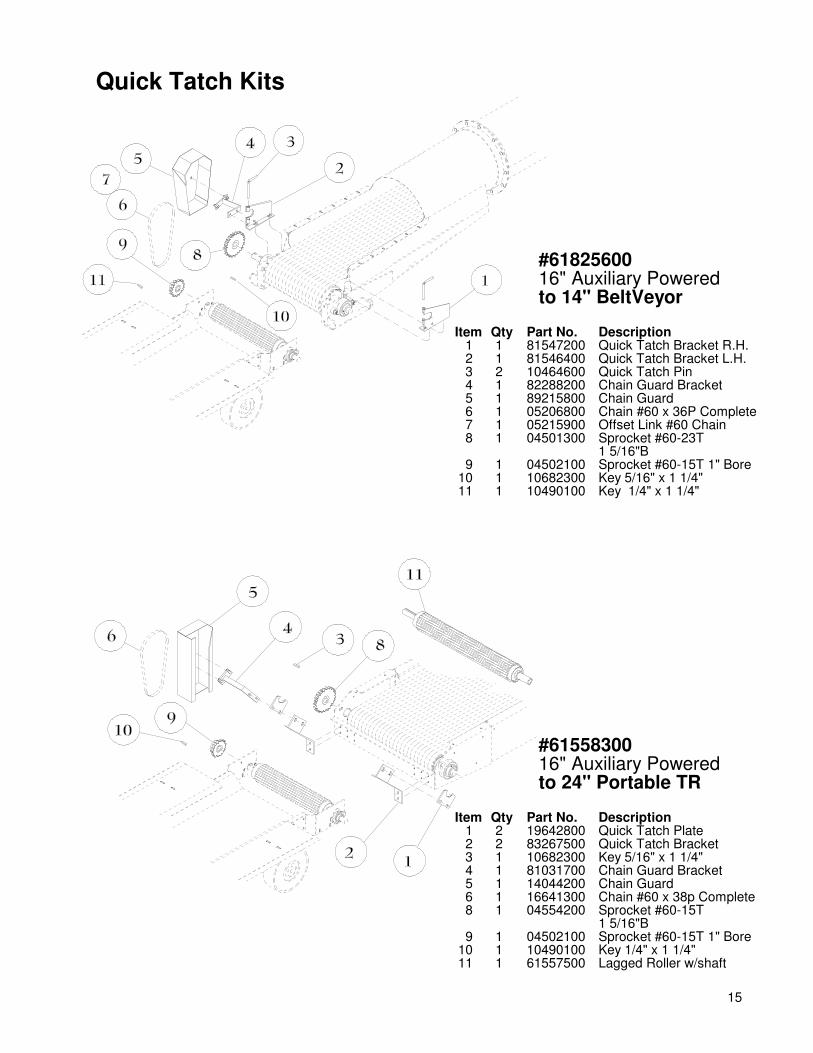
Quick Tatch Kits
#6182560016" Auxiliary Poweredto 14" BeltVeyor
Item Qty Part No. Description1 1 81547200 Quick Tatch Bracket R.H.2 1 81546400 Quick Tatch Bracket L.H.3 2 10464600 Quick Tatch Pin4 1 82288200 Chain Guard Bracket5 1 89215800 Chain Guard6 1 05206800 Chain #60 x 36P Complete7 1 05215900 Offset Link #60 Chain8 1 04501300 Sprocket #60-23T
1 5/16"B9 1 04502100 Sprocket #60-15T 1" Bore
10 1 10682300 Key 5/16" x 1 1/4"11 1 10490100 Key 1/4" x 1 1/4"
#6155830016" Auxiliary Poweredto 24" Portable TR
Item Qty Part No. Description1 2 19642800 Quick Tatch Plate2 2 83267500 Quick Tatch Bracket3 1 10682300 Key 5/16" x 1 1/4"4 1 81031700 Chain Guard Bracket5 1 14044200 Chain Guard6 1 16641300 Chain #60 x 38p Complete8 1 04554200 Sprocket #60-15T
1 5/16"B9 1 04502100 Sprocket #60-15T 1" Bore
10 1 10490100 Key 1/4" x 1 1/4"11 1 61557500 Lagged Roller w/shaft

16
4' Pan Extension12" Undercar Conveyor
Repair Parts
Item Qty Part No. Description1 1 82740200 4' Pan Wa.2 8'-0" 04056800 Belt PVK 120 Crescent Top
FS x 12"3 1 05120100 Cable .063 x 1 x 19
Nylon Coated4 1 06403000 Belt Splice
2' Pan Extension12" Undercar Conveyor
Repair Parts
Item Qty Part No. Description1 1 82741000 2' Pan Wa.2 4'-0" 04056800 Belt PVK 120 Crescent Top
FS x 12"3 1 05120100 Cable .063 x 1 x 19
Nylon Coated4 1 06403000 Belt Splice
17
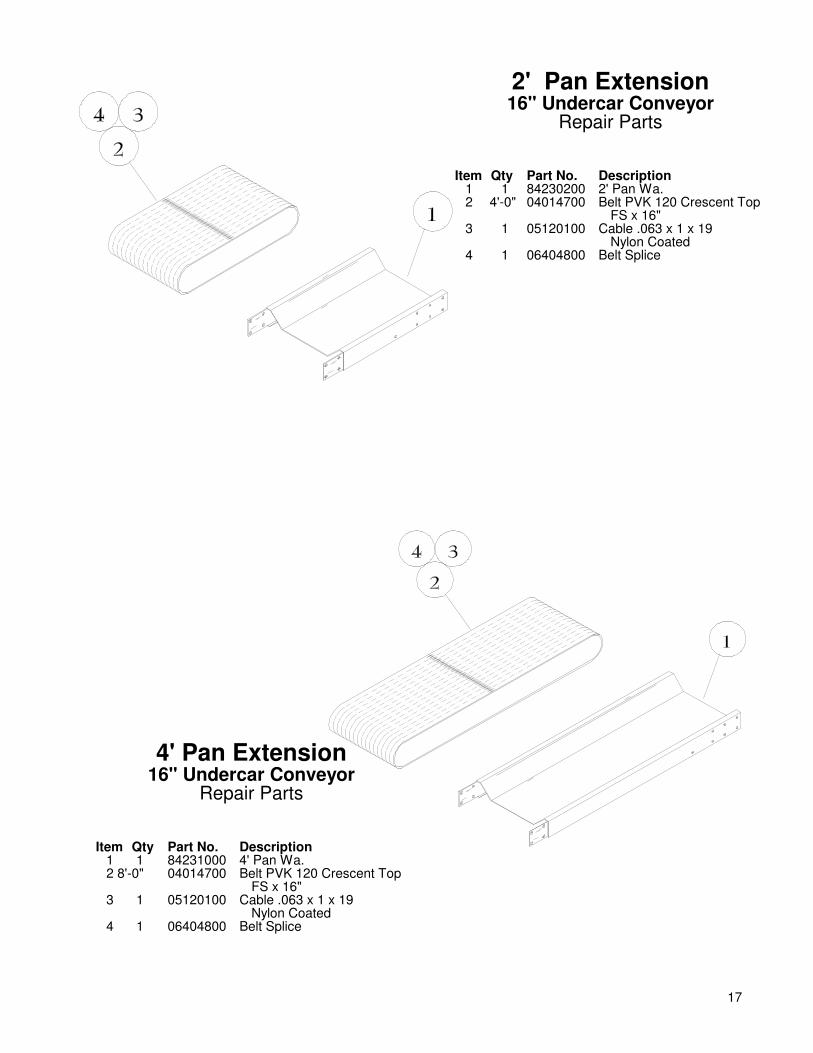
4' Pan Extension16" Undercar Conveyor
Repair Parts
Item Qty Part No. Description1 1 84231000 4' Pan Wa.2 8'-0" 04014700 Belt PVK 120 Crescent Top
FS x 16"3 1 05120100 Cable .063 x 1 x 19
Nylon Coated4 1 06404800 Belt Splice
2' Pan Extension16" Undercar Conveyor
Repair Parts
Item Qty Part No. Description1 1 84230200 2' Pan Wa.2 4'-0" 04014700 Belt PVK 120 Crescent Top
FS x 16"3 1 05120100 Cable .063 x 1 x 19
Nylon Coated4 1 06404800 Belt Splice
18
Assembly InstructionsFigure #1
STEP #1 Refer to Figure #1 - DETAIL A-A.Assemble the wheel brackets "A" to the undercarpan as shown using four(4) ea. 3/8" x 1" bolts,3/8" flat washers, and 3/8" hex nuts.
STEP #2 Refer to Figure #1 - DETAIL B-B.Assemble the axle shaft "B" thru the previouslyassembled axle brackets "A". Install wheels "C"and secure, using two(2) ea. 5/8" flat washers,and 3/16" x 1 1/2" cotter pins.
STEP #3 Refer to Figure #1 - DETAIL C-C.Assemble the side board brackets "D" to the sideboards "E" as shown using twelve(12) ea. 5/16"x 3/4" carriage bolts, 5/16" hex nuts, and 5/16"flat washers. Side boards may now be fitted intothe clips that are welded to the side of undercarpan.

19
Assembly InstructionsFigure #1

20
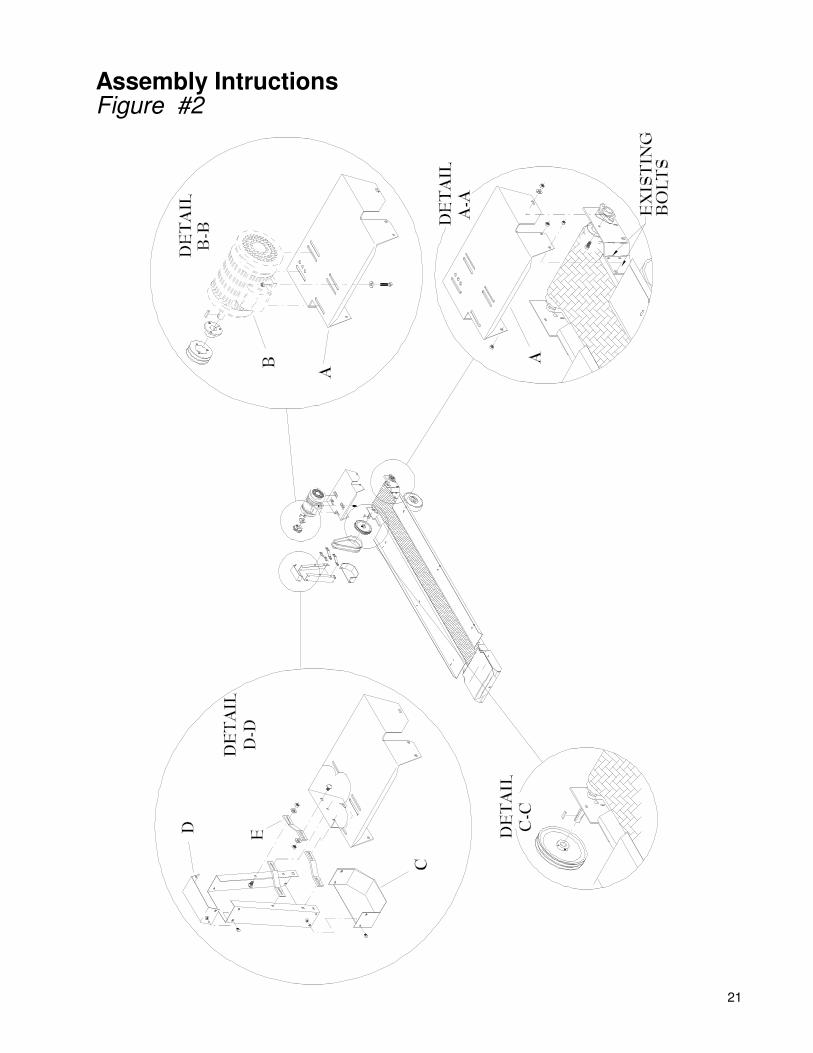
Assembly InstructionsFigure #2
STEP #1. Refer to Figure #2 - DETAIL A-A.Assemble the motor mount "A" to the undercarhead plates by first removing existing bolts andre-assembling with motor mount in place. Installtwo(2) ea additional 3/8" x 1" bolts, flat washers,and hex nuts as shown.
STEP #2. Refer to Figure #2 - DETAIL B-B.Assemble the electric motor "B" to the motormount "A" using four(4) 3/8" x 1 3/4" bolts, flatwashers, and hex nuts. DO NOT TIGHTEN ATTHIS TIME.
NOTE: Horse power requirements on page 4.
STEP #3. Refer to Figure #2 - DETAIL B-B.Assemble the 1 1/8" SH QD bushing and the 2B3.6 SH sheave to the motor shaft as shown usingone(1) 1/4" x 2 3/8" key.
STEP #4. Refer to Figure #2 - DETAIL C-C.Assemble the 2B 8.0 x 1" bore sheave to theundercar head shaft using one(1) 1/4" x 2 3/8"key.
STEP #5. Refer to Figure #2.Using a straight edge, square the two sheavesand secure them in place. Install the two(2) B-43V-belts. Tighten V-belts using the the three(3)round holes in motor mount as leverage to prymotor into place. Tighten the motor mount boltsnow.
STEP #6. Refer to Figure #2 - DETAIL D-D.Assemble the belt guard end cap weldment "C"and the belt guard tail cap "D" to the belt guardusing eight(8) 1/4" x 1/2" bolts and 1/4" hex nuts.Next assemble the belt guard to the motor mountas shown using three(3) 'S' brackets "E", six(6)5/16" x 3/4" carriage bolts, 5/16" flatwashers andhex nuts.
NOTE: Make sure belts and sheaves are notrubbing on belt guard. If so, adjust the beltguard until you have the proper clearance.
21
Assembly IntructionsFigure #2
22
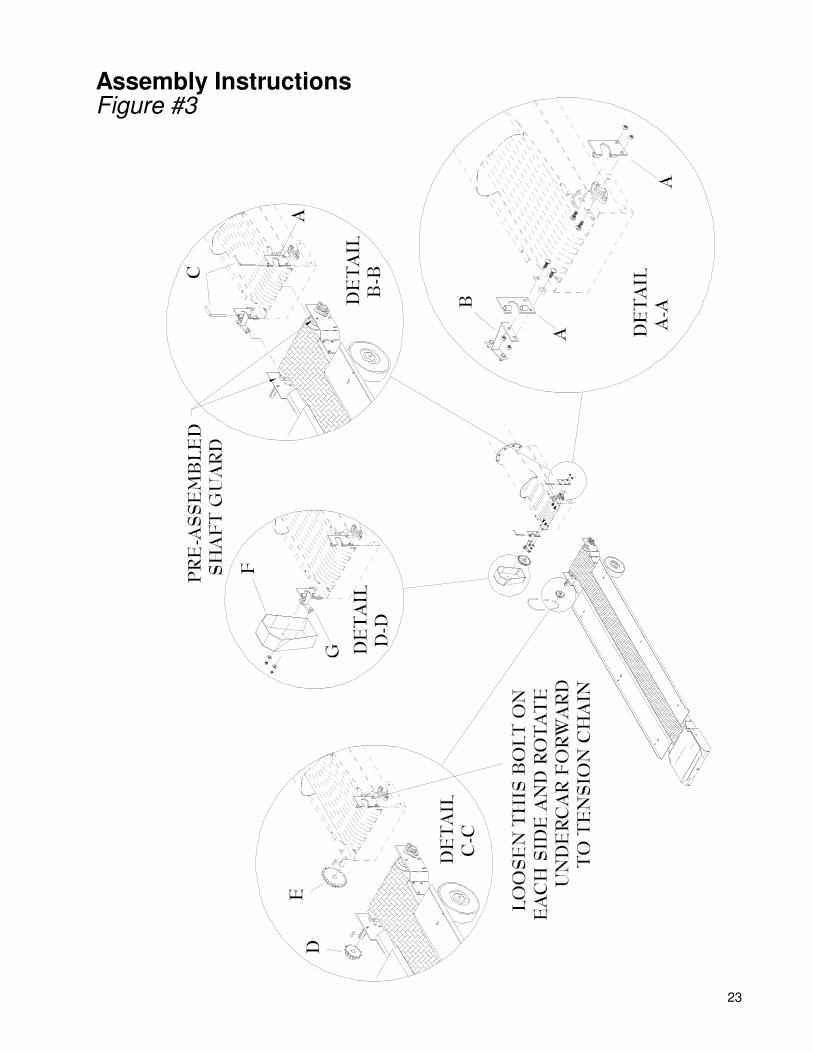
Assembly InstructionsFigure #3
STEP #1. Refer to Figure #3 - DETAIL A-A.Assemble the quick tatch brackets RH and LH"A" and the chain guard bracket "B" to thebeltveyor tail frame as shown, using four(4) ea.3/8" x 1 1/4" carriage bolts and 3/8" hex nuts.
STEP #2. Refer to Figure #3 - DETAIL B-B.Attach the utility undercar to the beltveyor bysliding the pre-assembled shaft guard tube intothe slots of the quick tatch brackets "A". Securewith the quick tatch pin "C".
STEP #3. Refer to Figure #3 - DETAIL C-C.Assemble the #6015T sprocket "D" onto theutility undercar head shaft using one(1) 1/4" x2 3/8" key. DO NOT TIGHTEN. Assemble the#60-23T sprocket "E" to the beltveyor tail shaftusing one(1) 1/4" x 2 3/8" key. Using a straightedge, square the two sprockets and tighten.Assemble chain, then properly tension byloosening the bolts called out and rotating theundercar forward.
STEP #4. Refer to Figure #3 - DETAIL D-D.Assemble the chain guard "F" to the chain guardbracket "G" and secure using two(2) ea 3/8" hexnuts and flat washers.
23
Assembly InstructionsFigure #3
P.O.Box 1438 Dodge City, Kansas 67801 (620) 227-7106