Embed Size (px)
Citation preview

Using Photo Story
Learning Technology Team 2010

This Session.....
> Preparing to use Photo Story> Story Boarding> Resizer> Photo Story > Outputting and using Photo Story files> TeacherTube> Discussion

Preparation Questions to Ask:
> Why?> Is this the best tool?> What am I trying to show or achieve?> What resources do I have and what do I need?> What photos do I have and what photos do I need?> Where am I going to output my Photo Story resource to?> Are my photos the correct size for my output intention?
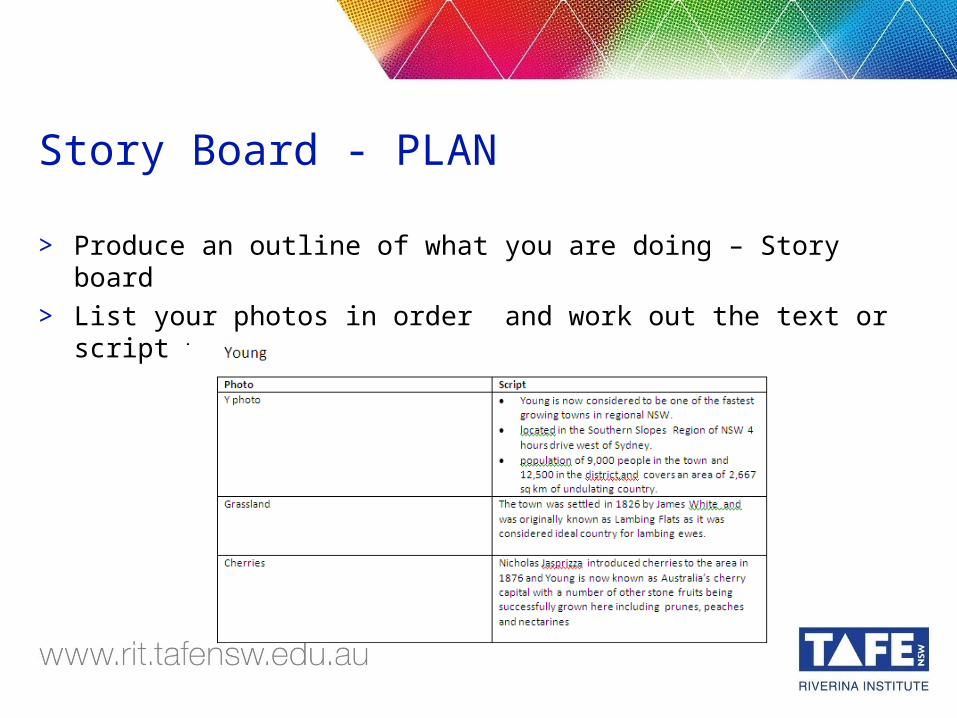
Story Board - PLAN
> Produce an outline of what you are doing – Story board> List your photos in order and work out the text or script that needs to
go with them

Photo size> Why resize?> Resizing reduces the file size of your
finished product eg Photo Story file> Less time to load and view for user or
to send across the web eg email> Reduce file size in online
environments where storage space can be an issue eg MOODLE, Wiki
> Solution.................

Resizer
> Quick resizing of photos particularly large numbers or bulk batching> Download it from
http://www.brothersoft.com/downloads/jpeg-resize.html> (Easily found by searching in Google – JPEG Resizer)
> When it is downloaded double click on the .exe file to run it

Four Basic Steps to Resize
> Add the File(s) or entire Folder
> Select the output size
> Select an output location
> Perform the resize

Demonstration of JPEG Resizer


Photo Story
> A step by step wizard to create your movie or show
> Before commencing make sure you have your:– story board on hand– photos resized and “conveniently” filed for easy access– audio and microphone are working– sound tracks eg music saved and at hand

Educational Uses of Photo Story
> Journal of work experience or project> Recording of steps in a process – especially for students with low
literacy> Assessment of work flow or steps where student s are given the
photo steps and asked to arrange and annotate them > Work or project descriptions by students> Identification of tools, plants, parts, equipment> Introduction to a problem or an issue > Promotion of a viewpoint or an issue eg recycling

Saving your Photo Story File
> Photo Story projects files are saved with the extension .wp3. This file is known as a project file and it can be opened and edited at any time.
> When a Photo Story project is completed (saved or not) it can be “exported” a number of ways and this will depend on your intended end use.
> Photo Story output files are exported as .wmv (Windows Audio/Video) files but their size and quality will vary according to the export type you select

Output Files from Photo Story

Demonstration of File Samples

What Output do I need
Output Use
Computer Profile Settings Saving and using on your computer or burning to CD/DVD. Too big for the web usually
Email Settings Email, web page embedding
Mobile Phone Settings Sending to mobiles, moblog sites like Facebook, Email and web page embedding eg Wiki
Portable Media Settings Portable DVD and CD players
Pocket PC Hand held PDA (personal digital assistant) such as Palm

Output Size(mb)versus Quality
> What if the Email Output is poor visual quality for my web use?
> Consider linking to the Photo Story file from a “cloud” resource eg public web server such as TeacherTube - they deal with the space issue not you

TeacherTube
> Go to www.teachertube.com> Click the sign up icon> Create an account> Upload your file> Use the TeacherTube URL (web address) to create a link in your web
page eg Wiki or Moodle course

Questions ?