Embed Size (px)
Citation preview
B1X1-0320-02ENZ0(00)November 2015
Windows/Linux
FUJITSU SoftwareSystemwalker Software Configuration Manager Express
User's Guide
Preface
Purpose of This Document
This document explains the overview, setup procedure, operation procedure, and management procedure of Systemwalker SoftwareConfiguration Manager.
Intended Readers
This document is intended for the users of Systemwalker Software Configuration Manager Express.
It is assumed that readers of this document already have the following knowledge:
- Basic knowledge of the operating system being used
In this document, Systemwalker Software Configuration Manager Express is abbreviated to "Systemwalker Software ConfigurationManager".
Structure of This Document
This document is structured as follows:
Part 1 Overview
Chapter 1 Overview
This chapter provides an overview of Systemwalker Software Configuration Manager.
Chapter 2 Function Explanation
This chapter provides an overview of the functions of Systemwalker Software Configuration Manager.
Chapter 3 Operating Environment
This chapter provides an overview of the operating environment of Systemwalker Software Configuration Manager.
Part 2 Installation
Chapter 4 Operation Design
This chapter explains the operation design of Systemwalker Software Configuration Manager.
Chapter 5 Installation
This chapter explains the installation procedure for Systemwalker Software Configuration Manager.
Chapter 6 Setup
This chapter explains the setup procedure for Systemwalker Software Configuration Manager.
Chapter 7 Setup Cancellation
This chapter explains how to cancel the setup for Systemwalker Software Configuration Manager.
Chapter 8 Uninstallation
This chapter explains the uninstallation procedure for Systemwalker Software Configuration Manager.
Part 3 Operation
Chapter 9 Operation Setup
This chapter explains how to set up Systemwalker Software Configuration Manager operations.
Chapter 10 Starting and Stopping Systemwalker Software Configuration Manager
This chapter explains how to start and stop Systemwalker Software Configuration Manager.
Chapter 11 Maintenance
This chapter explains relevant maintenance information (such as log output and backup/restore).
- i -
Part 4 Management
Chapter 12 Management Console
This chapter provides an overview of functions of the management console in Systemwalker Software Configuration Manager.
Chapter 13 Configuration Management
This chapter explains how to manage configuration information from the management console.
Appendix A Port Number List
This section provides a list of the port numbers used with Systemwalker Software Configuration Manager.
Appendix B Corrective Actions If the Site Certificate has Expired
This section explains the configuration procedure when the site certificate created for setup has expired.
Conventions Used in this Document
Refer to the Documentation Road Map for information on the names, abbreviations, and symbols used in this manual.
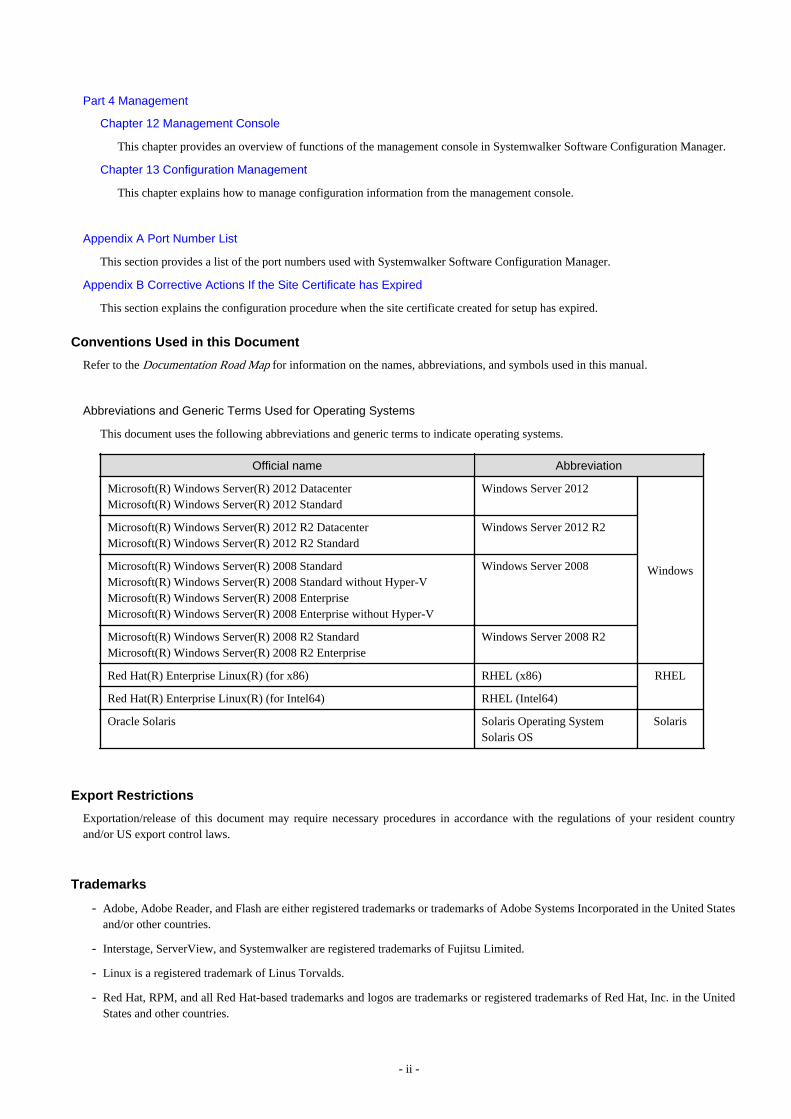
Abbreviations and Generic Terms Used for Operating Systems
This document uses the following abbreviations and generic terms to indicate operating systems.
Official name Abbreviation
Microsoft(R) Windows Server(R) 2012 DatacenterMicrosoft(R) Windows Server(R) 2012 Standard
Windows Server 2012
Windows
Microsoft(R) Windows Server(R) 2012 R2 DatacenterMicrosoft(R) Windows Server(R) 2012 R2 Standard
Windows Server 2012 R2
Microsoft(R) Windows Server(R) 2008 StandardMicrosoft(R) Windows Server(R) 2008 Standard without Hyper-VMicrosoft(R) Windows Server(R) 2008 EnterpriseMicrosoft(R) Windows Server(R) 2008 Enterprise without Hyper-V
Windows Server 2008
Microsoft(R) Windows Server(R) 2008 R2 StandardMicrosoft(R) Windows Server(R) 2008 R2 Enterprise
Windows Server 2008 R2
Red Hat(R) Enterprise Linux(R) (for x86) RHEL (x86) RHEL
Red Hat(R) Enterprise Linux(R) (for Intel64) RHEL (Intel64)
Oracle Solaris Solaris Operating SystemSolaris OS
Solaris
Export Restrictions
Exportation/release of this document may require necessary procedures in accordance with the regulations of your resident countryand/or US export control laws.
Trademarks
- Adobe, Adobe Reader, and Flash are either registered trademarks or trademarks of Adobe Systems Incorporated in the United Statesand/or other countries.
- Interstage, ServerView, and Systemwalker are registered trademarks of Fujitsu Limited.
- Linux is a registered trademark of Linus Torvalds.
- Red Hat, RPM, and all Red Hat-based trademarks and logos are trademarks or registered trademarks of Red Hat, Inc. in the UnitedStates and other countries.
- ii -

- Oracle and Java are registered trademarks of Oracle and/or its affiliates in the United States and other countries. Company names andproduct names used in this document are registered trademarks or trademarks of those companies.
- VMware, the VMware "boxes" logo and design, Virtual SMP, and VMotion are registered trademarks or trademarks of VMware, Inc.in the United States and/or other jurisdictions.
- Xen and XenSource are trademarks or registered trademarks of XenSource, Inc. in the United States and/or other countries.
- Microsoft, Internet Explorer, Hyper-V, Windows, and Windows Server are either registered trademarks or trademarks of MicrosoftCorporation in the United States and/or other countries.
- Other company names and product names are trademarks or registered trademarks of their respective owners.
- Note that system names and product names in this document are not accompanied by trademark symbols such as (TM) or (R).
Issue Date and Version
Version Manual code
August 2014: First edition B1X1-0320-01ENZ0(00) / B1X1-0320-01ENZ2(00)
November 2015: Second edition B1X1-0320-02ENZ0(00) / B1X1-0320-02ENZ2(00)
Copyright
Copyright 2010-2015 FUJITSU LIMITED
- iii -
ContentsPart 1 Overview........................................................................................................................................................................1
Chapter 1 Overview..................................................................................................................................................................21.1 What is Systemwalker Software Configuration Manager?..................................................................................................................21.2 Product Road Map............................................................................................................................................................................... 21.3 System Configuration.......................................................................................................................................................................... 3
1.3.1 System Configuration for Managing Hardware/Virtual Environment Configurations................................................................ 3
Chapter 2 Function Explanation............................................................................................................................................... 52.1 Discovery............................................................................................................................................................................................. 52.2 Configuration Management................................................................................................................................................................. 8
2.2.1 Hardware/Virtual Environment Configuration Management....................................................................................................... 8
Chapter 3 Operating Environment..........................................................................................................................................103.1 Required Hardware............................................................................................................................................................................ 10
3.1.1 Recommended Hardware Resources.......................................................................................................................................... 103.1.2 Disk Capacity..............................................................................................................................................................................10
3.2 Required Software............................................................................................................................................................................. 113.2.1 Operating Systems for Managing Hardware/Virtual Environment Configuration.....................................................................113.2.2 Mandatory Software................................................................................................................................................................... 11
3.2.2.1 Mandatory Software for Linux............................................................................................................................................ 123.2.3 Related Software.........................................................................................................................................................................173.2.4 Conflicting Software...................................................................................................................................................................17
3.3 Hardware and Hypervisor Supported for Configuration Management of Hardware/Virtual Environment...................................... 18
Part 2 Installation....................................................................................................................................................................21
Chapter 4 Operation Design...................................................................................................................................................224.1 Authentication....................................................................................................................................................................................224.2 Managing User Information...............................................................................................................................................................22
Chapter 5 Installation..............................................................................................................................................................255.1 Pre-installation Notes.........................................................................................................................................................................25
5.1.1 Checking the Port Numbers and Firewall Settings.....................................................................................................................255.1.2 Checking the Settings in the Hosts File or the DNS Server....................................................................................................... 255.1.3 Building a Single Sign-On Environment.................................................................................................................................... 255.1.4 Checking Linked Products (ServerView Resource Orchestrator).............................................................................................. 25
5.2 Installing on the Admin Server..........................................................................................................................................................255.2.1 Points to Note before Installing on the Admin Server................................................................................................................265.2.2 Tasks Required before Installing on the Admin Server..............................................................................................................31
5.2.2.1 Stopping ServerView Resource Orchestrator (If Linking to ServerView Resource Orchestrator).....................................315.2.2.2 Changing Terminal Services to Install Mode [Windows]................................................................................................... 325.2.2.3 Tuning System Parameters [Linux]..................................................................................................................................... 325.2.2.4 syslog Settings [Linux]........................................................................................................................................................ 34
5.2.3 Installing Systemwalker Software Configuration Manager........................................................................................................365.2.3.1 Installation in Windows....................................................................................................................................................... 365.2.3.2 Installation in Linux.............................................................................................................................................................39
5.2.4 Points to Note after Installing on the Admin Server...................................................................................................................415.3 If the Installation Fails....................................................................................................................................................................... 41
Chapter 6 Setup..................................................................................................................................................................... 426.1 Registering a License Key................................................................................................................................................................. 42
6.1.1 License Key Registration Procedure...........................................................................................................................................426.2 Setting up the Admin Server..............................................................................................................................................................42
6.2.1 Pre-setup Tasks for the Admin Server........................................................................................................................................426.2.1.1 Stopping ServerView Resource Orchestrator (When Linking to ServerView Resource Orchestrator).............................. 43
- iv -
6.2.1.2 Setting Port Numbers Used by Systemwalker Software Configuration Manager...............................................................436.2.1.3 Building the SSL Communication Environment for Management Console....................................................................... 45
6.2.1.3.1 Creating SSL Server Certificates..................................................................................................................................456.2.2 Setting up Systemwalker Software Configuration Manager...................................................................................................... 47
6.2.2.1 Execution of Setup...............................................................................................................................................................476.2.3 Post-setup Tasks......................................................................................................................................................................... 54
6.2.3.1 Starting the Products............................................................................................................................................................546.2.3.1.1 Starting ServerView Resource Orchestrator (If Linking to ServerView Resource Orchestrator)................................546.2.3.1.2 Starting Systemwalker Software Configuration Manager............................................................................................ 54
6.3 Registering an Infrastructure Administrator...................................................................................................................................... 556.4 Registering Hardware Information.................................................................................................................................................... 556.5 Executing the Initial Discovery......................................................................................................................................................... 556.6 Registering Discovery Schedules...................................................................................................................................................... 56
Chapter 7 Setup Cancellation.................................................................................................................................................587.1 Points to Note before Canceling the Setup........................................................................................................................................ 58
7.1.1 Backing up the Resources...........................................................................................................................................................587.2 Canceling the Setup for the Admin Server........................................................................................................................................ 58
7.2.1 Tasks Required before Setup Cancellation.................................................................................................................................587.2.1.1 Stop Systemwalker Software Configuration Manager........................................................................................................ 58
7.2.2 Canceling the Setup for Systemwalker Software Configuration Manager.................................................................................58
Chapter 8 Uninstallation......................................................................................................................................................... 598.1 Pre-uninstallation Notes.....................................................................................................................................................................598.2 Uninstalling from the Admin Server................................................................................................................................................. 59
8.2.1 Points to Note before Uninstalling from the Admin Server....................................................................................................... 598.2.2 Uninstalling Systemwalker Software Configuration Manager...................................................................................................598.2.3 Uninstalling SMEE [Linux]........................................................................................................................................................628.2.4 Uninstalling Securecrypto Library RunTime [Linux]................................................................................................................ 62
8.3 Post-uninstallation Notes................................................................................................................................................................... 628.3.1 Points to Note after Uninstalling from the Admin Server.......................................................................................................... 628.3.2 Uninstalling the "Uninstall (middleware)"................................................................................................................................. 63
Part 3 Operation..................................................................................................................................................................... 66
Chapter 9 Operation Setup.....................................................................................................................................................679.1 User Management.............................................................................................................................................................................. 67
9.1.1 Registering a User.......................................................................................................................................................................679.1.2 Changing the Password...............................................................................................................................................................679.1.3 Updating a User.......................................................................................................................................................................... 689.1.4 Moving a User............................................................................................................................................................................ 689.1.5 Deleting a User........................................................................................................................................................................... 68
9.2 Hardware/Virtual Environment Management................................................................................................................................... 689.2.1 Registering Hardware/Virtual Environment...............................................................................................................................689.2.2 Updating Hardware.....................................................................................................................................................................699.2.3 Deleting Hardware......................................................................................................................................................................69
9.3 Notification Settings in the Management Console............................................................................................................................ 69
Chapter 10 Starting and Stopping Systemwalker Software Configuration Manager..............................................................7110.1 Starting Systemwalker Software Configuration Manager............................................................................................................... 7110.2 Stopping Systemwalker Software Configuration Manager............................................................................................................. 7110.3 Checking the Status of Systemwalker Software Configuration Manager....................................................................................... 72
Chapter 11 Maintenance........................................................................................................................................................ 7311.1 Log Output.......................................................................................................................................................................................73
11.1.1 Logs Output on the Admin Server............................................................................................................................................7311.1.1.1 Log Output Destination..................................................................................................................................................... 7311.1.1.2 Investigation Logs..............................................................................................................................................................7311.1.1.3 Event Logs or syslogs........................................................................................................................................................ 74
- v -
11.1.2 Audit Logs for CMDB..............................................................................................................................................................7411.1.3 Audit Logs for Job Management.............................................................................................................................................. 75
11.2 Backing Up and Restoring the Admin Server................................................................................................................................. 7711.2.1 Notes on Backup and Restoration.............................................................................................................................................7711.2.2 Backing Up the Admin Server..................................................................................................................................................78
11.2.2.1 Required Disk Space for Backup.......................................................................................................................................8011.2.2.2 Backing Up User Information............................................................................................................................................8011.2.2.3 Backing Up ServerView Resource Orchestrator Assets (when Linked to ServerView Resource Orchestrator).............. 8011.2.2.4 Backup of Systemwalker Software Configuration Manager ............................................................................................ 80
11.2.3 Restoring the Admin Server..................................................................................................................................................... 8111.2.3.1 Restoring User Information............................................................................................................................................... 8211.2.3.2 Restoring ServerView Resource Orchestrator Assets (when Linked to ServerView Resource Orchestrator)..................8211.2.3.3 Restoration of Systemwalker Software Configuration Manager ......................................................................................8311.2.3.4 Updating to the Latest Configuration Information............................................................................................................ 83
11.3 Changing the Systemwalker Software Configuration Manager Environment................................................................................ 8311.3.1 Changing Passwords of Users who Use this Product............................................................................................................... 83
11.3.1.1 Changing the Password of a User for Process Control......................................................................................................8311.3.1.2 Changing the Password of an LDAP Administrator DN ..................................................................................................84
11.3.2 Changing Passwords of Operating System Users who Use this Product................................................................................. 8411.3.2.1 Changing the Password for swcfmgdb.............................................................................................................................. 84
11.4 Installing Updates on Systemwalker Software Configuration Manager......................................................................................... 8511.4.1 Installing Updates on the Admin Server...................................................................................................................................85
Part 4 Management................................................................................................................................................................87
Chapter 12 Management Console..........................................................................................................................................8812.1 Overview of the Management Console........................................................................................................................................... 8812.2 List of Functions Available from the Management Console...........................................................................................................8812.3 Login Users......................................................................................................................................................................................8912.4 Login and Logout.............................................................................................................................................................................90
12.4.1 Login.........................................................................................................................................................................................9012.4.2 Logout.......................................................................................................................................................................................91
12.5 Home................................................................................................................................................................................................92
Chapter 13 Configuration Management................................................................................................................................. 9313.1 Hardware List.................................................................................................................................................................................. 93
13.1.1 Chassis list................................................................................................................................................................................ 9313.1.1.1 Chassis details....................................................................................................................................................................94
13.1.2 Physical Server List.................................................................................................................................................................. 9613.1.2.1 Physical Server Details...................................................................................................................................................... 97
13.1.3 OS List...................................................................................................................................................................................... 9913.1.4 Map view................................................................................................................................................................................ 101
13.1.4.1 Displaying Details............................................................................................................................................................10213.2 Maintenance...................................................................................................................................................................................104
13.2.1 View CI...................................................................................................................................................................................10413.2.1.1 Displaying a Tree of Configuration Items....................................................................................................................... 10413.2.1.2 Searching Configuration Items........................................................................................................................................ 10613.2.1.3 Displaying Details............................................................................................................................................................107
13.2.2 Registering Configuration Items.............................................................................................................................................10913.2.3 Update/delete CI..................................................................................................................................................................... 111
13.2.3.1 Updating Configuration Items......................................................................................................................................... 11113.2.3.2 Deleting Configuration Items.......................................................................................................................................... 113
13.2.4 Importing Configuration Items............................................................................................................................................... 113
Appendix A Port Number List............................................................................................................................................... 115A.1 Port Number List.............................................................................................................................................................................115A.2 Procedure for Changing Ports.........................................................................................................................................................117
A.2.1 When the Port Number for syslog is Changed [Linux]........................................................................................................... 117
- vi -
Appendix B Corrective Actions If the Site Certificate has Expired........................................................................................119B.1 Updating the Expiration Date of a Site Certificate......................................................................................................................... 119
- vii -
Part 1 Overview
Chapter 1 Overview..........................................................................................................................................2
Chapter 2 Function Explanation....................................................................................................................... 5
Chapter 3 Operating Environment..................................................................................................................10
- 1 -
Chapter 1 OverviewThis chapter provides an overview of the Systemwalker Software Configuration Manager product.
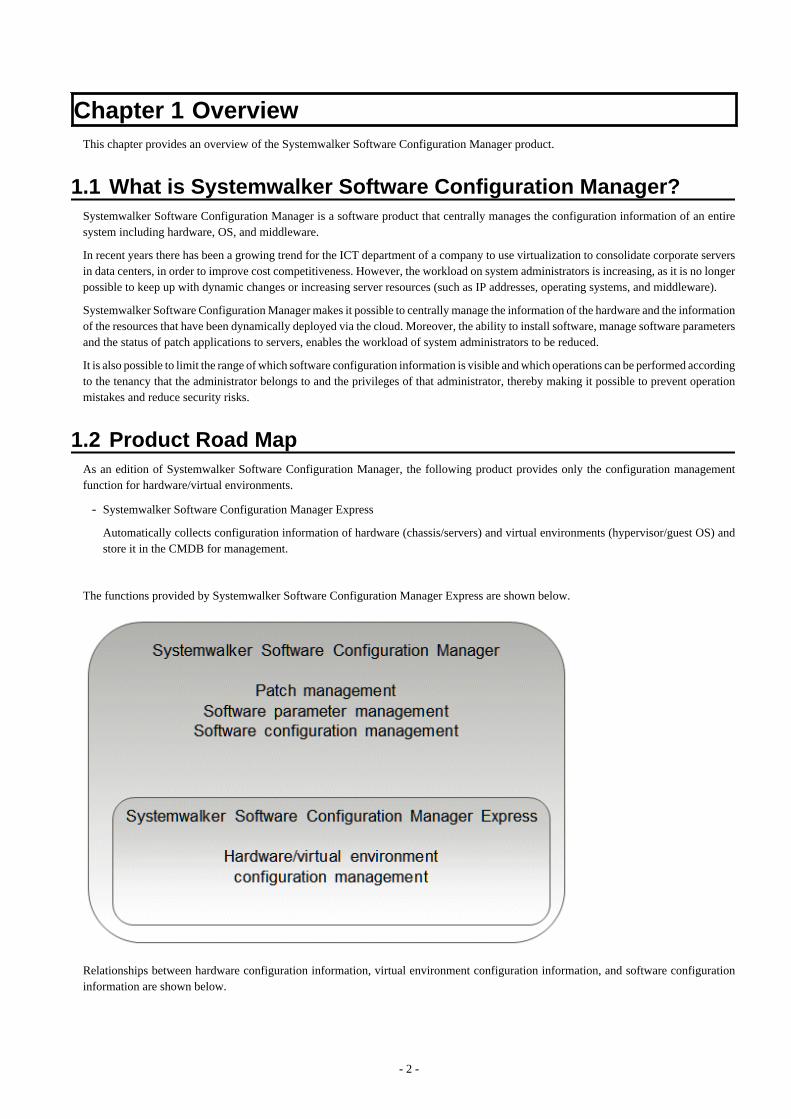
1.1 What is Systemwalker Software Configuration Manager?Systemwalker Software Configuration Manager is a software product that centrally manages the configuration information of an entiresystem including hardware, OS, and middleware.
In recent years there has been a growing trend for the ICT department of a company to use virtualization to consolidate corporate serversin data centers, in order to improve cost competitiveness. However, the workload on system administrators is increasing, as it is no longerpossible to keep up with dynamic changes or increasing server resources (such as IP addresses, operating systems, and middleware).
Systemwalker Software Configuration Manager makes it possible to centrally manage the information of the hardware and the informationof the resources that have been dynamically deployed via the cloud. Moreover, the ability to install software, manage software parametersand the status of patch applications to servers, enables the workload of system administrators to be reduced.
It is also possible to limit the range of which software configuration information is visible and which operations can be performed accordingto the tenancy that the administrator belongs to and the privileges of that administrator, thereby making it possible to prevent operationmistakes and reduce security risks.
1.2 Product Road MapAs an edition of Systemwalker Software Configuration Manager, the following product provides only the configuration managementfunction for hardware/virtual environments.
- Systemwalker Software Configuration Manager Express
Automatically collects configuration information of hardware (chassis/servers) and virtual environments (hypervisor/guest OS) andstore it in the CMDB for management.
The functions provided by Systemwalker Software Configuration Manager Express are shown below.
Relationships between hardware configuration information, virtual environment configuration information, and software configurationinformation are shown below.
- 2 -
1.3 System ConfigurationThis section explains the system configuration for Systemwalker Software Configuration Manager.
1.3.1 System Configuration for Managing Hardware/Virtual EnvironmentConfigurations
The following diagram illustrates the system configuration for managing hardware and virtual environment configuration.
- 3 -
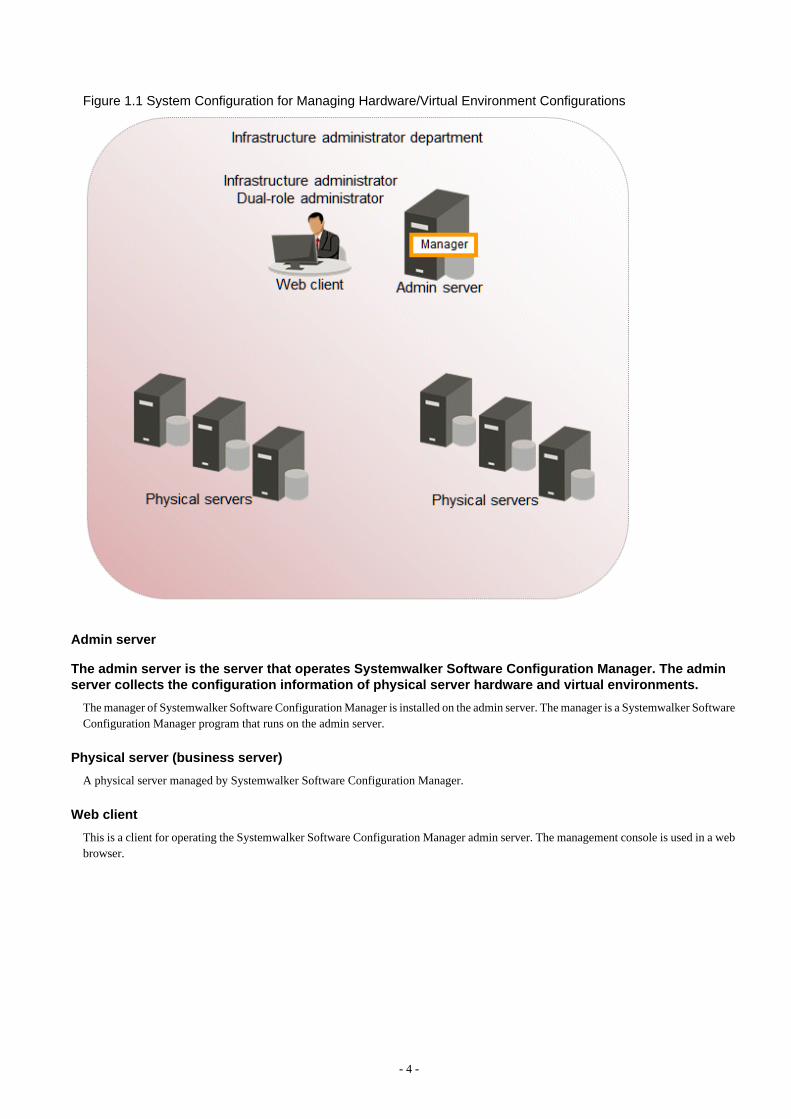
Figure 1.1 System Configuration for Managing Hardware/Virtual Environment Configurations
Admin server
The admin server is the server that operates Systemwalker Software Configuration Manager. The adminserver collects the configuration information of physical server hardware and virtual environments.
The manager of Systemwalker Software Configuration Manager is installed on the admin server. The manager is a Systemwalker SoftwareConfiguration Manager program that runs on the admin server.
Physical server (business server)
A physical server managed by Systemwalker Software Configuration Manager.
Web client
This is a client for operating the Systemwalker Software Configuration Manager admin server. The management console is used in a webbrowser.
- 4 -
Chapter 2 Function ExplanationThis product provides the following functions:
- Discovery
- Configuration management
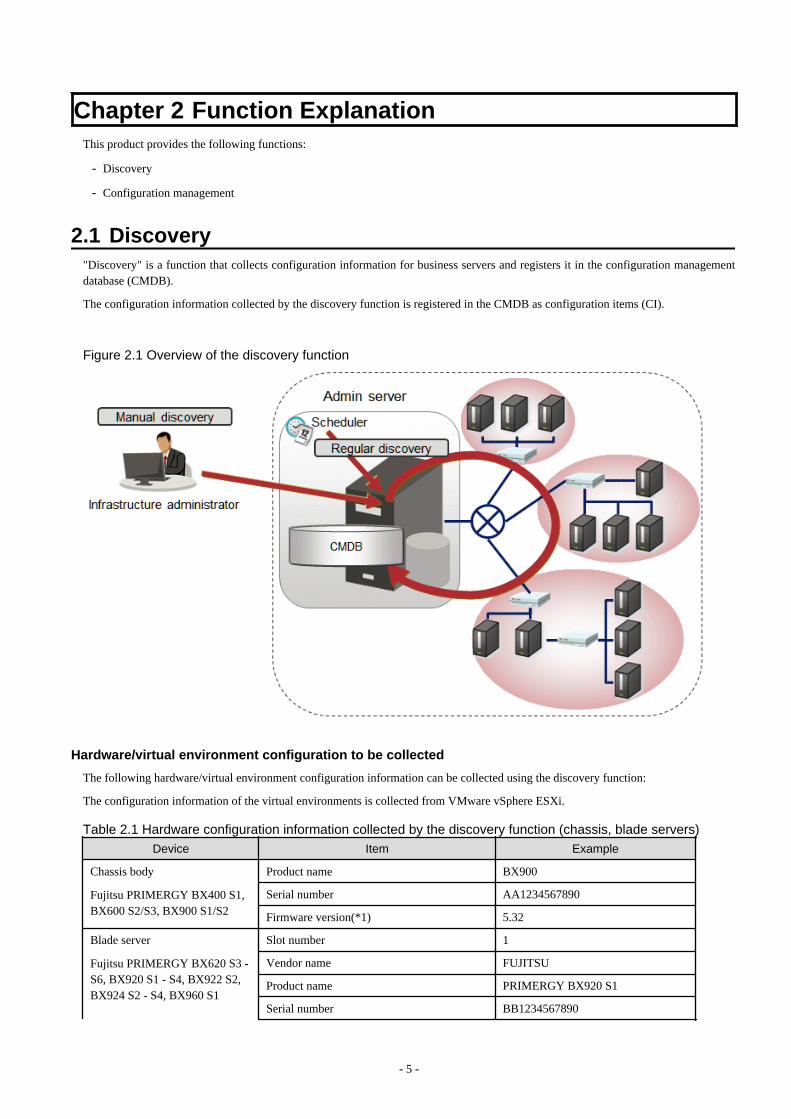
2.1 Discovery"Discovery" is a function that collects configuration information for business servers and registers it in the configuration managementdatabase (CMDB).
The configuration information collected by the discovery function is registered in the CMDB as configuration items (CI).
Figure 2.1 Overview of the discovery function
Hardware/virtual environment configuration to be collected
The following hardware/virtual environment configuration information can be collected using the discovery function:
The configuration information of the virtual environments is collected from VMware vSphere ESXi.
Table 2.1 Hardware configuration information collected by the discovery function (chassis, blade servers)
Device Item Example
Chassis body
Fujitsu PRIMERGY BX400 S1,BX600 S2/S3, BX900 S1/S2
Product name BX900
Serial number AA1234567890
Firmware version(*1) 5.32
Blade server
Fujitsu PRIMERGY BX620 S3 -S6, BX920 S1 - S4, BX922 S2,BX924 S2 - S4, BX960 S1
Slot number 1
Vendor name FUJITSU
Product name PRIMERGY BX920 S1
Serial number BB1234567890
- 5 -
Device Item Example
CPU Type Xeon
Frequency 1995 MHz
Quantity 2
Memory size 4096 MB
Firmware version(*2) 551
BIOS version(*2) 3D41
OS name(*3) VMware ESXi 5.1.0 build-1157734
*1: On PRIMERGY BX400 S1 and BX600 S2/S3, the firmware version cannot be discovered.
*2: On PRIMERGY BX620 S3 - S6, the firmware version and BIOS version cannot be discovered.
*3: Only when the version of the mounted hypervisor is VMware vSphere ESXi 5.1 or later can discovery be performed.
Table 2.2 Hardware configuration information collected by the discovery function (rack mount servers)
Device Item Example
Fujitsu PRIMERGY RX100/RX200/RX300 S6 or later,RX1330/RX2520/RX2540 M1 orlater
IBM System x3550 M4
HP ProLiant DL320e Gen8 v2
Product name PRIMERGY RX300 S7
Serial number CC1234567890
CPU Type (*2) Intel(R) Xeon(R) CPU E5-2609 v2 @2.50GHz
Frequency(*3) 2500 MHz
Quantity 2
Memory size 4096 MB
OS name(*1) VMware ESXi 5.1.0 build-1157734
*1: Only when the version of the mounted hypervisor is VMware vSphere ESXi 5.1 or later can discovery be performed.
*2: On PRIMERGY RX100/RX200/RX300 S6 the CPU type cannot be discovered.
*3: On IBM servers and HP servers, the frequency cannot be discovered.
Table 2.3 Virtual environment configuration information collected by the discovery function (for VMware vSphereESXi)
Hypervisor Type Item Example
VMware vSphereESXi
VM host information OS name VMware ESXi 5.1.0 build-1021289
CPU core count 8
MAC address 60:EB:69:07:F3:xx
IP address 192.168.1.12
VM guestinformation
Virtual machine name VM001
OS name Microsoft Windows Server 2012 (64-bit)
CPU core count 2
Frequency (GHz) 1.0
Memory size (GB) 2.0
MAC address 60:EB:69:07:D3:xx
IP address 192.168.10.122
- 6 -
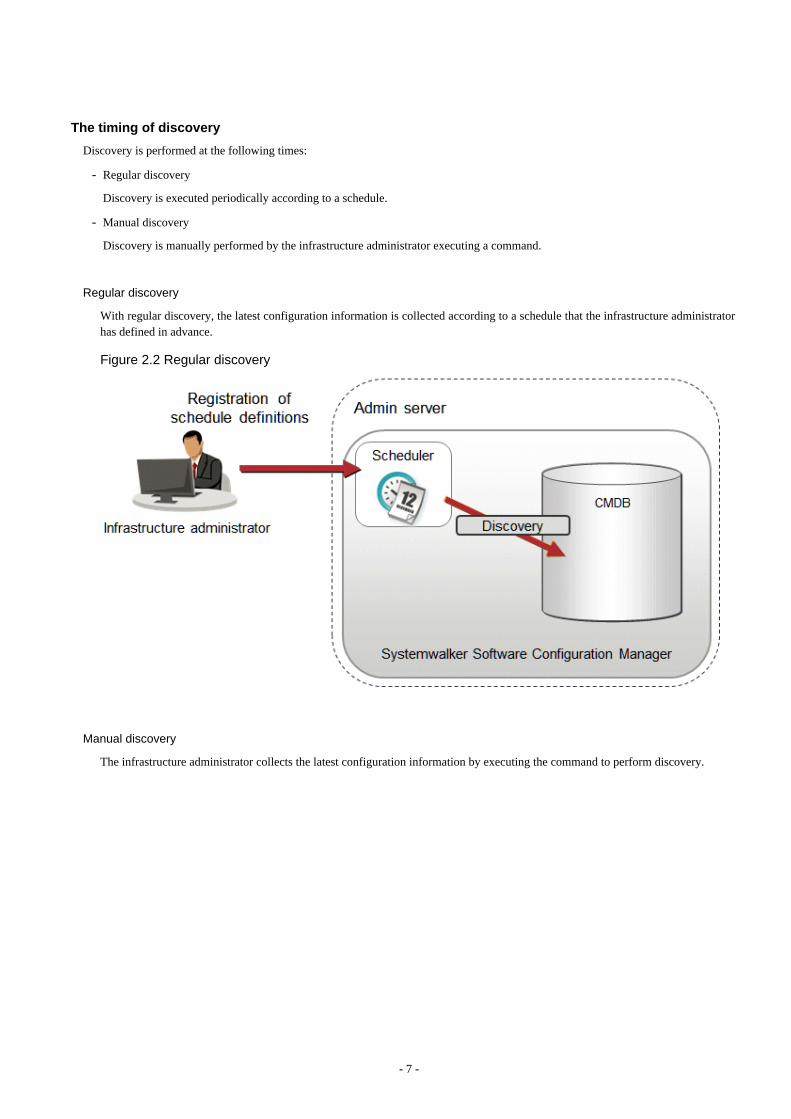
The timing of discovery
Discovery is performed at the following times:
- Regular discovery
Discovery is executed periodically according to a schedule.
- Manual discovery
Discovery is manually performed by the infrastructure administrator executing a command.
Regular discovery
With regular discovery, the latest configuration information is collected according to a schedule that the infrastructure administratorhas defined in advance.
Figure 2.2 Regular discovery
Manual discovery
The infrastructure administrator collects the latest configuration information by executing the command to perform discovery.
- 7 -
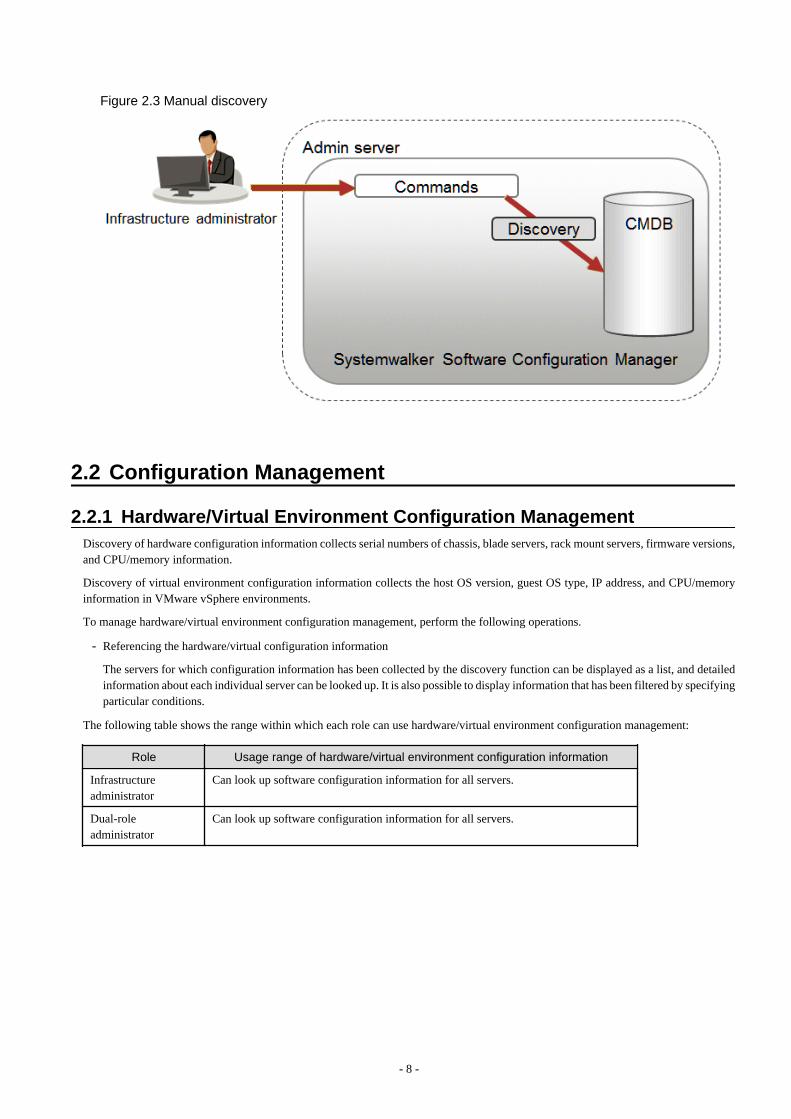
Figure 2.3 Manual discovery
2.2 Configuration Management
2.2.1 Hardware/Virtual Environment Configuration ManagementDiscovery of hardware configuration information collects serial numbers of chassis, blade servers, rack mount servers, firmware versions,and CPU/memory information.
Discovery of virtual environment configuration information collects the host OS version, guest OS type, IP address, and CPU/memoryinformation in VMware vSphere environments.
To manage hardware/virtual environment configuration management, perform the following operations.
- Referencing the hardware/virtual configuration information
The servers for which configuration information has been collected by the discovery function can be displayed as a list, and detailedinformation about each individual server can be looked up. It is also possible to display information that has been filtered by specifyingparticular conditions.
The following table shows the range within which each role can use hardware/virtual environment configuration management:
Role Usage range of hardware/virtual environment configuration information
Infrastructureadministrator
Can look up software configuration information for all servers.
Dual-roleadministrator
Can look up software configuration information for all servers.
- 8 -
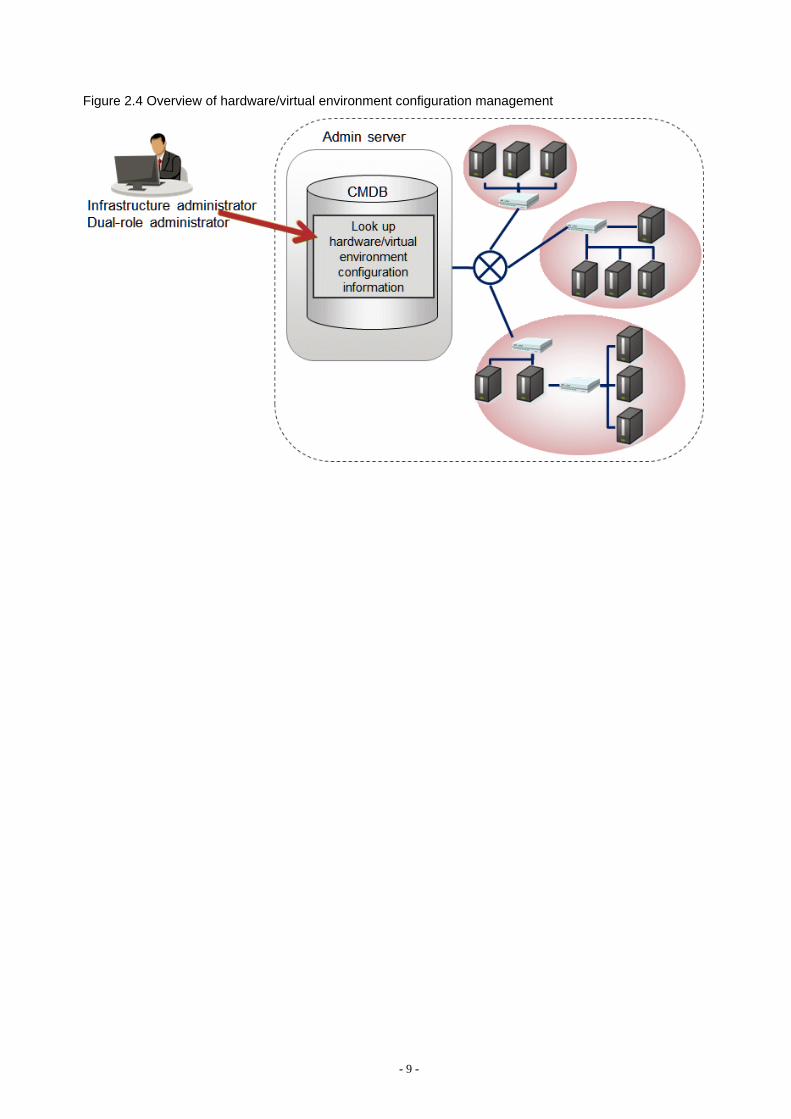
Figure 2.4 Overview of hardware/virtual environment configuration management
- 9 -
Chapter 3 Operating EnvironmentThis chapter explains the operating environment for this product.
3.1 Required Hardware
3.1.1 Recommended Hardware Resources
Admin server
Type of hardware Requirements
Supported model PRIMERGY, PRIMEQUEST 1000/2000 series
CPU Intel(R) Xeon(R) 3 GHz or higher
Number of CPUs 2 or more
Memory capacity (excluding the operatingsystem)
8.0 GB or more
See
Memory space for the CMDB manager
The size of the memory space for the CMDB manager increases as the number of managed business servers increases. Estimate the memorysize based on the number of business servers. Refer to "Database and memory space for the CMDB manager" for details.
3.1.2 Disk Capacity
Admin server
Static disk capacity[Windows]
Product name Disk space required for installation
Systemwalker Software Configuration Manager Installation directory: 13.3 GB
Note: In addition to the disk space requirements above, the following disk space is required to manage and uninstall the software.
- %SYSTEMDRIVE%\FujitsuF4CR: 150 MB
When linking to ServerView Resource Orchestrator
Product name Disk space required for installation
Systemwalker Software Configuration Manager Installation directory: 3 GB
Note: In addition to the disk space requirements above, the following disk space is required to manage and uninstall the software:
- %SYSTEMDRIVE%\FujitsuF4CR: 150 MB
Static disk capacity [Linux]
Product name Area used Disk space required for installation
Systemwalker Software Configuration Manager /opt 3.2 GB or more
/var 9.2 GB or more
/etc 0.7 GB or more
Note: In addition to the disk space requirements above, the following disk space is required to manage and uninstall the software.
- 10 -

-/opt: 150 MB
Dynamic disk capacity
Database and memory space for the CMDB manager
Use the following list as a guide to estimate the space for the database and memory.
Number of physical
serversTotal amount of disk space used Total amount of memory space used
500 1.0GB 1.5GB
3.2 Required SoftwareThis section explains the software resources that are required to install this product.
3.2.1 Operating Systems for Managing Hardware/Virtual EnvironmentConfiguration
This section lists the operating systems supported for managing hardware and virtual environment configuration.
Admin server
- Windows Server 2012 (for x64) (*1)
- Windows Server 2012 R2 (for x64) (*1)
- Windows Server 2008 (for x86)
- Windows Server 2008 (for x64) (*1)
- Windows Server 2008 R2 (*1)
- Red Hat Enterprise Linux 5 (for x86)
- Red Hat Enterprise Linux 5 (for Intel64) (*2)
- Red Hat Enterprise Linux 6 (for x86)
- Red Hat Enterprise Linux 6 (for Intel64) (*2)
*1: Runs as a 32-bit application on the WOW64 (Windows 32-bit On Windows 64-bit) subsystem
*2: Runs in 32-bit compatibility mode
3.2.2 Mandatory SoftwareThis section lists mandatory software.
Admin server
- ServerView Operations Manager V6.0 or later except following versions.
[Windows]
V7.11.04 to V7.11.06
[Linux]
V7.11.04 to V7.11.07
This software is required for Single Sign-On.
- 11 -
Web client
- Internet Explorer 9, 10, or 11
- Adobe Reader X or XI (required to view PDF manuals)
Note
The recommended display size (screen resolution) for the management console is 1024x768 pixels.
Business server
- VMware Tools must be installed on the guest OS on ESXi (required for managing hardware and virtual environment configurations)
3.2.2.1 Mandatory Software for Linux
Admin server
The following software, which comes with the operating system, is required.
- elfutils package
Red Hat Enterprise Linux 5.2 or earlier
elfutils-libelf-0.125-3.el5.i386.rpm (*1)
Red Hat Enterprise Linux 5.3 or later
elfutils-libelf-0.137-3.el5.i386.rpm (*1)
Red Hat Enterprise Linux 6.0 or later
elfutils-libelf-0.148-1.el6.i686.rpm (*1)
*1: The 32-bit version is required even for 64-bit version of Linux.
Red Hat Enterprise Linux 5, in addition to the above, the following software, which comes with the operating system, is required.
Red Hat Enterprise Linux 5 (for x86)
- apr package (32-bit version)
- apr-util package (32-bit version)
- glibc package (32-bit version)
- libtermcap package (32-bit version)
- libxml2 package (32-bit version)
- libXp package (32-bit version)
- libxslt package (32-bit version)
- ncurses package (32-bit versions)
- net-snmp package (32-bit version)
- net-snmp-utils package (32-bit version)
- postgresql-libs package (32-bit version)
- readline package (32-bit version)
- redhat-lsb package (32-bit version)
- sysstat package (32-bit version)
- zlib package (32-bit version)
- 12 -
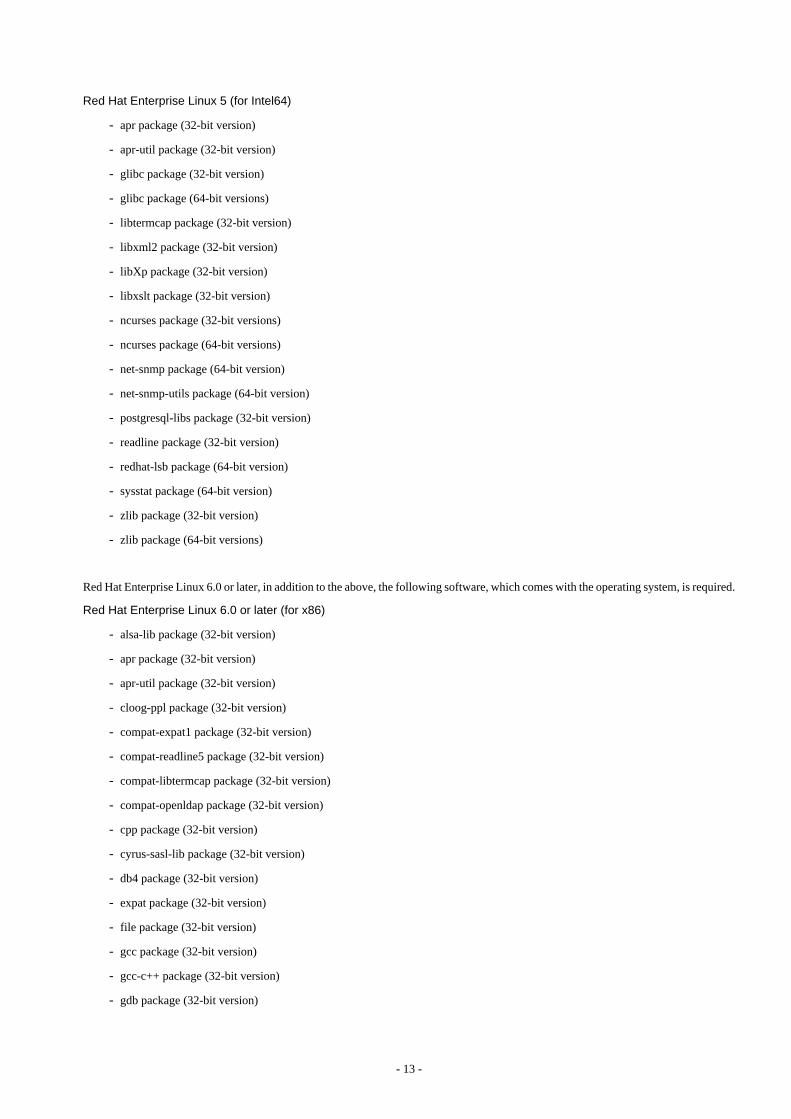
Red Hat Enterprise Linux 5 (for Intel64)
- apr package (32-bit version)
- apr-util package (32-bit version)
- glibc package (32-bit version)
- glibc package (64-bit versions)
- libtermcap package (32-bit version)
- libxml2 package (32-bit version)
- libXp package (32-bit version)
- libxslt package (32-bit version)
- ncurses package (32-bit versions)
- ncurses package (64-bit versions)
- net-snmp package (64-bit version)
- net-snmp-utils package (64-bit version)
- postgresql-libs package (32-bit version)
- readline package (32-bit version)
- redhat-lsb package (64-bit version)
- sysstat package (64-bit version)
- zlib package (32-bit version)
- zlib package (64-bit versions)
Red Hat Enterprise Linux 6.0 or later, in addition to the above, the following software, which comes with the operating system, is required.
Red Hat Enterprise Linux 6.0 or later (for x86)
- alsa-lib package (32-bit version)
- apr package (32-bit version)
- apr-util package (32-bit version)
- cloog-ppl package (32-bit version)
- compat-expat1 package (32-bit version)
- compat-readline5 package (32-bit version)
- compat-libtermcap package (32-bit version)
- compat-openldap package (32-bit version)
- cpp package (32-bit version)
- cyrus-sasl-lib package (32-bit version)
- db4 package (32-bit version)
- expat package (32-bit version)
- file package (32-bit version)
- gcc package (32-bit version)
- gcc-c++ package (32-bit version)
- gdb package (32-bit version)
- 13 -
- glibc-devel package (32-bit version)
- glibc-headers package (32-bit version)
- glibc package (32-bit version)
- kernel-headers package (32-bit version)
- keyutils-libs package (32-bit version)
- krb5-libs package (32-bit version)
- libattr package (32-bit version)
- libcap package (32-bit version)
- libcom_err package (32-bit version)
- libgcc package (32-bit version)
- libICE package (32-bit version)
- libselinux package (32-bit version)
- libSM package (32-bit version)
- libX11 package (32-bit version)
- libX11-common package
- libXau package (32-bit version)
- libXext package (32-bit version)
- libXi package (32-bit version)
- libXp package (32-bit version)
- libXrender package (32-bit versions)
- libXt package (32-bit version)
- libXtst package (32-bit version)
- libgomp package (32-bit version)
- libstdc++-devel package (32-bit version)
- libstdc++ package (32-bit version)
- libtool-ltdl package (32-bit version)
- libuuid package (32-bit version)
- libxcb package (32-bit version)
- lksctp-tools package (32-bit versions)
- make package (32-bit version)
- mpfr package (32-bit version)
- ncurses package (32-bit versions)
- net-snmp package (32-bit version)
- net-snmp-utils package (32-bit version)
- nspr package (32-bit version)
- nss package (32-bit version)
- nss-softokn-freebl package (32-bit version)
- nss-util package (32-bit version)
- 14 -
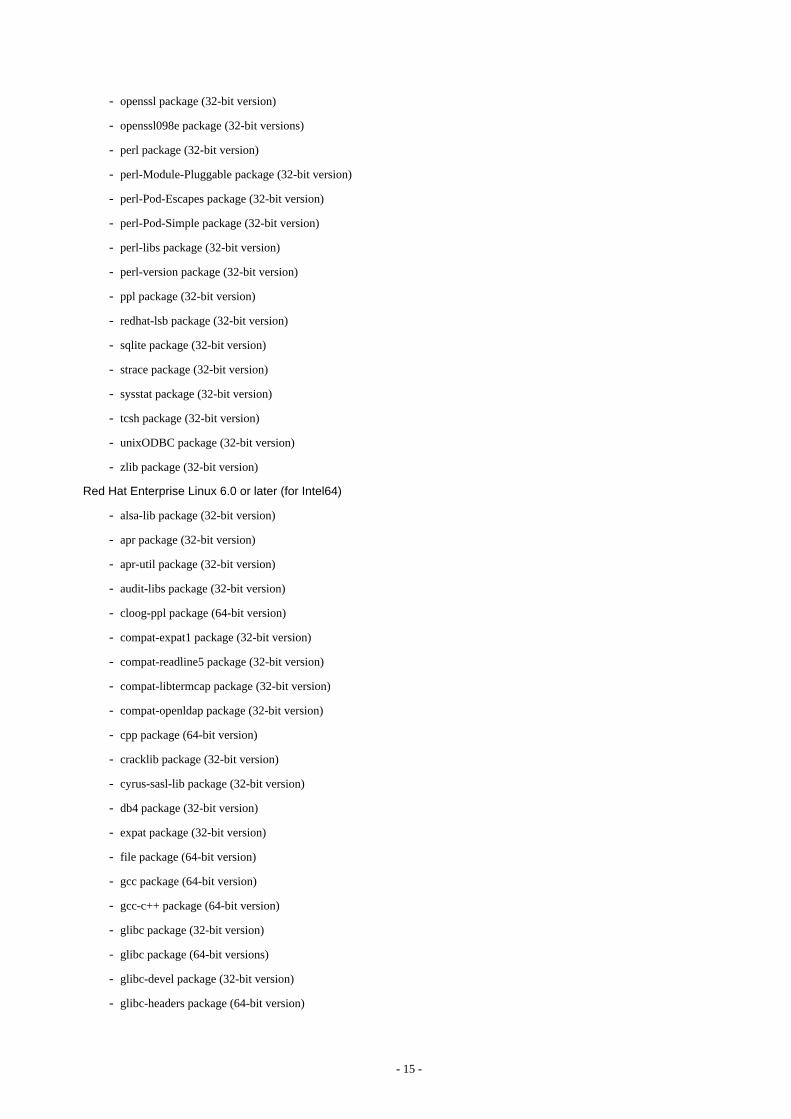
- openssl package (32-bit version)
- openssl098e package (32-bit versions)
- perl package (32-bit version)
- perl-Module-Pluggable package (32-bit version)
- perl-Pod-Escapes package (32-bit version)
- perl-Pod-Simple package (32-bit version)
- perl-libs package (32-bit version)
- perl-version package (32-bit version)
- ppl package (32-bit version)
- redhat-lsb package (32-bit version)
- sqlite package (32-bit version)
- strace package (32-bit version)
- sysstat package (32-bit version)
- tcsh package (32-bit version)
- unixODBC package (32-bit version)
- zlib package (32-bit version)
Red Hat Enterprise Linux 6.0 or later (for Intel64)
- alsa-lib package (32-bit version)
- apr package (32-bit version)
- apr-util package (32-bit version)
- audit-libs package (32-bit version)
- cloog-ppl package (64-bit version)
- compat-expat1 package (32-bit version)
- compat-readline5 package (32-bit version)
- compat-libtermcap package (32-bit version)
- compat-openldap package (32-bit version)
- cpp package (64-bit version)
- cracklib package (32-bit version)
- cyrus-sasl-lib package (32-bit version)
- db4 package (32-bit version)
- expat package (32-bit version)
- file package (64-bit version)
- gcc package (64-bit version)
- gcc-c++ package (64-bit version)
- glibc package (32-bit version)
- glibc package (64-bit versions)
- glibc-devel package (32-bit version)
- glibc-headers package (64-bit version)
- 15 -
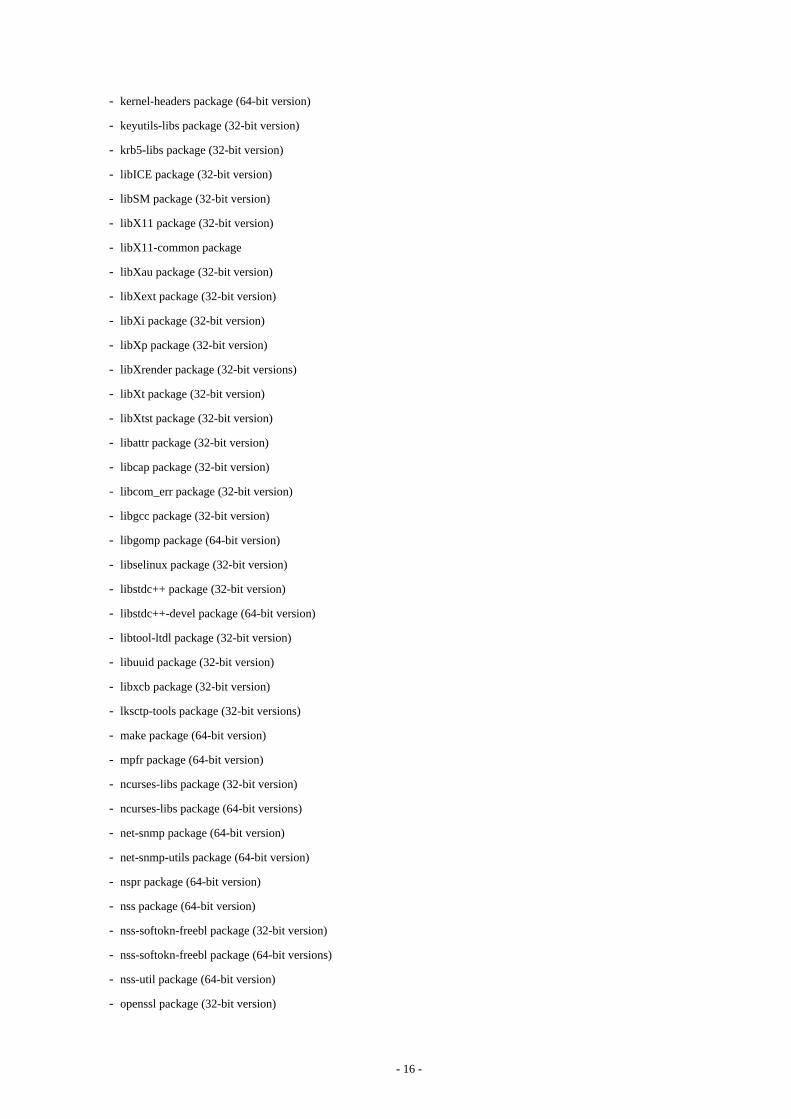
- kernel-headers package (64-bit version)
- keyutils-libs package (32-bit version)
- krb5-libs package (32-bit version)
- libICE package (32-bit version)
- libSM package (32-bit version)
- libX11 package (32-bit version)
- libX11-common package
- libXau package (32-bit version)
- libXext package (32-bit version)
- libXi package (32-bit version)
- libXp package (32-bit version)
- libXrender package (32-bit versions)
- libXt package (32-bit version)
- libXtst package (32-bit version)
- libattr package (32-bit version)
- libcap package (32-bit version)
- libcom_err package (32-bit version)
- libgcc package (32-bit version)
- libgomp package (64-bit version)
- libselinux package (32-bit version)
- libstdc++ package (32-bit version)
- libstdc++-devel package (64-bit version)
- libtool-ltdl package (32-bit version)
- libuuid package (32-bit version)
- libxcb package (32-bit version)
- lksctp-tools package (32-bit versions)
- make package (64-bit version)
- mpfr package (64-bit version)
- ncurses-libs package (32-bit version)
- ncurses-libs package (64-bit versions)
- net-snmp package (64-bit version)
- net-snmp-utils package (64-bit version)
- nspr package (64-bit version)
- nss package (64-bit version)
- nss-softokn-freebl package (32-bit version)
- nss-softokn-freebl package (64-bit versions)
- nss-util package (64-bit version)
- openssl package (32-bit version)
- 16 -
- openssl098e package (32-bit versions)
- pam package (32-bit version)
- perl package (64-bit version)
- perl-Module-Pluggable package (64-bit version)
- perl-Pod-Escapes package (64-bit version)
- perl-Pod-Simple package (64-bit version)
- perl-libs package (64-bit version)
- perl-version package (64-bit version)
- ppl package (64-bit version)
- readline package (32-bit version)
- redhat-lsb package (64-bit version)
- sqlite package (32-bit version)
- sysstat package (64-bit version)
- tcsh package (64-bit version)
- unixODBC package (32-bit version)
- zlib package (32-bit version)
- zlib package (64-bit versions)
3.2.3 Related SoftwareThis section lists related software programs that are required for this product.
Admin server
- ServerView Resource Orchestrator V3.2 Cloud Edition
This software is required to manage business servers deployed by ServerView Resource Orchestrator.
Note
If Systemwalker Software Configuration Manager is linked to ServerView Resource Orchestrator, uninstall Systemwalker SoftwareConfiguration Manager before performing the following tasks:
- Upgrading ServerView Resource Orchestrator
- Uninstalling ServerView Resource Orchestrator
Note
For the authentication method for ServerView Resource Orchestrator, use ServerView Single Sign-On (SSO). If the internalauthentication system is used for authentication, ServerView Resource Orchestrator cannot coordinate with SystemwalkerConfiguration Manager.
3.2.4 Conflicting SoftwareThe following table lists software that conflicts with this product.
- 17 -
Admin server
The Systemwalker Software Configuration Manager admin server cannot coexist with the following software:
[Windows]
Product V/L
FUJITSU Software Cloud Service Management Cannot coexist with any version
Systemwalker Runbook Automation (Management Server) Cannot coexist with V15.1.3 orearlier
Systemwalker Runbook Automation (Linkage Server/Relay Server) Cannot coexist with V15.1.3 orearlier
Systemwalker Runbook Automation (Business Server) Cannot coexist with V15.1.3 orearlier
Systemwalker Software Configuration Manager (linkage server) Cannot coexist with any version
Systemwalker Software Configuration Manager (business server) Cannot coexist with any version
Cloud infrastructure management software Cannot coexist with any version
[Linux]
Product V/L
FUJITSU Software Cloud Service Management Cannot coexist with any version
Systemwalker Runbook Automation (Management Server) Cannot coexist with V15.1.3 orearlier
Systemwalker Runbook Automation (Linkage Server/Relay Server) Cannot coexist with V15.1.3 orearlier
Systemwalker Runbook Automation (Business Server) Cannot coexist with V15.1.3 orearlier
Systemwalker Software Configuration Manager (linkage server) Cannot coexist with any version
Systemwalker Software Configuration Manager (business server) Cannot coexist with any version
Cloud infrastructure management software Cannot coexist with any version
3.3 Hardware and Hypervisor Supported for ConfigurationManagement of Hardware/Virtual Environment
Hardware supported for hardware configuration management is as follows.
Table 3.1 Hardware supported for hardware configuration management (chassis, blade servers)
Device Attribute name Management blade Server blade
BX600
S2/S3
BX900S1/S2
BX400S1
BX620S3/S4
BX620S5/S6
BX920S1 - S4
BX922S2
BX924S2 - S4
BX960 S1
Chassisbody
Product name Y Y Y - - - - - -
Serial number Y Y Y - - - - - -
Firmware version - Y - - - - - - -
Bladeserver
Slot number - - - Y Y Y Y Y Y
Vendor name - - - Y Y Y Y Y Y
- 18 -
Device Attribute name Management blade Server blade
BX600
S2/S3
BX900S1/S2
BX400S1
BX620S3/S4
BX620S5/S6
BX920S1 - S4
BX922S2
BX924S2 - S4
BX960 S1
Product name - - - Y Y Y Y Y Y
Serial number - - - Y Y Y Y Y Y
CPU Type - - - Y Y Y Y Y Y
Frequency - - - Y Y Y Y Y Y
Quantity - - - Y Y Y Y Y Y
Memory size - - - Y Y Y Y Y Y
Firmware version - - - - - Y Y Y Y
BIOS version - - - - - Y Y Y Y
OS name - - - Y (*1) Y (*1) Y (*1) Y (*1) Y (*1) Y(*1)
Y: Target of discovery.
-: Not target of discovery.
*1: When the version of the mounted hypervisor is VMware vSphere ESXi 5.1 or later, discovery can be performed.
Table 3.2 Hardware supported for hardware configuration management (rack mount servers)
Device Attribute name Target of discovery
Fujitsu PRIMERGY RX100/RX200/RX300 S6 orlater,RX1330/RX2520/RX2540M1 or later
IBM System x3550 M4
HP ProLiant DL320e Gen8 v2
Vendor name Y
Product name Y
Serial number Y
CPU Type (*1) Y(*1)
Frequency Y(*2)
Quantity Y
Memory size Y
OS name Y(*3)
Y: Target of discovery.
*1: On PRIMERGY RX100/RX200/RX300 S6 the CPU type cannot be discovered.
*2: On IBM servers and HP servers, the frequency cannot be discovered.
*3: Discovery can only be performed when the version of the mounted hypervisor is VMware vSphere ESXi 5.1 or later.
The following diagram illustrates the hypervisors for which virtual environment configuration can be managed.
Table 3.3 Hypervisor supported for virtual environment configuration management
Hypervisor Type Item Target of discovery
VMware vSphereESXi5.1 or later
VM host information OS name Y
CPU core count Y
MAC address Y
IP address Y
- 19 -
Hypervisor Type Item Target of discovery
VM guestinformation
Virtual machine name Y
OS name Y
CPU core count Y
Frequency Y
Memory size Y
MAC address Y
IP address Y
Y: Target of discovery.
- 20 -
Part 2 Installation
Chapter 4 Operation Design...........................................................................................................................22
Chapter 5 Installation......................................................................................................................................25
Chapter 6 Setup............................................................................................................................................. 42
Chapter 7 Setup Cancellation.........................................................................................................................58
Chapter 8 Uninstallation................................................................................................................................. 59
- 21 -
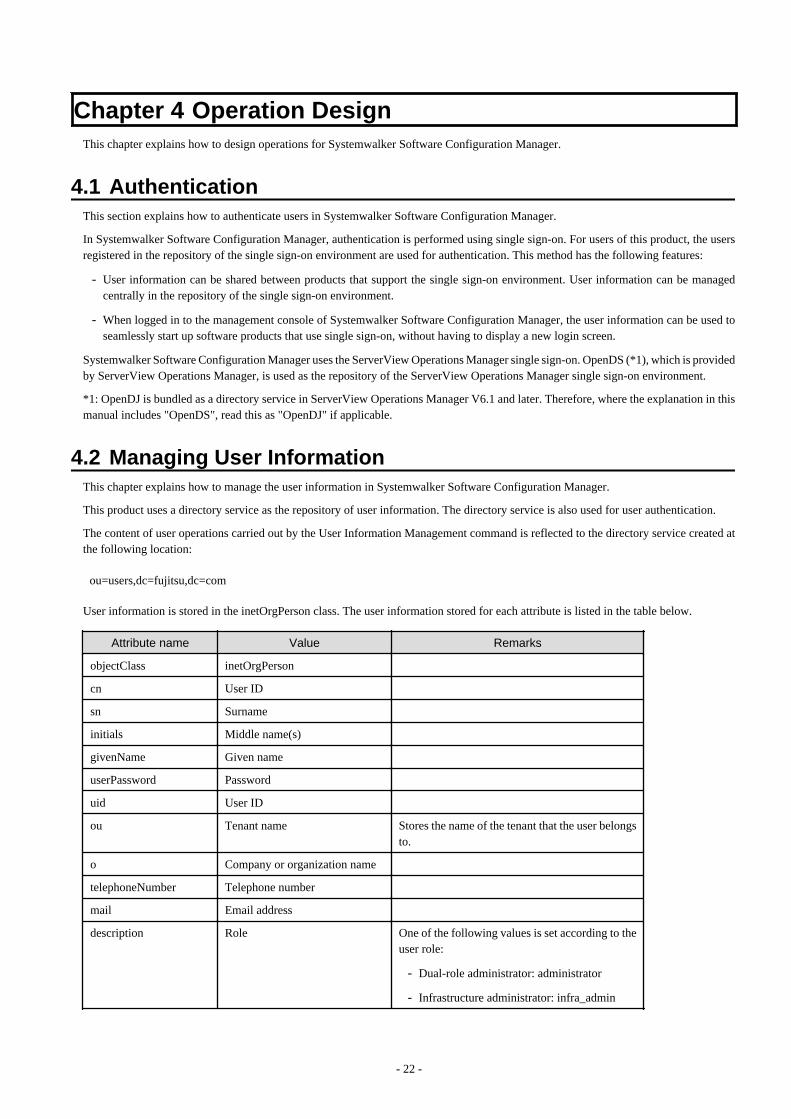
Chapter 4 Operation DesignThis chapter explains how to design operations for Systemwalker Software Configuration Manager.
4.1 AuthenticationThis section explains how to authenticate users in Systemwalker Software Configuration Manager.
In Systemwalker Software Configuration Manager, authentication is performed using single sign-on. For users of this product, the usersregistered in the repository of the single sign-on environment are used for authentication. This method has the following features:
- User information can be shared between products that support the single sign-on environment. User information can be managedcentrally in the repository of the single sign-on environment.
- When logged in to the management console of Systemwalker Software Configuration Manager, the user information can be used toseamlessly start up software products that use single sign-on, without having to display a new login screen.
Systemwalker Software Configuration Manager uses the ServerView Operations Manager single sign-on. OpenDS (*1), which is providedby ServerView Operations Manager, is used as the repository of the ServerView Operations Manager single sign-on environment.
*1: OpenDJ is bundled as a directory service in ServerView Operations Manager V6.1 and later. Therefore, where the explanation in thismanual includes "OpenDS", read this as "OpenDJ" if applicable.
4.2 Managing User InformationThis chapter explains how to manage the user information in Systemwalker Software Configuration Manager.
This product uses a directory service as the repository of user information. The directory service is also used for user authentication.
The content of user operations carried out by the User Information Management command is reflected to the directory service created atthe following location:
ou=users,dc=fujitsu,dc=com
User information is stored in the inetOrgPerson class. The user information stored for each attribute is listed in the table below.
Attribute name Value Remarks
objectClass inetOrgPerson
cn User ID
sn Surname
initials Middle name(s)
givenName Given name
userPassword Password
uid User ID
ou Tenant name Stores the name of the tenant that the user belongsto.
o Company or organization name
telephoneNumber Telephone number
mail Email address
description Role One of the following values is set according to theuser role:
- Dual-role administrator: administrator
- Infrastructure administrator: infra_admin
- 22 -
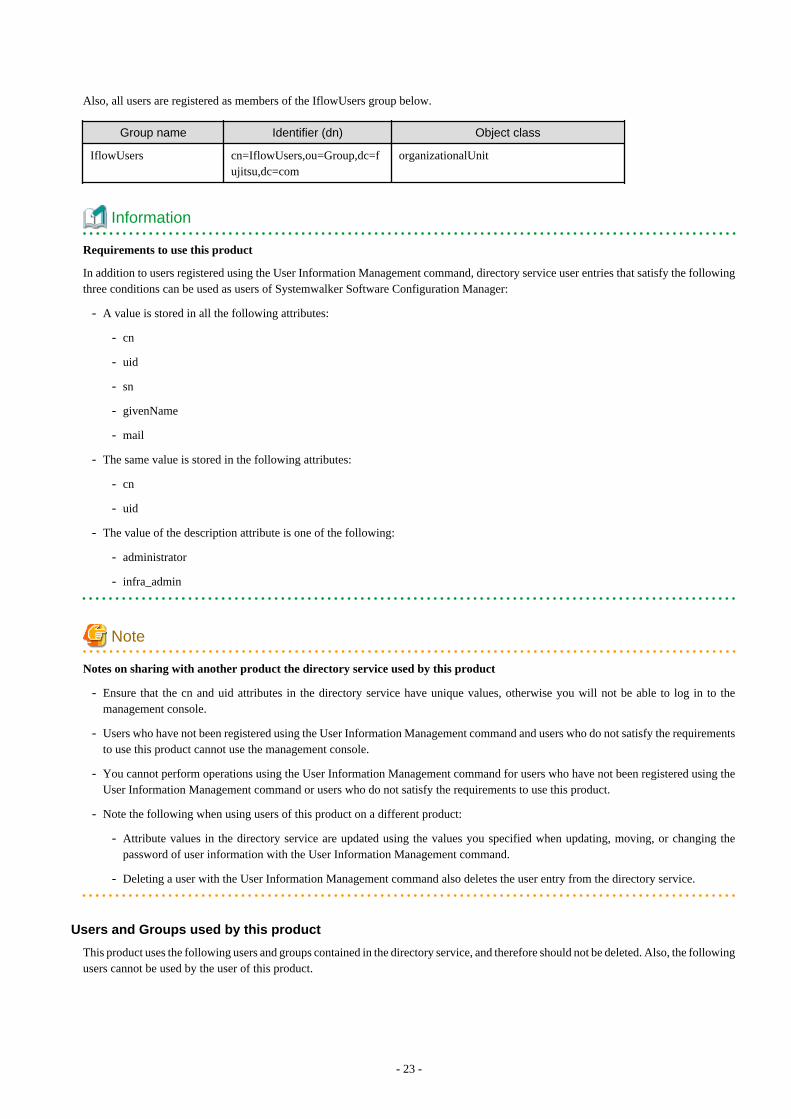
Also, all users are registered as members of the IflowUsers group below.
Group name Identifier (dn) Object class
IflowUsers cn=IflowUsers,ou=Group,dc=fujitsu,dc=com
organizationalUnit
Information
Requirements to use this product
In addition to users registered using the User Information Management command, directory service user entries that satisfy the followingthree conditions can be used as users of Systemwalker Software Configuration Manager:
- A value is stored in all the following attributes:
- cn
- uid
- sn
- givenName
- The same value is stored in the following attributes:
- cn
- uid
- The value of the description attribute is one of the following:
- administrator
- infra_admin
Note
Notes on sharing with another product the directory service used by this product
- Ensure that the cn and uid attributes in the directory service have unique values, otherwise you will not be able to log in to themanagement console.
- Users who have not been registered using the User Information Management command and users who do not satisfy the requirementsto use this product cannot use the management console.
- You cannot perform operations using the User Information Management command for users who have not been registered using theUser Information Management command or users who do not satisfy the requirements to use this product.
- Note the following when using users of this product on a different product:
- Attribute values in the directory service are updated using the values you specified when updating, moving, or changing thepassword of user information with the User Information Management command.
- Deleting a user with the User Information Management command also deletes the user entry from the directory service.
Users and Groups used by this product
This product uses the following users and groups contained in the directory service, and therefore should not be deleted. Also, the followingusers cannot be used by the user of this product.
- 23 -
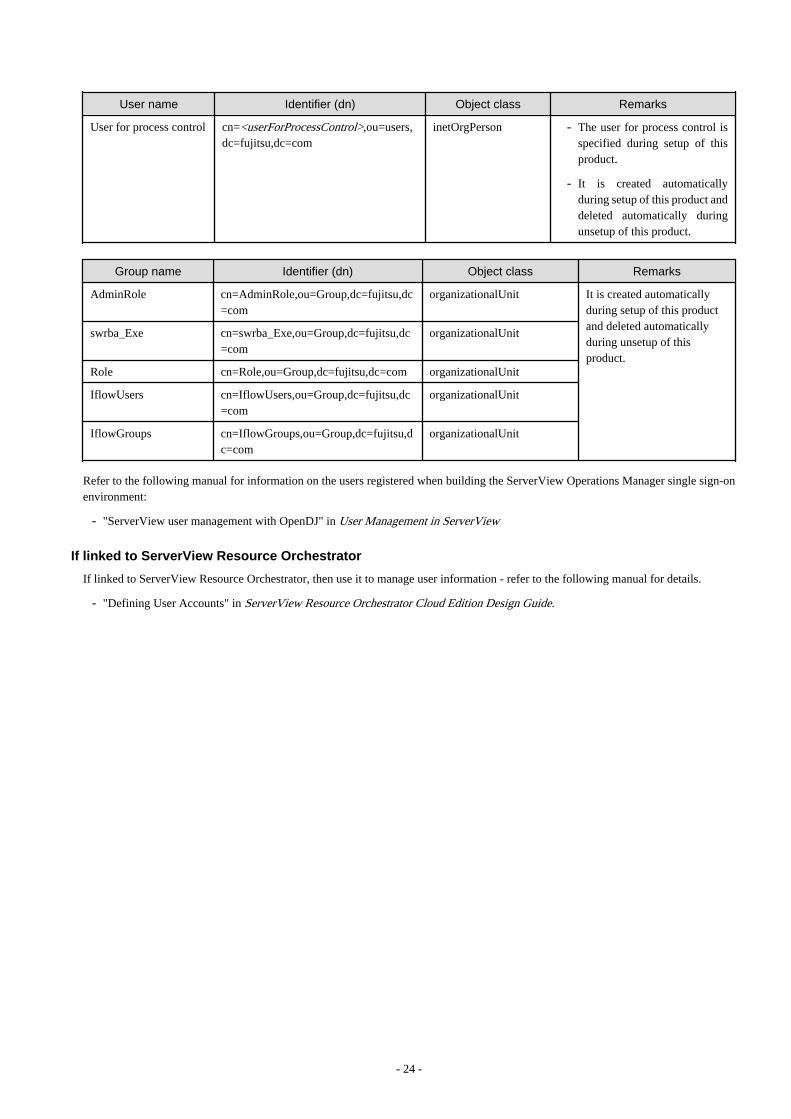
User name Identifier (dn) Object class Remarks
User for process control cn=<userForProcessControl>,ou=users,dc=fujitsu,dc=com
inetOrgPerson - The user for process control isspecified during setup of thisproduct.
- It is created automaticallyduring setup of this product anddeleted automatically duringunsetup of this product.
Group name Identifier (dn) Object class Remarks
AdminRole cn=AdminRole,ou=Group,dc=fujitsu,dc=com
organizationalUnit It is created automaticallyduring setup of this productand deleted automaticallyduring unsetup of thisproduct.
swrba_Exe cn=swrba_Exe,ou=Group,dc=fujitsu,dc=com
organizationalUnit
Role cn=Role,ou=Group,dc=fujitsu,dc=com organizationalUnit
IflowUsers cn=IflowUsers,ou=Group,dc=fujitsu,dc=com
organizationalUnit
IflowGroups cn=IflowGroups,ou=Group,dc=fujitsu,dc=com
organizationalUnit
Refer to the following manual for information on the users registered when building the ServerView Operations Manager single sign-onenvironment:
- "ServerView user management with OpenDJ" in User Management in ServerView
If linked to ServerView Resource Orchestrator
If linked to ServerView Resource Orchestrator, then use it to manage user information - refer to the following manual for details.
- "Defining User Accounts" in ServerView Resource Orchestrator Cloud Edition Design Guide.
- 24 -
Chapter 5 InstallationThis chapter explains how to install Systemwalker Software Configuration Manager.
5.1 Pre-installation NotesPerform the following tasks before installing this product.
5.1.1 Checking the Port Numbers and Firewall SettingsCheck whether the port numbers to be used by Systemwalker Software Configuration Manager are already being used. For the ports tobe used, refer to "Appendix A Port Number List" and check each server to see that none of the required ports are being used.
When installing this product in an environment where a firewall function is being used, the firewall function must be set up to allowcommunications via the necessary ports. Refer to "Appendix A Port Number List" for information on the required ports, and set up the"port numbers for which communications from external servers must be allowed" for each server. Refer to the operating system manualsfor information on how to set up the firewall function so as to allow communications via the necessary ports.
5.1.2 Checking the Settings in the Hosts File or the DNS ServerIt must be possible to resolve the IP address correctly from the local host name. Check the hosts file or the DNS server settings beforeinstalling the product, also check that the host name can be resolved to the IP address correctly.
5.1.3 Building a Single Sign-On EnvironmentBefore installing Systemwalker Software Configuration Manager, it is necessary to build the single sign-on environment using ServerViewOperations Manager - refer to the relevant ServerView Operations Manager manual for information on how to install it (it is not necessaryto perform a new installation if it is already installed).
Note
- Install ServerView Operations Manager on the admin server for Systemwalker Software Configuration Manager.
- The password for the LDAP administrator used in ServerView Operations Manager single sign-on cannot contain halfwidth spaces,fullwidth characters, or $ \ " = | [ ] : * ; + , < > ? /.
5.1.4 Checking Linked Products (ServerView Resource Orchestrator)If Systemwalker Software Configuration Manager is to be linked to ServerView Resource Orchestrator, ensure that the latter has beeninstalled and configured on the admin server.
Note
Use ServerView Single Sign-On (SSO) for the authentication method of ServerView Resource Orchestrator. When using internalauthentication, coordination with Systemwalker Configuration Manager is not possible.
5.2 Installing on the Admin ServerThis section explains how to install the product on the admin server.
Note
Check if any conflicting products have been installed.
- 25 -
5.2.1 Points to Note before Installing on the Admin Server
Checking linked products
If Systemwalker Software Configuration Manager is to be linked to ServerView Resource Orchestrator, check if the following softwarehas been installed and is ready for use:
- ServerView Resource Orchestrator Cloud Edition V3.2.0
Functions to be installed
The following functions must be installed in the admin server:
- The following functions are necessary for operating Systemwalker Software Configuration Manager:
- CMDB Manager
- SMEE, Securecrypto library runtime (*1)
- File transfer infrastructure
*1: When this product is operated linked to ServerView Resource Orchestrator, the function will not be installed again as it has alreadybeen installed.
Checking the port numbers
Ensure that the port number specified when installing Systemwalker Software Configuration Manager is not being used:
netstat -a -n
Even if the port number specified is not being used, it may already have been assigned to other software - refer to "Appendix A PortNumber List" for information on how to check if the port number is not in use.
Checking the language setting for the operating system
[Windows]
If installing Systemwalker Software Configuration Manager, ensure that the operating system is not a Japanese environment.
[Linux]
Check the LANG item in /etc/sysconfig/i18n, and ensure that the value of the character code for the system is not "ja_JP.UTF-8","ja_JP.SJIS" or "ja_JP.WINDOWS-31J". These character codes are not supported.
Checking the operating system users
When installing Systemwalker Software Configuration Manager, register the following users as operating system users. If they havealready been registered in the operating system, delete them before proceeding.
[Windows]
- swcfmgdb
[Linux]
- swcfmgdb
Required software [Linux]
Install the following software which attached operating system.
Install them referring to operating system manuals.
- elfutils package
Red Hat Enterprise Linux 5.2 or earlier
elfutils-libelf-0.125-3.el5.i386.rpm (*1)
- 26 -
Red Hat Enterprise Linux 5.3 or later
elfutils-libelf-0.137-3.el5.i386.rpm (*1)
Red Hat Enterprise Linux 6.0 or later
elfutils-libelf-0.148-1.el6.i686.rpm (*1)
*1: Install 32-bit version of elfutils package even if Linux operating system is 64-bit version.
For Red Hat Enterprise Linux 5, also install the software listed below, which is distributed with the operating system (refer to the operatingsystem manual before installing).
Red Hat Enterprise Linux 5 (for x86)
- apr package (32-bit version)
- apr-util package (32-bit version)
- glibc package (32-bit version)
- libtermcap package (32-bit version)
- libxml2 package (32-bit version)
- libXp package (32-bit version)
- libxslt package (32-bit version)
- net-snmp package (32-bit version)
- net-snmp-utils package (32-bit version)
- postgresql-libs package (32-bit version)
- readline package (32-bit version)
- redhat-lsb package (32-bit version)
- sysstat package (32-bit version)
- zlib package (32-bit version)
Red Hat Enterprise Linux 5 (for Intel64)
- apr package (32-bit version)
- apr-util package (32-bit version)
- glibc package (32-bit version)
- libtermcap package (32-bit version)
- libxml2 package (32-bit version)
- libXp package (32-bit version)
- libxslt package (32-bit version)
- net-snmp package (64-bit version)
- net-snmp-utils package (64-bit version)
- postgresql-libs package (32-bit version)
- readline package (32-bit version)
- redhat-lsb package (64-bit version)
- sysstat package (64-bit version)
- zlib package (32-bit version)
- 27 -
For Red Hat Enterprise Linux 6.0 or later, also install the software listed below, which is distributed with the operating system (refer tothe operating system manual before installing).
Red Hat Enterprise Linux 6.0 or later (for x86)
- alsa-lib package (32-bit version)
- apr package (32-bit version)
- apr-util package (32-bit version)
- cloog-ppl package (32-bit version)
- compat-expat1 package (32-bit version)
- compat-readline5 package (32-bit version)
- compat-libtermcap package (32-bit version)
- compat-openldap package (32-bit version)
- cpp package (32-bit version)
- cyrus-sasl-lib package (32-bit version)
- db4 package (32-bit version)
- expat package (32-bit version)
- file package (32-bit version)
- gcc package (32-bit version)
- gcc-c++ package (32-bit version)
- gdb package (32-bit version)
- glibc-devel package (32-bit version)
- glibc-headers package (32-bit version)
- glibc package (32-bit version)
- kernel-headers package (32-bit version)
- keyutils-libs package (32-bit version)
- krb5-libs package (32-bit version)
- libattr package (32-bit version)
- libcap package (32-bit version)
- libcom_err package (32-bit version)
- libgcc package (32-bit version)
- libICE package (32-bit version)
- libselinux package (32-bit version)
- libSM package (32-bit version)
- libX11 package (32-bit version)
- libX11-common package
- libXau package (32-bit version)
- libXext package (32-bit version)
- libXi package (32-bit version)
- libXp package (32-bit version)
- 28 -
- libXrender package (32-bit version)
- libXt package (32-bit version)
- libXtst package (32-bit version)
- libgomp package (32-bit version)
- libstdc++-devel package (32-bit version)
- libstdc++ package (32-bit version)
- libtool-ltdl package (32-bit version)
- libuuid package (32-bit version)
- libxcb package (32-bit version)
- lksctp-tools package (32-bit version)
- make package (32-bit version)
- mpfr package (32-bit version)
- net-snmp package (32-bit version)
- net-snmp-utils package (32-bit version)
- nspr package (32-bit version)
- nss package (32-bit version)
- nss-softokn-freebl package (32-bit version)
- nss-util package (32-bit version)
- openssl package (32-bit version)
- openssl098e package (32-bit version)
- perl package (32-bit version)
- perl-Module-Pluggable package (32-bit version)
- perl-Pod-Escapes package (32-bit version)
- perl-Pod-Simple package (32-bit version)
- perl-libs package (32-bit version)
- perl-version package (32-bit version)
- ppl package (32-bit version)
- redhat-lsb package (32-bit version)
- sqlite package (32-bit version)
- strace package (32-bit version)
- sysstat package (32-bit version)
- tcsh package (32-bit version)
- unixODBC package (32-bit version)
- zlib package (32-bit version)
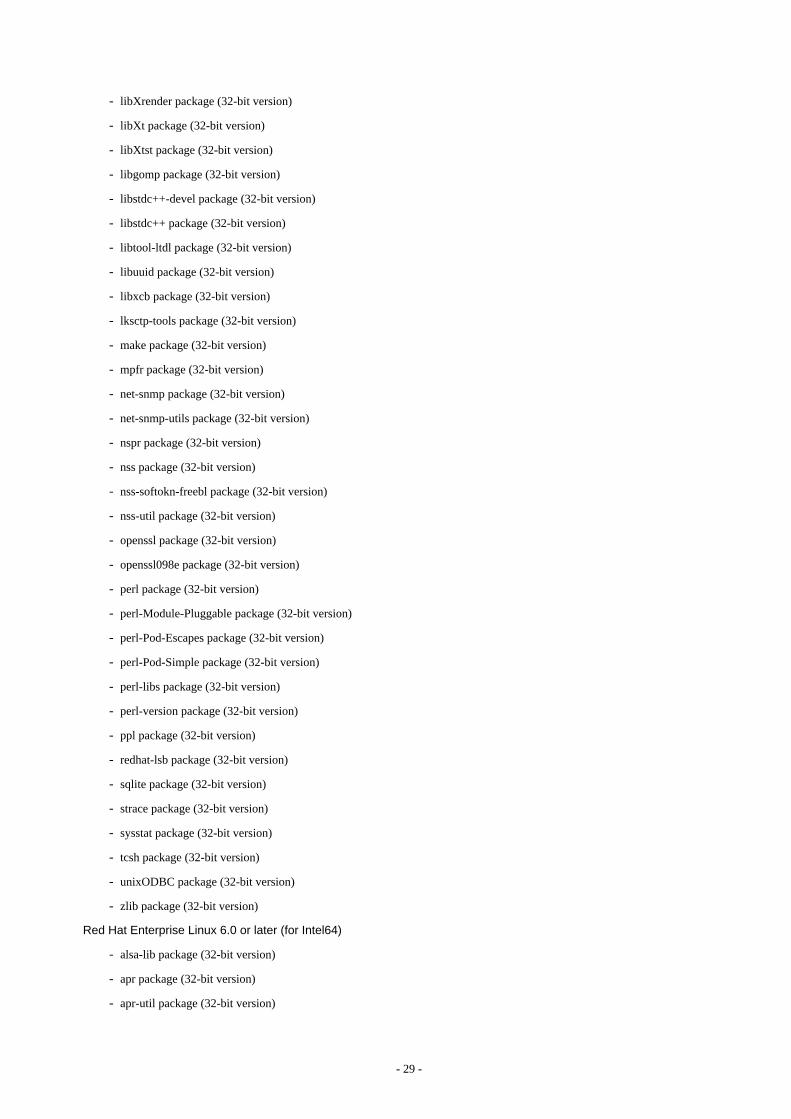
Red Hat Enterprise Linux 6.0 or later (for Intel64)
- alsa-lib package (32-bit version)
- apr package (32-bit version)
- apr-util package (32-bit version)
- 29 -
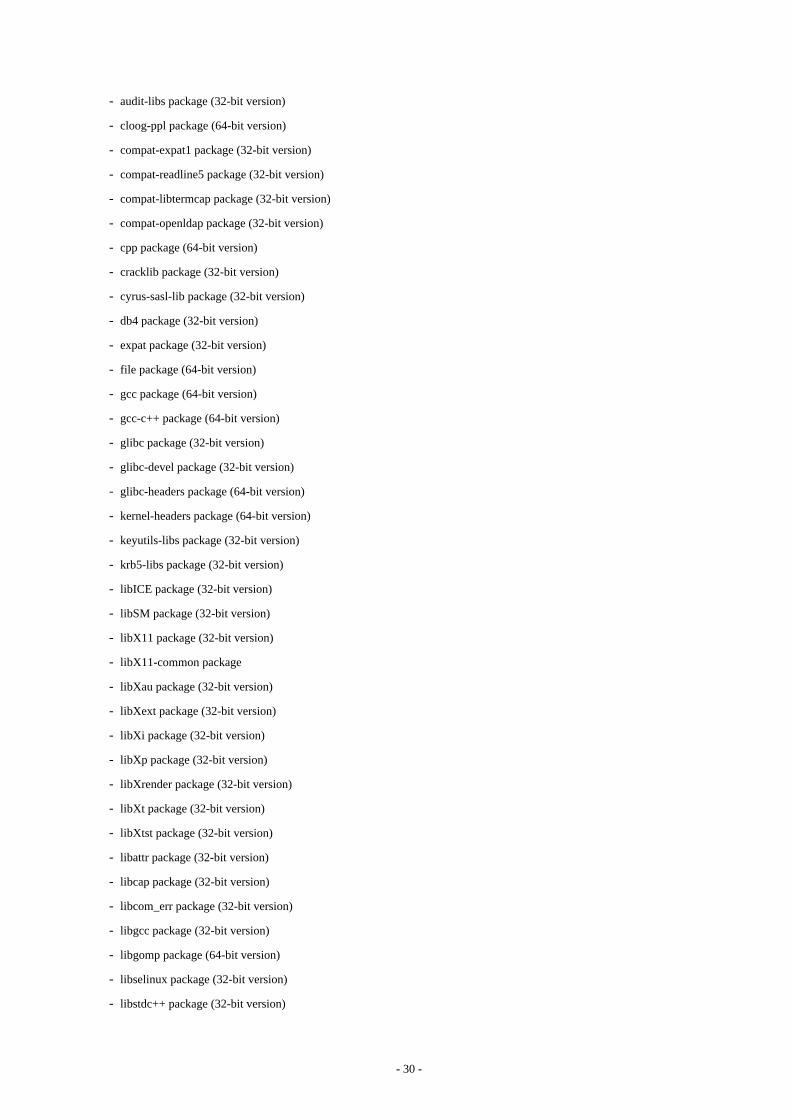
- audit-libs package (32-bit version)
- cloog-ppl package (64-bit version)
- compat-expat1 package (32-bit version)
- compat-readline5 package (32-bit version)
- compat-libtermcap package (32-bit version)
- compat-openldap package (32-bit version)
- cpp package (64-bit version)
- cracklib package (32-bit version)
- cyrus-sasl-lib package (32-bit version)
- db4 package (32-bit version)
- expat package (32-bit version)
- file package (64-bit version)
- gcc package (64-bit version)
- gcc-c++ package (64-bit version)
- glibc package (32-bit version)
- glibc-devel package (32-bit version)
- glibc-headers package (64-bit version)
- kernel-headers package (64-bit version)
- keyutils-libs package (32-bit version)
- krb5-libs package (32-bit version)
- libICE package (32-bit version)
- libSM package (32-bit version)
- libX11 package (32-bit version)
- libX11-common package
- libXau package (32-bit version)
- libXext package (32-bit version)
- libXi package (32-bit version)
- libXp package (32-bit version)
- libXrender package (32-bit version)
- libXt package (32-bit version)
- libXtst package (32-bit version)
- libattr package (32-bit version)
- libcap package (32-bit version)
- libcom_err package (32-bit version)
- libgcc package (32-bit version)
- libgomp package (64-bit version)
- libselinux package (32-bit version)
- libstdc++ package (32-bit version)
- 30 -
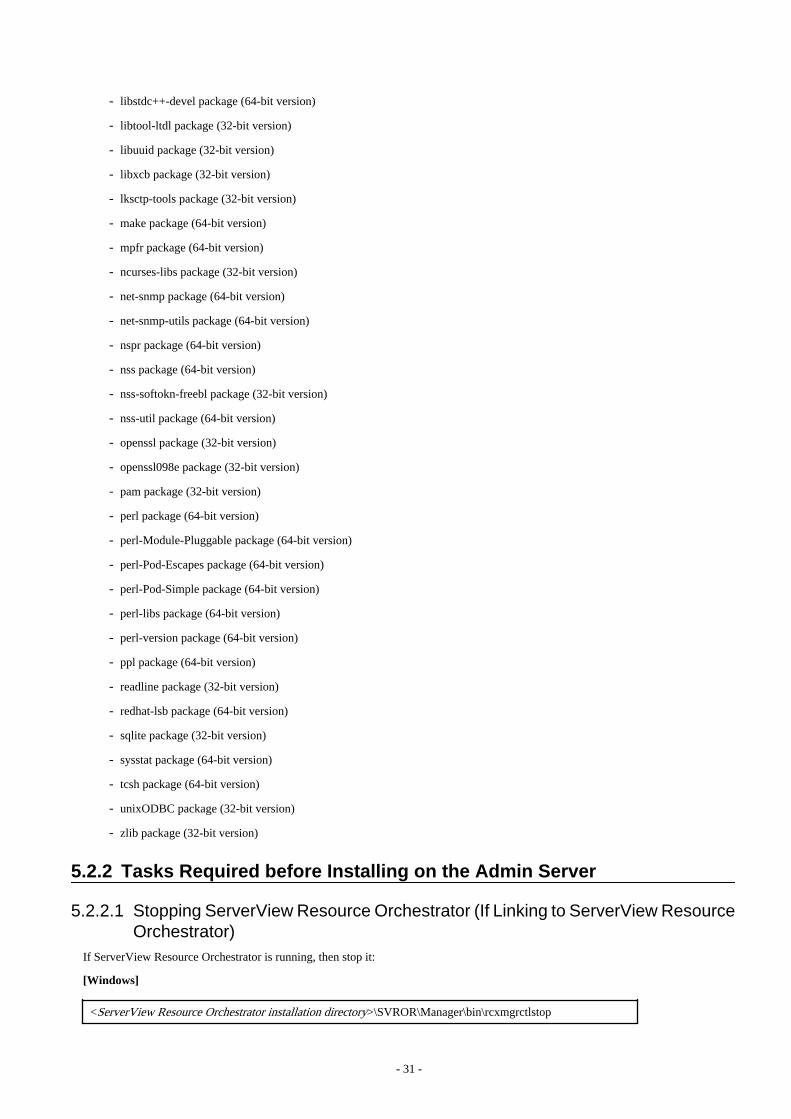
- libstdc++-devel package (64-bit version)
- libtool-ltdl package (32-bit version)
- libuuid package (32-bit version)
- libxcb package (32-bit version)
- lksctp-tools package (32-bit version)
- make package (64-bit version)
- mpfr package (64-bit version)
- ncurses-libs package (32-bit version)
- net-snmp package (64-bit version)
- net-snmp-utils package (64-bit version)
- nspr package (64-bit version)
- nss package (64-bit version)
- nss-softokn-freebl package (32-bit version)
- nss-util package (64-bit version)
- openssl package (32-bit version)
- openssl098e package (32-bit version)
- pam package (32-bit version)
- perl package (64-bit version)
- perl-Module-Pluggable package (64-bit version)
- perl-Pod-Escapes package (64-bit version)
- perl-Pod-Simple package (64-bit version)
- perl-libs package (64-bit version)
- perl-version package (64-bit version)
- ppl package (64-bit version)
- readline package (32-bit version)
- redhat-lsb package (64-bit version)
- sqlite package (32-bit version)
- sysstat package (64-bit version)
- tcsh package (64-bit version)
- unixODBC package (32-bit version)
- zlib package (32-bit version)
5.2.2 Tasks Required before Installing on the Admin Server
5.2.2.1 Stopping ServerView Resource Orchestrator (If Linking to ServerView ResourceOrchestrator)
If ServerView Resource Orchestrator is running, then stop it:
[Windows]
<ServerView Resource Orchestrator installation directory>\SVROR\Manager\bin\rcxmgrctlstop
- 31 -
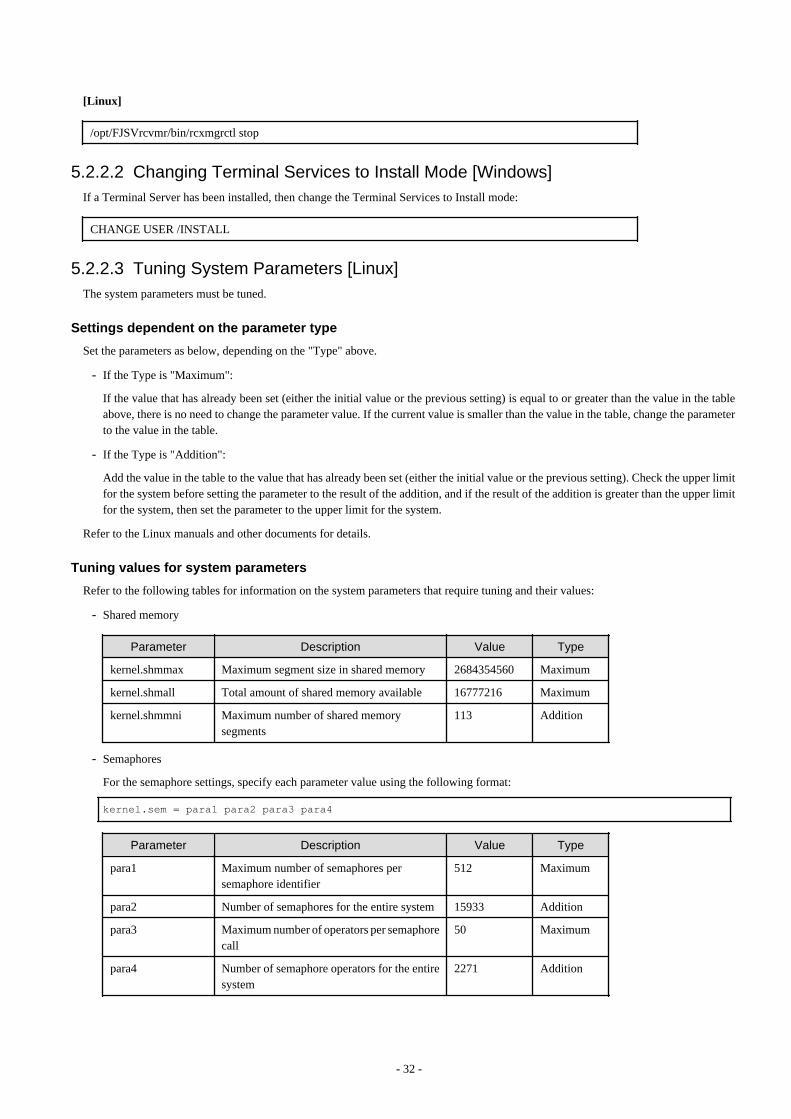
[Linux]
/opt/FJSVrcvmr/bin/rcxmgrctl stop
5.2.2.2 Changing Terminal Services to Install Mode [Windows]If a Terminal Server has been installed, then change the Terminal Services to Install mode:
CHANGE USER /INSTALL
5.2.2.3 Tuning System Parameters [Linux]The system parameters must be tuned.
Settings dependent on the parameter type
Set the parameters as below, depending on the "Type" above.
- If the Type is "Maximum":
If the value that has already been set (either the initial value or the previous setting) is equal to or greater than the value in the tableabove, there is no need to change the parameter value. If the current value is smaller than the value in the table, change the parameterto the value in the table.
- If the Type is "Addition":
Add the value in the table to the value that has already been set (either the initial value or the previous setting). Check the upper limitfor the system before setting the parameter to the result of the addition, and if the result of the addition is greater than the upper limitfor the system, then set the parameter to the upper limit for the system.
Refer to the Linux manuals and other documents for details.
Tuning values for system parameters
Refer to the following tables for information on the system parameters that require tuning and their values:
- Shared memory
Parameter Description Value Type
kernel.shmmax Maximum segment size in shared memory 2684354560 Maximum
kernel.shmall Total amount of shared memory available 16777216 Maximum
kernel.shmmni Maximum number of shared memorysegments
113 Addition
- Semaphores
For the semaphore settings, specify each parameter value using the following format:
kernel.sem = para1 para2 para3 para4
Parameter Description Value Type
para1 Maximum number of semaphores persemaphore identifier
512 Maximum
para2 Number of semaphores for the entire system 15933 Addition
para3 Maximum number of operators per semaphorecall
50 Maximum
para4 Number of semaphore operators for the entiresystem
2271 Addition
- 32 -

- Message queues
Parameter Description Value Type
kernel.msgmax Maximum size of messages 16384 Maximum
kernel.msgmnb Maximum value for messages that can be heldin one message queue
114432 Maximum
kernel.msgmni Maximum number of message queue IDs 1578 Addition
Settings dependent on the parameter type
Set the parameters as below, depending on the "Type" shown in the table above.
- If the Type is "Maximum":
If the value that has already been set (either the initial value or the previous setting) is equal to or greater than the value in the tableabove, there is no need to change the parameter value. If the current value is smaller than the value in the table, change the parameterto the value in the table.
- If the Type is "Addition":
Add the value in the table above to the value that has already been set (either the initial value or the previous setting). Check the upperlimit for the system before setting the parameter to the result of the addition, and if the result of the addition is greater than the upperlimit for the system, then set the parameter to the upper limit for the system.
Refer to the Linux manuals and other documents for details.
Tuning procedure
Use the following procedure to perform tuning tasks:
1. Use the following command to check the current settings for the system parameters:
# /sbin/sysctl -a
Example
# /sbin/sysctl -a. . . (omitted). . .kernel.sem = 250 32000 32 128. . .kernel.msgmnb = 65536kernel.msgmni = 16 kernel.msgmax = 8192kernel.shmmni = 4096kernel.shmall = 2097152kernel.shmmax = 33554432. . . (omitted). . .
2. Refer to "Tuning values for system parameters", and compare the current settings to the values in the tables above. Calculate anappropriate value for each parameter, taking into account the parameter type ("Maximum" or "Addition").
3. Edit the /etc/sysctl.conf file. Edit the file as shown in the following example:
- 33 -
Example
kernel.sem = 512 47933 50 2399kernel.msgmnb = 114432kernel.msgmni = 1594kernel.msgmax = 16384kernel.shmmax = 2684354560kernel.shmall = 16777216kernel.shmmni = 4209
4. Use the following command to check that the changes have been applied to the /etc/sysctl.conf file:
# /bin/cat /etc/sysctl.conf
5. To enable the settings in Step 4 above, perform either of the following methods:
- Apply the settings by rebooting the system.
# /sbin/shutdown -r now
- Apply the settings by executing the "/sbin/sysctl -p" command.
# /sbin/sysctl -p /etc/sysctl.conf (*1)
*1: There is no need to reboot the system if this command is used.
6. The output of the following command can be used to check that the changes made to the system parameter settings have beenapplied:
# /sbin/sysctl -a
Example
# /sbin/sysctl -a ... (omitted)kernel.sem = 512 47933 50 2399...kernel.msgmnb = 114432kernel.msgmni = 1594kernel.msgmax = 16384kernel.shmmax = 2684354560kernel.shmall = 16777216kernel.shmmni = 4209... (omitted)...
5.2.2.4 syslog Settings [Linux]This product outputs logs to syslog. In order to output logs to syslog, check the following settings and adjust the settings if necessary.
Settings for syslog.conf or rsyslog.conf
It is recommended that the default settings for the operating system be used.
Systemwalker Software Configuration Manager outputs logs using local0 (facility). The following settings are required. If the followingsettings are missing even though syslog.conf or rsyslog.conf has already been edited, add the following settings to syslog.conf orrsyslog.conf.
- 34 -
Refer to the syslog.conf manuals for information on how to edit the syslog.conf file. Refer to the rsyslog.conf manuals for information onhow to edit the rsyslog.conf file.
- "/etc/syslog.conf" (for RHEL5)
Selector field (facility.priority) Action field
local0.info /var/log/messages
- "/etc/rsyslog.conf" (for RHEL6)
<Rules>
Selector field (facility.priority) Action field
local0.info /var/log/messages
Point
There is no need to make modifications if "*.info" has been set for the selector field (facility.priority).
Enabling remote reception for syslog
Remote reception must be enabled in order to output logs to the syslog on the admin server from Systemwalker Software ConfigurationManager.
Configure settings so that syslog automatically starts in remote reception mode when the operating system starts.
Edit the following files:
- "/etc/sysconfig/syslog" (for RHEL5)
Add the "-r" option to SYSLOGD_OPTIONS.
Example:
SYSLOGD_OPTIONS="-r -m 0"
- "/etc/rsyslog.conf" (for RHEL6)
Enable $UDPServerRun.
$ModLoad imudp.so
$UDPServerRun 514
Note that the port used for remote reception is "514/udp". Refer to "Appendix A Port Number List" for a list of ports used bySystemwalker Software Configuration Manager.
Restarting syslogd or rsyslogd
If the settings have been changed in "Settings for syslog.conf or rsyslog.conf" or "Enabling remote reception for syslog", restart syslogdor rsyslogd for the changes to take effect.
Refer to the syslogd manuals for information on syslogd. Refer to the rsyslogd manuals for information on rsyslogd.
- "syslogd" (for RHEL5)
>/etc/init.d/syslog stop
>/etc/init.d/syslog start
- "rsyslogd" (for RHEL6)
>/etc/init.d/rsyslog stop
- 35 -
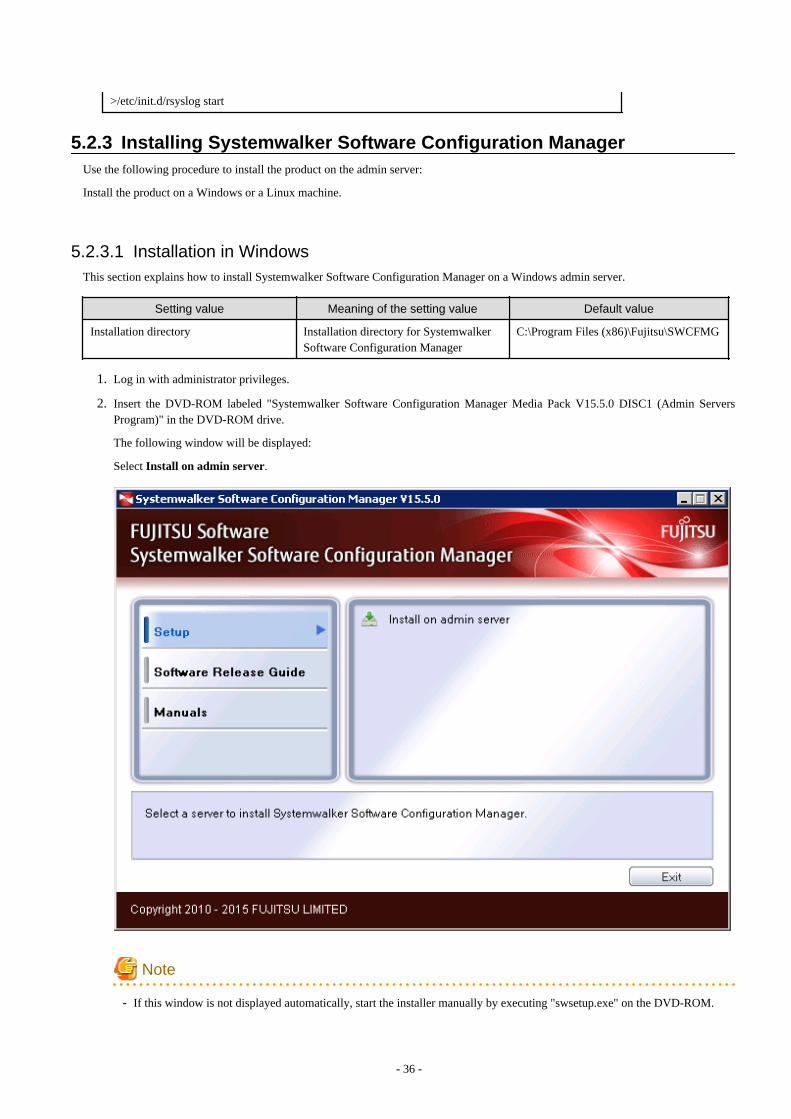
>/etc/init.d/rsyslog start
5.2.3 Installing Systemwalker Software Configuration ManagerUse the following procedure to install the product on the admin server:
Install the product on a Windows or a Linux machine.
5.2.3.1 Installation in WindowsThis section explains how to install Systemwalker Software Configuration Manager on a Windows admin server.
Setting value Meaning of the setting value Default value
Installation directory Installation directory for SystemwalkerSoftware Configuration Manager
C:\Program Files (x86)\Fujitsu\SWCFMG
1. Log in with administrator privileges.
2. Insert the DVD-ROM labeled "Systemwalker Software Configuration Manager Media Pack V15.5.0 DISC1 (Admin ServersProgram)" in the DVD-ROM drive.
The following window will be displayed:
Select Install on admin server.
Note
- If this window is not displayed automatically, start the installer manually by executing "swsetup.exe" on the DVD-ROM.
- 36 -
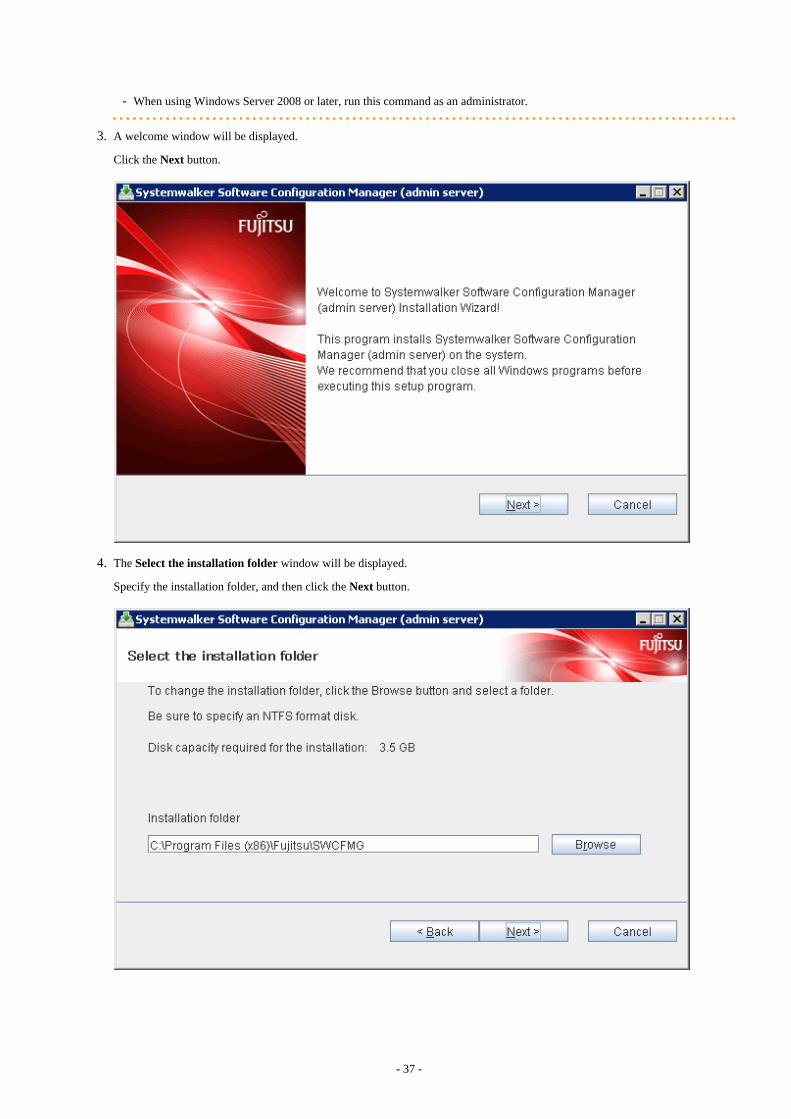
- When using Windows Server 2008 or later, run this command as an administrator.
3. A welcome window will be displayed.
Click the Next button.
4. The Select the installation folder window will be displayed.
Specify the installation folder, and then click the Next button.
- 37 -

Note
- Specify an NTFS format disk.
- Specify a path up to 40 bytes long.
- Specify a new folder.
- Do not specify relative paths or paths that start with "\\".
- Specify only alphanumeric characters, spaces, hyphens ("-"), and underscores ("_").
You can specify a directory under <system drive>\Program Files or <system drive>\Program Files (x86).
- The required packages for operating Systemwalker Software Configuration Manager are installed in the following directories:
- Systemwalker Software Configuration Manager installation directory
<specified installation directory>\SWCFMGA
<specified installation directory>\SWCFMGM
<Specified installation directory>\RBAM
<Specified installation directory>\BPM
<Specified installation directory>\APS
<Specified installation directory>\CMDB
<Specified installation directory>\ PGSQL
5. The Confirm the installation settings window will be displayed.
Check the settings, and then click the Confirm button to start the installation.
- 38 -
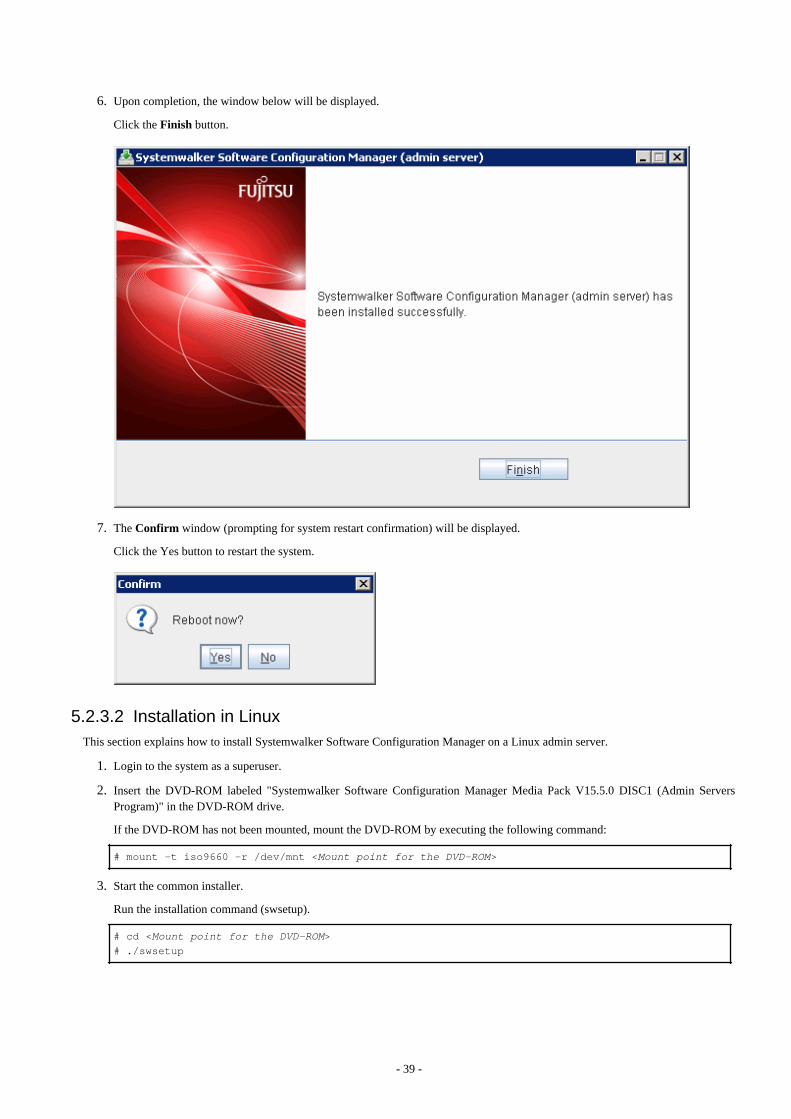
6. Upon completion, the window below will be displayed.
Click the Finish button.
7. The Confirm window (prompting for system restart confirmation) will be displayed.
Click the Yes button to restart the system.
5.2.3.2 Installation in LinuxThis section explains how to install Systemwalker Software Configuration Manager on a Linux admin server.
1. Login to the system as a superuser.
2. Insert the DVD-ROM labeled "Systemwalker Software Configuration Manager Media Pack V15.5.0 DISC1 (Admin ServersProgram)" in the DVD-ROM drive.
If the DVD-ROM has not been mounted, mount the DVD-ROM by executing the following command:
# mount -t iso9660 -r /dev/mnt <Mount point for the DVD-ROM>
3. Start the common installer.
Run the installation command (swsetup).
# cd <Mount point for the DVD-ROM> # ./swsetup
- 39 -
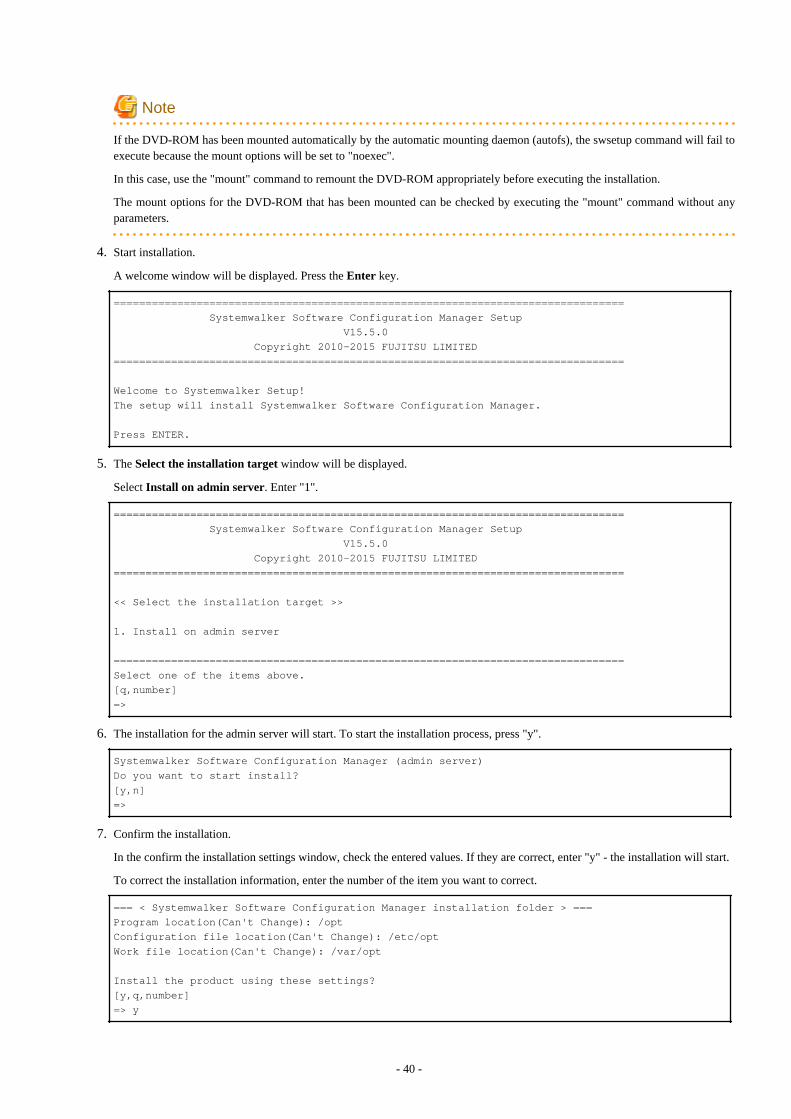
Note
If the DVD-ROM has been mounted automatically by the automatic mounting daemon (autofs), the swsetup command will fail toexecute because the mount options will be set to "noexec".
In this case, use the "mount" command to remount the DVD-ROM appropriately before executing the installation.
The mount options for the DVD-ROM that has been mounted can be checked by executing the "mount" command without anyparameters.
4. Start installation.
A welcome window will be displayed. Press the Enter key.
================================================================================ Systemwalker Software Configuration Manager Setup V15.5.0 Copyright 2010-2015 FUJITSU LIMITED================================================================================
Welcome to Systemwalker Setup!The setup will install Systemwalker Software Configuration Manager.
Press ENTER.
5. The Select the installation target window will be displayed.
Select Install on admin server. Enter "1".
================================================================================ Systemwalker Software Configuration Manager Setup V15.5.0 Copyright 2010-2015 FUJITSU LIMITED================================================================================
<< Select the installation target >>
1. Install on admin server
================================================================================Select one of the items above.[q,number]=>
6. The installation for the admin server will start. To start the installation process, press "y".
Systemwalker Software Configuration Manager (admin server)Do you want to start install?[y,n]=>
7. Confirm the installation.
In the confirm the installation settings window, check the entered values. If they are correct, enter "y" - the installation will start.
To correct the installation information, enter the number of the item you want to correct.
=== < Systemwalker Software Configuration Manager installation folder > ===Program location(Can't Change): /optConfiguration file location(Can't Change): /etc/optWork file location(Can't Change): /var/opt
Install the product using these settings?[y,q,number]=> y
- 40 -
8. The installation will start.
Once the preparations for the installation are complete, the following message will be displayed, and the installation will start:
installing...
9. The installation will complete.
Upon successful completion, the following message will be displayed.
Systemwalker Software Configuration Manager (admin server) install completed.
5.2.4 Points to Note after Installing on the Admin ServerThis section explains points to note after installing the product on the admin server.
[Windows]
- If a Terminal Server has been installed, then change the Terminal Services to Execute mode:
CHANGE USER /EXECUTE
[Linux]
- Character encoding
Do not change the system character encoding after installing Systemwalker Software Configuration Manager.
5.3 If the Installation FailsIf the installation fails, restart the system and then log in again as the same user that performed the installation. Remove the cause of theproblem based on the message that has been output, and then perform the installation again.
- 41 -
Chapter 6 SetupThis chapter explains how to set up Systemwalker Software Configuration Manager.
6.1 Registering a License KeyAfter installation of the product is completed, enter the license key using a command. Entering a license key registers the authorized userof the product. The license key is provided with the licensed product.
6.1.1 License Key Registration ProcedureOnce the license key is registered using a command, authorized use of the product starts. Using the command, you can enter the licensekey as a parameter or enter the license key in a file and specify the file.
Entering the license key as a parameter
Specify the register -k option in the fjlic command to enter the license key as a parameter. To specify multiple license keys, separate themusing commas.
[Windows]
<Systemwalker Software Configuration Manager installation directory>\FJLIC\fjlic\fjlic.exe register -k "License key" [,...]
[Linux]
/opt/FJSVcfmgm/FJLIC/fjlic/fjlic register -k "License key" [,...]
Entering the license key in a file
Specify the register -f option for the fjlic command to enter the license key in a file and specify the file.
1. Creating a license key file
Create a file containing license keys. Create the file using the following format. To enter multiple license keys, separate them usingline breaks.
XXXX-XXXX-XXXX-XXXX-XXXX-XXXX-XXXXXX-XXXX-XXXX-XXXX-XXXX-XXXX-XX
2. Executing the command
Specify the full path of the license key file for the register -f option in the fjlic command and execute the command.
[Windows]
<Systemwalker Software Configuration Manager installation directory>\FJLIC\fjlic\fjlic.exe register -f "The path of the license key file"
[Linux]
/opt/FJSVcfmgm/FJLIC/fjlic/fjlic register -f "The path of the license key file"
6.2 Setting up the Admin ServerThis section explains how to set up the admin server.
6.2.1 Pre-setup Tasks for the Admin ServerThis section explains the tasks required before setup for the admin server.
- 42 -
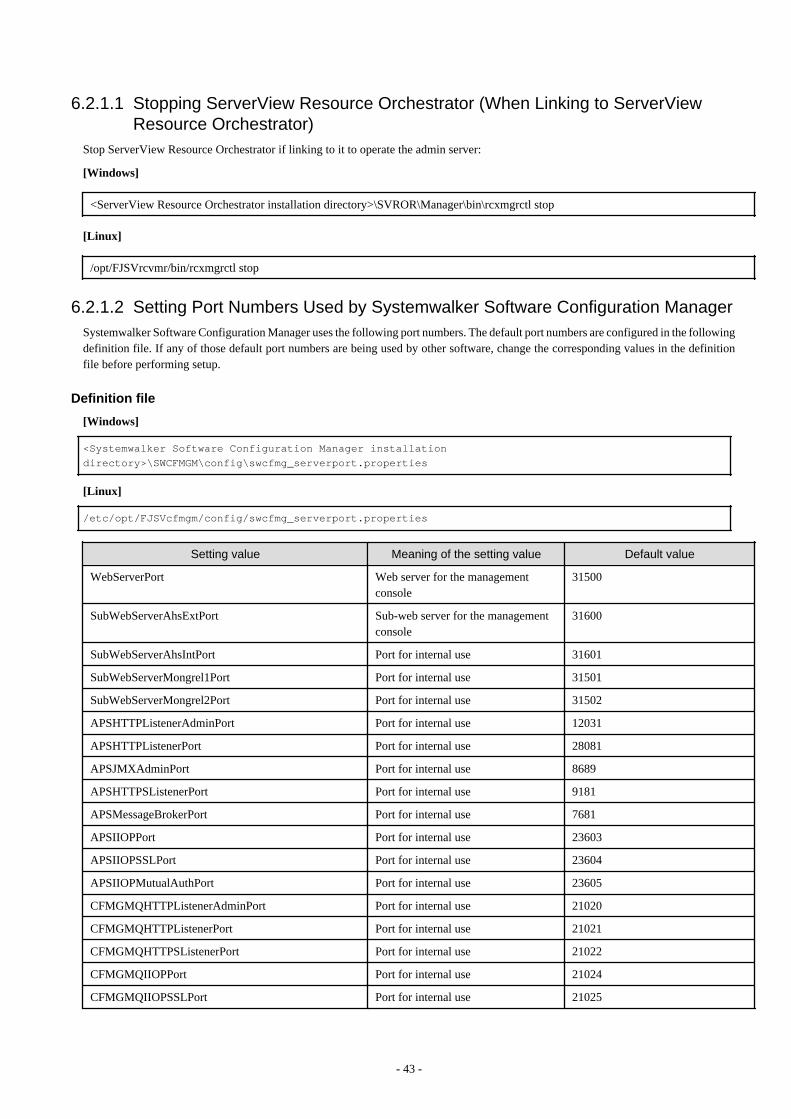
6.2.1.1 Stopping ServerView Resource Orchestrator (When Linking to ServerViewResource Orchestrator)
Stop ServerView Resource Orchestrator if linking to it to operate the admin server:
[Windows]
<ServerView Resource Orchestrator installation directory>\SVROR\Manager\bin\rcxmgrctl stop
[Linux]
/opt/FJSVrcvmr/bin/rcxmgrctl stop
6.2.1.2 Setting Port Numbers Used by Systemwalker Software Configuration ManagerSystemwalker Software Configuration Manager uses the following port numbers. The default port numbers are configured in the followingdefinition file. If any of those default port numbers are being used by other software, change the corresponding values in the definitionfile before performing setup.
Definition file
[Windows]
<Systemwalker Software Configuration Manager installationdirectory>\SWCFMGM\config\swcfmg_serverport.properties
[Linux]
/etc/opt/FJSVcfmgm/config/swcfmg_serverport.properties
Setting value Meaning of the setting value Default value
WebServerPort Web server for the managementconsole
31500
SubWebServerAhsExtPort Sub-web server for the managementconsole
31600
SubWebServerAhsIntPort Port for internal use 31601
SubWebServerMongrel1Port Port for internal use 31501
SubWebServerMongrel2Port Port for internal use 31502
APSHTTPListenerAdminPort Port for internal use 12031
APSHTTPListenerPort Port for internal use 28081
APSJMXAdminPort Port for internal use 8689
APSHTTPSListenerPort Port for internal use 9181
APSMessageBrokerPort Port for internal use 7681
APSIIOPPort Port for internal use 23603
APSIIOPSSLPort Port for internal use 23604
APSIIOPMutualAuthPort Port for internal use 23605
CFMGMQHTTPListenerAdminPort Port for internal use 21020
CFMGMQHTTPListenerPort Port for internal use 21021
CFMGMQHTTPSListenerPort Port for internal use 21022
CFMGMQIIOPPort Port for internal use 21024
CFMGMQIIOPSSLPort Port for internal use 21025
- 43 -
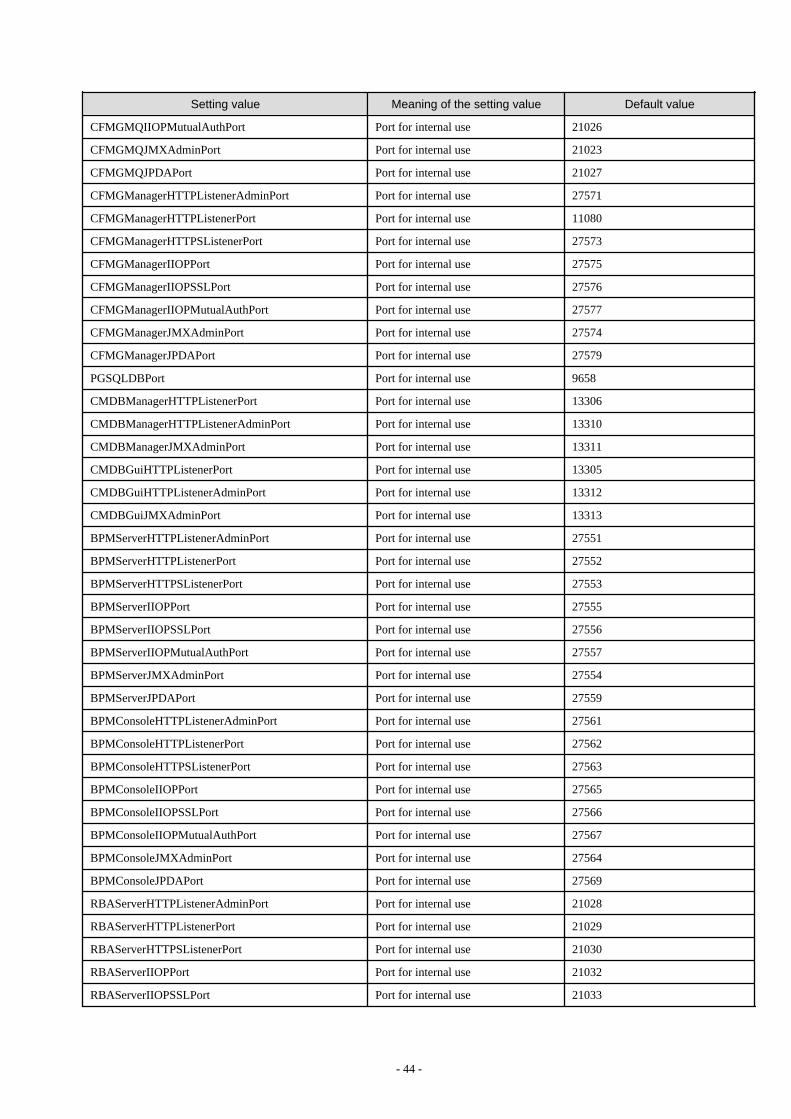
Setting value Meaning of the setting value Default value
CFMGMQIIOPMutualAuthPort Port for internal use 21026
CFMGMQJMXAdminPort Port for internal use 21023
CFMGMQJPDAPort Port for internal use 21027
CFMGManagerHTTPListenerAdminPort Port for internal use 27571
CFMGManagerHTTPListenerPort Port for internal use 11080
CFMGManagerHTTPSListenerPort Port for internal use 27573
CFMGManagerIIOPPort Port for internal use 27575
CFMGManagerIIOPSSLPort Port for internal use 27576
CFMGManagerIIOPMutualAuthPort Port for internal use 27577
CFMGManagerJMXAdminPort Port for internal use 27574
CFMGManagerJPDAPort Port for internal use 27579
PGSQLDBPort Port for internal use 9658
CMDBManagerHTTPListenerPort Port for internal use 13306
CMDBManagerHTTPListenerAdminPort Port for internal use 13310
CMDBManagerJMXAdminPort Port for internal use 13311
CMDBGuiHTTPListenerPort Port for internal use 13305
CMDBGuiHTTPListenerAdminPort Port for internal use 13312
CMDBGuiJMXAdminPort Port for internal use 13313
BPMServerHTTPListenerAdminPort Port for internal use 27551
BPMServerHTTPListenerPort Port for internal use 27552
BPMServerHTTPSListenerPort Port for internal use 27553
BPMServerIIOPPort Port for internal use 27555
BPMServerIIOPSSLPort Port for internal use 27556
BPMServerIIOPMutualAuthPort Port for internal use 27557
BPMServerJMXAdminPort Port for internal use 27554
BPMServerJPDAPort Port for internal use 27559
BPMConsoleHTTPListenerAdminPort Port for internal use 27561
BPMConsoleHTTPListenerPort Port for internal use 27562
BPMConsoleHTTPSListenerPort Port for internal use 27563
BPMConsoleIIOPPort Port for internal use 27565
BPMConsoleIIOPSSLPort Port for internal use 27566
BPMConsoleIIOPMutualAuthPort Port for internal use 27567
BPMConsoleJMXAdminPort Port for internal use 27564
BPMConsoleJPDAPort Port for internal use 27569
RBAServerHTTPListenerAdminPort Port for internal use 21028
RBAServerHTTPListenerPort Port for internal use 21029
RBAServerHTTPSListenerPort Port for internal use 21030
RBAServerIIOPPort Port for internal use 21032
RBAServerIIOPSSLPort Port for internal use 21033
- 44 -
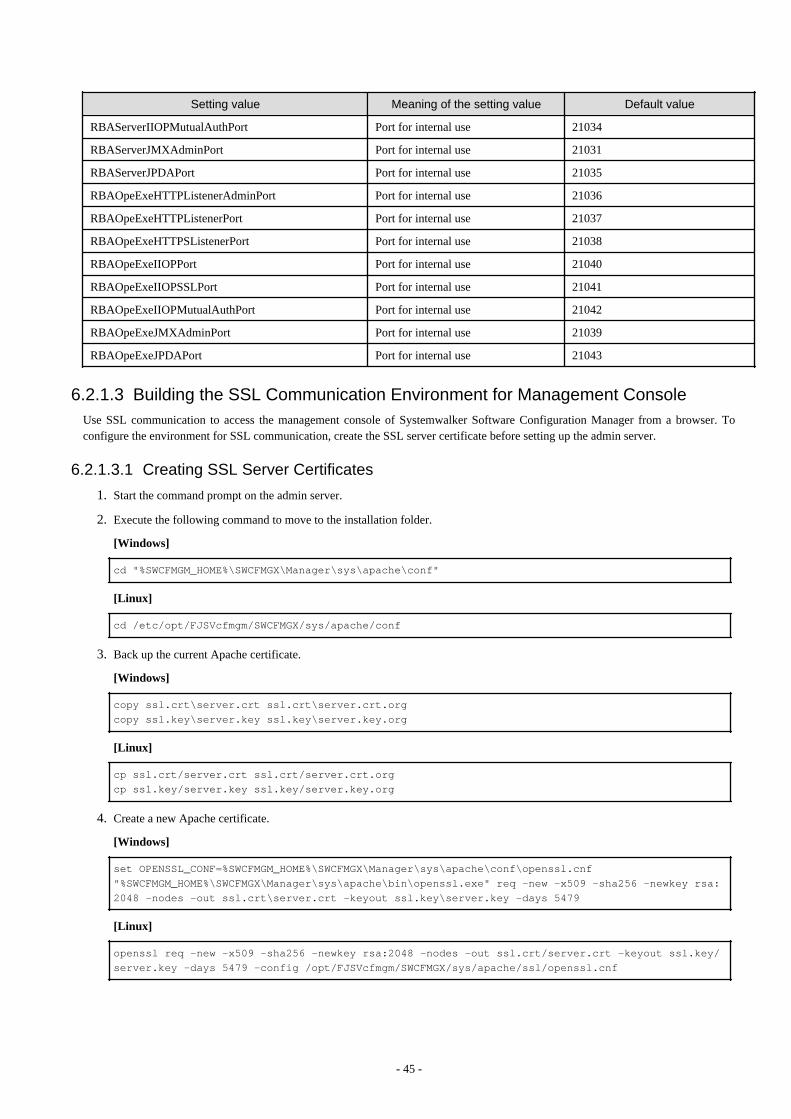
Setting value Meaning of the setting value Default value
RBAServerIIOPMutualAuthPort Port for internal use 21034
RBAServerJMXAdminPort Port for internal use 21031
RBAServerJPDAPort Port for internal use 21035
RBAOpeExeHTTPListenerAdminPort Port for internal use 21036
RBAOpeExeHTTPListenerPort Port for internal use 21037
RBAOpeExeHTTPSListenerPort Port for internal use 21038
RBAOpeExeIIOPPort Port for internal use 21040
RBAOpeExeIIOPSSLPort Port for internal use 21041
RBAOpeExeIIOPMutualAuthPort Port for internal use 21042
RBAOpeExeJMXAdminPort Port for internal use 21039
RBAOpeExeJPDAPort Port for internal use 21043
6.2.1.3 Building the SSL Communication Environment for Management ConsoleUse SSL communication to access the management console of Systemwalker Software Configuration Manager from a browser. Toconfigure the environment for SSL communication, create the SSL server certificate before setting up the admin server.
6.2.1.3.1 Creating SSL Server Certificates
1. Start the command prompt on the admin server.
2. Execute the following command to move to the installation folder.
[Windows]
cd "%SWCFMGM_HOME%\SWCFMGX\Manager\sys\apache\conf"
[Linux]
cd /etc/opt/FJSVcfmgm/SWCFMGX/sys/apache/conf
3. Back up the current Apache certificate.
[Windows]
copy ssl.crt\server.crt ssl.crt\server.crt.org copy ssl.key\server.key ssl.key\server.key.org
[Linux]
cp ssl.crt/server.crt ssl.crt/server.crt.org cp ssl.key/server.key ssl.key/server.key.org
4. Create a new Apache certificate.
[Windows]
set OPENSSL_CONF=%SWCFMGM_HOME%\SWCFMGX\Manager\sys\apache\conf\openssl.cnf"%SWCFMGM_HOME%\SWCFMGX\Manager\sys\apache\bin\openssl.exe" req -new -x509 -sha256 -newkey rsa:2048 -nodes -out ssl.crt\server.crt -keyout ssl.key\server.key -days 5479
[Linux]
openssl req -new -x509 -sha256 -newkey rsa:2048 -nodes -out ssl.crt/server.crt -keyout ssl.key/server.key -days 5479 -config /opt/FJSVcfmgm/SWCFMGX/sys/apache/ssl/openssl.cnf
- 45 -
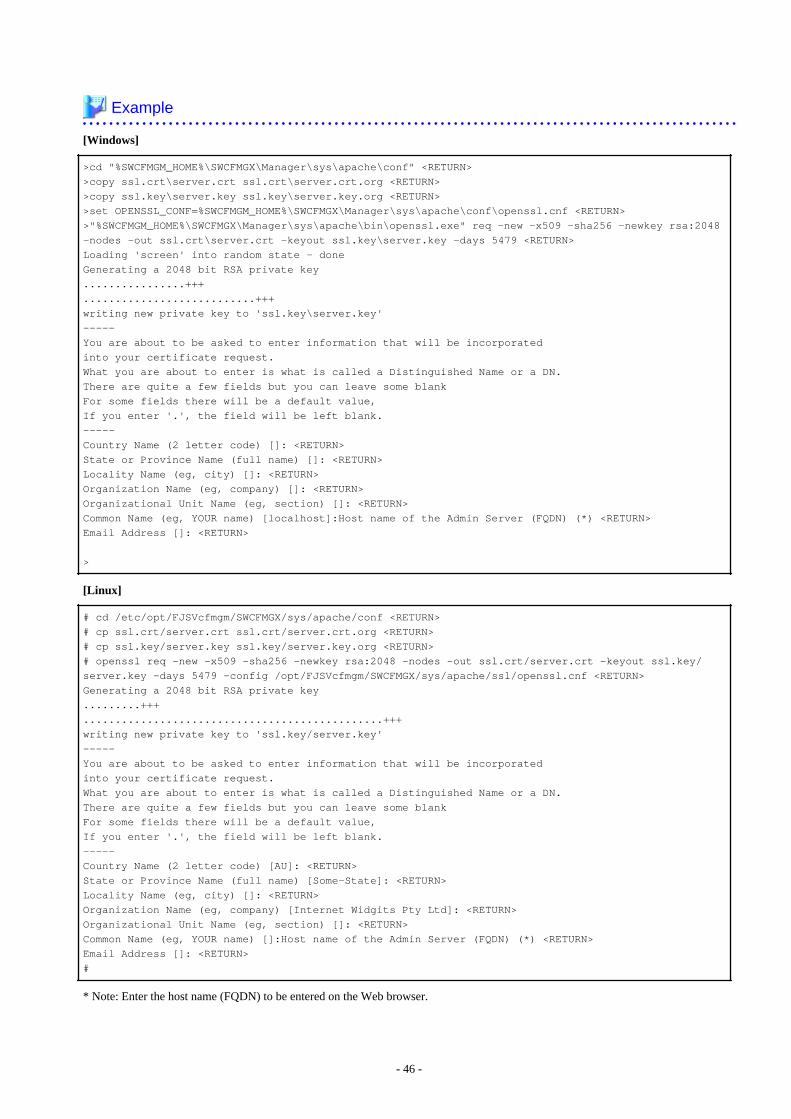
Example
[Windows]
>cd "%SWCFMGM_HOME%\SWCFMGX\Manager\sys\apache\conf" <RETURN>>copy ssl.crt\server.crt ssl.crt\server.crt.org <RETURN>>copy ssl.key\server.key ssl.key\server.key.org <RETURN>>set OPENSSL_CONF=%SWCFMGM_HOME%\SWCFMGX\Manager\sys\apache\conf\openssl.cnf <RETURN>>"%SWCFMGM_HOME%\SWCFMGX\Manager\sys\apache\bin\openssl.exe" req -new -x509 -sha256 -newkey rsa:2048 -nodes -out ssl.crt\server.crt -keyout ssl.key\server.key -days 5479 <RETURN>Loading 'screen' into random state - doneGenerating a 2048 bit RSA private key................+++...........................+++writing new private key to 'ssl.key\server.key'-----You are about to be asked to enter information that will be incorporatedinto your certificate request.What you are about to enter is what is called a Distinguished Name or a DN.There are quite a few fields but you can leave some blankFor some fields there will be a default value,If you enter '.', the field will be left blank.-----Country Name (2 letter code) []: <RETURN>State or Province Name (full name) []: <RETURN>Locality Name (eg, city) []: <RETURN>Organization Name (eg, company) []: <RETURN>Organizational Unit Name (eg, section) []: <RETURN>Common Name (eg, YOUR name) [localhost]:Host name of the Admin Server (FQDN) (*) <RETURN>Email Address []: <RETURN>
>
[Linux]
# cd /etc/opt/FJSVcfmgm/SWCFMGX/sys/apache/conf <RETURN># cp ssl.crt/server.crt ssl.crt/server.crt.org <RETURN># cp ssl.key/server.key ssl.key/server.key.org <RETURN># openssl req -new -x509 -sha256 -newkey rsa:2048 -nodes -out ssl.crt/server.crt -keyout ssl.key/server.key -days 5479 -config /opt/FJSVcfmgm/SWCFMGX/sys/apache/ssl/openssl.cnf <RETURN>Generating a 2048 bit RSA private key.........+++...............................................+++writing new private key to 'ssl.key/server.key'-----You are about to be asked to enter information that will be incorporatedinto your certificate request.What you are about to enter is what is called a Distinguished Name or a DN.There are quite a few fields but you can leave some blankFor some fields there will be a default value,If you enter '.', the field will be left blank.-----Country Name (2 letter code) [AU]: <RETURN>State or Province Name (full name) [Some-State]: <RETURN>Locality Name (eg, city) []: <RETURN>Organization Name (eg, company) [Internet Widgits Pty Ltd]: <RETURN>Organizational Unit Name (eg, section) []: <RETURN>Common Name (eg, YOUR name) []:Host name of the Admin Server (FQDN) (*) <RETURN>Email Address []: <RETURN>#
* Note: Enter the host name (FQDN) to be entered on the Web browser.
- 46 -
Example:
Host name: myhost.company.com
Point
When the site certificate expires, you are no longer able to log in to Systemwalker Software Configuration Manager. When the sitecertificate expires, update the site certificate referring to "Appendix B Corrective Actions If the Site Certificate has Expired".
6.2.2 Setting up Systemwalker Software Configuration ManagerIf necessary, set up the product on a Windows or a Linux machine.
Note
Before performing this procedure, ensure that the following operations have been completed.
If the operations have not been completed, setup of Systemwalker Software Configuration Manager will fail.
"6.2.1 Pre-setup Tasks for the Admin Server"
6.2.2.1 Execution of SetupPerform the setup by opening a new command prompt and executing the following command:
<Systemwalker Software Configuration Manager installation directory>\SWCFMGM\bin\swcfmg_setup_express -s
- 47 -
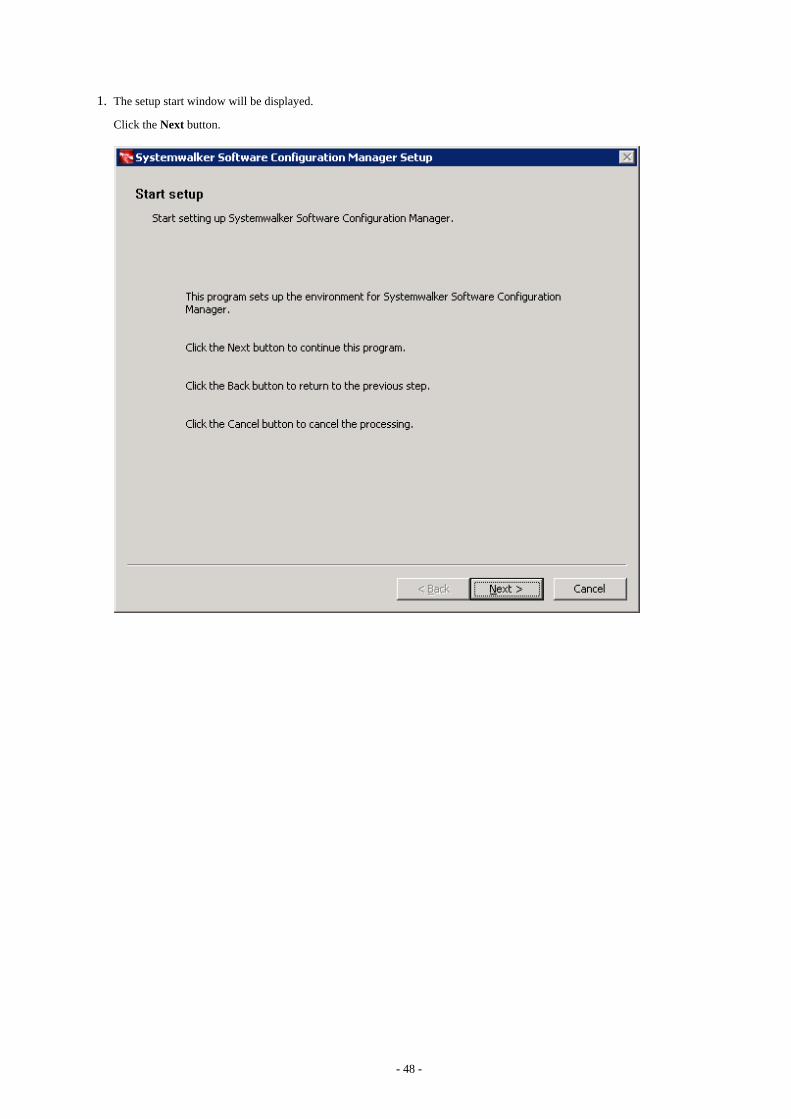
1. The setup start window will be displayed.
Click the Next button.
- 48 -
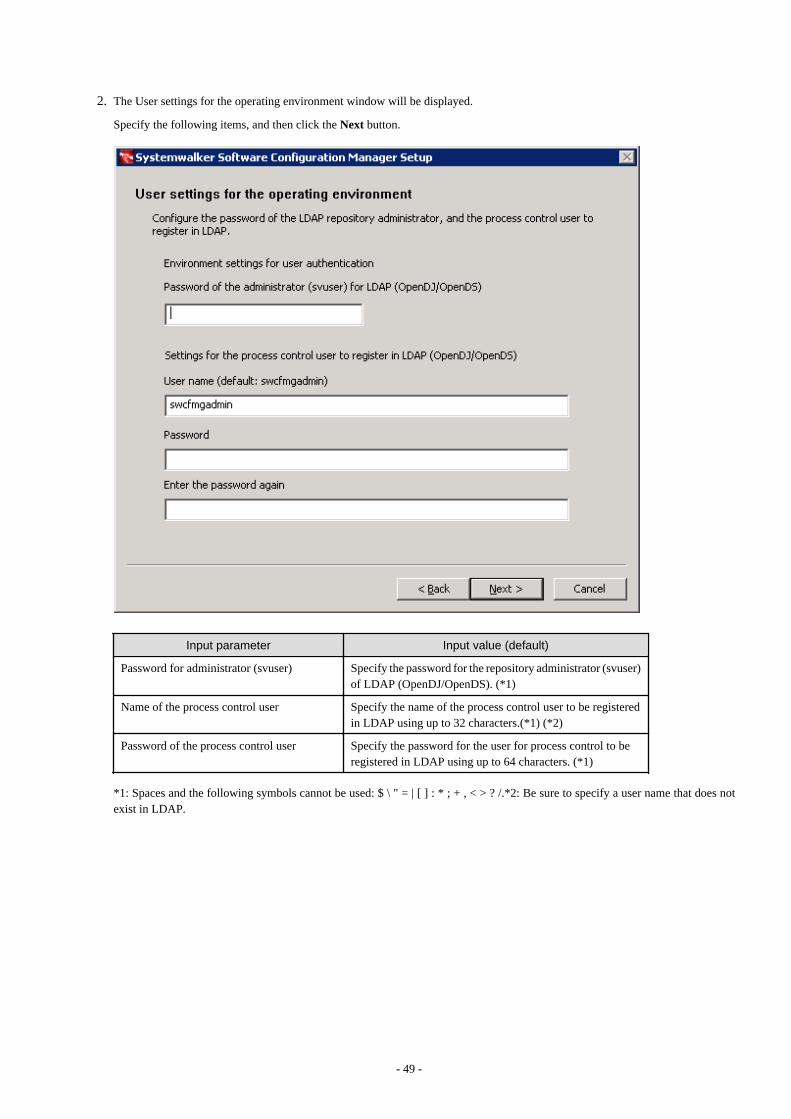
2. The User settings for the operating environment window will be displayed.
Specify the following items, and then click the Next button.
Input parameter Input value (default)
Password for administrator (svuser) Specify the password for the repository administrator (svuser)of LDAP (OpenDJ/OpenDS). (*1)
Name of the process control user Specify the name of the process control user to be registeredin LDAP using up to 32 characters.(*1) (*2)
Password of the process control user Specify the password for the user for process control to beregistered in LDAP using up to 64 characters. (*1)
*1: Spaces and the following symbols cannot be used: $ \ " = | [ ] : * ; + , < > ? /.*2: Be sure to specify a user name that does notexist in LDAP.
- 49 -
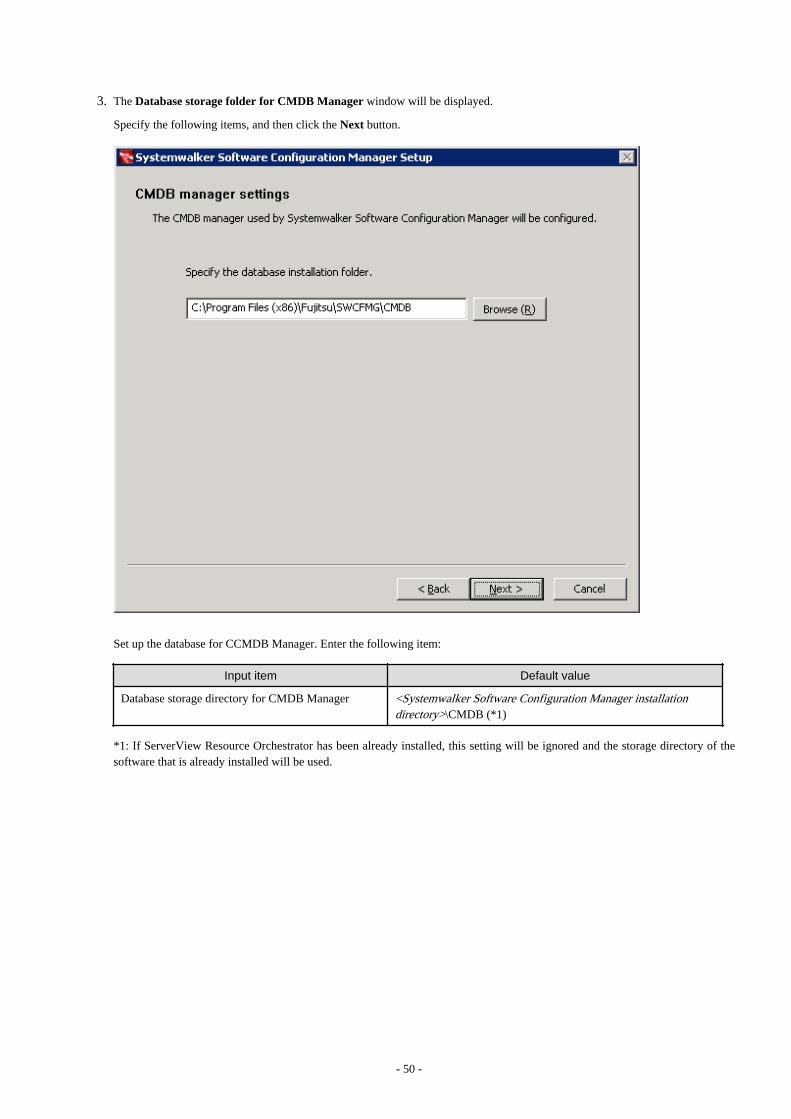
3. The Database storage folder for CMDB Manager window will be displayed.
Specify the following items, and then click the Next button.
Set up the database for CCMDB Manager. Enter the following item:
Input item Default value
Database storage directory for CMDB Manager <Systemwalker Software Configuration Manager installationdirectory>\CMDB (*1)
*1: If ServerView Resource Orchestrator has been already installed, this setting will be ignored and the storage directory of thesoftware that is already installed will be used.
- 50 -
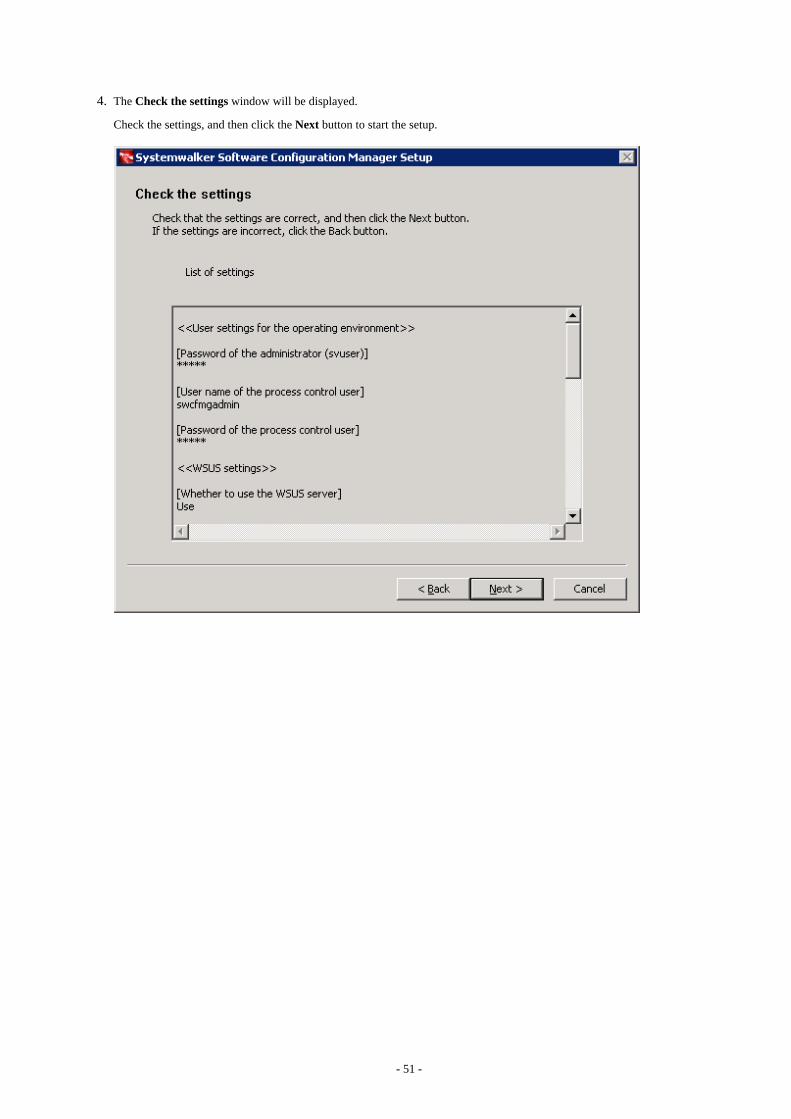
4. The Check the settings window will be displayed.
Check the settings, and then click the Next button to start the setup.
- 51 -
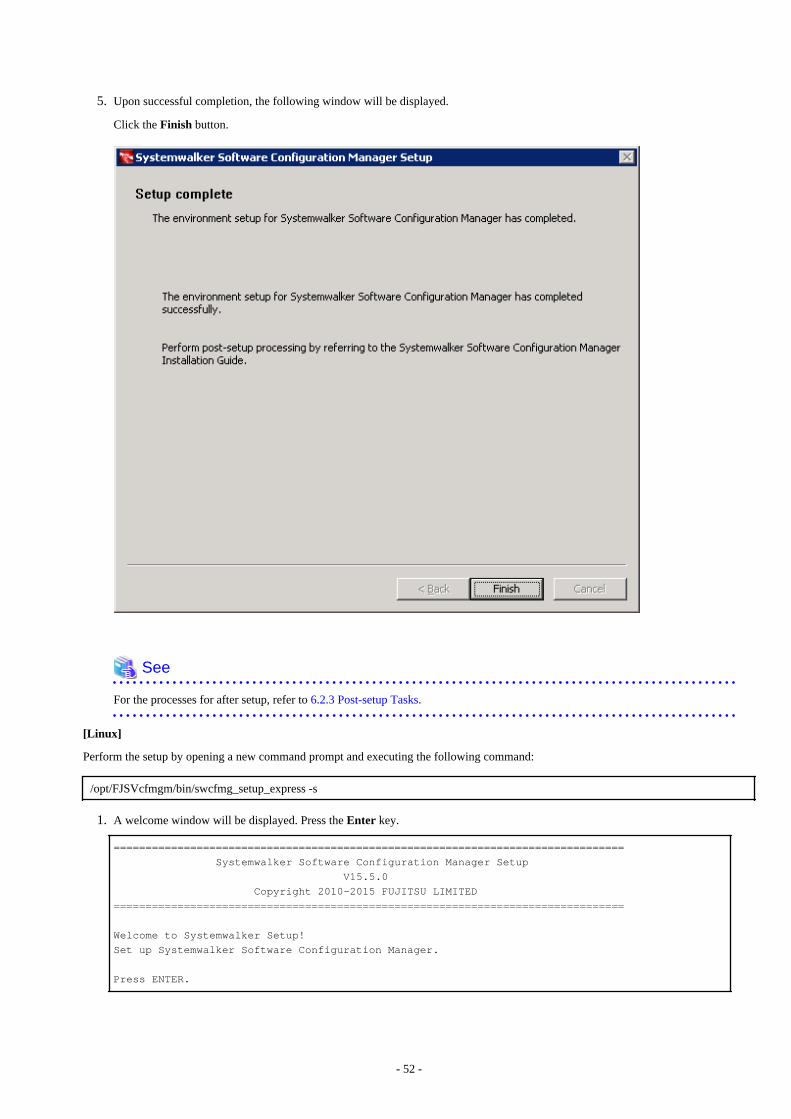
5. Upon successful completion, the following window will be displayed.
Click the Finish button.
See
For the processes for after setup, refer to 6.2.3 Post-setup Tasks.
[Linux]
Perform the setup by opening a new command prompt and executing the following command:
/opt/FJSVcfmgm/bin/swcfmg_setup_express -s
1. A welcome window will be displayed. Press the Enter key.
================================================================================ Systemwalker Software Configuration Manager Setup V15.5.0 Copyright 2010-2015 FUJITSU LIMITED================================================================================
Welcome to Systemwalker Setup!Set up Systemwalker Software Configuration Manager.
Press ENTER.
- 52 -

2. The setup start window will be displayed. Enter "y".
================================================================================ Systemwalker Software Configuration Manager Setup V15.5.0 Copyright 2010-2015 FUJITSU LIMITED================================================================================
Systemwalker Software Configuration Manager (admin server)
Start the setup?[y,n]=>
3. The User settings for the operating environment window will be displayed.
a. Specify the password for the LDAP repository administrator (svuser).
Specify the value that is specified for ServerView Operations Manager. The password cannot contain half-width spaces, full-width characters, or $ \ " = | [ ] : * ; + , < > ? /.
<< User settings for the operating environment >>Set the password for the LDAP repository administrator. =================================================================================
Enter the password of the administrator (svuser) for LDAP (OpenDJ/OpenDS). =>
b. Specify the name of the process control user to be registered in LDAP using up to 32 characters. Be sure to specify a username that does not exist in LDAP. The user name cannot contain half-width spaces, full-width characters, or $ \ " = | [ ] : * ;+ , < > ? /.
<< User settings for the operating environment >>
Set the process control user to register in LDAP. =================================================================================
Enter the user name of the process control user to register in LDAP (OpenDJ/OpenDS). =>
c. Specify the password for the user for process control to be registered in LDAP using up to 64 characters. The password cannotcontain half-width spaces, full-width characters, or $ \ " = | [ ] : * ; + , < > ? /.
<< User settings for the operating environment >>
Set the process control user to register in LDAP. =================================================================================
Enter the password of the process control user to register in LDAP (OpenDJ/OpenDS). =>
4. The CMDB manager settings window will be displayed.
Specify the directory where the database is to be installed.
However, if ServerView Resource Orchestrator has been already installed, this setting will be ignored and the storage directory ofthe software that is already installed will be used.
<<CMDB manager settings>>The CMDB manager used by Systemwalker Software Configuration Manager will be configured. =================================================================================
Current DB: Not configured
Specify the database installation directory.
- 53 -
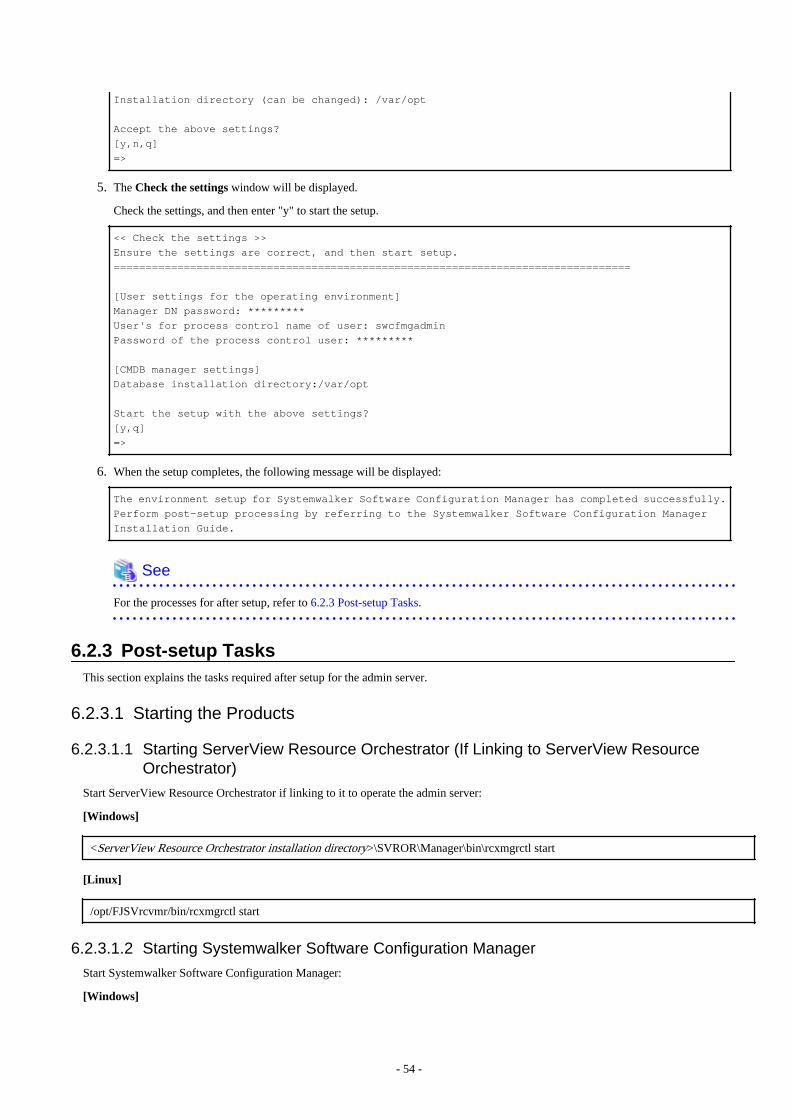
Installation directory (can be changed): /var/opt
Accept the above settings?[y,n,q]=>
5. The Check the settings window will be displayed.
Check the settings, and then enter "y" to start the setup.
<< Check the settings >>Ensure the settings are correct, and then start setup. =================================================================================
[User settings for the operating environment]Manager DN password: *********User's for process control name of user: swcfmgadminPassword of the process control user: *********
[CMDB manager settings]Database installation directory:/var/opt
Start the setup with the above settings? [y,q]=>
6. When the setup completes, the following message will be displayed:
The environment setup for Systemwalker Software Configuration Manager has completed successfully.Perform post-setup processing by referring to the Systemwalker Software Configuration Manager Installation Guide.
See
For the processes for after setup, refer to 6.2.3 Post-setup Tasks.
6.2.3 Post-setup TasksThis section explains the tasks required after setup for the admin server.
6.2.3.1 Starting the Products
6.2.3.1.1 Starting ServerView Resource Orchestrator (If Linking to ServerView ResourceOrchestrator)
Start ServerView Resource Orchestrator if linking to it to operate the admin server:
[Windows]
<ServerView Resource Orchestrator installation directory>\SVROR\Manager\bin\rcxmgrctl start
[Linux]
/opt/FJSVrcvmr/bin/rcxmgrctl start
6.2.3.1.2 Starting Systemwalker Software Configuration Manager
Start Systemwalker Software Configuration Manager:
[Windows]
- 54 -
<Systemwalker Software Configuration Manager installation directory>\SWCFMGM\bin\swcfmg_start
[Linux]
/opt/FJSVcfmgm/bin/swcfmg_start
6.3 Registering an Infrastructure AdministratorAn infrastructure administrator is a user who operates and maintains Systemwalker Software Configuration Manager. Create aninfrastructure administrator before starting operation of Systemwalker Software Configuration Manager.
Refer to "9.1 User Management" for information on how to create an infrastructure administrator.
If linking to ServerView Resource Orchestrator
If linking to ServerView Resource Orchestrator, create an infrastructure administrator in ServerView Resource Orchestrator - refer to"Registering User Accounts" in the ServerView Resource Orchestrator Cloud Edition User's Guide for Infrastructure Administrators(Resource Management) for details.
An infrastructure administrator who is already operating ServerView Resource Orchestrator can also operate Systemwalker SoftwareConfiguration Manager. In that situation, it is not necessary to register a new infrastructure administrator.
6.4 Registering Hardware InformationTo collect the configuration information of the hardware and virtual environments, it is necessary to register the blade chassis, bladeservers, rack mount servers, and the virtual environments of the discovery targets.
For details on the hardware information management commands, refer to the Reference Guide.
6.5 Executing the Initial DiscoveryThe first discovery performed after installation is called the initial discovery. Establish the following environment before performing theinitial discovery:
- Discovering the hardware information
- Discovering the hardware configuration information
- Register the hardware information of the discovery target using the hardware information management command.
- Confirm that the manager of this product can communicate with the hardware to be discovered.
Information
In order to collect CPU information and memory information of a blade server, the target blade server must have been poweredon at least one time.
- When collecting chassis and blade server information, confirm that the chassis is powered on.
- Discovering the virtual environment configuration information
- Register the hardware information and the VM host information of the discovery target using the hardware informationmanagement command.
- Install VMware Tools on the VM guest.
- Confirm that the VM host and the VM guest are powered on.
- Specify the admin LAN subnet address in the "Hardware discovery definition file". For details on the "Hardware discoverydefinition file", refer to the Reference Guide.
- 55 -
- If Host Isolation Response of vSphere HA clusters has been set to Leave Powered On, when isolating the VM host, the VMhost information is not updated by discovery. In addition, the information of the VM guests on that VM host will be deleted.
Hardware Information
Perform the initial discovery for hardware information by executing the following command:
[Windows]
%SWCFMGM_INSTALL_PATH%\CMDB\FJSVcmdbm\bin\cmdbrefresh.exe -q type=AGT_CFMGSRV
[Linux]
/opt/FJSVcfmgm/CMDB/FJSVcmdbm/bin/cmdbrefresh.sh -q type=AGT_CFMGSRV
Point
Guide to the time required for the initial discovery
It is recommended that the initial discovery be executed before operations commence.
The following tables show an approximate indication of the time required for the initial discovery:
- Hardware configuration information
- Blade server
Number of physical servers Time required for the initial discovery
500 100 minutes or more
- Rack mount server
Number of physical servers Time required for the initial discovery
500 170 minutes or more
- Virtual environment configuration information
Number of Virtual guests Time required for the initial discovery
500 10 minutes or more
1,000 20 minutes or more
1,500 30 minutes or more
6.6 Registering Discovery SchedulesRegister schedules for regular discoveries.
Hrdware Information
Discovery of hardware information is performed every day at the following time by default:
- 2:00 AM
When modifying the discovery schedule, edit the configuration information collection schedule definition file, and modify it to the arbitrarydate for collection. For details on configuration information collection schedule definition files, refer to the Reference Guide.
When it is not necessary to schedule automatic collection, add "#" to the top of the following line of the "configuration informationcollection schedule definition file".
- 56 -
AGT_CFMGSRV 0 2 * * *
If the schedule is modified or disabled, restart this product. If linked to ServerView Resource Orchestrator, restart ServerView ResourceOrchestrator
Point
Guide to the execution interval for regular discovery
It is recommended that regular discovery be executed once a day, outside business hours (such as late at night).
Take the following guide into account when setting an execution interval:
- Hardware configuration information
- Blade server
Number of physical servers Execution interval
500 100 minutes or more
- Rack mount server
Number of physical servers Execution interval
500 170 minutes or more
- Virtual environment configuration information
Number of Virtual guests Execution interval
500 10 minutes or more
1,000 20 minutes or more
1,500 30 minutes or more
- 57 -
Chapter 7 Setup CancellationThis chapter explains how to cancel the setup for Systemwalker Software Configuration Manager.
7.1 Points to Note before Canceling the SetupNote the following points when canceling the setup.
7.1.1 Backing up the ResourcesIf setup is canceled, all files and settings information including user assets will be deleted. For this reason, back up any necessary assetsbefore canceling the setup.
Refer to "11.2.2 Backing Up the Admin Server" for information on the various assets to back up.
7.2 Canceling the Setup for the Admin ServerThis section explains how to cancel the setup for the admin server.
7.2.1 Tasks Required before Setup CancellationThis section explains the tasks required before setup cancellation for the admin server.
7.2.1.1 Stop Systemwalker Software Configuration ManagerExecute the following command:
[Windows]
<Systemwalker Software Configuration Manager installation directory>\SWCFMGM\bin\swcfmg_stop
[Linux]
/opt/FJSVcfmgm/bin/swcfmg_stop
7.2.2 Canceling the Setup for Systemwalker Software ConfigurationManager
Cancel the setup for Systemwalker Software Configuration Manager by executing the following command:
[Windows]
<Systemwalker Software Configuration Manager installation directory>\SWCFMGM\bin\swcfmg_setup_express -u
[Linux]
/opt/FJSVcfmgm/bin/swcfmg_setup_express -u
- 58 -

Chapter 8 UninstallationThis chapter explains how to uninstall Systemwalker Software Configuration Manager.
8.1 Pre-uninstallation NotesBefore uninstalling Systemwalker Software Configuration Manager, the environment settings for Systemwalker Software ConfigurationManager must be canceled. Refer to "Chapter 7 Setup Cancellation" for information on setup cancellation.
8.2 Uninstalling from the Admin Server
8.2.1 Points to Note before Uninstalling from the Admin ServerDeleting the environment
- Before uninstalling Systemwalker Software Configuration Manager, the setup for the environment of Systemwalker SoftwareConfiguration Manager must be canceled - refer to "Chapter 7 Setup Cancellation" for details.
8.2.2 Uninstalling Systemwalker Software Configuration ManagerThis section explains the procedure for uninstalling the manager of Systemwalker Software Configuration Manager from the admin server.
Uninstall the product from a Windows or a Linux machine.
[Windows]
1. Log in with administrator privileges.
2. Select Start >> All Programs or All apps >> Fujitsu >> Uninstall (middleware).
The uninstaller will start.
Select Systemwalker Software Configuration Manager (admin server), and then click the Delete button.
When uninstalling Systemwalker Software Configuration Manager because of installation failure or for some other reason,Systemwalker Software Configuration Manager may be displayed in the Incomplete install tab. If Systemwalker Software
- 59 -
Configuration Manager is not displayed in the Currently installed products tab, click the Incomplete install tab to check thatSystemwalker Software Configuration Manager is displayed there. The subsequent uninstallation procedure is the same even ifSystemwalker Software Configuration Manager is displayed in the Incomplete install tab.
3. The Uninstall Systemwalker Software Configuration Manager (admin server) window will be displayed.
If the software can be removed, click the Uninstall button.
4. Upon successful completion, the following window will be displayed.
Click the Finish button.
- 60 -
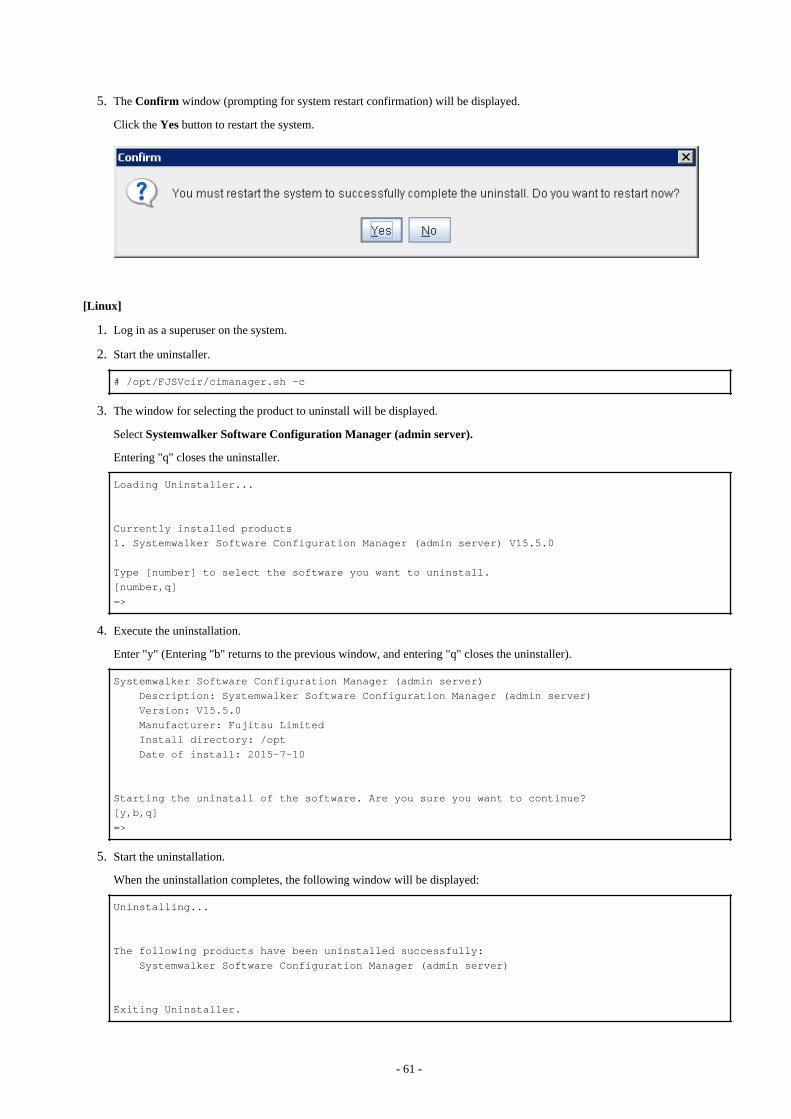
5. The Confirm window (prompting for system restart confirmation) will be displayed.
Click the Yes button to restart the system.
[Linux]
1. Log in as a superuser on the system.
2. Start the uninstaller.
# /opt/FJSVcir/cimanager.sh -c
3. The window for selecting the product to uninstall will be displayed.
Select Systemwalker Software Configuration Manager (admin server).
Entering "q" closes the uninstaller.
Loading Uninstaller...
Currently installed products1. Systemwalker Software Configuration Manager (admin server) V15.5.0
Type [number] to select the software you want to uninstall.[number,q]=>
4. Execute the uninstallation.
Enter "y" (Entering "b" returns to the previous window, and entering "q" closes the uninstaller).
Systemwalker Software Configuration Manager (admin server) Description: Systemwalker Software Configuration Manager (admin server) Version: V15.5.0 Manufacturer: Fujitsu Limited Install directory: /opt Date of install: 2015-7-10
Starting the uninstall of the software. Are you sure you want to continue?[y,b,q]=>
5. Start the uninstallation.
When the uninstallation completes, the following window will be displayed:
Uninstalling...
The following products have been uninstalled successfully: Systemwalker Software Configuration Manager (admin server)
Exiting Uninstaller.
- 61 -
8.2.3 Uninstalling SMEE [Linux]This section describes how to uninstall SMEE.
Note
Ensure that no other products are using SMEE before uninstalling it.
1. Log in as a superuser on the system.
2. Remove the FJSVsmee package:
rpm -e FJSVsmee
8.2.4 Uninstalling Securecrypto Library RunTime [Linux]This section describes how to uninstall Securecrypto Library RunTime.
Note
Ensure that no other products are using Securecrypto Library RunTime before uninstalling it.
1. Log in as a superuser on the system.
2. Remove the FJSVsclr package:
rpm -e FJSVsclr
8.3 Post-uninstallation Notes
8.3.1 Points to Note after Uninstalling from the Admin ServerThis section provides points to note after uninstalling System Software Configuration Manager from the admin server.
Files and directories that remain after uninstalling Systemwalker Software Configuration Manager
Note
Deletion may fail if these files are locked. In this case, restart the operating system and then delete the files.
The following files and directories may still remain after the uninstallation - if this happens, manually delete any unnecessary directoriesor files.
[Windows]
- Systemwalker Software Configuration Manager installation directory
[Linux]
- <home directory of root account>/InstallShield
- <Home directory of root account>/WriteAttachment
- <Home directory of root account>/ReadAttachment
- <Home directory of root account>/TWFRepository
- /etc/opt/FJSVcfmgb
- 62 -
- /etc/opt/FJSVcfmgm
- /etc/opt/FJSVlnkcf
- /opt/FJSVcfmgb
- /opt/FJSVcfmgm
- /opt/FJSVlnkcf
- /var/opt/FJSVcfmgb
- /var/opt/FJSVcfmgm
- /var/opt/FJSVlnkcf
Files and directories that remain after uninstalling SMEE and Securecrypto Library RunTime [Linux]
The following directories remain after uninstalling SMEE and Securecrypto Library RunTime. Check that these folders are not being usedby other products, and delete them manually if they are not required.
Note that files or directories under these directories may also still remain, so delete them as well.
- /opt/FJSVsmee
- /etc/opt/FJSVsclr
Directory service data that remains after uninstallation of Systemwalker Software Configuration Manager
After this product is uninstalled, the following data remains on the directory service. Check that these folders are not being used by otherproducts, and delete them manually if they are not required. For details on the following information, refer to "Managing User Information".
- User information registered using the user information management command
- The following group information used by this product
- AdminRole
- swrba_Exe
- Role
- IflowUsers
- IflowGroups
8.3.2 Uninstalling the "Uninstall (middleware)"The "Uninstall (middleware)" is a common tool for Fujitsu middleware products.
This tool manages information about the Fujitsu middleware products that have been installed, as well as launching the product uninstallers.
This product supports the Uninstall (middleware).
When this product is installed, the "Uninstall (middleware)" is installed first, after which the installation and uninstallation of Fujitsumiddleware products is controlled by this tool. The installation processing for the "Uninstall (middleware)" tool will not be performed ifit has already been installed.
This section explains how to uninstall the "Uninstall (middleware)". It also presents points to note during uninstallation.
Note
- Be sure to use the "Uninstall (middleware)" tool when uninstalling this product.
- This tool also manages information for Fujitsu middleware products other than this product. Do not uninstall this tool unless absolutelynecessary.
If this tool is uninstalled by mistake, use the following procedure to reinstall it:
[Windows]
- 63 -
1. Log in to the target machine (where the tool is to be installed) using an account with administrator privileges.
2. Insert the DVD-ROM.
Insert the "Systemwalker Software Configuration Manager Media Pack V15.5.0 DISC1 (Admin Servers Program)" or"Systemwalker Software Configuration Manager Media Pack V15.5.0 DISC2 (Linkage Servers/Business Servers Program)"DVD-ROM into the DVD-ROM drive.
3. Execute the installation command.
<DVD-ROM mount point>\<CIR installer root directory>\cirinst.exe
[Linux]
1. Log in as a superuser on the system.
2. Insert the DVD-ROM.
Insert the "Systemwalker Software Configuration Manager Media Pack V15.5.0 DISC1 (Admin Servers Program)" or"Systemwalker Software Configuration Manager Media Pack V15.5.0 DISC2 (Linkage Servers/Business Servers Program)"DVD-ROM into the DVD-ROM drive.
If the DVD-ROM has not been mounted, mount the DVD-ROM by executing the following command:
# mount -t iso9660 -r /dev/mnt <DVD-ROM mount point>
3. Execute the installation command.
# <DVD-ROM mount point>/<CIR installer root directory>/cirinst.sh
Use the following procedure to uninstall the Uninstall (middleware):
1. Start the "Uninstall (middleware)" to check whether there are any other Fujitsu middleware products left on the system. The methodfor starting this tool is as below.
[Windows]
Select Start >> All Programs or All apps >> Fujitsu >> Uninstall (middleware).
[Linux]
/opt/FJSVcir/cimanager.sh [-c]
-c: Command interface
Information
To run the tool in command mode, specify "-c". If "-c" is not specified, the tool will run in GUI mode if there is a GUI environment,or in command mode if there is no GUI environment.
2. If no Fujitsu middleware products have been installed, execute the following uninstallation command:
[Windows]
%SystemDrive%\FujitsuF4CR\bin\cirremove.exe
[Linux]
# /opt/FJSVcir/bin/cirremove.sh
3. When "This software is a tool that is shared with other Fujitsu products. Are you sure you want to remove this software? [y/n]" isdisplayed, enter "y" to continue with the uninstallation process.
The uninstallation process will finish in a few seconds.
- 64 -
4. After the uninstallation completes, the following directory and the files that it contains will still remain, so delete them:
[Windows]
%SystemDrive%\FujitsuF4CR
%ProgramData%\Fujitsu\FujitsuF4CR
[Linux]
/var/opt/FJSVcir/
- 65 -
Part 3 Operation
Chapter 9 Operation Setup.............................................................................................................................67
Chapter 10 Starting and Stopping Systemwalker Software Configuration Manager...................................... 71
Chapter 11 Maintenance................................................................................................................................ 73
- 66 -
Chapter 9 Operation SetupThis chapter explains how to set up Systemwalker Software Configuration Manager operations.
9.1 User ManagementThis section explains the following items with regard to managing users:
- Registering a user
- Changing the password
- Updating a user
- Moving a user
- Deleting a user
When linked to ServerView Resource Orchestrator
When linked to ServerView Resource Orchestrator, tasks such as registering a user or changing the password, as well as updating, moving,or deleting a user, should be performed from ServerView Resource Orchestrator. Refer to the following manuals for information on howto perform these tasks using ServerView Resource Orchestrator:
- "Tenant" in the ServerView Resource Orchestrator Cloud Edition User's Guide for Infrastructure Administrators
- "Tenant" in the ServerView Resource Orchestrator Cloud Edition User's Guide for Tenant Administrators
Refer to "Login Users" for information on the correspondences between the roles of users registered with ServerView ResourceOrchestrator and the roles for Systemwalker Software Configuration Manager.
9.1.1 Registering a UserThe following kinds of information can be specified when registering a user with the swcfmg_account command (refer to "swcfmg_account(User Information Management Command)" in the Reference Guide for details):
Information Description
User ID An ID that uniquely identifies the user.
Password User password.
Tenant Tenant to whom the user belongs.
Role Role of the user.
Email address Email address of the user.
Surname Name of the user. Registration of middle names is optional.
Middle name(s)
Given name
Telephone number Registration of the user's telephone number is optional.
Company or organization name Name of the company or organization to which the userbelongs. Registration is optional.
9.1.2 Changing the PasswordUse swcfmg_account to change the user password (refer to "swcfmg_account (User Information Management Command)" in the ReferenceGuide for details).
- 67 -
9.1.3 Updating a UserUse swcfmg_account to update user information (refer to "swcfmg_account (User Information Management Command)" in the ReferenceGuide for details).
9.1.4 Moving a UserThe tenant to which the user belongs can be changed by moving the user with swcfmg_account.
Moving of users is performed using the User Information Management command. Refer to "swcfmg_account (User InformationManagement Command)" in the Reference Guide for details.
9.1.5 Deleting a UserUse swcfmg_account to delete a user (refer to "swcfmg_account (User Information Management Command)" in the Reference Guide fordetails).
9.2 Hardware/Virtual Environment ManagementThe following hardware can be managed using this product.
- Blade server chassis
- Blade server server blades
- Single servers (rack mount or tower)
- The following virtual environments can be managed:
- VMware vSphere 5.1 or later
This section describes the following operations for managing hardware:
- Registering hardware
- Updating hardware
- Deleting hardware
Note
Ensure that the IP addresses of physical servers, hypervisors, and OSs managed using Systemwalker Software Configuration Manager areunique.
9.2.1 Registering Hardware/Virtual EnvironmentRegister hardware to enable chassis, server blades, and single servers to be managed by Systemwalker Software Configuration Manager.VMware vSphere can also be managed.
The following kinds of information can be registered when registering hardware. Use the hardware information management commandto register hardware. For details, refer to "swcfmg_hardware (Hardware Information Management Command)" in the Reference Guide.
To manage a server blade as the management target, it is also necessary to register the chassis on which the server blade is mounted as amanagement target.
Item Description
ipaddress The admin IP address.
serial-number The serial number.
- 68 -
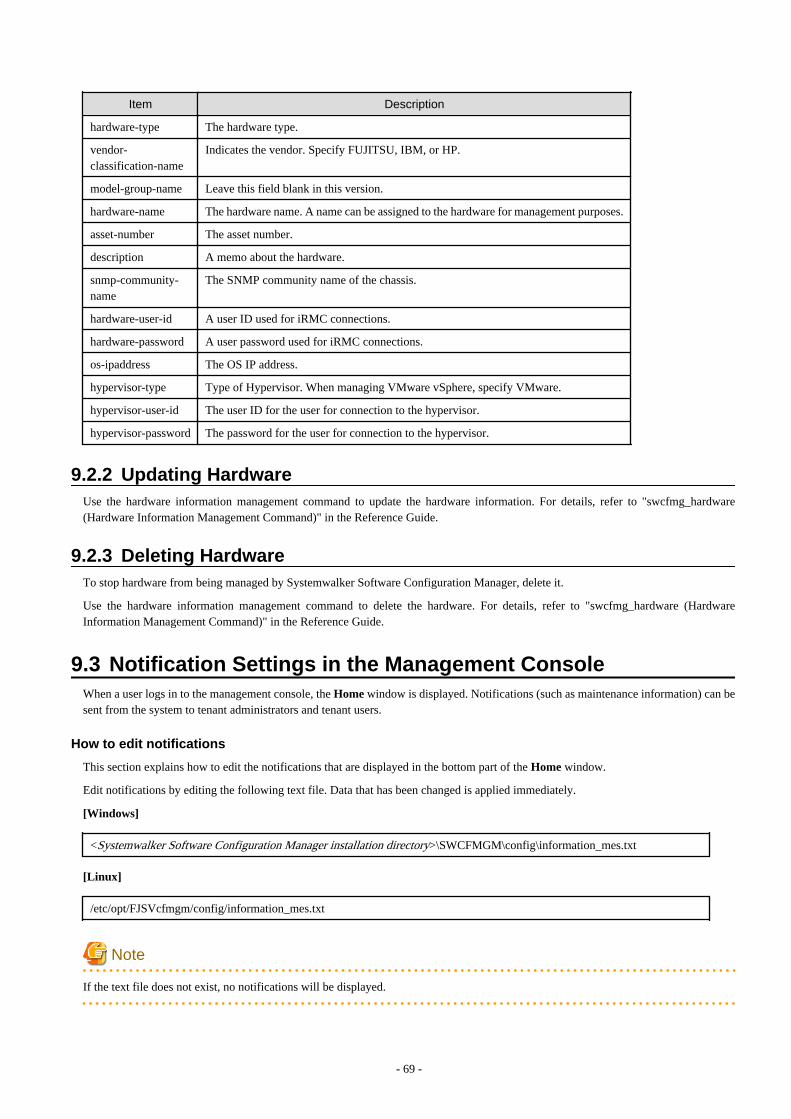
Item Description
hardware-type The hardware type.
vendor-classification-name
Indicates the vendor. Specify FUJITSU, IBM, or HP.
model-group-name Leave this field blank in this version.
hardware-name The hardware name. A name can be assigned to the hardware for management purposes.
asset-number The asset number.
description A memo about the hardware.
snmp-community-name
The SNMP community name of the chassis.
hardware-user-id A user ID used for iRMC connections.
hardware-password A user password used for iRMC connections.
os-ipaddress The OS IP address.
hypervisor-type Type of Hypervisor. When managing VMware vSphere, specify VMware.
hypervisor-user-id The user ID for the user for connection to the hypervisor.
hypervisor-password The password for the user for connection to the hypervisor.
9.2.2 Updating HardwareUse the hardware information management command to update the hardware information. For details, refer to "swcfmg_hardware(Hardware Information Management Command)" in the Reference Guide.
9.2.3 Deleting HardwareTo stop hardware from being managed by Systemwalker Software Configuration Manager, delete it.
Use the hardware information management command to delete the hardware. For details, refer to "swcfmg_hardware (HardwareInformation Management Command)" in the Reference Guide.
9.3 Notification Settings in the Management ConsoleWhen a user logs in to the management console, the Home window is displayed. Notifications (such as maintenance information) can besent from the system to tenant administrators and tenant users.
How to edit notifications
This section explains how to edit the notifications that are displayed in the bottom part of the Home window.
Edit notifications by editing the following text file. Data that has been changed is applied immediately.
[Windows]
<Systemwalker Software Configuration Manager installation directory>\SWCFMGM\config\information_mes.txt
[Linux]
/etc/opt/FJSVcfmgm/config/information_mes.txt
Note
If the text file does not exist, no notifications will be displayed.
- 69 -
Settings
Enter each message on separate lines using the following format:
date,message
- There is no set format for the date.
- Use UTF-8 as the character encoding for the text file.
- The text file contains "YYYY-MM-DD,XXXX" as the default value. If necessary, edit this default value.
Settings example
2013-07-15, There will be maintenance for related networks over the weekend.2013-07-10, A new patch has been released.2013-07-02, An urgent security patch has been released.
- 70 -
Chapter 10 Starting and Stopping Systemwalker SoftwareConfiguration Manager
This chapter explains how to start and stop the Systemwalker Software Configuration Manager admin server.
10.1 Starting Systemwalker Software Configuration ManagerThis section explains how to start Systemwalker Software Configuration Manager.
1. Ensure that ServerView Resource Orchestrator is running if you want to use it to manage servers deployed by the tool.
Refer to the ServerView Resource Orchestrator manuals for more information.
2. Execute the following command on the admin server:
[Windows]
Select Run as administrator to execute the command:
<Systemwalker Software Configuration Manager installation directory>\SWCFMGM\bin\swcfmg_start
[Linux]
Execute the command as a superuser:
/opt/FJSVcfmgm/bin/swcfmg_start
3. If Systemwalker Software Configuration Manager starts successfully, the following message will be output:
Startup processing for Systemwalker Software Configuration Manager will start.The startup processing for Systemwalker Software Configuration Manager has completed normally.
See
Refer to the Reference Guide for information on this command.
10.2 Stopping Systemwalker Software Configuration ManagerThis section explains how to stop Systemwalker Software Configuration Manager.
1. Execute the following command on the admin server:
[Windows]
Select Run as administrator to execute the command:
<Systemwalker Software Configuration Manager installation directory>\SWCFMGM\bin\swcfmg_stop
[Linux]
Execute the command as a superuser:
/opt/FJSVcfmgm/bin/swcfmg_stop
- 71 -
2. If Systemwalker Software Configuration Manager stops successfully, the following message will be output:
Stop processing for Systemwalker Software Configuration Manager will start.The stop processing for Systemwalker Software Configuration Manager has completed normally.
See
Refer to the Reference Guide for information on this command.
10.3 Checking the Status of Systemwalker Software ConfigurationManager
Use the status display command to check the setup status and startup status of Systemwalker Software Configuration Manager. Thefollowing statuses can be checked:
- Systemwalker Software Configuration Manager has not been set up.
- Systemwalker Software Configuration Manager is running.
- Systemwalker Software Configuration Manager is not running.
Use the following procedure to check the status of Systemwalker Software Configuration Manager:
1. Execute the following command on the admin server:
[Windows]
Select Run as administrator to execute the command:
<Systemwalker Software Configuration Manager installation directory>\SWCFMGM\bin\swcfmg_status
[Linux]
Execute the command as a superuser:
/opt/FJSVcfmgm/bin/swcfmg_status
2. The following messages are output according to the status of Systemwalker Software Configuration Manager:
- If Systemwalker Software Configuration Manager has not been set up:
Systemwalker Software Configuration Manager has not been set up.
- If Systemwalker Software Configuration Manager is running:
Systemwalker Software Configuration Manager is running.
- If Systemwalker Software Configuration Manager is not running:
Systemwalker Software Configuration Manager is not running.
See
Refer to the Reference Guide for information on this command.
- 72 -
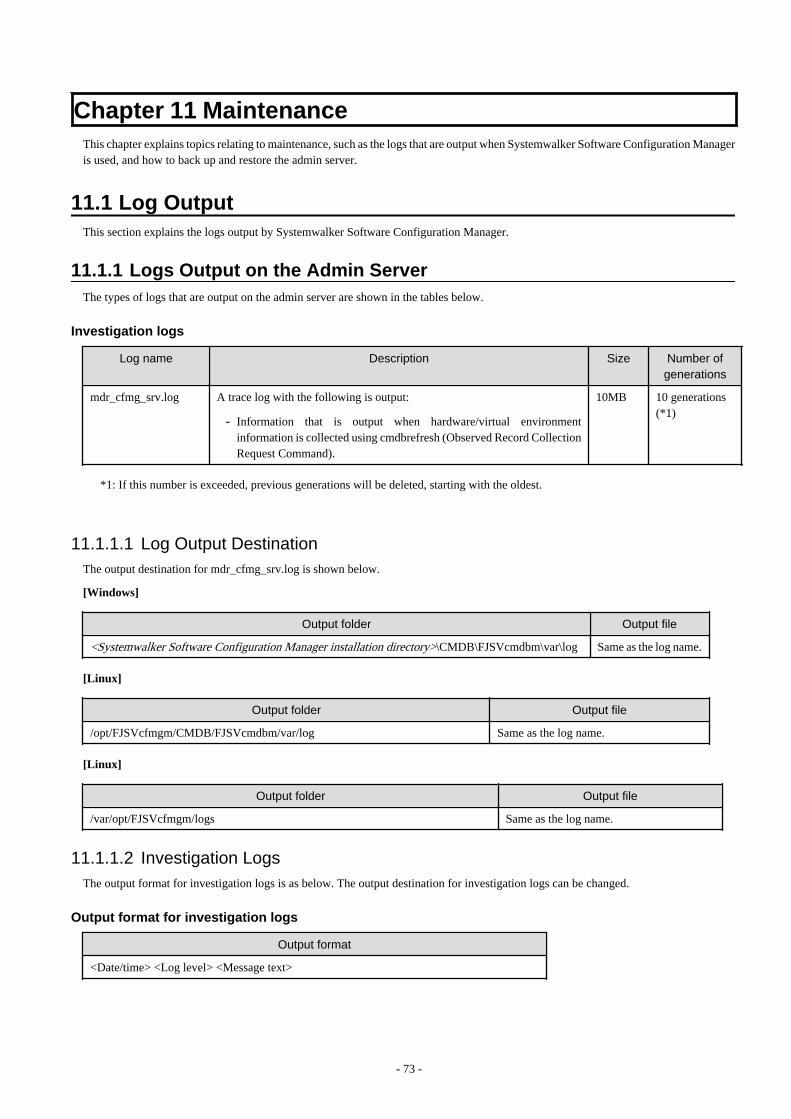
Chapter 11 MaintenanceThis chapter explains topics relating to maintenance, such as the logs that are output when Systemwalker Software Configuration Manageris used, and how to back up and restore the admin server.
11.1 Log OutputThis section explains the logs output by Systemwalker Software Configuration Manager.
11.1.1 Logs Output on the Admin ServerThe types of logs that are output on the admin server are shown in the tables below.
Investigation logs
Log name Description Size Number of
generations
mdr_cfmg_srv.log A trace log with the following is output:
- Information that is output when hardware/virtual environmentinformation is collected using cmdbrefresh (Observed Record CollectionRequest Command).
10MB 10 generations(*1)
*1: If this number is exceeded, previous generations will be deleted, starting with the oldest.
11.1.1.1 Log Output DestinationThe output destination for mdr_cfmg_srv.log is shown below.
[Windows]
Output folder Output file
<Systemwalker Software Configuration Manager installation directory>\CMDB\FJSVcmdbm\var\log Same as the log name.
[Linux]
Output folder Output file
/opt/FJSVcfmgm/CMDB/FJSVcmdbm/var/log Same as the log name.
[Linux]
Output folder Output file
/var/opt/FJSVcfmgm/logs Same as the log name.
11.1.1.2 Investigation LogsThe output format for investigation logs is as below. The output destination for investigation logs can be changed.
Output format for investigation logs
Output format
<Date/time> <Log level> <Message text>
- 73 -
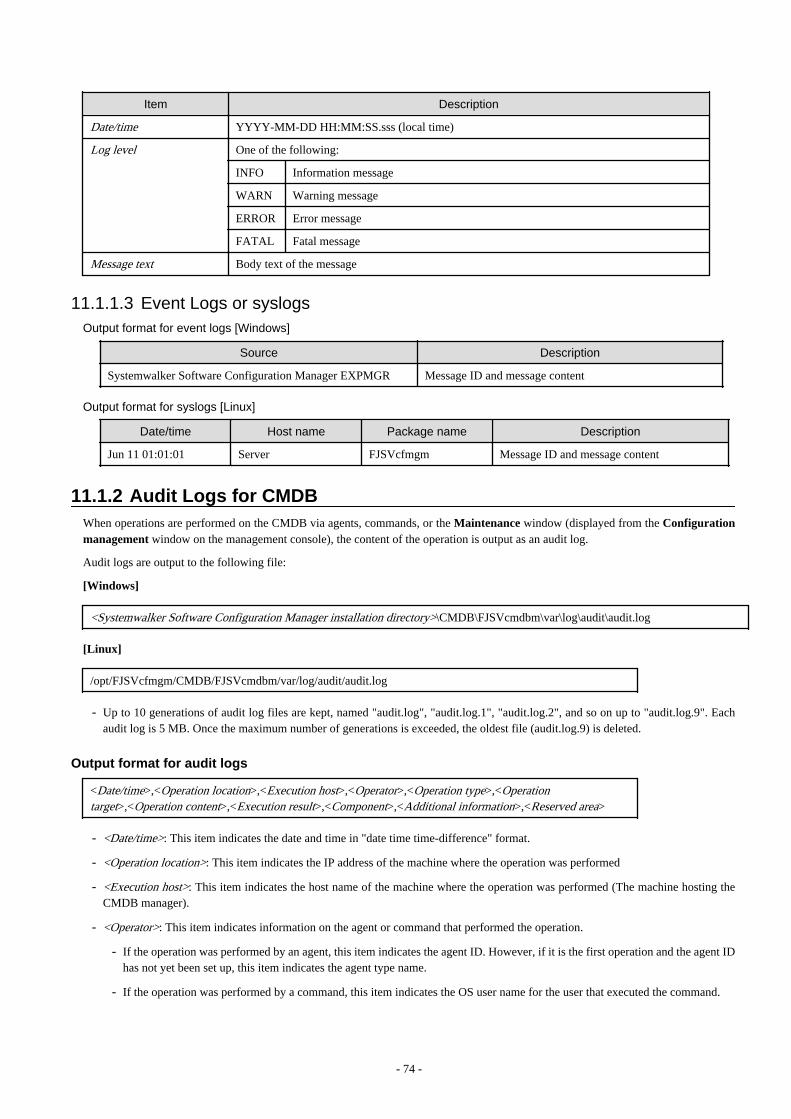
Item Description
Date/time YYYY-MM-DD HH:MM:SS.sss (local time)
Log level One of the following:
INFO Information message
WARN Warning message
ERROR Error message
FATAL Fatal message
Message text Body text of the message
11.1.1.3 Event Logs or syslogsOutput format for event logs [Windows]
Source Description
Systemwalker Software Configuration Manager EXPMGR Message ID and message content
Output format for syslogs [Linux]
Date/time Host name Package name Description
Jun 11 01:01:01 Server FJSVcfmgm Message ID and message content
11.1.2 Audit Logs for CMDBWhen operations are performed on the CMDB via agents, commands, or the Maintenance window (displayed from the Configurationmanagement window on the management console), the content of the operation is output as an audit log.
Audit logs are output to the following file:
[Windows]
<Systemwalker Software Configuration Manager installation directory>\CMDB\FJSVcmdbm\var\log\audit\audit.log
[Linux]
/opt/FJSVcfmgm/CMDB/FJSVcmdbm/var/log/audit/audit.log
- Up to 10 generations of audit log files are kept, named "audit.log", "audit.log.1", "audit.log.2", and so on up to "audit.log.9". Eachaudit log is 5 MB. Once the maximum number of generations is exceeded, the oldest file (audit.log.9) is deleted.
Output format for audit logs
<Date/time>,<Operation location>,<Execution host>,<Operator>,<Operation type>,<Operationtarget>,<Operation content>,<Execution result>,<Component>,<Additional information>,<Reserved area>
- <Date/time>: This item indicates the date and time in "date time time-difference" format.
- <Operation location>: This item indicates the IP address of the machine where the operation was performed
- <Execution host>: This item indicates the host name of the machine where the operation was performed (The machine hosting theCMDB manager).
- <Operator>: This item indicates information on the agent or command that performed the operation.
- If the operation was performed by an agent, this item indicates the agent ID. However, if it is the first operation and the agent IDhas not yet been set up, this item indicates the agent type name.
- If the operation was performed by a command, this item indicates the OS user name for the user that executed the command.
- 74 -
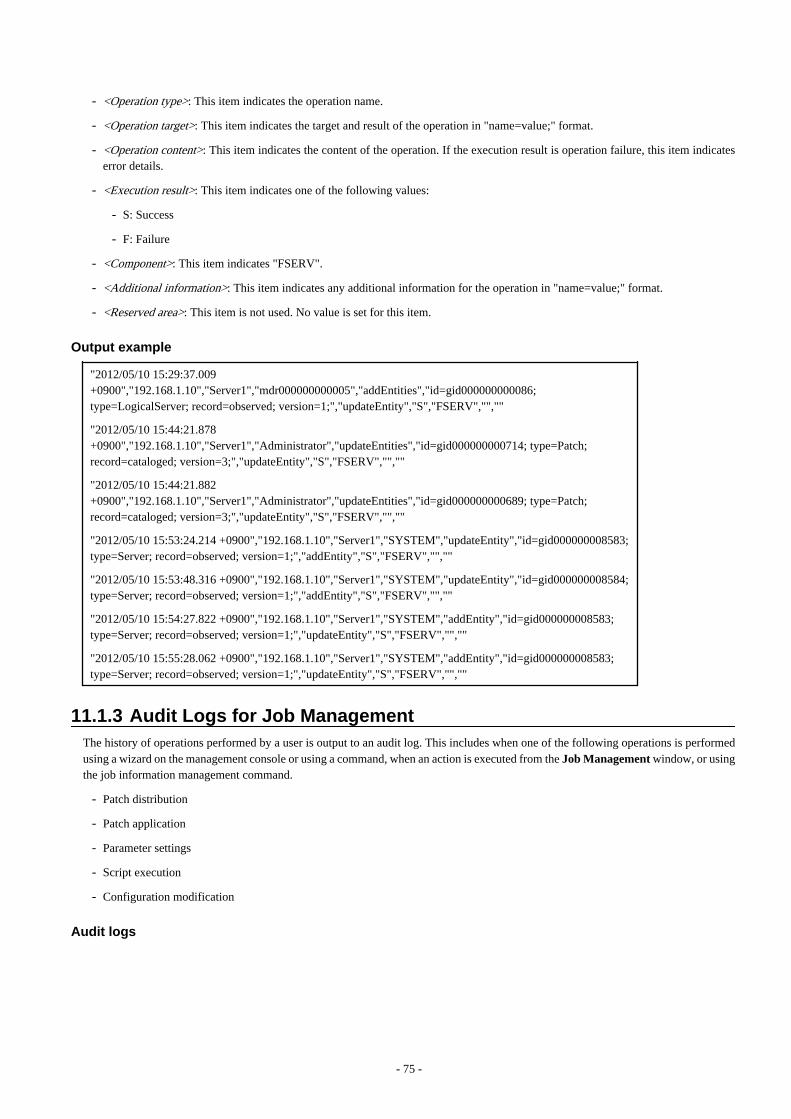
- <Operation type>: This item indicates the operation name.
- <Operation target>: This item indicates the target and result of the operation in "name=value;" format.
- <Operation content>: This item indicates the content of the operation. If the execution result is operation failure, this item indicateserror details.
- <Execution result>: This item indicates one of the following values:
- S: Success
- F: Failure
- <Component>: This item indicates "FSERV".
- <Additional information>: This item indicates any additional information for the operation in "name=value;" format.
- <Reserved area>: This item is not used. No value is set for this item.
Output example
"2012/05/10 15:29:37.009+0900","192.168.1.10","Server1","mdr000000000005","addEntities","id=gid000000000086;type=LogicalServer; record=observed; version=1;","updateEntity","S","FSERV","",""
"2012/05/10 15:44:21.878+0900","192.168.1.10","Server1","Administrator","updateEntities","id=gid000000000714; type=Patch;record=cataloged; version=3;","updateEntity","S","FSERV","",""
"2012/05/10 15:44:21.882+0900","192.168.1.10","Server1","Administrator","updateEntities","id=gid000000000689; type=Patch;record=cataloged; version=3;","updateEntity","S","FSERV","",""
"2012/05/10 15:53:24.214 +0900","192.168.1.10","Server1","SYSTEM","updateEntity","id=gid000000008583;type=Server; record=observed; version=1;","addEntity","S","FSERV","",""
"2012/05/10 15:53:48.316 +0900","192.168.1.10","Server1","SYSTEM","updateEntity","id=gid000000008584;type=Server; record=observed; version=1;","addEntity","S","FSERV","",""
"2012/05/10 15:54:27.822 +0900","192.168.1.10","Server1","SYSTEM","addEntity","id=gid000000008583;type=Server; record=observed; version=1;","updateEntity","S","FSERV","",""
"2012/05/10 15:55:28.062 +0900","192.168.1.10","Server1","SYSTEM","addEntity","id=gid000000008583;type=Server; record=observed; version=1;","updateEntity","S","FSERV","",""
11.1.3 Audit Logs for Job ManagementThe history of operations performed by a user is output to an audit log. This includes when one of the following operations is performedusing a wizard on the management console or using a command, when an action is executed from the Job Management window, or usingthe job information management command.
- Patch distribution
- Patch application
- Parameter settings
- Script execution
- Configuration modification
Audit logs
- 75 -
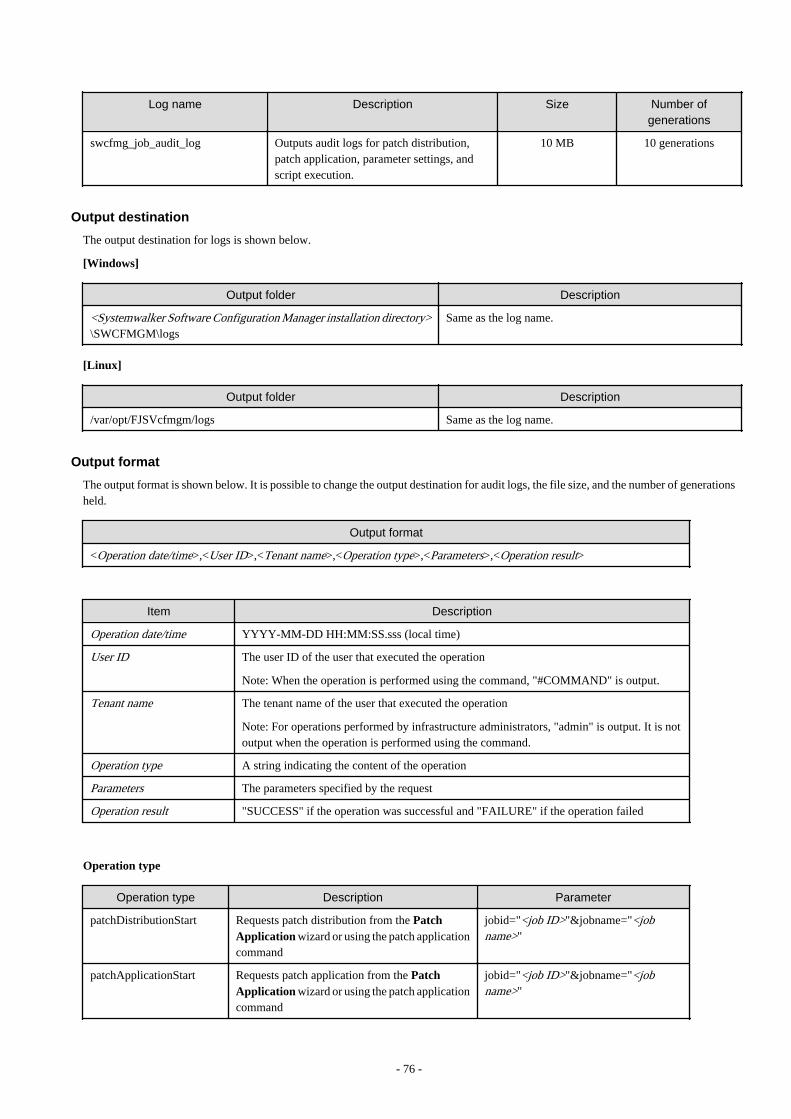
Log name Description Size Number ofgenerations
swcfmg_job_audit_log Outputs audit logs for patch distribution,patch application, parameter settings, andscript execution.
10 MB 10 generations
Output destination
The output destination for logs is shown below.
[Windows]
Output folder Description
<Systemwalker Software Configuration Manager installation directory>\SWCFMGM\logs
Same as the log name.
[Linux]
Output folder Description
/var/opt/FJSVcfmgm/logs Same as the log name.
Output format
The output format is shown below. It is possible to change the output destination for audit logs, the file size, and the number of generationsheld.
Output format
<Operation date/time>,<User ID>,<Tenant name>,<Operation type>,<Parameters>,<Operation result>
Item Description
Operation date/time YYYY-MM-DD HH:MM:SS.sss (local time)
User ID The user ID of the user that executed the operation
Note: When the operation is performed using the command, "#COMMAND" is output.
Tenant name The tenant name of the user that executed the operation
Note: For operations performed by infrastructure administrators, "admin" is output. It is notoutput when the operation is performed using the command.
Operation type A string indicating the content of the operation
Parameters The parameters specified by the request
Operation result "SUCCESS" if the operation was successful and "FAILURE" if the operation failed
Operation type
Operation type Description Parameter
patchDistributionStart Requests patch distribution from the PatchApplication wizard or using the patch applicationcommand
jobid="<job ID>"&jobname="<jobname>"
patchApplicationStart Requests patch application from the PatchApplication wizard or using the patch applicationcommand
jobid="<job ID>"&jobname="<jobname>"
- 76 -
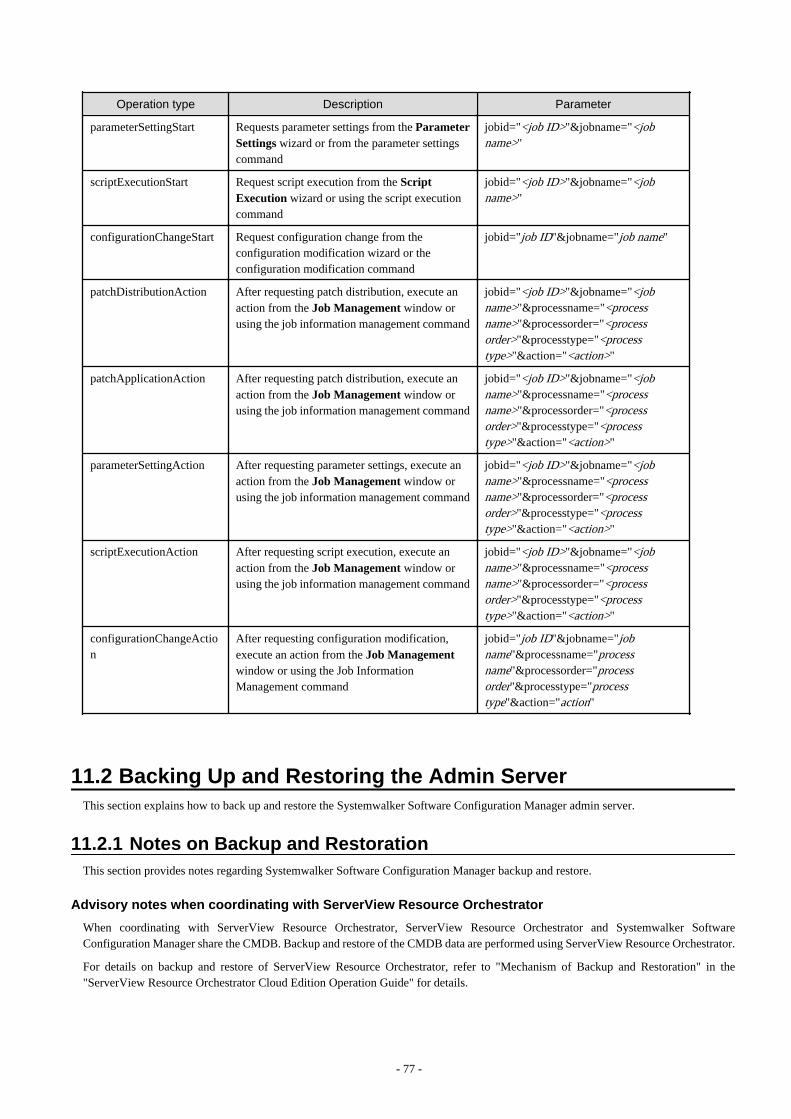
Operation type Description Parameter
parameterSettingStart Requests parameter settings from the ParameterSettings wizard or from the parameter settingscommand
jobid="<job ID>"&jobname="<jobname>"
scriptExecutionStart Request script execution from the ScriptExecution wizard or using the script executioncommand
jobid="<job ID>"&jobname="<jobname>"
configurationChangeStart Request configuration change from theconfiguration modification wizard or theconfiguration modification command
jobid="job ID"&jobname="job name"
patchDistributionAction After requesting patch distribution, execute anaction from the Job Management window orusing the job information management command
jobid="<job ID>"&jobname="<jobname>"&processname="<processname>"&processorder="<processorder>"&processtype="<processtype>"&action="<action>"
patchApplicationAction After requesting patch distribution, execute anaction from the Job Management window orusing the job information management command
jobid="<job ID>"&jobname="<jobname>"&processname="<processname>"&processorder="<processorder>"&processtype="<processtype>"&action="<action>"
parameterSettingAction After requesting parameter settings, execute anaction from the Job Management window orusing the job information management command
jobid="<job ID>"&jobname="<jobname>"&processname="<processname>"&processorder="<processorder>"&processtype="<processtype>"&action="<action>"
scriptExecutionAction After requesting script execution, execute anaction from the Job Management window orusing the job information management command
jobid="<job ID>"&jobname="<jobname>"&processname="<processname>"&processorder="<processorder>"&processtype="<processtype>"&action="<action>"
configurationChangeAction
After requesting configuration modification,execute an action from the Job Managementwindow or using the Job InformationManagement command
jobid="job ID"&jobname="jobname"&processname="processname"&processorder="processorder"&processtype="processtype"&action="action"
11.2 Backing Up and Restoring the Admin ServerThis section explains how to back up and restore the Systemwalker Software Configuration Manager admin server.
11.2.1 Notes on Backup and RestorationThis section provides notes regarding Systemwalker Software Configuration Manager backup and restore.
Advisory notes when coordinating with ServerView Resource Orchestrator
When coordinating with ServerView Resource Orchestrator, ServerView Resource Orchestrator and Systemwalker SoftwareConfiguration Manager share the CMDB. Backup and restore of the CMDB data are performed using ServerView Resource Orchestrator.
For details on backup and restore of ServerView Resource Orchestrator, refer to "Mechanism of Backup and Restoration" in the"ServerView Resource Orchestrator Cloud Edition Operation Guide" for details.
- 77 -
Notes on the environments where backups and restorations are performed
The backup and restoration environments must follow the criteria below:
- When OS are different in from backup and to restore
However, execution will be possible if the operating system versions of the same vendor are different.
- When the product installation directories are different [Windows]
- When the host information (host name/IP address) is different
- When the code types are different
- When the CMDB database storage directories are different
- When the Web server (Interstage HTTP Server), message broker, and server function port numbers are different
-
Notes on the timing of backups and restorations
- When backup and restore are executed, it will be necessary to restart Systemwalker Software Configuration Manager. When linkedto ServerView Resource Orchestrator, it will be necessary to restart Systemwalker Software Configuration Manager and ServerViewResource Orchestrator. For this reason, the operator should execute backup and restore in a time zone that does not use SystemwalkerSoftware Configuration Manager and ServerView Resource Orchestrator.
- The statuses of patch application, patch distribution, parameter setting, and script execution that were in effect at the time of backupwill be restored. If restore is performed using backup resources for which script execution is in progress, operation will be resumed.Before performing backup, confirm that patch application, patch distribution, parameter setting, and script execution are not running.
Handling backup resources
- When moving backup resources to the restoration target, move the directory specified as the backup directory and all its files.
- Do not delete the backup resources in the directory specified as the backup directory until the restoration completes.
- The backup command cannot be used to back up data to the following types of media:
- Optical disks such as CD-Rs and DVD-Rs
To save user assets to optical disks, first back up the data to the local disk, and then, write it to the media using a dedicated opticaldisk writer, for example.
- Network paths [Windows]
- Directories whose pathnames include spaces
11.2.2 Backing Up the Admin ServerThis section explains how to back up the Systemwalker Software Configuration Manager admin server.
Note that Systemwalker Software Configuration Manager must be stopped before performing backup.
For details on how to start and stop Systemwalker Software Configuration Manager, refer to "Chapter 10 Starting and StoppingSystemwalker Software Configuration Managerr".
- 78 -
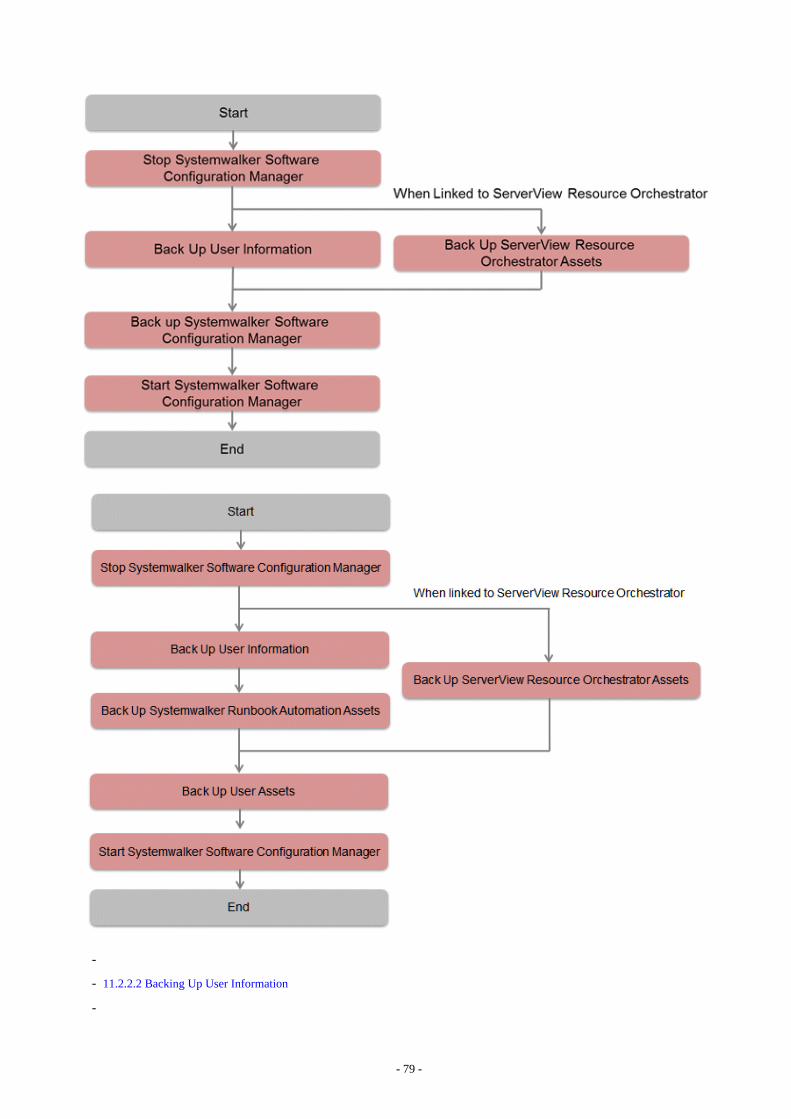
-
- 11.2.2.2 Backing Up User Information
-
- 79 -
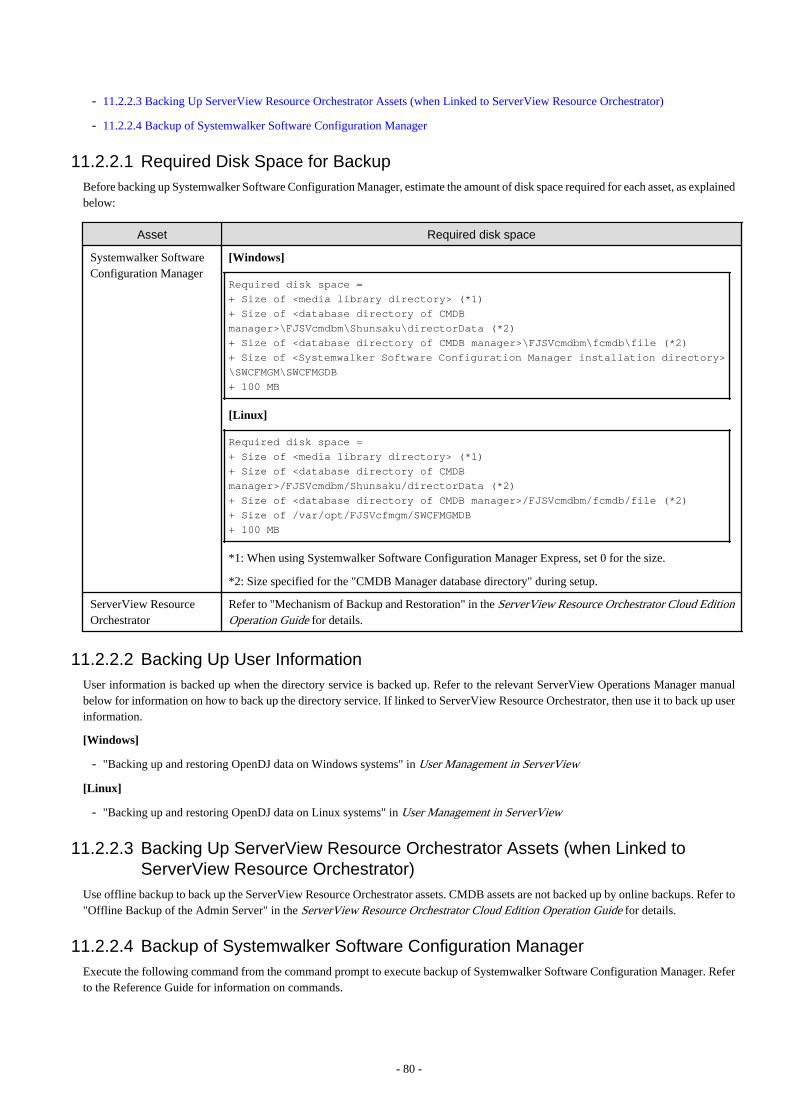
- 11.2.2.3 Backing Up ServerView Resource Orchestrator Assets (when Linked to ServerView Resource Orchestrator)
- 11.2.2.4 Backup of Systemwalker Software Configuration Manager
11.2.2.1 Required Disk Space for BackupBefore backing up Systemwalker Software Configuration Manager, estimate the amount of disk space required for each asset, as explainedbelow:
Asset Required disk space
Systemwalker SoftwareConfiguration Manager
[Windows]
Required disk space =+ Size of <media library directory> (*1)+ Size of <database directory of CMDBmanager>\FJSVcmdbm\Shunsaku\directorData (*2)+ Size of <database directory of CMDB manager>\FJSVcmdbm\fcmdb\file (*2)+ Size of <Systemwalker Software Configuration Manager installation directory>\SWCFMGM\SWCFMGDB+ 100 MB
[Linux]
Required disk space =+ Size of <media library directory> (*1)+ Size of <database directory of CMDBmanager>/FJSVcmdbm/Shunsaku/directorData (*2)+ Size of <database directory of CMDB manager>/FJSVcmdbm/fcmdb/file (*2)+ Size of /var/opt/FJSVcfmgm/SWCFMGMDB+ 100 MB
*1: When using Systemwalker Software Configuration Manager Express, set 0 for the size.
*2: Size specified for the "CMDB Manager database directory" during setup.
ServerView ResourceOrchestrator
Refer to "Mechanism of Backup and Restoration" in the ServerView Resource Orchestrator Cloud EditionOperation Guide for details.
11.2.2.2 Backing Up User InformationUser information is backed up when the directory service is backed up. Refer to the relevant ServerView Operations Manager manualbelow for information on how to back up the directory service. If linked to ServerView Resource Orchestrator, then use it to back up userinformation.
[Windows]
- "Backing up and restoring OpenDJ data on Windows systems" in User Management in ServerView
[Linux]
- "Backing up and restoring OpenDJ data on Linux systems" in User Management in ServerView
11.2.2.3 Backing Up ServerView Resource Orchestrator Assets (when Linked toServerView Resource Orchestrator)
Use offline backup to back up the ServerView Resource Orchestrator assets. CMDB assets are not backed up by online backups. Refer to"Offline Backup of the Admin Server" in the ServerView Resource Orchestrator Cloud Edition Operation Guide for details.
11.2.2.4 Backup of Systemwalker Software Configuration ManagerExecute the following command from the command prompt to execute backup of Systemwalker Software Configuration Manager. Referto the Reference Guide for information on commands.
- 80 -
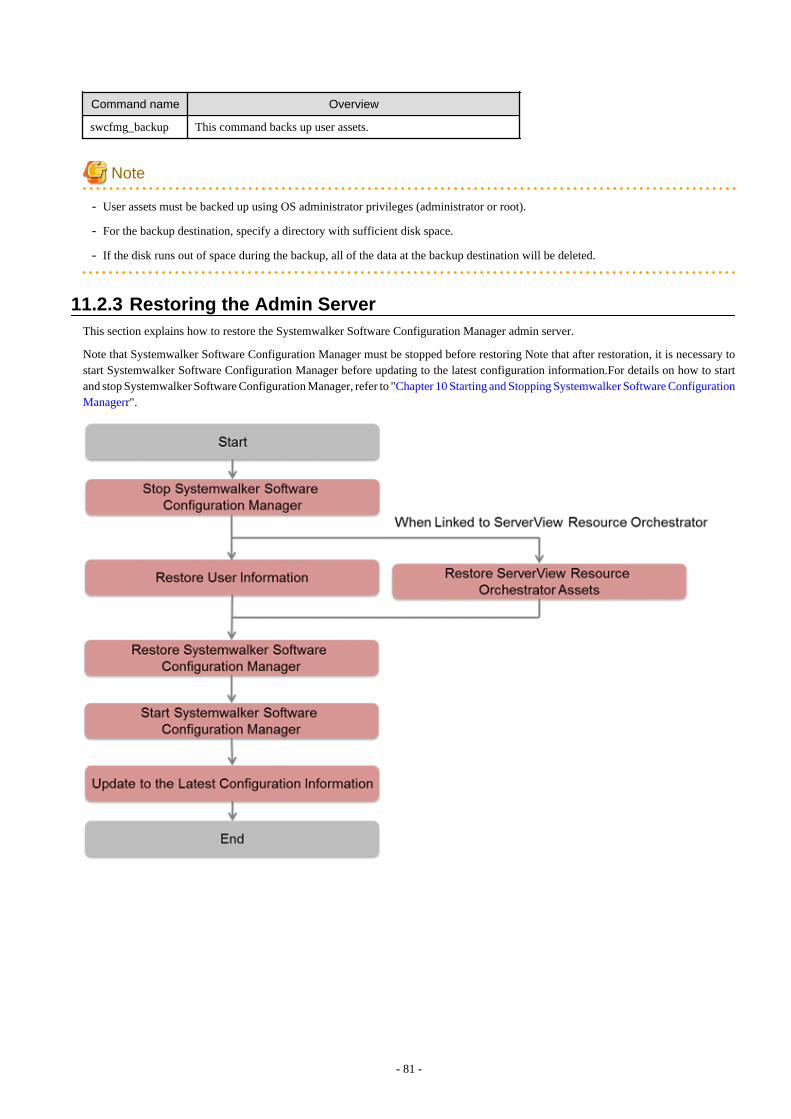
Command name Overview
swcfmg_backup This command backs up user assets.
Note
- User assets must be backed up using OS administrator privileges (administrator or root).
- For the backup destination, specify a directory with sufficient disk space.
- If the disk runs out of space during the backup, all of the data at the backup destination will be deleted.
11.2.3 Restoring the Admin ServerThis section explains how to restore the Systemwalker Software Configuration Manager admin server.
Note that Systemwalker Software Configuration Manager must be stopped before restoring Note that after restoration, it is necessary tostart Systemwalker Software Configuration Manager before updating to the latest configuration information.For details on how to startand stop Systemwalker Software Configuration Manager, refer to "Chapter 10 Starting and Stopping Systemwalker Software ConfigurationManagerr".
- 81 -
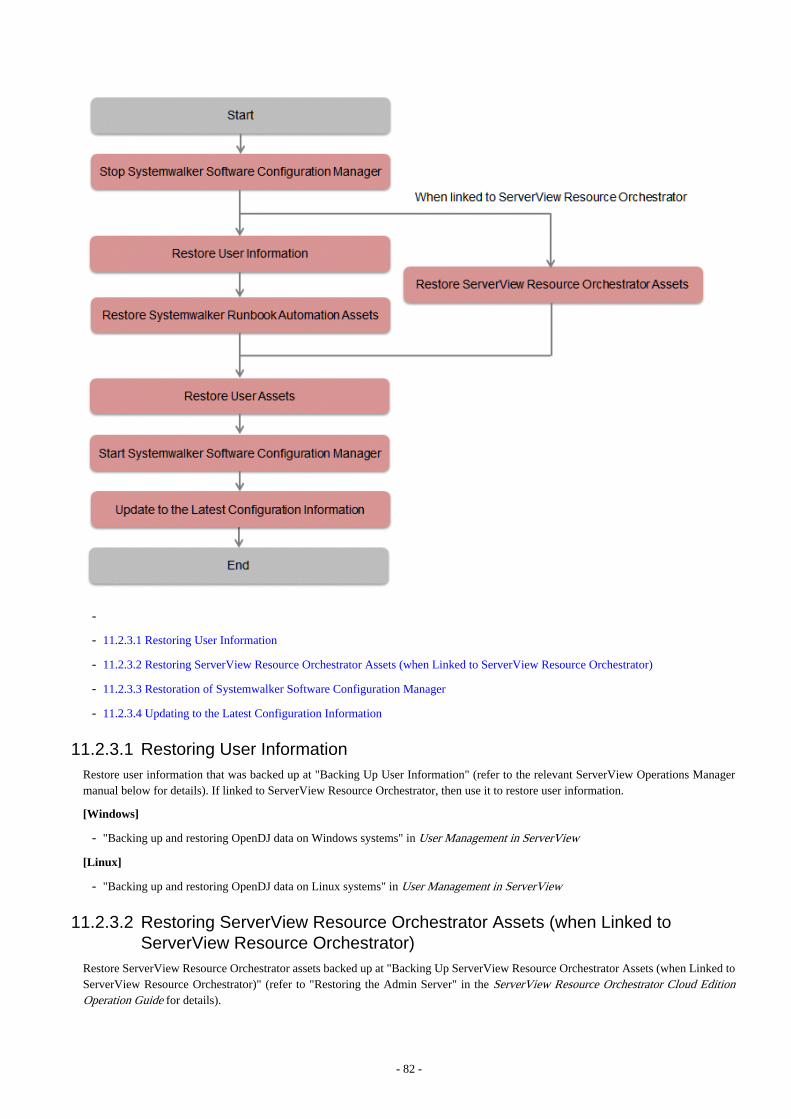
-
- 11.2.3.1 Restoring User Information
- 11.2.3.2 Restoring ServerView Resource Orchestrator Assets (when Linked to ServerView Resource Orchestrator)
- 11.2.3.3 Restoration of Systemwalker Software Configuration Manager
- 11.2.3.4 Updating to the Latest Configuration Information
11.2.3.1 Restoring User InformationRestore user information that was backed up at "Backing Up User Information" (refer to the relevant ServerView Operations Managermanual below for details). If linked to ServerView Resource Orchestrator, then use it to restore user information.
[Windows]
- "Backing up and restoring OpenDJ data on Windows systems" in User Management in ServerView
[Linux]
- "Backing up and restoring OpenDJ data on Linux systems" in User Management in ServerView
11.2.3.2 Restoring ServerView Resource Orchestrator Assets (when Linked toServerView Resource Orchestrator)
Restore ServerView Resource Orchestrator assets backed up at "Backing Up ServerView Resource Orchestrator Assets (when Linked toServerView Resource Orchestrator)" (refer to "Restoring the Admin Server" in the ServerView Resource Orchestrator Cloud EditionOperation Guide for details).
- 82 -
11.2.3.3 Restoration of Systemwalker Software Configuration ManagerRestore the assets collected in "Backup of Systemwalker Software Configuration Manager". Execute the following command from thecommand prompt to restore Systemwalker Software Configuration Manager. Refer to the Reference Guide for information on commands.
Command name Overview
swcfmg_restore This command restores user assets.
Note
User assets must be restored using OS administrator privileges (administrator or root).
11.2.3.4 Updating to the Latest Configuration InformationAfter restoring Systemwalker Software Configuration Manager, start Systemwalker Software Configuration Manager and then update tothe latest configuration information.
The procedure for updating to the latest configuration information is described below:
1. Execute cmdbrefresh to update the CMDB information:
[Windows]
%SWCMDBINSTALLPATH%\CMDB\FJSVcmdbm\bin\cmdbrefresh.exe -a -q-
[Linux]
/opt/FJSVcfmgm/CMDB/FJSVcmdbm/bin/cmdbrefresh.sh -a -q
11.3 Changing the Systemwalker Software Configuration ManagerEnvironment
11.3.1 Changing Passwords of Users who Use this ProductThis section explains how to change the passwords of users of the following directory services used with this product:
- User for process control
- LDAP administrator
11.3.1.1 Changing the Password of a User for Process ControlThe procedure for changing the password of a user for process control is described below:
1. Stop Systemwalker Software Configuration Manager.
Refer to "10.2 Stopping Systemwalker Software Configuration Manager" for details.
2. Change the password of the user for process control Execute the following command:
[Windows]
<Systemwalker Software Configuration Manager installation directory>\SWCFMGM\bin\swcfmg_environment -set -keyjob.process.controller.password -value <new password>
[Linux]
/opt/FJSVcfmgm/bin/swcfmg_environment -set -key job.process.controller.password -value <new password>
- 83 -
3. Restart Systemwalker Software Configuration Manager.
Refer to "10.1 Starting Systemwalker Software Configuration Manager" for details.
11.3.1.2 Changing the Password of an LDAP Administrator DNThe procedure for changing the password of an LDAP administrator DN is described below
When coordinating with ServerView Resource Orchestrator, also change the password registered in ServerView Resource Orchestrator.
1. Stop Systemwalker Software Configuration Manager.
Refer to "10.2 Stopping Systemwalker Software Configuration Manager" for details.
2. Change the LDAP administrator DN password. Change the password of svuser referring to manuals of ServerView OperationsManager.
- "Defining / changing the password of svuser" in "User Management in ServerView"
3. When coordinating with ServerView Resource Orchestrator, configure the new password in ServerView Resource Orchestrator. -Refer to "Reconfiguring Single Sign-On" in the ServerView Resource Orchestrator Cloud Edition Operation Guide for details.
4. Execute the following command in the command prompt to set the new password for Systemwalker Software ConfigurationManager:
[Windows]
<Systemwalker Software Configuration Manager installation directory>\SWCFMGM\bin\swcfmg_environment -set -keyuser.ldap.administrator.password -value <new password>
[Linux]
/opt/FJSVcfmgm/bin/swcfmg_environment -set -key user.ldap.administrator.password -value <new password>
5. Restart Systemwalker Software Configuration Manager. Refer to "10.1 Starting Systemwalker Software Configuration Manager"for details.
11.3.2 Changing Passwords of Operating System Users who Use thisProduct
The procedure for changing the passwords of the following users of operating systems used with this product is described below:
- swcfmgdb
11.3.2.1 Changing the Password for swcfmgdbThe procedure for changing the password for swcfmgdb is described below:
1. Stop Systemwalker Software Configuration Manager.
Refer to "10.2 Stopping Systemwalker Software Configuration Manager" for details.
2. Change the password.
If using Windows, execute the command below:
net user swcfmgdb <new password>
3. If using Windows, change the password of the service startup account.
The service below will be changed:
- Systemwalker Software Configuration Manager DataBase Service
- 84 -
4. Set a new password for Systemwalker Software Configuration Manager. Execute the following command: For the new password,set the same value as the password specified in steps 2 and 3.
[Windows]
<Systemwalker Software Configuration Manager installation directory>\SWCFMGM\bin\swcfmg_environment -set -keydatabase.user.password -value <new password>
[Linux]
/opt/FJSVcfmgm/bin/swcfmg_environment -set -key database.user.password -value <new password>
5. Restart Systemwalker Software Configuration Manager.
Refer to "10.1 Starting Systemwalker Software Configuration Manager" for details.
11.4 Installing Updates on Systemwalker Software ConfigurationManager
For stable and continuous operation of Systemwalker Software Configuration Manager, periodically check update information releasedby Fujitsu, and install released updates as soon as possible.
This section explains how to check update information for Systemwalker Software Configuration Manager, and how to install updates.
11.4.1 Installing Updates on the Admin ServerThis section explains how to install updates on the admin server.
The procedure for installing updates is described below:
1. Stop Systemwalker Software Configuration Manager
Execute the following command on the admin server:
[Windows]
Execute the command as a user with administrator privileges.
<Systemwalker Software Configuration Manager installation directory>\SWCFMGM\bin\swcfmg_stop
[Linux]
Execute the command as a superuser.
/opt/FJSVcfmgm/bin/swcfmg_stop
If Systemwalker Software Configuration Manager stops successfully, a stop completion message will be output.
Stop processing for Systemwalker Software Configuration Manager will start.Stop processing for Systemwalker Software Configuration Manager has completed normally.
2. Install the updates
Install the updates according to the explanations for the updates to be installed.
3. Start Systemwalker Software Configuration Manager
Execute the following command on the admin server:
[Windows]
Execute the command as a user with administrator privileges.
<Systemwalker Software Configuration Manager installation directory>\SWCFMGM\bin\swcfmg_start
- 85 -
[Linux]
Execute the command as a superuser.
/opt/FJSVcfmgm/bin/swcfmg_start
If Systemwalker Software Configuration Manager starts successfully, a startup completion message will be output.
Start processing for Systemwalker Software Configuration Manager will start.Start processing for Systemwalker Software Configuration Manager has completed normally.
- 86 -

Part 4 Management
Chapter 12 Management Console..................................................................................................................88
Chapter 13 Configuration Management......................................................................................................... 93
- 87 -
Chapter 12 Management ConsoleSystemwalker Software Configuration Manager provides a management console as a GUI for managing hardware (chassis and servers)and virtual environments (VM hosts and VM guests).
12.1 Overview of the Management ConsoleThe management console can be used to perform the following operations:
- Configuration information management
Collect and manage hardware (chassis and servers), virtual environment (VM hosts and VM guests), and software configurationinformation (server names, tenants, host names, IP addresses, installation software, and software parameters) on the managed servers.Also, perform parameter settings, script execution, and configuration modification.
The configuration items in the CMDB can also be looked up, updated, deleted and registered.
Setting up the web browser
Before using the management console, a web browser must be set up as follows:
- Configure settings to accept cookies.
- Enable JavaScript.
- Configure settings to use TLS 1.0.
- Configure settings to save the encrypted page to disk.
- Depending on the security level of the browser, the management console may not be displayed even after login. In this case, registerthe URL of the management console in Trusted sites.
- Use Internet Explorer in standard mode when logging in to the management console.
The procedure for configuring standard mode is as follows:
1. Press the "Alt" key on the keyboard to display the menu bar.
2. Click Tools > Compatibility View settings.
3. Remove the check from Display intranet sites in Compatibility View.
12.2 List of Functions Available from the Management ConsoleThe following table shows the functions that can be used with the management console, as well as which roles can use each function:
Table 12.1 Functions available from the management console
Function Window Information displayed/button
Infrastructure
administrator
Dual-role
administrator
Tenant
administra
tor
Tenant
user
Remarks
Home Home Function list Y Y Y Y A list of functions is displayed.
Notifications Y Y Y Y Notifications from the system aredisplayed.
Configurationmanagement
Hardwarelist
Chassis list Y Y - - Moves from the link to the chassisname to the chassis details.
Chassis details Y Y - - Moves from the link to the serverblade name to the physical serverdetails.
- 88 -

Function Window Information displayed/button
Infrastructure
administrator
Dual-role
administrator
Tenant
administra
tor
Tenant
user
Remarks
Physical server list Y Y - - Moves from the link to thephysical server name and chassisname to the details.
Physical server details Y Y - - Displays the details of thephysical server and a list of relatedVM guests.
OS list Y Y - - Displays the list of servers onwhich the OS is installed.
Map view Y Y - - Displays relationships betweenchassis, physical servers, servers,L-Platforms, and tenants.
Maintenance
View CI Y Y - - The configuration informationregistered in the CMDB can beviewed.
Register CI Y (*1) Y (*1) - - New configuration informationcan be registered in the CMDB.
Update/delete CI Y (*1) Y (*1) - - The configuration informationregistered in the CMDB can beupdated or deleted.
Import CI Y (*1) Y (*1) - - Configuration information can beimported in the CMDB.
Y: Can be used.
-: Cannot be used.
*1: These functions may not be available, depending on the ServerView Resource Orchestrator role that has been assigned to the loginuser. Refer to "12.3 Login Users" for information on roles.
12.3 Login UsersThe users who log in to this product must be registered with the directory service beforehand.
Before linking to ServerView Resource Orchestrator, users must be registered with ServerView Resource Orchestrator. The followingtable shows the correspondences between the roles for ServerView Resource Orchestrator and the roles for Systemwalker SoftwareConfiguration Manager.
If the roles have been customized on ServerView Resource Orchestrator, the basic roles of the copy source that correspond to the roles ofthis product are shown below. Refer to "Customizing Roles" in the ServerView Resource Orchestrator Cloud Edition Design Guide forinformation on customizing roles.
ServerView Resource Orchestrator Systemwalker Software Configuration Manager
Role category Role or basic role Role Viewing of HardwareConfiguration Information
Viewing of VirtualEnvironment
Configuration Information
Operations in theConfiguration
management >>Maintenance window
InfrastructureAdministrative Role
Infrastructure administrator Infrastructure administrator A A
Infrastructure operator A S (*1)
- 89 -
ServerView Resource Orchestrator Systemwalker Software Configuration Manager
Role category Role or basic role Role Viewing of HardwareConfiguration Information
Viewing of VirtualEnvironment
Configuration Information
Operations in theConfiguration
management >>Maintenance window
Infrastructure monitor A S (*1)
TenantManagementRoles
Tenant administrator Tenant administrator - -
Tenant operator - -
Tenant monitor - -
Tenant UseRoles
Tenant user Tenant user - -
MultipleRoles
Administrator Dual-role administrator A A
Operator A S (*1)
A: All operations can be performed.
S: Some operations can be performed.
-: No operations can be performed.
*1: Only the View CI menu can be operated.
Refer to "Restricting Access Using Roles" in the ServerView Resource Orchestrator Cloud Edition Design Guide for information onServerView Resource Orchestrator roles.
Note
Users who have not been registered using the user information management commands, and users who do not satisfy the conditions forusers of this product, cannot use the management console. After they log in to the management console, the error "HTTP Status 403" isdisplayed.
Refer to "4.2 Managing User Information" for information on requirements to use this product.
12.4 Login and LogoutThis section explains how to log in and log out of the management console.
12.4.1 LoginUse the following methods to open the management console:
https://<FQDN on the admin server>:31500/
If the port number for accessing the management console was changed when Systemwalker Software Configuration Manager was installed,specify the new port number.
When the management console is started, the following login window is displayed:
- 90 -
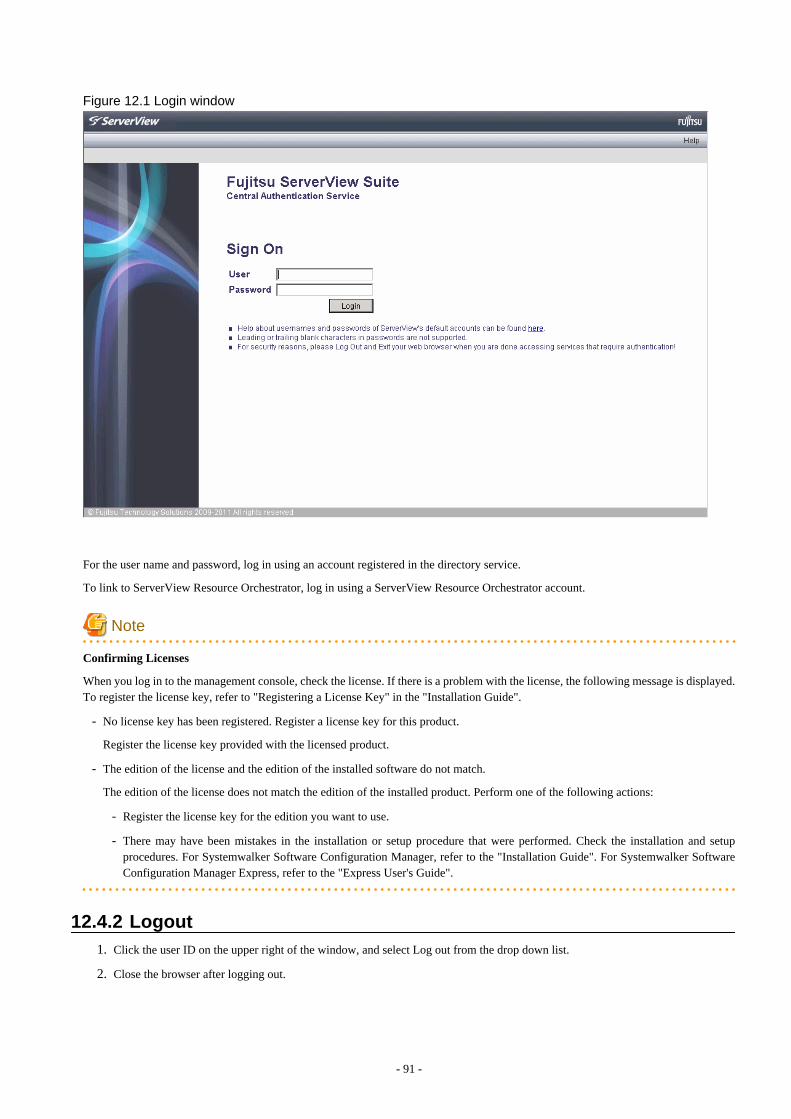
Figure 12.1 Login window
For the user name and password, log in using an account registered in the directory service.
To link to ServerView Resource Orchestrator, log in using a ServerView Resource Orchestrator account.
Note
Confirming Licenses
When you log in to the management console, check the license. If there is a problem with the license, the following message is displayed.To register the license key, refer to "Registering a License Key" in the "Installation Guide".
- No license key has been registered. Register a license key for this product.
Register the license key provided with the licensed product.
- The edition of the license and the edition of the installed software do not match.
The edition of the license does not match the edition of the installed product. Perform one of the following actions:
- Register the license key for the edition you want to use.
- There may have been mistakes in the installation or setup procedure that were performed. Check the installation and setupprocedures. For Systemwalker Software Configuration Manager, refer to the "Installation Guide". For Systemwalker SoftwareConfiguration Manager Express, refer to the "Express User's Guide".
12.4.2 Logout1. Click the user ID on the upper right of the window, and select Log out from the drop down list.
2. Close the browser after logging out.
- 91 -
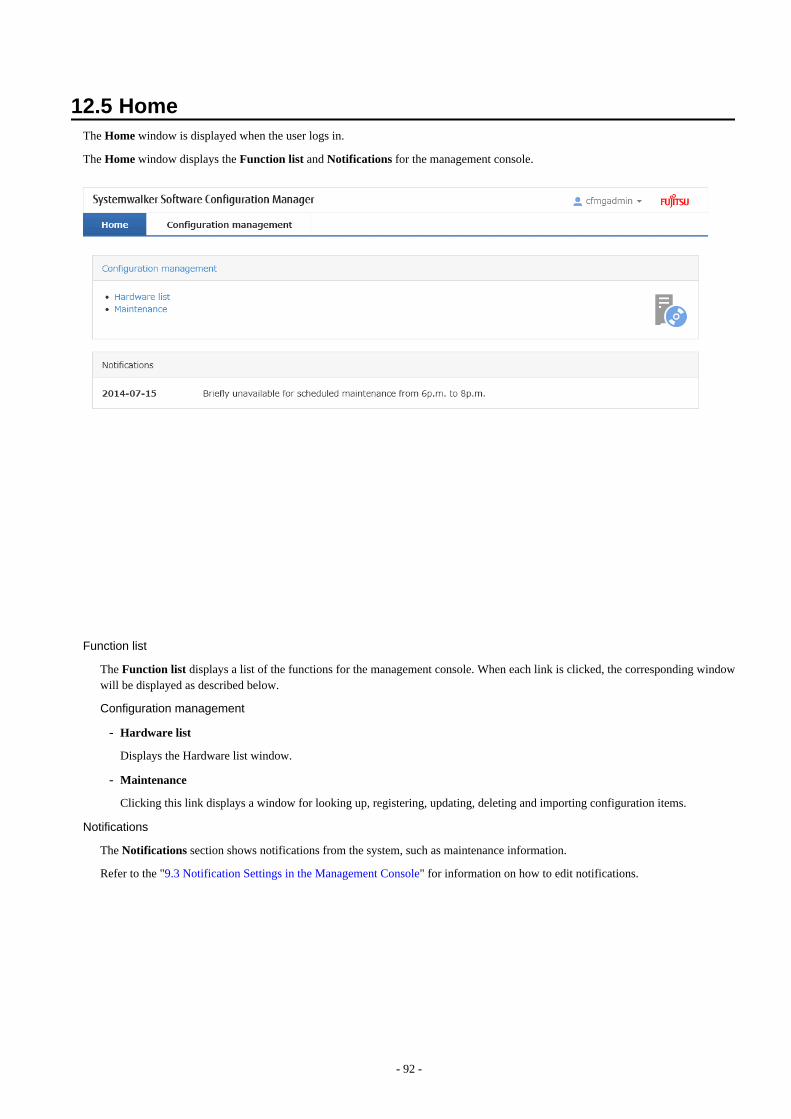
12.5 HomeThe Home window is displayed when the user logs in.
The Home window displays the Function list and Notifications for the management console.
Function list
The Function list displays a list of the functions for the management console. When each link is clicked, the corresponding windowwill be displayed as described below.
Configuration management
- Hardware list
Displays the Hardware list window.
- Maintenance
Clicking this link displays a window for looking up, registering, updating, deleting and importing configuration items.
Notifications
The Notifications section shows notifications from the system, such as maintenance information.
Refer to the "9.3 Notification Settings in the Management Console" for information on how to edit notifications.
- 92 -
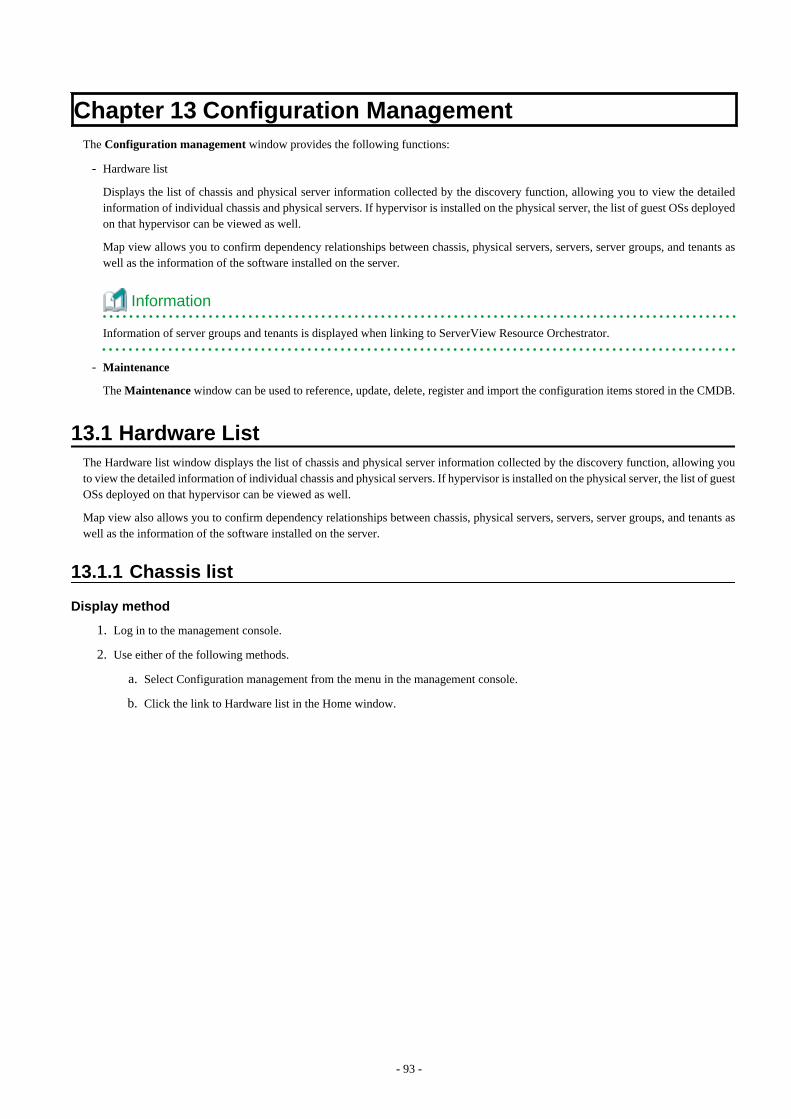
Chapter 13 Configuration ManagementThe Configuration management window provides the following functions:
- Hardware list
Displays the list of chassis and physical server information collected by the discovery function, allowing you to view the detailedinformation of individual chassis and physical servers. If hypervisor is installed on the physical server, the list of guest OSs deployedon that hypervisor can be viewed as well.
Map view allows you to confirm dependency relationships between chassis, physical servers, servers, server groups, and tenants aswell as the information of the software installed on the server.
Information
Information of server groups and tenants is displayed when linking to ServerView Resource Orchestrator.
- Maintenance
The Maintenance window can be used to reference, update, delete, register and import the configuration items stored in the CMDB.
13.1 Hardware ListThe Hardware list window displays the list of chassis and physical server information collected by the discovery function, allowing youto view the detailed information of individual chassis and physical servers. If hypervisor is installed on the physical server, the list of guestOSs deployed on that hypervisor can be viewed as well.
Map view also allows you to confirm dependency relationships between chassis, physical servers, servers, server groups, and tenants aswell as the information of the software installed on the server.
13.1.1 Chassis list
Display method
1. Log in to the management console.
2. Use either of the following methods.
a. Select Configuration management from the menu in the management console.
b. Click the link to Hardware list in the Home window.
- 93 -
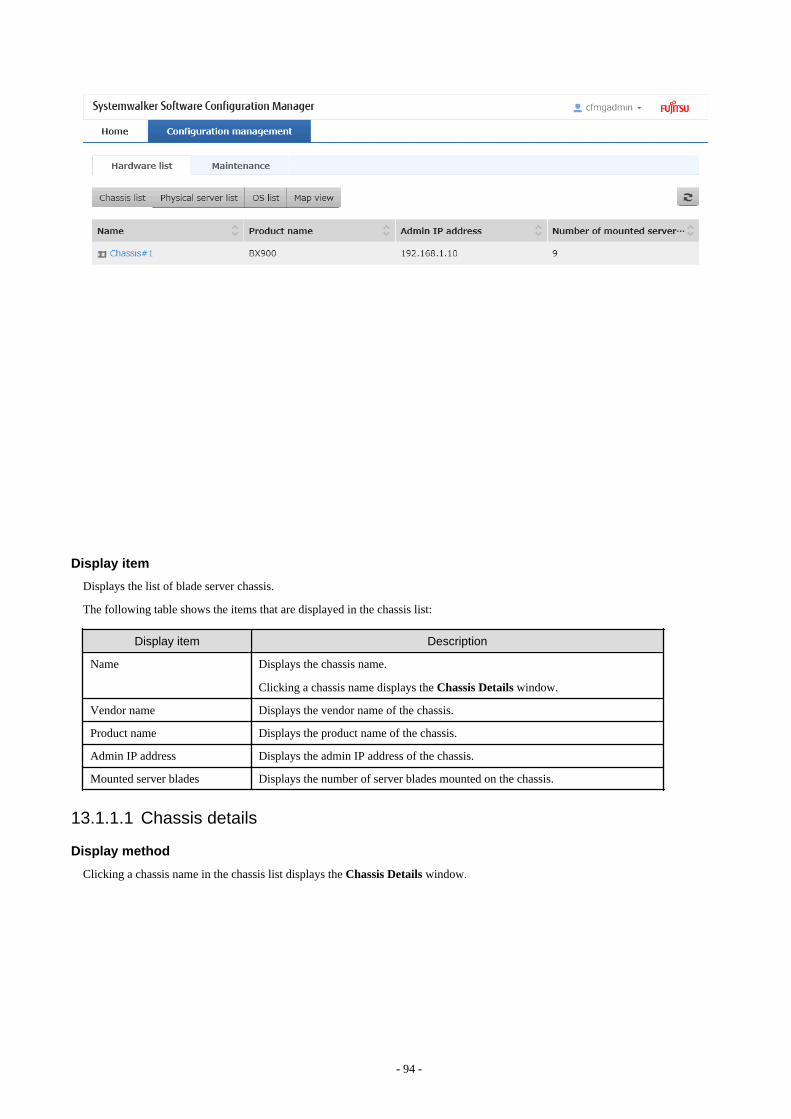
Display item
Displays the list of blade server chassis.
The following table shows the items that are displayed in the chassis list:
Display item Description
Name Displays the chassis name.
Clicking a chassis name displays the Chassis Details window.
Vendor name Displays the vendor name of the chassis.
Product name Displays the product name of the chassis.
Admin IP address Displays the admin IP address of the chassis.
Mounted server blades Displays the number of server blades mounted on the chassis.
13.1.1.1 Chassis details
Display method
Clicking a chassis name in the chassis list displays the Chassis Details window.
- 94 -
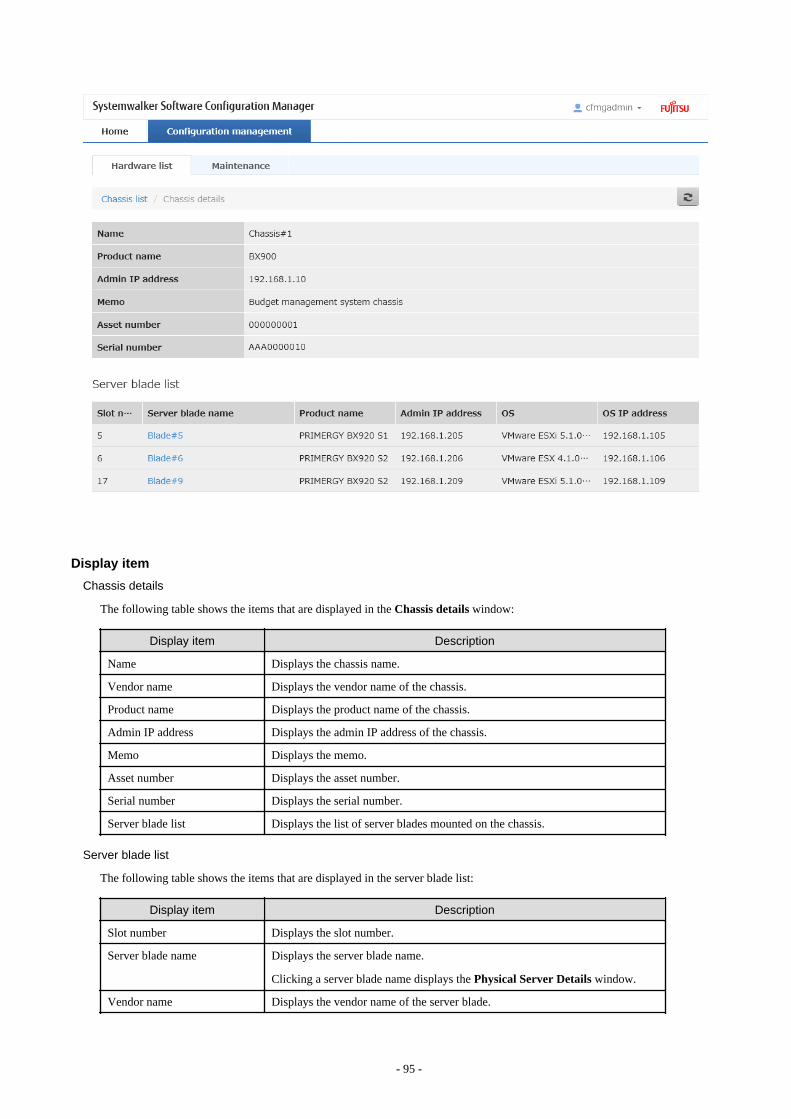
Display item
Chassis details
The following table shows the items that are displayed in the Chassis details window:
Display item Description
Name Displays the chassis name.
Vendor name Displays the vendor name of the chassis.
Product name Displays the product name of the chassis.
Admin IP address Displays the admin IP address of the chassis.
Memo Displays the memo.
Asset number Displays the asset number.
Serial number Displays the serial number.
Server blade list Displays the list of server blades mounted on the chassis.
Server blade list
The following table shows the items that are displayed in the server blade list:
Display item Description
Slot number Displays the slot number.
Server blade name Displays the server blade name.
Clicking a server blade name displays the Physical Server Details window.
Vendor name Displays the vendor name of the server blade.
- 95 -
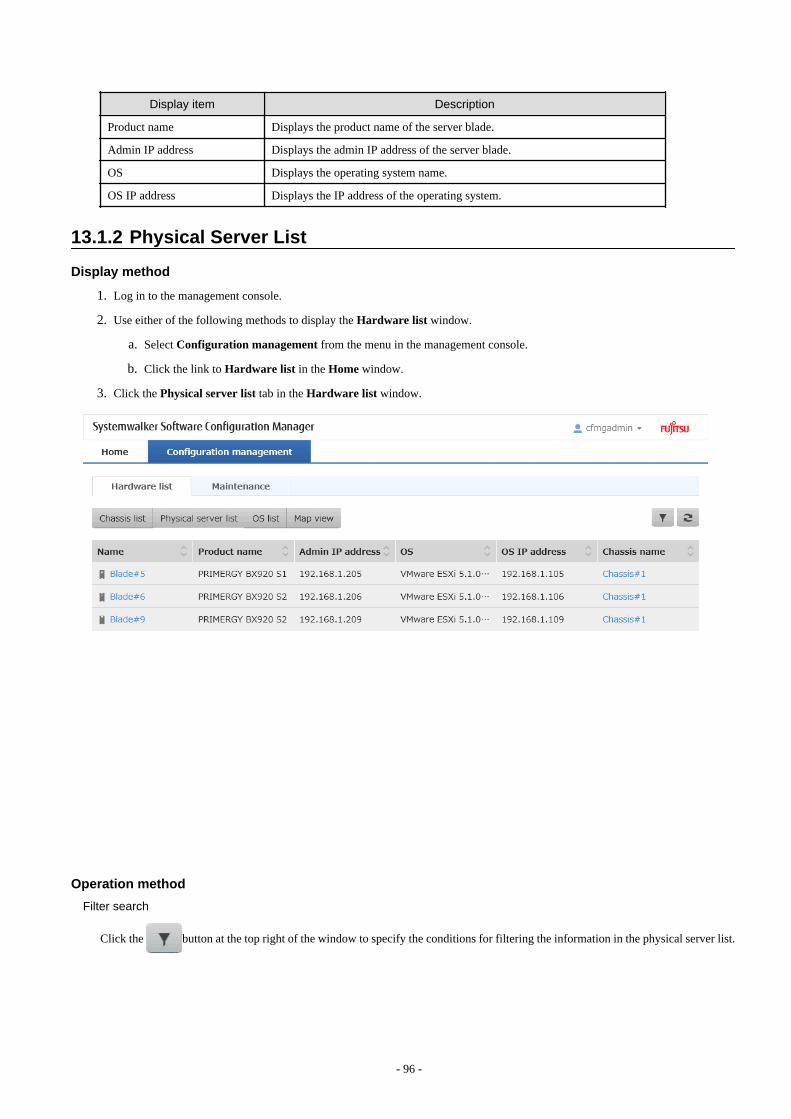
Display item Description
Product name Displays the product name of the server blade.
Admin IP address Displays the admin IP address of the server blade.
OS Displays the operating system name.
OS IP address Displays the IP address of the operating system.
13.1.2 Physical Server List
Display method
1. Log in to the management console.
2. Use either of the following methods to display the Hardware list window.
a. Select Configuration management from the menu in the management console.
b. Click the link to Hardware list in the Home window.
3. Click the Physical server list tab in the Hardware list window.
Operation method
Filter search
Click the button at the top right of the window to specify the conditions for filtering the information in the physical server list.
- 96 -

Display item Description
Filter The following filter conditions can be specified. Multiple filter conditions can bespecified.
- Name
- Vendor name
- Product name
- Admin IP address
- OS
- OS IP address
- Chassis name
Display item
The following table shows the items that are displayed in the physical server list:
Display item Description
Name Displays the physical server name.
Clicking a physical server name displays the Physical Server Details window.
Vendor name Displays the vendor name of the physical server.
Product name Displays the product name of the physical server.
Admin IP address Displays the admin IP address of the physical server.
OS Displays the operating system name.
OS IP address Displays the IP address of the operating system.
Chassis name For a server blade, the name of the chassis in which it is mounted is displayed.
Clicking a chassis name displays the Chassis Details window.
13.1.2.1 Physical Server Details
Display method
Clicking a physical server name in the physical server list displays the Physical Server Details window.
- 97 -
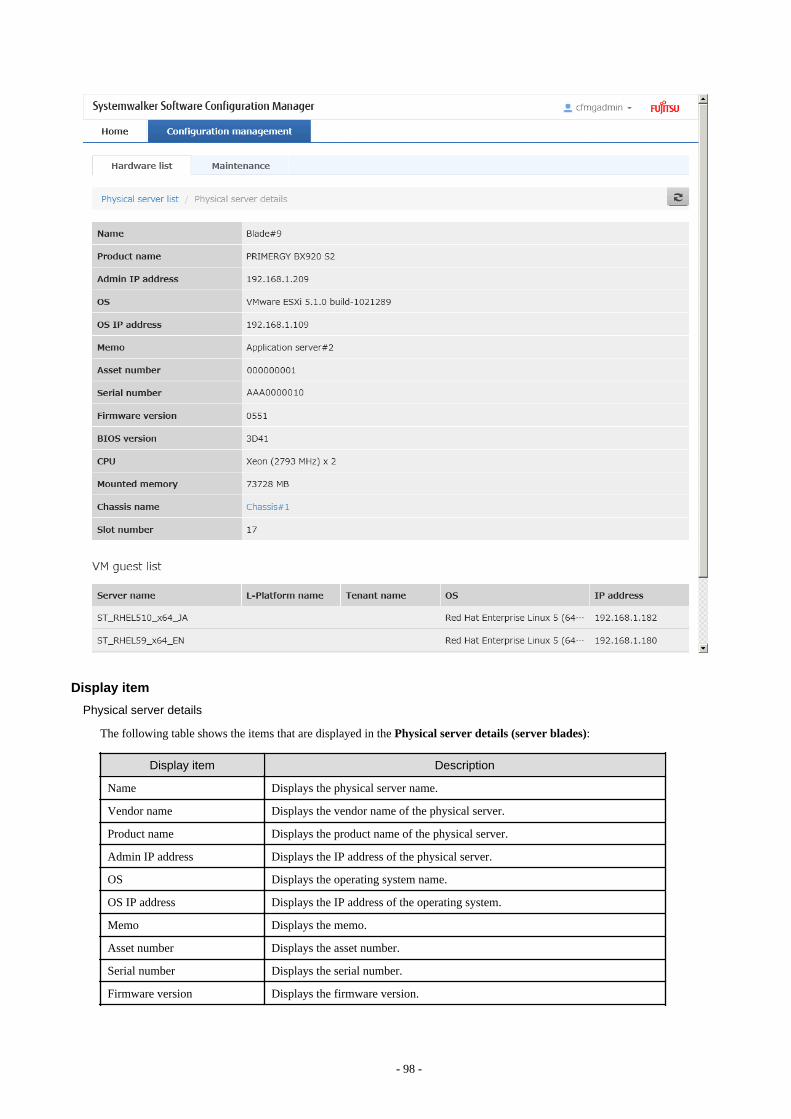
Display item
Physical server details
The following table shows the items that are displayed in the Physical server details (server blades):
Display item Description
Name Displays the physical server name.
Vendor name Displays the vendor name of the physical server.
Product name Displays the product name of the physical server.
Admin IP address Displays the IP address of the physical server.
OS Displays the operating system name.
OS IP address Displays the IP address of the operating system.
Memo Displays the memo.
Asset number Displays the asset number.
Serial number Displays the serial number.
Firmware version Displays the firmware version.
- 98 -
Display item Description
BIOS version Displays BIOS information.
CPU Displays CPU information.
Mounted memory size Displays the mounted memory size.
Chassis name For a server blade, the chassis name is displayed.
Clicking a chassis name displays the Chassis Details window.
Slot number For a server blade, the slot number is displayed.
Server name When an OS (except for a VM host) is installed on a physical server, the servername is displayed.
Server group name When an OS (except for a VM host) is installed on a physical server, the servergroup name is displayed.
Tenant When an OS (except for a VM host) is installed on a physical server, the tenant isdisplayed.
VM guest list Displays a list of related VM guests operating on the physical server.
Server list
The following table shows the items that are displayed in the VM guest list:
Display item Description
Server name Displays the VM guest name. When linked to ROR, the L-Server name isdisplayed.
Server group name Displays the server group name.
Tenant Displays the tenant.
OS Displays the operating system name.
IP address Displays the IP address of the operating system.
13.1.3 OS List
Display method
1. Log in to the management console.
2. Use either of the following methods to display the Hardware list window.
a. Select Configuration management from the menu in the management console.
b. Click the link to Hardware list in the Home window.
3. Click the OS list tab in the Hardware list window.
- 99 -
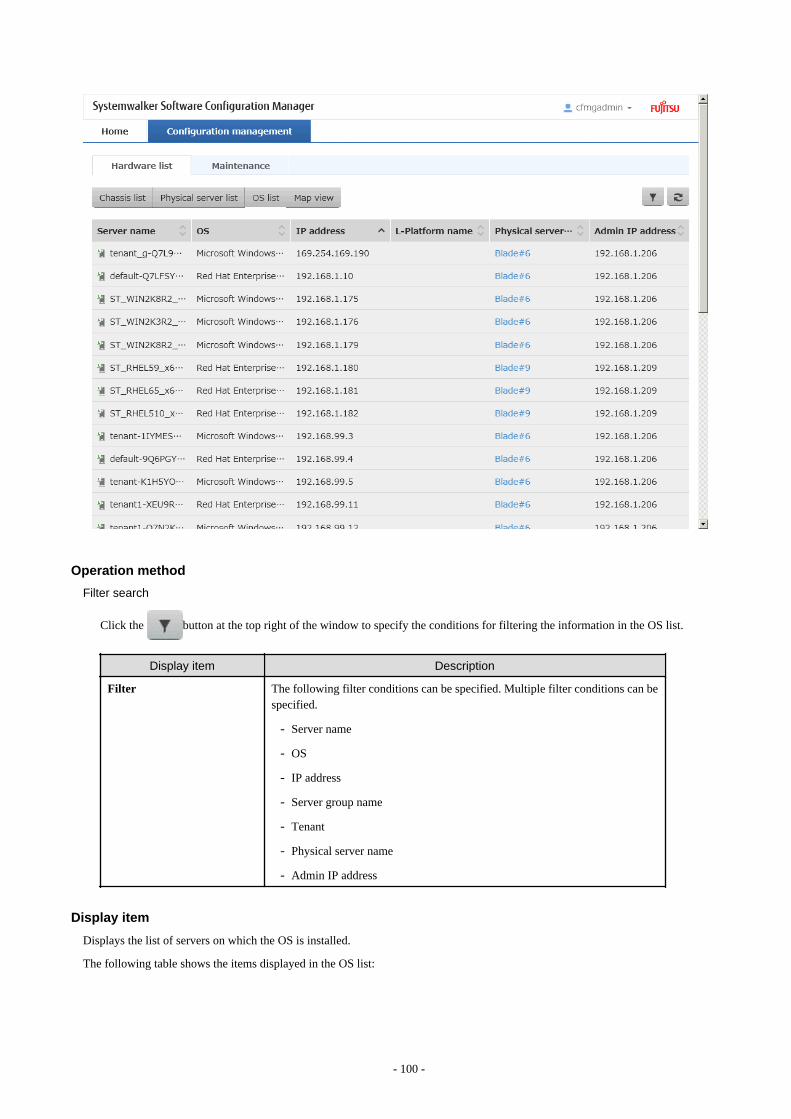
Operation method
Filter search
Click the button at the top right of the window to specify the conditions for filtering the information in the OS list.
Display item Description
Filter The following filter conditions can be specified. Multiple filter conditions can bespecified.
- Server name
- OS
- IP address
- Server group name
- Tenant
- Physical server name
- Admin IP address
Display item
Displays the list of servers on which the OS is installed.
The following table shows the items displayed in the OS list:
- 100 -
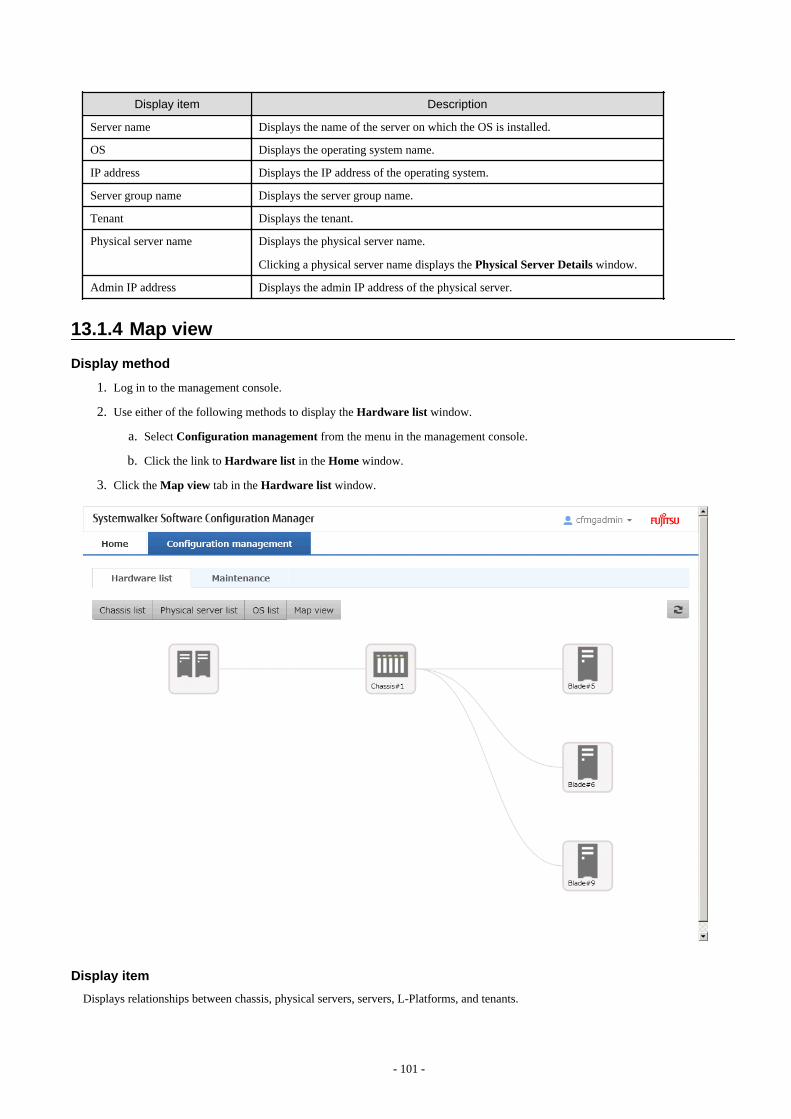
Display item Description
Server name Displays the name of the server on which the OS is installed.
OS Displays the operating system name.
IP address Displays the IP address of the operating system.
Server group name Displays the server group name.
Tenant Displays the tenant.
Physical server name Displays the physical server name.
Clicking a physical server name displays the Physical Server Details window.
Admin IP address Displays the admin IP address of the physical server.
13.1.4 Map view
Display method
1. Log in to the management console.
2. Use either of the following methods to display the Hardware list window.
a. Select Configuration management from the menu in the management console.
b. Click the link to Hardware list in the Home window.
3. Click the Map view tab in the Hardware list window.
Display item
Displays relationships between chassis, physical servers, servers, L-Platforms, and tenants.
- 101 -
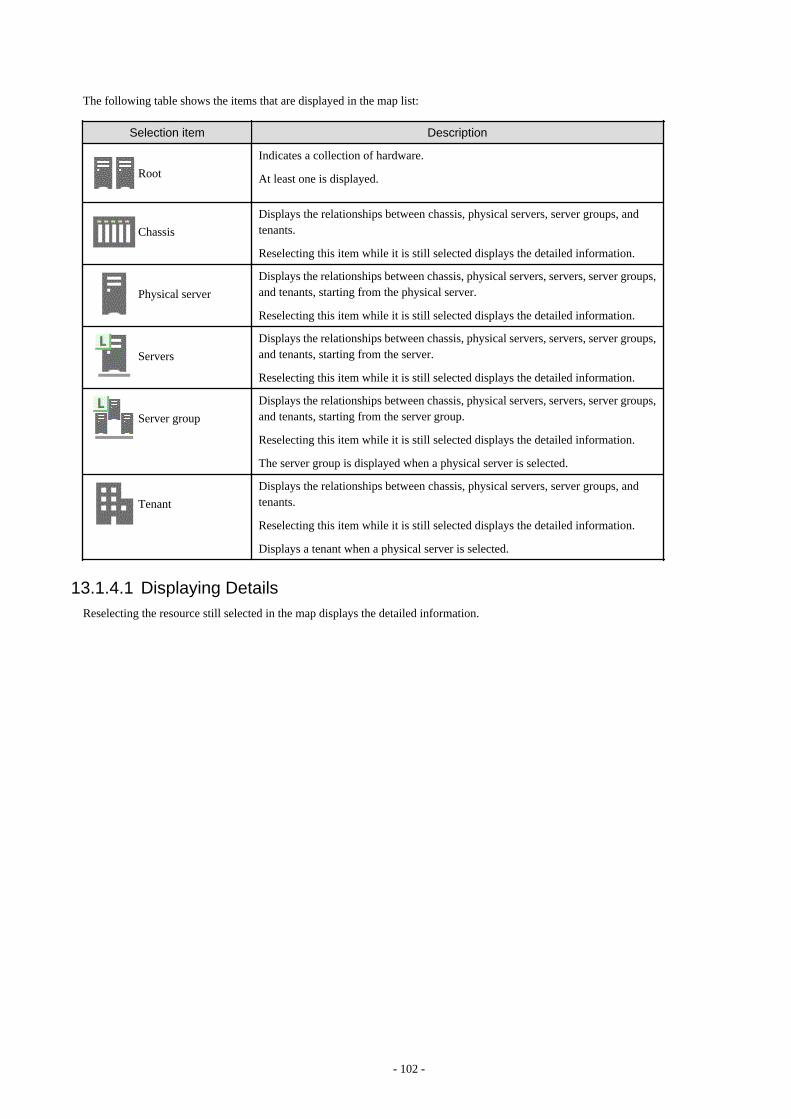
The following table shows the items that are displayed in the map list:
Selection item Description
Root
Indicates a collection of hardware.
At least one is displayed.
Chassis
Displays the relationships between chassis, physical servers, server groups, andtenants.
Reselecting this item while it is still selected displays the detailed information.
Physical server
Displays the relationships between chassis, physical servers, servers, server groups,and tenants, starting from the physical server.
Reselecting this item while it is still selected displays the detailed information.
Servers
Displays the relationships between chassis, physical servers, servers, server groups,and tenants, starting from the server.
Reselecting this item while it is still selected displays the detailed information.
Server group
Displays the relationships between chassis, physical servers, servers, server groups,and tenants, starting from the server group.
Reselecting this item while it is still selected displays the detailed information.
The server group is displayed when a physical server is selected.
Tenant
Displays the relationships between chassis, physical servers, server groups, andtenants.
Reselecting this item while it is still selected displays the detailed information.
Displays a tenant when a physical server is selected.
13.1.4.1 Displaying DetailsReselecting the resource still selected in the map displays the detailed information.
- 102 -
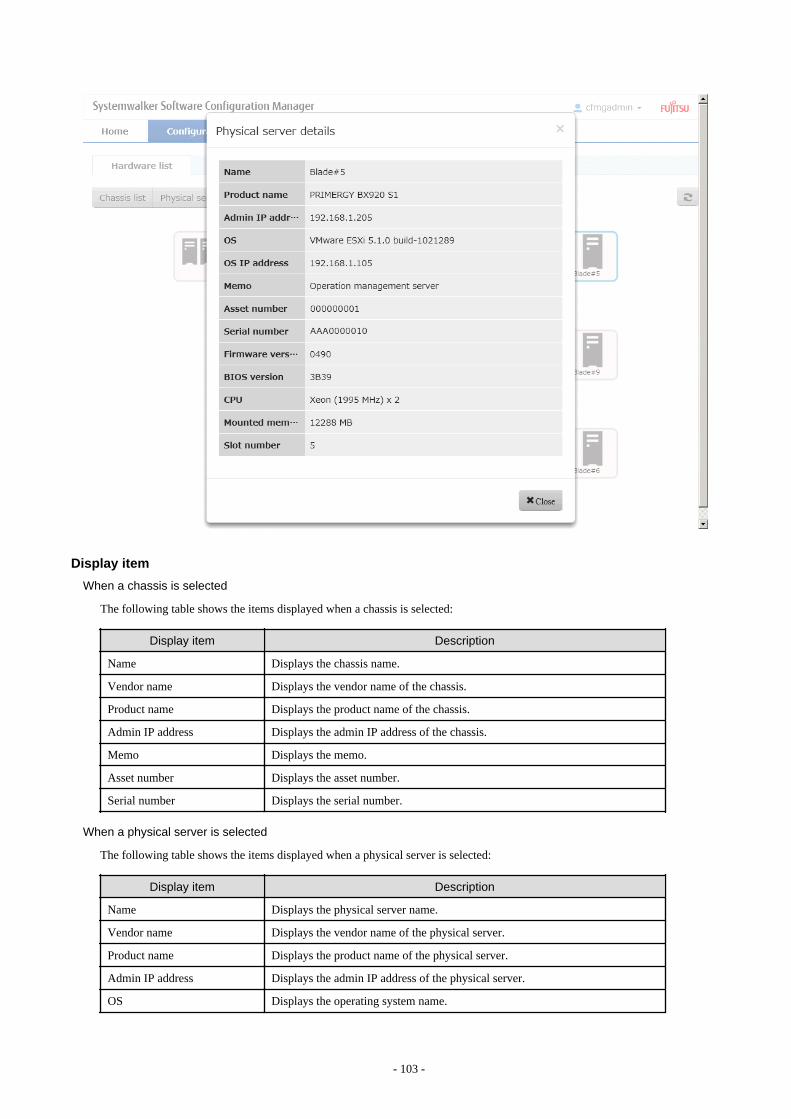
Display item
When a chassis is selected
The following table shows the items displayed when a chassis is selected:
Display item Description
Name Displays the chassis name.
Vendor name Displays the vendor name of the chassis.
Product name Displays the product name of the chassis.
Admin IP address Displays the admin IP address of the chassis.
Memo Displays the memo.
Asset number Displays the asset number.
Serial number Displays the serial number.
When a physical server is selected
The following table shows the items displayed when a physical server is selected:
Display item Description
Name Displays the physical server name.
Vendor name Displays the vendor name of the physical server.
Product name Displays the product name of the physical server.
Admin IP address Displays the admin IP address of the physical server.
OS Displays the operating system name.
- 103 -
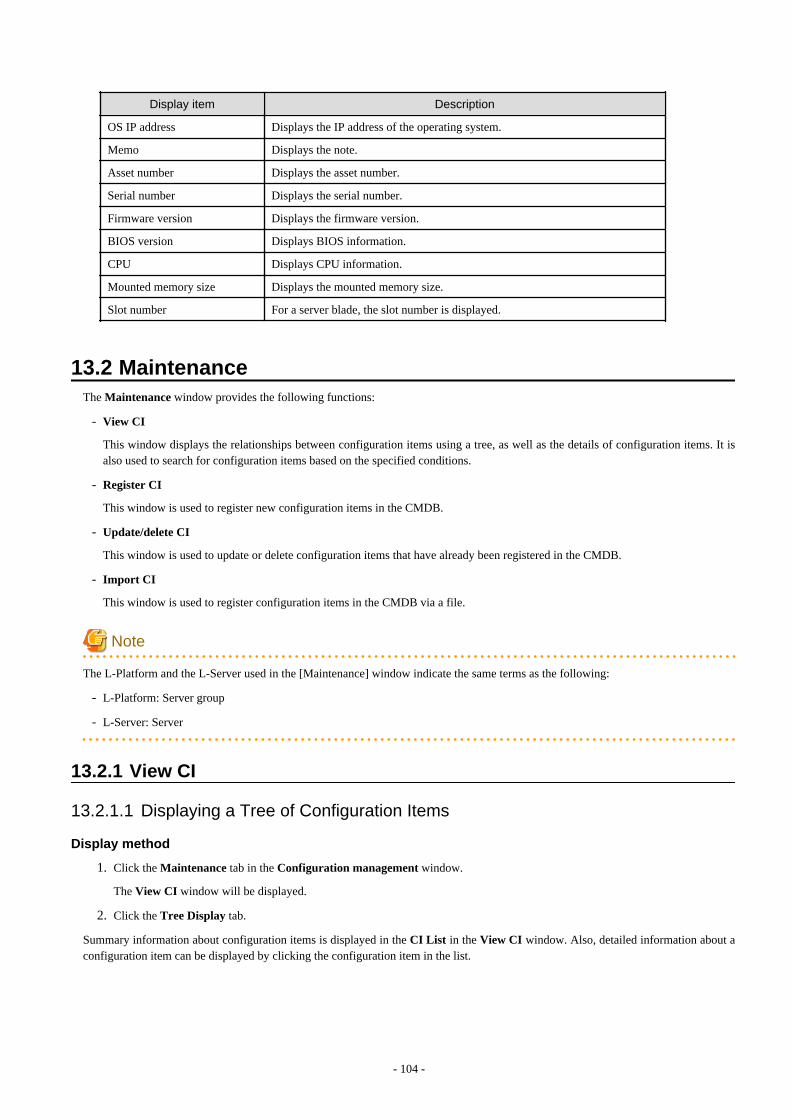
Display item Description
OS IP address Displays the IP address of the operating system.
Memo Displays the note.
Asset number Displays the asset number.
Serial number Displays the serial number.
Firmware version Displays the firmware version.
BIOS version Displays BIOS information.
CPU Displays CPU information.
Mounted memory size Displays the mounted memory size.
Slot number For a server blade, the slot number is displayed.
13.2 MaintenanceThe Maintenance window provides the following functions:
- View CI
This window displays the relationships between configuration items using a tree, as well as the details of configuration items. It isalso used to search for configuration items based on the specified conditions.
- Register CI
This window is used to register new configuration items in the CMDB.
- Update/delete CI
This window is used to update or delete configuration items that have already been registered in the CMDB.
- Import CI
This window is used to register configuration items in the CMDB via a file.
Note
The L-Platform and the L-Server used in the [Maintenance] window indicate the same terms as the following:
- L-Platform: Server group
- L-Server: Server
13.2.1 View CI
13.2.1.1 Displaying a Tree of Configuration Items
Display method
1. Click the Maintenance tab in the Configuration management window.
The View CI window will be displayed.
2. Click the Tree Display tab.
Summary information about configuration items is displayed in the CI List in the View CI window. Also, detailed information about aconfiguration item can be displayed by clicking the configuration item in the list.
- 104 -
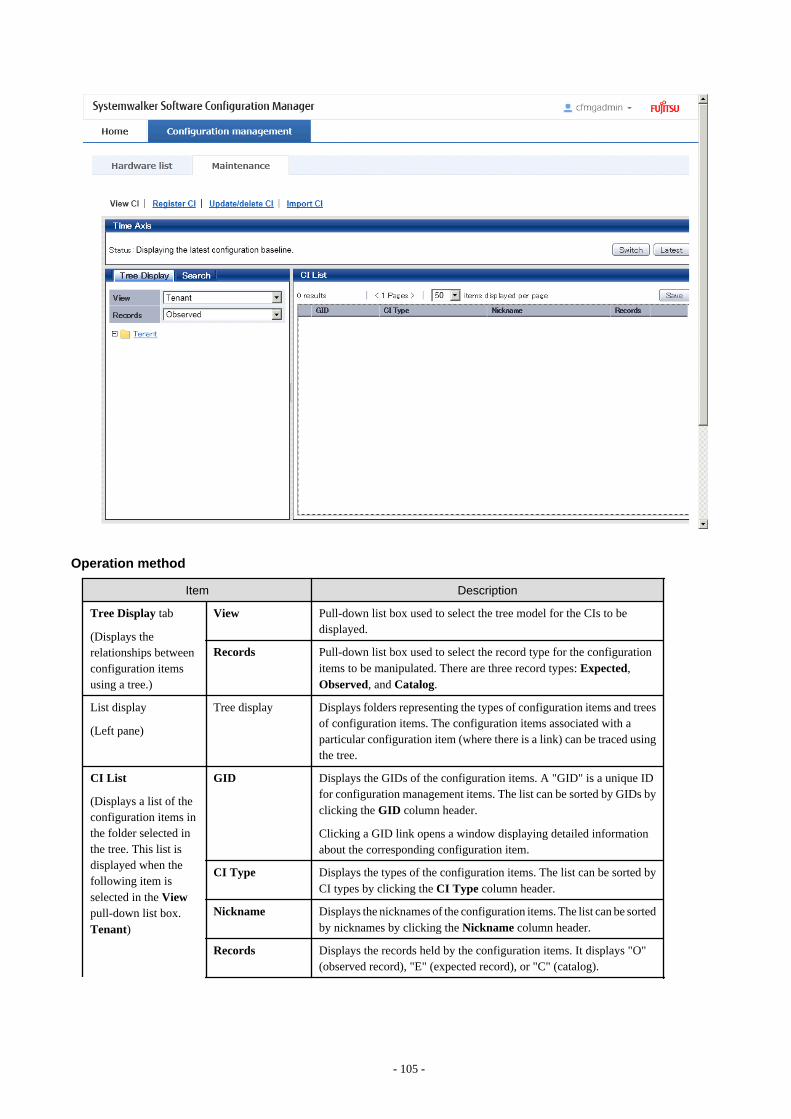
Operation method
Item Description
Tree Display tab
(Displays therelationships betweenconfiguration itemsusing a tree.)
View Pull-down list box used to select the tree model for the CIs to bedisplayed.
Records Pull-down list box used to select the record type for the configurationitems to be manipulated. There are three record types: Expected,Observed, and Catalog.
List display
(Left pane)
Tree display Displays folders representing the types of configuration items and treesof configuration items. The configuration items associated with aparticular configuration item (where there is a link) can be traced usingthe tree.
CI List
(Displays a list of theconfiguration items inthe folder selected inthe tree. This list isdisplayed when thefollowing item isselected in the Viewpull-down list box.Tenant)
GID Displays the GIDs of the configuration items. A "GID" is a unique IDfor configuration management items. The list can be sorted by GIDs byclicking the GID column header.
Clicking a GID link opens a window displaying detailed informationabout the corresponding configuration item.
CI Type Displays the types of the configuration items. The list can be sorted byCI types by clicking the CI Type column header.
Nickname Displays the nicknames of the configuration items. The list can be sortedby nicknames by clicking the Nickname column header.
Records Displays the records held by the configuration items. It displays "O"(observed record), "E" (expected record), or "C" (catalog).
- 105 -
Item Description
items displayedper page
Specifies the number of configuration items to be displayed in the list.If there are more configuration items than the specified number, thoseitems not displayed can be displayed by clicking the > link.
To go back, click the < link.
Save button Saves the configuration items selected using checkboxes to a file.
CI List
(Displays a list of theconfiguration items inthe folder selected inthe tree. This list isdisplayed when thefollowing item isselected in the Viewpull-down list box:VM Host)
VM Host Displays the VM hosts. The list can be sorted by VM hosts by clickingthe VM Host column header.
IP address Displays the IP addresses. The list can be sorted by IP addresses byclicking the IP address column header.
Number of VMs Displays the number of VMs. The list can be sorted by the number ofVMs by clicking the Number of VMs column header.
VM Type Displays the VM types. The list can be sorted by VM types by clickingthe VM Type column header.
items displayedper page
Specifies the number of configuration items to be displayed in the list.If there are more configuration items than the specified number, thoseitems not displayed can be displayed by clicking the > link.
To go back, click the < link.
Save button Saves the configuration items selected using checkboxes to an XMLfile.
- Save selected search results: Saves only the configuration itemsselected by checkboxes to an XML file.
- Save all search results: Saves all of the configuration itemsdisplayed in the CI list to an XML file.
The method for displaying a list of configuration items from the tree is as follows:
1. Click the Tree Display tab in the configuration management window.
2. Select the desired configuration item tree model from the View pull-down list box.
Select the tree model for the CIs to be displayed. Configuration items associated with the selected configuration item in terms ofthe selected perspective will be displayed in tree format.
The configuration item tree models that can be displayed are as follows:
- Tenant
- Displays the tenant and the L-Platforms (server groups) and L-Servers (servers) currently used by the tenant.
- VM Host
Displays a list of VM hosts.
3. Select the type of record to be displayed from the Records pull-down list box.
4. Click the + buttons in the tree to display the configuration item and the other configuration items associated with the targetconfiguration item.
5. Select a folder to display a list of configuration items in the CI List.
13.2.1.2 Searching Configuration Items
Display method
1. Click the Maintenance tab in the Configuration management window.
The View CI window will be displayed.
- 106 -
2. Click the Search tab.
Operation method
Item Description
Search tab
(Used to specify thesearch conditions forthe configuration itemsearch)
CI Type Pull-down list box used to select the type of configuration item to besearched for.
Records Pull-down list box used to select the record type for the configurationitems to be searched. There are three record types: Expected,Observed, and Catalog.
All Clear button Initializes the settings for the type of configuration item to besearched for and the filter conditions.
Search button Performs searches based on the specified type of configuration itemto be searched for and the specified filter conditions.
The Add button forattribute-basedconditions
Sets the conditions for filtering results based on the attribute valuesof configuration items. If multiple attribute values have beenspecified, searches can be performed by linking the conditions witha logical AND or a logical OR.
The Add button forconditions based onrelated configurationitems
Specifies the conditions for filtering results based on theconfiguration items associated with the target configuration item. Ifmultiple attribute values have been specified, searches can beperformed by linking the conditions with a logical AND or a logicalOR.
CI List
(Displays a list ofconfiguration items asthe search results.)
GID Displays the GIDs of the configuration items. A "GID" is a uniqueID for configuration management items. The list can be sorted byGIDs by clicking the GID column header.
Clicking a GID link opens a window displaying detailed informationabout the corresponding configuration item.
CI Type Displays the types of the configuration items. The list can be sortedby CI types by clicking the CI Type column header.
Nickname Displays the nicknames of the configuration items. The list can besorted by nicknames by clicking the Nickname column header.
Records Displays the records held by the configuration items. It displays "O"(observed record), "E" (expected record), or "C" (catalog).
items displayed perpage
Specifies the number of configuration items to be displayed in thelist. If there are more configuration items than the specified number,those items not displayed can be displayed by clicking the > link.
To go back, click the < link.
Save button Saves the configuration items selected using checkboxes to an XMLfile.
- Save selected search results: Saves only the configuration itemsselected by checkboxes to an XML file.
- Save all search results: Saves all of the configuration itemsdisplayed in the CI list to an XML file.
13.2.1.3 Displaying Details
- 107 -
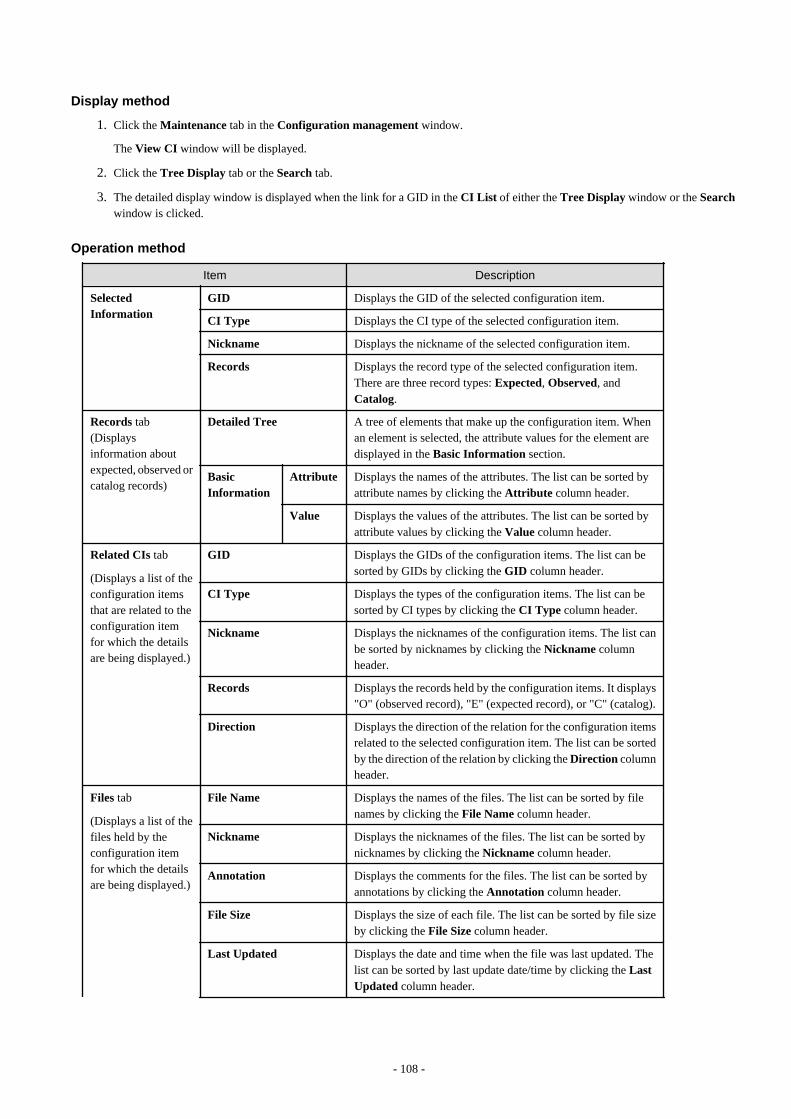
Display method
1. Click the Maintenance tab in the Configuration management window.
The View CI window will be displayed.
2. Click the Tree Display tab or the Search tab.
3. The detailed display window is displayed when the link for a GID in the CI List of either the Tree Display window or the Searchwindow is clicked.
Operation method
Item Description
SelectedInformation
GID Displays the GID of the selected configuration item.
CI Type Displays the CI type of the selected configuration item.
Nickname Displays the nickname of the selected configuration item.
Records Displays the record type of the selected configuration item.There are three record types: Expected, Observed, andCatalog.
Records tab(Displaysinformation aboutexpected, observed orcatalog records)
Detailed Tree A tree of elements that make up the configuration item. Whenan element is selected, the attribute values for the element aredisplayed in the Basic Information section.
BasicInformation
Attribute Displays the names of the attributes. The list can be sorted byattribute names by clicking the Attribute column header.
Value Displays the values of the attributes. The list can be sorted byattribute values by clicking the Value column header.
Related CIs tab
(Displays a list of theconfiguration itemsthat are related to theconfiguration itemfor which the detailsare being displayed.)
GID Displays the GIDs of the configuration items. The list can besorted by GIDs by clicking the GID column header.
CI Type Displays the types of the configuration items. The list can besorted by CI types by clicking the CI Type column header.
Nickname Displays the nicknames of the configuration items. The list canbe sorted by nicknames by clicking the Nickname columnheader.
Records Displays the records held by the configuration items. It displays"O" (observed record), "E" (expected record), or "C" (catalog).
Direction Displays the direction of the relation for the configuration itemsrelated to the selected configuration item. The list can be sortedby the direction of the relation by clicking the Direction columnheader.
Files tab
(Displays a list of thefiles held by theconfiguration itemfor which the detailsare being displayed.)
File Name Displays the names of the files. The list can be sorted by filenames by clicking the File Name column header.
Nickname Displays the nicknames of the files. The list can be sorted bynicknames by clicking the Nickname column header.
Annotation Displays the comments for the files. The list can be sorted byannotations by clicking the Annotation column header.
File Size Displays the size of each file. The list can be sorted by file sizeby clicking the File Size column header.
Last Updated Displays the date and time when the file was last updated. Thelist can be sorted by last update date/time by clicking the LastUpdated column header.
- 108 -
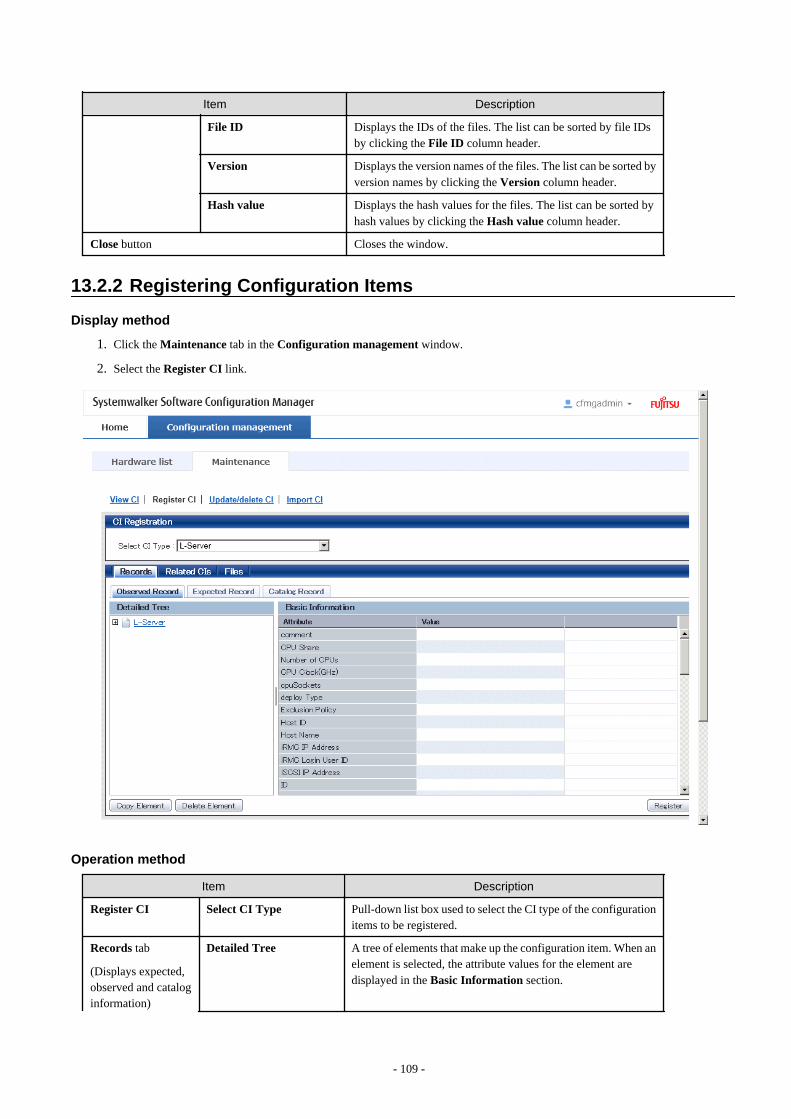
Item Description
File ID Displays the IDs of the files. The list can be sorted by file IDsby clicking the File ID column header.
Version Displays the version names of the files. The list can be sorted byversion names by clicking the Version column header.
Hash value Displays the hash values for the files. The list can be sorted byhash values by clicking the Hash value column header.
Close button Closes the window.
13.2.2 Registering Configuration Items
Display method
1. Click the Maintenance tab in the Configuration management window.
2. Select the Register CI link.
Operation method
Item Description
Register CI Select CI Type Pull-down list box used to select the CI type of the configurationitems to be registered.
Records tab
(Displays expected,observed and cataloginformation)
Detailed Tree A tree of elements that make up the configuration item. When anelement is selected, the attribute values for the element aredisplayed in the Basic Information section.
- 109 -
Item Description
BasicInformation
Attribute Displays the names of the attributes. The list can be sorted byattribute names by clicking the Attribute column header.
Values must be entered for the following attributes of each CItype:
- id
- nickname (if this attribute exists)
The value of the id attribute must be unique within each CI type.If a configuration item has been registered by specifying anexisting value for the id attribute, the existing configuration itemwill be updated by overwriting it.
For the following CI types, in addition to the above attributes,values must be entered for the attributes below.
- L-Server: IP Address attribute
- InstalledSoftware: productName attribute
- InstalledPatch: name attribute
Value Displays the values of the attributes. The value of an attributecan be edited by selecting the Value column corresponding tothe attribute and then either clicking the column or pressing theEnter key. The list can be sorted by attribute values by clickingthe Value column header.
Copy Element button Creates a duplicate of the element selected in the DetailedTree.
Delete Element button Deletes the element selected in the Detailed Tree.
Related CIs tab
(Displays a list of theconfiguration itemsthat are related to theconfiguration itemfor which the detailsare being displayed.)
GID Displays the GIDs of the configuration items. The list can besorted by GIDs by clicking the GID column header.
CI Type Displays the types of the configuration items. The list can besorted by CI types by clicking the CI Type column header.
Nickname Displays the nicknames of the configuration items. The list canbe sorted by nicknames by clicking the Nickname columnheader.
Records Displays the records held by the configuration items. It displays"O" (observed record), "E" (expected record), or "C" (catalog).
Direction Displays the direction of the relation for the configuration itemsrelated to the selected configuration item. The list can be sortedby the direction of the relation by clicking the Direction columnheader.
Add button Associates the configuration item being edited with anotherconfiguration item.
Remove button Deletes the relationship with the configuration item selected inthe list of related configuration items.
Files tab
(Displays a list of thefiles held by theconfiguration itemfor which the detailsare being displayed.)
File Name Displays the names of the files. The list can be sorted by filenames by clicking the File Name column header.
Nickname Displays the nicknames of the files. The list can be sorted bynicknames by clicking the Nickname column header.
Annotation Displays the annotations for the files. The list can be sorted byannotations by clicking the Annotation column header.
- 110 -
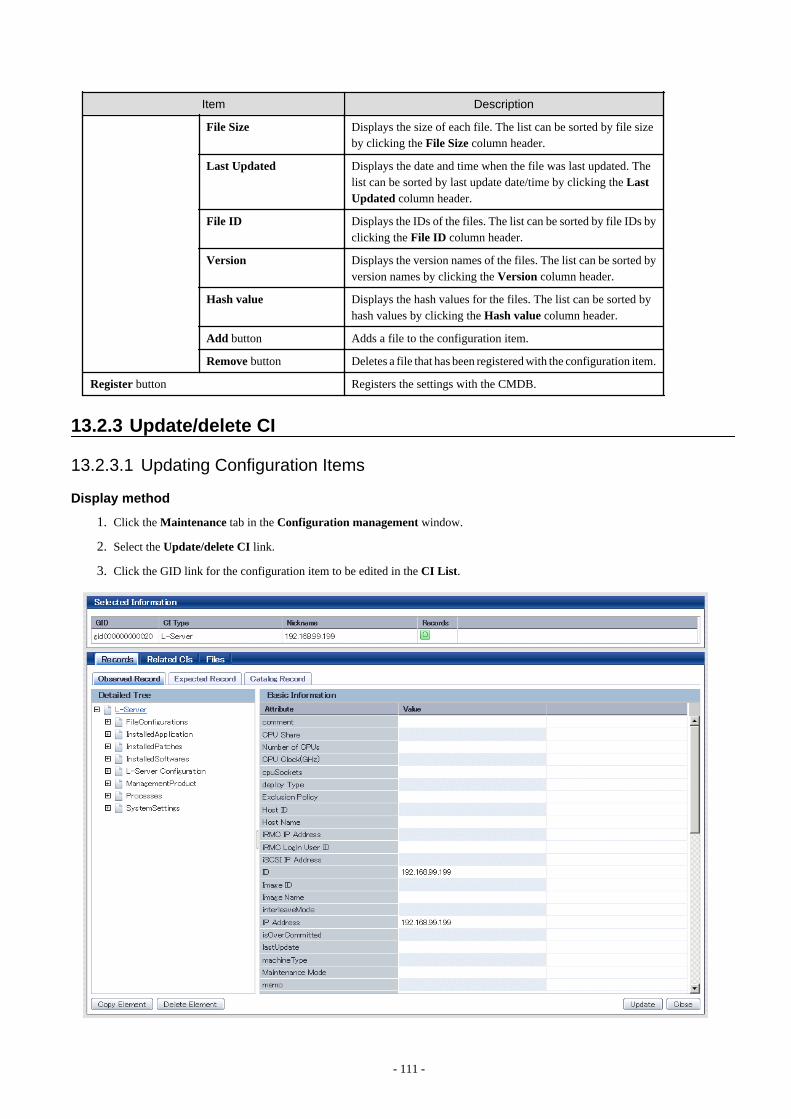
Item Description
File Size Displays the size of each file. The list can be sorted by file sizeby clicking the File Size column header.
Last Updated Displays the date and time when the file was last updated. Thelist can be sorted by last update date/time by clicking the LastUpdated column header.
File ID Displays the IDs of the files. The list can be sorted by file IDs byclicking the File ID column header.
Version Displays the version names of the files. The list can be sorted byversion names by clicking the Version column header.
Hash value Displays the hash values for the files. The list can be sorted byhash values by clicking the Hash value column header.
Add button Adds a file to the configuration item.
Remove button Deletes a file that has been registered with the configuration item.
Register button Registers the settings with the CMDB.
13.2.3 Update/delete CI
13.2.3.1 Updating Configuration Items
Display method
1. Click the Maintenance tab in the Configuration management window.
2. Select the Update/delete CI link.
3. Click the GID link for the configuration item to be edited in the CI List.
- 111 -
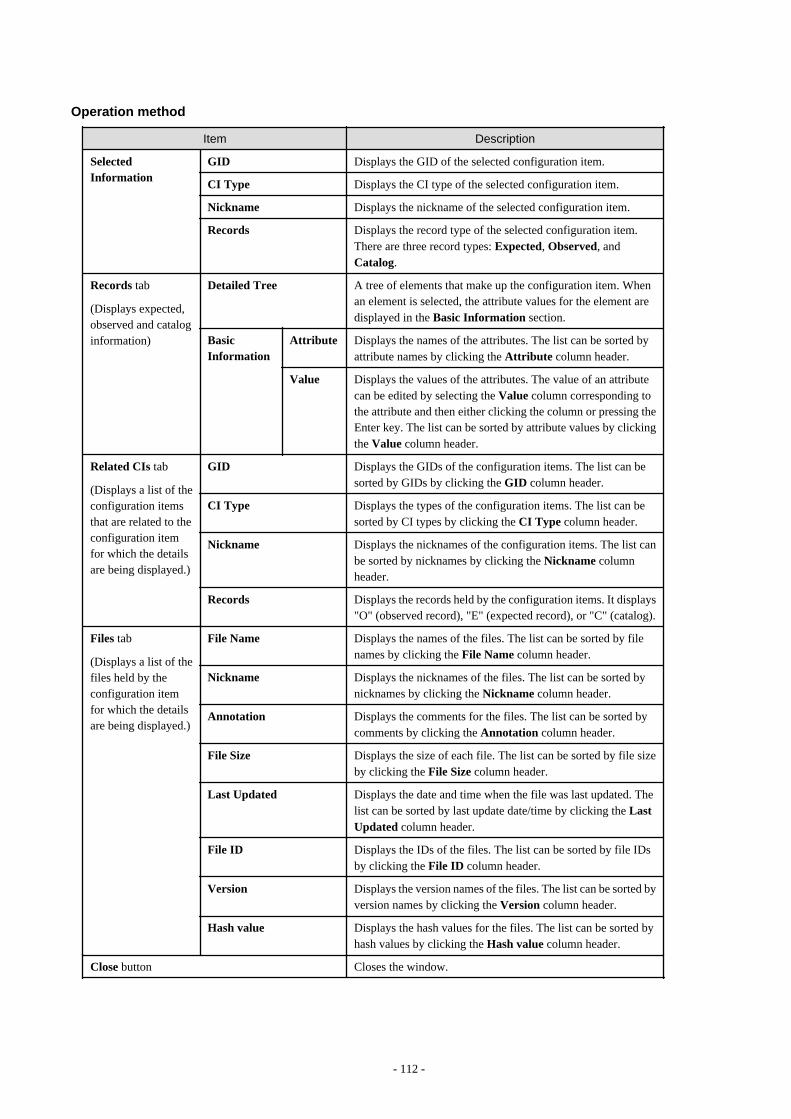
Operation method
Item Description
SelectedInformation
GID Displays the GID of the selected configuration item.
CI Type Displays the CI type of the selected configuration item.
Nickname Displays the nickname of the selected configuration item.
Records Displays the record type of the selected configuration item.There are three record types: Expected, Observed, andCatalog.
Records tab
(Displays expected,observed and cataloginformation)
Detailed Tree A tree of elements that make up the configuration item. Whenan element is selected, the attribute values for the element aredisplayed in the Basic Information section.
BasicInformation
Attribute Displays the names of the attributes. The list can be sorted byattribute names by clicking the Attribute column header.
Value Displays the values of the attributes. The value of an attributecan be edited by selecting the Value column corresponding tothe attribute and then either clicking the column or pressing theEnter key. The list can be sorted by attribute values by clickingthe Value column header.
Related CIs tab
(Displays a list of theconfiguration itemsthat are related to theconfiguration itemfor which the detailsare being displayed.)
GID Displays the GIDs of the configuration items. The list can besorted by GIDs by clicking the GID column header.
CI Type Displays the types of the configuration items. The list can besorted by CI types by clicking the CI Type column header.
Nickname Displays the nicknames of the configuration items. The list canbe sorted by nicknames by clicking the Nickname columnheader.
Records Displays the records held by the configuration items. It displays"O" (observed record), "E" (expected record), or "C" (catalog).
Files tab
(Displays a list of thefiles held by theconfiguration itemfor which the detailsare being displayed.)
File Name Displays the names of the files. The list can be sorted by filenames by clicking the File Name column header.
Nickname Displays the nicknames of the files. The list can be sorted bynicknames by clicking the Nickname column header.
Annotation Displays the comments for the files. The list can be sorted bycomments by clicking the Annotation column header.
File Size Displays the size of each file. The list can be sorted by file sizeby clicking the File Size column header.
Last Updated Displays the date and time when the file was last updated. Thelist can be sorted by last update date/time by clicking the LastUpdated column header.
File ID Displays the IDs of the files. The list can be sorted by file IDsby clicking the File ID column header.
Version Displays the version names of the files. The list can be sorted byversion names by clicking the Version column header.
Hash value Displays the hash values for the files. The list can be sorted byhash values by clicking the Hash value column header.
Close button Closes the window.
- 112 -
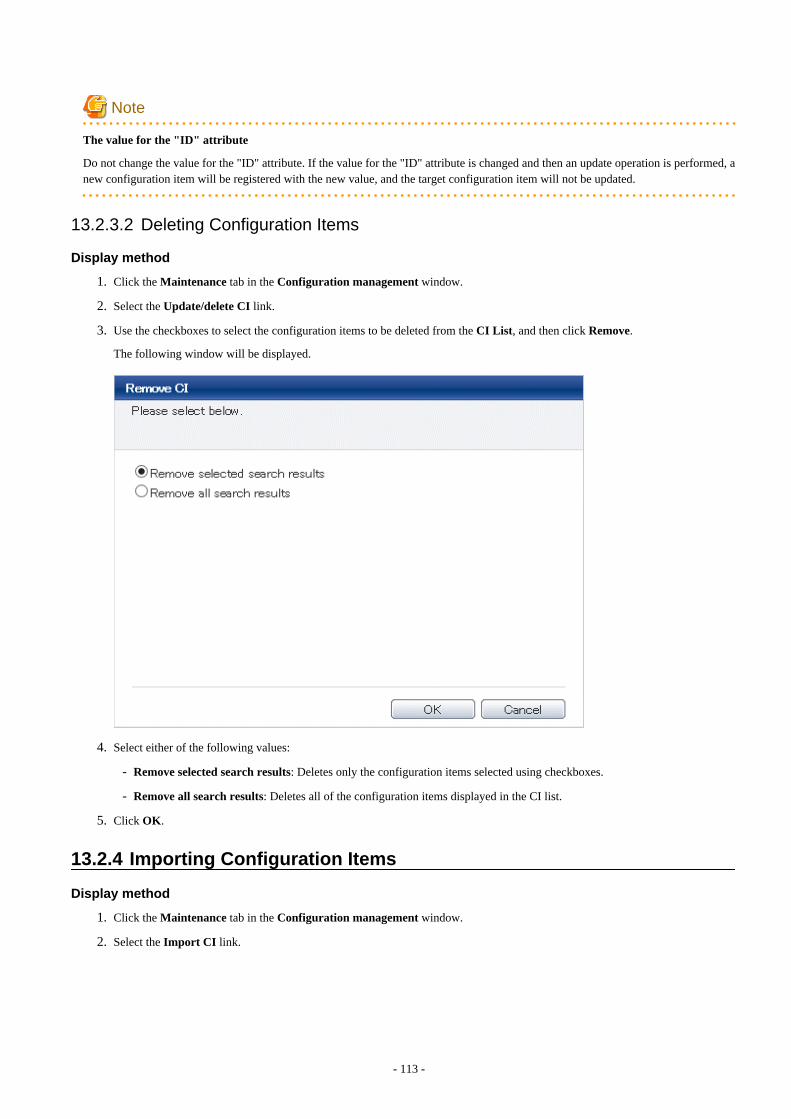
Note
The value for the "ID" attribute
Do not change the value for the "ID" attribute. If the value for the "ID" attribute is changed and then an update operation is performed, anew configuration item will be registered with the new value, and the target configuration item will not be updated.
13.2.3.2 Deleting Configuration Items
Display method
1. Click the Maintenance tab in the Configuration management window.
2. Select the Update/delete CI link.
3. Use the checkboxes to select the configuration items to be deleted from the CI List, and then click Remove.
The following window will be displayed.
4. Select either of the following values:
- Remove selected search results: Deletes only the configuration items selected using checkboxes.
- Remove all search results: Deletes all of the configuration items displayed in the CI list.
5. Click OK.
13.2.4 Importing Configuration Items
Display method
1. Click the Maintenance tab in the Configuration management window.
2. Select the Import CI link.
- 113 -
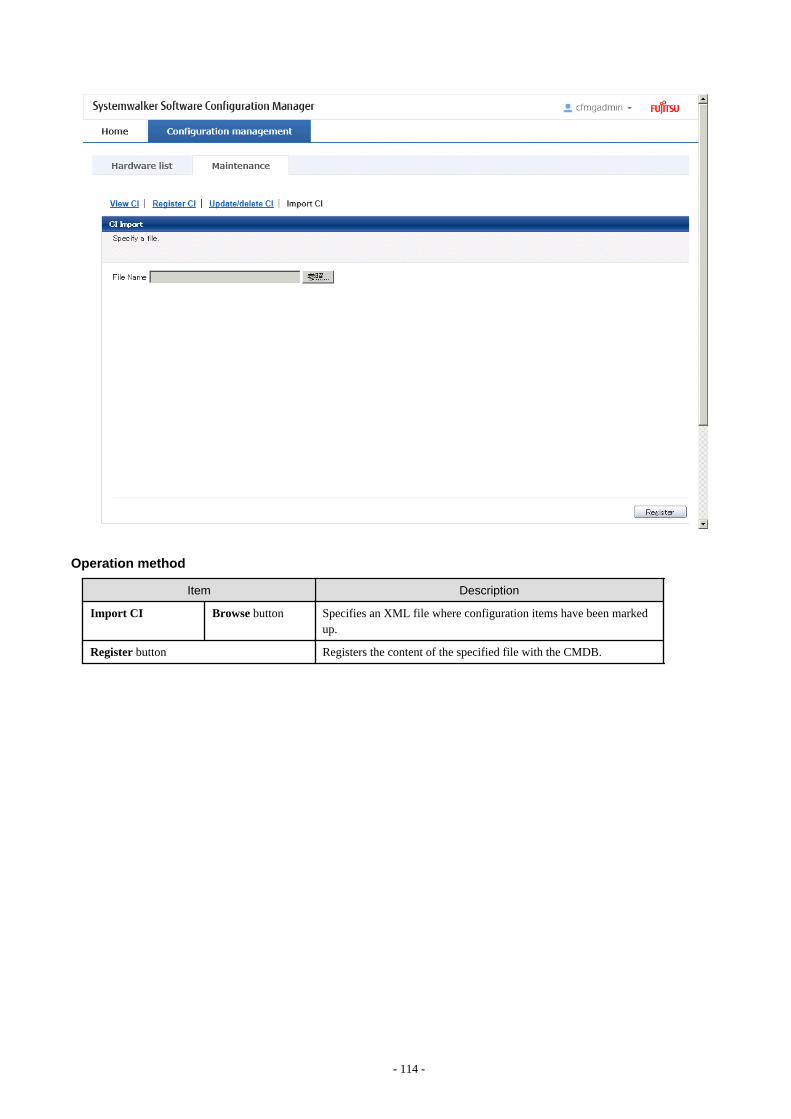
Operation method
Item Description
Import CI Browse button Specifies an XML file where configuration items have been markedup.
Register button Registers the content of the specified file with the CMDB.
- 114 -
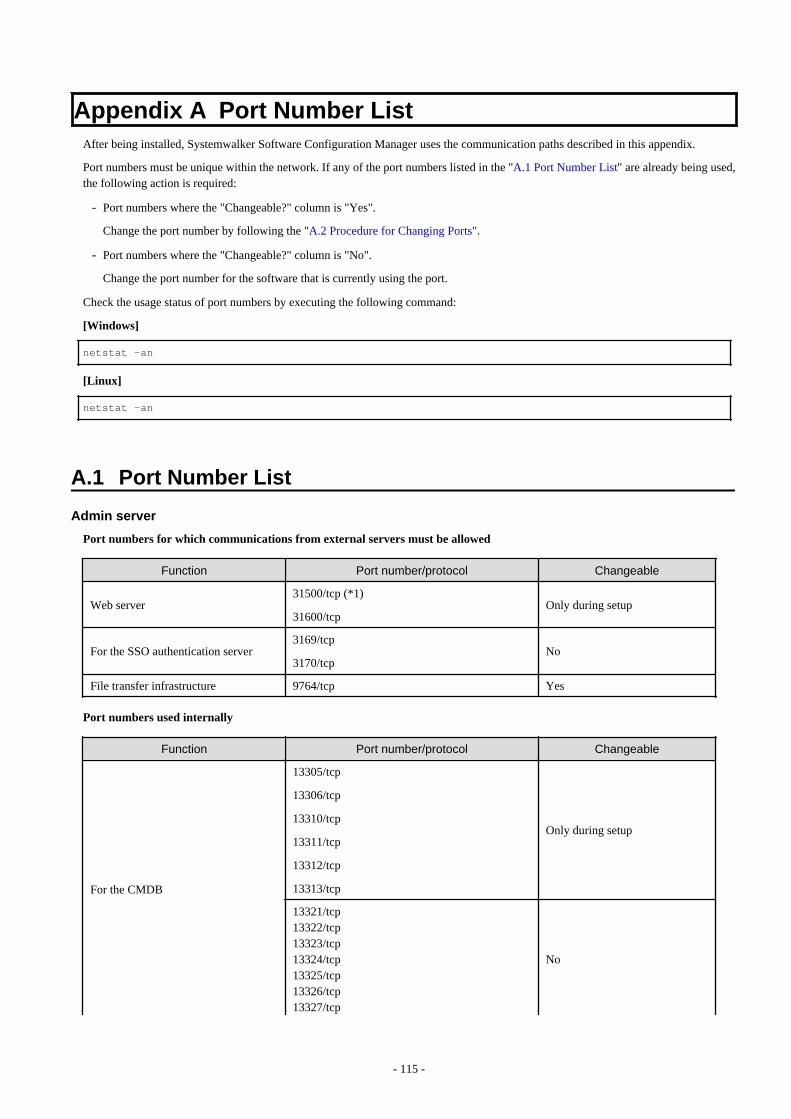
Appendix A Port Number ListAfter being installed, Systemwalker Software Configuration Manager uses the communication paths described in this appendix.
Port numbers must be unique within the network. If any of the port numbers listed in the "A.1 Port Number List" are already being used,the following action is required:
- Port numbers where the "Changeable?" column is "Yes".
Change the port number by following the "A.2 Procedure for Changing Ports".
- Port numbers where the "Changeable?" column is "No".
Change the port number for the software that is currently using the port.
Check the usage status of port numbers by executing the following command:
[Windows]
netstat -an
[Linux]
netstat -an
A.1 Port Number List
Admin server
Port numbers for which communications from external servers must be allowed
Function Port number/protocol Changeable
Web server31500/tcp (*1)
31600/tcpOnly during setup
For the SSO authentication server3169/tcp
3170/tcpNo
File transfer infrastructure 9764/tcp Yes
Port numbers used internally
Function Port number/protocol Changeable
For the CMDB
13305/tcp
13306/tcp
13310/tcp
13311/tcp
13312/tcp
13313/tcp
Only during setup
13321/tcp13322/tcp13323/tcp13324/tcp13325/tcp13326/tcp13327/tcp
No
- 115 -
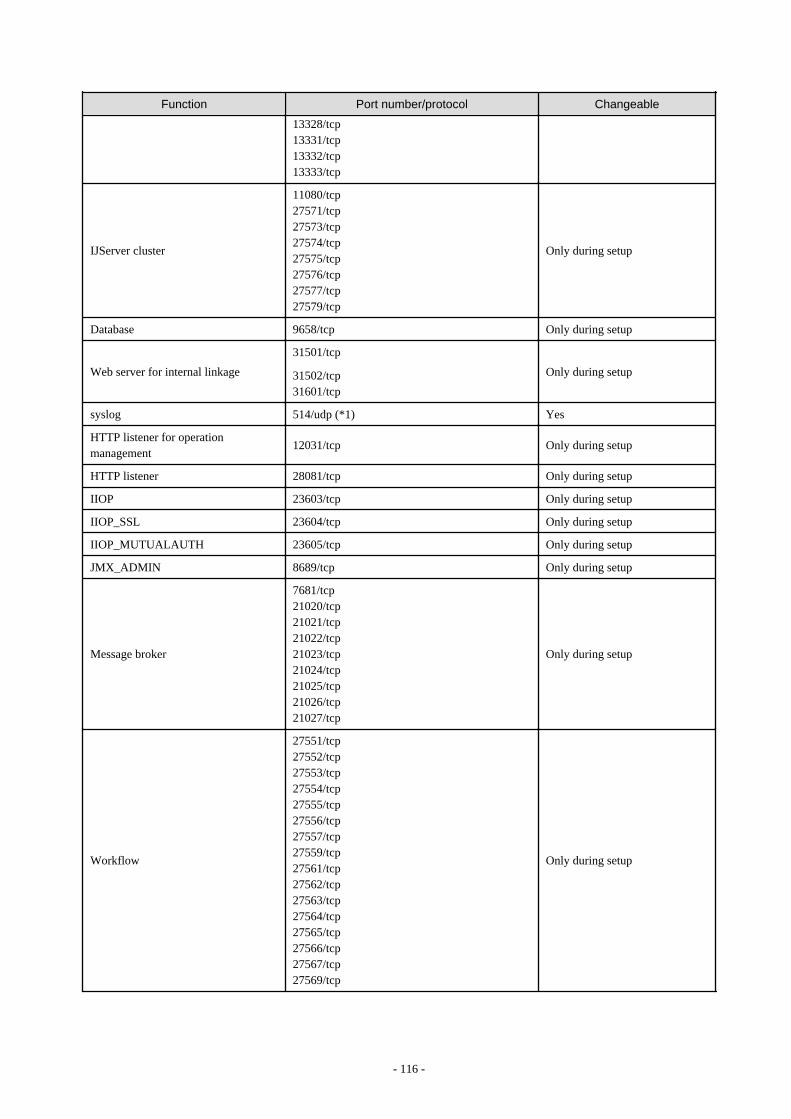
Function Port number/protocol Changeable
13328/tcp13331/tcp13332/tcp13333/tcp
IJServer cluster
11080/tcp27571/tcp27573/tcp27574/tcp27575/tcp27576/tcp27577/tcp27579/tcp
Only during setup
Database 9658/tcp Only during setup
Web server for internal linkage
31501/tcp
31502/tcp31601/tcp
Only during setup
syslog 514/udp (*1) Yes
HTTP listener for operationmanagement
12031/tcp Only during setup
HTTP listener 28081/tcp Only during setup
IIOP 23603/tcp Only during setup
IIOP_SSL 23604/tcp Only during setup
IIOP_MUTUALAUTH 23605/tcp Only during setup
JMX_ADMIN 8689/tcp Only during setup
Message broker
7681/tcp21020/tcp21021/tcp21022/tcp21023/tcp21024/tcp21025/tcp21026/tcp21027/tcp
Only during setup
Workflow
27551/tcp27552/tcp27553/tcp27554/tcp27555/tcp27556/tcp27557/tcp27559/tcp27561/tcp27562/tcp27563/tcp27564/tcp27565/tcp27566/tcp27567/tcp27569/tcp
Only during setup
- 116 -
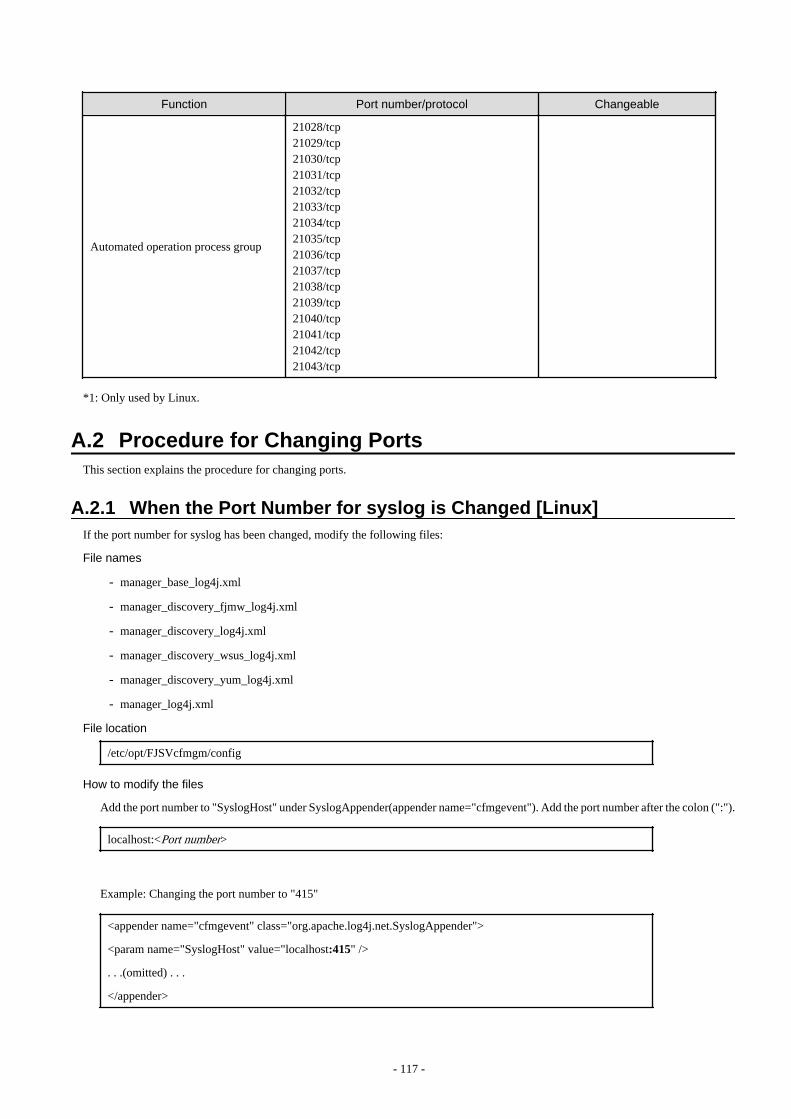
Function Port number/protocol Changeable
Automated operation process group
21028/tcp21029/tcp21030/tcp21031/tcp21032/tcp21033/tcp21034/tcp21035/tcp21036/tcp21037/tcp21038/tcp21039/tcp21040/tcp21041/tcp21042/tcp21043/tcp
*1: Only used by Linux.
A.2 Procedure for Changing PortsThis section explains the procedure for changing ports.
A.2.1 When the Port Number for syslog is Changed [Linux]If the port number for syslog has been changed, modify the following files:
File names
- manager_base_log4j.xml
- manager_discovery_fjmw_log4j.xml
- manager_discovery_log4j.xml
- manager_discovery_wsus_log4j.xml
- manager_discovery_yum_log4j.xml
- manager_log4j.xml
File location
/etc/opt/FJSVcfmgm/config
How to modify the files
Add the port number to "SyslogHost" under SyslogAppender(appender name="cfmgevent"). Add the port number after the colon (":").
localhost:<Port number>
Example: Changing the port number to "415"
<appender name="cfmgevent" class="org.apache.log4j.net.SyslogAppender">
<param name="SyslogHost" value="localhost:415" />
. . .(omitted) . . .
</appender>
- 117 -

After the files have been modified, there is no need to restart Systemwalker Software Configuration Manager.
- 118 -
Appendix B Corrective Actions If the Site Certificate hasExpired
This appendix explains the corrective actions to take when the site certificate that was created during setup has expired.
B.1 Updating the Expiration Date of a Site CertificateWhen the created site certificate expires, you are no longer able to log in to Systemwalker Software Configuration Manager. Use thefollowing procedure to update the expired site certificate.
1. Stop Systemwalker Software Configuration Manager.
[Windows]
<Systemwalker Software Configuration Manager installation directory>\SWCFMGM\bin\swcfmg_stop
[Linux]
/opt/FJSVcfmgm/bin/swcfmg_stop
2. Create SSL Server Certificates.
Follow the procedure explained in "6.2.1.3.1 Creating SSL Server Certificates6.2.1.3.1 Creating SSL Server Certificates" to createan SSL server certificate.
3. Update an SSL Communication Environment.
Use the following command to update an SSL communication environment.
[Windows]
<Systemwalker Software Configuration Manager installation directory>\SWCFMGM\bin\swcfmg_sslcert_update
[Linux]
/opt/FJSVcfmgm/bin/swcfmg_sslcert_update
4. Start the Systemwalker Software Configuration Manager Admin Server.
[Windows]
<Systemwalker Software Configuration Manager installation directory>\SWCFMGM\bin\swcfmg_start
[Linux]
/opt/FJSVcfmgm/bin/swcfmg_start
- 119 -


![Operation Manual - Samson TechnologiesZOOM B1/B1X 4 Controls and Functions / Connections Module selector RHYTHM [R/P] keyTop Panel (B1X) Rear Panel (B1) Switches between play mode,](https://img.dokumen.tips/doc/110x75/613ba8c7f8f21c0c82691f29/operation-manual-samson-zoom-b1b1x-4-controls-and-functions-connections-module.jpg)