Embed Size (px)
Citation preview
User Guide TC Command V3
EMS Solutions, Inc.

TC Command User Guide V3
www.tccommand.com
Copyright 2012. All rights reserved.
For registered users of TC Command only.

TC Command Page i 6/13/2012
Table of Contents
TC COMMAND ............................................................................................................................. 1 Document Overview ................................................................................................................... 1 Data Entry Screens ...................................................................................................................... 1
Data entry fields ...................................................................................................................... 1 Tabs ......................................................................................................................................... 1 Buttons .................................................................................................................................... 1
Basic Concepts ............................................................................................................................ 2 Unique IDs .............................................................................................................................. 2 Required fields ........................................................................................................................ 2 Found set ................................................................................................................................. 2 Entering names ........................................................................................................................ 2 Entering dates .......................................................................................................................... 2 Status toolbar .......................................................................................................................... 3 Menus and navigation ............................................................................................................. 4 Screen layout ........................................................................................................................... 4 TC Command buttons ............................................................................................................. 5 Mode popup menu .................................................................................................................. 6 Database records ..................................................................................................................... 7
Start TC Command ..................................................................................................................... 9 Navigation in TC Command ..................................................................................................... 10 Exit TC Command .................................................................................................................... 10 Initial Configuration .................................................................................................................. 11
TC Command ........................................................................................................................ 13 Training center ...................................................................................................................... 14 Training organizations .......................................................................................................... 17 Courses .................................................................................................................................. 18 User access ............................................................................................................................ 23
Backup and Restore .................................................................................................................. 30 Backup .................................................................................................................................. 30 Restore .................................................................................................................................. 30 Recover ................................................................................................................................. 30
INSTRUCTORS ........................................................................................................................... 31 Overview ................................................................................................................................... 31 Enter Instructors ........................................................................................................................ 31
Instructor-ECC tab ................................................................................................................ 34 Designate faculty for monitoring .......................................................................................... 35 Instructor-MISC tab .............................................................................................................. 36 Course History tab ................................................................................................................ 37 Provider Data/Notes tab ........................................................................................................ 39 Certification tab .................................................................................................................... 41
Maintain Instructor Teaching History ....................................................................................... 42 Add courses from other training centers ............................................................................... 42 Define training center field names ........................................................................................ 43

TC Command Page ii 6/13/2012
Inactivate/Reactivate Instructors ............................................................................................... 44 Maintain Instructor Certification .............................................................................................. 44
Create found set .................................................................................................................... 44 Track and maintain expiration dates ..................................................................................... 44 Track number of classes taught ............................................................................................. 45 Maintain monitoring information ......................................................................................... 45
Equipment Loanout ................................................................................................................... 46 Setup ..................................................................................................................................... 46 Record loans and requests ..................................................................................................... 48 Track loans and equipment ................................................................................................... 49
CLASSES ..................................................................................................................................... 50 Overview ................................................................................................................................... 50 Create New Class ...................................................................................................................... 50
Class Data tab ....................................................................................................................... 52 Extra Details tab .................................................................................................................... 55
Assign Instructors to Class ........................................................................................................ 56 Lead instructor ...................................................................................................................... 56 Assisting instructor ............................................................................................................... 56 Physician instructor ............................................................................................................... 57
Class Location ........................................................................................................................... 58 Enter class location ............................................................................................................... 58 Choose frequent location ...................................................................................................... 58 Set up frequent location in database ..................................................................................... 59 Review location listing ......................................................................................................... 60
Class Calendar .......................................................................................................................... 61 Post class to monthly calendar .............................................................................................. 61 Review monthly calendar ..................................................................................................... 61 Update monthly calendar ...................................................................................................... 61
Track Registration as Class Fills ............................................................................................... 62 Copy and Change a Class ......................................................................................................... 62 Remove Class Number from Dropdown List ........................................................................... 62 Enter Old Classes ...................................................................................................................... 63
EMPLOYEES ............................................................................................................................... 64 Overview ................................................................................................................................... 64 Set Up Employee Module ......................................................................................................... 64
Adding Departments ............................................................................................................. 66 Enter Employees ....................................................................................................................... 67
Import employee records ...................................................................................................... 68 Manual entry ......................................................................................................................... 69
Track Employee Certification ................................................................................................... 70 STUDENTS .................................................................................................................................. 71
Overview ................................................................................................................................... 71 Register Students for Classes .................................................................................................... 72
Using employee records ........................................................................................................ 74 Enter student info .................................................................................................................. 77 Course Data tab ..................................................................................................................... 78
TC Command Page iii 6/13/2012
Student Results tab ................................................................................................................ 80 Manage and allocate course fees ........................................................................................... 82
Class Followup .......................................................................................................................... 84 Enter written test score .......................................................................................................... 84 Record additional purchases ................................................................................................. 84 Review card issue/expiration dates ....................................................................................... 84 Manage renewals .................................................................................................................. 84 Manage remediation .............................................................................................................. 84
Find Class after Paperwork Is Completed ................................................................................ 85 Remind Students to Recertify ................................................................................................... 85 Register Student in Another Module ........................................................................................ 85
IMPORT/EXPORT ....................................................................................................................... 86 Setup ......................................................................................................................................... 86 Import ........................................................................................................................................ 86
From instructor ...................................................................................................................... 86 From training site .................................................................................................................. 86 Employee data ....................................................................................................................... 86
Roster Tool Data ....................................................................................................................... 87 Overview ............................................................................................................................... 87 Setup ..................................................................................................................................... 87 Class announcement .............................................................................................................. 88 Completed class roster .......................................................................................................... 88 Automated class creation ...................................................................................................... 90
Export ........................................................................................................................................ 91 Class data .............................................................................................................................. 91 Student data ........................................................................................................................... 91 Data outside TC Command ................................................................................................... 92
PRINTING .................................................................................................................................... 93 Overview ................................................................................................................................... 93 Found Sets ................................................................................................................................. 93 Preparation ................................................................................................................................ 93
Set up letterhead .................................................................................................................... 93 Remove information from header ......................................................................................... 95 Turn off letterhead ................................................................................................................ 95 Set up logo ............................................................................................................................ 95 Turn off logo ......................................................................................................................... 95 Set up footer for letters ......................................................................................................... 96 Label and badge stock ........................................................................................................... 96 Choose training type ............................................................................................................. 97
Printers ...................................................................................................................................... 97 Layout adjustment ................................................................................................................. 97 Envelope feeder .................................................................................................................... 97
Printing a Test Sheet ................................................................................................................. 97 Wallet card stock ................................................................................................................... 97 Preprinted letterhead ............................................................................................................. 97
Editing the Layout ..................................................................................................................... 98
TC Command Page iv 6/13/2012
Fixing field lineup ................................................................................................................. 98 Moving fields ........................................................................................................................ 99
[PRINT…] Button .................................................................................................................. 100 Print ..................................................................................................................................... 100 Print range ........................................................................................................................... 100
[PRINT…] Smart Panel .......................................................................................................... 101 Rosters and Sign-In Sheets ..................................................................................................... 102
Sign-in sheet ........................................................................................................................ 102 Front of roster ..................................................................................................................... 102 Back of roster ...................................................................................................................... 103
Wallet Cards ............................................................................................................................ 104 Wallet cards (smart panel) .................................................................................................. 105 Instructor cards .................................................................................................................... 106 Faculty cards ....................................................................................................................... 107 Student cards ....................................................................................................................... 108
Letters and Memos .................................................................................................................. 111 Setup ................................................................................................................................... 111 Printing letters (smart panel) ............................................................................................... 111 Letter Library ...................................................................................................................... 112 Standard letters .................................................................................................................... 112 Customizing a standard letter .............................................................................................. 120 Creating a new letter ........................................................................................................... 123 Hard-coded letters ............................................................................................................... 126 Blank templates ................................................................................................................... 126
Labels ...................................................................................................................................... 127 Mailing labels ...................................................................................................................... 127 Class folder labels ............................................................................................................... 129
Class Flyers ............................................................................................................................. 129 Badges ..................................................................................................................................... 129
Instructors ........................................................................................................................... 129 Students ............................................................................................................................... 129
Certificates .............................................................................................................................. 130 Standard note ...................................................................................................................... 130 Set up logos ......................................................................................................................... 130 Set up CME hours ............................................................................................................... 131 Add class title ...................................................................................................................... 131 Print certificates .................................................................................................................. 132
Reports .................................................................................................................................... 133 Reports (smart panel) .......................................................................................................... 133 Instructor ............................................................................................................................. 134 Class .................................................................................................................................... 138 Employee ............................................................................................................................ 140 Student ................................................................................................................................ 142 Financial .............................................................................................................................. 142 Quality assurance ................................................................................................................ 143 AED .................................................................................................................................... 144

TC Command Page v 6/13/2012
OnLine keys ........................................................................................................................ 145 Invoice/Inventory ................................................................................................................ 146
EMAILS ...................................................................................................................................... 147 Overview ................................................................................................................................. 147 Setup ....................................................................................................................................... 148
Choose email client ............................................................................................................. 148 Set up internal email system ............................................................................................... 149 Unsupported email clients ................................................................................................... 151
[E-MAIL…] tab on the smart panel ........................................................................................ 152 Roster Tool Emails ................................................................................................................. 153 Email Letters ........................................................................................................................... 153
Attached letters ................................................................................................................... 153 Employee manager emails .................................................................................................. 154 Student emails ..................................................................................................................... 155 Edit letter layout .................................................................................................................. 156
Custom Emails ........................................................................................................................ 157 Select group to receive email .............................................................................................. 157 Create email ........................................................................................................................ 158
Reports .................................................................................................................................... 160 [SEND to Lead Instructor as a PDF…] .............................................................................. 160
QUALITY ASSURANCE .......................................................................................................... 161 Overview ................................................................................................................................. 161 QA Questions .......................................................................................................................... 161
Maintain QA questions ....................................................................................................... 161 Add a new set of QA questions ........................................................................................... 163
QA Data .................................................................................................................................. 163 Enter QA data ..................................................................................................................... 163
FINANCIALS ............................................................................................................................. 165 Overview ................................................................................................................................. 165 Set Up Payment Methods ........................................................................................................ 165 Set Class Fees ......................................................................................................................... 166
Per class fee ......................................................................................................................... 167 Per student fee ..................................................................................................................... 167 Fee structure ........................................................................................................................ 167
Customize the Fee Structure ................................................................................................... 168 Review and change fee structure ........................................................................................ 168 Add new fee category ......................................................................................................... 170
Record Instructor Fees ............................................................................................................ 170 Record Book and Material Costs ............................................................................................ 172 Review Fee Payments ............................................................................................................. 172 Track Course Income and Expense ......................................................................................... 172
ONLINE KEYS .......................................................................................................................... 173 Overview ................................................................................................................................. 173 Setup ....................................................................................................................................... 174 Add New Keys ........................................................................................................................ 175
Enter manually .................................................................................................................... 175
TC Command Page vi 6/13/2012
Import .................................................................................................................................. 177 List Keys ................................................................................................................................. 179
Available keys ..................................................................................................................... 179 Assigned keys ..................................................................................................................... 179
Assign Key To Student ........................................................................................................... 180 Issue Instruction Letter ........................................................................................................... 180 Record Online Certificate ....................................................................................................... 181 Confirm Certificate Number ................................................................................................... 181 Record Skills Completion ....................................................................................................... 183 Return Expired Keys to Inventory .......................................................................................... 183
AED TOOLS .............................................................................................................................. 184 Overview ................................................................................................................................. 184 Setup ....................................................................................................................................... 185
Manufacturers and models .................................................................................................. 185 Vendors and customers ....................................................................................................... 186 Customer employees ........................................................................................................... 186 Service activities ................................................................................................................. 187
Record Units ........................................................................................................................... 188 Record Service ........................................................................................................................ 189
INVOICING ............................................................................................................................... 190 Overview ................................................................................................................................. 190 Setup ....................................................................................................................................... 190
Logo & letterhead ............................................................................................................... 190 Contacts ............................................................................................................................... 191 Inventory ............................................................................................................................. 192 Invoicing ............................................................................................................................. 195
Invoicing ................................................................................................................................. 197 Generate invoice ................................................................................................................. 198 Invoice options .................................................................................................................... 199
Payments ................................................................................................................................. 200 Track open invoices ............................................................................................................ 200 Record payments ................................................................................................................. 200
Maintain Inventory .................................................................................................................. 201 Review inventory ................................................................................................................ 202 Identify items to restock ...................................................................................................... 202 Add received stock .............................................................................................................. 202
APPENDIX ................................................................................................................................. 203 FileMaker Pro Capabilities ..................................................................................................... 203
Finding Information ............................................................................................................ 203 Sorting Information ............................................................................................................. 215 Omitting Records ................................................................................................................ 219 Exchanging Information ..................................................................................................... 220

TC Command Page vii 6/13/2012
List of Screens
Figure 1. Status toolbar ................................................................................................................... 3 Figure 2. Mode PopUp menu .......................................................................................................... 6 Figure 3. Desktop icon .................................................................................................................... 9 Figure 4. TC Command Main Menu ............................................................................................... 9 Figure 5. QUIT button .................................................................................................................. 10 Figure 6. Setup submenu ............................................................................................................... 11 Figure 7. Training Center SetUp Information ............................................................................... 12 Figure 8. Course Identification List .............................................................................................. 18 Figure 9. BLS Cross References for Course Sub-Options ............................................................ 22 Figure 10. Training Center Security SetUp .................................................................................. 24 Figure 11. Summary Listing of Users ........................................................................................... 26 Figure 12. User Details for Security Access ................................................................................. 27 Figure 13. Login screen ................................................................................................................ 29 Figure 14. Instructor Data Entry screen ........................................................................................ 31 Figure 15. Instructor-ECC tab ....................................................................................................... 34 Figure 16. Instructor-MISC tab ..................................................................................................... 36 Figure 17. Instructor Course History ........................................................................................... 37 Figure 18. Provider Data / Notes tab ............................................................................................ 39 Figure 19. Certification tab ........................................................................................................... 41 Figure 20. Outside classes ............................................................................................................. 42 Figure 21. Loan-Out Listing screen .............................................................................................. 46 Figure 22. Loan-Out Inventory screen .......................................................................................... 47 Figure 23. Class Registration – Data Entry .................................................................................. 50 Figure 24. Class Data tab .............................................................................................................. 52 Figure 25. ADD Instructors tab .................................................................................................... 56 Figure 26. Repetitive Class Location File ..................................................................................... 59 Figure 27. Employee Support tab ................................................................................................. 65 Figure 28. Personnel Data Entry screen ........................................................................................ 67 Figure 29. Student Data Entry ...................................................................................................... 72 Figure 30. Employee Search ......................................................................................................... 75 Figure 31. Course Data tab ........................................................................................................... 78 Figure 32. Student Results tab ...................................................................................................... 80 Figure 33. Financial Activity tab .................................................................................................. 82 Figure 34. Student import/export .................................................................................................. 89 Figure 35. Letter Headers, etc ....................................................................................................... 94 Figure 36. Print dialog box ......................................................................................................... 100 Figure 37. Smart panel to print letters ........................................................................................ 101 Figure 38. Smart panel for printing wallet cards ........................................................................ 105
TC Command Page viii 6/13/2012
Figure 39. Letter Library ............................................................................................................. 120 Figure 40. Editing Window ......................................................................................................... 121 Figure 41. Field Palette ............................................................................................................... 122 Figure 42. Blank Editing Window .............................................................................................. 124 Figure 43. Smart panel to print reports ....................................................................................... 133 Figure 44. Training Center E-Mail SetUp .................................................................................. 148 Figure 45. Training Center E-Mail - Internal .............................................................................. 150 Figure 46. Smart panel for emailing letters as attachments ........................................................ 152 Figure 47. E-Mail List ................................................................................................................. 157 Figure 48. Create a Group Email… ............................................................................................ 158 Figure 49. Smart panel for instructor report ............................................................................... 160 Figure 50. QA Questions ............................................................................................................ 162 Figure 51. Quality Assurance Data Entry ................................................................................... 164 Figure 52. Student Fees & Cost Analysis ................................................................................... 166 Figure 53. Multiple Fees ............................................................................................................. 169 Figure 54. Instructor Expenses ................................................................................................... 171 Figure 55. Online Keys screen .................................................................................................... 173 Figure 56. Key Matrix tab ........................................................................................................... 174 Figure 57. Manual Entry tab ....................................................................................................... 175 Figure 58. Import tab .................................................................................................................. 177 Figure 59. eLearning Fields ........................................................................................................ 181 Figure 60. Validate Certificate presented for Skills Test ............................................................ 182 Figure 61. AED Management submenu ...................................................................................... 184 Figure 62. Manufacturer Details ................................................................................................. 185 Figure 63. AED Service Action Listing ...................................................................................... 187 Figure 64. AED Data Entry Screen ............................................................................................. 188 Figure 65. AED Activity tab ....................................................................................................... 189 Figure 66. TC Contacts ............................................................................................................... 191 Figure 67. Sales Inventory .......................................................................................................... 193 Figure 68. Invoicing Setup .......................................................................................................... 195 Figure 69. Invoicing submenu .................................................................................................... 197 Figure 70. Sales Processing (Quick Invoicing) ........................................................................... 198 Figure 71. Payment Processing ................................................................................................... 200 Figure 72. Inventory submenu .................................................................................................... 201

TC COMMAND Document Overview
TC Command Page 1 6/13/2012
TTCC CCOOMMMMAANNDD TC Command is a comprehensive Emergency Cardiac Care (ECC) training center (TC) management solution, developed in FileMaker Pro, for training sites and centers providing ECC courses and related training.
TC Command, in conjunction with the TC Command Roster Tool, provides a unified solution for managing ECC training records, including instructor certification, employee and student certification, and communication from instructor to site, from site to center, and from center to training organization.
Setup, customization, and data entry in TC Command support reporting and communication needs, including data import and export.
DDooccuummeenntt OOvveerrvviieeww This document is organized by tasks. You will find instructions for each task under the task heading, even when the task spans several screens, or the fields for several tasks are included in one screen.
Most fields in TC Command are self-explanatory. Field definitions are given in the appropriate task for any fields that may not be immediately obvious.
DDaattaa EEnnttrryy SSccrreeeennss The information on data entry screens in TC Command is grouped into three general sections.
DDaattaa eennttrryy ffiieellddss The top left quadrant of the screen contains the data entry fields for the instructor, employee, student, or class fields. You can create a new record here or review existing records one by one.
TTaabbss The right-hand side of the data entry screen contains tabs for extended details related to the record in the data entry fields.
BBuuttttoonnss The buttons in the center of the screen provide additional capabilities for the displayed record. Buttons are grouped by functionality.
TC COMMAND Basic Concepts
TC Command Page 2 6/13/2012
BBaassiicc CCoonncceeppttss TC Command is based on FileMaker Pro, a database program. Training Center information is stored in the FileMaker Pro database files, and accessed through the TC Command solution (application).
TC Command uses multiple database files, with records of similar type stored together. For example, classes are stored in the class database, and students in BLS classes are stored in the BLS database. The two databases are linked by unique class numbers.
UUnniiqquuee IIDDss Instructors, classes, and employees have unique identification codes. Use a maximum of 20 alphanumeric characters. Do not use spaces in the ID. First initial and last name are not recommended as employee or instructor IDs.
RReeqquuiirreedd ffiieellddss Fields that you must enter for TC Command functionality are yellow. Use the other fields as appropriate for your Training Center.
FFoouunndd sseett You can select a particular record or group of records from the database. This record or group of records is called a “found set” in FileMaker Pro terminology. You can find a set (or group) of records before performing a task. For example, to remind students to recertify, find the students whose certifications will expire soon. Refer to the explanation of finding records on page 7 and FileMaker Pro Capabilities in the appendix.
EEnntteerriinngg nnaammeess First and last names entered in the instructor, employee, and student modules are automatically given initial capital letters. If additional capital letters are needed within a name, the user can add it.
To start a name with a lowercase letter, type a space first before typing the name.
EEnntteerriinngg ddaatteess When the calendar icon is available in a date field, click the icon and select the date.
Dates can be entered manually also, using the MM/DD/YYYY format.
TC COMMAND Basic Concepts
TC Command Page 3 6/13/2012
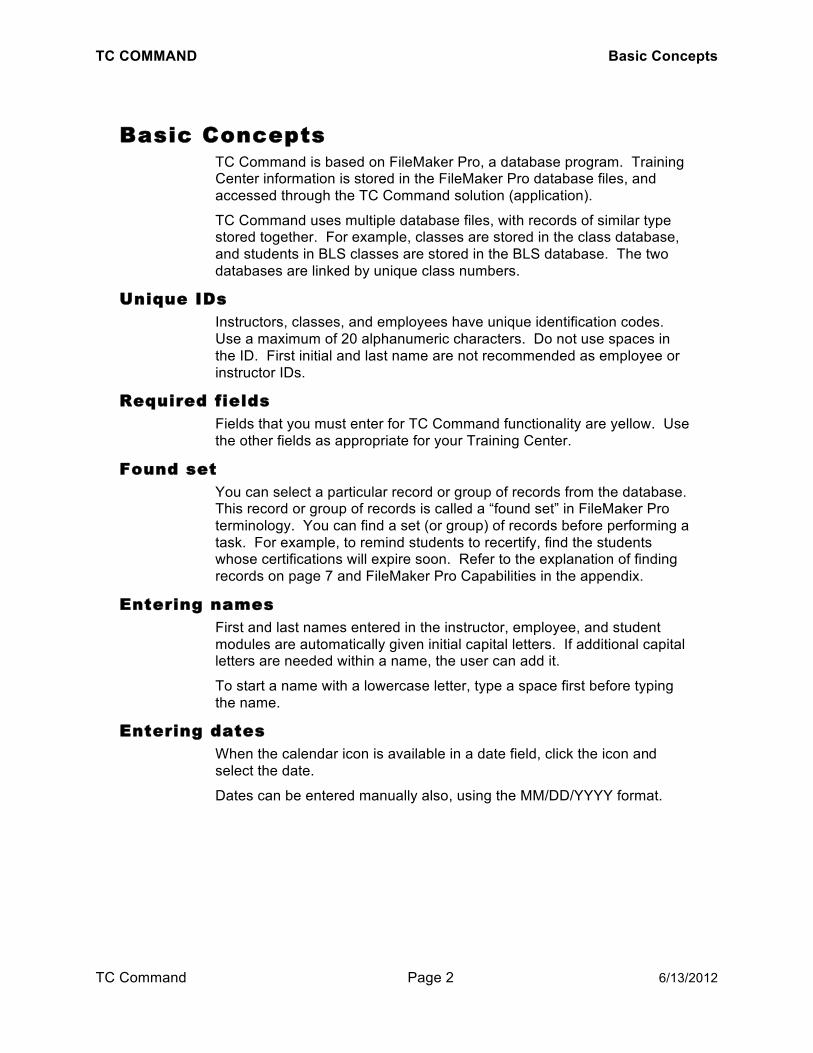
SSttaattuuss ttoooollbbaarr The FileMaker Pro status toolbar displayed above the TC Command screen provides capabilities for working with records. The available buttons change depending on the TC Command screen. Search for “status toolbar” in FileMaker Pro Help for more information on components of the status toolbar.
Figure 1. Status toolbar
Note: If the status toolbar is not displayed, click the toggle at the bottom of the screen, just to the left of “Browse.”
SSttaannddaarrdd bbuuttttoonnss
FFlliipp BBooookk In the status toolbar, use the 3-ring book with left and right arrows to browse through records.
SSlliiddeerr Drag the slider left or right to move quickly through records.
TToottaall ((SSoorrtteedd//UUnnssoorrtteedd)) All records of this type are available in this screen.
FFoouunndd ((SSoorrtteedd//UUnnssoorrtteedd)) An appropriate group of records is available in this screen, based on the current found set.
FFiinndd Use this button to select a record or a group of records. Refer to the explanation of finding records on page 7 and FileMaker Pro Capabilities in the appendix.
SShhooww AAllll If a found set is in place, click [Show All] to see all records again.
BBuuttttoonnss ccuussttoommiizzeedd iinn TTCC CCoommmmaanndd
AADDDD,, NNeeww RReeccoorrdd When the [ADD] or [New] button is available, use it to start a new record in the database.
TC COMMAND Basic Concepts
TC Command Page 4 6/13/2012
When you add a new record, it is created immediately in auto-save mode, so you do not have to “save” the record when the fields are complete.
The fields required for basic functionality are shown in yellow. These fields must be completed before another task can be performed.
DDeelleettee Use this button to delete the displayed record from the database.
If you have started to add a new record and do not wish to complete it, then use this button to delete the incomplete record.
SSoorrtt Refer to the explanation of sorting in the appendix.
MMeennuuss aanndd nnaavviiggaattiioonn The main menu in TC Command displays buttons that lead to data entry screens and submenus. When appropriate for a task, another screen can be accessed directly without going back to the menu.
While in a screen, use the [Tab] key on the keyboard or the mouse to navigate from field to field. Do not use the [Enter] key to move from field to field.
SSccrreeeenn llaayyoouutt TC Command V3 has wider screen layouts to accommodate laptops and newer monitors.
Data entry fields are still in the top left corner of the screen, with buttons for functionality directly below. Tabs for related details are now on the right-hand side of the data entry screens.

TC COMMAND Basic Concepts
TC Command Page 5 6/13/2012
TTCC CCoommmmaanndd bbuuttttoonnss The TC Command buttons available in the screens and reports perform multiple tasks. It is important to use the TC Command buttons to trigger these tasks. Do not use Macintosh or Windows capabilities with similar names, as they will not trigger the additional tasks.
[[MMaaiinn MMeennuu]] When the [Main Menu] button is available, use it to return to the TC Command Main Menu.
[[MMEENNUU]] When the [MENU] button is available, use it to return to the submenu for the current module.
[[PPRRIINNTT]] When the [PRINT] button is available, use it to print the displayed information. Refer to the printing section in this document.
[[EEMMAAIILL]] When the [EMAIL] button is available, use it to email the displayed information. Refer to the printing section in this document.
[[CCOOPPYY]] When the [COPY] button is available, use it to copy basic information in the current record in preparation for creating a new record with similar information.
TC COMMAND Basic Concepts
TC Command Page 6 6/13/2012
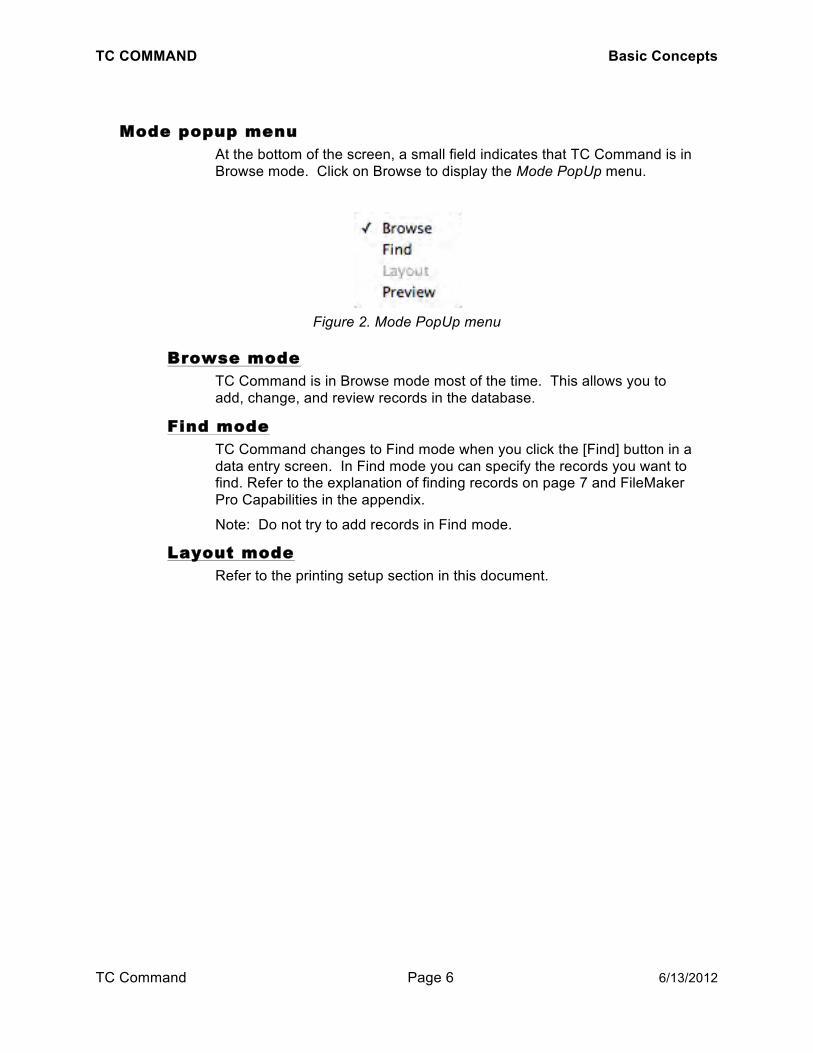
MMooddee ppooppuupp mmeennuu At the bottom of the screen, a small field indicates that TC Command is in Browse mode. Click on Browse to display the Mode PopUp menu.
Figure 2. Mode PopUp menu
BBrroowwssee mmooddee TC Command is in Browse mode most of the time. This allows you to add, change, and review records in the database.
FFiinndd mmooddee TC Command changes to Find mode when you click the [Find] button in a data entry screen. In Find mode you can specify the records you want to find. Refer to the explanation of finding records on page 7 and FileMaker Pro Capabilities in the appendix.
Note: Do not try to add records in Find mode.
LLaayyoouutt mmooddee Refer to the printing setup section in this document.
TC COMMAND Basic Concepts
TC Command Page 7 6/13/2012
DDaattaabbaassee rreeccoorrddss
AAddddiinngg rreeccoorrddss
Use the [ADD] button in the status toolbar to start a new record in the TC Command database.
FFiinnddiinngg rreeccoorrddss Use the [Find] button in the status toolbar to select a record or a group of records.
CChhaannggiinngg rreeccoorrddss The current displayed record can be changed by adding new information or replacing the displayed information. The changes are saved immediately.
DDeelleettiinngg rreeccoorrddss Use [Delete] to remove the displayed record from the database.
If (D) is available by a field, click the (D) to delete or clear the entry on that particular line.
FFiinnddiinngg rreeccoorrddss TC Command generates found sets to facilitate tasks. In addition, you can specify a group of records for a particular purpose.
To find a record or group of records, follow these steps in the data entry screen used to create the records.
1. Click the [Find] button in the status toolbar above the data entry screen.
2. Notice that the fields now are blank and surrounded by dotted lines. In addition, the Mode PopUp Menu changes from Browse mode to Find. Note: While specifying a find, the [Cancel Find] button is available to exit find mode.
3. Use the blank fields to specify the records you want to find. 4. Click the [Perform Find] button in the status toolbar. 5. The status toolbar shows the number of records found and the
Mode PopUp Menu changes back to Browse mode. 6. After reviewing the records, you can:
a. click [Find] again to find another group of records, b. click [Show All] to access all the records of this type in the
database again, c. perform a task with this found set in place, d. or go to another screen or report with this found set in place.
TC COMMAND Basic Concepts
TC Command Page 8 6/13/2012
Note: You can use multiple fields or partial information in a field to specify the records you want to find. For example, to find a student when the complete name is not known, enter the first few letters of the first and last names.
You can use more than one field to specify the records you want to find. For example, to find all students with a specific last name who took classes at a particular location in the last month, use the student data entry screen and enter the last name, the course location, and a date range for the class start date.
FileMaker Pro provides extensive capabilities for searching and sorting database records. For more information, refer to Find in the appendix and FileMaker Pro Help/Making a find request or FileMaker Pro Help/Finding records, on the menu bar.
TC COMMAND Start TC Command
TC Command Page 9 6/13/2012
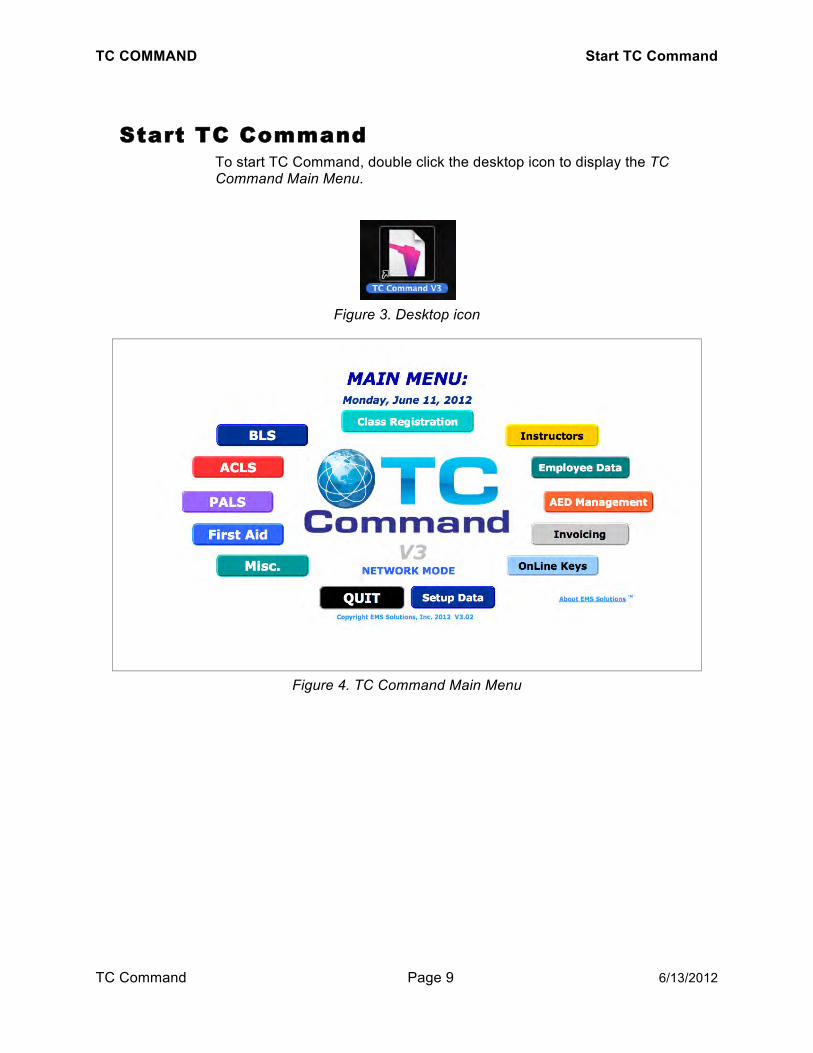
SSttaarrtt TTCC CCoommmmaanndd To start TC Command, double click the desktop icon to display the TC Command Main Menu.
Figure 3. Desktop icon
Figure 4. TC Command Main Menu
TC COMMAND Navigation in TC Command
TC Command Page 10 6/13/2012
NNaavviiggaattiioonn iinn TTCC CCoommmmaanndd Click buttons on the TC Command Main Menu to access data entry screens and related functionality. In the data entry screens, use the tabs and buttons to access additional functionality related to that screen.
After completing tasks in a data entry screen or module, return to the main menu to choose another module.
From the frequently used class registration module, buttons allow you to switch back and forth from the instructor and the student data entry modules, without going back to the main menu.
TC Command includes submenus where appropriate, providing a bridge from setup tasks to the main menu.
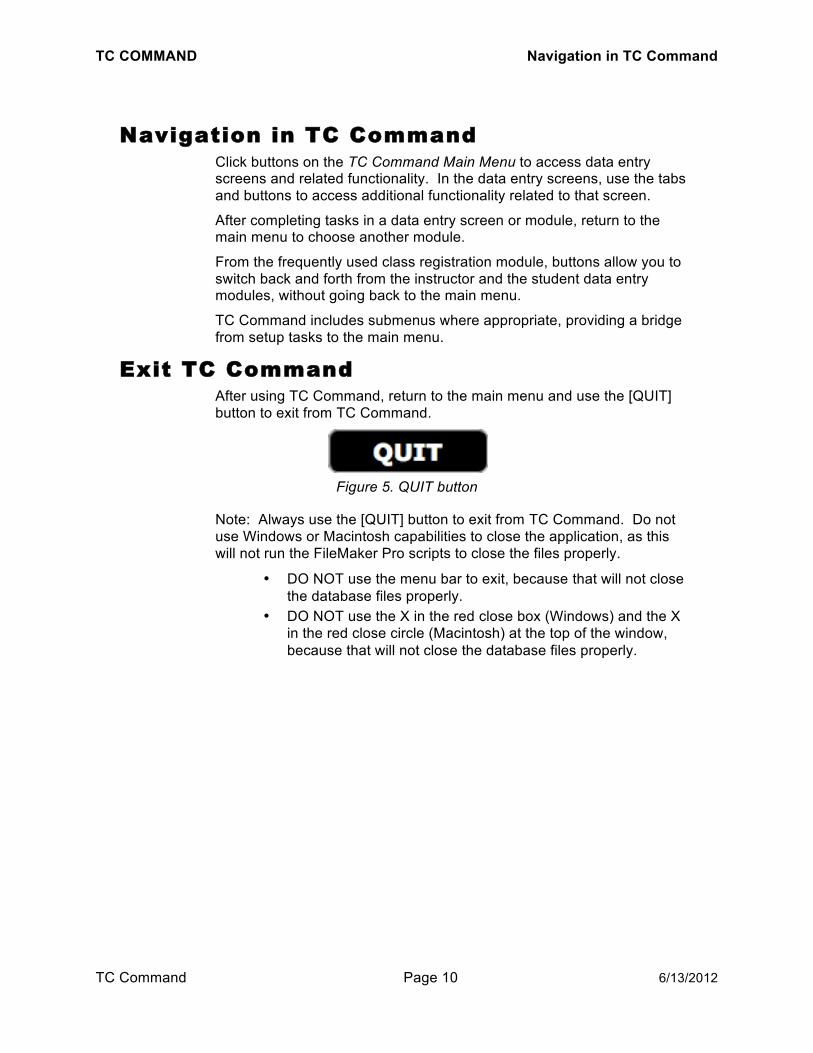
EExxiitt TTCC CCoommmmaanndd After using TC Command, return to the main menu and use the [QUIT] button to exit from TC Command.
Figure 5. QUIT button
Note: Always use the [QUIT] button to exit from TC Command. Do not use Windows or Macintosh capabilities to close the application, as this will not run the FileMaker Pro scripts to close the files properly.
DO NOT use the menu bar to exit, because that will not close the database files properly.
DO NOT use the X in the red close box (Windows) and the X in the red close circle (Macintosh) at the top of the window, because that will not close the database files properly.

TC COMMAND Initial Configuration
TC Command Page 11 6/13/2012
IInniittiiaall CCoonnffiigguurraattiioonn Before using TC Command, handle basic configuration tasks.
1. Choose [Setup Data] from the TC Command Main Menu. 2. The Setup submenu is displayed.
Figure 6. Setup submenu
3. Choose [General SetUp Information]. 4. The Training Center SetUp Information screen is displayed.
TC COMMAND Initial Configuration
TC Command Page 12 6/13/2012
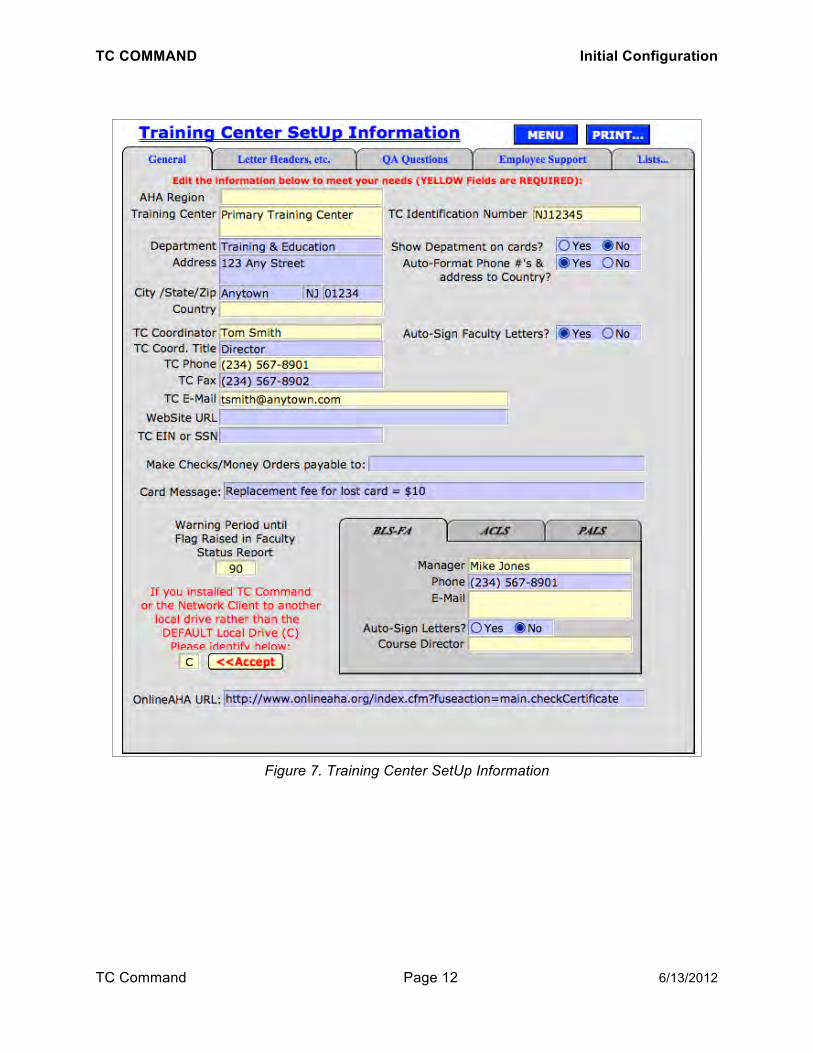
Figure 7. Training Center SetUp Information
TC COMMAND Initial Configuration
TC Command Page 13 6/13/2012
5. Use the General tab on this screen to define basic information for the training center and the TC Command software. Most fields are self-explanatory, and field definitions are given below for any tasks and fields that may not be immediately obvious.
6. After the initial configuration, click [MENU], then [Main Menu] to return to the TC Command Main Menu.
TTCC CCoommmmaanndd
FFoollddeerr llooccaattiioonn Check the location of the TC Command folder on the local hard drive. If it’s not on C:\, then specify the drive letter.
Note: The TC Command folder must be installed on a local hard drive for single users, primary users, and network clients.
CChheecckk ffoollddeerr llooccaattiioonn To check the local hard drive for the location of the TC Command folder, follow these steps:
1. Choose [start], then My Computer. 2. Under the Hard Disk Drives heading, doubleclick Local Disk (C:). 3. If the TC_Command_V3 folder (or the TC_Command_Client
folder) is not on the C:\ drive, then check the other local drives for the folder.
SSppeecciiffyy ffoollddeerr llooccaattiioonn Note: If TC Command is installed on the local C:\ drive, then skip this task because the folder is in the default location.
To specify an alternate local drive letter, follow these steps:
1. Choose [Setup Data] from the TC Command Main Menu. 2. Choose [General Setup Information]. 3. The Training Center SetUp Information screen (shown on page
12) is displayed. 4. Chose drive letter from the dropdown list or type a letter, then click
[Accept]. 5. Click [MENU], then [Main Menu] to return to the TC Command
Main Menu.

TC COMMAND Initial Configuration
TC Command Page 14 6/13/2012
TTrraaiinniinngg cceenntteerr
Use the fields on the right side of the General tab to define the training center itself.
Note: The training center ID number, address and phone number are required for wallet cards.
Field definitions Field definitions are given below for fields that are not self-explanatory.
Country Use the default of USA or choose another country from the dropdown list.
TC or SITE Identification Number The ID number assigned by the training organization. Note: This information will appear on wallet cards.
TC EIN or SSN The federal tax ID for the training center. For a private organization, use the social security number of the responsible individual.
TC COMMAND Initial Configuration
TC Command Page 15 6/13/2012
CCoooorrddiinnaattoorrss Use the fields on the right side of the screen to give contact information for the Training Center (TC) Coordinator.
Use the BLS-FA tab at the bottom of the screen to enter the contact information for the BLS-FA Manager, and specify the course director for that program.
Use the ACLS and the PALS tabs at the bottom of the screen to give contact information for these course coordinators, and specify the course director and physician instructor for those programs.
Note: If the TC Coordinator also performs any of these jobs, enter the TC Coordinator information again on the appropriate tab.
DDaattaa eennttrryy ppeerrssoonnnneell If user access is not activated in TC Command, then list data entry personnel, so when student information is entered, the person doing the data entry can log his or her name.
WWaarrnniinngg ppeerriioodd The default warning period is 90 days for expiring certification. If a longer or shorter warning period is needed, the number of days can be changed.
Use the Warning Period until Flag Raised in Status Report field on the General tab in the Training Center SetUp Information screen (shown on page 12) to specify how early a warning flag should appear for instructors, employees, and students.
For example, to display a warning flag on the Expiration Status Report at least four months before the certification will expire, enter 120 days in the warning period field.
TC COMMAND Initial Configuration
TC Command Page 16 6/13/2012
PPhhoonnee nnuummbbeerr aanndd aaddddrreessss ffoorrmmaattttiinngg Mailing addresses use the USA standard format by default.
UUSSAA pphhoonnee nnuummbbeerrss If the Training Center is in the USA, and area codes are included when entering phone numbers in TC Command, and standard formatting is needed for phone numbers, then click the Yes radio button for Auto-Format Phone #’s & address to Country?. This formats all phone numbers in TC Command in the (123) 456-7890 format.
If the Training Center is in the USA, and phone numbers are entered without the area code, then do not choose this option (because all phone numbers without area codes will be displayed in red to indicate “missing” information).
FFoorreeiiggnn aaddddrreesssseess && pphhoonnee nnuummbbeerrss If the Training Center is not in the USA, country-specific formatting can be applied to mailing addresses and phone numbers. Select the Training Center country and click the Yes radio button for Auto-Format Phone #’s & address to Country?.
This applies to mailing addresses and phone numbers for the Training Center, instructors, employees, students, and class locations. In any record, select the country from the dropdown list to trigger the correct auto-formatting for that individual record.
Note: The information display remains the same. The correct format is used when printing mailing addresses and phone numbers on labels and lists.
TC COMMAND Initial Configuration
TC Command Page 17 6/13/2012
TTrraaiinniinngg oorrggaanniizzaattiioonnss TC Command provides capabilities for printing wallet cards and rosters for Emergency Cardiac Care (ECC) programs such as the programs developed by these training organizations:
AHA ASHI ECSI
Use the Training Organizations table at the bottom of the Lists tab in Training Center SetUp Information to maintain the training program affiliations for your Training Center. Add a new training organization by typing the acronym and name on a blank line. Delete any training organizations that are not needed by clicking the [D] next to the organization and confirming the deletion. The training organizations listed here are then available for selection in the Course Identification List screen, and also control the type and format of wallet cards available for printing, the training program title on the roster and in the letter header.
Note: You may re-add deleted training organizations at any time and you must always have at least one organization listed.
For additional courses not under the ECC umbrella, refer to page 22 for setting up Miscellaneous courses in TC Command.
AAHHAA TTrraaiinniinngg OOrrggaanniizzaattiioonn If your training center runs AHA courses, use the fields on the left side of the General tab to define the AHA Region for the training center.
Note: All fields in this section, including the TC Identification Number are required for training centers running AHA courses.
TC COMMAND Initial Configuration
TC Command Page 18 6/13/2012
CCoouurrsseess Emergency Cardiac Care (ECC) course types, including Heartsaver suboptions, are standard in TC Command. In addition, you can add course types not available in ECC.
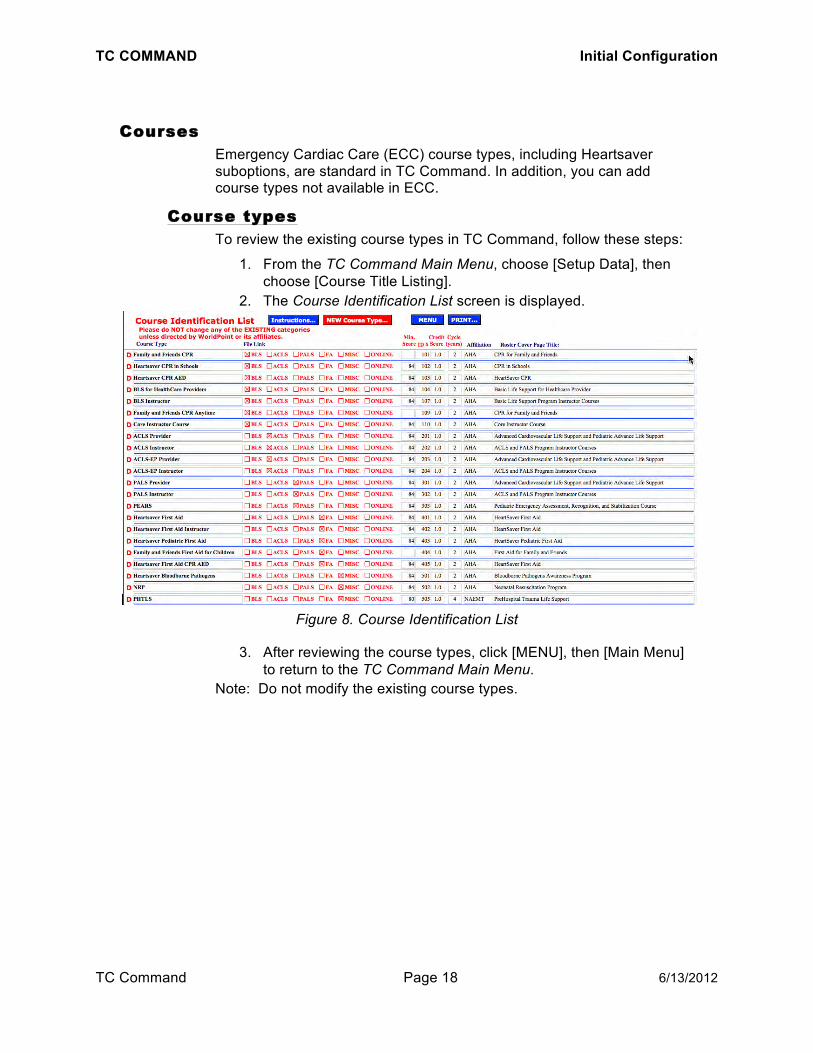
CCoouurrssee ttyyppeess To review the existing course types in TC Command, follow these steps:
1. From the TC Command Main Menu, choose [Setup Data], then choose [Course Title Listing].
2. The Course Identification List screen is displayed.
Figure 8. Course Identification List
3. After reviewing the course types, click [MENU], then [Main Menu] to return to the TC Command Main Menu.
Note: Do not modify the existing course types.

TC COMMAND Initial Configuration
TC Command Page 19 6/13/2012
DDeeffiinnee nneeww ccoouurrssee ttyyppee If a new course type is needed, it can be added to the TC Command database.
1. Follow the steps above for Course types to reach the Course Identification List screen.
2. Check the range of ID numbers allocated to the course type by clicking [Instructions…], then return by clicking [Return to List].
3. In the Course Identification List screen, click [NEW Course Type…].
4. A blank line is added to the screen under the cursor. 5. Type the name of the new course type and complete the
remaining fields. 6. When the new course type is complete, you can:
a. click [NEW Course Type…] again to create another course type,
b. or click [MENU], then [Main Menu] to return to the TC Command Main Menu.
Field definitions Field definitions are given below for fields that are not self-explanatory.
File Link Select the appropriate checkbox for the new course. Choose MISC for Miscellaneous courses not included in the ECC curriculum.
Min. Score If the course will have a written test, enter the minimum passing score (maximum 100), otherwise leave blank.
ID # Enter a unique ID# from the range allocated to this course type. This information is available via the [Instructions] button on the Course Identification List screen.
Credit Score For future use. Do not change default of 1.
Cycle (years) Enter the required recertification period in years, if the displayed 2 years is not correct for this course.
Affiliation Choose the correct training organization.
Roster Cover Page Title Type the course title for the front of the roster.
TC COMMAND Initial Configuration
TC Command Page 20 6/13/2012
RReecceerrttiiffiiccaattiioonn ppeerriioodd The default recertification period for student courses in TC Command is two years. The recertification period can be changed, on a course-by-course basis. This number is used to calculate the expiration date for student certifications.
1. Choose [Setup Data] from the TC Command Main Menu. 2. The Setup submenu is displayed. 3. Choose [Course Title Listing]. 4. The Course Identification List screen is displayed. 5. Use the Cycle (years) column to change the recertification period
for a course, if appropriate. 6. After changing any recertification periods needed, click [MENU],
then [Main Menu] to return to the TC Command Main Menu.

TC COMMAND Initial Configuration
TC Command Page 21 6/13/2012
CCoouurrssee ssuubbooppttiioonnss
The list of course types with suboptions can be reviewed, and new courses with suboptions can be added to TC Command.
HeartSaver classes for community members who do not require professional certification have multiple teaching suboptions available for some training organization programs.
Note: These suboptions are available for selection on the dropdown list in the Class Registration – Data Entry screen when a course type with suboptions is selected from the Course Type field in that screen.
RReevviieeww To review the available suboptions, follow these steps:
1. From the TC Command Main Menu, choose [Setup Data], then choose [Heartsaver Sub-Options Listing].
2. The BLS Cross References for Course Sub-Options screen is displayed.
3. After reviewing the information, click [MENU] to return to the setup menu.

TC COMMAND Initial Configuration
TC Command Page 22 6/13/2012
Figure 9. BLS Cross References for Course Sub-Options
The course title and the course suboptions are listed, along with the options taught in the course. The Xs show which modules will be crossed out on the wallet card.
Note: The groups of small xxxs indicate courses using new cardstock for wallet cards; the large Xs indicate courses that have not been updated yet.
AAdddd After adding the new course type in the Course Identification List screen, follow the steps above to access the BLS Cross References for Course Sub-Options screen, then select the new course ID from the dropdown list to display the new course name. Then to add the suboptions to the new course type, use the boxes on the right-hand side to enter strikeouts (small Xs) in the appropriate pattern and location to validate the card.
Note: The column headings for the columns of Xs give distance from the left side of the card stock.
MMiisscceellllaanneeoouuss ccoouurrsseess If your training center provides training in addition to ECC courses, these classes can be tracked in TC Command. Define the course types (see page 22) and instructor certifications (see 43) before setting up instructors and creating classes.
Note: The student data entry screen now has a fixed title of “Allied Health Programs.” The capability to change this name has been removed.
TC COMMAND Initial Configuration
TC Command Page 23 6/13/2012
UUsseerr aacccceessss You can restrict access to the TC Command system by creating one or more users and defining access on a module by module basis.
Setting up a user with a password can protect TC Command from accidental access when the computer is used for other purposes. Setting up users with different security settings can give each user the appropriate access when multiple people use TC Command. User security can be implemented when multiple users work on the same workstation or when each user has his or her own workstation.
AAcccceessss ttoo ssppeecciiffiieedd mmoodduulleess When a user is defined, the user’s access level can be specified for the selections on the TC Command Main Menu. Access to [Class Registration] and [TC Reports] is combined. Within [Setup Data], access to the user access setup screen can be further restricted.
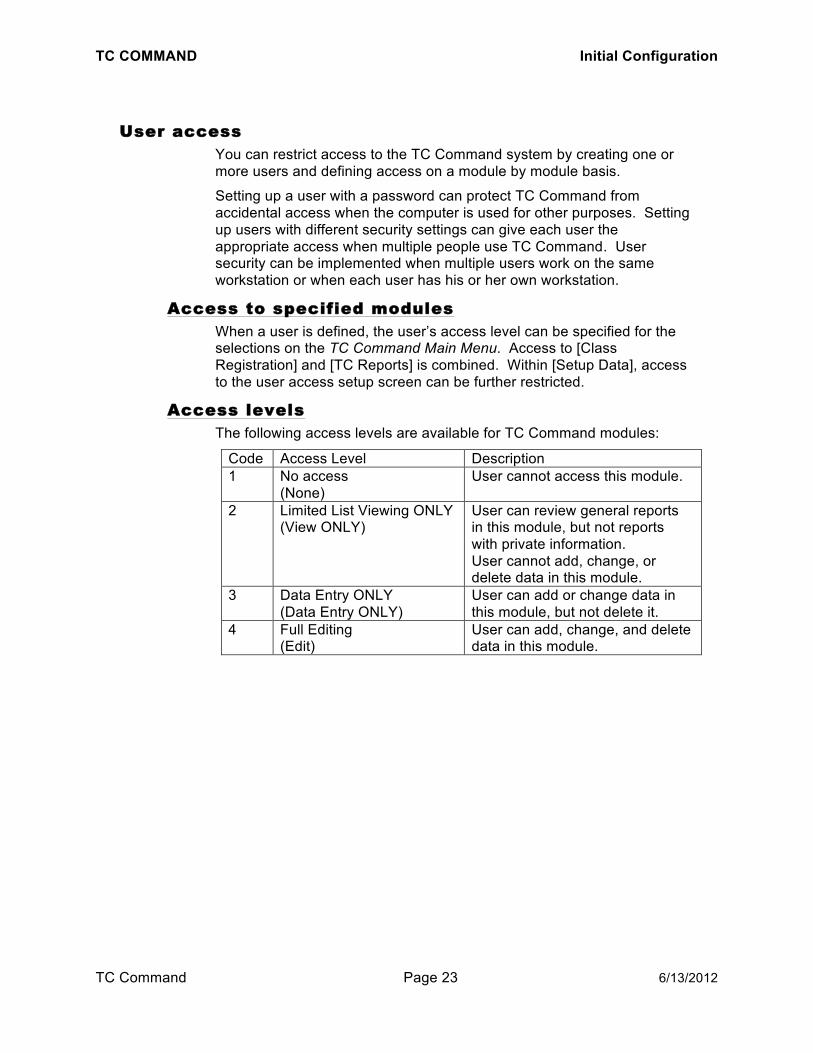
AAcccceessss lleevveellss The following access levels are available for TC Command modules:
Code Access Level Description 1 No access
(None) User cannot access this module.
2 Limited List Viewing ONLY (View ONLY)
User can review general reports in this module, but not reports with private information. User cannot add, change, or delete data in this module.
3 Data Entry ONLY (Data Entry ONLY)
User can add or change data in this module, but not delete it.
4 Full Editing (Edit)
User can add, change, and delete data in this module.
TC COMMAND Initial Configuration
TC Command Page 24 6/13/2012
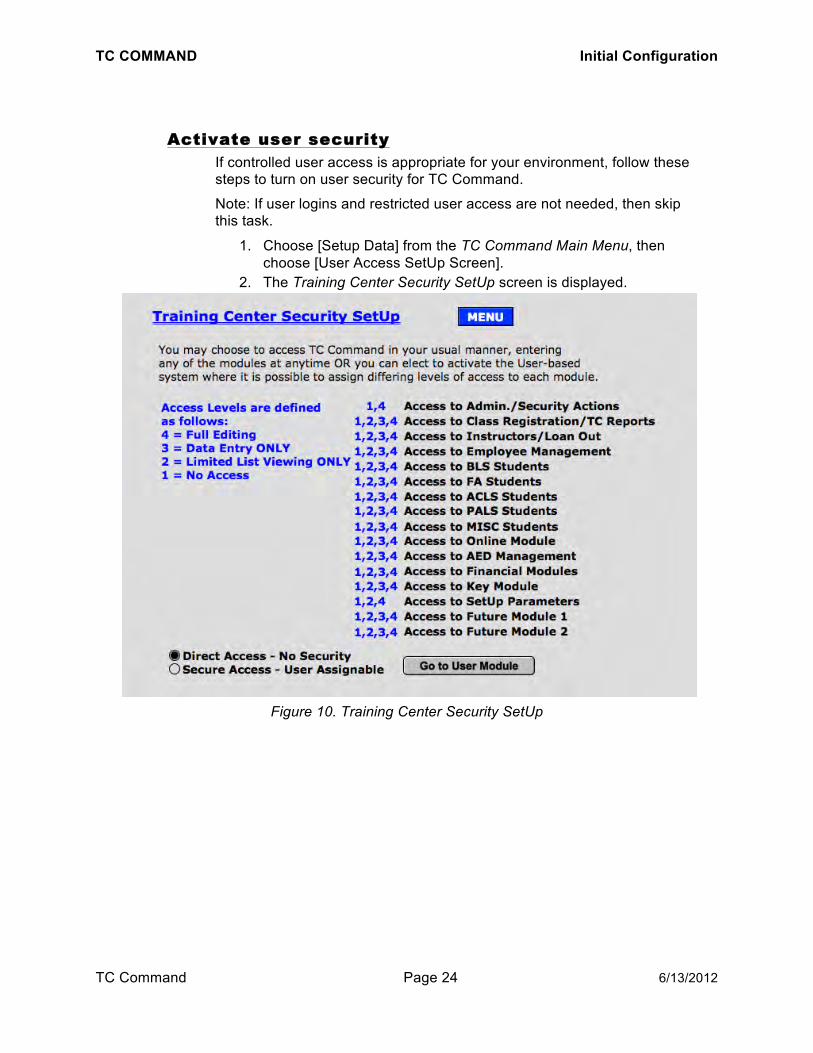
AAccttiivvaattee uusseerr sseeccuurriittyy If controlled user access is appropriate for your environment, follow these steps to turn on user security for TC Command.
Note: If user logins and restricted user access are not needed, then skip this task.
1. Choose [Setup Data] from the TC Command Main Menu, then choose [User Access SetUp Screen].
2. The Training Center Security SetUp screen is displayed.
Figure 10. Training Center Security SetUp

TC COMMAND Initial Configuration
TC Command Page 25 6/13/2012
3. Select the Secure – User Assignable radio button. 4. Click [MENU], then [Main Menu] to return to the TC Command
Main Menu. 5. Click [QUIT] to exit TC Command, then doubleclick the TC
Command desktop icon to start TC Command again. 6. Enter Training Center Manager for User ID, and use 1234 for
Password to login as the default administrator. 7. Choose [Setup Data] from the TC Command Main Menu, then
choose [User Access SetUp Screen]. 8. In the Training Center Security SetUp screen (shown on page 24),
choose [Go to User Module]. 9. In the Summary Listing of Personnel screen (shown on page 26),
click the default administrator (Training Center Manager) in the User Name column.
10. In the User Details for Security Access screen (shown on page 27), enter a new password in the Password field, following password standards for your organization.
11. After changing the password for the default administrator, you can: a. create new users, b. or click [Main Menu] to exit from the user security module.
TC COMMAND Initial Configuration
TC Command Page 26 6/13/2012
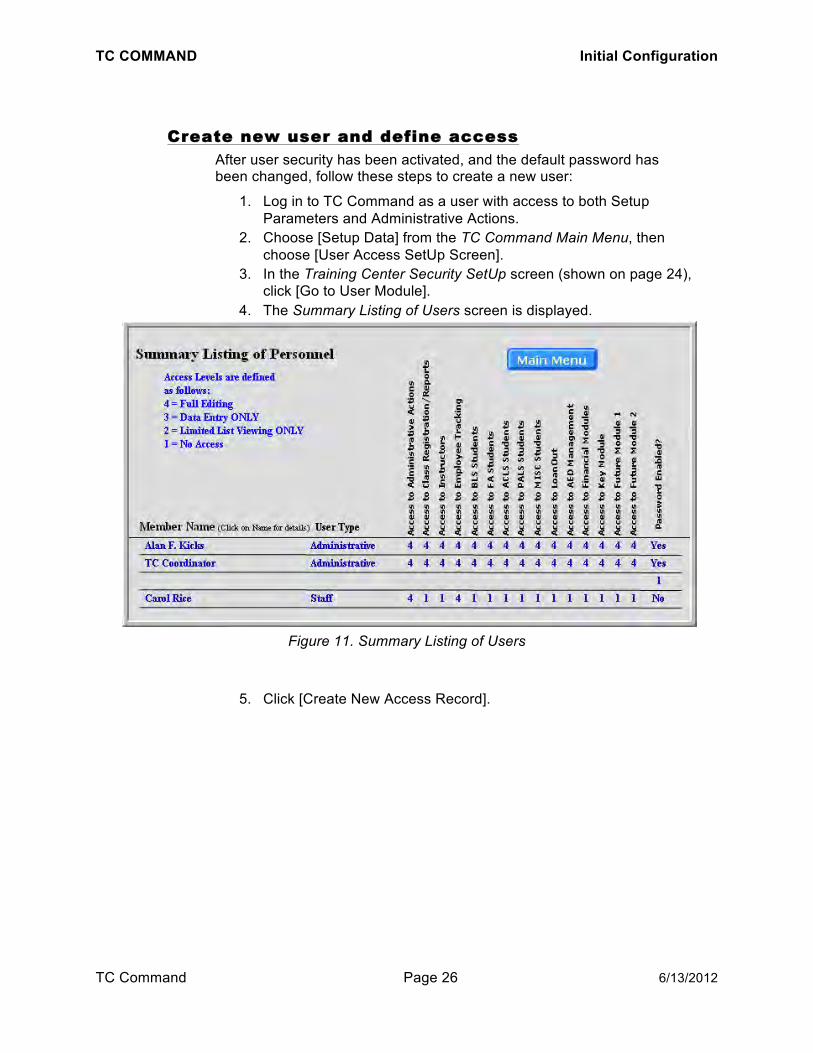
CCrreeaattee nneeww uusseerr aanndd ddeeffiinnee aacccceessss
After user security has been activated, and the default password has been changed, follow these steps to create a new user:
1. Log in to TC Command as a user with access to both Setup Parameters and Administrative Actions.
2. Choose [Setup Data] from the TC Command Main Menu, then choose [User Access SetUp Screen].
3. In the Training Center Security SetUp screen (shown on page 24), click [Go to User Module].
4. The Summary Listing of Users screen is displayed.
Figure 11. Summary Listing of Users
5. Click [Create New Access Record].
!

TC COMMAND Initial Configuration
TC Command Page 27 6/13/2012
6. The User Details for Security Access screen is displayed.
Figure 12. User Details for Security Access
7. Complete these fields to create a new user: UserID
User ID for login. Name
User name to be displayed on main menu. Password
User password for login. Allow Login?
Use default of Yes to activate user immediately.
8. Use the radio buttons to set security levels as appropriate for the user.
9. The new user record is now complete. You can: a. click [Create New Access Record] to create another user, b. or click [Menu], then [Main Menu] to return to the TC
Command Main Menu.
!

TC COMMAND Initial Configuration
TC Command Page 28 6/13/2012
RReevviieeww uusseerr aacccceessss
Existing security settings can be reviewed in the Summary Listing of Users screen (shown on page 26).
CChhaannggee uusseerr ppaasssswwoorrdd A user’s password can be changed.
1. In the Summary Listing of Users screen, click the user’s name in the User Name column.
2. When the User Details for Security Access screen is displayed, type the new password in the Password field.
CChhaannggee uusseerr aacccceessss Security levels for a user can be changed.
1. In the Summary Listing of Users screen, click the user’s name in the User Name column.
2. When the User Details for Security Access screen is displayed, use the security level radio buttons to change the user’s access to TC Command.
IInnaaccttiivvaattee uusseerr aacccceessss
A user on leave can be temporarily inactivated.
1. In the Summary Listing of Users screen, click the user’s name under the User Name heading.
2. In the User Details for Security Access screen, change Allow Login? to No for this user.
DDeelleettee uusseerr A user login can be permanently deleted.
1. In the Summary Listing of Users screen, click the user’s name under User Name.
2. In the User Details for Security Access screen, confirm the correct user is displayed.
3. Click [Delete Access Record], then [Delete] to remove this user access record.

TC COMMAND Initial Configuration
TC Command Page 29 6/13/2012
UUsseerr llooggiinn
If users are defined, the login screen is displayed before the main menu.
Figure 13. Login screen
Enter your user ID and password, then click [Accept…] to complete the login process for TC Command.
MMaaiinn mmeennuu ((uusseerr aacccceessss)) When users log in to TC Command, the current user is displayed on the main menu.
SSwwiittcchh ttoo nneeww uusseerr If another user is logged in on the workstation, and you need to use TC Command, return to the main menu and use the [Click HERE to Re-Login (or New User)] button to login with your own user ID.
!

TC COMMAND Backup and Restore
TC Command Page 30 6/13/2012
BBaacckkuupp aanndd RReessttoorree
BBaacckkuupp
Your data is valuable. Follow these steps to back it up:
1. Return to the TC Command Main Menu and click [QUIT] to exit. 2. Access the local drive (C:\) to find the TC_Command_V3 folder. 3. Copy the entire folder to external media.
Note: If backing up to an attached volume, use a compressed copy of the TC_Command_V3 folder to prevent FileMaker Pro from finding and using the backup files.
4. Observe standard backup protocol for your organization regarding storage and rotation of backups.
Note: When running TC Command in a server environment, backup can be scheduled as an automatic job.
RReessttoorree Use your latest backup to restore TC Command if your files are damaged by power failure or improper exit from the program.
If one file is damaged, replace that file only. If multiple files are damaged, compress the damaged
TC_Command_V3 folder and replace the entire folder from backup.
RReeccoovveerr If a problem occurs and you are prompted to recover, please do the following:
Do not choose to recover; exit from the error message instead. Document what you were doing before the problem occurred. Return to the TC Command Main Menu and click [QUIT] to
exit. If you cannot use the buttons in TC Command to return to the
main menu, then hold down [Ctrl] or [command] and press [1] to return to the main menu.
Stop using TC Command immediately and contact TC Command Technical Support for assistance.
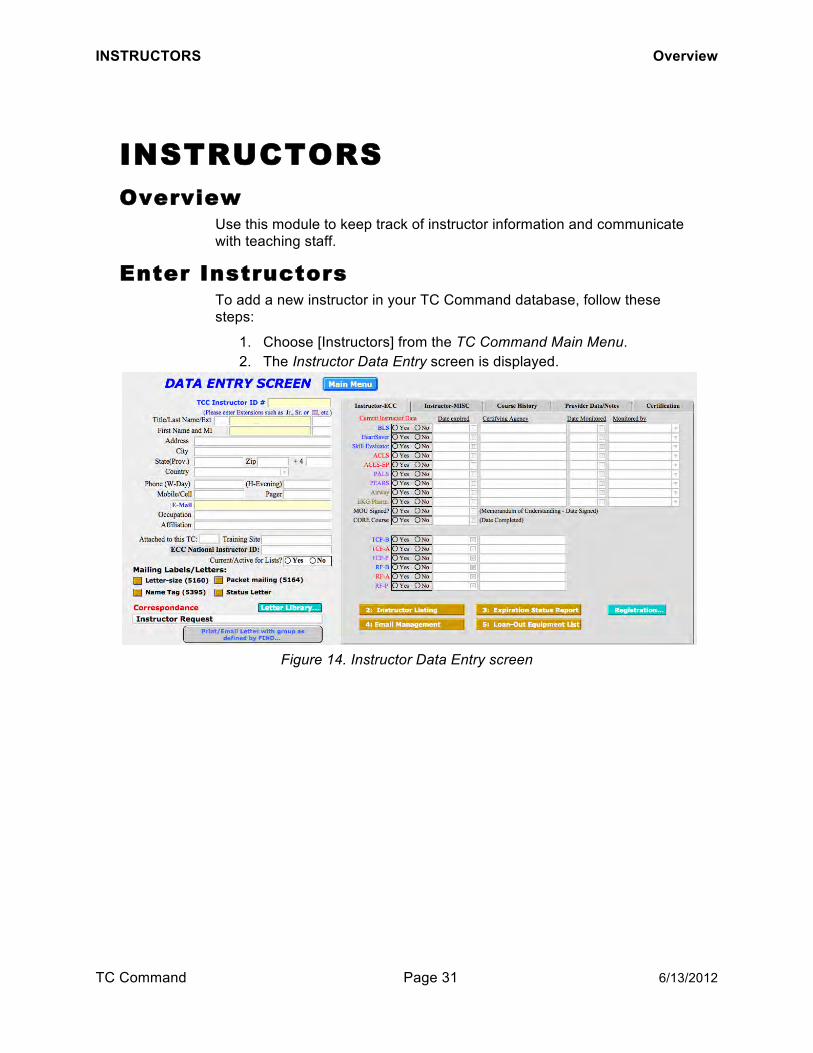
INSTRUCTORS Overview
TC Command Page 31 6/13/2012
IINNSSTTRRUUCCTTOORRSS OOvveerrvviieeww
Use this module to keep track of instructor information and communicate with teaching staff.
EEnntteerr IInnssttrruuccttoorrss To add a new instructor in your TC Command database, follow these steps:
1. Choose [Instructors] from the TC Command Main Menu. 2. The Instructor Data Entry screen is displayed.
Figure 14. Instructor Data Entry screen

INSTRUCTORS Enter Instructors
TC Command Page 32 6/13/2012
3. Click <New Instructor> and complete the fields to create a new record for an instructor.
4. After completing the appropriate fields, you can: a. click <New Instructor> again to create another new record, b. or click [Main Menu] to return to the TC Command Main Menu.
Field definitions Field definitions are given below for fields that are not self-explanatory. WARNING: Two instructor ID fields are used in TC Command: TCC Instructor ID # -- required to access each instructor’s
teaching history. ECC National Instructor ID – required for student wallet cards.
New users of TC Command may use the national ECC number in both fields. Existing users of TC Command or WorldPoint ONE cannot change the existing TCC instructor IDs. Existing users of TC Command and WorldPoint ONE must keep all existing instructor numbers. DO NOT change any TCC Instructor ID #s. If you are an existing user of TC Command, do not change the TCC Instructor ID # as it is necessary to access the instructor’s history. If you are a new user of TC Command, you may use the ECC National Instructor ID in both instructor ID fields.
TCC Instructor ID # Assign a unique ID to each instructor. Use a maximum of 20 alphanumeric characters with no spaces. First initial and last name are not recommended due to possible duplication and name changes. Note: Do not change any existing instructor IDs from TC Command or WorldPoint ONE, as the TC Command history depends on continuity in the ID#.
Title Can be used for honorific title such as Mr., Miss, Ms., Mrs.
Extension Can be used for generation title such as Sr., Jr., II, III. Can also be used for professional titles such as RN, MD, EMT, etc.
INSTRUCTORS Enter Instructors
TC Command Page 33 6/13/2012
E-Mail One email address allowed.
Occupation Instructor’s occupation, such as nurse, doctor, firefighter.
Affiliation Employer or volunteer organization.
Attached to this TC Yes – instructor is contractually bound to this training center and is included in reports. This training center is responsible for the instructor’s certification, monitoring, and recertification. No – instructor teaches classes for this training center, but the instructor reports to the training organization through a different training center.
Training Site Where the instructor does most of his or her teaching (this training center or an affiliated site under this training center).
ECC National Instructor ID National ID created by AHA. If the national instructor ID is already entered in the TCC Instructor ID field, click the [ECC National Instructor ID] field to copy the ID to this field.
Current/Active for Lists? Yes if instructor is available (default). No if instructor is on leave of absence.

INSTRUCTORS Enter Instructors
TC Command Page 34 6/13/2012
IInnssttrruuccttoorr--EECCCC ttaabb Use the fields on this tab (in the Instructor Data Entry screen) to enter the instructor’s current ECC certifications, expiration dates, and the training site responsible for the most recent certification or recertification for this skill.
Set the radio button to Yes if the instructor is certified to teach the discipline. If the instructor is not certified for a discipline, set the radio button to No.
Use the calendar icon in each Date expired field to select a date, or type the date using the MM/DD/YYYY format.
The Training Center manager’s name is given by default as the monitor for the certification. If another faculty member provided monitoring, choose that name from the dropdown list, which can be created on the Lists tab in the general setup screen.
Figure 15. Instructor-ECC tab
INSTRUCTORS Enter Instructors
TC Command Page 35 6/13/2012
Field definitions Field definitions are given below for fields that are not self-explanatory.
Skill Evaluator Evaluator certified to test physical skills for students completing the knowledge portion of the course online.
MOU Signed? Memo of understanding.
CORE Course Online or CD-based class taken prior to instructor class.
TCF Training Center Faculty, appointed by the Training Center Manager.
RF Regional Faculty
B Basic Life Support
A Advanced Cardiac Life Support
P Pediatric Advanced Life Support
Certifying Agency The agency that provided the most recent certification or recertification.
Date Monitored The date the instructor’s monitoring was performed.
Monitored By The Training Center manager’s name is used here by default. To use a Training Center faculty name or regional faculty name here instead, choose the name from the dropdown list.
DDeessiiggnnaattee ffaaccuullttyy ffoorr mmoonniittoorriinngg Use the TCF and RF radio buttons on the Instructor-ECC tab to designate Training Center faculty (TCF) and Regional faculty (RF). Instructors with these certifications are available on the dropdown list for Monitored By.

INSTRUCTORS Enter Instructors
TC Command Page 36 6/13/2012
IInnssttrruuccttoorr--MMIISSCC ttaabb All instructor certifications for Miscellaneous classes must be defined in TC Command. Before using this tab, choose the [General Information (SetUp)] button on the tab to set up additional teaching certifications in TC Command.
Then use the fields on this tab to enter the instructor’s current certifications, expiration dates, and the training site responsible for the most recent certification or recertification for this skill.
Set the radio button to Yes if the instructor is certified to teach the discipline. If the instructor is not certified for a discipline, set the radio button to No.
Use the calendar icon in each date expired field to select a date, or type the date using the MM/DD/YYYY format.
Figure 16. Instructor-MISC tab
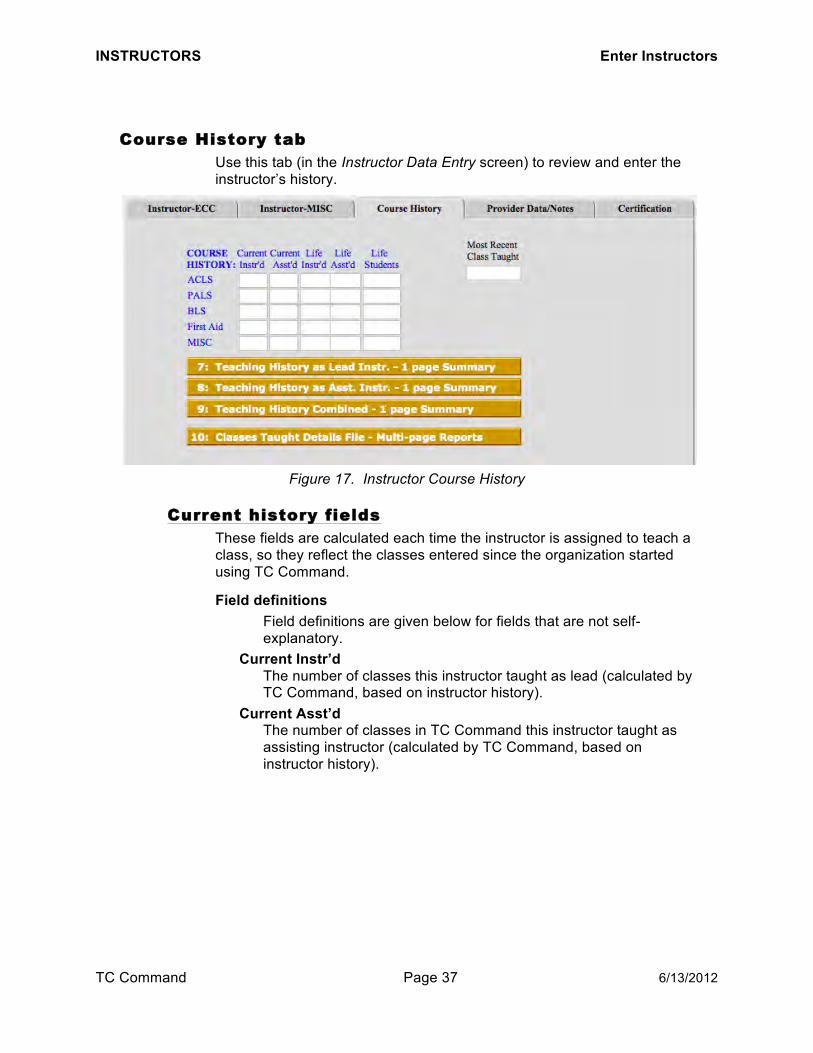
INSTRUCTORS Enter Instructors
TC Command Page 37 6/13/2012
CCoouurrssee HHiissttoorryy ttaabb Use this tab (in the Instructor Data Entry screen) to review and enter the instructor’s history.
Figure 17. Instructor Course History
CCuurrrreenntt hhiissttoorryy ffiieellddss These fields are calculated each time the instructor is assigned to teach a class, so they reflect the classes entered since the organization started using TC Command.
Field definitions Field definitions are given below for fields that are not self-explanatory.
Current Instr’d The number of classes this instructor taught as lead (calculated by TC Command, based on instructor history).
Current Asst’d The number of classes in TC Command this instructor taught as assisting instructor (calculated by TC Command, based on instructor history).
INSTRUCTORS Enter Instructors
TC Command Page 38 6/13/2012
LLiiffee hhiissttoorryy ffiieellddss These fields are optional totals entered by the user, to serve as a record for prior information that was maintained in TC Command.
Field definitions Field definitions are given below for fields that are not self-explanatory.
Life Instr’d Use this field to keep a record of prior classes taught as lead.
Life Asst’d Use this field to keep a record of prior classes taught as assisting instructor.
Life Students Use this field to keep a record of the total number of prior students taught by this instructor.
Most Recent Class Taught This date is pulled from the instructor’s history.
Note: Do not use these fields to enter current classes taught by this instructor at other training centers. Instead, refer to explanation on page 42.
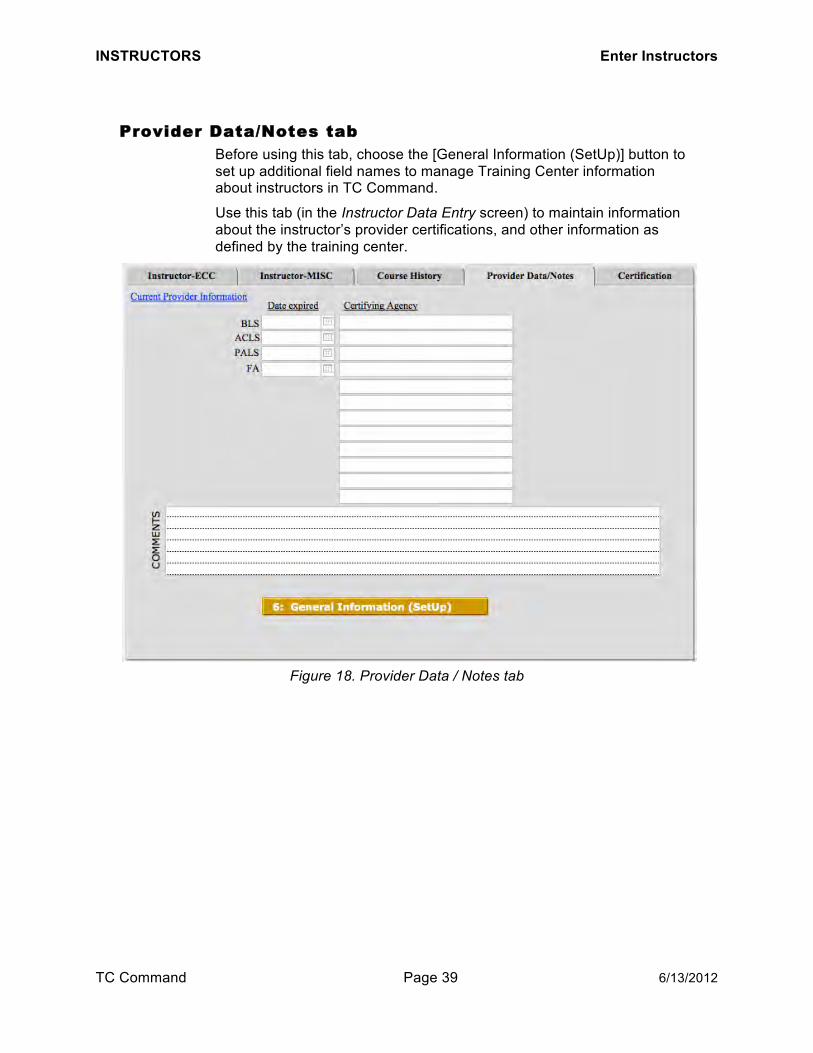
INSTRUCTORS Enter Instructors
TC Command Page 39 6/13/2012
PPrroovviiddeerr DDaattaa//NNootteess ttaabb Before using this tab, choose the [General Information (SetUp)] button to set up additional field names to manage Training Center information about instructors in TC Command.
Use this tab (in the Instructor Data Entry screen) to maintain information about the instructor’s provider certifications, and other information as defined by the training center.
Figure 18. Provider Data / Notes tab

INSTRUCTORS Enter Instructors
TC Command Page 40 6/13/2012
Field definitions Field definitions are given below for fields that are not self-explanatory.
Current Provider Information If the instructor has additional certifications as a provider, record them here.
Field Name 1 through 8 These fields are available for training center use as needed. Refer to the explanation of Training Center field names on page 43.
COMMENTS Use the notepad at the bottom of the tab to enter additional notes as needed for the instructor.
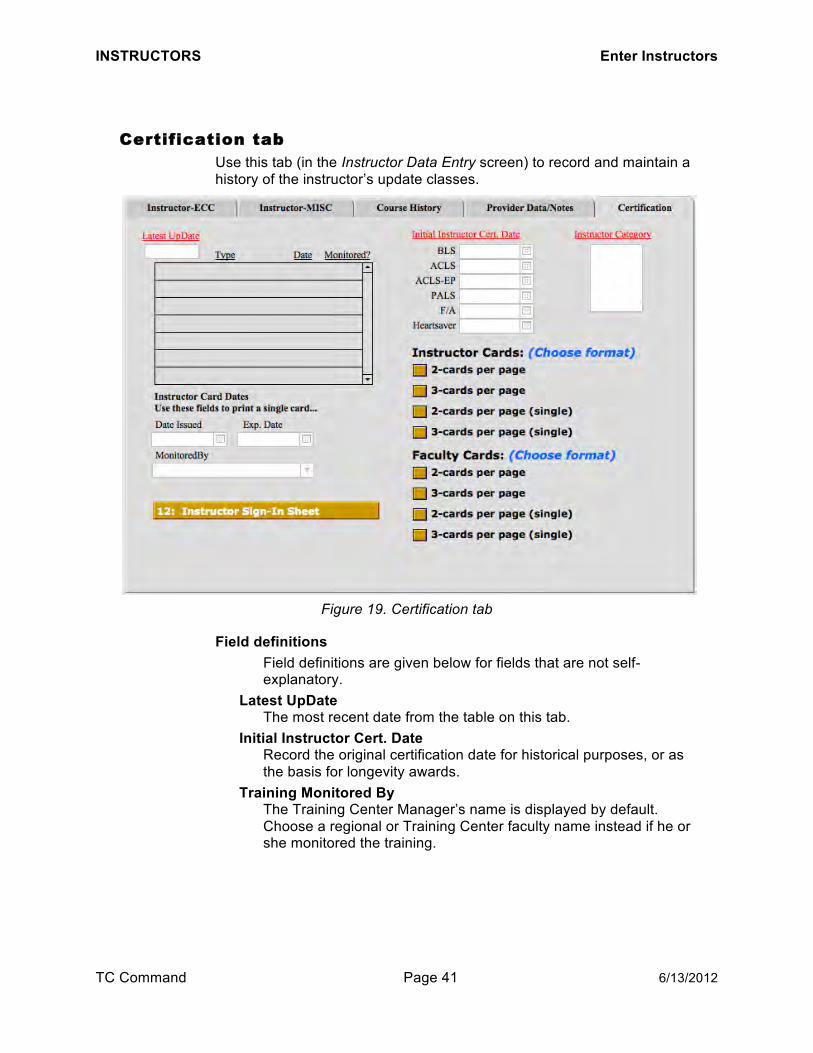
INSTRUCTORS Enter Instructors
TC Command Page 41 6/13/2012
CCeerrttiiffiiccaattiioonn ttaabb Use this tab (in the Instructor Data Entry screen) to record and maintain a history of the instructor’s update classes.
Figure 19. Certification tab
Field definitions Field definitions are given below for fields that are not self-explanatory.
Latest UpDate The most recent date from the table on this tab.
Initial Instructor Cert. Date Record the original certification date for historical purposes, or as the basis for longevity awards.
Training Monitored By The Training Center Manager’s name is displayed by default. Choose a regional or Training Center faculty name instead if he or she monitored the training.
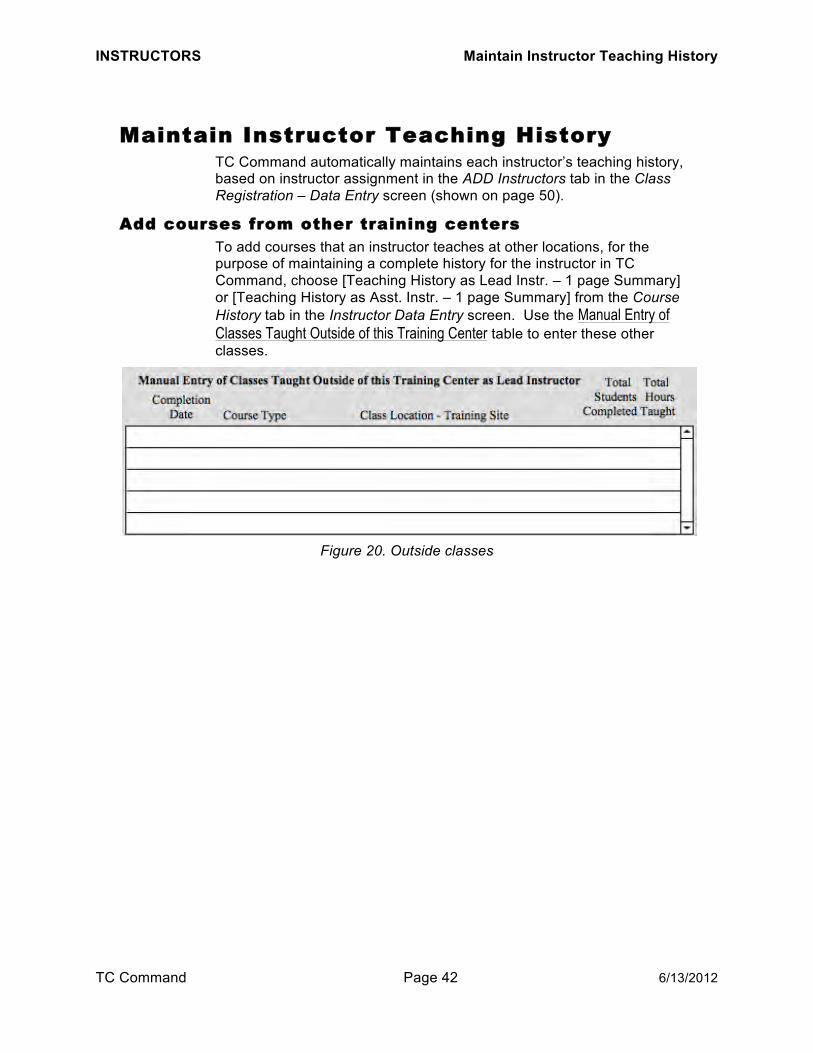
INSTRUCTORS Maintain Instructor Teaching History
TC Command Page 42 6/13/2012
MMaaiinnttaaiinn IInnssttrruuccttoorr TTeeaacchhiinngg HHiissttoorryy TC Command automatically maintains each instructor’s teaching history, based on instructor assignment in the ADD Instructors tab in the Class Registration – Data Entry screen (shown on page 50).
AAdddd ccoouurrsseess ffrroomm ootthheerr ttrraaiinniinngg cceenntteerrss To add courses that an instructor teaches at other locations, for the purpose of maintaining a complete history for the instructor in TC Command, choose [Teaching History as Lead Instr. – 1 page Summary] or [Teaching History as Asst. Instr. – 1 page Summary] from the Course History tab in the Instructor Data Entry screen. Use the Manual Entry of Classes Taught Outside of this Training Center table to enter these other classes.
Figure 20. Outside classes

INSTRUCTORS Maintain Instructor Teaching History
TC Command Page 43 6/13/2012
DDeeffiinnee ttrraaiinniinngg cceenntteerr ffiieelldd nnaammeess To define the field names available on the Provider Data/Notes tab, follow these steps:
1. Choose [General Information (SetUp)] from the Instructor-MISC or Provider Data/Notes tab in the Instructor Data Entry screen (shown on page 31).
2. Under the Title Management for User-Assignable Fields heading, use the field name fields to define information needed at your Training Center.
Example 1: To track instructor liability insurance, define one of the field names as “Liability Insurance,” then use the “Liability Insurance” field on this tab to enter the name of the instructor’s insurance company.
Example 2: To record additional training required for instructors, define one of the field names as “Additional Required Training,” then use the “Additional Required Training” field on this tab to enter the training and the date completed by this instructor.
Example 3:
To set up instructor certification for MISC courses defined in TC Command, use the lower set of fields (Instr1 – Instr8) for specific instructor certifications needed for the miscellaneous courses.
INSTRUCTORS Inactivate/Reactivate Instructors
TC Command Page 44 6/13/2012
IInnaaccttiivvaattee//RReeaaccttiivvaattee IInnssttrruuccttoorrss Use the Current/Active for Lists? radio buttons on the Instructor Data Entry screen (shown on page 31) to maintain instructor status.
Choose the No radio button to inactivate an instructor temporarily.
Choose the Yes radio button to reactivate an instructor.
MMaaiinnttaaiinn IInnssttrruuccttoorr CCeerrttiiffiiccaattiioonn To maintain certification, each instructor must meet current renewal requirements, including being monitored, teaching the required number of classes, and attending a renewal session.
CCrreeaattee ffoouunndd sseett To find instructors with expiration dates in selected ranges for specific certifications, follow these steps:
1. In the Instructor Data Entry screen, click <Find> at the top of the screen.
2. In the Instructor-ECC tab or the Instructor-MISC tab, use the Date expired fields.
3. For each certification that is needed, set up a date range. 4. Click <Perform Find> at the top of the screen to create the found
set. For example, to find all instructors with BLS certification expiring between 01/01/10 and 06/30/10, enter 01/01/10 … 06/30/10 in the Date expire field for BLS.
TTrraacckk aanndd mmaaiinnttaaiinn eexxppiirraattiioonn ddaatteess To track and maintain instructor certification dates, follow these steps:
1. Use the “Instructor Expiration Date List” report to identify instructors who will need recertification in the near future. (Refer to page 136.)
2. Contact these instructors via phone, letter, or email. a. For a list of instructor phone numbers, refer to page 134. b. To generate letters to instructors, find the group (refer to Note
on page 134), then use the deficient notification letter (refer to page 113), or renewal status letter (refer to page 113) as needed.
c. To generate emails to instructors, find the group (refer to Note on page 134), then use the email list (described on page 158).
3. After the instructors complete their recertification, enter the new expiration dates in the Instructor-ECC tab on the Instructor Data Entry screen (shown on page 31).

INSTRUCTORS Maintain Instructor Certification
TC Command Page 45 6/13/2012
TTrraacckk nnuummbbeerr ooff ccllaasssseess ttaauugghhtt
To track the number of classes an instructor has taught, use the teaching history reports (described on page 135), or the Instructor Expiration Date List report (see page 136) expanded to include teaching history.
Use the renewal status letter (described on page 113) to contact instructors about recertifying.
For instructors who need to teach additional classes before recertifying, use the deficient notification letter (described on page 113).
MMaaiinnttaaiinn mmoonniittoorriinngg iinnffoorrmmaattiioonn TC Command supplies the Training Center manager’s name as the person who monitored the instructor training. If the monitoring was performed by a regional or Training Center faculty member instead, then record the correct name on the Instructor-ECC tab (shown on page 34).
Note: The dropdown list for the Monitored by field is maintained in general setup in the Lists screen under Instructors monitored by.
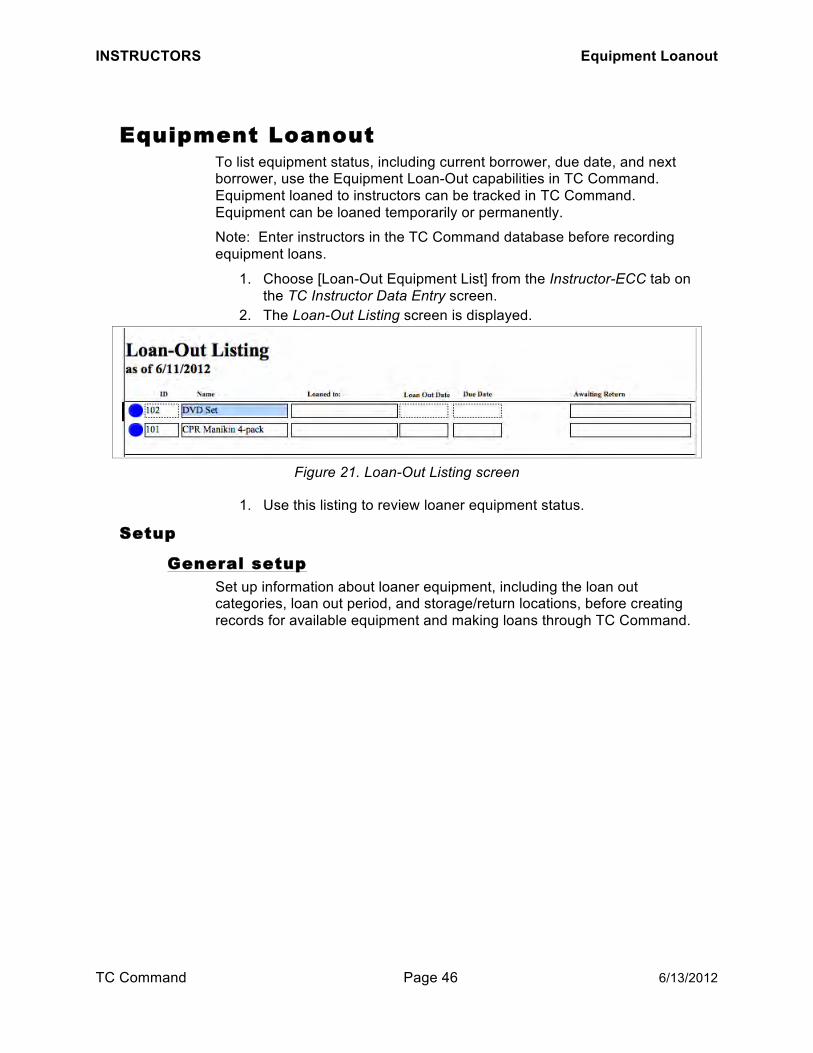
INSTRUCTORS Equipment Loanout
TC Command Page 46 6/13/2012
EEqquuiippmmeenntt LLooaannoouutt To list equipment status, including current borrower, due date, and next borrower, use the Equipment Loan-Out capabilities in TC Command. Equipment loaned to instructors can be tracked in TC Command. Equipment can be loaned temporarily or permanently.
Note: Enter instructors in the TC Command database before recording equipment loans.
1. Choose [Loan-Out Equipment List] from the Instructor-ECC tab on the TC Instructor Data Entry screen.
2. The Loan-Out Listing screen is displayed.
Figure 21. Loan-Out Listing screen
1. Use this listing to review loaner equipment status.
SSeettuupp
GGeenneerraall sseettuupp
Set up information about loaner equipment, including the loan out categories, loan out period, and storage/return locations, before creating records for available equipment and making loans through TC Command.
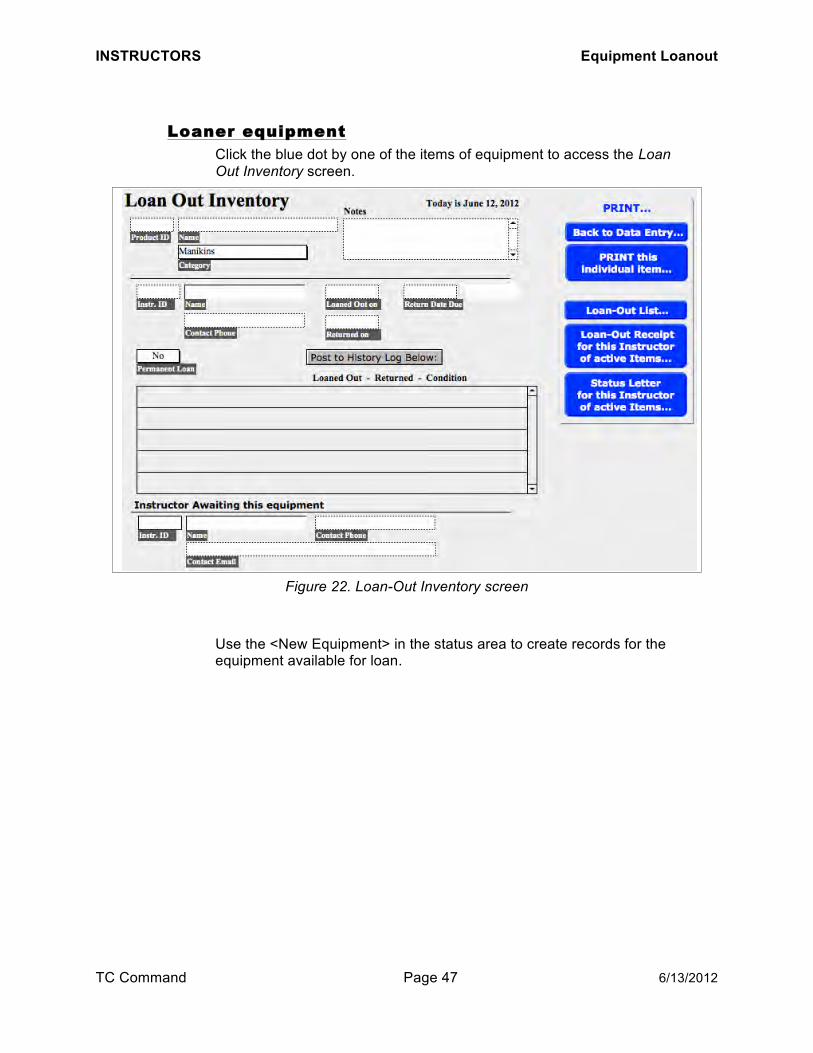
INSTRUCTORS Equipment Loanout
TC Command Page 47 6/13/2012
LLooaanneerr eeqquuiippmmeenntt Click the blue dot by one of the items of equipment to access the Loan Out Inventory screen.
Figure 22. Loan-Out Inventory screen
Use the <New Equipment> in the status area to create records for the equipment available for loan.

INSTRUCTORS Equipment Loanout
TC Command Page 48 6/13/2012
RReeccoorrdd llooaannss aanndd rreeqquueessttss After the loaner equipment is entered, it can be loaned to an instructor.
SSiinnggllee llooaann To loan a piece of equipment to an instructor, follow these steps:
1. Click the blue dot by the equipment on the Loan-Out Listing screen.
2. When the equipment record is displayed in the the Loan Out Inventory screen, use the dropdown list for Instr. ID to choose the instructor borrowing the equipment.
3. Enter the loan date and due date. 4. Click [Post to History Log Below] to record the load. 5. Click [Loan-Out Receipt] to print a receipt for the instructor to sign.
EEqquuiippmmeenntt rreettuurrnn
When the equipment is returned, find the record, enter the return date and click [Post to History Log Below] to show the equipment as available for loan again.
If equipment condition is tracked, use the [Condition] column to record the condition upon return in the table.
IInnssttrruuccttoorrss wwaaiittiinngg ffoorr eeqquuiippmmeenntt If an instructor needs a piece of equipment currently on loan to another instructor, note the instructor who needs it next by selecting the instructor ID from the dropdown list under the Instructor Awaiting this equipment heading.
INSTRUCTORS Equipment Loanout
TC Command Page 49 6/13/2012
TTrraacckk llooaannss aanndd eeqquuiippmmeenntt
SSiiggnn--oouutt rreecceeiipptt
To print or email a receipt for the instructor to sign, click [Loan-Out Receipt].
LLooaann--oouutt lliissttiinngg To review loaned equipment, choose [Loan-Out Equipment List] from the Instructor-ECC tab. Overdue loans are flagged. If an instructor is waiting to borrow the equipment, that instructor’s name is shown. Use [PRINT this list] to print the list.
SSttaattuuss lleetttteerr If an overdue loan is flagged on the list of loaned equipment, click the blue dot by the instructor’s name, then click [Status Letter] to generate a letter to the instructor. Alternately, an email can be sent to the instructor. All active loans, including overdue loans, to this instructor are included in this letter.
EEqquuiippmmeenntt hhiissttoorryy To print the history log for an individual item of equipment, click [PRINT this individual item].

CLASSES Overview
TC Command Page 50 6/13/2012
CCLLAASSSSEESS OOvveerrvviieeww
After setting up the training center and instructors, create classes in TC Command. After a class is created, employees and/or students can be registered in the class.
Classes can be created before they are run, or after the completed roster is received.
CCrreeaattee NNeeww CCllaassss 1. Choose [Class Registration] from the TC Command Main Menu. 2. The Class Registration Data Entry screen is displayed.
Figure 23. Class Registration – Data Entry
3. Click [ADD Class…] and complete the fields to create a new record for a class. Field definitions are given below for fields that are not self-explanatory.
4. After completing the appropriate fields, you can: a. click [ADD Class…] again to create another new record, b. or click [Main Menu] to return to the TC Command Main Menu.
CLASSES Create New Class
TC Command Page 51 6/13/2012
Field definitions Field definitions are given below for fields that are not self-explanatory.
Class No. The class number must be unique, and can contain both letters and numbers, but no spaces. Use a maximum of 20 characters.
Course Type Use these radio buttons to designate this class as initial training, renewal, or online. When online is selected, the back of the roster reflects the skills check off.
Class Location Enter information to describe the physical class location, or click the blue dot to select the location from the location listing.
Contact Phone Number Enter the phone number for the class location, if available. If the class location is selected from the location listing, then this field is automatically populated as well.
If HeartSaver, Options For a HeartSaver course, the options for this course are available by dropdown list. For additional clarification, the options that will NOT be crossed out on the card are also given.

CLASSES Create New Class
TC Command Page 52 6/13/2012
CCllaassss DDaattaa ttaabb Use the fields on this tab (in the Class Registration Data Entry screen) to enter dates, times, etc.
Figure 24. Class Data tab

CLASSES Create New Class
TC Command Page 53 6/13/2012
Field definitions Field definitions are given below for fields that are not self-explanatory.
Class Dates Select the start date from the calendar icon. If the class is more than one day, select the correct end date from the calendar icon.
Card Dates This field is automatically filled with the class end date. If you change the class end date, click [Card Dates: Issue/Exp] to update the card issue date to the new class end date. If the card issue date is different from the class end date, select the correct issue date from the calendar icon.
Class Times Enter the start and end times for the class, using a 24 hour clock. If the class is held on more than one day, enter only the start time.
Automatic, Manual Input If students will be registered individually so student details are available in TC Command, then use the default of Automatic for Attendance. If only student totals will be entered, and student details are not needed, then choose Manual Input for Attendance.
Estimated Use this field in Automatic mode to enter the maximum class size. The number of available seats is included in the dropdown list of classes, and is decreased as students are registered.
Actual If student details are not needed, use this field in Manual Input mode to enter the total number of students registered in the class.
Completed If student details are not needed, use this field in Manual Input mode to enter the total number of students successfully completing the class.
Remediated If student details are not needed, use this field in Manual Input mode to enter the total number of students successfully remediated.
Class Hours Enter the length of the class in hours. For example, if the class is four and a half hours long, enter 4.5.
Outside Students? If outside students are not allowed in this class, then set the radio button to No. Choose Yes if outside students are allowed.
In-House Staff?

CLASSES Create New Class
TC Command Page 54 6/13/2012
If this class is reserved for staff in your facility, then set the radio button to Yes.
Manikins Decontaminated by Use the default of lead instructor, or enter another name.
ACLS/PALS Physician Instructor If applicable, select this checkbox. The physician instructor set up for the training center is displayed, and can be overwritten with another name. Note: Select the checkbox first, before entering another name.
DDiissppllaayy ccllaassss oonn ddrrooppddoowwnn lliissttss Paperwork Completed?
This radio button controls the classes shown on the dropdown list in the student data entry screens. If you will need to access the class to register students, keep this set to No so the class is shown on the dropdown list in the student data entry screen.
CCoonnttiinnuuiinngg eedduuccaattiioonn hhoouurrss
If a class has continuing education hours, specify them in the CME Hours field on the Class Data tab (in the Class Registration Data Entry screen).
If each student’s category will determine the number of CE hours he or she will receive, then use the multiple fee structure to define the continuing education (CE) hours for the student categories. Refer to the explanation of fee structure in the Financials section.
CLASSES Create New Class
TC Command Page 55 6/13/2012
EExxttrraa DDeettaaiillss ttaabb Use this tab to enter additional information to describe a class, to clarify the class date and time, and to help students get to class.
Expand on Actual Course Dates Use this field to add information about the class start and end dates, in addition to what is already in the Class Dates: Start/End fields. For example, a two-day class running Thursday evening and Sunday afternoon. This information will be included in the student registration letters.
Expand on Actual Course Times Use this field to add information for a class, to clarify the class start and end times, in addition to what is already in the Class Times: Start/End fields. For example, a two-day class on Friday evening from 7-9pm and Saturday morning from 9-11am. This information will be included in the student registration letters.
Expand on Facility Parking If students need information about parking at the class location, enter it here. This information will be included in the student registration letters. Note: If this location is included in the list of frequently used locations, then leave this field blank and enter the parking information in the Repetitive Class Location File screen, shown on page 59.
Expand on Actual Registration Location, etc. Details: If students need additional directions to find the class location, enter it here. This information will be included in the student registration letters. Note: If this location is included in the list of frequently used locations, then leave this field blank and enter the registration information in the Repetitive Class Location File screen, shown on page 59.
Room assignment for Instructors ONLY Use this field to include the room number in the instructor’s “Active Instructor Assignments” report and on the labels for class packets.

CLASSES Assign Instructors to Class
TC Command Page 56 6/13/2012
AAssssiiggnn IInnssttrruuccttoorrss ttoo CCllaassss
LLeeaadd iinnssttrruuccttoorr Select the instructor’s name from the dropdown list in the Class Data tab (shown on page 52) or the ADD Instructors tab (shown on page 56). The instructor’s latest recertification date for the class type is shown.
AAssssiissttiinngg iinnssttrruuccttoorr Assisting instructors must be assigned on the ADD Instructors tab.
Figure 25. ADD Instructors tab
CLASSES Assign Instructors to Class
TC Command Page 57 6/13/2012
PPhhyyssiicciiaann iinnssttrruuccttoorr The physician instructor is needed for ACLS and PALS classes only.
To use the main physician instructor for the training center, select the Physician Instructor checkbox on the Class Data tab (in the 52 screen). The name is automatically supplied by TC Command.
To enter a different physician instructor, follow these steps:
1. First, select the Physician Instructor checkbox. 2. The default physician instructor’s name is displayed. 3. Overwrite the displayed name.
Note: Always select the checkbox first before typing the different name.
CLASSES Class Location
TC Command Page 58 6/13/2012
CCllaassss LLooccaattiioonn The class location can be entered manually when defining the class, or if the location will be used frequently, it can be added to the TC Command database so it is available for selection from a list.
EEnntteerr ccllaassss llooccaattiioonn
A class location can be entered manually. Use the Class Location field in the Class Registration Data Entry screen to enter the class location, then give address information also.
If the location will be used again, then after all the information for the location has been entered in the Class Registration Data Entry screen, click the [Class Location] field to add the record to the location list so it is available via the blue dot in the future.
CChhoooossee ffrreeqquueenntt llooccaattiioonn Frequent class locations may be available on the dropdown list for the Class Location field.
1. Click on the blue dot by the [Class Location] field in the Class Registration Data Entry screen.
2. The class location screen is displayed. 3. Highlight a selection in the Select Location list, then review data at
the top of the screen. 4. Click [Accept Selection…] to use this location. 5. The fields for the class location are populated based on the
selected location. Note: If the location is not listed, click [Location Data Entry] to add it to the list in the Repetitive Class Location screen. Refer to the next page.
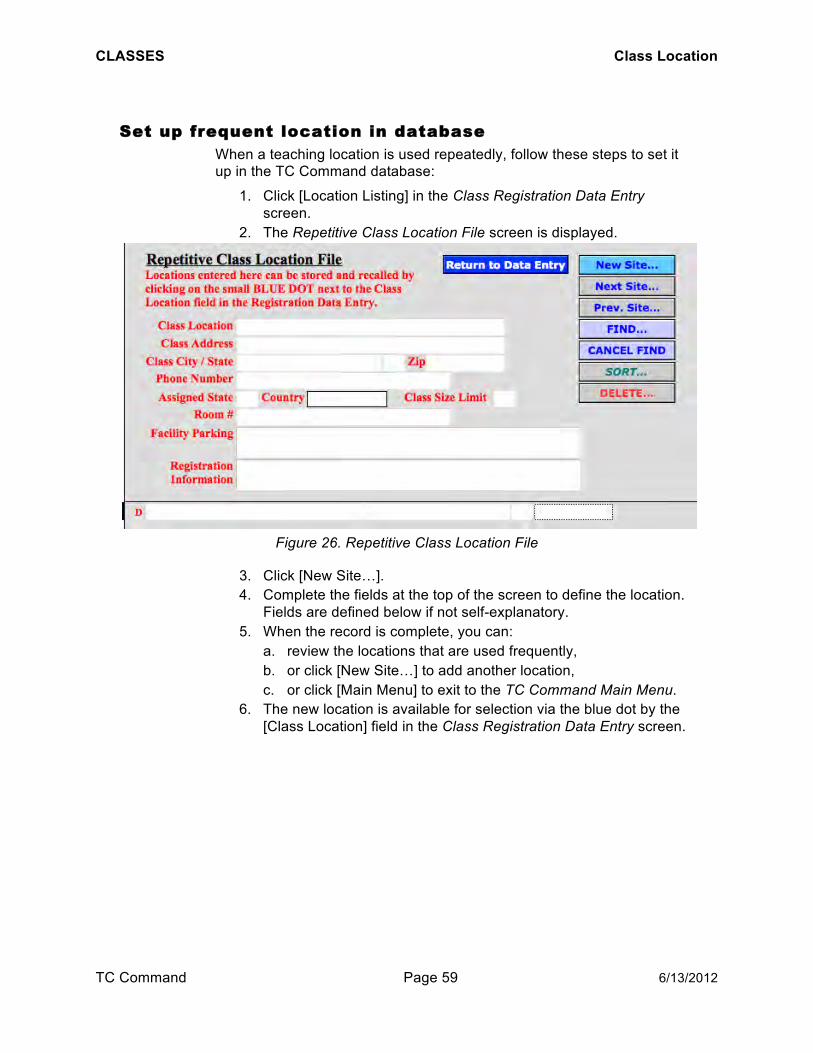
CLASSES Class Location
TC Command Page 59 6/13/2012
SSeett uupp ffrreeqquueenntt llooccaattiioonn iinn ddaattaabbaassee When a teaching location is used repeatedly, follow these steps to set it up in the TC Command database:
1. Click [Location Listing] in the Class Registration Data Entry screen.
2. The Repetitive Class Location File screen is displayed.
Figure 26. Repetitive Class Location File
3. Click [New Site…]. 4. Complete the fields at the top of the screen to define the location.
Fields are defined below if not self-explanatory. 5. When the record is complete, you can:
a. review the locations that are used frequently, b. or click [New Site…] to add another location, c. or click [Main Menu] to exit to the TC Command Main Menu.
6. The new location is available for selection via the blue dot by the [Class Location] field in the Class Registration Data Entry screen.
CLASSES Class Location
TC Command Page 60 6/13/2012
Field definitions Field definitions are given below for fields that are not self-explanatory.
Class Location Physical teaching location.
Phone Number Contact phone number at the physical teaching location.
Assigned State If the Training Center holds classes in multiple states or nationally, and the class location is not in the same state as the Training Center, then enter the state where the class was taught.
Country Use the default or select a country from the dropdown list.
Class Size Limit Use this field to enter the maximum number of students for the class. This information will be displayed in the Attendance: Estimated field on the Class Data tab in the Class Registration – Data Entry screen.
Room # Use this field to make the room number available to instructors on the “Active Class Assignment” report.
Facility Parking Additional details for students attending the class.
Registration Information Additional details for students attending the class.
RReevviieeww llooccaattiioonn lliissttiinngg Use the [Location Listing] button in the Class Registration Data Entry screen to review the available locations in the database.
After creating a class in the Class Registration – Data Entry screen, and entering the required information on the Class Data tab, click [ADD to Calendar] to post the class to the monthly calendar.

CLASSES Class Calendar
TC Command Page 61 6/13/2012
CCllaassss CCaalleennddaarr If you are using the monthly calendar capabilities for classes in TC Command, you can add classes to the calendar after they are created, update the calendar, and print a monthly calendar.
Note: For a weekly list of ongoing classes, refer to the Active Class Assignments report (see page 136). Note that this weekly report does not require the use of the [ADD to Calendar] button.
PPoosstt ccllaassss ttoo mmoonntthhllyy ccaalleennddaarr After creating a class, click [ADD to Calendar] on the Class Data tab.
RReevviieeww mmoonntthhllyy ccaalleennddaarr After posting classes to the monthly calendar, click [Calendar View] in the Class Registration – Data Entry screen.
The course type, class location, start date and start time for the class are displayed in the monthly calendar.
Refer to page 138 for accessing and printing the monthly calendar.
UUppddaattee mmoonntthhllyy ccaalleennddaarr If a class is changed after it is posted to the monthly calendar, click [ADD to Calendar] to post the changes to the calendar.

CLASSES Track Registration as Class Fills
TC Command Page 62 6/13/2012
TTrraacckk RReeggiissttrraattiioonn aass CCllaassss FFiillllss If students are entered before the class runs, use the Actual Attendance field on the Student Fees & Cost Analysis sub tab under the Financials tab on the Class Registration Data Entry screen to monitor registration.
CCooppyy aanndd CChhaannggee aa CCllaassss In TC Command, you can copy an existing class, then change information as appropriate to create a new class.
Use the Class Registration screen, find the existing class, click [COPY this Class], then fill and change fields as needed.
RReemmoovvee CCllaassss NNuummbbeerr ffrroomm DDrrooppddoowwnn LLiisstt When the class is done and the roster and cards have been printed, the course number is no longer needed in the student data entry screen. At this point you can set Paperwork completed? to Yes.
When you do this, the course number is removed from the course dropdown list. The class remains in the TC Command database, but is no longer displayed on the dropdown list. It’s important to remove the course number when it is no longer needed, to keep the dropdown list from getting too long.
To remove the completed course from the dropdown list, follow these steps:
1. Use the Class Data tab (shown on page 52). 2. Set the Paperwork Completed? radio button to Yes. 3. The course remains in the database, but is no longer displayed on
the dropdown list for Pick Course Number on the Course Data tab in the student data entry screen (shown on page 78).

CLASSES Enter Old Classes
TC Command Page 63 6/13/2012
EEnntteerr OOlldd CCllaasssseess When adding historical data to TC Command, you can enter the total number of students for each class. This capability is useful when an organization begins using TC Command partway through a training organization’s reporting period, so earlier data can be included in reports.
While creating the class, use Manual Input mode (refer to Class Data tab on page 52). Leave the Estimated field blank. Use the Class Data tab to enter student numbers in the Actual, Completed, and Remediated fields for reporting purposes.
Note: If individual student records will be needed for tracking and reminder purposes, the records can be added at a later date in Automatic mode.
EMPLOYEES Overview
TC Command Page 64 6/13/2012
EEMMPPLLOOYYEEEESS OOvveerrvviieeww
If you are responsible for tracking and reporting employee certification, use the employee module to maintain employee records.
SSeett UUpp EEmmppllooyyeeee MMoodduullee To use the employee module fully, first set up the following:
Primary Employer or Organization Departments or Locations Employment Status Primary Occupation Titles of Additional Certifications
Follow these steps to set up this information:
1. From the TC Command Main Menu, choose [Setup Data], then choose [General Setup Information].
2. When the Training Center SetUp Information screen is displayed, choose the Employee Support tab (shown on page 65).
3. Populate the tables in the screen with data needed for employee records.
4. When the information is complete, click [MENU], then [Main Menu] to return to the TC Command Main Menu.

EMPLOYEES Set Up Employee Module
TC Command Page 65 6/13/2012
Figure 27. Employee Support tab
EMPLOYEES Set Up Employee Module
TC Command Page 66 6/13/2012
Field definitions Field definitions are given below for fields that are not self-explanatory.
Primary Employer or Organization This is one employer (or organization), or it can be a list of organizations and/or employers.
Department(s) or Location(s) Define the departments (or locations) for the employers (or organizations) listed in Primary Employer or Organization.
Primary Occupation Define occupations to describe your employees.
Employment Status Define the types of employment used.
Titles of Additional Certifications Define additional certifications that you track for your employees.
AAddddiinngg DDeeppaarrttmmeennttss
After creating an employer (or organization) in the Primary Employer or Organization table, you can add departments (or locations) for that employer.
1. Under Department(s) or Locations(s), in the field with the shadow label of Employer or Organization, select the employer from the dropdown list.
2. Enter the department name (and ID code if applicable), plus the department head with his or her phone number and email address under Department(s) or Location(s).
3. Click [Click to ADD above to Department List]. 4. Repeat steps to add additional departments for the employer.
For example, a hospital is set up as the primary entity in the Primary Employer or Organization table, and its departments are created in the Department(s) or Location(s) table. As another example, a Training Center tracking employee certification for multiple hospitals creates each hospital in the Primary Employer or Organization table, then selects each hospital and creates departments for it in the Department(s) or Location(s) table.

EMPLOYEES Enter Employees
TC Command Page 67 6/13/2012
EEnntteerr EEmmppllooyyeeeess Employee records can be entered manually or imported from the Human Resources database.
Note: After setting up employees, then use the employee ID or last name to access the employee record when registering employees for classes.
1. Choose [Employee Data] from the TC Command Main Menu. 2. The Personnel Data Entry screen is displayed.
Figure 28. Personnel Data Entry screen

EMPLOYEES Enter Employees
TC Command Page 68 6/13/2012
IImmppoorrtt eemmppllooyyeeee rreeccoorrddss Before importing employee records, prepare a file of employee records for import. Common formats are .csv, .txt, .xls, etc. Make sure the employee ID is included in the file.
IInniittiiaall iimmppoorrtt To import employee records for the first time only, before entering any records manually, follow these steps:
1. Back up your TC Command data first. Refer to page 30. 2. Choose [Data Import Control] from the Personnel Data Entry
screen. 3. In the Import Controls screen, click [Initiate Import]. 4. In the dialog box, show all files for file type, and locate the
directory containing the file to import. 5. Select the file. The Import Field Mapping screen is displayed, with
a column on the left showing source fields from the file being imported, and a column on the right showing target fields in the TC Command employee module.
6. Move the TC Command fields in the right-hand column to match the fields you are importing. Fields that do not match will not be imported.
7. Make sure each field to be imported from the left-hand column has an arrow pointing to the appropriate TC Command field.
8. Under Import Action, select the radio button for Add new records. 9. Click [Import]. 10. In the Import Options screen, select the Perform auto-enter options
while importing checkbox. 11. After the employee records have been imported, review the new
records in the Personnel Data Entry screen.
EMPLOYEES Enter Employees
TC Command Page 69 6/13/2012
SSuubbsseeqquueenntt iimmppoorrttss
If any employee records have already been entered manually or imported into TC Command, and you need to import additional employees or import more information for existing employees, then follow these steps:
Follow the steps above for the initial import. After matching the source fields with the target fields and confirming all fields are related with arrows, perform these steps in order:
1. Under Import Action, select the radio button for Update matching records in found set.
2. Under Source Fields : Target Fields, highlight the Employee_ID field and click Match records based on this field.
3. Then click [Import] and select the Perform auto-enter options while importing checkbox.
MMaannuuaall eennttrryy
To enter the records manually, follow these steps:
1. Click <New Record> in the status area of the Personnel Data Entry screen.
2. Complete the fields in the screen to create the new record. Most fields are self-explanatory. Those that are not are defined below.
3. After completing the fields, the new record is created and you can: a. click <New Record> again to add another employee, b. or click [Main Menu] to return to the TC Command Main Menu.
Field definitions Field definitions are given below for fields that are not self-explanatory in the Personnel Data Entry screen, the Employer/Location tab, and the Certification tab.
Employee ID This is a unique code for the employee. Use a maximum of 20 alphanumeric characters. Spaces are not allowed. First initial and last name are not recommended for identification # due to possible duplication and future name changes.
Extension The extension field can be used for Jr, Sr, MD, RN, etc.
E-Mail One email address allowed.
Employment Status If this information was entered general setup, then select the appropriate status from the dropdown list for this field.

EMPLOYEES Track Employee Certification
TC Command Page 70 6/13/2012
Primary Employer If employer/organization and department/location information was entered in general setup, then select the appropriate organization and department from the dropdown list for this field.
Title/Position Include the job title if available.
Occupation Select the employee’s occupation from the dropdown list if this information has been set up in the Primary Occupation list on the Employee Support tab in the Training Center SetUp Information screen (shown on page 12).
Category The employee radio button is selected by default to aid organizations maintaining certification for their own employees. If maintaining certification for large customers, use radio buttons as appropriate.
Department If this information was entered in general setup, then select the appropriate department from the dropdown list for this field.
ID If a department ID code is included in general setup, then it is displayed when the department name is selected.
Exp Enter the employee’s initial expiration date in the first column. Use the second column for current expiration dates. As new expiration dates are entered in TC Command for the employee, they overwrite the dates in the second column.
TTrraacckk EEmmppllooyyeeee CCeerrttiiffiiccaattiioonn To track and maintain employee certification, use the educational history report (refer to page 140) and the expiration status report (refer to page 141).

STUDENTS Overview
TC Command Page 71 6/13/2012
SSTTUUDDEENNTTSS OOvveerrvviieeww
Create the class before registering students in the class. When a student is also an employee, complete the Employee Data module before registering students.
Create student records to register outside students for classes, or register employees by pulling in existing employee records to register employees.
A class can be created before it is held, and students can be pre-registered in the class. Alternately, a class and students can be entered after the class is held.
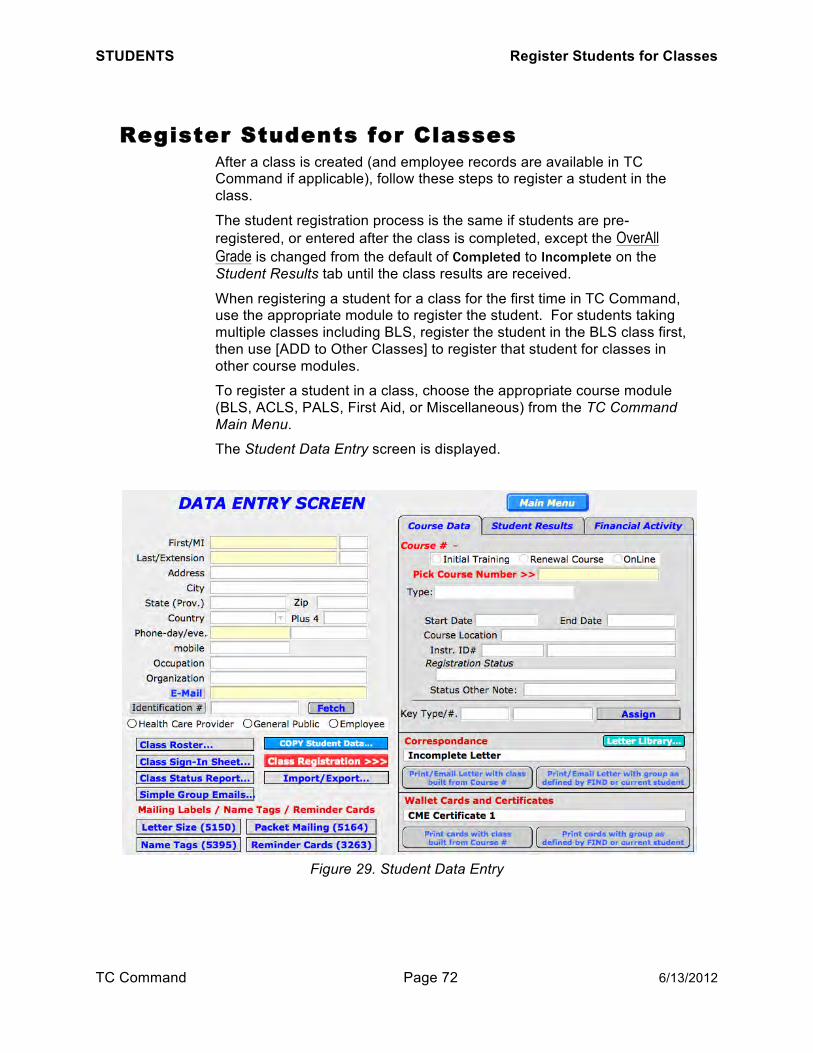
STUDENTS Register Students for Classes
TC Command Page 72 6/13/2012
RReeggiisstteerr SSttuuddeennttss ffoorr CCllaasssseess After a class is created (and employee records are available in TC Command if applicable), follow these steps to register a student in the class.
The student registration process is the same if students are pre-registered, or entered after the class is completed, except the OverAll Grade is changed from the default of Completed to Incomplete on the Student Results tab until the class results are received.
When registering a student for a class for the first time in TC Command, use the appropriate module to register the student. For students taking multiple classes including BLS, register the student in the BLS class first, then use [ADD to Other Classes] to register that student for classes in other course modules.
To register a student in a class, choose the appropriate course module (BLS, ACLS, PALS, First Aid, or Miscellaneous) from the TC Command Main Menu.
The Student Data Entry screen is displayed.
Figure 29. Student Data Entry

STUDENTS Register Students for Classes
TC Command Page 73 6/13/2012
1. Click [ADD Student…] in the status toolbar above the student data entry screen (shown on page 3).
2. Complete the student information, or else access the employee record (see below).
3. Select the class number from the dropdown list. If the student is pre-registering, and the estimated field in the Class Registration Data Entry screen is being used, then the number of remaining seats is included on the dropdown list.
4. Complete additional fields as appropriate. a. If the student is pre-registering, use the Student Results tab
(shown on page 80) to change the OverAll Grade to I for Incomplete.
b. If a fee structure is used for this class, use the Financial Activity tab (shown on page 82) to choose the fee category applicable for the student. Refer to the Financials section for an explanation of fee structure.
c. If the student is paying at the time of registration, use the Financial Activity tab to enter the amount paid and the date.
d. If payment is received and a printed receipt is needed, click [Payment Receipt] on the Financial Activity tab to print a receipt letter.
5. After creating the student record, you can: a. click [Main Menu] to return to the TC Command Main Menu, b. or click [ADD to Other Classes] on the Course Data tab to
register this student for a class in another module (available from the BLS student data entry screen only).
STUDENTS Register Students for Classes
TC Command Page 74 6/13/2012
UUssiinngg eemmppllooyyeeee rreeccoorrddss
If the employee record is in the employee module, use that record when registering an employee in a class.
Note: Do not add anything to an existing employee record while registering the employee for a class. Always use the employee data entry screen to add information to an existing employee record.
If the identification # is known, but the employee record is not yet in the employee module, then it is possible to create a preliminary record while registering the employee for the class.
AAcccceessss eemmppllooyyeeee rreeccoorrdd If the student is an existing employee, use one of these methods to access information in the employee record when registering the employee for a class.
vviiaa eemmppllooyyeeee IIDD
If the employee identification number is known, enter it in the Identification # field (in the Student Data Entry screen shown on page 72) and click [Fetch]. Information from the employee module is displayed in the Student Data Entry screen and the Identification # field is displayed in green. Continue registering the student by selecting the class number.
vviiaa eemmppllooyyeeee nnaammee 1. If the employee identification number is not known, click
[Identification #] to search for the employee record. 2. The Employee Search screen is displayed.

STUDENTS Register Students for Classes
TC Command Page 75 6/13/2012
Figure 30. Employee Search

STUDENTS Register Students for Classes
TC Command Page 76 6/13/2012
3. Enter all or part of the employee’s last name in the Enter Last Name Below… field, then click [SEARCH].
4. Review the selected employee(s) and click [Copy] for the appropriate record.
5. The employee record is displayed in the Student Data Entry screen. Continue registering the student by selecting the class number.
CCrreeaattee eemmppllooyyeeee rreeccoorrdd
If the employee has an identification number, but is not yet in the TC Command employee database, you can create an employee record while registering the employee in a class.
Note: To avoid creating duplicate records, be extremely careful when adding employees via the student data entry screen. If an employee record is already in the employee module, and a new employee record is created in error, then the duplicate employee records will cause problems when the employee recertifies. The employee’s prior history will be in the old employee record, and any new expiration dates will be in the new employee record. This will make tracking difficult.
To create the preliminary record, follow these steps:
1. Enter the new employee ID number in the Identification # field. 2. Click [Fetch]. 3. If the employee ID is not in the database, it is displayed in red with
the following message: ”This employee ID does not match any records in the database. Do you want to add this employee to the database?”
4. Click [Yes] to add the new employee. 5. The Employee Search screen is displayed (shown on page 75). 6. Double check for an existing record by searching for the employee
by name (see above). 7. If the record cannot be found via employee ID or name, then
create it. 8. Enter the fields under Employee Addition to Employee Module, then
click [Add Employee] to create a preliminary record for the employee.
9. After the new preliminary record is completed, use the employee module to add the remaining information to the new employee record at your earliest convenience.
STUDENTS Register Students for Classes
TC Command Page 77 6/13/2012
EEnntteerr ssttuuddeenntt iinnffoo
If the student is not an employee, complete the fields to describe the student. Field descriptions are given below for fields that are not self-explanatory.
Field definitions Field definitions are given below for fields that are not self-explanatory.
Extension Use this field to enter Jr, Sr, III, etc.
Occupation If this information was entered in general setup, then select the appropriate occupation from the dropdown list for this field.
Organization Employer, agency, or organization.
E-Mail One email address allowed.
Identification # Employee ID or other identification number.
Student data radio buttons If this student is not an employee, and if this information is needed for reporting purposes, then choose the Health Care Provider or General Public radio button.
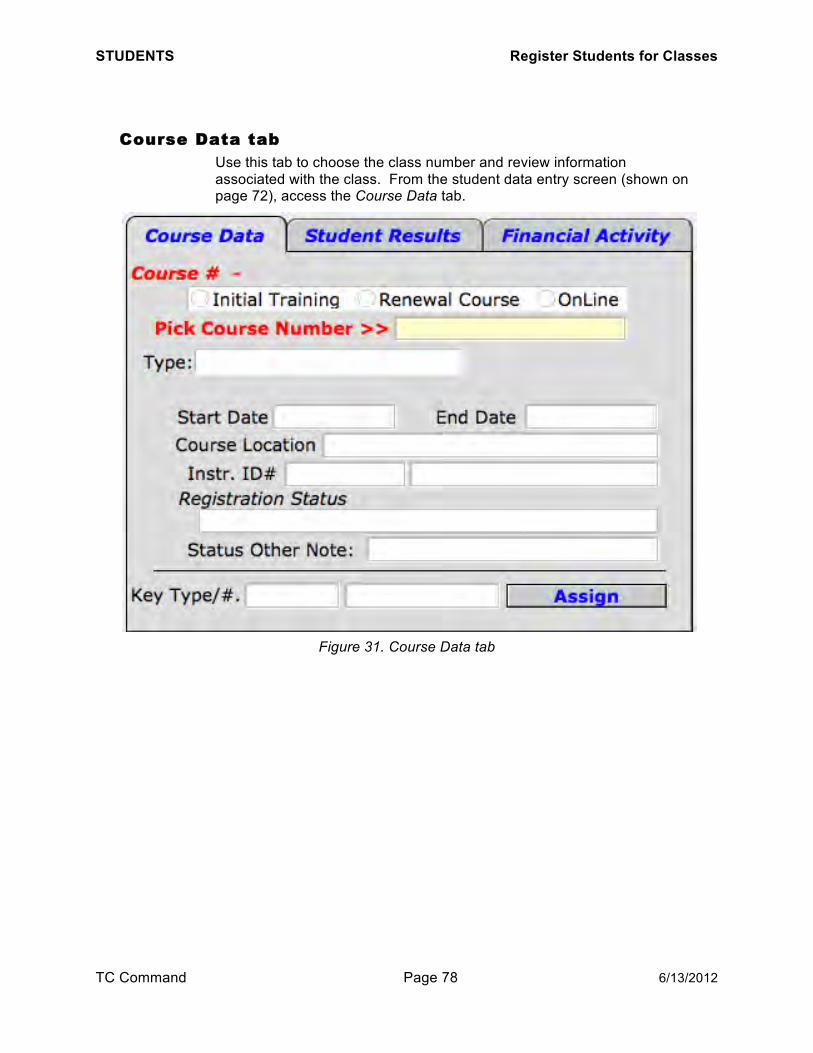
STUDENTS Register Students for Classes
TC Command Page 78 6/13/2012
CCoouurrssee DDaattaa ttaabb Use this tab to choose the class number and review information associated with the class. From the student data entry screen (shown on page 72), access the Course Data tab.
Figure 31. Course Data tab
STUDENTS Register Students for Classes
TC Command Page 79 6/13/2012
AAssssiiggnn ssttuuddeenntt ttoo ccoouurrssee
Use the dropdown list in the Pick Course Number field on the Course Data tab to pick the class for the student. Descriptive information for the class is displayed.
If the student is pre-registering, the number of seats remaining in the class is included with the course number on the dropdown list.
NNoottee ssttuuddeenntt ssttaattuuss
Use the dropdown list for the Registration Status field to choose student specific information to be included in the Incomplete Registration letter. This allows the Training Center to manage the student’s registration status via email.
Note: The registration status is an editable list maintained via the Lists tab in the General Setup screen.
If additional status information is needed in the student’s record, use the Status Other Note field, which does not print out on any student correspondence.

STUDENTS Register Students for Classes
TC Command Page 80 6/13/2012
SSttuuddeenntt RReessuullttss ttaabb Use this tab (in the Student Data Entry screen) to enter student results.
Figure 32. Student Results tab
Field definitions Field definitions are given below for fields that are not self-explanatory.
Materials Sent? Choose YES from the dropdown list if course materials have been sent directly to the student prior to the class.
Group If a large class will be broken up into training groups for station rotation, use the Group field on the Student Results tab to assign a group number to the student. Any format can be used for the group number, including A, B, C, D, … or 1, 2, 3, 4, and so on. This information is included on student name tags (badges).
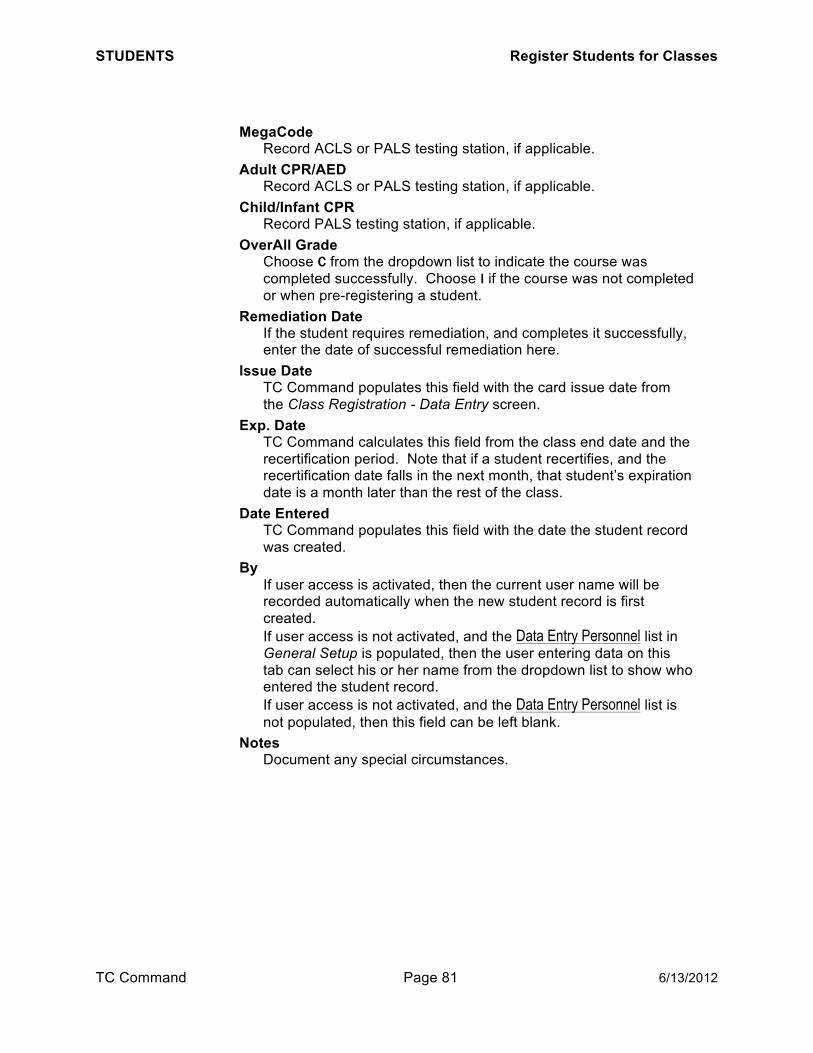
STUDENTS Register Students for Classes
TC Command Page 81 6/13/2012
MegaCode Record ACLS or PALS testing station, if applicable.
Adult CPR/AED Record ACLS or PALS testing station, if applicable.
Child/Infant CPR Record PALS testing station, if applicable.
OverAll Grade Choose C from the dropdown list to indicate the course was completed successfully. Choose I if the course was not completed or when pre-registering a student.
Remediation Date If the student requires remediation, and completes it successfully, enter the date of successful remediation here.
Issue Date TC Command populates this field with the card issue date from the Class Registration - Data Entry screen.
Exp. Date TC Command calculates this field from the class end date and the recertification period. Note that if a student recertifies, and the recertification date falls in the next month, that student’s expiration date is a month later than the rest of the class.
Date Entered TC Command populates this field with the date the student record was created.
By If user access is activated, then the current user name will be recorded automatically when the new student record is first created. If user access is not activated, and the Data Entry Personnel list in General Setup is populated, then the user entering data on this tab can select his or her name from the dropdown list to show who entered the student record. If user access is not activated, and the Data Entry Personnel list is not populated, then this field can be left blank.
Notes Document any special circumstances.
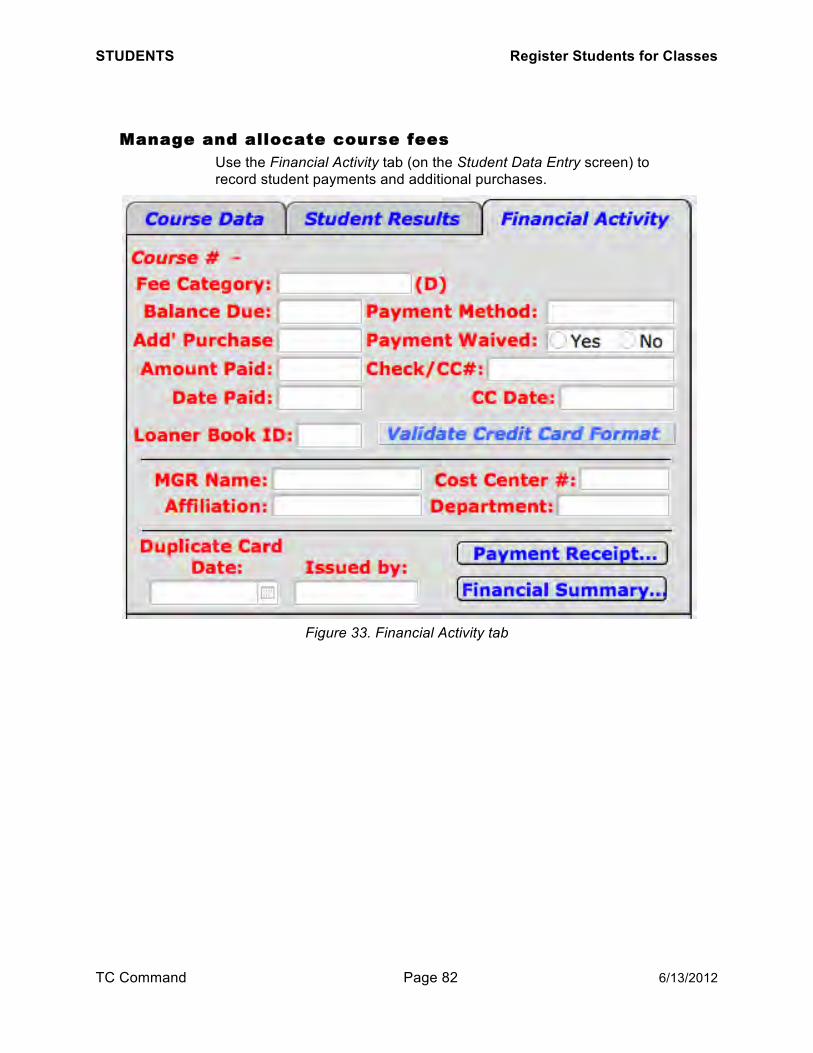
STUDENTS Register Students for Classes
TC Command Page 82 6/13/2012
MMaannaaggee aanndd aallllooccaattee ccoouurrssee ffeeeess Use the Financial Activity tab (on the Student Data Entry screen) to record student payments and additional purchases.
Figure 33. Financial Activity tab

STUDENTS Register Students for Classes
TC Command Page 83 6/13/2012
RReeccoorrdd ppaayymmeennttss
When the student pays, record the payment in the Amount Paid field.
WWaaiivvee ppaayymmeenntt
If the student does not have to pay for the course, select Yes for Payment Waived.
UUssee ffeeee ssttrruuccttuurree If the fee structure is being used for this class, choose the category for the student in the Fee Category field to apply the correct fees to the student.
CChheecckk ccrreeddiitt ccaarrdd nnuummbbeerr
When a credit card number is entered in the Check/CC# field, click [Validate Credit Card] to check the card number. This checks the format of the card number and leaves the last four numbers displayed.
Note: This does not perform credit card authorization.
AAllllooccaattee ccoossttss Notification of the certification can be distributed internally in the organization by using the find capability with the MGR Name, Cost Center #, Affiliation, and Department fields as appropriate.
DDuupplliiccaattee ccaarrdd
Before printing a replacement wallet card, use the Duplicate Card Action: section of the Financial Activity tab to enter the date the replacement card is being issued. If user security is not activated, use the Issued by dropdown list to select your name from the list of data entry personnel (entered on the Lists tab in general setup). After entering the duplicate card information on the Financial Activity tab, then print the card (see page 110) with the word “Duplicate” on the card.
STUDENTS Class Followup
TC Command Page 84 6/13/2012
CCllaassss FFoolllloowwuupp
EEnntteerr wwrriitttteenn tteesstt ssccoorree
If the course had a written test, enter the student’s score in the Written Test field on the Student Results tab.
RReeccoorrdd aaddddiittiioonnaall ppuurrcchhaasseess
If the student bought anything extra, record the purchase in the Add’ Purchase field on the Financial Activity tab.
RReevviieeww ccaarrdd iissssuuee//eexxppiirraattiioonn ddaatteess Card issue and expiration dates are entered for the whole class in the Class Registration Data Entry screen. These dates are also displayed on the Course Data tab (in the student data entry screen).
MMaannaaggee rreenneewwaallss
When a student renews certification, use the Previous Card Valid? field on the Student Results tab to record proof of existing certification.
MMaannaaggee rreemmeeddiiaattiioonn When a student does not complete the class successfully, choose I for incomplete from the dropdown list for the OverAll Grade field on the Student Results tab. When the student re-evaluates successfully, change the grade to C for completed and enter the completion date in the Remediation Date field on that same tab.
STUDENTS Find Class after Paperwork Is Completed
TC Command Page 85 6/13/2012
FFiinndd CCllaassss aafftteerr PPaappeerrwwoorrkk IIss CCoommpplleetteedd When the class is done and all printing is completed (roster and cards), the class can be marked No for Paperwork completed? to remove the class number from the dropdown list in the student data entry screen.
After the class number is removed from the dropdown list, if you need to use the class number to find student records in the student data entry screen, then use the Use for FIND after Course is Completed field on the Student Results tab.
RReemmiinndd SSttuuddeennttss ttoo RReecceerrttiiffyy If only the student totals were entered in TC Command for reporting purposes, this capability is not available.
If individual students were registered for classes, then expiration dates can be tracked for reminder purposes.
1. Find students who will need to recertify soon by using a date range in the Exp Date field (on the Student Results tab on page 80) in a find. Refer to the explanation of finding records on page 7 and FileMaker Pro Capabilities in the appendix.
2. Use this found set to contact students via postcard or email. a. Use Reminder Cards to send postcards. Refer to the
explanation on page 119. b. Use Reminder Letters to send emails or printed letters. Refer
to page 117.
RReeggiisstteerr SSttuuddeenntt iinn AAnnootthheerr MMoodduullee A student in a BLS class can be registered in another course module as follows:
1. Create (or find) the student record for the BLS class. 2. Click [Add to Other Courses]. 3. Review the displayed student information, but do not change it. 4. Register the student in the class or classes by choosing the class
number(s) from the appropriate dropdown list(s) and clicking [ADD] for each selected course module.
Note: This procedure must originate from a student record in the BLS module.
IMPORT/EXPORT Setup
TC Command Page 86 6/13/2012
IIMMPPOORRTT//EEXXPPOORRTT Data can be imported to TC Command from instructors using the Roster Tool, exported from a training site to the Training Center, imported from a training site by the Training Center, and exported from TC Command to LMS in Human Resources.
The C:\TC_Command_V3\TCC_Imports folder is provided for imported data files. An alternate folder location can be created to download imported data.
SSeettuupp Confirm the correct local drive letter is set up in TC Command before doing import/export. Refer to explanation on page 13.
IImmppoorrtt
FFrroomm iinnssttrruuccttoorr Refer to the explanation below for information on using TC Command with the Roster Tool to import student rosters.
FFrroomm ttrraaiinniinngg ssiittee After a training site has exported data from TC Command, it can be imported into TC Command at the Primary Training Center.
To import exported data into TC Command at the Primary Training Center, choose [Import/Export] in the student data entry screen, then choose the Importing/Exporting from Sites tab. Click [Import from Site Data Files] and browse to find the .tab file.
EEmmppllooyyeeee ddaattaa To import employee data into TC Command, refer to page 68.
IMPORT/EXPORT Roster Tool Data
TC Command Page 87 6/13/2012
RRoosstteerr TTooooll DDaattaa TC Command and the Roster Tool are set up to work together, with TC Command receiving class and student information from the Roster Tool.
OOvveerrvviieeww The Roster Tool provides instructors with a subset of the capabilities in TC Command. Instructors using the Roster Tool can email the following information to Training Centers using TC Command:
Pre-notification of planned classes Completed class rosters
This information streamlines class creation, allows importing student rosters directly into TC Command, and thereby facilitates printing of wallet cards.
When instructors pre-notify the Training Center about planned classes, then the Training Center can pre-assign class numbers.
Pre-assign class numbers, if applicable
SSeettuupp
Before using data from the Roster Tool, check the version of TC Command on the main menu, in the fine print at the bottom of the screen. The Roster Tool requires TC Command V3 or later, or else WorldPoint ONE running at V2.1 or later.
To prepare instructors for using the Roster Tool, make sure they are using instructor IDs identical to the IDs used in TC Command. Use the Instructor ID Notification letter (described on page 112) to notify instructors of their ID numbers, before receiving data from the Roster Tool.
IMPORT/EXPORT Roster Tool Data
TC Command Page 88 6/13/2012
CCllaassss aannnnoouunncceemmeenntt When the Training Center receives an announcement of a planned class from an instructor using the Roster Tool, follow these steps:
1. Create the new class in TC Command, based on the notification e-mail from the Roster Tool. Refer to page 90 for manual steps, or page 90 for automated class creation.
2. Confirm the new class to the instructor requesting approval, by clicking [Confirmation to Instructor] in the Class Registration – Data Entry screen. The assigned class number is included in the confirmation email.
CCoommpplleetteedd ccllaassss rroosstteerr
When the Training Center receives a completed class roster from an instructor using the Roster Tool, follow these steps:
3. Create the class in TC Command (if not completed in class announcement step above).
4. Note the following information from the Roster Tool e-mail: Number of students on the roster Class number, if used in the Roster Tool Course module Lead instructor ID Class start date Class start time
5. Download the attached list of students from the email and save it to the TCC_Imports folder in the TC_Command_V3 folder, unless another location has been designated for student lists from the Roster Tool.
6. From the student data entry screen (shown on page 72), choose [Import/Export].
7. The student import/export screen is displayed.

IMPORT/EXPORT Roster Tool Data
TC Command Page 89 6/13/2012
Figure 34. Student import/export
8. Choose the new class number from the dropdown list for the Select Class Number field on the Importing Student Data from Instructors tab.
9. Choose [Click HERE Import from Instructor e-mail Attachments] to browse for the downloaded file.
10. In the Open file dialog box, make sure Files of type is set to All file types, then browse to find the downloaded list of students, in the TC_Command_V3\TCC_Imports folder (or other designated location). The filename contains the course module, instructor ID, class start date, and class start time, in this format: MODULEID_DATE_TIME.
11. TC Command imports the students from the selected file, then displays the total number of students that have been imported.
12. Compare the total number of students imported to the number of students noted in the email, to confirm the correct number of students have been imported.
IMPORT/EXPORT Roster Tool Data
TC Command Page 90 6/13/2012
RReeggiisstteerr ssttuuddeennttss iinn ccllaassss
13. Check the e-mail, then choose the matching class from the dropdown list of classes in the module for SELECT CLASS NUMBER.
14. Choose [Click here to UPDATE the Imported Students] to register the students with all information from the Roster Tool screens.
15. Click [Back to Data Entry] to go to the student data entry screen for this course module, with the students in this class.
16. Continuing in the student data entry screen (shown on page 72) with the found set of students, choose the class number from the dropdown list for the Pick Course Number field for each student in the class.
PPrriinntt wwaalllleett ccaarrddss ffoorr ccllaassss
17. Choose the appropriate button from the Wallet Cards/Certificates panel to print cards for the students. Refer to page 104 for more information.
MMaarrkk ccllaassss ccoommpplleettee 18. After mailing the cards, use the Class Registration – Data Entry
screen to mark the class complete.
AAuuttoommaatteedd ccllaassss ccrreeaattiioonn
With TC Command V3 or later, create a class from a Roster Tool email by following this automated process.
1. Choose [Import/Export Controls] in the Class Registration Data Entry screen.
2. Then in the Importing/Exporting of Student Records screen, choose the Importing from Instructor Email tab.
3. Using the Roster Tool notification email to the Training Center, highlight and copy the whole list of data about the class from the end of the email, then paste it into box labeled Paste the copied text from the email below.
4. Click [1. Process email text to temporary fields] and confirm each field holds the correct type of data.
5. After confirming correct data in each field and correcting the first three fields if necessary by using the available dropdown lists, click [2. Create Class from temporary fields].
6. Use the Class No. field to enter the class number manually, as this is not added automatically. Note: Use the pre-assigned class number given to the instructor in the confirmation to instructor letter.
IMPORT/EXPORT Export
TC Command Page 91 6/13/2012
7. If the class has assisting instructors, check the ADD Instructors tab in the Class Registration Data Entry screen for displayed names, then click [Process Assisting Instructors from Import] to add the names to the class record. Note: With multiple assisting instructors, the first twelve will be added.
8. Review the newly created class in the Class Registration Data Entry screen.
EExxppoorrtt TC Command data on classes and students can be exported from a training site to the Training Center. Data can be exported quarterly, or as often as needed.
Data is exported from TC Command in tab delimited format. Exported data is placed in the TCC_Exports subfolder in the C:\TC_Command_V3 folder. The file name includes the ID number for the Training Center or training site and the date range specified for the exported data.
CCllaassss ddaattaa To export high level class information from a training site to the Training Center, choose [Import/Export Controls] in the Class Registration Data Entry screen, then choose the Exporting to Primary TC tab. Specify a date range using the two date fields, then click [Export ALL Data between below Dates]. A file is created with a .tab extension in the TCC_Exports folder. Copy the .tab file to disk or CD, or attach it to an email, to send it to the Primary Training Center.
To import that exported data into TC Command at the Primary Training Center, choose [Import/Export Controls] in the Class Registration Data Entry screen, then choose the Importing Data from Sites tab. Click [Click HERE Import from Site Data Files] and browse to find the .tab file.
SSttuuddeenntt ddaattaa To export student information from a training site to the Primary Training Center, choose [Import/Export] in the student data entry screen, then choose the Importing/Exporting from Sites tab. Specify a date range using the two date fields, then click [Export ALL Data between below Dates]. A file is created with a .tab extension. Copy the .tab file to disk or CD from the TC Command export directory, or attach it to an email, to send it to the Primary Training Center.

IMPORT/EXPORT Export
TC Command Page 92 6/13/2012
DDaattaa oouuttssiiddee TTCC CCoommmmaanndd In addition to Roster Tool capabilities for receiving class information and importing student rosters and FileMaker Pro capabilities for data exchange, TC Command has built-in import/export capabilities for sending data to TC Command at the Training Center and for exporting data to LMS for the HR Department.
LLeeaarrnniinngg MMaannaaggeemmeenntt SSyysstteemmss TC Command provides export capabilities to Learning Management Systems (LMS) for the Human Resources (HR) department.
1. In the student module screen, choose [Import/Export]. 2. In the Importing/Exporting of Student Records screen, choose the
Exporting to LMS Systems tab. 3. Set the date range for the export with the date fields. 4. Click [Export ALL Data between below Dates] to generate the
export file in the TCC_Command_V3\TCC_Exports folder, with filename format LMS_module_startdateenddate.
5. Email the file to HR. Note: In a server environment, the IT department can set up a weekly script to generate the LMS export file and place it in a standard location, and can also write a notification script to email a designated recipient to retrieve LMS file.
EExxcceell ddaattaa FileMaker Pro 11 supports export to .xls and .xlsx formats.
If additional export capabilities are needed, follow these steps in the data entry screen for the desired data:
1. From the FileMaker Pro menu bar at the top of the screen, choose File/Export Records.
2. In the Export Records to File dialog box, browse to set Save in to the TCC_Exports folder in the C:\TC_Command_V3 folder.
3. Use File name to name the file. 4. Set Save as type to Excel Files (*.xls), then click [Save]. 5. Name the Excel worksheet, then click [Continue]. 6. In the Specify Field Order for Export dialog box, select fields and
move them, then click [Export]. Note: Request assistance from Technical Support if fields from related tables are also needed in the export.

PRINTING Overview
TC Command Page 93 6/13/2012
PPRRIINNTTIINNGG OOvveerrvviieeww
Printing capabilities are provided throughout TC Command as appropriate. Depending on the document, printing and/or email is available. Information on emailing is available starting page 147.
Letters can be printed or attached to emails as pdf files. Reports can be printed, and in some cases can be emailed as pdf files. Emails can be created, and export files attached. Check for available capabilities in the screen, with [PRINT] buttons, and the PRINT and EMAIL tabs on the smart panel.
FFoouunndd SSeettss The found set determines the records available for printing. If a found set is in place, then those selected records are available for printing. If a found set is not in place, then all records of that type in the TC Command database are available for printing. Refer to the explanation of finding records on page 7 and FileMaker Pro Capabilities in the appendix for more information.
The found set for printing wallet cards and reports from the student data entry screen is all students in the current class, based on the course number in the displayed student record. To use a different found set for one of these printing tasks, first create the found set in the student data entry screen, then hold down [Alt] or [alt/option] while clicking the button in the screen for the printing task.
The found set for the Class Registration Data Entry screen is the single class displayed in the screen.
PPrreeppaarraattiioonn
SSeett uupp lleetttteerrhheeaadd Letterhead is turned on by default, and is used in both standard and custom letters. To customize the information included in the letterhead, follow these steps:
1. From the TC Command Main Menu, choose [Setup Data], then choose [General Setup Information].
2. Choose the [Letter Headers, etc.] tab.
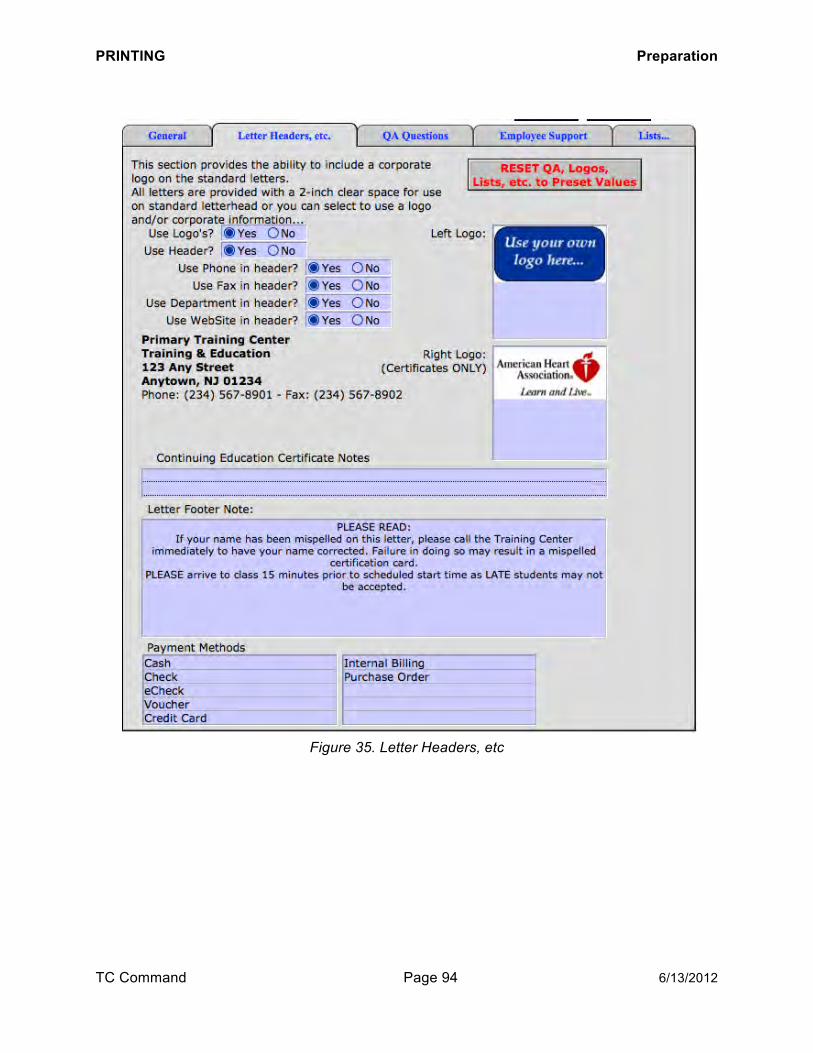
PRINTING Preparation
TC Command Page 94 6/13/2012
Figure 35. Letter Headers, etc
PRINTING Preparation
TC Command Page 95 6/13/2012
RReemmoovvee iinnffoorrmmaattiioonn ffrroomm hheeaaddeerr 1. Set any of the following radio buttons to No to exclude that
information from the letterhead information TC Command will print: Use Phone in header? Use Fax in header? Use Website in header?
2. After customizing the letterhead, click [MENU], then [Main Menu] to return to the TC Command Main Menu.
TTuurrnn ooffff lleetttteerrhheeaadd
If you use preprinted letterhead, then prevent TC Command from printing letterhead information.
1. From the TC Command Main Menu, choose [Setup Data], then choose [General Setup Information].
2. Choose the [Letter Headers, etc.] tab. 3. Set the Use Header? radio button in the Letter Headers, etc. tab in
general setup to No.
SSeett uupp llooggoo To include a logo with the letterhead information, use the Letter Headers, etc. tab in general setup.
1. Keep the default of Yes for the Use Logos? radio button. 2. Copy your logo graphic. 3. Click the Left Logo box and paste in your logo.
TTuurrnn ooffff llooggoo
Click the No radio button for Use Logos? in the Letter Headers, etc. tab in general setup.

PRINTING Preparation
TC Command Page 96 6/13/2012
SSeett uupp ffooootteerr ffoorr lleetttteerrss To add footer information to letters in TC Command, follow these steps:
1. From the TC Command Main Menu, choose [Setup Data], then choose [General Setup Information].
2. Choose the Letter Headers, etc. tab. 3. Enter the text for the footer in Letter Footer Note.
LLaabbeell aanndd bbaaddggee ssttoocckk The following stock can be used with TC Command.
regular folded letters letter-size 30 per page Avery 5160 large envelopes or packages Packet 6 per page Avery 5164 Badges name tag 8 per page Avery 5395 wallet cards card stock 2 per page AHA wallet cards card stock 3 per page AHA wallet cards card stock 5 per page ASHI wallet cards card stock 6 per page ECSI

PRINTING Printers
TC Command Page 97 6/13/2012
CChhoooossee ttrraaiinniinngg ttyyppee Use the Lists tab in the general setup screens to choose the training type (which controls wallet card printing), if this has not already been done. Refer to page 17.
PPrriinntteerrss
LLaayyoouutt aaddjjuussttmmeenntt Many different printers are used with TC Command. Print a test sheet to see if the layout needs any adjustment for your printer.
EEnnvveellooppee ffeeeeddeerr Your printer may have a separate envelope feeder, or it may allow you to slide the paper guides closer together to guide single wallet cards.
PPrriinnttiinngg aa TTeesstt SShheeeett Always print a test sheet on plain paper when working with a new printer. Depending on the printer, the layout may need to be edited to correct the lineup.
1. Working with plain paper, click [PRINT] to check the lineup and the records being printed.
2. In the Print dialog box, make sure the Print field is set to Records being browsed.
3. For the test, set Print range to Pages from 1 to 1 and click [OK]. 4. Fix the lineup if necessary. Refer to Mode PopUp Menu on page
6.
WWaalllleett ccaarrdd ssttoocckk
Always print a test sheet when using any of the student modules. If a correction is needed, it must be performed for each student module.
PPrreepprriinntteedd lleetttteerrhheeaadd Two inches at the top of the page are left blank to allow room for a preprinted heading. Print a test sheet if necessary before using preprinted letterhead.

PRINTING Editing the Layout
TC Command Page 98 6/13/2012
EEddiittiinngg tthhee LLaayyoouutt When the red [EDIT … Layout] or [EDIT Layout …] buttons are shown in the screen or smart panel for wallet cards and certificates, then editing capabilities are available for field positioning, but not for text content or which fields are included.
FFiixxiinngg ffiieelldd lliinneeuupp If the printing on the test sheet doesn’t line up properly on the letterhead, certificate, or card stock, edit the layout to move fields.
1. Click the red edit layout button. 2. When the Open dialog box is displayed, make sure the Account
Name is EDIT. 3. For Password, type 911EDIT, all one word, all letters in uppercase,
then click [OK]. 4. Use the Mode PopUp Menu (shown on page 6) to change from
Browse to Layout mode. 5. A grid is displayed over the fields on the card. 6. Select fields and move them as needed. 7. To print a test sheet in Layout mode, hold down [Ctrl] and press
[P], then click [Save] to save the changes before printing. 8. For the test sheet, in the Print dialog box, make sure the Print field
is set to Records being browsed and Print range is set to Pages from 1 to 1, then click [OK].
9. Continue moving selected fields as needed and printing test sheets until the layout is correct.
10. When the layout is correct, use the Mode PopUp Menu to change from Layout to Browse mode.
11. If prompted, click [Save] to save the changes. 12. The grid is removed. Click the red [RESET to Operate] button,
and continue with the steps to print student cards.
PRINTING Editing the Layout
TC Command Page 99 6/13/2012
MMoovviinngg ffiieellddss
HHooww ttoo mmoovvee aa ffiieelldd
Do not use the mouse to drag a field. Click on a field to select it, then use the cursor control keys
(arrow keys for UP, DOWN, LEFT, and RIGHT) on your keyboard to move the selected field.
IIff oonnllyy oonnee ffiieelldd iiss iinn tthhee wwrroonngg ppllaaccee
Click that field to select it, then move it with the arrow keys.
IIff sseevveerraall ffiieellddss aarree ooffff tthhee ssaammee aammoouunntt Click one of the fields to select it. Hold down the [Shift] key while clicking the other fields individually, so they are selected also. Then move the selected fields as one, using the arrow keys.
IIff aallll tthhee ffiieellddss nneeeedd ttoo bbee mmoovveedd Select all the fields by choosing Edit from the menu bar, then Select All. When the right fields are selected, use the arrow keys to move them all the same amount.
IIff tthhee ffiirrsstt wwaalllleett ccaarrdd iiss rriigghhtt,, aanndd tthhee nneexxtt oonnee
iissnn’’tt Use the mouse to drag the Body tab. Move it up to bring the wallet cards closer together, or move it down to make the cards farther apart.
FFiinnee ttuunnee ssttrriikkee--oouuttss oonn wwaalllleett ccaarrdd If the Xs need to be moved as a group, edit the wallet card layout to move the Strike Out Data Reference field.
If the groups of Xs are printing on the right line, and the first X is right, then follow these steps to edit the spacing for the Xs to fine tune the lineup in the wallet card screen.
1. From the TC Command Main Menu, choose [Setup Data], then choose [Heartsaver Sub-Options Listing].
2. The BLS Cross References for Course Sub-Options screen is displayed. Each group of Xs is shown with its current position in relation to the left edge of the card stock.
3. To fine tune the lineup in this screen, click in the field with the Xs, and add or remove spaces in the blank areas between the groups of Xs to reposition the Xs as needed.
4. Use the wallet card screen to print a test sheet (refer to test sheet explanation on page 97). If more changes are needed, return to the suboption screen.
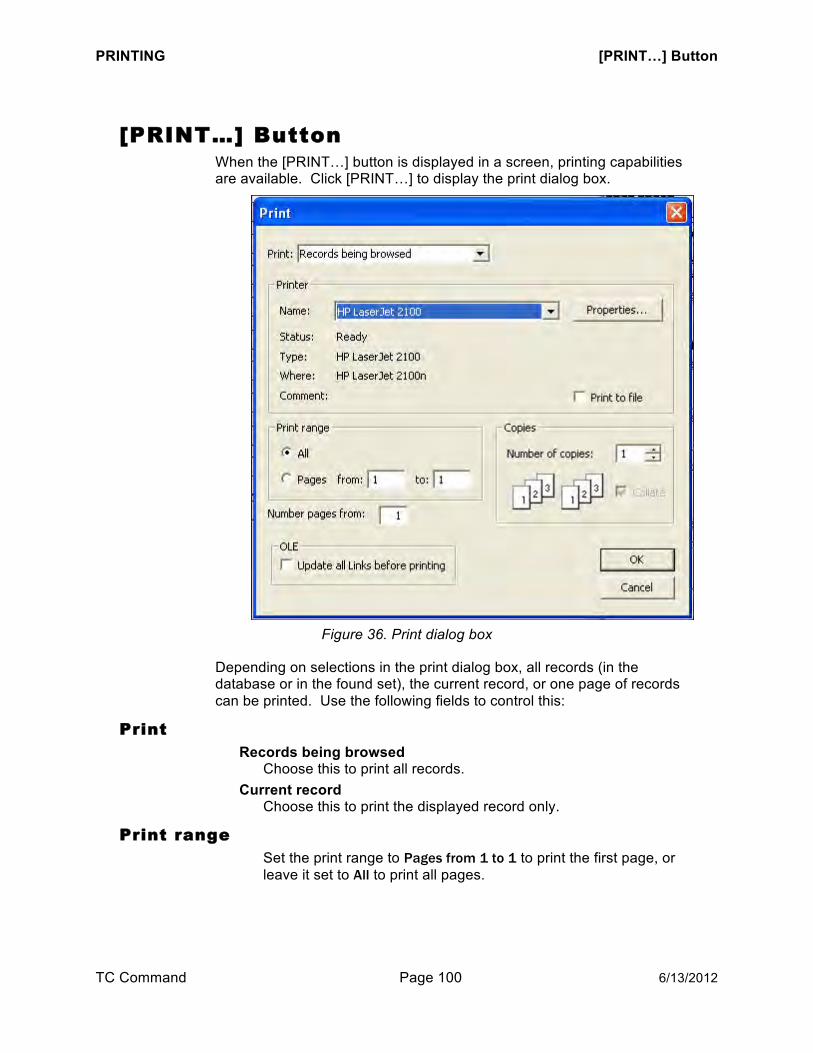
PRINTING [PRINT…] Button
TC Command Page 100 6/13/2012
[[PPRRIINNTT……]] BBuuttttoonn When the [PRINT…] button is displayed in a screen, printing capabilities are available. Click [PRINT…] to display the print dialog box.
Figure 36. Print dialog box
Depending on selections in the print dialog box, all records (in the database or in the found set), the current record, or one page of records can be printed. Use the following fields to control this:
PPrriinntt Records being browsed
Choose this to print all records. Current record
Choose this to print the displayed record only.
PPrriinntt rraannggee Set the print range to Pages from 1 to 1 to print the first page, or leave it set to All to print all pages.
!

PRINTING [PRINT…] Smart Panel
TC Command Page 101 6/13/2012
[[PPRRIINNTT……]] SSmmaarrtt PPaanneell The PRINT… smart panel provides print capabilities, including the following:
letters to group or individual wallet cards to group or individual printed lists and reports
Figure 37. Smart panel to print letters
PRINTING Rosters and Sign-In Sheets
TC Command Page 102 6/13/2012
RRoosstteerrss aanndd SSiiggnn--IInn SShheeeettss
SSiiggnn--iinn sshheeeett After students are pre-registered for a class, print a student sign-in sheet.
Have one of the students in the class displayed in the student data entry screen, then click [Class Sign-In Sheet] and print the sign-in sheet.
Note: When Other is selected in Training Center E-mail SetUp (shown on page 151), then this list cannot be emailed.
FFrroonntt ooff rroosstteerr To print the front of the roster, follow these steps:
1. Use the Class Registration Data Entry screen to find the class. Refer to the explanation of finding records on page 7 and FileMaker Pro Capabilities in the appendix.
2. Click [Course Roster - Front] in the Class Registration Data Entry screen.
3. The front of the roster is displayed. 4. Click [PRINT this page], then in the print dialog box choose Current
record and click [OK]. 5. After printing the front of the roster, click [Back to Data Entry] to
return to the Class Registration Data Entry screen.

PRINTING Rosters and Sign-In Sheets
TC Command Page 103 6/13/2012
BBaacckk ooff rroosstteerr
After registering the students in the class, check the back of the roster to ensure accuracy.
1. Use the student data entry screen (shown on page 72) to find a student in the class. Refer to the explanation of finding records on page 7 and FileMaker Pro Capabilities in the appendix.
2. Choose [Class Roster]. 3. The information for the back of the roster is displayed. 4. Review the displayed information, then click [PRINT this list] 5. In the Print dialog box, choose Records being browsed from the
Print dropdown list. 6. After printing, click [Back to Data Entry] to return to the student
data entry screen. If the class is designated as initial training or renewal in the Class Registration Data Entry screen, then the roster back includes:
Name Address Phone Course completion status (Complete or Incomplete)
If a student’s overall grade is blank or incomplete(I), then the card issue date on the roster is blank. If the roster is printed after the remediation is complete, then the remediation date is used in the card issued column for that student.
If the class is designated online, then the roster back includes:
Skill performance dates Skill performance times

PRINTING Wallet Cards
TC Command Page 104 6/13/2012
WWaalllleett CCaarrddss You can use TC Command to print instructor, faculty, and student cards, multiple cards per page, or single cards if using up leftover blank cards.
Note: If still using WorldPoint ONE, when switching from the 2005 standard card format to the new 2010 card format, before using cardstock with a new format, go to www.tccommand.com to download the latest update and instructions for wallet card printing.
To print wallet cards, first use the appropriate data entry screen to find the group of instructors or students, then choose the card format from the Wallet Cards and Certificates panel. After selecting [PRINT], make sure the Print field is set to Records being browsed, and always print a test sheet on plain paper when using a module or printer for the first time.
Note: Student cards can also be printed directly from the student data entry screen after finding one student in the class.

PRINTING Wallet Cards
TC Command Page 105 6/13/2012
WWaalllleett ccaarrddss ((ssmmaarrtt ppaanneell))
[[PPRRIINNTT ttoo tthhiiss iinnddiivviidduuaall aass aa SSiinnggllee CCaarrdd……]]
When this button is available on the smart panel, use it to print a wallet card for one person (the current record).
[[PPRRIINNTT ttoo tthhiiss FFoouunndd SSeett aass MMuullttiippllee CCaarrddss……]] When this button is available on the smart panel, use it to print wallet cards for each student in the found set (or each person in this course discipline, if printing student cards and a found set is not in place).
Figure 38. Smart panel for printing wallet cards
MMaaiilliinngg ccaarrddss After printing cards, mail them to the appropriate address, as designated on the Class Registration – Data Entry screen in the Send Cards To: field.
PRINTING Wallet Cards
TC Command Page 106 6/13/2012
IInnssttrruuccttoorr ccaarrddss You can print instructor cards for the instructors trained at your center. The expiration date can be entered in each instructor record before the cards are printed, in multiple instructor records when printing cards, or after the cards are printed if the dates were hand written on the cards.
Find the instructor or group of instructors. Set the card issue date and, if the instructor records do not
already contain the expiration date, the certification expiration date also.
Select the regional or Training Center faculty monitor for the class, if the Training Center manager did not monitor the class.
Print the card(s) on the appropriate card stock. Enter the expiration date for the certification in each
instructor’s record if it was not entered previously.

PRINTING Wallet Cards
TC Command Page 107 6/13/2012
PPrriinntt oonnee ccaarrdd
To print a card for one instructor, follow these steps:
1. Choose [Instructors] from the TC Command Main Menu (shown on page 9).
2. In the Instructor Data Entry screen (shown on page 31), find the instructor, then choose the Certification tab.
3. Under Instructor Card Dates, use the Date Issued field to enter the date the card is issued, and the Exp Date field to enter the certification expiration date.
4. Use the Instructor-ECC tab to manually enter this expiration date for the appropriate instructor certification.
5. Use the Certification tab to select one of the designated regional or Training Center faculty as monitor from the dropdown list for MonitoredBy, if the Training Center manager did not monitor the class.
6. Still on the Certification tab, under the Instructor Cards heading, choose the correct card layout. If you have leftover card stock, use one of the single formats.
7. In the card layout screen, click [PRINT…] and set the Print field to Current record, then click [OK].
PPrriinntt aa ggrroouupp ooff ccaarrddss
To print cards for a group of instructors, use the Instructor Data Entry screen to find the group of instructors who need cards for this type of certification, then follow the steps for one card.
FFaaccuullttyy ccaarrddss
Follow steps for instructor cards, choosing Faculty Cards instead of Instructor Cards.

PRINTING Wallet Cards
TC Command Page 108 6/13/2012
SSttuuddeenntt ccaarrddss Wallet cards can be printed for students (including employees) in classes.
Note: When student cards change, check www.tccommand.com for free updates needed in TC Command to handle the new layout.
CChhaannggee ssttuuddeenntt ccaarrdd mmeessssaaggee To change the standard message printed on the student wallet cards, follow these steps:
1. From the TC Command Main Menu, choose [Setup Data], then choose [General Setup Information].
2. The Training Center SetUp Information screen (shown on page 12) is displayed.
3. Use the Card Message field on the General tab to edit the message that will be printed on the cards.
4. After the card message is changed, click [MENU], then [Main Menu] to return to the TC Command Main Menu.

PRINTING Wallet Cards
TC Command Page 109 6/13/2012
PPrriinntt ccaarrddss ffoorr aa wwhhoollee ccllaassss
1. From the TC Command Main Menu, choose the appropriate student module.
2. In the student data entry screen (shown on page 72), find a student in the class.
3. Choose the appropriate cardstock from the dropdown list in the Wallet Cards and Certificates panel on the Course Data tab. Note: Available choices for cardstock are based on the training organizations selected when TC Command was initially configured. Refer to page 17.
4. To print cards for the students in the class displayed under Course #, click [Print cards with class built from Course #]. To print cards for the students in the class with the current displayed student, click [Print cards with group as defined by FIND or current student]. To print cards for the students in a group you have found (refer to the explanation of Find on page 3, click [Print cards with group as defined by FIND or current student].
5. Print a test sheet if necessary. Refer to test sheet explanation on page 97.
6. In the card layout screen, click [PRINT] and set the Print field to Records being browsed, then click [OK].
7. After printing the cards, click [Back to Data Entry] to return to the student data entry screen.
PPrriinntt ccaarrdd ffoorr oonnee ssttuuddeenntt
Follow the steps to print cards for a whole class, with these choices.
Find the student in the student data entry screen. Click [Print cards with group as defined by FIND or current
student]. In the Print dialog box, set the Print field to Current record.
PRINTING Wallet Cards
TC Command Page 110 6/13/2012
PPrriinntt ccaarrdd ffoorr rreemmeeddiiaatteedd ssttuuddeenntt
Follow the instructions to print a card for one student.
Note: The printed card for a remediated student uses the student’s remediation date as the card issue date.
PPrriinntt rreeppllaacceemmeenntt ccaarrdd
1. Locate the student’s record in the student data entry screen. 2. Use the Financial Activity tab (shown on page 82) to enter the
Date Issued and choose Issued by from the dropdown list (if it was set up in Data Entry Personnel in the Lists tab in general setup.
3. Hold down the [Alt] key and choose one of the card formats. Use a single card format if using leftover stock.
4. In the Print dialog box, set the Print field to Current record. 5. “DUPLICATE CARD” is printed along the spine of the wallet card.
UUssiinngg lleeffttoovveerr ccaarrddss
Leftover cards can be used when printing a single card for one student, or when printing cards for a whole class. All multiple leftovers must be separated into single cards.
Note: These steps can be used for 2 or 3 card per page stock.
To use leftover cards for a whole class, follow these steps:
1. In the student data entry screen, select a student in the class. 2. Choose one of the single card options in the Wallet
Cards/Certificates panel. 3. Click [PRINT to this Found Set as a sheet of Cards]. 4. Click [CENTER Feed Card]. 5. Orient the card stock as directed on the screen. Feed single
cards, one by one, through the envelope feeder or paper guides adjusted to single card width.
UUssiinngg HHeeaarrttSSaavveerr ssuubbooppttiioonnss
The HeartSaver options are selected when the class is created in the Class Registration – Data Entry screen (shown on page 50). The card layout can be edited if the strike-outs are not printing in the correct location (refer to explanation of alignment on page 99).

PRINTING Letters and Memos
TC Command Page 111 6/13/2012
LLeetttteerrss aanndd MMeemmooss If using pre-printed letterhead, make sure letterhead and logo are turned off in the Letter Headers, etc. tab (shown on page 94).
If letters are printed on plain paper, you can use the Training Center name and address in the letterhead, plus the phone, fax, and/or website also. Refer to explanation on page 93.
Add footers for letters, if applicable. Refer to page 96.
SSeettuupp
LLeetttteerr hheeaaddiinngg iinnffoorrmmaattiioonn
SSeett uupp aauuttoo--ssiiggnnaattuurree
If letters are signed by hand, skip this task.
To set up TC Command to print a simulated signature on letters, use the General tab on the Training Center SetUp Information screen (shown on page 12). Set the Auto-sign Letters? radio button to Yes.
The Auto-Sign Faculty Letters option is available for the Training Center Coordinator.
The Auto-Sign Letters option is available for BLS-FA Manager, and for the ACLS and PALS Course Coordinators.
PPeerrssoonnaalliizzeedd lleetttteerrss
Letters are personally addressed with individual names.
If the letter or memo will be generated with names of a group of individuals (or one individual), then select the group before generating the letters.
PPrriinnttiinngg lleetttteerrss ((ssmmaarrtt ppaanneell))
[[PPRRIINNTT ttoo tthhiiss iinnddiivviidduuaall aass aa SSiinnggllee LLeetttteerr……]] When this button is available on the smart panel, use it to print an individual letter to one person (the current record). The letter will be customized with the person’s name.
[[PPRRIINNTT ttoo tthhiiss FFoouunndd SSeett aass SSiinnggllee LLeetttteerrss……]] When this button is available on the smart panel, use it to print an individual letter to each person in the found set (or database, if a found set is not in place). Each letter will be customized with an individual’s name.

PRINTING Letters and Memos
TC Command Page 112 6/13/2012
LLeetttteerr LLiibbrraarryy The letter libraries in TC Command provide the following capabilities:
Includes customizable standard letters Provides ability to add new letters to library Preserves changes through future releases Letters can be printed or emailed
In the past, any customization of WorldPoint ONE letters was lost with each upgrade. Now with the release of TC Command, any changes you make to standard letters and any new letters you create will be preserved automatically through future updates and upgrades of TC Command.
Note: Any changes made to letters in earlier versions of WorldPoint ONE will be lost during the install of TC Command V3.
SSttaannddaarrdd lleetttteerrss TC Command provides you with standard letters for instructors, employees, and students. These instructor and student letters, available via the dropdown list in the Correspondence panel in the instructor and student data entry screens can be customized (refer to page 120). Employee letters are available under the Letters heading.
Note: The V3 release of TC Command does not provide full customization capabilities in the employee module, and any changes made to employee letters will be lost in future updates.
To use a standard letter, use the appropriate data entry screen to find a group or an individual instructor, employee, or student. Choose the letter from the dropdown list, then choose to print to the displayed individual or to the group.
IInnssttrruuccttoorr lleetttteerrss aanndd mmeemmooss TC Command provides standard letters communicating instructor needs for upcoming courses and insufficient course load to maintain certification. Existing letters can be changed, and new letters can be added.
IInnssttrruuccttoorr IIDD To notify instructors of their TC Command instructor IDs, use the Instructor ID Notification letter. Refer to page 112.
Note: When the Roster Tool is used with TC Command, the same instructor ID number must be used in both TC Command and in the Roster Tool.
IInnssttrruuccttoorr rreeqquueesstt
PRINTING Letters and Memos
TC Command Page 113 6/13/2012
Use a found set of instructors with current certification for the upcoming course. Refer to the explanation of finding records on page 7 and FileMaker Pro Capabilities in the appendix.
Before generating letters to request instructors for an upcoming class, follow these steps to describe the specific class and location.
1. In the Instructor Data Entry screen, choose [Letter Library]. 2. The letter library for instructors is displayed. 3. Click [View] for Instructor Request. 4. Edit the letter as needed. Refer to the explanation of the letter
library on pages 112 and 120.
CCoonnffiirrmmaattiioonn ttoo iinnssttrruuccttoorr To print a letter for the instructor, confirming that the class is being taught, click [Confirmation to Instructor] in the Class Registration Data Entry screen.
RReenneewwaall ssttaattuuss This letter is used to notify instructors of their certification expiration dates and the number of classes they have taught.
Create a found set of instructors who will need recertification in the near future and choose Renewal Reminder from the list under the Correspondance heading in the Instructor Data Entry screen.
DDeeffiicciieenntt nnoottiiffiiccaattiioonn Use a found set of instructors, based on current certification guidelines for number of classes taught, and choose the deficient notification letter from the Instructor Data Entry screen.
OOvveerrdduuee eeqquuiippmmeenntt lleetttteerr Choose [OverDue Return Letter] from the Loan Out Inventory screen to contact an instructor about returning loaned equipment.

PRINTING Letters and Memos
TC Command Page 114 6/13/2012
EEmmppllooyyeeee lleetttteerrss aanndd mmeemmooss TC Command provides standard letters to employees for warnings prior to certification expiration, and suspension due to certification expiration.
Note: Any changes to these letters will be lost during future updates to TC Command.
EEmmppllooyyeeee ffoouunndd sseett Use the Personnel Records screen (shown on page 67) to find a group of employees before printing letters.
By department
To find all the employees in a department, use the dropdown list in the Department field to select the department for the find.
Note: This is based on a populated Department list in the Employee Support tab in General Setup (shown on page 65)
Warning flag
To find all employees with certifications expiring within the next three months, use the field for the warning flag. In Find mode, this field appears right next to the Latest Exp field on the Certification tab in the Personnel Records screen.
Enter a 1 (the number one) in this field for the find. You may do this to specify warning status for one certification or for multiple certifications.
Expired certification
To find all employees with expired certifications, use the field for the expired flag. In Find mode, this field appears to the right of the warning flag.

PRINTING Letters and Memos
TC Command Page 115 6/13/2012
EExxppiirraattiioonn wwaarrnniinngg If an employee’s certification will be expiring soon, use the Expiration Warning Letter available on the Personnel Data Entry screen to inform the employee.
1. Find the employees with certification warnings (see steps above). 2. From the Personnel Data Entry screen (shown on page 67),
choose [Warning Letter]. 3. Specify Records being browsed when printing. 4. Click [Back to Data Entry] to return to the Personnel Data Entry
screen when printing is completed.
EExxppiirraattiioonn ssuussppeennssiioonn If an employee’s certification has expired, use the Expiration Suspension Letter available on the Personnel Data Entry screen to inform the employee.
Follow the steps for expiration warnings, finding employees with expired certifications, and choosing [Suspension Letter] from the Personnel Data Entry screen.
BBllaannkk mmeemmoo ffoorrmm Choose [MEMO Tool] from the Personnel Data Entry screen. Enter the date and a subject for the memo. Type in the blank memo area to create the text of the memo.
Memo to a group of employees
Use a found set if appropriate, then select the All Personnel radio button in the memo. Individual memos will be addressed to all employees in the TC Command database, or to all employees in the found set.
Memo to one employee
Find the employee, then select the Specific Name radio button in the memo. One memo will be generated, addressed to the current record.

PRINTING Letters and Memos
TC Command Page 116 6/13/2012
SSttuuddeenntt lleetttteerrss TC Command provides standard letters to students, including an introductory letter for a pre-registered student, a payment receipt, congratulations upon completion to accompany a wallet card sent by mail, and a notification to reschedule retesting. These letters are available from the dropdown list in the Correspondence panel in the student data entry screen.
SSeettuupp ffoorr ssttuuddeenntt lleetttteerrss
Extra details for student letters
If additional information about a class is needed for the introductory or receipt letter, enter the information in the Extra Details tab (described on page 55) in the Class Registration – Data Entry screen for that specific class.
Footer notes for student letters
To add a standard note at the bottom of all student correspondence, use the Letter Footer Note field on the Letter Headers, etc tab (shown on page 94).
WWeellccoommee//rreeggiissttrraattiioonn After a student pre-registers for a class, you can use the standard Welcome / Registration letter.
UUnnpprroocceesssseedd rreeggiissttrraattiioonn Choose “Incomplete Registration Letter” from the dropdown list under Correspondence in the student data entry screen when a student’s registration is pending receipt of additional information.
BBaallaannccee dduuee Two student letters are available from the dropdown list in the Correspondence panel in the student data entry screen. Find the student, review the Balance Due field in the Financial Activity tab, and choose “Balance DUE before class” or “Balance DUE after class” to create a letter that can be printed or emailed.
RReecceeiipptt When payment is received from the student, choose [Payment Receipt] on the Financial Activity tab to print the receipt letter, which also includes course date, time, and location, and any extra details that have been added to the class.
Note: This letter can be edited, although changes to it will not be preserved in future TC Command updates. Alternately, if significant

PRINTING Letters and Memos
TC Command Page 117 6/13/2012
changes are needed, use the Letter Library capabilities to create a new custom letter.
CCoommpplleettiioonn If you will be mailing the wallet card to the student, you can use the Completion Letter, customized with class information and the student’s expiration date, to accompany the card.
IInnccoommpplleettee//rreetteesstt Use the Incomplete Letter if the student did not successfully complete the class, and you need a standard letter, customized with the student’s results, asking the student to schedule a retest.
CCaanncceellllaattiioonn Use the Cancellation Letter to notify each student if the class is cancelled after the students are registered.
OOnnLLIInnee kkeeyy Use the OnLine Key Letter if you have provided the student with an online key for the knowledge part of a class.
RReenneewwaall rreemmiinnddeerr In a student data entry screen, with a found set of students who will need to recertify in the near future, choose Expiration Reminder Letter from the dropdown list under Correspondence, or click [Reminder Cards] under Mailing Labels / Name Tags / Reminder Cards.

PRINTING Letters and Memos
TC Command Page 118 6/13/2012
OOnnLLiinnee kkeeyy lleetttteerr For students purchasing online keys for eLearning, an instruction letter can be generated.
One student
To generate an instruction letter, follow these steps:
1. In the student data entry screen (shown on page 72), for a student with an online key assigned in the Key Type/# field, choose Online Key Letter.
2. An informational letter with the student’s first name, key number, and key expiration is generated.
Group of students
If a found set is in place for assigning online keys, choose the OnLine Key Letter to generate the letter for the group after the keys are assigned.

PRINTING Letters and Memos
TC Command Page 119 6/13/2012
RReecceerrttiiffiiccaattiioonn rreemmiinnddeerrss TC Command provides the capability to send reminders before certification expires. Employees and students are flagged at 90 days prior to expiration; the warning period for instructors can be specified. Reminders can be sent by letter, postcard, or email.
SSeett wwaarrnniinngg ppeerriioodd For faculty and instructors, the warning period for expiring certification is initially set to 90 days and can be changed. Use the Warning Period until Flag Raised in Faculty Status Report field in the Training Center SetUp Information screen (shown on page 12) to specify a longer or shorter warning period.
IInnssttrruuccttoorrss To remind faculty and instructors of impending certification expiration, use the Instructor Data Entry screen to find the group to remind (Refer to the explanation of finding records on page 7 and FileMaker Pro Capabilities in the appendix), then choose Renewal Reminder from the dropdown list under Correspondence.
Detail information on expiring certifications is available in the “Instructor Expiration Date List” available via the [Expiration Status Report] button on the Instructor-ECC tab or Instructor-MISC tab, or the individual instructor record via the Instructor Data Entry screen.
EEmmppllooyyeeeess To contact employees whose certification will expire within the next 90 days, find the group to remind (Refer to the explanation of finding records on page 7 and FileMaker Pro Capabilities in the appendix), then choose [Warning Letter] under the Letters heading on the Employee Data submenu.
SSttuuddeennttss To remind students via postcard to contact the training center to recertify, find the group of students whose certification will expire within the next 90 days in the student data entry screen, using the Type and End Date fields on the Course Data tab, or the Exp. Date field on the Student Results tab. (Refer to the explanation of finding records on page 7 and FileMaker Pro Capabilities in the appendix.) Then choose [Reminder Cards] under Mailing Labels / Name Tags / Reminder Cards. The reminder cards can be printed for mailing. The reminder letters can be printed or emailed.
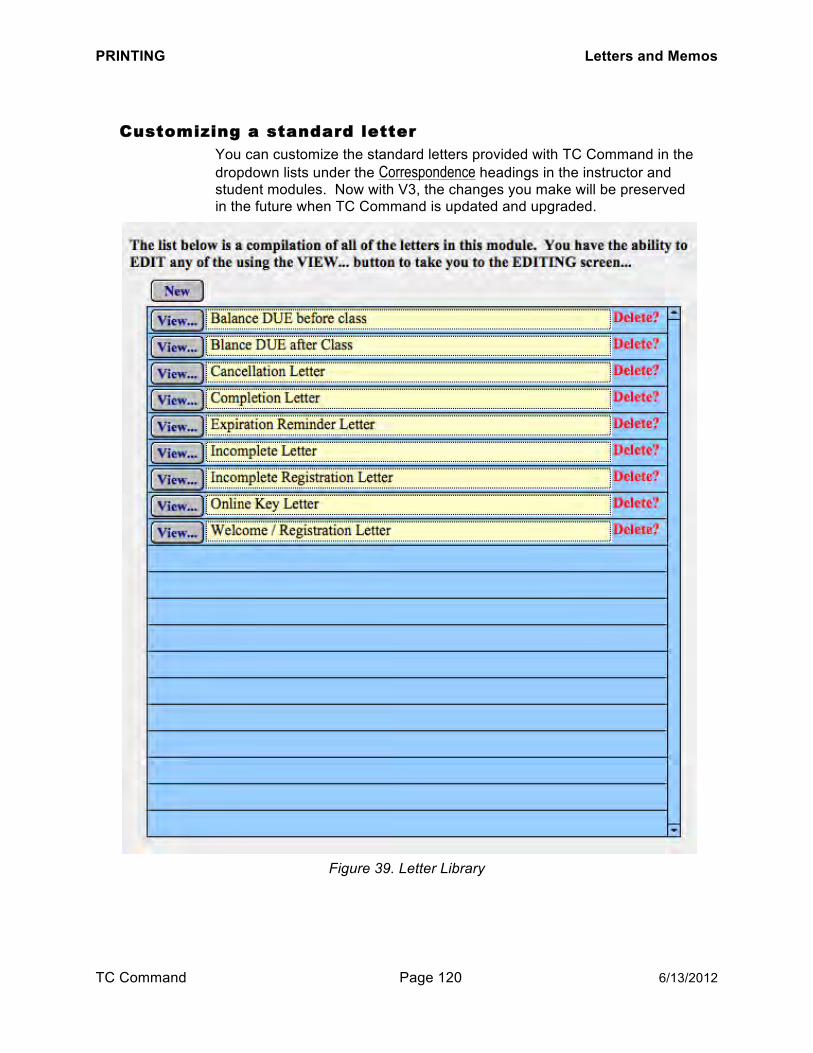
PRINTING Letters and Memos
TC Command Page 120 6/13/2012
CCuussttoommiizziinngg aa ssttaannddaarrdd lleetttteerr You can customize the standard letters provided with TC Command in the dropdown lists under the Correspondence headings in the instructor and student modules. Now with V3, the changes you make will be preserved in the future when TC Command is updated and upgraded.
Figure 39. Letter Library

PRINTING Letters and Memos
TC Command Page 121 6/13/2012
Use the [Letter Library] button in the Correspondence panel in the instructor and student data entry screens to access the standard letters provided with TC Command, then click [View] to choose one of the letters from the displayed list.
Figure 40. Editing Window

PRINTING Letters and Memos
TC Command Page 122 6/13/2012
When the letter is displayed, edit the letter text as needed, using the Edit capabilities on the FileMaker Pro menu bar. To add a new field to the letter, click to position the cursor where the new field will be added, then select the new field from the palettes of fields available.
Figure 41. Field Palette
Continue editing the standard text and adding fields as needed. You can then print the letter as needed and edit it again in the future.

PRINTING Letters and Memos
TC Command Page 123 6/13/2012
CCrreeaattiinngg aa nneeww lleetttteerr TC Command provides capabilities for creating custom letters from scratch or by copying and changing an existing letter, and adding them to the TC Command letter library. Note that custom letters stored in the TC Command letter libraries will not be affected in any way by future updates and upgrades to TC Command.
To create a new custom letter, follow these steps:
1. Access the Instructor Data Entry screen (page 31) or the student data entry screen (page 72) from the TC Command Main Menu.
2. Click [Letter Library] in the Correspondence panel. 3. The list of letters in the letter library is displayed. 4. Click [New] to create a new letter.
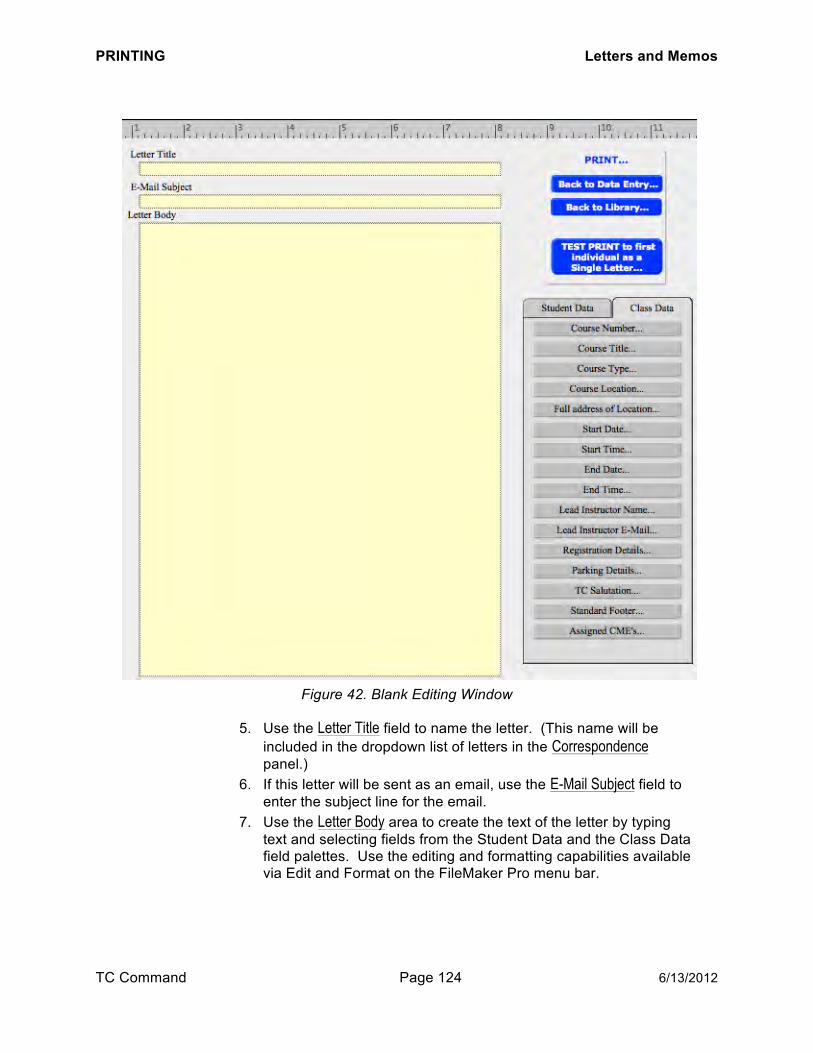
PRINTING Letters and Memos
TC Command Page 124 6/13/2012
Figure 42. Blank Editing Window
5. Use the Letter Title field to name the letter. (This name will be included in the dropdown list of letters in the Correspondence panel.)
6. If this letter will be sent as an email, use the E-Mail Subject field to enter the subject line for the email.
7. Use the Letter Body area to create the text of the letter by typing text and selecting fields from the Student Data and the Class Data field palettes. Use the editing and formatting capabilities available via Edit and Format on the FileMaker Pro menu bar.

PRINTING Letters and Memos
TC Command Page 125 6/13/2012
8. Choose fields to insert in the letter from the field palette. Note: Each field is inserted at the current cursor position, so always check the cursor location before choosing a field.
9. Click [TEST PRINT to first individual as a Single Letter] to print a test letter and check the page layout, then make changes as needed.
10. When the new letter is ready, find the individual record or group of records and then select the new letter from the dropdown list under Correspondence, then: a. to print one letter for the current instructor or student, choose
[Print/Email letter with group as defined by FIND or current student] and then click [PRINT to this individual as a Single Letter],
b. to print a letter for each instructor or student in the found set, choose [Print/Email letter with group as defined by FIND or current student] and then click [PRINT these x letters],
c. or to print a letter for every student in the current class, choose either Print/Email button and then click [PRINT these x letters].
To copy and modify an existing letter, follow these steps:
1. Access the Instructor Data Entry screen (page 31) or the student data entry screen (page 72) from the TC Command Main Menu.
2. Click [Letter Library] in the Correspondence panel. 3. The list of letters in the letter library is displayed. 4. Click Letters on the FileMaker Pro menu bar, and choose Copy
Letter from the dropdown menu. 5. Then change the letter name and edit the letter.
AAvvaaiillaabbllee ffiieellddss The field palettes for each module contains fields appropriate for that type of record. When a field is added to a letter, it acts as a placeholder for the information; then when the letter is printed, the specified information is added to each letter, record by record.
FFoorrmmaattttiinngg ccuussttoomm lleetttteerrss Use the formatting capabilities available from the FileMaker Pro menu bar under Edit and Format.
PRINTING Letters and Memos
TC Command Page 126 6/13/2012
HHaarrdd--ccooddeedd lleetttteerrss The following letters are not included in the Letter Libraries as they have fixed formats and cannot be changed:
Status Letter (Instructor) Confirmation to Instructor (Class)
In addition, letters in the Employee module are not included in a letter library, so any changes to these letters will be lost when future updates to TC Command are applied.
BBllaannkk tteemmppllaatteess When blank memo capabilities are available in TC Command, use them to create ad hoc communications.
Note: Installing TC Command V3 will erase any text that has been added to WorldPoint ONE, and any changes to blank memos will not be preserved during future updates to TC Command.

PRINTING Labels
TC Command Page 127 6/13/2012
LLaabbeellss
MMaaiilliinngg llaabbeellss TC Command provides capabilities for printing mailing labels on label stock. Find the record or group of records before printing, or else print labels for all records. Refer to the table of label stock on page 96.
Individual labels can be printed for mailing student wallet cards and for mailing invoices. These individual labels require a label printer.
Note: The country field in the mailing address works with the Auto-Format Phone #’s & address to Country field on the General tab in the Training Center SetUp Information screen (shown on page 12). If this radio button is set to Yes, then each mailing label will be formatted correctly for the country.
LLaabbeell pprriinntteerr If a label printer is available, it can be used to print individual labels for mailing student wallet cards to the teaching location or the lead instructor, and for mailing invoices.
When a [Label] button is available in a screen, click it and copy the displayed address information to the clipboard, then paste the address into the label printer program.
TTrraaiinniinngg cceenntteerr To print labels with the training center address, so instructors can send materials to the Training Center, choose [Setup Data] from the TC Command Main Menu, then choose [Training Center Return Labels].
TTeeaacchhiinngg llooccaattiioonn To print a mailing label for a repeat teaching location, so student wallet cards can be mailed to the teaching location, use the [Label] button on the Class Data tab in the Class Registration Data Entry screen (shown on page 50) and copy the Location Mail Label.
Note: For use with label printer only.
IInnssttrruuccttoorr To print a mailing label for an instructor, so student wallet cards can be mailed to the instructor, use the [Label] button on the Class Data tab in the Class Registration Data Entry screen (shown on page 50) and copy the Lead Instructor Mail Label.
Note: For use with label printer only.
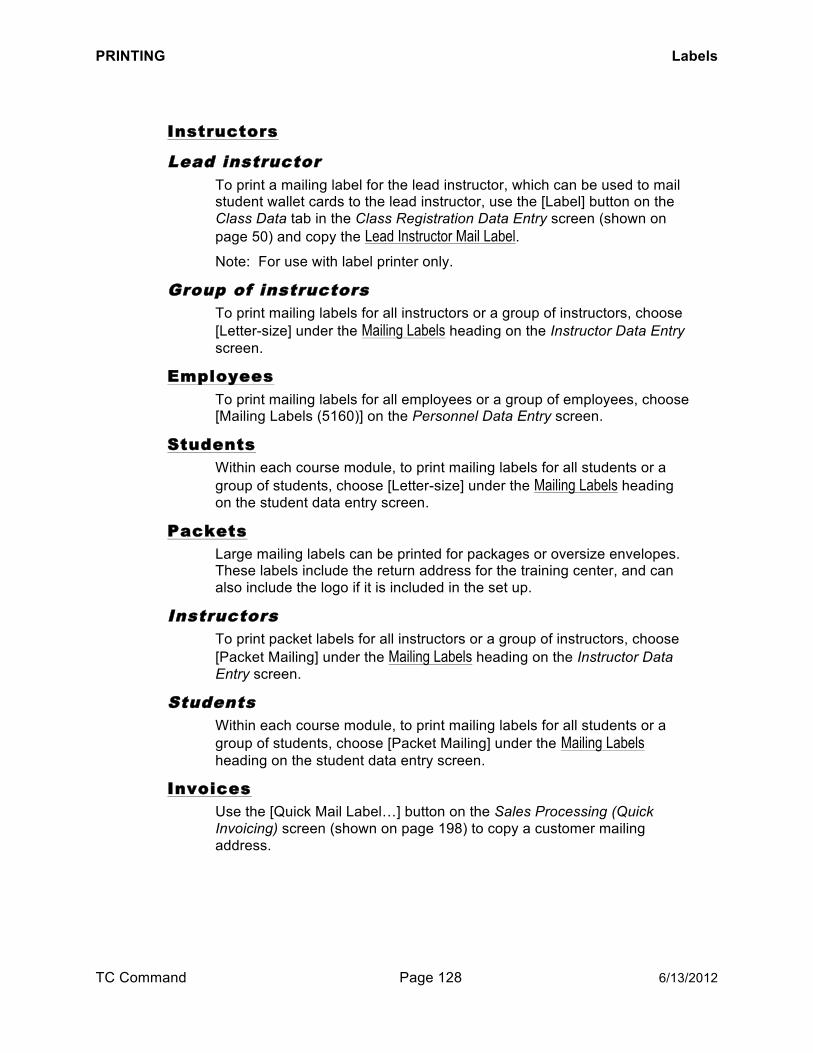
PRINTING Labels
TC Command Page 128 6/13/2012
IInnssttrruuccttoorrss
LLeeaadd iinnssttrruuccttoorr To print a mailing label for the lead instructor, which can be used to mail student wallet cards to the lead instructor, use the [Label] button on the Class Data tab in the Class Registration Data Entry screen (shown on page 50) and copy the Lead Instructor Mail Label.
Note: For use with label printer only.
GGrroouupp ooff iinnssttrruuccttoorrss To print mailing labels for all instructors or a group of instructors, choose [Letter-size] under the Mailing Labels heading on the Instructor Data Entry screen.
EEmmppllooyyeeeess
To print mailing labels for all employees or a group of employees, choose [Mailing Labels (5160)] on the Personnel Data Entry screen.
SSttuuddeennttss Within each course module, to print mailing labels for all students or a group of students, choose [Letter-size] under the Mailing Labels heading on the student data entry screen.
PPaacckkeettss Large mailing labels can be printed for packages or oversize envelopes. These labels include the return address for the training center, and can also include the logo if it is included in the set up.
IInnssttrruuccttoorrss To print packet labels for all instructors or a group of instructors, choose [Packet Mailing] under the Mailing Labels heading on the Instructor Data Entry screen.
SSttuuddeennttss Within each course module, to print mailing labels for all students or a group of students, choose [Packet Mailing] under the Mailing Labels heading on the student data entry screen.
IInnvvooiicceess Use the [Quick Mail Label…] button on the Sales Processing (Quick Invoicing) screen (shown on page 198) to copy a customer mailing address.
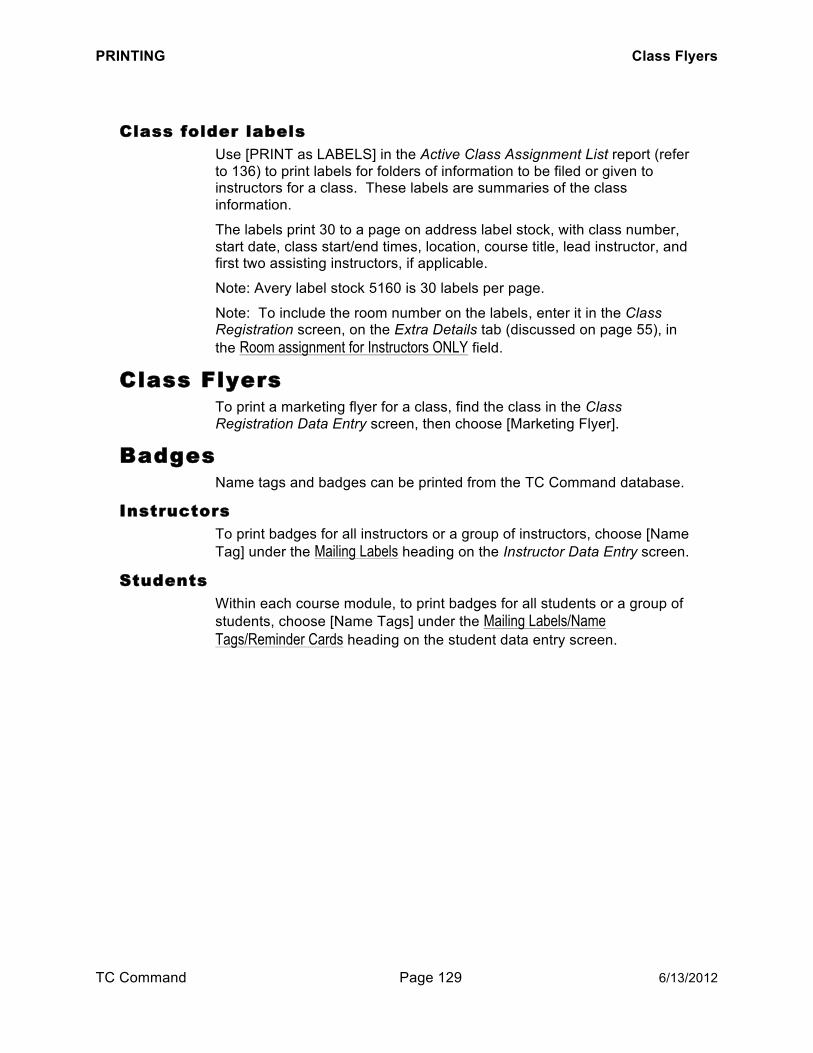
PRINTING Class Flyers
TC Command Page 129 6/13/2012
CCllaassss ffoollddeerr llaabbeellss Use [PRINT as LABELS] in the Active Class Assignment List report (refer to 136) to print labels for folders of information to be filed or given to instructors for a class. These labels are summaries of the class information.
The labels print 30 to a page on address label stock, with class number, start date, class start/end times, location, course title, lead instructor, and first two assisting instructors, if applicable.
Note: Avery label stock 5160 is 30 labels per page.
Note: To include the room number on the labels, enter it in the Class Registration screen, on the Extra Details tab (discussed on page 55), in the Room assignment for Instructors ONLY field.
CCllaassss FFllyyeerrss To print a marketing flyer for a class, find the class in the Class Registration Data Entry screen, then choose [Marketing Flyer].
BBaaddggeess Name tags and badges can be printed from the TC Command database.
IInnssttrruuccttoorrss To print badges for all instructors or a group of instructors, choose [Name Tag] under the Mailing Labels heading on the Instructor Data Entry screen.
SSttuuddeennttss Within each course module, to print badges for all students or a group of students, choose [Name Tags] under the Mailing Labels/Name Tags/Reminder Cards heading on the student data entry screen.

PRINTING Certificates
TC Command Page 130 6/13/2012
CCeerrttiiffiiccaatteess Two Continuing Medical Education (CME) certificates are available for each course module and can be used to recognize student accomplishment for training not included on standard wallet cards. Certificates include the student name, course title, course number, completion date, and CME hours if applicable.
SSttaannddaarrdd nnoottee
To add a standard note to the bottom of all certificates, use the Continuing Education Certificate Notes field on the Letter Headers, etc. tab (shown on page 94).
SSeett uupp llooggooss If the training center logo is included in the letterhead, it will also be included on the left side of the certificate. An additional logo can be added for the right side of the certificate.
If the left-hand logo is being used, then an additional logo can be added on the right for certificates. Refer to explanation on page 95.
PRINTING Certificates
TC Command Page 131 6/13/2012
SSeett uupp CCMMEE hhoouurrss
When creating a class with continuing education hours, use the CME Hours field on the Class Data tab in the Class Registration Data Entry screen (shown on page 50) to enter the hours of credit available for the class. For example, if a class has 2 ½ CMEs, enter 2.5. For a class with 3 CME hours, enter 3.0.
AAdddd ccllaassss ttiittllee Before printing certificates for a specific class, enter a title to appear in the middle of the certificate.
1. Choose one of the CME certificates from the dropdown list under Wallet Cards and Certificates on the student data entry screen.
2. Choose [Print cards with class built from Course #] to print certificates for all students in the current class or [Print cards with group as defined by FIND or current student] to print certificates for a group of students you have selected by FIND.
3. Leave the To provide special certificates, enter the title below field blank to use the course title on the certificate, or enter a specific title to print on the certificates.
4. Then choose [PRINT to this individual as a Single Certificate] to print one certificate for the current student, or [PRINT to this Found Set as Single Certificates] to print certificates for all students in the current class or found set.
Note: To add a class title to the second certificate, click [Go to Certificate #2] on the smart panel.

PRINTING Certificates
TC Command Page 132 6/13/2012
PPrriinntt cceerrttiiffiiccaatteess Certificates can be printed from the student data entry screen (shown on page 72). To print certificates for a class, use the student data entry screen to find one of the students in the class, then choose CME Certificate 1 or 2 from the dropdown list in the Wallet Cards and Certificates panel and click [Print cards with class built from Course #]. Refer to the explanation of finding records on page 7 and FileMaker Pro Capabilities in the appendix.
To print certificates for a different group, use the student data entry screen to find the group of students and choose CME Certificate 1 or 2 from the dropdown list. Then click [Print cards with group as defined by FIND or current student].
Choose one of these buttons for certificates ([Completion Certificate] or [CME Certificates]), then click [Go to Certificate #2] if applicable.
After clicking one of the [Print cards with …] buttons, type the certificate title if applicable under To provide special certificates, enter the title below.
Then choose one of the [PRINT] buttons from the smart panel and print a test sheet on plain paper, choosing the Current record in the Print dialog box. Ensure the logos (if applicable), the note at the bottom of the certificate, the class title, and the CME hours are all printing correctly.
When the test sheet is printing correctly, then print on certificate stock, using one of the [PRINT] buttons in the smart panel and the provided settings in the Print dialog box.
Note: When Other is selected in Email Setup (shown on page 151), then PDF certificates cannot be sent out attached to emails.
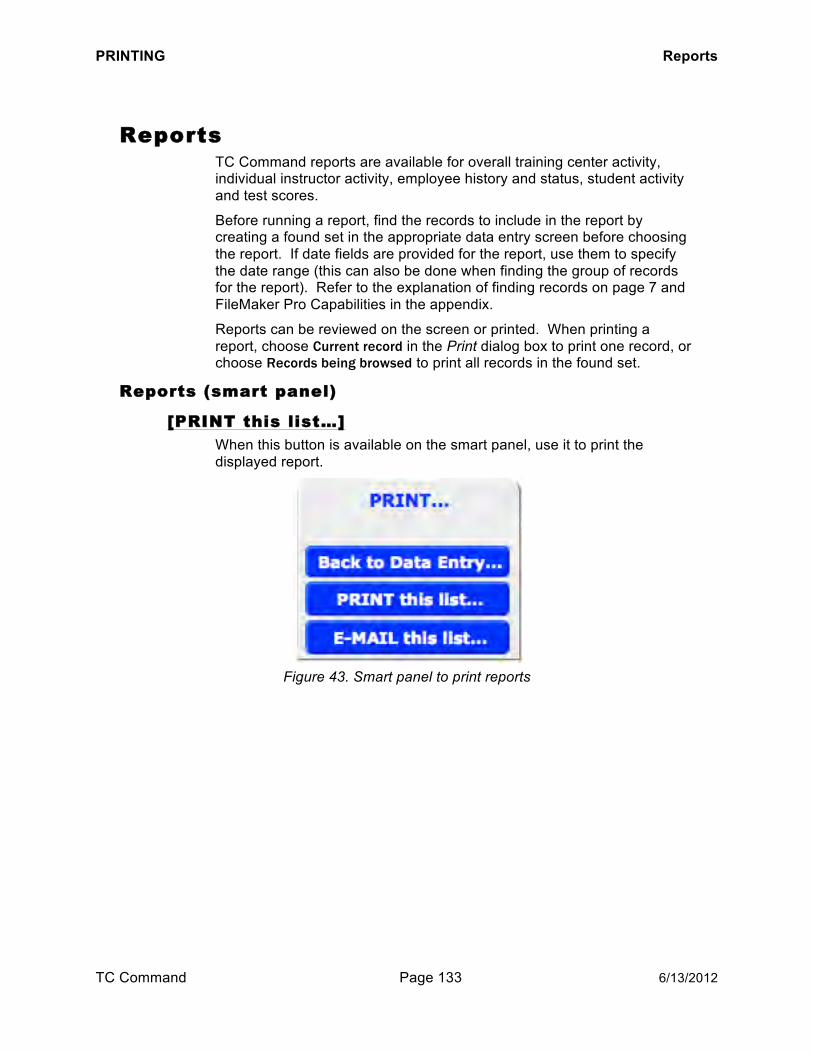
PRINTING Reports
TC Command Page 133 6/13/2012
RReeppoorrttss TC Command reports are available for overall training center activity, individual instructor activity, employee history and status, student activity and test scores.
Before running a report, find the records to include in the report by creating a found set in the appropriate data entry screen before choosing the report. If date fields are provided for the report, use them to specify the date range (this can also be done when finding the group of records for the report). Refer to the explanation of finding records on page 7 and FileMaker Pro Capabilities in the appendix.
Reports can be reviewed on the screen or printed. When printing a report, choose Current record in the Print dialog box to print one record, or choose Records being browsed to print all records in the found set.
RReeppoorrttss ((ssmmaarrtt ppaanneell))
[[PPRRIINNTT tthhiiss lliisstt……]]
When this button is available on the smart panel, use it to print the displayed report.
Figure 43. Smart panel to print reports
PRINTING Reports
TC Command Page 134 6/13/2012
IInnssttrruuccttoorr
IInnssttrruuccttoorr lliisstt
To display a list of instructors, follow these steps. An instructor phone list is available, plus a more detailed list with additional information.
Note: This list can include all instructors in TC Command. To limit the list to a certain group of instructors, use [Find] in the Instructor Data Entry screen before choosing [Instructor Listing].
1. Choose [Instructor Listing] from the Instructor-ECC tab in the Instructor Data Entry screen (shown on page 34).
2. The “Instructor Phone Contact List” is displayed. 3. Click [Instructor Information List…] to show additional information
in a different format. 4. The “Instructor Information List” is displayed. 5. Toggle back and forth between the two screens using the
[Instructor Phone List…] and [Instructor Information List…] buttons as needed.
6. After reviewing the information, you can: a. print the displayed list by clicking [PRINT…] and choosing
Records being browsed for the Print field, b. or click [Back to Data Entry] to return to the Instructor Data
Entry screen.
PRINTING Reports
TC Command Page 135 6/13/2012
TTeeaacchhiinngg hhiissttoorryy
The instructor’s teaching history for all modules can be reviewed as lead, assisting, plus both lead and assisting combined, in summary reports and in a longer detailed report. To review this information for one instructor or a specified group of instructors, use the Instructor Data Entry screen (see page 31) to find the instructor(s) before choosing the report. For instructors in a selected group, use the flipbook in the status area to review each record in turn.
LLeeaadd hhiissttoorryy ssuummmmaarryy To review a summary of the classes an instructor has taught as lead, follow these steps for a one page report of the first ten classes:
1. Choose [Teaching History as Lead Instr. – 1 page Summary] from the Course History tab.
2. The “Lead Instructor Teaching Activity” screen is displayed. 3. Review the displayed information, using the side scroll bar to
display additional courses if necessary. 4. After reviewing the displayed information:
a. print the report via the [PRINT] button, b. review another instructor in the found set if applicable, c. or click [Back to Data Entry] to return to the Instructor Data
Entry screen.
AAssssiissttiinngg hhiissttoorryy ssuummmmaarryy To review a summary of the classes an instructor has taught as assisting instructor, follow the steps above for lead, choosing [Teaching History as Asst. Instr. – 1 page Summary] from the Course History tab.
LLeeaadd aanndd aassssiissttiinngg hhiissttoorryy ssuummmmaarryy To review a summary of all the classes an instructor has taught, with lead and assisting combined, follow the steps the steps above for lead, choosing [Teaching History Combined – 1 page Summary] from the Course History tab, and specifying the date range for the report via the Start Date and End Date fields, if appropriate.
PRINTING Reports
TC Command Page 136 6/13/2012
LLoonngg hhiissttoorryy If the entire combined history must be printed for an individual instructor, for either lead or assisting, and it cannot be displayed without using the scroll bar, then choose [Classes Taught Details File – Multi-page Reports] from the Course History tab in the Instructor Data Entry screen. Use the Start and End dates to specify the report period, or leave them blank to include all teaching history, select the instructor from the dropdown list, and then choose the appropriate report button for lead or assisting instructor. The “Instructor Summary Report” is displayed. Choose [PRINT] and Records being browsed to print the report.
Note: Use the Start Date and End Date fields to print the history in sections. Twelve or six month date ranges are recommended.
IInnssttrruuccttoorr EExxppiirraattiioonn DDaattee LLiisstt This report lists instructors with certification expiration dates. The information can be generated for ECC certifications, or for non-ECC certifications created in the Miscellaneous course module. Warning flags are shown for instructors whose certifications will expire soon.
To generate this report, choose [Expiration Status Report] from the Instructor-ECC or Instructor-MISC tab in the Instructor Data Entry screen.
Instructors are listed in order by ID number, with certification expiration dates and warning flags for any dates within the warning period or past the expiration date.
Use the [FIND] button in the report to create a found set of instructors for the report, if applicable. Refer to page 7 and Find in the appendix for information on Find.
Use the [SORT] button in the report to change the order the instructors are listed. Refer to Sort in the appendix for information on Sort.
Use the [MISC List] button in the report to switch to certifications created in TC Command. Refer to page 43 to create these certifications.
To change the warning period (default of 90 days), use the Warning Period until Flag Raised in Faculty Status Report field on the General tab (shown on page 12).
AAHHAA rreenneewwaall ssttaattuuss rreeppoorrtt This report has been replaced by the “Instructor Expiration Date List” report, accessible via [Expiration Status Report] on the Instructor-ECC tab in the Instructor Data Entry screen.
AAccttiivvee CCllaassss AAssssiiggnnmmeenntt LLiisstt For information on active classes, including class number, course type, class date, time, location, room number, maximum number of students

PRINTING Reports
TC Command Page 137 6/13/2012
allowed, whether registration is limited to in-house staff, type of training, and lead instructor, plus first two assisting instructors if applicable, use the “Active Class Assignment List” report. This report is organized with information for each week on a separate page, and is useful to both instructors and coordinators.
1. From the Class Registration Data Entry screen (shown on page 50), choose [ACTIVE Class Assignments].
2. Click [Exit Preview] or [Continue] in the status area. 3. Review and/or print the information, then:
a. Click [PRINT as LABELS] to print folder labels (described on page 129), or
b. Click [DATA ENTRY] to return to the Class Registration Data Entry screen.
Note: To make full use of this report, include the Room assignment for Instructors ONLY field on the Extra Details tab in the Class Registration – Data Entry screen.
IInnssttrruuccttoorr ssiiggnniinn sshheeeett Choose [Instructor Sign-In Sheet] from the Certification tab in the Instructor Data Entry screen to print a sign in sheet to record attendance for instructor meetings and update classes.

PRINTING Reports
TC Command Page 138 6/13/2012
CCllaassss Multiple reports are available in TC Command for classes.
CCllaassss ccaalleennddaarr From the Class Registration Data Entry screen, choose [Calendar View].
Note: This report is based on information posted to the calendar via the calendar button on the Class Data tab in the Class Registration Data Entry screen.
IInnddiivviidduuaall ccllaasssseess
CCllaassss ssttaattuuss For information on elearning, book loans, status of materials sent, valid renewal cards, assigned group, and fee category by student, for one class, use the “Class Status” report.
1. From the student data entry screen (shown on page 72), choose [Class Status Report].
2. The following information is displayed:
eLearning Yes, if the student has purchased an online key.
Book ID Yes, if the Training Center has lent the student a book.
Mat’ls Sent Yes, if materials have been sent to the student.
If Renewal, Card Valid Yes, if a valid card was noted for the student.
Group If the student is assigned to a group for station rotation, the group is included.
Category If a multiple fee structure is used for the class, the student’s assigned category is shown.
3. Review and/or print the information, then click [Back to Data Entry] to return to the student data entry screen.
PRINTING Reports
TC Command Page 139 6/13/2012
MMuullttiippllee ccllaasssseess
AAllll ccllaasssseess 1. To list all classes, specify the date range for the report, then
choose [ALL Classes Listing] from the Class Registration Data Entry screen.
2. The “Full Class List” report is displayed. 3. Review the displayed data and print the report, then click [DATA
ENTRY] to return to the Class Registration Data Entry screen.
AAccttiivvee ccllaasssseess
Classes are available on this report if Paperwork Complete? is set to No in the Class Registration Data Entry screen (shown on page 50).
1. To list the active classes, specify the date range for the report, then choose [Current ACTIVE Listing] from the Class Registration Data Entry screen.
2. The “Active Class List” report is displayed. 3. Review the displayed data, print the report, then click [DATA
ENTRY] to return to the Class Registration Data Entry screen.
SSuummmmaarriizzeedd ccllaassss ddaattaa
CCllaasssseess ssuummmmaarriizzeedd bbyy ttyyppee This summary report provides total numbers of classes by type for initial, renewal, online, and cancelled NEW classes, and student totals by class type for attended, completed and remediated students.
Note: This report aggregates all Training Center reporting requirements into one report.
1. To summarize classes by type, use the Report Period fields to specify a date range for the report, then choose [Class Summary by Type List] from the Class Registration Data Entry screen.
2. The “Summary Report for Classes Taught” report is displayed. 3. Review the displayed data and/or print the report, then click
[DATA ENTRY] to return to the Class Registration Data Entry screen.
PRINTING Reports
TC Command Page 140 6/13/2012
EEmmppllooyyeeee
LLiisstt eemmppllooyyeeeess Employee contact information is available.
1. Choose [Contact Listing] from the Personnel Data Entry screen. 2. The “Personnel Phone Contact Listing” screen is displayed. 3. Review and/or print the information, then click [Back to Data Entry]
to return to the Personnel Data Entry screen.
TTrraacckk eemmppllooyyeeee cceerrttiiffiiccaattiioonn
RReevviieeww cceerrttiiffiiccaattiioonn hhiissttoorryy To review certification history for an employee or group of employees, follow these steps:
1. Choose [Educational History] from the Personnel Data Entry screen.
2. The “Personnel Records” screen is displayed. 3. Use the flip book to review this information for the employees. 4. Use [Find…] to select one employee or a group of employees to
review. Refer to the explanation of finding records on page 7 and FileMaker Pro Capabilities in the appendix.
5. Review and/or print the information, then click [Back to Data Entry] to return to the Personnel Data Entry screen.

PRINTING Reports
TC Command Page 141 6/13/2012
TTrraacckk uuppccoommiinngg eexxppiirraattiioonnss Track upcoming certification expiration for employees with the “Expiration Status Report” and the “Department Summary.”
Employees with certifications expiring in the next 90 days are flagged. The certification that is about to expire is identified with a warning flag, and expired certifications are tagged.
total expirations
1. Choose [Status Listing] from the Personnel Data Entry screen. 2. The “Employee Summary Listing” screen is displayed. 3. Review and/or print the information, then click [Back to Data Entry]
to return to the Personnel Data Entry screen.
departmental expirations
This report contains data by department for employees with certification that is expired or will expire soon. It can be printed or emailed.
Note: This report depends on department information entered in the Employee Support tab in General Setup Information (shown on page 65).
1. Choose [Department Summary] from the Personnel Data Entry screen.
2. The “Employee Summary Listing” screen is displayed. 3. Click [Continue] in the status aresa at the top of the screen. 4. Review and/or print the information, then click [Back to Data Entry]
to return to the Personnel Data Entry screen.

PRINTING Reports
TC Command Page 142 6/13/2012
SSttuuddeenntt Use the Class Registration Data Entry screen to print a list of students in the class. First, select the class, then choose [Course Roster – Front] and click [Go To Student list].
FFiinnaanncciiaall
RReevviieeww ccoouurrssee ccoossttss
Course financials can be reviewed by individual course, for a group of courses, and for all courses.
TTrraacckk aammoouunntt rreecceeiivveedd aanndd ccllaassss nneett
individual class
1. In the Class Registration Data Entry screen, select a class. Refer to the explanation of finding records on page 7 and FileMaker Pro Capabilities in the appendix.
2. Choose the Financials tab, then the Student Fees & Cost Analysis tab.
3. Click the [Course Cost Analysis Printed Summary] button. 4. Review and/or print the information, then click [DATA ENTRY] to
return to the Class Registration Data Entry screen. Note: When Other is selected in Training Center E-mail SetUp (discussed on page 151), then this report cannot be emailed.
multiple classes
To analyze profit and loss by class, follow these steps:
1. Select the class or group of classes. Refer to the explanation of finding records on page 7 and FileMaker Pro Capabilities in the appendix.
2. Choose the Financials tab in the Class Registration Data Entry screen, then choose the Student Fees & Cost Analysis subtab.
3. Click [Course Cost Analysis Printed Summary]. 4. The income/expense summary is displayed. 5. Review and/or print the information, then click [DATA ENTRY] to
return to the Class Registration Data Entry screen.

PRINTING Reports
TC Command Page 143 6/13/2012
QQuuaalliittyy aassssuurraannccee
QQAA rreeppoorrtt The Quality Assurance (QA) results entered in the Quality Assurance Data Entry screen (shown on page 164), can be summarized by class.
1. Choose [Course Q/A Data Entry] from the Class Registration Data Entry screen (shown on page 50) to see data for the current class.
2. Click [SUMMARY] in the Quality Assurance Data Entry screen. 3. Review the displayed information with the QA questions, then click
[Continue] in the status bar. 4. Review and/or print the information, then click [DATA ENTRY] to
return to the Class Registration Data Entry screen.

PRINTING Reports
TC Command Page 144 6/13/2012
AAEEDD
MMaannuuffaaccttuurreerrss
Manufacturer information for the displayed unit is available on the Manufactured by tab in the AED Data Entry screen (shown on page 188).
VVeennddoorrss If applicable, vendor information for the displayed unit is available on the Manufactured by tab in the AED Data Entry screen.
A vendor list is available from the TC Contact screen. Refer to page 191.
CCuussttoommeerrss Customer information for the displayed unit is available on the Customer Details tab in the AED Data Entry screen.
A customer list is available from the TC Contact screen.
AAEEDD EEqquuiippmmeenntt Reports are available for monitoring AED equipment and status.
BByy ccuussttoommeerr Use the “AED Equipment Listing” report to list equipment by customer, with installed location and contact information.
1. Choose [AED Listing by Customer] from the AED Management submenu, then click [Continue] in the status area.
2. Review and/or print the “AED Equipment Listing” report, then click [AED MRG MENU] to return to the AED Management submenu.
UUnniitt sseerrvviiccee hhiissttoorryy Use the “AED Equipment Activity” report to list service activity on each unit.
1. Choose [Activity Summary by AED] from the AED Management submenu, then click [Continue] in the status area.
2. Review and/or print the “AED Equipment Activity Report,” then click [AED MRG MENU] to return to the AED Management submenu.

PRINTING Reports
TC Command Page 145 6/13/2012
CCuussttoommeerr sseerrvviiccee hhiissttoorryy Use the “AED Activity Report” report to list service activity by customers, with a separate page for each customer.
1. Choose [AED Summary by Customer] from the AED Management submenu, then click [Continue] in the status area.
2. Review and/or print the “AED Activity Report ,” then click [AED MRG MENU] to return to the AED Management submenu.
PPeennddiinngg sseerrvviiccee Use the pending service report to list service activity needed in the future. Tasks are shown by customer.
Note: When a service activity is marked Yes for Remind? and a reminder date is given, then the service activity is included in this report 90 days prior to the reminder date. Refer to page 189.
1. Choose [Pending Activity Report] from the AED Management submenu, then click [Continue] in the status area.
2. Review and/or print the pending service report, then click [AED MRG MENU] to return to the AED Management submenu.
AAEEDD IInnvvooiicceess
Invoices can be generated to bill customers for AED service. Refer to page 198.
TTrraacckk eemmppllooyyeeee ttrraaiinniinngg To track AED training for AED customer employees, use the educational history report to track the Training Organization classes with AED components. Refer to page 140.
OOnnLLiinnee kkeeyyss To list available online keys in your inventory, choose [Available Keys] from the Online Keys submenu. To list online keys you have assigned to students, choose [Assigned Online Keys] from the Online Keys submenu.

PRINTING Reports
TC Command Page 146 6/13/2012
IInnvvooiiccee//IInnvveennttoorryy The following reports are available for the Invoice/Inventory module:
CCoonnttaaccttss To list contacts, choose [Contact (Customers/Vendors)] from the Invoicing submenu. From the TC Contacts screen (shown on page 191), click one of the buttons for a list. For example, to print a list of customers, click [Customer List].
PPrriinntt iinnvvooiiccee Use the Sales Processing (Quick Invoicing) screen (shown on page 198) with the correct invoice displayed.
TTrraacckk iinnvvooiicceess To review all invoices by date, choose [Invoice Log] from the Invoicing submenu. Then to review open invoices, choose [SHOW OPEN].
GGeenneerraattee oovveerrdduuee nnoottiiccee To generate notices for all overdue invoices, choose [Invoice Log] from the Invoicing submenu (shown on page 197) and click [Click here to gather all overdue invoices.]. Notices are generated for all the overdue invoices and can be printed.
Note: To print one overdue notice, find the customer and choose Current record in the Print dialog box.
CCuussttoommeerr hhiissttoorryy To review invoice history for customers, choose [History Report by Customer] from the Invoicing submenu. Click [Continue] in the status area. Review and/or print the summary report. To print the same data with a page break for each customer, click [One Customer per page].
Note: Overdue invoices are flagged.
TTrraacckk iinnvveennttoorryy Use the “Inventory Listing” report (available from the Inventory submenu shown on page 201) to review all items in inventory.
Use the “Low Level - Inventory Listing” report (available from the Inventory submenu) to review items with stock below the reorder level.
EMAILS Overview
TC Command Page 147 6/13/2012
EEMMAAIILLSS OOvveerrvviieeww
Email capabilities are available for instructors, employees, and students, with the ability to send personalized email(s) to an individual, a group, or all records of that type in the database.
Before creating an email in TC Command, make sure emailing has been set up for the training center.
Note: Email capabilities in TC Command depend on the email program in use at the TC.
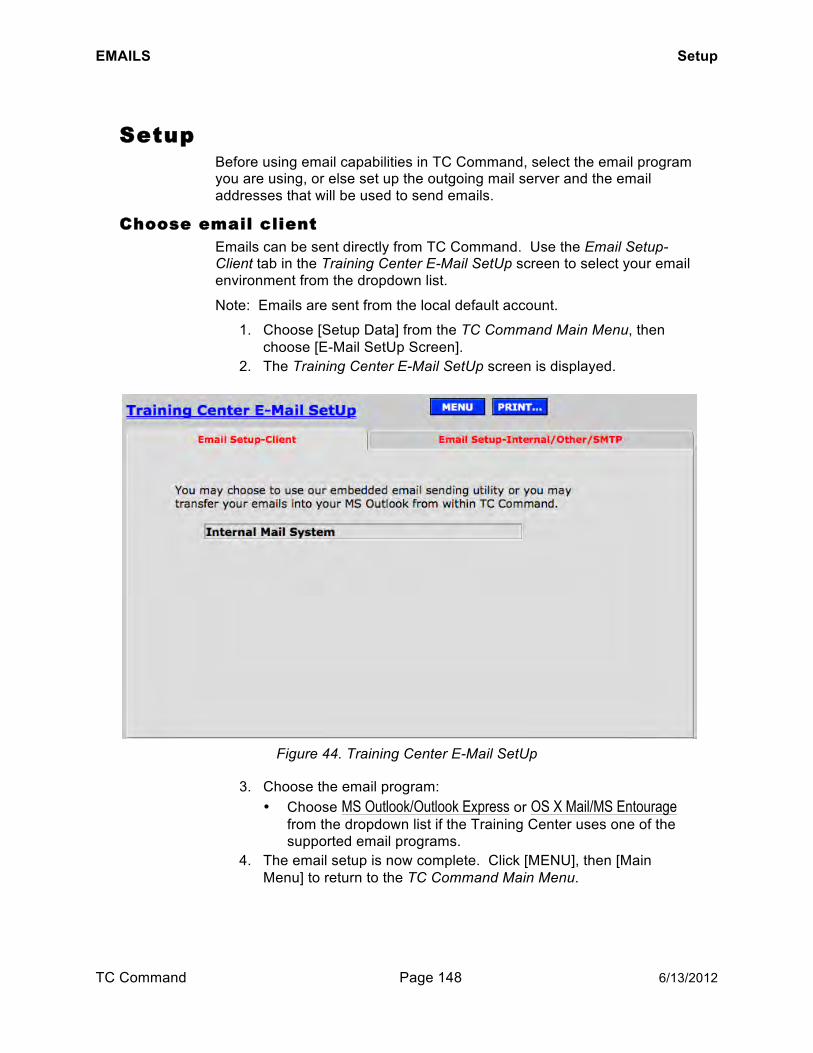
EMAILS Setup
TC Command Page 148 6/13/2012
SSeettuupp Before using email capabilities in TC Command, select the email program you are using, or else set up the outgoing mail server and the email addresses that will be used to send emails.
CChhoooossee eemmaaiill cclliieenntt Emails can be sent directly from TC Command. Use the Email Setup-Client tab in the Training Center E-Mail SetUp screen to select your email environment from the dropdown list.
Note: Emails are sent from the local default account.
1. Choose [Setup Data] from the TC Command Main Menu, then choose [E-Mail SetUp Screen].
2. The Training Center E-Mail SetUp screen is displayed.
Figure 44. Training Center E-Mail SetUp
3. Choose the email program: Choose MS Outlook/Outlook Express or OS X Mail/MS Entourage
from the dropdown list if the Training Center uses one of the supported email programs.
4. The email setup is now complete. Click [MENU], then [Main Menu] to return to the TC Command Main Menu.

EMAILS Setup
TC Command Page 149 6/13/2012
SSeett uupp iinntteerrnnaall eemmaaiill ssyysstteemm
If the Training Center is using a different email system (not MS Outlook, Outlook Express, VISTA Mail, OS X Mail, or MS Entourage), then additional information is needed so emails can be sent from TC Command via the Training Center’s email system, including web-based email systems.
Use the Email Setup-Client tab in the email setup screen to choose Internal Mail System from the dropdown list, then use the Email Setup-Internal/Other/SMTP tab to set up the required SMTP information. The internal choice supports the use of PDF attachments for emails, including letters and reports.
Note: The internal email system capabilities are available if the Training Center uses a web-based email program not listed in the email choice
1. Follow the steps to choose the email client, choosing Internal Mail System on the Email Setup-Client tab in the Training Center E-Mail SetUp screen. Note: Internal Mail System can be selected if the Training Center uses a web-based email or another email program not listed. However, if the Training Center is running its own email servers other than exchange based, then follow instructions for Other.
2. Use the Email Setup-Internal/Other/SMTP tab to complete the setup.
3. To set up the email server, start with the SMTP Server field. For these fields, request the following information from the technical department or the email provider: Outgoing mail server name Router port number If SMTP authentication is used on the outgoing mail server,
the following information is also needed: o SMTP user name o SMTP password o SMTP AUTH
The email setup is now complete. Click [MENU], then [Main Menu] to return to the TC Command Main Menu.
Note: The internal mail system choice cannot be used with Novell Groupwise.
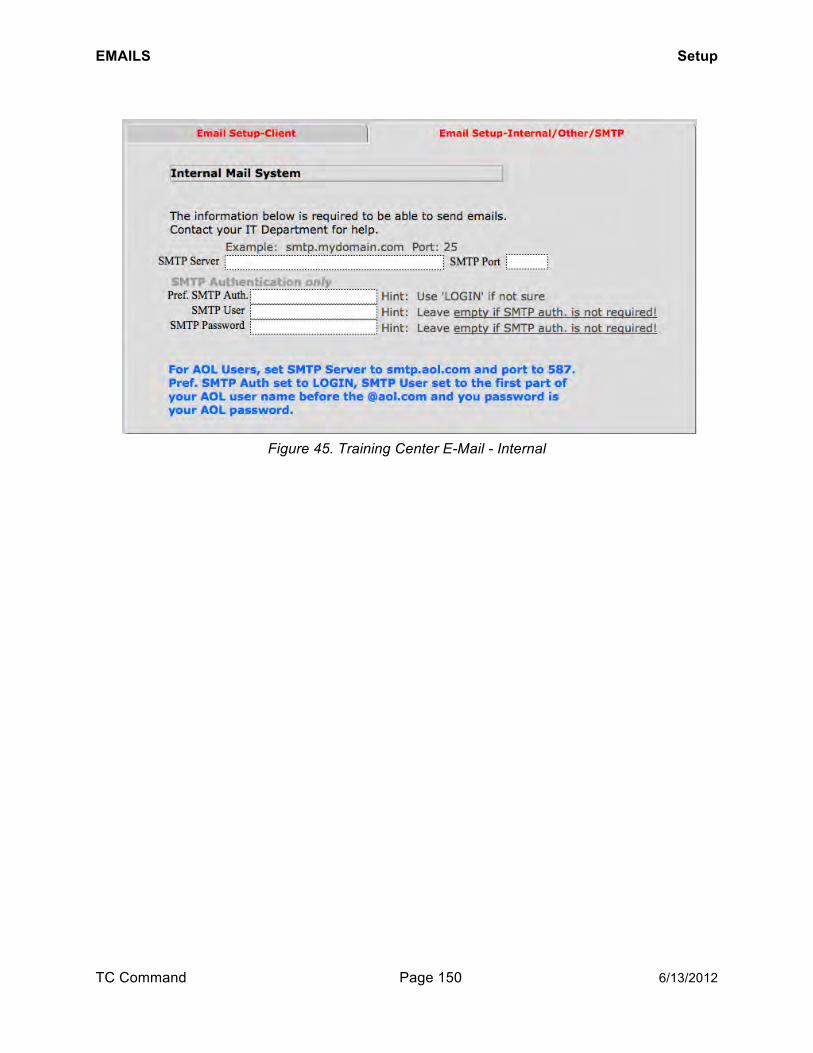
EMAILS Setup
TC Command Page 150 6/13/2012
Figure 45. Training Center E-Mail - Internal
EMAILS Setup
TC Command Page 151 6/13/2012
UUnnssuuppppoorrtteedd eemmaaiill cclliieennttss If the Training Center is not using one of the standard email systems available by radio button from the email setup screen, and the Internal Mail System is not implemented, then emails may still be sent from TC Command by unsupported email clients (not exchange-based), however email attachments are not supported and some reports cannot be sent at all. Follow the directions above to set up the internal email system, and choose Other.
IImmppoorrttaanntt ccoonnssiiddeerraattiioonnss TC Command endeavors to work with as many email clients as possible but does not guarantee complete functionality or interaction with any unsupported email client.
When Other is chosen, email attachments are not supported. In the case of PDF letters, typically a text-only e-mail will be generated with the information from the PDF attachment. However, generated lists and reports (including signin sheet, financial activity/summary, etc) cannot be sent by PDF attachment nor in the body of the email.
In addition, customization of letters is not supported.
Note: Choose Other if the Training Center uses Novell Groupwise.
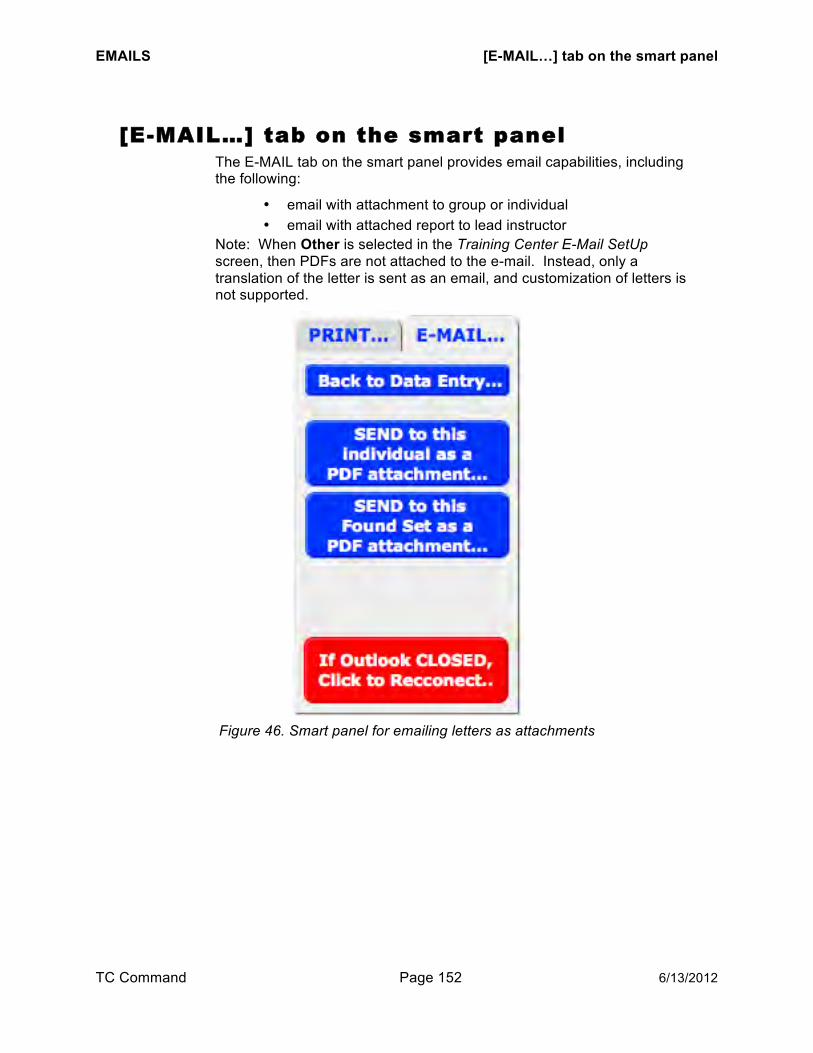
EMAILS [E-MAIL…] tab on the smart panel
TC Command Page 152 6/13/2012
[[EE--MMAAIILL……]] ttaabb oonn tthhee ssmmaarrtt ppaanneell The E-MAIL tab on the smart panel provides email capabilities, including the following:
email with attachment to group or individual email with attached report to lead instructor
Note: When Other is selected in the Training Center E-Mail SetUp screen, then PDFs are not attached to the e-mail. Instead, only a translation of the letter is sent as an email, and customization of letters is not supported.
Figure 46. Smart panel for emailing letters as attachments

EMAILS Roster Tool Emails
TC Command Page 153 6/13/2012
RRoosstteerr TTooooll EEmmaaiillss When using TC Command to work with instructors using the Roster Tool, you will use the following emails:
Pre-notification email received from instructor (optional) Confirmation email sent to instructor (optional) Class roster received from instructor
EEmmaaiill LLeetttteerrss When the smart panel is available with email capabilities, you can send a TC Command letter as a PDF attachment, or when attachments are not allowed, send the text of the TC Command letter in the body of the email.
Note: When Other is selected in Email Setup (discussed on page 151), then PDF letters cannot be sent out attached to emails; instead the text of the letter is included in the email. However, any customization of the text in TC Command letters is not supported.
AAttttaacchheedd lleetttteerrss When a letter is sent out as an attachment to an email, each letter includes the individual’s name, and other individualized information as applicable.
[[SSEENNDD ttoo tthhiiss iinnddiivviidduuaall aass aa PPDDFF aattttaacchhmmeenntt……]] When this button is available on the smart panel, use it to generate an individual letter to one person (the current record) and send it as an email attachment.
[[SSEENNDD ttoo tthhiiss FFoouunndd SSeett aass aa PPDDFF aattttaacchhmmeenntt ……]] When this button is available on the smart panel, use it to email individual letters as attachments to each person in the found set (or database, if a found set is not in place).
EMAILS Email Letters
TC Command Page 154 6/13/2012
EEmmppllooyyeeee mmaannaaggeerr eemmaaiillss This e-mail report provides an employee certification status report, for one department or all departments within one organization. This report can be generated for AHA certifications only, or for all certifications set up in TC Command. The report is sent out by email as a PDF attachment, with one email to each department manager.
Before using this report, set up organization and department information, including department manager and email address, in the Employee Support tab, shown on page 65.
1. Choose [Dept. Email Manager] from the Personnel Data Entry screen (shown on page 67).
2. Choose the organization from the dropdown list for Select Company / Organization.
3. For all departments in the selected organization, leave Select Department or leave blank for ALL blank. To generate this report for one department in the organization, choose a department from the dropdown list.
4. Click one of the BUILD and SEND buttons to generate the e-mails to the managers. Choose […AHA Certifications ONLY] to include only AHA certification status in the e-mails; choose […with ALL Certifications] to include all certifications from TC Command in the e-mails.
5. Confirm e-mails have been generated and sent for the correct number of departments by checking the Department Count field.
6. Note: If your Training Center uses Outlook for email, and it I not currently running, click [If Outlook CLOSED, Click to Reconnect].
7. After sending the e-mails, you can: a. Click [RESET List View] to clear the fields in preparation for
generating emails for another organization or department, b. or click [Return to Data Entry] to return to the Personnel Data
Entry screen.

EMAILS Email Letters
TC Command Page 155 6/13/2012
SSttuuddeenntt eemmaaiillss
The [Simple Group Emails] button in the student data entry screen also provides capabilities for creating a custom text-only email (no attachments). This screen is used when emailing a group of students or an individual student.
Use the group of students in the displayed class number (provided automatically by TC Command based on the current record) or find a different group of students for the email.
To email a group of students, follow these steps:
1. Choose [Simple Group EMails] in the student data entry screen. 2. The selected students are displayed in the Student E-Mail List
screen. 3. Click [Select ALL in Group Set] to set all displayed students to Yes
under Send Group Email. 4. Click [Compose Group E-Mail]. In the Create a Group Email
screen, complete the Attachments field and the Global Content: Plain Text field.
5. To personalize the letters with student names, position the cursor in the appropriate place in the text you have created in the Global Content: Plain Text field and click the [Greeting], [First Name] and/or [Last Name] buttons.
6. When the email text is complete, click [Send these n emails]. 7. TC Command generates an email for each student you selected.
The student’s name is included in each email if the personalization capabilities have been used.
8. After the emails have been sent, click [Return to Email Listing] to confirm all emails were sent under Successfully Sent, then click [Return to Data Entry].
To email an individual student, follow the steps above with this change:
Click [Reset ALL to No], then set the selected student to Yes.
EMAILS Email Letters
TC Command Page 156 6/13/2012
EEddiitt lleetttteerr llaayyoouutt
AAttttaacchheedd lleetttteerrss If sending a TC Command letter as an attachment, use the editing capabilities in the letter itself. Refer to the editing explanation on page 98.
Note: When Other is chosen in email setup (refer to page 151), then email attachments are not supported. Do not edit the letter text, as only the standard text will be placed in the email.
1. Choose the course discipline. 2. Choose the type of student letter. 3. Enter changes as needed. 4. When the changes for the email are completed, click [MENU],
then [Main Menu] to return to the TC Command Main Menu.
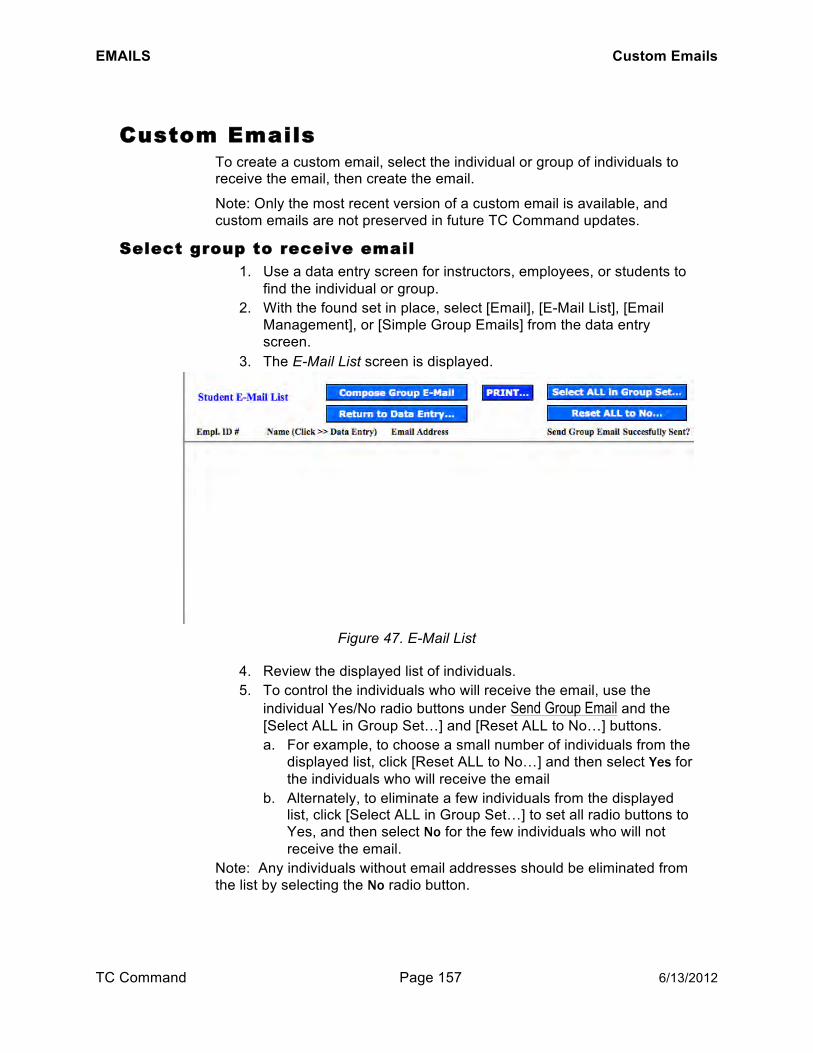
EMAILS Custom Emails
TC Command Page 157 6/13/2012
CCuussttoomm EEmmaaiillss To create a custom email, select the individual or group of individuals to receive the email, then create the email.
Note: Only the most recent version of a custom email is available, and custom emails are not preserved in future TC Command updates.
SSeelleecctt ggrroouupp ttoo rreecceeiivvee eemmaaiill 1. Use a data entry screen for instructors, employees, or students to
find the individual or group. 2. With the found set in place, select [Email], [E-Mail List], [Email
Management], or [Simple Group Emails] from the data entry screen.
3. The E-Mail List screen is displayed.
Figure 47. E-Mail List
4. Review the displayed list of individuals. 5. To control the individuals who will receive the email, use the
individual Yes/No radio buttons under Send Group Email and the [Select ALL in Group Set…] and [Reset ALL to No…] buttons. a. For example, to choose a small number of individuals from the
displayed list, click [Reset ALL to No…] and then select Yes for the individuals who will receive the email
b. Alternately, to eliminate a few individuals from the displayed list, click [Select ALL in Group Set…] to set all radio buttons to Yes, and then select No for the few individuals who will not receive the email.
Note: Any individuals without email addresses should be eliminated from the list by selecting the No radio button.

EMAILS Custom Emails
TC Command Page 158 6/13/2012
CCrreeaattee eemmaaiill 1. In the E-Mail List screen (shown on page 157), click [Compose
Group E-Mail]. 2. The Create a Group Email screen is displayed.
Figure 48. Create a Group Email…
Note: This screen may also be reached by clicking the field name email button.
3. Complete the fields and type the text of the email. Fields that are not self-explanatory are defined here.
4. When the email and the group are ready, click [Send these x emails…] to send the displayed email to the group of selected individuals in the email list, where x is the number of emails that will be sent, based on the number of individuals in the found set.

EMAILS Custom Emails
TC Command Page 159 6/13/2012
Field Definitions From
Choose from the dropdown list. To
TC Command uses the found set for this field. Do not enter any email addresses here.
CC, Bcc If someone must receive a copy of the email, enter his/her email address in the carbon copy or blind carbon copy field.
Record First, Last Name TC Command displays the name of the first individual in the found set.
Priority If the email priority must be changed, use this dropdown list.
Read Receipt Choose ON to receive notification when the email has been read.
Attachment Add an attachment to the email. Available in the Faculty module.
AAdddd ggrreeeettiinngg oorr nnaammee iinn eemmaaiill Before sending the email, you can add a personalized greeting at the beginning of the email, or include the individual’s name anywhere in the email.
To add a personalized greeting to the email, place the cursor at the beginning of the email text and click [Greeting]. This will insert “Dear” followed by the individual’s first name, last name, and then a comma.
To include the individual’s name in the text of the email, place the cursor in the right location in the email, then click [First Name] and/or [Last Name] to personalize the email each individual will receive. When using both first and last name together, be sure to include a space between the names.
AAddddiinngg ccuussttoomm ffiieellddss In the instructor data entry screen or in one of the student data entry screens, field palettes are available. Create the email, following instructions for custom emails and the customizable letter library.
Note: Only the last created email is available in TC Command, and it will not be preserved when future updates to TC Command are applied.
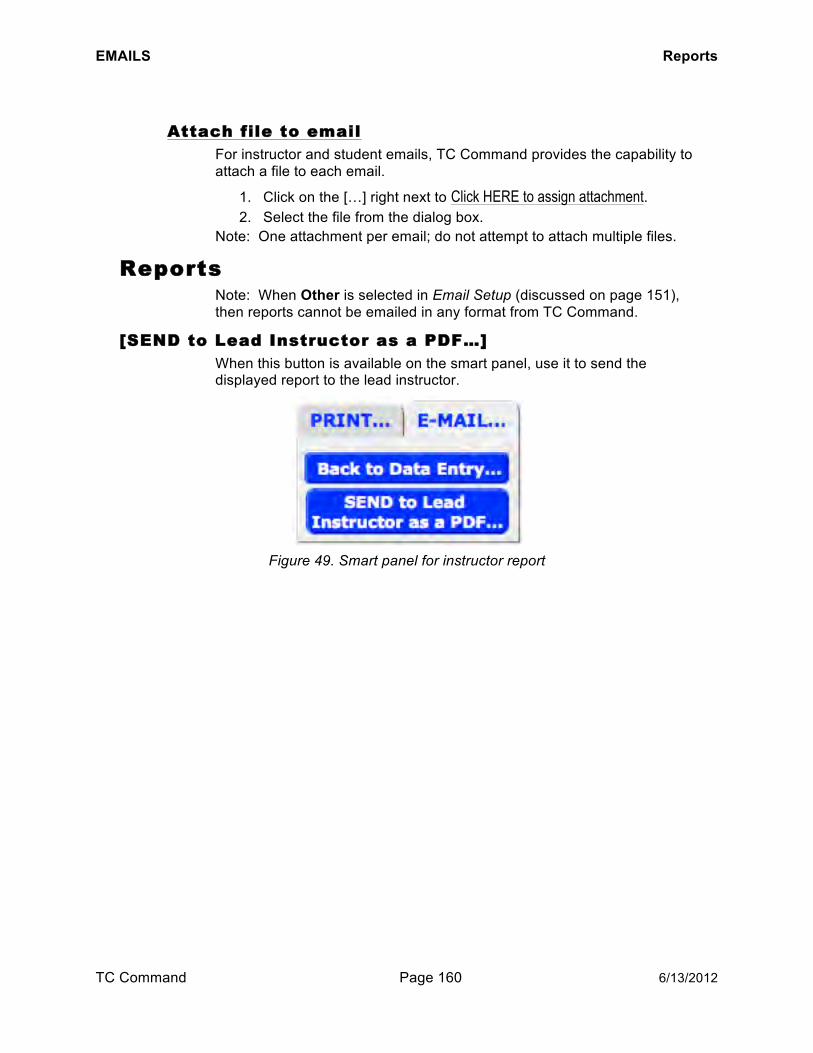
EMAILS Reports
TC Command Page 160 6/13/2012
AAttttaacchh ffiillee ttoo eemmaaiill For instructor and student emails, TC Command provides the capability to attach a file to each email.
1. Click on the […] right next to Click HERE to assign attachment. 2. Select the file from the dialog box.
Note: One attachment per email; do not attempt to attach multiple files.
RReeppoorrttss Note: When Other is selected in Email Setup (discussed on page 151), then reports cannot be emailed in any format from TC Command.
[[SSEENNDD ttoo LLeeaadd IInnssttrruuccttoorr aass aa PPDDFF……]] When this button is available on the smart panel, use it to send the displayed report to the lead instructor.
Figure 49. Smart panel for instructor report

QUALITY ASSURANCE Overview
TC Command Page 161 6/13/2012
QQUUAALLIITTYY AASSSSUURRAANNCCEE OOvveerrvviieeww
To ensure quality instruction, request student feedback and record the results in TC Command.
QQAA QQuueessttiioonnss
MMaaiinnttaaiinn QQAA qquueessttiioonnss You can customize quality assurance (QA) questions for disciplines and course types.
Note: Any changes made to a set of questions for a course type will apply to all prior classes using this set of questions.
To change an existing set of questions, follow these steps:
1. From the TC Command Main Menu, choose [Setup Data], then choose [General Setup Information].
2. Choose the QA Questions tab in the Training Center SetUp Information screen.
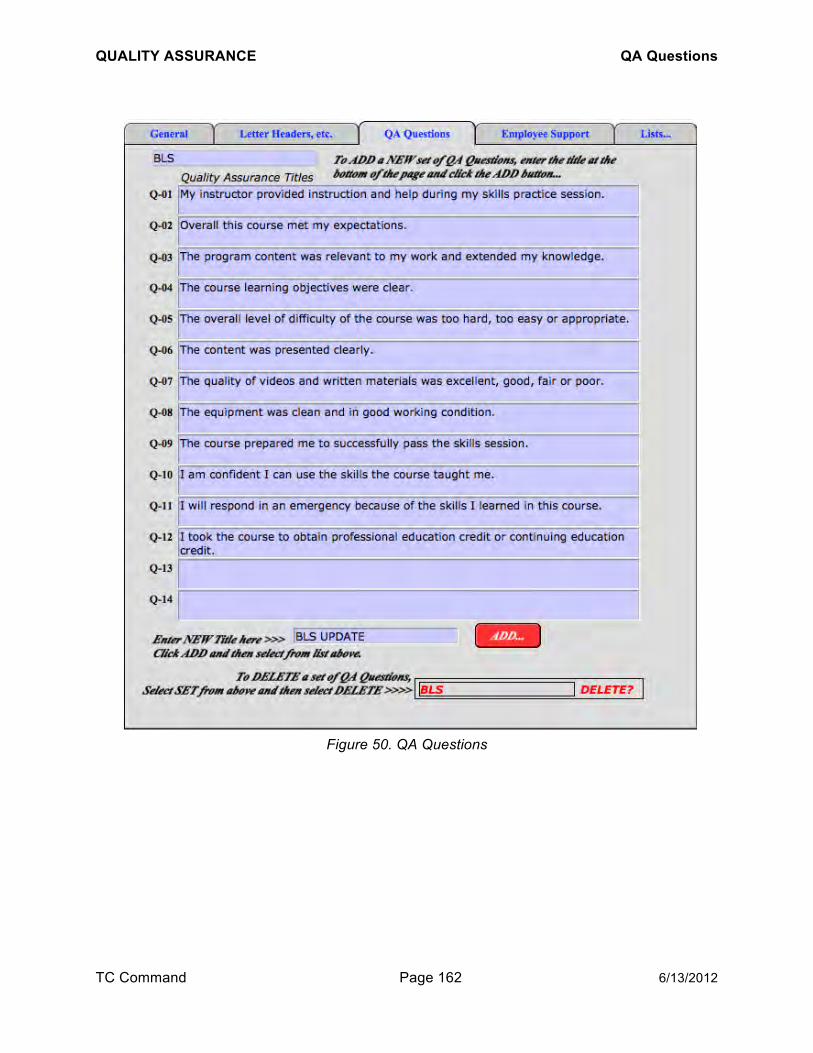
QUALITY ASSURANCE QA Questions
TC Command Page 162 6/13/2012
Figure 50. QA Questions

QUALITY ASSURANCE QA Data
TC Command Page 163 6/13/2012
3. Use the dropdown list at the top left corner to select the discipline. 4. Review the displayed questions for the selected discipline, and
edit the questions as needed. 5. When the questions have been changed, you can:
a. select another course discipline in the top left corner, b. or click [MENU], then [Main Menu] to return to the TC
Command Main Menu.
AAdddd aa nneeww sseett ooff QQAA qquueessttiioonnss You can add questions for new course types in the QA Questions tab.
Type the new course type in the Enter NEW Title here field, then click [ADD…].
Then select the new course type from the dropdown list in the top left corner, and enter a set of questions appropriate for the course type.
QQAA DDaattaa
EEnntteerr QQAA ddaattaa After collecting the student evaluations for a class, manually tabulate the answers to each question. Then enter the tabulated data in TC Command.
1. Find the class in the Class Registration Data Entry screen (shown on page 50). Refer to the explanation of finding records on page 7 and FileMaker Pro Capabilities in the appendix.
2. Choose [Course Q/A Data Entry]. 3. The Quality Assurance Data Entry screen is displayed.

QUALITY ASSURANCE QA Data
TC Command Page 164 6/13/2012
Figure 51. Quality Assurance Data Entry
4. Enter the total number of evaluations received for this class. 5. Choose the appropriate set of QA questions from the dropdown
list for the Course Type for Evaluation field. 6. For each question, enter the total number of responses at each of
the five levels. 7. TC Command calculates the average, which is used for the
summary report, and the percentage. 8. After entering the tabulated QA data, click [Return…] to return to
the Class Registration Data Entry screen.
!

FINANCIALS Overview
TC Command Page 165 6/13/2012
FFIINNAANNCCIIAALLSS OOvveerrvviieeww
The Financials module provides the capability to set up the following:
accepted payment methods class fees customized fee structure
Instructor fees, book/material costs, and fee payments can be recorded.
SSeett UUpp PPaayymmeenntt MMeetthhooddss To set up payment methods accepted by the training center, follow these steps:
1. Choose [Setup Data] from the TC Command Main Menu, then choose [General Setup Information].
2. In the Training Center SetUp Information screen, choose the General tab (shown on page 12).
3. Use the Make Checks/Money Orders payable to: field to specify the payable name for student invoice letters and student receipts.
4. In the Training Center SetUp Information screen, choose the Letter Headers, etc. tab (shown on page 94).
5. Use the Payment Methods table at the bottom of the tab to enter the payment methods used at your training center.
6. When finished, click [MENU], then [Main Menu] to return to the TC Command Main Menu.
These payment methods are now available in the dropdown list for the Payment Method field in the Financial Activity tab on the student data entry screen (shown on page 72).
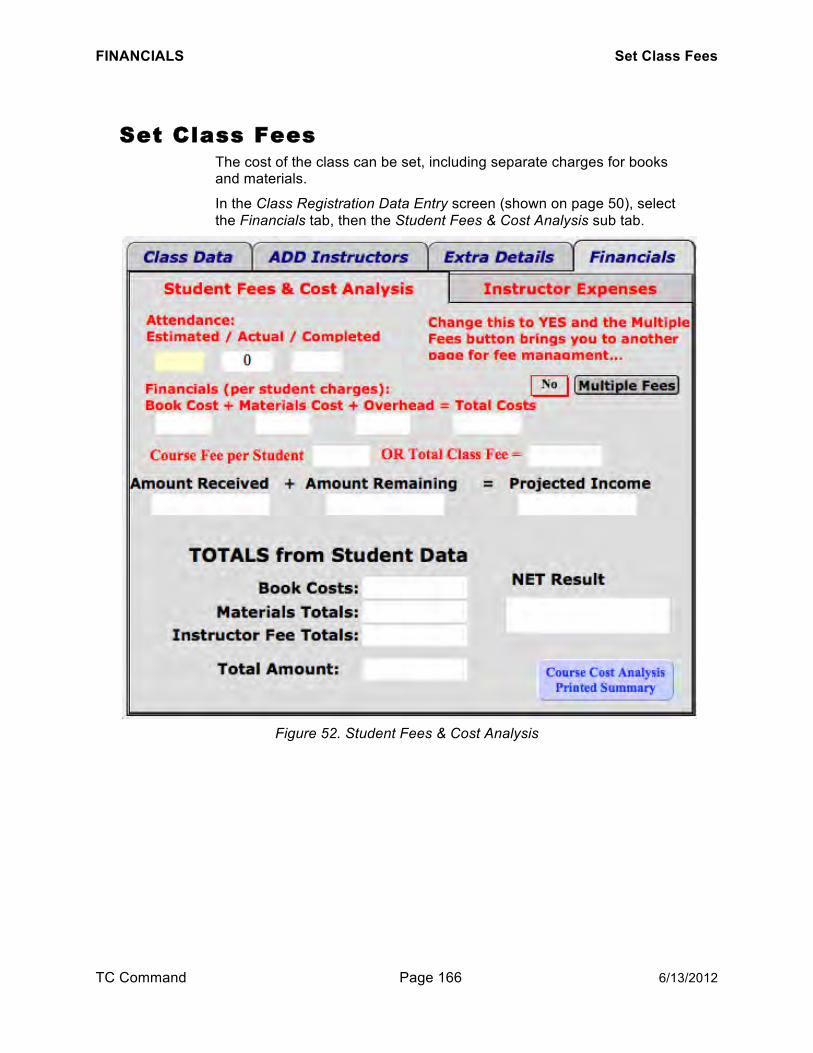
FINANCIALS Set Class Fees
TC Command Page 166 6/13/2012
SSeett CCllaassss FFeeeess The cost of the class can be set, including separate charges for books and materials.
In the Class Registration Data Entry screen (shown on page 50), select the Financials tab, then the Student Fees & Cost Analysis sub tab.
Figure 52. Student Fees & Cost Analysis

FINANCIALS Set Class Fees
TC Command Page 167 6/13/2012
PPeerr ccllaassss ffeeee
To set a fixed fee for the class, use the Total Class Fee field on the Student Fees & Cost Analysis sub tab. This includes all charges, and is not affected by the number of students.
If this fee is set, it is used for the Amount Received field and no calculations are performed to determine the amount received.
PPeerr ssttuuddeenntt ffeeee To charge each student a fixed fee for the class, enter the fee in the Course Fee per Student field on the Student Fees & Cost Analysis sub tab. If the class has separate charges for books and materials, then use the Book Cost and Materials Cost fields.
FFeeee ssttrruuccttuurree A fee structure can be used to charge different amounts based on student category. Default categories of EMS Personnel, Nurse, Physician, and Outside are provided for each course discipline. Additional categories can be added.
If the charges in the fee structure have been customized for your organization, and the fee structure will be used for this class, then choose Yes for [Multiple Fees] on the Student Fees & Cost Analysis sub tab (shown on page 166).
The appropriate fee(s) will be charged to each student, based on the fee category assigned when the student registers.

FINANCIALS Customize the Fee Structure
TC Command Page 168 6/13/2012
CCuussttoommiizzee tthhee FFeeee SSttrruuccttuurree Before using the fee structure for a class, check the default charges for each category in the course discipline. Add new categories and change fees as needed.
RReevviieeww aanndd cchhaannggee ffeeee ssttrruuccttuurree To review existing fees and change them as needed for the course discipline (ACLS, BLS, FA, MISC, or PALS), follow these steps:
1. In the Student Fees & Cost Analysis sub tab (shown on page 166), choose Yes for [Multiple Fees].
2. Click [Multiple Fees]. 3. The multiple fees screen is displayed.

FINANCIALS Customize the Fee Structure
TC Command Page 169 6/13/2012
Figure 53. Multiple Fees
4. Change the Fee, Materials, and Books fees as needed for any of the categories in each course discipline.
5. After changing the fees, click [Return to Registration Screen].
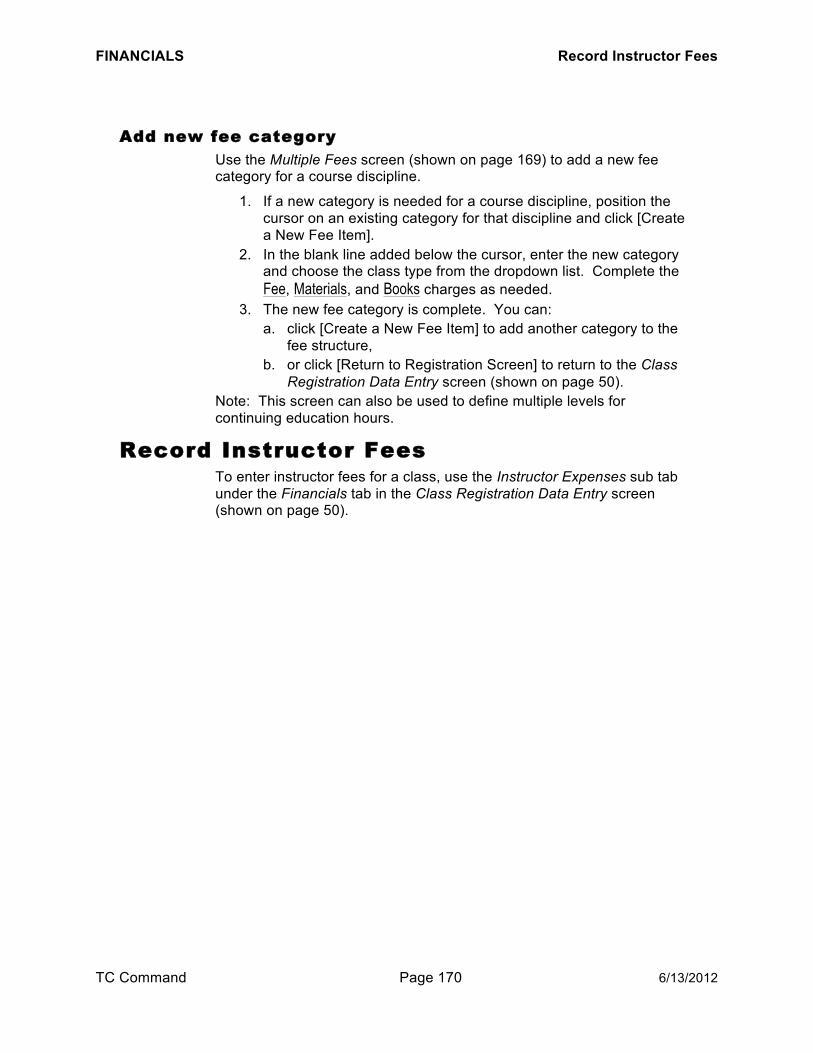
FINANCIALS Record Instructor Fees
TC Command Page 170 6/13/2012
AAdddd nneeww ffeeee ccaatteeggoorryy
Use the Multiple Fees screen (shown on page 169) to add a new fee category for a course discipline.
1. If a new category is needed for a course discipline, position the cursor on an existing category for that discipline and click [Create a New Fee Item].
2. In the blank line added below the cursor, enter the new category and choose the class type from the dropdown list. Complete the Fee, Materials, and Books charges as needed.
3. The new fee category is complete. You can: a. click [Create a New Fee Item] to add another category to the
fee structure, b. or click [Return to Registration Screen] to return to the Class
Registration Data Entry screen (shown on page 50). Note: This screen can also be used to define multiple levels for continuing education hours.
RReeccoorrdd IInnssttrruuccttoorr FFeeeess To enter instructor fees for a class, use the Instructor Expenses sub tab under the Financials tab in the Class Registration Data Entry screen (shown on page 50).
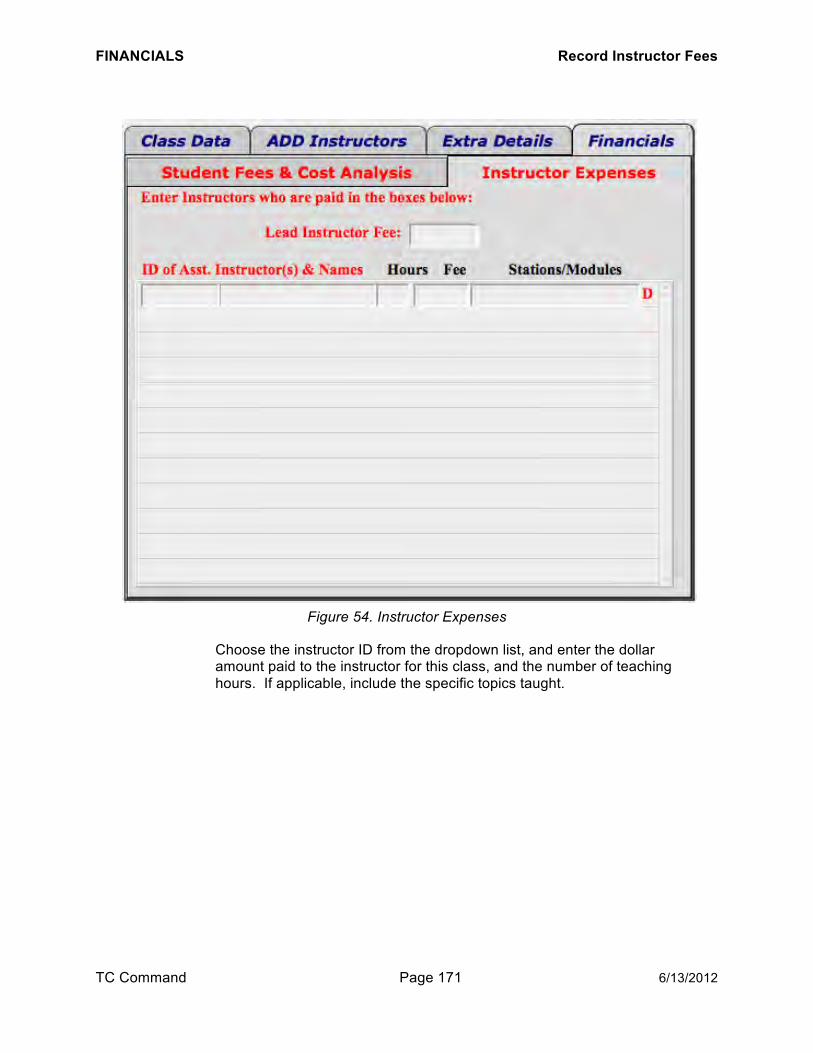
FINANCIALS Record Instructor Fees
TC Command Page 171 6/13/2012
Figure 54. Instructor Expenses
Choose the instructor ID from the dropdown list, and enter the dollar amount paid to the instructor for this class, and the number of teaching hours. If applicable, include the specific topics taught.

FINANCIALS Record Book and Material Costs
TC Command Page 172 6/13/2012
RReeccoorrdd BBooookk aanndd MMaatteerriiaall CCoossttss If the cost of books and materials is included in the course fee, or if a set fee is charged for the entire class, then skip this task.
Use the Student Fees & Cost Analysis sub tab (shown on page 166) to record book and material costs.
Book Costs The cost to the Training Center, per student, for the book(s) used in this course.
Materials Totals The cost to the Training Center, per student, for the materials used in this course.
RReevviieeww FFeeee PPaayymmeennttss Skip this task if a set fee is charged for the entire class.
Choose [Course Fee Summary] for a list of students registered in the class, outstanding fees, and amounts paid.
TTrraacckk CCoouurrssee IInnccoommee aanndd EExxppeennssee Use the Student Fees & Cost Analysis sub tab under the Financials tab on the Class Registration Data Entry screen to review class revenue and net as the class fills.

ONLINE KEYS Overview
TC Command Page 173 6/13/2012
OONNLLIINNEE KKEEYYSS OOvveerrvviieeww
TC Command can manage your inventory of online keys for students completing the knowledge part of a course online. Online keys are available for a variety of programs.
1. Choose [OnLine Keys] from the TC Command Main Menu. 2. The Online Keys screen with tabs is displayed.
Figure 55. Online Keys screen

ONLINE KEYS Setup
TC Command Page 174 6/13/2012
SSeettuupp As new online courses become available, add them to TC Command via the Key Matrix tab in the Online Keys screen. Online courses with no corresponding physical skills requirement can be included in TC Command for record keeping purposes.
Use the blank line at the end of the list of online courses to add new online courses as they become available, entering the new product number for CODE, typing the assigned course name, and choosing the module. Note that courses in the ONLINE module will appear on all dropdown lists, while online courses specified for course modules with appear only on the specified dropdown lists.
Figure 56. Key Matrix tab

ONLINE KEYS Add New Keys
TC Command Page 175 6/13/2012
AAdddd NNeeww KKeeyyss When new keys are purchased for distribution, they can be imported into TC Command or added manually.
EEnntteerr mmaannuuaallllyy
1. Choose the Manual Entry tab from the Online Keys screen.
Figure 57. Manual Entry tab
To create a record for each key, follow these steps:
2. Click [ADD Key…] 3. Complete the fields for the new key. 4. When the new record is complete, you can:
a. click [ADD Key…] again to enter another new key, b. or click [Main Menu] to return to the TC Command main menu.

ONLINE KEYS Add New Keys
TC Command Page 176 6/13/2012
Field Definitions Key
The code number for the online key. Purchasing Agency
The purchasing agency for the Training Center, or the Training Center itself.
Purchase Date The date the online key was purchased by the Training Center or the student.
Product No. Use the dropdown list to select the standard AHA product number for the key. Note: The dash is omitted in TC Command.
Module This field is not in use at this time.
Availability? TC Command automatically marks the newly entered key as OPEN, to indicate that it is available, and then marks it as USED when it is no longer available.
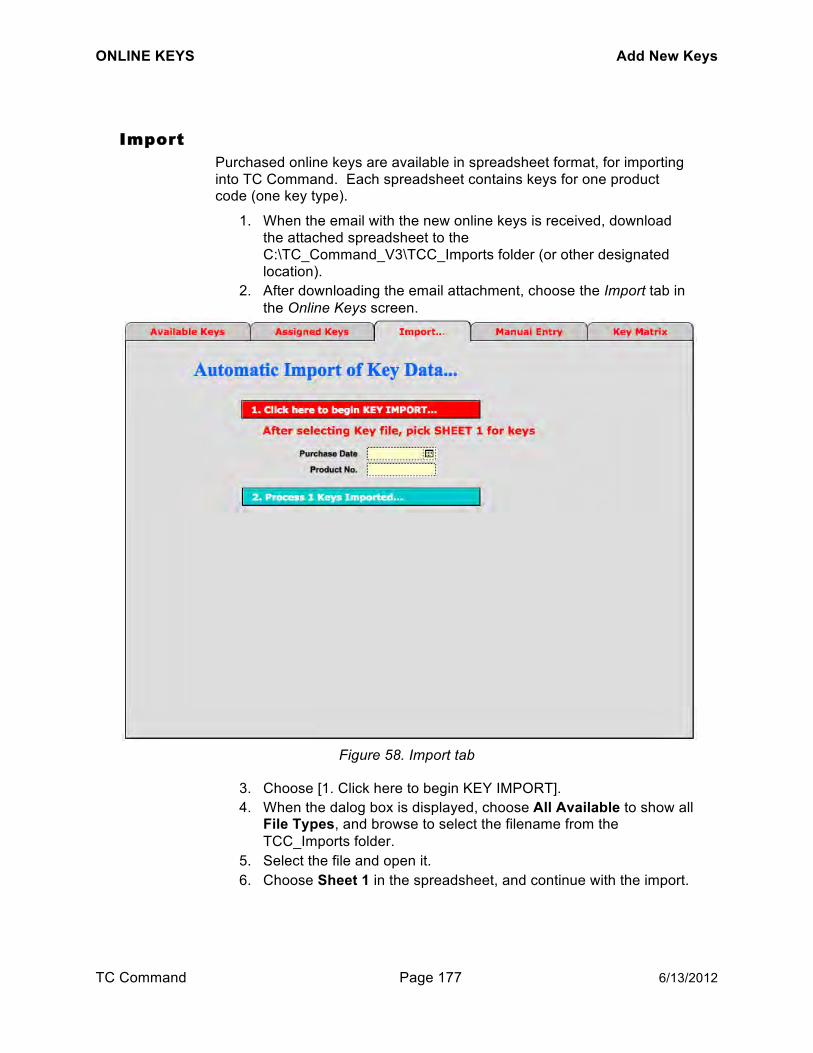
ONLINE KEYS Add New Keys
TC Command Page 177 6/13/2012
IImmppoorrtt Purchased online keys are available in spreadsheet format, for importing into TC Command. Each spreadsheet contains keys for one product code (one key type).
1. When the email with the new online keys is received, download the attached spreadsheet to the C:\TC_Command_V3\TCC_Imports folder (or other designated location).
2. After downloading the email attachment, choose the Import tab in the Online Keys screen.
Figure 58. Import tab
3. Choose [1. Click here to begin KEY IMPORT]. 4. When the dalog box is displayed, choose All Available to show all
File Types, and browse to select the filename from the TCC_Imports folder.
5. Select the file and open it. 6. Choose Sheet 1 in the spreadsheet, and continue with the import.

ONLINE KEYS Add New Keys
TC Command Page 178 6/13/2012
7. The online keys are displayed in the lower part of the screen. Delete any header lines that may have been included from the top of the spreadsheet.
8. Confirm the correct number of keys have been imported by comparing the number imbedded in [2. Process n Keys Imported]
9. Enter the purchasing information in the Purchase Date and Product No. fields.
10. Choose [2. Process n Keys Imported] to add the two fields of purchasing information to all keys being imported.
11. Importing the keys is now completed, and the keys are available for review in the Available Keys tab in this screen. The newly imported keys are now available for assignment to students, in the student data entry screen.
Field Definitions PurchaseDate
The date the online key was purchased by the Training Center or the student, for informational purposes.
Product No. Use the dropdown list to select the product number for the key. Note: Any dashes are omitted in TC Command.
ONLINE KEYS List Keys
TC Command Page 179 6/13/2012
LLiisstt KKeeyyss Online keys can be listed. Available keys are listed separately from assigned keys.
AAvvaaiillaabbllee kkeeyyss To review online keys that are available for students, follow these steps:
1. Choose [Available Keys…] from the Online Keys screen. 2. The available keys are listed. 3. Review and/or print the list.
AAssssiiggnneedd kkeeyyss To review online keys that have been assigned to students, follow these steps:
1. Choose [Assigned Keys…] from the Online Keys screen. 2. Assigned keys are listed with the student’s name and the date the
key was assigned to the student. 3. If the key was not used in the allotted time period, the past due
date is included with a warning flag. 4. Review and/or print the list.
ONLINE KEYS Assign Key To Student
TC Command Page 180 6/13/2012
AAssssiiggnn KKeeyy TToo SSttuuddeenntt A student who wishes to complete the knowledge part of the course online may purchase an online key from the Training Center.
Create an “online key” class. Some Training Centers create one class each month for students using online keys.
1. Register the student in the class. 2. On the Course Data tab in the student data entry screen (shown
on page 72) choose the product code from the dropdown list for Key Type. Only the keys appropriate for the selected course module are displayed in the dropdown list.
3. Use the Key # field to select one of the Training Center’s online keys for the student, or enter the key number if it has not been added to TC Command yet.
4. Click [Assign].
IIssssuuee IInnssttrruuccttiioonn LLeetttteerr After registering the student in the class, choose the OnLine Key Letter from the dropdown list under Correspondence on the Course Data tab (shown on page 78) to create the instruction letter for the student. Refer to explanation on page 118.
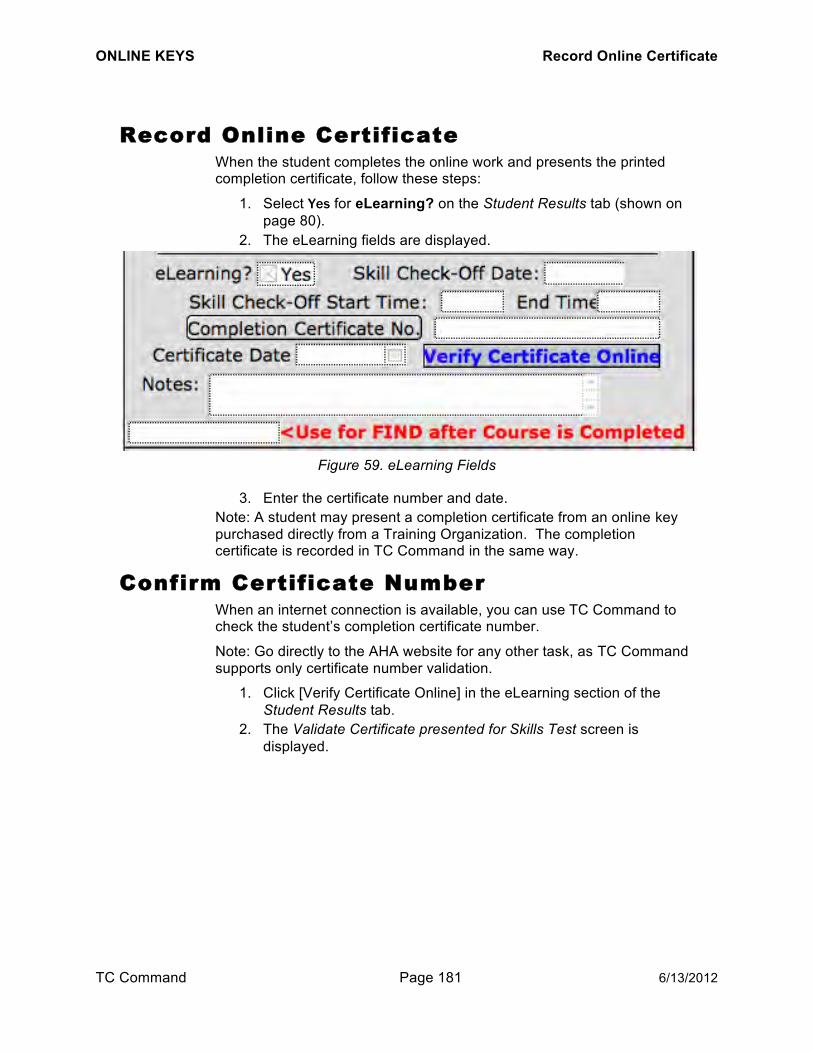
ONLINE KEYS Record Online Certificate
TC Command Page 181 6/13/2012
RReeccoorrdd OOnnlliinnee CCeerrttiiffiiccaattee When the student completes the online work and presents the printed completion certificate, follow these steps:
1. Select Yes for eLearning? on the Student Results tab (shown on page 80).
2. The eLearning fields are displayed.
Figure 59. eLearning Fields
3. Enter the certificate number and date. Note: A student may present a completion certificate from an online key purchased directly from a Training Organization. The completion certificate is recorded in TC Command in the same way.
CCoonnffiirrmm CCeerrttiiffiiccaattee NNuummbbeerr When an internet connection is available, you can use TC Command to check the student’s completion certificate number.
Note: Go directly to the AHA website for any other task, as TC Command supports only certificate number validation.
1. Click [Verify Certificate Online] in the eLearning section of the Student Results tab.
2. The Validate Certificate presented for Skills Test screen is displayed.

ONLINE KEYS Confirm Certificate Number
TC Command Page 182 6/13/2012
Figure 60. Validate Certificate presented for Skills Test
3. Use the [COPY] buttons to copy the fields of student and certificate information from TC Command and paste them one by one into the AHA validation webpage.
4. Click [Check] in the webpage to validate the presented certificate against the information entered when the student performed the online course work.
5. After checking a certificate number, use TC Command to: a. Click [Reset Screen] to check another certificate number, b. or click [Return to Data Entry] to select another student to
check. If the webpage does not load because of a problem with the internet connection, correct the connectivity problem, then click [Reset Screen] to access the internet again.
Note: In the event the AHA webpage is moved, use the OnlineAHA URL field on the General tab (shown on page 12) to update the online location for certificate verification.

ONLINE KEYS Record Skills Completion
TC Command Page 183 6/13/2012
RReeccoorrdd SSkkiillllss CCoommpplleettiioonn When a student with an online completion certificate completes the physical skills part of the test, use the eLearning fields on the Student Results tab (shown on page 80) to mark the skills verification as complete and enter the date and time completed.
RReettuurrnn EExxppiirreedd KKeeyyss ttoo IInnvveennttoorryy If the online key is not used by the student, then add the key number back into inventory by following these steps.
1. Choose [Assigned Online Keys] from the Online Keys screen (shown on page 173).
2. Locate the unused key and click the [Re-Claim] on the same line. 3. The selected key is removed from the list of assigned keys and
added to the list of available keys. Now you can: a. select and reclaim other online key, b. or click [MENU] to return to the Online Keys submenu.
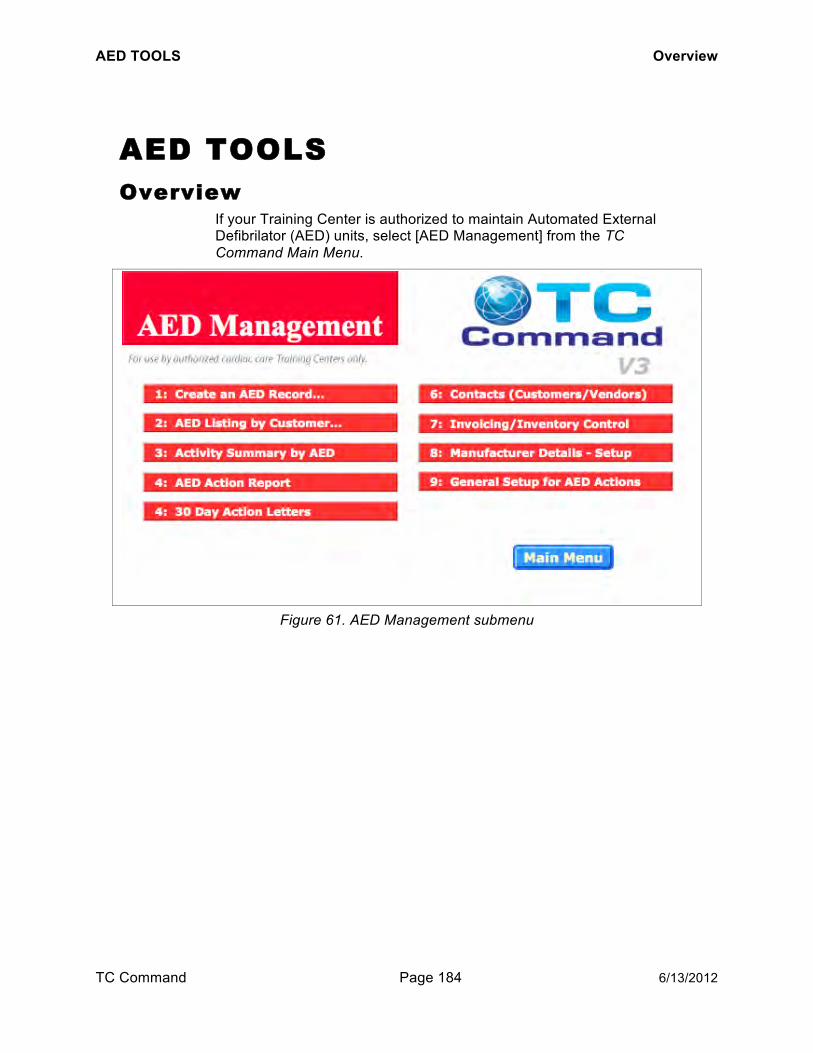
AED TOOLS Overview
TC Command Page 184 6/13/2012
AAEEDD TTOOOOLLSS OOvveerrvviieeww
If your Training Center is authorized to maintain Automated External Defibrilator (AED) units, select [AED Management] from the TC Command Main Menu.
Figure 61. AED Management submenu

AED TOOLS Setup
TC Command Page 185 6/13/2012
SSeettuupp When first using this module, set up manufacturers, equipment models, vendors, and customers.
MMaannuuffaaccttuurreerrss aanndd mmooddeellss Set up the manufacturers and the AED models that you handle.
1. Choose [Manufacturer Details – Setup] from the AED Management submenu.
Figure 62. Manufacturer Details
2. Assign a unique ID number to the manufacturer (maximum 20 alphanumeric characters, no spaces allowed) and complete the contact information for the manufacturer.
3. Use the AED Models table to enter the models purchased from this manufacturer.
4. After adding the manufacturer and its models, you can: a. click [New MFGR] to add another manufacturer, b. or click [MENU] to return to the AED Management submenu.

AED TOOLS Setup
TC Command Page 186 6/13/2012
VVeennddoorrss aanndd ccuussttoommeerrss
The TC Contacts screen is used to add vendor and customer information. Refer to page 191.
CCuussttoommeerr eemmppllooyyeeeess If you will be responsible for tracking employee training for your AED customers, set up the AED customers as employers and the customer’s employees as employees.
Set up AED customers as employers on the Employee Support tab (shown on page 65). If the AED customer has units at multiple locations, then enter the locations in the Departments or Locations list on this tab.
After setting up the AED customers, then set up the AED customer’s employees in the employee module.
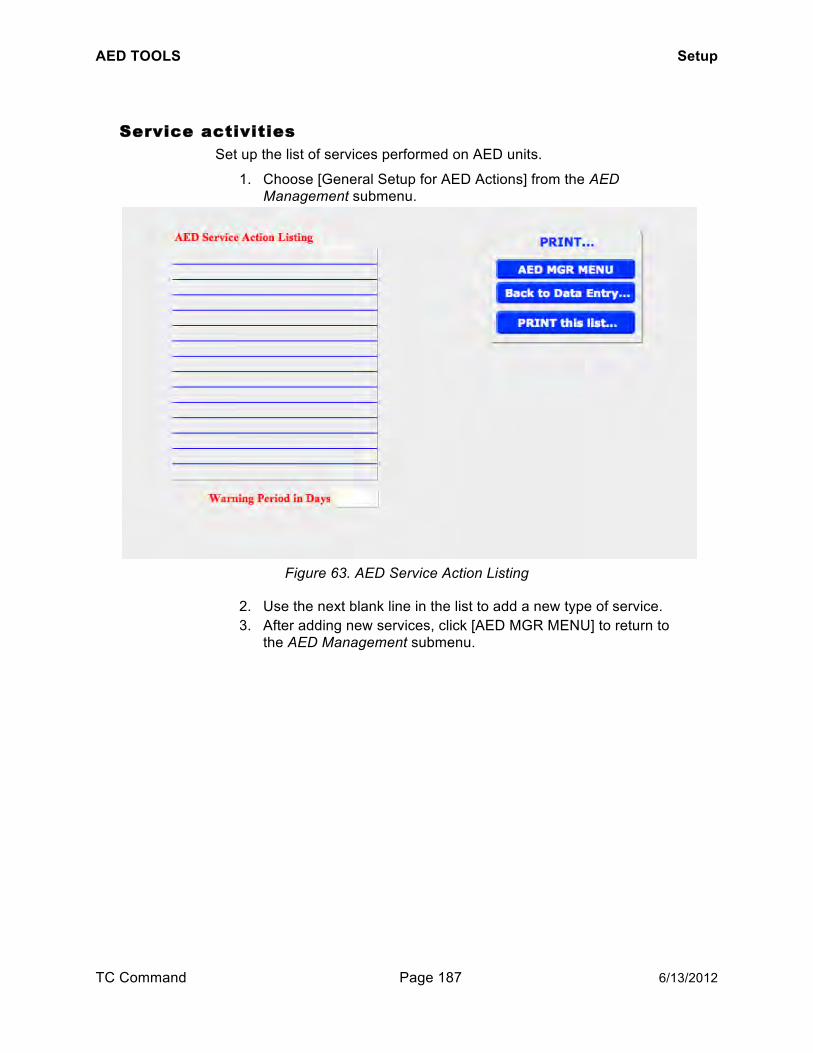
AED TOOLS Setup
TC Command Page 187 6/13/2012
SSeerrvviiccee aaccttiivviittiieess Set up the list of services performed on AED units.
1. Choose [General Setup for AED Actions] from the AED Management submenu.
Figure 63. AED Service Action Listing
2. Use the next blank line in the list to add a new type of service. 3. After adding new services, click [AED MGR MENU] to return to
the AED Management submenu.
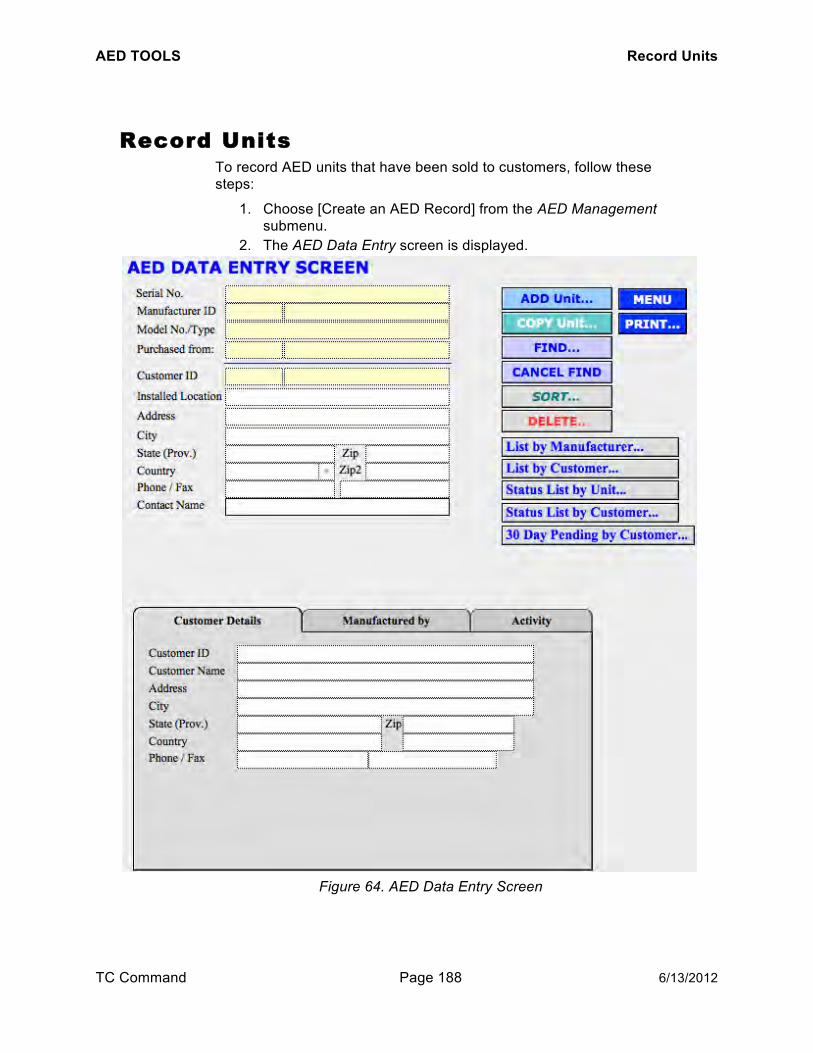
AED TOOLS Record Units
TC Command Page 188 6/13/2012
RReeccoorrdd UUnniittss To record AED units that have been sold to customers, follow these steps:
1. Choose [Create an AED Record] from the AED Management submenu.
2. The AED Data Entry screen is displayed.
Figure 64. AED Data Entry Screen
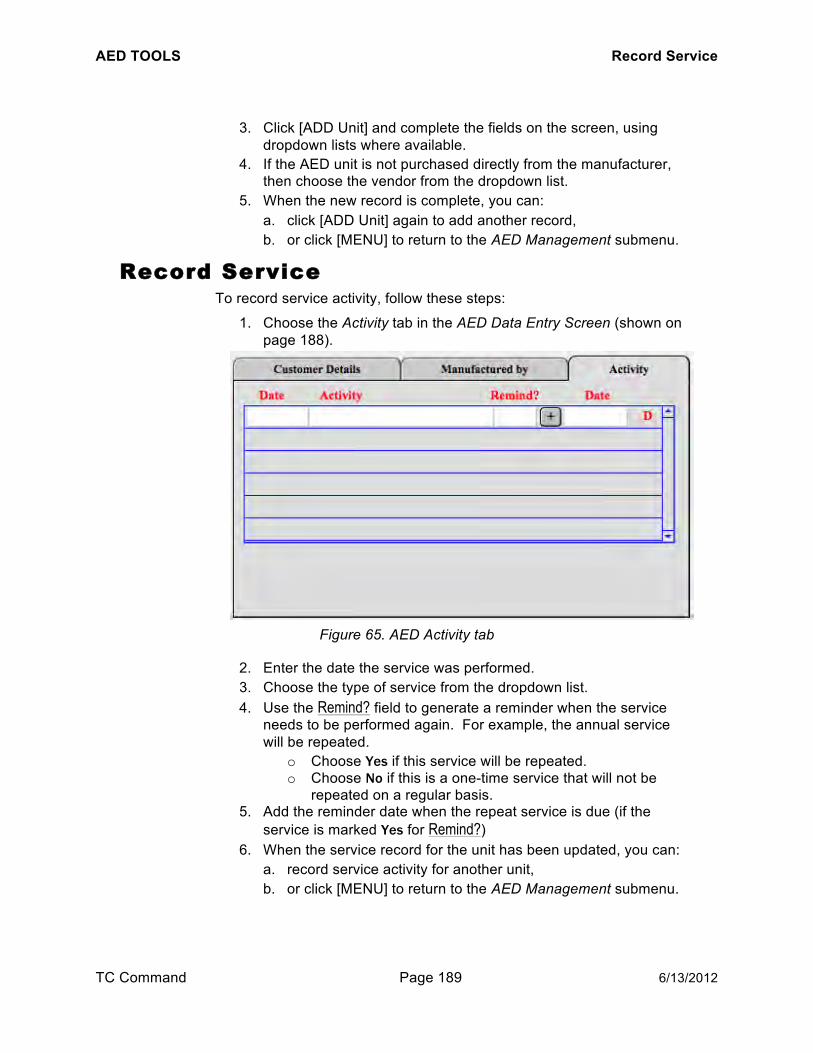
AED TOOLS Record Service
TC Command Page 189 6/13/2012
3. Click [ADD Unit] and complete the fields on the screen, using dropdown lists where available.
4. If the AED unit is not purchased directly from the manufacturer, then choose the vendor from the dropdown list.
5. When the new record is complete, you can: a. click [ADD Unit] again to add another record, b. or click [MENU] to return to the AED Management submenu.
RReeccoorrdd SSeerrvviiccee To record service activity, follow these steps:
1. Choose the Activity tab in the AED Data Entry Screen (shown on page 188).
Figure 65. AED Activity tab
2. Enter the date the service was performed. 3. Choose the type of service from the dropdown list. 4. Use the Remind? field to generate a reminder when the service
needs to be performed again. For example, the annual service will be repeated.
o Choose Yes if this service will be repeated. o Choose No if this is a one-time service that will not be
repeated on a regular basis. 5. Add the reminder date when the repeat service is due (if the
service is marked Yes for Remind?) 6. When the service record for the unit has been updated, you can:
a. record service activity for another unit, b. or click [MENU] to return to the AED Management submenu.

INVOICING Overview
TC Command Page 190 6/13/2012
IINNVVOOIICCIINNGG OOvveerrvviieeww
For authorized cardiac care Training Centers, this module provides capabilities for managing inventory and invoicing customers.
Note: When stock is used internally rather than sold outside your organization, TC Command can be used to track internal product use and inventory. To do this, write invoices to oneself, instructors, and departments.
SSeettuupp Before using the Inventory / Invoicing / Purchasing module, set up vendor and customer contacts, current inventory stock, and invoice settings.
LLooggoo && lleetttteerrhheeaadd If logo and letterhead information will be included when printing invoices, then set this up before using the module. Refer to page 93.

INVOICING Setup
TC Command Page 191 6/13/2012
CCoonnttaaccttss TC Command provides the capability to set up customer and vendor contacts for the AED and Invoicing modules.
Note: The contact screen can also be used to record and review two additional types of contacts (Private and Resource), with this information available only through the TC Contacts screen.
1. Choose [Contacts (Customers/Vendors)] from the Invoicing submenu (shown on page 197).
2. The TC Contacts screen is displayed.
Figure 66. TC Contacts
3. Click [NEW Record…]. 4. Click the radio button for Customer or Vendor. 5. Enter a unique ID (maximum 20 alphanumeric characters, no
spaces). 6. Complete the contact information. 7. The mailing label layout is displayed below. 8. The new contact record is now complete and you can:
a. click [NEW Record…] again to add another contact, b. or click [MENU] to return to the Invoicing submenu.

INVOICING Setup
TC Command Page 192 6/13/2012
IInnvveennttoorryy
To set up items in inventory, follow these steps:
1. Choose [Inventory Detail] from the Inventory submenu (shown on page 201).
2. The Sales Inventory screen is displayed (shown on the next page).
3. Click [New Record…] and complete the appropriate fields. 4. The new inventory record is now complete and you can:
a. click [New Record…] again to create another inventory item, b. or click [MENU] to return to the Inventory submenu.

INVOICING Setup
TC Command Page 193 6/13/2012
Figure 67. Sales Inventory

INVOICING Setup
TC Command Page 194 6/13/2012
Product ID Assign the new product identification number, based on Training Center inventory guidelines. Note: A maximum of 20 alphanumeric characters are allowed. Spaces are not allowed.
Name The name used at the Training Center for this inventory item.
Initial Level Use this field when first setting up the inventory in TC Command to record the number of items in stock.
Reorder Level Set this amount to flag low inventory. Warning levels can be set to indicate when low inventory levels should be restocked.
Peak Level Set this for reference purposes to indicate maximum desired inventory level for the item.
Cost Set the price for the item. This dollar amount is used to charge paying customers, or for budgeting purposes in the case of internal transfers.

INVOICING Setup
TC Command Page 195 6/13/2012
IInnvvooiicciinngg To enter settings for invoices, follow these steps:
1. Choose [Invoice Notes / Preferences] from the Invoicing submenu (shown on page 197).
2. The Invoicing Setup screen is displayed.
Figure 68. Invoicing Setup
3. Complete the fields as appropriate, then click [MENU] to return to the Invoicing submenu.
INVOICING Setup
TC Command Page 196 6/13/2012
GGrraaccee ppeerriioodd
To create a grace period for invoice payment, use the Invoice Period until Alarm field.
SSaalleess ttaaxx
If the Training Center is in a state with sales tax, use the Sales Tax % (if applicable) field to set the percentage charged for sales within the state.
PPaayymmeenntt mmeetthhooddss
Complete the Payment Methods table to define accepted payment methods.
IInnvvooiiccee nnootteess
To create the notes that can be added to invoices, use the INV Note fields. A dropdown list of these notes is available when creating invoices.
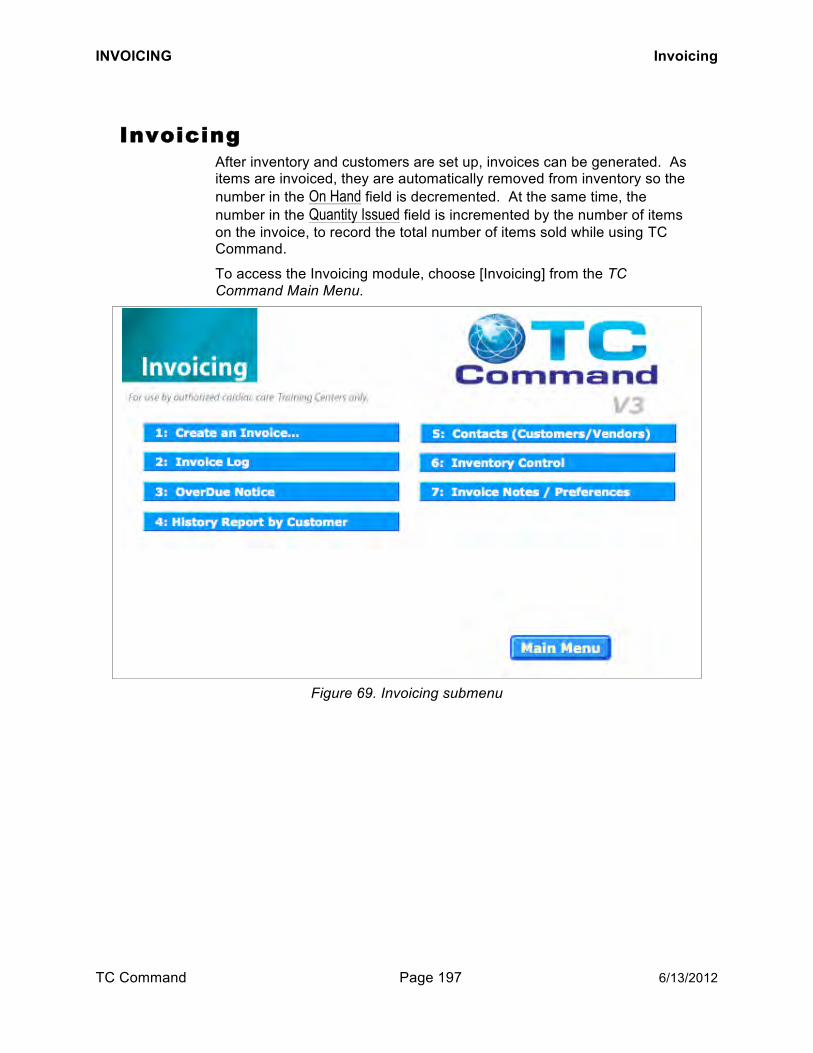
INVOICING Invoicing
TC Command Page 197 6/13/2012
IInnvvooiicciinngg After inventory and customers are set up, invoices can be generated. As items are invoiced, they are automatically removed from inventory so the number in the On Hand field is decremented. At the same time, the number in the Quantity Issued field is incremented by the number of items on the invoice, to record the total number of items sold while using TC Command.
To access the Invoicing module, choose [Invoicing] from the TC Command Main Menu.
Figure 69. Invoicing submenu
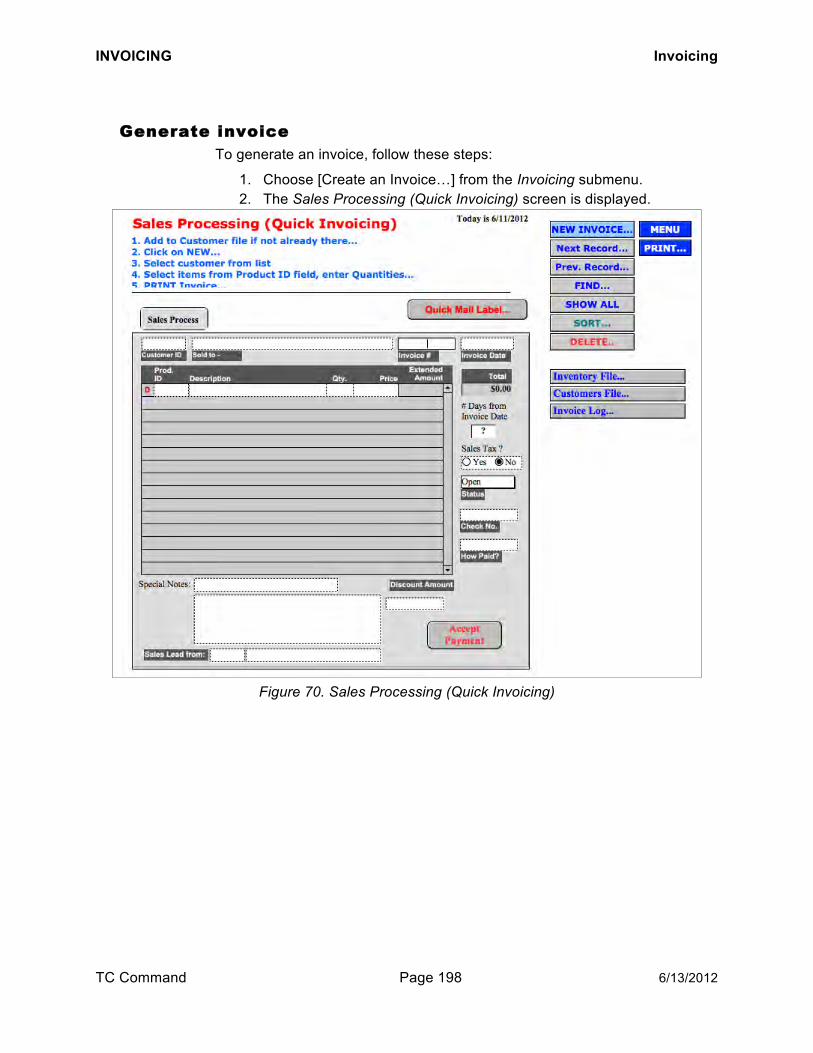
INVOICING Invoicing
TC Command Page 198 6/13/2012
GGeenneerraattee iinnvvooiiccee To generate an invoice, follow these steps:
1. Choose [Create an Invoice…] from the Invoicing submenu. 2. The Sales Processing (Quick Invoicing) screen is displayed.
Figure 70. Sales Processing (Quick Invoicing)

INVOICING Invoicing
TC Command Page 199 6/13/2012
3. Click [NEW INVOICE…]. The next sequential invoice number is automatically generated.
4. Select the customer ID from the dropdown list. 5. Select the first product ID from the dropdown list, enter the
quantity, and click on the next line of the invoice. 6. The cost for that quantity is generated and added to the invoice
total. 7. To add more items to the invoice, use the next blank line to select
another product ID and specify the amount. 8. When all items have been added to the invoice, select invoice
options as needed to complete the record. Then you can: a. click [NEW INVOICE…] again to create another invoice, b. or click [MENU] to return to the Invoicing submenu.
IInnvvooiiccee ooppttiioonnss
AAttttrriibbuuttee lleeaadd ttoo ssaalleess ppeerrssoonn
While creating an invoice, use the Sales Lead from field to credit the contact responsible for the sale. Type the name, or if the lead came from an instructor, use the dropdown list to choose the instructor.
AAppppllyy ddiissccoouunntt If the customer will receive a discount for this order, enter the dollar amount in the Discount Amount field.
AAdddd nnoottee ttoo iinnvvooiiccee
Use the Special Notes dropdown list to select one of the standard notes, or type a note specifically for this customer.
CChhaarrggee ssaalleess ttaaxx The preset percentage for sales tax can be applied to the whole invoice by clicking the Yes radio button for Sales Tax?.
CChhaannggee iinnvvooiiccee ddaattee The invoice date is automatically supplied by TC Command and can be changed by typing over the date.

INVOICING Payments
TC Command Page 200 6/13/2012
PPaayymmeennttss
TTrraacckk ooppeenn iinnvvooiicceess All open invoices are listed on the invoice summary, available by [Invoice Log] from the Invoicing submenu.
RReeccoorrdd ppaayymmeennttss When payment is received for an invoice, use the Sales Processing (Quick Invoicing) screen (shown on page 198) to change the invoice status from open to paid, choose the payment method from the dropdown list, and enter the check number if applicable.
Note: To record payment amounts and partial payments, choose [Invoice Log] from the Invoicing submenu (shown on page 197) and click a khaki green dot to access the Payment Processing screen for that open invoice.
Figure 71. Payment Processing
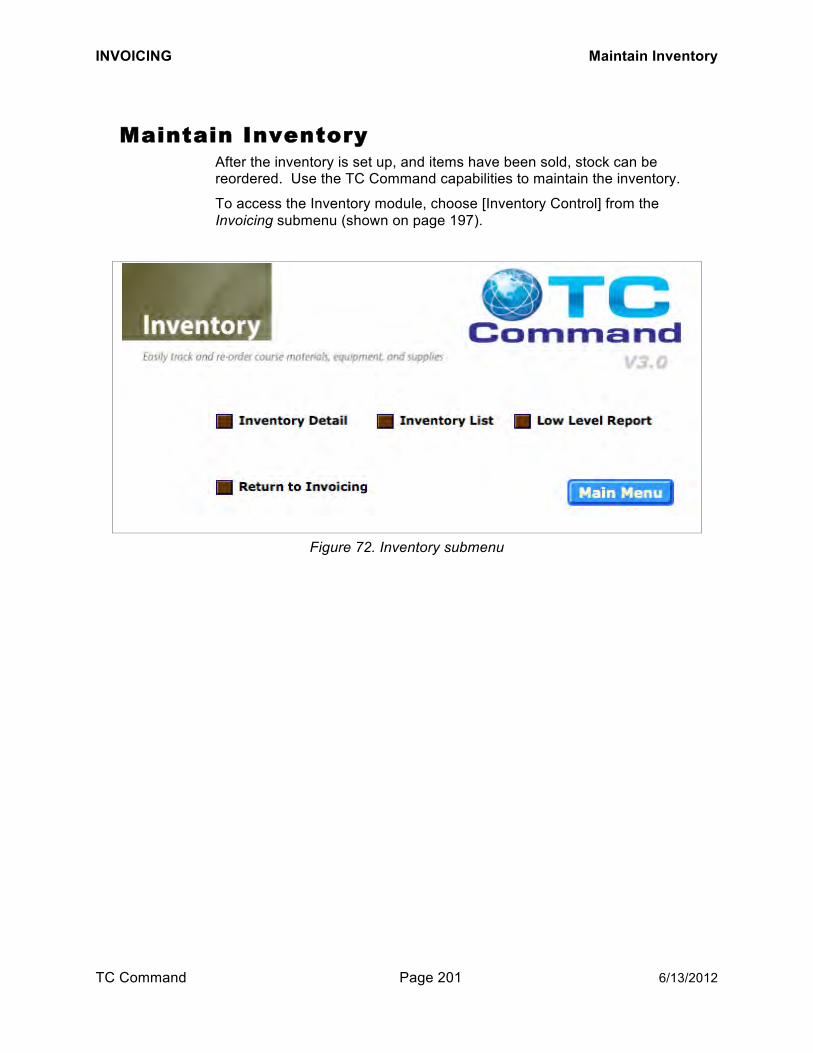
INVOICING Maintain Inventory
TC Command Page 201 6/13/2012
MMaaiinnttaaiinn IInnvveennttoorryy After the inventory is set up, and items have been sold, stock can be reordered. Use the TC Command capabilities to maintain the inventory.
To access the Inventory module, choose [Inventory Control] from the Invoicing submenu (shown on page 197).
Figure 72. Inventory submenu
INVOICING Maintain Inventory
TC Command Page 202 6/13/2012
RReevviieeww iinnvveennttoorryy To review inventory items, choose [Inventory List] from the Inventory submenu (shown on page 201). Review the On Hand column to see the available amount calculated from the initial inventory level and the invoiced and restocked items. Use the [RESET On-Hand] button if necessary to reset the inventory to 0 (zero).
IIddeennttiiffyy iitteemmss ttoo rreessttoocckk To review inventory items, choose [Low Level Report] from the Inventory submenu. Items below restock amount are flagged.
AAdddd rreecceeiivveedd ssttoocckk 1. When new inventory is received, locate the item in the Sales
Inventory screen (shown on page 193). 2. With the item displayed, complete the Purchase Order No., Purchase
Date, and Purchase Quantity fields. 3. Click [ADD ReStock>>]. 4. The new inventory is added to the On Hand field.

APPENDIX FileMaker Pro Capabilities
TC Command Page 203 6/13/2012
AAPPPPEENNDDIIXX FFiilleeMMaakkeerr PPrroo CCaappaabbiilliittiieess
FFiinnddiinngg IInnffoorrmmaattiioonn In Find mode, you can create find requests to:
Get specific information - Because FileMaker Pro places all the information in your records in an index, you can easily find records containing any text, number, date, or time.
Separate a group of records - After you find records, FileMaker Pro displays only the records found so you can work with a subset of your database - called the found set. You can find a group of records to view, edit, calculate summaries for, sort, print, delete, export, or copy to another file.
If you need to reduce the group of records found to an even more exclusive group, you can use the Omit or Omit Multiple commands.
Find records with errors - You can find records that have empty fields, duplicate values, invalid dates or times, or mistakes you might notice while viewing the index (for example, misspellings).
To find records, you provide a description of what you want to find - the criteria. The criteria are the values you want to find in a field; if FileMaker Pro finds the value in that field, it collects that record, and makes it part of the found set. In Find mode, you type or paste the criteria into a blank record called a find request. FileMaker Pro then examines all the records in the file and compares them to the criteria in the request. The records that meet the criteria become the records being browsed.
A search always examines all the records of a particular file, not just the records being browsed. Because of this, a search may create a new group that contains records from the file that were not previously being browsed.
You can find records that match several criteria in a single find request - often called a logical AND search. See “Finding Records that Match All the Criteria,” later in this chapter. Or you can find records that match one set of criteria or another set - called a logical OR search. See “Finding Records That Match One Criterion or Another,” also later in this chapter.
APPENDIX FileMaker Pro Capabilities
TC Command Page 204 6/13/2012
CCrreeaattiinngg aa FFiinndd RReeqquueesstt To find records, in Find mode you fill out one or more requests - blank records into which you type or paste criteria in text, number, date, time, or calculation fields.
You can use more than one request - multiple find requests - to describe separate sets of criteria and tell FileMaker Pro to find records that match any of the sets.
To create a find request:
1. Switch to the Data Entry Screen and Click the Find Button. FileMaker Pro changes to Find and display a blank request.
2. Click in the field where you want to enter such a criterion. Then type values or combine values you type with operators from the Symbols pop-up list (on your left side of the screen) in the status area. (You can also use the index to paste values into a find request.) Put criteria in as many fields as you need. FileMaker Pro finds the records that match the criteria in the request, field for field.
Note you can’t put search criteria in summary fields because values in summary fields are calculated for groups of records rather than stored in individual records. You can search for date in sub-summary fields.
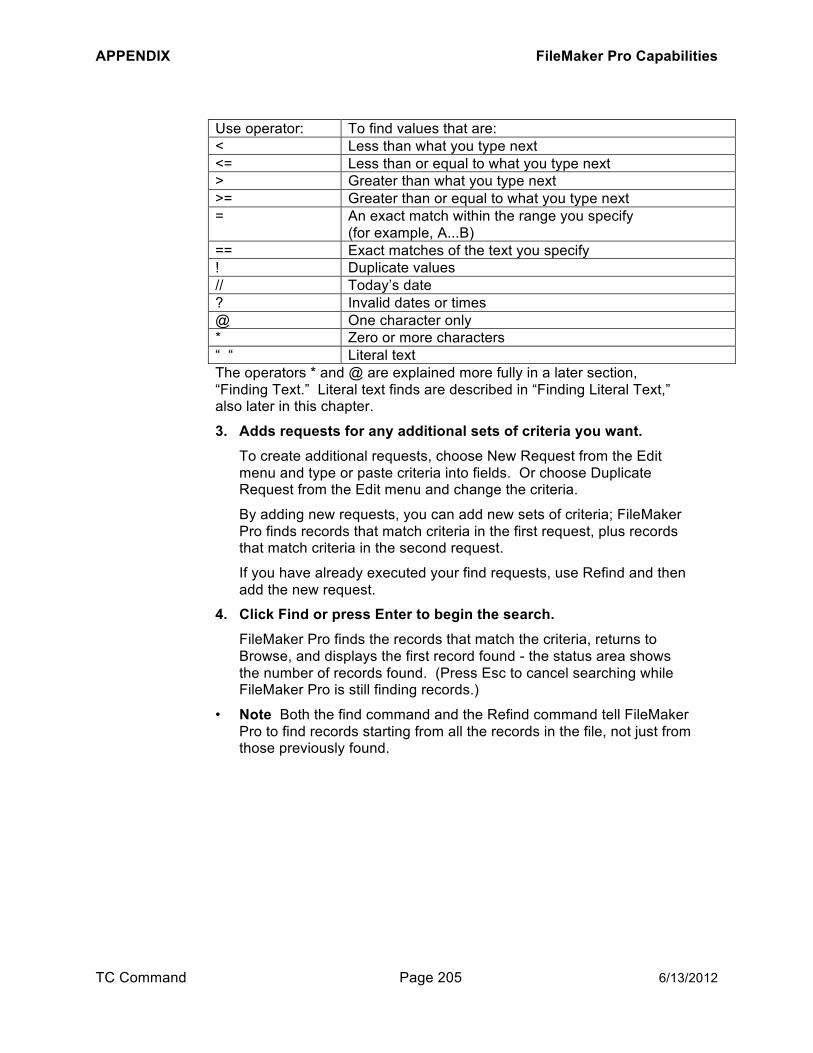
APPENDIX FileMaker Pro Capabilities
TC Command Page 205 6/13/2012
Use operator: To find values that are: < Less than what you type next <= Less than or equal to what you type next > Greater than what you type next >= Greater than or equal to what you type next = An exact match within the range you specify
(for example, A...B) == Exact matches of the text you specify ! Duplicate values // Today’s date ? Invalid dates or times @ One character only * Zero or more characters “ “ Literal text The operators * and @ are explained more fully in a later section, “Finding Text.” Literal text finds are described in “Finding Literal Text,” also later in this chapter.
3. Adds requests for any additional sets of criteria you want. To create additional requests, choose New Request from the Edit menu and type or paste criteria into fields. Or choose Duplicate Request from the Edit menu and change the criteria.
By adding new requests, you can add new sets of criteria; FileMaker Pro finds records that match criteria in the first request, plus records that match criteria in the second request.
If you have already executed your find requests, use Refind and then add the new request.
4. Click Find or press Enter to begin the search. FileMaker Pro finds the records that match the criteria, returns to Browse, and displays the first record found - the status area shows the number of records found. (Press Esc to cancel searching while FileMaker Pro is still finding records.)
Note Both the find command and the Refind command tell FileMaker Pro to find records starting from all the records in the file, not just from those previously found.

APPENDIX FileMaker Pro Capabilities
TC Command Page 206 6/13/2012
RReeppeeaattiinngg aanndd EEddiittiinngg FFiinndd RReeqquueessttss You can repeat your most recent find request to find records that match the same criteria. If you’ve added or deleted records since you put in the first request, you will end up with a different found set of records. You may also edit your requests before finding records again.
To repeat or edit a find request:
1. Choose Refind from the Select menu. You see the first request as the current request. If necessary, edit any of the requests in the usual way. Use the book to switch between requests.
2. Click Find. FileMaker Pro searches all the records in the file for records that match any of the requests.
Note If you’ve changed layouts since last finding records, criteria are deleted from any fields that are not on the current layout. This is to prevent FileMaker Pro from finding records using criteria that you can’t see in the request. If the current layout doesn’t contain any of the fields that contained criteria in the previous request, choosing Refind displays a blank request.
DDeelleettiinngg aa RReeqquueesstt FileMaker Pro lets you delete requests as long as you keep at least one.
1. Choose Refind from the Select menu. You see the first request.
2. Choose the request you want to delete as the current request. Use the page book on the upper left side to switch requests.
3. Choose Delete Request from the Edit menu.

APPENDIX FileMaker Pro Capabilities
TC Command Page 207 6/13/2012
FFiinnddiinngg AAllll tthhee RReeccoorrddss iinn aa FFiillee You can return to browsing all records in the file.
Choose Find All from the Select menu.
FileMaker Pro finds all the records in the file. The current record is the one you were last browsing.
FFiinnddiinngg RReeccoorrddss TThhaatt MMaattcchh AAllll tthhee CCrriitteerriiaa When you fill in several fields on a single request or enter two or more values in a single field, FileMaker Pro understands that you want to find only those records that match all the criteria you’ve entered, field for field.
(This is sometimes known as a logical AND search because it finds records that contain both this information AND that information.)
Criteria into as many fields as needed to make your request specific, and then click Find.
For example, you might enter criteria like “Johnson” and “Personnel” to find all the records for people named Johnson who work in Personnel.

APPENDIX FileMaker Pro Capabilities
TC Command Page 208 6/13/2012
FFiinnddiinngg RReeccoorrddss TThhaatt MMaattcchh EEiitthheerr OOnnee CCrriitteerriioonn oorr
AAnnootthheerr To find all the records that match one set of criteria OR another, you need to fill out separate requests. For example, to find all records that contain the name Smith or Jones you need to use additional requests.
By using the New Request or Duplicate Request commands from the Edit menu to add new requests, you can add new sets of criteria to the search. When you click Find, FileMaker Pro finds records that match criteria in the first request, plus records that match criteria in the second request. For example, if you type New York in the City field in the first request and San Francisco in the City field in the second request, FileMaker Pro will find all records that contain either New York or San Francisco in the City field. Each find request searches through the entire set of records.
You can add a request in either of the following ways:
Create a new blank request and fill it in.
Duplicate and then modify an existing request.
Preventing mistakes Besides saving you time, using the Duplicate Request command can also prevent mistakes. For example, if your search requires two requests - one to find New York and the other San Francisco - as well as a third criterion such as sales greater than $10,000, it’s important that the sales value of $10,00 be in both find requests. Duplicating and editing a request can help ensure the necessary criteria appear in both.
To add another find request:
1. Choose New Request from the Edit menu. Or display the request that you want to duplicate, and choose Duplicate Request from the Edit menu.
2. Enter or edit the criteria for the search. 3. Continue adding new or modified requests for each set of
criteria. 4. Click Find.
FileMaker Pro searches the entire set of records for each find request and returns to Browse. The status area shows the number of records found.

APPENDIX FileMaker Pro Capabilities
TC Command Page 209 6/13/2012
FFiinnddiinngg TTeexxtt FileMaker Pro can find records with text that matches a word, phrase, or string of characters in a text field or calculation field that has a text result.
To find records with words that start with specific characters (when you know the exact characters and their order), type those characters in the field.
To find records with an exact word, type an equal sign before the word.
To find records where there are exact matches on words in several fields, type an equal sign before the value in each individual field.
To find records where you have exact matches on several words in the same field, type an equal sign before each word in the search criterion in that field.
To find records with words that vary by one character, use the wildcard character @. Or if you’re sure of all but one character in a word, use @ to substitute for that character in the find request. (See the examples that follow.)
To find records with words that vary by one or more characters, use the wildcard character *. Or is you’re not sure of the number of or order of certain characters in a word, use * to substitute for them in the find request. (See the examples that follow.)
Wildcard searches Because FileMaker Pro doesn’t use the index when you use wildcard characters in a find request, it takes longer to do wildcard searches - especially in a large database. Wildcard searches are much more effective if you specify other criteria along with the wildcard criterion. This reduces the number of records FileMaker Pro has to search through.
APPENDIX FileMaker Pro Capabilities
TC Command Page 210 6/13/2012
Examples
To find all the records with Chris Smith as well as Chris Smithson and Christopher Smithwick, type Chris Smith in the field.
To find only the records with Chris Smith, type the search criterion =Chris =Smith in the field.
To find the records with Gray and Grey, type Gr@y in the field.
To find the records with McKineh and McKennah, type McK*h in the field.
Word order and case FileMaker Pro ignores the exact order of words in a field, unless you pressed Ctrl+Space between them when you typed the words during data entry. Words joined by Ctrl+Space are indexed as a single word. FileMaker Pro always ignores capitalization when comparing words.
To find text:
1. Type the text in the next field (or a calculation field that yields a text result) of a find request. Put an equal sign before each word for which you want only an exact match. Choose the equal sign from the Symbols list to place an equal sign at the insertion point. To find words in the same order as you enter them, press Ctrl+Space between the two words. Ctrl+Space is only a valid search criterion if you used this feature when entering the data.
2. Click Find. You return to Browse and see the first found record. The total number of records found appears on the left in the status area.
APPENDIX FileMaker Pro Capabilities
TC Command Page 211 6/13/2012
FFiinnddiinngg LLiitteerraall TTeexxtt You can find characters that aren’t indexed by typing them within double quotation marks (“ “). The text or characters between the quotation marks is called literal text.
When you do literal text searches, you search for whole words. In the find request, you must type the words in the order that they appear in the records you’re searching for; but FileMaker Pro ignores capitalization.
If you want to find a text string that includes part of a word, you must combine it with the wildcard character *, described in the following examples. (Searching for whole words is much faster than searching for a text string that contains part of a word.)
Examples
To find the records that have a comma (as in Markley Insurance, Inc.), type “,” in the field.
To find Marten and Jones Interiors, in that order, type “Marten and Jones Interiors” in the field.
To find a text string with part of a word, like “son & Phillips”, type *”son & Phillips” (where you’re searching for records such as Johnson & Phillips or Paulson & Phillips).
To find literal text:
1. In Find, click in the field you want and choose Literal text from the Symbols list in the status area. The insertion point appears between the double quotation marks so you can begin typing.
2. Type the text you want to search for - including spaces and punctuation. When searching for literal text, you must match the text you’re searching for character for character, including spaces and punctuation.
Literal text searches Because FileMaker Pro doesn’t use the index when you search for literal text, it takes much longer to do a search - especially in a large database.
APPENDIX FileMaker Pro Capabilities
TC Command Page 212 6/13/2012
FFiinnddiinngg NNuummbbeerrss,, DDaatteess,, aanndd TTiimmeess You can search for values in a number, date, or time field, or a calculation field that results in a number, date, or time. Unless you search for a range, such matches are always exact, so there’s no need to type an equal sign before the value.
In a number or calculation field in a find request, type the unformatted number, and click Find.
For example, to find the number .50 in a field formatted to display it as 50%, type .50 in the request.
Note For Boolean numbers, type the value you’re using in the field, for example, Y or 1.
In a date or calculation field in a find request, type the date as digits separated by a non-numeric character and click Find.
For example, type 11/11/92.
In a time or calculation field in a find request, type the time as digits separated by colons and click Find.
For example, type 12:53:09.
Number, date, and time formats Find requests that include criteria for numbers, dates, or times must match the formats you’re using. for example, if the current date format is Y/M/D, you must enter date criteria in the find request in that order
FFiinnddiinngg aa RRaannggee ooff VVaalluueess FileMaker Pro lets you find values that are within:
an alphabetical range in a text field or a calculation field with a text result
a numeric range in a number field or calculation field with a number result
a chronological range in a date field or time field, or a calculation field with a date or time result
To find records with values within a range:
Type the range symbol (...) between the values in the find request and click Find. (You can also choose the range symbol from the Symbols list in the status area.)
For example, 12:30...17:30 finds records that contain times in that field from 12:30 through 17:30, inclusive. Or to find records that contain dates in a date field between 11/1/89 and 11/1/92, type 11/1/89...11/1/92.
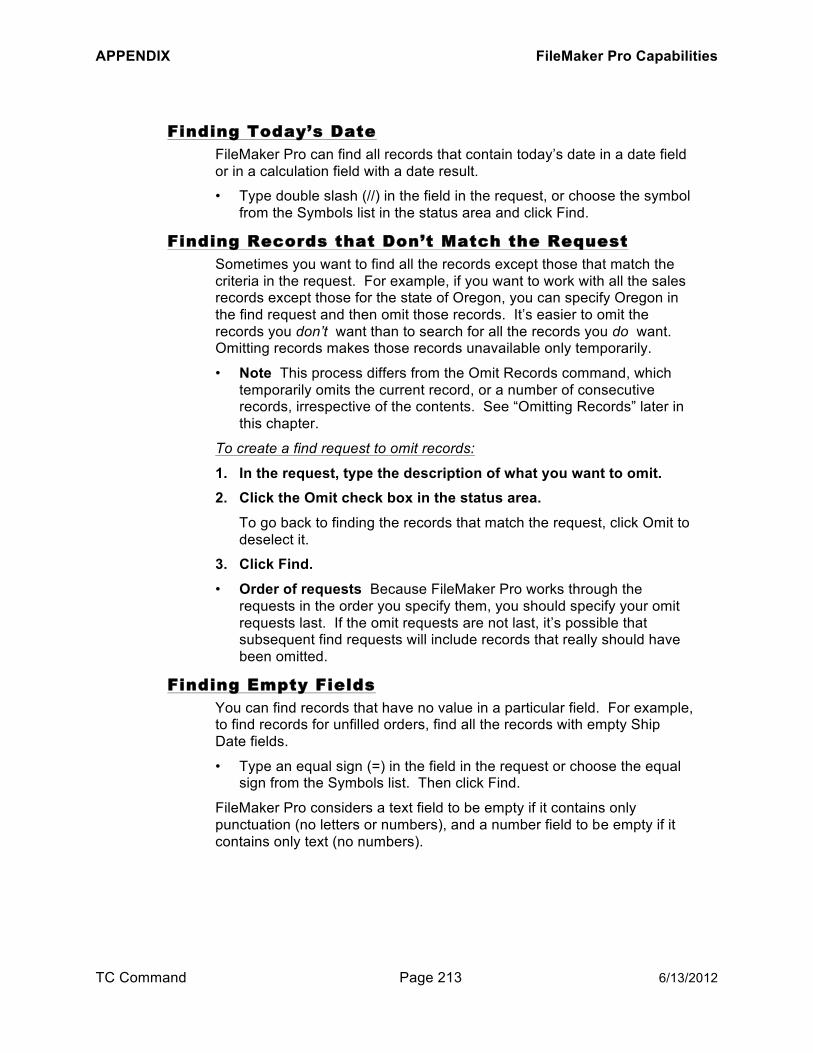
APPENDIX FileMaker Pro Capabilities
TC Command Page 213 6/13/2012
FFiinnddiinngg TTooddaayy’’ss DDaattee FileMaker Pro can find all records that contain today’s date in a date field or in a calculation field with a date result.
Type double slash (//) in the field in the request, or choose the symbol from the Symbols list in the status area and click Find.
FFiinnddiinngg RReeccoorrddss tthhaatt DDoonn’’tt MMaattcchh tthhee RReeqquueesstt Sometimes you want to find all the records except those that match the criteria in the request. For example, if you want to work with all the sales records except those for the state of Oregon, you can specify Oregon in the find request and then omit those records. It’s easier to omit the records you don’t want than to search for all the records you do want. Omitting records makes those records unavailable only temporarily.
Note This process differs from the Omit Records command, which temporarily omits the current record, or a number of consecutive records, irrespective of the contents. See “Omitting Records” later in this chapter.
To create a find request to omit records:
1. In the request, type the description of what you want to omit. 2. Click the Omit check box in the status area.
To go back to finding the records that match the request, click Omit to deselect it.
3. Click Find. Order of requests Because FileMaker Pro works through the
requests in the order you specify them, you should specify your omit requests last. If the omit requests are not last, it’s possible that subsequent find requests will include records that really should have been omitted.
FFiinnddiinngg EEmmppttyy FFiieellddss You can find records that have no value in a particular field. For example, to find records for unfilled orders, find all the records with empty Ship Date fields.
Type an equal sign (=) in the field in the request or choose the equal sign from the Symbols list. Then click Find.
FileMaker Pro considers a text field to be empty if it contains only punctuation (no letters or numbers), and a number field to be empty if it contains only text (no numbers).
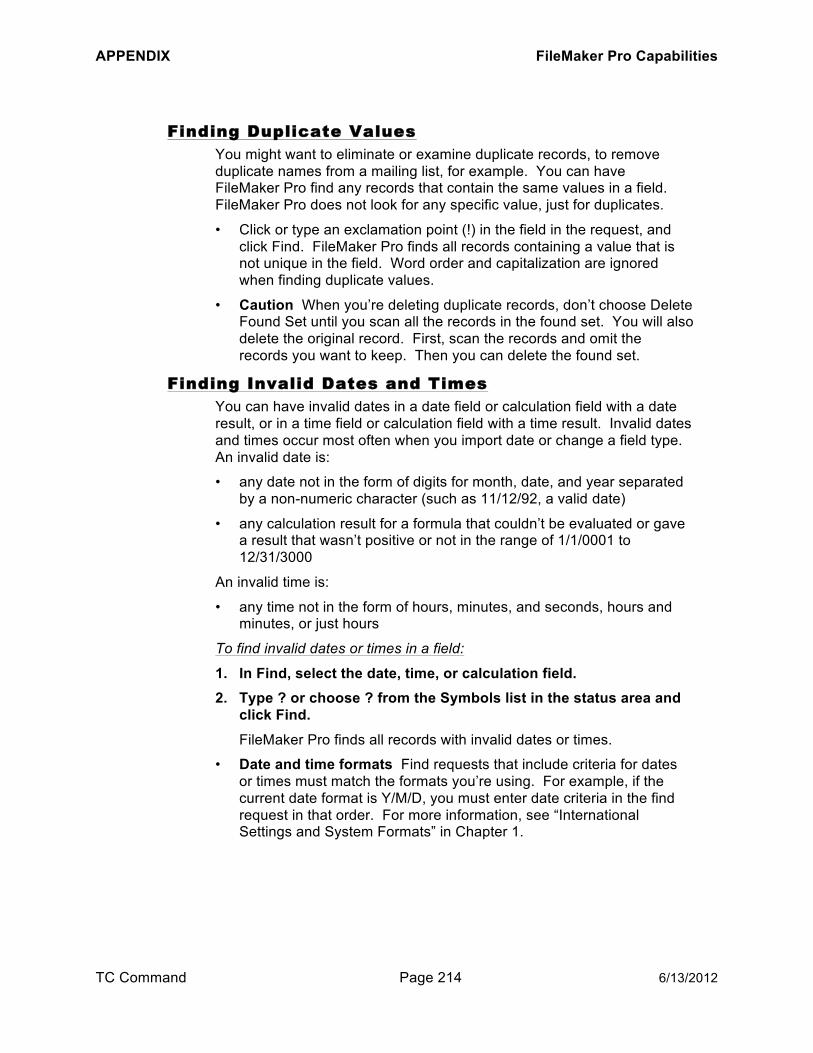
APPENDIX FileMaker Pro Capabilities
TC Command Page 214 6/13/2012
FFiinnddiinngg DDuupplliiccaattee VVaalluueess You might want to eliminate or examine duplicate records, to remove duplicate names from a mailing list, for example. You can have FileMaker Pro find any records that contain the same values in a field. FileMaker Pro does not look for any specific value, just for duplicates.
Click or type an exclamation point (!) in the field in the request, and click Find. FileMaker Pro finds all records containing a value that is not unique in the field. Word order and capitalization are ignored when finding duplicate values.
Caution When you’re deleting duplicate records, don’t choose Delete Found Set until you scan all the records in the found set. You will also delete the original record. First, scan the records and omit the records you want to keep. Then you can delete the found set.
FFiinnddiinngg IInnvvaalliidd DDaatteess aanndd TTiimmeess You can have invalid dates in a date field or calculation field with a date result, or in a time field or calculation field with a time result. Invalid dates and times occur most often when you import date or change a field type. An invalid date is:
any date not in the form of digits for month, date, and year separated by a non-numeric character (such as 11/12/92, a valid date)
any calculation result for a formula that couldn’t be evaluated or gave a result that wasn’t positive or not in the range of 1/1/0001 to 12/31/3000
An invalid time is:
any time not in the form of hours, minutes, and seconds, hours and minutes, or just hours
To find invalid dates or times in a field:
1. In Find, select the date, time, or calculation field. 2. Type ? or choose ? from the Symbols list in the status area and
click Find. FileMaker Pro finds all records with invalid dates or times.
Date and time formats Find requests that include criteria for dates or times must match the formats you’re using. For example, if the current date format is Y/M/D, you must enter date criteria in the find request in that order. For more information, see “International Settings and System Formats” in Chapter 1.

APPENDIX FileMaker Pro Capabilities
TC Command Page 215 6/13/2012
SSoorrttiinngg IInnffoorrmmaattiioonn FileMaker Pro stores the records in your file in the order you add them. But the order you enter records is not always the order you want to look at them later. Rearranging the order of your records, based on the entries in a field or set of fields, is called sorting. Use Sort to temporarily change the order of either a group of records or all the records, so you can browse, update, or print records in a different sequence.
To sort records, choose Sort from the Select menu and establish a sort order by selecting one or more fields. The first field you select tells FileMaker Pro to arrange the records based on the contents of this field. The second field you select is used to arrange records when two or more records have the same value in the first field, and so on. You can sort records in ascending order, descending order, or custom order based on a field’s value list.
FileMaker Pro keeps the records in the sorted order until you do a search. You can easily sort the file again since FileMaker Pro saves the most recent sort order.
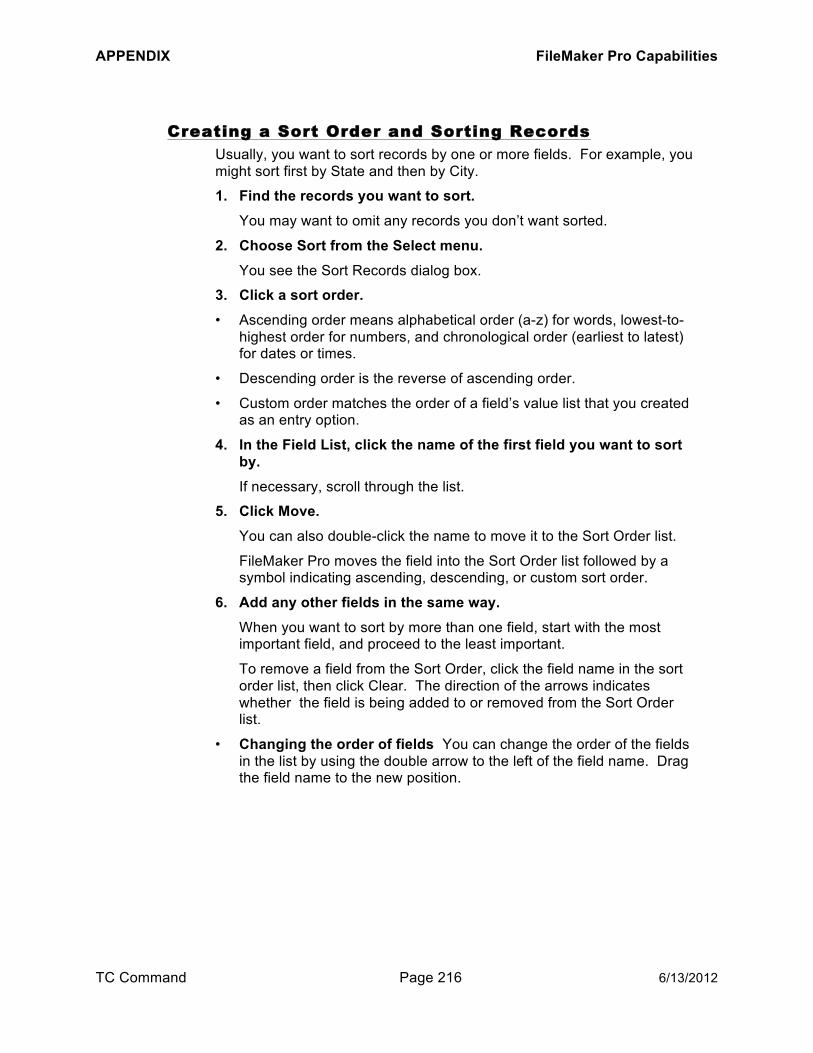
APPENDIX FileMaker Pro Capabilities
TC Command Page 216 6/13/2012
CCrreeaattiinngg aa SSoorrtt OOrrddeerr aanndd SSoorrttiinngg RReeccoorrddss Usually, you want to sort records by one or more fields. For example, you might sort first by State and then by City.
1. Find the records you want to sort. You may want to omit any records you don’t want sorted.
2. Choose Sort from the Select menu. You see the Sort Records dialog box.
3. Click a sort order. Ascending order means alphabetical order (a-z) for words, lowest-to-
highest order for numbers, and chronological order (earliest to latest) for dates or times.
Descending order is the reverse of ascending order.
Custom order matches the order of a field’s value list that you created as an entry option.
4. In the Field List, click the name of the first field you want to sort by. If necessary, scroll through the list.
5. Click Move. You can also double-click the name to move it to the Sort Order list.
FileMaker Pro moves the field into the Sort Order list followed by a symbol indicating ascending, descending, or custom sort order.
6. Add any other fields in the same way. When you want to sort by more than one field, start with the most important field, and proceed to the least important.
To remove a field from the Sort Order, click the field name in the sort order list, then click Clear. The direction of the arrows indicates whether the field is being added to or removed from the Sort Order list.
Changing the order of fields You can change the order of the fields in the list by using the double arrow to the left of the field name. Drag the field name to the new position.

APPENDIX FileMaker Pro Capabilities
TC Command Page 217 6/13/2012
7. Click Sort. FileMaker Pro sorts the records and displays the first record in the sorted order.
To cancel sorting before FileMaker Pro is finished, press Esc.
Semi-sorted records If you add a new record while records are sorted, FileMaker Pro tries to maintain the order. The message in the status area changes to Semi-sorted to show that the order is approximate. After adding new records, use the Sort Command to make sure the records are sorted correctly.
CCuussttoomm SSoorrttiinngg BBaasseedd oonn aa VVaalluuee LLiisstt You can specify a sort order that matches the order of a field’s value list that you created as an entry option.
In the Sort Records dialog box, click “Custom order based on field’s value list.”
For example, if your value list contains the names of the months, sorting based on this value list wouldn’t sort the records by alphabetical order but in order by month.
UUssiinngg aann IInntteerrnnaattiioonnaall SSoorrtt OOrrddeerr In the Sort Records dialog box, a list displays the names of all languages for which FileMaker Pro provides a sort order. When a different language is selected, the sort algorithm changes to that of the selected language.
In the Sort Records dialog box, click the arrow to open the list in the upper-right corner. Then choose the language you want.

APPENDIX FileMaker Pro Capabilities
TC Command Page 218 6/13/2012
CChhaannggiinngg tthhee SSoorrtt OOrrddeerr You can change the latest sort order whenever you want.
1. Choose sort from the Select menu. You see the Sort Records dialog box.
2. Make the changes you want. To remove all fields from the Sort Order list, click Clear all.
To remove a field from the sort order, click the field name in the Sort Order list, and then click Clear. (Or double-click the field name).
To specify whether a field is sorted in ascending, descending, or custom order, click the field name in the Sort Order list, and then click the desired order.
To add field names to the end of the Sort Order list, click the name in the Field List; click ascending, descending, or custom order; and then click Move.
3. Click Sort. FileMaker sorts the records and displays the first record in the new sorted order.
To cancel sorting before FileMaker Pro is finished, press Esc.
RReessttoorriinngg RReeccoorrddss ttoo TThheeiirr OOrriiggiinnaall OOrrddeerr After sorting, you can restore records to their original order - the order in which they were added to the file (creation order).
To restore records to their original order:
1. Choose Sort from the Select menu. You see the Sort Records dialog box.
2. Click Unsort. The records return to the order in which they were added to the file and the first record appears in Browse.

APPENDIX FileMaker Pro Capabilities
TC Command Page 219 6/13/2012
OOmmiittttiinngg RReeccoorrddss You may not want to include all records in a particular group. Omitting a record makes it temporarily unavailable. Omitting a record doesn’t remove it form the file - just from the group you’re browsing. Omitted records aren’t included in summaries, and they are not sorted, printed, or exported to another file.
There are two ways to omit a record.
Find records that meet certain criteria, then omit them. This technique is described in “Finding Records That Don’t Match the Request” earlier in this chapter.
Select the current record and have that record or a range of records omitted without regard to their contents. This technique is described in the following sections.
OOmmiittttiinngg aa SSppeecciiffiicc RReeccoorrdd To omit a specific record:
1. Make the record you want to omit the current record. 2. Choose Omit from the Select menu.
OOmmiittttiinngg GGrroouuppss ooff RReeccoorrddss To omit a group of records:
1. Make the current record the first in a number of consecutive records you want to omit.
2. Choose Omit Multiple from the Select menu. You see the Omit Multiple dialog box.
3. Type the number of records you want to omit. 4. Click Omit.
BBrriinnggiinngg BBaacckk OOmmiitttteedd RReeccoorrddss To include all the records in the file, choose Find All from the Select
menu.
To find a different group of records, choose Find from the Select menu.
SSwwiittcchhiinngg tthhee FFoouunndd SSeett wwiitthh tthhee OOmmiitttteedd SSeett When you omit some records, using either the Find or Omit commands, FileMaker Pro keeps track of them. You can then switch back and forth between the two sets of records, the found set and the omitted set.
Choose Find Omitted from the Select menu. The found set becomes the omitted set, and the omitted set becomes the found set.

APPENDIX FileMaker Pro Capabilities
TC Command Page 220 6/13/2012
EExxcchhaannggiinngg IInnffoorrmmaattiioonn One of the most powerful features of FileMaker Pro is its ability to share information. With FileMaker Pro, you can consolidate information among your own files or from files of other FileMaker Pro users on the network.
FileMaker Pro also lets you exchange information between FileMaker Pro and many other applications by:
importing data
exporting data to other file formats
This section describes the information exchange features of FileMaker Pro.
EExxcchhaannggiinngg IInnffoorrmmaattiioonn wwiitthh OOtthheerr AApppplliiccaattiioonnss You might want to use FileMaker Pro data in a word processing application, a project planning application, a spreadsheet application, or another database application. You can also bring data from these applications into FileMaker Pro.
Note: Before importing data into TC Command, select the data entry screen for the type of data you are importing.
Different programs use different file formats - the internal organization of information within a file. FileMaker Pro provides the capability to convert information from one application’s format to the FileMaker Pro internal format.
Use Import to input data from another application into a FileMaker Pro file.
Use Export to create a file in a format that can be used by a spreadsheet, a word processor, a database, or another application.
Terminology When you exchange information, data comes from the source file and goes into the destination file.

APPENDIX FileMaker Pro Capabilities
TC Command Page 221 6/13/2012
UUnnddeerrssttaannddiinngg FFiillee FFoorrmmaattss The following pages describe the file formats FileMaker Pro can import from and export to.
TTaabb--SSeeppaarraatteedd TTeexxtt ((TTeexxtt ffiillee,,..TTAABB oorr ..TTXXTT eexxtteennssiioonnss))
Description
This format is common to most applications
Input/Output Characteristics
FileMaker Pro exports text in unformatted ASCII characters; tabs separate field values/ ASCII 29 separates the values in repeating fields; and carriage return/line feed characters separate records. Carriage return/line feed characters in a field value are output as ASCII 11 vertical tab characters. If a number field includes text or symbols, FileMaker Pro outputs only the number. If you click “Don’t format output” in the “Specify field order for export” dialog box, FileMaker Pro outputs numbers, dates, or times exactly as you type them. If you click “Format output using current layout,” it uses the same format you see for the fields in Browse.
When you import a Tab-Separated Text file, FileMaker Pro uses the values in the Text file to fill fields in each new record according to the field order you set. If the Text file has fewer fields than the FileMaker Pro file, some FileMaker Pro fields will be empty or not updated. If the Text file has more fields, FileMaker Pro won’t import the extra field values.

APPENDIX FileMaker Pro Capabilities
TC Command Page 222 6/13/2012
MMeerrggee ((..MMEERR eexxtteennssiioonn)) Description
This format, similar to the Text file format, can be used to create personalized form letters and other documents. For example, in Microsoft Word, you can combine data in a Merge file with text in a main document to print form letters or other documents that merge standard text with variable data. The Merge file is equivalent to a Microsoft Word data document.
Input/Output Characteristics
Commas separate field values; ASCII 29 characters separate repeating fields; and carriage return/line feed characters separate records. The first record, a header, lists the field names. FileMaker Pro puts quotation marks around the field data. If you have quotation marks (“) in a field value that aren’t smart quotes, FileMaker Pro outputs them as double quotation marks (“ “). Carriage return/line feed characters in a field value are output as ASCII 11 vertical tab characters. If you click “Don’t format output” in the “Specify field order for export” dialog box, FileMaker Pro outputs numbers, dates, or times exactly as you type them. If you click “Format output using current layout,” it uses the same format you see for the fields in Browse.
CCoommmmaa--SSeeppaarraatteedd TTeexxtt ((..CCSSVV oorr ..TTXXTT eexxtteennssiioonnss)) Description
This format, also called Comma Separated Values (CSV), can be read by BASIC programs. Applications like dBASE can read Comma-Separated Text files.
Input/Output Characteristics
Commas separate field values, and carriage return/line feed characters separate records. Carriage return/line feed characters in a field value are output as ASCII 11 vertical tab characters. Quotation marks enclose all field values, except unformatted numbers. If you have quotation marks (“) in a field value that aren’t smart quotes, FileMaker Pro outputs them as double quotation marks (“ “). If a number field includes text or symbols, FileMaker Pro outputs only the number.

APPENDIX FileMaker Pro Capabilities
TC Command Page 223 6/13/2012
BBAASSIICC ((..BBAASS eexxtteennssiioonn)) Description
This format is a variation of Comma-Separated Text developed to conform to the Microsoft BASIC standard. This is the format generated with the PRINT# or PRINT USING # statements in a BASIC program.
Input/Output Characteristics
BASIC characteristics are like those of Comma-Separated Text, with these differences: Carriage return/line feed characters in a field value are output as spaces. If you have quotation marks (“) in a field value that aren’t smart quotes, FileMaker Pro outputs them as single quotation marks (‘). FileMaker Pro conforms to the format’s restrictions when it creates the destination file. For example, it outputs only the first 255 characters of a text field, the maximum size BASIC can read.
When importing FileMaker Pro uses the same rules for the format of the source field as BASIC uses for the INPUT# statement, except that FileMaker Pro can exceed the BASIC limit of 255 characters for a text field value.
SSYYLLKK ((..SSLLKK eexxtteennssiioonn)) Description
The Symbolic Link Format stores date in rows and columns. This is the format used by spreadsheet applications like Wingz and Microsoft Excel.
Input/Output Characteristics
FileMaker Pro outputs each field as a column, starting with column one. Each record is a row, starting with row one. Carriage return/line feed characters are output as spaces. If a number field includes text or symbols, FileMaker Pro outputs only the number. SYLK interprets each cell as a piece of text or a number. FileMaker Pro outputs dates and times as text in quotation marks. You can’t select the “Format output using current layout” option when you export. FileMaker Pro conforms to the format’s restrictions when it creates the destination file. For example, it outputs a maximum of 245 characters for any field.
The characteristics of the file for importing are the same as for exporting. FileMaker Pro ignores most SYLK formatting special options.
Formatted dates imported to text fields retain formatting as text. When importing to date fields, date formats apply.

APPENDIX FileMaker Pro Capabilities
TC Command Page 224 6/13/2012
DDIIFF ((..DDIIFF eexxtteennssiioonn)) Description
This format stores data in rows and columns and is used by some spreadsheet programs like Visicalc.
Input/Output Characteristics
FileMaker Pro outputs each field as a column, starting with column one. Each record is a row, starting with row one. You can’t select the “Format output using current layout” options when you export.
WWKKSS ((..WWKKSS oorr ..WWKK11 eexxtteennssiioonnss)) Description
This is a worksheet file format used by Lotus 1-2-3. FileMaker Pro can import both .WKS and .WK1 files but can only export to .WK1 files.
Input/Output Characteristics
FileMaker Pro outputs each field as a column, starting with column one. Each record is a row, starting with row one.

APPENDIX FileMaker Pro Capabilities
TC Command Page 225 6/13/2012
DDBBFF ((..DDBBFF eexxtteennssiioonn)) Description
This is the format for use with dBASE III and IV files.
Input/Output Characteristics
FileMaker Pro conforms to the dBASE III restrictions when it creates the destination file. For example, it truncates field names to 10 characters and outputs a maximum of 254 characters per field and 128 fields per record.
FileMaker Pro imports dBASE memo field data if the memo file (filename.DBT) is in the same directory as the database file (filename.DBF) you choose to import.
SPECIAL NOTES: Copying text attributes Because of restrictions in most destination
file formats, FileMaker Pro doesn’t copy the font, size, or style specified for text fields to the destination files.
Repeating fields FileMaker Pro outputs values in repeating fields to Text, BASIC, .DIF, and Merge file formats using the ASCII 29 group separator character between the values. For the SYLK, WKS, and DBF formats, which can’t interpret more than one value per cell or field, FileMaker Pro outputs only the first value in a repeating field. To output all of the values in a repeating field to SYLK, WKS, or DBF, first divide them into separate records by saving a clone of the file and importing the data into the cloned file (choosing the option to split the values into separate records). See “Importing a File from Another FileMaker Pro File or Another Application” later in this chapter.

APPENDIX FileMaker Pro Capabilities
TC Command Page 226 6/13/2012
IImmppoorrttiinngg You can use Import to bring data into a FileMaker Pro file from:
another FileMaker Pro file, including files on different platforms
another application like dBASE
You can copy date from any type of field into any compatible field except calculation and summary fields. (You can’t copy data into a calculation or summary field, because FileMaker Pro computes the value in those fields according to the formula specified in the field definition.)
When you import data to FileMaker Pro, you can choose whether to append new records or update existing ones in the current file. For example, you might use data from a spreadsheet program to do a weekly update of records in a FileMaker Pro file. Or you might want to combine two mailing lists into one. The records you import to the FileMaker Pro file become the found set, so you can immediately browse just the new records in the file.
When you use the Import command, FileMaker Pro copies data from fields you match but doesn’t copy layouts from the source file into the current file. To copy layouts and field definitions from a FileMaker Pro file into a new FileMaker Pro file, save a clone of the file using the Save a Copy As command. To copy layouts and field definitions from one FileMaker Pro file into an existing FileMaker Pro file, use the Copy and Past commands.
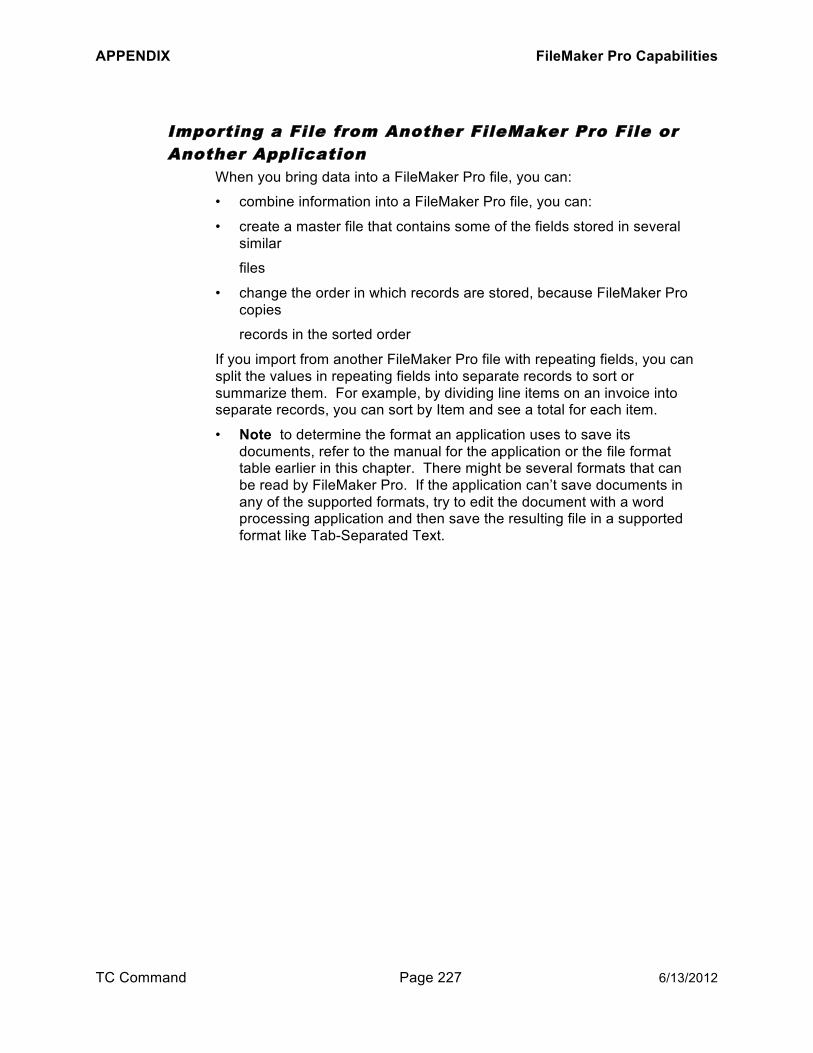
APPENDIX FileMaker Pro Capabilities
TC Command Page 227 6/13/2012
IImmppoorrttiinngg aa FFiillee ffrroomm AAnnootthheerr FFiilleeMMaakkeerr PPrroo FFiillee oorr AAnnootthheerr AApppplliiccaattiioonn
When you bring data into a FileMaker Pro file, you can:
combine information into a FileMaker Pro file, you can:
create a master file that contains some of the fields stored in several similar
files
change the order in which records are stored, because FileMaker Pro copies
records in the sorted order
If you import from another FileMaker Pro file with repeating fields, you can split the values in repeating fields into separate records to sort or summarize them. For example, by dividing line items on an invoice into separate records, you can sort by Item and see a total for each item.
Note to determine the format an application uses to save its documents, refer to the manual for the application or the file format table earlier in this chapter. There might be several formats that can be read by FileMaker Pro. If the application can’t save documents in any of the supported formats, try to edit the document with a word processing application and then save the resulting file in a supported format like Tab-Separated Text.

APPENDIX FileMaker Pro Capabilities
TC Command Page 228 6/13/2012
TToo iimmppoorrtt ddaattaa iinnttoo aa FFiilleeMMaakkeerr PPrroo ffiillee:: 1. Open the FileMaker Pro destination file.
If you’re importing from another FileMaker Pro file, you can clone the source file to create a new file with identical field names.
If you’re updating existing records, it’s a good idea to make a backup copy of the destination file. Use Find or Omit to select the records you want to update. Sort the records into the same order as records in the source file.
2. In Browse, choose Import/Export from the File menu and Import Records from the sub menu. You see the Import Records From File dialog box.
3. From the Import File of Type list, select the file type you want to import from. The list is preset to All Available. When you select All Available, FileMaker Pro determines the file type of the file you select. When you select another file type, the list displays only files that could be that type.
4. In the File Name list, select the name of the source file. If necessary, scroll through the list, or change the directory or drive to find the file you want.
5. Click OK. You see the Specify Field Order for Import dialog box, which lists the fields in the source file on the left.
The box on the right lists the fields in the destination file with arrows pointing from corresponding fields in the source file. Unless you change the order of fields, FileMaker Pro maps the data in fields in the source file to the corresponding fields in the destination file.
6. Make any changes to the matching order of the fields in the source and destination files. In a field in the source file has data that you don’t want to import, click the arrow to deselect the field. Although you can’t change the order of data in the source file, you can change the order of fields in the destination file.
To change the field order, move the cursor over a field name in the destination file column to change the cursor to a double arrow. Hold down the mouse button and drag the field name where you want it.
APPENDIX FileMaker Pro Capabilities
TC Command Page 229 6/13/2012
7. If the source file uses a different character set, select a set option from the Character Set list. Choose from Windows (ANSI), DOS, Lotus (LICS), or Macintosh character sets so that the high ASCII characters (symbols and accented characters) transfer properly. For example, if the source file is a Tab-Separated Text file created in WordPerfect, choose DOS for the way you want the characters mapped so you can read all the data in Windows.
8. Click “Add new records” to append the records from the source file to the destination file. Click “Replace data in current found set” to overwrite existing data in the destination file. If you choose “Replace data in current found set,” FileMaker Pro replaces field values in the records you’re browsing with the values from the source file. Be sure to sort the records you’re browsing to match the sort order of the source file, and specify the field order for import so it matches the order of the fields in the source file.
9. Click OK. If you choose “Add new records” and you’re importing from a FileMaker Pro file with values in repeating fields, you see a dialog box with options for the repeating values. Click an option and click OK. Depending on the file type, a message box tells you either how many records FileMaker Pro has left to import or how many records FileMaker Pro already imported. To stop the import, press Esc.
FileMaker Pro returns to Browse after copying the data from the source file into the destination file. The status area shows the total number of records now in the current file and the total number of records found. The records found are the records you just imported.
If you updated current records, the status area is unchanged. Check the file to make sure updated records are correct before discarding the backup copy.
If you appended records and you stopped the import before it finished, you can delete the records already imported by choosing Delete Found Set from the Edit menu.

APPENDIX FileMaker Pro Capabilities
TC Command Page 230 6/13/2012
Warning If you delete the found set after using the “Replace data in current found set” option, you delete your original found set (which might be all your data).
Cross-platform considerations When you exchange information between FileMaker Pro files on the Windows and Macintosh platforms, you may see difference in:
file names
font mapping
alignment of layout text and objects
character set mapping
Passwords When importing information from a FileMaker Pro file with an assigned password, you must know the password to import the data.

APPENDIX FileMaker Pro Capabilities
TC Command Page 231 6/13/2012
EExxppoorrttiinngg To export data, you take data from a FileMaker Pro file and make it accessible to another application. For example, you can export FileMaker Pro files to the Merge format for Microsoft Word so the data can be included in a memo or mail merge.
You can export to all the file formats FileMaker Pro can import from, except you can’t export to another FileMaker Pro file. You must import data between files.
When you export, the FileMaker Pro file is the source file. The file you export to is the destination file. You create a new file to receive your exported data. If the destination file is an existing file, the data in the file is overwritten.

APPENDIX FileMaker Pro Capabilities
TC Command Page 232 6/13/2012
To export FileMaker Pro data to another file format:
1. Open the FileMaker Pro source file. To export only a subset of the records, first use Find or Omit to select the records. You can also create a different sort order.
2. In Browse, choose Import/Export from the File menu and Export Records from the sub menu. You see the Export Records to File dialog box.
3. Select the file type you want from the Export File of Type list. Check the manual of the receiving application to see which format you must use. For a description of the formats see “Understanding File Formats” earlier in this chapter.
4. In the File Name box, type a name for the export file, and specify where you want it saved. If necessary, change the directory or drive.
5. Click OK. You see the Specify Field Order for Export dialog box, which lists the fields in the source file. FileMaker Pro puts a check mark next to the fields that can be exported and dims the fields that can’t be exported.
6. Deselect any field you don’t want to export and change the export order of the fields as necessary. Click on the check mark to deselect a field. To move a field, place the cursor over the field name. When the cursor changes to a double arrow, drag the field to the new location.
7. If the destination file needs a different character set, select a character set from the Character Set list. If you’re exporting to another platform or application-specific format, choose from Windows (ANSI), DOS, Lotus (LICS), or Macintosh, depending on the platform of the application receiving the data. The character set specifies the mapping of high ASCII characters over 127 - symbols and accented characters.
8. Choose a format option for the fields. Choose “Don’t format output” to export unformatted values. choose “Format output using current layout” to export values with the number, date, and time formats from the current layout. You can’t choose this option for SYLK, DBF, or DIF formats.
9. Click OK. a copy of the data is saved in the specified format, and you can open that file later from other applications.

APPENDIX FileMaker Pro Capabilities
TC Command Page 233 6/13/2012
EExxppoorrttiinngg SSuummmmaarryy DDaattaa You can export summary data from a FileMaker Pro file if you:
specify how to sort the data and sort it
choose the export order
select one or more summary fields
select the fields to summarize by
Simple summary fields You can export some summary fields, like running totals and summary fields not in sub-summary parts, as you would export any other field. You get a summary value for each record in the database.
To export summary fields:
1. Open the FileMaker Pro source file. Follow steps 2 through 5 in the previous section, “Exporting.”
2. In the Specify field Order for Export dialog box, select the summary fields you want to export and then click “Summarize by.” You see the Summarize By dialog box with the options for how you can summarize the field. You can export the same field more than once - for example, you can summarize a Total Quarter Plan field in a sub-summary part by Department Responsible, Person Responsible, or both.
3. Choose one or more options and click OK to return to the Export dialog box. You see one summary field for each option you set in the Summarize By dialog box.
4. If you don’t want a grand summary, deselect the summary field that has no “Summarize by” option set for it. The summary field with no “Summarize by” option exports a grand summary. The summary field with a “Summarize by” option exports sub-summary values.
5. Click OK.

APPENDIX FileMaker Pro Capabilities
TC Command Page 234 6/13/2012
Document History Date Page # Change 08/16/07 Released document. (DV-044) 12/31/09 Updates for V2.2 (DV-015) 06/13/12 Updates for V3