Embed Size (px)
Citation preview

User and Developer Guide

User and Developer Guide
This is version 5.0.0.0 of the KonaKart User Guide
This User Guide can be downloaded in PDF format from http://www.konakart.com/docs/KonaKart_User_Guide.pdf[KonaKart_User_Guide.pdf]
Legal Notices
(c) 2006 DS Data Systems UK Ltd, All rights reserved.
DS Data Systems and KonaKart and their respective logos, are trademarks of DS Data Systems UK Ltd. All rights reserved.
The information in this document is free; you can redistribute it and/or modify it under the terms of the GNU Lesser General Public License aspublished by the Free Software Foundation; either version 2.1 of the License, or (at your option) any later version.
This documentation is distributed in the hope that it will be useful, but WITHOUT ANY WARRANTY; without even the implied warranty ofMERCHANTABILITY or FITNESS FOR A PARTICULAR PURPOSE. See the GNU Lesser General Public License for more details.


iv
Table of Contents1. Introduction ................................................................................................................... 1
What is KonaKart ? .................................................................................................... 1Who is the software intended for? ................................................................................. 1
Retailer ............................................................................................................. 1Solution Provider / System Integrator / OEM ........................................................... 1ISP ................................................................................................................... 1
2. KonaKart Information ...................................................................................................... 2Community and Enterprise Versions .............................................................................. 2Is KonaKart Open Source? ........................................................................................... 3Is the source code available? ........................................................................................ 3
3. KonaKart Features .......................................................................................................... 4General Functionality .................................................................................................. 4
JSR 168 portlet .................................................................................................. 4Open CMS Support ............................................................................................ 4Setup/Installation ................................................................................................ 4Design/Layout .................................................................................................... 4Multi-Store ........................................................................................................ 5Customer Functionality ........................................................................................ 5Customer Groups - Wholesale/Retail ...................................................................... 6Call Center Functionality ..................................................................................... 6One page checkout ............................................................................................. 6Checkout without registration ............................................................................... 6Products ............................................................................................................ 6Product Bundles ................................................................................................. 7Gift Certificates .................................................................................................. 7Reward Points .................................................................................................... 7Indexed Search .................................................................................................. 7Product Tags and Tag Groups .............................................................................. 7Digital Downloads .............................................................................................. 8Merchandising ................................................................................................... 8Promotions ........................................................................................................ 8Marketing - Customer Tags and Expressions ........................................................... 9Advanced Search Engine Optimization (SEO) ......................................................... 9Reporting .......................................................................................................... 9Payment Functionality ......................................................................................... 9Recurring Billing ................................................................................................ 9Shipping Functionality ....................................................................................... 10Tax Functionality .............................................................................................. 10Returns ........................................................................................................... 10PDF Invoices ................................................................................................... 10
4. Architecture ................................................................................................................. 11Software Architecture ................................................................................................ 11
5. Installation ................................................................................................................... 14Before You Begin ..................................................................................................... 14
Platforms Supported .......................................................................................... 14Pre-requisites ................................................................................................... 14Install Java ...................................................................................................... 14
Create a Database ..................................................................................................... 14If you already have an osCommerce database ........................................................ 15Upgrading the Database between releases of KonaKart ............................................ 15
Install KonaKart ....................................................................................................... 15

User and Developer Guide
v
Installing KonaKart on Windows ......................................................................... 16Installing KonaKart on Unix/Linux ...................................................................... 16Silent Mode Installations .................................................................................... 16Graphical Installation Wizard .............................................................................. 17
Manual Installation ................................................................................................... 29Starting Up and Shutting Down KonaKart ..................................................................... 31
Starting up KonaKart ......................................................................................... 31Shutting down KonaKart .................................................................................... 31
Default Admin App Credentials .................................................................................. 32Super User ...................................................................................................... 32
Installation Notes for Databases .................................................................................. 32Defining the Database Parameters ........................................................................ 32Defining the Database Parameters - Using JNDI ..................................................... 33Notes for DB2 and Oracle .................................................................................. 34Notes for Postgresql .......................................................................................... 34Notes for MySQL ............................................................................................. 35
6. Installation of KonaKart Enterprise Extensions ................................................................... 36Before You Begin ..................................................................................................... 36
Pre-requisites ................................................................................................... 36Create a Database ..................................................................................................... 36Installing Enterprise Extensions ................................................................................... 37
Installing KonaKart Enterprise Extensions on Windows ........................................... 37Installing KonaKart Enterprise Extensions on Unix/Linux ........................................ 37Silent Mode Installations .................................................................................... 38Graphical Installation Wizard .............................................................................. 39
Manual Installation of the Enterprise Extensions ............................................................. 50Users created by the Enterprise Extensions Installation .................................................... 56
Single Store Mode ............................................................................................ 57Multi-Store Multiple DB Mode ........................................................................... 57Multi-Store Single DB Mode with Shared Customers .............................................. 57Multi-Store Single DB Mode NON-Shared Customers ............................................. 58
7. Installation of KonaKart on other Application Servers .......................................................... 59General Notes on Installing KonaKart on Application Servers ........................................... 60
Edit Config Files - Admin Application Functionality ............................................... 60Email Properties File ......................................................................................... 62Reporting Port Numbers and Report Location ........................................................ 62Configuring Parameters for Images ...................................................................... 62Setting the Optimum Memory Values ................................................................... 62
Installing KonaKart on BEA's WebLogic Application Server ............................................ 63Installation ....................................................................................................... 63Configuration ................................................................................................... 63
Installing KonaKart on JBoss ...................................................................................... 64Installation ....................................................................................................... 64Configuration ................................................................................................... 65
Installing KonaKart on IBM's WebSphere Application Server ........................................... 65Installation ....................................................................................................... 66Configuration ................................................................................................... 66
Installing KonaKart on IBM's WebSphere Application Server Community Edition ................ 66Installation ....................................................................................................... 66Configuration ................................................................................................... 66
Installing KonaKart on GlassFish ................................................................................ 67Installation ....................................................................................................... 67Configuration ................................................................................................... 67
Installing KonaKart on JOnAS with Tomcat .................................................................. 67

User and Developer Guide
vi
Installation ....................................................................................................... 67Configuration ................................................................................................... 67
Installing KonaKart on JOnAS with Jetty ...................................................................... 68Installation ....................................................................................................... 68Configuration ................................................................................................... 68
8. Administration and Configuration .................................................................................... 70KonaKart Administration Application ........................................................................... 70Launching the Admin App ......................................................................................... 74Configuring KonaKart for HTTPS / SSL ....................................................................... 74Editing the KonaKart Configuration Files ...................................................................... 74Changing the Editable File List in the Admin App .......................................................... 75Internationalization of KonaKart .................................................................................. 76
Translating the KonaKart Application ................................................................... 76Translating the KonaKart Admin Application ......................................................... 76
Changing the Date Format in the KonaKart Application ................................................... 77Formatting of Addresses ............................................................................................ 77Email Configuration .................................................................................................. 78Modifying the Email Templates .................................................................................. 79Enabling / Disabling One Page Checkout ...................................................................... 79Search Engine Optimization (SEO) Features .................................................................. 79Adding Custom Functionality to the Admin App ............................................................ 80
Adding Panels .................................................................................................. 80Adding Buttons ................................................................................................ 80
Searching with wildcards ........................................................................................... 81Making something happen when a product needs to be reordered ....................................... 82Making something happen when the state of an order changes ........................................... 82PDF Invoices ........................................................................................................... 84Activating a Promotion .............................................................................................. 85Displaying Coupon Entry Fields in your Store ............................................................... 85Configuring Digital Downloads ................................................................................... 85Import/Export of KonaKart Data ................................................................................. 86
Import/Export of Product Data using KKImporter .................................................. 86Import/Export of KonaKart Data using XML_IO ................................................... 86
Multiple Prices for Products ....................................................................................... 89Tax Configuration ..................................................................................................... 90Default Sort Order for Products ................................................................................... 91Bundle Configuration ................................................................................................ 91Product Tags ............................................................................................................ 91Credit Card Refunds .................................................................................................. 93Saving and Editing of Credit Card details ..................................................................... 93
Configuration of Admin Application .................................................................... 93Configuration of Store Front Application .............................................................. 94
Edit Order Number and Custom Fields ......................................................................... 95Wish Lists ............................................................................................................... 96Gift Registries .......................................................................................................... 96Gift Certificates ........................................................................................................ 97Enable Gift Certificates .............................................................................................. 97Creating a Gift Certificate .......................................................................................... 98Creating a new Admin App User ............................................................................... 100Creating New Roles ................................................................................................. 101Default Customer Configuration ................................................................................ 101Customer Groups .................................................................................................... 101Auditing ................................................................................................................ 102Custom Credential Checking ..................................................................................... 102

User and Developer Guide
vii
Multi-Store Configuration and Administration .............................................................. 103Introduction .................................................................................................... 103Configuring KonaKart to function in Multi-Store Mode .......................................... 103Multi-Store Configuration ................................................................................. 105
Configuring KonaKart to use the Solr Search Engine ..................................................... 112Introduction .................................................................................................... 112Configuration Instructions ................................................................................. 112Customization of Solr ...................................................................................... 113
Scheduling in KonaKart ........................................................................................... 113Configuring Quartz to execute KonaKart jobs ...................................................... 113Customizing the KonaKart jobs ......................................................................... 117
Deletion of Expired Data .......................................................................................... 118Configuring KonaKart to use Analytics Tools .............................................................. 118
Configuring KonaKart to use Google Analytics .................................................... 119Configuring KonaKart to use Other Analytics Tools .............................................. 120
Publishing Product Data to Google Base ..................................................................... 121Setting Up Google Base ................................................................................... 121Executing the Google Base Publishing Feed ......................................................... 121
9. Marketing - Customer Tags and Expressions .................................................................... 124What are Customer Tags? ......................................................................................... 124What are Expressions? ............................................................................................. 125Tutorial for creating an expression using the standard customer tags ................................. 125How to set Customer Tag Values in Java code ............................................................. 130
10. Reward Points ........................................................................................................... 132Configuration of Reward Points ................................................................................. 132Technical Details .................................................................................................... 136
11. Payment, Shipping and OrderTotal Modules ................................................................... 137Module Types ........................................................................................................ 137
Payment Modules ............................................................................................ 137Shipping Modules ........................................................................................... 137Order Total Modules ....................................................................................... 139
How to Create a Payment Module .............................................................................. 140Introduction .................................................................................................... 140Study the "KonaPay" APIs ............................................................................... 140Choose which Interface Type you want for your users ............................................ 141Sign up for a Test Account with "KonaPay" ......................................................... 141Determine which of the existing payment modules is the closest match ...................... 141Copy the files of the closest match as the starting point .......................................... 142Define the configuration parameters ................................................................... 142Understanding the Configuration Options ............................................................ 144Add the "KonaPay" gateway to the Admin App .................................................... 145Implement the PaymentInterface ........................................................................ 145NameValue[] Parameters .................................................................................. 146Implement the Action code ............................................................................... 146Save IPN details ............................................................................................. 146Save the gateway response to a file .................................................................... 146Send payment confirmation email ...................................................................... 147Struts mapping ................................................................................................ 147Build, Deploy and Test .................................................................................... 148
12. Recurring Billing ....................................................................................................... 149Payment Schedule ................................................................................................... 149Subscription ........................................................................................................... 149Using a Payment Gateway that supports Recurring Billing .............................................. 149Managing Recurring Billing through KonaKart ............................................................. 150

User and Developer Guide
viii
13. Custom Validation ..................................................................................................... 151Custom Validation for the Store Front ........................................................................ 151
Configuring validation on data entered through the UI ........................................... 151Configuring validation for Custom Fields ............................................................ 151
Custom Validation for the Admin Application .............................................................. 151CustomValidaton.properties file ......................................................................... 151Fields Supported by Custom Validation ............................................................... 152
14. One Page Checkout .................................................................................................... 154Introduction ............................................................................................................ 154
Technology used for the One Page Checkout Code ............................................... 154How to customize the One Page Checkout Code ................................................... 154Step by step guide on how to customize the One Page Checkout Code ....................... 154
15. Programming Guide ................................................................................................... 161Using the Java APIs ................................................................................................ 161Using the SOAP Web Service APIs ........................................................................... 162
Enable the SOAP Web Services ......................................................................... 163Securing the SOAP Web Services ...................................................................... 163Step-by-step guide to using the SOAP APIs: ........................................................ 163
Running Your Own SQL .......................................................................................... 166Customizable Source Code ....................................................................................... 167
Source Code Location ...................................................................................... 167Building the Customizable Source ...................................................................... 169
Customization of the KonaKart Engines ...................................................................... 171KonaKart Customization Framework .................................................................. 171Adding a New API call .................................................................................... 171Modifying an Existing API call ......................................................................... 177Enabling Engine Customizations ........................................................................ 181
Pluggable Managers ................................................................................................. 182Adding a Shopping Cart via SOAP ............................................................................ 183
How To Add a KonaKart Shopping Cart? ............................................................ 183Why loosely-coupled? ...................................................................................... 184Movie Review Example ................................................................................... 184SOAP client code generation ............................................................................. 187Example Source Code ...................................................................................... 188
16. Reporting ................................................................................................................. 189KonaKart Reporting from the Admin App ................................................................... 189
Modifying the Reports ..................................................................................... 189Adding New Reports ....................................................................................... 189Defining a Chart to appear on the Status Page of the Admin App ............................ 190Reports Configuration ...................................................................................... 190Defining the Set of Reports Shown in the Admin App .......................................... 190Accessing the Database in the Reports ................................................................ 191
17. Portal Integration ....................................................................................................... 192Introduction ............................................................................................................ 192Creation of portlet WAR files ................................................................................... 192Installation Instructions ............................................................................................ 193
Jetspeed ......................................................................................................... 193Liferay .......................................................................................................... 193Liferay for the KonaKart Admin Application ....................................................... 194

1
Chapter 1. IntroductionWhat is KonaKart ?
KonaKart is software that implements an enterprise java eCommerce / shopping cart system. It's maincomponents are:
• A shop application used by customers to buy your products
• An Administration application to enable you to manage your store
• Many Customization and Extension features - allowing your to customize and extend the way KonaKartworks
Who is the software intended for?
RetailerIf you are a retailer and looking for a product to develop an on line store, then KonaKart could be a goodmatch. Regardless of your size, KonaKart will provide a powerful solution that should cover most, if notall of your requirements, delivering unparalleled price / performance.
Although KonaKart is very easy to install and to get up and running, it really does require some JSP / Javadevelopment and deployment knowledge in order to realistically take a store into production. Therefore, ifyou have no Java knowledge in your company and you don’t intend on using external professional services,then it’s probably not the product that you should be using.
If you company has Java competency then you should feel right at home using KonaKart and soon be in aposition where you can install and customize the software to cover all of your business needs and integratewith your other systems.
We provide Professional Services and Support Contracts to assist you during the development stage andto ensure that your store continues to run smoothly once in production.
Solution Provider / System Integrator / OEMKonaKart offers an enterprise level eCommerce solution that you can easily customize to match the re-quirements of your customers. Most of the customizable areas such as the store front application, payment,shipping and promotion modules are open source. Also, the KonaKart engine implements a documentedAPI, on top of which you can write integration modules and custom features in order to personalize yourKonaKart offering.
We offer a Partner Program, Professional Services and Support Contracts to help you be successful andprofitable in your eCommerce projects.
ISPKonaKart is a very good match for ISPs offering Java hosting and software solutions. You may offer thecommunity edition completely free of charge to your customers, with point and click installation to easilyenable them to create their on line store.
The enterprise version of KonaKart which includes multi-store, is a good solution for providing manystores in a resource efficient manner.

2
Chapter 2. KonaKart Information
Community and Enterprise VersionsSince version 3.2.0.0, KonaKart comes in two separate installations:
• A free Community Edition which can be downloaded from our web site downloads page.
• Enterprise Extensions which we charge for. See our web site prices page for pricing details.
The Community Edition is intended for small businesses and charitable organizations. A condition of thelicense agreement is to display "Powered By KonaKart" with a link to our web site, on the main page ofthe on line store.
The Enterprise Extensions are available as a separate installation kit which is installed on top of the com-munity edition to provide more features and functionality. Although we would prefer you to keep it, the"Powered by KonaKart" link is not mandatory for a KonaKart based store when the Enterprise Extensionsare installed. Currently the features present only in the Enterprise Extensions are:
• Multi-Store. An Enterprise Extensions license allows you to run an unlimited number of stores with asingle KonaKart installation and a single database schema.
• Indexed Search. Indexed search using Lucene search technology gives you a lightning fast search ex-perience even for very large product catalogs. Digital download products (.txt and .pdf) can be indexedin the SOLR search engine and text fragments (snippets) surrounding search keywords can be returned.
• Advanced marketing functionality that allows you to capture customer data as the customer uses yourKonaKart eCommerce store; and to use that data within complex expressions in order to show dynamiccontent, activate promotions and send eMail communications. For example, you could show a banneror activate a promotion only to customers in a certain age bracket that have Product A in their wish listand at least $50 worth of goods in their cart.
• Wish List functionality. Registered customers can add products to a wish list. The KonaKart API sup-ports multiple named wish lists for each customer.
• Gift Registry functionality. Registered customers can create a gift registry which can be made publicor private. Public gift registries can be searched for by shoppers and items within the registry can bebought and shipped directly to the address of the registry owner. The store front application containsan implementation of a wedding registry.
• Reward Points which enable you to increase customer loyalty and increase sales by rewarding customersfor purchases as well as other actions such as registering, writing a review, referrals etc. The points maybe redeemed during checkout.
• Gift Certificates. Gift Certificate products may be connected to any type of promotion and activatedthrough a coupon code contained within the certificate.
• Job Scheduling. This is achieved with an integration of the Open Source Quartz scheduler. There is aframework for adding your own batch jobs and the source code of some useful example jobs.
• Support for Recurring Billing. Payment Schedule and Subscription objects have been introduced tosupport recurring billing natively using a KonaKart batch or through a payment gateway that managesthe billing process at regular intervals.

KonaKart Information
3
• Google Base integration which allows you to publish your product information for inclusion in Googlesearch results.
• XML Import/Export feature for KonaKart objects such as product, customer, order etc. This feature canbe run with a script, providing arguments to define which objects to import or export. Some examplescripts are provided.
• Digital download products (txt and .pdf) may now be indexed in the SOLR search engine and textfragments (snippets) surrounding search keywords can be returned from the search.
• For applications requiring an unlimited number of prices for products, these prices may now be set ina new database table and accessed instead of the standard product prices saved with the product data.This functionality allows you to define any number of catalogs, each of which may contain differentproduct prices.
• The language of the admin app may be changed dynamically.
• PDF invoices can be created and sent to customers as email attachments and downloaded from thestore-front application. The created PDF invoices can be stored on disk for archiving purposes or createddynamically whenever they are required.
Support Packages and Professional Services are available for *all* versions of KonaKart.
Is KonaKart Open Source?Only the customizable parts of KonaKart are open source. These include the Struts action classes andforms, the JSPs, the payment modules, order total modules, shipping modules and the GWT One PageCheckout code. They are shipped under the GNU Lesser General Public License.
Is the source code available?Under certain circumstances DS Data Systems will sell the KonaKart source code, although we prefer tosell an Escrow service where possible.
For the cases where functionality is missing, and it makes sense for this functionality to reside in theKonaKart eCommerce engines, we normally provide fixed price quotes for implementing the missingfeatures and providing an API which we maintain for new releases. This allows you to easily upgradewhen new releases become available and also allows you to be supported. The disadvantage of taking thesource code and editing it, is that in most cases this results in a branching of the KonaKart code base whichbecomes difficult to upgrade and maintain.

4
Chapter 3. KonaKart Features
General Functionality• KonaKart supports most popular databases through JDBC. (e.g. MySQL, PostgreSQL, Oracle, DB2,
MS SQL Server are all supported in the download package). The database schema is an extension of theosCommerce 2.2 schema, and update scripts are provided to convert an original osCommerce databaseinto a KonaKart database.
• Written in Java. Needs a servlet engine such as Apache Tomcat to run.
• Modular approach with APIs at various levels as well as SOAP Web Service interfaces. The web ser-vice interface promotes connectivity even from outside of the company firewall and allows client sideapplications (i.e. .Net, MS Excel etc.) to use the KonaKart engine. It also allows you to easily integrateeCommerce functionality into your current application, which may be for example, a content manage-ment system.
• Completely multilingual.
• Many objects contain custom fields to facilitate personalizations
JSR 168 portlet• We realize that many of you require eCommerce functionality integrated within your portal server or
Content Management System. For this reason we have integrated KonaKart with some popular productsthat support the JSR 168 portlet specification. We currently have support for:
• Apache Jetspeed Portal
• Liferay Portal
KonaKart as a portlet may also work in other systems that support the JSR 168 portlet standard.
Open CMS Support• An OpenCms module is available for KonaKart in order to integrate KonaKart functionality within this
popular Open Source content management system .
Setup/Installation• Simple click and run installation through an installer.
Design/Layout• The store front application uses a JSP / Struts design. The source code of the JSPs and Struts Action
classes is provided in the download so that they may be customized.
• It is relatively easy to write a UI in the technology of your choice by calling the KonaKart Client API.An example of this is our Catalog Inspector Demo which consists of a Adobe Flash object created usingOpen Laszlo technology.

KonaKart Features
5
Multi-Store• KonaKart provides advanced multi-store functionality to enable you to run your stores from a single
KonaKart deployment and a single database.
• There is a shared customers mode that allows you to share customers between all stores. This is veryuseful for shopping mall applications since a customer only has to register once in order to shop inmany different stores.
• There is a shared products mode that allows you to share products between stores. This means that theproducts may only exist once in the database for maintenance purposes, but may be included in manystores. The product price may be different for each store in which the product is included. This is auseful mode for companies setting up stores in different countries, selling the same products.
• When KonaKart is configured to be in multi-store mode with a shared database (Engine Mode 2), prod-uct searches can span more than one store. They can span all of the stores, or a list of stores can besupplied in the search request.
The ProductSearch object has a searchAllStores boolean which should be set to search all stores. If thesearch is only for a limited number of stores, then an array of storeId Strings can be set (storesToSearch)to identify which stores should be searched.
• The administration application allows a super user to create a store and then create a store administratorrole so that when the store administrator logs into the administration application, he can only administerthe store that has been assigned to him.
• For special cases where store data has to be kept within separate DB schemas, KonaKart can be con-figured to achieve this, although some of the functionality such as the sharing of customers describedabove, is not available in this mode.
• When in shared customer mode, other data, such as countries, zones and tax information is also shared.This can save a great deal of time in administering a KonaKart multi-store installation as these objectsonly need to be set up once for all stores.
Customer Functionality• Customers can view their order history and order statuses.
• Customers can maintain their accounts. They have an address book for multiple shipping and billingaddresses.
• Permanent shopping carts for guests and registered customers. The permanent cart for guests is managedthrough cookies.
• Registered customers can create wish lists.
• Registered customers can create a gift registry which can be made public or private. Public gift registriescan be searched for by shoppers and items within the registry can be bought and shipped directly tothe address of the registry owner. The store front application contains an implementation of a weddingregistry.
• Fast and friendly quick search and advanced search features. Search for products by category, by man-ufacturer or both.
• Product reviews for an interactive shopping experience.
• Number of products in each category can be shown or hidden.

KonaKart Features
6
• Global and per-category bestseller lists.
• Dynamic product attributes relationship.
• HTML based product descriptions.
• Display of specials
• Control if out of stock products can still be shown and are available for purchase.
• Customers can subscribe to products to receive related emails/newsletters.
• All emails are template driven and so fully customizable using the Apache Velocity template language.
Customer Groups - Wholesale/Retail• Control what prices are displayed to customers. i.e. You may show different prices to wholesale cus-
tomers or company employees etc.
• Enable promotions. Promotions may be enabled only for certain types of customers. i.e. You may wanta 3 for 2 promotion to only apply to your retail customers.
• Send communications. You may send out bulk emails only to customers that belong to a particularcustomer group.
Call Center Functionality• From the administration application, an administrator can open up a browser displaying the KonaKart
eCommerce application and log in on behalf of a customer without requiring the customer's credentials.Once logged in as that customer, he can process orders for the customer and perform all tasks that arenormally enabled for the customer when logging in independently.
One page checkout• One Page Checkout screen using AJAX technology
• Existing customers go directly to the checkout screen where they can add coupons, change shippingmethods, payment methods etc. and immediately see the updated total order amount without a screenrefresh.
• New customers can add address details as part of the checkout process. They don't have to go througha registration process.
Checkout without registration• KonaKart may be configured to allow customers to checkout without registering and creating an ac-
count.
Products• Each product may be configured with multiple options. Every configuration may have:
• A unique price
• A unique SKU

KonaKart Features
7
• A unique quantity
• A unique available date
• Each product may be associated with a number of images.
• Each product may be associated with up to 4 prices. The actual price displayed can be controlled bythe customer group. The Enterprise Extensions package allows you to associate an unlimited numberof prices to a product.
• Each product may contain structured data as well as a description. The structured data can be used forcomparing product features.
• KonaKart includes an import/export tool to efficiently load products into the database from a file, andto create a file from the products in the database.
Product Bundles• Bundle products can be defined in the Admin App. The quantity of the bundle product is calculated
automatically and tools are provided to calculate the cost (optionally using discounts) and the weight.In the application, the bundled products are available in the product detail screen, the quantity availableis calculated and the quantity in stock of the bundled products is decremented automatically when anorder is processed.
Gift Certificates• Gift Certificate products may be connected to any type of promotion and activated through a coupon
code contained within the certificate.
Reward Points• Reward Points enable you to increase customer loyalty and increase sales by rewarding customers for
purchases as well as other actions such as registering, writing a review, referrals etc. The points maybe redeemed during checkout.
Indexed Search• KonaKart has been engineered to manage product catalogs containing tens of thousands of products.
In order to search for these products in an efficient manner, KonaKart may be configured to use theApache SOLR enterprise search server based on the Lucene Java search library.
• This powerful technology not only provides for a lightning fast search experience, but also incorporatesintelligence to correct common problems such as misspellings and plurals which often frustrate shop-pers making them go elsewhere. For example, the words Television, Televisions, TV, TVs can all beconfigured to find televisions.
Product Tags and Tag Groups• Tags are attributes that can be associated to a product and can be used to refine product searches.
• The purpose of a tag group is to organize tags and a tag group may be associated to a category so thatit can be automatically displayed in a context sensitive fashion when a customer is viewing productsbelonging to a specific category.

KonaKart Features
8
Digital Downloads• A product may be defined as a digital download.
• When a digital download has been paid for, a download link appears in the customer's private accountpage.
• The download link can be set to expire after a number of days or after a number of downloads.
Merchandising• Display what other customers have ordered with the current product shown.
• For every product you may define a list of products for:
• Up-selling
• Cross-selling
• Accessories
• Dependent products (e.g. Service Plans or Extended Warranties)
Promotions• Very powerful promotions sub-system
• All promotions can be associated with one or more coupons. Each coupon can be configured for unlim-ited use or to be used only for a programmable number of times.
• The following rules can be set for all promotions:
• Include only some customers (e.g. those that haven't placed an order in the last 60 days) or excludesome customers (e.g. those that have placed an order in the last 60 days). Configure how many timesan included customer can use the promotion.
• Include or exclude products based on their category.
• Include or exclude products based on their manufacturer.
• Include or exclude any products at a product option granularity. (e.g. Promotion only applies to shoesize 7 or applies to all sizes except size 7)
• Promotions may be cumulative (e.g. A promotion of 10% discount for all hardware products and apromotion of 20% discount for all software products) or promotions may be exclusive, in which casethe promotion giving the largest discount is chosen.
• All promotions may be configured to have a start and end date.
• The promotions themselves are KonaKart Order Total Modules which can easily be developed andslotted into the KonaKart architecture. The source code of the available promotion modules is includedin the download package.
• The currently available modules are :
• Order Total Discount

KonaKart Features
9
• The promotion gives a discount on the total amount of the order.• You may set a minimum order value, the minum number of products, the minimum quantity of a
single product, the discount as an amount or a percentage and whether to apply the discount beforeor after tax.
• Product Discount
•The promotion gives a discount on a product
• You may set a minimum order value, the minimum quantity of a single product, the discount as anamount or a percentage and whether to apply the discount before or after tax.
Marketing - Customer Tags and Expressions• The Enterprise version of KonaKart contains sophisticated marketing functionality that allows you to
capture customer data as the customer uses your KonaKart eCommerce store; and to use that data withincomplex expressions in order to show dynamic content, activate promotions and send eMail commu-nications.
• Later in this document there is a chapter dedicated to this functionality.
Advanced Search Engine Optimization (SEO)• You have full control over which SEO features to activate. KonaKart allows you to define multi-lingual
templates in order to write product information (name, model, manufacturer, category) into:• The URL• The window title• The meta description• The meta keywords
• Google Base is a free Google service that allows you to publish your product information for inclusion inGoogle search results. The KonaKart Admin App allows you to easily publish your products to GoogleBase with the click of a button.
Reporting• KonaKart is integrated with BIRT which is is an open source Eclipse-based reporting system. The de-
fault installation package includes a number of useful reports. Others may be easily added through theAdmin App or just by copying them to a directory where they are automatically read by KonaKart.Instructions can be found in the Reporting FAQ.
Payment Functionality• KonaKart implements an API and modular approach for introducing payment gateways. We include
the source code of all currently available gateways.
• Disable certain payment services based on a zone basis.
Recurring Billing• Support for Recurring Billing. Payment Schedule and Subscription objects have been introduced to
support recurring billing natively using a KonaKart batch or through a payment gateway that managesthe billing process at regular intervals.

KonaKart Features
10
• Later in this document there is a chapter dedicated to this functionality.
Shipping Functionality• Weight, price, and destination based shipping modules
• Free shipping based on amount and destination
• Free shipping on a product by product basis
• Disable certain shipping services based on a zone basis
• KonaKart implements an API and modular approach for introducing custom shipping services.
Tax Functionality• Flexible tax implementation on a state and country basis.
• Set different tax rates for different products.
• Charge tax on shipping on a per shipping service basis.
Returns• Returns may be managed from the Admin App. KonaKart can support multiple returns per order, each
of which may contain different product quantities and have a unique RMA code.
PDF Invoices• PDF invoices can be created and sent to customers as email attachments and downloaded from the
store-front application. The created PDF invoices can be stored on disk for archiving purposes or createddynamically whenever they are required.

11
Chapter 4. ArchitectureKonaKart has a flexible architecture lending itself to a variety of different physical implementations tosuit different needs.
Software ArchitectureKonaKart has a modular architecture consisting of different software layers as can be seen in the followingdiagram:
KonaKart - Software Architecture
The Relational Database is accessed through a widely used persistence layer ( Torque [http://db.apache.org/torque/] ) which caters for databases from many different vendors such as Oracle,Microsoft’s SQL Server, DB2 from IBM, MySQL, Postgres and many others.
The KonaKart Server is a multi-threaded component that contains the core functionality of the eCommerceapplication. It exposes both a SOAP Web Service interface ( WSDL [http://www.konakart.com/konakart/

Architecture
12
services/KKWebServiceEng?wsdl] ) and a Java API ( Javadoc [http://www.konakart.com/javadoc/serv-er/] ).
The KonaKart Client manages the state of a user (associated with the user’s session) as he navigates aroundthe application. The process of writing a web based application is greatly simplified by using the APIof the KonaKart client ( Javadoc [http://www.konakart.com/javadoc/client/] ) rather than by calling theKonaKart Server directly.
Struts [http://struts.apache.org/] is a popular framework that implements the Model-View-Controller(MVC) architecture. The source code of the Struts Action classes (for the store front application [http://www.konakart.com/konakart/Welcome.do] ) is included in the download package in order to provide ex-amples of how to call the KonaKart Client API. The store front application uses JSPs to generate the UI.However, different technologies can easily be implemented thanks to the modular approach of KonaKart.An example of this is our Catalog Inspector Demo [http://www.konakart.com/konakart_cat_inspector/main.swf] which consists of a Adobe Flash object created using Open Laszlo [http://www.openlaszlo.org/]technology.

Architecture
13
KonaKart - Architecture Diagram

14
Chapter 5. InstallationPlease read this section carefully before attempting to install KonaKart.
Before You BeginBefore proceeding, please check that your chosen platform is one that is currently supported and that youhave installed the pre-requisite software.
Platforms SupportedCurrently KonaKart can be installed on Linux, Unix, or Windows XP/2003/Vista. It has been successfullyinstalled on other platforms including Mac OS using the manual installation .
Please contact the KonaKart team at <[email protected]> if you would like to see KonaKartsupport running on another platform.
Pre-requisites• A Java runtime environment
• A database loaded with KonaKart tables
• KonaKart itself
Install JavaKonaKart requires the Java 2 Standard Edition Runtime Environment (JRE) version 5.0 or later.
• Download the Java 2 Standard Edition Runtime Environment (JRE), release version 5.0 or later, fromhttp://java.sun.com/j2se .
• Install the JRE according to the instructions included with the release.
• It is not essential for you to set JAVA_HOME, or JRE_HOME globally. The installation wizard will setup KonaKart to run with the selected java location regardless of the global settings of JAVA_HOMEor JRE_HOME.
The installer atempts to locate your JRE automatically but you can override the one that's found if yourequire. The selected JRE is validated to help you avoid typing errors when entering the JRE locationmanually.
Create a DatabaseKonaKart needs a JDBC-compliant database. For the community edition of KonaKart you must use eitherMySQL (with the InnoDB engine to get support for transactions), PostgreSQL, Oracle, DB2 or MS SQLServer but if you would like KonaKart to be supported on any other database please contact us. MySQLworks well with KonaKart and is free so this makes a popular choice. You can obtain MySQL fromhttp://www.mysql.com/.
Installation
15
Check the specific notes for each database to verify that the database you plan to use is fully supported(see below in this FAQ) or whether you might have to take a few additional manual steps to load thedatabase objects.
Since the KonaKart database is an extension of the osCommerce database, if you already have an osCom-merce database you can use that for KonaKart. If this is the case you only need to run a supplementarySQL script for KonaKart (see below). (If you wish to keep the data in your existing osCommerce database(as you probably will do) take care not to run the full database initialization script which will re-createall your tables).
Once the database is installed, create a new database user for KonaKart then either run the installationwizard which will (optionally) load up the database ready for using KonaKart, or if you prefer, execute theSQL script appropriate for your chosen database manually. The database initialization scripts are providedfor all supported databases under the database directory under your KonaKart installation directory.
If you already have an osCommerce databaseIf you are already an osCommerce user you can use the database that you have already created. Theadvantage of doing this is that you will not have to load up all of your configuration parameters again(especially the product catalog!). All that you have to do in this case is run a supplementary SQL script,appropriate for your database platform (this will almost certainly be MySQL as osCommerce is currentlyonly supported on MySQL). The supplementary script can be found under the database/MySQL directoryunder the KonaKart home directory (i.e. where you installed KonaKart).
Note that executing this supplementary script should not break your current osCommerce system fromworking, but we only recommend that you run it on a test database and not a production database.
Note that if you wish to keep the data in your existing osCommerce database (as you probably will do)take care not to run the full database initialization script which will re-create all your tables.
Upgrading the Database between releases of KonaKartStarting with the upgrade from KonaKart v2.2.0.0 to v2.2.0.1 there will always be an upgrade script pro-vided that can be run on your database without risking the loss of your existing data (although it is alwaysrecommended to backup your database on a regular basis). The upgrade script will apply all the databasechanges that are required to upgrade a database being used for a specified KonaKart version to the next.
As an example a script called upgrade_2.2.0.0_to_2.2.0.1.sql is provided that will upgrade your databasebeing used on a KonaKart v2.2.0.0 system to one suitable for a KonaKart v2.2.0.1 system.
If you chose to skip KonaKart releases for whatever reason, you will have to apply the upgrade scripts forall intermediate releases - all upgrade scripts are planned to be shipped with all future releases.
Another option is to run the full database creation script (see above) which is always provided for everyrelease. Note that this has the disadvantage of clearing away all of the data you may have set up for yourKonaKart store (eg. your special configuration data, your catalogs etc) so will probably not be the preferredoption for existing storekeepers.
Install KonaKartOnce you have java v5 installed and a database (either pre-loaded with all the necessary tables etc or readyto be loaded), you are ready to install KonaKart itself. To do this, download an installation kit, compatiblewith your chosen platform, and follow the installation instructions below for your platform :

Installation
16
Note that if the GUI or silent installers do not work on your platform you should download the zip versionof KonaKart and follow the manual installation instructions.
Installing KonaKart on Windows
Run the set-up program that executes a graphical installation wizard - see Graphical Installation Wizardbelow. (You can use the "Silent Mode" installation if you prefer, but the graphical version is probablyeasier if you're installing for the first time).
Installing KonaKart on Unix/Linux
Create a terminal session on your machine and enter the following: (You may prefer to use commands todo the same thing from your X-desktop if you have one installed).
$# (replace 2.2.6.0 with the version you have downloaded)$ chmod +x KonaKart-2.2.6.0-Linux-Install $ ./KonaKart-2.2.6.0-Linux-Install
If you have a graphical environment on your Linux/Unix machine you will be able to run the GUI. Inwhich case see the Graphical Installation Wizard below (identical steps to the Windows installation).
If you don't have a graphical environment you will see this warning message:
$ ./KonaKart-2.1.0.0-Linux-InstallThis program must be run in a graphical environmentor in silent, unattended mode (with the -S option).
Silent Mode Installations
When running in "silent" (-S) (or "unattended") mode you are able to specify configuration parameterson the command line, for example:
$ ./KonaKart-2.1.0.0-Linux-Install -S \ -DDatabaseType mysql \ -DDatabaseUrl jdbc:mysql://localhost:3306/mykkdb \ -DDatabaseUsername kkdbusr \ -DDatabasePassword ikk8271
Silent Mode Parameters
The following parameters can be added to the command line, as in the example above, to specify defaultvalues for KonaKart at installation time:
Parameter Default Value Explanation
DatabaseType mysql mysql, postgresql, db2net, or-acle, mssql
DatabaseUrl Database URL

Installation
17
jdbc:mysql://localhost:3306/dbname?zeroDateTimeBehavior=convertToNull
DatabaseUsername root Database User's Username
DatabasePassword Database User's Password
DatabaseDriver com.mysql.jdbc.Driver Database Driver
mssqlDBO dbo Database Owner (only usedby MS SQL Server)
InstallationDir Windows: C:\Program Files\KonaKart
*nix (as root): /usr/local
*nix (as user): ~/konakart
Installation Directory
LoadDB 0 1=Load DB
0=Do not Load DB
JavaJRE The Java runtime location
PortNumber 8780 KonaKart Port Number
Graphical Installation Wizard
This shows a typical installation that uses the wizard:
Either double-click on the installation setup program (either KonaKart-2.2.0.4-Windows-Setup.exe onWindows, or KonaKart-2.2.0.4-Linux-Install on Linux - or respective later version numbers) or run it froma command shell. You are first presented with this small window which allows you to confirm that youwish to proceed with the installation:
Click on Yes to continue to:

Installation
18
Check that you have the correct version number and click on next to get to the next screen. Note in pass-ing the email address for support questions. Please contact us and / or search the forum if you have anydifficulties at all with the installation and we will endeavour to help you as soon as possible.

Installation
19
Please read the license agreement carefully and if you are happy to do so under the terms of the agreement,click on the "I accept the terms of the license agreement" bullet and click next to continue. If you are notprepared to accept that license agreement please quit the installation at this point.
Click on next to reach:

Installation
20
This is where you specify where you want KonaKart to be installed. On Windows this defaults to"C:\Program Files\", on Linux this is the user's home directory (if the user is not root) or "/usr/local" (ifthe user is root). This can be specified in the silent mode of on the command line of the GUI version using-DInstallationDir.
It is recommended that you accept the default location, but this is not essential.
On clicking next you reach:

Installation
21
Here you have to confirm or specify the location of the java runtime environment. The wizard will try tofind this for you but it is not always successful. In the cases where it isn't successful (or you wish to changeits selection) you will have to enter the location manually. If you have installed java v5 or v6 in the defaultlocation or it appears in your environment's path, the wizard should find it for you.
The java location selected is validated to help you avoid typing errors and will only allow you to proceedin the wizard when it validates the location successfully.
Click on next to get to:
Installation
22
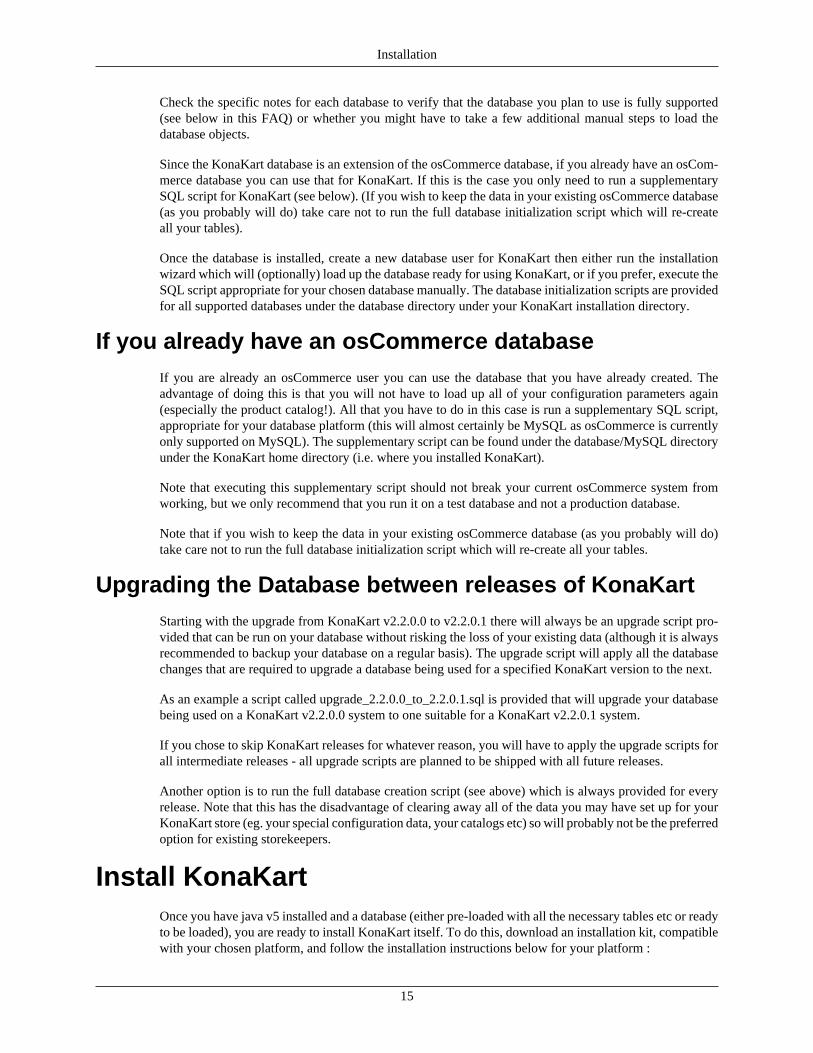
This is where you define the port number that KonaKart will run on. Actually, KonaKart uses ApacheTomcat, so this is the port number that Tomcat is configured to run on. Whilst it is certainly possible tochoose another port, it's advisable to accept the default which is 8780. KonaKart will not start up if anotherapplication is using the port you select, so make sure the port you select here is not currently being used.
Clicking next moves you on to:

Installation
23
This is your final chance to check your settings before copying the files into position.
Clicking next will start the process of copying the KonaKart files into position as can be seen on the nextscreen:

Installation
24
After about a minute or so the file copying will have completed and you are presented with this screen tochoose the Database Type that you wish to use:

Installation
25
Choose your preferred database type. You must set up the database yourself - this is not done as part ofthe installation (see database creation).
Click next to continue to :
It is very likely that you will have to modify values on this screen. You have to define the database con-nection parameters to KonaKart for the database that you created earlier (see database creation)
KonaKart currently supports MySQL, PostgreSQL, Oracle, DB2 and MS SQL Server and includes all theJDBC driver jars required to access these.
Note that you must append "?zeroDateTimeBehavior=convertToNull" to your Database URL if you'reusing MySQL. Typically, for MySQL, you will need to change "dbname" in the default URL for the nameof your own database schema. A good example for such a name might be "store1" or "konakart" but youare free to choose whatever name you like.
After clicking next, the installer will check the database connection and report the results on the next screenas follows. For an unsuccessful connection you will see something like this:

Installation
26
At this point you can go back and modify the database connection parameters and then click next to trythe database connection test again. If successful you will see a screen like this:

Installation
27
If the database connection fails, you can choose to click on next and finish the installation without execut-ing the database initialisation. Normally, for a fresh install, you are advised to correct your database con-nection parameters so that you see a successful database connection message, then proceed to the databaseinitialisation screen which looks like this:
Note that the default is that the database initialisation is NOT executed. To execute it you must click onthe checkbox and click next to reach the next step.
Be warned that the database initialisation script will drop and re-create all the KonaKart tables and populatethem with a default set of starting data. This default starting position is ideal for users who are setting upKonaKart for the first time but this is probably not what you want to do if you already have a KonaKartdatabase with a product catalog loaded for your store.
Note that for users who already have an existing KonaKart database (or an osCommerce database) theremay be additional steps to ensure your database is suitably-configured for the version of KonaKart thatyou're installing. See Database Creation.
If you do not check the 'Create the tables..' box then click next you would jump to the final page of thewizard. Alternatively, if you do check the 'Create the tables...' box then click next, you will be presentedwith a screen that shows the loading of the database initialisation script in a scolling window which willlook like this:

Installation
28
In the above example the script ran successfully (see last comment "SQL executed successfully" in thescrollable text area). If the script does not run successfully you will see the error message in this window.
After clicking next you reach the following screen:
Finally you are congratulated on a successful installation on the final screen of the wizard:
Installation
29
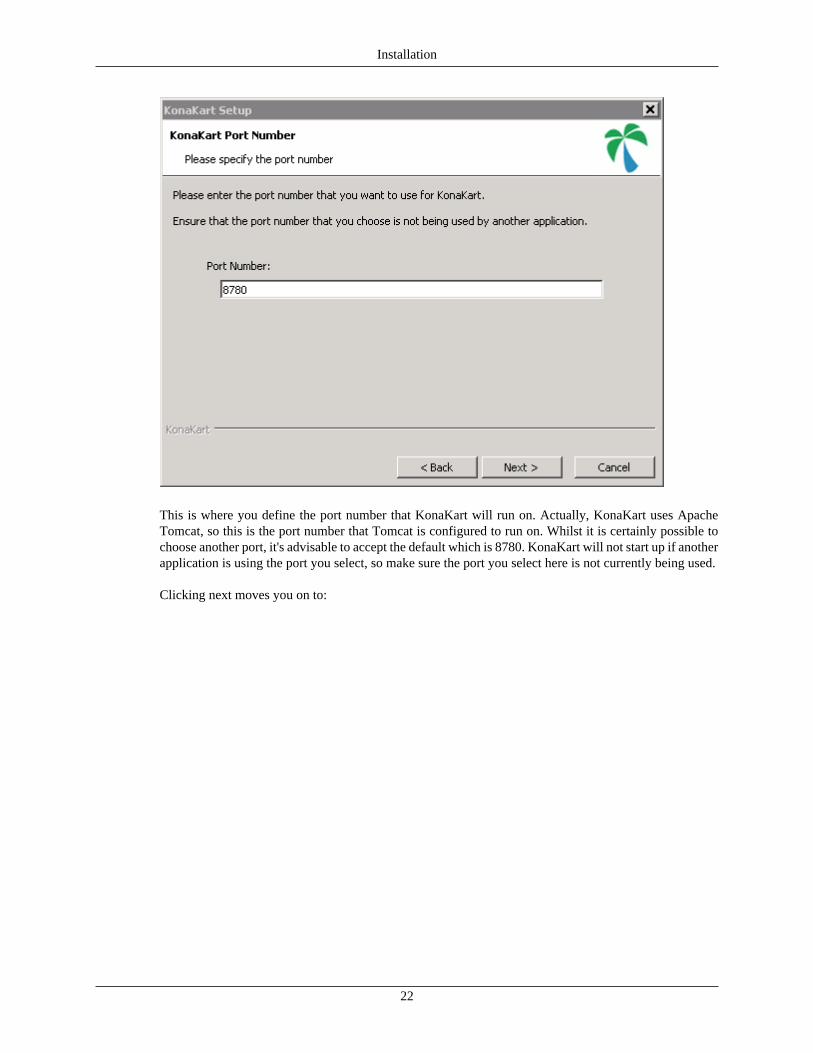
Finally you have the option to create a desktop icon (which is defined to start the KonaKart server andlaunch the GUI) and launch the application immediately after the installation has completed. The "LaunchKonaKart" option executes a startup of the KonaKart server and then launches the default browser to showthe KonaKart UI, and the KonaKart Administration Application.
Manual InstallationIf you are installing on a platform that supports the GUI installer (Windows, Linux, Unix), it is recom-mended that you use that. If not, but you are on a platform that supports the silent form of the installer(again Windows, Linux, Unix), it is recommended that you use that. Otherwise, use the manual installation.
If you plan to install KonaKart in an existing servlet container, it is still advisable to run through the GUIinstaller if you can. The reason for this is that it will populate all the properties files for you and load yourdatabase automatically. Once you have done this you can make WARs from the GUI-installed version ofKonaKart (details below) and deploy them elsewhere as you please.
These instructions for manually installing KonaKart were first provided in a post to our forum by "BoJo"(aka "Bob") and have been expanded here.
The KonaKart Installation section contains general KonaKart installation instructions (although focuseson using the GUI-driven and silent versions of the installer) and contains important information that isalso relevant for the manual installation so check this before starting out.
In general, you need to follow all the documented installation instructions except for the "Install KonaKart"section which explains how to use the automated GUI and Silent versions of the installation.
Perform all the documented installation instructions for:
• A Java runtime environment

Installation
30
• A database loaded with KonaKart tables
For the purposes of this FAQ we'll use MySQL and a database named "konakart".
1. Populate the Database
Make sure you have created an empty database instance in the RDBMS of choice as per the FAQinstructions: eg:
$ mysql> create database konakart
To create the database load konakart_demo.sql for the database you have chosen. In this case:
$ mysql -u root -p konakart < ./konakart/database/MySQL/konakart_demo.sql
2. Configure the Properties Files
a. Download the zip file
Download the zip file for manual installation as described on the Downloads [http://www.konakart.com/downloads.php] page
b. Set Database Parameters
Set DB name (and other database connection parameters) in konakart.properties andkonakartadmin.properties Change the string "dbname" to the name of your database (in this case"konakart") in the following files:
{konakart}/webapps/konakart/WEB-INF/classes/konakart.properties
{konakart}/webapps/konakartadmin/WEB-INF/classes/konakartadmin.properties
This is documented in the "Defining the Database Parameters" section below.
3. Deployment
Now, when it comes to deployment, there is a choice.
Either: run KonaKart using the tomcat that was provided in the download kit or create WARs and loadthem into your chosen servlet container.
a. Deploy to the tomcat provided
i. Start tomcat using {konakart}/bin/startkonakart.sh (or, if you are working on Windows, use{konakart}\bin\StartAndLaunchKonaKart.bat).
ii. Run KonaKart and KonaKartAdmin
Try http://localhost:8780/konakart/ [http://localhost:8780/konakart/] and http://localhost:8780/konakartadmin/ [http://localhost:8780/konakartadmin/] in your browser.
b. Create WARs and deploy in another servlet container
i. Generate and deploy the war files.

Installation
31
$ cd {konakart}/custom $ ./custom/bin/ant make_wars
More detailed instruction for building the war files are available in the customization section ifyou need them.
Deploy the generated WAR files. This is different for different servlet containers, but for tomcat,just copy the .war files in {konakart}/custom/war to your tomcat's webapps directory.
Restart the servlet container if necessary.
ii. Run KonaKart and KonaKartAdmin
Try http://localhost:8780/konakart/ [http://localhost:8780/konakart/] and http://localhost:8780/konakartadmin/ [http://localhost:8780/konakartadmin/] in your browser, adjusting the port asnecessary if you deployed to a different port number.
Starting Up and Shutting Down KonaKartIf you are not using the default bundled tomcat refer to your chosen servlet container's startup/shutdownprocedures. If you have installed the default KonaKart system with a bundled tomcat, you can follow theseinstructions to startup and shutdown KonaKart:
Starting up KonaKartThe KonaKart Server can be started by executing the following commands:
c:\> %CATALINA_HOME%\bin\startkonakart.bat (Windows)
$ ${CATALINA_HOME}/bin/startkonakart.sh (Unix/Linux)
On Windows there are also shortcuts created under the KonaKart program group that can be used to:
• start the KonaKart Server
• stop the KonaKart Server
• launch the KonaKart application in your default browser
• launch the KonaKart Administration application in your default browser
• uninstall KonaKart
Shutting down KonaKartKonaKart can be shut down by executing the following command:
c:\> %CATALINA_HOME%\bin\stopkonakart.bat (Windows)
$ ${CATALINA_HOME}/bin/stopkonakart.sh (Unix/Linux)

Installation
32
On Windows a shortcut is created under the KonaKart program group that can be used to shut down theKonaKart server.
Default Admin App CredentialsThree users are created with different roles assigned.
Username Password Roles
[email protected] princess KonaKart Super-User
root@localhost password Sample User
[email protected] princess KonaKart Catalog Maintainer
[email protected] princess KonaKart Order and Customer Manager
Choose new usernames and passwords to secure the KonaKart Administration Application at the earliestopportunity.
The default users and roles are set up as examples of typical configurations of the role-based securitysystem. You may wish to add new Admin users or adjust some of the roles as you see fit. The three usersabove should give you a few ideas about how the system can be configured.
The three users above are defined as "Admin Users". Note that "Admin Users" can actually log in to theKonaKart store using the same credentials. It doesn't work the other way around however: "Non AdminUsers" cannot log into the Admin Application.
Although it's not recommended, it is possible to disable security completely if you wish. To configurethis, see the comments inside the konakartadmin.properties file which can be found under the konakartinstallation directory at:
webapps\konakartadmin\WEB-INF\classes\konakartadmin.properties
(There are a number of additional configuration options that you can adjust to modify the behaviour ofthe KonaKart Administration Application - please refer to the comments in in the above properties filefor details).
Super UserA "Super User" must be an Admin User with a role that has the super_user indicator set.
Since the "Super User" has privileges to change all the configuration settings in a KonaKart store, youmust guard these credentials carefully.
Ensure that you change the password of the "Super User" account(s) as required by your Site Securitypolicy for highly-privileged accounts.
Installation Notes for Databases
Defining the Database ParametersYou define the database parameters in two configuration files underneath your konakart installation di-rectory at:

Installation
33
webapps\konakart\WEB-INF\classes\konakart.properties andwebapps\konakartadmin\WEB-INF\classes\konakartadmin.properties
(Therefore, the default on Windows will be at C:\Program Files\KonaKart\webapps\konakart\WEB-INF\classes\konakart.properties).
Inside these files you will find: (the url parameter is broken into two lines for readability only - you shouldkeep it on one line)
# -----------------------------------------------------------------------------------# D A T A B A S E P R O P E R T I E S# Database Connection Parameters Set by Installer on 20-Jan-2009# -----------------------------------------------------------------------------------
torque.applicationRoot = .
torque.database.default = store1
torque.database.store1.adapter = mysqltorque.dsfactory.store1.connection.driver = com.mysql.jdbc.Drivertorque.dsfactory.store1.connection.url = jdbc:mysql://localhost:3306/store1?zeroDateTimeBehavior=convertToNulltorque.dsfactory.store1.connection.user = fruittorque.dsfactory.store1.connection.password = secret
-------------------------------------------------------------------------------------
Leave the torque.database.default equal to store1.
You need to set the five parameters appropriate for your environment:
• torque.database.store1.adapter (either "mysql", "oracle", "db2net", "mssql" "postgresql")
• torque.dsfactory.store1.connection.driver (All JDBC drivers for the supported databases are on the de-fault classpath)
• torque.dsfactory.store1.connection.url (keep the value on the same line after the equals sign)
• torque.dsfactory.store1.connection.user
• torque.dsfactory.store1.connection.password
Defining the Database Parameters - Using JNDI
It is also possible to define your data source using JNDI. (For various optional configurations not coveredhere please refer to the Torque Database Configuration documentation on the Apache site.)
In this example Torque is configured to create a JNDI Data Source and deploy it into JNDI:
You would modify your konakart.properties files by commenting out the connection properties used bythe default SharedPoolDataSourceFactory factory and replace them as follows:

Installation
34
torque.dsfactory.store1.factory = org.apache.torque.dsfactory.JndiDataSourceFactorytorque.dsfactory.store1.jndi.path = jdbc/konakarttorque.dsfactory.store1.jndi.ttl = 60000torque.dsfactory.store1.datasource.classname = org.apache.commons.dbcp.BasicDataSource
torque.database.store1.adapter = mysql
torque.dsfactory.store1.jndi.java.naming.factory.initial = \ org.apache.naming.java.javaURLContextFactory
torque.dsfactory.store1.datasource.driverClassName = com.mysql.jdbc.Drivertorque.dsfactory.store1.datasource.url = \ jdbc:mysql://localhost:3306/store1?zeroDateTimeBehavior=convertToNulltorque.dsfactory.store1.datasource.username = fruit torque.dsfactory.store1.datasource.password = secret
#For JNDI you also need to comment out the following line (as it has been replaced above:#torque.dsfactory.store1.factory=org.apache.torque.dsfactory.SharedPoolDataSourceFactory
For the database definition for the BIRT reporting engine you need to leave the original connection prop-erties either in a separate properties file or in konakartadmin.properties as follows:
# Leave these for the BIRT reports
torque.dsfactory.store1.connection.driver = com.mysql.jdbc.Drivertorque.dsfactory.store1.connection.url = \ jdbc:mysql://localhost:3306/store1?zeroDateTimeBehavior=convertToNulltorque.dsfactory.store1.connection.user = fruittorque.dsfactory.store1.connection.password = secret
Note that if you chose to use a separate file, remember to add that file name to the "var dbPropsFile"definition in the "...\webapps\birtviewer\reports\lib\konakart.rptlibrary" file.
Notes for DB2 and Oracle
In addition to the settings above, you have to set the validationQuery for DB2 and Oracle slightly differ-ently to the others, as follows. This section is defined just below the database parameter definitions in thetwo properties files (konakart.properties and konakartadmin.properties):
# The SQL query that will be used to validate connections from this pool before # returning them to the caller. If specified, this query MUST be an SQL SELECT # statement that returns at least one row. # Recommended settings:# for MySQL/PostgreSQL/MS SQL use: SELECT 1# for Oracle use: SELECT 1 from dual# for DB2 use: SELECT 1 FROM sysibm.sysdummy1
torque.dsfactory.store1.pool.validationQuery=SELECT 1#torque.dsfactory.store2.pool.validationQuery=SELECT 1
-------------------------------------------------------------------
Notes for Postgresql
Note that the SQL that is optionally run at installation time uses the "DROP TABLE IF EXISTS TABLE-NAME;" command. This works fine for PostgreSQL 8.2 and above (which support "IF EXISTS") but notfor earlier versions.

Installation
35
This is only a problem during the installation process; KonaKart performs well on versions of PostgreSQLprior to 8.2. To workaround this problem, for example for PostgreSQL 8.1, you will have to edit thedatabase/konakart_demo.sql file and remove all the "DROP TABLE" commands then run this SQL man-ually. In addition to modifying the "IF EXISTS" syntax you will also have to add SQL statements to createsequences for all the SERIAL primary keys. For example, for the counter table, which is created like this:
CREATE TABLE counter ( counter_id SERIAL, startdate char(8), counter integer, PRIMARY KEY (counter_id));
You have to create the SEQUENCEs with these conventions:
CREATE SEQUENCE <table>_<SERIAL column>_seq
for example:
.. for the counter_id column in the counter table above, you need to create a SRQUENCE like this:
CREATE SEQUENCE counter_counter_id_seq INCREMENT 1 MINVALUE 1 MAXVALUE 9223372036854775807 START 1 CACHE 1;
Another, preferable, alternative is to update to the latest version of PostgreSQL and run the standard GUIinstallation and have all the data loaded by the installer.
Notes for MySQLNote that the SQL that is optionally run at installation time uses the "DROP TABLE IF EXISTS" syntax.This works fine for MySQL 5 and above, but not on MySQL 4.1.
This is only a problem during the installation process; KonaKart performs well on MySQL 4.1 but youhave to modify the konakat_demo.sql file and run it yourself manually. You have to edit the database/konakart_demo.sql file and remove all the "DROP TABLE" commands then run this SQL manually. Aftersuccessfully running this SQL you will be able to run KonaKart with MySQL 4.1.

36
Chapter 6. Installation of KonaKartEnterprise Extensions
This chapter explains how to install the KonaKart Enterprise Extensions.
Please read this section carefully before attempting to install the Enterprise Extensions.
Before You BeginThe KonaKart Enterprise Extensions are installed "on top of" a standard Community Edition installationof KonaKart. Therefore, before you begin, ensure that you have installed KonaKart Community Editionsuccessfully.
The Enterprise Extensions require a Community Edition installation of the same version. Therefore, if youare using an earlier version of KonaKart, you will need to upgrade to the appropriate Community Editionversion before attempting an installation of the Enterprise Extensions. There are database upgrade scriptsavailable to help you migrate up to new versions of KonaKart - see the KonaKart installation for details.
Ensure that KonaKart has been stopped before you start the installation process.
Ensure that you have backed up your existing KonaKart data before proceeding. This is a critical stepbefore any upgrade or installation of KonaKart.
There are no additional platform requirements for the Enterprise Extensions - so if your Community Edi-tion of KonaKart is running successfully on your particular platform, you can have confidence that theEnterprise Extensions will also work.
Pre-requisitesThe only pre-requisite is:
• A successfully installed KonaKart Community Edition
Create a DatabaseYou will already have created a database for your Community Edition installation which should be workingsuccessfully in the standard single-store mode.
Note that when this section of the guide talks about a "database" what it means is a defined set of tablesfor a defined user and password. Different database suppliers implement this separation differently but solong as you set up your database so that your defined user can create and access his own tables, you canset up your database as you like. In some cases you may wish to load the KonaKart tables in an existingschema for ease of integration to other applications. So long as there are no database object (tables namesetc) conflicts, this is fine.
Now you have to consider whether or not you need a new database for the Enterprise Extensions. TheKonaKart Engine Mode you require will affect what databases you will have to create.
• Single Store Mode

Installation of KonaKartEnterprise Extensions
37
No new databases are required. The original database set up for your existing Community Edition willbe used.
• Multi-Store Shared DB Mode
No new databases are required. All new stores will use the existing Community Edition database.
• Multi-Store Non-Shared DB Mode
A new database ("schema", "user" etc. - see above) is required for every new store. The KonaKartEnterprise Extensions installation only supports the population of a second store (called "store2"). Ifyou need to set up additional stores in this mode you will have to create additional databases for thoseand configure the konakart properties files manually. This is easy to do by following the examples thatthe Enterprise Extensions installation creates for "store1" and "store2".
You will need to populate these newly created databases (that is, databases you create after "store2"which is populated by the installer). Populate them using the konakart_demo.sql SQL script which canbe found for all supported databases under the database directory under your KonaKart installationdirectory.
Installing Enterprise ExtensionsUse of the KonaKart Enterprise Extensions requires that you first sign an "End User License Agreement".Please see the KonaKart website for further details.
Once you have signed the license agreement you can proceed to install the Enterprise Extensions.
Note that if the GUI or silent installers do not work on your platform you should download the zip versionof KonaKart and follow the manual installation instructions.
Take Careful Note: The installation can be configured to execute SQL commands that will change datain your database. Ensure that you have saved a backup of your database before you begin the installationjust in case you have to revert.
Installing KonaKart Enterprise Extensions on Windows
Run the set-up program that executes a graphical installation wizard - see Graphical Installation Wizardbelow. (You can use the "Silent Mode" installation if you prefer, but the graphical version is probablyeasier if you're installing for the first time).
Installing KonaKart Enterprise Extensions on Unix/Linux
Create a terminal session on your machine and enter the following: (You may prefer to use commands todo the same thing from your X-desktop if you have one installed).
$# (replace 3.2.0.0 with the version you wish to install)$ chmod +x KonaKart-Enterprise-3.2.0.0-Linux-Install
If you have a graphical environment on your Linux/Unix machine you will be able to run the GUI. Inwhich case see the Graphical Installation Wizard below (identical steps to the Windows installation).

Installation of KonaKartEnterprise Extensions
38
If you don't have a graphical environment you will see this warning message:
../../src/programlistings/PL_graphical_env.xml
Silent Mode Installations
When running in "silent" (-S) (or "unattended") mode you are able to specify configuration parameterson the command line, for example:
$ ./KonaKart-Enterprise-3.2.0.0-Linux-Install -S \ -DDatabaseType mysql \ -DSharedCustomers True \ -DEngineMode 2 \ -DLoadDB 1 \ -DJavaJRE "/usr/lib/jvm/java-6-sun/"
Silent Mode Parameters
The following parameters can be added to the command line, as in the example above, to specify defaultvalues for KonaKart at installation time:
Note that the database user, password and URL are only required when you need to define a new database(for example when creating a Multi-Store Multi-Database installation - which is Engine Mode 1).
Parameter Default Value Explanation
DatabaseType mysql mysql, postgresql, db2net, or-acle, mssql
DatabaseUrl jdbc:mysql://localhost:3306/dbname?zeroDateTimeBehavior=convertToNull
Database URL
DatabaseUsername root Database User's Username
DatabasePassword Database User's Password
DatabaseDriver com.mysql.jdbc.Driver Database Driver
mssqlDBO dbo Database Owner (only usedby MS SQL Server)
InstallationDir Windows: C:\Program Files\KonaKart
*nix (as root): /usr/local
*nix (as user): ~/konakart
Installation Directory
LoadDB 0 1=Load DB
0=Do not Load DB
JavaJRE The Java runtime location
EngineMode 0 KonaKart Engine Mode (0,1or 2)
SharedCustomers True Share Customers (true orfalse)
SharedProducts False Share Products (true or false)

Installation of KonaKartEnterprise Extensions
39
Note that currently you can only have shared Products if you also share Customers.
Graphical Installation Wizard
This shows a typical installation that uses the wizard:
Either double-click on the installation setup program (either KonaKart-Enterprise-3.2.0.0-Windows-Setup.exe on Windows, or KonaKart-Enterprise-3.2.0.0-Linux-Install on Linux - or respective later ver-sion numbers) or run it from a command shell. You are first presented with this small window whichallows you to confirm that you wish to proceed with the installation:
Click on Yes to continue to:
Check that you have the correct version number and click on next to get to the next screen. Note in pass-ing the email address for support questions. Please contact us and / or search the forum if you have anydifficulties at all with the installation and we will endeavour to help you as soon as possible.

Installation of KonaKartEnterprise Extensions
40
Please read the license agreement carefully and if you are happy to do so under the terms of the agreement,click on the "I accept the terms of the license agreement" bullet and click next to continue. If you are notprepared to accept that license agreement please quit the installation at this point and delete all copies ofthe software.
Click on next to reach:

Installation of KonaKartEnterprise Extensions
41
This is where you specify where you previously installed the Community Edition of KonaKart. On Win-dows this defaults to "C:\Program Files\", on Linux this is the user's home directory (if the user is not root)or "/usr/local" (if the user is root). This can be specified in the silent mode of on the command line of theGUI version using -DInstallationDir.
The location specified must match the location of your Community Edition installation.
On clicking next you reach:

Installation of KonaKartEnterprise Extensions
42
Here you have to confirm or specify the location of the java runtime environment. The wizard will tryto find this for you but it is not always successful. In the cases where it isn't successful you will have toenter the location manually. If you have installed java v5 or v6 in the default location or it appears in yourenvironment's path, the wizard should find it for you.
Click on next to get to:

Installation of KonaKartEnterprise Extensions
43
This is where you define KonaKart Engine Mode. There are three choices here:
• Single Store (Engine Mode 0)
This is similar to the way the Community Edition works. There is one database with one store.
• Multi-Store Multiple Databases (Engine Mode 1)
In this mode, one instance of KonaKart manages multiple stores with the data for each store being heldin a separate database. This mode offers some security advantages (database credentials are not sharedbetween stores) but is more effort to maintain as you cannot dynamically-create new stores.
• Multi-Store Single Database (Engine Mode 2)
In Engine Mode 2 one KonaKart instance manages multiple stores in one database. This is a flexiblemode that allows the creation of new stores dynamically. Within this mode there are additional optionsto define which KonaKart objects (products/customers) you wish to "share" between stores:
• Shared Products Mode
In this mode products may be shared amongst the different stores in the KonaKart "mall". Therefore,a product can be made available for sale in any subset of the stores in the mall in Shared ProductsMode. To use Shared Products you must also have Shared Customers (see below).
If some subset of the products are shared between stores, this mode can be advantageous becausethere is only one copy of each product so maintenance of products can be reduced. If you update thedescription for a shared product, this description will be available in all stores that share that product.
• Non-Shared Products Mode

Installation of KonaKartEnterprise Extensions
44
In this mode, the products are not sharable between the individual stores in the mall. The productsmust be maintained independently for each store. In Non-Shared Products Mode it's possible to haveShared Customers OR Non-Shared Customers (see below).
• Shared Customers Mode
In this mode customers are shared amongst the different stores in the KonaKart "mall". Therefore, acustomer who has registered an account with one of the stores in the KonaKart instance, can use thesame credentials to log on to any other store managed by the KonaKart instance.
• Non-Shared Customers Mode
In this mode, one instance of KonaKart manages multiple stores with the data for each store beingheld in a separate database. This mode offers some security advantages (database credentials are notshared between stores) but, if you need to create a large number of stores, requires more effort tomaintain as you cannot dynamically-create new stores.
The next screen shown is dependent on which Engine Mode you select. If you select Multi-Store Single DB,you will be presented with this screen, offering you the choice of having "Shared Products" or "Non-SharedProducts":
Click the checkbox to choose Shared Products Mode which will allow you to share products between themultiple stores in your mall.
When you click on the "Next" button the next screen presented to you will depend on whether you choseShared Products or not. Since with Shared Products you must also have Shared Customers Mode, if SharedProducts is selected, you will then skip the Shared Customers Choice screen and be back on the same pathas if you'd chosen one of the other Engine Modes.

Installation of KonaKartEnterprise Extensions
45
However, if you chose Non-Shared Products mode, you are presented with the following screen whereyou choose between Shared and Non-Shared Customers:
Click the checkbox to choose Shared Customers Mode which will allow customers who register in oneof the stores in your KonaKart instance, to be able to log in to the other stores in the KonaKart instanceusing the same credentials.
When you click on the "Next" button you will be back on the same path as if you'd chosen one of the otherEngine Modes on an earlier screen in the wizard.
If you had selected not to Share Products but to Share Customers the next screen will appear as follows:

Installation of KonaKartEnterprise Extensions
46
If you had selected Shared Products Mode and Shared Customers Mode this screen would appear as fol-lows:

Installation of KonaKartEnterprise Extensions
47
This is your final chance to check your settings before copying the files into position. (The values shownon the screen are dependent on the settings you have selected earlier in the wizard).
Clicking next will start the process of copying the KonaKart Enterprise Edition files into position. Thecopying of the files is shown on an "Installing Files..." window but there aren't very many files so you mayfind that it only flashes up for a second or two before moving forward automatically to the next screen.
The next screen in the wizard is again dependent on the selected Engine Mode.
For Single Store Mode you are taken to the very last screen in the wizard which tells you whether or notthe installation has been successful and gives you the option to restart KonaKart with the newly installedEnterprise Extensions.
For Multi-Store Multiple DB Mode you are taken to a screen that asks for the database connection param-eters for your second store:
After setting these parameters and clicking on the "Next" button you are taken to a database connectiontest screen (as below for the Multi-Store Single Database mode)
For Multi-Store Single DB Mode you are taken to a Database Connection Test window which will checkto see whether or not it can connect to the database that your existing Community Edition installation ofKonaKart is using. This screen looks like this after a successful connection test:

Installation of KonaKartEnterprise Extensions
48
After a successful database connection test, you are asked whether or not you want to load the databasewith the new Multi-Store data. In most cases you will want to load the data, so click the checkbox onthis screen:

Installation of KonaKartEnterprise Extensions
49
After about 10 secs (Single DB mode) or about 60 secs (Multiple DB mode) you will be presented with ascreen that will report the success or failure of the database load. (Naturally, the time it takes to completethe database load will depend on how fast your system operates).
If there's a problem with the database load, double-check these installation instructions, check the Kon-aKart forum for similar problems or, if you have a support contract, contact the KonaKart support teamfor assistance.
After a successful installation of the KonaKart Enterprise Extensions you will be presented with the fol-lowing screen:

Installation of KonaKartEnterprise Extensions
50
If you leave the checkbox as it is (the default is checked) the wizard will re-start KonaKart with theEnterprise Extensions, running in the Engine Mode you have chosen.
Click "Finish" to finish the installation.
Run KonaKart and KonaKartAdmin exactly as you did with the Community Edition by entering:
http://localhost:8780/konakart/ [http://localhost:8780/konakart/] or http://localhost:8780/konakartadmin/[http://localhost:8780/konakartadmin/] in your browser, adjusting the port as necessary if you deployedto a different port number.
Manual Installation of the Enterprise Exten-sions
If you are installing on a platform that supports the GUI installer (Windows, Linux, Unix), it is recom-mended that you use that. If not, but you are on a platform that supports the silent form of the installer(again Windows, Linux, Unix), it is recommended that you use that. Otherwise, or if you have other re-quirements, use the manual installation.
The installation work required is dependent on your target environment. Follow the guidelines for manualinstallation for your target platform that are documented for the Community Edition. These instructionswill supplement those.
However you plan to install KonaKart Enterprise Extensions, it is still advisable to run through the GUIinstaller if you can. The reason for this is that it will populate all the properties files for you and load yourdatabase automatically. Once you have done this you can make WARs from the GUI-installed version ofKonaKart (details below) and deploy them elsewhere as you please.

Installation of KonaKartEnterprise Extensions
51
The KonaKart Enterprise Extensions Installation section contains general KonaKart Enterprise Extensionsinstallation instructions (although focuses on using the GUI-driven and silent versions of the installer)and contains important information that is also relevant for the manual installation so check this beforestarting out.
In general, you need to follow all the documented installation instructions except for the "Install EnterpriseExtensions" section which explains how to use the automated GUI and Silent versions of the installation.
Perform all the documented installation instructions for:
• A Java runtime environment
• A database loaded with KonaKart tables
• A successfully working KonaKart Community Edition
For the purposes of this guide we'll use MySQL and a database named "store1" (and "store2" where ap-plicable).
1. Copy the Enterprise Extensions files into position
Unzip the package you KonaKart-Enterprise-3.2.0.0.zip file for your version on top of the existingKonaKart Community edition installation. Ensure that you unzip to the home directory of the existingKonaKart installation so that all the files are loaded into the correct positions.
2. Modify the KonaKart Configuration Files
a. Set Database Parameters
Modifications should only be required if you have chosen Multi-Store Multiple Database Mode(Engine Mode 1). For all other modes, the database parameters should already be set correctly.
Set DB name (and other database connection parameters) in konakart.properties andkonakartadmin.properties Change the string "dbname" in the URL for MySQL to the name of yourdatabase (in this case "konakart") in the following files:
{konakart}/webapps/konakart/WEB-INF/classes/konakart.properties
{konakart}/webapps/konakartadmin/WEB-INF/classes/konakartadmin.properties
This is documented in the "Defining the Database Parameters" section of the Community Editioninstallation.
For Multi-Store Single DB Modes (Engine Mode 2) there is no difference to the database definitionrequired in the two properties files. However, if you are using the Multi-Store Multiple DBs Mode(Engine Mode 1) you will need to enter database connection credentials for each of your stores. Anexample of a two-store set-up is:

Installation of KonaKartEnterprise Extensions
52
# -----------------------------------------------------------------------------------# D A T A B A S E P R O P E R T I E S# -----------------------------------------------------------------------------------
torque.applicationRoot = .
torque.database.default = store1
torque.database.store1.adapter = mysqltorque.dsfactory.store1.connection.driver = com.mysql.jdbc.Drivertorque.dsfactory.store1.connection.url = jdbc:mysql://localhost:3306/store1?zeroDateTimeBehavior=convertToNulltorque.dsfactory.store1.connection.user = roottorque.dsfactory.store1.connection.password =
# Enterprise Featuretorque.database.store2.adapter = mysqltorque.dsfactory.store2.connection.driver = com.mysql.jdbc.Drivertorque.dsfactory.store2.connection.url = jdbc:mysql://localhost:3306/store2?zeroDateTimeBehavior=convertToNulltorque.dsfactory.store2.connection.user = roottorque.dsfactory.store2.connection.password =
# -----------------------------------------------------------------------------------# C O N N E C T I O N P O O L P R O P E R T I E S# -----------------------------------------------------------------------------------# We can leave the defaults# -----------------------------------------------------------------------------------
# Using commons-dbcp
torque.dsfactory.store1.factory=org.apache.torque.dsfactory.SharedPoolDataSourceFactorytorque.dsfactory.store2.factory=org.apache.torque.dsfactory.SharedPoolDataSourceFactory
# The maximum number of active connections that can be allocated from this pool at # the same time, or zero for no limit.
torque.dsfactory.store1.pool.maxActive=0torque.dsfactory.store2.pool.maxActive=0
# The maximum number of active connections that can remain idle in the pool, without # extra ones being released, or zero for no limit.
torque.dsfactory.store1.pool.maxIdle=10torque.dsfactory.store2.pool.maxIdle=10
# The maximum number of milliseconds that the pool will wait (when there are no # available connections) for a connection to be returned before throwing an exception,# or -1 to wait indefinitely.
torque.dsfactory.store1.pool.maxWait=-1torque.dsfactory.store2.pool.maxWait=-1
# The indication of whether objects will be validated before being borrowed from the# pool. If the object fails to validate, it will be dropped from the pool, and we will# attempt to borrow another.
torque.dsfactory.store1.pool.testOnBorrow=truetorque.dsfactory.store2.pool.testOnBorrow=true
# The SQL query that will be used to validate connections from this pool before # returning them to the caller. If specified, this query MUST be an SQL SELECT # statement that returns at least one row. # Recommended settings:# for MySQL/PostgreSQL/MS SQL use: SELECT 1# for Oracle use: SELECT 1 from dual# for DB2 use: SELECT 1 FROM sysibm.sysdummy1
torque.dsfactory.store1.pool.validationQuery=SELECT 1torque.dsfactory.store2.pool.validationQuery=SELECT 1
Notice how most of the Torque parameters are repeated for each store.

Installation of KonaKartEnterprise Extensions
53
b. konakartadmin.properties
The changes required are dependent on the chosen Engine Mode.
For Multi-Store Multiple Databases Mode (Engine Mode 1) you need to define the databases thatare used for each store. These parameters can be ignored for other Engine Modes. This is an exampleof a two database setup with databases store1 and store2:
# -----------------------------------------------------------------------------------# Enterprise Feature# The databases actually used in a multi store / multi database environment# The "used" database definitions must map to the Torque definitions above# The "description.*" definitions are friendly names for the Stores
konakart.databases.used = store1 store2konakart.databases.description.store1 = Store1konakart.databases.description.store2 = Store2
For all Multi-Store Modes (Engine Modes 1 and 2) you need to define the Engine Mode that the webservices engines will use: This is an example of a definition for Engine Mode 2:
# -----------------------------------------------------------------------------------# Enterprise Feature# Engine mode that the web services engine will use# 0 = Single Store (default)# 1 = Multi-Store Multiple-Databases (add konakart.databases.used above as well)# 2 = Multi-Store Single Database
konakart.ws.mode = 2
Note the reminder in the comment above to set the konakart.databases.used property for EngineMode 1 (Multi-Store Multiple Database Mode).
For Multi-Store Single Database Mode (Engine Mode 2) you need to define whether or not you areoperating in the Shared Customers Mode. This setting is not used for other engine modes. This is anexample of a definition for defining that you wish to use Shared Customers:
# -----------------------------------------------------------------------------------# Enterprise Feature# When in multi-store single database mode, the customers can be shared between stores
konakart.ws.customersShared = true
For Multi-Store Single Database Mode (Engine Mode 2) you also need to define whether or not youare operating in the Shared Products Mode. This setting is not used for other engine modes. This isan example of a definition for defining that you wish to use Shared Products:
# -----------------------------------------------------------------------------------# Enterprise Feature# When in multi-store single database mode, the products can be shared between stores
konakart.ws.productsShared = true
c. konakartadmin_gwt.properties

Installation of KonaKartEnterprise Extensions
54
Modify this file as required to set the Engine Mode and appropriate value for customersShared andproductsShared. The file is deployed to {konakart}/webapps/konakartadmin/WEB-INF/classes/ .
The following example shows a setup for EngineMode 2 with Shared Customers and Shared Prod-ucts:
# -----------------------------------------------------------------------------------# Enterprise Feature# Engine mode that the KonaKart Admin engine will use# 0 = Single Store (default)# 1 = Multi-Store Multiple-Databases (add konakart.databases.used above as well)# 2 = Multi-Store Single Database
konakartadmin.gwt.mode = 2
# -----------------------------------------------------------------------------------# Enterprise Feature# When in multi-store single database mode, the customers can be shared between stores
konakartadmin.gwt.customersShared = true
# When in multi-store single database mode, the products can be shared between stores
konakartadmin.gwt.productsShared = true
d. konakart.properties
The changes required are dependent on the chosen Engine Mode.
The database parameters should be set up in the same way as you did in the konakartadmin.propertiesfile (see above).
For Multi-Store Multiple Databases Mode (Engine Mode 1) you need to define the databases thatare used for each store. These parameters can be ignored for other Engine Modes. This is an exampleof a two database setup with databases store1 and store2:
# Enterprise Feature# The databases actually used in a multi store / multi database environmentkonakart.databases.used = store1 store2
Define the web services Engine Mode and the customers shared property as you did inkonakartadmin.properties (see above). Here is an example of a setup that defines Engine Mode 2without sharing customers or products:

Installation of KonaKartEnterprise Extensions
55
# -----------------------------------------------------------------------------------# Enterprise Feature# Engine mode that the web services engine will use# 0 = Single Store (default)# 1 = Multi-Store Multiple-Databases (add konakart.databases.used above as well)# 2 = Multi-Store Single Database
konakart.ws.mode = 2
# -----------------------------------------------------------------------------------# Enterprise Feature# When in multi-store single database mode, the customers can be shared between stores
konakart.ws.customersShared = false
# When in multi-store single database mode, the products can be shared between stores
konakart.ws.productsShared = false
e. struts-config.xml
A few modifications need to be made to the struts-config.xml file to set the mode of the KonaKartplugins. The Engine Mode must be set to 0 (Single Store mode), 1 (Multi-Store Multiple DBs Mode)or 2 (Multi-Store Single DB Mode). If you are using Engine Mode 2 and you have chosen SharedCustomers you must also set customersShared to "true" otherwise leave that as "false". Likewise,set productsShared to true or false as appropriate.
<plug-in className="com.konakart.plugins.KKEngPlugin"> <set-property property="propertiesPath" value="konakart.properties"/> <set-property property="mode" value="2"/> <set-property property="customersShared" value="true"/> <set-property property="productsShared" value="true"/> <set-property property="definitions-debug" value="2"/> </plug-in>
<plug-in className="com.konakart.plugins.KKAppEngPlugin"> <set-property property="propertiesPath" value="konakart.properties"/> <set-property property="appPropertiesPath" value="konakart_app.properties"/> <set-property property="mode" value="2"/> <set-property property="customersShared" value="true"/> <set-property property="productsShared" value="true"/> <set-property property="definitions-debug" value="2"/> </plug-in>
f. Populate the Database ready for the Enterprise Extensions
This is an example of a Windows BAT file that you should run for setting up a Multi-Store SingleDB (Engine Mode 2) system. You need to configure the properties files (see above) before executingthis program because it needs to know the chosen configuration:

Installation of KonaKartEnterprise Extensions
56
@echo offremrem Set up database for KonaKart Enterprise Extensions rem - Manual Installation Onlyremrem Normally this is executed by the Enterprise Extensions Installation Wizardrem
set INSTALL_DIR=C:/Program Files/KonaKartset WEBAPPS_DIR=C:/Program Files/KonaKart/webappsset DBDIR=MySQLset SHARED_CUSTOMERS=Trueset SHARED_PRODUCTS=True
set CP=%WEBAPPS_DIR%\konakartadmin\WEB-INF\classesset CP=%CP%;%WEBAPPS_DIR%\konakartadmin\WEB-INF\lib\konakartadmin_multistore.jarset CP=%CP%;%WEBAPPS_DIR%\konakartadmin\WEB-INF\lib\konakartadmin.jarset CP=%CP%;%WEBAPPS_DIR%\konakartadmin\WEB-INF\lib\konakartadmin_multistore.jarset CP=%CP%;%WEBAPPS_DIR%\konakartadmin\WEB-INF\lib\konakartadmin_solr.jarset CP=%CP%;%WEBAPPS_DIR%\konakartadmin\WEB-INF\lib\konakartadmin_publishproducts.jarset CP=%CP%;%WEBAPPS_DIR%\konakart\WEB-INF\lib\konakart.jarset CP=%CP%;%WEBAPPS_DIR%\konakart\WEB-INF\lib\konakart_utils.jarset CP=%CP%;%WEBAPPS_DIR%\konakart\WEB-INF\lib\konakart_torque-3.3-RC1.jarset CP=%CP%;%WEBAPPS_DIR%\konakart\WEB-INF\lib\velocity-1.5.jarset CP=%CP%;%WEBAPPS_DIR%\konakart\WEB-INF\lib\konakart_village-2.0.jarset CP=%CP%;%WEBAPPS_DIR%\konakart\WEB-INF\lib\commons-pool-1.2.jarset CP=%CP%;%WEBAPPS_DIR%\konakart\WEB-INF\lib\commons-dbcp-1.2.2.jarset CP=%CP%;%WEBAPPS_DIR%\konakart\WEB-INF\lib\commons-configuration-1.1.jarset CP=%CP%;%WEBAPPS_DIR%\konakart\WEB-INF\lib\commons-beanutils-1.7.0.jarset CP=%CP%;%WEBAPPS_DIR%\konakart\WEB-INF\lib\commons-lang-2.1.jarset CP=%CP%;%WEBAPPS_DIR%\konakart\WEB-INF\lib\commons-collections-3.1.jarset CP=%CP%;%WEBAPPS_DIR%\konakart\WEB-INF\lib\commons-logging-1.0.4.jarset CP=%CP%;%WEBAPPS_DIR%\konakart\WEB-INF\lib\log4j-1.2.12.jarset CP=%CP%;%WEBAPPS_DIR%\konakart\WEB-INF\lib\mysqljdbc.jarset CP=%CP%;%WEBAPPS_DIR%\konakart\WEB-INF\lib\ojdbc14.jarset CP=%CP%;%WEBAPPS_DIR%\konakart\WEB-INF\lib\postgresql-8.2-504.jdbc3.jarset CP=%CP%;%WEBAPPS_DIR%\konakart\WEB-INF\lib\jtds-1.2.2.jarset CP=%CP%;%WEBAPPS_DIR%\konakart\WEB-INF\lib\db2jcc.jarset CP=%CP%;%WEBAPPS_DIR%\konakart\WEB-INF\lib\db2jcc_license_cu.jar
"%JAVA_HOME%\bin\java" -cp "%CP%" ^ com.konakartadmin.utils.CreateEnterpriseDB ^ -p "%WEBAPPS_DIR%/konakartadmin/WEB-INF/classes/konakartadmin.properties" ^ -h "%INSTALL_DIR%" ^ -db %DBDIR% ^ -ps %SHARED_PRODUCTS% ^ -c %SHARED_CUSTOMERS% remrem The "-d" parameter can be added to enable debugging. This is useful if you rem have problems.rem
Users created by the Enterprise Extensions In-stallation
This section describes the users that are created by default during the standard KonaKart installations. Formore details on creating new stores and defining new users for these new stores, see the section in thisUser Guide on Multi-Store Configuration .
When you install the Community Edition, the following users are automatically created:
Three users are created with different roles assigned.
Username Password Roles

Installation of KonaKartEnterprise Extensions
57
[email protected] princess KonaKart Super-User
root@localhost password Sample User
[email protected] princess KonaKart Catalog Maintainer
[email protected] princess KonaKart Order and Customer Manager
The above users remain after installing the KonaKart Enterprise Extensions but additional users are createdfor use with the second store (if one of the Multi-Store Modes is chosen). The above users remain withthe same privileges they had originally and can log in to both the Application and the Admin App forstore1 as before.
In addition, if and only if, the Multi-Store Single Database with Shared Customers Mode is selected, theseusers will be able to log on to the Applications for other stores managed by the KonaKart instance. Notethat only the Super User user above ( [email protected] ) is granted privileges to log on to the AdminApp for the other stores This is the standard behavior when you opt to allow Shared Customers.
Single Store Mode
No new users are created.
Multi-Store Multiple DB Mode
If Multi-Store Multiple Databases Mode is selected, the users created in store2 match those for store1 sincethe same data load is performed. In case you need to execute it manually, the SQL file executed is calledkonakart_demo.sql and can be modified (carefully!) to suit local requirements. A konakart_demo.sql SQLscript file is provided for each of the supported databases under the database directory under your Kon-aKart home directory. In Multi-Store Multiple Databases Mode there is no support for shared customersso the users created are only authorized to log in to their own stores.
Multi-Store Single DB Mode with Shared Customers
If Multi-Store Single Database Mode with Shared Customers is selected, the following user is created:
One user is created with the Store Administrator's role.
Username Password Roles
[email protected] princess KonaKart Store Administrator
By default the "Store Administrator" role allows the created user to administer the more business-relatedaspects of a specific store, but not the configuration settings. By "business-related" it means the storeadministrator user can maintain the products, manufacturers, categories (etc) and administer orders. The"Store Administrator" can log on to the application of any the stores managed by the KonaKart instance,but is not granted any privileges to administer any store other than the one assigned (which is store2 inthis case).
In this mode there is no need to create a new "Super User" user as the original "Super User" created forthe Community Edition, called [email protected] , has sufficient privileges to Administer all otherstores in a Shared Customer environment. Note the power of the "Super User"! Ensure that you changeall the user passwords as soon as possible and deny access to the "Super User" account to all who whoshould not be able to use it.

Installation of KonaKartEnterprise Extensions
58
Multi-Store Single DB Mode NON-Shared CustomersIf Multi-Store Single Database Mode without Shared Customers is selected, the following users are createdby the installer:
One user is created with the Store Administrator's role.
Username Password Roles
[email protected] princess KonaKart Store Administrator
[email protected] princess KonaKart Store Super User
store2-root@localhost password Sample User
[email protected] princess KonaKart Catalog Maintainer
[email protected] princess KonaKart Order and Customer Manager
By default the "Store Administrator" role allows the created user to administer the more business-relatedaspects of a store, but not the configuration settings. By "business-related" it means the store administra-tor user can maintain the products, manufacturers, categories (etc) and administer orders. This user canadminister only the store he has been assigned and no others, because he isn't a "Super User".
In this non-customer shared mode, the "Store Administrator" cannot log in to the application of any otherstore (than the one that he is assigned to) managed by the KonaKart instance because the users aren't shared.
Also, in this mode, a new "Super User" user ( [email protected] ) is created for administering themore-technical configuration settings of the new store. Note that this new user will have broad Super-Userprivileges by default. By default, this user will be able to log on and administer all of stores in the mallby virtue of being a "Super User". Some customers may decide not to disclose the credentials of thisnewly-created "Super User" account, whereas others may decide to change the role that is assigned to this"Super User". You can define the role to be assigned in the Multi-Store Configuration - see details onconfiguring Multi-Store.

59
Chapter 7. Installation of KonaKart onother Application Servers
By default, KonaKart is provided with Tomcat, but it is actually designed to be usable on any compliantJ2EE Application Server. This section provides some notes to help you install and configure KonaKart ona selection of other leading Application Servers.
Most Application Servers give users a variety of choices for application deployment. Some like to importEARs, others prefer WAR files. Some Application Servers accept "exploded" directory structures as thesource for deployment whereas others require "un-exploded" EAR or WAR files.
There is nothing in KonaKart that should prevent you from choosing the deployment system you preferfor your chosen Application Server.
In most cases the best way to begin is to run a complete installation of KonaKart from the GUI installer(or silent mode if you prefer), verifying and populating the database as part of this process. It can saveyou some time if you select the port number the target Application Server will use as the KonaKart portnumber during this installation process so that there is less configuration to do later on (for example, ifyour target Application Server is BEA WebLogic, you would choose to install KonaKart at port 7001).
Once KonaKart is installed you have the choice to use the expanded webapps for deployment or use theincluded ant build files to produce WAR and EAR files as you require.
In most cases, the easiest approach will be to use the ant scripts to produce an EAR file containing the3 KonaKart webapps ( konakart , konakartadmin and birtviewer ). It can be advantageous to produce anEAR file as the whole application can be deployed in one go, rather than 3 separate WAR installations(which is, of course, perfectly possible, and may even be more-appropriate in some situations - see JBossnotes below).
To produce the EAR, (and the 3 WARs as a by-product), run the " ant make_ear " command in the "custom " directory of your KonaKart installation as in the example below:

Installation of KonaKart onother Application Servers
60
C:\Program Files\KonaKart\custom>.\bin\ant make_earBuildfile: build.xml
clean_wars: [echo] Cleanup WARs... [echo] Cleanup EARs...
make_wars: [mkdir] Created dir: C:\Program Files\KonaKart\custom\war [echo] Create konakart.war [war] Building war: C:\Program Files\KonaKart\custom\war\konakart.war [echo] Create konakartadmin.war [war] Building war: C:\Program Files\KonaKart\custom\war\konakartadmin.war [echo] Create birtviewer.war [war] Building war: C:\Program Files\KonaKart\custom\war\birtviewer.war
make_ear: [mkdir] Created dir: C:\Program Files\KonaKart\custom\ear [echo] Create konakart.ear [ear] Building ear: C:\Program Files\KonaKart\custom\ear\konakart.ear [echo] Create exploded version of konakart.ear [mkdir] Created dir: C:\Program Files\KonaKart\custom\konakart.ear [unzip] Expanding: C:\Program Files\KonaKart\custom\ear\konakart.ear into C:\Program Files\KonaKart\custom\konakart.ear [move] Moving 1 file to C:\Program Files\KonaKart\custom\konakart.ear [move] Moving 1 file to C:\Program Files\KonaKart\custom\konakart.ear [move] Moving 1 file to C:\Program Files\KonaKart\custom\konakart.ear [unzip] Expanding: C:\Program Files\KonaKart\custom\konakart.ear\birtviewer.war.tmp into C:\Program Files\KonaKart\custom\konakart.ear\birtviewer.war [unzip] Expanding: C:\Program Files\KonaKart\custom\konakart.ear\konakart.war.tmp into C:\Program Files\KonaKart\custom\konakart.ear\konakart.war [unzip] Expanding: C:\Program Files\KonaKart\custom\konakart.ear\konakartadmin.war.tmp into C:\Program Files\KonaKart\custom\konakart.ear\konakartadmin.war
BUILD SUCCESSFULTotal time: 1 minute 0 seconds
In the following sections you will find guidance notes for installing KonaKart on selected ApplicationServers.
General Notes on Installing KonaKart on Appli-cation Servers
These general notes apply to installations on most application servers. Note any specific exceptions belowin the sections dedicated to each Application Server.
Edit Config Files - Admin Application FunctionalityIn the KonaKart Admin Application there is a feature that allows you to define a set of files to view andedit from the Admin App. The files that are made available to view and edit are defined in the XML filecalled konakart_config_files.xml . This control file must be available on the classpath of the KonaKartAdmin Application. In the default installation that includes Tomcat, this file is set up with relative pathsto various properties files. This is hardly ever appropriate for other application servers so if this feature isrequired, the control file must be updated to suite your environment.
Rather than use relative pathnames for these files, it is often easier to use full path names.
Some examples of file references are: (note that on Windows you must use forward rather than backwardslashes)
WebSphere:
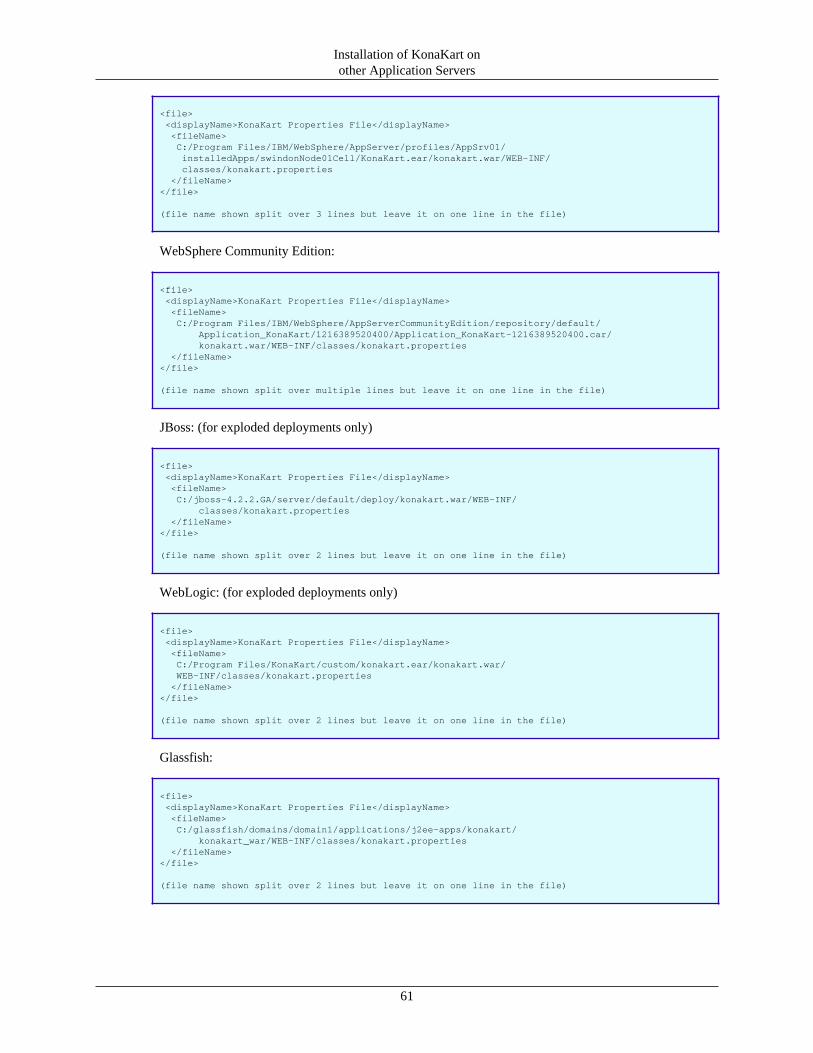
Installation of KonaKart onother Application Servers
61
<file> <displayName>KonaKart Properties File</displayName> <fileName> C:/Program Files/IBM/WebSphere/AppServer/profiles/AppSrv01/ installedApps/swindonNode01Cell/KonaKart.ear/konakart.war/WEB-INF/ classes/konakart.properties </fileName></file>
(file name shown split over 3 lines but leave it on one line in the file)
WebSphere Community Edition:
<file> <displayName>KonaKart Properties File</displayName> <fileName> C:/Program Files/IBM/WebSphere/AppServerCommunityEdition/repository/default/ Application_KonaKart/1216389520400/Application_KonaKart-1216389520400.car/ konakart.war/WEB-INF/classes/konakart.properties </fileName></file>
(file name shown split over multiple lines but leave it on one line in the file)
JBoss: (for exploded deployments only)
<file> <displayName>KonaKart Properties File</displayName> <fileName> C:/jboss-4.2.2.GA/server/default/deploy/konakart.war/WEB-INF/ classes/konakart.properties </fileName></file>
(file name shown split over 2 lines but leave it on one line in the file)
WebLogic: (for exploded deployments only)
<file> <displayName>KonaKart Properties File</displayName> <fileName> C:/Program Files/KonaKart/custom/konakart.ear/konakart.war/ WEB-INF/classes/konakart.properties </fileName></file>
(file name shown split over 2 lines but leave it on one line in the file)
Glassfish:
<file> <displayName>KonaKart Properties File</displayName> <fileName> C:/glassfish/domains/domain1/applications/j2ee-apps/konakart/ konakart_war/WEB-INF/classes/konakart.properties </fileName></file>
(file name shown split over 2 lines but leave it on one line in the file)

Installation of KonaKart onother Application Servers
62
Email Properties FileIf you use additional email properties (most people will not need to) you place these in a properties filecalled konakart_mail.properties . You have to define this filename in the KonaKart Admin Applicationunder the Configuration > Email Options panel. You have to specify the full path name here (for theKonaKart mail properties filename field.
Some examples of mail properties file references are: (note that on Windows you must use forward ratherthan backward slashes)
Tomcat Default:
C:/Program Files/KonaKart/conf/konakart_mail.properties
JBoss:
C:/jboss-4.2.2.GA/server/default/conf/konakart_mail.properties
Reporting Port Numbers and Report Location1. Set the port number for reporting as required (set these using the KonaKart Admin App under the
Configuration > Reports section). Use the standard HTTP port for your application server, eg. 8080(Tomcat/JBoss), 7001 (WebLogic), 9080 (WebSphere) etc..
2. Set the location ( the " Report definitions base path ") of the reports to your chosen location. This can beanywhere on the disk that's accessible to your application server. This could be the location where youfirst installed KonaKart in order to produce the EAR files. If so, you can leave the default for this field.
Configuring Parameters for Images1. Set the port number for the image base URL as required (set these using the KonaKart Admin App
under the Configuration > Images section). Use the standard HTTP port for your application server,eg. 8080 (Tomcat/JBoss), 7001 (WebLogic), 9080 (WebSphere) etc..
2. In a similar fashion to the above, set the image base path to the appropriate location for your environ-ment. Typically, this will be the images directory under your konakart webapp. Some examples:
Tomcat Default:
C:/Program Files/KonaKart/conf/konakart_mail.properties
JBoss:
C:/jboss-4.2.2.GA/server/default/deploy/konakart.war/images
Setting the Optimum Memory ValuesIf you find that you run out of memory you will need to define more memory for your Application Server.This can be done in a variety of ways, so check the documentation for your chosen Application Serverfor setting memory flags.
When setting memory settings by defining values for CATALINA_OPTS or JAVA_OPTS you might needto set values such as these:
-XX:PermSize=256m -XX:MaxPermSize=256m -Xms512m -Xmx1024m

Installation of KonaKart onother Application Servers
63
(You may find you need different settings for your particular environment).
Some Application Servers allow you to define JVM parameters from within their Administrative Consoles.An example of this is WebSphere where you need to navigate to Server > Server Infrastructure > Java &Process Management > Process Defn then set your values for Maximum Heap Size (eg. 1024) and InitialHeap Size (eg. 512). (You may need require different settings to suit your own environment).
Installing KonaKart on BEA's WebLogic Appli-cation Server
Verified on WebLogic 10.0 MP1 on Windows Vista
Refer to the general notes for installing KonaKart on all Application Servers .
InstallationUse the deployment method of choice. If you want to be able to edit KonaKart configuration files (egkonakart.properties) without having to re-deploy the application you will have to install using explodeddirectories. If you don't need this functionality, you can simply deploy KonaKart as an EAR file.
Deploying using WebLogic's Install Application Assistant in the Administration Console is particularlystraightforward but WebLogic has a variety of deployment options you could also use (such as the autode-ploy facility or their command-line driven deploy tool.
Follow these steps when using the Administration Console for deployment:
"Lock and Edit" then choose "Install", then browse to your EAR file (for non-exploded deployments) orto the directory (a directory called konakart.ear under the custom directory of your KonaKart installation)where your exploded version of the EAR is located (for exploded deployments).
If you used the ant build file to create the EAR file and the exploded EAR file these will be located underyour KonaKart installation directory at:
1. /custom/ear/konakart.ear (the non-exploded EAR file)
2. /custom/konakart.ear (the exploded EAR file directory)
Once selected, proceed through the wizard. For "Targeting style" choose "Install this deployment as anapplication". Accept all other defaults, click on "Finish", then finally click on "Activate Changes" whensuccessful.
Eventually, you should see the message "All changes have been activated. No restarts are necessary." andthere should be no errors in the WebLogic log.
Next, click on the checkbox next to konakart and start the application by choosing "Start Servicing AllRequests" from the "Start" dropdown list. Confirm this action on the next screen and check theWebLogiclog for any errors.
Configuration1. Set the port numbers (7001) for the reporting configuration variables as required (set these using the
KonaKart Admin App under the Configuration > Reports section)

Installation of KonaKart onother Application Servers
64
2. To set-up KonaKart to use SSL you need for set it up in the KonaKart Admin App and the BEA We-bLogc Administration Console as follows:
Set the HTTP (7001) and HTTPS (7002) port numbers as required (set these using the KonaKart AdminApp under the Configuration > HTTP/HTTPS section)
To enable SSL in WebLogic first click the 'Lock and Edit' button under the Change Center. Under the"Domain Structure" navigate through "Environment" then "Servers" then click on your server listedunder the "Servers" table on the right hand side. (The default server will be called "AdminServer").
On the General Configurations panel, check the "SSL Listen Port Enabled" checkbox. Leave the portnumber for SSL as 7002 and ensure this matches the port number specified above in the KonaKartAdmin Application.
Click on the "Save" button, then click on "Activate Changes" to save these changes in your WebLogicenvironment.
3. Set the memory parameters to suit your environment. Set your memory arguments inside thesetDomainEnv.cmd (Windows) or setDomainEnv.sh (Unix/Linux) files.
Set a new USER_MEM_ARGS environment variable with your chosen memory flags, or modify theexisting MEM_FLAGS environment variable assignment to suit your requirements. Take note of thecode that follows the assignment to MEM_FLAGS - you might find that then your values are overrid-den.
Restart WebLogic for the changes to take effect and double-check the beginning of the WebLogic logto see what memory settings you actually achieved!
Installing KonaKart on JBossVerified on JBoss 4.2.2 GA on Windows XP and Vista
Refer to the general notes for installing KonaKart on all Application Servers .
InstallationFor JBoss we recommend that you deploy KonaKart as an exploded EAR file, or exploded WAR files sothat you can guarantee the full path names of the various configuration files. This is useful so that you candefine these full path names and subsequently edit these files from within the comfort of the KonaKartAdmin Application.
1. The KonaKart applications can be deployed in the 'server configuration' directory of your choice. In thisexample we will use the 'default' configuration. In this example we also assume a Windows installationin the C:\jboss-4.2.2.GA directory.
2. Here we follow the procedure for the 3 WAR installation (but for the exploded EAR procedure followan almost identical path). Create three new directories under C:\jboss-4.2.2.GA\server\default\deploy :
1. konakart.war
2. konakartadmin.war
3. birtviewer.war
3. Expand konakart.war into the konakart.war directory and do the same for konakartadmin and birtviewer.

Installation of KonaKart onother Application Servers
65
4. Start JBoss.
5. Check the JBoss log to ensure that there are no errors.
If you do not deploy as 3 separate exploded WAR files, JBoss generates its own temporary directoriesto hold these deployments. This wouldn't be so bad except that JBoss creates new temporary directoriesevery time you restart JBoss.
It's still possible to deploy KonaKart into JBoss using an "unexploded" konakart.ear file but you will not beable to use the "Edit Config Files" functionality in the KonaKart Admin Application. If you wish to deployusing the EAR file you simply drop it into the deploy directory of your JBoss installation for automaticdeployment. Check your JBoss server log; there should be no errors during this deployment.
Configuration
1. Set the port numbers (8080) for reporting as required (set these using the KonaKart Admin App underthe Configuration > Reports section)
2. Set the HTTP (8080) and HTTPS (8443) port numbers as required (set these using the KonaKart AdminApp under the Configuration > HTTP/HTTPS section). You will also have to setup SSL in JBoss if youhaven't already done so (refer to JBoss documentation to find out how to do this). A quick way to do thisif you don't have a keystore already (and for development purposes only) is to copy the conf/.keystorefile from your KonaKart installation to the C:\jboss-4.2.2.GA\server\default\conf directory of JBoss,then edit your C:\jboss-4.2.2.GA\server\default\deploy\jboss-web.deployer\server.xml file as follows:
<!-- Define a SSL HTTP/1.1 Connector on port 8443 This connector uses the JSSE configuration, when using APR, the connector should be using the OpenSSL style configuration described in the APR documentation -->
<Connector port="8443" protocol="HTTP/1.1" SSLEnabled="true" clientAuth="false" sslProtocol="TLS" keystoreFile="conf/.keystore" keystorePass="kkpassword" />
3. Set the memory parameters to suit your environment (eg. I set JAVA_OPTS=-XX:PermSize=256m-XX:MaxPermSize=256m -Xms512m -Xmx1024m ).
Installing KonaKart on IBM's WebSphere Appli-cation Server
Verified on WebSphere 6.1 on Windows Vista
Refer to the general notes for installing KonaKart on all Application Servers .
Usage Limitation: Reports with embedded charts produced using EMF 2.2 cannot be run in the defaultWebSphere 6.1 installation due to a conflict between versions of EMF (WebSphere 6.1 uses 2.1 whereasKonaKart/BIRT use EMF 2.2). If reports with embedded charts are important to you, you can either writenew, compatible, reports using EMF 2.1 or modify the class-loading mode of the KonaKart application toparent last (as described in various reports on the subject on the Internet).

Installation of KonaKart onother Application Servers
66
Note that the default download kit of KonaKart contains code compiled with a java 1.5 target thereforeit will not work on WebSphere 6.0 which uses a 1.4 JRE. If you need us to create a version of KonaKartbuilt for a java 1.4 target please contact us at [email protected] .
InstallationUse the deployment method of choice. Loading using an EAR is probably the simplest by navigating toEnterprise Applications in the Administrative Console, "Install" application, browse to your EAR file, thenproceed through the wizard accepting all the defaults.
Configuration1. If you are not using a Sun JRE for WebSphere, you will need to add two jars jsse.jar and jce.jar from
your Sun JRE to support some SSL and mail functionality of KonaKart. Either package these in theWARs of konakart.war and konakartadmin.war, or place them in the lib directories of these applicationsonce deployed.
2. Set the port numbers (9080) for the reporting configuration variables as required (set these using theKonaKart Admin App under the Configuration > Reports section)
3. Set the HTTP (9080) and HTTPS (9443) port numbers as required (set these using the KonaKart AdminApp under the Configuration > HTTP/HTTPS section)
4. Set the memory parameters to suit your environment. Use the WebSpehere Administrative Console toset the JVM parameters. Navigate to Server > Server Infrastructure > Java & Process Management> Process Defn then your values for Maximum Heap Size (eg. 1024) and Initial Heap Size (eg. 512).(You may need require different settings to suit your own environment).
Installing KonaKart on IBM's WebSphere Appli-cation Server Community Edition
Verified on WebSphere ASCE 2.0.0.2 on Windows Vista
Refer to the general notes for installing KonaKart on all Application Servers .
InstallationLoad the KonaKart EAR using the Administrative console, accepting all defaults. (Some XML descriptorvalidation warnings appear in the console log but these can be ignored - there are no geronimo-web.xmlfiles included).
Configuration1. Set the port numbers (8080) for reporting as required (set these using the KonaKart Admin App under
the Configuration > Reports section)
2. Set the HTTP (8080) and HTTPS (8443) port numbers as required (set these using the KonaKart AdminApp under the Configuration > HTTP/HTTPS section)
3. Set the memory parameters to suit your environment (eg. I set JAVA_OPTS=-XX:PermSize=256m-XX:MaxPermSize=256m -Xms400m -Xmx700m )

Installation of KonaKart onother Application Servers
67
Installing KonaKart on GlassFishVerified on GlassFish v2 UR2 b04 on Windows XP (also known as Sun Java System Application Server9.1_02 b04-fcs)
Refer to the general notes for installing KonaKart on all Application Servers .
InstallationAssuming a vanilla installation of Glassfish, simply place the KonaKart EAR in the domains/domain1/au-todeploy/ directory of the GlassFish installation. The KonaKart EAR is loaded automatically by GlassFish.Check the GlassFish server log to ensure there are no errors.
Alternatively you can deploy the EAR file by using the GlassFish admin console (typically at http://loa-clhost:4848)
Configuration1. Set the port numbers (8080) for reporting as required (set these using the KonaKart Admin App under
the Configuration > Reports section)
2. Set the HTTP (8080) and HTTPS (8181) port numbers as required (set these using the KonaKart AdminApp under the Configuration > HTTP/HTTPS section). You can use the default SSL setup of GlassFishfor development purposes.
3. If you find you run out of memory, adjust the JVM memory parameters to suit your environment.The easiest way to do this with GlassFish is by using the Admin Console under Configurations >server-config > JVM Settings
4. Configure the image locations in the Admin App under Configuration > Images . Set the image baseurl to http://localhost:8080/konakart/images/ and the image base path to something like C:/glassfish/domains/domain1/applications/j2ee-apps/konakart/ konakart_war/images (or the equivalent in yourinstallation).
Installing KonaKart on JOnAS with TomcatVerified on JOnAS v4.9.2 / Apache Tomcat v5.5.26 on Windows Vista
Refer to the general notes for installing KonaKart on all Application Servers .
InstallationPlace the KonaKart EAR in the apps/autoload directory of the JOnAS installation. The KonaKart EAR isloaded automatically by JOnAS (some warnings about the use of DTDs can be ignored: "konakart.ear isusing DTDs, WsGen needs Schema only : WEB-INF/web.xml use a DTD").
Configuration1. Set the port numbers (9000) for reporting as required (set these using the KonaKart Admin App under
the Configuration > Reports section)

Installation of KonaKart onother Application Servers
68
2. Set the HTTP (9000) and HTTPS (9043)port numbers as required (set these using the KonaKart AdminApp under the Configuration > HTTP/HTTPS section). You will also have to setup SSL in JOnAS/Tomcat if you haven't already done so (refer to JOnAS and Tomcat documentation to find out how todo this). A quick way to do this if you don't have a keystore already (and for development purposesonly) is to copy the conf/.keystore file from your KonaKart installation to the conf directory of JOnAS,then add to your server.xml file as follows:
<!-- Define a SSL Coyote HTTP/1.1 Connector on port 9043 -->
<Connector port="9043" maxHttpHeaderSize="8192" maxThreads="150" minSpareThreads="25" maxSpareThreads="75" enableLookups="false" disableUploadTimeout="true" acceptCount="100" scheme="https" secure="true" clientAuth="false" sslProtocol="TLS" keystoreFile="conf/.keystore" keystorePass="kkpassword" />
3. Set the memory parameters to suit your environment (eg. I set JONAS_OPTS=-XX:PermSize=256m-XX:MaxPermSize=256m -Xms400m -Xmx700m ). ("Your mileage may vary").
4. Configure the image locations in the Admin App under Configuration > Images . Set the image base urlto http://localhost:9000/konakart/images/ and the image base path to something like C:/JOnAS-4.9.2/tomcat/work/webapps/jonas/ear/konakart/konakart/images (or the equivalent in your installation).
Installing KonaKart on JOnAS with JettyVerified on JOnAS v4.9.2 / Jetty v5.1.10 on Windows Vista
Refer to the general notes for installing KonaKart on all Application Servers .
Installation
Place the KonaKart EAR in the apps/autoload directory of the JOnAS installation. The KonaKart EAR isloaded automatically by JOnAS (some warnings about the use of DTDs can be ignored: "konakart.ear isusing DTDs, WsGen needs Schema only : WEB-INF/web.xml use a DTD").
Configuration
1. Set the port numbers (9000) for reporting as required (set these using the KonaKart Admin App underthe Configuration > Reports section)
2. Set the HTTP (9000) and HTTPS (9043)port numbers as required (set these using the KonaKart AdminApp under the Configuration > HTTP/HTTPS section). You will also have to setup SSL in JOnAS/Jettyif you haven't already done so (refer to JOnAS and Jetty documentation to find out how to do this). Aquick way to do this if you don't have a keystore already (and for development purposes only) is tocopy the conf/.keystore file from your KonaKart installation to the conf directory of JOnAS, then addto edit your jetty5.xml file as follows:

Installation of KonaKart onother Application Servers
69
<!-- - - - - - - - - - - - - - - - - - - - - - - - - - - - - - - - - --><!-- Add a HTTPS SSL listener on port 9043 --><!-- - - - - - - - - - - - - - - - - - - - - - - - - - - - - - - - - --><!-- UNCOMMENT TO ACTIVATE --><Call name="addListener"> <Arg> <New class="org.mortbay.http.SunJsseListener"> <Set name="Port">9043</Set> <Set name="MinThreads">5</Set> <Set name="MaxThreads">100</Set> <Set name="MaxIdleTimeMs">30000</Set> <Set name="LowResourcePersistTimeMs">2000</Set> <Set name="Keystore"><SystemProperty name="jetty.home" default="."/> ./../../conf/.keystore</Set> <Set name="Password">kkpassword</Set> <Set name="KeyPassword">kkpassword</Set> </New> </Arg></Call>
3. Set the memory parameters to suit your environment (eg. I set JONAS_OPTS=-XX:PermSize=256m-XX:MaxPermSize=256m -Xms400m -Xmx700m ). ("Your mileage may vary").
4. Configure the image locations in the Admin App under Configuration > Images . Set the image base urlto http://localhost:9000/konakart/images/ and the image base path to something like C:/JOnAS-4.9.2/jetty/work/webapps/jonas/ear/konakart/konakart/images (or the equivalent in your installation).

70
Chapter 8. Administration andConfiguration
This chapter seeks to explain the many different ways in which KonaKart can be configured.
Most of the Administration and Configuration of KonaKart can be carried out using the KonaKart Ad-ministration Application.
KonaKart Administration ApplicationKonaKart includes a sophisticated browser based administration application. It uses AJAX technology toprovide a snappy user interface while the maintaining the advantages of running the application from abrowser. Each application window has an on-line help facility which is the first place to look in order tounderstand the available functionality.
It incorporates a security subsystem with role based security. Each user can be assigned one or more rolesthat determine access to the available functionality with read / insert / edit and delete granularity. The username / password based access, has the facility to block users for a programmable period after a numberof unsuccessful login attempts.
Auditing may be enabled for all Admin App API calls with two levels of detail. All audit data is stored inthe KonaKart database and may be browsed and filtered through the Admin App.
The admin application is fully internationalized and can be translated via a message catalog. Each panelhas an online help facility that explains the functionality available.

Administration and Configuration
71
KonaKart Admin Application - Status View
The main features of the admin app are:
• Store status summary (i.e. number of orders, number of products etc.)
• Store maintenance
• Create new stores
• Edit existing stores
• Change state of stores (i.e. enable / disable, maintenance mode)
• Delete stores
• Maintenance of configuration variables

Administration and Configuration
72
• Product maintenance
• Product Category maintenance
• Product Manufacturer maintenance
• Product Review maintenance
• Product Option maintenance
• Promotion maintenance
• Coupon maintenance
• Tag group and Tag maintenance
• Installation and removal of modules (payment, shipping and order total modules)
• Customer maintenance
• Send email
• Role maintenance
• Reset Password
• Login to eCommerce application on behalf of a customer. Useful for call center applications.
• Customer Group maintenance
• Customer communications
• You can send template based eMails to all customers, to all customers who have requested to receivethe newsletter, to customers that have asked to be notified about any updates for a particular productand to customers belonging to a particular group..
• Orders
• Generate invoice (template based)
• Generate packing slip (template based)
• Change state of order and send email
• View all payment gateway notifications associated with order
• Manage returns
• Country maintenance>
• Zone maintenance
• Tax Area maintenance
• Tax Class maintenance
• Tax Rate maintenance
• Currency maintenance

Administration and Configuration
73
• Language maintenance
• Order Status maintenance
• Address Format maintenance
• Reports
• View Audit Data
• Tools
• Delete expired sessions
• Refresh caches
• Manage SOLR search engine
• Publish products to Google Base
• Custom panels - Add custom panels that implement your custom business logic.
The KonaKart admin application provides powerful reporting functionality through integration with BIRT[http://www.eclipse.org/birt/phoenix/] , the very popular open source Business Intelligence and ReportingTool. Although an ever expanding list of useful reports is provided in the KonaKart download, the inte-gration is done in such a way that allows users and system integrators to develop and customize their ownreports by using the BIRT Eclipse based development environment.
Many panels in the admin application may be configured to display or hide certain fields and buttons. Theconfiguration is set by selecting a role in the Maintain Roles panel and then by clicking on the Privilegesbutton on the same panel. A pop-up panel should appear similar to the image shown below:
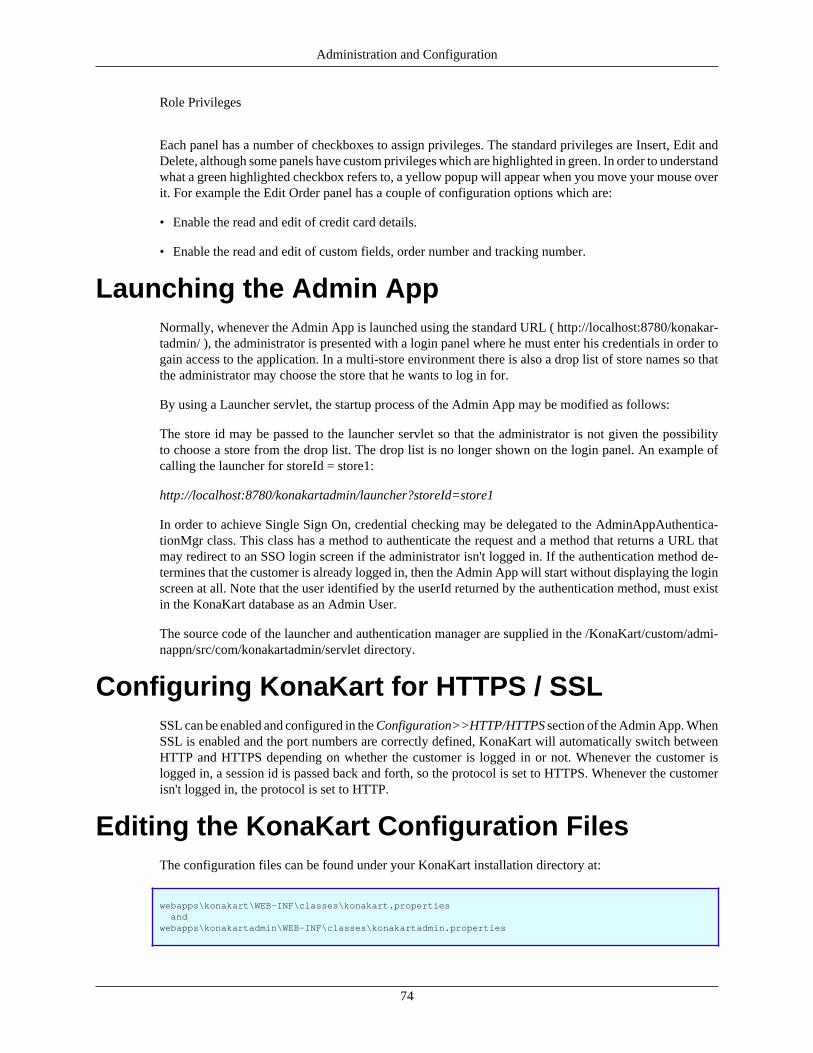
Administration and Configuration
74
Role Privileges
Each panel has a number of checkboxes to assign privileges. The standard privileges are Insert, Edit andDelete, although some panels have custom privileges which are highlighted in green. In order to understandwhat a green highlighted checkbox refers to, a yellow popup will appear when you move your mouse overit. For example the Edit Order panel has a couple of configuration options which are:
• Enable the read and edit of credit card details.
• Enable the read and edit of custom fields, order number and tracking number.
Launching the Admin AppNormally, whenever the Admin App is launched using the standard URL ( http://localhost:8780/konakar-tadmin/ ), the administrator is presented with a login panel where he must enter his credentials in order togain access to the application. In a multi-store environment there is also a drop list of store names so thatthe administrator may choose the store that he wants to log in for.
By using a Launcher servlet, the startup process of the Admin App may be modified as follows:
The store id may be passed to the launcher servlet so that the administrator is not given the possibilityto choose a store from the drop list. The drop list is no longer shown on the login panel. An example ofcalling the launcher for storeId = store1:
http://localhost:8780/konakartadmin/launcher?storeId=store1
In order to achieve Single Sign On, credential checking may be delegated to the AdminAppAuthentica-tionMgr class. This class has a method to authenticate the request and a method that returns a URL thatmay redirect to an SSO login screen if the administrator isn't logged in. If the authentication method de-termines that the customer is already logged in, then the Admin App will start without displaying the loginscreen at all. Note that the user identified by the userId returned by the authentication method, must existin the KonaKart database as an Admin User.
The source code of the launcher and authentication manager are supplied in the /KonaKart/custom/admi-nappn/src/com/konakartadmin/servlet directory.
Configuring KonaKart for HTTPS / SSLSSL can be enabled and configured in the Configuration>>HTTP/HTTPS section of the Admin App. WhenSSL is enabled and the port numbers are correctly defined, KonaKart will automatically switch betweenHTTP and HTTPS depending on whether the customer is logged in or not. Whenever the customer islogged in, a session id is passed back and forth, so the protocol is set to HTTPS. Whenever the customerisn't logged in, the protocol is set to HTTP.
Editing the KonaKart Configuration FilesThe configuration files can be found under your KonaKart installation directory at:
webapps\konakart\WEB-INF\classes\konakart.properties andwebapps\konakartadmin\WEB-INF\classes\konakartadmin.properties

Administration and Configuration
75
They can be edited using any text editor. Alternatively, they can be edited from theConfiguration>>Configuration Files section of the Admin Tool. Note that most changes will not takeeffect until KonaKart is restarted.
Changing the Editable File List in the AdminApp
In the Configuration Files section of the Admin Tool a list of files is shown that can be edited. By defaultthese are the main KonaKart properties and logging files.
You can add any files you like to that list so long as they are accessible to the KonaKart server - whereverthat's running in your configuration.
There's a simple XML file (called konakart_config_files.xml ) where the files that are shown are defined.It looks like this:
<?xml version="1.0" encoding="ISO-8859-1"?>
<konakart-config-files> <file> <displayName> KonaKart Properties File </displayName> <fileName> ../webapps/konakart/WEB-INF/classes/konakart.properties </fileName> </file>
<file> <displayName> KonaKart Admin Properties File </displayName> <fileName> ../webapps/konakartadmin/WEB-INF/classes/konakartadmin.properties </fileName> </file>
<file> <displayName> KonaKart Logging Properties File </displayName> <fileName> ../webapps/konakart/WEB-INF/classes/konakart-logging.properties </fileName> </file>
<file> <displayName> KonaKart Admin Logging Properties File </displayName> <fileName> ../webapps/konakartadmin/WEB-INF/classes/konakart-logging.properties </fileName> </file></konakart-config-files>
You'll find this file under webapps/konakartadmin/WEB-INF/classes . In the default in-stallation on Windows that is: C:\Program Files\KonaKart\webapps\konakartadmin\WEB-INF\classes\konakart_config_files.xml .
You'll see that you define a path to the file and a "display name" which is the name you see in the listin the Admin Tool.

Administration and Configuration
76
A point to note if no files are listed:
Depending on your configuration (eg. if you are not using the default tomcat container supplied inthe download kit) you may find that the default definitions of the relative paths in the suppliedkonakart_config_files.xml will not work - you will have to amend these to suit your environment.
Internationalization of KonaKartKonaKart is completely multi-lingual both at the database level and at the UI level.
Translating the KonaKart ApplicationThe data within the database such as product descriptions and category names etc. may exist in differentlanguages. The database contains a languages table that contains information about each of the supportedlanguages. When a new product is added to the database through the administration tool, it is possible toenter a description in multiple languages.
There is also a message catalog for each language. These can be found in the WEB-INF/classes directoryof the application server. The default message catalog is called Messages.properties. This is defined as thedefault catalog in the struts-config.xml file in the WEB-INF directory using the following syntax:
<message-resources parameter="Messages" null="false" />
In order to change a language, the following steps must be taken (An example can be seen in the classSetLocaleAction.java):
Struts must be informed of the new language by calling the method setLocale() from withinthe Struts action. If Struts is passed a locale of en_GB, it looks for a message catalog calledMessages_en_GB.properties. If it can’t find that, it looks for Messages_en.properties. If it cannot find that,it defaults to Messages.properties which was set as the default in the struts-config.xml file.
The KonaKart client engine must be informed of the new locale by calling the setLocale() method on it.This call configures the engine so that all subsequent calls will retrieve data from the KonaKart databasein the appropriate language.
Translating the KonaKart Admin ApplicationThe KonaKart Administration Application can be completely translated simply by creating two messagecatalogs for your chosen language.
Whichever language you use this is also a handy way to re-label the "custom" fields that appear on manyof the important objects within KonaKart to reflect the meaning in your particular system.
Your new message catalogs must be called:
// contains all the strings except the help page text AdminMessages_[language-code].properties
// contains just the text on the help pagesAdminHelpMessages_[language-code].properties

Administration and Configuration
77
For [language_code] you should use the 2-character language code that you have set up in the languagessection of the admin application. For example, you might have "fr" for French, "zh" for Chinese, "de" forGerman, "ja" for Japanese etc.
You should place your completed message catalogs in this directory:
webapps/konakartadmin/WEB-INF/classes
Since there are quite a large number of messages to translate, you might choose to do this over a period oftime. A recommended approach is to start your new message catalogs with copies of the default (English)catalogs (called AdminMessages.properties and AdminHelpMessages.properties) then translate the mes-sages that are most important to you first and complete the rest as time permits.
There are also a number of strings in the database that need to be translated. These are used by the AdminApp to label some of the configuration parameters and provide helpful comments. If you issue a: "SELECTconfiguration_title, configuration_description FROM configuration;" SQL query, you will see the valuesthat you can update.
Also, you may wish to include translations for the velocity templates (eg. EmailNewPassword, OrderDe-tails, OrderInvoice, OrderPackingList and OrderStatusChange).
Once you have completed the message catalogs, velocity templates and a sql update script for your lan-guage, please contribute these to the KonaKart Community by posting them to the contributions sectionof our forum for the benefit of other users.
Changing the Date Format in the KonaKart Ap-plication
This has to be changed in two places:
In WEB-INF/validation.xml it must be set in this section towards the top of the file. This is used to validateany dates that are input through the UI.
<constant> <constant-name>DATE_PATTERN</constant-name> <constant-value>dd/MM/yyyy</constant-value></constant>
In the WEB-INF/classes/Messages.properties file it must be changed under the date.format key. i.e.date.format=dd/MM/yyyy
Formatting of AddressesIn the admin app under Localizations >> Address Formats, there are a number of templates which can beassociated to countries, in order to format addresses correctly for the country. Valid template key words are:
• $cr - Carriage return (new line)
• $firstname
• $lastname
• $streets = $street + line break + $suburb
• $street

Administration and Configuration
78
• $suburb
• $city
• $postcode
• $state
• $telephone
• $telephone1
• $country
The formatting is performed by substituting the above keywords with the actual values within theaddress object. A typical template could be : $company$cr$firstname $lastname$cr$streets$cr$city,$postcode$cr$state, $country$crtel: $telephone$crtel1: $telephone1$creMail: $email .
Email ConfigurationIn most cases email can be configured completely within the KonaKart Admin App in theConfiguration>>Email Options section (see image below). Here you can set up your SMTP server host,your SMTP username, SMTP password and whether or not the SMTP server requires authentication:
Administration and Configuration
79
KonaKart Admin Application - Email Configuration
As with all fields in the Admin App, use the floatover text on each label to find out more about eachconfiguration option.
For more advanced users there is a konakart_mail.properties file in which you can define additional mailproperties. (In fact, you can rename this file if you wish and change its location - so long as you define thefilename holding these values in the Admin App - see "KonaKart mail properties filename in the imageabove)). A common example of the use of this konakart_mail.properties file is for setting up access tothe Google Mail SMTPS server (this uses a non-standard port (465), requires authentication and usesencryption. An example of the parameters to set to use the Google SMTPS mail gateway is provided inthe default konakart_mail.properties file.
Modifying the Email TemplatesIf configured to do so, KonaKart will send out emails after registration, to confirm orders and to distributenew passwords. The emails are generated using Velocity [http://velocity.apache.org] templates which canbe found in the /WEB-INF/classes directory of both the App and the Admin App. The current templatesare all files following the pattern *.vm. Note that the file name must end with an underscore followed bya two letter country code (i.e. OrderConfirmation_en.vm).
When the state of an order is changed through the Admin App, an eMail may be sent to the cus-tomer based on the template called OrderStatusChange_xx.vm where xx is the two letter countrycode. A different template may be defined for each order state where the naming convention isOrderStatusChange_stateId_xx.vm . For example if the order changes state from state 1 to state 2, it willuse the template called OrderStatusChange_2_xx.vm if it exists. If it doesn't exist, KonaKart will use thedefault OrderStatusChange_xx.vm template.
Enabling / Disabling One Page CheckoutIn the Configuration>>My Store section of the Admin App there are two configuration variables thatcontrol "One Page Checkout". When the Enable variable is set to true , the application automatically usesOne Page Checkout. When set to false, the original shipping, payment and checkout screens are used.
There is another variable for enabling checkout without registration. If One Page Checkout is enabled andthis variable is also set to true , then a customer doesn't have to complete a separate registration processbefore checking out. He can just enter the shipping address during the checkout process.
Search Engine Optimization (SEO) FeaturesThe SEO features can be configured through the message catalogs with the attributes beginning with "seo."(e.g seo.default.meta.description or seo.meta.keywords.template). The catalogs contain multi-lingual tem-plates in order to write product information (name, model, manufacturer, category) into:
• The URL
• The window title
• The meta description
• The meta keywords

Administration and Configuration
80
The templates may contain the following placeholders : $category, $manufacturer, $name, $model whichare substituted by real data depending on what is being viewed at the time. Each attribute within themessage catalog has a description which explains how it is used.
Adding Custom Functionality to the Admin AppFrom version 2.2.6.0 the Admin App allows you to define custom panels and custom buttons in definedareas, to allow you to extend the Admin App by adding your own administration functionality outside thestandard Admin App.
Adding PanelsThere are 10 custom panels that display a predefined URL in a frame. The urls are defined in theConfiguration>>Custom Panel Config section of the Admin App and the labels of the panels can bechanged by editing the message catalog. The panel links can be rendered visible / invisible by configuringthe role based security. The session id of the logged in user is appended to the URL so that the customapplication can control security using the Admin Engine API. The string appended to each url is similarto the following, except that the session id will be random:
sess=6596bd465a824bb9cdfa6080af07e02f
The urls defined in the admin app should always end in "?" or "&". For example:
http://www.mycustom.com/custom1.do?
or
http://www.mycustom.com/custom1.do?parm1=abc&
Each custom panel may have its own online help. The text for the online help is defined in the fileAdminHelpMessages.properties under the keys, help.customPanel1 to help.customPanel10.
Adding ButtonsThe buttons will call pre-defined urls and will normally pass some parameters to allow you to checksecurity and/or operate on selected objects. The button labels are defined in the Configuration>>AdminApp Configuration section of the Admin App and the buttons remain invisible until the button labels areset with some text. The buttons and parameters available are in the following panels:
• Customer Panel
• id - the customer id
• sess - the session id of the admin user
• Returned Products Panel
• order_return_id - id of the OrderReturn object
• order_id - id of the Order object
• total_inc_tax - total amount of the Order
• sess - session id

Administration and Configuration
81
• tx_id - gateway transaction
Searching with wildcardsIn version 5.0.0.0 of KonaKart, the search constraints for most objects are paired with a search rule thatcan be configured in order to determine whether a wildcard is added before, after or before and afterthe search string. These "rule" attributes can be set when making the API call that searches for products,orders, customers etc.
The admin application has a new properties file called AdminSearchRules.properties which is used toconfigure the search rules for the various panels of the Admin App.
## --------------------------------------------------------------------# Default wild card settings for the Admin GWT Application# --------------------------------------------------------------------## Allows you to set wild card settings when searching# for data using the admin app. The accepted values are :## SEARCH_EXACT = 0;# SEARCH_ADD_WILDCARD_BEFORE = 1;# SEARCH_ADD_WILDCARD_AFTER = 2;# SEARCH_ADD_WILDCARD_BEFORE_AND_AFTER = 3;# SEARCH_USE_GLOBAL_CONFIG = 4;## When set to 4, the search parameters will use the global settings # defined by the configuration variables: ADMIN_APP_ADD_WILDCARD_BEFORE# and ADMIN_APP_ADD_WILDCARD_AFTER . The global settings will also be used if # this file is missing.#------------------------------------------------------------------------------
address.format = 4address.summary.format = 4
country.iso2 = 4country.iso3 = 4country.name = 4
coupon.code = 4coupon.name = 4
currency.name = 4
customer.email = 4customer.city = 4customer.first.name = 4customer.last.name = 4customer.postcode = 4customer.street = 4
etc. etc.
As can be seen in the example above, there are various rules such as SEARCH_EXACT andSEARCH_ADD_WILDCARD_BEFORE etc. which map to integer values. If for example I want to beable to search for customers using the customer last name with a trailing wildcard, I must set:
customer.last.name = 2
Before version 5.0.0.0, there were global configuration variables for the admin app called:
• ADMIN_APP_ADD_WILDCARD_BEFORE

Administration and Configuration
82
• ADMIN_APP_ADD_WILDCARD_AFTER
These variables still exist and will be used when the rules are set to the valueSEARCH_USE_GLOBAL_CONFIG, which is the default case for backwards compatibility.
Making something happen when a productneeds to be reordered
When the number of products in stock hits the reorder level defined by the configura-tion property STOCK_REORDER_LEVEL, KonaKart instantiates a class defined by the prop-erty STOCK_REORDER_CLASS. If this property isn't set, the class that is instantiated iscom.konakart.bl.ReorderMgr. If you write a custom class it must implement the interfacecom.konakart.bl.ReorderMgrInterface which contains only one method:
public void reorder(int productId, String sku, int currentQuantity) throws Exception;
After the class is instantiated, the reorder method is called and information regarding the productId, theSKU and current product quantity is passed to the method so that it can use this information to trigger anevent. This mechanism is a useful generic way to interface KonaKart to external systems since the customclass could write data to a database, call a web service or write data to a file etc.
If the configuration variable STOCK_REORDER_EMAIL is set, then KonaKart will also send an eMailalert using the LowStockAlert template.
All of the configuration variables can be edited in the Configuration>>Stock and Orders section of theAdmin App.
Making something happen when the state of anorder changes
When an order is saved in the database or the status of an order is changed (i.e. through the callback of a pay-ment gateway), KonaKart instantiates a class defined by the property ORDER_INTEGRATION_CLASS.If this property isn't set, the class that is instantiated is com.konakart.bl.OrderIntegrationMgr. If you writea custom class it must implement the interface com.konakart.bl.OrderIntegrationMgrInterface which con-tains some methods:

Administration and Configuration
83
/** * Called just after an order has been saved. The order details are passed to the method so that * all the information should be available in order to integrate with external systems. * * @param order */ public void saveOrder(OrderIf order);
/** * Called just before an order has been saved. This method gives the opportunity to modify any * detail of the order before it is saved. If null is returned, then no action is taken. If a * non null Order is returned, then this is the order that will be saved. * * @param order * @return Returns an order object which will be saved */ public OrderIf beforeSaveOrder(OrderIf order);
/** * Called just after an order status change * * @param orderId * @param currentStatus * @param newStatus */ public void changeOrderStatus(int orderId, int currentStatus, int newStatus);
/** * This method allows you to introduce a proprietary algorithm for creating the order number for * an order just before the order is saved. It is called by the saveOrder() method. * The value returned by this method populates the orderNumber attribute of the * order when it is saved. * If a null value is returned, then the order number of the order is left unchanged. * If an exception is thrown, the exception will be also thrown by the saveOrder() method and * the order will not be saved. * * @param order * @return Return the order number for the new order * @throws Exception */ public String createOrderNumber(OrderIf order) throws Exception;
/** * This method allows you to generate a tracking number for an order just before the order is * saved. It is called by the saveOrder() method. The value returned by this method * populates the trackingNumber attribute of the order when it is saved. * If a null value is returned, then the tracking number of the order is left unchanged. * If an exception is thrown, the exception will be also thrown by the saveOrder() method and * the order will not be saved. * * @param order * @return Return the tracking number for the new order * @throws Exception */ public String createTrackingNumber(OrderIf order) throws Exception;
The state of an order may be changed manually through the Admin App. In this case KonaKart instantiatesa class defined by the property ADMIN_ORDER_INTEGRATION_CLASS. If this property isn't set,the class that is instantiated is com.konakartadmin.bl.AdminOrderIntegrationMgr. If you write a customclass it must implement the interface com.konakartadmin.bl.AdminOrderIntegrationMgrInterface whichcontains the method:

Administration and Configuration
84
/** * Called just after an order status change * * @param orderId * @param currentStatus * @param newStatus */ public void changeOrderStatus(int orderId, int currentStatus, int newStatus);
This mechanism is a useful generic way to interface KonaKart to external systems since the custom classescould write data to a database, call a web service or write data to a file etc.
The ORDER_INTEGRATION_CLASS and ADMIN_ORDER_INTEGRATION_CLASS properties canbe edited in the Configuration>>Stock and Orders section of the Admin App.
PDF InvoicesPDF invoices can be created by KonaKart for a variety of different purposes including:
• To send to customers as email attachments in order confirmation emails.
• For internal record-keeping - some store owners may wish to save all their invoices in PDF format.
• For display and download from both the store front (under the customer's "My Account" page) and theAdmin Application. In order to activate the download links, you must set the "Enable" configurationvariable in the Configuration >> PDF Configuration section of the Admin App.
By default, no PDF invoices are created by KonaKart. They can be created in a number of different ways:
• The application code can be modified to create the PDF invoices typically at the point when an order isconfirmed or when payment is received. The methods that need to be modified are getEmailOptions()in CheckoutConfirmationSubmitAction.java (for when an order is confirmed) and sendOrderConfirma-tionMail() in BaseGatewayAction.java (for when payment is received).
• A batch job is provided that can be executed from Quartz (using standard KonaKart job scheduling) thatwill create invoices for orders that haven't yet had invoices created. This batch job can be modified tosuit your particular requirements - for example you may only want invoices to be created when an orderreaches a certain order status. Full source code is provided for the batch jobs to enable you to make anymodifications required. By default the batch job is not scheduled to execute. To schedule it to run youneed to uncomment the cron-expression tag for the CreateInvoicesTrigger in your konakart_jobs.xmlQuartz job definition file.
• Invoices can be created by calling a "createInvoice()" method from the OrderIntegrationMgr and/or theAdminOrderIntegrationMgr. This call is commented out in the supplied versions of these two orderintegration managers making it easy to modify to create the invoices at this stage. As in the batch job,it would also be easy to code logic here that only created invoices when the order reached a certainspecified order status if that was required.
• Invoices can be created "on-the-fly" by calling the GetPDF servlet. This is useful when you don't everwant to create a permanent record of the PDF file on the file system (possibly for Data Protectionrestrictions). The GetPDF servlet will return the PDF invoice if it already exists or, if it doesn't exist,create the PDF invoice dynamically and then return the contents of this.
By default, KonaKart stores the created invoices in a hierarchical structure on the file system. The directorystructure is deep to distribute the files evenly across multiple directories to avoid the possibility of creat-ing too many files in a single directory. The root location is defined in the "PDF_BASE_DIRECTORY"

Administration and Configuration
85
configuration variable. This can be set to any location accessible to the KonaKart code that creates theinvoices.
An example PDF invoice filename, on Linux, is: "/home/greg/konakart/pdf/store1/2/2010/3/199-547b759d-735c-48bb-a23d-4cf526be9c3a.pdf"
In turn, the directories used are:
• "store1" - the storeId
• "2" - 2 is the code for an Invoice (other document types are packing slips (3) and order details (1))
• "2010" - the year at the time the invoice was created (YYYY)
• "3" - the month at the time the invoice was created (M)
• "199-547b759d-735c-48bb-a23d-4cf526be9c3a.pdf" - the filename has the format: orderId + "-" +UUID + ".pdf"
Activating a PromotionYou must follow these steps :
• Ensure that the promotion module that you want to use, is installed. All promotion modules can be foundin the Modules>>Order Total section of the Admin App.
• Create a new promotion in the Products>>Promotions section of the Admin App. The online helpprovides extra information and most attributes have floatover text with a more detailed description.When creating the promotion, you must select which promotion module to use from the PromotionType drop list. The configuration data required, depends on the promotion type. Once the promotionhas been saved, it is immediately active as long as the Active check box was ticked and the current datelies between the promotion start and end dates.
• Rules may be added to the promotion by clicking on the Rules button. When a rule is selected, a pop-upwindow opens where the rule can be configured (e.g. Activate promotion for products belonging to acertain category). When the pop-up window is closed, the rule is saved and the Promotion Rules windowshows a summary of the rules that have been set.
• If the promotion needs to be activated through a coupon, you can create a coupon by clicking theCoupons button. The coupon must be given a name and a code (the text entered by the customer toactivate the coupon). The coupon may also be programmed so that it can only be used a defined numberof times. The final step is to enable the coupon entry field in the UI during checkout. To do this you mustset the "Display Coupon Entry Field" to true in the Configuration>>My Store section of the Admin App.
Displaying Coupon Entry Fields in your StoreYou must set the "Display Coupon Entry Field" to true in the Configuration>>My Store section of theAdmin App.
Configuring Digital DownloadsKonaKart supports digital downloads which can be downloaded from the KonaKart on line store, as soonas payment is received for the products. A new section appears on the customer's Account page, with alink for each downloadable product in the order.
To configure KonaKart for selling digital downloads, the following steps must be taken :

Administration and Configuration
86
• Using the Admin App, ensure that the "Product Type" attribute of all downloadable products is set to"Digital Download". You must also enter the "File Path" and the "Content Type"
• File Path : The File Path will be concatenated to the "Base Path" defined by a configuration variable.For example, if the Base Path is set to "C:/images/" and the File Path is set to "cities/london.jpg",then the downloaded file will be C:/images/cities/london.jpg . If the Base Path is left empty (defaultvalue) then the File Path must be set to the full name, i.e. C:/images/cities/london.jpg . Note that ifthe Base Path ends with a "/" then the file path should not start with a "/" because the two strings areconcatenated to create the full path for the digital product.
• Content Type : The Content Type describes the content of the file. Examples are "image/jpeg" or"application/pdf". A list of Content Types may be found here.
• Using the Admin App in the section Configuration>>Configure Digital Downloads you may configuresome parameters regarding the digital download functionality. These are:
• Base Path : The base path of the downloadable files as explained above.
• Max Number of Downloads : The maximum number of times that the file can be downloaded. -1 foran unlimited number of downloads.
• Number of days link is valid : The number of days that the download link is valid for. -1 for anunlimited number of days.
• Delete record on expiration : When the download link expires, the database table record definingthe link will be automatically deleted. Setting this to true avoids having to do manual cleanup of thedatabase.
• Download as an attachment : When set to true, the digital download is downloaded as an attachedfile that can be saved on disk. When set to false, the browser attempts to display or run the file.
• The digital downloads shipping module must be installed in the Modules>>Shipping section of theAdmin App. This shipping module activates automatically when the whole of the order consists of digitaldownloads and displays a $0 shipping cost. Any other shipping module should not return a shippingquote in the case of a digital download order.
Import/Export of KonaKart DataTwo tools are provided for import/export of KonaKart data. KKImporter allows the import and exportof product data only whereas the much more sophisticated XML_IO import/export tool, allows you toimport/export almost every data item stored in KonaKart's database.
Import/Export of Product Data using KKImporterKKImporter is a tool, provided in all KonaKart download packages, that allows you to load the KonaKartdatabase with product information contained in a file. It also allows you to create a file from product datapresent in a KonaKart database.
Instructions on how to use KKImporter can be found in the KKImporter user's guide which is providedas part of the download package.
Import/Export of KonaKart Data using XML_IOXML_IO is a tool, provided in the Enterprise Extensions of KonaKart, that allows you to import and exportKonaKart data in XML files.

Administration and Configuration
87
It can be found in the xml_io directory which is located directly under the KonaKart installation directory.
The XML_IO utility can be configured to backup KonaKart systems, transfer product data from one systemto another (e.g. from some kind of staging system to the live system), or any other use you can think ofinvolving the import and export of XML data!
For some users it may be a useful way to export products or orders in XML format for subsequent com-munication with other systems. Indeed it could also be a useful way to import customers or products intoKonaKart that are defined in other systems that can produce compatible XML files.
These are merely examples and it is expected that users will end up using the XML_IO utility in manydifferent ways to suit their own specific requirements.
Configuration of XML_IO
A properties file allows you to define which KonaKart data objects you would like to be imported orexported providing tremendous flexibility of usage.
The properties file allows you to define the following:
When not modified, the default setting is true.
#accessoryProducts = false#addressFormats = false#audit = false#bundledProducts = false#categories = false#categoriesToTagGroups = false#configurationGroups = false#configurations = false#countries = false#coupons = false#crossSellProducts = false#customerGroups = false#customerTags = false#customerTagsForCusts = false#currencies = false#customers = false#dependentProducts = false#digitalDownloads = false#expressions = false#geoZones = false#ipnHistory = false#languages = false#manufacturers = false#productOptions = false#orders = false#orderStatuses = false#productCategories = false#productOptionValues = false#products = false#productsToStores = false#reviews = false#subZones = false#tagGroups = false#tagGroupToTags = false#tags = false#taxClasses = false#taxRates = false#upSellProducts = false#wishLists = false#zones = false
The properties file allows you to define the data to be imported/exported using the Xml_IO import/exportutility in KonaKart. You can call the properties file anything you like as its name is specified as an argumentto the XML_IO command line utility (for details of the "usage" of the command line utility, see below).
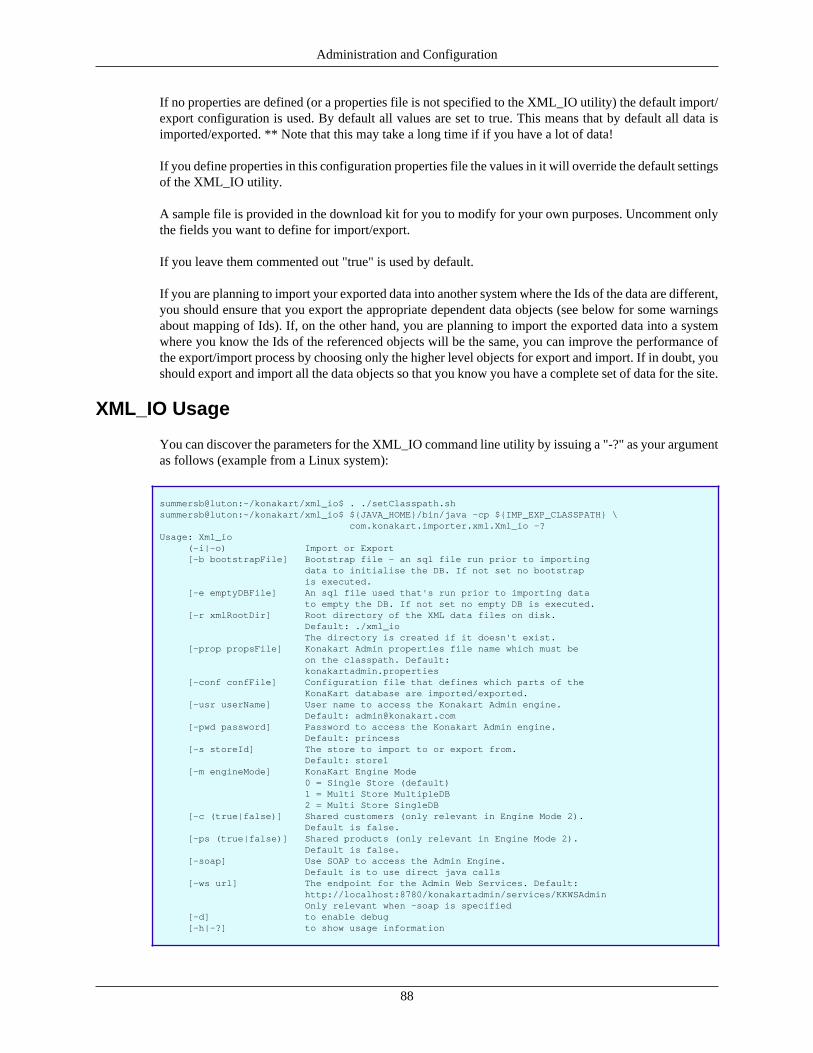
Administration and Configuration
88
If no properties are defined (or a properties file is not specified to the XML_IO utility) the default import/export configuration is used. By default all values are set to true. This means that by default all data isimported/exported. ** Note that this may take a long time if if you have a lot of data!
If you define properties in this configuration properties file the values in it will override the default settingsof the XML_IO utility.
A sample file is provided in the download kit for you to modify for your own purposes. Uncomment onlythe fields you want to define for import/export.
If you leave them commented out "true" is used by default.
If you are planning to import your exported data into another system where the Ids of the data are different,you should ensure that you export the appropriate dependent data objects (see below for some warningsabout mapping of Ids). If, on the other hand, you are planning to import the exported data into a systemwhere you know the Ids of the referenced objects will be the same, you can improve the performance ofthe export/import process by choosing only the higher level objects for export and import. If in doubt, youshould export and import all the data objects so that you know you have a complete set of data for the site.
XML_IO Usage
You can discover the parameters for the XML_IO command line utility by issuing a "-?" as your argumentas follows (example from a Linux system):
summersb@luton:~/konakart/xml_io$ . ./setClasspath.shsummersb@luton:~/konakart/xml_io$ ${JAVA_HOME}/bin/java -cp ${IMP_EXP_CLASSPATH} \ com.konakart.importer.xml.Xml_io -?Usage: Xml_io (-i|-o) Import or Export [-b bootstrapFile] Bootstrap file - an sql file run prior to importing data to initialise the DB. If not set no bootstrap is executed. [-e emptyDBFile] An sql file used that's run prior to importing data to empty the DB. If not set no empty DB is executed. [-r xmlRootDir] Root directory of the XML data files on disk. Default: ./xml_io The directory is created if it doesn't exist. [-prop propsFile] Konakart Admin properties file name which must be on the classpath. Default: konakartadmin.properties [-conf confFile] Configuration file that defines which parts of the KonaKart database are imported/exported. [-usr userName] User name to access the Konakart Admin engine. Default: [email protected] [-pwd password] Password to access the Konakart Admin engine. Default: princess [-s storeId] The store to import to or export from. Default: store1 [-m engineMode] KonaKart Engine Mode 0 = Single Store (default) 1 = Multi Store MultipleDB 2 = Multi Store SingleDB [-c (true|false)] Shared customers (only relevant in Engine Mode 2). Default is false. [-ps (true|false)] Shared products (only relevant in Engine Mode 2). Default is false. [-soap] Use SOAP to access the Admin Engine. Default is to use direct java calls [-ws url] The endpoint for the Admin Web Services. Default: http://localhost:8780/konakartadmin/services/KKWSAdmin Only relevant when -soap is specified [-d] to enable debug [-h|-?] to show usage information

Administration and Configuration
89
Warning
A word of warning when using the XML_IO utility! Loading data from one system to another can be avery complicated process so proceed with extreme caution. It is suggested that you backup your systemsbefore executing XML_IO imports in the event that an import doesn't function the way you expect.
Complications arise in a number of different areas. One is in the case where exported Ids (and keys) fromone system do not match those on the target system to import into. The XML_IO utility does have the"intelligence" necessary to "map" these ids during the import process and does this in a number of differentways. One way to ensure the mappings are correct is to include the necessary reference data in the XML_IOexport so that this can be used during the import process by XML_IO to figure out the correct mappings.An example is to include the languages export when you export the products so that when the products aresubsequently loaded into a different system (where languages could easily be defined with different Ids)the language Ids can be mapped on the imported products.
Nevertheless, it is important to note that even when you include all the necessary reference data thereare, unavoidably, occasions when XML_IO cannot calculate a mapping successfully. This can occur, forexample, when it tries to locate a language by name in the target system (in order to figure out the mappingof Ids) but fails to find exactly one match. In such cases the XML_IO utility will report the mapping failureas a "Warning" in the log.
Therefore, it is strongly advised that you check your import/export processes carefully before unleashingin production. XML_IO is a very powerful utility but if used incorrectly can lead to duplicate records andin some cases a loss of integrity in your database.
Examples
In the xml_io directory, located under the KonaKart installation home directory, you will find some ex-ample scripts for running XML_IO either directly using the "engine" or via SOAP. These may be usefulas they stand or they could be used as templates for your own XML_IO scripts that are tailored for yourown particular environment.
Multiple Prices for ProductsEach KonaKart product object has 4 price fields that can be used to store 4 different prices. For example,these may be retail price, wholesale price, MRP, employee price etc.
The prices may be stored just for reporting purposes since whenever a product is added to an Order and anOrderProduct object is created which becomes an attribute of the Order object, this OrderProduct containsall of the product prices. This means that whenever documentation is generated from the order, you canshow customers information such as the discount from the MRP etc.
The prices may also be used to display different prices to different customers based on what customergroup they belong to.
In order to have an unlimited number of prices, they may be stored in a separate database table and ref-erenced by a catalog id. The database table is called kk_product_prices. In order to pick up the externalprices, the Application Engine must be configured with the correct catalog id. The catalog id can be cal-culated in a number of ways and is application specific. For example, it may depend on the country that thecustomer is accessing from, or the URL or the type of customer etc. One way of configuring the applicationengine is in the KKAppEngCallouts class as shown below:

Administration and Configuration
90
/** * Callouts to add custom code to the KKAppEng */public class KKAppEngCallouts{ /** * Called at the start of startup * * @param eng */ public void beforeStartup(KKAppEng eng) { System.out.println("Set product options for current customer"); FetchProductOptionsIf fpo = new FetchProductOptions(); fpo.setCatalogId("cat1"); fpo.setUseExternalPrice(true); eng.setFetchProdOptions(fpo); }
/** * Called at the end of startup * * @param eng */ public void afterStartup(KKAppEng eng) { }
Note that when using the API directly, this functionality is available on all of the API calls that accept anOptions object such as FetchProductOptions or AddToBasketOptions. Note also that the functionality isonly available when the Enterprise Extensions are installed.
Tax ConfigurationKonaKart includes a powerful tax calculation system containing the following entities:
• Zone: A physical area and is normally a state or region within a country.
• Tax Area: An area defined for tax purposes and can be mapped to a zone or a country.
• Tax Class: Defines a type of product for tax purposes because products within the same tax area may betaxed differently depending on their tax class. For example, children's clothes or basic necessities suchas milk, may be taxed differently to luxury goods.
• Tax Rate: A percentage number used to actually calculate the tax on a product. It has to be associatedwith a tax area and a tax class.
To start, you should define all of the zones for the country that you are interested in. Our database comespre-populated with zones for a few countries. Even if the tax rate doesn't change between zones, it is stilla good idea to populate them since this helps customers when entering addresses because they can bedisplayed in a drop down list.
Next, you should define the tax areas which may map directly to the zones. For example, the state of Texasmay map directly to a tax area. Once you've defined all of you tax areas, you should map them to thezones using the Admin App.
The following step is to define the tax classes which are needed before entering any products. Once theseare defined, the final step is to insert all of the tax rates that could be applied and map them with a taxarea and a tax class.
If for some reason you need to look up the tax rate to be applied for a product from an external system,this rate can be applied to the order before saving it. In order to do this you must loop through all of the

Administration and Configuration
91
OrderProduct objects contained in the order and call the setTaxRate() method to set the tax rate. Oncethis has been done, you can call the getOrderTotals() engine call which re-calculates the order for the newtax rates.
Default Sort Order for ProductsTo set the default sort order for products retrieved using the client API you must use the setDefaultOrder-By() call on the com.konakart.al.ProductMgr. This sets the default sort order used by the following calls:
• fetchProductsPerCategory()
• fetchAllSpecials()
• searchForProducts()
• fetchProductsPerManufacturer()
• fetchAlsoPurchasedArray()
• fetchRelatedProducts()
setDefaultOrderBy() should be called in the struts action class prior to making the API call thatactually fetches the data from the DB. The parameter accepted by setDefaultOrderBy() must bean attribute of com.konakart.app.DataDescConstants such as ORDER_BY_NAME_ASCENDING orORDER_BY_MANUFACTURER etc.
Bundle ConfigurationFrom version 2.2.6.0, KonaKart supports bundled products. To define a bundle, the following steps mustbe taken using the Admin App:
• When inserting or editing a product, select a product type of "Bundle" or "Bundle with free shipping".
• Using the "Select Products" button which appears next to the Product Type drop list, open a pop-upwindow to select the bundled products.
• When you return to the main window after having selected the bundled products, you can get the AdminApp to calculate the price and the weight of the bundle. When calculating the price, a percentage ortotal discount may be configured. The calculated values can be overridden before saving. The quantityis read only and is always a calculated value based on the quantity of bundled products in stock.
Within the application, bundle products are treated in the same way as other products. The products thatmake up the bundle (bundled products) can be retrieved through the API using the getRelatedProducts()API call. ProductDetailsBody.jsp has been modified to display description information for each bundledproduct when it exists. Just like other products, the quantity in stock of a bundle product is retrieved usingthe updateBasketWithStockInfo() method. The quantity returned is calculated based on the availability ofthe bundled products and when a bundle product is sold, the stock info of the bundled products is modified.
Product TagsFrom version 2.2.6.0, KonaKart supports product tags. Tags are attributes that can be associated to aproduct and can be used to refine product searches. For example, in the case of a digital camera the tagscould be arranged as follows:

Administration and Configuration
92
MegaPixels Optical Zoom Weight
6.0 3x less than 100g
8.0 4x between 100g and 200g
10.0 5x greater than 200g
The Optical Zoom tags (3x,4x and 5x) are contained within a tag group called Optical Zoom. All tags mustbelong to a tag group and a tag may belong to multiple groups. The purpose of a tag group is to organizetags and a tag group may be associated to a category so that it can be automatically displayed in a contextsensitive fashion when a customer is viewing products belonging to a specific category.
For example, the image below shows that the MPAA Movie rating and the DVD Format tag groups aredisplayed in the DVD Movie>>Action category . When a customer clicks on a tag , he refines the searchto only show products that include that tag information. Multiple tags may be selected . When within thesame tag group, they are OR'ed together. e.g. I want to see all movies with rating PG or PG-13. Whenwithin different groups they are AND'ed together. e.g. Show me all movies that have a PG or PG-13 ratingand are available in Blu-ray format.
Tag functionality is available through the application API. The ProductSearch object has been enhancedto include an array of Tag Group objects, each of which may contain a number of tags. There is also a newAPI call getTagGroupsPerCategory() to enable you to determine which tag groups have been associatedto a category. The Product object now has a tags attribute which is populated in the getProduct() methodwith an array of tags, so that you may see which tags have been associated to a product.

Administration and Configuration
93
Credit Card RefundsThe actual process involved depends on the payment gateway being used. In version 2.2.6.0 a custombutton has been introduced in the panel that processes returns. This feature allows you to extend the AdminApp by adding your own administration functionality outside the standard Admin App. The followingparameters are added to your defined URL to allow you to check security and/or operate on selectedobjects:
• order_return_id - id of the OrderReturn object
• order_id - id of the Order object
• total_inc_tax - total amount of the Order
• sess - session id
• tx_id - gateway transaction id
Note that this button will not be visible unless you define the label to be non-empty in the Admin AppConfiguration Panel.
Saving and Editing of Credit Card details
Configuration of Admin Application
The admin app now allows you to enter and/or edit credit card details for any order using the "edit order"panel, which is opened by selecting an order and clicking the edit button. This functionality is only availableif the role allows it. In order to set privileges you must navigate to Customers>>Maintain Roles and selecta role. Once the role has been selected you must click the Privileges button and set the check box on theEdit Order panel shown below.
In order for the new role information to be picked up, you must log out and log in again, at which pointin the edit order screen you should see the following fields (see below) which can be modified and saved.The information is saved in the database in fields e1 to e6 of the orders table in an encrypted format.

Administration and Configuration
94
Configuration of Store Front Application
A new API call has been introduced in order to set the credit card details on an order.
/** * The credit card details in the CreditCard object passed in as a parameter, are saved in the * database for an existing order. Before being saved, this sensitive information is encrypted. * No update or insert is done for attributes of the CreditCard object that are set to null. The * credit card details are mapped as follows to attributes in the order object: * * e1 - Credit Card owner * e2 - Credit Card number * e3 - Credit Card expiration * e4 - Credit Card CVV * e5 - Credit Card Type * * * @param sessionId * The session id of the logged in user * @param OrderId * The numeric id of the order * @param card * CreditCard object containing the credit card details * @throws KKException */
public void setCreditCardDetailsOnOrder(String sessionId, int orderId, CreditCardIf card) throws KKException;
This API call can be integrated into the application where you see fit. i.e. You could write a simplifiedpayment gateway that just collects the credit card information and saves it rather than sending it to apayment gateway. A configuration variable has been added which can be set in the admin app underconfiguration>>Stock and Orders .

Administration and Configuration
95
This config variable could be used in your code to determine whether or not to save the credit card details.Using AuthorizenetAction as an example :
Edit Order Number and Custom FieldsThe admin app now allows you to enter and/or edit the order number and custom fields for any order usingthe "edit order" panel, which is opened by selecting an order and clicking the edit button. This functionalityis only available if the role allows it. In order to set privileges you must navigate to Customers>>MaintainRoles and select a role. Once the role has been selected you must click the Privileges button and set thecheck box on the Edit Order panel shown below.
In order for the new role information to be picked up, you must log out and log in again, at which point inthe edit order screen you should see the following fields (see below) which can be modified and saved.

Administration and Configuration
96
Wish ListsWish List functionality can be enabled in the Configuration>>Store Configuration section of the AdminApp. Once enabled, the store front application will display an "Add to Wish List" button when viewingproduct details, and a Wish List tile containing products that have been added to the wish list.
There is a Wish List screen that allows a customer to remove products from the list and also to transferthem directly to the shopping cart.
Gift RegistriesGift Registry functionality can be enabled in the Configuration>>Store Configuration section of the Ad-min App. Once enabled, the store front application will display Wedding List functionality. Note that itis relatively straightforward to customize the store front application to handle other types of gift registriessuch as birthday lists.
Only a registered customer can create a wedding list after logging into the application by clicking a linkin the Wedding List section of the My Account page. The wedding list can be made public or private andonce created, the shipping address and other details may be modified by clicking the edit link that willappear in the Wedding List section of the My Account page.
Products can be added to the wedding list by navigating to the product details page and clicking on the addto wedding list link. Note that you will see a link for each wedding list that you have created and the linkwill contain the name of the list. Once a product has been added to the list, you may modify the priorityand the quantity desired attribute.
Any shopper can search for a public wedding list by clicking the Wedding Lists link at the top of thescreen next to the Cart Contents and Checkout links. If no constraints are entered, all wedding lists arefound and can be paged through. Otherwise constraints such as the wedding date or name of bride etc.can be used to narrow down the search. Once a wedding list has been found, you may click on it's name

Administration and Configuration
97
in order to see the list of gifts sorted by priority. You may select one or more gifts and add them to thecart, ready for checkout. When gifts are added to the cart from this screen, the system will ensure that thewedding list is updated with quantity received (once the order has been paid for) and the default shippingaddress will be the address of the wedding list. During the checkout process, you can change the shippingaddress if you desire.
Gift CertificatesIn KonaKart, a Gift Certificate is a product of type gift certificate, that can be bought by a customerand delivered as a digital download, through eMail or even regular mail. The gift certificate contains apromotion code which is usable only once to obtain a discount on an order.
Behind the scenes, a gift certificate object needs to be related to a promotion which can only be activatedthrough the use of a coupon code. When an order containing one or more gift certificates is paid for, acoupon code and document must be created for each gift certificate. For example, the document could be astylish pdf file containing the coupon code which the customer can download. The generation of the actualdocument is a customization that needs to be carried out, since the example source code just generates asimple txt file containing only the coupon code.
com.konakart.bl.OrderIntegrationMgr and com.konakartadmin.bl.AdminOrderIntegrationMgr are thetwo files that contain the code that is run when an order changes state after payment is received. The ap-plication code is run when the state is changed through the application (i.e. when a customer pays usinga credit card) and the admin app code is run when the state is changed through the admin app. The actualmethod to look at is called manageGiftCertificates() . As you can see from the source code, this methodimplements the following tasks:
• Find the promotion attached to the gift certificate.
• Create a coupon code.
• Create a coupon with the new code.
• Attach the coupon to the promotion.
• Insert the coupon code into a downloadable product that can be downloaded by the customer. Thisbecomes the gift certificate that the customer can forward on to the receiver of the gift..
Depending on your requirements, the method can be customized. For example, you may not wish the fileto be made available as a digital download or you may wish to generate a more simple coupon code. Analmost obligatory customization is the getGiftCertificateFilePath() method which at the moment producesa simple txt file just containing the coupon code. For production usage it should create maybe a pdf orhtml document that resembles a real gift certificate.
Enable Gift CertificatesIn order to enable the gift certificate entry field in the store-front application, the configuration variablemust be set in the Configuration>>Store Configuration section of the admin app.

Administration and Configuration
98
Creating a Gift CertificateThe following steps must be taken to create a gift certificate:
Create a product of type gift certificate using the admin app. You may choose different products for dif-ferent amounts or choose a single product and configure the amounts as product attributes which can beselected by the customer before adding the certificate to the shopping cart.
For each gift certificate, create a promotion of type Gift Certificate, where the value is equivalent to thevalue of the gift certificate. The promotion should require a coupon.
Once the promotion has been created you need to click the Gift Certificates button on the promotions panelin order to connect the promotion to a gift certificate.

Administration and Configuration
99
The above example shows a Gift Certificate product that has three options (Gold, Silver, Bronze) whichare expanded out when the product is selected. It is important the promotion is only associated with oneof these options so the other two must be removed as shown below.

Administration and Configuration
100
Note that a gift certificate product may be connected to any type of promotion, which means that youcould, for example create a gift certificate that gives 10% discount for an order. Also the standard rules canbe added to the promotion in order to filter it for certain products, categories, manufacturers, customersand expressions.
Creating a new Admin App UserNew Admin App users can be created and configured using the Admin App, if you are logged in as a userwith the required privileges.

Administration and Configuration
101
Each KonaKart user can be assigned one or more roles in order to define the functionality available to thatuser. The first step is to create a new user in the Customers>>Customers section of the Admin App. Theuser type must be set to "Admin User".
Once the user has been created, roles may be assigned in the Customers>>Assign Roles section of theAdmin App. The role assignment becomes active the next time the user logs in.
Creating New RolesThe default KonaKart database already contains a number of roles. New roles may be created (and existingroles may be edited) in the Customers>>Maintain Roles section of the Admin App.
Each role is mapped to a number of panels with a set of privileges. Each role to panel association mayhave a combination of read / insert / edit / delete privileges.
API call security may also be enabled in the Configuration>>Security and Auditing section of the AdminApp. When enabled, this allows you to map roles to API calls and is useful for enforcing security throughthe SOAP Web Service interface of the Admin App.
Precise instructions on how to create new roles, can be found in the on-line help.
Default Customer ConfigurationA Default Customer can be defined using the Admin Application. Only one default customer should bedefined. It is a fictitious customer used to create a temporary order for displaying order totals before thecheckout process. This is useful for example to create estimated shipping costs and promotional discounts(the order totals of the order), which can be displayed to a customer in the edit cart screen without himhaving to log in or register. The address of the default customer should be an address that will generateaverage shipping costs. i.e. If the majority of your business is national then it shouldn’t be an internationaladdress.
The default customer is used by the application API method createOrderWithOptions(String sessionId,BasketIf[] basketItemArray, CreateOrderOptionsIf options, int languageId) if the options object is set touse the default customer. In this case the sessionId may be set to null.
Customer GroupsVersion 2.2.3.0 is the first version of KonaKart that includes Customer Group functionality.
A customer group is a way of aggregating customers that are similar in some way. For example, youmay use them to distinguish between retail and wholesale customers or between company employees andexternal customers etc.
Customer groups may be created and maintained using the KonaKart Admin application. Once a grouphas been created, you can associate a customer to that group through a drop list in the Edit Customer panel.When editing a customer, if the Customer group is changed to a valid new group, you will be prompted tosend a template based email to the customer. This is a useful feature for when the customer is going throughan approval process. For example, a customer may have registered through the application as a wholesalecustomer. During registration he was placed in a "Waiting for Approval" customer group and now theadministrator may approve or decline the request. As a result of the approval, the customer may receive anemail informing him of the decision. The template used is in the form CustGroupChange_groupId_lang.vme.g. CustGroupChange_2_en.vm, if the customer has been moved to the group with id equals 2 in a systemwhere the language code is "en". This means that different templates can be used depending on which groupthe customer has been moved to. i.e. You could have different templates for approved and denied requests.

Administration and Configuration
102
Groups may be used to:
• Control what prices are displayed to customers.
• Each group has a PriceId attribute which may have a value of 0 to 3. When set to 0, a customerbelonging to that group will see the normal price of the product (i.e. the price attribute). When set to1, the customer will see the price defined in the Price 1 attribute of the product and so on for 2 and3. This functionality for example, allows you to display wholesale prices to wholesale customers andretail prices to retail customers. If a customer belongs to no groups, then the price from the normalprice attribute is displayed. Note that in the Admin App you may change the price labels from Price1,Price2 etc. to a more meaningful description such as Wholesale price, MRP, Employee price etc.
• Enable promotions.
• Promotions may be enabled for customers belonging to a particular group. i.e. You may want toenable certain promotions just for your retail customers.
• Send communications.
• Bulk emails may be sent to only customers belonging to a particular customer group.
AuditingAuditing can be enabled on the Admin App API in order to keep track of when API calls are made andby whom. All audit data is written to the KonaKart database and can be viewed in the Audit Data>>AuditData section of the Admin App.
Auditing can be configured in the Configuration>>Configure Auditing section of the Admin App. It canbe configured independently for Reads / Edits / Inserts and Deletes. The level may be set to "summary"or "detailed" :
• Summary : The name of the API call, the type of Action (read , write etc.) , the id of the object beingedited, inserted etc. (where applicable) and the time stamp are saved.
• Detailed : Where possible, the objects being deleted, edited etc. are also saved in a serialized form .Note that enabling detailed auditing can have a detrimental affect on performance and may save a largeamount of data.
Custom Credential CheckingWhen the login() method is called, KonaKart instantiates a class defined by the proper-ty LOGIN_INTEGRATION_CLASS . If this property isn't set, the class that is instantiated iscom.konakart.bl.LoginIntegrationMgr . If you write a custom class it must implement the interfacecom.konakart.bl.LoginIntegrationMgrInterface which contains the method:
public int checkCredentials(String emailAddr, String password) throws KKException;
The checkCredentials() method can return the following values:
• A negative number in order for the login attempt to fail. The KonaKart login() method will return anull sessionId.
• Zero, to signal that this method is not implemented. The KonaKart login() method will perform thecredential check.

Administration and Configuration
103
• A positive number for the login attempt to pass. The KonaKart login() will not check credentials, andwill log in the customer, returning a valid session id.
A similar mechanism exists for the Admin App. The property is calledADMIN_LOGIN_INTEGRATION_CLASS and if it isn't set then the class that is instantiated iscom.konakartadmin.bl.AdminLoginIntegrationMgr . If you write a custom class it must implement theinterface com.konakartadmin.bl.AdminLoginIntegrationMgrInterface which contains the method as de-scribed above.
public int checkCredentials(String emailAddr, String password) throws KKAdminException;
This mechanism is a useful generic way to implement a Single Sign On system or to connect KonaKart toan LDAP directory or just to implement your own custom credentials checking..
The LOGIN_INTEGRATION_CLASS and ADMIN_LOGIN_INTEGRATION_CLASS properties can beedited in the Configuration>>Security and Auditing section of the Admin App.
Multi-Store Configuration and AdministrationMulti-Store functionality is provided as part of the KonaKart Enterprise Extensions.
Before Multi-Store can be configured it must be installed by following the instructions for installing theKonaKart Enterprise Extensions .
IntroductionSince version 3.0.1.0, the enterprise version of KonaKart can run in multi-store mode. When in this mode,one instance of the KonaKart engine can manage multiple stores. Previous to this version, each store wouldhave required its own instance of the KonaKart engine. Each store still requires its own database schema(i.e. its own instance of database tables).
Configuring KonaKart to function in Multi-Store ModeThe instructions that follow, are to set up two stores on localhost using the Tomcat servlet engine in thedownload kit. Obviously this isn't a production scenario, but will quickly allow you to use two KonaKartstores picking up separate data but running on a single KonaKart deployment. The URLs to access thestores will be :
• http://store1.localhost:8780/konakart/Welcome.do
• http://store2.localhost:8780/konakart/Welcome.do
The first step is to install the KonaKart Enterprise Extensions. It is recommended that you use the auto-mated GUI installation but it is also possible to install manually. During the installation process you areprompted to choose one of the multi-store modes that KonaKart supports. All of the modes are compatiblewith the following steps that need to be taken.
Configuration Steps
Mapping
DNS has to be set up to map store1.localhost and store2.localhost to 127.0.0.1. This can be done by editingyour hosts file as follows:

Administration and Configuration
104
127.0.0.1 store1.localhost127.0.0.1 store2.localhost
Note that this is a manual configuration step that is not carried out by the Enterprise Extensions installation.
In the Tomcat server.xml file you must set up aliases in the Host section:
<Host name="localhost" appBase="webapps" unpackWARs="true" autoDeploy="true" xmlValidation="false" xmlNamespaceAware="false"> <Alias>store1.localhost</Alias> <Alias>store2.localhost</Alias></Host>
BaseAction.java
This step that is not carried out automatically by the Enterprise Extensions installation and so needs tobe performed manually.
com.konakart.actions.BaseAction.java contains a method called getStoreIdFromRequest() . The purposeof this method is to derive the storeId from the HttpServletRequest so that the correct storeId canbe passed to the KonaKart engine when it is instantiated. Below you can see an example where thestore id is derived from the server name. It returns store1 when the server name is store1.localhostand store2 when the server name is store2.localhost. You can find the source for this class in theKonaKart\custom\appn\src\com\konakart\actions directory. All you need to do is to un-comment the codeand compile it. In other parts of this document there are instructions for compiling and deploying the mod-ified code. There is an ant build file in the KonaKart\custom directory with suitable targets for buildingand deploying the modified jars.
/** * In a multi-store scenario, you should implement your own logic here to extract the storeId * from the request and return it. * * @param request * @return Returns the storeId */ private String getStoreIdFromRequest(HttpServletRequest request) { /* * If the server name could contain store1.localhost or store2.localhost which both point to * localhost, we could get the store id from the server name. */ if (request != null && request.getServerName() != null) { String[] nameArray = request.getServerName().split("\\."); if (nameArray.length > 1) { String storeId = nameArray[0]; return storeId; } }
return null; }
Final Steps
Once the modifications have been completed, you must re-start Tomcat. Assuming the database ta-bles for store1 and store2 both contain valid data, you should be able to navigate directly to http://

Administration and Configuration
105
store1.localhost:8780/konakart/Welcome.do [http://store1.localhost:8780/konakart/Welcome.do] and tohttp://store2.localhost:8780/konakart/Welcome.do [http://store2.localhost:8780/konakart/Welcome.do] .
In order to configure KonaKart separately for each store, the Admin App now allows you to choose thestore before logging in.
Choose store during login
Once you've logged you will will be able to configure the store that was chosen from the drop down list.
Multi-Store Configuration
This section describes the functions and configuration options available to a KonaKart administrator onceMulti-Store has been successfully installed.
All functionality related to the creation of new stores is only relevant if the Multi-Store Single DatabaseMode is selected.
The administration panels are made accessible to an Admin App user by virtue of role settings that have tobe applied by a Super User of the KonaKart system. By default, following a successful installation of theEnterprise Extensions, the "Super User" user(s) created will have access to the panels described below.
By contrast, the panels discussed below will not be visible in the Admin App (by default) in Single-StoreMode, or Multi-Store Multiple DB modes where the functionality is not available.
Multi-Store Management Panel
Assuming you have sufficient privileges, you can maintain multiple stores on the Multi-Store ManagementPanel:

Administration and Configuration
106
KonaKart Admin Application - Store Maintenance
If you have been granted sufficient privileges, you may search for a store in the mall by entering anycombination of the search criteria at the top of the panel then clicking the Search button.
The search is not case sensitive unless your database is configured to be non-case sensitive. Wildcard con-figuration parameters control the precise searches of substrings (See Configuration>>Admin App Config-uration ) but with the default settings a wildcard is added before and after all search text which means that,for example, storeId StoreX will be returned if you enter tor as the StoreId.
In a similar fashion you can search for a store in the mall on whether or not it is enabled or disabled, undermaintenance or not under maintenance and whether or not it is marked as deleted.
Only the stores you are authorized to maintain will be returned.
Any displayed stores may be edited or deleted by selecting them in the table then clicking the respectivebuttons at the bottom of the list assuming the relevant privileges have been granted to the current user.
The user must have edit store privileges for the Edit Store panel in order for the Edit button to be visible.
Creating a New Store - Without Cloning
Note that storeIds must contain no embedded spaces and no special characters that cannot be used whencreating directory names.
To create a new store without cloning click the New button whereupon a new panel will be displayed onwhich you define the attributes for the new store.
Stores can have a number of different statuses. These are defined as follows:
Enabled = active stores that are available for use. If disabled a store is not accessible to application oradmin app users.
Under Maintenance = stores that are currently being maintained so are inaccessible to application users,but can be accessed by admin app users.

Administration and Configuration
107
Deleted = stores that are deleted are no longer available for use by application or admin app users. Thesestores are not physically deleted from the database but only marked as "deleted". Therefore it is possibleto "Un-delete" a store if required simply by changing the deleted status back to false.
When a new store is created, the following new users are created:
• Multi-Store Single Database - Shared Customers Mode:
One user is created with the Store Administrator's role.
Username Password Roles
{new store Id}[email protected]
princess KonaKart Store Administrator
• Multi-Store Single Database - NON-Shared Customers Mode:
One user is created with the Store Administrator's role, and one user with the Super User role.
Username Password Roles
{new store Id}[email protected]
princess KonaKart Store Administrator
{new store Id}[email protected]
princess KonaKart Store Super User
The users created above will have the {new store Id} replaced with the storeId of the new store. Thus,if the new store was called "store3" the new users would be named [email protected] [email protected] as applicable.
The particular role that is assigned to the each user can be defined in the Admin App. You can configurethe roles themselves as you wish so that when new stores are created, the users that are created will haveonly the permissions that you have defined.
In the case of the Non-Shared Customers Mode, where a new "Super User" is created, you can decide toprovide these credentials to a "Super User" of the new store or keep them secret.
Creating a New Store - With Cloning
To create a new store by cloning another store, select the row containing the store you wish to clone andclick the Clone button whereupon a new dialogue will be displayed on which you define the attributesfor the new store.
For cloning you are prompted for the credentials of a user authorized to export data from the store to becloned.
Differences between "New" and "Clone"
Both the New and Clone options can be used to create a new store. The major difference between the twooptions is that in the case of the clone, a lot more data is cloned for the new store.
When you create a new store using the "New" option, the following objects are created in the new store:
• Standard users and their respective role assignments (see above).
• Address formats, Countries, Languages, Tax zones, Currencies.
• Order Statuses, Configuration Data.

Administration and Configuration
108
When you clone a store, using the "Clone" option, in addition to the above, the following objects areexported from the store to be cloned and imported into the new store:
• Products, Categories, Manufacturers, Coupons
• Customer Groups
• Zones, Sub-Zones, Tax Classes, Tax Rates.
• Tags and Tag Groups.
Note that cloning does not include the copying of the following objects:
• Auditing Data, IPN (payment gateway responses).
• Customers, Reviews
• Configuration Groups (this table is no longer used by KonaKart)
You can edit stores using the Edit Store Panel:
KonaKart Admin Application - Edit or Insert Store
Multi-Store Table Sharing
These details will not be of interest to many KonaKart Administrators as they will regard this as an im-plementation detail but it could be useful when analyzing the database directly for various purposes.

Administration and Configuration
109
When in MultiStore Single DB Mode (engine mode 2) database tables are shared between stores. In mostcases the data is segmented for each store using a store_id column to identify which store the data belongsto. Some tables are shared across all stores so no store_id column is created, whereas some tables areshared only in customer shared or products shared mode.
When tables are "shared" there is either no store_id column on the table to identify which store the databelongs to, or if the store_id column is present, it isn't used.
Tables that are Always Shared • kk_api_call
• kk_cookie
• kk_panel
• kk_role
• kk_store
• utility
Tables Shared only when Customers are Shared • address_book
• address_format
• countries
• customers
• customers_info
• geo_zones
• kk_customer_group
• kk_customers_to_role
• kk_role_to_api_call
• kk_role_to_panel
• sessions
• tax_class
• tax_rates
• zones
• zones_to_geo_zones
Tables Shared only when Products are Shared • kk_payment_schedule
• kk_tag
• kk_tag_group
• kk_tag_group_to_tag
• kk_tag_to_product

Administration and Configuration
110
• languages
• manufacturers
• manufacturers_info
• orders_status
• products
• products_attributes
• products_description
• products_options
• products_options_values
• products_options_values_to_products_options
• products_attributes_download
• reviews
• reviews_description
• specials
Multi-Store Configuration Panel
You can configure the following parameters on the Multi-Store Configuration Panel:

Administration and Configuration
111
KonaKart Admin Application - Multi-Store Configuration Parameters
These are the configuration variables that are used in a multi-store installation.
You can define the multi-store template storeId to the store whose reports you wish to copy for new stores(in the future, more configuration data may be copied from the template store).
You can define the roles that will be assigned to new users that are created when you create new stores.The number of new users that are created when creating new stores is dependent on whether you areusing Shared or Non-Shared Customers. In Shared Customers mode, only a "Store Administrator" useris created, but in Non-Shared Customers mode a "Super User" user is also created. You can change theroles that are assigned for the users and change the roles themselves to configure the permissions grantedto new users exactly as you please.
When new stores are created some SQL commands are run to set up the database in various ways. Firstthe "KonaKart new store creation SQL" script is run, then KonaKart loads some set-up data that isn't inany SQL script, then finally this is followed by the execution of the "User new store creation SQL" script.If you need to change the data that is loaded, you should add your SQL commands to the "User new storecreation SQL" script and not modify the "KonaKart" script.
For more specialized requirements there is a "hook" function that is called whenever a storeis created or modified. If you need special behavior at these points, you have to implementthis class in java (default name is com.konakartadmin.bl.AdminStoreIntegrationMgr ) and it willbe executed by KonaKart at the appropriate times. Your implementation must implement thecom.konakartadmin.bl.AdminStoreIntegrationMgrInterface interface which has the following methods:
package com.konakartadmin.bl;
import com.konakartadmin.app.AdminStore;
/** * Used to provide an integration point when a store is added or changed */public interface AdminStoreIntegrationMgrInterface{ /** * Called whenever a new store is added * * @param store * The new store */ public void storeAdded(AdminStore store);
/** * Called whenever a new store is added * * @param oldStore * The store object before the change * @param newStore * The new store object after the change */ public void storeChanged(AdminStore oldStore, AdminStore newStore);}
If required, you can change the name of the class that is instantiated so long as it implementscom.konakartadmin.bl.AdminStoreIntegrationMgrInterface and you modify its name in the configurationpanel in the Admin Store Integration Class field.

Administration and Configuration
112
Configuring KonaKart to use the Solr SearchEngine
Introduction
Since version 3.0.1.0, the enterprise version of KonaKart can use the Apache Solr [http://lucene.apache.org/solr/] search engine. Solr gives you fully indexed search using the Jakarta Lucene searchengine. As well as being very fast regardless of the size of your catalog; it caters for misspellings, syn-onyms, plurals and alternate spellings.
Solr can be installed on a dedicated search server or on the same server and servlet engine where KonaKartis running. KonaKart Enterprise Extensions includes a war called solr.war which will install Solr whenplaced in the webapps directory of Tomcat. The standard KonaKart installation already creates a solrdirectory where Solr can be configured and where the indexed data is stored.
Configuration Instructions
The first step is to install Solr. As mentioned above, this can be done on a dedicated search server or simplyby dropping solr.war into the Tomcat webapps directory. The following instructions assume that Solr isinstalled in the same container as KonaKart.
Next, KonaKart must be told where Solr is located and also instructed to use Solr rather than the standarddatabase search. This can be achieved in the Configuration>>Solr Search Engine panel of the Admin Appas shown in the screen shot below:
Configure Solr Search Engine
Once KonaKart has been configured to use Solr, you must instruct it to index the product catalog currentlyin the KonaKart database. This can be done in the Tools>Manage Solr Search Engine panel of the AdminApp. This tool allows you to index all of the products or to remove all of the products from Solr. The"add" operation can be performed multiple times. Products that already exist will be overwritten and notadded twice.
When KonaKart is enabled to use Solr, the Solr index will be updated automatically whenever a newproduct is added or an existing product is edited or deleted using the Admin App.

Administration and Configuration
113
Customization of SolrThe Solr search engine behaves differently when compared to a relational database, so we make it straight-forward to customize Solr to allow you to configure the search behavior in order to satisfy your require-ments. For example, the standard KonaKart behavior when searching for a product using a search stringis to add a wild card before and after the string in order to make the search work reliably. Let's say thatthe name of a product is "Hewlett Packard LaserJet 1100Xi" and a search is made for Laserjet. With arelational database, the product will not be found unless it has a leading and trailing wildcard. i.e. Thesearch string becomes %laserjet%. However, with Solr the string is tokenized and the search for laserjetreturns a result without requiring any wild cards so by default they are not added because this makes thequery slower and affects the behavior of synonyms. However, if a search is made for Laser, the relationaldatabase with its wild cards will return a result whereas Solr will not return a result unless a wild card isadded so that the search string becomes laser*.
Under KonaKart/java_api_examples/src/com/konakart/apiexamples you will find a Java file calledMySolrMgr.java with a couple of methods that allow you to define how you want wild cards to be usedfor Solr searches. One method is used for managing wild cards when searching for products using textsearches. The other method is used for managing the wild cards when searching by matching custom fields.If you decide to change the default behavior, you must edit the konakart.properties file in order to use thenew manager rather than the standard manager.
konakart.manager.SolrMgr = com.konakart.bl.MySolrMgr
Scheduling in KonaKartJob scheduling in KonaKart is achieved with an integration with the Open Source Quartz scheduler. (It'salso easy to use any other scheduler if you prefer but the notes below refer to integration of the Quartzscheduler). Quartz integration is provided in the Enterprise Extensions of KonaKart.
Configuring Quartz to execute KonaKart jobsThis section describes how to configure Quartz to execute KonaKart batch jobs. All the files mentionedare provided as examples in the Enterprise Extensions of KonaKart.
The quartz jar (version 1.6.5 is provided in KonaKart v4.0.0.0) is provided in the kit and is added to thekonakartadmin/WEB-INF/lib directory alongside all the other KonaKart Admin jars.
Configuring web.xml
To start-up Quartz you need to uncomment a section in the konakartadmin webapp's web.xml file (this islocated in the konakartadmin/WEB-INF directory).
You need to uncomment this section so that the QuartzInitializerServlet starts up when KonaKart starts.
<!-- Quartz Scheduler <servlet> <servlet-name>QuartzInitializer</servlet-name> <servlet-class>org.quartz.ee.servlet.QuartzInitializerServlet</servlet-class> <init-param> <param-name>shutdown-on-unload</param-name> <param-value>true</param-value> </init-param> <load-on-startup>2</load-on-startup></servlet>End of Quartz Scheduler -->

Administration and Configuration
114
Configuring quartz.properties
The Quartz properties file should be placed on the konakartadmin classpath (the installer will place it inthe konakartadmin/WEB-INF/classes directory).
The following is the default for KonaKart:
#============================================================================# Configure Main Scheduler Properties #============================================================================
org.quartz.scheduler.instanceName = KonaKartSchedulerorg.quartz.scheduler.instanceId = AUTO
#============================================================================# Configure ThreadPool #============================================================================
org.quartz.threadPool.class = org.quartz.simpl.SimpleThreadPoolorg.quartz.threadPool.threadCount = 3org.quartz.threadPool.threadPriority = 5
#============================================================================# Configure JobStore #============================================================================
org.quartz.jobStore.misfireThreshold = 60000org.quartz.jobStore.class = org.quartz.simpl.RAMJobStore
#============================================================================# Configure Plugins #============================================================================
org.quartz.plugin.triggHistory.class = org.quartz.plugins.history.LoggingJobHistoryPlugin
org.quartz.plugin.jobInitializer.class = org.quartz.plugins.xml.JobInitializationPluginorg.quartz.plugin.jobInitializer.fileNames = konakart_jobs.xmlorg.quartz.plugin.jobInitializer.overWriteExistingJobs = trueorg.quartz.plugin.jobInitializer.failOnFileNotFound = trueorg.quartz.plugin.jobInitializer.scanInterval = 6300org.quartz.plugin.jobInitializer.wrapInUserTransaction = false
A useful parameter that you may wish to modify is the filenames parameter which, by default, is set to"konakart_jobs.xml". The "konakart_jobs.xml" file contains definitions of the example KonaKart jobs thatcan be run.
It is possible that you may wish to have additional job definition files like "konakart_jobs.xml" for definingbatch schedules for other stores in a multi-store environment. Additional job definition files can be addedto the filenames property.
Configuring konakart_jobs.xml
The default job definition file is called "konakart_jobs.xml" and is placed in the konakartadmin/WEB-INF/classes directory.
The following is an extract from "konakart_jobs.xml" that defines a single job:

Administration and Configuration
115
<job-detail> <name>RemoveExpiredCustomers</name> <group>KonaKart Batch Jobs</group> <description>Removes expired Customers for privacy and performance</description> <job-class>com.konakartadmin.bl.ExecuteBatchEE</job-class> <volatility>false</volatility> <durability>false</durability> <recover>false</recover> <job-data-map> <entry> <key>credentialsFile</key> <value>konakart_jobs.properties</value> </entry> <entry> <key>executionClass</key> <value>com.konakartadmin.bl.AdminCustomerBatchMgr</value> </entry> <entry> <key>executionMethod</key> <value>removeExpiredCustomersBatch</value> </entry> <entry> <key>param0</key> <value>removeExpiredCustomers</value> </entry> <entry> <key>param1</key> <value>true</value> </entry> <entry> <key>param2</key> <value>25</value> </entry> <entry> <key>param3</key> <value>0-1-2-3</value> </entry> </job-data-map></job-detail>
This particular batch job removes expired sessions from KonaKart. Note the following parameters:
job-class = com.konakartadmin.bl.ExecuteBatchEE
The job-class defines the class that Quartz will execute when the job is run. The ExecuteBatchEE classis the Quartz > KonaKart bridge class that can be used to call KonaKart batch jobs from jobs defined inQuartz.
key: credentialsFile = konakart_jobs.properties
Inside the job-data-map tag an entry is defined that contains the name of a KonaKart "Credentials" file.The file can be named anything you like but it must be located on the class path so that ExecuteBatchEEcan access it. In our example, the file is called "konakart_jobs.properties" (see below for more detail onthe contents of this file). The credentials are required so that the ExecuteBatchEE class can create andlog into a KonaKart Admin Engine, then finally execute the "execute()" API call on that engine to runthe defined batch job.
key: executionClass = com.konakartadmin.bl.AdminCustomerBatchMgr
The execution class is the name of the class that will be instantiated by KonaKart to execute the definedbatch job. It is possible to define your own class as the executionClass which is an excellent way to extendKonaKart's batch functionality.
key: executionMethod = removeExpiredCustomersBatch

Administration and Configuration
116
The execution method is the name of the method on the executionClass that will be executed by KonaKartto run the defined batch job. It is possible to define your own class and methods as described above toextend KonaKart functionality as you require.
key: param0, param1, ..., paramN
The "param" keys are the parameters that are passed to the batch job. These can be whatever the batch jobneeds but must be represented as strings and the ordering is significant.
It is essential that you name the parameters "param0", "param1" and so on for each of the parameters.
In our example, param0, the first argument, is used in this job to define the name of the log file producedby the batch job.
Quartz executes the defined jobs when defined "Triggers" fire. These triggers are also defined in thekonakart_jobs.xml file:
The following is an extract from "konakart_jobs.xml" that defines a single trigger:
<trigger> <cron> <name>RemoveExpiredCustomersTrigger</name> <group>KonaKart Batch Jobs</group> <description>Trigger for RemoveExpiredCustomers</description> <job-name>RemoveExpiredCustomers</job-name> <job-group>KonaKart Batch Jobs</job-group> <!-- every hour 0 0 * ? * * --> <!-- every 30 seconds 0,30 * * ? * * --> <!-- every day @ 9:00pm 0 0 21 ? * * --> <cron-expression>0 5 21 ? * *</cron-expression> </cron></trigger>
This is where you define when you want a particular batch job to be executed.
In this case we have chosen to use the cron trigger definition but Quartz provides other trigger mechanismsthat you can easily use instead if you prefer.
Some examples of cron expressions are provided (commented out).
Configuring konakart_jobs.properties
The default job definition credentials file is called "konakart_jobs.properties" and is placed in the kon-akartadmin/WEB-INF/classes directory.
The file name is actually defined in the "konakart_jobs.xml" file - see the credentialsFile tag above. Hence,you can easily change the name to suit your needs. You can also have more than one credentials file - whichwould be required if you needed to run batch jobs on different stores, in a multi-store configuration, wherethe access credentials were different for the different stores.
The following is an extract from "konakart_jobs.properties" that defines the parameters required to createand log in to an Admin Engine:

Administration and Configuration
117
#============================================================================# konakart_jobs.properties## Used to define the engine configuration for batch jobs.# If multiple configurations are required, use multiple files and define# these in multiple org.quartz.plugin.jobInitializer.fileNames files.#============================================================================
# -----------------------------------------------------------------------------------# Engine mode that the batch jobs will use# 0 = Single Store (default)# 1 = Multi-Store Multiple-Databases (add konakart.databases.used above as well)# 2 = Multi-Store Single Database
konakart.mode = 2
# -----------------------------------------------------------------------------------# When in multi-store single database mode, the customers can be shared between stores
konakart.customersShared = true
# -----------------------------------------------------------------------------------# Credentials to use for the batch jobs
konakart.user = [email protected] = princess
It is recommended that you secure this file appropriately as it could contain the credentials of a privilegedAdmin user.
Other configuration options are possible in credentials files (eg. the engine class can be defined and theproperties files it uses can be defined). If the other configuration parameters are left commented out defaultvalues are used.
Customizing the KonaKart jobs
This section describes how to customize the batch jobs provided or create new ones and rebuild them.Source and build files are provided in the Enterprise Extensions of KonaKart.
The java source files can be found under the KonaKart installation directory under custom/batch . Thejava files can be modified here and new ones added as required to implement different or new batchfunctionality.
To rebuild the konakartadmin_batch.jar (the jar containing all of the batch class files) execute the ANTbuild script as follows:

Administration and Configuration
118
C:\Program Files\KonaKart\custom\batch>..\bin\ant Buildfile: build.xml
clean: [echo] Cleanup...
compile: [echo] Compile the batch sources [mkdir] Created dir: C:\Program Files\KonaKart\custom\batch\classes [javac] Compiling 4 source files to C:\Program Files\KonaKart\custom\batch\classes
make_batch_jar: [echo] Create the batch jar [mkdir] Created dir: C:\Program Files\KonaKart\custom\batch\jar [jar] Building jar: C:\Program Files\KonaKart\custom\batch\jar\konakartadmin_batch.jar
build:
BUILD SUCCESSFULTotal time: 2 seconds
Once rebuilt, for convenience, you can use the copy_jars ANT target to copy the konakartadmin_batch.jarinto the konakartadmin webapp.
C:\Program Files\KonaKart\custom\batch>..\bin\ant Buildfile: build.xml
copy_jars: [echo] Copy the batch jar to the lib directory [copy] Copying 1 file to C:\Program Files\KonaKart\webapps\konakartadmin\WEB-INF\lib
BUILD SUCCESSFULTotal time: 0 seconds
After possible reconfiguration of the scheduling configuration files (which you would need to do if youhave added a new batch job - see above), restart tomcat to test your new jobs.
Deletion of Expired DataIn order to keep KonaKart running efficiently, expired data should be deleted from the database at regularintervals. If not deleted, the data in some database tables, tends to grow and reduce the overall systemperformance. A batch job that can be scheduled through Quartz is provided for this task. The name of thejob is AdminCustomerBatchMgr.deleteTemporaryDataBatch .
Expired sessions are deleted from the sessions table. These accumulate because most customers tend notto do a formal logout from the application after they've logged in. Another table that tends to grow is thekk_cookie table. Whenever a guest comes to the store, a cookie is created which contains the key to akk_cookie table record. A temporary customer id is contained within this record and this id is used to insertand fetch shopping cart data so that a customer's cart is persisted even if he is a non-registered customer.The batch job deletes the cookie and cart records if they haven't been read for a programmable number ofdays. Finally, there is a counter table which is used to get unique ids for temporary customers. The batchjob also deletes the data from this table.
Configuring KonaKart to use Analytics ToolsThis feature of KonaKart can be used to integrate with Google Analysts or any other analytics enginesassuming their requirement is simply to insert some code into each page. Indeed, it's also possible to usethis feature to insert some code into each page for any other purpose that you might have!

Administration and Configuration
119
Configuring KonaKart to use Google Analytics
This section describes how to integrate KonaKart with Google Analytics. The integration technique isactually so generic in nature that it can be used for integrating with other analytics tools as well as Google's.
First you need to create an account with Google Analytics - see http://www.google.com/analytics/ fordetails.
KonaKart - Google Analytics Integration
Setting up Google Analytics
Following Google's guidelines, set up a web site profile for your KonaKart site. By default the defaultpage is /konakart/Welcome.do .
Take note of the javascript "Tracking Code" that Google generate for your profile. You will need this toconfigure KonaKart (see below).

Administration and Configuration
120
Setting up KonaKart to use Google Analytics
KonaKart will insert the Google Analytics "Tracking Code" for your site into every page of the Kon-aKart store. For KonaKart to use your own unique code, you will have to copy this and add it to yourMessages.properties file (or your own locale version of this file, as appropriate).
You must add the text of the "Tracking Code" on one line as the value of the analytics.code property. Itmay be convenient to use the default tracking code value that is included by default - but if you do thisyou must ensure that you replace the dummy UA-9999999-1 identifier with your own.
Once the analytics code is defined in the Messages.properties file you have to enable analytics in theKonaKart Admin App. You can find this configuration parameter under the Configuration >> Loggingsection.
Now sit back and wait for the data to be collected and enjoy studying the reports that Google produces!
Be patient, however, because data does not appear in your Google account for 24 hours or more.
Configuring KonaKart to use Other Analytics Tools
This feature of KonaKart can be used to integrate with other analytics engines assuming their requirementis simply to insert some code into each page. Indeed, it's also possible to use this feature to insert somecode into each page for any other purpose that you might have!
Defining the Code to be inserted
For KonaKart to insert your own code into each page, you have to define it in your Messages.propertiesfile (or your own locale version of this file, as appropriate).
You must add the code on one line as the value of the analytics.code property overwriting whatever isdefined there by default.
Once your code is defined in the Messages.properties file you have to enable analytics in the KonaKartAdmin App. You can find this configuration parameter under the Configuration >> Logging section.Whilst you may not actually be using the feature for "analytics", you still need to enable this setting sothat the code is inserted in each page.

Administration and Configuration
121
Publishing Product Data to Google BaseKonaKart provides the functionality to publish product data to Google Base. You can execute this fromeither a command line utility or from the KonaKart Admin App. Since this might be a process you wouldwant to run on a regular basis to keep your products in sync with the items in Google Base, it might beappropriate for you to execute the command line utility from your system scheduler at a frequency thatmakes sense for your shop's product catalog. Note that published products "expire" in Google Base after30 days, so bear this in mind when scheduling publishing runs.
Products are published with the target country defined as the shop where the store resides with productdescriptions published only in the default language for the store.
Neither inactive or invisible products are published.
Setting Up Google BaseBefore you can use this feature you must create an account in Google, get an API key and define theseconfiguration parameters in the KonaKart Admin App. At the time of writing, these accounts are free tocreate. See Google Base Account Set-up [http://base.google.com/] for details.
KonaKart Admin Application - Data Feeds Configuration
You need to obtain a Google Base API key for "Installed Apps". You can obtain one of these from GoogleAPI Keys [http://code.google.com/apis/base/signup.html] .
Executing the Google Base Publishing FeedThere are two different ways to publish products in Google Base. One is automatically executed by Kon-aKart whenever changes are made to products in the application. The other is explicit execution of theprocess to publish products to Google.
If you want KonaKart to update the products published in Google whenever a change occurs to theseproducts in KonaKart, you have to "Enable Google Base" in the Configuration section of the Admin App.If you only want to publish products at specific times, and not whenever changes occur to products insideKonaKart, you can disable Google Base. This enable Google Base setting in the configuration parametersonly controls the automated updates to Google Base by KonaKart so even if you do not enable it, you canalways run the full publish products process, whenever you like.

Administration and Configuration
122
There are two ways to run the process to publish all products to Google Base as follows:
• From the Admin App
• From a Script
Publishing Products From the Admin App
Under the Tools Menu you will find the Data Feeds menu item. Once here, you will see the "Publish"option. When you click on the "Publish" button you will initiate a process that publishes your product toGoogle Base. Since this can take a very long time (the more products you have, the longer time it will take),this job executes in the background so that the Admin App user does not have to wait for it to completebefore moving on to another task.
KonaKart Admin Application - Tools > Publish Products
Publishing Products From Scripts
Scripts are provided for both Windows and Linux/Unix. These are located in the googleBase directorydirectly underneath the KonaKart home directory, and are called:
• PublishProducts.bat (Windows)
• PublishProducts.sh (Unix/Linux)
These scripts can be executed directly from the command line or from a system scheduling utility (suchas cron on Unix).
The usage is the same on both platforms:

Administration and Configuration
123
C:\Program Files\KonaKart\googleBase>PublishProducts===================================================================================================Publish KonaKart Products in Google Base===================================================================================================No username specified.Usage: PublishProducts [-s storeId] [-l logFileName] -u user -p password [-t feed-type] [-d] -u user = KonaKart Admin User -s storeId = KonaKart Store Id (default storeId) -p password = KonaKart Admin Password -t feed type = Data Feed Type (default 1 = Google) -l log file name = log file name (default PublishProducts.log) -d = Enable debug mode
Example execution:
keller@swansea:~/konakart/googleBase$ ./PublishProducts.sh -u [email protected] -p princess ===============================================================================================Publish KonaKart Products in Google Base===============================================================================================
**** Enterprise version of KonaKartAdmin Engine ****
Published 28 products to GoogleProducts Published successfully
124
Chapter 9. Marketing - Customer Tagsand Expressions
The Enterprise version of KonaKart contains sophisticated marketing functionality that allows you to cap-ture customer data as the customer uses your KonaKart eCommerce store; and to use that data within com-plex expressions in order to show dynamic content, activate promotions and send eMail communications.
What are Customer Tags?A customer tag is an entity that can be associated with a logged in customer and given a value for thatcustomer. The best way of understanding what this really means is to look at the tags included in thestandard KonaKart installation.
• PRODUCTS_VIEWED - A list of the most recently viewed products
• CATEGORIES_VIEWED - A list of the most recently viewed categories
• MANUFACTURERS_VIEWED - A list of the most recently viewed manufacturers
• PRODUCTS_IN_CART - A list of products in the shopping cart
• PRODUCTS_IN_WISHLIST - A list of products in the wish list
• SEARCH_STRING - The search string of the last product search made by the customer
• COUNTRY_CODE - The code of the customer's country
• CART_TOTAL - The currency total of the shopping cart
• WISHLIST_TOTAL - The currency total of the wish list
• BIRTH_DATE - When the customer was born
• IS_MALE - The sex of the customer
They tend to be used to keep track of a customer's actions in the store-front application (i.e. what productshave been looked at, what products are in the wish list, what the customer has searched for etc.) and tostore information about the customer such as whether he is male or female and what country he livesin. New customer tags can easily be added to store whatever information is important for your businessrequirements. If you create a new tag, for example, to keep track of how many orders the customer hasplaced in the last 6 months, then you also need to create a way of populating the tag value for each customer.In this example you could use a scheduled batch job that runs once a day.
Tags have a name, a description (used in the expression builder) and a type which can be:
• STRING_TYPE - The tag value is in the format of a String. i.e. To store the country from which thestore is being accessed.
• INT_TYPE - The tag type is in the format of an int. i.e. To save the product id of the last product viewedby the customer.
• MULTI_INT_TYPE - The tag type allows the tag to store an array of ints. When this type is selected,the Max Number of Ints attribute determines the maximum number of ints in the array. i.e. To store theids of the last 5 products viewed by the customer.

Marketing - CustomerTags and Expressions
125
• DECIMAL_TYPE - The tag type is in the format of a decimal. i.e. To store the value of all items inthe basket.
• DATE_TYPE - The tag type is in the format of a date. i.e. To store the date of the last login for thecustomer.
• BOOLEAN_TYPE - The tag type is in the format of a boolean. i.e. To store the customer gender. Thetag could be named IS_MALE and take values of true or false.
What are Expressions?Expressions are a way of combining customer tag values using AND/OR operators. An expression can beevaluated for a customer and always returns true or false. For example, I may want to show a banner to acustomer if his cart already contains $50.00 worth of goods and he has Product A in his wish list or he hasrecently viewed Product A. Since I know that the customer has shown an interest in Product A, my bannercould attempt to persuade him to add it to the cart. In order to achieve this, I need to create an expressionand run it for a customer before he checks out.
Expressions may be used for three different tasks:
• To show dynamic content such as a banner, as in the example above.
• To activate a promotion. The expression can be selected in the panel used to set promotion rules oncea promotion has been created.
• To filter customers when sending out eMail communications. The expression can be selected in theCustomer Communications panel.
Tutorial for creating an expression using thestandard customer tags
Note that when creating expressions we often use the numeric internal ids of products, categories andmanufacturers to identify them. These ids are visible in the admin app although they may be hidden bysetting the configuration variables under the Admin App Configuration sub menu.
The id of a product (and SKU) may be viewed as you move your mouse over the product name in theProducts panel:

Marketing - CustomerTags and Expressions
126
It may also be viewed in the Details tab of the Edit Product panel:
The id of a category is visible in the Categories panel:
The id of a manufacturer is visible in the Manufacturers panel:
Now that we know where to find the ids, lets move on to the expression that we want to create. As explainedin the example above we want to create an expression to show a banner to a customer if his cart alreadycontains $50.00 worth of goods and he has Product A in his wish list or he has recently viewed ProductA. For the sake of the tutorial we can attribute a product id of 10 to Product A. Let's create an expressioncalled MY_EXPRESSION as shown below.

Marketing - CustomerTags and Expressions
127
Once the expression has been saved, we must click on the Variables button in order to open a new panelwhere we can enter the expression variables that define the expression.
Click the New button to create the first variable.
We choose CartTotal from the list of customer tags and give it a value of >= 50. Now we must AND thistag with the the following two tags OR'ed together. To achieve this, we click the Group button.
After entering the Customer Tag value for product in wish list, we need to OR it with the recently viewedproduct tag, by clicking the New button.

Marketing - CustomerTags and Expressions
128
Now we can click the save button to save the expression variables.
We have created the expression: (Cart_Total >= 50) AND ((prod in wishlist == 10) OR (recently viewedprod == 10))
The demo store front application is already partially set up to show a tile (DynamicContentTile.jsp) dy-namically for a logged in customer. In order to enable the tile, we must edit the file called tiles-defs.xmlwhich can be found under the webapps\konakart\WEB-INF directory. As can be seen from the image be-low, we must uncomment the line for leftTile3 in order to add DynamicContentTile.jsp. We must alsocomment or delete the line below this which adds an empty tile called Empty.jsp. Note that once this tile isenabled and customer tag functionality has been enabled, it will attempt to evaluate an expression calledMY_EXPRESSION and an exception will be thrown if this expression doesn't exist.
Finally, before running the application to try out our expression, we must enable customer tags in theCustomer Details section of the configuration variables, as shown below:

Marketing - CustomerTags and Expressions
129
The code that sets the wish list and cart customer tags is embedded within the client engine and so this tagfunctionality has to be enabled separately. All other customer tags are set within the Struts action classessuch as CustomerRegistrationSubmitAction.java for which the source code is shipped.
As can be seen from the image above, a tile appears (red arrow) after logging in, when the cart total isabove $50 and Under Siege 2 (product id = 10) is in the wish list. The tile appears on the home page view.Obviously in a real life situation the tile could be a banner.
At any time, you can view (and edit) the customer tag values for any customer from the Tags folder ofthe Edit Customer panel.

Marketing - CustomerTags and Expressions
130
How to set Customer Tag Values in Java codeThe KonaKart Store Front Server eCommerce Engine has methods to get and set the customer tags. Thesemethods are:
• insertCustomerTag()
• addToCustomerTag()
• getCustomerTag()
• getCustomerTagValue()
• deleteCustomerTag()
• getCustomerTags()
The CustomerTag object has getter and setter methods to set and read data as BigDecimal, Boolean, Date,Int, Int Array and String. These methods should be used rather than setting the tag value directly as a Stringbecause the internal representation of the tag data may change over time.
The best way of seeing how the customer tag data is set in the store front application is to look at the sourcecode of the Struts Action classes where this data is set using the Client Engine. Here are a few examples:
ShowProductDetailsAction.java

Marketing - CustomerTags and Expressions
131
// Set the PRODUCTS_VIEWED customer tag for this customer kkAppEng.getCustomerTagMgr().addToCustomerTag("PRODUCTS_VIEWED", selectedProd.getId());
QuickSearchAction.java
// Set the SEARCH_STRING customer tag for this customer kkAppEng.getCustomerTagMgr().insertCustomerTag("SEARCH_STRING", searchText);
EditCustomerSubmitAction.java
// Set the BIRTH_DATE customer tag for this customer CustomerTag ct = new CustomerTag(); ct.setValueAsDate(d); ct.setName("BIRTH_DATE"); kkAppEng.getCustomerTagMgr().insertCustomerTag(ct);

132
Chapter 10. Reward PointsThe Enterprise version of KonaKart supports reward points which enable you to increase customer loyaltyand increase sales by rewarding customers for purchases as well as other actions such as registering, writinga review, referrals etc. During the checkout process, points may be redeemed for discounts up to the totalvalue of the order.
The mechanism to redeem and allocate points is controlled by the KonaKart promotion sub-system whichmeans that both actions may be assigned the rules applicable to all promotions. i.e. You may decide to onlyaccept points redemption if the order value is above a limit or only allocate points for an order containinga particular product etc.
Configuration of Reward PointsIn order to configure the reward point system, you must take the following steps:
In the Configuration>>Reward Points section of the Admin App, the Reward Point functionality must beenabled. There are also configuration variables to assign a number of points for when a customer registersor writes a review. More options like this may be easily added to the solution.

Reward Points
133
The Reward Point and Redeem Point Order Total modules must be installed in the Modules>>Order Totalssection of the Admin App. The sort order of these modules is important. The Redeem Points module mustcome before the Total module and the Reward Points module must come after. The reason for this canbe explained by the image below.
Now two promotions must be defined that use the modules that have just been installed:

Reward Points
134
The Reward Points Promotion is the promotion that allocates a number of points to the customer basedon the value of the order. The number of points is calculated by multiplying the order value by the pointsmultiplier attribute. i.e. If the value of the order is $50 and the multiplier is 10, then 50 x 10 = 500 pointswill be assigned to the customer when the order is paid for.

Reward Points
135
The Redeem Points Promotion is the promotion that converts points into a discount. The discount is cal-culated by multiplying the number of points redeemed by the points multiplier. i.e. If 1000 points areredeemed and the point multiplier is 0.01, then a discount of 1000 x 0.01 = $10.00 is created. The pointsmultiplier can also be considered to be the value of a single point. In the example above, a single pointis worth 1 cent.

Reward Points
136
When a customer logs into the store front application he can view a statement of his reward point transac-tions and he always has available the total number of points that he can spend.
The administrator can view the reward point transactions for any customer, and has the ability to add anddelete points from the customer's account.
Technical DetailsReward points are added and removed from a customer's account when an order is saved orchanges state. The code that manages this is in the com.konakart.bl.OrderIntegrationMgr andcom.konakartadmin.bl.AdminOrderIntegrationMgr.
When an order is saved but hasn't been paid for, redeemed points are reserved so that they cannot beused twice. If the order is cancelled, these reserved points are returned to the customer, otherwise they arepermanently removed once the order is paid for.
If your business requires reward points to expire after a certain period, then you may run theAdminCustomerBatchMgr.removeExpiredCustomersBatch which will expire all unused points older thana specified number of days. Once the points have been expired, they are no longer available to be usedby a customer.

137
Chapter 11. Payment, Shipping andOrderTotal Modules
Module TypesKonaKart has a flexible plug-in architecture to support the addition of modules for "payment", "shipping"and "order-totals".
Payment Modules
Payment modules shipped with KonaKart are installed and configured through the Administration Appli-cation.
If you wish to add a new payment gateway and are not a programmer, please contact us. If you are a Javaprogrammer, it is possible for you to add your own module by following the examples we provide in thepackage. There is a detailed guide below.
The best approach is to learn by example. We supply all of our supported modules in source code format.They can be found under the KonaKart/custom/modules/src/com/konakart/bl/modules/payment directory.All payment modules should extend com.konakart.bl.modules.payment.BasePaymentModule and imple-ment com.konakart.bl.modules.payment.PaymentInterface.
In order to determine which Payment Modules are installed, the KonaKart engine reads the"MODULE_PAYMENT_INSTALLED" configuration property which should contain a semicolon delim-ited list of payment modules installed. In the case of a current osCommerce database, the property will con-tain a list of PHP modules (i.e. cc.php;cod.php). KonaKart ignores the extension. Let's say that you intro-duce a new module called "MyModule". In this case, KonaKart will look for a class called MyModule.classin the package "com.konakart.bl.modules.payment.mymodule". Note that the package name is always theclass name converted to lower case.
The interface that the payment module implements is relatively simple . The main method is calledgetPaymentDetails(Order order, PaymentInfo info) . The module is passed in the Order object and a Pay-mentInfo object . The PaymentInfo object contains details on zone information so that the module can bedisabled if the delivery address isn't within a zone. It also contains details used mainly for IPN (InstantPayment Notification) such as the host and port details for the return notification and a secret key that canbe used to validate the return notification. The order object contains all details about the order, some ofwhich, may be required. In the case of the PayPal example, the final piece of the puzzle is contained in aStruts action class called com.konakart.actions.ipn.PayPalAction. This action is called by PayPal in orderto return the status of the payment. When received, the action class may change the state of the order aswell as updating the inventory.
Shipping Modules
Shipping modules shipped with KonaKart are installed and configured through the Administration Appli-cation.
If you wish to add a new shipping module and are not a programmer, please contact us. If you are a Javaprogrammer, it is possible for you to add your own module by following the examples we provide in thepackage. The best approach is to learn by example. We supply a few examples in source code format:

Payment, Shipping andOrderTotal Modules
138
• com.konakart.bl.modules.shipping.digitaldownload.DigitalDownload.java - If you sell digital down-load products in your store, then you should install this module.
• com.konakart.bl.modules.shipping.fedex.Fedex.java - A FedEx shipping module
• com.konakart.bl.modules.shipping.flat.Flat.java - A flat rate
• com.konakart.bl.modules.shipping.free.Free.java - You should install this module to provide free ship-ping.
• com.konakart.bl.modules.shipping.freeproduct.FreeProduct.java - If you have one or more products thathave been configured for free shipping, then you should install this module.
• com.konakart.bl.modules.shipping.item.Item.java - A rate per item
• com.konakart.bl.modules.shipping.table.Table.java - This shipping module implements a rate per orderweight or a rate based on the total cost.
• com.konakart.bl.modules.shipping.ups.Ups.java - UPS shipping module.
• com.konakart.bl.modules.shipping.zones.Zones.java - This shipping module implements a rate per itemweight per zone.
In order to determine which Shipping Modules are installed, the KonaKart engine reads the"MODULE_SHIPPING_INSTALLED" configuration property which should contain a semicolon delim-ited list of shipping modules installed. In the case of a current osCommerce database, the property willcontain a list of PHP modules (i.e. flat.php;item.php;table.php). KonaKart ignores the extension. Let's saythat you introduce a new module called "MyModule". In this case, KonaKart will look for a class calledMyModule.class in the package "com.konakart.bl.modules.shipping.mymodule". Note that the packagename is always the class name converted to lower case.
The interface that the shipping module implements is relatively simple . The main method is calledgetQuote(Order order, ShippingInfo info) . The module is passed in the Order object and a ShippingInfoobject . The ShippingInfo object contains details on zone information so that the module can be disabledif the delivery address isn't within a zone. It also contains information about the number of packages andtheir weight etc so that the shipping cost can be calculated . The order object contains all details about theorder, some of which, may be required.
An alternative approach is to contact us with details of the Shipping Module that you would like to integratewith KonaKart so that we can create the module for you.
Configuring Free Shipping
From version 2.2.3.0, free shipping can be set on a product by product basis. To set free shipping for aproduct, you must navigate to the Details tab of the Edit Product panel in the Admin App. There you mustchange the product type to "Physical Product - Free Shipping". In order for this mechanism to functioncorrectly, you must install the Shipping Module called "FreeProduct". This module will return a shippingquote of zero if it detects that the physical products within the order all have free shipping.
Free shipping for all products can be configured in the Administration Application in the sectionModules>>Order Totals by selecting the Shipping Module.
You may allow free shipping by setting the Allow Free Shipping value to "true" . In order to not show theshipping cost of zero on the order you must set Display Shipping to "false". Free shipping can be madeconditional for orders over a certain amount or just for a combination of national / international orders.

Payment, Shipping andOrderTotal Modules
139
The text that you display on the screen in the area that you would normally select a shipping method, isdefined in WEB-INF\classes\com\konakart\bl\modules\shipping\Shipping_xx.properties. This can be setto e.g. "Free shipping for orders over $50", "Free Shipping", "No Shipping" etc.
Note that in order to completely remove shipping from the checkout process, you will need to make modi-fications to the checkout process (i.e. JSPs, Struts Actions and GWT code in the case of one page checkout).
Configuring the Zones Shipping Module
The Zones Shipping Module allows you implement shipping rates based on the weight of the shipment,for different countries. The module can be installed and configured through the Admin App. The numberof different shipping zones has to be decided before running the Admin App. It is set in the properties file:
/webapps/konakartadmin/WEB-INF/classes/com/konakartadmin/modules/shipping/zones/Zones.properties
by editing the section:
# Set this to the number of zones you require.MODULE_SHIPPING_ZONES_NUMBER_OF_ZONES=1
The Admin App uses the above information to create a number of entry fields called "Zone 1 Countries"," Zone 1 Shipping Table", "Zone 1 Handling Fee", "Zone 2 Countries", Zone 2 Shipping Table" etc.depending on how many shipping zones are required.
For each shipping zone you must enter data in :
• Zone X Countries
Contains a comma separated list of two character ISO country codes that are part of a shipping zone(i.e. US, CA for USA and Canada)
• Zone X Weight Charges
Contains shipping rates to shipping zone destinations based on a group of maximum order weights. Ex-ample: 3:8.50,7:10.50,... Weights less than or equal to 3 cost 8.50 for destinations in this Zone. Weightsgreater than 3 but less than or equal to 7, cost 10.50 for destinations in this zone.
• Zone X Handling Fee
Handling Fee for this shipping zone
Order Total Modules
Order Total modules shipped with KonaKart are installed and configured through the Administration Ap-plication.
If you wish to add a new order total module and are not a programmer, please contact us. If you are aJava programmer, it is possible for you to add your own module by following the examples we providein the package.
The best approach is to learn by example. We supply a few examples in source code format:

Payment, Shipping andOrderTotal Modules
140
• com.konakart.bl.modules.ordertotal.productdiscount.ProductDiscount.java - Discount for individualproducts
• com.konakart.bl.modules.ordertotal.shipping.Shipping.java - Displays the shipping cost of the order
• com.konakart.bl.modules.ordertotal.subtotal.Subtotal.java - Calculates the subtotal of the order
• com.konakart.bl.modules.ordertotal.tax.Tax.java - Calculates the tax of the order
• com.konakart.bl.modules.ordertotal.total.Total.java - Calculates the total of the order
• com.konakart.bl.modules.ordertotal.totaldiscount.TotalDiscount.java - Discount on the total of the or-der
In order to determine which Order Total Modules are installed, the KonaKart engine reads the"MODULE_ORDER_TOTAL_INSTALLED" configuration property which should contain a semicolondelimited list of order total modules installed. In the case of a current osCommerce database, the propertywill contain a list of PHP modules (i.e. ot_subtotal.php;ot_tax.php;ot_shipping.php). KonaKart ignoresthe extension. Let's say that you introduce a new module called "MyModule". In this case, KonaKart willlook for a class called MyModule.class in the package "com.konakart.bl.modules.ordertotal.mymodule".Note that the package name is always the class name converted to lower case.
The interface that the order total module implements is relatively simple . The main method is calledgetOrderTotal(Order order, boolean dispPriceWithTax, Locale locale) . The module is passed in the Orderobject which contains all details about the order, some of which, may be required.
An alternative approach is to contact us with details of the Order Total Module that you would like tointegrate with KonaKart so that we can create the module for you.
How to Create a Payment ModuleThis section explains how to create a new payment module for KonaKart using its module plug-in frame-work.
IntroductionKonaKart supports additional payment/shipping/order total/discount modules using a simple plug-in mod-el.
Payment modules are typically designed to interface between KonaKart and a 3rd Party payment gatewaysupplier - like PayPal, Authorize.Net or WorldPay etc.
You can install as many payment gateways as you like with KonaKart but typically you would just haveone configured as there is usually a cost associated with the merchant account that you have to set-up witheach payment organization in order to receive your payments.
Suppose you want to create a brand new payment gateway module to interface between KonaKart and yourchosen payment gateway supplier. For the purposes of this guide, let's call the payment gateway supplier"KonaPay" (a completely fictitious gateway).
Study the "KonaPay" APIsFirst of all you should find out as much as you can about which interfaces "KonaPay" supports. They mightsupply an XML interface, a HTTP post interface, a SOAP interface or any kind of weird custom API that

Payment, Shipping andOrderTotal Modules
141
allows you to communicate with them. Some payment gateways do not provide any APIs for providingcredit card information at all and require that your user is directed to their site to enter such sensitive details.
Choose which Interface Type you want for your users
So, you have to consider which type of gateway you want to implement for your users? This may wellaffect which gateway supplier you choose. Do you want to collect the credit card details yourself withinKonaKart or do you want to send the users off to a payment gateway site to collect this information? Someprefer the former, some the latter.
You will see in the code that you need to set the paymentType on the PaymentDetails object, which defineswhich of these two modes you want:
// For Authorize.Net,YourPay etc.setPaymentType(PaymentDetails.SERVER_PAYMENT_GATEWAY);
or
// For PayPal, WorldPay etc.setPaymentType(PaymentDetails.BROWSER_PAYMENT_GATEWAY);
For the sake of our discussion, KonaPay provides a well-documented HTTP API that allows us to collectcredit card information on the KonaKart site and send these off synchronously for payment authorization- which we think provides the best user experience at payment time. It's attractive to us because we canretain the same look and feel of our KonaKart store across the full shopping experience - rather than havingto jump off to a payment gateway page provided by the gateway supplier which doesn't look anythinglike the rest of our site.
OK, we've chosen "KonaPay" because it fits our preferred implementation model and it has a well-docu-mented API, what next?
Sign up for a Test Account with "KonaPay"
Typically, the payment gateway supplier will provide a free dummy test account so the next step is toapply for one of these at "KonaPay". Fortunately, "KonaPay" do provide a test account so we sign up andstudy the API documentation in a little more detail.
Determine which of the existing payment modules is theclosest match
The next important step is to study the existing payment modules to see which one looks to be the closest fitto "KonaPay". This step is very important and will save you a great deal of time if you pick a close match.
The good news is that many of the gateways work in very similar ways within the two distinct paymentmodule groups:
• Payment details are collected inside KonaKart ("Server Mode" - Authorize.Net, YourPay, PayJunction,USAePay)
• Payment details are collected at Gateway Supplier's Site ("Browser Mode" - WorldPay, PayPal, Chrono-Pay, ePayBg)

Payment, Shipping andOrderTotal Modules
142
Copy the files of the closest match as the starting point
We decide that PayJunction is the closest match to "KonaPay" so we make copies of all the PayJunctionfiles and directories - ensuring that we are completely consistent with the naming conventions used byPayJuntion (ie, the same lower/mixed case conventions as PayJunction). Make copies of the various prop-erties files as well and rename these as appropriate to "KonaPay", "Konapay" or "konapay" in a consistentmanner.
There will be payment directories to copy under com.konakart.bl.modules.payment andcom.konakartadmin.modules.payment.
We also need to copy modules/src/com/konakart/actions/gateways/PayjunctionAction.java to modules/src/com/konakart/actions/gateways/KonapayAction.java
Define the configuration parameters
Next, we need to decide which configuration options we will allow an administrator to change once the"KonaPay" module is installed.
PayJunction allows these to be configured: (the following is the code that initializes these in modules/src/com/konakartadmin/modules/payment/payjunction/Payjunction.java:)

Payment, Shipping andOrderTotal Modules
143
configs[i++] = new KKConfiguration( /* title */"Enable PayJunction Module", /* key */"MODULE_PAYMENT_PAYJUNCTION_STATUS", /* value */"true", /* description */ "Do you want to accept PayJunction payments? ('true' or 'false')", /* groupId */groupId, /* sort Order */i, /* useFun */"", /* setFun */"tep_cfg_select_option(array('true', 'false'), ", /* dateAdd */now);
configs[i++] = new KKConfiguration( /* title */"Sort order of display.", /* key */"MODULE_PAYMENT_PAYJUNCTION_SORT_ORDER", /* value */"0", /* description */ "Sort order of display. Lowest is displayed first.", /* groupId */groupId, /* sort Order */i, /* useFun */"", /* setFun */"", /* dateAdd */now);
configs[i++] = new KKConfiguration( /* title */"Payment Zone", /* key */"MODULE_PAYMENT_PAYJUNCTION_ZONE", /* value */"0", /* description */ "If a zone is selected, only enable this payment method for that zone.", /* groupId */groupId, /* sort Order */i, /* useFun */"tep_get_zone_class_title", /* setFun */"tep_cfg_pull_down_zone_classes(", /* dateAdd */now);
configs[i++] = new KKConfiguration( /* title */"PayJunction Username", /* key */"MODULE_PAYMENT_PAYJUNCTION_USERNAME", /* value */"pj-ql-01", /* description */ "The username used to access the PayJunction service", /* groupId */groupId, /* sort Order */i, /* useFun */"", /* setFun */"", /* dateAdd */now);
configs[i++] = new KKConfiguration( /* title */"PayJunction Password", /* key */"MODULE_PAYMENT_PAYJUNCTION_PASSWORD", /* value */"pj-ql-01p", /* description */ "The password used to access the PayJunction service", /* groupId */groupId, /* sort Order */i, /* useFun */"", /* setFun */"", /* dateAdd */now);
configs[i++] = new KKConfiguration( /* title */"Payment Server URL", /* key */"MODULE_PAYMENT_PAYJUNCTION_URL", /* value */"https://payjunction.com/quick_link", /* description */ "URL used by KonaKart to send the transaction details", /* groupId */groupId, /* sort Order */i, /* useFun */"", /* setFun */"", /* dateAdd */now);
configs[i++] = new KKConfiguration( /* title */"Security Options", /* key */"MODULE_PAYMENT_PAYJUNCTION_SECURITY", /* value */"AWZ|M|false|true|false", /* description */ "Security Options for Pay Junction - refer to PayJunction documentation for details", /* groupId */groupId, /* sort Order */i, /* useFun */"", /* setFun */"", /* dateAdd */now);
configs[i++] = new KKConfiguration( /* title */"Debug Mode", /* key */"MODULE_PAYMENT_PAYJUNCTION_DEBUG_MODE", /* value */"true", /* description */ "If set to true, the PayJunction module will be set to debug code", /* groupId */groupId, /* sort Order */i, /* useFun */"", /* setFun */"tep_cfg_select_option(array('true', 'false'), ", /* dateAdd */now);
The above are quite a typical combination of fields. Let's look at each one in turn:
• MODULE_PAYMENT_PAYJUNCTION_STATUS - for enabling/disabling the module. Typicallyprovided for all modules.
• MODULE_PAYMENT_PAYJUNCTION_SORT_ORDER - for order the module is displayed if thereare more than one available. Typically provided for all modules

Payment, Shipping andOrderTotal Modules
144
• MODULE_PAYMENT_PAYJUNCTION_ZONE - for defining a zone where this payment module canbe used. Typically provided for all modules.
• MODULE_PAYMENT_PAYJUNCTION_USERNAME - username to access the payment gatewayservice. Often required for payment modules
• MODULE_PAYMENT_PAYJUNCTION_PASSWORD - password to access the payment gatewayservice. Often required for payment modules
• MODULE_PAYMENT_PAYJUNCTION_URL - the payment service URL. Often required for pay-ment modules (useful for switching between the payment service's test and live services.
• MODULE_PAYMENT_PAYJUNCTION_SECURITY - a special configuration option particular toPayJunction. Typically payment modules would have one or two of these, but they would be differentbetween gateway services.
• MODULE_PAYMENT_PAYJUNCTION_DEBUG_MODE - handy for diagnosing problems, espe-cially in development. Typically provided for all modules
For "KonaPay" we will change the configuration parameter names to include "KONAPAY" rather than"PAYJUNCTION", so we would have "MODULE_PAYMENT_KONAPAY_STATUS" etc... We need toreplace _PAYJUNCTION_ with _KONAPAY_ throughout all the source and properties files. For "Kon-aPay" we will assume, for simplicity that we will define the same set as is defined for PayJunction exceptthe MODULE_PAYMENT_PAYJUNCTION_SECURITY variable which we'll exclude.
Understanding the Configuration OptionsLooking more closely at the KKConfiguration structure that is initialized for each configuration object:
configs[i++] = new KKConfiguration( /* title */"Enable PayJunction Module", /* key */"MODULE_PAYMENT_PAYJUNCTION_STATUS", /* value */"true", /* description */ "Do you want to accept PayJunction payments? ('true' or 'false')", /* groupId */groupId, /* sort Order */i, /* useFun */"", /* setFun */ "tep_cfg_select_option(array('true', 'false'), ", /* dateAdd */now);
The comments should help a lot in understanding what these attributes are for. In more detail:
• title - affects what's shown on the screen of the Admin App
• key - the unique key by which this key is known
• value - the default value
• description - this is provided as floatover help in the Admin App
• groupId - the groupId - this is 6 for payment modules
• sortOrder - the order in which these keys are displayed in the Admin App
• useFun - a function that defines how this key should be "used"

Payment, Shipping andOrderTotal Modules
145
• setFun - a function that defines how this key is "set"
• dateAdd - the date the key is added to the database.
The only slightly complicated ones are the use and set functions. The example above shows the setFun touse to display a true/false toggle in the Admin App. The setFun and useFun can be null for most simpletext fields. These setFun and useFun formats are used throughout the Admin App and perhaps the easiestway to see how they work is to look at these columns in the database for each configuration key thatuses them.. eg: Issue "SELECT configuration_title, configuration_key, use_function, set_function FROMconfiguration;" against your database to see lots of examples.
** Ask questions in the forum if you're uncertain about these.
Add the "KonaPay" gateway to the Admin AppIn order to see the "KonaPay" payment gateway module in the Admin App we have to add it to the listof payment modules in webapps/konakartadmin/WEB-INF/classes/konakartadmin.properties. Rememberto match the classname - so be careful with your lower case/upper case characters! Once set, the AdminApp will inclde the "KonaPay" module in the set of modules that can be installed or removed from thesystem: (Konapay has been added in bold below):
# ------------------------------------------------------------------# Set the class names of the various modules you would like to make # available. The administrator can still choose to enable or disable# these.## Note that if you remove a module from the definitions below that # has already been set up in the database the users may still have # access to the modules in the konakart application. Hence, it is# advisable to remove the modules before they are removed from these# definitions.
# Make these space or semi-colon-separated class names - they have# implied prefixes of:## com.konakartadmin.modules.payment.{lower case module name}.# com.konakartadmin.modules.shipping.{lower case module name}.# com.konakartadmin.modules.orderTotal.{lower case module name}.
konakart.modules.payment=Authorizenet Yourpay Payjunction Konapaykonakart.modules.shipping=Flat Item Table Zones Free DigitalDownloadkonakart.modules.ordertotal=Tax Total ProductDiscount TotalDiscount
Implement the PaymentInterfaceNext we need to implement the PaymentInterface in our Konapay class in thecom.konakart.bl.modules.payment.konapay package. If the PayJunction directories were copied correctlyearlier the java file should be at custom/modules/src/com/konakart/bl/modules/payment/konapay
This Konapay.java source extends BasePaymentModule (whose source is provided at custom/appn/src/com/konakart/bl/modules/payment/BasePaymentModule.java) and implements PaymentInterface.
It's advisable to follow the pattern you see in the file you copied. Therefore, rename all the constants andvariables to names appropriate for "KonaPay" and set up the PaymentDetails object in a similar way ingetPaymentDetails().
Payment, Shipping andOrderTotal Modules
146
For much of the PaymentDetails, the values set will be very similar between payment modules (eg. thepayment module code, the sort order, title and description etc) but there will always be differences in the"NameValue[]" parameters that are added further down in the getPaymentDetails() method.
NameValue[] Parameters
Each payment gateway will need different parameter names so to work out which NameValue pairs youneed to add you need to study the API specification. With PayJunction, you can see that the followingare required: dc_logon, dc_password, dc_transaction_type etc. With "KonaPay" there will be differentnames and perhaps different encoding rules; the API documentation will define the requirements. Checkthe examples in the gateway documentation, these often make it clear what the names and values shouldbe. Once the parameters are understood, add these to the PaymentDetails - they will be used later to buildthe request to the gateway supplier.
Implement the Action code
Next we need to implement the Action code in our KonapayAction class in thecom.konakart.actions.gateways package. The "KonaPay" java file should be called custom/modules/src/com/konakart/actions/gateways/KonapayAction.java. (Notice that the (usually synchronous) mod-ules which collect the payment information from the user on the KonaKart site have to have"com.konakart.actions.gateways" implementations, whereas the (asynchronous) modules that divert theuser off to a page on the gateway's site have to have "com.konakart.actions.ipn" implementations).
This Konapay.java source extends BasePaymentModule (whose source is provided at custom/appn/src/com/konakart/bl/modules/payment/BasePaymentModule.java) and implements PaymentInterface.
It's advisable to follow the pattern in the file you copied from PayJunction. Therefore, rename all theconstants and variables to names appropriate for "KonaPay" and set up the PaymentDetails object in asimilar way in getPaymentDetails().
The Action files are quite well documented so it should be easy to see where to make modifications fora new module. Basically you will have to create your message to post to the gateway then process thereturned information to determine success or failure. If there's a failure you can return the user to the creditcard screen to try again (and show the error message that you received). Alternatively, for more seriouserrors, you can show the exception in a standard form for the KonaKart site.
Save IPN details
In order for your KonaKart administrator to diagnose payment gateway problems in the fu-ture, it's a good idea to save details of each transaction with a call to "saveIpnHistory" (seekkAppEng.getEng().saveIpnHistory()). Set the various attributes on IpnHistoryIf to values that you derivefrom the response as you see in the example source. These records are available in the KonaKart AdminApp for inspection and can be useful when diagnosing problems with payment gateways. The records canalso be useful in recording unique transaction codes that are provided by the gateway suppliers for provingthat payments have been made, should that need ever arise.
Save the gateway response to a file
Another technique that you can use to diagnose problems is to save gateway responses to a file on disk.An example of such code is in the YourpayAction source as follows:
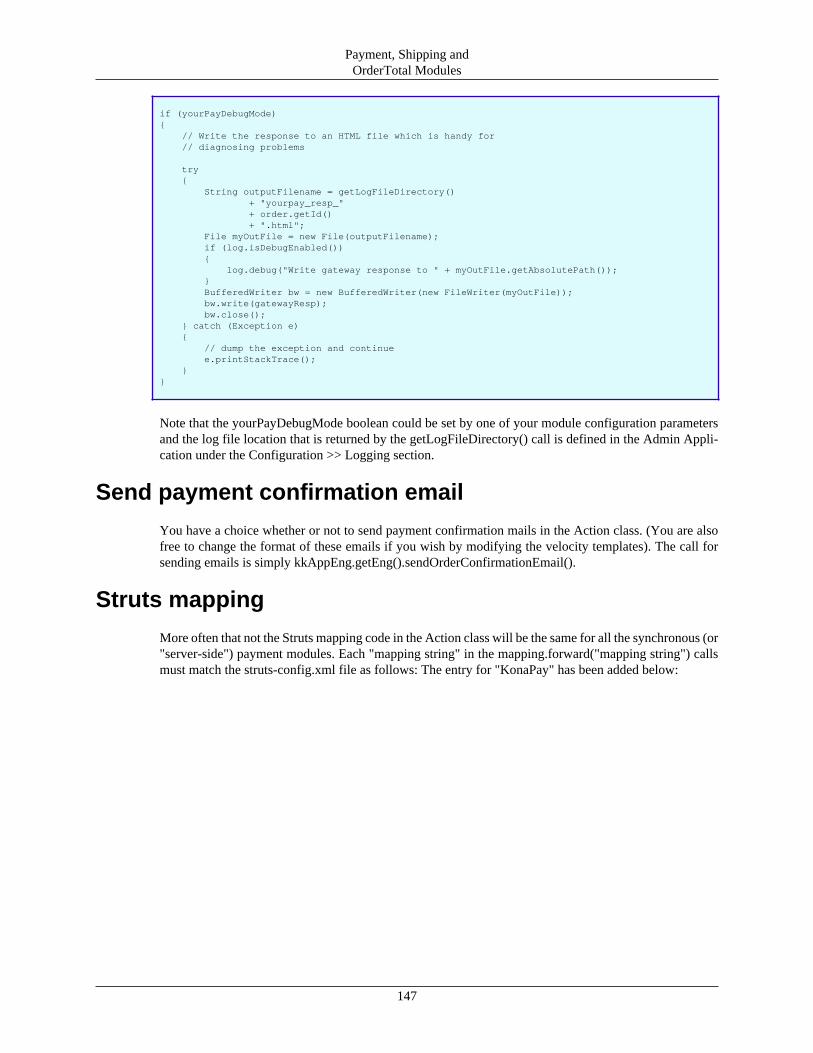
Payment, Shipping andOrderTotal Modules
147
if (yourPayDebugMode){ // Write the response to an HTML file which is handy for // diagnosing problems
try { String outputFilename = getLogFileDirectory() + "yourpay_resp_" + order.getId() + ".html"; File myOutFile = new File(outputFilename); if (log.isDebugEnabled()) { log.debug("Write gateway response to " + myOutFile.getAbsolutePath()); } BufferedWriter bw = new BufferedWriter(new FileWriter(myOutFile)); bw.write(gatewayResp); bw.close(); } catch (Exception e) { // dump the exception and continue e.printStackTrace(); }}
Note that the yourPayDebugMode boolean could be set by one of your module configuration parametersand the log file location that is returned by the getLogFileDirectory() call is defined in the Admin Appli-cation under the Configuration >> Logging section.
Send payment confirmation email
You have a choice whether or not to send payment confirmation mails in the Action class. (You are alsofree to change the format of these emails if you wish by modifying the velocity templates). The call forsending emails is simply kkAppEng.getEng().sendOrderConfirmationEmail().
Struts mapping
More often that not the Struts mapping code in the Action class will be the same for all the synchronous (or"server-side") payment modules. Each "mapping string" in the mapping.forward("mapping string") callsmust match the struts-config.xml file as follows: The entry for "KonaPay" has been added below:

Payment, Shipping andOrderTotal Modules
148
<!-- ================================= Server Side Gateways --> <action path="/USAePay" type="com.konakart.actions.gateways.UsaepayAction"> <forward name="Approved" path="/CheckoutFinished.do"/> <forward name="TryAgain" path="/CheckoutServerPayment.do"/> <forward name="NotLoggedIn" path="/CheckoutDelivery.do"/> </action>
<action path="/AuthorizeNet" type="com.konakart.actions.gateways.AuthorizenetAction"> <forward name="Approved" path="/CheckoutFinished.do"/> <forward name="TryAgain" path="/CheckoutServerPayment.do"/> <forward name="NotLoggedIn" path="/CheckoutDelivery.do"/> </action>
<action path="/PayJunction" type="com.konakart.actions.gateways.PayjunctionAction"> <forward name="Approved" path="/CheckoutFinished.do"/> <forward name="TryAgain" path="/CheckoutServerPayment.do"/> <forward name="NotLoggedIn" path="/CheckoutDelivery.do"/> </action>
<action path="/KonaPay" type="com.konakart.actions.gateways.KonapayAction"> <forward name="Approved" path="/CheckoutFinished.do"/> <forward name="TryAgain" path="/CheckoutServerPayment.do"/> <forward name="NotLoggedIn" path="/CheckoutDelivery.do"/> </action>
<action path="/YourPay" type="com.konakart.actions.gateways.YourpayAction"> <forward name="Approved" path="/CheckoutFinished.do"/> <forward name="TryAgain" path="/CheckoutServerPayment.do"/> <forward name="NotLoggedIn" path="/CheckoutDelivery.do"/> </action>
One other change is required in struts-config.xml which defines the forwarding for the server-side pay-ments: It's critical to maintain naming consistency here (use lower or mixed case as in the other examples- or whatever it takes to match your definitions elsewhere).
<action path="/CheckoutServerPaymentSubmit" type="com.konakart.actions.CheckoutServerPaymentSubmitAction" name="CreditCardForm" scope="request" validate="true" input="/CheckoutServerPayment.do"> <forward name="usaepay" path="/USAePay.do"/> <forward name="authorizenet" path="/AuthorizeNet.do"/> <forward name="payjunction" path="/PayJunction.do"/> <forward name="konapay" path="/KonaPay.do"/> <forward name="yourpay" path="/YourPay.do"/></action>
Build, Deploy and TestOnce the java code is built, the properties files and the struts-config.xml have been updated, all that isrequired to be done is to execute the ant build, copy the new jars into position, restart tomcat and test!
The gateway suppliers typically provide test credit card numbers for you to use for these tests.
If you have questions on customizing KonaKart please post these on our forum [http://www.konakart.com/forum] , at http://www.konakart.com/forum

149
Chapter 12. Recurring BillingKonaKart provides support for recurring billing which may be implemented in one of two alternate ways.The actual payment transactions may be performed by a payment gateway that supports recurring billing, orthey may be performed by a KonaKart batch program that interfaces with the payment gateway to make theregular payments. We recommend the first approach since it doesn’t require that you store sensitive creditcard information within your local database because once they have been sent to the payment gateway tocreate the subscription, it is the gateway that automatically makes the payments.
There are two main objects within KonaKart that provide recurring billing support. These are the PaymentSchedule object and the Subscription object. Both have dedicated panels within the Admin App so that theymay be managed. The Payment Schedule panel may be found under Products, whereas the SubscriptionPanel may be found under Orders.
Payment ScheduleA payment schedule defines the frequency of payments for a product as well as the total number. i.e.Payments may be monthly, lasting for two years. In the case of monthly payments, it allows you to definethe day of the month the payment should be made. It also allows you to define one or more trial paymentswhich may be for a different amount. i.e. The subscription may consist of monthly payments of $9.99 forthe first 6 months before increasing to $30.00 .
A payment schedule is associated to a product. This is done in the Edit Product panel. A drop list containingpayment schedules will appear in the Details tab of the Edit Product panel if one or more payment schedulesexist. When an order is confirmed by a customer during the checkout process, the products within the orderare examined to detect whether any of them have an associated payment schedule. If a payment scheduleis found, this triggers off the process of creating a recurring billing subscription.
SubscriptionA subscription defines the payment amount and start date for the payments. It can be activated / deactivatedand if any problems are found (i.e. credit card expired) during the payment transaction, these problems arelogged in the subscription object . As mentioned above, a subscription is created and saved at the momentwhen an order is confirmed, if any of the products within the order are associated to payment schedules. Asubscription can be associated with one or more Payment Info objects, each of which records the amountpaid on a particular date, as well as saving the complete transaction reply from the payment gateway.
A subscription object contains many other attributes such as the last and next billing dates, the ordernumber, the product SKU and custom fields. These are all optional, but may be used to save importantinformation that can be used for reporting purposes and to control the actual payments when they are beingmanaged by KonaKart.
Using a Payment Gateway that supports Recur-ring Billing
Many payment gateways support recurring billing and provide interfaces to create and manage subscrip-tions. In this case we recommend using the KonaKart Admin Custom engine in order to communicate tothe Payment Gateway whenever a Subscription is created or edited so that the Subscription in the Kon-aKart database always reflects the subscription in the payment gateway. These are the API calls that needto be customized:

Recurring Billing
150
Admin Engine API
• InsertSubscription() : The subscription should first be sent to the payment gateway since the paymentgateway will normally return a subscription code that should be added to the subscription before it issaved by KonaKart. This code will be used in future communications with the payment gateway in orderto identify the subscription.
• UpdateSubscription() : The subscription being edited will contain the subscription code that should beused to edit the subscription saved by the payment gateway. An update may be used for example todisable the subscription.
• DeleteSubscription() : The subscription being deleted will contain the subscription code that should beused to delete the subscription saved by the payment gateway.
In the case of the Application Engine, the OrderIntegrationMgr contains code that will insert a subscrip-tion object when the order is saved. This needs to be edited to also send the subscription to the PaymentGateway. The method called manageSubscriptions() is commented out by default. If your store supportsrecurring billing, this method must be uncommented. Note that the credit card details may be passed inas attributes of the order object from the application. Since you don’t want to save this information in thedatabase but only use it to pass to the payment gateway, you should copy it into a temporary object in thebeforeSaveOrder() method and delete it from the order so that it doesn’t get persisted into the database.
Some example code is provided under KonaKart / custom / modules / src / com / konakartadmin / modules/ payment / authorizenet in the file RecurringBilling.java which contains the methods:
• createSubscription()
• updateSubscription()
• cancelSubscription()
This code may be copied and placed under the directory of the Payment Gateway that you are currentlyusing ( if it isn’t AuthorizeNet ). Once copied you need to implement the actual code that communicateswith the payment gateway.
Managing Recurring Billing through KonaKartIn this case the credit card details are stored by KonaKart in an encrypted format within the Order object.The actual payments are made by a KonaKart Batch program that interfaces to the payment gateway to per-form the payment transaction. An example of this batch is provided in source code format so that it can bemodified. The batch is called recurringBillingBatch() and can be found within AdminOrderBatchMgr.java.It loops through all subscriptions that are active and that have a nextBillingDate equal to or later thanthe current date. Based on the data found within the Subscription object and attached PaymentScheduleobject, the batch program can make the payment and update the Subscription with a new nextBillingDate.The subscription object is also updated if the transaction with the payment gateway fails to indicate thatthere has been a problem.
The batch does not contain the actual code that interfaces with the payment gateway to make the payment.The easiest way to achieve this functionality is to copy and modify the code from the payment gatewaymodule that you are currently using i.e. Authorizenet.java under KonaKart / custom / modules / src / com/ konakart / bl / modules / payment /authorizenet for the case of AuthorizeNet.

151
Chapter 13. Custom ValidationConfiguring the Validation used in KonaKart.
Custom Validation for the Store FrontThis section defines how you configure the custom validation for the KonaKart application
Configuring validation on data entered through the UIThe configuration is done via an xml file called WEB-INF/validation.xml. There is a section near the topof the file containing all of the parameters that can be customized, with names that describe the actualentry field. e.g.
<constant> <constant-name>ENTRY_FIRST_NAME_MIN_LENGTH</constant-name> <constant-value>2</constant-value></constant>
Note that in order for modifications to take effect, the KonaKart application must be rebooted.
Configuring validation for Custom FieldsAs for other data entered through the UI, validation for custom fields is set in WEB-INF/validation.xml .The file contains an example for a custom field where the minimum length is set to 5.
<field property="customerCustom1" depends="minlength"> <arg0 key="register.customer.body.custom1"/> <arg1 name="minlength" key="${var:minlength}" resource="false"/> <var> <var-name>minlength</var-name> <var-value>5</var-value> </var></field>
Custom Validation for the Admin ApplicationThis section defines how you configure the custom validation for the KonaKart Admin application
CustomValidaton.properties fileFrom release 2.2.3.0 of KonaKart it is possible to modify the default field validation in certain parts ofthe Admin App.
A new properties file is provided, called CustomValidation.properties. You will find this in the classesdirectory of the konakartadmin webapp.
The format and description of this file is defined within the file itself, but an extract is as follows:

Custom Validation
152
# ------------------------------------------------------------------## K O N A K A R T C U S T O M V A L I D A T I O N## ------------------------------------------------------------------# Parameters to define custom validation in the KonaKart Admin App# ------------------------------------------------------------------
# ------------------------------------------------------------------# If no custom validations are defined (or this file is removed) the# default validation rules are used in the KonaKart Admin App.## If you define custom validations in this file they will override# the default rules defined in the KonaKart Admin App.# Therefore, you only need to define the custom validation rules# that are different to the defaults.# ------------------------------------------------------------------
# ------------------------------------------------------------------# If your intention is to increase the number of characters allowed# in the database for a certain quantity, you will have to modify # the characteristics of that column in the database first. If you# then wish to validate the attribute in the KonaKart Admin App to# allow for the increased column width... you also need to add your# custom validation to this file# ------------------------------------------------------------------
# ------------------------------------------------------------------# Format:## ClassName.Attribute = [min];[max]## If min or max are not specified they will not be checked.#
Therefore, if you wanted to change the validation on the Product SKU field in the Admin App, you wouldspecify:
Product.sku = 1;18
Fields Supported by Custom Validation
Only a certain subset of fields can have their validation overridden in this way, but if you need other fieldsto be made available for validation please get in touch with support at KonaKart.
Currently you can define validation rules for the following fields:

Custom Validation
153
Address.companyAddress.custom1Address.custom2Address.custom3Address.custom4Address.custom5Address.postcodeAddress.street_addressAddress.suburb
Category.nameCategory.imageCategory.custom1Category.custom2Category.custom3
CustGroup.priceId
Customer.email_addressCustomer.custom1Customer.custom2Customer.custom3Customer.custom4Customer.custom5Customer.telephoneCustomer.fax
Order.custom1Order.custom2Order.custom3Order.custom4Order.custom5Order.number
Order_Status_History.comment
Product.contentTypeProduct.custom1Product.custom2Product.custom3Product.custom4Product.custom5Product.descriptionProduct.quantityProduct.modelProduct.nameProduct.priceIdProduct.skuProduct.weight
Manufacturer.name
All of these fields appear (commented out) in the default CustomValidation.properties file in the defaultinstallation for ease of reference.

154
Chapter 14. One Page CheckoutIntroduction
This chapter contains information that explains how you can customize the One Page Checkout code inorder to personalize the checkout procedure for your customers.
Technology used for the One Page Checkout CodeAJAX technology is used to give an improved user experience in this critical area where you don't wantyour customers to leave your shop. We use Google's Web Toolkit http://code.google.com/webtoolkit[http://code.google.com/webtoolkit] embedded inside the Struts application.
How to customize the One Page Checkout CodeAll the source code for the one-page checkout is freely available for you to modify as you see fit.
To get you started with this, especially if you're unfamiliar with Google's "GWT", we provide a simpleone-page checkout developers toolkit. This allows you to modify the one-page checkout code, recompileand run, quickly and easily, without needing the rest of the application running.
The one-page checkout developers toolkit is included in every KonaKart download and can be found underthe custom directory where KonaKart was installed. On Windows the default location is: C:\ProgramFiles\KonaKart\custom\onepagecheckout .
Step by step guide on how to customize the One PageCheckout Code
1) Create a command shell window and change directory to the onepagecheckout directory inside yourKonaKart installation. The directory should contain the following files:
Directory of C:\Program Files\KonaKart\custom\onepagecheckout
06/01/2010 11:58 <DIR> .06/01/2010 11:58 <DIR> ..05/01/2010 15:26 5,937 .classpath05/01/2010 15:26 442 .project05/01/2010 15:26 514 build.properties05/01/2010 15:26 6,090 build.xml05/01/2010 15:26 2,878 KonaKart_One_Page_Checkout.launch06/01/2010 11:58 <DIR> lib06/01/2010 11:58 <DIR> src06/01/2010 11:58 <DIR> war 5 File(s) 15,861 bytes
2) Ensure that you have a java installation installed. KonaKart requires the Java 2 Standard Edition RuntimeEnvironment (JRE) version 5.0 or later. Download the Java 2 Standard Edition Runtime Environment(JRE), release version 5.0 or later from http://java.sun.com/j2se. (You've probably already done this sinceit is required to run KonaKart).
3) Ensure that you have installed Apache ANT (this is used by the supplied ANT build file that compilesand runs the code). (Alternatively, you can use the ant that's provided under the custom/bin directory).

One Page Checkout
155
4) Modify the build.properties file to suit your environment. You have to define your database connectionparameters because the code that you run will need to access the database. Use the database connectionparameters that you have set up for your KonaKart application.
# --------------------------------------------------------------------------------------# konakart_gwt build properties## Set the parameters in this file to suit your environment# --------------------------------------------------------------------------------------
# Database Parameters
adapter=mysqluser=rootpassword=url=jdbc:mysql://localhost:3306/store1?zeroDateTimeBehavior=convertToNulldriver=com.mysql.jdbc.DrivervalidationQuery=select 1
# KonaKart Home
KONAKART_HOME=../../
4) Add an item to your shopping cart. Run the KonaKart application and add an item (or many items) toa user's shopping cart. You need to do this to access the one-page checkout when it's run.
5) Finally, you are ready to build and run the code as follows by simply running ant. Note that the fileKKGWTServiceImpl.java, instantiates a KonaKart engine which is normally already instantiated whenthe one page checkout code is embedded within the store front application. It is coded to instantiate anengine in MODE_SINGLE_STORE. If you are setup to run in multi-store mode then you must changethe code accordingly.

One Page Checkout
156
C:\Program Files\KonaKart\custom\onepagecheckout>..\bin\antBuildfile: build.xml
clean: [echo] Cleanup...
copy_libs: [echo] Copy Jars...
copy_images: [echo] Copy Images...
compile: [echo] Compile the sources [mkdir] Created dir: C:\Program Files\KonaKart\custom\onepagecheckout\war\WEB-INF\classes [javac] Compiling 82 source files to C:\Program Files\KonaKart\custom\onepagecheckout\war\WEB-INF\classes [echo] GWT-Compile the sources
setConfigs: [echo] Set Configs to: [echo] adapter = mysql [echo] driver = com.mysql.jdbc.Driver [echo] user = root [echo] password = [echo] url = jdbc:mysql://localhost:3306/store1?zeroDateTimeBehavior=convertToNull [echo] validationQuery = select 1
run: [java] KonakartGWTServer() Engine to be used by application is com.konakart.al.KKAppEng [java] getAppEngByName(com.konakart.al.KKAppEng) [java] [java] ********************************************************************************** [java] * KONAKART LICENSE AGREEMENT * [java] * You may not use this software except in compliance with the licenses. * [java] * Please study the licenses on the KonaKart website for the rights, obligations * [java] * and limitations governing the use of this software. * [java] * For users of the Community Edition of KonaKart see: * [java] * http://www.konakart.com/documents/COMMUNITY-LICENSE.txt * [java] * For users of the Enterprise Extensions of KonaKart see: * [java] * http://www.konakart.com/documents/ENTERPRISE-LICENSE.txt * [java] ********************************************************************************** [java]
build:
BUILD SUCCESSFUL
When the one-page checkout code runs it will launch the GWT "dev mode" shell which allows you totest your code changes.
You have to set up a KonaKart application user (or use the default John Doe account which has emailaddress: "root@localhost" and password "password"). To run the one-page checkout in the GWT "DevMode" enter your user's credentials as instructed:
First the username which is an email address. The default username that is created at installation isroot@localhost :

One Page Checkout
157
Next enter the password. The default password that is created at installation is password :

One Page Checkout
158
If successful, and your user has a product in their shopping cart, you will see the following which is theone-page checkout screen:

One Page Checkout
159
Notes;
• You will notice that the configurable text strings (for labels and headings etc) are shown with theirproperties file references and not their translated names. This should help you locate the messages inthe message catalogues, especially if you need to translate them.
• To test your one-page checkout in a fully-integrated fashion (and with the message catalog referencestranslated) you will have to copy the generated javascript files into position (under the konakart webapp).
• A common error is to forget to place an item in your user's cart before running the one-page checkout.If you don't add at least one product to your user's cart you will see this error:

One Page Checkout
160
• GWT has an extremely useful debugging system that integrates with Eclipse. This allows you to debugboth client and server code in the Eclipse debugger. This is highly-recommended if you expect to bewriting anything more than the most trivial modifications to the one-page checkout.
To set up the One Page Checkout as an Eclipse project:
• Execute the default ANT task as above to copy libraries and images into position.
• In Eclipse, use "File Import" then choose "Existing Projects into Workspace" and click "Next".Browse for the onepagecheckout directory (under the custom directory where you installed Kon-aKart). Once selected, note that the KonaKart_one_page_checkout project should have been found.
• Finally, take all the defaults and click "Finish" which will create your Eclipse project which youshould see as "konakart_one_page_checkout" in your workspace.
• In addition to loading the source code ready to edit, the project has also defined a run configuration(called "KonaKart_One_Page_Checkout") which can be used to run the one page checkout fromEclipse.

161
Chapter 15. Programming GuideA guide to programming and customizing KonaKart.
One of the most powerful aspects of KonaKart is the flexibility in the number of different ways it can becustomized. This chapter contains descriptions of some of these techniques.
Using the Java APIsOne of the most important features of KonaKart is the availability of a set of open APIs that allow you tocontrol KonaKart as you require as part of your IT solution. You may wish to add a different front-end foryour KonaKart shopping cart application or you may wish to integrate KonaKart with other applicationsin your back office. When you use the java APIs for whatever purpose you can be confident that they willwork with future releases of KonaKart as backwards compatibility will always be maintained (althoughsome API calls may be deprecated, they will not be removed). A number of simple java sources are pro-vided in every KonaKart download kit (you can find them under the installation directory in a directorycalled java_api_examples) that demonstrate how you call the direct POJO form of the KonaKart APIs: Togive you a flavor of the examples in the downloadable sources, here is an extract from one of them thatdemonstrates how you can register a new customer using the KonaKart Admin APIs. (See the examplesources for a complete set of java files).

Programming Guide
162
// Instantiate an AdminCustomerRegistration object and set its // attributes
AdminCustomerRegistration acr = new AdminCustomerRegistration();
// Compulsory attributes
// Gender should be set to "m" of "f"
acr.setGender("m"); acr.setFirstName("Peter");acr.setLastName("Smith");
// If you do not require the birthdate, just set it to the current // date. It is compulsory and so needs to be set. acr.setBirthDate(new Date());acr.setEmailAddr("[email protected]"); acr.setStreetAddress("23 Halden Close"); acr.setCity("Newcastle"); acr.setPostcode("ST5 ORT");acr.setTelephoneNumber("01782 639706"); acr.setPassword("secret");
// Optional attributes
acr.setCompany("DS Data Systems Ltd.");
// Country Id needs to be set with the id of a valid country from// the Countries table
acr.setCountryId(222); acr.setFaxNumber("01782 639707");
// Newsletter should be set to "0" (don't receive) or "1" (receive)acr.setNewsletter("1");
acr.setSuburb("May Bank"); acr.setState("Staffs");
// Optional Custom fields for customer object
acr.setCustomerCustom1("Number Plate"); acr.setCustomerCustom2("Driver's license");acr.setCustomerCustom3("Passport"); acr.setCustomerCustom4("custom 4");acr.setCustomerCustom5("custom 5");
// Optional Custom fields for address object
acr.setAddressCustom1("custom 1");acr.setAddressCustom2("custom 2"); acr.setAddressCustom3("custom 3");acr.setAddressCustom4("custom 4"); acr.setAddressCustom5("custom 5");
// Register the customer and get the customer Id
int custId = eng.registerCustomer(sessionId, acr);;
System.out.println("Id of the new customer = " + custId);
Using the SOAP Web Service APIsKonaKart has two major interface types - the direct POJO interface, and the SOAP interface. Both supportexactly the same interface calls. Which one you choose will depend on many factors but the best perfor-mance is likely to come from the direct interface, whereas the SOAP interface gives greater flexibility indistributed implementations and inter-operability.

Programming Guide
163
It's remarkably simple to use KonaKart's SOAP interfaces. If your IDE can create client stubs from WSDLthen you can use that to create your SOAP clients or, if you prefer, you can use AXIS as in the downloadableexample which follows.
There are two WSDL definitions; one for the KonaKart Application API, and the other for the KonaKartAdmin API. They can be seen at these URLs:
• http://www.konakart.com/konakart/services/KKWebServiceEng?wsdl [http://www.konakart.com/konakart/services/KKWebServiceEng?wsdl]
• http://www.konakart.com/konakartadmin/services/KKWSAdmin?wsdl [http://www.konakart.com/konakartadmin/services/KKWSAdmin?wsdl]
Enable the SOAP Web ServicesSince version 3.2.0.0 of KonaKart, the SOAP APIs are disabled during the installation process. The pur-pose of this decision is to make the KonaKart engines more secure. The process for enabling the APIs isvery simple and can be achieved by running an ant target called enableWebServices in the KonaKart/cus-tom directory as shown below.
C:\Program Files\KonaKart\custom>.\bin\ant enableWebServicesBuildfile: build.xml
enableWebServices: [echo] Allow all methods in WSDD files:
BUILD SUCCESSFULTotal time: 0 seconds
The ant target modifies the files called server-config.wsdd present in the WEB-INF directory of the Kon-aKart store front and admin applications. The modification is simple:
The line
<parameter name="allowedMethods" value="none"/>
is changed to
<parameter name="allowedMethods" value="*"/>
Securing the SOAP Web ServicesKonaKart web services use the AXIS 1 web services framework in a standard manner. This allows you toadd handlers in the request and response pipelines of the web service message processors for a variety ofpurposes. Two common examples are for web service monitoring and security.
A step-by-step guide to implementing WS-Security for the KonaKart web services is provided in thedownload kits under java_soap_examples in a document called KonaKart-WS-Security.txt.
Step-by-step guide to using the SOAP APIs:1. The SOAP examples kit that is provided in every KonaKart download kit (you can find them under
the installation directory in a directory called java_soap_examples) contains everything you need tobuild a simple SOAP client from the KonaKart Application WSDL. First verify that you have the kitin your version of KonaKart.

Programming Guide
164
2. Next, ensure that KonaKart is running on your machine. After the default installation you should beable to start KonaKart by clicking on the "Start KonaKart Server" start-up icon (on Windows) or byexecuting the {Konakart Home}/bin/startkonakart.sh script (on *nix). You need KonaKart to be runningin order to get responses so your SOAP calls that you will make with the examples.
3. Check that the KonaKart server has started OK - a quick way would be to see if the application appearsat http://localhost:8780/konakart [http://localhost:8780/konakart]
4. Open up a console window and change directory to the location of the java_soap_examples, for examplethis would be:
C:\> cd C:\Program Files\KonaKart\java_soap_examples on Windows.
5. Ensure that the environment variable JAVA_HOME is set correctly. On Windows, a suitable settingmight be:
JAVA_HOME=C:\jdk1.5.0_07
6. Ensure that the JAVA_HOME/bin directory appears on your PATH. On Windows, this might looksomething like this:
Path=C:\jdk1.5.0_07\bin;C:\WINDOWS\system32;C:\WINDOWS
{You could also check that when you issue "java -version" you get the java version you expect}
7. If you already have ANT installed, ANT_HOME is defined and ANT's bin directory is on your PATHyou can skip the next two sections. If you don't have ANT installed you can use the cut-down versionof ANT that we include in the KonaKart download kit, but you must set the following environmentvariables. Ensure that the environment variable ANT_HOME is set correctly in the command shell thatyou are executing (you probably don't want to change the environment variable globally). On Windows,if you installed KonaKart to the default location (C:\Program Files\KonaKart), it would be (note theslashes):
ANT_HOME=C:/Program Files/KonaKart/custom/bin
8. Ensure that the ANT_HOME/bin directory appears on your PATH. On Windows, this might look some-thing like this:
Path=C:\jdk1.5.0_07\bin;C:\WINDOWS\system32;C:\WINDOWS;C:\ProgramFiles\KonaKart\custom\bin
As a sanity check that you are set up ready to build the examples, check that you see the followingwhen you issue a "ant -p" command:
C:\Program Files\KonaKart\java_soap_examples>ant -pBuildfile: build.xml
Main targets:
axis_client_generation Generate client stubs from the WSDL build Creates the SOAP clients, compiles and runs a little example clean Clears away everything that's created during a build compile Compile the examples run Run the little example programDefault target: build

Programming Guide
165
[The KonaKart download kit contains just enough of ANT for you to build the examples. For subsequentdevelopment using ANT you should consider installing a complete ANT installation - check the ApacheANT site [http://ant.apache.org/] for details]
9. Simply execute the "ant" command to compile, then run, the simple SOAP example.
If all is well you should see the following output:
C:\Program Files\KonaKart\java_soap_examples>..\custom\bin\antBuildfile: build.xml
clean: [echo] Cleanup...
axis_client_generation: [echo] Create the KonaKart client stubs from the WSDL
compile: [echo] Compile the examples [mkdir] Created dir: C:\Program Files\KonaKart\java_soap_examples\classes [javac] Compiling 59 source files to C:\Program Files\KonaKart\java_soap_examples\classes [javac] Note: Some input files use unchecked or unsafe operations. [javac] Note: Recompile with -Xlint:unchecked for details.
run: [java] First the low-level version... [java] [java] There are 239 countries [java] There are 10 manufacturers [java] The default currency is: USD [java] 29 products found [java] 29 length of product array [java] [java] Next the recommended high-level version... [java] [java] There are 239 countries [java] There are 10 manufacturers [java] The default currency is: USD [java] 29 products found [java] 29 length of product array
build:
BUILD SUCCESSFULTotal time: 10 seconds
The code is very simple; here are a couple of extracts from AxisExample.java. This is the lower-levelversion:
KKWSEngIf port = new KKWSEngIfServiceLocator().getKKWebServiceEng();
// make some example calls
Country[] countries = port.getAllCountries();System.out.println("There are " + countries.length + " countries");
Manufacturer[] manufacturers = port.getAllManufacturers();System.out.println("There are " + manufacturers.length + " manufacturers");
Currency curr = port.getDefaultCurrency();System.out.println("The default currency is: " + curr.getCode());
This is the recommended higher-level version:

Programming Guide
166
KKEngIf engine = new KKWSEng();
// make some example calls
CountryIf[] countries = engine.getAllCountries();System.out.println("There are " + countries.length + " countries");
ManufacturerIf[] manufacturers = engine.getAllManufacturers();System.out.println("There are " + manufacturers.length + " manufacturers");
CurrencyIf curr = engine.getDefaultCurrency();System.out.println("The default currency is: " + curr.getCode());
Notes:
• If you've installed to a port other than 8780, you will have to modify the konakart.wsdl file to match(change the port number right at the end of the file) .
• If you get "connection refused" - check that your firewall isn't blocking your client calls.
• Remember you have to enable the web services - see above for enabling the web services .
Running Your Own SQLA convenient way to use the same database connection techniques as KonaKart is as follows:
First a SELECT query... note the processing of the result set after the results are returned.
/* * Run a query that selects the product id and product model from * all products that have an id less than 10. All Select queries * need to be run using the BasePeer.executeQuery command */
List<Record> records = BasePeer .executeQuery("select products_id, products_model, " + "products_price " + "from products " + "where products_id < 10");
/* * Loop through the result set and print out the results. Note that * the first attribute in the Record object is at index = 1 and not * index = 0 */
if (records != null){ for (Iterator<Record> iterator = records.iterator(); iterator.hasNext();) { Record rec = (Record) iterator.next(); System.out.println("id = " + rec.getValue(1).asInt() + "; model = " + rec.getValue(2).asString() + "; price = " + rec.getValue(3).asBigDecimal(/* scale */2)); }}
Here's a simple UPDATE example:

Programming Guide
167
/* * Now let's run another query to change the model name of the * product with id = 1. * * All non select queries need to be run using the * BasePeer.executeStatement command */
BasePeer.executeStatement( "update products set products_model='Super Turbo' where products_id=1");
The /java_api_examples/src/com/konakart/apiexamples/RunCustomQuery.java example, provided in thedownload kit, illustrates this technique.
Customizable Source CodeNot all of KonaKart source code is provided in the download kits, only the parts designed to be customized.These include:
• Struts Actions
• Struts Forms
• All JSPs
• All of the Modules (Shipping, Payment, Order Totals, Discount)
• GWT code for the single-page checkout
Source Code Location
Once you have installed KonaKart you will be able to study the customizable source code in the followinglocations:

Programming Guide
168
You will find all the java sources and associated properties files under the "custom" directory in everydownload kit from KonaKart version 2.2.1.0 and above. (These source files were available in previousreleases but structured slightly differently). In the future, more directories will be added under the customdirectory as more customizable source is made available - so don't be surprised if the directory structurethat you see is different to the one on the left.
The "custom" directory is located directly under the installation directory that was selected for KonaKart.
The "custom" directory has two main source directories underneath: "appn" and "modules".
The "appn" directory tree holds the java source for the actions, the forms, the module super-classes andother customisable classes such as AdminOrderIntegrationMgr.java.
The "modules" directory tree holds all of the java classes required to implement each of the modules.
An ant build file (build.xml) can be found at the root of the custom directory.

Programming Guide
169
The "bin" directory under custom contains a cut-down ant that is sufficient to build all of the custom code- all you need is to set JAVA_HOME to your JDK.
The "custom/lib" directory contains jars for ant.
Once you have executed an ant build you will see a few more directories under "custom" which are theproducts of the build process. For example, you will see classes directories, a new jar directory etc. Toremove the files and directories produced by the build you can execute the "clean" target of the ant build, eg:
$ bin/ant clean
Building the Customizable SourceAn ant file is provided that should make it easy to build the customizable java classes. Use "ant -p" tosee the ant command targets:
C:\Program Files\KonaKart\custom>.\bin\ant -pBuildfile: build.xml
Main targets:
build Compiles all the custom code and creates all the jars clean Clears away everything that's created during a build clean_admin_portlet_war Clears away the admin portlet war clean_portlet_war Clears away the portlet war clean_torque_classes Clears away everything that's created during a build of the torque classes clean_wars Clears away all the WARs and EARs compile Compile the customisable application code compile_custom_adminengine Compile the customisable admin engine code compile_custom_engine Compile the customisable engine code compile_modules Compile the customisable module code copy_jars Copy the konakart custom jars to the lib directories create_torque_classes Process the Custom Schema to produce torque classes enableWebServices Enable Web Services in deployed server generate_torque_java Process the Custom Schema to produce torque java files make_admin_liferay_portlet_war Create the konakartadmin portlet war for Liferay make_ear Create the konakart EAR make_jars Create the konakart custom jars make_jetspeed_portlet_war Create the konakart portlet war for Jetspeed make_liferay_portlet_war Create the konakart portlet war for Liferay make_ordertotal_module_jar Create the ordertotal module jar make_payment_module_jar Create the payment module jar make_shipping_module_jar Create the shipping module jar make_torque_jar Create the konakart custom torque jar make_wars Create the konakart warsDefault target: build
Notice that the default build target compiles all the source files and creates the jars. It doesn't move thejars or create any wars.
If after building the jars you wish to move these to your webapp lib directories you should use the"copy_jars" target.
The "make_wars" target is just a convenient means of creating wars out of the KonaKart webapps. It is notrequired to be run to build and deploy the custom code so it's not closely-related to the topics discussedon this page.
The "make_*_portlet_war" targets are for creating JSR-168 compliant WARs out of your current KonaKartapplication. See the section of this documentation regarding portlets for more details.
Here is an example of running the default ant target:

Programming Guide
170
$ ~/konakart/custom$ ./bin/antBuildfile: build.xml
clean_wars: [echo] Cleanup WARs... [echo] Cleanup EARs... clean: [echo] Cleanup...
compile: [echo] Compile the customisable application code [mkdir] Created dir: /home/pete/konakart/custom/appn/classes [javac] Compiling 104 source files to /home/pete/konakart/custom/appn/classes
compile_modules: [echo] Compile the customisable module code [mkdir] Created dir: /home/pete/konakart/custom/modules/classes [javac] Compiling 50 source files to /home/pete/konakart/custom/modules/classes
make_payment_module_jar: [echo] Create the module jar [mkdir] Created dir: /home/pete/konakart/custom/jar [jar] Building jar: /home/pete/konakart/custom/jar/konakart_payment_authorizenet.jar
make_payment_module_jar: [echo] Create the module jar [jar] Building jar: /home/pete/konakart/custom/jar/konakart_payment_chronopay.jar
make_payment_module_jar: [echo] Create the module jar [jar] Building jar: /home/pete/konakart/custom/jar/konakart_payment_cod.jar
make_payment_module_jar: [echo] Create the module jar [jar] Building jar: /home/pete/konakart/custom/jar/konakart_payment_payjunction.jar
make_payment_module_jar: [echo] Create the module jar [jar] Building jar: /home/pete/konakart/custom/jar/konakart_payment_paypal.jar
-- some of the modules have been excluded from this output --
make_shipping_module_jar: [echo] Create the module jar [jar] Building jar: /home/pete/konakart/custom/jar/konakart_shipping_free.jar
make_shipping_module_jar: [echo] Create the module jar [jar] Building jar: /home/pete/konakart/custom/jar/konakart_shipping_item.jar
make_shipping_module_jar: [echo] Create the module jar [jar] Building jar: /home/pete/konakart/custom/jar/konakart_shipping_table.jar
make_shipping_module_jar: [echo] Create the module jar [jar] Building jar: /home/pete/konakart/custom/jar/konakart_shipping_zones.jar
make_jars: [echo] Create the konakart_custom.jar [jar] Building jar: /home/pete/konakart/custom/jar/konakart_custom.jar [echo] Create the konakartadmin_custom.jar [jar] Building jar: /home/pete/konakart/custom/jar/konakartadmin_custom.jar
build:
BUILD SUCCESSFULTotal time: 8 seconds

Programming Guide
171
Customization of the KonaKart EnginesOne of the most important features of KonaKart is the availability of a set of open APIs that allow you tocontrol KonaKart as you require as part of your IT solution. These work fine most of the time but thereare occasions, especially with heavily-customized solutions, where you need to modify the behavior ofthe KonaKart APIs.
KonaKart Customization FrameworkA simple framework has been developed that allows you to modify what happens when you call the Kon-aKart APIs.
It may be instructive to start by explaining the architecture so that you get a clear view of where you shouldadd your customizations.
The interface to the KonaKart application engine is defined in KKEngIf.java . This is implemented byKKEng.java . A new, custom, implementation of the interface is provided in KKCustomEng.java . Forevery API call, there is a method in KKCustomEng.java that in turn calls a method in KKEng.java . Thecall is made by instantiating an instance of a class that has the same name as the method and executingthe relevant API call on that class. The source for all of these classes is provided in the download package(from version 2.2.6.0). If you wish to change the behavior of a certain API call, you simply move the rele-vant source file from custom/gensrc/com/konakart/app/METHOD.java to custom/src/com/konakart/app/METHOD.java , then modify the code in that java file, to implement the behavior you require for thatparticular API call.
KonaKart has two major API sets - one for the Application [http://www.konakart.com/javadoc/server] ,and one for Administration [http://www.konakart.com/javadoc/admin] . The paragraph above explainedthe classes involved in the Application API but there is an equivalent set for the Administration API asfollows:
The interface to the KonaKart administration engine is defined in KKAdminIf.java . This is implemented byKKAdmin.java . A new, custom, implementation of the interface is provided in KKAdminCustomEng.java. For every API call, there is a method in KKAdminCustomEng.java that in turn calls a method inKKAdmin.java . The call is made by instantiating an instance of a class that has the same name as themethod and executing the relevant API call on that class. The source for all of these classes is providedin the download package (from version 2.2.6.0). If you wish to change the behavior of a certain API call,you simply move the relevant source file from custom/gensrc/com/konakartadmin/app/METHOD.java tocustom/src/com/konakartadmin/app/METHOD.java , then modify the code in that java file, to implementthe behavior you require for that particular API call.
An ANT build file is provided in the standard download kits that help you build your custom code intojars and wars for subsequent deployment.
The next two sections step through the engine customization process in detail. The first illustrates how toadd your own code in the custom() interface call, and the second shows you how to modify what happensin the getCustomerForId() API call.
Adding a New API callAs from KonaKart version 2.2.6.0 there are two custom API calls for both the application APIs and theAdmin APIs for this purpose. The default implementations all return null. One of the two calls is calledcustomSecure ("Secure" because a sessionId is validated before it is executed), and the other simply calledcustom . An equivalent pair of calls are available on the Admin API.
The calls are defined as follows (you could also find this information in the javadoc):

Programming Guide
172
/** * A custom interface that you have to provide an implementation * for. The default implementation will simply return a null. * * There are two versions, one that requires a valid sessionId * (customSecure) and one that does not (custom). * * You are free to use the two input String parameters in any way * you choose, for example you may wish to use one to indicate which * of your custom functions to run, and the other might * contain XML to give you a great deal of flexibility - but it's up * to you! * * @param input1 * The first input String - can be anything you choose * @param input2 * The second input String - can be anything you choose * @return Returns a String * @throws KKException */
public String custom(String input1, String input2) throws KKException;
Also, the version that checks the session ID:
/** * A custom interface that you have to provide an implementation * for. The default implementation will throw an exception for an * invalid sessionId or return a null. * * There are two versions, one that requires a valid sessionId * (customSecure) and one that does not (custom). * * You are free to use the two input String parameters in any way * you choose, for example you may wish to use one to indicate which * of your custom functions to run, and the other might contain XML * to give you a great deal of flexibility - but it's up to you! * * @param sessionId * The session id of the logged in user * @param input1 * The first input String - can be anything you choose * @param input2 * The second input String - can be anything you choose * @return Returns a String * @throws KKException */
public String customSecure(String sessionId, String input1, String input2) throws KKException;
So let's work through an example of using the custom API call.
Let's suppose you wanted to create an API call that returns the OrderId of the last order that was processed.(Yes, it's a simple case, but you can make it do whatever you like once you know how to use this mech-anism!).
This functionality is best-suited to the Admin API so we'll use that in our example.
1. Move (yes, don't copy but move, because we only want one version of this file to ensure there are noduplicate classes produced) the Custom.java file from the gensrc directory tree to the src directory tree:
$ mv custom/adminengine/gensrc/com/konakartadmin/app/Custom.java \ custom/adminengine/src/com/konakartadmin/app/

Programming Guide
173
It is possible to edit these files in the gensrc directory tree but this isn't advisable as it will make it harderfor you to upgrade to a future version of KonaKart. It's better to separate your customized versions outfrom the gensrc tree so that you can easily see which interfaces you've customized.
2. Implement the code in Custom.java
Before you change it, Custom.java contains just this:
package com.konakartadmin.app;
import com.konakartadmin.bl.KKAdmin;
/** * The KonaKart Custom Engine - Custom - * Generated by CreateKKAdminCustomEng */public class Custom{ KKAdmin kkAdminEng = null;
/** * Constructor */ public Custom(KKAdmin _kkAdminEng) { kkAdminEng = _kkAdminEng; }
public String custom( String input1, String input2) throws KKAdminException { return kkAdminEng.custom(input1, input2); }}
Since the default implementation for these custom() and customSecure() methods is simply to returnnull we will need to replace the lines above (marked in bold) with the following code: (full source codefor this example is provided in the download kit in custom/adminengine/examples/com/konakartad-min/app/Custom.java )
public String custom(String input1, String input2) throws KKAdminException{ /* * Run a query that selects the orders_id of the last order * processed. */
List<Record> records = BasePeer.executeQuery("SELECT max(orders_id) FROM orders");
if (records == null) { // No Orders Found return null; } else { return records.get(0).getValue(1).asString(); }}
3. Compile the new Custom class and rebuild the jars

Programming Guide
174
An ANT build file is provided for this purpose - under the custom directory in the download kit.
C:\Program Files\KonaKart\custom>.\bin\ant -pBuildfile: build.xml
Main targets:
build Compiles all the custom code and creates all the jars clean Clears away everything that's created during a build clean_admin_portlet_war Clears away the admin portlet war clean_portlet_war Clears away the portlet war clean_torque_classes Clears away everything that's created during a build of the torque classes clean_wars Clears away all the WARs and EARs compile Compile the customisable application code compile_custom_adminengine Compile the customisable admin engine code compile_custom_engine Compile the customisable engine code compile_modules Compile the customisable module code copy_jars Copy the konakart custom jars to the lib directories create_torque_classes Process the Custom Schema to produce torque classes enableWebServices Enable Web Services in deployed server generate_torque_java Process the Custom Schema to produce torque java files make_admin_liferay_portlet_war Create the konakartadmin portlet war for Liferay make_ear Create the konakart EAR make_jars Create the konakart custom jars make_jetspeed_portlet_war Create the konakart portlet war for Jetspeed make_liferay_portlet_war Create the konakart portlet war for Liferay make_ordertotal_module_jar Create the ordertotal module jar make_payment_module_jar Create the payment module jar make_shipping_module_jar Create the shipping module jar make_torque_jar Create the konakart custom torque jar make_wars Create the konakart warsDefault target: build
You can compile and copy the relevant jars in one statement, as follows:
C:\Program Files\KonaKart\custom>.\bin\ant build,copy_jarsBuildfile: build.xml
clean_wars: [echo] Cleanup WARs... [echo] Cleanup EARs...
clean: [echo] Cleanup...
compile: [echo] Compile the customisable application code [mkdir] Created dir: C:\Program Files\KonaKart\custom\appn\classes [javac] Compiling 106 source files to C:\Program Files\KonaKart\custom\appn\classes
compile_modules: [echo] Compile the customisable module code [mkdir] Created dir: C:\Program Files\KonaKart\custom\modules\classes [javac] Compiling 54 source files to C:\Program Files\KonaKart\custom\modules\classes
make_payment_module_jar: [echo] Create the module jar [mkdir] Created dir: C:\Program Files\KonaKart\custom\jar [jar] Building jar: C:\Program Files\KonaKart\custom\jar\konakart_payment_authorizenet.jar
(- the middle section has been cut out here -)

Programming Guide
175
make_shipping_module_jar: [echo] Create the module jar [jar] Building jar: C:\Program Files\KonaKart\custom\jar\konakart_shipping_zones.jar
compile_custom_engine: [echo] Compile the customisable engine code [mkdir] Created dir: C:\Program Files\KonaKart\custom\engine\classes [javac] Compiling 104 source files to C:\Program Files\KonaKart\custom\engine\classes
compile_custom_adminengine: [echo] Compile the customisable admin engine code [mkdir] Created dir: C:\Program Files\KonaKart\custom\adminengine\classes [javac] Compiling 234 source files to C:\Program Files\KonaKart\custom\adminengine\classes [javac] Note: Recompile with -Xlint:unchecked for details.
make_jars: [echo] Create the konakart_custom.jar [jar] Building jar: C:\Program Files\KonaKart\custom\jar\konakart_custom.jar [jar] Building jar: C:\Program Files\KonaKart\custom\jar\konakart_custom_engine.jar [echo] Create the konakartadmin_custom.jar [jar] Building jar: C:\Program Files\KonaKart\custom\jar\konakartadmin_custom.jar [jar] Building jar: C:\Program Files\KonaKart\custom\jar\konakartadmin_custom_engine.jar
build:
copy_jars: [echo] Copy the custom jars to their respective lib directories [copy] Copying 27 files to C:\Program Files\KonaKart\webapps\konakart\WEB-INF\lib [copy] Copying 27 files to C:\Program Files\KonaKart\webapps\konakartadmin\WEB-INF\lib
BUILD SUCCESSFULTotal time: 18 secondsC:\Program Files\KonaKart\custom>
4. Define the Engine Implementation Class
Your custom code will never be executed if we don't define that KonaKart should instantiate the KKAd-minCustomEng class as its engine class rather than the default, which is KKAdmin.
A small java program is provided in the download kit (called /java_api_examples/src/com/konakar-tadmin/apiexamples/CustomExamples.java ) which demonstrates how you would call one version ofcustom() or the other from a java program.
The code in CustomExamples.java actually calls custom() three times, once with the defaultcom.konakartadmin.bl.KKAdmin engine, once with the com.konakartadmin.app.KKAdminCustomEngengine and finally using the web services client engine, called com.konakartadmin.ws.KKWSAdmin .
When calling using the default com.konakartadmin.bl.KKAdmin engine you should see the default re-sponse from custom() which is a null being returned.
When calling using the com.konakartadmin.app.KKAdminCustomEng engine you should see the re-sponse from the custom() implementation that we coded above (i.e. it should return the highest orderIdin the database).
Finally when calling using the com.konakartadmin.app.KKAdminCustomEng engine, what you seedepends on which engine the web services are configured to use (they could be using the defaultcom.konakartadmin.bl.KKAdmin engine or the custom com.konakartadmin.app.KKAdminCustomEngengine). Which engine is used in this case is defined in the konakartadmin.properties file as follows:

Programming Guide
176
# ------------------------------------------------------------------# KonaKart engine class used by the admin web services# For the default engine use: com.konakartadmin.bl.KKAdmin# For the custom engine use: com.konakartadmin.app.KKAdminCustomEng
konakart.admin.ws.engine.classname = com.konakartadmin.bl.KKAdmin
The above definition is for the Admin App engine class name definition. An equivalent engine classname definition is required for the application web services, and this is defined in konakart.properties(you can find this under webapps\konakart\WEB-INF\classes )
# ------------------------------------------------------------------# KonaKart engine class used by the web services# For the default engine use: com.konakart.app.KKEng# For the custom engine use: com.konakart.app.KKCustomEng
konakart.app.ws.engine.classname = com.konakart.app.KKEng
Finally, to actually run the CustomExamples , change directory to the java_api_examples directorywhere there is another ANT build file for building and running the examples. (You will have to startthe KonaKart server before running the CustomExamples test if you want a response from the webservice call!):

Programming Guide
177
C:\Program Files\KonaKart\custom>cd ../java_api_examples
C:\Program Files\KonaKart\java_api_examples> ..\custom\bin\ant clean, compile, runCustomExamplesBuildfile: build.xml
clean: [echo] Cleanup...
compile: [echo] Compile the examples [mkdir] Created dir: C:\Program Files\KonaKart\java_api_examples\classes [javac] Compiling 11 source files to C:\Program Files\KonaKart\java_api_examples\classes [echo] Copy Properties for the examples [copy] Copying 1 file to C:\Program Files\KonaKart\java_api_examples\classes
runCustomExamples: [java] (?:init:?) Finished Initialising Log4j [java] (?:init:?) The configuration file being used is /C:/Program%20Files/KonaKart/webapps/konakartadmin/WEB-INF/ classes/konakartadmin.properties [java] (?:init:?) Initialising KKAdmin [java] (?:initKonakart:?) KonaKart Admin V2.2.6.0 built 5:03PM 7-Apr-2008 BST [java] (?:init:?) Finished Initialising KonaKartAdmin [java] (?:init:?) Initialising Torque [java] (?:init:?) Initialising KonaKart-Torque for org.apache.torque.adapter.DBMM [java] (?:init:?) Finished Initialising Torque [java] (?:login:?) User '[email protected]' has just logged in to the Admin App [java] [java] Call the custom interface 'Custom' using Engine named com.konakartadmin.bl.KKAdmin [java] Result was: null [java] [java] (?:login:?) User '[email protected]' has just logged in to the Admin App [java] [java] Call the custom interface 'Custom' using Engine named com.konakartadmin.app.KKAdminCustomEng [java] Result was: 27 [java] [java] new KKWSAdminSoapBindingStub setup OK to http://localhost:8780/konakartadmin/services/KKWSAdmin [java] [java] Call the custom interface 'Custom' using Engine named com.konakartadmin.ws.KKWSAdmin [java] Result was: null
BUILD SUCCESSFULTotal time: 6 seconds
Modifying an Existing API callWe will illustrate how this is done with an example using the getCustomerForId() Admin API call.
The default implementation of getCustomerForId() returns an AdminCustomer object for the specifiedcustomer Id.
Suppose you want to change the data returned for whatever reason. It may be that you have customer datain another table somewhere that you would like to look up and add to the AdminCustomer object whenevergetCustomerForId() is called (this other table may or may not be a KonaKart table).
Anyway, to keep this really simple so that we don't lose track of the point of this example we will set theString value "CUSTOM SETTING" in the custom5 attribute of the AdminCustomer object that is returned.This does mean we will overwrite the previous custom5 attribute value if such existed - so you in a properimplementation will have to be aware of which fields are freely available for your use (the custom fieldsare designed for customers to use in ways that they see fit).

Programming Guide
178
1. Move the GetCustomerForId.java file to the src directory tree.
We need to modify the default implementation and to do this we move the file from the gensrc direc-tory tree to the src directory tree, specifically, this means we need to move the GetCustomerForId.javafrom /custom/adminengine/gensrc/com/konakartadmin/app to /custom/adminengine/src/com/konakar-tadmin/app .
2. Add our customizations to GetCustomerForId.java
By default the implementation of GetCustomerForId.java is as follows:
/** * The KonaKart Custom Engine - GetCustomerForId * Generated by CreateKKAdminCustomEng */public class GetCustomerForId{ KKAdmin kkAdminEng = null;
/** * Constructor */ public GetCustomerForId(KKAdmin _kkAdminEng) { kkAdminEng = _kkAdminEng; }
public AdminCustomer getCustomerForId( String sessionId, int customerId) throws KKAdminException { return kkAdminEng.getCustomerForId(sessionId, customerId); }}
We will add our simple changes so that it looks like this: (this file is included in the download kit underthe custom/adminengine/examples directory structure)
public AdminCustomer getCustomerForId (String sessionId, int customerId) throws KKAdminException{ // Leave the original call to the KonaKart API unchanged AdminCustomer myCustomer = kkAdminEng.getCustomerForId(sessionId, customerId);
// Now add our special value into custom5: // (we may have got this value from a database query?)
myCustomer.setCustom5("CUSTOM SETTING");
return myCustomer;}
3. Compile the new GetCustomerForId class and rebuild the jars:
An ANT build file is provided for this purpose - under the custom directory in the download kit.

Programming Guide
179
C:\Program Files\KonaKart\custom>.\bin\ant -pBuildfile: build.xml
Main targets:
build Compiles all the custom code and creates all the jars clean Clears away everything that's created during a build clean_admin_portlet_war Clears away the admin portlet war clean_portlet_war Clears away the portlet war clean_torque_classes Clears away everything that's created during a build of the torque classes clean_wars Clears away all the WARs and EARs compile Compile the customisable application code compile_custom_adminengine Compile the customisable admin engine code compile_custom_engine Compile the customisable engine code compile_modules Compile the customisable module code copy_jars Copy the konakart custom jars to the lib directories create_torque_classes Process the Custom Schema to produce torque classes enableWebServices Enable Web Services in deployed server generate_torque_java Process the Custom Schema to produce torque java files make_admin_liferay_portlet_war Create the konakartadmin portlet war for Liferay make_ear Create the konakart EAR make_jars Create the konakart custom jars make_jetspeed_portlet_war Create the konakart portlet war for Jetspeed make_liferay_portlet_war Create the konakart portlet war for Liferay make_ordertotal_module_jar Create the ordertotal module jar make_payment_module_jar Create the payment module jar make_shipping_module_jar Create the shipping module jar make_torque_jar Create the konakart custom torque jar make_wars Create the konakart warsDefault target: build
You can compile and copy the relevant jars in one statement, as follows:
C:\Program Files\KonaKart\custom>.\bin\ant build,copy_jars
4. Define the Engine Implementation Class
Your custom code will never be executed if we don't define that KonaKart should instantiate the KKAd-minCustomEng class as its engine class rather than the default, which is KKAdmin .
A small java program is provided in the download kit (called /java_api_examples/src/com/konakar-tadmin/apiexamples/GetCustomerExamples.java ) which demonstrates how you would call one ver-sion of getCustomerForId() or the other from a java program.
The code in GetCustomerExamples.java actually calls getCustomerForId() threetimes, once with the default com.konakartadmin.bl.KKAdmin engine, once with thecom.konakartadmin.app.KKAdminCustomEng engine and finally using the web services client engine,called com.konakartadmin.ws.KKWSAdmin .
When calling using the default com.konakartadmin.bl.KKAdmin engine you should see the default re-sponse from getCustomerForId() which should show a null being returned for the custom5 attribute(unless you fill in these values with something else in your own implementation).
When calling using the com.konakartadmin.app.KKAdminCustomEng engine you should see the re-sponse from the getCustomerForId() implementation that we coded above (i.e. it should return "CUS-TOM SETTING" in the custom5 attribute).

Programming Guide
180
Finally when calling using the com.konakartadmin.app.KKAdminCustomEng engine, what you seedepends on which engine the web services are configured to use (they could be using the defaultcom.konakartadmin.bl.KKAdmin engine or the custom com.konakartadmin.app.KKAdminCustomEngengine). Which engine is used in this case is defined in the konakartadmin.properties file as follows:
# ------------------------------------------------------------------# KonaKart engine class used by the admin web services# For the default engine use: com.konakartadmin.bl.KKAdmin# For the custom engine use: com.konakartadmin.app.KKAdminCustomEng
konakart.admin.ws.engine.classname = com.konakartadmin.bl.KKAdmin
The above definition is for the Admin App engine class name definition. An equivalent engine classname definition is required for the application web services, and this is defined in konakart.properties(you can find this under webapps\konakart\WEB-INF\classes )
# ------------------------------------------------------------------# KonaKart engine class used by the web services# For the default engine use: com.konakart.app.KKEng# For the custom engine use: com.konakart.app.KKCustomEng
konakart.app.ws.engine.classname = com.konakart.app.KKEng
Finally, to actually run the GetCustomerExamples , change directory to the java_api_examples direc-tory where there is another ANT build file for building and running the examples. (You will have tostart the KonaKart server before running the CustomExamples test if you want a response from the webservice call!):

Programming Guide
181
C:\Program Files\KonaKart\custom>cd ../java_api_examples
C:\Program Files\KonaKart\java_api_examples> ..\custom\bin\ant clean, compile, runGetCustomerExamplesBuildfile: build.xml
clean: [echo] Cleanup...
compile: [echo] Compile the examples [mkdir] Created dir: C:\Program Files\KonaKart\java_api_examples\classes [javac] Compiling 12 source files to C:\Program Files\KonaKart\java_api_examples\classes [echo] Copy Properties for the examples [copy] Copying 1 file to C:\Program Files\KonaKart\java_api_examples\classes
runGetCustomerExamples: [java] (?:init:?) Finished Initialising Log4j [java] (?:init:?) The configuration file being used is C:/Program%20Files/KonaKart/webapps/ konakartadmin/WEB-INF/classes/konakartadmin.properties [java] (?:init:?) Initialising KKAdmin [java] (?:initKonakart:?) KonaKart Admin V2.2.6.0 built 5:03PM 7-Apr-2008 BST [java] (?:init:?) Finished Initialising KonaKartAdmin [java] (?:init:?) Initialising Torque [java] (?:init:?) Initialising KonaKart-Torque for org.apache.torque.adapter.DBMM [java] (?:init:?) Finished Initialising Torque [java] (?:login:?) User '[email protected]' has just logged in to the Admin App [java] [java] Call the custom interface 'Custom' using Engine named com.konakartadmin.bl.KKAdmin [java] Found: John doe [java] custom5 = null [java] [java] (?:login:?) User '[email protected]' has just logged in to the Admin App [java] [java] Call the custom interface 'Custom' using Engine named com.konakartadmin.app.KKAdminCustomEng [java] Found: John doe [java] custom5 = CUSTOM SETTING [java] [java] new KKWSAdminSoapBindingStub setup OK to http://localhost:8780/konakartadmin/services/KKWSAdmin [java] [java] Call the custom interface 'Custom' using Engine named com.konakartadmin.ws.KKWSAdmin [java] Found: John doe [java] custom5 = null [java]
BUILD SUCCESSFULTotal time: 7 seconds
Enabling Engine CustomizationsSo, you've made some engine customizations as described above and you want them to be executed whenyou run KonaKart.
Assuming you have placed all the newly-built jars in the appropriate lib directories (the ANT buildcopy_jars target will do this for you in a standard tomcat installation) you have to modify some proper-ties files to make KonaKart instantiate the custom engines so that your customizations will actually beexecuted.
There is a lot of flexibility here as you can define different engines in different places. It's advisable tochange only those engine definitions that you need to change however.
• webapps/konakart/WEB-INF/classes/konakart_app.properties
Defines which engine the main Struts Application will use

Programming Guide
182
# ------------------------------------------------------------------# KonaKart engine class used by the KonaKart Application users## For the default engine use: com.konakart.app.KKEng# For the custom engine use: com.konakart.app.KKCustomEng# For the web services engine use: com.konakart.app.KKWSEng
konakart.app.engineclass = com.konakart.app.KKEng
• webapps/konakart/WEB-INF/classes/konakart.properties
Defines which engine the Application web services will use
# ------------------------------------------------------------------# KonaKart engine class used by the web services# For the default engine use: com.konakart.app.KKEng# For the custom engine use: com.konakart.app.KKCustomEng
konakart.app.ws.engine.classname = com.konakart.app.KKEng
• webapps/konakartadmin/WEB-INF/classes/konakartadmin.properties
Defines which engine the Administration web services will use
# ------------------------------------------------------------------# KonaKart engine class used by the admin web services# For the default engine use: com.konakartadmin.bl.KKAdmin# For the custom engine use: com.konakartadmin.app.KKAdminCustomEng
konakart.admin.ws.engine.classname = com.konakartadmin.bl.KKAdmin
• webapps/konakartadmin/WEB-INF/classes/konakartadmin_gwt.properties
Defines which engine the GWT Admin Application will use
# ------------------------------------------------------------------# KonaKart engine class used by the KonaKart Admin Application users## For the default engine use: com.konakartadmin.bl.KKAdmin# For the custom engine use: com.konakartadmin.app.KKAdminCustomEng# For the WSs engine use: com.konakartadmin.ws.KKWSAdmin
konakartadmin.gwt.engineclass = com.konakartadmin.bl.KKAdmin
Pluggable ManagersSince version 3.2.0.0, the internal managers of the KonaKart engines are instantiated by name and adhereto interfaces so that they can easily be substituted by alternative implementations. The managers are listedin the konakart and konakartadmin properties files under WEB-INF/classes for both applications.
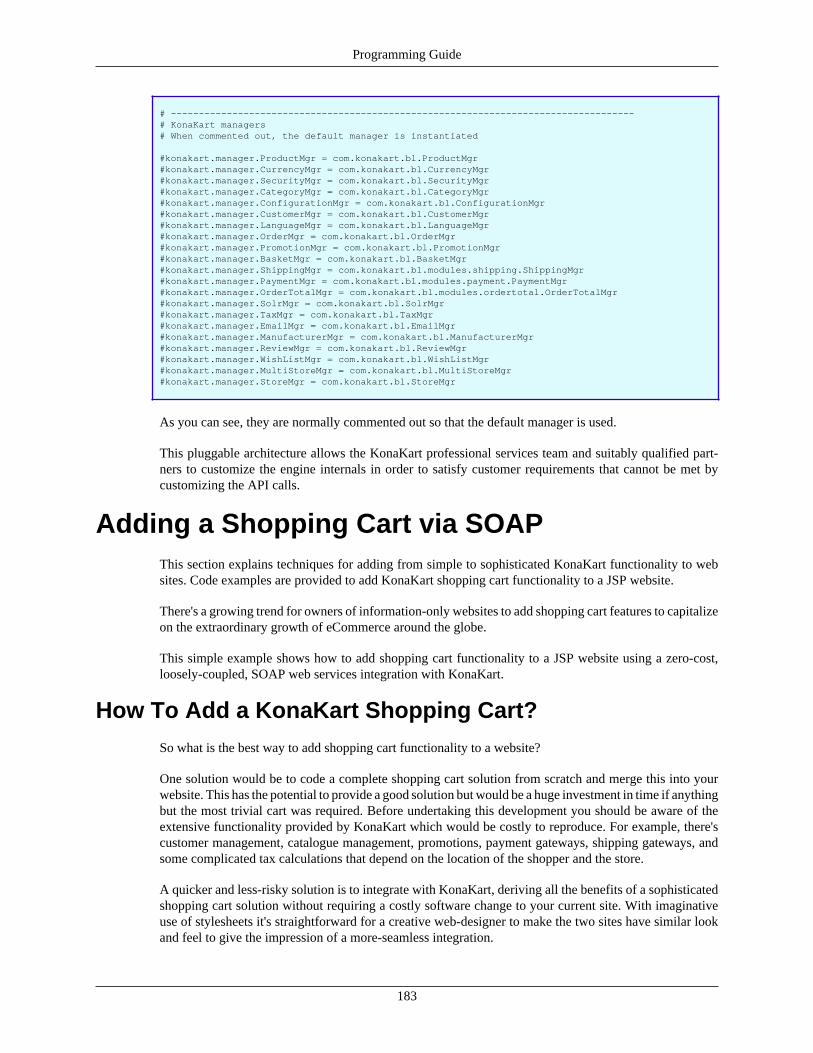
Programming Guide
183
# -----------------------------------------------------------------------------------# KonaKart managers# When commented out, the default manager is instantiated
#konakart.manager.ProductMgr = com.konakart.bl.ProductMgr#konakart.manager.CurrencyMgr = com.konakart.bl.CurrencyMgr#konakart.manager.SecurityMgr = com.konakart.bl.SecurityMgr#konakart.manager.CategoryMgr = com.konakart.bl.CategoryMgr#konakart.manager.ConfigurationMgr = com.konakart.bl.ConfigurationMgr#konakart.manager.CustomerMgr = com.konakart.bl.CustomerMgr#konakart.manager.LanguageMgr = com.konakart.bl.LanguageMgr#konakart.manager.OrderMgr = com.konakart.bl.OrderMgr#konakart.manager.PromotionMgr = com.konakart.bl.PromotionMgr#konakart.manager.BasketMgr = com.konakart.bl.BasketMgr#konakart.manager.ShippingMgr = com.konakart.bl.modules.shipping.ShippingMgr#konakart.manager.PaymentMgr = com.konakart.bl.modules.payment.PaymentMgr#konakart.manager.OrderTotalMgr = com.konakart.bl.modules.ordertotal.OrderTotalMgr#konakart.manager.SolrMgr = com.konakart.bl.SolrMgr#konakart.manager.TaxMgr = com.konakart.bl.TaxMgr#konakart.manager.EmailMgr = com.konakart.bl.EmailMgr#konakart.manager.ManufacturerMgr = com.konakart.bl.ManufacturerMgr#konakart.manager.ReviewMgr = com.konakart.bl.ReviewMgr#konakart.manager.WishListMgr = com.konakart.bl.WishListMgr#konakart.manager.MultiStoreMgr = com.konakart.bl.MultiStoreMgr#konakart.manager.StoreMgr = com.konakart.bl.StoreMgr
As you can see, they are normally commented out so that the default manager is used.
This pluggable architecture allows the KonaKart professional services team and suitably qualified part-ners to customize the engine internals in order to satisfy customer requirements that cannot be met bycustomizing the API calls.
Adding a Shopping Cart via SOAPThis section explains techniques for adding from simple to sophisticated KonaKart functionality to websites. Code examples are provided to add KonaKart shopping cart functionality to a JSP website.
There's a growing trend for owners of information-only websites to add shopping cart features to capitalizeon the extraordinary growth of eCommerce around the globe.
This simple example shows how to add shopping cart functionality to a JSP website using a zero-cost,loosely-coupled, SOAP web services integration with KonaKart.
How To Add a KonaKart Shopping Cart?So what is the best way to add shopping cart functionality to a website?
One solution would be to code a complete shopping cart solution from scratch and merge this into yourwebsite. This has the potential to provide a good solution but would be a huge investment in time if anythingbut the most trivial cart was required. Before undertaking this development you should be aware of theextensive functionality provided by KonaKart which would be costly to reproduce. For example, there'scustomer management, catalogue management, promotions, payment gateways, shipping gateways, andsome complicated tax calculations that depend on the location of the shopper and the store.
A quicker and less-risky solution is to integrate with KonaKart, deriving all the benefits of a sophisticatedshopping cart solution without requiring a costly software change to your current site. With imaginativeuse of stylesheets it's straightforward for a creative web-designer to make the two sites have similar lookand feel to give the impression of a more-seamless integration.

Programming Guide
184
Why loosely-coupled?Loose coupling of your current site and the shopping cart site provides a painless migration of an infor-mation-only site to an eCommerce-enabled site with minimal effort. You could take this loose-couplingto extremes and introduce a single link from your existing store to your on-line shop and this is a solutionmany would be content with. However, with very little effort, you can do much better in bringing yoursite to life with live product information that will encourage your visitors to buy.
The power and simplicity of SOAP interfaces in KonaKart enables this loosely-coupled integration allow-ing you to maintain your information-only site and online shop completely independently and potentiallyrunning with different technologies.
Being SOAP, the simple example described below could have been written in any language that supportsSOAP calls, but JSPs have been chosen in this case:
Movie Review ExampleLet us imagine, for the sake of this article, that we have a "Movie Review" website that looks like this:
Movie Review Example - Image 1
OK, it's a simple example! Let's say the site contains little more than reviews of the latest movies but hasattracted a lively community who might even be contributing with their own reviews.

Programming Guide
185
A natural extension of this website would be to offer DVDs for sale, so rather than build all that shoppingcart functionality into Movie Review, we'll integrate with an external site.
The first step would be to add three simple links to the site to take the user directly to his current shoppingcart, his account details (to review old orders), and directly to the checkout page. These are simple HTMLlinks which do not require SOAP:
The links were added at the top right:
Movie Review Example - Image 2
Now let's use the power of SOAP to access some information about the DVDs for sale and tempt thevisitors of Movie Review to buy. A typical set of data that might be of interest would be a list of newproducts. We access this in the JSP, in just a few lines of code, as follows:

Programming Guide
186
// Get the products from the KonaKart engine using a SOAP call
URL endpointUrl = new URL(kkSoapServiceUrl);KKWSEngIf eng = new KKWSEngIfServiceLocator().getKKWebServiceEng(endpointUrl);
DataDescriptor dataDesc = new DataDescriptor();dataDesc.setOffset(0); // Offset = 0dataDesc.setLimit(3); // We only want to get back 3 productsdataDesc.setOrderBy(DataDescConstants.ORDER_BY_DATE_ADDED);
Products products = eng.getProductsPerCategory(null, /* Data Descriptor defining how many products, the offset and the sort order */ dataDesc, /* CategoryId. 3 is for DVD Movies */ 3, /* searchInSubCats */ true, /* The language id. -1 for the default store language */ -1);
Product[] prods = products.getProductArray();
Once we have the products back in the SOAP response from the shop we can arrange them how we pleaseon the screen.
Another interesting view we could add is to show a list of best sellers. The code is very similar, but wejust use a different SOAP interface:
// Get the best sellers from the KonaKart engine using a SOAP call
URL endpointUrl = new URL(kkSoapServiceUrl);KKWSEngIf eng = new KKWSEngIfServiceLocator().getKKWebServiceEng(endpointUrl);
DataDescriptor dataDesc = new DataDescriptor();dataDesc.setOffset(0); // Offset = 0dataDesc.setLimit(16); // We only want to get back 16 productsdataDesc.setOrderBy(DataDescConstants.ORDER_BY_TIMES_ORDERED);dataDesc.setOrderBy_1(DataDescConstants.ORDER_BY_NAME_ASCENDING);
Product[] prods = eng.getBestSellers( /* Data Descriptor defining how many products, the offset and the sort order */ dataDesc, /* CategoryId. 3 is for DVD Movies */ 3, /* The language id. -1 for the default store language */ -1);
Adding these two sets of products to our Movie Review website we now get:

Programming Guide
187
Movie Review Example - Image 3
Every product shown has a link that takes the user directly to the shopping cart, just a few clicks frompurchase.
Utilizing the rich set of SOAP APIs provided by KonaKart, the Movie Review website could be improvedincrementally with tighter integration.
SOAP client code generationThe simple SOAP calls illustrated above are supported by code that is generated directly from the KonaKartWSDL (at http://www.konakart.com/konakart/services/KKWebServiceEng?wsdl
The steps are simply:
1. Call the Apache AXIS WSDL2Java utility to produce java classes from the WSDL
2. Compile the generated classes
3. Build WAR
4. Deploy to container

Programming Guide
188
Example Source CodeAll the source code and ANT build scripts used in this example are available for download in abasic development kit from http://www.konakart.com/kits/konakart-movie-review-dev-kit.zip [http://www.konakart.com/kits/konakart-movie-review-dev-kit.zip]
A WAR is also available which contains all the JSPs and everything you need to run the example ina container (such as tomcat) from http://www.konakart.com/kits/konakart-movie-review-war.zip [http://www.konakart.com/kits/konakart-movie-review-war.zip]
Feel free to try out the code in either format. It generates code that interfaces with the live KonaKart demoweb site so you don't actually have to set up your own independent KonaKart website just to try out thisexample.

189
Chapter 16. ReportingThis section describes the KonaKart reporting sub-system. KonaKart uses the popular open source BIRT[http://www.eclipse.org/birt/] (http://www.eclipse.org/birt/) reporting system but it is loosely-coupled soit is easy to integrate an alternative or additional reporting system if you wish.
KonaKart Reporting from the Admin AppThe reports are accessible from the "Reports" tab of the KonaKart Admin Application. A new browserwindow will be created that will run the BIRT viewer for the selected report.
Modifying the ReportsYou will find the report files under the birtviewer webapp at: {konakart home}/webapps/birtviewer/re-ports/stores/store1 By default the reports have the .rptdesign file extension although this can be set inthe configuration parameters to some other file extension if you wish. For very simple modifications tothe reports you can simply edit the report files (they are XML files). You can edit them directly from theAdmin Application or using a file editor of your choice. For more complicated modifications or for addingyour own new reports, you will have to set up the BIRT/Eclipse report design tools as explained below.
(Note that from version 3.2.0.0 the default reports location has moved to accommodate Multi-Store func-tionality where each store has its own set of reports. This is why the new location has the store numberat the end of the directory path).
(Note that prior to version 2.2.7.0 the "birtviewer" webapp was called "birt-viewer". The change was madedue to certain application servers not being able to handle the name "birt-viewer" in all circumstances).
Adding New ReportsKonaKart has been designed to allow the integration of any reporting system. although BIRT [http://www.eclipse.org/birt/] has been used in the download package and makes an excellent choice for addingaddition reporting functionality.
BIRT [http://www.eclipse.org/birt/] is a free Eclipse-based open source reporting system for web applica-tions, especially those based on Java and J2EE. BIRT has two main components: a report designer basedon Eclipse, and a runtime component that you can add to your app server. BIRT also offers a charting en-gine that lets you add charts. Included in the KonaKart download package we provide the "BIRT Viewer"web application that includes the BIRT runtime system which is all you need to produce your reports.
For development of addition reports you are advised to follow the instructions on the BIRT web site forsetting up BIRT in Eclipse. Note that currently we are using BIRT 2.2.1 so it is strongly advised that youuse that version for new reports to ensure compatibility.
Once you have created your new report you can either upload it using the Admin Application or simplyadd your report to the directory defined to hold your reports (the directory is a configuration parameterthat is set up default to C:/Program Files/KonaKart/webapps/birtviewer/reports/stores/store1 (therefore,this will have to be changed if you have not installed KonaKart in the default location on Windows. Youcan set this value in the Admin Application under the Reports Configuration section.)
To make your report appear in the list of reports with a friendly name rather than its filename you have tospecify the text to display in the text-property title tag of your BIRT report, for example:

Reporting
190
<text-property name="title"> Orders in last 30 Days (Chart Only)</text-property>
Defining a Chart to appear on the Status Page of the Ad-min App
By default KonaKart is configured to display a plot showing number of orders over the preceding 30 dayson the Status page of the Admin Application. What you display in this particular frame is entirely up toyou - you can choose another plot, or indeed any page you like that might even be unrelated to KonaKart.You define the URL for the page in the Reports Configuration section of the Admin Application.
Reports Configuration
By default KonaKart is configured to use port 8780. If you change this port you will have to modifythe "Report Viewer URL" and the "Status Page Report URL" configuration parameters in the ReportsConfiguration section of the Admin Application to reflect the different port. These are set automaticallyif you installed using the installer so you should only need to do this if you either installed manually usingthe zip package or changed the KonaKart port number after installation. Here's an example of what youwould set these parameters to if you were running KonaKart on port 8080:
KonaKart - Reports Configuration
Defining the Set of Reports Shown in the Admin App
By default KonaKart is configured to search for report files with the .rptdesign extension in the C:/Pro-gram Files/KonaKart/webapps/birtviewer/reports/stores/store1 directory. If you use a different file ex-tension for your reports or you have installed KonaKart in any location other than C:/Program Files/Kon-aKart/ you will have to modify the configuration parameter to suit your installation. You will have tomodify the reporting configuration parameters in the Administration Application. You define all of thereporting configuration parameters in the Reports Configuration section of the Admin Application.

Reporting
191
Accessing the Database in the ReportsKonaKart may be looking for the database connection parameters in the wrong file. Check yourkonakart.rptlibrary file under webapps/birtviewer/reports/lib/ . Find the beforeOpen section under <da-ta-sources>:
<data-sources> <oda-data-source extensionID="org.eclipse.birt.report.data.oda.jdbc" name ="KonaKart-Database" id ="4"> <method name="beforeOpen"><
192
Chapter 17. Portal IntegrationIntroduction
We realize that many people require eCommerce functionality integrated within their portal servers orContent Management Systems. For this reason we have integrated KonaKart with some popular productsthat support the JSR 168 portlet specification. We currently have support for:
• Apache Jetspeed Portal
• Liferay Portal (Store Front and Admin App)
The generated portlets may work in other portals supporting the JSR 168 standard, although they haven'tbeen tested.
Creation of portlet WAR filesIn order to create the WAR file that can be loaded into a portal, you must first install KonaKart normallyand ensure that it is working correctly.
Navigate to the KonaKart\custom directory and run the command .\bin\ant -p to view the ant targets inthe supplied build file.
C:\Program Files\KonaKart\custom>.\bin\ant -pBuildfile: build.xml
Main targets:
build Compiles all the custom code and creates all the jars clean Clears away everything that's created during a build clean_admin_portlet_war Clears away the admin portlet war clean_portlet_war Clears away the portlet war clean_torque_classes Clears away everything that's created during a build of the torque classes clean_wars Clears away all the WARs and EARs compile Compile the customisable application code compile_custom_adminengine Compile the customisable admin engine code compile_custom_engine Compile the customisable engine code compile_modules Compile the customisable module code copy_jars Copy the konakart custom jars to the lib directories create_torque_classes Process the Custom Schema to produce torque classes enableWebServices Enable Web Services in deployed server generate_torque_java Process the Custom Schema to produce torque java files make_admin_liferay_portlet_war Create the konakartadmin portlet war for Liferay make_ear Create the konakart EAR make_jars Create the konakart custom jars make_jetspeed_portlet_war Create the konakart portlet war for Jetspeed make_liferay_portlet_war Create the konakart portlet war for Liferay make_ordertotal_module_jar Create the ordertotal module jar make_payment_module_jar Create the payment module jar make_shipping_module_jar Create the shipping module jar make_torque_jar Create the konakart custom torque jar make_wars Create the konakart warsDefault target: build
The targets that interest us for building the portlet WAR files are:
• make_jetspeed_portlet_war
• make_liferay_portlet_war

Portal Integration
193
• make_admin_liferay_portlet_war
For example, in order to create the portlet for LifeRay, you must run the command as shown below:
C:\Program Files\KonaKart\custom>.\bin\ant make_liferay_portlet_warBuildfile: build.xml
clean_portlet_war: [echo] Cleanup portlet WARs... [echo] Cleanup portlet WAR staging area...
make_liferay_portlet_war: [mkdir] Created dir: C:\Program Files\KonaKart\custom\portlet_war [mkdir] Created dir: C:\Program Files\KonaKart\custom\konakart_portlet\stage\konakart [mkdir] Created dir: C:\Program Files\KonaKart\custom\konakart_portlet\stage\konakart\WEB-INF\jsp [echo] Lay out the WAR in the staging area [echo] Copy (almost) the whole konakart webapp to staging area [copy] Copying 383 files to C:\Program Files\KonaKart\custom\konakart_portlet\stage\konakart [copy] Copied 35 empty directories to 2 empty directories under C:\Program Files\KonaKart\custom\konakart_portlet\stage\konakart [echo] Copy the jars reqd for the portlet to staging area [copy] Copying 2 files to C:\Program Files\KonaKart\custom\konakart_portlet\stage\konakart\WEB-INF\lib [echo] Copy the config files reqd for the portlet to staging area [copy] Copying 4 files to C:\Program Files\KonaKart\custom\konakart_portlet\stage\konakart\WEB-INF [echo] Filter the JSPs to staging area for the portlet WAR [echo] Filter the web.xml to staging area for the portlet WAR [echo] Filter the struts-config.xml to staging area for the portlet WAR [echo] Create portlet konakart.war [war] Building war: C:\Program Files\KonaKart\custom\portlet_war\konakart.war
BUILD SUCCESSFULTotal time: 32 seconds
A file called konakart.war is created in the \KonaKart\custom\portlet_war directory. This is the file thatyou must import into your portal.
Note:
• The GWT based One Page Checkout code cannot be used for the portlet implementation. It is disabledautomatically.
Installation Instructions
Jetspeed• Place konakart.psml (found in KonaKart/custom/konakart_portlet/jetspeed) into the Jetspeed deploy-
ment under /Jetspeed-2.1.3/webapps/jetspeed/WEB-INF/pages for Jetspeed 2.1.3 and under the /Jet-speed-2.2.0/pages directory for Jetspeed 2.2. This will create a KonaKart folder.
• Deploy KonaKart by putting the generated konakart.war file into /Jetspeed-2.x.x/webapps/jetspeed/WEB-INF/deploy.
• Run Jetspeed. After logging in, you should see a KonaKart folder which contains the KonaKart appli-cation.
Liferay• Using the Liferay plugin installer, install the generated konakart.war file.

Portal Integration
194
• Add a page to Liferay and give it a 1 column layout template.
• Using the "Add Application" tool, add the newly installed KonaKart application to the page.
Liferay for the KonaKart Admin ApplicationIn order for Liferay users to be able to seamlessly log into the Admin App, the KonaKart roles must beedited to add information so that they can be matched with the Liferay roles. The name of the Liferay rolemust be written into the Custom1 field of the KonaKart role that should be used. For example let's assumethat there is a Liferay role called "Administrator" and we want all Liferay users with this Administratorrole to log into KonaKart using the KonaKart "SuperUser" role. To do this we must edit the SuperUserrole and add the text "Administrator" to the Custom1 field as shown in the diagram below.
Edit Role
A slight complication occurs when running in multi-store mode. In this case the Liferay role name must bein the form role_store. i.e. catalog_store2, order_store1. In the case of catalog_store2, the string "catalog"must be written in the custom1 field of the KonaKart catalog role and the software will ensure that theuser will be logged into store2 with that role.

Portal Integration
195
Once the roles have been matched, you can generate and install the WAR using a process similar to thestore front application. Note that the WAR for the KonaKart Admin application can also be generated forJBoss by adding "-Djbossliferay=true" as below:
C:\KonaKart\custom>.\bin\ant make_admin_liferay_portlet_war -Djbossliferay=true
Now to import the WAR into Liferay:
• Using the Liferay plugin installer, install the generated konakartadmin.war file.
• Add a page to Liferay and give it a 1 column layout template.
• Using the "Add Application" tool, add the newly installed KonaKart Admin application to the page.
There are some additional installation notes for installing KonaKart in Liferay in the document includedin the installation package at:
• {KonaKart-Home}/custom/konakartadmin_portlet/liferay/doc/Installation.pdf