Embed Size (px)
Citation preview
Unit 6 : Windows Networking A laptop is without a doubt one of the most useful tools for business travelers, but staying connected can be a challenge. While networking technologies have improved greatly over the past few years, problems can still occur that require some basic knowledge of how Windows Networking works. The Microsoft Windows family of operating systems supports numerous networking technologies and features.
Lesson 1 : Introduction to Windows Networking 1.1. Learning Objectives On completion of this lesson you will be able to describe:
The requirements of networking in Windows Operating System.
The steps of networking.
1.2. Client for Microsoft Networks
The Client for Microsoft Networks is an essential networking software component
for the Microsoft Windows family of operating systems. A Windows computer
must run the Client for Microsoft Networks to remotely access files, printers and
other shared network resources. These step-by-step instructions explain how to
verify this Windows client is present and, if not, how to install it. The steps are as
follows:
Step 1: Navigate to the Windows Control Panel.
Step 2: If the computer runs Windows 2000, Windows XP or newer, locate and right
click "My Network Places" in the Start Menu and choose Properties from
the menu that appears. A new window titled "Network Connections"
opens. In this window, open the "Local Area Connection" item.
Step 3: If the computer runs any older version of Windows, like Windows 95 or
Windows 98, locate and right-click on Network Neighborhood, then choose
"Properties" from the menu that appears. Alternatively, navigate to Control
Panel and open the "Network" item.
Step 4: If the computer runs Windows 2000, Windows XP or newer, view the
General tab and verify the checkbox next to Client for Microsoft Windows
is unchecked. This confirms the component has not already been installed.
If the network is currently active, you may not see any checkboxes in the
window. In this case, click the "Properties" button one more time to reach
the full General tab.
Steps for Installation
of Windows Networks

Operating System
108
Step 5: If the computer runs any older version of Windows, view the Configuration
tab and verify the Client for Microsoft Windows does not appear in this
list. This confirms the component has not already been installed.
Step 6: If the computer runs Windows 2000, Windows XP or newer, first click the
checkbox next to Client for Microsoft Windows, then click the "Install..."
button to begin the process of installing this component.
Step 7: If the computer runs any older version of Windows, simply click the
"Add..." to begin the process of installing Client for Microsoft Windows.
Step 8: For all versions of Windows, select "Client" as the type of component from
the list in the new window that appears. Click the "Add..." button to
continue.
Step 9: For all versions of Windows, next choose "Microsoft" from the list of
manufacturers shown on the left of the active window. Then, choose
"Client for Microsoft Windows" from the list of Network Clients on the
right side of the window. Click the "OK" button to continue.
Step 10: Complete the installation by clicking the "OK" button to close the window,
and then proceed to reboot the computer. After the computer has restarted,
Client for Microsoft Windows will be installed.
1.3. Networking in Windows XP
Windows XP provides modern networking features for home and business LANs.
Windows XP noticeably improves on the network technology of previous version of
Microsoft Windows.
Follow these steps to quickly find the Internet Protocol (IP) and Media Access
Control (MAC) address of a Windows XP computer. The steps are as follows:
Step 1: Click the Start menu button on the Windows taskbar.
Step 2: Click 'Run...' on this menu.
Step 3: Type 'cmd' in the text box that appears. A command prompt window
launches on the desktop.
Step 4: In this command window, type 'ipconfig /all'. Details are shown for
each of the computer's network adapters. Computers installed with
VPN software or emulation software will possess one or more virtual
adapters.
Step 5: The 'IP Address' field states the current IP address for that network
adapter.
Step 6: The 'Physical Address' field states the MAC address for that adapter.
Networking in
Windows XP

Windows Networking
109
1.4. Networking With Microsoft Windows 7
The Microsoft Windows 7 contains new technologies and interfaces for connecting
PCs to networks. Windows 7 HomeGroup, for example, is specifically designed to
simplify home networking.
1.4.1 How To Use Windows 7 HomeGroup
HomeGroup is a networking feature of Microsoft Windows introduced with
Windows 7. HomeGroup provides a method for Windows 7 PCs to share resources
including printers and different types of files with each other.
Creating a Windows 7 Home Group
To create a new Home Group, follow these steps:
Find and open the "HomeGroup" icon from within Windows Control Panel
Double-click this icon to open a wizard titled "Share with other home
computers running Windows 7"
Click the "Create a homegroup" button to move to the next page of the
wizard
Select the types of resources on this PC to be shared with the home group
from among the available choices Pictures, Music, Videos, Documents and
Printers. (These choices can be changed later.)
Click Next
Write down the automatically-generated password (combination of letters
and numbers) and click Finish to exit the wizard.
By design, a Windows 7 PC cannot support creating home groups if it is running
Home Basic or Windows 7 Starter Edition. These two versions of Windows 7
disable the capability to create home groups (although they can join existing ones).
Setting up a home group requires the home network to have at least one PC
running a more advanced version of Windows 7 such as Home Premium, or
Professional. Home groups also cannot be created from PCs which already belong
to a Windows domain.
Joining and Leaving Home Groups
Home groups become useful only when two or more computers belong to it. To add
more Windows 7 PCs to a home group, follow these steps from each computer to be
joined:
Open the HomeGroup sharing window from inside Control Panel (First and
Second steps above)

Operating System
110
Confirm the home group name listed is correct and click the "Join now"
button
Select which resources (Pictures, Movies, Videos, Documents and Printers)
on this PC are to be shared with the home group and click Next
Enter the home group’s password and click Next to complete the process,
and click Finish to exit
Computers can also be added to a home group during Windows 7 installation. If
the PC is connected to the local network and the O/S discovers a home group
during install, the user is prompted whether to join that group. To remove a
computer from a home group, open the HomeGroup sharing window and click the
"Leave the homegroup…" link near the bottom.
A PC can belong to only one home group at a time. To join a different home group
than the one a PC is currently connected to, first leave the current home group then
join the new group following the procedures outlined above.
Using Home Groups
Windows organizes the file resources shared by home groups into a special view
within Windows Explorer. To access home group shared files, open Windows
Explorer and navigate to the "Homegroup" section located in the left-hand pane
between the "Libraries" and "Computer" sections. Expanding the Homegroup icon
shows a list of devices currently connected to the group, and expanding each device
icon in turn accesses the tree of files and folders that PC is currently sharing (under
Documents, Music, Pictures and Video).
Files shared with HomeGroup can be accessed from any member computer as if
they were local. When the hosting PC is off the network, however, its files and
folders are unavailable and not listed in Windows Explorer. By default,
HomeGroup shares files with read-only access. Several options exit for managing
folder sharing and individual file permission settings:
To change the categories of resources being shared, right-click on the
Homegroup icon in Windows Explorer and choose "Change HomeGroup
settings" from this menu
To manage permissions of local files being shared with the home group,
open the Libraries section within Windows Explorer, navigate to the desired
folder or file level, and use the "Share with" toolbar button to change
permissions for those specific resources
HomeGroup also automatically adds shared printers into the Devices and Printers
section of each PC connected to the group.
Home Groups

Windows Networking
111
Changing the Home Group Password
While Windows automatically generates a home group password when the group
is first created, an administrator can change the default password to a new one
that's easier to remember. This password also should be changed when wanting to
permanently remove computers from the home group and/or ban individual
people.
To change a home group password:
1. From any computer belonging to the home group, open the HomeGroup
sharing window in Control Panel.
2. Scroll down and click the "Change the password…" link near the bottom of
the window. (The password currently in use can be viewed by clicking the
"View or print the homegroup password" link)
3. Enter the new password, click Next, and click Finish.
4. Repeat steps 1-3 for each computer in the home group
To prevent synchronization issues with other computers on the network, Microsoft
recommends completing this procedure across all devices in the group
immediately.
1.4.2 Connecting to a Wireless Home Network
To create a connection with a wireless home network, first you must open the
Network and Sharing Center. Right-click on the wireless icon in the system tray
and click the "Network and Sharing Center" link.
The Network and Sharing Center shows a picture of the current active network. In
this example, you see that the PC is not connected to a network. To troubleshoot
why this has happened (presuming that your computer was previously connected),
click the "Diagnose and Repair" link.
Connecting to a
Wireless Home
Network

Operating System
112
After the "Diagnose and Repair" tool has done its test, it will suggest some possible
solutions. You can click on one of these and go further with this process. For the
purpose of this example, click the Cancel button, and then click on the "Connect to a
Network" link (in the left hand tasks area).
The "Connect to a Network" screen displays all available wireless networks. Choose
the network you want to connect with, right-click on it and click "Connect."

Windows Networking
113
After you click on the "Connect" link, a secure network will require a password
(that you should know, if you want to connect to it). Enter the Security Key or
passphrase (fancy name for password) and click the "Connect" button.
When the connection process works, your computer will be connected with the
network you chose. At this point, you can choose to "Save this Network" (that
Windows can use in the future); you can also choose to "Start this connection
automatically" every time your computer recognizes this network - in other words,
your computer will always logon automatically to this network, when available.
These are the settings (both boxes checked) you want, if you are connecting to a
home network. However, if this is an open network in a public place, you may not
want to connect automatically with it in the future (so the boxes would not be
checked). When you have finished, click the "Close" button.
The Network and Sharing Center should now show your computer connected to
the selected network. It also shows a lot of information about Sharing and
Discovery settings. The status window provides a wealth of information about your

Operating System
114
network connection. To see this information, click the "View Status" link, next to the
network name in the center of the screen.
This screen provides a lot of useful information, the most important being the speed
and signal quality of your network connection.

Windows Networking
115
1.5. Exercise
1.5.1 Multiple choice questions
a. What must be run in a Windows computer to remotely access files, printers
and other shared network resources?
(i) Server for Microsoft Networks
(ii) Protocols for Microsoft Networks
(iii) Client for Microsoft Networks
(iv) Process for Microsoft Networks
b. Network Neighborhood is found in
(i) Windows 7
(ii) Windows 98
(iii) Windows 2000
(iv) Windows XP
c. In which version of Windows disable the capability to create home groups?
(i) Windows 7 Home Premium
(ii) Windows 7 Home Professional
(iii) Windows 7 Starter
(iv) Windows 7 Professional
d. PCs may fail to join a home group if they have an enabled
(i) Trusted Platform Module
(ii) Trusted Process Module
(iii) Trusted Platform Manager
(iv) True Platform Module
e. In which version of Windows enables IPv6 by default?
(i) Windows 98SE
(ii) Windows ME
(iii) Windows 2000
(iv) Windows 7
1.5.2 Questions for short answers
a. What is “HomeGroup”?
b. How can you find IP address and MAC address in PC running Windows
XP?
c. How can you change the HomeGroup password?
1.5.3 Analytical Questions
a. Describe the steps for setting up clients for networking.
b. Describe Wireless Network Connection process.
Operating System
116
Lesson 2 : Concept of Domains, Windows Domains,
Workgroups
2.1. Learning Objectives On completion of this lesson you will be able to describe:
Domain and workgroup.
Configuration of domain.
2.2. Domains
One of the most important concepts in Windows networking is that of a domain. A domain is basically a collection of user accounts and computer accounts that are grouped together so that they can be centrally managed. It is the job of the domain controller to facilitate this central management of domain resources. The concept of "domain" refers to communities of organizations that share some sort of common goals. All objects are assigned a domain attribute when they are created. A domain is a characteristic of an object that controls how programs can access the object. Once set, the domain remains in effect for the life of the object. The two possible attributes are system and user.
2.3. Windows Domains
A Windows domain is a form of a computer network in which all user accounts, computers, printers and other security principals, are registered with a central database (called a directory service) located on one or cluster of central computers known as domain controllers. Authentication takes place on domain controllers. Each person who uses computers within a domain receives a unique user account that can then be assigned access to resources within the domain. Starting with Windows 2000, Active Directory is the Windows component in charge of maintaining that central database. The concept of Windows domain is in contrast with that of a workgroup in which each computer maintains its own database of security principals. Configuration Computers can connect to a domain via LAN, WAN or using a VPN connection. Users of a domain are able to use enhanced security for their VPN connection due to the support for a certification authority which is gained when a domain is added to a network, and as a result smart cards and digital certificates can be used to confirm identities and protect stored information.

Windows Networking
117
2.3.1. Domain controllers
In a Windows domain, the directory resides on computers that are configured as "domain controllers." A domain controller is a Windows or Samba server that manages all security-related aspects between user and domain interactions, centralizing security and administration. A Windows Server domain is generally suited for businesses and/or organizations when more than 10 PCs are in use. A domain does not refer to a single location or specific type of network configuration. The computers in a domain can share physical proximity on a small LAN or they can be located in different parts of the world. As long as they can communicate, their physical position is irrelevant.
2.3.2. Integration
Where PCs running a Windows operating system must be integrated into a domain that includes non-Windows PCs, the free Open Source package Samba is a suitable alternative. Whichever package is used to control it, the database contains the user accounts and security information for the resources in that domain.
2.4. Workgroups
In computer networking, a workgroup is a collection of computers on a local area network (LAN) that share common resources and responsibilities. Workgroups provide easy sharing of files, printers and other network resources. Being a peer-to-peer (P2P) network design, each workgroup computer may both share and access resources if configured to do so. The Microsoft Windows family of operating systems supports assigning of computers to named workgroups. Workgroups are designed for small LANs in homes, schools, and small businesses. A Windows Workgroup, for example, functions best with 15 or fewer computers. As the number of computers in a workgroup grows, workgroup LANs eventually become too difficult to administer and should be replaced with alternative solutions like domains or other client/server approaches.
2.5. Naming Rules for Workgroups and Domains
Each Windows computer belongs either to a workgroup or a domain. Home networks and other small LANs utilize workgroups, whereas larger business networks operate with domains. Choosing proper workgroup and/or domain names is essential to avoiding technical problems in networking Windows computers. Ensure your workgroups and/or domains are named appropriately according to the following rules.
Ensure each workgroup and domain name is no longer than 15 characters.

Operating System
118
Ensure no workgroup or domain name contains spaces. Windows ME and
earlier versions of Windows do not support workgroups or domains with
spaces in their name.
Whenever possible, ensure all computers on the LAN use the same
workgroup/domain name. Using common workgroups/domains makes it
easier to browse the network and avoids some security complications when
sharing files. Note that the default workgroup name in Windows XP is
"MSHOME" but in older versions of Windows is "WORKGROUP".
Ensure the name of the workgroup/domain is different from the name of
any computer on that network.
Avoid special characters in workgroup and domain names. Whenever
possible, do not use any of the characters when naming Windows
workgroups and domains: / \ * , . " @
For simplicity, avoid using lower-case letters in workgroup or domain
names.
The workgroup name need not match the network name (SSID) on a Wi-Fi
LAN.
2.5.1 Set or Change workgroup/domain names in Windows XP or later version
To set or change workgroup/domain names in Windows XP or later version
right-click on My Computer or open the System icon in Control Panel
choose the Computer Name tab
click the Change... button to access the workgroup/domain name fields.
2.5.2. Set or Change workgroup/domain names in Windows 2000
To set or change workgroup/domain names in Windows 2000
open the System icon in Control Panel
choose the Network Identification tab
click the Properties button.
Windows Networking
119
2.6. Exercise 2.6.1 Multiple choice questions
a. Once set, the domain remains in effect for
(i) three hours.
(ii) two hours.
(iii) the life of the object.
(iv) one hour.
b. Ensure each workgroup and domain name is no longer than
(i) 20 characters.
(ii) 15 characters.
(iii) 25 characters.
(iv) 35 characters.
c. Windows Workgroup functions best with
(i) 15 or fewer computers.
(ii) 45 or fewer computers.
(iii) 35 or fewer computers.
(iv) 25 or fewer computers.
d. Starting with Windows 2000, which is the Windows component in charge of
maintaining the central database.
(i) User Domain
(ii) Active Directory
(iii) System Domain
(iv) No such component
2.6.2. Questions for short answers
a. What is a workgroup?
b. Write the steps to set or change workgroup/domain names in
Windows XP or later version.
c. What is domain controller?
2.6.3 Analytical Questions
a. Describe naming rules for workgroups and domains.
Operating System
120
Lesson 3 : Network Protocols, TCP/IP Protocol Setting for Windows
3.1. Learning Objectives On completion of this lesson you will be able to describe:
Different types of Network Protocols.
Comparison among the network protocols.
3.2. Introduction
A network protocol defines rules and conventions for communication between network devices. Protocols for computer networking all generally use packet switching techniques to send and receive messages in the form of packets. Network protocols include mechanisms for devices to identify and make connections with each other, as well as formatting rules that specify how data is packaged into messages sent and received. Some protocols also support message acknowledgement and data compression designed for reliable and/or high-performance network communication. Hundreds of different computer network protocols have been developed each designed for specific purposes and environments.
3.3. Internet Protocols
The Internet Protocol family contains a set of related (and among the most widely used network protocols. Besides Internet Protocol (IP) itself, higher-level protocols like TCP, UDP, HTTP, and FTP all integrate with IP to provide additional capabilities. Similarly, lower-level Internet Protocols like ARP and ICMP also co-exist with IP. These higher level protocols interact more closely with applications like Web browsers while lower-level protocols interact with network adapters and other computer hardware.
3.4. Routing Protocols
Routing protocols are special-purpose protocols designed specifically for use by network routers on the Internet. Common routing protocols include EIGRP, OSPF and BGP.
3.5. How Network Protocols Are Implemented
Modern operating systems like Microsoft Windows contain built-in services or daemons that implement support for some network protocols. Applications like Web browsers contain software libraries that support the high level protocols necessary for that application to function. For some lower level TCP/IP and routing
Windows Networking
121
protocols, support is implemented in directly hardware (silicon chipsets) for improved performance. 3.6. Types of Network Protocols
The most common network protocols are:
Ethernet
Local Talk
Token Ring
FDDI
ATM
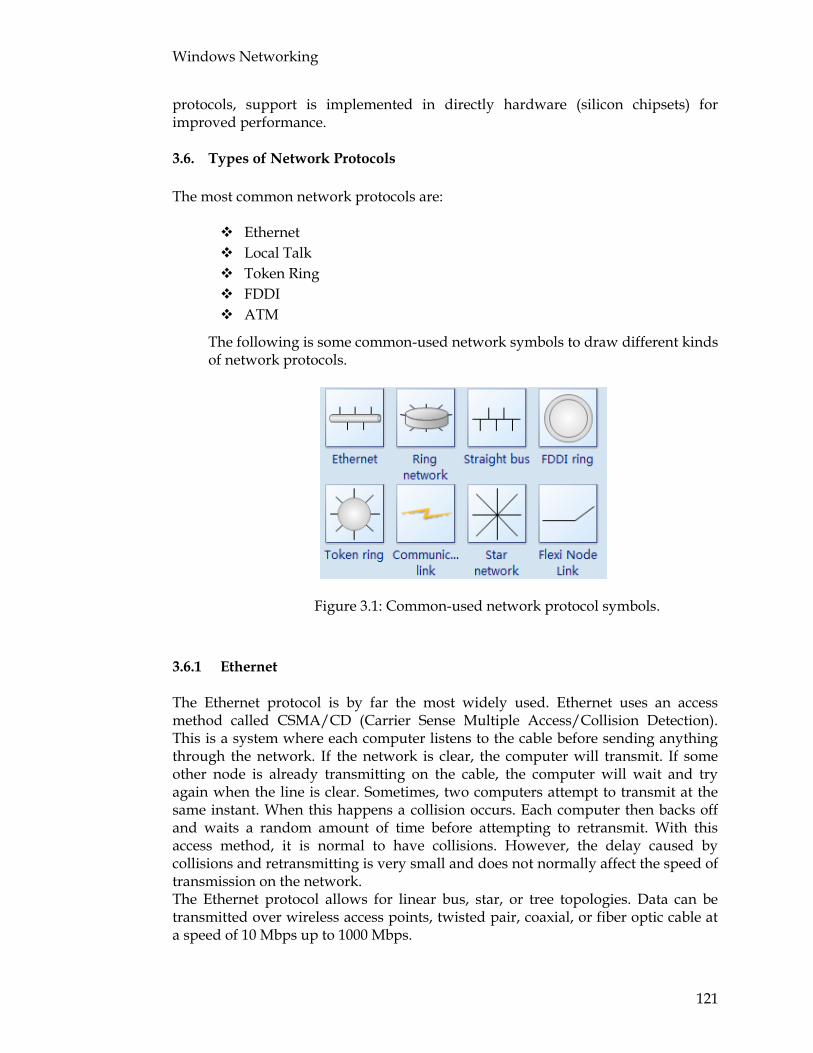
The following is some common-used network symbols to draw different kinds of network protocols.
Figure 3.1: Common-used network protocol symbols.
3.6.1 Ethernet
The Ethernet protocol is by far the most widely used. Ethernet uses an access method called CSMA/CD (Carrier Sense Multiple Access/Collision Detection). This is a system where each computer listens to the cable before sending anything through the network. If the network is clear, the computer will transmit. If some other node is already transmitting on the cable, the computer will wait and try again when the line is clear. Sometimes, two computers attempt to transmit at the same instant. When this happens a collision occurs. Each computer then backs off and waits a random amount of time before attempting to retransmit. With this access method, it is normal to have collisions. However, the delay caused by collisions and retransmitting is very small and does not normally affect the speed of transmission on the network. The Ethernet protocol allows for linear bus, star, or tree topologies. Data can be transmitted over wireless access points, twisted pair, coaxial, or fiber optic cable at a speed of 10 Mbps up to 1000 Mbps.
Operating System
122
3.6.2 Local Talk
Local Talk is a network protocol that was developed by Apple Computer, Inc. for Macintosh computers. The method used by Local Talk is called CSMA/CA (Carrier Sense Multiple Access with Collision Avoidance). It is similar to CSMA/CD except that a computer signals its intent to transmit before it actually does so. Local Talk adapters and special twisted pair cable can be used to connect a series of computers through the serial port. The Local Talk protocol allows for linear bus, star, or tree topologies using twisted pair cable. A primary disadvantage of Local Talk is speed. Its speed of transmission is only 230 Kbps.
3.6.3 Token Ring
The Token Ring protocol was developed by IBM in the mid-1980s. The access method used involves token-passing. In Token Ring, the computers are connected so that the signal travels around the network from one computer to another in a logical ring. A single electronic token moves around the ring from one computer to the next. If a computer does not have information to transmit, it simply passes the token on to the next workstation. If a computer wishes to transmit and receives an empty token, it attaches data to the token. The token then proceeds around the ring until it comes to the computer for which the data is meant. At this point, the data is captured by the receiving computer. The Token Ring protocol requires a star-wired ring using twisted pair or fiber optic cable. It can operate at transmission speeds of 4 Mbps or 16 Mbps. Due to the increasing popularity of Ethernet, the use of Token Ring in school environments has decreased.
3.6.4 FDDI
Fiber Distributed Data Interface (FDDI) is a network protocol that is used primarily to interconnect two or more local area networks, often over large distances. The access method used by FDDI involves token-passing. FDDI uses a dual ring physical topology. Transmission normally occurs on one of the rings; however, if a break occurs, the system keeps information moving by automatically using portions of the second ring to create a new complete ring. A major advantage of FDDI is speed. It operates over fiber optic cable at 100 Mbps.
3.6.5 ATM
Asynchronous Transfer Mode (ATM) is a network protocol that transmits data at a speed of 155 Mbps and higher. ATM works by transmitting all data in small packets of a fixed size; whereas, other protocols transfer variable length packets. ATM supports a variety of media such as video, CD-quality audio, and imaging. ATM employs a star topology, which can work with fiber optic as well as twisted pair cable.
Windows Networking
123
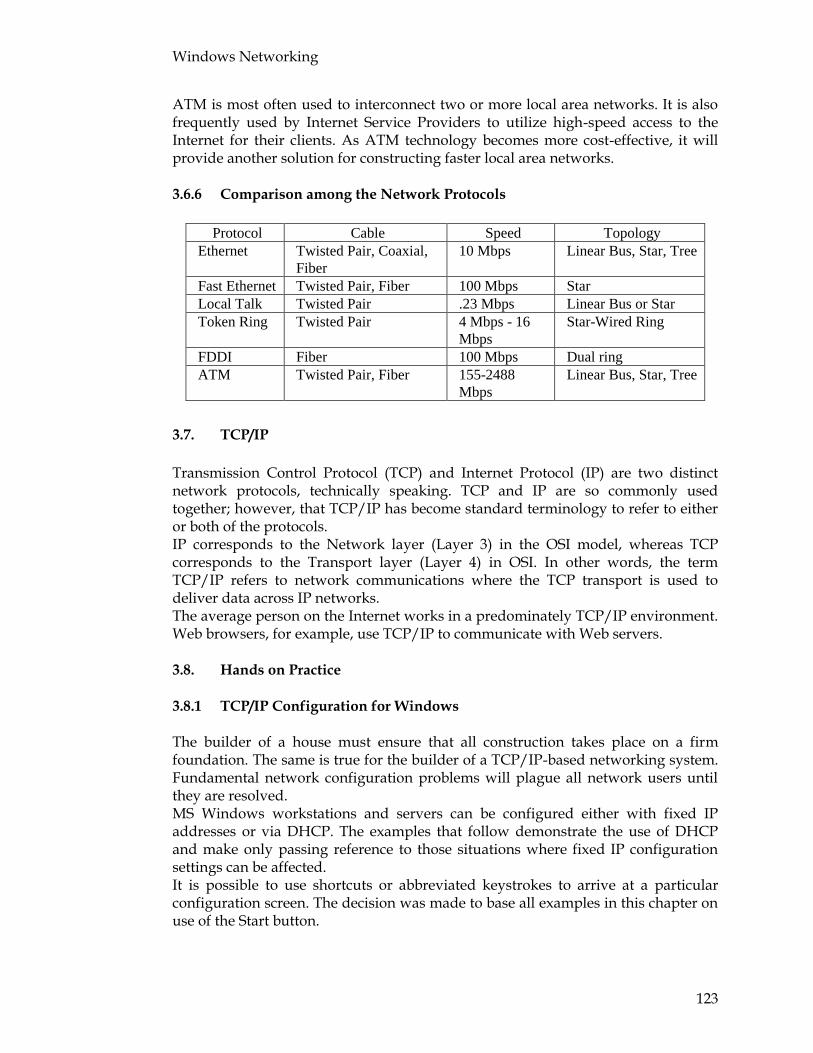
ATM is most often used to interconnect two or more local area networks. It is also frequently used by Internet Service Providers to utilize high-speed access to the Internet for their clients. As ATM technology becomes more cost-effective, it will provide another solution for constructing faster local area networks. 3.6.6 Comparison among the Network Protocols
Protocol Cable Speed Topology
Ethernet Twisted Pair, Coaxial,
Fiber
10 Mbps Linear Bus, Star, Tree
Fast Ethernet Twisted Pair, Fiber 100 Mbps Star
Local Talk Twisted Pair .23 Mbps Linear Bus or Star
Token Ring Twisted Pair 4 Mbps - 16
Mbps
Star-Wired Ring
FDDI Fiber 100 Mbps Dual ring
ATM Twisted Pair, Fiber 155-2488
Mbps
Linear Bus, Star, Tree
3.7. TCP/IP
Transmission Control Protocol (TCP) and Internet Protocol (IP) are two distinct network protocols, technically speaking. TCP and IP are so commonly used together; however, that TCP/IP has become standard terminology to refer to either or both of the protocols. IP corresponds to the Network layer (Layer 3) in the OSI model, whereas TCP corresponds to the Transport layer (Layer 4) in OSI. In other words, the term TCP/IP refers to network communications where the TCP transport is used to deliver data across IP networks. The average person on the Internet works in a predominately TCP/IP environment. Web browsers, for example, use TCP/IP to communicate with Web servers. 3.8. Hands on Practice
3.8.1 TCP/IP Configuration for Windows
The builder of a house must ensure that all construction takes place on a firm foundation. The same is true for the builder of a TCP/IP-based networking system. Fundamental network configuration problems will plague all network users until they are resolved. MS Windows workstations and servers can be configured either with fixed IP addresses or via DHCP. The examples that follow demonstrate the use of DHCP and make only passing reference to those situations where fixed IP configuration settings can be affected. It is possible to use shortcuts or abbreviated keystrokes to arrive at a particular configuration screen. The decision was made to base all examples in this chapter on use of the Start button.
Operating System
124
3.8.2 MS Windows XP
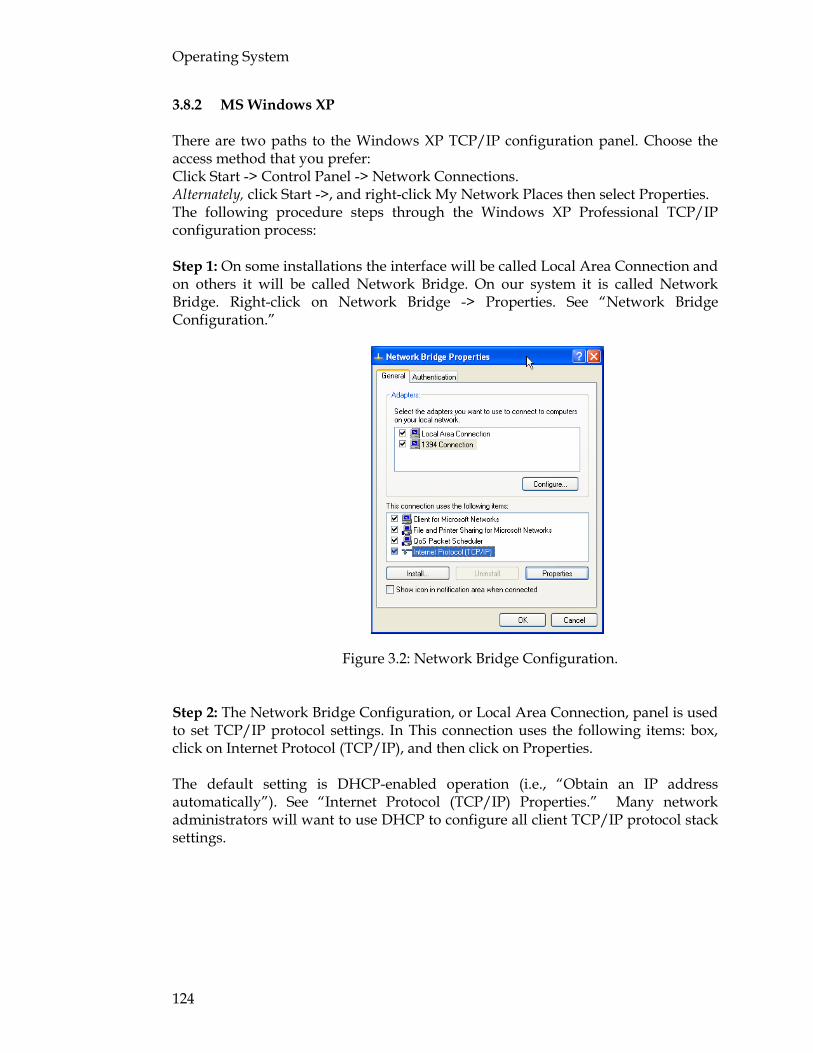
There are two paths to the Windows XP TCP/IP configuration panel. Choose the access method that you prefer: Click Start -> Control Panel -> Network Connections. Alternately, click Start ->, and right-click My Network Places then select Properties. The following procedure steps through the Windows XP Professional TCP/IP configuration process: Step 1: On some installations the interface will be called Local Area Connection and on others it will be called Network Bridge. On our system it is called Network Bridge. Right-click on Network Bridge -> Properties. See “Network Bridge Configuration.”
Figure 3.2: Network Bridge Configuration. Step 2: The Network Bridge Configuration, or Local Area Connection, panel is used to set TCP/IP protocol settings. In This connection uses the following items: box, click on Internet Protocol (TCP/IP), and then click on Properties. The default setting is DHCP-enabled operation (i.e., “Obtain an IP address automatically”). See “Internet Protocol (TCP/IP) Properties.” Many network administrators will want to use DHCP to configure all client TCP/IP protocol stack settings.

Windows Networking
125
Figure 3.3: Internet Protocol (TCP/IP) Properties.
If it is necessary to provide a fixed IP address, click on “Use the following IP address” and enter the IP Address, the subnet mask, and the default gateway address in the boxes provided.
Step 3: Click the Advanced button to proceed with TCP/IP configuration. This opens a panel in which it is possible to create additional IP addresses for this interface. The technical name for the additional addresses is IP aliases, and additionally this panel permits the setting of more default gateways (routers). In most cases where DHCP is used, it will not be necessary to create additional settings. See “Advanced Network Settings” to see the appearance of this panel.
Figure 3.4: Advanced Network Settings.

Operating System
126
Fixed settings may be required for DNS and WINS if these settings are not provided automatically via DHCP.
Step 4: Click the DNS tab to add DNS server settings. The example system uses manually configured DNS settings. When finished making changes, click the OK to commit the settings. See “DNS Configuration.”
Figure 3.5: DNS Configuration.
Step 5: Click the WINS tab to add manual WINS server entries. This step demonstrates an example system that uses manually configured WINS settings. When finished making changes, click OK to commit the settings. See “WINS Configuration”.
Figure 3.6: WINS Configuration.

Windows Networking
127
3.8.3 MS Windows 7
To make it easier to manage TCP/IP settings, we recommend using automated Dynamic Host Configuration Protocol (DHCP). DHCP automatically assigns Internet Protocol (IP) addresses to the computers on your network, if your network supports it. If you use DHCP, then you don't have to change your TCP/IP settings if you move your computer to another location, and DHCP doesn't require you to manually configure TCP/IP settings, such as Domain Name System (DNS) and Windows Internet Name Service (WINS). To enable DHCP or change other TCP/IP settings, follow these steps:
1. Open Network Connections by clicking the Start button , and then clicking
Control Panel. In the search box, type adapter, and then, under Network and
Sharing Center, click View network connections.
2. Right-click the connection that you want to change, and then click Properties.
If you're prompted for an administrator password or confirmation, type the
password or provide confirmation.
3. Click the Networking tab. Under This connection uses the following items,
click either Internet Protocol Version 4 (TCP/IPv4) or Internet Protocol
Version 6 (TCP/IPv6), and then click Properties.
4. To specify IPv4 IP address settings, do one of the following:
To get IP settings automatically using DHCP, click Obtain an IP address
automatically, and then click OK.
To specify an IP address, click Use the following IP address, and then,
in the IP address, Subnet mask, and Default gateway boxes, type the IP
address settings.
Figure 3.7: The Network Connection Properties dialog box.

Operating System
128
5. To specify IPv6 IP address settings, do one of the following:
To get IP settings automatically using DHCP, click Obtain an IPv6
address automatically, and then click OK.
To specify an IP address, click Use the following IPv6 address, and
then, in the IPv6 address, Subnet prefix length, and Default gateway
boxes, type the IP address settings.
6. To specify DNS server address settings, do one of the following:
To get a DNS server address automatically using DHCP, click Obtain
DNS server address automatically, and then click OK.
To specify a DNS server address, click Use the following DNS server
addresses, and then, in the Preferred DNS server and Alternate DNS
server boxes, type the addresses of the primary and secondary DNS
servers.
To change advanced DNS, WINS, and IP settings, click Advanced.
Figure 3.8: The Internet Protocol Version 4 (TCP/IPv4) Properties dialog box.

Windows Networking
129
3.9. Exercise
3.9.1. Multiple choice questions a. Which one is the higher-level Internet Protocol?
(i) EIGRP
(ii) TCP
(iii) ARP
(iv) ICMP
b. Local Talk protocols speed of transmission is
(i) 230 Mbps
(ii) 10 Kbps
(iii) 230 Kbps
(iv) 100 Mbps
c. Which one can be used with both fiber optic cabling and copper?
(i) Token Ring
(ii) Local Talk
(iii) FDDI
(iv) Gigabit Ethernet
d. DHCP stands for
(i) Dynamic Hop Control Protocol
(ii) Dynamic Host Control Protocol
(iii) Dynamic Host Configuration Protocol
(iv) Dynamic Hop Configuration Protocol
3.9.2. Questions for short answers
a. Compare between CSMA/CA and CSMA/CD.
b. Write short notes on “Token Ring”.
c. What is Asynchronous Transfer Mode?
d. Write the advantages of using DHCP to configure IP addresses.
3.9.3. Analytical Questions
a. Draw the common network protocol symbols.
b. Give the comparison among the network protocols.

Operating System
130
Lesson 4 : Virtual Private Networks and Remote Networking
4.1. Learning Objectives On completion of this lesson you will be able to describe: Virtual Private Network (VPN), Firewalls, Proxy Servers, Remote Networking
etc.
Security Issues of VPN.
4.2. Introduction
A public network, like the public telephone system and the Internet, is a large collection of unrelated peers that exchange information more or less freely with each other. A private network is composed of computers owned by a single organization that share information specifically with each other. The typical corporate Local Area Network (LAN) or Wide Area Network (WAN) is an example of a private network.
4.3. Virtual Private Network
Virtual private network (VPN) is a concept that blurs the line between a public and private network. VPNs allow you to create a secure, private network over a public network such as the Internet. They can be created using software, hardware, or a combination of the two that creates a secure link between peers over a public network. This is done through encryption, authentication, packet tunneling, and firewalls.
4.3.1 What Does a VPN Do?
A virtual private network is a way to simulate a private network over a public network, such as the Internet. It is called "virtual" because it depends on the use of virtual connections—that is, temporary connections that have no real physical presence, but consist of packets routed over various machines on the Internet on an ad hoc basis. Secure virtual connections are created between two machines, a machine and a network, or two networks.
4.3.2 Intranets
Intranets connect an organization’s locations. These locations range from the headquarters offices, to branch offices, to a remote employee’s home. Often this connectivity is used for e-mail and for sharing applications and files. While Frame Relay, ATM, and MPLS accomplish these tasks, the shortcomings of each limit
Windows Networking
131
connectivity. The cost of connecting home users is also very expensive compared to Internet-access technologies, such as DSL or cable. Because of this, organizations are moving their networks to the Internet, which is inexpensive, and using IPSec to create these networks.
4.3.3 Remote Access
Remote access enables telecommuters and mobile workers to access e-mail and business applications. A dial-up connection to an organization’s modem pool is one method of access for remote workers, but it is expensive because the organization must pay the associated long distance telephone and service costs. Remote access VPNs greatly reduce expenses by enabling mobile workers to dial a local Internet connection and then set up a secure IPSec-based VPN communications to their organization.
4.3.4 Extranets
Extranets are secure connections between two or more organizations. Common uses for extranets include supply-chain management, development partnerships, and subscription services. These undertakings can be difficult using legacy network technologies due to connection costs, time delays, and access availability. IPSec-based VPNs are ideal for extranet connections. IPSec-capable devices can be quickly and inexpensively installed on existing Internet connections.
4.3.5 How VPNs relate to Intranets
Virtual private networks can be used to expand the reach of an Intranet. Since Intranets are typically used to communicate proprietary information, you don't want them accessible from the Internet. There may be cases, however, where you'll want far-flung offices to share data or remote users to connect to your Intranet and these users may be using the Internet as their means of connection. A VPN will allow them to connect to the Intranet securely, so there are no fears of sensitive information leaving the network unprotected. You might see this type of connection also referred to as an "Extranet."
4.3.6 Security Risks of the Internet
The risks associated with the Internet are advertised every day by the trade and mainstream media. Whether it's someone accessing your credit card numbers, prying into your legal troubles, or erasing your files, there's a new scare every month about the (supposedly) private information someone can find out about you on the Internet. (Not to mention the perceived risk that you might happen upon some information that you find offensive, or that you might not want your children to see.)

Operating System
132
For corporations, the risks are even more real and apparent. Stolen or deleted corporate data can adversely affect people's livelihoods, and cost the company money.
4.4. How VPNs Solve Internet Security Issues
There are several technologies that VPNs use to protect data travelling across the Internet. The most important concepts are firewalls, authentication, encryption, and tunneling.
4.4.1 Firewalls
It uses such techniques as examining Internet addresses on packets or ports requested on incoming connections to decide what traffic is allowed into a network. Although most VPN packages themselves don't implement firewalls directly, they are an integral part of a VPN. The idea is to use the firewall to keep unwanted visitors from entering your network, while allowing VPN users through.
4.4.2 Authentication
Authentication techniques are essential to VPNs, as they ensure the communicating parties that they are exchanging data with the correct user or host. Authentication is analogous to "logging in" to a system with a username and password. VPNs, however, require more stringent authentication methods to validate identities. Most VPN authentication systems are based on a shared key system. Authentication is typically performed at the beginning of a session, and then at random during the course of a session to ensure that an impostor didn't "slip into" the conversation. Authentication can also be used to ensure data integrity.
4.4.3 Encryption
All VPNs support some type of encryption technology, which essentially packages data into a secure envelope. Encryption is often considered as essential as authentication, for it protects the transported data from packet sniffing. There are two popular encryption techniques employed in VPNs: secret (or private) key encryption and public key encryption. In secret key encryption, there is a shared secret password or passphrase known to all parties that need access to the encrypted information. This single key is used to both encrypt and decrypt the information. The data encryption standard (DES), which the Unix crypt system call uses to encrypt passwords, is an example of a private key encryption method.
4.4.4 Tunneling
VPNs allow you to connect to a remote network over the Internet, which is an IP network. The fact is, though, that many corporate LANs don't exclusively use IP (although the trend is moving in that direction).

Windows Networking
133
Networks with Windows NT servers, for instance, might use NetBEUI, while Novell servers use IPX. Tunneling allows you to encapsulate a packet within a packet to accommodate incompatible protocols. The packet within the packet could be of the same protocol or of a completely foreign one. For example, tunneling can be used to send IPX packets over the Internet so that a user can connect to an IPX-only Novell server remotely.
4.1 Remote Networking
The ability to log onto a network from a distant location is called remote networking. Generally, this implies a computer, a modem, and some remote access software to connect to the network. Whereas remote control refers to taking control of another computer, remote access means that the remote computer actually becomes a full-fledged host on the network. The remote access software dials in directly to the network server. The only difference between a remote host and workstations connected directly to the network is slower data transfer speeds. Remote networking is also referred to as Dial-Up Networking or remote access. With Dial-Up Networking and virtual private networking, you can connect from a remote site to a computer that has been configured as a remote access server, or connect to a network through the remote access server. For example, as Figure 4.1 shows, if you connect to a Windows NT Remote Access Server, you can access its shared resources (if the Microsoft File and Printer Sharing service has been enabled), or you can use it as a gateway to a network that is running the TCP/IP, IPX/SPX, and NetBEUI network protocols.
Figure 4.1: Connecting to a remote access server.
Figure 4.1 illustrates two types of connections: a dial-up connection and a virtual private network connection through the Internet. You would use either the dial-up connection or the virtual private network connection to access those resources. As Figure 4.2 shows, a Windows 98 dial-up client can connect to a wide variety of networks, because Windows 98 supports a variety of connection and network protocols.

Operating System
134
As Figure 4.2 shows, a Windows 98 dial-up client can connect to a wide variety of networks, because Windows 98 supports a variety of connection and network protocols.
Figure 4.2: Connecting to a remote access server.
With virtual private networking, you can connect to remote servers not only over telephone lines, but also over Internet connections and the corporate intranet. This provides the following benefits: a) Inexpensive remote access
b) Secure access to private data
c) Private addressing schemes
Windows Networking
135
4.6. Exercise
4.6.1 Multiple choice questions
a. The secure connections between two or more organizations are called
(i) Extranets
(ii) Intranets
(iii) Internets
(iv) Remote Accesses
b. Which are typically software solutions run on top of a network operating
system?
(i) Active Servers
(ii) Proxy Servers
(iii) Firewalls
(iv) Intranets
c. Most VPN authentication systems are based on
(i) a dynamic key system
(ii) a static key system.
(iii) a shared key system.
(iv) a host key system.
d. The ability to log onto a network from a distant location is called
(i) home networking
(ii) workgroup networking
(iii) office networking
(iv) remote networking
4.6.2 Questions for short answers
a. What is “IPSec”? b. How tunneling works?
4.6.3 Analytical Questions
a. Describe the Dial-Up Networking technique.

Operating System
136