Embed Size (px)
Citation preview
CONFERENCING & COLLABORATION UNIFIED MEETING 5
| 1
Unified Meeting® 5, a meeting and collaboration
application enhances the way you communicate
by making meetings convenient and easy to
manage.
It improves your meeting experience with intuitive and powerful
productivity enhancements in a hosted service that is integrated
with the tools you already use every day.
The instructions in this user guide will help make meetings easier
to manage, more effective and more productive.
Get Started
It’s never been easier! Just follow the simple instructions below
and you are on the way to your first visual audio experience.
Note: Before proceeding with the following steps, please ensure that you have administrator rights to perform the download and installation.
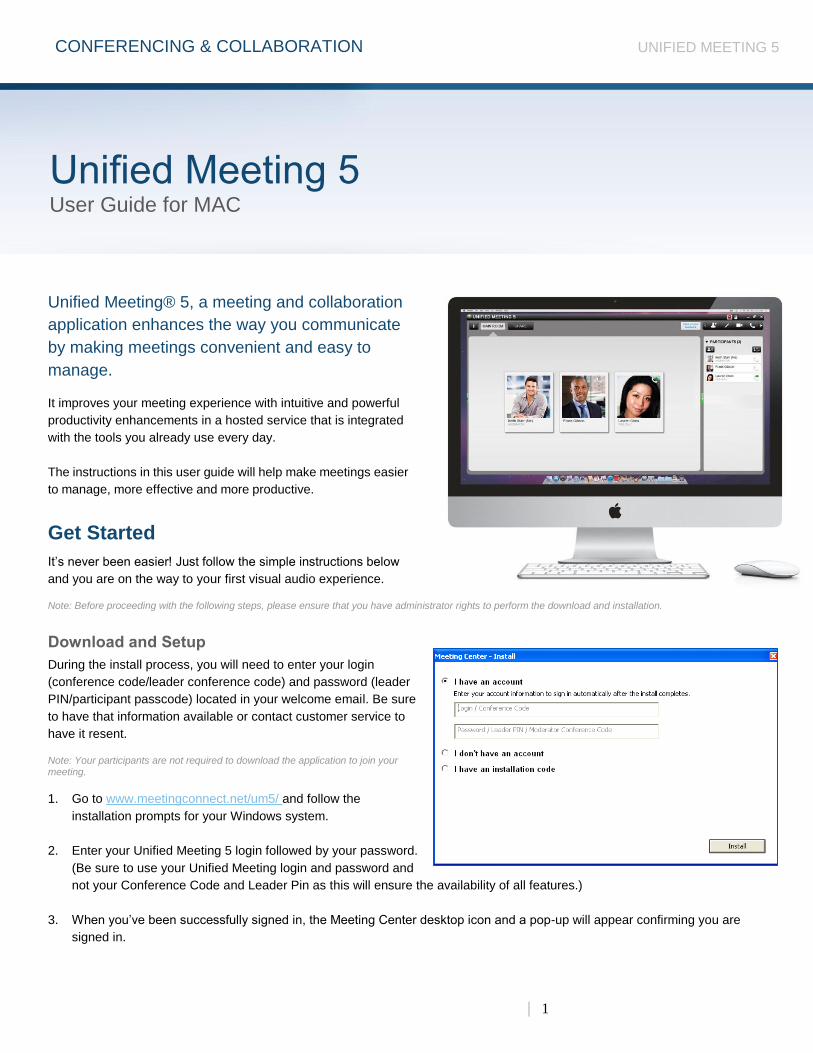
Download and Setup
During the install process, you will need to enter your login
(conference code/leader conference code) and password (leader
PIN/participant passcode) located in your welcome email. Be sure
to have that information available or contact customer service to
have it resent.
Note: Your participants are not required to download the application to join your meeting.
1. Go to www.meetingconnect.net/um5/ and follow the
installation prompts for your Windows system.
2. Enter your Unified Meeting 5 login followed by your password.
(Be sure to use your Unified Meeting login and password and
not your Conference Code and Leader Pin as this will ensure the availability of all features.)
3. When you’ve been successfully signed in, the Meeting Center desktop icon and a pop-up will appear confirming you are
signed in.
Unified Meeting 5 User Guide for MAC
CONFERENCING & COLLABORATION UNIFIED MEETING 5
| 2
Meeting Center Desktop Icon
Once installation is complete, you will see the Meeting Center icon in the Menu bar in the bottom right corner of your
desktop. From here, you can:
Schedule meetings
Start and join meetings
Change your settings
Check for application updates
Browser Application
If you do not install the meeting application, you can launch browser-only meetings to manage your audio participants online.
You can utilize features such as mute, dial me, chat and open/close meeting room door.
Please note that the following features are not available in browser-only: Voice over IP, document sharing, integration with
instant messenger, scheduling, calendars, contacts and audio contact look-up
Supported operating systems and browsers for browser moderator include:
Operating system
Windows XP SP3 / Vista / 7
Mac OS X 10.6 (Snow Leopard) or higher
Android® Tablet (limited support)
iPad® (limited support)
Browser
Microsoft Internet Explorer 7 or higher
Google Chrome 11 or higher
Mozilla Firefox 10 or higher
Safari 5.1 or higher
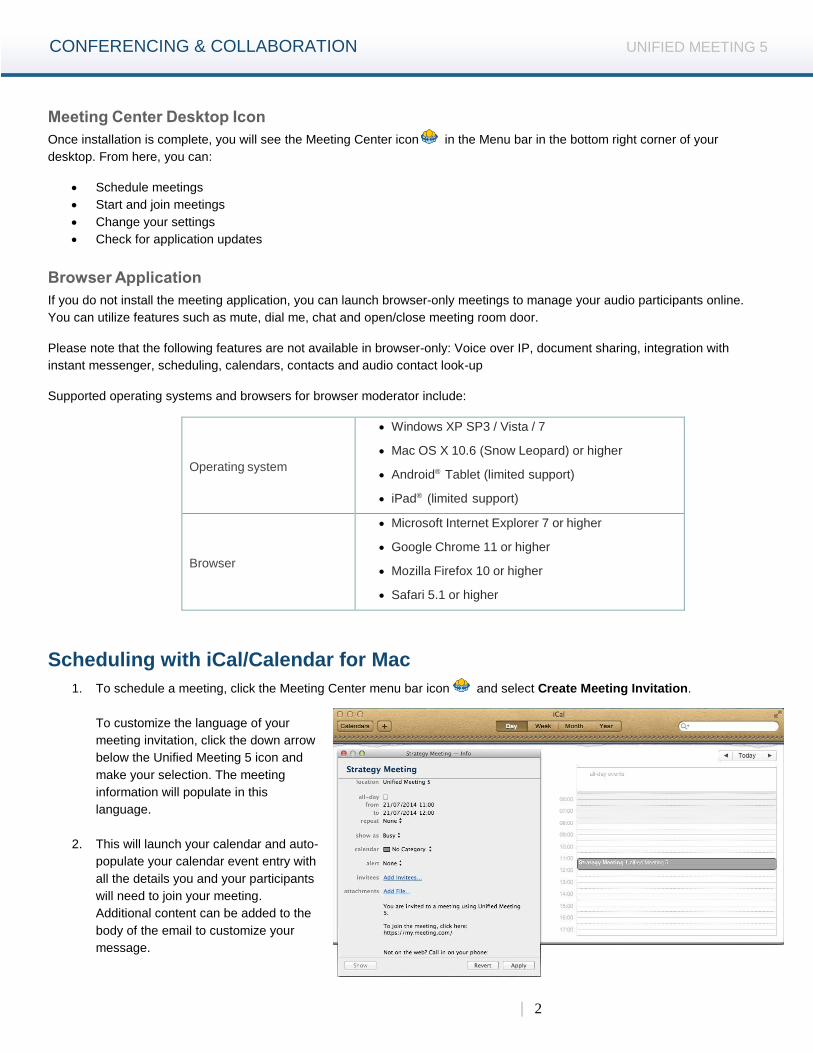
Scheduling with iCal/Calendar for Mac
1. To schedule a meeting, click the Meeting Center menu bar icon and select Create Meeting Invitation.
To customize the language of your
meeting invitation, click the down arrow
below the Unified Meeting 5 icon and
make your selection. The meeting
information will populate in this
language.
2. This will launch your calendar and auto-
populate your calendar event entry with
all the details you and your participants
will need to join your meeting.
Additional content can be added to the
body of the email to customize your
message.
CONFERENCING & COLLABORATION UNIFIED MEETING 5
| 3
Start Your First Meeting
1. From the desktop menu, select Start Meeting.
2. Enter your details on the left under My Information.
3. Select how you wish to join the audio portion of the meeting from these four options:
Call Me: Choose your country and enter
a phone number for the system to dial
out to you.
Dial In: View dial-in access numbers and
conference code which you can dial from
any touch tone device.
I’m Already On: You are already
connected to the audio or wish to have a
web only meeting.
VoIP: Join audio using Voice over IP
softphone *
*Please note additional instructions / requirements for computer audio are on the next page.
4. Click Start Meeting.
Alternatively, you can also click the link to join the meeting from your own email calendar invite. If you are accessing the
meeting from a device on which the meeting application is not installed, simply go to the URL listed in your welcome email and
log into your account with your login and password.
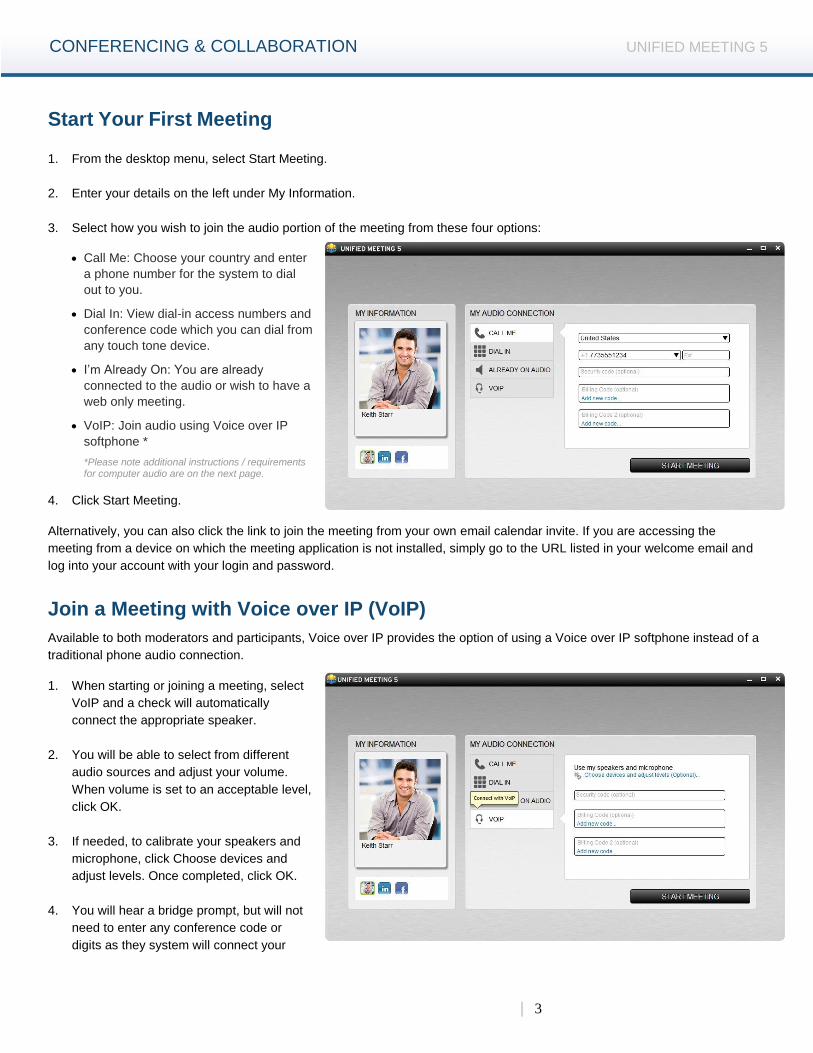
Join a Meeting with Voice over IP (VoIP)
Available to both moderators and participants, Voice over IP provides the option of using a Voice over IP softphone instead of a
traditional phone audio connection.
1. When starting or joining a meeting, select
VoIP and a check will automatically
connect the appropriate speaker.
2. You will be able to select from different
audio sources and adjust your volume.
When volume is set to an acceptable level,
click OK.
3. If needed, to calibrate your speakers and
microphone, click Choose devices and
adjust levels. Once completed, click OK.
4. You will hear a bridge prompt, but will not
need to enter any conference code or
digits as they system will connect your
CONFERENCING & COLLABORATION UNIFIED MEETING 5
| 4
directly.
5. During the meeting, you can choose to disconnect your Voice over IP connection and establish a phone connection by
clicking the disconnect Voice over IP icon (headset with line) on your participant card.
Please note: Voice over IP works with inbuilt microphones, however when joining from a public location it is recommended
that HD headsets be used to avoid background noise.
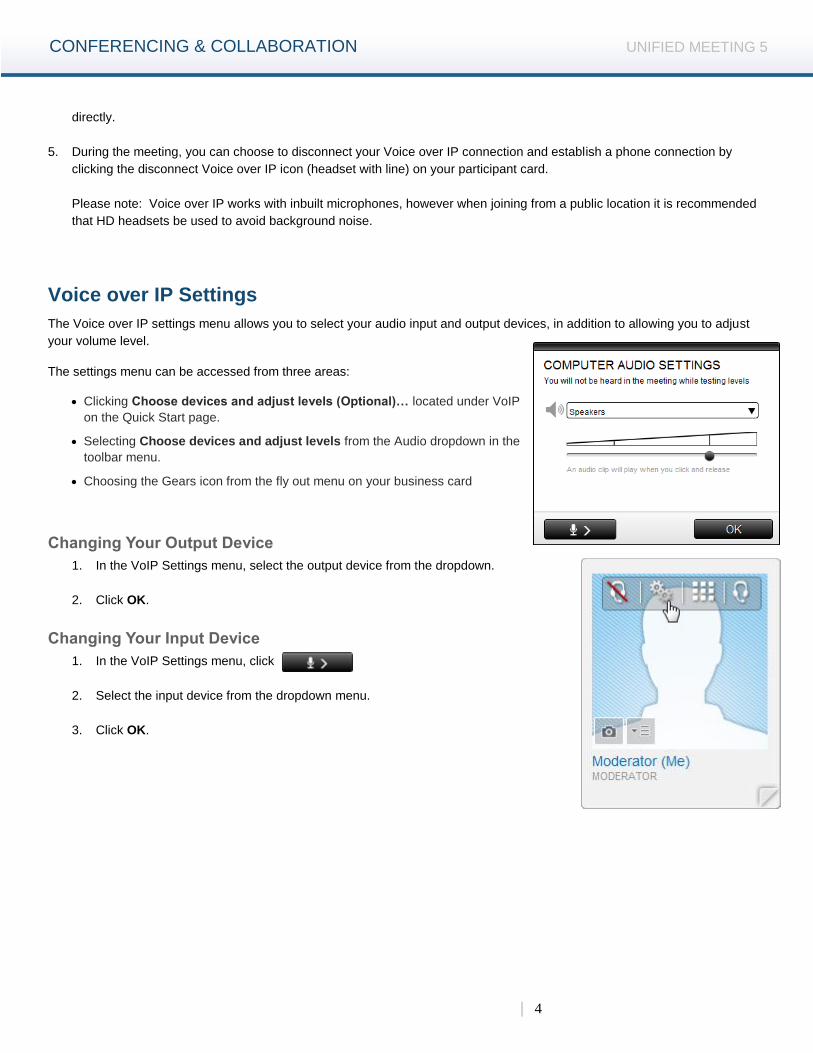
Voice over IP Settings
The Voice over IP settings menu allows you to select your audio input and output devices, in addition to allowing you to adjust
your volume level.
The settings menu can be accessed from three areas:
Clicking Choose devices and adjust levels (Optional)… located under VoIP
on the Quick Start page.
Selecting Choose devices and adjust levels from the Audio dropdown in the
toolbar menu.
Choosing the Gears icon from the fly out menu on your business card
Changing Your Output Device
1. In the VoIP Settings menu, select the output device from the dropdown.
2. Click OK.
Changing Your Input Device
1. In the VoIP Settings menu, click
2. Select the input device from the dropdown menu.
3. Click OK.
CONFERENCING & COLLABORATION UNIFIED MEETING 5
| 5
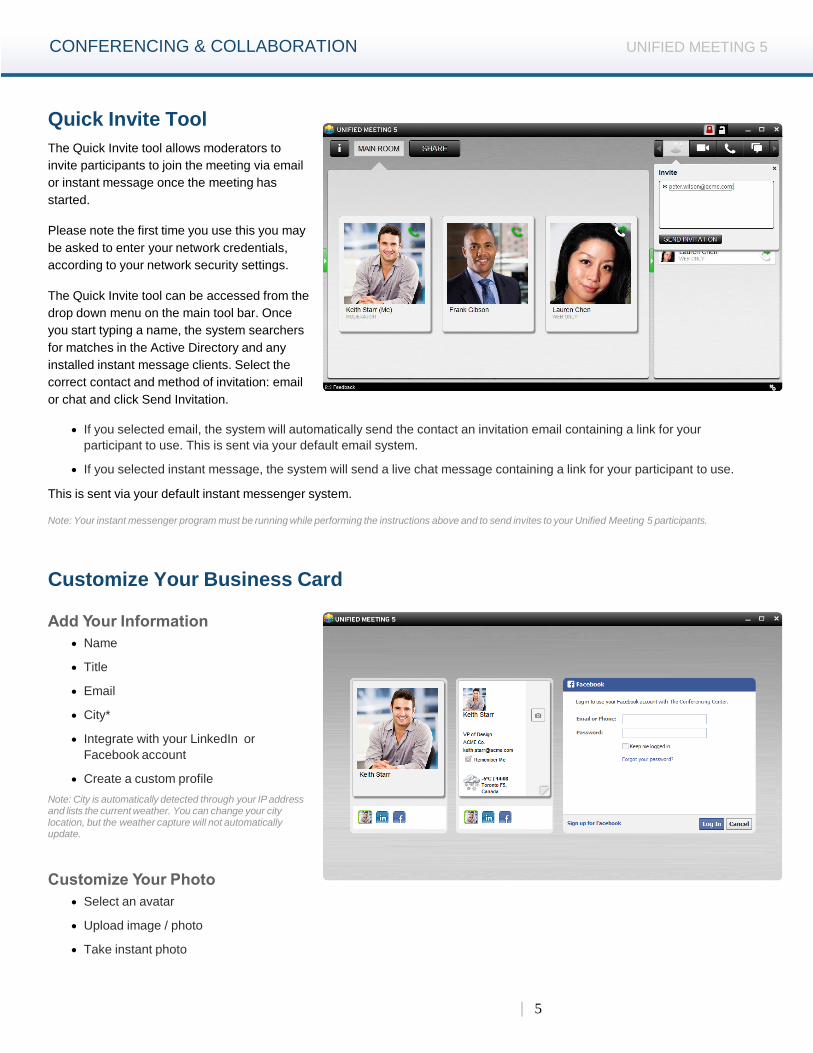
Quick Invite Tool
The Quick Invite tool allows moderators to
invite participants to join the meeting via email
or instant message once the meeting has
started.
Please note the first time you use this you may
be asked to enter your network credentials,
according to your network security settings.
The Quick Invite tool can be accessed from the
drop down menu on the main tool bar. Once
you start typing a name, the system searchers
for matches in the Active Directory and any
installed instant message clients. Select the
correct contact and method of invitation: email
or chat and click Send Invitation.
If you selected email, the system will automatically send the contact an invitation email containing a link for your
participant to use. This is sent via your default email system.
If you selected instant message, the system will send a live chat message containing a link for your participant to use.
This is sent via your default instant messenger system.
Note: Your instant messenger program must be running while performing the instructions above and to send invites to your Unified Meeting 5 participants.
Customize Your Business Card
Add Your Information
Name
Title
City*
Integrate with your LinkedIn or
Facebook account
Create a custom profile
Note: City is automatically detected through your IP address and lists the current weather. You can change your city location, but the weather capture will not automatically update.
Customize Your Photo
Select an avatar
Upload image / photo
Take instant photo

CONFERENCING & COLLABORATION UNIFIED MEETING 5
| 6
Meeting Security
Closing the Meeting Room Door
Add further security to your meeting by closing the meeting room door by clicking the lock icon.
You can screen your participants in the waiting room and then provide them access to the meeting one at a time.
You will be notified of an incoming participant by the desktop icon prompt. You can accept or reject an incoming
participant by either:
Clicking the corresponding link in the
desktop icon prompt.
Selecting the incoming participant in the wait
list from the top left of the interface.
Note: By default the door to the meeting is closed if only the web portion of the meeting is launched.
CONFERENCING & COLLABORATION UNIFIED MEETING 5
| 7
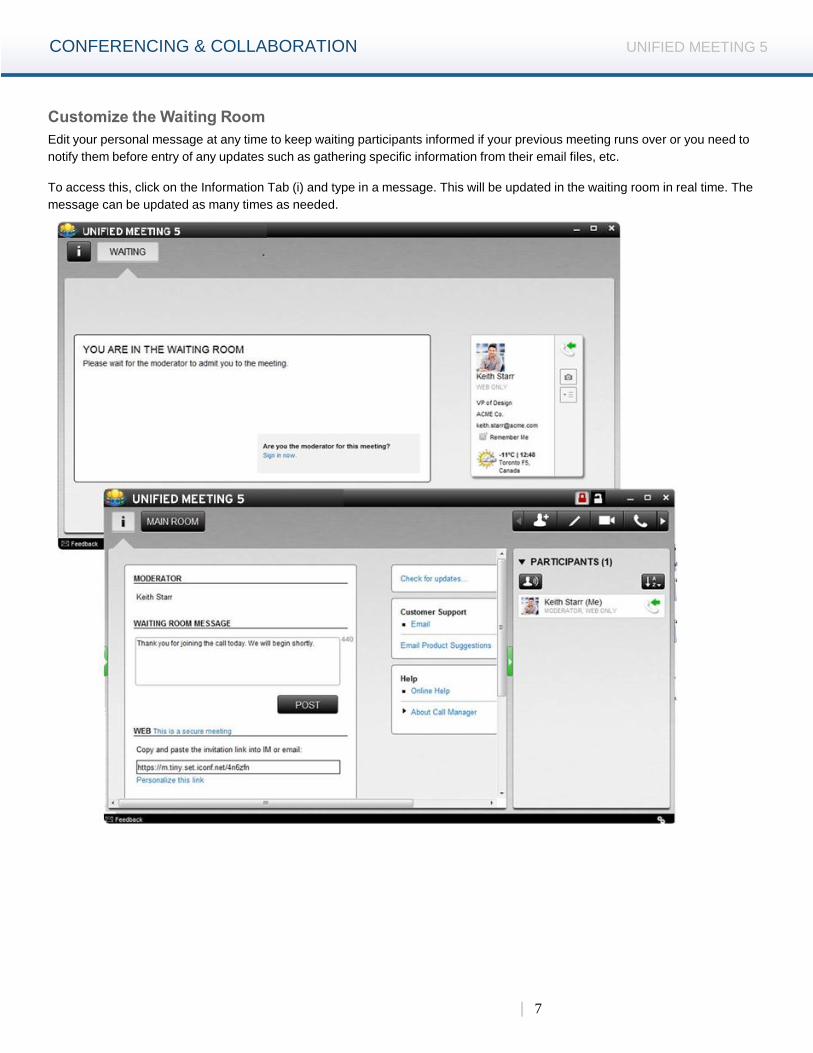
Customize the Waiting Room
Edit your personal message at any time to keep waiting participants informed if your previous meeting runs over or you need to
notify them before entry of any updates such as gathering specific information from their email files, etc.
To access this, click on the Information Tab (i) and type in a message. This will be updated in the waiting room in real time. The
message can be updated as many times as needed.
CONFERENCING & COLLABORATION UNIFIED MEETING 5
| 8
Call Control
You can always see the voice status of your participants in the participant panel or business cards.
Know who is currently speaking or has recently spoken in the meeting by selecting on the participants list.
Online Web and Audio Synchronization
By dragging and dropping their name and phone connections together in the participant list, moderators and participants can
synchronize their own audio and web connections via the web interface without touching a telephone keypad.
Moderators can also synchronize participants’ audio and web lines to easily identify who is speaking.
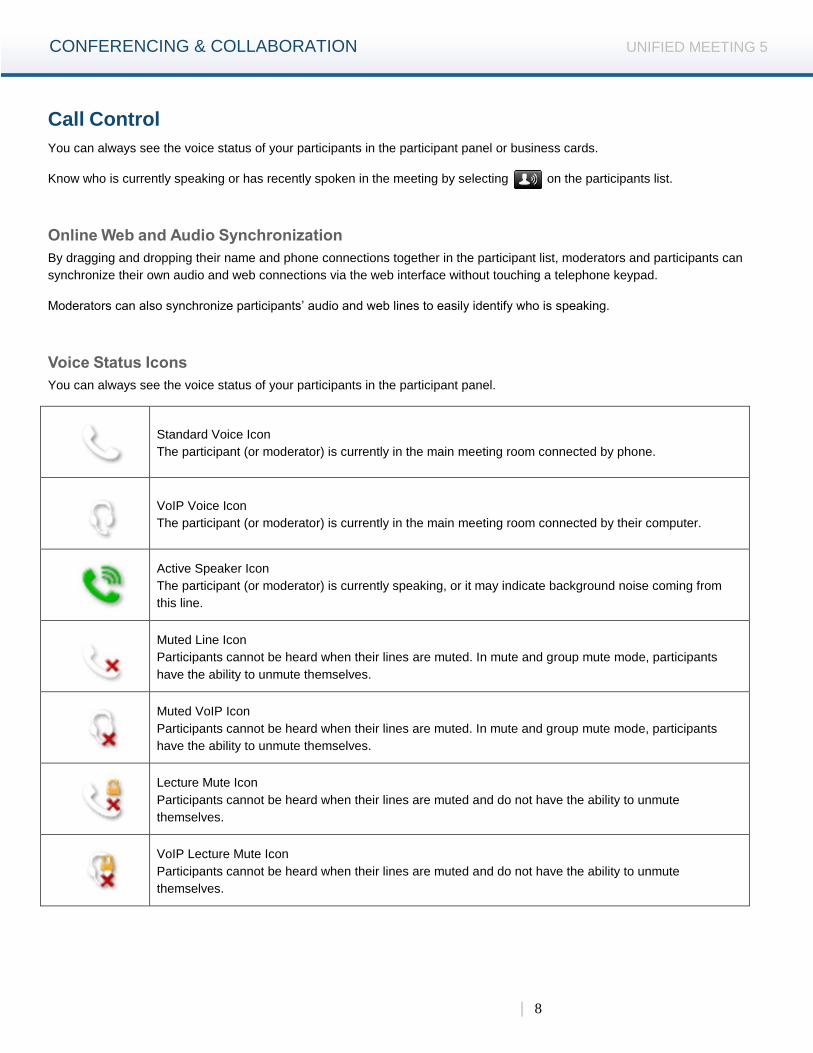
Voice Status Icons
You can always see the voice status of your participants in the participant panel.
Standard Voice Icon
The participant (or moderator) is currently in the main meeting room connected by phone.
VoIP Voice Icon
The participant (or moderator) is currently in the main meeting room connected by their computer.
Active Speaker Icon
The participant (or moderator) is currently speaking, or it may indicate background noise coming from
this line.
Muted Line Icon
Participants cannot be heard when their lines are muted. In mute and group mute mode, participants
have the ability to unmute themselves.
Muted VoIP Icon
Participants cannot be heard when their lines are muted. In mute and group mute mode, participants
have the ability to unmute themselves.
Lecture Mute Icon
Participants cannot be heard when their lines are muted and do not have the ability to unmute
themselves.
VoIP Lecture Mute Icon
Participants cannot be heard when their lines are muted and do not have the ability to unmute
themselves.
CONFERENCING & COLLABORATION UNIFIED MEETING 5
| 9
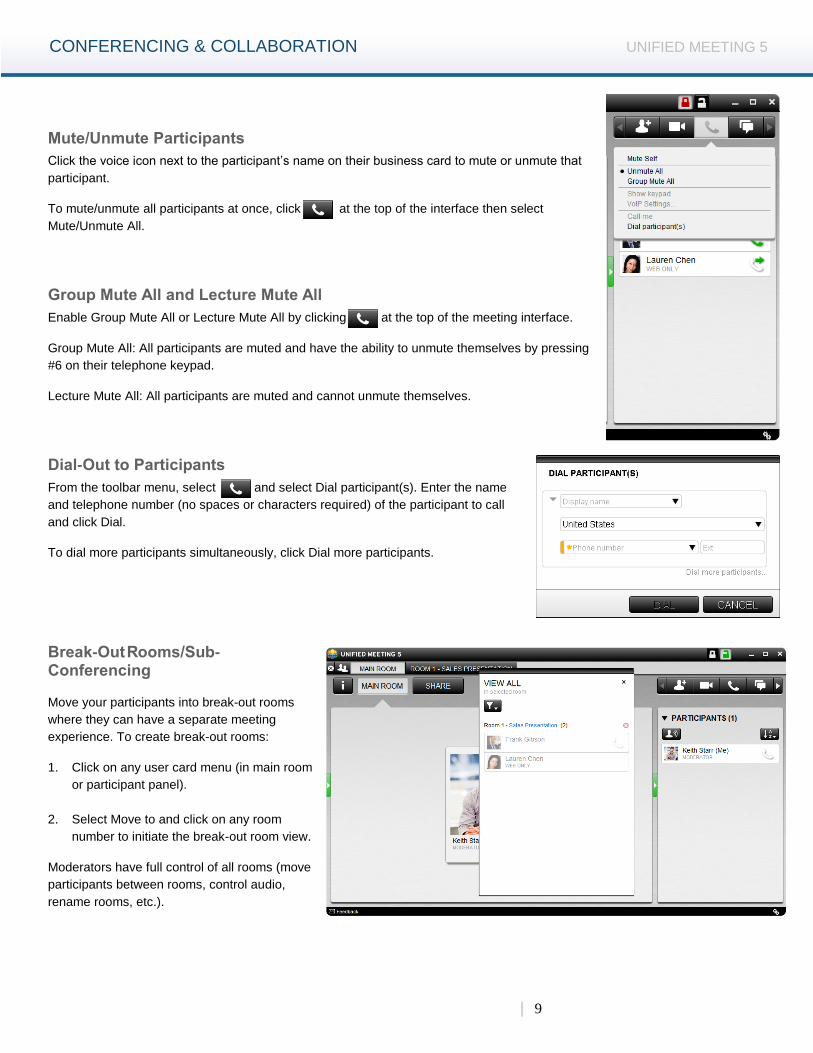
Mute/Unmute Participants
Click the voice icon next to the participant’s name on their business card to mute or unmute that
participant.
To mute/unmute all participants at once, click at the top of the interface then select
Mute/Unmute All.
Group Mute All and Lecture Mute All
Enable Group Mute All or Lecture Mute All by clicking at the top of the meeting interface.
Group Mute All: All participants are muted and have the ability to unmute themselves by pressing
#6 on their telephone keypad.
Lecture Mute All: All participants are muted and cannot unmute themselves.
Dial-Out to Participants
From the toolbar menu, select and select Dial participant(s). Enter the name
and telephone number (no spaces or characters required) of the participant to call
and click Dial.
To dial more participants simultaneously, click Dial more participants.
Break-Out Rooms/Sub-Conferencing
Move your participants into break-out rooms
where they can have a separate meeting
experience. To create break-out rooms:
1. Click on any user card menu (in main room
or participant panel).
2. Select Move to and click on any room
number to initiate the break-out room view.
Moderators have full control of all rooms (move
participants between rooms, control audio,
rename rooms, etc.).
CONFERENCING & COLLABORATION UNIFIED MEETING 5
| 10
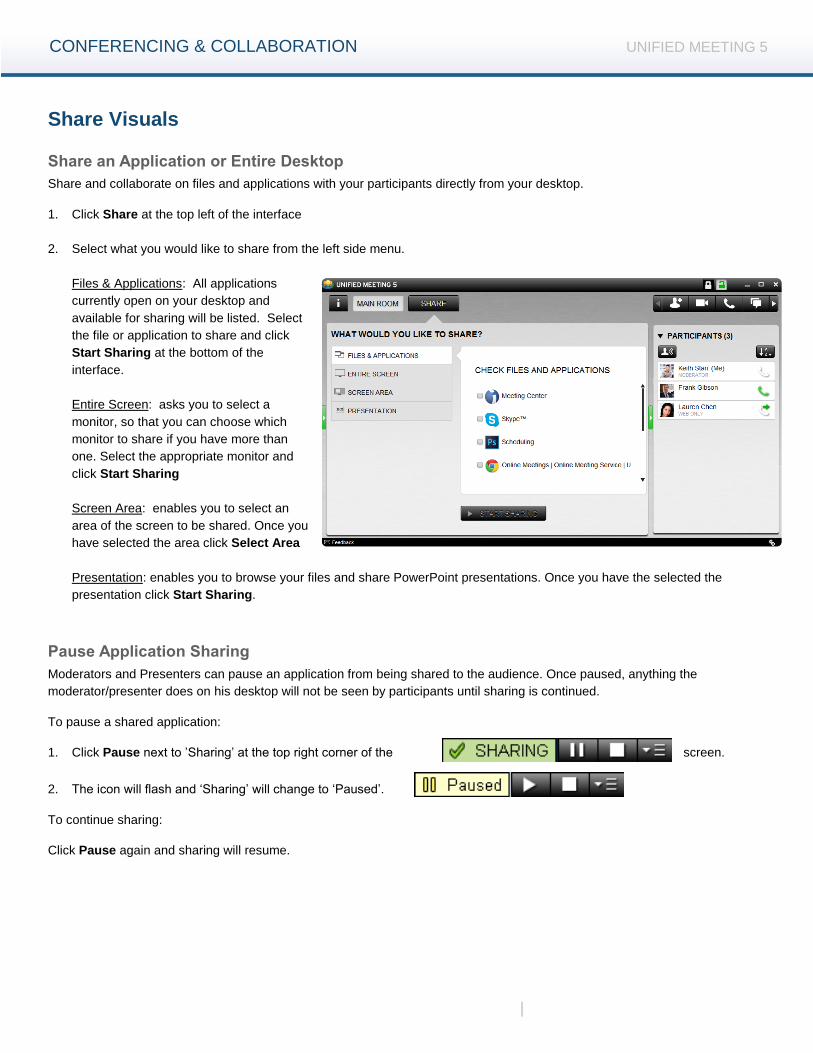
Share Visuals
Share an Application or Entire Desktop
Share and collaborate on files and applications with your participants directly from your desktop.
1. Click Share at the top left of the interface
2. Select what you would like to share from the left side menu.
Files & Applications: All applications
currently open on your desktop and
available for sharing will be listed. Select
the file or application to share and click
Start Sharing at the bottom of the
interface.
Entire Screen: asks you to select a
monitor, so that you can choose which
monitor to share if you have more than
one. Select the appropriate monitor and
click Start Sharing
Screen Area: enables you to select an
area of the screen to be shared. Once you
have selected the area click Select Area
Presentation: enables you to browse your files and share PowerPoint presentations. Once you have the selected the
presentation click Start Sharing.
Pause Application Sharing
Moderators and Presenters can pause an application from being shared to the audience. Once paused, anything the
moderator/presenter does on his desktop will not be seen by participants until sharing is continued.
To pause a shared application:
1. Click Pause next to ’Sharing’ at the top right corner of the screen.
2. The icon will flash and ‘Sharing’ will change to ‘Paused’.
To continue sharing:
Click Pause again and sharing will resume.
CONFERENCING & COLLABORATION UNIFIED MEETING 5
| 11
Enhance Sharing
Annotations
Allows presenter to annotate while sharing any application or slideshow. Ability to annotate on all applications being shared.
Scaling & Resizing
Presenter and participants have the ability to collapse panels to increase the viewing area. Controls expand and collapse the
left or right side of main meeting window.
Zoom
Presenters and participants have the ability to zoom in on what is being shared. This coupled with the scaling and re-sizing
tools works very well to ensure you do not miss any important information.
Promoting Participants to Presenter
Participants can be promoted to a Presenter during a meeting so they can share content from their own computers.
To promote a participant to Presenter:
1. Right-click on the name of the participant you wish to promote.
2. Select Promote to Presenter.
3. The participant will receive a notification that they have been promoted to the role of Presenter.
To revoke control and demote a Presenter to participant, simply right click the participant’s name and select Demote to
Participant. Participants can also right-click on their own name to demote themselves from Presenter back to participant.
Note: Participants must install the Unified Meeting 5 application in order to be promoted to Presenter.
Pass Sharing Control Presenters can pass sharing control to participants during application or desktop share to control or edit content being shared
by the moderator
1. Click on the participant card
2. Select the menu
3. Click Pass Sharing Control.
CONFERENCING & COLLABORATION UNIFIED MEETING 5
| 12
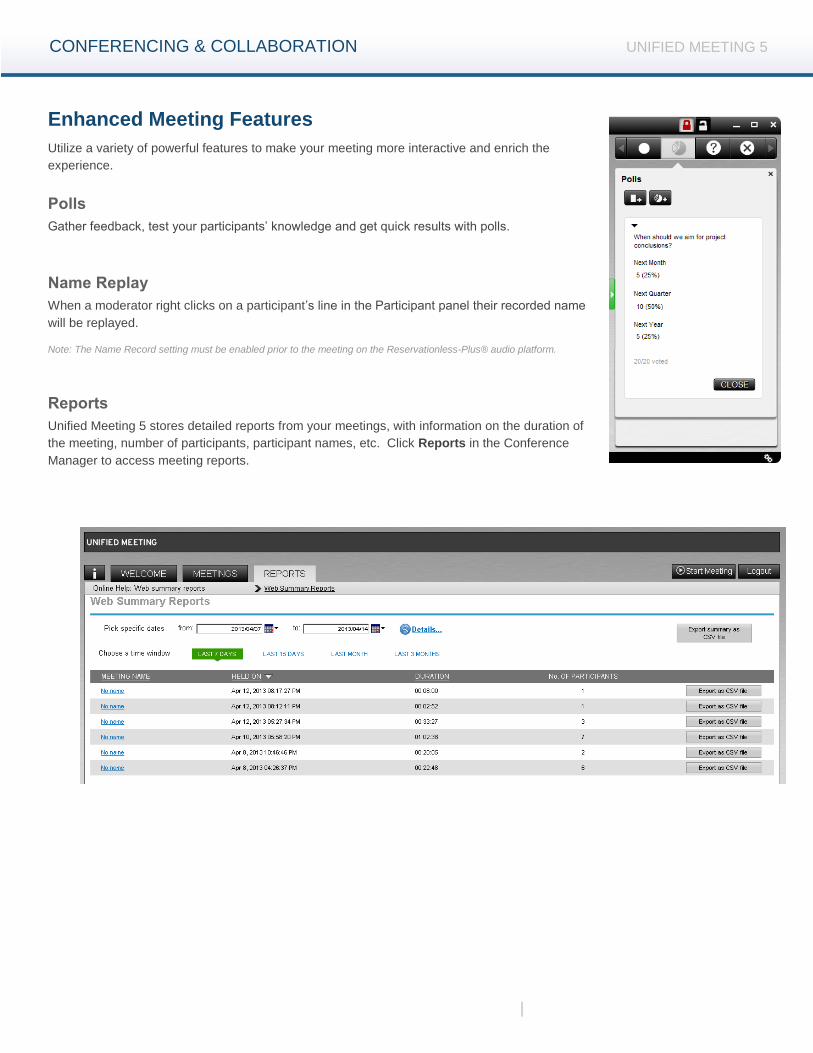
Enhanced Meeting Features
Utilize a variety of powerful features to make your meeting more interactive and enrich the
experience.
Polls
Gather feedback, test your participants’ knowledge and get quick results with polls.
Name Replay
When a moderator right clicks on a participant’s line in the Participant panel their recorded name
will be replayed.
Note: The Name Record setting must be enabled prior to the meeting on the Reservationless-Plus® audio platform.
Reports
Unified Meeting 5 stores detailed reports from your meetings, with information on the duration of
the meeting, number of participants, participant names, etc. Click Reports in the Conference
Manager to access meeting reports.
CONFERENCING & COLLABORATION UNIFIED MEETING 5
| 13
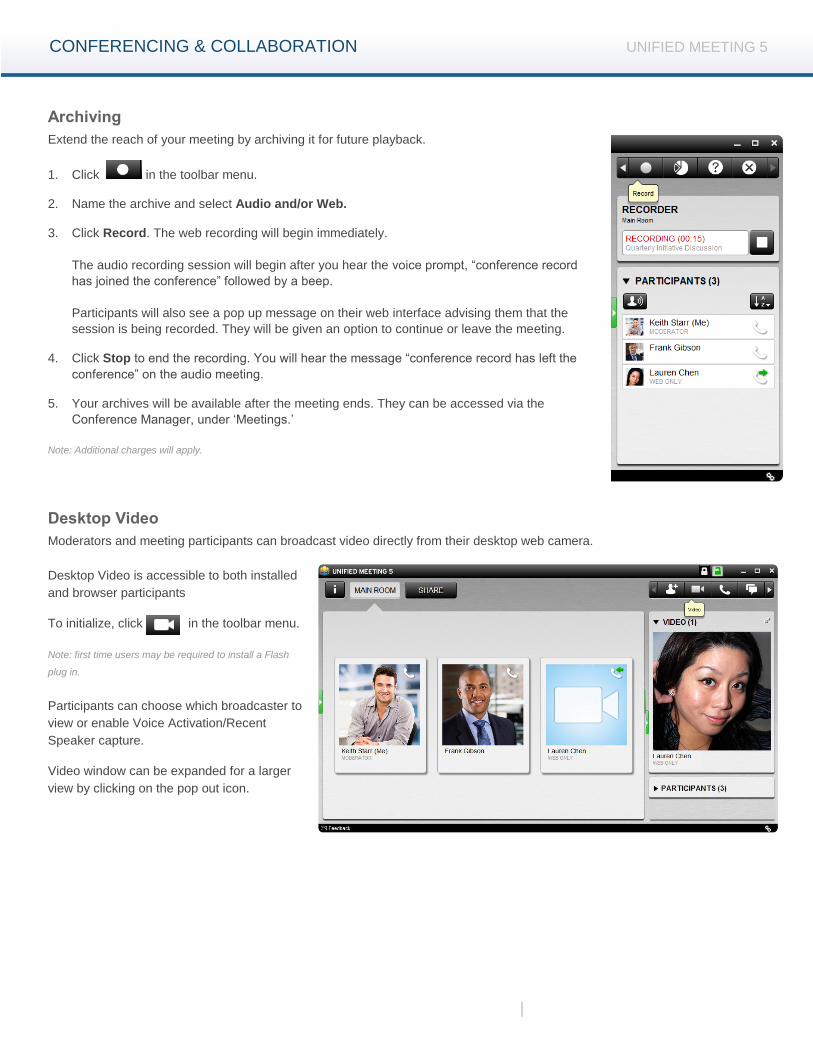
Archiving
Extend the reach of your meeting by archiving it for future playback.
1. Click in the toolbar menu.
2. Name the archive and select Audio and/or Web.
3. Click Record. The web recording will begin immediately.
The audio recording session will begin after you hear the voice prompt, “conference record
has joined the conference” followed by a beep.
Participants will also see a pop up message on their web interface advising them that the
session is being recorded. They will be given an option to continue or leave the meeting.
4. Click Stop to end the recording. You will hear the message “conference record has left the
conference” on the audio meeting.
5. Your archives will be available after the meeting ends. They can be accessed via the
Conference Manager, under ‘Meetings.’
Note: Additional charges will apply.
Desktop Video
Moderators and meeting participants can broadcast video directly from their desktop web camera.
Desktop Video is accessible to both installed
and browser participants
To initialize, click in the toolbar menu.
Note: first time users may be required to install a Flash
plug in.
Participants can choose which broadcaster to
view or enable Voice Activation/Recent
Speaker capture.
Video window can be expanded for a larger
view by clicking on the pop out icon.

CONFERENCING & COLLABORATION UNIFIED MEETING 5
| 14
Customer Service and Support
Technical Support and Account Assistance
Technical support [email protected]
Technical support during meeting
On your phone keypad:
*0 (meeting) or 00 (individual) On the web:
Click in the Unified Meeting 5 interface and select the appropriate
contact: Customer Support or Product Suggestions.
Billing and account inquires (877) 769-7229