Embed Size (px)
Citation preview
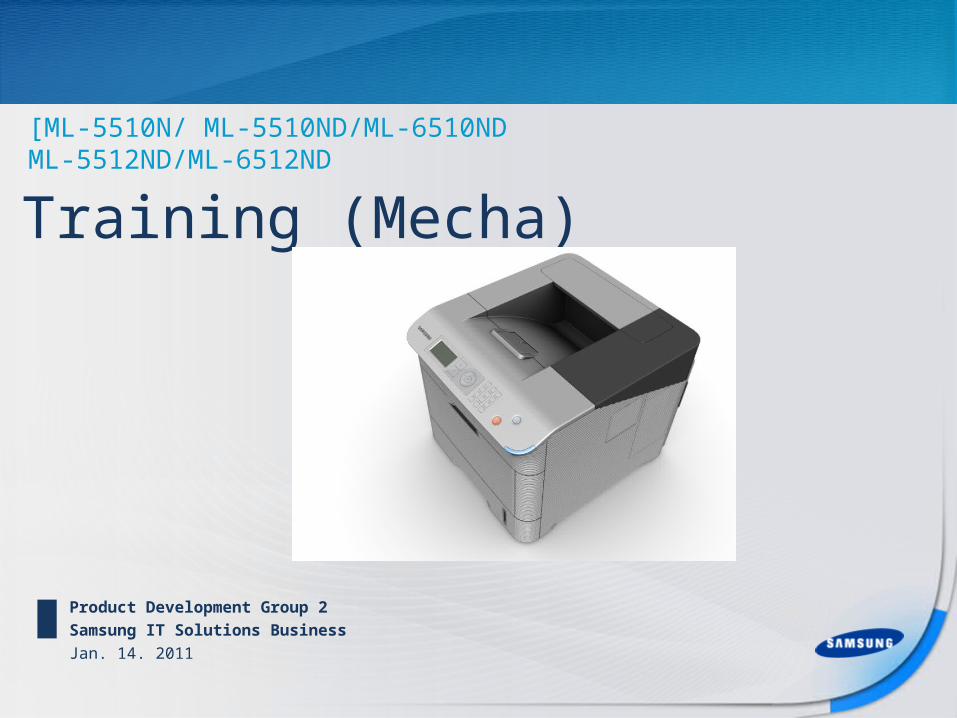
Training (Mecha)
Product Development Group 2
Samsung IT Solutions Business
Jan. 14. 2011
[ML-5510N/ ML-5510ND/ML-6510NDML-5512ND/ML-6512ND

ContentsContents1. Process
2. Installation of Option
3. Disassembly
4. Fault Diagnosis
5. Troubleshooting
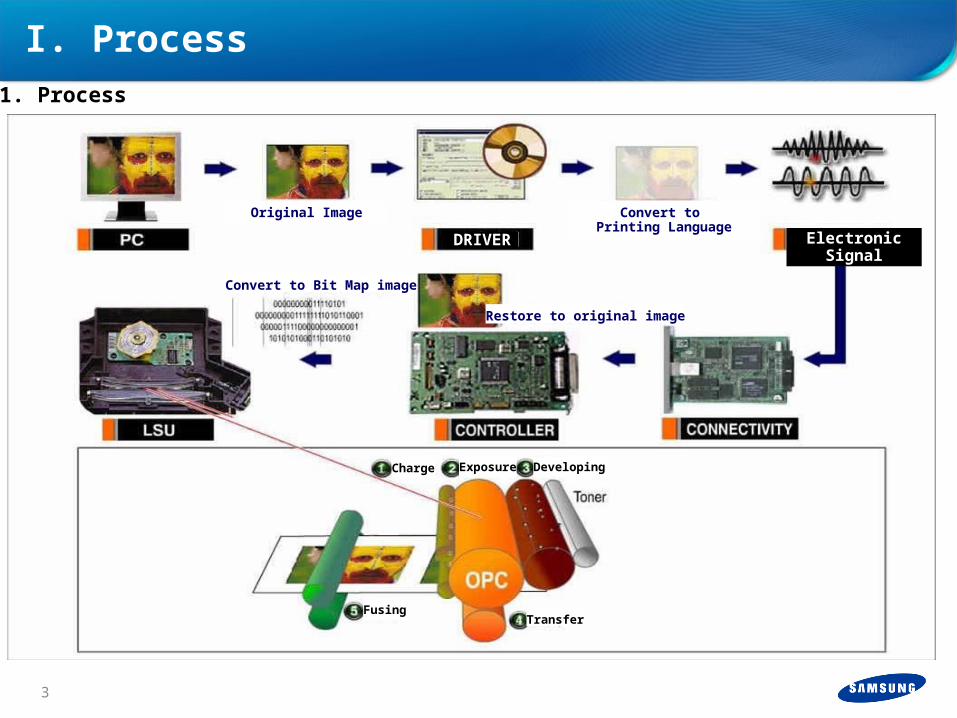
LSU
Original Image
DRIVER Electronic Signal
Convert to Printing Language
Restore to original image
Convert to Bit Map image
FusingTransfer
DevelopingExposureCharge
I. Process1. Process
3
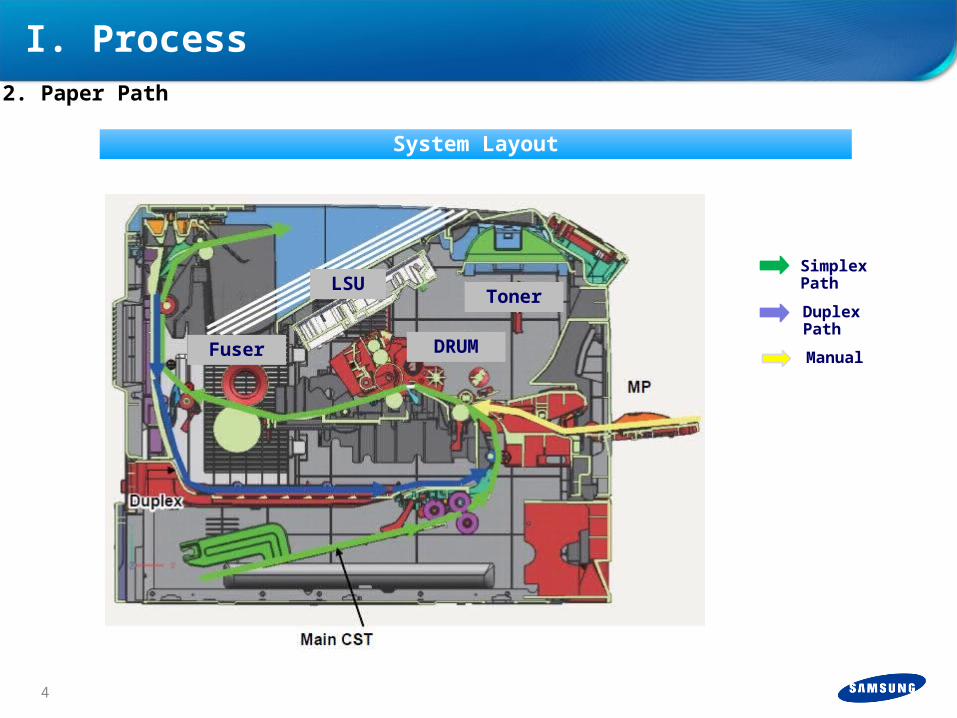
System Layout
DRUMFuser
TonerLSU
I. Process2. Paper Path
Simplex Path
Duplex Path
Manual
4
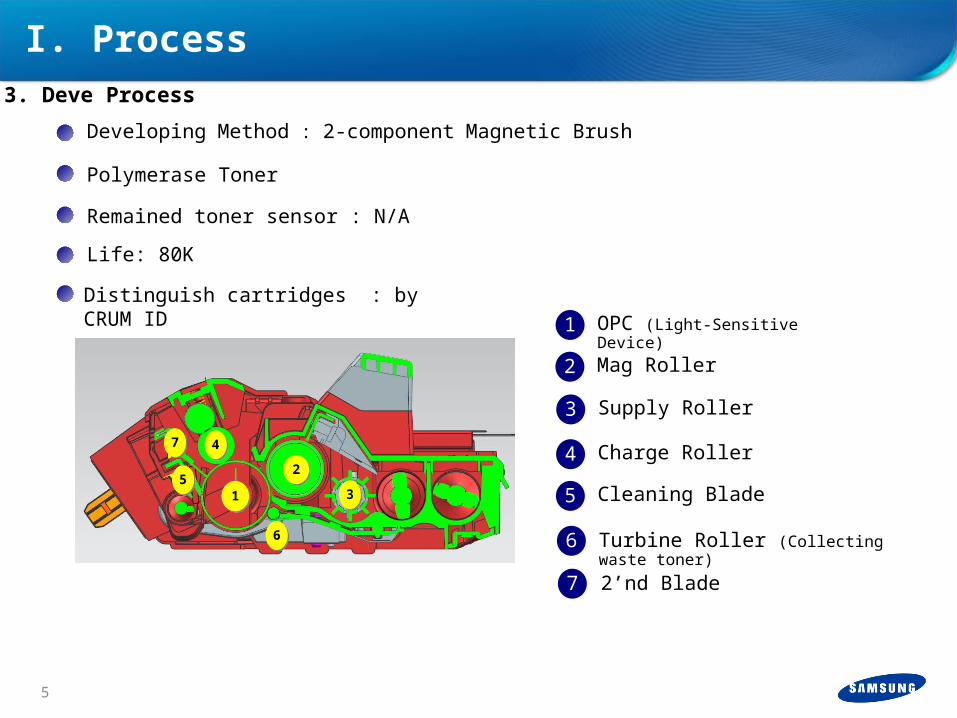
3. Deve Process
Developing Method : 2-component Magnetic Brush
Polymerase Toner
Remained toner sensor : N/A
1 OPC (Light-Sensitive Device)
2 Mag Roller
3 Supply Roller
4 Charge Roller
5 Cleaning Blade
6
11
44
22
3355
Turbine Roller (Collecting waste toner)
66
77
7 2’nd Blade
Life: 80K
Distinguish cartridges : by CRUM ID
I. Process
5
Life: 10K (CRU 20K/30K)
Developing Method : 2-component Magnetic Brush
OPC Cleaning : Collect residue toner with cleaning blade
Distinguish TONER CARTRIDGE : by CRUM ID
4. Toner
I. Process
6

Feeding Method : Cassette
Loading Basis : Center Loading
Capacity : 520sheets (80g/ ㎡ )
Paper Sensing : Empty Sensor
Paper-Size Sensor : Tact S/W (A4, Letter, A5, B5, State., Folio,
Legal, Custom)
5. Feeding Unit (Cassette)
I. Process
7

Retard Roller & Knock-up Lifting method
- Improved multi-feeding and Jam issues
- Easier Service : Simple Exchange of Pickup & Retard Roller
Supporting Media
- Weight : 60 ~ 163 g/ ㎡
- Size : Letter, Legal, Oficio, Folio, A4, JIS B5, ISO B5, Executive, A5,
Statement,
A6, Cardstock, Postcard,
Custom[98.6x148.5mm(3.88"x5.85“)~216x356mm(8.5”x14")]
- Support Special Paper : Envelope 50sheets (Monarch, No.10, DL,
C5, C6, No.9)
I. Process
5. Feeding Unit (Cassette)
8
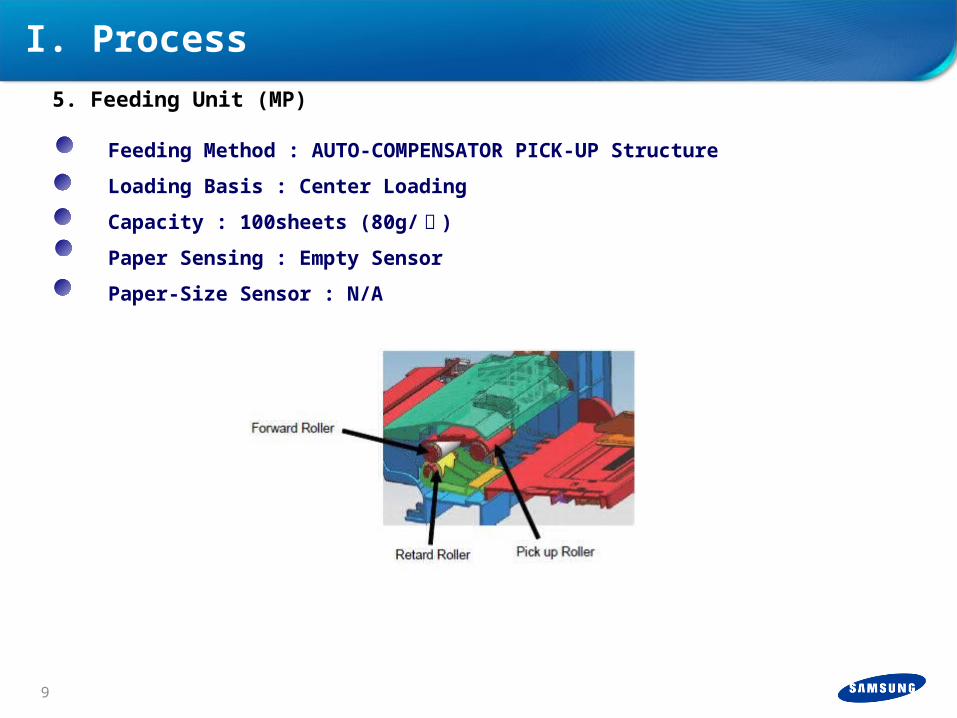
Feeding Method : AUTO-COMPENSATOR PICK-UP Structure
Loading Basis : Center Loading
Capacity : 100sheets (80g/ ㎡ )
Paper Sensing : Empty Sensor
Paper-Size Sensor : N/A
I. Process
5. Feeding Unit (MP)
9
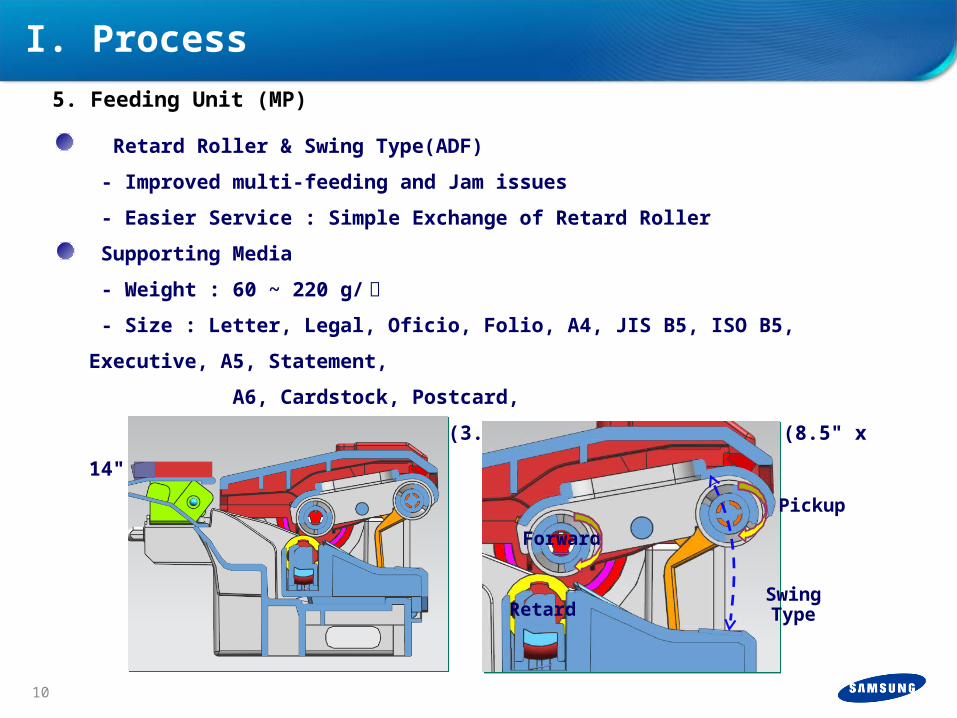
Retard Roller & Swing Type(ADF)
- Improved multi-feeding and Jam issues
- Easier Service : Simple Exchange of Retard Roller
Supporting Media
- Weight : 60 ~ 220 g/ ㎡
- Size : Letter, Legal, Oficio, Folio, A4, JIS B5, ISO B5, Executive, A5,
Statement,
A6, Cardstock, Postcard,
Custom[76 x 127mm (3.0" x 5.0") ~ 216 x 356mm (8.5" x 14")]
Pickup
Forward
RetardSwing Type
I. Process
5. Feeding Unit (MP)
10
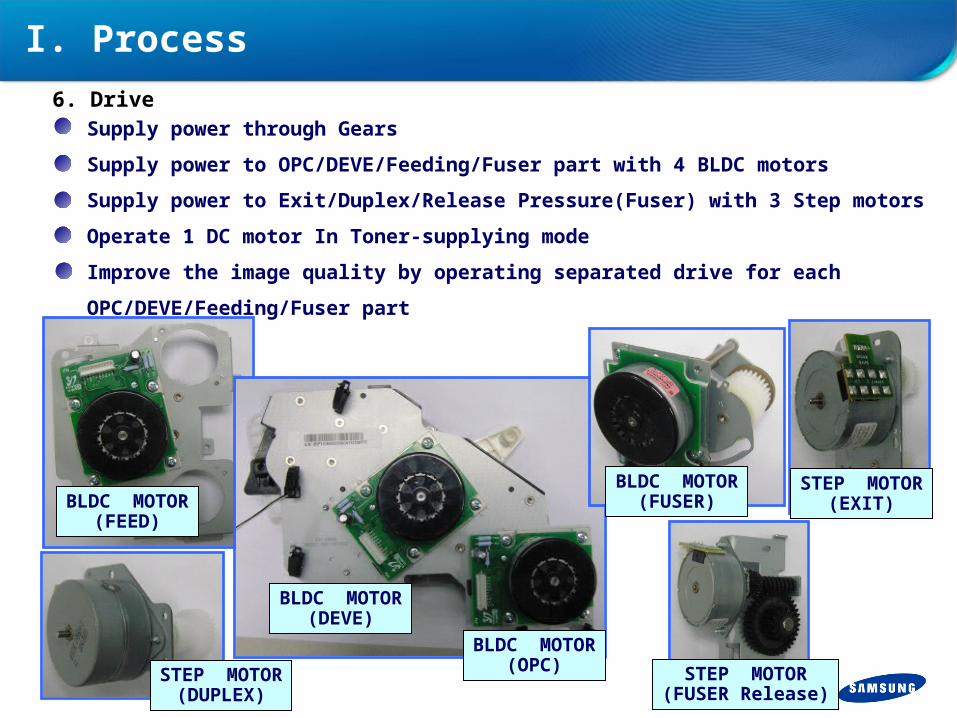
Supply power through Gears
Supply power to OPC/DEVE/Feeding/Fuser part with 4 BLDC motors
Supply power to Exit/Duplex/Release Pressure(Fuser) with 3 Step motors
Operate 1 DC motor In Toner-supplying mode
Improve the image quality by operating separated drive for each
OPC/DEVE/Feeding/Fuser part
BLDC MOTOR(FEED)
BLDC MOTOR(DEVE)
BLDC MOTOR(OPC)STEP MOTOR
(DUPLEX)
BLDC MOTOR(FUSER)
STEP MOTOR(EXIT)
STEP MOTOR(FUSER Release)
6. Drive
I. Process
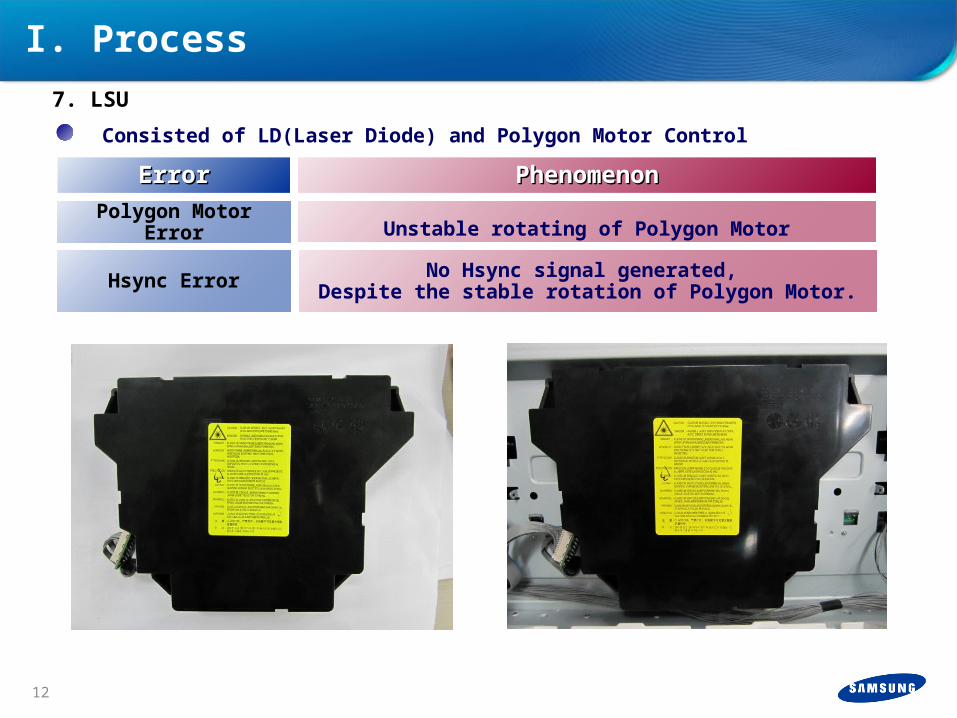
Consisted of LD(Laser Diode) and Polygon Motor Control
ErrorError
Polygon Motor Error
Hsync Error
PhenomenonPhenomenon
Unstable rotating of Polygon Motor
No Hsync signal generated, Despite the stable rotation of Polygon Motor.
7. LSU
I. Process
12
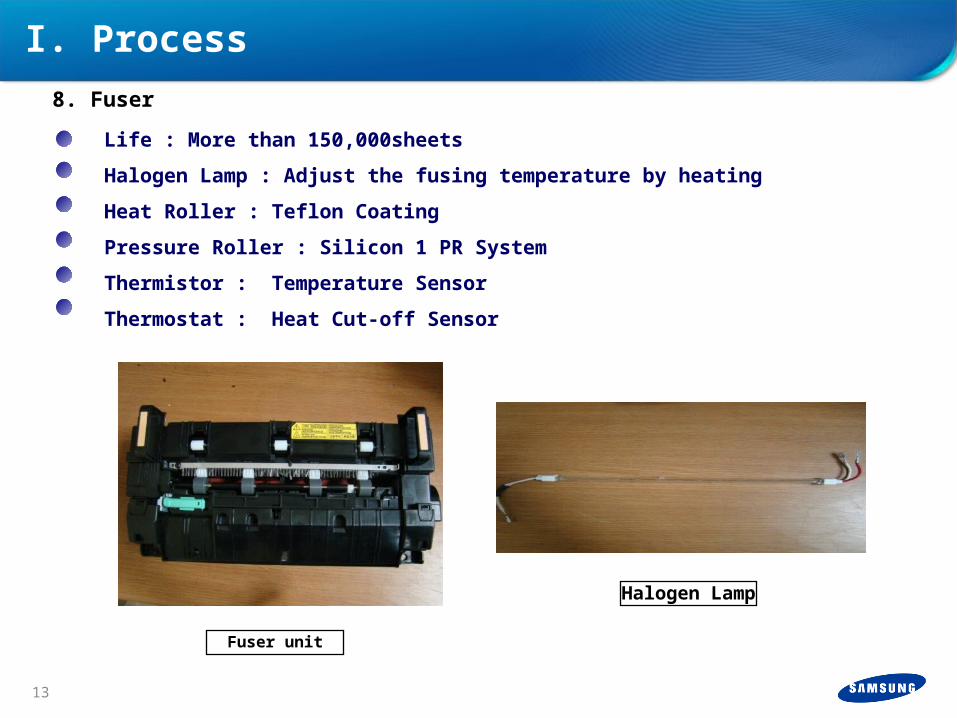
Halogen Lamp
Fuser unit
Life : More than 150,000sheets
Halogen Lamp : Adjust the fusing temperature by heating
Heat Roller : Teflon Coating
Pressure Roller : Silicon 1 PR System
Thermistor : Temperature Sensor
Thermostat : Heat Cut-off Sensor
8. Fuser
I. Process
13
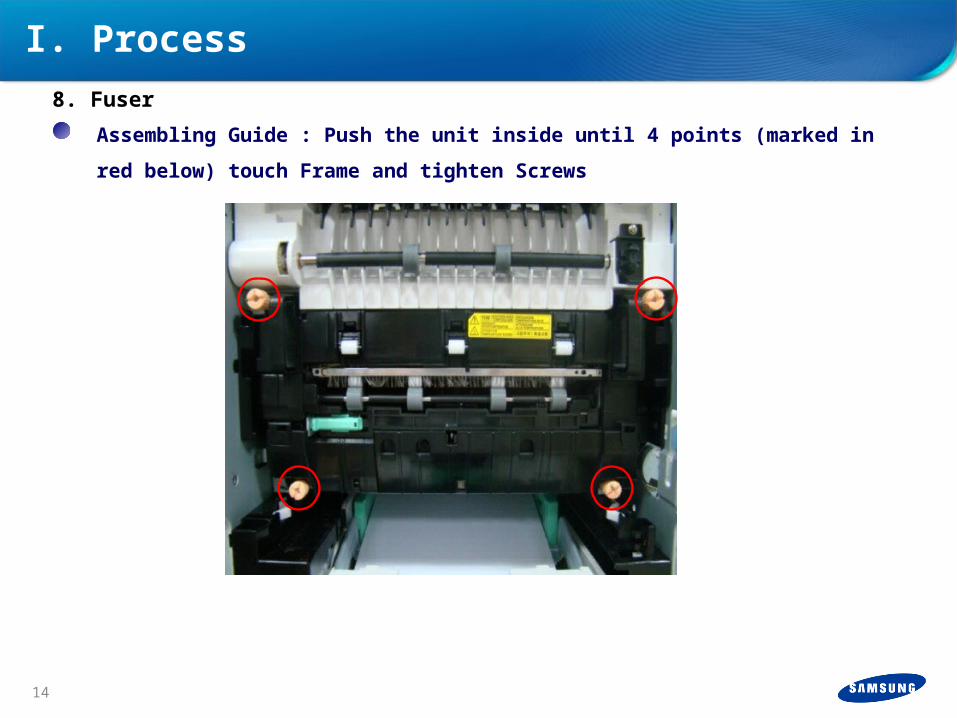
Assembling Guide : Push the unit inside until 4 points (marked in red
below) touch Frame and tighten Screws
8. Fuser
I. Process
14
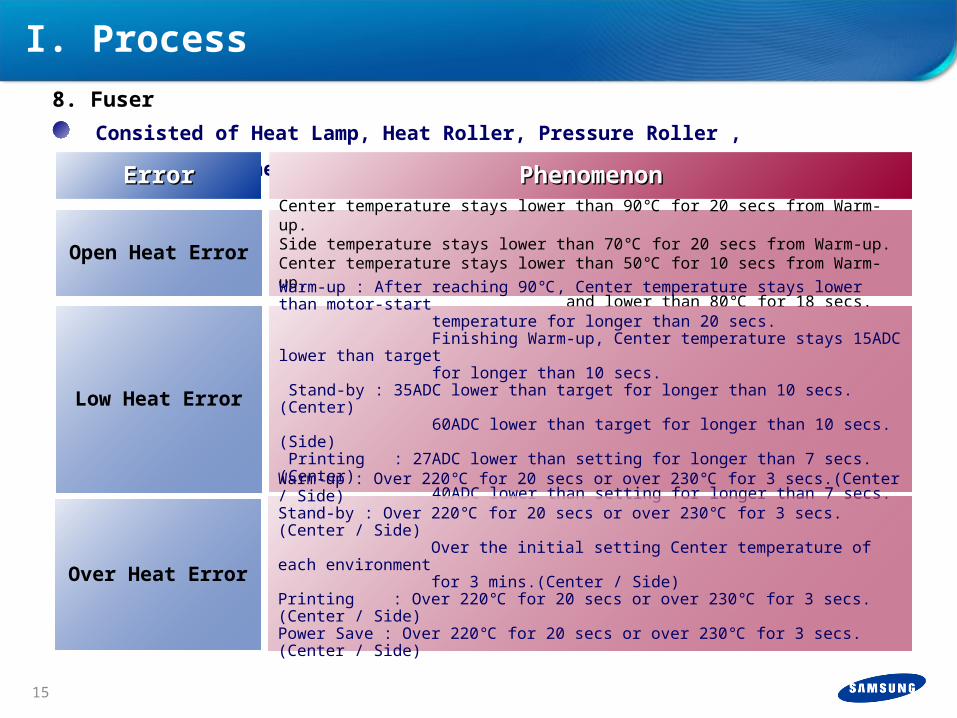
Consisted of Heat Lamp, Heat Roller, Pressure Roller ,
Thermistor, ThermostatErrorError
Open Heat Error
Low Heat Error
PhenomenonPhenomenon
Center temperature stays lower than 90℃ for 20 secs from Warm-up.Side temperature stays lower than 70℃ for 20 secs from Warm-up.Center temperature stays lower than 50℃ for 10 secs from Warm-up, and lower than 80℃ for 18 secs.
Warm-up : After reaching 90℃, Center temperature stays lower than motor-start temperature for longer than 20 secs. Finishing Warm-up, Center temperature stays 15ADC lower than target for longer than 10 secs. Stand-by : 35ADC lower than target for longer than 10 secs. (Center) 60ADC lower than target for longer than 10 secs. (Side) Printing : 27ADC lower than setting for longer than 7 secs. (Center) 40ADC lower than setting for longer than 7 secs. (Side)
Over Heat Error
Warm-up : Over 220℃ for 20 secs or over 230℃ for 3 secs.(Center / Side)Stand-by : Over 220℃ for 20 secs or over 230℃ for 3 secs.(Center / Side) Over the initial setting Center temperature of each environment for 3 mins.(Center / Side)Printing : Over 220℃ for 20 secs or over 230℃ for 3 secs.(Center / Side)Power Save : Over 220℃ for 20 secs or over 230℃ for 3 secs.(Center / Side)
8. Fuser
I. Process
15
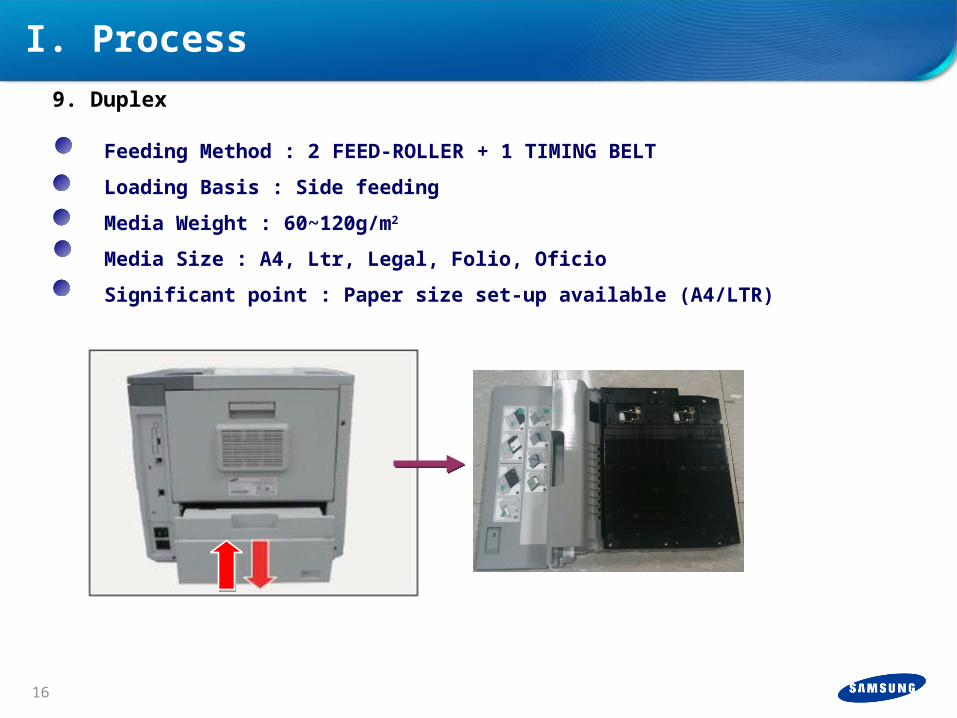
Feeding Method : 2 FEED-ROLLER + 1 TIMING BELT
Loading Basis : Side feeding
Media Weight : 60~120g/m2
Media Size : A4, Ltr, Legal, Folio, Oficio
Significant point : Paper size set-up available (A4/LTR)
9. Duplex
I. Process
16
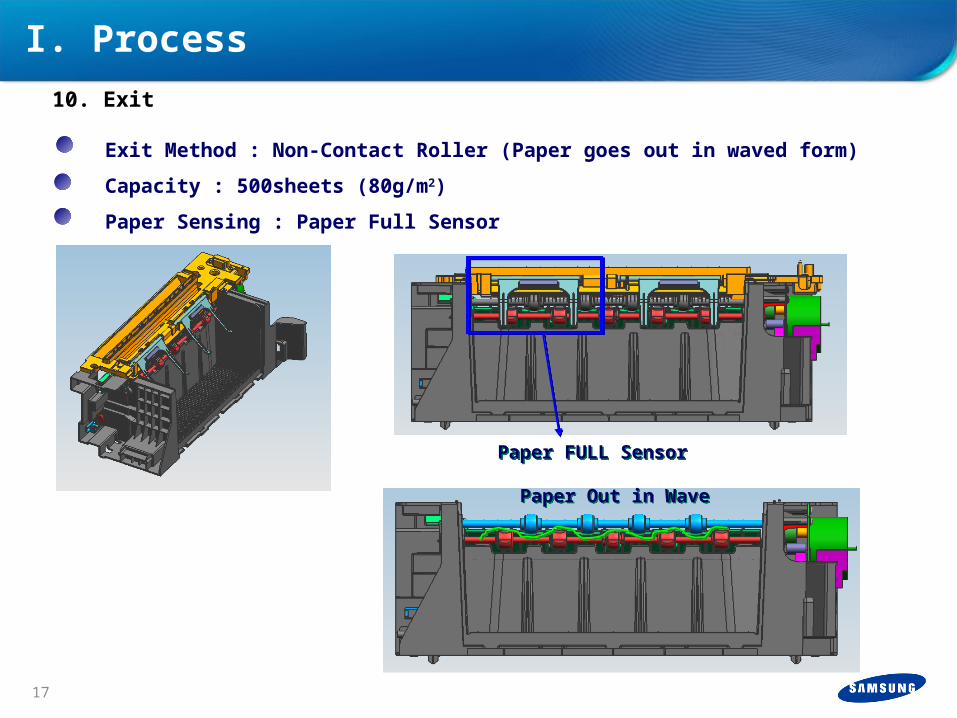
Exit Method : Non-Contact Roller (Paper goes out in waved form)
Capacity : 500sheets (80g/m2)
Paper Sensing : Paper Full Sensor
Paper FULL SensorPaper FULL Sensor
Paper Out in WavePaper Out in Wave
10. Exit
I. Process
17
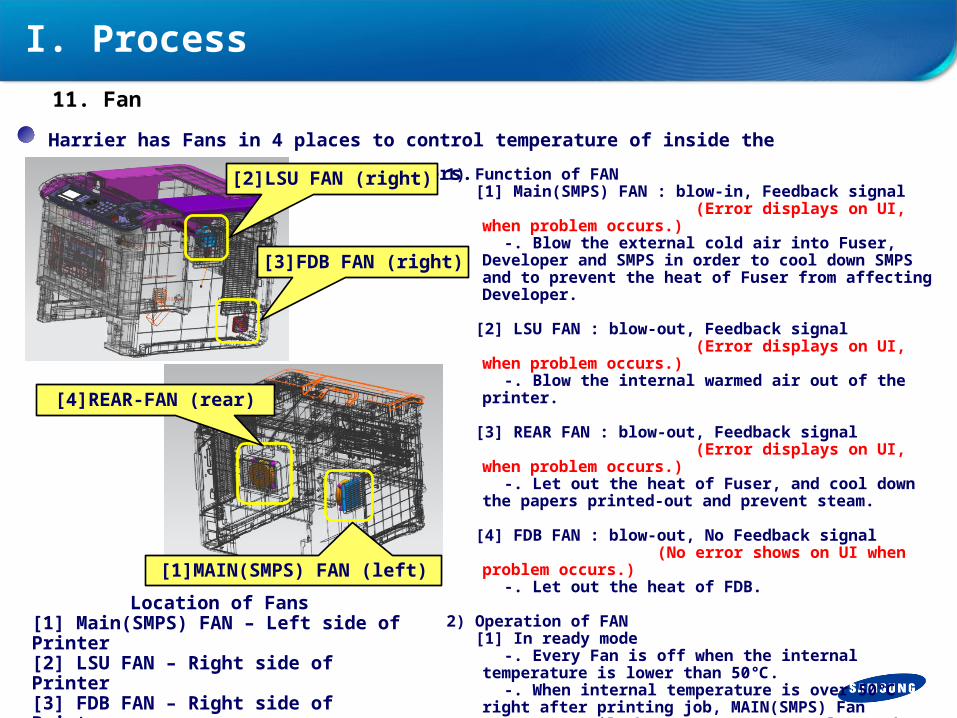
Harrier has Fans in 4 places to control temperature of inside the
Printer/LSU/SMPS/FDB/Print-out papers.
Location of Fans[1] Main(SMPS) FAN – Left side of Printer[2] LSU FAN – Right side of Printer[3] FDB FAN – Right side of Printer[4] REAR FAN – Rear side of Printer
1) Function of FAN [1] Main(SMPS) FAN : blow-in, Feedback signal (Error displays on UI, when problem
occurs.) -. Blow the external cold air into Fuser, Developer
and SMPS in order to cool down SMPS and to prevent the heat of Fuser from affecting Developer.
[2] LSU FAN : blow-out, Feedback signal (Error displays on UI, when problem
occurs.) -. Blow the internal warmed air out of the printer.
[3] REAR FAN : blow-out, Feedback signal (Error displays on UI, when problem
occurs.) -. Let out the heat of Fuser, and cool down the
papers printed-out and prevent steam.
[4] FDB FAN : blow-out, No Feedback signal (No error shows on UI when problem
occurs.) -. Let out the heat of FDB.
2) Operation of FAN [1] In ready mode -. Every Fan is off when the internal temperature
is lower than 50℃. -. When internal temperature is over 50℃ right
after printing job, MAIN(SMPS) Fan operates until the temperature gets lower than 50℃.
[2] During warm-up or printing -. Every Fan operates.
[2]LSU FAN (right)
[3]FDB FAN (right)
[4]REAR-FAN (rear)
[1]MAIN(SMPS) FAN (left)
11. Fan
I. Process

1) Toner Feature
Item ML-551x & ML-651x series Model name Remark
Toner(Black) -Initial: average output 10K MLT-D309S
-High Yield: average output 30K MLT-D309L
Imaging Unit Initial : 80K MLT-R309
Evaluating Criteria ISO/IEC 19752 Test Page Print-out -
Key CRUM type -
Life detect By Dot Count -
2) Reliability and Life
Item ML-551x series ML-651x series
Recommended Monthly Print Volume
6,000 sheets/month 7,000 sheets/month
Maximum Monthly Print Volume 275,000 sheets/month 275,000 sheets/month
MPBF 87,500 sheets 125,000 sheets
MTBF 12 months 12 months
MTTR 30 min. 30 min.
SET life 1,000,000 sheets or 5 years (whichever comes first)
1,000,000 sheets or 5 years (whichever comes first)
12. CRU/FRU Information
I. Process
19
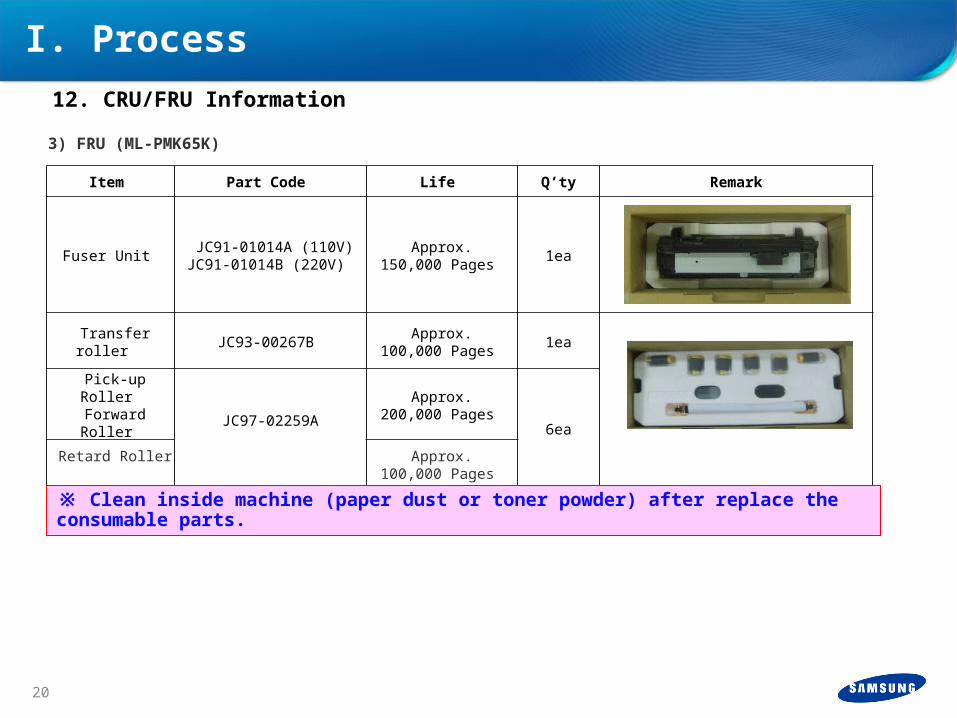
3) FRU (ML-PMK65K)
Item Part Code Life Q’ty Remark
Fuser Unit JC91-01014A (110V)
JC91-01014B (220V) Approx.
150,000 Pages 1ea
Transfer roller JC93-00267B Approx.
100,000 Pages 1ea
Pick-up Roller Forward Roller JC97-02259A
Approx. 200,000 Pages
6ea
Retard Roller Approx.
100,000 Pages
12. CRU/FRU Information
I. Process
20
※ Clean inside machine (paper dust or toner powder) after replace the consumable parts.
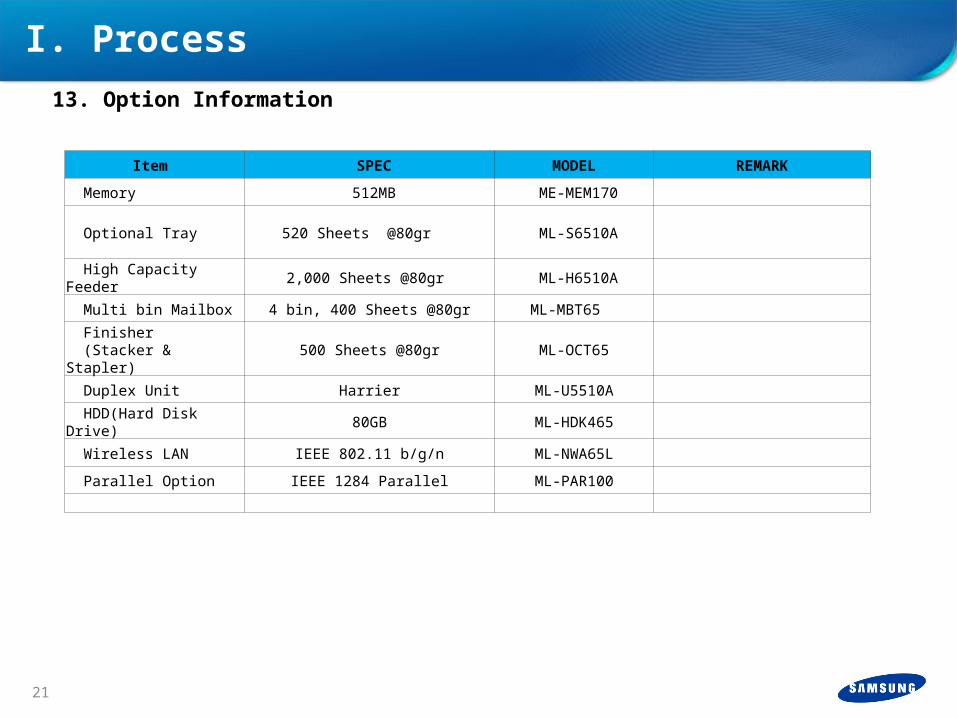
Item SPEC MODEL REMARK
Memory 512MB ME-MEM170
Optional Tray 520 Sheets @80gr ML-S6510A
High Capacity Feeder 2,000 Sheets @80gr ML-H6510A
Multi bin Mailbox 4 bin, 400 Sheets @80gr ML-MBT65
Finisher (Stacker & Stapler)
500 Sheets @80gr ML-OCT65
Duplex Unit Harrier ML-U5510A
HDD(Hard Disk Drive) 80GB ML-HDK465
Wireless LAN IEEE 802.11 b/g/n ML-NWA65L
Parallel Option IEEE 1284 Parallel ML-PAR100
13. Option Information
I. Process
21
22
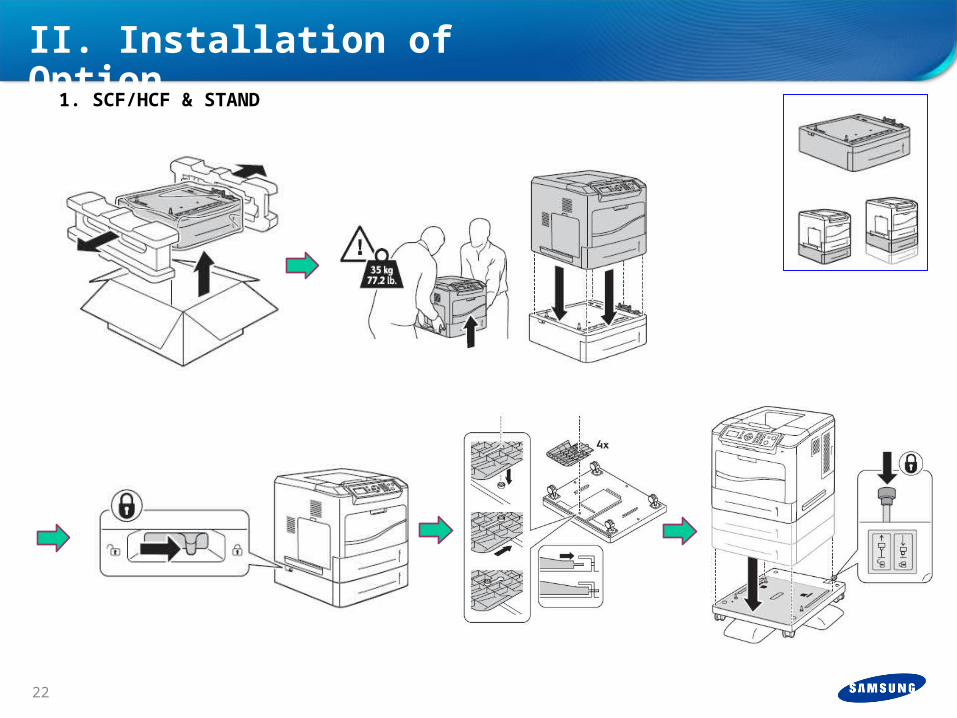
II. Installation of Option1. SCF/HCF & STAND
23
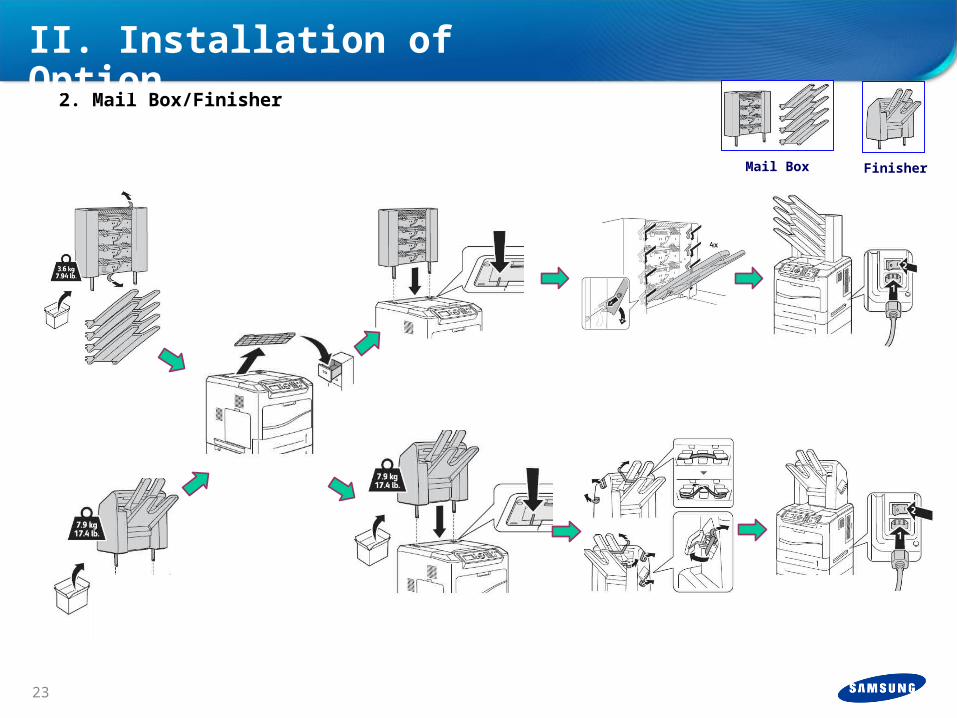
2. Mail Box/Finisher
Mail Box Finisher
II. Installation of Option
24
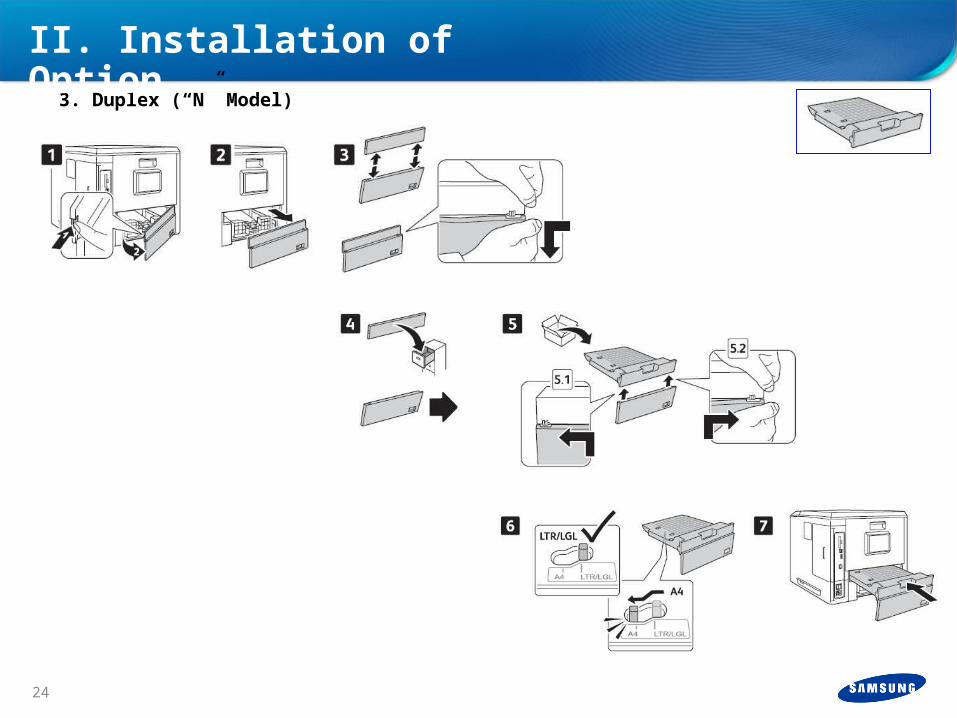
3. Duplex (“N” Model)
II. Installation of Option
25
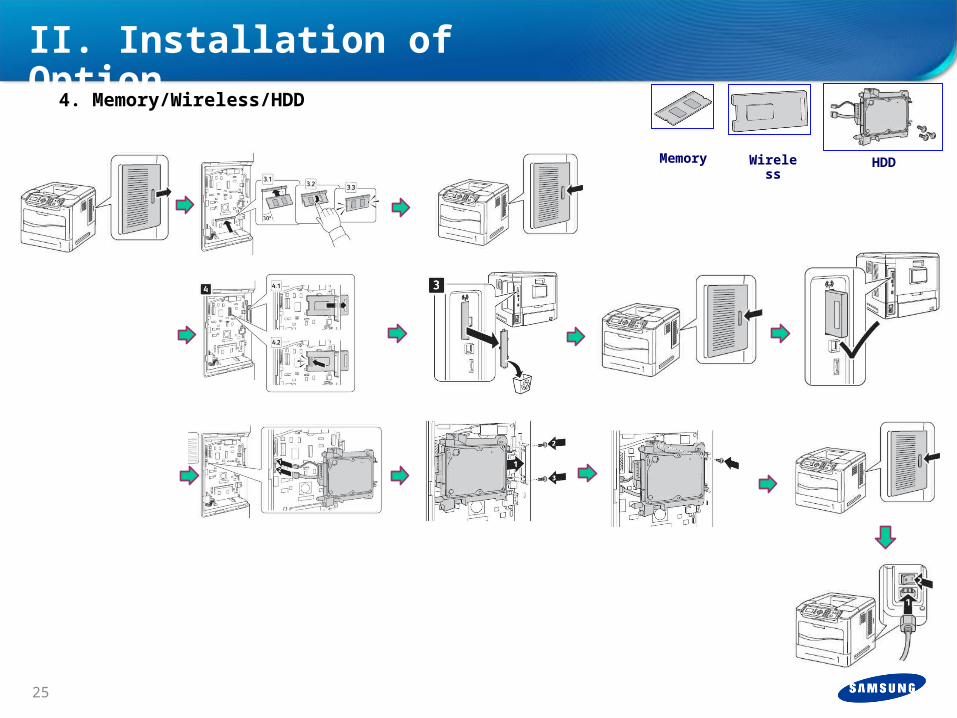
4. Memory/Wireless/HDD
Memory
Wireless
HDD
II. Installation of Option
26
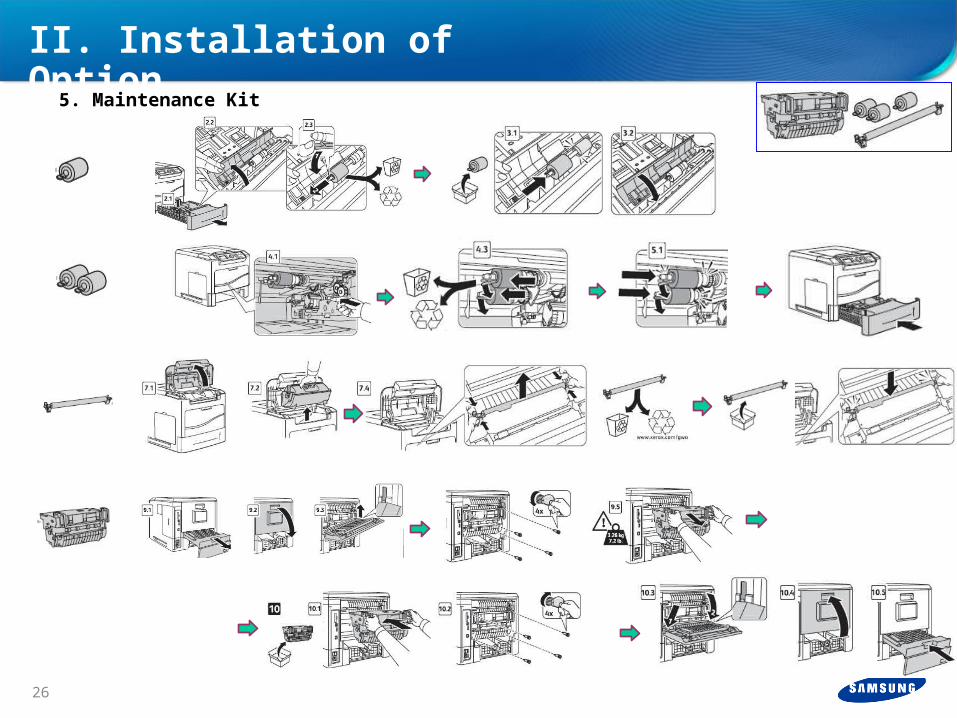
5. Maintenance Kit
II. Installation of Option
Ⅰ. Learn how to disassemble printer
Ⅱ. Understand the function of each part
Ⅲ. Understand the basic structure of main parts
PurposePurpose
III. Disassembly
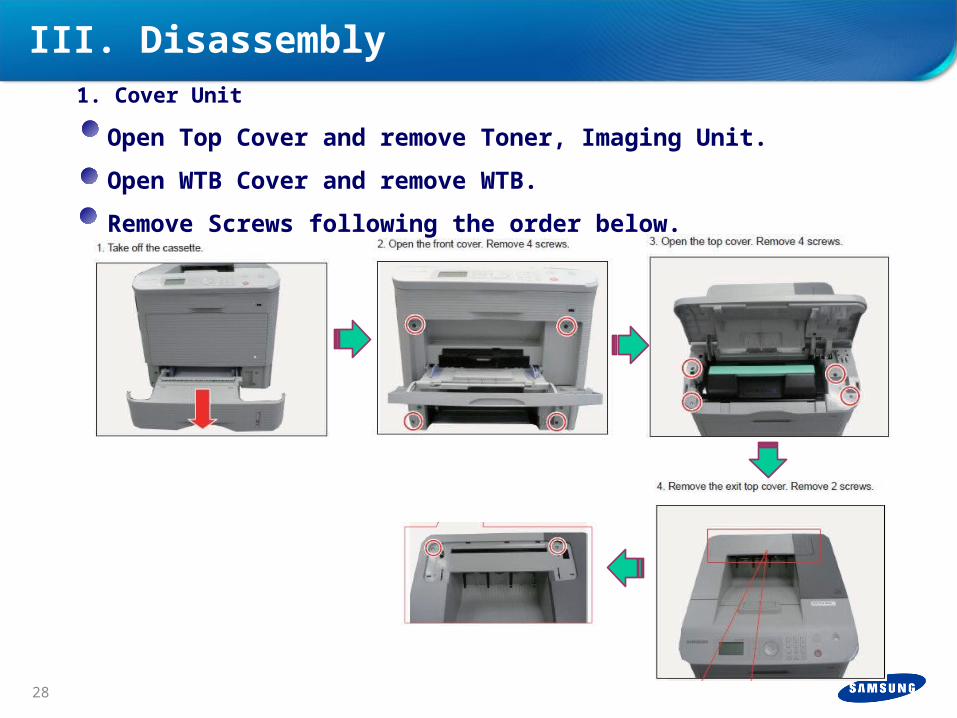
Open Top Cover and remove Toner, Imaging Unit.
Open WTB Cover and remove WTB.
Remove Screws following the order below.
1. Cover Unit
III. Disassembly
28
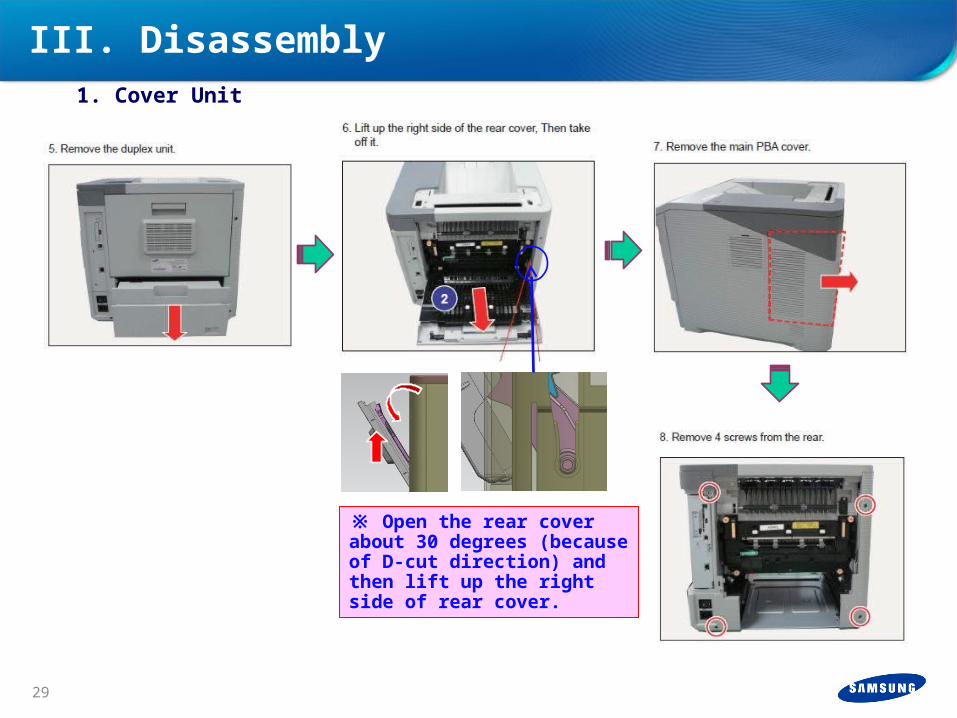
1. Cover Unit
III. Disassembly
※ Open the rear cover about 30 degrees (because of D-cut direction) and then lift up the right side of rear cover.
29
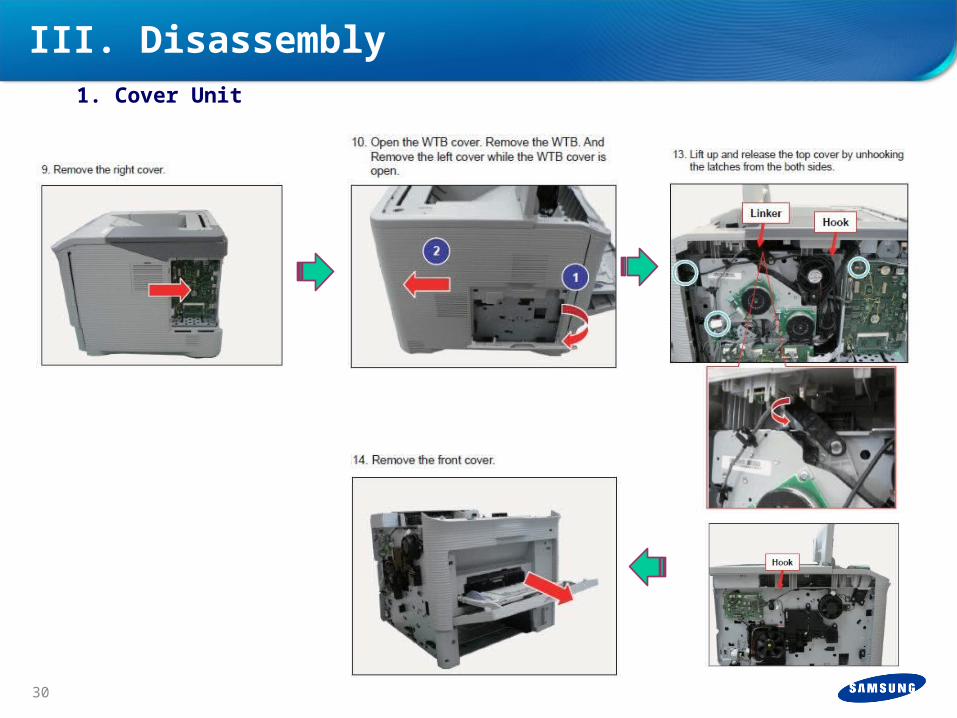
1. Cover Unit
III. Disassembly
30
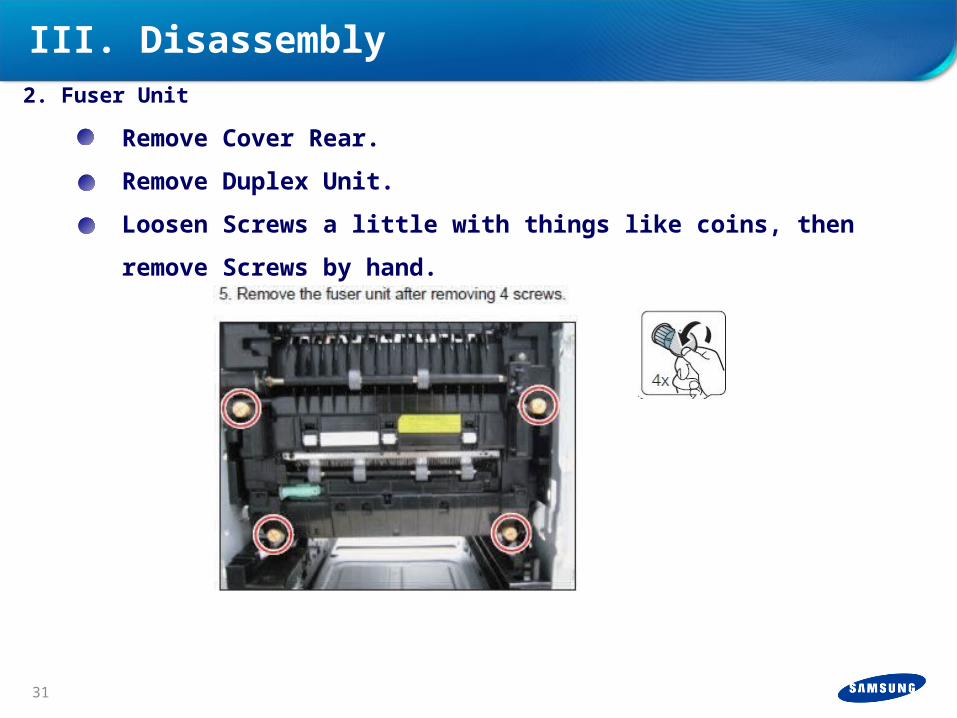
Remove Cover Rear.
Remove Duplex Unit.
Loosen Screws a little with things like coins, then remove
Screws by hand.
2. Fuser Unit
III. Disassembly
31

Remove Cover Right.
Remove connector from Main PBA & Engine PBA.
Remove Screws following the order below, then remove
PBA.Main PBA Engine PBA
3. Main PBA & Engine PBA
III. Disassembly
※ It would be more easy unplug all harness connectors before unfasten screws.
32
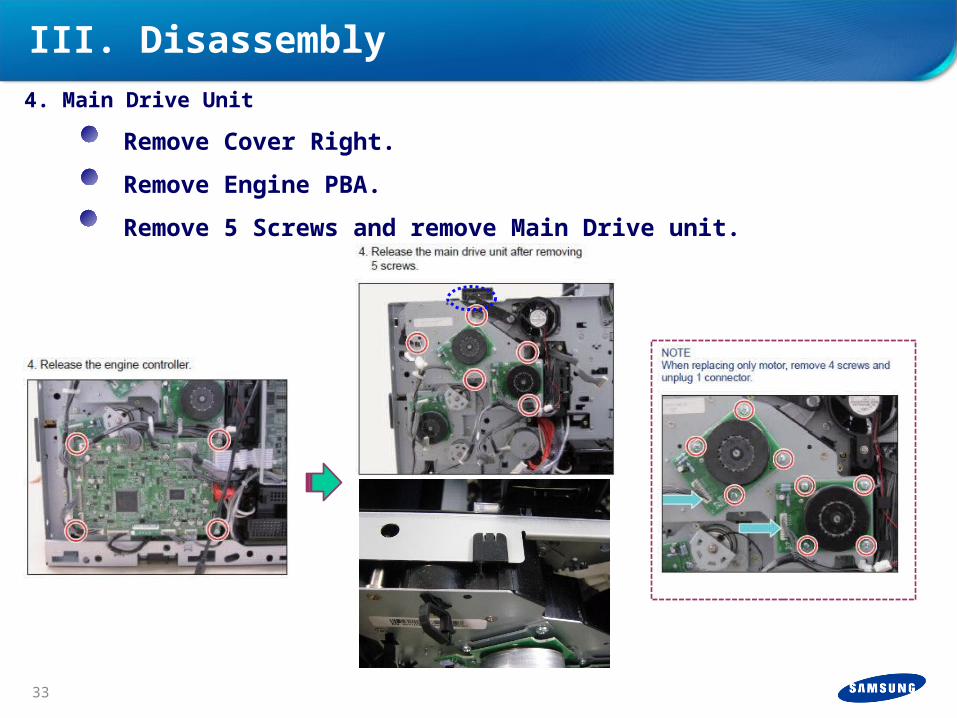
Remove Cover Right.
Remove Engine PBA.
Remove 5 Screws and remove Main Drive unit.
4. Main Drive Unit
III. Disassembly
33
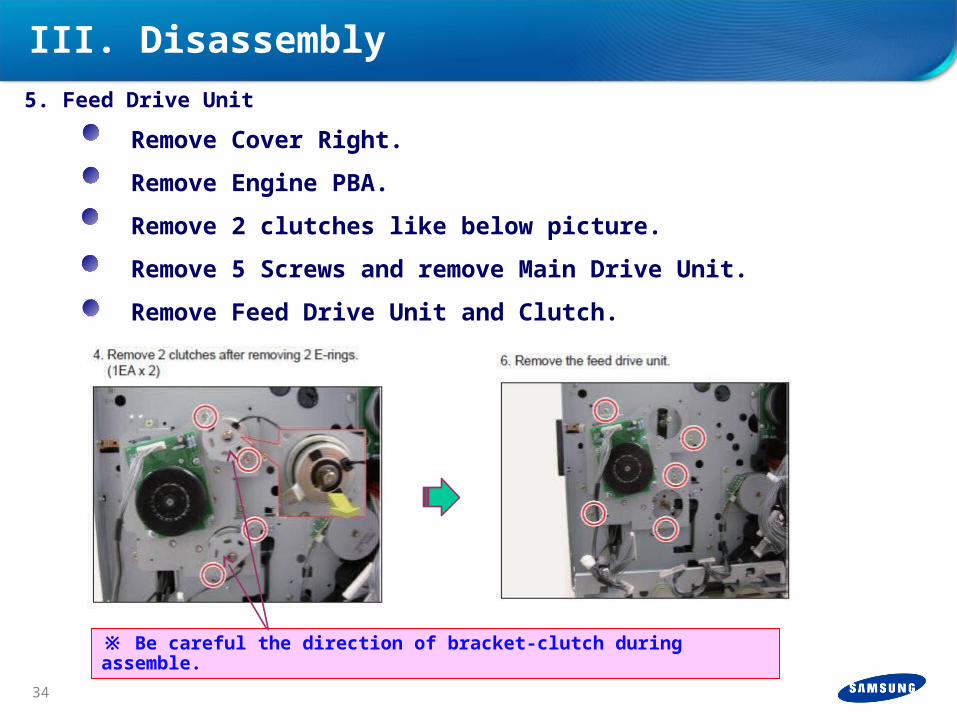
Remove Cover Right.
Remove Engine PBA.
Remove 2 clutches like below picture.
Remove 5 Screws and remove Main Drive Unit.
Remove Feed Drive Unit and Clutch.
5. Feed Drive Unit
III. Disassembly
※ Be careful the direction of bracket-clutch during assemble.
34
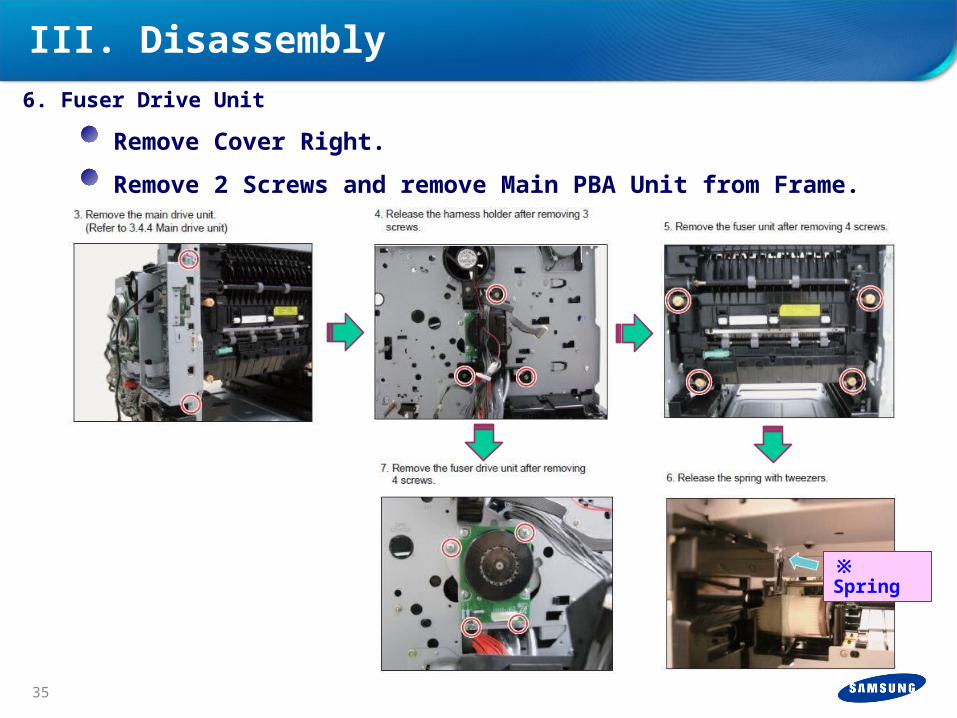
Remove Cover Right.
Remove 2 Screws and remove Main PBA Unit from Frame.
6. Fuser Drive Unit
III. Disassembly
※ Spring
35
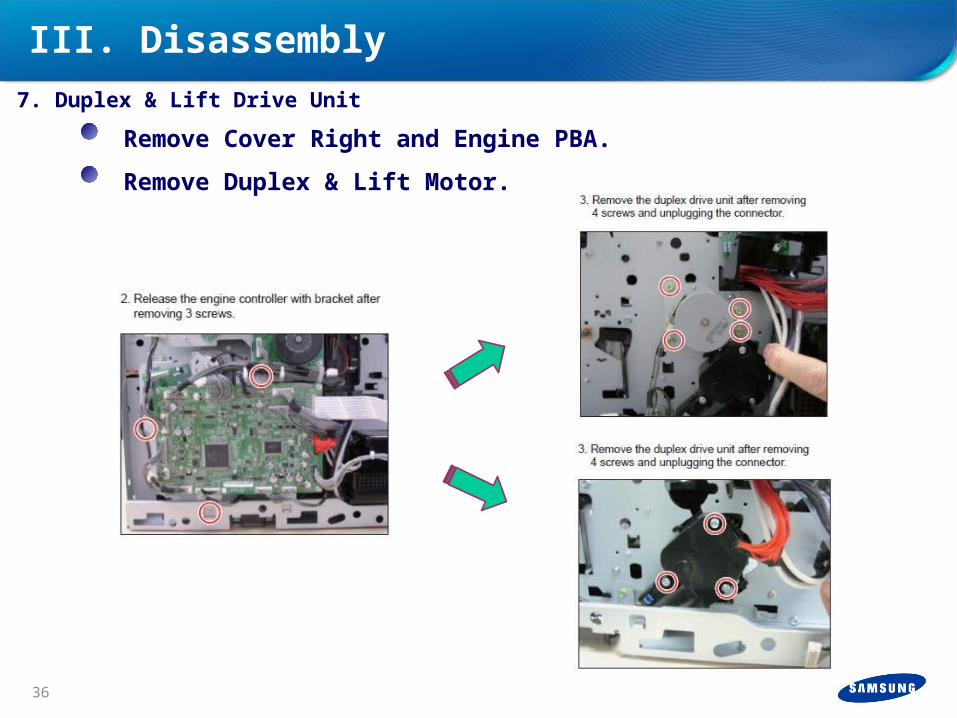
Remove Cover Right and Engine PBA.
Remove Duplex & Lift Motor.
7. Duplex & Lift Drive Unit
III. Disassembly
36
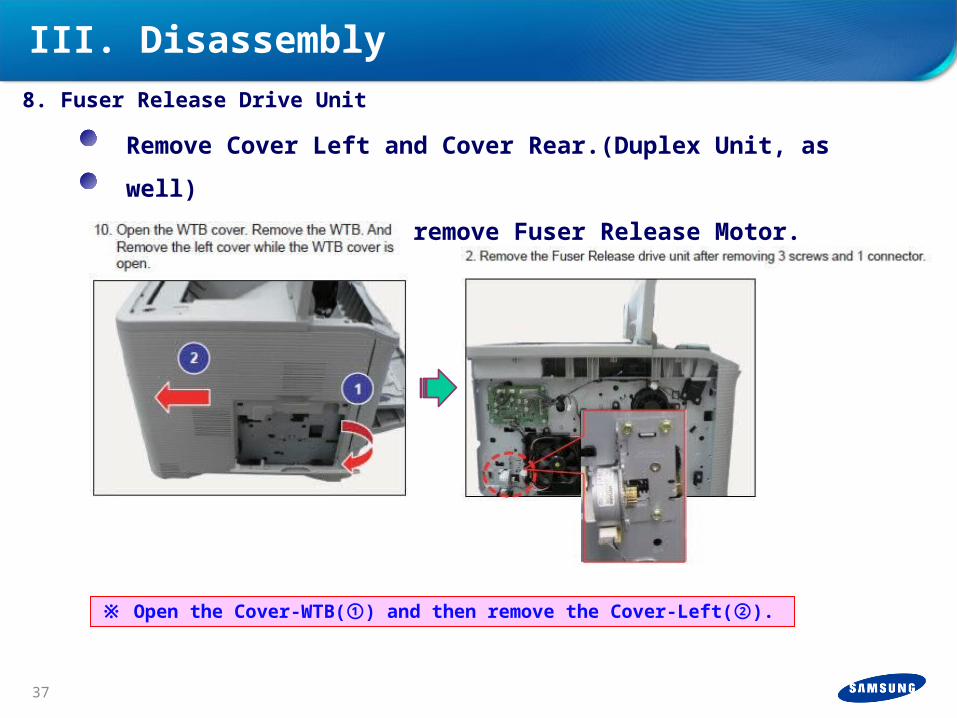
Remove Cover Left and Cover Rear.(Duplex Unit, as
well)
Remove 3 Screws and remove Fuser Release Motor.
※ Open the Cover-WTB(① ) and then remove the Cover-Left(②).
8. Fuser Release Drive Unit
III. Disassembly
37
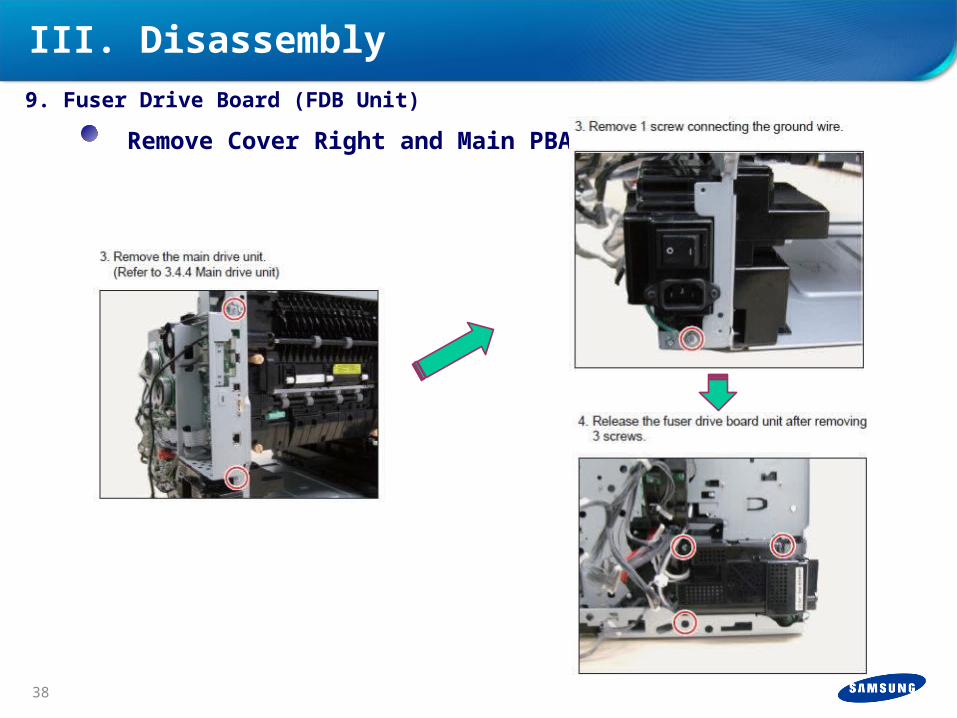
Remove Cover Right and Main PBA.
9. Fuser Drive Board (FDB Unit)
III. Disassembly
38
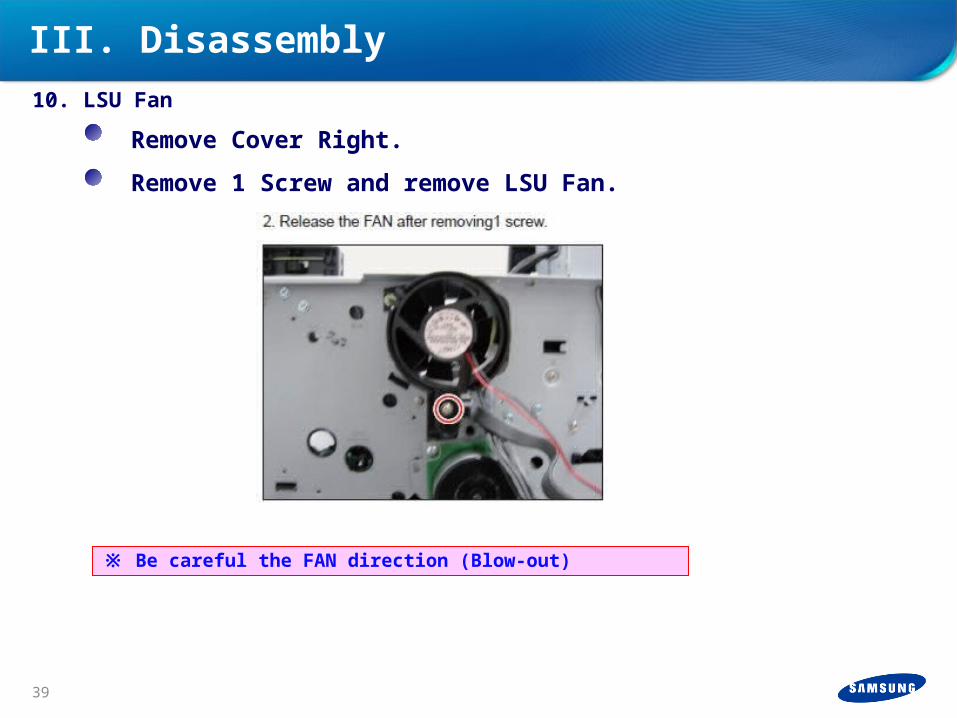
Remove Cover Right.
Remove 1 Screw and remove LSU Fan.
※ Be careful the FAN direction (Blow-out)
10. LSU Fan
III. Disassembly
39
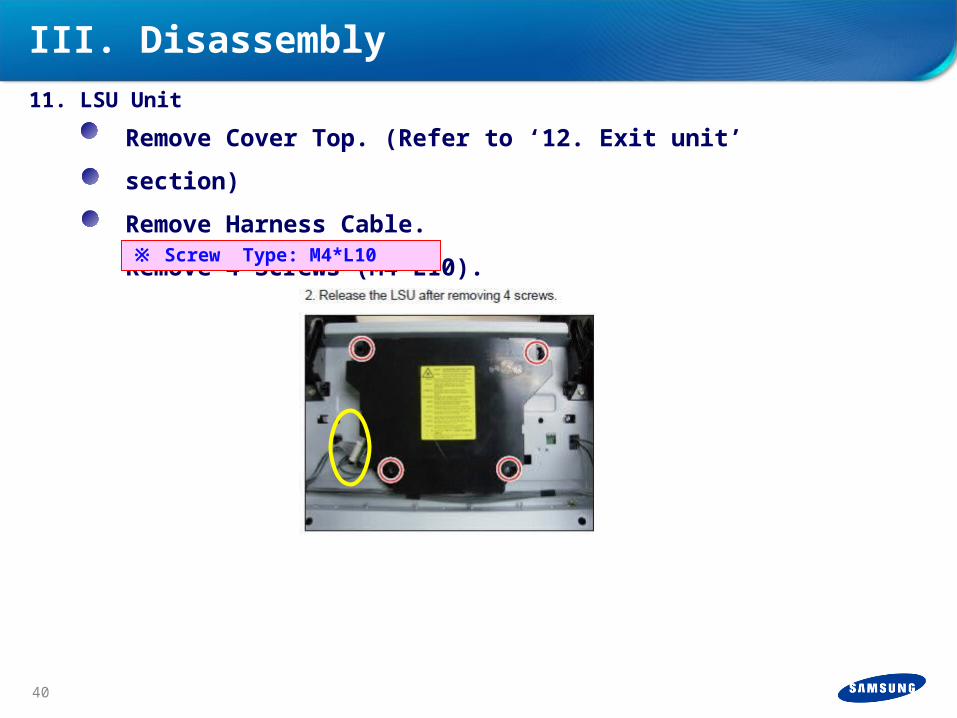
Remove Cover Top. (Refer to ‘12. Exit unit’ section)
Remove Harness Cable.
Remove 4 Screws (M4*L10).
11. LSU Unit
III. Disassembly
※ Screw Type: M4*L10
40
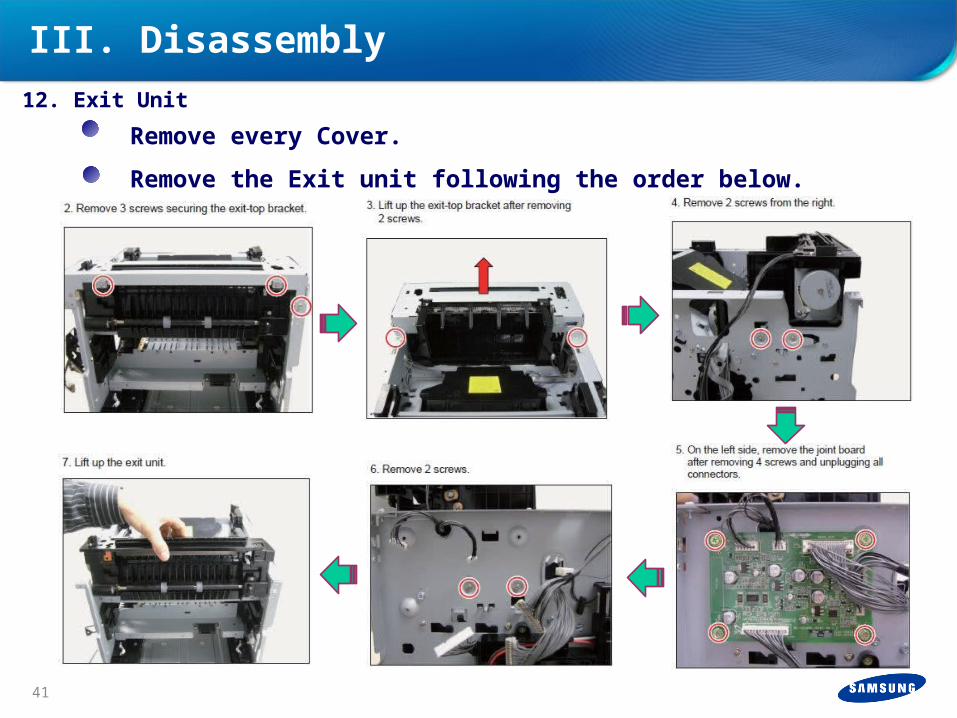
Remove every Cover.
Remove the Exit unit following the order below.
12. Exit Unit
III. Disassembly
41
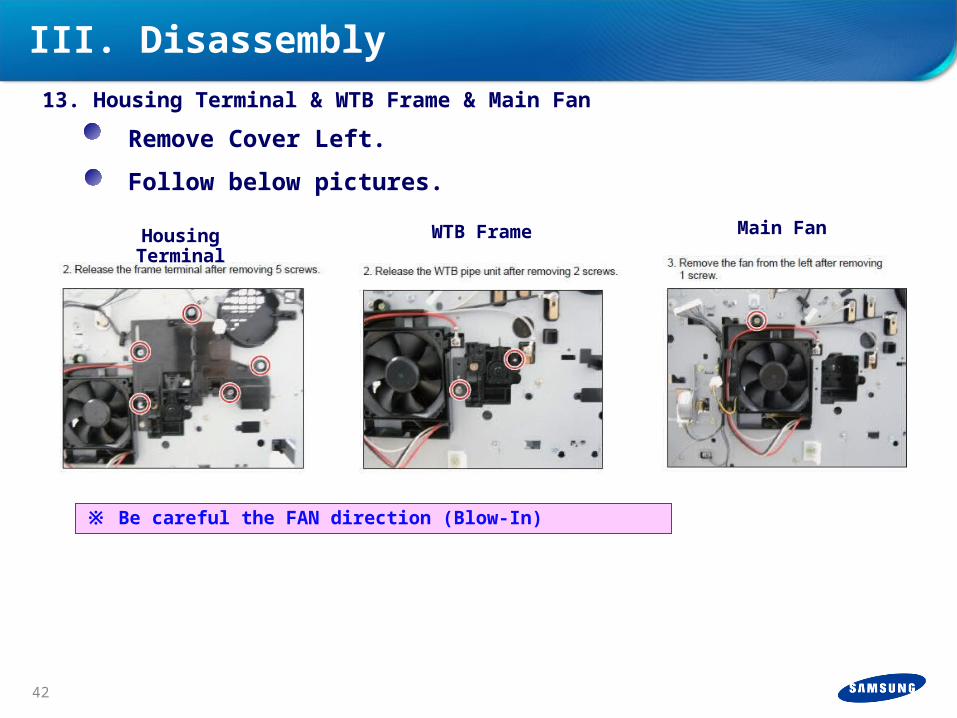
Remove Cover Left.
Follow below pictures.
Housing Terminal
WTB Frame Main Fan
※ Be careful the FAN direction (Blow-In)
13. Housing Terminal & WTB Frame & Main Fan
III. Disassembly
42
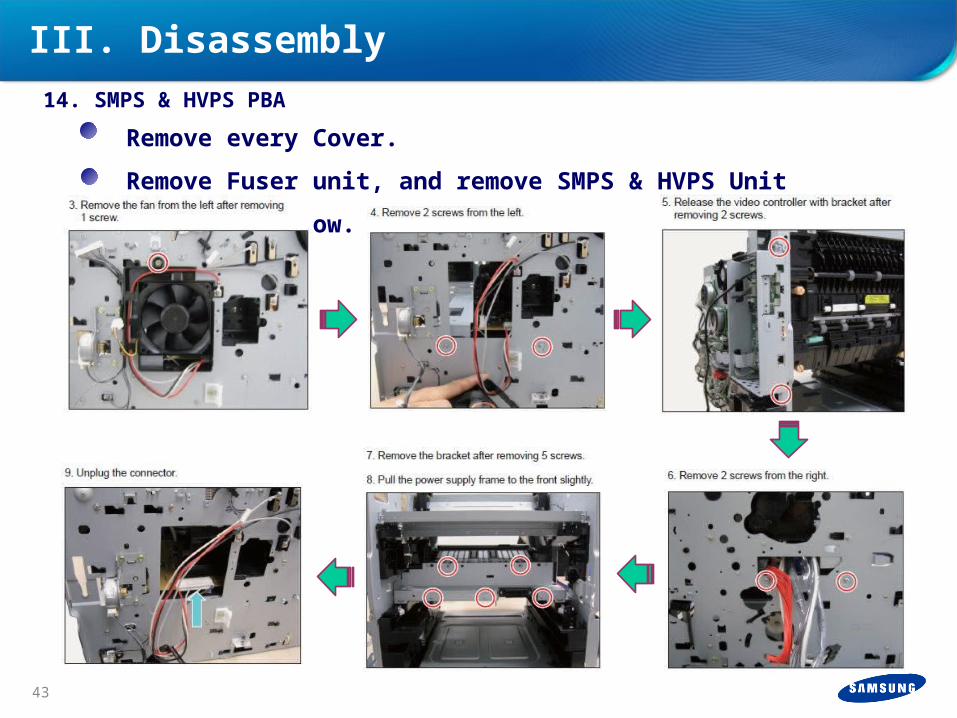
Remove every Cover.
Remove Fuser unit, and remove SMPS & HVPS Unit
following below.
14. SMPS & HVPS PBA
III. Disassembly
43
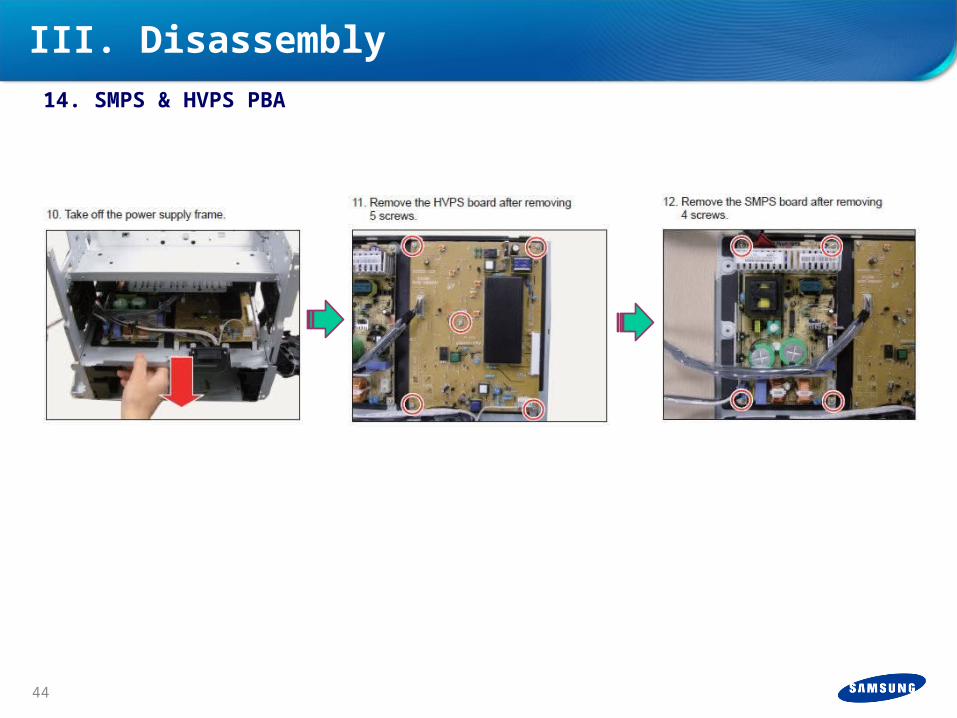
14. SMPS & HVPS PBA
III. Disassembly
44
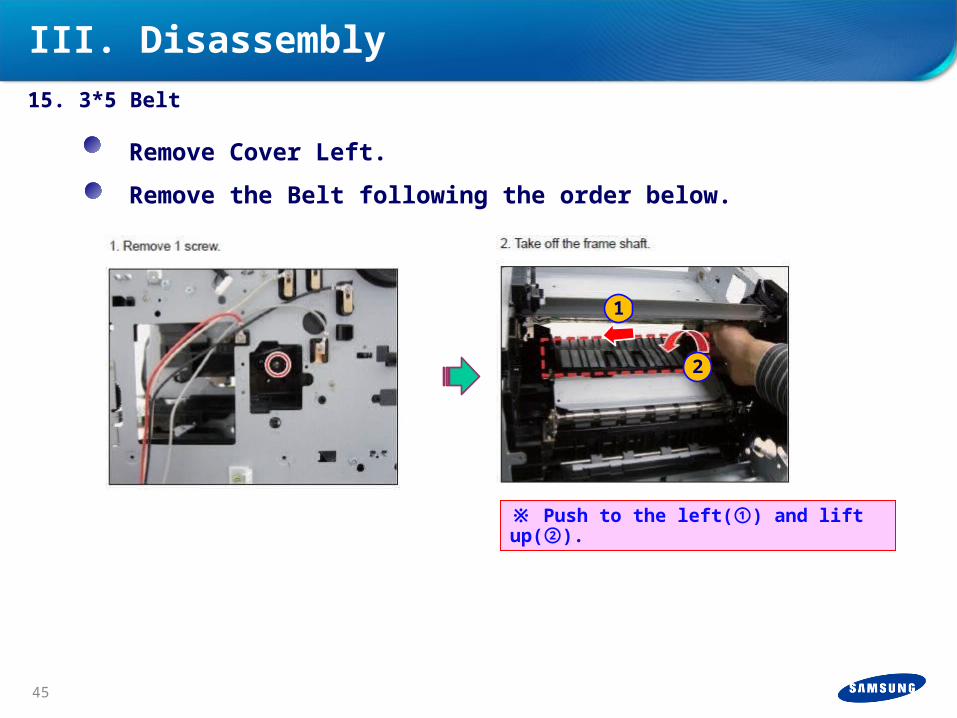
Remove Cover Left.
Remove the Belt following the order below.
15. 3*5 Belt
III. Disassembly
※ Push to the left(①) and lift up(②).
1
2
45
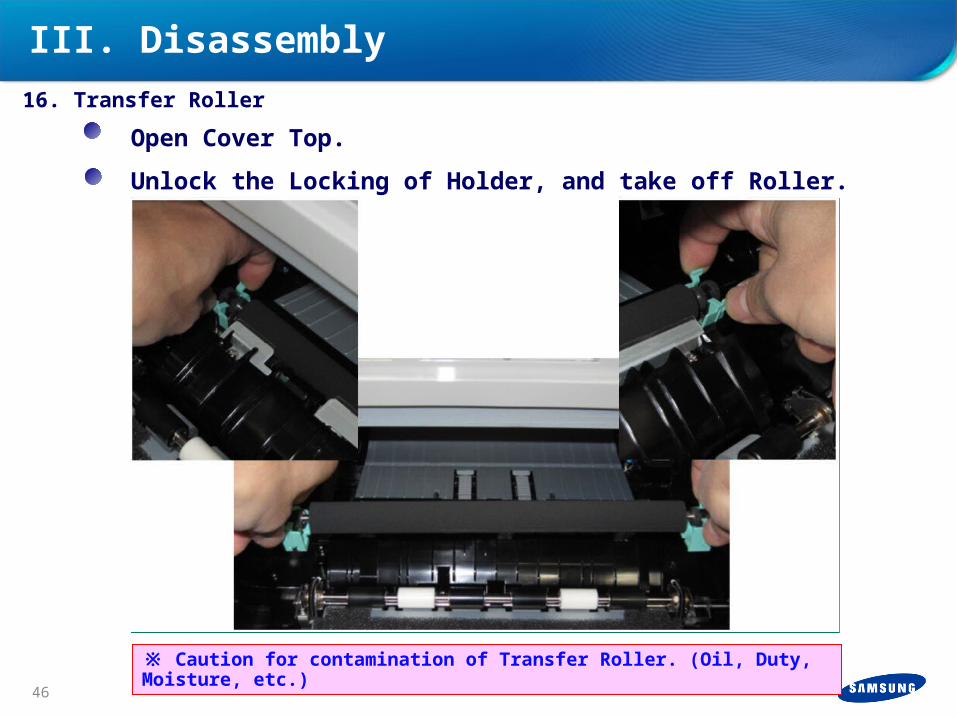
Open Cover Top.
Unlock the Locking of Holder, and take off Roller.
※ Caution for contamination of Transfer Roller. (Oil, Duty, Moisture, etc.)
16. Transfer Roller
III. Disassembly
46
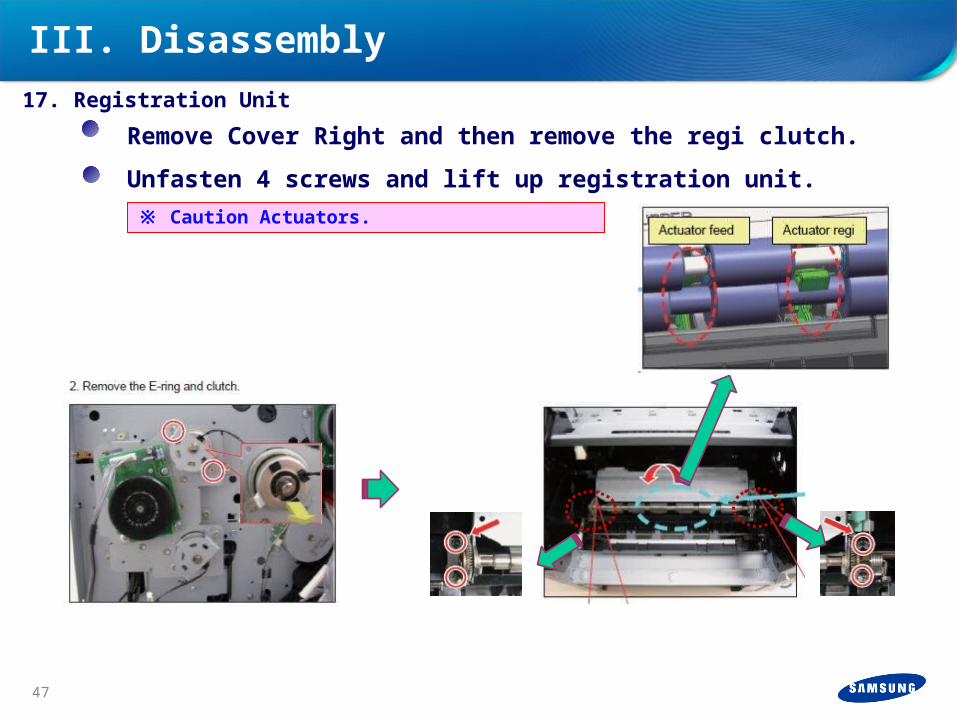
Remove Cover Right and then remove the regi clutch.
Unfasten 4 screws and lift up registration unit.
17. Registration Unit
III. Disassembly
※ Caution Actuators.
47
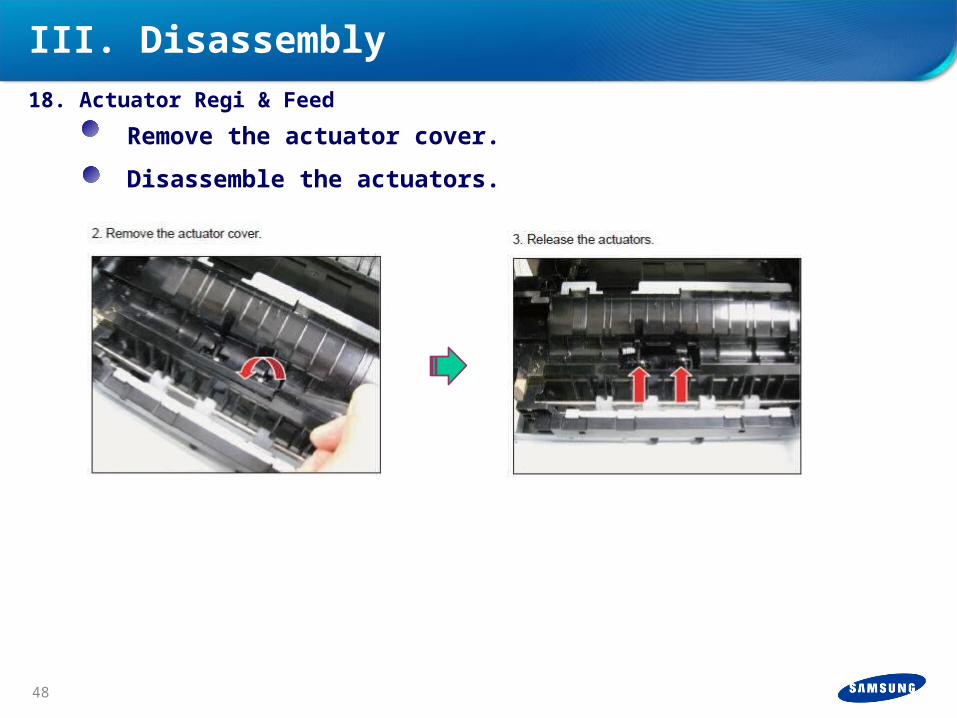
Remove the actuator cover.
Disassemble the actuators.
18. Actuator Regi & Feed
III. Disassembly
48

Remove Cover Right.
Remove 1 Screw and remove Sensor.
19. External Temperature Sensor
III. Disassembly
49
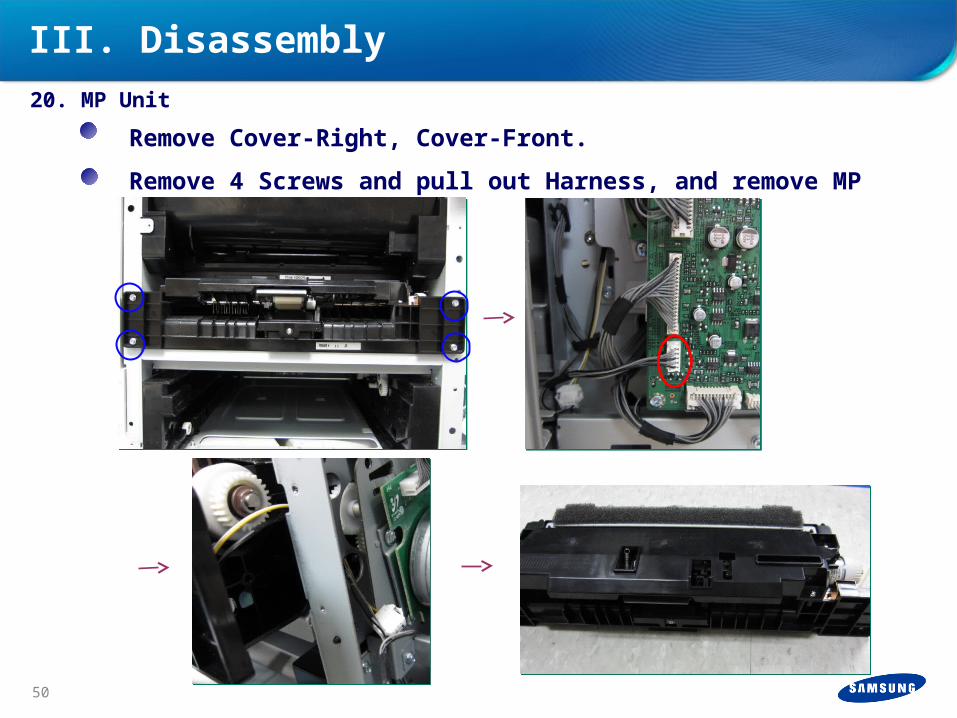
Remove Cover-Right, Cover-Front.
Remove 4 Screws and pull out Harness, and remove
MP Unit.
20. MP Unit
III. Disassembly
50
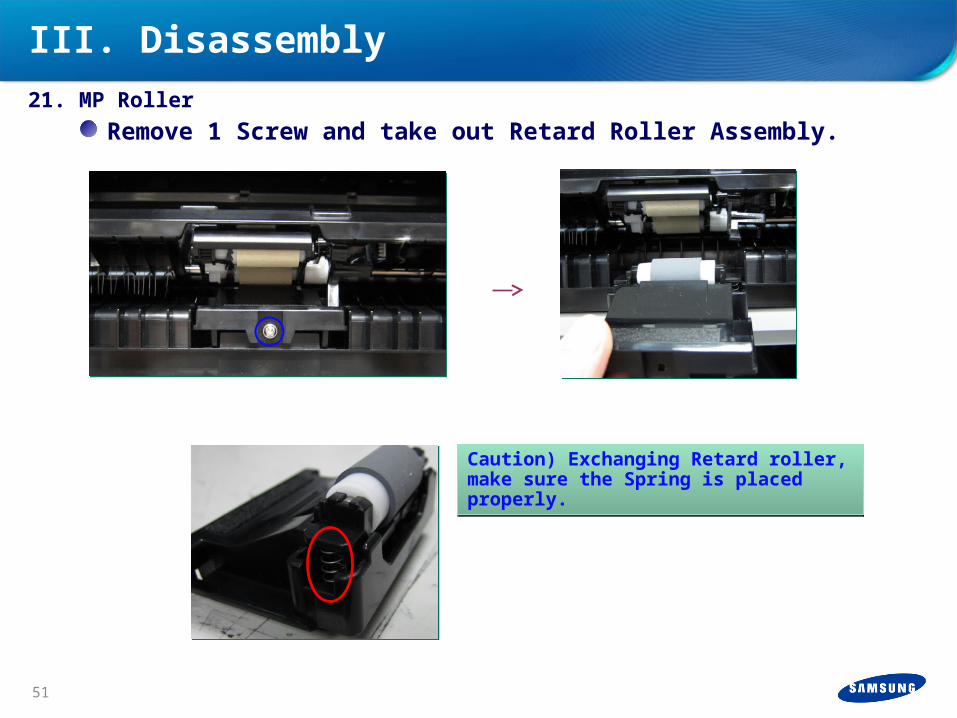
Remove 1 Screw and take out Retard Roller Assembly.
Caution) Exchanging Retard roller, make sure the Spring is placed properly.Caution) Exchanging Retard roller, make sure the Spring is placed properly.
21. MP Roller
III. Disassembly
51
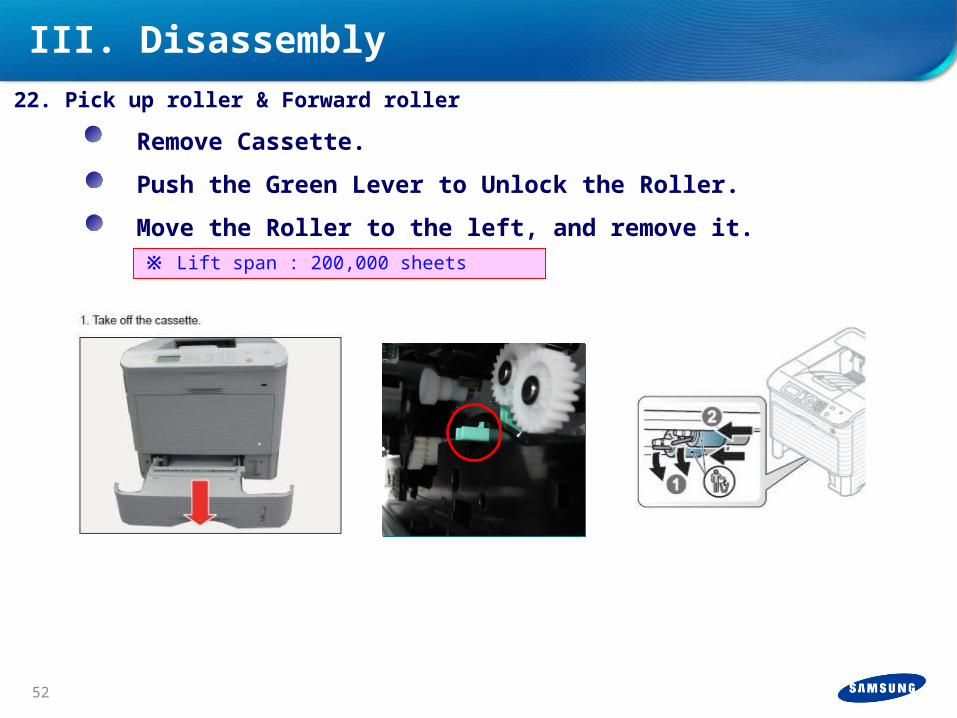
Remove Cassette.
Push the Green Lever to Unlock the Roller.
Move the Roller to the left, and remove it.
22. Pick up roller & Forward roller
III. Disassembly
※ Lift span : 200,000 sheets
52
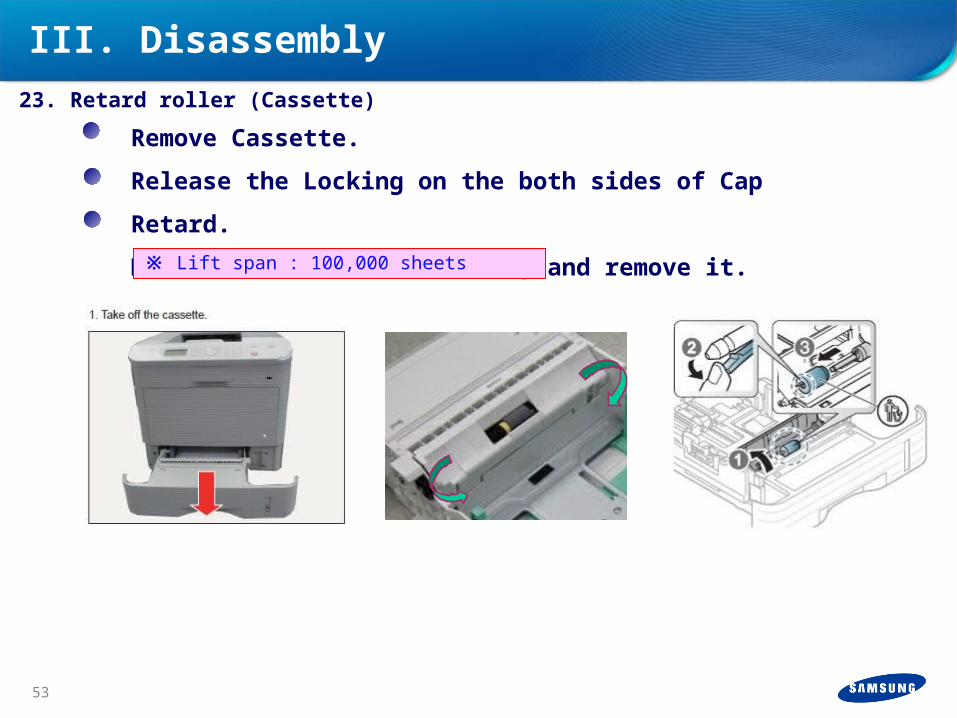
Remove Cassette.
Release the Locking on the both sides of Cap Retard.
Move the Roller to the left, and remove it.
23. Retard roller (Cassette)
III. Disassembly
※ Lift span : 100,000 sheets
53
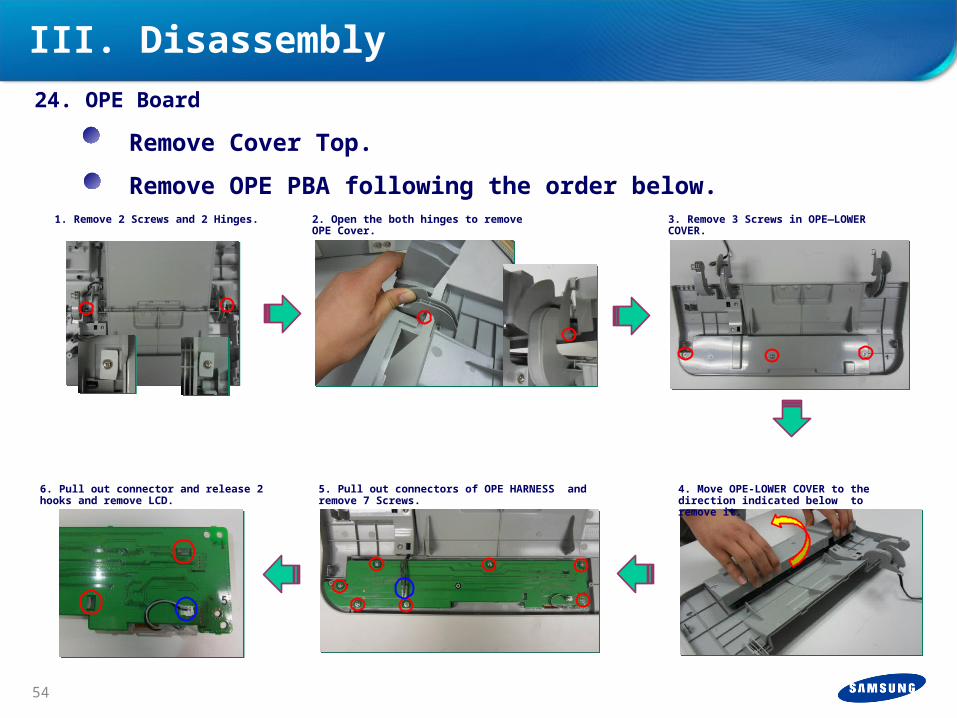
Remove Cover Top.
Remove OPE PBA following the order below.1. Remove 2 Screws and 2 Hinges.
2. Open the both hinges to remove OPE Cover.
3. Remove 3 Screws in OPE—LOWER COVER.
4. Move OPE-LOWER COVER to the direction indicated below to remove it.
5. Pull out connectors of OPE HARNESS and remove 7 Screws.
6. Pull out connector and release 2 hooks and remove LCD.
24. OPE Board
III. Disassembly
54
Can you disassemble and re-assemble Harrier?
(ML-551x/ML-651x Series)
ReviewReview
III. Disassembly
56
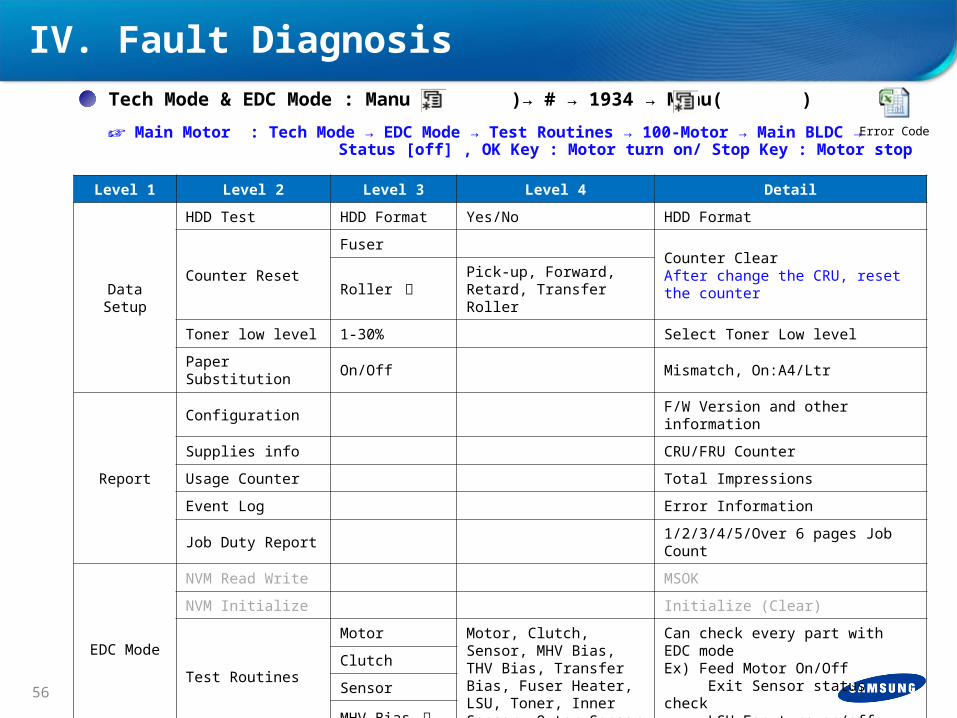
IV. Fault DiagnosisTech Mode & EDC Mode : Manu ( )→ # → 1934 → Manu( )
☞ Main Motor : Tech Mode → EDC Mode → Test Routines → 100-Motor → Main BLDC → Status [off] , OK Key : Motor turn on/ Stop Key : Motor stop
Level 1 Level 2 Level 3 Level 4 Detail
Data Setup
HDD Test HDD Format Yes/No HDD Format
Counter Reset
Fuser Counter ClearAfter change the CRU, reset the counterRoller 류 Pick-up, Forward,
Retard, Transfer Roller
Toner low level 1-30% Select Toner Low level
Paper Substitution On/Off Mismatch, On:A4/Ltr
Report
Configuration F/W Version and other information
Supplies info CRU/FRU Counter
Usage Counter Total Impressions
Event Log Error Information
Job Duty Report 1/2/3/4/5/Over 6 pages Job Count
EDC Mode
NVM Read Write MSOK
NVM Initialize Initialize (Clear)
Test Routines
Motor Motor, Clutch, Sensor, MHV Bias, THV Bias, Transfer Bias, Fuser Heater, LSU, Toner, Inner Sensor, Outer Sensor
Can check every part with EDC modeEx) Feed Motor On/Off Exit Sensor status check LSU Fan turn on/off
Clutch
Sensor
MHV Bias 외
Error Code
57
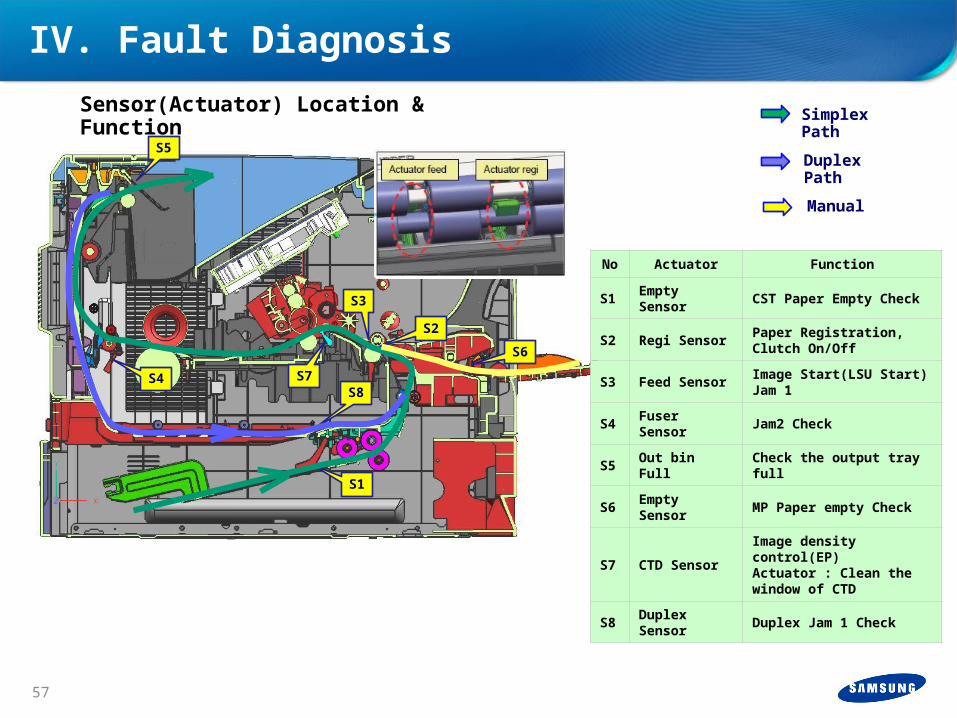
Sensor(Actuator) Location & Function
Simplex Path
Duplex Path
Manual
S5
S4
S1
S6
S2
S3
S7S8
No Actuator Function
S1Empty Sensor
CST Paper Empty Check
S2 Regi SensorPaper Registration, Clutch On/Off
S3 Feed SensorImage Start(LSU Start)Jam 1
S4Fuser Sensor
Jam2 Check
S5 Out bin FullCheck the output tray full
S6Empty Sensor
MP Paper empty Check
S7 CTD Sensor
Image density control(EP)Actuator : Clean the window of CTD
S8Duplex Sensor
Duplex Jam 1 Check
IV. Fault Diagnosis
58
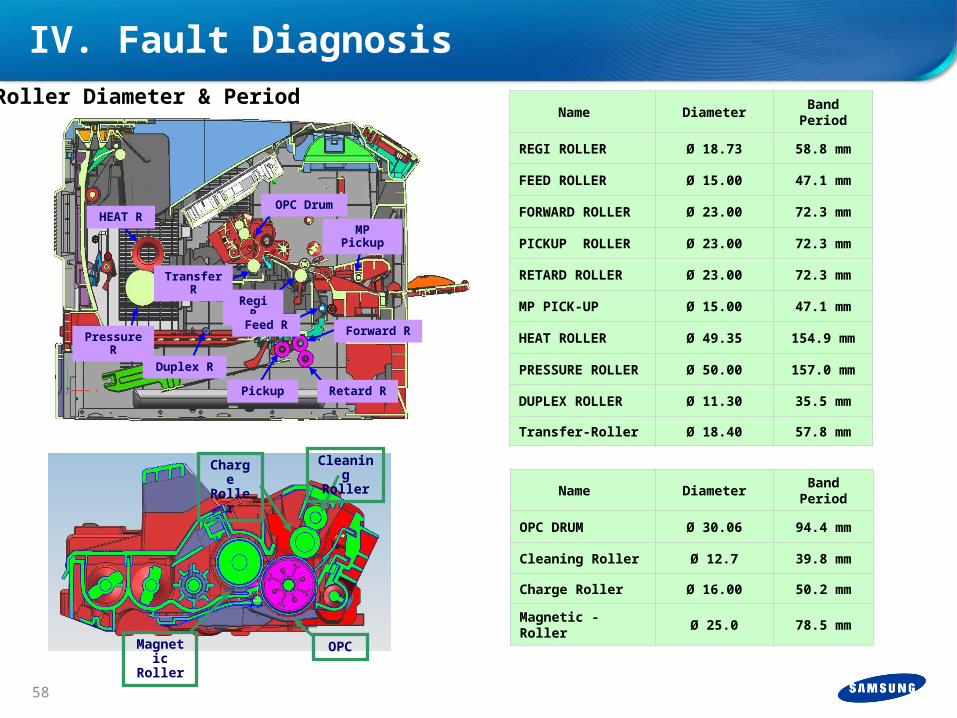
Name DiameterBand
Period
REGI ROLLER Ø 18.73 58.8 mm
FEED ROLLER Ø 15.00 47.1 mm
FORWARD ROLLER
Ø 23.00 72.3 mm
PICKUP ROLLER Ø 23.00 72.3 mm
RETARD ROLLER Ø 23.00 72.3 mm
MP PICK-UP Ø 15.00 47.1 mm
HEAT ROLLER Ø 49.35 154.9 mm
PRESSURE ROLLER
Ø 50.00 157.0 mm
DUPLEX ROLLER Ø 11.30 35.5 mm
Transfer-Roller Ø 18.40 57.8 mm
OPC Drum
Transfer R
Pickup
HEAT R
Pressure R
Retard R
Forward R
MP Pickup
Regi R
Feed R
Duplex R
OPCMagnetic
Roller
Cleaning
Roller
Charge
Roller Name DiameterBand
Period
OPC DRUM Ø 30.06 94.4 mm
Cleaning Roller Ø 12.7 39.8 mm
Charge Roller Ø 16.00 50.2 mm
Magnetic -Roller Ø 25.0 78.5 mm
Roller Diameter & Period
IV. Fault Diagnosis
Check ListCheck List
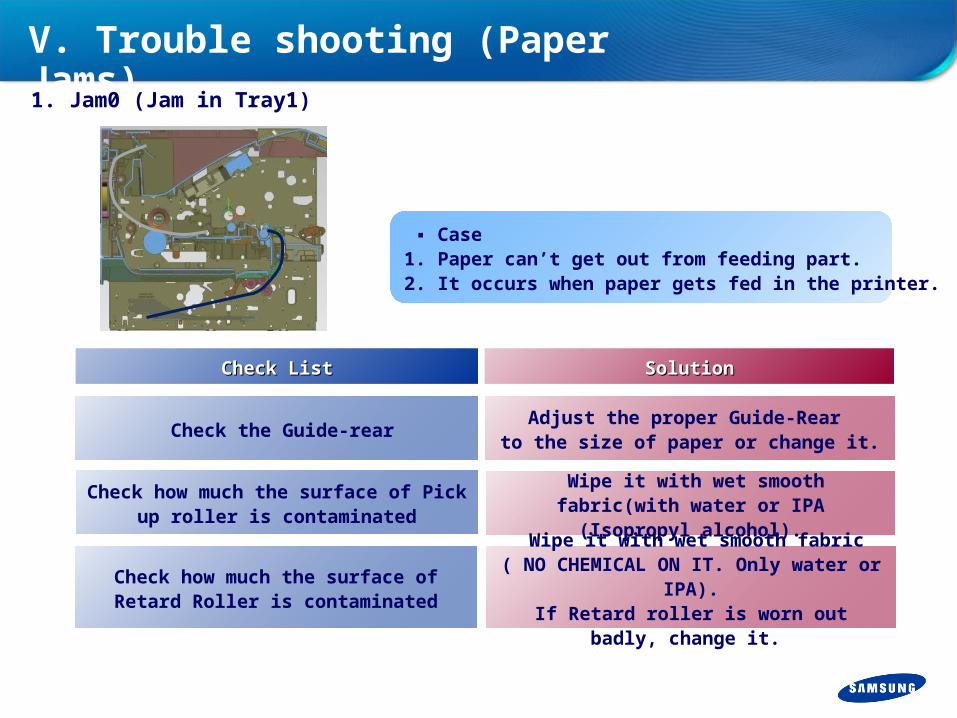
Check the Guide-rear
SolutionSolution
Adjust the proper Guide-Rear to the size of paper or change it.
Check how much the surface of Pick up roller is contaminated
Wipe it with wet smooth fabric(with water or IPA (Isopropyl alcohol).
▪ Case1. Paper can’t get out from feeding part.2. It occurs when paper gets fed in the printer.
Check how much the surface of Retard Roller is contaminated
Wipe it with wet smooth fabric( NO CHEMICAL ON IT. Only water or
IPA).If Retard roller is worn out badly,
change it.
V. Trouble shooting (Paper Jams)1. Jam0 (Jam in Tray1)
Check ListCheck List
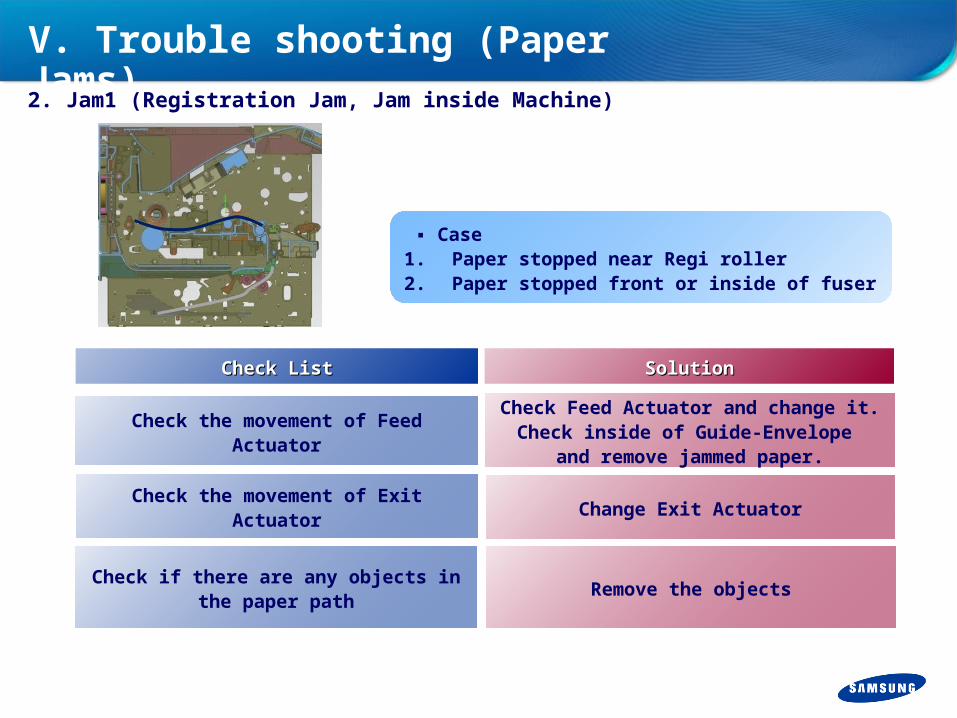
Check the movement of Feed Actuator
SolutionSolution
Check Feed Actuator and change it.Check inside of Guide-Envelope
and remove jammed paper.
Check the movement of Exit Actuator
Change Exit Actuator
▪ Case1. Paper stopped near Regi roller2. Paper stopped front or inside of fuser
Check if there are any objects in the paper path
Remove the objects
V. Trouble shooting (Paper Jams)2. Jam1 (Registration Jam, Jam inside Machine)
Check ListCheck List
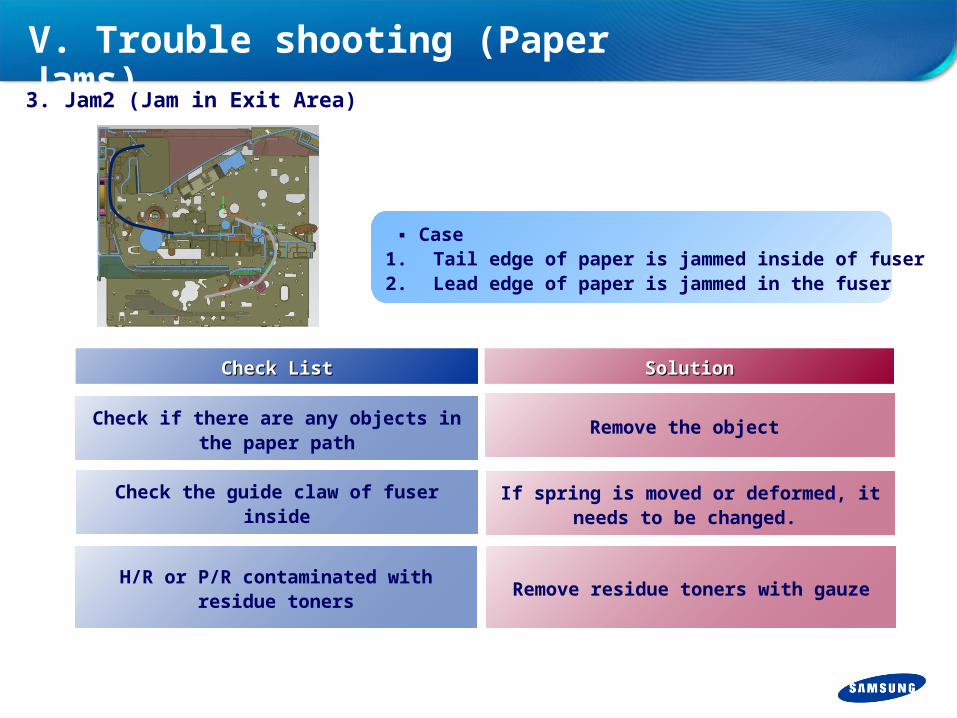
Check if there are any objects in the paper path
SolutionSolution
Remove the object
Check the guide claw of fuser insideIf spring is moved or deformed, it
needs to be changed.
▪ Case1. Tail edge of paper is jammed inside of fuser2. Lead edge of paper is jammed in the fuser
H/R or P/R contaminated with residue toners
Remove residue toners with gauze
V. Trouble shooting (Paper Jams)3. Jam2 (Jam in Exit Area)
Check ListCheck List
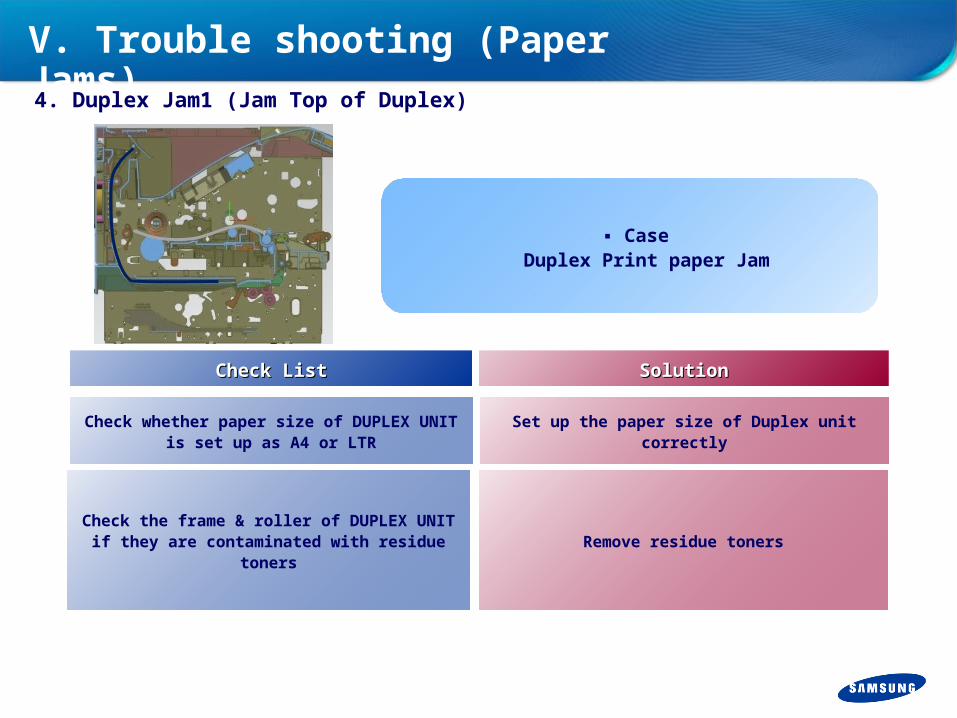
Check whether paper size of DUPLEX UNIT is set up as A4 or LTR
SolutionSolution
Set up the paper size of Duplex unit correctly
▪ Case Duplex Print paper Jam
Check the frame & roller of DUPLEX UNIT if they are contaminated with residue
tonersRemove residue toners
V. Trouble shooting (Paper Jams)4. Duplex Jam1 (Jam Top of Duplex)
Check ListCheck List
Check if there are any object on Guide-Paper or Burr
SolutionSolution
Remove the object & burr
Check Feed & Regi Roller if they are contaminated or worn out
Remove the contaminated part.Change the part if necessary
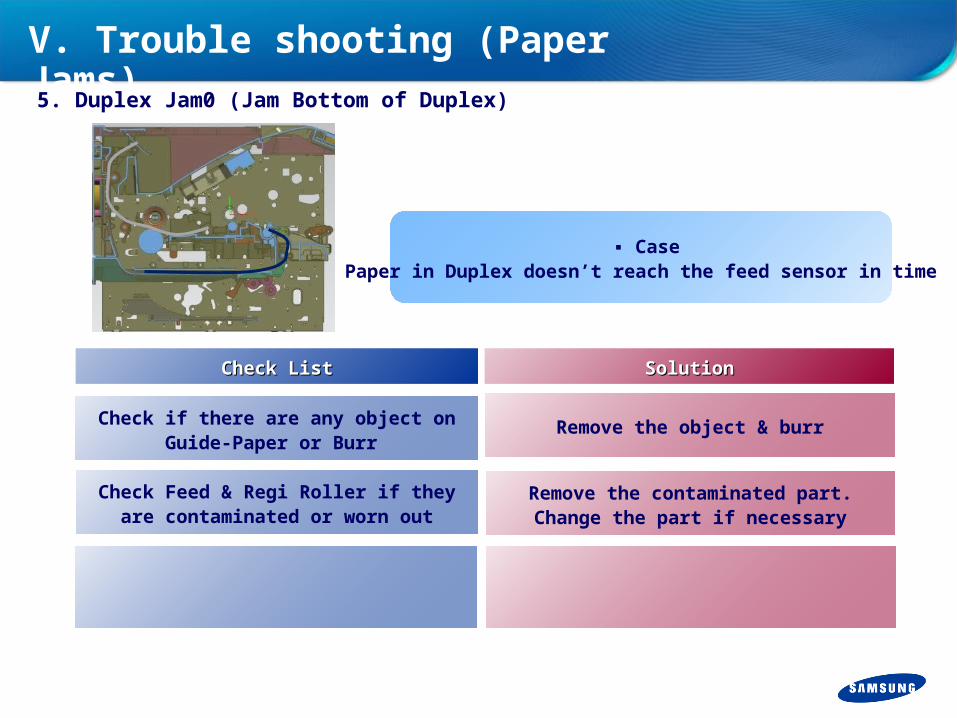
▪ CasePaper in Duplex doesn’t reach the feed sensor in time
V. Trouble shooting (Paper Jams)5. Duplex Jam0 (Jam Bottom of Duplex)
Check ListCheck List
Check the condition of roller (contaminated?, worn out?)
SolutionSolution
Remove the contaminated part.Change the part if necessary
Stopper is locked because paper is pushed too much.
Re-install the Stopper so it doesn’t get pressed too much
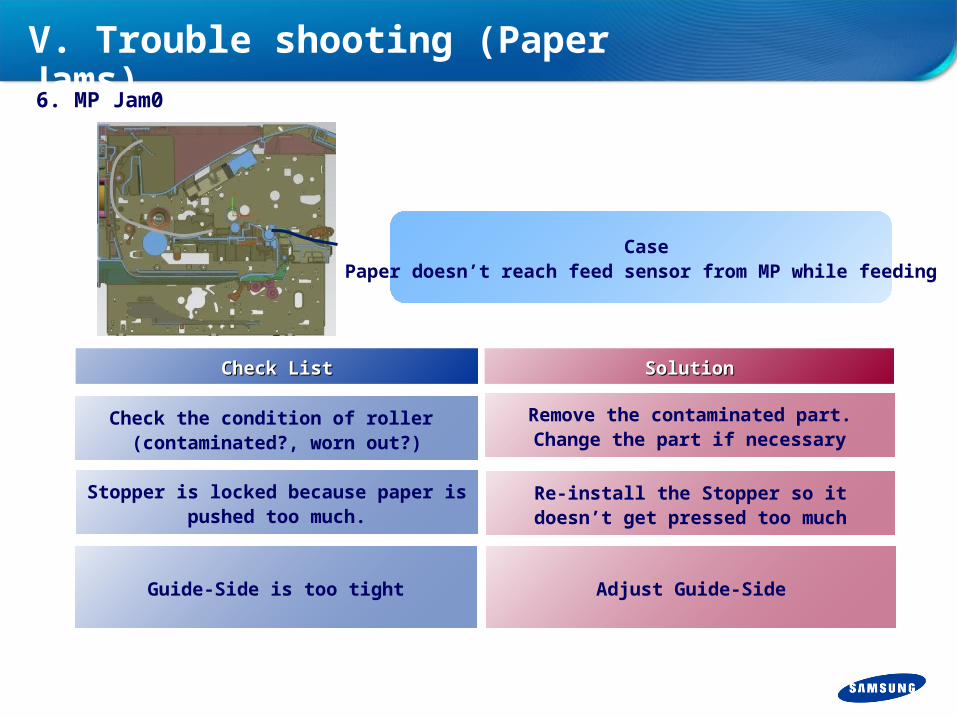
CasePaper doesn’t reach feed sensor from MP while feeding
Guide-Side is too tight Adjust Guide-Side
V. Trouble shooting (Paper Jams)6. MP Jam0
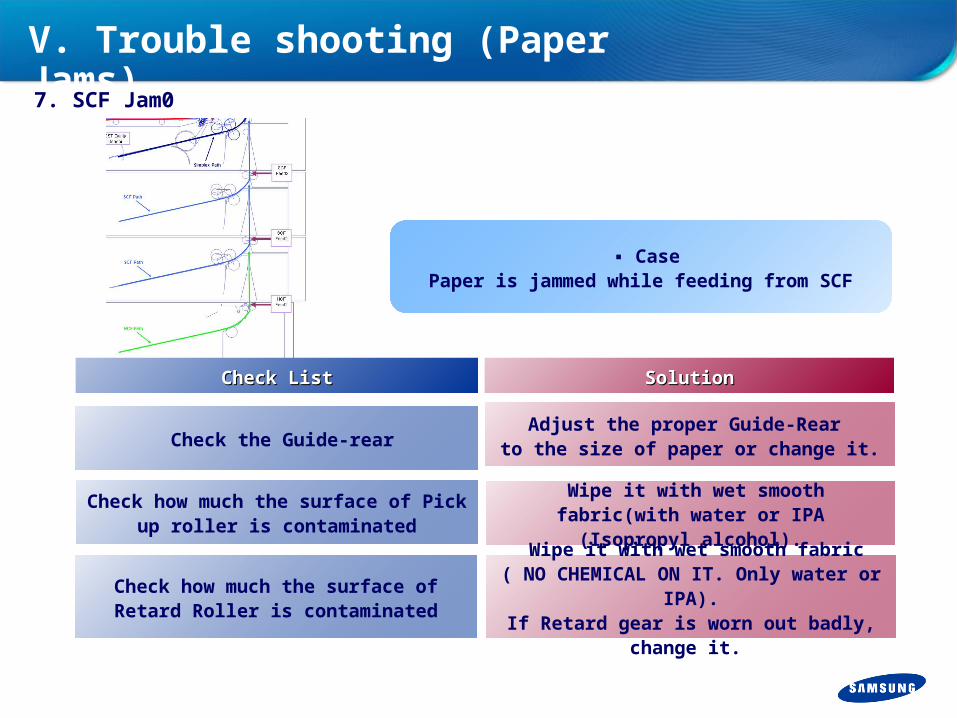
▪ CasePaper is jammed while feeding from SCF
Check ListCheck List
Check the Guide-rear
SolutionSolution
Adjust the proper Guide-Rear to the size of paper or change it.
Check how much the surface of Pick up roller is contaminated
Wipe it with wet smooth fabric(with water or IPA (Isopropyl alcohol).
Check how much the surface of Retard Roller is contaminated
Wipe it with wet smooth fabric( NO CHEMICAL ON IT. Only water or
IPA).If Retard gear is worn out badly,
change it.
V. Trouble shooting (Paper Jams)7. SCF Jam0
Check ListCheck List
Check the location of paper jam by opening Mail Box Cover
SolutionSolution
Correct the actuator & diverter in Mail Box
Check paper Curl If paper is curled too much, flip the paper to use
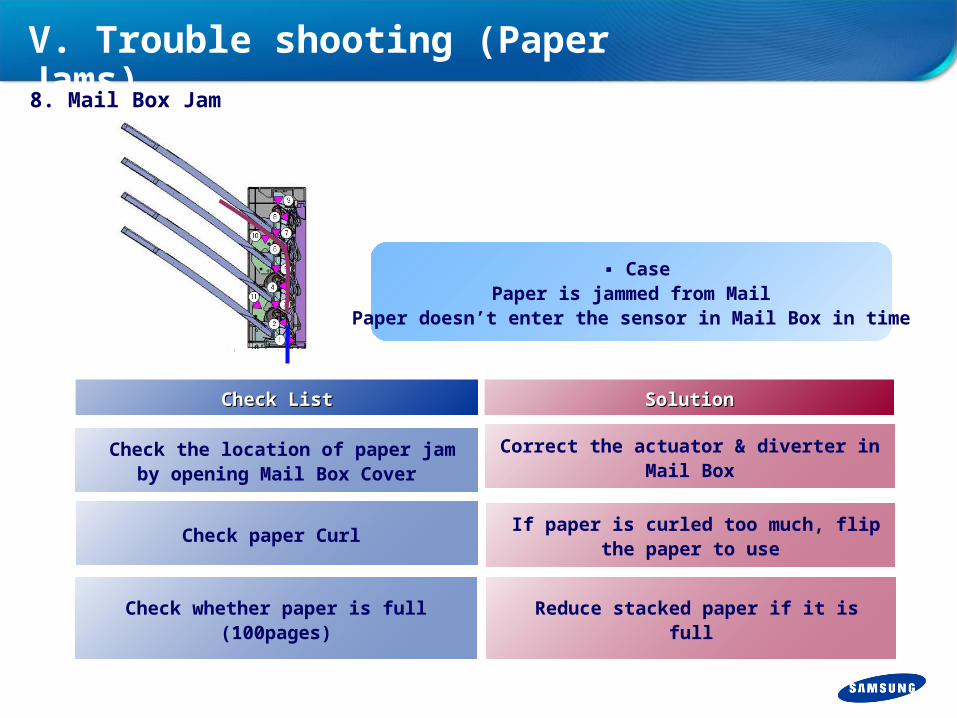
▪ CasePaper is jammed from Mail
Paper doesn’t enter the sensor in Mail Box in time
Check whether paper is full (100pages)
Reduce stacked paper if it is full
V. Trouble shooting (Paper Jams)8. Mail Box Jam
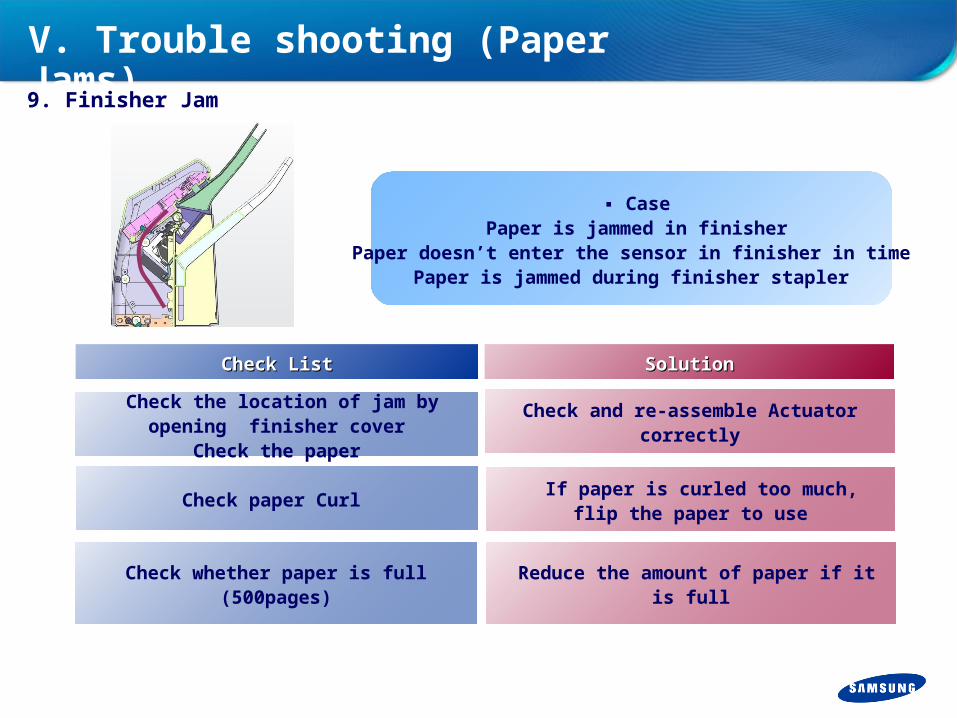
▪ Case Paper is jammed in finisher
Paper doesn’t enter the sensor in finisher in timePaper is jammed during finisher stapler
Check ListCheck List
Check the location of jam by opening finisher cover
Check the paper
SolutionSolution
Check and re-assemble Actuator correctly
Check paper Curl If paper is curled too much, flip the paper to use
Check whether paper is full (500pages)
Reduce the amount of paper if it is full
V. Trouble shooting (Paper Jams)9. Finisher Jam
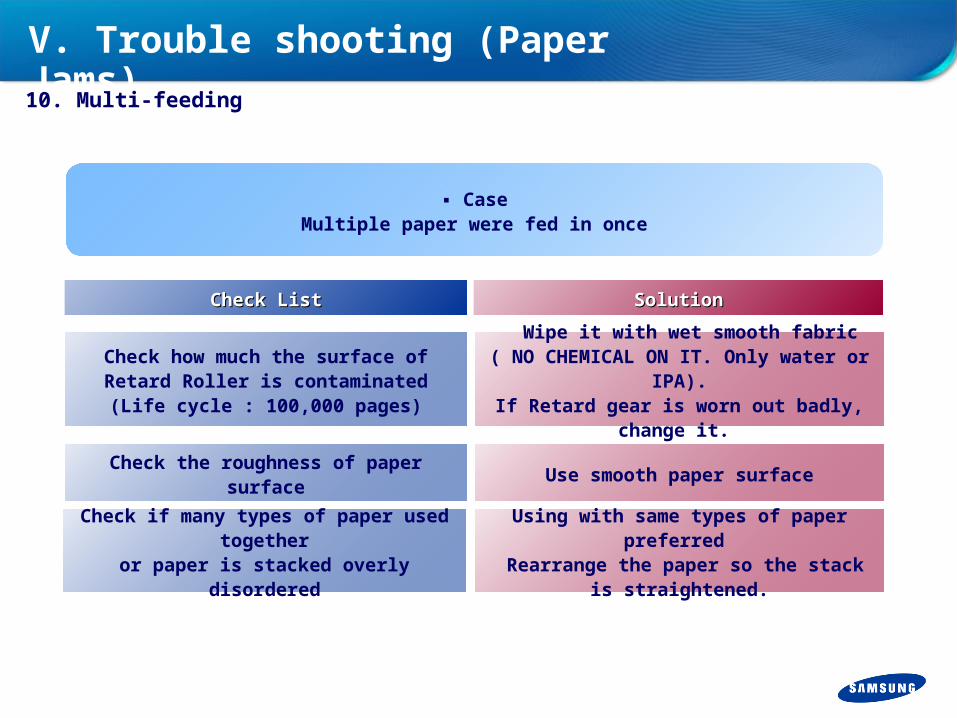
Check ListCheck List SolutionSolution
Check how much the surface of Retard Roller is contaminated(Life cycle : 100,000 pages)
Wipe it with wet smooth fabric( NO CHEMICAL ON IT. Only water or
IPA).If Retard gear is worn out badly,
change it.
Check the roughness of paper surface
Use smooth paper surface
▪ Case Multiple paper were fed in once
Check if many types of paper used together
or paper is stacked overly disordered
Using with same types of paper preferred
Rearrange the paper so the stack is straightened.
V. Trouble shooting (Paper Jams)10. Multi-feeding

Thank you !Thank you !