Embed Size (px)
Citation preview
Training Manual: Hiring Process and Applicant Tracking System
Foremost is the need to set standards of excellence in CRJ’s hiring process in order to attract, hire and retain the best candidates/employees possible. “Best Practices” have been applied throughout this process to ensure that there are open lines of communication between Hiring Managers and HR throughout the entire hiring process. The Applicant Tracking System (iCIMS) provides hiring managers with direct access to resumes and applications, automates approval procedure, tightens up time lines, and establishes immediate accountability through reporting of each step of the process from opening of a requisition to on-boarding
1 | P a g e R e v i s e d 1 1 / 1 1 / 1 2
TABLE OF CONTENTS
Login Page 2
Dashboard Page 3
Creating a Requisition Page 4
Approval Process Page 9
Postings Page 15
Application Process Page 15
Managing Your Requisitions Page 16
Screening Procedure Page 21
Selection Procedure Page 22
Background Checks Page 23
Job Offer Procedure Page 25
Appendix A
Sourcing List B
Applicant Flow Statuses and Dispositions C
Definitions of Applicant Statuses D
Reference Form –Exempt E
Reference Form – Non- Exempt F
Offer Letter Template G
2 | P a g e R e v i s e d 1 1 / 1 1 / 1 2
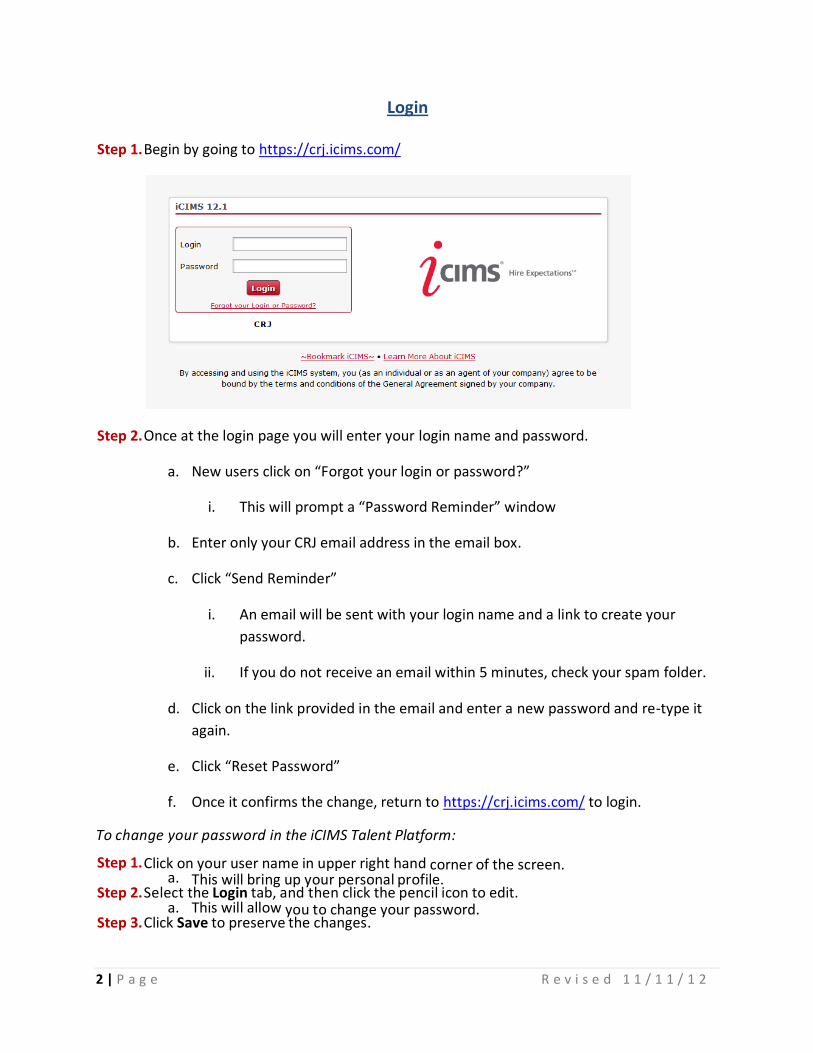
Login Step 1. Begin by going to https://crj.icims.com/
Step 2. Once at the login page you will enter your login name and password.
a. New users click on “Forgot your login or password?”
i. This will prompt a “Password Reminder” window
b. Enter only your CRJ email address in the email box.
c. Click “Send Reminder”
i. An email will be sent with your login name and a link to create your
password.
ii. If you do not receive an email within 5 minutes, check your spam folder.
d. Click on the link provided in the email and enter a new password and re-type it
again.
e. Click “Reset Password”
f. Once it confirms the change, return to https://crj.icims.com/ to login.
To change your password in the iCIMS Talent Platform:
Step 1. Click on your user name in upper right hand corner of the screen. a. This will bring up your personal profile.
Step 2. Select the Login tab, and then click the pencil icon to edit. a. This will allow you to change your password.
Step 3. Click Save to preserve the changes.
3 | P a g e R e v i s e d 1 1 / 1 1 / 1 2
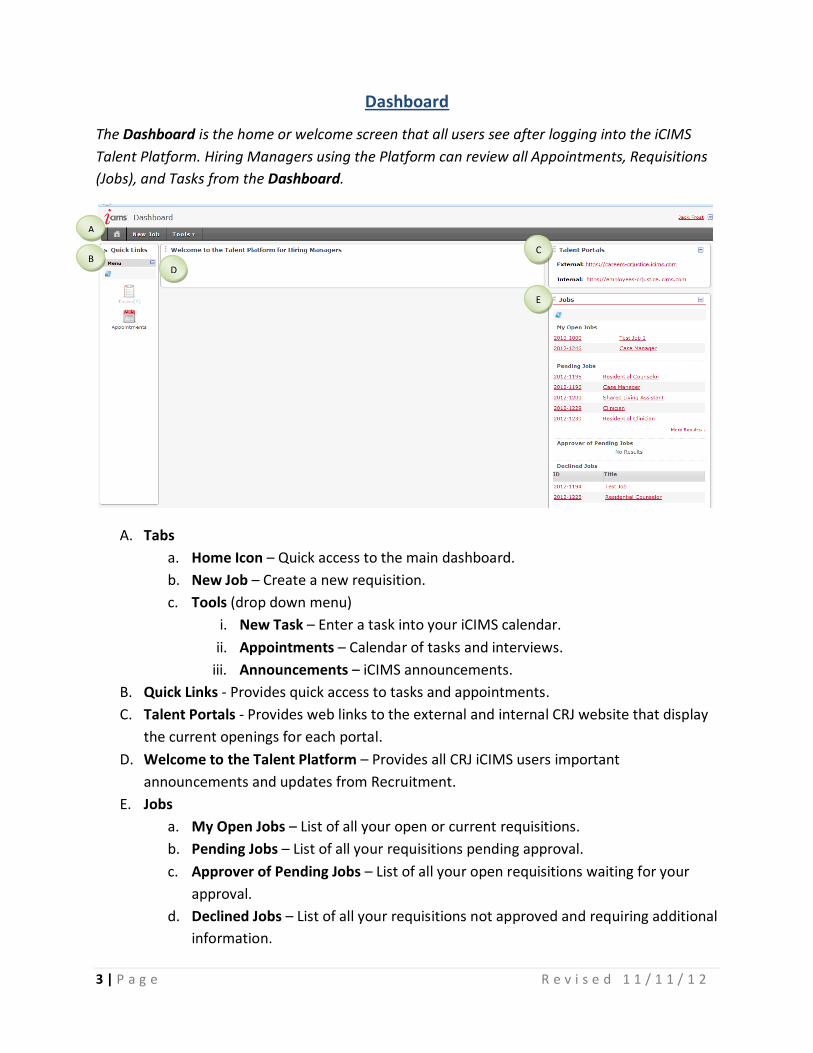
Dashboard
The Dashboard is the home or welcome screen that all users see after logging into the iCIMS
Talent Platform. Hiring Managers using the Platform can review all Appointments, Requisitions
(Jobs), and Tasks from the Dashboard.
A. Tabs
a. Home Icon – Quick access to the main dashboard.
b. New Job – Create a new requisition.
c. Tools (drop down menu)
i. New Task – Enter a task into your iCIMS calendar.
ii. Appointments – Calendar of tasks and interviews.
iii. Announcements – iCIMS announcements.
B. Quick Links - Provides quick access to tasks and appointments.
C. Talent Portals - Provides web links to the external and internal CRJ website that display
the current openings for each portal.
D. Welcome to the Talent Platform – Provides all CRJ iCIMS users important
announcements and updates from Recruitment.
E. Jobs
a. My Open Jobs – List of all your open or current requisitions.
b. Pending Jobs – List of all your requisitions pending approval.
c. Approver of Pending Jobs – List of all your open requisitions waiting for your
approval.
d. Declined Jobs – List of all your requisitions not approved and requiring additional
information.
A
B C
D
E

4 | P a g e R e v i s e d 1 1 / 1 1 / 1 2
Creating a Requisition
When a hiring manager receives notice of a pending vacancy, it is expected that a requisition be created within one to two business days from time of notification or termination. Before creating a requisition, be sure the following have been addressed;
1. Review the job description, competencies, range of pay, and prepare specific criteria for the selection process.
2. Develop critical/qualifying questions for on-line employment application process. 3. Prepare functional and/or behavioral interview questions. 4. Determine involvement of other team members needed for the interview process.
Step 1. Click New Job tab.
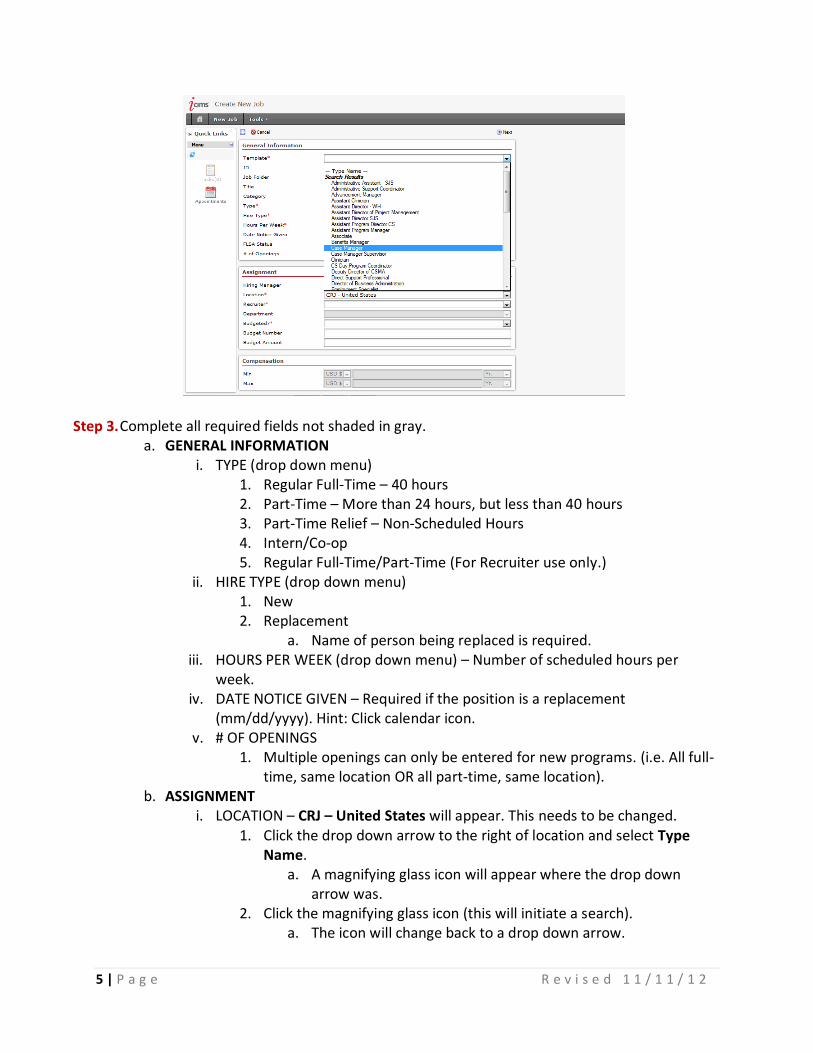
a. Under General Information, to the right of the Template box, click magnifying glass. Then click the arrow to the drop down menu.
b. This is a list of job titles that represent job descriptions that are in the system.
Step 2. Select the appropriate title from the Search Results list. Your selection will pre-populate several gray shaded areas in the requisition.
a. If the job title is not in the Search Results list, you will need to contact the Recruiter to have the job title/description approved by the HR Director. You cannot continue with creating the requisition until this is approved and uploaded into the system.
5 | P a g e R e v i s e d 1 1 / 1 1 / 1 2
Step 3. Complete all required fields not shaded in gray. a. GENERAL INFORMATION
i. TYPE (drop down menu) 1. Regular Full-Time – 40 hours 2. Part-Time – More than 24 hours, but less than 40 hours 3. Part-Time Relief – Non-Scheduled Hours 4. Intern/Co-op 5. Regular Full-Time/Part-Time (For Recruiter use only.)
ii. HIRE TYPE (drop down menu) 1. New 2. Replacement
a. Name of person being replaced is required. iii. HOURS PER WEEK (drop down menu) – Number of scheduled hours per
week. iv. DATE NOTICE GIVEN – Required if the position is a replacement
(mm/dd/yyyy). Hint: Click calendar icon. v. # OF OPENINGS
1. Multiple openings can only be entered for new programs. (i.e. All full-time, same location OR all part-time, same location).
b. ASSIGNMENT i. LOCATION – CRJ – United States will appear. This needs to be changed.
1. Click the drop down arrow to the right of location and select Type Name.
a. A magnifying glass icon will appear where the drop down arrow was.
2. Click the magnifying glass icon (this will initiate a search). a. The icon will change back to a drop down arrow.
6 | P a g e R e v i s e d 1 1 / 1 1 / 1 2
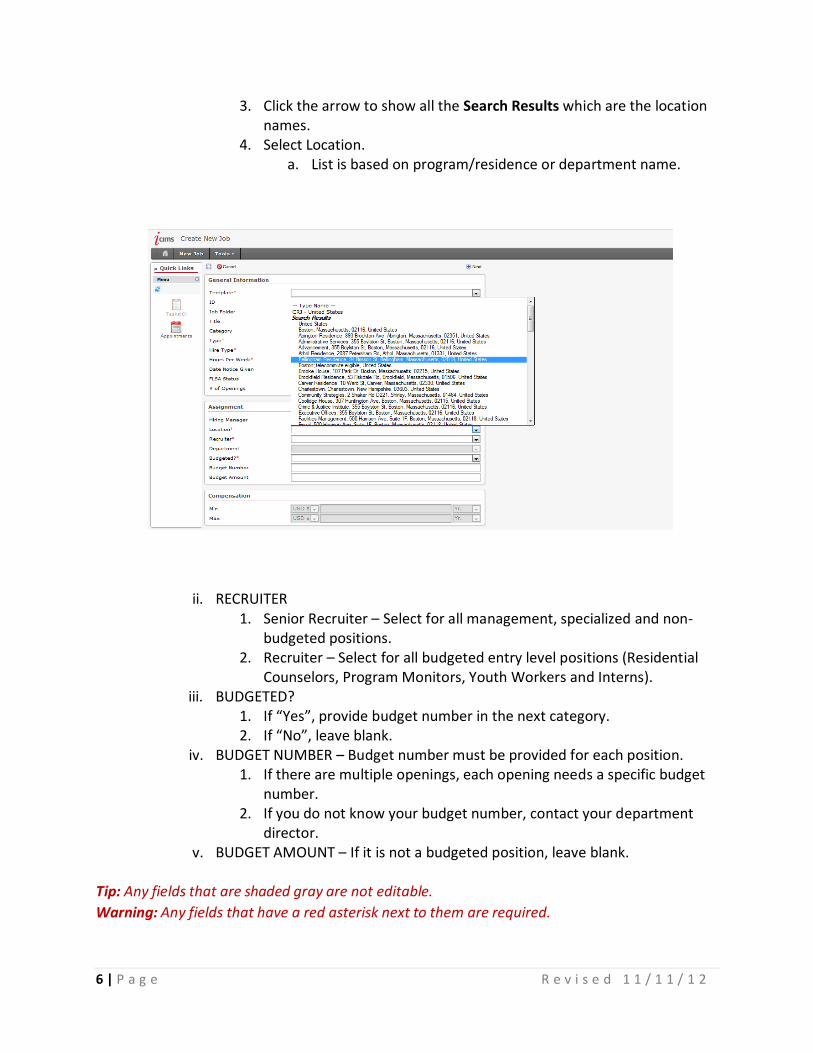
3. Click the arrow to show all the Search Results which are the location names.
4. Select Location. a. List is based on program/residence or department name.
ii. RECRUITER 1. Senior Recruiter – Select for all management, specialized and non-
budgeted positions. 2. Recruiter – Select for all budgeted entry level positions (Residential
Counselors, Program Monitors, Youth Workers and Interns). iii. BUDGETED?
1. If “Yes”, provide budget number in the next category. 2. If “No”, leave blank.
iv. BUDGET NUMBER – Budget number must be provided for each position. 1. If there are multiple openings, each opening needs a specific budget
number. 2. If you do not know your budget number, contact your department
director. v. BUDGET AMOUNT – If it is not a budgeted position, leave blank.
Tip: Any fields that are shaded gray are not editable.
Warning: Any fields that have a red asterisk next to them are required.
7 | P a g e R e v i s e d 1 1 / 1 1 / 1 2
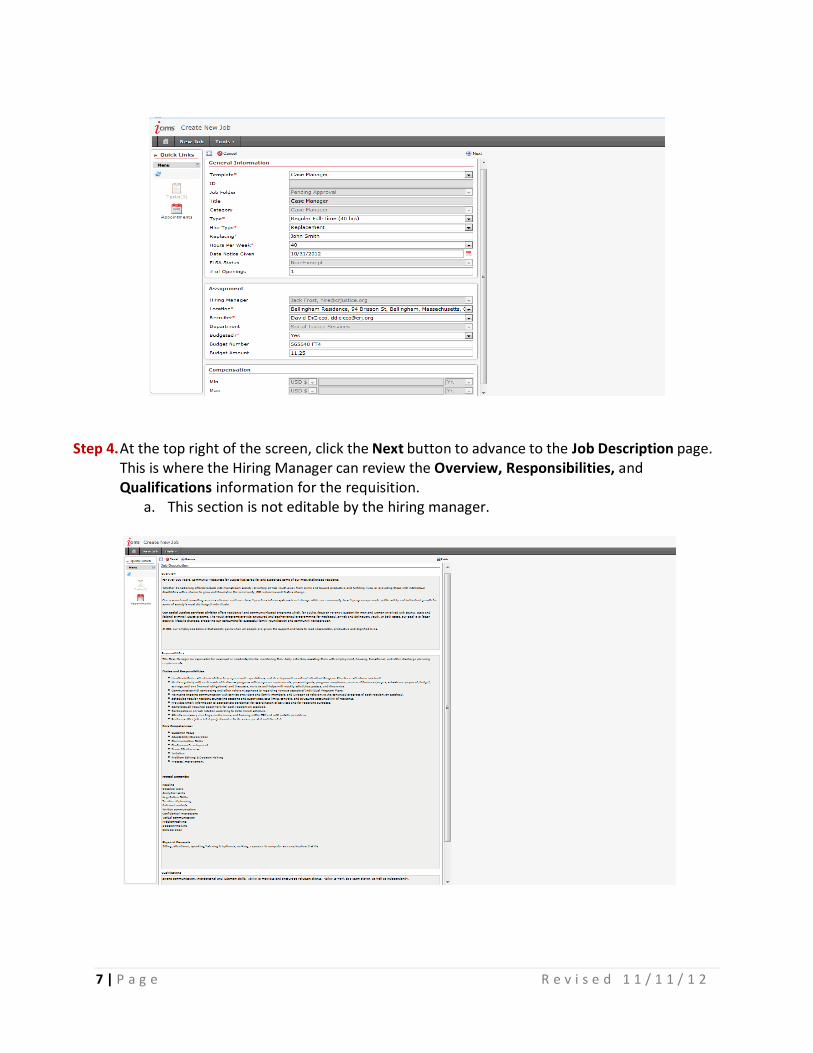
Step 4. At the top right of the screen, click the Next button to advance to the Job Description page.
This is where the Hiring Manager can review the Overview, Responsibilities, and Qualifications information for the requisition.
a. This section is not editable by the hiring manager.
8 | P a g e R e v i s e d 1 1 / 1 1 / 1 2
Step 5. If the job description is correct, click the Finish button to advance to the Approval page. a. If a description needs to be revised or you are not ready to continue, click the Finish
icon at the top right of the job description, then click Save on the Approval page. b. To return to the Job Description page, click on the on requisition in the Pending Jobs
section of the Dashboard. Click on the Job Description tab. If it is correct, click the Finish icon at the top right.
9 | P a g e R e v i s e d 1 1 / 1 1 / 1 2
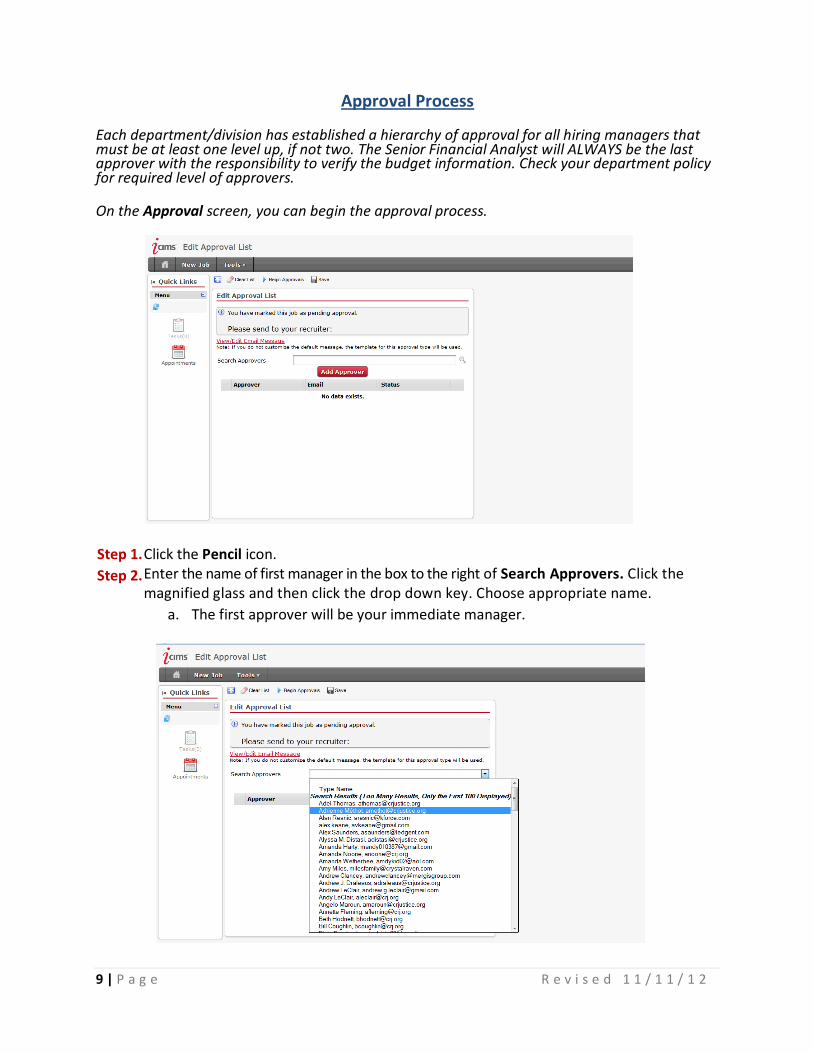
Approval Process Each department/division has established a hierarchy of approval for all hiring managers that must be at least one level up, if not two. The Senior Financial Analyst will ALWAYS be the last approver with the responsibility to verify the budget information. Check your department policy for required level of approvers. On the Approval screen, you can begin the approval process.
Step 1. Click the Pencil icon.
Step 2. Enter the name of first manager in the box to the right of Search Approvers. Click the magnified glass and then click the drop down key. Choose appropriate name.
a. The first approver will be your immediate manager.
10 | P a g e R e v i s e d 1 1 / 1 1 / 1 2
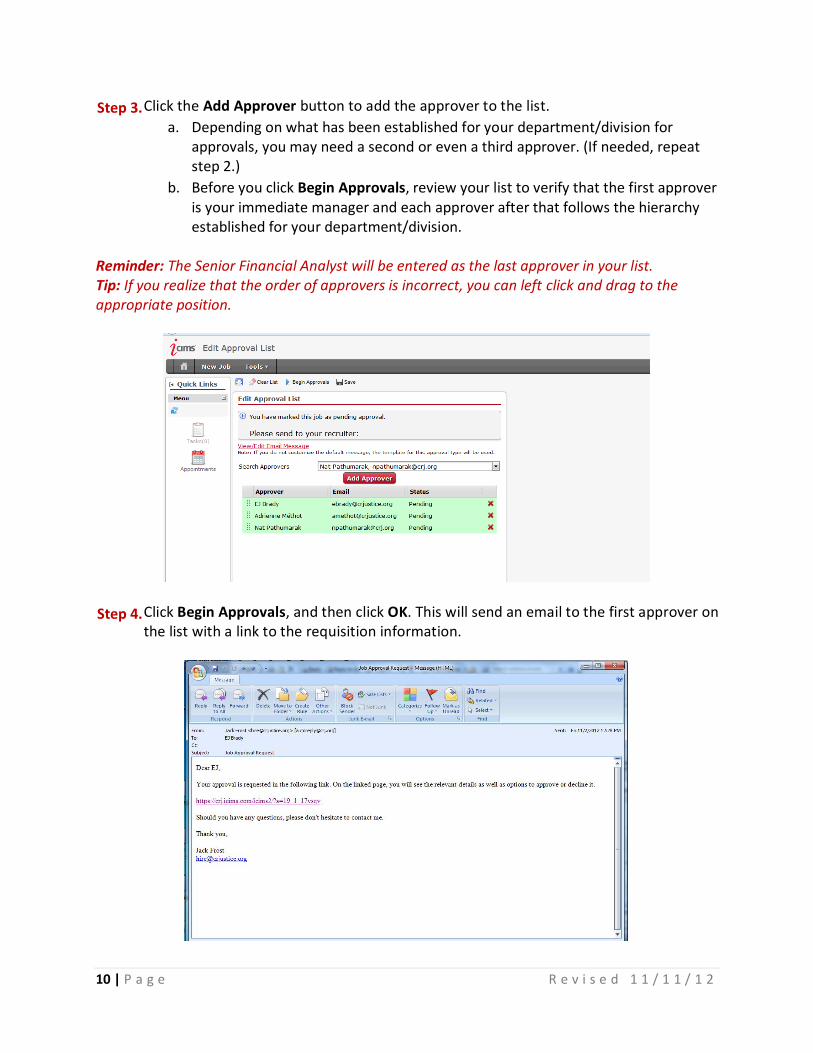
Step 3. Click the Add Approver button to add the approver to the list. a. Depending on what has been established for your department/division for
approvals, you may need a second or even a third approver. (If needed, repeat step 2.)
b. Before you click Begin Approvals, review your list to verify that the first approver is your immediate manager and each approver after that follows the hierarchy established for your department/division.
Reminder: The Senior Financial Analyst will be entered as the last approver in your list. Tip: If you realize that the order of approvers is incorrect, you can left click and drag to the appropriate position.
Step 4. Click Begin Approvals, and then click OK. This will send an email to the first approver on the list with a link to the requisition information.
11 | P a g e R e v i s e d 1 1 / 1 1 / 1 2
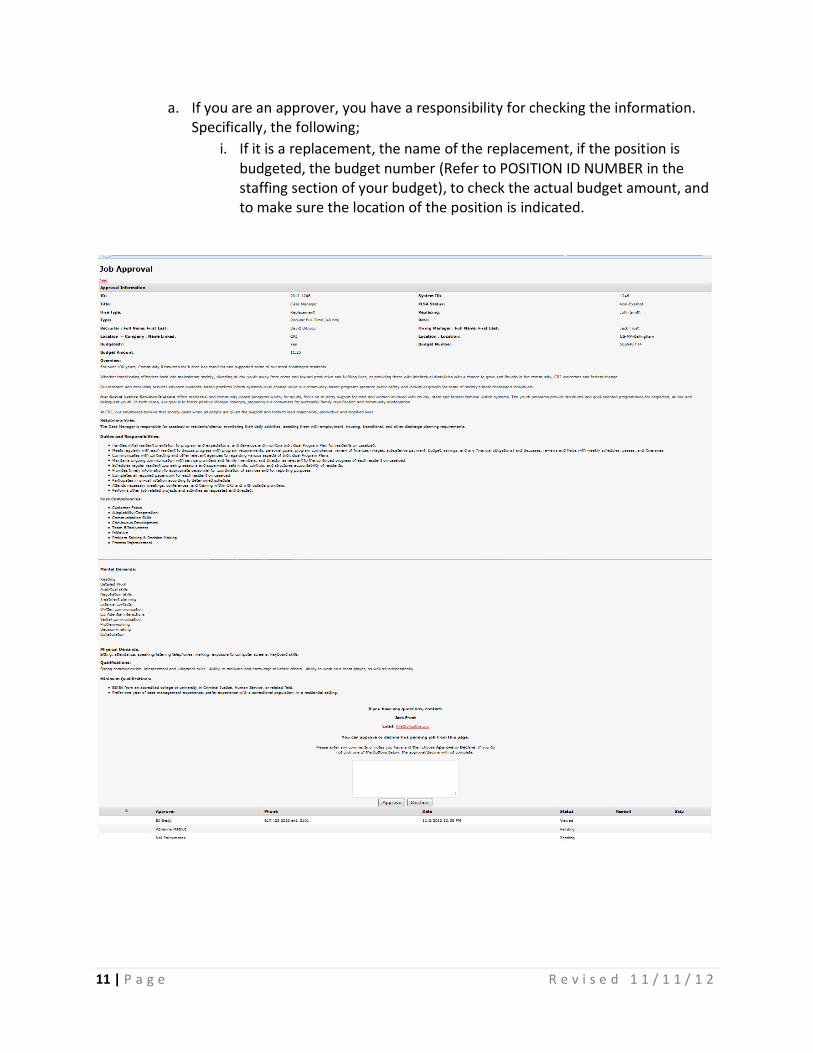
a. If you are an approver, you have a responsibility for checking the information. Specifically, the following;
i. If it is a replacement, the name of the replacement, if the position is budgeted, the budget number (Refer to POSITION ID NUMBER in the staffing section of your budget), to check the actual budget amount, and to make sure the location of the position is indicated.

12 | P a g e R e v i s e d 1 1 / 1 1 / 1 2
b. If an approver declines the requisition, an email is sent to the hiring manager and the recruiter.
13 | P a g e R e v i s e d 1 1 / 1 1 / 1 2
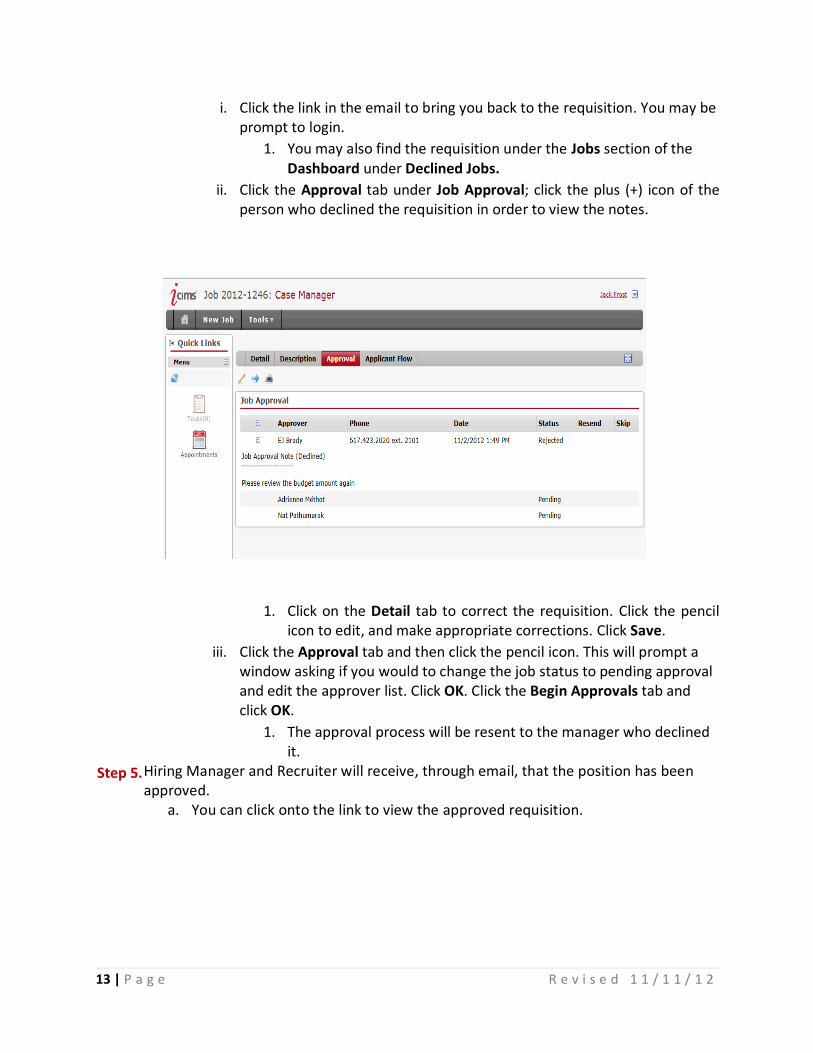
i. Click the link in the email to bring you back to the requisition. You may be prompt to login.
1. You may also find the requisition under the Jobs section of the Dashboard under Declined Jobs.
ii. Click the Approval tab under Job Approval; click the plus (+) icon of the person who declined the requisition in order to view the notes.
1. Click on the Detail tab to correct the requisition. Click the pencil icon to edit, and make appropriate corrections. Click Save.
iii. Click the Approval tab and then click the pencil icon. This will prompt a window asking if you would to change the job status to pending approval and edit the approver list. Click OK. Click the Begin Approvals tab and click OK.
1. The approval process will be resent to the manager who declined it.
Step 5. Hiring Manager and Recruiter will receive, through email, that the position has been approved.
a. You can click onto the link to view the approved requisition.
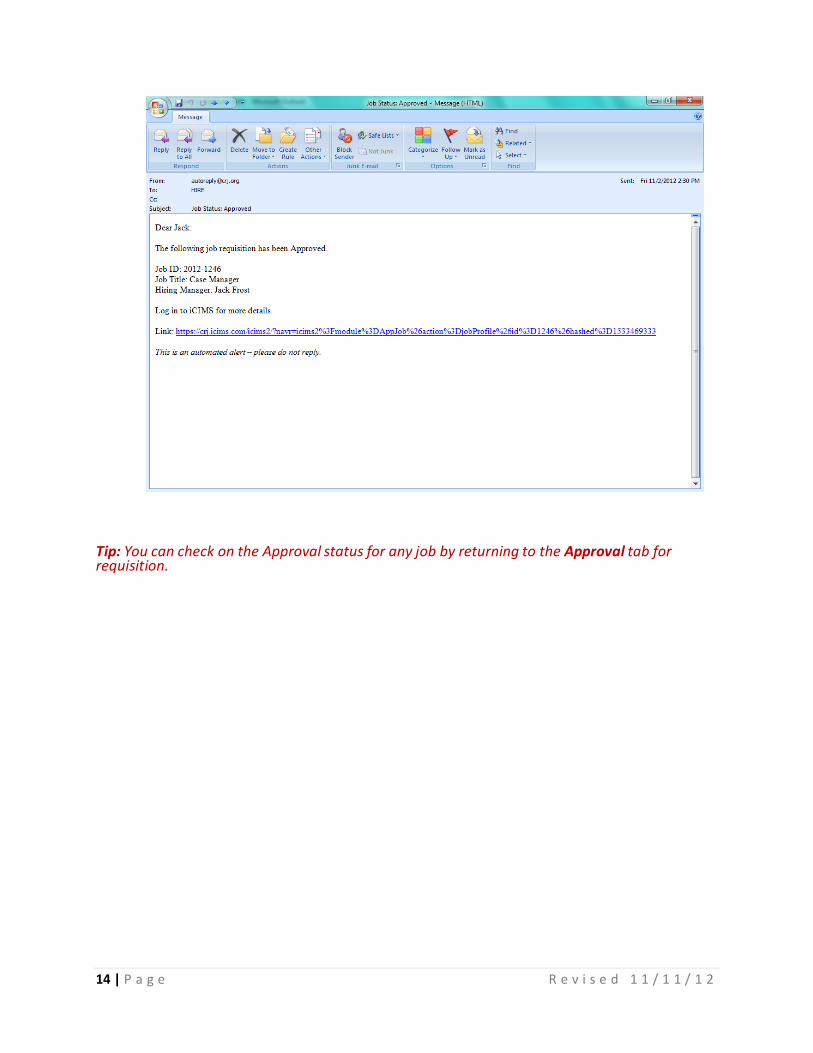
14 | P a g e R e v i s e d 1 1 / 1 1 / 1 2
Tip: You can check on the Approval status for any job by returning to the Approval tab for requisition.
15 | P a g e R e v i s e d 1 1 / 1 1 / 1 2
Postings Once the Recruiter receives the approved notification the job will automatically be posted to the following;
o Internally to the CRJ website o Externally to the CRJ website career section after the 3 day internal posting o A number of diverse job boards. See Appendix B for Sourcing List
Note: Notify the Recruiter if there are any other places you wish to post.
Application Process
Employment Application
Applicants complete on-line CRJ Application for Employment form - http://crj.org/hr_recruit/ - no hard copy applications accepted
Resumes are required of applicants for all supervisory/manager and specialized positions.
Employment applications for those not hired are retained for possible future sourcing.
Equal Employment Opportunity (EEO)
CRJ offers the applicant the option to complete the Equal Employment Opportunity information (EEO) as part of the Employment Application.
Internal CRJ Applicants
Employees interested in applying for an open position must complete the on-line
internal application through the career section of the staff website and include a current
resume if this is a management or specialized position.
16 | P a g e R e v i s e d 1 1 / 1 1 / 1 2
Managing Your Requisitions
Applicant Flow tab will allow you to review and move applicants to various statuses in the hiring process.
See Appendix C for Applicant Flow Statuses and Dispositions See Appendix D for Definitions of Statuses
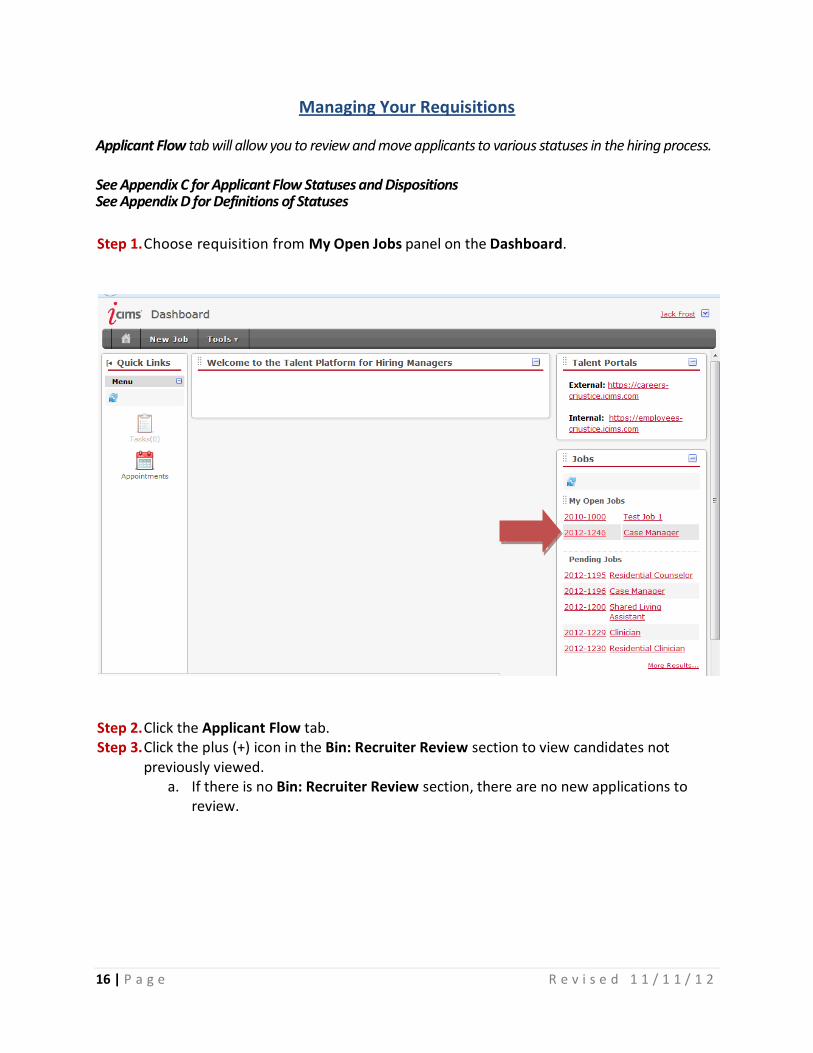
Step 1. Choose requisition from My Open Jobs panel on the Dashboard.
Step 2. Click the Applicant Flow tab. Step 3. Click the plus (+) icon in the Bin: Recruiter Review section to view candidates not
previously viewed. a. If there is no Bin: Recruiter Review section, there are no new applications to
review.
17 | P a g e R e v i s e d 1 1 / 1 1 / 1 2
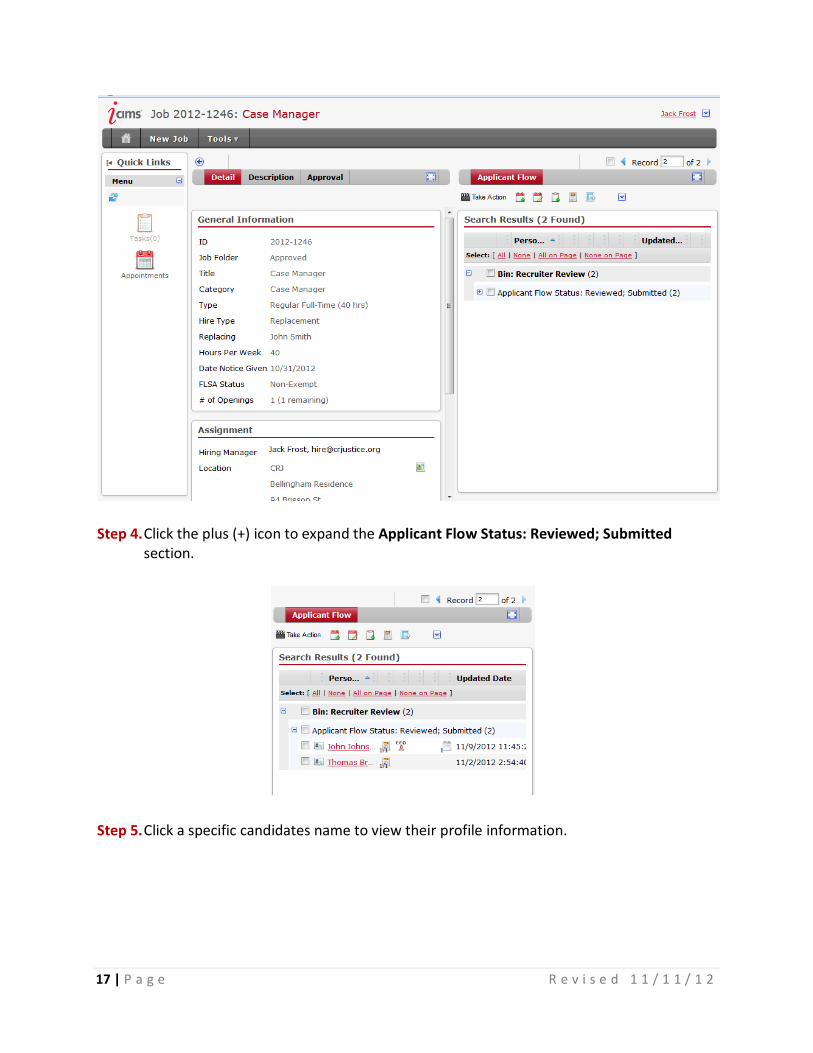
Step 4. Click the plus (+) icon to expand the Applicant Flow Status: Reviewed; Submitted section.
Step 5. Click a specific candidates name to view their profile information.
18 | P a g e R e v i s e d 1 1 / 1 1 / 1 2
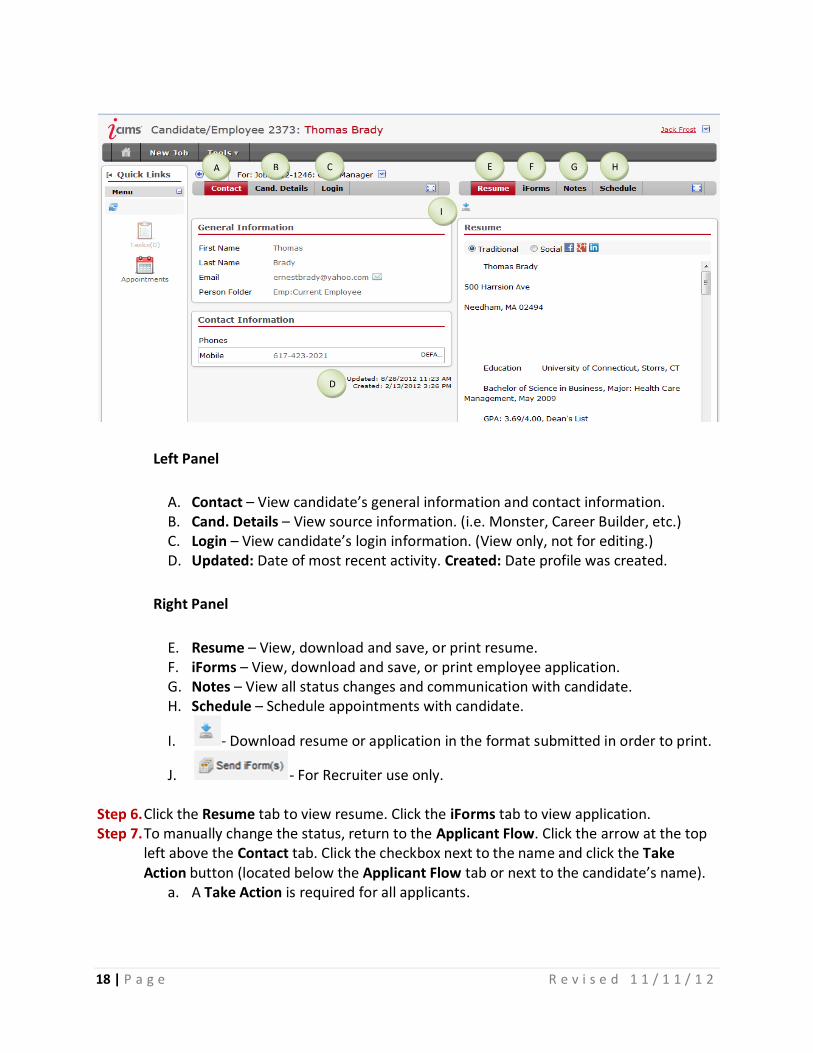
Left Panel
A. Contact – View candidate’s general information and contact information. B. Cand. Details – View source information. (i.e. Monster, Career Builder, etc.) C. Login – View candidate’s login information. (View only, not for editing.) D. Updated: Date of most recent activity. Created: Date profile was created.
Right Panel
E. Resume – View, download and save, or print resume. F. iForms – View, download and save, or print employee application. G. Notes – View all status changes and communication with candidate. H. Schedule – Schedule appointments with candidate.
I. - Download resume or application in the format submitted in order to print.
J. - For Recruiter use only.
Step 6. Click the Resume tab to view resume. Click the iForms tab to view application. Step 7. To manually change the status, return to the Applicant Flow. Click the arrow at the top
left above the Contact tab. Click the checkbox next to the name and click the Take Action button (located below the Applicant Flow tab or next to the candidate’s name).
a. A Take Action is required for all applicants.
A B C
D
E F G H
I

19 | P a g e R e v i s e d 1 1 / 1 1 / 1 2
Step 8. In the Edit Profiles window, select the appropriate applicant flow status and then click the Save button.
a. A window will launch that will require you to enter a Disposition for each candidate moved to the following status options using Hiring Manager Review:
i. Reviewed; Not Selected ii. Phone Screened; Not Selected
iii. Interviewed; Not Selected b. Click Save.
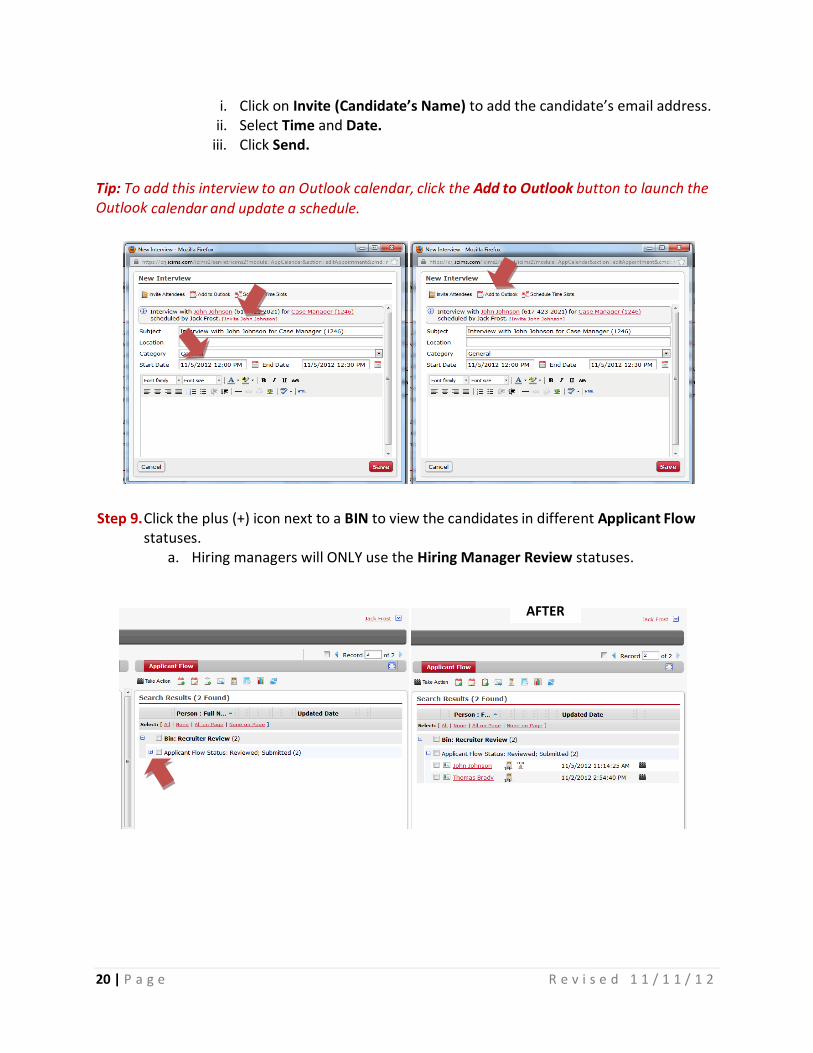
b. For candidates moved to the Hiring Manager Review: Interview Scheduled, the Communications Center will launch to allow you to create the interview appointment and email the confirmation to the candidate.
20 | P a g e R e v i s e d 1 1 / 1 1 / 1 2
i. Click on Invite (Candidate’s Name) to add the candidate’s email address. ii. Select Time and Date.
iii. Click Send.
Tip: To add this interview to an Outlook calendar, click the Add to Outlook button to launch the Outlook calendar and update a schedule.
Step 9. Click the plus (+) icon next to a BIN to view the candidates in different Applicant Flow statuses.
a. Hiring managers will ONLY use the Hiring Manager Review statuses.
AFTER
21 | P a g e R e v i s e d 1 1 / 1 1 / 1 2
Screening Procedure
The following activities are necessary in the pre-screening process:
1. Review applications/resumes in the Bin: Recruiter Review; Reviewed; Submitted and determine candidate list for phone screening process.
o Candidates will be moved to the following status options Bin: Hiring Manager Review;
Reviewed; Selected – Manager interested in candidate, but not ready to proceed.
Reviewed; Not Selected – Candidate profile was reviewed and not selected.
Selected for Phone Screening – Candidate was selected and scheduled for a phone screen.
2. Conduct initial phone screens. o Start by calling the candidate. If they answer, ask if this is a good time to speak. If
yes, proceed with the phone screen or set up a time to call back. If they do not answer, leave a voicemail and send a follow up email. If there is no response after 3 days, focus on other candidates.
3. Review initial phone screen results, determine candidate list and schedule interviews o Candidates will be moved to the following status options Bin: Hiring Manager
Review;
Phone Screened; Not Selected – Candidate was phone screened and not selected.
Interview Scheduled – Candidate selected for in-person interview. 4. Conduct interviews
o Provide Job Description & Benefits Summary and review with candidates o Conduct any pre-employment written testing – requires HR Dept. approval for
appropriate validation o Candidate completes appropriate paperwork for background checks and
required ID, employment and education verification forms, list of references 5. Review candidate information to determine final candidate list – application, resume,
interview notes, etc. A second round of interviews may be required/applicable for some positions before moving to next steps - HR Director or HR Designee is involved in any final interviews for management and specialized positions for both external and internal applicants.
o Candidates will be moved to the following status options Bin: Hiring Manager Review;
Interview Scheduled – Candidate selected for a second in-person interview. (Leave candidate in this status if a second interview is required.)
Interviewed; Not Selected – Candidate interviewed and not selected. o For the 2 to 3 final candidates, candidates will be moved to the following status
Bin: Hiring Manager Review;
Background/Reference Check Initiated – Process the paperwork that was received after the interview for final candidate(s).
22 | P a g e R e v i s e d 1 1 / 1 1 / 1 2
Selection Procedure
1. Initiate the following to assist in making your decision on the final candidate o Assessment Tool – Predictive Index (PI) – The PI is a scientifically based personality
assessment tool that offers insight into the behavior of employees and candidates.
PI is required for specialized and management positions for external and internal applicants.
PI is initiated and administered by the HR/Recruiter through email to the final candidates.
o Candidate – completes and submits on-line o HR receives automated results within 5 to 10 minutes o Interpretation of the Data – HR/Recruiter contacts the Hiring
Manager with the results
Schedules a debrief of the final candidates’ report(s) o References – Reference checks provide valuable information about a candidate’s
background that is not evident in a resume or interview. Hiring Managers will gain the perspective of past employers by asking probing questions about a candidate’s background/behavior. It's the hesitation or the enthusiasm of the respondent that's critical. See Appendix E and F for Reference Forms
Hiring Manager will conduct and document all references.
At least two of the references should be current or previous supervisor/managers of the candidate for management and specialized positions. This information is compared against the application. Recent graduates or individuals new to employment may provide professional references using professors, teachers, job counselor, etc.
For any entry level positions at least one current or past supervisor is needed as part of the three references.
o Review all candidates’ information
The information gathered from the references, the interview notes, and the PI (if applicable) for each candidate should be compared to the job requirements and other candidate’s results to determine a final candidate.
o Determine Final Candidate – continue process on the final candidate.
It is “Best Practice” to hold off on notifying final candidates that the position has been filled until after an offer is signed and returned.

23 | P a g e R e v i s e d 1 1 / 1 1 / 1 2
Background Checks
o Initiate one or more of the following based on your programs/departments requirements. Whichever forms are needed and initiated, you need to provide a scanned and emailed copy to HR at [email protected] or fax a copy of the forms to 617-423-2268.
Pre-employment drug testing: This requirement is specific to McGrath and Brooke Houses (Social Justice Services) and conducted at the time or at the final interview.
NCIC Checks: For those sites with Federal Bureau of Prisons (FBOP) contracts, the NCIC request form must be submitted to FBOP and returned as cleared.
Board of Probation (BOP) Checks: For those sites with MA Department of Corrections (DOC) contracts, the BOP request form must be submitted to DOC and returned as cleared.
Department of Early Education and Care (DEEC) Check: For those sites licensed by DEEC, a DEEC form must be completed and cleared.
CORI Check: Required MA hires- Based on current MA regulation, the CORI check can only be conducted for the target candidate.
State of Connecticut Department of Public Safety: For those CS sites in Connecticut a Criminal History Record form must be completed and cleared.
DDS Abuse and Neglect Registry Check: For those CS sites in Connecticut an Abuse and Neglect Registry Check form must be completed and cleared.
Driver’s Check: If a potential employee is required to transport residents in their vehicle or in a CRJ vehicle, they are required to have a driver’s check.
Department of Health and Human Services: For those CS sites in New Hampshire, a BEAS State Registry Consent form must be completed and cleared.
New Hampshire Department of Safety - Division of State Police: For those CS sites in New Hampshire, a Criminal History Record Information Authorization form must be completed and cleared.
o Verification of Employment, Residence and Education: HR Department
Process requires documenting 10 year residence and employment history
HR reviews this information against application for any significant discrepancies
Results of verifications and comparison are discussed with Hiring Manager
Note: The above must be completed and/or verified before a verbal or written offer can be
given.
24 | P a g e R e v i s e d 1 1 / 1 1 / 1 2
o Once all background results are reviewed and cleared, HR/Recruiter will notify Hiring Manager with consent to make a verbal offer.
o Complete the Offer Letter Template and email it to HR at: [email protected]. See Appendix G for Offer Letter Template
The email must include: 1. 3 references 2. Background check results (if applicable) 3. Drug test results (if applicable)
For selected candidates, they will be moved to the following status option Bin: Hiring Manager Review;
Offer Requested – Offer Letter Template sent to [email protected]
For candidates not selected, they will be moved to the following status Bin: Hiring Manager Review;
Background/Reference Check; Not Selected – Final candidate(s) not selected after background/reference check completed.
Note: Offer Letter Templates for new hires received after 12pm on Wednesday will NOT be scheduled for orientation or first day of work for the upcoming Monday, but will be scheduled for the following orientation as their first day of work.
25 | P a g e R e v i s e d 1 1 / 1 1 / 1 2
Job Offer Procedure
1. Hiring Manager discusses with the Recruiter the decision by reviewing the final candidates Offer Letter Template and finalizes offer.
2. Verbal offer is made by the Hiring Manager or Recruiter communicating to the candidate that the HR department will be sending a written offer by email.
o Candidates will be moved to the following status option Bin: Hiring Manager Review;
Verbal Offer Extended by HR/MGR – Candidate extended offer by phone.
3. Written offer with benefits summary is sent by HR/Recruiter to the candidate with a “cc” to the Hiring Manager and Sr. Recruiter. Instructions to electronically accept or decline the offer are included.
o HR/Recruiter will move candidate to the following status option Bin: Offer
Written Offer Extended by HR – Official offer letter email sent to candidate. o It is “Best Practice” to allow a candidate at least 2 days to consider an offer.
4. Candidate will “Reply to All” (HR/Recruiter and Hiring Manager) with their decision.
o HR/Recruiter will move candidate to the following status options Bin: Offer
Written Offer Accepted – Candidate accepted offer by returning signed offer letter.
Offer Declined/Rejected – Candidate declined/rejected offer. o Upon electronic acceptance, HR/Recruiter will reply with new hire orientation
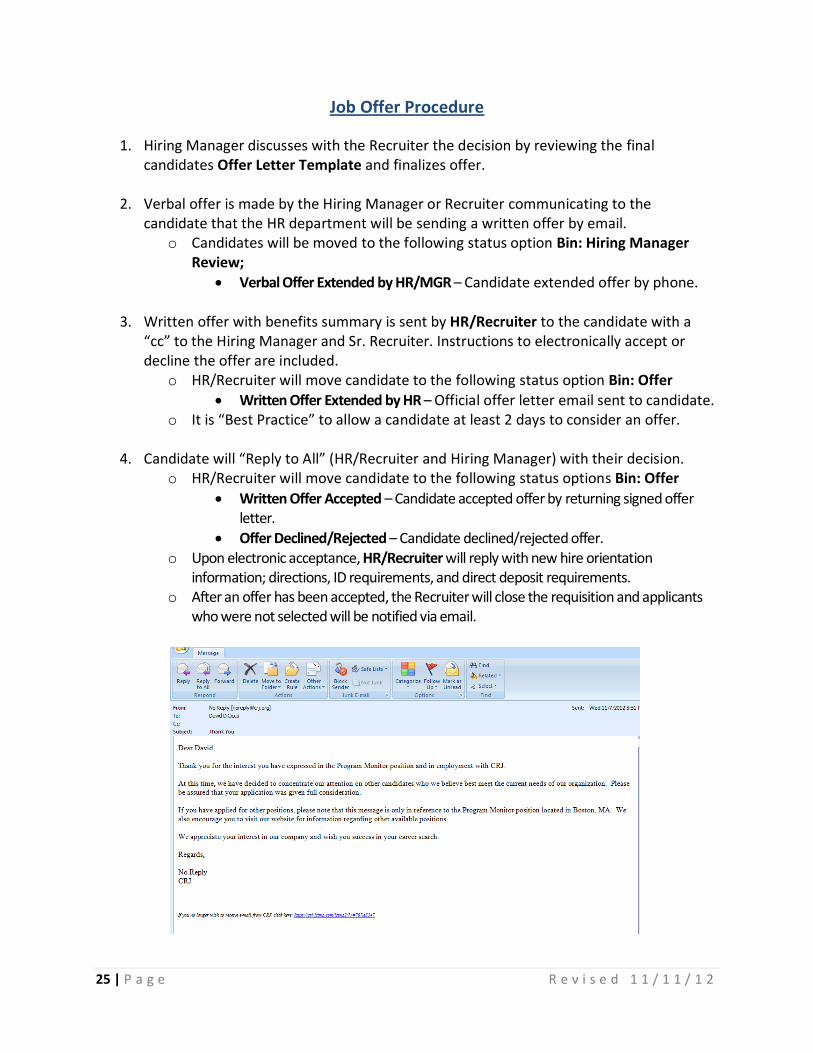
information; directions, ID requirements, and direct deposit requirements. o After an offer has been accepted, the Recruiter will close the requisition and applicants
who were not selected will be notified via email.
26 | P a g e R e v i s e d 1 1 / 1 1 / 1 2
5. New Hire attends NEO/first day of work.
o HR/Recruiter will move candidate to the following status option Bin: Hired
Hired – Candidate attended NEO or first day of employment. o No candidate starts employment before attending NEO without consent of HR
Director.
APPENDIX
A | P a g e R e v i s e d 1 1 / 1 0 / 1 2
B | P a g e R e v i s e d 1 1 / 1 1 / 1 2
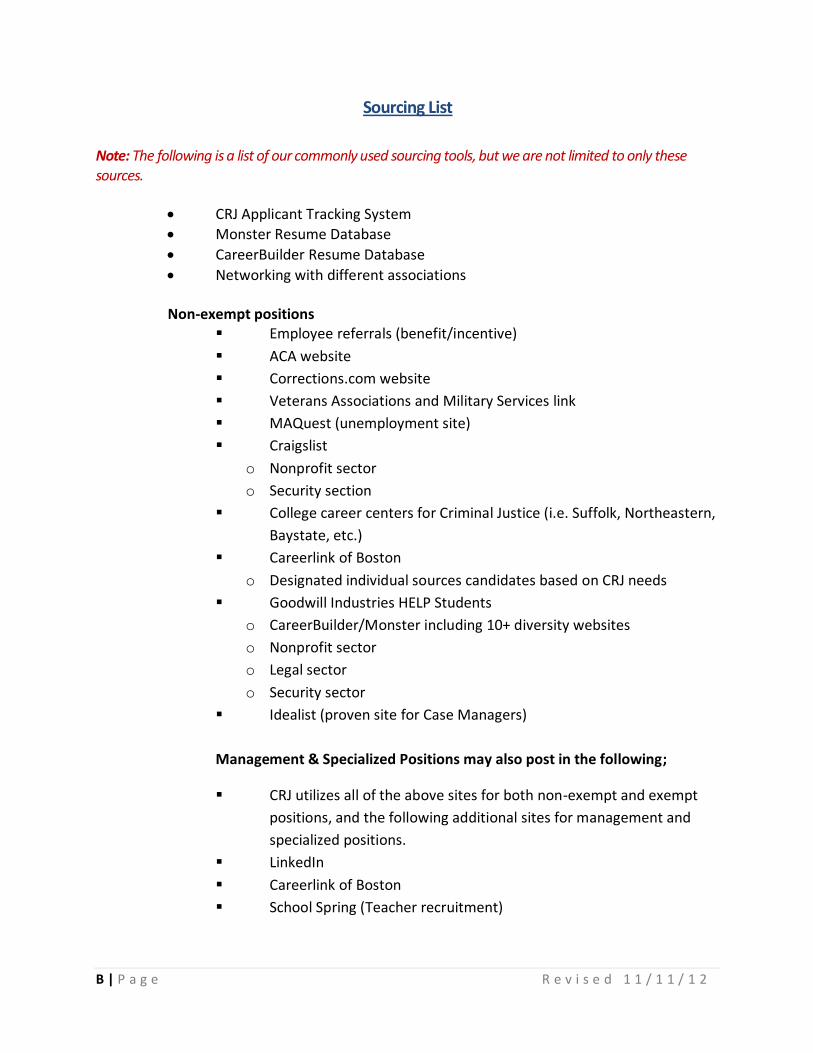
Sourcing List
Note: The following is a list of our commonly used sourcing tools, but we are not limited to only these sources.
CRJ Applicant Tracking System
Monster Resume Database
CareerBuilder Resume Database
Networking with different associations Non-exempt positions
Employee referrals (benefit/incentive)
ACA website
Corrections.com website
Veterans Associations and Military Services link
MAQuest (unemployment site)
Craigslist
o Nonprofit sector
o Security section
College career centers for Criminal Justice (i.e. Suffolk, Northeastern,
Baystate, etc.)
Careerlink of Boston
o Designated individual sources candidates based on CRJ needs
Goodwill Industries HELP Students
o CareerBuilder/Monster including 10+ diversity websites
o Nonprofit sector
o Legal sector
o Security sector
Idealist (proven site for Case Managers)
Management & Specialized Positions may also post in the following;
CRJ utilizes all of the above sites for both non-exempt and exempt
positions, and the following additional sites for management and
specialized positions.
Careerlink of Boston
School Spring (Teacher recruitment)
C | P a g e R e v i s e d 1 1 / 1 1 / 1 2
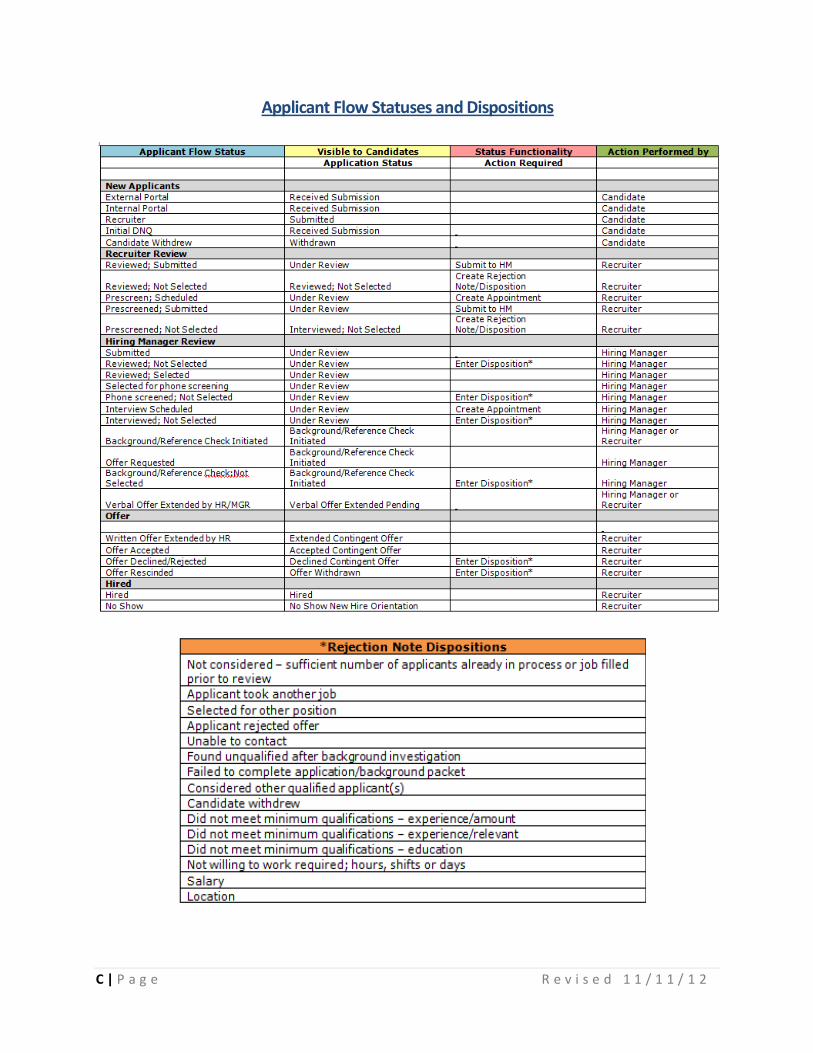
Applicant Flow Statuses and Dispositions
D | P a g e R e v i s e d 1 1 / 1 1 / 1 2
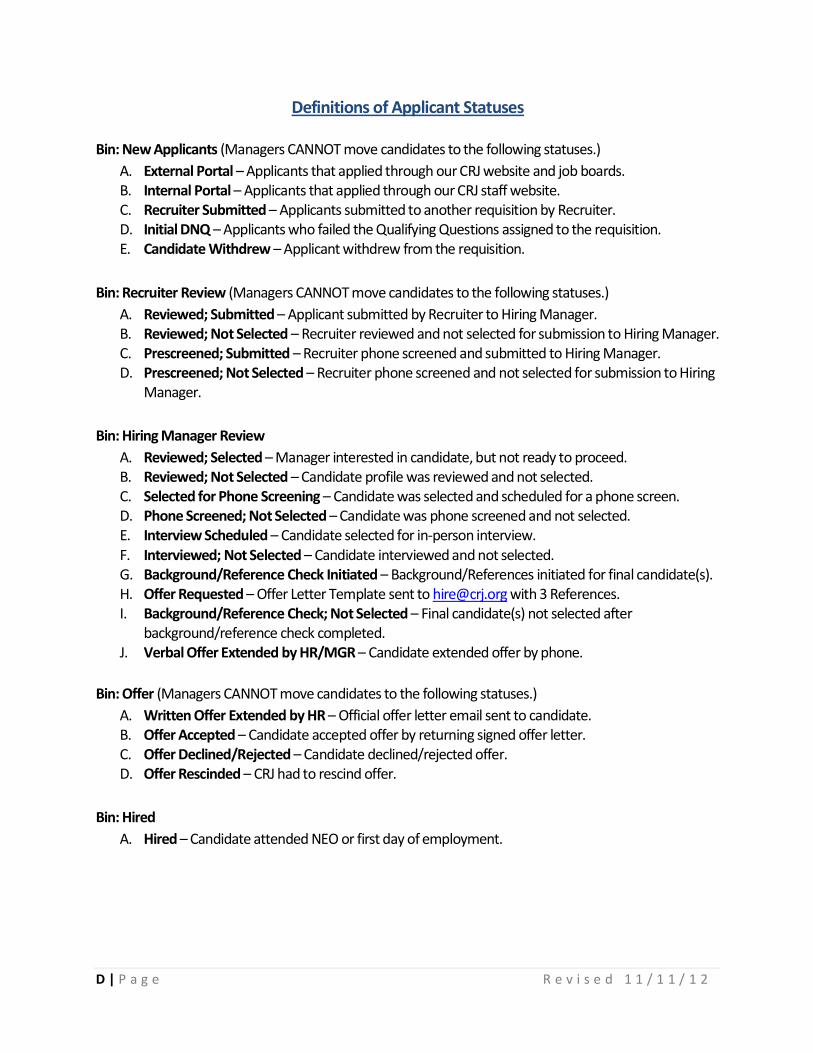
Definitions of Applicant Statuses
Bin: New Applicants (Managers CANNOT move candidates to the following statuses.)
A. External Portal – Applicants that applied through our CRJ website and job boards. B. Internal Portal – Applicants that applied through our CRJ staff website. C. Recruiter Submitted – Applicants submitted to another requisition by Recruiter. D. Initial DNQ – Applicants who failed the Qualifying Questions assigned to the requisition. E. Candidate Withdrew – Applicant withdrew from the requisition.
Bin: Recruiter Review (Managers CANNOT move candidates to the following statuses.)
A. Reviewed; Submitted – Applicant submitted by Recruiter to Hiring Manager. B. Reviewed; Not Selected – Recruiter reviewed and not selected for submission to Hiring Manager. C. Prescreened; Submitted – Recruiter phone screened and submitted to Hiring Manager. D. Prescreened; Not Selected – Recruiter phone screened and not selected for submission to Hiring
Manager.
Bin: Hiring Manager Review
A. Reviewed; Selected – Manager interested in candidate, but not ready to proceed. B. Reviewed; Not Selected – Candidate profile was reviewed and not selected. C. Selected for Phone Screening – Candidate was selected and scheduled for a phone screen. D. Phone Screened; Not Selected – Candidate was phone screened and not selected. E. Interview Scheduled – Candidate selected for in-person interview. F. Interviewed; Not Selected – Candidate interviewed and not selected. G. Background/Reference Check Initiated – Background/References initiated for final candidate(s). H. Offer Requested – Offer Letter Template sent to [email protected] with 3 References. I. Background/Reference Check; Not Selected – Final candidate(s) not selected after
background/reference check completed. J. Verbal Offer Extended by HR/MGR – Candidate extended offer by phone.
Bin: Offer (Managers CANNOT move candidates to the following statuses.)
A. Written Offer Extended by HR – Official offer letter email sent to candidate. B. Offer Accepted – Candidate accepted offer by returning signed offer letter. C. Offer Declined/Rejected – Candidate declined/rejected offer. D. Offer Rescinded – CRJ had to rescind offer.
Bin: Hired
A. Hired – Candidate attended NEO or first day of employment.
E | P a g e R e v i s e d 1 1 / 1 1 / 1 2
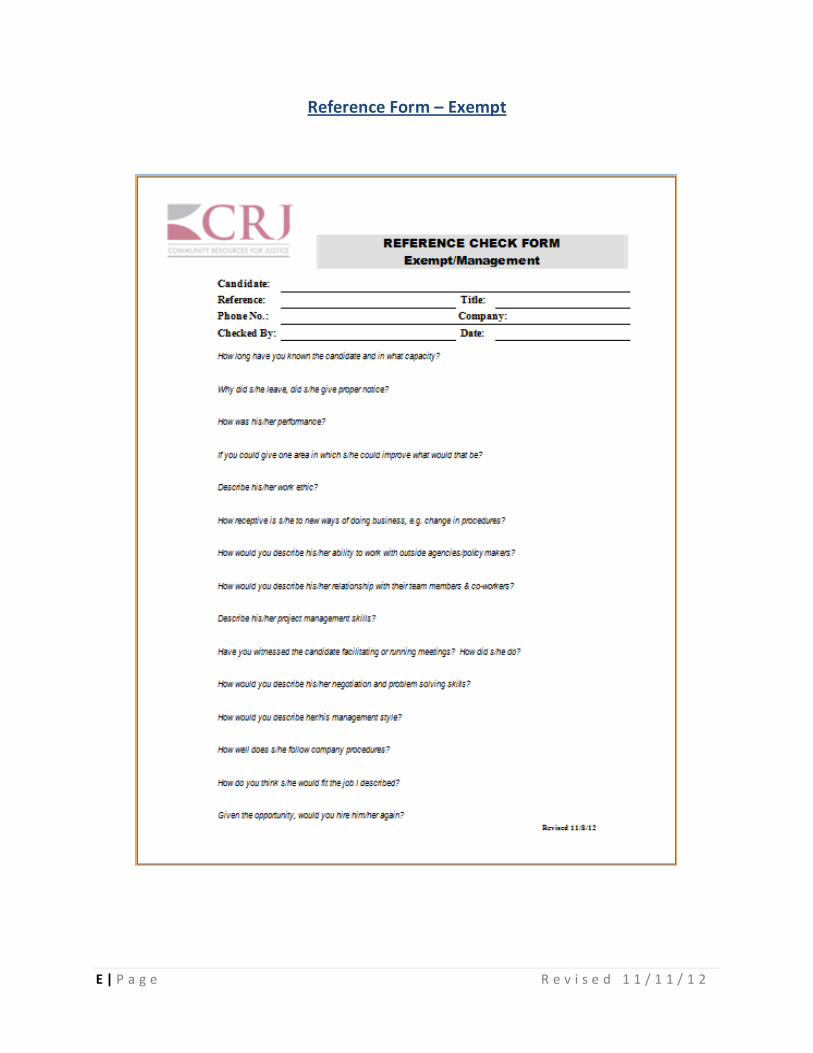
Reference Form – Exempt

F | P a g e R e v i s e d 1 1 / 1 1 / 1 2
Reference Form – Non-Exempt

G | P a g e R e v i s e d 1 1 / 1 1 / 1 2
Offer Letter Template
Note: The Offer Letter Template is located in the HR section of the staff website.


