Embed Size (px)
DESCRIPTION
OUM's notes
Citation preview

� INTRODUCTION
In the previous topic, we have discussed the perimeter and area of two-dimensional shapes. In this topic, we shall deal with surface areas and volumes of three-dimensional objects, especially cubes and cuboids. Before you proceed, make sure that your students have already mastered the concepts of area and perimeter. They must be proficient in operational skills that combine +, �, � and �.
TTooppiicc
1100
� Solid Geometry
LEARNING OUTCOMES
By the end of this topic, you should be able to:
1. Identify common geometric solids;
2. State the properties of cubes and cuboids;
3. Construct models of cubes and cuboids;
4. Draw layouts or nets of cubes and cuboids;
5. Explain the concept of surface area of cubes and cuboids;
6. Explain the concept of volume of cubes and cuboids;
7. Solve problems related to surface area and volume of cubes andcuboids.

TOPIC 10 SOLID GEOMETRY �
421
Teaching Sample Activity 10.1: Induction set.
To motivate the students, we can start the lesson by asking them about the famous structures or buildings that they are familiar with.
Figure 10.1
Source: flashydubai.com
Figure 10.2
Source: infoplease.com
The „Burj Khalifa‰ (Figure 10.1) which is located in Dubai, United Arab Emirates (Figure 10.2), rises over 800m and is the tallest building constructed in the world.
In Malaysia, the Petronas Twin Towers (Figure 10.3) in Kuala Lumpur stands at 452m. Ask the students if they have visited the towers.
Figure 10.3
Source: upload.wikimedia.org

� TOPIC 10 SOLID GEOMETRY 422
Meanwhile, some of the students may be familiar with the „Kaabah‰ (Figure 10.4). It is located in Mecca, Saudi Arabia (Figure 10.5). This is the location where Muslims around the world congregate to perform their „haj‰. It was built thousands of years ago and has been rebuilt several times since then.
Figure 10.4 Source: photobucket.com
Figure 10.5
Source: www.lib.utexas.edu
Below is another famous structure. It is called a „pyramid‰ (Figure 10.6) and it is located in Egypt (Figure 10.7). It was also built thousands of years ago by the ancient Egyptians.
Figure 10.6
Source: www.guardians.net
Figure 10.7
Source: www.lib.utexas.edu
These buildings or structures, are made up of basic shapes which are called geometric solids. Geometric solids help us explore the three-dimensional space that we live in.
TOPIC 10 SOLID GEOMETRY �
423
GEOMETRIC SOLIDS
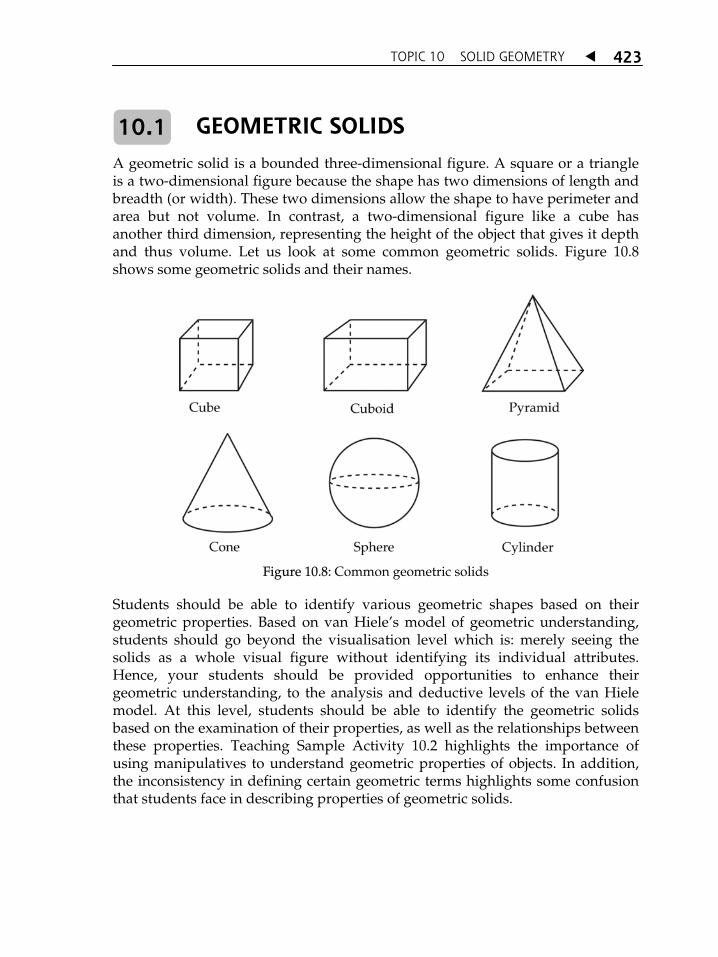
A geometric solid is a bounded three-dimensional figure. A square or a triangle is a two-dimensional figure because the shape has two dimensions of length and breadth (or width). These two dimensions allow the shape to have perimeter and area but not volume. In contrast, a two-dimensional figure like a cube has another third dimension, representing the height of the object that gives it depth and thus volume. Let us look at some common geometric solids. Figure 10.8 shows some geometric solids and their names.
Figure 10.8: Common geometric solids
Students should be able to identify various geometric shapes based on their geometric properties. Based on van HieleÊs model of geometric understanding, students should go beyond the visualisation level which is: merely seeing the solids as a whole visual figure without identifying its individual attributes. Hence, your students should be provided opportunities to enhance their geometric understanding, to the analysis and deductive levels of the van Hiele model. At this level, students should be able to identify the geometric solids based on the examination of their properties, as well as the relationships between these properties. Teaching Sample Activity 10.2 highlights the importance of using manipulatives to understand geometric properties of objects. In addition, the inconsistency in defining certain geometric terms highlights some confusion that students face in describing properties of geometric solids.
10.1

� TOPIC 10 SOLID GEOMETRY 424
Teaching Sample Activity 10.2: Exploring properties of geometric solids.
1. Provide your students with three-dimensional models of cubes, cuboids, cylinders, cones, pyramids and spheres.
2. Instruct them to search the Internet or in books, to find the definitions of vertex (plural: vertices), edge and face of a geometric solid. For example:
A vertex is a point where two or more straight lines meet.
An edge is the line segment where two edges meet.
3. As your students work along using the various definitions, ask them to keep a note of any limitations or problems encountered in using them. For example, does the definition for vertex apply to cones? Does the cone have any edges, if the definition above for edges is used?
4. Working in small groups of four, students can examine the solids and describe the vertices, edges and faces of each one.
5. Students then record their observations in Table 10.1.
Table 10.1: Examination of geometric solids
Solid Name Description of Vertices
Description of Edges
Description of Faces

TOPIC 10 SOLID GEOMETRY �
425
6. Each group describes the properties of the solids to the class, highlighting the definitions used and limitations encountered.
Extension: Using digital cameras, students can take photographs of objects around them that use or show the shapes of the geometrical solids. For each photograph, students are required to write a short description on how the geometry of the object is related to that of the solid.
Issues of definition often confuse teachers and students in describing properties of geometric shapes. For example, if the definitions of vertex and edge as stated in Teaching Sample Activity 10.2 are used, the cone would not have any edges or vertices.
You can get some ideas of the issues being discussed at the Math Forum @ Drexel at the following links:
http://mathforum.org/library/drmath/view/54681.html
http://mathforum.org/library/drmath/view/54701.html
CUBES AND CUBOIDS
One definition of a cube is:
A geometric solid which has six square faces of the same size and 12 edges of the same length.
(Cho, Mangai, Suhana & Tiew, 2005).
10.2

� TOPIC 10 SOLID GEOMETRY 426
Figure 10.9
Similarly, a cuboid is often defined as:
The definitions given for a cube and a cuboid are quite similar. Therefore, we can say that they have certain similar properties.
10.2.1 Properties of Cubes and Cuboids
Let us now compare a cuboid (Figure 10.10) with a cube (Figure 10.11).
Figure 10.10 Figure 10.11
A geometric solid with six rectangular faces and 12 edges.
(Cho, Mangai, Suhana & Tiew, 2005).

TOPIC 10 SOLID GEOMETRY �
427
We can then summarise the geometric properties of cubes and cuboids as per Table 10.2.
Table 10.2: Geometric Properties of Cubes and Cuboids
Properties Cubes Cuboids
Shape Regular Regular
Faces Square Rectangular
Number of faces 6 6
Have edges? � �
Have vertices? � �
Graphic organisers can be given to students to help them to compare and contrast the properties of cubes and cuboids. Graphic organisers are great visual thinking tools that can help students to organise their thoughts and develop their thinking skills. Figure 10.12 shows a commonly used graphic diagram that students can use to explore the similarities and differences between cubes and cuboids.
Figure 10.12: Comparison between cubes and cuboids

� TOPIC 10 SOLID GEOMETRY 428
Another graphic organisr you can use is one of the thinking maps proposed by David Hyerle called the Double Bubble as shown in Figure 10.13.
Figure 10.13: The Double Bubble
10.2.2 Constructing a Model of a Cube and Cuboid
Constructing models of cubes and cuboids is an important learning activity for students. Three-dimensional models are concrete representations of geometric solids and provide an effectives means of displaying their properties visually. Very often these models can be touched, rotated, and viewed from different angles; thus, allowing a manipulative advantage that aids in the construction of geometric understanding. In addition, as learners make three-dimensional models with different materials, they develop problem solving skills, manipulative skills as well as spatial abilities.
Models can be constructed to represent cubes and cuboids using different methods. You can make a geometric model of a solid, using one of three methods: (a) a frame model, (b) a surface model, or (c) a solid model.
(a) In the frame model, the vertices and edges of the geometric solid are used as the frame to construct the model. The frame can be made from wires, sticks, straws or even folded paper strips.

TOPIC 10 SOLID GEOMETRY �
429
(b) In the surface model, faces of the geometric solid made from flat materials such as cardboards, are used to construct the model.
(c) In the solid model, the geometric solids are made from solid or semi-solid materials like wood, plasticine, or clay.
Each of these models, has its own advantages and disadvantages. For example, the frame model of a cube allows the underlying structure of the cube to be clearly seen through the representation of the vertices and edges. The surface and solid models provide a „solid‰ feel and its faces are distinctly visible and can be felt. The volume and mass of cubes and cuboids are also better visualised, when represented by surface and solid models.
10.2.3 Making a Frame Model of a Cube and Cuboid
Teaching Sample Activity 10.3: Making a frame model of a cube and cuboid.
Instruct the students to bring drinking straws and paper clips to class.
1. In order to construct a cube, each student must have:
(a) 12 drinking straws of equal length; and
(b) 8 modified paper clips.
2. In order to construct a cuboid, each student must have:
(a) 4 drinking straws, each 8cm long;
(b) 4 drinking straws, each 6cm long;
(c) 4 drinking straws, cut 4cm long; and
(d) 8 modified paper clips

� TOPIC 10 SOLID GEOMETRY 430
Before we start, we must first modify our paper clips. These clips will be used to hold the straws together when we construct our models.
Step 1: Students must have a paper clip ready as shown in Figure 10.14.
Figure 10.14: A paper clip
Step 2: Straighten the clip as in Figure 10.15.
Figure 10.15: Straightened paper clip
Step 3: Form three equal loops which are perpendicular to one another, as in Figure 10.16.
Figure 10.16: Three equal loops which are perpendicular to one another
Step 4: Repeat the steps above for the other seven clips.
(a) Join all the straws of equal length to form a cube model as shown in Figure 10.17.
Figure 10.17: Cube model

TOPIC 10 SOLID GEOMETRY �
431
(b) Use the modified clips to hold the straws together at the vertices.
(c) Join all the straws of 8cm, 6cm and 4cm lengths to form a cuboid model as shown in Figure 10.18, using the same methods as that of the cube.
Figure 10.18: Cuboid model
(d) Do not forget to use the clips to hold the straws together at the vertices.
10.2.4 Making a Surface Model of a Cube and Cuboid
Teaching Sample Activity 10.4: Making a surface model of a cube and cuboid.
Instruct each student to bring:
1. 2 pieces of manila card
2. A pair of scissors
3. A roll of cellophane tape
4. A ruler
5. Pen/pencil

� TOPIC 10 SOLID GEOMETRY 432
In order to construct a cube and cuboid from manila card, follow the steps below:
Step 1: Draw a layout of a cube, according to the dimensions in Figure 10.19, onto a manila card. Make sure that each side of the cube is 5cm.
Figure 10.19: Layout of cube
Step 2: Use the scissors to cut the layout out of the manila card.
Step 3: Fold the card along the dotted lines as in Figure 10.20.
Figure 10.20: Fold along the dotted lines on the layout

TOPIC 10 SOLID GEOMETRY �
433
Step 4: Join the edges of the layout with cellophane tape and a cube will emerge, as in Figure 10.21.
Figure 10.21: Cube
Step 5: Repeat the above steps, but this time using different dimensions, as in Figure 10.22.
Figure 10.22: Layout with different dimensions from the cube

� TOPIC 10 SOLID GEOMETRY 434
Step 6: Fold the edges as indicated in Figure 10.20 and join the edges. A cuboid will emerge as in Figure 10.23.
Figure 10.23: Cuboid
Figure 10.20 and Figure 10.22 are „nets‰ that when folded, form a cube and a cuboid respectively. There are 11 nets that can be folded to form a cube. Can you identify them?
Teaching Sample Activity 10.5: Investigating nets of cubes.
1. Provide your students with the nets as shown in Figure 10.24.
2. Instruct them to make a prediction as to which nets can be folded to form a cube and those that cannot.
3. Students can then check their predictions by cutting out the nets and folding them to form the shape of a cube.

TOPIC 10 SOLID GEOMETRY �
435
Extension: Students can be asked to investigate how many different nets they can make for a 2 � 1 � 1 cuboid, a 2 � 2 � 1 cuboid, and a 1 � 2 � 3 cuboid.
1. What are the similarities and differences between a cube and acuboid?
2. Think of ways to construct a cube or a cuboid.
SELF-CHECK 10.1

� TOPIC 10 SOLID GEOMETRY 436
Teaching Sample Activity 10.6: Induction set.
To stimulate studentsÊ thinking, pose the following problem to them:
You put a gift for your mother, into a cube box. How much gift wrapping paper is needed to cover all the faces of the cube box? What concept of measurement is involved in determining the amount of paper needed?
If the cube box is measured as 8cm � 6cm � 10cm, what is the minimum amount of wrapping paper needed?
SURFACE AREA OF CUBES AND CUBOIDS
Let us continue our study by looking at the surface area of cubes and cuboids.
10.3.1 Concept of Surface Area
The learning of surface area for geometric solids involve distinguishing the concept from the concept of area of two-dimensional shapes. Although area and surface area both describe the amount of space enclosed within a closed shape, there are subtle but important differences between the two that students should understand.
Teaching Sample Activity 10.7: Developing the concept of surface area.
1. Show the students a picture of a cube, to represent the gift in the problem posed in Teaching Sample Activity 10.6.
2. Carry out a discussion with the students to inculcate their ideas and opinions. The following questions can serve as a guide:
What kind of an object is a cube?
(Three-dimensional object)
What kind of shapes make up the faces of a cube?
(Squares)
10.3

TOPIC 10 SOLID GEOMETRY �
437
What is the difference between a cube and a square?
(A square is a two-dimensional figure whereas a cube is three-dimensional figure.)
If you have two pieces of wrapping paper, and one is larger than the other, what does it mean in mathematical terms in relation to the topic at hand?
(The larger piece has a bigger area than the smaller piece.)
If the pieces of wrapping paper are square shapes, how do you determine the area of each one?
(Find the dimensions of length and width, then multiply them.)
Does a cube have area(s)? Why?
(Yes, because there are faces that are squares and we can find areas of squares.)
If you want to find the areas of all the square faces in a cube, how would you do so?
(Find the area of one square face and then mutiply by six since there are six square faces in all.)
How is this total area the same as the area of a square?
(Both are measured in cm2. Both measure amount of space or wrapping paper needed. Both measurements are within a boundary.)
At this stage the teacher will bring in the term „surface area‰ as denoting the total area of all the faces of the cube. Teacher explains that it is incorrect to say the „area of a cube‰ because a cube is made up of six two-dimensional square faces.
How is the surface area of a cube different from the area of a square?
(Surface area measures the total surface of the cube whereas area measures the particular square face.)

� TOPIC 10 SOLID GEOMETRY 438
3. Instruct the students to summarise the discussion by comparing and contrasting the concepts of surface area and area using the Double Bubble thinking map shown in Figure 10.13. Figure 10.25 shows an example of the comparison.
Figure 10.25: Double Bubble thinking map of the comparison between the concepts of
surface and area
10.3.2 Surface Area of a Cube
Example 10.1 You are given a three-dimensional cube in Figure 10.26. One of its edges is 7cm. Calculate, in cm2, its surface area.
Figure 10.26: Three-dimensional cube

TOPIC 10 SOLID GEOMETRY �
439
Solution:
Step 1: Understand the problem! What is the task?
To calculate, in cm2, its surface area.
Step 2: Plan! Recall the facts and use them.
Area of square = Side � Side
Its layout (or net) would probably be like this:
Step 3: Execute! Compute the values.
Let us consider the shaded area in Figure 10.27.
The area is 7cm � 7cm = 49cm2
Figure 10.27

� TOPIC 10 SOLID GEOMETRY 440
How many squares are there?
There are altogether six squares of equal size in the figure.
�The surface area of the cube = 49cm2 � 6 squares
= 294cm2
Answer: 294cm2
Step 4: Check! Look at your working solution and check your answer again.
Example 10.2 Figure 10.28 shows a cube. One of its edges is 70cm. Calculate, in m2, its surface area.
Figure 10.28: Cube
Solution:
Step 1: Understand the problem! What is the task?
To calculate, in m2, its surface area.
Step 2: Plan! Recall the facts and use them.
Area of square = Side � Side
100cm = 1m
� 70cm = 0.7m

TOPIC 10 SOLID GEOMETRY �
441
Step 3: Execute! Compute the values.
Area of 1 square = 0.7m � 0.7m
= 0.49m2
Surface area = 0.49m2 � 6 squares
= 2.94m2
Answer: 2.94m2
Step 4: Check! Look at your working solution and check your answer again.
Teaching Sample Activity 10.8: Deriving the formula of surface area of a cube.
After the students have successfully solved a few problems on finding the surface area of cubes, guide them to derive a general formula for a cube, with an edge of a units.
Area of a square face = side � side
= a � a
= a2 unit2
�Surface area of cube = 6a2 unit2

� TOPIC 10 SOLID GEOMETRY 442
10.3.3 Surface Area of a Cuboid
Example 10.3 Figure 10.29 shows a three-dimensional cuboid with dimensions of 10cm � 4cm � 7cm. Find, in cm2, its surface area.
Figure 10.29: 3-dimensional cuboid
Solution:
Step 1: Understand the problem! What is the task?
To calculate, in cm2, its surface area.
Step 2: Plan! Recall the facts and use them.
Area of rectangle = Length � Breadth
Its layout (net) would look like that of Figure 10.30.
Figure 10.30: Layout of a cuboid

TOPIC 10 SOLID GEOMETRY �
443
Step 3: Execute! Compute the values.
First, there are six rectangles as shown in Figure 10.31.
Figure 10.31: 6 rectangles on the cuboid
Now, let us find the area for each rectangle in Figure 10.31.
� � � �
[7cm � 4cm ] [7cm � 10cm] [7cm � 4cm] [4cm � 10cm] � �
[7cm � 10cm] [4cm � 10cm]
We can simplify these to:
� + � + � + � + � + �
28cm2 + 70cm2 + 28cm + 40cm2 + 70cm2 + 40cm2 = 276cm2
�The surface area of the cuboid is 276cm2.
Answer: 276cm2
Step 4: Check! Look at your working solution and check your answer again.

� TOPIC 10 SOLID GEOMETRY 444
Example 10.4 In Figure 10.32, the cuboid measures 100cm by 40cm by 70cm. Find, in m2, its surface area.
Figure 10.32: Cuboid
Solution:
Step 1: Understand the problem! What is the task?
To calculate, in m2, its surface area.
Step 2: Plan! Recall the facts and use them.
Area of rectangle = Length � Breadth
100cm = 1m
There are 6 rectangles in the layout.
Step 3: Execute! Compute the values.
Now, let us find the area for each rectangle in the layout, using the same method as that of Figure 10.29.
� � � �
[0.7 m � 0.4 m ] [0.7 m � 1.0 m] [0.7 m � 0.4 m] [0.4 m � 1.0 m] � �
[0.7 m � 1.0cm] [0.4 m � 1.0 m]

TOPIC 10 SOLID GEOMETRY �
445
We can simplify these to:
� + � + � + � + � + �
0.28 m2 + 0.70 m2 + 0.28 m2 + 0.40 m2 + 0.70 m2 + 0.40 m2 = 2.76 m2
�The surface area of the cuboid is 2.76 m2.
Answer: 2.76 m2
Step 4: Check! Look at your working solution and check your answer again.
Example 10.5 Figure 10.33 shows a cuboid. Its surface area is 5200cm2 . Find, in cm, the value of x.
Figure 10.33: Cuboid with a surface area of 5200cm2
Solution:
Step 1: Understand the problem! What is the task?
To calculate, in cm2, its surface area.
Step 2: Plan! Recall the facts and use them.
Area of rectangle = Length � Breadth
There are six rectangles in the cuboid.

� TOPIC 10 SOLID GEOMETRY 446
Step 3: Execute! Compute the values.
Now, let us find the area for each rectangle.
� � � �
[80cm � 20cm ] [80cm � 20cm] [80cm � x cm] [80cm � x cm] � �
[20cm � x cm] [20cm � x cm]
We can simplify these to:
� + � + � + � + � + �
1600cm2 + 1600cm2 + 80x cm2 + 80x cm 2 + 20x cm 2 + 20x cm 2 = 5200cm2
�The surface area of the cuboid is 2.76m2.
3200cm2 + 200x cm2 = 5200cm2
or 3200 + 200x = 5200
3200 200 5200
200 2000
10
x
x
x
� �
�
�
Answer: 10cm
Step 4: Check! Look at your working solution and check your answer again.
3 200 � 3 200 5 200 � 3 200
200 � 200 2000 � 200

TOPIC 10 SOLID GEOMETRY �
447
Teaching Sample Activity 10.9: Deriving the formula for surface area of a cuboid.
1. After the students have successfully solved a few problems on finding the surface area of cuboids, guide them to derive a general formula for a cuboid with dimensions of a � b � c units.
2. Instruct them to draw the layout or net for the cuboid as shown in Figure 10.34, and to label all its sides. They should also label all its rectangular faces.
Figure 10.34: Layout of the cuboid
3. Instruct the students to use the formula of calculating the area of a rectangle to derive the general formula for the surface area of a cuboid as follows:
Surface area of a cuboid = Area of rectangle A + Area of rectangle B +
Area of rectangle C + Area of rectangle D +
Area of rectangle E + Area of rectangle F
= ac + bc + ac + bc + ab + ab
= 2ab + 2ac + 2bc
= 2(ab + ac + bc) unit2
a b
c

� TOPIC 10 SOLID GEOMETRY 448
Teaching Sample Activity 10.10: Calculationg of surface area and area of cubes and cuboids.
To test their understanding, give the following problems to the students.
1. Figure 10.35 is of a cube which has sides of 8cm each. Calculate its surface area, in cm2 and m2.
Figure 10.35: Cube with 8cm sides
2. A cuboid measures 60cm by 30cm by 15cm. Find, its surface area, in cm2 and m2.
3. The length of a box is 20cm, its breadth is 10cm and its height is 5cm. What is its surface area? State your answer in cm2 and m2.
4. The area of a face of a cube is given as 150cm2. Find, in cm2, the area of its surface.
5. A cuboid has a length of 80cm, breadth 30cm and a height of y cm. Given that its surface area is 7220cm2, find in cm, the value of y.
EXERCISE 10.1
1. How many different layouts (nets) can be folded to form a cube?
2. What are the formulaes to calculate the surface areas of a cube anda cuboid?
SELF-CHECK 10.2

TOPIC 10 SOLID GEOMETRY �
449
VOLUME OF CUBES AND CUBOIDS
Let us move on to learning how to find the volume of cubes and cuboids.
10.4.1 Concept of Volume of Solids
Volume is an important mathematical concept as it is related to many concepts widely used in scientific inquiry and learning. A solid understanding of volume, ensures effective learning of scientific concepts such as pressure, displacement, density and many more.
Volume is often defined as the amount of space occupied by a three-dimensional object. How do you illustrate this idea? Explaining measurement concepts like that of volume, is best communicated by activities involving measuring using non-standard units and followed by measuring in standard units. Teaching Sample Activity 10.11 shows the importance of concrete representation to illustrate volume by measuring in non-standard units.
Teaching SSample Activity 10.11: Developing the concept of volume and measuring volume in non-standard units.
1. Instruct your students to bring boxes of various sizes to class.
2. Ask them to examine the empty space within each box. Question them:
Which box do you think has the largest amount of space inside?
(The largest box.)
Which box do you think has the smallest amount of space inside?
(The smallest box.)
If you are comparing two boxes that are almost the same size, how do you know which one has more space within?
(By measuring the space.)
How can we measure this attribute, that is, the amount of space in the box?
(We can fill them with objects and count the number of objects.)
10.4

� TOPIC 10 SOLID GEOMETRY 450
3. You can then explain that the attribute to be measured is the amount of space occupied in the box, and this measurement is called the volume.
4. Inform them they are to find and compare the volumes of these boxes by filling them with marbles.
5. Provide an activity sheet as shown in Table 10.3.
6. Instruct them to estimate how many marbles can be filled in each box and then check their estimations by comparing these with the actual number of marbles. Record the findings in Table 10.3.
Table 10.3: Activity Sheet
Box Estimated (No. of Marbles)
Actual (No. of Marbles)
Volume (in Marbles)

TOPIC 10 SOLID GEOMETRY �
451
7. Discuss with the students on the effectiveness of using marbles to measure the volume of the boxes.
What would happen if we use marbles of different sizes?
(Difficult to compare the volumes because bigger marbles occupy more space but fewer are needed to fill the box.)
Do you think the number of marbles represent the amount of space within the box? Why?
(No, because there are empty spaces which are not filled up by the marbles.)
8. You can illustrate the limitation of non-standard units of measures as shown in Figure 10.36, to give them a visual representation of the limitation.
Figure 10.36: Limitation of non-standard units of measures
Empty spaces

� TOPIC 10 SOLID GEOMETRY 452
Measuring volume with non-standard units of measures should be followed by teaching and learning activities involving measurement with standard units, such as the one in Teaching Sample Activity 10.12.
Teaching Sample Activity 10.12: Measuring the volume of cuboids in standard units.
1. Provide your students with various nets drawn on a 1cm grid paper to create open boxes as shown in Figure 10.37.

TOPIC 10 SOLID GEOMETRY �
453
Figure 10.37: Nets on 1cm grid paper to show open boxes
2. Instruct them to cut out the nets and construct the boxes.
3. Provide students with another 1cm grid paper and instruct them to make 50 unit cubes using the net as shown in Figure 10.37.
4. Working in small groups, students should estimate and then determine how many unit cubes can be filled in each box, as shown in Figure 10.38.
Figure 10.38: Unit cubes to be filled in each box
5. Record the measurements in Table 10.4.
Table 10.4: Estimation and Actual Number of Unit Cubes
Box Estimated (No. of Unit Cubes)
Actual (No. of Unit Cubes)
Volume (in Unit Cubes)
A
B
C
D
6. Discuss with students on the effectiveness of using unit cubes to measure the volume of boxes.
Which is a better representation of the volume of the boxes � number of marbles or number of unit cubes? Why?
(Number of unit cubes, because all the spaces are filled up.)
7. Then go on to introduce the standard units of measuring volume. For example, if the unit cubes have dimensions of 1cm � 1cm � 1cm, then each unit cube measures, 1 cubic centimetre or 1cm3.

� TOPIC 10 SOLID GEOMETRY 454
10.4.2 Volume of Cubes
If a cube is given with sides a unit as shown in Figure 10.39, the volume is calculated as follows:
Figure 10.39
Volume a cube = side � side � side
= a � a � a
= a3 unit3
Example 10.6 Figure 10.40 shows a cube with each side measuring 5cm. Find, in cm3, its volume.
Figure 10.40: Cube with sides of 5cm
Solution:
Step 1: Understand the problem! What is the task?
To calculate, in cm3, its volume.
Step 2: Plan! Recall the facts and use them.
Volume of a cube = side � side � side
= a � a � a
= a3 unit3

TOPIC 10 SOLID GEOMETRY �
455
Step 3: Execute! Compute the values.
Volume of a cube = 5cm � 5cm � 5cm
= 125cm3
Answer: 125cm3
Step 4: Check! Look at your working solution and check your answer again.
Example 10.7 Figure 10.41 shows a cubic box with a side of 10m. Inside this box is a smaller cubic box with a side of 3m. What is the amount of space left in the bigger box?
Figure 10.41: Cubic box with a smaller cubic box inside
Solution:
Step 1: Understand the problem! What is the task?
To find the amount of space, that is, volume.
Step 2: Plan! Recall the facts and use them.
Volume of a cube = side � side � side
= a � a � a
= a3 unit3
Find the volume of the bigger box and smaller box. Then subtract.

� TOPIC 10 SOLID GEOMETRY 456
Step 3: Execute! Compute the values.
Volume of a bigger box = 10m � 10 � 10m
= 100m3
Volume of a smaller box = 3m � 3m � 3m
= 27m3
�Amount of space left = 100m3 � 27m3
= 73m3
Answer: 73 m3
Step 4: Check! Look at your working solution and check your answer again.
10.4.3 Volume of Cuboids
When the dimensions of a cuboid are given as shown in Figure 10.42, the volume can be calculated as follows:
Figure 10.42: Cuboid
Volume of a cuboid = Length � Width � Height
= l � b � h
= lbh unit3

TOPIC 10 SOLID GEOMETRY �
457
Example 10.8 Figure 10.43 shows a cuboid with a length of 6cm, width of 8cm and height of 10cm. Find, in cm3, its volume.
Figure 10.43: Cuboid
Solution:
Step 1: Understand the problem! What is the task?
To calculate, in cm3, its volume.
Step 2: Plan! Recall the facts and use them.
Volume of a cuboid = length � breadth � height
Step 3: Execute! Compute the values.
Volume of a cuboid = 6cm � 8cm � 10cm
= 480cm3
Answer: 480cm3
Step 4: Check! Look at your working solution and check your answer again.

� TOPIC 10 SOLID GEOMETRY 458
Example 10.9 A cuboid container has a base area of 68m2, as shown in Figure 10.44. If the volume of the container is 884m2, what is the height of the container?
Figure 10.44: Cuboid container
Solution:
Step 1: Understand the problem! What is the task?
To find the height of the container.
Step 2: Plan! Recall the facts and use them.
Volume of a cuboid = Length � Breadth � Height
= Base area � Height
Find the height by dividing its volume with its rectangular base area.

TOPIC 10 SOLID GEOMETRY �
459
Step 3: Execute! Compute the values.
Volume of a cuboid container = 884m2
Rectangular base area � Height = 884m2
68 884
68 88468 68
13m
h
h
h
� �
�
�
�Height of container = 13m
Answer: 13m
Step 4: Check! Look at your working solution and check your answer again.
The formulae for cubes and cuboids can be derived inductively by students, using the method similar to finding the area of triangles as described in the previous topic. Using this method, allows the students to develop inductive thinking in a more hands-on and constructive approach to learning mathematical formulae.
Divide by 68 Divide by 68
� TOPIC 10 SOLID GEOMETRY 460
Teaching Sample Activity 10.13: Deriving the formula for the volume of a cuboid.
1. Use the same cuboid boxes as that of Teaching Sample Activity 10.12. The students can use the results of measurement from the activity to conduct their investigations for this one.
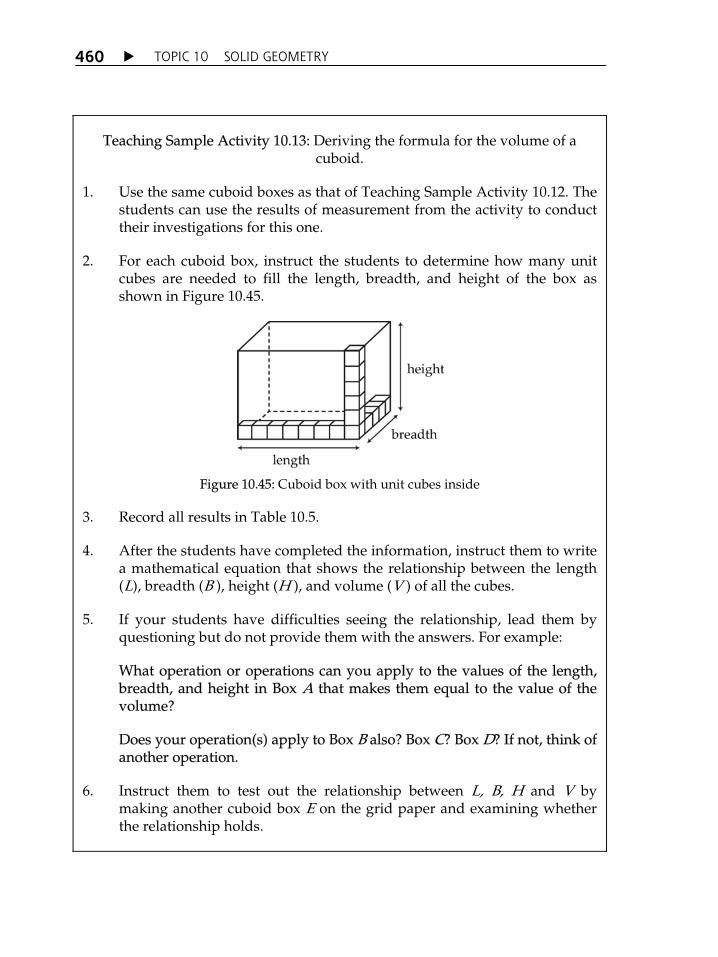
2. For each cuboid box, instruct the students to determine how many unit cubes are needed to fill the length, breadth, and height of the box as shown in Figure 10.45.
Figure 10.45: Cuboid box with unit cubes inside
3. Record all results in Table 10.5.
4. After the students have completed the information, instruct them to write a mathematical equation that shows the relationship between the length (L), breadth (B ), height (H ), and volume (V ) of all the cubes.
5. If your students have difficulties seeing the relationship, lead them by questioning but do not provide them with the answers. For example:
What operation or operations can you apply to the values of the length, breadth, and height in Box A that makes them equal to the value of the volume?
Does your operation(s) apply to Box B also? Box C? Box D? If not, think of another operation.
6. Instruct them to test out the relationship between L, B, H and V by making another cuboid box E on the grid paper and examining whether the relationship holds.

TOPIC 10 SOLID GEOMETRY �
461
7. Students can then draw a conclusion by writing the general formula for finding the volume of a cuboid.
Table 10.5
Box Length (L) (Unit Cube)
Breadth (B)(Unit Cube)
Height (H) (Unit Cube)
Volume (V) (Unit Cube)
Relationship between V, L, B, and H
A
B
C
D
Conclusion: The volume of a cuboid is given by: V =
8. Discuss with the students how the formula can be modified for volume of cubes.
9. Students can now proceed to use the formula to solve problems.
Most textbook problems are routine calculation problems. It is important that students should also solve non-routine problems because this will enable them to develop problem solving skills, creative thinking and communication skills, especially if the problems are solved cooperatively together with their peers.
Teaching Sample Activity 10.14: Solving non-routine problems.2 5
To encourage solving of non-routine problems, give the following exercises to the students for them to solve.

� TOPIC 10 SOLID GEOMETRY 462
1. You have 12 cubes, each with sides 1cm long. How many differentcuboids can you make using all the cubes for each? Figure 10.46shows one cuboid with the dimension, 2 � 2 � 3. Find the rest anddescribe them.
Figure 10.46: Cuboid with the dimension of 2 � 2 � 3
2. You are given 125 cubes, each with sides of 1cm in length. Find thesurface areas of all possible cuboids formed by using, all the cubes.
(i) Which cuboid has the smallest surface area?
(ii) Find the surface area:volume ratio. Which cuboid has thelargest ratio?
3. A cuboid water tank has a rectangular base of 12m by 15m and a
height of 24m. When the tank is 34
full, what is its volume of water,
in m3?
4. A farmer takes one day to dig a cuboid hole that is 3.5m long, 1.5mwide and 4m deep. At this rate, how long will it take the farmer todig a hole that is 7m long, 3m wide and 8m deep?
EXERCISE 10.2

TOPIC 10 SOLID GEOMETRY �
463
� Volume is the amount of space that an object or substance fills.
� A cube is a geometric solid which has six square faces of the same size and 12 edges of the same length.
� The surface area of a cube can be calculated by this formula:
Area of 1 face � 6
Unit used: Unit2
� The volume of a cube can be calculated using: Side � Side � Side
Unit used: Unit3
� A cuboid is a geometric solid with six rectangular faces and 12 edges.
� The surface area of a cuboid is: Sum of area of rectangular faces
Unit used: Unit2
5. Figure 10.47 shows a net of a cube. If the net is folded, draw a possible view of the cube in Figure 10.48.
Figure 10.47: Net of a cube
Figure 10.48: Folded net

� TOPIC 10 SOLID GEOMETRY 464
� The volume of a cuboid can be calculated using this formula:
Length � Breadth � Height
Unit used: Unit3
Cubes
Cuboids
Framework
Properties
Cho, S. M., Mangai, R., Suhana Sebi, & Tiew, E. K. (2005). Glossary for mathematics: Form 1 to form 3. Petaling Jaya: Sasbadi Sdn. Bhd.
Chua, M. K., Teh, E. K., & Ooi, S. H. (2002). Mathematics Form 1 Volume 2. Johor Bahru: Penerbitan Pelangi.
Pusat Perkembangan Kurikulum. (2002). Integrated Curriculum Specifications: Mathematics form 1. Kuala Lumpur: Ministry of Education Malaysia.