Embed Size (px)
Citation preview

Safety firstOne of the most important tools any contractor hasis his own common sense. Safety on the job is a fore-most concern for contractors, because accidentswith power tools can be critical, even disabling ordeadly. No amount of experience or expertiseexempts you from the safety risks inherent in usingthe tools required to install wood floors.
The good news is: These risks are easily managed.Start with these general guidelines:✱ Never work when you are tired.✱ Never work under the influence of alcohol, drugs
or medications.✱ Work when others are nearby, if possible.✱ Do not work on a cluttered floor.✱ Use proper lighting and ventilation.✱ Make sure that the electrical power and wiring at the
jobsite is sufficient to operate all machines safely.✱ Know your insurance company’s policy on cover-
N A T I O N A L W O O D F L O O R I N G A S S O C I A T I O N T E C H N I C A L P U B L I C A T I O N N o . A 3 0 0
Introduction: A Tour of the Trade’s Tools
Becoming a hardwood flooring contractorrequires more than a truck, an answeringmachine and a business card. Professional
floor mechanics must also be equipped with tools.But, which tools? For what purposes? This publi-
cation is intended to walk a contractor through thetools needed on the jobsite.
Setting yourself up with the tools required to install,sand and finish a floor, from start to finish, is no smalltask. True, you can opt to rent some pieces, but mostprofessionals prefer to purchase their own high-qualitytools, renting only infrequently used items. Contractorswho consistently rent equipment are spending moneythat could go toward their own new equipment. More-over, rental equipment often is noticeably used andmay have improper settings from the previous rental.Thus, owning one’s equipment is the best option. Mostquality distributors have lease/purchase plans avail-able to help spread out the cost.
The range of tools for the hardwood flooring trade isconsiderable. The equipment list runs far beyond nail-ing and sanding machines; indeed, it seems every stepof the process demands a unique tool. There are edgersand disc polishers. There are saws — scrollsaws, jig-saws, handsaws, table saws, band saws, jamb saws,portable electric saws, miter saws and radial saws.There are specialty tools — routers, nail sets, scrapers,tape applicators, files, planes, and power boosters.
Even within a tool category, there are choices. Apinless moisture meter or probe moisture meter?Manual nailer or pneumatic nailer? Belt sander ordrum sander? Finding the kind of tools you are mostcomfortable with — through on-the-job experience,and maybe even trying them out at a National WoodFlooring Association training seminar — is a startingpoint for building your inventory. Also, your distribu-tor is an excellent resource and starting point forlearning about various tools and products. Distribu-tors often work with manufacturers to educate con-tractors through “demo days” or workshops. Consultyour local distributor for more information.
TOOLS OFTHE TRADE
WHAT CONTRACTORS NEED FOR HARDWOOD FLOORINGINSTALLATION, SANDING AND FINISHING
Safety first: Operating any tool involves understandingthe manufacturer’s guidelines.
© 1996 NATIONAL WOOD FLOORING ASSOCIATION 3

4 © 1996 NATIONAL WOOD FLOORING ASSOCIATION
N A T I O N A L W O O D F L O O R I N G A S S O C I A T I O N T E C H N I C A L P U B L I C A T I O N N o . A 3 0 0
age related to accidents or other jobsite situations.✱ Wear proper work clothing and shoes. Do not
wear loose clothing that could get caught in amachine.
✱ Wear approved hearing protection and dust andfume respirators.
✱ Read and fully understand the owner’s manualsthat are supplied with the equipment.
✱ Use tools only as intended.✱ Use all tool and machine safety guards. ✱ Turn off and unplug electrical tools and machines
when making adjustments and attaching accessories.✱ Turn off all sources of ignition (furnace, hot water, etc.)
when using flammables (finishes, sealers, fillers, etc.). ✱ Use ground fault circuit interrupters (GFCIs) on
electric tools to avoid electric shock. ✱ Keep all your electric cords in good condition. ✱ Carry and read MSDS (Material Safety Data
Sheets) for all products.This manual is intended to serve as a brief intro-
duction to the tools for hardwood flooring installa-tion. It discusses the specific tools and materialsrequired, how they function, how they’re used in thetrade, and general safety and maintenance issuesrelated to each.
It should be noted here that this manual is notintended to teach you how to use these tools — forthis you must consult the owner’s manual and getproper education to operate each tool and under-stand its warnings. Nor is this an attempt to teachthe installation of wood flooring. That is best donethrough the national and regional seminars offeredby NOFMA (National Oak Flooring ManufacturersAssociation) and the NWFA. Tools of the Tradeshould help you determine if you have all of the toolsnecessary to get started or improve your existingbusiness.
Creating A Safe Working Environment
T he professional floor mechanic arrives at thejobsite with more than just heavy hardware:He or she has protective wear, too, all with eye,
ear and respiratory safety in mind. Outfitting for thejob means outfitting for safety, with protectiveglasses or goggles, dust and vapor respirators forrespiratory protection and ear plugs or ear muffs forhearing protection.
Here is a look at each of the safety precautions:
Eye protectionJob sites are rife with opportunities for eye injury.These injuries happen literally in the blink of an eye— in the time it takes a piece of wood or metal, or adrop of finishing material to fly from the work area toyour face — and range from minor injuries to perma-nent disabilities. Adopting a habit of always wearing
eye protection, either glasses, goggles or a faceshield, greatly reduces the risk of eye injury.
OSHA (Occupational Safety and Health Act) regu-lations require eye protection when using mostpower tools.
Glasses: Glasses should meet performance stan-dards set by the American National Standards Insti-tute (ANSI), called ANSI Z87.1-1989 or Canadiancode CSA Z94.3.
Many of today’s safety glasses resemble athleticfashion eye wear more than “Buddy Holly” glasses.Safety eye wear catalogs are jammed with styles andcolor choices; it should be easy to find a pair that fitswell and looks good, and is light and comfortableenough to wear all day. Normal glasses or contactlenses do not qualify as protective eyewear.
Goggles: Goggles are best for some conditions:Polycarbonate lenses in goggles, safety glasses andface shields all have the same impact resistance. Butgoggles seal off the eye socket more effectively thaneither spectacles or face shields, and because they fittightly against the face all the way around, they dis-tribute impact force more evenly. Even though faceshields and glasses are available with brow guardsthat keep out material from above, they don’t offerthe same level of protection that goggles do.
Hardened glass was once the material of choicefor safety eye wear, and is still available. However,plastics (principally polycarbonate) a tremendouslyresilient material, are now more widely used.Although plastic resists impact better, hardenedglasses may still be the right choice if materials atthe job site are harmful to plastics.
Hearing protectionIf you have to shout to be heard, the noise level isprobably more than 90 decibels, and you need hear-ing protection. Prolonged exposure to these soundlevels can result in hearing loss. There are too manyflooring contractors who never knew about audiohazards when they started in this business. Theynow have 30 to 70 percent loss of hearing, and someof them are only in their 30s.
The most effective way to combat high noise levels— and the only one for most in the constructiontrades — is to use ear protection. Unfortunately,wads of cotton offer little or no actual hearing protec-tion. You will need legitimate ear plugs or ear muffs.
Ear plugs: Earplugs are effective and inexpensive,and come in two forms: foam inserts and premoldedplugs. Premolded plugs are reusable, flanged plugsthat are simply inserted into the ear. Foam insertsare rolled and compressed into tiny cylinders that,once inserted, slowly expand to provide a custom fit.Earplugs should be cleaned with soap and waterafter use, and most plugs should be discarded afterseveral uses.
Ear muffs: Ear muffs are bulkier than other alter-natives, but they can be as effective as foam inserts.

© 1996 NATIONAL WOOD FLOORING ASSOCIATION 5
N A T I O N A L W O O D F L O O R I N G A S S O C I A T I O N T E C H N I C A L P U B L I C A T I O N N o . A 3 0 0
Here are the recommended items for carrying to the jobsite in your van:Installation Sanding Finishing
Maps � � �
Notebook � � �
Change order cards/color signoff sheets � � �
Fire extinguisher � � �
First aid kit � � �
MSDS/DOT sheets � � �
Moldings, 3⁄4-inch and 1⁄2-inch �
Wood filler/putty/floor patch � � �
Extra abrasives �
Tape and masking materials � � �
Steel wool or pads � �
Slip tongues/splines �
Shingles/shims �
Felt paper �
Trowels � �
Mastic/glue/adhesives �
Stain � � �
Finishes (as ordinances or OSHA allow) � �
Applicators, brushes, rags � � �
Approved container for soiled rags � � �
MATERIALS LIST FOR THE VEHICLE
Muffs consist of dome-shaped protectors that fit overthe external ear; they keep out sound with a cushionor pad sealing them against the head. Sony Walk-man® headphones and similar devices are not con-sidered ear protection.
Respiratory protectionRespiratory protection is needed when sanding, aswell as when applying finish.
Wood dust is widely recognized as a potentialhealth hazard. Dust and chips are most likely todirectly affect your eyes, skin and respiratory sys-tem. Glasses or goggles can protect you against fly-ing debris, but won’t prevent dust from settling onyour skin or in your lungs.
Sensitivity to dust varies from person to person. Itcan cause irritation of the upper respiratory tract,inflammation of the nasal tract, tightness of thechest, shortness of breath, dizziness, asthma andmucosal irritations.
The adverse effects of dust can be partially dealtwith by keeping the work area as clean as possible,and ensuring proper ventilation. Full protection,however, requires the use of a dust respirator.
Dust respirators range from simple disposabletypes to more sophisticated models with replaceablefilter cartridges. Wearing any dust respirator is a vastimprovement on wearing none at all. Remember,
Note: Stains, finishes, applicators and soiled rags should only be transported — never stored in the vehicle.
too, that dust from some wood species have beenknown to affect wood workers.
For the proper respiratory protection to wearwhen applying finish. always refer to the finishmanufacturer’s Material Safety Data Sheets(MSDS). Most require use of an organic vapor respi-rator, with the appropriate cartridge inserted.
Knee padsMuch of the work in installing flooring is executedclose to the ground. That is, you will be spending afair amount of time on your knees. Knee pads willease the related strain and pain. On nail-downinstallations, avoid hard plastic versions that willdamage the floor. “Hard” pads can “burnish” afreshly sanded floor and cause shiny spots. Instead,look for contractor-grade pad that are adjustableand fit well, with soft non-marring outer surfaces.
Work shoesShoes are as much a safety feature as goggles and adust respirator. Athletic shoes won’t do the job ofprotecting your toes and feet in case something isdropped. Cleated shoes should never be worn onprefinished wood floors.

6 © 1996 NATIONAL WOOD FLOORING ASSOCIATION
N A T I O N A L W O O D F L O O R I N G A S S O C I A T I O N T E C H N I C A L P U B L I C A T I O N N o . A 3 0 0
Here is a basic list of tools to outfit the professional flooring contractor. Somemay be supplied by the company, others you may have to supply yourself.
Installation Sanding FinishingEye protection � � �
Knee pads � � �
Respirator � � �
Ear plugs � � �
Moisture meter � �
Nailing machines �
Assorted nails, cleats, pins �
Air tank, hoses and fittings �
Jig saw �
Band saw �
Reciprocating saw �
Table saw �
Hand saw � � �
Jamb saw � �
Circular saw � �
Miter box with saw � � �
Chalk line �
Staplers � �
Squares �
Level/straight-edge �
Compass and protractor �
Scrapers, blades and files � �
Pry bar �
Drills and bits � � �
Router and bits � � �
Hammers � � �
Chisels � � �
Nail sets � � �
Pliers and wrenches � � �
Nail pullers � � �
Screwdrivers � � �
Rule or tape � � �
Block plane � � �
Utility knife � � �
Electric tester � � �
Keel or crayon � �
Fans � � �
Brooms � � �
Drop cord light � � �
General purpose oil (non-detergent �
for pneumatic tools) � � �
Extension cord, adequate length, grounded � � �
Electric plugs, adapters � � �
Electrical tape � � �
Vacuum cleaner � � �
Plastic bags for waste � �
Sanders �
Edgers �
Oscillating sanders � �
Buffers � �
Sander cords �
Sander bags �
Applicators, brushes �
Trowels �
TOOLS CHECKLIST

© 1996 NATIONAL WOOD FLOORING ASSOCIATION 7
N A T I O N A L W O O D F L O O R I N G A S S O C I A T I O N T E C H N I C A L P U B L I C A T I O N N o . A 3 0 0
Moisture Meters
Moisture meters are portable electric or elec-tronic devices that measure the amount ofmoisture in wood flooring and subfloors;
some will even measure moisture in concrete. Deter-mining moisture content levels is crucial to qualitycontrol in the flooring installation process. Excessmoisture in the flooring lumber, subfloor or concreteslab in particular will have adverse effects on theinstalled flooring, both short and long-term. Mois-ture meters are therefore an essential tool for everyprofessional floor mechanic.
Wood is constantly gaining and releasing mois-ture to and from the surrounding air. As it does so,its shape and size is likely to change slightly. Whendried wood reaches a level of balance with its sur-rounding atmosphere — that is, it is neither takingin or giving off moisture — it has reached its equilib-rium moisture content, or EMC. Moisture content isexpressed as percentage of the wood’s dry weight.Six percent moisture content means that 6 percentof the board’s dry weight is water.
Although it varies slightly with relative humidity,an optimal moisture content is between 6 and 9 per-cent for most areas of North America. Beforeinstalling, the wood flooring’s moisture contentshould be at the level expected under normal livingconditions, and the difference between the moisturecontents of the wood flooring and the subfloorshould be no more than 4 percentage points. Inother words, if the average EMC for the wood is 9percent, the subfloor should be no more than 13percent.
Moisture meters can also be used to assess waterdamage, and to determine when subsequent coats offinish can be applied. Readings should be taken inseveral locations on the floor rather than just a sin-gle one. For more information on the effects of mois-ture on wood flooring, consult Water and Wood: HowMoisture Affects Wood Flooring, publication A100 inthis series. Contact the National Wood Flooring Asso-ciation, 233 Old Meramec Station Road, Manchester,MO 63021. The toll-free number in the United Statesis 800/422-4556. In Canada it’s 800/848-8824.Local and international call 314/391-5161.
OperationThere are two main types of moisture meters. Probetypes have small probes or pins that need to beinserted into the material to determine moisture con-tent. Pinless meters require no penetration of thematerial. The two types of meters measure differentproperties to determine moisture content.
Probe-type moisture meters: The probe device mea-sures electrical resistance across the two or more smallpins, which are inserted into the wood. The higher themoisture content, the lower the resistance and thusthe greater current flow and higher content reading.
Probe-type meters are fast and easy to use, andare offered with different measurement indicators:some units have L.E.D. display lights indicating dif-ferent moisture levels, while other units have analogor digital displays and some allow the use of differ-ent probes for an assortment of pin sizes.
Some meters also have insulated pins, whichallows testing for moisture content at specific depthswithin the wood.
Pins should be inserted as fully as possible, inline with the grain. With moisture content levelsbelow 10 percent, minimal insertion or mere contactwith the wood may be enough: Consult the meter’smanufacturer for details.
Pinless moisture meters: The pinless models arealso referred to as “non-destructive” moisturemeters, because they don’t leave any small holes inthe wood. Pinless meters work by transmitting low-frequency signals from rubber electrodes at the baseof the instrument into the wood, measuring an areabeneath the footprint of the meter. Instruments arecalibrated to translate this measurement into mois-ture content by weight, which is displayed on theanalog or digital dial.
Signal penetration may be up to one inch deep for
9.0A probe-type moisture meter

8 © 1996 NATIONAL WOOD FLOORING ASSOCIATION
N A T I O N A L W O O D F L O O R I N G A S S O C I A T I O N T E C H N I C A L P U B L I C A T I O N N o . A 3 0 0
Saws
When selecting a saw, it’s best to keep inmind that a saw is only as good as itsblade. The blade must be sharp enough to
do the job, but it must also be the right type for thework. The teeth on blades designed for ripping wood(cutting with the direction of the grain) are angled fora more aggressive cut. Blades designed for crosscut-ting (cutting across the grain) have a less aggressivetooth design.
Saw blades are available in steel, carbide and dia-mond-toothed designs. Carbide lasts longer thansteel, and diamond lasts longer than carbide, but asblade materials get harder, cuts become less “clean.”In many situations, the extra blade life may justifygiving a little on the quality of cut. But in someinstances, a clean cut may be most important.
Hand sawsHand saws make quick work ofsmall sawing jobs, andcut down on job-site noise anddust. They arepractical and affordable, and are a worthy comple-ment to a floor mechanic’s fleet of power saws. Someof the available types:
Standard hand crosscut and rip saws: For basicstraight cuts.
Backsaws: A shorter, fine-toothed saw, commonlyused with miter boxes. The blade on a backsaw issupported by a U-shaped band of metal, which isalso used as a guide for miter boxes.
Coping saws: Used for fine, intricate cuts, as wellas curved or circular cuts. Their thin blades are heldby a high arched back with a handle.
Hacksaws and mini-hacksaws: Similar to copingsaws, with longer, deeper fine-toothed blades andless back clearance, though not usually used onwood. They are more effective in cutting metals andplastics.
Jamb saws: Have an offset handle that allows thesaws to be used for undercutting door jambs.
Power saws There are three basic types of power saws: circularsaws, reciprocating-type saws, and band saws. Allare highly productive, and are available in differentconfigurations for different jobs.
both hardwood and softwood. The meter can be usedto identify pockets of moisture in a wood block orplank. Measurements can also be taken throughcoatings without damage to the surface.
OptionsThe best moisture meter for your toolbox is one thatcombines accuracy with flexibility of use and the fea-tures you need. Here are some of the available fea-tures to consider: • A built-in thermo-hygrometer to measure ambient
temperature and relative humidity.• The capability to measure a wide moisture con-
tent range, from at least 5 to 30 percent.• The ability to take readings from concrete.• The necessary adjustment tables for various
species.• An easily readable indicator.• On probed meters, the ability to use external
probes, and a selection of pin sizes.• A carrying case.
Be aware, however, that no meter offers all thesefeatures.
A pinless moisture meter

© 1996 NATIONAL WOOD FLOORING ASSOCIATION 9
Circular power sawsCircular saws are basically an electric motor with acircular blade attached to its arbor. Their forte ismaking fast, straight cuts. Blades range from lessthan five to more than eight inches in diameter, andfeature tooth designs for many kinds of materials —hardwood, softwood, plywood, oriented strand board(OSB), even masonry and tile. The blade angle, ortilt, is usually adjustable. Different horsepower rat-ings abound, but remember: The higher the power,the heavier the saw. Portable circular saws cut fromthe bottom, so for the best quality cuts, keep the faceof the board down. The following saws, however, cutfrom the top down, so keep the face of the board upwhen making cuts.
Power miter saws: A circular saw in a miter box,used for angle cutting of molding and trim. Com-pound miter saws incorporate blade tilt. With plung-ing miter saws, the blade and motor pivot from apoint behind the fence, allowing the blade to be low-ered for quick, precise cuts.
Jamb saws: A saw with the blade mounted hori-zontally. The blade “height” is adjustable relative tothe shroud/base of the unit. Jamb saws are particu-larly useful for sawing off baseboards and doorjambs and casings to allow flooring to be slippedunderneath. This can assist in allowing for expan-sion of flooring.
Radial arm saws: A base-mounted circular sawthat travels on an overhead arm across the cuttingarea. Most models allow for swinging, tilting, raisingand lowering motions to adjust the cutting direction.
Table saws: A stationary circular saw that cutsup from under a table. Blade height and angle isadjustable on most models. Precision rip cuts aremade by adjusting a guide fence to the desiredwidth. Crosscutting is accomplished by guidingpieces past the blade with the miter gauge, whichcan be adjusted for cuts of different angles.
Reciprocating-type sawsSaber saws, reciprocating saws and scroll saws alloperate on the same principle: a small, straight bladethat moves in an up-and-down or back-and-forthmotion. These saws cut in one direction – up – so cutwith the face of the board down.
Saber/jig saws: A reciprocating-type saw, this isused vertically for intricate and scrolling cuts at slowspeeds.
Reciprocating saws: A larger, more powerful versionof the saber saw. It’s often used for removing flooringand joists, or sawing through walls and ceilings.
Scroll saws: A table-mounted reciprocating-typesaw, also used for odd-shaped cuts.
Band sawsBand saws cut with an endless band blade travelingaround an upper and a lower wheel. They are capa-ble of high-production guided cuts, resawing (cuttingthinner boards from one thick one), and freehandscrolling cuts, when equipped with a fine blade. Theywork extremely well on parquet floors.
Band saws cut down, so saw with the face of theboard up.
Safety considerations Saws may be the most dangerous tool you will use.Always follow these guidelines when operating anykind of saw:✱ Read and understand the warnings and opera-
tional instructions that are provided by the man-ufacturer of your saw.
✱ Never remove or disable safety guards suppliedwith any type of saw.
✱ Keep the cord clear of the blade’s path.✱ Make sure that the saw is grounded properly.
Avoid working in damp places.✱ Make all adjustments and change the blade with
the saw disconnected from the power source.✱ Set the circular blade depth to no more than 1⁄4
inch greater than stock thickness.✱ Make sure the base is adjusted correctly and
locked securely. Check the locking mechanismsperiodically while working.
✱ Make sure the saw is equipped with the appropri-ate blade for the job.
✱ Never reach under the work or allow your handsto line up with the saw cut (in front or back of thesaw).
✱ Be sure to wear protective glasses and ear protec-tion.
✱ Allow the blade to come up to full speed beforestarting the cut.
✱ Allow the blade to come to a complete stop beforeremoving cut pieces or waste from the saw.
✱ Remove dust from the saws occasionally to pro-mote air flow and lubrication, and to prevent fires.
✱ Always use a push stick for table sawing.
N A T I O N A L W O O D F L O O R I N G A S S O C I A T I O N T E C H N I C A L P U B L I C A T I O N N o . A 3 0 0
Reciprocating saw

N A T I O N A L W O O D F L O O R I N G A S S O C I A T I O N T E C H N I C A L P U B L I C A T I O N N o . A 3 0 0
Nailing Machines
There are varying styles of machines. Theratchet-style and spring-loaded fasteners arestruck with a mallet to release each nail. The
pneumatic nailers shoot fasteners into wood (someare designed to nail into concrete) with the impact ofa mallet or the pull of a trigger and the help of anattached air compressor.
These machines are available in both side (45-degree), and face (90-degree, for work against walls)configurations. And through use of changeableadaptor plates, they can be adjusted for installingvaried thicknesses of flooring.
The nailing machines serve to reduce nailing timeto an absolute minimum, and eliminate time spentreaching for nails. Nailers works as fast as the usercan position the machine.
Ratchet nailers: Because they can operate withmultiple strikes, ratchet-style nailers are easier fornovices to use, but perhaps not as fast as experi-enced professionals would like.
Spring-loaded nailers: Spring-loaded machinesoperate on the one-strike, one-nail principle.
Pneumatic fasteners: Pneumatic machines, alsoknown as air nailers, require compressed air to oper-ate. Therefore, they also require more safety con-sciousness.
FastenersDifferent applications require different types of fas-teners. They allow for wood movement in the mostefficient way.
Cleats are barbed nails with a T- or L-hookedhead. Most are proprietary designs, for use only witha specified type of nailer. Their thin rectangularshape guards against wood splitting.
Some nailing machines use staples, rather thancleats and these, too, have been proven to be effec-tive fasteners.
Case nails, cut nails, finish nails and screws arealso used to fasten wood flooring. Hand nailing isespecially useful for the first and last few rows offlooring in a room, when there isn’t room to employ anailing machine. Screws are sometimes used to fas-ten plank flooring.
CompressorsThere are many air compressors on the marketdesigned for jobsite operation of pneumatic staplersand nailers. When choosing a compressor, select theproper size to produce adequate air volume (cubicfeet per minute) and air pressure (pounds per squareinch) for your pneumatic floor stapler or nailer.
A one-horsepower electric compressor with afour-gallon tank will produce about three cubic feet
per minute of air volume at 90 pounds ofpressure. It weighs less than 50 pounds anddraws very few amps of electricity, and it isadequate for running one tool at mediumspeed.
A 1.5- to 2-horsepower electric compres-sor with a five-gallon tank produces approxi-mately six cubic feet per minute at 90pounds per square inch. Weighing less than70 pounds and operating on a 15-amp circuitbreaker, this compressor is adequate for onefast tool operator or two at medium speed.
A 1.5- to 2-horsepower electric compres-sor with an eight-gallon tank weighs about125 pounds and is adequate for two fast tooloperators.
You may need to sacrifice portability forvolume, but when in doubt, select the largerunit. When you’re on the job, you don’t wantto be forced to wait for the compressor tocatch up.
Pneumatic nailer
10 © 1996 NATIONAL WOOD FLOORING ASSOCIATION
N A T I O N A L W O O D F L O O R I N G A S S O C I A T I O N T E C H N I C A L P U B L I C A T I O N N o . A 3 0 0
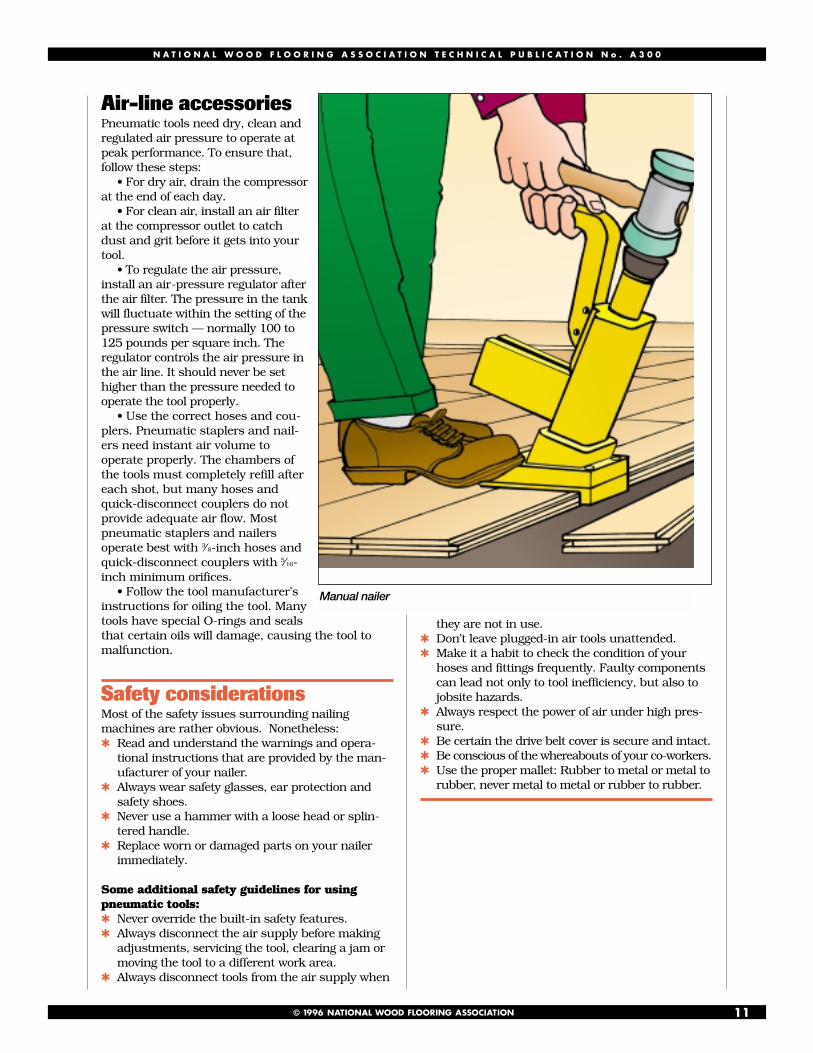
Air-line accessoriesPneumatic tools need dry, clean andregulated air pressure to operate atpeak performance. To ensure that,follow these steps:
• For dry air, drain the compressorat the end of each day.
• For clean air, install an air filterat the compressor outlet to catchdust and grit before it gets into yourtool.
• To regulate the air pressure,install an air-pressure regulator afterthe air filter. The pressure in the tankwill fluctuate within the setting of thepressure switch — normally 100 to125 pounds per square inch. Theregulator controls the air pressure inthe air line. It should never be sethigher than the pressure needed tooperate the tool properly.
• Use the correct hoses and cou-plers. Pneumatic staplers and nail-ers need instant air volume tooperate properly. The chambers ofthe tools must completely refill aftereach shot, but many hoses andquick-disconnect couplers do notprovide adequate air flow. Mostpneumatic staplers and nailersoperate best with 3⁄ 8-inch hoses andquick-disconnect couplers with 5⁄16-inch minimum orifices.
• Follow the tool manufacturer’sinstructions for oiling the tool. Manytools have special O-rings and sealsthat certain oils will damage, causing the tool tomalfunction.
Safety considerationsMost of the safety issues surrounding nailingmachines are rather obvious. Nonetheless:✱ Read and understand the warnings and opera-
tional instructions that are provided by the man-ufacturer of your nailer.
✱ Always wear safety glasses, ear protection andsafety shoes.
✱ Never use a hammer with a loose head or splin-tered handle.
✱ Replace worn or damaged parts on your nailerimmediately.
Some additional safety guidelines for usingpneumatic tools:✱ Never override the built-in safety features.✱ Always disconnect the air supply before making
adjustments, servicing the tool, clearing a jam ormoving the tool to a different work area.
✱ Always disconnect tools from the air supply when
they are not in use. ✱ Don’t leave plugged-in air tools unattended.✱ Make it a habit to check the condition of your
hoses and fittings frequently. Faulty componentscan lead not only to tool inefficiency, but also tojobsite hazards.
✱ Always respect the power of air under high pres-sure.
✱ Be certain the drive belt cover is secure and intact.✱ Be conscious of the whereabouts of your co-workers.✱ Use the proper mallet: Rubber to metal or metal to
rubber, never metal to metal or rubber to rubber.
Manual nailer
© 1996 NATIONAL WOOD FLOORING ASSOCIATION 11

N A T I O N A L W O O D F L O O R I N G A S S O C I A T I O N T E C H N I C A L P U B L I C A T I O N N o . A 3 0 0
Sanding Machines
Hardwood flooring contractors have a choicewhen it comes to sanding machines — usinga drum sander or a belt sander. Like many
other decisions, the use of either is a matter of per-sonal preference.
Drum and belt sanders Drum sanders and belt sanders are both large,heavy walk-behind electric sanding machinesdesigned for high production. They are the sandingworkhorse of your tool arsenal, usually available inwidths of 8, 10 or 12 inches. Most have integrateddust collection. They are used for sanding wood overlarge, open areas, as well as removing old stain orfinish.
Belt sanders (below) are of a newer design thandrum sanders, with abrasive belts traveling over amain powered roller or drum (not to be confusedwith drum sanders, right) and a smaller tensioningroller located above. The drum, which brings theabrasive into contact with the floor, has a soft rubbersurface.
Abrasive belts are easy to change. They literallyslip on and off when the tension is loosened. Thecontinuous abrasive belts and solid drum featureadjustments to align the tracking of the belt.
Drum sanders have just a single drum, on whicha sheet of abrasive is placed. A cam slot running thewidth of the drum holds and tensions the abrasive
sheet. These sanders are more common than thebelt version, but loading paper can be somewhatmore difficult for the novice.
Drum levels are adjustable, and most users setthem so there is greater pressure on the motor drivebelt side.
Safety considerationsStandard safety precautions apply for both kinds ofsanding machines:✱ Proper electrical connections are essential. Refer
to manufacturers’ guidelines.✱ Read and understand the warnings and opera-
tional instructions that are provided by the man-ufacturer of your sanding machine.
✱ Eye and ear protection and a dust respirator arerecommended.
✱ Safe work shoes (with laces tied!) are important.✱ Make sure you are always in complete control of
the tool. ✱ Keep the cord away from the drum and out from
underfoot and off your shoulders. ✱ Keep an eye on the dust collection bag. Empty it
often in the proper container.✱ Always empty dust collection bags before trans-
porting the machine or leaving it at the jobsite —even when you take a break for lunch.
Belt sander
Drum sander
12 © 1996 NATIONAL WOOD FLOORING ASSOCIATION

© 1996 NATIONAL WOOD FLOORING ASSOCIATION 13
N A T I O N A L W O O D F L O O R I N G A S S O C I A T I O N T E C H N I C A L P U B L I C A T I O N N o . A 3 0 0
Disc Polishers, Buffers andOscillating Machines
Disc machines use circular sanding paper,screens, pads or polishing brushes — sizesvary from around 15 to more than 22 inches.
They are walk-behind machines that abrade in a cir-cular pattern. There are also oscillating machinesavailable which move in an oval or back-and-forthpattern. Oscillating machines provide a less aggres-sive cut, but with more random and harder-to-seescratch patterns.
Disc machines run at low speeds, usually in the175-rpm range, and are used for finish sanding,screening, screening between finish coats, and low-speed buffing. Some models are designed for dedi-cated use as either sanders or polishers — be sure tomatch the machine with your main application.These machines generally do not have integrateddust collection, although the newest models incorpo-rate this feature as a system.
One of the primary uses of these machines is toblend drum or belt sander and edger marks to getrid of the “picture frame” effect around a room. Somefinish manufacturers also recommend using bufferscreens or pads after sealer or finish application tosmooth imperfections and to lightly abrade the sur-face for better adhesion between coats. However,other finish suppliers recommend different methods.As always, rely on the recommendations made bythe manufacturer of the finish you are applying.
Smooth, sweeping motionsDisc polishers can be difficult for beginners to oper-ate. On start-up, they tend to “kick” to one side, usu-ally the left. It’s best to practice initially with apolishing pad in the middle of a large room. Startwith the handle at waist height. You will notice thatas you raise it, it will move to the right. And as youlower it, it moves to the left. An easy way to remem-ber this is raise-right (R-R) and lower-left (L-L).
Safety considerations✱ Read and understand the warnings and opera-
tional instructions that are provided by the man-ufacturer of your machine.
✱ As buffing and polishing can potentially launchsmall projectiles and kick up dust, eye protectionis required and a dust respirator is recom-mended.
✱ Make sure you are always in complete control ofthe tool.
✱ Do not let go of the buffer’s handles until themachine has stopped rotating.
✱ Unplug the machine when you are adjusting themachine or attaching paper.
✱ When attaching paper to the machine, carefullycenter the abrasive.
✱ Use the same caution you would apply to otherelectrical tools: Keep the cord out of the pad, outfrom underfoot and off your shoulders.
Oscillating polisher
Disc polisher

14 © 1996 NATIONAL WOOD FLOORING ASSOCIATION
N A T I O N A L W O O D F L O O R I N G A S S O C I A T I O N T E C H N I C A L P U B L I C A T I O N N o . A 3 0 0
Edgers
Edgers, or spinners, are small cir-cular sanding machinesdesigned to reach the areas
where bigger machines can’t. Severaltypes of edgers are available, mostconsisting of a seven-inch shroudeddisc connected to a large motor. Twowheels on the shroud hold most ofthe machine’s weight; each isadjustable to vary the depth andangle of cut. The spinner plate, a rub-ber-faced disc, is set to hold thesandpaper disc at a slight angle tothe floor.
The offset edger drives a smallerdisc, three to seven inches in diame-ter and offset from the motor, with abelt-and-pulley arrangement. Thisconfiguration allows reaching underdifficult areas like cabinet toe kicks and radiators, orbetween stair spindles.
Some companies now offer integrated dust collec-tion for edgers, directly connecting a portable vac-uum system to the edger to gather sawdust as it isproduced.
An edger can be set to cut on the left, right ornear center of the leading edge of the paper. The bestplace to adjust the edger is to the right side of thedisc, at approximately 1 o’clock. The pad contactshould be about one inch in length.
Because edgers usually cut more aggressively onthe right side of the disc, they should be moved
along the floor from the left to the right, in semicircu-lar, or other similar, motions.
Never apply weight or bear down on the edger toproduce extra cutting power. This is not only hard onthe machine; it almost always results in ugly “dish”markings in the floor.
Safety considerations✱ Read and understand the warnings and opera-
tional instructions that are provided by the man-ufacturer of your edger.
✱ Edgers create dust and are capable of kicking upharmful objects; eye and ear protection and adust respirator are musts.
✱ Maintain control of the tool.✱ Unplug the machine when you are not working
with it. ✱ When not in use, always store the edger on its
side, with the spinner plate out of touch with thefloor.
✱ Keep the cord away from the sanding disc andout from underfoot.
✱ Keep an eye on the dust collection bag. Empty itoften in the proper container.
✱ Always empty dust collection bags before trans-porting the machine or leaving it at the jobsite —even when you take a break for lunch.
Edger sander
Offset edger
N A T I O N A L W O O D F L O O R I N G A S S O C I A T I O N T E C H N I C A L P U B L I C A T I O N N o . A 3 0 0
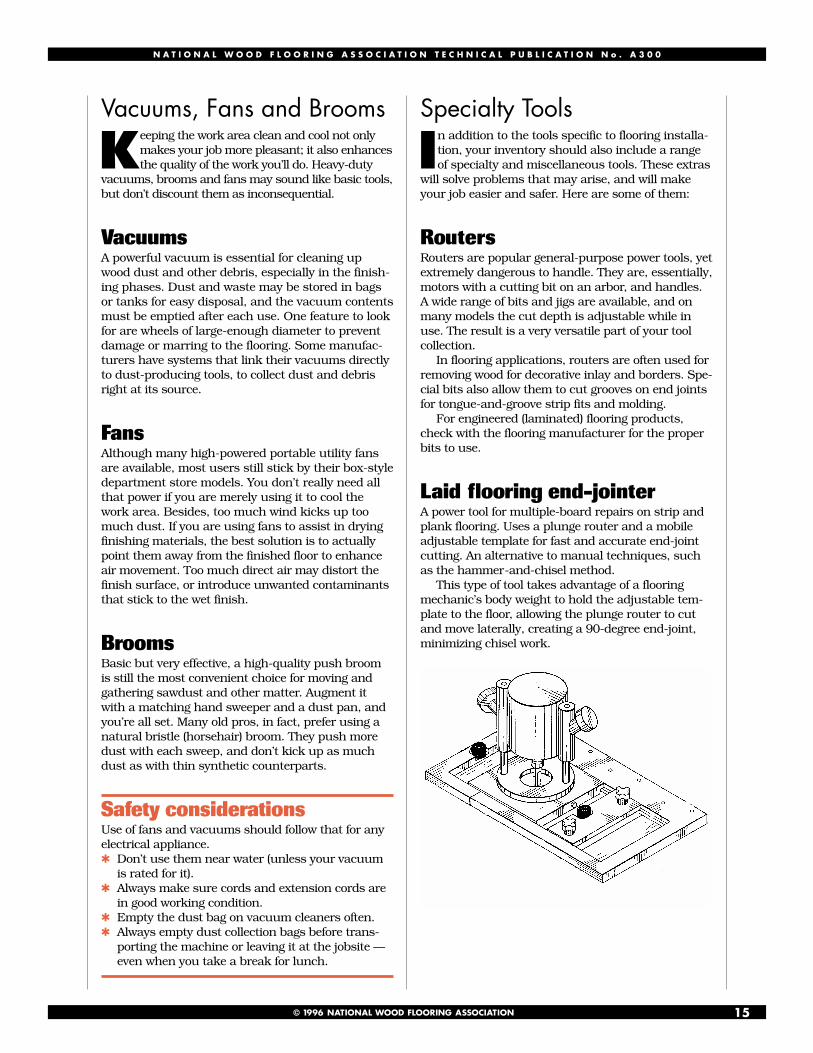
Vacuums, Fans and Brooms
Keeping the work area clean and cool not onlymakes your job more pleasant; it also enhancesthe quality of the work you’ll do. Heavy-duty
vacuums, brooms and fans may sound like basic tools,but don’t discount them as inconsequential.
VacuumsA powerful vacuum is essential for cleaning upwood dust and other debris, especially in the finish-ing phases. Dust and waste may be stored in bagsor tanks for easy disposal, and the vacuum contentsmust be emptied after each use. One feature to lookfor are wheels of large-enough diameter to preventdamage or marring to the flooring. Some manufac-turers have systems that link their vacuums directlyto dust-producing tools, to collect dust and debrisright at its source.
FansAlthough many high-powered portable utility fansare available, most users still stick by their box-styledepartment store models. You don’t really need allthat power if you are merely using it to cool thework area. Besides, too much wind kicks up toomuch dust. If you are using fans to assist in dryingfinishing materials, the best solution is to actuallypoint them away from the finished floor to enhanceair movement. Too much direct air may distort thefinish surface, or introduce unwanted contaminantsthat stick to the wet finish.
BroomsBasic but very effective, a high-quality push broomis still the most convenient choice for moving andgathering sawdust and other matter. Augment itwith a matching hand sweeper and a dust pan, andyou’re all set. Many old pros, in fact, prefer using anatural bristle (horsehair) broom. They push moredust with each sweep, and don’t kick up as muchdust as with thin synthetic counterparts.
Safety considerationsUse of fans and vacuums should follow that for anyelectrical appliance.✱ Don’t use them near water (unless your vacuum
is rated for it).✱ Always make sure cords and extension cords are
in good working condition.✱ Empty the dust bag on vacuum cleaners often.✱ Always empty dust collection bags before trans-
porting the machine or leaving it at the jobsite —even when you take a break for lunch.
Specialty Tools
In addition to the tools specific to flooring installa-tion, your inventory should also include a rangeof specialty and miscellaneous tools. These extras
will solve problems that may arise, and will makeyour job easier and safer. Here are some of them:
RoutersRouters are popular general-purpose power tools, yetextremely dangerous to handle. They are, essentially,motors with a cutting bit on an arbor, and handles.A wide range of bits and jigs are available, and onmany models the cut depth is adjustable while inuse. The result is a very versatile part of your toolcollection.
In flooring applications, routers are often used forremoving wood for decorative inlay and borders. Spe-cial bits also allow them to cut grooves on end jointsfor tongue-and-groove strip fits and molding.
For engineered (laminated) flooring products,check with the flooring manufacturer for the properbits to use.
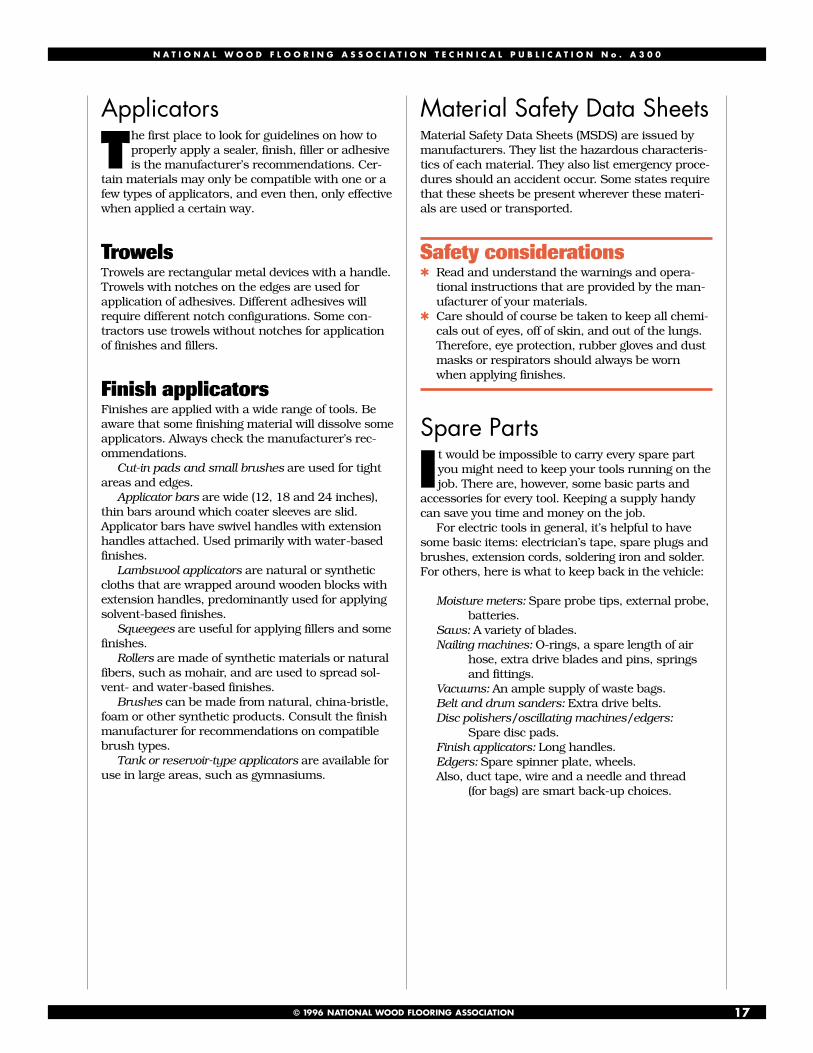
Laid flooring end-jointerA power tool for multiple-board repairs on strip andplank flooring. Uses a plunge router and a mobileadjustable template for fast and accurate end-jointcutting. An alternative to manual techniques, suchas the hammer-and-chisel method.
This type of tool takes advantage of a flooringmechanic’s body weight to hold the adjustable tem-plate to the floor, allowing the plunge router to cutand move laterally, creating a 90-degree end-joint,minimizing chisel work.
© 1996 NATIONAL WOOD FLOORING ASSOCIATION 15

16 © 1996 NATIONAL WOOD FLOORING ASSOCIATION
N A T I O N A L W O O D F L O O R I N G A S S O C I A T I O N T E C H N I C A L P U B L I C A T I O N N o . A 3 0 0
Spline-groove router bitsUsed to cut a 1⁄4-by-1⁄4-inch spline groove in 3⁄4-inchflooring. Can be used for border installations, nos-ings, headers or other areas where a new tongue-and-groove joint is needed.
Taping machinesThese devices apply tape to floors, usually sportsfloors, to create lines. Most models are rolled alongon small wheels, and use guides to lay a precise lineof tape. Radius rods are used for circular patterns.They apply two strips of tape at the same time forpainted lines.
Power boostersPower boosters are safe, inexpensive ways to protectyour expensive floor-sanding equipment from low-voltage power siutations.
Use a power booster to centrally connect yourinstallation, floor sanding and vacuum equipment.Use a booster whenever extra-long power cords arenecessary (more than 75 feet), when drawing powerfrom temporary power poles or when the local powerit cut with excessive demands.
Use a booster to run 220-volt sanders and 115-volt edgers, buffers and vacuums. Professionalequipment requires no less than 30-amp breakersand should be on 10-3 cable. Boosters should beplaced no more than 75 feet from your equipment.
ScrapersScrapers are essentially knives. They come in a vari-ety of designs, from wide-blade spatula-like versions,to razor blade holders for taking paint and tape off ofwindows. You will find them valuable in many situa-tions. Many scrapers have two-handed handle con-figurations for leverage and control.
FilesFiles come in a variety of shapes and tooth configu-rations for several different uses. Their general pur-pose is to remove small amounts of material fromwhatever surface they are designed for. A typicalapplication is smoothing or sharpening scrapers.Files should always be used with a properly sizedhandle.
Nail setsNail sets are small, hardened steel devices used todrive nails below the surface of the wood. Whenhand nailing tongue-and-groove flooring, use the nailset on its side to avoid damaging the corner of theflooring strip.
Appliance moversThere are several different methods for moving heavyappliances. One of the most basic is to place a seriesof thick plastic sheets under the appliance, and slideit out of the room. Dollies and hand trucks also workwell, but beware of debris in the wheels that coulddamage a new wood floor when moving appliancesback into a newly finished room. One of the latestinnovations is a device that uses air bags under theappliance and a blower motor to lift it off the floor,allowing it to be easily moved.
PlanesPlanes are tools with knives that protrude below aflat surface and at an angle, for removing wood inpasses. Block planers are designed for general sur-face smoothing and squaring. Jack or joiner planersare larger, for removing more material along thegrain of the wood. Some small electric planers arealso available.
Electric testersElectric testers check for the presence and amountof current in an outlet. They are used to determine ifa certain machine can be safely run from that outlet— too little power will burn out an electric motor.
© 1996 NATIONAL WOOD FLOORING ASSOCIATION 17
N A T I O N A L W O O D F L O O R I N G A S S O C I A T I O N T E C H N I C A L P U B L I C A T I O N N o . A 3 0 0
Applicators
The first place to look for guidelines on how toproperly apply a sealer, finish, filler or adhesiveis the manufacturer’s recommendations. Cer-
tain materials may only be compatible with one or afew types of applicators, and even then, only effectivewhen applied a certain way.
TrowelsTrowels are rectangular metal devices with a handle.Trowels with notches on the edges are used forapplication of adhesives. Different adhesives willrequire different notch configurations. Some con-tractors use trowels without notches for applicationof finishes and fillers.
Finish applicatorsFinishes are applied with a wide range of tools. Beaware that some finishing material will dissolve someapplicators. Always check the manufacturer’s rec-ommendations.
Cut-in pads and small brushes are used for tightareas and edges.
Applicator bars are wide (12, 18 and 24 inches),thin bars around which coater sleeves are slid.Applicator bars have swivel handles with extensionhandles attached. Used primarily with water-basedfinishes.
Lambswool applicators are natural or syntheticcloths that are wrapped around wooden blocks withextension handles, predominantly used for applyingsolvent-based finishes.
Squeegees are useful for applying fillers and somefinishes.
Rollers are made of synthetic materials or naturalfibers, such as mohair, and are used to spread sol-vent- and water-based finishes.
Brushes can be made from natural, china-bristle,foam or other synthetic products. Consult the finishmanufacturer for recommendations on compatiblebrush types.
Tank or reservoir-type applicators are available foruse in large areas, such as gymnasiums.
Material Safety Data SheetsMaterial Safety Data Sheets (MSDS) are issued bymanufacturers. They list the hazardous characteris-tics of each material. They also list emergency proce-dures should an accident occur. Some states requirethat these sheets be present wherever these materi-als are used or transported.
Safety considerations✱ Read and understand the warnings and opera-
tional instructions that are provided by the man-ufacturer of your materials.
✱ Care should of course be taken to keep all chemi-cals out of eyes, off of skin, and out of the lungs.Therefore, eye protection, rubber gloves and dustmasks or respirators should always be wornwhen applying finishes.
Spare Parts
It would be impossible to carry every spare partyou might need to keep your tools running on thejob. There are, however, some basic parts and
accessories for every tool. Keeping a supply handycan save you time and money on the job.
For electric tools in general, it’s helpful to havesome basic items: electrician’s tape, spare plugs andbrushes, extension cords, soldering iron and solder.For others, here is what to keep back in the vehicle:
Moisture meters: Spare probe tips, external probe, batteries.
Saws: A variety of blades.Nailing machines: O-rings, a spare length of air
hose, extra drive blades and pins, springs and fittings.
Vacuums: An ample supply of waste bags.Belt and drum sanders: Extra drive belts.Disc polishers/oscillating machines/edgers:
Spare disc pads.Finish applicators: Long handles.Edgers: Spare spinner plate, wheels. Also, duct tape, wire and a needle and thread
(for bags) are smart back-up choices.

18 © 1996 NATIONAL WOOD FLOORING ASSOCIATION
N A T I O N A L W O O D F L O O R I N G A S S O C I A T I O N T E C H N I C A L P U B L I C A T I O N N o . A 3 0 0
Applicators . . . . . . . . . . . . . . . . . . . . . . . . . . . . . . . . . . . . . 17applicator bars . . . . . . . . . . . . . . . . . . . . . . . . . . . . . . . . 17brushes . . . . . . . . . . . . . . . . . . . . . . . . . . . . . . . . . . . . . . . 17cut-in pads. . . . . . . . . . . . . . . . . . . . . . . . . . . . . . . . . . . . 17finish applicators. . . . . . . . . . . . . . . . . . . . . . . . . . . . . . 17lambswool applicators. . . . . . . . . . . . . . . . . . . . . . . . . 17reservoir-type applicators . . . . . . . . . . . . . . . . . . . . . 17rollers . . . . . . . . . . . . . . . . . . . . . . . . . . . . . . . . . . . . . . . . . 17squeegees . . . . . . . . . . . . . . . . . . . . . . . . . . . . . . . . . . . . . 17trowels . . . . . . . . . . . . . . . . . . . . . . . . . . . . . . . . . . . . . . . . 17
Belt sanders. . . . . . . . . . . . . . . . . . . . . . . . . . . . . . . . . . . . 12
Buffers . . . . . . . . . . . . . . . . . . . . . . . . . . . . . . . . . . . . . . . . . . 13
Compressors. . . . . . . . . . . . . . . . . . . . . . . . . . . . . . . . . . . . 10air-line accessories . . . . . . . . . . . . . . . . . . . . . . . . . . . . 11air-pressure regulator . . . . . . . . . . . . . . . . . . . . . . . . . 10safety considerations . . . . . . . . . . . . . . . . . . . . . . . . . . 11
Disc polishers . . . . . . . . . . . . . . . . . . . . . . . . . . . . . . . . . . 13
Drum sanders . . . . . . . . . . . . . . . . . . . . . . . . . . . . . . . . . . 12
Dust respirators . . . . . . . . . . . . . . . . . 5, 12, 13, 14, 17
Edgers. . . . . . . . . . . . . . . . . . . . . . . . . . . . . . . . . . . . . . . . . . . 14
Electric testers . . . . . . . . . . . . . . . . . . . . . . . . . . . . . . . . . 16
End-jointers . . . . . . . . . . . . . . . . . . . . . . . . . . . . . . . . . . . . 15
Eye protection. . . . . . . . . . . . . 4, 9, 11, 12, 13, 14, 17glasses . . . . . . . . . . . . . . . . . . . . . . . . . . . . . . . . . . . . . . . . . 4goggles . . . . . . . . . . . . . . . . . . . . . . . . . . . . . . . . . . . . . . . . . 4when applying finishes . . . . . . . . . . . . . . . . . . . . . . . . 17when using nailers . . . . . . . . . . . . . . . . . . . . . . . . . . . . 11when using sanding machines. . . . . . . . . 12, 13, 14when using saws . . . . . . . . . . . . . . . . . . . . . . . . . . . . . . . 9
Fasteners . . . . . . . . . . . . . . . . . . . . . . . . . . . . . . . . . . . . . . . 10case nails, cut nails, finish nails . . . . . . . . . . . . . . . 10cleats. . . . . . . . . . . . . . . . . . . . . . . . . . . . . . . . . . . . . . . . . . 10screws . . . . . . . . . . . . . . . . . . . . . . . . . . . . . . . . . . . . . . . . 10staples . . . . . . . . . . . . . . . . . . . . . . . . . . . . . . . . . . . . . . . . 10
Hearing protection. . . . . . . . . . . . . . 4, 9, 11, 12, 13, 14
Knee pads . . . . . . . . . . . . . . . . . . . . . . . . . . . . . . . . . . . . . . . 5
Material Safety Data Sheets (MSDS). . . 4, 5, 17
Materials list for the van. . . . . . . . . . . . . . . . . . . . . . 5
Moisture meters . . . . . . . . . . . . . . . . . . . . . . . . . . . . . . . . 7pinless. . . . . . . . . . . . . . . . . . . . . . . . . . . . . . . . . . . . . . . . . . 7probe type . . . . . . . . . . . . . . . . . . . . . . . . . . . . . . . . . . . . . . 7
Nailing machines . . . . . . . . . . . . . . . . . . . . . . . . . . . . . . 10pneumatic fasteners. . . . . . . . . . . . . . . . . . . . . . . . . . . 10ratchet nailers. . . . . . . . . . . . . . . . . . . . . . . . . . . . . . . . . 10spring-loaded nailers . . . . . . . . . . . . . . . . . . . . . . . . . . 10
Offset edger . . . . . . . . . . . . . . . . . . . . . . . . . . . . . . . . . . . 14
Oscillating machines . . . . . . . . . . . . . . . . . . . . . . . . . . 13
Pneumatic fasteners . . . . . . . . . . . . . . . . . . . . . . . . . . 10
Power boosters . . . . . . . . . . . . . . . . . . . . . . . . . . . . . . . . 16
Respiratory protection . . . . . . . . . 4, 5, 12, 13, 14, 17
Routers. . . . . . . . . . . . . . . . . . . . . . . . . . . . . . . . . . . . . . . . . . 15
Safetyalcohol, drugs, medications. . . . . . . . . . . . . . . . . . . . . 3electrical power and wiring . . . . . . . . . . . . . . . . . . . . . 3ground fault circuit interrupters . . . . . . . . . . . . . . . . 4lighting and ventilation . . . . . . . . . . . . . . . . . . . . . . . . . 3Material Safety Data Sheets (MSDS),. . . . . . . . 5, 17nailing machines . . . . . . . . . . . . . . . . . . . . . . . . . . . . . . 11proper clothing. . . . . . . . . . . . . . . . . . . . . . . . . . . . . . . 4, 5safety guards . . . . . . . . . . . . . . . . . . . . . . . . . . . . . . . . 4, 9sanding machines . . . . . . . . . . . . . . . . . . . . . 12, 13, 14saws. . . . . . . . . . . . . . . . . . . . . . . . . . . . . . . . . . . . . . . . . . . . 9
Safety guards . . . . . . . . . . . . . . . . . . . . . . . . . . . . . . . . . 4, 9
Sanding machines . . . . . . . . . . . . . . . . . . . . . . 12, 13, 14belt sanders . . . . . . . . . . . . . . . . . . . . . . . . . . . . . . . . . . . 12buffers . . . . . . . . . . . . . . . . . . . . . . . . . . . . . . . . . . . . . . . . 13disc polishers . . . . . . . . . . . . . . . . . . . . . . . . . . . . . . . . . 13drum sanders . . . . . . . . . . . . . . . . . . . . . . . . . . . . . . . . . 12dust collection. . . . . . . . . . . . . . . . . . . . . . . . . 12, 13, 14edgers. . . . . . . . . . . . . . . . . . . . . . . . . . . . . . . . . . . . . . . . . 14offset edger. . . . . . . . . . . . . . . . . . . . . . . . . . . . . . . . . . . . 14oscillating machines. . . . . . . . . . . . . . . . . . . . . . . . . . . 13spinner plate . . . . . . . . . . . . . . . . . . . . . . . . . . . . . . . . . . 14
Saws. . . . . . . . . . . . . . . . . . . . . . . . . . . . . . . . . . . . . . . . . . . . 8, 9backsaws. . . . . . . . . . . . . . . . . . . . . . . . . . . . . . . . . . . . . . . 8band saws. . . . . . . . . . . . . . . . . . . . . . . . . . . . . . . . . . . . . . 9circular saws . . . . . . . . . . . . . . . . . . . . . . . . . . . . . . . . . . . 9coping saws . . . . . . . . . . . . . . . . . . . . . . . . . . . . . . . . . . . . 8cross-cut and rips saws . . . . . . . . . . . . . . . . . . . . . . . . 8hacksaws. . . . . . . . . . . . . . . . . . . . . . . . . . . . . . . . . . . . . . . 8hand saws. . . . . . . . . . . . . . . . . . . . . . . . . . . . . . . . . . . . . . 8jamb saws . . . . . . . . . . . . . . . . . . . . . . . . . . . . . . . . . . . 8, 9power miter saws . . . . . . . . . . . . . . . . . . . . . . . . . . . . . . . 9power saws . . . . . . . . . . . . . . . . . . . . . . . . . . . . . . . . . . 8, 9radial arm saws . . . . . . . . . . . . . . . . . . . . . . . . . . . . . . . . 9reciprocating saws. . . . . . . . . . . . . . . . . . . . . . . . . . . . . . 9saber/jig saws. . . . . . . . . . . . . . . . . . . . . . . . . . . . . . . . . . 9scroll saws. . . . . . . . . . . . . . . . . . . . . . . . . . . . . . . . . . . . . . 9table saws . . . . . . . . . . . . . . . . . . . . . . . . . . . . . . . . . . . . . . 9
Spare parts. . . . . . . . . . . . . . . . . . . . . . . . . . . . . . . . . . . . . 17
Specialty tools . . . . . . . . . . . . . . . . . . . . . . . . . . . . . . 15, 16applicance movers. . . . . . . . . . . . . . . . . . . . . . . . . . . . . 16electric testers. . . . . . . . . . . . . . . . . . . . . . . . . . . . . . . . . 16end-jointers . . . . . . . . . . . . . . . . . . . . . . . . . . . . . . . . . . . 15files . . . . . . . . . . . . . . . . . . . . . . . . . . . . . . . . . . . . . . . . . . . 16nail sets . . . . . . . . . . . . . . . . . . . . . . . . . . . . . . . . . . . . . . . 16planes. . . . . . . . . . . . . . . . . . . . . . . . . . . . . . . . . . . . . . . . . 16power boosters . . . . . . . . . . . . . . . . . . . . . . . . . . . . . . . . 16routers . . . . . . . . . . . . . . . . . . . . . . . . . . . . . . . . . . . . . . . . 15scrapers. . . . . . . . . . . . . . . . . . . . . . . . . . . . . . . . . . . . . . . 16spline-groove router bits. . . . . . . . . . . . . . . . . . . . . . . 16taping machines . . . . . . . . . . . . . . . . . . . . . . . . . . . . . . 16
Taping machines . . . . . . . . . . . . . . . . . . . . . . . . . . . . . . . 16
Tools checklist . . . . . . . . . . . . . . . . . . . . . . . . . . . . . . . . . . . 6
Trowels. . . . . . . . . . . . . . . . . . . . . . . . . . . . . . . . . . . . . . . . . . 17
Vacuums . . . . . . . . . . . . . . . . . . . . . . . . . . . . . . . . . . . . . . . . 15
Work shoes. . . . . . . . . . . . . . . . . . . . . . . . . . . . . . . . . . . 5, 11
INDEX

© 1996 NATIONAL WOOD FLOORING ASSOCIATION 19
N A T I O N A L W O O D F L O O R I N G A S S O C I A T I O N T E C H N I C A L P U B L I C A T I O N N o . A 2 0 0
NWFA TECHNICAL AND EDUCATION COMMITTEE
• John Hoopes, 3M Company, committee chair
• Coley Armstrong, Basic Coatings
• Joe Audino, Rode Brothers Floors
• Don Bollinger, Wood Floor Products
• Daniel Boone, National Wood Flooring Association
• Jeff Buysse, Minuteman International
• Don Conner, Harris-Tarkett Inc.
• Tom Conser, The Roane Company
• Tom Derleth, Indiana Hardwood Specialists
• Galen Fitzel, 3M Company
• Jim Garth, Dynamic Laser Applications
• John Goss, Woodwise/Design Hardwood Products
• Kevin Hacke, Maple Flooring Manufacturers’ Association
• Woody Hilscher, BonaKemi USA
• John Mayers, Dura Seal
• Tim McCool, Dri-Tac Adhesives Group
• Mickey Moore, National Oak Flooring Manufacturers’ Association
• Neil Moss, Hartco Flooring
• Bob Vanderlinden, Bruce Hardwood Floors
THE FOLLOWING COMPANIES AND INDIVIDUALSCONTRIBUTED INFORMATION FOR THISPUBLICATION, SERVED AS REVIEWERS,OR BOTH:
• BonaKemi USA, Mike Hodges
• Dura Seal, Bill Costello
• Erickson’s Flooring and Supply, Dick Walters
• Floor Style Products, Brian Mattson
• Galaxy Floor Sanding Machines, Jim Tasikas
• Golden State Flooring Company, Chris Coates
• McSwain Hardwood Floor Company, Jonny and Ralph McSwain
• Magee Industries, Kenn Parr
• Porta-Nails Inc., Jerry Coleman
• Powernail Company, Bill McLaughlin
• Primatech, Richard Poirier
• Rode Brothers Floors, Greg Rudolph
• Squar-Buff, John Kelleher
• Stanley-Bostitch, Chris Dutra and Lew Oliver
• Start to Finish Hardwood Floors,Mike Osborn
• Treska Products, Larry Dean
ILLUSTRATIONS FOR THIS PUBLICATION WERECREATED AND/OR COLORIZED BY:
• Victor Klouse, Clarke Industries
• Kay Lum, Athletic Business Publications
• Michael Roberts, Athletic Business Publications
SOURCES AND CREDITS