Embed Size (px)
Citation preview

1 © School Thing Limited 2015
Timetable Construction Steps 1 -‐ 6
User Guide

2 © School Thing Limited 2015
Contents
Enabling Access to Timetable Construction ........................................................................................................................... 3
Step 1) SETUP ......................................................................................................................................................................... 4
Step 2) GRID ........................................................................................................................................................................... 5
Step 3) TEACHER DATA .......................................................................................................................................................... 6
Step 4) TEACHER SETS ............................................................................................................................................................ 7
Step 5) CLASS DATA ............................................................................................................................................................... 9
Step 6) TEACHER .................................................................................................................................................................. 15

3 © School Thing Limited 2015
Enabling Access to Timetable Construction Timetable Construction is automatically available to any user logged on in the role of Principal. However, it can also be made available to any user by going to their profile and under “Account” tick the box “Enable Access Timetable Construction”.
Expand the last red tab (3 lines) and select Timetable Construction from the list
4 © School Thing Limited 2015
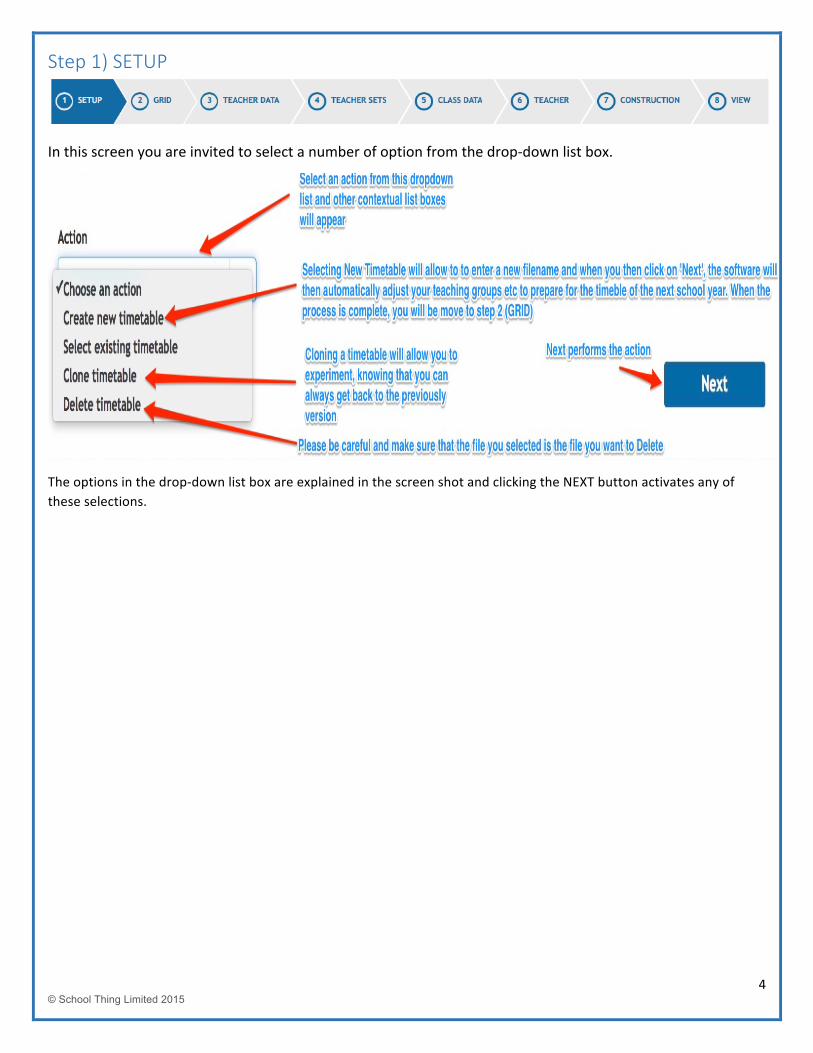
Step 1) SETUP
In this screen you are invited to select a number of option from the drop-‐down list box.
The options in the drop-‐down list box are explained in the screen shot and clicking the NEXT button activates any of these selections.
5 © School Thing Limited 2015
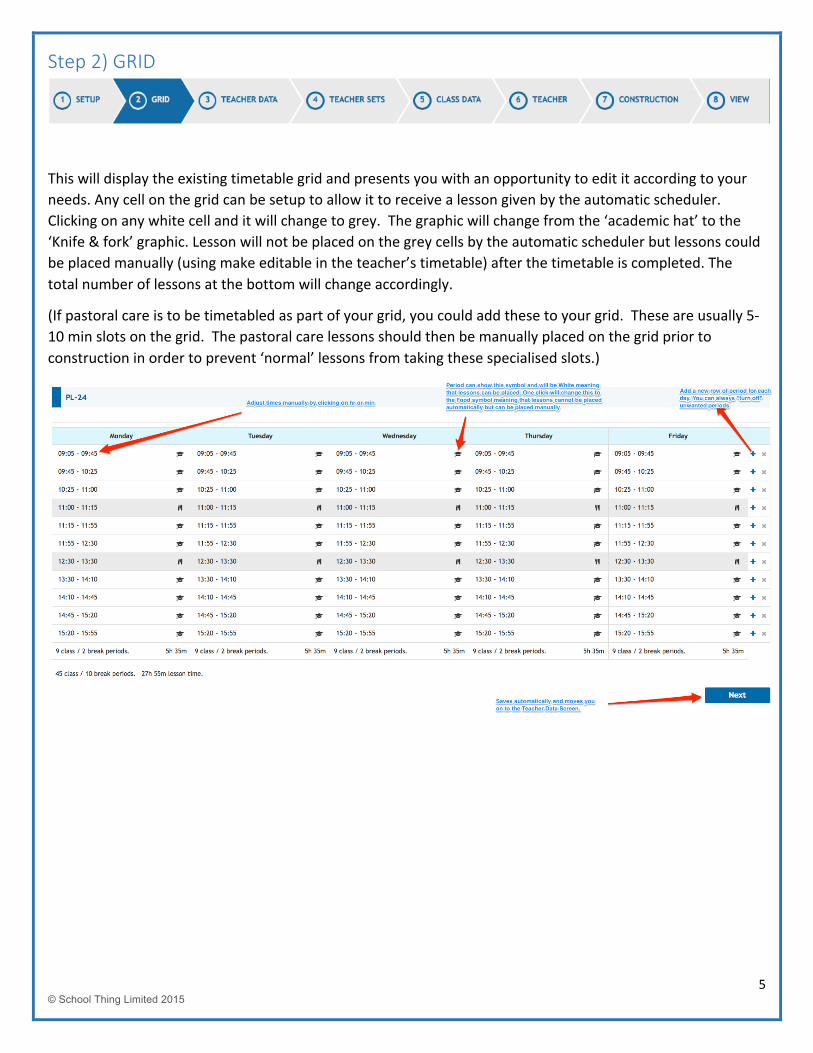
Step 2) GRID
This will display the existing timetable grid and presents you with an opportunity to edit it according to your needs. Any cell on the grid can be setup to allow it to receive a lesson given by the automatic scheduler. Clicking on any white cell and it will change to grey. The graphic will change from the ‘academic hat’ to the ‘Knife & fork’ graphic. Lesson will not be placed on the grey cells by the automatic scheduler but lessons could be placed manually (using make editable in the teacher’s timetable) after the timetable is completed. The total number of lessons at the bottom will change accordingly.
(If pastoral care is to be timetabled as part of your grid, you could add these to your grid. These are usually 5-‐10 min slots on the grid. The pastoral care lessons should then be manually placed on the grid prior to construction in order to prevent ‘normal’ lessons from taking these specialised slots.)

6 © School Thing Limited 2015
Step 3) TEACHER DATA
In this screen you will see the list of teachers that are included in your live timetable. Under the personal profile of any teacher, there is a tickbox ‘Include in Timetabling’. If this is changed to ‘NO’, the teacher will not appear in the Teacher Data Screen. You can delete a teacher from the Teacher Data screen if they have been carried forward in error. This will show you the list of the teachers who will be included in next year’s timetable. Deleting a teacher from this screen will not delete them from the live data.
Please read the explanations written on the screen shot below.
A new teacher may be added using -‐ Actions – Add Teacher. The new teacher will be added to the list of teachers in the Teacher Data Screen. When the teacher’s name is not yet known, we suggest that you add something meaningful like ‘NEW MATHS”. The new teacher will not appear in VS until the timetable for next year has been published. When the timetable is published, the teacher called ‘NEW MATHS’ will have a profile and timetable. This can be edited and the precise details of the new maths teacher can then be included.
Although it is very easy to mark a teacher as unavailable, we strongly advise that you only do this where absolutely necessary. These restrictions will make the construction stage of the timetable more difficult.
7 © School Thing Limited 2015
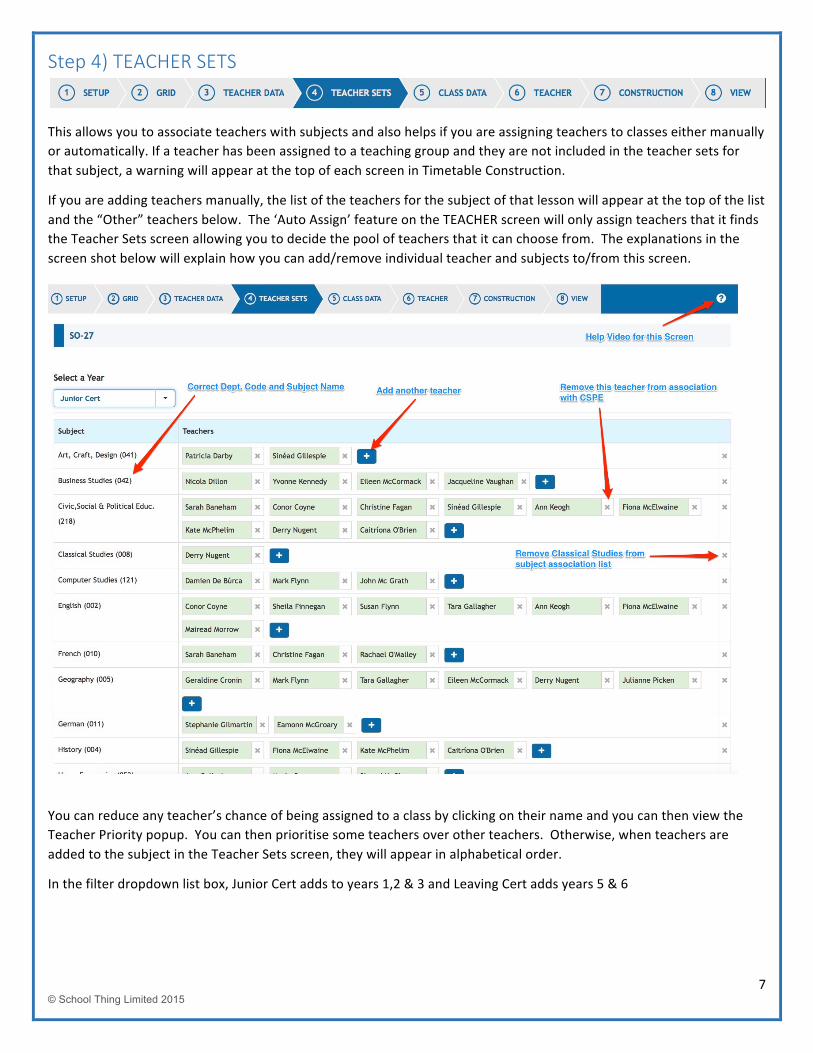
Step 4) TEACHER SETS
This allows you to associate teachers with subjects and also helps if you are assigning teachers to classes either manually or automatically. If a teacher has been assigned to a teaching group and they are not included in the teacher sets for that subject, a warning will appear at the top of each screen in Timetable Construction.
If you are adding teachers manually, the list of the teachers for the subject of that lesson will appear at the top of the list and the “Other” teachers below. The ‘Auto Assign’ feature on the TEACHER screen will only assign teachers that it finds the Teacher Sets screen allowing you to decide the pool of teachers that it can choose from. The explanations in the screen shot below will explain how you can add/remove individual teacher and subjects to/from this screen.
You can reduce any teacher’s chance of being assigned to a class by clicking on their name and you can then view the Teacher Priority popup. You can then prioritise some teachers over other teachers. Otherwise, when teachers are added to the subject in the Teacher Sets screen, they will appear in alphabetical order.
In the filter dropdown list box, Junior Cert adds to years 1,2 & 3 and Leaving Cert adds years 5 & 6

8 © School Thing Limited 2015
When you change the priority of any teacher, their cell colour on screen will change accordingly.

9 © School Thing Limited 2015
Step 5) CLASS DATA
This is a very important screen as it is here that you specify how you want your curriculum to be timetabled.
The screen in divided into two separate sections. The top part displays the “Blocks” in each year group and the lower part of this screen shows the ‘Core”. Core in this screen means the subjects being studied by each base class.
The base classes are arranged in columns. For the core section of the screen, the classes will be timetabled completely independently of the other classes in the core section.
In the blocks section, you will also see the base class columns but in this section, these classes will run concurrently. You may also see what we refer to as a ‘Dummy Class(es)’. These are required when practical subjects in Option Blocks have less students that the number of students assigned to base classes and therefore you require additional classes to be created. Normally, three base classes (with thirty students in each) would require four or five groupings for Option Block classes as these will have only 24 students or less in each.
If the number of Base Classes and Dummy Classes exceeds six, a filter will appear allowing you to select only the class or classes you wish to view.
Please read carefully the descriptions added to the screen shots below.

10 © School Thing Limited 2015
In the above screen shot, you will see that there are three Option Blocks imported from our Options feature (Opt Blocks 1,2 & 3). So for example, all five of the Teaching Groups in Opt Block 1 will run concurrently. (In this case, it is a language line with three French and Two Germans classes.
You will also see that we have one block of Maths and 1 Block of English. This will allow all of the students in year 2 to attend any of those English and Maths lessons. However in Irish, we have two ‘mini-‐blocks’. One of these (Block 1) will allow only the students from Base Classes 2A, 2B and 2C to attend. The remaining students in classes 2D and 2E can be scheduled for any other subject from their core section at that time. Similarly, the student in Base Classes 2D & 2E will have Irish at the same time allowing them to move between these two classes.
To create a new block, simply click ‘New Block’ and it will be automatically created
In the screen shot below, you will see that each of the classes 2A, 2B, 2C, 2D, 2E will study each of the eight subjects listed. All of these classes will run completely independently of each other. However, there is a random chance that they could have a same subject at the same time.
New Core subject can be added by clicking on ‘New Core”. When doing this, selecting the tick box – ‘Apply to all Teaching Groups” will create a Teaching Group for each of the base classes with the number of lessons and spread entered by the user.

11 © School Thing Limited 2015
In all of the Class Data screens, it is important to note that the total number of lessons is shown for each column and that for the base classes, this number should match the number of available slots on the grid. If this number is less than the number of slots on the grid, then students will have free periods during the day. If you have a number of lessons greater than the number of places on the grid, the header for that class will turn red and this means that all of the lessons could not possibly be scheduled, as there are not enough slots on the grid.
(Please Note: If a class is entered in the dummy class column of this screen, students from any base class with an entry in that row are free to attend this class also. Therefore, it is important that the number of lessons in the dummy class column is never greater than the number of lessons for each of the entries across that same row)
12 © School Thing Limited 2015
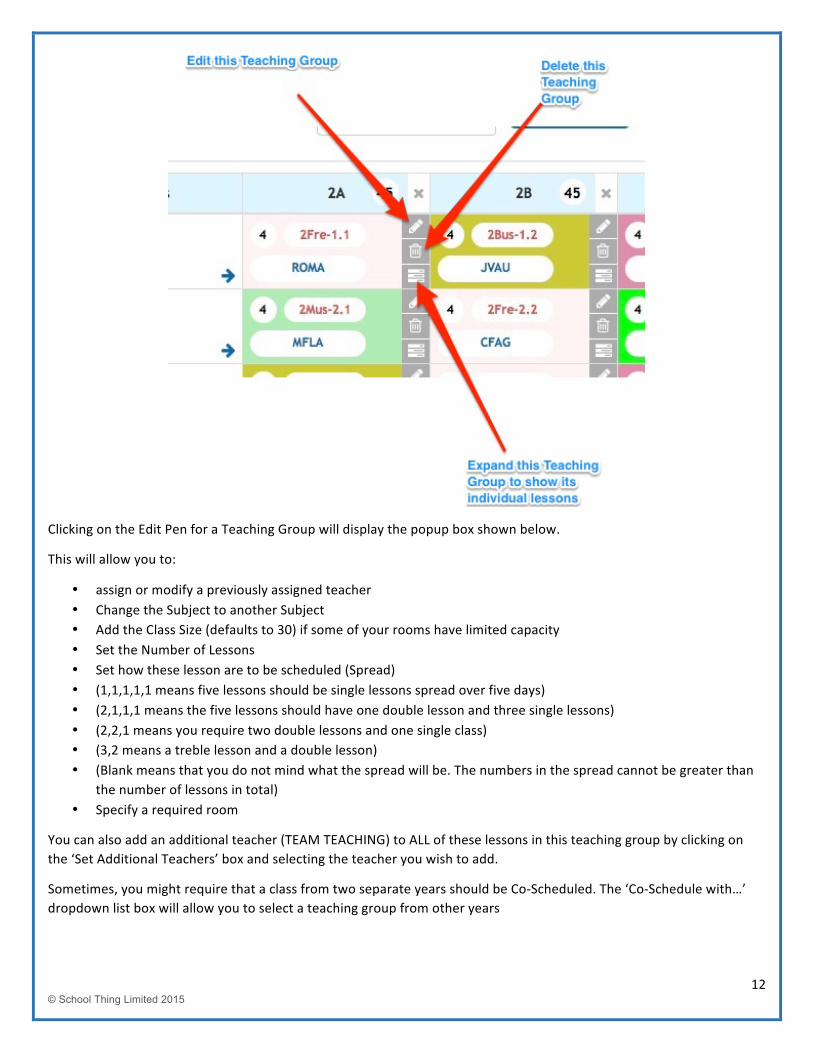
Clicking on the Edit Pen for a Teaching Group will display the popup box shown below.
This will allow you to:
• assign or modify a previously assigned teacher • Change the Subject to another Subject • Add the Class Size (defaults to 30) if some of your rooms have limited capacity • Set the Number of Lessons • Set how these lesson are to be scheduled (Spread) • (1,1,1,1,1 means five lessons should be single lessons spread over five days) • (2,1,1,1 means the five lessons should have one double lesson and three single lessons) • (2,2,1 means you require two double lessons and one single class) • (3,2 means a treble lesson and a double lesson) • (Blank means that you do not mind what the spread will be. The numbers in the spread cannot be greater than
the number of lessons in total) • Specify a required room
You can also add an additional teacher (TEAM TEACHING) to ALL of these lessons in this teaching group by clicking on the ‘Set Additional Teachers’ box and selecting the teacher you wish to add.
Sometimes, you might require that a class from two separate years should be Co-‐Scheduled. The ‘Co-‐Schedule with…’ dropdown list box will allow you to select a teaching group from other years
13 © School Thing Limited 2015
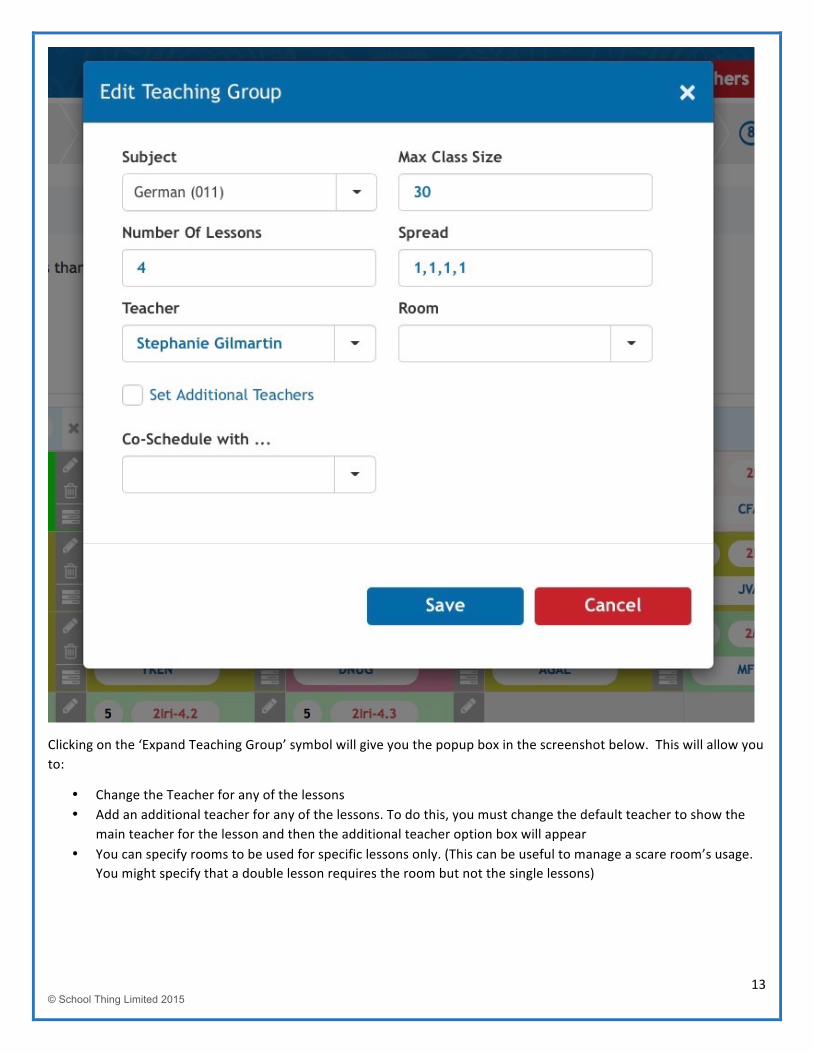
Clicking on the ‘Expand Teaching Group’ symbol will give you the popup box in the screenshot below. This will allow you to:
• Change the Teacher for any of the lessons • Add an additional teacher for any of the lessons. To do this, you must change the default teacher to show the
main teacher for the lesson and then the additional teacher option box will appear • You can specify rooms to be used for specific lessons only. (This can be useful to manage a scare room’s usage.
You might specify that a double lesson requires the room but not the single lessons)

14 © School Thing Limited 2015

15 © School Thing Limited 2015
Step 6) TEACHER
This screen is in two sections. Both sections will scroll separately to allow for easy viewing and moving of classes.
This screen will show you the list of teachers who will be included in the timetable and the list of classes that they have been assigned. It will also show you the ‘Load Taken’ by that teacher (in hours & minutes and Periods) and their permitted ‘Load’ (set by you in a previous screen)
The classes can be dragged and dropped from one teacher to another or also to the Unassigned Teaching Groups section at the bottom of the screen. This will allow you to assign a class to a teacher or to “fine tune” the classes already assigned. (Changes made in this screen will be reflected in the Class Data screen
The ‘Auto-‐assign’ feature in also available on this screen. Clicking Auti-‐assign will use the information added in the Teacher Sets screen to automatically add a teacher to any teaching group without a teacher assigned. It will not modify the teacher already assigned to a teaching group allowing us to ensure continuity of a class teacher from year to the next. You can manually replace any teacher who has been automatically assigned with a teacher of your choice.
Please read carefully the descriptions added to the screen shots below.

16 © School Thing Limited 2015
The UNASSIGNED TEACHING GROUPS at the bottom of this screen will highlight any teaching group without a teacher assigned. Teaching Groups can be dragged from here and dropped into the row of the required teacher.