Embed Size (px)
Citation preview

24
7 | Chapter
AdditionalTechniques for
Thigh, Hip,and Pelvis
Wrapping Techniques
QUADRICEPS STRAIN TECHNIQUE TWO Figure 7–1
Purpose: The quadriceps strain technique is used to provide compression and mild to moderate circularsupport when treating strains. This technique may be used to anchor protective padding for a quadricepscontusion or myositis ossificans (Fig. 7–1).Materials:• 4 inch or 6 inch width by 10 yard length elastic wrap, metal clips, 11/2 inch non-elastic tape, 2 inch or
3 inch elastic tape, taping scissorsPosition of the individual: Standing on a taping table, bench, or floor with the majority of the weight on thenoninvolved leg and the involved leg placed in a neutral position with slight knee flexion. Maintain this position during application.Preparation: To lessen migration, apply adherent tape spray, tape strips, or anchors directly to the skin. Ifusing a pad, place it over the injured area.
Application:
➠
➠
➠
➠
➠
2558_BC_Ch07_024-030 26/09/11 2:15 PM Page 24
Chapter 7 | Additional Techniques for Thigh, Hip, and Pelvis 25
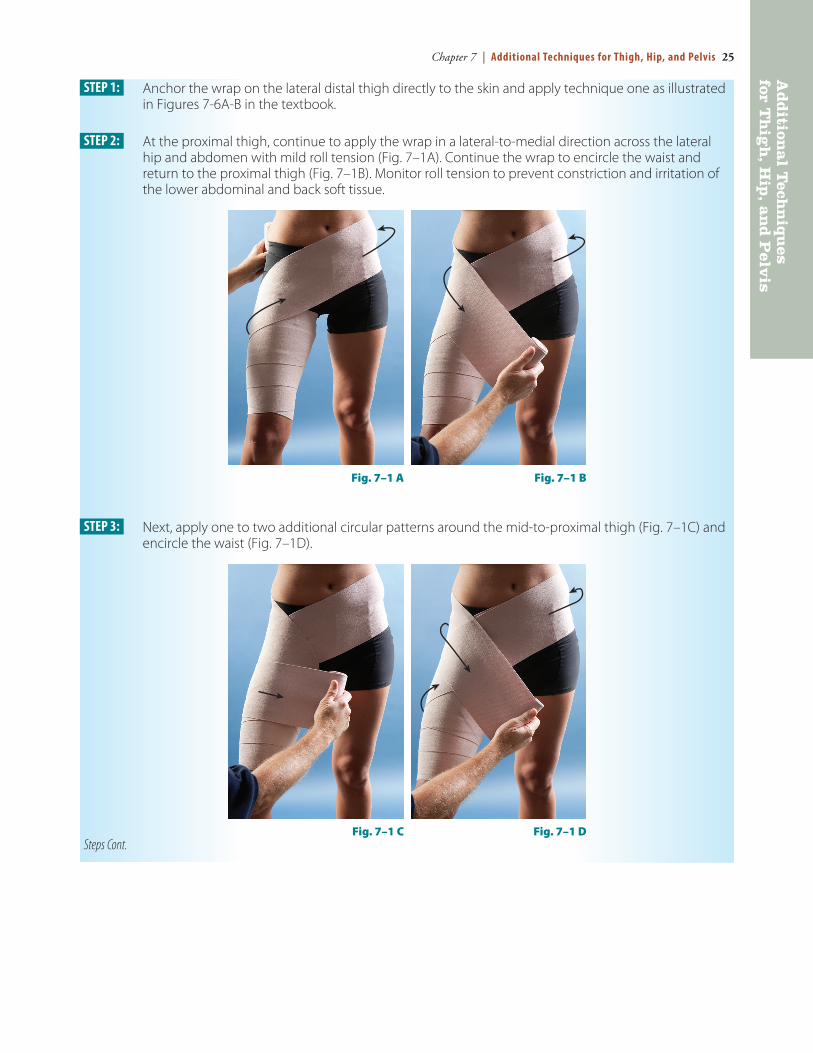
Anchor the wrap on the lateral distal thigh directly to the skin and apply technique one as illustratedin Figures 7-6A-B in the textbook.
At the proximal thigh, continue to apply the wrap in a lateral-to-medial direction across the lateralhip and abdomen with mild roll tension (Fig. 7–1A). Continue the wrap to encircle the waist and return to the proximal thigh (Fig. 7–1B). Monitor roll tension to prevent constriction and irritation ofthe lower abdominal and back soft tissue.
Next, apply one to two additional circular patterns around the mid-to-proximal thigh (Fig. 7–1C) andencircle the waist (Fig. 7–1D).
STEP 2:
STEP 1:
STEP 3:
Steps Cont.
Fig. 7–1 A Fig. 7–1 B
Ad
dition
al T
echn
iqu
es for T
hig
h, H
ip, a
nd
Pelv
is
Fig. 7–1 C Fig. 7–1 D
2558_BC_Ch07_024-030 26/09/11 2:15 PM Page 25

26 Chapter 7 | Additional Techniques for Thigh, Hip, and Pelvis
Ad
dit
ion
al
Tec
hn
iqu
es
for
Th
igh
, H
ip, a
nd
Pel
vis Anchor the wrap over the mid thigh. Use Velcro, metal clips, or 11/2 inch non-elastic tape to anchor
for non-athletic or non-work activities . During athletic or work activities, anchor 2 inch or 3 inch elastic tape on the lateral distal thigh and apply two to four continuous lateral-to-medial circular patterns around the thigh with moderate roll tension.
STEP 4: ➠
➠
Fig. 7–1 E
HAMSTRINGS STRAIN TECHNIQUE T WO Figure 7–2
Purpose: Use the hamstrings strain technique to provide compression and mild to moderate circular support when treating strains (Fig. 7–2).Materials:• 4 inch or 6 inch width by 10 yard length elastic wrap, metal clips, 11/2 inch non-elastic tape, 2 inch or
3 inch elastic tape, taping scissorsPosition of the individual: Standing on a taping table, bench, or floor with the majority of the weight on thenoninvolved leg and the involved leg placed in a neutral position with slight knee flexion. Maintain this position during application.Preparation: To lessen migration, apply adherent tape spray, tape strips, or anchors directly to the skin.
Application:
➠
➠
➠
➠
➠
At the proximal thigh, continue to apply the elastic tape with mildroll tension to encircle the waist and anchor on the circular tapepattern on the mid thigh (Fig. 7–1E). No additional anchors are required.
STEP 5:
2558_BC_Ch07_024-030 26/09/11 2:15 PM Page 26

Chapter 7 | Additional Techniques for Thigh, Hip, and Pelvis 27
Ad
dition
al T
echn
iqu
es for T
hig
h, H
ip, a
nd
Pelv
is
Fig. 7–2 A Fig. 7–2 B
When treating a medial hamstrings strain, anchor the extended end of the wrap on the distal, poste-rior medial thigh and apply technique one as illustrated in Figures 7-7A-B in the textbook.
At the proximal thigh, continue to apply the wrap in a medial-to-lateral direction across the lateral hip and encircle the waist with mild roll tension (Fig. 7–2A), returning to the proximal thigh (see Fig. 7–2B). Monitor roll tension to prevent constriction and irritation of the soft tissue.
STEP 1:
STEP 2:
Steps Cont.
Next, apply one to two additional circular patterns around themid-to-proximal thigh and encircle the waist (Fig. 7–2C).
STEP 3:
Fig. 7–2 C
2558_BC_Ch07_024-030 26/09/11 2:15 PM Page 27

28 Chapter 7 | Additional Techniques for Thigh, Hip, and Pelvis
Ad
dit
ion
al
Tec
hn
iqu
es
for
Th
igh
, H
ip, a
nd
Pel
vis Anchor the wrap over the mid thigh. Use Velcro, metal clips, or
11/2 inch non-elastic tape to anchor with non-athletic or non-workactivities . With athletic or work activities, anchor 2 inch or 3 inch elastic tape on the posterior medial thigh and apply two to four continuous medial-to-lateral circular patterns with moderate roll tension around the thigh (Fig. 7–2D).
At the proximal thigh, continue to apply the elastic tape with mildroll tension to encircle the waist and anchor on the circular tapepattern on the mid thigh (Fig. 7–2E). No additional anchors are required.
STEP 4:
➠
➠
STEP 5:
Fig. 7–2 D
Fig. 7–2 E
When treating a lateral hamstrings strain, anchor the extended end of the wrap on the distal, poste-rior lateral thigh directly to the skin and apply technique one as illustrated in Figures 7-7D-E in thetextbook.
STEP 6:
2558_BC_Ch07_024-030 26/09/11 2:15 PM Page 28

Chapter 7 | Additional Techniques for Thigh, Hip, and Pelvis 29
Ad
dition
al T
echn
iqu
es for T
hig
h, H
ip, a
nd
Pelv
is
At the proximal thigh, continue to apply the wrap in a lateral-to-medial direction across the lateral hip and encircle the waist with mild roll tension (Fig. 7–2F), returning to the proximal thigh (see Fig. 7–2G).
Next, apply one to two additional circular patterns around the mid-to-proximal thigh and encircle the waist (Fig. 7–2H). Anchor the wrap over the mid thigh with Velcro, metal clips, or 11/2 inch non-elastic tape , or as illustrated in Figures 7–2D and 7–2E. Apply the 11/2 inch non-elastic or 2 inch or 3 inch elastic tape in a lateral-to-medial circular pattern (Fig. 7–2I).
STEP 8:
➠
➠
STEP 7:
Fig. 7–2 F Fig. 7–2 G
Fig. 7–2 H Fig. 7–2 I
2558_BC_Ch07_024-030 26/09/11 2:15 PM Page 29

30 Chapter 7 | Additional Techniques for Thigh, Hip, and Pelvis
Ad
dit
ion
al
Tec
hn
iqu
es
for
Th
igh
, H
ip, a
nd
Pel
vis HIP POINTER TECHNIQUE T WO Figure 7-3
Purpose: The hip pointer technique is commonly used to anchor off-the-shelf and custom-made pads tothe iliac crest to absorb shock when preventing and treating contusions (Fig. 7–3).Materials:• 4 inch or 6 inch width by 10 yard length elastic wrap, 2 inch or 3 inch elastic tape, taping scissorsPosition of the individual: Standing on a taping table, bench, or floor with the majority of the weight on thenoninvolved leg and the involved leg placed in a neutral position with slight knee flexion. Maintain this position during application.Preparation: To lessen migration, apply adherent tape spray, tape strips, or anchors directly to the skin.
Application:
➠
➠
➠
➠
➠
Anchor the wrap with 2 inch or 3 inch elastic tape. Apply one totwo continuous medial-to-lateral circular patterns with moderateroll tension around the thigh, hip, and waist. Finish and anchor on the mid thigh circular tape pattern (Fig. 7–3). No additional anchors are required.
STEP 2:
Fig. 7–3
Place the pad over the injured area. Anchor the extended end of the wrap on the mid medial thighdirectly to the skin and apply the hip flexor strain technique over the pad (see Figs. 7-9A-E in the text).Note that achieving the moderate upward pull used with the strain technique is not necessary.
STEP 1:
2558_BC_Ch07_024-030 26/09/11 2:15 PM Page 30