Embed Size (px)
DESCRIPTION
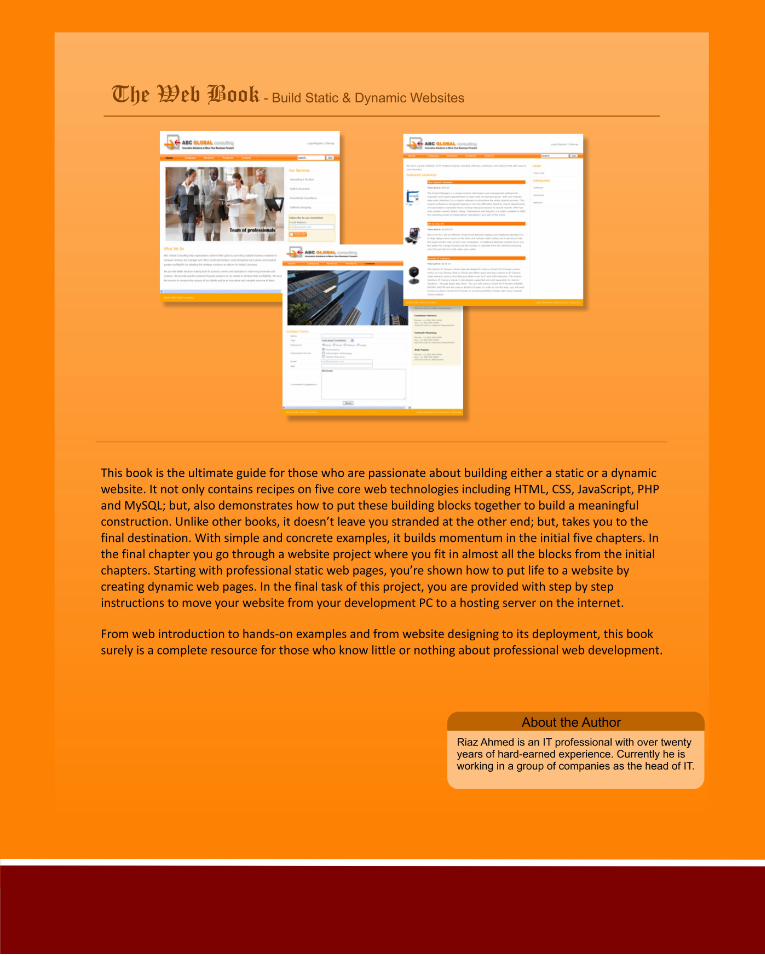
Researched and written by myself, this book is the ultimate guide for those who are passionate about building either a static or a dynamic website. It not only contains recipes on five core web technologies including HTML, CSS, JavaScript, PHP and MySQL but, also demonstrates how to put these building blocks together to build a meaningful construction. Unlike other books, it doesn’t leave you stranded at the other end (guessing what to do next) but takes you to the final milestone. It builds the learning momentum in the initial five chapters with simple and concrete examples. In the final chapter, you go through a website project where you fit in almost all the blocks from the initial chapters. Starting with professional static web pages, you’re shown how to put life to a website by creating dynamic web pages. In the final task of this project, you are provided with step by step instructions to move your website from your development PC to a hosting server on the internet.From web introduction to hands-on examples and from website designing to its deployment, this book surely is a complete resource for those who know little or nothing about professional web development.
Citation preview
The Web Book Build Static & Dynamic Websites
An ultimate resource to build static & dynamic websites
RIAZ AHMED
The Web Book – Build Static & Dynamic Websites
Copyright © 2013 Riaz Ahmed
All rights reserved.
ISBN‐13: 978‐1483929279 ISBN‐10: 1483929272
No part of this publication may be reproduced, stored in a retrieval system or transmitted in any form or by any means, electronic, mechanical, photocopying, recording, scanning or otherwise, except as permitted under Sections 107 or 108 of the 1976 United States Copyright Act, without the prior written permission of the Author. Limit of Liability/Disclaimer of Warranty: The author make no representations or warranties with respect to the accuracy or completeness of the contents of this work and specifically disclaim all warranties, including without limitation warranties of fitness for a particular purpose. No warranty may be created or extended by sales or promotional materials. The advice and strategies contained herein may not be suitable for every situation. This work is sold with the understanding that the author is not engaged in rendering legal, accounting, or other professional services. If professional assistance is required, the services of a competent professional person should be sought. The author shall not be liable for damages arising here from. The fact that an organization or Web site is referred to in this work as a citation and/or a potential source of further information does not mean that the author endorses the information the organization or Web site may provide or recommendations it may make. Further, readers should be aware that Internet Web sites listed in this work may have changed or disappeared between when this work was written and when it is read. Trademarks: All trademarks are the property of their respective owners. The author is not associated with any product or vendor mentioned in this book.

Dedication
I dedicate this book to the two greatest personalities in my life - my parents - who taught me
two brilliant arts: reading and writing.

CONTENTS
Preface ............................................................................................................... i
Chapter 1 ‐ The World Wide Web ‐ An Introduction ........................................... 1
1.1 The Internet and the World Wide Web ............................................................................ 2
1.1.1 Is Web and Internet the same? ............................................................................................ 2
1.1.2 What is Internet Backbone? ................................................................................................. 2
1.1.3 Who is Internet Service Provider? ........................................................................................ 2
1.1.4 Types of Internet Connections ............................................................................................. 3
1.1.5 Security Consideration .......................................................................................................... 3
1.1.6 The World Wide Web ........................................................................................................... 3
1.1.7 What a Web page is? ............................................................................................................. 4
1.1.8 What is a Website? ............................................................................................................... 4
1.1.9 What is a Web Server? ......................................................................................................... 4
1.1.10 What is a Web Browser? .................................................................................................... 5
1.1.11 What are Hyperlinks? ......................................................................................................... 5
1.1.12 What is a Web Address or URL? ......................................................................................... 6
1.1.13 What is a Search Engine? .................................................................................................... 6
1.1.14 How do Search Engines work? ........................................................................................... 7
1.1.15 What are Weblogs or Blogs? .............................................................................................. 8
1.1.16 What is a Web Portal? ........................................................................................................ 8
1.1.17 What is Web Syndication? .................................................................................................. 8
1.1.18 What is E‐commerce? ......................................................................................................... 9
1.2 Launch a Website ........................................................................................................... 10
1.3 Choosing the right Hosting Company .............................................................................. 10
1.3.1 Storage Space ..................................................................................................................... 11
1.3.2 Bandwidth ........................................................................................................................... 11
1.3.3 Domain Name ..................................................................................................................... 11
1.4 What E‐mail is and how it works? .................................................................................. 12
CONTENT
vi
1.5 Scripting Languages ........................................................................................................ 13
1.5.1 Client side scripting ............................................................................................................ 13
1.5.2 Server side scripting ........................................................................................................... 14
1.5.3 Client vs. Server side scripting ............................................................................................ 15
Chapter 2 ‐ Hypertext Markup Language (HTML) ............................................ 17
2.1 About Markup Languages ................................................................................................ 18
2.2 Your First HTML Web Page ............................................................................................. 20
2.3 Elements in HTML ........................................................................................................... 21
2.4 Attributes in HTML ......................................................................................................... 23
2.5 Headings in HTML ........................................................................................................... 24
2.6 Paragraphs in HTML ........................................................................................................ 26
2.7 Lines and Line Breaks in HTML ....................................................................................... 27
2.8 Comments in HTML ........................................................................................................ 28
2.9 Formatting Text in HTML ................................................................................................ 29
2.10 White Space in HTML .................................................................................................... 30
2.11 Abbreviation & Acronyms ............................................................................................ 32
2.12 Long and Short Quotations in HTML ............................................................................ 33
2.13 Web Links in HTML ....................................................................................................... 34
2.14 E‐mail Links in HTML ..................................................................................................... 35
2.15 Bookmarking in HTML .................................................................................................. 36
2.16 Images in HTML ............................................................................................................ 38
2.17 Lists in HTML ................................................................................................................. 40
2.18 Tables in HTML ............................................................................................................. 42
2.19 Divisions/Sections in HTML .......................................................................................... 44
2.20 Forms in HTML .............................................................................................................. 46
2.21 Text and Password Elements ........................................................................................ 48
2.22 Text Area Element ........................................................................................................ 49
2.23 Radio Button ................................................................................................................. 50
2.24 Check Box ...................................................................................................................... 51
2.25 Dropdown List Box ......................................................................................................... 52
2.26 Submit Button ............................................................................................................... 54

CONTENT
vii
2.27 Button Element ............................................................................................................ 56
2.28 File Input Element ........................................................................................................ 56
2.29 Grouping Form Elements ............................................................................................. 57
2.30 iFrames in HTML .......................................................................................................... 58
2.31 What’s new in HTML5 .................................................................................................. 59
2.31.1 Calendar ........................................................................................................................ 60
2.31.2 Form Validation ............................................................................................................. 61
2.31.3 Add Search Box to a Web page ..................................................................................... 62
2.31.4 Play Videos on a Web page ........................................................................................... 63
2.31.5 New HTML5 Layout ....................................................................................................... 64
Chapter 3 ‐ Cascading Style Sheets (CSS) ......................................................... 65
3.1 About CSS ....................................................................................................................... 66
3.2 CSS Benefits .................................................................................................................... 67
3.3 What is CSS3? ................................................................................................................. 67
3.4 CSS Rules and Syntax ...................................................................................................... 68
3.5 Creating Style Sheets (External/Internal) ....................................................................... 69
3.6 Understand the Cascade ................................................................................................ 70
3.7 CSS ID and Class ............................................................................................................... 72
3.8 Comments in CSS ............................................................................................................ 74
3.9 CSS Color Property .......................................................................................................... 74
3.10 CSS Font ........................................................................................................................ 76
3.11 CSS Text ........................................................................................................................ 77
3.12 Style Links and Pseudo‐Classes .................................................................................... 78
3.13 Styling Lists ................................................................................................................... 80
3.14 Styling Tables ................................................................................................................ 84
3.15 Understanding the Box Model ..................................................................................... 86
3.16 Control Element Positioning ......................................................................................... 88
3.17 Floating Elements ......................................................................................................... 94
3.18 Navigation ..................................................................................................................... 98
3.19 Opacity and Transparency ............................................................................................ 99
CONTENT
viii
3.20 CSS3 Borders ............................................................................................................... 100
3.21 CSS3 Fonts ................................................................................................................... 101
3.22 CSS3 Animation ........................................................................................................... 102
Chapter 4 ‐ JavaScript .................................................................................... 105
4.1 About JavaScript ........................................................................................................... 106
4.2 Comments in JavaScript ................................................................................................ 108
4.3 Few points to remember .............................................................................................. 109
4.4 Using HTML elements in JavaScript .............................................................................. 110
4.5 Variables in JavaScript .................................................................................................. 111
4.6 Types of Variables ......................................................................................................... 111
4.7 Assignment and Arithmetic Operators in JavaScript .................................................... 113
4.8 Comparison Operators in JavaScript ............................................................................ 114
4.9 Logical Operators in JavaScript ..................................................................................... 115
4.10 Conditional Operators in JavaScript ........................................................................... 116
4.11 The IF Conditional Statement ..................................................................................... 116
4.12 The SWITCH Statement .............................................................................................. 118
4.13 Alert Box ..................................................................................................................... 120
4.14 Confirm Box ................................................................................................................. 121
4.15 Prompt Box ................................................................................................................. 122
4.16 Using Functions in JavaScript ..................................................................................... 123
4.17 Iterative Statements ................................................................................................... 126
4.17.1 FOR Loop ..................................................................................................................... 126
4.17.2 WHILE Loop ................................................................................................................. 127
4.17.3 DO…WHILE Loop ......................................................................................................... 128
4.18 Break and Continue Statements ................................................................................. 129
4.19 Objects in JavaScript ................................................................................................... 130
4.19.1 Declaring an Object ..................................................................................................... 130
4.19.2 Add Properties to Object ............................................................................................. 131
4.19.3 Why Use Objects ......................................................................................................... 131
4.19.4 Creating Objects & Defining Properties ...................................................................... 132
CONTENT
ix
4.19.5 Creating Methods ........................................................................................................ 132
4.19.6 Creating an Object’s Instance ...................................................................................... 133
4.19.7 Testing Objects ............................................................................................................ 134
4.20 JavaScript Events ........................................................................................................ 136
4.20.1 Common Events .......................................................................................................... 137
4.21 Using JavaScripts with HTML Forms ........................................................................... 138
4.21.1 Form Attributes ............................................................................................................ 138
4.21.2 Form Methods ............................................................................................................. 138
4.21.3 Form Events ................................................................................................................. 138
4.21.4 Referring Form Elements ............................................................................................ 138
4.21.5 Validating Form Data ................................................................................................... 140
Chapter 5 ‐ PHP and MySQL ........................................................................... 143
5.1 Introduction to PHP & MySQL ...................................................................................... 144
5.2 Set up Environment for Server‐Side Scripting ............................................................. 146
5.2.1 Install Internet Information Services (IIS) ......................................................................... 146
5.2.2 Add Default Documents to IIS .......................................................................................... 147
5.2.3 Download and Configure PHP .......................................................................................... 148
5.2.4 Add PHP Directory to the PATH on Windows ................................................................... 150
5.2.5 Configure IIS to process PHP request ................................................................................ 151
5.2.6 Test PHP ............................................................................................................................ 152
5.2.7 Download and Install MySQL Database ............................................................................ 152
5.2.8 Test MySQL ....................................................................................................................... 153
5.3 Structured Query Language (SQL) ................................................................................ 154
5.4 Handling Database ....................................................................................................... 155
5.5 MySQL Data Types ........................................................................................................ 156
5.6 Creating Tables ............................................................................................................. 158
5.6.1 Adding Data ...................................................................................................................... 159
5.6.2 Querying Data ................................................................................................................... 160
5.6.3 Updating Data ................................................................................................................... 162
5.6.4 Removing Data ................................................................................................................. 163
5.7 PHP: Hypertext Preprocessor ....................................................................................... 164
CONTENT
x
5.8 Variables in PHP ............................................................................................................. 164
5.9 Arrays in PHP ................................................................................................................ 166
5.10 PHP Sessions ................................................................................................................ 167
5.11 Creating a PHP Function ............................................................................................. 168
5.12 Dealing with Forms ..................................................................................................... 170
5.12.1 Connect to MySQL Database and Fetch Records ........................................................ 170
5.12.2 Insert Form’s Data in MySQL Database ....................................................................... 172
5.12.3 Update Form’s Data in MySQL Database .................................................................... 176
5.12.4 Delete Form’s Data from MySQL Database ................................................................ 178
5.13 PHP Data Objects (PDO) ............................................................................................. 179
5.13.1 Connect to MySQL Database through PDO ................................................................. 180
5.13.2 Execute a SELECT Statement ....................................................................................... 181
5.13.3 Execute an INSERT Statement ..................................................................................... 182
5.13.4 Execute an UPDATE Statement ................................................................................... 183
5.13.5 Execute a DELETE Statement ...................................................................................... 183
5.14 Using FOREACH Loop .................................................................................................. 184
5.15 INCLUDE and REQUIRE Statements ............................................................................ 186
5.16 Send Mail from PHP .................................................................................................... 188
Step‐1: Download & Setup PEAR Core Package ..................................................................... 189
Step‐2: Set INCLUDE path for PEAR ........................................................................................ 189
Step‐3: Update PEAR Installation ........................................................................................... 190
Step‐4: The PEAR Mail Package .............................................................................................. 191
Step‐5: Create PHP Script to Send Mail .................................................................................. 192
Chapter 6 ‐ Website Project .......................................................................... 195
6.1 Project Introduction ..................................................................................................... 196
6.2 Website Security ........................................................................................................... 197
6.2.1 Use a secure connection .................................................................................................. 197
6.2.2 What is SSL Certification ................................................................................................... 198
6.2.3 Use Authentication ........................................................................................................... 198
6.2.4 Encrypting Password ........................................................................................................ 198
6.3 Build Website’s Static Pages ......................................................................................... 199
CONTENT
xi
6.4 The Home Page ............................................................................................................. 200
Step‐1: Create a blank HTML page ............................................................................................ 208
Step‐2: Create main wrapper and header elements ................................................................. 210
Step‐3: Create main Navigation bar and add Search Box .......................................................... 212
Step‐4: Create content section .................................................................................................. 215
Step‐5: Create aside area .......................................................................................................... 218
Step‐6: Create page footer ........................................................................................................ 221
6.5 The Company Page ....................................................................................................... 222
Step‐1: Create header, navigation, and footer .......................................................................... 224
Step‐2: Create and style main content ..................................................................................... 226
Step‐3: Create list of services .................................................................................................... 228
Step‐4: Create events list using Marquee ................................................................................. 231
Step‐5: Create latest news section ............................................................................................ 232
6.6 The Services Page ......................................................................................................... 234
6.7 Make the Website Dynamic ......................................................................................... 238
6.7.1 Task List ............................................................................................................................ 239
6.7.2 Directory Structure ........................................................................................................... 240
6.7.3 Anatomy of Controller file ................................................................................................ 242
6.7.4 Database Structure ........................................................................................................... 244
6.8 Task 1 ‐ Contact Form ................................................................................................... 245
Step‐1: Create database table ................................................................................................... 246
Step‐2: Create header, navigation, contact form, and footer ................................................... 246
Step‐3: Create aside sections .................................................................................................... 252
6.9 Task 2 ‐ Newsletter Subscription .................................................................................. 255
Step‐1: Create table in MySQL database ................................................................................... 255
Step‐2: Copy PHP files ............................................................................................................... 256
6.10 Manage Website Dynamically ‐ Admin Modules ....................................................... 261
6.11 Task 3 ‐ Admin Login Module ..................................................................................... 261
6.12 Task 4 ‐ Manage Categories ....................................................................................... 276
6.13 Task 5 ‐ Manage Products .......................................................................................... 288
6.13.1 Listing products on a web page from the database .................................................... 289
6.13.2 View product details ................................................................................................... 296
6.13.3 Delete product ............................................................................................................ 308
CONTENT
xii
6.13.4 Update product ........................................................................................................... 311
6.13.5 Image Manager ........................................................................................................... 320
6.13.6 Add Product ................................................................................................................. 330
6.14 Task 6 ‐ Manage Orders .............................................................................................. 332
6.14.1 Orders List ................................................................................................................... 334
6.14.2 Order information, confirmation, and deletion .......................................................... 340
6.15 Task 7 ‐ Manage Admin Accounts .............................................................................. 346
6.16 Purchase Products Over the Internet ‐ Member Modules ......................................... 356
6.17 Task 8 ‐ Member Login Module .................................................................................. 357
6.18 Task 9 ‐ Member Registration Module ....................................................................... 362
6.19 Task 10 ‐ Password Reset Module .............................................................................. 372
6.20 Task 11 ‐ My Account Module ................................................................................... 378
6.21 Task 12 ‐ Display Products Catalog ............................................................................. 382
6.22 Task 13 ‐ Product Details ........................................................................................... 390
6.23 Task 14 ‐ Add Online Shopping Cart ........................................................................... 391
6.23.1 Add products to shopping cart .................................................................................... 394
6.23.2 Update product in the shopping cart .......................................................................... 401
6.24 Task 15 ‐ Checkout Module ....................................................................................... 402
6.24.1 Order confirmation ..................................................................................................... 403
6.24.2 Payment Information .................................................................................................. 408
6.25 Task 16 ‐ Website Deployment ................................................................................... 418
Step‐1: Hosting the website ................................................................................................... 418
Step‐2: Install FileZilla and upload files .................................................................................. 420
Step‐3: Access web hosting control panel ............................................................................. 422
Step‐4: Create database and users ........................................................................................ 425
Setp‐5: Create database table ................................................................................................ 428
Step‐6: Install PEAR package .................................................................................................. 428
Conclusion .................................................................................................... 429
About the Author .......................................................................................... 430
Index ............................................................................................................ 431


i
Preface During my programming career, I developed many desktop applications all with the help of a single tool. With the advent of World Wide Web, I also dared to get my feet wet. But, to develop my first web application I had to put on many hats like HTML, CSS, Client and Server-side scripting languages and databases; scattered under individual titles. Just like my previous books, this one too shares my experience with the world and teaches the above mentioned technologies under one umbrella. This book is neither a comprehensive guide nor it can be treated as a manual on any of these comprehensive topics, but, it surely lays a solid foundation that helps building both static and dynamic websites. With uncountable sites and freely available material, I wrote this book due to the following reasons: Assemble all scattered pieces in one place. This volume contains HTML/5, CSS/3, JavaScript, PHP and
MySQL. Sequential instructions are provided to download and install all the required software and components to setup a complete development environment on your own pc.
Focus on inspiring practical aspect of these web technologies. Last, but the most significant one - take the audience gradually right from creating an HTML file with
a text editor, through learning HTML, CSS, JavaScript, PHP and MySQL all the way to creating a professional website.
It covers: Definitions and exercises of various HTML/5, CSS/3, JavaScript, PHP & MySQL components. The last part is the essence of this book where you will create a website for ABC Global Consulting -
a fictitious company. In this part, you will apply almost all the techniques you went through in the book. The website project is divided into two parts: static and dynamic. In the static part, you’ll create web pages that remain unchanged and deliver static content whenever they are accessed. In contrast, the dynamic part will teach you how to create pages that access fresh content from a database. This part comprises an E-Commerce module that allows visitors to purchase products online, a Newsletter subscription module to subscribe to company’s newsletters, and Contact Form module which will be provided to interact with site visitors. The E-commerce application development is divided into two major parts: Admin and Member interfaces. In the Admin part you will undergo five tasks: Admin Login module, Manage Categories, Manage Products, Manager Orders, and Manage Admin Accounts. The Member part comprises eight tasks: Member Login module, Register New Member, Reset Password, My Account, Featured Products Catalog, Individual Product Details, Shopping Cart, and Checkout (confirm order). After accomplishing all the above tasks, you’ll be guided on how to deploy the project on a host server.
From web introduction to hands-on examples and from website designing to its deployment, this book surely is a complete resource for those who know little or nothing about professional web development.
Download Book Code http://www.maqcon.com/test/download/TheWebBookCode.rar
Blog http://the‐web‐book.blogspot.com/2013/03/the‐web‐book‐build‐static‐dynamic.html
- Riaz Ahmed, Author [email protected]

1
YOU WILL LEARN
Internet and World Wide Web
Introduction to websites, web pages, E-commerce, E-mail, and many other areas related to the world of web.
How to select a hosting provider?
Server and client side scripting.
CHAPTER 1
THE WORLD WIDE WEB
AN INTRODUCTION
I am a great believer in luck, and I find that the harder I work, the more I have of it.
Chapter 1 ‐ The World Wide Web ‐ An Introduction
2
1.1 The Internet and the World Wide Web
The Internet is playing a vital role in our lives and has become a mainstay in personal, work and
education fields. It can be defined as a global system of interconnected computer networks that serve
billions of users worldwide. It consists of millions of public, private, business, academic, and government
networks that are linked by a wide range of electronic, wireless, and optical network technologies. It
provides a huge information resource such as the inter‐linked hypertext documents of the World Wide
Web (WWW) and renders infrastructure support service for electronic mails (E‐mails). It enables you to
read the latest news, to do research, to shop, to communicate, to listen to music, to play games, and to
access a wide variety of information. It has provided new means of human interactions through
messaging, forums, and social networking and has boomed businesses through online shopping.
1.1.1 Is Web & Internet the same? 1.1.2 What is Internet Backbone?
No. The two are not synonymous. The Internet
connects millions of computers together globally
to form a massive network in which these
computers can communicate with each other.
The World Wide Web, on the other hand, is a
system of interlinked hypertext documents
accessed via the Internet. It is an information‐
sharing model that is built on top of the Internet.
A collection of fiber‐optic cables and
telephone lines spread all over the world form
the Internet's backbone. Data travels at the
speed of light along this backbone enabling
you to access data within seconds from any
part of the world.
1.1.3 Who is Internet Service Provider?
The Internet cannot be accessed directly.
Instead, you have to rent a connection from an
Internet Service Provider (ISP). An ISP is a
company that has direct access to the Internet
backbone. You're provided with a modem or
wireless router that you use to connect to your
ISP, which then connects you to the Internet.
The Web Book ‐ Build Static & Dynamic Websites
3
1.1.4 Types of Internet Connections
Dial‐up Connection: In the past, the most widely used connection to access the Internet was through
dial‐up modems. These connections provide a speed of 28.8 kilobits per second and do not exceed a
speed of 56 kbit/s downstream (towards the end user) and 34 or 48 kbit/s upstream (toward the
global Internet). Although inexpensive, it is the slowest connection and people are, therefore,
switching over to other available options.
Broadband Connection: This technology uses wires or fiber optic cables. Slightly more expensive than
dial‐up, broadband connections are extremely fast. They provide connection speed of 1 to several
megabits per second. ISPs provide a high‐speed modem to their subscribers to connect to the
Internet. It commonly uses digital subscriber line (DSL) telephone service for the connection which
uses existing 2‐wire copper telephone line connected to the premise so service is delivered
simultaneously with wired telephone service (it doesn’t tie up your phone line as an analog dial‐up
connection does). The two main categories of DSL are called ADSL and SDSL. The data throughput of
consumer DSL services typically ranges from 256 kbit/s to 20 Mbit/s in the direction to the customer
(downstream), depending on DSL technology, line conditions, and service‐level implementation. VDSL
or VHDSL (very‐high‐bit‐rate digital subscriber line) is a DSL standard that provides data rates up to 52
Mbit/s downstream and 16 Mbit/s upstream over copper wires and up to 85 Mbit/s down and
upstream on coaxial cable. VDSL2 is an enhanced second‐generation version of VDSL. It is able to
provide data rates exceeding 100 Mbit/s simultaneously in both the upstream and downstream
directions. Cable broadband internet is another connection that is designed to operate over cable TV
lines. Because the coaxial cable used by cable TV provides much greater bandwidth than telephone
lines, a cable connection can be used to achieve extremely fast access.
Wireless broadband: Wireless Internet or wireless broadband is one of the newest Internet
connection types that provide high‐speed wireless Internet access or computer networking access.
Instead of using telephone or cable networks for Internet connection, it uses radio frequency bands.
Wireless Internet can be accessed from anywhere — as long as you’re within a geographically
network coverage area. It includes Wi‐Fi, WiMAX, Satellite broadband, and Mobile broadband.
1.1.5 Security Consideration 1.1.6 The World Wide Web
After connecting to the Internet, it is very
much possible that your computer gets
infected through viruses or other malicious
attacks. You must draw your first line of
defense before connecting to the Internet by
setting Windows Firewall. Turn this option on
to prevent intruders from accessing your
computer over the Internet.
The World Wide Web, or simply the Web, is a
massive storehouse of information that resides on
computers, called Web servers, located all over the
world.
Chapter 1 ‐ The World Wide Web ‐ An Introduction
4
1.1.7 What a Web Page is?
The web provides information on almost every imaginable topic through billions of web pages. A
webpage is a document, typically written in plain text with formatting instructions of Hypertext
Markup Language (HTML, XHTML). Web pages are accessed and transported with the Hypertext
Transfer Protocol (HTTP), which may optionally employ encryption (HTTPS ‐ HTTP Secure) to provide
security and privacy for the user of the webpage content. The pages of a website can usually be
accessed from a simple Uniform Resource Locator (URL) called the web address. When you seek
some information, it is returned by a web server ‐ that holds that information ‐ to your computer
using a web browser, such as Firefox or Internet Explorer. A web page can carry text, images,
sounds, and videos on any subject.
1.1.8 What is a Website? 1.1.9 What is a Web Server?
A website is a set of related web pages
associated with a particular person, business,
government, school, or organization containing
content such as text, images, video, audio, etc. A
website is hosted on at least one web server,
accessible via a network such as the Internet or
a private local area network through an Internet
address known as a Uniform Resource Locator
(URL).
Web server can either be the hardware (the
powerful computer capable of handling
thousands of site visitors at a time) or the
software (the computer application) that delivers
Web content through the Internet. It is the
primary function of web servers to deliver HTML
documents and other content such as images,
style sheets and scripts in shape of web pages to
the requesting clients. Besides entertaining client
requests, web servers also receive content from
them through web forms and uploaded files. A
large website is often run by hundreds of servers
which is referred to as server farms in web
terminology.
The Web Book ‐ Build Static & Dynamic Websites
5
1.1.10 What is a Web Browser?
A web browser can be defined as an application software
designed to enable users to access, retrieve and view documents
and other resources on the Internet or a program designed to
download and display web pages. The primary purpose of a web
browser is to bring information resources to the users, allow
them to view the information, and then access other information
through navigational links.
Although browsers are primarily intended to use the World Wide
Web, they can also be used to access information provided by
web servers in private networks or files in file systems. The major web browsers are Chrome, Firefox,
Internet Explorer, Opera, and Safari.
All major web browsers allow the user to open multiple information resources at the same time,
either in different browser windows or in different tabs of the same window. Major browsers also
include pop‐up blockers to prevent unwanted windows from "popping up" without the user's
consent. Most web browsers can display a list of web pages that the user has bookmarked (called
"Favorites" in Internet Explorer) so that the user can quickly return to them.
1.1.11 What are Hyperlinks?
In computing, a hyperlink (or link) is a cross‐reference to data that the reader can directly follow, or
that is followed automatically. It takes visitors to another page on the same site or to a page on
another Web site. A hyperlink points to a whole document or to a specific element within a
document. A web browser usually displays a hyperlink in some distinguishing way, e.g. in a different
color, font or style. The behavior and style of links can be specified using the Cascading Style Sheets
(CSS) language. A link can also appear as an image. When you click a link the page loads in a new
browser window or in a new tab in the existing window.
Chapter 1 ‐ The World Wide Web ‐ An Introduction
6
1.1.12 What is a Web Address or URL?
Every site and page on the web is identified by its own unique address which is also called Uniform
Resource Locator (URL). Visitors usually access a website by clicking a link found on another site.
They can also access a site or a page within a site by typing its URL in the address bar of their web
browsers. The URL of a website carries four pieces of information: 1‐the transfer protocol (http or
https), 2‐the domain name, 3‐directory and 4‐filename:
Each domain name ends with a suffix that defines the type of organization. For example, any
commercial enterprise or corporation that has a Web site will have a domain suffix of .com, which
means it is a commercial entity. The domain suffix provides you with a clue about the purpose or
audience of a website. The domain suffix might also give you a clue about the geographic origin of a
website. Many sites from the United Kingdom will have a domain suffix of .uk. Here follows a list of
the most common domain suffixes and the types of organizations that would use them.
Domain suffixes
.com Commercial site
.edu Educational institution
.gov Government
.org Non‐profit organization
.mil Military
.net Network
Country domain suffixes
.au Australia
.ca Canada
.fr France
.it Italy
.mx Mexico
.uk United Kingdom
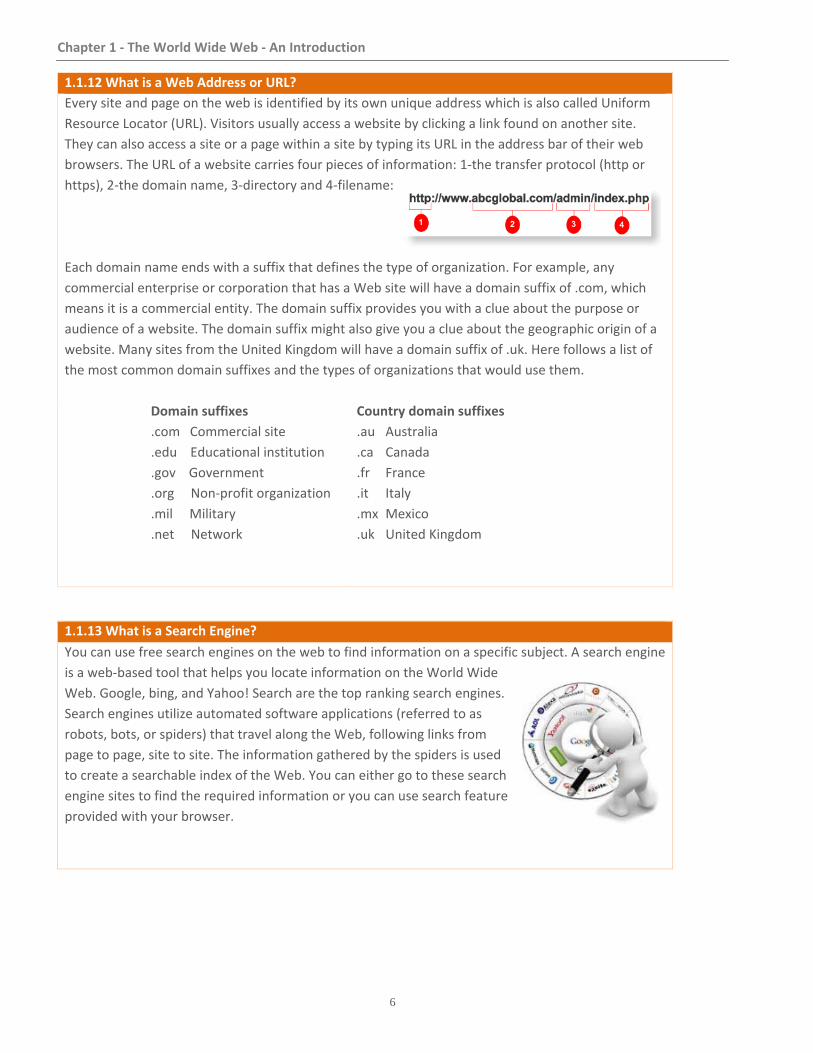
1.1.13 What is a Search Engine?
You can use free search engines on the web to find information on a specific subject. A search engine
is a web‐based tool that helps you locate information on the World Wide
Web. Google, bing, and Yahoo! Search are the top ranking search engines.
Search engines utilize automated software applications (referred to as
robots, bots, or spiders) that travel along the Web, following links from
page to page, site to site. The information gathered by the spiders is used
to create a searchable index of the Web. You can either go to these search
engine sites to find the required information or you can use search feature
provided with your browser.
The Web Book ‐ Build Static & Dynamic Websites
7
1.1.14 How do Search Engines work?
Every search engine uses different complex mathematical formulas to generate search results. The
results for a specific query are then displayed on the search engine results page (SERP). Search
engine algorithms take the key elements of a web page, including the page title, content and
keyword density, and come up with a ranking for where to place the results on the pages. Each
search engine’s algorithm is unique, so a top ranking on Yahoo! does not guarantee a prominent
ranking on Google, and vice versa. To make things more
complicated, the algorithms used by search engines are
not only closely guarded secrets, they are also constantly
undergoing modification and revision. This means that the
criteria to best optimize a site with must be surmised
through observation, as well as trial and error — and not
just once, but continuously.
Search engines only “see” the text on web pages, and use the underlying HTML structure to
determine relevance. Large photos, or dynamic Flash animation mean nothing to search engines, but
the actual text on your pages does. It is difficult to build a Flash site that is as friendly to search
engines; as a result, Flash sites will tend not to rank as high as sites developed with well coded HTML
and CSS (Cascading Style Sheets — a complex mechanism for adding styles to website pages above
and beyond regular HTML). It will be very difficult for your website to yield high placement in the
SERPs if the terms you want to be found but do not appear in the text of your website.
Chapter 1 ‐ The World Wide Web ‐ An Introduction
8
1.1.15 What are Web Logs or Blogs?
A Web log, or blog, is a discussion or informational site published on the World Wide Web consisting
of frequently updated, reverse‐chronological entries (the most recent post appears first) on a
particular topic. Many blogs provide commentary on a particular subject; some function as more
personal online diaries; others function more as online brand advertising of a particular individual or
company. A typical blog combines text, images, and links to other blogs, Web pages, and other
media related to its topic. The ability of readers to leave comments in an interactive format is an
important contribution to the popularity of many blogs. Most blogs are primarily textual, although
some focus on art (art blogs), photographs (photoblogs), videos (video blogs or "vlogs"), music (MP3
blogs), and audio (podcasts). Microblogging (such as twitter) is another type of blogging, featuring
very short posts. In education, blogs can be used as instructional resources. These blogs are referred
to as edublogs.
1.1.16 What is a Web Portal? 1.1.17 What is Web Syndication?
A web portal is a web site that gathers
information from hundreds or even thousands of
online sources in a uniform way. Usually, each
information source gets its dedicated area on
the page for displaying information (a portlet);
often, the user can configure which ones to
display. Apart from the standard search engines
feature, web portals offer other services such as
e‐mail, news, stock prices, information,
databases and entertainment. Examples of
public web portals are AOL, Excite, iGoogle,
MSN, Naver, India.com and Yahoo!
Rather than surfing the web from one site to
another to get the desired information, you can
have the information set to you. Web syndication
is a form of syndication in which website material
is made available to multiple other sites. Most
commonly, web syndication refers to making
web feeds available from a site in order to
provide other people with a summary or update
of the website's recently added content (for
example, the latest news or forum posts). Today,
many sites use syndication by enabling an
aggregator (Real Simple Syndication ‐ RSS) to
show the syndicated content. Latest versions of
Firefox, IE, and Safari have built in aggregators.
The Web Book ‐ Build Static & Dynamic Websites
9
1.1.18 What is E‐Commerce?
Electronic Commerce, often referred to as
simply ecommerce (or e‐commerce), is a
phrase used to describe business that is
conducted over the Internet using any of the
applications that rely on the Internet, such
as e‐mail, instant messaging, shopping carts,
Web services, UDDI, FTP, and EDI, among
others. Electronic commerce can be between two businesses transmitting
funds, goods, services and/or data or between a business and a customer. It
is the buying and selling of product or service over electronic systems such
as the Internet and other computer networks and draws on such
technologies as mobile commerce, electronic funds transfer, supply chain
management, Internet marketing, online transaction processing, electronic
data interchange (EDI), inventory management systems, and automated
data collection systems. You can use Web‐based stores to purchase books,
theater tickets, and even cars. You can also create your own virtual store at
http://smallbusiness.yahoo.com. There are also many sites that enable you
to sell or auction your products or household items. Sites like eBay
(www.ebay.com) allow you to put your products online for auction.
Thousands of Web sites are devoted to online shopping. Some focus on one
product or service, while others, such as Amazon.com offer a wide range of
goods. When you shop at an e‐commerce site, you usually add the items
that you want to purchase to a virtual shopping cart — also called a
shopping basket — that keeps track of these items and the quantity. Most
sites have a View Cart link that enables you to view the contents of your
shopping cart. The cart usually has a Proceed to Checkout link that leads
you to a page where you provide your address and payment information.
Payments on the web are usually made by credit cards. You are required to
provide the credit card number, cvv number and expiry date. To ensure the
security of this sensitive data, you must provide this information only on
secured sites which are prefixed with https rather than http.
Chapter 1 ‐ The World Wide Web ‐ An Introduction
10
1.2 Launching a Website
The initial step in this process is to create web pages that constitute a website. To do so, you need a
simple text editor such as Notepad or some special web page designing software such as Microsoft
Expression Web or Adobe Dreamweaver. After creating your site, the next step is to acquire a domain
name (www.abcglobal.com) and setup an account with a web‐hosting company. Web hosting providers
offer different packages (including free domain registration) to store your web pages on their servers
from where the world can access your website. For further instructions, see section 6.25 ‐ Website
Deployment.
1.3 Choosing the right Hosting Company
There are thousands of Web Hosting Companies out there and counting. How do you choose the ideal
plan for your Web Site? The key here is to understand what your Web Site needs are. Once you know
what is required, you can eliminate many options. These are the most important points that you need to
focus on:
‐ How much storage space does your Web Site require?
‐ How much Monthly Transfer (Bandwidth) do you need?
‐ How many e‐mail accounts do you need?
‐ What type of database is required for your site?
‐ What Scripting Languages does your web site use?
‐ Does your site need Server‐side scripting language?
‐ If so, What Servlet Technology does your web site use?
‐ What Operating System should you go for?
‐ Should you use SHARED hosting or DEDICATED hosting?
The Web Book ‐ Build Static & Dynamic Websites
11
1.3.1 Storage Space 1.3.2 Bandwidth
Storage space refers to
the amount of disk space
allotted on the hosting
Web server to store your
website files. If you have
a 100MB limit, then you
cannot store more than 100MB worth of files on
the server. HTML files are not big, but if your
website holds files such as images, videos, audio
etc., you need to watch your limit.
Bandwidth is a measure of
how much of your data the
server sends out. For
example, if you have a
page that is 10KB,
including images, and 10
people access the page (either at the same time
or over a period of time), the total bandwidth is
100KB. Most hosts give you a bandwidth limit (or
cap), which is usually a specified number of
megabytes or gigabytes per month.
1.3.3 Domain Name
A domain name is a general Internet address, such
as microsoft.com or cyber.net. Domain names are
formed by the rules and procedures of the Domain
Name System (DNS). DNS is the most recognized
system for assigning addresses to Internet web
servers. Somewhat like international phone
numbers, the domain name system helps to give every Internet server a memorable and easy‐to‐spell
address. Simultaneously, the domain names keep the really technical IP address invisible from end
users. The registration of domain names is usually administered by domain name registrars who sell
their services to the public. A domain name registrar is an organization or commercial entity that
manages the reservation of Internet domain names. Some hosting providers supply free domain
name registration service with their packages.
Chapter 1 ‐ The World Wide Web ‐ An Introduction
12
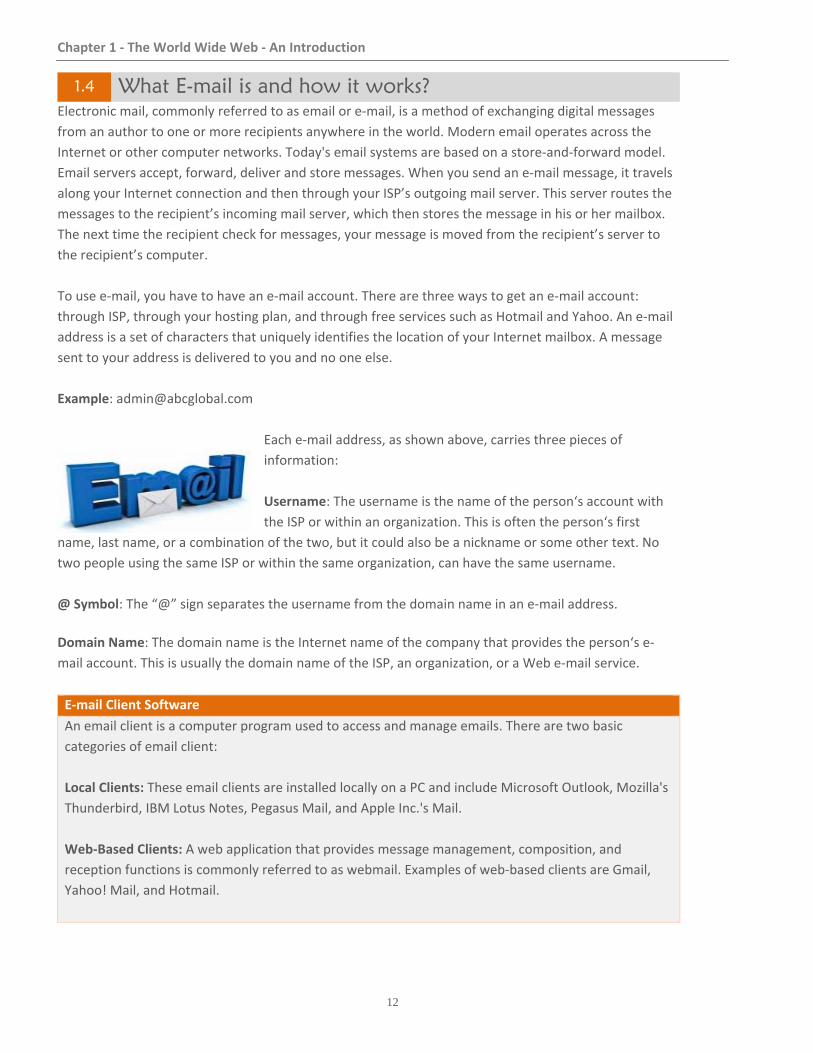
1.4 What E-mail is and how it works? Electronic mail, commonly referred to as email or e‐mail, is a method of exchanging digital messages
from an author to one or more recipients anywhere in the world. Modern email operates across the
Internet or other computer networks. Today's email systems are based on a store‐and‐forward model.
Email servers accept, forward, deliver and store messages. When you send an e‐mail message, it travels
along your Internet connection and then through your ISP’s outgoing mail server. This server routes the
messages to the recipient’s incoming mail server, which then stores the message in his or her mailbox.
The next time the recipient check for messages, your message is moved from the recipient’s server to
the recipient’s computer.
To use e‐mail, you have to have an e‐mail account. There are three ways to get an e‐mail account:
through ISP, through your hosting plan, and through free services such as Hotmail and Yahoo. An e‐mail
address is a set of characters that uniquely identifies the location of your Internet mailbox. A message
sent to your address is delivered to you and no one else.
Example: [email protected]
Each e‐mail address, as shown above, carries three pieces of
information:
Username: The username is the name of the person‘s account with
the ISP or within an organization. This is often the person‘s first
name, last name, or a combination of the two, but it could also be a nickname or some other text. No
two people using the same ISP or within the same organization, can have the same username.
@ Symbol: The “@” sign separates the username from the domain name in an e‐mail address.
Domain Name: The domain name is the Internet name of the company that provides the person‘s e‐
mail account. This is usually the domain name of the ISP, an organization, or a Web e‐mail service.
E‐mail Client Software
An email client is a computer program used to access and manage emails. There are two basic
categories of email client:
Local Clients: These email clients are installed locally on a PC and include Microsoft Outlook, Mozilla's
Thunderbird, IBM Lotus Notes, Pegasus Mail, and Apple Inc.'s Mail.
Web‐Based Clients: A web application that provides message management, composition, and
reception functions is commonly referred to as webmail. Examples of web‐based clients are Gmail,
Yahoo! Mail, and Hotmail.
The Web Book ‐ Build Static & Dynamic Websites
13
1.5 Scripting Languages A scripting language or script language is a programming language that supports the writing of
scripts, programs written for a software environment that automate the execution of tasks
which could alternatively be executed one‐by‐one by a human operator.
Scripts are invisible to the visitor's eye but their availability within the code of a website
defines how the website behaves in response to certain click requests sent by the user. Apart
from the World Wide Web, scripts are also used for the automation of processes on a local
computer. All in all, scripts have contributed a lot to making the web such a usable and
flexibility driven environment as we are used to seeing it today.
Each script represents a text document containing a list of instructions that need to be
executed by a certain program or scripting manager so that the desired automated action
could be achieved. This will prevent users from having to go through many complicated steps
in order to reach certain results while browsing a website or working on their personal
computers. The text nature of the scripts allows them to be opened and edited with the help
of a basic text editor.
1.5.1 Client‐Side Scripting
Client‐side scripting generally refers to the class of computer programs on the web that are executed
client‐side, by the user's web browser, instead of server‐side (on the web server). This type of
computer programming is an important part of the Dynamic HTML (DHTML) concept, enabling web
pages to be scripted.
Client‐side scripts are often embedded within an HTML or XHTML document (hence known as an
"embedded or internal script"), but they may also be contained in a separate file, which is referenced
by the document (or documents) that use it (hence known as an "external script"). Upon request, the
necessary files are sent to the user's computer by the web server (or servers) where they reside. The
user's web browser executes the script, and then displays the document, including any visible output
from the script. Client‐side scripts may also contain instructions for the browser to follow in response
to certain user actions, (e.g., clicking a button).
Chapter 1 ‐ The World Wide Web ‐ An Introduction
14
1.5.2 Server‐Side Scripting Server‐side Scripting
Languages
Server‐side scripting is usually used to provide an interface and to
limit client access to proprietary databases or other data sources.
These scripts may assemble client characteristics for use in
customizing the response based on those characteristics, the user's
requirements, access rights, etc. Server‐side scripting also enables
the website owner to reduce user access to the source code of
server‐side scripts which may be proprietary and valuable in itself.
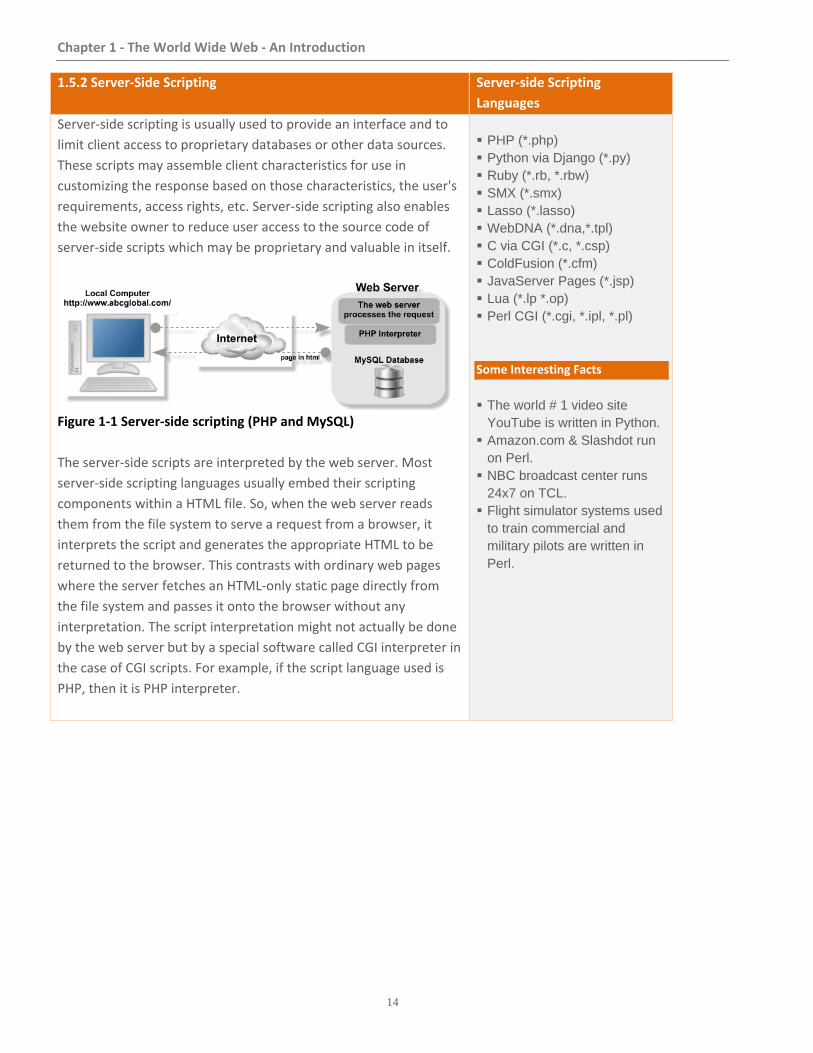
Figure 1‐1 Server‐side scripting (PHP and MySQL)
The server‐side scripts are interpreted by the web server. Most
server‐side scripting languages usually embed their scripting
components within a HTML file. So, when the web server reads
them from the file system to serve a request from a browser, it
interprets the script and generates the appropriate HTML to be
returned to the browser. This contrasts with ordinary web pages
where the server fetches an HTML‐only static page directly from
the file system and passes it onto the browser without any
interpretation. The script interpretation might not actually be done
by the web server but by a special software called CGI interpreter in
the case of CGI scripts. For example, if the script language used is
PHP, then it is PHP interpreter.
PHP (*.php) Python via Django (*.py) Ruby (*.rb, *.rbw) SMX (*.smx) Lasso (*.lasso) WebDNA (*.dna,*.tpl) C via CGI (*.c, *.csp) ColdFusion (*.cfm) JavaServer Pages (*.jsp) Lua (*.lp *.op) Perl CGI (*.cgi, *.ipl, *.pl) Some Interesting Facts
The world # 1 video site
YouTube is written in Python. Amazon.com & Slashdot run
on Perl. NBC broadcast center runs
24x7 on TCL. Flight simulator systems used
to train commercial and military pilots are written in Perl.
The Web Book ‐ Build Static & Dynamic Websites
15
1.5.3 Client‐Side vs. Server‐side Scripting
Server side scripting, (ex. ASP.Net, ASP,
JSP, PHP, Ruby, or others), is executed
by the server (Web Server), and the
page that is sent to the browser is
produced by the serve‐side scripting.
So when a server sends out a page, it
executes server‐side scripts, but does
not execute client‐side scripts. Once the
browser receives the page, it executes
the client‐side scripts.
Server side scripting can connect to
databases that reside on the web
server or another server reachable
from web server. Client side scripting
cannot do that.
Server side scripting can access the file
system that reside at the web server,
client side cannot.
Server side scripting can access settings
belonging to Web server while client
side cannot.
The server may do things like database
lookup, reading/writing files and user
authentication that would be either
impossible or very insecure to do in a
browser.
Client side scripting is a script, (ex. JavaScript,
VB script), that is executed by the browser
(i.e. Firefox, Internet Explorer, Safari, Opera,
etc.) that resides at the user computer.
Client side scripting consumes cycles from
user's computer not web server one, while
server side scripting consumes cycles form
web server one.
Client side scripting can access files and
settings that are local at the user computer.
Client‐side scripts have greater access to the
information and functions available on the
user's browser, whereas server‐side scripts
have greater access to the information and
functions available on the server.
Client side script such as JavaScript runs
primarily in the browser, which server side
languages like PHP, JSP, Ruby on Rails etc.
cannot do.
Chapter 1 ‐ The World Wide Web ‐ An Introduction
16
Client‐Side vs. Server‐side Scripting (Continued)
Server‐side scripts require that their
language's interpreter be installed on
the server, and produce the same
output regardless of the client's
browser, operating system, or other
system details. Client‐side scripts do
not require additional software on the
server (making them popular with
authors who lack administrative access
to their servers); however, they do
require that the user's web browser
understands the scripting language in
which they are written. It is therefore
impractical for an author to write
scripts in a language that is not
supported by popular web browsers.
There are also a couple of tasks that are
commonly done both places, like form
validation ‐ on the client to give quick
feedback. This validation can also be done
on the server to ensure that what is
submitted is actually safe and valid. Note
that an attacker could easily skip any
browser validation and submit illegal
values.
17
YOU WILL LEARN
About Markup Languages
All basic elements & attributes in HTML required to build a website such as divisions, headings, paragraphs, text formatting, and more.
How to add web, email links, and bookmarks to a web page?
Incorporate images, lists, and tables
Forms and related controls such as Radio buttons, Checkbox, Dropdown list, File input and Submit buttons
Play videos on a web page and
What’s new in HTML5?
CHAPTER 2
HYPERTEXT MARKUP LANGUAGE
<HTML>
Your aspirations are your possibilities.
Chapter 2 ‐ Hypertext Markup Language <HTML>
18
2.1 About Markup Languages
HTML stands for HyperText Markup Language. It
is a markup language for structuring and
presenting content in a web browser for the
World Wide Web, and is a core technology of
the Internet. HTML is written in the form of
HTML elements consisting of tags enclosed in
angle brackets (like <html>), within the web
page content. HTML tags most commonly come
in pairs like <h1> and </h1>, although some tags,
known as empty elements, are unpaired, for
example <img>. The first tag in a pair is the start
tag, the second tag is the end tag (they are also
called opening tags and closing tags). In between
these tags web designers can add text, tags,
comments and other types of text‐based
content.
HTML documents are read in a web browser
(Chrome, Internet Explorer, Firefox etc.) which is
responsible to organize these documents into
visible or audible web pages. The browser uses
the HTML tags to interpret the content of the
page. Web browsers can also refer to Cascading
Style Sheets (CSS) to define the appearance and
layout of text and other material.
HTML elements form the building blocks of all
websites. HTML allows images and objects to be
embedded and can be used to create interactive
forms. It provides a resource to create
structured documents by denoting structural
semantics for text such as headings, paragraphs,
lists, links, quotes and other items. It can embed
scripts in languages such as JavaScript which
affect the behavior of HTML web pages.
XHTML is a separate language that began as a
reformulation of HTML 4.01 using XML 1.0. XML
(eXtensible Markup Language) was published in
1998. HTML4 was reformulated to follow the
rules of XML and hence the term XHTML
(eXtensible Hypertext Markup Language)
evolved. The emergence of XHTML set some
new and stricter rules for developers to write
markup. For example, a mandatory closing tag
(except empty elements such as <img>), use of
lowercase for attribute names, mandatory
attribute value in double quotes etc. The three
versions of XHTML are Strict XHTML 1.0,
Transitional XHTML 1.0, and XHTML 1.0
Frameset.
HTML5 is the fifth revision of the HTML
standard and is focused in this book. Its core
aims have been to improve the language with
support for the latest multimedia while keeping
it easily readable by humans and consistently
understood by computers and devices. HTML5
is intended to subsume not only HTML 4, but
XHTML 1 and DOM Level 2 HTML as well.
HTML5 is an attempt to define a single markup
language that can be written in either HTML or
XHTML syntax. It includes detailed processing
models to encourage more interoperable
implementations and introduces markup and
application programming interfaces (APIs) for
complex web applications. For the same
reasons, HTML5 is also a potential candidate for
cross‐ platform mobile applications.
The Web Book ‐ Build Static & Dynamic Websites
19
Many features of HTML5 have been built with
the consideration of being able to run on low‐
powered devices such as smartphones and
tablets. In particular, HTML5 adds many new
syntactical features. These include the new
<video>, <audio> and <canvas> elements, as
well as the integration of scalable vector
graphics (SVG) content that replaces the uses of
generic <object> tags and MathML for
mathematical formulas. These features are
designed to make it easy to include and handle
multimedia and graphical content on the web
without having to resort to proprietary plugins
and APIs. Other new elements, such as
<section>, <article>, <header>, <footer> and
<nav>, are designed to enrich the semantic
content of documents.
New attributes have been introduced for the
same purpose, while some elements and
attributes have been removed. Some elements,
such as <a>, <cite> and <menu> have been
changed, redefined or standardized. The APIs
and document object model (DOM) are no
longer afterthoughts, but are fundamental
parts of the HTML5 specification. HTML5 also
defines in some detail the required processing
for invalid documents so that syntax errors will
be treated uniformly by all conforming
browsers and other user agents.
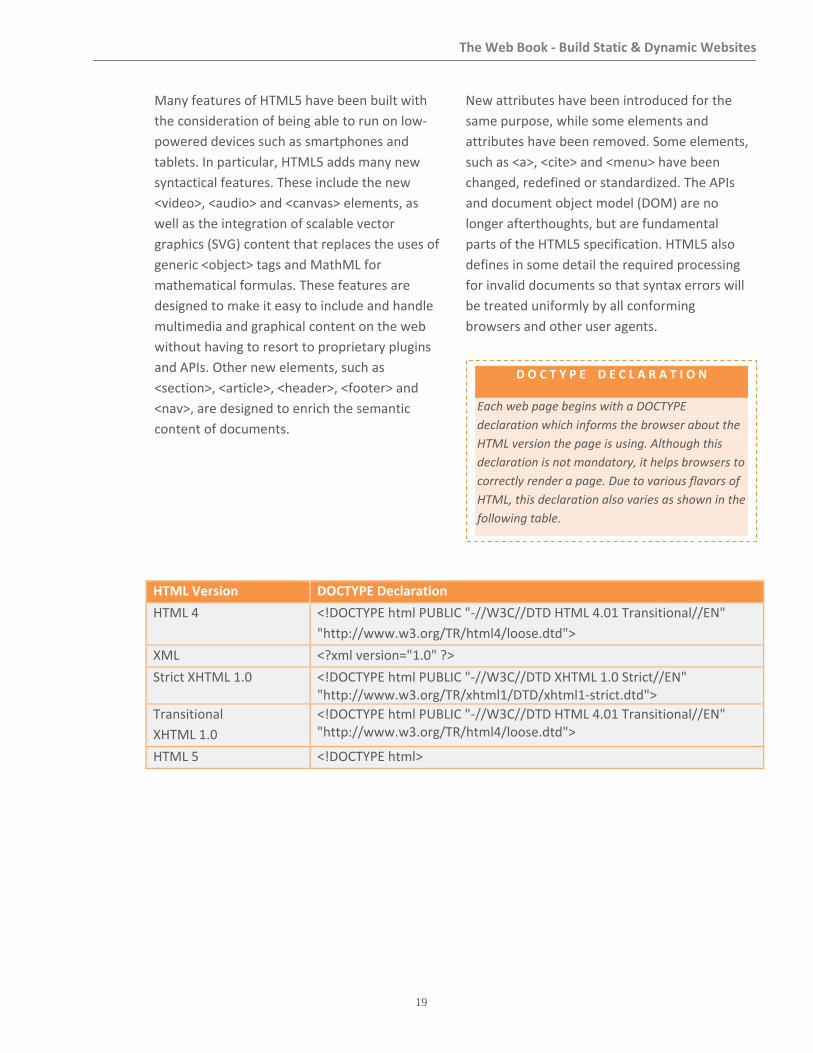
HTML Version DOCTYPE Declaration
HTML 4 <!DOCTYPE html PUBLIC "‐//W3C//DTD HTML 4.01 Transitional//EN"
"http://www.w3.org/TR/html4/loose.dtd">
XML <?xml version="1.0" ?>
Strict XHTML 1.0 <!DOCTYPE html PUBLIC "‐//W3C//DTD XHTML 1.0 Strict//EN" "http://www.w3.org/TR/xhtml1/DTD/xhtml1‐strict.dtd">
Transitional
XHTML 1.0
<!DOCTYPE html PUBLIC "‐//W3C//DTD HTML 4.01 Transitional//EN" "http://www.w3.org/TR/html4/loose.dtd">
HTML 5 <!DOCTYPE html>
D O C T Y P E D E C L A R A T I O N
Each web page begins with a DOCTYPE
declaration which informs the browser about the
HTML version the page is using. Although this
declaration is not mandatory, it helps browsers to
correctly render a page. Due to various flavors of
HTML, this declaration also varies as shown in the
following table.
Chapter 2 ‐ Hypertext Markup Language <HTML>
20
2.2 Your First HTML Web Page
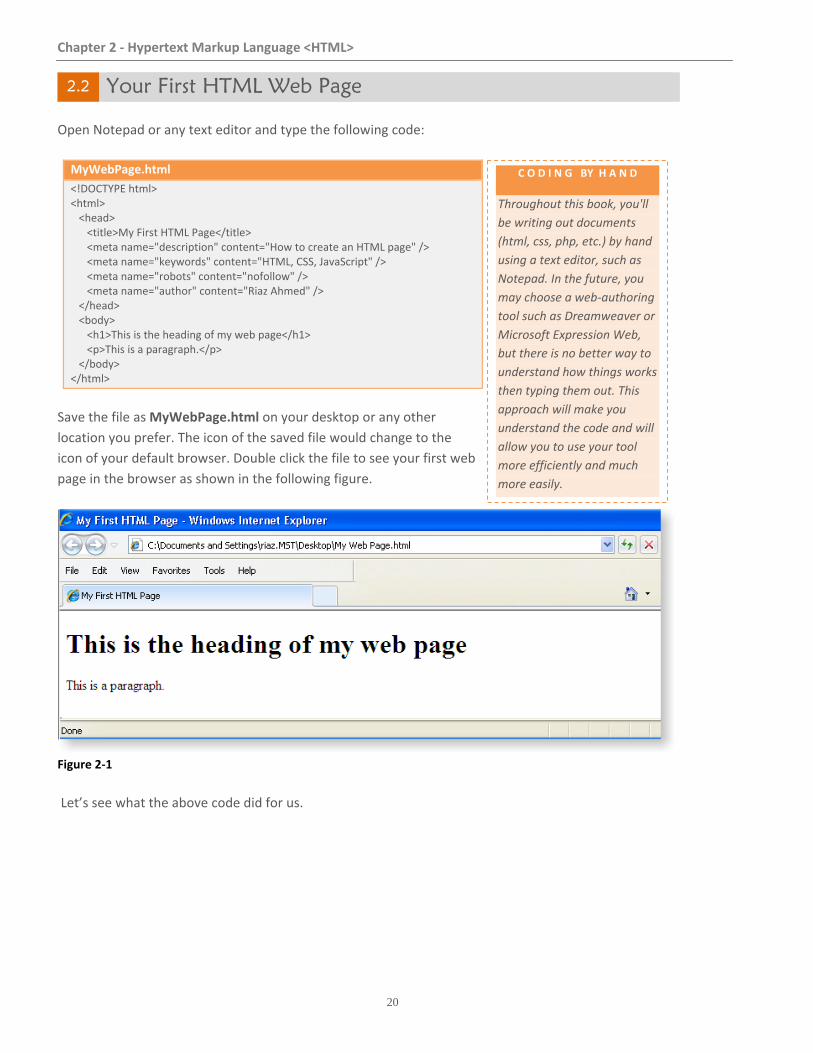
Open Notepad or any text editor and type the following code:
MyWebPage.html
<!DOCTYPE html> <html> <head> <title>My First HTML Page</title> <meta name="description" content="How to create an HTML page" /> <meta name="keywords" content="HTML, CSS, JavaScript" /> <meta name="robots" content="nofollow" /> <meta name="author" content="Riaz Ahmed" /> </head> <body> <h1>This is the heading of my web page</h1> <p>This is a paragraph.</p> </body> </html>
Save the file as MyWebPage.html on your desktop or any other
location you prefer. The icon of the saved file would change to the
icon of your default browser. Double click the file to see your first web
page in the browser as shown in the following figure.
Figure 2‐1
Let’s see what the above code did for us.
C O D I N G BY H A N D
Throughout this book, you'll
be writing out documents
(html, css, php, etc.) by hand
using a text editor, such as
Notepad. In the future, you
may choose a web‐authoring
tool such as Dreamweaver or
Microsoft Expression Web,
but there is no better way to
understand how things works
then typing them out. This
approach will make you
understand the code and will
allow you to use your tool
more efficiently and much
more easily.
The Web Book ‐ Build Static & Dynamic Websites
23
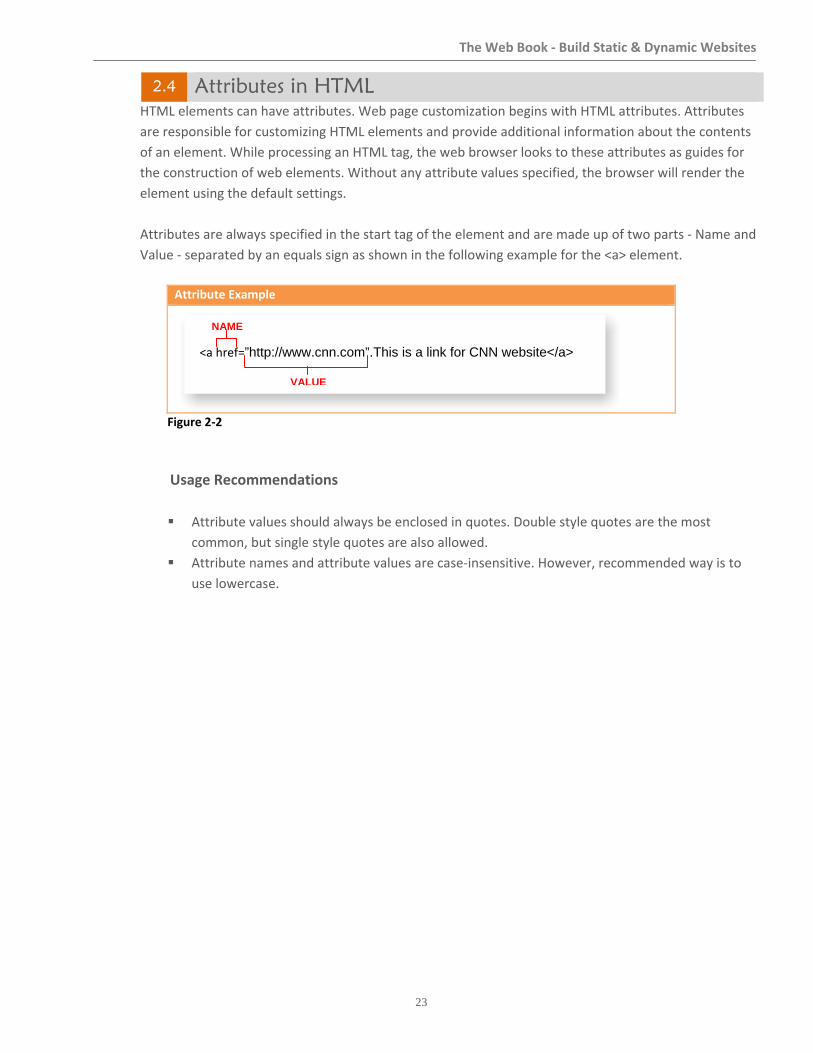
2.4 Attributes in HTML
HTML elements can have attributes. Web page customization begins with HTML attributes. Attributes
are responsible for customizing HTML elements and provide additional information about the contents
of an element. While processing an HTML tag, the web browser looks to these attributes as guides for
the construction of web elements. Without any attribute values specified, the browser will render the
element using the default settings.
Attributes are always specified in the start tag of the element and are made up of two parts ‐ Name and
Value ‐ separated by an equals sign as shown in the following example for the <a> element.
Attribute Example
Figure 2‐2
Usage Recommendations
Attribute values should always be enclosed in quotes. Double style quotes are the most
common, but single style quotes are also allowed.
Attribute names and attribute values are case‐insensitive. However, recommended way is to
use lowercase.
NAME
VALUE
<a href=”http://www.cnn.com”.This is a link for CNN website</a>

Chapter 2 ‐ Hypertext Markup Language <HTML>
24
2.5 Headings in HTML
Headings and subheadings in a document are used to present information in a hierarchical format. For
instance, a document usually starts with a big heading before the main introduction of a topic, followed
by relevant subheadings.
Figure 2‐3
You can use <h1> to <h6> tags to define headings in your website where <h1> defines the most
important heading while <h6> defines the least important one. Headings are displayed in different sizes
by the browser. The content enclosed in <h1> is the largest, and that in <h6> is the smallest. You will
learn how to set the size of content, its color, and font in the second part of this book where you'll be
taught about Cascading Style Sheets (CSS).
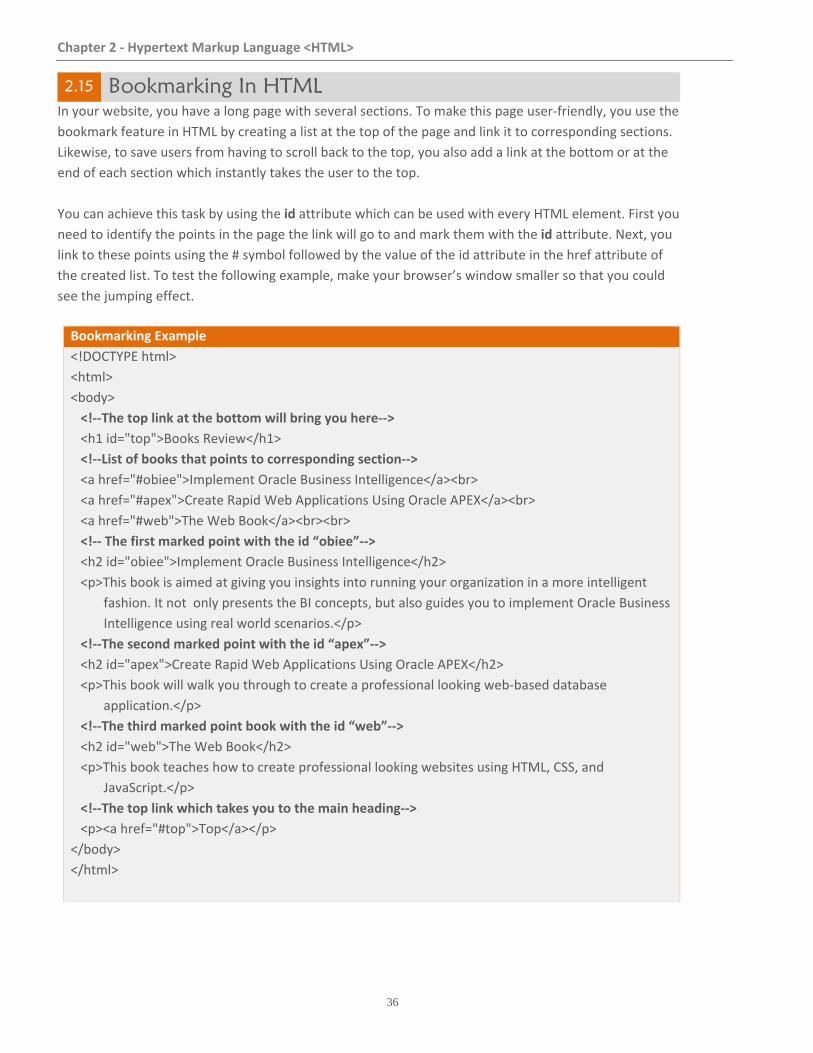
Chapter 2 ‐ Hypertext Markup Language <HTML>
36
2.15 Bookmarking In HTML
In your website, you have a long page with several sections. To make this page user‐friendly, you use the
bookmark feature in HTML by creating a list at the top of the page and link it to corresponding sections.
Likewise, to save users from having to scroll back to the top, you also add a link at the bottom or at the
end of each section which instantly takes the user to the top.
You can achieve this task by using the id attribute which can be used with every HTML element. First you
need to identify the points in the page the link will go to and mark them with the id attribute. Next, you
link to these points using the # symbol followed by the value of the id attribute in the href attribute of
the created list. To test the following example, make your browser’s window smaller so that you could
see the jumping effect.
Bookmarking Example
<!DOCTYPE html>
<html>
<body>
<!‐‐The top link at the bottom will bring you here‐‐>
<h1 id="top">Books Review</h1>
<!‐‐List of books that points to corresponding section‐‐>
<a href="#obiee">Implement Oracle Business Intelligence</a><br>
<a href="#apex">Create Rapid Web Applications Using Oracle APEX</a><br>
<a href="#web">The Web Book</a><br><br>
<!‐‐ The first marked point with the id “obiee”‐‐>
<h2 id="obiee">Implement Oracle Business Intelligence</h2>
<p>This book is aimed at giving you insights into running your organization in a more intelligent
fashion. It not only presents the BI concepts, but also guides you to implement Oracle Business
Intelligence using real world scenarios.</p>
<!‐‐The second marked point with the id “apex”‐‐>
<h2 id="apex">Create Rapid Web Applications Using Oracle APEX</h2>
<p>This book will walk you through to create a professional looking web‐based database
application.</p>
<!‐‐The third marked point book with the id “web”‐‐>
<h2 id="web">The Web Book</h2>
<p>This book teaches how to create professional looking websites using HTML, CSS, and
JavaScript.</p>
<!‐‐The top link which takes you to the main heading‐‐>
<p><a href="#top">Top</a></p>
</body>
</html>
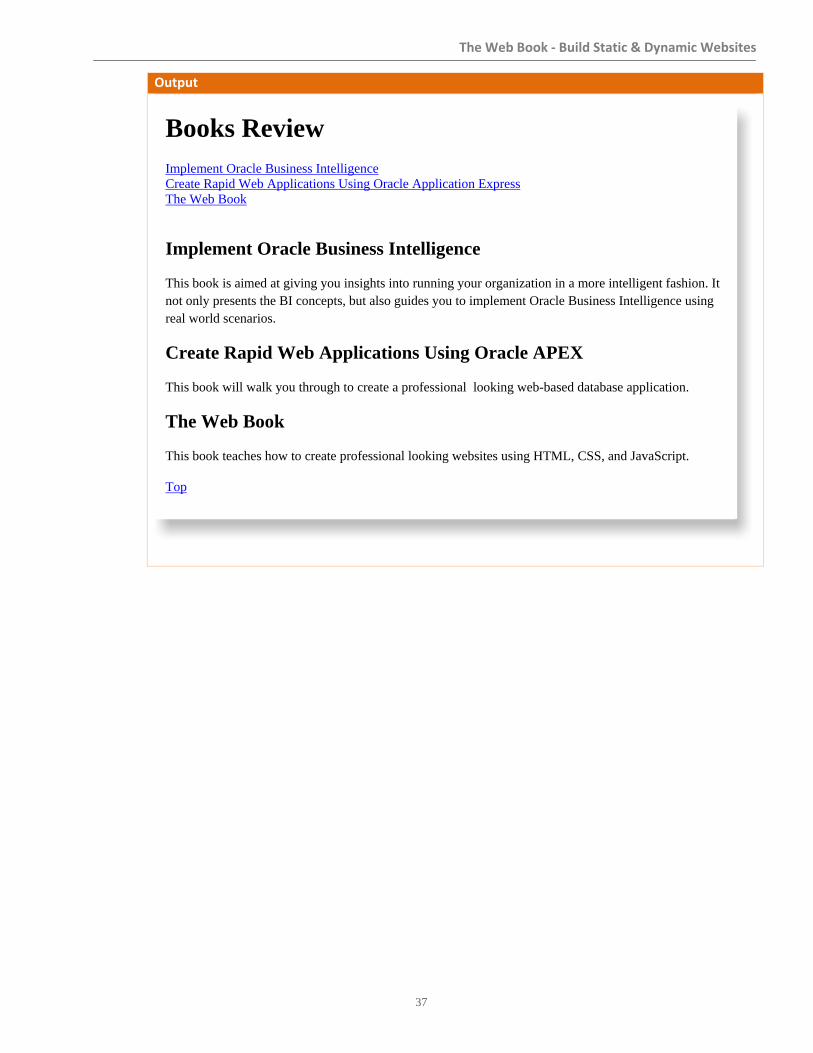
The Web Book ‐ Build Static & Dynamic Websites
37
Output
Books Review Implement Oracle Business Intelligence Create Rapid Web Applications Using Oracle Application Express The Web Book
Implement Oracle Business Intelligence
This book is aimed at giving you insights into running your organization in a more intelligent fashion. It not only presents the BI concepts, but also guides you to implement Oracle Business Intelligence using real world scenarios.
Create Rapid Web Applications Using Oracle APEX
This book will walk you through to create a professional looking web-based database application.
The Web Book
This book teaches how to create professional looking websites using HTML, CSS, and JavaScript.
Top
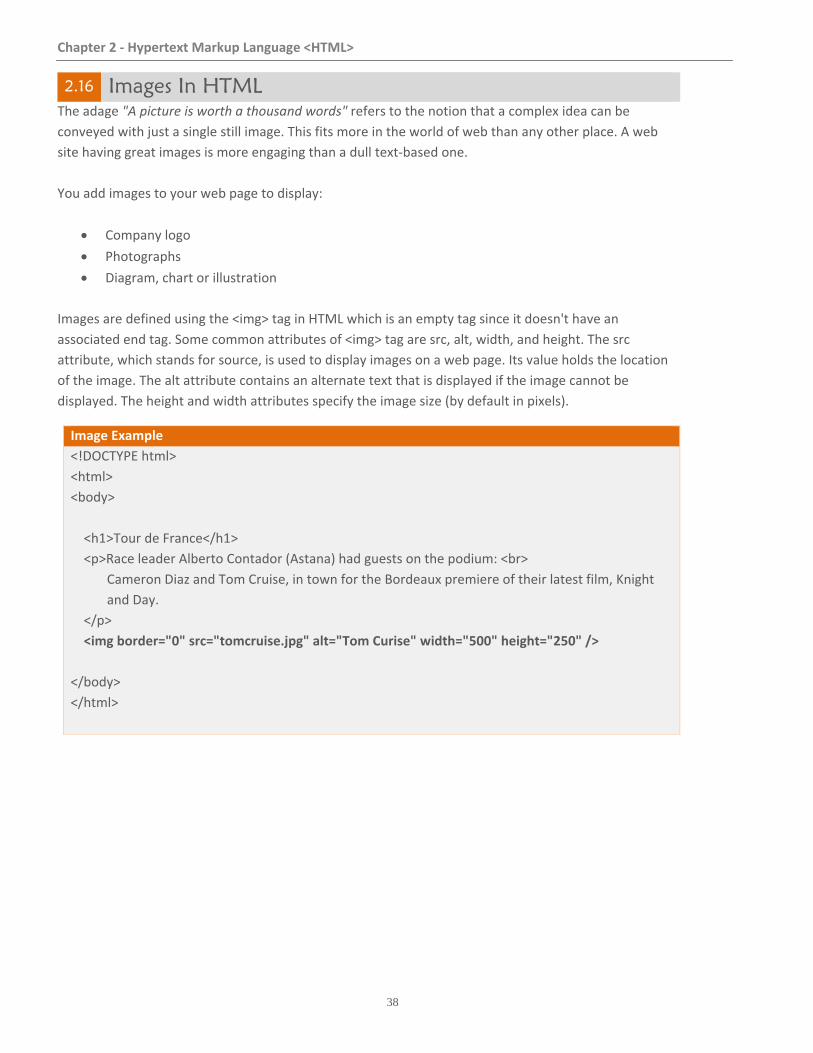
Chapter 2 ‐ Hypertext Markup Language <HTML>
38
2.16 Images In HTML
The adage "A picture is worth a thousand words" refers to the notion that a complex idea can be
conveyed with just a single still image. This fits more in the world of web than any other place. A web
site having great images is more engaging than a dull text‐based one.
You add images to your web page to display:
Company logo
Photographs
Diagram, chart or illustration
Images are defined using the <img> tag in HTML which is an empty tag since it doesn't have an
associated end tag. Some common attributes of <img> tag are src, alt, width, and height. The src
attribute, which stands for source, is used to display images on a web page. Its value holds the location
of the image. The alt attribute contains an alternate text that is displayed if the image cannot be
displayed. The height and width attributes specify the image size (by default in pixels).
Image Example
<!DOCTYPE html>
<html>
<body>
<h1>Tour de France</h1>
<p>Race leader Alberto Contador (Astana) had guests on the podium: <br>
Cameron Diaz and Tom Cruise, in town for the Bordeaux premiere of their latest film, Knight
and Day.
</p>
<img border="0" src="tomcruise.jpg" alt="Tom Curise" width="500" height="250" />
</body>
</html>
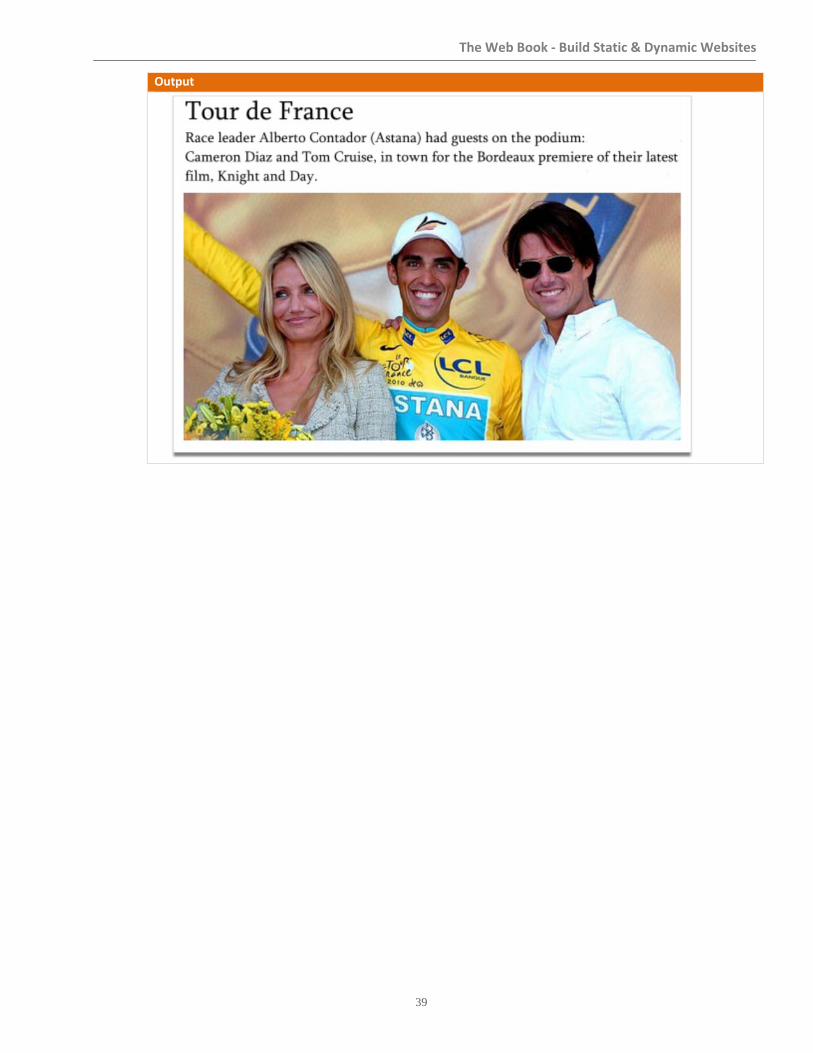
The Web Book ‐ Build Static & Dynamic Websites
39
Output
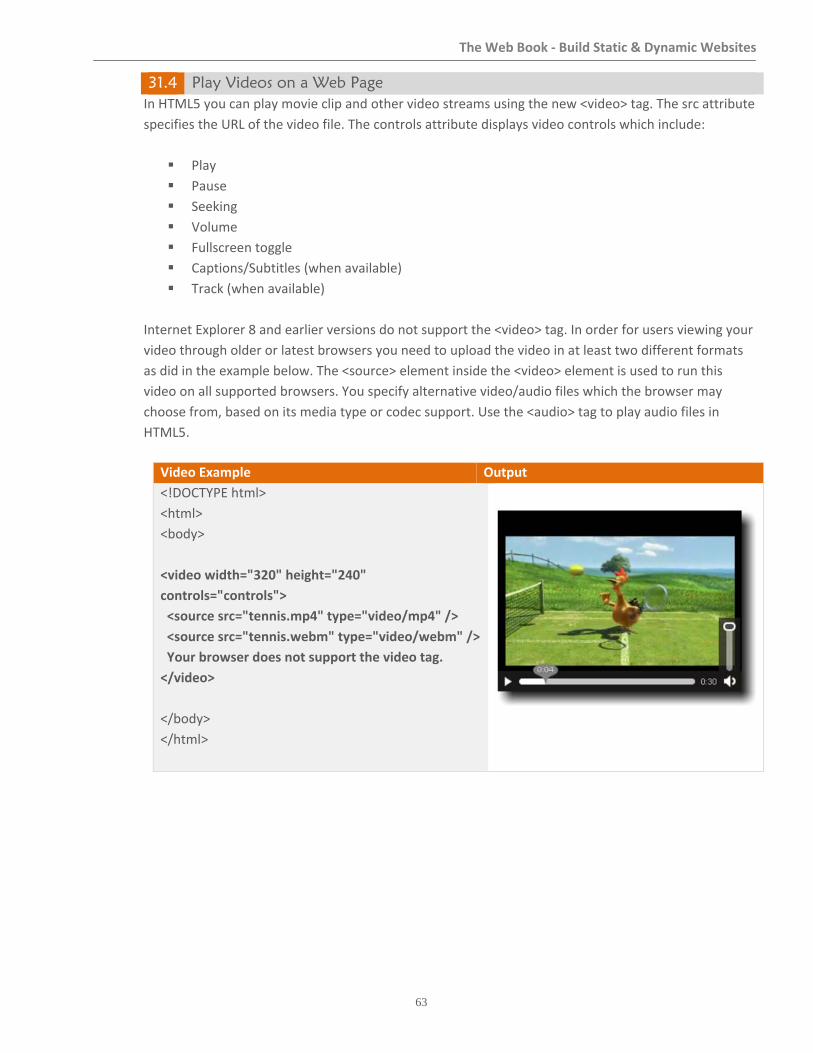
The Web Book ‐ Build Static & Dynamic Websites
63
31.4 Play Videos on a Web Page In HTML5 you can play movie clip and other video streams using the new <video> tag. The src attribute
specifies the URL of the video file. The controls attribute displays video controls which include:
Play
Pause
Seeking
Volume
Fullscreen toggle
Captions/Subtitles (when available)
Track (when available)
Internet Explorer 8 and earlier versions do not support the <video> tag. In order for users viewing your
video through older or latest browsers you need to upload the video in at least two different formats
as did in the example below. The <source> element inside the <video> element is used to run this
video on all supported browsers. You specify alternative video/audio files which the browser may
choose from, based on its media type or codec support. Use the <audio> tag to play audio files in
HTML5.
Video Example Output
<!DOCTYPE html>
<html>
<body>
<video width="320" height="240"
controls="controls">
<source src="tennis.mp4" type="video/mp4" />
<source src="tennis.webm" type="video/webm" />
Your browser does not support the video tag.
</video>
</body>
</html>
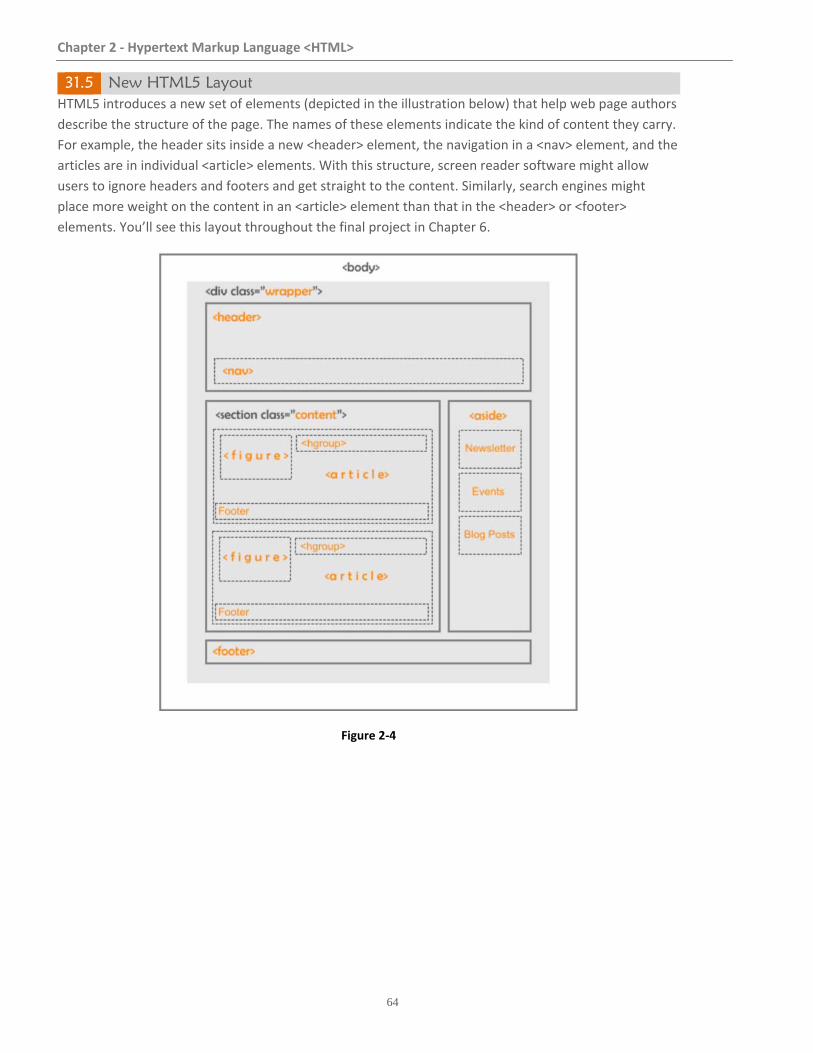
Chapter 2 ‐ Hypertext Markup Language <HTML>
64
31.5 New HTML5 Layout HTML5 introduces a new set of elements (depicted in the illustration below) that help web page authors
describe the structure of the page. The names of these elements indicate the kind of content they carry.
For example, the header sits inside a new <header> element, the navigation in a <nav> element, and the
articles are in individual <article> elements. With this structure, screen reader software might allow
users to ignore headers and footers and get straight to the content. Similarly, search engines might
place more weight on the content in an <article> element than that in the <header> or <footer>
elements. You’ll see this layout throughout the final project in Chapter 6.
Figure 2‐4
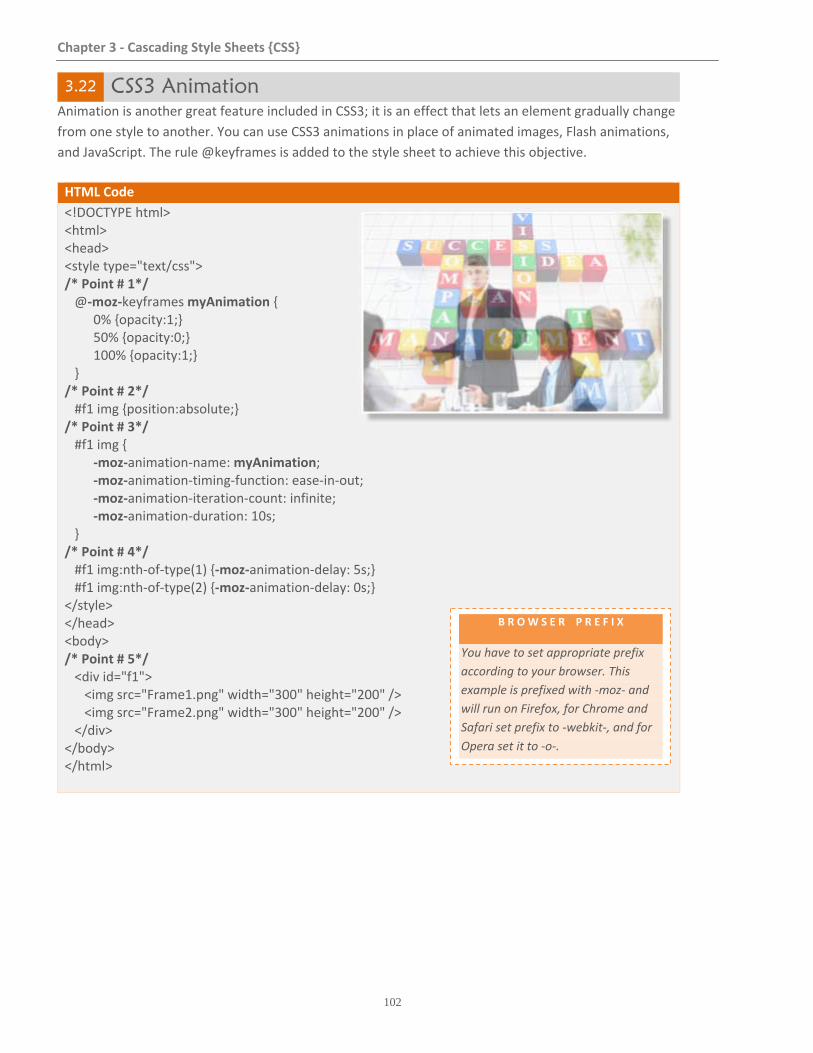
Chapter 3 ‐ Cascading Style Sheets {CSS}
102
3.22 CSS3 Animation
Animation is another great feature included in CSS3; it is an effect that lets an element gradually change
from one style to another. You can use CSS3 animations in place of animated images, Flash animations,
and JavaScript. The rule @keyframes is added to the style sheet to achieve this objective.
HTML Code
<!DOCTYPE html> <html> <head> <style type="text/css"> /* Point # 1*/ @‐moz‐keyframes myAnimation { 0% {opacity:1;} 50% {opacity:0;} 100% {opacity:1;} } /* Point # 2*/ #f1 img {position:absolute;} /* Point # 3*/ #f1 img { ‐moz‐animation‐name: myAnimation; ‐moz‐animation‐timing‐function: ease‐in‐out; ‐moz‐animation‐iteration‐count: infinite; ‐moz‐animation‐duration: 10s; } /* Point # 4*/ #f1 img:nth‐of‐type(1) {‐moz‐animation‐delay: 5s;} #f1 img:nth‐of‐type(2) {‐moz‐animation‐delay: 0s;} </style> </head> <body> /* Point # 5*/ <div id="f1"> <img src="Frame1.png" width="300" height="200" /> <img src="Frame2.png" width="300" height="200" /> </div> </body> </html>
B R O W S E R P R E F I X
You have to set appropriate prefix
according to your browser. This
example is prefixed with ‐moz‐ and
will run on Firefox, for Chrome and
Safari set prefix to ‐webkit‐, and for
Opera set it to ‐o‐.
The Web Book ‐ Build Static & Dynamic Websites
103
In this example, we're using two images that will cross fade infinitely one after the other. Point # 1:
Created a keyframe rule for Firefox and named it myAnimation. Specified when the change will happen
in percent, which ranges from 0% to 100%. Initially, we will display actual picture by setting the opacity
to 1. When the animation is at 50%, it will become transparent (opacity:0), and again to actual when
the animation is 100% complete. This rule will be applied to all images defined in Point 5.
Point # 2:
In this rule we provided absolute position to images. If you omit this rule, both pictures will appear
relatively (side‐by‐side).
Point # 3:
The animation‐name property specifies the name of the keyframe you want to bind to the selector.
Here, you have provided the name myAnimation to the keyframe and bound it to #f1 selector that has
<img> elements.
The animation‐timing‐function property describes how the animation will progress over one
cycle of its duration. We set it to ease‐in‐out which means that the animation has both a slow
start and a slow end.
The animation‐iteration‐count property specifies the number of times an animation is played.
The infinite value is set to play the animation forever.
The animation‐duration property specifies how many seconds or milliseconds an animation
takes to complete one cycle. We set the value to ten seconds (5 seconds for each picture).
Point # 4:
The :nth‐of‐type pseudo‐class matches elements based on their position within the parent element's
list of child elements of the same type. This pseudo‐class accepts an argument (N) which can be a
number, keyword, or expression. In our example we're referencing the two images defined in Point#5.
The animation‐delay property defines when the animation will start.
The total duration of this animation is 10s (Point#3). The animation will start with the second image
(Frame2.png) and will last for 5 seconds. Then the first image (Frame1.png) will appear and it too will
last for 5 seconds.
Point # 5:
We defined two images in a <div> element. These images will act as a source for the animation and will
appear and fade in a cycle.
Chapter 4 ‐ JavaScript
106
4.1 About JavaScript
HTML is a simple text markup language, it can't respond to the user, make decisions, or automate repetitive tasks. Interactive tasks such as these require a more sophisticated language: a programming language, or a scripting language. Although many programming languages are complex, scripting languages are generally simple. They have a simple syntax, can perform tasks with a minimum of commands, and are easy to learn. Web scripting languages enable you to combine scripting with HTML to create interactive web pages.
JavaScript is one of the most popular and widely
used scripting language of the web and is used in
billions of Web pages to add functionality,
validate forms, communicate with the server,
and much more. It is primarily a client‐side
scripting language for use in Web browsers. Its
main focus is to help developers interact with
Web pages and the Web browser window itself.
Because it is embedded in all modern browsers,
it has an extraordinary wide distribution.
One of the most powerful features of the
language is its flexibility. As a JavaScript
programmer, you can make your programs as
simple or as complex as you wish them to be.
The language also allows several different
programming styles. You can write your code in
the functional style or in the slightly more
complex object‐oriented style. It also lets you
write relatively complex programs without
knowing anything at all about functional or
object‐oriented programming; you can be
productive in this language just by writing simple
functions. It allows programmers to accomplish
useful tasks with a very small, easy‐to‐learn
subset of the language.
JavaScript is almost as easy to learn as HTML,
and it can be included directly in HTML
documents. Here are the few things you can
do with JavaScript:
Display messages to the user as part of a
web page, in the browser's status line, or
in alert boxes.
Validate the contents of a form and make
calculations (for example, an order form
can automatically display a running total
as you enter item quantities).
Animate images or create images that
change when you move the mouse over
them.
Create ad banners that interact with the
user, rather than simply displaying a
graphic
Detect the browser in use or its features
and perform advanced functions only on
browsers that support them.
Detect installed plug‐ins and notify the
user if a plug‐in is required.
Modify all or part of a web page without
requiring the user to reload it.
Display or interact with data retrieved
from a remote server.

The Web Book ‐ Build Static & Dynamic Websites
107
You can do all this and more with JavaScript, including creating entire applications. A JavaScript
is added to an HTML document using the <script> tag with type=”text/javascript”. It is typically
used to manipulate existing HTML elements using the id attribute of those elements. To access
these elements JavaScript provides a method called document.getElementById(). Within the
parenthesis of this method you specify the id of the element you're trying to access.
Let's go through a simple example to embed JavaScript in an HTML document. In this example
a JavaScript is used to manipulate text of a paragraph using the paragraph’s id p1. The
innerHTML property returns the inner HTML of an element.
Embed JavaScript in HTML
<!DOCTYPE html> <html> <body> <h2>JavaScript Example</h2> <p id="p1">This text will be replaced with the text in the following JavaScript.</p> <script type="text/javascript"> document.getElementById("p1").innerHTML="Welcome to the exciting world of JavaScript!"; </script> </body> </html>
Output
JavaScript Example
Welcome to the exciting world of JavaScript!
Chapter 4 ‐ JavaScript
138
4.21 Using JavaScript with HTML Forms We went through HTML forms in section 2.20 earlier in this book and exercised various aspect of it using
different form controls. In this section, you will learn how to make a form interactive with JavaScript. In
JavaScript, each form is represented as an object with the same name as the NAME attribute mentioned
in the <form> tag.
4.21.1 Form Attributes name: Using this attribute, you provide a name to your form in the <form> tag. You assign a name to a
form to recognize it in JavaScript.
method: It has two values, GET and POST. You send data to the server using these methods. For further
details on these two method, see Chapter 2 ‐ section 2.20.
action: Using this attribute you send form's data either through a CGI script or through email to the
desired destination.
4.21.2 Form Methods
The form object has two methods, submit() and reset(). The former one lets you submit the form's data
whereas the later one clears the form.
4.21.3 Form Events
You can use two event handlers for a form object in JavaScript, onSubmit and onReset. The onSubmit
event is called before the data is submitted to the CGI script. If the statement or function returns true,
the data is submitted. This submission can be prevented by returning a value of false for the event
handler. Similarly, the functionality of a Reset button can be prevented with the onReset event handler.
4.21.4 Referring Form Elements
You can refer to a form element either by its name or by its index. For example, the two expressions
below correspond to the first element in the contact form, the fname text field.
document.contactform.elements[0] document.contactform.fname
To find a form object you use the document.getElementById() method. The following statement finds a
text field called fname and stores it in the sFname variable:
sFname = document.getElementById("fname");
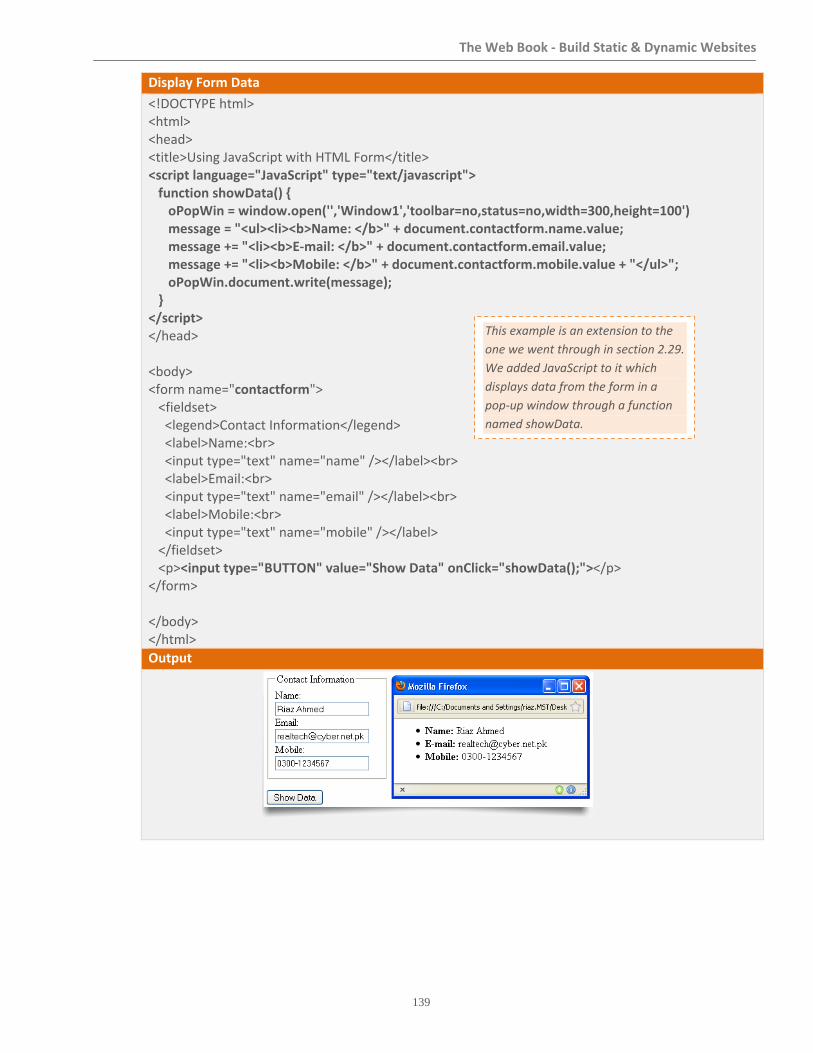
The Web Book ‐ Build Static & Dynamic Websites
139
Display Form Data
<!DOCTYPE html> <html> <head> <title>Using JavaScript with HTML Form</title> <script language="JavaScript" type="text/javascript"> function showData() { oPopWin = window.open('','Window1','toolbar=no,status=no,width=300,height=100') message = "<ul><li><b>Name: </b>" + document.contactform.name.value; message += "<li><b>E‐mail: </b>" + document.contactform.email.value; message += "<li><b>Mobile: </b>" + document.contactform.mobile.value + "</ul>"; oPopWin.document.write(message); } </script> </head> <body> <form name="contactform"> <fieldset> <legend>Contact Information</legend> <label>Name:<br> <input type="text" name="name" /></label><br> <label>Email:<br> <input type="text" name="email" /></label><br> <label>Mobile:<br> <input type="text" name="mobile" /></label> </fieldset> <p><input type="BUTTON" value="Show Data" onClick="showData();"></p> </form> </body> </html>
Output
This example is an extension to the
one we went through in section 2.29.
We added JavaScript to it which
displays data from the form in a
pop‐up window through a function
named showData.
Chapter 4 ‐ JavaScript
140
4.21.5 Validating Form’s Data You saw how JavaScript is used in HTML forms, but its most significant use is to validate data entered in
these forms. For example, you can check that the form's mandatory fields are not left blank or, if
entered, they are in the correct format. Data in the previous form could be validated as shown in the
following example. The checkData() JavaScript function is used to check data in the name field through
the field's length. If you leave the field blank and hit the submit button, the submission is stopped and
an alert message comes up with relevant information.
We used document.contactform.name.focus() statement to place the cursor on the field where the error
occurred. The function checkData() is called using the onSubmit event handler in the <form> tag. The
value returned by the checkData() function is determined by the return keyword to assess whether to
submit the form. You can use the onChange event handler in each form field to validate data individually
prior to submission.
Chapter 5 ‐ PHP & MySQL
144
5.1 Introduction to PHP and MySQL Database
In this part, you will be introduced to PHP, MySQL, and the interaction of the two.
PHP MySQL
PHP stands for PHP: Hypertext Preprocessor. It is
a server‐side scripting language, which can be
embedded in HTML or used as a standalone
binary (although the former use is much more
common). PHP is a powerful tool for making
dynamic and interactive Web pages and is the
widely‐used, free, and efficient alternative to
competitors such as Microsoft's ASP.
Below are some basic general facts about PHP:
PHP is a server‐side scripting language
and its scripts are executed on the
server.
PHP is an open source software and is
free to download and use.
PHP files have extensions ".php",
".php3", or ".phtml". These files can hold
text, HTML tags and scripts.
PHP files are returned to the browser as
plain HTML.
PHP supports many databases (MySQL,
Oracle, PostgreSQL, Sybase, Informix,
Solid, Generic ODBC, etc.)
PHP is easy to learn, compared to the
other ways to achieve similar
functionality. Unlike Java Server Pages or
C‐based CGI, PHP doesn’t require you to
gain a deep understanding of a major
programming language before you can
make a trivial database or remote‐server
call. Unlike Perl, which has been called a
“write‐only language,” PHP has a syntax
that is quite easy to parse and human‐
friendly. And unlike ASP.NET, PHP is
stable and ready to solve your problems
today.
MySQL (pronounced My Ess Q El) is an open
source, SQL Relational Database Management
System (RDBMS) that is free for many uses. It is
used to store data. Data in MySQL is stored in
objects called tables. For example, a database of
a company can have the following tables:
Customers
Vendors
Products
Orders
Contact
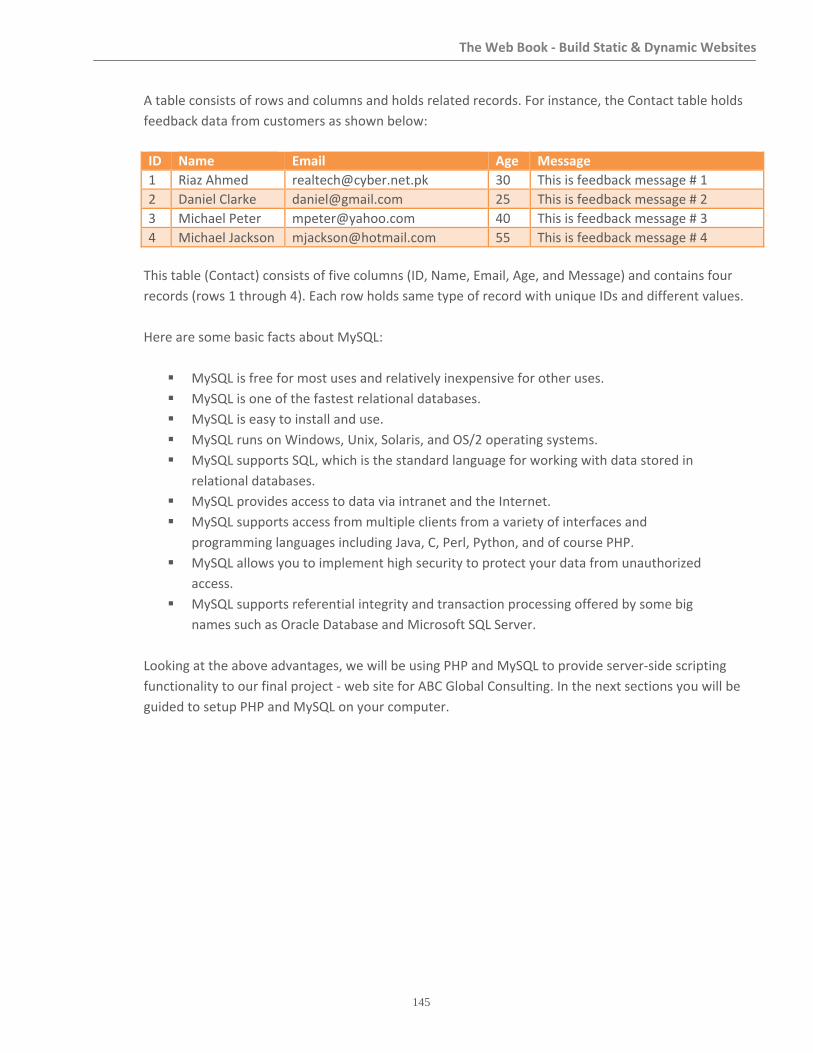
The Web Book ‐ Build Static & Dynamic Websites
145
A table consists of rows and columns and holds related records. For instance, the Contact table holds
feedback data from customers as shown below:
ID Name Email Age Message
1 Riaz Ahmed [email protected] 30 This is feedback message # 1
2 Daniel Clarke [email protected] 25 This is feedback message # 2
3 Michael Peter [email protected] 40 This is feedback message # 3
4 Michael Jackson [email protected] 55 This is feedback message # 4
This table (Contact) consists of five columns (ID, Name, Email, Age, and Message) and contains four
records (rows 1 through 4). Each row holds same type of record with unique IDs and different values.
Here are some basic facts about MySQL:
MySQL is free for most uses and relatively inexpensive for other uses.
MySQL is one of the fastest relational databases.
MySQL is easy to install and use.
MySQL runs on Windows, Unix, Solaris, and OS/2 operating systems.
MySQL supports SQL, which is the standard language for working with data stored in
relational databases.
MySQL provides access to data via intranet and the Internet.
MySQL supports access from multiple clients from a variety of interfaces and
programming languages including Java, C, Perl, Python, and of course PHP.
MySQL allows you to implement high security to protect your data from unauthorized
access.
MySQL supports referential integrity and transaction processing offered by some big
names such as Oracle Database and Microsoft SQL Server.
Looking at the above advantages, we will be using PHP and MySQL to provide server‐side scripting
functionality to our final project ‐ web site for ABC Global Consulting. In the next sections you will be
guided to setup PHP and MySQL on your computer.
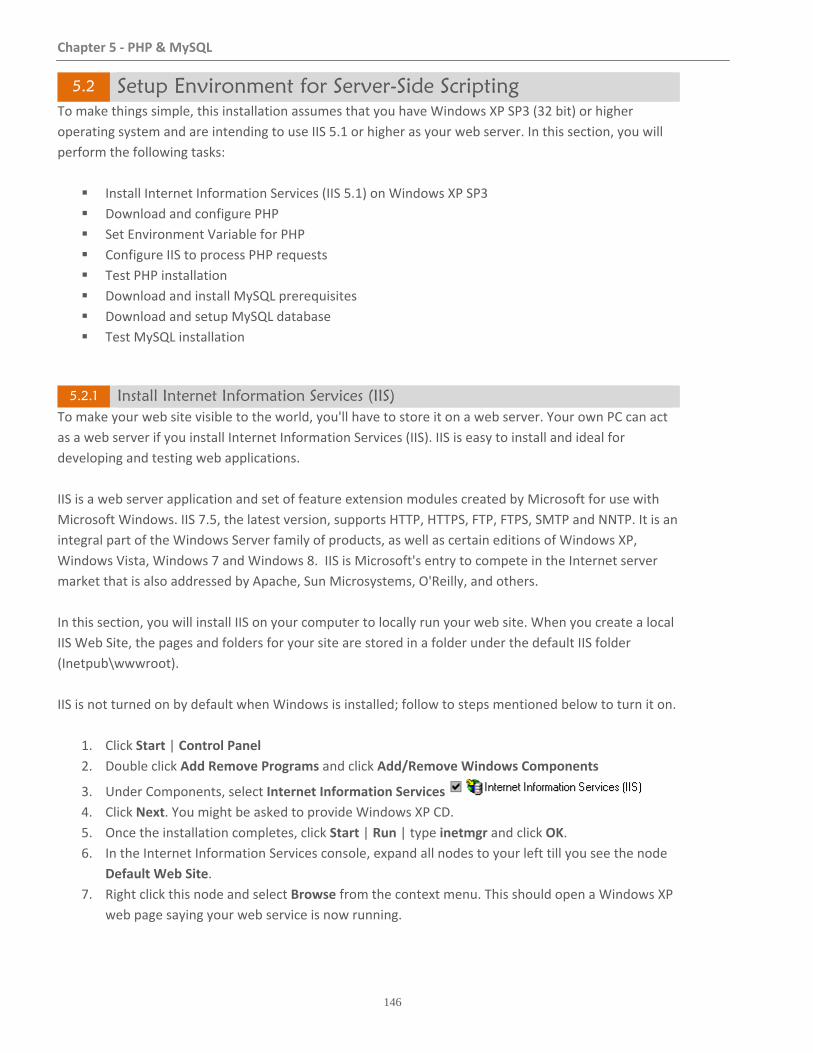
Chapter 5 ‐ PHP & MySQL
146
5.2 Setup Environment for Server-Side Scripting
To make things simple, this installation assumes that you have Windows XP SP3 (32 bit) or higher
operating system and are intending to use IIS 5.1 or higher as your web server. In this section, you will
perform the following tasks:
Install Internet Information Services (IIS 5.1) on Windows XP SP3
Download and configure PHP
Set Environment Variable for PHP
Configure IIS to process PHP requests
Test PHP installation
Download and install MySQL prerequisites
Download and setup MySQL database
Test MySQL installation
5.2.1 Install Internet Information Services (IIS) To make your web site visible to the world, you'll have to store it on a web server. Your own PC can act
as a web server if you install Internet Information Services (IIS). IIS is easy to install and ideal for
developing and testing web applications.
IIS is a web server application and set of feature extension modules created by Microsoft for use with
Microsoft Windows. IIS 7.5, the latest version, supports HTTP, HTTPS, FTP, FTPS, SMTP and NNTP. It is an
integral part of the Windows Server family of products, as well as certain editions of Windows XP,
Windows Vista, Windows 7 and Windows 8. IIS is Microsoft's entry to compete in the Internet server
market that is also addressed by Apache, Sun Microsystems, O'Reilly, and others.
In this section, you will install IIS on your computer to locally run your web site. When you create a local
IIS Web Site, the pages and folders for your site are stored in a folder under the default IIS folder
(Inetpub\wwwroot).
IIS is not turned on by default when Windows is installed; follow to steps mentioned below to turn it on.
1. Click Start | Control Panel
2. Double click Add Remove Programs and click Add/Remove Windows Components
3. Under Components, select Internet Information Services
4. Click Next. You might be asked to provide Windows XP CD.
5. Once the installation completes, click Start | Run | type inetmgr and click OK.
6. In the Internet Information Services console, expand all nodes to your left till you see the node
Default Web Site.
7. Right click this node and select Browse from the context menu. This should open a Windows XP
web page saying your web service is now running.
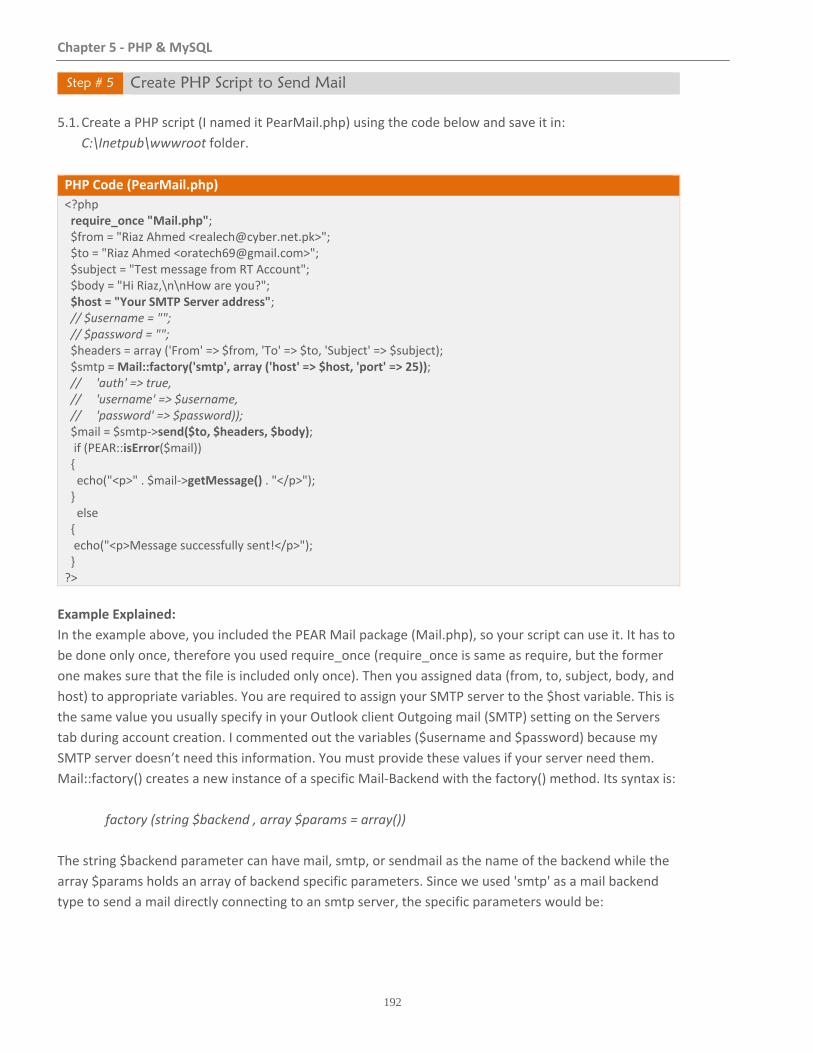
Chapter 5 ‐ PHP & MySQL
192
Step # 5 Create PHP Script to Send Mail
5.1. Create a PHP script (I named it PearMail.php) using the code below and save it in:
C:\Inetpub\wwwroot folder.
PHP Code (PearMail.php)
<?php require_once "Mail.php"; $from = "Riaz Ahmed <[email protected]>"; $to = "Riaz Ahmed <[email protected]>"; $subject = "Test message from RT Account"; $body = "Hi Riaz,\n\nHow are you?"; $host = "Your SMTP Server address"; // $username = ""; // $password = ""; $headers = array ('From' => $from, 'To' => $to, 'Subject' => $subject); $smtp = Mail::factory('smtp', array ('host' => $host, 'port' => 25)); // 'auth' => true, // 'username' => $username, // 'password' => $password)); $mail = $smtp‐>send($to, $headers, $body); if (PEAR::isError($mail)) { echo("<p>" . $mail‐>getMessage() . "</p>"); } else { echo("<p>Message successfully sent!</p>"); } ?>
Example Explained:
In the example above, you included the PEAR Mail package (Mail.php), so your script can use it. It has to
be done only once, therefore you used require_once (require_once is same as require, but the former
one makes sure that the file is included only once). Then you assigned data (from, to, subject, body, and
host) to appropriate variables. You are required to assign your SMTP server to the $host variable. This is
the same value you usually specify in your Outlook client Outgoing mail (SMTP) setting on the Servers
tab during account creation. I commented out the variables ($username and $password) because my
SMTP server doesn’t need this information. You must provide these values if your server need them.
Mail::factory() creates a new instance of a specific Mail‐Backend with the factory() method. Its syntax is:
factory (string $backend , array $params = array())
The string $backend parameter can have mail, smtp, or sendmail as the name of the backend while the
array $params holds an array of backend specific parameters. Since we used 'smtp' as a mail backend
type to send a mail directly connecting to an smtp server, the specific parameters would be:
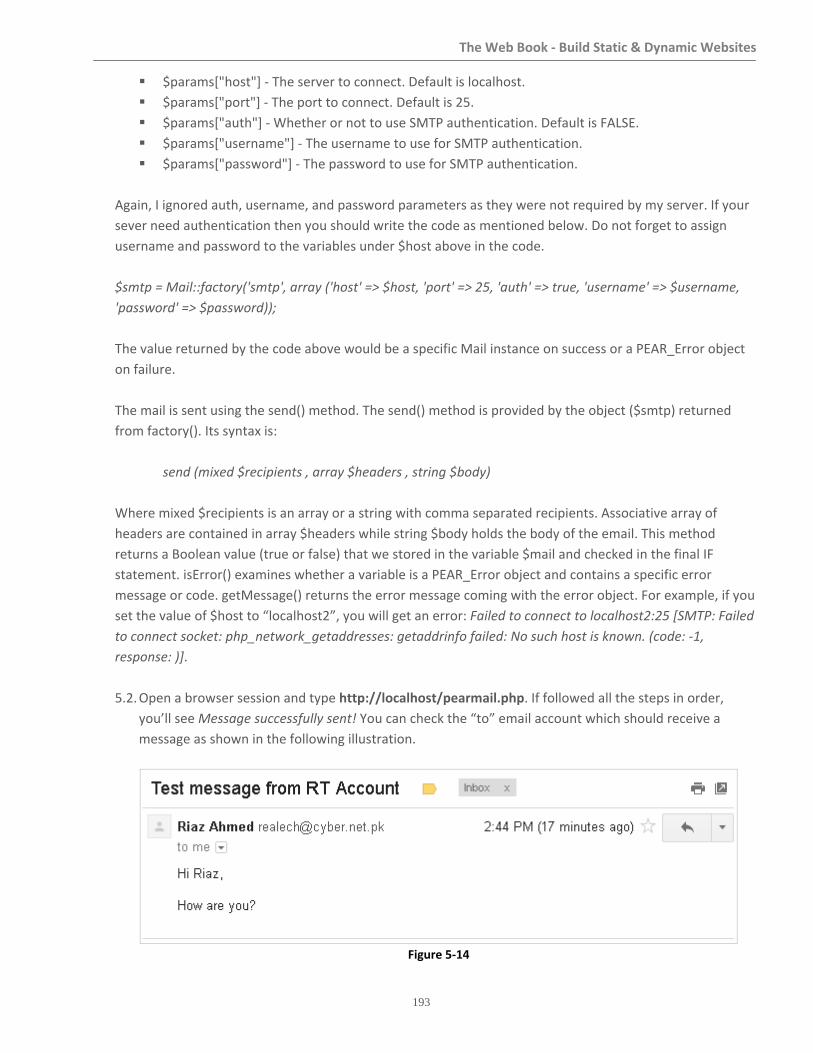
The Web Book ‐ Build Static & Dynamic Websites
193
$params["host"] ‐ The server to connect. Default is localhost.
$params["port"] ‐ The port to connect. Default is 25.
$params["auth"] ‐ Whether or not to use SMTP authentication. Default is FALSE.
$params["username"] ‐ The username to use for SMTP authentication.
$params["password"] ‐ The password to use for SMTP authentication.
Again, I ignored auth, username, and password parameters as they were not required by my server. If your
sever need authentication then you should write the code as mentioned below. Do not forget to assign
username and password to the variables under $host above in the code.
$smtp = Mail::factory('smtp', array ('host' => $host, 'port' => 25, 'auth' => true, 'username' => $username,
'password' => $password));
The value returned by the code above would be a specific Mail instance on success or a PEAR_Error object
on failure.
The mail is sent using the send() method. The send() method is provided by the object ($smtp) returned
from factory(). Its syntax is:
send (mixed $recipients , array $headers , string $body)
Where mixed $recipients is an array or a string with comma separated recipients. Associative array of
headers are contained in array $headers while string $body holds the body of the email. This method
returns a Boolean value (true or false) that we stored in the variable $mail and checked in the final IF
statement. isError() examines whether a variable is a PEAR_Error object and contains a specific error
message or code. getMessage() returns the error message coming with the error object. For example, if you
set the value of $host to “localhost2”, you will get an error: Failed to connect to localhost2:25 [SMTP: Failed
to connect socket: php_network_getaddresses: getaddrinfo failed: No such host is known. (code: ‐1,
response: )].
5.2. Open a browser session and type http://localhost/pearmail.php. If followed all the steps in order,
you’ll see Message successfully sent! You can check the “to” email account which should receive a
message as shown in the following illustration.
Figure 5‐14

195
YOU WILL LEARN
Build a website comprising static & dynamic pages
Difference between static & dynamic web pages
How to create web Contact Form
Newsletter Subscription Module
E-Commerce Module comprising various Admin & Member modules
Manage dynamic content through the Admin modules
Place Online Orders through the Member modules
Website Deployment on hosting server
CHAPTER 6
WEBSITE PROJECT
YOU must be the CHANGE that you wish to see in the world.
Chapter 6 ‐ Website Project
196
6.1 Project’s Introduction
You’ve landed to the most interesting part of this book. Here, you’ll create a professional website for
ABC Global Consulting and will apply the techniques you’ve learned so far. The project is divided into
two categories:
Dynamic
Dynamic web pages are generated at the time of access by a user or change
as a result of interaction with the user. These pages can give the website
owner the ability to simply update and add new content to the site. For
example, news and events could be posted to the site through a simple
browser interface. Dynamic features of a site are only limited by imagination.
Some examples of dynamic website features could be: content management
system, e‐commerce system, bulletin / discussion boards, intranet or
extranet facilities, ability for clients or users to upload documents, ability for
administrators or users to create content or add information to a site. In this
part of the book, you’ll create an e‐commerce system and couple of more
interfaces with the help of PHP and MySQL database:
Contact Form ‐ This html page is meant to interact with the site
visitors. A form will be provided to the visitors of the website to add
their comments and feedback. This form will use PHP and MySQL to
store the comments in a database table. Besides, it will receive
contact details such as e‐mail address and other relevant
information.
Newsletter Subscription ‐ Using a form site visitors would enter
their e‐mail address to subscribe to company’s newsletters. This
form will be added to the home page (index.html). A process will be
created with the help of PHP and MySQL to interact with site
visitors.
Admin Interface ‐ In the dynamic part, you’ll create an e‐commerce
prototype application that will comprise admin and members
sections. The admin section will be accessible only to the site
administrators who will use this interface to manage tasks such as
products and orders management. See section 6.7 ‐ Make the
Website Dynamic later in this part for complete details.
Members Interface ‐ This will allow end users to become site
members and will allow them to view and purchase products from
the website. For further details, see section 6.7 ‐ Make the Website
Dynamic.
STATIC VS DYNAMIC
When you create a normal web page with HTML and CSS, all the content is fixed by the webmaster. Everyone who visits the page sees the same content—it's static. By contrast, the content of a
dynamic web page frequently
changes. For example, the
Products page in our project
would displays three most
recent products (marked as
featured products) from the
database. When a new item is
added to the database, the PHP
code in the page automatically
displays it. Whenever this page
is called, the content changes to
display a list of newly added
featured products. The code in
the page controls the content
depending on the request it
receives from the browser.
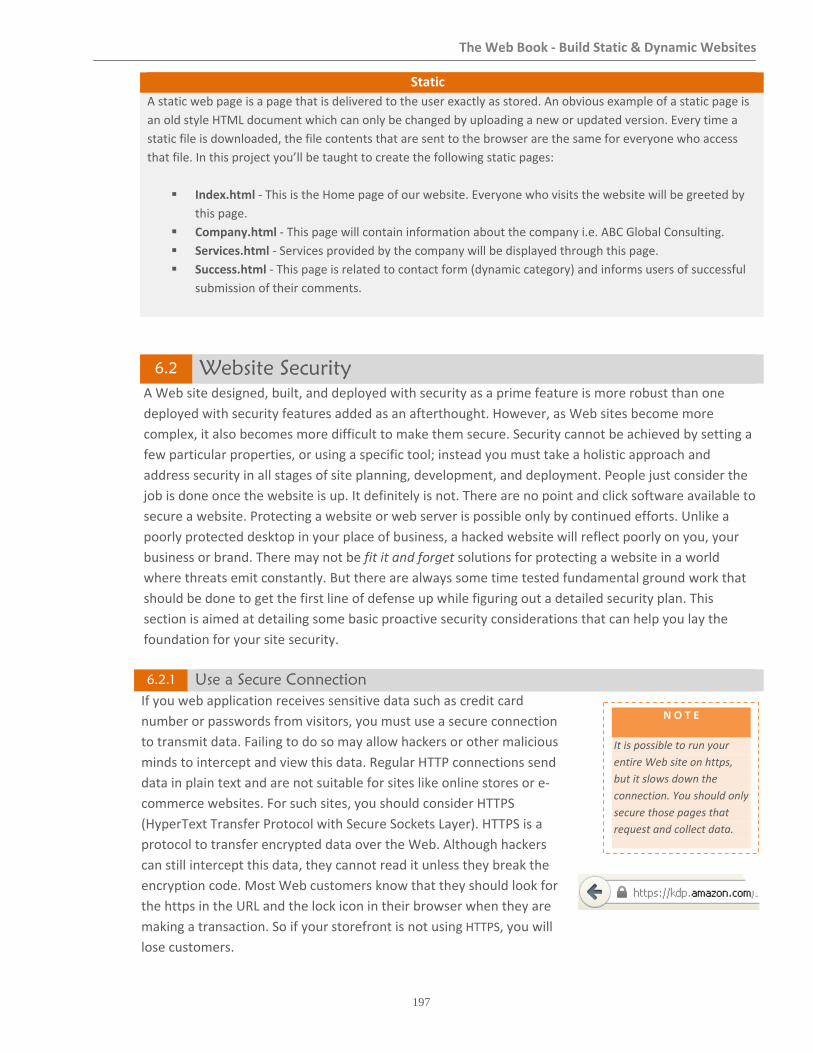
The Web Book ‐ Build Static & Dynamic Websites
197
Static
A static web page is a page that is delivered to the user exactly as stored. An obvious example of a static page is
an old style HTML document which can only be changed by uploading a new or updated version. Every time a
static file is downloaded, the file contents that are sent to the browser are the same for everyone who access
that file. In this project you’ll be taught to create the following static pages:
Index.html ‐ This is the Home page of our website. Everyone who visits the website will be greeted by
this page.
Company.html ‐ This page will contain information about the company i.e. ABC Global Consulting.
Services.html ‐ Services provided by the company will be displayed through this page.
Success.html ‐ This page is related to contact form (dynamic category) and informs users of successful
submission of their comments.
6.2 Website Security
A Web site designed, built, and deployed with security as a prime feature is more robust than one
deployed with security features added as an afterthought. However, as Web sites become more
complex, it also becomes more difficult to make them secure. Security cannot be achieved by setting a
few particular properties, or using a specific tool; instead you must take a holistic approach and
address security in all stages of site planning, development, and deployment. People just consider the
job is done once the website is up. It definitely is not. There are no point and click software available to
secure a website. Protecting a website or web server is possible only by continued efforts. Unlike a
poorly protected desktop in your place of business, a hacked website will reflect poorly on you, your
business or brand. There may not be fit it and forget solutions for protecting a website in a world
where threats emit constantly. But there are always some time tested fundamental ground work that
should be done to get the first line of defense up while figuring out a detailed security plan. This
section is aimed at detailing some basic proactive security considerations that can help you lay the
foundation for your site security.
6.2.1 Use a Secure Connection If you web application receives sensitive data such as credit card
number or passwords from visitors, you must use a secure connection
to transmit data. Failing to do so may allow hackers or other malicious
minds to intercept and view this data. Regular HTTP connections send
data in plain text and are not suitable for sites like online stores or e‐
commerce websites. For such sites, you should consider HTTPS
(HyperText Transfer Protocol with Secure Sockets Layer). HTTPS is a
protocol to transfer encrypted data over the Web. Although hackers
can still intercept this data, they cannot read it unless they break the
encryption code. Most Web customers know that they should look for
the https in the URL and the lock icon in their browser when they are
making a transaction. So if your storefront is not using HTTPS, you will
lose customers.
N O T E
It is possible to run your
entire Web site on https,
but it slows down the
connection. You should only
secure those pages that
request and collect data.

The Web Book ‐ Build Static & Dynamic Websites
199
6.3 Build Website’s Static Pages Taking the simple route first, you’ll build the static pages of your project in this section. While creating
these web pages, you’ll apply the skills learned in earlier parts of this book with the addition of some
more useful stuff.
General Steps:
1. If not yet done, download the book’s code from:
http://www.maqcon.com/test/download/TheWebBookCode.rar
2. Extract this file in a folder (I extracted it in c:\bookcode and will refer to this folder as ‘source’
in subsequent sections).
3. Create a folder named ABCGLOBAL under c:\Inetpub\wwwroot. This folder will be referred to
as ‘site folder’.
4. Copy Images folder from c:\bookcode\project to c:\Inetpub\wwwroot\abcglobal
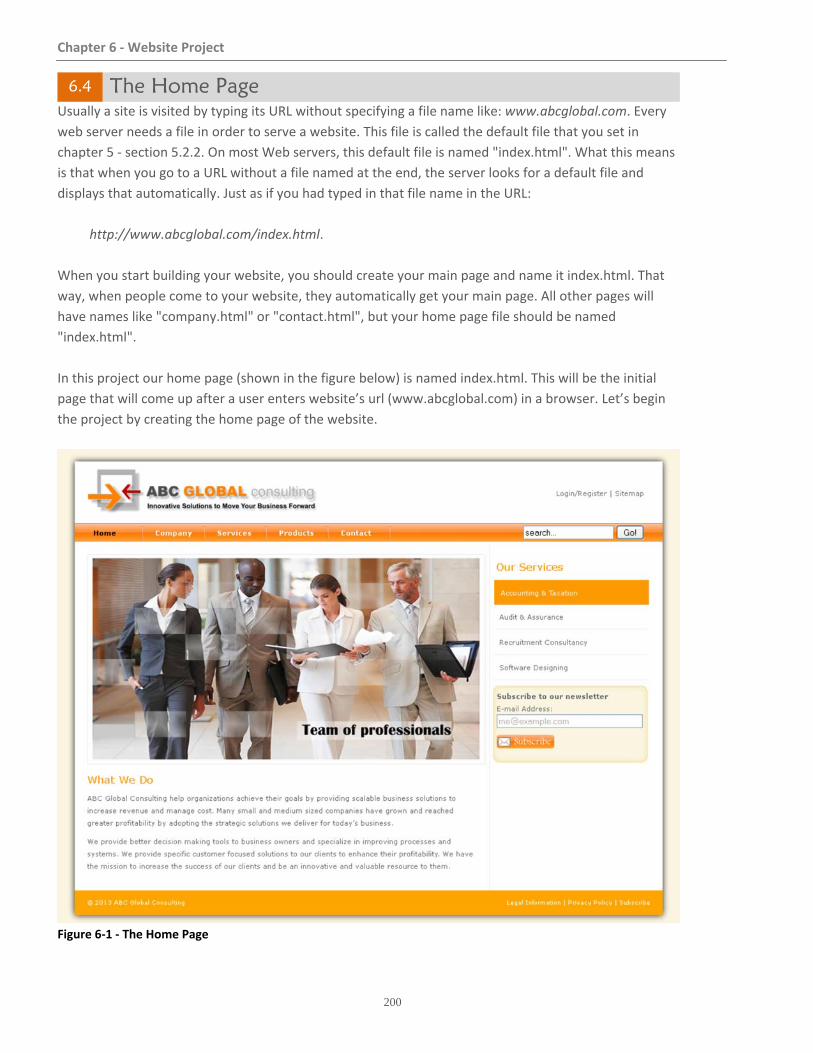
Chapter 6 ‐ Website Project
200
6.4 The Home Page
Usually a site is visited by typing its URL without specifying a file name like: www.abcglobal.com. Every
web server needs a file in order to serve a website. This file is called the default file that you set in
chapter 5 ‐ section 5.2.2. On most Web servers, this default file is named "index.html". What this means
is that when you go to a URL without a file named at the end, the server looks for a default file and
displays that automatically. Just as if you had typed in that file name in the URL:
http://www.abcglobal.com/index.html.
When you start building your website, you should create your main page and name it index.html. That
way, when people come to your website, they automatically get your main page. All other pages will
have names like "company.html" or "contact.html", but your home page file should be named
"index.html".
In this project our home page (shown in the figure below) is named index.html. This will be the initial
page that will come up after a user enters website’s url (www.abcglobal.com) in a browser. Let’s begin
the project by creating the home page of the website.
Figure 6‐1 ‐ The Home Page
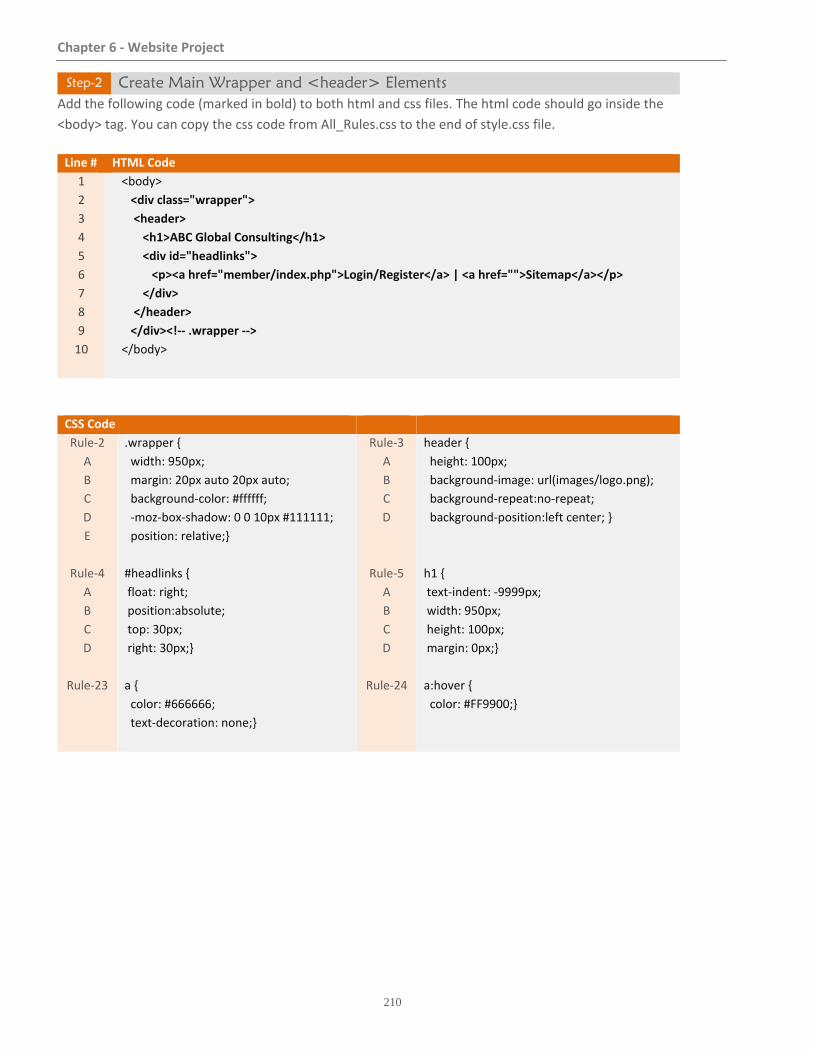
Chapter 6 ‐ Website Project
210
Step-2 Create Main Wrapper and <header> Elements Add the following code (marked in bold) to both html and css files. The html code should go inside the
<body> tag. You can copy the css code from All_Rules.css to the end of style.css file.
Line # HTML Code
1
2
3
4
5
6
7
8
9
10
<body>
<div class="wrapper">
<header>
<h1>ABC Global Consulting</h1>
<div id="headlinks">
<p><a href="member/index.php">Login/Register</a> | <a href="">Sitemap</a></p>
</div>
</header>
</div><!‐‐ .wrapper ‐‐>
</body>
CSS Code
Rule‐2
A
B
C
D
E
Rule‐4
A
B
C
D
Rule‐23
.wrapper {
width: 950px;
margin: 20px auto 20px auto;
background‐color: #ffffff;
‐moz‐box‐shadow: 0 0 10px #111111;
position: relative;}
#headlinks {
float: right;
position:absolute;
top: 30px;
right: 30px;}
a {
color: #666666;
text‐decoration: none;}
Rule‐3
A
B
C
D
Rule‐5
A
B
C
D
Rule‐24
header {
height: 100px;
background‐image: url(images/logo.png);
background‐repeat:no‐repeat;
background‐position:left center; }
h1 {
text‐indent: ‐9999px;
width: 950px;
height: 100px;
margin: 0px;}
a:hover {
color: #FF9900;}
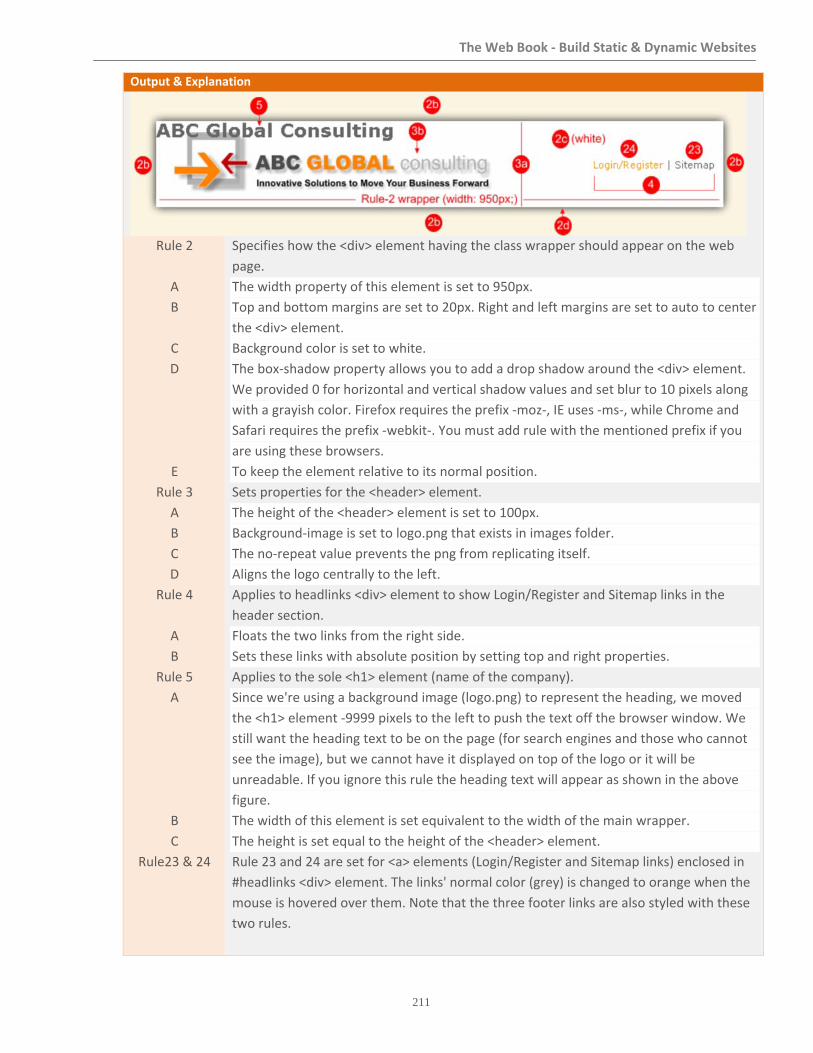
The Web Book ‐ Build Static & Dynamic Websites
211
Output & Explanation
Rule 2
A
B
C
D
E
Rule 3
A
B
C
D
Rule 4
A
B
Rule 5
A
B
C
Rule23 & 24
Specifies how the <div> element having the class wrapper should appear on the web
page.
The width property of this element is set to 950px.
Top and bottom margins are set to 20px. Right and left margins are set to auto to center
the <div> element.
Background color is set to white.
The box‐shadow property allows you to add a drop shadow around the <div> element.
We provided 0 for horizontal and vertical shadow values and set blur to 10 pixels along
with a grayish color. Firefox requires the prefix ‐moz‐, IE uses ‐ms‐, while Chrome and
Safari requires the prefix ‐webkit‐. You must add rule with the mentioned prefix if you
are using these browsers.
To keep the element relative to its normal position.
Sets properties for the <header> element.
The height of the <header> element is set to 100px.
Background‐image is set to logo.png that exists in images folder.
The no‐repeat value prevents the png from replicating itself.
Aligns the logo centrally to the left.
Applies to headlinks <div> element to show Login/Register and Sitemap links in the
header section.
Floats the two links from the right side.
Sets these links with absolute position by setting top and right properties.
Applies to the sole <h1> element (name of the company).
Since we're using a background image (logo.png) to represent the heading, we moved
the <h1> element ‐9999 pixels to the left to push the text off the browser window. We
still want the heading text to be on the page (for search engines and those who cannot
see the image), but we cannot have it displayed on top of the logo or it will be
unreadable. If you ignore this rule the heading text will appear as shown in the above
figure.
The width of this element is set equivalent to the width of the main wrapper.
The height is set equal to the height of the <header> element.
Rule 23 and 24 are set for <a> elements (Login/Register and Sitemap links) enclosed in
#headlinks <div> element. The links' normal color (grey) is changed to orange when the
mouse is hovered over them. Note that the three footer links are also styled with these
two rules.
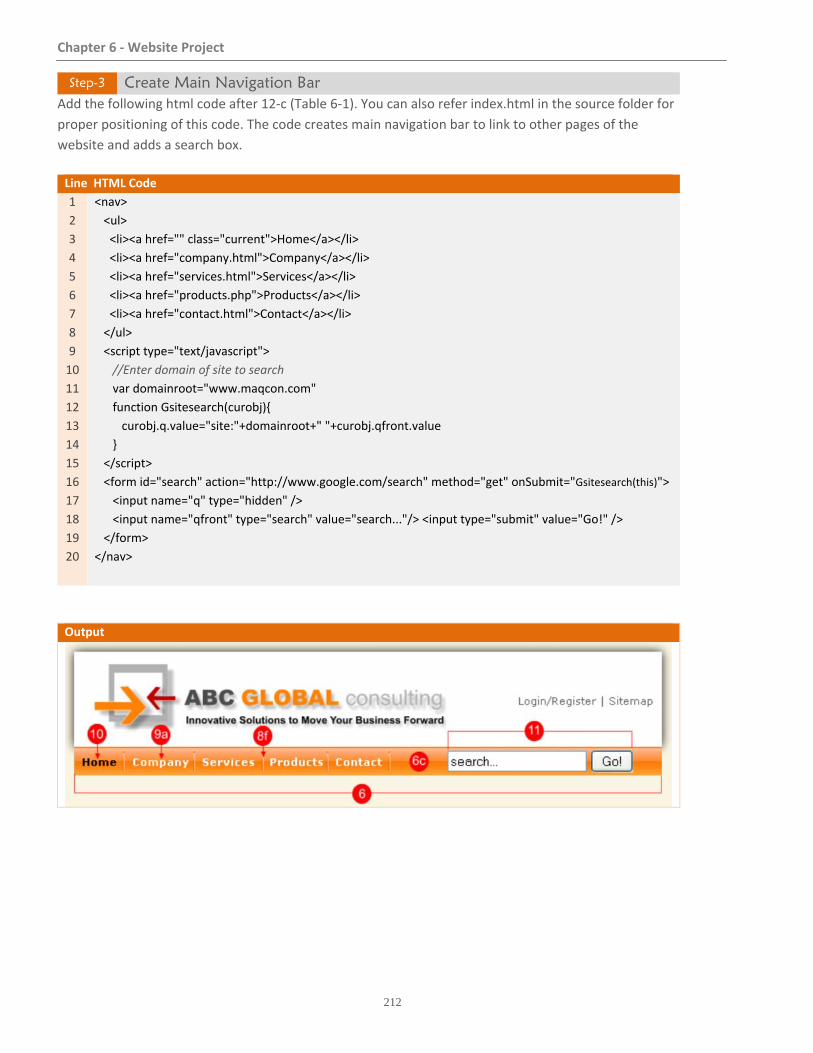
Chapter 6 ‐ Website Project
212
Step-3 Create Main Navigation Bar Add the following html code after 12‐c (Table 6‐1). You can also refer index.html in the source folder for
proper positioning of this code. The code creates main navigation bar to link to other pages of the
website and adds a search box.
Line HTML Code
1
2
3
4
5
6
7
8
9
10
11
12
13
14
15
16
17
18
19
20
<nav>
<ul>
<li><a href="" class="current">Home</a></li>
<li><a href="company.html">Company</a></li>
<li><a href="services.html">Services</a></li>
<li><a href="products.php">Products</a></li>
<li><a href="contact.html">Contact</a></li>
</ul>
<script type="text/javascript">
//Enter domain of site to search
var domainroot="www.maqcon.com"
function Gsitesearch(curobj){
curobj.q.value="site:"+domainroot+" "+curobj.qfront.value
}
</script>
<form id="search" action="http://www.google.com/search" method="get" onSubmit="Gsitesearch(this)">
<input name="q" type="hidden" />
<input name="qfront" type="search" value="search..."/> <input type="submit" value="Go!" />
</form>
</nav>
Output
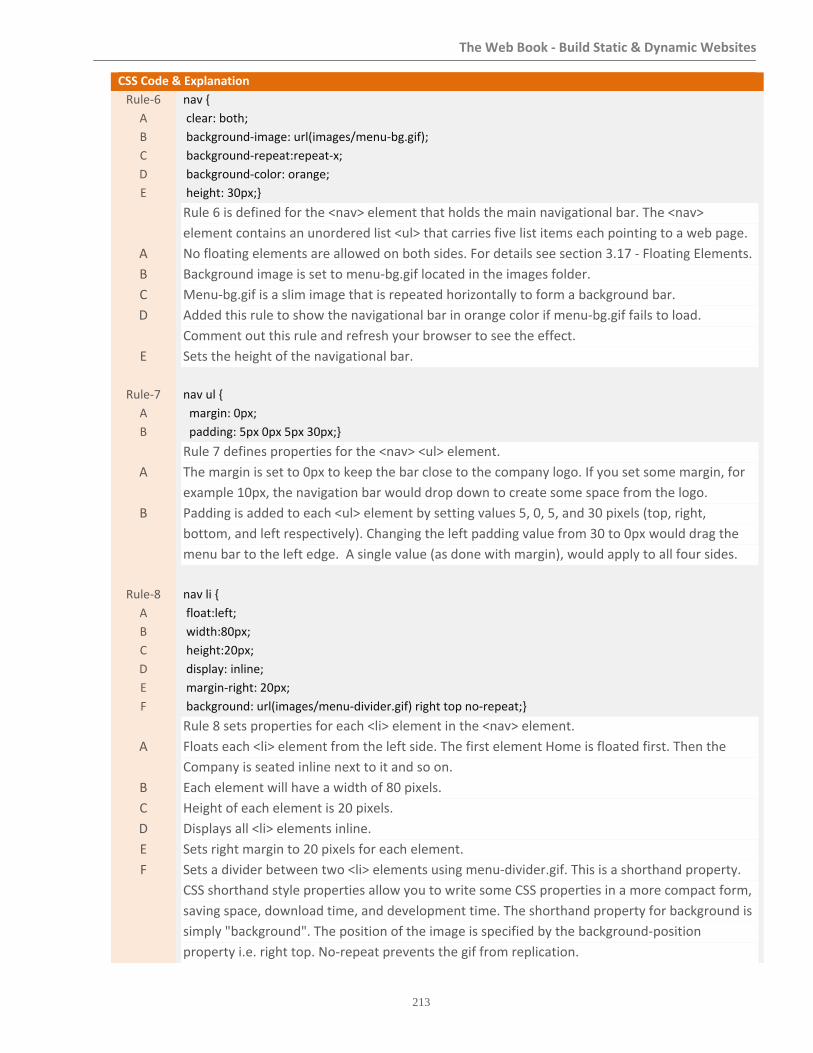
The Web Book ‐ Build Static & Dynamic Websites
213
CSS Code & Explanation
Rule‐6
A
B
C
D
E
A
B
C
D
E
Rule‐7
A
B
A
B
Rule‐8
A
B
C
D
E
F
A
B
C
D
E
F
nav {
clear: both;
background‐image: url(images/menu‐bg.gif);
background‐repeat:repeat‐x;
background‐color: orange;
height: 30px;}
Rule 6 is defined for the <nav> element that holds the main navigational bar. The <nav>
element contains an unordered list <ul> that carries five list items each pointing to a web page.
No floating elements are allowed on both sides. For details see section 3.17 ‐ Floating Elements.
Background image is set to menu‐bg.gif located in the images folder.
Menu‐bg.gif is a slim image that is repeated horizontally to form a background bar.
Added this rule to show the navigational bar in orange color if menu‐bg.gif fails to load.
Comment out this rule and refresh your browser to see the effect.
Sets the height of the navigational bar.
nav ul {
margin: 0px;
padding: 5px 0px 5px 30px;}
Rule 7 defines properties for the <nav> <ul> element.
The margin is set to 0px to keep the bar close to the company logo. If you set some margin, for
example 10px, the navigation bar would drop down to create some space from the logo.
Padding is added to each <ul> element by setting values 5, 0, 5, and 30 pixels (top, right,
bottom, and left respectively). Changing the left padding value from 30 to 0px would drag the
menu bar to the left edge. A single value (as done with margin), would apply to all four sides.
nav li {
float:left;
width:80px;
height:20px;
display: inline;
margin‐right: 20px;
background: url(images/menu‐divider.gif) right top no‐repeat;}
Rule 8 sets properties for each <li> element in the <nav> element.
Floats each <li> element from the left side. The first element Home is floated first. Then the
Company is seated inline next to it and so on.
Each element will have a width of 80 pixels.
Height of each element is 20 pixels.
Displays all <li> elements inline.
Sets right margin to 20 pixels for each element.
Sets a divider between two <li> elements using menu‐divider.gif. This is a shorthand property.
CSS shorthand style properties allow you to write some CSS properties in a more compact form,
saving space, download time, and development time. The shorthand property for background is
simply "background". The position of the image is specified by the background‐position
property i.e. right top. No‐repeat prevents the gif from replication.
Chapter 6 ‐ Website Project
238
This concludes the part of static web page creation. These exercises were destined to consolidate the
crumbs you went through in HTML and CSS parts earlier in this book. The foundation has been laid. If
you firmly grasp these techniques, you’ll be able to design almost any website. Things are not finished
yet, let’s move on to buff up our skills even more and learn how to put life into a website.
6.7 Make the Website Dynamic In previous sections you completed the static parts of the website. Now it’s time to create the dynamic
segments using PHP and MySQL. In this part you will enable your website to interact with its visitors by
adding the following modules.
Contact Form
All modern websites provide some means of communication with their visitors; a contact form is one
of them. You’ll be guided to add a contact form to the website so that visitors could input their
comments. This data will then be stored in a table named Contact in the MySQL database. The form
will be created in section 6.8 ‐ Task 1.
Newsletter Subscription
E‐mail newsletters are a very popular way to open a channel of communication with your site visitors.
Newsletters provide great benefit of keeping a site's user base up‐to‐date on the latest news and
offerings from an organization. Moreover, they have the potential for turning site visitors into
customers. For newsletters to be successful, they have to be easy to subscribe to and—just as
importantly—unsubscribe from. Recall that while creating the Home page we added the interface of
this module. That will be put to work in section 6.9 ‐ Task 2.
E‐Commerce Module
Besides consulting services, ABC Global Consulting also deals in IT related products and intends to sell
them through their website. To achieve this task you have to add interactive functionalities to the
website. You have to build a products page that will show relevant information (image, description,
price etc.) from a database and will allow users to buy those products. But before that, you have to
create few modules that will manage administrative tasks such as uploading categories and products
information. These modules will be accessible only to the site administrators.
The Web Book ‐ Build Static & Dynamic Websites
239
6.7.1 Tasks List The following table lists the tasks you will be performing in this chapter:
Task Module Description
General Tasks
Task 1
Task 2
Contact Form
Newsletter Subscription
Add contact form to receive visitor’s comments and store
them in the database.
Allow visitors to subscribe to company’s newsletter.
Admin Interface Tasks
Task 3
Task 4
Task 5
Task 6
Task 7
Admin Login Module
Manage Categories
Manage Products
Manage Orders
Manage Accounts
Create login interface for site administrators
View, add, update and delete product categories
View, add, update and delete individual products
View, ship, and delete orders placed by customers
Add, update, and delete admin users
Member Interface Tasks
Task 8
Task 9
Task 10
Task 11
Task 12
Task 13
Task 14
Task 15
Task 16
Member Login Module
Register New Member
Reset Password
My Account
Featured Products
Catalog
Product Details
Shopping Cart
Checkout (Confirm
Order)
Website Deployment
Interface for site members
Allow new users to become members
Provides new passwords to site members.
This page lets users edit their information and review
their orders.
This page will be added to the website and will be
accessible to all through the Products main navigation
link. This page will show featured products along with
images, short description, and prices.
This page will provide complete details about a particular
product and will have an Add to Cart button.
Once the member clicks the Add to Cart button, he will
be brought to this page to check his cart.
The cart page will contain a checkout link. The module
will ask the member to login before placing an order.
Once logged in successfully, he or she will proceed to the
payment page which will accept credit card information
from the member.
After completion, the website will be deployed on a host
server so that the world could access it.

Chapter 6 ‐ Website Project
240
6.7.2 Directory Structure The table on the next page presents the directory structure for the tasks mentioned above. Each module
is stored in a separate directory. For example, Checkout module files are stored in the checkout
directory. Member, Catalog, Cart, and Checkout directories hold files for the end users of the web site.
In contrast, administrative modules are stored under the Admin directory. This directory has four sub‐
directories (Users, Category, Product, and Orders) to manage admin users, categories, products, and
orders placed by customers respectively.
Each directory contains a controller file (index.php) which is the default file that runs for each directory.
This file in turn calls relevant functions and view files stored in respective directories. The web site's root
directory has a product.php file that is executed when the user clicks the Products link on the main
navigation bar. This file calls show_product.php file to display featured products from the database.
The errors directory contains PHP scripts for displaying application errors, the images directory holds all
the image files used in the web site. Files in the model directory provide database functions whereas the
utility directory carries files that provide parsing, global and session functions. The view directory
contains files (header, footer, sidebar etc.) that are used by all modules to provide a consistent look.
This directory structure is ideal to maintain and enhance a web site. For instance, if you decide to use
two different headers, one for the end user and one for the administrators, you just add a new header
file to the view directory and modify the files that use it. You will create separate headers for admin and
end users to display separate navigation bar. Similarly, if you wish to change something in the cart
module, you can go to the cart directory that contains all relevant files to this module. The following
illustration presents a general PHP process pattern called MVC (Model, View, and Controller).
Figure 6‐4
In this example, the process initiates when an administrator clicks the Products link on the main
navigation bar. The flow is received by the controller: index.php file (Point 1). Then, the controller gets
appropriate data from the model (Point 2). The model connects to the database and fetches data
through various functions. For instance, here the administrator requested for products data. So, a file
product_lib.php is called to fetch the information. After receiving the information, the controller calls a
file (product_list.php) from the view layer (Point 3). This file consists of HTML and PHP code to render
the list of products (Point 4). The products list is then presented to the administrator through the
controller (Point 5).
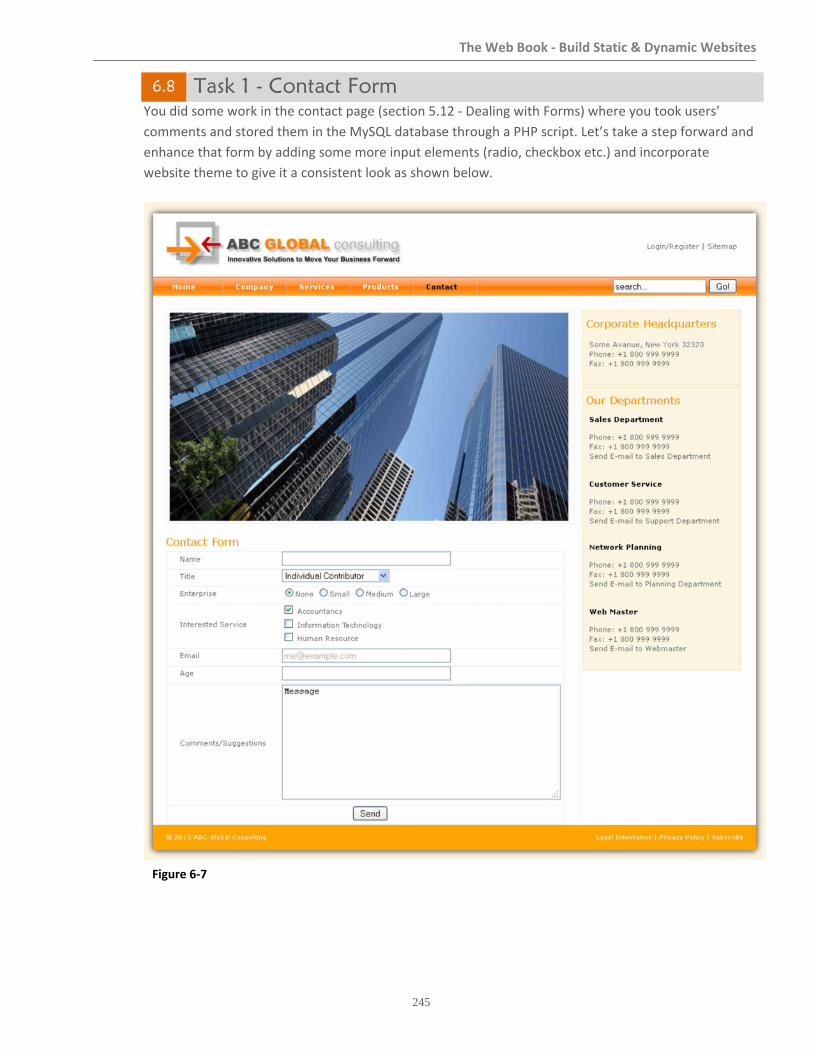
The Web Book ‐ Build Static & Dynamic Websites
245
6.8 Task 1 - Contact Form
You did some work in the contact page (section 5.12 ‐ Dealing with Forms) where you took users’
comments and stored them in the MySQL database through a PHP script. Let’s take a step forward and
enhance that form by adding some more input elements (radio, checkbox etc.) and incorporate
website theme to give it a consistent look as shown below.
Figure 6‐7
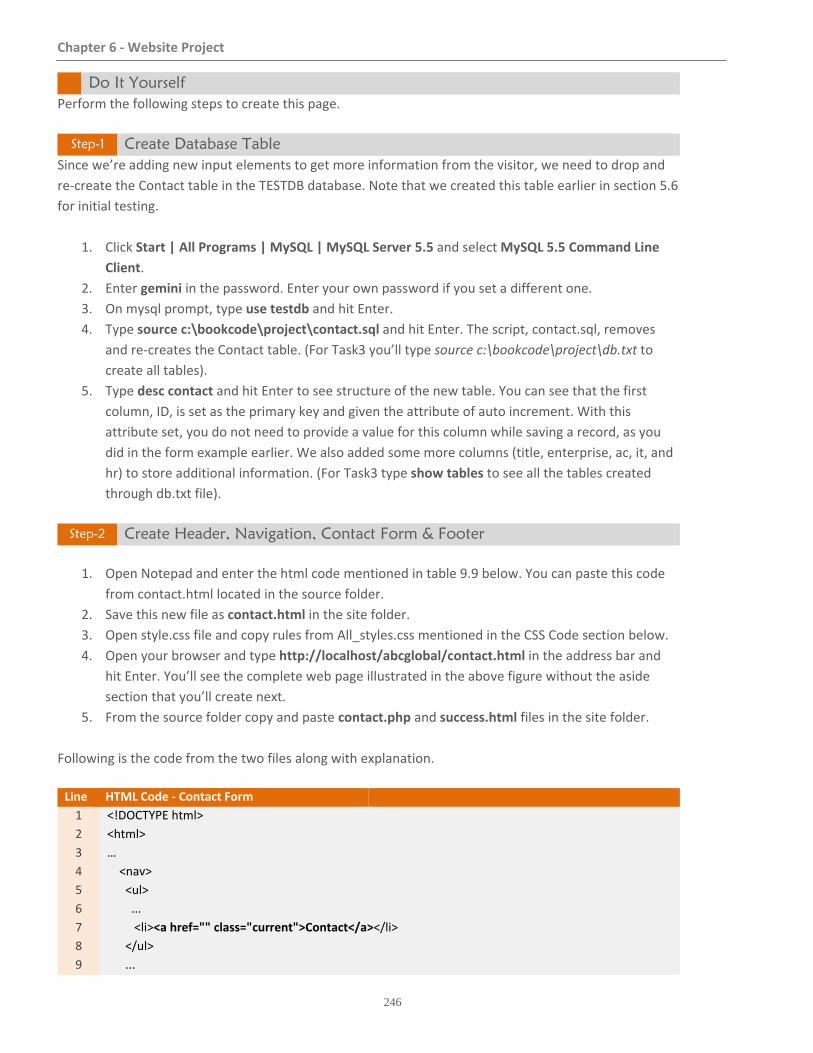
Chapter 6 ‐ Website Project
246
Do It Yourself Perform the following steps to create this page.
Step-1 Create Database Table Since we’re adding new input elements to get more information from the visitor, we need to drop and
re‐create the Contact table in the TESTDB database. Note that we created this table earlier in section 5.6
for initial testing.
1. Click Start | All Programs | MySQL | MySQL Server 5.5 and select MySQL 5.5 Command Line
Client.
2. Enter gemini in the password. Enter your own password if you set a different one.
3. On mysql prompt, type use testdb and hit Enter.
4. Type source c:\bookcode\project\contact.sql and hit Enter. The script, contact.sql, removes
and re‐creates the Contact table. (For Task3 you’ll type source c:\bookcode\project\db.txt to
create all tables).
5. Type desc contact and hit Enter to see structure of the new table. You can see that the first
column, ID, is set as the primary key and given the attribute of auto increment. With this
attribute set, you do not need to provide a value for this column while saving a record, as you
did in the form example earlier. We also added some more columns (title, enterprise, ac, it, and
hr) to store additional information. (For Task3 type show tables to see all the tables created
through db.txt file).
Step-2 Create Header, Navigation, Contact Form & Footer
1. Open Notepad and enter the html code mentioned in table 9.9 below. You can paste this code
from contact.html located in the source folder.
2. Save this new file as contact.html in the site folder.
3. Open style.css file and copy rules from All_styles.css mentioned in the CSS Code section below.
4. Open your browser and type http://localhost/abcglobal/contact.html in the address bar and
hit Enter. You’ll see the complete web page illustrated in the above figure without the aside
section that you’ll create next.
5. From the source folder copy and paste contact.php and success.html files in the site folder.
Following is the code from the two files along with explanation.
Line HTML Code ‐ Contact Form
1
2
3
4
5
6
7
8
9
<!DOCTYPE html>
<html>
…
<nav>
<ul>
...
<li><a href="" class="current">Contact</a></li>
</ul>
...
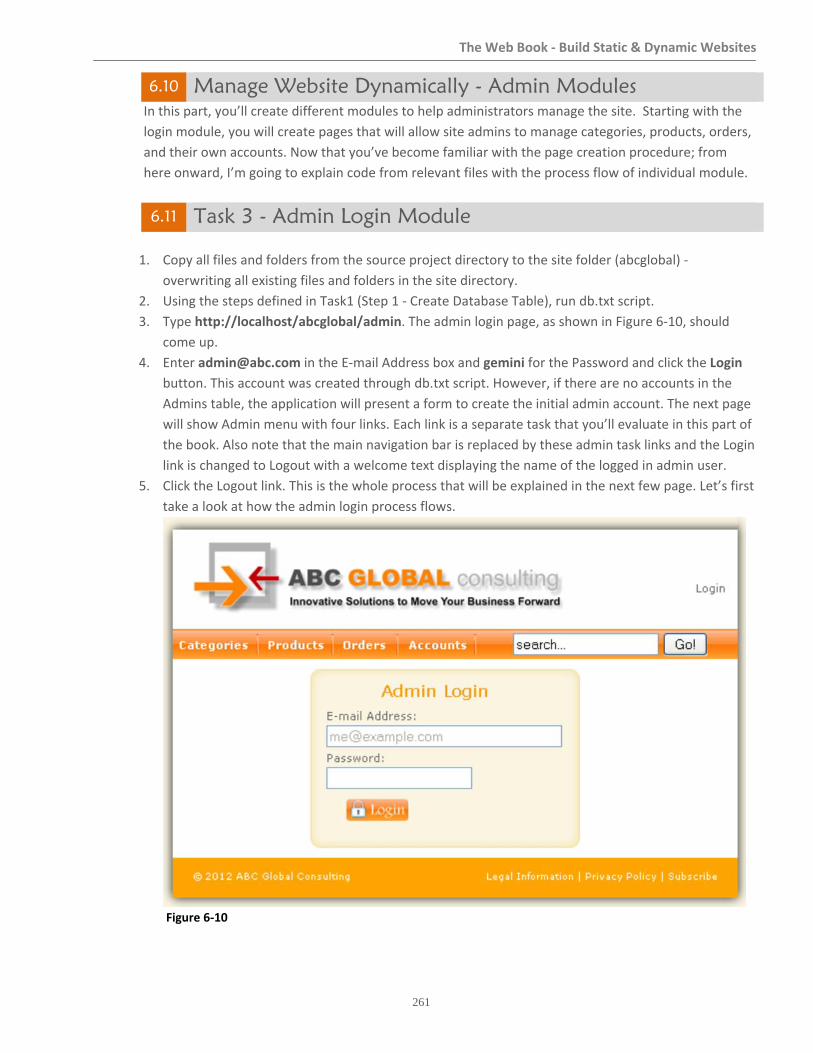
The Web Book ‐ Build Static & Dynamic Websites
261
6.10 Manage Website Dynamically - Admin Modules In this part, you’ll create different modules to help administrators manage the site. Starting with the
login module, you will create pages that will allow site admins to manage categories, products, orders,
and their own accounts. Now that you’ve become familiar with the page creation procedure; from
here onward, I’m going to explain code from relevant files with the process flow of individual module.
6.11 Task 3 - Admin Login Module
1. Copy all files and folders from the source project directory to the site folder (abcglobal) ‐
overwriting all existing files and folders in the site directory.
2. Using the steps defined in Task1 (Step 1 ‐ Create Database Table), run db.txt script.
3. Type http://localhost/abcglobal/admin. The admin login page, as shown in Figure 6‐10, should
come up.
4. Enter [email protected] in the E‐mail Address box and gemini for the Password and click the Login
button. This account was created through db.txt script. However, if there are no accounts in the
Admins table, the application will present a form to create the initial admin account. The next page
will show Admin menu with four links. Each link is a separate task that you’ll evaluate in this part of
the book. Also note that the main navigation bar is replaced by these admin task links and the Login
link is changed to Logout with a welcome text displaying the name of the logged in admin user.
5. Click the Logout link. This is the whole process that will be explained in the next few page. Let’s first
take a look at how the admin login process flows.
Figure 6‐10
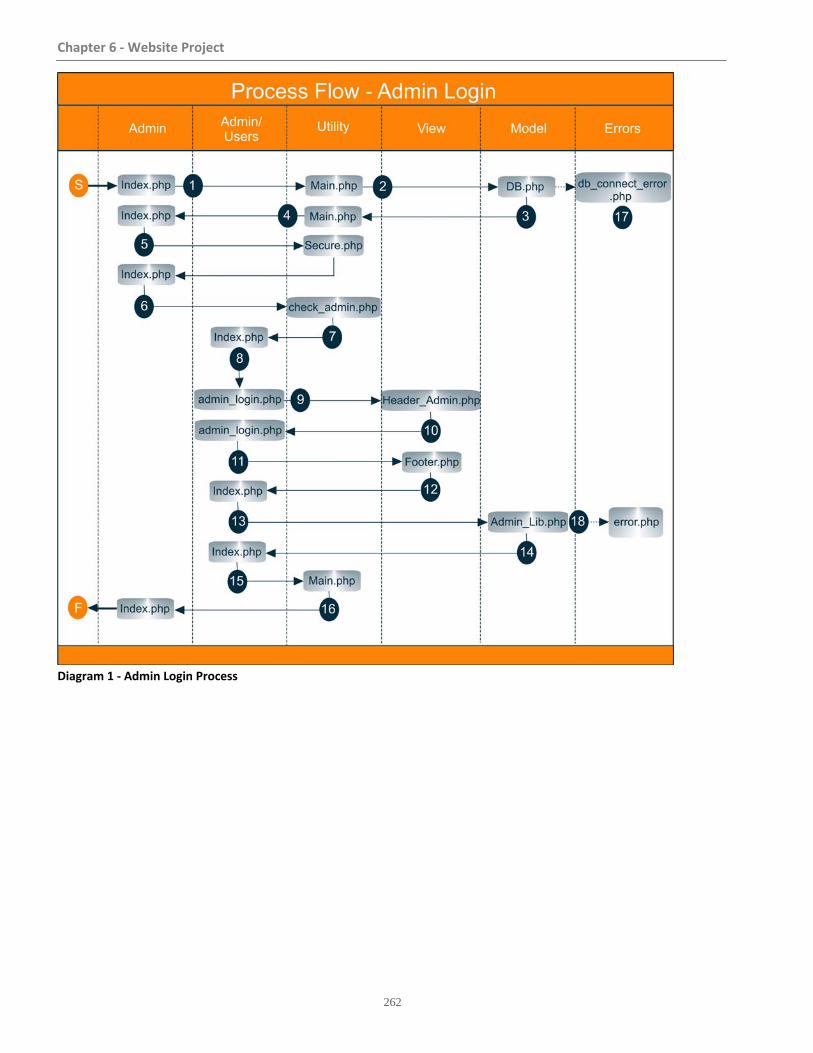
Chapter 6 ‐ Website Project
262
Diagram 1 ‐ Admin Login Process
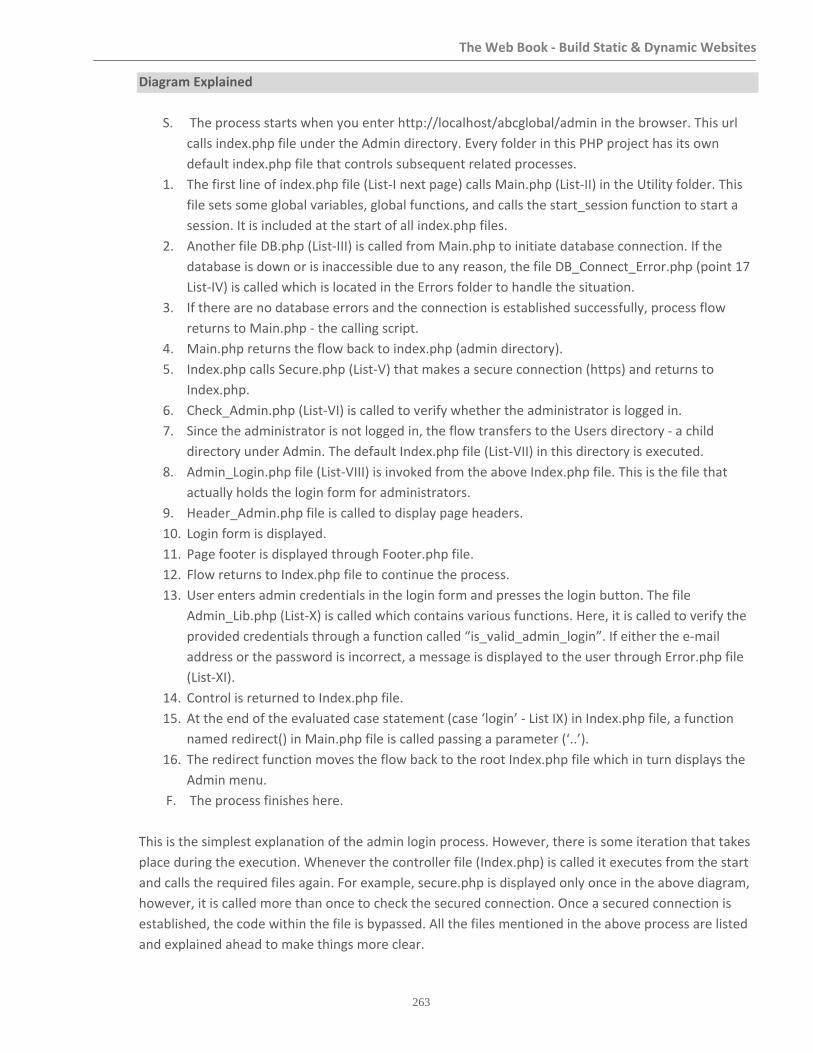
The Web Book ‐ Build Static & Dynamic Websites
263
Diagram Explained
S. The process starts when you enter http://localhost/abcglobal/admin in the browser. This url
calls index.php file under the Admin directory. Every folder in this PHP project has its own
default index.php file that controls subsequent related processes.
1. The first line of index.php file (List‐I next page) calls Main.php (List‐II) in the Utility folder. This
file sets some global variables, global functions, and calls the start_session function to start a
session. It is included at the start of all index.php files.
2. Another file DB.php (List‐III) is called from Main.php to initiate database connection. If the
database is down or is inaccessible due to any reason, the file DB_Connect_Error.php (point 17
List‐IV) is called which is located in the Errors folder to handle the situation.
3. If there are no database errors and the connection is established successfully, process flow
returns to Main.php ‐ the calling script.
4. Main.php returns the flow back to index.php (admin directory).
5. Index.php calls Secure.php (List‐V) that makes a secure connection (https) and returns to
Index.php.
6. Check_Admin.php (List‐VI) is called to verify whether the administrator is logged in.
7. Since the administrator is not logged in, the flow transfers to the Users directory ‐ a child
directory under Admin. The default Index.php file (List‐VII) in this directory is executed.
8. Admin_Login.php file (List‐VIII) is invoked from the above Index.php file. This is the file that
actually holds the login form for administrators.
9. Header_Admin.php file is called to display page headers.
10. Login form is displayed.
11. Page footer is displayed through Footer.php file.
12. Flow returns to Index.php file to continue the process.
13. User enters admin credentials in the login form and presses the login button. The file
Admin_Lib.php (List‐X) is called which contains various functions. Here, it is called to verify the
provided credentials through a function called “is_valid_admin_login”. If either the e‐mail
address or the password is incorrect, a message is displayed to the user through Error.php file
(List‐XI).
14. Control is returned to Index.php file.
15. At the end of the evaluated case statement (case ‘login’ ‐ List IX) in Index.php file, a function
named redirect() in Main.php file is called passing a parameter (‘..’).
16. The redirect function moves the flow back to the root Index.php file which in turn displays the
Admin menu.
F. The process finishes here.
This is the simplest explanation of the admin login process. However, there is some iteration that takes
place during the execution. Whenever the controller file (Index.php) is called it executes from the start
and calls the required files again. For example, secure.php is displayed only once in the above diagram,
however, it is called more than once to check the secured connection. Once a secured connection is
established, the code within the file is bypassed. All the files mentioned in the above process are listed
and explained ahead to make things more clear.
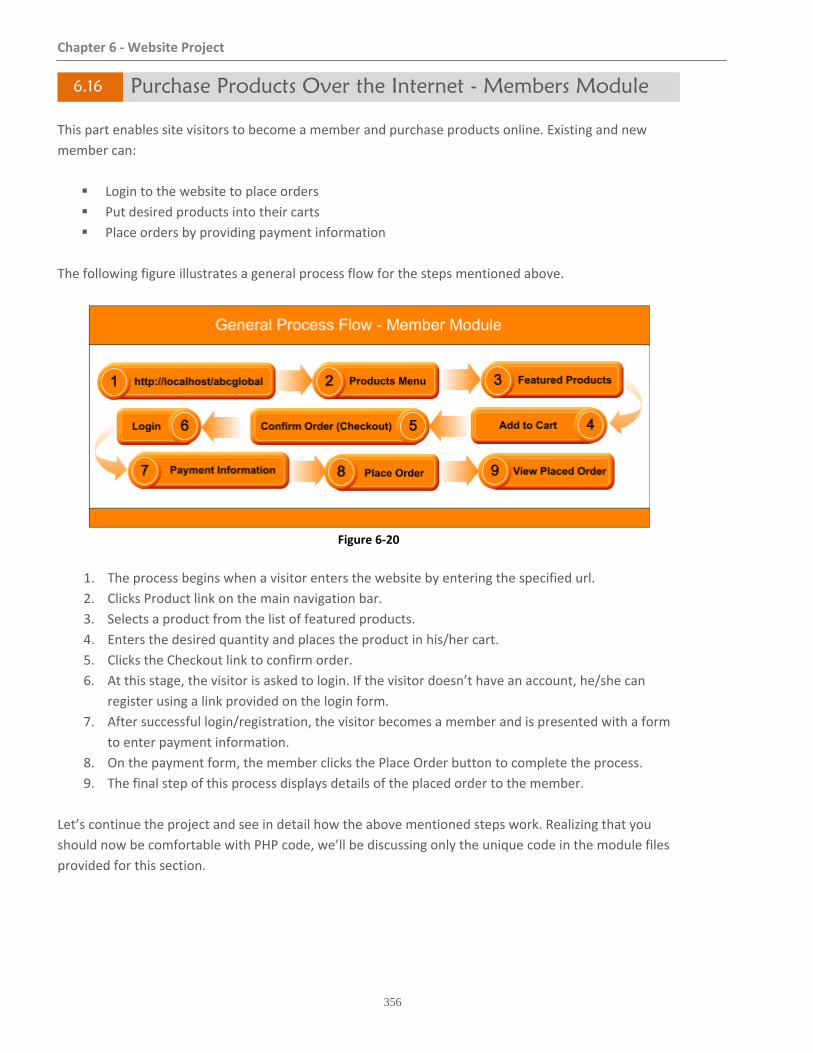
Chapter 6 ‐ Website Project
356
6.16 Purchase Products Over the Internet - Members Module
This part enables site visitors to become a member and purchase products online. Existing and new
member can:
Login to the website to place orders
Put desired products into their carts
Place orders by providing payment information
The following figure illustrates a general process flow for the steps mentioned above.
Figure 6‐20
1. The process begins when a visitor enters the website by entering the specified url.
2. Clicks Product link on the main navigation bar.
3. Selects a product from the list of featured products.
4. Enters the desired quantity and places the product in his/her cart.
5. Clicks the Checkout link to confirm order.
6. At this stage, the visitor is asked to login. If the visitor doesn’t have an account, he/she can
register using a link provided on the login form.
7. After successful login/registration, the visitor becomes a member and is presented with a form
to enter payment information.
8. On the payment form, the member clicks the Place Order button to complete the process.
9. The final step of this process displays details of the placed order to the member.
Let’s continue the project and see in detail how the above mentioned steps work. Realizing that you
should now be comfortable with PHP code, we’ll be discussing only the unique code in the module files
provided for this section.
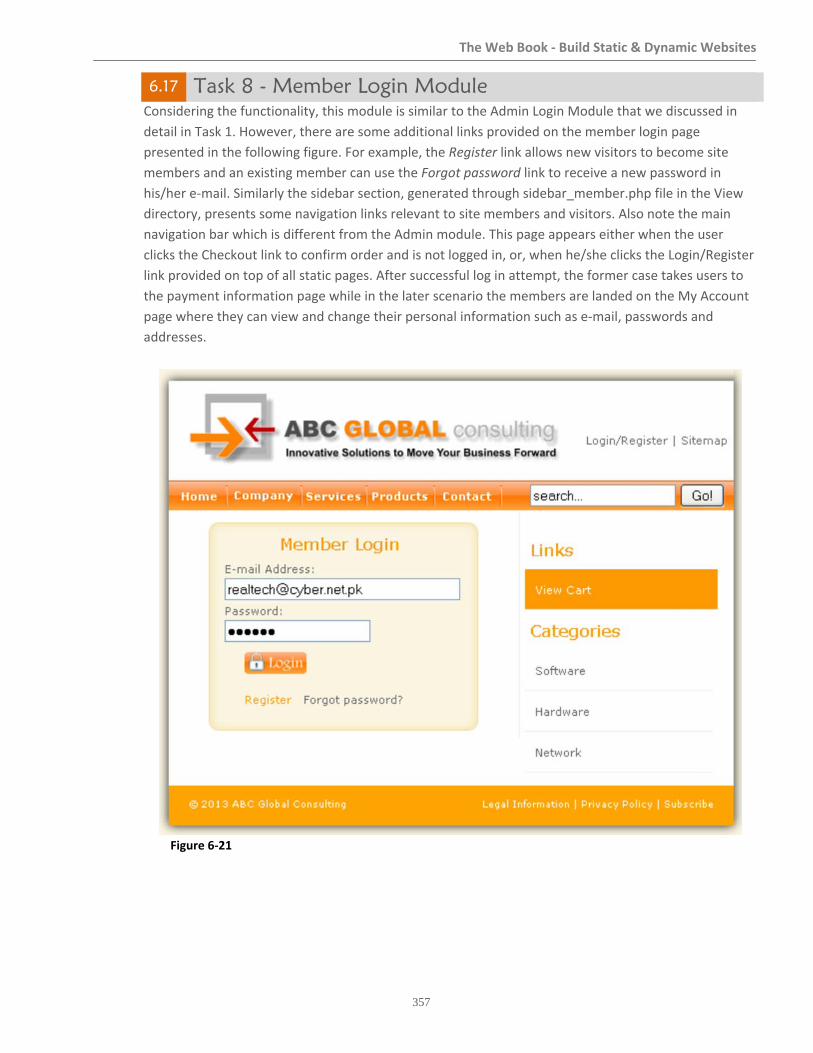
The Web Book ‐ Build Static & Dynamic Websites
357
6.17 Task 8 - Member Login Module
Considering the functionality, this module is similar to the Admin Login Module that we discussed in
detail in Task 1. However, there are some additional links provided on the member login page
presented in the following figure. For example, the Register link allows new visitors to become site
members and an existing member can use the Forgot password link to receive a new password in
his/her e‐mail. Similarly the sidebar section, generated through sidebar_member.php file in the View
directory, presents some navigation links relevant to site members and visitors. Also note the main
navigation bar which is different from the Admin module. This page appears either when the user
clicks the Checkout link to confirm order and is not logged in, or, when he/she clicks the Login/Register
link provided on top of all static pages. After successful log in attempt, the former case takes users to
the payment information page while in the later scenario the members are landed on the My Account
page where they can view and change their personal information such as e‐mail, passwords and
addresses.
Figure 6‐21

Chapter 6 ‐ Website Project
358
Diagram 12 ‐ Member Login Process
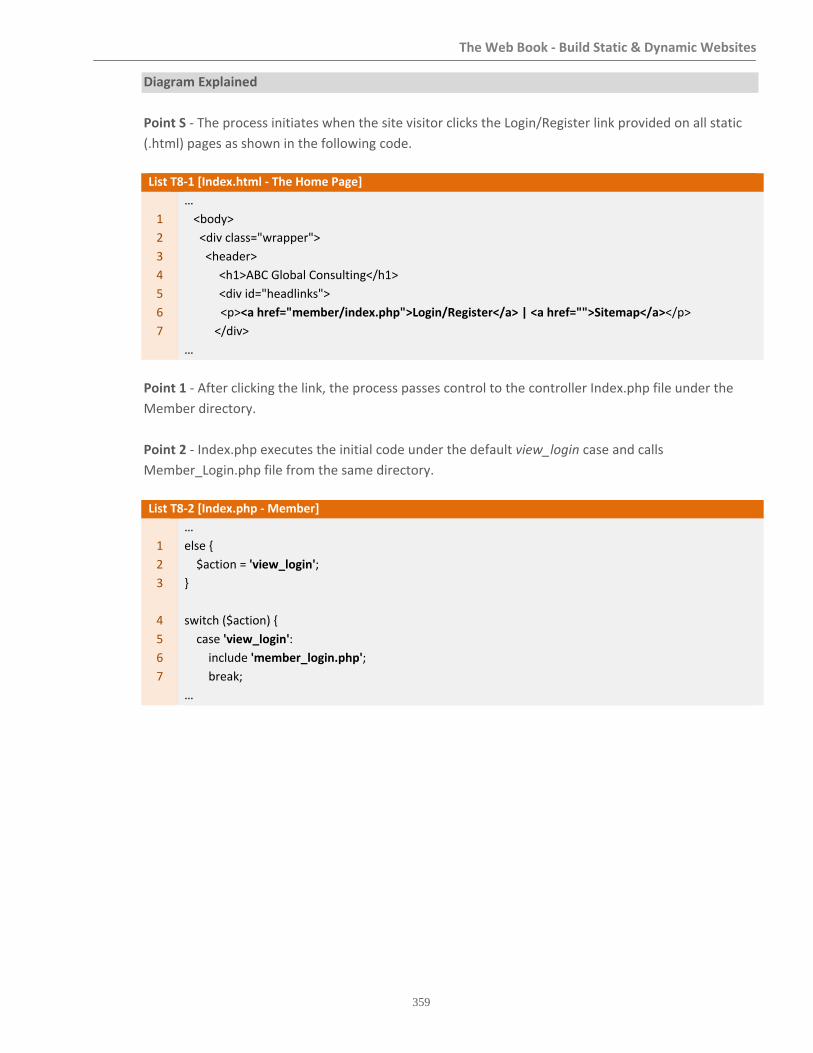
The Web Book ‐ Build Static & Dynamic Websites
359
Diagram Explained
Point S ‐ The process initiates when the site visitor clicks the Login/Register link provided on all static
(.html) pages as shown in the following code.
List T8‐1 [Index.html ‐ The Home Page]
1
2
3
4
5
6
7
…
<body>
<div class="wrapper">
<header>
<h1>ABC Global Consulting</h1>
<div id="headlinks">
<p><a href="member/index.php">Login/Register</a> | <a href="">Sitemap</a></p>
</div>
…
Point 1 ‐ After clicking the link, the process passes control to the controller Index.php file under the
Member directory.
Point 2 ‐ Index.php executes the initial code under the default view_login case and calls
Member_Login.php file from the same directory.
List T8‐2 [Index.php ‐ Member]
1
2
3
4
5
6
7
…
else {
$action = 'view_login';
}
switch ($action) {
case 'view_login':
include 'member_login.php';
break;
…
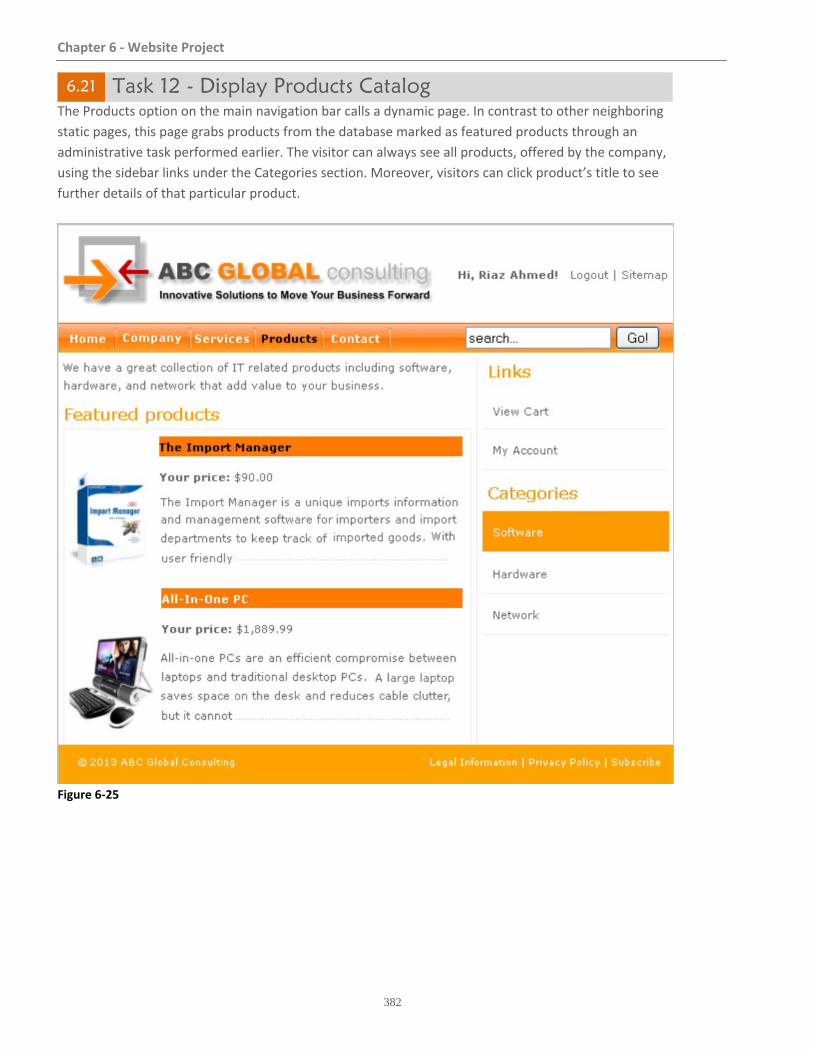
Chapter 6 ‐ Website Project
382
6.21 Task 12 - Display Products Catalog
The Products option on the main navigation bar calls a dynamic page. In contrast to other neighboring
static pages, this page grabs products from the database marked as featured products through an
administrative task performed earlier. The visitor can always see all products, offered by the company,
using the sidebar links under the Categories section. Moreover, visitors can click product’s title to see
further details of that particular product.
Figure 6‐25
Chapter 6 ‐ Website Project
418
6.25 Task 16 - Website Deployment After completing the website and giving it a thorough test run, you’re ready to deploy it on a hosting
server from where the world could access it. The following steps need to be completed in order to
accomplish this task.
1. Host the website 2. Install FileZilla FTP Client and upload files 3. Access control panel 4. Create a blank database and a database user. Grant database access privileges to the new user. 5. Call phpMyAdmin tool to create database tables using the Import option. 6. Install PEAR core and PEAR Mail packages
Step-1 Hosting the Website To make your Web site visible to the world, it has to be hosted on a Web server. Every website on the
Internet needs to be stored somewhere, and that’s what referred to as “web hosting“. A website host is
just a computer that is on all the time and connected to the Internet. When you visit a website, you
download some files from the machine that stores that particular website. Any computer can be used to
host a website, even the one you are using now – but the computers used by professional hosting
companies are incredibly powerful with lots of hard disks and memory, highly optimized to deliver the
website files to thousands of readers simultaneously.
The two basic ways of hosting a website are: self and commercial.
Self Hosting If you want to go the DIY free route, then it is in fact entirely possible to host your own website at home,
on your own Internet connection. With advances that allowed Internet access to move away from dial‐
up services and into a realm of faster and more robust use of Internet resources, the possibility of self‐
hosting became more viable. As is true with many forms of electronic equipment, the hardware
necessary to create and manage a hosting network became more affordable. At the same time, software
packages that could help configure and operate the networks also became more cost‐effective. Coupled
with the fact that more people began to make use of the Internet for both personal and commercial
purposes, and also became more familiar with how to design sites and understand bandwidth, the idea
of self‐hosting is now well worth consideration.
While self‐hosting is certainly more viable than in years past, the process still requires securing the right
equipment, using software to manage the resources, and protect the host from all the threats that could
filter into the hosting process via the Internet connection. This means that users who are not
comfortable with these types of management processes are likely to find that working with a hosting
company rather than trying to handle the processes alone may still be the best bet. For others who feel
competent to engage in self‐hosting, the strategy can mean greater ease in managing resources and
even allowing the entire project to be much more cost effective.
There are a lot of security issues that can come up when self‐hosting. Configuration issues can take a bit of
doing to get the right software installed, and set up to behave correctly. Also, a commercial host will usually

Chapter 6 ‐ Website Project
420
Step-2 Install FileZilla FTP Client and Upload Files After purchasing a hosting plan, the next step is to upload your website files to the hosting server using
some FTP client software.
FileZilla client is a cross‐platform graphical FTP, FTPS and SFTP software with lot of features, supporting
Windows, Linux, Mac OS X and more. It is used to transfer files between computers. It is open source
software distributed free of charge under the terms of the GNU General Public License and can be
downloaded from http://filezilla‐project.org/. In order to use FileZilla client on your client PC, you must
disable FTP Access Filter if you’re behind a firewall such as Microsoft ISA Server.
Figure 6‐30

The Web Book ‐ Build Static & Dynamic Websites
429
Figure 6‐36
Conclusion
After fitting in all the blocks at their proper locations, you should run this project on your hosting
server to see how it works on the web. Refer to all the stuff provided in this book as you review this
website project and explore new ways to improve it.
You have been introduced to the huge website development topic and taken to a position from where
you can learn more about it on your own. This book served as a crucial starting point. The concepts
covered herein provided invaluable information for your future projects. Specifically you learned about
the various components that make up what we know as a tiered architecture model in that you have a
client, the Web server, and a data store. You learned about the role client‐side technologies such as
HTML, CSS, and JavaScript play in the architecture model. You also saw how server‐side technologies
such as PHP and MySQL database fit into the model.
Aside from the theoretical material provided in this book, you also learned how to install and configure
all the required software such as Microsoft’s Web server IIS, PHP with its packages and MySQL
database.
You also went through how to build static and dynamic web pages. Created a prototype on your
development machine and were guided on how to deploy a website on a hosting server with all
necessary base information.
While this book introduced what seems like a ton of concepts, terminology, and so on, it’s merely a
stepping stone to move you forward to explore the enormous world of web development.
430
ABOUT THE AUTHOR
Riaz Ahmed is an IT professional with over twenty years of hard‐earned experience. He started his
career as a programmer in early 90's and is currently working as the head of IT with a reputed group of
companies. His areas of interest are web‐based development technologies. Prior to this book, he wrote
“Create Rapid Web Applications Using Oracle Application Express” (which is listed on Oracle
Corporation’s web site) and Implement Oracle Business Intelligence. You can reach him at:
E‐mail: [email protected]
Blog ‐ The Web Book: http://the‐web‐book.blogspot.com/
Blog ‐ Oracle APEX and BI: http://Oracle‐Tutorial‐Books.blogspot.com
Create Rapid Web Applications Using
Oracle Application Express
A practical guide to rapidly develop professional web applications
http://www.amazon.com/Create‐Applications‐Oracle‐
Application‐Express/dp/1466350652
Implement Oracle
Business Intelligence
Analyze the Past
Streamline the Present Control the Future
http://www.amazon.com/Implement‐Oracle‐Business‐
Intelligence‐Volume/dp/1475122012
Download Book Code http://www.maqcon.com/test/download/TheWebBookCode.rar
Blog http://the‐web‐book.blogspot.com/2013/03/the‐web‐book‐build‐static‐dynamic.html