Embed Size (px)
Citation preview

Customer Care and Aftersales
January 2016, Volume 18, No. 1
The Next Generation Multiple Diagnostic Interface – The MDI 2The next generation of the J2534 GM Multiple Diagnostic Interface, or MDI 2, offers increased processing power and security for faster program-ming speeds on current Global A vehicles as well as future Global B vehicles. The compact communication module is required in order to manage the transfer of data between a vehicle's onboard network and a service technician’s PC.
The EL-52100 MDI 2 is now available for purchase at the Special Service Tools website, gmtoolsandequipment.com or by calling 1-800-GM-TOOLS.
The MDI 2 supports diagnostic applications — GDS 2, Data Bus Diagnostic Tool, and Tech2Win — as well as Pass-Thru programming applications — TIS2Web–SPS.
Enhancements to the tool were based on technicians’ feedback on how they use the MDI and how to improve it. It replaces the first generation MDI, introduced in 2007, for Pass-Thru programming on current GM models. The MDI 2 is backward compatible, so it can be used to perform Pass-Thru programming on all vehicles built since 1996.
The MDI 2 connects to the vehicle via the J1962 connector using a new DLC cable. Connection between the MDI 2 and the PC running the Global Diagnostic System 2 (GDS 2) software can be accomplished via standalone (USB), through a new Point-to-Point wireless Wi-Fi interface feature (a simple plug & play), or through the dealership network (Ethernet or wireless).
MDI 2 Kit
The MDI 2 Kit includes:
• MDI 2 Unit
• SAE J1962 DLC Cable
• 10-ft. USB A to USB B Cable
• Ethernet Cable
• D-Link Wireless USB Adapters (Dongles) for wireless connection
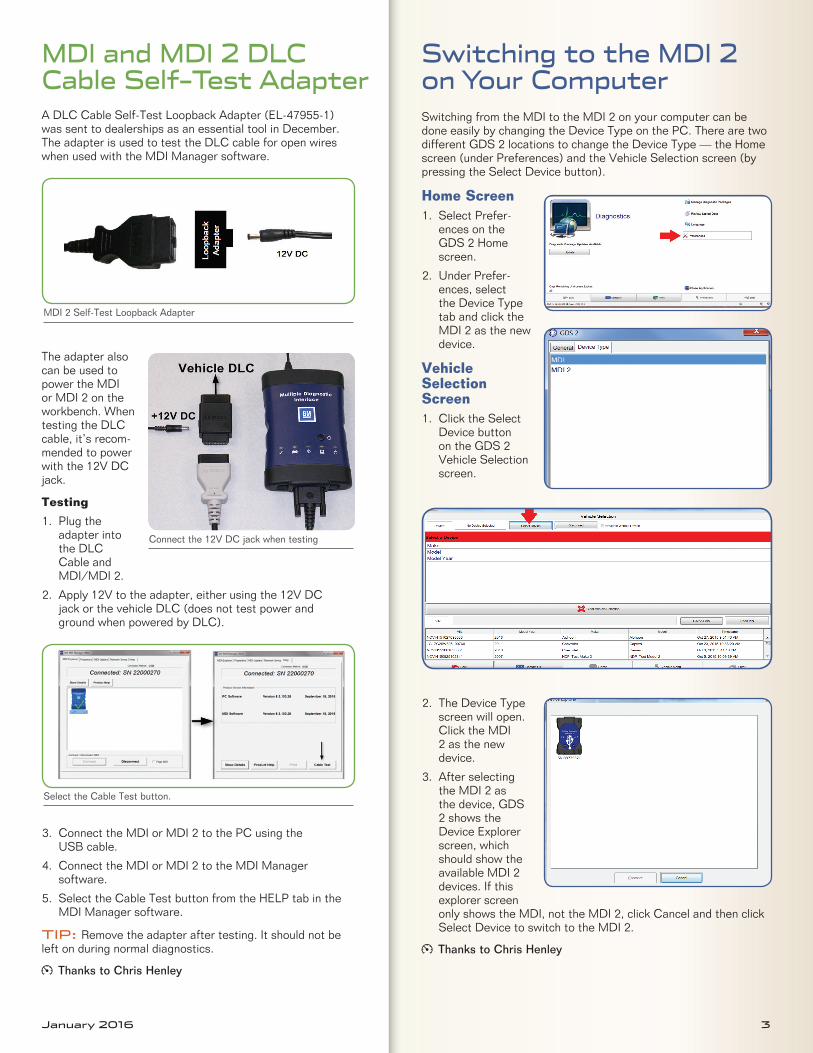
A DLC Cable Self-Test Loopback Adapter was sent to dealerships as an essential tool in December. It’s compatible with the MDI and MDI 2. It’s also sold separately through GM Dealer Equipment.
The adapter is used to test the DLC cable for open wires when used with the MDI Manager software. The adapter also can be used to power the MDI or MDI 2 on the workbench.
continued on page 2
The original MDI and the new MDI 2
CONTENTS
The Next Generation Multiple Diagnostic Interface – The MDI 2 . . . . . . . 1
MDI and MDI2 DLC Cable Self-Test Adapter . . . . . . . . . . . . . . . . . . . 3
Switching to the MDI 2 on Your Computer . . . . . . . . . . . . . . . . . . . . . 3
TOP TIER Detergent Gasoline Update . . . 4
Loss of Power Steering Assist . . . . . . . . . . 4
Backup Camera Display after Shifting Out of Reverse . . . . . . . . . . . . . . . 4
No Start, Loss of Communication Conditions . . . . . . . . . . . . . . . . . . . . . . . . . 5
Connector Corrosion Conditions . . . . . . . . 5
Bulletin Review . . . . . . . . . . . . . . . . . . . . . 6
Emerging Issues. . . . . . . . . . . . . . . . . . . . . 7
2 January 2016
The Next Generation Multiple Diagnostic Interface – The MDI 2continued from page 1
New Features• Wi-Fi Connection – The USB Wi-Fi adapter uses a USB
dongle that enables Point-to-Point connections without the need for Wi-Fi SSID information or a wireless router.
• USB Connection – Uses a new, more secure Type B connec-tor and Ground Offset Failure protection. A wired connection is recommended for longer programming events.
• Power Source – The MDI 2 is powered from the vehicle battery via the DLC Cable. It may also be pow-ered over USB to perform firmware updates only using a PC.
• Power Backup – Internal batteries that were used in case of a power in-terruption have been removed, which eliminates the possi-bility of old batteries corroding over time and damaging the unit. Capacitors maintain power during engine crank-ing, so operation is maintained.
• Firmware Download – Uses USB 2.0 for faster firmware down-loads instead of a separate AC power supply.
• Future Expansion – Additional USB ports, an SD memory card slot and Function but-tons are built into the unit for future enhancements.
• Operating Temperature Range –The temperature range has been extended to -20° to 70°C (the MDI range was zero to 50° C).
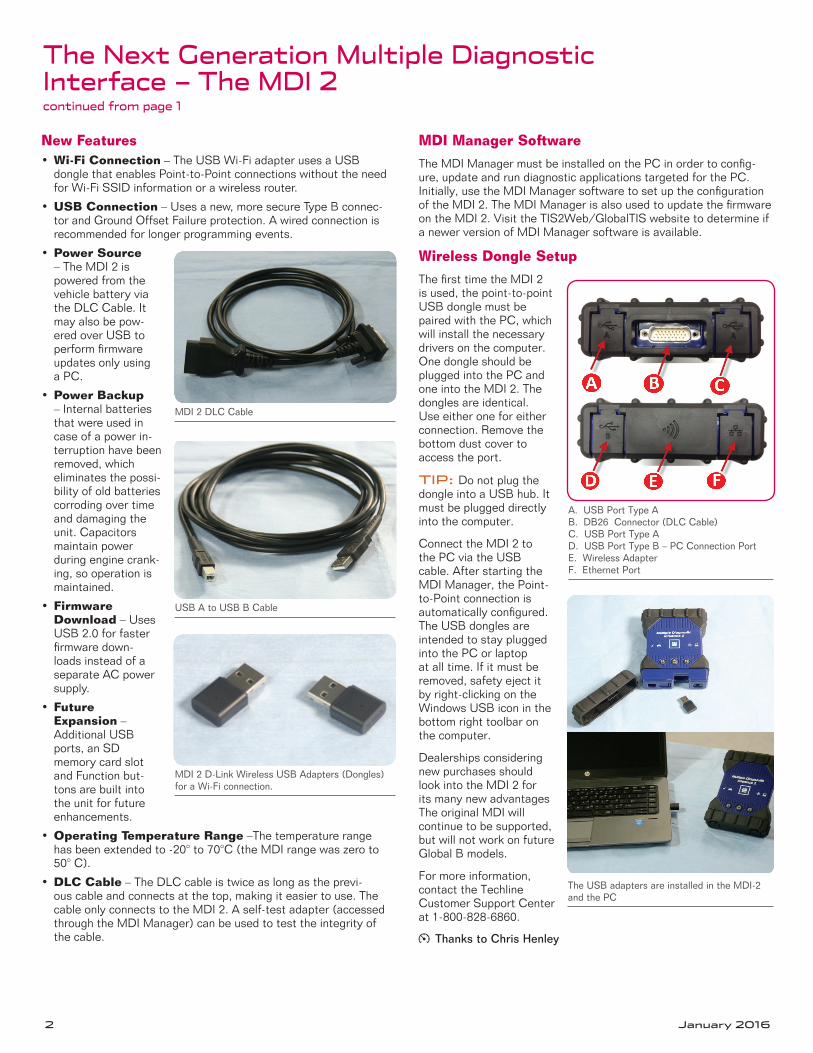
• DLC Cable – The DLC cable is twice as long as the previ-ous cable and connects at the top, making it easier to use. The cable only connects to the MDI 2. A self-test adapter (accessed through the MDI Manager) can be used to test the integrity of the cable.
MDI Manager Software
The MDI Manager must be installed on the PC in order to config-ure, update and run diagnostic applications targeted for the PC. Initially, use the MDI Manager software to set up the configuration of the MDI 2. The MDI Manager is also used to update the firmware on the MDI 2. Visit the TIS2Web/GlobalTIS website to determine if a newer version of MDI Manager software is available.
Wireless Dongle Setup
The first time the MDI 2 is used, the point-to-point USB dongle must be paired with the PC, which will install the necessary drivers on the computer. One dongle should be plugged into the PC and one into the MDI 2. The dongles are identical. Use either one for either connection. Remove the bottom dust cover to access the port.
TIP: Do not plug the dongle into a USB hub. It must be plugged directly into the computer.
Connect the MDI 2 to the PC via the USB cable. After starting the MDI Manager, the Point-to-Point connection is automatically configured. The USB dongles are intended to stay plugged into the PC or laptop at all time. If it must be removed, safety eject it by right-clicking on the Windows USB icon in the bottom right toolbar on the computer.
Dealerships considering new purchases should look into the MDI 2 for its many new advantages The original MDI will continue to be supported, but will not work on future Global B models.
For more information, contact the Techline Customer Support Center at 1-800-828-6860.
Thanks to Chris Henley
MDI 2 DLC Cable
A. USB Port Type A B. DB26 Connector (DLC Cable) C. USB Port Type A D. USB Port Type B – PC Connection Port E. Wireless Adapter F. Ethernet Port
USB A to USB B Cable
The USB adapters are installed in the MDI-2 and the PC
MDI 2 D-Link Wireless USB Adapters (Dongles) for a Wi-Fi connection.
January 2016 3
Switching from the MDI to the MDI 2 on your computer can be done easily by changing the Device Type on the PC. There are two different GDS 2 locations to change the Device Type — the Home screen (under Preferences) and the Vehicle Selection screen (by pressing the Select Device button).
Home Screen1. Select Prefer-
ences on the GDS 2 Home screen.
2. Under Prefer-ences, select the Device Type tab and click the MDI 2 as the new device.
Vehicle Selection Screen1. Click the Select
Device button on the GDS 2 Vehicle Selection screen.
2. The Device Type screen will open. Click the MDI 2 as the new device.
3. After selecting the MDI 2 as the device, GDS 2 shows the Device Explorer screen, which should show the available MDI 2 devices. If this explorer screen only shows the MDI, not the MDI 2, click Cancel and then click Select Device to switch to the MDI 2.
Thanks to Chris Henley
MDI and MDI 2 DLC Cable Self-Test Adapter
Switching to the MDI 2 on Your Computer
A DLC Cable Self-Test Loopback Adapter (EL-47955-1) was sent to dealerships as an essential tool in December. The adapter is used to test the DLC cable for open wires when used with the MDI Manager software.
The adapter also can be used to power the MDI or MDI 2 on the workbench. When testing the DLC cable, it’s recom-mended to power with the 12V DC jack.
Testing
1. Plug the adapter into the DLC Cable and MDI/MDI 2.
2. Apply 12V to the adapter, either using the 12V DC jack or the vehicle DLC (does not test power and ground when powered by DLC).
3. Connect the MDI or MDI 2 to the PC using the USB cable.
4. Connect the MDI or MDI 2 to the MDI Manager software.
5. Select the Cable Test button from the HELP tab in the MDI Manager software.
TIP: Remove the adapter after testing. It should not be left on during normal diagnostics.
Thanks to Chris Henley
Connect the 12V DC jack when testing
MDI 2 Self-Test Loopback Adapter
Select the Cable Test button.
4 January 2016
TOP TIER Detergent Gasoline Update
Backup Camera Display after Shifting Out of Reverse
Loss of Power Steering Assist
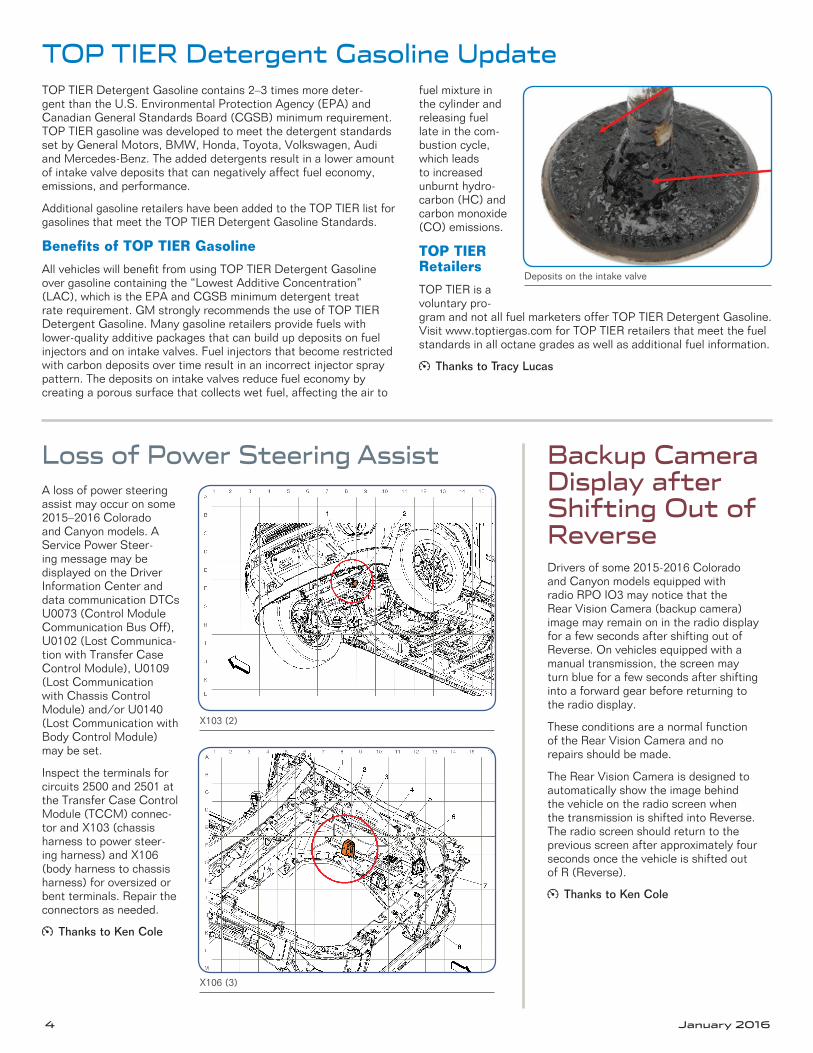
TOP TIER Detergent Gasoline contains 2–3 times more deter-gent than the U.S. Environmental Protection Agency (EPA) and Canadian General Standards Board (CGSB) minimum requirement. TOP TIER gasoline was developed to meet the detergent standards set by General Motors, BMW, Honda, Toyota, Volkswagen, Audi and Mercedes-Benz. The added detergents result in a lower amount of intake valve deposits that can negatively affect fuel economy, emissions, and performance.
Additional gasoline retailers have been added to the TOP TIER list for gasolines that meet the TOP TIER Detergent Gasoline Standards.
Benefits of TOP TIER Gasoline
All vehicles will benefit from using TOP TIER Detergent Gasoline over gasoline containing the “Lowest Additive Concentration” (LAC), which is the EPA and CGSB minimum detergent treat rate requirement. GM strongly recommends the use of TOP TIER Detergent Gasoline. Many gasoline retailers provide fuels with lower-quality additive packages that can build up deposits on fuel injectors and on intake valves. Fuel injectors that become restricted with carbon deposits over time result in an incorrect injector spray pattern. The deposits on intake valves reduce fuel economy by creating a porous surface that collects wet fuel, affecting the air to
fuel mixture in the cylinder and releasing fuel late in the com-bustion cycle, which leads to increased unburnt hydro-carbon (HC) and carbon monoxide (CO) emissions.
TOP TIER Retailers
TOP TIER is a voluntary pro-gram and not all fuel marketers offer TOP TIER Detergent Gasoline. Visit www.toptiergas.com for TOP TIER retailers that meet the fuel standards in all octane grades as well as additional fuel information.
Thanks to Tracy Lucas
Drivers of some 2015-2016 Colorado and Canyon models equipped with radio RPO IO3 may notice that the Rear Vision Camera (backup camera) image may remain on in the radio display for a few seconds after shifting out of Reverse. On vehicles equipped with a manual transmission, the screen may turn blue for a few seconds after shifting into a forward gear before returning to the radio display.
These conditions are a normal function of the Rear Vision Camera and no repairs should be made.
The Rear Vision Camera is designed to automatically show the image behind the vehicle on the radio screen when the transmission is shifted into Reverse. The radio screen should return to the previous screen after approximately four seconds once the vehicle is shifted out of R (Reverse).
Thanks to Ken Cole
A loss of power steering assist may occur on some 2015–2016 Colorado and Canyon models. A Service Power Steer-ing message may be displayed on the Driver Information Center and data communication DTCs U0073 (Control Module Communication Bus Off), U0102 (Lost Communica-tion with Transfer Case Control Module), U0109 (Lost Communication with Chassis Control Module) and/or U0140 (Lost Communication with Body Control Module) may be set.
Inspect the terminals for circuits 2500 and 2501 at the Transfer Case Control Module (TCCM) connec-tor and X103 (chassis harness to power steer-ing harness) and X106 (body harness to chassis harness) for oversized or bent terminals. Repair the connectors as needed.
Thanks to Ken Cole
Deposits on the intake valve
X103 (2)
X106 (3)
January 2016 5
GM TechLink is published for all GM retail technicians and service consultants to provide timely information to help increase know-ledge about GM products and improve the performance of the service department.
Publisher:John Meade GM Customer Care and Aftersales
Editor:Lisa G. Scott GM Customer Care and Aftersales
Technical Editor:Mark Spencer /[email protected]
Production Manager:Marie Meredith
Graphic Design:5by5 Design LLC/[email protected]
Fax number: 3 1-248-729-4704
Write to: * TechLinkPO Box 500Troy, MI 48007-0500
GM TechLink on the Web: : GM GlobalConnect
General Motors service tips are intended for use by professional technicians, not a “do-it-yourselfer.” T hey are written to inform those technicians of conditions that may occur on some vehicles, or to provide information that could assist in the proper service of a vehicle. Properly trained technicians have the equipment, tools, safety instructions and know-how to do a job properly and safely. If a condition is described, do not assume that the information applies to your vehicle or that your vehicle will have that condition. See a General Motors dealer servicing your brand of General Motors vehicle for information on whether your vehicle may benefit from the information.Inclusion in this publication is not necessarily an endorsement of the individual or the company.
Copyright© 2016 General Motors All rights reserved.
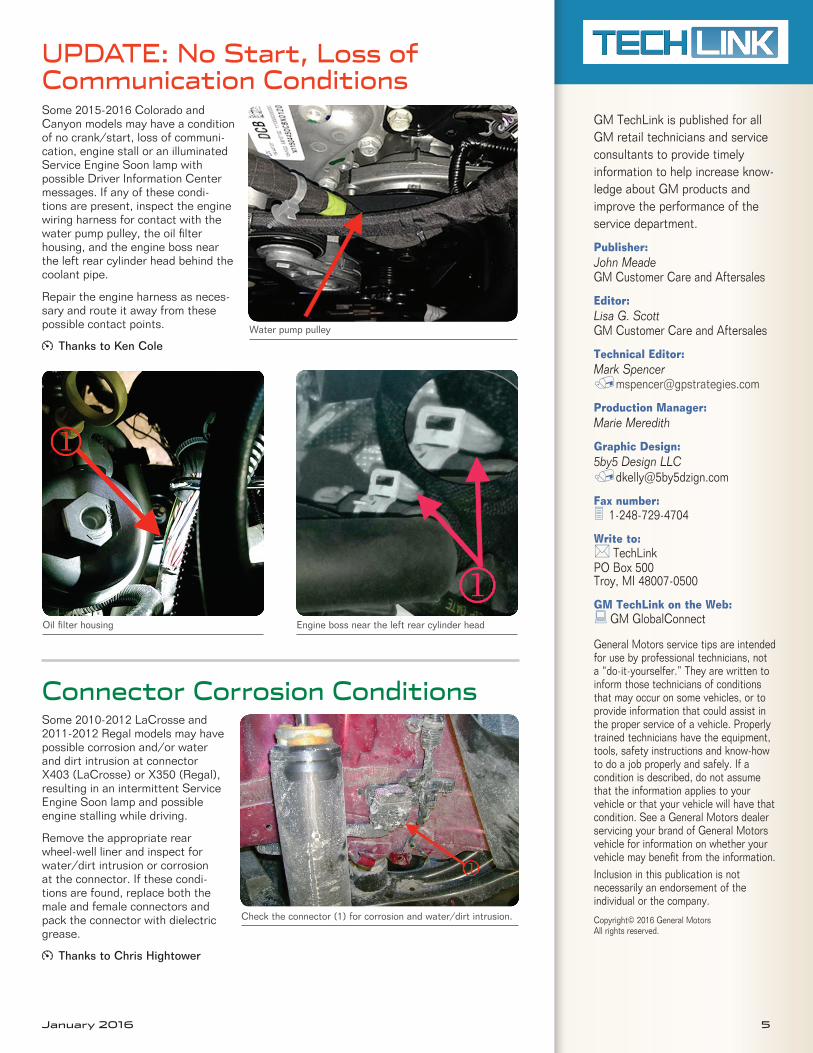
UPDATE: No Start, Loss of Communication ConditionsSome 2015-2016 Colorado and Canyon models may have a condition of no crank/start, loss of communi-cation, engine stall or an illuminated Service Engine Soon lamp with possible Driver Information Center messages. If any of these condi-tions are present, inspect the engine wiring harness for contact with the water pump pulley, the oil filter housing, and the engine boss near the left rear cylinder head behind the coolant pipe.
Repair the engine harness as neces-sary and route it away from these possible contact points.
Thanks to Ken ColeWater pump pulley
Oil filter housing Engine boss near the left rear cylinder head
Connector Corrosion ConditionsSome 2010-2012 LaCrosse and 2011-2012 Regal models may have possible corrosion and/or water and dirt intrusion at connector X403 (LaCrosse) or X350 (Regal), resulting in an intermittent Service Engine Soon lamp and possible engine stalling while driving.
Remove the appropriate rear wheel-well liner and inspect for water/dirt intrusion or corrosion at the connector. If these condi-tions are found, replace both the male and female connectors and pack the connector with dielectric grease.
Thanks to Chris Hightower
Check the connector (1) for corrosion and water/dirt intrusion.
6 January 2016
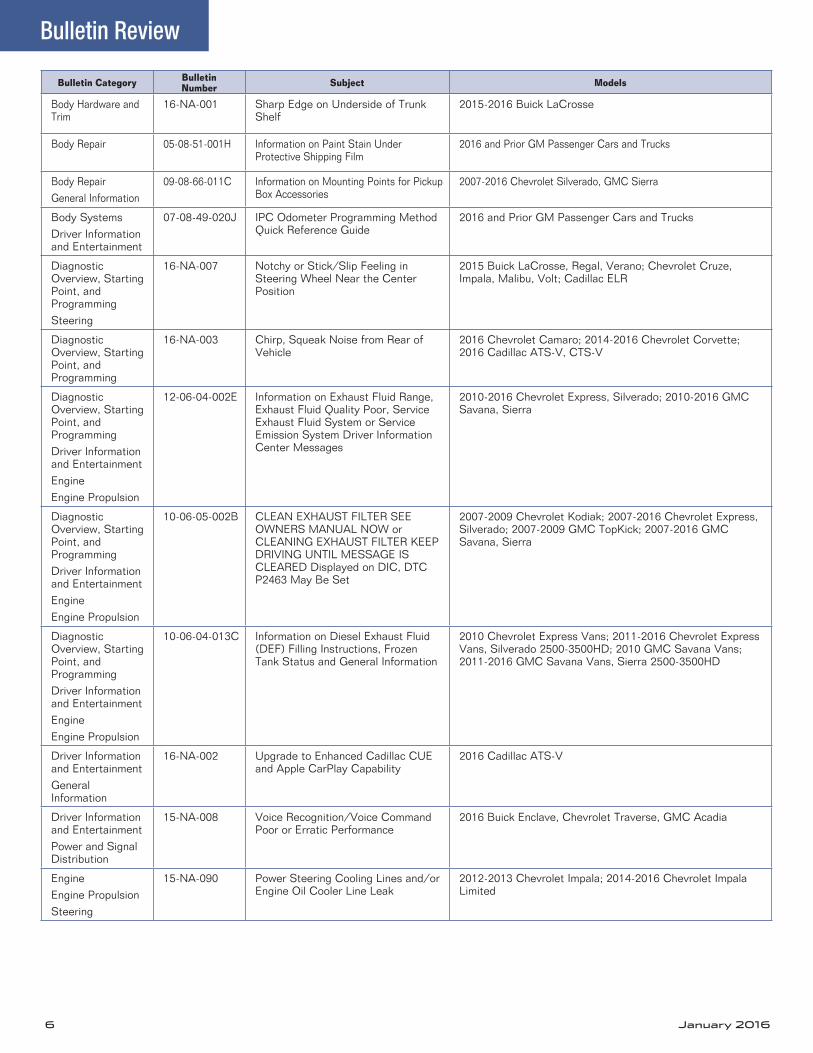
Bulletin Category Bulletin Number Subject Models
Body Hardware and Trim
16-NA-001 Sharp Edge on Underside of Trunk Shelf
2015-2016 Buick LaCrosse
Body Repair 05-08-51-001H Information on Paint Stain Under Protective Shipping Film
2016 and Prior GM Passenger Cars and Trucks
Body RepairGeneral Information
09-08-66-011C Information on Mounting Points for Pickup Box Accessories
2007-2016 Chevrolet Silverado, GMC Sierra
Body SystemsDriver Information and Entertainment
07-08-49-020J IPC Odometer Programming Method Quick Reference Guide
2016 and Prior GM Passenger Cars and Trucks
Diagnostic Overview, Starting Point, and ProgrammingSteering
16-NA-007 Notchy or Stick/Slip Feeling in Steering Wheel Near the Center Position
2015 Buick LaCrosse, Regal, Verano; Chevrolet Cruze, Impala, Malibu, Volt; Cadillac ELR
Diagnostic Overview, Starting Point, and Programming
16-NA-003 Chirp, Squeak Noise from Rear of Vehicle
2016 Chevrolet Camaro; 2014-2016 Chevrolet Corvette; 2016 Cadillac ATS-V, CTS-V
Diagnostic Overview, Starting Point, and ProgrammingDriver Information and EntertainmentEngineEngine Propulsion
12-06-04-002E Information on Exhaust Fluid Range, Exhaust Fluid Quality Poor, Service Exhaust Fluid System or Service Emission System Driver Information Center Messages
2010-2016 Chevrolet Express, Silverado; 2010-2016 GMC Savana, Sierra
Diagnostic Overview, Starting Point, and ProgrammingDriver Information and EntertainmentEngineEngine Propulsion
10-06-05-002B CLEAN EXHAUST FILTER SEE OWNERS MANUAL NOW or CLEANING EXHAUST FILTER KEEP DRIVING UNTIL MESSAGE IS CLEARED Displayed on DIC, DTC P2463 May Be Set
2007-2009 Chevrolet Kodiak; 2007-2016 Chevrolet Express, Silverado; 2007-2009 GMC TopKick; 2007-2016 GMC Savana, Sierra
Diagnostic Overview, Starting Point, and ProgrammingDriver Information and EntertainmentEngineEngine Propulsion
10-06-04-013C Information on Diesel Exhaust Fluid (DEF) Filling Instructions, Frozen Tank Status and General Information
2010 Chevrolet Express Vans; 2011-2016 Chevrolet Express Vans, Silverado 2500-3500HD; 2010 GMC Savana Vans; 2011-2016 GMC Savana Vans, Sierra 2500-3500HD
Driver Information and EntertainmentGeneral Information
16-NA-002 Upgrade to Enhanced Cadillac CUE and Apple CarPlay Capability
2016 Cadillac ATS-V
Driver Information and EntertainmentPower and Signal Distribution
15-NA-008 Voice Recognition/Voice Command Poor or Erratic Performance
2016 Buick Enclave, Chevrolet Traverse, GMC Acadia
EngineEngine PropulsionSteering
15-NA-090 Power Steering Cooling Lines and/or Engine Oil Cooler Line Leak
2012-2013 Chevrolet Impala; 2014-2016 Chevrolet Impala Limited
Bulletin Review
January 2016 7
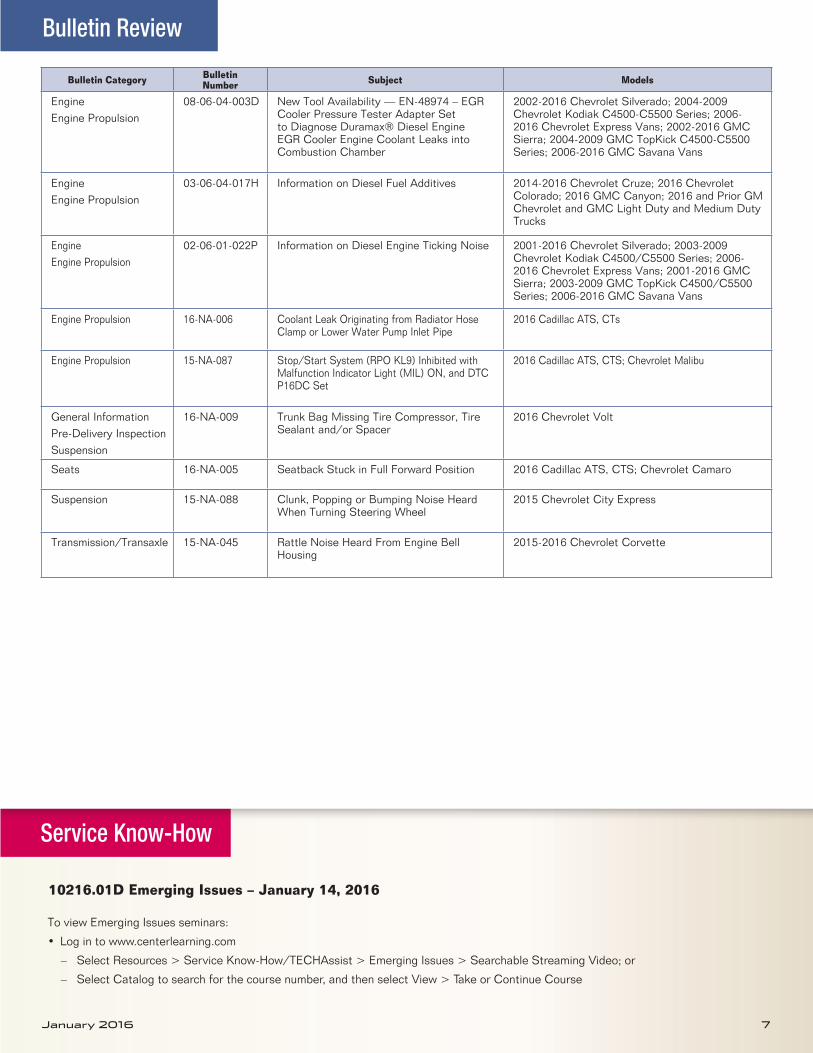
Bulletin Category Bulletin Number Subject Models
EngineEngine Propulsion
08-06-04-003D New Tool Availability — EN-48974 – EGR Cooler Pressure Tester Adapter Set to Diagnose Duramax® Diesel Engine EGR Cooler Engine Coolant Leaks into Combustion Chamber
2002-2016 Chevrolet Silverado; 2004-2009 Chevrolet Kodiak C4500-C5500 Series; 2006-2016 Chevrolet Express Vans; 2002-2016 GMC Sierra; 2004-2009 GMC TopKick C4500-C5500 Series; 2006-2016 GMC Savana Vans
EngineEngine Propulsion
03-06-04-017H Information on Diesel Fuel Additives 2014-2016 Chevrolet Cruze; 2016 Chevrolet Colorado; 2016 GMC Canyon; 2016 and Prior GM Chevrolet and GMC Light Duty and Medium Duty Trucks
EngineEngine Propulsion
02-06-01-022P Information on Diesel Engine Ticking Noise 2001-2016 Chevrolet Silverado; 2003-2009 Chevrolet Kodiak C4500/C5500 Series; 2006-2016 Chevrolet Express Vans; 2001-2016 GMC Sierra; 2003-2009 GMC TopKick C4500/C5500 Series; 2006-2016 GMC Savana Vans
Engine Propulsion 16-NA-006 Coolant Leak Originating from Radiator Hose Clamp or Lower Water Pump Inlet Pipe
2016 Cadillac ATS, CTs
Engine Propulsion 15-NA-087 Stop/Start System (RPO KL9) Inhibited with Malfunction Indicator Light (MIL) ON, and DTC P16DC Set
2016 Cadillac ATS, CTS; Chevrolet Malibu
General InformationPre-Delivery InspectionSuspension
16-NA-009 Trunk Bag Missing Tire Compressor, Tire Sealant and/or Spacer
2016 Chevrolet Volt
Seats 16-NA-005 Seatback Stuck in Full Forward Position 2016 Cadillac ATS, CTS; Chevrolet Camaro
Suspension 15-NA-088 Clunk, Popping or Bumping Noise Heard When Turning Steering Wheel
2015 Chevrolet City Express
Transmission/Transaxle 15-NA-045 Rattle Noise Heard From Engine Bell Housing
2015-2016 Chevrolet Corvette
10216.01D Emerging Issues – January 14, 2016
To view Emerging Issues seminars:
• Log in to www.centerlearning.com
– Select Resources > Service Know-How/TECHAssist > Emerging Issues > Searchable Streaming Video; or
– Select Catalog to search for the course number, and then select View > Take or Continue Course
Service Know-How
Bulletin Review