Embed Size (px)
Citation preview

A E S T H E T I C S U R G E R Y J O U R N A L ~ N O V E M B E R / D E C E M B E R 2 0 0 0 1
S c i e n t i f i c F o r u m
The Digital Darkroom, Part 2: Digital Photography Basics
Gregory M. Galdino, MD; Paul N. Manson, MD; and Craig A. Vander Kolk, MD
In Part 2 of this series, we review the basics of digital photography, including thecommon components of digital cameras; the variables affecting image capture, pro-cessing and storage that affect picture quality; and the various types of digital cam-eras currently available.
Sir Gilles acknowledged photography as one of the greatest advances in plasticsurgery during his address to the First International Congress of Plastic Surgery in1955.1 Since its acceptance as a standard tool for documenting results, there have
been several publications professing the need for standardization and reproducibility inphotography.1-10
The digital age has introduced a new variable into the equation: digital photography.Digital photography has advanced to the point where for standard medical photographyit is an acceptable and in many cases preferable method of photographic documentation,demonstrating both excellent quality and cost efficiency. DeLange and Diana11 presenteda basic comparison of 35-mm photography and digital photography and concluded thatdigital photography has several advantages over conventional 35-mm photography, par-ticularly with regard to cost, and provides photo quality that is satisfactory for patientdocumentation. Roth et al12 examined the use of digital photography in telemedicine toassess wounds through images captured in remote locations or at sites distant from thephysician and found that digital images were as useful as 35-mm slides in relaying infor-mation about wounds. Edstrom13 discussed the issues of converting to digital photogra-phy and photo archiving, the elements needed, and the potential economic gains. Ourown investigation of the economic benefit of using digital photography as a replacementfor 35-mm photography in an academic institution found that it results in significanteconomic gains and provides numerous additional advantages not readily available with35-mm film.14
In the short time since DiSaia et al15 introduced digital photography to the plastic surgerycommunity, marked advances have been made, most notably with regard to more afford-able technology and improved image quality. Most standards for medical photography,such as those relating to light and patient positioning, apply to digital photogra-phy.1-10,16,17 However, a digital camera is more akin to a video camera or scanner than to
From the Johns Hopkins Hospital,Baltimore, MD.
Accepted for publication July 7,2000.
Reprint requests: Gregory M.Galdino, MD, Division of Plasticand Reconstructive Surgery, JohnsHopkins Hospital, 601 N. CarolineStreet, 8130A McElderry,Baltimore, MD 21287.
Copyright © 2000 by The AmericanSociety for Aesthetic PlasticSurgery, Inc.
1084-0761/2000/$12.00 + 0
70/1/111949doi:10.1067/maj.2000.111949
a 35-mm camera, and it thus differs from a conventionalfilm device in how it captures light and color and how itresponds to movement. Moreover, as will become clear,all digital cameras are not created equal. The user mustunderstand the basics of digital cameras and image cap-ture to take reproducible, standardized photographs whilereaping the benefits of this new technology.
An understanding of the principles of conventional pho-tography, however, does help elucidate some of the princi-ples of digital photography while making the differenceswith digital imaging more obvious. More specifically, anunderstanding of light capture and color theory is neces-sary to truly understand digital photography.
Image Capture
Conventional photography is based on changes takingplace on the film at a molecular level. In black-and-whitephotography, light-sensitive silver halide atoms are sus-pended on the film in a gelatinous material known as anemulsion. When light strikes the emulsion, it causes thehalide ions to become chemically altered. During thedeveloping process, each halide ion attracts silver atomsin direct proportion to the intensity of the light that hasstruck it (more atoms for stronger light), creating largeclumps that become visible to form an image (negative).18-20
Capturing color on film as a single exposure was not pos-sible until the twentieth century, when color couplers(light-sensitive chemicals with color dyes that are the
complements of the colors to which these chemicals aresensitive) were integrated into the photographic emul-sion, producing dyes in the emulsion when it chemicallyreacted with developing fluid. The basic structure ofcolor-negative film has been unchanged since the 1930s.The film consists of a sandwich of an outer acetate baseand protective covering with 3 layers of emulsion (con-taining the silver halide ions already described) and witha color coupler specific for blue, green, or red light (theprimary colors) between each two layers.19 As the film isexposed, white light hits the blue-sensitive emulsion layerfirst, then passes through a yellow filter (which dissolveswith development), allowing the remaining light (red andgreen light, selected by the yellow filter) to strike thegreen-sensitive emulsion and finally the red-sensitiveemulsion.19 Thus, blue light is recorded only on theblue-sensitive emulsion layer, as a black-and-white image.Similarly, red and green light are recorded on their respec-tive emulsion layers. During development, the color cou-pler releases a dye specific to the complement of theprimary color to which the emulsion is sensitive. (Comp-lementary colors are formed by mixing the 2 remainingprimaries—ie, the blue layer releases yellow [formed bymixing red and green] dye, the green layer releases magenta[blue and red] dye, and the red layer releases cyan [greenand blue] dye.) The film is bleached to remove the silver,leaving an image composed only of yellow, magenta, andcyan dyes.19 In photographic color printing, white light,which is composed of equal proportions of red, green,and blue (RGB) light shines through the negative (dyed
2 A E S T H E T I C S U R G E R Y J O U R N A L ~ N O V E M B E R / D E C E M B E R 2 0 0 0 Volume 20, Number 6
S c i e n t i f i c F o r u m
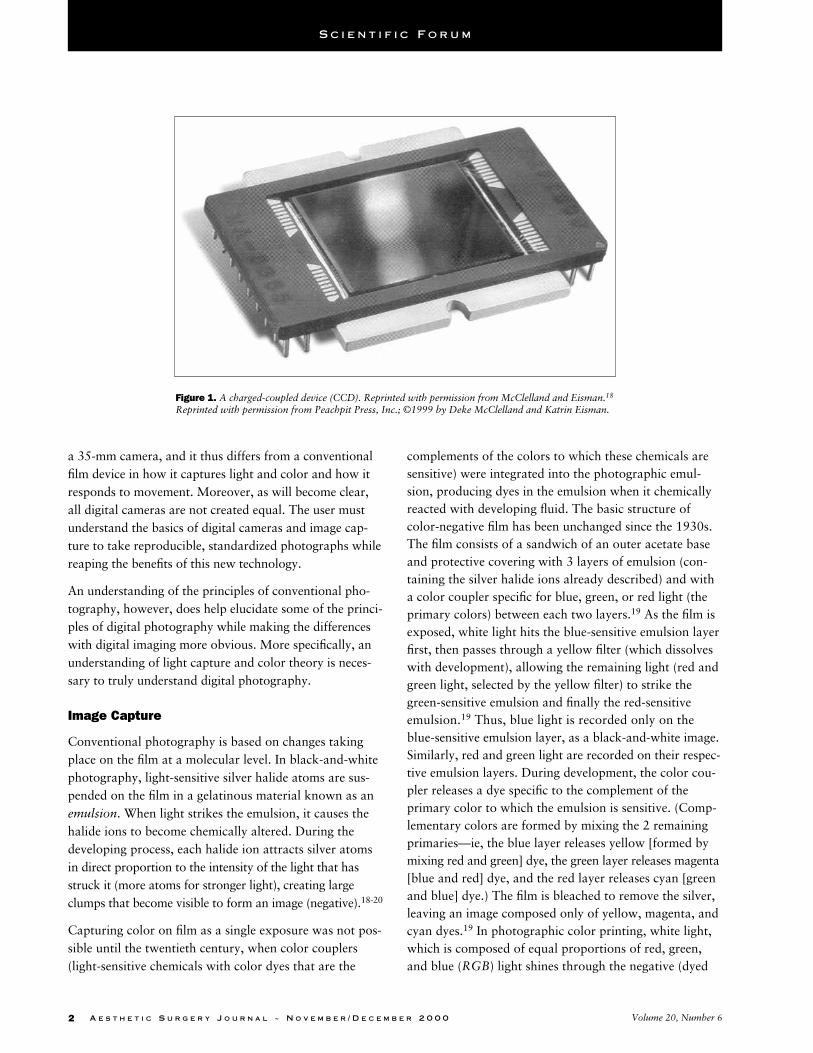
Figure 1. A charged-coupled device (CCD). Reprinted with permission from McClelland and Eisman.18
Reprinted with permission from Peachpit Press, Inc.; ©1999 by Deke McClelland and Katrin Eisman.
cyan, magenta, and yellow, or CMY) and strikes colorpaper that is composed of the same 3 layers that colorfilm is composed of. If a red object is recorded on film,the object appears as cyan on the negative. In the printingprocess, the cyan color on the negative transmits onlyblue and green light. On the paper, the blue light andgreen light strike the blue and green sensitive layers,respectively. During development, the blue layer releasesits complement dye, yellow, and the green layer releasesits complement dye, magenta. Magenta and yellow thencombine to form red, the original color of the object.
Positive prints, or slides, use essentially the same filmstructure, but the developing process is different. In termsof the example above: a red object is exposed on the film,and the first developer converts the exposed image on thered-sensitive emulsion layer to metallic silver. The nextdeveloper, called the reversal chemical, exposes theremaining nonexposed silver halide (existing everywhereexcept where the initial exposure occurred)—in this case,in the blue- and green-sensitive layers. When these newexposed areas are reduced to silver, the resulting oxida-tion reacts with the color dyes. In this example, the dyesproduced would be yellow (from the blue layer) andmagenta (from the green layer). The silver is then washed
off, leaving only the dyes. When light shows through theslide, the red image appears red because of the light beingfiltered through the yellow and magenta layers (yellow +magenta = red). Thus this process is also known as thecolor reversal process (or E6 process).19
Digital photography involves some of the same principles.The key to digital photography is the image sensor. Thesensor used most widely is the charged-coupled device, orCCD (Figure 1).18 The CCD, actually an analog device, isan electronic chip composed of light-sensitive electrodes(each representing a single picture element, or pixel) on asilicone (electron-rich) layer enclosed in a light-free envi-ronment.18 When light enters through the optics (lens) ofthe camera, it passes through a diaphragm, which in thedigital camera functions as both a shutter and an apertureregulator. (Most digital cameras do not contain mechani-cal shutters, because exposure is typically controlled elec-tronically; the diaphragm shields the light-sensitive chipfrom light, prolonging its life while also controlling theaperture).18 The photons of light excite the negativelycharged electrons, causing them to scatter. Voltageapplied to the electrodes causes the electrodes to gatherinto clusters (termed photosites).18 This process is similarin principle to the clumping together of silver halide ions
A E S T H E T I C S U R G E R Y J O U R N A L ~ N O V E M B E R / D E C E M B E R 2 0 0 0 3The Digital Darkroom, Part 2: Digital Photography Basics
S c i e n t i f i c F o r u m
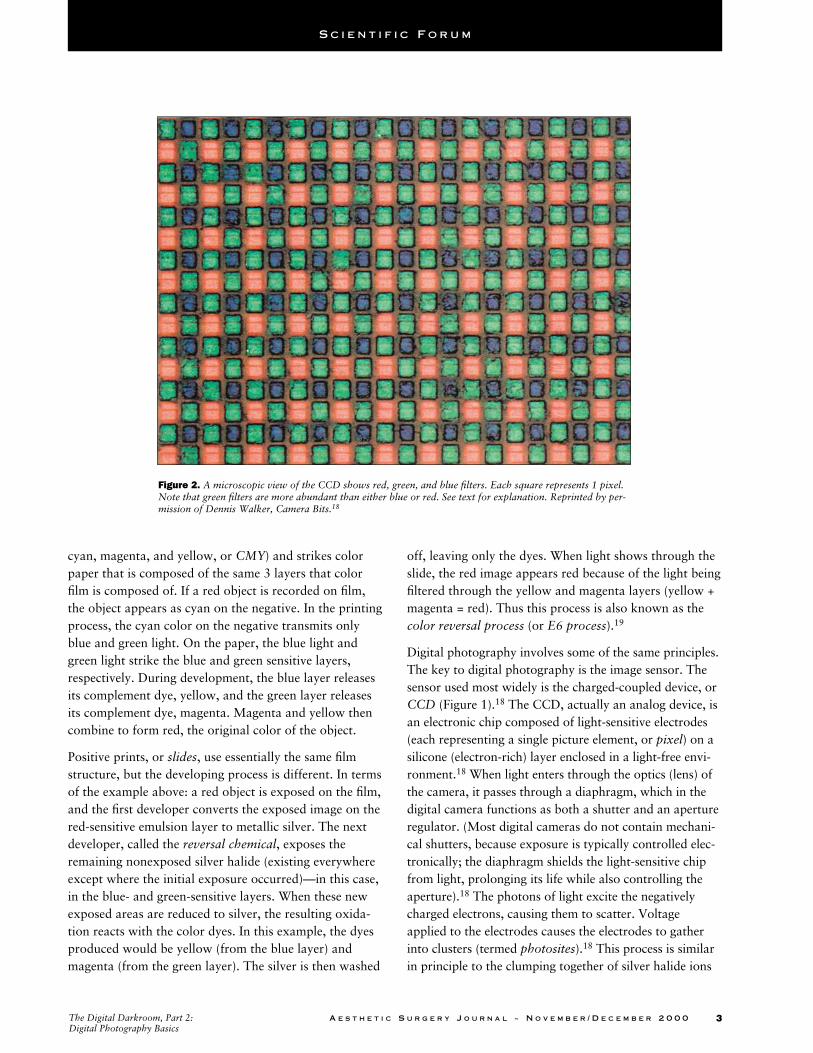
Figure 2. A microscopic view of the CCD shows red, green, and blue filters. Each square represents 1 pixel.Note that green filters are more abundant than either blue or red. See text for explanation. Reprinted by per-mission of Dennis Walker, Camera Bits.18

when they are exposed to light. The intensity of light isreflected in the number of electrons gathered; strongerlight and higher voltage at a specific electrode translatesinto a greater number of electrons at that site.18 Becausethe CCD is analog, a digital converter is necessary tocount the electrons at each site and send this digital infor-mation to the logic board (similar to the motherboard in acomputer) and microprocessor unit (similar to the centralprocessing unit—also called the processor or CPU—of acomputer) for processing; it then releases the electrons,and the process begins again.18 The intensities of light areorganized into a black-and-white image.
Because CCDs are not sensitive to color, color-sensitivefilters consisting of the primary colors (red, green, andblue) are placed over individual electrodes to make eachelectrode sensitive to a particular primary color.18,22
These kinds of filters are termed color filter arrays, orCFAs.22 Such a photographic device is termed a single-array camera (Figure 2). (Some professional digital stilland video cameras have a separate CCD for each of theRGB colors; these are called multiple-array cameras.) Theexact filtering method, including the arrangement of fil-
ters, may differ between sensors. Most digital camerashave twice as many green pixels as blue or red pixels,mimicking our vision, which is more sensitive to greenlight than to blue or red light.18 One theoretical draw-back to the use of a single-array system is that the colorinformation captured is not complete for each primarycolor, also known as a channel. This means that missinginformation must be mathematically determined by thefactoring of information from surrounding pixels that areknown and captured.18 For example, when missing redpixels are calculated, information from the surroundinggreen and blue pixels is used. This process is called colorinterpolation or CFA interpolation (Figure 3).18,22 Theinformation from the 3 channels is used to generate thefinal full-color image; this is similar to the additiveprocess in which the 3 RGB layers are used to project afinal image. The results of the process of interpolation aremuch more precise than our eyes can discern, and mostcurrent megapixel digital cameras generate images withvivid color and sharpness without any noticeable deficitsfrom interpolation.
Although digital images are capable of capturing more
4 A E S T H E T I C S U R G E R Y J O U R N A L ~ N O V E M B E R / D E C E M B E R 2 0 0 0 Volume 20, Number 6
S c i e n t i f i c F o r u m
Figure 3. Information from each channel (red, green, and blue). The picture is captured through the color fil-ter, allowing only the color specific to the filter to pass; this produces a black-and-white image. When all ofthe channels are combined, a color image results. This image was separated into channels in Adobe PhotoShop.

than 16.7 million colors (24-bit), the perception of thesecolors is limited by our vision. Most people can distin-guish slightly more than 1000 different colors when col-ors are presented side by side23; in contrast, they canperceive fewer than a dozen colors when colors are pre-sented individually, with several seconds between eachviewing and the next.23 In addition, most printers arecapable of printing only a few thousand colors.18
The Digital Camera
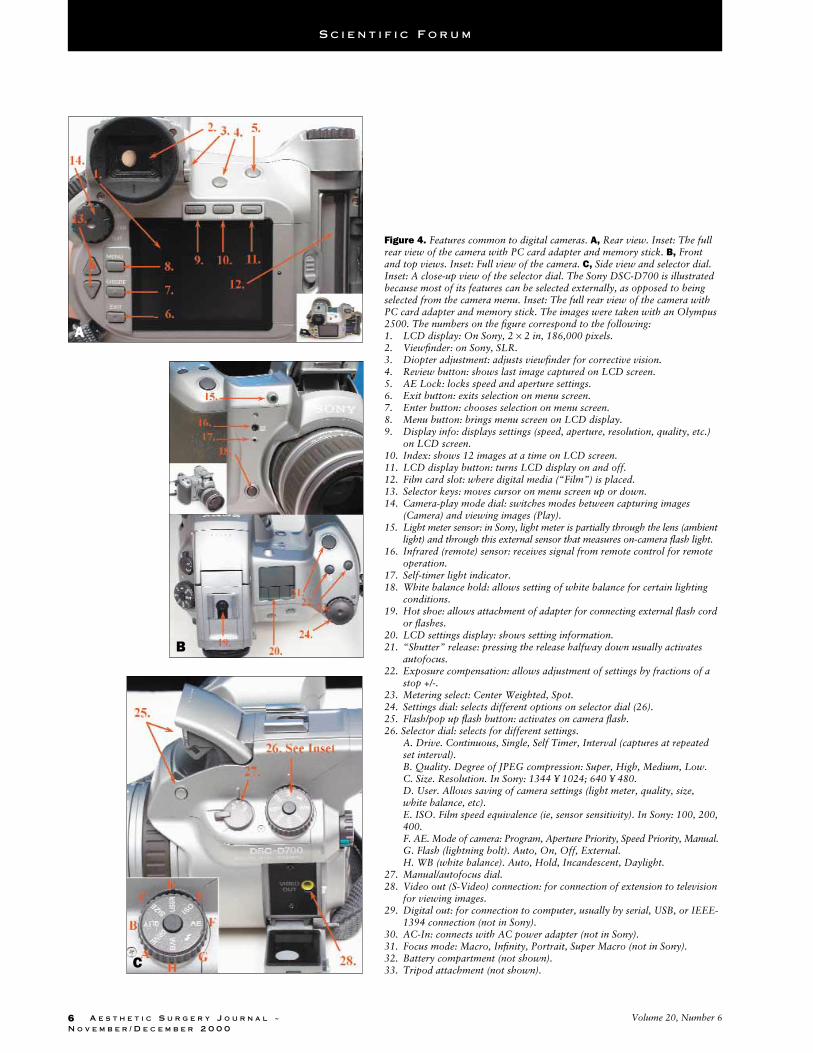
Figure 4 shows the common components of a digitalcamera (in this case, a Sony DSC-D700) that are usuallyaccessible either externally on the camera or through useof a menu on the liquid crystal display (LCD) screen.
Most digital cameras applicable to photography in plasticsurgery range in cost between $500 and $1800. Camerasin this price range are often referred to as professional-lite or prosumer cameras. New types of single-lens reflex(SLR) cameras (eg, the Nikon D1) that use traditionalcamera backs modified for digital photography and allowinterchangeable existing lenses are available in the pricerange of $4000 to $5000.
Variables Directly Affecting Image Quality
Many variables, both direct and indirect, determine theoverall quality of the final digital image. They also helpto define the differences between digital photography andconventional 35-mm photography.
Lenses
As in 35-mm photography, the camera optics have a pro-found effect on image quality. In most digital camerasapplicable to medical photography, the lens is generallymade of polished glass and adjustable to wide-angle ortelephoto/zoom. The better the quality of lens, the betterthe quality of picture produced. Inexpensive, consumer-grade point-and-shoot digital cameras may use plasticand/or fixed lenses.
Some digital cameras have large lenses similar to those on35-mm cameras; some have very small lenses. Regardlessof size, the quality of the lens’s construction is mostimportant. Some well-known manufacturers of optics,such as Karl-Zeiss, are manufacturing lenses for digitalcameras. Trust lenses from manufacturers with reputa-tions for good optics. Every lens should be protected witha lens cover or ultraviolet filter cover, which screws ontothe front of the lens.
In professional digital cameras, standard 35-mm autofo-cus lenses can be mounted on a digital camera body. Thisallows interchangeability through use of current conven-tional autofocus lenses. This feature is currently availableon the Nikon D1 and Fuji FinePix S1 Pro and will likelybecome more widely available in more affordable digitalcameras in the near future.
FocusDigital cameras may have fixed-focus (nonadjustable),autofocus, or manual focus capability. Fixed-focus cam-eras are least desirable for medical photography. Somedigital cameras offer both autofocus and manual focusmodes, usually selectable by means of a switch on thecamera lens or body. Autofocus cameras can typically beidentified by a central circle or crosshatch that is seenwhen one looks through the viewfinder. The focusingmechanism in a digital camera is often slower than thatin a standard 35-mm SLR camera (except when a stan-dard 35-mm lens is being used, as in the Nikon D1). Toadjust the focus sharply, the focusing mechanism looksfor contrast and vertical lines, as in 35-mm photography.Thus, focusing on the eye for a facial shot or on the nip-ple/areola for a breast shot usually ensures sharp pictures.Focusing on areas lacking contrast and lines, such as thecheek and abdomen, can result in out-of-focus pictures.Many digital cameras also offer a focus lock so that thesubject can be repositioned in the frame. Focus lock,which also locks in the light meter reading, can beengaged either by pressing the shutter halfway down orby means of a separate focus lock button, often locatednear the shutter button.
Manual focus may allow the user to adjust the focus ringon the lens (in which case the diopter must be set correct-ly to the user’s eye to keep the picture in focus). Othermanual focus modes, such as that found on the Olympus2500, allow a series of fixed-focus settings for differentdistances between the subject and the camera. Becausemany digital cameras do not allow lens focus, indexingfor reproducibility is not possible. If the camera has atelephoto and wide-angle lever, using the full telephotosetting and maintaining a set distance from the patientcan ensure reproducibility.
ZoomThe telephoto and wide-angle ability of the lens is indi-cated by the focal length (the distance, measured in mil-limeters, from the point where the light makes its lastbend after passing through the lens element to the pointwhere it focuses perfectly on the film or sensor; more
A E S T H E T I C S U R G E R Y J O U R N A L ~ N O V E M B E R / D E C E M B E R 2 0 0 0 5The Digital Darkroom, Part 2: Digital Photography Basics
S c i e n t i f i c F o r u m
6 A E S T H E T I C S U R G E R Y J O U R N A L ~N O V E M B E R / D E C E M B E R 2 0 0 0
Volume 20, Number 6
S c i e n t i f i c F o r u m
Figure 4. Features common to digital cameras. A, Rear view. Inset: The fullrear view of the camera with PC card adapter and memory stick. B, Frontand top views. Inset: Full view of the camera. C, Side view and selector dial.Inset: A close-up view of the selector dial. The Sony DSC-D700 is illustratedbecause most of its features can be selected externally, as opposed to beingselected from the camera menu. Inset: The full rear view of the camera withPC card adapter and memory stick. The images were taken with an Olympus2500. The numbers on the figure correspond to the following:1. LCD display: On Sony, 2 × 2 in, 186,000 pixels.2. Viewfinder: on Sony, SLR.3. Diopter adjustment: adjusts viewfinder for corrective vision.4. Review button: shows last image captured on LCD screen.5. AE Lock: locks speed and aperture settings.6. Exit button: exits selection on menu screen. 7. Enter button: chooses selection on menu screen.8. Menu button: brings menu screen on LCD display.9. Display info: displays settings (speed, aperture, resolution, quality, etc.)
on LCD screen. 10. Index: shows 12 images at a time on LCD screen.11. LCD display button: turns LCD display on and off.12. Film card slot: where digital media (“Film”) is placed.13. Selector keys: moves cursor on menu screen up or down.14. Camera-play mode dial: switches modes between capturing images
(Camera) and viewing images (Play).15. Light meter sensor: in Sony, light meter is partially through the lens (ambient
light) and through this external sensor that measures on-camera flash light.16. Infrared (remote) sensor: receives signal from remote control for remote
operation. 17. Self-timer light indicator.18. White balance hold: allows setting of white balance for certain lighting
conditions. 19. Hot shoe: allows attachment of adapter for connecting external flash cord
or flashes.20. LCD settings display: shows setting information.21. “Shutter” release: pressing the release halfway down usually activates
autofocus.22. Exposure compensation: allows adjustment of settings by fractions of a
stop +/-.23. Metering select: Center Weighted, Spot.24. Settings dial: selects different options on selector dial (26).25. Flash/pop up flash button: activates on camera flash.26. Selector dial: selects for different settings.
A. Drive. Continuous, Single, Self Timer, Interval (captures at repeatedset interval).B. Quality. Degree of JPEG compression: Super, High, Medium, Low.C. Size. Resolution. In Sony: 1344 ¥ 1024; 640 ¥ 480.D. User. Allows saving of camera settings (light meter, quality, size,white balance, etc).E. ISO. Film speed equivalence (ie, sensor sensitivity). In Sony: 100, 200,400.F. AE. Mode of camera: Program, Aperture Priority, Speed Priority, Manual.G. Flash (lightning bolt). Auto, On, Off, External.H. WB (white balance). Auto, Hold, Incandescent, Daylight.
27. Manual/autofocus dial.28. Video out (S-Video) connection: for connection of extension to television
for viewing images.29. Digital out: for connection to computer, usually by serial, USB, or IEEE-
1394 connection (not in Sony).30. AC-In: connects with AC power adapter (not in Sony).31. Focus mode: Macro, Infinity, Portrait, Super Macro (not in Sony).32. Battery compartment (not shown).33. Tripod attachment (not shown).
A
B
C
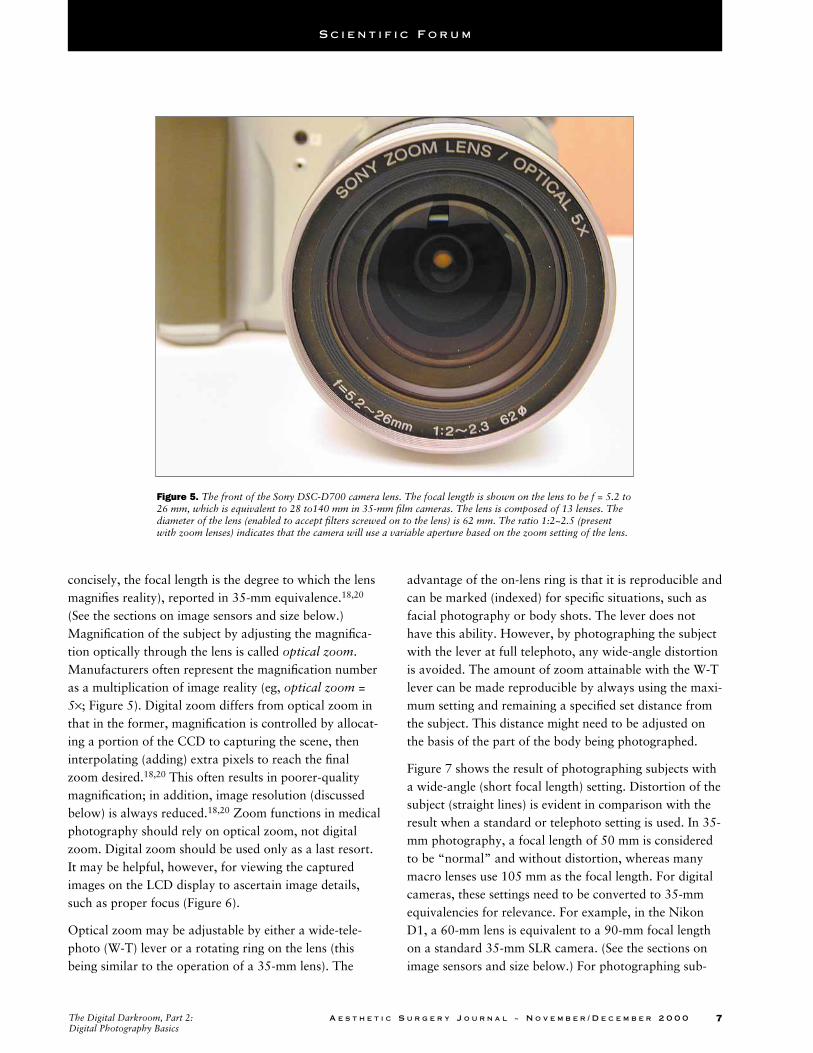
concisely, the focal length is the degree to which the lensmagnifies reality), reported in 35-mm equivalence.18,20
(See the sections on image sensors and size below.)Magnification of the subject by adjusting the magnifica-tion optically through the lens is called optical zoom.Manufacturers often represent the magnification numberas a multiplication of image reality (eg, optical zoom =5×; Figure 5). Digital zoom differs from optical zoom inthat in the former, magnification is controlled by allocat-ing a portion of the CCD to capturing the scene, theninterpolating (adding) extra pixels to reach the finalzoom desired.18,20 This often results in poorer-qualitymagnification; in addition, image resolution (discussedbelow) is always reduced.18,20 Zoom functions in medicalphotography should rely on optical zoom, not digitalzoom. Digital zoom should be used only as a last resort.It may be helpful, however, for viewing the capturedimages on the LCD display to ascertain image details,such as proper focus (Figure 6).
Optical zoom may be adjustable by either a wide-tele-photo (W-T) lever or a rotating ring on the lens (thisbeing similar to the operation of a 35-mm lens). The
advantage of the on-lens ring is that it is reproducible andcan be marked (indexed) for specific situations, such asfacial photography or body shots. The lever does nothave this ability. However, by photographing the subjectwith the lever at full telephoto, any wide-angle distortionis avoided. The amount of zoom attainable with the W-Tlever can be made reproducible by always using the maxi-mum setting and remaining a specified set distance fromthe subject. This distance might need to be adjusted onthe basis of the part of the body being photographed.
Figure 7 shows the result of photographing subjects witha wide-angle (short focal length) setting. Distortion of thesubject (straight lines) is evident in comparison with theresult when a standard or telephoto setting is used. In 35-mm photography, a focal length of 50 mm is consideredto be “normal” and without distortion, whereas manymacro lenses use 105 mm as the focal length. For digitalcameras, these settings need to be converted to 35-mmequivalencies for relevance. For example, in the NikonD1, a 60-mm lens is equivalent to a 90-mm focal lengthon a standard 35-mm SLR camera. (See the sections onimage sensors and size below.) For photographing sub-
A E S T H E T I C S U R G E R Y J O U R N A L ~ N O V E M B E R / D E C E M B E R 2 0 0 0 7The Digital Darkroom, Part 2: Digital Photography Basics
S c i e n t i f i c F o r u m
Figure 5. The front of the Sony DSC-D700 camera lens. The focal length is shown on the lens to be f = 5.2 to26 mm, which is equivalent to 28 to140 mm in 35-mm film cameras. The lens is composed of 13 lenses. Thediameter of the lens (enabled to accept filters screwed on to the lens) is 62 mm. The ratio 1:2~2.5 (presentwith zoom lenses) indicates that the camera will use a variable aperture based on the zoom setting of the lens.

jects at close range, the macro setting or telephoto settingshould be used instead of the wide-angle setting so as toavoid distortion.
Macro modeDigital macro photography produces excellent-qualityresults, permitting photographic results once possibleonly with expensive macro lenses and ring flashes. Figure8 is a photograph taken in macro mode (Nikon 950)with only the on-camera flash.
Macro capability differs between digital cameras. Somecameras can photograph a subject as close as 6 in awaywithout a macro mode. Additional close-up filters (mea-sured in diopters of +1, +2, etc), can attach to the frontof the lens (often screwing onto the lens; with respect tosize [in millimeters], the lens and filter must be compati-ble). Still other cameras offer a specific macro mode(often indicated by a flower symbol or icon) or supermacro mode in which the camera can focus from 0.8 to20 in (depending on the camera). Focusing in this modecan be difficult when a parallax viewfinder is being used(see below) and often requires using the LCD display to
position the subject. Furthermore, to photograph at theclosest distance specified by the manufacturer, the lensmay have to be set at the widest angle, as exemplified bythe Olympus 2500 (0.8-1 in at wide angle, super macromode; 1-2 in at telephoto, super macro mode). Somedevices, such as attachable guides with and withoutrulers, are available to help the user determine and set theproper distance from the subject. These are very helpfuland may be used in cameras with and cameras withoutmacro modes (Figure 9).
Viewfinder
Most digital cameras have LCD displays for viewing thepicture after it has been captured. However, some digitalcameras also use their LCD displays as viewfinders forpositioning the subject and framing the picture, in con-trast to those cameras that have optical viewfinders.Many cameras have both kinds of viewfinder, the LCDdisplay being designed to be used in the macro mode ifthe camera has a parallax optical viewfinder or if theoptical viewfinder is less convenient (eg, when one is pho-tographing a patient on the operating room [OR] table
8 A E S T H E T I C S U R G E R Y J O U R N A L ~ N O V E M B E R / D E C E M B E R 2 0 0 0 Volume 20, Number 6
S c i e n t i f i c F o r u m
Figure 6. Optical zoom (A) and 2× digital zoom (B). The images were taken with a Sony DSC-D700. The dis-tance from the patient was 3 feet. Resolution for the digital zoom on the Sony is 640 × 480. The optical zoomresolution is 1344 × 1024 at 100-mm zoom. When the images are viewed at higher power, the digital zoom(D) exhibits slight degradation in image quality in comparison with the optical zoom (C).

from above). Because the LCD display uses significantbattery power when it is kept on for more than a few sec-onds, it is advisable to conserve power by using the opti-cal viewfinder if there is one (excluding macro mode).However, some users may prefer to use the LCD for con-venience, regardless of the power consumption.
The optical viewfinder is typically one of the followingtypes: (1) parallax (or rangefinder; seen in many point-and-shoot 35-mm cameras) or (2) through-the-lens(TTL) or SLR (Figure 10). Parallax viewfinders mayexhibit parallel distortion (inaccuracies in subject/lensrelationship). This is most noticeable when the user isclose to the subject and disappears or becomes lessnoticeable at greater distances from the subject (Figure11).18 TTL always provides an accurate representationof the subject because it is reflects what the lens sees.
The type of viewfinder is a consideration when one ispurchasing a digital camera.
Some digital cameras have an adjustable diopter locatedon the viewfinder (Figure 12). This adjusts the focus ofthe optical viewfinder and should be adjusted to theuser’s eye. This adjustment may be a factor to consider ifdigital images do not appear in focus when the picturesare taken but are in focus when viewed.
Image Sensors
Image sensors differ in type, size, sensitivity to light, fil-tering method, and resolution. The CCD is used in mostdigital cameras available today because of its low costand superior quality.24 Complementary metal-oxide semi-conductor (CMOS) sensors are available in less expensivedigital cameras, and recent advances in technology haveenabled some manufacturers to use them in more expen-sive cameras, such as the Canon EOS D30. The CMOS
A E S T H E T I C S U R G E R Y J O U R N A L ~ N O V E M B E R / D E C E M B E R 2 0 0 0 9The Digital Darkroom, Part 2: Digital Photography Basics
S c i e n t i f i c F o r u m
Figure 7. When a wide angle setting (A) is used for macro photography,there is distortion of straight lines, as on these images. The telephotosetting (B) produces no distortion (110 mm). The images were takenwith a Sony DSC-D700.
Figure 9. This digital photograph illustrates the macro capabilities ofdigital cameras without the need for additional attachments to the cam-era. It was taken with the Nikon 950 on macro mode through use of theon-camera flash and softbox lighting. The inset shows the flower iconcommonly used to indicate macro mode.
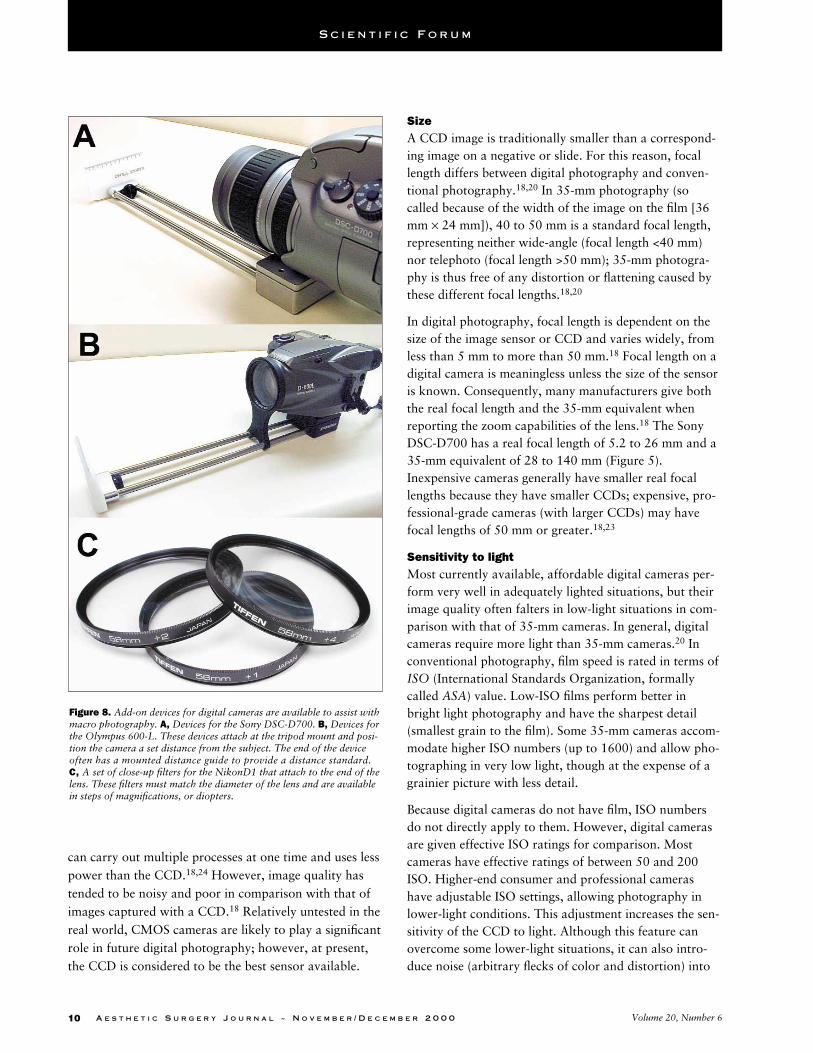
can carry out multiple processes at one time and uses lesspower than the CCD.18,24 However, image quality hastended to be noisy and poor in comparison with that ofimages captured with a CCD.18 Relatively untested in thereal world, CMOS cameras are likely to play a significantrole in future digital photography; however, at present,the CCD is considered to be the best sensor available.
SizeA CCD image is traditionally smaller than a correspond-ing image on a negative or slide. For this reason, focallength differs between digital photography and conven-tional photography.18,20 In 35-mm photography (socalled because of the width of the image on the film [36mm × 24 mm]), 40 to 50 mm is a standard focal length,representing neither wide-angle (focal length <40 mm)nor telephoto (focal length >50 mm); 35-mm photogra-phy is thus free of any distortion or flattening caused bythese different focal lengths.18,20
In digital photography, focal length is dependent on thesize of the image sensor or CCD and varies widely, fromless than 5 mm to more than 50 mm.18 Focal length on adigital camera is meaningless unless the size of the sensoris known. Consequently, many manufacturers give boththe real focal length and the 35-mm equivalent whenreporting the zoom capabilities of the lens.18 The SonyDSC-D700 has a real focal length of 5.2 to 26 mm and a35-mm equivalent of 28 to 140 mm (Figure 5).Inexpensive cameras generally have smaller real focallengths because they have smaller CCDs; expensive, pro-fessional-grade cameras (with larger CCDs) may havefocal lengths of 50 mm or greater.18,23
Sensitivity to lightMost currently available, affordable digital cameras per-form very well in adequately lighted situations, but theirimage quality often falters in low-light situations in com-parison with that of 35-mm cameras. In general, digitalcameras require more light than 35-mm cameras.20 Inconventional photography, film speed is rated in terms ofISO (International Standards Organization, formallycalled ASA) value. Low-ISO films perform better inbright light photography and have the sharpest detail(smallest grain to the film). Some 35-mm cameras accom-modate higher ISO numbers (up to 1600) and allow pho-tographing in very low light, though at the expense of agrainier picture with less detail.
Because digital cameras do not have film, ISO numbersdo not directly apply to them. However, digital camerasare given effective ISO ratings for comparison. Mostcameras have effective ratings of between 50 and 200ISO. Higher-end consumer and professional camerashave adjustable ISO settings, allowing photography inlower-light conditions. This adjustment increases the sen-sitivity of the CCD to light. Although this feature canovercome some lower-light situations, it can also intro-duce noise (arbitrary flecks of color and distortion) into
10 A E S T H E T I C S U R G E R Y J O U R N A L ~ N O V E M B E R / D E C E M B E R 2 0 0 0 Volume 20, Number 6
S c i e n t i f i c F o r u m
Figure 8. Add-on devices for digital cameras are available to assist withmacro photography. A, Devices for the Sony DSC-D700. B, Devices forthe Olympus 600-L. These devices attach at the tripod mount and posi-tion the camera a set distance from the subject. The end of the deviceoften has a mounted distance guide to provide a distance standard.C, A set of close-up filters for the NikonD1 that attach to the end of thelens. These filters must match the diameter of the lens and are availablein steps of magnifications, or diopters.

the image, lowering overall image quality (Figure 13).18,20
Professional cameras exhibit less of this induction ofnoise into the image at high ISO settings and produceexcellent results in lower-light conditions. This is mostlikely an effect of the CCD and image-processing capabil-ities of these cameras. However, to produce the highest-quality images, it is advisable to shoot at the lowest ISOsetting allowable under given lighting conditions.
For timed exposures in low-light situations (below 1⁄30 s), atripod is required to prevent camera shake. In 35-mmphotography, timed exposures allow the shutter to stayopen longer, exposing the film to light for a greater lengthof time. Digital cameras control exposure electronically,which is why digital cameras often do not contain shut-ters. In low-light situations, the CCD is charged tobecome more sensitive to light; this is similar to adjusting
the ISO. The exposure time, however, can often be adjust-ed to less than 1⁄30 s, so camera shake is still a real problem.Tripods are still recommended with digital photographyin low-light conditions and when one is photographing atspeeds of less than 1⁄30 s. Long timed exposures may intro-duce some noise into the digital image and should be usedas a last resort in medical photography.
ResolutionResolution is the probably variable most frequentlyreferred to when quality in digital photography is beingdiscussed. Understanding resolution is paramount inunderstanding digital photography, scanning and workingwith digital images, and printing digital images.18,20,24
Learning what resolution is appropriate for specific pur-poses is half of the battle in learning and being comfortableworking with digital images. However, resolution does not
A E S T H E T I C S U R G E R Y J O U R N A L ~ N O V E M B E R / D E C E M B E R 2 0 0 0 11The Digital Darkroom, Part 2: Digital Photography Basics
S c i e n t i f i c F o r u m
Figure 10. These illustrations show the difference between parallax viewfinders (A) and through-the-lens (TTL) or single-lens reflex (SLR) viewfinders (B). Using a parallax viewfinder (or range-finder) can lead to parallax distortion when an image is captured; in other words, what you see isnot always what you get. This becomes evident when one is shooting close to the subject.18
Reprinted by permission from Peachpit Press, Inc.; ©1999 by Deke McClelland and Katrin Eisman.
A
B

always mean better-quality images, and the highest resolu-tion available may not be the best or most efficient one touse (Figure 14). In addition, there is often a trade-offbetween resolution and file size. The higher the resolution,the larger the file size, and this limits the number of pic-tures that can be captured on a memory card. Some newlyavailable digital cameras are able to capture more than 3.3million pixels per picture (3.3 megapixels). However, thefile size of each highest-quality, highest-resolution image isapproximately 9.5 megabytes (MB). Cameras capable ofcapturing images with file sizes this large may be more effi-cient with internal hard drives or some of the newerremovable media having more than 1 GB of storage capac-ity. Cameras with resolutions this large may also have“size” settings that allow adjustment of the resolution.
Because 35-mm film is not expressed in terms of resolu-tion, it is difficult to determine an exact equivalent num-ber of “pixels” in a 35-mm slide (which will in any casevary according to the film speed and manufacturer). It issafe to say that this number is probably between 4 and10 million pixels, and for consumer-grade 35-mm film itcan be estimated at 6 million pixels.18 Several industrialstudies that compared digital photography (professionaldigital camera backs) with 35-mm film photography withrespect to quality, color matching, and tonal range con-cluded that the digital image was cleaner, showed no evi-dence of grain, had more exact colors, and provided abetter dynamic range.26
The best way to approach resolution is to determine whatthe image will be used for. For example, when one isphotographing patients, it is rarely, if ever, necessary toenlarge the image to 8 × 10 in for printing; more often,
12 A E S T H E T I C S U R G E R Y J O U R N A L ~ N O V E M B E R / D E C E M B E R 2 0 0 0 Volume 20, Number 6
S c i e n t i f i c F o r u m
Figure 11. Macro images taken with the Nikon 950 Coolpix illustrateparallax error associated with use of the parallax viewfinder. This erroris maximized at close distances to the subject. A, View through theviewfinder. B, The resulting image. To avoid this error, the LCD displayshould be used to frame subjects at close distances when a cameraequipped with a parallax viewfinder is used.
Figure 12. The location of the diopter adjustment switch on 2 digitalcameras is identified. A, Sony DSC-D700. B, Nikon 950 Coolpix.Adjustment of the diopter helps to focus the image that the photograph-er sees but does not affect the focus of the image that is captured.

images only 5 × 7 in or smaller are all that are needed.Most cameras with total resolutions of 1.5 to 2.7 millionpixels capture sufficient resolution to print excellent 5 ×
7-in and 8 × 10-in photographic-quality prints. If theimages are going to be displayed only on a monitor, aneven lower resolution is sufficient, inasmuch as monitors
A E S T H E T I C S U R G E R Y J O U R N A L ~ N O V E M B E R / D E C E M B E R 2 0 0 0 13The Digital Darkroom, Part 2: Digital Photography Basics
S c i e n t i f i c F o r u m
Figure 13. This figure shows the effect of adjusting the ISO on image quality and image settings. As the ISOis increased (for low-light environments), the CCD is electronically charged to become more sensitive to light.The result is a grainier, noisier, poorer-quality image. The benefit is the ability to photograph in low-light situ-ations without worrying about camera shake, subject movement, or need for a tripod. (Speed: 1/110 vs 1/30).To permit capture of the best image quality, most professional lite cameras should be used at ISO 100 if possi-ble. Images were taken with the Sony DCS-D700 with softbox lighting.
Figure 14. Digital image quality is determined, in part, by resolution, as illustrated in this figure. A, An imagewith 1.4 million pixels taken with an Olympus 600. B, An image with 1.5 million pixels taken with a SonyDSC-D700. C, An image with 2.7 million pixels taken with a Nikon D1 and 60-mm lens (90-mm 35-mm equiv-alent). Note the detail in the eyebrow in the images. Resolution, however, is only part of the equation, as illus-trated by the small difference in resolution (100,000 pixels) and the large difference in image quality betweenFigure 14, A and Figure 14, B. Other factors, such as lens quality, image processing, and compression, can alsoaffect resolution significantly. All images were taken at highest JPEG setting and the lowest ISO setting and insimilar lighting conditions (Olympus 600 required on camera flash to trigger softbox flash).

display a maximum of 72 to 100 pixels per inch (PPI).20
Additional resolution is unnecessary and may contributeto wasted memory or hard disk space. A general rule ofthumb is this: Always shoot at a slightly higher resolutionthan you think you might need, on the basis of what theimage will be used for.20 This is not always the highestresolution setting on the camera or the highest resolutionavailable in the newest camera on the market.
Resolution is often described in several ways. In theexamples that follow, all of the specifications representthe same resolution:
Total resolution: eg, 1.9 million pixels (the total numberof pixels in an image)
Height versus width: eg, 1600 × 1200 pixels (1.92 mil-lion total pixels)
PPI (when the length and width are known): eg, 96 PPI(16.7 × 12 in).
When a digital camera is being used, resolution can oftenbe selected between different settings in the menu pro-gram. For example, the Nikon 990 (3.3 megapixels: 2048× 1536) allows image sizes at XGA resolution of 1024 ×768 and at standard resolution of 640 × 480; it alsoallows a change in ratio size to 3:2 (2048 × 1360). Thehighest setting is equal to the total resolution of the cam-era; the lowest setting is often 640 × 480, the standardsetting on most monitors. There may or may not be set-tings in between. However, if the setting of 1600 × 1200is used to capture an image, it will often be imported intothe computer and displayed as 72 PPI with dimensions of18.67 × 14.22 in. All of these values represent the sameresolution. If this image is resized (through use of image-editing software) to roughly 8 × 10 in, the resolutionwould have to be 155 PPI in order for all of the originaldata to be preserved. If the dimensions are reduced butthe resolution stays the same (72 PPI), the total numberof pixels would decrease (any unused information wouldbe discarded) and the file size would be reduced. Thisaction, termed downsampling, does not affect the imagequality at this smaller dimensional size (eg, changing an 8× 10-in image to a 5 × 7-in image).18 However, increasingthe dimensional size while keeping resolution constanthas an adverse effect on picture quality. Imagine pixels asparticles of a gas; as the volume is increased, the particlesspread out and the density of the gas decreases. Here, thedensity of the image decreases and the same pixels areused to display a larger image.18 This may result in pix-elization of the image.
When images are viewed on a monitor, they may be viewedat different pixel ratios. For example, if each pixel in theimage is viewed on the screen, the ratio is 1:1, or 100%.Some image editing software, such as Adobe PhotoShop,allows viewing at higher ratios (eg, 1:2 or 1:4) or lower per-centages (eg, 50% or 25% [equivalent to 1:2 and 1:4,respectively]).20 At ratios lower than 1:1, some pixels arenot displayed.20 For optimum evaluation of digital images,they should be viewed at 1:1 (100%). This might not bepossible if the resolution of the monitor (dependent on thevideo graphics card and monitor) is lower than the resolu-tion of the image. Larger monitors (≥19 in) can often dis-play a resolution of 1600 × 1200 at 96 PPI. Otherwise, thefull resolution of the image will not be displayed. This isanother reason that the highest resolution is not always thebest for a particular use—especially inasmuch as the resultsmight not even be displayed when the image is viewed!
Monitor resolution is often described as VGA (640 ×480), SVGA (800 × 600), XGA (1024 × 768), SXGA(1280 × 1024), or UXGA (1600 × 1200). Some digitalcameras, such as the Nikon 950 and 990, allow changingthe resolution setting to match these standard resolutions.In addition, all current LCD projectors display one ofthese standard resolutions, and this may be the limitingfactor in the total resolution that can be displayed.
High-quality CCDs are able to capture 1 pixel for eachpixel displayed.20 However, some manufacturers state acamera resolution that is actually higher than the CCD isable to capture. (There may be some trimming of pixelsat the edge of the image, which may reduce the total reso-lution that the CCD is able to capture. For example, theNikon 950 2.1 Megapixel camera captures an image thatis 1.92 million pixels; whereas the camera’s total resolu-tion is 2.1 million pixels, the effective resolution is 1.92million pixels.)
If an image is interpolated to a higher resolution, this canhave an adverse effect on image quality; in fact, digitalcameras with lower actual resolution often produce bet-ter images than cameras with higher interpolated images.Actual resolution, not interpolated resolution, should beconsidered when one is evaluating digital cameras. Thisphilosophy is being challenged by Fuji, which is market-ing its new Super CCD, composed of octagonally shaped,light-sensitive sensors (pixels), which captures 3.4 millionpixels but can output the image at an “effective resolu-tion” of 6.1 million pixels through interpolation. Othermanufacturers are also using interpolation to increasetheir effective resolution of the CCD.
14 A E S T H E T I C S U R G E R Y J O U R N A L ~ N O V E M B E R / D E C E M B E R 2 0 0 0 Volume 20, Number 6
S c i e n t i f i c F o r u m

Printing resolution (expressed in dots per inch [DPI]) is
different from screen resolution (expressed in PPI). A
thorough discussion of printer resolution is beyond the
scope of this text, but other resources are available to
help distinguish between the two.18,20,24 It should be
noted, however, that a printer dot does not equal a pixel.
Compression
Resolution and compression are often confused in discus-
sions of digital photography, because both contribute to
image quality. Perhaps one of the confusing issues is that
the quality setting on the digital camera often adjusts the
compression, whereas the size setting usually adjusts res-
A E S T H E T I C S U R G E R Y J O U R N A L ~ N O V E M B E R / D E C E M B E R 2 0 0 0 15The Digital Darkroom, Part 2: Digital Photography Basics
S c i e n t i f i c F o r u m
Figure 15. This figure illustrates the difference in image quality when the file format used is the only variable.It also illustrates the reduction in file size with increasing compression. A, TIFF, 4 MB. B, JPEG high setting,926 KB. C, JPEG medium setting, 839 KB. D, JPEG setting, 638 KB. There is only minimal reduction inimage quality noticeable at the maximum compression. Images were taken with a Sony DCS-D700 with anexternal flash system. We photograph patients routinely using the medium setting to maximize file size reduc-tion without compromising image quality.
olution. Some cameras, such as the Olympus 2500, offercompression but do not allow different degrees of com-pression. This tends to further complicate the issue of res-olution and compression.
Information from digital images is saved in file formats.There are more than 100 image file formats, many withtheir own unique properties. However, only 2 of theseformats are currently used frequently by digital cameras:TIFF and JPEG (older cameras may use only JPEG).Images can be saved in many formats with the aid ofimage-editing software, such as Adobe PhotoShop. Thefollowing discussion will concentrate on TIFF and JPEGformats.
TIFF (tagged image file format) is a file format in whichinformation for every pixel in the original image is con-tained in the image file. It is usually represented by the“super high” or highest-quality setting on the digitalcamera (if the camera supports the TIFF format). Becauseeach pixel is recorded in the data, the file size is thelargest of all the quality settings, often approaching 9.5MB for a 3.3-megapixel camera at the highest resolutionsetting. Therefore, unless the memory card is unusuallylarge, it is not efficient to save routine photographicimages in the TIFF format unless the images are down-loaded to the hard disk frequently. Even then, hard diskspace is rapidly consumed. Special photographs forwhich enlargement is desired or which are destined foradvertising or publication use should be saved in this for-mat, because it retains all of the original information.The other file format, JPEG, is much easier to use,because the file size is significantly lower. Working copiesof the original image may be made through use of image-
editing software and saved in JPEG format for editing orpresentations. The original image is retained for furtheruse in its original TIFF format.
Compression is a technique for reducing the file size of animage by means of an algorithm. Some image editingsoftware has a form of compression built into the TIFFformat.18,20 Although this may seem to contradict theinformation presented above, the compression is accom-plished without the loss of any pixel information; it ismerely recorded in a more efficient way. It is thus knownas “lossless” compression.18,20 For example, if a solid-color white backdrop is used while patients are beingphotographed, most of the pixels in the image contain thesame color information and differ only by position in theimage. Because color information takes up the greatestamount of data (3 bytes per pixel for 24-bit color; see thesection on bit depth below), 5% to 50% of the file sizecan be reduced by grouping all of the white backdroppixels in the image together and assigning them the samecolor (white) instead of having repeated assignments ofthe color (repeated data and thus increased file size) foreach pixel. This compression (known as LZW) is not per-formed in the camera.
In contrast to the TIFF format, JPEG (Joint PhotographicExpert Group) involves “lossy” compression.18,20 Pixeldata from the original image are removed in the finalimage, which markedly reduces the file size; this is usuallyindicated in terms of a ratio comparing the image size tothe original size—eg, 10:1. JPEG supports 100 degrees ofquality compression.18,20 The most commonly used com-pression ratios produce too little image quality loss to bedetected by the human eye (Figure 15).20 Degradation in
16 A E S T H E T I C S U R G E R Y J O U R N A L ~ N O V E M B E R / D E C E M B E R 2 0 0 0 Volume 20, Number 6
S c i e n t i f i c F o r u m
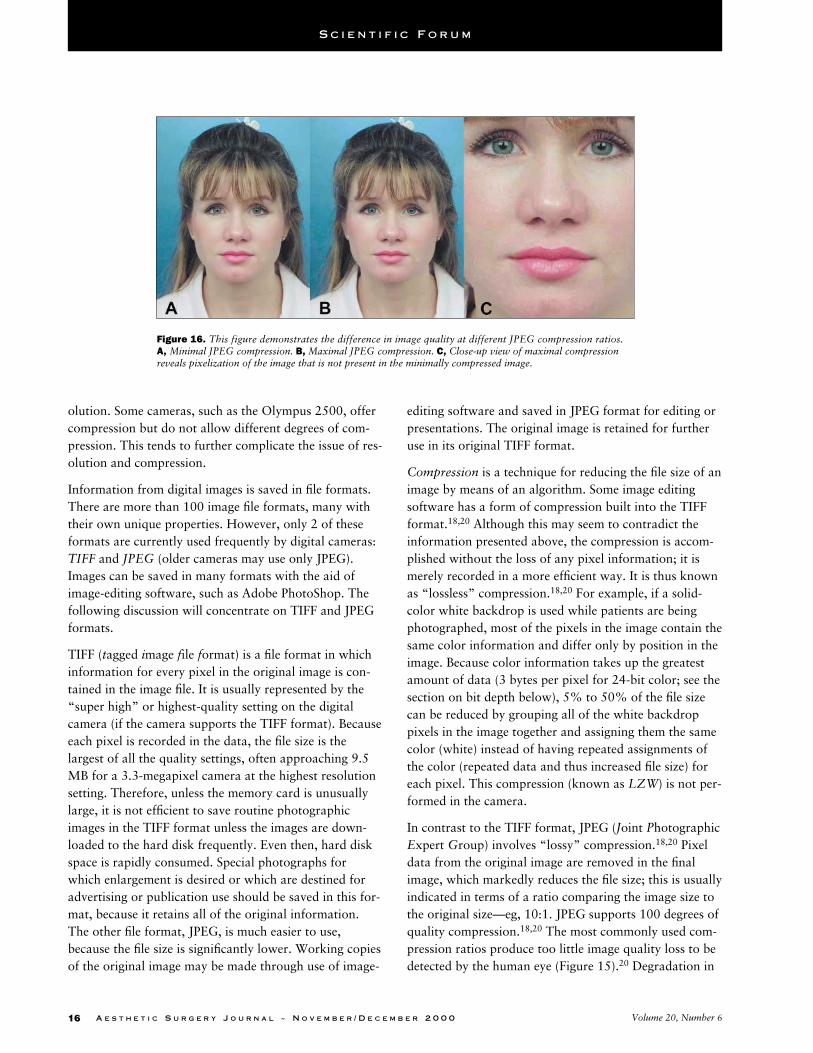
Figure 16. This figure demonstrates the difference in image quality at different JPEG compression ratios.A, Minimal JPEG compression. B, Maximal JPEG compression. C, Close-up view of maximal compressionreveals pixelization of the image that is not present in the minimally compressed image.

image quality is noticeable with large compression ratiosand repeated compression of the image (repeatedly re-saving the image as JPEG in image-editing software).20
This may produce artifacts on the image (Figure 16).
JPEG compression is achieved mathematically by averag-ing the data and reorganizing the pixels so that they canbe expressed through use of fewer data.18 (For example,in the Sony DSC-D700, a low-quality image is 180 kilo-bytes [KB], a medium-quality image is 370 KB, a high-quality image is 666 KB, and a super high–quality [TIFF]image is 4.07 MB.) The JPEG algorithm examines 8 × 8pixel blocks (64 in all) and averages the color in theblocks, placing this color value (the full 3 bytes of data)in the top right pixel.18 It then reassigns the other 63 pix-els in the block truncated values on the basis of howclosely they resemble the average.18 In addition, it assignsthose pixels that are very “close” to the average color thevalue of the average color, making the block morehomogenous.18 By assigning multiple pixels the samevalue, file size is dramatically reduced, as illustratedabove in the example of file size.
JPEG2000, a format to be released in 2001, uses a newcompression algorithm that compresses an image up to200 times with no appreciable degradation in image qual-ity.26 This means that a 3-MB image can be compressedto 19 KB without noticeable quality loss. Such compres-sion, which reduces file size without compromising quali-ty, will surely have an impact on digital photography inupcoming years. In addition, a technique that changes theimage from a raster-based graphic to a vector-basedgraphic can enlarge the image to any print size without areduction in quality. Once it is perfected, this technology,which is based on fractals, will eliminate the need to savefiles at the highest resolution for printed enlargements.
Image Processing
Once the image is focused onto the sensor, a new set ofvariables comes into play to determine how the image iscaptured and processed. These variables can affect thefinal quality of the image.18,21 The image must be con-verted from an analog signal into a digital signal bymeans of a converter (A/D converter). The processor thenprocesses the image. Although it is difficult to determine
A E S T H E T I C S U R G E R Y J O U R N A L ~ N O V E M B E R / D E C E M B E R 2 0 0 0 17The Digital Darkroom, Part 2: Digital Photography Basics
S c i e n t i f i c F o r u m
Figure 17. A, An image captured with the Sony DSC-D700. B, The same image as captured with the Olympus600-L. The two photographs were taken under identical lighting conditions and color balanced with an 18%gray card (eliminating color shift). Note the differing contrast; this example shows how digital image capturediffers from one manufacturer to the next on the basis of the image processing performed in the camera.

the exact nature of the internal components of a digitalcamera, analyzing representative pictures, especiallythose with high subject contrast, can be helpful when oneis trying to select the best camera.
Photographic recording on 35-mm film is instantaneous;in contrast, in the digital camera, the steps required toelectronically capture, process, and store the digitalimage often result in a slight delay (approximately 1 s)between the time of capture and the time before the nextimage can be captured.18 Some of the newer SLR andprofessional digital cameras offer multiple (continuousmode or burst mode) picture-taking ability, which cap-tures the images without noticeable delay. Some of thesecameras sacrifice data for speed; however, some are ableto allocate extra memory to temporarily store theseimages while they are being captured.
Dynamic range (tonal range)The term dynamic range refers to a camera’s ability tocapture detail in the lightest and darkest portions of aphotograph. All digital cameras are not created equal.Different cameras capture the same photograph different-ly because of differences in their sensors and processors(Figure 17).18
Switching digital cameras is akin to switching film types,which differ in their ability to display contrast, color, andimage detail (graininess of the film). To maintain consis-tency in preoperative and postoperative photographs, thesame digital camera should be used for both. The NikonD1, like some other professional cameras, allows imagecapture in raw format without any onboard image pro-cessing in the camera. To view the image, however, spe-cific software from Nikon must be used. This camera alsoallows the image to be captured in another color mode(YbCbCr-TIFF), which records the color information in 2color axes (instead of 3, as in RGB mode), and intro-duces another variable, luminosity (or brightness). Thisfeature allows more consistency when one is viewing andprinting on several different computers.
Bit depthThe term bit depth refers to the amount of color informa-tion per pixel that the camera is able to capture. Mostdigital cameras capture 24-bit color (3 channels [RGB] of8-bit color). In other words, each pixel can have a redvalue, a green value, and a blue value between 0 (black)and 255 (white)—ie, it can yield any one of 256 shadesof each of the 3 colors. This represents 16.7 million (256× 256 × 256) possible colors. Because 8 bits equal 1 byte,
each pixel in a 24-bit image is 3 bytes. Megapixel cam-eras now exceed 3 million pixels, and this amounts to alarge quantity of information and large files that require agreat deal of storage. For example, a 24-bit, 1600 × 1200resolution image takes up 5.5 MB (1600 × 1200 × 3 [1KB = 1024 bytes; 1 MB = 1024 KB]) without compres-sion. Higher-end professional cameras are able to capture10- to 16-bit color per channel (30- to 48-bit color, orbillions of colors).18 Depending on the resolution, thesecan be huge files. The processor interpolates the higherbit color to 24-bit color for output to a printer or to amonitor for display. This process simply results in a morerealistic final image, but it requires significant on-camerastorage. This begs the question, “What is the use of thephotograph?” For medical documentation and patientphotography, the highest resolution and color bit depthmight not be the most practical and/or the most efficient.
Variables Indirectly Affecting Image Quality
Lighting Most of the principles of conventional photography thatpertain to lighting setups also apply to digital photogra-phy. There are several publications illustrating propersetup.1,3-6,9,10 Digital photography differs somewhat fromconventional photography in the following respects:
• External flash attachment (hot shoe). Some cameras doallow hot shoe attachments to external flash or studioflash systems, such as White Lightning. However, mostdo not support TTL metering with the use of theseflashes, unless it is explicitly stated by the company(such as Nikon in the case of its SpeedLight) that theydo. This means that the picture will likely be overex-posed. The advantage of digital photography is that itallows immediate viewing of the image, so that the set-tings, including exposure compensation (see below),flash power adjustment, overriding of light meter set-tings in manual mode, and repositioning/bouncing ofthe flash, can be corrected. Most cameras have a flashsetting on the menu; it generally lists auto (ie, automat-ic; the camera determines whether it needs a flash),always on, always off, and external. The external set-ting needs to be selected when the hot shoe is beingused. If the camera does not have a hot shoe and theflash system slaves to flash, the on-camera flash cantrigger the external flashes. The settings again have tobe adjusted for the proper exposure. It may be neces-sary to experiment with different settings in a constantlighting condition to find the setting that gives the bestexposure (the trial-and-error approach).
18 A E S T H E T I C S U R G E R Y J O U R N A L ~ N O V E M B E R / D E C E M B E R 2 0 0 0 Volume 20, Number 6
S c i e n t i f i c F o r u m

• On-camera flash. Most digital cameras have on-cameraflashes; however, the position of the flash on the bodyof the camera differs. If the flash is located on the topof the camera, as is usually the case, it will create a sideshadow when the camera is turned vertically (portraitposition). Other cameras have the flash side-mounted,and this may cast a slight side shadow when the cam-era is held horizontally (landscape position). Mostflashes perform well when the macro mode is beingused, taking the place of a ring flash. However, if theon-camera flash is located on top of the camera, it cancast a shadow at close range.
• Direct lighting. This can be achieved by means of anyone of several different sources, such as OR lights, softbox lights, and photofloods. Because digital cameraperformance usually decreases as the amount of lightdecreases, adequate lighting is important for good-quality photographs (Figure 18).18,20 With adequatelighting, the flash is usually unnecessary; this reducesthe chance of shadows. Some lighting systems, such asCool Lights (photofloods designed to run at coolertemperatures) are very useful in digital photographyand may be substituted for flash systems. They provideconstant light, so that images are usually what-you-see-is-what-you-get.
• In lower-light situations, the ISO of the digital cameracan be adjusted (if this is permitted) to make the CCDmore sensitive to light. As noted above, most digitalcameras are programmed from ISO 50 to ISO 100(bright lighting conditions) and work best at this set-ting. Some cameras allow the ISO to be adjusted sothat they can perform better in lower-light conditions;however, this may reduce image quality (Figure 15).
MeteringMany prosumer cameras offer different metering modesto assist the user with proper exposure. All light meters(35-mm, digital, and hand-held) are programmed toexpose the photograph for 18% gray (reflecting 18% ofthe light hitting it).18 In other words, they assume thatthe entire world is a gray card (18% gray).18 This stan-dard results from the observation that 18% gray isroughly the average value in an average photograph.18
Changing the metering mode may change what the lightmeter determines to be 18% gray. The 3 most commonmetering modes are center-weighted metering, spotmetering, and matrix (multisegment) metering. Center-weighted metering is least useful and least accommodat-ing. It assumes that the subject is located in the center ofthe picture, and it gives greater weight to that part of thephotograph when exposing the image.
A E S T H E T I C S U R G E R Y J O U R N A L ~ N O V E M B E R / D E C E M B E R 2 0 0 0 19The Digital Darkroom, Part 2: Digital Photography Basics
S c i e n t i f i c F o r u m
Figure 18. A, This photograph was taken under low-light conditions. B, The same subject as photographedunder adequate light. Most professional lite digital cameras perform best in high-light (low ISO) situations.This example illustrates the point by revealing a loss of image detail in low-light conditions as compared withadequate light conditions. Both images were taken with the Olympus 600-L through use of softbox only(Figure 18, A) and softbox with additional photoflood lighting only (no flash; Figure 18, B).
Spot metering uses a small circle in the center of theframe (3-10 degrees) to measure a specific area of thephotograph.18 For example, in the OR, spot meteringmay be used to meter from a more neutral area of thesubject between the focused beam of light, which is thebrightest part of the image, and the darkest part of theimage, which is generally off the table. The setting can be“locked” either by means of the exposure lock button(often located near the shutter release) or by pressing theshutter down halfway (focus lock). The subject can thenbe repositioned in the frame and the picture taken. Caremust be taken to avoid wrongly exposing the picture inthis mode. This may occur when one is focusing on anobject that differs in color and contrast from the subject(which may lock the meter reading to expose for theobject) and then repositioning the frame to the subject.
Matrix metering is generally the most versatile setting inmost situations. It typically breaks the frame into smallersegments and measures those areas, taking into accountthe lightest and darkest areas of the photograph, and itthen adjusts the exposure accordingly. Some cameras areable to measure more than 256 areas.18 This meteringmode may have some difficulties with very light or verydark backgrounds, because the light reflected off the back-ground is considered in the exposure. For these instances,spot metering (off the patient) may be preferable.
Exposure compensation allows the photographer to over-ride the light meter. Typically represented by a ± sign onthe digital camera menu or button setting, this featureallows the exposure to be adjusted by a partial f-stop(determined by the manufacturer; often one third to onehalf of a stop). It can be used to correct for overexposure(use of external flashes) and underexposure (from back-lighting). Effects of the adjustment can be viewed imme-diately on the LCD screen. Exposure can also be adjustedmanually through use of the manual settings mode,which allows the speed and aperture to be set manually.This may be necessary when a large amount of compen-sation is required.
Many digital cameras also allow saving of the camera set-tings, such as aperture, speed, exposure compensation,resolution, quality, and flash settings (often as user 1,user 2, or user 3), so that for particular lighting condi-tions, such as a photoroom or OR in which the lightsremain the same each time, the settings can be recalledwith the push of a button.
Depth of Field
The degree to which the subject and the background arein focus is known as depth of field. The aperture of thecamera, represented by the f-stop, opens and closes the“shutter,” controlling the amount of light that enters thecamera and strikes the sensor. The smallest f-stops (eg,f2.0) are the most sought-after, because they allow pho-tographing in low-light conditions by permitting morelight to enter the camera. However, they have a very shal-low depth of field and often throw the background out offocus.18 Higher f-stops (eg, f32) have a very deep depthof field and often have the entire frame in sharp focus,but they require longer exposure times and brighter light.
In digital photography, depth of field is also dependenton the focal length of the lens and the size of the CCD.18
The wider the lens and the smaller the sensor, the greater
20 A E S T H E T I C S U R G E R Y J O U R N A L ~ N O V E M B E R / D E C E M B E R 2 0 0 0 Volume 20, Number 6
S c i e n t i f i c F o r u m
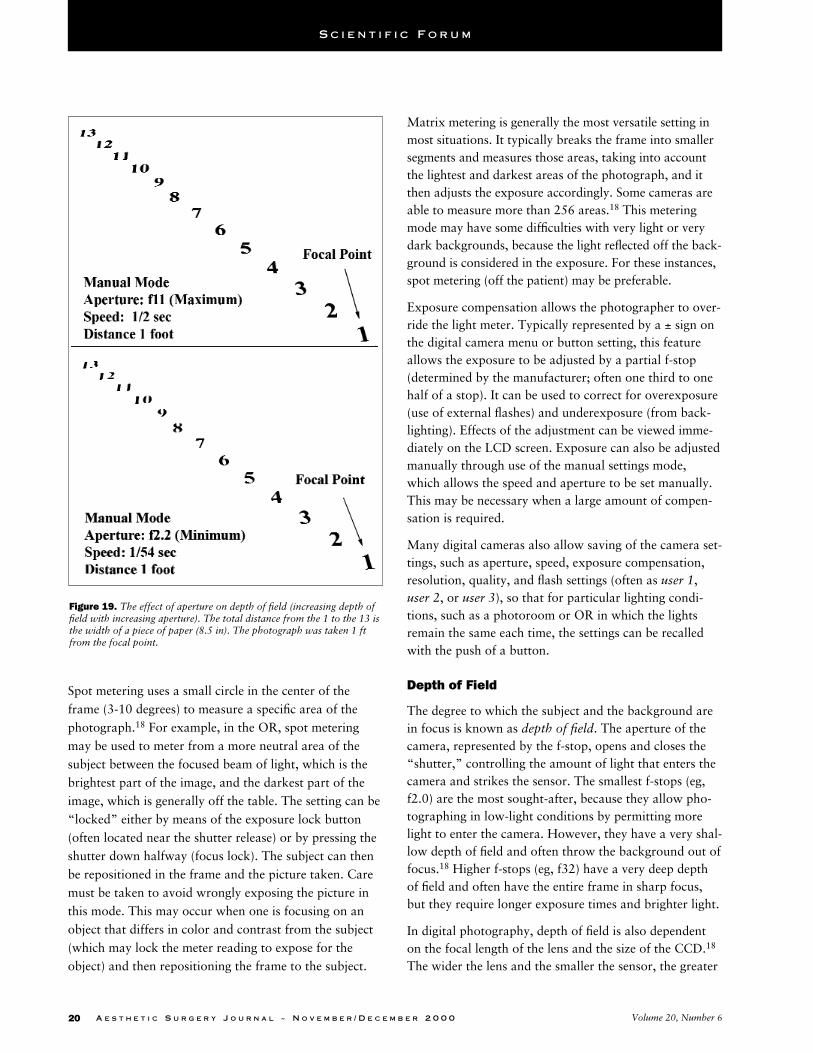
Figure 19. The effect of aperture on depth of field (increasing depth offield with increasing aperture). The total distance from the 1 to the 13 isthe width of a piece of paper (8.5 in). The photograph was taken 1 ftfrom the focal point.
the inherent depth of field (the range of distance in whichobjects will be in focus) the camera will produce.18 Thishas an impact on digital photography, because most pro-sumer cameras have lenses permitting wide-angle shoot-ing and CCDs much smaller than those associated with35-mm photography. In addition, many digital camerashave f-stops only in the range of f2.2 to f11. Thus, depthof field is not as adjustable as it is in 35-mm photogra-phy. This means that most digital images may have onlyminimal blurring of the background (Figure 19). Thenewer SLR cameras, such as the Nikon D1, have a widerange of f-stops (from f2.8 to f32). However, because theexposure is controlled electronically, the f-stop setting onthe lens has to be set to maximum. These cameras have amore noticeable depth-of-field effect with blurring of thebackground.
Most prosumer cameras have adjustable shooting modes,including program, aperture priority, shutter priority,and manual modes. Program mode, the default setting,lets the camera determine the f-stop and shutter speedthat are appropriate for adequate exposure on the basisof the meter reading. Aperture priority mode allows theaperture to be adjusted manually while the camera deter-mines the correct speed for proper exposure; this modeallows immediate control over depth of field and is themode recommended most often for use by experiencedphotographers. Shutter priority mode allows the speed tobe adjusted manually while the camera determines thecorrect aperture for proper exposure; this mode allowshigher shutter speeds for freezing action (such as themotion of helicopter blades) in the photograph. Manualmode gives full control over the exposure and is anotherway to override the light meter.
Color Temperature
Color temperature refers to the inherent color of light,reported in degrees Kelvin. The lower the temperature,the warmer (slightly reddish), the light; the higher thetemperature, the colder (slightly bluish) the light.20
Tungsten light (incandescent) has a temperature of3,200°K; daylight is 55,000°K; blue sky is 10,000°K.20
Film is balanced for certain color temperatures, such asdaylight and tungsten light (incandescent). The colorcompensation takes place in the film. Because tungstenlight is generally more orange-yellow, the film has a bluecast to compensate for this and produce pictures withouta color cast. This is evident when daylight film, contain-ing an orange cast to compensate for the bluish color of
daylight, is exposed indoors; an orange cast is created.The best lighting is one from a pure source, such as all-incandescent or all-flash (daylight). However, many con-ditions in medical photography have mixed lighting. Forexample, fluorescent lighting is present in many ORs andphysician offices. This lighting tends to produce a green-ish cast. Some photographic setups require the use ofmore than one source (such as overhead lights and day-light from a window) to allow photographing above 1⁄30 s(at which setting camera shake can occur). Use of whitebalancing (described below) can help with color castsfrom different light sources. Filters are also available forchanging the color of the light entering the camera to cor-rectly expose the film for the incorrect light; for instance,a blue filter can be used with daylight film indoors to off-set the orange cast.
Because digital cameras do not use film, the sensor recordscolor casts in the image. Thus, the color cast can be com-pensated for by using the white balance control, which isa common feature on most professional and prosumercameras. This feature is identical to the white balance onlaparoscopic and endoscopic equipment. Adjusting thewhite balance lets the camera processor know how thecolor “white” appears in certain lighting conditions. Mostprofessional and prosumer cameras have different whitebalance settings for different conditions, which includeauto white balance, incandescent, daylight, flash, and holdbalance (to define “white” in particular lighting condi-tions, the sensor is pointed at a white color while the but-ton is held down). Unless the light source is solitary (ie,only incandescent light, in which case the white balanceshould be set to incandescent [indoor], or only flash light,in which case the white balance should be set to flash), thewhite balance should be set to auto. This generally pro-duces excellent results. In addition, using an 18% graycard or sticker allows software correction of any colorcasts that might be present. For example, some softwareprograms, such as Mirror, have a tool that allows a clickon an area of the photograph that is 18% gray (such as an18% gray card) to remove any color casts present fromthe entire photograph.
Output
The method of output can affect the appearance of thedigital picture. Digital cameras have several means ofoutputting their data. Some means of output, such asmonitors, LCD displays, and LCD projectors, have limit-ed resolution (maximum, 72-100 PPI) and may not be
A E S T H E T I C S U R G E R Y J O U R N A L ~ N O V E M B E R / D E C E M B E R 2 0 0 0 21The Digital Darkroom, Part 2: Digital Photography Basics
S c i e n t i f i c F o r u m

able to display all of the pixel information and/or colorinformation contained in the image.
The LCD display on the camera shows a limited numberof the pixels that will be contained in the final image. Forexample, the Sony DSC-D700 LCD displays 180,000 ofthe 1.5 million total pixels captured in each image,whereas the Nikon D1 displays only 120,000 of 2.74million pixels. Depending on the quality of the LCD dis-play, certain characteristics of the image, such as focusand composition, can be ascertained from this display.However, the LCD display may be slightly misleading,especially with respect to brightness and color saturation.Certain display characteristics of the LCD display, suchas brightness and contrast, can be adjusted. This is espe-cially important when the display is being viewed inbright light. Experimentation with these settings may benecessary to ensure that what is seen on the LCD displayis what will be shown on the monitor when the image isimported into the computer.
Many prosumer cameras have a video output connection,allowing direct viewing of images on a television set. Thevideo-out connector is connected to the video input (ifthere is one) on the television set. Full-screen resolutionof video on television sets is limited to 640 × 480.
An LCD projector has more in common with a computermonitor than with an actual slide projector. The twomost important variables affecting the quality of the dis-play are light intensity (measured in ANSI lumens) andresolution. Most higher-quality projectors availabletoday offer XGA (1024 × 768) and higher resolution andhave intensities greater than 800 to 2700 ANSI lumens. Ifthe LCD resolution is less than the resolution of the digi-tal camera, then this limits the full resolution of the digi-tal picture. (Information from the image is being hiddenwhen it is projected [downsampled] and cannot bedetected by the human eye.)
Once images are input into the computer, the monitordisplay affects the appearance of the image. Most moni-tors have specific color profiles; there is software avail-able to help calibrate the monitor display to what isprinted or to standardize display between computers. Afull discussion of color profiles, monitor-to-printer cali-bration, and specifics of printing are beyond the scope ofthis text; however, there are references available thatcover these topics.18,20,24
Factors to consider when digital pictures are being print-ed include the type of printer, the printing resolution
(which is different from screen resolution), the type ofpaper, and the color-matching software used. Printing ofvery high quality can be achieved with high-quality, low-cost ink jet printers and the appropriate paper. An expla-nation of the details involved in achieving qualityidentical to that of custom-printed material is beyond thescope of this text; however, some references offer in-depth discussions.18,20
Factors Affecting Camera Performance
Factors that can improve the performance, enhance theefficiency, and maximize use of the digital camera includethe power source, storage capacity, and image transfermode.
PowerThe source of power for the camera has a profoundimpact on the length of time that the camera can be used,the maximum number of pictures that can be taken con-tinuously, and the use of the flash. Digital cameras aregenerally powered by one of the following: standardalkaline batteries (usually AA), nickel cadmium (NiCd orNicad) batteries, nickel metal hydride (NiMH) batteries,and lithium ion batteries. The latter 3 types are recharge-able; they lose their charge faster than disposables, butthey can frequently be reused more than 100 times.18
Digital cameras consume much more battery power thanstandard 35-mm SLR cameras, mainly because of powerexpenditure related to use of the LCD viewer/screen, theflash, storage to memory, and initialization of the memo-ry.18,20 Therefore, it is most economical to power thecamera with rechargeable batteries to avoid frequent bat-tery replacement or limited use of LCD, flash, and power-intensive commands, such as initialization of removablememory. NiCd batteries have the unfortunate character-istic of developing memory if they are charged beforebeing completely drained, and they may not again retaina full charge. Lithium ion batteries and NiHM batteries,which last roughly twice as long as NiCd batteries, donot have memory. Both NiCd and NiMH batteries comein AA form, so these can be replaced if necessary withdisposable alkaline AA batteries. A lithium ion batteryhas no replacement other than a second battery; it is wellworth the additional cost (approximately $50) to keep afully-charged battery on hand. In most professional andprosumer cameras, pictures are not lost from the storagecard if the battery power is drained, and the date (pow-ered by a small lithium ion watch battery with a 5-yearlife span) remains intact. An AC (alternating current)
22 A E S T H E T I C S U R G E R Y J O U R N A L ~ N O V E M B E R / D E C E M B E R 2 0 0 0 Volume 20, Number 6
S c i e n t i f i c F o r u m

adapter is also useful at certain times, especially when anoutlet is available in an area or areas where the camera isused repeatedly.
Storage
Although digital cameras are “filmless,” they do use atype of “film” known as a memory card. Removablememory (also known as flash RAM) for digital camerasgenerally costs from $1 to $5 per MB and comes in 3standard formats: Smart Media, Compact Flash, andMemory Stick (Figure 20).18 PC Cards (which fit in stan-dardized PCMCIA slots in portable computers) are
another type of removable media and have reached 1 GB
in total capacity. Some cameras use removable floppy
disks for storage, such as the newly-released Iomega Clik
Disk, which is capable of holding 40 MB of data, and the
standard 1.44 -MB floppy disk, used almost exclusively
in the Sony Mavica series, which has a markedly reduced
capacity for digital pictures. The manufacturer largely
dictates the storage media available for specific cameras.
Many high-end professional cameras have internal or
portable hard disks (about the size of a quarter) or inter-
nal memory or require direct connection to a computer.
A E S T H E T I C S U R G E R Y J O U R N A L ~ N O V E M B E R / D E C E M B E R 2 0 0 0 23The Digital Darkroom, Part 2: Digital Photography Basics
S c i e n t i f i c F o r u m
Figure 20. The most common storage media available for digital cameras: Smart Media (left), Memory Stickby Sony (center), and Compact Flash (right).
Figure 21. The adapters required to use the digital flash media in a standard PCMCIA slot (available on mostlaptops and card readers). Some card readers accommodate both Compact Flash media (without adapter) andPCMCIA cards. Some Sony laptops have a slot dedicated to the Memory Stick.

The most versatile cameras can accommodate more thanone form of removable memory; these cameras oftenrequire an adapter (such as a PCMCIA adapter) designedspecifically for one of the different memory cards (Figure21). Currently, compact flash memory cards exceeding224 MB are available. Smart Media and Memory Stickhave not yet reached this capacity; they do not exceed 64MB. A good rule of thumb is to have an average-to-largememory card (32-48 MB) so that picture-taking is notlimited by frequent downloads. However, good habits,such as regularly downloading images into a database,can help you to free up memory and keep track of patientrecords and information in an efficient manner. Manynewer professional cameras (eg, the Olympus 2500 andFuji FinePix S1 Pro) accommodate both Smart Mediaand Compact Flash, adding to their versatility.
Image transferImage transfer can affect digital camera performance andefficiency. Until recently, the standard connection withthe computer has been the serial port. This port, accom-modating transfer rates of 40 to 60 KB/s,18,20 is a slowand cumbersome means by which to transfer large num-bers of pictures. In addition, the computer needs to berebooted each time the serial port is attached. A fasterand more efficient method is use of the Universal SerialBus (USB) port, which supports transfer rates in excess of1 MB/s (more than 100 times faster than serial porttransfer) and which supports true plug-and-play configu-ration (this is also known as being hot swappable), thusavoiding the task of rebooting the computer each time itis connected.18
Removable memory generally requires an adapter toinput the images directly into the computer or into a cardreader. These adapters, frequently referred to as PC cardadapters or PCMCIA card adapters, are standard inputdevices for laptop computers (Figure 23). They cost from$10 to $50. The removable memory slides into anadapter that is specific for the each type; the adapter thenfits into the slot of the laptop computer. In this way, theremovable memory acts like a removable drive, similar toa Zip disk or floppy disk drive. Images can be either (1)directly transferred from removable memory to the harddisk with the help of Windows Explorer or some otherfile management software or (2) imported into databasesoftware, such as Mirror software. Advantages of PCM-CIA adapters are speed, low cost, and compatibility withall laptops and most card readers.
Another common mode of transfer is the card reader;
removable memory fits into the card reader, which is con-nected to the computer via a parallel port (printer port)or USB connection. If the connection is via a parallelport, the card reader usually offers an additionalthrough-attachment for the printer connection. Somecard readers can accommodate more than one type ofremovable media, making them ideal for managing inputfrom different types of cameras. Parallel port connectionshave a slower transfer rate than USB connections but arestill substantially faster than either serial port or floppydisk adapters.
Less common methods for transferring images are theClik drive and the Flash Path adapter. The latter supportsSmart Media flash memory and is inserted into the 1.44-MB floppy drive. Although it is faster than serial porttransfer, transfer with the Flash Path adapter cannotmatch parallel or USB methods of transfer.
Professional digital cameras generally also have SCSI andIEEE-1394 (Firewire, iLink) connections into the comput-er. These methods offer transfer rates from 5 to 50 MB/s.Many video camcorders available today use IEEE-1394to download video. Look for IEEE-1394 to become avail-able on a much broader scale (eventually replacing SCSI)in the near future. (Some manufacturers are incorporat-ing IEEE-1394 into their desktops and laptops as stan-dard connections. Sony incorporates both USB andIEEE-1394 as well as a slot for the Memory Stick in itsline of laptop computers, the Vaio.)
Finally, some professional cameras (eg, the Nikon D1and Sony DKC-FP3) that incorporate IEEE-1394 as atransfer connection allow immediate display and impor-tation of the images into archiving software. This elimi-nates the need to remove the film card and input imagesvia card reader or PCMCIA, but it limits the mobility ofthe camera, which must be physically connected to thecomputer via an IEEE-1394 cable to allow this function.
Optional featuresEach manufacturer may incorporate different optionsinto its cameras. For example, some cameras allow cap-ture of pictures in black and white (a color image can beconverted to black and white [grayscale] in an image-editing program such as Adobe PhotoShop, usually withthe click of a button). Other extras include operation byremote control (via infrared communication), labeling ofimages in the camera, attachment of sound files to theimage (if the camera has a recording mode), capture ofshort video segment (usually 1 minute of video), database
24 A E S T H E T I C S U R G E R Y J O U R N A L ~ N O V E M B E R / D E C E M B E R 2 0 0 0 Volume 20, Number 6
S c i e n t i f i c F o r u m

management software, and differing methods of imagetransfer. Some cameras are packaged with a card reader,battery, memory, and software; others require these itemsto be purchased separately.
The software integrated into the digital camera (usuallyreferred to as firmware) controls many of the operationsof the camera. The firmware for some digital cameras canbe upgraded by downloading software from the Internetor received directly from the manufacturer. This firmwaremay improve functions such as speed and quality offocus, metering operation (including improving operationin lower light), LCD brightness, and fixes to previous ver-sions of the firmware. Camera owners should check themanufacturer’s Web site for information regardingfirmware updates.
A Word about Ethics
One of the criticisms leveled at digital photography per-tains to the ease with which images can be manipulatedand altered. This criticism has little merit, inasmuch as35-mm slides and negatives can also be easily convertedto very high-resolution digital images (by means of ascanner), altered, and then printed back onto 35-mmslides or negatives (by means of a film recorder).Therefore, computer alteration of images for purposesother than improving image quality is entirely a matter ofthe ethics of the surgeon, not the mode of photography.
The American Board of Plastic Surgery has recently(September 1999) accepted digital images for Boardcases. The candidate is required to sign a waiver indicat-ing the authenticity of each image and declaring that theimages have not been altered. In addition, images mustcurrently be submitted in a printed format for review.There will likely be a set of guidelines set forth by theBoard for submission of digital images, outlining in moredetail the requirements for the use of such images.
Choosing a Camera
Having used most of the higher-end prosumer digitalcameras available today, we suggest that the followingissues be evaluated when one is selecting a camera:
1. What is the general intended use of the camera forthe practice in question? Is most of the photographyfor clinical patients or intraoperative use (with aheavy reliance on macro photography)? Is portabilityan issue? Who is the primary user?
Our experience has been that the Nikon 950, 990, and
D1 have a macro capability that is far superior to that ofother cameras in their price range. Nikon, Olympus,Minolta, Sony, Fuji, and Canon have developed non–consumer grade cameras targeted for higher-end uses.The only reasonably priced true SLR cameras are theSony DSC-D700/770, the Olympus 2500, and the NikonD1, as well as the newly-released SLR cameras from Fuji(FinePix S1 Pro) and Canon (EOS D30). The other cam-eras use parallax viewfinders or LCD backs to frame thepicture. However, a smaller camera with the LCD back,such as the Nikon 950 or the Nikon 990, is advanta-geous for intraoperative photography and is the mostportable.
2. What are the lighting conditions in which the camerawill be used? Will lighting be from an external flashsystem, a softbox using photofloods, or existing lightfrom windows and ceiling lights?
If the photoroom uses an external flash system, the cam-era will require a hot shoe attachment. The Nikon 950and 990 do not have hot shoe attachments and use onlyNikon-specific flashes to allow for TTL metering.Additional connection cords are available for the Nikonthat allow connection to these flash systems at a substan-tial cost. If the flash system has a slave flash option, theon-camera flash can trigger the others. Using an externalflash system will require overriding the camera’s meteringsystem and using a manual setting mode, available on theNikon 950, 990, and D1, the Olympus 2500, and theSony D700 and 770. If the camera has the flash on top(as do the Olympus 600 and 2500 and the Sony D700),the flash will cast a shadow if the camera is turned in theportrait position. Existing lighting or a single photofloodusually requires the use of a tripod or on-camera flash,because the meter reading is frequently at or below 1⁄30 to1⁄45 s, the points at which camera shake is evident.
3. How will the photographs be viewed and used? Willthey be printed? What size prints will be required?
These questions address the issue of camera resolution.For most medical photography, in which enlargementsgreater than 8 × 10 in are rarely, if ever, necessary, reso-lution between 1.5 and 2.7 million pixels is more thanadequate.
4. What additional features (such as video, sound, filetransfer, speed of focus) are necessary?
The individual features of digital cameras differ greatly.The Nikon 990 can capture a 90-second video clip. Mosthigh-end Kodak cameras (eg, the DC290) also capture
A E S T H E T I C S U R G E R Y J O U R N A L ~ N O V E M B E R / D E C E M B E R 2 0 0 0 25The Digital Darkroom, Part 2: Digital Photography Basics
S c i e n t i f i c F o r u m

video and sound. File transfer is an important issue,because image transfer to the computer is time consuming.
5. What is the cost digital photographic equipment?
High-end SLR cameras, such as the Nikon D1, range inprice from $4000 to $5000 and likely will not fall below$3000 in the next few years. These cameras capture out-standing image quality, and they are completely cus-tomizable. Most permit the use of interchangeable lenses.Most of the other higher-end cameras suitable for pho-tography in plastic surgery range in price from $500 to$1800. For those who would like to try digital photogra-phy without spending a lot of money, the Nikon 950 is agood choice; it is available for less than $600. Althoughcamera models are likely to change often, these priceranges will still apply when cameras are being evaluatedfor use by an individual or in a practice.
What’s Next in Digital Technology?
Photography in plastic surgery has now become an inte-gral part of the plastic surgeon’s daily activities. Plasticsurgeons should have a solid understanding of basic pho-tographic principles. It is inevitable that digital photogra-phy will replace conventional photography as the meansof photodocumentation in the near future. Consequently,plastic surgeons will need to develop and maintain anunderstanding of digital photography and have the basiccomputer skills that are needed to keep pace with thisadvancing technology. Several new digital cameras in theprosumer category will be coming onto the market,boasting resolutions as high as 3.4 million pixels (6.1million interpolated output), interchangeable lenses (for35-mm cameras), and ultrafast transfer of data to thecomputer through use of IEEE-1394 (Firewire) connec-tions. In addition, removable storage is increasing in size,and newer features (such as a text mode that allows thedigital camera to act as a portable document scanner) arebeing introduced. CCD technology is continually beingimproved (Fuji boasts that its new octagonal Super CCDprovides 60% higher resolution and comparable increas-es in sensor performance and color reproduction whilereducing power consumption).27 Another developingtechnology, e-film (Silicon Film), may soon transformstandard 35-mm cameras into digital cameras with theuse of a digital backing (previously available only inmedium-format cameras and costing $20,000 and up).Early releases of this technology offer 1.3 million pixelsand a CMOS chip, which produces images of lower qual-ity and with lower resolution in comparison with cur-
rently available CCD technology. Polaroid has plans tointroduce a combination digital and film camera, provid-ing the best of both worlds.28 Last, 3-dimensional cam-eras have been introduced that allow measurementanalysis, volume determination, and 360-degree viewing.Look for this technology to be added to the armamentari-um of digital tools for routine analysis and photodocumen-tation for the plastic surgeon during the next 5 years.29 �
References
1. Guy C, Guy RJ, Zook EG. In discussion of: Zarem HA. Standards of pho-
tography. Plast Reconstr Surg 1984;74:145-146.
2. Chapple JG, Stephenson KL. Photographic misrepresentation. Plast
Reconstr Surg 1970;45:135-140.
3. Morello DC, Converse JM, Allen D. Making uniform photographic records
in plastic surgery. Plast Reconstr Surg 1977;59:366-372.
4. Zarem HA. Standards of photography. Plast Reconstr Surg
1984;74:137-144.
5. Jemec BI, Jemec GB. Photographic surgery: standards in clinical photog-
raphy. Aesthetic Plast Surg 1986;10:177.
6. Kesselring UK. Standards of photography [letter]. Plast Reconstr Surg
1985;75:280-281.
7. Goldwyn RM. The missing post-operative photography and other eva-
sions. Plast Reconstr Surg 1993.
8. Ellenbogen R, Jankauskas S, Collini FJ. Achieving standardized pho-
tographs in aesthetic surgery. Plast Reconstr Surg 1990;86:955-961.
9. Schwartz MS, Tardy ME. Standardized photodocumentation in facial
plastic surgery. Facial Plast Surg 1990;7:1.
10. DiBernardo BE, Adams RL, Krause J, et al. Photographic standards in
plastic surgery. Plast Reconstr Surg 1998;102:559-568.
11. DeLange GS, Diana M. 35 mm film vs. digital photography for patient
documentation: is it time to change. Ann Plast Surg 1999;42:15-19.
12. Roth AC, Reid JC, Puckett CL, Concannon MJ. Digital images in the diag-
nosis of wound healing problems. Plast Reconstr Surg 1999;103:483-
486.
13. Edstrom LE. Conversion to digital photography and photo archiving [let-
ter]. Plast Reconstr Surg 2000;105:1576-1577.
14. Galdino GM, Swier P, Manson PN, Vander Kolk CA. Converting to digital
photography: a model for a large group practice or academic practice.
Plast Reconstr Surg 2000;106:119-124.
15. DiSaia JP, Ptak JJ, Achauer BM. Digital photography for the plastic sur-
geon. Plast Reconstr Surg 1998;102:569-573.
16. Price MA, Goldstein GD. The use of a digital imaging system in a derma-
tologic surgery practice. Dermatol Surg 1997;23:31-32.
17. Perednia DA. What dermatologists should know about digital imaging. J
Am Acad Dermatol 1991;25:89-108.
18. McClelland D, Eisman K. Real World Digital Photography. Berkeley, CA:
Peachpit Press; 1999.
19. Hirsch R. Exploring Color Photography. 3rd ed. Boston: McGraw-Hill;
1997.
20. Johnson D. Digital Photography, Answers! Certified Tech Support.
Berkeley, CA: Osborne/McGraw-Hill; 1999.
21. Adams J, Parulski K, Spaulding K. Color processing in digital cameras.
IEEE Micro 1998;Nov-Dec:20-30.
26 A E S T H E T I C S U R G E R Y J O U R N A L ~ N O V E M B E R / D E C E M B E R 2 0 0 0 Volume 20, Number 6
S c i e n t i f i c F o r u m

22. Sekuler R, Blake R. Perception. 2nd ed. Boston; McGraw-Hill: 1990.
23. Kawamura S. Capturing images with a digital still camera. IEEE Micro
1998;Nov-Dec:14-19.
24. Galdino GM, Klatsky SA, Manson PN, Vander Kolk CA. The digital dark-
room, 1: integrating digital technology into plastic surgery. Aesthetic
Surg J 2000;20:387-94.
25. Internet resource: www.phaseone.com/press/releases/digfilm.html.
26. Johnson RC. JPEG wavelet compression spec approved. [EE Times Website] December 29, 1999. Available at: http://www.eetimes.com/story/OEG19991228S0028.
27. MacNeill D. Cool new stuff. Digital Camera 2000;11:6.
28. Gomez T. Camera quest: and now . . . a digital “back” for 35mm cam-eras. Digital Photographer 2000;2:10-14.
29. Geng ZJ. Rainbow three dimensional camera: new concept of highspeed three dimensional vision systems. Opt Engin 1996;35.
A E S T H E T I C S U R G E R Y J O U R N A L ~ N O V E M B E R / D E C E M B E R 2 0 0 0 27The Digital Darkroom, Part 2: Digital Photography Basics
S c i e n t i f i c F o r u m