Embed Size (px)
Citation preview

8/2/2019 Template Publishing Best Practices
http://slidepdf.com/reader/full/template-publishing-best-practices 1/30
Template Publishing
Best Practices
An overview of Template Publishing including use of Adobe Illustrator,
InDesign and Photoshop for template design, updated for the AdobeScene7 Publishing System and Image Serving/AGM Serving 4.3
Original Author: Rajkumari Neogy
Revisions: Tanya Alva-Boone, Lonn
Lorenz and Rajkumari Neogy
October 2009
Version 1.0
8/2/2019 Template Publishing Best Practices
http://slidepdf.com/reader/full/template-publishing-best-practices 2/30
8/2/2019 Template Publishing Best Practices
http://slidepdf.com/reader/full/template-publishing-best-practices 3/30
P a g e | 3
Confidential. Property of Adobe Systems, Inc. Copyright 2000-2009. 3
Overv iew
Template Publishing is the web-to-print solution within the Scene7 Publishing System (SPS). Using
resolution-independent FXG files, you can create customizable templates for output to print, web,
e-mail, desktop, and devices. You can design templates in Adobe® Illustrator® CS4, AdobeInDesign® CS4, or Adobe Photoshop® CS4, and then convert them to FXG upon upload.
FXG templates use tags to indicate variable objects within a document. When presented within a
Scene7 template, variables allow the user to personalize the document. You can tag any design
objects (text, graphics, images) as variables while designing your template in Illustrator orInDesign. You can also tag objects as variables within Scene7 Template Publishing after you’veuploaded the document.
In this Template Publishing Best Practices document, you will learn how to tag objects and scripts,
upload your assets into SPS, parameterize your variables and publish your content so that you canaccess the URL for the template ready for users to access online and personalize.

8/2/2019 Template Publishing Best Practices
http://slidepdf.com/reader/full/template-publishing-best-practices 4/30
P a g e | 4
Confidential. Property of Adobe Systems, Inc. Copyright 2000-2009. 4
W o r k f l o w D ia g r am & Ou t l i n e
Below is a graphical representation of the workflow for publishing a template from start to
finish.
Work f l ow Ou t l i ne:
1. Create Template Design in Adobe Illustrator, Adobe InDesign, or Adobe Photoshop.
a. Choose the application that will best suit your needs.
b. Create your design, including:
i. Text
ii. Images
iii. Graphics
iv. Add appropriate variable tags within the application
2. Upload, Tag, Preview and Publish.
a. Upload your Template into the S7 Template Publishing system
b. Tag or modify any additional template objects within the Publishing System
c. Preview your template and variables, checking for appearance and functionality
d. Publish your template for personalization by users
e. Or output a PDF, SWF or Image file for review or desktop use.
3. User Facing Application (hosted by client).
4. SPS Delivers a URL string for displaying, using, or manipulating your template.
8/2/2019 Template Publishing Best Practices
http://slidepdf.com/reader/full/template-publishing-best-practices 5/30
P a g e | 5
Confidential. Property of Adobe Systems, Inc. Copyright 2000-2009. 5
Crea te Design Layou t i n I l l us t ra t o r , I nDesign , o r Pho t oshop
Illustrator, InDesign and Photoshop are all applications suitable for designing templates. All
three have the ability to add or define variables for the objects you create. Once the
variables have been defined, they can be personalized and modified in the SPS Template
Publishing application.
Best Pract ices
Complete the design of your document first, then add variable tags to the existing
text, graphics, and images.
Illustrator source files may contain multiple artboards. InDesign source files can
have multiple pages. Additionally, you may have the same variables across multiple
artboards /pages.
8/2/2019 Template Publishing Best Practices
http://slidepdf.com/reader/full/template-publishing-best-practices 6/30
P a g e | 6
Confidential. Property of Adobe Systems, Inc. Copyright 2000-2009. 6
Tem p la t e Des ign i n I l l u s t r a t o r
The following is the process in creating a template from your native Adobe Illustrator (AI) file. Design your
document first, and then add variable tags to text, graphics and images. Within AI, there are methods fortagging content as variable: 1) Inline text, and 2) Objects. Any objects (text frame, graphics or images) that are
to be used as variables MUST to be on their own named layer. This is important to keep this in mind while
designing your file.
1. Open your Illustrator file.
Tagging Text Variables
2. There are two ways to tag text as variables:
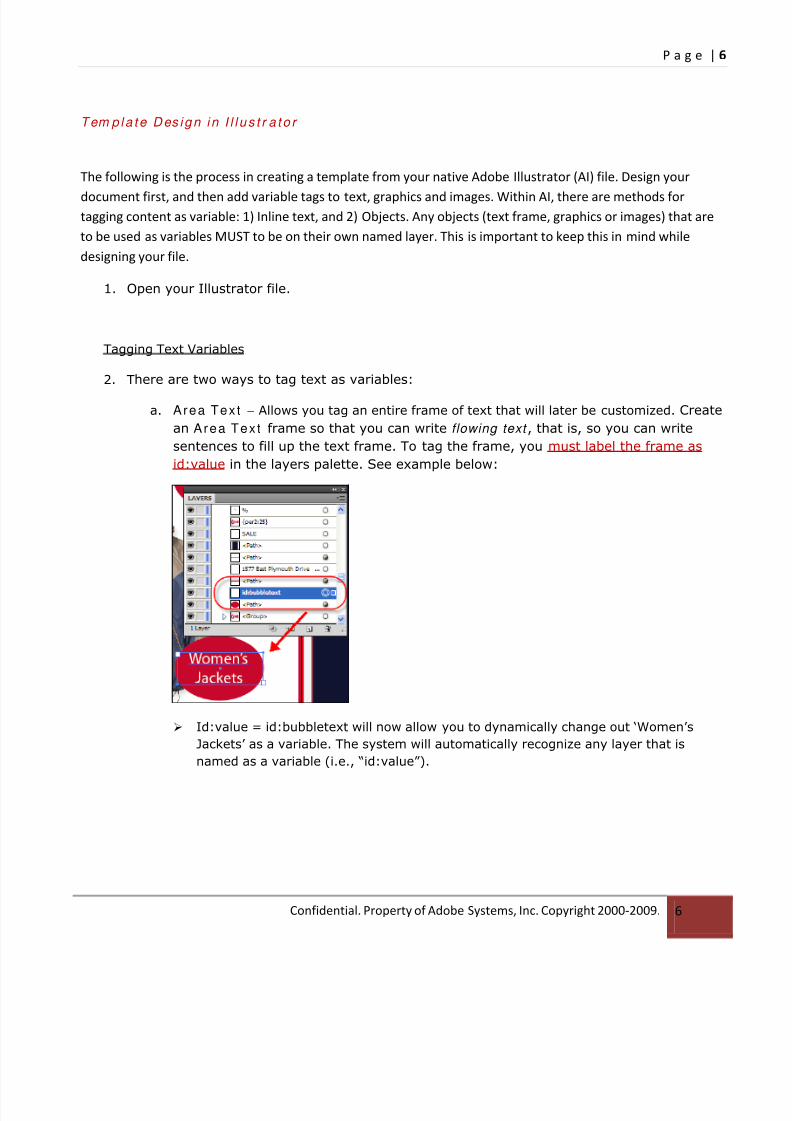
a. Area Tex t − Allows you tag an entire frame of text that will later be customized. Create
an Area Tex t frame so that you can write flowing text , that is, so you can write
sentences to fill up the text frame. To tag the frame, you must label the frame as
id:value in the layers palette. See example below:
Id:value = id:bubbletext will now allow you to dynamically change out ‘Women’s
Jackets’ as a variable. The system will automatically recognize any layer that is
named as a variable (i.e., “id:value”).
8/2/2019 Template Publishing Best Practices
http://slidepdf.com/reader/full/template-publishing-best-practices 7/30
P a g e | 7
Confidential. Property of Adobe Systems, Inc. Copyright 2000-2009. 7
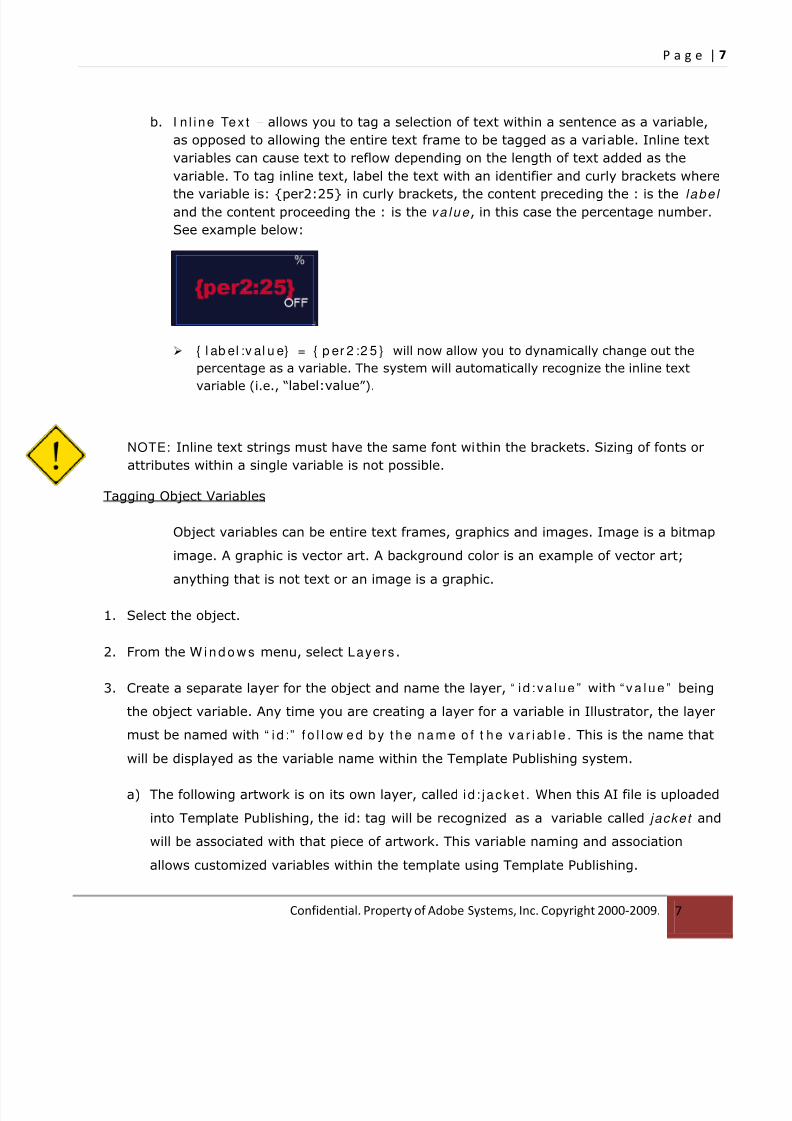
b. I n l i ne Tex t − allows you to tag a selection of text within a sentence as a variable,
as opposed to allowing the entire text frame to be tagged as a variable. Inline text
variables can cause text to reflow depending on the length of text added as the
variable. To tag inline text, label the text with an identifier and curly brackets where
the variable is: {per2:25} in curly brackets, the content preceding the : is the l abe l and the content proceeding the : is the va lue , in this case the percentage number.
See example below:
{ l ab el :v al u e} = { p er 2 :2 5 } will now allow you to dynamically change out the
percentage as a variable. The system will automatically recognize the inline text
variable (i.e., “label:value”).
NOTE: Inline text strings must have the same font within the brackets. Sizing of fonts or
attributes within a single variable is not possible.
Tagging Object Variables
Object variables can be entire text frames, graphics and images. Image is a bitmap
image. A graphic is vector art. A background color is an example of vector art;
anything that is not text or an image is a graphic.
1. Select the object.
2. From the W i n d o w s menu, select Layers.
3. Create a separate layer for the object and name the layer, “ i d : va lue ” with “ v a l u e ” being
the object variable. Any time you are creating a layer for a variable in Illustrator, the layer
must be named with “ i d :” f o l l ow e d b y t h e n a m e o f t h e v a r i ab l e . This is the name that
will be displayed as the variable name within the Template Publishing system.
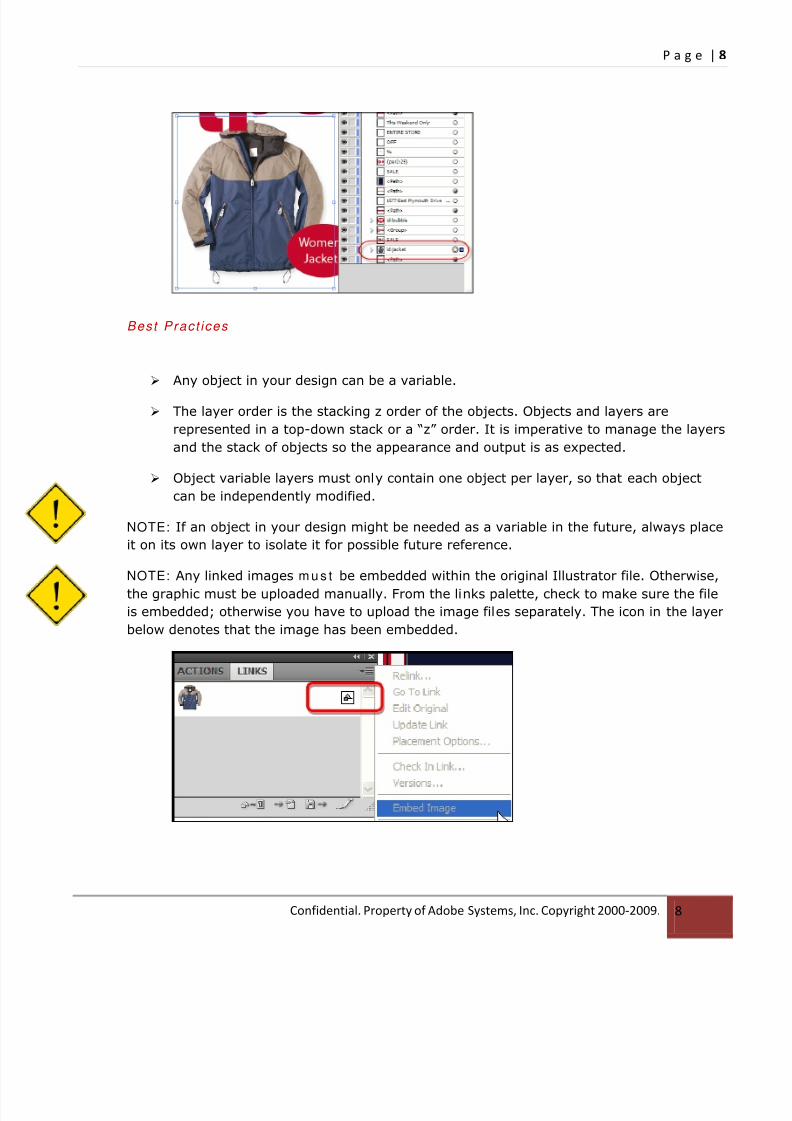
a) The following artwork is on its own layer, called i d : j acke t . When this AI file is uploaded
into Template Publishing, the id: tag will be recognized as a variable called jacket and
will be associated with that piece of artwork. This variable naming and association
allows customized variables within the template using Template Publishing.
8/2/2019 Template Publishing Best Practices
http://slidepdf.com/reader/full/template-publishing-best-practices 8/30
P a g e | 8
Confidential. Property of Adobe Systems, Inc. Copyright 2000-2009. 8
Best Pract ices
Any object in your design can be a variable.
The layer order is the stacking z order of the objects. Objects and layers are
represented in a top-down stack or a “z” order. It is imperative to manage the layers
and the stack of objects so the appearance and output is as expected.
Object variable layers must only contain one object per layer, so that each object
can be independently modified.
NOTE: If an object in your design might be needed as a variable in the future, always place
it on its own layer to isolate it for possible future reference.
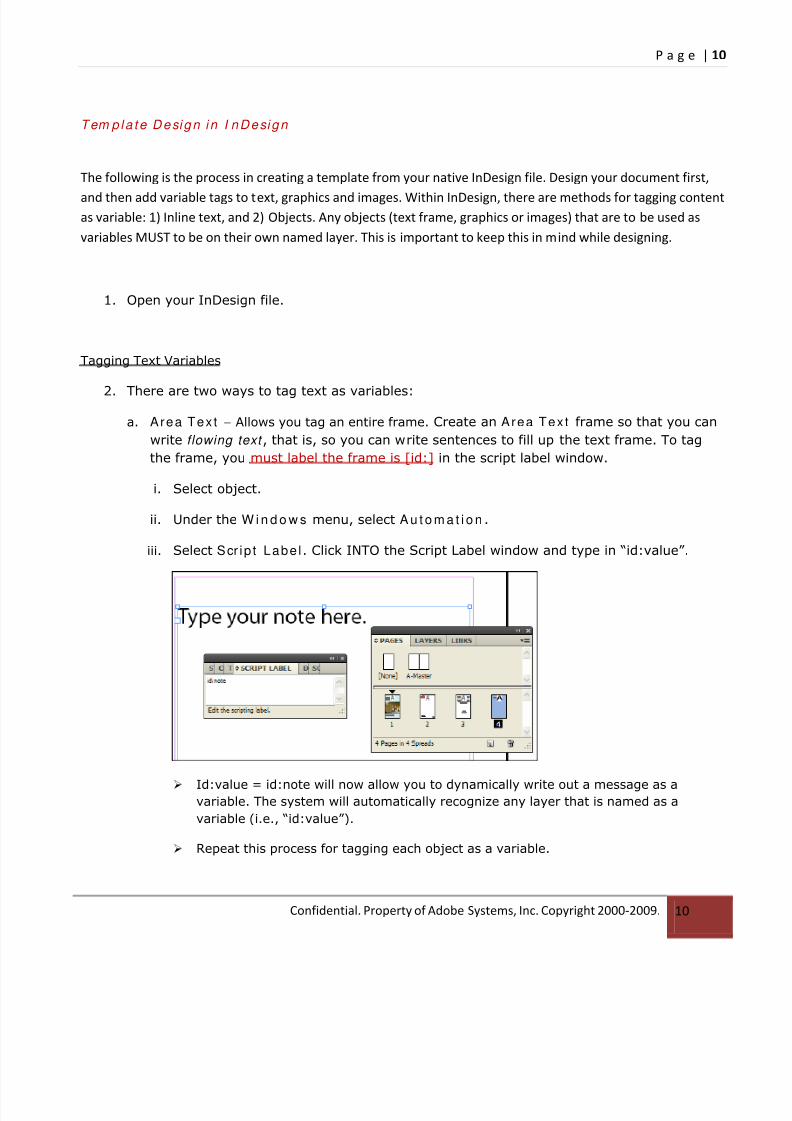
NOTE: Any linked images m u s t be embedded within the original Illustrator file. Otherwise,
the graphic must be uploaded manually. From the links palette, check to make sure the file
is embedded; otherwise you have to upload the image files separately. The icon in the layer
below denotes that the image has been embedded.

8/2/2019 Template Publishing Best Practices
http://slidepdf.com/reader/full/template-publishing-best-practices 9/30
P a g e | 9
Confidential. Property of Adobe Systems, Inc. Copyright 2000-2009. 9
Save your Illustrator file as an .AI file for reference.
i. Names for source files (AI,ID,PS) cannot have any spaces, special characters,
such as: ( & # ) _ @ $ , - / \.
ii. No underlines or dashes.
Once the overall design is completed, some additional production will ensure that
the template will be created properly when the AI file is uploaded into the Template
Publishing System.
o If this template is for high quality print production, verify the following:
Resolution set to 300ppi (unless only desired to be lower resolution
output). No less than 200ppi is recommended for print. This is found
under the EFFECT menu, select DOCUMENT EFFECTS RASTER
RESOLUTI ON.
Remove unused colors and ensure that CMYK and/or spot colors ONLY
are used.
o Clean up layers (removing unnecessary layers so they don’t become
variables).
o Remember to embed your images.
o Gather all fonts used in the document. Under the TYPE menu, select Find
Font . This displays all the fonts used in the document. Go to your system file
and place them in a folder to be uploaded into SPS.
FROM HERE, GO TO PAGE 16 TO UPLOA D YOUR A SSETS.
8/2/2019 Template Publishing Best Practices
http://slidepdf.com/reader/full/template-publishing-best-practices 10/30
P a g e | 10
Confidential. Property of Adobe Systems, Inc. Copyright 2000-2009. 10
Tem p la t e Design i n I nDesign
The following is the process in creating a template from your native InDesign file. Design your document first,
and then add variable tags to text, graphics and images. Within InDesign, there are methods for tagging contentas variable: 1) Inline text, and 2) Objects. Any objects (text frame, graphics or images) that are to be used as
variables MUST to be on their own named layer. This is important to keep this in mind while designing.
1. Open your InDesign file.
Tagging Text Variables
2. There are two ways to tag text as variables:
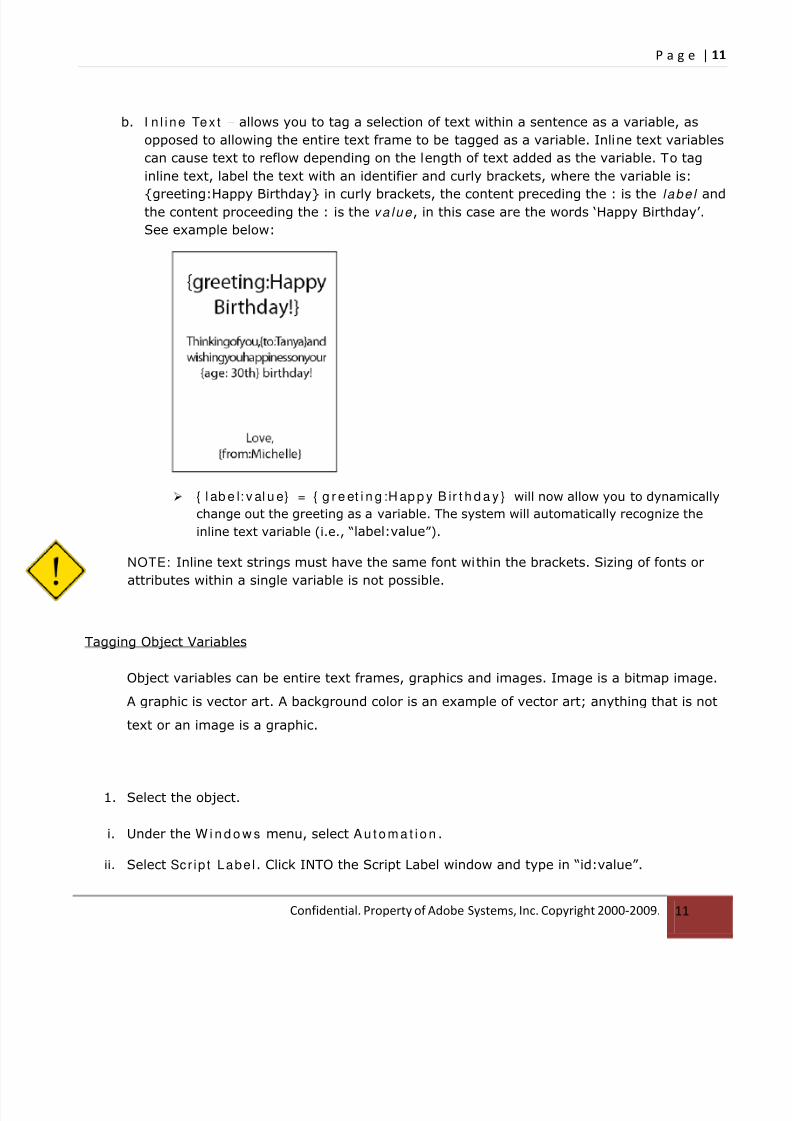
a. Area Tex t − Allows you tag an entire frame. Create an Area Tex t frame so that you can
write flowing text , that is, so you can write sentences to fill up the text frame. To tag
the frame, you must label the frame is [id:] in the script label window.
i. Select object.
ii. Under the W i n d o w s menu, select A u t o m a t i o n .
iii. Select Scr ip t Labe l. Click INTO the Script Label window and type in “id:value”.
Id:value = id:note will now allow you to dynamically write out a message as avariable. The system will automatically recognize any layer that is named as a
variable (i.e., “id:value”).
Repeat this process for tagging each object as a variable.
8/2/2019 Template Publishing Best Practices
http://slidepdf.com/reader/full/template-publishing-best-practices 11/30
P a g e | 11
Confidential. Property of Adobe Systems, Inc. Copyright 2000-2009. 11
b. I n l i ne Tex t − allows you to tag a selection of text within a sentence as a variable, as
opposed to allowing the entire text frame to be tagged as a variable. Inline text variables
can cause text to reflow depending on the length of text added as the variable. To tag
inline text, label the text with an identifier and curly brackets, where the variable is:
{greeting:Happy Birthday} in curly brackets, the content preceding the : is the l abe l andthe content proceeding the : is the va lue , in this case are the words ‘Happy Birthday’.
See example below:
{ l ab e l: v al u e} = { g r e et i n g :H ap p y B ir t h d a y } will now allow you to dynamically
change out the greeting as a variable. The system will automatically recognize the
inline text variable (i.e., “label:value”).
NOTE: Inline text strings must have the same font within the brackets. Sizing of fonts or
attributes within a single variable is not possible.
Tagging Object Variables
Object variables can be entire text frames, graphics and images. Image is a bitmap image.
A graphic is vector art. A background color is an example of vector art; anything that is not
text or an image is a graphic.
1. Select the object.
i. Under the W i n d o w s menu, select A u t o m a t i o n .
ii. Select Scr ip t Labe l. Click INTO the Script Label window and type in “id:value”.

8/2/2019 Template Publishing Best Practices
http://slidepdf.com/reader/full/template-publishing-best-practices 12/30
P a g e | 12
Confidential. Property of Adobe Systems, Inc. Copyright 2000-2009. 12
Id:value = id:picture will now allow you to dynamically change out an image or graphic
as a variable. The SPS system will automatically recognize any label that is named as a
variable (i.e., “id:value”).
NOTE: If an object in your design will be a variable, you can tag it.
Examples below:
Tagging an object as a variable uses i d : va lue as a script label.

8/2/2019 Template Publishing Best Practices
http://slidepdf.com/reader/full/template-publishing-best-practices 13/30
P a g e | 13
Confidential. Property of Adobe Systems, Inc. Copyright 2000-2009. 13
NOTE: Any linked images m u s t be embedded within the original InDesign file. Otherwise
you have to upload the graphic file. From the links palette, check to make sure the file is
embedded; otherwise you have to upload the image files separately. The example below
shows the links being embedded. What is important here is to know where this command is
located in the flyout menu.
Best Pract ices
Use InDesign ‘package’ feature under File > Package to collect all fonts used within
your InDesign document. This creates a new packaged directory storing all of the
fonts, images and final InDesign file.
Once the overall design is completed, some additional production will ensure that
the template will be created properly when the InDesign file is uploaded into the
Template Publishing System.
a. If this template if for high quality print production, verify the following:
i. Remove unused colors and ensure that CMYK and/or spot colors ONLY are
used.
b. Clean up layers (removing unnecessary layers so they don’t become variables).
c. Remember to embed your images.
The same inline text variable can be used repeatedly across a multi-page document.
This enables any change of that variable to affect any instance of that variable
across that entire document.
Once you’ve tagged anything in the source file as a variable, it will be automatically
recognized within the SPS system.
8/2/2019 Template Publishing Best Practices
http://slidepdf.com/reader/full/template-publishing-best-practices 14/30
P a g e | 14
Confidential. Property of Adobe Systems, Inc. Copyright 2000-2009. 14
Save your InDesign file as an .IDD file for reference.
i. Names for source files (AI,ID,PS) cannot have any spaces, special characters,
such as: ( & # ) _ @ $ , - / \.
ii. No underlines or dashes.
FROM HERE, GO TO PAGE 16 TO UPLOAD YOUR ASSETS.

8/2/2019 Template Publishing Best Practices
http://slidepdf.com/reader/full/template-publishing-best-practices 15/30
P a g e | 15
Confidential. Property of Adobe Systems, Inc. Copyright 2000-2009. 15
Create Des ign Layout in Photosho p
Photoshop still makes use of the layer structure and layer naming applied to SPS prior to version
4.3 and does not yet use the tagging features. However with 4.3, you can still use the old method,
and/or combine the old with the new.
1. Create your file using Photoshop.
2. Create layers and name them.
a. Assign each variable (i.e., text and graphics) its own layer. Name each layer, so that it
can be changed or assigned to a different attribute in SPS, separate from the other
layers. This enables you to easily keep track of your layers when they are uploaded into
SPS.
b. When creating text, draw out a text box rather than using point text. That way the
definitions are exported into the FXG file, and they won’t have to be manually adjusted
in SPS.
3. Save your Photoshop file as an FXG, and as an .PSD file for reference.
a. When you save your Photoshop file as an .FXG, a folder is automatically generated
containing your assets and the .FXG file.
b. Names for source files (AI,ID,PS) cannot have any spaces, special characters (&#)_@$,
underlines or dashes, etc).
FROM HERE, GO TO PAGE 16 TO UPLOAD YOUR ASSETS.

8/2/2019 Template Publishing Best Practices
http://slidepdf.com/reader/full/template-publishing-best-practices 16/30
P a g e | 16
Confidential. Property of Adobe Systems, Inc. Copyright 2000-2009. 16
Upload ing Assets in t o SPS
Template Publishing version 4.3 enables upload of native Illustrator and InDesign files
which are automatically converted to FXG. Scene7 recommends uploading native formats
such as Illustrator and InDesign for your templates. Desktop plug-ins are no longer
required as FXG conversion is handled during the upload process. Desktop plug-ins,
however, can still be used if manual conversion to FXG is required. Photoshop still requires
the plug-ins for FXG conversion prior to upload.
1. Log in to SPS.
Assets can be uploaded as individual files from the desktop or folders via FTP. Files more
than 100 MB require FTP or SPSDesktop.
NOTE: Yo u m u s t F IRST up load FONTS PRI OR to up load in g t he sour ce f i le in t o SPS.
Sou r ce f i l e s con t a in l i nks em bedded i n t he docum en t s . By up load ing t he FONTS
PRI OR to t he source f i les , t he l i nks po in t i ng t o t he f on t s w i l l r ema in i n t ac t .
Add i t i ona l l y , i t i s cr i t i ca l t ha t t he up load job fo r th e fon t s be COMPLETED be f o r e
beg inn ing t h e up load o f t h e sou r ce f i l e .
2. Click Upload in SPS.
8/2/2019 Template Publishing Best Practices
http://slidepdf.com/reader/full/template-publishing-best-practices 17/30
P a g e | 17
Confidential. Property of Adobe Systems, Inc. Copyright 2000-2009. 17
3. Upload all fonts PRIOR to any other asset.
a. Ensure that the UPLOAD for the fonts is COMPLETE. Verify visually that the upload
was successful.
Images and graphics files will be automatically uploaded with AI and IDD source files
since they were embedded.
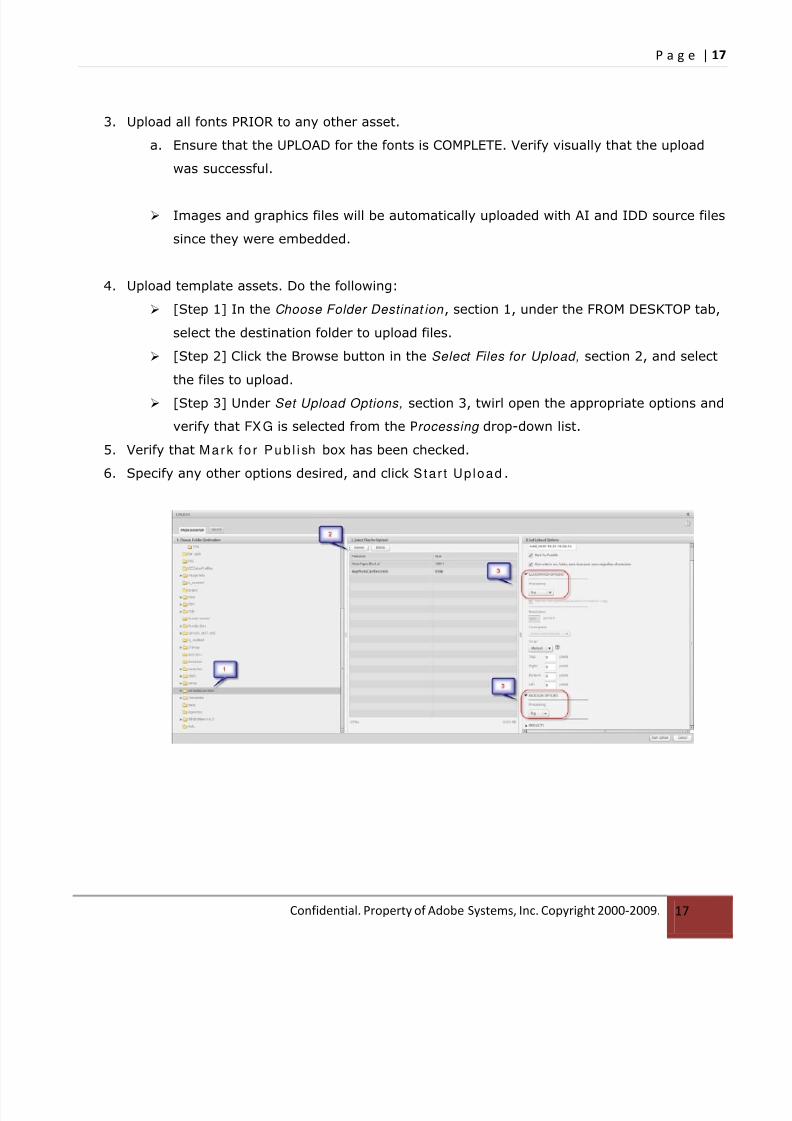
4. Upload template assets. Do the following:
[Step 1] In the Choose Folder Destinat ion , section 1, under the FROM DESKTOP tab,
select the destination folder to upload files.
[Step 2] Click the Browse button in the Select Files for Upload, section 2, and select
the files to upload.
[Step 3] Under Set Upload Options, section 3, twirl open the appropriate options and
verify that FX G is selected from the Processing drop-down list.
5. Verify that Mar k f o r Pub l i sh box has been checked.
6. Specify any other options desired, and click Star t Up load .
8/2/2019 Template Publishing Best Practices
http://slidepdf.com/reader/full/template-publishing-best-practices 18/30
P a g e | 18
Confidential. Property of Adobe Systems, Inc. Copyright 2000-2009. 18
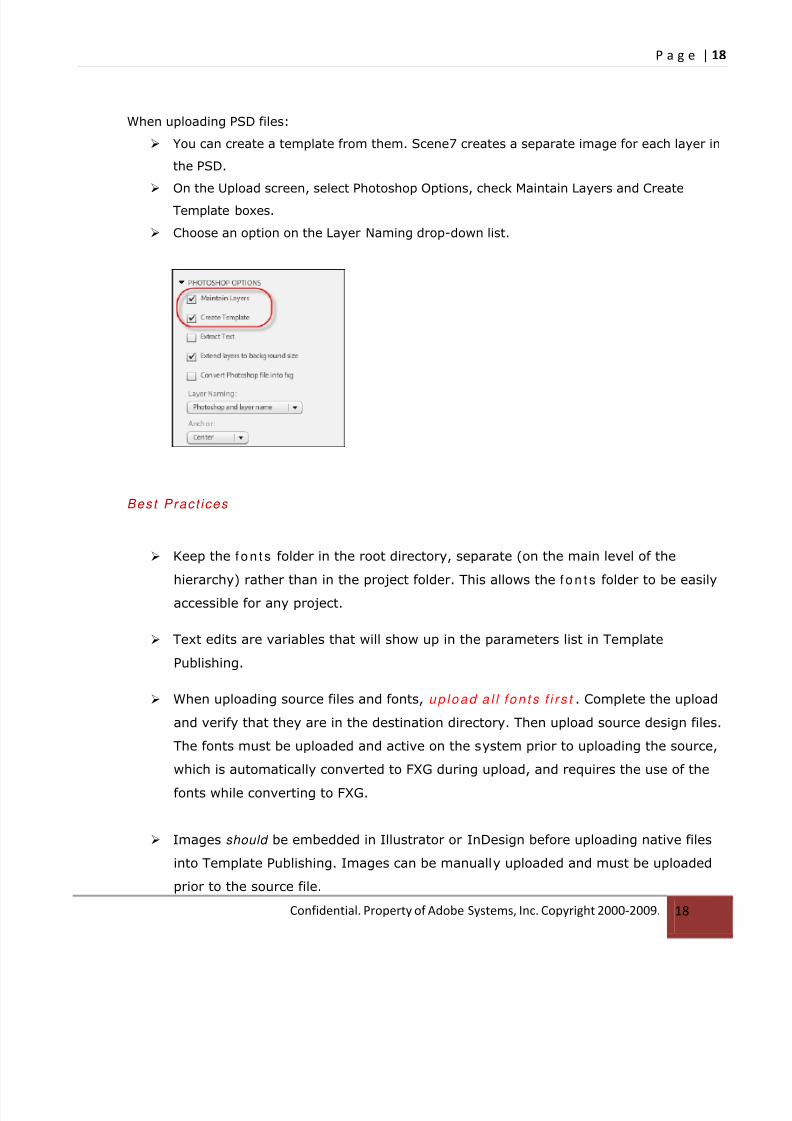
When uploading PSD files:
You can create a template from them. Scene7 creates a separate image for each layer in
the PSD.
On the Upload screen, select Photoshop Options, check Maintain Layers and Create
Template boxes.
Choose an option on the Layer Naming drop-down list.
Best Pract ices
Keep the f o n t s folder in the root directory, separate (on the main level of the
hierarchy) rather than in the project folder. This allows the f o n t s folder to be easily
accessible for any project.
Text edits are variables that will show up in the parameters list in Template
Publishing.
When uploading source files and fonts, up load a l l f on t s f i r s t . Complete the upload
and verify that they are in the destination directory. Then upload source design files.
The fonts must be uploaded and active on the system prior to uploading the source,
which is automatically converted to FXG during upload, and requires the use of the
fonts while converting to FXG.
Images should be embedded in Illustrator or InDesign before uploading native files
into Template Publishing. Images can be manually uploaded and must be uploaded
prior to the source file.
8/2/2019 Template Publishing Best Practices
http://slidepdf.com/reader/full/template-publishing-best-practices 19/30
P a g e | 19
Confidential. Property of Adobe Systems, Inc. Copyright 2000-2009. 19
Tem pla te Ed i t i n g
In addition to identifying variables in Illustrator or InDesign application, you can assign objects as
variables within Template Publishing by naming it as an parameter. Once parameters are exposed,
the template image can now be dynamically constructed from the Image Server and called out using the
generated URL.
Assigning Parameters
This is the MANUAL method of assigning objects as variables.
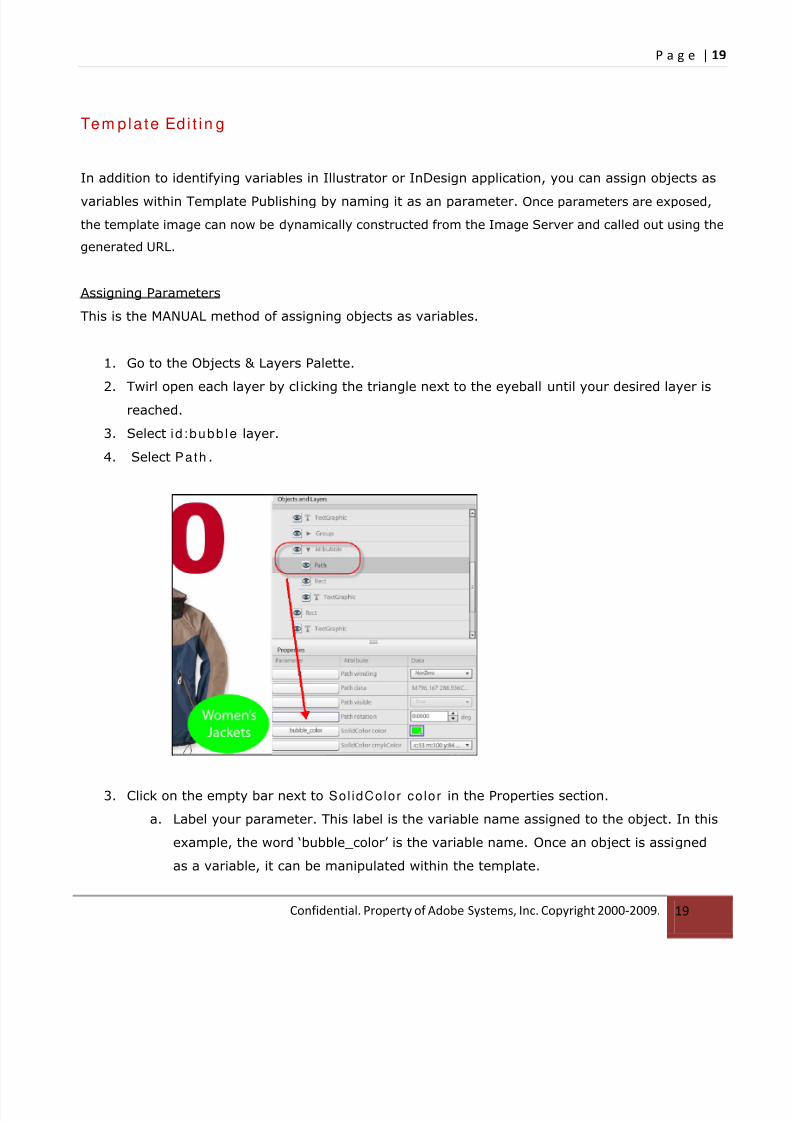
1. Go to the Objects & Layers Palette.
2.
Twirl open each layer by clicking the triangle next to the eyeball until your desired layer isreached.
3. Select i d : bubb le layer.
4. Select Path .
3. Click on the empty bar next to Sol idColor co lor in the Properties section.
a. Label your parameter. This label is the variable name assigned to the object. In this
example, the word ‘bubble_color’ is the variable name. Once an object is assigned
as a variable, it can be manipulated within the template.
8/2/2019 Template Publishing Best Practices
http://slidepdf.com/reader/full/template-publishing-best-practices 20/30
P a g e | 20
Confidential. Property of Adobe Systems, Inc. Copyright 2000-2009. 20
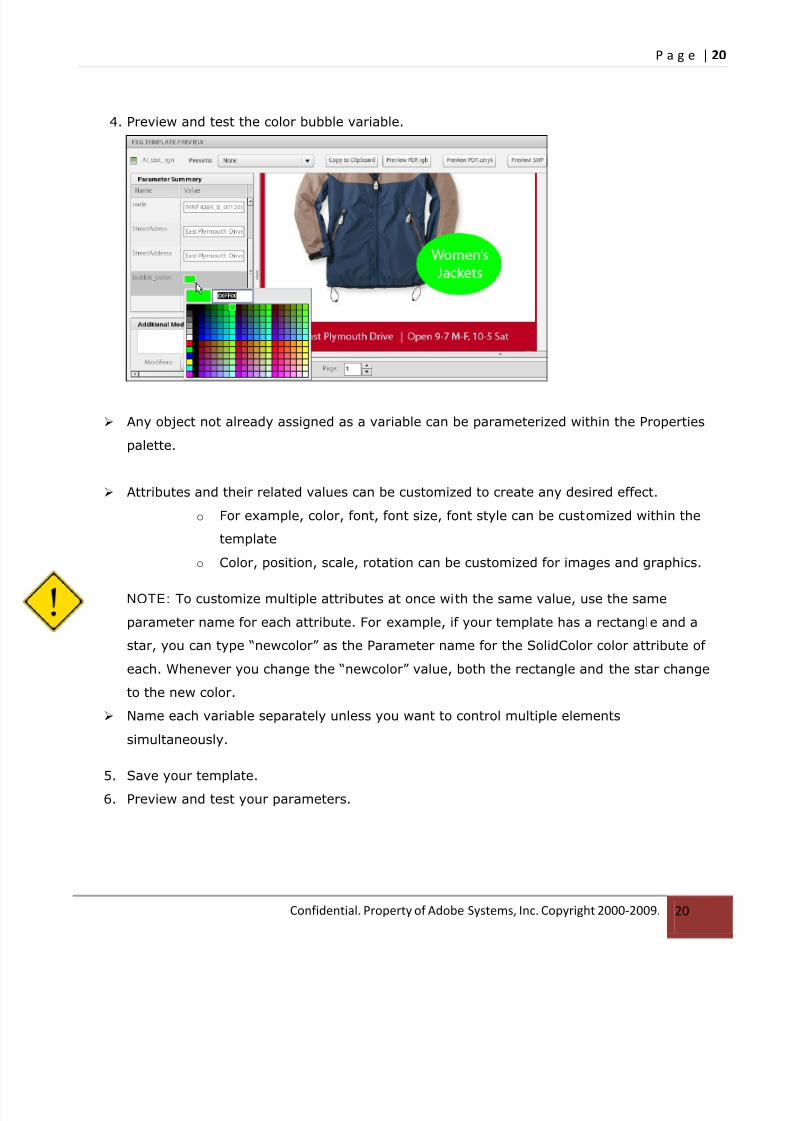
4. Preview and test the color bubble variable.
Any object not already assigned as a variable can be parameterized within the Properties
palette.
Attributes and their related values can be customized to create any desired effect.
o For example, color, font, font size, font style can be customized within the
template
o Color, position, scale, rotation can be customized for images and graphics.
NOTE: To customize multiple attributes at once with the same value, use the same
parameter name for each attribute. For example, if your template has a rectangle and a
star, you can type “newcolor” as the Parameter name for the SolidColor color attribute of
each. Whenever you change the “newcolor” value, both the rectangle and the star change
to the new color.
Name each variable separately unless you want to control multiple elements
simultaneously.
5. Save your template.
6. Preview and test your parameters.

8/2/2019 Template Publishing Best Practices
http://slidepdf.com/reader/full/template-publishing-best-practices 21/30
P a g e | 21
Confidential. Property of Adobe Systems, Inc. Copyright 2000-2009. 21
Pub l i sh ing th e Tem p la te
You must publish assets to the Scene7 Image Servers. After assets are published, they are available for delivery.
The URL will now be available from the Scene7 Publishing System and can be added to your website or
application.
1. Go to the Adobe Scene7 Publishing System.
a. Click Pub l ish
b. Select any desired options, then Click Star t Pub l ish .
8/2/2019 Template Publishing Best Practices
http://slidepdf.com/reader/full/template-publishing-best-practices 22/30
P a g e | 22
Confidential. Property of Adobe Systems, Inc. Copyright 2000-2009. 22
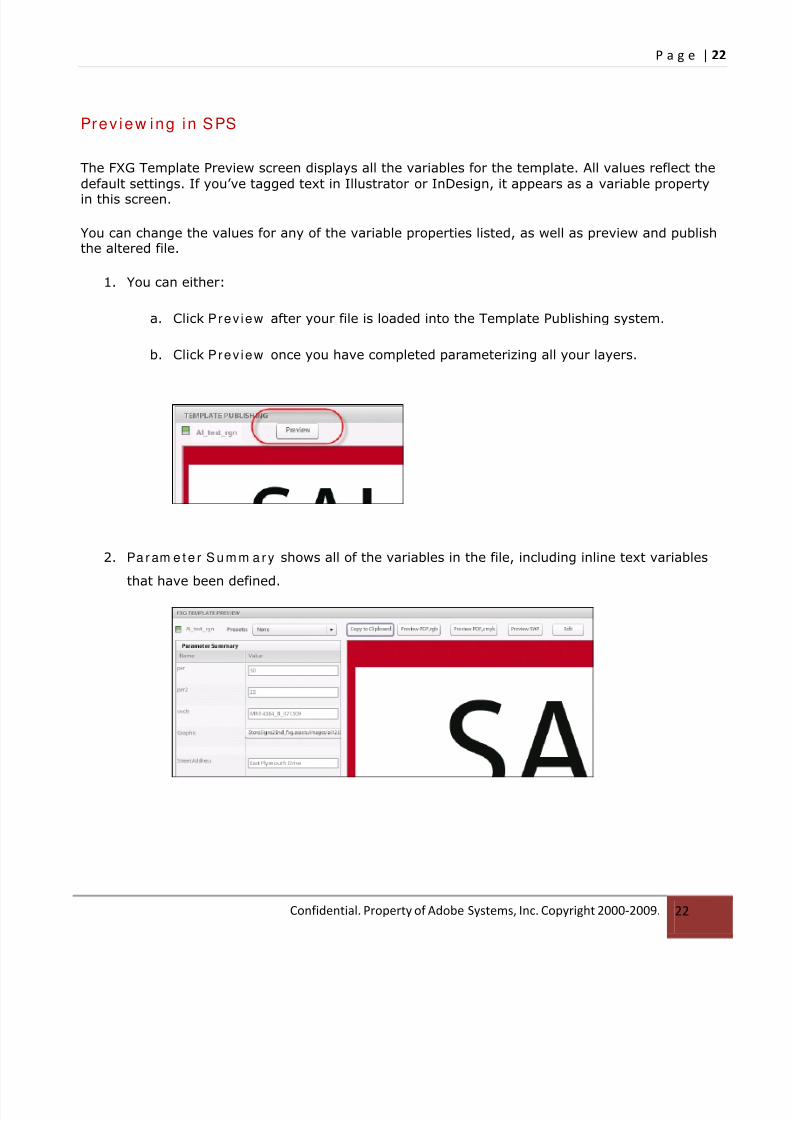
Prev iew ing in SPS
The FXG Template Preview screen displays all the variables for the template. All values reflect the
default settings. If you’ve tagged text in Illustrator or InDesign, it appears as a variable property
in this screen.
You can change the values for any of the variable properties listed, as well as preview and publishthe altered file.
1. You can either:
a. Click Prev iew after your file is loaded into the Template Publishing system.
b. Click Prev iew once you have completed parameterizing all your layers.
2. Pa r am e t e r S u m m a r y shows all of the variables in the file, including inline text variables
that have been defined.
8/2/2019 Template Publishing Best Practices
http://slidepdf.com/reader/full/template-publishing-best-practices 23/30
P a g e | 23
Confidential. Property of Adobe Systems, Inc. Copyright 2000-2009. 23
Best Pract ices
The objects you’ve defined as layers populate the Objec ts and Layers window; you
can see the text graphics and the photos and identify them, then assign attributes to
them as variables. You will get the inline text variables here, and the others within
DOM (Direct Object Model), or the edit screen. Please reference the Appendix for
more information about the DOM.
Whatever you do within the Pr ope r t i es window and DOM will be written in the URL.
You can do almost everything from the Pr ope r t i es window, but everything you can
do within the FXG spec is available in DOM.
Any attributes you want to change would have to be done through DOM or the
Pr ope r t i es window.
Layers and objects tagged in Illustrator or InDesign appear as DOM (Document
Object Model) manipulation elements in Scene7 (see description of DOM in
Appendix).
8/2/2019 Template Publishing Best Practices
http://slidepdf.com/reader/full/template-publishing-best-practices 24/30
P a g e | 24
Confidential. Property of Adobe Systems, Inc. Copyright 2000-2009. 24
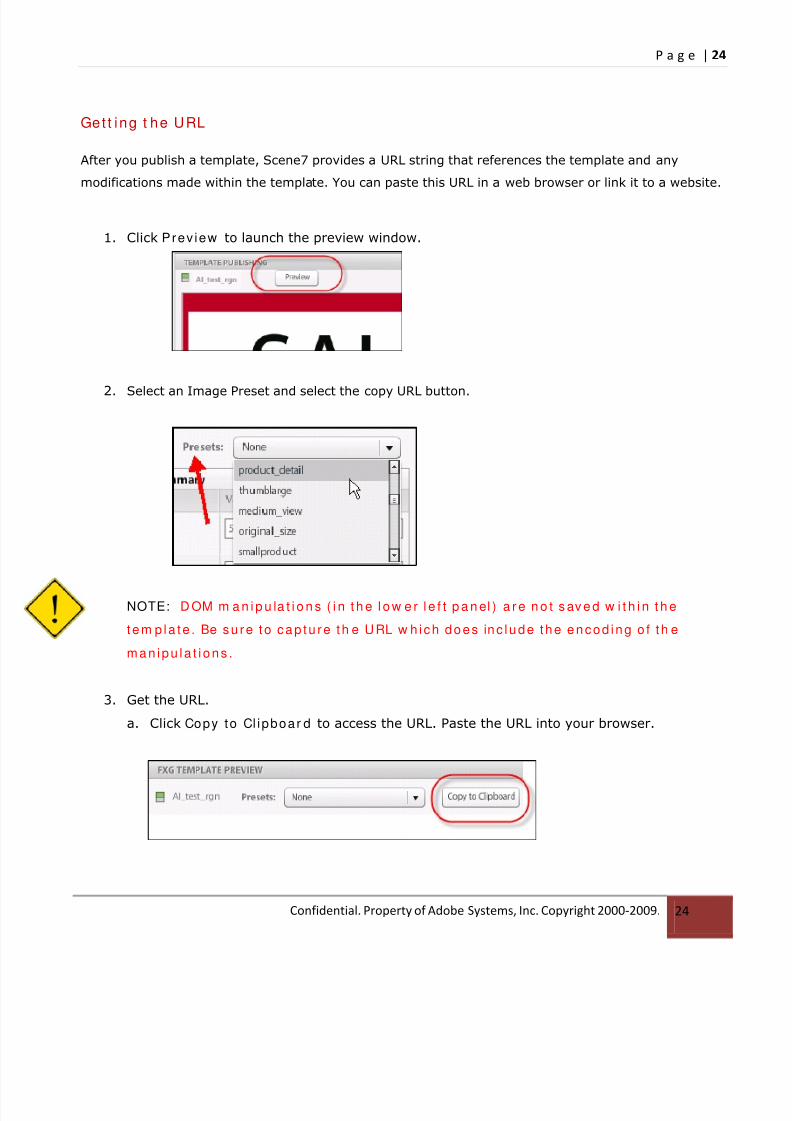
Get t ing t he URL
After you publish a template, Scene7 provides a URL string that references the template and any
modifications made within the template. You can paste this URL in a web browser or link it to a website.
1. Click Prev iew to launch the preview window.
2. Select an Image Preset and select the copy URL button.
NOTE: D OM m a n i p u la t i o n s ( i n t h e l o w e r l e f t p a n el ) a r e n o t s av e d w i t h i n t h e
t em p la t e . Be su r e t o cap t u r e t h e URL w h ich does inc lude t he encod ing o f t h e
man ipu la t i ons .
3. Get the URL.
a. Click Copy to Cl ipboar d to access the URL. Paste the URL into your browser.

8/2/2019 Template Publishing Best Practices
http://slidepdf.com/reader/full/template-publishing-best-practices 25/30
P a g e | 25
Confidential. Property of Adobe Systems, Inc. Copyright 2000-2009. 25
The Copy to Clipboard option will allow you to access your URL.
Sample URL:
http://s7d7.scene7.com/is/agm/S7train/AI_test_rgn?&$per=50&$per2=25&$code=MR%23%204384_B_071509&$Graphic=StoreSigns2End_fxg.assets%2Fimages%2Fai12559884411
.png&$StreetAdress=East%C2%A0Plymouth%C2%A0Drive&$StreetAddress=East%C2%A0
Plymouth%C2%A0Drive
8/2/2019 Template Publishing Best Practices
http://slidepdf.com/reader/full/template-publishing-best-practices 26/30
P a g e | 26
Confidential. Property of Adobe Systems, Inc. Copyright 2000-2009. 26
Append ix
DOM Man ipu la t ion
Text characters tagged in Illustrator or InDesign appear automatically as variables inthe Parameters list, as something modifiable in Scene7. Layers and objects tagged in
Illustrator or InDesign are available as DOM (Document Object Model) manipulation
elements in Scene7.
DOM Manipulation within Template Publishing allows the developer to define and
customize ANY tagged object within a template. If not tagged, the object is considered
static, or safe from edits. DOM manipulations allow editing of the objects and text
attributes without having to go back to the source AI, ID, or PS file. DOM manipulations
can be entered manually during template editing and can be performed
programmatically using the url, updating the template according to changes to the url
(for an example of this, see section Pr ev iew ing i n SPS). For descriptions of the range
of elements and their attributes, see the Elements Guide in the online Help.
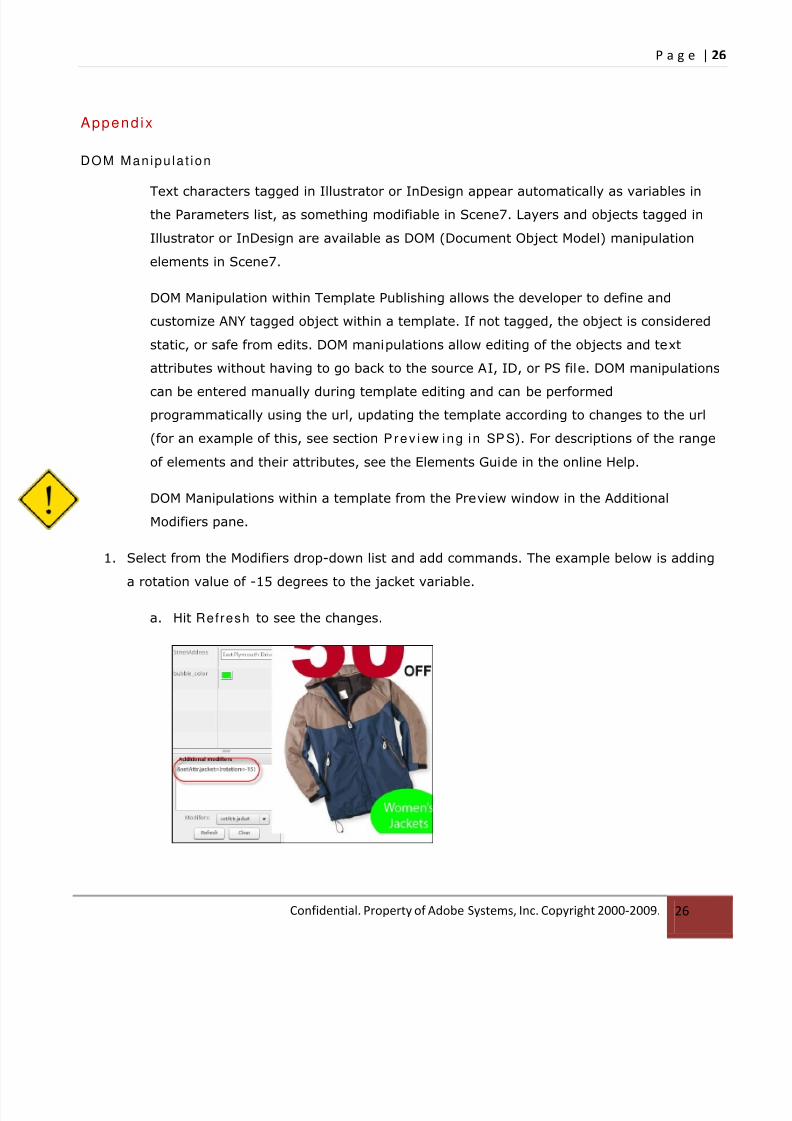
DOM Manipulations within a template from the Preview window in the Additional
Modifiers pane.
1. Select from the Modifiers drop-down list and add commands. The example below is adding
a rotation value of -15 degrees to the jacket variable.
a. Hit Refresh to see the changes.
8/2/2019 Template Publishing Best Practices
http://slidepdf.com/reader/full/template-publishing-best-practices 27/30
P a g e | 27
Confidential. Property of Adobe Systems, Inc. Copyright 2000-2009. 27
These DOM manipulations are reflected in the URL. See page 28 for URL examples:
Tagging inline text allows you to assign parameters to it; however, if you want to
manipulate the text with DOM, you must use script labels (InDesign) or layers
(Illustrator).
NOTE: If you have made changes in the DOM screen and save your template, the DOM
changes will not have been saved. You must copy the and save the url if you want to keep
those changes.
8/2/2019 Template Publishing Best Practices
http://slidepdf.com/reader/full/template-publishing-best-practices 28/30
P a g e | 28
Confidential. Property of Adobe Systems, Inc. Copyright 2000-2009. 28
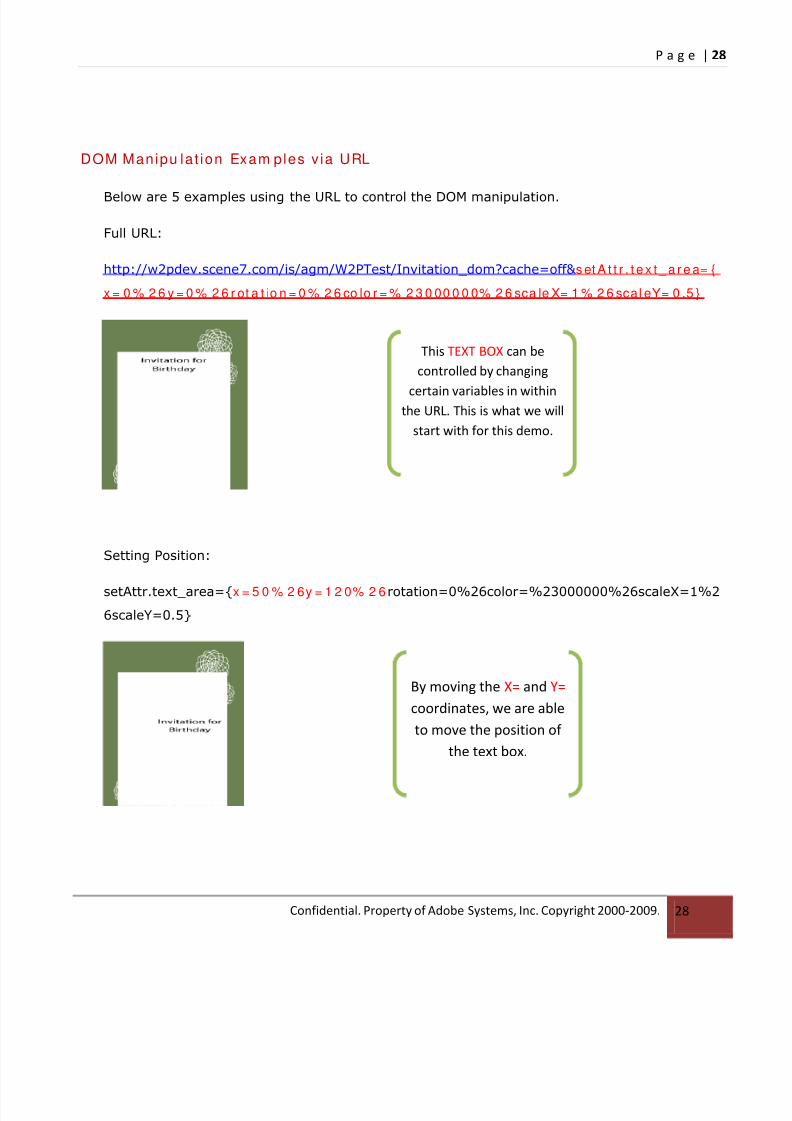
DOM Manipu la t ion Exam ples v ia URL
Below are 5 examples using the URL to control the DOM manipulation.
Full URL:
http://w2pdev.scene7.com/is/agm/W2PTest/Invitation_dom?cache=off& s et A t t r . t e x t _ a r e a= {
x = 0 % 2 6 y = 0 % 2 6 r ot a t io n = 0 % 2 6 co lo r = % 2 3 0 00 0 0 0% 2 6 sca le X= 1 % 2 6 scal eY= 0 .5 }
Setting Position:
setAttr.text_area={x = 5 0 % 2 6y = 1 2 0% 2 6rotation=0%26color=%23000000%26scaleX=1%2
6scaleY=0.5}
By moving the X= and Y=
coordinates, we are able
to move the position of
the text box.
This TEXT BOX can be
controlled by changing
certain variables in withinthe URL. This is what we will
start with for this demo.
8/2/2019 Template Publishing Best Practices
http://slidepdf.com/reader/full/template-publishing-best-practices 29/30
P a g e | 29
Confidential. Property of Adobe Systems, Inc. Copyright 2000-2009. 29
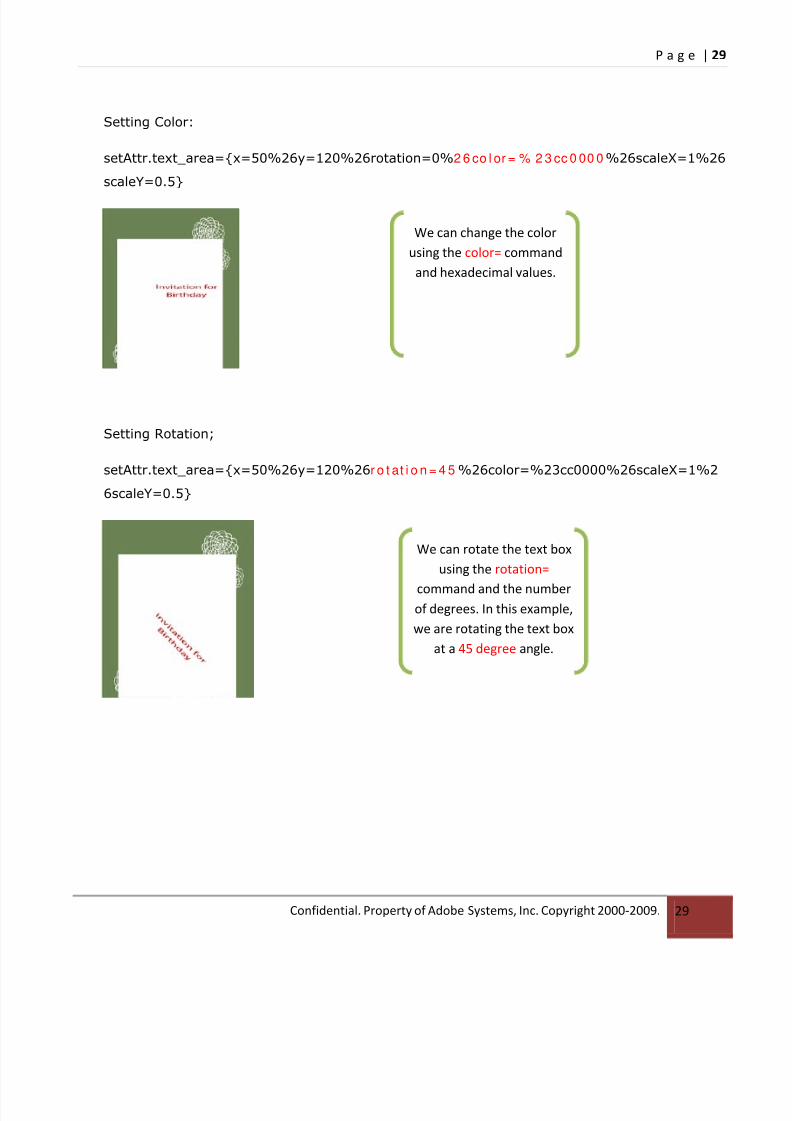
Setting Color:
setAttr.text_area={x=50%26y=120%26rotation=0%2 6 co l or = % 2 3 cc 0 00 0%26scaleX=1%26
scaleY=0.5}
Setting Rotation;
setAttr.text_area={x=50%26y=120%26r o t at i o n = 4 5 %26color=%23cc0000%26scaleX=1%2
6scaleY=0.5}
We can change the color
using the color= command
and hexadecimal values.
We can rotate the text box
using the rotation=
command and the numberof degrees. In this example,
we are rotating the text box
at a 45 degree angle.
8/2/2019 Template Publishing Best Practices
http://slidepdf.com/reader/full/template-publishing-best-practices 30/30
P a g e | 30
Confidential. Property of Adobe Systems, Inc. Copyright 2000-2009. 30
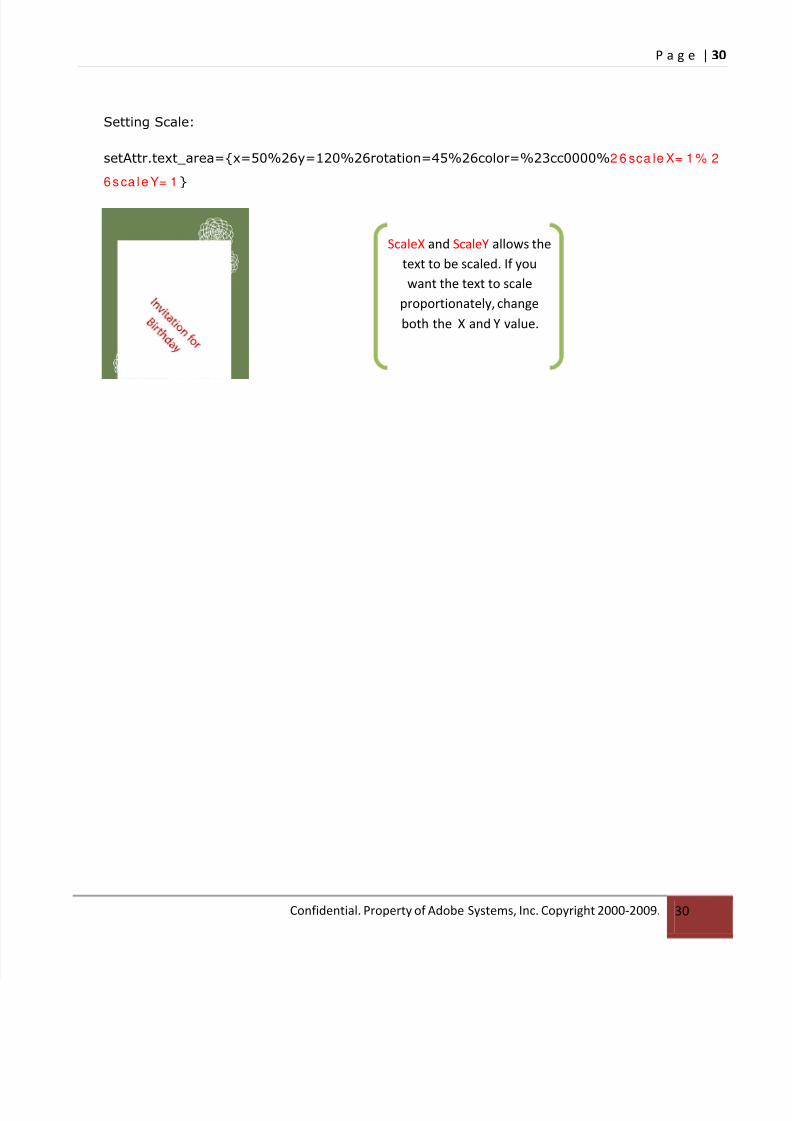
Setting Scale:
setAttr.text_area={x=50%26y=120%26rotation=45%26color=%23cc0000%2 6 sca le X= 1 % 2
6sca leY= 1}
ScaleX and ScaleY allows the
text to be scaled. If you
want the text to scale
proportionately, change
both the X and Y value.