Embed Size (px)
Citation preview
User Guide – Airwatch for Telenet
PAGE 1
Infosys
USER GUIDE DOCUMENTATION
References
Telenet Airwatch User Guide
User Guide – Airwatch for Telenet
PAGE 2
INFOSYS LIMITED,
Bangalore.
Document No. : Version.Rev : 1.5
Authorized by: Signature/:
Date
07-DEC-2016
User Guide – Airwatch for Telenet
PAGE 3
COPYRIGHT NOTICE
© 2016-2017 Infosys Limited, Bangalore, India. All Rights Reserved. Infosys believes the information in this
document is accurate as of its publication date; such information is subject to change without notice. Infosys
acknowledges the proprietary rights of other companies to the trademarks, product names and such other intellectual
property rights mentioned in this document. Except as expressly permitted, neither this documentation nor any part of
it may be reproduced, stored in a retrieval system, or transmitted in any form or by any means, electronic,
mechanical, printing, photocopying, recording or otherwise, without the prior permission of Infosys Limited and/or any
named intellectual property rights holders under this document.
Infosys Limited
Electronic City,
Hosur Road,
Bangalore 560 100
India.
Telephone: 91 80 2852 0261
Fax: 91 80 2852 0362
Website: http://www.infosys.com
User Guide – Airwatch for Telenet
PAGE 4
Table of Contents
CONTENTS 1. INTRODUCTION .................................................................................................................................... 5
2. Audience ............................................................................................................................................... 5
3. Conventions Used in this Manual ......................................................................................................... 5
4. Device Preparation Guide ..................................................................................................................... 5
5. Steps to complete auto enrollment through KNOX ................................................................................ 22
6. STEPS to verify Enrolment status ............................................................................................................ 32
7. STEPS TO VERIFY THE INSTALLATION ............................................................................................... 35
7.1. AIRWATCH LAUNCHER ................................................................................................................ 35
7.2. Webclips on Launcher screen ..................................................................................................... 39
7.3. App installation ........................................................................................................................... 39
8. Steps to Verify Applications installed ................................................................................................. 39
8.1. CONTENT LOCKER: ....................................................................................................................... 39
8.2. SUPPORT app, Yelo app, Play sports app ................................................................................... 41
8.3. WIFI ANALYZER ............................................................................................................................ 41
9. Troubleshooting ...................................................................................................................................... 42
10. Known defects....................................................................................................................................... 42

User Guide – Airwatch for Telenet
PAGE 5
1. INTRODUCTION This document will cover the Detailed Installation guide for Telenet Airwatch Installation
which includes the Knox enrollment and Airwatch Agent setup.
2. Audience This user manual is intended for the following users:
Business users
Technicians
3. Conventions Used in this Manual This user manual uses the following typographical conventions:
Screenshots representing the actual device screen
Screenshots are number tagged as per the procedure steps
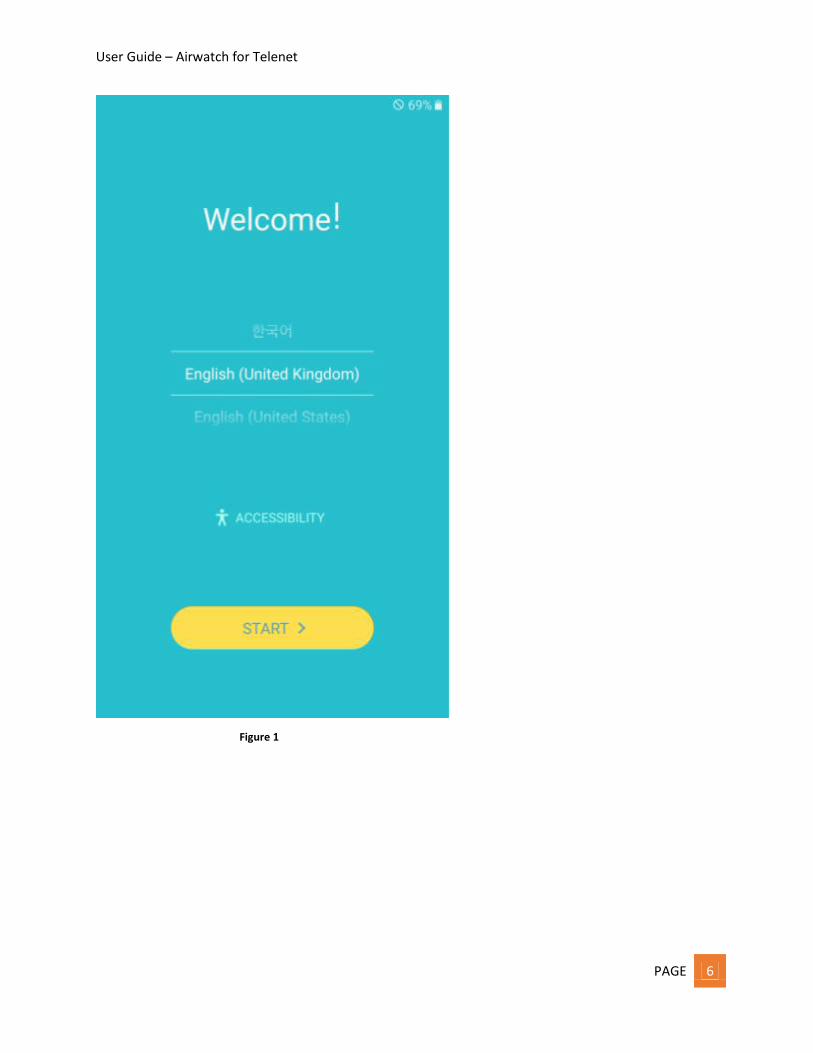
4. Device Preparation Guide The ‘Samsung Galaxy Tab S2’ device should be prepared according to the following steps before it is
enrolled with Airwatch through KNOX
1. Switch on the ‘Samsung Note 5’ device, the below screen will look similar to Figure 1, select the
language as ‘English’ and click ‘Start’
Note: never enter a google id/password or upgrade the OS
User Guide – Airwatch for Telenet
PAGE 6
Figure 1

User Guide – Airwatch for Telenet
PAGE 7
1. Configure ‘Wifi’ settings and press ‘Next’, refer Figure 2
Figure 2

User Guide – Airwatch for Telenet
PAGE 8
2. Samsung terms and conditions screen will be displayed on the device. Check the
‘Privacy Policy’ and click ‘Next’, refer Figure 4
Figure 4

User Guide – Airwatch for Telenet
PAGE 9
3. ‘Terms and conditions’ pop up will be displayed, click ‘Agree’ refer Figure 6
Figure 6
User Guide – Airwatch for Telenet
PAGE 10
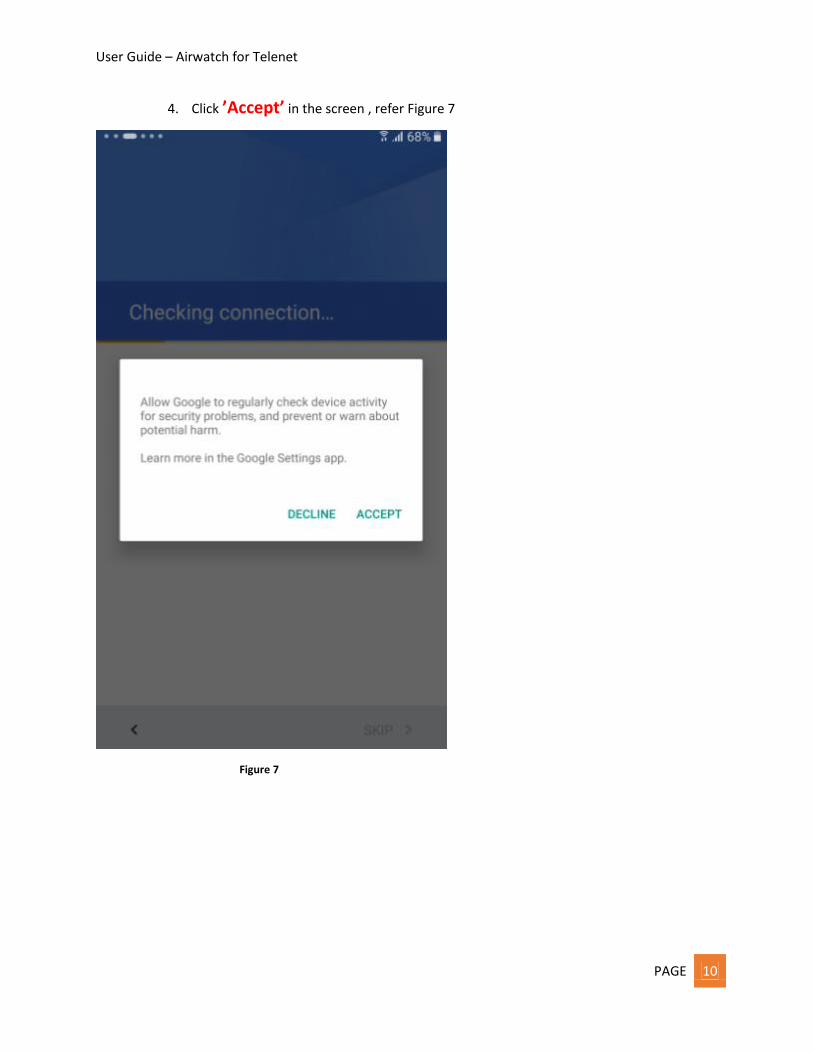
4. Click ’Accept’ in the screen , refer Figure 7
Figure 7

User Guide – Airwatch for Telenet
PAGE 11
5. The screen will be displayed as shown in Figure 8
Figure 8
User Guide – Airwatch for Telenet
PAGE 12
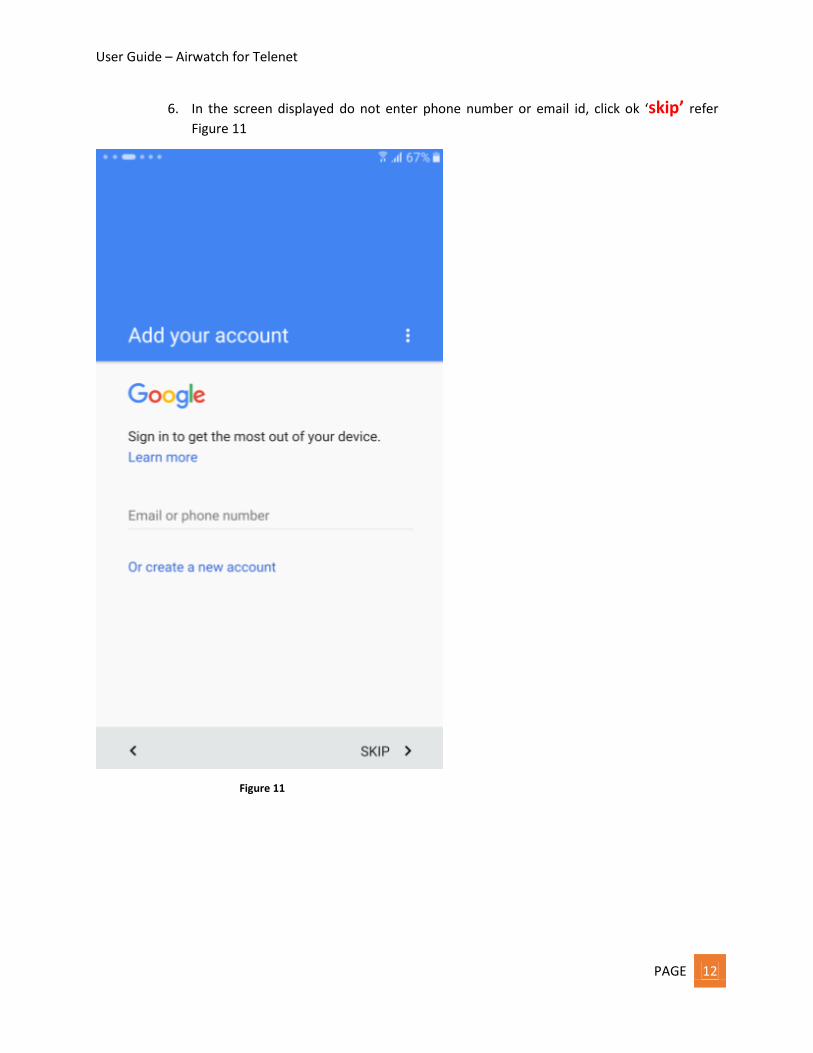
6. In the screen displayed do not enter phone number or email id, click ok ‘skip’ refer
Figure 11
Figure 11

User Guide – Airwatch for Telenet
PAGE 13
7. In the screen displayed click ‘Skip’, refer Figure 12
Figure 12

User Guide – Airwatch for Telenet
PAGE 14
8. In the screen displayed set the time and click on ‘Next’ refer Figure 13
Figure 13
User Guide – Airwatch for Telenet
PAGE 15
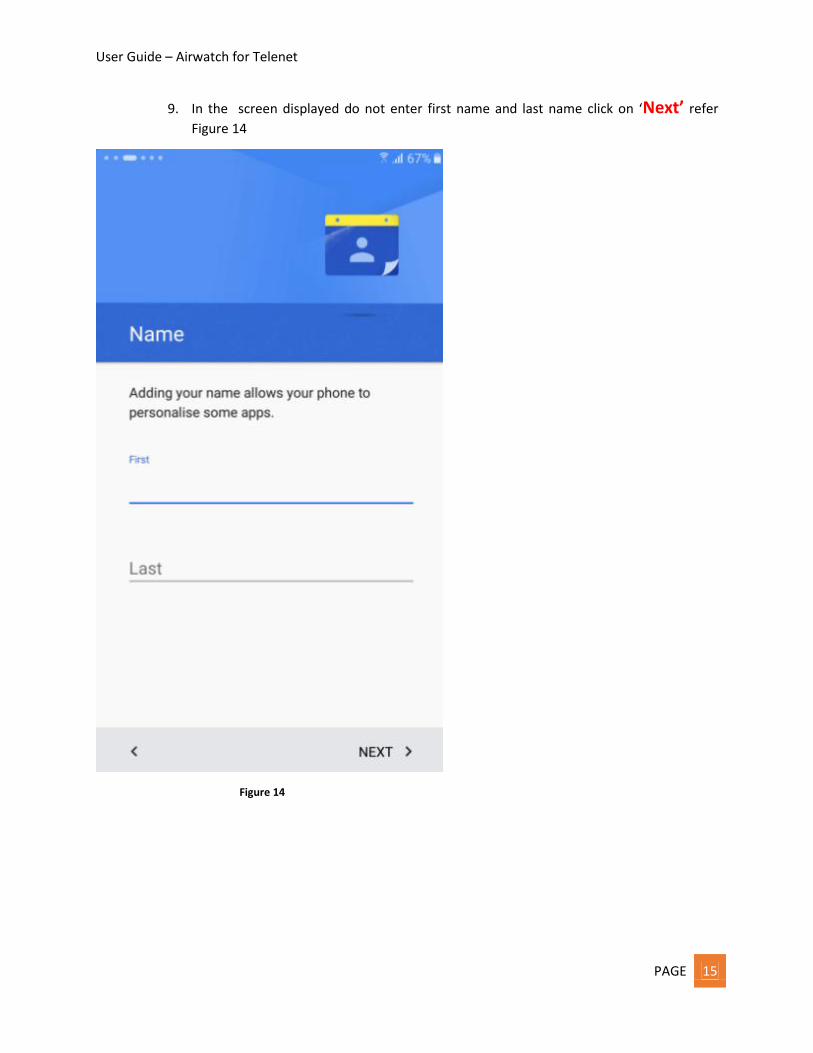
9. In the screen displayed do not enter first name and last name click on ‘Next’ refer
Figure 14
Figure 14

User Guide – Airwatch for Telenet
PAGE 16
10. In the screen displayed select ‘Not now’ option and click on ‘Next’, refer Figure 15
Figure 15

User Guide – Airwatch for Telenet
PAGE 17
11. In the screen displayed , select ‘No, Thank you’ and click ‘Skip’. 6 digit pin can be
set during enrollment so skip this step refer Figure 16
Figure 16
User Guide – Airwatch for Telenet
PAGE 18
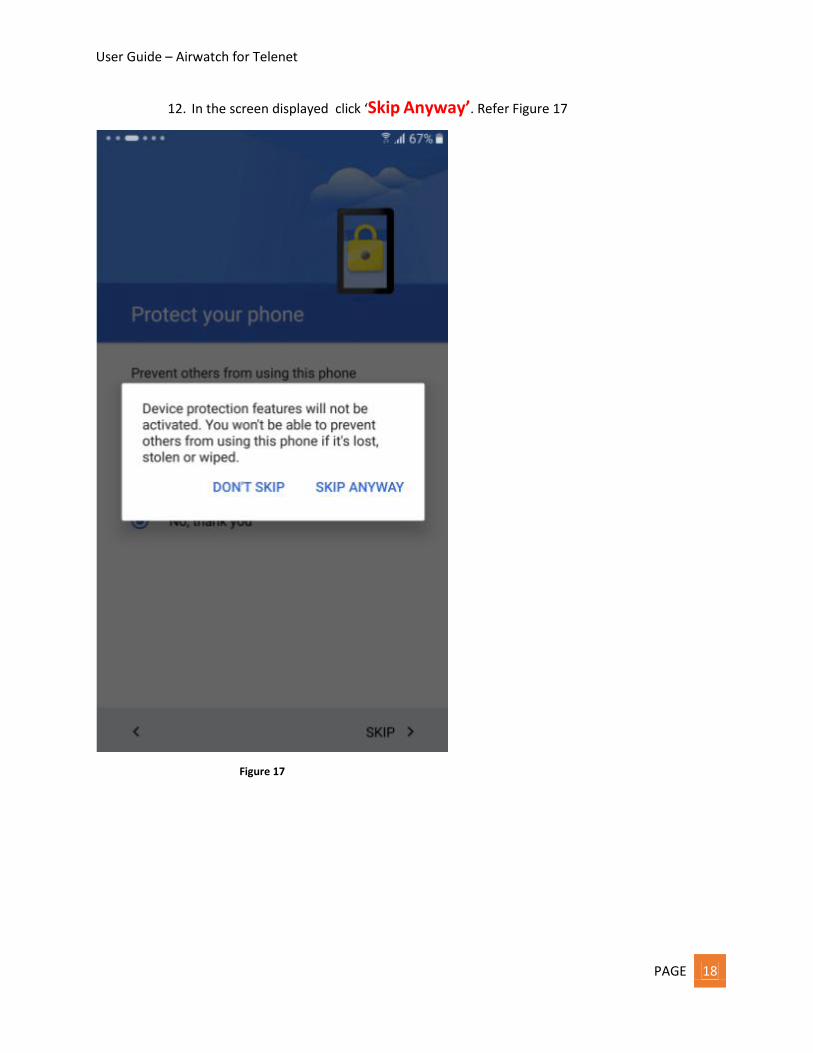
12. In the screen displayed click ‘Skip Anyway’. Refer Figure 17
Figure 17

User Guide – Airwatch for Telenet
PAGE 19
13. In the screen displayed click ‘Next’. Refer Figure 18
Figure 18

User Guide – Airwatch for Telenet
PAGE 20
14. In the screen displayed do not enter any email id and password click ‘skip’ button on
bottom right corner , refer Figure 19
Figure 19

User Guide – Airwatch for Telenet
PAGE 21
15. In the Weather displayed click ‘Next’ , refer Figure 21
Figure 21
User Guide – Airwatch for Telenet
PAGE 22
5. STEPS TO COMPLETE AUTO ENROLLMENT THROUGH KNOX
Airwatch installation and enrollment is automatically triggered. End users or IT Admins must turn on the devices,
connect to Wi-Fi, and finish the setup wizard to complete the KNOX Mobile Enrollment process. An AirWatch
Agent app is downloaded and installed on each mobile device. End users should provide a username and password
to complete the enrollment. The enrollment process will take several minutes.
Refer the screen shots for KNOX enrollment process
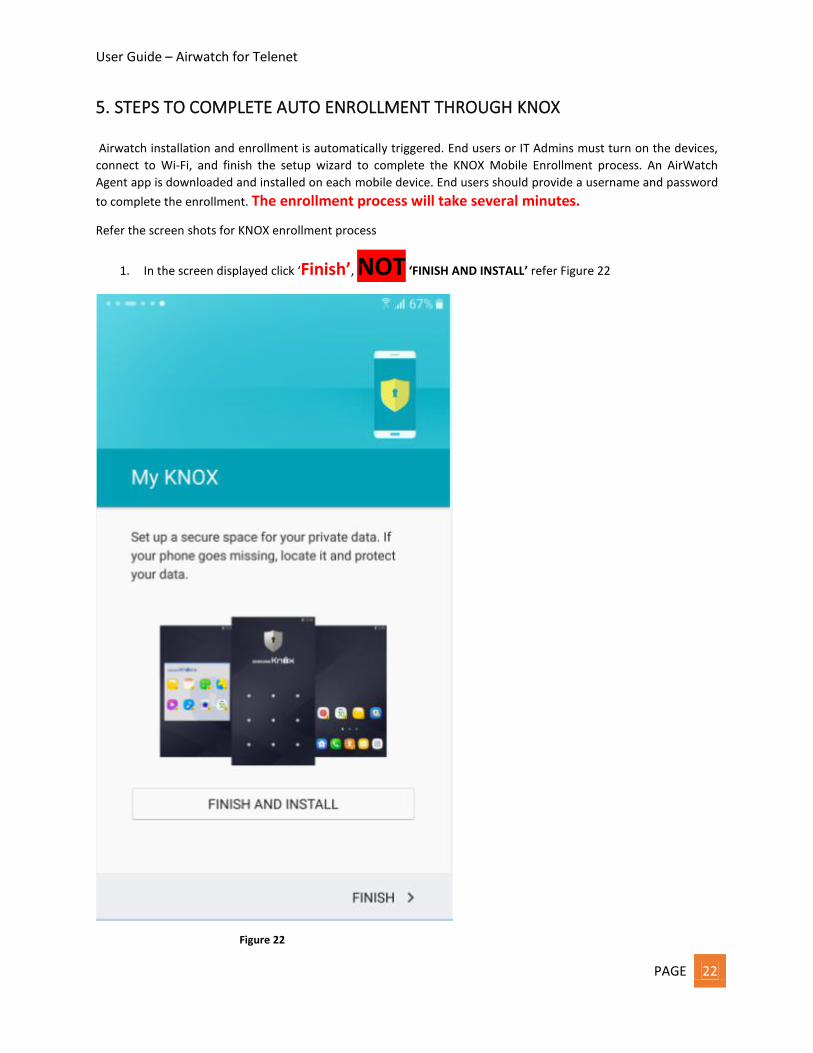
1. In the screen displayed click ‘Finish’, NOT ‘FINISH AND INSTALL’ refer Figure 22
Figure 22

User Guide – Airwatch for Telenet
PAGE 23
2. Several screens will be displayed on which no action is required as shown in Figure 23
Figure 23

User Guide – Airwatch for Telenet
PAGE 24
3. In the screen displayed click ‘Next’, refer Figure 24
Figure 24
User Guide – Airwatch for Telenet
PAGE 25
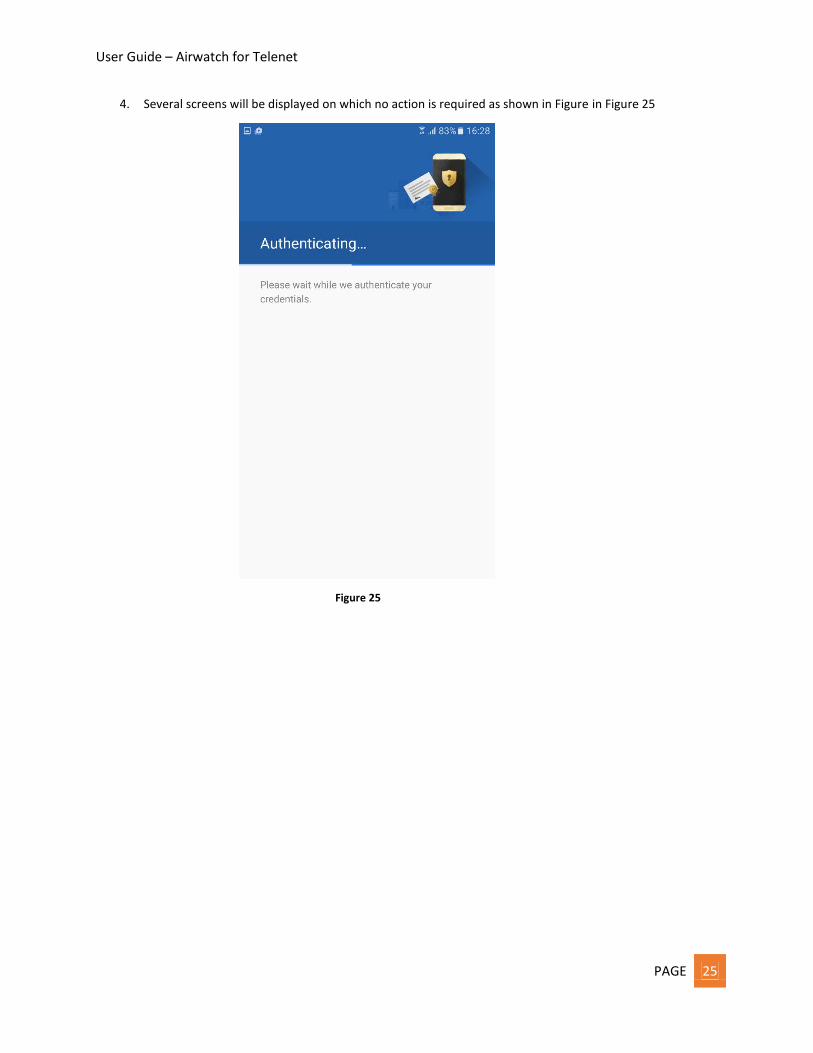
4. Several screens will be displayed on which no action is required as shown in Figure in Figure 25
Figure 25
User Guide – Airwatch for Telenet
PAGE 26
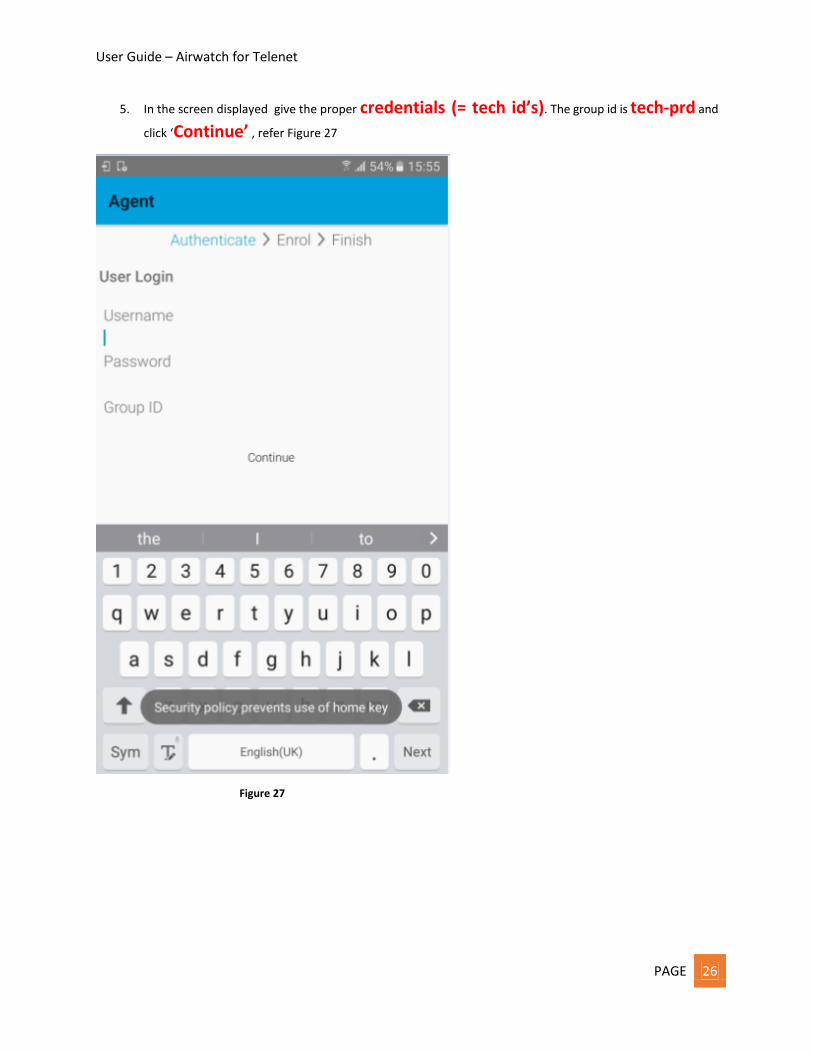
5. In the screen displayed give the proper credentials (= tech id’s). The group id is tech-prd and
click ‘Continue’ , refer Figure 27
Figure 27

User Guide – Airwatch for Telenet
PAGE 27
6. The screen should be displayed as shown in Figure 28
Figure 28
User Guide – Airwatch for Telenet
PAGE 28
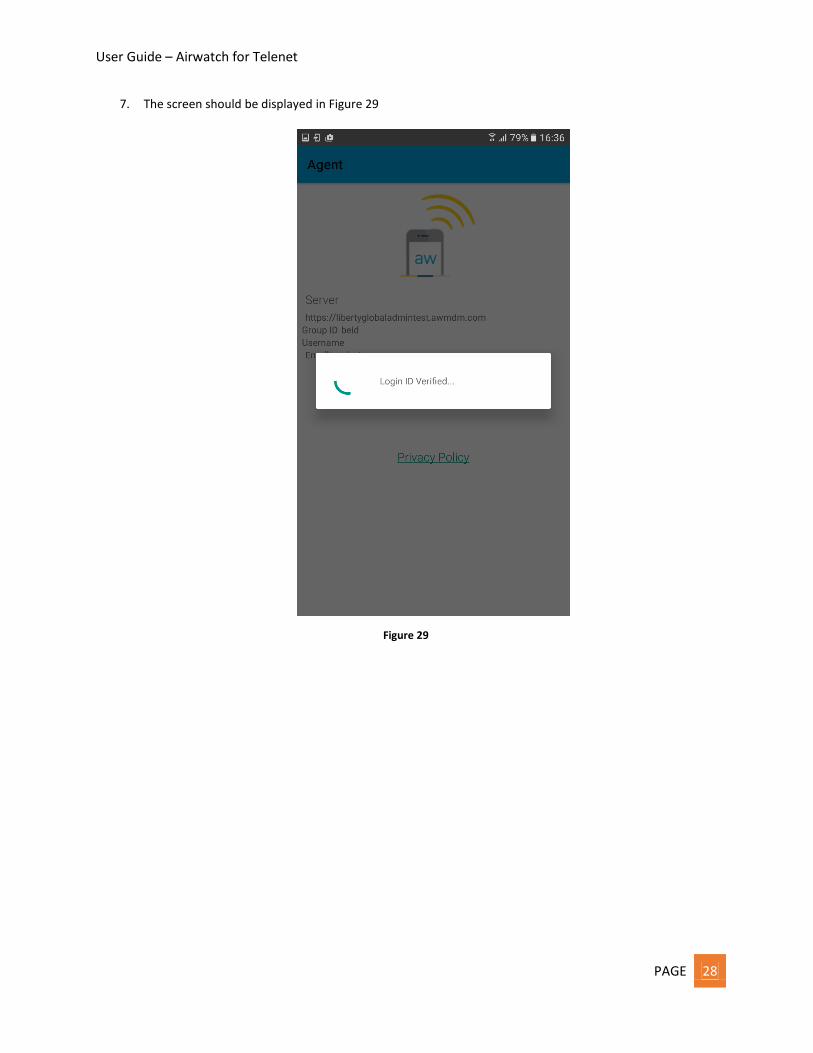
7. The screen should be displayed in Figure 29
Figure 29

User Guide – Airwatch for Telenet
PAGE 29
8. Once login is verified ‘accept’ the terms and conditions, refer Figure 30
Figure 10

User Guide – Airwatch for Telenet
PAGE 30
9. The Airwatch agent home screen will be displayed , refer Figure 31
Figure 21
User Guide – Airwatch for Telenet
PAGE 31
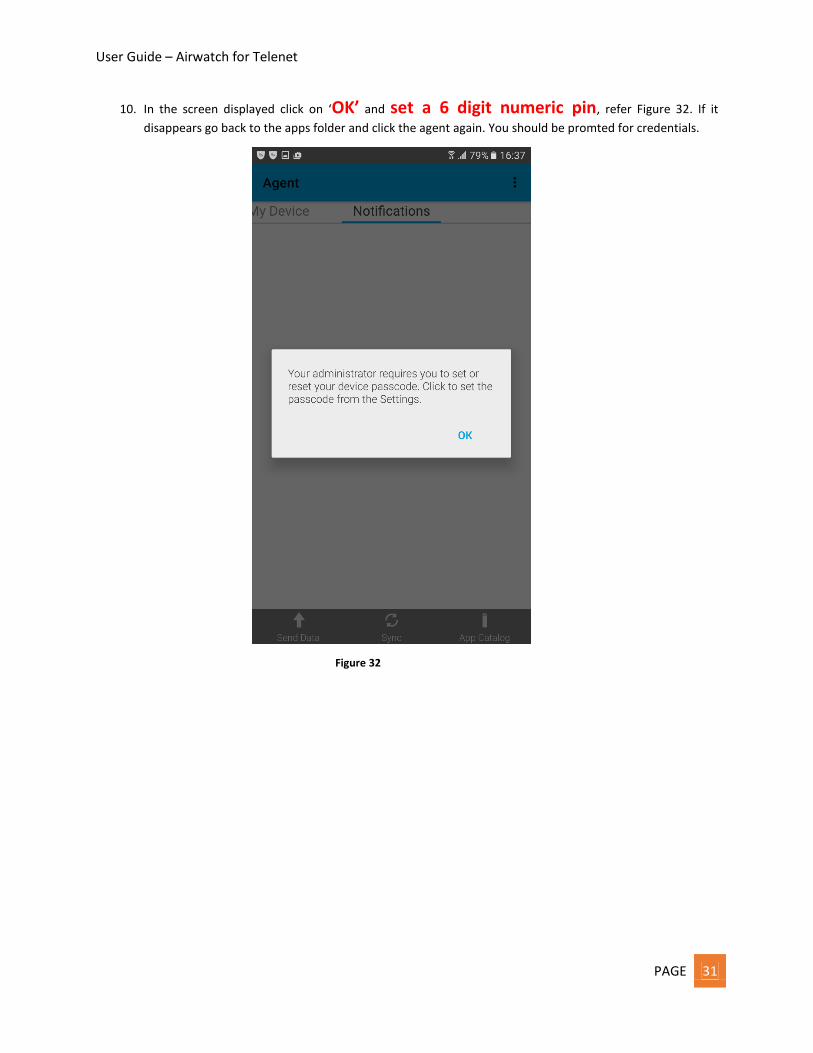
10. In the screen displayed click on ‘OK’ and set a 6 digit numeric pin, refer Figure 32. If it
disappears go back to the apps folder and click the agent again. You should be promted for credentials.
Figure 32

User Guide – Airwatch for Telenet
PAGE 32
6. STEPS TO VERIFY ENROLMENT STATUS When the user follows the above steps, the device will be successfully enrolled to Airwatch
through KNOX. Now the user should verify if the enrolment is successful. Airwatch Agent application will
be installed on the device, the following steps must be followed to ensure successful enrolment
1. AirWatch agent should look like the screen shown in Figure 33
Figure 43

User Guide – Airwatch for Telenet
PAGE 33
User selects the ‘Agent status’ option from the Airwatch agent home screen, the ‘Enrolment’ screen
should be displayed showing enrollment status as ‘Enrolled’ with a green tick mark, refer Figure 34
Figure 54
User Guide – Airwatch for Telenet
PAGE 34
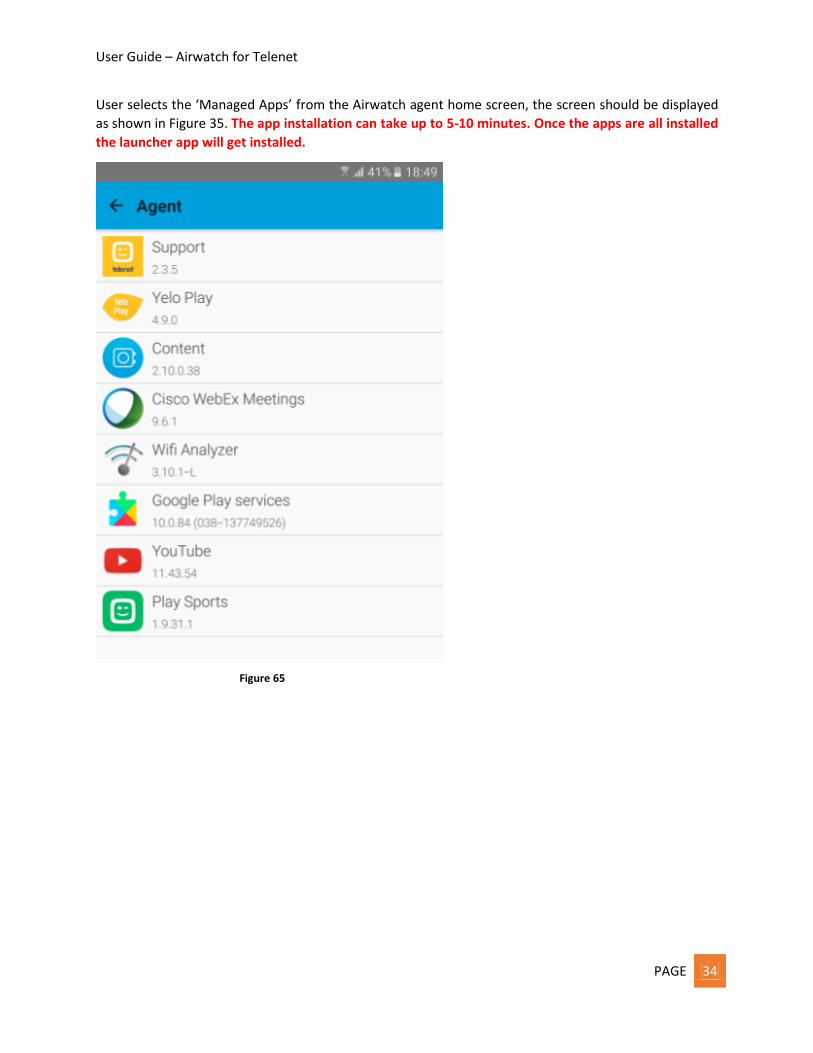
User selects the ‘Managed Apps’ from the Airwatch agent home screen, the screen should be displayed
as shown in Figure 35. The app installation can take up to 5-10 minutes. Once the apps are all installed
the launcher app will get installed.
Figure 65

User Guide – Airwatch for Telenet
PAGE 35
7. STEPS TO VERIFY THE INSTALLATION The user verifies the successful enrolment of the device via Airwatch, now the user must verify if
the device is configured as per the Airwatch configurations. User should follow the steps
mentioned below.
7.1. AIRWATCH LAUNCHER After successful enrolment Airwatch launcher will be pushed to the device. User will be asked to grant
permission for launcher, click on ‘Grant’ button as shown in figure 36 . Sometimes installation
proceeds without having to grant permission. In that case you will be ask to grant permission after the
first reboot.
Figure 76

User Guide – Airwatch for Telenet
PAGE 36
After the permission is granted the user will be navigated to ‘Settings’ , there the current launcher
setting is ‘off’ tap on that and toggle to ‘On’, then press the home button. Refer Figure 37
Figure 37

User Guide – Airwatch for Telenet
PAGE 37
The launcher home screen will look like Figure 38 (Figure to be updated)

User Guide – Airwatch for Telenet
PAGE 38
User Guide – Airwatch for Telenet
PAGE 39
Figure 38
7.2. Webclips on Launcher screen
Telenet, telenet klantenservice, mijn telenet, telenet webmail, feedback tool, wikirepair, install portal &
office login web clips/shortcuts should be displayed on the home screen. When the user click the web
clip the web page should be opened in chrome browser.
7.3. App installation
After the device is enrolled successfully to Airwatch, a list of apps will be installed on the device.
8. Steps to Verify Applications installed User should verify if all the applications installed on the device are working. To verify this click each of
the application icon displayed on the application screen.
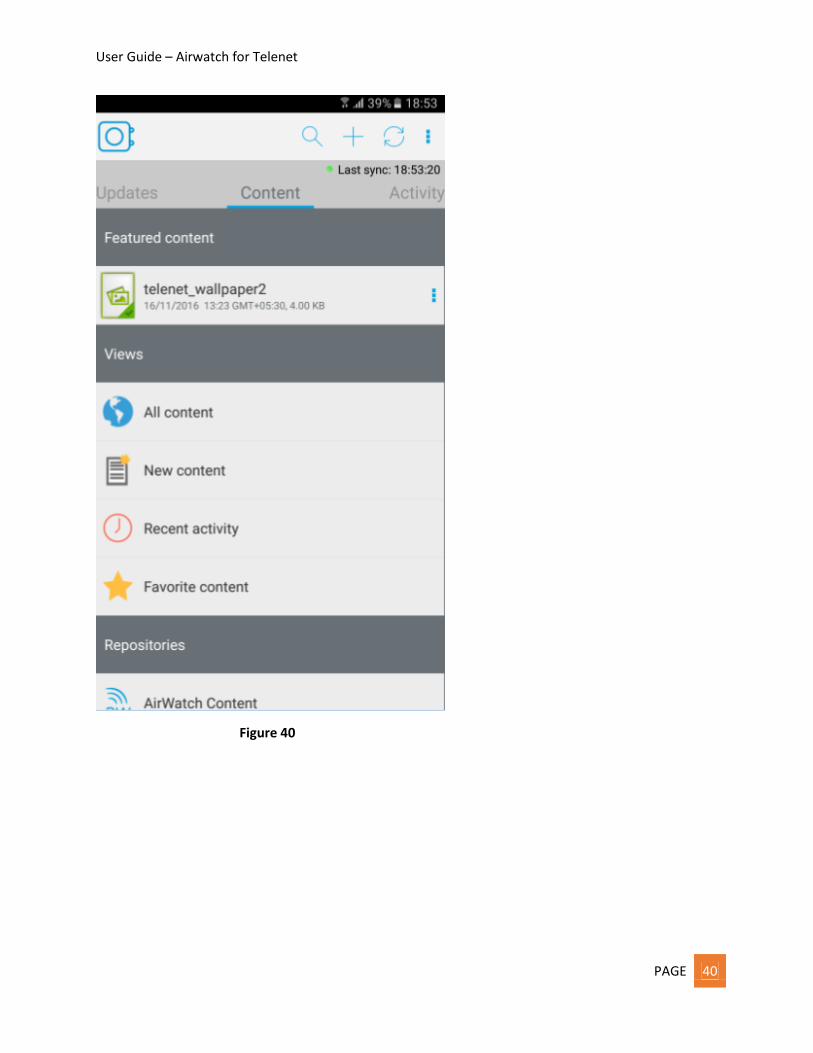
8.1. CONTENT LOCKER: The content locker app contains all the enterprise content. The content available in the content locker
are pushed and managed through Airwatch admin. The user can play/view any of the content like video,
pdf or images available in the content locker. Content available in the content locker can be viewed in
offline mode.
When user selects ‘Content locker’ application from the application screen it should be displayed as
shown in Figure 40 and Figure 41
User Guide – Airwatch for Telenet
PAGE 40
Figure 40

User Guide – Airwatch for Telenet
PAGE 41
Figure 41
8.2. Other apps Verify the following apps are installed
support app,
yelo app,
Wifimeter
playsports app
Tiny scanner
youtube
User Guide – Airwatch for Telenet
PAGE 42
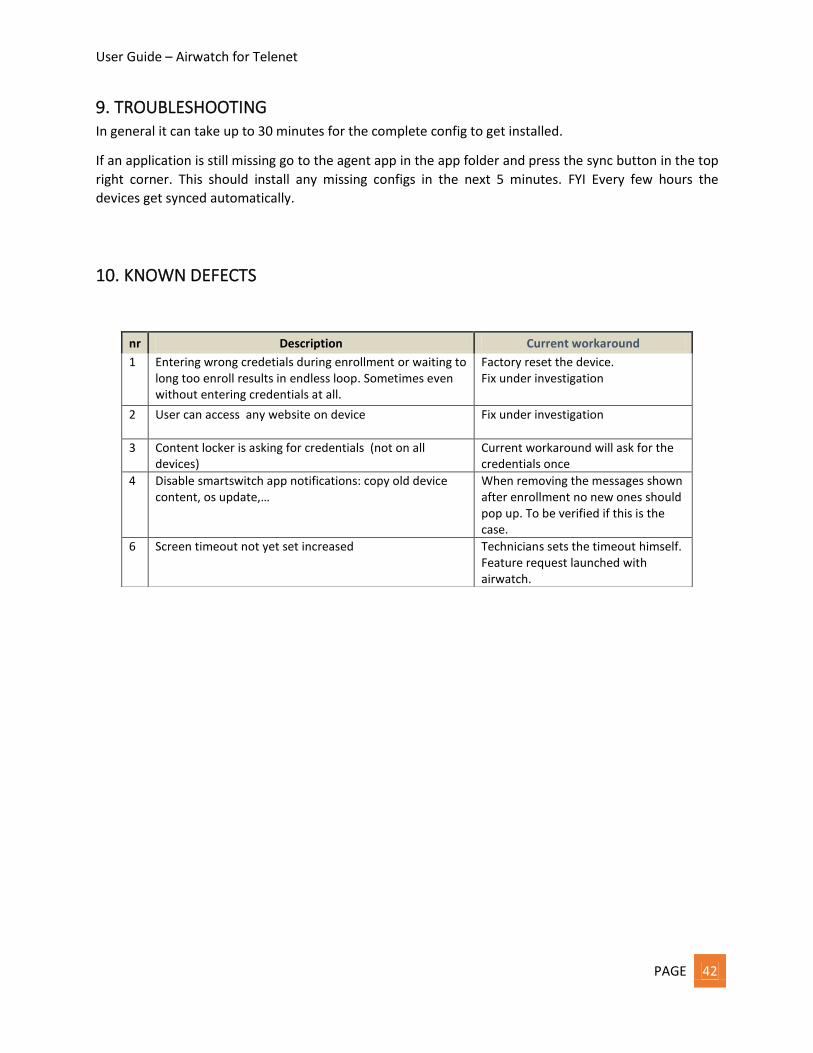
9. TROUBLESHOOTING In general it can take up to 30 minutes for the complete config to get installed.
If an application is still missing go to the agent app in the app folder and press the sync button in the top
right corner. This should install any missing configs in the next 5 minutes. FYI Every few hours the
devices get synced automatically.
10. KNOWN DEFECTS
nr Description Current workaround
1 Entering wrong credetials during enrollment or waiting to long too enroll results in endless loop. Sometimes even without entering credentials at all.
Factory reset the device. Fix under investigation
2 User can access any website on device Fix under investigation
3 Content locker is asking for credentials (not on all devices)
Current workaround will ask for the credentials once
4 Disable smartswitch app notifications: copy old device content, os update,…
When removing the messages shown after enrollment no new ones should pop up. To be verified if this is the case.
6 Screen timeout not yet set increased Technicians sets the timeout himself. Feature request launched with airwatch.