Embed Size (px)
Citation preview
www.novell.com/documentation
System Planning, Deployment, and Best Practices GuideNovell Service Desk
Legal Notices
Novell, Inc. makes no representations or warranties with respect to the contents or use of this documentation, and specifically disclaims any express or implied warranties of merchantability or fitness for any particular purpose. Further, Novell, Inc. reserves the right to revise this publication and to make changes to its content, at any time, without obligation to notify any person or entity of such revisions or changes.
Further, Novell, Inc. makes no representations or warranties with respect to any software, and specifically disclaims any express or implied warranties of merchantability or fitness for any particular purpose. Further, Novell, Inc. reserves the right to make changes to any and all parts of Novell software, at any time, without any obligation to notify any person or entity of such changes.
Any products or technical information provided under this Agreement may be subject to U.S. export controls and the trade laws of other countries. You agree to comply with all export control regulations and to obtain any required licenses or classification to export, re-export or import deliverables. You agree not to export or re-export to entities on the current U.S. export exclusion lists or to any embargoed or terrorist countries as specified in the U.S. export laws. You agree to not use deliverables for prohibited nuclear, missile, or chemical biological weaponry end uses. See the Novell International Trade Services Web page (http://www.novell.com/info/exports/) for more information on exporting Novell software. Novell assumes no responsibility for your failure to obtain any necessary export approvals.
Copyright © 2014 Novell, Inc. All rights reserved. No part of this publication may be reproduced, photocopied, stored on a retrieval system, or transmitted without the express written consent of the publisher.
Novell, Inc.1800 South Novell PlaceProvo, UT 84606U.S.A.www.novell.com
Online Documentation: To access the latest online documentation for this and other Novell products, see the Novell Documentation Web page (http://www.novell.com/documentation).
Novell Trademarks
For Novell trademarks, see the Novell Trademark and Service Mark list (http://www.novell.com/company/legal/trademarks/tmlist.html).
Third-Party Materials
All third-party trademarks are the property of their respective owners.
Contents
About This Guide 5
1 Overview 7
1.1 The Service Desk. . . . . . . . . . . . . . . . . . . . . . . . . . . . . . . . . . . . . . . . . . . . . . . . . . . . . . . . . . . . . . . . . 71.2 Customer Loyalty . . . . . . . . . . . . . . . . . . . . . . . . . . . . . . . . . . . . . . . . . . . . . . . . . . . . . . . . . . . . . . . . . 81.3 Novell Service Desk for ITIL Service Management . . . . . . . . . . . . . . . . . . . . . . . . . . . . . . . . . . . . . . . 81.4 Scalable and Open. . . . . . . . . . . . . . . . . . . . . . . . . . . . . . . . . . . . . . . . . . . . . . . . . . . . . . . . . . . . . . . . 81.5 Cost Effective . . . . . . . . . . . . . . . . . . . . . . . . . . . . . . . . . . . . . . . . . . . . . . . . . . . . . . . . . . . . . . . . . . . . 81.6 Instant Upgrades . . . . . . . . . . . . . . . . . . . . . . . . . . . . . . . . . . . . . . . . . . . . . . . . . . . . . . . . . . . . . . . . . 81.7 Supported ITIL Processes . . . . . . . . . . . . . . . . . . . . . . . . . . . . . . . . . . . . . . . . . . . . . . . . . . . . . . . . . . 81.8 Improved Service Support . . . . . . . . . . . . . . . . . . . . . . . . . . . . . . . . . . . . . . . . . . . . . . . . . . . . . . . . . . 91.9 Achieving Service Support . . . . . . . . . . . . . . . . . . . . . . . . . . . . . . . . . . . . . . . . . . . . . . . . . . . . . . . . . 101.10 Conclusion . . . . . . . . . . . . . . . . . . . . . . . . . . . . . . . . . . . . . . . . . . . . . . . . . . . . . . . . . . . . . . . . . . . . . 10
2 ITIL Primer 13
2.1 Introduction . . . . . . . . . . . . . . . . . . . . . . . . . . . . . . . . . . . . . . . . . . . . . . . . . . . . . . . . . . . . . . . . . . . . 132.2 Service Strategy - Financial Management . . . . . . . . . . . . . . . . . . . . . . . . . . . . . . . . . . . . . . . . . . . . . 142.3 Service Strategy - Service Portfolio Management . . . . . . . . . . . . . . . . . . . . . . . . . . . . . . . . . . . . . . . 152.4 Service Design – Service Catalogue . . . . . . . . . . . . . . . . . . . . . . . . . . . . . . . . . . . . . . . . . . . . . . . . . 152.5 Service Desk - Service Level Management . . . . . . . . . . . . . . . . . . . . . . . . . . . . . . . . . . . . . . . . . . . . 162.6 Service Transition - Change Management. . . . . . . . . . . . . . . . . . . . . . . . . . . . . . . . . . . . . . . . . . . . . 162.7 Service Transition - Configuration Management . . . . . . . . . . . . . . . . . . . . . . . . . . . . . . . . . . . . . . . . 172.8 Service Transition - Release and Deployment Management . . . . . . . . . . . . . . . . . . . . . . . . . . . . . . . 172.9 Service Transition - Knowledge Management . . . . . . . . . . . . . . . . . . . . . . . . . . . . . . . . . . . . . . . . . . 182.10 Service Operation - Incident Management. . . . . . . . . . . . . . . . . . . . . . . . . . . . . . . . . . . . . . . . . . . . . 192.11 Service Operation - Problem Management . . . . . . . . . . . . . . . . . . . . . . . . . . . . . . . . . . . . . . . . . . . . 192.12 Service Operation - Request Fulfillment Overview. . . . . . . . . . . . . . . . . . . . . . . . . . . . . . . . . . . . . . . 20
3 Pre-Design Activities 23
3.1 Business Assessment . . . . . . . . . . . . . . . . . . . . . . . . . . . . . . . . . . . . . . . . . . . . . . . . . . . . . . . . . . . . 233.2 Who Are Your Customers and What Business Function Do They Have? . . . . . . . . . . . . . . . . . . . . . 253.3 What Do Customers Need Support For? . . . . . . . . . . . . . . . . . . . . . . . . . . . . . . . . . . . . . . . . . . . . . . 273.4 What Types of Requests Will Customers Make?. . . . . . . . . . . . . . . . . . . . . . . . . . . . . . . . . . . . . . . . 293.5 What Response Are Customers Expecting? . . . . . . . . . . . . . . . . . . . . . . . . . . . . . . . . . . . . . . . . . . . 303.6 Who Are The Support Staff? . . . . . . . . . . . . . . . . . . . . . . . . . . . . . . . . . . . . . . . . . . . . . . . . . . . . . . . 323.7 What Can The Staff Support? . . . . . . . . . . . . . . . . . . . . . . . . . . . . . . . . . . . . . . . . . . . . . . . . . . . . . . 323.8 What Types of Requests Can the Staff Handle? . . . . . . . . . . . . . . . . . . . . . . . . . . . . . . . . . . . . . . . . 333.9 What Response Can the Staff Provide? . . . . . . . . . . . . . . . . . . . . . . . . . . . . . . . . . . . . . . . . . . . . . . 343.10 What Metrics Will Be Used?. . . . . . . . . . . . . . . . . . . . . . . . . . . . . . . . . . . . . . . . . . . . . . . . . . . . . . . . 35
4 Design Activities 39
4.1 Database . . . . . . . . . . . . . . . . . . . . . . . . . . . . . . . . . . . . . . . . . . . . . . . . . . . . . . . . . . . . . . . . . . . . . . 394.1.1 Database Versions . . . . . . . . . . . . . . . . . . . . . . . . . . . . . . . . . . . . . . . . . . . . . . . . . . . . . . . 394.1.2 TCP Ports . . . . . . . . . . . . . . . . . . . . . . . . . . . . . . . . . . . . . . . . . . . . . . . . . . . . . . . . . . . . . . 40
Contents 3
4.1.3 WAN . . . . . . . . . . . . . . . . . . . . . . . . . . . . . . . . . . . . . . . . . . . . . . . . . . . . . . . . . . . . . . . . . . 404.1.4 Default Character Set . . . . . . . . . . . . . . . . . . . . . . . . . . . . . . . . . . . . . . . . . . . . . . . . . . . . . 404.1.5 Collation. . . . . . . . . . . . . . . . . . . . . . . . . . . . . . . . . . . . . . . . . . . . . . . . . . . . . . . . . . . . . . . . 404.1.6 Database User. . . . . . . . . . . . . . . . . . . . . . . . . . . . . . . . . . . . . . . . . . . . . . . . . . . . . . . . . . . 404.1.7 Database Settings . . . . . . . . . . . . . . . . . . . . . . . . . . . . . . . . . . . . . . . . . . . . . . . . . . . . . . . . 414.1.8 Database Schema . . . . . . . . . . . . . . . . . . . . . . . . . . . . . . . . . . . . . . . . . . . . . . . . . . . . . . . . 414.1.9 Creating the Schema . . . . . . . . . . . . . . . . . . . . . . . . . . . . . . . . . . . . . . . . . . . . . . . . . . . . . . 41
4.2 Configuring Your System . . . . . . . . . . . . . . . . . . . . . . . . . . . . . . . . . . . . . . . . . . . . . . . . . . . . . . . . . . 434.2.1 Considerations for System Configuration . . . . . . . . . . . . . . . . . . . . . . . . . . . . . . . . . . . . . . 434.2.2 Configuration Steps . . . . . . . . . . . . . . . . . . . . . . . . . . . . . . . . . . . . . . . . . . . . . . . . . . . . . . . 444.2.3 Customizing or Creating Workflows. . . . . . . . . . . . . . . . . . . . . . . . . . . . . . . . . . . . . . . . . . . 564.2.4 Service Request and Change Management Workflows . . . . . . . . . . . . . . . . . . . . . . . . . . . 644.2.5 Creating Teams . . . . . . . . . . . . . . . . . . . . . . . . . . . . . . . . . . . . . . . . . . . . . . . . . . . . . . . . . . 71
4.3 Integrating Service Desk with ZENworks Configuration Management . . . . . . . . . . . . . . . . . . . . . . 1334.3.1 Prerequisites . . . . . . . . . . . . . . . . . . . . . . . . . . . . . . . . . . . . . . . . . . . . . . . . . . . . . . . . . . . 1344.3.2 Switch on Integration within Novell Service Desk . . . . . . . . . . . . . . . . . . . . . . . . . . . . . . . 1344.3.3 Telling Novell Service Desk about your ZENworks Configuration Management
System. . . . . . . . . . . . . . . . . . . . . . . . . . . . . . . . . . . . . . . . . . . . . . . . . . . . . . . . . . . . . . . . 1364.3.4 Telling ZENworks Configuration Management about your Novell Service Desk
System. . . . . . . . . . . . . . . . . . . . . . . . . . . . . . . . . . . . . . . . . . . . . . . . . . . . . . . . . . . . . . . . 1384.3.5 Importing Assets from ZENworks Configuration Management into Novell Service
Desk. . . . . . . . . . . . . . . . . . . . . . . . . . . . . . . . . . . . . . . . . . . . . . . . . . . . . . . . . . . . . . . . . . 1394.3.6 Create Role for Novell Service Desk Users in ZENworks Configuration Management . . . 1404.3.7 Creating Administrators in ZENworks Configuration Management for Novell Service
Desk Users . . . . . . . . . . . . . . . . . . . . . . . . . . . . . . . . . . . . . . . . . . . . . . . . . . . . . . . . . . . . 1414.3.8 Assigning a Role to Administrator Groups in ZENworks Configuration Management
for Novell Service Desk Users . . . . . . . . . . . . . . . . . . . . . . . . . . . . . . . . . . . . . . . . . . . . . . 1414.3.9 Verifying that the Integration Is Working . . . . . . . . . . . . . . . . . . . . . . . . . . . . . . . . . . . . . . 1424.3.10 Verifying that the Remote Control is working. . . . . . . . . . . . . . . . . . . . . . . . . . . . . . . . . . . 143
4 Novell Service Desk System Planning, Deployment, and Best Practices Guide
About This Guide
The purpose of this System Planning, Deployment, and Best Practices Guide is to describe the items that need to be considered when designing a Novell Service Desk solution and deploying it across small and large scale enterprises.
The information in this guide is organized as follows:
Chapter 1, “Overview,” on page 7 Chapter 2, “ITIL Primer,” on page 13 Chapter 3, “Pre-Design Activities,” on page 23 Chapter 4, “Design Activities,” on page 39
Audience
This guide is intended for administrators.
Feedback
We want to hear your comments and suggestions about this manual and the other documentation included with this product. Please use the User Comments feature at the bottom of each page of the online documentation.
Additional Documentation
Novell Service Desk is supported by other documentation that you can use to learn about and implement the product. For additional documentation, see Novell Service Desk documentation Web site (http://www.novell.com/documentation/servicedesk7/)
About This Guide 5
6 Novell Service Desk System Planning, Deployment, and Best Practices Guide
1 1Overview
Promoting a culture of service management, both internally and externally, is the key to being more relevant to customers within any market vertical. This allows an organization to shape its products and service based on the specific requirements of its customers and encourages business confidence by providing more reliable service and support.
Internally, IT service management encourages a clear understanding of actual IT capabilities, and promotes IT service continuity. In most cases, the largest percentage of the IT spend is on the day-to-day support costs and this can be reduced by an effective service management process.
Service management ensures IT resources are aligned with business requirements, and allows the IT department to appropriately identify points of flexibility and adaptability within the services they provide. This ensures service issues and change requirements are handled efficiently and effectively, to keep organizations running at an optimum level.
1.1 The Service DeskThe Service Desk provides the essential daily contact between customers, users, IT service and any relevant third-party support organization. The main objective of the service desk is to drive and improve service support to, and on behalf of an organization.
This customer-facing support service is a single point of contact that provides advice, guidance and rapid restoration of normal services to its customers and users. It handles Incidents, Problems and Change requests. More than this, it also manages maintenance contracts, software licenses, and provides Service Level Management, Configuration Management.
The successful implementation of a service desk results in a professional service that builds business confidence and provides greater customer satisfaction. This is a result of the professional service that is positioned to provide a consolidated and fiscally positive business activity that impacts all aspects of service beyond the IT department. The key to service desk success is the employment of professional people, well-defined and repeatable processes and good tools, which in turn makes the product or service being supported, to some degree, immaterial.
Adopting a service management approach results in benefits across all level of any business:
Customers – obtain a sustainable, reliable, secure, quality service Line Management - achieve greater control over the change management process Senior Management – can monitor performance and adjust resources appropriately Boards - gain confidence from the adoption of best practices service, which in turn mitigates
personal risk Business Partners - provides greater control over inter-business risks
Overview 7
1.2 Customer LoyaltyThe IT group within an organization can use customer feedback accessed through service and support, to continually improve . By responding consistently and appropriately to customer requests, IT is seen be delivering what the greater organization needs.
To be successful at this endeavor, organizations can use technology to enhance the business process, by harnessing IT to deliver improved customer satisfaction. Businesses can employ service management best practices and measure its service results, in an effort to promote an environment of continual improvement.
1.3 Novell Service Desk for ITIL Service ManagementNovell Service Desk for ITIL Service Management is a complete service management tool for the enterprise designed around ITIL. Based on open standards and a Web 2.0 interface, Novell Service Desk enables organizations to implement best practices in a matter of weeks, not months.
Supporting 11 core ITIL processes out-of-the-box and integrated CMDB, Novell Service Desk enables full visibility into the organization’s infrastructure and support services. Instantly identify whether your business is delivering against Key Performance Indicators (KPI’s) such as Service Level Agreements, response times and spot rates.
1.4 Scalable and OpenNovell Service Desk is highly scalable supporting thousands of concurrent users with quick response times. Installation and configuration is just as easy for a small organization as it is for a department with thousands of technicians and clients. Any browser can be used to access the system. And because the browser interface is pure HTML (no downloads or plug-ins) there is zero cost for client installation and maintenance.
1.5 Cost EffectiveNovell Service Desk focuses less on consulting and more on solutions. The software license costs represents 98% of the total cost of the solution. The software has been specifically designed for customizing simple toggles directly in the user interface, as well as standard HTML and CSS. Novell and its partners are more interested in solving your business problems. Therefore, our consulting focuses more on business process re-engineering and training, not software programming.
1.6 Instant UpgradesOne of the significant advantages of Novell Service Desk is the ability to upgrade to the latest release with a single click. This is very rare in the Enterprise software segment, which traditionally focuses on upgrade fees and heavy consulting services.
1.7 Supported ITIL Processes Request Fulfilment: The Request Fulfillment process manages Service Requests for information
or advice.
8 Novell Service Desk System Planning, Deployment, and Best Practices Guide
Incident Management: The Incident Management process aims to restore normal service operation as quickly as possible.
Problem Management: Problem Management is to prevent Incidents from happening and to minimize the Impact of Incidents that cannot be prevented.
Change Management: The Change Management process ensures that standardized methods and procedures are used for efficient and prompt handling of all changes with minimum disruption to services.
Configuration Management: Configuration Management provides a logical model of the infrastructure or a service.
Knowledge Management: The primary purpose of Knowledge Management is to improve efficiency by reducing the need to rediscover knowledge.
Service Level Management: The process of defining, agreeing, documenting and managing levels of customer service that are required and cost justified.
Service Catalog Management: Service Catalogs provide the details, current status and service interdependencies on all operational services and those being prepared to be run operationally.
Service Portfolio Management: The process of designing a strategy to serve customers, and to develop the service provider’s offerings and capabilities.
Financial Management: Financial Management quantifies, in financial terms, the value of IT services for a business and IT department. This includes measuring the value of the underpinning infrastructure used to provide IT services, as well as qualifying operational forecasts.
Release and Deployment Management: The purpose of Release and Deployment Management is to maintain the integrity of an organization’s production environment when implementing releases.
1.8 Improved Service SupportAt the point organizations are judged based on the quality of their service support, businesses need to assess how their IT services meet the customer and business requirements. Where a support service already exists, an organization needs to ask the following questions:
Does our support team log and understand the technical nature of customer difficulty at first point of contact?
Do they respond relevant to the degree of urgency stipulated by the customer? Does the support team communicate with the customer regarding the follow-up activity? Do they meet the expectations outlined to the customer? Do they complete work with the minimum disruption to the customer, and in a positive and
professional manner? Is customer follow-up action taken? For example, ensure the issue is resolved and the customer
is happy.
Organizations need to know that all service requests are handled in a consistent manner and with good communication as business confidence is gained when customers know that a support service is managed in this way. Confidence is lost when service requests appear to go into a “black hole”. That is, a customer service request is dealt with using an unpredictable and inconsistent process.
The inconsistency may be due to the support team having no formal processes or standardized procedures. This means the staff cannot rely on their colleagues for assistance, as no-one really knows what is expected of them. In this situation, the service staff have no real idea how their role affects the organization as a whole.
Overview 9
To successfully differentiate an organization within any market, high quality and predictable IT service is required to drive increased business and revenue. However, this requires the IT service support process to move from an ad-hoc, chaotic process to an ideal of value-add service.
1.9 Achieving Service SupportTo build a service support culture that underpins the success of an organization, strong leadership and vision is required. To develop a business based on service, an organization must:
Understand its current position. Is the service offering: Chaotic? Reactive? Proactive? Service? Or Value?
Set the goal, regarding the level of service management needed to best support the business. Set the right personal performance metrics and rewards that will encourage staff beyond fire-
fighting and reactive support mode Dedicate time and training to document repeatable processes and become proficient at their
execution Continually review the service, to ensure an active predictable service quality is maintained.
The implementation of formalized processes provides cost-effective and consistent IT services, which allow organizations to handle service requests and change in an efficient way with minimal disruption to customers. Such improvements to the quality of service and support, allows IT service to become a true business asset.
For organizations to successfully capitalize on the potential of IT services they must:
Develop a culture of IT operations excellence Create well-defined, repeatable processes that undergo continual refinement Build an organizational structure that underpins the processes Measure and report on the success and failure of the processes
1.10 ConclusionThe implementation of service support standards provides organizations with the opportunity to differentiate their business and service offerings from their competitors. To be successful, an organization must make an honest assessment of its current position and use this as the basis for planning its future achievements.
To successfully provide predictable, high quality service, businesses must develop formalized processes that are constantly monitored and reviewed. In order to achieve this, the service desk application adopted by the organization must tightly integrate Incident, Problem and Change Management with an easy-to-use workflow engine and the Service Level Management process. To ensure the cost effectiveness of IT infrastructure, an embedded CMDB must be easily accessible to the change management team.
To guarantee the service desk is running at an optimum level and meeting its service targets, reports should be easy to generate and readily distributed to the relevant parties. And as customer communication is paramount for maintaining satisfaction, this should be provided through multiple channels, including email and a customer portal. A central port of knowledge should also be readily accessible to re-cycle useful information and solutions, but also empower customers to provide their own fixes.
10 Novell Service Desk System Planning, Deployment, and Best Practices Guide
The change process required to implement a culture of service and support, requires support across the organization as a whole. A standards-based approach such as ITIL provides the guidelines for making the change, which result in the alignment of business objectives and customer needs with IT infrastructure that provides benefits across all facets of the organization and ultimately to the bottom-line.
Overview 11

12 Novell Service Desk System Planning, Deployment, and Best Practices Guide
2 2ITIL Primer
Section 2.1, “Introduction,” on page 13 Section 2.2, “Service Strategy - Financial Management,” on page 14 Section 2.3, “Service Strategy - Service Portfolio Management,” on page 15 Section 2.4, “Service Design – Service Catalogue,” on page 15 Section 2.5, “Service Desk - Service Level Management,” on page 16 Section 2.6, “Service Transition - Change Management,” on page 16 Section 2.7, “Service Transition - Configuration Management,” on page 17 Section 2.8, “Service Transition - Release and Deployment Management,” on page 17 Section 2.9, “Service Transition - Knowledge Management,” on page 18 Section 2.10, “Service Operation - Incident Management,” on page 19 Section 2.11, “Service Operation - Problem Management,” on page 19 Section 2.12, “Service Operation - Request Fulfillment Overview,” on page 20
2.1 IntroductionYou don't need to be certified in ITIL or have any intention of implementing it to use Novell Service Desk. However, you should have an understanding of the main concepts as ITIL is well on the way to becoming the de facto approach for running I.T within an organization.
The objective of ITIL is to provide IT services that are fit for purpose, stable and reliable so that customers trust them as a utility. This is achieved by encouraging adoption of a common framework of practices across all areas of IT with the single aim of delivering value to the business.
An ITIL approach to service management protects an organization's IT investment. It ensures baseline services and build capabilities to learn in one area of the organization while providing improvements elsewhere. ITIL delivers service management functionality with sound structure, stability and strength that is built on principles, methods and tools.
The essence of ITIL core practice is captured by the Service Lifecycle that demonstrates an iterative and multidimensional approach to providing services. The phases of the Service Lifecycle include:
Service Strategy: sets the objectives and performance expectations for IT Services and IT Service Management in line with the organizational needs.
Service Design: focuses on designing new or changed services for introduction into the production environment.
Service Transition: plans and manages the capacity and resources needed to package, build, test and deploy a release into production, while establishing the service within the customer and stakeholder requirements.
ITIL Primer 13
Service Operations: coordinates and conducts activities and processes needed to deliver and support services at agreed levels to business users and customers.
Continual Service Improvement: constantly aligns and realigns IT service to the evolving business requirements by identifying and implementing to the IT services that underpin the business processes.
With each core phase there are various processes that help to deliver the desired outcomes (Novell Service Desk has up to 11 process depending on version):
Financial Management (Service Strategy) Service Portfolio (Service Strategy) Service Catalog (Service Design) Service Level Management (Service Design) Change Management (Service Transition) Service Asset and Configuration Management (Service Transition) Release and Deployment (Service Transition) Knowledge Management (Service Transition) Incident Management (Service Operation) Problem Management (Service Operation) Request Fulfillment (Service Operation)
2.2 Service Strategy - Financial ManagementFinancial Management quantifies, in financial terms, the value of IT services for the business and IT department. This includes measuring the value of the underpinning infrastructure that provides the services and qualifying operational forecasts. Applying a services approach to IT, financial management helps identify, document and agree on the value of services being provisioned by IT, and provides service demand modelling and management.
With a goal to ensure funding for the delivery and consumption of services, Financial Management focuses on the demand and supply requirements based on business strategy, capacity inputs and forecasting use. As a transitional role between an organization's corporate finances and service management, Financial Management calculates and assigns a monetary value to a Service and service components to allow costs to be spread across the organization.
The monetary value is derived by calculating the operating and capital costs, which include the investments made in hardware and software license costs, annual maintenance fees for hardware and software and personnel resources used to support and maintain the services, across the number of Users.
Tightly integrated throughout the application, Financial Management derives hierarchical costs from within the CMDB and considers Org Units as Cost Centers, while extending functionality built into the Service Item costs calculator. Used as a forecasting tool, it provides the service organization with information about pricing a service, by detailing the contributing cost factors and applying concepts such as cost splitting across services that leverage common infrastructure. Because the information is stored in the central CMDB repository, organizations can generate their own reports and all data is broken down by cost center, ready to be reassembled in real time for the User interface to assist with business planning and the budgeting processes.
14 Novell Service Desk System Planning, Deployment, and Best Practices Guide
2.3 Service Strategy - Service Portfolio ManagementThe Service Portfolio details the commitments and investments made by a Service Provider to its customers and within the markets they service. It contains current contractual obligations, services under development and continuing service improvement programs.
The Portfolio represents all engaged resources and resources being released during the different phases of the Service Lifecycle. It includes the Service Pipeline that consists of services under development and the Service Catalog, which includes customer visible active services that have the potential to recover costs or earn profits for the Services provided.
Service Portfolio Management is a dynamic and ongoing process that covers the following stages in work practices:
Define - list services, confirm business cases and verify portfolio data Analyze - maximize portfolio value, set priorities Approve - finalize portfolio proposal, authorize services and resources Charter - communicate decision and allocate resources.
Service Portfolio Management in the system allows organizations to create Service Categories that include business-related attributes, such as business processes supported, business owners and business users. This ensures that organizations record all relevant information against the Service.
Organizations can further optimize their Service Portfolio Management by tracking and reporting on Service Offering and Service Component usage, Service Level performance and costs. This includes the functionality to calculate break-even points (B.E.P.) for offering a service, which allows support organizations to charge the appropriate cost for offering the service to their internal or external customers. This is achieved by recording of financial attributes against services, including service cost, service charges and service revenue.
2.4 Service Design – Service CatalogueThe Service Catalogue provides the ability to contain critical information in a central repository accessible by both the IT department and the Business.
The information contained within the Service Catalogue relates to all Services provided by the IT department to the Business. The Service Catalogue is generic and can be applied across all platforms, environments or geographical locations of any organization.
ITIL only provides minim definition for a Service within the Service Catalogue. We'd suggest that the following make a good place to start:
Service Description: The Service Description should be written in easy to understand, simple, non technical terms that almost any person within the organization could understand.
Service Owner: The Service Owner is the person within the organization is responsible for the Service although this may not include the actual delivery.
Criticality: The criticality of the Service is determined by the Business. Relationships: A Service is linked to the actual items within the I.T infrastructure that deliver it.
This enables analysis across the chain to determine impacts of outages, upgrades etc.
ITIL Primer 15
2.5 Service Desk - Service Level ManagementThe goal of Service Level Management is to maintain and improve the alignment between business activities and IT service quality. This is achieved through the cycle of:
Agree on service level expectations and record them in Service Level Agreements (SLAs) Monitor the service provided Report actual service delivery results Review IT service delivery results in relation to the SLA, and adjust accordingly
A Service Level Agreement (SLA) is a formal, negotiated contract that outlines service level expectations and clarifies responsibilities between the Service Desk and its Customers. When unacceptable levels of service are noted throughout the service cycle, action can be taken to re-align expectations with actual service delivery results.
2.6 Service Transition - Change ManagementThe goal of Change Management is to ensure that standardized procedures are used to efficiently handle all changes, and minimize the impact of any related Incidents upon a service. The Change Management process prevents unauthorized CMDB modifications and reduces disruption to Customers. It does this by coordinating the build, test and implementation of any change that impacts the CMDB.
Changes may arise reactively in response to Problems or externally imposed requirements, for example a new or changed regulatory situation. They may also be proactive, instigated by management to improve an organization’s efficiency and effectiveness, or to enable or reflect new service improvement initiatives.
The Change Advisory Board (CAB) is responsible for approving any Request for Change (RFC). This involves assessing the impact, resources and priority of the RFC. The CAB then advises the Change Manager of their assessment and assigns an appropriate Workflow.
Change Workflows within the system ensure that each RFC is handled with consistency, based on the risk and impact assessment of the CAB. Change Workflows define the actions required to correctly implement the change, and define the responsibilities, authorization and timescale expected to manage the change.
Once a Workflow is assigned to an RFC, it is routed to an appropriate Technician based on the Change Workflow State. After a Technician completes their assignment, the RFC is forwarded to the next Technician based on the next state of the Change Workflow.
When the RFC has progressed through all of the required Workflow States, a change review is undertaken to verify that the RFC has achieved its objectives. If the change objectives are not met, the RFC’s associated backout procedure is implemented to rollback the change and restore the CMDB to a valid state.
As part of the Change Management Process, all requests related to a Change Request are automatically closed when the related RFC is closed. The system views the request hierarchy from low to high as Service Request, Incident, Problem and Change Request, and if a related request of a higher type is closed, all the lesser type requests are automatically closed.
16 Novell Service Desk System Planning, Deployment, and Best Practices Guide

2.7 Service Transition - Configuration ManagementThe objective of Configuration Management is to provide a logical model of the IT infrastructure. It identifies, controls, maintains and verifies the versions of all Configuration Items (CIs) that form an organization’s IT infrastructure.
The fully embedded Configuration Management Database (CMDB) provides access to up-to-the-minute information regarding the state of any infrastructure item. It includes:
Fully customizable Configuration Item Templates Configuration Item Lifecycles Problem Classifications
The power of the CMDB is obtained by the quality and details of the CI relationships stored within it, which can be used by the Service Catalog. The Service Catalog maps the relationships between individual CIs and allows the Service Desk to assess the real impact of a loss of a service as opposed to an individual asset being off-line.
Once the CMDB has been successfully implemented, Configuration Management will help the Service Desk by:
Reducing the time required to log a request Improving the accuracy of fault diagnosis and request allocation to Support Teams, thereby
minimizing the overall resolution time Preventing outages caused by poorly planned changes by revealing the full impact and risk of
any change to a CI inside the control of the CMDB Aiding recovery after a disaster by providing a rollback facility Listing the authorized software for given desktop Recording and reporting on previous, current and planned states of the CI
The benefits of the CMDB are immense, especially when combined with other ITIL Service Management disciplines of Request Fulfilment, Incident, Problem, Change and Service Management.
2.8 Service Transition - Release and Deployment ManagementThe purpose of Release and Deployment Management is to maintain the integrity of an organization's production environment when deploying releases. Effective Release and Deployment processes allow your service organization to deliver change faster and with minimal risk to the business. It provides consistency in implementation approach and assures customers that they can use a new or changed service in line with business requirements.
Part of the Service Transition phase of the Service Lifecycle, Release is responsible for planning, scheduling and controlling changes and updates from Test to Live environments. It ensures the integrity of the Live Environment is protected and that the correct components are released. While Deployment includes the activities or tasks responsible for moving new or changed hardware, software, documentation and process to the Live Environment.
This process is overseen by the Release Manager, whose role is paramount to the success of a release and a required member of a Release Team. The Release Manager directs the process using all information presented to help assess release readiness, and to efficiently identify deployment targets for the deployment phases of a release. This level of control guarantees the Release Manager can deliver updates to the live environment successfully, to all relevant parties, on time.
ITIL Primer 17
The capability to leverage relationship maps defined within the embedded CMDB allows the Release Manager to assess the impact of a release, as all related Items can be easily associated with a release package. The extensive use of CIs to represent all aspects of a release and the capability to directly associate any category of CI with the release itself provides a complete picture of how a release will impact the organization before any tasks are undertaken. The Release Manager can identify CI Types impacted by the deployment and CMDB information details users, organizational units and specific infrastructure affected by a release.
Complex and generally a lengthy process, large scale deployments require project management to ensure success. To this end, Release Management includes related activities that require scheduling in and around the internal activities of the service desk. The Release Manager can readily achieve this by exporting release package information to Microsoft Project and administering the full process using a dedicated project management tool.
Exported project files contain all related Change Requests for a Release, providing all relevant parties with an end-to-end schedule of change. The export can also be filtered to include deployment activities that can be merged into the final schedule once the Implementation of Changes is completed, resulting in a full historical account of the release cycle.
Within the system the Release Manager creates and manages the Release within the Change > Release tab. Within the Deploy tab of a Release, the Deployment Tasks are generated and made available as groups within the Change > Deployment tab, while the individual activities are available within the Change > Deployment Tasks tab.
2.9 Service Transition - Knowledge ManagementKnowledge Management falls within the realm of Service Transition, as part of ITIL. Within an Organization it is the Process responsible for gathering, analyzing, storing and sharing knowledge and information. Its main role is to improve service management efficiency by reducing the need to rediscover knowledge.
To this end, the system includes the Knowledge Base as an integral part of the Configuration Management System, using the Classifications, Categories and Types of the CMDB as the filing system for all Knowledge Base Articles. Therefore, when new requests are logged with the Service Desk, the system automatically searches through its information store for any Articles related to the current issue.
The Knowledge Base includes a variety of Article types. These are defined as:
Article Type Description
Article A reference document for general information
FAQs Frequently Asked Questions
Solution Created within an Incident or Problem, to resolve a specific issue. Solutions are allocated an Assigned Request status, and can only be viewed by Users and Owners/Customers of the Item associated with the request.
Workaround Created within an Incident or Problem, to provide a possible workaround for a specific request.
Backout Procedure Created within Change Request as a fallback plan for withdrawing a change procedure.
18 Novell Service Desk System Planning, Deployment, and Best Practices Guide
2.10 Service Operation - Incident ManagementThe function of the Service Desk is to act as the point of contact between customers of IT services (end users) and the IT service provider (IT department). Its role is to handle all requests for service, including Incidents, and provide an interface for other activities such as Request Fulfilment, Change, Problem and Configuration Management.
An Incident is defined as any event that is not part of the standard operation of a service, and causes, or may cause, an interruption to, or a reduction in the quality of service. The goal of Incident Management is to restore normal service as quickly as possible, with minimal disruption to the business. This ensures that the highest achievable levels of availability and service are maintained.
Incident Management objectives include:
Incident detection and recording Classification of all Incidents and initial support Investigation and diagnosis Escalation Resolution and recovery Incident closure Incident ownership, monitoring, tracking and communication
As part of the Incident Management Process, if an Incident is related to a Problem or Change Request and that related request in the other Process is closed, the Incident will be automatically closed. The system views the request hierarchy from low to high as Service Request, Incident, Problem and Change Request, and if a related request of a higher type is closed, all the lesser type requests are automatically closed.
2.11 Service Operation - Problem ManagementProblem Management extends the process of Incident Management. An Incident is a non-standard operational event with the potential to harm the quality of an IT service. Incidents are reported by end-Users, encountered by technicians and system/database Administrators, or automatically detected by system management tools. In all instances, Incidents should be reported to the Service Desk.
A Problem describes the underlying cause of one or more Incidents that are being investigated. However, not all Incidents are investigated as Problems.For example, if the power-supply in a desktop computer blew up, it should be treated as an Incident, and the power-supply replaced. ( Although if the power supply is controlled by Change Management, it would need to be treated as a minor change request. ) However, if there was a spate of burntout power-supplies in the same model desktop, then an underlying Problem with the desktop may possibly exist and further investigation into the cause and potential solutions may be required.
For Incidents to be correctly categorized as a Problem, organizations must define the evaluation criteria. For example, raise a Problem if more than 10 Incidents are logged in the space of three hours that refer to the same Configuration Item.
After the underlying cause of a Problem has been diagnosed, it is referred to as a Known Error. At this point, the root cause of the Problem is known, and the most appropriate course of action is to be determined. This may take the form of a structural resolution by raising a request for change (RFC). Alternatively, it may be decided, after consultation with Users and Customers, to implement a workaround or recovery action.
ITIL Primer 19
In the case of the above example:
Problem: Brand X Desktops no longer operating Root Cause: Faulty power-supply in July ’09 models Known Error: Warranty - replace with new power-supply
As part of the Problem Management Process, if a Problem is related to a Change Request and that related Change Request is closed, the Problem will be automatically closed. The system views the request hierarchy from low to high as Service Request, Incident, Problem and Change Request, and if a related request of a higher type is closed, all the lesser type requests are automatically closed.
2.12 Service Operation - Request Fulfillment OverviewThe goal of Request Fulfillment is to manage the lifecycle of all Service Requests.
A Service Request is a generic term that describes the numerous and varied demands placed on the service and support organization. Many are small changes, which are considered to be low risk, frequently occurring and low cost in nature, such as change a password or install a software application request. Alternatively, it may simply be a Customer asking for information. It is the scale, frequency and low-risk nature of the Service Requests that require that they be handled by the Request Fulfillment process, and not Incident or Change Management.
The frequent recurrence of Service Requests requires a predefined process Workflow be set with the support Technicians, service targets and escalation paths in place. To cater for the diverse nature of Service Requests, at minimum two Workflows should be customized for Request Fulfillment, one to handle simple requests for information and the other to deal with standard changes.
In the system, Service Requests are logged against Service Items in the Service Catalog and follow Workflows that ensure that each Request is handled with consistency. The Workflows define the actions required to correctly implement any changes to the Service and define the responsibilities, authorization and timeframe expected to manage the changes that may result from a Service Request.
Once a Workflow is assigned to a Service Request, it is routed to an appropriate Technician based on Service Request Workflow State. After a Technician completes their assignment, the Request is forwarded to the next User based on the configuration of the next State for a standard change or closed, if it is a simple request for information.
When Service Requests are raised for Service Item breakdowns, the system allows them to be easily associated with an Incident within the Analysis tab of the Request. Or, if the Service Request results in a change to an Item that is not in the Service Catalog, a Change Request can easily be generated within the Service Request.
If a Service Request is related to an Incident, Problem or Change Request and that related request in the other Process is closed, the Service Request is automatically closed. The system views the request hierarchy from low to high as Service Request, Incident, Problem and Change Request, and if a related request of a higher type is closed, all the lesser type requests are automatically closed, or if the handshaking facility is enabled for the system, moved to the Pending-Approval State.
The Service Strategy volume provides guidance on how to design, develop, and implement service management not only as an organizational capability but also as a strategic asset. Guidance is provided on the principles underpinning the practice of service management that are useful for developing service management policies, guidelines and processes across the ITIL Service Lifecycle.
20 Novell Service Desk System Planning, Deployment, and Best Practices Guide
Service Strategy guidance is useful in the context of Service Design, Service Transition, Service Operation, and Continual Service Improvement. Topics covered in Service Strategy include the development of markets, internal and external, service assets, Service Catalogue, and implementation of strategy through the Service Lifecycle. Financial Management, Service Portfolio Management, Organizational Development, and Strategic Risks are among other major topics.
Organizations use the guidance to set objectives and expectations of performance towards serving customers and market spaces, and to identify, select, and prioritize opportunities. Service Strategy is about ensuring that organizations are in a position to handle the costs and risks associated with their Service Portfolios, and are set up not just for operational effectiveness but also for Distinctive performance decisions made with respect to Service Strategy have far-reaching consequences including those with delayed effect.
ITIL Primer 21

22 Novell Service Desk System Planning, Deployment, and Best Practices Guide
3 3Pre-Design Activities
A firm understanding of the organization’s business and technical requirements that will take part is the first step in developing a solid design that meets the organization’s immediate and future needs.
IMPORTANT: Throughout this document, we refer to the need for proper documentation. Documentation is of the utmost importance. Documentation is a complete and accurate reference to the system you have designed and built, but most importantly, it is a reference for the future. As individuals transition in and out of the IT organization, the design documents become a reference as new employees learn the infrastructure they support, including techniques, policies, and design decisions. Documentation is also a good reference for others inside the organization who might not be involved in the day-to-day management of Novell Service Desk but are involved in the management of other projects that might have an impact on IT service delivery.
The following activities should be performed during the pre-design phase of implementing Novell Service Desk:
Section 3.1, “Business Assessment,” on page 23 Section 3.2, “Who Are Your Customers and What Business Function Do They Have?,” on
page 25 Section 3.3, “What Do Customers Need Support For?,” on page 27 Section 3.4, “What Types of Requests Will Customers Make?,” on page 29 Section 3.5, “What Response Are Customers Expecting?,” on page 30 Section 3.6, “Who Are The Support Staff?,” on page 32 Section 3.7, “What Can The Staff Support?,” on page 32 Section 3.8, “What Types of Requests Can the Staff Handle?,” on page 33 Section 3.9, “What Response Can the Staff Provide?,” on page 34 Section 3.10, “What Metrics Will Be Used?,” on page 35
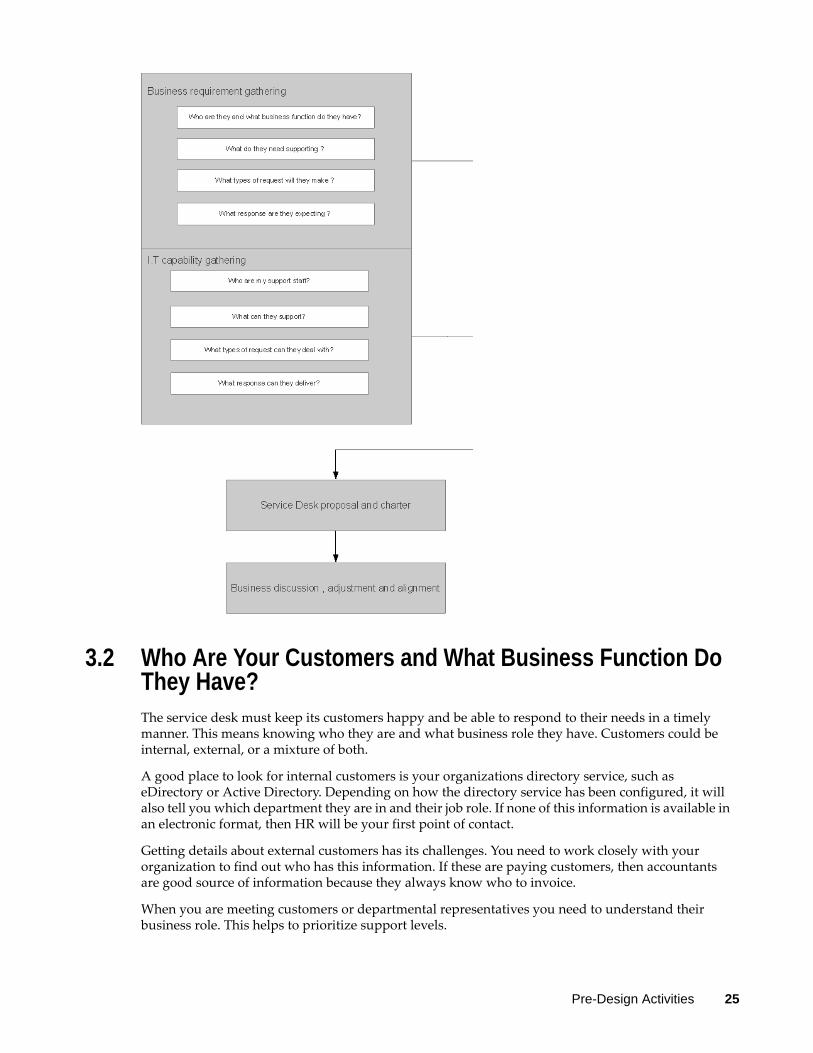
3.1 Business AssessmentYour first need is a detailed business assessment. If you do not have a solid understanding of the overall business (or individual business units) needs or desires, you cannot design a solution to meet them.
The best way to handle this is through a set of informal workshops, which include a high-level introduction to the technology, what it does, how the departments and end users benefit, and possibly a short demonstration of the product.
The three main reasons you hold these workshops are:
To inform departments of what you are doing
Pre-Design Activities 23

Get their buy-in Get their feedback in the form of requirements
The meetings should sufficiently inform department members so they begin to give you feedback about how they will leverage the system. Remember that you are only gathering data at this point; do not make any commitments.
The following list presents some ideas on what you need to define. Think of these as the bare minimum; use your imagination and tailor them to your organization's unique landscape along with any industry methodology that you might be following, such as ITIL.
Who are they and what business function do they have? What do they need support for? For example, software What types of request will they make? For example, X is broken, how do I achieve Y, I need Z What response are they expecting? For example, if X is broken, then it must be fixed within Y
hours
After you have your first set of meetings with the greater business, do the same with the IT department.
Who are the support staff? What can they support? What types of request can they deal with? What response can they deliver?
There will be differences between what the business expects and what IT is capable of delivering. You will need to meet with the various parts of the business again, or even several times, to discuss these and obtain alignment. Only then should you move forward with implementation.
This is not a static exercise. You need to review and adjust over time as requirements change.
24 Novell Service Desk System Planning, Deployment, and Best Practices Guide
3.2 Who Are Your Customers and What Business Function Do They Have?The service desk must keep its customers happy and be able to respond to their needs in a timely manner. This means knowing who they are and what business role they have. Customers could be internal, external, or a mixture of both.
A good place to look for internal customers is your organizations directory service, such as eDirectory or Active Directory. Depending on how the directory service has been configured, it will also tell you which department they are in and their job role. If none of this information is available in an electronic format, then HR will be your first point of contact.
Getting details about external customers has its challenges. You need to work closely with your organization to find out who has this information. If these are paying customers, then accountants are good source of information because they always know who to invoice.
When you are meeting customers or departmental representatives you need to understand their business role. This helps to prioritize support levels.
Pre-Design Activities 25
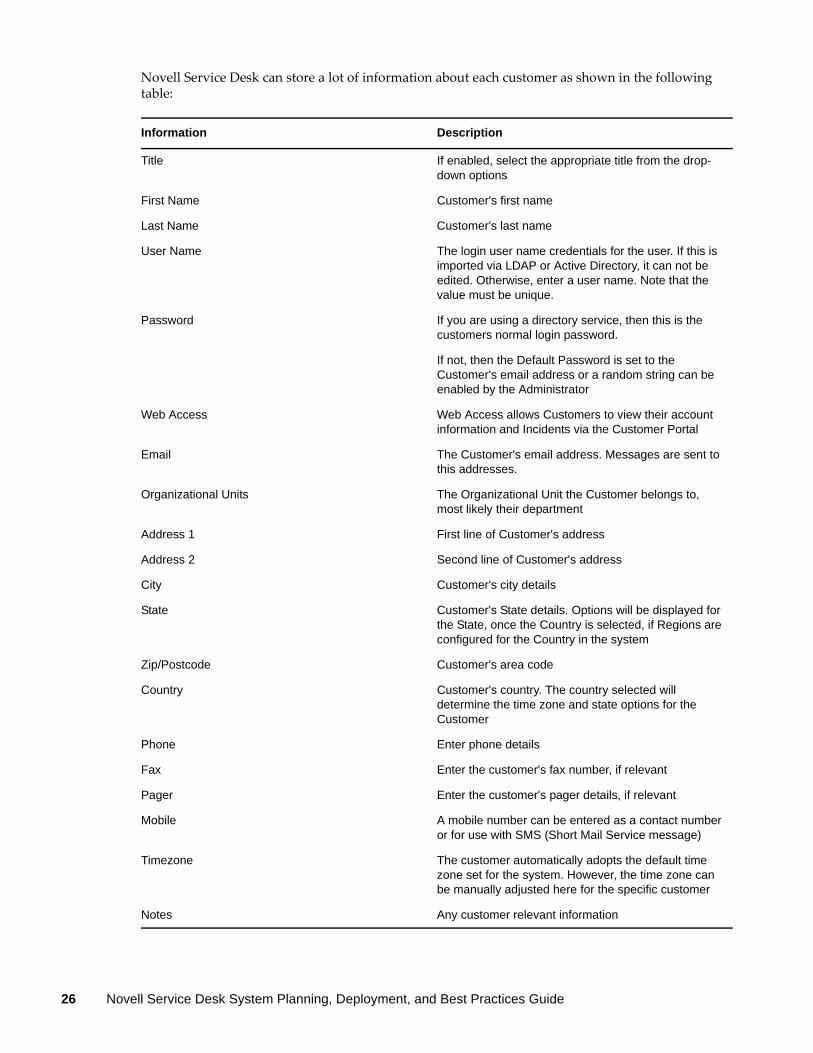
Novell Service Desk can store a lot of information about each customer as shown in the following table:
Information Description
Title If enabled, select the appropriate title from the drop-down options
First Name Customer's first name
Last Name Customer's last name
User Name The login user name credentials for the user. If this is imported via LDAP or Active Directory, it can not be edited. Otherwise, enter a user name. Note that the value must be unique.
Password If you are using a directory service, then this is the customers normal login password.
If not, then the Default Password is set to the Customer's email address or a random string can be enabled by the Administrator
Web Access Web Access allows Customers to view their account information and Incidents via the Customer Portal
Email The Customer's email address. Messages are sent to this addresses.
Organizational Units The Organizational Unit the Customer belongs to, most likely their department
Address 1 First line of Customer's address
Address 2 Second line of Customer's address
City Customer's city details
State Customer's State details. Options will be displayed for the State, once the Country is selected, if Regions are configured for the Country in the system
Zip/Postcode Customer's area code
Country Customer's country. The country selected will determine the time zone and state options for the Customer
Phone Enter phone details
Fax Enter the customer's fax number, if relevant
Pager Enter the customer's pager details, if relevant
Mobile A mobile number can be entered as a contact number or for use with SMS (Short Mail Service message)
Timezone The customer automatically adopts the default time zone set for the system. However, the time zone can be manually adjusted here for the specific customer
Notes Any customer relevant information
26 Novell Service Desk System Planning, Deployment, and Best Practices Guide
The minimum amount of information that you need for each customer is a subset of what is in the table:
First name Last name User name Email
The more information that it is practical to collect, the better the customer profile will be. This is very useful customers contact service desk.
3.3 What Do Customers Need Support For?Novell Service Desk has a centralized Configuration Management Database (CMDB) to manage and control infrastructure information. At the simplest level the CMDB can be used to store hardware, software and document asset details. At its most complex, the CMDB can be configured as an enterprise wide IT business service catalogue defining business services and the supporting infrastructure. Essentially, it's a list of 'stuff' to be supported and (potentially) relationships to each other.
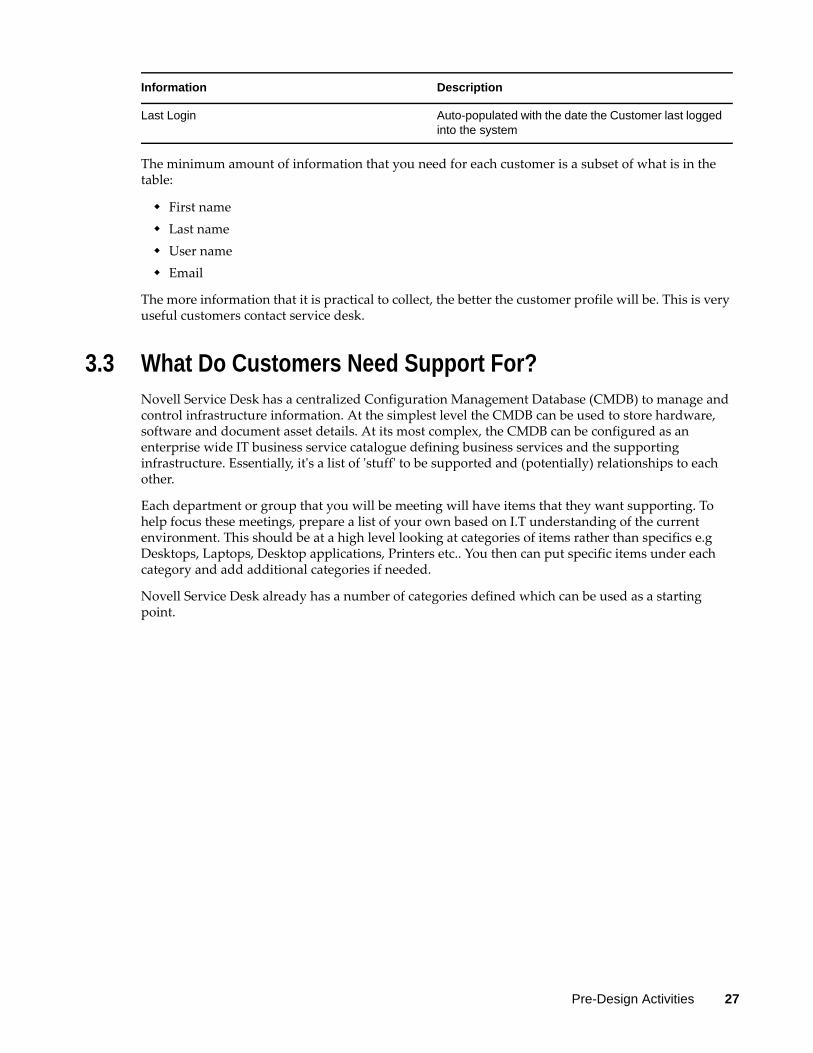
Each department or group that you will be meeting will have items that they want supporting. To help focus these meetings, prepare a list of your own based on I.T understanding of the current environment. This should be at a high level looking at categories of items rather than specifics e.g Desktops, Laptops, Desktop applications, Printers etc.. You then can put specific items under each category and add additional categories if needed.
Novell Service Desk already has a number of categories defined which can be used as a starting point.
Last Login Auto-populated with the date the Customer last logged into the system
Information Description
Pre-Design Activities 27
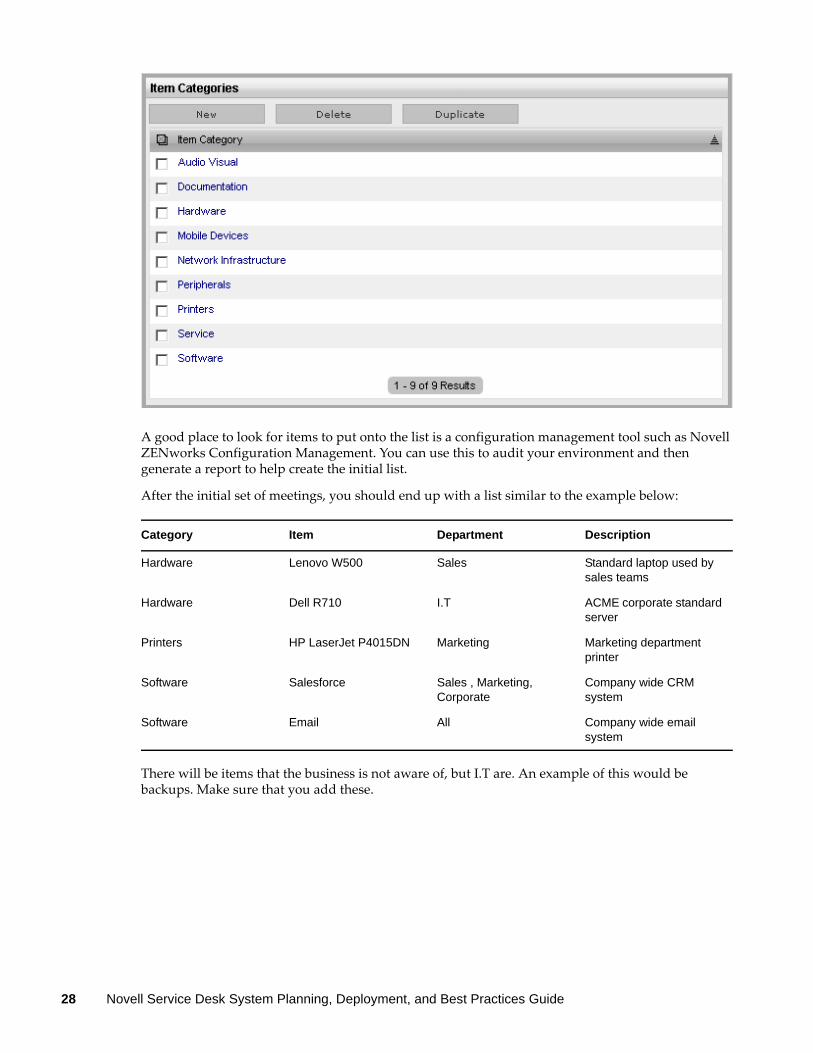
A good place to look for items to put onto the list is a configuration management tool such as Novell ZENworks Configuration Management. You can use this to audit your environment and then generate a report to help create the initial list.
After the initial set of meetings, you should end up with a list similar to the example below:
There will be items that the business is not aware of, but I.T are. An example of this would be backups. Make sure that you add these.
Category Item Department Description
Hardware Lenovo W500 Sales Standard laptop used by sales teams
Hardware Dell R710 I.T ACME corporate standard server
Printers HP LaserJet P4015DN Marketing Marketing department printer
Software Salesforce Sales , Marketing, Corporate
Company wide CRM system
Software Email All Company wide email system
28 Novell Service Desk System Planning, Deployment, and Best Practices Guide
3.4 What Types of Requests Will Customers Make?As you create the list of 'stuff' (any ITIL person is going to cringe every time we use that term - which is fine ) then you need to understand what type of request may be made against it. This will help determine what the service desk will be expected to deliver although you may choose not to service certain types of request immediately or not at all. ITIL ( I.T Infrastructure Library ) comes in handy at this point as it offers classifications for requests that can be made to the service desk.
Novell Service Desk also uses the same terminology. Here they are:
Service Request: A request from a customer for information, advice, standard change or for access to an IT Service. For example, how to create a table in MS Word or can application X be installed. Alternatively look at Service Requests as being “Everything is working fine, I just want something”. The difference between Service Request vs Incident is a long running debate. We would advise that you treat everything as an Incident to begin with and then see if Service Request will add value in the future.
Incident: An unplanned interruption to an IT Service or a reduction in the Quality of an IT Service. For example Blue Screen of Death on a Windows device. We like to think of Incident simply meaning “X is no longer working”.
Change: The addition, modification or removal of anything that could have an effect on IT Services. For example, adding more memory to server or an application installation. Changes might require authorization from one or more people.
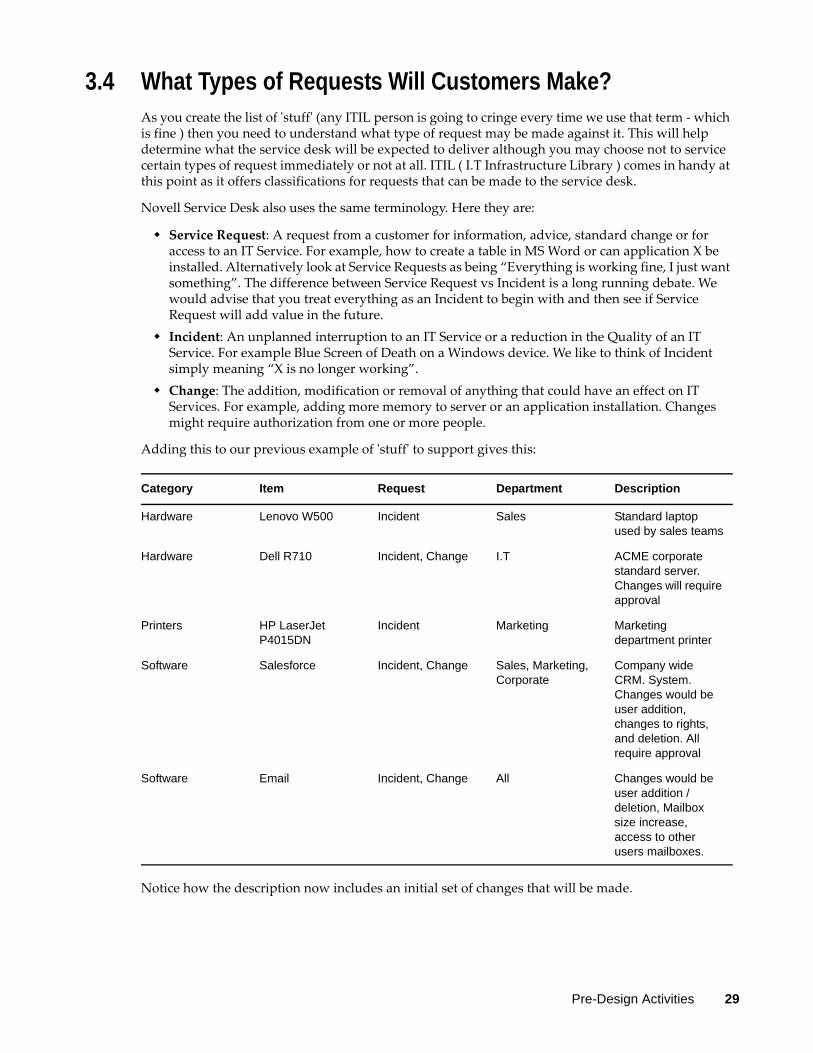
Adding this to our previous example of 'stuff' to support gives this:
Notice how the description now includes an initial set of changes that will be made.
Category Item Request Department Description
Hardware Lenovo W500 Incident Sales Standard laptop used by sales teams
Hardware Dell R710 Incident, Change I.T ACME corporate standard server. Changes will require approval
Printers HP LaserJet P4015DN
Incident Marketing Marketing department printer
Software Salesforce Incident, Change Sales, Marketing, Corporate
Company wide CRM. System. Changes would be user addition, changes to rights, and deletion. All require approval
Software Email Incident, Change All Changes would be user addition / deletion, Mailbox size increase, access to other users mailboxes.
Pre-Design Activities 29
3.5 What Response Are Customers Expecting?Service Level Agreements ( SLA ) define response times. Typically a SLA will vary depending on what the request is for and the type of request. A SLA will also define the hours for which support is being provided. For example a printer running out of toner will have a low priority as opposed to the order processing application. The printer will only be supported 8 x 5 where as the order processing application will be supported 24 x 7.
Novell Service Desk always uses a SLA (Service Level Agreement) against every request. This is a time period in which the Support function should resolve the incoming request and will be active during certain hours. It is also possible to break the SLA down further into periods in which the request should be initially responded to and a workaround given within the overall resolution time period.
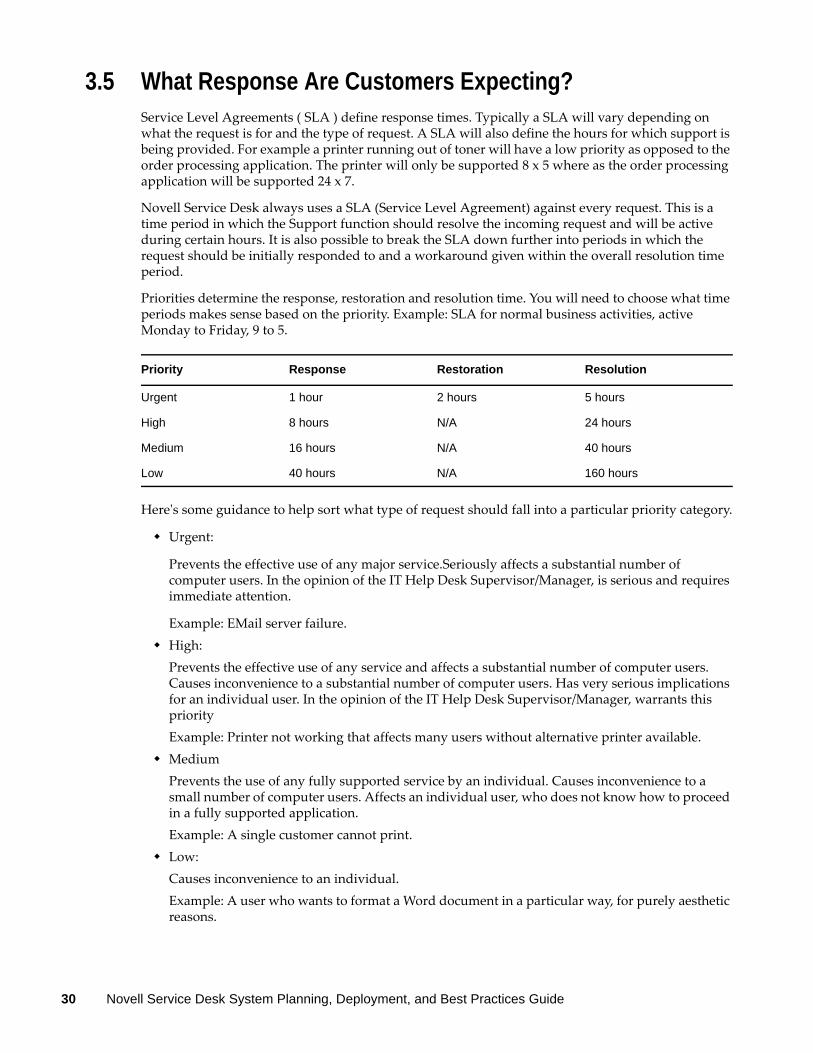
Priorities determine the response, restoration and resolution time. You will need to choose what time periods makes sense based on the priority. Example: SLA for normal business activities, active Monday to Friday, 9 to 5.
Here's some guidance to help sort what type of request should fall into a particular priority category.
Urgent:
Prevents the effective use of any major service.Seriously affects a substantial number of computer users. In the opinion of the IT Help Desk Supervisor/Manager, is serious and requires immediate attention.
Example: EMail server failure. High:
Prevents the effective use of any service and affects a substantial number of computer users. Causes inconvenience to a substantial number of computer users. Has very serious implications for an individual user. In the opinion of the IT Help Desk Supervisor/Manager, warrants this priorityExample: Printer not working that affects many users without alternative printer available.
MediumPrevents the use of any fully supported service by an individual. Causes inconvenience to a small number of computer users. Affects an individual user, who does not know how to proceed in a fully supported application.Example: A single customer cannot print.
Low:Causes inconvenience to an individual.Example: A user who wants to format a Word document in a particular way, for purely aesthetic reasons.
Priority Response Restoration Resolution
Urgent 1 hour 2 hours 5 hours
High 8 hours N/A 24 hours
Medium 16 hours N/A 40 hours
Low 40 hours N/A 160 hours
30 Novell Service Desk System Planning, Deployment, and Best Practices Guide
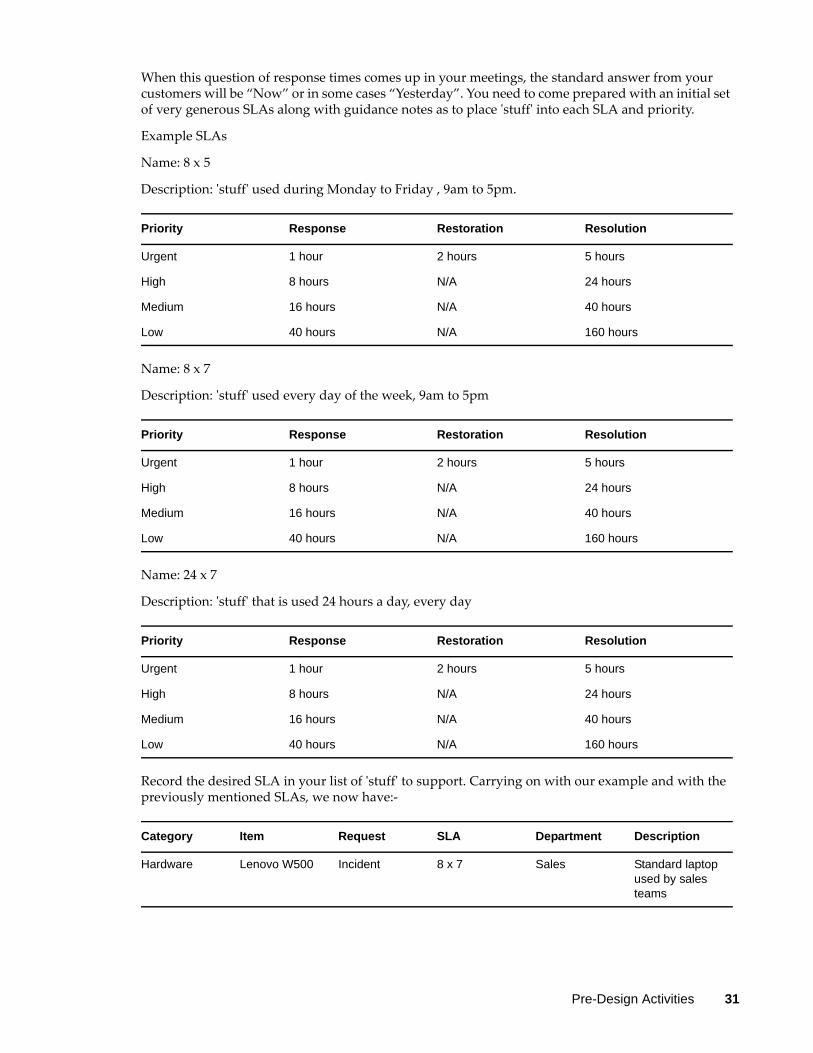
When this question of response times comes up in your meetings, the standard answer from your customers will be “Now” or in some cases “Yesterday”. You need to come prepared with an initial set of very generous SLAs along with guidance notes as to place 'stuff' into each SLA and priority.
Example SLAs
Name: 8 x 5
Description: 'stuff' used during Monday to Friday , 9am to 5pm.
Name: 8 x 7
Description: 'stuff' used every day of the week, 9am to 5pm
Name: 24 x 7
Description: 'stuff' that is used 24 hours a day, every day
Record the desired SLA in your list of 'stuff' to support. Carrying on with our example and with the previously mentioned SLAs, we now have:-
Priority Response Restoration Resolution
Urgent 1 hour 2 hours 5 hours
High 8 hours N/A 24 hours
Medium 16 hours N/A 40 hours
Low 40 hours N/A 160 hours
Priority Response Restoration Resolution
Urgent 1 hour 2 hours 5 hours
High 8 hours N/A 24 hours
Medium 16 hours N/A 40 hours
Low 40 hours N/A 160 hours
Priority Response Restoration Resolution
Urgent 1 hour 2 hours 5 hours
High 8 hours N/A 24 hours
Medium 16 hours N/A 40 hours
Low 40 hours N/A 160 hours
Category Item Request SLA Department Description
Hardware Lenovo W500 Incident 8 x 7 Sales Standard laptop used by sales teams
Pre-Design Activities 31
3.6 Who Are The Support Staff?In similar way to when you created customers and their profiles, we need to perform the same process for our support staff.
With the I.T department create a list of people who are involved in running the I.T systems that the business relies on.
The minimum amount of information that you need for each member of the support staff is:
First name Last name User name Email
3.7 What Can The Staff Support?You already have a list of 'stuff' that the business is asking to be supported. Rationalise this list so that all duplicates are removed. Now you need to discuss with the support staff what skills they have. You should create a list showing each support staff with the 'stuff' they can support.
Hardware Dell R710 Incident
Change
24 x7 I.T ACME corporate standard server. Changes will require approval
Printers HP LaserJet P4015DN
Incident 8 x 5 Marketing Marketing department printer
Software Salesforce Incident
Change
24 x 7 Sales, Marketing, Corporate
Company wide CRM. System. Changes would be user addition, changes to rights, and deletion. All require approval.
Software Email Incident
Change
24 x 7
8 x 7
All Email is supported 24 x 7. However changes would only be actioned during business hours
Category Item Request SLA Department Description
32 Novell Service Desk System Planning, Deployment, and Best Practices Guide

When compared with what the business is asking for, it is likely that there will be differences. Investigate how these gaps can be filled and the cost of doing so. For example, online training can be used to skill up support staff. Put those items on the exception list for discussion.
3.8 What Types of Requests Can the Staff Handle?In the discussions with the business, you covered what type of request that they would make at a high level. Possible candidates were Service Request, Incident and Change. There are more processes that the service desk can perform such as Problem Management where historical incident data is analysed to determine any underlying cause. For now, we are focusing on customer facing ones.
Here are the definitions again:
Service Request: A request from a customer for information, advice, standard change or for access to an IT Service.
Incident: n unplanned interruption to an IT Service or a reduction in the Quality of an IT Service.
Change: The addition, modification or removal of anything that could have an effect on IT Services.
A good starting point as to what requests to handle is Incident, followed by Change and then Service Requests.
At this point in time we are designing how these requests will function, merely if we should be doing them or not. To this end, here are the typical activities involved in each to help you arrive at that decision.
Support staff Category Item
Keith Richards
Richard Jones
Ron Hipcock
Hardware Lenovo W500
Robert Miller
Daniel Porter
Hardware Dell R710
Keith Richards
Richard Jones
Ron Hipcock
Printers HP LaserJet P4015DN
Keith Richards
Richard Jones
Ron Hipcock
Software Salesforce
Robert Miller
Daniel Porter
Software Email
Pre-Design Activities 33
3.9 What Response Can the Staff Provide?Traditionally managers determine SLAs in terms of time. That is, managers estimate how long they anticipate certain tasks will take in order to deal with a request. This is problematic as it's not the manager performing the tasks and they always tend to be optimistic at best.
We going to recommend a considerably different approach to determining times. First of all, a request may require work from an entire team not just an individual. Philosophically, this places an emphasis on collective effort. Second, we need to acknowledge that each request will have a certain degree of difficulty and effort to resolve. This is a major break from traditional methods: Instead of a manager estimating on behalf of other individuals and assigning SLA times based on conjecture, team members will use effort and degree of difficulty to estimate their own work.
In the response meeting, support staff sit down to estimate SLA times for each of priorities (Critical, High, Medium and Low ). For each of the priorities, use example requests to help determine what the SLA time should. It is essential that honest appraisals are given. As such, it is recommended that all
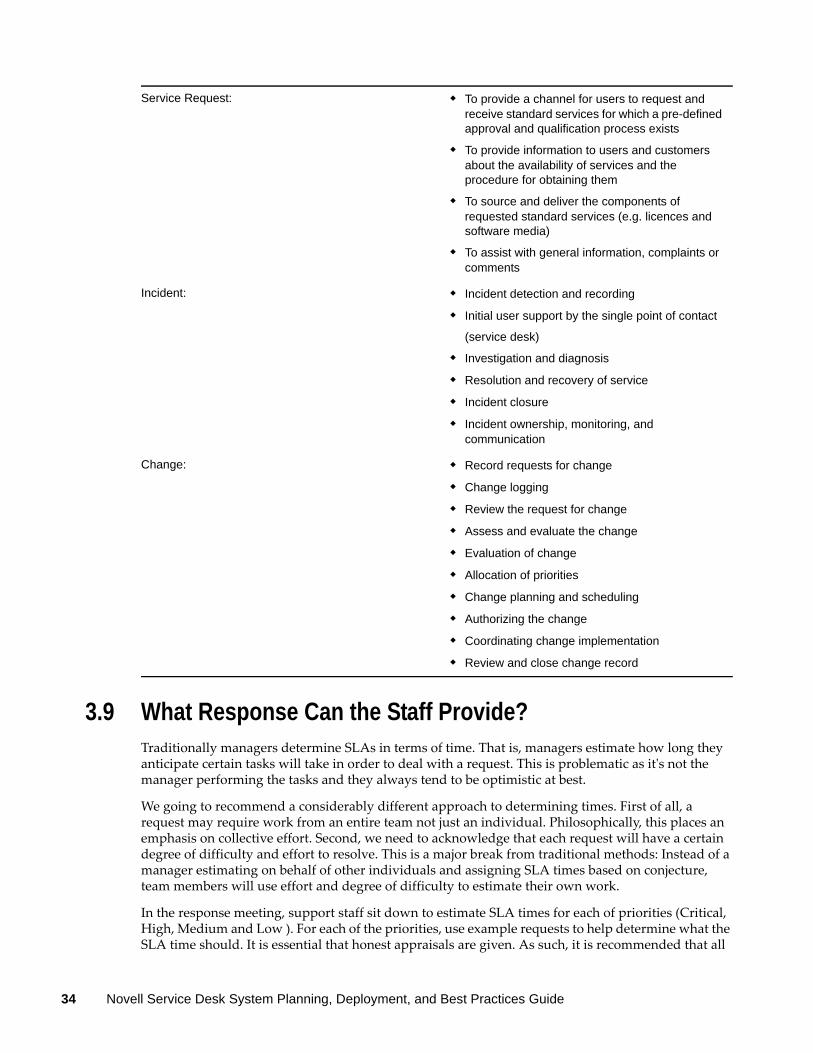
Service Request: To provide a channel for users to request and receive standard services for which a pre-defined approval and qualification process exists
To provide information to users and customers about the availability of services and the procedure for obtaining them
To source and deliver the components of requested standard services (e.g. licences and software media)
To assist with general information, complaints or comments
Incident: Incident detection and recording
Initial user support by the single point of contact
(service desk)
Investigation and diagnosis
Resolution and recovery of service
Incident closure
Incident ownership, monitoring, and communication
Change: Record requests for change
Change logging
Review the request for change
Assess and evaluate the change
Evaluation of change
Allocation of priorities
Change planning and scheduling
Authorizing the change
Coordinating change implementation
Review and close change record
34 Novell Service Desk System Planning, Deployment, and Best Practices Guide
team members disclose their estimates simultaneously. When it comes to estimates, give the support staff a series of numbers that represent the time to choose from e.g Fibonacci sequence (1, 2, 3, 5, 8, 13, 21, 34, etc.) Because individuals “show their hands” at once, this process is not unlike a game of poker. Some support staff have even developed their own decks of playing cards expressly for this process.
The support staff also needs to estimate how often they can meet a SLA. There will be times when regardless of the effort and dedication involved, times will be missed. Standard practice is to say that a SLA will be met a certain percentage over a set period of time e.g SLA x will be achieve 80% of the time during a six month window.
To arrive at a single SLA estimation that reflects the entire team’s sense of a requests difficulty, it often requires numerous rounds of estimation. Another output of these meetings is the justification behind them.
3.10 What Metrics Will Be Used?Above all else, remember why we produce management reports and identify key performance metrics.
“To enable stakeholders involved in IT service management to make informed, rational decisions about the IT services and support offered to customers”.
Starting from this premise, some of this data is going to be more important to us than the rest. We will refer to the data which is important to us as Key Performance Data.
Your own choice of what is Key Performance Data should be influenced by:
The challenges you face in delivering IT services to customers The demands made of the IT Service Management function by stakeholders The intended use of the reports Audience of the reports
For instance, you may provide an E-mail system and your organization requires the SLA to be met 90% of the time. In this case, it would make sense to include SLA target achievement data as part of the Key Performance Data.
At first glance, it might seem that identifying your Key Performance Data is a very difficult task, particularly as there will be a lot data to use in reports. To help, we are going to classify performance data into the requests types that we have used previously, those of Service Request, Incident and Change. In each case, you need to have a clear idea of what the data might tell you about the services you are providing to customers.
Service Request:
The total number of service requests (for trend analysis) The breakdown of service requests at each stage (e.g. logged, work in progress, closed, etc.) The size of the current backlog of outstanding service requests The mean elapsed time for handling each type of service request The number and percentage of service requests completed within agreed target times
Incident:
In addition to recording the number of incidents logged each week, compare the numbers to incidents logged prior to implementing incident management
Pre-Design Activities 35

Show the average length of time taken to resolve incidents before and after implementing incident management
Where possible, show the types of incident reported Show the percentage of incidents handled within the agreed response time Show the percentage of incidents closed by the service desk without the need for contacting
technical support Show the number and percentage of incidents resolved remotely, without the need for a visit
Change:
The number of changes implemented to services which met the customer’s agreed requirements, e.g. quality/ cost/time (expressed as a percentage of all changes)
Reduction in the number of disruptions to services, defects and rework caused by inaccurate specification, poor or incomplete impact assessment of changes Reduction in the number of unauthorised changes
Reduction in the number and percentage of unplanned changes and emergency fixes Change success rate (percentage of changes deemed successful at review/number of RFCs
approved) Reduction in the number of changes where remediation is invoked Reduction in the number of failed changes Average time to implement based on urgency/priority/change type Incidents attributable to changes Percentage accuracy in change estimate
Along with metrics for each of these areas, you should also consider measuring the satisfaction of your customers that interact with the service desk. This is an area this is frequently overlooked but carries substantial value.
A good approach to measure customer satisfaction is case-by-case surveying. Each time a case is closed, which means the request has been resolved and the resolution has already been communicated to the applicant, a short survey on the case is sent to the customer.
With the following example survey you might want to add options such as very satisfied, somewhat satisfied, somewhat dissatisfied and very dissatisfied. Do not use “NA” or “neutral”.
Speed of response Was your question answered in full? Knowledge of staff Ability for help desk to diagnose the problem quickly Helpfulness of staff Professionalism of staff Ability to get through to a staff member promptly Time to solve problem Kept informed of the progress of your ticket Ease of opening your help desk ticket
You then might want an open ended question about how your customer sees how you could improve your overall service or anything else they may want to add.
36 Novell Service Desk System Planning, Deployment, and Best Practices Guide
Service Desk Proposal
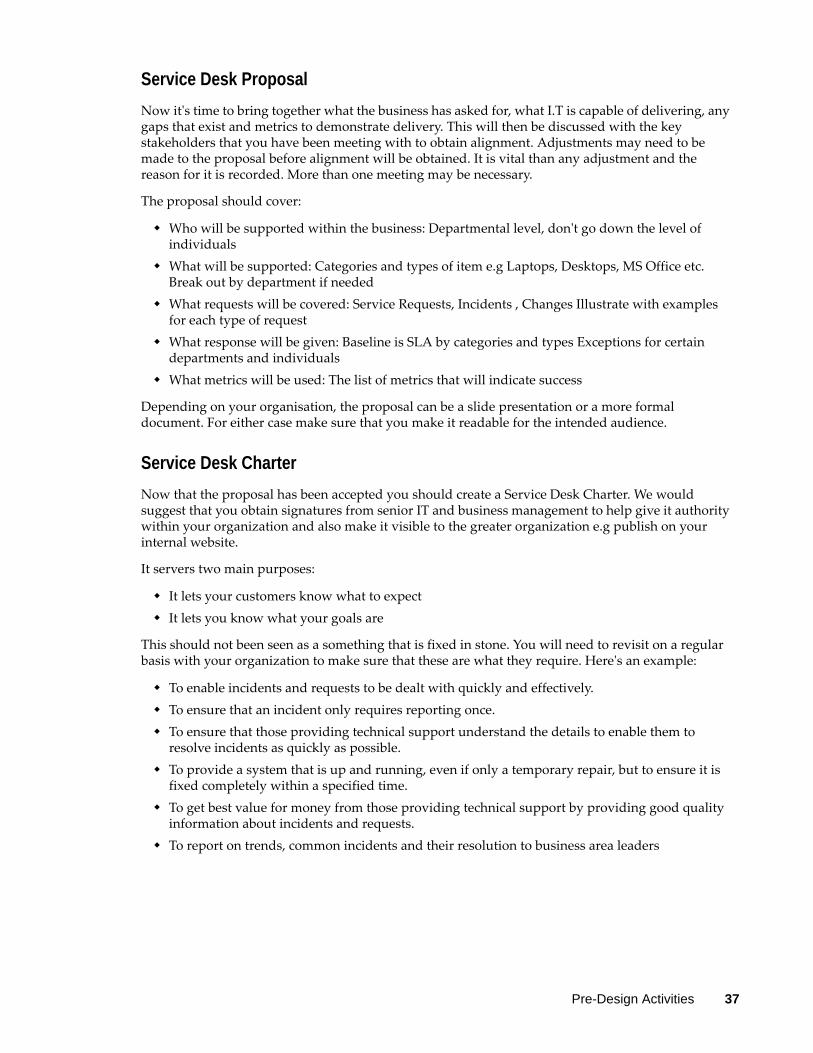
Now it's time to bring together what the business has asked for, what I.T is capable of delivering, any gaps that exist and metrics to demonstrate delivery. This will then be discussed with the key stakeholders that you have been meeting with to obtain alignment. Adjustments may need to be made to the proposal before alignment will be obtained. It is vital than any adjustment and the reason for it is recorded. More than one meeting may be necessary.
The proposal should cover:
Who will be supported within the business: Departmental level, don't go down the level of individuals
What will be supported: Categories and types of item e.g Laptops, Desktops, MS Office etc. Break out by department if needed
What requests will be covered: Service Requests, Incidents , Changes Illustrate with examples for each type of request
What response will be given: Baseline is SLA by categories and types Exceptions for certain departments and individuals
What metrics will be used: The list of metrics that will indicate success
Depending on your organisation, the proposal can be a slide presentation or a more formal document. For either case make sure that you make it readable for the intended audience.
Service Desk Charter
Now that the proposal has been accepted you should create a Service Desk Charter. We would suggest that you obtain signatures from senior IT and business management to help give it authority within your organization and also make it visible to the greater organization e.g publish on your internal website.
It servers two main purposes:
It lets your customers know what to expect It lets you know what your goals are
This should not been seen as a something that is fixed in stone. You will need to revisit on a regular basis with your organization to make sure that these are what they require. Here's an example:
To enable incidents and requests to be dealt with quickly and effectively. To ensure that an incident only requires reporting once. To ensure that those providing technical support understand the details to enable them to
resolve incidents as quickly as possible. To provide a system that is up and running, even if only a temporary repair, but to ensure it is
fixed completely within a specified time. To get best value for money from those providing technical support by providing good quality
information about incidents and requests. To report on trends, common incidents and their resolution to business area leaders
Pre-Design Activities 37

38 Novell Service Desk System Planning, Deployment, and Best Practices Guide
4 4Design Activities
This chapter outline the steps required to set up your enterprise database management system to work with Novell Service Desk, important recommendations and system configuration steps.
Section 4.1, “Database,” on page 39 Section 4.2, “Configuring Your System,” on page 43 Section 4.3, “Integrating Service Desk with ZENworks Configuration Management,” on
page 133
4.1 DatabaseThe following sections outline the steps required to set up your enterprise database management system to work with Novell Service Desk. This assumes that you are hosting the Service Desk database on a separate server from the Service Desk server or appliance.
Novell Service Desk requires an external database to function. The database must meet the following requirements:
Section 4.1.1, “Database Versions,” on page 39 Section 4.1.2, “TCP Ports,” on page 40 Section 4.1.3, “WAN,” on page 40 Section 4.1.4, “Default Character Set,” on page 40 Section 4.1.5, “Collation,” on page 40 Section 4.1.6, “Database User,” on page 40 Section 4.1.7, “Database Settings,” on page 41 Section 4.1.8, “Database Schema,” on page 41 Section 4.1.9, “Creating the Schema,” on page 41
4.1.1 Database Versions
For information on the supported database versions refer to the Platform Support Matrix document in Novell Service Desk documentation Web site (http://www.novell.com/documentation/servicedesk7/).
Design Activities 39
4.1.2 TCP Ports
The database server must allow communication on the database port. For MS SQL, ensure that you configure static ports for the database server.
The default ports are:
1433 for MS SQL 1521 for Oracle
IMPORTANT: You can change the default port number if you have a conflict. However, you must ensure that the port is opened for the Novell Service Desk to talk to the database.
4.1.3 WAN
The Novell Service Desk server and the database must reside on the same network segment. If they are separated by a WAN, this configuration is not supported.
4.1.4 Default Character Set
UTF-8 character set
4.1.5 Collation
Ensure that the database is case insensitive before setting it up.
4.1.6 Database User
When you create a user account to be used by Novell Service Desk to communicate to its database, ensure the following:
For MS SQL, the user account requires the DBO privilege For Oracle, the user account requires ACCESS_ANY_WORKSPACE,
CREATE_ANY_WORKSPACE, UNLIMITED TABLESPACE, CONNECT, and RESOURCE
SQL*PLUS> CREATE USER "NSD" PROFILE "DEFAULT" IDENTIFIED BY "*******" DEFAULT
TABLESPACE "USERS" TEMPORARY TABLESPACE "TEMP" ACCOUNT UNLOCK
GRANT ACCESS_ANY_WORKSPACE TO “NSD”
GRANT CREATE_ANY_WORKSPACE TO “NSD”
GRANT UNLIMITED TABLESPACE TO “NSD”
GRANT "CONNECT" TO "NSD"
GRANT "RESOURCE" TO "NSD"
All databases must use password-based authentication. Integrated authentication with Active Directory or eDirectory is not supported.
40 Novell Service Desk System Planning, Deployment, and Best Practices Guide
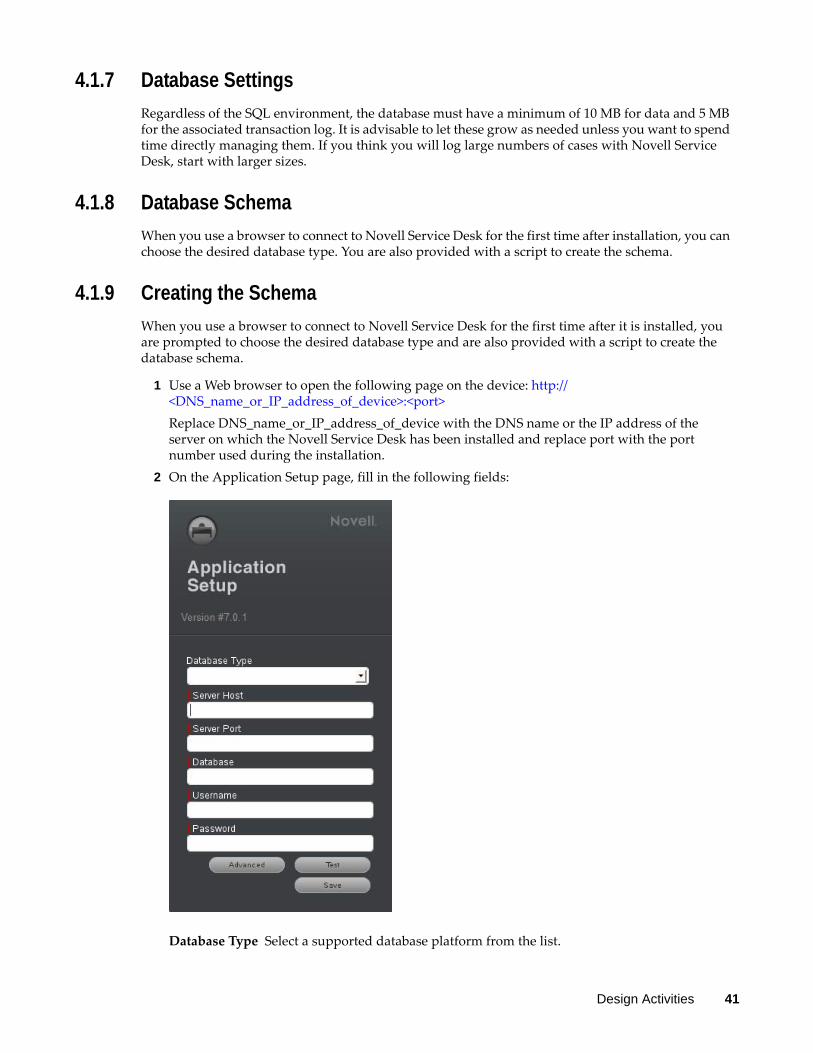
4.1.7 Database Settings
Regardless of the SQL environment, the database must have a minimum of 10 MB for data and 5 MB for the associated transaction log. It is advisable to let these grow as needed unless you want to spend time directly managing them. If you think you will log large numbers of cases with Novell Service Desk, start with larger sizes.
4.1.8 Database Schema
When you use a browser to connect to Novell Service Desk for the first time after installation, you can choose the desired database type. You are also provided with a script to create the schema.
4.1.9 Creating the Schema
When you use a browser to connect to Novell Service Desk for the first time after it is installed, you are prompted to choose the desired database type and are also provided with a script to create the database schema.
1 Use a Web browser to open the following page on the device: http://<DNS_name_or_IP_address_of_device>:<port>Replace DNS_name_or_IP_address_of_device with the DNS name or the IP address of the server on which the Novell Service Desk has been installed and replace port with the port number used during the installation.
2 On the Application Setup page, fill in the following fields:
Database Type Select a supported database platform from the list.
Design Activities 41
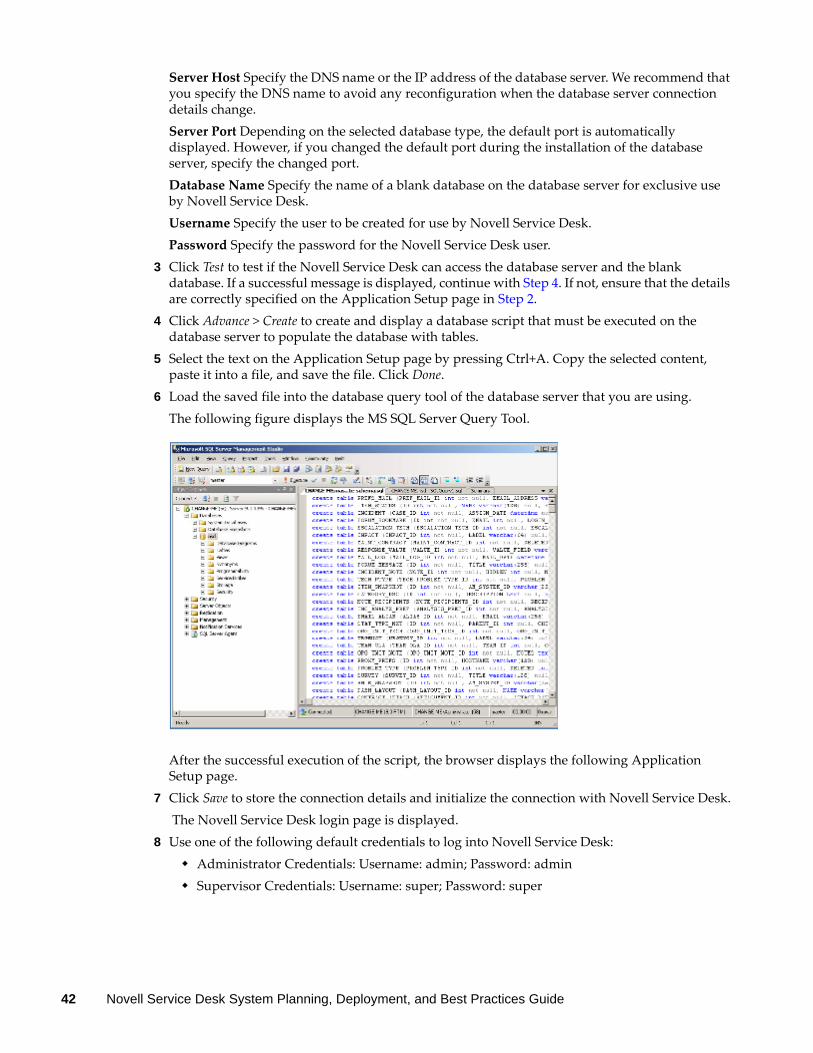
Server Host Specify the DNS name or the IP address of the database server. We recommend that you specify the DNS name to avoid any reconfiguration when the database server connection details change.Server Port Depending on the selected database type, the default port is automatically displayed. However, if you changed the default port during the installation of the database server, specify the changed port.Database Name Specify the name of a blank database on the database server for exclusive use by Novell Service Desk.Username Specify the user to be created for use by Novell Service Desk.Password Specify the password for the Novell Service Desk user.
3 Click Test to test if the Novell Service Desk can access the database server and the blank database. If a successful message is displayed, continue with Step 4. If not, ensure that the details are correctly specified on the Application Setup page in Step 2.
4 Click Advance > Create to create and display a database script that must be executed on the database server to populate the database with tables.
5 Select the text on the Application Setup page by pressing Ctrl+A. Copy the selected content, paste it into a file, and save the file. Click Done.
6 Load the saved file into the database query tool of the database server that you are using.The following figure displays the MS SQL Server Query Tool.
After the successful execution of the script, the browser displays the following Application Setup page.
7 Click Save to store the connection details and initialize the connection with Novell Service Desk. The Novell Service Desk login page is displayed.
8 Use one of the following default credentials to log into Novell Service Desk: Administrator Credentials: Username: admin; Password: admin Supervisor Credentials: Username: super; Password: super
42 Novell Service Desk System Planning, Deployment, and Best Practices Guide
4.2 Configuring Your System Section 4.2.1, “Considerations for System Configuration,” on page 43 Section 4.2.2, “Configuration Steps,” on page 44 Section 4.2.3, “Customizing or Creating Workflows,” on page 56 Section 4.2.4, “Service Request and Change Management Workflows,” on page 64 Section 4.2.5, “Creating Teams,” on page 71
4.2.1 Considerations for System Configuration
Before using the service management system, please read the following important recommendations:
Logging In The system includes a default Supervisor and Administrator account to initially access the application. To log in with the Supervisor account, enter the user name super and the password super. This User also has the Administrator Role that allows the User to switch easily between the Administrator and Supervisor interfaces when configuring the system.
Setting the Time Zone Each User should set the Time Zone (in the My Account tab) during initial login. A default Time Zone can also be configured system-wide by the Administrator within the Setup > Privileges > Customer tab.
Browser Buttons Use the hyperlinks and buttons within the application screens, instead of the forward and back browser buttons. This ensures that the application maintains control of the session and the data is refreshed appropriately.
Active Directory Server Integration When you use Active Directory for User authentication, the server-side User group definitions and subgroups must be of type Universal Distribution. The Domain User group or any other security group cannot be added to any User group. For more information about working with directory servers, see Active Directory Integration within the Administrator Guide.
Setting up Billing If Billing is to be used to manage Contracts, enable it before you do other configuration, to prevent system disruptions.
1. Log in as the Administrator.2. Select the Setup tab.3. Go to the Billing option4. Fill in the required information (Refer to the Setup > Billing section of the Administrator Guide
for further information.)5. Click Save.
Deleting Records Deleting Records: Before you begin to populate the database and use the system, it is important to note that records for Customers, Technicians, Items, Item Types, and Knowledge Base Categories or Articles are only disabled within the application when the Delete option is selected. The records are not deleted from the database. This preserves the integrity of your data while maintaining audit trails.We strongly advice that you do not manually delete records from the database because this might invalidate existing relationships in the application and cause the system to crash.
Design Activities 43
4.2.2 Configuration Steps
These configuration steps are recommended as a guide to assist with customizing the application to suit the service environment. These are the minimum steps required to enable your system. They require access to the Administrator and Supervisor views.
The following procedure covers editing the logged-in User account details and ensuring that this User has all the relevant privileges to achieve what is required to configure the system. It then details the steps to enable the system to work with email, setting the privileges for how Customers and Technicians can interact with the system, and how requests and the system will behave. This is defined within the Setup >Privileges tabs.
The User then has the option to customize the look and feel of the system, although this can be done later, if preferred. The next step is to create Customers and Users in the system.
Moving to the Supervisor Role, the User then configures the day-to-day elements within the application, which are part of creating and managing requests. This includes setting the time frames for managing requests and defining trigger points for escalations by configuring SLAs (Service Level Agreements); detailing the steps a request will move through by customizing Workflows, which includes setting the stages of the Workflow where timers trigger automatic warnings and escalations; defining the Teams of Technicians who will be associated with the customized Workflows and SLAs.
With the basic elements in the system now in place, the User then moves to the Configuration tab to customize the Configuration Management Database (CMDB). This part is often considered the most complex part of configuring the system, because this is where the service environment, including physical and service Items, is mapped into the system with associated relationships. When you design the CMDB, the templates for all the different Item Categories are first created. These are refined as Item Type templates, with these two templates used to define the information recorded against each Item and classification of issues that can be associated with each Item when requests are logged by Customers.
After the CMDB structure is defined, Items are imported via AMIE or a .csv file. This is when the Items are associated with Customers or Organizational Units, who can log requests against the assigned Items.
“Customizing the Default Supervisor Access” on page 44 “Configuring Email Setup and Email Messages” on page 45 “Enabling System Privileges” on page 46 “Customizing Banners and the Welcome Page Message” on page 49 “Creating Customers and Users” on page 51 “Setting Up Service Level Agreements” on page 52 “Creating Operational Level Agreements and Underpinning Contracts” on page 53
Customizing the Default Supervisor Access
Include Incident, Service Level Management and if applicable, Request Fulfillment, Problem and Change Management. Adjust the User Timezone, if applicable.
44 Novell Service Desk System Planning, Deployment, and Best Practices Guide
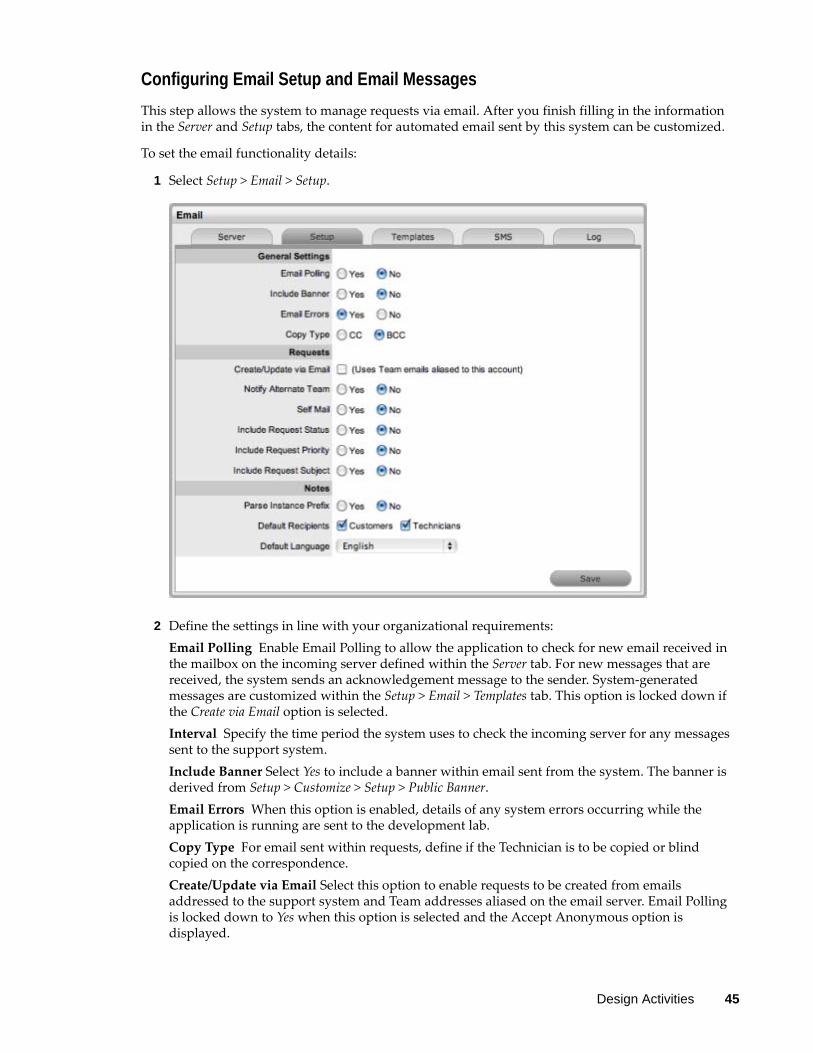
Configuring Email Setup and Email Messages
This step allows the system to manage requests via email. After you finish filling in the information in the Server and Setup tabs, the content for automated email sent by this system can be customized.
To set the email functionality details:
1 Select Setup > Email > Setup.
2 Define the settings in line with your organizational requirements:Email Polling Enable Email Polling to allow the application to check for new email received in the mailbox on the incoming server defined within the Server tab. For new messages that are received, the system sends an acknowledgement message to the sender. System-generated messages are customized within the Setup > Email > Templates tab. This option is locked down if the Create via Email option is selected.Interval Specify the time period the system uses to check the incoming server for any messages sent to the support system.Include Banner Select Yes to include a banner within email sent from the system. The banner is derived from Setup > Customize > Setup > Public Banner.Email Errors When this option is enabled, details of any system errors occurring while the application is running are sent to the development lab.Copy Type For email sent within requests, define if the Technician is to be copied or blind copied on the correspondence.Create/Update via Email Select this option to enable requests to be created from emails addressed to the support system and Team addresses aliased on the email server. Email Polling is locked down to Yes when this option is selected and the Accept Anonymous option is displayed.
Design Activities 45
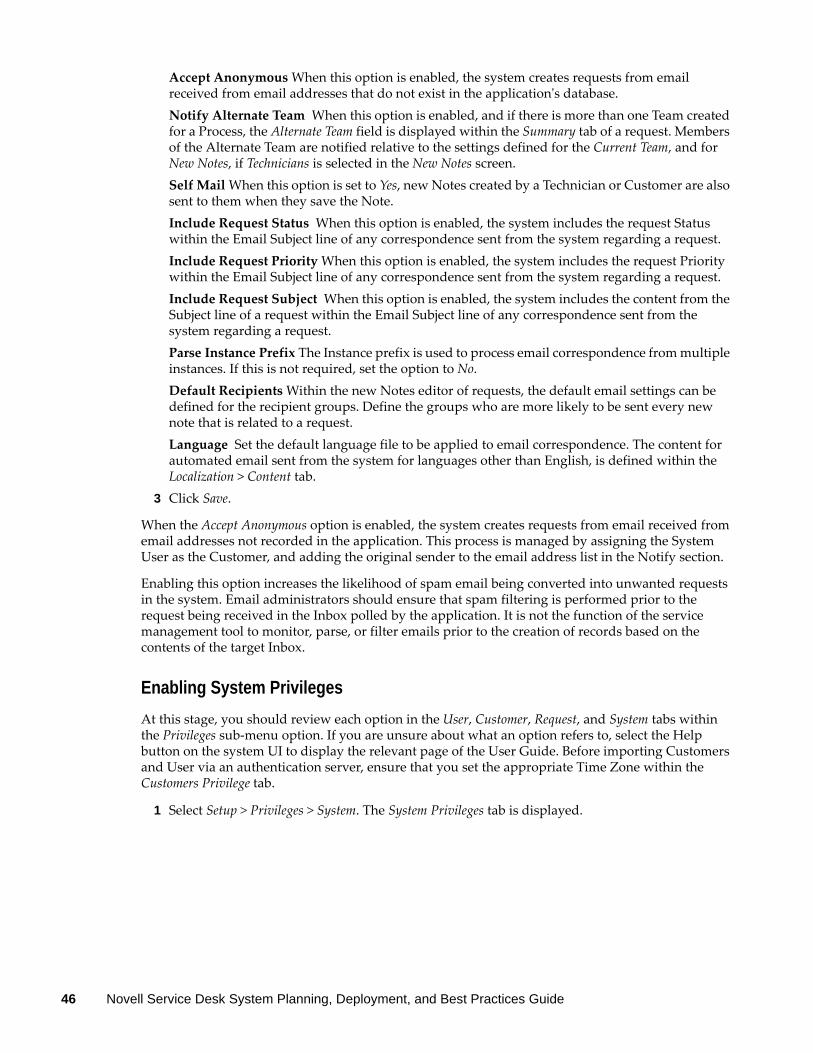
Accept Anonymous When this option is enabled, the system creates requests from email received from email addresses that do not exist in the application's database.Notify Alternate Team When this option is enabled, and if there is more than one Team created for a Process, the Alternate Team field is displayed within the Summary tab of a request. Members of the Alternate Team are notified relative to the settings defined for the Current Team, and for New Notes, if Technicians is selected in the New Notes screen.Self Mail When this option is set to Yes, new Notes created by a Technician or Customer are also sent to them when they save the Note.Include Request Status When this option is enabled, the system includes the request Status within the Email Subject line of any correspondence sent from the system regarding a request.Include Request Priority When this option is enabled, the system includes the request Priority within the Email Subject line of any correspondence sent from the system regarding a request.Include Request Subject When this option is enabled, the system includes the content from the Subject line of a request within the Email Subject line of any correspondence sent from the system regarding a request.Parse Instance Prefix The Instance prefix is used to process email correspondence from multiple instances. If this is not required, set the option to No.Default Recipients Within the new Notes editor of requests, the default email settings can be defined for the recipient groups. Define the groups who are more likely to be sent every new note that is related to a request.Language Set the default language file to be applied to email correspondence. The content for automated email sent from the system for languages other than English, is defined within the Localization > Content tab.
3 Click Save.
When the Accept Anonymous option is enabled, the system creates requests from email received from email addresses not recorded in the application. This process is managed by assigning the System User as the Customer, and adding the original sender to the email address list in the Notify section.
Enabling this option increases the likelihood of spam email being converted into unwanted requests in the system. Email administrators should ensure that spam filtering is performed prior to the request being received in the Inbox polled by the application. It is not the function of the service management tool to monitor, parse, or filter emails prior to the creation of records based on the contents of the target Inbox.
Enabling System Privileges
At this stage, you should review each option in the User, Customer, Request, and System tabs within the Privileges sub-menu option. If you are unsure about what an option refers to, select the Help button on the system UI to display the relevant page of the User Guide. Before importing Customers and User via an authentication server, ensure that you set the appropriate Time Zone within the Customers Privilege tab.
1 Select Setup > Privileges > System. The System Privileges tab is displayed.
46 Novell Service Desk System Planning, Deployment, and Best Practices Guide
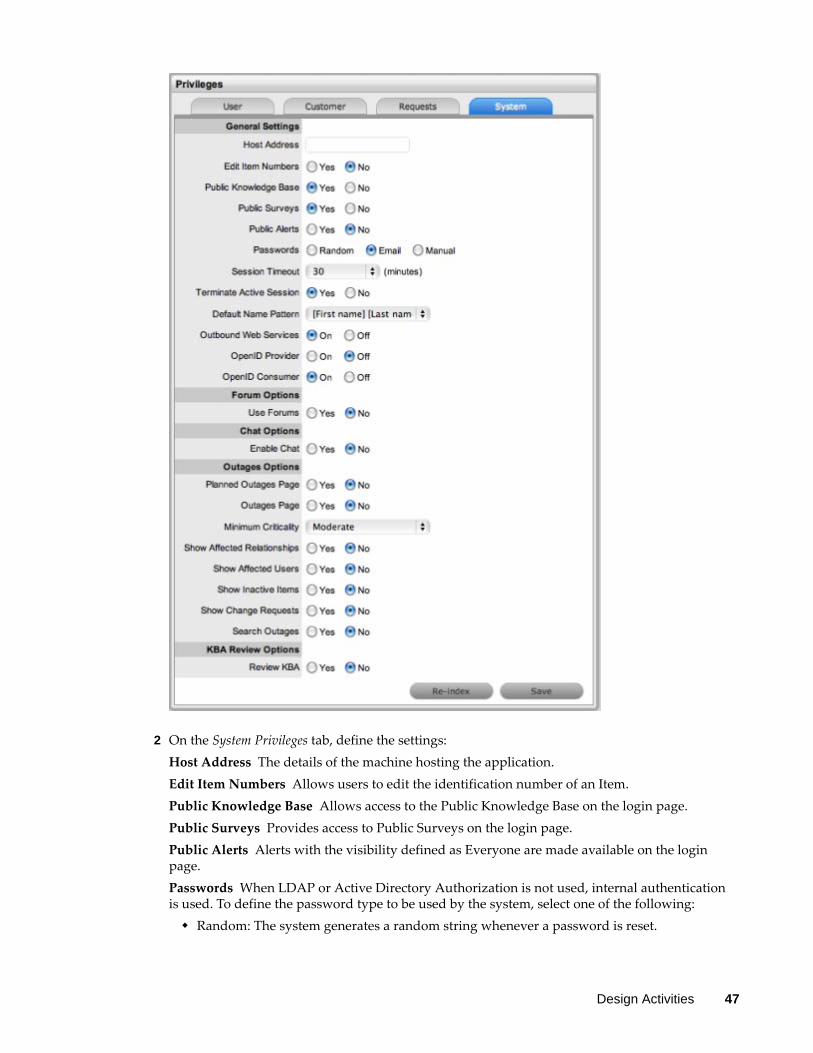
2 On the System Privileges tab, define the settings:Host Address The details of the machine hosting the application.Edit Item Numbers Allows users to edit the identification number of an Item.Public Knowledge Base Allows access to the Public Knowledge Base on the login page.Public Surveys Provides access to Public Surveys on the login page.Public Alerts Alerts with the visibility defined as Everyone are made available on the login page.Passwords When LDAP or Active Directory Authorization is not used, internal authentication is used. To define the password type to be used by the system, select one of the following: Random: The system generates a random string whenever a password is reset.
Design Activities 47
Email: The User’s email address is used as the password. Manual: Allows the User to manually create a password.
Session Timeout The number of minutes the system waits before terminating idle sessions. Ensure that the session timeout on the server hosting the application is equal to or greater than the Timeout option defined in the System Privileges.Terminate Active Session When this option is enabled, if a User attempts to log into the system when they already have an active session, they are prompted to end the active session to allow for the new login.Default Name Pattern Select the order for names being displayed in the system, when the First and Last Name are shown together on a screen.Outbound Web Services When this option is enabled, request Workflow States and Item Lifecycle States can be assigned a listener, which allows these details to be updated in external systems.OpenID Provider Enables the system to function as an OpenID Provider for User authentication across network resources, as the user authentication source.The OpenIDProvider URL should be: <PROTOCOL>://<SERVER>/LiveTime/WebObjects/LiveTime.woa/wa/providerLookupThe Protocol should be set to http or https and the server details should include where the system is hosted.OpenID Consumer Enables the system to delegate authentication of Users and Customers to one or more OpenID Providers (such as, Google or Yahoo). OpenID Providers that are to be used as delegates are configured in the Setup > Authentication > Social tab.Use Forums This option enables and disables all Forums within the system.Default Sort Order Sets the default Forum Topic sort order to either ascending or descending.Public Forums This option enables Public Forums to be viewed from the login page and does not require an account to view.Enable Chat Select Yes to activate Chat facility within the application.Chat Request Assignment Set this option to Technician if Customers are to be restricted to chatting only with the Technician assigned to their Request. Set it to Team to allow Customers to chat with any member of the Team assigned to their request.Default Technician Availability Sets the default availability for chat status in newly created Technician Account information screens.Planned Outages Page A link to the Planned Outages page is displayed on the login screen. Outages can be set within Configuration Item properties to schedule when the item is offline.Outages Page A link to the Outages page is displayed on the login screen.Minimum Criticality Defines the Minimum Criticality required for Items to be displayed on the Outages pages.Show Affected Relationships Enables an Item from the Outages page to show the Item's Relationships.Show Affected Users Allows the Item owner's details to be displayed on the Outages page.Show Inactive Items Displays inactive Items on the Outages page. An inactive Item is an Item that is currently not in use by the organization.Show Change Requests Allows Customers to view Change Requests related to Outages displayed in the Customer Portal.Search Outages Enables Outages to be searched by using the Customer email addresses or Item number.
48 Novell Service Desk System Planning, Deployment, and Best Practices Guide
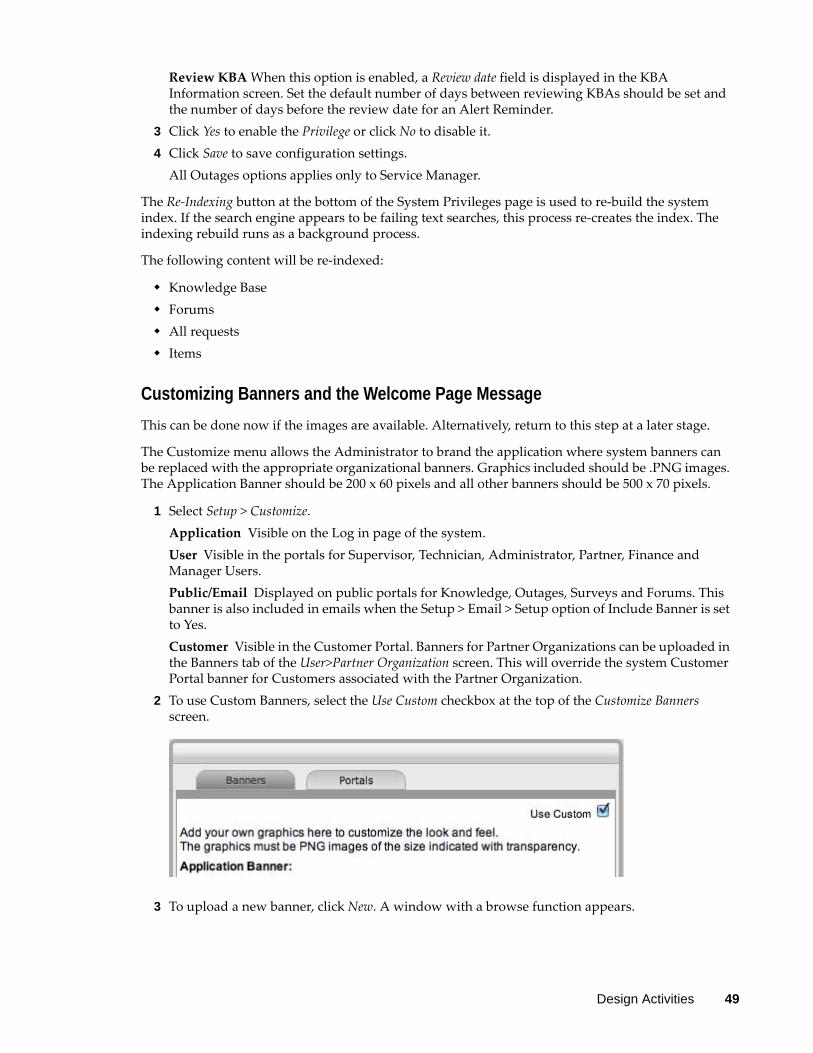
Review KBA When this option is enabled, a Review date field is displayed in the KBA Information screen. Set the default number of days between reviewing KBAs should be set and the number of days before the review date for an Alert Reminder.
3 Click Yes to enable the Privilege or click No to disable it.4 Click Save to save configuration settings.
All Outages options applies only to Service Manager.
The Re-Indexing button at the bottom of the System Privileges page is used to re-build the system index. If the search engine appears to be failing text searches, this process re-creates the index. The indexing rebuild runs as a background process.
The following content will be re-indexed:
Knowledge Base Forums All requests Items
Customizing Banners and the Welcome Page Message
This can be done now if the images are available. Alternatively, return to this step at a later stage.
The Customize menu allows the Administrator to brand the application where system banners can be replaced with the appropriate organizational banners. Graphics included should be .PNG images. The Application Banner should be 200 x 60 pixels and all other banners should be 500 x 70 pixels.
1 Select Setup > Customize.Application Visible on the Log in page of the system.User Visible in the portals for Supervisor, Technician, Administrator, Partner, Finance and Manager Users.Public/Email Displayed on public portals for Knowledge, Outages, Surveys and Forums. This banner is also included in emails when the Setup > Email > Setup option of Include Banner is set to Yes.Customer Visible in the Customer Portal. Banners for Partner Organizations can be uploaded in the Banners tab of the User>Partner Organization screen. This will override the system Customer Portal banner for Customers associated with the Partner Organization.
2 To use Custom Banners, select the Use Custom checkbox at the top of the Customize Banners screen.
3 To upload a new banner, click New. A window with a browse function appears.
Design Activities 49
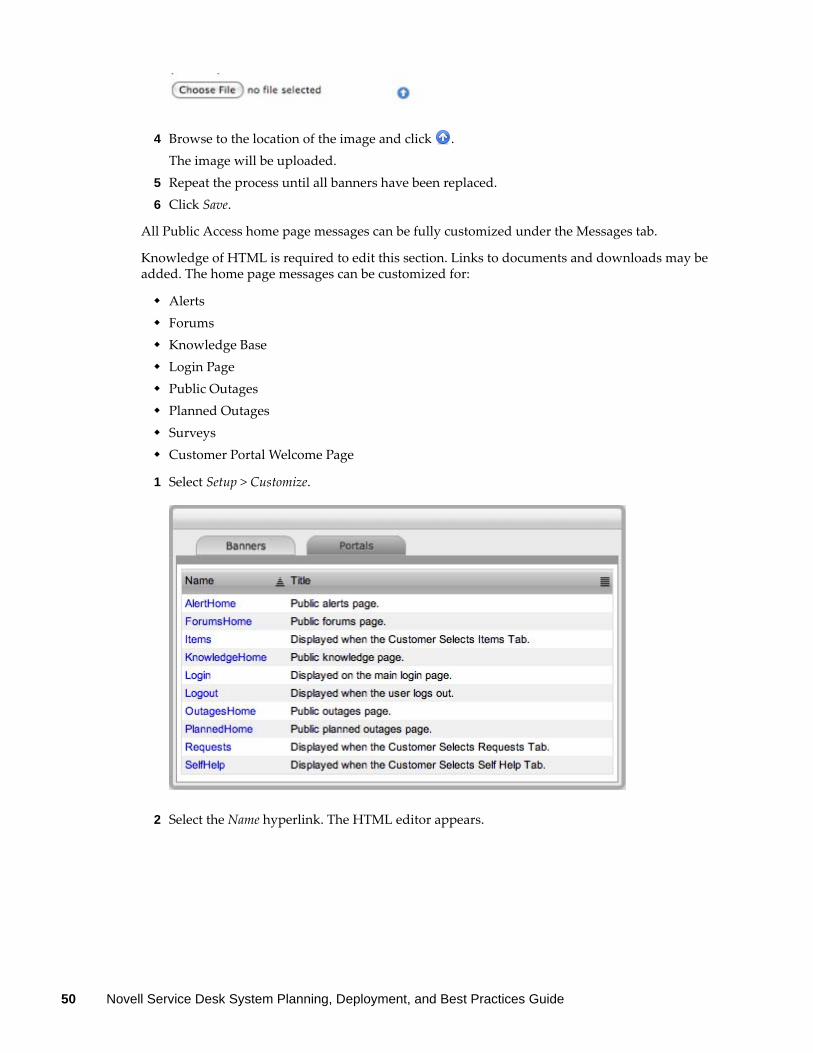
4 Browse to the location of the image and click . The image will be uploaded.
5 Repeat the process until all banners have been replaced.6 Click Save.
All Public Access home page messages can be fully customized under the Messages tab.
Knowledge of HTML is required to edit this section. Links to documents and downloads may be added. The home page messages can be customized for:
Alerts Forums Knowledge Base Login Page Public Outages Planned Outages Surveys Customer Portal Welcome Page
1 Select Setup > Customize.
2 Select the Name hyperlink. The HTML editor appears.
50 Novell Service Desk System Planning, Deployment, and Best Practices Guide
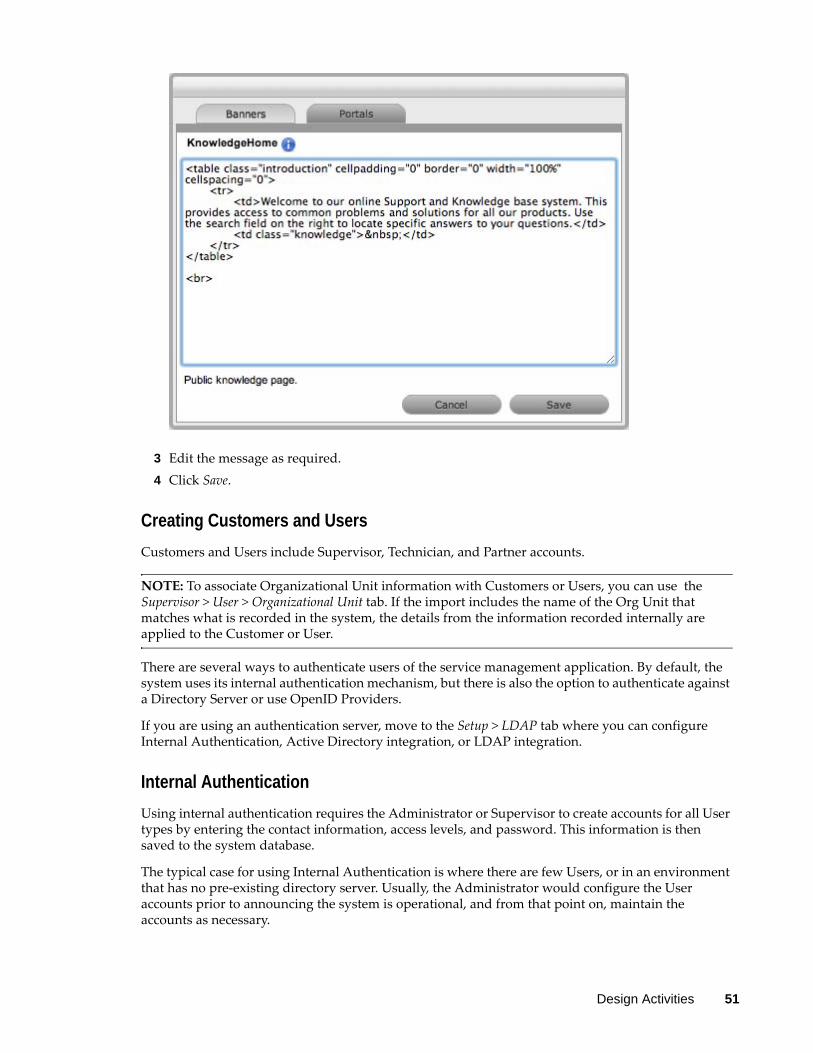
3 Edit the message as required.4 Click Save.
Creating Customers and Users
Customers and Users include Supervisor, Technician, and Partner accounts.
NOTE: To associate Organizational Unit information with Customers or Users, you can use the Supervisor > User > Organizational Unit tab. If the import includes the name of the Org Unit that matches what is recorded in the system, the details from the information recorded internally are applied to the Customer or User.
There are several ways to authenticate users of the service management application. By default, the system uses its internal authentication mechanism, but there is also the option to authenticate against a Directory Server or use OpenID Providers.
If you are using an authentication server, move to the Setup > LDAP tab where you can configure Internal Authentication, Active Directory integration, or LDAP integration.
Internal Authentication
Using internal authentication requires the Administrator or Supervisor to create accounts for all User types by entering the contact information, access levels, and password. This information is then saved to the system database.
The typical case for using Internal Authentication is where there are few Users, or in an environment that has no pre-existing directory server. Usually, the Administrator would configure the User accounts prior to announcing the system is operational, and from that point on, maintain the accounts as necessary.
Design Activities 51
OpenID Providers
OpenID is a decentralized process to verify a Customer's or User's online identity. It addresses the single sign-on issue by not relying on a centralized Web site to confirm a User's identity. The system can be enabled to be an OpenID consumer, which provides seamless authentication between third-party authentication utilities and the service management system. OpenID Providers are configured within the Social tab, and Customers or Users that have accounts with the configured OpenID Providers can log into the system by selecting the relevant icon on the Login page.
Directory Server Authentication
The system allows the Administrator to connect to a Directory Server for User authentication purposes. This removes the need to create User accounts because it allows the application to synchronize User accounts and access levels with the existing Directory Server. It has the added benefit of allowing the Administrator to work with existing infrastructure.
Directory Server Groups (External Authentication)
Roles are used to grant access within the application. Users must be assigned to Groups on the directory server that correspond to the Roles within the support system. Group members are assigned Roles and access levels within the service management tool.
If you are creating accounts directly in the system (that is, using internal authentication), go to the User tab.
Setting Up Service Level Agreements
Move to the Supervisor view by clicking the User link next to the name of the logged-in User.
If these are unknown at this time, the system includes a default SLA that can be used.
The goal of Service Level Management is to maintain and improve the alignment between business activities and IT service quality. This is achieved through the following cycle:
Agreeing on service level expectations and recording them in Service Level Agreements (SLAs) Monitoring the service provided Reporting actual service delivery results Reviewing IT service delivery results in relation to the SLA, and adjusting accordingly
A Service Level Agreement (SLA) is a formal, negotiated contract that outlines service level expectations and clarifies responsibilities between the Service Desk and its Customers. When unacceptable levels of service are noted throughout the service cycle, action can be taken to re-align expectations with actual service delivery results.
Within the system, SLAs are specific and time-based in order to help monitor and report on performance. They can be applied to any of the following elements within the application:
Customers Organizational Units Items
Only users who have the Service Level Management role can create or modify SLAs
52 Novell Service Desk System Planning, Deployment, and Best Practices Guide
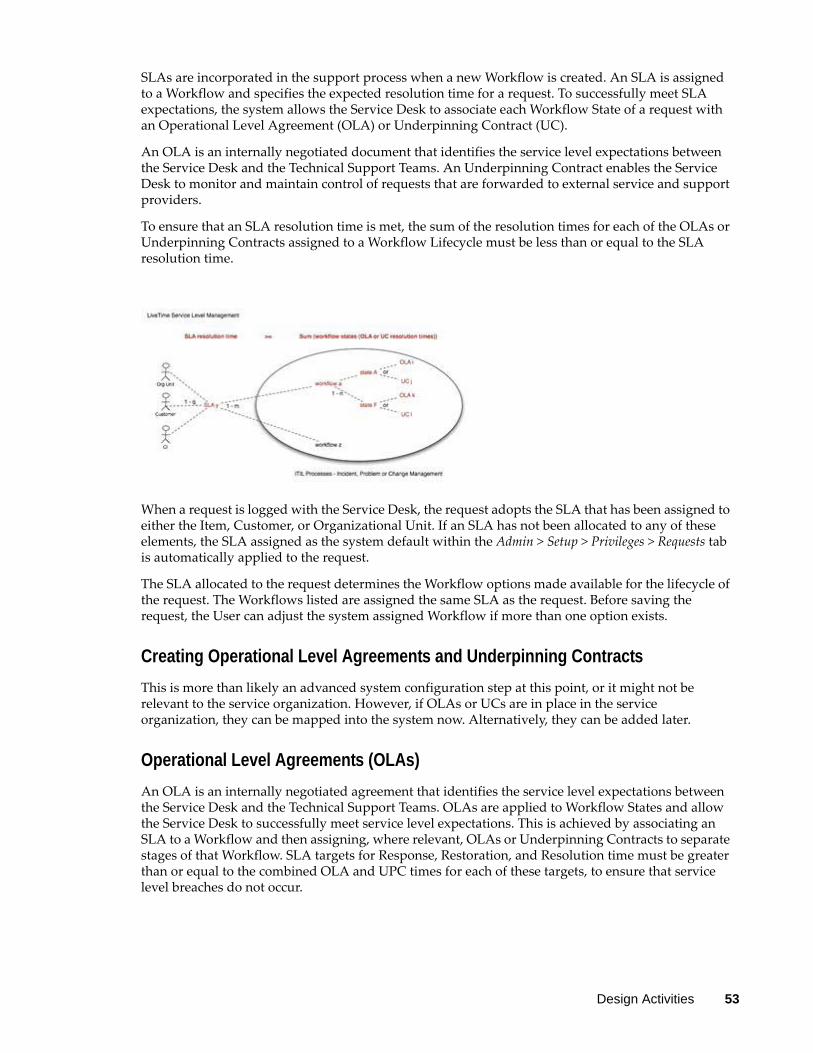
SLAs are incorporated in the support process when a new Workflow is created. An SLA is assigned to a Workflow and specifies the expected resolution time for a request. To successfully meet SLA expectations, the system allows the Service Desk to associate each Workflow State of a request with an Operational Level Agreement (OLA) or Underpinning Contract (UC).
An OLA is an internally negotiated document that identifies the service level expectations between the Service Desk and the Technical Support Teams. An Underpinning Contract enables the Service Desk to monitor and maintain control of requests that are forwarded to external service and support providers.
To ensure that an SLA resolution time is met, the sum of the resolution times for each of the OLAs or Underpinning Contracts assigned to a Workflow Lifecycle must be less than or equal to the SLA resolution time.
When a request is logged with the Service Desk, the request adopts the SLA that has been assigned to either the Item, Customer, or Organizational Unit. If an SLA has not been allocated to any of these elements, the SLA assigned as the system default within the Admin > Setup > Privileges > Requests tab is automatically applied to the request.
The SLA allocated to the request determines the Workflow options made available for the lifecycle of the request. The Workflows listed are assigned the same SLA as the request. Before saving the request, the User can adjust the system assigned Workflow if more than one option exists.
Creating Operational Level Agreements and Underpinning Contracts
This is more than likely an advanced system configuration step at this point, or it might not be relevant to the service organization. However, if OLAs or UCs are in place in the service organization, they can be mapped into the system now. Alternatively, they can be added later.
Operational Level Agreements (OLAs)
An OLA is an internally negotiated agreement that identifies the service level expectations between the Service Desk and the Technical Support Teams. OLAs are applied to Workflow States and allow the Service Desk to successfully meet service level expectations. This is achieved by associating an SLA to a Workflow and then assigning, where relevant, OLAs or Underpinning Contracts to separate stages of that Workflow. SLA targets for Response, Restoration, and Resolution time must be greater than or equal to the combined OLA and UPC times for each of these targets, to ensure that service level breaches do not occur.
Design Activities 53
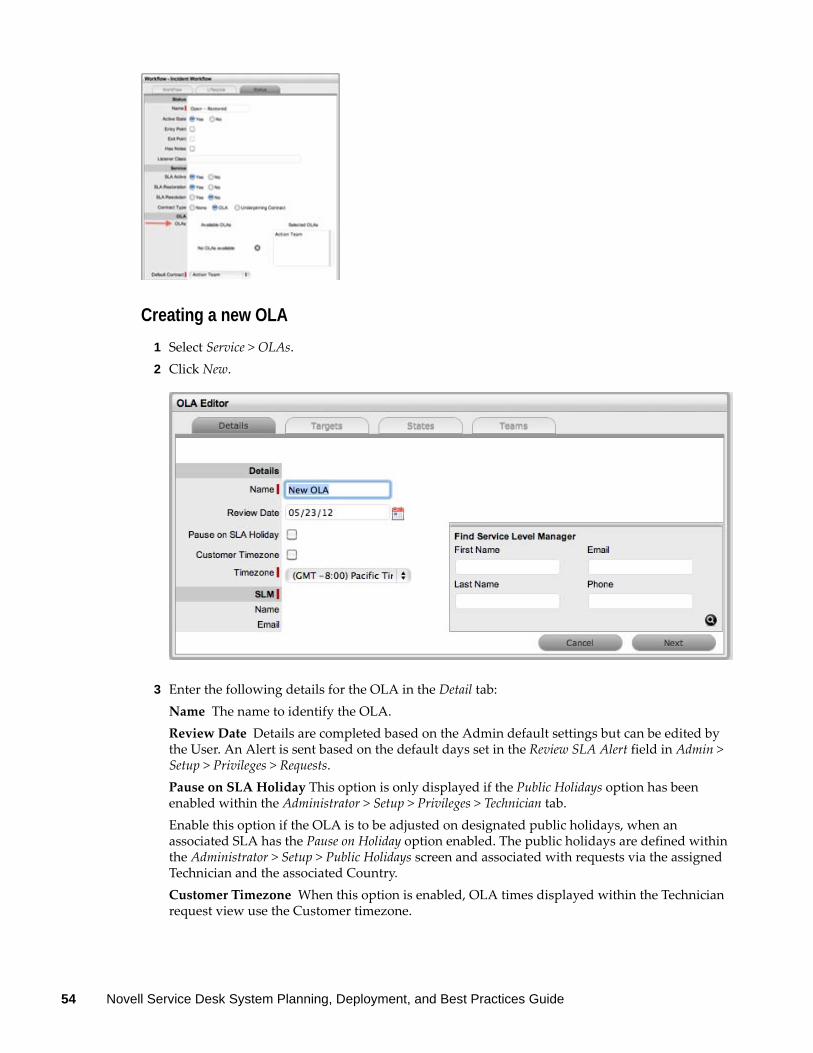
Creating a new OLA
1 Select Service > OLAs.2 Click New.
3 Enter the following details for the OLA in the Detail tab: Name The name to identify the OLA.Review Date Details are completed based on the Admin default settings but can be edited by the User. An Alert is sent based on the default days set in the Review SLA Alert field in Admin > Setup > Privileges > Requests.Pause on SLA Holiday This option is only displayed if the Public Holidays option has been enabled within the Administrator > Setup > Privileges > Technician tab.Enable this option if the OLA is to be adjusted on designated public holidays, when an associated SLA has the Pause on Holiday option enabled. The public holidays are defined within the Administrator > Setup > Public Holidays screen and associated with requests via the assigned Technician and the associated Country.Customer Timezone When this option is enabled, OLA times displayed within the Technician request view use the Customer timezone.
54 Novell Service Desk System Planning, Deployment, and Best Practices Guide
Timezone This option is visible when Customer Timezone is not set and all SLA dates are calculated based on the Timezone set within this field. This is especially applicable for User Work Hours and Blackouts, which also impacts the SLA Reports.SLM Name and Email Use the Find Service Level Manager search option, to enter the contact details of the Manager who monitors the performance of the OLA.
4 Adjust the Review Date, if necessary (A reminder Alert is sent to the SLM, based on the default days set in Admin > Setup > Privileges > Request).
5 Select the Customer Timezone option, if relevant. Apply this option if the User is to view OLA due dates by using the Customer Timezone.
6 Search for and select a Service Level Manager. A Service Level Manager (SLM) is a User that has the Service Level Management Process.
7 Move to the Targets tab.8 Fill in the following information:
Targets Select Common if the OLA is to apply across Incidents, Requests, Problems, and Change Management. If the OLA is specific to a Process, select Per Process and choose a Process from the drop-down list.Interval Define if the time is to be calculated in Hours or Minutes.Priority Urgent, High, Medium, and LowInitial Response The maximum time the Customer would wait from the point of request creation before receiving a Note update for a Technician. The Response trigger is stopped when a Note has been added to the request by the assigned Technician and an email is sent to the Customer. If the Response Time is reached without a Note being added, the request is escalated.Restoration Time The maximum time the Customer should wait from the time the request was created until a workaround or temporary fix has been implemented. The Restoration trigger stops by assigning the request a Workflow State that has the OLA Restoration option set to Yes. By default, this Workflow State is Open - Restored.Resolution Time The time taken from the point of request creation until the request is moved to a Workflow State with the OLA Resolution option set to Yes. Any of the default Workflow Exit States stop the Resolution Timer.Notify Override If the system is to override the default notification method set for a request when the Priority being edited is assigned to a request, select this option.Notification Type Set Email or SMS as the type of notification when the override action is applied to a Priority.Reminder Sends a reminder email to the Technician when the defined percentage of time elapses for a Response, Restoration, or Resolution target that has not been met on a request. Can be set up to 200% of the OLA. Alert intervals are not cumulative.Warning Sends a warning email to the Technician when the defined percentage of time elapses for a Response, Restoration, or Resolution target that has not been met on a request. Can be set up to 200% of the OLA.Escalation Escalates the request to a higher escalation layer when the defined percentage of time elapses for a Response, Restoration, or Resolution target that has not been met on a request. Can be set up to 200% of the OLA. The Service Level Manager is also notified when an OLA is breached.24x7 Do not amend if the OLA is to apply 24 hours a day, 7 days a week.
Design Activities 55
Normal Support Select if service hours are to be defined for the OLA. When this option is selected, define the service hours by either selecting a template (Templates are configured by the Administrator in the Setup > Localization > Hours tab) or manually define the days and time by making selections within the drop-down lists.
9 Add one or multiple Warning Alerts, if required Trigger intervals are not cumulative.In the default OLA for Warranty, the Urgent default times of 6, 12, and 24, indicate 6 hours for the Response stage, 12 hours for Restoration from initial creation, and 24 hours to reach the Resolution from initial creation.
10 Define the support hours. Within 24 X 7, if the OLA's urgent Initial Response field is set to 6 hours, and an urgent request that uses the OLA is created at midnight in the assigned Technician's time zone, those 6 hours will expire by 6:00 a.m. This is the option to use if your support is staffed 24 hours a day.Normal support ensures that request timers do not run when Technicians are not available. For instance, if the support hours are 9:00 a.m. to 5:00 p.m. and the SLAs reflect this, the urgent request timer does not start until 9:00 a.m. the following business day and would expire at 3:00 p.m.
11 Click Save.12 Click Done.13 Next, associate the OLA with a Team within the Service tab of the Team Information screen. The
OLA is also available within the OLA options displayed when OLA is selected as a Contract Type option within the Workflow Status editor screen.
14 Move to the States tab. The OLA States tab lists the Workflow stages that are assigned to the OLA.15 Move to the Teams tab. The Teams tab displays the Team Names and Processes that are assigned
to the OLA.
Assigning an OLA to a Team
OLAs are assigned to support Teams when Teams are created or edited. To view an OLA Team assignment, select an OLA to display the list of assigned support Teams within the Teams tab. The Team Lead and the Process the Team supports are also visible.
OLAs and Blackout Periods
If a request is assigned an OLA State and the request's SLA is in a Blackout Period, the OLA adopts the SLA Blackout Period. This means that the OLA timers stop until the Blackout Period has elapsed.
4.2.3 Customizing or Creating Workflows
The system includes default Workflows across all Processes. At this point, the default Workflows might be sufficient, or they can be customized to suit the service organization requirements. Alternatively, new Workflows can be created from scratch.
“Incident and Problem Workflows” on page 57 “SLAs and Workflows” on page 57 “Editing Default Incident and Problem Workflows” on page 57 “Editing Template Workflows” on page 58 “Workflow Map” on page 64 “Deleting a Workflow State” on page 64
56 Novell Service Desk System Planning, Deployment, and Best Practices Guide
Incident and Problem Workflows
Workflows define the sequence of States to be followed by requests logged with the application. Within the system, an unlimited number of Workflows can be configured for Incident and Problem Management.
When deployed, the system includes one fully customizable Workflow for each of the Incident and Problem Management processes. These can be used immediately, or they can be edited to more comprehensively reflect the support service requirements.
SLAs and Workflows
Each Workflow can be associated with one or more SLAs. The SLA provides the contract time that must be met by requests using the Workflow.
For example, if the Service Desk uses one Incident Workflow, which has multiple SLAs assigned to it, logged Incidents follow the same Lifecycle but the time allowed within each stage is based on the SLA contract requirements. The SLA assigned to either the Item, Customer, Organizational Unit, or Incident determines which Workflow is selected for the Incident.
Editing Default Incident and Problem Workflows
Incident and Problem Workflows can be configured to reflect the organizational Service Desk requirements for these processes. The default Workflows include States that are used by the business logic of the application to maintain control of the request Lifecycle.
The Selected States used by the application, as indicated by an asterisk, should not be removed from the Workflow Lifecycle. However, other Available States can be added to the Selected States list.
The following list contains the default Incident and Problem Workflow States. The * denotes the system States.
Cancelled Used to cancel a request when it is no longer to be worked on.
Cancelled Unpaid* Used by the system from the Pending - No Contract State when Contracts and Invoices are enabled.
Closed Resolved Used when the request has been resolved. This is the Default Closed State for the Incident and Problem Workflows. This marks the end of SLA timing and is used when measuring SLA times for Reports.
Closed Restored Used when the request has been closed and the service restored for the Customer. This marks the end of SLA timing and is used when measuring SLA times for Reports.
On Hold Used when the request is on hold. By default, this State stops SLA timing.
On Hold - Client Action Awaiting a response from the Customer. When a Note is added to the request by the Customer, the system changes the status to Open.
On Hold - Pending Approval* An Incident automatically moves to this State when the Propose button is used for sending an Incident Note. This means the CloseRequest email is sent to the Customer, asking them to verify the proposed solution. If the Customer does not respond to the email, the request is automatically closed by the number of days set within the Handshaking Privilege. (The email handshaking option is set by the Administrator in Setup > Privileges > Requests.) By clicking the URL provided in the email, the Customer ensures that the request retains an open and active state.
Design Activities 57
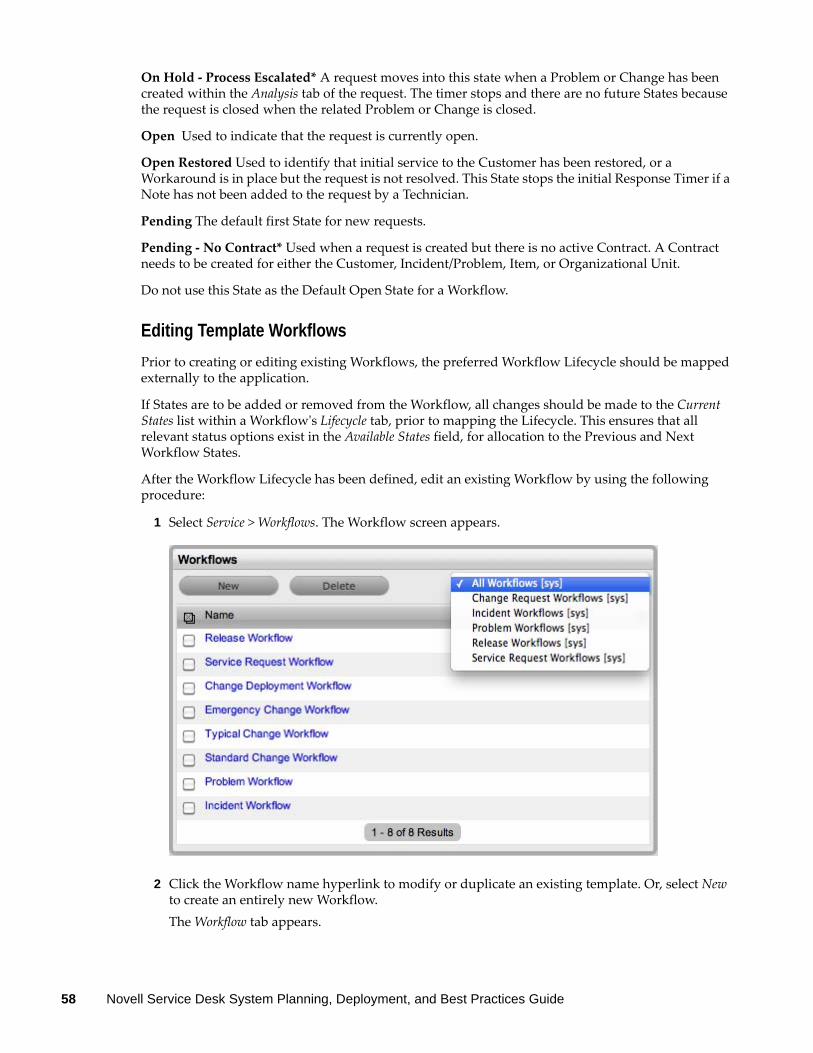
On Hold - Process Escalated* A request moves into this state when a Problem or Change has been created within the Analysis tab of the request. The timer stops and there are no future States because the request is closed when the related Problem or Change is closed.
Open Used to indicate that the request is currently open.
Open Restored Used to identify that initial service to the Customer has been restored, or a Workaround is in place but the request is not resolved. This State stops the initial Response Timer if a Note has not been added to the request by a Technician.
Pending The default first State for new requests.
Pending - No Contract* Used when a request is created but there is no active Contract. A Contract needs to be created for either the Customer, Incident/Problem, Item, or Organizational Unit.
Do not use this State as the Default Open State for a Workflow.
Editing Template Workflows
Prior to creating or editing existing Workflows, the preferred Workflow Lifecycle should be mapped externally to the application.
If States are to be added or removed from the Workflow, all changes should be made to the Current States list within a Workflow's Lifecycle tab, prior to mapping the Lifecycle. This ensures that all relevant status options exist in the Available States field, for allocation to the Previous and Next Workflow States.
After the Workflow Lifecycle has been defined, edit an existing Workflow by using the following procedure:
1 Select Service > Workflows. The Workflow screen appears.
2 Click the Workflow name hyperlink to modify or duplicate an existing template. Or, select New to create an entirely new Workflow. The Workflow tab appears.
58 Novell Service Desk System Planning, Deployment, and Best Practices Guide
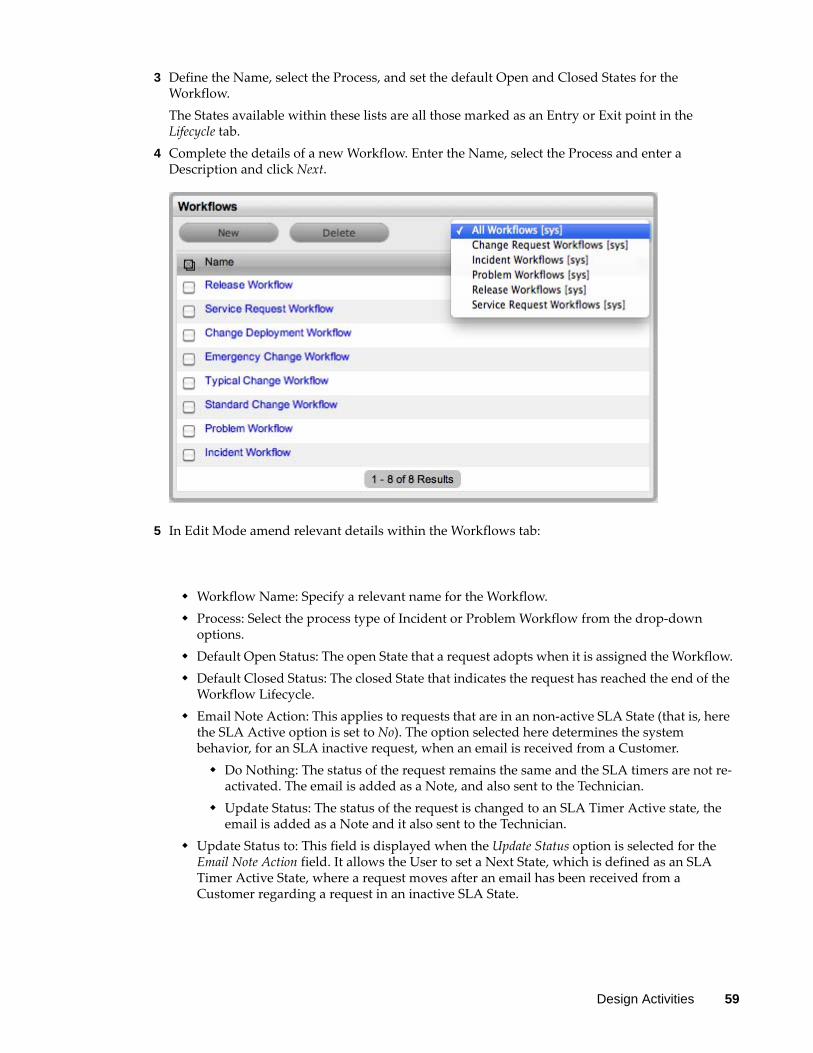
3 Define the Name, select the Process, and set the default Open and Closed States for the Workflow. The States available within these lists are all those marked as an Entry or Exit point in the Lifecycle tab.
4 Complete the details of a new Workflow. Enter the Name, select the Process and enter a Description and click Next.
5 In Edit Mode amend relevant details within the Workflows tab:
Workflow Name: Specify a relevant name for the Workflow. Process: Select the process type of Incident or Problem Workflow from the drop-down
options. Default Open Status: The open State that a request adopts when it is assigned the Workflow. Default Closed Status: The closed State that indicates the request has reached the end of the
Workflow Lifecycle. Email Note Action: This applies to requests that are in an non-active SLA State (that is, here
the SLA Active option is set to No). The option selected here determines the system behavior, for an SLA inactive request, when an email is received from a Customer. Do Nothing: The status of the request remains the same and the SLA timers are not re-
activated. The email is added as a Note, and also sent to the Technician. Update Status: The status of the request is changed to an SLA Timer Active state, the
email is added as a Note and it also sent to the Technician. Update Status to: This field is displayed when the Update Status option is selected for the
Email Note Action field. It allows the User to set a Next State, which is defined as an SLA Timer Active State, where a request moves after an email has been received from a Customer regarding a request in an inactive SLA State.
Design Activities 59
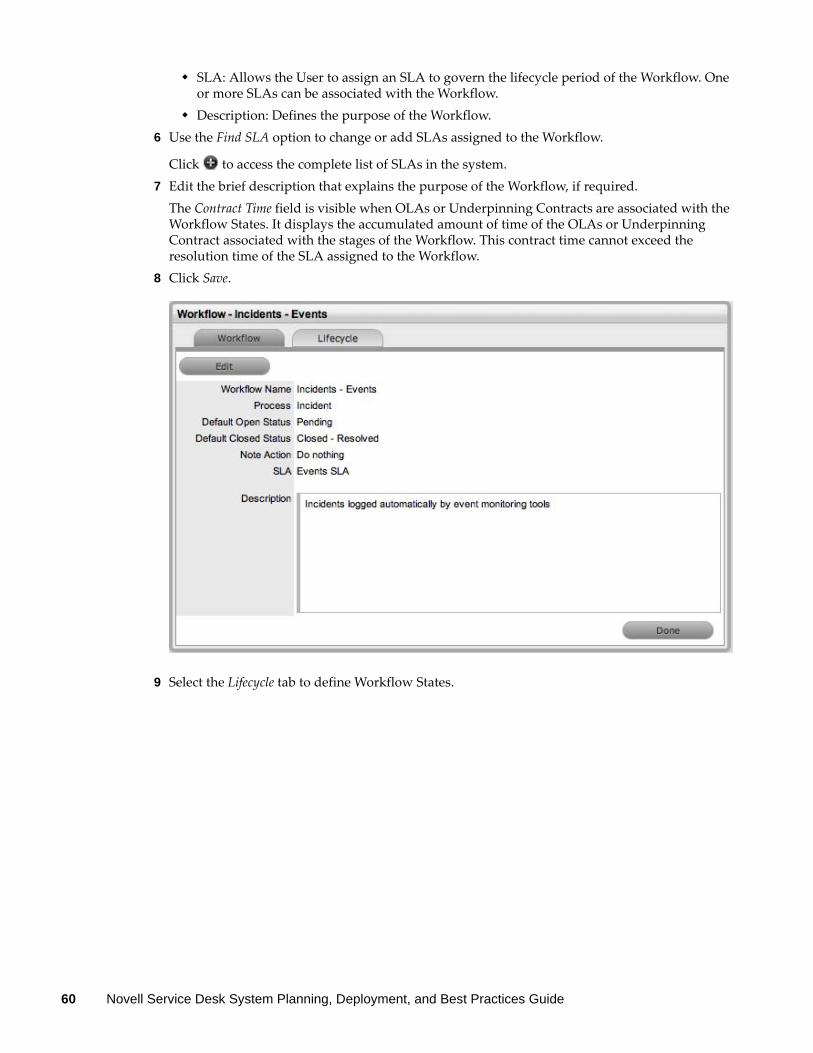
SLA: Allows the User to assign an SLA to govern the lifecycle period of the Workflow. One or more SLAs can be associated with the Workflow.
Description: Defines the purpose of the Workflow.6 Use the Find SLA option to change or add SLAs assigned to the Workflow.
Click to access the complete list of SLAs in the system. 7 Edit the brief description that explains the purpose of the Workflow, if required.
The Contract Time field is visible when OLAs or Underpinning Contracts are associated with the Workflow States. It displays the accumulated amount of time of the OLAs or Underpinning Contract associated with the stages of the Workflow. This contract time cannot exceed the resolution time of the SLA assigned to the Workflow.
8 Click Save.
9 Select the Lifecycle tab to define Workflow States.
60 Novell Service Desk System Planning, Deployment, and Best Practices Guide
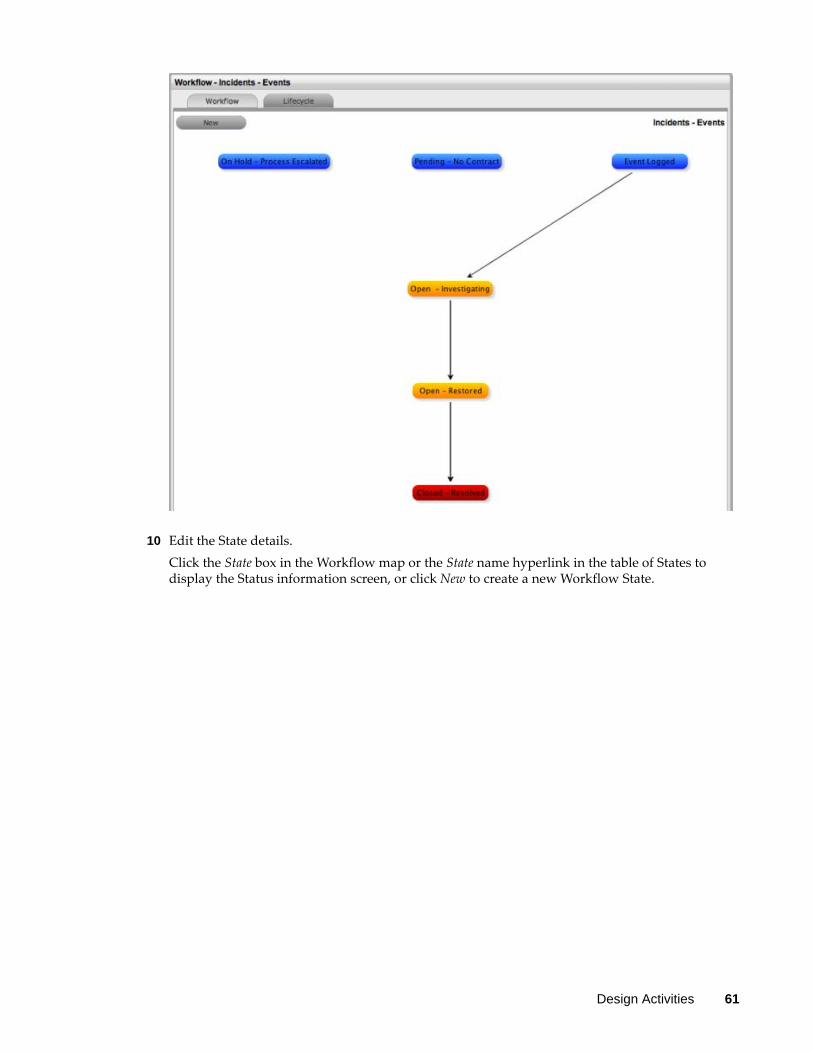
10 Edit the State details. Click the State box in the Workflow map or the State name hyperlink in the table of States to display the Status information screen, or click New to create a new Workflow State.
Design Activities 61
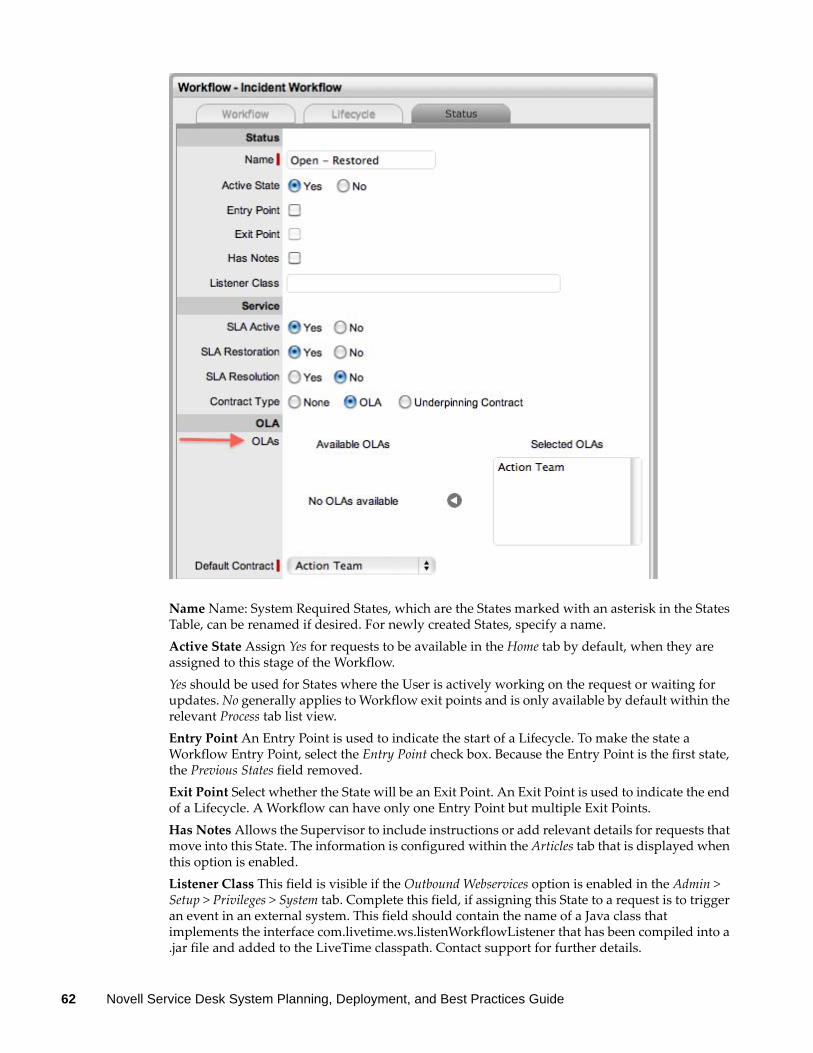
Name Name: System Required States, which are the States marked with an asterisk in the States Table, can be renamed if desired. For newly created States, specify a name.Active State Assign Yes for requests to be available in the Home tab by default, when they are assigned to this stage of the Workflow.Yes should be used for States where the User is actively working on the request or waiting for updates. No generally applies to Workflow exit points and is only available by default within the relevant Process tab list view.Entry Point An Entry Point is used to indicate the start of a Lifecycle. To make the state a Workflow Entry Point, select the Entry Point check box. Because the Entry Point is the first state, the Previous States field removed.Exit Point Select whether the State will be an Exit Point. An Exit Point is used to indicate the end of a Lifecycle. A Workflow can have only one Entry Point but multiple Exit Points.Has Notes Allows the Supervisor to include instructions or add relevant details for requests that move into this State. The information is configured within the Articles tab that is displayed when this option is enabled.Listener Class This field is visible if the Outbound Webservices option is enabled in the Admin > Setup > Privileges > System tab. Complete this field, if assigning this State to a request is to trigger an event in an external system. This field should contain the name of a Java class that implements the interface com.livetime.ws.listenWorkflowListener that has been compiled into a .jar file and added to the LiveTime classpath. Contact support for further details.
62 Novell Service Desk System Planning, Deployment, and Best Practices Guide
SLA Active Links the status with timing set within SLAs and OLAs. When the option is set to No, the SLA/OLA timers stop and the triggers for escalations and warnings do not fire.SLA Restoration When timing is set by using SLAs and OLAs, the SLA Restoration Time trigger is disabled when the request is moved to this state. Restoration Time indicates that a Customer has access restored or a temporary workaround. Reports on Restoration Time are measured from when the Restoration Time trigger is disabled.SLA Resolution Allows the State selected to be used to mark the SLA Resolution Time. This is used in SLA reporting.Contract Type Defines if the Workflow State will be managed by an internal (OLA) or external (Underpinning Contract) support agreement. If OLAs or Underpinning Contracts are assigned to a Workflow Lifecycle, the Workflow SLA Resolution Time cannot be exceeded by the sum of Resolution Times for all Contract Types assigned to the Workflow Lifecycle.Assign SLM This field is displayed when a UPC is associated with the Workflow State. Use this field to define if the request ownership is to be maintained by the Assigned Technician or moved to the Manager of the SLA associated with the request.Previous States If the State is not an Entry Point, use the arrow button to select Previous States from the Available States and choose when this State appears as a drop-down menu option in the Next Action field.Next States If the State is not an Exit Point, use the arrow button to select the Next States a request can move to, in the Next Action field of a request Information Summary tab.
11 Delete the State or edit Name/Rename the State name.12 Enter all State information up to the SLA Resolution field.13 Save the updated State details.
All States that are to be included in the Workflow should be added or re-named now.After all States have been entered in the system, the mapping of the Workflow can be more easily achieved.
14 Continue to edit, add, or delete States until all relevant States exist for the Workflow.15 Create the Workflow Lifecycle by assigning States to the transitional states of Previous or Next.
To move Available States to the Previous State or Next State field, open the Status Details screen by clicking the State object in the Workflow map, or select the State hyperlink in the table beneath the Workflow map.
16 Assign a States to a Next or Previous State. For the Current Status select an option in the Available State list and click the right arrow to move it to the Selected States field.When a State is used as a Previous and a Next State, it allows a request to move forward and backward in a Lifecycle An Open State cannot have any previous States and a Closed State cannot have any Next States.
17 Click Save to return to the Workflow map and to access other States to build on the Workflow Lifecycle.
18 Repeat Steps 15 to 17 until all transitional stages of the Workflow have been mapped.To successfully save a Workflow, the sum of the Resolution Time of the individual Contract Types assigned to each transitional state of the Workflow Lifecycle must be less than or equal to the Workflow's SLA Resolution Time.
19 Click Save.The visual representation of the Workflow is displayed.
Design Activities 63
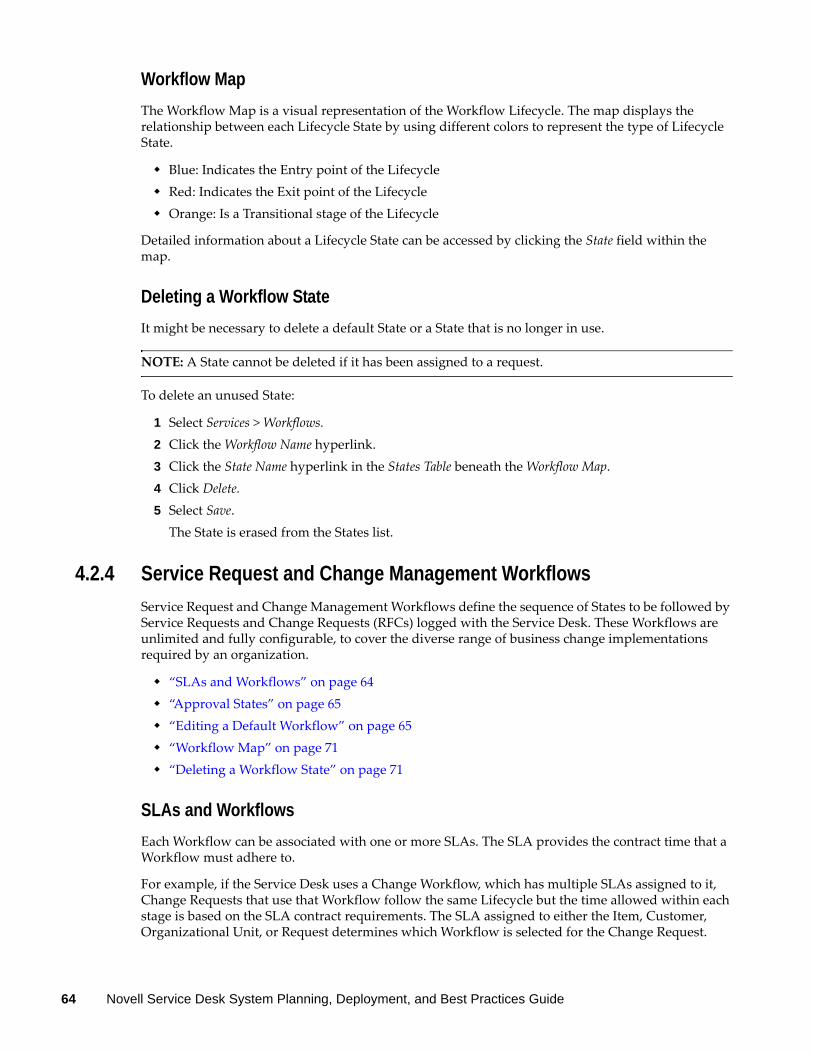
Workflow Map
The Workflow Map is a visual representation of the Workflow Lifecycle. The map displays the relationship between each Lifecycle State by using different colors to represent the type of Lifecycle State.
Blue: Indicates the Entry point of the Lifecycle Red: Indicates the Exit point of the Lifecycle Orange: Is a Transitional stage of the Lifecycle
Detailed information about a Lifecycle State can be accessed by clicking the State field within the map.
Deleting a Workflow State
It might be necessary to delete a default State or a State that is no longer in use.
NOTE: A State cannot be deleted if it has been assigned to a request.
To delete an unused State:
1 Select Services > Workflows. 2 Click the Workflow Name hyperlink.3 Click the State Name hyperlink in the States Table beneath the Workflow Map.4 Click Delete.5 Select Save.
The State is erased from the States list.
4.2.4 Service Request and Change Management Workflows
Service Request and Change Management Workflows define the sequence of States to be followed by Service Requests and Change Requests (RFCs) logged with the Service Desk. These Workflows are unlimited and fully configurable, to cover the diverse range of business change implementations required by an organization.
“SLAs and Workflows” on page 64 “Approval States” on page 65 “Editing a Default Workflow” on page 65 “Workflow Map” on page 71 “Deleting a Workflow State” on page 71
SLAs and Workflows
Each Workflow can be associated with one or more SLAs. The SLA provides the contract time that a Workflow must adhere to.
For example, if the Service Desk uses a Change Workflow, which has multiple SLAs assigned to it, Change Requests that use that Workflow follow the same Lifecycle but the time allowed within each stage is based on the SLA contract requirements. The SLA assigned to either the Item, Customer, Organizational Unit, or Request determines which Workflow is selected for the Change Request.
64 Novell Service Desk System Planning, Deployment, and Best Practices Guide
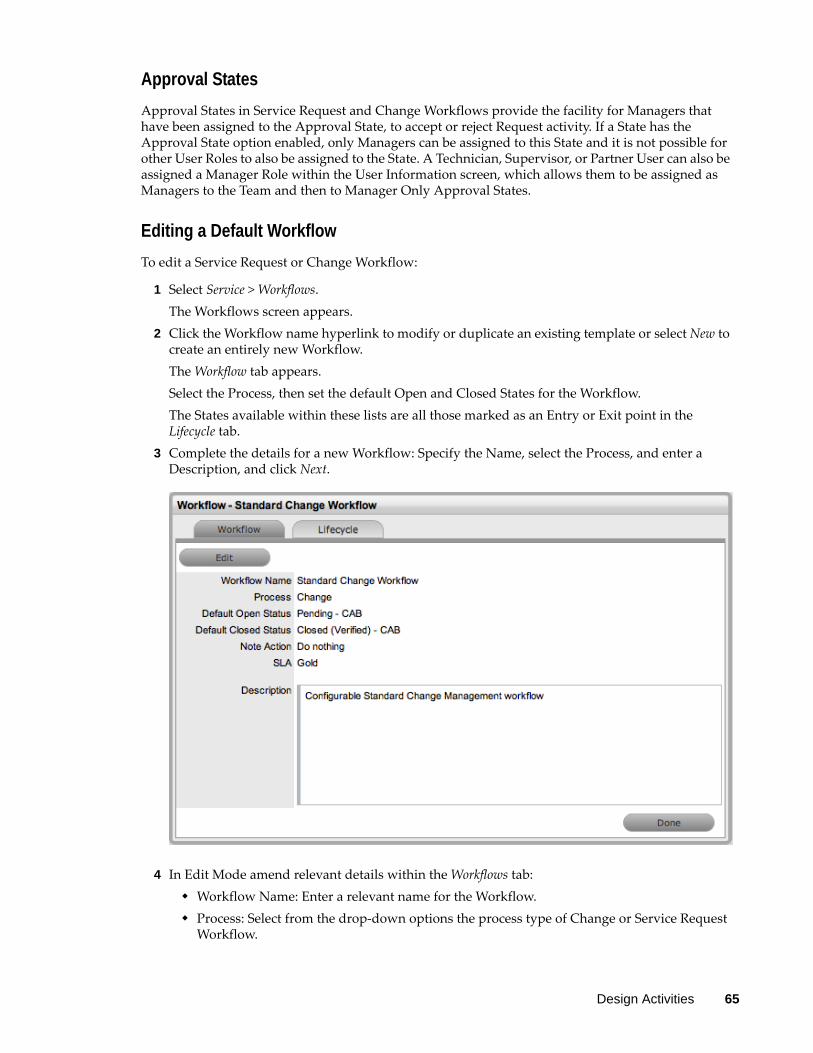
Approval States
Approval States in Service Request and Change Workflows provide the facility for Managers that have been assigned to the Approval State, to accept or reject Request activity. If a State has the Approval State option enabled, only Managers can be assigned to this State and it is not possible for other User Roles to also be assigned to the State. A Technician, Supervisor, or Partner User can also be assigned a Manager Role within the User Information screen, which allows them to be assigned as Managers to the Team and then to Manager Only Approval States.
Editing a Default Workflow
To edit a Service Request or Change Workflow:
1 Select Service > Workflows.The Workflows screen appears.
2 Click the Workflow name hyperlink to modify or duplicate an existing template or select New to create an entirely new Workflow. The Workflow tab appears. Select the Process, then set the default Open and Closed States for the Workflow. The States available within these lists are all those marked as an Entry or Exit point in the Lifecycle tab.
3 Complete the details for a new Workflow: Specify the Name, select the Process, and enter a Description, and click Next.
4 In Edit Mode amend relevant details within the Workflows tab: Workflow Name: Enter a relevant name for the Workflow. Process: Select from the drop-down options the process type of Change or Service Request
Workflow.
Design Activities 65

Default Open Status: The open state that a Request adopts when it is assigned the Workflow.
Default Closed Status: The closed state that indicates the Request has reached the end of the Workflow Lifecycle.
Email Note Action: This applies to Requests that are in a non-active SLA State (that is, where the SLA Active option is set to No). The option selected here determines the system behavior, regarding an SLA inactive Request, when an email is received from a Customer. Do Nothing: Means the status of the Request remains the same and the SLA timers are
not re-activated. The email is added as a Note and also sent to the Technician. Update Status: Means the status of the Request is changed to an SLA Timer Active
State, the email is added as a Note and it also sent to the Technician. Update Status to: This field is displayed when the Update Status option is selected for the
Email Note Action field. It allows the User to set a Next State, which is defined as an SLA Timer Active State, where a request will move to after an email has been received from a Customer regarding a Request in an inactive SLA State.
SLA: Allows the User to assign a SLA to govern the lifecycle period of the Workflow.(See SLAs & Workflows above, for more information.)
Description: Defines the purpose of the Workflow.5 Use the Find SLA option to change or add SLAs assigned to the Workflow.
Click to access the complete list of SLAs in the system. Refer to the above section for more information regarding SLAs and Workflows.
66 Novell Service Desk System Planning, Deployment, and Best Practices Guide
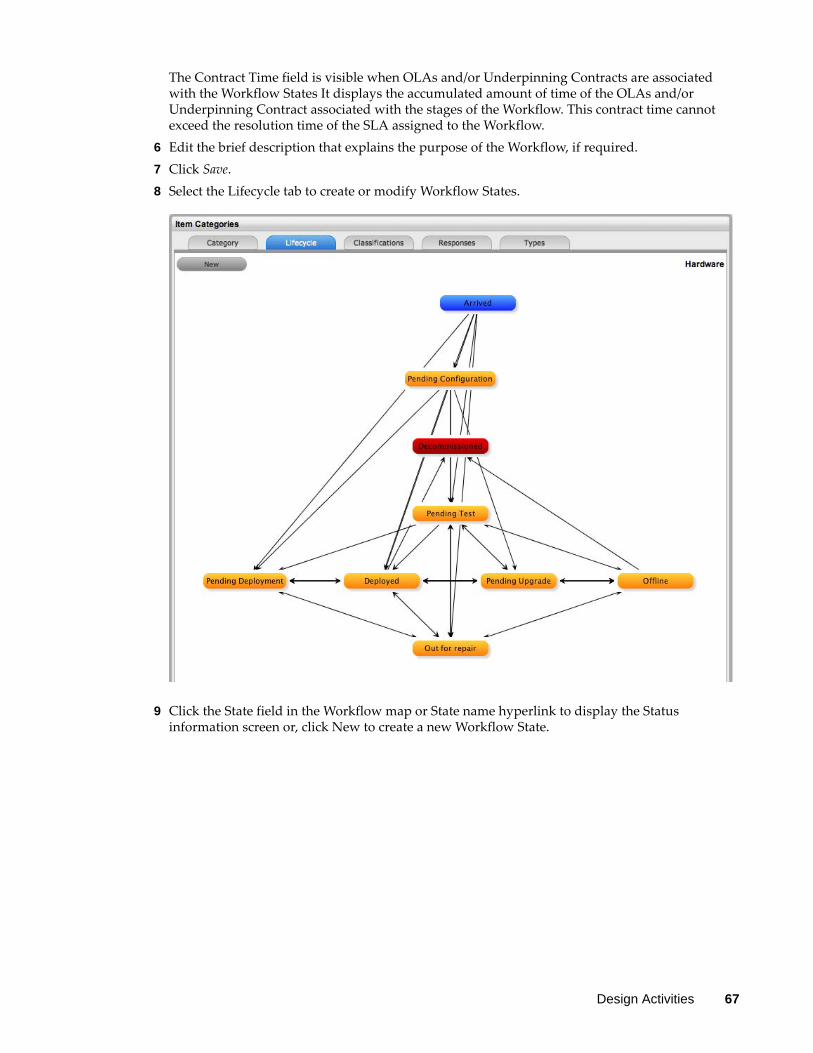
The Contract Time field is visible when OLAs and/or Underpinning Contracts are associated with the Workflow States It displays the accumulated amount of time of the OLAs and/or Underpinning Contract associated with the stages of the Workflow. This contract time cannot exceed the resolution time of the SLA assigned to the Workflow.
6 Edit the brief description that explains the purpose of the Workflow, if required.7 Click Save.8 Select the Lifecycle tab to create or modify Workflow States.
9 Click the State field in the Workflow map or State name hyperlink to display the Status information screen or, click New to create a new Workflow State.
Design Activities 67
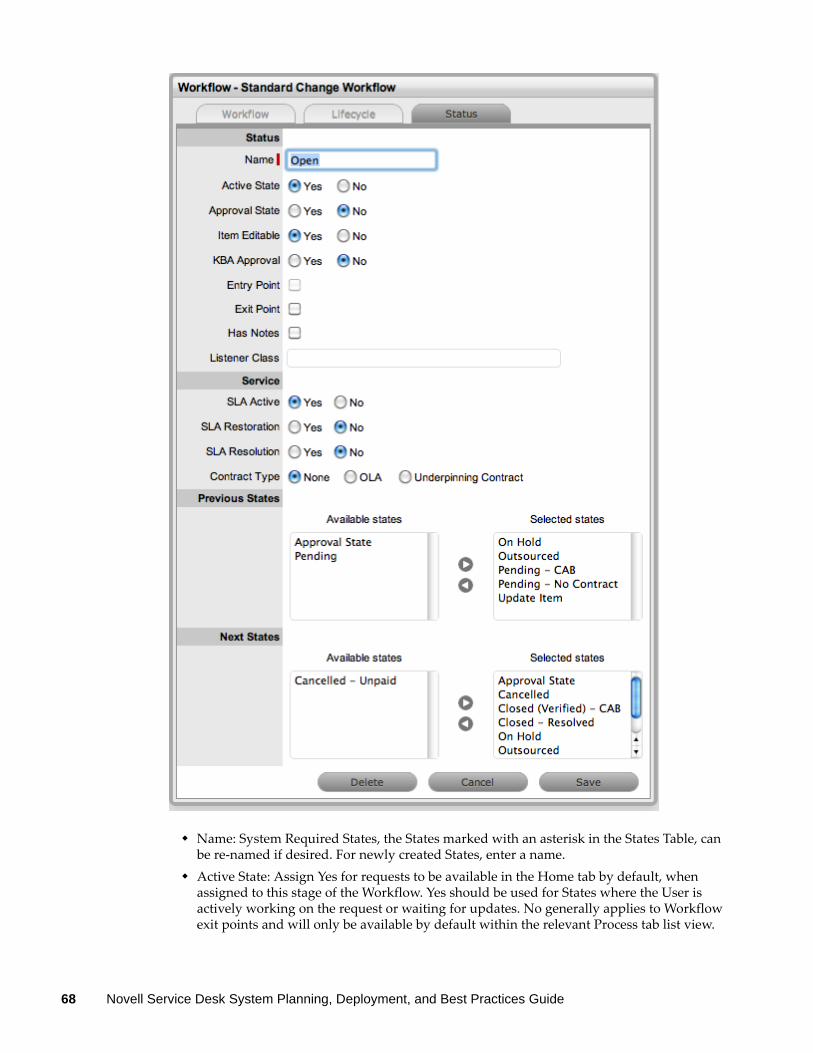
Name: System Required States, the States marked with an asterisk in the States Table, can be re-named if desired. For newly created States, enter a name.
Active State: Assign Yes for requests to be available in the Home tab by default, when assigned to this stage of the Workflow. Yes should be used for States where the User is actively working on the request or waiting for updates. No generally applies to Workflow exit points and will only be available by default within the relevant Process tab list view.
68 Novell Service Desk System Planning, Deployment, and Best Practices Guide
Approval State: Sets the Status as an Approval State. This allows a Manager User to be assigned to this State, which enables them to approve or reject a Request when it moves into this stage of the Workflow. An Entry/Exit status cannot be an Approval State.
Item Editable: Select this option to allow the details of an Item to be edited when a Request is moved into this State . When this option is enabled for a Workflow State, inline_edit.gif is visible next to the Item Type link in the Summary tab of the Request.
KBA Approval: Enable this option as part of the KBA Approval process, which displays the Accept, Revise and Reject buttons for the User to publish, advise content revision or reject content. Enabling this option, removes the Next States fields and requires the User to define where the request will move to if the Accept and Reject buttons are selected. If the Revise button is selected, the Request will move to the "On Hold - KBA Rework" system state. See:KBA Content Approval
Entry Point: An Entry Point is used to indicate the start of a Lifecycle. To make the state Workflow Entry Point, select the Entry Point checkbox. As the Entry Point is the first state, the Previous States field will be removed.
Exit Point: Select whether the state will be an Exit Point. An Entry Point is used to indicate the end of a Lifecycle. A Workflow can have only one Entry Point but multiple Exit Points.
Has Notes: Allows the Supervisor to include instructions or add relevant details for Requests that move into this State. The information is configured within the Notes tab that is displayed when this option is enabled. Information and attachments included on the Notes tab, are displayed as a scroll-over when the Request moves into the State.
Listener Class: This field is visible if the Outbound Web Services option is enabled in the Admin>Setup>Privileges>System tab. Complete this field, if assigning this State to a request is to trigger an event in an external system.This field should contain the name of a Java class that implements the interface com.livetime.ws.listenWorkflowListener that has been compiled into a jar file and added to the LiveTime classpath. Please contact support for further details.
SLA Active: Links the Status with timing set within SLAs and OLAs. When the option is set to No, the SLA/OLA timers stop and the triggers for reminders, escalations and warnings do not fire.
SLA Restoration: If the 'Yes' option is selected for SLA Restoration, it means that Requests that move into this Stage of the Workflow have met the SLARestoration Time.
SLA Resolution: If the Yes option is selected for SLA Resolution, it means that Requests that move into this Stage of the Workflow have met the SLA Resolution Time.
Contract Type: Defines if the Workflow State will be managed by an internal (OLA) or external (Underpinning Contract) support agreement. If OLA's or Underpinning Contracts are assigned to a Workflow Lifecycle, the Workflow SLA Resolution Time cannot be exceeded by the sum of Resolution Times for all Contract Types assigned to the Workflow Lifecycle.
Assign SLM: This field is displayed when an UPC is associated with the Workflow State. Use this field to define if the request ownership is to be maintained by the Assigned Technician or moved to the Manager of the SLA associated with the request.
Previous States: If the State is not an Entry Point, Previous States can be assigned to the Workflow stage. Highlight the relevant State and use the arrow button to move Available States to the Previous States field. These options designate the Workflow stages a Request can come from, before it arrives in this Workflow State.
Design Activities 69
Next States: If the State is not an Exit Point, Next States can be assigned to the Workflow state. Use the arrow button to select the Next States from the Available States. These options are included in the Next Action drop-down menu of a Request.
Accept State: (Visible when the Approval State or KBA Approval option is Yes.) Displays the States that a Request can move to when a Request action is Accepted. Select the appropriate State, for the system to automatically route the Request when the Accept option is selected. By default the system will assign Single for one Manager to Approve a Request.If more than one Manager needs to Approve a Request, select Multiple or Percentage. If Multiple is selected, set the number of Managers that are required to Approve the
Request before the system will automatically apply the defined Accept or Reject State.
If Percentage is selected, set the percentage weighting that must be achieved by Managers voting before the system will automatically apply the defined Accept or Reject State.
Reject State: (Visible when the Approval State or KBA Approval option is Yes.) Displays the States that a Request can move to when a Request action is Rejected. Select the appropriate State, for the system to automatically route the Request when the Reject option is selected.
10 Delete the State if required, or Name/Rename the State.11 Enter all State information up to the SLA Resolution field.12 Save the updated State details:
It is recommended that all States that are to be included in the Workflow be added or re-named now.
After all States have been entered in the system, the mapping of the Workflow can be more easily achieved.
13 Continue to edit, add or delete States until all relevant States exist for the Workflow.14 To create the Workflow Lifecycle, States need to be assigned to the transitional states of Previous
and/or Next. To move Available states to the Previous State or Next State field, open the Status details screen by clicking the State field in the Workflow map or select the State hyperlink in the table beneath the Workflow map.
15 Assign a States to be a Next and/or Previous State.For the Current Status highlight an option in the Available State list and click the right-pointing arrow to move it to the Selected States field.When a State is used as a Previous and a Next State, it allows a request to move forward and backward in a Lifecycle. An Open State cannot have any previous States and a Closed State cannot have any Next States.
16 Click Save to return to the Workflow map and to access other States to build on the Workflow lifecycle.
17 Repeat Steps 13 to 16 until all transitional stages of the Workflow have been mapped.To successfully save a Workflow, the sum Resolution Time of the individual Contract Types assigned to each transitional state of the Workflow Lifecycle, must be less than or equal to the Workflow's SLA Resolution Time.
18 Click Save. The visual representation of the Workflow is displayed.
70 Novell Service Desk System Planning, Deployment, and Best Practices Guide
Workflow Map
The Workflow Map is a visual representation of the Workflow Lifecycle. The map displays the relationship between each Lifecycle State by using different colors to represent the type of Lifecycle State.
Blue: Indicates the Entry point of the Lifecycle. Red: Indicates the Exit point of the Lifecycle. Orange: Is a Transitional stage of the Lifecycle.
Detailed information about a Lifecycle State can be accessed by clicking on the State field within the Map.
Deleting a Workflow State
It may be necessary to delete a system default State or a State that is no longer in use. Note that a State cannot be deleted if it has been assigned to a Request.
It is recommended that any States listed in the table of States included on the Life Cycle tab that are not included in the Workflow or used by the system, be removed from the table as all States included here are listed in the States tab when Workflow Technician assignment is being configured. By removing unused States from the table, assigning Technicians to the relevant stages of the Workflow becomes an easier task.
To delete an unused State:
1 Select Service > Workflows.2 Click on the Workflow hyperlink.3 Move to the Lifecycle tab.4 Select the State name link in the table of States included in the Lifecycle tab.5 Click Delete.6 Click Done.
4.2.5 Creating Teams
By default the system includes one Process Team and the Unknown Team. Edit the existing Process Team, including defining the way it works, assigning the relevant Technicians, associating the Workflows that the Team will support, and setting the Technicians to work in the appropriate Escalation Layer(s). Teams are to be created for all Processes that are to be managed by the system (i.e., Incident, Problem, Change, Service Request.), although it may be relevant to finish one Process first, and return to do the other Processes at a later date.
Technicians are allocated to Teams for the various support processes. For each Process (i.e., Incident, Problem, Change and Service Request) there must be at least one support Team.
Default Teams are assigned to specific Item Types. Support requests generated against an Item Type are then assigned to a Technician within the default support Team for that Process. The Team may be reassigned based on other options provided through the associated SLA(s) and Workflow(s).
Support Teams for Incident and Problem Management include escalation layers, and Technicians are assigned to each of these layers. Incidents and Problems follow the escalation path determined by the service level triggers assigned to the request. For a Technician to be able to edit a request, they must be a member of the assigned Team, although they do not need to be included in an escalation layer.
Design Activities 71
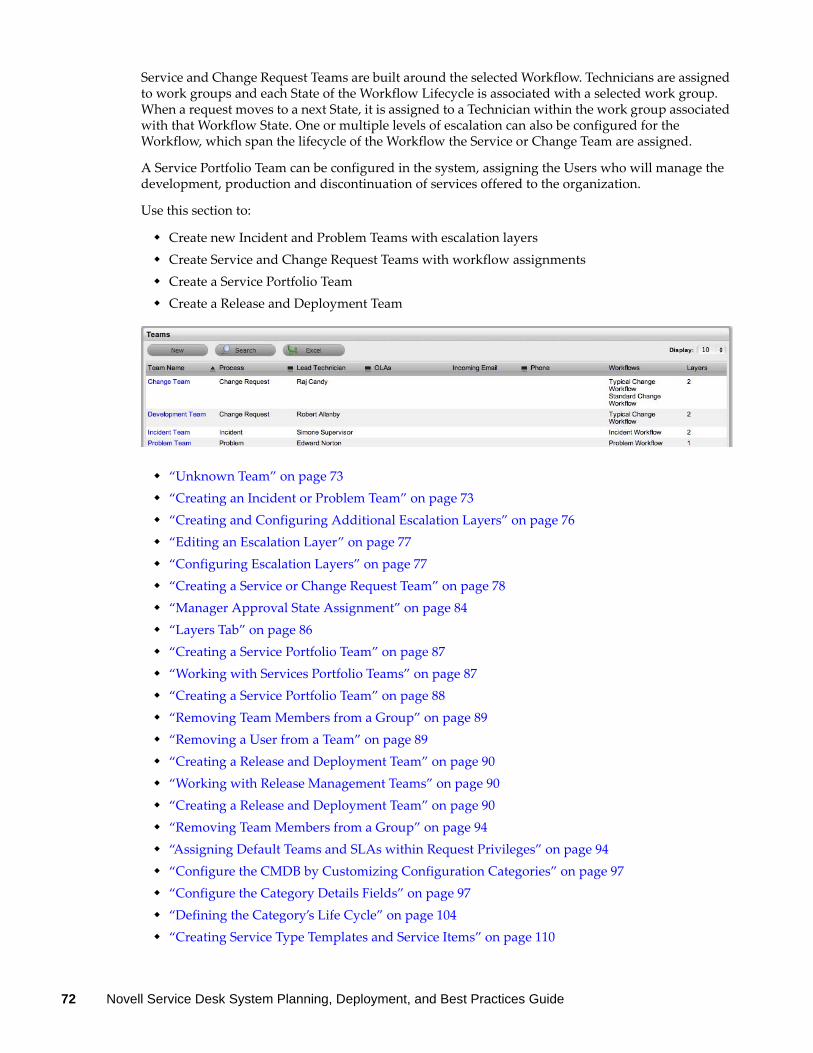
Service and Change Request Teams are built around the selected Workflow. Technicians are assigned to work groups and each State of the Workflow Lifecycle is associated with a selected work group. When a request moves to a next State, it is assigned to a Technician within the work group associated with that Workflow State. One or multiple levels of escalation can also be configured for the Workflow, which span the lifecycle of the Workflow the Service or Change Team are assigned.
A Service Portfolio Team can be configured in the system, assigning the Users who will manage the development, production and discontinuation of services offered to the organization.
Use this section to:
Create new Incident and Problem Teams with escalation layers Create Service and Change Request Teams with workflow assignments Create a Service Portfolio Team Create a Release and Deployment Team
“Unknown Team” on page 73 “Creating an Incident or Problem Team” on page 73 “Creating and Configuring Additional Escalation Layers” on page 76 “Editing an Escalation Layer” on page 77 “Configuring Escalation Layers” on page 77 “Creating a Service or Change Request Team” on page 78 “Manager Approval State Assignment” on page 84 “Layers Tab” on page 86 “Creating a Service Portfolio Team” on page 87 “Working with Services Portfolio Teams” on page 87 “Creating a Service Portfolio Team” on page 88 “Removing Team Members from a Group” on page 89 “Removing a User from a Team” on page 89 “Creating a Release and Deployment Team” on page 90 “Working with Release Management Teams” on page 90 “Creating a Release and Deployment Team” on page 90 “Removing Team Members from a Group” on page 94 “Assigning Default Teams and SLAs within Request Privileges” on page 94 “Configure the CMDB by Customizing Configuration Categories” on page 97 “Configure the Category Details Fields” on page 97 “Defining the Category’s Life Cycle” on page 104 “Creating Service Type Templates and Service Items” on page 110
72 Novell Service Desk System Planning, Deployment, and Best Practices Guide

“AMIE Import – Managing Items through Database Management” on page 121 “CSV Import – Importing Items by Using a .CSV File” on page 126
Unknown Team
By default the system includes the system Team, Unknown, within the Teams List. This is the Team used by the application for Incidents created via email. It can be configured to use the system email address or an email account that is an alias for the main system account and Technicians can be assigned like any other Incident Team.
The Unknown Team should NOT be re-named and will NOT appear in any other Teams lists throughout the application, i.e., when assigning a Team to an Item or Item Type.
Creating an Incident or Problem Team
To create an Incident or Problem Team:
1 Select User>Teams. 2 Click New. 3 Enter the Team Name.
4 Select Incident or Problem Process.5 Enter the Team email address, if relevant.
Design Activities 73
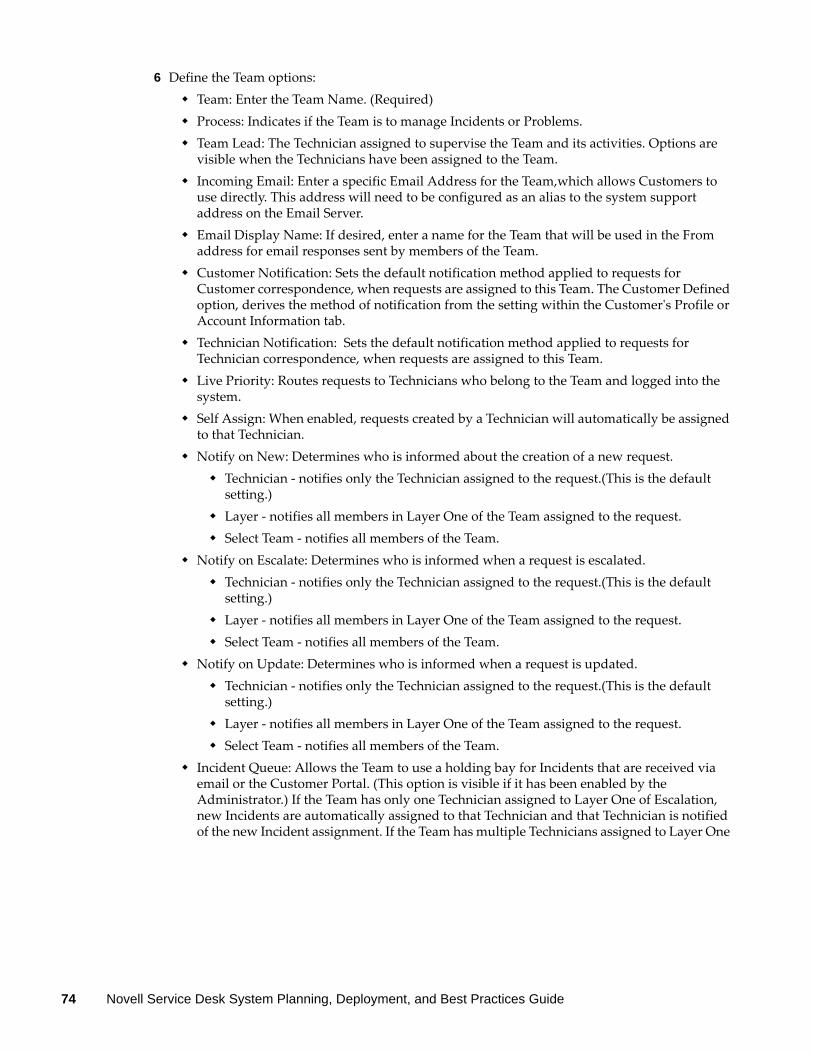
6 Define the Team options: Team: Enter the Team Name. (Required) Process: Indicates if the Team is to manage Incidents or Problems. Team Lead: The Technician assigned to supervise the Team and its activities. Options are
visible when the Technicians have been assigned to the Team. Incoming Email: Enter a specific Email Address for the Team,which allows Customers to
use directly. This address will need to be configured as an alias to the system support address on the Email Server.
Email Display Name: If desired, enter a name for the Team that will be used in the From address for email responses sent by members of the Team.
Customer Notification: Sets the default notification method applied to requests for Customer correspondence, when requests are assigned to this Team. The Customer Defined option, derives the method of notification from the setting within the Customer's Profile or Account Information tab.
Technician Notification: Sets the default notification method applied to requests for Technician correspondence, when requests are assigned to this Team.
Live Priority: Routes requests to Technicians who belong to the Team and logged into the system.
Self Assign: When enabled, requests created by a Technician will automatically be assigned to that Technician.
Notify on New: Determines who is informed about the creation of a new request. Technician - notifies only the Technician assigned to the request.(This is the default
setting.) Layer - notifies all members in Layer One of the Team assigned to the request. Select Team - notifies all members of the Team.
Notify on Escalate: Determines who is informed when a request is escalated. Technician - notifies only the Technician assigned to the request.(This is the default
setting.) Layer - notifies all members in Layer One of the Team assigned to the request. Select Team - notifies all members of the Team.
Notify on Update: Determines who is informed when a request is updated. Technician - notifies only the Technician assigned to the request.(This is the default
setting.) Layer - notifies all members in Layer One of the Team assigned to the request. Select Team - notifies all members of the Team.
Incident Queue: Allows the Team to use a holding bay for Incidents that are received via email or the Customer Portal. (This option is visible if it has been enabled by the Administrator.) If the Team has only one Technician assigned to Layer One of Escalation, new Incidents are automatically assigned to that Technician and that Technician is notified of the new Incident assignment. If the Team has multiple Technicians assigned to Layer One
74 Novell Service Desk System Planning, Deployment, and Best Practices Guide
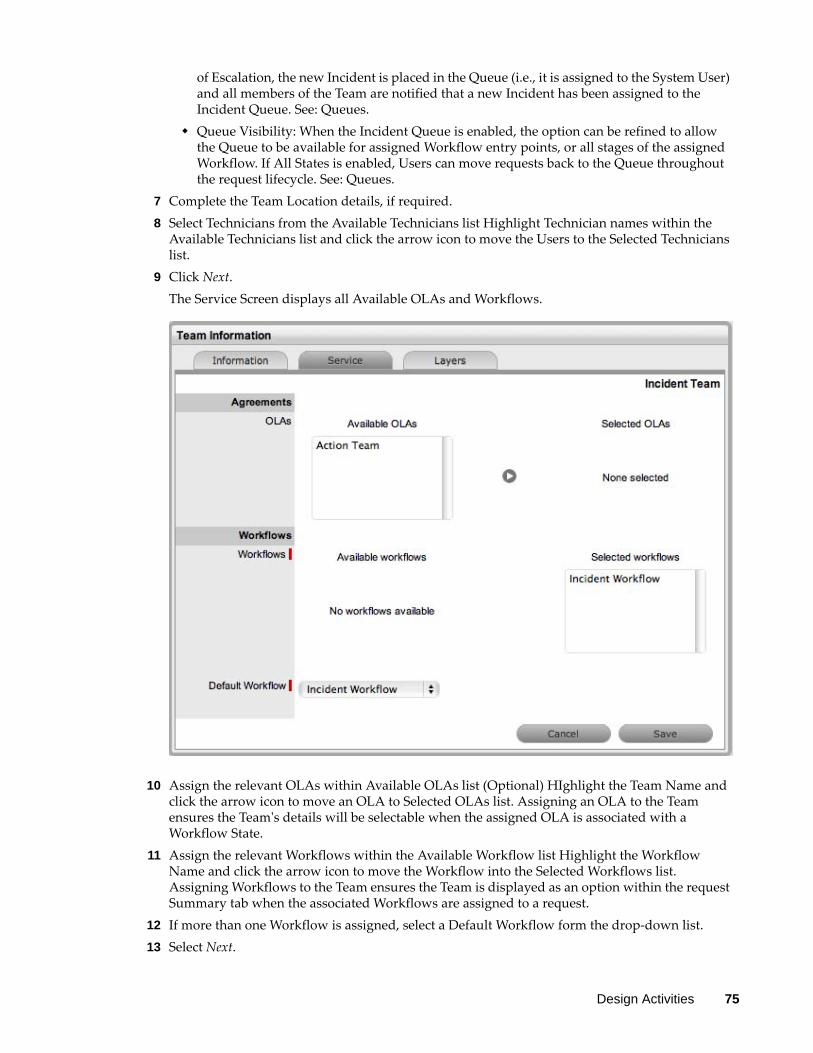
of Escalation, the new Incident is placed in the Queue (i.e., it is assigned to the System User) and all members of the Team are notified that a new Incident has been assigned to the Incident Queue. See: Queues.
Queue Visibility: When the Incident Queue is enabled, the option can be refined to allow the Queue to be available for assigned Workflow entry points, or all stages of the assigned Workflow. If All States is enabled, Users can move requests back to the Queue throughout the request lifecycle. See: Queues.
7 Complete the Team Location details, if required.8 Select Technicians from the Available Technicians list Highlight Technician names within the
Available Technicians list and click the arrow icon to move the Users to the Selected Technicians list.
9 Click Next. The Service Screen displays all Available OLAs and Workflows.
10 Assign the relevant OLAs within Available OLAs list (Optional) HIghlight the Team Name and click the arrow icon to move an OLA to Selected OLAs list. Assigning an OLA to the Team ensures the Team's details will be selectable when the assigned OLA is associated with a Workflow State.
11 Assign the relevant Workflows within the Available Workflow list Highlight the Workflow Name and click the arrow icon to move the Workflow into the Selected Workflows list. Assigning Workflows to the Team ensures the Team is displayed as an option within the request Summary tab when the associated Workflows are assigned to a request.
12 If more than one Workflow is assigned, select a Default Workflow form the drop-down list.13 Select Next.
Design Activities 75
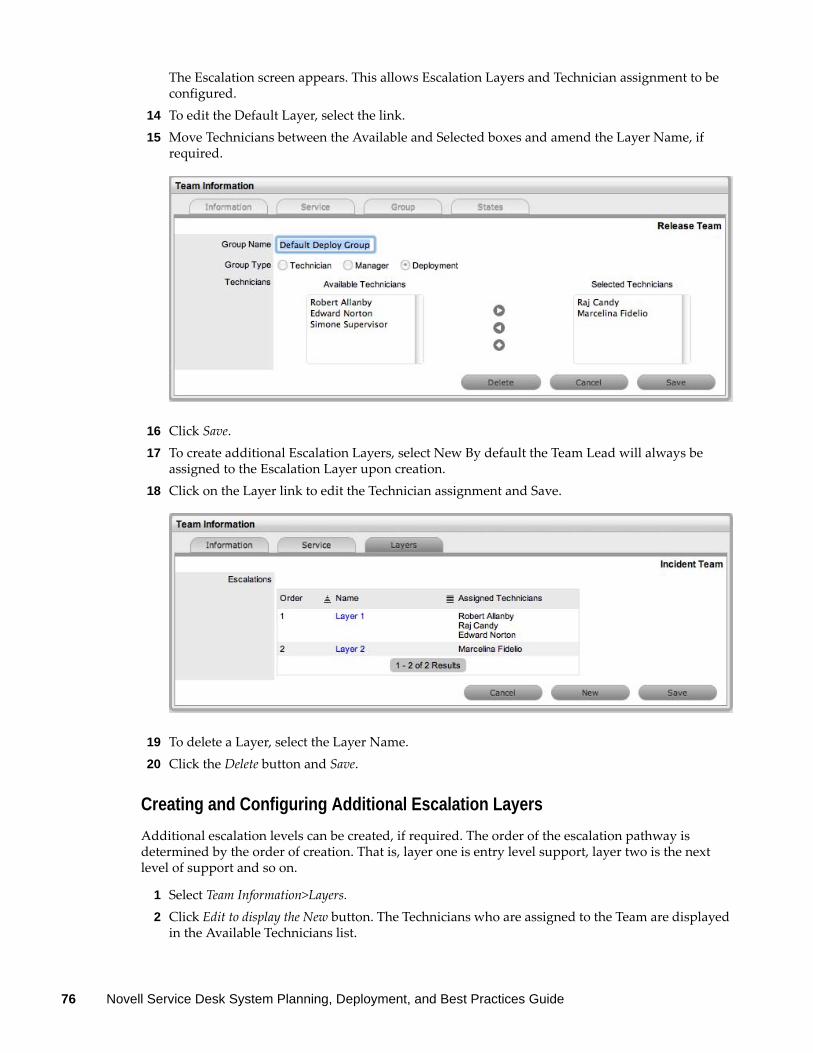
The Escalation screen appears. This allows Escalation Layers and Technician assignment to be configured.
14 To edit the Default Layer, select the link.15 Move Technicians between the Available and Selected boxes and amend the Layer Name, if
required.
16 Click Save.17 To create additional Escalation Layers, select New By default the Team Lead will always be
assigned to the Escalation Layer upon creation.18 Click on the Layer link to edit the Technician assignment and Save.
19 To delete a Layer, select the Layer Name.20 Click the Delete button and Save.
Creating and Configuring Additional Escalation Layers
Additional escalation levels can be created, if required. The order of the escalation pathway is determined by the order of creation. That is, layer one is entry level support, layer two is the next level of support and so on.
1 Select Team Information>Layers.2 Click Edit to display the New button. The Technicians who are assigned to the Team are displayed
in the Available Technicians list.
76 Novell Service Desk System Planning, Deployment, and Best Practices Guide
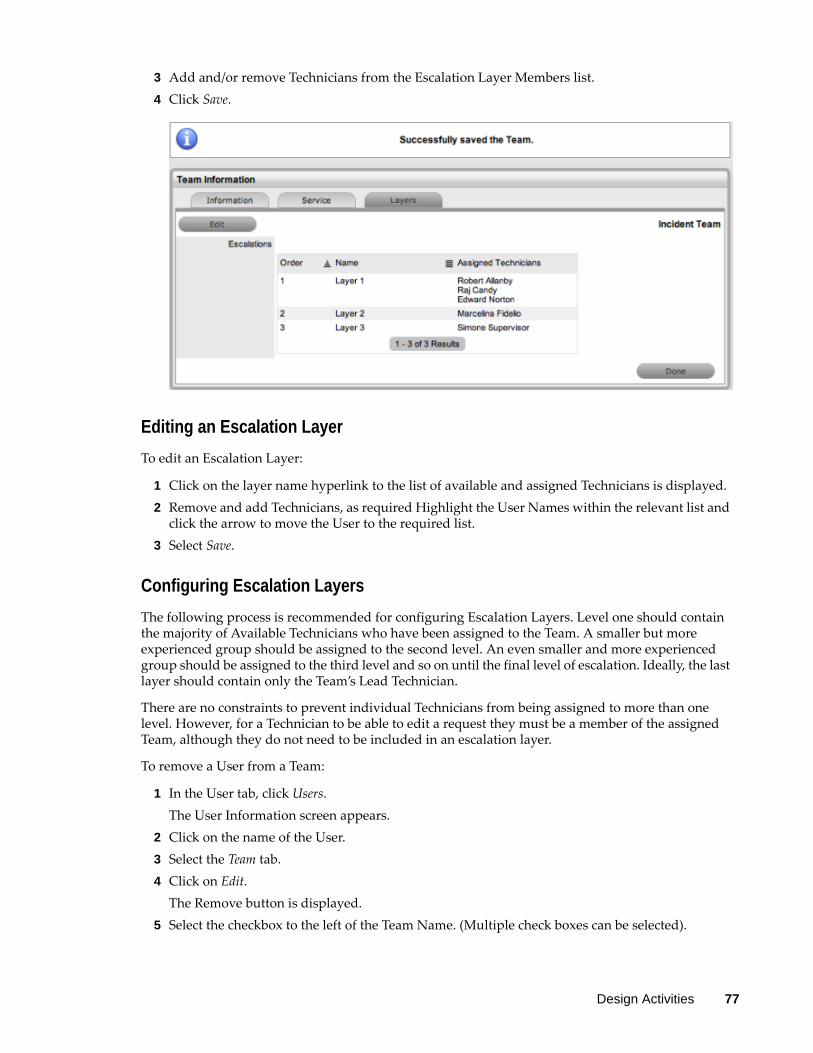
3 Add and/or remove Technicians from the Escalation Layer Members list.4 Click Save.
Editing an Escalation Layer
To edit an Escalation Layer:
1 Click on the layer name hyperlink to the list of available and assigned Technicians is displayed.2 Remove and add Technicians, as required Highlight the User Names within the relevant list and
click the arrow to move the User to the required list.3 Select Save.
Configuring Escalation Layers
The following process is recommended for configuring Escalation Layers. Level one should contain the majority of Available Technicians who have been assigned to the Team. A smaller but more experienced group should be assigned to the second level. An even smaller and more experienced group should be assigned to the third level and so on until the final level of escalation. Ideally, the last layer should contain only the Team’s Lead Technician.
There are no constraints to prevent individual Technicians from being assigned to more than one level. However, for a Technician to be able to edit a request they must be a member of the assigned Team, although they do not need to be included in an escalation layer.
To remove a User from a Team:
1 In the User tab, click Users. The User Information screen appears.
2 Click on the name of the User.3 Select the Team tab.4 Click on Edit.
The Remove button is displayed.5 Select the checkbox to the left of the Team Name. (Multiple check boxes can be selected).
Design Activities 77
6 Select Remove to delete the User from a Team.(The User Name is removed from the Team).7 Click Done.
Creating a Service or Change Request Team
Service and Change Request Teams are built around the selected Workflow. Technicians and Managers are assigned to work groups and each State of the Workflow Lifecycle is associated with a selected work group. When a request moves to a next State, it is assigned to a Technician or Manger within the work group associated with that Workflow State. One or multiple levels of escalation can also be configured for the Workflow, which span the lifecycle of the Workflow the Service or Change Team are assigned.
To create a Service Request or Change Management Support Team:
1 Select User>Teams. 2 Click New.3 Enter the Team Name.4 Select the Service or Change Request Process.5 Enter the Team email address, if relevant.
78 Novell Service Desk System Planning, Deployment, and Best Practices Guide
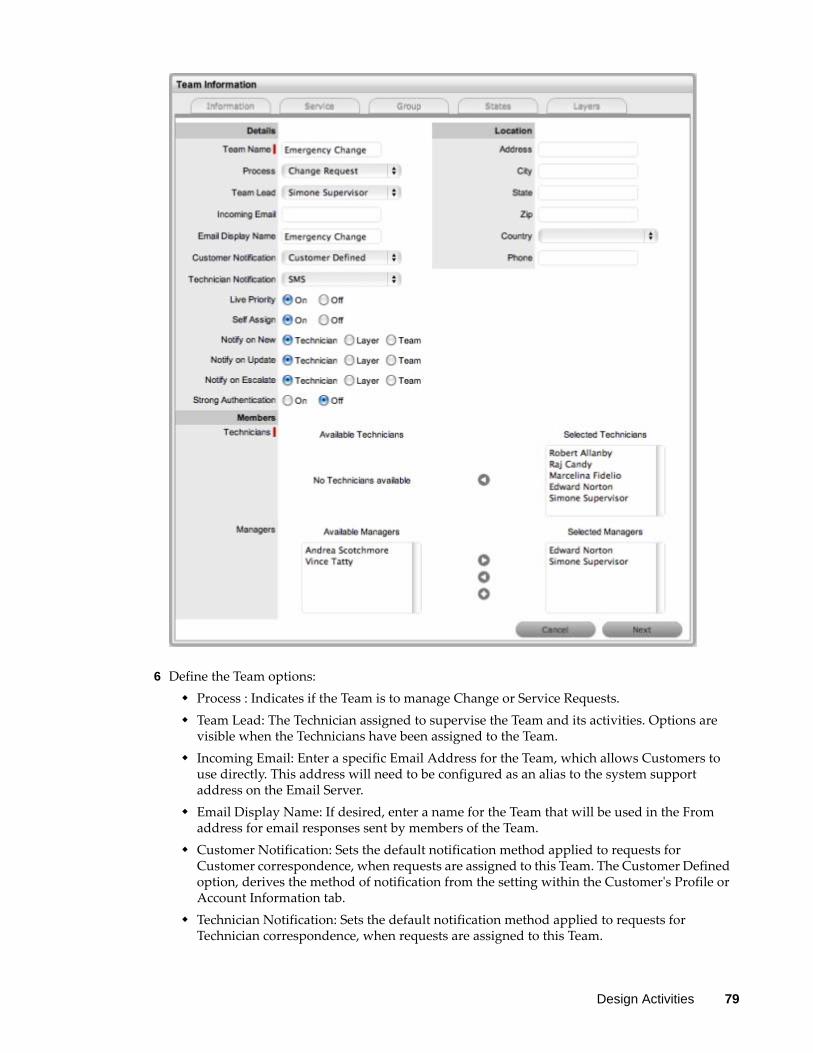
6 Define the Team options: Process : Indicates if the Team is to manage Change or Service Requests. Team Lead: The Technician assigned to supervise the Team and its activities. Options are
visible when the Technicians have been assigned to the Team. Incoming Email: Enter a specific Email Address for the Team, which allows Customers to
use directly. This address will need to be configured as an alias to the system support address on the Email Server.
Email Display Name: If desired, enter a name for the Team that will be used in the From address for email responses sent by members of the Team.
Customer Notification: Sets the default notification method applied to requests for Customer correspondence, when requests are assigned to this Team. The Customer Defined option, derives the method of notification from the setting within the Customer's Profile or Account Information tab.
Technician Notification: Sets the default notification method applied to requests for Technician correspondence, when requests are assigned to this Team.
Design Activities 79
Self Assign: When enabled, Requests created by a Technician will automatically be assigned to that Technician.
Notify on New: Determines who is informed about the creation of a new Request. Technician - notifies only the Technician assigned to the request. (This is the default
setting.) Layer - notifies all members in Layer One of the Team assigned to the request. Select Team - notifies all members of the Team.
Notify on Update: Determines who is informed when a Request is updated. Technician - notifies only the Technician assigned to the request. (This is the default
setting.) Layer - notifies all members in Layer One of the Team assigned to the request. Select Team - notifies all members of the Team.
Notify on Escalate: Determines who is informed when a Request is escalated. Technician - notifies only the Technician assigned to the request. (This is the default
setting.) Layer - notifies all members in Layer One of the Team assigned to the request. Select Team - notifies all members of the Team.
Request Queue: (Service Request Teams only) Allows the Team to use a holding bay for Requests that are received via email or the Customer Portal. (This option is visible if it has been enabled by the Administrator.) If the Team has only one Technician assigned to the work group associated with the
Workflow Default Entry State, new Requests are automatically assigned to that Technician and that Technician is notified of the new Request assignment.
If the Team has multiple Technicians assigned to the work group associated with the Workflow Default Entry State, the new Request is placed in the Queue (i.e., it is assigned to the System User) and all members of the Team are notified that a new Request has been assigned to the Request Queue.
Queue Visibility: (Service Request Teams only) When the Request Queue is enabled, the option can be refined to allow the Queue to be available for assigned Workflow entry points, or all stages of the assigned Workflow. If All States is enabled Users can move Requests back to the Queue throughout the Request lifecycle.
Strong Authentication: If the Manager User Name and Password is required to be re-entered during the processing of a Request in an Approval State, set this option to Yes.
7 Complete the Team Location details, if required.8 Select Technicians from the Available Technicians list Highlight Technician names within the
Available Technicians list and click the arrow icon to move the Users to the Selected Technicians list.
9 Select Managers from the Available Managers list This is required if a Manager is to be assigned to a Workflow Approval State.Highlight Manager names within the Available Managers list and click the arrow icon to move the Users to the Selected Manager list.
10 Click Next. The Service Screen displays all Available OLAs and Workflows.
80 Novell Service Desk System Planning, Deployment, and Best Practices Guide
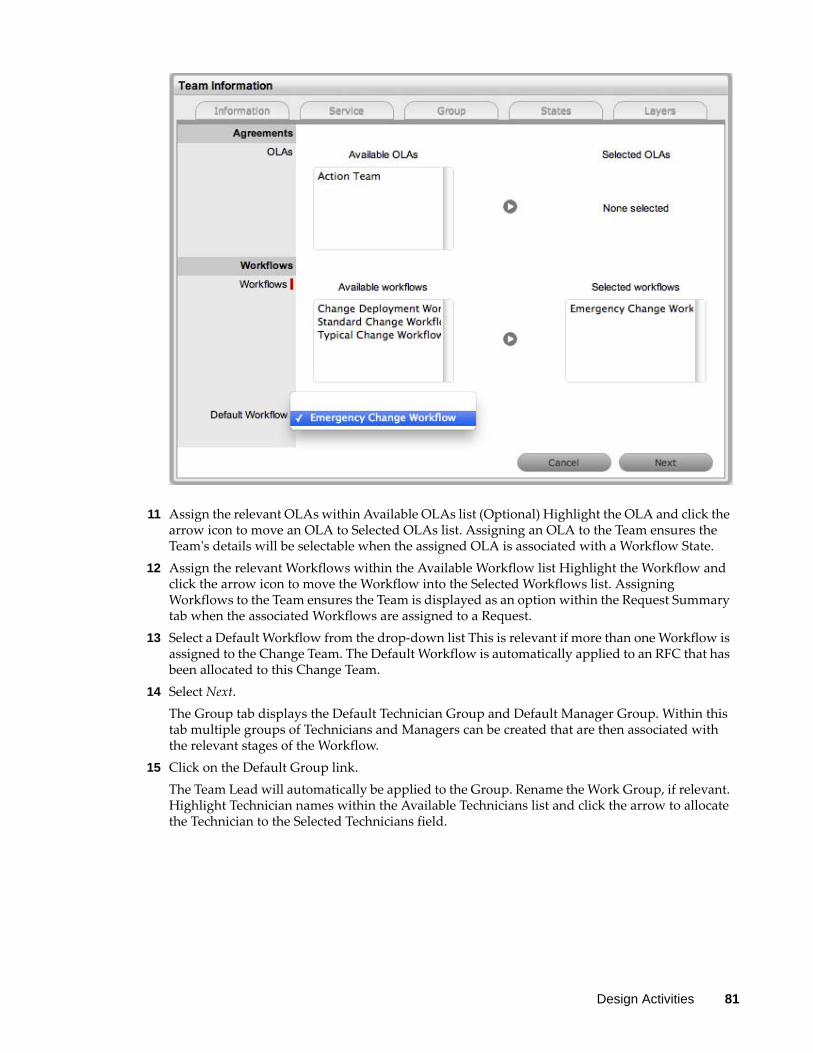
11 Assign the relevant OLAs within Available OLAs list (Optional) Highlight the OLA and click the arrow icon to move an OLA to Selected OLAs list. Assigning an OLA to the Team ensures the Team's details will be selectable when the assigned OLA is associated with a Workflow State.
12 Assign the relevant Workflows within the Available Workflow list Highlight the Workflow and click the arrow icon to move the Workflow into the Selected Workflows list. Assigning Workflows to the Team ensures the Team is displayed as an option within the Request Summary tab when the associated Workflows are assigned to a Request.
13 Select a Default Workflow from the drop-down list This is relevant if more than one Workflow is assigned to the Change Team. The Default Workflow is automatically applied to an RFC that has been allocated to this Change Team.
14 Select Next.The Group tab displays the Default Technician Group and Default Manager Group. Within this tab multiple groups of Technicians and Managers can be created that are then associated with the relevant stages of the Workflow.
15 Click on the Default Group link.The Team Lead will automatically be applied to the Group. Rename the Work Group, if relevant. Highlight Technician names within the Available Technicians list and click the arrow to allocate the Technician to the Selected Technicians field.
Design Activities 81
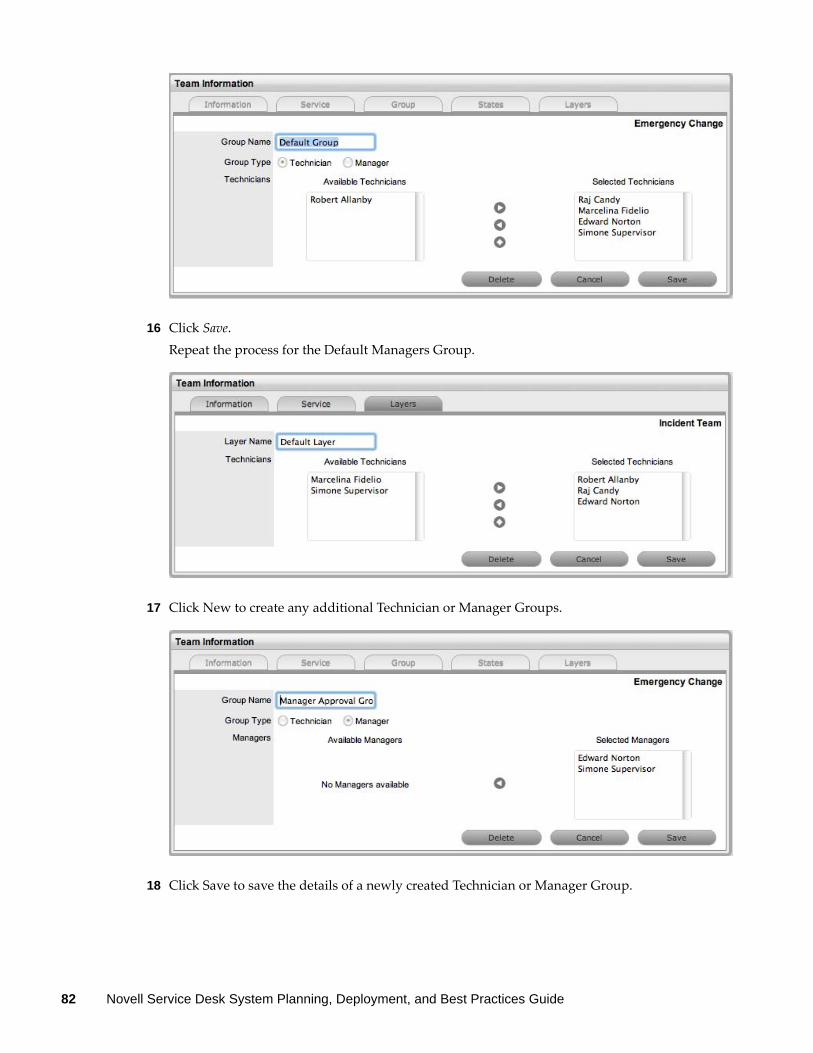
16 Click Save. Repeat the process for the Default Managers Group.
17 Click New to create any additional Technician or Manager Groups.
18 Click Save to save the details of a newly created Technician or Manager Group.
82 Novell Service Desk System Planning, Deployment, and Best Practices Guide
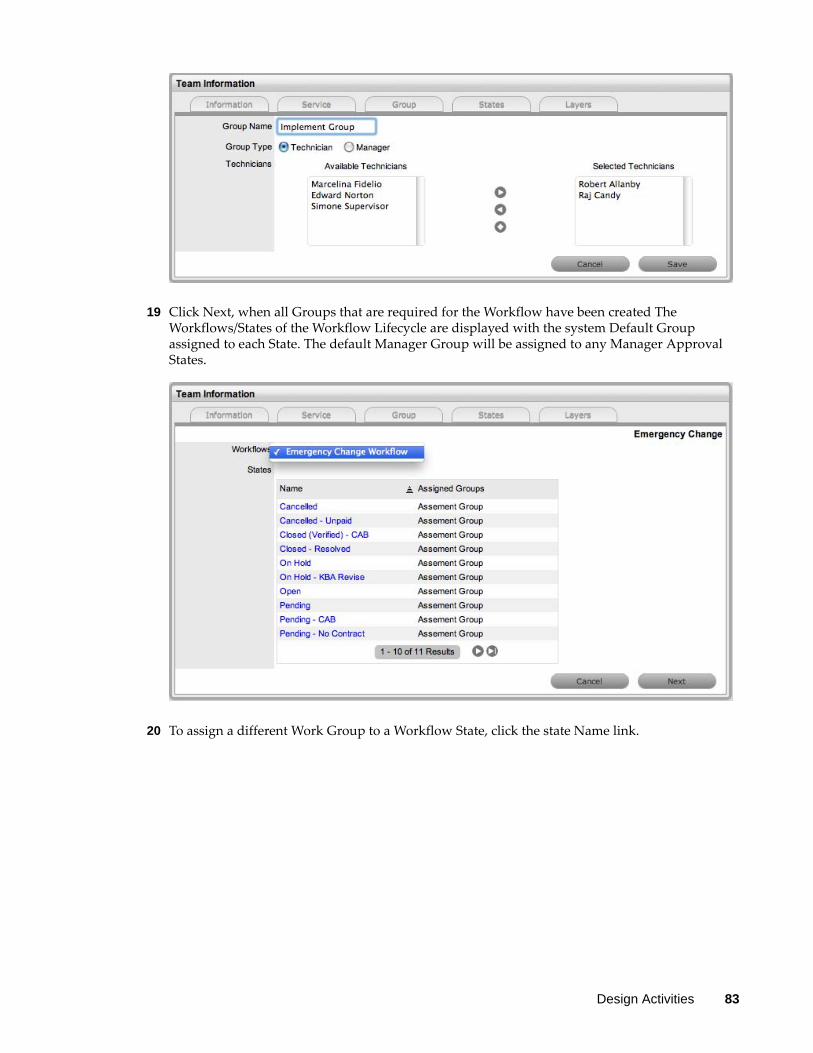
19 Click Next, when all Groups that are required for the Workflow have been created The Workflows/States of the Workflow Lifecycle are displayed with the system Default Group assigned to each State. The default Manager Group will be assigned to any Manager Approval States.
20 To assign a different Work Group to a Workflow State, click the state Name link.
Design Activities 83
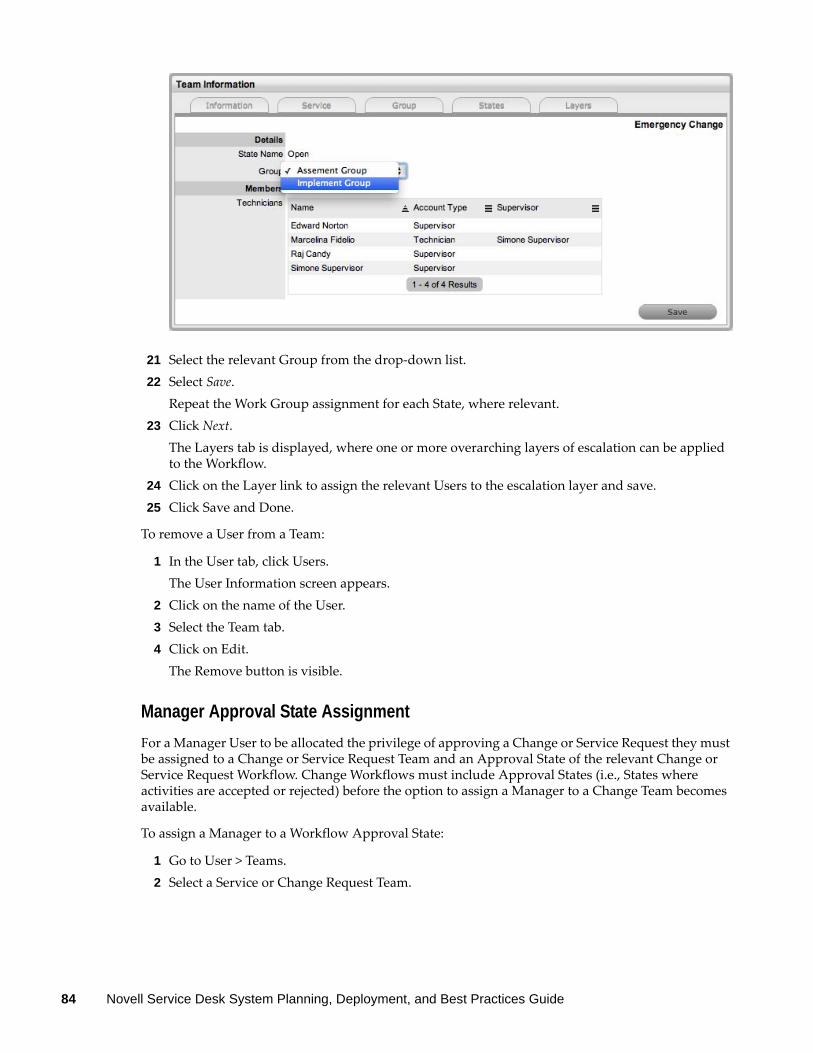
21 Select the relevant Group from the drop-down list.22 Select Save.
Repeat the Work Group assignment for each State, where relevant.23 Click Next.
The Layers tab is displayed, where one or more overarching layers of escalation can be applied to the Workflow.
24 Click on the Layer link to assign the relevant Users to the escalation layer and save.25 Click Save and Done.
To remove a User from a Team:
1 In the User tab, click Users. The User Information screen appears.
2 Click on the name of the User.3 Select the Team tab.4 Click on Edit.
The Remove button is visible.
Manager Approval State Assignment
For a Manager User to be allocated the privilege of approving a Change or Service Request they must be assigned to a Change or Service Request Team and an Approval State of the relevant Change or Service Request Workflow. Change Workflows must include Approval States (i.e., States where activities are accepted or rejected) before the option to assign a Manager to a Change Team becomes available.
To assign a Manager to a Workflow Approval State:
1 Go to User > Teams.2 Select a Service or Change Request Team.
84 Novell Service Desk System Planning, Deployment, and Best Practices Guide
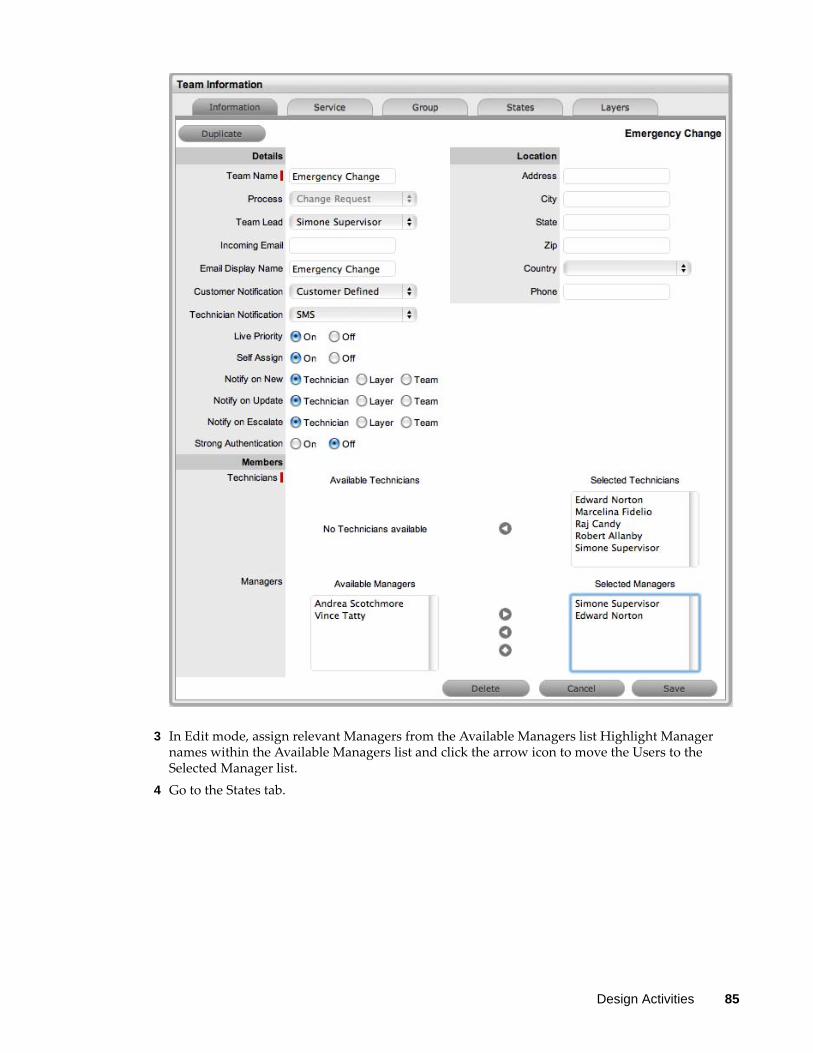
3 In Edit mode, assign relevant Managers from the Available Managers list Highlight Manager names within the Available Managers list and click the arrow icon to move the Users to the Selected Manager list.
4 Go to the States tab.
Design Activities 85
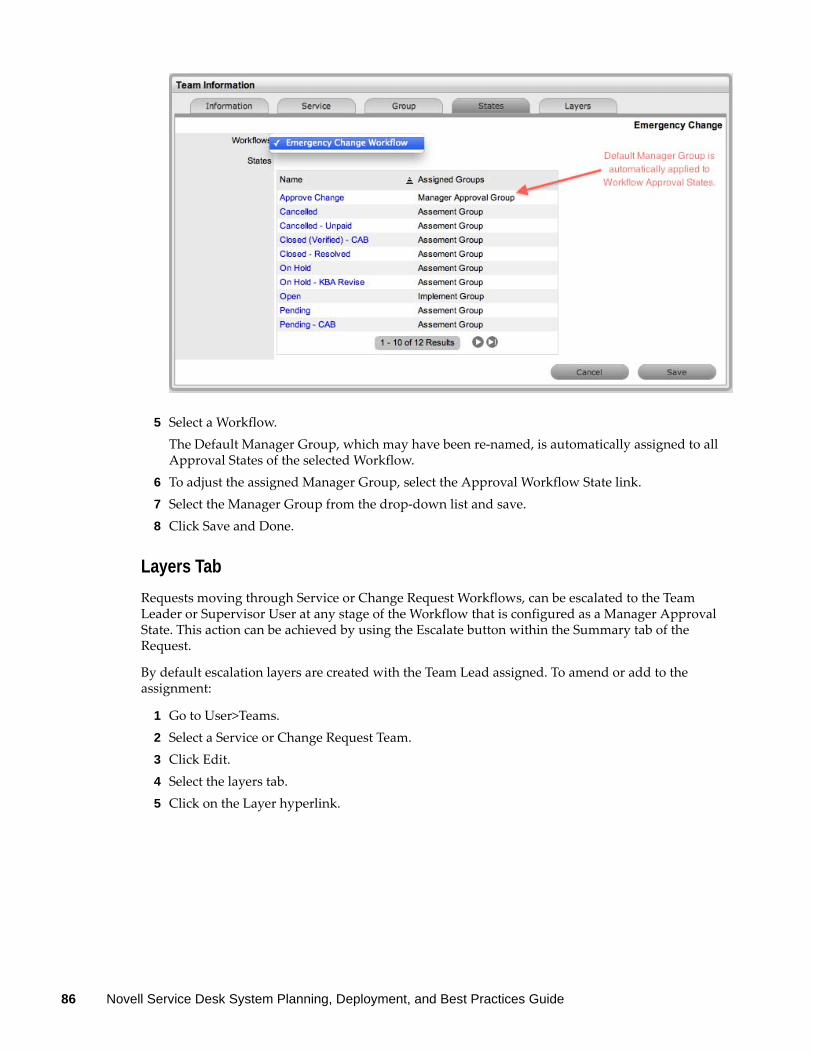
5 Select a Workflow.The Default Manager Group, which may have been re-named, is automatically assigned to all Approval States of the selected Workflow.
6 To adjust the assigned Manager Group, select the Approval Workflow State link.7 Select the Manager Group from the drop-down list and save.8 Click Save and Done.
Layers Tab
Requests moving through Service or Change Request Workflows, can be escalated to the Team Leader or Supervisor User at any stage of the Workflow that is configured as a Manager Approval State. This action can be achieved by using the Escalate button within the Summary tab of the Request.
By default escalation layers are created with the Team Lead assigned. To amend or add to the assignment:
1 Go to User>Teams.2 Select a Service or Change Request Team.3 Click Edit.4 Select the layers tab.5 Click on the Layer hyperlink.
86 Novell Service Desk System Planning, Deployment, and Best Practices Guide
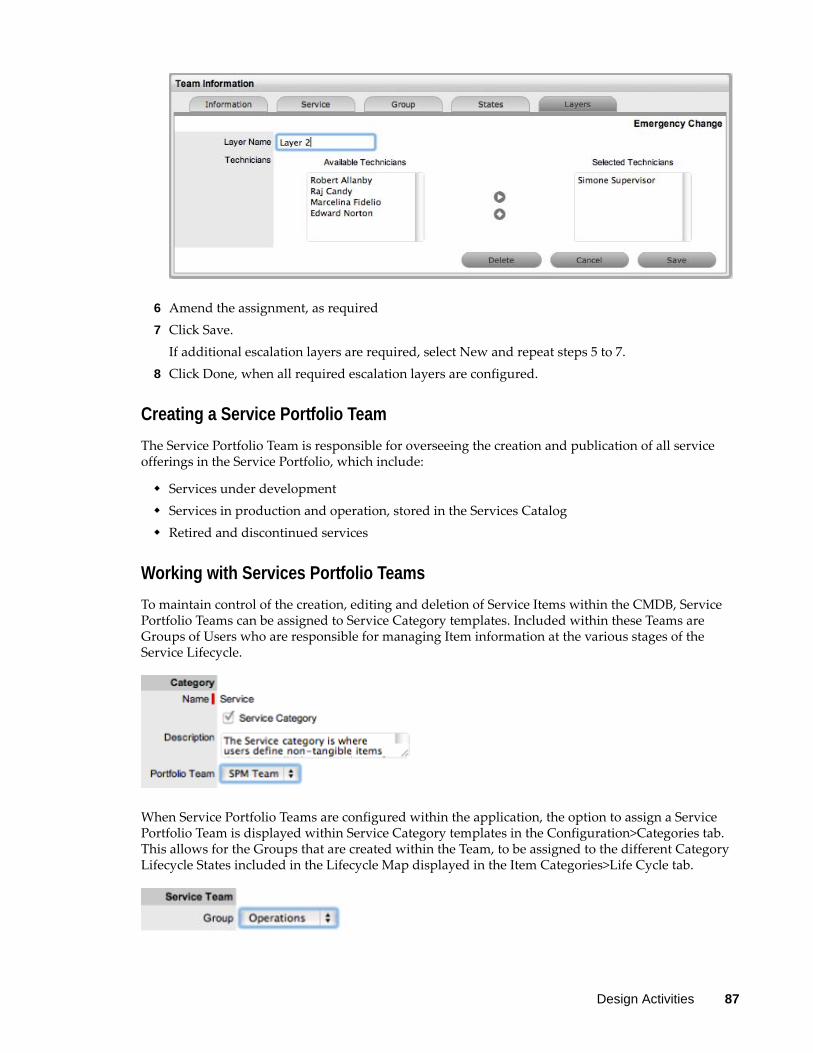
6 Amend the assignment, as required7 Click Save.
If additional escalation layers are required, select New and repeat steps 5 to 7.8 Click Done, when all required escalation layers are configured.
Creating a Service Portfolio Team
The Service Portfolio Team is responsible for overseeing the creation and publication of all service offerings in the Service Portfolio, which include:
Services under development Services in production and operation, stored in the Services Catalog Retired and discontinued services
Working with Services Portfolio Teams
To maintain control of the creation, editing and deletion of Service Items within the CMDB, Service Portfolio Teams can be assigned to Service Category templates. Included within these Teams are Groups of Users who are responsible for managing Item information at the various stages of the Service Lifecycle.
When Service Portfolio Teams are configured within the application, the option to assign a Service Portfolio Team is displayed within Service Category templates in the Configuration>Categories tab. This allows for the Groups that are created within the Team, to be assigned to the different Category Lifecycle States included in the Lifecycle Map displayed in the Item Categories>Life Cycle tab.
Design Activities 87
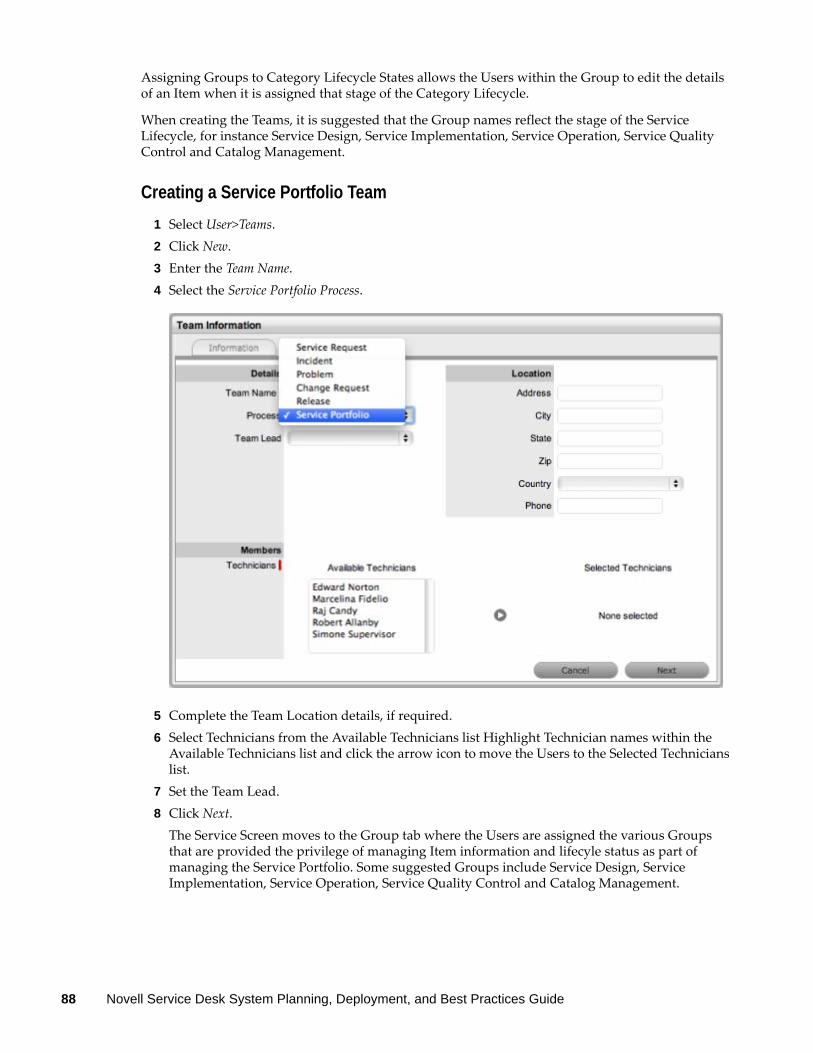
Assigning Groups to Category Lifecycle States allows the Users within the Group to edit the details of an Item when it is assigned that stage of the Category Lifecycle.
When creating the Teams, it is suggested that the Group names reflect the stage of the Service Lifecycle, for instance Service Design, Service Implementation, Service Operation, Service Quality Control and Catalog Management.
Creating a Service Portfolio Team
1 Select User>Teams.2 Click New.3 Enter the Team Name.4 Select the Service Portfolio Process.
5 Complete the Team Location details, if required.6 Select Technicians from the Available Technicians list Highlight Technician names within the
Available Technicians list and click the arrow icon to move the Users to the Selected Technicians list.
7 Set the Team Lead.8 Click Next.
The Service Screen moves to the Group tab where the Users are assigned the various Groups that are provided the privilege of managing Item information and lifecyle status as part of managing the Service Portfolio. Some suggested Groups include Service Design, Service Implementation, Service Operation, Service Quality Control and Catalog Management.
88 Novell Service Desk System Planning, Deployment, and Best Practices Guide
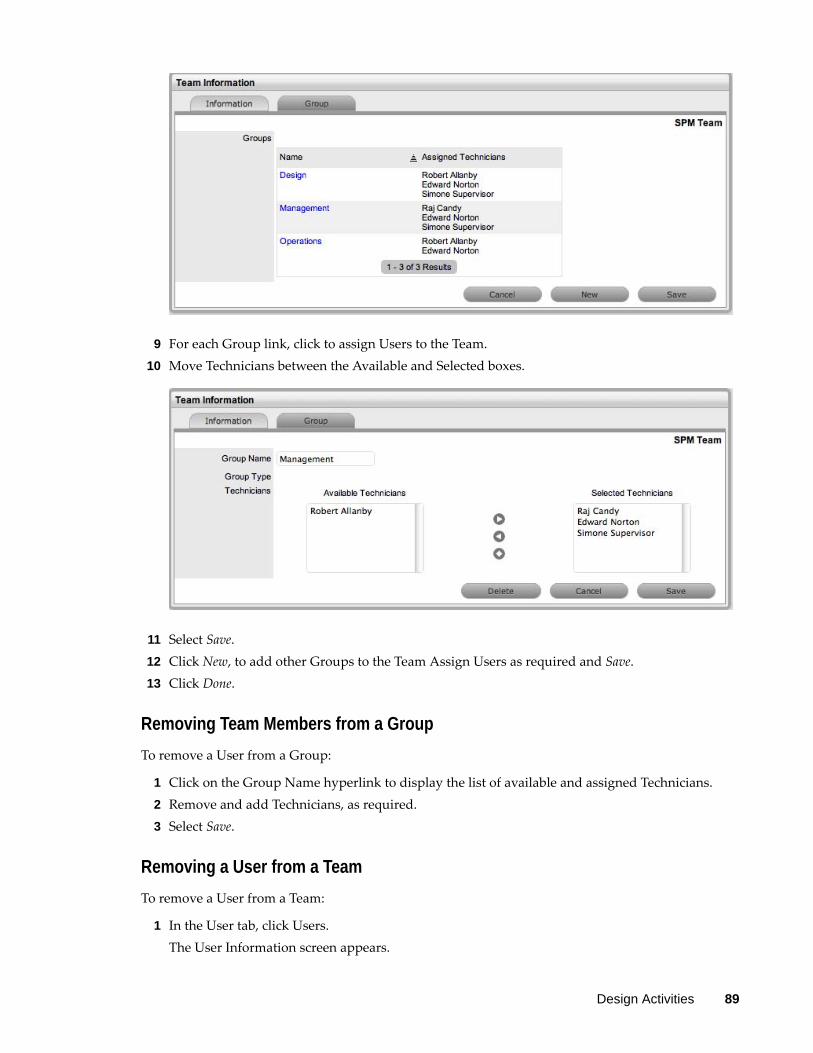
9 For each Group link, click to assign Users to the Team.10 Move Technicians between the Available and Selected boxes.
11 Select Save.12 Click New, to add other Groups to the Team Assign Users as required and Save.13 Click Done.
Removing Team Members from a Group
To remove a User from a Group:
1 Click on the Group Name hyperlink to display the list of available and assigned Technicians.2 Remove and add Technicians, as required.3 Select Save.
Removing a User from a Team
To remove a User from a Team:
1 In the User tab, click Users.The User Information screen appears.
Design Activities 89
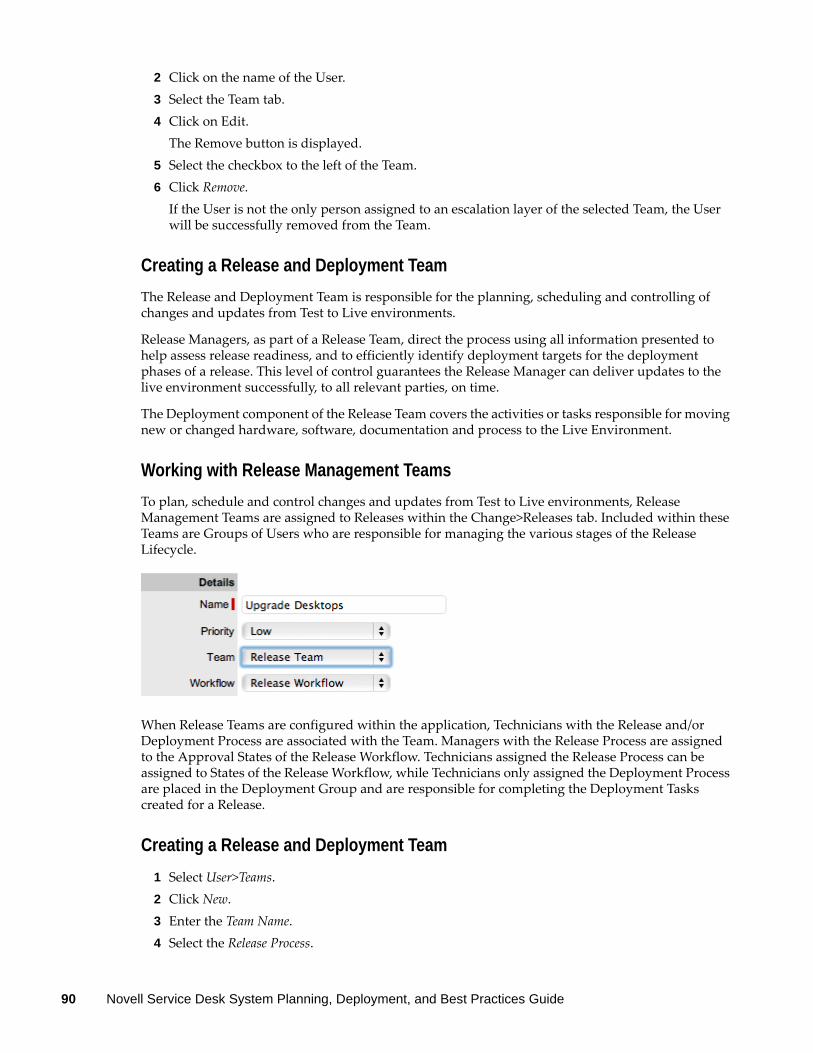
2 Click on the name of the User.3 Select the Team tab.4 Click on Edit.
The Remove button is displayed.5 Select the checkbox to the left of the Team.6 Click Remove.
If the User is not the only person assigned to an escalation layer of the selected Team, the User will be successfully removed from the Team.
Creating a Release and Deployment Team
The Release and Deployment Team is responsible for the planning, scheduling and controlling of changes and updates from Test to Live environments.
Release Managers, as part of a Release Team, direct the process using all information presented to help assess release readiness, and to efficiently identify deployment targets for the deployment phases of a release. This level of control guarantees the Release Manager can deliver updates to the live environment successfully, to all relevant parties, on time.
The Deployment component of the Release Team covers the activities or tasks responsible for moving new or changed hardware, software, documentation and process to the Live Environment.
Working with Release Management Teams
To plan, schedule and control changes and updates from Test to Live environments, Release Management Teams are assigned to Releases within the Change>Releases tab. Included within these Teams are Groups of Users who are responsible for managing the various stages of the Release Lifecycle.
When Release Teams are configured within the application, Technicians with the Release and/or Deployment Process are associated with the Team. Managers with the Release Process are assigned to the Approval States of the Release Workflow. Technicians assigned the Release Process can be assigned to States of the Release Workflow, while Technicians only assigned the Deployment Process are placed in the Deployment Group and are responsible for completing the Deployment Tasks created for a Release.
Creating a Release and Deployment Team
1 Select User>Teams.2 Click New.3 Enter the Team Name.4 Select the Release Process.
90 Novell Service Desk System Planning, Deployment, and Best Practices Guide
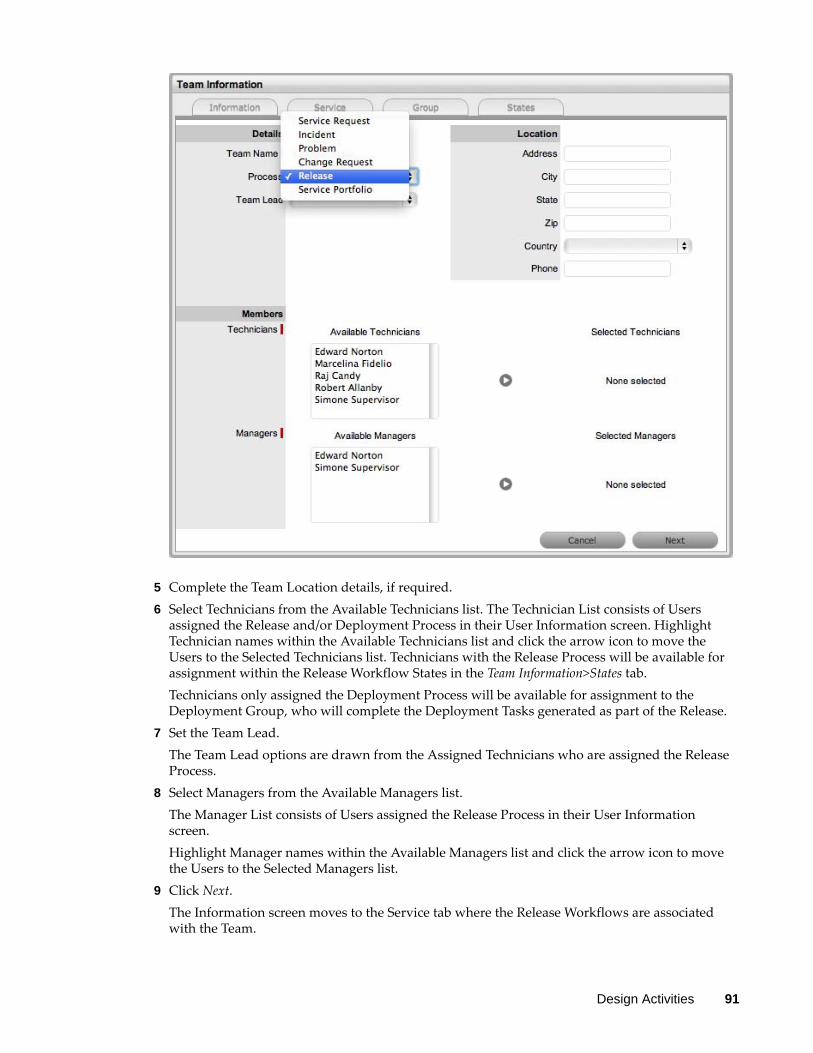
5 Complete the Team Location details, if required.6 Select Technicians from the Available Technicians list. The Technician List consists of Users
assigned the Release and/or Deployment Process in their User Information screen. Highlight Technician names within the Available Technicians list and click the arrow icon to move the Users to the Selected Technicians list. Technicians with the Release Process will be available for assignment within the Release Workflow States in the Team Information>States tab. Technicians only assigned the Deployment Process will be available for assignment to the Deployment Group, who will complete the Deployment Tasks generated as part of the Release.
7 Set the Team Lead.The Team Lead options are drawn from the Assigned Technicians who are assigned the Release Process.
8 Select Managers from the Available Managers list.The Manager List consists of Users assigned the Release Process in their User Information screen.Highlight Manager names within the Available Managers list and click the arrow icon to move the Users to the Selected Managers list.
9 Click Next.The Information screen moves to the Service tab where the Release Workflows are associated with the Team.
Design Activities 91
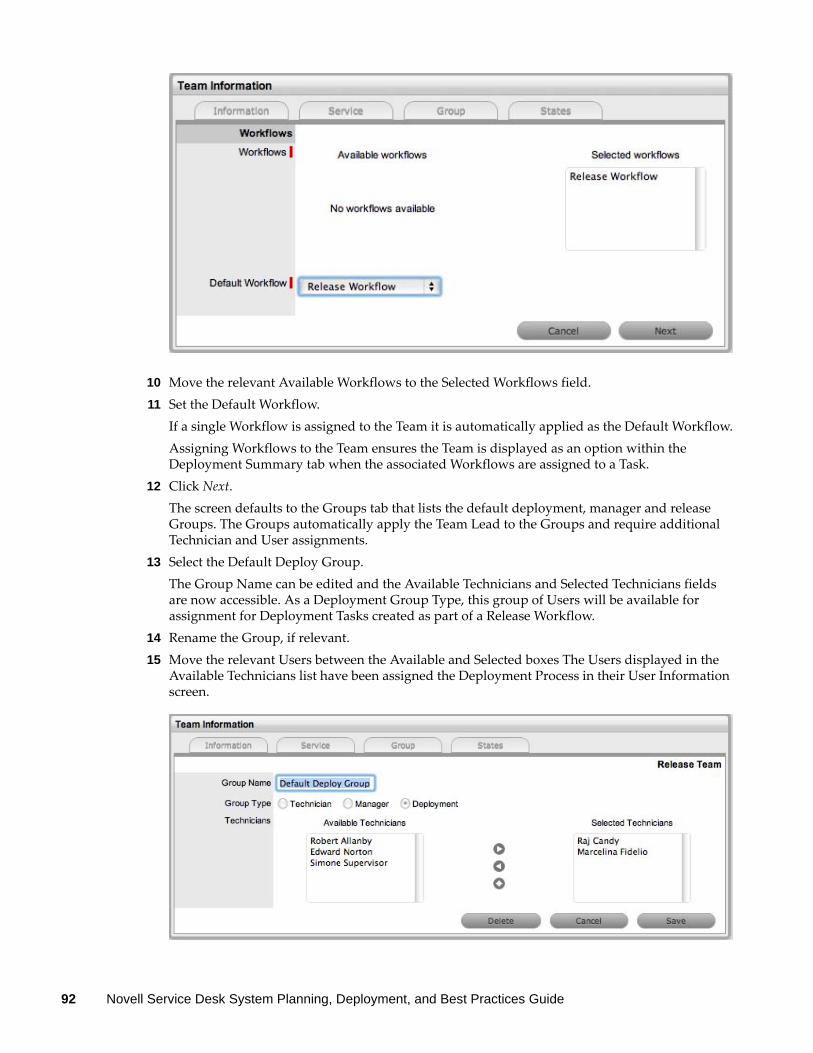
10 Move the relevant Available Workflows to the Selected Workflows field.11 Set the Default Workflow.
If a single Workflow is assigned to the Team it is automatically applied as the Default Workflow.Assigning Workflows to the Team ensures the Team is displayed as an option within the Deployment Summary tab when the associated Workflows are assigned to a Task.
12 Click Next.The screen defaults to the Groups tab that lists the default deployment, manager and release Groups. The Groups automatically apply the Team Lead to the Groups and require additional Technician and User assignments.
13 Select the Default Deploy Group.The Group Name can be edited and the Available Technicians and Selected Technicians fields are now accessible. As a Deployment Group Type, this group of Users will be available for assignment for Deployment Tasks created as part of a Release Workflow.
14 Rename the Group, if relevant.15 Move the relevant Users between the Available and Selected boxes The Users displayed in the
Available Technicians list have been assigned the Deployment Process in their User Information screen.
92 Novell Service Desk System Planning, Deployment, and Best Practices Guide
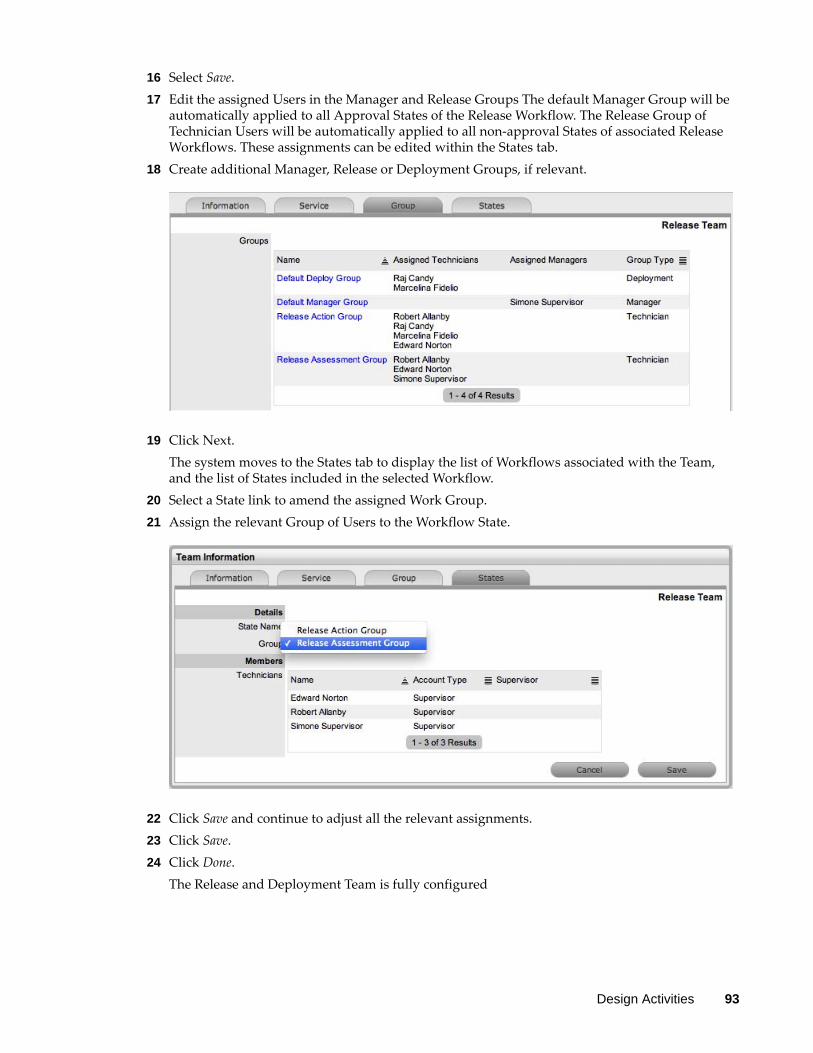
16 Select Save.17 Edit the assigned Users in the Manager and Release Groups The default Manager Group will be
automatically applied to all Approval States of the Release Workflow. The Release Group of Technician Users will be automatically applied to all non-approval States of associated Release Workflows. These assignments can be edited within the States tab.
18 Create additional Manager, Release or Deployment Groups, if relevant.
19 Click Next. The system moves to the States tab to display the list of Workflows associated with the Team, and the list of States included in the selected Workflow.
20 Select a State link to amend the assigned Work Group.21 Assign the relevant Group of Users to the Workflow State.
22 Click Save and continue to adjust all the relevant assignments.23 Click Save.24 Click Done.
The Release and Deployment Team is fully configured
Design Activities 93
Removing Team Members from a Group
To remove a User from a State or Group, with the tab in Edit mode:
1 Click on the State or Group Name hyperlink to display the list of available and assigned Technicians.
2 Remove and add Technicians, as required.3 Select Save.
Removing a User from a Team:
1 In the User tab, click Users.The User Information screen appears.
2 Click on the name of the User.3 Select the Team tab.4 Click on Edit.
The Remove button is displayed.5 Select the checkbox to the left of the Team.6 Click Remove.
If the User is not the only person assigned to an escalation layer of the selected Team, the User will be successfully removed from the Team.
Assigning Default Teams and SLAs within Request Privileges
Move to Administrator view by clicking the Setup link, next to the logged in User Name. These settings will be applied to all newly created Items and Item Types that result from an AMIE import.
Requests Privileges allows the Administrator to control the functionality available for requests and set default requirements. These privileges are applied system-wide.
1 Select Setup>Privileges>Requests. The Requests Screen appears.
94 Novell Service Desk System Planning, Deployment, and Best Practices Guide
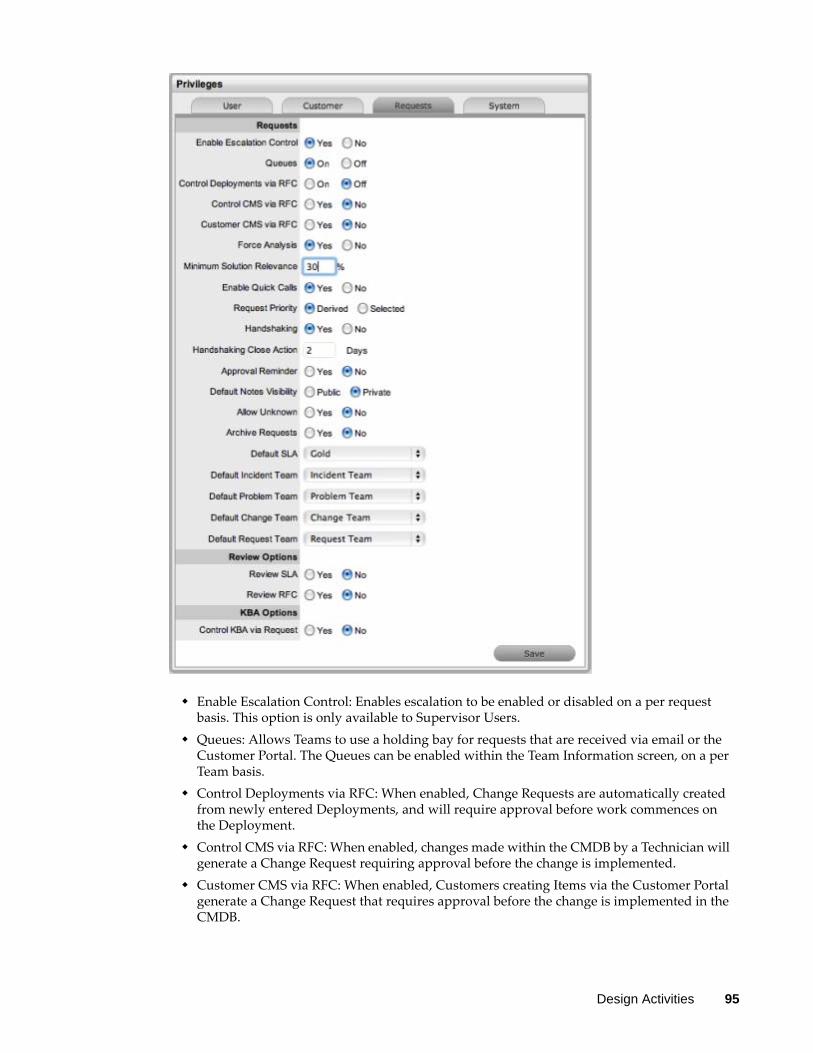
Enable Escalation Control: Enables escalation to be enabled or disabled on a per request basis. This option is only available to Supervisor Users.
Queues: Allows Teams to use a holding bay for requests that are received via email or the Customer Portal. The Queues can be enabled within the Team Information screen, on a per Team basis.
Control Deployments via RFC: When enabled, Change Requests are automatically created from newly entered Deployments, and will require approval before work commences on the Deployment.
Control CMS via RFC: When enabled, changes made within the CMDB by a Technician will generate a Change Request requiring approval before the change is implemented.
Customer CMS via RFC: When enabled, Customers creating Items via the Customer Portal generate a Change Request that requires approval before the change is implemented in the CMDB.
Design Activities 95
Force Analysis: The system will propose relevant Solutions during the profiling of an Incident.
Minimum Solution Relevance: Define the minimum degree of relevancy for content included in the Description field of a request, when the system automatically searches the Knowledge Base to propose solutions.
Enable Quick Calls: Enables the functionality that allows the Supervisor to profile Requests using Quick Call Templates. These can be used by other system Users when creating new requests.
Request Priority: (Derived/Selected) Enable Derived to allow the system to derive the Priority based on Urgency and Impact of the request . Enable 'Selected' to manually apply the Priority from a list of options.
Default Priority: **This option is displayed when the Incident Priority is set to Selected. The selection made from the drop-down menu, is automatically applied as the default Priority for newly created requests.
Handshaking: Enables notifications to be sent to a Customer using the Propose button within an Incident or Request, stating the Incident/Request will be closed if no reply is received from them within a set number of days.Note: The Solution button within an open Incident/Request is not accessible when the Handshaking facility is enabled. When enabled, if Problems or Changes are closed, any related Incidents or Requests are moved to the Pending - Approval State not to the default Closed State.
Handshaking Close Action: Sets the system default number of days to lapse before an Incident or Request will close if the Customer does not respond to the handshake email notification. This can be adjusted on a per Org Unit basis. Note: To allow Customers to re-open an Incident or Request using the link in the handshake email, the web server must be using Port 80.
Approval Reminder: To automatically send Managers reminder emails regarding Requests requiring their approval, set this option to Yes. When Yes is selected, define the number of days to lapse before a reminder will be sent. The content of the reminder email is drawn from the ApproveChange or ApproveServiceRequest template. These are configured within Setup>Email>Templates tab.
Default Notes Visibility: Sets the system default visibility of Notes, when added to requests. If it is expected that the majority of Notes are to be emailed to Customers, select Public.
Allow Unknown: When set to No and a User opens a request that is assigned the Unknown Service Item, the User will be prompted to update the Item before saving the request.
Archive Requests: When enabled, the number of days a request is closed before being removed from the List View and archived is to be set. Requests that are archived have attachments removed and they are no longer included in the full text index for searching. They are still accessible for reporting purposes and attribute based searches.
Default SLA: Is used as the Default SLA when a new request is created without an SLA defined for the Item, Customer or Org Unit.
Default Incident* Team (required if using AMIE): Set the Default Incident Team, which is used for AMIE integration and also set as a default Support Team for Item Types.
Default Problem* Team (required if using AMIE): Set the Default Problem Team, which is used for AMIE integration and also set as a default Support Team for Item Types.
Default Change* Team (required if using AMIE): Set the Default Change Team, which is used for AMIE integration and also set as a default Support Team for Item Types.
Default Request Team* (required if using AMIE): Set the Default Request Team, which is used for AMIE integration and also set as a default Support Team for Item Types.
96 Novell Service Desk System Planning, Deployment, and Best Practices Guide

Review SLA: When enabled will display the Review date field in the Service Level Information screen. The default number of days between reviewing SLAs should be set and the number of days before the review date for an Alert Reminder, should also be entered.
Review RFC: When enabled the system will display a Review date in the RFC Information tab. The default number of days between reviewing RFCs should be set and the number of days before the review date for an Alert Reminder, should also be entered.
Control KBA via Request: When enabled, a Request is generated when the KBA is created, deleted or amended and can only be published to the KB by a User with publishing privileges.
Request Type: Specify the type of request to be generated when new or amended KB content is moved to a "Pending Publication" state. (The options are based on the ownership of Change and Service Request licenses.)
Default SLA: Set the default SLA to be used for when requests are logged regarding updates in the knowledge base. Applying an SLA here, determines which workflow and team will receive the requests for approval, as with any other request logged in the system.
2 Click Yes to enable, or No to disable the Privilege.3 Click Save.
Configure the CMDB by Customizing Configuration Categories
Return to the Supervisor view by clicking the User link, next to the logged in User Name.
The system includes a number of default Categories, which should be more than enough for most organizations. Within the Category, the attributes of an Item that are to be recorded in the system, are defined by customizing the field labels. The stages that an Item can move through in its lifecycle are defined within the Life Cycle tab (i.e., Installed>Pending Configuration> Pending Test,etc). The types of issues reported against an Item are then created in the Classifications tab.
Configure the Category Details Fields Define the Category's Life Cycle Create Category Classifications
Configure the Category Details Fields
Within the application the number of Item Categories that can be defined is unlimited. By default the following Categories are included:
Audio Visual Documentation Hardware Mobile Devices Network Infrastructure Peripherals Printers & Scanners Software Service
Design Activities 97
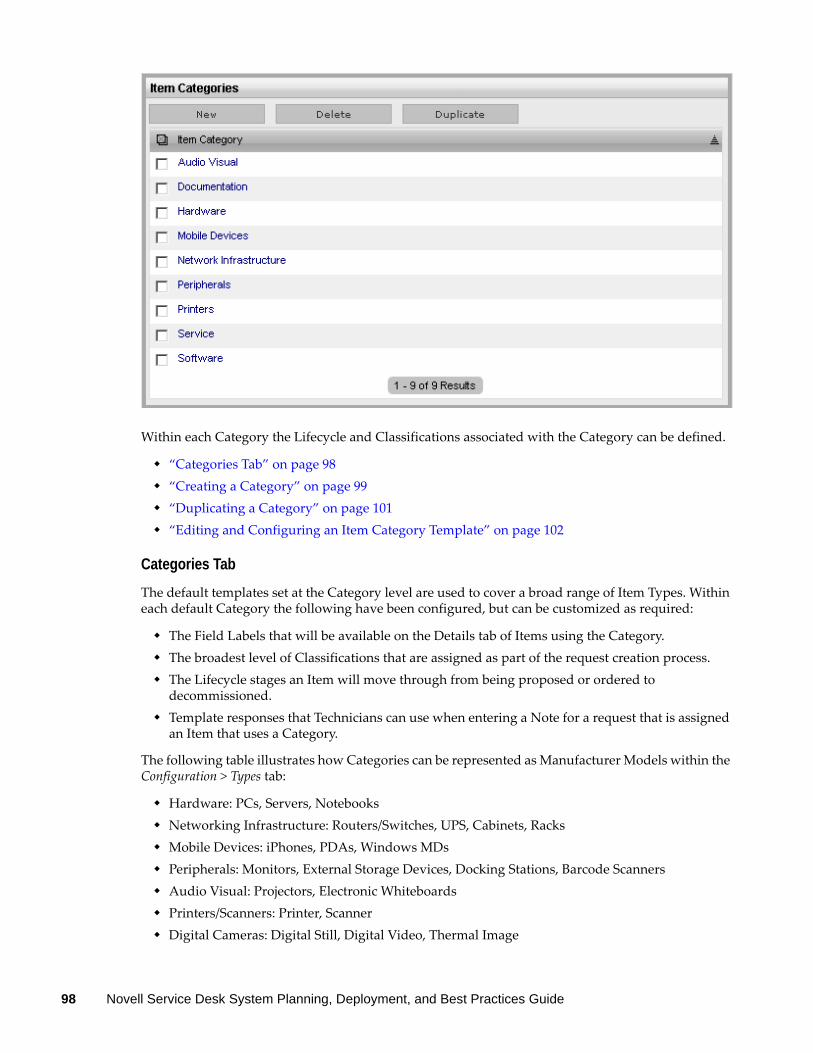
Within each Category the Lifecycle and Classifications associated with the Category can be defined.
“Categories Tab” on page 98 “Creating a Category” on page 99 “Duplicating a Category” on page 101 “Editing and Configuring an Item Category Template” on page 102
Categories Tab
The default templates set at the Category level are used to cover a broad range of Item Types. Within each default Category the following have been configured, but can be customized as required:
The Field Labels that will be available on the Details tab of Items using the Category. The broadest level of Classifications that are assigned as part of the request creation process. The Lifecycle stages an Item will move through from being proposed or ordered to
decommissioned. Template responses that Technicians can use when entering a Note for a request that is assigned
an Item that uses a Category.
The following table illustrates how Categories can be represented as Manufacturer Models within the Configuration > Types tab:
Hardware: PCs, Servers, Notebooks Networking Infrastructure: Routers/Switches, UPS, Cabinets, Racks Mobile Devices: iPhones, PDAs, Windows MDs Peripherals: Monitors, External Storage Devices, Docking Stations, Barcode Scanners Audio Visual: Projectors, Electronic Whiteboards Printers/Scanners: Printer, Scanner Digital Cameras: Digital Still, Digital Video, Thermal Image
98 Novell Service Desk System Planning, Deployment, and Best Practices Guide
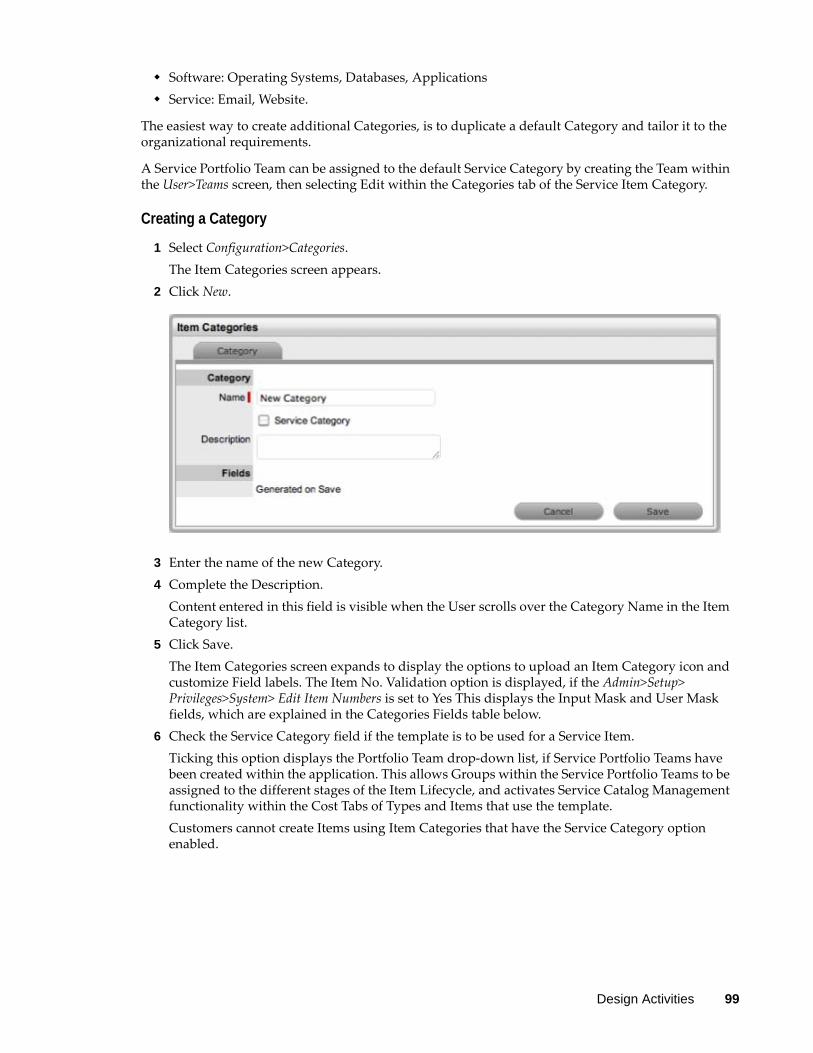
Software: Operating Systems, Databases, Applications Service: Email, Website.
The easiest way to create additional Categories, is to duplicate a default Category and tailor it to the organizational requirements.
A Service Portfolio Team can be assigned to the default Service Category by creating the Team within the User>Teams screen, then selecting Edit within the Categories tab of the Service Item Category.
Creating a Category
1 Select Configuration>Categories. The Item Categories screen appears.
2 Click New.
3 Enter the name of the new Category.4 Complete the Description.
Content entered in this field is visible when the User scrolls over the Category Name in the Item Category list.
5 Click Save.The Item Categories screen expands to display the options to upload an Item Category icon and customize Field labels. The Item No. Validation option is displayed, if the Admin>Setup> Privileges>System> Edit Item Numbers is set to Yes This displays the Input Mask and User Mask fields, which are explained in the Categories Fields table below.
6 Check the Service Category field if the template is to be used for a Service Item.Ticking this option displays the Portfolio Team drop-down list, if Service Portfolio Teams have been created within the application. This allows Groups within the Service Portfolio Teams to be assigned to the different stages of the Item Lifecycle, and activates Service Catalog Management functionality within the Cost Tabs of Types and Items that use the template.Customers cannot create Items using Item Categories that have the Service Category option enabled.
Design Activities 99
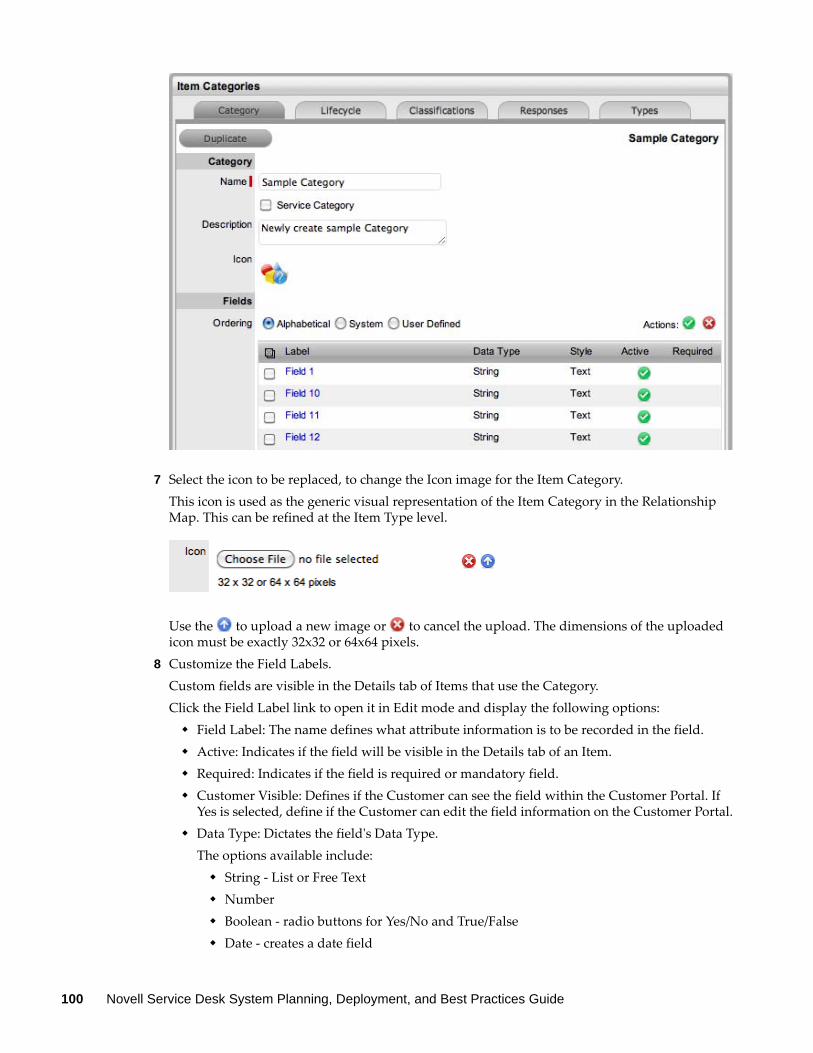
7 Select the icon to be replaced, to change the Icon image for the Item Category.This icon is used as the generic visual representation of the Item Category in the Relationship Map. This can be refined at the Item Type level.
Use the to upload a new image or to cancel the upload. The dimensions of the uploaded icon must be exactly 32x32 or 64x64 pixels.
8 Customize the Field Labels. Custom fields are visible in the Details tab of Items that use the Category.Click the Field Label link to open it in Edit mode and display the following options: Field Label: The name defines what attribute information is to be recorded in the field. Active: Indicates if the field will be visible in the Details tab of an Item. Required: Indicates if the field is required or mandatory field. Customer Visible: Defines if the Customer can see the field within the Customer Portal. If
Yes is selected, define if the Customer can edit the field information on the Customer Portal. Data Type: Dictates the field's Data Type.
The options available include: String - List or Free Text Number Boolean - radio buttons for Yes/No and True/False Date - creates a date field
100 Novell Service Desk System Planning, Deployment, and Best Practices Guide
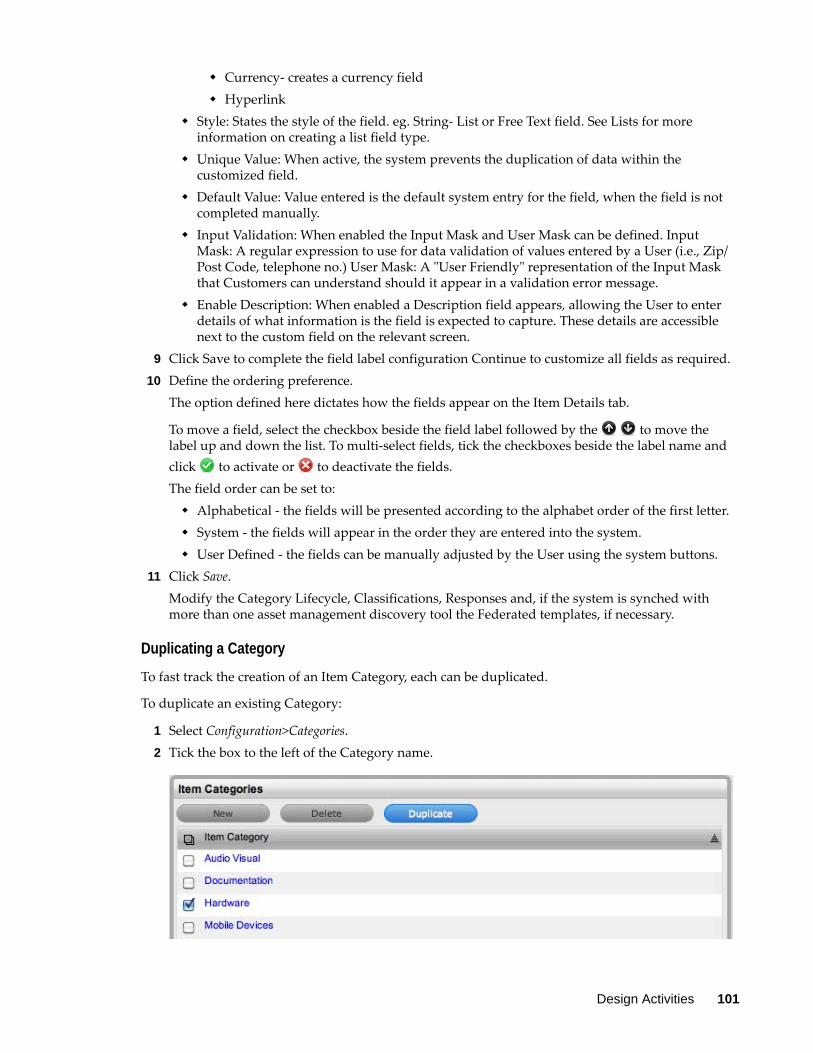
Currency- creates a currency field Hyperlink
Style: States the style of the field. eg. String- List or Free Text field. See Lists for more information on creating a list field type.
Unique Value: When active, the system prevents the duplication of data within the customized field.
Default Value: Value entered is the default system entry for the field, when the field is not completed manually.
Input Validation: When enabled the Input Mask and User Mask can be defined. Input Mask: A regular expression to use for data validation of values entered by a User (i.e., Zip/Post Code, telephone no.) User Mask: A "User Friendly" representation of the Input Mask that Customers can understand should it appear in a validation error message.
Enable Description: When enabled a Description field appears, allowing the User to enter details of what information is the field is expected to capture. These details are accessible next to the custom field on the relevant screen.
9 Click Save to complete the field label configuration Continue to customize all fields as required.10 Define the ordering preference.
The option defined here dictates how the fields appear on the Item Details tab.
To move a field, select the checkbox beside the field label followed by the to move the label up and down the list. To multi-select fields, tick the checkboxes beside the label name and click to activate or to deactivate the fields.The field order can be set to: Alphabetical - the fields will be presented according to the alphabet order of the first letter. System - the fields will appear in the order they are entered into the system. User Defined - the fields can be manually adjusted by the User using the system buttons.
11 Click Save.Modify the Category Lifecycle, Classifications, Responses and, if the system is synched with more than one asset management discovery tool the Federated templates, if necessary.
Duplicating a Category
To fast track the creation of an Item Category, each can be duplicated.
To duplicate an existing Category:
1 Select Configuration>Categories.2 Tick the box to the left of the Category name.
Design Activities 101
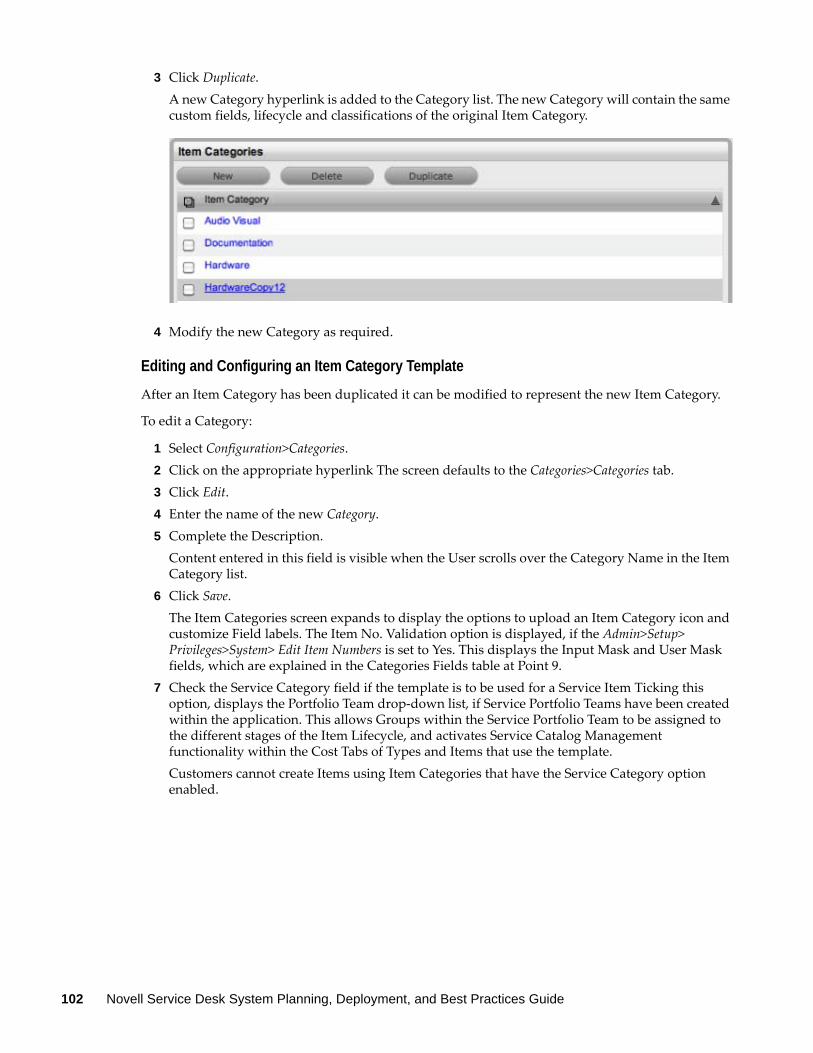
3 Click Duplicate.A new Category hyperlink is added to the Category list. The new Category will contain the same custom fields, lifecycle and classifications of the original Item Category.
4 Modify the new Category as required.
Editing and Configuring an Item Category Template
After an Item Category has been duplicated it can be modified to represent the new Item Category.
To edit a Category:
1 Select Configuration>Categories.2 Click on the appropriate hyperlink The screen defaults to the Categories>Categories tab.3 Click Edit.4 Enter the name of the new Category.5 Complete the Description.
Content entered in this field is visible when the User scrolls over the Category Name in the Item Category list.
6 Click Save.The Item Categories screen expands to display the options to upload an Item Category icon and customize Field labels. The Item No. Validation option is displayed, if the Admin>Setup> Privileges>System> Edit Item Numbers is set to Yes. This displays the Input Mask and User Mask fields, which are explained in the Categories Fields table at Point 9.
7 Check the Service Category field if the template is to be used for a Service Item Ticking this option, displays the Portfolio Team drop-down list, if Service Portfolio Teams have been created within the application. This allows Groups within the Service Portfolio Team to be assigned to the different stages of the Item Lifecycle, and activates Service Catalog Management functionality within the Cost Tabs of Types and Items that use the template.Customers cannot create Items using Item Categories that have the Service Category option enabled.
102 Novell Service Desk System Planning, Deployment, and Best Practices Guide
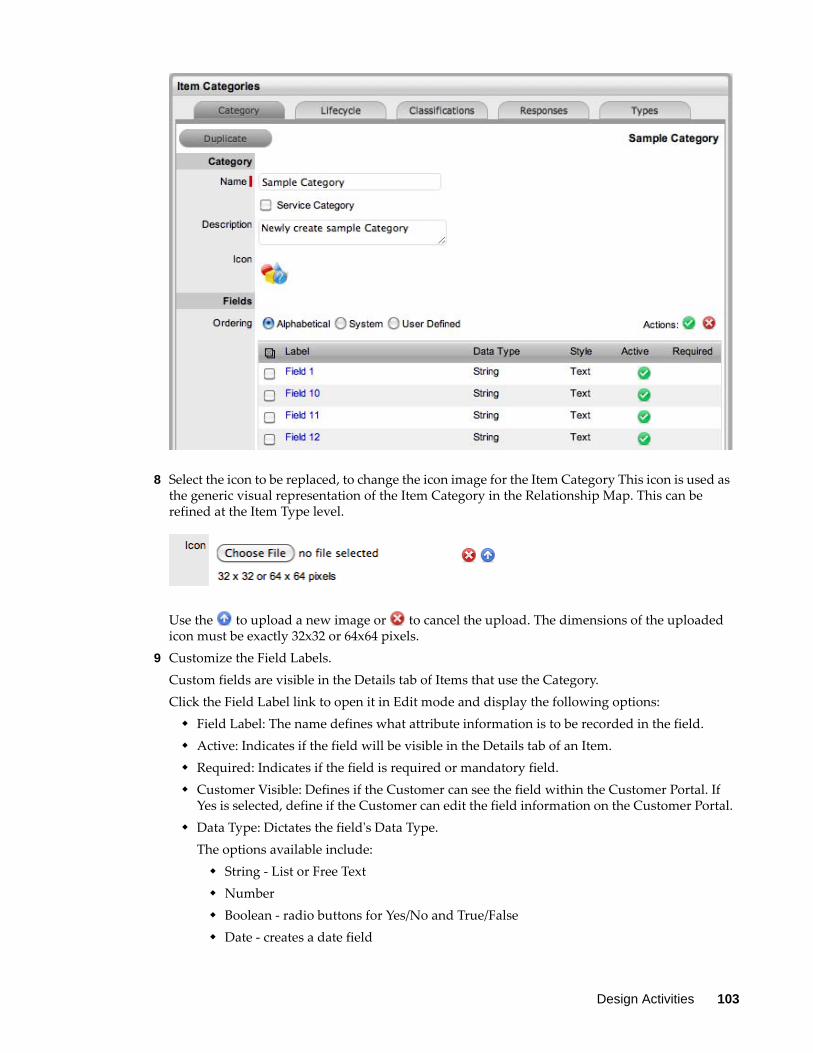
8 Select the icon to be replaced, to change the icon image for the Item Category This icon is used as the generic visual representation of the Item Category in the Relationship Map. This can be refined at the Item Type level.
Use the to upload a new image or to cancel the upload. The dimensions of the uploaded icon must be exactly 32x32 or 64x64 pixels.
9 Customize the Field Labels.Custom fields are visible in the Details tab of Items that use the Category.Click the Field Label link to open it in Edit mode and display the following options: Field Label: The name defines what attribute information is to be recorded in the field. Active: Indicates if the field will be visible in the Details tab of an Item. Required: Indicates if the field is required or mandatory field. Customer Visible: Defines if the Customer can see the field within the Customer Portal. If
Yes is selected, define if the Customer can edit the field information on the Customer Portal. Data Type: Dictates the field's Data Type.
The options available include: String - List or Free Text Number Boolean - radio buttons for Yes/No and True/False Date - creates a date field
Design Activities 103
Currency- creates a currency field Hyperlink
Style: States the style of the field. eg. String- List or Free Text field. See Lists for more information on creating a list field type.
Unique Value: When active, the system prevents the duplication of data within the customized field.
Default Value: Value entered is the default system entry for the field, when the field is not completed manually.
Input Validation: When enabled the Input Mask and User Mask can be defined. Input Mask: A regular expression to use for data validation of values entered by a User (i.e., Zip/Post Code, telephone no.) User Mask: A "User Friendly" representation of the Input Mask that Customers can understand should it appear in a validation error message.
Enable Description: When enabled a Description field appears, allowing the User to enter details of what information is the field is expected to capture. These details are accessible next to the custom field on the relevant screen.
10 Click Save to complete the field label configuration Continue to customize all fields as required.11 Define the ordering preference.
The option defined here dictates how the fields appear on the Item Details tab.
To move a field, select the checkbox beside the field label followed by the to move the label up and down the list. To multi-select fields, tick the checkboxes beside the label name and click to activate or to deactivate the fields.The field order can be set to: Alphabetical - the fields will be presented according to the alphabet order of the first letter. System - the fields will appear in the order they are entered into the system. User Defined - the fields can be manually adjusted by the User using the system buttons.
12 Click Save.Modify the Category Lifecycle, Classifications, Responses and, if the system is synched with more than one asset management discovery tool the Federated templates, if necessary.
Defining the Category’s Life Cycle
The Lifecycle details the stages of life for a Configuration Item. This allows Items to be tracked from the conceptualization/purchase stage through to being decommissioned/discarded, and can be used to indicate availability levels throughout the Lifecycle.
The States configured here are used within the Item information screen and allow the User to easily see if an Item is at a start or end point of its life, whilst also indicating if the Item is available or not. If an Item is moved to an Offline state, this information is also used on the Outage pages, for easy reference.
By default, the system is installed with some pre-defined Lifecycles, which are displayed with the three types of States:- Previous, Current and Next. Based on the configuration of the Current State, the listings displayed in the Previous or Next column show where an Item can move to from the Current State.
If the default Lifecycles do not match the requirements of the service and support organization, they can be customized. To avoid confusion, it is suggested that the default Lifecycle States be erased completely if they are not relevant to your organization.
104 Novell Service Desk System Planning, Deployment, and Best Practices Guide
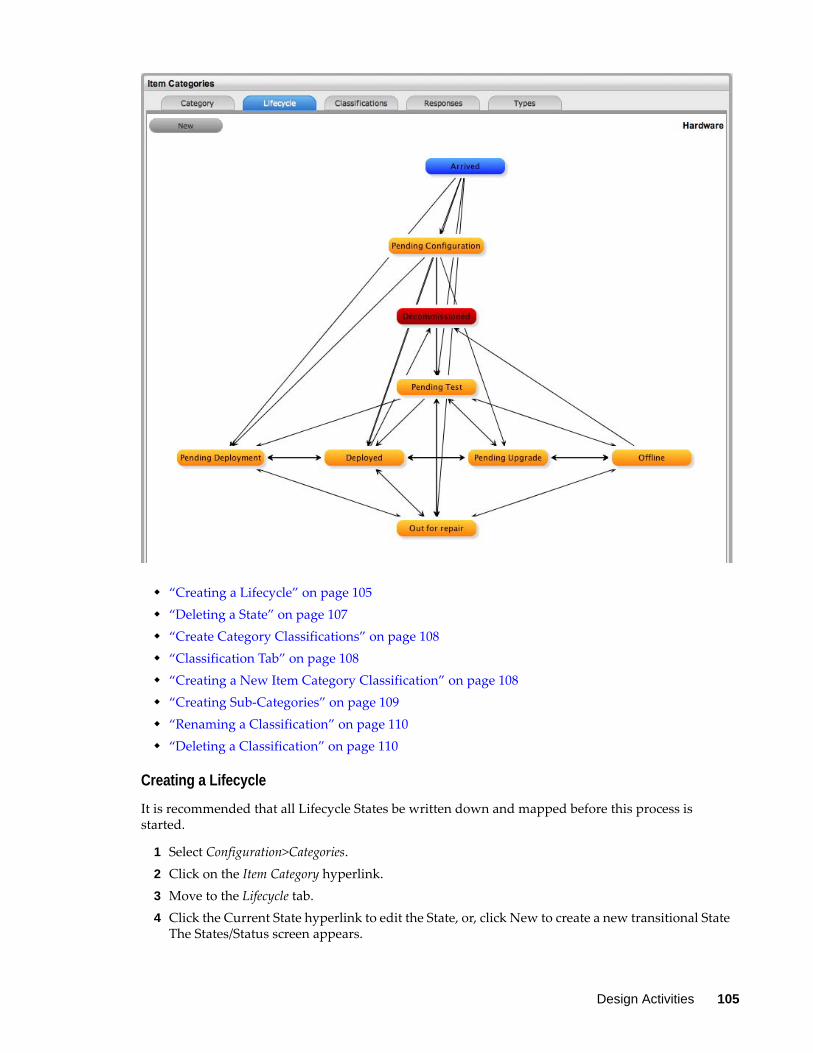
“Creating a Lifecycle” on page 105 “Deleting a State” on page 107 “Create Category Classifications” on page 108 “Classification Tab” on page 108 “Creating a New Item Category Classification” on page 108 “Creating Sub-Categories” on page 109 “Renaming a Classification” on page 110 “Deleting a Classification” on page 110
Creating a Lifecycle
It is recommended that all Lifecycle States be written down and mapped before this process is started.
1 Select Configuration>Categories.2 Click on the Item Category hyperlink.3 Move to the Lifecycle tab.4 Click the Current State hyperlink to edit the State, or, click New to create a new transitional State
The States/Status screen appears.
Design Activities 105
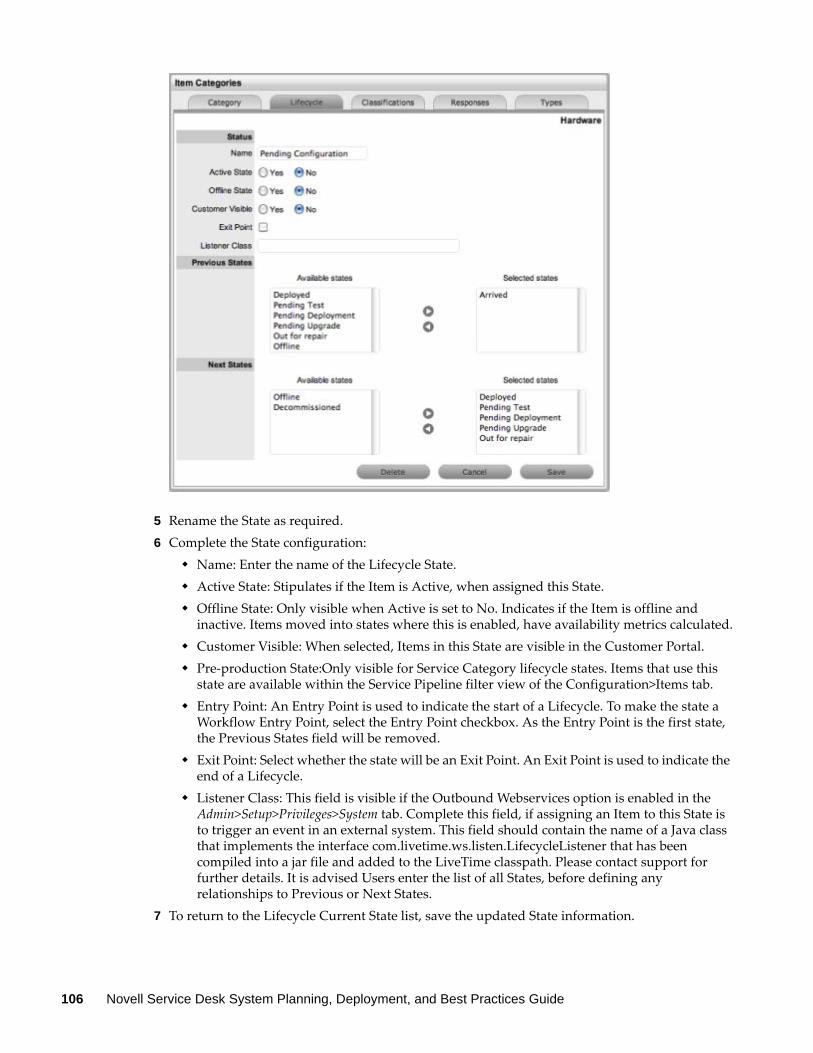
5 Rename the State as required.6 Complete the State configuration:
Name: Enter the name of the Lifecycle State. Active State: Stipulates if the Item is Active, when assigned this State. Offline State: Only visible when Active is set to No. Indicates if the Item is offline and
inactive. Items moved into states where this is enabled, have availability metrics calculated. Customer Visible: When selected, Items in this State are visible in the Customer Portal. Pre-production State:Only visible for Service Category lifecycle states. Items that use this
state are available within the Service Pipeline filter view of the Configuration>Items tab. Entry Point: An Entry Point is used to indicate the start of a Lifecycle. To make the state a
Workflow Entry Point, select the Entry Point checkbox. As the Entry Point is the first state, the Previous States field will be removed.
Exit Point: Select whether the state will be an Exit Point. An Exit Point is used to indicate the end of a Lifecycle.
Listener Class: This field is visible if the Outbound Webservices option is enabled in the Admin>Setup>Privileges>System tab. Complete this field, if assigning an Item to this State is to trigger an event in an external system. This field should contain the name of a Java class that implements the interface com.livetime.ws.listen.LifecycleListener that has been compiled into a jar file and added to the LiveTime classpath. Please contact support for further details. It is advised Users enter the list of all States, before defining any relationships to Previous or Next States.
7 To return to the Lifecycle Current State list, save the updated State information.
106 Novell Service Desk System Planning, Deployment, and Best Practices Guide
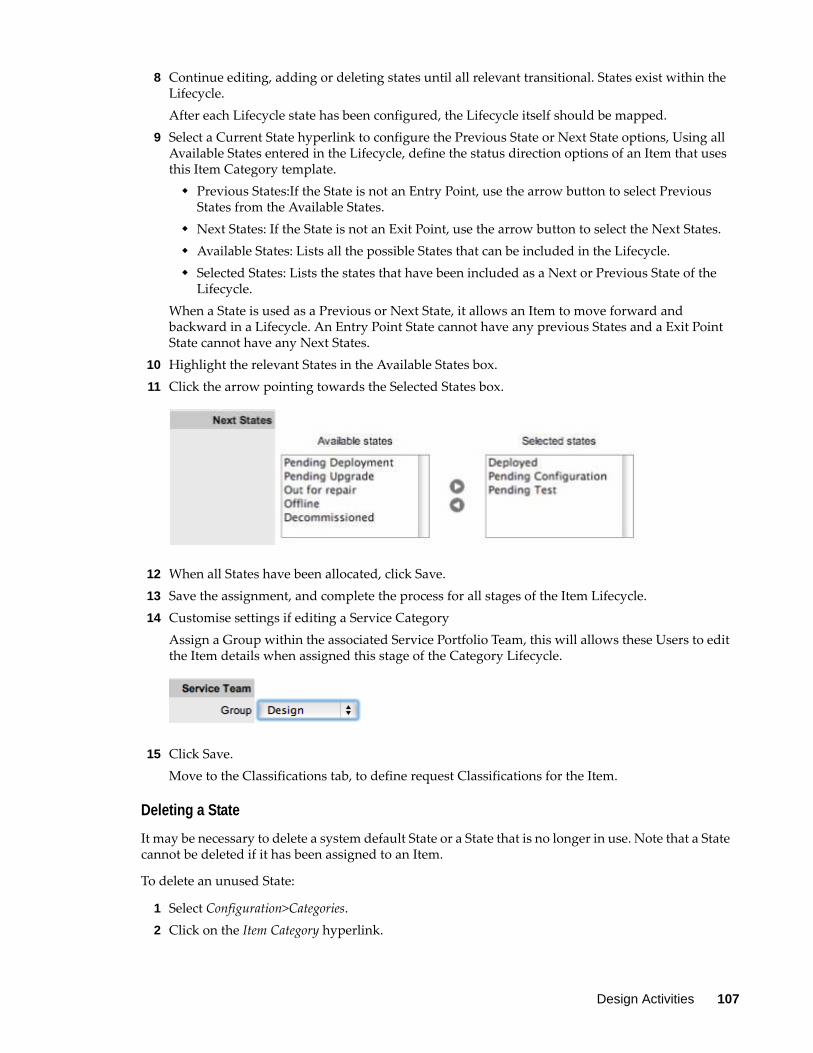
8 Continue editing, adding or deleting states until all relevant transitional. States exist within the Lifecycle.After each Lifecycle state has been configured, the Lifecycle itself should be mapped.
9 Select a Current State hyperlink to configure the Previous State or Next State options, Using all Available States entered in the Lifecycle, define the status direction options of an Item that uses this Item Category template. Previous States:If the State is not an Entry Point, use the arrow button to select Previous
States from the Available States. Next States: If the State is not an Exit Point, use the arrow button to select the Next States. Available States: Lists all the possible States that can be included in the Lifecycle. Selected States: Lists the states that have been included as a Next or Previous State of the
Lifecycle.When a State is used as a Previous or Next State, it allows an Item to move forward and backward in a Lifecycle. An Entry Point State cannot have any previous States and a Exit Point State cannot have any Next States.
10 Highlight the relevant States in the Available States box.11 Click the arrow pointing towards the Selected States box.
12 When all States have been allocated, click Save.13 Save the assignment, and complete the process for all stages of the Item Lifecycle.14 Customise settings if editing a Service Category
Assign a Group within the associated Service Portfolio Team, this will allows these Users to edit the Item details when assigned this stage of the Category Lifecycle.
15 Click Save. Move to the Classifications tab, to define request Classifications for the Item.
Deleting a State
It may be necessary to delete a system default State or a State that is no longer in use. Note that a State cannot be deleted if it has been assigned to an Item.
To delete an unused State:
1 Select Configuration>Categories.2 Click on the Item Category hyperlink.
Design Activities 107
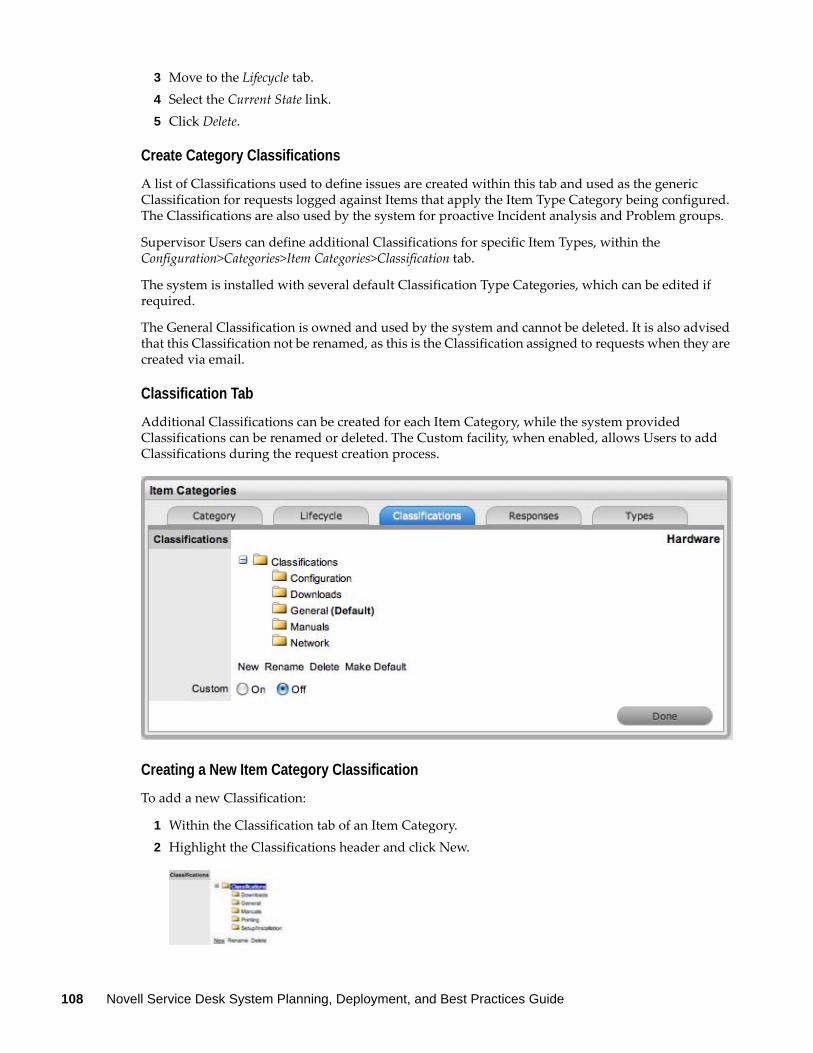
3 Move to the Lifecycle tab.4 Select the Current State link.5 Click Delete.
Create Category Classifications
A list of Classifications used to define issues are created within this tab and used as the generic Classification for requests logged against Items that apply the Item Type Category being configured. The Classifications are also used by the system for proactive Incident analysis and Problem groups.
Supervisor Users can define additional Classifications for specific Item Types, within the Configuration>Categories>Item Categories>Classification tab.
The system is installed with several default Classification Type Categories, which can be edited if required.
The General Classification is owned and used by the system and cannot be deleted. It is also advised that this Classification not be renamed, as this is the Classification assigned to requests when they are created via email.
Classification Tab
Additional Classifications can be created for each Item Category, while the system provided Classifications can be renamed or deleted. The Custom facility, when enabled, allows Users to add Classifications during the request creation process.
Creating a New Item Category Classification
To add a new Classification:
1 Within the Classification tab of an Item Category.2 Highlight the Classifications header and click New.
108 Novell Service Desk System Planning, Deployment, and Best Practices Guide
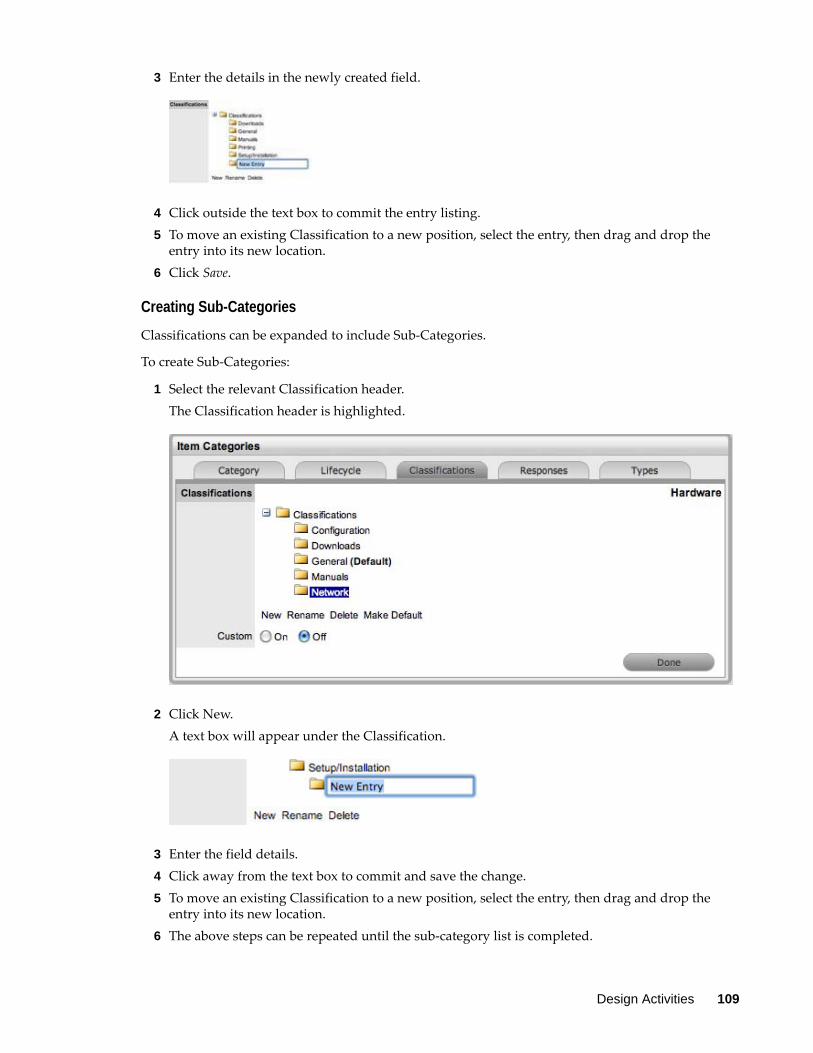
3 Enter the details in the newly created field.
4 Click outside the text box to commit the entry listing.5 To move an existing Classification to a new position, select the entry, then drag and drop the
entry into its new location.6 Click Save.
Creating Sub-Categories
Classifications can be expanded to include Sub-Categories.
To create Sub-Categories:
1 Select the relevant Classification header.The Classification header is highlighted.
2 Click New.A text box will appear under the Classification.
3 Enter the field details.4 Click away from the text box to commit and save the change.5 To move an existing Classification to a new position, select the entry, then drag and drop the
entry into its new location.6 The above steps can be repeated until the sub-category list is completed.
Design Activities 109
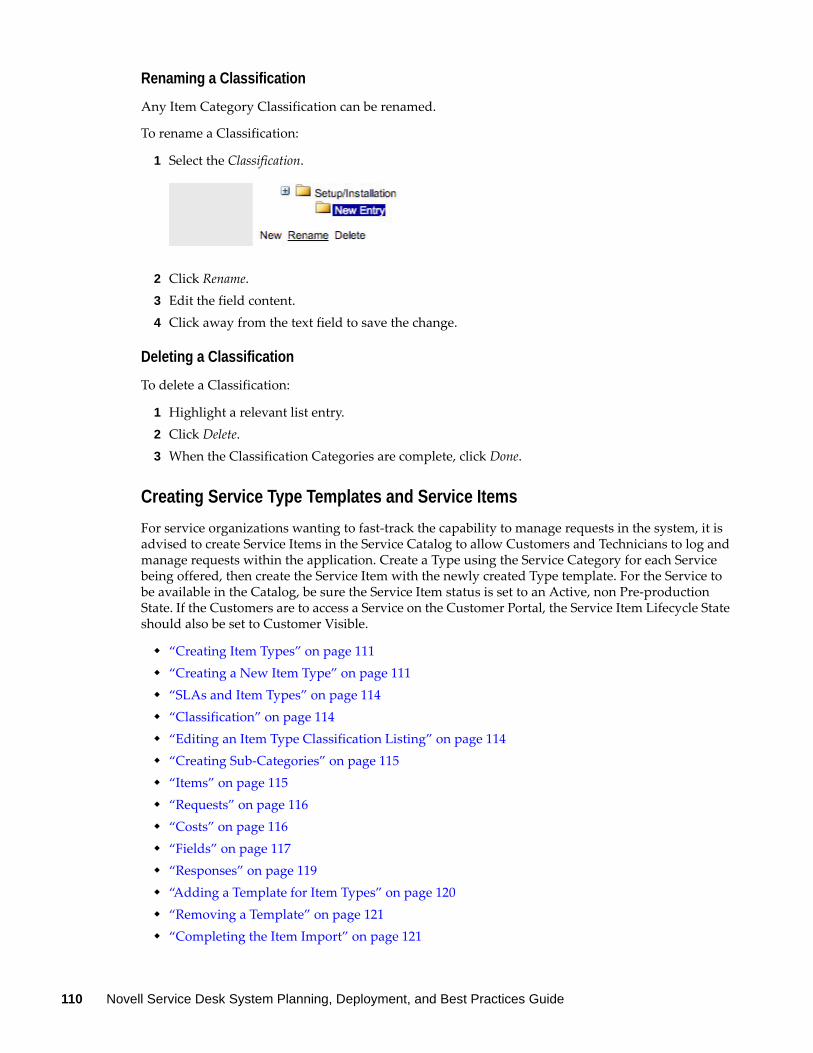
Renaming a Classification
Any Item Category Classification can be renamed.
To rename a Classification:
1 Select the Classification.
2 Click Rename.3 Edit the field content.4 Click away from the text field to save the change.
Deleting a Classification
To delete a Classification:
1 Highlight a relevant list entry.2 Click Delete.3 When the Classification Categories are complete, click Done.
Creating Service Type Templates and Service Items
For service organizations wanting to fast-track the capability to manage requests in the system, it is advised to create Service Items in the Service Catalog to allow Customers and Technicians to log and manage requests within the application. Create a Type using the Service Category for each Service being offered, then create the Service Item with the newly created Type template. For the Service to be available in the Catalog, be sure the Service Item status is set to an Active, non Pre-production State. If the Customers are to access a Service on the Customer Portal, the Service Item Lifecycle State should also be set to Customer Visible.
“Creating Item Types” on page 111 “Creating a New Item Type” on page 111 “SLAs and Item Types” on page 114 “Classification” on page 114 “Editing an Item Type Classification Listing” on page 114 “Creating Sub-Categories” on page 115 “Items” on page 115 “Requests” on page 116 “Costs” on page 116 “Fields” on page 117 “Responses” on page 119 “Adding a Template for Item Types” on page 120 “Removing a Template” on page 121 “Completing the Item Import” on page 121
110 Novell Service Desk System Planning, Deployment, and Best Practices Guide
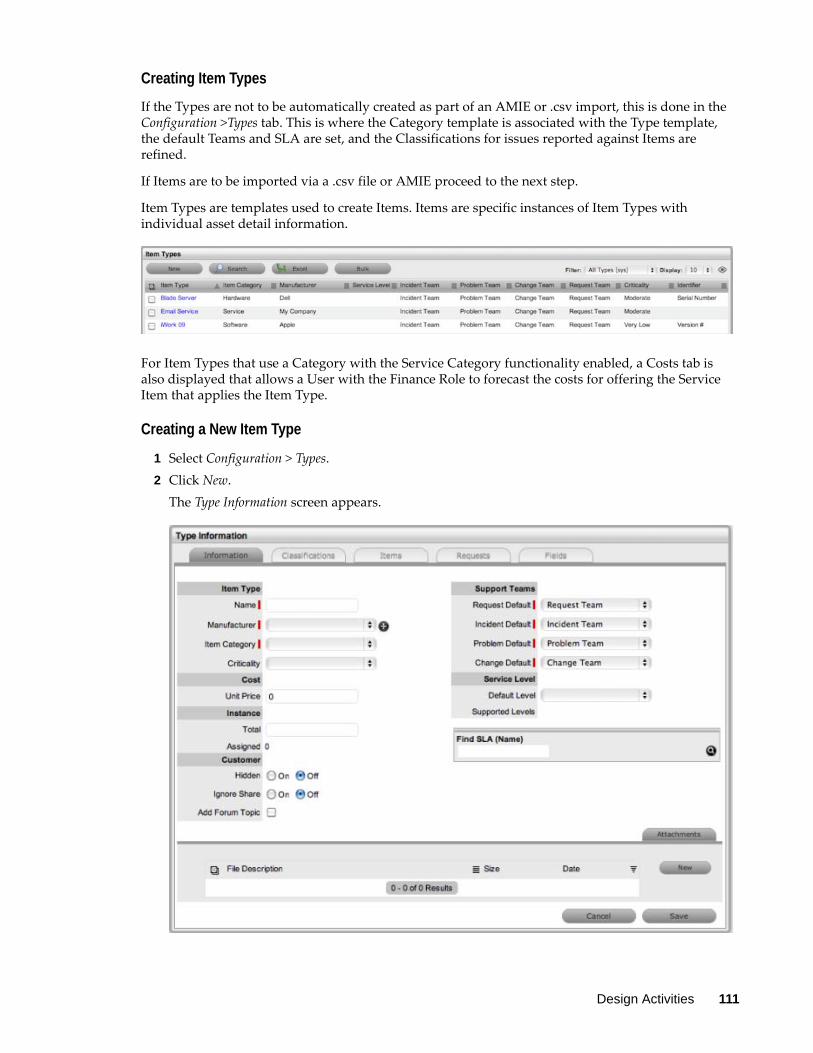
Creating Item Types
If the Types are not to be automatically created as part of an AMIE or .csv import, this is done in the Configuration >Types tab. This is where the Category template is associated with the Type template, the default Teams and SLA are set, and the Classifications for issues reported against Items are refined.
If Items are to be imported via a .csv file or AMIE proceed to the next step.
Item Types are templates used to create Items. Items are specific instances of Item Types with individual asset detail information.
For Item Types that use a Category with the Service Category functionality enabled, a Costs tab is also displayed that allows a User with the Finance Role to forecast the costs for offering the Service Item that applies the Item Type.
Creating a New Item Type
1 Select Configuration > Types.2 Click New.
The Type Information screen appears.
Design Activities 111
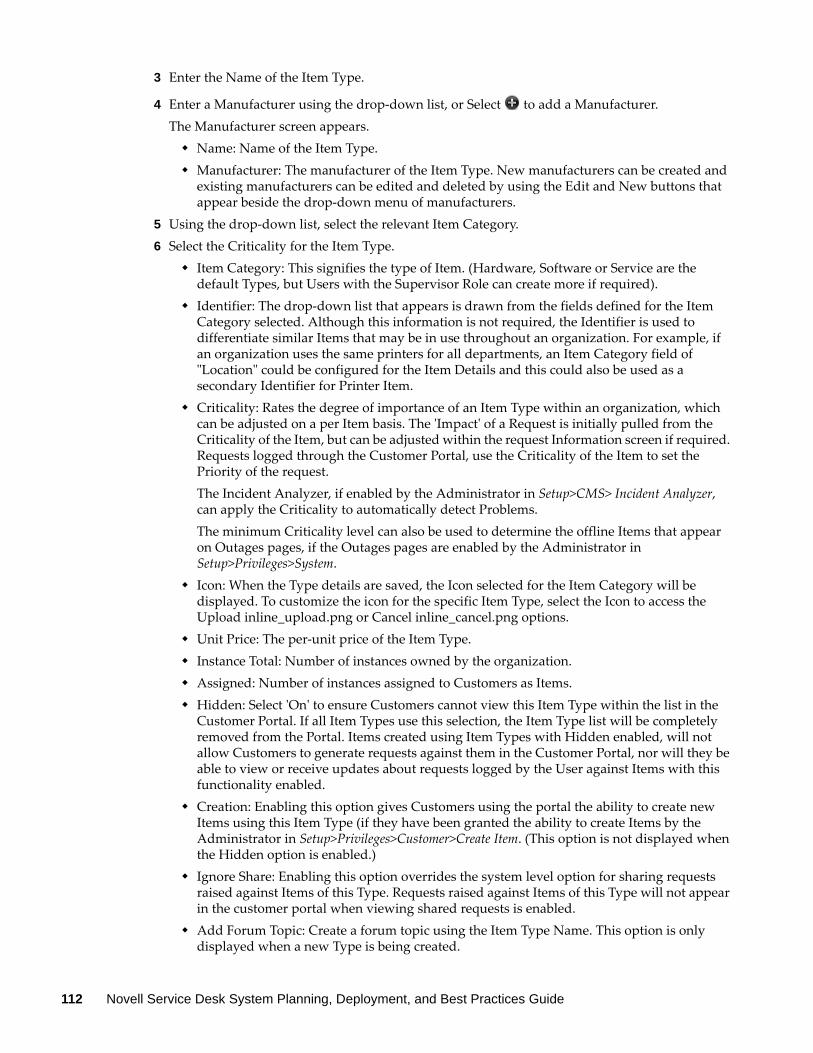
3 Enter the Name of the Item Type.
4 Enter a Manufacturer using the drop-down list, or Select to add a Manufacturer.The Manufacturer screen appears. Name: Name of the Item Type. Manufacturer: The manufacturer of the Item Type. New manufacturers can be created and
existing manufacturers can be edited and deleted by using the Edit and New buttons that appear beside the drop-down menu of manufacturers.
5 Using the drop-down list, select the relevant Item Category.6 Select the Criticality for the Item Type.
Item Category: This signifies the type of Item. (Hardware, Software or Service are the default Types, but Users with the Supervisor Role can create more if required).
Identifier: The drop-down list that appears is drawn from the fields defined for the Item Category selected. Although this information is not required, the Identifier is used to differentiate similar Items that may be in use throughout an organization. For example, if an organization uses the same printers for all departments, an Item Category field of "Location" could be configured for the Item Details and this could also be used as a secondary Identifier for Printer Item.
Criticality: Rates the degree of importance of an Item Type within an organization, which can be adjusted on a per Item basis. The 'Impact' of a Request is initially pulled from the Criticality of the Item, but can be adjusted within the request Information screen if required. Requests logged through the Customer Portal, use the Criticality of the Item to set the Priority of the request. The Incident Analyzer, if enabled by the Administrator in Setup>CMS> Incident Analyzer, can apply the Criticality to automatically detect Problems.The minimum Criticality level can also be used to determine the offline Items that appear on Outages pages, if the Outages pages are enabled by the Administrator in Setup>Privileges>System.
Icon: When the Type details are saved, the Icon selected for the Item Category will be displayed. To customize the icon for the specific Item Type, select the Icon to access the Upload inline_upload.png or Cancel inline_cancel.png options.
Unit Price: The per-unit price of the Item Type. Instance Total: Number of instances owned by the organization. Assigned: Number of instances assigned to Customers as Items. Hidden: Select 'On' to ensure Customers cannot view this Item Type within the list in the
Customer Portal. If all Item Types use this selection, the Item Type list will be completely removed from the Portal. Items created using Item Types with Hidden enabled, will not allow Customers to generate requests against them in the Customer Portal, nor will they be able to view or receive updates about requests logged by the User against Items with this functionality enabled.
Creation: Enabling this option gives Customers using the portal the ability to create new Items using this Item Type (if they have been granted the ability to create Items by the Administrator in Setup>Privileges>Customer>Create Item. (This option is not displayed when the Hidden option is enabled.)
Ignore Share: Enabling this option overrides the system level option for sharing requests raised against Items of this Type. Requests raised against Items of this Type will not appear in the customer portal when viewing shared requests is enabled.
Add Forum Topic: Create a forum topic using the Item Type Name. This option is only displayed when a new Type is being created.
112 Novell Service Desk System Planning, Deployment, and Best Practices Guide
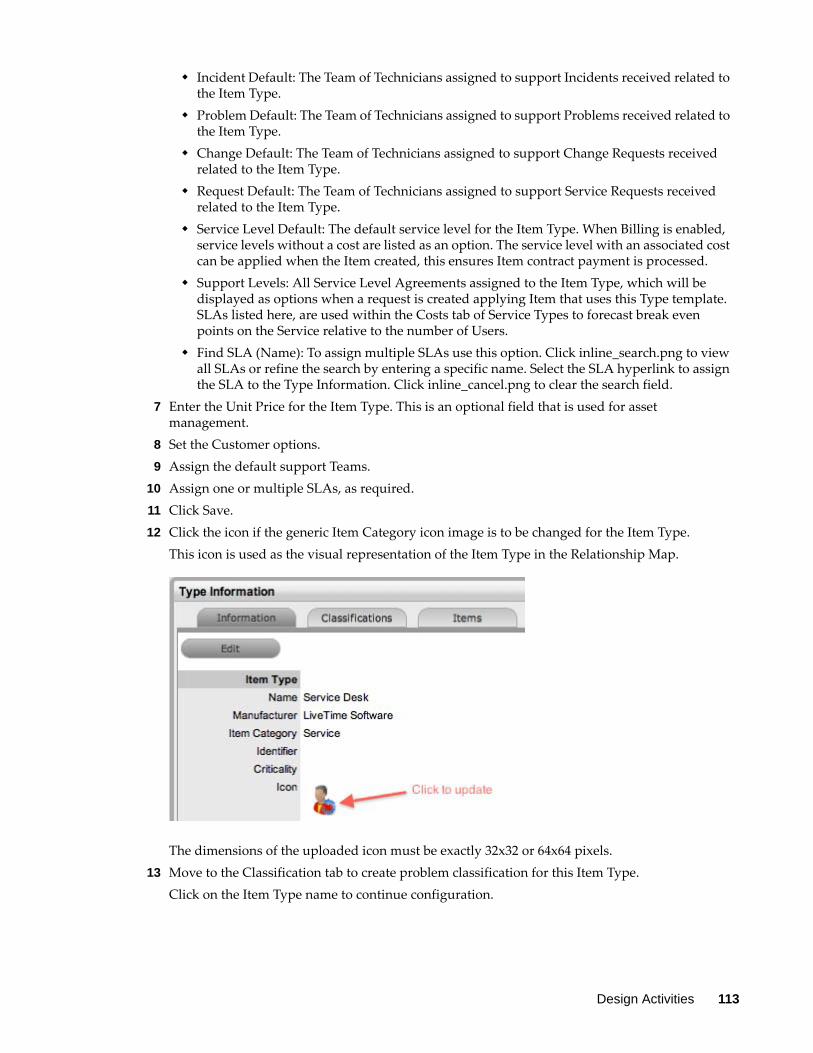
Incident Default: The Team of Technicians assigned to support Incidents received related to the Item Type.
Problem Default: The Team of Technicians assigned to support Problems received related to the Item Type.
Change Default: The Team of Technicians assigned to support Change Requests received related to the Item Type.
Request Default: The Team of Technicians assigned to support Service Requests received related to the Item Type.
Service Level Default: The default service level for the Item Type. When Billing is enabled, service levels without a cost are listed as an option. The service level with an associated cost can be applied when the Item created, this ensures Item contract payment is processed.
Support Levels: All Service Level Agreements assigned to the Item Type, which will be displayed as options when a request is created applying Item that uses this Type template. SLAs listed here, are used within the Costs tab of Service Types to forecast break even points on the Service relative to the number of Users.
Find SLA (Name): To assign multiple SLAs use this option. Click inline_search.png to view all SLAs or refine the search by entering a specific name. Select the SLA hyperlink to assign the SLA to the Type Information. Click inline_cancel.png to clear the search field.
7 Enter the Unit Price for the Item Type. This is an optional field that is used for asset management.
8 Set the Customer options.9 Assign the default support Teams.
10 Assign one or multiple SLAs, as required.11 Click Save.12 Click the icon if the generic Item Category icon image is to be changed for the Item Type.
This icon is used as the visual representation of the Item Type in the Relationship Map.
The dimensions of the uploaded icon must be exactly 32x32 or 64x64 pixels.13 Move to the Classification tab to create problem classification for this Item Type.
Click on the Item Type name to continue configuration.
Design Activities 113
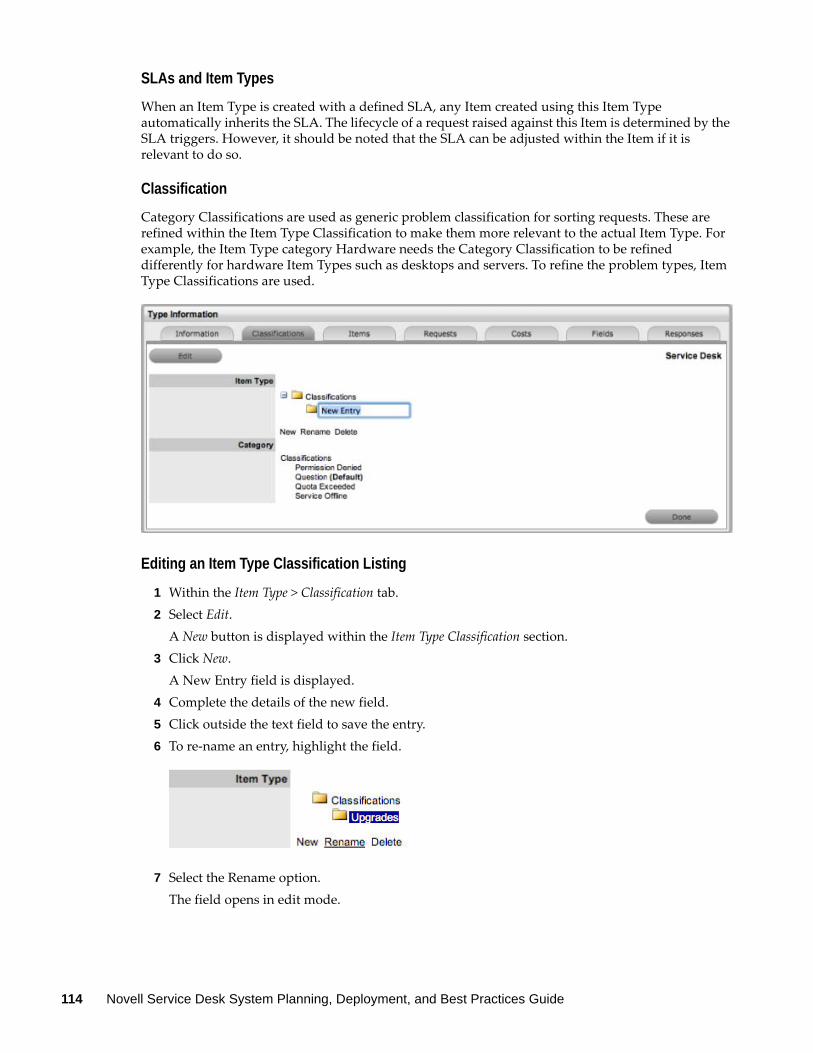
SLAs and Item Types
When an Item Type is created with a defined SLA, any Item created using this Item Type automatically inherits the SLA. The lifecycle of a request raised against this Item is determined by the SLA triggers. However, it should be noted that the SLA can be adjusted within the Item if it is relevant to do so.
Classification
Category Classifications are used as generic problem classification for sorting requests. These are refined within the Item Type Classification to make them more relevant to the actual Item Type. For example, the Item Type category Hardware needs the Category Classification to be refined differently for hardware Item Types such as desktops and servers. To refine the problem types, Item Type Classifications are used.
Editing an Item Type Classification Listing
1 Within the Item Type > Classification tab.2 Select Edit.
A New button is displayed within the Item Type Classification section.3 Click New.
A New Entry field is displayed.4 Complete the details of the new field.5 Click outside the text field to save the entry.6 To re-name an entry, highlight the field.
7 Select the Rename option.The field opens in edit mode.
114 Novell Service Desk System Planning, Deployment, and Best Practices Guide
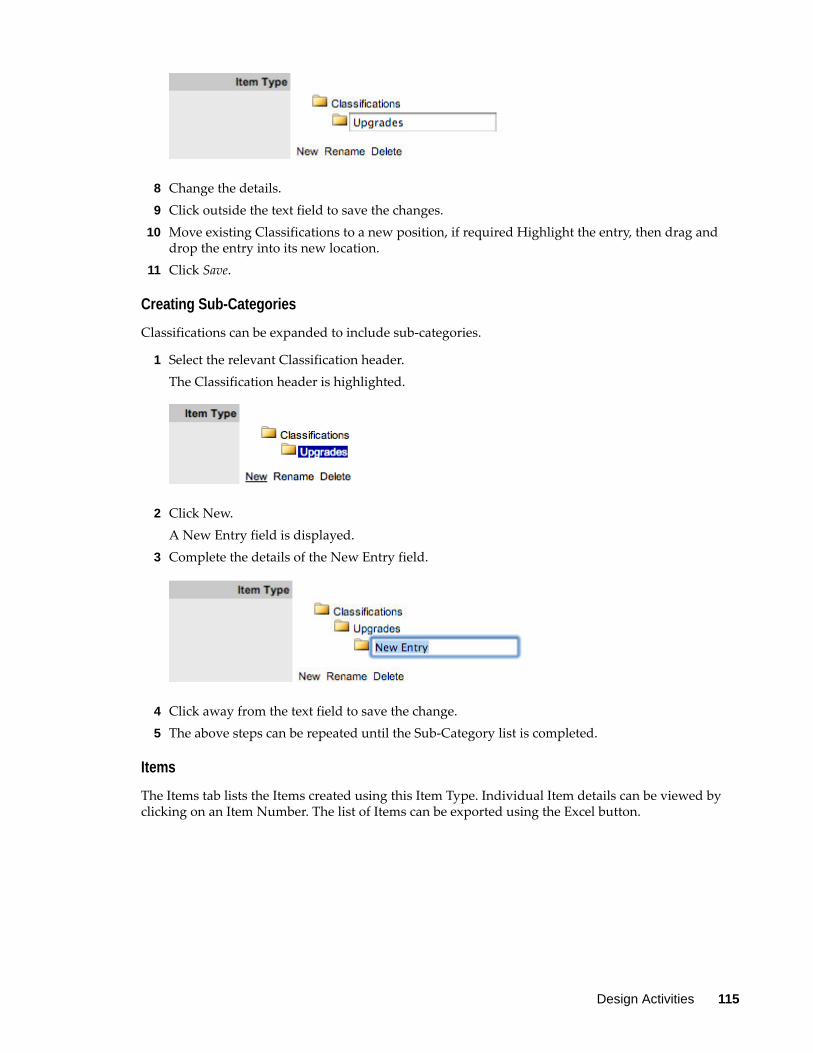
8 Change the details.9 Click outside the text field to save the changes.
10 Move existing Classifications to a new position, if required Highlight the entry, then drag and drop the entry into its new location.
11 Click Save.
Creating Sub-Categories
Classifications can be expanded to include sub-categories.
1 Select the relevant Classification header.The Classification header is highlighted.
2 Click New. A New Entry field is displayed.
3 Complete the details of the New Entry field.
4 Click away from the text field to save the change.5 The above steps can be repeated until the Sub-Category list is completed.
Items
The Items tab lists the Items created using this Item Type. Individual Item details can be viewed by clicking on an Item Number. The list of Items can be exported using the Excel button.
Design Activities 115

Requests
The Requests tab lists all requests that have been created for this Item Type.
Use the Filter to switch between Incident, Problem, Change and Service Requests views. Requests can be viewed from this screen by clicking on the Task# or Problem Report hyperlink. The list of Requests can be exported using the Excel button.
Costs
This is only visible to Users with the Finance Role.
The Costs tab is only available within the Service Type Information screens and allows organizations to calculate the Break-Even Point (BEP) of a service based on forecasting the number of Customers of that Service. This allows the service organization to account for the per calendar month price of the Service, which is used to calculate the ongoing revenue figures within the Item Costs tab that uses the Service Type template.
116 Novell Service Desk System Planning, Deployment, and Best Practices Guide
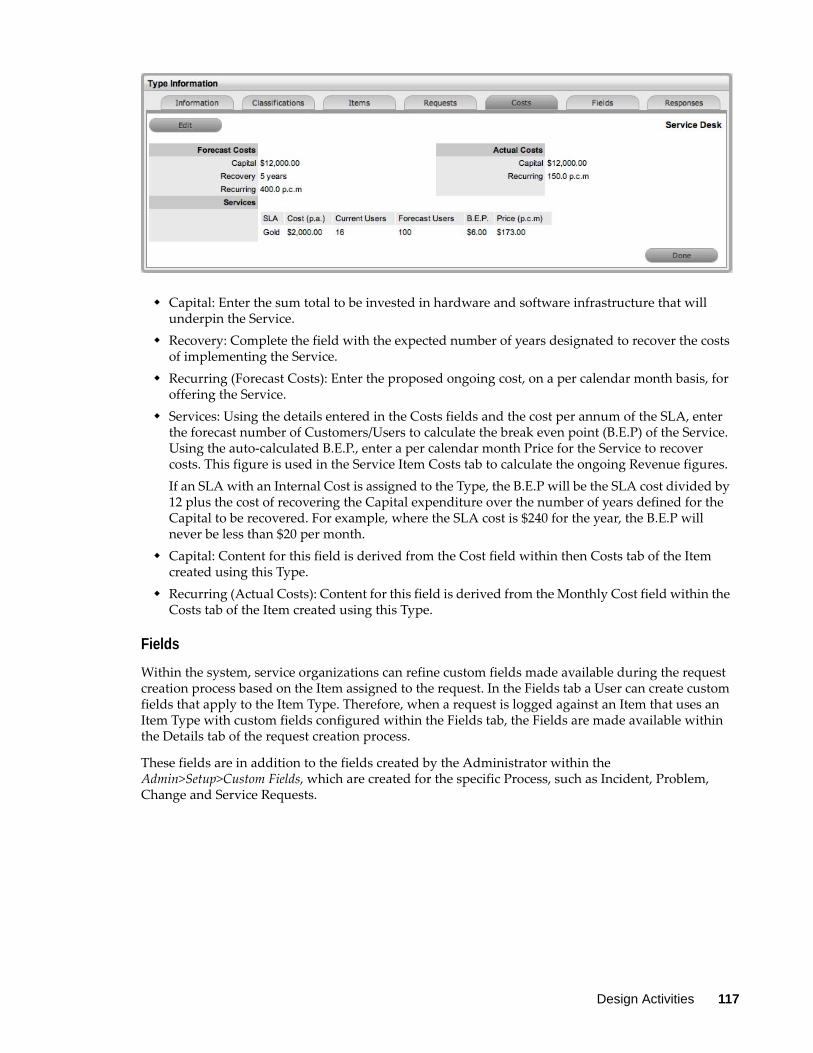
Capital: Enter the sum total to be invested in hardware and software infrastructure that will underpin the Service.
Recovery: Complete the field with the expected number of years designated to recover the costs of implementing the Service.
Recurring (Forecast Costs): Enter the proposed ongoing cost, on a per calendar month basis, for offering the Service.
Services: Using the details entered in the Costs fields and the cost per annum of the SLA, enter the forecast number of Customers/Users to calculate the break even point (B.E.P) of the Service. Using the auto-calculated B.E.P., enter a per calendar month Price for the Service to recover costs. This figure is used in the Service Item Costs tab to calculate the ongoing Revenue figures.If an SLA with an Internal Cost is assigned to the Type, the B.E.P will be the SLA cost divided by 12 plus the cost of recovering the Capital expenditure over the number of years defined for the Capital to be recovered. For example, where the SLA cost is $240 for the year, the B.E.P will never be less than $20 per month.
Capital: Content for this field is derived from the Cost field within then Costs tab of the Item created using this Type.
Recurring (Actual Costs): Content for this field is derived from the Monthly Cost field within the Costs tab of the Item created using this Type.
Fields
Within the system, service organizations can refine custom fields made available during the request creation process based on the Item assigned to the request. In the Fields tab a User can create custom fields that apply to the Item Type. Therefore, when a request is logged against an Item that uses an Item Type with custom fields configured within the Fields tab, the Fields are made available within the Details tab of the request creation process.
These fields are in addition to the fields created by the Administrator within the Admin>Setup>Custom Fields, which are created for the specific Process, such as Incident, Problem, Change and Service Requests.
Design Activities 117
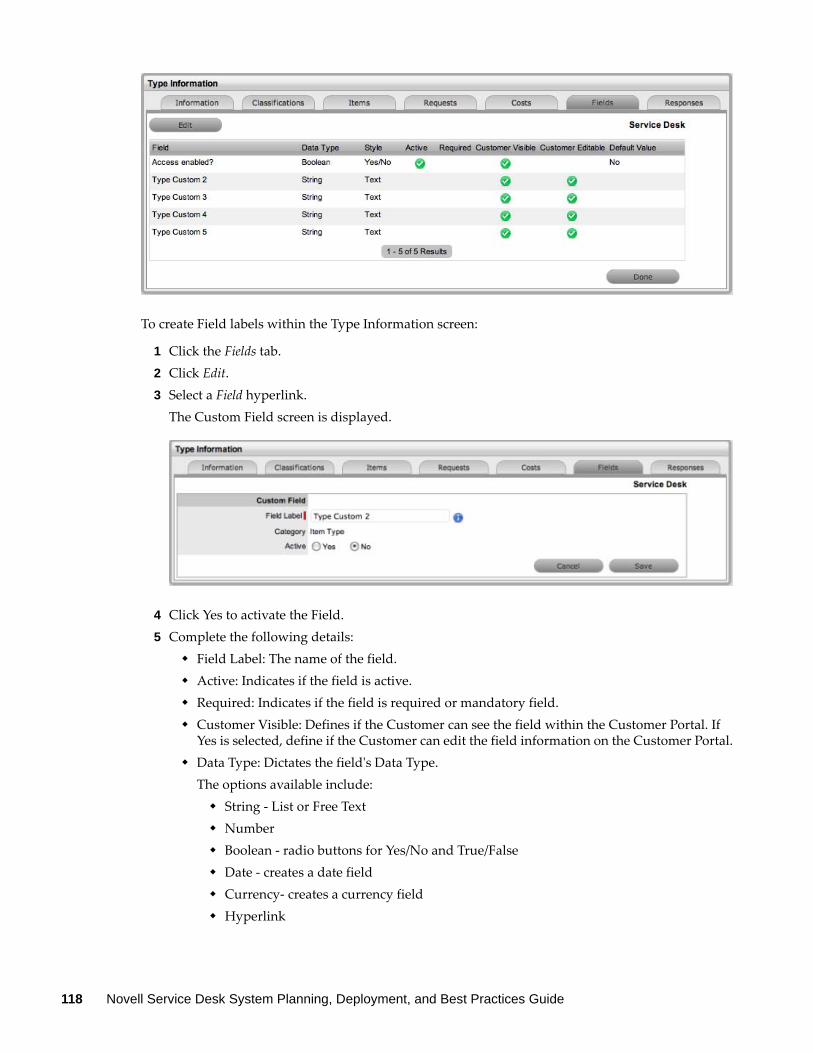
To create Field labels within the Type Information screen:
1 Click the Fields tab.2 Click Edit.3 Select a Field hyperlink.
The Custom Field screen is displayed.
4 Click Yes to activate the Field.5 Complete the following details:
Field Label: The name of the field. Active: Indicates if the field is active. Required: Indicates if the field is required or mandatory field. Customer Visible: Defines if the Customer can see the field within the Customer Portal. If
Yes is selected, define if the Customer can edit the field information on the Customer Portal. Data Type: Dictates the field's Data Type.
The options available include: String - List or Free Text Number Boolean - radio buttons for Yes/No and True/False Date - creates a date field Currency- creates a currency field Hyperlink
118 Novell Service Desk System Planning, Deployment, and Best Practices Guide
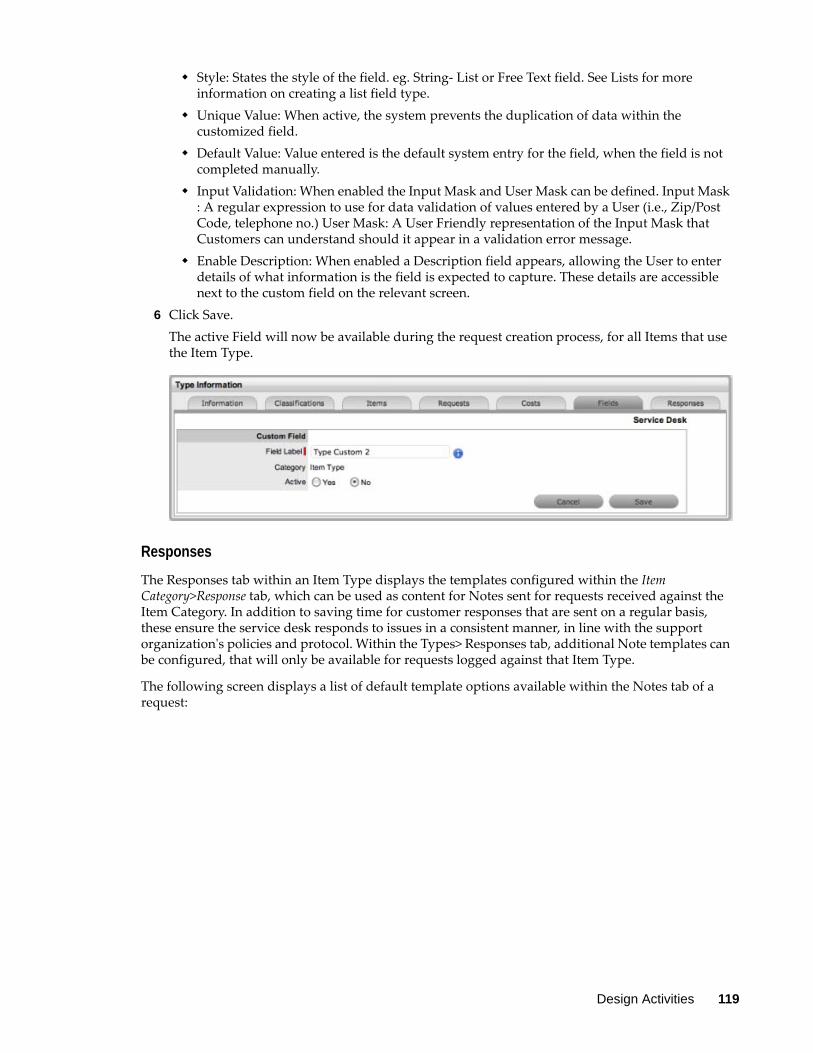
Style: States the style of the field. eg. String- List or Free Text field. See Lists for more information on creating a list field type.
Unique Value: When active, the system prevents the duplication of data within the customized field.
Default Value: Value entered is the default system entry for the field, when the field is not completed manually.
Input Validation: When enabled the Input Mask and User Mask can be defined. Input Mask : A regular expression to use for data validation of values entered by a User (i.e., Zip/Post Code, telephone no.) User Mask: A User Friendly representation of the Input Mask that Customers can understand should it appear in a validation error message.
Enable Description: When enabled a Description field appears, allowing the User to enter details of what information is the field is expected to capture. These details are accessible next to the custom field on the relevant screen.
6 Click Save.The active Field will now be available during the request creation process, for all Items that use the Item Type.
Responses
The Responses tab within an Item Type displays the templates configured within the Item Category>Response tab, which can be used as content for Notes sent for requests received against the Item Category. In addition to saving time for customer responses that are sent on a regular basis, these ensure the service desk responds to issues in a consistent manner, in line with the support organization's policies and protocol. Within the Types> Responses tab, additional Note templates can be configured, that will only be available for requests logged against that Item Type.
The following screen displays a list of default template options available within the Notes tab of a request:
Design Activities 119
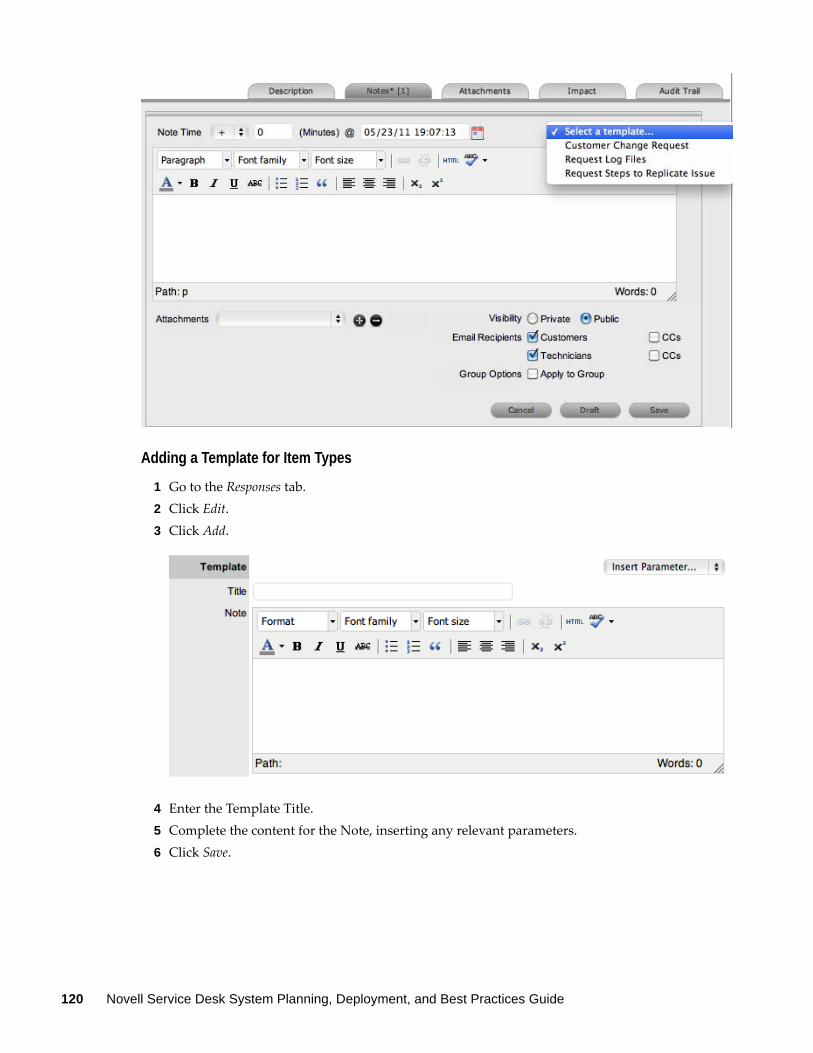
Adding a Template for Item Types
1 Go to the Responses tab.2 Click Edit.3 Click Add.
4 Enter the Template Title.5 Complete the content for the Note, inserting any relevant parameters.6 Click Save.
120 Novell Service Desk System Planning, Deployment, and Best Practices Guide
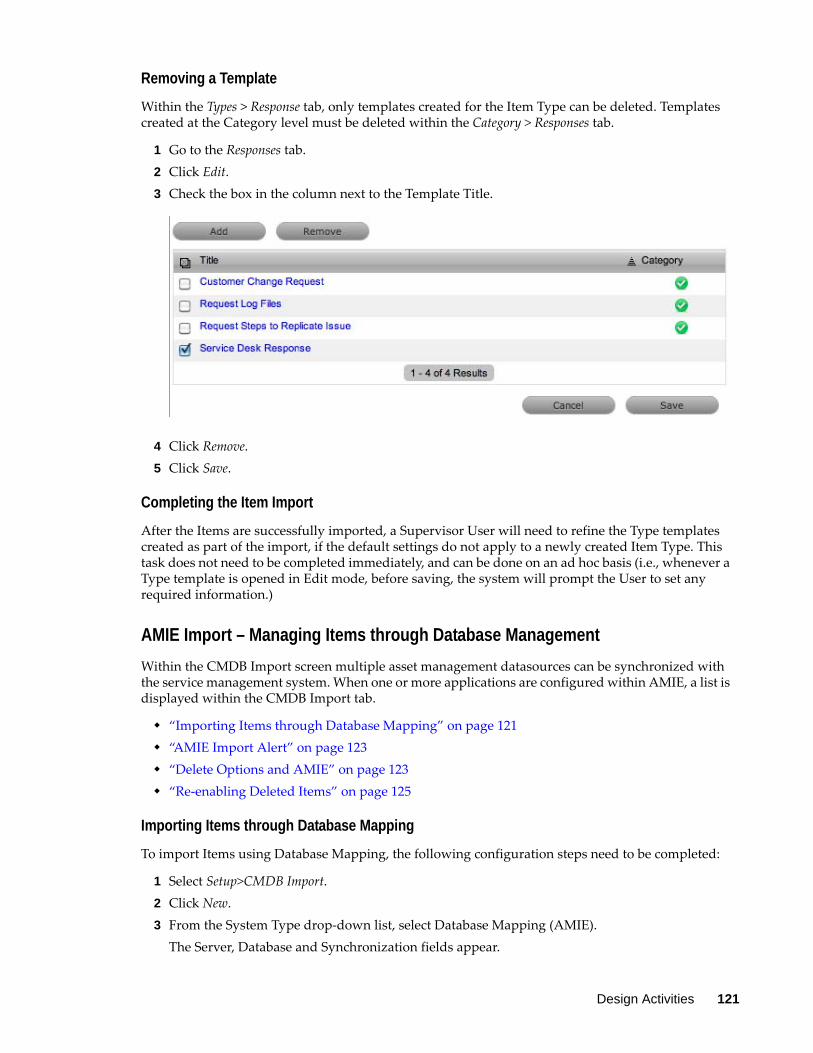
Removing a Template
Within the Types > Response tab, only templates created for the Item Type can be deleted. Templates created at the Category level must be deleted within the Category > Responses tab.
1 Go to the Responses tab.2 Click Edit.3 Check the box in the column next to the Template Title.
4 Click Remove.5 Click Save.
Completing the Item Import
After the Items are successfully imported, a Supervisor User will need to refine the Type templates created as part of the import, if the default settings do not apply to a newly created Item Type. This task does not need to be completed immediately, and can be done on an ad hoc basis (i.e., whenever a Type template is opened in Edit mode, before saving, the system will prompt the User to set any required information.)
AMIE Import – Managing Items through Database Management
Within the CMDB Import screen multiple asset management datasources can be synchronized with the service management system. When one or more applications are configured within AMIE, a list is displayed within the CMDB Import tab.
“Importing Items through Database Mapping” on page 121 “AMIE Import Alert” on page 123 “Delete Options and AMIE” on page 123 “Re-enabling Deleted Items” on page 125
Importing Items through Database Mapping
To import Items using Database Mapping, the following configuration steps need to be completed:
1 Select Setup>CMDB Import.2 Click New.3 From the System Type drop-down list, select Database Mapping (AMIE).
The Server, Database and Synchronization fields appear.
Design Activities 121
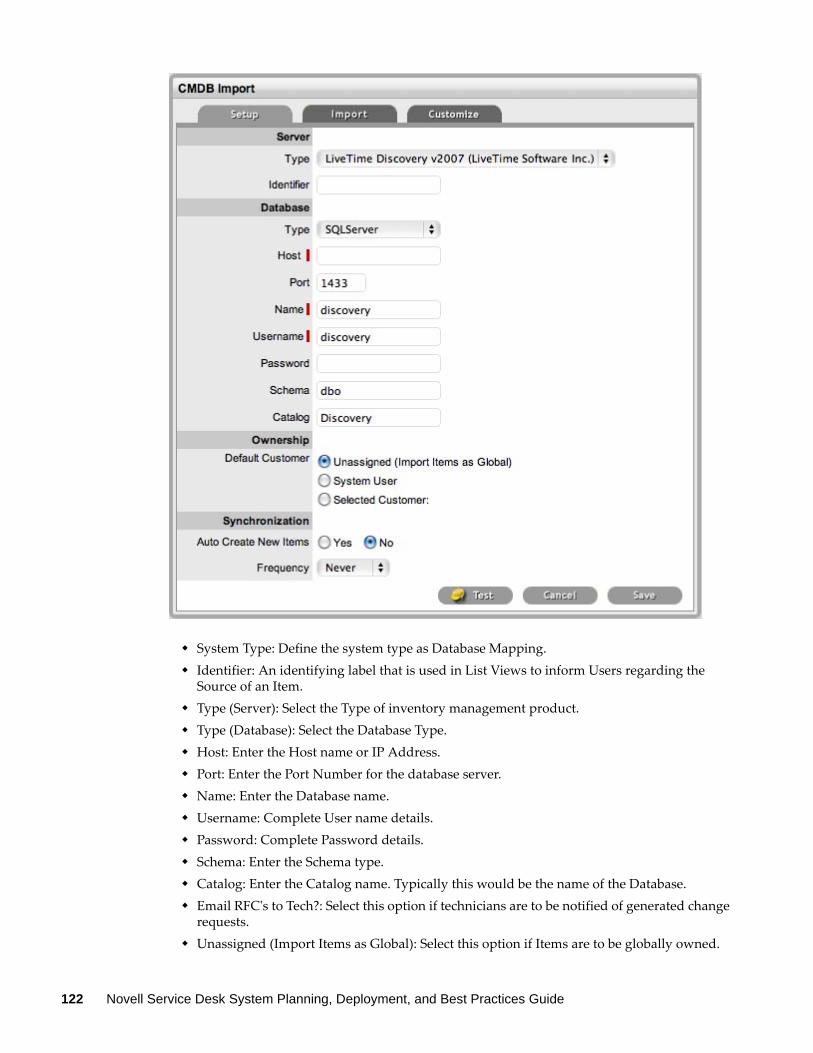
System Type: Define the system type as Database Mapping. Identifier: An identifying label that is used in List Views to inform Users regarding the
Source of an Item. Type (Server): Select the Type of inventory management product. Type (Database): Select the Database Type. Host: Enter the Host name or IP Address. Port: Enter the Port Number for the database server. Name: Enter the Database name. Username: Complete User name details. Password: Complete Password details. Schema: Enter the Schema type. Catalog: Enter the Catalog name. Typically this would be the name of the Database. Email RFC's to Tech?: Select this option if technicians are to be notified of generated change
requests. Unassigned (Import Items as Global): Select this option if Items are to be globally owned.
122 Novell Service Desk System Planning, Deployment, and Best Practices Guide
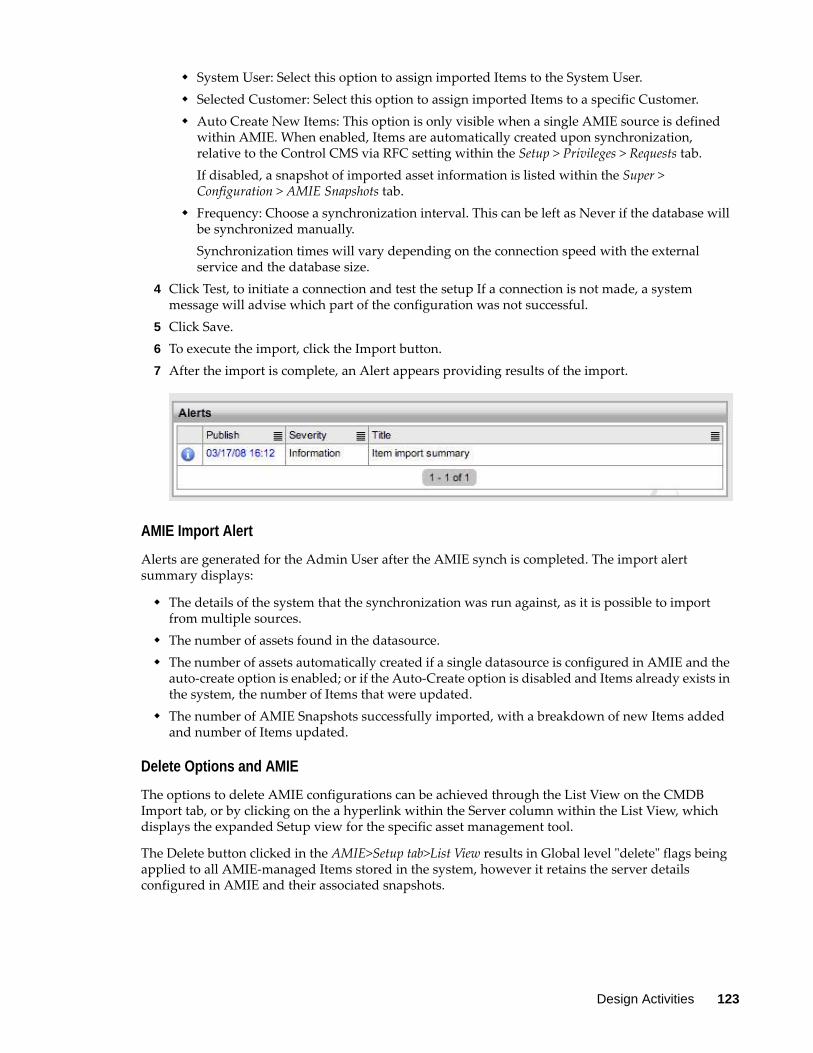
System User: Select this option to assign imported Items to the System User. Selected Customer: Select this option to assign imported Items to a specific Customer. Auto Create New Items: This option is only visible when a single AMIE source is defined
within AMIE. When enabled, Items are automatically created upon synchronization, relative to the Control CMS via RFC setting within the Setup > Privileges > Requests tab.If disabled, a snapshot of imported asset information is listed within the Super > Configuration > AMIE Snapshots tab.
Frequency: Choose a synchronization interval. This can be left as Never if the database will be synchronized manually.Synchronization times will vary depending on the connection speed with the external service and the database size.
4 Click Test, to initiate a connection and test the setup If a connection is not made, a system message will advise which part of the configuration was not successful.
5 Click Save.6 To execute the import, click the Import button.7 After the import is complete, an Alert appears providing results of the import.
AMIE Import Alert
Alerts are generated for the Admin User after the AMIE synch is completed. The import alert summary displays:
The details of the system that the synchronization was run against, as it is possible to import from multiple sources.
The number of assets found in the datasource. The number of assets automatically created if a single datasource is configured in AMIE and the
auto-create option is enabled; or if the Auto-Create option is disabled and Items already exists in the system, the number of Items that were updated.
The number of AMIE Snapshots successfully imported, with a breakdown of new Items added and number of Items updated.
Delete Options and AMIE
The options to delete AMIE configurations can be achieved through the List View on the CMDB Import tab, or by clicking on the a hyperlink within the Server column within the List View, which displays the expanded Setup view for the specific asset management tool.
The Delete button clicked in the AMIE>Setup tab>List View results in Global level "delete" flags being applied to all AMIE-managed Items stored in the system, however it retains the server details configured in AMIE and their associated snapshots.
Design Activities 123
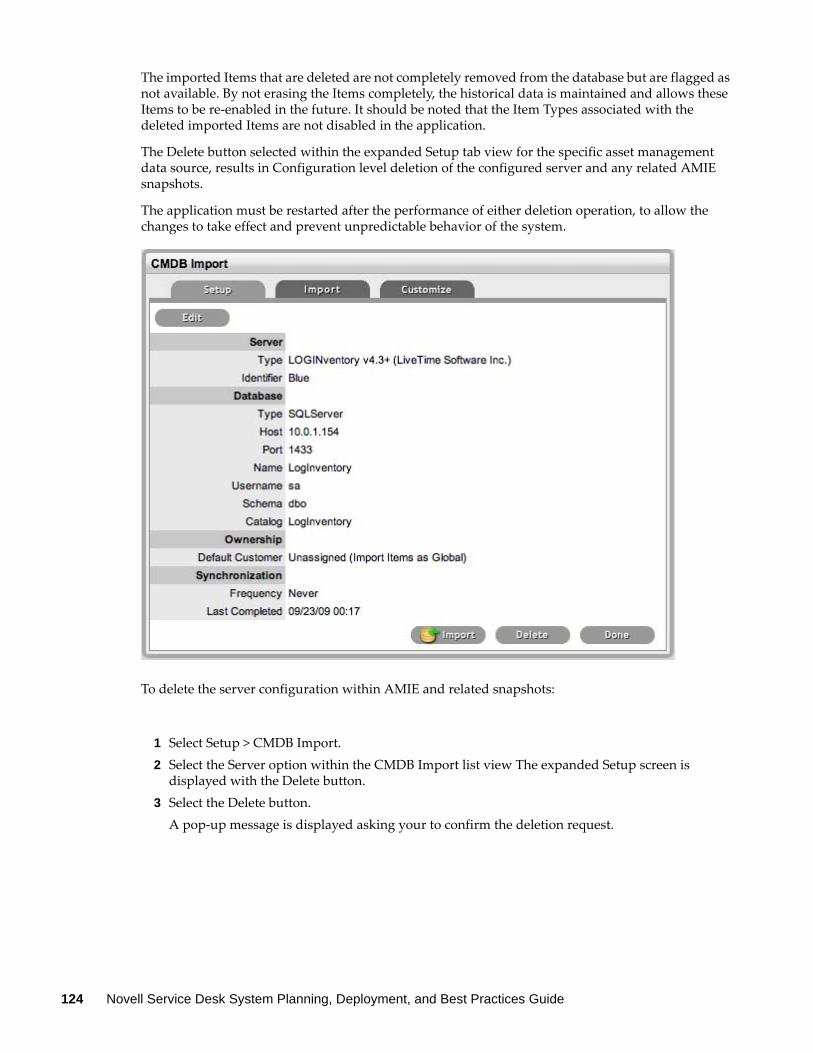
The imported Items that are deleted are not completely removed from the database but are flagged as not available. By not erasing the Items completely, the historical data is maintained and allows these Items to be re-enabled in the future. It should be noted that the Item Types associated with the deleted imported Items are not disabled in the application.
The Delete button selected within the expanded Setup tab view for the specific asset management data source, results in Configuration level deletion of the configured server and any related AMIE snapshots.
The application must be restarted after the performance of either deletion operation, to allow the changes to take effect and prevent unpredictable behavior of the system.
To delete the server configuration within AMIE and related snapshots:
1 Select Setup > CMDB Import.2 Select the Server option within the CMDB Import list view The expanded Setup screen is
displayed with the Delete button.3 Select the Delete button.
A pop-up message is displayed asking your to confirm the deletion request.
124 Novell Service Desk System Planning, Deployment, and Best Practices Guide
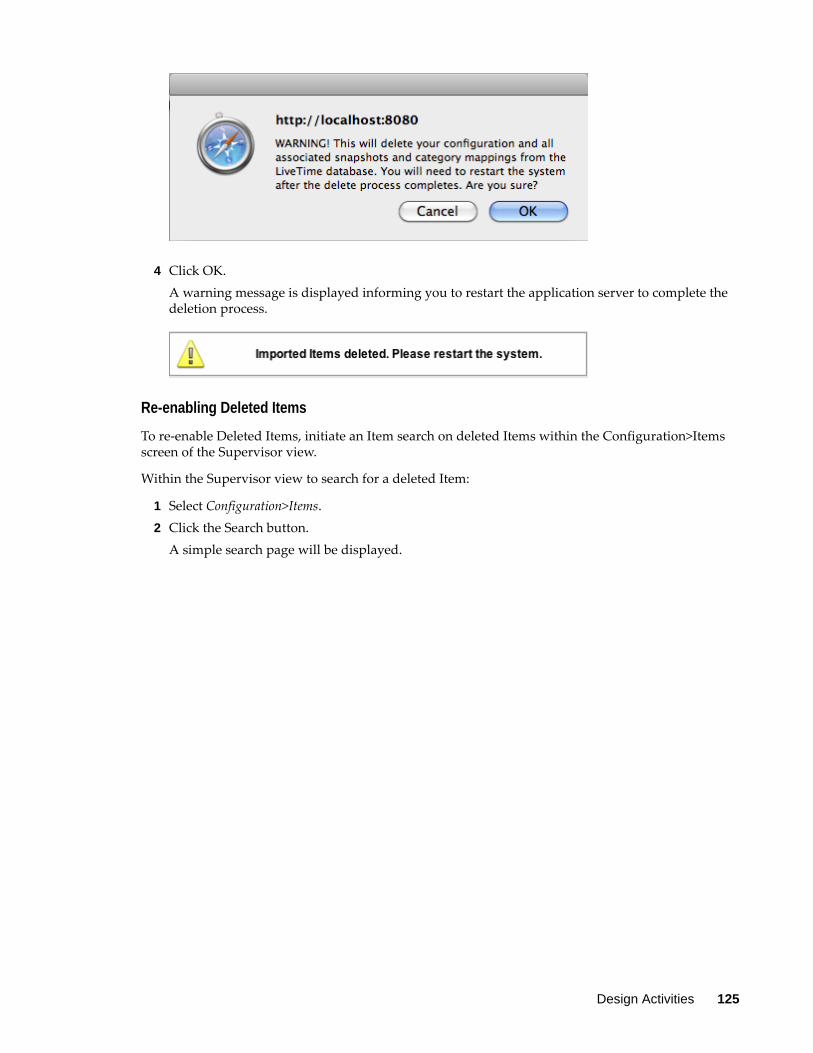
4 Click OK.A warning message is displayed informing you to restart the application server to complete the deletion process.
Re-enabling Deleted Items
To re-enable Deleted Items, initiate an Item search on deleted Items within the Configuration>Items screen of the Supervisor view.
Within the Supervisor view to search for a deleted Item:
1 Select Configuration>Items.2 Click the Search button.
A simple search page will be displayed.
Design Activities 125

3 Enter a search term.4 Select the Deleted Item Only option.5 Click Search.
A list of Items is displayed.6 For the Item to be re-enabled, select the Item ID#.7 Click Enable.
CSV Import – Importing Items by Using a .CSV File
To import Items using a .CSV file, a .CSV template, containing all available fields, can be downloaded and populated. The service management system uses a field mapping Wizard to match fields in the template to those in the system. To download the template go to Setup > Item Import > Import.
“Before Importing a CSV File” on page 127 “Importing Items” on page 127 “Configuring Items after the Import” on page 131 “A” on page 131 “Updating Item Information via .CSV” on page 132 “Creating Items” on page 132 “Viewing an Item” on page 133
126 Novell Service Desk System Planning, Deployment, and Best Practices Guide
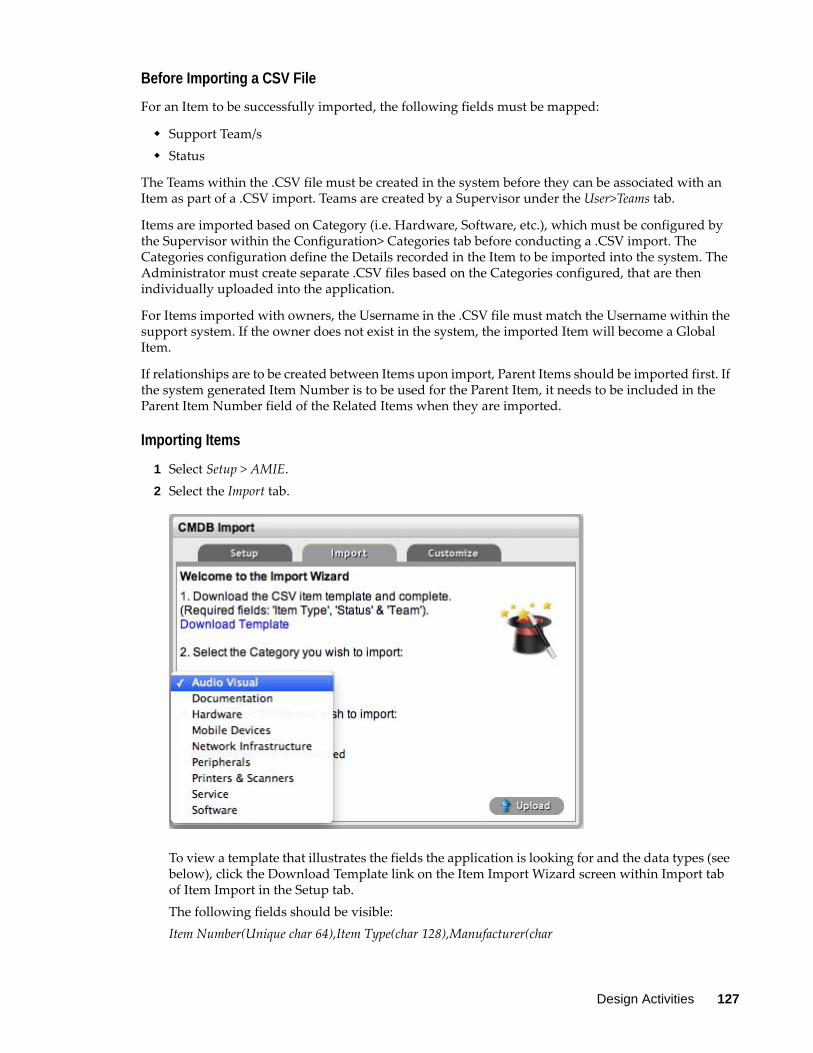
Before Importing a CSV File
For an Item to be successfully imported, the following fields must be mapped:
Support Team/s Status
The Teams within the .CSV file must be created in the system before they can be associated with an Item as part of a .CSV import. Teams are created by a Supervisor under the User>Teams tab.
Items are imported based on Category (i.e. Hardware, Software, etc.), which must be configured by the Supervisor within the Configuration> Categories tab before conducting a .CSV import. The Categories configuration define the Details recorded in the Item to be imported into the system. The Administrator must create separate .CSV files based on the Categories configured, that are then individually uploaded into the application.
For Items imported with owners, the Username in the .CSV file must match the Username within the support system. If the owner does not exist in the system, the imported Item will become a Global Item.
If relationships are to be created between Items upon import, Parent Items should be imported first. If the system generated Item Number is to be used for the Parent Item, it needs to be included in the Parent Item Number field of the Related Items when they are imported.
Importing Items
1 Select Setup > AMIE.2 Select the Import tab.
To view a template that illustrates the fields the application is looking for and the data types (see below), click the Download Template link on the Item Import Wizard screen within Import tab of Item Import in the Setup tab.The following fields should be visible:Item Number(Unique char 64),Item Type(char 128),Manufacturer(char
Design Activities 127
128),Incident Team(char 64),Problem Team(char 64),Change Team(char 64),Request Team(char 64), Company(char 128),Department(char 128),Room(char 64),Username (char 64),Status(char128),Criticality(char 64)Purchase Date(datetime),Cost(decimal),Field1(char 256),Field2(char 256),Field3(char 256),Field4(char 256),Field5(char 256),Field6(char 256),Field7(char 256),Field8(char 256),Field9(char 256), Field10(char 256),Field11(char 256),Field12(char256),Field13(char 256),Field14(char 256),Field15(char 256),Field16(char 256),Field17(char 256),Field18(char 256),Field19(char256),Field20(char 256),Notes(CLOB),Relationship Name(char256),Parent Item Number(char 64)The char ### designation in parentheses after each field name signifies what type of data the import utility expects to see in each field. For instance:Item Type (char 128) means that the first name field cannot exceed 128 characters.Fields marked as Unique must be unique in the system.Note the Room details MUST be in the following format: COMPANYDEPARTMENT; Room When creating a .CSV file for a Category, to determine the Field number of a configured Custom Field, within the Category tab of an Item Category select the System defined Ordering option. The field labels will then be listed in sequential order from one to twenty.
3 To import, select the Item Category.The drop-down list consists of all Categories created by the Supervisor in Configuration>Categories.
4 Enter the file location, or use the Browse button.5 Select Upload.
128 Novell Service Desk System Planning, Deployment, and Best Practices Guide

The Field Mapping Wizard appears. Fields that can be mapped to the CSV file are available in the drop-down list.
6 Use the drop-down list to select the fields to be mapped.7 Map all necessary fields with those within the .CSV
Item Number: Unique Item number of the Configuration Item, this can be generated by the system or defined in the .CSV file.
Design Activities 129
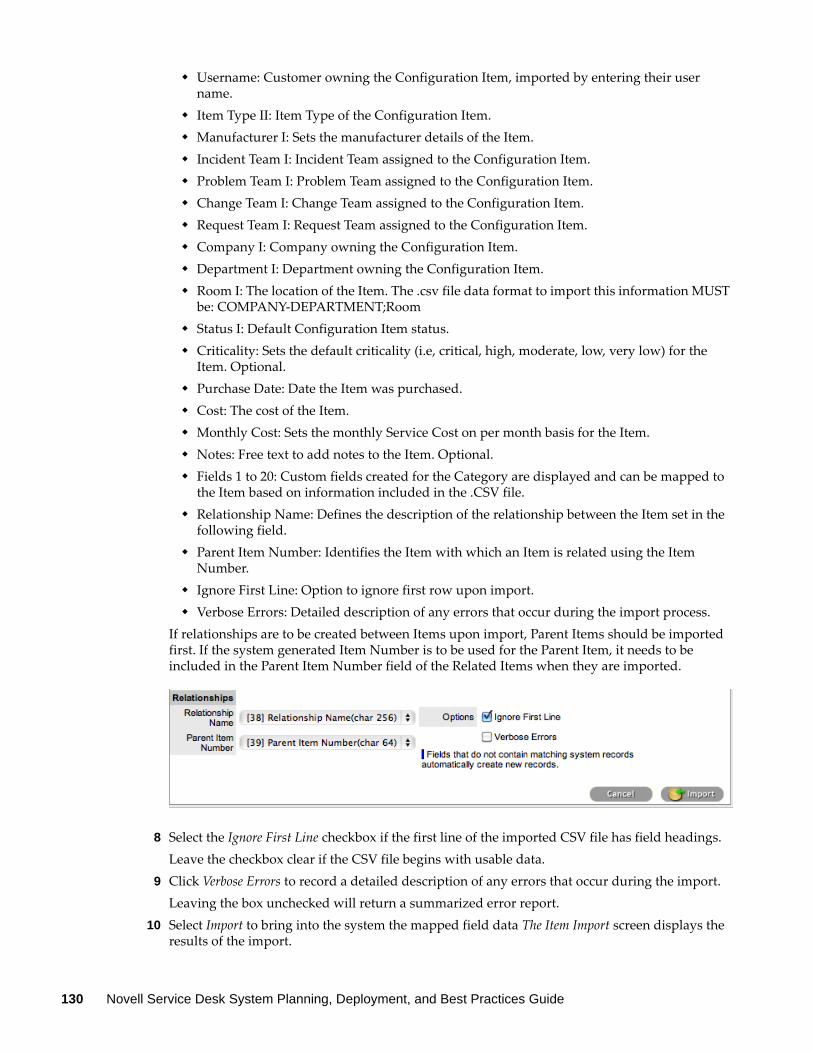
Username: Customer owning the Configuration Item, imported by entering their user name.
Item Type II: Item Type of the Configuration Item. Manufacturer I: Sets the manufacturer details of the Item. Incident Team I: Incident Team assigned to the Configuration Item. Problem Team I: Problem Team assigned to the Configuration Item. Change Team I: Change Team assigned to the Configuration Item. Request Team I: Request Team assigned to the Configuration Item. Company I: Company owning the Configuration Item. Department I: Department owning the Configuration Item. Room I: The location of the Item. The .csv file data format to import this information MUST
be: COMPANY-DEPARTMENT;Room Status I: Default Configuration Item status. Criticality: Sets the default criticality (i.e, critical, high, moderate, low, very low) for the
Item. Optional. Purchase Date: Date the Item was purchased. Cost: The cost of the Item. Monthly Cost: Sets the monthly Service Cost on per month basis for the Item. Notes: Free text to add notes to the Item. Optional. Fields 1 to 20: Custom fields created for the Category are displayed and can be mapped to
the Item based on information included in the .CSV file. Relationship Name: Defines the description of the relationship between the Item set in the
following field. Parent Item Number: Identifies the Item with which an Item is related using the Item
Number. Ignore First Line: Option to ignore first row upon import. Verbose Errors: Detailed description of any errors that occur during the import process.
If relationships are to be created between Items upon import, Parent Items should be imported first. If the system generated Item Number is to be used for the Parent Item, it needs to be included in the Parent Item Number field of the Related Items when they are imported.
8 Select the Ignore First Line checkbox if the first line of the imported CSV file has field headings.Leave the checkbox clear if the CSV file begins with usable data.
9 Click Verbose Errors to record a detailed description of any errors that occur during the import.Leaving the box unchecked will return a summarized error report.
10 Select Import to bring into the system the mapped field data The Item Import screen displays the results of the import.
130 Novell Service Desk System Planning, Deployment, and Best Practices Guide
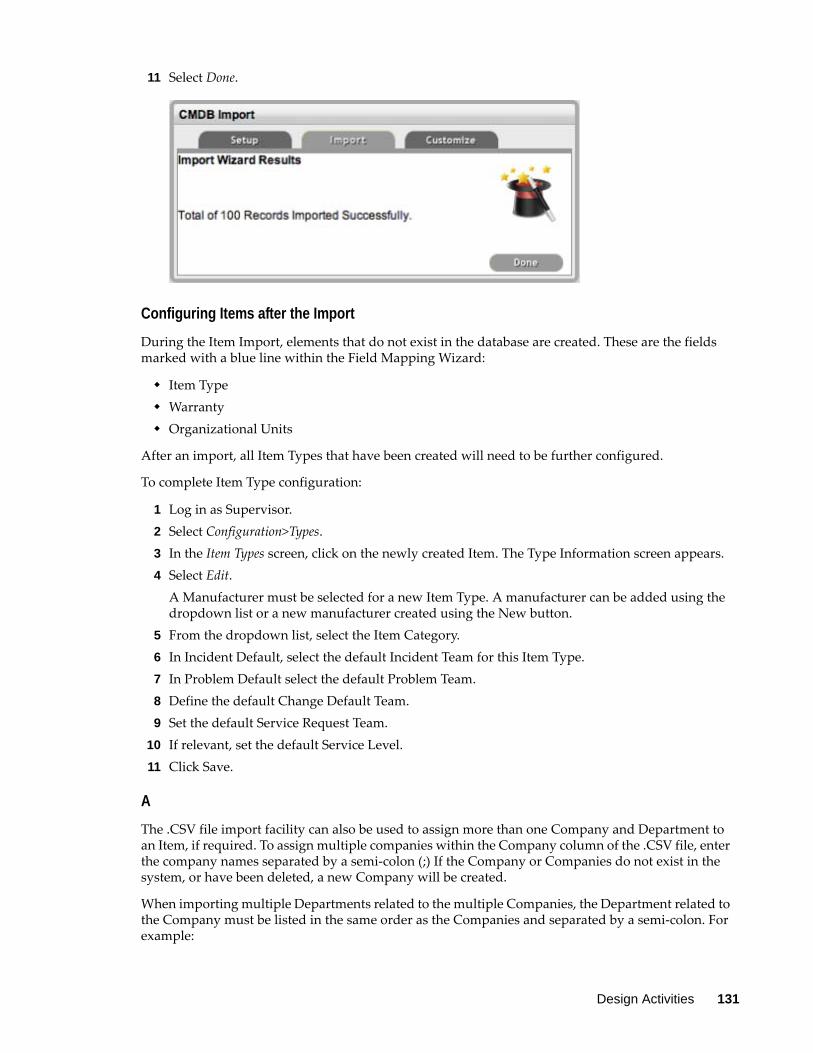
11 Select Done.
Configuring Items after the Import
During the Item Import, elements that do not exist in the database are created. These are the fields marked with a blue line within the Field Mapping Wizard:
Item Type Warranty Organizational Units
After an import, all Item Types that have been created will need to be further configured.
To complete Item Type configuration:
1 Log in as Supervisor.2 Select Configuration>Types.3 In the Item Types screen, click on the newly created Item. The Type Information screen appears.4 Select Edit.
A Manufacturer must be selected for a new Item Type. A manufacturer can be added using the dropdown list or a new manufacturer created using the New button.
5 From the dropdown list, select the Item Category.6 In Incident Default, select the default Incident Team for this Item Type.7 In Problem Default select the default Problem Team.8 Define the default Change Default Team.9 Set the default Service Request Team.
10 If relevant, set the default Service Level.11 Click Save.
A
The .CSV file import facility can also be used to assign more than one Company and Department to an Item, if required. To assign multiple companies within the Company column of the .CSV file, enter the company names separated by a semi-colon (;) If the Company or Companies do not exist in the system, or have been deleted, a new Company will be created.
When importing multiple Departments related to the multiple Companies, the Department related to the Company must be listed in the same order as the Companies and separated by a semi-colon. For example:
Design Activities 131
Company Field: comp1;comp2 Department Field: dept1:depart2 or ;dept2 or dept1; Any departments that do not exist in the database or have been deleted, will be created as a result of the .CSV import.
To assign rooms to one of the locations of this multiple Company/Department assignment, the full details of the Company and Department must be entered into the column followed by a semi-colon and the Room number. An example of the Room import format is:
Company Field:CompName1;CompName2 Department Field:Dept1;Dept2 Room Field: CompName1 - Dept1;Room1
Updating Item Information via .CSV
To easily update multiple Items that already exist within system, information can be imported using a .CSV file. For the update to be successful, the Item number in the .CSV file must match the Item number in the system.
Follow the above Importing Items procedure and ensure the Item Number field is mapped correctly. If an Item Number is not included in the .CSV file, a new Item will be created.
Creating Items
If Items are to be created directly within the system, this is completed in the Configuration>Items tab. An Item Type template is selected for the new Item, which applies all the default information set within the Categories and Types tabs, then ownership of the Item is assigned to the new Item. Ownership can be Everyone (i.e., a Global Item), one or more specific Customers or Organizational Units. The specific attributes of the Item are recorded in the Details tab, and any relationships with other Items in the system can be created within the Relationships tab, now or at some point in the future.
Configuration Items within the system are referred to as Items. Items have multiple connections with other elements throughout the application, these may include Customers, Organizational Units and Service Level Agreements. The table below outlines how Items interact with other system elements:
Customers: Each Item must be assigned to one or more Customers who are the Owners of the Item. This Customer may be Everyone, making the Item a Global Item. Only Item Owners are able to raise requests against an Item.
Service Level Agreements (SLAs): Service Level Agreements can be linked as follows: Per Item Per Customer Per Request or To an Organizational Unit.
Teams: Within Item Types, Default Teams are assigned to Items. When requests are raised for an Item, they will be assigned to the Default Team.
Technicians: Technicians can be associated with Skills based on Items, Item Types and Classifications. When a request is raised with the combination of Item Type and issue Classification, it is assigned to that Technician.
Outages: Where states in the Lifecycle of an Item Type are defined as Off-line, when an Item is in an Off-line state, it will appear in the Outages page.
An Item record consists of the following attributes:
Information Tab Details Tab Costs Tab
132 Novell Service Desk System Planning, Deployment, and Best Practices Guide
Requests Tab Relationships Tab.
Options available within the Items screen, include:
New - Create an Item Search - Search for an Item Bulk - Allows the User to update the ownership of Items in a bulk lot.
Filter views that are available within the Configuration > Items screen include:
All Items: All Items stored within the CMDB, regardless of the assigned Lifecycle State. Hardware Catalog: All Items that use the Hardware Category Template stored within the
CMDB, regardless of the assigned Lifecycle State. Service Catalog: All Items that use the Service Category Template stored within the CMDB that
are in an active Lifecycle State. Service Pipeline: All Items that use the Service Category Template stored within the CMDB that
are assigned a Pre-production Lifecycle State. Service Portfolio: All Items that use the Service Category Template stored within the
CMDB,regardless of the assigned Lifecycle State. Software Catalog: All Items that use the Software Category Template stored within the CMDB,
regardless of the assigned Lifecycle State.
Viewing an Item
Within the Item sub-menu option, Users can view a list of Items created within the system. To view the details of an Item, select the Item Number hyperlink and the Item Information screen is displayed. The Item Information screen includes tabs for the following information:
Attribute details Relevant costs Requests created against the Item Relationships associated with the Item
4.3 Integrating Service Desk with ZENworks Configuration Management Novell Service Desk brings with it a host of new and exciting features. One of these is the ability to leverage the capabilities of Novell ZENworks Configuration Management bundles from within Novell Service Desk’s Web console. For example, Sue from Finance contacts the service desk to request installation of Visio 2010. The service deck technician, Bob, uses the new Bundle Management feature to deliver Visio 2010 to Sue and resolves the call immediately. We can build out from this example to include approvals from Sue’s line manager and even automatic checking of available licenses with initiation of purchasing workflows if required.
This section enables you to achieve an initial integration between the two solutions so that you can start to explore the possibilities. You should try this on a test system, then note your settings and transfer them to your production system when everything is working as you expect.
Design Activities 133
First we need to ensure a few prerequisites are met before continuing:
Section 4.3.1, “Prerequisites,” on page 134 Section 4.3.2, “Switch on Integration within Novell Service Desk,” on page 134 Section 4.3.3, “Telling Novell Service Desk about your ZENworks Configuration Management
System,” on page 136 Section 4.3.4, “Telling ZENworks Configuration Management about your Novell Service Desk
System,” on page 138 Section 4.3.5, “Importing Assets from ZENworks Configuration Management into Novell
Service Desk,” on page 139 Section 4.3.6, “Create Role for Novell Service Desk Users in ZENworks Configuration
Management,” on page 140 Section 4.3.7, “Creating Administrators in ZENworks Configuration Management for Novell
Service Desk Users,” on page 141 Section 4.3.8, “Assigning a Role to Administrator Groups in ZENworks Configuration
Management for Novell Service Desk Users,” on page 141 Section 4.3.9, “Verifying that the Integration Is Working,” on page 142 Section 4.3.10, “Verifying that the Remote Control is working,” on page 143
4.3.1 Prerequisites
Time on the ZENworks Configuration Management primary and Novell Service Desk servers must be within 1 minute of each other. You should use NTP to ensure that time is accurate on the servers. Time drift is a common occurrence in virtual environments.
ZENworks Configuration Management primary and Novell Service Desk servers must be able to resolve each other’s host names to IP addresses.You should use static IP addresses and have entries in your DNS system for these servers.
ZENworks Configuration Management and Novell Service Desk must reference the same LDAP source. This guide presumes that you have already done this in both products.
Devices from ZENworks Configuration Management must be imported into Novell Service Desk’s CMDB to use bundle management capabilities. You will reference one of the standard mapping files (These can be customized, but this is outside of the scope of this document).
4.3.2 Switch on Integration within Novell Service Desk
1 Log in to the Novell Service Desk as a supervisor or administrator.2 Click Setup > Privileges > System.
134 Novell Service Desk System Planning, Deployment, and Best Practices Guide
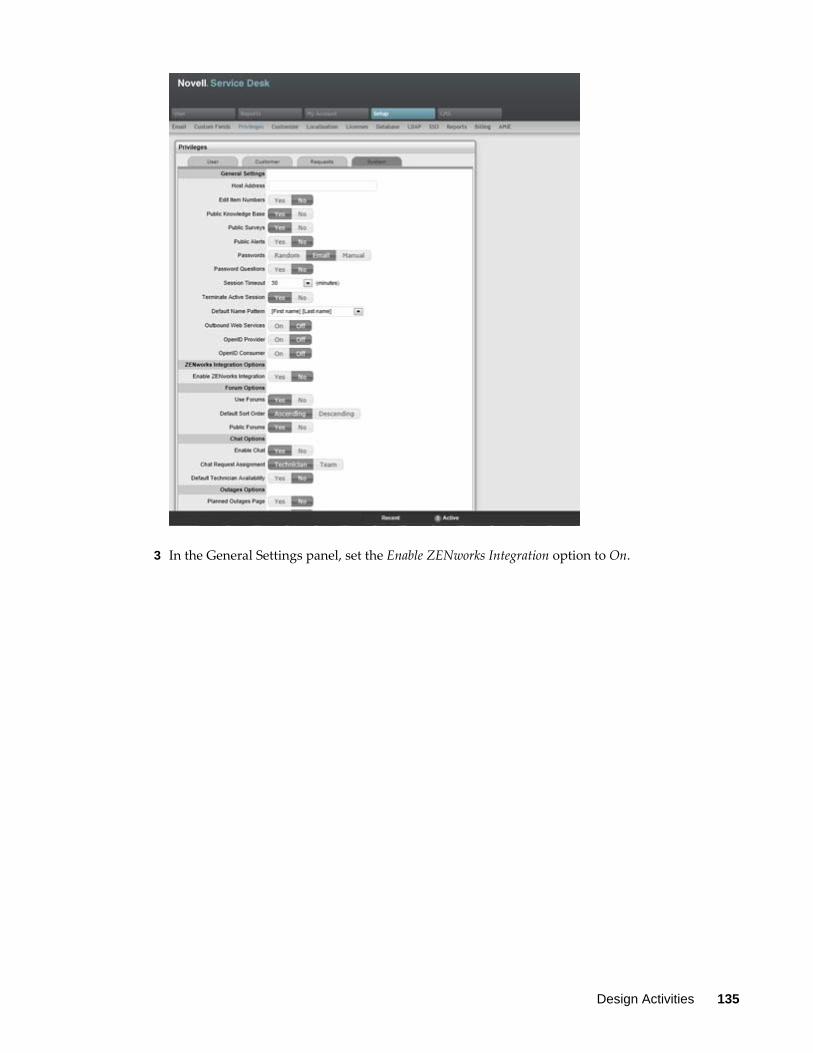
3 In the General Settings panel, set the Enable ZENworks Integration option to On.
Design Activities 135
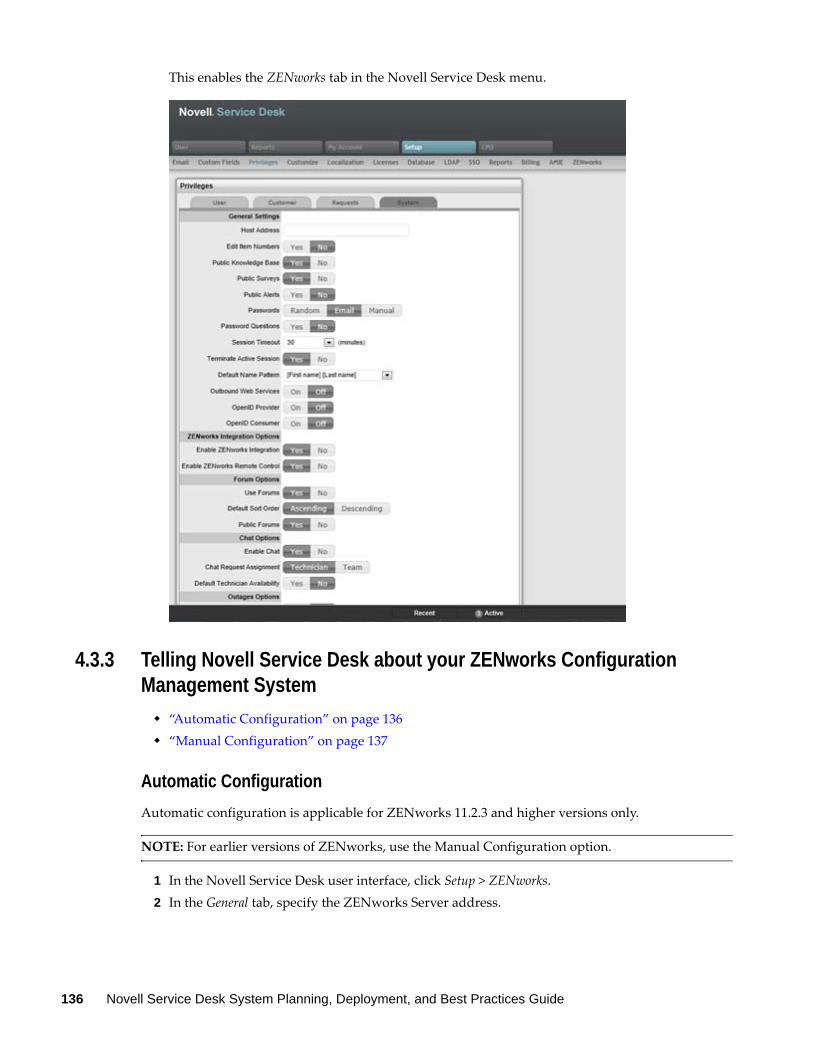
This enables the ZENworks tab in the Novell Service Desk menu.
4.3.3 Telling Novell Service Desk about your ZENworks Configuration Management System
“Automatic Configuration” on page 136 “Manual Configuration” on page 137
Automatic Configuration
Automatic configuration is applicable for ZENworks 11.2.3 and higher versions only.
NOTE: For earlier versions of ZENworks, use the Manual Configuration option.
1 In the Novell Service Desk user interface, click Setup > ZENworks.2 In the General tab, specify the ZENworks Server address.
136 Novell Service Desk System Planning, Deployment, and Best Practices Guide
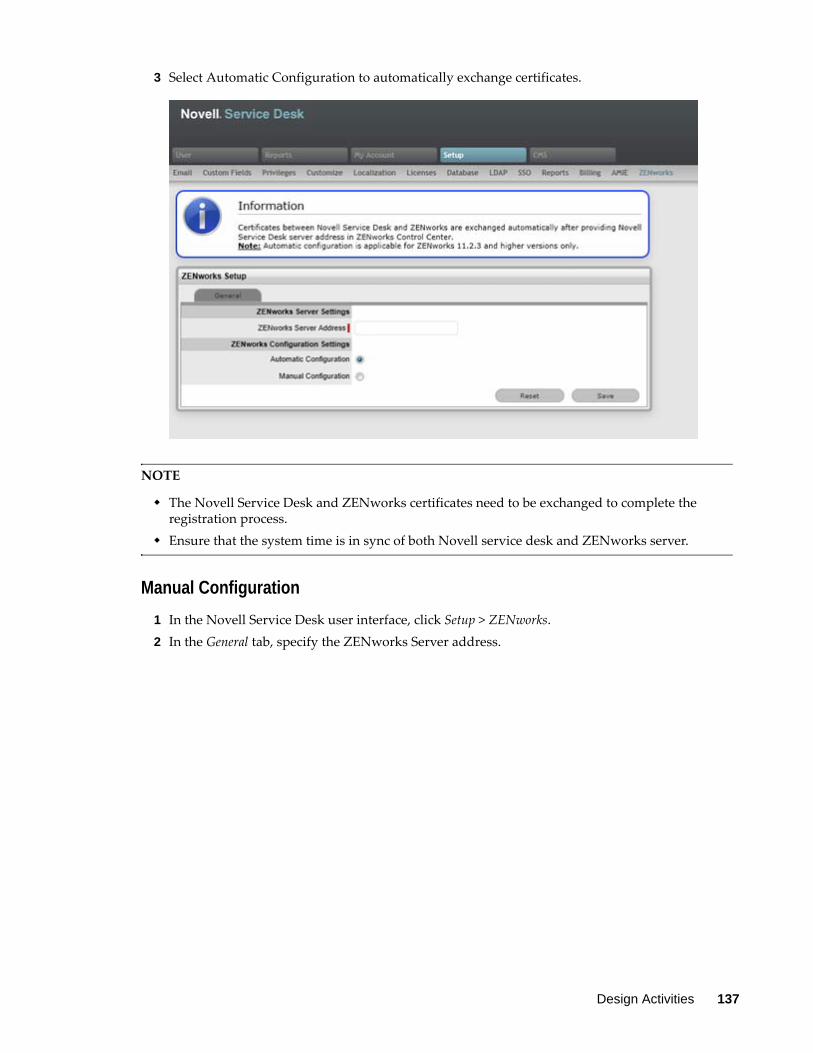
3 Select Automatic Configuration to automatically exchange certificates.
NOTE
The Novell Service Desk and ZENworks certificates need to be exchanged to complete the registration process.
Ensure that the system time is in sync of both Novell service desk and ZENworks server.
Manual Configuration
1 In the Novell Service Desk user interface, click Setup > ZENworks.2 In the General tab, specify the ZENworks Server address.
Design Activities 137
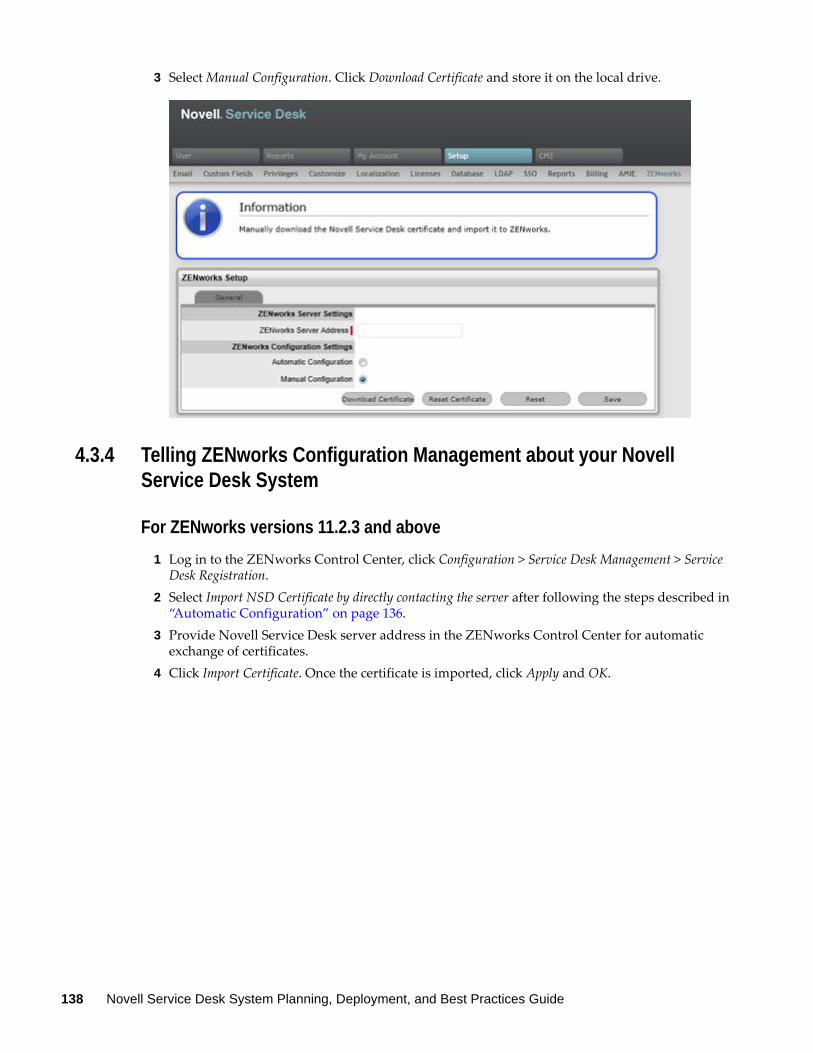
3 Select Manual Configuration. Click Download Certificate and store it on the local drive.
4.3.4 Telling ZENworks Configuration Management about your Novell Service Desk System
For ZENworks versions 11.2.3 and above
1 Log in to the ZENworks Control Center, click Configuration > Service Desk Management > Service Desk Registration.
2 Select Import NSD Certificate by directly contacting the server after following the steps described in “Automatic Configuration” on page 136.
3 Provide Novell Service Desk server address in the ZENworks Control Center for automatic exchange of certificates.
4 Click Import Certificate. Once the certificate is imported, click Apply and OK.
138 Novell Service Desk System Planning, Deployment, and Best Practices Guide
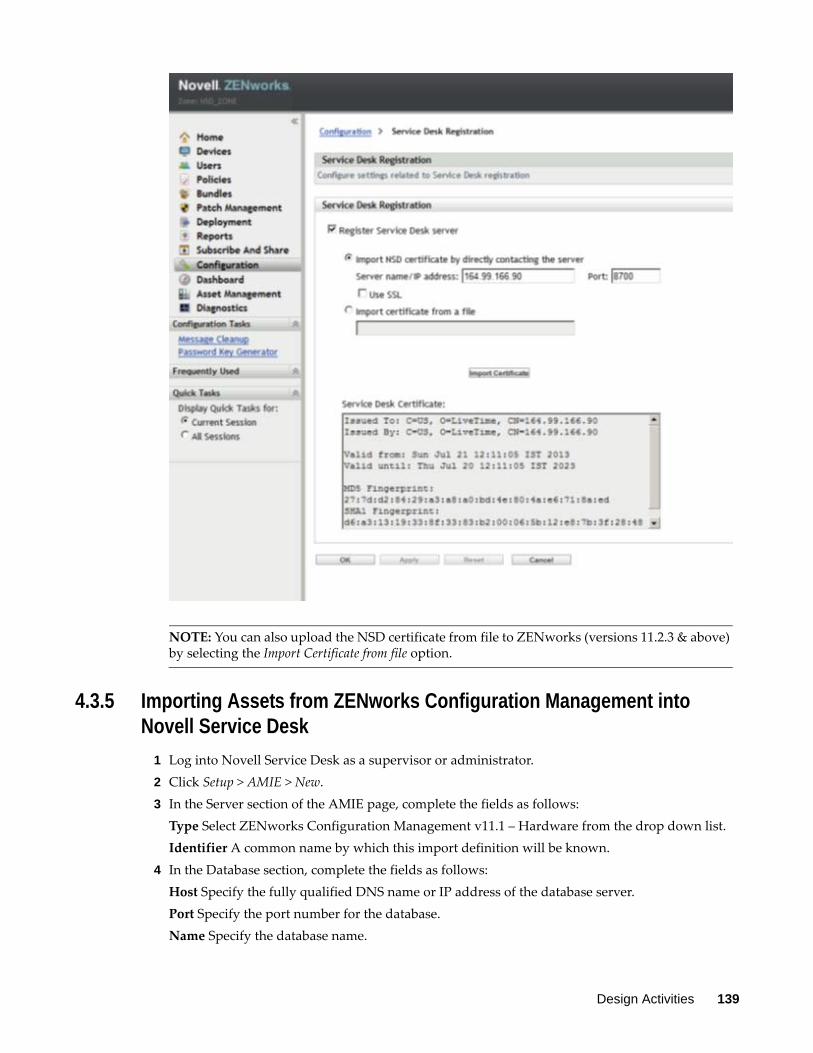
NOTE: You can also upload the NSD certificate from file to ZENworks (versions 11.2.3 & above) by selecting the Import Certificate from file option.
4.3.5 Importing Assets from ZENworks Configuration Management into Novell Service Desk
1 Log into Novell Service Desk as a supervisor or administrator.2 Click Setup > AMIE > New.3 In the Server section of the AMIE page, complete the fields as follows:
Type Select ZENworks Configuration Management v11.1 – Hardware from the drop down list.Identifier A common name by which this import definition will be known.
4 In the Database section, complete the fields as follows:Host Specify the fully qualified DNS name or IP address of the database server.Port Specify the port number for the database.Name Specify the database name.
Design Activities 139
Username Specify the user name.Password Specify the password.Use the password that you configured during the ZENworks Primary Server installation: Schema: Specify the schema type. Depending on the database type, you must specify one of
the following schema types: For MS_SQL: dbo For Oracle: ZENWORKS
Catalog: Depending on the database server, you must specify one of the following catalog names:- For MS_SQL: zenworks_zonename
Replace the zone name with the name of the management zone in which the Primary Server is installed.
For Oracle: ZENWORKS5 Optional: In the Notification section, select whether you want notify technicians for generated
change requests. You can do this only if Control CMS via RFC is also enabled.6 Fill in the fields in the Ownership section:
Unassigned (Import Items as Global) Select this option if the items are to be globally owned if they cannot be linked with a Novell Service Desk customer automatically during the import. This is performed by matching the login names between Novell Service Desk and reported by the items operating system.System User Select this option to assign imported items to the System User. Selected Customer: Select this option to assign imported items to a specific customer.
7 Fill in the fields in the Synchronization section: Auto Create New Items This option is visible only when a single AMIE source is defined within AMIE. Click Yes to automatically create items upon synchronization, relative to the Control CMS via RFC setting in the Setup > Privileges > Requests tab. If the setting is disabled, a snapshot of imported asset information is listed within the Super > Configuration >AMIE Snapshots tab.Frequency Choose a synchronization interval. You can leave this set to Never if the database will be synchronized manually. The synchronization time can vary, depending on the connection speed with the external service and the database size.
8 Click Test to initiate a connection and test the setup.9 Click Save.
10 Click Import to immediately import the asset information from Novell ZENworks Configuration Management into Novell Service Desk. Depending on number of managed / inventoried devices that you have, this might take some time to complete.
4.3.6 Create Role for Novell Service Desk Users in ZENworks Configuration Management
1 Log in to ZENworks Control Center as a administrator or equivalent2 Click Configuration.3 Scroll down to Roles.4 Click New.
140 Novell Service Desk System Planning, Deployment, and Best Practices Guide
5 In Add Role window: Name: NSD bundle management Description: All rights to allow Novell Service Desk users to use bundle management
featuresFor Rights, assign the following: Bundle Rights: Modify Settings and Assign Bundles Device Rights: Modify, Create / Delete and Assign Bundles Quick Task Rights: Refresh ZENworks Adaptive Agent and Install / Launch Bundles User Rights: Modify and Assign Bundles
6 Click Ok.
4.3.7 Creating Administrators in ZENworks Configuration Management for Novell Service Desk Users
1 Log in to ZENworks Control Center as a administrator or equivalent.2 Click Configuration.3 Scroll down to Administrators.4 Click New.5 Choose New Administrator Group.6 In Add new Administrator group.
Administrator Group Name: Link to NSD users Description: ZCC Administrator accounts link to Novell Service Desk users
7 Click Add.8 Explore the user source and choose the groups that Novell Service Desk is using for Supervisors
and Technicians.9 Click Ok.
10 Make that Import user members of each user group as administrators immediately is selected.11 Click Ok.
4.3.8 Assigning a Role to Administrator Groups in ZENworks Configuration Management for Novell Service Desk Users
1 Log in to ZENworks Control Center as a administrator or equivalent.2 Click Configuration.3 Scroll down to Administrators.
For each of the Novell Service Desk related groups imported from the user source complete the following
4 Click the group.5 Click the Rights tab in the group summary page.6 In Assigned Roles, add the NSD bundle management.7 Click Ok.8 In the Add Role Assignment window set the necessary rights.
Design Activities 141
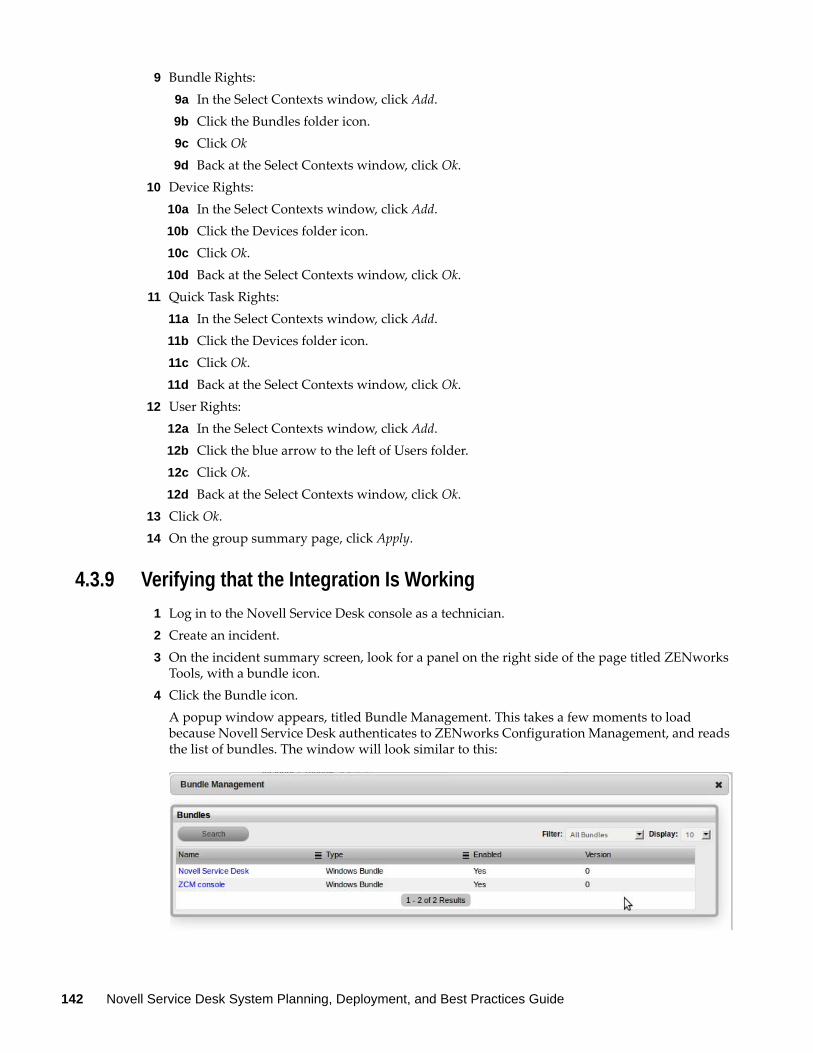
9 Bundle Rights:9a In the Select Contexts window, click Add.9b Click the Bundles folder icon.9c Click Ok9d Back at the Select Contexts window, click Ok.
10 Device Rights:10a In the Select Contexts window, click Add.10b Click the Devices folder icon.10c Click Ok.10d Back at the Select Contexts window, click Ok.
11 Quick Task Rights:11a In the Select Contexts window, click Add.11b Click the Devices folder icon.11c Click Ok.11d Back at the Select Contexts window, click Ok.
12 User Rights:12a In the Select Contexts window, click Add.12b Click the blue arrow to the left of Users folder.12c Click Ok.12d Back at the Select Contexts window, click Ok.
13 Click Ok.14 On the group summary page, click Apply.
4.3.9 Verifying that the Integration Is Working
1 Log in to the Novell Service Desk console as a technician.2 Create an incident.3 On the incident summary screen, look for a panel on the right side of the page titled ZENworks
Tools, with a bundle icon.4 Click the Bundle icon.
A popup window appears, titled Bundle Management. This takes a few moments to load because Novell Service Desk authenticates to ZENworks Configuration Management, and reads the list of bundles. The window will look similar to this:
142 Novell Service Desk System Planning, Deployment, and Best Practices Guide
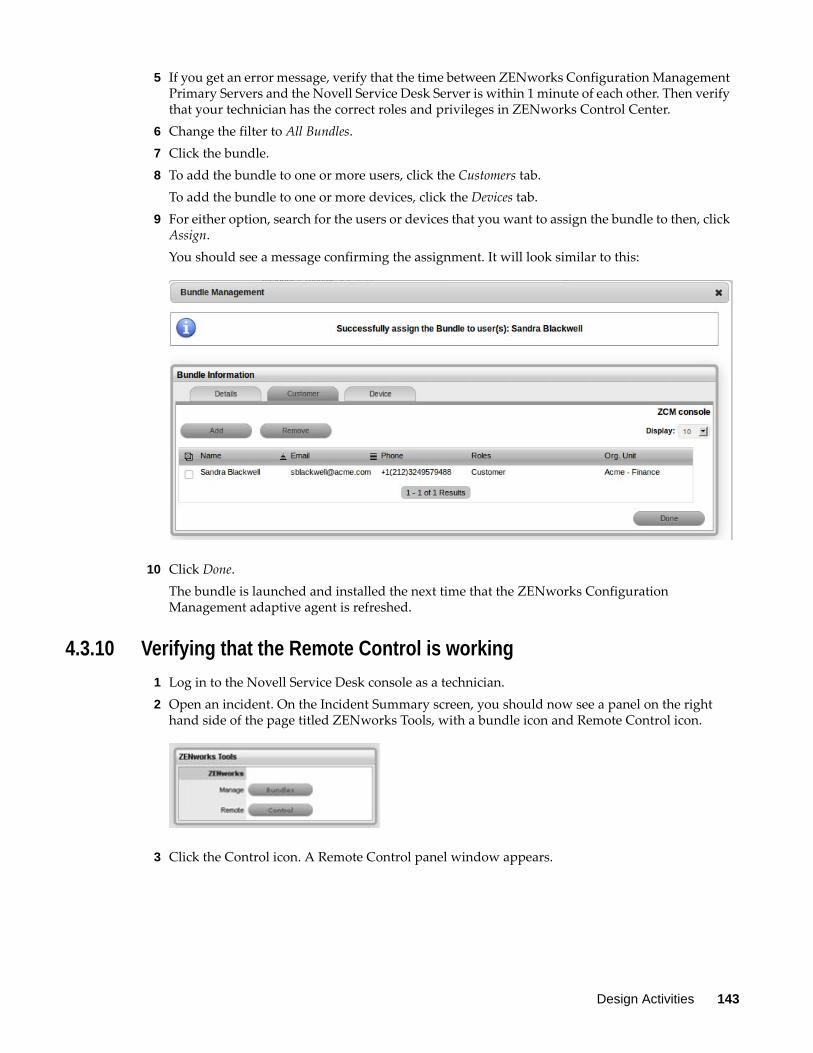
5 If you get an error message, verify that the time between ZENworks Configuration Management Primary Servers and the Novell Service Desk Server is within 1 minute of each other. Then verify that your technician has the correct roles and privileges in ZENworks Control Center.
6 Change the filter to All Bundles.7 Click the bundle.8 To add the bundle to one or more users, click the Customers tab.
To add the bundle to one or more devices, click the Devices tab.9 For either option, search for the users or devices that you want to assign the bundle to then, click
Assign.You should see a message confirming the assignment. It will look similar to this:
10 Click Done.The bundle is launched and installed the next time that the ZENworks Configuration Management adaptive agent is refreshed.
4.3.10 Verifying that the Remote Control is working
1 Log in to the Novell Service Desk console as a technician.2 Open an incident. On the Incident Summary screen, you should now see a panel on the right
hand side of the page titled ZENworks Tools, with a bundle icon and Remote Control icon.
3 Click the Control icon. A Remote Control panel window appears.
Design Activities 143
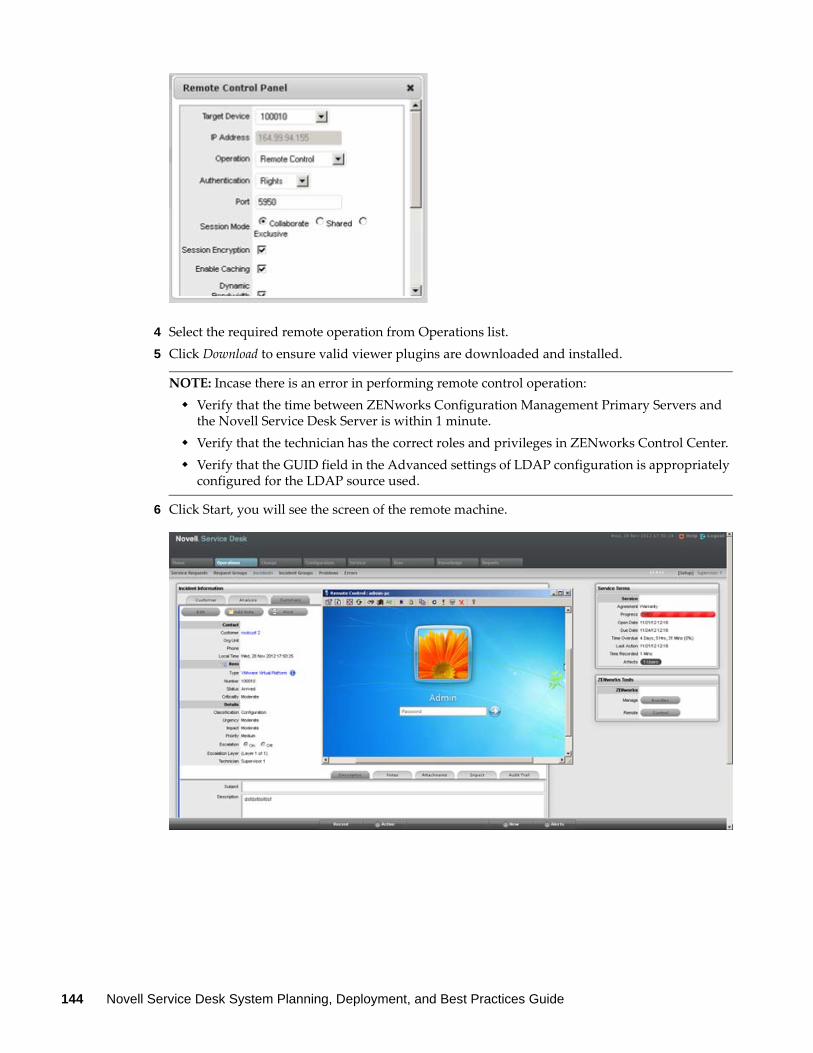
4 Select the required remote operation from Operations list.5 Click Download to ensure valid viewer plugins are downloaded and installed.
NOTE: Incase there is an error in performing remote control operation: Verify that the time between ZENworks Configuration Management Primary Servers and
the Novell Service Desk Server is within 1 minute. Verify that the technician has the correct roles and privileges in ZENworks Control Center. Verify that the GUID field in the Advanced settings of LDAP configuration is appropriately
configured for the LDAP source used.
6 Click Start, you will see the screen of the remote machine.
144 Novell Service Desk System Planning, Deployment, and Best Practices Guide