Embed Size (px)
Citation preview
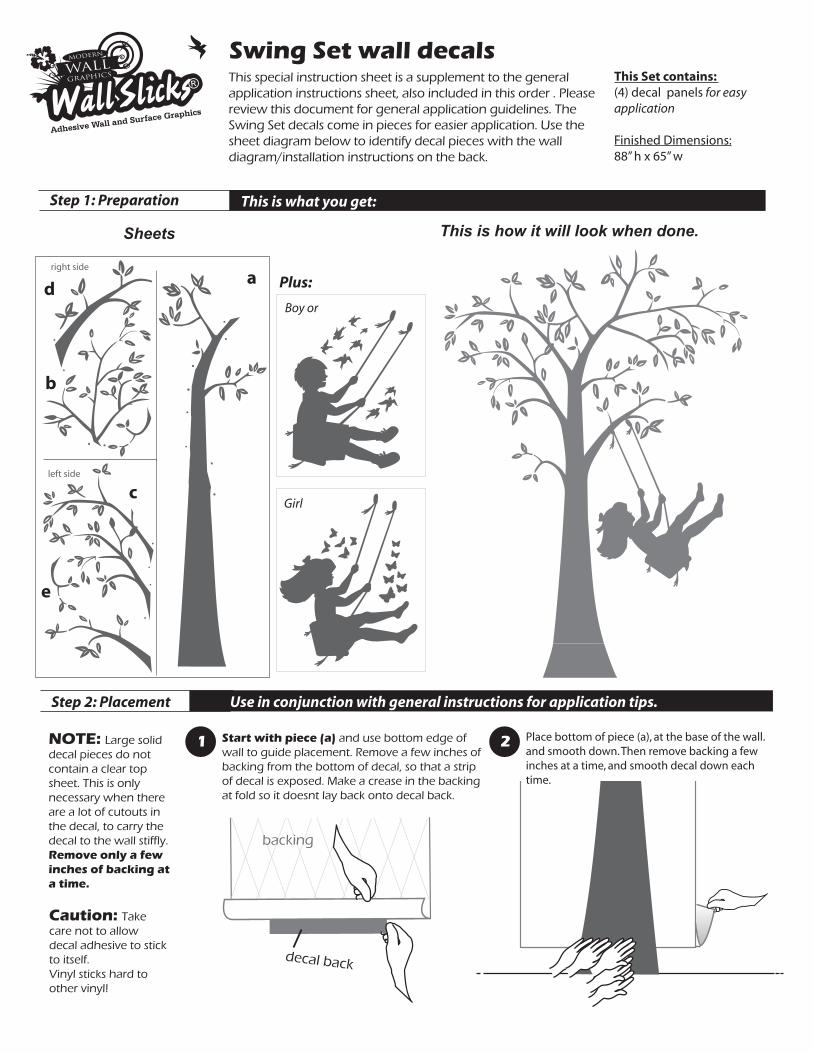
This is how it will look when done. Sheets
This is what you get: Step 1: Preparation
Swing Set wall decalsThis special instruction sheet is a supplement to the general application instructions sheet, also included in this order . Please review this document for general application guidelines. The Swing Set decals come in pieces for easier application. Use the sheet diagram below to identify decal pieces with the wall diagram/installation instructions on the back.
Use in conjunction with general instructions for application tips.Step 2: Placement
NOTE: Large solid decal pieces do not contain a clear top sheet. This is only necessary when there are a lot of cutouts in the decal, to carry the decal to the wall stiffly. Remove only a few inches of backing at a time.
Caution: Take care not to allow decal adhesive to stick to itself. Vinyl sticks hard to other vinyl!
1
This Set contains: (4) decal panels for easy application
Finished Dimensions: 88” h x 65” w
Plus:
Girl
Boy or
a
b
d
e
c
2 Place bottom of piece (a), at the base of the wall. and smooth down. Then remove backing a few inches at a time, and smooth decal down each time.
backing
decal back
Start with piece (a) and use bottom edge of wall to guide placement. Remove a few inches of backing from the bottom of decal, so that a strip of decal is exposed. Make a crease in the backing at fold so it doesnt lay back onto decal back.

2 Place piece (b) as shown, matching up the square shaped alignment dots to achieve the correct positioning. You can also adjust the positioning how you like to achieve the look you want. Overlap edges slightly.
3
4 5
6 7
© Copyright Modern Wall Graphics 2007 Wall Slicks is a Registered Trademark of Modern Wall Graphics. All Rights Reserved.
floor
floorfloor
floorfloor
There are two extra branch pieces that you can use wherever you want.
Bonus!
floor
Place piece (c) as shown, lining up the round alignment dots to achieve the correct positioning. Overlap edges slightly.
Place piece (d) as shown, lining up the star-shaped alignment dots to achieve the correct positioning. Overlap edges slightly.
Place piece (e) how you like (there are no alignment dots for this piece). Overlap edges slightly. Place girl or boy decal piece so that the rope part of
the decal touches the branch part.
zoom
Once the decal is in place, squeegee it down to ensure it is adhered well to the wall, and remove the clear top sheet.