Embed Size (px)
Citation preview

IBM Storwize V7000Version 6.4.1
Troubleshooting, Recovery, andMaintenance Guide
GC27-2291-04
���

NoteBefore using this information and the product it supports, read the general information in “Notices” on page 157, theinformation in the “Safety and environmental notices” on page ix, as well as the information in the IBM EnvironmentalNotices and User Guide , which is provided on a DVD.
This edition applies to IBM Storwize V7000, Version 6.4.1, and to all subsequent releases and modifications untilotherwise indicated in new editions.
This edition replaces GC27-2291-03.
© Copyright IBM Corporation 2010, 2012.US Government Users Restricted Rights – Use, duplication or disclosure restricted by GSA ADP Schedule Contractwith IBM Corp.

Contents
Figures . . . . . . . . . . . . . . . v
Tables . . . . . . . . . . . . . . . vii
Safety and environmental notices . . . ixSound pressure . . . . . . . . . . . . . ix
About this guide . . . . . . . . . . . xiWho should use this guide . . . . . . . . . xiAccessibility . . . . . . . . . . . . . . xiSummary of changes for GC27-2291-04 StorwizeV7000 Troubleshooting, Recovery, and MaintenanceGuide . . . . . . . . . . . . . . . . xiSummary of changes for GC27-2291-03 StorwizeV7000 Troubleshooting, Recovery, and MaintenanceGuide . . . . . . . . . . . . . . . . xiiEmphasis . . . . . . . . . . . . . . . xiiStorwize V7000 library and related publications . . xiiHow to order IBM publications. . . . . . . . xvSending your comments . . . . . . . . . . xv
Chapter 1. Storwize V7000 hardwarecomponents . . . . . . . . . . . . . 1Components in the front of the enclosure . . . . . 2
Drives . . . . . . . . . . . . . . . 2Drive indicators . . . . . . . . . . . . 2Enclosure end cap indicators . . . . . . . . 4
Components in the rear of the enclosure . . . . . 5Power supply unit and battery for the controlenclosure . . . . . . . . . . . . . . 6Power supply unit for the expansion enclosure . . 7Node canister ports and indicators . . . . . . 8Expansion canister ports and indicators . . . . 15
Chapter 2. Best practices fortroubleshooting . . . . . . . . . . . 19Record access information . . . . . . . . . 19Follow power management procedures . . . . . 20Set up event notifications . . . . . . . . . . 20Set up inventory reporting . . . . . . . . . 21Back up your data . . . . . . . . . . . . 21Manage your spare and failed drives . . . . . . 21Resolve alerts in a timely manner . . . . . . . 21Keep your software up to date . . . . . . . . 22Keep your records up to date . . . . . . . . 22Subscribe to support notifications . . . . . . . 22Know your IBM warranty and maintenanceagreement details . . . . . . . . . . . . 22
Chapter 3. Understanding the StorwizeV7000 battery operation for the controlenclosure . . . . . . . . . . . . . 25Maintenance discharge cycles . . . . . . . . 26
Chapter 4. Understanding the mediumerrors and bad blocks . . . . . . . . 29
Chapter 5. Storwize V7000 userinterfaces for servicing your system . . 31Management GUI interface . . . . . . . . . 31
When to use the management GUI . . . . . 32Accessing the management GUI . . . . . . 32
Service assistant interface . . . . . . . . . . 33When to use the service assistant . . . . . . 33Accessing the service assistant . . . . . . . 34
Cluster (system) command-line interface. . . . . 35When to use the cluster (system) CLI . . . . . 35Accessing the cluster (system) CLI. . . . . . 35
Service command-line interface . . . . . . . . 35When to use the service CLI . . . . . . . . 36Accessing the service CLI. . . . . . . . . 36
USB flash drive and Initialization tool interface . . 36When to use the USB flash drive . . . . . . 36Using a USB flash drive . . . . . . . . . 36Using the initialization tool . . . . . . . . 37satask.txt commands . . . . . . . . . . 38
Chapter 6. Resolving a problem . . . . 43Start here: Use the management GUI recommendedactions . . . . . . . . . . . . . . . . 43Problem: Management IP address unknown . . . 44Problem: Unable to connect to the management GUI 44Problem: Unable to log on to the management GUI 45Problem: Cannot create a clustered storage system 46Problem: Node canister service IP address unknown 46Problem: Cannot connect to the service assistant . . 47Problem: Management GUI or service assistant doesnot display correctly . . . . . . . . . . . 48Problem: A node canister has a location node error 48Problem: SAS cabling not valid . . . . . . . . 49Problem: New expansion enclosure not detected . . 49Problem: Control enclosure not detected . . . . . 50Problem: Mirrored volume copies no longeridentical . . . . . . . . . . . . . . . 50Problem: Command file not processed from USBflash drive . . . . . . . . . . . . . . . 50Procedure: Resetting superuser password . . . . 51Procedure: Identifying which enclosure or canisterto service . . . . . . . . . . . . . . . 51Procedure: Checking the status of your system . . 52Procedure: Getting node canister and systeminformation using the service assistant . . . . . 53Procedure: Getting node canister and systeminformation using a USB flash drive . . . . . . 53Procedure: Understanding the system status usingthe LEDs . . . . . . . . . . . . . . . 54Procedure: Finding the status of the Ethernetconnections . . . . . . . . . . . . . . 59
© Copyright IBM Corp. 2010, 2012 iii
||
||
|||||

Procedure: Removing system data from a nodecanister . . . . . . . . . . . . . . . . 59Procedure: Deleting a system completely . . . . 60Procedure: Fixing node errors . . . . . . . . 60Procedure: Changing the service IP address of anode canister . . . . . . . . . . . . . . 61Procedure: Initializing a clustered system with aUSB flash drive without using the initialization tool . 62Procedure: Initializing a clustered system using theservice assistant . . . . . . . . . . . . . 63Procedure: Accessing a canister using a directlyattached Ethernet cable . . . . . . . . . . 64Procedure: Reseating a node canister . . . . . . 65Procedure: Powering off your system . . . . . . 65Procedure: Collecting information for support . . . 66Procedure: Rescuing node canister software fromanother node (node rescue) . . . . . . . . . 67Procedure: FCoE host-link . . . . . . . . . 67SAN problem determination. . . . . . . . . 68Fibre Channel link failures . . . . . . . . . 68Servicing storage systems. . . . . . . . . . 69
Chapter 7. Recovery procedures. . . . 71Recover system procedure . . . . . . . . . 71
When to run the recover system procedure . . . 72Fix hardware errors. . . . . . . . . . . 74Removing system information for node canisterswith error code 550 or error code 578 using theservice assistant . . . . . . . . . . . . 74Performing system recovery using the serviceassistant . . . . . . . . . . . . . . 74Recovering from offline VDisks using the CLI . . 76What to check after running the system recovery 77
Backing up and restoring the system configuration 78Backing up the system configuration using theCLI . . . . . . . . . . . . . . . . 79Restoring the system configuration . . . . . 81Deleting backup configuration files using the CLI 84
Chapter 8. Removing and replacingparts . . . . . . . . . . . . . . . 85Preparing to remove and replace parts . . . . . 85Replacing a node canister. . . . . . . . . . 85Replacing an expansion canister . . . . . . . 87Replacing an SFP transceiver . . . . . . . . 89Replacing a power supply unit for a controlenclosure . . . . . . . . . . . . . . . 91Replacing a power supply unit for an expansionenclosure . . . . . . . . . . . . . . . 94Replacing a battery in a power supply unit . . . . 98Releasing the cable retention bracket . . . . . 102Replacing a 3.5" drive assembly or blank carrier 102Replacing a 2.5" drive assembly or blank carrier 104Replacing enclosure end caps . . . . . . . . 106
Replacing a SAS cable . . . . . . . . . . 106Replacing a control enclosure chassis . . . . . 107Replacing an expansion enclosure chassis . . . . 112Replacing the support rails . . . . . . . . . 115Storwize V7000 replaceable units . . . . . . . 116
Chapter 9. Event reporting . . . . . . 119Understanding events . . . . . . . . . . 119
Viewing the event log . . . . . . . . . 119Managing the event log . . . . . . . . . 120Describing the fields in the event log . . . . 120
Event notifications. . . . . . . . . . . . 121Power-on self-test . . . . . . . . . . . . 121Understanding the error codes . . . . . . . 122
Event IDs . . . . . . . . . . . . . 122Error event IDs and error codes . . . . . . 126Node error code overview . . . . . . . . 137Clustered-system code overview . . . . . . 138Error code range . . . . . . . . . . . 138
Appendix. Accessibility features forIBM Storwize V7000 . . . . . . . . . 155
Notices . . . . . . . . . . . . . . 157Trademarks . . . . . . . . . . . . . . 159Electronic emission notices . . . . . . . . . 159
Federal Communications Commission (FCC)statement. . . . . . . . . . . . . . 159Industry Canada compliance statement . . . . 160Avis de conformité à la réglementationd'Industrie Canada . . . . . . . . . . 160Australia and New Zealand Class A Statement 160European Union Electromagnetic CompatibilityDirective . . . . . . . . . . . . . . 160Germany Electromagnetic compatibilitydirective . . . . . . . . . . . . . . 161Japan VCCI Council Class A statement . . . . 162People's Republic of China Class A ElectronicEmission Statement . . . . . . . . . . 162International Electrotechnical Commission (IEC)statement. . . . . . . . . . . . . . 162United Kingdom telecommunicationsrequirements . . . . . . . . . . . . 162Korean Communications Commission (KCC)Class A Statement . . . . . . . . . . . 162Russia Electromagnetic Interference (EMI) ClassA Statement . . . . . . . . . . . . . 163Taiwan Class A compliance statement . . . . 163
European Contact Information. . . . . . . . 163Taiwan Contact Information . . . . . . . . 163
Index . . . . . . . . . . . . . . . 165
iv Storwize V7000: Troubleshooting, Recovery, and Maintenance Guide
||

Figures
1. 12 drives on either 2076-112 or 2076-312 . . . 22. 24 drives on either 2076-124 or 2076-324 . . . 23. LED indicators on a single 3.5" drive . . . . 34. LED indicators on a single 2.5" drive . . . . 35. 12 drives and two end caps . . . . . . . 46. Left enclosure end cap . . . . . . . . . 47. Rear view of a model 2076-112 or a model
2076-124 control enclosure . . . . . . . . 58. Rear view of a model 2076-312 or a model
2076-324 control enclosure . . . . . . . . 69. Rear view of a model 2076-212 or a model
2076-224 expansion enclosure . . . . . . . 610. LEDs on the power supply units of the control
enclosure. . . . . . . . . . . . . . 711. LEDs on the power supply units of the
expansion enclosure . . . . . . . . . . 812. Fibre Channel ports on the node canisters 913. LEDs on the Fibre Channel ports . . . . . . 914. USB ports on the node canisters. . . . . . 1115. Ethernet ports on the 2076-112 and 2076-124
node canisters. . . . . . . . . . . . 1216. 10 Gbps Ethernet ports on the 2076-312 and
2076-324 node canisters . . . . . . . . 1217. SAS ports on the node canisters. . . . . . 1318. LEDs on the node canisters . . . . . . . 1419. SAS ports and LEDs in rear of expansion
enclosure . . . . . . . . . . . . . 16
20. LEDs on the expansion canisters . . . . . 1721. LEDs on the power supply units of the control
enclosure . . . . . . . . . . . . . 5522. LEDs on the node canisters . . . . . . . 5723. LEDs on the node canisters . . . . . . . 6624. Rear of node canisters that shows the handles. 8625. Removing the canister from the enclosure 8726. Rear of expansion canisters that shows the
handles.. . . . . . . . . . . . . . 8827. Removing the canister from the enclosure 8928. SFP transceiver . . . . . . . . . . . 9029. Directions for lifting the handle on the power
supply unit . . . . . . . . . . . . 9330. Using the handle to remove a power supply
unit . . . . . . . . . . . . . . . 9331. Directions for lifting the handle on the power
supply unit . . . . . . . . . . . . 9732. Using the handle to remove a power supply
unit . . . . . . . . . . . . . . . 9733. Removing the battery from the control
enclosure power-supply unit . . . . . . 10134. Unlocking the 3.5" drive . . . . . . . . 10335. Removing the 3.5" drive . . . . . . . . 10436. Unlocking the 2.5" drive . . . . . . . . 10537. Removing the 2.5" drive . . . . . . . . 10538. SAS cable . . . . . . . . . . . . . 10739. Removing a rail assembly from a rack cabinet 116
© Copyright IBM Corp. 2010, 2012 v

vi Storwize V7000: Troubleshooting, Recovery, and Maintenance Guide

Tables
1. Storwize V7000 library . . . . . . . . xiii2. Other IBM publications . . . . . . . . xiv3. IBM documentation and related websites xv4. Drive LEDs . . . . . . . . . . . . . 35. LED descriptions . . . . . . . . . . . 56. Power supply unit LEDs in the rear of the
control enclosure . . . . . . . . . . . 77. Power supply unit LEDs in the rear of the
expansion enclosure . . . . . . . . . . 88. Fibre Channel port LED locations on canister 1 109. Fibre Channel port LED status descriptions 10
10. 1 Gbps Ethernet port LEDs . . . . . . . 1211. 10 Gbps Ethernet port LEDs . . . . . . . 1312. SAS port LEDs on the node canister . . . . 1313. Node canister LEDs . . . . . . . . . . 14
14. SAS port LEDs on the expansion canister 1615. Expansion canister LEDs . . . . . . . . 1716. Access information for your system . . . . 1917. Bad block errors . . . . . . . . . . . 2918. Power-supply unit LEDs . . . . . . . . 5519. Power LEDs . . . . . . . . . . . . 5620. System status and fault LEDs . . . . . . 5721. Control enclosure battery LEDs . . . . . . 5822. Replaceable units . . . . . . . . . . 11723. Description of data fields for the event log 12024. Notification levels . . . . . . . . . . 12125. Informational events . . . . . . . . . 12226. Error event IDs and error codes . . . . . 12627. Message classification number range 138
© Copyright IBM Corp. 2010, 2012 vii

viii Storwize V7000: Troubleshooting, Recovery, and Maintenance Guide

Safety and environmental notices
Review the multilingual safety notices for the IBM® Storwize® V7000 system beforeyou install and use the product.
Suitability for telecommunication environment: This product is not intended toconnect directly or indirectly by any means whatsoever to interfaces of publictelecommunications networks.
To find the translated text for a caution or danger notice:1. Look for the identification number at the end of each caution notice or each
danger notice. In the following examples, the numbers (C001) and (D002) arethe identification numbers.CAUTION:A caution notice indicates the presence of a hazard that has the potential ofcausing moderate or minor personal injury. (C001)
DANGER
A danger notice indicates the presence of a hazard that has the potentialof causing death or serious personal injury. (D002)
2. Locate IBM Storwize V7000 Safety Notices with the user publications that wereprovided with the Storwize V7000 hardware.
3. Find the matching identification number in the IBM Storwize V7000 SafetyNotices. Then review the topics concerning the safety notices to ensure that youare in compliance.
4. Optionally, read the multilingual safety instructions on the Storwize V7000website. Go to www.ibm.com/storage/support/storwize/v7000 and click thedocumentation link.
Sound pressureAttention: Depending on local conditions, the sound pressure can exceed 85dB(A) during service operations. In such cases, wear appropriate hearingprotection.
© Copyright IBM Corp. 2010, 2012 ix

x Storwize V7000: Troubleshooting, Recovery, and Maintenance Guide

About this guide
This guide describes how to service, maintain, and troubleshoot the IBM StorwizeV7000.
The chapters that follow introduce you to the hardware components and to thetools that assist you in troubleshooting and servicing the Storwize V7000, such asthe management GUI and the service assistant.
The troubleshooting procedures can help you analyze failures that occur in aStorwize V7000 system. With these procedures, you can isolate the componentsthat fail.
You are also provided with step-by-step procedures to remove and replace parts.
Who should use this guideThis guide is intended for system administrators who use and diagnose problemswith the Storwize V7000.
AccessibilityIBM has a long-standing commitment to people with disabilities. In keeping withthat commitment to accessibility, IBM strongly supports the U.S. Federalgovernment's use of accessibility as a criterion in the procurement of ElectronicInformation Technology (EIT).
IBM strives to provide products with usable access for everyone, regardless of ageor ability.
This product uses standard Windows navigation keys.
For more information, see “Accessibility features for IBM Storwize V7000,” on page155.
Summary of changes for GC27-2291-04 Storwize V7000Troubleshooting, Recovery, and Maintenance Guide
The summary of changes provides a list of new and changed information since thelast version of the guide.
New information
This topic describes the changes to this guide since the previous edition,GC27-2291-03. The following sections summarize the changes that have since beenimplemented from the previous version.
This version includes the following new information:v Backing up and restoring the system configuration
© Copyright IBM Corp. 2010, 2012 xi

Summary of changes for GC27-2291-03 Storwize V7000Troubleshooting, Recovery, and Maintenance Guide
The summary of changes provides a list of new and changed information since thelast version of the guide.
New information
This topic describes the changes to this guide since the previous edition,GC27-2291-02. The following sections summarize the changes that have since beenimplemented from the previous version.
This version includes the following new information:v Fibre Channel over Ethernet
Changed information
This version does not include any changed information.
EmphasisDifferent typefaces are used in this guide to show emphasis.
The following typefaces are used to show emphasis:
Boldface Text in boldface represents menu items.
Bold monospace Text in bold monospace represents commandnames.
Italics Text in italics is used to emphasize a word.In command syntax, it is used for variablesfor which you supply actual values, such asa default directory or the name of a system.
Monospace Text in monospace identifies the data orcommands that you type, samples ofcommand output, examples of program codeor messages from the system, or names ofcommand flags, parameters, arguments, andname-value pairs.
Storwize V7000 library and related publicationsProduct manuals, other publications, and websites contain information that relatesto Storwize V7000.
Storwize V7000 Information Center
The IBM Storwize V7000 Information Center contains all of the information that isrequired to install, configure, and manage the Storwize V7000. The informationcenter is updated between Storwize V7000 product releases to provide the mostcurrent documentation. The information center is available at the followingwebsite:
publib.boulder.ibm.com/infocenter/storwize/ic/index.jsp
xii Storwize V7000: Troubleshooting, Recovery, and Maintenance Guide

Storwize V7000 library
Unless otherwise noted, the publications in the Storwize V7000 library areavailable in Adobe portable document format (PDF) from the following website:
www.ibm.com/storage/support/storwize/v7000
Each of the PDF publications in Table 1 is available in this information center byclicking the number in the “Order number” column:
Table 1. Storwize V7000 library
Title Description Order number
IBM Storwize V7000 QuickInstallation Guide
This guide providesinstructions for unpackingyour shipping order andinstalling your system. Thefirst of three chaptersdescribes verifying yourorder, becoming familiarwith the hardwarecomponents, and meetingenvironmental requirements.The second chapter describesinstalling the hardware andattaching data cables andpower cords. The lastchapter describes accessingthe management GUI toinitially configure yoursystem.
GC27-2290
IBM Storwize V7000Expansion EnclosureInstallation Guide, Machinetype 2076
This guide providesinstructions for unpackingyour shipping order andinstalling the 2076 expansionenclosure for the StorwizeV7000 system.
IBM Storwize V7000Troubleshooting, Recovery, andMaintenance Guide
This guide describes how toservice, maintain, andtroubleshoot the StorwizeV7000 system.
GC27-2291
IBM Storwize V7000 CIMAgent Developer's Guide
This guide describes theconcepts of the CommonInformation Model (CIM)environment. Proceduresdescribe such tasks as usingthe CIM agent object classinstances to complete basicstorage configuration tasks,establishing new CopyServices relationships, andperforming CIM agentmaintenance and diagnostictasks.
GC27-2292
About this guide xiii

Table 1. Storwize V7000 library (continued)
Title Description Order number
IBM Systems Safety Notices This guide containstranslated caution anddanger statements. Eachcaution and dangerstatement in the StorwizeV7000 documentation has anumber that you can use tolocate the correspondingstatement in your languagein the IBM Systems SafetyNotices document.
G229-9054
IBM Storwize V7000 ReadFirst Flyer
This document introducesthe major components of theStorwize V7000 system anddescribes how to get startedwith the IBM Storwize V7000Quick Installation Guide.
GC27-2293
IBM System Storage SANVolume Controller and IBMStorwize V7000 Command-LineInterface User's Guide
This guide describes thecommands that you can usefrom the Storwize V7000command-line interface(CLI).
GC27-2287
IBM Statement of LimitedWarranty (2145 and 2076)
This multilingual documentprovides information aboutthe IBM warranty formachine types 2145 and2076.
Part number: 4377322
IBM License Agreement forMachine Code
This multilingual guidecontains the LicenseAgreement for MachineCode for the Storwize V7000product.
SC28-6872 (containsZ125-5468)
Other IBM publications
Table 2 lists IBM publications that contain information related to the StorwizeV7000.
Table 2. Other IBM publications
Title Description Order number
IBM Storage ManagementPack for Microsoft SystemCenter Operations ManagerUser Guide
This guide describes how toinstall, configure, and use theIBM Storage Management Packfor Microsoft System CenterOperations Manager (SCOM).
GC27-3909
publibfp.dhe.ibm.com/epubs/pdf/c2739092.pdf
IBM Storage ManagementConsole for VMware vCenter,version 3.0.0, User Guide
This publication describes how toinstall, configure, and use theIBM Storage ManagementConsole for VMware vCenter,which enables Storwize V7000and other IBM storage systems tobe integrated in VMware vCenterenvironments.
GA32-0929
publibfp.dhe.ibm.com/epubs/pdf/a3209295.pdf
xiv Storwize V7000: Troubleshooting, Recovery, and Maintenance Guide

IBM documentation and related websites
Table 3 lists websites that provide publications and other information about theStorwize V7000 or related products or technologies.
Table 3. IBM documentation and related websites
Website Address
Support for Storwize V7000 (2076) www.ibm.com/storage/support/storwize/v7000
Support for IBM System Storage®
and IBM TotalStorage productswww.ibm.com/storage/support/
IBM Publications Center www.ibm.com/e-business/linkweb/publications/servlet/pbi.wss
IBM Redbooks® publications www.redbooks.ibm.com/
Related accessibility information
To view a PDF file, you need Adobe Acrobat Reader, which can be downloadedfrom the Adobe website:
www.adobe.com/support/downloads/main.html
How to order IBM publicationsThe IBM Publications Center is a worldwide central repository for IBM productpublications and marketing material.
The IBM Publications Center offers customized search functions to help you findthe publications that you need. Some publications are available for you to view ordownload at no charge. You can also order publications. The publications centerdisplays prices in your local currency. You can access the IBM Publications Centerthrough the following website:
www.ibm.com/e-business/linkweb/publications/servlet/pbi.wss
Sending your commentsYour feedback is important in helping to provide the most accurate and highestquality information.
To submit any comments about this book or any other Storwize V7000documentation:v Go to the feedback page on the website for the Storwize V7000 Information
Center at publib.boulder.ibm.com/infocenter/storwize/ic/index.jsp?topic=/com.ibm.storwize v7000.doc/feedback.htm. There you can use the feedback pageto enter and submit comments or browse to the topic and use the feedback linkin the running footer of that page to identify the topic for which you have acomment.
v Send your comments by email to [email protected]. Include the followinginformation for this publication or use suitable replacements for the publicationtitle and form number for the publication on which you are commenting:– Publication title: IBM Storwize V7000 Troubleshooting, Recovery, and Maintenance
Guide
– Publication form number: GC27-2291-02
About this guide xv

– Page, table, or illustration numbers that you are commenting on– A detailed description of any information that should be changed
xvi Storwize V7000: Troubleshooting, Recovery, and Maintenance Guide

Chapter 1. Storwize V7000 hardware components
A Storwize V7000 system consists of one or more machine type 2076 rack-mountedenclosures.
There are several model types. The main differences among the model types arethe following items:v The number of drives that an enclosure can hold. Drives are located on the front
of the enclosure. An enclosure can hold up to 12 3.5-inch drives or up to 242.5-inch drives.
v Whether the model is a control enclosure or an expansion enclosure.Control enclosures contain the main processing units that control the wholesystem. They are where external systems, such as host application servers, otherstorage systems, and management workstations are connected through theEthernet ports or Fibre Channel ports. Control enclosures can also be connectedto expansion enclosures through the serial-attached SCSI (SAS) ports.Expansion enclosures contain additional storage capacity. Expansion enclosuresconnect either to control enclosures or to other expansion enclosures through theSAS ports.
v If the control enclosure has either 1 Gbps Ethernet capability or 10 GbpsEthernet capability.
These are the control enclosure models:v Machine type and model 2076-112, which can hold up to 12 3.5-inch drivesv Machine type and model 2076-124, which can hold up to 24 2.5-inch drivesv Machine type and model 2076-312, which can hold up to 12 3.5-inch drives and
includes 10 Gbps Ethernet capabilityv Machine type and model 2076-324, which can hold up to 24 2.5-inch drives and
includes 10 Gbps Ethernet capability
These are the expansion enclosure models:v Machine type and model 2076-212, which can hold up to 12 3.5-inch drivesv Machine type and model 2076-224, which can hold up to 24 2.5-inch drives
The machine type and model (MTM) are shown on these labels that are located onthe front and the rear of each enclosure:v The left end cap on the front of the enclosure. The label also indicates if the
enclosure is a control enclosure or an expansion enclosure.v The rear of the left enclosure flange.
© Copyright IBM Corp. 2010, 2012 1

Note: The labels also show the enclosure serial number. You must know the serialnumber when you contact IBM support.
Because of the differences between the enclosures, you must be able to distinguishbetween the control enclosures and the expansion enclosures when you service thesystem. Be aware of the following differences:v The model type that is shown on the labels.v The model description that is shown on the left end cap.v The number of ports at the rear of the enclosure. Control enclosures have
Ethernet ports, Fibre Channel ports, and USB ports. Expansion enclosures do nothave any of these ports.
Components in the front of the enclosureThis topic describes the components in the front of the enclosure.
DrivesAn enclosure can hold up to twelve 3.5 in. (8.89 cm) drives or up to twenty-four2.5 in. (6.35 cm) drives.
The drives are located in the front of the enclosure. The 12 drives are mountedhorizontally in four columns with three rows.
The 24 drives are mounted vertically in one row.
Note: The drive slots cannot be empty. A drive assembly or blank carrier must bein each slot.
Figure 1 shows 12 drives, and Figure 2 shows 24 drives.
Drive indicatorsThe drives have two LED indicators each. They have no controls or connectors.
The LED color is the same for both drives. The LEDs for the 3.5-inch drives areplaced vertically above and below each other. The LEDs for the 2.5-inch drives areplaced next to each other at the bottom.
svc00609
Figure 1. 12 drives on either 2076-112 or 2076-312svc00608
Figure 2. 24 drives on either 2076-124 or 2076-324
2 Storwize V7000: Troubleshooting, Recovery, and Maintenance Guide

�1� Fault LED�2� Activity LED
Table 4 shows the status descriptions for the two LEDs.
Table 4. Drive LEDs
Name Description Color
Activity Indicates if the drive is ready or active.
v If the LED is on, the drive is ready to be used.
v If the LED is off, the drive is not ready.
v If the LED is flashing, the drive is ready, and there is activity.
Green
Fault Indicates a fault or identifies a drive.
v If the LED is on, a fault exists on the drive.
v If the LED is off, no known fault exists on the drive.
v If the LED is flashing, the drive is being identified. A fault mightor might not exist.
Amber
1
2
svc00607
Figure 3. LED indicators on a single 3.5" drive
1 2
svc00606
Figure 4. LED indicators on a single 2.5" drive
Chapter 1. Storwize V7000 hardware components 3

Enclosure end cap indicatorsThis topic describes the indicators on the enclosure end cap.
Figure 5 shows where the end caps are located on the front of an enclosure with 12drives. The end caps are located in the same position for an enclosure with 24drives.v �1� Left end capv �2� Drivesv �3� Right end cap
Figure 6 shows the indicators on the front of the enclosure end cap.
The left enclosure end caps for both enclosures are identical and contain onlyindicators. The left enclosure end cap contains no controls or connectors. The rightenclosure end cap for both enclosures has no controls, indicators, or connectors.
svc00694
1 2 3
Figure 5. 12 drives and two end caps
2
3
1
4
svc00605
Figure 6. Left enclosure end cap
4 Storwize V7000: Troubleshooting, Recovery, and Maintenance Guide

Table 5. LED descriptions
Name Description Color Symbol
Power �1� The power LED is the upper LED. When thegreen LED is lit, it indicates that the main poweris available to the enclosure
Green
Fault �2� The fault LED is the middle LED. When theamber LED is lit, it indicates that one of theenclosure components has a hardware fault.
Amber
Identify �3� The identify LED is the lower LED. Whenthe blue LED is lit, it identifies the enclosure.
Blue
N/A �4� The two-character LCD display shows theenclosure ID.
N/A N/A
Components in the rear of the enclosureThis topic describes the hardware components in the rear of the enclosure.
Two canisters are located in the middle of each enclosure. The power supply unitsare located on the left and right of the canisters. The left slot is power supply 1(�1�), and the right slot is power supply 2 (�2�). Power supply 1 is top side up,and power supply 2 is inverted. The upper slot is canister 1 (�3�), and the lowerslot is canister 2 (�4�). Canister 1 is top side up, and canister 2 is inverted.
Figure 7 shows the rear view of a model 2076-112 or a model 2076-124 controlenclosure. Figure 8 on page 6 shows the rear view of a model 2076-312 or a model2076-324 control enclosure with the 10 Gbps Ethernet port (�5�). Figure 9 on page 6shows the rear of an expansion enclosure.
1 23
svc00662
4
Figure 7. Rear view of a model 2076-112 or a model 2076-124 control enclosure
Chapter 1. Storwize V7000 hardware components 5

�1� Power supply unit 1�2� Power supply unit 2�3� Canister 1�4� Canister 2
Power supply unit and battery for the control enclosureThe control enclosure contains two power supply units, each with an integratedbattery.
The two power supply units in the enclosure are installed with one unit top sideup and the other inverted. The power supply unit for the control enclosure has sixLEDs.
There is a power switch on each of the power supply units. The switch must be onfor the power supply unit to be operational. If the power switches are turned off,or the main power is removed, the integrated batteries temporarily continue tosupply power to the node canisters. As a result, the canisters can storeconfiguration data and cached data to their internal drives. Battery power isrequired only if both power supply units stop operating.
Figure 10 on page 7 shows the location of the LEDs �1� in the rear of the powersupply unit.
1 3 2
4 svc00726
5
Figure 8. Rear view of a model 2076-312 or a model 2076-324 control enclosure
1 23
svc00610
4
Figure 9. Rear view of a model 2076-212 or a model 2076-224 expansion enclosure
6 Storwize V7000: Troubleshooting, Recovery, and Maintenance Guide

Table 6 identifies the LEDs in the rear of the control enclosure.
Table 6. Power supply unit LEDs in the rear of the control enclosure
Name Color Symbol
ac power failure Amber
Power supply OK Green
Fan failure Amber
dc power failure Amber
Battery failure Amber + -
Battery state Green + -
See “Procedure: Understanding the system status using the LEDs” on page 54 forhelp in diagnosing a particular failure.
Power supply unit for the expansion enclosureThe expansion enclosure contains two power supply units.
The two power supply units in the enclosure are installed with one unit top sideup and the other inverted. The power supply unit for the expansion enclosure hasfour LEDs, two less than the power supply for the control enclosure.
svc00670
1
1
Figure 10. LEDs on the power supply units of the control enclosure
Chapter 1. Storwize V7000 hardware components 7

There is a power switch on each of the power supply units. The switch must be onfor the power supply unit to be operational. If the power switches are turned off,the power supply units stop providing power to the system.
Figure 11 shows the locations of the LEDs �1� in the rear of the power supply unit.
Table 7 identifies the LEDs in the rear of the expansion enclosure.
Table 7. Power supply unit LEDs in the rear of the expansion enclosure
Name Color Symbol
ac power failure Amber
Power supply OK Green
Fan failure Amber
dc power failure Amber
See “Procedure: Understanding the system status using the LEDs” on page 54 forhelp in diagnosing a particular failure.
Node canister ports and indicatorsThe node canister has indicators and ports but no controls.
Fibre Channel ports and indicatorsThe Fibre Channel port LEDs show the speed of the Fibre Channel ports andactivity level.
1
svc00671
1
Figure 11. LEDs on the power supply units of the expansion enclosure
8 Storwize V7000: Troubleshooting, Recovery, and Maintenance Guide

Each node canister has four Fibre Channel ports located on the left side of thecanister as shown in Figure 12. The ports are in two rows of two ports. The portsare numbered 1 - 4 from left to right and top to bottom.
Note: The reference to the left and right locations applies to canister 1, which isthe upper canister. The port locations are inverted for canister 2, which is the lowercanister.
There are two green LEDs associated with each port: the speed LED and the linkactivity LED. These LEDs are in the shape of a triangle. The LEDs are located inbetween the two rows of the ports as shown in Figure 13. Figure 13 shows theLEDs for the Fibre Channel ports on canister 1. Each LED points to the associatedport. The first and second LEDs in each set show the speed state, and the thirdand fourth LEDs show the link state.
svc00689
Figure 12. Fibre Channel ports on the node canisters
svc00685
5 6 7 8
1 2
43
1 2 3 4
Figure 13. LEDs on the Fibre Channel ports
Chapter 1. Storwize V7000 hardware components 9

Table 8. Fibre Channel port LED locations on canister 1
Associated port LED location LED status
Port 3 �3� First LED between ports 1and 3 �1�
Speed
Port 1 �1� Second LED between ports 1and 3 �2�
Speed
Port 3 �3� Third LED between ports 1and 3 �3�
Link
Port 1 �1� Fourth LED between ports 1and 3 �4�
Link
Port 4 �4� First LED between ports 2and 4 �5�
Speed
Port 2 �2� Second LED between ports 2and 4 �6�
Speed
Port 4 �4� Third LED between ports 2and 4 �7�
Link
Port 2 �2� Fourth LED between ports 2and 4 �8�
Link
Table 9 provides the status descriptions for the LEDs on the Fibre Channel ports.
Table 9. Fibre Channel port LED status descriptions
Speed state LED Link state LED Link state
Off Off Inactive
Off On or flashing Active low speed (2 Gbps)
Flashing On or flashing Active medium speed (4Gbps)
On On or flashing Active high speed (8 Gbps)
Fibre Channel port numbers and worldwide port names:
Fibre Channel ports are identified by their physical port number and by aworldwide port name (WWPN).
The physical port numbers identify Fibre Channel cards and cable connectionswhen you perform service tasks. The WWPNs are used for tasks such as FibreChannel switch configuration and to uniquely identify the devices on the SAN.
The WWPNs are derived from the worldwide node name (WWNN) that isallocated to the Storwize V7000 node in which the ports are installed. The WWNNfor each node is stored within the enclosure. When you replace a node canister, theWWPNs of the ports do not change.
The WWNN is in the form 50050768020XXXXX, where XXXXX is specific to anenclosure.
USB portsTwo USB ports are located side by side on each node canister.
The USB ports are numbered 1 on the left and 2 on the right as shown in Figure 14on page 11. One port is used during installation.
10 Storwize V7000: Troubleshooting, Recovery, and Maintenance Guide

Note: The reference to the left and right locations applies to canister 1, which isthe upper canister. The port locations are inverted for canister 2, which is the lowercanister.
The USB ports have no indicators.
Ethernet ports and indicatorsEthernet ports are located side by side on the rear of the node canister. All controlenclosure models have two 1 Gbps Ethernet ports per node canister. Model2076-312 and model 2076-324 also have two 10 Gbps Ethernet ports per nodecanister.
For the 1 Gbps support, the Ethernet ports are numbered 1 on the left and 2 on theright as shown in Figure 15 on page 12. Port 1 must be connected; the use of port 2is optional. Two LEDs are associated with each port.
Note: The reference to the left and right locations applies to canister 1, which isthe upper canister. The port locations are inverted for canister 2, which is the lowercanister.
svc00690
Figure 14. USB ports on the node canisters
Chapter 1. Storwize V7000 hardware components 11

Table 10 provides a description of the two LEDs.
Table 10. 1 Gbps Ethernet port LEDs
Name Description Color
Link speed (LED on right ofupper canister)
The LED is on when there is a linkconnection; otherwise, the LED is off.
Green
Activity (LED on left ofupper canister)
The LED is flashing when there is activity onthe link; otherwise, the LED is off.
Yellow
Figure 16 shows the location of the 10 Gbps Ethernet ports.
Table 11 on page 13 provides a description of the LEDs.
svc00691
Figure 15. Ethernet ports on the 2076-112 and 2076-124 node canisters
svc00727
Figure 16. 10 Gbps Ethernet ports on the 2076-312 and 2076-324 node canisters
12 Storwize V7000: Troubleshooting, Recovery, and Maintenance Guide

Table 11. 10 Gbps Ethernet port LEDs
Name Symbol Description Color
Activity Tx/Rx The LED is flashing when there isactivity on the link; otherwise, theLED is off.
Green
Link LNK The LED is on when there is alink connection; otherwise, theLED is off.
Amber
Node canister SAS ports and indicatorsTwo serial-attached SCSI (SAS) ports are located side by side in the rear of thenode canister.
The SAS ports are numbered 1 on the left and 2 on the right as shown in Figure 17.Port 1 is used if you add one expansion enclosure. Port 2 is used if you add asecond expansion enclosure. Each port provides four data channels.
Note: The reference to the left and right locations applies to canister 1, which isthe upper canister. The port locations are inverted for canister 2, which is the lowercanister.
SAS ports must be connected to Storwize V7000 enclosures only. See “Problem:SAS cabling not valid” on page 49 for help in attaching the SAS cables.
Four LEDs are located with each port. Each LED describes the status of one datachannel within the port. The data channel number is shown with the LED.
Table 12. SAS port LEDs on the node canister
LED state Description
Off No link is connected.
Flashing The link is connected and has activity.
On The link is connected.
svc00692
Figure 17. SAS ports on the node canisters.
Chapter 1. Storwize V7000 hardware components 13

Node canister LEDsEach node canister has three LEDs that provide status and identification for thenode canister.
The three LEDs are located in a horizontal row near the upper right of the canister�1�. Figure 18 shows the rear view of the node canister LEDs.
Note: The reference to the left and right locations applies to canister 1, which isthe upper canister. The port locations are inverted for canister 2, which is the lowercanister.
Table 13. Node canister LEDs
Name Description Color Symbol
Systemstatus
Indicates the status of the node.
v The on status indicates that the node is active, thatis, it is an active member of a clustered system.When the node is active, do not remove it.
v The off state indicates there is no power to thecanister or the canister is in standby mode. Theseconditions can cause the off state:
– The main processor is off and only the serviceprocessor is active.
– A power-on self-test (POST) is running on thecanister.
– The operating system is loading.
v The flashing status indicates that the node is incandidate state or service state. It is not able toperform I/O in a system. When the node is ineither of these states, it can be removed. Do notremove the canister unless directed by a serviceprocedure.
Green
1
svc006721
Figure 18. LEDs on the node canisters
14 Storwize V7000: Troubleshooting, Recovery, and Maintenance Guide

Table 13. Node canister LEDs (continued)
Name Description Color Symbol
Fault Indicates if a fault is present and identifies whichcanister.
v The on status indicates that the node is in servicestate or an error exists that might be preventing thecode from starting. Do not assume that this statusindicates a hardware error. Further investigation isrequired before replacing the node canister.
v The off status indicates that the node is a candidateor is active. This status does not mean that there isnot a hardware error on the node. Any error thatwas detected is not severe enough to stop the nodefrom participating in a system.
v The flashing status indicates that the canister isbeing identified. This status might or might not bea fault.
Amber
Power Indicates if power is available and the boot status ofthe canister.
v The on status indicates that the canister is poweredon and that the main processor or processors arerunning.
v The off status indicates that no power is available.
v The slow flashing (1 Hz) status indicates that poweris available and that the canister is in standbymode. The main processor or processors are off andonly the service processor is active.
v The fast flashing (2 Hz) indicates that the canister isrunning the power-on self-test (POST).
Green
Notes:
1. If the system status LED is on and the fault LED is off, the node canister is an activemember of a system.
2. If the system status LED is on and the fault LED is on, there is a problem establishing asystem.
For a more complete identification of the system LEDs, go to “Procedure: Understandingthe system status using the LEDs” on page 54.
Expansion canister ports and indicatorsAn expansion canister is one of two canisters that is located in the rear of theexpansion enclosure. The expansion canister has no controls.
There is a diagnostic port on the left of the canister. There are no indicators thatare associated with the port. There are no defined procedures that use the port.
Note: The reference to the left and right locations applies to canister 1, which isthe upper canister. The port locations are inverted for canister 2, which is the lowercanister.
Expansion canister SAS ports and indicatorsTwo SAS ports are located in the rear of the expansion canister.
Chapter 1. Storwize V7000 hardware components 15
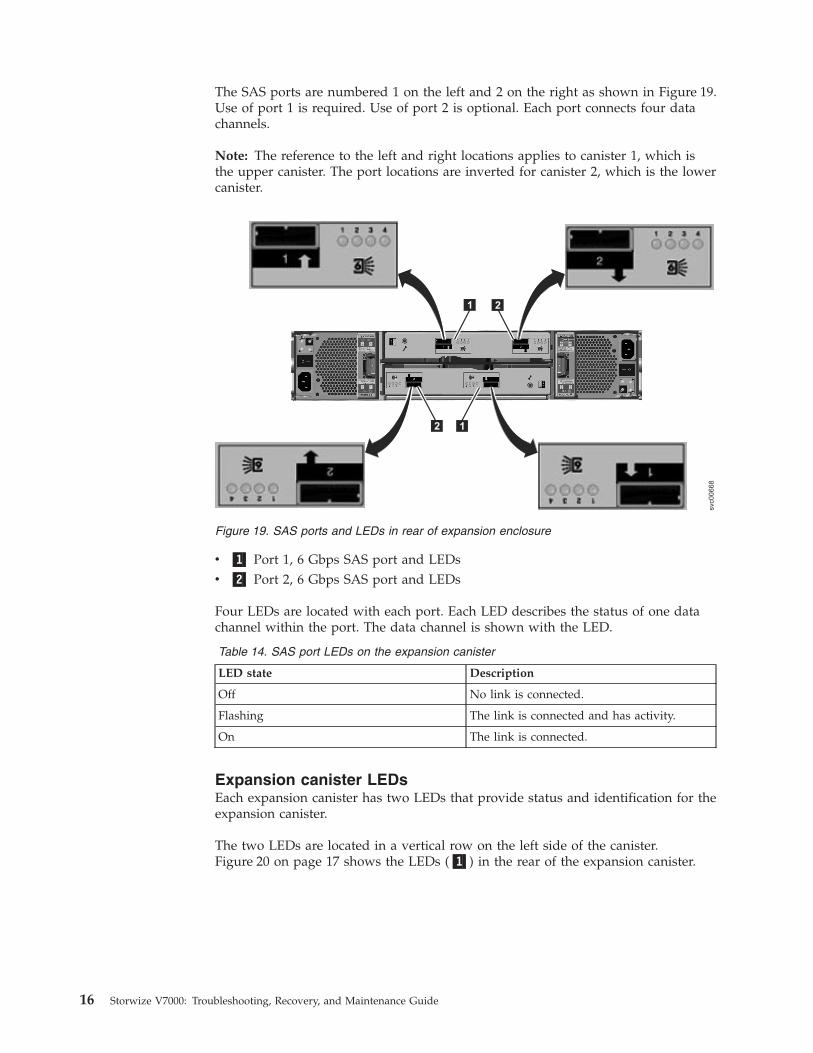
The SAS ports are numbered 1 on the left and 2 on the right as shown in Figure 19.Use of port 1 is required. Use of port 2 is optional. Each port connects four datachannels.
Note: The reference to the left and right locations applies to canister 1, which isthe upper canister. The port locations are inverted for canister 2, which is the lowercanister.
v �1� Port 1, 6 Gbps SAS port and LEDsv �2� Port 2, 6 Gbps SAS port and LEDs
Four LEDs are located with each port. Each LED describes the status of one datachannel within the port. The data channel is shown with the LED.
Table 14. SAS port LEDs on the expansion canister
LED state Description
Off No link is connected.
Flashing The link is connected and has activity.
On The link is connected.
Expansion canister LEDsEach expansion canister has two LEDs that provide status and identification for theexpansion canister.
The two LEDs are located in a vertical row on the left side of the canister.Figure 20 on page 17 shows the LEDs (�1�) in the rear of the expansion canister.
svc00668
1
12
2
Figure 19. SAS ports and LEDs in rear of expansion enclosure
16 Storwize V7000: Troubleshooting, Recovery, and Maintenance Guide

Table 15. Expansion canister LEDs
Name Description Color Symbol
Status Indicates if the canister is active.
v If the LED is on, the canister is active.
v If the LED is off, the canister is not active.
v If the LED is flashing, there is a vital product data(VPD) error.
Green
Fault Indicates if a fault is present and identifies the canister.
v If the LED is on, a fault exists.
v If the LED is off, no fault exists.
v If the LED is flashing, the canister is being identified.This status might or might not be a fault.
Amber
1
svc00673
1
Figure 20. LEDs on the expansion canisters
Chapter 1. Storwize V7000 hardware components 17

18 Storwize V7000: Troubleshooting, Recovery, and Maintenance Guide

Chapter 2. Best practices for troubleshooting
Taking advantage of certain configuration options, and ensuring vital system accessinformation has been recorded, makes the process of troubleshooting easier.
Record access informationIt is important that anyone who has responsibility for managing the system knowhow to connect to and log on to the system. Give attention to those times when thenormal system administrators are not available because of vacation or illness.
Record the following information and ensure that authorized people know how toaccess the information:v The management IP addresses. This address connects to the system using the
management GUI or starts a session that runs the command-line interface (CLI)commands. The system has two Ethernet ports. Each port can have either anIPv4 address or an IPv6 address or both. Record this address and any limitationsregarding where it can be accessed from within your Ethernet network.
v The service IP addresses for the control enclosure canister. These addresses arenormally not needed. You might need a service IP address to access the serviceassistant during some recovery procedures. Use this address if the controlenclosure CLI is not working. These addresses are not set during the installationof a Storwize V7000 system, but you can set these IP addresses later by usingthe chserviceip CLI command.
v The service IP address of the node canisters on the control enclosures is usedonly in certain circumstances. The service IP address connects to a node canisterin the control enclosure. Access to the address is sometimes required if thecanister has a fault that stops it from becoming an active member of the system.Each of the two node canisters can have a service IP address that is specified forEthernet port 1. Each address can have either an IPv4 address or an IPv6address or both. Ensure that the address specified for each node canister isdifferent.
v The system password for user superuser. The password is required to access thesystem through the service IP address. The authentication of superuser is alwayslocal; therefore, the user ID can be used when a remote authentication serverthat is used for other users is not available.
Table 16. Access information for your system
Item Value Notes
The management IP address for theGUI and CLI
The management user ID (the defaultis admin)
The management user ID password(the default is admin)
The control enclosure management IPaddress
Control enclosure service IP address:node canister 1
© Copyright IBM Corp. 2010, 2012 19

Table 16. Access information for your system (continued)
Item Value Notes
Control enclosure service IP address:node canister 2
The control enclosure superuserpassword (the default is passw0rd)
Follow power management proceduresAccess to your volume data can be lost if you incorrectly power off all or part of asystem.
Use the management GUI or the CLI commands to power off a system. Usingeither of these methods ensures that the data that is cached in the node canistermemory is correctly flushed to the RAID arrays.
Do not power off an enclosure unless instructed to do so. If you power off anexpansion enclosure, you cannot read or write to the drives in that enclosure or toany other expansion enclosure that is attached to it from the SAS ports. Poweringoff an expansion enclosure can prevent the control enclosure from flushing all thedata that it has cached to the RAID arrays.
Remove a node canister only when directed to do so by a service action. Physicallyremoving an active node canister means that it is unable to write any configurationdata or volume data that it has cached to its internal disk and the data is lost. Ifboth node canisters in a control enclosure are removed in quick succession, runrecovery actions, which might include restoring your volume data from a backup.
Set up event notificationsConfigure your system to send notifications when a new event is reported.
Correct any issues reported by your system as soon as possible. To avoidmonitoring for new events by constantly monitoring the management GUI,configure your system to send notifications when a new event is reported. Selectthe type of event that you want to be notified about. For example, restrictnotifications to just events that require immediate action. Several event notificationmechanisms exist:v Email. An event notification can be sent to one or more email addresses. This
mechanism notifies individuals of problems. Individuals can receive notificationswherever they have email access which includes mobile devices.
v Simple Network Management Protocol (SNMP). An SNMP trap report can besent to a data-center management system, such as IBM Systems Director, thatconsolidates SNMP reports from multiple systems. Using this mechanism, youcan monitor your data center from a single workstation.
v Syslog. A syslog report can be sent to a data-center management system thatconsolidates syslog reports from multiple systems. Using this mechanism, youcan monitor your data center from a single workstation.
If your system is within warranty, or you have a hardware maintenance agreement,configure your system to send email events to IBM if an issue that requireshardware replacement is detected. This mechanism is called Call Home. When this
20 Storwize V7000: Troubleshooting, Recovery, and Maintenance Guide

event is received, IBM automatically opens a problem report, and if appropriate,contacts you to verify if replacement parts are required.
If you set up Call Home to IBM, ensure that the contact details that you configureare correct and kept up to date as personnel change.
Set up inventory reportingInventory reporting is an extension to the Call Home email.
Rather than reporting a problem, an email is sent to IBM that describes yoursystem hardware and critical configuration information. Object names and otherinformation, such as IP addresses, are not sent. The inventory email is sent on aregular basis. Based on the information that is received, IBM can inform you if thehardware or software that you are using requires an upgrade because of a knownissue.
Back up your dataBack up your system configuration data and volume data.
The storage system backs up your control enclosure configuration data to a fileevery day. This data is replicated on each control node canister in the system.Download this file regularly to your management workstation to protect the data.This file must be used if there is a serious failure that requires you to restore yoursystem configuration. It is important to back up this file after modifying yoursystem configuration.
Your volume data is susceptible to failures in your host application or yourStorwize V7000 system. Follow a backup and archive policy that is appropriate tothe data that you have for storing the volume data on a different system.
Manage your spare and failed drivesYour RAID arrays that are created from drives consist of drives that are activemembers and drives that are spares.
The spare drives are used automatically if a member drive fails. If you havesufficient spare drives, you do not have to replace them immediately when theyfail. However, monitoring the number, size, and technology of your spare drives,ensures that you have sufficient drives for your requirements. Ensure that there aresufficient spare drives available so that your RAID arrays are always online.
Resolve alerts in a timely mannerYour system reports an alert when there is an issue or a potential issue thatrequires user attention. The Storwize V7000 helps resolve these problems throughthe Recommended actions only option from the Events panel.
Perform the recommended actions as quickly as possible after the problem isreported. Your system is designed to be resilient to most single hardware failures.However, if you operate for any period of time with a hardware failure, thepossibility increases that a second hardware failure can result in some volume datathat is unavailable.
Chapter 2. Best practices for troubleshooting 21

If there are a number of unfixed alerts, fixing any one alert might become moredifficult because of the effects of the other alerts.
Keep your software up to dateCheck for new code releases and update your code on a regular basis.
This can be done using the management GUI or check the IBM support website tosee if new code releases are available:
www.ibm.com/storage/support/storwize/v7000
The release notes provide information about new function in a release plus anyissues that have been resolved. Update your code regularly if the release notesindicate an issue that you might be exposed to.
Keep your records up to dateRecord the location information for your enclosures.
If you have only one system, it is relatively easy to identify the enclosures thatmake up the system. Identification becomes more difficult when you have multiplesystems in your data center and multiple systems in the same rack.
The enclosure identifier that is displayed on the front of the display is uniquewithin a system. However, the identifiers can be repeated between differentsystems. Do not rely solely on this identifier.
For each system, record the location of the control enclosure and the location ofany expansion enclosures. It is useful to label the enclosures themselves with thesystem name and the management IP addresses.
Subscribe to support notificationsSubscribe to support notifications so that you are aware of best practices and issuesthat might affect your system.
Subscribe to support notifications by visiting the IBM support page on the IBMwebsite:
www.ibm.com/storage/support/storwize/v7000
By subscribing, you are informed of new and updated support site information,such as publications, hints and tips, technical notes, product flashes (alerts), anddownloads.
Know your IBM warranty and maintenance agreement detailsIf you have a warranty or maintenance agreement with IBM, know the details thatmust be supplied when you call for support.
Have the phone number of the support center available. When you call support,provide the machine type (always 2076) and the serial number of the enclosurethat has the problem. If the problem does not relate to a specific enclosure, providethe control enclosure serial number. The serial numbers are on the labels on theenclosures.
22 Storwize V7000: Troubleshooting, Recovery, and Maintenance Guide

Support personnel also ask for your customer number, machine location, contactdetails, and the details of the problem.
Chapter 2. Best practices for troubleshooting 23

24 Storwize V7000: Troubleshooting, Recovery, and Maintenance Guide

Chapter 3. Understanding the Storwize V7000 batteryoperation for the control enclosure
Storwize V7000 node canisters cache volume data and hold state information involatile memory.
If the power fails, the cache and state data is written to a local solid-state drive(SSD) in the canister. The batteries within the control enclosure provide the powerto write the cache and state data to a local drive.
Note: Storwize V7000 expansion canisters do not cache volume data or store stateinformation in volatile memory. They, therefore, do not require battery power. If acpower to both power supplies in an expansion enclosure fails, the enclosurepowers off. When ac power is restored to at least one of the power supplies, thecontroller restarts without operator intervention.
There are two power supply units in the control enclosure. Each one contains anintegrated battery. Both power supply units and batteries provide power to bothcontrol canisters. Each battery has a sufficient charge to power both node canistersfor the duration of saving critical data to the local drive. In a fully redundantsystem with two batteries and two canisters, there is enough charge in the batteriesto support saving critical data from both canisters to a local drive twice. In asystem with a failed battery, there is enough charge in the remaining battery tosupport saving critical data from both canisters to a local drive once.
If the ac power to a control enclosure is lost, the canisters do not start savingcritical data to a local drive until approximately 10 seconds after the loss of acpower is first detected. If the power is restored within this period, the systemcontinues to operate. This loss in power is called a brown out. As soon as thesaving of the critical data starts, the system stops handling I/O requests from thehost applications, and Metro Mirror and Global Mirror relationships go offline. Thesystem powers off when the saving of the critical data completes.
If both node canisters shut down without writing the cache and state data to thelocal drive, the system is unable to restart without an extended service action. Thesystem configuration must be restored. If any cache write data is lost, volumesmust be restored from a backup. It is, therefore, important not to remove thecanisters or the power supply units from the control enclosures unless directed todo so by the service procedures. Removing either of these components mightprevent the node canister from writing its cache and state data to the local drive.
When the ac power is restored to the control enclosure, the system restarts withoutoperator intervention. How quickly it restarts depends on whether there is ahistory of previous power failures.
When the ac power is restored after a power outage that causes both canisters tosave their critical data, the system restarts only when the batteries have sufficientcharge to power both canisters for the duration of saving the critical data again. Ina fully redundant system with two batteries, this condition means that after one acpower outage and a saving of critical data, the system can restart as soon as thepower is restored. If a second ac power outage occurs before the batteries have
© Copyright IBM Corp. 2010, 2012 25

completed charging, then the system starts in service state and does not permitI/O operations to be restarted until the batteries are half charged. The rechargingtakes approximately 30 minutes.
In a system with a failed battery, an ac power failure causes both canisters to savecritical data and completely discharges the remaining battery. When the ac poweris restored, the system starts in service state and does not permit I/O operations tobe restarted until the remaining battery is fully charged. The recharging takesapproximately 1 hour.
A battery is considered failed for the following conditions:v When the system can communicate with it and it reports an error.v When the system is unable to communicate with the battery. Failed
communication exists because the power supply, which contains the battery, hasbeen removed or because the power supply has failed in a manner that makescommunication with the battery impossible.
There are conditions other than loss of ac power that can cause critical data to besaved and the nodes to go into service state and not permit I/O operations. Thenode canister saves critical data if they detect there is no longer sufficient batterycharge to support a saving of critical data. This situation happens when, forexample, both batteries have two-thirds of a charge. The total charge that isavailable in the enclosure is sufficient to support a saving of critical data once;therefore, both canisters are in active state and I/O operations are permitted. If onebattery fails though, the remaining battery has only two-thirds of a charge, and thetotal charge that is available in the enclosure is now insufficient to perform asaving of the critical data if the ac power fails. Data protection cannot beguaranteed in this case. When the battery has sufficient charge, the systemautomatically restarts.
Important: Although Storwize V7000 is resilient to power failures and brownouts, always install Storwize V7000 in an environment where there is reliable andconsistent ac power that meets the Storwize V7000 requirements. Consideruninterruptible power supply units to avoid extended interruptions to data access.
Maintenance discharge cyclesMaintenance discharge cycles extend the lifetime of the batteries and ensure thatthe system can accurately measure the charge in the batteries. Discharge cyclesguarantee that the batteries have sufficient charge to protect the Storwize V7000system.
Maintenance discharge cycles are scheduled automatically by the system andinvolve fully discharging a battery and then recharging it again. Maintenancedischarges are normally scheduled only when the system has two fully chargedbatteries. This condition ensures that for the duration of the maintenance cycle, thesystem still has sufficient charge to complete a save of the critical data if the acpower fails. This condition also ensures that I/O operations continue while themaintenance cycle is performed. It is usual for both batteries to require amaintenance discharge at the same time. In these circumstances, the systemautomatically schedules the maintenance of one battery. When the maintenance onthat battery completes, the maintenance on the other battery starts.
Maintenance discharges are scheduled for the following situations:
26 Storwize V7000: Troubleshooting, Recovery, and Maintenance Guide

v A battery has been powered on for three months without a maintenancedischarge.
v A battery has provided protection for saving critical data at least twice.v A battery has provided protection for at least 10 brown outs, which lasted up to
10 seconds each.
A maintenance discharge takes approximately 10 hours to complete. If the acpower outage occurs during the maintenance cycle, the cycle must be restarted.The cycle is scheduled automatically when the battery is fully charged.
Under the following conditions, a battery is not considered when calculatingwhether there is sufficient charge to protect the system. This condition persistsuntil a maintenance discharge cycle is completed.v A battery is performing a maintenance discharge.v A battery has provided protection for saving critical data at least four times
without any intervening maintenance discharge.v A battery has provided protection for at least 20 brown outs, which lasted up to
10 seconds each.v A battery must restart a maintenance discharge because the previous
maintenance cycle was disrupted by an ac power outage.
If a system suffers repeated ac power failures without a sufficient time interval inbetween the ac failures to complete battery conditioning, then neither battery isconsidered when calculating whether there is sufficient charge to protect thesystem. In these circumstances, the system enters service state and does not permitI/O operations to be restarted until the batteries have charged and one of thebatteries has completed a maintenance discharge. This activity takes approximately10 hours.
If one of the batteries in a system fails and is not replaced, it prevents the otherbattery from performing a maintenance discharge. Not only does this conditionreduce the lifetime of the remaining battery, but it also prevents a maintenancedischarge cycle from occurring after the battery has provided protection for at least2 critical saves or 10 brown outs. Preventing this maintenance cycle from occurringincreases the risk that the system accumulates a sufficient number of poweroutages to cause the remaining battery to be discounted when calculating whetherthere is sufficient charge to protect the system. This condition results in the systementering service state while the one remaining battery performs a maintenancedischarge. I/O operations are not permitted during this process. This activity takesapproximately 10 hours.
Chapter 3. Understanding the Storwize V7000 battery operation for the control enclosure 27

28 Storwize V7000: Troubleshooting, Recovery, and Maintenance Guide

Chapter 4. Understanding the medium errors and bad blocks
A storage system returns a medium error response to a host when it is unable tosuccessfully read a block. The Storwize V7000 response to a host read follows thisbehavior.
The volume virtualization that is provided extends the time when a medium erroris returned to a host. Because of this difference to non-virtualized systems, theStorwize V7000 uses the term bad blocks rather than medium errors.
The Storwize V7000 allocates volumes from the extents that are on the manageddisks (MDisks). The MDisk can be a volume on an external storage controller or aRAID array that is created from internal drives. In either case, depending on theRAID level used, there is normally protection against a read error on a singledrive. However, it is still possible to get a medium error on a read request ifmultiple drives have errors or if the drives are rebuilding or are offline due toother issues.
The Storwize V7000 provides migration facilities to move a volume from oneunderlying set of physical storage to another or to replicate a volume that usesFlashCopy or Metro Mirror or Global Mirror. In all these cases, the migratedvolume or the replicated volume returns a medium error to the host when thelogical block address on the original volume is read. The system maintains tablesof bad blocks to record where the logical block addresses that cannot be read are.These tables are associated with the MDisks that are providing storage for thevolumes.
The dumpmdiskbadblocks command and the dumpallmdiskbadblocks command areavailable to query the location of bad blocks.
Important: The dumpmdiskbadblocks only outputs the virtual medium errors thathave been created, and not a list of the actual medium errors on MDisks or drives.
It is possible that the tables that are used to record bad block locations can fill up.The table can fill either on an MDisk or on the system as a whole. If a table doesfill up, the migration or replication that was creating the bad block fails because itwas not possible to create an exact image of the source volume.
The system creates alerts in the event log for the following situations:v When it detects medium errors and creates a bad blockv When the bad block tables fill up
The following errors are identified:
Table 17. Bad block errors
Error code Description
1840 The managed disk has bad blocks. On anexternal controller, this can only be a copiedmedium error.
1226 The system has failed to create a bad blockbecause the MDisk already has themaximum number of allowed bad blocks.
© Copyright IBM Corp. 2010, 2012 29

Table 17. Bad block errors (continued)
Error code Description
1225 The system has failed to create a bad blockbecause the system already has themaximum number of allowed bad blocks.
The recommended actions for these alerts guide you in correcting the situation.
Clear bad blocks by deallocating the volume disk extent, by deleting the volume orby issuing write I/O to the block. It is good practice to correct bad blocks as soonas they are detected. This action prevents the bad block from being propagatedwhen the volume is replicated or migrated. It is possible, however, for the badblock to be on part of the volume that is not used by the application. For example,it can be in part of a database that has not been initialized. These bad blocks arecorrected when the application writes data to these areas. Before the correctionhappens, the bad block records continue to use up the available bad block space.
30 Storwize V7000: Troubleshooting, Recovery, and Maintenance Guide
Chapter 5. Storwize V7000 user interfaces for servicing yoursystem
Storwize V7000 provides a number of user interfaces to troubleshoot, recover, ormaintain your system. The interfaces provide various sets of facilities to helpresolve situations that you might encounter.
The interfaces for servicing your system connect through the 1 Gbps Ethernet portsthat are accessible from port 1 of each canister. You cannot manage a system usingthe 10 Gbps Ethernet ports.v Use the initialization tool to do the initial setup of your system.v Use the management GUI to monitor and maintain the configuration of storage
that is associated with your clustered systems.v Perform service procedures from the service assistant.v Use the command-line interface (CLI) to manage your system.
Management GUI interfaceThe management GUI is a browser-based GUI for configuring and managing allaspects of your system. It provides extensive facilities to help troubleshoot andcorrect problems.
About this task
You use the management GUI to manage and service your system. The Monitoring> Events panel provides access to problems that must be fixed and maintenanceprocedures that step you through the process of correcting the problem.
The information on the Events panel can be filtered three ways:
Recommended actions (default)Shows only the alerts that require attention. Alerts are listed in priorityorder and should be fixed sequentially by using the available fixprocedures. For each problem that is selected, you can:v Run a fix procedure.v View the properties.
Unfixed messages and alertsDisplays only the alerts and messages that are not fixed. For each entrythat is selected, you can:v Run a fix procedure.v Mark an event as fixed.v Filter the entries to show them by specific minutes, hours, or dates.v Reset the date filter.v View the properties.
Show allDisplays all event types whether they are fixed or unfixed. For each entrythat is selected, you can:v Run a fix procedure.v Mark an event as fixed.
© Copyright IBM Corp. 2010, 2012 31

v Filter the entries to show them by specific minutes, hours, or dates.v Reset the date filter.v View the properties.
Some events require a certain number of occurrences in 25 hours before they aredisplayed as unfixed. If they do not reach this threshold in 25 hours, they areflagged as expired. Monitoring events are below the coalesce threshold and areusually transient.
You can also sort events by time or error code. When you sort by error code, themost serious events, those with the lowest numbers, are displayed first. You canselect any event that is listed and select Actions > Properties to view details aboutthe event.
When to use the management GUIThe management GUI is the primary tool that is used to service your system.
Regularly monitor the status of the system using the management GUI. If yoususpect a problem, use the management GUI first to diagnose and resolve theproblem.
Use the views that are available in the management GUI to verify the status of thesystem, the hardware devices, the physical storage, and the available volumes. TheMonitoring > Events panel provides access to all problems that exist on thesystem. Use the Recommended Actions filter to display the most important eventsthat need to be resolved.
If there is a service error code for the alert, you can run a fix procedure that assistsyou in resolving the problem. These fix procedures analyze the system and providemore information about the problem. They suggest actions to take and step youthrough the actions that automatically manage the system where necessary. Finally,they check that the problem is resolved.
If there is an error that is reported, always use the fix procedures within themanagement GUI to resolve the problem. Always use the fix procedures for bothsystem configuration problems and hardware failures. The fix procedures analyzethe system to ensure that the required changes do not cause volumes to beinaccessible to the hosts. The fix procedures automatically perform configurationchanges that are required to return the system to its optimum state.
Accessing the management GUIThis procedure describes how to access the management GUI.
About this task
You must use a supported web browser. Verify that you are using a supported webbrowser from the following website:
www.ibm.com/storage/support/storwize/v7000
You can use the management GUI to manage your system as soon as you havecreated a clustered system.
32 Storwize V7000: Troubleshooting, Recovery, and Maintenance Guide

Procedure1. Start a supported web browser and point the browser to the management IP
address of your system.The management IP address is set when the clustered system is created. Up tofour addresses can be configured for your use. There are two addresses forIPv4 access and two addresses for IPv6 access.
2. When the connection is successful, you see a login panel.3. Log on by using your user name and password.4. When you have logged on, select Monitoring > Events.5. Ensure that the events log is filtered using Recommended actions.6. Select the recommended action and run the fix procedure.7. Continue to work through the alerts in the order suggested, if possible.
Results
After all the alerts are fixed, check the status of your system to ensure that it isoperating as intended.
If you encounter problems logging on the management GUI or connecting to themanagement GUI, see “Problem: Unable to log on to the management GUI” onpage 45 or “Problem: Unable to connect to the management GUI” on page 44.
Service assistant interfaceThe service assistant interface is a browser-based GUI that is used to serviceindividual node canisters in the control enclosures.
You connect to the service assistant on one node canister through the service IPaddress. If there is a working communications path between the node canisters,you can view status information and perform service tasks on the other nodecanister by making the other node canister the current node. You do not have toreconnect to the other node.
When to use the service assistantThe primary use of the service assistant is when a node canister in the controlenclosure is in service state. The node canister cannot be active as part of a systemwhile it is in service state.
Attention: Perform service actions on node canisters only when directed to do soby the fix procedures. If used inappropriately, the service actions that are availablethrough the service assistant can cause loss of access to data or even data loss.
The node canister might be in service state because it has a hardware issue, hascorrupted data, or has lost its configuration data.
Use the service assistant in the following situations:v When you cannot access the system from the management GUI and you cannot
access the storage Storwize V7000 to run the recommended actionsv When the recommended action directs you to use the service assistant.
The storage system management GUI operates only when there is an onlinesystem. Use the service assistant if you are unable to create a system or if bothnode canisters in a control enclosure are in service state.
Chapter 5. Storwize V7000 user interfaces for servicing your system 33

The service assistant does not provide any facilities to help you service expansionenclosures. Always service the expansion enclosures by using the managementGUI.
The service assistant provides detailed status and error summaries, and the abilityto modify the World Wide Node Name (WWN) for each node.
You can also perform the following service-related actions:v Collect logs to create and download a package of files to send to support
personnel.v Remove the data for the system from a node.v Recover a system if it fails.v Install a code package from the support site or rescue the code from another
node.v Upgrade code on node canisters manually versus performing a standard
upgrade procedure.v Configure a control enclosure chassis after replacement.v Change the service IP address that is assigned to Ethernet port 1 for the current
node canister.v Install a temporary SSH key if a key is not installed and CLI access is required.v Restart the services used by the system.
A number of tasks that are performed by the service assistant cause the nodecanister to restart. It is not possible to maintain the service assistant connection tothe node canister when it restarts. If the current node canister on which the tasksare performed is also the node canister that the browser is connected to and youlose your connection, reconnect and log on to the service assistant again afterrunning the tasks.
Accessing the service assistantThe service assistant is a web application that helps troubleshoot and resolveproblems on a node canister in a control enclosure.
About this task
You must use a supported web browser. Verify that you are using a supported andan appropriately configured web browser from the following website:
www.ibm.com/storage/support/storwize/v7000
To start the application, perform the following steps:
Procedure1. Start a supported web browser and point your web browser to
<serviceaddress>/service for the node canister that you want to work on.For example, if you set a service address of 11.22.33.44 for a node canister,point your browser to 11.22.33.44/service. If you are unable to connect to theservice assistant, see “Problem: Cannot connect to the service assistant” on page47.
2. Log on to the service assistant using the superuser password.
34 Storwize V7000: Troubleshooting, Recovery, and Maintenance Guide

If you are accessing a new node canister, the default password is passw0rd. Ifthe node canister is a member of a system or has been a member of a system,use the password for the superuser password.If you do not know the current superuser password, reset the password. Go to“Procedure: Resetting superuser password” on page 51.
Results
Perform the service assistant actions on the correct node canister. If you did notconnect to the node canister that you wanted to work on, access the Change Nodepanel from the home page to select a different current node.
Commands are run on the current node. The current node might not be the nodecanister that you connected to. The current node identification is shown on the leftat the top of the service assistant screen. The identification includes the enclosureserial number, the slot location, and if it has one, the node name of the currentnode.
Cluster (system) command-line interfaceUse the command-line interface (CLI) to manage a clustered system using the taskcommands and information commands.
For a full description of the commands and how to start an SSH command-linesession, see the “Command-line interface” topic in the “Reference” section of theStorwize V7000 Information Center.
When to use the cluster (system) CLIThe cluster (system) CLI is intended for use by advanced users who are confidentat using a command-line interface.
Nearly all of the flexibility that is offered by the CLI is available through themanagement GUI. However, the CLI does not provide the fix procedures that areavailable in the management GUI. Therefore, use the fix procedures in themanagement GUI to resolve the problems. Use the CLI when you require aconfiguration setting that is unavailable in the management GUI.
You might also find it useful to create command scripts using the CLI commandsto monitor for certain conditions or to automate configuration changes that youmake on a regular basis.
Accessing the cluster (system) CLIFollow the steps that are described in the “Command-line interface” topic in the“Reference” section of the Storwize V7000 Information Center to initialize and usea CLI session.
Service command-line interfaceUse the service command-line interface (CLI) to manage a node canister in acontrol enclosure using the task commands and information commands.
For a full description of the commands and how to start an SSH command-linesession, see the “Command-line interface” topic in the “Reference” section of theStorwize V7000 Information Center.
Chapter 5. Storwize V7000 user interfaces for servicing your system 35

When to use the service CLIThe service CLI is intended for use by advanced users who are confident at usinga command-line interface.
To access a node canister directly, it is normally easier to use the service assistantwith its graphical interface and extensive help facilities.
Accessing the service CLIFollow the steps that are described in the “Command-line interface” topic in the“Reference” section of the Storwize V7000 Information Center to initialize and usea CLI session.
USB flash drive and Initialization tool interfaceUse a USB flash drive to initialize a system and also to help service the nodecanisters in a control enclosure.
The initialization tool is a Windows application. Use the initialization tool to set upthe USB flash drive to perform the most common tasks.
When a USB flash drive is inserted into one of the USB ports on a node canister ina control enclosure, the node canister searches for a control file on the USB flashdrive and runs the command that is specified in the file. When the commandcompletes, the command results and node status information are written to theUSB flash drive.
When to use the USB flash driveThe USB flash drive is normally used to initialize the configuration after installinga new system.
Using the USB flash drive is required in the following situations:v When you cannot connect to a node canister in a control enclosure using the
service assistant and you want to see the status of the node.v When you do not know, or cannot use, the service IP address for the node
canister in the control enclosure and must set the address.v When you have forgotten the superuser password and must reset the password.
Using a USB flash driveUse any USB flash drive that is formatted with a FAT32 file system on its firstpartition.
About this task
When a USB flash drive is plugged into a node canister, the node canister codesearches for a text file named satask.txt in the root directory. If the code finds thefile, it attempts to run a command that is specified in the file. When the commandcompletes, a file called satask_result.html is written to the root directory of theUSB flash drive. If this file does not exist, it is created. If it exists, the data isinserted at the start of the file. The file contains the details and results of thecommand that was run and the status and the configuration information from thenode canister. The status and configuration information matches the detail that isshown on the service assistant home page panels.
36 Storwize V7000: Troubleshooting, Recovery, and Maintenance Guide

The satask.txt file can be created on any workstation by using a text editor. If aMicrosoft Windows workstation is being used, the initialization tool can be used tocreate the commands that are most often used.
The fault LED on the node canister flashes when the USB service action is beingperformed. When the fault LED stops flashing, it is safe to remove the USB flashdrive.
Results
The USB flash drive can then be plugged into a workstation and thesatask_result.html file viewed in a web browser.
To protect from accidentally running the same command again, the satask.txt fileis deleted after it has been read.
If no satask.txt file is found on the USB flash drive, the result file is still created,if necessary, and the status and configuration data is written to it.
Using the initialization toolThe initialization tool is a graphical user interface (GUI) application. You musthave Microsoft Windows XP Professional or higher to run the application.
About this task
The initialization tool is available on the USB flash drive that is shipped with thecontrol enclosures. The name of the application file is InitTool.exe. If you cannotlocate the USB flash drive, you can download the application from the supportwebsite (search for initialization tool):
www.ibm.com/storage/support/storwize/v7000
If you download the initialization tool, you must copy the file onto the USB flashdrive that you are going to use.
To start the initialization tool, insert the USB flash drive that contains the programinto a USB slot on a suitable personal computer. Run the InitTool.exe programfrom the USB drive.
The initialization tool is used to create the satask.txt file on a USB flash drive.After the satask.txt file is created, follow the instructions in “Using a USB flashdrive” on page 36 to run the commands on the node.
The initialization tool prompts you for the task that you want to perform and forthe parameters that are relevant to that task. It prompts you when to put it in thenode canister on the control enclosure. When the commands have run, return theUSB flash drive to your personal computer and start the tool again to see theresults.
Results
By using the initialization tool, you can set the USB flash drive to run one of thefollowing tasks:v Create a new system.v Reset the superuser password.
Chapter 5. Storwize V7000 user interfaces for servicing your system 37

v Set or reset the service IP address on the node canister on the control enclosure.
For any other tasks that you want to perform on a node canister on the controlenclosure, you must create the satask.txt file using a text editor.
satask.txt commandsThis topic identifies the commands that can be run from a USB flash drive.
If you are creating the satask.txt command file by using a text editor, the filemust contain a single command on a single line in the file. The commands thatyou use are the same as the service CLI commands except where noted. Not allservice CLI commands can be run from the USB flash drive. The satask.txtcommands always run on the node that the USB flash drive is plugged into.
Reset service IP address and superuser password commandUse this command to obtain service assistant access to a node canister even if thecurrent state of the node canister is unknown. The physical access to the nodecanister is required and is used to authenticate the action.
Syntax
�� satask chserviceip -serviceip ipv4-gw ipv4 -mask ipv4 -resetpassword
��
�� satask chserviceip -serviceip_6 ipv6-gw_6 ipv6 -prefix_6 int -resetpassword
��
�� satask chserviceip -default-resetpassword
��
Parameters
-serviceip(Optional) The IPv4 address for the service assistant.
-gw(Optional) The IPv4 gateway for the service assistant.
-mask(Optional) The IPv4 subnet for the service assistant.
-serviceip_6(Optional) The IPv6 address for the service assistant.
-gw_6(Optional) The IPv6 gateway for the service assistant.
-default(Optional) Resets to the default IPv4 address.
-prefix_6(Optional) The IPv6 prefix for the service assistant.
-resetpassword(Optional) Sets the service assistant password to the default value.
38 Storwize V7000: Troubleshooting, Recovery, and Maintenance Guide

Description
This command resets the service assistant IP address to the default value. If thecommand is run on the upper canister, the default value is 192.168.70.121 subnetmask: 255.255.255.0. If the command is run on the lower canister, the default valueis 192.168.70.122 subnet mask: 255.255.255.0. If the node canister is active in asystem, the superuser password for the system is reset; otherwise, the superuserpassword is reset on the node canister.
If the node canister becomes active in a system, the superuser password is reset tothat of the system. You can configure the system to disable resetting the superuserpassword. If you disable that function, this action fails.
This action calls the satask chserviceip command and the satask resetpasswordcommand.
Reset service assistant password commandUse this command when you are unable to logon to the system because you haveforgotten the superuser password, and you wish to reset it.
Syntax
�� satask resetpassword ��
Parameters
None.
Description
This command resets the service assistant password to the default value passw0rd.If the node canister is active in a system, the superuser password for the system isreset; otherwise, the superuser password is reset on the node canister.
If the node canister becomes active in a system, the superuser password is reset tothat of the system. You can configure the system to disable resetting the superuserpassword. If you disable that function, this action fails.
This command calls the satask resetpassword command.
Snap commandUse this command to collect diagnostic information from the node canister and towrite the output to a USB flash drive.
Syntax
�� satask snap -options ��
Parameters
-options(Optional) Specifies which diagnostic information to collect.
Chapter 5. Storwize V7000 user interfaces for servicing your system 39

Description
This command moves a snap file to a USB flash drive.
This command calls the satask snap command.
Apply software commandUse this command to install a specific upgrade package on the node canister.
Syntax
�� satask installsoftware -file filename-ignore
��
Parameters
-file(Required) The file name of upgrade package .
-ignore(Optional) Overrides prerequisite checking and forces installation of theupgrade package.
Description
This command copies the file from the USB flash drive to the upgrade directory onthe node canister and then installs the upgrade package.
This command calls the satask installsoftware command.
Create cluster commandUse this command to create a storage system.
Syntax
�� satask mkcluster -clusterip ipv4-gw ipv4 -mask ipv4 -name cluster_name
��
�� satask mkcluster -clusterip_6 ipv6-gw_6 ipv6 -prefix_6 int -name cluster_name
��
Parameters
-clusterip(Optional) The IPv4 address for Ethernet port 1 on the system.
-gw(Optional) The IPv4 gateway for Ethernet port 1 on the system.
-mask(Optional) The IPv4 subnet for Ethernet port 1 on the system.
-clusterip_6(Optional) The IPv6 address for Ethernet port 1 on the system.
-gw_6(Optional) The IPv6 gateway for Ethernet port 1 on the system.
40 Storwize V7000: Troubleshooting, Recovery, and Maintenance Guide

-prefix_6(Optional) The IPv6 prefix for Ethernet port 1 on the system.
-name(Optional) The name of the new system.
Description
This command creates a storage system.
This command calls the satask mkcluster command.
Query status commandUse this command to determine the current service state of the node canister.
Syntax
�� sainfo getstatus ��
Parameters
None.
Description
This command writes the output from each node canister to the USB flash drive.
This command calls the sainfo lsservicenodes command, the sainfolsservicestatus command, and the sainfo lsservicerecommendation command.
Chapter 5. Storwize V7000 user interfaces for servicing your system 41

42 Storwize V7000: Troubleshooting, Recovery, and Maintenance Guide

Chapter 6. Resolving a problem
Described here are some procedures to help resolve fault conditions that mightexist on your system and which assume a basic understanding of the StorwizeV7000 system concepts.
The following procedures are often used to find and resolve problems:v Procedures that involve data collection and system configurationv Procedures that are used for hardware replacement.
Always use the recommended actions on the Events panel of the management GUIas the starting point to diagnose and resolve a problem.
The following topics describe a type of problem that you might experience, that isnot resolved by using the management GUI. In those situations, review thesymptoms and follow the actions that are provided here.
The “Start here: Use the management GUI recommended actions” topic gives thestarting point for any service action. The situations covered in this section are thecases where you cannot start the management GUI or the node canisters in thecontrol enclosure are unable to run the system software.
Note: After you have created your clustered system, remove hardware componentsonly when directed to do so by the fix procedures. Failure to follow the procedurescan result in loss of access to data or loss of data. Follow the fix procedures whenservicing a control enclosure.
Start here: Use the management GUI recommended actionsThe management GUI provides extensive facilities to help you troubleshoot andcorrect problems on your system.
You can connect to and manage a Storwize V7000 system using the managementGUI as soon as you have created a clustered system. If you cannot create aclustered system, see the problem that contains information about what to do ifyou cannot create one. Go to “Problem: Cannot create a clustered storage system”on page 46.
To run the management GUI, start a supported web browser and point it to themanagement IP address of your system. Up to four addresses can be configuredfor your use. There are two addresses for IPv4 access, and two addresses for IPv6access. If you do not know the system management IP address, go to “Problem:Management IP address unknown” on page 44. After the connection is successful,you see a login panel. If you are unable to access the login panel, go to “Problem:Unable to connect to the management GUI” on page 44.
Log on using your user name and password. If you are unable to log on, go to“Problem: Unable to log on to the management GUI” on page 45.
© Copyright IBM Corp. 2010, 2012 43
||

When you have logged on, select Monitoring > Events. Depending on how youchoose to filter alerts, you might see only the alerts that require attention, alertsand messages that are not fixed, or all event types whether they are fixed orunfixed.
Select the recommended alert, or any other alert, and run the fix procedure. The fixprocedure steps you through the process of troubleshooting and correcting theproblem. The fix procedure displays information that is relevant to the problemand provides various options to correct the problem. Where it is possible, the fixprocedure runs the commands that are required to reconfigure the system.
Always use the recommended action for an alert because these actions ensure thatall required steps are taken. Use the recommended actions even in cases where theservice action seems obvious, such as a drive showing a fault. In this case, thedrive must be replaced and reconfiguration must be performed. The fix procedureperforms the reconfiguration for you.
The fix procedure also checks that another existing problem does not result in a fixprocedure that causes volume data to be lost. For example, if a power supply unitin a node enclosure must be replaced, the fix procedure checks and warns you ifthe integrated battery in the other power supply unit is not sufficiently charged toprotect the system.
If possible, fix the alerts in the order shown to resolve the most serious issues first.Often, other alerts are fixed automatically because they were the result of a moreserious issue.
After all the alerts are fixed, go to “Procedure: Checking the status of your system”on page 52.
Problem: Management IP address unknown
This topic helps you if you are not able to run the management GUI because youdo not know the IP address. This address is also known as the management IPaddress.
The management IP address is set when the clustered system is created. Anaddress for port 2 can be added after the clustered system is created.
If you do not know the management IP address, it is part of the data that is shownin the service assistant home panel or the data that is returned by the USB flashdrive. If you know the service address of a node canister, go to “Procedure:Getting node canister and system information using the service assistant” on page53.
Problem: Unable to connect to the management GUIIf you are unable to connect to the management GUI from your web browser andreceived a Page not found or similar error, this information might help you resolvethe issue.
Consider the following possibilities if you are unable to connect to themanagement GUI:v You cannot connect if the system is not operational with at least one node
online. If you know the service address of a node canister, go to “Procedure:
44 Storwize V7000: Troubleshooting, Recovery, and Maintenance Guide
|||
||
|||||

Getting node canister and system information using the service assistant” onpage 53; otherwise, go to “Procedure: Getting node canister and systeminformation using a USB flash drive” on page 53 and obtain the state of each ofthe node canisters from the data that is returned. If there is not a node canisterwith a state of active, resolve the reason why it is not in active state. If the stateof both node canisters is candidate, then there is not a clustered system toconnect to. If the node state is service, go to “Procedure: Fixing node errors” onpage 60.
v Ensure that you are using the correct system IP address. If you know the serviceaddress of a node canister, go to “Procedure: Getting node canister and systeminformation using the service assistant” on page 53; otherwise, go to “Procedure:Getting node canister and system information using a USB flash drive” on page53 and obtain the management IP address from the data that is returned.
v Ensure that all node canisters have an Ethernet cable that is connected to port 1and that the port is working. To understand the port status, go to “Procedure:Finding the status of the Ethernet connections” on page 59.
v Ping the management address to see if the Ethernet network permits theconnection. If the ping fails, check the Ethernet network configuration to see ifthere is a routing or a firewall issue. Ensure that the Ethernet networkconfiguration is compatible with the gateway and subnet or prefix settings.Ensure that you have not used the Ethernet address of another device as themanagement address. If necessary, modify your network settings to establish aconnection.
v If the system IP address settings are incorrect for your environment, take thesesteps:1. Determine the service address of the configuration node canister. You can
determine this if you can access the service assistant on any node canister,alternatively use the summary data returned, when a USB flash drive isplugged into a node canister.
2. You can temporarily run the management GUI on the service address of theconfiguration node. Point your browser to service address/gui. For example, ifthe service address of the configuration node is 11.22.33.44, point yourbrowser to 11.22.33.44/gui.
3. Use the options in the settings > network panel to change the managementIP settings.
4. As an alternative to using the management GUI, you can use the chsystemipCLI command to correct the system IP address settings by using ssh to theservice IP of the configuration node.
Problem: Unable to log on to the management GUI
This topic assists you when you can see the management GUI login screen butcannot log on.
Log on using your user name and password. Follow the suggested actions whenyou encounter a specific situation:v If you are not logging on as superuser, contact your system administrator who
can verify your user name and reset your account password.v If the user name that you are using is authenticated through a remote
authentication server, verify that the server is available. If the authenticationserver is unavailable, you can log on as user name superuser. This user isalways authenticated locally.
Chapter 6. Resolving a problem 45
||
||||
||||
||
|||
||

v If you do not know the password for superuser, go to “Procedure: Resettingsuperuser password” on page 51.
Problem: Cannot create a clustered storage systemThis topic helps if your attempt to create a clustered storage system has failed.
The failure is reported regardless of the method that you used to create a clusteredstorage system:v USB flash drivev management consolev Service assistantv Service command line
The create clustered-system function protects the system from loss of volume data.If you create a clustered system on a control enclosure that was previously used,you lose all of the volumes that you previously had. To determine if there is anexisting system, use data that is returned by “Procedure: Getting node canister andsystem information using the service assistant” on page 53 or “Procedure: Gettingnode canister and system information using a USB flash drive” on page 53.v The node canister that you are attempting to create a clustered system on is in
candidate state. The node canister is in candidate state if it is a new canister.v The partner node canister in the control enclosure is not in active state.v The latest system ID of the control enclosure is 0.
If the create function failed because there is an existing system, fix the existingclustered system; do not re-create a new clustered system. If you want to create aclustered system and do not want to use any data from the volumes used in theprevious clustered system, go to “Procedure: Deleting a system completely” onpage 60, and then run the create function again.
You might not be able to create a cluster if the node canister (the one on whichyou are attempting to create the clustered system) is in service state. Checkwhether the node canister is in service state by using the data returned by“Procedure: Getting node canister and system information using the serviceassistant” on page 53 or “Procedure: Getting node canister and system informationusing a USB flash drive” on page 53. If the node is in service state, fix the reportednode errors. For more information, go to “Procedure: Fixing node errors” on page60. After the node error is corrected, attempt to create a clustered storage systemagain.
Problem: Node canister service IP address unknownThis topic describes the methods that you can use to determine the service addressof a node canister.
If you are able to access the management GUI, the service IP addresses of the nodecanisters are shown by selecting a node and port at Settings > Network > ServiceIP Addresses.
If you are unable to access the management GUI but you know the managementIP address of the system, you can use the address to log into the service assistantthat is running on the configuration node.
46 Storwize V7000: Troubleshooting, Recovery, and Maintenance Guide
||
|
||
|||
|||

1. Point your browser at the /service directory of the management IP address ofthe system. If your management IP address is 11.22.33.44, point your webbrowser to 11.22.33.44/service.
2. Log into the service assistant.3. The service assistant home page lists the node canister that can communicate
with the node.4. If the service address of the node canister that you are looking for is listed in
the Change Node window, make the node the current node. Its service addressis listed under the Access tab of the node details.
If you know the service IP address of any node canister in the system, you can loginto the service assistant of that node. Follow the previous instructions for usingthe service assistant, but at step 1, point your browser at the /service directory ofthe service IP address you know. If you know a service IP address is 11.22.33.56,point your web browser to 11.22.33.56/service.
Some types of errors can prevent nodes from communicating with each other; inthat event, it might be necessary to point your browser directly at the serviceassistant of the node that requires administering, rather than change the currentnode in the service assistant.
If you are unable to find the service address of the node using the managementGUI or service assistant, you can also use a USB flash drive to find it. For moreinformation, see “Procedure: Getting node canister and system information using aUSB flash drive” on page 53.
Problem: Cannot connect to the service assistantThis topic provides assistance if you are unable to display the service assistant onyour browser.
You might encounter a number of situations when you cannot connect to theservice assistant.v Check that you have entered the “/service” path after the service IP address.
Point your web browser to <control enclosure management IP address>/service forthe node that you want to work on. For example, if you set a service address of11.22.33.44 for a node canister, point your browser to 11.22.33.44/service.
v Check that you are using the correct service address for the node canister. Tofind the IPv4 and IPv6 addresses that are configured on the node, go to“Problem: Node canister service IP address unknown” on page 46. Try accessingthe service assistant through these addresses. Verify that the IP address, subnet,and gateway are specified correctly for IPv4 addresses. Verify that the IPaddress, prefix, and gateway are specified for the IPv6 addresses. If any of thevalues are incorrect, see “Procedure: Changing the service IP address of a nodecanister” on page 61.
v You cannot connect to the service assistant if the node canister is not able tostart the Storwize V7000 code. To verify that the LEDs indicate that the code isactive, see “Procedure: Understanding the system status using the LEDs” onpage 54.
v The service assistant is configured on Ethernet port 1 of a node canister. Verifythat an Ethernet cable is connected to this port and to an active port on yourEthernet network. See “Procedure: Finding the status of the Ethernetconnections” on page 59 for details.
Chapter 6. Resolving a problem 47
|||
|
||
|||
|||||
||||
||||

v Ping the management address to see if the Ethernet network permits theconnection. If the ping fails, check the Ethernet network configuration to see ifthere is a routing or a firewall issue. Check that the Ethernet networkconfiguration is compatible with the gateway and subnet or prefix settings.Check that you have not used an address that is used by another device on yourEthernet network. If necessary, change the network configuration or see“Procedure: Changing the service IP address of a node canister” on page 61 tochange the service IP address of a node.
v A default service address is initially assigned to each node canister. The serviceIP address 192.168.70.121 subnet mask 255.255.255.0 is preconfigured on Ethernetport 1 of the upper canister, canister 1. The service IP address 192.168.70.122subnet mask 255.255.255.0 is preconfigured on Ethernet port 2 of the lowercanister, canister 2.You might not be able to access these addresses because of the followingconditions:– These addresses are the same as the addresses that are used by other devices
on the network.– These addresses cannot be accessed on your network.– There are other reasons why they are not suitable for use on your network.
If the previous conditions apply, see “Procedure: Changing the service IPaddress of a node canister” on page 61 to change the service IP address to onethat works in your environment.If you are unable to change the service address, for example, because you cannotuse a USB flash drive in the environment, see “Procedure: Accessing a canisterusing a directly attached Ethernet cable” on page 64.
Problem: Management GUI or service assistant does not displaycorrectly
This topic provides assistance if the Management GUI or the service assistant doesnot display correctly.
You must use a supported web browser. Verify that you are using a supported webbrowser from the following website:
www.ibm.com/storage/support/storwize/v7000
Switch to using a supported web browser. If the problem continues, contact IBMSupport.
Problem: A node canister has a location node errorThe node error that is listed on the service assistant home page or in the event logcan indicate a location error.
The node error, that is listed on the service assistant home page, can be classifiedas a location error. This indicates that the node canister, or the enclosure midplanehas been moved or changed. This is normally due to a service action not beingcompleted or not being implemented correctly.
There are a number of different conditions that report as a location error. Eachcondition is indicated by different node error. To find out how to resolve the nodeerror, go to “Procedure: Fixing node errors” on page 60.
48 Storwize V7000: Troubleshooting, Recovery, and Maintenance Guide
|
||
||||
|||

Be aware that after a node canister has been used in a system, the node canistermust not be moved to a different location, either within the same enclosure or in adifferent enclosure because this might compromise its access to storage, or a hostapplication's access to volumes. Do not move the canister from its original locationunless directed to do so by a service action.
Problem: SAS cabling not validThis topic provides information to be aware of if you receive errors that indicatethe SAS cabling is not valid.
Check the following items:v No more than five expansion enclosures can be chained to port 1 (below the
control enclosure). The connecting sequence from port 1 of the node canister iscalled chain 1.
v No more than four expansion enclosures can be chained to port 2 (above thecontrol enclosure). The connecting sequence from port 2 of the node canister iscalled chain 2.
v Do not connect a SAS cable between a port on an upper canister and a port on alower canister.
v In any enclosure, the same ports must be used on both canisters.v No SAS cable can be connected between ports in the same enclosure.v For any enclosure, the cables that are connected to SAS port 1 on each canister
must attach to the same enclosure. Similarly, for any enclosure, the cables thatare connected to SAS port 2 on each canister must attach to the same enclosure.Cable attachments for SAS port 1 and cable attachments for SAS port 2 do notgo to the same enclosure.
v For cables connected between expansion enclosures, one end is connected to port1 while the other end is connected to port 2.
v For cables that are connected between a control enclosure and expansionenclosures, port 1 must be used on the expansion enclosures.
v The last enclosure in a chain must not have cables in port 2 of canister 1 andport 2 of canister 2.
v Ensure that each SAS cable is fully inserted.
Problem: New expansion enclosure not detectedThis topic helps you resolve why a newly installed expansion enclosure was notdetected by the system.
When installing a new expansion enclosure, follow the management GUI AddEnclosure wizard, which is available from the Manage Devices Actions menu.
If the expansion enclosure is not detected, perform the following verifications:v Verify the status of the LEDs at the back of the expansion enclosure. At least one
power supply unit must be on with no faults shown. At least one canister mustbe active, with no fault LED on, and all the serial-attached SCSI (SAS) port 1LEDs must be on. For details about the LED status, see “Procedure:Understanding the system status using the LEDs” on page 54.
v Verify that the SAS cabling to the expansion enclosure is correctly installed. Toreview the requirements, see “Problem: SAS cabling not valid.”
Chapter 6. Resolving a problem 49
|||||

Problem: Control enclosure not detectedIf a control enclosure is not detected by the system, this procedure may help youresolve the problem.
When installing a new control enclosure, follow the management GUI Add Controland Expansion Enclosures wizard, which is available from the Monitoring >System Details menu. After selecting the control enclosure from the navigationtree, click the Actions menu, and then select Add Enclosures > Control andExpansions.
If the control enclosure is not detected, check the following items:v The enclosure is powered on.v The enclosure is not part of another system.v At least one node is in candidate state.v The Fibre Channel cables are connected and zoning is set up according to the
zoning rules defined in the SAN configuration and zoning rules summary topic.There must be a zone that includes all ports from all node canisters.
v The existing system and the nodes in the enclosure that are not detected haveStorwize V7000 6.2 or later installed.
Problem: Mirrored volume copies no longer identicalThe management GUI provides options to either check copies that are identical orto check that the copies are identical and to process any differences that are found.
To confirm that the two copies of a mirrored volume are still identical, choose thevolume view that works best for you. Select one of the volume copies in thevolume that you want to check. From the Actions menu, select the ValidateVolume Copies option.
You have the following choices:v Validate that the volume copies are identical.v Validate that the volume copies are identical, mark, and repair any differences
that are found.
If you want to resolve any differences, you have the following options:v Consider that one volume is correct and make the other volume copy match the
other copy if any differences are found. The primary volume copy is the copythat is considered correct.
v Do not assume that either volume copy is correct. If a difference is found, thesector is marked. A media error is returned if the volume is read by a hostapplication.
Problem: Command file not processed from USB flash drive
This information assists you in determining why the command file is not beingprocessed, when using a USB flash drive.
You might encounter this problem during initial setup or when running commandsif you are using your own USB flash drive rather than the USB flash drive thatwas packaged with your order.
50 Storwize V7000: Troubleshooting, Recovery, and Maintenance Guide
||

If you encounter this situation, verify the following items:v That an satask_result.html file is in the root directory on the USB flash drive.
If the file does not exist, then the following problems are possible:– The USB flash drive is not formatted with the correct file system type. Use
any USB flash drive that is formatted with FAT32 file system on its firstpartition; for example, NTFS is not a supported type. Reformat the key or usea different key.
– The USB port is not working. Try the key in the other USB port.– The node is not operational. Check the node status using the LEDs. See
“Procedure: Understanding the system status using the LEDs” on page 54.v If there is a satask_result.html file, check the first entry in the file. If there is
no entry that matches the time the USB flash drive was used, it is possible thatthe USB port is not working or the node is not operational. Check the nodestatus using the LEDs. See “Procedure: Understanding the system status usingthe LEDs” on page 54.
v If there is a status output for the time the USB flash drive was used, then thesatask.txt file was not found. Check that the file was named correctly. Thesatask.txt file is automatically deleted after it has been processed.
Procedure: Resetting superuser passwordYou can reset the superuser password to the default password of passw0rd byusing a USB flash drive command action.
About this task
You can use this procedure to reset the superuser password if you have forgottenthe password. This command runs differently depending on whether you run it ona node canister that is active in a clustered system.
Note: If a node canister is not in active state, the superuser password is stillrequired to log on to the service assistant.
It is possible to configure your system so that resetting the superuser passwordwith the USB flash drive command action is not permitted. If your system isconfigured this way, there is no work-around. Contact the person who knows thepassword.
To use a USB flash drive to reset the superuser password, see “USB flash drive andInitialization tool interface” on page 36.
See also “Problem: Unable to log on to the management GUI” on page 45.
Results
If the node canister is active in a clustered system, the password for superuser ischanged on the clustered system. If the node canister is not in active state, thesuperuser password for the node canister is changed. If the node canister joins aclustered system later, the superuser password is reset to that of the clusteredsystem.
Procedure: Identifying which enclosure or canister to serviceUse this procedure to identify which enclosure or canister must be serviced.
Chapter 6. Resolving a problem 51
|

About this task
Procedure
Use the following options to identify an enclosure. An enclosure is identified by itsID and serial number.v The ID is shown on the LCD panel on the front left of the enclosure. The serial
number is also found on the front left end cap of the enclosure and is repeatedon the rear left flange of the enclosure. The enclosure ID is unique within aStorwize V7000 system. However, if you have more than one Storwize V7000system, the same ID can be used within more than one system. The serialnumber is always unique.
Note: Use the Manage Device options from the management GUI to change theID of an enclosure. Use this option to set a unique ID on all your enclosures.
v Within an enclosure, a canister is identified by its slot location. Slot 1 is theupper canister. Slot 2 is the lower canister. A canister is uniquely identified bythe enclosure that it is in and the slot location. The ID can be shown as E-C orE|C where E is the enclosure ID and C is the canister location. On the serviceassistant, the ID is known as the Panel.
Note: When a node canister is added to a clustered system as a node, it is givena node name and a node ID. The default node name is nodeN, where N is aninteger number. This number does not represent the slot location of the node.Similarly, the node ID does not indicate the slot location. The Manage Device >Canister panel from the management GUI shows both the node name and thecanister location. The service assistant home page also shows both the nodename and the canister location. If you have only the node name, use thesepanels to determine the node canister location.
v Use the service assistant to identify a node canister by turning on the identifyLED of the containing enclosure. This option is at the upper left of the serviceassistant page. It is a good practice to identify a node in this way beforeperforming any service action. Performing a service action on the wrong canistercan lead to loss of access to data or loss of data.
Procedure: Checking the status of your systemUse this procedure to verify the status of objects in your system using themanagement GUI. If the status of the object is not online, view the alerts and runthe recommended fix procedures.
About this task
Volumes normally show offline because another object is offline. A volume isoffline if one of the MDisks that makes up the storage pool that it is in is offline.You do not see an alert that relates to the volume; instead, the alert relates to theMDisk. Performing the fix procedures for the MDisk enables the volume to goonline.
Procedure
Use the following management GUI functions to find a more detailed status:v Monitoring > System Details
v Pools > MDisks by Pools
52 Storwize V7000: Troubleshooting, Recovery, and Maintenance Guide
|
|||
|
|||||
|
|
|
|

v Volumes > Volumes
v Monitoring > Events, and then use the filtering options to display alerts,messages, or event types.
Procedure: Getting node canister and system information using theservice assistant
This procedure explains how to view information about the node canisters andsystem using the service assistant.
About this task
To obtain the information:1. Log on to the service assistant, as described in “Accessing the service assistant”
on page 342. View the information about the node canister to which you connected or the
other node canister in the enclosure. To change which node's information isshown, select the node in the Change Node table of the Home page.
The Home page shows a table of node errors that exist on the node canister and atable of node details for the current node. The node errors are shown in priorityorder.
The node details are divided into several sections. Each section has a tab. Examinethe data that is reported in each tab for the information that you want.v The Node tab shows general information about the node canister that includes
the node state and whether it is a configuration node.v The Hardware tab shows information about the hardware.v The Access tab shows the management IP addresses and the service addresses
for this node.v The Location tab identifies the enclosure in which the node canister is located.v The Ports tab shows information about the I/O ports.
Procedure: Getting node canister and system information using a USBflash drive
This procedure explains how to view information about the node canister andsystem using a USB flash drive.
About this task
Use any USB flash drive with a FAT32 file system on its first partition.1. Ensure that the USB flash drive does not contain a file named satask.txt in
the root directory.
If satask.txt does exist in the directory, the node attempts to run the commandthat is specified in the file. The information that is returned is appended to thesatask_result.html file. Delete this file if you no longer want the previous output.
Procedure1. Insert the USB flash drive in one of the USB ports of the node canister from
which you want to collect data.
Chapter 6. Resolving a problem 53
|
||
||
|
||
|
|
||
|||
|||
||
||
|
||
|
|
|

2. The node canister fault LED flashes while information is collected and writtento the USB flash drive.
3. Wait until the LED stops flashing before removing the USB flash drive. Becausethe LED is a fault indicator, it might remain permanently on or off.
4. View the results in file satask_result.html in a web browser. The file containsthe details and results of the command that was run and the status and theconfiguration information from the node canister.
Procedure: Understanding the system status using the LEDsThis procedure helps you determine the system status using the LED indicators onthe system.
About this task
The LEDs provide a general idea of the system status. You can obtain more detailfrom the management GUI and the service assistant. Examine the LEDs when youare not able to access the management GUI or the service assistant, or when thesystem is not showing any information about a device. For information about theLEDs, go to “Power supply unit and battery for the control enclosure” on page 6,“Power supply unit for the expansion enclosure” on page 7, “Fibre Channel portsand indicators” on page 8, “Ethernet ports and indicators” on page 11, “Nodecanister SAS ports and indicators” on page 13, “Node canister LEDs” on page 14,“Expansion canister SAS ports and indicators” on page 15, and “Expansion canisterLEDs” on page 16.
The procedure shows the status for the enclosure chassis, power supply units andbatteries, and canisters. It does not show the status for the drives.
The first step is to determine the state of the control enclosure, which includes itspower supply units, batteries, and node canisters. Your control enclosure isoperational if you can manage the system using the management GUI. You mightalso want to view the status of the individual power supply units, batteries, ornode canisters.
Find the control enclosure for the system that you are troubleshooting. There is onecontrol enclosure in a system. If you are unsure which one is the control enclosure,go to “Procedure: Identifying which enclosure or canister to service” on page 51.
Procedure1. Use the state of the ac power failure, power supply OK, fan failure, and dc
power failure LEDs on each power supply unit in the enclosure to determine ifthere is power to the system, or if there are power problems. Figure 21 on page55 shows the LEDs on the power supply unit for the 2076-112 or 2076-124. TheLEDs on the power supply units for the 2076-312 and 2076-324 are similar, butthey are not shown here.
54 Storwize V7000: Troubleshooting, Recovery, and Maintenance Guide
||

Table 18. Power-supply unit LEDs
Powersupply
OKac failure
Fan
failuredc failure
Status Action
On On On On Communicationfailure betweenthe powersupply unit andthe enclosurechassis
Replace the powersupply unit. If failure isstill present, replace theenclosure chassis.
Off Off Off Off No ac power tothe enclosure.
Turn on power.
Off Off Off On The ac power ison but powersupply unit isnot seatedcorrectly in theenclosure.
Seat the power supplyunit correctly in theenclosure.
svc00670
1
1
Figure 21. LEDs on the power supply units of the control enclosure
Chapter 6. Resolving a problem 55

Table 18. Power-supply unit LEDs (continued)
Powersupply
OKac failure
Fan
failuredc failure
Status Action
Off On Off On No ac power tothis powersupply
1. Check that the switchon the power supplyunit is on.
2. Check that the acpower is on.
3. Reseat and replacethe power cable.
On Off Off Off Power supply ison andoperational.
No actions
Off Off On Off Fan failure Replace the powersupply unit.
Off On On On Communicationfailure andpower supplyproblem
Replace the powersupply unit. If replacingthe power supply unitdoes not fix the problem,replace the enclosurechassis.
Flashing X X X No canister isoperational.
Both canisters are eitheroff or not seatedcorrectly. Turn off theswitch on both powersupply units and thenturn on both switches. Ifthis action does notresolve the problem,remove both canistersslightly and then pushthe canisters back in.
Off Flashing Flashing Flashing Firmware isdownloading.
No actions. Do notremove ac power.Note: In this case, ifthere is a battery in apower supply unit, itsLEDs also flash.
2. At least one power supply in the enclosure must indicate Power supply OK orPower supply firmware downloading for the node canisters to operate. For thissituation, review the three canister status LEDs on each of the node canisters.Start with the power LED.
Table 19. Power LEDs
Power LED
status Description
Off There is no power to the canister. Try reseating the canister. Go to “Procedure:Reseating a node canister” on page 65. If the state persists, follow thehardware replacement procedures for the parts in the following order: nodecanister, enclosure chassis.
56 Storwize V7000: Troubleshooting, Recovery, and Maintenance Guide

Table 19. Power LEDs (continued)
Power LED
status Description
Slowflashing (1Hz)
Power is available, but the canister is in standby mode. Try to start the nodecanister by reseating it. Go to “Procedure: Reseating a node canister” on page65.
Fastflashing (2Hz)
The canister is running its power-on self-test (POST). Wait for the test tocomplete. If the canister remains in this state for more than 10 minutes, tryreseating the canister. Go to “Procedure: Reseating a node canister” on page65. If the state persists, follow the hardware replacement procedure for thenode canister.
Figure 22 shows the LEDs on the node canister.
3. If the power LED is on, consider the states of the clustered-system status andfault LEDs.
Table 20. System status and fault LEDs
System status
LED Fault LED Status Action
Off Off Code is notactive.
v Follow procedures for reviewingpower LEDs.
v If the power LEDs show green, reseatthe node canister. See “Procedure:Reseating a node canister” on page65. If the LED status does notchange, see “Replacing a nodecanister” on page 85.
Off On Code is notactive. The BIOSor the serviceprocessor hasdetected ahardware fault.
Follow the hardware replacementprocedures for the node canister.
On Off Code is active.Node state isactive.
No action. The node canister is part ofa clustered system and can be managedby the management GUI.
1
svc006721
Figure 22. LEDs on the node canisters
Chapter 6. Resolving a problem 57

Table 20. System status and fault LEDs (continued)
System status
LED Fault LED Status Action
On On Code is activeand is in startingstate. However, itdoes not haveenough resourcesto form theclustered system.
The node canister cannot become activein a clustered system. There are nodetected problems on the node canisteritself. However, it cannot connect toenough resources to safely form aclustered system. Follow the procedureto fix the node errors. Go to“Procedure: Fixing node errors” onpage 60.
Flashing Off Code is active.Node state iscandidate.
Create a clustered system on the nodecanister, or add the node canister to theclustered system. If the other nodecanister in the enclosure is in activestate, it automatically adds this nodecanister into the clustered system. Anode canister in this state can bemanaged using the service assistant.
Flashing On Code is active.Node state isservice.
The node canister cannot become activein a clustered system. Several problemscan exist: hardware problem, a problemwith the environment or its location, orproblems with the code or data on thecanister. Follow the procedure to fix thenode errors. Go to “Procedure: Fixingnode errors” on page 60.
Any Flashing The node canisteris beingidentified so thatyou can locate it.
The fix procedures in the managementGUI might have identified thecomponent because it requiresservicing. Continue to follow the fixprocedures. The service assistant has afunction to identify node canisters. Ifthe identification LED is on in error,use the service assistant node actions toturn off the LED.
Results
To review the status of the control enclosure batteries, see Table 21.
Table 21. Control enclosure battery LEDs
Battery Good+ -
Battery Fault+ -
Description Action
On Off Battery is good and fullycharged.
None
Flashing off Battery is good but not fullycharged. The battery is eithercharging or a maintenancedischarge is being performed.
None
58 Storwize V7000: Troubleshooting, Recovery, and Maintenance Guide

Table 21. Control enclosure battery LEDs (continued)
Battery Good+ -
Battery Fault+ -
Description Action
Off On Nonrecoverable battery fault. Replace the battery. Ifreplacing the batterydoes not fix the issue,replace the power supplyunit.
Off Flashing Recoverable battery fault. None
Flashing Flashing The battery cannot be usedbecause the firmware for thepower supply unit is beingdownloaded.
None
Procedure: Finding the status of the Ethernet connectionsThis procedure explains how to find the status of the Ethernet connections whenyou cannot connect.
About this task
Ensure that the software is active on the node before you begin this procedure. Goto “Procedure: Understanding the system status using the LEDs” on page 54.Ethernet port 1 must be connected to an active port on your Ethernet network.
Determine the state of the Ethernet LEDs by using one of the following methods:v Use the USB flash drive to obtain the most comprehensive information for the
node status. Go to “Procedure: Getting node canister and system informationusing a USB flash drive” on page 53.The status, speed, and MAC address are returned for each port. Information isreturned that identifies whether the node is the configuration node and if anynode errors were reported.
v Examine the LEDs of the Ethernet ports. For the status of the LEDs, go to“Ethernet ports and indicators” on page 11.
If your link is not connected, perform the following actions to check the port statuseach time until it is corrected or connected:
Procedure1. Verify that each end of the cable is securely connected.2. Verify that the port on the Ethernet switch or hub is configured correctly.3. Connect the cable to a different port on your Ethernet network.4. If the status is obtained using the USB flash drive, review all the node errors
that are reported.5. Replace the Ethernet cable.
Procedure: Removing system data from a node canisterThis procedure guides you through the process to remove system information froma node canister. The information that is removed includes configuration data, cachedata, and location data.
Chapter 6. Resolving a problem 59

About this task
Attention: If the enclosure reaches a point where the system data is not availableon any node canister in the system, you have to perform a system recovery. Thisrecovery is an extended service action and might not be able to recover all of yourvolumes. Do not perform this action to remove the system data from a node unlessthere is a node canister with saved system information in the enclosure. Do notremove the system data from a node unless instructed to do so by a serviceprocedure.
Procedure1. Start the service assistant on the node canister.2. Use the service assistant node action to hold the node in service state.3. Use the Manage System option to remove the system data from the node.
Results
The node restarts in service state. When you want the node canister to be activeagain, use the service assistant home page action to leave service state.
Procedure: Deleting a system completely
This procedure guides you through the process of completely removing all systeminformation. When the procedure is finished, the system performs like a newinstallation.
About this task
Attention: This procedure makes all the volume data that you have on yoursystem inaccessible. You cannot recover the data. This procedure affects allvolumes that are managed by your system.
Do not continue unless you are certain that you want to remove all the volumedata and configuration data from your system. This procedure is not used as partof any recovery action.
There are two stages to this procedure. First, the node canisters are reset. Second,the enclosure data is reset.
Procedure1. Start the service assistant on one of the node canisters.2. Use the service assistant node action to hold the node in service state.3. Use the Manage System option to remove the system data from the node.4. Perform the previous steps on the second node canister in the enclosure.5. On one node, open the service assistant Configure Enclosure and select the
Reset System ID option. This action causes the system to reset.
Procedure: Fixing node errorsTo fix a node error that is detected on one of the node canisters in your system,use this procedure.
60 Storwize V7000: Troubleshooting, Recovery, and Maintenance Guide
|||
|||
||

About this task
Node errors are reported when there is an error that is detected that affects aspecific node canister.
Procedure1. Use the service assistant to view the current node errors on any node.2. If available, use the management GUI to run the recommended action for the
alert.3. Follow the fix procedure instructions.4. If the recommended action does not provide sufficient information to determine
the service action, review the node error descriptions and service actions. Go to“Error code range” on page 138.See the node error descriptions if you cannot access the management GUI or ifthe management GUI is not reporting an alert because it cannot connect to thenode. When you cannot connect to the management GUI, follow the procedurefor getting node canister and clustered-system information using the serviceassistant. Go to “Procedure: Getting node canister and system informationusing the service assistant” on page 53. Start with the node that displays anerror. The home page shows the node errors on the current node in the prioritythat you must service them. Start with the node error with the highest priority.
5. Select a different node in the system to see the node errors on that node.6. Attempt to service the node errors in the priority order that they are listed.7. Use the error number as an index when reviewing the node error descriptions.
The service actions for each error are listed with the error code. Go to “Errorcode range” on page 138.
Procedure: Changing the service IP address of a node canisterThis procedure identifies many methods that you can use to change the service IPaddress of a node canister.
About this task
When you change an IPv4 address, you change the IP address, the subnet, mask,and gateway. When you change an IPv6 address, you change the IP address,prefix, and gateway.
Which method to use depends on the status of the system and the other nodecanisters in the system. Follow the methods in the order shown until you aresuccessful in setting the IP address to the required value.
You can set an IPv4 address, an IPv6 address, or both, as the service address of anode. Enter the required address correctly. If you set the address to 0.0.0.0 or0000:0000:0000:0000:0000:0000:0000, you disable the access to the port on thatprotocol.
Procedure
Change the service IP address.v Use the control enclosure management GUI when the system is operating and
the system is able to connect to the node with the service IP address that youwant to change.
Chapter 6. Resolving a problem 61

1. Select Settings > Network from the navigation.2. Select Service IP Addresses.3. Complete the panel. Be sure to select the correct node to configure.
v Use the service assistant when you can connect to the service assistant on eitherthe node canister that you want to configure or on a node canister that canconnect to the node canister that you want to configure:1. Make the node canister that you want to configure the current node.2. Select Change Service IP from the menu.3. Complete the panel.
v Use one of the following procedures if you cannot connect to the node canisterfrom another node:– Use the initialization tool to write the correct command file to the USB flash
drive. Go to “Using the initialization tool” on page 37.– Use a text editor to create the command file on the USB flash drive. Go to
“Using a USB flash drive” on page 36.
Procedure: Initializing a clustered system with a USB flash drivewithout using the initialization tool
Use this procedure to initialize a clustered system using a USB flash drive whenyou do not have a Microsoft Windows workstation to run the initialization tool oryou do not have a copy of the tool.
About this task
In these situations, you must manually create an satask.txt file on a USB flashdrive to initialize your clustered system. Use the USB flash drive that was suppliedwith your system or any USB flash drive that is formatted with a FAT32 filesystem on its first partition.
Procedure1. Open a file editor that can create ASCII text files.2. Create a file called satask.txt.3. Add a single line of command text to the file.
If you are creating a clustered system with an IPv4 address, the command lineis like the following string:satask mkcluster -clusterip aaa.aaa.aaa.aaa
-gw ggg.ggg.ggg.ggg -mask mmm.mmm.mmm.mmm
where you must replace aaa.aaa.aaa.aaa with the management IP address,ggg.ggg.ggg.ggg with the network gateway address, and mmm.mmm.mmm.mmmwith the subnet mask address.If you are creating a clustered system with an IPv6 address, the command lineis like the following string:satask mkcluster -clusterip_6 aaaa:aaaa:aaaa:aaaa:aaaa:aaaa:aaaa:aaaa
-gw_6 gggg:gggg:gggg:gggg:gggg:gggg:gggg:gggg -prefix_6 pp
where you must replace aaaa:aaaa:aaaa:aaaa:aaaa:aaaa:aaaa:aaaa with themanagement IPv6 address, gggg:gggg:gggg:gggg:gggg:gggg:gggg:gggg with thenetwork gateway IPv6 address, and pp with the prefix value.
4. Save the file to a USB flash drive.
62 Storwize V7000: Troubleshooting, Recovery, and Maintenance Guide

5. Plug the USB flash drive into a USB port on a control canister.6. The system detects the USB flash drive, reads the satask.txt file, runs the
command, and writes the results to the USB flash drive. The satask.txt file isdeleted after the command is run.
7. Wait for the fault LED on the node canister to stop flashing before removingthe USB flash drive.
8. Remove the USB flash drive and insert it into your workstation to view theresults.
9. Use a web browser to view the results file, satask_result.html.Check that there were no errors returned by the command. If there isinsufficient battery charge to protect the system, the clustered system createssuccessfully, but it does not start immediately. In the results, look for thetime_to_charge field for the battery. The results provide an estimate of thetime, in minutes, before the system can start. If the time is not 0, wait for therequired time. Check that the node canister that you inserted the USB flashdrive into has its clustered-state LED on permanently. For additionalinformation, see “Procedure: Understanding the system status using theLEDs” on page 54.
10. If the initialization was successful and the batteries are sufficiently charged,point a supported browser to the management IP address that you specifiedto start the management GUI. You see the management GUI logon panel.
11. Log on as superuser. Use passw0rd for the password.12. Follow the on-screen instructions.
Results
For more information about using the USB flash drive, see “USB flash drive andInitialization tool interface” on page 36.
Procedure: Initializing a clustered system using the service assistantTo initialize a clustered system using the service assistant rather than the USB flashdrive, use this procedure.
About this task
Note: The service assistant gives you the option to create a clustered system onlyif the node state is candidate.
To initialize a clustered system using the service assistant, perform the followingsteps:
Procedure1. Point your web browser to the service assistant address of a node canister. It is
best to use node canister in slot 1; when viewed from the rear of the controlenclosure, the left node canister. The default service address for this canister is192.168.70.121/service.
2. Log on with the superuser password. The default password is passw0rd.If you are unable to connect, see “Problem: Cannot connect to the serviceassistant” on page 47.
3. Select Manage System.4. Enter the system name and the management IP address.
Chapter 6. Resolving a problem 63
||||

5. Click Create System.
Results
Attention: Without a USB flash drive to service the system, it is not possible toreset the superuser password or to change the system IP addresses in the event ofa fault that prevents access to the management interface. It is essential that youtake steps to record this information for use in the event of a failure.
Procedure: Accessing a canister using a directly attached Ethernetcable
If you need to use a direct Ethernet connection to attach a personal computer to anode canister to run the service assistant or to use the service CLI, use thisprocedure.
About this task
Perform this procedure if you are not authorized to use a USB flash drive in yourdata center and when the service address of your nodes cannot be accessed overyour Ethernet network. This situation might occur for a new installation where thedefault service IP addresses cannot be accessed on your network. The defaultservice addresses are listed in “Problem: Cannot connect to the service assistant”on page 47.
Note: Do not attempt to use a directly attached Ethernet cable to a canister that isactive in a clustered system. You might disrupt access from host applications or themanagement GUI. If the node is active, go to Settings > Network in themanagement GUI to set the service IP address to one that is accessible on thenetwork.
Perform the following steps to access a canister using a directly attached Ethernetcable:
Procedure1. Connect one end of an Ethernet cable to Ethernet port 1 of a node canister in
the control enclosure.
Note: A cross-over Ethernet cable is not required.2. Connect the other end of the Ethernet cable directly to the Ethernet port on a
personal computer that has a web browser installed.3. Use the operating system tools on the computer to set the IP address of the
Ethernet port that is used in the previous step to 192.168.70.10.4. Point the web browser to the service IP address for the node canister attached
at step 1. If the service IP address has not been changed at any time, use thedefault service IP addresses listed in “Problem: Cannot connect to the serviceassistant” on page 47.
5. Log on with the superuser password. The default password is passw0rd.6. After the action completes, disconnect your personal computer, and reconnect
the node canister to the Ethernet network.7. Set the service address of the canister to one that can be accessed on the
network as soon as possible.
64 Storwize V7000: Troubleshooting, Recovery, and Maintenance Guide
||||||
|||||
||
|
||||
|
||
||

Procedure: Reseating a node canisterUse this procedure to reseat a canister that is in service state or because a serviceaction has directed you.
About this task
Verify that you are reseating the correct node canister and that you use the correctcanister handle for the node that you are reseating. Handles for the node canistersare located next to each other. The handle on the right operates the upper canister.The handle on the left operates the lower canister.
Procedure1. Verify the clustered-system status LED on the node canister. If it is
permanently on, the node is active. If the node is active, no reseating isrequired.
2. Verify that you have selected the correct node canister and verify why you arereseating it. Go to “Procedure: Identifying which enclosure or canister toservice” on page 51.If you reseat a node that is active, it cannot store its state data and cannotrestart without other service actions.If the other node canister in the enclosure is not active, reseating the nodecanister while it is active results in loss of the data on your volumes and thesystem is unavailable to hosts.
3. Grasp the handle between the thumb and forefinger.4. Squeeze them together to release the handle.5. Pull out the handle to its full extension.6. Grasp the canister and pull it out 2 or 3 inches.7. Push the canister back into the slot until the handle starts to move.8. Finish inserting the canister by closing the handle until the locking catch clicks
into place.9. Verify that the cables were not displaced.
10. Verify that the LEDs are on.
Results
Procedure: Powering off your systemUse this procedure to power off your Storwize V7000 system when it must beserviced or to permit other maintenance actions in your data center.
About this task
To power off your Storwize V7000 system, use the following steps:1. Stop hosts.2. Shut down the system by using the management GUI. Click Monitoring >
System Details. From the Actions menu, select Shut Down System.3. Wait for the power LED on both node canisters in all control enclosures to start
flashing, which indicates that the shutdown operation has completed.The following figure shows the LEDs on the node canisters. The power LED isthe LED on the left when the canister is top-side up.
Chapter 6. Resolving a problem 65
||
||
|
||||
|
|||
|||
||
|||
|
|
|
|
|
||
|
|
|
||
||
|
|
|
||
||
|||

4. Using the power switches, power off the control enclosures.5. Using the power switches, power off the expansion enclosures.6. (Optional) Shut down external storage systems.7. (Optional) Shut down Fibre Channel switches.
Procedure: Collecting information for supportIBM support might ask you to collect trace files and dump files from your systemto help them resolve a problem.
About this task
The management GUI and the service assistant have features to assist you incollecting the required information. The management GUI collects informationfrom all the components in the system. The service assistant collects informationfrom a single node canister. When the information that is collected is packagedtogether in a single file, the file is called a snap.
Special tools that are only available to the support teams are required to interpretthe contents of the support package. The files are not designed for customer use.
Procedure
Always follow the instructions that are given by the support team to determinewhether to collect the package by using the management GUI or the serviceassistant. Instruction is also given for which package content option is required.v If you are collecting the package by using the management GUI, select Settings
> Support. Click Download Support Package. Follow the instructions todownload the appropriate log files.
v If you are collecting the package by using the service assistant, ensure that thenode that you want to collect logs from is the current node. Select the CollectLogs option from the navigation. You can collect a support package or copy anindividual file from the node canister. Follow the instructions to collect theinformation.
1
svc006721
Figure 23. LEDs on the node canisters
66 Storwize V7000: Troubleshooting, Recovery, and Maintenance Guide
|
|
|
|
||
||
|
|||||
||
|
|||
|||
|||||
Procedure: Rescuing node canister software from another node (noderescue)
Use this procedure to perform a node rescue.
About this task
A failure has indicated that the node software is damaged and must be reinstalled.
Procedure1. Ensure that the node you want to reinstall the code on is the current node. Go
to “Accessing the service assistant” on page 34.2. Select Reinstall Machine Code from the navigation.3. Select Rescue from another node.
Results
Procedure: FCoE host-linkAbout this task
If you are having problems attaching to the FCoE hosts, your problem might berelated to the network, the Storwize V7000 system, or the host.
Procedure1. If you are seeing error code 705 on the node, this means Fibre Channel I/O
port is inactive. Note that FCoE uses Fibre Channel as a protocol and anEthernet as an interconnect. If you are dealing with an FCoE enabled port thatmeans either the Fibre Channel Forwarder (FCF) is not seen or the FCoEfeature is not configured on the switch:a. Check that the FCoE feature is enabled on the FCF.b. Check the remote port (switch port) properties on the FCF.
2. If you connecting the host through a Converged Enhanced Ethernet (CEE)switch, for network problems, you can attempt any of the following actions:a. Test your connectivity between the host and CEE switch.b. Ask the Ethernet network administrator to check the firewall and router
settings.3. Please run svcinfo lsfabric and check that the host is seen as a remote port in
the output. If not, then do the following tasks in order:a. Verify that Storwize V7000 and host get an fcid on FCF. If not, check the
VLAN configuration.b. Verify that Storwize V7000 and host port are part of a zone and that zone is
currently in force.c. Verify the volumes are mapped to the host and that they are online. See
lshostvdiskmap and lsvdisk in the CLI configuration guide for moreinformation.
4. If you still have FCoE problems, you can attempt the following action:a. Verify that the host adapter is in good state. You can unload and load the
device driver and see the operating system utilities to verify that the devicedriver is installed, loaded, and operating correctly.
Chapter 6. Resolving a problem 67
||
|
|
|
|
||

SAN problem determination
About this task
SAN failures might cause Storwize V7000 volumes to be inaccessible to hostsystems. Failures can be caused by SAN configuration changes or by hardwarefailures in SAN components.
The following list identifies some of the hardware that might cause failures:v Power, fan, or cooling switchv Application-specific integrated circuitsv Installed small form-factor pluggable (SFP) transceiverv Fiber-optic cables
Perform the following steps if you were sent here from the error codes:
Procedure1. Verify that the power is turned on to all switches and storage controllers that
the Storwize V7000 system uses, and that they are not reporting any hardwarefailures. If problems are found, resolve those problems before proceedingfurther.
2. Verify that the Fibre Channel cables that connect the systems to the switchesare securely connected.
3. If you have a SAN management tool, use that tool to view the SAN topologyand isolate the failing component.
Fibre Channel link failuresWhen a failure occurs on a single Fibre Channel link, the small form-factorpluggable (SFP) transceiver might need to be replaced.
Before you begin
The following items can indicate that a single Fibre Channel link has failed:v The Fibre Channel status LEDs at the rear of the node canisterv An error that indicates a single port has failed
Attempt each of these actions, in the following order, until the failure is fixed:1. Ensure that the Fibre Channel cable is securely connected at each end.2. Replace the Fibre Channel cable.3. Replace the SFP transceiver for the failing port on the Storwize V7000 Storwize
V7000 node.
Note: Storwize V7000 nodes are supported with both longwave SFPtransceivers and shortwave SFP transceivers. You must replace an SFPtransceiver with the same type of SFP transceiver. If the SFP transceiver toreplace is a longwave SFP transceiver, for example, you must provide a suitablereplacement. Removing the wrong SFP transceiver could result in loss of dataaccess.
4. Perform the Fibre Channel switch service procedures for a failing Fibre Channellink. This might involve replacing the SFP transceiver at the switch.
5. Contact IBM Support for assistance in replacing the node canister.
68 Storwize V7000: Troubleshooting, Recovery, and Maintenance Guide
|
|
|
|
|

Servicing storage systemsStorage systems that are supported for attachment to the Storwize V7000 systemare designed with redundant components and access paths to enable concurrentmaintenance. Hosts have continuous access to their data during component failureand replacement.
Chapter 6. Resolving a problem 69

70 Storwize V7000: Troubleshooting, Recovery, and Maintenance Guide

Chapter 7. Recovery procedures
This topic describes these recovery procedures: recover a system and back up andrestore a system configuration.
Recover system procedureThe recover system procedure recovers the entire system if the block cluster statehas been lost from all nodes.The recover system procedure recovers the entirestorage system if the data has been lost from all control enclosure node canisters.The procedure re-creates the storage system by using saved configuration data. Therecovery might not be able to restore all volume data. This procedure is alsoknown as Tier 3 (T3) recovery.
Attention: Perform service actions only when directed by the fix procedures. Ifused inappropriately, service actions can cause loss of access to data or even dataloss. Before attempting to recover a storage system, investigate the cause of thefailure and attempt to resolve those issues by using other fix procedures. Read andunderstand all of the instructions before performing any action.
Attention: Do not attempt the recovery procedure unless the following conditionsare met:v All hardware errors are fixed.v All node canisters have candidate status.v All node canisters must be at the same level of code that the storage system had
before the system failure. If any node canisters were modified or replaced, usethe service assistant to verify the levels of code, and where necessary, to upgradeor downgrade the level of code.
The system recovery procedure is one of several tasks that must be performed. Thefollowing list is an overview of the tasks and the order in which they must beperformed:1. Preparing for system recovery
a. Review the information regarding when to run the recover systemprocedure
b. Fix your hardware errorsc. Remove the system information for node canisters with error code 550 or
error code 578 by using the service assistant.2. Performing the system recovery. After you prepared the system for recovery
and met all the pre-conditions, run the system recovery.
Note: Run the procedure on one system in a fabric at a time. Do not performthe procedure on different node canisters in the same system. This restrictionalso applies to remote systems.
3. Performing actions to get your environment operationalv Recovering from offline VDisks (volumes) by using the CLIv Checking your system, for example, to ensure that all mapped volumes can
access the host.
© Copyright IBM Corp. 2010, 2012 71

When to run the recover system procedureA recover procedure must be attempted only after a complete and thoroughinvestigation of the cause of the system failure. Attempt to resolve those issues byusing other service procedures.
Attention: If you experience failures at any time while you are running therecover system procedure, call the IBM Support Center. Do not attempt to dofurther recovery actions because these actions might prevent IBM Support fromrestoring the system to an operational status.
Certain conditions must be met before you run the recovery procedure. Use thefollowing items to help you determine when to run the recovery procedure:
Note: It is important that you know the number of control enclosures in thesystem, and when the instructions indicate that every node is checked, you mustcheck the status of both nodes in every control enclosure. For some systemproblems or Fibre Channel network problems, you must run the service assistantdirectly on the node to get its status.v Check to see if any node in the system has a node status of active. This status
means that the system is still available. In this case, recovery is not necessary.v Do not recover the system if the management IP address is available from
another node. Ensure that all service procedures have been run.v Check the node status of every node canister that is part of this system. Resolve
all hardware errors except node error 578 or node error 550.– All nodes must be reporting either a node error 578 or a node error 550.
These error codes indicate that the system has lost its configuration data. Ifany nodes report anything other than these error codes, do not perform arecovery. You can encounter situations where non-configuration nodes reportother node errors, such as a 550 node error. The 550 error can also indicatethat a node is not able to join a system.
– If any nodes show a node error 550, record the error data that is associatedwith the 550 error from the service assistant.- In addition to the node error 550, the report can show data that is
separated by spaces in one of the following forms:v Node identifiers in the format: <enclosure_serial>-<canister slot ID>(7
characters, hyphen, 1 number), for example, 01234A6-2v Quorum drive identifiers in the format: <enclosure_serial>:<drive slot
ID>[<drive 11S serial number>] (7 characters, colon, 1 or 2 numbers,open square bracket, 22 characters, close square bracket), for example,01234A9:21[11S1234567890123456789]
v Quorum MDisk identifier in the format: WWPN/LUN (16 hexadecimaldigits followed by a forward slash and a decimal number), for example,1234567890123456/12
- If the error data contains a node identifier, ensure that the node that isreferred to by the ID is showing node error 578. If the node is showing anode error 550, ensure that the two nodes can communicate with eachother. Verify the SAN connectivity, and if the 550 error is still present,restart one of the two nodes by clicking Restart Node from the serviceassistant.
- If the error data contains a quorum drive identifier, locate the enclosurewith the reported serial number. Verify that the enclosure is powered onand that the drive in the reported slot is powered on and functioning. If thenode canister that is reporting the fault is in the I/O group of the listed
72 Storwize V7000: Troubleshooting, Recovery, and Maintenance Guide

enclosure, ensure that it has SAS connectivity to the listed enclosure. If thenode canister that is reporting the fault is in a different I/O group from thelisted enclosure, ensure that the listed enclosure has SAS connectivity toboth node canisters in the control enclosure in its I/O group. Afterverifying these things, restart the node by clicking Restart Node from theservice assistant.
- If the error data contains a quorum MDisk identifier, verify the SANconnectivity between this node and that WWPN. Check the storagecontroller to ensure that the LUN referred to is online. After verifying thesethings, if the 550 error is still present, restart the node by clicking RestartNode from the service assistant.
- If there is no error data, the error is because there are insufficientconnections between nodes over the Fibre Channel network. Each nodemust have at least two independent Fibre Channel logical connections, orlogins, to every node that is not in the same enclosure. An independentconnection is one where both physical ports are different. In this case, thereis a connection between the nodes, but there is not a redundant connection.If there is no error data, wait 3 minutes for the SAN to initialize. Nextcheck that the following items:v That there are at least two Fibre Channel ports that are operational and
connected on every node.v That the SAN zoning allows every port to connect to every port on every
other nodev If redundant SANs are being used, that all of them are operational.After verifying these things, if the 550 error is still present, restart the nodeby clicking Restart Node from the service assistant.
Note: If after resolving all these scenarios, half or greater than half of thenodes are reporting node error 578, it is appropriate to run the recoveryprocedure. You can also call IBM Support for further assistance.
– For any nodes that are reporting a node error 550, ensure that all the missinghardware that is identified by these errors is powered on and connectedwithout faults. If you cannot contact the service assistant from any node,isolate the problems by using the LED indicators.
– If you have not been able to restart the system and if any node other than thecurrent node is reporting node error 550 or 578, you must remove systemdata from those nodes. This action acknowledges the data loss and puts thenodes into the required candidate state.
v Do not attempt to recover the system if you have been able to restart it.v If back-end MDisks are removed from the configuration, those volumes that
depended on that hardware cannot be recovered. All previously configuredback-end hardware must be present for a successful recovery.
v Any nodes that were replaced must have the same WWNN as the nodes thatthey replaced.
v If any of the node canisters were replaced, they must not have participated inany other system. You can resolve this issue by performing a node rescue on theaffected canister by using the service assistant. Do not perform this action onany of the other node canisters.
v The configuration backup file must be up to date. If any configuration changeshad been made since the backup was taken, the data is inconsistent and furtherinvestigation is needed. Manual changes are required after the system isrecovered.
Chapter 7. Recovery procedures 73

v Any data that was in the cache at the point of failure is lost. The loss of data canresult in data corruption on the affected volumes. If the volumes are corrupted,call the IBM Support Center.
Fix hardware errorsBefore you can run a system recovery procedure, it is important that the root causeof the hardware issues be identified and fixed.
Obtain a basic understanding about the hardware failure. In most situations whenthere is no clustered system, a power issue is the cause. For example, both powersupplies might have been removed.
Removing system information for node canisters with errorcode 550 or error code 578 using the service assistant
The system recovery procedure works only when all node canisters are incandidate status. If there are any node canisters that display error code 550 or errorcode 578, you must remove their data.
About this task
Before performing this task, ensure that you have read the introductoryinformation in the overall recover system procedure.
To remove system information from a node canister with an error 550 or 578,follow this procedure using the service assistant:
Procedure1. Point your browser to the service IP address of one of the nodes, for example,
https://node_service_ip_address/service/.If you do not know the IP address or if it has not been configured, you mustassign an IP address using the initialization tool.
2. Log on to the service assistant.3. Select Manage System.4. Click Remove System Data.5. Confirm that you want to remove the system data when prompted.6. Remove the system data for the other nodes that display a 550 or a 578 error.
All nodes previously in this system must have a node status of Candidate andhave no errors listed against them.
7. Resolve any hardware errors until the error condition for all nodes in thesystem is None.
8. Ensure that all nodes in the system display a status of candidate.
Results
When all nodes display a status of candidate and all error conditions are None,you can run the recovery procedure.
Performing system recovery using the service assistantStart recovery when all node canisters that were members of the system are onlineand have candidate status. If any nodes display error code 550 or 578, remove theirsystem data to place them into candidate status. Do not run the recoveryprocedure on different node canisters in the same system.
74 Storwize V7000: Troubleshooting, Recovery, and Maintenance Guide

About this task
All node canisters must be at the original level of code, prior to the system failure.If any node canisters were modified or replaced, use the service assistant to verifythe levels of code, and where necessary, to upgrade or downgrade the level ofcode.
Attention: This service action has serious implications if not performed properly.If at any time an error is encountered not covered by this procedure, stop and callIBM Support.
Note: The web browser must not block pop-up windows, otherwise progresswindows cannot open.
Any one of the following categories of messages may be displayed:v T3 successful
The volumes are back online. Use the final checks to get your environmentoperational again.
v T3 recovery completed with errors
T3 recovery completed with errors: One or more of the volumes are offlinebecause there was fast write data in the cache. To bring the volumes online, see“Recovering from offline VDisks using the CLI” on page 76 for details.
v T3 failed
Call IBM Support. Do not attempt any further action.
Run the recovery from any node canisters in the system; the node canisters mustnot have participated in any other system.
Note: Each individual stage of the recovery procedure might take significant timeto complete, dependant upon the specific configuration.
Before performing this procedure, read the recover system procedure introductoryinformation; see “Recover system procedure” on page 71.
Procedure1. Point your browser to the service IP address of one of the node canisters.
If the IP address is unknown or has not been configured, assign an IP addressusing the initialization tool; see “Procedure: Changing the service IP address ofa node canister” on page 61.
2. Log on to the service assistant.3. Check that all node canisters that were members of the system are online and
have candidate status.If any nodes display error code 550 or 578, remove their system data to placethem into candidate status; see “Procedure: Removing system data from a nodecanister” on page 59.
4. Select Recover System from the navigation.5. Follow the online instructions to complete the recovery procedure.
a. Verify the date and time of the last quorum time. The time stamp must beless than 30 minutes before the failure. The time stamp format isYYYYMMDD hh:mm, where YYYY is the year, MM is the month, DD is theday, hh is the hour, and mm is the minute.
Chapter 7. Recovery procedures 75

Attention: If the time stamp is not less than 30 minutes before the failure, callIBM Support.a. Verify the date and time of the last backup date. The time stamp must be
less than 24 hours before the failure. The time stamp format is YYYYMMDDhh:mm, where YYYY is the year, MM is the month, DD is the day, hh is thehour, and mm is the minute.
Attention: If the time stamp is not less than 24 hours before the failure, callIBM Support.Changes made after the time of this backup date might not be restored.
Results
Verify the environment is operational by performing the checks provided in “Whatto check after running the system recovery” on page 77.
If any errors are logged in the error log after the system recovery procedurecompletes, use the fix procedures to resolve these errors, especially the errorsrelated to offline arrays.
If the recovery completes with offline volumes, go to “Recovering from offlineVDisks using the CLI.”
Recovering from offline VDisks using the CLIIf a Tier 3 recovery procedure completes with offline volumes, then it is likely thatthe data which was in the write-cache of the node canisters was lost during thefailure that caused all of the node canisters to lose the block storage system clusterstate. You can use the command-line interface (CLI) to acknowledge that was lostdata lost from the write-cache and bring the volume back online so that you canattempt to deal with the data loss.
About this task
If you have performed the recovery procedure, and it has completed successfullybut there are offline volumes, you can perform the following steps to bring thevolumes back online. Any volumes that are offline and are not thin-provisioned (orcompressed) volumes are offline because of the loss of write-cache data during theevent that led all node canisters to lose their cluster state. Any data lost from thewrite-cache cannot be recovered. These volumes might need additional recoverysteps after the volume is brought back online.
Note: If you encounter errors in the error log after running the recovery procedurethat are related to offline arrays, use the fix procedures to resolve the offline arrayerrors before fixing the offline volume (VDisk) errors.
Example
Perform the following steps to recover an offline volume after the recoveryprocedure has completed:1. Delete all IBM FlashCopy® function mappings and Metro Mirror or Global
Mirror relationships that use the offline volumes.2. Run the recovervdisk or recovervdiskbysystem command. (This will only bring
the volume back online so that you can attempt to deal with the data loss.)
76 Storwize V7000: Troubleshooting, Recovery, and Maintenance Guide

3. Refer to “What to check after running the system recovery” for what to dowith volumes that have been corrupted by the loss of data from thewrite-cache.
4. Recreate all FlashCopy mappings and Metro Mirror or Global Mirrorrelationships that use the volumes.
What to check after running the system recoverySeveral tasks must be performed before you use the system.
The recovery procedure performs a recreation of the old system from the quorumdata. However, some things cannot be restored, such as cached data or system datamanaging in-flight I/O. This latter loss of state affects RAID arrays managinginternal storage. The detailed map about where data is out of synchronization hasbeen lost, meaning that all parity information must be restored, and mirrored pairsmust be brought back into synchronization. Normally this results in either old orstale data being used, so only writes in flight are affected. However, if the arrayhad lost redundancy (such as syncing, or degraded or critical RAID status) prior tothe error requiring system recovery, then the situation is more severe. Under thissituation you need to check the internal storage:v Parity arrays will likely be syncing to restore parity; they do not have
redundancy when this operation proceeds.v Because there is no redundancy in this process, bad blocks may have been
created where data is not accessible.v Parity arrays could be marked as corrupt. This indicates that the extent of lost
data is wider than in-flight IO, and in order to bring the array online, the dataloss must be acknowledged.
v Raid-6 arrays that were actually degraded prior the system recovery may requirea full restore from backup. For this reason, it is important to have at least acapacity match spare available.
Be aware of the following differences regarding the recovered configuration:v FlashCopy mappings are restored as “idle_or_copied” with 0% progress. Both
volumes must have been restored to their original I/O groups.v The management ID is different. Any scripts or associated programs that refer to
the system-management ID of the clustered system must be changed.v Any FlashCopy mappings that were not in the “idle_or_copied” state with 100%
progress at the point of disaster have inconsistent data on their target disks.These mappings must be restarted.
v Intersystem remote copy partnerships and relationships are not restored andmust be re-created manually.
v Consistency groups are not restored and must be re-created manually.v Intrasystem remote copy relationships are restored if all dependencies were
successfully restored to their original I/O groups.v The system time zone might not have been restored.
Before using the volumes, perform the following tasks:v Start the host systems.v Manual actions might be necessary on the hosts to trigger them to rescan for
devices. You can perform this task by disconnecting and reconnecting the FibreChannel cables to each host bus adapter (HBA) port.
v Verify that all mapped volumes can be accessed by the hosts.
Chapter 7. Recovery procedures 77

v Run file system consistency checks.v Run the application consistency checks.
Backing up and restoring the system configurationYou can back up and restore the configuration data for the system afterpreliminary tasks are completed.
Configuration data for the system provides information about your system and theobjects that are defined in it. The backup and restore functions of the svcconfigcommand can back up and restore only your configuration data for the StorwizeV7000 system. You must regularly back up your application data by using theappropriate backup methods.
You can maintain your configuration data for the system by completing thefollowing tasks:v Backing up the configuration datav Restoring the configuration datav Deleting unwanted backup configuration data files
Before you back up your configuration data, the following prerequisites must bemet:v No independent operations that change the configuration for the system can be
running while the backup command is running.v No object name can begin with an underscore character (_).
Note:
v The default object names for controllers, I/O groups, and managed disks(MDisks) do not restore correctly if the ID of the object is different from what isrecorded in the current configuration data file.
v All other objects with default names are renamed during the restore process. Thenew names appear in the format name_r where name is the name of the object inyour system.
Before you restore your configuration data, the following prerequisites must bemet:v You have the Security Administrator role associated with your user name and
password.v You have a copy of your backup configuration files on a server that is accessible
to the system.v You have a backup copy of your application data that is ready to load on your
system after the restore configuration operation is complete.v You know the current license settings for your system.v You did not remove any hardware since the last backup of your configuration.v No zoning changes were made on the Fibre Channel fabric which would prevent
communication between the Storwize V7000 and any storage controllers whichare present in the configuration.
v For configurations with more than one I/O group, if a new system is created onwhich the configuration data is to be restored, the I/O groups for the othercontrol enclosures must be added.
Use the following steps to determine how to achieve an ideal T4 recovery:
78 Storwize V7000: Troubleshooting, Recovery, and Maintenance Guide
|

v Open the appropriate svc.config.backup.xml (or svc.config.cron.xml) file with asuitable text editor or browser and navigate to the node section of the file.
v For each node entry, make a note of the value of following properties;IO_group_id, canister_id, enclosure_serial_number.
v Use the CLI sainfo lsservicenodes command and the adata to determine whichnode canisters previously belonged in each IO group.
Restoring the system configuration should be performed via one of the nodespreviously in IO group zero. For example, property name="IO_group_id"value="0" . The remaining enclosures should be added, as required, in theappropriate order based on the previous IO_group_id of its node canisters.
Note: It is not currently possible to determine which canister within the identifiedenclosure was previously used for cluster creation. Typically the restoration shouldbe performed via canister 1.
The Storwize V7000 analyzes the backup configuration data file and the system toverify that the required disk controller system nodes are available.
Before you begin, hardware recovery must be complete. The following hardwaremust be operational: hosts, Storwize V7000, drives, the Ethernet network, and theSAN fabric.
Backing up the system configuration using the CLIYou can back up your configuration data using the command-line interface (CLI).
Before you begin
Before you back up your configuration data, the following prerequisites must bemet:v No independent operations that change the configuration can be running while
the backup command is running.v No object name can begin with an underscore character (_).
About this task
The backup feature of the svcconfig CLI command is designed to back upinformation about your system configuration, such as volumes, local Metro Mirrorinformation, local Global Mirror information, managed disk (MDisk) groups, andnodes. All other data that you wrote to the volumes is not backed up. Anyapplication that uses the volumes on the system as storage, must back up itsapplication data using the appropriate backup methods.
You must regularly back up your configuration data and your application data toavoid data loss. It is recommended that this is performed after any significantchanges in configuration have been made to the system. Note that the systemautomatically creates a backup of the configuration data each day at 1AM. This isknown as a cron backup and is written to /dumps/svc.config.cron.xml_<serial#>on the configuration node. A manual backup can be generated at any time usingthe instructions in this task. If a severe failure occurs, both the configuration of thesystem and application data may be lost. The backup of the configuration data canbe used to restore the system configuration to the exact state it was in before thefailure. In some cases it may be possible to automatically recover the applicationdata. This can be attempted via the <Recover System Procedure> also known as aTier 3 (T3) procedure. Restoring the system configuration without attempting to
Chapter 7. Recovery procedures 79
||
||
||
||||
|||

recover the application data is performed via the <Restoring the SystemConfiguration> procedure also known as a Tier 4 (T4) recovery. Both of theseprocedures require a recent backup of the configuration data.
Perform the following steps to back up your configuration data:
Procedure1. Back up all of the application data that you stored on your volumes using your
preferred backup method.2. Issue the following CLI command to remove any temporary working files
created by a previous configuration backup or restore attempt:svcconfig clear -all
3. Issue the following CLI command to back up your configuration:svcconfig backup
The following output is an example of the messages that may be displayedduring the backup process:
CMMVC6112W io_grp io_grp1 has a default nameCMMVC6112W io_grp io_grp2 has a default nameCMMVC6112W mdisk mdisk14 ...CMMVC6112W node node1 ...CMMVC6112W node node2 .......................................................
The svcconfig backup CLI command creates three files that provideinformation about the backup process and the configuration. These files arecreated in the /dumps directory of the configuration node canister.The following table describes the three files that are created by the backupprocess:
File name Description
svc.config.backup.xml_<serial#> This file that contains your configurationdata.
svc.config.backup.sh_<serial#> This file that contains the names of thecommands that were issued to create thebackup of the system.
svc.config.backup.log_<serial#> This file contains details about the backup,including any reported errors or warnings.
4. Check that the svcconfig backup command completes successfully, andexamine the command output for any warnings or errors. The following outputis an example of the message that is displayed when the backup process issuccessful:
CMMVC6155I SVCCONFIG processing completed successfully.
If the process fails, resolve the errors, and run the command again.5. It is recommended to keep backup copies of the files above outside the system
to protect them against a system hardware failure. Copy the backup files off thesystem to a secure location using either the management GUI or scp commandline. For example:pscp superuser@cluster_ip:/dumps/svc.config.backup.*/offclusterstorage/
80 Storwize V7000: Troubleshooting, Recovery, and Maintenance Guide

The cluster_ip is the IP address or DNS name of the system andoffclusterstorage is the location where you want to store the backup files.
Tip: To maintain controlled access to your configuration data, copy the backupfiles to a location that is password-protected.
Restoring the system configurationUse this procedure in the following situations: only if the recover procedure hasfailed or if the data that is stored on the volumes is not required. For directions onthe recover procedure, see “Recover system procedure” on page 71.
Before you begin
This configuration restore procedure is designed to restore information about yourconfiguration, such as volumes, local Metro Mirror information, local Global Mirrorinformation, storage pools, and nodes. All the data that you have written to thevolumes is not restored. To restore the data on the volumes, you must restoreapplication data from any application that uses the volumes on the clusteredsystem as storage separately. Therefore, you must have a backup of this data beforeyou follow the configuration recovery process.
About this task
You must regularly back up your configuration data and your application data toavoid data loss. If a system is lost after a severe failure occurs, both configurationfor the system and application data is lost. You must reinstate the system to theexact state it was in before the failure, and then recover the application data.
Important: There are two phases during the restore process: prepare and execute.You must not change the fabric or system between these two phases.
If you do not understand the instructions to run the CLI commands, see thecommand-line interface reference information.
To restore your configuration data, follow these steps:
Procedure1. Verify that all nodes are available as candidate nodes before you run this
recovery procedure. You must remove errors 550 or 578 to put the node incandidate state. For all nodes that display these errors, perform the followingsteps:a. Point your browser to the service IP address of one of the nodes, for
example, https://node_service_ip_address/service/.b. Log on to the service assistant.c. From the Home page, put the node into service state if it is not already in
that state.d. Select Manage System.e. Click Remove System Data.f. Confirm that you want to remove the system data when prompted.g. Exit service state from the Home page. The 550 or 578 errors are removed,
and the node appears as a candidate node.h. Remove the system data for the other nodes that display a 550 or a 578
error.
Chapter 7. Recovery procedures 81

All nodes previously in this system must have a node status of Candidateand have no errors listed against them.
Note: A node that is powered off might not show up in this list of nodesfor the system. Diagnose hardware problems directly on the node usingthe service assistant IP address and by physically verifying the LEDs forthe hardware components.
2. Verify that all nodes are available as candidate nodes with blank system fields.Perform the following steps on one node in each control enclosure:a. Connect to the service assistant on either of the nodes in the control
enclosure.b. Select Configure Enclosure.c. Select the Reset the system ID option. Do not make any other changes on
the panel.d. Click Modify to make the changes.
3. Use the initialization tool that is available on the USB flash drive to a create anew Storwize V7000 system. Select the Initialize a new Storwize V7000 (blocksystem only) option from the Welcome panel of the initialization tool.
4. In a supported browser, enter the IP address that you used to initialize thesystem and the default superuser password (passw0rd).
5. At this point the setup wizard is shown. Be aware of the following items:a. Accept the license agreements.b. Set the values for the system name, date and time settings, and the system
licensing. The original settings are restored during the configurationrestore process.
c. Verify the hardware. Only the control enclosure on which the clusteredsystem was created and directly attached expansion enclosures aredisplayed. Any other control enclosures and expansion enclosures in otherI/O groups will be added to the system.
d. On the Configure Storage panel, deselect Yes, automatically configureinternal storage now. Any internal storage configuration is recovered afterthe system is restored.
6. Optional: From the management GUI, click Access > Users and configure anSSH key for the superuser.
7. By default, the newly initialized system is created in the storage layer. Thelayer of the system is not restored automatically from the configurationbackup XML file, so if the system you are restoring was previously configuredin the replication layer, you must change the layer manually now. Refer toMetro Mirror and Global Mirror partnerships located under Product overview,in the IBM Storwize V7000 Information Center for more information.
8. For configurations with more than one I/O group add the rest of the controlenclosures into the clustered system.a. From the management GUI, select Monitoring > System Details.b. Select the system name in the tree.c. Go to Actions > Add Enclosures > Control and Expansions .d. Continue to follow the on-screen instructions to add the control enclosures.
Decline the offer to configure storage for the new enclosures when asked ifyou want to do so.
9. Identify the configuration backup file that you want to restore from.
82 Storwize V7000: Troubleshooting, Recovery, and Maintenance Guide
|||
||
||||||
||
|
|
|
|||
|

The file can be either a local copy of the configuration backup XML file thatyou saved when backing up the configuration or an up-to-date file on one ofthe nodes.Configuration data is automatically backed up daily at 01:00 system time onthe configuration node.Download and check the configuration backup files on all nodes that werepreviously in the system to identify the one containing the most recentcomplete backupFor each node in the system:a. From the management GUI, click Settings > Support.b. Click Show full log listing.c. Select the node to operate on from the selection box at the top of the table.d. Find the file name that begins with svc.config.cron.xml.e. Double-click the file to download the file to your computer.
The XML files contain a date and time that can be used to identify the mostrecent backup. After you identify the backup XML file that is to be used whenyou restore the system, rename the file to svc.config.backup.xml.
10. Issue the following CLI command to remove all of the existing backup andrestore configuration files that are located on your configuration node in the/tmp directory: svcconfig clear -all
11. Copy the XML backup file that you wish to restore from back onto the system.pscp full_path_to_identified_svc.config.backup.xmlsuperuser@cluster_ip:/tmp/
12. Issue the following CLI command to compare the current configuration withthe backup configuration data file:svcconfig restore -prepare
This CLI command creates a log file in the /tmp directory of the configurationnode. The name of the log file is svc.config.restore.prepare.log.
Note: It can take up to a minute for each 256-MDisk batch to be discovered. Ifyou receive error message CMMVC6200W for an MDisk after you enter thiscommand, all the managed disks (MDisks) might not have been discoveredyet. Allow a suitable time to elapse and try the svcconfig restore -preparecommand again.
13. Issue the following command to copy the log file to another server that isaccessible to the system:pscp superuser@cluster_ip:/tmp/svc.config.restore.prepare.logfull_path_for_where_to_copy_log_files
14. Open the log file from the server where the copy is now stored.15. Check the log file for errors.
v If there are errors, correct the condition that caused the errors and reissuethe command. You must correct all errors before you can proceed to step 16.
v If an error indicates that the system layer will not be restored, then returnto 7 on page 82, configure the layer setting correctly, and then continue therestore process from 10.
v If you need assistance, contact the IBM Support Center.16. Issue the following CLI command to restore the configuration:
svcconfig restore -execute
This CLI command creates a log file in the /tmp directory of the configurationnode. The name of the log file is svc.config.restore.execute.log.
Chapter 7. Recovery procedures 83
|||
||
|||
|
|
|
|
|
|
|||

17. Issue the following command to copy the log file to another server that isaccessible to the system:pscp superuser@cluster_ip:/tmp/svc.config.restore.execute.logfull_path_for_where_to_copy_log_files
18. Open the log file from the server where the copy is now stored.19. Check the log file to ensure that no errors or warnings have occurred.
Note: You might receive a warning stating that a licensed feature is notenabled. This message means that after the recovery process, the currentlicense settings do not match the previous license settings. The recoveryprocess continues normally and you can enter the correct license settings inthe management GUI at a later time.When you log into the CLI again over SSH, you see this output:
IBM_2076:your_cluster_name:superuser>
20. After the configuration is restored, verify that the quorum disks are restoredto the MDisks that you want by using the lsquorum command. To restore thequorum disks to the correct MDisks, issue the appropriate chquorum CLIcommands.
What to do next
You can remove any unwanted configuration backup and restore files from the/tmp directory on your configuration by issuing the following CLI command:
svcconfig clear -all
Deleting backup configuration files using the CLIYou can use the command-line interface (CLI) to delete backup configuration files.
About this task
Perform the following steps to delete backup configuration files:
Procedure1. Issue the following command to log on to the system:
plink -i ssh_private_key_file superuser@cluster_ip
where ssh_private_key_file is the name of the SSH private key file for thesuperuser and cluster_ip is the IP address or DNS name of the clustered systemfrom which you want to delete the configuration.
2. Issue the following CLI command to erase all of the files that are stored in the/tmp directory:svconfig clear -all
84 Storwize V7000: Troubleshooting, Recovery, and Maintenance Guide
||||

Chapter 8. Removing and replacing parts
You can remove and replace customer-replaceable units (CRUs) from the controlenclosure or the expansion enclosure.
Attention: If your system is powered on and performing I/O operations, go tothe management GUI and follow the fix procedures. Performing the replacementactions without the assistance of the fix procedures can result in loss of data oraccess to data.
Even though many of these procedures are hot-swappable, they are intended to beused only when your system is not up and running and performing I/Ooperations. If your system is powered on and performing I/O operations, go to themanagement GUI and follow the fix procedures. Performing the replacementactions without the assistance of the fix procedures can result in loss of data or lossof access to data.
Each replaceable unit has its own removal procedure. Sometimes you can find thata step within a procedure might refer you to a different remove and replaceprocedure. You might want to complete the new procedure before you continuewith the first procedure that you started.
Remove or replace parts only when you are directed to do so.
Be careful when you are replacing the hardware components that are located in theback of the system that you do not inadvertently disturb or remove any cables thatyou are not instructed to remove.
Preparing to remove and replace partsBefore you remove and replace parts, you must be aware of all safety issues.
Before you begin
First, read the safety precautions in the IBM Systems Safety Notices. Theseguidelines help you safely work with the Storwize V7000.
Replacing a node canisterThis topic describes how to replace a node canister.
About this task
Attention: If your system is powered on and performing I/O operations, go tothe management GUI and follow the fix procedures. Performing the replacementactions without the assistance of the fix procedures can result in loss of data oraccess to data.
Be careful when you are replacing the hardware components that are located in theback of the system that you do not inadvertently disturb or remove any cables thatyou are not instructed to remove.
© Copyright IBM Corp. 2010, 2012 85

Attention: Do not replace one type of node canister with another type. Forexample, do not replace a model 2076-112 node canister with a model 2076-312node canister.
Be aware of the following canister LED states:v If both the power LED and system status LED are on, do not remove a node
canister unless directed to do so by a service procedure.v If the system status is off, it is acceptable to remove a node canister. However,
do not remove a node canister unless directed to do so by a service procedure.v If the power LED is flashing or off, it is safe to remove a node canister.
However, do not remove a node canister unless directed to do so by a serviceprocedure.
Attention: Even if a node canister is powered off, it is still possible to lose data.Do not remove a node canister unless directed to do so by a service procedure.
To replace the node canister, perform the following steps:
Procedure1. Read the safety information to which “Preparing to remove and replace parts”
on page 85 refers.2. Confirm that you know which canister to replace. Go to “Procedure:
Identifying which enclosure or canister to service” on page 51.3. Record which data cables are plugged into the specific ports of the node
canister. The cables must be inserted back into the same ports after thereplacement is complete; otherwise, the system cannot function properly.
4. Disconnect the data cables for each canister.5. Grasp the handle between the thumb and forefinger.
Note: Ensure that you are opening the correct handle. The handle locationsfor the node canisters and expansion canisters are slightly different.Handles for the node canisters are located in close proximity to each other.The handle with the finger grip on the right removes the upper canister (�1�).The handle with the finger grip on the left removes the lower canister (�2�).
6. Squeeze them together to release the handle.
1
2 svc00744
Figure 24. Rear of node canisters that shows the handles.
86 Storwize V7000: Troubleshooting, Recovery, and Maintenance Guide

7. Pull out the handle to its full extension.8. Grasp canister and pull it out.9. Insert the new canister into the slot with the handle pointing towards the
center of the slot. Insert the unit in the same orientation as the one that youremoved.
10. Push the canister back into the slot until the handle starts to move.11. Finish inserting the canister by closing the handle until the locking catch clicks
into place.If the enclosure is powered on, the canister starts automatically.
12. Reattach the data cables.
Replacing an expansion canisterThis topic describes how to replace an expansion canister.
About this task
Attention: If your system is powered on and performing I/O operations, go tothe management GUI and follow the fix procedures. Performing the replacementactions without the assistance of the fix procedures can result in loss of data oraccess to data.
Even though many of these procedures are hot-swappable, they are intended to beused only when your system is not up and running and performing I/Ooperations. If your system is powered on and performing I/O operations, go to themanagement GUI and follow the fix procedures. Performing the replacementactions without the assistance of the fix procedures can result in loss of data or lossof access to data.
svc00631
Figure 25. Removing the canister from the enclosure
Chapter 8. Removing and replacing parts 87

Be careful when you are replacing the hardware components that are located in theback of the system that you do not inadvertently disturb or remove any cables thatyou are not instructed to remove.
Be aware of the following canister LED states:v If the power LED is on, do not remove an expansion canister unless directed to
do so by a service procedure.v If the power LED is flashing or off, it is safe to remove an expansion canister.
However, do not remove an expansion canister unless directed to do so by aservice procedure.
Attention: Even if an expansion canister is powered off, it is still possible to losedata. Do not remove an expansion canister unless directed to do so by a serviceprocedure.
To replace an expansion canister, perform the following steps:
Procedure1. Read the safety information to which “Preparing to remove and replace parts”
on page 85 refers.2. Record which SAS cables are plugged into the specific ports of the expansion
canister. The cables must be inserted back into the same ports after thereplacement is complete; otherwise, the system cannot function properly.
3. Disconnect the SAS cables for each canister.4. Grasp the handle between the thumb and forefinger.
Note: Ensure that you are opening the correct handle. The handle locationsfor the node canisters and expansion canisters are slightly different.Handles for the upper and lower expansion canisters overlap each other. Thehandle with the finger grip on the left removes the upper canister (�1�). Thehandle with the finger grip on the right removes the lower canister (�2�).
5. Squeeze them together to release the handle.
1
2 svc00745
Figure 26. Rear of expansion canisters that shows the handles.
88 Storwize V7000: Troubleshooting, Recovery, and Maintenance Guide

6. Pull out the handle to its full extension.7. Grasp canister and pull it out.8. Insert the new canister into the slot with the handle pointing towards the
center of the slot. Insert the unit in the same orientation as the one that youremoved.
9. Push the canister back into the slot until the handle starts to move.10. Finish inserting the canister by closing the handle until the locking catch clicks
into place.11. Reattach the SAS cables.
Replacing an SFP transceiverWhen a failure occurs on a single link, the SFP transceiver might need to bereplaced.
Before you begin
Even though many of these procedures are hot-swappable, they are intended to beused only when your system is not up and running and performing I/Ooperations. If your system is powered on and performing I/O operations, go to themanagement GUI and follow the fix procedures. Performing the replacementactions without the assistance of the fix procedures can result in loss of data or lossof access to data.
Be careful when you are replacing the hardware components that are located in theback of the system that you do not inadvertently disturb or remove any cables thatyou are not instructed to remove.
svc00631
Figure 27. Removing the canister from the enclosure
Chapter 8. Removing and replacing parts 89

CAUTION:Some laser products contain an embedded Class 3A or Class 3B laser diode.Note the following information: laser radiation when open. Do not stare into thebeam, do not view directly with optical instruments, and avoid direct exposureto the beam. (C030)
About this task
Perform the following steps to remove and then replace an SFP transceiver:
Procedure1. Carefully determine the failing physical port connection.
Important: The Fibre Channel links in the enclosures are supported with bothlongwave SFP transceivers and shortwave SFP transceivers. A longwave SFPtransceiver has some blue components that are visible even when the SFPtransceiver is plugged in. You must replace an SFP transceiver with the sametype of SFP transceiver that you are replacing. If the SFP transceiver to replaceis a longwave SFP transceiver, for example, you must replace with anotherlongwave SFP transceiver. Removing the wrong SFP transceiver might result inloss of data access.
2. Remove the optical cable by pressing the release tab and pulling the cable out.Be careful to exert pressure only on the connector and do not pull on theoptical cables.
3. Remove the SFP transceiver. There are a number of different handling orlocking mechanisms that are used on the SFP transceivers. Some SFPtransceivers might have a plastic tag. If so, pull the tag to remove the SFPtransceiver.
Important: Always check that the SFP transceiver that you replace matches theSFP transceiver that you remove.
4. Push the new SFP transceiver into the aperture and ensure that it is securelypushed home. The SFP transceiver usually locks into place without having toswing the release handle until it locks flush with the SFP transceiver. Figure 28illustrates an SFP transceiver and its release handle.
5. Reconnect the optical cable.6. Confirm that the error is now fixed. Either mark the error as fixed or restart the
node depending on the failure indication that you originally noted.
svc00418
Figure 28. SFP transceiver
90 Storwize V7000: Troubleshooting, Recovery, and Maintenance Guide

Replacing a power supply unit for a control enclosureYou can replace either of the two 764 watt hot-swap redundant power supplies inthe control enclosure. These redundant power supplies operate in parallel, onecontinuing to power the canister if the other fails.
Before you begin
DANGER
When working on or around the system, observe the following precautions:
Electrical voltage and current from power, telephone, and communicationcables are hazardous. To avoid a shock hazard:
v Connect power to this unit only with the IBM provided power cord. Do notuse the IBM provided power cord for any other product.
v Do not open or service any power supply assembly.
v Do not connect or disconnect any cables or perform installation,maintenance, or reconfiguration of this product during an electrical storm.
v The product might be equipped with multiple power cords. To remove allhazardous voltages, disconnect all power cords.
v Connect all power cords to a properly wired and grounded electrical outlet.Ensure that the outlet supplies proper voltage and phase rotation accordingto the system rating plate.
v Connect any equipment that will be attached to this product to properlywired outlets.
v When possible, use one hand only to connect or disconnect signal cables.
v Never turn on any equipment when there is evidence of fire, water, orstructural damage.
v Disconnect the attached power cords, telecommunications systems,networks, and modems before you open the device covers, unlessinstructed otherwise in the installation and configuration procedures.
v Connect and disconnect cables as described in the following procedureswhen installing, moving, or opening covers on this product or attacheddevices.
To disconnect:
1. Turn off everything (unless instructed otherwise).
2. Remove the power cords from the outlets.
3. Remove the signal cables from the connectors.
4. Remove all cables from the devices.
To connect:
1. Turn off everything (unless instructed otherwise).
2. Attach all cables to the devices.
3. Attach the signal cables to the connectors.
4. Attach the power cords to the outlets.
5. Turn on the devices.
v Sharp edges, corners and joints may be present in and around the system.Use care when handling equipment to avoid cuts, scrapes and pinching.
(D005)
Chapter 8. Removing and replacing parts 91
Attention: If your system is powered on and performing I/O operations, go tothe management GUI and follow the fix procedures. Performing the replacementactions without the assistance of the fix procedures can result in loss of data oraccess to data.
Attention: A powered-on enclosure must not have a power supply removed formore than five minutes because the cooling does not function correctly with anempty slot. Ensure that you have read and understood all these instructions andhave the replacement available, and unpacked, before you remove the existingpower supply.
Even though many of these procedures are hot-swappable, they are intended to beused only when your system is not up and running and performing I/Ooperations. If your system is powered on and performing I/O operations, go to themanagement GUI and follow the fix procedures. Performing the replacementactions without the assistance of the fix procedures can result in loss of data or lossof access to data.
Be careful when you are replacing the hardware components that are located in theback of the system that you do not inadvertently disturb or remove any cables thatyou are not instructed to remove.
Attention: In some instances, it might not be advisable to remove a power supplyunit when a system is performing I/O. For example, the charge in the backupbattery might not be sufficient enough within the partner power-supply unit tocontinue operations without causing a loss of access to the data. Wait until thepartner battery is 100% charged before replacing the power supply unit.
Ensure that you are aware of the procedures for handling static-sensitive devicesbefore you replace the power supply.
About this task
A replacement power supply unit is not shipped with a battery; therefore, transferthe battery from the existing power supply unit to the replacement unit. Totransfer a battery, go to “Replacing a battery in a power supply unit” on page 98.
To replace the power supply, perform the following steps:
Procedure1. Read the safety information to which “Preparing to remove and replace parts”
on page 85 refers.2. Examine the Identify LED that is lit on the front of the enclosure to identify
the correct enclosure.3. Turn off the power to the power supply units using the switches at the back
of the units.4. Disconnect the cable retention bracket and the power cord from the power
supply that you are replacing.5. Remove the power supply unit. Record the orientation of the power supply
unit. Power supply unit 1 is top side up, and power supply unit 2 is inverted.a. Depress the black locking catch from the side with the colored sticker as
shown in Figure 29 on page 93.
92 Storwize V7000: Troubleshooting, Recovery, and Maintenance Guide

b. Grip the handle to pull the power supply out of the enclosure as shown inFigure 30.
6. Insert the replacement power supply unit into the enclosure with the handlepointing towards the center of the enclosure. Insert the unit in the sameorientation as the one that you removed.
svc00633
Figure 29. Directions for lifting the handle on the power supply unit
svc00632
Figure 30. Using the handle to remove a power supply unit
Chapter 8. Removing and replacing parts 93

7. Push the power supply unit back into the enclosure until the handle starts tomove.
8. Finish inserting the power supply unit into the enclosure by closing thehandle until the locking catch clicks into place.
9. Reattach the power cable and cable retention bracket.10. Turn on the power switch to the power supply unit.
What to do next
If required, return the power supply. Follow all packaging instructions, and useany packaging materials for shipping that are supplied to you.
Replacing a power supply unit for an expansion enclosureYou can replace either of the two 580 watt hot-swap redundant power supplies inthe expansion enclosure. These redundant power supplies operate in parallel, onecontinuing to power the canister if the other fails.
94 Storwize V7000: Troubleshooting, Recovery, and Maintenance Guide

Before you begin
DANGER
When working on or around the system, observe the following precautions:
Electrical voltage and current from power, telephone, and communicationcables are hazardous. To avoid a shock hazard:
v Connect power to this unit only with the IBM provided power cord. Do notuse the IBM provided power cord for any other product.
v Do not open or service any power supply assembly.
v Do not connect or disconnect any cables or perform installation,maintenance, or reconfiguration of this product during an electrical storm.
v The product might be equipped with multiple power cords. To remove allhazardous voltages, disconnect all power cords.
v Connect all power cords to a properly wired and grounded electrical outlet.Ensure that the outlet supplies proper voltage and phase rotation accordingto the system rating plate.
v Connect any equipment that will be attached to this product to properlywired outlets.
v When possible, use one hand only to connect or disconnect signal cables.
v Never turn on any equipment when there is evidence of fire, water, orstructural damage.
v Disconnect the attached power cords, telecommunications systems,networks, and modems before you open the device covers, unlessinstructed otherwise in the installation and configuration procedures.
v Connect and disconnect cables as described in the following procedureswhen installing, moving, or opening covers on this product or attacheddevices.
To disconnect:
1. Turn off everything (unless instructed otherwise).
2. Remove the power cords from the outlets.
3. Remove the signal cables from the connectors.
4. Remove all cables from the devices.
To connect:
1. Turn off everything (unless instructed otherwise).
2. Attach all cables to the devices.
3. Attach the signal cables to the connectors.
4. Attach the power cords to the outlets.
5. Turn on the devices.
v Sharp edges, corners and joints may be present in and around the system.Use care when handling equipment to avoid cuts, scrapes and pinching.
(D005)
Attention: If your system is powered on and performing I/O operations, go tothe management GUI and follow the fix procedures. Performing the replacementactions without the assistance of the fix procedures can result in loss of data oraccess to data.
Chapter 8. Removing and replacing parts 95

Attention: A powered-on enclosure must not have a power supply removed formore than five minutes because the cooling does not function correctly with anempty slot. Ensure that you have read and understood all these instructions andhave the replacement available, and unpacked, before you remove the existingpower supply.
Even though many of these procedures are hot-swappable, they are intended to beused only when your system is not up and running and performing I/Ooperations. If your system is powered on and performing I/O operations, go to themanagement GUI and follow the fix procedures. Performing the replacementactions without the assistance of the fix procedures can result in loss of data or lossof access to data.
Be careful when you are replacing the hardware components that are located in theback of the system that you do not inadvertently disturb or remove any cables thatyou are not instructed to remove.
Ensure that you are aware of the procedures for handling static-sensitive devicesbefore you replace the power supply.
About this task
To replace the power supply unit in an expansion enclosure, perform the followingsteps:
Procedure1. Read the safety information to which “Preparing to remove and replace parts”
on page 85 refers.2. Examine the Identify LED that is lit on the front of the enclosure to identify
the correct enclosure.3. Turn off the power to the power supply units using the switches at the back
of the units.4. Disconnect the cable retention bracket and the power cord from the power
supply that you are replacing.5. Remove the power supply unit. Record the orientation of the power supply
unit. Power supply unit 1 is top side up, and power supply unit 2 is inverted.a. Depress the black locking catch from the side with the colored sticker as
shown in Figure 31 on page 97.
96 Storwize V7000: Troubleshooting, Recovery, and Maintenance Guide

b. Grip the handle to pull the power supply out of the enclosure as shown inFigure 32.
6. Insert the replacement power supply unit into the enclosure with the handlepointing towards the center of the enclosure. Insert the unit in the sameorientation as the one that you removed.
svc00633
Figure 31. Directions for lifting the handle on the power supply unit
svc00632
Figure 32. Using the handle to remove a power supply unit
Chapter 8. Removing and replacing parts 97

7. Push the power supply unit back into the enclosure until the handle starts tomove.
8. Finish inserting the power supply unit in the enclosure by closing the handleuntil the locking catch clicks into place.
9. Reattach the power cable and cable retention bracket.10. Turn on the power switch to the power supply unit.
What to do next
If required, return the power supply. Follow all packaging instructions, and useany packaging materials for shipping that are supplied to you.
Replacing a battery in a power supply unitThis topic describes how to replace the battery in the control enclosurepower-supply unit.
98 Storwize V7000: Troubleshooting, Recovery, and Maintenance Guide

Before you begin
DANGER
When working on or around the system, observe the following precautions:
Electrical voltage and current from power, telephone, and communicationcables are hazardous. To avoid a shock hazard:
v Connect power to this unit only with the IBM provided power cord. Do notuse the IBM provided power cord for any other product.
v Do not open or service any power supply assembly.
v Do not connect or disconnect any cables or perform installation,maintenance, or reconfiguration of this product during an electrical storm.
v The product might be equipped with multiple power cords. To remove allhazardous voltages, disconnect all power cords.
v Connect all power cords to a properly wired and grounded electrical outlet.Ensure that the outlet supplies proper voltage and phase rotation accordingto the system rating plate.
v Connect any equipment that will be attached to this product to properlywired outlets.
v When possible, use one hand only to connect or disconnect signal cables.
v Never turn on any equipment when there is evidence of fire, water, orstructural damage.
v Disconnect the attached power cords, telecommunications systems,networks, and modems before you open the device covers, unlessinstructed otherwise in the installation and configuration procedures.
v Connect and disconnect cables as described in the following procedureswhen installing, moving, or opening covers on this product or attacheddevices.
To disconnect:
1. Turn off everything (unless instructed otherwise).
2. Remove the power cords from the outlets.
3. Remove the signal cables from the connectors.
4. Remove all cables from the devices.
To connect:
1. Turn off everything (unless instructed otherwise).
2. Attach all cables to the devices.
3. Attach the signal cables to the connectors.
4. Attach the power cords to the outlets.
5. Turn on the devices.
v Sharp edges, corners and joints may be present in and around the system.Use care when handling equipment to avoid cuts, scrapes and pinching.
(D005)
Chapter 8. Removing and replacing parts 99

CAUTION:The battery is a lithium ion battery. To avoid possible explosion, do not burn.Exchange only with the IBM-approved part. Recycle or discard the battery asinstructed by local regulations. In the United States, IBM has a process for thecollection of this battery. For information, call 1-800-426-4333. Have the IBM partnumber for the battery unit available when you call. (C007)
Attention: If your system is powered on and performing I/O operations, go tothe management GUI and follow the fix procedures. Performing the replacementactions without the assistance of the fix procedures can result in loss of data oraccess to data.
Even though many of these procedures are hot-swappable, they are intended to beused only when your system is not up and running and performing I/Ooperations. If your system is powered on and performing I/O operations, go to themanagement GUI and follow the fix procedures. Performing the replacementactions without the assistance of the fix procedures can result in loss of data or lossof access to data.
Be careful when you are replacing the hardware components that are located in theback of the system that you do not inadvertently disturb or remove any cables thatyou are not instructed to remove.
About this task
Each power supply unit in a control enclosure contains an integrated battery thatis used during temporary short-term power outages. You must replace the batterywith the exact same model.
To replace the battery in the power supply unit of the control enclosure, performthe following steps:
Procedure1. Read the safety information to which “Preparing to remove and replace parts”
on page 85 refers.2. Follow the removing steps of the replacing a power-supply unit procedure. Go
to “Replacing a power supply unit for a control enclosure” on page 91.3. Remove the battery, as shown in Figure 33 on page 101.
100 Storwize V7000: Troubleshooting, Recovery, and Maintenance Guide

a. Press the catch to release the handle �1�.b. Lift the handle on the battery �2�.c. Lift the battery out of the power supply unit �3�.
4. Install the replacement battery.Attention: The replacement battery has protective end caps that must beremoved prior to use.a. Remove the battery from the packaging.b. Remove the end caps.c. Attach the end caps to both ends of the battery that you removed and place
the battery in the original packaging.
2
svc00611
3
1
Figure 33. Removing the battery from the control enclosure power-supply unit
Chapter 8. Removing and replacing parts 101

d. Place the replacement battery in the opening on top of the power supply inits proper orientation.
e. Press the battery to seat the connector.f. Place the handle in its downward location
5. Push the power supply unit back into the enclosure until the handle starts tomove.
6. Finish inserting the power supply unit into the enclosure by closing the handleuntil the locking catch clicks into place.
7. Reattach the power cable and cable retention bracket.8. Turn on the power switch to the power supply unit.
What to do next
If required, return the battery. Follow all packaging instructions, and use anypackaging materials for shipping that are supplied to you.
Releasing the cable retention bracketThis topic provides instructions for releasing the cable retention bracket whenremoving the power cords from the power supply unit.
About this task
Be careful when you are replacing the hardware components that are located in theback of the system that you do not inadvertently disturb or remove any cables thatyou are not instructed to remove.
Each cable retention bracket comes attached to the back of the power supply unitby the power cord plug-in.
To release a cable retention bracket, perform these steps:
Procedure1. Unlock the cable retention bracket that is around the end of the power cord.2. Pull the lever next to the black plastic loop slightly towards the center of the
canister.3. Continue to pull the lever towards you as you slide the cable retention bracket
away from the end of the cable.
Replacing a 3.5" drive assembly or blank carrierThis topic describes how to replace a 3.5" drive assembly or blank carrier.
About this task
Attention: If your drive is configured for use, go to the management GUI andfollow the fix procedures. Performing the replacement actions without theassistance of the fix procedures results in loss of data or access to data.
Attention: Do not leave a drive slot empty. Do not remove a drive or driveassembly before you have a replacement available.
102 Storwize V7000: Troubleshooting, Recovery, and Maintenance Guide

The drives can be distinguished from the blank carriers by the color-coded stripingon the drive. The drives are marked with an orange striping. The blank carriers aremarked with a blue striping.
To replace the drive assembly or blank carrier, perform the following steps:
Procedure1. Read the safety information to which “Preparing to remove and replace parts”
on page 85 refers.2. Unlock the assembly by squeezing together the tabs on the side.
3. Open the handle to the full extension.
svc00612
Figure 34. Unlocking the 3.5" drive
Chapter 8. Removing and replacing parts 103

4. Pull out the drive.5. Push the new drive back into the slot until the handle starts to move.6. Finish inserting the drive by closing the handle until the locking catch clicks
into place.
Replacing a 2.5" drive assembly or blank carrierThis topic describes how to remove a 2.5" drive assembly or blank carrier.
About this task
Attention: If your drive is configured for use, go to the management GUI andfollow the fix procedures. Performing the replacement actions without theassistance of the fix procedures results in loss of data or access to data.
Attention: Do not leave a drive slot empty. Do not remove a drive or driveassembly before you have a replacement available.
To replace the drive assembly or blank carrier, perform the following steps:
Procedure1. Read the safety information to which “Preparing to remove and replace parts”
on page 85 refers.2. Unlock the module by squeezing together the tabs at the top.
svc00613
Figure 35. Removing the 3.5" drive
104 Storwize V7000: Troubleshooting, Recovery, and Maintenance Guide

3. Open the handle to the full extension.
4. Pull out the drive.5. Push the new drive back into the slot until the handle starts to move.6. Finish inserting the drive by closing the handle until the locking catch clicks
into place.
svc00614
Figure 36. Unlocking the 2.5" drive
svc00615
Figure 37. Removing the 2.5" drive
Chapter 8. Removing and replacing parts 105

Replacing enclosure end capsTo replace enclosure end caps, use this procedure.
About this task
To remove either the left or right end cap, complete the following steps:
Procedure1. If the enclosure is on a table or other flat surface, elevate the enclosure front
slightly or carefully extend the front over the table edge.2. Grasp the end cap by the blue touch point and pull it until the bottom edge of
the end cap is clear of the bottom tab on the chassis flange.3. Lift the end cap off the chassis flange.
To install either the left or right end cap, complete the following steps:4. Fit the slot that is on the top of the end cap over the tab on the top of the
chassis flange.5. Rotate the end cap down until it snaps into place. Make sure that the inside
surface of the end cap is flush with the chassis.Attention:
The left end cap is printed with information that helps identify the enclosure.v machine type and modelv enclosure serial numberv its machine part number
The information on the end cap should always match the information printedon the rear of the enclosure, and it should also match the information that isstored on the enclosure midplane.
Replacing a SAS cableThis topic describes how to replace a SAS cable.
About this task
Be careful when you are replacing the hardware components that are located in theback of the system that you do not inadvertently disturb or remove any cables thatyou are not instructed to remove.
To replace a SAS cable, perform the following steps:
Procedure1. Record which SAS cable is plugged into the specific port of the expansion
canister. The cable must be inserted back into the same port after thereplacement is complete; otherwise, the system cannot function properly.
Note: If you are replacing a single cable, this step is not necessary.2. Pull the tab with the arrow away from the connector.
106 Storwize V7000: Troubleshooting, Recovery, and Maintenance Guide
|
|
|
|
|
||
||
|
|
||
||
|
|
|
|
|
|||
|

3. Plug the replacement cable into the specific port.4. Ensure that the SAS cable is fully inserted. A click is heard when the cable is
successfully inserted.
Replacing a control enclosure chassisThis topic describes how to replace a control enclosure chassis.
Before you begin
Note: Ensure that you know the type of enclosure chassis that you are replacing.The procedures for replacing a control enclosure chassis are different from thoseprocedures for replacing an expansion enclosure chassis. For information aboutreplacing an expansion enclosure chassis, see “Replacing an expansion enclosurechassis” on page 112.
svc00651
Figure 38. SAS cable
Chapter 8. Removing and replacing parts 107

DANGER
When working on or around the system, observe the following precautions:
Electrical voltage and current from power, telephone, and communicationcables are hazardous. To avoid a shock hazard:
v Connect power to this unit only with the IBM provided power cord. Do notuse the IBM provided power cord for any other product.
v Do not open or service any power supply assembly.
v Do not connect or disconnect any cables or perform installation,maintenance, or reconfiguration of this product during an electrical storm.
v The product might be equipped with multiple power cords. To remove allhazardous voltages, disconnect all power cords.
v Connect all power cords to a properly wired and grounded electrical outlet.Ensure that the outlet supplies proper voltage and phase rotation accordingto the system rating plate.
v Connect any equipment that will be attached to this product to properlywired outlets.
v When possible, use one hand only to connect or disconnect signal cables.
v Never turn on any equipment when there is evidence of fire, water, orstructural damage.
v Disconnect the attached power cords, telecommunications systems,networks, and modems before you open the device covers, unlessinstructed otherwise in the installation and configuration procedures.
v Connect and disconnect cables as described in the following procedureswhen installing, moving, or opening covers on this product or attacheddevices.
To disconnect:
1. Turn off everything (unless instructed otherwise).
2. Remove the power cords from the outlets.
3. Remove the signal cables from the connectors.
4. Remove all cables from the devices.
To connect:
1. Turn off everything (unless instructed otherwise).
2. Attach all cables to the devices.
3. Attach the signal cables to the connectors.
4. Attach the power cords to the outlets.
5. Turn on the devices.
v Sharp edges, corners and joints may be present in and around the system.Use care when handling equipment to avoid cuts, scrapes and pinching.
(D005)
108 Storwize V7000: Troubleshooting, Recovery, and Maintenance Guide

Attention: Perform this procedure only if instructed to do so by a service actionor the IBM support center. If you have a single control enclosure, this procedurerequires that you shut down your system to replace the control enclosure. If youhave more than one control enclosure, you can keep part of the system running,but you lose access to the volumes that are on the affected I/O group and anyvolumes that are in other I/O groups that depend on the drives that are in theaffected I/O group. If the system is still performing I/O requests in all the I/Ogroups, schedule the replacement during a maintenance period or other time whenthe I/O can be stopped.
Be careful when you are replacing the hardware components that are located in theback of the system that you do not inadvertently disturb or remove any cables thatyou are not instructed to remove.
Ensure that you are aware of the procedures for handling static-sensitive devicesbefore you remove the enclosure.
About this task
To replace a control enclosure chassis, perform the following steps:
Procedure1. If you are able to access either of the node canisters with the service assistant,
record the machine type and model of the enclosure, the serial number of theenclosure, and the two WWNNs for the enclosure.v From the service assistant home page, open the location data for the node.
Record the machine type and model (MTM), the serial number, WWNN 1and WWNN 2 from the enclosure column.
v If you are replacing the enclosure because neither node canister can start,retrieve this information after you have completed the replacement.a. Start the service assistant on one of the canisters.b. Go to the node location data on the home page.c. Record the machine type and model, the serial number, WWNN 1 and
WWNN 2 from the node copy column.The machine type and model and the serial number are also shown onthe labels at the front and back of the enclosure.
2. If the enclosure is still active, shut down the host I/O and the Metro Mirrorand Global Mirror activity to all the volumes that depend on the affectedenclosure.This statement applies to all volumes in the I/O group that are managed bythis enclosure plus any volumes in other I/O groups that depend on thedrives in the affected I/O group.
3. If your system contains a single I/O group and if the clustered system is stillonline, shut the system down by using the management GUI.a. From the management GUI, go to Monitoring > Manage Device.b. Select Shut Down System from the Actions menu.c. Wait for the shutdown to complete.
4. If your system contains more than one I/O group and if this I/O group is stillonline, shut down the I/O group by using the CLI.a. Identify the two nodes in the I/O group.b. To shut down each node, issue the following CLI command once for each
of the two node canisters:
Chapter 8. Removing and replacing parts 109

stopsystem -force -node <node ID>
c. Wait for the shutdown to complete.5. Verify that it is safe to remove the power from the enclosure.
For each of the canisters, verify the status of the system status LED. If theLED is lit on either of the canisters, do not continue because the system is stillonline. Determine why the node canisters did not shut down in step 3 onpage 109 or step 4 on page 109.
Note: If you continue while the system is still active, you risk losing theclustered system configuration and volume cache data that is stored in thecanister.
6. Turn off the power to the enclosure using the switches on the power supplyunits.
7. Record which data cables are plugged into the specific ports. The cables mustbe inserted back into the same ports after the replacement is complete;otherwise, the system cannot function properly.
8. Disconnect the cable retention brackets and the power cords from the powersupply units.
9. Disconnect the data cables for each canister.10. Remove the power supply units from the enclosure.11. Remove the canisters from the enclosure. Record the location of each canister.
They must be inserted back into the same location in the new enclosure.12. Remove all the drives and blank drive assemblies from the enclosure. Record
the location for each drive. They must be inserted back into the same locationin the new enclosure.
13. Remove both enclosure end caps from the enclosure. Keep the left end capbecause it is used again.
14. Remove the clamping screws that attached the enclosure to the rack cabinet.15. Remove the enclosure chassis from the front of the rack cabinet and take the
chassis to a work area.16. Install the new enclosure chassis in the rack cabinet.17. Remove the end caps from the new enclosure and install the clamping screws
that attach the enclosure to the rack cabinet.18. Replace the end caps. Use the new right end cap and use the left end cap that
you removed in step 13.Using the left end cap that you removed preserves the model and serialnumber identification.
19. Reinstall the drives in the new enclosure. The drives must be inserted backinto the same location from which they were removed on the old enclosure.
20. Reinstall the canisters in the enclosure. The canisters must be inserted backinto the same location from which they were removed on the old enclosure.
21. Install the power supply units.22. Reattach the data cables to each canister using the information that you
recorded previously.
Note: The cables must be inserted back into the same ports from which theywere removed on the old enclosure; otherwise, the system cannot functionproperly.
23. Attach the power cords and the cable retention brackets to the power supplyunits.
110 Storwize V7000: Troubleshooting, Recovery, and Maintenance Guide

24. Write the old enclosure machine type and model (MTM) and serial number onthe repair identification (RID) tag that is supplied. Attach the tag to the leftflange at the back of the enclosure.
25. Turn on the power to the enclosure using the switches on the power supplyunits.The node canisters boot up. The fault LEDs are on because the new enclosurehas not been set with the identity of the old enclosure. The node canistersreport that they are in the wrong location.a. Connect to the service assistant on one of the node canisters to configure
the machine type and model, serial number, and WWNNs that are storedin the enclosure. If you have replaced a node canister, connect to thecanister that has not been replaced.You can connect using the previous service address. However, it is notalways possible to maintain this address. If you cannot connect throughthe original service address, attempt to connect using the default serviceaddress. If you still cannot access the system, see “Problem: Cannotconnect to the service assistant” on page 47.
b. Use the Configure enclosure panel.c. Select the options to Update WWNN 1, Update WWNN 2, Update the
machine type and model, and Update the serial number. Do not updatethe system ID. Use the node copy data for each of the values. Check thatthese values match the values that you recorded in step 1 on page 109.If you were not able to record the values, use the node copy values only ifnone of them have all zeroes as their value. If any of the node copy valuesare all zeroes, connect the service assistant to the other node canister andconfigure the enclosure there. If you still do not have a full set of values,contact IBM support.After you modify the configuration, the node attempts to restart.
Note: There are situations where the canisters restart and report criticalnode error 508. If the node canisters fail to become active after they restartwhen the enclosure is updated, check their status by using the serviceassistant. If both node canisters show critical node error 508, use theservice assistant to restart the nodes. For any other node error, see“Procedure: Fixing node errors” on page 60. To restart a node from theservice assistant, perform the following steps:1) Log on to the service assistant.2) From the home page, select the node that you want to restart from the
Changed Node List.3) Select Actions > Restart.
d. The system starts and can handle I/O requests from the host systems.
Note: The configuration changes that are described in the following stepsmust be performed to ensure that the system is operating correctly. If youdo not perform these steps, the system is unable to report certain errors.
26. Start the management GUI and select Monitoring > System Details. You seean additional enclosure in the system list because the system has detected thereplacement control enclosure. The original control enclosure is still listed inits configuration. The original enclosure is listed with its original enclosure ID.It is offline and managed. The new enclosure has a new enclosure ID. It isonline and unmanaged.
27. Select the original enclosure in the tree view.
Chapter 8. Removing and replacing parts 111

Verify that it is offline and managed and that the serial number is correct.28. From the Actions menu, select Remove enclosure and confirm the action. The
physical hardware has already been removed. You can ignore the messagesabout removing the hardware. Verify that the original enclosure is no longerlisted in the tree view.
29. Add the new enclosure to the system.a. Select the enclosure from the tree view.b. From the Actions menu, select Add Control and Expansion Enclosures.c. Because you have already added the hardware, select Next on the first
panel that asks you to install the hardware. The next panel shows theunmanaged new enclosure.
d. Follow the steps in the wizard. The wizard changes the control enclosureto Managed.
e. Select the enclosure and add it to the system.30. Select the new enclosure in the tree view and verify that it is now online and
managed.31. Change the enclosure ID of the replaced enclosure to that of the original
enclosure. From the Enclosure ID field, select the ID value of the originalenclosure.
32. Check the status of all volumes and physical storage to ensure everything isonline.
33. Restart the host application and any FlashCopy activities, Global Mirroractivities, or Metro Mirror activities that were stopped.
Results
Replacing an expansion enclosure chassisThis topic describes how to replace an expansion enclosure chassis.
Before you begin
Note: Ensure that you know the type of enclosure chassis that you are replacing.The procedures for replacing an expansion enclosure chassis are different fromthose procedures for replacing a control enclosure chassis. For information aboutreplacing a control enclosure chassis, see “Replacing a control enclosure chassis”on page 107.
112 Storwize V7000: Troubleshooting, Recovery, and Maintenance Guide

DANGER
When working on or around the system, observe the following precautions:
Electrical voltage and current from power, telephone, and communicationcables are hazardous. To avoid a shock hazard:
v Connect power to this unit only with the IBM provided power cord. Do notuse the IBM provided power cord for any other product.
v Do not open or service any power supply assembly.
v Do not connect or disconnect any cables or perform installation,maintenance, or reconfiguration of this product during an electrical storm.
v The product might be equipped with multiple power cords. To remove allhazardous voltages, disconnect all power cords.
v Connect all power cords to a properly wired and grounded electrical outlet.Ensure that the outlet supplies proper voltage and phase rotation accordingto the system rating plate.
v Connect any equipment that will be attached to this product to properlywired outlets.
v When possible, use one hand only to connect or disconnect signal cables.
v Never turn on any equipment when there is evidence of fire, water, orstructural damage.
v Disconnect the attached power cords, telecommunications systems,networks, and modems before you open the device covers, unlessinstructed otherwise in the installation and configuration procedures.
v Connect and disconnect cables as described in the following procedureswhen installing, moving, or opening covers on this product or attacheddevices.
To disconnect:
1. Turn off everything (unless instructed otherwise).
2. Remove the power cords from the outlets.
3. Remove the signal cables from the connectors.
4. Remove all cables from the devices.
To connect:
1. Turn off everything (unless instructed otherwise).
2. Attach all cables to the devices.
3. Attach the signal cables to the connectors.
4. Attach the power cords to the outlets.
5. Turn on the devices.
v Sharp edges, corners and joints may be present in and around the system.Use care when handling equipment to avoid cuts, scrapes and pinching.
(D005)
Chapter 8. Removing and replacing parts 113

Attention: If your system is powered on and performing I/O operations, go themanagement GUI and follow the fix procedures. Performing the replacementactions without the assistance of the fix procedures can result in loss of data oraccess to data.
Even though many of these procedures are hot-swappable, these procedures areintended to be used only when your system is not up and running and performingI/O operations. Unless your system is offline, go to the management GUI andfollow the fix procedures.
Be careful when you are replacing the hardware components that are located in theback of the system that you do not inadvertently disturb or remove any cables thatyou are not instructed to remove.
Ensure that you are aware of the procedures for handling static-sensitive devicesbefore you remove the enclosure.
About this task
Note: If your system is online, replacing an expansion enclosure can cause one ormore of your volumes to go offline or your quorum disks to be inaccessible. Beforeyou proceed with these procedures, verify which volumes might go offline. Fromthe management GUI, go to Home > Manage Devices. Select the enclosure thatyou want to replace. Then select Show Dependent Volumes in the Actions menu.
To replace an expansion enclosure chassis, perform the following steps:
Procedure1. Shut down the I/O activity to the enclosure, which includes host access,
FlashCopy, Metro Mirror and Global Mirror access.2. Turn off the power to the enclosure by using the switches on the power
supply units.3. Record which data cables are plugged into the specific ports. The cables must
be inserted back into the same ports after the replacement is complete;otherwise, the system cannot function properly.
4. Disconnect the cable retention brackets and the power cords from the powersupply units.
5. Disconnect the data cables for each canister.6. Remove the power supply units from the enclosure.7. Remove the canisters from the enclosure.8. Remove all the drives and blank drive assemblies from the enclosure. Record
the location for each drive. They must be inserted back into the same locationin the new enclosure.
9. Remove both enclosure end caps from the enclosure. Keep the left end capbecause it is used again.
10. Remove the clamping screws that attached the enclosure to the rack cabinet.11. Remove the enclosure chassis from the front of the rack cabinet and take the
chassis to a work area.12. Install the new enclosure chassis in the rack cabinet.13. Remove the end caps from the new enclosure and install the clamping screws
that attach the enclosure to the rack cabinet.
114 Storwize V7000: Troubleshooting, Recovery, and Maintenance Guide

14. Replace the end caps. Use the new right end cap and use the left end cap thatyou removed in step 9 on page 114.Using the left end cap that you removed preserves the model and serialnumber identification.
15. Reinstall the drives in the new enclosure. The drives must be inserted backinto the same location from which they were removed on the old enclosure.
16. Reinstall the canisters in the enclosure.17. Install the power supply units.18. Reattach the data cables to each canister by using the information that you
recorded previously.
Note: The cables must be inserted back into the same ports from which theywere removed on the old enclosure; otherwise, the system cannot functionproperly.
19. Attach the power cords and the cable retention brackets to the power supplyunits.
20. Write the old enclosure machine type and model (MTM) and serial number onthe repair identification (RID) tag that is supplied. Attach the tag to the leftflange at the back of the enclosure.
21. Turn on the power to the enclosure by using the switches on the powersupply units.
Results
The system records an error that indicates that an enclosure FRU replacement wasdetected. Go to the management GUI to use the fix procedure to change themachine type and model and serial number in the expansion enclosure.
Replacing the support railsThis topic describes how to replace the support rails.
About this task
Perform the following steps to replace the support rails:
Procedure1. Remove the enclosure.2. Record the location of the rail assembly in the rack cabinet.3. Working from the back of the rack cabinet, remove the clamping screw�1�
from the rail assembly on both sides of the rack cabinet.
Chapter 8. Removing and replacing parts 115

4. Working from the front of the rack cabinet, remove the clamping screw fromthe rail assembly on both sides of the rack cabinet.
5. From one side of the rack cabinet, grip the rail and slide the rail piecestogether to shorten the rail.
6. Disengage the rail location pins �2�.7. From the other side the rack cabinet, grip the rail and slide the rail pieces
together to shorten the rail.8. Disengage the rail location pins �2�.9. Starting from the location of the previous rail assembly, align the bottom of
the rail with the bottom of the two rack units. Insert the rail location pinsthrough the holes in the rack cabinet.
10. Insert a clamping screw into the upper mounting hole between the raillocation pins.
11. Tighten the screw to secure the rail to the rack.12. Working from the rear of the rack cabinet, extend the rail that you secured to
the front to align the bottom of the rail with the bottom of the two rack units.
Note: Ensure that the rail is level between the front and the back.13. Insert the rail location pins through the holes in the rack cabinet.14. Insert a clamping screw into the upper mounting hole between the rail
location pins.15. Tighten the screw to secure the rail to the rack from the back side.16. Repeat the steps to secure the opposite rail to the rack cabinet.
Storwize V7000 replaceable unitsTheStorwize V7000 consists of several replaceable units. Generic replaceable unitsare cables, SFP transceivers, canisters, power supply units, battery assemblies, andenclosure chassis.
Table 22 on page 117 provides a brief description of each replaceable unit.
1
2
svc00650
Figure 39. Removing a rail assembly from a rack cabinet
116 Storwize V7000: Troubleshooting, Recovery, and Maintenance Guide

Table 22. Replaceable units
Part Part numberApplicablemodels
FRU or customerreplaced
2U24 enclosure chassis (emptychassis)
85Y5897 124, 224, 324 FRU
2U12 enclosure chassis (emptychassis)
85Y5896 112, 212, 312 FRU
Type 100 node canister 85Y5899 112, 124 Customerreplaced
Type 300 node canister with 10Gbps Ethernet ports
85Y6116 312, 324 Customerreplaced
Expansion canister 85Y5850 212, 224 Customerreplaced
764 W power supply unit 85Y5847 112, 124, 312, 324 Customerreplaced
580 W power supply unit 85Y5846 212, 224 Customerreplaced
Battery backup unit 85Y5898 112, 124, 312, 324 Customerreplaced
1 m SAS cable 44V4041 212, 224 Customerreplaced
3 m SAS cable 44V4163 212, 224 Customerreplaced
6 m SAS cable 44V4164 212, 224 Customerreplaced
1 m Fibre Channel cable 39M5699 112, 124, 312, 324 Customerreplaced
5 m Fibre Channel cable 39M5700 112, 124, 312, 324 Customerreplaced
25 m Fibre Channel cable 39M5701 112, 124, 312, 324 Customerreplaced
1.8 m power cord (Chicago) 39M5080 All Customerreplaced
2.8 m power cord (EMEA) 39M5151 All Customerreplaced
2.8 m power cord (Australia) 39M5102 All Customerreplaced
2.8 m power cord (Africa) 39M5123 All Customerreplaced
2.8 m power cord (Denmark) 39M5130 All Customerreplaced
2.8 m power cord (South Africa) 39M5144 All Customerreplaced
2.8 m power cord (Switzerland) 39M5158 All Customerreplaced
2.8 m power cord (Chile) 39M5165 All Customerreplaced
2.8 m power cord (Israel) 39M5172 All Customerreplaced
Chapter 8. Removing and replacing parts 117

Table 22. Replaceable units (continued)
Part Part numberApplicablemodels
FRU or customerreplaced
2.8 m power cord (Group 1including the United States)
39M5081 All Customerreplaced
2.8 m power cord (Argentina) 39M5068 All Customerreplaced
2.8 m power cord (China) 39M5206 All Customerreplaced
2.8 m power cord (Taiwan) 39M5247 All Customerreplaced
2.8 m power cord (Brazil) 39M5233 All Customerreplaced
2.0 m jumper cable 39M5376 All Customerreplaced
2.8 m power cord (India) 39M5226 All Customerreplaced
4.3 m power cord (Japan) 39M5200 All Customerreplaced
2.8 m power cord (Korea) 39M5219 All Customerreplaced
2.5" SSD, 300 GB, in carrierassembly
85Y5861 124, 224, 324 Customerreplaced
2.5" 10 K, 300 GB, in carrierassembly
85Y5862 124, 224, 324 Customerreplaced
2.5" 10 K, 450 GB, in carrierassembly
85Y5863 124, 224, 324 Customerreplaced
2.5" 10 K, 600 GB, in carrierassembly
85Y5864 124, 224, 324 Customerreplaced
3.5" 7.2 K nearline SAS - 2 TB incarrier assembly
85Y5869 112, 212, 312 Customerreplaced
Blank 2.5" carrier 85Y5893 124, 224, 324 Customerreplaced
Blank 3.5" carrier 85Y5894 112, 212, 312 Customerreplaced
Fibre Channel shortwave smallform-factor pluggable (SFP)
85Y5958 112, 124, 312, 324 Customerreplaced
Fibre Channel longwave smallform-factor pluggable (SFP)
85Y5957 112, 124, 312, 324 Customerreplaced
Ethernet small form-factorpluggable (SFP)
31P1549 312, 324 Customerreplaced
Rail kit 85Y5852 All Customerreplaced
Left enclosure cap includingRID tag but no black MTM label
85Y5901 All Customerreplaced
Right enclosure cap (2U12) 85Y5903 112, 212, 312 Customerreplaced
Right enclosure cap (2U24) 85Y5904 124, 224, 324 Customerreplaced
118 Storwize V7000: Troubleshooting, Recovery, and Maintenance Guide

Chapter 9. Event reporting
Events that are detected are saved in an event log. As soon as an entry is made inthis event log, the condition is analyzed. If any service activity is required, anotification is sent.
Event reporting process
The following methods are used to notify you and the IBM Support Center of anew event:v If you enabled Simple Network Management Protocol (SNMP), an SNMP trap is
sent to an SNMP manager that is configured by the customer.v If enabled, log messages can be forwarded from a sender to a receiver on an IP
network by using the syslog protocol.v If enabled, event notifications can be forwarded from a sender to a receiver
through Call Home email.v If Call Home is enabled, critical faults generate a problem management record
(PMR) that is sent directly to the appropriate IBM Support Center.
Understanding eventsWhen a significant change in status is detected, an event is logged in the event log.
Error data
Events are classified as either alerts or messages:v An alert is logged when the event requires some action. Some alerts have an
associated error code that defines the service action that is required. The serviceactions are automated through the fix procedures. If the alert does not have anerror code, the alert represents an unexpected change in state. This situationmust be investigated to see if it is expected or represents a failure. Investigate analert and resolve it as soon as it is reported.
v A message is logged when a change that is expected is reported, for instance, anIBM FlashCopy operation completes.
Viewing the event logYou can view the event log by using the management GUI or the command-lineinterface (CLI).
About this task
You can view the event log by using the Monitoring > Events options in themanagement GUI. The event log contains many entries. You can, however, selectonly the type of information that you need.
You can also view the event log by using the command-line interface (lseventlog).See the “Command-line interface” topic for the command details.
© Copyright IBM Corp. 2010, 2012 119

Managing the event logThe event log has a limited size. After it is full, newer entries replace entries thatare no longer required.
To avoid having a repeated event that fills the event log, some records in the eventlog refer to multiple occurrences of the same event. When event log entries arecoalesced in this way, the time stamp of the first occurrence and the last occurrenceof the problem is saved in the log entry. A count of the number of times that theerror condition has occurred is also saved in the log entry. Other data refers to thelast occurrence of the event.
Describing the fields in the event logThe event log includes fields with information that you can use to diagnoseproblems.
Table 23 describes some of the fields that are available to assist you in diagnosingproblems.
Table 23. Description of data fields for the event log
Data field Description
Event ID This number precisely identifies why the event was logged.
Error code This number describes the service action that should be followed toresolve an error condition. Not all events have error codes that areassociated with them. Many event IDs can have the same error codebecause the service action is the same for all the events.
Sequence number A number that identifies the event.
Event count The number of events coalesced into this event log record.
Object type The object type to which the event log relates.
Object ID A number that uniquely identifies the instance of the object.
Fixed When an alert is shown for an error condition, it indicates if thereason for the event was resolved. In many cases, the systemautomatically marks the events fixed when appropriate. There aresome events that must be manually marked as fixed. If the event is amessage, this field indicates that you have read and performed theaction. The message must be marked as read.
First time The time when this error event was reported. If events of a similartype are being coalesced together, so that one event log recordrepresents more than one event, this field is the time the first errorevent was logged.
Last time The time when the last instance of this error event was recorded in thelog.
Root sequencenumber
If set, this number is the sequence number of an event that representsan error that probably caused this event to be reported. Resolve theroot event first.
Sense data Additional data that gives the details of the condition that caused theevent to be logged.
120 Storwize V7000: Troubleshooting, Recovery, and Maintenance Guide

Event notificationsThe SAN Volume Controller product can use Simple Network ManagementProtocol (SNMP) traps, syslog messages, emails and Call Homes notify you andthe IBM(r) Remote Technical Support Center when significant events are detected.Any combination of these notification methods can be used simultaneously.Notifications are normally sent immediately after an event is raised. However,there are some events that might occur because of service actions that are beingperformed. If a recommended service action is active, these events are notified onlyif they are still unfixed when the service action completes.
Only events recorded in the event log can be notified. Most CLI messages inresponse to some CLI commands are not recorded in the event log so do not causean event notification.
Table 24 describes the levels of event notifications.
Table 24. Notification levels
Notification level Description
Critical Critical notification is sent to indicate a problem that must becorrected as soon as possible.
This notification indicates a serious problem with the StorwizeV7000. For example, the event that is being reported could indicatea loss of redundancy in the system, and it is possible that anotherfailure could result in loss of access to data. The most typical reasonthat this type of notification is sent is because of a hardware failure,but some configuration errors or fabric errors also are included inthis notification level. Critical notifications can be configured to besent as a Call Home to the IBM Remote Technical Support.
Warning A warning notification is sent to indicate a problem or unexpectedcondition with the Storwize V7000. Always immediately investigatethis type of notification to determine the effect that it might haveon your operation, and make any necessary corrections.
A warning notification does not require any replacement parts andtherefore should not require IBM Support Center involvement. Theallocation of notification type Warning does not imply that theevent is less serious than one that has notification level Critical.
Information An informational notification is sent to indicate that an expectedevent has occurred: for example, a FlashCopy operation hascompleted. No remedial action is required when these notificationsare sent.
Power-on self-testWhen you turn on the system, the node canisters perform self-tests.
A series of tests is performed to check the operation of components and some ofthe options that have been installed when the units are first turned on. This seriesof tests is called the power-on self-test (POST).
If a critical failure is detected during the POST, the software is not loaded and thefault LED is illuminated. To determine if there is a POST error on a canister, go to“Procedure: Understanding the system status using the LEDs” on page 54.
Chapter 9. Event reporting 121

When the code is loaded, additional testing takes place, which ensures that all ofthe required hardware and code components are installed and functioningcorrectly.
Understanding the error codesError codes are generated by the event-log analysis and system configuration code.
Error codes help you to identify the cause of a problem, the failingfield-replaceable units (FRUs), and the service actions that might be needed tosolve the problem.
Event IDsThe Storwize V7000 software generates events, such as informational events anderror events. An event ID or number is associated with the event and indicates thereason for the event.
Informational events provide information about the status of an operation.Informational events are recorded in the event log, and depending on theconfiguration, can be notified through email, SNMP, or syslog.
Error events are generated when a service action is required. An error event mapsto an alert with an associated error code. Depending on the configuration, errorevents can be notified through email, SNMP, or syslog.
Informational eventsThe informational events provide information about the status of an operation.
Informational events are recorded in the event log and, depending on theconfiguration, can be notified through email, SNMP, or syslog.
Informational events can be either notification type I (information) or notificationtype W (warning). An informational event report of type (W) might require userattention. Table 25 provides a list of informational events, the notification type, andthe reason for the event.
Table 25. Informational events
Event IDNotificationtype Description
980221 I The error log is cleared.
980230 I The SSH key was discarded for the service login user.
980231 I User name has changed.
980301 I Degraded or offline managed disk is now online.
980310 I A degraded or offline storage pool is now online.
980320 I Offline volume is now online.
980321 W Volume is offline because of degraded or offlinestorage pool.
980330 I All nodes can see the port.
980340 I All ports in this host are now logged in.
980341 W One or more ports in this host is now degraded.
980342 W One or more ports in this host is now offline.
122 Storwize V7000: Troubleshooting, Recovery, and Maintenance Guide

Table 25. Informational events (continued)
Event IDNotificationtype Description
980343 W All ports in this host are now offline.
980349 I A node has been successfully added to the cluster(system).
980350 I The node is now a functional member of the cluster(system).
980351 I A noncritical hardware error occurred.
980352 I Attempt to automatically recover offline nodestarting.
980370 I Both nodes in the I/O group are available.
980371 I One node in the I/O group is unavailable.
980372 W Both nodes in the I/O group are unavailable.
980380 I Maintenance mode was started.
980381 I Maintenance mode has ended.
980392 I Cluster (system) recovery completed.
980435 W Failed to obtain directory listing from remote node.
980440 W Failed to transfer file from remote node.
980445 I The migration is complete.
980446 I The secure delete is complete.
980501 W The virtualization amount is close to the limit that islicensed.
980502 W The FlashCopy feature is close to the limit that islicensed.
980503 W The Metro Mirror or Global Mirror feature is close tothe limit that is licensed.
980504 I The limit was reached for the external virtualizationfeature.
980505 I The limit was reached for the compression featurelicense.
981002 I Fibre Channel discovery occurred; configurationchanges are pending.
981003 I Fibre Channel discovery occurred; configurationchanges are complete.
981004 I Fibre Channel discovery occurred; no configurationchanges were detected.
981007 W The managed disk is not on the preferred path.
981009 W The initialization for the managed disk failed.
981014 W The LUN discovery has failed. The cluster (system)has a connection to a device through this node butthis node cannot discover the unmanaged ormanaged disk that is associated with this LUN.
981015 W The LUN capacity equals or exceeds the maximum.Only part of the disk can be accessed.
981020 W The managed disk error count warning threshold hasbeen met.
Chapter 9. Event reporting 123

Table 25. Informational events (continued)
Event IDNotificationtype Description
981022 I Managed disk offline imminent, offline preventionstarted
981025 I Drive firmware download started
981026 I Drive FPGA download started
981101 I SAS discovery occurred; no configuration changeswere detected.
981102 I SAS discovery occurred; configuration changes arepending.
981103 I SAS discovery occurred; configuration changes arecomplete.
981104 W The LUN capacity equals or exceeds the maximumcapacity. Only the first 1 PB of disk will be accessed.
981105 I The drive format has started.
981106 I The drive recovery was started.
982003 W Insufficient virtual extents.
982004 W The migration suspended because of insufficientvirtual extents or too many media errors on thesource managed disk.
982007 W Migration has stopped.
982009 I Migration is complete.
982010 W Copied disk I/O medium error.
983001 I The FlashCopy operation is prepared.
983002 I The FlashCopy operation is complete.
983003 W The FlashCopy operation has stopped.
984001 W First customer data being pinned in a virtual diskworking set.
984002 I All customer data in a virtual disk working set isnow unpinned.
984003 W The volume working set cache mode is in the processof changing to synchronous destage because thevolume working set has too much pinned data.
984004 I Volume working set cache mode updated to allowasynchronous destage because enough customer datahas been unpinned for the volume working set.
984501 I The firmware level of an enclosure component isbeing updated.
984502 I The firmware level updated has completed.
984503 I The battery conditioning completed.
984504 I The battery conditioning started.
984505 I The statesave information for the enclosure wascollected.
984506 I The debug from an IERR was extracted to disk.
984507 I An attempt was made to power on the slots.
984508 I All the expanders on the strand were reset.
124 Storwize V7000: Troubleshooting, Recovery, and Maintenance Guide

Table 25. Informational events (continued)
Event IDNotificationtype Description
984509 I The component firmware update paused to allow thebattery charging to finish.
984511 I The update for the component firmware pausedbecause the system was put into maintenance mode.
984512 I A component firmware update is needed but isprevented from running.
985001 I The Metro Mirror or Global Mirror background copyis complete.
985002 I The Metro Mirror or Global Mirror is ready to restart.
985003 W Unable to find path to disk in the remote cluster(system) within the timeout period.
986001 W The thin-provisioned volume copy data in a node ispinned.
986002 I All thin-provisioned volume copy data in a node isunpinned.
986010 I The thin-provisioned volume copy import has failedand the new volume is offline; either upgrade theStorwize V7000 software to the required version ordelete the volume.
986011 I The thin-provisioned volume copy import issuccessful.
986020 W A thin-provisioned volume copy space warning hasoccurred.
986030 I A thin-provisioned volume copy repair has started.
986031 I A thin-provisioned volume copy repair is successful.
986032 I A thin-provisioned volume copy validation is started.
986033 I A thin-provisioned volume copy validation issuccessful.
986034 I The import of the compressed-virtual volume copywas successful.
986035 W A compressed-virtual volume copy space warninghas occurred.
986036 I A compressed-virtual volume copy repair has started.
986037 I A compressed-virtual volume copy repair issuccessful.
986038 I A compressed-virtual volume copy has too many badblocks.
986201 I A medium error has been repaired for the mirroredcopy.
986203 W A mirror copy repair, using the validate optioncannot complete.
986204 I A mirror disk repair is complete and no differencesare found.
986205 I A mirror disk repair is complete and the differencesare resolved.
Chapter 9. Event reporting 125

Table 25. Informational events (continued)
Event IDNotificationtype Description
986206 W A mirror disk repair is complete and the differencesare marked as medium errors.
986207 I The mirror disk repair has been started.
986208 W A mirror copy repair, using the set medium erroroption, cannot complete.
986209 W A mirror copy repair, using the resync option, cannotcomplete.
987102 W Node coldstarted.
987103 W A node power-off has been requested from the powerswitch.
987104 I Additional Fibre Channel ports were connected.
987301 W The connection to a configured remote cluster(system) has been lost.
987400 W The node unexpectedly lost power but has now beenrestored to the cluster (system).
988100 W An overnight maintenance procedure has failed tocomplete. Resolve any hardware and configurationproblems that you are experiencing on the cluster(system). If the problem persists, contact your IBMservice representative for assistance.
988300 W An array MDisk is offline because it has too manymissing members.
988301 I The rebuild for an array MDisk was started.
988302 I The rebuild for an array MDisk has finished.
988304 I A RAID array has started exchanging an arraymember.
988305 I A RAID array has completed exchanging an arraymember.
988306 I A RAID array needs resynchronization.
989001 W A managed disk group space warning has occurred.
Error event IDs and error codesError codes describe a service procedure that must be followed. Each event ID thatrequires service has an associated error code.
Error codes can be either notification type E (error) or notification type W(warning). Table 26 lists the event IDs and corresponding error codes, thenotification type, and the condition of the event.
Table 26. Error event IDs and error codes
EventID
Notificationtype Condition
Errorcode
009020 E An automatic system recovery has started. Allconfiguration commands are blocked.
1001
009040 E The error event log is full. 1002
126 Storwize V7000: Troubleshooting, Recovery, and Maintenance Guide

Table 26. Error event IDs and error codes (continued)
EventID
Notificationtype Condition
Errorcode
009052 W The following causes are possible:
v The node is missing.
v The node is no longer a functional member of thesystem.
1196
009053 E A node has been missing for 30 minutes. 1195
009100 W The software install process has failed. 2010
009101 W The software upgrade package delivery has failed. 2010
009150 W Unable to connect to the SMTP (email) server 2600
009151 W Unable to send mail through the SMTP (email) server 2601
009170 W The Metro Mirror or Global Mirror feature capacity isnot set.
3030
009171 W The FlashCopy feature capacity is not set. 3031
009172 W The Virtualization feature has exceeded the amount thatis licensed.
3032
009173 W The FlashCopy feature has exceeded the amount that islicensed.
3032
009174 W The Metro Mirror or Global Mirror feature has exceededthe amount that is licensed.
3032
009175 W The usage for the thin-provisioned volume is notlicensed.
3033
009176 W The value set for the virtualization feature capacity is notvalid.
3029
009177 E A physical disk FlashCopy feature license is required. 3035
009178 E A physical disk Metro Mirror and Global Mirror featurelicense is required.
3036
009179 E A virtualization feature license is required. 3025
009180 E Automatic recovery of offline node failed. 1194
009181 W Unable to send email to any of the configured emailservers.
3081
009182 W The external virtualization feature license limit wasexceeded.
3032
009183 W Unable to connect to LDAP server. 2251
009184 W The LDAP configuration is not valid. 2250
009185 E The limit for the compression feature license wasexceeded.
3032
009186 E The limit for the compression feature license wasexceeded.
3032
010002 E The node ran out of base event sources. As a result, thenode has stopped and exited the system.
2030
010003 W The number of device logins has reduced. 1630
010006 E A software error has occurred. 2030
010008 E The block size is invalid, the capacity or LUN identityhas changed during the managed disk initialization.
1660
Chapter 9. Event reporting 127
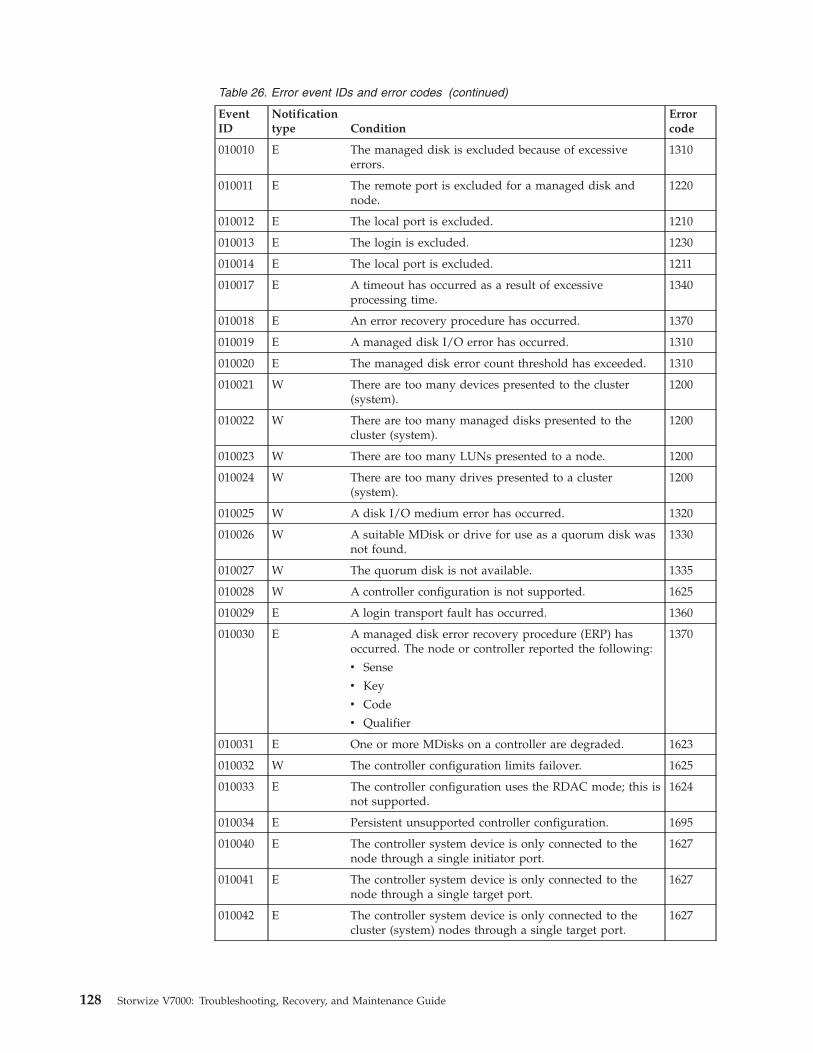
Table 26. Error event IDs and error codes (continued)
EventID
Notificationtype Condition
Errorcode
010010 E The managed disk is excluded because of excessiveerrors.
1310
010011 E The remote port is excluded for a managed disk andnode.
1220
010012 E The local port is excluded. 1210
010013 E The login is excluded. 1230
010014 E The local port is excluded. 1211
010017 E A timeout has occurred as a result of excessiveprocessing time.
1340
010018 E An error recovery procedure has occurred. 1370
010019 E A managed disk I/O error has occurred. 1310
010020 E The managed disk error count threshold has exceeded. 1310
010021 W There are too many devices presented to the cluster(system).
1200
010022 W There are too many managed disks presented to thecluster (system).
1200
010023 W There are too many LUNs presented to a node. 1200
010024 W There are too many drives presented to a cluster(system).
1200
010025 W A disk I/O medium error has occurred. 1320
010026 W A suitable MDisk or drive for use as a quorum disk wasnot found.
1330
010027 W The quorum disk is not available. 1335
010028 W A controller configuration is not supported. 1625
010029 E A login transport fault has occurred. 1360
010030 E A managed disk error recovery procedure (ERP) hasoccurred. The node or controller reported the following:
v Sense
v Key
v Code
v Qualifier
1370
010031 E One or more MDisks on a controller are degraded. 1623
010032 W The controller configuration limits failover. 1625
010033 E The controller configuration uses the RDAC mode; this isnot supported.
1624
010034 E Persistent unsupported controller configuration. 1695
010040 E The controller system device is only connected to thenode through a single initiator port.
1627
010041 E The controller system device is only connected to thenode through a single target port.
1627
010042 E The controller system device is only connected to thecluster (system) nodes through a single target port.
1627
128 Storwize V7000: Troubleshooting, Recovery, and Maintenance Guide

Table 26. Error event IDs and error codes (continued)
EventID
Notificationtype Condition
Errorcode
010043 E The controller system device is only connected to thecluster (system) nodes through half of the expectedtarget ports.
1627
010044 E The controller system device has disconnected all targetports to the cluster (system) nodes.
1627
010050 W A solid-state drive (SSD) failed. A rebuild is required. 1201
010051 E A solid-state drive (SSD) is missing. 1202
010052 E A solid-state drive (SSD) is offline as a result of a drivehardware error.
1205
010053 E A solid-state drive (SSD) is reporting a predictive failureanalysis (PFA).
1215
010054 E A solid-state drive (SSD) is reporting too many errors. 1215
010055 W An unrecognized SAS device. 1665
010056 E SAS error counts exceeded the warning thresholds. 1216
010057 E SAS errors exceeded critical thresholds. 1216
010058 E The drive initialization failed because of an unknownblock size or a block size that is not valid; an unknowncapacity or a capacity that is not valid; or was not able toset the required mode pages.
1661
010059 E A solid-state drive (SSD) is offline due to excessiveerrors.
1311
010060 E A solid-state drive (SSD) exceeded the warningtemperature threshold.
1217
010061 E A solid-state drive (SSD) exceeded the offlinetemperature threshold.
1218
010062 E A drive exceeded the warning temperature threshold. 1217
010063 W Drive medium error. 1321
010066 W Controller indicates that it does not support descriptorsense for LUNs that are greater than 2 TBs.
1625
010067 W Too many enclosures were presented to a cluster(system).
1200
010068 E The solid-state drive (SSD) format was corrupted. 1204
010069 E The block size for the solid-state drive (SSD) wasincorrect.
1204
010070 W Too many controller target ports were presented to thecluster (system).
1200
010071 W Too many target ports were presented to the cluster(system) from a single controller.
1200
010072 E The drive is offline as a result of a drive hardware error. 1680
010073 E The drive is reporting predictive failure analysis (PFA)errors.
1680
010080 E The drive is reporting too many errors. 1680
010081 E The drive format is corrupted. 1206
010082 E The block size for the drive was incorrect. 1206
Chapter 9. Event reporting 129

Table 26. Error event IDs and error codes (continued)
EventID
Notificationtype Condition
Errorcode
010083 E The drive is offline due to excessive errors. 1680
010084 E The error counts for the SAS drive exceeded the warningthresholds.
1285
010085 W The SAS device was not recognized. 1666
010086 W The SAS enclosure was not recognized. 1666
010087 W The SAS device was not able to be identified. 1666
010088 E There were excessive medium errors on the drive. 1680
010089 E There were excessive overall timeout errors on the drive. 1680
010090 E There were excessive times when the drive stopped. 1680
010091 E A drive failed validation testing. 1680
010092 E There were excessive medium errors on the solid-statedrive (SSD).
1215
010093 E There were excessive overall timeout errors on thesolid-state drive (SSD).
1204
010094 E Login excluded. 1231
010095 E Drive failed. 1687
010096 E The drive initialization failed because of an unknownblock size or a block size that is not valid; an unknowncapacity or a capacity that is not valid; or was not able toset the required mode pages.
1680
010097 E A drive is reporting excessive errors. 1685
010098 W There are too many drives presented to a cluster(system).
1200
020001 E There are too many medium errors on the managed disk. 1610
020002 E A managed disk group is offline. 1620
020003 W There are insufficient virtual extents. 2030
029001 W The managed disk has bad blocks. On an externalcontroller, this can only be a copied medium error.
1840
029002 E The system failed to create a bad block because MDiskalready has the maximum number of allowed badblocks.
1226
029003 E The system failed to create a bad block because theclustered system already has the maximum number ofallowed bad blocks.
1225
030000 W The trigger prepare command has failed because of acache flush failure.
1900
030010 W The mapping is stopped because of the error that isindicated in the data.
1910
030020 W The mapping is stopped because of a clustered system orcomplete I/O group failure, and the current state of therelationship could not be recovered.
1895
045001 E One or more power supply unit fans have failed. 1124
045002 E A fan is operating outside the expected range. 1126
045003 E There was a fan status communications failure. 1126
130 Storwize V7000: Troubleshooting, Recovery, and Maintenance Guide

Table 26. Error event IDs and error codes (continued)
EventID
Notificationtype Condition
Errorcode
045004 E The power supply unit is not installed. 1128
045005 W The power supply unit has indicated an input powerfailure.
1138
045006 E The power supply unit has indicated a dc failure. 1126
045007 E The power supply unit has failed. 1124
045008 E There is no communication with the power supply unit. 1148
045009 E The model type for this enclosure is not valid. 1124
045010 E The power supply unit type is unknown to this product. 1124
045011 E The power supply unit serial number is not valid. 1124
045012 W The canister temperature is at the warning level. 1098
045013 W The canister temperature is at the critical level. 1095
045014 E The SAS cable was excluded because of a missing device. 1260
045015 E A SAS cable was excluded because too many changeevents were caused.
1260
045016 E A SAS cable was excluded. 1255
045017 E A SAS cable is operating at a reduced speed. 1260
045018 E A SAS cable was excluded because frames were dropped. 1260
045019 E A SAS cable was excluded because the enclosurediscovery timed out.
1260
045020 W A SAS cable is not present. 1265
045021 E A canister was removed from the system. 1036
045022 E A canister has been in a degraded state for too long andcannot be recovered.
1034
045023 E A canister is encountering communication problems. 1038
045024 E The canister VPD is not valid. 1032
045025 E The canister has experienced too many resets. 1032
045026 E The drive slot is causing the network to be unstable. 1686
045027 E The drive slot is not running at 6 Gbps 1686
045028 E The drive slot is dropping frames. 1686
045029 E The drive is visible through only one SAS port. 1686
045031 E The drive power control is not functional. 1008
045033 E The drive slot contains a device that is not responding toqueries.
1685
045034 E The managed enclosure is not visible from any nodecanisters.
1042
045035 E The electronics in the enclosure has failed. 1694
045036 E The electronics in the enclosure has experienced a criticalfailure.
1008
045037 E The SAS network has too many errors. 1048
045038 E The SAS network has too many errors. 1048
045040 W The firmware update for the enclosure component hasfailed.
3015
Chapter 9. Event reporting 131

Table 26. Error event IDs and error codes (continued)
EventID
Notificationtype Condition
Errorcode
045041 W More than one initiator port was detected on the samestrand.
1005
045042 W The order of the enclosures is different on each strand. 1005
045044 W Multiple canisters are connected to a single canister port. 1005
045045 W Canister 1 is connected to canister 2. 1005
045046 W An enclosure is connected to more than one I/O group. 1005
045047 W A managed enclosure is connected to the wrong I/Ogroup.
1005
045048 W An enclosure is connected to more than one chain. 1005
045049 W Too many canisters are connected to a strand. 1005
045050 W The canister is connected to the wrong port. 1005
045051 E A SAS cable is excluded because of single port activedrives.
1260
045052 W More than one canister was detected at the same hopcount.
1005
045053 E The node location is not able to be detected. 1031
045054 E An enclosure display cannot be updated. 1694
045055 E There is an enclosure battery fault. 1118
045056 E An enclosure battery is missing. 1112
045057 E An enclosure battery is nearing end of life. 1114
045058 E An enclosure battery is at end of life. 1113
045062 W An enclosure battery conditioning is required but notpossible.
1131
045063 E There was an enclosure battery communications error. 1116
045064 W A SAS port is active, but no enclosures can be detected. 1005
045065 E There is a connectivity problem between a canister andan enclosure.
1036
045066 E The FRU identity of the enclosure is not valid. 1008
045067 W A new enclosure FRU was detected and needs to beconfigured.
1041
045068 E The internal device on a node canister was excludedbecause of too many change events.
1034
045069 E The internal connector on the node canister wasexcluded as the cause of single ported drives.
1034
045070 W The canister temperature sensor cannot be read. 1034
045071 W The enclosure contains both a node canister and anexpansion canister.
1037
045072 E The discovery failed to complete. 1048
045073 E The VPD for the enclosure cannot be read. 1048
045080 E There are too many self-initiated resets on the enclosure. 1048
045082 E The slots are powered off. 1048
132 Storwize V7000: Troubleshooting, Recovery, and Maintenance Guide

Table 26. Error event IDs and error codes (continued)
EventID
Notificationtype Condition
Errorcode
050001 W The relationship is stopped because of a clustered systemor complete I/O group failure, and the current state ofthe mapping could not be recovered.
1700
050002 W A Metro Mirror or Global Mirror relationship orconsistency group exists within a clustered system, butits partnership has been deleted.
3080
050010 W A Global Mirror relationship has stopped because of apersistent I/O error.
1920
050011 W A remote copy has stopped because of a persistent I/Oerror.
1915
050020 W Remote copy has stopped. 1720
050030 W There are too many cluster (system) partnerships. Thenumber of partnerships has been reduced.
1710
050031 W There are too many cluster (system) partnerships. Thesystem has been excluded.
1710
050040 W Background copy process for the Remote Copy wasblocked.
1960
060001 W The thin-provisioned volume copy is offline becausethere is insufficient space.
1865
060002 W The thin-provisioned volume copy is offline because themetadata is corrupt.
1862
060003 W The thin-provisioned volume copy is offline because therepair has failed.
1860
060004 W The compressed volume copy is offline because there isinsufficient space.
1865
060005 W The compressed volume copy is offline because themetadata is corrupt.
1862
060006 W The compressed volume copy is offline because therepair has failed.
1860
060007 W The compressed volume copy has bad blocks. 1850
062001 W Unable to mirror medium error during volume copysynchronization
1950
062002 W The mirrored volume is offline because the data cannotbe synchronized.
1870
062003 W The repair process for the mirrored disk has stoppedbecause there is a difference between the copies.
1600
070000 E Unrecognized node error. 1083
070510 E Detected memory size does not match the expectedmemory size.
1022
070517 E The WWNN that is stored on the service controller andthe WWNN that is stored on the drive do not match.
1192
070521 E Unable to detect any Fibre Channel adapter. 1016
070522 E The system board processor has failed. 1020
070523 W The internal disk file system of the node is damaged. 1187
070524 E Unable to update BIOS settings. 1027
Chapter 9. Event reporting 133

Table 26. Error event IDs and error codes (continued)
EventID
Notificationtype Condition
Errorcode
070525 E Unable to update the service processor firmware for thesystem board.
1020
070528 W The ambient temperature is too high while the system isstarting.
1182
070550 E Cannot form cluster (system) due to lack of resources. 1192
070556 E Duplicate WWNN detected on the SAN. 1192
070558 E A node is unable to communicate with other nodes. 1192
070562 E The node hardware does not meet minimumrequirements.
1183
070564 E Too many software failures. 1188
070574 E The node software is damaged. 1187
070576 E The cluster (system) data cannot be read. 1030
070578 E The cluster (system) data was not saved when powerwas lost.
1194
070580 E Unable to read the service controller ID. 1044
070690 W Node held in service state. 1189
071820 W Node canister has the incorrect model for the enclosure. 3020
071840 W Detected hardware is not a valid configuration. 1198
071841 W Detected hardware needs activation. 1199
072900 E There was a PCIe link failure between canisters. 1006
072901 E The PCIe link is degraded between canisters. 1052
072911 E The PCIe link for the CPU is degraded. 1034
073003 E The Fibre Channel ports are not operational. 1060
073005 E Cluster (system) path failure. 1550
073006 W The SAN is not correctly zoned. As a result, more than512 ports on the SAN have logged into one StorwizeV7000 port.
1800
073007 W There are fewer Fibre Channel ports operational than areconfigured.
1061
073305 W One or more Fibre Channel ports are running at a speedthat is lower than the last saved speed.
1065
073310 E A duplicate Fibre Channel frame has been detected,which indicates that there is an issue with the FibreChannel fabric. Other Fibre Channel errors might also begenerated.
1203
073500 W Incorrect enclosure. 1021
073501 E Incorrect canister position. 1192
073502 E No enclosure identity; cannot get status from partner. 1192
073503 E Incorrect enclosure type. 1192
073504 E No enclosure identity and partner does match. 1192
073505 E No enclosure identity and partner does not match. 1192
073506 E No enclosure identity and no state on partner. 1192
134 Storwize V7000: Troubleshooting, Recovery, and Maintenance Guide

Table 26. Error event IDs and error codes (continued)
EventID
Notificationtype Condition
Errorcode
073507 E No enclosure identity and no node state. 1192
073508 W Cluster (system) identity is different on the enclosureand the node.
1023
073509 E Cannot read enclosure identity. 1036
073510 E Detected memory size does not match the expectedmemory size.
1032
073512 E Enclosure VPD is inconsistent 1008
073522 E The system board service processor has failed. 1034
073523 W The internal disk file system of the node is damaged. 1187
073525 E Unable to update the service processor firmware of thesystem board.
1034
073528 E Ambient temperature is too high during system startup. 1098
073535 E The internal PCIe switch of the node canister failed. 1034
073550 E Cannot form cluster (system) due to lack of resources. 1192
073556 E Duplicate WWNN detected on the SAN. 1133
073562 E The node hardware does not meet the minimumrequirements.
1034
073564 W Too many software failures. 1188
073565 E The internal drive of the node is failing. 1032
073573 E The node software is inconsistent. 1187
073574 E The cluster (system) data cannot be read. 1187
073578 E The cluster (system) data was not saved when powerwas lost.
1194
073651 E The canister battery is missing. 1153
073652 E The canister battery has failed. 1154
073653 E The canister battery’s temperature is too low. 1156
073654 E The canister battery’s temperature is too high 1157
073655 E The canister battery communications fault. 1158
073656 E The canister battery has insufficient charge. 1184
073690 W Node held in service state. 1189
073700 E FC adapter missing. 1045
073701 E FC adapter failed. 1046
073702 E FC adapter PCI error. 1046
073703 E FC adapter degraded. 1045
073704 W Fewer Fibre Channel ports operational. 1061
073705 W Fewer Fibre Channel IO ports operational. 1450
073710 E SAS adapter missing. 1045
073711 E SAS adapter failed. 1046
073712 E SAS adapter PCI error. 1046
073713 E SAS adapter degraded. 1046
073720 E Ethernet adapter missing. 1045
Chapter 9. Event reporting 135

Table 26. Error event IDs and error codes (continued)
EventID
Notificationtype Condition
Errorcode
073721 E Ethernet adapter failed. 1046
073722 E Ethernet adapter PCI error. 1046
073723 E Ethernet adapter degraded. 1046
073724 W Fewer Ethernet ports operational. 1401
073730 E Bus adapter missing. 1032
073731 E Bus adapter failed. 1032
073732 E Bus adapter PCI error. 1032
073733 E Bus adapter degraded. 1032
073734 W Inter-canister PCIe link failure. 1006
073768 W Ambient temperature warning. 1094
073769 W CPU temperature warning. 1093
073840 E Detected hardware is not a valid configuration. 1198
073841 E Detected hardware needs activation. 1199
073860 W Fabric too large. 1800
074001 W Unable to determine the vital product data (VPD) for anFRU. This is probably because a new FRU has beeninstalled and the software does not recognize that FRU.The cluster (system) continues to operate; however, youmust upgrade the software to fix this warning.
2040
074002 E The node warm started after a software error. 2030
074003 W A connection to a configured remote system has beenlost because of a connectivity problem.
1715
074004 W A connection to a configured remote system has beenlost because of too many minor errors.
1716
076001 E The internal disk for a node has failed. 1030
076002 E The hard disk is full and cannot capture any moreoutput.
2030
076401 E One of the two power supply units in the node hasfailed.
1096
076402 E One of the two power supply units in the node cannotbe detected.
1096
076403 E One of the two power supply units in the node iswithout power.
1097
076502 E Degraded PCIe lanes on a high-speed SAS adapter. 1121
076503 E A PCI bus error occurred on a high-speed SAS adapter. 1121
076504 E A high-speed SAS adapter requires a PCI bus reset. 1122
076505 E Vital product data (VPD) is corrupt on high-speed SASadapter.
1121
076511 E A high-speed SAS controller is missing. 1032
076512 E Degraded PCIe lanes on a high-speed SAS adapter. 1032
076513 E A PCI bus error occurred on a high-speed SAS adapter. 1032
076514 E A high-speed SAS adapter requires a PCI bus reset. 1034
136 Storwize V7000: Troubleshooting, Recovery, and Maintenance Guide

Table 26. Error event IDs and error codes (continued)
EventID
Notificationtype Condition
Errorcode
079500 W The limit on the number of cluster (system) secure shell(SSH) sessions has been reached.
2500
079501 W Unable to access the Network Time Protocol (NTP)network time server.
2700
081002 E An Ethernet port failure has occurred. 1401
082001 E A server error has occurred. 2100
084000 W An array MDisk has deconfigured members and has lostredundancy.
1689
084100 W An array MDisk is corrupt because of lost metadata. 1240
084200 W An array MDisk has taken a spare member that is not anexact match to the array goals.
1692
084201 W An array has members that are located in a different I/Ogroup.
1688
084300 W An array MDisk is no longer protected by an appropriatenumber of suitable spares.
1690
084500 W An array MDisk is offline. The metadata for the inflightwrites is on a missing node.
1243
084600 W An array MDisk is offline. Metadata on the missing nodecontains needed state information.
1243
Node error code overviewNode error codes describe failure that relate to a specific node canister.
Because node errors are specific to a node, for example, memory has failed, theerrors are only reported on that node. However, some of the conditions that thenode detects relate to the shared components of the enclosure. In these cases bothnode canisters in the enclosure report the error.
There are two types of node errors: critical node errors and noncritical node errors.
Critical errors
A critical error means that the node is not able to participate in a clustered systemuntil the issue that is preventing it from joining a clustered system is resolved. Thiserror occurs because part of the hardware has failed or the system detects that thescode is corrupt. If it is possible to communicate with the canister with a nodeerror, an alert that describes the error is logged in the event log. If the systemcannot communicate with the node canister, a Node missing alert is reported. If anode has a critical node error, it is in service state, and the fault LED on the nodeis on. The exception is when the node cannot connect to enough resources to forma clustered system. It shows a critical node error but is in the starting state. Therange of errors that are reserved for critical errors are 500 - 699.
Some critical errors might be accompanied by error codes 1021, 1036, 1188, and1189.
Noncritical errors
Chapter 9. Event reporting 137

A noncritical error code is logged when there is a hardware or code failure that isrelated to just one specific node. These errors do not stop the node from enteringactive state and joining a clustered system. If the node is part of a clusteredsystem, there is also an alert that describes the error condition. The node error isshown to make it clear which of the node canisters the alert refers to. The range oferrors that are reserved for noncritical errors are 800 - 899.
Clustered-system code overviewRecovery codes for clustered systems indicate that a critical software error hasoccurred that might corrupt your system. Each error-code topic includes an errorcode number, a description, action, and possible field-replaceable units (FRUs).
Error codes for recovering a clustered system
You must perform software problem analysis before you can perform furtheroperations to avoid the possibility of corrupting your configuration.
Error code rangeThis topic shows the number range for each message classification.
Table 27 lists the number range for each message classification.
Table 27. Message classification number range
Message classification Range
Node errors Critical node errors 500-699
Some critical errors might beaccompanied by error codes1021, 1036, 1188, and 1189.
Noncritical node errors 700-899
Error codes whenrecovering a clusteredsystem
920, 990
500 Incorrect enclosure
Explanation: The node canister has saved clusterinformation, which indicates that the canister is nowlocated in a different enclosure from where it waspreviously used. Using the node canister in this statemight corrupt the data held on the enclosure drives.
User response: Follow troubleshooting procedures tomove the nodes to the correct location.
1. Follow the procedure: Getting node canister andsystem information and review the node canister'ssaved location information and the status of theother node canister in the enclosure (the partnercanister). Determine if the enclosure is part of anactive system with volumes that contain requireddata. See “Procedure: Getting node canister andsystem information using the service assistant” onpage 53.
2. If you have unintentionally moved the canister intothis enclosure, move the canister back to its original
location, and put the original canister back in thisenclosure. Follow the “Replacing a node canister”on page 85 procedure.
3. If you have intentionally moved the node canisterinto this enclosure you should check it is safe tocontinue or whether you will lose data on theenclosure you removed it from. Do not continue ifthe system the node canister was removed from isoffline, rather return the node canister to thatsystem.
4. If you have determined it is alright to continue,follow the procedure to remove cluster data fromnode canister. See “Procedure: Removing systemdata from a node canister” on page 59.
5. If the partner node in this enclosure is not online, oris not present, you will have to perform a systemrecovery. Do not create a new system, you will loseall the volume data.
Possible Cause-FRUs or other cause:
500
138 Storwize V7000: Troubleshooting, Recovery, and Maintenance Guide
|||||||
||||

v None
501 Incorrect slot
Explanation: The node canister has saved clusterinformation, which indicates that the canister is nowlocated in the expected enclosure, but in a different slotfrom where it was previously used. Using the nodecanister in this state might mean that hosts are not ableto connect correctly.
User response: Follow troubleshooting procedures torelocate the node canister to the correct location.
1. Follow the procedure: Getting node canister andsystem information and review the saved locationinformation of the node canister and the status ofthe other node canister in the enclosure (the partnercanister). If the node canister has been inadvertentlyswapped, the other node canister will have thesame error. See “Procedure: Getting node canisterand system information using the service assistant”on page 53.
2. If the canisters have been swapped, use the“Replacing a node canister” on page 85 procedureto swap the canisters. The system should start.
3. If the partner canister is in candidate state, use thehardware remove and replace canister procedure toswap the canisters. The system should start.
4. If the partner canister is in active state, it is runningthe cluster on this enclosure and has replaced theoriginal use of this canister. You must follow theprocedure to remove cluster data from this nodecanister. The node canister will then become activein the cluster in its current slot. See “Procedure:Removing system data from a node canister” onpage 59.
5. If the partner canister is in service state, review itsnode error to determine the correct action.Generally, you will fix the errors reported on thepartner node in priority order, and review thesituation again after each change. If you have toreplace the partner canister with a new one youshould move this canister back to the correctlocation at the same time.
Possible Cause-FRUs or other:
v None
502 No enclosure identity exists and a statusfrom the partner node could not beobtained.
Explanation: The enclosure has been replaced andcommunication with the other node canister (partnernode) in the enclosure is not possible. The partner nodecould be missing, powered off, unable to boot, or aninternode communication failure may exist.
User response: Follow troubleshooting procedures toconfigure the enclosure:
1. Follow the procedures to resolve a problem to getthe partner node started. An error will still existbecause the enclosure has no identity. If the errorhas changed, follow the service procedure for thaterror.
2. If the partner has started and is showing a locationerror (probably this one), then the PCI link isprobably broken. Since the enclosure midplane wasrecently replaced, this is likely the problem. Obtaina replacement enclosure midplane, and replace it.See “Replacing a control enclosure chassis” on page107.
3. If this action does not resolve the issue, contact IBMSupport Center. They will work with you to ensurethat the system state data is not lost while resolvingthe problem. Also see Chapter 6, “Resolving aproblem,” on page 43.
Possible Cause—FRUs or other:
v Enclosure midplane (100%)
504 No enclosure identity and partner nodematches.
Explanation: The enclosure vital product dataindicates that the enclosure midplane has beenreplaced. This node canister and the other node canisterin the enclosure were previously operating in the sameenclosure midplane.
User response: Follow troubleshooting procedures toconfigure the enclosure.
1. This is an expected situation during the hardwareremove and replace procedure for a controlenclosure midplane. Continue following the removeand replace procedure and configure the newenclosure.
Possible Cause—FRUs or other:
v None
505 No enclosure identity and partner hassystem data that does not match.
Explanation: The enclosure vital product dataindicates that the enclosure midplane has beenreplaced. This node canister and the other node canisterin the enclosure do not come from the same originalenclosure.
User response: Follow troubleshooting procedures torelocate nodes to the correct location.
1. Follow the procedure: Getting node canister andsystem information and review the node canister'ssaved location information and the status of theother node canister in the enclosure (the partnercanister). Determine if the enclosure is part of anactive system with volumes that contain required
501 • 505
Chapter 9. Event reporting 139
||||||||

data. See “Procedure: Getting node canister andsystem information using the service assistant” onpage 53.
2. Decide what to do with the node canister that didnot come from the enclosure that is being replaced.
a. If the other node canister from the enclosurebeing replaced is available, use the hardwareremove and replace canister procedures toremove the incorrect canister and replace it withthe second node canister from the enclosurebeing replaced. Restart both canisters. The twonode canister should show node error 504 andthe actions for that error should be followed.
b. If the other node canister from the enclosurebeing replaced is not available, check theenclosure of the node canister that did not comefrom the replaced enclosure. Do not use thiscanister in this enclosure if you require thevolume data on the system from which the nodecanister was removed, and that system is notrunning with two online nodes. You shouldreturn the canister to its original enclosure anduse a different canister in this enclosure.
c. When you have checked that it is not requiredelsewhere, follow the procedure to removecluster data from the node canister that did notcome from the enclosure that is being replaced.See “Procedure: Removing system data from anode canister” on page 59. Restart both nodes.Expect node error 506 to now be reported, andfollow the service procedures for that error.
Possible Cause—FRUs or other:
v None
506 No enclosure identity and no node stateon partner
Explanation: The enclosure vital product dataindicates that the enclosure midplane has beenreplaced. There is no cluster state information on theother node canister in the enclosure (the partnercanister), so both node canisters from the originalenclosure have not been moved to this one.
User response: Follow troubleshooting procedures torelocate nodes to the correct location:
1. Follow the procedure: Getting node canister andsystem information and review the saved locationinformation of the node canister and determine whythe second node canister from the original enclosurewas not moved into this enclosure. See “Procedure:Getting node canister and system information usingthe service assistant” on page 53.
2. If you are sure that this node canister came fromthe enclosure that is being replaced, and the originalpartner canister is available, use the “Replacing anode canister” on page 85 procedure to install thesecond node canister in this enclosure. Restart the
node canister. The two node canisters should shownode error 504, and the actions for that error shouldbe followed.
3. If you are sure this node canister came from theenclosure that is being replaced, and that theoriginal partner canister has failed, continuefollowing the remove and replace procedure for anenclosure midplane and configure the newenclosure.
Possible Cause—FRUs or other:
v None
507 No enclosure identity and no node state
Explanation: The node canister has been placed in areplacement enclosure midplane. The node canister isalso a replacement or has had all cluster state removedfrom it.
User response: Follow troubleshooting procedures torelocate the nodes to the correct location.
1. Check the status of the other node in the enclosure.It should show node error 506. Unless it also showserror 507, check the errors on the other node andfollow the corresponding procedures to resolve theerrors.
2. If the other node in the enclosure is also reporting507, the enclosure and both node canisters have nostate information. You should contact IBM technicalsupport. They will assist you in setting theenclosure vital product data and running clusterrecovery.
Possible Cause-FRUs or other:
v None
508 Cluster identifier is different betweenenclosure and node
Explanation: The node canister location informationshows it is in the correct enclosure, however theenclosure has had a new cluster created on it since thenode was last shut down. Therefore, the cluster statedata stored on the node is not valid.
User response: Follow troubleshooting procedures tocorrectly relocate the nodes.
1. Check whether a new cluster has been created onthis enclosure while this canister was not operatingor whether the node canister was recently installedin the enclosure.
2. Follow the procedure: Get node canister and systeminformation using the service assistant, and checkthe partner node canister to see if it is alsoreporting node error 508; if it is, check that thesaved system information on this and the partnernode match. See “Procedure: Getting node canisterand system information using the service assistant”on page 53.
506 • 508
140 Storwize V7000: Troubleshooting, Recovery, and Maintenance Guide
|||||||
|||||
|||
||||||

3. If this node canister is the one to be used in thisenclosure, follow “Procedure: Removing systemdata from a node canister” on page 59 to removecluster data from the node canister. It will then jointhe cluster.
4. If this is not the node canister that you intended touse, follow the “Replacing a node canister” on page85 procedure to replace the node canister with theone intended for use.
Possible Cause—FRUs or other:
v Service procedure error (90%)
v Enclosure midplane (10%)
509 The enclosure identity cannot be read.
Explanation: The canister was unable to read vitalproduct data (VPD) from the enclosure. The canisterrequires this data to be able to initialize correctly.
User response: Follow troubleshooting procedures tofix the hardware:
1. Check errors reported on the other node canister inthis enclosure (the partner canister).
2. If it is reporting the same error follow the hardwareremove and replace procedure to replace theenclosure midplane.
3. If the partner canister is not reporting this error,follow the hardware remove and replace procedureto replace this canister.
Note: If a newly installed system has this error on bothnode canister, the data that needs to be written to theenclosure will not be available on the canisters, youshould contact IBM support for the WWNNs to use.Possible Cause—FRUs or other:
v Node canister (50%)
v Enclosure midplane (50%)
510 The detected memory size does notmatch the expected memory size.
Explanation:
The amount of memory detected in the node canister isless than the amount required for the canister tooperate as an active member of a system. The errorcode data shows the detected memory, in MB, followedby the minimum required memory, in MB, there is thena series of values indicating the amount of memory, inGB, detected in each memory slot.
Data:
v Detected memory on MB
v Minimum required memory in MB
v Memory in slot 1 in GB
v Memory in slot 2 in GB
v ... etc.
User response: Follow troubleshooting procedures tofix the hardware:
1. Use the hardware remove and replace node canisterprocedure to install a new node canister.
Possible Cause—FRUs or other:
v Node canister (100%)
522 The system board service processor hasfailed.
Explanation: The service processor (PSOC) in thecanister has failed or is not communicating.
User response:
1. Reseat the node canister.
2. If the error persists, use the remove and replaceprocedures to replace the node canister.
Possible Cause—FRUs or other:
v Node canister
523 The internal disk file system isdamaged.
Explanation: The node startup procedures have foundproblems with the file system on the internal disk ofthe node.
User response: Follow troubleshooting procedures toreload the software.
1. Follow the procedures to rescue the software of anode from another node.
2. If the rescue node does not succeed, use thehardware remove and replace procedures for thenode canister.
Possible Cause—FRUs or other:
v Node canister (100%)
525 Unable to update system board serviceprocessor firmware.
Explanation: The node startup procedures have beenunable to update the firmware configuration of thenode canister.
User response: Follow troubleshooting procedures tofix the hardware:
1. Follow the hardware remove and replaceprocedures for the node canister.
Possible Cause—FRUs or other:
v Node canister (100%)
509 • 525
Chapter 9. Event reporting 141
|||
|||
|
|||||||
|
|
|
|
|
|
||
|
|
||
|
|

528 Ambient temperature is too high duringsystem startup.
Explanation: The ambient temperature in theenclosure, read during the node canister startupprocedures, is too high for the node canister tocontinue. The startup procedure will continue when thetemperature is within range.
User response: Reduce the temperature around thesystem.
1. Resolve the issue with the ambient temperature, bychecking and correcting:
a. Room temperature and air conditioning
b. Ventilation around the rack
c. Airflow within the rack
Possible Cause—FRUs or other:
v Environment issue (100%)
535 Canister internal PCIe switch failed
Explanation: The PCI Express switch has failed orcannot be detected. In this situation, the onlyconnectivity to the node canister is through theEthernet ports.
User response: Follow troubleshooting procedures tofix the hardware:
1. Follow the procedure for reseating a node canister.See “Procedure: Reseating a node canister” on page65.
2. If reseating the canister does not resolve thesituation, follow the “Replacing a node canister” onpage 85 procedure to replace the canister.
Possible Cause—FRUs or other:
v Node canister (100%)
541 Multiple, undetermined, hardwareerrors
Explanation: Multiple hardware failures have beenreported on the data paths within the node canister,and the threshold of the number of acceptable errorswithin a given time frame has been reached. It has notbeen possible to isolate the errors to a singlecomponent.
After this node error has been raised, all ports on thenode will be deactivated. The reason for this is that thenode canister is considered unstable, and has thepotential to corrupt data.
User response:
1. Follow the procedure for collecting information forsupport, and contact your support organization.
2. A software [code] upgrade may resolve the issue.
3. Replace the node canister.
550 A cluster cannot be formed because of alack of cluster resources.
Explanation: The node canister cannot become activein a cluster because it is unable to connect to enoughcluster resources. The cluster resources are the nodecanisters in the system and the active quorum disk ordrive. The node needs to be able to connect to amajority of the resources before that group will form anonline cluster. This prevents the cluster splitting intotwo or more active parts, with both partsindependently performing I/O.
The error data lists the missing resources. This willinclude a list of node canisters and optionally a drivethat is operating as the quorum drive or a LUN on anexternal storage system that is operating as the quorumdisk.
If a drive in one of the system enclosures is the missingquorum disk, it is listed as enclosure:slot[partidentification] where enclosure:slot is the location of thedrive when the node shut down, enclosure is the sevendigit product serial number of the enclosure, slot is anumber between 1 and 24. The part identification is the22 character string starting "11S" found on a label on adrive. The part identification cannot be seen until thedrive is removed from the enclosure.
If a LUN on an external storage system is the missingquorum disk, it is listed it is listed asWWWWWWWWWWWWWWWW/LL, whereWWWWWWWWWWWWWWWW is a worldwide portname (WWPN) on the storage system that contains themissing quorum disk and LL is the Logical UnitNumber (LUN).
User response: Follow troubleshooting procedures tocorrect connectivity issues between the cluster nodesand the quorum devices.
1. Check for any node errors that indicate issues withbus or Fibre Channel connectivity. Resolve anyissues.
2. Check the status of other node canisters in thesystem, resolve any faults on them.
3. Check all enclosures in the system are powered onand that the SAS cabling between the enclosureshas not been disturbed. If any wiring changes havebeen made check all cables are securely connectedand that the cabling rules have been followed.
4. If a quorum drive in a system enclosure is shown asmissing, find the drive and check that it is working.The drive may have been moved from the locationshown, in that case find the drive and ensure it isinstalled and working. If the drive is not located inthe control enclosure, try moving it to the controlenclosure, because a problem in SAS connectivitymay be the issue.
Note: If you are able to reestablish the systemsoperation you will be able to use the extra
528 • 550
142 Storwize V7000: Troubleshooting, Recovery, and Maintenance Guide
|||
||||||
||||
|
||
|
|
|||
||
|||||
||||||||
||

diagnostics the system provides to diagnoseproblems on SAS cables and expansion enclosures.
5. If a quorum disk on an external storage system isshown as missing, find the storage control andconfirm that the LUN is available, check the FibreChannel connections between the storage controllerand the 2076 are working and that any changesmade to the SAN configuration and zoning havenot effected the connectivity. Check the status of theFibre Channel ports on the node and resolve anyissues.
6. If a quorum disk on an external storage system isshown as missing, find the storage control andconfirm that the LUN is available, check the FibreChannel connections between the storage controllerand the system are working and that any changesmade to the SAN configuration and zoning havenot effected the connectivity. Check the status of theFibre Channel ports on the canister and resolve anyissues.
7. If all canisters have either node error 578 or 550,attempt to reestablish a cluster by following theservice procedures for the nodes showing nodeerror 578. If this is not successful, follow the clusterrecovery procedures.
556 A duplicate WWNN has been detected.
Explanation:
The node canister has detected another device that hasthe same World Wide Node Name (WWNN) on theFibre Channel network. A WWNN is 16 hexadecimaldigits long. For a Storwize V7000, the first 11 digits arealways 50050768020. The last 5 digits of the WWNNare given in the additional data of the error. The FibreChannel ports of the node canister are disabled toprevent disruption of the Fibre Channel network. Oneor both node canisters with the same WWNN can showthe error. Because of the way WWNNs are allocated, adevice with a duplicate WWNN is normally anotherStorwize V7000 node canister.
User response:
1. Find the Storwize V7000 node canister with thesame WWNN as the node canister reporting theerror. The WWNN for a Storwize V7000 nodecanister can be found from the node Vital ProductData (VPD) or from the node canister details shownby the service assistant. The node with the duplicateWWNN need not be part of the same cluster as thenode reporting the error; it could be remote fromthe node reporting the error on a part of the fabricconnected through an inter-switch link. The twonode canisters within a control enclosure must havedifferent WWNNs. The WWNN of the node canisteris stored within the enclosure chassis, so theduplication is most likely caused by thereplacement of a control enclosure chassis.
2. If a Storwize V7000 node canister with a duplicateWWNN is found, determine whether it, or the node
reporting the error, has the incorrect WWNN.Generally, it is the node canister that has had itsenclosure chassis recently replaced or had itsWWNN changed incorrectly. Also, consider how theSAN is zoned when making your decision.
3. Determine the correct WWNN for the node with theincorrect WWNN. If the enclosure chassis has beenreplaced as part of a service action, the WWNN forthe node canister should have been written down. Ifthe correct WWNN cannot be determined contactyour support center for assistance.
4. Use the service assistant to modify the incorrectWWNN. If it is the node showing the error thatshould be modified, this can safely be doneimmediately. If it is an active node that should bemodified, use caution because the node will restartwhen the WWNN is changed. If this node is theonly operational node in an enclosure, access to thevolumes that it is managing will be lost. You shouldensure that the host systems are in the correct statebefore you change the WWNN.
5. If the node showing the error had the correctWWNN, it can be restarted, using the serviceassistant, after the node with the duplicate WWNNis updated.
6. If you are unable to find a Storwize V7000 nodecanister with the same WWNN as the node canistershowing the error, use the SAN monitoring tools todetermine whether there is another device on theSAN with the same WWNN. This device should notbe using a WWNN assigned to a Storwize V7000, soyou should follow the service procedures for thedevice to change its WWNN. Once the duplicatehas been removed, restart the node canister.
562 The nodes hardware configuration doesnot meet the minimum requirements
Explanation: The node hardware is not at theminimum specification for the node to become active ina cluster. This may be because of hardware failure, butis also possible after a service action has used anincorrect replacement part.
User response:
Follow troubleshooting procedures to fix the hardware:
1. It is not possible to service parts within the nodecanister. Reseat the existing node canister to seewhether the problem fixes. If it does not, use thehardware node canister remove and replaceprocedures to change the node canister.
564 Too many machine code crashes haveoccurred.
Explanation: The node has been determined to beunstable because of multiple resets. The cause of theresets can be that the system encountered anunexpected state or has executed instructions that were
556 • 564
Chapter 9. Event reporting 143
||
|||||||||
|||||||||
|||||
|
||||||||||||
|
|||||||||||||||
||
|||||
||||||
||||||||||
||||
|||||||||
|
|
|||||

not valid. The node has entered the service state so thatdiagnostic data can be recovered.
The node error does not persist across restarts of thenode machine code.
User response: Follow troubleshooting procedures toreload the machine code:
1. Get a support package (snap), including dumps,from the node, using the management GUI or theservice assistant.
2. If more than one node is reporting this error,contact IBM technical support for assistance. Thesupport package from each node will be required.
3. Check the support site to see whether the issue isknown and whether a machine code upgrade existsto resolve the issue. Update the cluster machinecode if a resolution is available. Use the manualupgrade process on the node that reported the errorfirst.
4. If the problem remains unresolved, contact IBMtechnical support and send them the supportpackage.
Possible Cause—FRUs or other:
v None
565 The internal drive of the node is failing.
Explanation: The internal drive within the node isreporting too many errors. It is no longer safe to relyon the integrity of the drive. Replacement isrecommended.
User response: Follow troubleshooting procedures tofix the hardware:
1. The drive of the node canister cannot be replacedindividually. Follow the hardware remove andreplace instructions to change the node canister.
Possible Cause—FRUs or other:
v Node canister (100%)
573 The node machine code is inconsistent.
Explanation: Parts of the node machine code packageare receiving unexpected results; there may be aninconsistent set of subpackages installed, or onesubpackage may be damaged.
User response: Follow troubleshooting procedures toreload the machine code.
1. Follow the procedure to run a node rescue.
2. If the error occurs again, contact IBM technicalsupport.
Possible Cause—FRUs or other:
v None
574 The node machine code is damaged.
Explanation: A checksum failure has indicated thatthe node machine code is damaged and needs to bereinstalled.
User response:
1. If the other nodes are operational, run node rescue;otherwise, install new machine code using theservice assistant. Node rescue failures, as well as therepeated return of this node error afterreinstallation, are symptomatic of a hardware faultwith the node.
Possible Cause—FRUs or other:
v None
576 The cluster state and configuration datacannot be read.
Explanation: The node has been unable to read thesaved cluster state and configuration data from itsinternal drive because of a read or medium error.
User response: Follow troubleshooting procedures tofix the hardware:
1. The drive of the node canister cannot be replacedindividually. Follow the hardware remove andreplace instructions to change the node canister.
Possible Cause—FRUs or other:
v None
578 The state data was not saved followinga power loss.
Explanation: On startup, the node was unable to readits state data. When this happens, it expects to beautomatically added back into a cluster. However, if ithas not joined a cluster in 60 sec, it raises this nodeerror. This is a critical node error, and user action isrequired before the node can become a candidate tojoin a cluster.
User response: Follow troubleshooting procedures tocorrect connectivity issues between the cluster nodesand the quorum devices.
1. Manual intervention is required once the nodereports this error.
2. Attempt to reestablish the cluster using other nodes.This may involve fixing hardware issues on othernodes or fixing connectivity issues between nodes.
3. If you are able to reestablish the cluster, remove thecluster data from the node showing 578 so it goes tocandidate state, it will then be automatically addedback to the cluster.
a. To remove the cluster data from the node, eithergo to the service assistant, select the radiobutton for the node with a 578, click ManageSystem, then choose Remove System Data.
565 • 578
144 Storwize V7000: Troubleshooting, Recovery, and Maintenance Guide

b. Or use the CLI to satask leavecluster.
If the node does not automatically add back to thecluster, note the name and I/O group of the node,then delete the node from the cluster configuration(if this has not already happened) and then add thenode back to the cluster using the same name andI/O group.
4. If all nodes have either node error 578 or 550,follow the cluster recovery procedures.
5. Attempt to determine what caused the nodes toshut down.
Possible Cause—FRUs or other:
v None
650 The canister battery is not supported
Explanation: The canister battery shows product datathat indicates it cannot be used with the code versionof the canister.
User response: This is resolved by either obtaining abattery which is supported by the system's code level,or the canister's code level is updated to a level whichsupports the battery.
1. Remove the canister and its lid and check the FRUpart number of the new battery matches that of thereplaced battery. Obtain the correct FRU part if itdoes not.
2. If the canister has just been replaced, check the codelevel of the partner node canister and use theservice assistant to upgrade this canister's code levelto the same level.
Possible cause—FRUs or other cause
v canister battery
651 The canister battery is missing
Explanation: The canister battery cannot be detected.
User response:
1. Use the remove and replace procedures to removethe node canister and its lid.
2. Use the remove and replace procedures to install abattery.
3. If there is a battery present ensure it is fullyinserted. Replace the canister.
4. If this error persists, use the remove and replaceprocedures to replace the battery.
Possible cause—FRUs or other cause
v canister battery
652 The canister battery has failed
Explanation: The canister battery has failed. Thebattery may be showing an error state, it may havereached the end of life, or it may have failed to charge.
Data
Number indicators with failure reasons
v 1—battery reports a failure
v 2—end of life
v 3—failure to charge
User response:
1. Use the remove and replace procedures to replacethe battery.
Possible cause—FRUs or other cause
v canister battery
653 The canister battery’s temperature is toolow
Explanation: The canister battery’s temperature isbelow its minimum operating temperature.
User response:
v Wait for the battery to warm up, the error will clearwhen its minimum working temperature is reached.
v If the error persists for more than an hour when theambient temperature is normal, use the remove andreplace procedures to replace the battery.
Possible cause—FRUs or other cause
v canister battery
654 The canister battery’s temperature is toohigh
Explanation: The canister battery’s temperature isabove its safe operating temperature.
User response:
v If necessary, reduce the ambient temperature.
v Wait for the battery to cool down, the error will clearwhen normal working temperature is reached. Keepchecking the reported error as the system maydetermine the battery has failed.
v If the node error persists for more than two hoursafter the ambient temperature returns to the normaloperating range, use the remove and replaceprocedures to replace the battery.
Possible cause—FRUs or other cause
v canister battery
650 • 654
Chapter 9. Event reporting 145
||
|||
||||
||||
||||
|
|
||
|
|
||
||
||
||
|
|
||
|||
|
|
|
|
|
|
||
|
|
|||
||
|
||
|||
|
|
|||
||
|
|
||||
||||
|
|

655 The canister battery communicationsfault
Explanation: The canister cannot communicate withthe battery.
User response:
v Use the remove and replace procedures to replacethe battery.
v If the node error persists, use the remove and replaceprocedures to replace the node canister.
Possible cause—FRUs or other cause
v canister battery
v node canister
656 The canister battery has insufficientcharge
Explanation: The canister battery has insufficientcharge to save the canister’s state and cache data to theinternal drive if power were to fail.
User response:
v Wait for the battery to charge, the battery does notneed to be fully charged for the error toautomatically clear.
Possible cause—FRUs or other cause
v none
671 The available battery charge is notenough to allow the node canister tostart. Two batteries are charging.
Explanation: The battery charge within the enclosureis not sufficient for the node to safely become active ina cluster. The node will not start until sufficient chargeexists to store the state and configuration data held inthe node canister memory if power were to fail. Twobatteries are within the enclosure, one in each of thepower supplies. Neither of the batteries indicate anerror—both are charging.
The node will start automatically when sufficientcharge is available. The batteries do not have to befully charged before the nodes can become active.
Both nodes within the enclosure share the batterycharge, so both node canisters report this error. Theservice assistant shows the estimated start time in thenode canister hardware details.
User response: Wait for the node to automatically fixthe error when sufficient charge becomes available.
672 The available battery charge is notenough to allow the node canister tostart. One battery is charging.
Explanation: The battery charge within the enclosureis not sufficient for the node to safely become active in
a cluster. The node will not start until sufficient chargeexists to store the state and configuration data held inthe node canister memory if power were to fail. Twobatteries are within the enclosure, one in each of thepower supplies. Only one of the batteries is charging,so the time to reach sufficient charge will be extended.
The node will start automatically when sufficientcharge is available. The batteries do not have to befully charged before the nodes can become active.
Both nodes within the enclosure share the batterycharge, so both node canisters report this error.
The service assistant shows the estimated start time,and the battery status, in the node canister hardwaredetails.
Possible Cause-FRUs or other:
v None
User response:
1. Wait for the node to automatically fix the errorwhen sufficient charge becomes available.
2. If possible, determine why one battery is notcharging. Use the battery status shown in the nodecanister hardware details and the indicator LEDs onthe PSUs in the enclosure to diagnose the problem.If the issue cannot be resolved, wait until the clusteris operational and use the troubleshooting optionsin the management GUI to assist in resolving theissue.
Possible Cause-FRUs or other:
v Battery (33%)
v Control power supply (33%)
v Power cord (33%)
673 The available battery charge is notenough to allow the node canister tostart. No batteries are charging.
Explanation: A node cannot be in active state if itdoes not have sufficient battery power to storeconfiguration and cache data from memory to internaldisk after a power failure. The system has determinedthat both batteries have failed or are missing. Theproblem with the batteries must be resolved to allowthe system to start.
User response: Follow troubleshooting procedures tofix hardware:
1. Resolve problems in both batteries by following theprocedure to determine status using the LEDs.
2. If the LEDs do not show a fault on the powersupplies or batteries, power off both power suppliesin the enclosure and remove the power cords. Wait20 seconds, then replace the power cords andrestore power to both power supplies. If both nodecanisters continue to report this error replace theenclosure chassis.
655 • 673
146 Storwize V7000: Troubleshooting, Recovery, and Maintenance Guide
|||
||
|
||
||
|
|
|
|||
|||
|
|||
|
|

Possible Cause-FRUs or other:
v Battery (33%)
v Power supply (33%)
v Power cord (33%)
v Enclosure chassis (1%)
690 The node is held in the service state.
Explanation: The node is in service state and has beeninstructed to remain in service state. While in servicestate, the node will not run as part of a cluster. A nodemust not be in service state for longer than necessarywhile the cluster is online because a loss of redundancywill result. A node can be set to remain in service stateeither because of a service assistant user action orbecause the node was deleted from the cluster.
User response: When it is no longer necessary to holdthe node in the service state, exit the service state toallow the node to run:
1. Use the service assistant action to release the servicestate.
Possible Cause—FRUs or other:
v none
700 The Fibre Channel adapter that waspreviously present has not beendetected.
Explanation: A Fibre Channel adapter that waspreviously present has not been detected. For StorwizeV7000, the adapter is located on the node canistersystem board.
This node error does not, in itself, stop the nodecanister from becoming active in the system; however,the Fibre Channel network might be being used tocommunicate between the node canisters in a clusteredsystem. It is possible that this node error indicates whythe critical node error 550 A cluster cannot be formedbecause of a lack of cluster resources is reportedon the node canister.
Data:
v Location—A number indicating the adapter location.Location 0 indicates the adapter integrated into thesystem board is being reported.
User response:
1. If possible, this noncritical node error should beserviced using the management GUI and runningthe recommended actions for the service error code.
2. As the adapter is located on the system board,replace the node canister using the remove andreplace procedures.
There are a number of possibilities.
a. If you have deliberately removed the adapter(possibly replacing it with a different adaptertype), you will need to follow the management
GUI recommended actions to mark thehardware change as intentional.
b. As the adapter is located on the system board,replace the node canister using the remove andreplace procedures.
Possible Cause—FRUs or other cause:
v Node canister 100%
701 A Fibre Channel adapter has failed.
Explanation: A Fibre Channel adapter has failed. Theadapter is located on the node canister system board.
This node error does not, in itself, stop the nodecanister becoming active in the system. However, theFibre Channel network might be being used tocommunicate between the node canisters in a clusteredsystem. Therefore, it is possible that this node errorindicates the reason why the critical node error 550 Acluster cannot be formed because of a lack ofcluster resources is reported on the node canister.
Data:
v A number indicating the adapter location. Location 0indicates the adapter integrated into the systemboard is being reported.
User response:
1. If possible, use the management GUI to run therecommended actions for the associated serviceerror code.
2. As the adapter is located on the system board,replace the node canister using the remove andreplace procedures.
Possible Cause-FRUs or other cause:
v Node canister
702 A Fibre Channel adapter has a PCIerror.
Explanation: A Fibre Channel adapter has a PCI error.The adapter is located on the node canister systemboard.
This node error does not, in itself, stop the nodecanister becoming active in the system. However, theFibre Channel network might be being used tocommunicate between the node canisters in a clusteredsystem. Therefore, it is possible that this node errorindicates the reason why the critical node error 550 Acluster cannot be formed because of a lack ofcluster resources is reported on the node canister.
Data:
v A number indicating the adapter location. Location 0indicates the adapter integrated into the systemboard is being reported.
User response:
690 • 702
Chapter 9. Event reporting 147
||

1. If possible, use the management GUI to run therecommended actions for the associated serviceerror code.
2. Use the procedures to restart (physically removeand reseat) a node canister.
3. As the adapter is located on the system board,replace the node canister by using the remove andreplace procedures.
Possible Cause-FRUs or other cause:
v Node canister
703 A Fibre Channel adapter is degraded.
Explanation: A Fibre Channel adapter is degraded.The adapter is located on the node canister systemboard.
This node error does not, in itself, stop the nodecanister becoming active in the system. However, theFibre Channel network might be being used tocommunicate between the node canisters in a clusteredsystem. Therefore, it is possible that this node errorindicates the reason why the critical node error 550 Acluster cannot be formed because of a lack ofcluster resources is reported on the node canister.
Data:
v A number indicating the adapter location. Location 0indicates the adapter integrated into the systemboard is being reported.
User response:
1. If possible, use the management GUI to run therecommended actions for the associated serviceerror code.
2. Use the procedures to restart (physically removeand reseat) a node canister .
3. As the adapter is located on the system board,replace the node canister using the remove andreplace procedures.
Possible Cause-FRUs or other cause:
v Node canister
704 Fewer Fibre Channel ports operational.
Explanation: A Fibre Channel port that waspreviously operational is no longer operational. Thephysical link is down.
This node error does not, in itself, stop the nodecanister becoming active in the system. However, theFibre Channel network might be being used tocommunicate between the node canisters in a clusteredsystem. Therefore, it is possible that this node errorindicates the reason why the critical node error 550 Acluster cannot be formed because of a lack ofcluster resources is reported on the node canister.
Data:
Three numeric values are listed:
v The ID of the first unexpected inactive port. This IDis a decimal number.
v The ports that are expected to be active, which is ahexadecimal number. Each bit position represents aport, with the least significant bit representing port 1.The bit is 1 if the port is expected to be active.
v The ports that are actually active, which is ahexadecimal number. Each bit position represents aport, with the least significant bit representing port 1.The bit is 1 if the port is active.
User response:
1. If possible, use the management GUI to run therecommended actions for the associated serviceerror code.
2. Possibilities:
v If the port has been intentionally disconnected,use the management GUI recommended actionfor the service error code and acknowledge theintended change.
v Check that the Fibre Channel cable is connectedat both ends and is not damaged. If necessary,replace the cable.
v Check the switch port or other device that thecable is connected to is powered and enabled in acompatible mode. Rectify any issue. The deviceservice interface might indicate the issue.
v Use the remove and replace procedures to replacethe SFP transceiver in the Storwize V7000 and theSFP transceiver in the connected switch or device.
v As the adapter is located on the system board,replace the node canister using the remove andreplace procedures.
Possible Cause-FRUs or other cause:
v Fibre Channel cable
v SFP transceiver
v Node canister
705 Fewer Fibre Channel I/O portsoperational.
Explanation: One or more Fibre Channel I/O portsthat have previously been active are now inactive. Thissituation has continued for one minute.
A Fibre Channel I/O port might be established oneither a Fibre Channel platform port or an Ethernetplatform port using FCoE. This error is expected if theassociated Fibre Channel or Ethernet port is notoperational.
Data:
Three numeric values are listed:
v The ID of the first unexpected inactive port. This IDis a decimal number.
703 • 705
148 Storwize V7000: Troubleshooting, Recovery, and Maintenance Guide

v The ports that are expected to be active, which is ahexadecimal number. Each bit position represents aport, with the least significant bit representing port 1.The bit is 1 if the port is expected to be active.
v The ports that are actually active, which is ahexadecimal number. Each bit position represents aport, with the least significant bit representing port 1.The bit is 1 if the port is active.
User response:
1. If possible, use the management GUI to run therecommended actions for the associated serviceerror code.
2. Follow the procedure for mapping I/O ports toplatform ports to determine which platform port isproviding this I/O port.
3. Check for any 704 (Fibre channel platform portnot operational) or 724 (Ethernet platform portnot operational) node errors reported for theplatform port.
4. Possibilities:
v If the port has been intentionally disconnected,use the management GUI recommended actionfor the service error code and acknowledge theintended change.
v Resolve the 704 or 724 error.
v If this is an FCoE connection, use the informationthe view gives about the Fibre Channel forwarder(FCF) to troubleshoot the connection between theport and the FCF.
Possible Cause-FRUs or other cause:
v None
706 Fibre Channel clustered system pathfailure.
Explanation: One or more Fibre Channel (FC)input/output (I/O) ports that have previously beenable to see all required online node canisters can nolonger see them. This situation has continued for 5minutes. This error is not reported unless a node isactive in a clustered system.
A Fibre Channel I/O port might be established oneither a FC platform port or an Ethernet platform portusing Fiber Channel over Ethernet (FCoE).
Data:
Three numeric values are listed:
v The ID of the first FC I/O port that does not haveconnectivity. This is a decimal number.
v The ports that are expected to have connections. Thisis a hexadecimal number, and each bit positionrepresents a port - with the least significant bitrepresenting port 1. The bit is 1 if the port isexpected to have a connection to all online nodecanisters.
v The ports that actually have connections. This is ahexadecimal number, each bit position represents aport, with the least significant bit representing port 1.The bit is 1 if the port has a connection to all onlinenodes.
User response:
1. If possible, this noncritical node error should beserviced using the management GUI and runningthe recommended actions for the service error code.
2. Follow the procedure: Mapping I/O ports toplatform ports to determine which platform portdoes not have connectivity.
3. There are a number of possibilities.
v If the port’s connectivity has been intentionallyreconfigured, use the management GUIrecommended action for the service error codeand acknowledge the intended change. You musthave at least two I/O ports with connections toall other node canisters, except the node canistersin the same enclosure.
v Resolve other node errors relating to thisplatform port or I/O port.
v Check that the SAN zoning is correct.
Possible Cause: FRUs or other cause:
v None.
710 The SAS adapter that was previouslypresent has not been detected.
Explanation: A SAS adapter that was previouslypresent has not been detected. The adapter is locatedon the node canister system board.
Data:
v A number indicating the adapter location. Location 0indicates the adapter integrated into the systemboard is being reported.
User response:
1. If possible, use the management GUI to run therecommended actions for the associated serviceerror code.
2. As the adapter is located on the system board,replace the node canister using the remove andreplace procedures.
Possible Cause-FRUs or other cause:
v Node canister
711 A SAS adapter has failed.
Explanation: A SAS adapter has failed. The adapter islocated on the node canister system board.
Data:
706 • 711
Chapter 9. Event reporting 149

v A number indicating the adapter location. Location 0indicates that the adapter integrated into the systemboard is being reported.
User response:
1. If possible, use the management GUI to run therecommended actions for the associated serviceerror code.
2. As the adapter is located on the system board,replace the node canister using the remove andreplace procedures.
Possible Cause-FRUs or other cause:
v Node canister
712 A SAS adapter has a PCI error.
Explanation: A SAS adapter has a PCI error. Theadapter is located on the node canister system board.
Data:
v A number indicating the adapter location. Location 0indicates the adapter that is integrated into thesystem board is being reported.
User response:
1. If possible, use the management GUI to run therecommended actions for the associated serviceerror code.
2. Use the procedures to restart (physically removeand reseat) a node canister.
3. Locate the adapter on the system board and replacethe node canister using the remove and replaceprocedures.
Possible Cause-FRUs or other cause:
v Node canister
713 A SAS adapter is degraded.
Explanation: A SAS adapter is degraded. The adapteris located on the node canister system board.
Data:
v A number indicating the adapter location. Location 0indicates that the adapter integrated into the systemboard is being reported.
User response:
1. If possible, use the management GUI to run therecommended actions for the associated serviceerror code.
2. Use the procedures to restart (physically removeand reseat) a node canister.
3. Locate the adapter on the system board and replacethe node canister using the remove and replaceprocedures.
Possible Cause-FRUs or other cause:
v Node canister
720 Ethernet adapter that was previouslypresent has not been detected.
Explanation: An Ethernet adapter that was previouslypresent has not been detected. The adapters form a partof the canister assembly.
Data:
v A number indicating the adapter location. Thelocation indicates an adapter slot. See the nodecanister description for the definition of the adapterslot locations. If the location is 0, the adapterintegrated into the system board is being reported.
User response:
1. If possible, use the management GUI to run therecommended actions for the associated serviceerror code.
2. As the Ethernet adapters are integrated into thenode canisters, replace the node canister using theremove and replace procedures.
Possible Cause-FRUs or other cause:
v Node canister
721 An Ethernet adapter has failed.
Explanation: An Ethernet adapter has failed. Theadapters form part of the canister assembly.
Data:
v
A number indicating the adapter location. Thelocation indicates an adapter slot. See the nodecanister description for the definition of the adapterslot locations. If the location is 0, the adapterintegrated into the system board is being reported.
User response:
1. If possible, use the management GUI to run therecommended actions for the associated serviceerror code.
2. As the Ethernet adapters are integrated into thenode canisters, use the remove and replaceprocedures to replace the node canister.
Possible Cause—FRUs or other cause:
v Node canister
722 An Ethernet adapter has a PCI error.
Explanation: An Ethernet adapter has a PCI error. Theadapters form part of the canister assembly.
Data:
v
A number indicating the adapter location. Thelocation indicates an adapter slot. See the node
712 • 722
150 Storwize V7000: Troubleshooting, Recovery, and Maintenance Guide

canister description for the definition of the adapterslot locations. If the location is 0, the adapterintegrated into the system board is being reported.
User response:
1. If possible, use the management GUI to run therecommended actions for the associated serviceerror code.
2. As the Ethernet adapters are integrated into thenode canisters, use the remove and replaceprocedures to replace the node canister.
Possible Cause—FRUs or other cause:
v Node canister
723 An Ethernet adapter is degraded.
Explanation: An Ethernet adapter is degraded. Theadapters form part of the canister assembly.
Data:
v
A number indicating the adapter location. Thelocation indicates an adapter slot. See the nodecanister description for the definition of the adapterslot locations. If the location is 0, the adapterintegrated into the system board is being reported.
User response:
1. If possible, use the management GUI to run therecommended actions for the associated serviceerror code.
2. As the Ethernet adapters are integrated into thenode canisters, use the remove and replaceprocedures to replace the node canister.
Possible Cause—FRUs or other cause:
v Node canister
724 Fewer Ethernet ports active.
Explanation: An Ethernet port that was previouslyoperational is no longer operational. The physical linkis down.
Data:
Three numeric values are listed:
v The ID of the first unexpected inactive port. This is adecimal number.
v The ports that are expected to be active. This is ahexadecimal number. Each bit position represents aport, with the least significant bit representing port 1.The bit is 1 if the port is expected to be active.
v The ports that are actually active. This is ahexadecimal number. Each bit position represents aport, with the least significant bit representing port 1.The bit is 1 if the port is active.
User response:
1. If possible, use the management GUI to run therecommended actions for the associated serviceerror code.
2. Possibilities:
a. If the port has been intentionally disconnected,use the management GUI recommended actionfor the service error code and acknowledge theintended change.
b. Make sure the Ethernet cable is connected atboth ends and is undamaged. If necessary,replace the cable.
c. Make sure the switch port or other device thecable is connected to is powered and enabled ina compatible mode. Rectify any issue. Thedevice service interface might indicate the issue.
d. If this is a 10 Gb/s port, use the remove andreplace procedures to replace the SFP transceiverin the Storwize V7000 and the SFP transceiver inthe connected switch or device.
e. Replace the node canister using the remove andreplace procedures.
Possible Cause—FRUs or other cause:
v Ethernet cable
v Ethernet SFP transceiver
v Node canister
730 The bus adapter has not been detected.
Explanation: The bus adapter that connects thecanister to the enclosure midplane has not beendetected.
This node error does not, in itself, stop the nodecanister becoming active in the system. However, thebus might be being used to communicate between thenode canisters in a clustered system. Therefore, it ispossible that this node error indicates the reason whythe critical node error 550 A cluster cannot be formedbecause of a lack of cluster resources is reportedon the node canister.
Data:
v A number indicating the adapter location. Location 0indicates that the adapter integrated into the systemboard is being reported.
User response:
1. If possible, use the management GUI to run therecommended actions for the associated serviceerror code.
2. As the adapter is located on the system board,replace the node canister using the remove andreplace procedures.
Possible Cause-FRUs or other cause:
v Node canister
723 • 730
Chapter 9. Event reporting 151

731 The bus adapter has failed.
Explanation: The bus adapter that connects thecanister to the enclosure midplane has failed.
This node error does not, in itself, stop the nodecanister becoming active in the system. However, thebus might be being used to communicate between thenode canisters in a clustered system. Therefore, it ispossible that this node error indicates the reason whythe critical node error 550 A cluster cannot be formedbecause of a lack of cluster resources is reportedon the node canister.
Data:
v A number indicating the adapter location. Location 0indicates that the adapter integrated into the systemboard is being reported.
User response:
1. If possible, use the management GUI to run therecommended actions for the associated serviceerror code.
2. As the adapter is located on the system board,replace the node canister using the remove andreplace procedures.
Possible Cause-FRUs or other cause:
v Node canister
732 The bus adapter has a PCI error.
Explanation: The bus adapter that connects thecanister to the enclosure midplane has a PCI error.
This node error does not, in itself, stop the nodecanister becoming active in the system. However, thebus might be being used to communicate between thenode canisters in a clustered system; therefore it ispossible that this node error indicates the reason whythe critical node error 550 A cluster cannot be formedbecause of a lack of cluster resources is reportedon the node canister.
Data:
v A number indicating the adapter location. Location 0indicates that the adapter integrated into the systemboard is being reported.
User response:
1. If possible, this noncritical node error should beserviced using the management GUI and runningthe recommended actions for the service error code.
2. As the adapter is located on the system board,replace the node canister using the remove andreplace procedures.
Possible Cause-FRUs or other cause:
v Node canister
733 The bus adapter degraded.
Explanation: The bus adapter that connects thecanister to the enclosure midplane is degraded.
This node error does not, in itself, stop the nodecanister becoming active in the system. However, thebus might be being used to communicate between thenode canisters in a clustered system. Therefore, it ispossible that this node error indicates the reason whythe critical node error 550 A cluster cannot be formedbecause of a lack of cluster resources is reportedon the node canister.
Data:
v A number indicating the adapter location. Location 0indicates that the adapter integrated into the systemboard is being reported.
User response:
1. If possible, use the management GUI to run therecommended actions for the associated serviceerror code.
2. As the adapter is located on the system board,replace the node canister using the remove andreplace procedures.
Possible Cause-FRUs or other cause:
v Node canister
734 Fewer bus ports.
Explanation: One or more PCI bus ports that havepreviously been active are now inactive. This conditionhas existed for over one minute. That is, the internodelink has been down at the protocol level.
This could be a link issue but is more likely caused bythe partner node unexpectedly failing to respond.
Data:
Three numeric values are listed:
v The ID of the first unexpected inactive port. This is adecimal number.
v The ports that are expected to be active. This is ahexadecimal number. Each bit position represents aport, with the least significant bit representing port 1.The bit is 1 if the port is expected to be active.
v The ports that are actually active. This is ahexadecimal number. Each bit position represents aport, with the least significant bit representing port 1.The bit is 1 if the port is active.
User response:
1. If possible, this noncritical node error should beserviced using the management GUI and runningthe recommended actions for the service error code.
2. Follow the procedure for getting node canister andclustered-system information and determine thestate of the partner node canister in the enclosure.Fix any errors reported on the partner node canister.
731 • 734
152 Storwize V7000: Troubleshooting, Recovery, and Maintenance Guide

3. Use the remove and replace procedures to replacethe enclosure.
Possible Cause-FRUs or other cause:
v Node canister
v Enclosure midplane
820 Canister type is incompatible withenclosure model
Explanation: The node canister has detected that ithas a hardware type that is not compatible with thecontrol enclosure MTM, such as node canister type 300in an enclosure with MTM 2076-112.
This is an expected condition when a control enclosureis being upgraded to a different type of node canister.
User response:
1. Check that all the upgrade instructions have beenfollowed completely.
2. Use the management GUI to run the recommendedactions for the associated service error code.
Possible Cause-FRUs or other cause:
v None
860 Fibre Channel network fabric is too big.
Explanation: The number of Fibre Channel (FC) loginsmade to the node canister exceeds the allowed limit.The node canister continues to operate, but onlycommunicates with the logins made before the limitwas reached. The order in which other devices log intothe node canister cannot be determined, so the nodecanister’s FC connectivity might vary after each restart.The connection might be with host systems, otherstorage systems, or with other node canisters.
This error might be the reason the node canister isunable to participate in a system.
The number of allowed logins per node is 1024.
Data:
v None
User response: This error indicates a problem with theFibre Channel fabric configuration. It is resolved byreconfiguring the FC switch:
1. If possible, use the management GUI to run therecommended actions for the associated serviceerror code.
2. Rezone the FC network so only the ports the nodecanister needs to connect to are visible to it.
Possible Cause-FRUs or other cause:
v None
878 Attempting recovery after loss of statedata.
Explanation: During startup, the node canister cannotread its state data. It reports this error while waiting tobe added back into a clustered system. If the nodecanister is not added back into a clustered systemwithin a set time, node error 578 is reported.
User response:
1. Allow time for recovery. No further action isrequired.
2. Keep monitoring in case the error changes to errorcode 578.
920 Unable to perform cluster recoverybecause of a lack of cluster resources.
Explanation: The node is looking for a quorum ofresources which also require cluster recovery.
User response: Contact IBM technical support.
950 Special upgrade mode.
Explanation: Special upgrade mode.
User response: None.
990 Cluster recovery has failed.
Explanation: Cluster recovery has failed.
User response: Contact IBM technical support.
1021 Incorrect enclosure
Explanation: The cluster is reporting that a node isnot operational because of critical node error 500. Seethe details of node error 500 for more information.
User response: See node error 500.
1036 The enclosure identity cannot be read.
Explanation: The cluster is reporting that a node isnot operational because of critical node error 509. Seethe details of node error 509 for more information.
User response: See node error 509.
1188 Too many software crashes haveoccurred.
Explanation: The cluster is reporting that a node isnot operational because of critical node error 564. Seethe details of node error 564 for more information.
User response: See node error 564.
820 • 1188
Chapter 9. Event reporting 153

1189 The node is held in the service state.
Explanation: The cluster is reporting that a node isnot operational because of critical node error 690. Seethe details of node error 690 for more information.
User response: See node error 690.
1202 A solid-state drive is missing from theconfiguration.
Explanation: The offline solid-state drive (SSD)identified by this error must be repaired.
User response: In the management GUI, clickTroubleshooting > Recommended Actions to run therecommended action for this error. Otherwise, use MAP6000 to replace the drive.
1189 • 1202
154 Storwize V7000: Troubleshooting, Recovery, and Maintenance Guide

Appendix. Accessibility features for IBM Storwize V7000
Accessibility features help a user who has a physical disability, such as restrictedmobility or limited vision, to use software products successfully.
Accessibility features
These are the major accessibility features associated with the Storwize V7000Information Center:v You can use screen-reader software and a digital speech synthesizer to hear what
is displayed on the screen. PDF documents have been tested using AdobeReader version 7.0. HTML documents have been tested using JAWS version 13.0.
v This product uses standard Windows navigation keys.
Keyboard navigation
You can use keys or key combinations to perform operations and initiate menuactions that can also be done through mouse actions. You can navigate the StorwizeV7000 Information Center from the keyboard by using the shortcut keys for yourbrowser or screen-reader software. See your browser or screen-reader softwareHelp for a list of shortcut keys that it supports.
IBM and accessibility
See the IBM Human Ability and Accessibility Center for more information aboutthe commitment that IBM has to accessibility.
© Copyright IBM Corp. 2010, 2012 155

156 Storwize V7000: Troubleshooting, Recovery, and Maintenance Guide

Notices
This information was developed for products and services offered in the U.S.A.
IBM may not offer the products, services, or features discussed in this document inother countries. Consult your local IBM representative for information on theproducts and services currently available in your area. Any reference to an IBMproduct, program, or service is not intended to state or imply that only that IBMproduct, program, or service may be used. Any functionally equivalent product,program, or service that does not infringe any IBM intellectual property right maybe used instead. However, it is the user's responsibility to evaluate and verify theoperation of any non-IBM product, program, or service.
IBM may have patents or pending patent applications covering subject matterdescribed in this document. The furnishing of this document does not grant youany license to these patents. You can send license inquiries, in writing, to:
IBM Director of LicensingIBM CorporationNorth Castle DriveArmonk, NY 10504-1785U.S.A.
For license inquiries regarding double-byte character set (DBCS) information,contact the IBM Intellectual Property Department in your country or sendinquiries, in writing, to:
Intellectual Property LicensingLegal and Intellectual Property LawIBM Japan Ltd.19-21, Nihonbashi-Hakozakicho, Chuo-kuTokyo 103-8510, Japan
The following paragraph does not apply to the United Kingdom or any othercountry where such provisions are inconsistent with local law:INTERNATIONAL BUSINESS MACHINES CORPORATION PROVIDES THISPUBLICATION "AS IS" WITHOUT WARRANTY OF ANY KIND, EITHEREXPRESS OR IMPLIED, INCLUDING, BUT NOT LIMITED TO, THE IMPLIEDWARRANTIES OF NON-INFRINGEMENT, MERCHANTABILITY OR FITNESSFOR A PARTICULAR PURPOSE. Some states do not allow disclaimer of express orimplied warranties in certain transactions, therefore, this statement may not applyto you.
This information could include technical inaccuracies or typographical errors.Changes are periodically made to the information herein; these changes will beincorporated in new editions of the publication. IBM may make improvementsand/or changes in the product(s) and/or the program(s) described in thispublication at any time without notice.
Any references in this information to non-IBM Web sites are provided forconvenience only and do not in any manner serve as an endorsement of those Websites. The materials at those Web sites are not part of the materials for this IBMproduct and use of those Web sites is at your own risk.
© Copyright IBM Corp. 2010, 2012 157

IBM may use or distribute any of the information you supply in any way itbelieves appropriate without incurring any obligation to you.
Licensees of this program who wish to have information about it for the purposeof enabling: (i) the exchange of information between independently createdprograms and other programs (including this one) and (ii) the mutual use of theinformation which has been exchanged, should contact:
IBM CorporationAlmaden Research650 Harry RoadBldg 80, D3-304, Department 277San Jose, CA 95120-6099U.S.A.
Such information may be available, subject to appropriate terms and conditions,including in some cases, payment of a fee.
The licensed program described in this document and all licensed materialavailable for it are provided by IBM under terms of the IBM Customer Agreement,IBM International Program License Agreement or any equivalent agreementbetween us.
Any performance data contained herein was determined in a controlledenvironment. Therefore, the results obtained in other operating environments mayvary significantly. Some measurements may have been made on development-levelsystems and there is no guarantee that these measurements will be the same ongenerally available systems. Furthermore, some measurements may have beenestimated through extrapolation. Actual results may vary. Users of this documentshould verify the applicable data for their specific environment.
Information concerning non-IBM products was obtained from the suppliers ofthose products, their published announcements or other publicly available sources.IBM has not tested those products and cannot confirm the accuracy ofperformance, compatibility or any other claims related to non-IBM products.Questions on the capabilities of non-IBM products should be addressed to thesuppliers of those products.
All statements regarding IBM's future direction or intent are subject to change orwithdrawal without notice, and represent goals and objectives only.
This information is for planning purposes only. The information herein is subject tochange before the products described become available.
This information contains examples of data and reports used in daily businessoperations. To illustrate them as completely as possible, the examples include thenames of individuals, companies, brands, and products. All of these names arefictitious and any similarity to the names and addresses used by an actual businessenterprise is entirely coincidental.
COPYRIGHT LICENSE:
This information contains sample application programs in source language, whichillustrate programming techniques on various operating platforms. You may copy,modify, and distribute these sample programs in any form without payment toIBM, for the purposes of developing, using, marketing or distributing application
158 Storwize V7000: Troubleshooting, Recovery, and Maintenance Guide

programs conforming to the application programming interface for the operatingplatform for which the sample programs are written. These examples have notbeen thoroughly tested under all conditions. IBM, therefore, cannot guarantee orimply reliability, serviceability, or function of these programs. The sampleprograms are provided "AS IS", without warranty of any kind. IBM shall not beliable for any damages arising out of your use of the sample programs.
If you are viewing this information softcopy, the photographs and colorillustrations may not appear.
TrademarksIBM trademarks and special non-IBM trademarks in this information are identifiedand attributed.
IBM, the IBM logo, and ibm.com® are trademarks or registered trademarks ofInternational Business Machines Corp., registered in many jurisdictions worldwide.Other product and service names might be trademarks of IBM or other companies.A current list of IBM trademarks is available on the web at Copyright andtrademark information at www.ibm.com/legal/copytrade.shtml.
Adobe and the Adobe logo are either registered trademarks or trademarks ofAdobe Systems Incorporated in the United States, and/or other countries.
Intel, Intel logo, Intel Xeon, and Pentium are trademarks or registered trademarksof Intel Corporation or its subsidiaries in the United States and other countries.
Linux is a registered trademark of Linus Torvalds in the United States, othercountries, or both.
Microsoft, Windows, Windows NT, and the Windows logo are trademarks ofMicrosoft Corporation in the United States, other countries, or both.
UNIX is a registered trademark of The Open Group in the United States and othercountries.
Java and all Java-based trademarks and logos are trademarks or registeredtrademarks of Oracle and/or its affiliates.
Electronic emission noticesThe following electronic emission statements apply to this product. The statementsfor other products that are intended for use with this product are included in theiraccompanying documentation.
Federal Communications Commission (FCC) statementThis explains the Federal Communications Commission's (FCC) statement.
This equipment has been tested and found to comply with the limits for a Class Adigital device, pursuant to Part 15 of the FCC Rules. These limits are designed toprovide reasonable protection against harmful interference when the equipment isoperated in a commercial environment. This equipment generates, uses, and canradiate radio frequency energy and, if not installed and used in accordance withthe instruction manual, might cause harmful interference to radio communications.
Notices 159

Operation of this equipment in a residential area is likely to cause harmfulinterference, in which case the user will be required to correct the interference athis own expense.
Properly shielded and grounded cables and connectors must be used in order tomeet FCC emission limits. IBM is not responsible for any radio or televisioninterference caused by using other than recommended cables and connectors, or byunauthorized changes or modifications to this equipment. Unauthorized changesor modifications could void the user's authority to operate the equipment.
This device complies with Part 15 of the FCC Rules. Operation is subject to thefollowing two conditions: (1) this device might not cause harmful interference, and(2) this device must accept any interference received, including interference thatmight cause undesired operation.
Industry Canada compliance statement
This Class A digital apparatus complies with ICES-003.
Cet appareil numérique de la classe A est conform à la norme NMB-003 duCanada.
Avis de conformité à la réglementation d'Industrie CanadaCet appareil numérique de la classe A est conforme à la norme NMB-003 duCanada.
Australia and New Zealand Class A Statement
Attention: This is a Class A product. In a domestic environment this productmight cause radio interference in which case the user might be required to takeadequate measures.
European Union Electromagnetic Compatibility Directive
This product is in conformity with the protection requirements of European Union(EU) Council Directive 2004/108/EC on the approximation of the laws of theMember States relating to electromagnetic compatibility. IBM cannot acceptresponsibility for any failure to satisfy the protection requirements resulting from anon-recommended modification of the product, including the fitting of non-IBMoption cards.
Attention: This is an EN 55022 Class A product. In a domestic environment thisproduct might cause radio interference in which case the user might be required totake adequate measures.
Responsible Manufacturer:
International Business Machines Corp.New Orchard RoadArmonk, New York 10504914-499-1900
European community contact:
160 Storwize V7000: Troubleshooting, Recovery, and Maintenance Guide
IBM Deutschland GmbHTechnical Regulations, Department M372IBM-Allee 1, 71139 Ehningen, GermanyTele: +49 7032 15 2941e-mail: mailto:[email protected]
Germany Electromagnetic compatibility directive
Deutschsprachiger EU Hinweis: Hinweis für Geräte der Klasse AEU-Richtlinie zur Elektromagnetischen Verträglichkeit
Dieses Produkt entspricht den Schutzanforderungen der EU-Richtlinie2004/108/EG zur Angleichung der Rechtsvorschriften über die elektromagnetischeVerträglichkeit in den EU-Mitgliedsstaaten und hält die Grenzwerte der EN 55022Klasse A ein.
Um dieses sicherzustellen, sind die Geräte wie in den Handbüchern beschrieben zuinstallieren und zu betreiben. Des Weiteren dürfen auch nur von der IBMempfohlene Kabel angeschlossen werden. IBM übernimmt keine Verantwortung fürdie Einhaltung der Schutzanforderungen, wenn das Produkt ohne Zustimmung derIBM verändert bzw. wenn Erweiterungskomponenten von Fremdherstellern ohneEmpfehlung der IBM gesteckt/eingebaut werden.
EN 55022 Klasse A Geräte müssen mit folgendem Warnhinweis versehen werden:
"Warnung: Dieses ist eine Einrichtung der Klasse A. Diese Einrichtung kann imWohnbereich Funk-Störungen verursachen; in diesem Fall kann vom Betreiberverlangt werden, angemessene Mabnahmen zu ergreifen und dafüraufzukommen."
Deutschland: Einhaltung des Gesetzes über dieelektromagnetische Verträglichkeit von Geräten
Dieses Produkt entspricht dem "Gesetz über die elektromagnetische Verträglichkeitvon Geräten (EMVG)." Dies ist die Umsetzung der EU-Richtlinie 2004/108/EG inder Bundesrepublik Deutschland.
Zulassungsbescheinigung laut dem Deutschen Gesetz über dieelektromagnetische Verträglichkeit von Geräten (EMVG) (bzw. derEMC EG Richtlinie 2004/108/EG) für Geräte der Klasse A
Dieses Gerät ist berechtigt, in übereinstimmung mit dem Deutschen EMVG dasEG-Konformitätszeichen - CE - zu führen.
Verantwortlich für die Einhaltung der EMV Vorschriften ist der Hersteller:International Business Machines Corp.New Orchard RoadArmonk,New York 10504Tel: 914-499-1900
Der verantwortliche Ansprechpartner des Herstellers in der EU ist:
IBM Deutschland GmbHTechnical Regulations, Department M372
Notices 161

IBM-Allee 1, 71139 Ehningen, GermanyTele: +49 7032 15 2941e-mail: mailto:[email protected]
Generelle Informationen: Das Gerät erfüllt dieSchutzanforderungen nach EN 55024 und EN 55022 Klasse A.
Japan VCCI Council Class A statement
People's Republic of China Class A Electronic EmissionStatement
International Electrotechnical Commission (IEC) statementThis product has been designed and built to comply with (IEC) Standard 950.
United Kingdom telecommunications requirements
This apparatus is manufactured to the International Safety Standard EN60950 andas such is approved in the U.K. under approval number NS/G/1234/J/100003 forindirect connection to public telecommunications systems in the United Kingdom.
Korean Communications Commission (KCC) Class AStatement
162 Storwize V7000: Troubleshooting, Recovery, and Maintenance Guide

Russia Electromagnetic Interference (EMI) Class A Statement
Taiwan Class A compliance statement
European Contact InformationThis topic contains the product service contact information for Europe.
European Community contact:IBM Technical RegulationsPascalstr. 100, Stuttgart, Germany 70569Tele: 0049 (0)711 785 1176Fax: 0049 (0)711 785 1283Email: mailto: tjahn @ de.ibm.com
Taiwan Contact InformationThis topic contains the product service contact information for Taiwan.IBM Taiwan Product Service Contact Information:IBM Taiwan Corporation3F, No 7, Song Ren Rd., Taipei TaiwanTel: 0800-016-888
rusem
i
f2c0
07
90
Notices 163

164 Storwize V7000: Troubleshooting, Recovery, and Maintenance Guide

Index
Numerics10G Ethernet 682.5" drive assembly
replacing 1043.5" drive assembly
replacing 102
Aabout this document
sending comments xvaccessibility
disability xi, 155features 155keyboard xi, 155navigation 155overview xirepeat rate
up and down buttons 155shortcut keys 155
accessingcanisters
Ethernet cable 64cluster (system) CLI 35management GUI 32publications 155service assistant 34, 66service CLI 36
actionsreset service IP address 38reset superuser password 38
alertsbest practices 21, 22
apply software command 40
Bbacking up
best practices 21system configuration files 79
backup configuration filesdeleting
using the CLI 84restoring 81
bad blocks 29battery
maintenance 25, 26removing 99
best practicesalerts 21, 22backing up data 21drive characteristics 21inventory reporting 21IP address 19notifications 20passwords 19power management 20RAID 21record
location information 22
best practices (continued)subscribe
notifications 22troubleshooting 19warranty agreement
maintenance agreement 22blank carrier
replacing 102, 104browsers
supported 48
Ccable retention bracket
releasing 102Canadian electronic emission notice 160canister
expanison 87identification 52node 85replacing 85, 87
changingservice IP address 61
CLIcluster (system) commands 35service commands 35
cluster (system) CLIaccessing 35when to use 35
cluster (system) commandsCLI 35
clustered storage systemfailure to create 46
clustered systeminitializing
with service assistant 63with USB key 62
restore 77clustered systems
error codes 138recovery codes 138restore 72T3 recovery 72
codesnode error
critical 137noncritical 137
commandsapply software 40create cluster 40query status 41reset service assistant password 39satask.txt 38snap 39svcconfig backup 79svcconfig restore 81
comments, sending xvcomponents
enclosure 2illustration 5
components (continued)end cap
indicators 4hardware 1
contact informationEuropean 163Taiwan 163
control enclosuredetection error 50power supply unit 6
control enclosure chassisreplacing 107
create cluster command 40critical
node errors 137Customer replaced 116
Ddeleting
backup configuration filesusing the CLI 84
system 60detection error
control location 50expansion location 49
determiningSAN problem 68
Deutschsprachiger EU Hinweis 161disability
accessibility xi, 155documentation
improvement xvdrive characteristics
best practices 21drives
2.5-inch drives 23.5-inch drives 2LED indicator 2
Eelectronic emission notices
Avis de conformité à laréglementation d'IndustrieCanada 160
Deutschsprachiger EU Hinweis 161European Union (EU) 160Federal Communications Commission
(FCC) 159French Canadian 160Germany 161Industry Canada 160International Electrotechnical
Commission (IEC) 162Japanese Voluntary Control Council
for Interference (VCCI) 162Korean 162New Zealand 160People's Republic of China 162
© Copyright IBM Corp. 2010, 2012 165

electronic emission notices (continued)Taiwan 163United Kingdom 162
EMC statement, People's Republic ofChina 162
enclosurecomponents 5identification 52
enclosure end capsreplacing 106
end capindicators 4
environmental notices ixerror
control enclosure 50expansion enclosure 49node canister 48not detected 49, 50SAS cabling 49USB flash drive 50
error codes 126understanding 122
error event IDs 126error events 119errors
logsdescribing the fields 120error events 119managing 120understanding 119viewing 119
node 137Ethernet
accessingcanister 64
ports 11status 59
European contact information 163European Union (EU), EMC Directive
conformance statement 160event IDs 122event notification 121events
reporting 119expansion canister
LEDs 16expansion enclosure
detection error 49power supply unit 7replacing 112
Ffailure
storage system creation 46FCC (Federal Communications
Commission) electronic emissionnotice 159
featuresaccessibility 155
Federal Communications Commission(FCC) electronic emission notice 159
Fibre Channellink failures 68port numbers 10SFP transceiver 68
Fibre Channel portsrear-panel indicators 9
field replaceable units (FRUs) 116fields
event log 120finding
Ethernetstatus 59
fixerrors 74
fixingnode errors 61
French Canadian electronic emissionnotice 160
GGermany electronic emission compliance
statement 161GUI connectivity issues
troubleshooting procedure 44, 47
Hhardware components 1
Iidentifying
canister 52enclosure 52status 52
IEC (International ElectrotechnicalCommission) electronic emissionnotice 162
indicatorsend cap 4
information center xiiinformational events 122initialization tool
interface 36using 37
initializingclustered system
with USB key 62clustered systems
with service assistant 63International Electrotechnical Commission
(IEC) electronic emission notice 162inventory information 121inventory reporting
best practices 21IP address
best practices 19
JJapanese electronic emission notice 162
Kkeyboard
accessibility xi, 155Korean electronic emission
statement 162
LLEDs
expansion canister 16Fibre Channel ports 9node canister 14rear-panel indicators 9system status 54
legal noticesNotices 157trademarks 159
link failuresFibre Channel 68
location informationrecord
best practices 22log files
viewing 119
Mmaintenance
battery 25, 26maintenance agreement
best practices 22management GUI
accessing 32cannot log on 45supported browsers 48troubleshooting procedure
start here 43management GUI interface
when to use 32management IP address
troubleshooting procedure 44managing
event log 120medium errors 29message classification 138mirrored volumes
not identical 50
Nnavigation
accessibility 155New Zealand electronic emission
statement 160node canister
LEDs 14location error 48reseating 65unknown service address 46USB ports 10viewing
system status 53node errors
fixing 61node rescue
performing 67noncritical
node errors 137notifications
best practices 20sending 121subscribe
best practices 22
166 Storwize V7000: Troubleshooting, Recovery, and Maintenance Guide

number range 138
Ppanel
rearFibre Channel ports 9
partsremoving
overview 85preparing 85
replacingoverview 85preparing 85
passwordsbest practices 19
People's Republic of China, electronicemission statement 162
performingnode rescue 67
portsEthernet 11port names, worldwide 10port numbers, Fibre Channel 10SAS 13, 16
POST (power-on self-test) 121power management
best practices 20power supply
replacing 91, 95power supply unit
control enclosure 6expansion enclosure 7with battery 6
power-on self-test 121powering off
system 65problem
mirrored volumesnot identical 50
publicationsaccessing 155
Qquery status command 41
RRAID
best practices 21reader feedback, sending xvrear-panel indicators
Fibre Channel ports 9recovering
offline virtual disks (volumes)using CLI 76
recoverysystem
when to run 72systems
starting 75related information xiireleasing
cable retention bracket 102
removing550 errors 74578 errors 74parts
overview 85preparing 85
SFP transceiver 89system 60system data 60
replaceable units 116replacing
2.5" drive assembly 1043.5" drive assembly 102battery 99blank carrier 102, 104control enclosure chassis 107enclosure end caps 106expansion canister 87expansion enclosure 112node canister 85parts
overview 85preparing 85
power supplycontrol enclosure 91expansion enclosure 95
SAS cable 106SFP transceiver 89support rails 115
reportingevents 119
rescueperforming
for a node 67reseating
node canister 65reset service assistant password 39reset service IP address 38reset superuser password 38resetting
superuser password 51restore
system 71, 77
Ssafety notices ix
sound pressure ixSAN (storage area network)
problem determination 68SAS
ports 13, 16SAS cable
replacing 106SAS cabling
location error 49satask.txt
commands 38sending
comments xvservice address
unknown 46service assistant
accessing 34, 66interface 33supported browsers 48when to use 33
service CLIaccessing 36when to use 36
service commandsapply software 40CLI 35create cluster 40reset service assistant password 39reset service IP address 38reset superuser password 38snap 39
service IP addresschanging 61
SFP transceiverremoving 89replacing 89
shortcut keysaccessibility 155keyboard 155
snap command 39sound pressure
safety notices ixstarting
system recovery 75status
Ethernet 59identifying 52node canister 53system 53
storage area network (SAN)problem determination 68
storage systemsrestore 71servicing 71
Storwize V7000 libraryrelated publications xii
summary of changes xi, xiisuperuser
passwordresetting 51
supported browsers 48system
backing up configuration file usingthe CLI 79
deleting 60restoring backup configuration
files 81system data
removing 60system status
LEDs 54
TT3 recovery
removing550 errors 74578 errors 74
when to run 72Taiwan
contact information 163electronic emission notice 163
trademarks 159troubleshooting
best practices 19event notification email 121node errors 61
Index 167

troubleshooting (continued)SAN failures 68
troubleshooting procedureGUI connectivity issues
main GUI 44service assistant 47
management IP address 44start here
management GUI 43
Uunderstanding
clustered-system recovery codes 138error codes 122event log 119
United Kingdom electronic emissionnotice 162
USB flash drivedetection error 50
USB keyusing 36when to use 36
USB ports 10using
GUI interfaces 31initialization tool 37initialization tool interface 36management GUI 31service assistant 33USB key 36
VVDisks (volumes)
recovering from offlineusing CLI 76
viewingevent log 119node canister
status 53system
status 53volumes (VDisks)
recovering from offlineusing CLI 76
Wwarranty agreement
best practices 22when to use
cluster (system) CLI 35management GUI interface 32service assistant 33service CLI 36USB key 36
worldwide port names (WWPNs)description 10
168 Storwize V7000: Troubleshooting, Recovery, and Maintenance Guide


����
Printed in USA
GC27-2291-04


![IBM Storwize V3500img.zhilankeji.com/ibm/storwize_v3500_01.pdf · 2013-12-18 · IBM Storwize V7000 2010 年 10 ... V7000 Storwize V7000 [ Unified ] DS4000, DS5000, Storwize V7000](https://img.dokumen.tips/doc/110x75/5f8da2e2ad21c4137b6552e2/ibm-storwize-2013-12-18-ibm-storwize-v7000-2010-10-v7000-storwize-v7000.jpg)