Embed Size (px)
Citation preview

StoreFront 2.5.x
2015-05-12 18:00:14 UTC
© 2015 Citrix Systems, Inc. All rights reserved. Terms of Use | Trademarks | Privacy Statement
Contents
StoreFront 2.5.x .............................................................................................. 5
About this release................................................................................ 6
Known issues ................................................................................ 12
System requirements ............................................................................ 14
Infrastructure requirements .............................................................. 16
User device requirements ................................................................. 20
Smart card requirements ............................................................ 27
Plan................................................................................................. 29
User access options......................................................................... 32
Citrix Receiver ......................................................................... 33
Configure email-based account discovery ................................... 35
Receiver for Web sites ............................................................... 37
Desktop Appliance sites .............................................................. 40
XenApp Services URLs ................................................................ 42
User authentication ........................................................................ 44
Use smart cards with StoreFront.................................................... 47
Optimize the user experience ............................................................ 52
StoreFront high availability and multi-site configuration ............................ 56
Install and set up................................................................................. 60
To install StoreFront ....................................................................... 62
To install StoreFront at a command prompt ........................................... 63
Configure StoreFront ....................................................................... 64
To create a new deployment........................................................ 65
To add XenDesktop, XenApp, and VDI-in-a-Box resources to the store 67
To add App Controller applications to the store............................ 69
To provide remote access to the store through a NetScaler Gatewayappliance.......................................................................... 70
To provide remote access to the store through an Access Gateway 5.0cluster ............................................................................. 72
Join an existing server group........................................................ 74
2
To uninstall StoreFront .................................................................... 75
Upgrade............................................................................................ 76
Manage............................................................................................. 78
Configure server groups ................................................................... 79
To create the authentication service.................................................... 81
Configure the authentication service.................................................... 83
Create or remove a store.................................................................. 86
Create an unauthenticated store ........................................................ 92
Configure stores ............................................................................ 95
To export store provisioning files for users ....................................... 96
Hide and advertise stores to users ................................................. 97
To manage the resources made available in stores.............................. 98
To manage remote access to stores through NetScaler Gateway.............. 100
To manage Citrix Receiver updates ................................................ 103
To integrate Citrix Online applications with stores.............................. 104
Configure support for connections through XenApp Services URLs............ 105
To create a Receiver for Web site ....................................................... 106
Configure Receiver for Web sites ........................................................ 107
To add a NetScaler Gateway connection ............................................... 110
Configure NetScaler Gateway connection settings .................................... 113
To configure beacon points ............................................................... 117
Configure smart card authentication .................................................... 119
To enable pass-through with smart card authentication for Receiver forWindows ................................................................................ 124
Set up highly available multi-site store configurations ............................... 125
To configure load balancing, failover, disaster recovery, and user mappingfor a store .............................................................................. 126
To configure subscription synchronization ........................................ 129
To configure optimal NetScaler Gateway routing for a store .................. 132
To configure a store for NetScaler Gateway global server load balancing 134
Example highly available multi-site store configurations....................... 135
Load balancing and failover example......................................... 137
User mapping example.......................................................... 140
Subscription synchronization example ....................................... 143
Optimal NetScaler Gateway routing example ............................... 145
Configure StoreFront using the configuration files .................................... 147
To enable ICA file signing ............................................................ 148
To configure communication time-out duration and retry attempts.......... 150
3

To configure the password expiry notification period........................... 151
To disable file type association ..................................................... 152
To enable socket pooling ............................................................ 153
Customize the Citrix Receiver logon dialog box.................................. 154
To prevent Receiver for Windows from caching passwords..................... 155
Configure Receiver for Web sites using the configuration files ..................... 156
To configure how resources are displayed for users ............................. 157
To make Citrix Receiver installation files available on the server ............ 158
To disable detection and deployment of Citrix Receiver ....................... 160
To configure workspace control .................................................... 161
To stop offering provisioning files to users........................................ 163
To configure Receiver for HTML5 use of browser tabs .......................... 164
To configure store time-out duration and retry attempts ...................... 165
To configure session duration ....................................................... 166
Configure Desktop Appliance sites ....................................................... 167
Configure authentication for XenApp Services URLs .................................. 171
Configuring Resource Filtering............................................................ 172
Secure.............................................................................................. 174
Troubleshoot...................................................................................... 176
4

5
StoreFront 2.5.x
Citrix StoreFront 2.5.x enables you to create enterprise app stores that aggregate resourcesfrom XenDesktop, XenApp, and VDI-in-a-Box in one place. The stores you create provideyour users with self-service access to their Windows desktops and applications through asingle portal from all their devices. You get a single place to manage the provisioning ofcorporate desktops and applications to your users. Consolidating the delivery of resourcesthrough StoreFront means you no longer need to manage multiple delivery mechanisms fordifferent applications or provide support for manual installations and updates.
6
About StoreFront
StoreFront manages the delivery of desktops and applications from XenApp, XenDesktop,XenMobile, or VDI-in-a-Box servers in the datacenter to users' devices. StoreFrontenumerates and aggregates available desktops and applications into stores. Users accessStoreFront stores through Citrix Receiver directly or by browsing to a Receiver for Web orDesktop Appliance site. Users can also access StoreFront using thin clients and other enduser compatible devices through XenApp Services site.
StoreFront keeps a record of each user's applications and automatically updates theirdevices, ensuring that users have a consistent experience as they roam between their smartphones, tablets, laptops, and desktop computers. StoreFront is an integral component ofXenApp 7 and XenDesktop 7 but can be used with several versions of XenApp andXenDesktop.
What's NewThe following new features and enhancements were introduced in StoreFront 2.5.
Domain pass-through authentication for Receiver for Web.
With this feature, Windows domain-joined users utilizing Internet Explorer can accessReceiver for Web without additional authentication steps.
Receiver for Web with smart card authentication.
StoreFront enables Linux, Mac OSX, or Windows users to access Receiver for Web using theirsmart cards for authentication.
Receiver for Web smart card single-sign on for NetScaler Gateway.
NetScaler Gateway integrated StoreFront systems now support smart card authenticationwith single-sign on.

Mandatory applications and Stores for Receiver for Web.
Administrators can enable a specific set of apps or desktops to be made available to allusers without users being able to remove them.
New version of Receiver for HTML5
Receiver for HTML5 1.3 offers users secure self-service access to virtual desktops and appsprovided by XenDesktop and XenApp using only a standard web browser.
Anonymous (unauthenticated) XenApp stores.
Anonymous stores can be configured for XenApp 6.5 sessions. This new store type allows forthe use of alternative authentication sources or for the creation of anonymous, orunauthenticated, applications, which can be made available to all Stores, regardless of userauthentication method.
HTTP basic authentication.
This feature exposes a simple, Internet-standard-defined mechanism for clients, plug-ins,and third-party applications to inject user credentials. This authentication mechanismenables a rich new set of single-sign on products for use with XenApp and XenDesktop.
Store customization.
StoreFront allows administrators to develop custom behaviors to match the needs ofcomplex business requirements. Custom logic can be applied to create decision pointsthroughout the application delivery process to shape StoreFront-published servicesaccording to unique access requirements.
Note: A Citrix.com account is needed to access this page.
Resource filtering by types or keywords.
About this release
7
StoreFront allows administrators to filter enumeration resources based on key words andresource types.
Parallel resource enumeration.
This performance enhancement improves the enumeration of resources between backendDelivery Controllers and StoreFront, resulting in faster response times for client resourceaccess and an overall improved client experience. Multisite StoreFront installations inparticular will see noticeable improvements in client access speeds.
Other featuresSeparate database no longer required. The requirement for a separate database has beenremoved. Users' application subscription data are stored locally and automaticallyreplicated between StoreFront servers.
High availability and multi-site configuration. To enable load balancing and failoverbetween the deployments providing the desktops and applications, you can definegroupings and hierarchies, including specific backup deployments. You can restrict useraccess to specific resources by mapping deployments to Active Directory user groups.
Smart card authentication. StoreFront supports smart card authentication through bothReceiver for Windows and NetScaler Gateway. Smart card authentication from desktopappliances and repurposed PCs through Desktop Appliance sites and XenApp Services URLs isalso supported.
Desktop Appliance sites. You can enable users to access their desktops fromnon-domain-joined desktop appliances. The web browser on the appliance is configured toaccess the Desktop Appliance site for a store in full-screen mode at startup.
About this release
8

Fast Connect support. StoreFront supports pass-through authentication with proximitycards through Fast Connect-compatible third-party products to XenApp Services URLs.
IPv6 support. StoreFront supports communications with both servers and clients on IPv6networks and on hybrid dual-stack IPv4/IPv6 networks.
Citrix Receiver integration. Citrix Receiver provides users with intuitive, self-serviceaccess to your StoreFront stores from any device, anywhere.
Email-based account discovery. You can enable users who install Citrix Receiver on adevice for the first time to set up their accounts by entering their email addresses.
One-click configuration of Citrix Receiver. You can configure Citrix Receiver for your usersby making provisioning files available.
Automatically provisioned applications. You can automatically subscribe all users to a coreset of applications.
Application synchronization. Subscribed applications follow users from device to device.Users do not need to resubscribe to their applications each time they use a differentdevice, ensuring that they enjoy a consistent experience across all their devices.
About this release
9
Receiver for Web sites. In addition to accessing StoreFront stores within Citrix Receiver,users can also access stores through web pages.
Citrix Receiver detection and deployment. Receiver for Web sites prompt Windows andMac OS X users who do not have Citrix Receiver installed to download the appropriateversion from the Citrix website.
NetScaler Gateway support. StoreFront integrates with NetScaler Gateway to secureconnections from remote users over public networks. Both connections through theNetScaler Gateway Plug-in and clientless access are supported. You can use SmartAccess tocontrol user access to resources on the basis of session policies.
Pass-through authentication. StoreFront supports pass-through of domain and smart cardcredentials from users' devices, and pass-through authentication from NetScaler Gateway.
Secure user connections. You can configure StoreFront to use HTTPS to securecommunications with users' devices.
ICA file signing. StoreFront can digitally sign ICA files so that versions of Citrix Receiverthat support this feature can verify that the file originates from a trusted source.
Workspace control. You can configure applications to follow users as they move betweendevices so that they do not have to restart their applications on each device.
About this release
10

Legacy client support. When you create a new store, access for older clients that supportWeb Interface XenApp Services sites is enabled by default.
About this release
11

12
Known issues in StoreFront 2.5.x
The following issues are known to exist in this release
Third-party popup blockers will block Receiver for HTML5 client auto-reconnectattempts
To re-establish their session, users can manually initiate a reconnection by clicking on apublished Receiver application. To prevent the popup blocking software from interferingwith the reconnect attempts, users can either disable popup blocking software or configurethe software to allow popups from the StoreFront host or relevant domain. [#452754]
Receiver for HTML5 will fail to load for Chromebook users when local installation isconfigured
When the Install locally option is selected for Receiver deployment, delivery of the clientsoftware will not succeed for Chromebook users, who will see fatal errors. To properlydeliver Receiver for HTML5 for Chromebook users, you must use either the Use Receiver forHTML5 if local install fails or the Always use Receiver for HTML5 option. [#448101]
Firefox and Chrome users are not prompted to authenticate when using PASSTHROUGHauthentication from StoreFront
Domain pass through for Receiver for Web is limited to Windows operating systems utilizingInternet Explorer. [#441487]
Configuration mismatches are created in cluster installations by StoreFront console
Any instance of clicking OK in a dialog box in the StoreFront console writes to theweb.config file, even if no changes were made. This configuration change has no impact instandalone StoreFront installations, but cluster installations will have configurationmismatches. To resolve this configuration mismatch, you can use the Propagate changesoption for the relevant Server Group to force a configuration update. [#319844]
Third-party ad blockers will prevent Chrome users from seeing StoreFront logon dialogboxes
This will prevent a store from being accessible to users. As a workaround, users can eitherdisable ad-blocking software or add an exception for the desired service domain to thead-blocking software's configuration. [#319305]
Single-server StoreFront 1.2 deployments using SQL Server 2012 Express cannot beupgraded
StoreFront 1.2 deployments that cannot be upgraded to 2.0 are those using Microsoft SQLServer 2012 Express for the application subscription database and where all components,including the database, are installed on a single server.
Pending updates may not complete during upgrades to Receiver for Windows 3.4 fromCitrix.com

During upgrades of Receiver for Windows 3.4 from the Citrix website, pending updates, suchas to plug-ins, may not be completed. As a workaround, manually upgrade Receiver forWindows 3.4. [#396558]
Upgrading from Receiver Storefront 1.1 removes the existing configuration
Upgrading Receiver Storefront 1.1 to StoreFront 2.0 directly is not supported. However, ifyou attempt to do so, your existing Receiver Storefront configuration is removed and cannotbe recovered. To avoid this issue, first upgrade Receiver Storefront 1.1 to StoreFront 1.2before upgrading to StoreFront 2.0. [#395810]
Upgrades to Receiver for Windows 3.3 from citrix.com cannot be completed
When upgrading Receiver for Windows 3.3 from the Citrix website, users receive the errormessage "Cannot complete setup". As a work around, manually upgrade Receiver forWindows 3.3. [#393294]
Receiver for Web sites may be slow to respond on Internet Explorer 8
Users running Internet Explorer 8 may find that Receiver for Web sites containing a largenumber of desktops and applications are slow to respond when browsing the store orentering search terms. [#274126]
Fixed issuesFor issues fixed in this release, see http://support.citrix.com/article/CTX138215
Known issues
13

14
System requirements for StoreFront 2.5.x
When planning your installation, Citrix recommends that you allow at least an additional 2GB of RAM for StoreFront over and above the requirements of any other products installedon the server. The subscription store service requires a minimum of 5 MB disk space, plusapproximately 8 MB for every 1000 application subscriptions. All other hardwarespecifications must meet the minimum requirements for the installed operating system.
Citrix has tested and provides support for StoreFront installations on the followingplatforms.
• Windows Server 2012 R2 Datacenter and Standard editions
• Windows Server 2012 Datacenter and Standard editions
• Windows Server 2008 R2 Service Pack 1 Enterprise and Standard editions
Upgrading the operating system version on a server running StoreFront is not supported.Citrix recommends that you install StoreFront on a new installation of the operating system.All the servers in a multiple server deployment must run the same operating system versionwith the same locale settings. StoreFront server groups containing mixtures of operatingsystem versions and locales are not supported. Note that a server group can contain amaximum of five servers.
Microsoft Internet Information Services (IIS) and Microsoft .NET Framework are required onthe server. If either of these prerequisites is installed but not enabled, the StoreFrontinstaller enables them before installing the product. Windows PowerShell and MicrosoftManagement Console, which are both default components of Windows Server, must beinstalled on the web server before you can install StoreFront. The relative path toStoreFront in IIS must be the same on all the servers in a group.
StoreFront uses the following ports for communications. Ensure your firewalls and othernetwork devices permit access to these ports.
• TCP ports 80 and 443 are used for HTTP and HTTPS communications, respectively, andmust be accessible from both inside and outside the corporate network.
• TCP port 808 is used for communications between StoreFront servers and must beaccessible from inside the corporate network.
• A TCP port randomly selected from all unreserved ports is used for communicationsbetween the StoreFront servers in a server group. When you install StoreFront, aWindows Firewall rule is configured enabling access to the StoreFront executable.However, since the port is assigned randomly, you must ensure that any firewalls orother devices on your internal network do not block traffic to any of the unassigned TCPports.
• TCP port 8008 is used by Receiver for HTML5, where enabled, for communications fromlocal users on the internal network to the servers providing their desktops andapplications.
StoreFront supports both pure IPv6 networks and dual-stack IPv4/IPv6 environments.
System requirements
15
16
Infrastructure requirements
Citrix has tested and provides support for StoreFront when used with the following Citrixproduct versions.
Citrix server requirementsStoreFront stores aggregate desktops and applications from the following products.
• XenDesktop
• XenDesktop 7.5
• XenDesktop 7.1
• XenDesktop 7
• XenDesktop 5.6 Feature Pack 1
• XenDesktop 5.6
• XenDesktop 5.5• XenApp
• XenApp 7.5
• XenApp 6.5 Feature Pack 2
• XenApp 6.5 Feature Pack 1 for Windows Server 2008 R2
• XenApp 6.5 for Windows Server 2008 R2
• XenApp 6.0 for Windows Server 2008 R2
• XenApp 5.0 Feature Pack 3 for Windows Server 2008 x64 Edition
• XenApp 5.0 Feature Pack 3 for Windows Server 2008
• XenApp 5.0 Feature Pack 3 for Windows Server 2003 x64 Edition
• XenApp 5.0 Feature Pack 3 for Windows Server 2003
• XenApp 5.0 Feature Pack 2 for Windows Server 2008 x64 Edition
• XenApp 5.0 Feature Pack 2 for Windows Server 2008
• XenApp 5.0 Feature Pack 2 for Windows Server 2003 x64 Edition
• XenApp 5.0 Feature Pack 2 for Windows Server 2003
• XenApp 5.0 Feature Pack 1 for Windows Server 2003 x64 Edition
• XenApp 5.0 Feature Pack 1 for Windows Server 2003
• XenApp 5.0 for Windows Server 2008 x64 Edition
• XenApp 5.0 for Windows Server 2008
• XenApp 5.0 for Windows Server 2003 x64 Edition
• XenApp 5.0 for Windows Server 2003
• VDI-in-a-Box
• VDI-in-a-Box 5.3
• VDI-in-a-Box 5.2For more information about requirements and limitations, see Use StoreFront withVDI-in-a-Box.
NetScaler Gateway requirementsThe following versions of NetScaler Gateway can be used to provide access to StoreFront forusers on public networks.
• NetScaler Gateway 10.1
• Access Gateway 10 Build 69.4 (the version number is displayed at the top of theconfiguration utility)
• Access Gateway 9.3, Enterprise Edition
• Access Gateway 5.0.4
Receiver for HTML5 requirementsIf you plan to enable users to access desktops and applications using Receiver for HTML5running on Receiver for Web sites, the following additional requirements apply.
For internal network connections, Receiver for HTML5 enables access to desktops andapplications provided by the following products.
• XenDesktop 7.5
• XenDesktop 7.1
• XenDesktop 7
• XenApp 6.5 Feature Pack 2
• XenApp 6.5 Feature Pack 1 for Windows Server 2008 R2 (requires Hotfix XA650R01W2K8R2X64051, which is available at
Infrastructure requirements
17
http://support.citrix.com/article/CTX135757)
For remote users outside the corporate network, Receiver for HTML5 enables access todesktops and applications through the following versions of NetScaler Gateway.
• NetScaler Gateway 10.1
• Access Gateway 10 Build 71.6014 (the version number is displayed at the top of theconfiguration utility)
For users connecting through NetScaler Gateway, Receiver for HTML5 enables access todesktops and applications provided by the following products.
• XenDesktop
• XenDesktop 7.5
• XenDesktop 7.1
• XenDesktop 7
• XenDesktop 5.6
• XenDesktop 5.5• XenApp
• XenApp 6.5 Feature Pack 2
• XenApp 6.5 Feature Pack 1 for Windows Server 2008 R2
• XenApp 6.5 for Windows Server 2008 R2
• XenApp 6.0 for Windows Server 2008 R2
• XenApp 5.0 Feature Pack 3 for Windows Server 2008 x64 Edition
• XenApp 5.0 Feature Pack 3 for Windows Server 2008
• XenApp 5.0 Feature Pack 3 for Windows Server 2003 x64 Edition
• XenApp 5.0 Feature Pack 3 for Windows Server 2003
• XenApp 5.0 Feature Pack 2 for Windows Server 2008 x64 Edition
• XenApp 5.0 Feature Pack 2 for Windows Server 2008
• XenApp 5.0 Feature Pack 2 for Windows Server 2003 x64 Edition
• XenApp 5.0 Feature Pack 2 for Windows Server 2003
• XenApp 5.0 Feature Pack 1 for Windows Server 2003 x64 Edition
• XenApp 5.0 Feature Pack 1 for Windows Server 2003
• XenApp 5.0 for Windows Server 2008 x64 Edition
Infrastructure requirements
18
• XenApp 5.0 for Windows Server 2008
• XenApp 5.0 for Windows Server 2003 x64 Edition
• XenApp 5.0 for Windows Server 2003
• VDI-in-a-Box
• VDI-in-a-Box 5.3
• VDI-in-a-Box 5.2
Merchandising Server requirementsIf you plan to configure Merchandising Server to use the authentication service to identifyusers when delivering Citrix Receiver configurations, StoreFront can be used with thefollowing versions of Merchandising Server.
• Merchandising Server 2.2
• Merchandising Server 2.1
Infrastructure requirements
19

20
User device requirements
StoreFront provides a number of different options for users to access their desktops andapplications. Citrix Receiver users can either access stores through Citrix Receiver or use aweb browser to log on to a Receiver for Web site for the store. For users who cannot installCitrix Receiver, but have an HTML5-compatible web browser, you can provide access todesktops and applications directly within the web browser by enabling Receiver for HTML5on your Receiver for Web site.
Users with non-domain-joined desktop appliances access their desktops through their webbrowsers, which are configured to access Desktop Appliance sites. In the case ofdomain-joined desktop appliances and repurposed PCs running the Citrix Desktop Lock,along with older Citrix clients that cannot be upgraded, users must connect through theXenApp Services URL for the store.
If you plan to deliver offline applications to users, the Offline Plug-in is required in additionto Receiver for Windows. If you want to deliver Microsoft Application Virtualization (App-V)sequences to users, a supported version of the Microsoft Application Virtualization DesktopClient is also required. For more information, see Publishing Applications for Streaming andPublishing App-V Sequences in XenApp. Users cannot access offline applications or App-Vsequences through Receiver for Web sites.
It is assumed that all user devices meet the minimum hardware requirements for theinstalled operating system.
Requirements for access to stores within CitrixReceiver
The following Citrix Receiver versions can be used to access StoreFront stores from bothinternal network connections and through NetScaler Gateway. Connections throughNetScaler Gateway can be made using both the NetScaler Gateway Plug-in and clientlessaccess.
• Citrix Receiver for Windows 8.1
• Citrix Receiver for Windows 8/RT 1.4
• Citrix Receiver for Windows 4.1
• Citrix Receiver for Windows 4.0
• Citrix Receiver for Windows 3.4
• Citrix Receiver for Mac 11.8
• Citrix Receiver for Mac 11.7
• Citrix Receiver for iOS 5.8
• Citrix Receiver for iOS 5.7
• Citrix Receiver for Android 3.4
• Citrix Receiver for Android 3.3
• Citrix Receiver for Linux 12.1
• Citrix Receiver for Linux 13
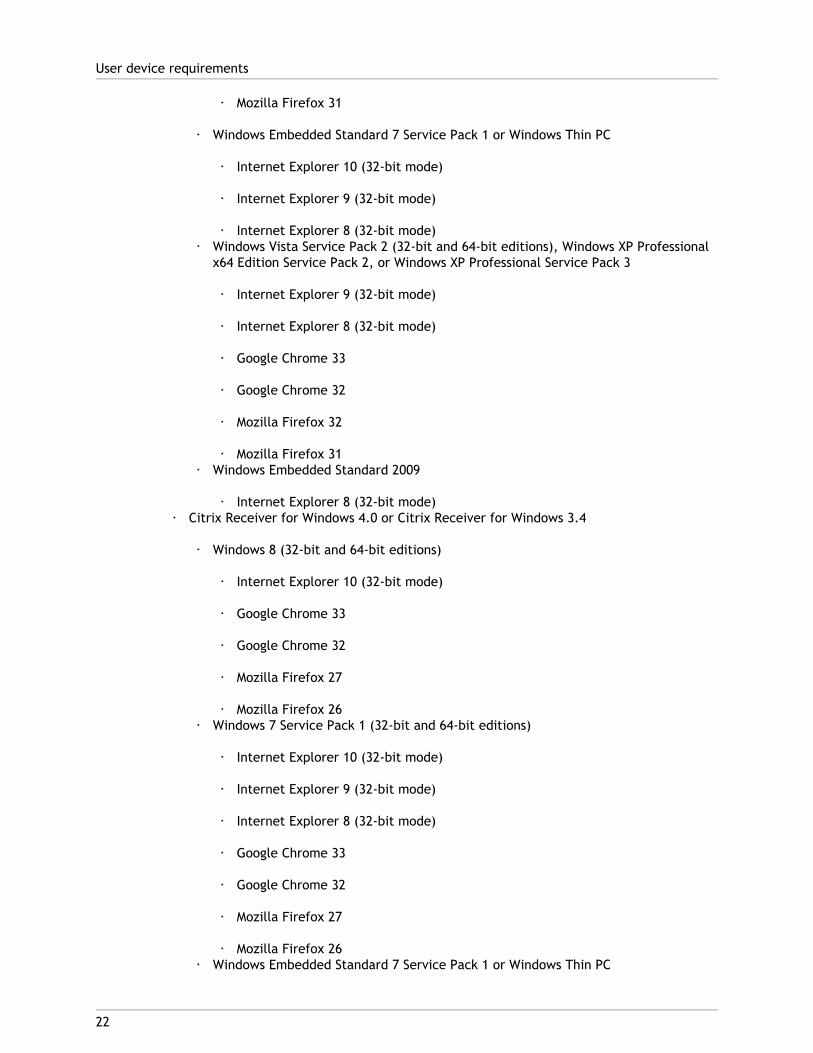
Requirements for access to stores through Receiverfor Web sites
The following Citrix Receiver, operating system, and web browser combinations arerecommended for users to access Receiver for Web sites from both internal networkconnections and through NetScaler Gateway. Connections through NetScaler Gateway canbe made using both the NetScaler Gateway Plug-in and clientless access.
• Citrix Receiver for Windows 4.1
• Windows 8.1 (32-bit and 64-bit editions)
• Internet Explorer 11 (32-bit mode)
• Google Chrome 33
• Mozilla Firefox 32
• Mozilla Firefox 31• Windows 8 (32-bit and 64-bit editions)
• Internet Explorer 10 (32-bit mode)
• Google Chrome 33
• Google Chrome 32
• Mozilla Firefox 32
• Mozilla Firefox 31• Windows 7 Service Pack 1 (32-bit and 64-bit editions)
• Internet Explorer 10 (32-bit mode)
• Internet Explorer 9 (32-bit mode)
• Internet Explorer 8 (32-bit mode)
• Google Chrome 33
• Google Chrome 32
• Mozilla Firefox 32
User device requirements
21
• Mozilla Firefox 31
• Windows Embedded Standard 7 Service Pack 1 or Windows Thin PC
• Internet Explorer 10 (32-bit mode)
• Internet Explorer 9 (32-bit mode)
• Internet Explorer 8 (32-bit mode)• Windows Vista Service Pack 2 (32-bit and 64-bit editions), Windows XP Professional
x64 Edition Service Pack 2, or Windows XP Professional Service Pack 3
• Internet Explorer 9 (32-bit mode)
• Internet Explorer 8 (32-bit mode)
• Google Chrome 33
• Google Chrome 32
• Mozilla Firefox 32
• Mozilla Firefox 31• Windows Embedded Standard 2009
• Internet Explorer 8 (32-bit mode)• Citrix Receiver for Windows 4.0 or Citrix Receiver for Windows 3.4
• Windows 8 (32-bit and 64-bit editions)
• Internet Explorer 10 (32-bit mode)
• Google Chrome 33
• Google Chrome 32
• Mozilla Firefox 27
• Mozilla Firefox 26• Windows 7 Service Pack 1 (32-bit and 64-bit editions)
• Internet Explorer 10 (32-bit mode)
• Internet Explorer 9 (32-bit mode)
• Internet Explorer 8 (32-bit mode)
• Google Chrome 33
• Google Chrome 32
• Mozilla Firefox 27
• Mozilla Firefox 26• Windows Embedded Standard 7 Service Pack 1 or Windows Thin PC
User device requirements
22

• Internet Explorer 10 (32-bit mode)
• Internet Explorer 9 (32-bit mode)
• Internet Explorer 8 (32-bit mode)
• Windows Vista Service Pack 2 (32-bit and 64-bit editions), Windows XP Professionalx64 Edition Service Pack 2, or Windows XP Professional Service Pack 3
• Internet Explorer 9 (32-bit mode)
• Internet Explorer 8 (32-bit mode)
• Google Chrome 33
• Google Chrome 32
• Mozilla Firefox 27
• Mozilla Firefox 26• Windows Embedded Standard 2009
• Internet Explorer 8 (32-bit mode)• Citrix Receiver for Mac 11.8 or Citrix Receiver for Mac 11.7
• Mac OS X 10.9 Mavericks
• Safari 7
• Google Chrome 33
• Mozilla Firefox 27• Mac OS X 10.8 Mountain Lion
• Safari 6
• Google Chrome 33
• Mozilla Firefox 27• Mac OS X 10.7 Lion
• Safari 5.1
• Google Chrome 33
• Mozilla Firefox 27• Mac OS X 10.6 Snow Leopard
• Safari 5.0
• Google Chrome 33
• Mozilla Firefox 27• Citrix Receiver for Linux 12.1 or Citrix Receiver for Linux 13
• Google Chrome 33
User device requirements
23
• Mozilla Firefox 27
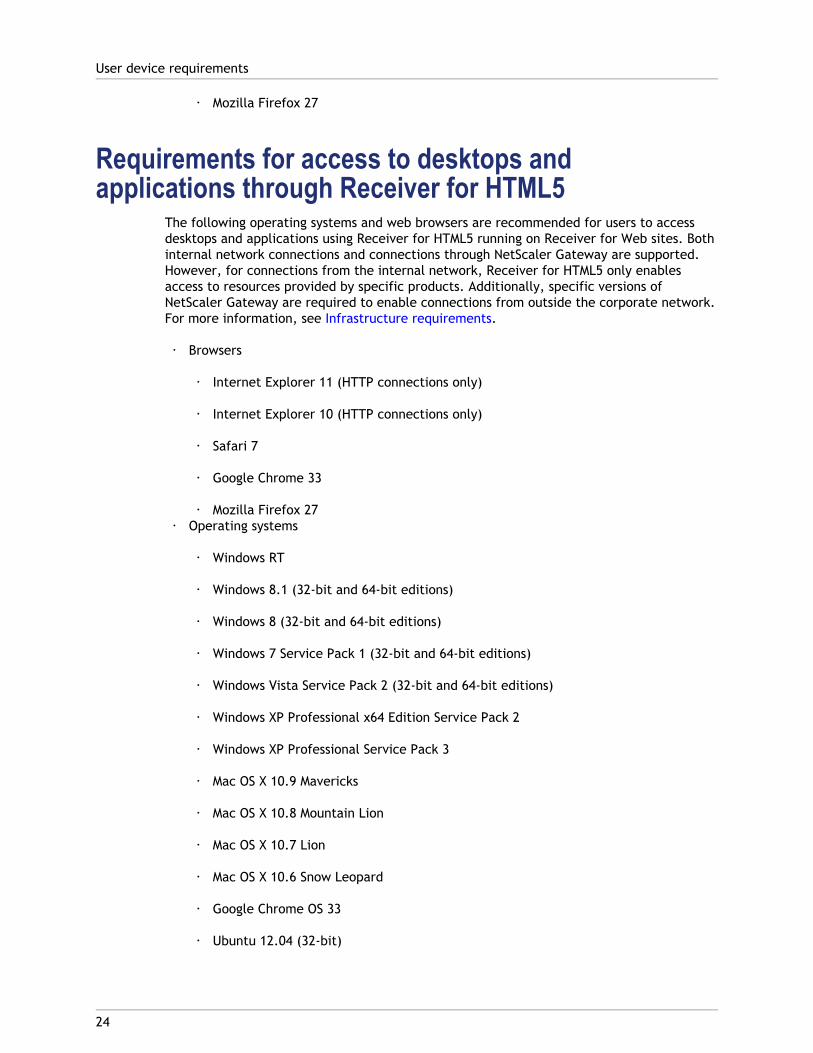
Requirements for access to desktops andapplications through Receiver for HTML5
The following operating systems and web browsers are recommended for users to accessdesktops and applications using Receiver for HTML5 running on Receiver for Web sites. Bothinternal network connections and connections through NetScaler Gateway are supported.However, for connections from the internal network, Receiver for HTML5 only enablesaccess to resources provided by specific products. Additionally, specific versions ofNetScaler Gateway are required to enable connections from outside the corporate network.For more information, see Infrastructure requirements.
• Browsers
• Internet Explorer 11 (HTTP connections only)
• Internet Explorer 10 (HTTP connections only)
• Safari 7
• Google Chrome 33
• Mozilla Firefox 27• Operating systems
• Windows RT
• Windows 8.1 (32-bit and 64-bit editions)
• Windows 8 (32-bit and 64-bit editions)
• Windows 7 Service Pack 1 (32-bit and 64-bit editions)
• Windows Vista Service Pack 2 (32-bit and 64-bit editions)
• Windows XP Professional x64 Edition Service Pack 2
• Windows XP Professional Service Pack 3
• Mac OS X 10.9 Mavericks
• Mac OS X 10.8 Mountain Lion
• Mac OS X 10.7 Lion
• Mac OS X 10.6 Snow Leopard
• Google Chrome OS 33
• Ubuntu 12.04 (32-bit)
User device requirements
24
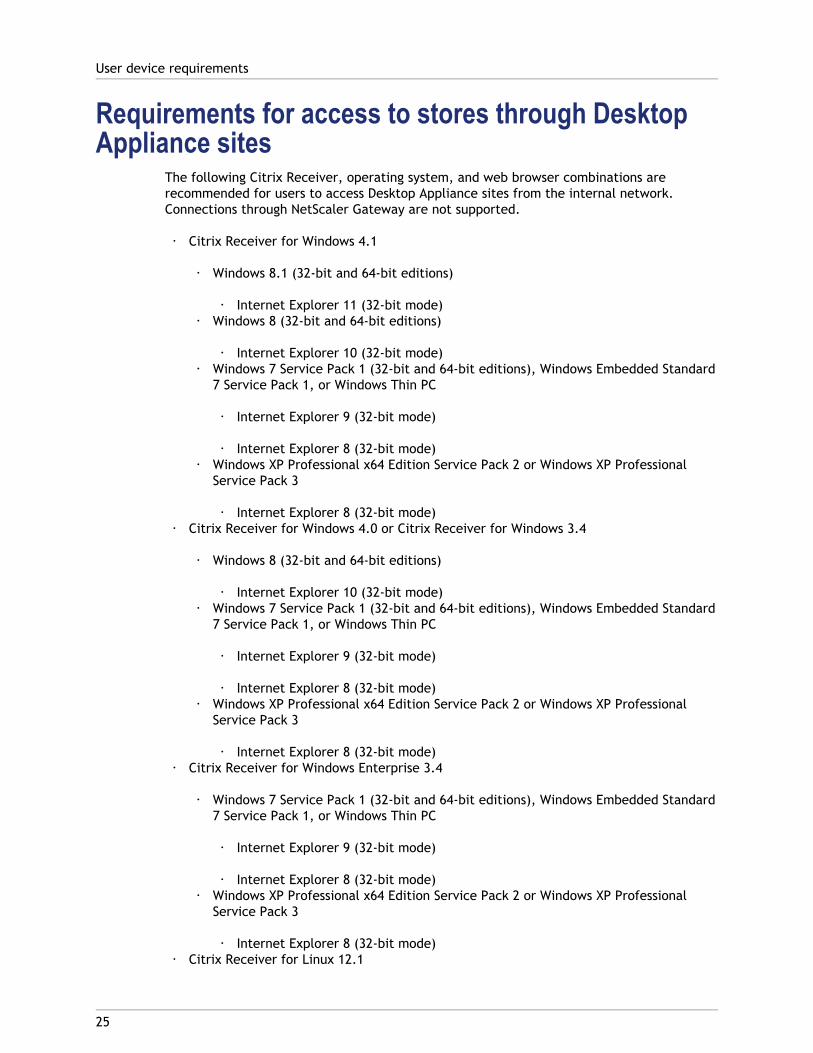
Requirements for access to stores through DesktopAppliance sites
The following Citrix Receiver, operating system, and web browser combinations arerecommended for users to access Desktop Appliance sites from the internal network.Connections through NetScaler Gateway are not supported.
• Citrix Receiver for Windows 4.1
• Windows 8.1 (32-bit and 64-bit editions)
• Internet Explorer 11 (32-bit mode)• Windows 8 (32-bit and 64-bit editions)
• Internet Explorer 10 (32-bit mode)• Windows 7 Service Pack 1 (32-bit and 64-bit editions), Windows Embedded Standard
7 Service Pack 1, or Windows Thin PC
• Internet Explorer 9 (32-bit mode)
• Internet Explorer 8 (32-bit mode)• Windows XP Professional x64 Edition Service Pack 2 or Windows XP Professional
Service Pack 3
• Internet Explorer 8 (32-bit mode)• Citrix Receiver for Windows 4.0 or Citrix Receiver for Windows 3.4
• Windows 8 (32-bit and 64-bit editions)
• Internet Explorer 10 (32-bit mode)• Windows 7 Service Pack 1 (32-bit and 64-bit editions), Windows Embedded Standard
7 Service Pack 1, or Windows Thin PC
• Internet Explorer 9 (32-bit mode)
• Internet Explorer 8 (32-bit mode)• Windows XP Professional x64 Edition Service Pack 2 or Windows XP Professional
Service Pack 3
• Internet Explorer 8 (32-bit mode)• Citrix Receiver for Windows Enterprise 3.4
• Windows 7 Service Pack 1 (32-bit and 64-bit editions), Windows Embedded Standard7 Service Pack 1, or Windows Thin PC
• Internet Explorer 9 (32-bit mode)
• Internet Explorer 8 (32-bit mode)• Windows XP Professional x64 Edition Service Pack 2 or Windows XP Professional
Service Pack 3
• Internet Explorer 8 (32-bit mode)• Citrix Receiver for Linux 12.1
User device requirements
25
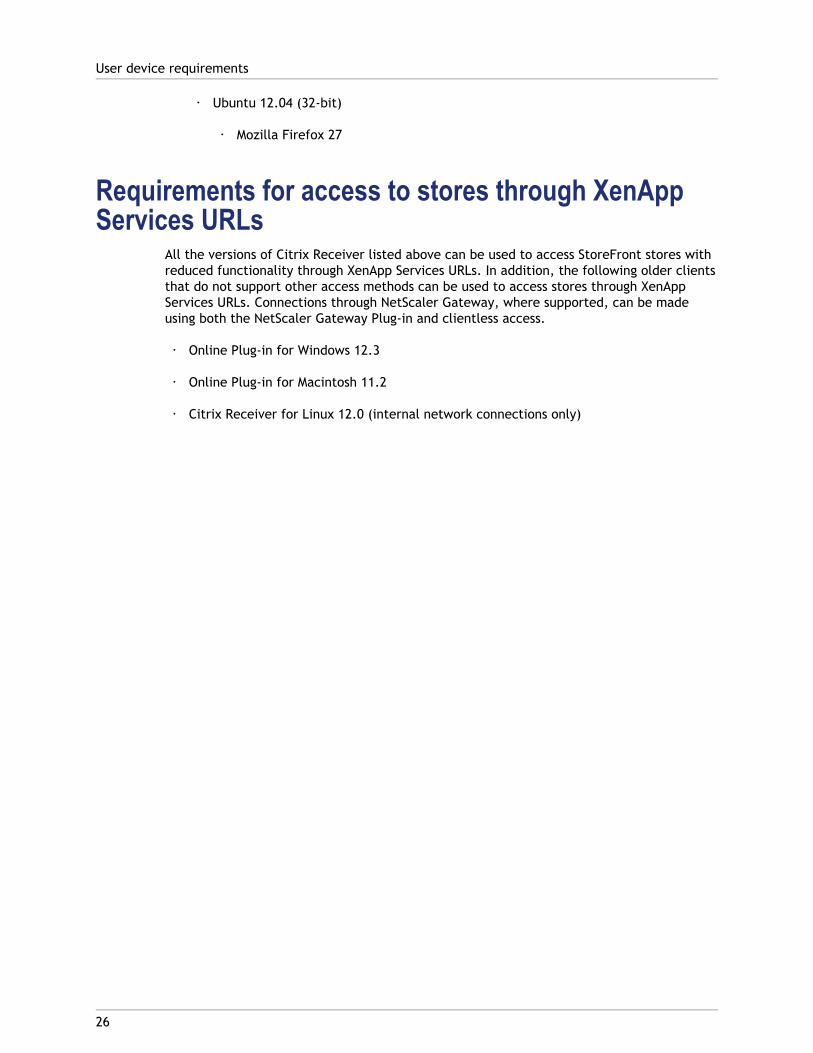
• Ubuntu 12.04 (32-bit)
• Mozilla Firefox 27
Requirements for access to stores through XenAppServices URLs
All the versions of Citrix Receiver listed above can be used to access StoreFront stores withreduced functionality through XenApp Services URLs. In addition, the following older clientsthat do not support other access methods can be used to access stores through XenAppServices URLs. Connections through NetScaler Gateway, where supported, can be madeusing both the NetScaler Gateway Plug-in and clientless access.
• Online Plug-in for Windows 12.3
• Online Plug-in for Macintosh 11.2
• Citrix Receiver for Linux 12.0 (internal network connections only)
User device requirements
26

27
Smart card requirements
Citrix tests for compatibility with the U.S. Government Common Access Card (CAC), U.S.National Institute of Standards and Technology Personal Identity Verification (NIST PIV)cards, and USB smart card tokens. You can use contact card readers that comply with theUSB Chip/Smart Card Interface Devices (CCID) specification and are classified by theGerman Zentraler Kreditausschuss (ZKA) as Class 1 smart card readers. ZKA Class 1 contactcard readers require that users insert their smart cards into the reader. Other types ofsmart card readers, including Class 2 readers (which have keypads for entering PINs),contactless readers, and virtual smart cards based on Trusted Platform Module (TPM) chips,are not supported.
For Windows devices, smart card support is based on Microsoft Personal Computer/SmartCard (PC/SC) standard specifications. As a minimum requirement, smart cards and cardreaders must be supported by the operating system and have received Windows HardwareCertification.
The following smart card and middleware combinations have been tested by Citrix asrepresentative examples of their type. However, other smart cards and middleware canalso be used. For more information about Citrix-compatible smart cards and middleware,see http://www.citrix.com/ready.
Middleware implementation Smart card
HID Global ActivClient 7.0 in both GSC-ISand NIST PIV modes
CAC
HID Global ActivClient 6.2 CAC edition inGSC-IS mode
CAC
NIST PIV
Gemalto Minidriver 8.3 for .NET SmartCard
Gemalto IDPrime .NET 510
SafeNet Authentication Client 8.0 forWindows
SafeNet eToken 5100
GSC-IS – (U.S.) Government Smart Card Interoperability Specifications
Citrix Receiver requirementsFor users with desktop appliances and repurposed PCs running the Citrix Desktop Lock,Citrix Receiver for Windows Enterprise 3.4 is required for smart card authentication. On allother Windows devices, Citrix Receiver for Windows 4.1 can be used.

Requirements for authentication through NetScalerGateway
The following versions of NetScaler Gateway can be used to provide access to StoreFront forusers on public networks authenticating with smart cards.
• NetScaler Gateway 10.1
• Access Gateway 10 Build 69.4 (the version number is displayed at the top of theconfiguration utility)
• Access Gateway 9.3, Enterprise Edition
Smart card requirements
28
29
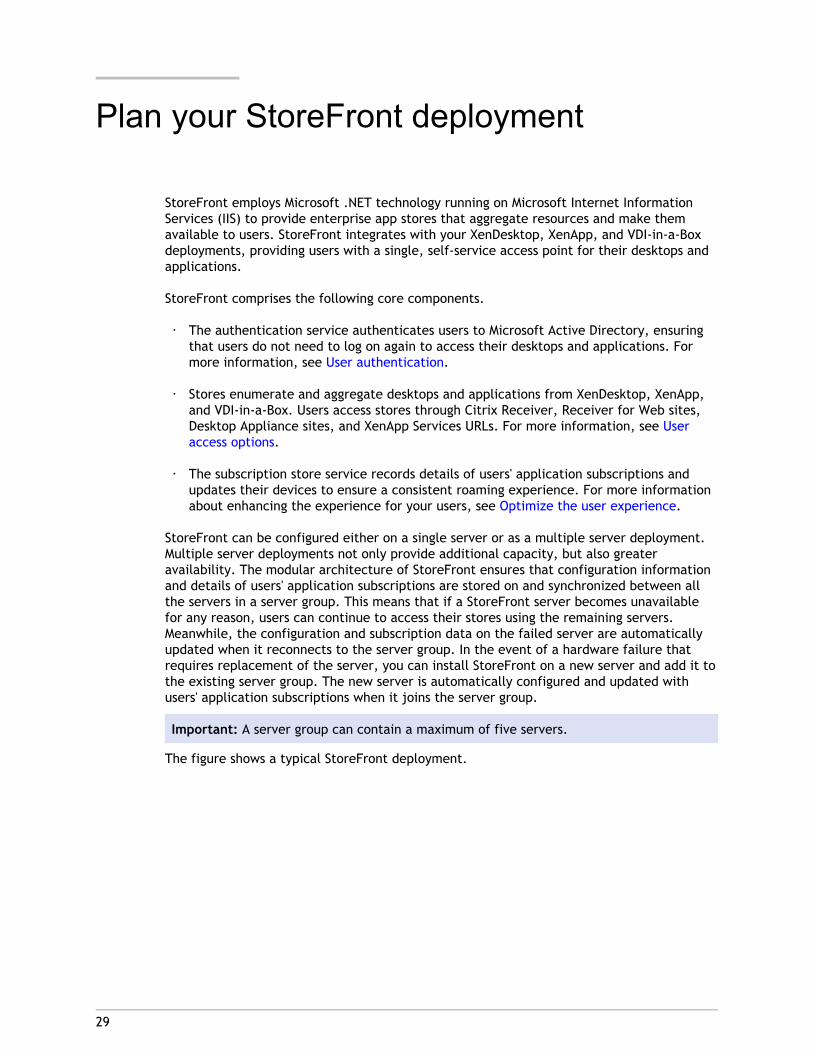
Plan your StoreFront deployment
StoreFront employs Microsoft .NET technology running on Microsoft Internet InformationServices (IIS) to provide enterprise app stores that aggregate resources and make themavailable to users. StoreFront integrates with your XenDesktop, XenApp, and VDI-in-a-Boxdeployments, providing users with a single, self-service access point for their desktops andapplications.
StoreFront comprises the following core components.
• The authentication service authenticates users to Microsoft Active Directory, ensuringthat users do not need to log on again to access their desktops and applications. Formore information, see User authentication.
• Stores enumerate and aggregate desktops and applications from XenDesktop, XenApp,and VDI-in-a-Box. Users access stores through Citrix Receiver, Receiver for Web sites,Desktop Appliance sites, and XenApp Services URLs. For more information, see Useraccess options.
• The subscription store service records details of users' application subscriptions andupdates their devices to ensure a consistent roaming experience. For more informationabout enhancing the experience for your users, see Optimize the user experience.
StoreFront can be configured either on a single server or as a multiple server deployment.Multiple server deployments not only provide additional capacity, but also greateravailability. The modular architecture of StoreFront ensures that configuration informationand details of users' application subscriptions are stored on and synchronized between allthe servers in a server group. This means that if a StoreFront server becomes unavailablefor any reason, users can continue to access their stores using the remaining servers.Meanwhile, the configuration and subscription data on the failed server are automaticallyupdated when it reconnects to the server group. In the event of a hardware failure thatrequires replacement of the server, you can install StoreFront on a new server and add it tothe existing server group. The new server is automatically configured and updated withusers' application subscriptions when it joins the server group.
Important: A server group can contain a maximum of five servers.
The figure shows a typical StoreFront deployment.
None
Load balancingFor multiple server deployments, external load balancing through, for example, NetScaleror Windows Network Load Balancing is required. Configure the load balancing environmentfor failover between servers to provide a fault-tolerant deployment. For more informationabout load balancing with NetScaler, see Load Balancing. For more information aboutWindows Network Load Balancing, seehttp://technet.microsoft.com/en-us/library/hh831698.aspx.
Active load balancing of requests sent from StoreFront to XenDesktop sites and XenAppfarms is recommended for deployments with thousands of users or where high loads occur,such as when a large number of users log on over a short period of time. Use a loadbalancer with built-in XML monitors and session persistency, such as NetScaler.
Active Directory considerationsStoreFront servers must reside either within the Active Directory domain containing yourusers' accounts or within a domain that has a trust relationship with the user accountsdomain. All the StoreFront servers in a group must reside within the same domain.
Plan
30

User connectionsIn a production environment, Citrix recommends using HTTPS to secure communicationsbetween StoreFront and users' devices. To use HTTPS, StoreFront requires that the IISinstance hosting the authentication service and associated stores is configured for HTTPS. Inthe absence of the appropriate IIS configuration, StoreFront uses HTTP for communications.You can change from HTTP to HTTPS at any time, provided the appropriate IIS configurationis in place.
If you plan to enable access to StoreFront from outside the corporate network, NetScalerGateway is required to provide secure connections for remote users. Deploy NetScalerGateway outside the corporate network, with firewalls separating NetScaler Gateway fromboth the public and internal networks. Ensure that NetScaler Gateway is able to access theActive Directory forest containing the StoreFront servers.
ScalabilityThe number of Citrix Receiver users supported by a StoreFront server group depends on thehardware you use and on the level of user activity. Based on simulated activity where userslog on, enumerate their resources, and access three existing subscribed resources, a singleStoreFront server with the minimum recommended specification of virtualized twin 3.6 GHzdual-core CPUs and 4 GB RAM is expected to enable up to 10,000 user connections per hour.
Based on simulated activity (using StoreFront 2.6), a server group with two similarlyconfigured servers in the group is expected to enable up to 18,000 user connections perhour. A server group with three similarly configured servers in the group would be expectedto enable up to 24,000 user connections per hour. While StoreFront server groups cancontain up to five servers, from a capacity perspective based on simulations, there is noadvantage of server groups containing more than three servers.
As your usage patterns will be different than those simulated above, your servers mightsupport more or fewer numbers of users connections per hour.
Important: All servers in a server group must reside in the same location. StoreFrontserver groups containing mixtures of operating system versions and locales are notsupported.
Plan
31

32
User access options
Four different methods are available for users to access StoreFront stores.
• Citrix Receiver—Users with compatible versions of Citrix Receiver can access StoreFrontstores within the Citrix Receiver user interface. Accessing stores within Citrix Receiverprovides the best user experience and the greatest functionality.
• Receiver for Web sites—Users with compatible web browsers can access StoreFrontstores by browsing to Receiver for Web sites. By default, users also require acompatible version of Citrix Receiver to access their desktops and applications.However, you can configure your Receiver for Web sites to enable users withHTML5-compatible browsers to access their resources without installing Citrix Receiver.When you create a new store, a Receiver for Web site is created for the store bydefault.
• Desktop Appliance sites—Users with non-domain-joined desktop appliances can accesstheir desktops through the web browsers on their appliances, which are configured toaccess Desktop Appliance sites in full-screen mode. When you create a new store for aXenDesktop deployment using Citrix Studio, a Desktop Appliance site is created for thestore by default.
• XenApp Services URLs—Users of domain-joined desktop appliances and repurposed PCsrunning the Citrix Desktop Lock, along with users who have older Citrix clients thatcannot be upgraded, can access stores using the XenApp Services URL for the store.When you create a new store, the XenApp Services URL is enabled by default.
The figure shows the options for users to access StoreFront stores.
None
33
Citrix Receiver
Accessing stores from within the Citrix Receiver user interface provides the best userexperience and the greatest functionality. For the Citrix Receiver versions that can be usedto access stores in this way, see System requirements for StoreFront 2.5.x.
Citrix Receiver uses internal and external URLs as beacon points. By attempting to contactthese beacon points, Citrix Receiver can determine whether users are connected to local orpublic networks. When a user accesses a desktop or application, the location information ispassed to the server providing the resource so that appropriate connection details can bereturned to Citrix Receiver. This enables Citrix Receiver to ensure that users are notprompted to log on again when they access a desktop or application. For more information,see To configure beacon points.
After installation, Citrix Receiver must be configured with connection details for the storesproviding users' desktops and applications. You can make the configuration process easierfor your users by providing them with the required information in one of the followingways.
Important: By default, Citrix Receiver requires HTTPS connections to stores. If StoreFrontis not configured for HTTPS, users must carry out additional configuration steps to useHTTP connections. Citrix strongly recommends that you do not enable unsecured userconnections to StoreFront in a production environment. For more information, seeConfigure and install Receiver for Windows using command-line parameters.
Email-based account discoveryUsers who install Citrix Receiver on a device for the first time can set up accounts byentering their email addresses, provided that they download Citrix Receiver from the Citrixwebsite or a Citrix Receiver download page hosted within your internal network. Youconfigure Service Location (SRV) locator resource records for NetScaler Gateway orStoreFront on your Microsoft Active Directory Domain Name System (DNS) server. Users donot need to know the access details for their stores, instead they enter their emailaddresses during the Citrix Receiver initial configuration process. Citrix Receiver contactsthe DNS server for the domain specified in the email address and obtains the details youadded to the SRV resource record. Users are then presented with a list of stores that theycan access through Citrix Receiver. For more information, see Configure email-basedaccount discovery.

Provisioning filesYou can provide users with provisioning files containing connection details for their stores.After installing Citrix Receiver, users open the .cr file to automatically configure accountsfor the stores. By default, Receiver for Web sites offer users a provisioning file for thesingle store for which the site is configured. You could instruct your users to visit theReceiver for Web sites for the stores they want to access and download provisioning filesfrom those sites. Alternatively, for a greater level of control, you can use the CitrixStoreFront management console to generate provisioning files containing connection detailsfor one or more stores. You can then distribute these files to the appropriate users. Formore information, see To export store provisioning files for users.
Auto-generated setup URLsFor users running Mac OS, you can use the Citrix Receiver for Mac Setup URL Generator tocreate a URL containing connection details for a store. After installing Citrix Receiver, usersclick on the URL to configure an account for the store automatically. Enter details of yourdeployment into the tool and generate a URL that you can distribute to your users. Formore information, see To create and configure a setup URL.
Manual configurationMore advanced users can create new accounts by entering store URLs into Citrix Receiver.Remote users accessing StoreFront through NetScaler Gateway 10.1 and Access Gateway 10enter the appliance URL. Citrix Receiver obtains the required account configurationinformation when the connection is first established. For connections through AccessGateway 9.3 or Access Gateway 5.0, users cannot set up accounts manually and must useone of the alternative methods above. For more information, see the Citrix Receiverdocumentation.
Citrix Receiver
34

35
Configure email-based account discovery
Configure email-based account discovery to enable users who install Citrix Receiver on adevice for the first time to set up their accounts by entering their email addresses.Provided that they download Citrix Receiver from the Citrix website or a Citrix Receiverdownload page hosted within your internal network, users do not need to know the accessdetails for their stores when they install and configure Citrix Receiver. Email-based accountdiscovery is not available if Citrix Receiver is downloaded from any other location, such as aReceiver for Web site, and cannot be used with Citrix Receiver Updater. For moreinformation about creating your own Citrix Receiver download page, see http://www.citrix.com/downloads/citrix-receiver/administration/citrix-receiver-download-page-template.ht ml.
During the initial configuration process, Citrix Receiver prompts users to enter either anemail address or a store URL. When a user enters an email address, Citrix Receiver contactsthe Microsoft Active Directory Domain Name System (DNS) server for the domain specifiedin the email address to obtain a list of available stores from which the user can select.
To enable Citrix Receiver to locate available stores on the basis of users' email addresses,you configure Service Location (SRV) locator resource records for NetScaler Gateway orStoreFront on your DNS server. As a fallback, you can also deploy StoreFront on a servernamed "discoverReceiver.domain," where domain is the domain containing your users' emailaccounts. If no SRV record is found in the specified domain, Citrix Receiver searches for amachine named "discoverReceiver" to identify a StoreFront server.
You must install a valid server certificate on the NetScaler Gateway appliance or StoreFrontserver to enable email-based account discovery. The full chain to the root certificate mustalso be valid. For the best user experience, install a certificate with a Subject or SubjectAlternative Name entry of discoverReceiver.domain, where domain is the domaincontaining your users' email accounts. Although you can use a wildcard certificate for thedomain containing your users' email accounts, you must first ensure that the deployment ofsuch certificates is permitted by your corporate security policy. Other certificates for thedomain containing your users' email accounts can also be used, but users will see acertificate warning dialog box when Citrix Receiver first connects to the StoreFront server.Email-based account discovery cannot be used with any other certificate identities.
To enable email-based account discovery for users connecting from outside the corporatenetwork, you must also configure NetScaler Gateway with the StoreFront connectiondetails. For more information, see Connecting to StoreFront by Using Email-BasedDiscovery.

To add a SRV record to your DNS server1. On the Windows Start screen, click Administrative Tools and, in the Administrative
Tools folder, click DNS.
2. In the left pane of DNS Manager, select your domain in the forward or reverse lookupzones. Right-click the domain and select Other New Records.
3. In the Resource Record Type dialog box, select Service Location (SRV) and then clickCreate Record.
4. In the New Resource Record dialog box, enter in the Service box the host value_citrixreceiver.
5. Enter in the Protocol box the value _tcp.
6. In the Host offering this service box, specify the fully qualified domain name (FQDN)and port for your NetScaler Gateway appliance (to support both local and remote users)or StoreFront server (to support local users only) in the form servername.domain:port.
If your environment includes both internal and external DNS servers, you can add a SRVrecord specifying the StoreFront server FQDN on your internal DNS server and anotherrecord on your external server specifying the NetScaler Gateway FQDN. With thisconfiguration, local users are provided with the StoreFront details, while remote usersreceive NetScaler Gateway connection information.
Note: The FQDN for your StoreFront deployment must be unique and different fromthe NetScaler Gateway virtual server FQDN. Using the same FQDN for StoreFront andthe NetScaler Gateway virtual server is not supported. To use email-based accountdiscovery, Citrix Receiver requires that the StoreFront FQDN is a unique address thatis only resolvable from user devices connected to the internal network.
7. If you configured a SRV record for your NetScaler Gateway appliance, add theStoreFront connection details to NetScaler Gateway in a session profile or globalsetting.
Configure email-based account discovery
36

37
Receiver for Web sites
Users with compatible web browsers can access StoreFront stores by browsing to Receiverfor Web sites. When you create a new store, a Receiver for Web site is automaticallycreated for the store. The default configuration for Receiver for Web sites requires thatusers install a compatible version of Citrix Receiver to access their desktops andapplications. For more information about the Citrix Receiver and web browser combinationsthat can be used to access Receiver for Web sites, see User device requirements.
By default, when a user accesses a Receiver for Web site from a computer running Windowsor Mac OS X, the site attempts to determine whether Citrix Receiver is installed on theuser's device. If Citrix Receiver cannot be detected, the user is prompted to download andinstall the appropriate Citrix Receiver for their platform. The default download location isthe Citrix website, but you can also copy the installation files to the StoreFront server andprovide users with these local files instead. Storing the Citrix Receiver installation fileslocally enables you to configure the site to offer users with older clients the option toupgrade to the version on the server. For more information about configuring deploymentof Receiver for Windows and Receiver for Mac, see Configure Receiver for Web sites.
Receiver for HTML5Receiver for HTML5 is a component of StoreFront that is integrated by default with Receiverfor Web sites. You can enable Receiver for HTML5 on your Receiver for Web sites so thatusers who cannot install Citrix Receiver can still access their resources. With Receiver forHTML5, users can access desktops and applications directly within HTML5-compatible webbrowsers without needing to install Citrix Receiver. When a site is created, Receiver forHTML5 is disabled by default. For more information about enabling Receiver for HTML5, seeConfigure Receiver for Web sites.
To access their desktops and applications using Receiver for HTML5, users must access theReceiver for Web site with an HTML5-compatible browser. For more information about theoperating systems and web browsers that can be used with Receiver for HTML5, see Userdevice requirements.
Receiver for HTML5 can be used by both users on the internal network and remote usersconnecting through NetScaler Gateway. For connections from the internal network,Receiver for HTML5 only supports access to desktops and applications provided by a subsetof the products supported by Receiver for Web sites. Users connecting through NetScalerGateway can access resources provided by a wider range of products if you chose Receiverfor HTML5 as an option when configuring StoreFront. Specific versions of NetScaler Gatewayare required for use with Receiver for HTML5. For more information, see Infrastructurerequirements.
For local users on the internal network, access through Receiver for HTML5 to resourcesprovided by XenDesktop and XenApp is disabled by default. To enable local access todesktops and applications using Receiver for HTML5, you must enable the ICA WebSocketsconnections policy on your XenDesktop and XenApp servers. Ensure your firewalls and othernetwork devices permit access to the Receiver for HTML5 port specified in the policy. Formore information, see WebSockets policy settings.

By default, Receiver for HTML5 starts desktops and applications in a new browser tab.However, when users start resources from shortcuts using Receiver for HTML5, the desktopor application replaces the Receiver for Web site in the existing browser tab rather thanappearing in a new tab. You can configure Receiver for HTML5 so that resources are alwaysstarted in the same tab as the Receiver for Web site. For more information, see Toconfigure Receiver for HTML5 use of browser tabs.
Resource shortcutsYou can generate URLs that provide access to desktops and applications available throughReceiver for Web sites. Embed these links on websites hosted on the internal network toprovide users with rapid access to resources. Users click on a link and are redirected to theReceiver for Web site, where they log on if they have not already done so. The Receiver forWeb site automatically starts the resource. In the case of applications, users are alsosubscribed to the application if they have not subscribed previously. For more informationabout generating resource shortcuts, see Configure Receiver for Web sites.
As with all desktops and applications accessed from Receiver for Web sites, users musteither have installed Citrix Receiver or be able to use Receiver for HTML5 to accessresources through shortcuts. The method used by a Receiver for Web site depends on thesite configuration, on whether Citrix Receiver can be detected on users' devices, and onwhether an HTML5-compatible browser is used. For security reasons, Internet Explorer usersmay be prompted to confirm that they want to start resources accessed through shortcuts.Instruct your users to add the Receiver for Web site to the Local intranet or Trusted siteszones in Internet Explorer to avoid this extra step. By default, both workspace control andautomatic desktop starts are disabled when users access Receiver for Web sites throughshortcuts.
When you create an application shortcut, ensure that no other applications available fromthe Receiver for Web site have the same name. Shortcuts cannot distinguish betweenmultiple instances of an application with the same name. Similarly, if you make multipleinstances of a desktop from a single desktop group available from the Receiver for Website, you cannot create separate shortcuts for each instance. Shortcuts cannot passcommand-line parameters to applications.
To create application shortcuts, you configure StoreFront with the URLs of the internalwebsites that will host the shortcuts. When a user clicks on an application shortcut on awebsite, StoreFront checks that website against the list of URLs you entered to ensure thatthe request originates from a trusted website. However, for users connecting throughNetScaler Gateway, websites hosting shortcuts are not validated because the URLs are notpassed to StoreFront. To ensure that remote users can only access application shortcuts ontrusted internal websites, configure NetScaler Gateway to restrict user access to only thosespecific sites. For more information, see http://support.citrix.com/article/CTX123610.
Customize your sitesReceiver for Web sites provide a mechanism for customizing the user interface. You cancustomize strings, the cascading style sheet, and the JavaScript files. You can also add acustom pre-logon or post-logon screen, and add language packs. For more informationabout customizing the appearance of Receiver for Web sites, seehttp://support.citrix.com/article/CTX134791.
Receiver for Web sites
38

Important considerationsUsers accessing stores through a Receiver for Web site benefit from many of the featuresavailable with store access within Citrix Receiver, such as application synchronization.When you decide whether to use Receiver for Web sites to provide users with to access yourstores, consider the following restrictions.
• Only a single store can be accessed through each Receiver for Web site.
• Receiver for Web sites cannot initiate Secure Sockets Layer (SSL) virtual privatenetwork (VPN) connections. Users logging on through NetScaler Gateway without a VPNconnection cannot access web applications for which App Controller requires that sucha connection is used.
• Subscribed applications are not available on the Windows Start screen when accessing astore through a Receiver for Web site.
• File type association between local documents and hosted applications accessedthrough Receiver for Web sites is not available.
• Offline applications cannot be accessed through Receiver for Web sites.
• Receiver for Web sites do not support Citrix Online products integrated into stores.Citrix Online products must be delivered with App Controller or made available ashosted applications to enable access through Receiver for Web sites.
• With Internet Explorer, Receiver for HTML5 can only be used over HTTP connections.
• To use Receiver for HTML5 with Mozilla Firefox over HTTPS connections, users musttype about:config in the Firefox address bar and set thenetwork.websocket.allowInsecureFromHTTPS preference to true.
Receiver for Web sites
39

40
Desktop Appliance sites
Users with non-domain-joined desktop appliances can access their desktops throughDesktop Appliance sites. Non-domain-joined in this context means devices that are notjoined to a domain within the Microsoft Active Directory forest containing the StoreFrontservers.
When you create a new store for a XenDesktop deployment using Citrix Studio, a DesktopAppliance site is created for the store by default. Desktop Appliance sites are only createdby default when StoreFront is installed and configured as part of a XenDesktop installation.You can create Desktop Appliance sites manually using Windows PowerShell commands. Formore information, see Configure Desktop Appliance sites.
Desktop Appliance sites provide a user experience that is similar to logging on to a localdesktop. The web browsers on desktop appliances are configured to start in full-screenmode displaying the logon screen for a Desktop Appliance site. When a user logs on to asite, by default, the first desktop (in alphabetical order) available to the user in the storefor which the site is configured starts automatically. If you provide users with access tomultiple desktops in a store, you can configure the Desktop Appliance site to display theavailable desktops so users can choose which one to access. For more information, seeConfigure Desktop Appliance sites.
When a user's desktop starts, it is displayed in full-screen mode, obscuring the webbrowser. The user is automatically logged out from the Desktop Appliance site. When theuser logs off from the desktop, the web browser, displaying the Desktop Appliance sitelogon screen, is visible again. A message is displayed when a desktop is started, providing alink for the user to click to restart the desktop if it cannot be accessed. To enable thisfunctionality, you must configure the Delivery Group to enable users to restart theirdesktops. For more information, see Manage application and desktop delivery.
To provide access to desktops, a compatible version of Citrix Receiver is required on thedesktop appliance. Typically, XenDesktop-compatible appliance vendors integrate CitrixReceiver into their products. For Windows appliances, the Citrix Desktop Lock must also beinstalled and configured with the URL for your Desktop Appliance site. If Internet Exploreris used, the Desktop Appliance site must be added to the Local intranet or Trusted siteszones. For more information about the Citrix Desktop Lock, see Prevent user access to thelocal desktop.
Important considerationsDesktop Appliance sites are intended for local users on the internal network accessingdesktops from non-domain-joined desktop appliances. When you decide whether to useDesktop Appliance sites to provide users with access to your stores, consider the followingrestrictions.
• If you plan to deploy domain-joined desktop appliances and repurposed PCs, do notconfigure them to access stores through Desktop Appliance sites. Instead, configureCitrix Receiver with the XenApp Services URL for the store. For more information, seeXenApp Services URLs.

• Desktop Appliance sites do not support connections from remote users outside thecorporate network. Users logging on to NetScaler Gateway cannot access DesktopAppliance sites.
Desktop Appliance sites
41
42
XenApp Services URLs
Users with older Citrix clients that cannot be upgraded can access stores by configuringtheir clients with the XenApp Services URL for a store. You can also enable access to yourstores through XenApp Services URLs from domain-joined desktop appliances andrepurposed PCs running the Citrix Desktop Lock. Domain-joined in this context meansdevices that are joined to a domain within the Microsoft Active Directory forest containingthe StoreFront servers.
StoreFront supports pass-through authentication with proximity cards through CitrixReceiver to XenApp Services URLs. Citrix Ready partner products use the Citrix Fast ConnectAPI to streamline user logons through Receiver for Windows to connect to stores using theXenApp Services URL. Users authenticate to workstations using proximity cards and arerapidly connected to desktops and applications provided by XenDesktop and XenApp. Formore information, see Receiver for Windows 4.0.
When you create a new store, the XenApp Services URL for the store is enabled by default.The XenApp Services URL for a store has the formhttp[s]://serveraddress/Citrix/storename/PNAgent/config.xml, where serveraddress is thefully qualified domain name of the server or load balancing environment for your StoreFrontdeployment and storename is the name specified for the store when it was created. For theclients that can be used to access stores through XenApp Services URLs, see User devicerequirements.
Important considerationsXenApp Services URLs are intended to support users who cannot upgrade to Citrix Receiverand for scenarios where alternative access methods are not available. When you decidewhether to use XenApp Services URLs to provide users with access to your stores, considerthe following restrictions.
• You cannot modify the XenApp Services URL for a store.
• You cannot modify XenApp Services URL settings by editing the configuration file,config.xml.
• XenApp Services URLs support explicit, domain pass-through, and pass-through withsmart card authentication. Explicit authentication is enabled by default. Only oneauthentication method can be configured for each XenApp Services URL and only oneURL is available per store. If you need to enable multiple authentication methods, youmust create separate stores, each with a XenApp Services URL, for each authenticationmethod. Your users must then connect to the appropriate store for their method ofauthentication. For more information about configuring user authentication to XenAppServices URLs, see Configure authentication for XenApp Services URLs.
• Workspace control is enabled by default for XenApp Services URLs and cannot beconfigured or disabled.
• User requests to change their passwords are routed to the domain controller directlythrough the XenDesktop, XenApp, and VDI-in-a-Box servers providing desktops and

applications for the store, bypassing the StoreFront authentication service.
XenApp Services URLs
43

44
User authentication
StoreFront supports a number of different authentication methods for users accessingstores, although not all are available depending on the user access method and theirnetwork location. For security reasons, some authentication methods are disabled bydefault when you create your first store. For more information about, enabling anddisabling user authentication methods, see Configure the authentication service.
User name and passwordUsers enter their credentials and are authenticated when they access their stores. Explicitauthentication is enabled by default when you create your first store. All user accessmethods support explicit authentication.
When a user employs NetScaler Gateway to access Receiver for Web, NetScaler Gatewayhandles the logon and password change at expiration. Users can make elective passwordchanges with the Receiver for Web UI. After an elective password change, the NetScalerGateway session terminates and the user must log on again.
Domain pass-throughUsers authenticate to their domain-joined Windows computers and their credentials areused to log them on automatically when they access their stores. When you installStoreFront and create your first store, domain pass-through authentication is disabled bydefault. Domain pass-through authentication can be enabled for users connecting to storesthrough Citrix Receiver and XenApp Services URLs. Receiver for Web sites and DesktopAppliance sites do not support domain pass-through authentication. To use domainpass-through authentication, users require Receiver for Windows or the Online Plug-in forWindows. Pass-through authentication must be enabled when Receiver for Windows or theOnline Plug-in for Windows are installed on users' devices.
Smart cardUsers authenticate using smart cards and PINs when they access their stores. When youinstall StoreFront and create your first store, smart card authentication is disabled bydefault. Smart card authentication can be enabled for users connecting to stores throughCitrix Receiver, Desktop Appliance sites, and XenApp Services URLs. Receiver for Web sitesdo not support smart card authentication. For more information about configuringStoreFront for use with smart cards, see Use smart cards with StoreFront.

Pass-through from NetScaler GatewayUsers authenticate to NetScaler Gateway and are automatically logged on when they accesstheir stores. Pass-through from NetScaler Gateway authentication is enabled by defaultwhen you first configure remote access to a store. Users can connect through NetScalerGateway to stores using Citrix Receiver or Receiver for Web sites. Desktop Appliance sitesdo not support connections through NetScaler Gateway. For more information aboutconfiguring StoreFront for NetScaler Gateway, see To add a NetScaler Gateway connection.For more information about setting up NetScaler Gateway to connect to StoreFront, seeIntegrating NetScaler Gateway with XenMobile App Edition.
StoreFront supports pass-through with the following NetScaler Gateway authenticationmethods.
• Security token. Users log on to NetScaler Gateway using passcodes that are derivedfrom tokencodes generated by security tokens combined, in some cases, with personalidentification numbers. If you enable pass-through authentication by security tokenonly, ensure that the resources you make available do not require additional oralternative forms of authentication, such as users' Microsoft Active Directory domaincredentials.
• Domain and security token. Users logging on to NetScaler Gateway are required toenter both their domain credentials and security token passcodes.
• Client certificate. Users log on to NetScaler Gateway and are authenticated based onthe attributes of the client certificate presented to NetScaler Gateway. Configureclient certificate authentication to enable users to log on to NetScaler Gateway usingsmart cards. Client certificate authentication can also be used with otherauthentication types to provide double-source authentication.
StoreFront uses the NetScaler Gateway authentication service to provide pass-throughauthentication for remote users so that they only need to enter their credentials once.However, by default, pass-through authentication is only enabled for users logging on toNetScaler Gateway with a password. To configure pass-through authentication fromNetScaler Gateway to StoreFront for smart card users, delegate credential validation toNetScaler Gateway. For more information, see Configure the authentication service.
Users can connect to stores within Citrix Receiver with pass-through authentication througha Secure Sockets Layer (SSL) virtual private network (VPN) tunnel using the NetScalerGateway Plug-in. Remote users who cannot install the NetScaler Gateway Plug-in can useclientless access to connect to stores within Citrix Receiver with pass-throughauthentication. To use clientless access to connect to stores, users require a version ofCitrix Receiver that supports clientless access.
Additionally, you can enable clientless access with pass-through authentication to Receiverfor Web sites. To do this, configure NetScaler Gateway to act as a secure remote proxy.Users log on to NetScaler Gateway directly and use the Receiver for Web site to access theirapplications without needing to authenticate again. For more information about configuringNetScaler Gateway as a remote proxy, see Creating and Applying Web and File Share Links.
If you configure double-source authentication to NetScaler Gateway for remote users accessing stores from within Citrix Receiver, you must create two authentication policies on NetScaler Gateway. Configure RADIUS (Remote Authentication Dial-In User Service) as the primary authentication method and LDAP (Lightweight Directory Access Protocol) as the secondary method. Modify the credential index to use the secondary authentication method
User authentication
45

in the session profile so that LDAP credentials are passed to StoreFront. When you add theNetScaler Gateway appliance to your StoreFront configuration, set the Logon type toDomain and security token. For more information, seehttp://support.citrix.com/article/CTX125364
To enable multidomain authentication through NetScaler Gateway to StoreFront, set SSOName Attribute to userPrincipalName in the NetScaler Gateway LDAP authentication policyfor each domain. You can require users to specify a domain on the NetScaler Gateway logonpage so that the appropriate LDAP policy to use can be determined. When you configure theNetScaler Gateway session profiles for connections to StoreFront, do not specify a singlesign-on domain. You must configure trust relationships between each of the domains.Ensure that you allow users to log on to StoreFront from any domain by not restrictingaccess to explicitly trusted domains only.
Where supported by your NetScaler Gateway deployment, you can use SmartAccess tocontrol user access to XenDesktop and XenApp resources on the basis of NetScaler Gatewaysession policies. For more information about SmartAccess, see Configuring SmartAccess onNetScaler Gateway.
User authentication
46

47
Use smart cards with StoreFront
Use smart card authentication to streamline the logon process for your users while alsoenhancing the security of user access to your infrastructure. Access to the internalcorporate network is protected by certificate-based two-factor authentication using publickey infrastructure. Private keys are protected by hardware controls and never leave thesmart card. Your users get the convenience of accessing their desktops and applicationsfrom a range of corporate devices using their smart cards and PINs.
You can use smart cards for user authentication through StoreFront to desktops andapplications provided by XenDesktop and XenApp. Smart card users logging on to StoreFrontcan also access applications provided by App Controller. However, users must authenticateagain to access App Controller web applications that use client certificate authentication.
To enable smart card authentication, users' accounts must be configured either within theMicrosoft Active Directory domain containing the StoreFront servers or within a domain thathas a direct two-way trust relationship with the StoreFront server domain. Multi-forestdeployments involving one-way trust or trust relationships of different types, are notsupported.
The configuration of smart card authentication with StoreFront depends on the userdevices, the clients installed, and whether the devices are domain-joined. In this context,domain-joined means devices that are joined to a domain within the Active Directory forestcontaining the StoreFront servers.
Use smart cards with Receiver for WindowsUsers with devices running Receiver for Windows can authenticate using smart cards, eitherdirectly or through NetScaler Gateway. Both domain-joined and non-domain-joined devicescan be used, although the user experience is slightly different.

The figure shows the options for smart card authentication through Receiver for Windows.
For local users with domain-joined devices, you can configure smart card authentication sothat users are only prompted for their credentials once. Users log on to their devices usingtheir smart cards and PINs and, with the appropriate configuration in place, are notprompted for their PINs again. Users are silently authenticated to StoreFront and also whenthey access their desktops and applications. To achieve this, you configure Receiver forWindows for pass-through authentication and enable domain pass-through authentication toStoreFront.
In the case of non-domain-joined devices on the local network, the minimum number oflogon prompts that users can receive is two. Users log on to their devices and thenauthenticate to Receiver for Windows using their smart cards and PINs. With theappropriate configuration in place, users are only prompted to enter their PINs again whenthey access their desktops and applications. To achieve this, you enable smart cardauthentication to StoreFront.
Because users of non-domain-joined devices log on to Receiver for Windows directly, youcan enable users to fall back to explicit authentication. If you configure both smart cardand explicit authentication, users are initially prompted to log on using their smart cardsand PINs but have the option to select explicit authentication if they experience any issueswith their smart cards.
Users connecting through NetScaler Gateway must log on using their smart cards and PINs atleast twice to access their desktops and applications. This applies to both domain-joinedand non-domain-joined devices. Users authenticate using their smart cards and PINs, and,with the appropriate configuration in place, are only prompted to enter their PINs againwhen they access their desktops and applications. To achieve this, you enable pass-through
Use smart cards with StoreFront
48
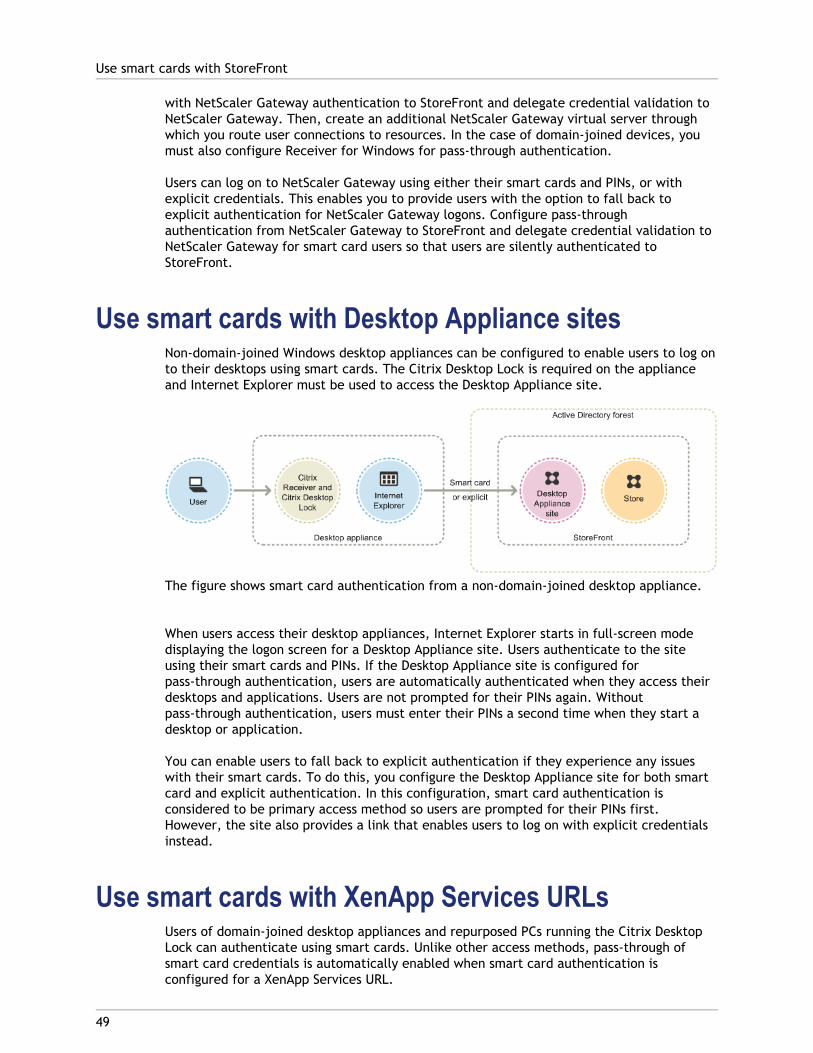
with NetScaler Gateway authentication to StoreFront and delegate credential validation toNetScaler Gateway. Then, create an additional NetScaler Gateway virtual server throughwhich you route user connections to resources. In the case of domain-joined devices, youmust also configure Receiver for Windows for pass-through authentication.
Users can log on to NetScaler Gateway using either their smart cards and PINs, or withexplicit credentials. This enables you to provide users with the option to fall back toexplicit authentication for NetScaler Gateway logons. Configure pass-throughauthentication from NetScaler Gateway to StoreFront and delegate credential validation toNetScaler Gateway for smart card users so that users are silently authenticated toStoreFront.
Use smart cards with Desktop Appliance sitesNon-domain-joined Windows desktop appliances can be configured to enable users to log onto their desktops using smart cards. The Citrix Desktop Lock is required on the applianceand Internet Explorer must be used to access the Desktop Appliance site.
The figure shows smart card authentication from a non-domain-joined desktop appliance.
When users access their desktop appliances, Internet Explorer starts in full-screen modedisplaying the logon screen for a Desktop Appliance site. Users authenticate to the siteusing their smart cards and PINs. If the Desktop Appliance site is configured forpass-through authentication, users are automatically authenticated when they access theirdesktops and applications. Users are not prompted for their PINs again. Withoutpass-through authentication, users must enter their PINs a second time when they start adesktop or application.
You can enable users to fall back to explicit authentication if they experience any issueswith their smart cards. To do this, you configure the Desktop Appliance site for both smartcard and explicit authentication. In this configuration, smart card authentication isconsidered to be primary access method so users are prompted for their PINs first.However, the site also provides a link that enables users to log on with explicit credentialsinstead.
Use smart cards with XenApp Services URLsUsers of domain-joined desktop appliances and repurposed PCs running the Citrix DesktopLock can authenticate using smart cards. Unlike other access methods, pass-through ofsmart card credentials is automatically enabled when smart card authentication isconfigured for a XenApp Services URL.
Use smart cards with StoreFront
49

The figure shows smart card authentication from a domain-joined device running the CitrixDesktop Lock.
Users log on to their devices using their smart cards and PINs. The Citrix Desktop Lock thensilently authenticates users to StoreFront through the XenApp Services URL. Users areautomatically authenticated when they access their desktops and applications, and are notprompted for their PINs again. Smart card authentication without pass-through of smartcard credentials is not available for XenApp Services URLs.
Important considerationsUse of smart cards for user authentication with StoreFront is subject to the followingrequirements and restrictions.
• To use virtual private network (VPN) tunnels with smart card authentication, users mustinstall the NetScaler Gateway Plug-in and log on through a web page, using their smartcards and PINs to authenticate at each step. Pass-through authentication to StoreFrontwith the NetScaler Gateway Plug-in is not available for smart card users.
• Multiple smart cards and multiple readers can be used on the same user device, but ifyou enable pass-through with smart card authentication, users must ensure that onlyone smart card is inserted when accessing a desktop or application.
• When a smart card is used within an application, such as for digital signing orencryption, users might see additional prompts to insert a smart card or enter a PIN.This can occur if more than one smart card has been inserted at the same time. Userswho are prompted to insert a smart card when the smart card is already in the readermust click Cancel. If users are prompted for a PIN, they must enter their PINs again.
• If you enable pass-through with smart card authentication to XenDesktop and XenAppfor Receiver for Windows users with domain-joined devices who do not access storesthrough NetScaler Gateway, this setting applies to all users of the store. To enable bothdomain pass-through and pass-through with smart card authentication to desktops andapplications, you must create separate stores for each authentication method. Yourusers must then connect to the appropriate store for their method of authentication.
• If you enable pass-through with smart card authentication to XenDesktop and XenAppfor Receiver for Windows users with domain-joined devices accessing stores throughNetScaler Gateway, this setting applies to all users of the store. To enable pass-through
Use smart cards with StoreFront
50
authentication for some users and require others to log on to their desktops andapplications, you must create separate stores for each group of users. Then, direct yourusers to the appropriate store for their method of authentication.
• Only one authentication method can be configured for each XenApp Services URL andonly one URL is available per store. If you need to enable other types of authenticationin addition to smart card authentication, you must create separate stores, each with aXenApp Services URL, for each authentication method. Then, direct your users to theappropriate store for their method of authentication.
• When StoreFront is installed, the default configuration in Microsoft Internet InformationServices (IIS) only requires that client certificates are presented for HTTPS connectionsto the certificate authentication URL of the StoreFront authentication service. IIS doesnot request client certificates for any other StoreFront URLs. This configuration enablesyou to provide smart card users with the option to fall back to explicit authentication ifthey experience any issues with their smart cards. Subject to the appropriate Windowspolicy settings, users can also remove their smart cards without needing toreauthenticate.
If you decide to configure IIS to require client certificates for HTTPS connections to allStoreFront URLs, the authentication service and stores must be collocated on the sameserver. You must use a client certificate that is valid for all the stores. With this IIS siteconfiguration, smart card users cannot connect through NetScaler Gateway and cannotfall back to explicit authentication. Users must log on again if they remove their smartcards from their devices.
Use smart cards with StoreFront
51
52
Optimize the user experience
StoreFront includes features designed to enhance the user experience. These features areconfigured by default when you create new stores and their associated Receiver for Websites, Desktop Appliance sites, and XenApp Services URLs.
Workspace controlAs users move between devices, workspace control ensures that the applications they areusing follow them. Users can keep working with the same application instances acrossmultiple devices rather than having to restart all their applications each time they log on toa new device. This enables, for example, clinicians in hospitals to save time as they movefrom workstation to workstation accessing patient data.
Workspace control is enabled by default for Receiver for Web sites and connections tostores through XenApp Services URLs. When users log on, they are automaticallyreconnected to any applications that they left running. For example, consider a user loggingon to a store, either through the Receiver for Web site or the XenApp Services URL, andstarting some applications. If the user then logs on to the same store using the same accessmethod but on a different device, the running applications are automatically transferred tothe new device. All the applications that the user starts from a particular store areautomatically disconnected, but not shut down, when the user logs off from that store. Inthe case of Receiver for Web sites, the same browser must be used to log on, start theapplications, and log off.
Workspace control for XenApp Services URLs cannot be configured or disabled. For moreinformation about configuring workspace control for Receiver for Web sites, see Toconfigure workspace control.
Use of workspace control on Receiver for Web sites is subject to the following requirementsand restrictions.
• Workspace control is not available when Receiver for Web sites are accessed fromhosted desktops and applications.
• For users accessing Receiver for Web sites from Windows devices, workspace control isonly enabled if the site can detect that Citrix Receiver is installed on users' devices or ifReceiver for HTML5 is used to access resources.
• To reconnect to disconnected applications, users accessing Receiver for Web sitesthrough Internet Explorer must add the site to the Local intranet or Trusted sites zones.
• If there is only one desktop available for a user on a Receiver for Web site that isconfigured to start single desktops automatically when the user logs on, that user'sapplications are not reconnected, regardless of the workspace control configuration.
• Users must disconnect from their applications using the same browser that wasoriginally used to start them. Resources started using a different browser or startedlocally from the desktop or Start menu using Citrix Receiver cannot be disconnected orshut down by Receiver for Web sites.

Content redirectionWhere users have subscribed to the appropriate application, content redirection enableslocal files on users' devices to be opened using subscribed applications. To enableredirection of local files, associate the application with the required file types inXenDesktop or XenApp. File type association is enabled by default for new stores. For moreinformation, see To disable file type association.
User change passwordYou can enable Receiver for Web site users logging on with Microsoft Active Directorydomain credentials to change their passwords at any time. Alternatively, you can restrictpassword changes to users whose passwords have expired. This means you can ensure thatusers are never prevented from accessing their desktops and applications by an expiredpassword.
If you enable Receiver for Web site users to change their passwords at any time, local userswhose passwords are about to expire are shown a warning when they log on. By default, thenotification period for a user is determined by the applicable Windows policy setting.Password expiry warnings are only displayed to users connecting from the internal network.For more information about enabling users to change their passwords, see Configure theauthentication service.
Users logging on to Desktop Appliance sites can only change expired passwords, even if youenable users to change their passwords at any time. Desktop Appliance sites do not providecontrols to enable users to change their passwords after they have logged on.
When you create the authentication service, the default configuration prevents Receiver forWeb site users from changing their passwords, even if the passwords have expired. If youdecide to enable this feature, ensure that the policies for the domains containing yourservers do not prevent users from changing their passwords. StoreFront must be able tocontact the domain controller to change users' passwords.
Enabling users to change their passwords exposes sensitive security functions to anyone whocan access any of the stores that use the authentication service. If your organization has asecurity policy that reserves user password change functions for internal use only, ensurethat none of the stores are accessible from outside your corporate network.
Receiver for Web site desktop and application viewsWhen both desktops and applications are available from a Receiver for Web site, the sitedisplays separate desktop and application views by default. Users see the desktop view firstwhen they log on to the site. Regardless of whether applications are also available from aReceiver for Web site, if only a single desktop is available for a user, the site starts thatdesktop automatically when the user logs on. You can configure which views appear foryour sites and prevent Receiver for Web sites from automatically starting desktops forusers. For more information, see To configure how resources are displayed for users.
The behavior of the views on Receiver for Web sites depends on the types of resourcesbeing delivered. For example, users must subscribe to applications before they appear inthe application view, whereas all the desktops available to a user are automaticallydisplayed in the desktop view. For this reason, users cannot remove desktops from the
Optimize the user experience
53
desktop view and cannot reorganize them by dragging and dropping the icons. Whendesktop restarts are enabled by the XenDesktop administrator, controls that enable users torestart their desktops are provided in the desktop view. If users have access to multipleinstances of a desktop from a single desktop group, Receiver for Web sites differentiate thedesktops for users by appending numerical suffixes to the desktop names.
For users connecting to stores within Citrix Receiver or through XenApp Services URLs, theway in which desktops and applications are displayed, and their behavior, is determined bythe Citrix client being used.
Additional recommendationsWhen delivering applications with XenDesktop and XenApp, consider the following optionsto enhance the experience for users when they access their applications through yourstores. For more information about delivering applications, see Create a Delivery Groupapplication.
• Organize applications into folders to make it easier for users to find what they needwhen browsing through the available resources. The folders you create in XenDesktopand XenApp appear as categories in Citrix Receiver. You could, for example, groupapplications according to type or, alternatively, create folders for different user rolesin your organization.
• Ensure that you include meaningful descriptions when you deliver applications, as thesedescriptions are visible to users in Citrix Receiver.
• You can specify that all users have a core set of applications that cannot be removedfrom the Receiver home screen by appending the string KEYWORDS:Mandatory to theapplication description. Users can still use the self-service UI to add more applicationsor remove nonmandatory applications.
• You can automatically subscribe all users of a store to an application by appending thestring KEYWORDS:Auto to the description you provide when you deliver the application.When users log on to the store, the application is automatically provisioned withoutusers needing to manually subscribe.
• Advertise XenDesktop applications to users or make commonly used applications easierto find by listing them in the Featured list in Citrix Receiver. To do this, append thestring KEYWORDS:Featured to the application description.
Note: Multiple keywords must be separated by spaces only; for example,KEYWORDS:Auto Featured.
• By default, XenDesktop and XenApp hosted shared desktops are treated like otherdesktops by Receiver for Web sites. To change this behavior, append the stringKEYWORDS:TreatAsApp to the desktop description. The desktop is displayed in theapplication views of Receiver for Web sites rather than the desktop views and users arerequired to subscribe before they can access the desktop. In addition, the desktop isnot automatically started when the user logs on to the Receiver for Web site and is notaccessed with the Desktop Viewer, even if the site is configured to do this for otherdesktops.
• For Windows users, you can specify that the locally installed version of an application should be used in preference to the equivalent delivered instance if both are available.
Optimize the user experience
54

To do this, append the string KEYWORDS:prefer="application" to the applicationdescription, where application is either one or more complete words in the name of thelocal application as given by the shortcut file name, or the absolute path including theexecutable file name to the local application from the \Start Menu folder. When a usersubscribes to an application with this keyword, Citrix Receiver searches for thespecified name or path on the user's device to determine whether the application isalready installed locally. If the application is found, Citrix Receiver subscribes the userto the delivered application, but does not create a shortcut. When the user starts thedelivered application from Citrix Receiver, the locally installed instance runs instead.For more information, see Configure application delivery.
Optimize the user experience
55

56
StoreFront high availability and multi-siteconfiguration
StoreFront includes a number of features that combine to enable load balancing andfailover between the deployments providing resources for stores. You can also specifydedicated disaster recovery deployments for increased resiliency. These features enableyou to configure StoreFront deployments distributed over multiple sites to provide highavailability for your stores. StoreFront high availability and multi-site configurations are setup by editing the store configuration files. Highly available multi-site configurations cannotbe set up or managed using the Citrix StoreFront management console. For moreinformation, see Set up highly available multi-site store configurations.
Resource aggregationBy default, StoreFront enumerates all the deployments providing desktops and applicationsfor a store and treats all those resources as distinct. This means that if the same resource isavailable from several deployments, users see an icon for each resource, which might beconfusing if the resources have the same name. When you set up highly available multi-siteconfigurations, you can group XenDesktop, XenApp, and VDI-in-a-Box deployments thatdeliver the same desktop or application so that identical resources can be aggregated forusers. Grouped deployments do not need to be identical, but resources must have the samename and path on each server to be aggregated.
When a desktop or application is available from multiple XenDesktop, XenApp, andVDI-in-a-Box deployments configured for a particular store, StoreFront aggregates allinstances of that resource and presents users with a single icon. App Controller applicationscannot be aggregated. When a user starts an aggregated resource, StoreFront determinesthe most appropriate instance of that resource for the user on the basis of serveravailability, whether the user already has an active session, and the ordering you specifiedin your configuration.
StoreFront dynamically monitors servers that fail to respond to requests on the basis thatsuch servers are either overloaded or temporarily unavailable. Users are directed toresource instances on other servers until communications are re-established. Wheresupported by the servers providing the resources, StoreFront attempts to reuse existingsessions to deliver additional resources. If a user already has an active session on adeployment that also provides the requested resource, StoreFront reuses the session if it iscompatible with that resource. Minimizing the number of sessions for each user reduces thetime taken to start additional desktops or applications and can allow for more efficient useof product licenses.
After checking for availability and existing user sessions, StoreFront uses the orderingspecified in your configuration to determine the deployment to which the user isconnected. If multiple equivalent deployments are available to the user, you can specifythat users are connected either to the first available deployment or randomly to anydeployment in the list. Connecting users to the first available deployment enables you tominimize the number of deployments in use for the current number of users. Randomlyconnecting users provides a more even distribution of users across all the available

deployments.
You can override the specified deployment ordering for individual XenDesktop and XenAppresources to define preferred deployments to which users are connected when they accessa particular desktop or application. This enables you to, for example, specify that users arepreferentially connected to a deployment specifically adapted to deliver a particulardesktop or application, but use other deployments for other resources. To do this, appendthe string KEYWORDS:Primary to the description of the desktop or application on thepreferred deployment and KEYWORDS:Secondary to the resource on other deployments.Where possible, users are connected to the deployment providing the primary resource,regardless of the deployment ordering specified in your configuration. Users are connectedto deployments providing secondary resources when the preferred deployment isunavailable or when the user already has an active session on a non-preferred deployment.
Map users to resourcesBy default, users accessing a store see an aggregate of all the resources available from allthe deployments configured for that store. To provide different resources for differentusers, you can configure separate stores or even separate StoreFront deployments.However, when you set up highly available multi-site configurations, you can provide accessto particular deployments on the basis of users' membership of Microsoft Active Directorygroups. This enables you to configure different experiences for different user groupsthrough a single store.
For example, you can group common resources for all users on one deployment and financeapplications for the Accounts department on another deployment. In such a configuration, auser who is not a member of the Accounts user group sees only the common resources whenaccessing the store. A member of the Accounts user group is presented with both thecommon resources and the finance applications.
Alternatively, you can create a deployment for power users that provides the sameresources as your other deployments, but with faster and more powerful hardware. Thisenables you to provide an enhanced experience for business-critical users, such as yourexecutive team. All users see the same desktops and applications when they log on to thestore, but members of the Executives user group are preferentially connected to resourcesprovided by the power user deployment.
Subscription synchronizationIf you enable your users to access the same applications from similar stores in differentStoreFront deployments, users' application subscriptions must be synchronized between theserver groups. Otherwise, users who subscribe to an application in a store on one StoreFrontdeployment might need to resubscribe to the application when they log on to a differentserver group. To provide a seamless experience for users moving between separateStoreFront deployments, you can configure periodic synchronization of users' applicationsubscriptions between stores in different server groups. Choose between regularsynchronization at a specific interval or schedule synchronization to occur at particulartimes throughout the day.
StoreFront high availability and multi-site configuration
57

Dedicated disaster recovery resourcesYou can configure specific disaster recovery deployments that are not used unless all otherdeployments are unavailable. Typically, disaster recovery deployments are not collocatedwith the main deployments, provide only a subset of the resources that are normallyavailable, and might offer a degraded user experience. When you specify that a deploymentis to be used for disaster recovery, the deployment will not be used for load balancing orfailover. Users cannot access desktops and applications provided by disaster recoverydeployments unless all the other deployments for which the disaster recovery deploymentsare configured become unavailable.
When access to any other deployment is re-established, users cannot start more disasterrecovery resources, even if they are already using such a resource. Users running disasterrecovery resources are not disconnected from those resources when access to otherdeployments is restored. However, they cannot start disaster recovery resources again oncethey have exited these resources. Similarly, StoreFront does not attempt to reuse existingsessions with disaster recovery deployments if any other deployments have subsequentlybecome available.
Optimal NetScaler Gateway routingIf you have configured separate NetScaler Gateway appliances for your deployments,StoreFront enables you to define the optimal appliance for users to access each of thedeployments providing resources for a store. For example, if you create a store thataggregates resources from two geographical locations, each with a NetScaler Gatewayappliance, users connecting through an appliance in one location can start a desktop orapplication in the other location. However, by default, the connection to the resource isthen routed through the appliance to which the user originally connected and musttherefore traverse the corporate WAN.
To improve the user experience and reduce network traffic over the WAN, you can specifythe optimal NetScaler Gateway appliance for each of your deployments. With thisconfiguration, user connections to resources are automatically routed through theappliance local to the deployment providing the resources, regardless of the location of theappliance through which the user accesses the store.
Optimal NetScaler Gateway routing can also be used in the special case where local userson the internal network are required to log on to NetScaler Gateway for endpoint analysis.With this configuration, users connect to the store through the NetScaler Gatewayappliance, but there is no need to route the connection to the resource through theappliance as the user is on the internal network. In this case, you enable optimal routing,but do not specify an appliance for the deployment, so user connections to desktops andapplications are routed directly and not through NetScaler Gateway. Note that you mustalso configure a specific internal virtual server IP address for the NetScaler Gatewayappliance. Additionally, specify an inaccessible internal beacon point so that Citrix Receiveris always prompted to connect to NetScaler Gateway, regardless of the user's networklocation.
StoreFront high availability and multi-site configuration
58

NetScaler Gateway global server load balancingStoreFront supports NetScaler Gateway deployments configured for global server loadbalancing with multiple appliances configured with a single fully qualified domain name(FQDN). For user authentication and to route user connections through the appropriateappliance, StoreFront must be able to distinguish between the appliances. Because theappliance FQDN cannot be used as a unique identifier in a global server load balancingconfiguration, you must configure StoreFront with unique IP addresses for each of theappliances. Typically, this is the IP address of the NetScaler Gateway virtual server.
Important considerationsWhen you decide whether to set up highly available multi-site configurations for yourstores, consider the following requirements and restrictions.
• Desktops and applications must have the same name and path on each server to beaggregated. In addition, the properties of aggregated resources, such as names andicons, must be the same. If this is not the case, users could see the properties of theirresources change when Citrix Receiver enumerates the available resources.
• Assigned desktops, both pre-assigned and assigned-on-first-use, should not beaggregated. Ensure that Delivery Groups providing such desktops do not have the samename and path in sites that you configure for aggregation.
• App Controller applications cannot be aggregated.
• Primary deployments in the same equivalent deployment set must be identical.StoreFront only enumerates and displays to users the resources from the first availableprimary deployment in a set, since it is assumed that each deployment provides exactlythe same resources. Configure separate equivalent deployment sets for deploymentsthat differ even slightly in the resources they provide.
• If you configure synchronization of users' application subscriptions between stores onseparate StoreFront deployments, the stores must have the same name in each servergroup. In addition, both server groups must reside within the Active Directory domaincontaining your users' accounts or within a domain that has a trust relationship with theuser accounts domain.
• StoreFront only provides access to backup deployments for disaster recovery when allthe primary sites in the equivalent deployment set are unavailable. If a backupdeployment is shared between multiple equivalent deployment sets, all the primarysites in each of the sets must be unavailable before users can access the disasterrecovery resources.
StoreFront high availability and multi-site configuration
59

60
To install and set up StoreFront
To install and configure StoreFront, complete the following steps in order.
1. If you plan to use StoreFront to deliver XenDesktop, XenApp, or VDI-in-a-Box resourcesto users, ensure that the StoreFront server is joined to either the Microsoft ActiveDirectory domain containing your users' accounts or a domain that has a trustrelationship with the user accounts domain.
Note: StoreFront cannot be installed on a domain controller.
2. If not already present, StoreFront requires Microsoft .NET 4.5 Framework, which can bedownloaded from Microsoft. You must have Microsoft .NET 4.5 installed before you caninstall StoreFront.
3. Optionally, if you plan to configure a multiple server StoreFront deployment, set up aload balancing environment for your StoreFront servers.
To use NetScaler for load balancing, you define a virtual server to proxy your StoreFrontservers. For more information on configuring NetScaler for load balancing, see LoadBalancing Traffic on a NetScaler.
a. Ensure that load balancing is enabled on your NetScaler appliance.
b. For each StoreFront server, create individual HTTP or SSL load balancing services,as appropriate, using the StoreFront monitor type.
For more information, see Monitoring Citrix StoreFront Stores.
c. Configure the services to insert the client IP address into the X-Forwarded-For HTTPheader of requests forwarded to StoreFront, overriding any global policies.
StoreFront requires users' IP addresses to establish connections to their resources.For more information, see Inserting the IP Address of the Client in the RequestHeader.
d. Create a virtual server and bind the services to the virtual server.
e. On the virtual server, configure persistence on the basis of source IP address.
Persistence ensures that only the initial user connection is load balanced, afterwhich subsequent requests from that user are directed to the same StoreFrontserver. For more information, see Persistence Based on Source IP Address.
4. Optionally, enable the following features.
• .NET Framework 4.5 Features > .NET Framework 4.5, ASP.NET 4.5Optionally, enable the following roles and their dependencies on the StoreFront server.
• Web Server (IIS) > Web Server > Common HTTP Features > Default Document, HTTPErrors, Static Content, HTTP Redirection
• Web Server (IIS) > Web Server > Health and Diagnostics > HTTP Logging

• Web Server (IIS) > Web Server > Security > Request Filtering, WindowsAuthentication
• On Windows Server 2012 servers:
Web Server (IIS) > Web Server > Application Development > .NET Extensibility 4.5,Application Initialization, ASP.NET 4.5, ISAPI Extensions, ISAPI Filters
On Windows Server 2008 R2 servers:
Web Server (IIS) > Web Server > Application Development > .NET Extensibility,Application Initialization, ASP.NET, ISAPI Extensions, ISAPI Filters
• Web Server (IIS) > Management Tools > IIS Management Console, IIS ManagementScripts and Tools
The StoreFront installer checks that all the features and server roles above areenabled.
5. Install StoreFront.
6. Optionally, configure Microsoft Internet Information Services (IIS) for HTTPS if you planto use HTTPS to secure communications between StoreFront and users' devices.
HTTPS is required for smart card authentication. By default, Citrix Receiver requiresHTTPS connections to stores. You can change from HTTP to HTTPS at any time afterinstalling StoreFront, provided the appropriate IIS configuration is in place.
To configure IIS for HTTPS, use the Internet Information Services (IIS) Manager consoleon the StoreFront server to create a server certificate signed by your domaincertification authority. Then, add HTTPS binding to the default website. For moreinformation about creating a server certificate in IIS, seehttp://technet.microsoft.com/en-us/library/hh831637.aspx#CreateCertificate. Formore information about adding HTTPS binding to an IIS site, seehttp://technet.microsoft.com/en-us/library/hh831632.aspx#SSLBinding.
7. Ensure your firewalls and other network devices permit access to TCP port 80 or 443, asappropriate, from both inside and outside the corporate network. In addition, ensurethat any firewalls or other devices on your internal network do not block traffic to anyof the unassigned TCP ports.
When you install StoreFront, a Windows Firewall rule is configured enabling access tothe StoreFront executable through a TCP port randomly selected from all unreservedports. This port is used for communications between the StoreFront servers in a servergroup.
8. Use the Citrix StoreFront management console to configure your server.
Install and set up
61

62
To install StoreFront
1. Log on to the StoreFront server using an account with local administrator permissions.
2. Ensure that the required Microsoft .NET 4.5 Framework is installed on the server.
3. Browse your installation media or download package, locate CitrixStoreFront-x64.exe,and run the file as an administrator.
Note: On Windows Server 2008 R2 servers, a message may be displayed indicatingthat the .NET feature will be enabled. If this message appears, click Yes.
4. Read and accept the license agreement, and click Next.
5. If the Review prerequisites page appears, click Next.
6. On the Ready to install page, check the prerequisites and StoreFront components thatare listed for installation and click Install.
Before the components are installed, the following roles are enabled if they are notalready configured on the server.
• Web Server (IIS) > Web Server > Common HTTP Features > Default Document, HTTPErrors, Static Content, HTTP Redirection
• Web Server (IIS) > Web Server > Health and Diagnostics > HTTP Logging
• Web Server (IIS) > Web Server > Security > Request Filtering, WindowsAuthentication
• On Windows Server 2012 & 2012 R2 servers:
Web Server (IIS) > Web Server > Application Development > .NET Extensibility 4.5,Application Initialization, ASP.NET 4.5, ISAPI Extensions, ISAPI Filters
On Windows Server 2008 R2 servers:
Web Server (IIS) > Web Server > Application Development > .NET Extensibility 3.5.1,Application Initialization, ASP.NET 3.5.1, ISAPI Extensions, ISAPI Filters
• Web Server (IIS) > Management Tools > IIS Management Console, IIS ManagementScripts and Tools
On Windows Server 2012 and Windows Server 2012 R2, the following features are alsoenabled if they are not already configured.
• .NET Framework 4.5 Features > .NET Framework 4.5, ASP.NET 4.57. When the installation is complete, click Finish.
The Citrix StoreFront management console starts automatically so that you canconfigure your server.

63
To install StoreFront at a commandprompt
1. Log on to the StoreFront server using an account with local administrator permissions.
2. Ensure that all of the requirements for installation of StoreFront are met beforeinstalling StoreFront. Refer to the installation overview for details.
3. Browse your installation media or download package, locate CitrixStoreFront-x64.exe,and copy the file to a temporary location on the server.
4. At a command prompt, navigate to the folder containing the installation file and typethe following command.
CitrixStoreFront-x64.exe [-silent] [-INSTALLDIR installationlocation] [-WINDOWS_CLIENT filelocation\filename.exe] [-MAC_CLIENT filelocation\filename.dmg]
Use the -silent argument to perform a silent installation of StoreFront and all theprerequisites. By default, StoreFront is installed at C:\Program Files\Citrix\ReceiverStoreFront\. However, you can specify a different installation location using the-INSTALLDIR argument, where installationlocation is the directory in which to installStoreFront.
By default, if a Receiver for Web site cannot detect Citrix Receiver on a Windows orMac OS X device, the user is prompted to download and install the appropriate CitrixReceiver for their platform from the Citrix website. You can modify this behavior sothat users download the Citrix Receiver installation files from the StoreFront serverinstead. For more information, see To make Citrix Receiver installation files availableon the server.
If you plan to make this configuration change, specify the -WINDOWS_CLIENT and-MAC_CLIENT arguments to copy Receiver for Windows and Receiver for Mac installationfiles, respectively, to the appropriate location in your StoreFront deployment. Replacefilelocation with the directory containing the installation file that you want to copy andfilename with the name of the Citrix Receiver installation file. Receiver for Windowsand Receiver for Mac installation files are included on your StoreFront installationmedia or download package.

64
Configure StoreFront
When the Citrix StoreFront management console first starts, two options are available.
• Create a new deployment. Configure the first server in a new StoreFront deployment.Single-server deployments are ideal for evaluating StoreFront or for small productiondeployments. Once you have configured your first StoreFront server, you can add moreservers to the group at any time to increase the capacity of your deployment.
• Join existing server group. Add another server to an existing StoreFront deployment.Select this option to rapidly increase the capacity of your StoreFront deployment.External load balancing is required for multiple server deployments. To add a newserver, you will need access to an existing server in the deployment.
65
To create a new deployment
1. If the Citrix StoreFront management console is not already open after installation ofStoreFront, on the Windows Start screen or Apps screen, locate and click the CitrixStoreFront tile.
2. In the results pane of the Citrix StoreFront management console, click Create a newdeployment.
3. Specify the URL of the StoreFront server or the load balancing environment for amultiple server deployment in the Base URL box.
If you have not yet set up your load balancing environment, enter the server URL. Youcan modify the base URL for your deployment at any time. For more information, seeConfigure server groups.
4. Click Next to set up the authentication service, which authenticates users to MicrosoftActive Directory.
To use HTTPS to secure communications between StoreFront and users' devices, youmust configure Microsoft Internet Information Services (IIS) for HTTPS. In the absence ofthe appropriate IIS configuration, StoreFront uses HTTP for communications.
By default, Citrix Receiver requires HTTPS connections to stores. If StoreFront is notconfigured for HTTPS, users must carry out additional configuration steps to use HTTPconnections. HTTPS is required for smart card authentication. You can change fromHTTP to HTTPS at any time after configuring StoreFront, provided the appropriate IISconfiguration is in place. For more information, see Configure server groups.
5. On the Store Name page, specify a name for your store and click Next.
StoreFront stores aggregate desktops and applications, making them available to users.Store names appear in Citrix Receiver under users' accounts, so choose a name thatgives users information about the content of the store.
6. On the Delivery Controllers page, list the infrastructure providing the resources thatyou want to make available in the store. To add desktops and applications to the store,follow the appropriate procedure below. You can configure stores to provide resourcesfrom any mixture of XenDesktop, XenApp, App Controller, and VDI-in-a-Boxdeployments. Repeat the procedures, as necessary, to add all the deploymentsproviding resources for the store.
• To add XenDesktop, XenApp, and VDI-in-a-Box resources to the store
• To add App Controller applications to the store7. When you have added all the required resources to the store, on the Delivery
Controllers page, click Next.
8. On the Remote Access page, specify whether and how users connecting from publicnetworks can access the store through NetScaler Gateway.

• To make the store unavailable to users on public networks, select None. Only localusers on the internal network will be able to access the store.
• To make only resources delivered through the store available through NetScalerGateway, select No VPN tunnel. Users log on directly to NetScaler Gateway and donot need to use the NetScaler Gateway Plug-in.
• To make the store and all other resources on the internal network available througha Secure Sockets Layer (SSL) virtual private network (VPN) tunnel, select Full VPNtunnel. Users require the NetScaler Gateway Plug-in to establish the VPN tunnel.
If you configure remote access to the store through NetScaler Gateway, thepass-through from NetScaler Gateway authentication method is automatically enabled.Users authenticate to NetScaler Gateway and are automatically logged on when theyaccess their stores.
9. If you enabled remote access, list the NetScaler Gateway deployments through whichusers can access the store. To add a NetScaler Gateway deployment, follow theappropriate procedure below. Repeat the procedures, as necessary, to add furtherdeployments.
• To provide remote access to the store through a NetScaler Gateway appliance
• To provide remote access to the store through an Access Gateway 5.0 cluster10. When you have added all your NetScaler Gateway deployments, select from the
NetScaler Gateway appliances list the deployments through which users can access thestore. If you enable access through multiple deployments, specify the defaultdeployment to be used to access the store.
11. On the Remote Access page, click Create. Once the store has been created, click Finish.
After creating the store, further options become available in the Citrix StoreFrontmanagement console. For more information, see Manage your StoreFront deployment.
Your store is now available for users to access with Citrix Receiver, which must beconfigured with access details for the store. There are a number of ways in which you canprovide these details to users to make the configuration process easier for them. For moreinformation, see User access options.
Alternatively, users can access the store through the Receiver for Web site, which enablesusers to access their desktops and applications through a webpage. The URL for users toaccess the Receiver for Web site for the new store is displayed when you create the store.
When you create a new store, the XenApp Services URL is enabled by default. Users ofdomain-joined desktop appliances and repurposed PCs running the Citrix Desktop Lock,along with users who have older Citrix clients that cannot be upgraded, can access storesdirectly using the XenApp Services URL for the store. The XenApp Services URL has the formhttp[s]://serveraddress/Citrix/storename/PNAgent/config.xml, where serveraddress is thefully qualified domain name of the server or load balancing environment for your StoreFrontdeployment and storename is the name you specified for the store in Step 5.
You can quickly add more servers to your deployment by selecting the option to join anexisting server group when installing further instances of StoreFront.
To create a new deployment
66
67
To add XenDesktop, XenApp, andVDI-in-a-Box resources to the store
Complete the following steps to make desktops and applications provided by XenDesktop,XenApp, and VDI-in-a-Box available in the store that you create as part of the initialconfiguration of your StoreFront server. It is assumed that you have completed Steps 1 to 6in To create a new deployment.
1. On the Delivery Controllers page of the Create Store wizard, click Add.
2. In the Add Delivery Controller dialog box, specify a name that will help you to identifythe deployment and indicate whether the resources that you want to make available inthe store are provided by XenDesktop, XenApp, or VDI-in-a-Box.
3. Add the names or IP addresses of your servers to the Servers list. Specify multipleservers to enable fault tolerance, listing the entries in order of priority to set thefailover sequence. For XenDesktop sites, give details of Delivery Controllers. In the caseof XenApp farms, list servers running the Citrix XML Service. To add VDI-in-a-Box grids,specify either the grid-wide virtual IP address, if configured, or list the IP addresses ofyour servers.
4. Select from the Transport type list the type of connections for StoreFront to use forcommunications with the servers.
• To send data over unencrypted connections, select HTTP. If you select this option,you must make your own arrangements to secure connections between StoreFrontand your servers.
• To send data over secure HTTP connections using Secure Sockets Layer (SSL) orTransport Layer Security (TLS), select HTTPS. If you select this option forXenDesktop and XenApp servers, ensure that the Citrix XML Service is set to shareits port with Microsoft Internet Information Services (IIS) and that IIS is configuredto support HTTPS.
• To send data over secure connections to XenApp servers using the SSL Relay toperform host authentication and data encryption, select SSL Relay.
Note: If you are using HTTPS or the SSL Relay to secure connections betweenStoreFront and your servers, ensure that the names you specify in the Servers listmatch exactly (including the case) the names on the certificates for those servers.
5. Specify the port for StoreFront to use for connections to the servers. The default port is80 for connections using HTTP and the SSL Relay, and 443 for HTTPS connections. In thecase of XenDesktop and XenApp servers, the specified port must be the port used by theCitrix XML Service.
6. If you are using the SSL Relay to secure connections between StoreFront and XenAppservers, specify the TCP port of the SSL Relay in the SSL Relay port box. The defaultport is 443. Ensure that all the servers running the SSL Relay are configured to monitorthe same port.

You can configure stores to provide resources from any mixture of XenDesktop, XenApp,App Controller, and VDI-in-a-Box deployments. To add further XenDesktop sites, XenAppfarms, or VDI-in-a-Box grids, repeat the procedure above. To make applications managed byApp Controller available in the store, follow the steps in To add App Controller applicationsto the store. When you have added all the required resources to the store, return to Step 7in To create a new deployment.
To add XenDesktop, XenApp, and VDI-in-a-Box resources to the store
68
69
To add App Controller applications to thestore
Complete the following steps to make applications managed by App Controller available inthe store that you create as part of the initial configuration of your StoreFront server. It isassumed that you have completed Steps 1 to 6 in To create a new deployment.
1. On the Delivery Controllers page of the Create Store wizard, click Add.
2. In the Add Delivery Controller dialog box, specify a name that will help you to identifythe App Controller virtual appliance managing the applications that you want to makeavailable in the store. Ensure that the name does not contain any spaces. SelectAppController.
3. Enter the name or IP address of the App Controller virtual appliance in the Server boxand specify the port for StoreFront to use for connections to App Controller. Thedefault port is 443.
You can configure stores to provide resources from any mixture of XenDesktop, XenApp,App Controller, and VDI-in-a-Box deployments. To add applications managed by other AppController virtual appliances, repeat the procedure above. To make desktops andapplications provided by XenDesktop, XenApp, and VDI-in-a-Box available in the store,follow the steps in To add XenDesktop, XenApp, and VDI-in-a-Box resources to the store.When you have added all the required resources to the store, return to Step 7 in To createa new deployment.

70
To provide remote access to the storethrough a NetScaler Gateway appliance
Complete the following steps to configure remote access through a NetScaler Gatewayappliance to the store that you create as part of the initial configuration of your StoreFrontserver. It is assumed that you have completed Steps 1 to 9 in To create a new deployment.
1. On the Remote Access page of the Create Store wizard, click Add.
2. In the Add NetScaler Gateway Appliance dialog box, specify a name for the appliancethat will help users to identify it.
Users see the display name you specify in Citrix Receiver, so include relevantinformation in the name to help users decide whether to use that appliance. Forexample, you can include the geographical location in the display names for yourNetScaler Gateway deployments so that users can easily identify the most convenientdeployment for their location.
3. Enter the URL of the virtual server or user logon point (for Access Gateway 5.0) for yourappliance. Specify the product version used in your deployment.
The fully qualified domain name (FQDN) for your StoreFront deployment must be uniqueand different from the NetScaler Gateway virtual server FQDN. Using the same FQDNfor StoreFront and the NetScaler Gateway virtual server is not supported.
4. If you are adding an Access Gateway 5.0 appliance, select from the Deployment modelist Appliance. Otherwise, specify the subnet IP address of the NetScaler Gatewayappliance, if necessary. A subnet IP address is required for Access Gateway 9.3appliances, but optional for more recent product versions.
The subnet address is the IP address that NetScaler Gateway uses to represent the userdevice when communicating with servers on the internal network. This can also be themapped IP address of the NetScaler Gateway appliance. Where specified, StoreFrontuses the subnet IP address to verify that incoming requests originate from a trusteddevice.
5. If you are adding an appliance running NetScaler Gateway 10.1, Access Gateway 10, orAccess Gateway 9.3, select from the Logon type list the authentication method youconfigured on the appliance for Citrix Receiver users.
The information you provide about the configuration of your NetScaler Gatewayappliance is added to the provisioning file for the store. This enables Citrix Receiver tosend the appropriate connection request when contacting the appliance for the firsttime.
• If users are required to enter their Microsoft Active Directory domain credentials,select Domain.
• If users are required to enter a tokencode obtained from a security token, selectSecurity token.

• If users are required to enter both their domain credentials and a tokencodeobtained from a security token, select Domain and security token.
• If users are required to enter a one-time password sent by text message, select SMSauthentication.
• If users are required to present a smart card and enter a PIN, select Smart card.
If you configure smart card authentication with a secondary authentication method towhich users can fall back if they experience any issues with their smart cards, selectthe secondary authentication method from the Smart card fallback list.
6. Complete the NetScaler Gateway authentication service URL in the Callback URL box.StoreFront automatically appends the standard portion of the URL. Click Next.
Enter the internally accessible URL of the appliance. StoreFront contacts the NetScalerGateway authentication service to verify that requests received from NetScalerGateway originate from that appliance.
7. If you are making resources provided by XenDesktop, XenApp, or VDI-in-a-Box availablein the store, list on the Secure Ticket Authority (STA) page URLs for servers running theSTA. Add URLs for multiple STAs to enable fault tolerance, listing the servers in order ofpriority to set the failover sequence. If you configured a grid-wide virtual IP address foryour VDI-in-a-Box deployment, you need only specify this address to enable faulttolerance.
Important: VDI-in-a-Box STA URLs must be entered in the formhttps://serveraddress/dt/sta in the Add Secure Ticket Authority URL dialog box,where serveraddress is the FQDN or IP address of the VDI-in-a-Box server, or thegrid-wide virtual IP address.
The STA is hosted on XenDesktop, XenApp, and VDI-in-a-Box servers and issues sessiontickets in response to connection requests. These session tickets form the basis ofauthentication and authorization for access to XenDesktop, XenApp, and VDI-in-a-Boxresources.
8. If you want XenDesktop, XenApp, and VDI-in-a-Box to keep disconnected sessions openwhile Citrix Receiver attempts to reconnect automatically, select the Enable sessionreliability check box. If you configured multiple STAs and want to ensure that sessionreliability is always available, select the Request tickets from two STAs, whereavailable check box.
When the Request tickets from two STAs, where available check box is selected,StoreFront obtains session tickets from two different STAs so that user sessions are notinterrupted if one STA becomes unavailable during the course of the session. If, for anyreason, StoreFront is unable to contact two STAs, it falls back to using a single STA.
9. Click Create to add your NetScaler Gateway deployment to the list on the RemoteAccess page.
To add further deployments, repeat the procedure above. To configure remote access tothe store through an Access Gateway 5.0 cluster, follow the steps in To provide remoteaccess to the store through an Access Gateway 5.0 cluster. When you have added all yourNetScaler Gateway deployments, return to Step 10 in To create a new deployment.
To provide remote access to the store through a NetScaler Gateway appliance
71

72
To provide remote access to the storethrough an Access Gateway 5.0 cluster
Complete the following steps to configure remote access through an Access Gateway 5.0cluster to the store that you create as part of the initial configuration of your StoreFrontserver. It is assumed that you have completed Steps 1 to 9 in To create a new deployment.
1. On the Remote Access page of the Create Store wizard, click Add.
2. In the Add NetScaler Gateway Appliance dialog box, specify a name for the cluster thatwill help users to identify it.
Users see the display name you specify in Citrix Receiver, so include relevantinformation in the name to help users decide whether to use that cluster. For example,you can include the geographical location in the display names for your NetScalerGateway deployments so that users can easily identify the most convenient deploymentfor their location.
3. Enter the URL of the user logon point for your cluster and select from the Version list5.x.
4. From the Deployment mode list, select Access Controller and click Next.
5. On the Appliances page, list the IP addresses or fully qualified domain names (FQDNs) ofthe appliances in the cluster and click Next.
6. On the Enable Silent Authentication page, list URLs for the authentication servicerunning on the Access Controller servers. Add URLs for multiple servers to enable faulttolerance, listing the servers in order of priority to set the failover sequence. ClickNext.
StoreFront uses the authentication service to authenticate remote users so that they donot need to re-enter their credentials when accessing stores.
7. If you are making resources provided by XenDesktop, XenApp, or VDI-in-a-Box availablein the store, list on the Secure Ticket Authority (STA) page URLs for servers running theSTA. Add URLs for multiple STAs to enable fault tolerance, listing the servers in order ofpriority to set the failover sequence. If you configured a grid-wide virtual IP address foryour VDI-in-a-Box deployment, you need only specify this address to enable faulttolerance.
Important: VDI-in-a-Box STA URLs must be entered in the formhttps://serveraddress/dt/sta in the Add Secure Ticket Authority URL dialog box,where serveraddress is the FQDN or IP address of the VDI-in-a-Box server, or thegrid-wide virtual IP address.
The STA is hosted on XenDesktop, XenApp, and VDI-in-a-Box servers and issues sessiontickets in response to connection requests. These session tickets form the basis ofauthentication and authorization for access to XenDesktop, XenApp, and VDI-in-a-Boxresources.

8. If you want XenDesktop, XenApp, and VDI-in-a-Box to keep disconnected sessions openwhile Citrix Receiver attempts to reconnect automatically, select the Enable sessionreliability check box. If you configured multiple STAs and want to ensure that sessionreliability is always available, select the Request tickets from two STAs, whereavailable check box.
When the Request tickets from two STAs, where available check box is selected,StoreFront obtains session tickets from two different STAs so that user sessions are notinterrupted if one STA becomes unavailable during the course of the session. If, for anyreason, StoreFront is unable to contact two STAs, it falls back to using a single STA.
9. Click Create to add your NetScaler Gateway deployment to the list on the RemoteAccess page.
To add further clusters, repeat the procedure above. To configure remote access to thestore through NetScaler Gateway 10.1, Access Gateway 10, Access Gateway 9.3, or a singleAccess Gateway 5.0 appliance, follow the steps in To provide remote access to the storethrough a NetScaler Gateway appliance. When you have added all your NetScaler Gatewaydeployments, return to Step 10 in To create a new deployment.
To provide remote access to the store through an Access Gateway 5.0 cluster
73

74
Join an existing server group
Before installing StoreFront, ensure that the server you are adding to the group is runningthe same operating system version with the same locale settings as the other servers in thegroup. StoreFront server groups containing mixtures of operating system versions andlocales are not supported. A server group can contain a maximum of five servers. Inaddition, ensure that the relative path to StoreFront in IIS on the server you are adding isthe same as on the other servers in the group.
Important: When you add a new server to a server group, StoreFront service accounts areadded as members of the local administrators group on the new server. These servicesrequire local administrator permissions to join and synchronize with the server group. Ifyou use Group Policy to prevent addition of new members to the local administratorgroup or if you restrict the permissions of the local administrator group on your servers,StoreFront cannot join a server group.
1. If the Citrix StoreFront management console is not already open after installation ofStoreFront, on the Windows Start screen or Apps screen, locate and click the CitrixStoreFront tile.
2. In the results pane of the Citrix StoreFront management console, click Join existingserver group.
3. Log on to a server in the StoreFront deployment that you wish to join and open theCitrix StoreFront management console. Select the Server Group node in the left pane ofthe console and, in the Actions pane, click Add Server. Make a note of the authorizationcode that is displayed.
4. Return to the new server and, in the Join Server Group dialog box, specify the name ofthe existing server in the Authorizing server box. Enter the authorization code obtainedfrom that server and click Join.
Once joined to the group, the configuration of the new server is updated to match theconfiguration of the existing server. All the other servers in the group are updated withdetails of the new server.
To manage a multiple server deployment, use only one server at a time to make changes tothe configuration of the server group. Ensure that the Citrix StoreFront managementconsole is not running on any of the other servers in the deployment. Any configurationchanges you make must be propagated to the other servers in the group to ensure aconsistent configuration across the deployment.

75
To uninstall StoreFront
In addition to the product itself, uninstalling StoreFront removes the authenticationservice, stores, Receiver for Web sites, Desktop Appliance sites, and XenApp Services URLs,and their associated configurations. The subscription store service containing users'application subscription data is also deleted. In single-server deployments, this means thatdetails of users' application subscriptions are lost. However, in multiple server deploymentsthese data are retained on other servers in the group. Prerequisites enabled by theStoreFront installer, such as the .NET Framework features and the Web Server (IIS) roleservices, are not removed from the server when StoreFront is uninstalled.
1. Log on to the StoreFront server using an account with local administrator permissions.
2. On the Windows Start screen or Apps screen, locate the Citrix StoreFront tile.Right-click the tile and click Uninstall.
3. In the Programs and Features dialog box, select Citrix StoreFront and click Uninstall toremove all StoreFront components from the server.
4. In the Uninstall Citrix StoreFront dialog box, click Yes. When the uninstallation iscomplete, click OK.

76
Upgrade StoreFront
To upgrade existing StoreFront 2.0 or StoreFront 2.1 deployments to StoreFront 2.5, you runthe StoreFront 2.5 installation file. Releases before StoreFront 2.0 cannot be upgraded toStoreFront 2.5 directly. Instead, you must first upgrade StoreFront 1.2 to StoreFront 2.0before upgrading to StoreFront 2.5. Similarly, you cannot upgrade Receiver Storefront 1.1to StoreFront 2.5 directly. You must upgrade Receiver Storefront 1.1 to StoreFront 1.2 andthen again to StoreFront 2.0 before finally upgrading to StoreFront 2.5. Refer to theStoreFront 2.1 upgrade tasks for more information on upgrading from previous releases ofStoreFront prior to the 2.1 release.
Once the upgrade process is started, it cannot be rolled back. If the upgrade is interruptedor cannot be completed, the existing configuration is removed but StoreFront is notinstalled. Before starting to upgrade, you must disconnect users from the StoreFrontdeployment and prevent users from accessing the servers while the upgrade is in progress.This ensures that all StoreFront files are accessible by the installer during the upgrade. Ifany files cannot be accessed by the installer, they cannot be replaced and so the upgradewill fail, resulting in the removal of the existing StoreFront configuration. StoreFront doesnot support multiple server deployments containing different product versions, so allservers in a group must be updated concurrently. Citrix recommends that you back up yourdata before upgrading.
Uninstalling StoreFront removes the authentication service, stores, users' applicationsubscriptions, Receiver for Web sites, Desktop Appliance sites, and XenApp Services URLs.This means that if you decide to uninstall StoreFront, you must manually recreate yourservices, stores, and sites when you reinstall StoreFront. Upgrading also enables you topreserve your StoreFront configuration and leaves users' application subscription data intactso that users do not need to resubscribe to all of their applications.
Upgrading the operating system version on a server running StoreFront is not supported.Citrix recommends that you install StoreFront on a new installation of the operating system.

To upgrade from StoreFront 2.1 to StoreFront 2.51. If you are upgrading a multiple server StoreFront deployment, disable access to the
deployment through the load balancing environment.
Disabling the load-balanced URL prevents users from connecting to the deploymentduring the upgrade. All servers in a multiple server deployment must be updatedconcurrently.
2. Restart the StoreFront server.
Restarting the server ensures that any file locks are cleared and that there are noWindows updates pending.
3. Run the StoreFront installation file as an administrator.
Important: Be sure that no other installations or updates are in effect while runningthe StoreFront upgrade.
4. Restart the StoreFront server and check that all the StoreFront services are running.
Restarting the server ensures that all caches are cleared and the StoreFront servicesare restarted.
5. If you are upgrading a multiple server StoreFront deployment, repeat Steps 2 to 4 foreach of the remaining servers in your deployment until you have upgraded them all.
Important: Ensure you finish upgrading the current server before starting to upgradethe next. In multiple server StoreFront deployments, servers must be upgradedsequentially. Upgrading multiple servers in parallel is not supported and can causeconfiguration mismatches that lead to stores, sites, and services becoming unusable.
When the upgrade process is complete on the final server in your deployment,StoreFront automatically updates the configuration of the other servers in thedeployment to match that of the final server.
6. For multiple server StoreFront deployments, on each server in the deployment, openEvent Viewer and, in the left pane, navigate to Applications and Services Logs > CitrixDelivery Services. Search for events logged by the Citrix Subscriptions Store Servicewith an Event ID of 3 and a Task Category of 2901. Ensure that an entry is logged foreach store on every server in the deployment before continuing.
7. If you are upgrading a multiple server StoreFront deployment, restore access to yourdeployment through the load-balanced URL.
Upgrade
77
78
Manage your StoreFront deployment
After initial configuration of StoreFront, further tasks that enable you to manage yourdeployment become available in the Citrix StoreFront management console. For certainadvanced administration tasks, you must edit the StoreFront configuration files.
This section includes the following topics.
• Configure server groups
• To create the authentication service
• Configure the authentication service
• Create or remove a store
• Create an unauthenticated store
• Configure stores
• To create a Receiver for Web site
• Configure Receiver for Web sites
• To add a NetScaler Gateway connection
• Configure NetScaler Gateway connection settings
• To configure beacon points
• Configure smart card authentication
• Set up highly available multi-site store configurations
• Configure StoreFront using the configuration files
• Configure Receiver for Web sites using the configuration files
• Configure Desktop Appliance sites
• Configure authentication for XenApp Services URLs
• Configuring Resource Filtering

79
Configure server groups
The tasks below enable you to modify settings for multiple server StoreFront deployments.To manage a multiple server deployment, use only one server at a time to make changes tothe configuration of the server group. Ensure that the Citrix StoreFront managementconsole is not running on any of the other servers in the deployment. Any configurationchanges you make must be propagated to the other servers in the group to ensure aconsistent configuration across the deployment.
Add a server to a server groupUse the Add Server task to obtain an authorization code to enable you to join a newlyinstalled StoreFront server to your existing deployment. A server group can contain amaximum of five servers. For more information about adding new servers to existingStoreFront deployments, see Join an existing server group.
Remove servers from a server groupUse the Remove Server task to delete servers from a multiple server StoreFrontdeployment. You can remove any server in the group apart from the server on which youare running the task. Before removing a server from a multiple server deployment, firstremove the server from the load balancing environment.
Propagate local changes to a server groupUse the Propagate Changes task to update the configuration of all the other servers in amultiple server StoreFront deployment to match the configuration of the current server.Any changes made on other servers in the group are discarded. While running this task, youcannot make any further changes until all the servers in the group have been updated.
Important: If you update the configuration of a server without propagating the changesto the other servers in the group, you might lose your updates if you subsequentlypropagate changes from another server in the deployment.
Change the base URL for a deploymentUse the Change Base URL task to modify the URL that is used as the root of the URLs for thestores and other StoreFront services hosted on a deployment. For multiple serverdeployments, specify the load-balanced URL. You can use this task to change from HTTP toHTTPS at any time, provided that Microsoft Internet Information Services (IIS) is configuredfor HTTPS.
To configure IIS for HTTPS, use the Internet Information Services (IIS) Manager console on the StoreFront server to create a server certificate signed by your Microsoft Active Directory domain certification authority. Then, add HTTPS binding to the default website.
For more information about creating a server certificate in IIS, seehttp://technet.microsoft.com/en-us/library/hh831637.aspx#CreateCertificate. For moreinformation about adding HTTPS binding to an IIS site, seehttp://technet.microsoft.com/en-us/library/hh831632.aspx#SSLBinding.
Generate security keys for a server groupUse the Generate Security Keys task to generate new security keys for self-signedcertificates used by a server group. As part of security best practice, Citrix recommendsthat you periodically generate new security keys for self-signed certificates generated byStoreFront. When you generate new security keys, any users that are currently logged onwill need to reauthenticate to their stores. As a result, this task is best carried out duringperiods of low user activity.
Configure server groups
80

81
To create the authentication service
Use the Create Authentication Service task to configure the StoreFront authenticationservice. The authentication service authenticates users to Microsoft Active Directory,ensuring that users do not need to log on again to access their desktops and applications.
You can only configure one authentication service per StoreFront deployment. This task isonly available when the authentication service has not yet been configured.
To use HTTPS to secure communications between StoreFront and users' devices, you mustconfigure Microsoft Internet Information Services (IIS) for HTTPS. In the absence of theappropriate IIS configuration, StoreFront uses HTTP for communications.
By default, Citrix Receiver requires HTTPS connections to stores. If StoreFront is notconfigured for HTTPS, users must carry out additional configuration steps to use HTTPconnections. HTTPS is required for smart card authentication. You can change from HTTP toHTTPS at any time, provided the appropriate IIS configuration is in place. For moreinformation, see Configure server groups.
Important: In multiple server deployments, use only one server at a time to makechanges to the configuration of the server group. Ensure that the Citrix StoreFrontmanagement console is not running on any of the other servers in the deployment. Oncecomplete, propagate your configuration changes to the server group so that the otherservers in the deployment are updated.
1. On the Windows Start screen or Apps screen, locate and click the Citrix StoreFront tile.
2. Select the Authentication node in the left pane of the Citrix StoreFront managementconsole and, in the Actions pane, click Create Authentication Service.
3. Specify the access methods that you want to enable for your users and click Create.
• Select the User name and password check box to enable explicit authentication.Users enter their credentials when they access their stores.
• Select the Domain pass-through check box to enable pass-through of ActiveDirectory domain credentials from users' devices. Users authenticate to theirdomain-joined Windows computers and are automatically logged on when theyaccess their stores. In order to use this option, pass-through authentication must beenabled when Receiver for Windows is installed on users' devices.
• Select the Smart card check box to enable smart card authentication. Usersauthenticate using smart cards and PINs when they access their stores.
• Select the HTTP Basic check box to enable HTTP Basic authentication. Usersauthenticate with the StoreFront server's IIS web server.
• Select the Pass-through from NetScaler Gateway check box to enable pass-throughauthentication from NetScaler Gateway. Users authenticate to NetScaler Gatewayand are automatically logged on when they access their stores.
To enable pass-through authentication for smart card users accessing stores through NetScaler Gateway, use the Configure Delegated Authentication task. For more
information, see Configure the authentication service.
4. Once the authentication service has been created, click Finish.
For more information about modifying settings for the authentication service, seeConfigure the authentication service.
To create the authentication service
82
83
Configure the authentication service
The authentication service authenticates users to Microsoft Active Directory, ensuring thatusers do not need to log on again to access their desktops and applications. You can onlyconfigure one authentication service per StoreFront deployment.
The tasks below enable you to modify settings for the StoreFront authentication service.Some advanced settings can only be changed by editing the authentication serviceconfiguration files. For more information, see Configure StoreFront using the configurationfiles.
Important: In multiple server deployments, use only one server at a time to makechanges to the configuration of the server group. Ensure that the Citrix StoreFrontmanagement console is not running on any of the other servers in the deployment. Oncecomplete, propagate your configuration changes to the server group so that the otherservers in the deployment are updated.
To manage authentication methodsYou can enable or disable user authentication methods set up when the authenticationservice was created by selecting an authentication method in the results pane of the CitrixStoreFront management console and, in the Actions pane, clicking Enable Method or DisableMethod, as appropriate. To remove an authentication method from the authenticationservice or to add a new one, use the Add/Remove Methods task.
1. On the Windows Start screen or Apps screen, locate and click the Citrix StoreFront tile.
2. Select the Authentication node in the left pane of the Citrix StoreFront managementconsole and, in the Actions pane, click Add/Remove Methods.
3. Specify the access methods that you want to enable for your users.
• Select the User name and password check box to enable explicit authentication.Users enter their credentials when they access their stores.
• Select the Domain pass-through check box to enable pass-through of ActiveDirectory domain credentials from users' devices. Users authenticate to theirdomain-joined Windows computers and are automatically logged on when theyaccess their stores. In order to use this option, pass-through authentication must beenabled when Receiver for Windows is installed on users' devices.
• Select the Smart card check box to enable smart card authentication. Usersauthenticate using smart cards and PINs when they access their stores.
• Select the HTTP Basic check box to enable HTTP Basic authentication. Usersauthenticate with the StoreFront server's IIS web server.
• Select the Pass-through from NetScaler Gateway check box to enable pass-throughauthentication from NetScaler Gateway. Users authenticate to NetScaler Gatewayand are automatically logged on when they access their stores.

To enable pass-through authentication for smart card users accessing stores throughNetScaler Gateway, use the Configure Delegated Authentication task.
To configure trusted user domainsUse the Configure Trusted Domains task to restrict access to stores for users logging on withexplicit domain credentials, either directly or using pass-through authentication fromNetScaler Gateway.
1. On the Windows Start screen or Apps screen, locate and click the Citrix StoreFront tile.
2. Select the Authentication node in the left pane of the Citrix StoreFront managementconsole and, in the results pane, select the appropriate authentication method. In theActions pane, click Configure Trusted Domains.
3. Select Trusted domains only. Click Add to enter the name of a trusted domain. Userswith accounts in that domain will be able to log on to all stores that use theauthentication service. To modify a domain name, select the entry in the Trusteddomains list and click Edit. Select a domain in the list and click Remove to discontinueaccess to stores for user accounts in that domain.
The way in which you specify the domain name determines the format in which usersmust enter their credentials. If you want users to enter their credentials in domain username format, add the NetBIOS name to the list. To require that users enter theircredentials in user principal name format, add the fully qualified domain name to thelist. If you want to enable users to enter their credentials in both domain user nameformat and user principal name format, you must add both the NetBIOS name and thefully qualified domain name to the list.
4. If you configure multiple trusted domains, select from the Default domain list thedomain that is selected by default when users log on.
To enable users to change their passwordsUse the Manage Password Options task to enable Receiver for Web site users logging on withdomain credentials to change their passwords. When you create the authentication service,the default configuration prevents Receiver for Web site users from changing theirpasswords, even if the passwords have expired. If you decide to enable this feature, ensurethat the policies for the domains containing your servers do not prevent users fromchanging their passwords. Enabling users to change their passwords exposes sensitivesecurity functions to anyone who can access any of the stores that use the authenticationservice. If your organization has a security policy that reserves user password changefunctions for internal use only, ensure that none of the stores are accessible from outsideyour corporate network.
1. On the Windows Start screen or Apps screen, locate and click the Citrix StoreFront tile.
2. Select the Authentication node in the left pane of the Citrix StoreFront managementconsole and, in the results pane, select User name and password. In the Actions pane,click Manage Password Options.
Configure the authentication service
84

3. Specify the circumstances under which Receiver for Web site users logging on withdomain credentials are able to change their passwords.
• To enable users to change their passwords whenever they want, select At any time.Local users whose passwords are about to expire are shown a warning when they logon. Password expiry warnings are only displayed to users connecting from theinternal network. By default, the notification period for a user is determined by theapplicable Windows policy setting. For more information about setting customnotification periods, see To configure the password expiry notification period.
• To enable users to change their passwords only when the passwords have alreadyexpired, select When expired. Users who cannot log on because their passwordshave expired are redirected to the Change Password dialog box.
• To prevent users from changing their passwords, select Never. If you select thisoption, you must make your own arrangements to support users who cannot accesstheir desktops and applications because their passwords have expired.
If you enable Receiver for Web site users to change their passwords at any time, ensurethat there is sufficient disk space on your StoreFront servers to store profiles for allyour users. To check whether a user's password is about to expire, StoreFront creates alocal profile for that user on the server. StoreFront must be able to contact the domaincontroller to change users' passwords.
Delegate credential validation to NetScaler GatewayUse the Configure Delegated Authentication task to enable pass-through authentication forsmart card users accessing stores through NetScaler Gateway. This task is only availablewhen Pass-through from NetScaler Gateway is enabled and selected in the results pane.
When credential validation is delegated to NetScaler Gateway, users authenticate toNetScaler Gateway with their smart cards and are automatically logged on when theyaccess their stores. This setting is disabled by default when you enable pass-throughauthentication from NetScaler Gateway, so that pass-through authentication only occurswhen users log on to NetScaler Gateway with a password.
Configure the authentication service
85

86
Create or remove a store
Use the Create Store task to configure additional stores. You can create as many stores asyou need; for example, you can create a store for a particular group of users or to grouptogether a specific set of resources. You can also create an unauthenticated store thatallows for anonymous, or unauthenticated store. To create this type of store, refer to theCreate an unauthenticated store instruction.
To create a store, you identify and configure communications with the servers providing theresources that you want to make available in the store. Then, optionally, you configureremote access to the store through NetScaler Gateway.
Important: In multiple server deployments, use only one server at a time to makechanges to the configuration of the server group. Ensure that the Citrix StoreFrontmanagement console is not running on any of the other servers in the deployment. Oncecomplete, propagate your configuration changes to the server group so that the otherservers in the deployment are updated.
To add desktops and applications to the store1. On the Windows Start screen or Apps screen, locate and click the Citrix StoreFront tile.
2. Select the Stores node in the left pane of the Citrix StoreFront management consoleand, in the Actions pane, click Create Store.
3. On the Store Name page, specify a name for your store and click Next.
Store names appear in Citrix Receiver under users' accounts, so choose a name thatgives users information about the content of the store.
4. On the Delivery Controllers page, list the infrastructure providing the resources thatyou want to make available in the store. Click Add.
5. In the Add Delivery Controller dialog box, specify a name that will help you to identifythe deployment and indicate whether the resources that you want to make available inthe store are provided by XenDesktop, XenApp, or VDI-in-a-Box.
6. To make desktops and applications provided by XenDesktop, XenApp, or VDI-in-a-Boxavailable in the store, add the names or IP addresses of your servers to the Servers list.Specify multiple servers to enable fault tolerance, listing the entries in order of priorityto set the failover sequence. For XenDesktop sites, give details of Delivery Controllers.In the case of XenApp farms, list servers running the Citrix XML Service. To addVDI-in-a-Box grids, specify either the grid-wide virtual IP address, if configured, or listthe IP addresses of your servers.
7. Select from the Transport type list the type of connections for StoreFront to use forcommunications with the servers.
• To send data over unencrypted connections, select HTTP. If you select this option,you must make your own arrangements to secure connections between StoreFrontand your servers.
• To send data over secure HTTP connections using Secure Sockets Layer (SSL) orTransport Layer Security (TLS), select HTTPS. If you select this option forXenDesktop and XenApp servers, ensure that the Citrix XML Service is set to shareits port with Microsoft Internet Information Services (IIS) and that IIS is configuredto support HTTPS.
• To send data over secure connections to XenApp servers using the SSL Relay toperform host authentication and data encryption, select SSL Relay.
Note: If you are using HTTPS or the SSL Relay to secure connections betweenStoreFront and your servers, ensure that the names you specify in the Servers listmatch exactly (including the case) the names on the certificates for those servers.
8. Specify the port for StoreFront to use for connections to the servers. The default port is80 for connections using HTTP and the SSL Relay, and 443 for HTTPS connections. In thecase of XenDesktop and XenApp servers, the specified port must be the port used by theCitrix XML Service.
9. If you are using the SSL Relay to secure connections between StoreFront and XenAppservers, specify the TCP port of the SSL Relay in the SSL Relay port box. The defaultport is 443. Ensure that all the servers running the SSL Relay are configured to monitor
Create or remove a store
87
the same port.
10. Click OK. You can configure stores to provide resources from any mixture ofXenDesktop, XenApp, and VDI-in-a-Box deployments. Repeat Steps 4 to 11, asnecessary, to list additional deployments providing resources for the store. When youhave added all the required resources to the store, click Next.
11. On the Remote Access page, specify whether and how users connecting from publicnetworks can access the store through NetScaler Gateway.
• To make the store unavailable to users on public networks, select None. Only localusers on the internal network will be able to access the store.
• To make only resources delivered through the store available through NetScalerGateway, select No VPN tunnel. Users log on directly to NetScaler Gateway and donot need to use the NetScaler Gateway Plug-in.
• To make the store and all other resources on the internal network available throughan SSL virtual private network (VPN) tunnel, select Full VPN tunnel. Users requirethe NetScaler Gateway Plug-in to establish the VPN tunnel.
If it is not already enabled, the pass-through from NetScaler Gateway authenticationmethod is automatically enabled when you configure remote access to the store. Usersauthenticate to NetScaler Gateway and are automatically logged on when they accesstheir stores.
12. If you enabled remote access, continue to the next procedure to specify the NetScalerGateway deployments through which users can access the store. Otherwise, on theRemote Access page, click Create. Once the store has been created, click Finish.
To provide remote access to the store throughNetScaler Gateway
Complete the following steps to configure remote access through NetScaler Gateway to thestore that you created in the previous procedure. It is assumed that you have completed allthe preceding steps.
1. On the Remote Access page of the Create Store wizard, select from the NetScalerGateway appliances list the deployments through which users can access the store. Anydeployments you configured previously for other stores are available for selection in thelist. If you want to add a further deployment to the list, click Add. Otherwise, continueto Step 13.
2. In the Add NetScaler Gateway Appliance dialog box, specify a name for the NetScalerGateway deployment that will help users to identify it.
Users see the display name you specify in Citrix Receiver, so include relevantinformation in the name to help users decide whether to use that deployment. Forexample, you can include the geographical location in the display names for yourNetScaler Gateway deployments so that users can easily identify the most convenientdeployment for their location.
3. Enter the URL of the virtual server or user logon point (for Access Gateway 5.0) for yourdeployment. Specify the product version used in your deployment.
Create or remove a store
88

The fully qualified domain name (FQDN) for your StoreFront deployment must be uniqueand different from the NetScaler Gateway virtual server FQDN. Using the same FQDNfor StoreFront and the NetScaler Gateway virtual server is not supported.
4. If you are adding an Access Gateway 5.0 deployment, continue to Step 6. Otherwise,specify the subnet IP address of the NetScaler Gateway appliance, if necessary. Asubnet IP address is required for Access Gateway 9.3 appliances, but optional for morerecent product versions.
The subnet address is the IP address that NetScaler Gateway uses to represent the userdevice when communicating with servers on the internal network. This can also be themapped IP address of the NetScaler Gateway appliance. Where specified, StoreFrontuses the subnet IP address to verify that incoming requests originate from a trusteddevice.
5. If you are adding an appliance running NetScaler Gateway 10.1, Access Gateway 10, orAccess Gateway 9.3, select from the Logon type list the authentication method youconfigured on the appliance for Citrix Receiver users.
The information you provide about the configuration of your NetScaler Gatewayappliance is added to the provisioning file for the store. This enables Citrix Receiver tosend the appropriate connection request when contacting the appliance for the firsttime.
• If users are required to enter their Microsoft Active Directory domain credentials,select Domain.
• If users are required to enter a tokencode obtained from a security token, selectSecurity token.
• If users are required to enter both their domain credentials and a tokencodeobtained from a security token, select Domain and security token.
• If users are required to enter a one-time password sent by text message, select SMSauthentication.
• If users are required to present a smart card and enter a PIN, select Smart card.If you configure smart card authentication with a secondary authentication method towhich users can fall back if they experience any issues with their smart cards, selectthe secondary authentication method from the Smart card fallback list. Continue toStep 7.
6. To add an Access Gateway 5.0 deployment, indicate whether the user logon point ishosted on a standalone appliance or an Access Controller server that is part of acluster. If you are adding a cluster, click Next and continue to Step 8.
7. If you are configuring StoreFront for NetScaler Gateway 10.1, Access Gateway 10,Access Gateway 9.3, or a single Access Gateway 5.0 appliance, complete the NetScalerGateway authentication service URL in the Callback URL box. StoreFront automaticallyappends the standard portion of the URL. Click Next and continue to Step 10.
Enter the internally accessible URL of the appliance. StoreFront contacts the NetScalerGateway authentication service to verify that requests received from NetScalerGateway originate from that appliance.
Create or remove a store
89

8. To configure StoreFront for an Access Gateway 5.0 cluster, list on the Appliances pagethe IP addresses or FQDNs of the appliances in the cluster and click Next.
9. On the Enable Silent Authentication page, list URLs for the authentication servicerunning on the Access Controller servers. Add URLs for multiple servers to enable faulttolerance, listing the servers in order of priority to set the failover sequence. ClickNext.
StoreFront uses the authentication service to authenticate remote users so that they donot need to re-enter their credentials when accessing stores.
10. For all deployments, if you are making resources provided by XenDesktop, XenApp, orVDI-in-a-Box available in the store, list on the Secure Ticket Authority (STA) page URLsfor servers running the STA. Add URLs for multiple STAs to enable fault tolerance,listing the servers in order of priority to set the failover sequence. If you configured agrid-wide virtual IP address for your VDI-in-a-Box deployment, you need only specifythis address to enable fault tolerance.
Important: VDI-in-a-Box STA URLs must be entered in the formhttps://serveraddress/dt/sta in the Add Secure Ticket Authority URL dialog box,where serveraddress is the FQDN or IP address of the VDI-in-a-Box server, or thegrid-wide virtual IP address.
The STA is hosted on XenDesktop, XenApp, and VDI-in-a-Box servers and issues sessiontickets in response to connection requests. These session tickets form the basis ofauthentication and authorization for access to XenDesktop, XenApp, and VDI-in-a-Boxresources.
11. If you want XenDesktop, XenApp, and VDI-in-a-Box to keep disconnected sessions openwhile Citrix Receiver attempts to reconnect automatically, select the Enable sessionreliability check box. If you configured multiple STAs and want to ensure that sessionreliability is always available, select the Request tickets from two STAs, whereavailable check box.
When the Request tickets from two STAs, where available check box is selected,StoreFront obtains session tickets from two different STAs so that user sessions are notinterrupted if one STA becomes unavailable during the course of the session. If, for anyreason, StoreFront is unable to contact two STAs, it falls back to using a single STA.
12. Click Create to add your NetScaler Gateway deployment to the list on the RemoteAccess page.
13. Repeat Steps 1 to 12, as necessary, to add more NetScaler Gateway deployments to theNetScaler Gateway appliances list. If you enable access through multiple deploymentsby selecting more than one entry in the list, specify the default deployment to be usedto access the store.
14. On the Remote Access page, click Create. Once the store has been created, click Finish.
For more information about modifying settings for stores, see Configure stores.
Your store is now available for users to access with Citrix Receiver, which must beconfigured with access details for the store. There are a number of ways in which you canprovide these details to users to make the configuration process easier for them. For moreinformation, see User access options.
Create or remove a store
90

Alternatively, users can access the store through the Receiver for Web site, which enablesusers to access their desktops and applications through a webpage. The URL for users toaccess the Receiver for Web site for the new store is displayed when you create the store.
When you create a new store, the XenApp Services URL is enabled by default. Users ofdomain-joined desktop appliances and repurposed PCs running the Citrix Desktop Lock,along with users who have older Citrix clients that cannot be upgraded, can access storesdirectly using the XenApp Services URL for the store. The XenApp Services URL has the formhttp[s]://serveraddress/Citrix/storename/PNAgent/config.xml, where serveraddress is theFQDN of the server or load balancing environment for your StoreFront deployment andstorename is the name you specified for the store in Step 3.
Remove a store
Use the Remove Store task to delete a store. When you remove a store, any associatedReceiver for Web sites, Desktop Appliance sites, and XenApp Services URLs are also deleted.
Important: In multiple server deployments, use only one server at a time to makechanges to the configuration of the server group. Ensure that the Citrix StoreFrontmanagement console is not running on any of the other servers in the deployment. Oncecomplete, propagate your configuration changes to the server group so that the otherservers in the deployment are updated.
Create or remove a store
91

92
Create an unauthenticated store
Use the Create Store for Unauthenticated Users task to configure additionalunauthenticated stores to support access to anonymous apps with XenApp. You can createas many unauthenticated stores as you need; for example, you can create anunauthenticated store for a particular group of users or to group together a specific set ofresources.
To create an unauthenticated store, you identify and configure communications with theservers providing the resources that you want to make available in the store.
Important: In multiple server deployments, use only one server at a time to makechanges to the configuration of the server group. Ensure that the Citrix StoreFrontmanagement console is not running on any of the other servers in the deployment. Oncecomplete, propagate your configuration changes to the server group so that the otherservers in the deployment are updated.

To add desktops and applications to the store1. On the Windows Start screen or Apps screen, locate and click the Citrix StoreFront tile.
2. Select the Stores node in the left pane of the Citrix StoreFront management consoleand, in the Actions pane, click Create Store for Unauthenticated Users. After readingthe informational screen explaining unauthenticated stores, click Next.
3. On the Store Name page, specify a name for your store and click Next.
Store names appear in Citrix Receiver under users' accounts, so choose a name thatgives users information about the content of the store.
4. On the Delivery Controllers page, list the infrastructure providing the resources thatyou want to make available in the store. Click Add.
5. In the Add Delivery Controller dialog box, specify a name that will help you to identifythe deployment and indicate whether the resources that you want to make available inthe store are provided by XenDesktop, XenApp, or VDI-in-a-Box. When assigning DeliveryControllers, ensure that you are only using those which support the anonymous appsfeature. Configuring your unauthenticated store with Delivery Controllers that do notsupport this feature may lead to no anonymous apps being available from the store.
6. To make desktops and applications provided by XenDesktop, XenApp, or VDI-in-a-Boxavailable in the store, add the names or IP addresses of your servers to the Servers list.Specify multiple servers to enable fault tolerance, listing the entries in order of priorityto set the failover sequence. For XenDesktop sites, give details of Delivery Controllers.In the case of XenApp farms, list servers running the Citrix XML Service. To addVDI-in-a-Box grids, specify either the grid-wide virtual IP address, if configured, or listthe IP addresses of your servers.
7. Select from the Transport type list the type of connections for StoreFront to use forcommunications with the servers.
• To send data over unencrypted connections, select HTTP. If you select this option,you must make your own arrangements to secure connections between StoreFrontand your servers.
• To send data over secure HTTP connections using Secure Sockets Layer (SSL) orTransport Layer Security (TLS), select HTTPS. If you select this option forXenDesktop and XenApp servers, ensure that the Citrix XML Service is set to shareits port with Microsoft Internet Information Services (IIS) and that IIS is configuredto support HTTPS.
Note: If you are using HTTPS to secure connections between StoreFront and yourservers, ensure that the names you specify in the Servers list match exactly (includingthe case) the names on the certificates for those servers.
8. Specify the port for StoreFront to use for connections to the servers. The default port is80 for connections using HTTP and 443 for HTTPS connections. In the case ofXenDesktop and XenApp servers, the specified port must be the port used by the CitrixXML Service.
9. Click OK. You can configure stores to provide resources from any mixture ofXenDesktop, XenApp, and VDI-in-a-Box deployments. Repeat Steps 4 to 10, as
Create an unauthenticated store
93

necessary, to list additional deployments providing resources for the store. When youhave added all the required resources to the store, click Create.
Your unauthenticated store is now available for use. To enable user access to the newstore, Citrix Receiver must be configured with access details for the store. There are anumber of ways in which you can provide these details to users to make the configurationprocess easier for them. For more information, see User access options.
Alternatively, users can access the store through the Receiver for Web site, which enablesusers to access their desktops and applications through a web page. The URL for users toaccess the Receiver for Web site for the new store is displayed when you create the store.
When you create a new store, the XenApp Services URL is enabled by default. Users ofdomain-joined desktop appliances and repurposed PCs running the Citrix Desktop Lock,along with users who have older Citrix clients that cannot be upgraded, can access storesdirectly using the XenApp Services URL for the store. The XenApp Services URL has the formhttp[s]://serveraddress/Citrix/storename/PNAgent/config.xml, where serveraddress is theFQDN of the server or load balancing environment for your StoreFront deployment andstorename is the name you specified for the store in Step 3.
Note: In StoreFront configurations where the web.config file has been configured withthe parameter LogoffAction=”terminate", Receiver for Web sessions accessing thisunauthenticated store will not terminate. Typically, the web.config file can be found atC:\inetpub\wwwroot\Citrix\storename\, where storename is the name specified for thestore when it was created. To ensure these sessions terminate properly, the XenAppserver being used by this store must have the Trust XML requests option enabled as shownin Configuring the Citrix XMS Service Port and Trust.
Create an unauthenticated store
94

95
Configure stores
StoreFront stores enumerate and aggregate desktops and applications from XenDesktop,XenApp, XenMobile App Controller, and VDI-in-a-Box, making these resources available tousers. The tasks in this section describe how to modify settings for your stores using theCitrix StoreFront management console. Some advanced settings can only be changed byediting the store configuration files. For more information, see Configure StoreFront usingthe configuration files.
This section includes the following topics.
• To export store provisioning files for users
• Hide and advertise stores to users
• To manage the resources made available in stores
• To manage remote access to stores through NetScaler Gateway
• To manage Citrix Receiver updates
• To integrate Citrix Online applications with stores
• Configure support for connections through XenApp Services URLs

96
To export store provisioning files for users
Use the Export Multi-Store Provisioning File and Export Provisioning File tasks to generatefiles containing connection details for stores, including any NetScaler Gateway deploymentsand beacons configured for the stores. Make these files available to users to enable them toconfigure Citrix Receiver automatically with details of the stores. Users can also obtainCitrix Receiver provisioning files from Receiver for Web sites.
Important: In multiple server deployments, use only one server at a time to makechanges to the configuration of the server group. Ensure that the Citrix StoreFrontmanagement console is not running on any of the other servers in the deployment. Oncecomplete, propagate your configuration changes to the server group so that the otherservers in the deployment are updated.
1. On the Windows Start screen or Apps screen, locate and click the Citrix StoreFront tile.Select the Stores node in the left pane of the Citrix StoreFront management console.
2. To generate a provisioning file containing details for multiple stores, in the Actionspane, click Export Multi-Store Provisioning File and select the stores to include in thefile. Select a store in the results pane and, in the Actions pane, click ExportProvisioning File to generate a file for the selected store only.
3. Click Export and save the provisioning file with a .cr extension to a suitable location onyour network.

97
Hide and advertise stores to users
Use the Hide Store task to prevent stores being presented to users to add to their accountswhen they configure Citrix Receiver through email-based account discovery or FQDN. Bydefault, when you create a store it is presented as an option for users to add in CitrixReceiver when they discover the StoreFront deployment hosting the store. Hiding a storedoes not make it inaccessible, instead users must configure Citrix Receiver with connectiondetails for the store, either manually, using a setup URL, or with a provisioning file. Toresume advertising a hidden store, use the Advertise Store task.
Important: In multiple server deployments, use only one server at a time to makechanges to the configuration of the server group. Ensure that the Citrix StoreFrontmanagement console is not running on any of the other servers in the deployment. Oncecomplete, propagate your configuration changes to the server group so that the otherservers in the deployment are updated.

98
To manage the resources made availablein stores
Use the Manage Delivery Controllers task to add and remove from stores resources providedby XenDesktop, XenApp, and VDI-in-a-Box, and to modify the details of the serversproviding these resources.
Important: In multiple server deployments, use only one server at a time to makechanges to the configuration of the server group. Ensure that the Citrix StoreFrontmanagement console is not running on any of the other servers in the deployment. Oncecomplete, propagate your configuration changes to the server group so that the otherservers in the deployment are updated.
1. On the Windows Start screen or Apps screen, locate and click the Citrix StoreFront tile.
2. Select the Stores node in the left pane of the Citrix StoreFront management consoleand, in the results pane, select a store. In the Actions pane, click Manage DeliveryControllers.
3. In the Manage Delivery Controllers dialog box, click Add to include desktops andapplications from another XenDesktop, XenApp, or VDI-in-a-Box deployment in thestore. To modify the settings for a deployment, select the entry in the Deliverycontrollers list and click Edit. Select an entry in the list and click Remove to stop theresources provided by the deployment being available in the store.
4. In the Add Delivery Controller or Edit Delivery Controller dialog box, specify a namethat will help you to identify the deployment and indicate whether the resources thatyou want to make available in the store are provided by XenDesktop, XenApp, orVDI-in-a-Box.
5. To make desktops and applications provided by XenDesktop, XenApp, or VDI-in-a-Boxavailable in the store, click Add to enter the name or IP address of a server. Specifymultiple servers to enable fault tolerance, listing the entries in order of priority to setthe failover sequence. For XenDesktop sites, give details of Delivery Controllers. In thecase of XenApp farms, list servers running the Citrix XML Service. To add VDI-in-a-Boxgrids, specify either the grid-wide virtual IP address, if configured, or list the IPaddresses of your servers. To modify the name or IP address of a server, select theentry in the Servers list and click Edit. Select an entry in the list and click Remove tostop StoreFront contacting the server to enumerate the resources available to the user.
6. Select from the Transport type list the type of connections for StoreFront to use forcommunications with the servers.
• To send data over unencrypted connections, select HTTP. If you select this option,you must make your own arrangements to secure connections between StoreFrontand your servers.
• To send data over secure HTTP connections using Secure Sockets Layer (SSL) orTransport Layer Security (TLS), select HTTPS. If you select this option forXenDesktop and XenApp servers, ensure that the Citrix XML Service is set to share

its port with Microsoft Internet Information Services (IIS) and that IIS is configuredto support HTTPS.
• To send data over secure connections to XenApp servers using the SSL Relay toperform host authentication and data encryption, select SSL Relay.
Note: If you are using HTTPS or the SSL Relay to secure connections betweenStoreFront and your servers, ensure that the names you specify in the Servers listmatch exactly (including the case) the names on the certificates for those servers.
7. Specify the port for StoreFront to use for connections to the servers. The default port is80 for connections using HTTP and the SSL Relay, and 443 for HTTPS connections. In thecase of XenDesktop and XenApp servers, the specified port must be the port used by theCitrix XML Service.
8. If you are using the SSL Relay to secure connections between StoreFront and XenAppservers, specify the TCP port of the SSL Relay in the SSL Relay port box. The defaultport is 443. Ensure that all the servers running the SSL Relay are configured to monitorthe same port.
9. Click OK. You can configure stores to provide resources from any mixture ofXenDesktop, XenApp, and VDI-in-a-Box deployments. Repeat Steps 3 to 10, asnecessary, to add or modify other deployments in the Delivery controllers list.
To manage the resources made available in stores
99

100
To manage remote access to storesthrough NetScaler Gateway
Use the Enable Remote Access task to configure access to stores through NetScaler Gatewayfor users connecting from public networks. Remote access through a NetScaler Gatewaycannot be applied to unauthenticated stores.
Important: In multiple server deployments, use only one server at a time to makechanges to the configuration of the server group. Ensure that the Citrix StoreFrontmanagement console is not running on any of the other servers in the deployment. Oncecomplete, propagate your configuration changes to the server group so that the otherservers in the deployment are updated.
1. On the Windows Start screen or Apps screen, locate and click the Citrix StoreFront tile.
2. Select the Stores node in the left pane of the Citrix StoreFront management consoleand, in the results pane, select a store. In the Actions pane, click Enable RemoteAccess.
3. In the Enable Remote Access dialog box, specify whether and how users connectingfrom public networks can access the store through NetScaler Gateway.
• To make the store unavailable to users on public networks, select None. Only localusers on the internal network will be able to access the store.
• To make only resources delivered through the store available through NetScalerGateway, select No VPN tunnel. Users log on directly to NetScaler Gateway and donot need to use the NetScaler Gateway Plug-in.
• To make the store and other resources on the internal network available through aSecure Sockets Layer (SSL) virtual private network (VPN) tunnel, select Full VPNtunnel. Users require the NetScaler Gateway Plug-in to establish the VPN tunnel.
If it is not already enabled, the pass-through from NetScaler Gateway authenticationmethod is automatically enabled when you configure remote access to the store. Usersauthenticate to NetScaler Gateway and are automatically logged on when they accesstheir stores.
4. If you enabled remote access, select from the NetScaler Gateway appliances list thedeployments through which users can access the store. Any deployments you configuredpreviously for this and other stores are available for selection in the list. If you want toadd a further deployment to the list, click Add. Otherwise, continue to Step 16.
5. On the General Settings page, specify a name for the NetScaler Gateway deploymentthat will help users to identify it.
Users see the display name you specify in Citrix Receiver, so include relevantinformation in the name to help users decide whether to use that deployment. Forexample, you can include the geographical location in the display names for yourNetScaler Gateway deployments so that users can easily identify the most convenientdeployment for their location.

6. Enter the URL of the virtual server or user logon point (for Access Gateway 5.0) for yourdeployment. Specify the product version used in your deployment.
The fully qualified domain name (FQDN) for your StoreFront deployment must be uniqueand different from the NetScaler Gateway virtual server FQDN. Using the same FQDNfor StoreFront and the NetScaler Gateway virtual server is not supported.
7. If you are adding an Access Gateway 5.0 deployment, continue to Step 9. Otherwise,specify the subnet IP address of the NetScaler Gateway appliance, if necessary. Asubnet IP address is required for Access Gateway 9.3 appliances, but optional for morerecent product versions.
The subnet address is the IP address that NetScaler Gateway uses to represent the userdevice when communicating with servers on the internal network. This can also be themapped IP address of the NetScaler Gateway appliance. Where specified, StoreFrontuses the subnet IP address to verify that incoming requests originate from a trusteddevice.
8. If you are adding an appliance running NetScaler Gateway 10.1, Access Gateway 10, orAccess Gateway 9.3, select from the Logon type list the authentication method youconfigured on the appliance for Citrix Receiver users.
The information you provide about the configuration of your NetScaler Gatewayappliance is added to the provisioning file for the store. This enables Citrix Receiver tosend the appropriate connection request when contacting the appliance for the firsttime.
• If users are required to enter their Microsoft Active Directory domain credentials,select Domain.
• If users are required to enter a tokencode obtained from a security token, selectSecurity token.
• If users are required to enter both their domain credentials and a tokencodeobtained from a security token, select Domain and security token.
• If users are required to enter a one-time password sent by text message, select SMSauthentication.
• If users are required to present a smart card and enter a PIN, select Smart card.If you configure smart card authentication with a secondary authentication method towhich users can fall back if they experience any issues with their smart cards, selectthe secondary authentication method from the Smart card fallback list. Continue toStep 10.
9. To add an Access Gateway 5.0 deployment, indicate whether the user logon point ishosted on a standalone appliance or an Access Controller server that is part of acluster. If you are adding a cluster, click Next and continue to Step 11.
10. If you are configuring StoreFront for NetScaler Gateway 10.1, Access Gateway 10,Access Gateway 9.3, or a single Access Gateway 5.0 appliance, complete the NetScalerGateway authentication service URL in the Callback URL box. StoreFront automaticallyappends the standard portion of the URL. Click Next and continue to Step 13.
Enter the internally accessible URL of the appliance. StoreFront contacts the NetScalerGateway authentication service to verify that requests received from NetScaler
To manage remote access to stores through NetScaler Gateway
101

Gateway originate from that appliance.
11. To configure StoreFront for an Access Gateway 5.0 cluster, list on the Appliances pagethe IP addresses or FQDNs of the appliances in the cluster and click Next.
12. On the Enable Silent Authentication page, list URLs for the authentication servicerunning on the Access Controller servers. Add URLs for multiple servers to enable faulttolerance, listing the servers in order of priority to set the failover sequence. ClickNext.
StoreFront uses the authentication service to authenticate remote users so that they donot need to re-enter their credentials when accessing stores.
13. For all deployments, if you are making resources provided by XenDesktop, XenApp, orVDI-in-a-Box available in the store, list on the Secure Ticket Authority (STA) page URLsfor servers running the STA. Add URLs for multiple STAs to enable fault tolerance,listing the servers in order of priority to set the failover sequence. If you configured agrid-wide virtual IP address for your VDI-in-a-Box deployment, you need only specifythis address to enable fault tolerance.
Important: VDI-in-a-Box STA URLs must be entered in the formhttps://serveraddress/dt/sta in the Add Secure Ticket Authority URL dialog box,where serveraddress is the FQDN or IP address of the VDI-in-a-Box server, or thegrid-wide virtual IP address.
The STA is hosted on XenDesktop, XenApp, and VDI-in-a-Box servers and issues sessiontickets in response to connection requests. These session tickets form the basis ofauthentication and authorization for access to XenDesktop, XenApp, and VDI-in-a-Boxresources.
14. If you want XenDesktop, XenApp, and VDI-in-a-Box to keep disconnected sessions openwhile Citrix Receiver attempts to reconnect automatically, select the Enable sessionreliability check box. If you configured multiple STAs and want to ensure that sessionreliability is always available, select the Request tickets from two STAs, whereavailable check box.
When the Request tickets from two STAs, where available check box is selected,StoreFront obtains session tickets from two different STAs so that user sessions are notinterrupted if one STA becomes unavailable during the course of the session. If, for anyreason, StoreFront is unable to contact two STAs, it falls back to using a single STA.
15. Click Create to add your NetScaler Gateway deployment to the list in the EnableRemote Access dialog box.
16. Repeat Steps 4 to 15, as necessary, to add more NetScaler Gateway deployments to theNetScaler Gateway appliances list. If you enable access through multiple deploymentsby selecting more than one entry in the list, specify the default deployment to be usedto access the store.
To manage remote access to stores through NetScaler Gateway
102

103
To manage Citrix Receiver updates
Use the Manage Citrix Receiver Updates task to specify the mechanism for delivery ofupdates to users who install Receiver for Windows on a device and access the store for thefirst time. If you enable automatic updates from the Citrix website, you can also provideadditional plug-ins for installation on users' devices to ensure that they can immediatelyaccess all the functionality of the store once they have configured Receiver for Windows.
Important: In multiple server deployments, use only one server at a time to makechanges to the configuration of the server group. Ensure that the Citrix StoreFrontmanagement console is not running on any of the other servers in the deployment. Oncecomplete, propagate your configuration changes to the server group so that the otherservers in the deployment are updated.
1. On the Windows Start screen or Apps screen, locate and click the Citrix StoreFront tile.
2. Select the Stores node in the left pane of the Citrix StoreFront management consoleand, in the results pane, select a store. In the Actions pane, click Manage CitrixReceiver Updates.
3. Specify how first-time Receiver for Windows users accessing the store receive updates.
• If you want users to receive updates automatically from Citrix, select Citrix(citrix.com). Users automatically receive the latest updates for Receiver forWindows and their plug-ins from the Citrix website, provided they are connected tothe Internet.
• If you are using Merchandising Server to manage updates for Receiver for Windowsusers, select Merchandising Server and specify the fully qualified domain name ofyour Merchandising Server appliance. If you are using Configuring AuthenticationHTTPS for communications with the authentication service, ensure that you installSecure Sockets Layer (SSL) certificates on your Merchandising Server appliance. Formore information about using the StoreFront authentication service to enableMerchandising Server to identify users, see mer-config-client-token.html.
• If you have an alternative strategy for managing updates, such as using athird-party electronic software distribution tool, select Do not check for updates.Users can still manually check for updates from the Receiver for Windows userinterface
4. If you configured automatic updates from the Citrix website, specify the plug-ins toinstall on users' devices.
• Select Offline Plug-in to enable Receiver for Windows users to access offlineapplications.
• Select Secure Access Plug-in to enable users on public networks to establish virtualprivate network (VPN) connections to the store and other resources on the internalnetwork. If you configured the store to provide full VPN access for users, theNetScaler Gateway Plug-in is included by default and cannot be removed.
• Select HDX RealTime Media Engine to enable Receiver for Windows users to accessaudio and video communications provided by XenDesktop resources.
104
To integrate Citrix Online applications withstores
Use the Integrate with Citrix Online task to select the Citrix Online applications to includein a store and specify the action that Citrix Receiver takes when users subscribe to a CitrixOnline application.
Important: In multiple server deployments, use only one server at a time to makechanges to the configuration of the server group. Ensure that the Citrix StoreFrontmanagement console is not running on any of the other servers in the deployment. Oncecomplete, propagate your configuration changes to the server group so that the otherservers in the deployment are updated.
1. On the Windows Start screen or Apps screen, locate and click the Citrix StoreFront tile.
2. Select the Stores node in the left pane of the Citrix StoreFront management consoleand, in the results pane, select a store. In the Actions pane, click Integrate with CitrixOnline.
3. Select the Citrix Online applications that you want to include in the store and specifythe action that Citrix Receiver takes when users subscribe to a Citrix Online application.
• If you want to allow users without an account for the selected applications to visitthe Citrix website and set up personal trial accounts, select Help users set up a trialaccount, if required.
• If you want to prompt users to contact the system administrator to obtain anaccount for the selected applications, choose Ask users to contact their help deskfor an account.
• If accounts for all users are already in place for the selected applications, chooseAdd the app immediately.
105
Configure support for connections throughXenApp Services URLs
Use the Configure Legacy Support task to configure access to your stores through XenAppServices URLs. Users of domain-joined desktop appliances and repurposed PCs running theCitrix Desktop Lock, along with users who have older Citrix clients that cannot be upgraded,can access stores directly using the XenApp Services URL for the store. When you create anew store, the XenApp Services URL is enabled by default.
Important: In multiple server deployments, use only one server at a time to makechanges to the configuration of the server group. Ensure that the Citrix StoreFrontmanagement console is not running on any of the other servers in the deployment. Oncecomplete, propagate your configuration changes to the server group so that the otherservers in the deployment are updated.
1. On the Windows Start screen or Apps screen, locate and click the Citrix StoreFront tile.
2. Select the Stores node in the left pane of the Citrix StoreFront management consoleand, in the results pane, select a store. In the Actions pane, click Configure LegacySupport.
3. Select or clear the Enable legacy support check box to, respectively, enable or disableuser access to the store through the displayed XenApp Services URL.
The XenApp Services URL for a store has the formhttp[s]://serveraddress/Citrix/storename/PNAgent/config.xml, where serveraddress isthe fully qualified domain name of the server or load balancing environment for yourStoreFront deployment and storename is the name specified for the store when it wascreated.
4. If you enable legacy support, optionally specify a default store in your StoreFrontdeployment for users with the Citrix Online Plug-in.
Specify a default store so that your users can configure the Citrix Online Plug-in withthe server URL or load-balanced URL of the StoreFront deployment, rather than theXenApp Services URL for a particular store.
106
To create a Receiver for Web site
Use the Create Website task to add Receiver for Web sites, which enable users to accessstores through a webpage.
Important: In multiple server deployments, use only one server at a time to makechanges to the configuration of the server group. Ensure that the Citrix StoreFrontmanagement console is not running on any of the other servers in the deployment. Oncecomplete, propagate your configuration changes to the server group so that the otherservers in the deployment are updated.
1. On the Windows Start screen or Apps screen, locate and click the Citrix StoreFront tile.
2. Select the Receiver for Web node in the left pane of the Citrix StoreFront managementconsole and, in the Actions pane, click Create Website.
3. Select the store for which you want to create the Receiver for Web site. To create asite for a store hosted on another server, select Remote store and specify the URL ofthe remote store.
4. If you want to alter the URL to which users will browse to access the Receiver for Website, make the required changes in the Website path box. Click Create and then, oncethe site has been created, click Finish.
The URL for users to access the Receiver for Web site is displayed. For moreinformation about modifying settings for Receiver for Web sites, see Configure Receiverfor Web sites.
By default, when a user accesses a Receiver for Web site from a computer running Windowsor Mac OS X, the site attempts to determine whether Citrix Receiver is installed on theuser's device. If Citrix Receiver cannot be detected, the user is prompted to download andinstall the appropriate Citrix Receiver for their platform from the Citrix website. For moreinformation about modifying this behavior, see To disable detection and deployment ofCitrix Receiver.
The default configuration for Receiver for Web sites requires that users install a compatibleversion of Citrix Receiver to access their desktops and applications. However, you canenable Receiver for HTML5 on your Receiver for Web sites so that users who cannot installCitrix Receiver can still access resources. For more information, see Configure Receiver forWeb sites.

107
Configure Receiver for Web sites
Receiver for Web sites enable users to access stores through a webpage. The tasks belowenable you to modify settings for your Receiver for Web sites. Some advanced settings canonly be changed by editing the site configuration files. For more information, see ConfigureReceiver for Web sites using the configuration files.
Important: In multiple server deployments, use only one server at a time to makechanges to the configuration of the server group. Ensure that the Citrix StoreFrontmanagement console is not running on any of the other servers in the deployment. Oncecomplete, propagate your configuration changes to the server group so that the otherservers in the deployment are updated.
Choose authentication methodsUse the Choose Authentication Methods task to assign authentication methods for usersconnecting to the Receiver for Web site. This action allows you to specify a subset ofauthentication methods for each Receiver for Web site.
1. On the Windows Start screen or Apps screen, locate and click the Citrix StoreFront tile.
2. Select the Receiver for Web node in the left pane of the Citrix StoreFront managementconsole and select the relevant store that you want to modify from the results pane.
3. In the Actions pane, click Choose Authentication Method to specify the access methodsthat you want to enable for your users. If a desired authentication method is notavailable for selection, verify that it is enabled in the Authentication node beforeconfiguring Receiver for Web site authentication methods.
• Select the User name and password check box to enable explicit authentication.Users enter their credentials when they access their stores.
• Select the Domain pass-through check box to enable pass-through of ActiveDirectory domain credentials from users' devices. Users authenticate to theirdomain-joined Windows computers and are automatically logged on when theyaccess their stores. In order to use this option, pass-through authentication must beenabled when Receiver for Windows is installed on users' devices. Note that Domainpass-through for Receiver for Web is limited to Windows operating systems usingInternet Explorer.
• Select the Smart card check box to enable smart card authentication. Usersauthenticate using smart cards and PINs when they access their stores.
• Select the Pass-through from NetScaler Gateway check box to enable pass-throughauthentication from NetScaler Gateway. Users authenticate to NetScaler Gatewayand are automatically logged on when they access their stores.
4. Once the authentication method has been selected, click OK.
For more information about modifying settings for authentication methods, seeConfigure the authentication service.

To add resource shortcuts to other websitesUse the Add Shortcuts to Websites task to provide users with rapid access to desktops andapplications from websites hosted on the internal network. You generate URLs for resourcesavailable through the Receiver for Web site and embed these links on your websites. Usersclick on a link and are redirected to the Receiver for Web site, where they log on if theyhave not already done so. The Receiver for Web site automatically starts the resource. Inthe case of applications, users are also subscribed to the application if they have notsubscribed previously.
1. On the Windows Start screen or Apps screen, locate and click the Citrix StoreFront tile.
2. Select the Receiver for Web node in the left pane of the Citrix StoreFront managementconsole and, in the results pane, select a site. In the Actions pane, click Add Shortcutsto Websites.
3. Click Add to enter the URL for a website on which you plan to host shortcuts. URLs mustbe specified in the form http[s]://hostname[:port], where hostname is the fullyqualified domain name of the website host and port is the port used for communicationwith the host if the default port for the protocol is not available. Paths to specificpages on the website are not required. To modify a URL, select the entry in theWebsites list and click Edit. Select an entry in the list and click Remove to delete theURL for a website on which you no longer want to host shortcuts to resources availablethrough the Receiver for Web site.
4. Click Get app shortcuts and then click Save when you are prompted to save yourconfiguration changes.
5. Log on to the Receiver for Web site and copy the URLs you require to your website.
Change the store for a Receiver for Web siteUse the Change Store task to switch the store that users access through a Receiver for Website. Only a single store can be accessed through each site. To switch to a store hosted onanother server, select Remote store and specify the URL of the remote store.
To configure site behavior for users without CitrixReceiver
Use the Deploy Citrix Receiver task to configure the behavior of a Receiver for Web sitewhen a Windows or Mac OS X user without Citrix Receiver installed accesses the site. Bydefault, Receiver for Web sites automatically attempt to determine whether Citrix Receiveris installed when accessed from computers running Windows or Mac OS X. For moreinformation about modifying this behavior, see To disable detection and deployment ofCitrix Receiver.
If Citrix Receiver cannot be detected, the user is prompted to download and install theappropriate Citrix Receiver for their platform. The default download location is the Citrixwebsite, but you can also copy the installation files to the StoreFront server and provideusers with these local files instead. For more information, see To make Citrix Receiverinstallation files available on the server.
Configure Receiver for Web sites
108

For users who cannot install Citrix Receiver, you can enable Receiver for HTML5 on yourReceiver for Web sites. Receiver for HTML5 enables users to access desktops andapplications directly within HTML5-compatible web browsers without needing to installCitrix Receiver. Both internal network connections and connections through NetScalerGateway are supported. However, for connections from the internal network, Receiver forHTML5 only enables access to resources provided by specific products. Additionally, specificversions of NetScaler Gateway are required to enable connections from outside thecorporate network. For more information, see Infrastructure requirements.
For local users on the internal network, access through Receiver for HTML5 to resourcesprovided by XenDesktop and XenApp is disabled by default. To enable local access todesktops and applications using Receiver for HTML5, you must enable the ICA WebSocketsconnections policy on your XenDesktop and XenApp servers. XenDesktop and XenApp useport 8008 for Receiver for HTML5 connections. Ensure your firewalls and other networkdevices permit access to this port. For more information, see WebSockets policy settings.
Receiver for HTML5 can only be used with Internet Explorer over HTTP connections. To useReceiver for HTML5 with Mozilla Firefox over HTTPS connections, users must typeabout:config in the Firefox address bar and set thenetwork.websocket.allowInsecureFromHTTPS preference to true.
1. On the Windows Start screen or Apps screen, locate and click the Citrix StoreFront tile.
2. Select the Receiver for Web node in the left pane of the Citrix StoreFront managementconsole and, in the results pane, select a site. In the Actions pane, click Deploy CitrixReceiver.
3. Specify the response of the Receiver for Web site if Citrix Receiver cannot be detectedon a user's device.
• If you want the site to prompt the user to download and install the appropriateCitrix Receiver for their platform, select Install locally. Users must install CitrixReceiver to access desktops and applications through the site.
• If you want the site to prompt the user to download and install Citrix Receiver butfall back to Receiver for HTML5 if Citrix Receiver cannot be installed, select UseReceiver for HTML5 if local install fails. Users without Citrix Receiver are promptedto download and install Citrix Receiver every time they log on to the site.
• If you want the site to enable access to resources through Receiver for HTML5without prompting the user to download and install Citrix Receiver, select Alwaysuse Receiver for HTML5. With that option selected, users always access desktopsand applications on the site through Receiver for HTML5, provided they use anHTML5-compatible browser. Users without an HTML5-compatible browser have toinstall the native Citrix Receiver.
Remove Receiver for Web sitesUse the Remove Website task to delete a Receiver for Web site. When you remove a site,users can no longer use that webpage to access the store.
Configure Receiver for Web sites
109

110
To add a NetScaler Gateway connection
Use the Add NetScaler Gateway Appliance task to add NetScaler Gateway deploymentsthrough which users can access your stores. You must enable the pass-through fromNetScaler Gateway authentication method before you can configure remote access to yourstores through NetScaler Gateway. For more information about configuring NetScalerGateway for StoreFront, see Integrating NetScaler Gateway with XenMobile App Edition.
Important: In multiple server deployments, use only one server at a time to makechanges to the configuration of the server group. Ensure that the Citrix StoreFrontmanagement console is not running on any of the other servers in the deployment. Oncecomplete, propagate your configuration changes to the server group so that the otherservers in the deployment are updated.
1. On the Windows Start screen or Apps screen, locate and click the Citrix StoreFront tile.
2. Select the NetScaler Gateway node in the left pane of the Citrix StoreFrontmanagement console and, in the Actions pane, click Add NetScaler Gateway Appliance.
3. On the General Settings page, specify a name for the NetScaler Gateway deploymentthat will help users to identify it.
Users see the display name you specify in Citrix Receiver, so include relevantinformation in the name to help users decide whether to use that deployment. Forexample, you can include the geographical location in the display names for yourNetScaler Gateway deployments so that users can easily identify the most convenientdeployment for their location.
4. Enter the URL of the virtual server or user logon point (for Access Gateway 5.0) for yourdeployment. Specify the product version used in your deployment.
The fully qualified domain name (FQDN) for your StoreFront deployment must be uniqueand different from the NetScaler Gateway virtual server FQDN. Using the same FQDNfor StoreFront and the NetScaler Gateway virtual server is not supported.
5. If you are adding an Access Gateway 5.0 deployment, continue to Step 7. Otherwise,specify the subnet IP address of the NetScaler Gateway appliance, if necessary. Asubnet IP address is required for Access Gateway 9.3 appliances, but optional for morerecent product versions.
The subnet address is the IP address that NetScaler Gateway uses to represent the userdevice when communicating with servers on the internal network. This can also be themapped IP address of the NetScaler Gateway appliance. Where specified, StoreFrontuses the subnet IP address to verify that incoming requests originate from a trusteddevice.
6. If you are adding an appliance running NetScaler Gateway 10.1, Access Gateway 10, orAccess Gateway 9.3, select from the Logon type list the authentication method youconfigured on the appliance for Citrix Receiver users.
The information you provide about the configuration of your NetScaler Gatewayappliance is added to the provisioning file for the store. This enables Citrix Receiver to

send the appropriate connection request when contacting the appliance for the firsttime.
• If users are required to enter their Microsoft Active Directory domain credentials,select Domain.
• If users are required to enter a tokencode obtained from a security token, selectSecurity token.
• If users are required to enter both their domain credentials and a tokencodeobtained from a security token, select Domain and security token.
• If users are required to enter a one-time password sent by text message, select SMSauthentication.
• If users are required to present a smart card and enter a PIN, select Smart card.If you configure smart card authentication with a secondary authentication method towhich users can fall back if they experience any issues with their smart cards, selectthe secondary authentication method from the Smart card fallback list. Continue toStep 8.
7. To add an Access Gateway 5.0 deployment, indicate whether the user logon point ishosted on a standalone appliance or an Access Controller server that is part of acluster. If you are adding a cluster, click Next and continue to Step 9.
8. If you are configuring StoreFront for NetScaler Gateway 10.1, Access Gateway 10,Access Gateway 9.3, or a single Access Gateway 5.0 appliance, complete the NetScalerGateway authentication service URL in the Callback URL box. StoreFront automaticallyappends the standard portion of the URL. Click Next and continue to Step 11.
Enter the internally accessible URL of the appliance. StoreFront contacts the NetScalerGateway authentication service to verify that requests received from NetScalerGateway originate from that appliance.
9. To configure StoreFront for an Access Gateway 5.0 cluster, list on the Appliances pagethe IP addresses or FQDNs of the appliances in the cluster and click Next.
10. On the Enable Silent Authentication page, list URLs for the authentication servicerunning on the Access Controller servers. Add URLs for multiple servers to enable faulttolerance, listing the servers in order of priority to set the failover sequence. ClickNext.
StoreFront uses the authentication service to authenticate remote users so that they donot need to re-enter their credentials when accessing stores.
11. For all deployments, if you are making resources provided by XenDesktop, XenApp, orVDI-in-a-Box available in the store, list on the Secure Ticket Authority (STA) page URLsfor servers running the STA. Add URLs for multiple STAs to enable fault tolerance,listing the servers in order of priority to set the failover sequence. If you configured agrid-wide virtual IP address for your VDI-in-a-Box deployment, you need only specifythis address to enable fault tolerance.
Important: VDI-in-a-Box STA URLs must be entered in the formhttps://serveraddress/dt/sta in the Add Secure Ticket Authority URL dialog box,where serveraddress is the FQDN or IP address of the VDI-in-a-Box server, or thegrid-wide virtual IP address.
To add a NetScaler Gateway connection
111

The STA is hosted on XenDesktop, XenApp, and VDI-in-a-Box servers and issues sessiontickets in response to connection requests. These session tickets form the basis ofauthentication and authorization for access to XenDesktop, XenApp, and VDI-in-a-Boxresources.
12. If you want XenDesktop, XenApp, and VDI-in-a-Box to keep disconnected sessions openwhile Citrix Receiver attempts to reconnect automatically, select the Enable sessionreliability check box. If you configured multiple STAs and want to ensure that sessionreliability is always available, select the Request tickets from two STAs, whereavailable check box.
When the Request tickets from two STAs, where available check box is selected,StoreFront obtains session tickets from two different STAs so that user sessions are notinterrupted if one STA becomes unavailable during the course of the session. If, for anyreason, StoreFront is unable to contact two STAs, it falls back to using a single STA.
13. Click Create to add details of your NetScaler Gateway deployment. Once thedeployment has been added, click Finish.
For more information about updating the details of your deployments, see ConfigureNetScaler Gateway connection settings.
To provide access to stores through NetScaler Gateway, one internal beacon point and atleast two external beacon points are required. Citrix Receiver uses beacon points todetermine whether users are connected to local or public networks and then selects theappropriate access method. By default, StoreFront uses the server URL or load-balancedURL of your deployment as the internal beacon point. The Citrix website and the virtualserver or user logon point (for Access Gateway 5.0) URL of the first NetScaler Gatewaydeployment you add are used as external beacon points by default. For more informationabout changing beacon points, see To configure beacon points.
To enable users to access your stores through NetScaler Gateway, ensure that you configureremote user access for those stores.
To add a NetScaler Gateway connection
112

113
Configure NetScaler Gateway connectionsettings
The tasks below enable you to update details of the NetScaler Gateway deploymentsthrough which users access your stores. For more information about configuring NetScalerGateway for StoreFront, see Integrating NetScaler Gateway with XenMobile App Edition.
If you make any changes to your NetScaler Gateway deployments, ensure that users whoaccess stores through these deployments update Citrix Receiver with the modifiedconnection information. Where a Receiver for Web site is configured for a store, users canobtain an updated Citrix Receiver provisioning file from the site. Otherwise, you can exporta provisioning file for the store and make this file available to your users.
Important: In multiple server deployments, use only one server at a time to makechanges to the configuration of the server group. Ensure that the Citrix StoreFrontmanagement console is not running on any of the other servers in the deployment. Oncecomplete, propagate your configuration changes to the server group so that the otherservers in the deployment are updated.
To change general NetScaler Gateway settingsUse the Change General Settings task to modify the NetScaler Gateway deployment namesshown to users and to update StoreFront with changes to the virtual server or user logonpoint URL, and the deployment mode of your NetScaler Gateway infrastructure.
1. On the Windows Start screen or Apps screen, locate and click the Citrix StoreFront tile.
2. Select the NetScaler Gateway node in the left pane of the Citrix StoreFrontmanagement console and, in the results pane, select a NetScaler Gateway deployment.In the Actions pane, click Change General Settings.
3. Specify a name for the NetScaler Gateway deployment that will help users to identifyit.
Users see the display name you specify in Citrix Receiver, so include relevantinformation in the name to help users decide whether to use that deployment. Forexample, you can include the geographical location in the display names for yourNetScaler Gateway deployments so that users can easily identify the most convenientdeployment for their location.
4. Enter the URL of the virtual server or user logon point (for Access Gateway 5.0) for yourdeployment. Specify the product version used in your deployment.
The fully qualified domain name (FQDN) for your StoreFront deployment must be uniqueand different from the NetScaler Gateway virtual server FQDN. Using the same FQDNfor StoreFront and the NetScaler Gateway virtual server is not supported.
5. If your deployment is running Access Gateway 5.0, continue to Step 7. Otherwise,specify the subnet IP address of the NetScaler Gateway appliance, if necessary. Asubnet IP address is required for Access Gateway 9.3 appliances, but optional for morerecent product versions.
The subnet address is the IP address that NetScaler Gateway uses to represent the userdevice when communicating with servers on the internal network. This can also be themapped IP address of the NetScaler Gateway appliance. Where specified, StoreFrontuses the subnet IP address to verify that incoming requests originate from a trusteddevice.
6. If your appliance is running NetScaler Gateway 10.1, Access Gateway 10, or AccessGateway 9.3, select from the Logon type list the authentication method you configuredon the appliance for Citrix Receiver users.
The information you provide about the configuration of your NetScaler Gatewayappliance is added to the provisioning file for the store. This enables Citrix Receiver tosend the appropriate connection request when contacting the appliance for the firsttime.
• If users are required to enter their Microsoft Active Directory domain credentials,select Domain.
• If users are required to enter a tokencode obtained from a security token, selectSecurity token.
• If users are required to enter both their domain credentials and a tokencodeobtained from a security token, select Domain and security token.
• If users are required to enter a one-time password sent by text message, select SMSauthentication.
• If users are required to present a smart card and enter a PIN, select Smart card.If you configure smart card authentication with a secondary authentication method towhich users can fall back if they experience any issues with their smart cards, selectthe secondary authentication method from the Smart card fallback list.
7. If your deployment consists of NetScaler Gateway 10.1, Access Gateway 10, AccessGateway 9.3, or a single Access Gateway 5.0 appliance, complete the NetScalerGateway authentication service URL in the Callback URL box. StoreFront automaticallyappends the standard portion of the URL.
Enter the internally accessible URL of the appliance. StoreFront contacts the NetScalerGateway authentication service to verify that requests received from NetScalerGateway originate from that appliance.
Manage Access Gateway 5.0 appliancesUse the Manage Appliances task to add, edit, or remove from StoreFront the IP addresses orFQDNs of the appliances in your Access Gateway 5.0 cluster.
Configure NetScaler Gateway connection settings
114

Enable silent user authentication through AccessController
Use the Enable Silent Authentication task to add, edit, or remove URLs for theauthentication service running on the Access Controller servers for your Access Gateway 5.0cluster. Enter URLs for multiple servers to enable fault tolerance, listing the servers inorder of priority to set the failover sequence. StoreFront uses the authentication service toauthenticate remote users so that they do not need to re-enter their credentials whenaccessing stores.
To manage Secure Ticket AuthoritiesUse the Secure Ticket Authority task to update the list of Secure Ticket Authorities (STAs)from which StoreFront obtains user session tickets and to configure session reliability. TheSTA is hosted on XenDesktop, XenApp, and VDI-in-a-Box servers and issues session tickets inresponse to connection requests. These session tickets form the basis of authentication andauthorization for access to XenDesktop, XenApp, and VDI-in-a-Box resources.
1. On the Windows Start screen or Apps screen, locate and click the Citrix StoreFront tile.
2. Select the NetScaler Gateway node in the left pane of the Citrix StoreFrontmanagement console and, in the results pane, select a NetScaler Gateway deployment.In the Actions pane, click Secure Ticket Authority.
3. Click Add to enter the URL for a server running the STA. Specify URLs for multiple STAsto enable fault tolerance, listing the servers in order of priority to set the failoversequence. If you configured a grid-wide virtual IP address for your VDI-in-a-Boxdeployment, you need only specify this address to enable fault tolerance. To modify aURL, select the entry in the Secure Ticket Authority URLs list and click Edit. Select aURL in the list and click Remove to stop StoreFront obtaining session tickets from thatSTA.
Important: VDI-in-a-Box STA URLs must be entered in the formhttps://serveraddress/dt/sta in the Add Secure Ticket Authority URL dialog box,where serveraddress is the FQDN or IP address of the VDI-in-a-Box server, or thegrid-wide virtual IP address.
4. If you want XenDesktop, XenApp, and VDI-in-a-Box to keep disconnected sessions openwhile Citrix Receiver attempts to reconnect automatically, select the Enable sessionreliability check box. If you configured multiple STAs and want to ensure that sessionreliability is always available, select the Request tickets from two STAs, whereavailable check box.
When the Request tickets from two STAs, where available check box is selected,StoreFront obtains session tickets from two different STAs so that user sessions are notinterrupted if one STA becomes unavailable during the course of the session. If, for anyreason, StoreFront is unable to contact two STAs, it falls back to using a single STA.
Configure NetScaler Gateway connection settings
115

Remove NetScaler Gateway deploymentsUse the Remove NetScaler Gateway Appliance task to delete the details of a NetScalerGateway deployment from StoreFront. Once a NetScaler Gateway deployment is removed,users are no longer be able to access stores through that deployment.
Configure NetScaler Gateway connection settings
116

117
To configure beacon points
Use the Manage Beacons task to specify URLs inside and outside your internal network to beused as beacon points. Citrix Receiver attempts to contact beacon points and uses theresponses to determine whether users are connected to local or public networks. When auser accesses a desktop or application, the location information is passed to the serverproviding the resource so that appropriate connection details can be returned to CitrixReceiver. This ensures that users are not prompted to log on again when they access adesktop or application.
For example, if the internal beacon point is accessible, this indicates that the user isconnected to the local network. However, if Citrix Receiver cannot contact the internalbeacon point and receives responses from both the external beacon points, this means thatthe user has an Internet connection but is outside the corporate network. Therefore, theuser must connect to desktops and applications though NetScaler Gateway. When the useraccesses a desktop or application, the server providing the resource is notified to providedetails of the NetScaler Gateway appliance through which the connection must be routed.This means that the user does not need to log on to the appliance when accessing thedesktop or application.
By default, StoreFront uses the server URL or load-balanced URL of your deployment as theinternal beacon point. The Citrix website and the virtual server or user logon point (forAccess Gateway 5.0) URL of the first NetScaler Gateway deployment you add are used asexternal beacon points by default.
If you change any beacon points, ensure that users update Citrix Receiver with the modifiedbeacon information. Where a Receiver for Web site is configured for a store, users canobtain an updated Citrix Receiver provisioning file from the site. Otherwise, you can exporta provisioning file for the store and make this file available to your users.
Important: In multiple server deployments, use only one server at a time to makechanges to the configuration of the server group. Ensure that the Citrix StoreFrontmanagement console is not running on any of the other servers in the deployment. Oncecomplete, propagate your configuration changes to the server group so that the otherservers in the deployment are updated.
1. On the Windows Start screen or Apps screen, locate and click the Citrix StoreFront tile.
2. Select the Beacons node in the left pane of the Citrix StoreFront management consoleand, in the Actions pane, click Manage Beacons.
3. Specify the URL to use as the internal beacon point.
• To use the server URL or load-balanced URL of your StoreFront deployment, selectUse the service URL.
• To use an alternative URL, select Specify beacon address and enter a highlyavailable URL within your internal network.
4. Click Add to enter the URL of an external beacon point. To modify a beacon point,select the URL in the External beacons list and click Edit. Select a URL in the list andclick Remove to stop using that address as a beacon point.

You must specify at least two highly available external beacon points that can beresolved from public networks. The beacon URLs should be fully qualified domain namese.g. http://domain.com and not the abbreviated NetBIOS name e.g. http://domain.This enables Citrix Receiver to determine whether users are located behind an Internetpaywall, such as in a hotel or Internet café. In such cases, all the external beaconpoints connect to the same proxy.
To configure beacon points
118

119
Configure smart card authentication
This topic gives an overview of the tasks involved in setting up smart card authenticationfor all the components in a typical StoreFront deployment. For more information andstep-by-step configuration instructions, see the documentation for the individual products.
Prerequisites• Ensure that accounts for all users are configured either within the Microsoft Active
Directory domain in which you plan to deploy your StoreFront servers or within adomain that has a direct two-way trust relationship with the StoreFront server domain.
• If you plan to enable pass-through with smart card authentication, ensure that yoursmart card reader types, middleware type and configuration, and middleware PINcaching policy permit this.
• Install your vendor's smart card middleware on the virtual or physical machines runningthe Virtual Delivery Agent that provide users' desktops and applications. For moreinformation about using smart cards with XenDesktop, see Authenticate securely withsmart cards.
• Before continuing, ensure that your public-key infrastructure is configuredappropriately. Check that certificate to account mapping is configured correctly foryour Active Directory environment and that user certificate validation can beperformed successfully.
Configure NetScaler Gateway• On your NetScaler Gateway appliance, install a signed server certificate from a
certification authority. For more information, see Installing and Managing Certificates.
• Install on your appliance the root certificate of the certification authority issuing yoursmart card user certificates. For more information, see To install a root certificate onNetScaler Gateway.
• Create and configure a virtual server for client certificate authentication. Create acertificate authentication policy, specifying SubjectAltName:PrincipalName for username extraction from the certificate. Then, bind the policy to the virtual server andconfigure the virtual server to request client certificates. For more information, seeConfiguring and Binding a Client Certificate Authentication Policy.
• Bind the certification authority root certificate to the virtual server. For moreinformation, see To add a root certificate to a virtual server.
• To ensure that users do not receive an additional prompt for their credentials at thevirtual server when connections to their resources are established, create a secondvirtual server. When you create the virtual server, disable client authentication in theSecure Sockets Layer (SSL) parameters. For more information, see Configuring SmartCard Authentication.
You must also configure StoreFront to route user connections to resources through thisadditional virtual server. Users log on to the first virtual server and the second virtualserver is used for connections to their resources. When the connection is established,users do not need to authenticate to NetScaler Gateway but are required to enter theirPINs to log on to their desktops and applications. Configuring a second virtual server foruser connections to resources is optional unless you plan to enable users to fall back toexplicit authentication if they experience any issues with their smart cards.
• Create session policies and profiles for connections from NetScaler Gateway toStoreFront and bind them to the appropriate virtual server. For more information, seeAccess to StoreFront Through NetScaler Gateway.
• If you configured the virtual server used for connections to StoreFront to require clientcertificate authentication for all communications, you must create a further virtualserver to provide the callback URL for StoreFront. This virtual server is used only byStoreFront to verify requests from the NetScaler Gateway appliance and so does notneed to be publically accessible. A separate virtual server is required when clientcertificate authentication is mandatory because StoreFront cannot present a certificateto authenticate. For more information, see Creating Additional Virtual Servers.
Configure smart card authentication
120

Configure StoreFront• You must use HTTPS for communications between StoreFront and users' devices to
enable smart card authentication. Configure Microsoft Internet Information Services(IIS) for HTTPS by obtaining an SSL certificate in IIS and then adding HTTPS binding tothe default website. For more information about creating a server certificate in IIS, seehttp://technet.microsoft.com/en-us/library/hh831637.aspx#CreateCertificate. Formore information about adding HTTPS binding to an IIS site, seehttp://technet.microsoft.com/en-us/library/hh831632.aspx#SSLBinding.
• If you want to require that client certificates are presented for HTTPS connections toall StoreFront URLs, configure IIS on the StoreFront server.
When StoreFront is installed, the default configuration in IIS only requires that clientcertificates are presented for HTTPS connections to the certificate authentication URLof the StoreFront authentication service. This configuration is required to provide smartcard users with the option to fall back to explicit authentication and, subject to theappropriate Windows policy settings, enable users to remove their smart cards withoutneeding to reauthenticate.
When IIS is configured to require client certificates for HTTPS connections to allStoreFront URLs, smart card users cannot connect through NetScaler Gateway andcannot fall back to explicit authentication. Users must log on again if they remove theirsmart cards from their devices. To enable this IIS site configuration, the authenticationservice and stores must be collocated on the same server, and a client certificate thatis valid for all the stores must be used. Moreover, this configuration where IIS isrequiring client certificates for HTTPS connections to all StoreFront URLs, will conflictwith authentication for Receiver for Web clients. For this reason, this configurationshould be used when Receiver for Web client access is not required.
If you are installing StoreFront on Windows Server 2012, note that non-self-signedcertificates installed in the Trusted Root Certification Authorities certificate store onthe server are not trusted when IIS is configured to use SSL and client certificateauthentication. For more information about this issue, seehttp://support.microsoft.com/kb/2802568.
• Install and configure StoreFront. Create the authentication service and add your stores,as required. If you configure remote access through NetScaler Gateway, do not enablevirtual private network (VPN) integration. For more information, see To install and setup StoreFront.
• Enable smart card authentication to StoreFront for local users on the internal network.For smart card users accessing stores through NetScaler Gateway, enable thepass-through with NetScaler Gateway authentication method and ensure thatStoreFront is configured to delegate credential validation to NetScaler Gateway. If youplan to enable pass-through authentication when you install Receiver for Windows ondomain-joined user devices, enable domain pass-through authentication. For moreinformation, see Configure the authentication service.
To allow Receiver for Web client authentication with smart cards, you must enable theauthentication method per Receiver for Web site. For more information, see theConfigure Receiver for Web sites instruction.
If you want smart card users to be able to fall back to explicit authentication if they experience any issues with their smart cards, do not disable the user name and
Configure smart card authentication
121
password authentication method. For more information about the user deviceconfigurations for which falling back to explicit authentication is available, see Usesmart cards with StoreFront.
• If you plan to enable pass-through authentication when you install Receiver forWindows on domain-joined user devices, edit the default.ica file for the store to enablepass-through of users' smart card credentials when they access their desktops andapplications. For more information, see To enable pass-through with smart cardauthentication for Receiver for Windows.
• If you created an additional NetScaler Gateway virtual server to be used only for userconnections to resources, configure optimal NetScaler Gateway routing through thisvirtual server for connections to the deployments providing the desktops andapplications for the store. For more information, see To configure optimal NetScalerGateway routing for a store.
• To enable users of non-domain-joined Windows desktop appliances to log on to theirdesktops using smart cards, enable smart card authentication to your Desktop Appliancesites. For more information, see Configure Desktop Appliance sites.
Configure the Desktop Appliance site for both smart card and explicit authentication toenable users to log on with explicit credentials if they experience any issues with theirsmart cards.
• To enable users of domain-joined desktop appliances and repurposed PCs running theCitrix Desktop Lock to authenticate using smart cards, enable pass-through with smartcard authentication to your XenApp Services URLs. For more information, see Configureauthentication for XenApp Services URLs.
Configure smart card authentication
122

Configure user devices• Ensure that your vendor's smart card middleware is installed on all user devices.
• For users with non-domain-joined Windows desktop appliances, install Receiver forWindows Enterprise using an account with administrator permissions. Configure InternetExplorer to start in full-screen mode displaying the Desktop Appliance site when thedevice is powered on. Note that Desktop Appliance site URLs are case sensitive. Add theDesktop Appliance site to the Local intranet or Trusted sites zone in Internet Explorer.Once you have confirmed that you can log on to the Desktop Appliance site with a smartcard and access resources from the store, install the Citrix Desktop Lock. For moreinformation, see To install the Desktop Lock.
• For users with domain-joined desktop appliances and repurposed PCs, install Receiverfor Windows Enterprise using an account with administrator permissions. ConfigureReceiver for Windows with the XenApp Services URL for the appropriate store. Once youhave confirmed that you can log on to the device with a smart card and accessresources from the store, install the Citrix Desktop Lock. For more information, see Toinstall the Desktop Lock.
• For all other users, install the appropriate version of Citrix Receiver on the user device.To enable pass-through of smart card credentials to XenDesktop and XenApp for userswith domain-joined devices, use an account with administrator permissions to installReceiver for Windows at a command prompt with the /includeSSON option. For moreinformation, see Configure and install Receiver for Windows using command-lineparameters.
Ensure that Receiver for Windows is configured for smart card authentication eitherthrough a domain policy or a local computer policy. For a domain policy, use the GroupPolicy Management Console to import the Receiver for Windows Group Policy Objecttemplate file, icaclient.adm, onto the domain controller for the domain containing yourusers' accounts. To configure an individual device, use the Group Policy Object Editoron that device to configure the template. For more information, see Configure Receiverwith the Group Policy Object template.
Enable the Smart card authentication policy. To enable pass-through of users' smartcard credentials, select Use pass-through authentication for PIN. Then, to pass users'smart card credentials through to XenDesktop and XenApp, enable the Local user nameand password policy and select Allow pass-through authentication for all ICAconnections. For more information, see ICA Settings Reference.
If you enabled pass-through of smart card credentials to XenDesktop and XenApp forusers with domain-joined devices, add the store URL to the Local intranet or Trustedsites zone in Internet Explorer. Ensure that Automatic logon with the current user nameand password is selected in the security settings for the zone.
• Where necessary, provide users with connection details for the store (for users on theinternal network) or NetScaler Gateway appliance (for remote users) using anappropriate method. For more information about providing configuration information toyour users, see Citrix Receiver.
Configure smart card authentication
123

124
To enable pass-through with smart cardauthentication for Receiver for Windows
You can enable pass-through authentication when you install Receiver for Windows ondomain-joined user devices. To enable pass-through of users' smart card credentials whenthey access desktops and applications hosted by XenDesktop and XenApp, you edit thedefault.ica file for the store.
Important: In multiple server deployments, use only one server at a time to makechanges to the configuration of the server group. Ensure that the Citrix StoreFrontmanagement console is not running on any of the other servers in the deployment. Oncecomplete, propagate your configuration changes to the server group so that the otherservers in the deployment are updated.
1. Use a text editor to open the default.ica file for the store, which is typically located inthe C:\inetpub\wwwroot\Citrix\storename\App_Data\ directory, where storename is thename specified for the store when it was created.
2. To enable pass-through of smart card credentials for users who access stores withoutNetScaler Gateway, add the following setting in the [Application] section.
DisableCtrlAltDel=Off
This setting applies to all users of the store. To enable both domain pass-through andpass-through with smart card authentication to desktops and applications, you mustcreate separate stores for each authentication method. Then, direct your users to theappropriate store for their method of authentication.
3. To enable pass-through of smart card credentials for users accessing stores throughNetScaler Gateway, add the following setting in the [Application] section.
UseLocalUserAndPassword=On
This setting applies to all users of the store. To enable pass-through authentication forsome users and require others to log on to access their desktops and applications, youmust create separate stores for each group of users. Then, direct your users to theappropriate store for their method of authentication.
125
Set up highly available multi-site storeconfigurations
For stores that aggregate resources from multiple deployments, particularly geographicallydispersed deployments, you can configure load balancing and failover betweendeployments, mapping of users to deployments, and specific disaster recovery deploymentsto provide highly available resources. Where you have configured separate NetScalerGateway appliances for your deployments, you can define the optimal appliance for usersto access each of the deployments. If you deploy NetScaler Gateway in a global server loadbalancing configuration, you must update the store configuration with details for each ofthe appliances.
This section includes the following topics.
• To configure load balancing, failover, disaster recovery, and user mapping for a store
• To configure subscription synchronization
• To configure optimal NetScaler Gateway routing for a store
• To configure a store for NetScaler Gateway global server load balancing
• Example highly available multi-site store configurations

126
To configure load balancing, failover,disaster recovery, and user mapping for astore
To set up load balancing, failover, disaster recovery, and user mapping, you edit the storeconfiguration files. After configuring load balancing, failover, disaster recovery, and usermapping for a store, some tasks become unavailable in the Citrix StoreFront managementconsole to prevent misconfiguration.
Important: In multiple server deployments, use only one server at a time to makechanges to the configuration of the server group. Ensure that the Citrix StoreFrontmanagement console is not running on any of the other servers in the deployment. Oncecomplete, propagate your configuration changes to the server group so that the otherservers in the deployment are updated.
1. Ensure that you have configured the store with details of all the XenDesktop, XenApp,and VDI-in-a-Box deployments that you want to use in your configuration, includingdisaster recovery deployments. For more information about adding deployments tostores, see To manage the resources made available in stores.
2. Use a text editor to open the web.config file for the store, which is typically located inthe C:\inetpub\wwwroot\Citrix\storename\ directory, where storename is the namespecified for the store when it was created.
3. Locate the following section in the file.
<resourcesWingConfigurations> <resourcesWingConfiguration name="Default" wingName="Default" /></resourcesWingConfigurations>
4. Specify your configuration as shown below.
<resourcesWingConfigurations> <resourcesWingConfiguration name="Default" wingName="Default"> <userFarmMappings> <clear /> <userFarmMapping name="user_mapping"> <groups> <group name="domain\usergroup" sid="securityidentifier" /> <group ... /> ... </groups> <equivalentFarmSets> <equivalentFarmSet name="setname" loadBalanceMode="{LoadBalanced | Failover}" aggregationGroup="aggregationgroupname"> <primaryFarmRefs> <farm name="primaryfarmname" /> <farm ... />

... </primaryFarmRefs> <backupFarmRefs> <farm name="backupfarmname" /> <farm ... /> ... </backupFarmRefs> </equivalentFarmSet> <equivalentFarmSet ... > ... </equivalentFarmSet> </equivalentFarmSets> </userFarmMapping> <userFarmMapping> ... </userFarmMapping> </userFarmMappings> </resourcesWingConfiguration></resourcesWingConfigurations>
Use the following elements to define your configuration.
userFarmMapping
Specifies groups of deployments and defines the load balancing and failover behaviorbetween those deployments. Identifies deployments to be used for disaster recovery.Controls user access to resources by mapping Microsoft Active Directory user groupsto the specified groups of deployments.
groups
Specifies the names and security identifiers (SIDs) of Active Directory user groups towhich the associated mapping applies. User group names must be entered in theformat domain\usergroup. Where more than one group is listed, the mapping is onlyapplied to users who are members of all the specified groups. To enable access forall Active Directory user accounts, set the group name to Everyone.
equivalentFarmSet
Specifies a group of equivalent deployments providing resources to be aggregated forload balancing or failover, plus an associated group of disaster recoverydeployments. The loadBalanceMode attribute determines the allocation of users todeployments. Set the value of the loadBalanceMode attribute to LoadBalanced torandomly assign users to deployments in the equivalent deployment set, evenlydistributing users across all the available deployments. When the value of theloadBalanceMode attribute is set to Failover, users are connected to the firstavailable deployment in the order in which they are listed in the configuration,minimizing the number of deployments in use at any given time. Specify names foraggregation groups to identify equivalent deployment sets providing resources to beaggregated. Resources provided by equivalent deployment sets belonging to thesame aggregation group are aggregated. While deployments within an equivalentdeployment set must be identical, deployments aggregated from different sets donot need to provide exactly the same resources. To specify that the deploymentsdefined in a particular equivalent deployment set should not be aggregated withothers, set the aggregation group name to None.
To configure load balancing, failover, disaster recovery, and user mapping for a store
127

primaryFarmRefs
Specifies a set of equivalent XenDesktop, XenApp, or VDI-in-a-Box deploymentsproviding identical resources. Enter the names of deployments that you have alreadyadded to the store. The names of the deployments you specify must match exactlythe names you entered when you added the deployments to the store.
optimalGatewayForFarms
Specifies groups of deployments and defines the optimal NetScaler Gatewayappliances for users to access resources provided by these deployments. Typically,the optimal appliance for a deployment is collocated in the same geographicallocation as that deployment. You only need to define optimal NetScaler Gatewayappliances for deployments where the appliance through which users accessStoreFront is not the optimal appliance.
To configure load balancing, failover, disaster recovery, and user mapping for a store
128

129
To configure subscription synchronization
To configure periodic pull synchronization of users' application subscriptions from stores indifferent StoreFront deployments, you execute Windows PowerShell commands.
Note: The StoreFront and PowerShell consoles cannot be open at the same time. Alwaysclose the StoreFront admin console before using the PowerShell console to administeryour StoreFront configuration. Likewise, close all instances of PowerShell before openingthe StoreFront console.
Important: In multiple server deployments, use only one server at a time to makechanges to the configuration of the server group. Ensure that the Citrix StoreFrontmanagement console is not running on any of the other servers in the deployment. Oncecomplete, propagate your configuration changes to the server group so that the otherservers in the deployment are updated.
When establishing your subscription synchronization, note that the configured DeliveryControllers must be named identically between the synchronized Stores and that theDelivery Controller names are case sensitive. Failing to duplicate the Delivery Controllernames exactly may lead to users having different subscriptions across the synchronizedStores.
1. Use an account with local administrator permissions to start Windows PowerShell and,at a command prompt, type the following commands to import the StoreFront modules.
Import-Module "installationlocation\Management\Cmdlets\UtilsModule.psm1"Import-Module "installationlocation\Management\Cmdlets\ SubscriptionSyncModule.psm1"
Where installationlocation is the directory in which StoreFront is installed, typicallyC:\Program Files\Citrix\Receiver StoreFront\.
2. To specify the remote StoreFront deployment containing the store to be synchronized,type the following command.
Add-DSSubscriptionsRemoteSyncCluster –clusterName deploymentname –clusterAddress deploymentaddress
Where deploymentname is a name that helps you identify the remote deployment anddeploymentaddress is the externally accessible address of the StoreFront server orload-balanced server group for the remote deployment.
3. To specify the remote store with which to synchronize users' application subscriptions,type the following command.
Add-DSSubscriptionsRemoteSyncStore –clusterName deploymentname –storeName storename
Where deploymentname is the name that you defined for the remote deployment in theprevious step and storename is the name specified for both the local and remote storeswhen they were created. To synchronize application subscriptions between the stores,both stores must have the same name in their respective StoreFront deployments.
4. To configure synchronization to occur at a particular time every day, type the followingcommand.
Add-DSSubscriptionsSyncSchedule –scheduleName synchronizationname –startTime hh:mm
Where synchronizationname is a name that helps you identify the schedule you arecreating. Use the -startTime setting to specify a time of day at which you want tosynchronize subscriptions between the stores. Configure further schedules to specifyadditional synchronization times throughout the day.
5. Alternatively, to configure regular synchronization at a specific interval, type thefollowing command.
Add-DSSubscriptionsSyncReoccuringSchedule –scheduleName synchronizationname –startTime hh:mm:ss -repeatMinutes interval
Where synchronizationname is a name that helps you identify the schedule you arecreating. Use the -startTime setting to specify the delay in hours, minutes, and secondsbefore the new schedule becomes active once created. For interval, specify the time inminutes between each synchronization.
6. Add the Microsoft Active Directory domain machine accounts for each StoreFront serverin the remote deployment to the local Windows user group CitrixSubscriptionSyncUserson the current server.
This will allow the servers in the remote deployment to access the subscription storeservice on the local deployment once you have configured a synchronization scheduleon the remote deployment. The CitrixSubscriptionSyncUsers group is automaticallycreated when you import the subscription synchronization module in Step 1. For moreinformation about modifying local user groups, seehttp://technet.microsoft.com/en-us/library/cc772524.aspx.
7. If your local StoreFront deployment consists of multiple servers, use the CitrixStoreFront management console to propagate the configuration changes to the otherservers in the group.
For more information about propagating changes in a multiple server StoreFrontdeployment, see Configure server groups.
8. Repeat Steps 1 to 7 on the remote StoreFront deployment to configure acomplementary subscription synchronization schedule from the remote deployment tothe local deployment.
When configuring the synchronization schedules for your StoreFront deployments,ensure that the schedules do not lead to a situation where the deployments areattempting to synchronize simultaneously.
9. To start synchronizing users' application subscriptions between the stores, restart thesubscription store service on both the local and remote deployments. At a WindowsPowerShell command prompt on a server in each deployment, type the followingcommand.
Restart-DSSubscriptionsStoreSubscriptionService
To configure subscription synchronization
130
10. To remove an existing subscription synchronization schedule, type the followingcommand. Then, propagate the configuration change to the other StoreFront servers inthe deployment and restart the subscription store service.
Remove-DSSubscriptionsSchedule –scheduleName synchronizationname
Where synchronizationname is the name that you specified for the schedule when youcreated it.
11. To list the subscription synchronization schedules currently configured for yourStoreFront deployment, type the following command.
Get-DSSubscriptionsSyncScheduleSummary
To configure subscription synchronization
131

132
To configure optimal NetScaler Gatewayrouting for a store
To configure optimal NetScaler Gateway appliances for your deployments, you edit thestore configuration files.
Important: In multiple server deployments, use only one server at a time to makechanges to the configuration of the server group. Ensure that the Citrix StoreFrontmanagement console is not running on any of the other servers in the deployment. Oncecomplete, propagate your configuration changes to the server group so that the otherservers in the deployment are updated.
1. Use a text editor to open the web.config file for the store, which is typically located inthe C:\inetpub\wwwroot\Citrix\storename\ directory, where storename is the namespecified for the store when it was created.
2. Locate the following element in the file.
<optimalGatewayForFarmsCollection />
3. Specify the optimal NetScaler Gateway routing for your deployments as shown below.
<optimalGatewayForFarmsCollection> <optimalGatewayForFarms enabledOnDirectAccess="{true | false}"> <farms> <farm name="farmname" /> ... </farms> <optimalGateway key="_" name="deploymentname" stasUseLoadBalancing="{true | false}" stasBypassDuration="hh:mm:ss" enableSessionReliability="{true | false}" useTwoTickets="{true | false}"> <hostnames> <add hostname="appliancefqdn:port" /> </hostnames> <staUrls> <add staUrl="https://stapath/scripts/ctxsta.dll" /> ... </staUrls> </optimalGateway> </optimalGatewayForFarms> <optimalGatewayForFarms> ... </optimalGatewayForFarms></optimalGatewayForFarmsCollection>
Use the following elements to define your configuration.
optimalGatewayForFarms
Specifies groups of deployments and defines the optimal NetScaler Gatewayappliances for users to access resources provided by these deployments. Typically,the optimal appliance for a deployment is collocated in the same geographicallocation as that deployment. You only need to define optimal NetScaler Gatewayappliances for deployments where the appliance through which users accessStoreFront is not the optimal appliance. Set the value of the enabledOnDirectAccessattribute to true to ensure that when local users on the internal network log onStoreFront directly, connections to their resources are still routed through theoptimal appliance for the deployment. When the value of the enabledOnDirectAccessattribute is set to false, connections to resources are not routed through the optimalappliance for the deployment unless users access StoreFront through NetScalerGateway.
farms
Specifies a set of, typically collocated, XenDesktop, XenApp, and VDI-in-a-Boxdeployments that share a common optimal NetScaler Gateway appliance. Enter thenames of deployments that you have already added to the store. The names of thedeployments you specify must match exactly the names you entered when you addedthe deployments to the store.
optimalGateway
Specifies details of the optimal NetScaler Gateway appliance for users to accessresources provided by the listed deployments. Enter a name for the NetScalerGateway appliance that enables you to identify it. Set the value of thestasUseLoadBalancing attribute to true to randomly obtain session tickets from allSTAs, evenly distributing requests across all the STAs. When the value of thestasUseLoadBalancing attribute is set to false, users are connected to the firstavailable STA in the order in which they are listed in the configuration, minimizingthe number of STAs in use at any given time. Use the stasBypassDuration attribute toset the time period, in hours, minutes, and seconds, for which an STA is consideredunavailable after a failed request. To keep disconnected sessions open while CitrixReceiver attempts to reconnect automatically, set the value of theenableSessionReliability attribute to true. If you configured multiple STAs and wantto ensure that session reliability is always available, set the value of theuseTwoTickets attribute to true to obtain session tickets from two different STAs incase one STA becomes unavailable during the session.
hostnames
Specifies the fully qualified domain name (FQDN) and port of the optimal NetScalerGateway appliance.
staUrls
Specifies the URLs for XenDesktop, XenApp, and VDI-in-a-Box servers running theSecure Ticket Authority (STA). For XenDesktop and XenApp servers, stapath is thefully FQDN or IP address of the server. In the case of VDI-in-a-Box servers, stapath isthe fully qualified domain name or IP address of the VDI-in-a-Box server, or thegrid-wide virtual IP address, followed by /dt/sta.
To configure optimal NetScaler Gateway routing for a store
133

134
To configure a store for NetScalerGateway global server load balancing
Important: In multiple server deployments, use only one server at a time to makechanges to the configuration of the server group. Ensure that the Citrix StoreFrontmanagement console is not running on any of the other servers in the deployment. Oncecomplete, propagate your configuration changes to the server group so that the otherservers in the deployment are updated.
1. Use the Enable Remote Access task to configure the store with details of yourload-balanced NetScaler Gateway deployment. For more information, see To manageremote access to stores through NetScaler Gateway.
2. When prompted for the NetScaler Gateway URL, enter the load-balanced URL for thedeployment. For the subnet IP address, specify the virtual server IP address for one ofthe appliances in your deployment.
3. Repeat the process using exactly the same settings except for the display name and thesubnet IP address. For the subnet IP address, enter the virtual server IP address foranother appliance in your deployment.
4. Continue until you have added entries for all the appliances in your load-balancedNetScaler Gateway deployment. Each entry should be identical except for the displayname and the subnet IP address.

135
Example highly available multi-site storeconfigurations
StoreFront enables you to configure load balancing and failover between the deploymentsproviding resources for stores, map users to deployments, and designate specific disasterrecovery deployments for increased resiliency. To illustrate how you can configureStoreFront deployments distributed over multiple sites to provide high availability for yourstores, consider the example configuration below.
The figure shows an example highly available multi-site configuration.
The example consists of two main locations, each with separate, load-balanced groups ofStoreFront servers, providing desktops and application for users. A third location providesdisaster recovery resources that are only intended to be used in the event that all resourcesprovided by both the other locations are unavailable. Location 1 contains a group ofidentical deployments (XenDesktop sites, XenApp farms, or VDI-in-a-Box grids) providingexactly the same desktops and applications. Location 2 consists of a similar group ofidentical deployments delivering largely the same resources provided in Location 1, butwith a few differences. Some specific resources that are not available in Location 2 areprovided by a separate unique deployment in Location 1.
This section includes the following topics.
• Load balancing and failover example
• User mapping example
• Subscription synchronization example
• Optimal NetScaler Gateway routing example
Example highly available multi-site store configurations
136

137
Load balancing and failover example
In this example, you want users at both locations to be able to log on to their localStoreFront servers and access desktops and applications provided locally, where possible. Inthe event that local resources are not available, either due to a failure or capacity issues,users must be automatically and silently redirected to resources delivered from the otherlocation. If all resources provided by both locations are unavailable, users must be able tocontinue working with a subset of the most business-critical desktops and applications.
To achieve this user experience, you configure the store in Location 1 as shown below.
<resourcesWingConfigurations> <resourcesWingConfiguration name="Default" wingName="Default"> <userFarmMappings> <clear /> <userFarmMapping name="user_mapping"> <groups> <group name="Everyone" sid="S-1-1-0" /> </groups> <equivalentFarmSets> <equivalentFarmSet name="Location1" loadBalanceMode="LoadBalanced" aggregationGroup="AggregationGroup1"> <primaryFarmRefs> <farm name="Location1Deployment1" /> <farm name="Location1Deployment2" /> <farm name="Location1Deployment3" /> </primaryFarmRefs> <backupFarmRefs> <farm name="DisasterRecoveryDeployment" /> </backupFarmRefs> </equivalentFarmSet> <equivalentFarmSet name="Location2" loadBalanceMode="Failover" aggregationGroup="AggregationGroup1"> <primaryFarmRefs> <farm name="Location2Deployment1" /> <farm name="Location2Deployment2" /> <farm name="Location2Deployment3" /> </primaryFarmRefs> <backupFarmRefs> <farm name="DisasterRecoveryDeployment" /> </backupFarmRefs> </equivalentFarmSet> <equivalentFarmSet name="Location1Unique" loadBalanceMode="LoadBalanced" aggregationGroup=""> <primaryFarmRefs> <farm name="Location1UniqueDeployment" /> </primaryFarmRefs> <backupFarmRefs> </backupFarmRefs> </equivalentFarmSet>

</equivalentFarmSets> </userFarmMapping> </userFarmMappings> </resourcesWingConfiguration></resourcesWingConfigurations>
There is a single mapping available to all users, listing the Location 1 deployments first andthe Location 2 deployments second. In both cases, the disaster recovery deployment isconfigured as the backup and all the deployments are assigned to the same aggregationgroup. The configuration of the store in Location 2 is almost identical, differing only in thatthe order in which the deployments are listed is reversed such that the Location 2deployments are listed first. In both cases, the deployment providing the Location 1 uniqueresources is listed last with no backup deployment or aggregation group defined.
When users at Location 1 log on to their local store, StoreFront contacts a Location 1deployment to enumerate the desktops and applications available. Because theloadBalanceMode attribute is set to LoadBalanced, the exact deployment contacted isselected randomly to evenly distribute requests across the available deployments. If theselected Location 1 deployment is unavailable, StoreFront randomly selects anotherLocation 1 deployment to contact.
In the case of the Location 2 deployments, the loadBalanceMode attribute is set to Failover.This means that StoreFront always contacts the deployments in the specified order. As aresult, resources are enumerated from Location 2 Deployment 1 for every user request untilDeployment 1 stops responding. Subsequent requests are then routed to Deployment 2 untilDeployment 1 becomes available again. This minimizes the number of deployments in use atLocation 2 at any given time.
When a response is received from a Location 1 deployment, StoreFront does not contact anyfurther Location 1 deployments. Including all the Location 1 deployments in a single<equivalentFarmSet> element specifies that these deployments provide exactly the sameresources. Similar behavior also occurs during enumeration of the Location 2 resources.Finally, the Location 1 unique deployment is contacted, although since there is noalternative in this case, the unique resources are not enumerated if the deployment isunavailable.
Where a desktop or application with the same name and path on the server is availablefrom both Location 1 and Location 2, StoreFront aggregates these resources and presentsusers with a single icon. This behavior is a result of setting the aggregationGroup attributeto AggregationGroup1 for both the Location 1 and Location 2 deployments. Users clicking onan aggregated icon are typically connected to the resource in their location, whereavailable. However, if a user already has an active session on another deployment thatsupports session reuse, the user is preferentially connected to the resource on thatdeployment to minimize the number of sessions used.
Because an aggregation group is not specified for the Location 1 unique resources, users seeseparate icons for each of the unique resources. In this example, none of the uniqueresources are available on the other deployments. However, if a desktop or application withthe same name and path on the server were available from another deployment, userswould see two icons with the same name.
Only when resources cannot be enumerated from any of the Location 1 or Location 2deployments does StoreFront contact the disaster recovery deployment. Because the samedisaster recovery deployment is configured for both Location 1 and Location 2, all of thesedeployments must be unavailable before StoreFront will attempt to enumerate the disaster
Load balancing and failover example
138
recovery resources. In this example, a disaster recovery alternative is not configured forthe Location 1 unique deployment, so the availability of the unique deployment does notaffect this determination.
Load balancing and failover example
139

140
User mapping example
In this example, you want to provide different mixtures of resources for different users onthe basis of their membership of Microsoft Active Directory user groups. Standard users inLocation 1 and Location 2 only need access to the desktops and applications providedlocally. These users do not need to access resources in the other locations. You also have agroup of power users for whom you want to provide access to all the available resources,including the Location 1 unique resources, with high availability and disaster recovery. Forthis example, it is assumed that Location 1 and Location 2 share a common Active Directorydomain.
To achieve this user experience, you configure the stores in both locations as shown below.
<resourcesWingConfigurations> <resourcesWingConfiguration name="Default" wingName="Default"> <userFarmMappings> <clear /> <userFarmMapping name="UserMapping1"> <groups> <group name="Location1Users" sid="S-1-5-21-1004336348-1177238915-682003330-1001" /> </groups> <equivalentFarmSets> <equivalentFarmSet name="Location1" loadBalanceMode="LoadBalanced" aggregationGroup="AggregationGroup1"> <primaryFarmRefs> <farm name="Location1Deployment1" /> <farm name="Location1Deployment2" /> <farm name="Location1Deployment3" /> </primaryFarmRefs> <backupFarmRefs> <farm name="DisasterRecoveryDeployment" /> </backupFarmRefs> </equivalentFarmSet> </equivalentFarmSets> </userFarmMapping> <userFarmMapping name="UserMapping2"> <groups> <group name="Location2Users" sid="S-1-5-21-1004336348-1177238915-682003330-1002" /> </groups> <equivalentFarmSets> <equivalentFarmSet name="Location2" loadBalanceMode="Failover" aggregationGroup="AggregationGroup1"> <primaryFarmRefs> <farm name="Location2Deployment1" /> <farm name="Location2Deployment2" /> <farm name="Location2Deployment3" /> </primaryFarmRefs> <backupFarmRefs>

<farm name="DisasterRecoveryDeployment" /> </backupFarmRefs> </equivalentFarmSet> </equivalentFarmSets> </userFarmMapping> <userFarmMapping name="UserMapping3"> <groups> <group name="Location1Users" sid="S-1-5-21-1004336348-1177238915-682003330-1001" /> <group name="Location2Users" sid="S-1-5-21-1004336348-1177238915-682003330-1002" /> </groups> <equivalentFarmSets> <equivalentFarmSet name="Location1Unique" loadBalanceMode="LoadBalanced" aggregationGroup=""> <primaryFarmRefs> <farm name="Location1UniqueDeployment" /> </primaryFarmRefs> <backupFarmRefs> </backupFarmRefs> </equivalentFarmSet> </equivalentFarmSets> </userFarmMapping> </userFarmMappings> </resourcesWingConfiguration></resourcesWingConfigurations>
Instead of creating a mapping that applies to all users, as in the load balancing and failoverexample, you create mappings for specific user groups. The main Location 1 deploymentsare mapped to the domain user group for Location 1 users. Similarly, the Location 2deployments are mapped to the Location 2 user group. The mapping for the Location 1unique resources specifies both user groups, which means that users must be members ofboth groups to access the unique resources.
Users who are members of the Location 1 user group see only resources from Location 1when they log on to a store, even if that store is in Location 2. Likewise, Location 2 usergroup members are only presented with resources from Location 2. Neither group haveaccess to the Location 1 unique resources. Domain users who are not members of eithergroup can log on to the store, but do not see any desktops or applications.
To give your power users access to all the resources, including the unique resources, youadd them to both user groups. When users who are members of both the Location 1 andLocation 2 user groups log on to the store, they see an aggregate of the resources availablefrom both locations, plus the Location 1 unique resources. As in the load balancing andfailover example, the Location 1 and Location 2 deployments are assigned to the sameaggregation group. The resource aggregation process functions in exactly the same way asdescribed for the load balancing and failover example.
Disaster recovery also operates as described in the load balancing and failover example.Users only see the disaster recovery resources when all the Location 1 and Location 2deployments are unavailable. Unfortunately, this means that there are some scenarioswhen standard users are not able to access any desktops or applications. For example, if allthe deployments in Location 1 are unavailable, but the Location 2 deployments are stillaccessible, StoreFront does not enumerate the disaster recovery resources. So, users whoare not members of the Location 2 user group do not see any resources in the store.
User mapping example
141

To resolve this issue, you would need to configure separate disaster recovery deploymentsfor the Location 1 and Location 2 mappings. You would then add the disaster recoverydeployments to the same aggregation group to aggregate the disaster recovery resourcesfor your power users.
User mapping example
142

143
Subscription synchronization example
In the load balancing and failover and user mapping examples, users moving betweenLocation 1 and Location 2 would benefit from synchronization of their applicationsubscriptions between the two deployments. For example, a user based in Location 1 couldlog on to the StoreFront deployment in Location 1, access the store, and subscribe to someapplications. If the same user then traveled to Location 2 and accessed the similar storeprovided by the Location 2 StoreFront deployment, the user would need to resubscribe toall the applications again to access them from Location 2. This is because the StoreFrontdeployments in each location maintain details of users' application subscriptions separately,by default.
To ensure that users only need to subscribe to applications in one location, you configuresubscription synchronization between the stores provided by the two StoreFrontdeployments. First, you ensure that both stores have the same name, "Location1and2Store."Then, on a server in Location 1, you import the StoreFront modules UtilsModule.psm1 andSubscriptionSyncModule.psm1. You add the Microsoft Active Directory domain machineaccounts for each StoreFront server in the Location 2 deployment to theCitrixSubscriptionSyncUsers local users group on the Location 1 server. Then, you configuresynchronization of users' application subscriptions from Location 1 to Location 2 byexecuting the following Windows PowerShell commands.
Note: The StoreFront and PowerShell consoles cannot be open at the same time. Alwaysclose the StoreFront admin console before using the PowerShell console to administeryour StoreFront configuration. Likewise, close all instances of PowerShell before openingthe StoreFront console.
When establishing your subscription synchronization, note that the configured DeliveryControllers must be named identically and that the Delivery Controller names are casesensitive. Failing to duplicate the Delivery Controller names exactly may lead to inaccurateresource IDs across subscription synchronization Stores.
Add-DSSubscriptionsRemoteSyncCluster –clusterName "Location2" –clusterAddress "location2storefront.example.com"Add-DSSubscriptionsRemoteSyncStore –clusterName "Location2" –storeName "Location1and2Store"Add-DSSubscriptionsSyncSchedule –scheduleName "Location1Sync2Daily1" –startTime 06:00:00Add-DSSubscriptionsSyncSchedule –scheduleName "Location1Sync2Daily2" -startTime 18:00:00
Using the Citrix StoreFront management console, you propagate the configuration changesto the other servers in the Location 1 deployment. Then, you repeat the process on aStoreFront server in Location 2, including importing the modules and adding the Location 1StoreFront server machine accounts to the synchronization service users group. You executethe following Windows PowerShell commands and propagate the change to the otherservers in Location 2.
Add-DSSubscriptionsRemoteSyncCluster –clusterName "Location1" –clusterAddress "location1storefront.example.com"
Add-DSSubscriptionsRemoteSyncStore –clusterName "Location1" –storeName "Location1and2Store"Add-DSSubscriptionsSyncSchedule –scheduleName "Location2Sync1Daily1" –startTime 06:30:00Add-DSSubscriptionsSyncSchedule –scheduleName "Location2Sync1Daily2" -startTime 18:30:00
To start synchronizing users' application subscriptions between the stores, you restart thesubscription store service on the StoreFront servers in both Location 1 and Location 2. Withthis configuration, users' application subscriptions are synchronized from Location 1 toLocation 2 every day, once at 06:00 in the morning and again at 18:00 in the evening.Synchronization from Location 2 to Location 1 also occurs twice daily, but is offset by 30minutes to ensure that a conflict cannot arise whereby both deployments attempt tosynchronize simultaneously. Only subscriptions to resources provided by the stores named"Location1and2Store" are synchronized between the two deployments. Subscriptions todesktops and applications delivered through other stores are not synchronized.
Subscription synchronization example
144
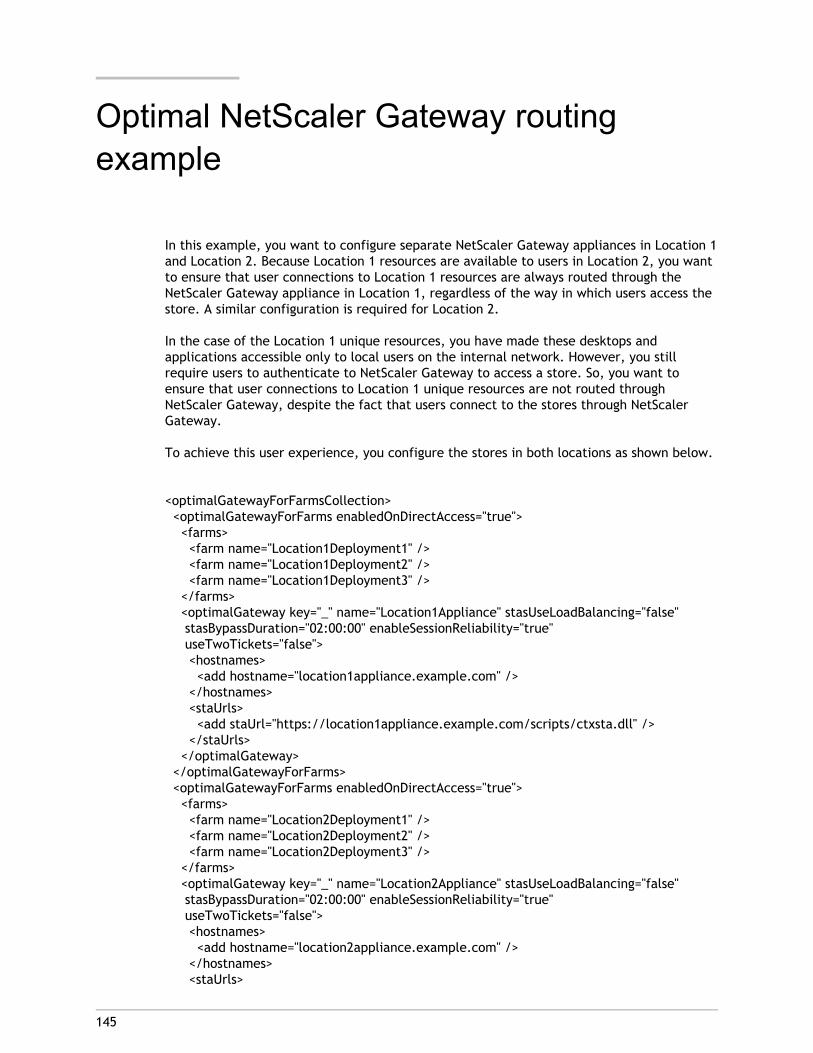
145
Optimal NetScaler Gateway routingexample
In this example, you want to configure separate NetScaler Gateway appliances in Location 1and Location 2. Because Location 1 resources are available to users in Location 2, you wantto ensure that user connections to Location 1 resources are always routed through theNetScaler Gateway appliance in Location 1, regardless of the way in which users access thestore. A similar configuration is required for Location 2.
In the case of the Location 1 unique resources, you have made these desktops andapplications accessible only to local users on the internal network. However, you stillrequire users to authenticate to NetScaler Gateway to access a store. So, you want toensure that user connections to Location 1 unique resources are not routed throughNetScaler Gateway, despite the fact that users connect to the stores through NetScalerGateway.
To achieve this user experience, you configure the stores in both locations as shown below.
<optimalGatewayForFarmsCollection> <optimalGatewayForFarms enabledOnDirectAccess="true"> <farms> <farm name="Location1Deployment1" /> <farm name="Location1Deployment2" /> <farm name="Location1Deployment3" /> </farms> <optimalGateway key="_" name="Location1Appliance" stasUseLoadBalancing="false" stasBypassDuration="02:00:00" enableSessionReliability="true" useTwoTickets="false"> <hostnames> <add hostname="location1appliance.example.com" /> </hostnames> <staUrls> <add staUrl="https://location1appliance.example.com/scripts/ctxsta.dll" /> </staUrls> </optimalGateway> </optimalGatewayForFarms> <optimalGatewayForFarms enabledOnDirectAccess="true"> <farms> <farm name="Location2Deployment1" /> <farm name="Location2Deployment2" /> <farm name="Location2Deployment3" /> </farms> <optimalGateway key="_" name="Location2Appliance" stasUseLoadBalancing="false" stasBypassDuration="02:00:00" enableSessionReliability="true" useTwoTickets="false"> <hostnames> <add hostname="location2appliance.example.com" /> </hostnames> <staUrls>

<add staUrl="https://location2appliance.example.com/scripts/ctxsta.dll" /> </staUrls> </optimalGateway> </optimalGatewayForFarms> <optimalGatewayForFarms enabledOnDirectAccess="false"> <farms> <farm name="Location1UniqueDeployment" /> </farms> </optimalGatewayForFarms></optimalGatewayForFarmsCollection>
You map the main Location 1 deployments to the NetScaler Gateway appliance in Location1. This configuration ensures that users always connect to Location 1 resources through theNetScaler Gateway appliance in that location, even for users that logged on to the storethrough the appliance in Location 2. A similar mapping is configured for Location 2. Forboth deployments, you set the value of the enabledOnDirectAccess attribute to true toroute all connections to resources through the optimal appliance specified for thedeployment, even for local users on the internal network who log on to StoreFront directly.As a result, the responsiveness of remote desktops and applications is improved for localusers because data do not traverse the corporate WAN.
For the Location 1 unique resources, you configure a mapping for the deployment but donot specify a NetScaler Gateway appliance. This configuration ensures that connections toLocation 1 unique resources are not routed through NetScaler Gateway, even for users thatlogged on to the store through NetScaler Gateway. As a result, only local users on theinternal network can access these desktops and applications.
You must also configure a specific internal virtual server IP address for the appliance and aninaccessible internal beacon point. Making the internal beacon point inaccessible to localusers prompts Citrix Receiver to access stores through NetScaler Gateway from devicesconnected to the internal network. This enables you, for example, to apply NetScalerGateway endpoint analysis to local users on the internal network without the overhead ofrouting all user connections to resources through the appliance.
Optimal NetScaler Gateway routing example
146
147
Configure StoreFront using theconfiguration files
This section describes additional configuration tasks that cannot be carried out using theCitrix StoreFront management console.
• To enable ICA file signing
• To configure communication time-out duration and retry attempts
• To configure the password expiry notification period
• To disable file type association
• To enable socket pooling
• Customize the Citrix Receiver logon dialog box
• To prevent Receiver for Windows from caching passwords
148
To enable ICA file signing
StoreFront provides the option to digitally sign ICA files so that versions of Citrix Receiverthat support this feature can verify that the file originates from a trusted source. When filesigning is enabled in StoreFront, the ICA file generated when a user starts an application issigned using a certificate from the personal certificate store of the StoreFront server. ICAfiles can be signed using any hash algorithm supported by the operating system running onthe StoreFront server. The digital signature is ignored by clients that do not support thefeature or are not configured for ICA file signing. If the signing process fails, the ICA file isgenerated without a digital signature and sent to Citrix Receiver, the configuration of whichdetermines whether the unsigned file is accepted.
To be used for ICA file signing with StoreFront, certificates must include the private keyand be within the allowed validity period. If the certificate contains a key usage extension,this must allow the key to be used for digital signatures. Where an extended key usageextension is included, it must be set to code signing or server authentication.
For ICA file signing, Citrix recommends using a code signing or SSL signing certificateobtained from a public certification authority or from your organization's privatecertification authority. If you are unable to obtain a suitable certificate from a certificationauthority, you can either use an existing SSL certificate, such as a server certificate, orcreate a new root certification authority certificate and distribute it to users' devices.
ICA file signing is disabled by default in stores. To enable ICA file signing, you edit the storeconfiguration file and execute Windows PowerShell commands. For more information aboutenabling ICA file signing in Citrix Receiver, see ICA File Signing to protect againstapplication or desktop launches from untrusted servers.
Note: The StoreFront and PowerShell consoles cannot be open at the same time. Alwaysclose the StoreFront admin console before using the PowerShell console to administeryour StoreFront configuration. Likewise, close all instances of PowerShell before openingthe StoreFront console.
Important: In multiple server deployments, use only one server at a time to makechanges to the configuration of the server group. Ensure that the Citrix StoreFrontmanagement console is not running on any of the other servers in the deployment. Oncecomplete, propagate your configuration changes to the server group so that the otherservers in the deployment are updated.
1. Ensure that the certificate you want to use to sign ICA files is available in the CitrixDelivery Services certificate store on the StoreFront server and not the current user'scertificate store.
2. Use a text editor to open the web.config file for the store, which is typically located inthe C:\inetpub\wwwroot\Citrix\storename\ directory, where storename is the namespecified for the store when it was created.
3. Locate the following section in the file.
<certificateManager> <certificates> <clear />

<add ... /> ... </certificates></certificateManager>
4. Include details of the certificate to be used for signing as shown below.
<certificateManager> <certificates> <clear /> <add id="certificateid" thumb="certificatethumbprint" /> <add ... /> ... </certificates></certificateManager>
Where certificateid is a value that helps you to identify the certificate in the storeconfiguration file and certificatethumbprint is the digest (or thumbprint) of thecertificate data produced by the hash algorithm.
5. Locate the following element in the file.
<icaFileSigning enabled="False" certificateId="" hashAlgorithm="sha1" />
6. Change the value of the enabled attribute to True to enable ICA file signing for thestore. Set the value of the certificateId attribute to the ID you used to identify thecertificate, that is, certificateid in Step 4.
7. If you want to use a hash algorithm other than SHA-1, set the value of the hashAgorithmattribute to sha256, sha384, or sha512, as required.
8. Using an account with local administrator permissions, start Windows PowerShell and,at a command prompt, type the following commands to enable the store to access theprivate key.
Add-PSSnapin Citrix.DeliveryServices.Framework.Commands $certificate = Get-DSCertificate "certificatethumbprint"
Add-DSCertificateKeyReadAccess -certificate $certificate[0] -accountName "IIS APPPOOL\Citrix Delivery Services Resources"
Where certificatethumbprint is the digest of the certificate data produced by the hashalgorithm.
To enable ICA file signing
149

150
To configure communication time-outduration and retry attempts
By default, requests from StoreFront to a server providing resources for a store time outafter 30 seconds. The server is considered unavailable after two unsuccessfulcommunication attempts. To change these settings, you edit the configuration file for thestore.
Important: In multiple server deployments, use only one server at a time to makechanges to the configuration of the server group. Ensure that the Citrix StoreFrontmanagement console is not running on any of the other servers in the deployment. Oncecomplete, propagate your configuration changes to the server group so that the otherservers in the deployment are updated.
1. Use a text editor to open the web.config files for the store, which is typically located inthe C:\inetpub\wwwroot\Citrix\Authentication\ andC:\inetpub\wwwroot\Citrix\storename\ directories, respectively, where storename isthe name specified for the store when it was created.
2. Locate the following element in the file.
<farmset ... serverCommunicationAttempts="2" communicationTimeout="30" connectionTimeout="6" ... >
3. Change the value of the serverCommunicationAttempts attribute to the set the numberof unsuccessful communication attempts before the server is considered to beunavailable. Use the communicationTimeout attribute to set the time limit in secondsfor a response from the server. Set the time limit in seconds for StoreFront to resolvethe address of the server by changing the value of the connectionTimeout attribute.
151
To configure the password expirynotification period
If you enable Receiver for Web site users to change their passwords at any time, local userswhose passwords are about to expire are shown a warning when they log on. By default, thenotification period for a user is determined by the applicable Windows policy setting. To seta custom notification period for all users, you edit the configuration file for theauthentication service.
Important: In multiple server deployments, use only one server at a time to makechanges to the configuration of the server group. Ensure that the Citrix StoreFrontmanagement console is not running on any of the other servers in the deployment. Oncecomplete, propagate your configuration changes to the server group so that the otherservers in the deployment are updated.
1. Use a text editor to open the web.config file for the authentication service, which istypically located in the C:\inetpub\wwwroot\Citrix\Authentication\ directory.
2. Locate the following element in the file.
<explicitBL ... allowUserPasswordChange="Always" showPasswordExpiryWarning="Windows" passwordExpiryWarningPeriod="10" ... >
3. Ensure that the allowUserPasswordChange attribute is set to Always to enable passwordexpiry notifications. Change the value of the showPasswordExpiryWarning attribute toCustom to apply a specific password expiry notification period to all users. Use thepasswordExpiryWarningPeriod attribute to set the password expiry notification period indays. Receiver for Web site users connecting from the local network whose passwordsare due to expire within the specified time period are shown a warning when they logon.
152
To disable file type association
By default, file type association is enabled in stores so that content is seamlessly redirectedto users' subscribed applications when they open local files of the appropriate types. Todisable file type association, you edit the store configuration file.
Important: In multiple server deployments, use only one server at a time to makechanges to the configuration of the server group. Ensure that the Citrix StoreFrontmanagement console is not running on any of the other servers in the deployment. Oncecomplete, propagate your configuration changes to the server group so that the otherservers in the deployment are updated.
1. Use a text editor to open the web.config file for the store, which is typically located inthe C:\inetpub\wwwroot\Citrix\storename\ directory, where storename is the namespecified for the store when it was created.
2. Locate the following element in the file.
<farmset ... enableFileTypeAssociation="on" ... >
3. Change the value of the enableFileTypeAssociation attribute to off to disable file typeassociation for the store.

153
To enable socket pooling
Socket pooling is disabled by default in stores. When socket pooling is enabled, StoreFrontmaintains a pool of sockets, rather than creating a socket each time one is needed andreturning it to the operating system when the connection is closed. Enabling socket poolingenhances performance, particularly for Secure Sockets Layer (SSL) connections. To enablesocket pooling, you edit the store configuration file.
Important: In multiple server deployments, use only one server at a time to makechanges to the configuration of the server group. Ensure that the Citrix StoreFrontmanagement console is not running on any of the other servers in the deployment. Oncecomplete, propagate your configuration changes to the server group so that the otherservers in the deployment are updated.
1. Use a text editor to open the web.config file for the store, which is typically located inthe C:\inetpub\wwwroot\Citrix\storename\ directory, where storename is the namespecified for the store when it was created.
2. Locate the following element in the file.
<farmset ... pooledSockets="off" ... >
3. Change the value of the pooledSockets attribute to on to enable socket pooling for thestore.

154
Customize the Citrix Receiver logondialog box
When Citrix Receiver users log on to a store, no title text is displayed on the logon dialogbox, by default. You can display the default text “Please log on” or compose your owncustom message. To display and customize the title text on the Citrix Receiver logon dialogbox, you edit the files for the authentication service.
Important: In multiple server deployments, use only one server at a time to makechanges to the configuration of the server group. Ensure that the Citrix StoreFrontmanagement console is not running on any of the other servers in the deployment. Oncecomplete, propagate your configuration changes to the server group so that the otherservers in the deployment are updated.
1. Use a text editor to open the Explicit.tfrm file for the authentication service, which istypically located in the C:\inetpub\wwwroot\Citrix\Authentication\App_Data\Templates\directory.
2. Locate the following lines in the file.
@* @Heading("ExplicitAuth:AuthenticateHeadingText") *@
3. Uncomment the statement by removing the leading and trailing leading @* and trailing*@, as shown below.
@Heading("ExplicitAuth:AuthenticateHeadingText")
Citrix Receiver users see the default title text “Please log on”, or the appropriatelocalized version of this text, when they log on to stores that use this authenticationservice.
4. To modify the title text, use a text editor to open the ExplicitAuth.resx file for theauthentication service, which is typically located in theC:\inetpub\wwwroot\Citrix\Authentication\App_Data\resources\ directory.
5. Locate the following elements in the file. Edit the text enclosed within the <value>element to modify the title text that users see on the Citrix Receiver logon dialog boxwhen they access stores that use this authentication service.
<data name="AuthenticateHeadingText" xml:space="preserve"> <value>My Company Name</value></data>
To modify the Citrix Receiver logon dialog box title text for users in other locales, editthe localized files ExplicitAuth.languagecode.resx, where languagecode is the localeidentifier.

155
To prevent Receiver for Windows fromcaching passwords
By default, Receiver for Windows stores users' passwords when they log on to StoreFrontstores. To prevent Receiver for Windows, but not Receiver for Windows Enterprise, fromcaching users' passwords, you edit the files for the authentication service.
Important: In multiple server deployments, use only one server at a time to makechanges to the configuration of the server group. Ensure that the Citrix StoreFrontmanagement console is not running on any of the other servers in the deployment. Oncecomplete, propagate your configuration changes to the server group so that the otherservers in the deployment are updated.
1. Use a text editor to open the Authenticate.aspx file for the authentication service,which is typically located in theC:\inetpub\wwwroot\Citrix\Authentication\Views\ExplicitForms\ directory.
2. Locate the following line in the file.
<% Html.RenderPartial("SaveCredentialsRequirement", SaveCredentials); %>
3. Comment the statement by adding leading and trailing double hyphens, as shownbelow.
<%-- Html.RenderPartial("SaveCredentialsRequirement", SaveCredentials); --%>
Receiver for Windows users must enter their passwords every time they log on to storesthat use this authentication service. This setting does not apply to Receiver forWindows Enterprise.

156
Configure Receiver for Web sites usingthe configuration files
This section describes additional configuration tasks for Receiver for Web sites that cannotbe carried out using the Citrix StoreFront management console.
• To configure how resources are displayed for users
• To make Citrix Receiver installation files available on the server
• To disable detection and deployment of Citrix Receiver
• To configure workspace control
• To stop offering provisioning files to users
• To configure Receiver for HTML5 use of browser tabs
• To configure store time-out duration and retry attempts
• To configure session duration

157
To configure how resources are displayedfor users
When both desktops and applications are available from a Receiver for Web site, separatedesktop and application views are displayed by default. Users see the desktop view firstwhen they log on to the site. If only a single desktop is available for a user, regardless ofwhether applications are also available from a site, that desktop starts automatically whenthe user logs on. To change these settings, you edit the site configuration file.
Important: In multiple server deployments, use only one server at a time to makechanges to the configuration of the server group. Ensure that the Citrix StoreFrontmanagement console is not running on any of the other servers in the deployment. Oncecomplete, propagate your configuration changes to the server group so that the otherservers in the deployment are updated.
1. Use a text editor to open the web.config file for the Receiver for Web site, which istypically located in the C:\inetpub\wwwroot\Citrix\storenameWeb\ directory, wherestorename is the name specified for the store when it was created.
2. Locate the following element in the file.
<uiViews showDesktopsView="true" showAppsView="true" defaultView="desktops" />
3. Change the value of the showDesktopsView and showAppsView attributes to false toprevent desktops and applications, respectively, being displayed to users, even if theyare available from the site. When both the desktop and application views are enabled,set the value of the defaultView attribute to apps to display the application view firstwhen users log on to the site.
4. Locate the following element in the file.
<userInterface ... autoLaunchDesktop="true">
5. Change the value of the autoLaunchDesktop attribute to false to prevent Receiver forWeb sites from automatically starting a desktop when a user logs on to the site and onlya single desktop is available for that user.
When the autoLaunchDesktop attribute is set to true and a user for whom only onedesktop is available logs on, that user's applications are not reconnected, regardless ofthe workspace control configuration.
Note: To enable Receiver for Web sites to start their desktops automatically, usersaccessing the site through Internet Explorer must add the site to the Local intranet orTrusted sites zones.

158
To make Citrix Receiver installation filesavailable on the server
By default, when a user accesses a Receiver for Web site from a computer running Windowsor Mac OS X, the site attempts to determine whether Citrix Receiver is installed on theuser's device. If Citrix Receiver cannot be detected, the user is prompted to download andinstall the appropriate Citrix Receiver for their platform from the Citrix website.
If you copy Receiver for Windows and Receiver for Mac installation files to the StoreFrontserver, you can configure the site to provide users with these local files rather thanredirecting them to the Citrix website. When Citrix Receiver installation files are availableon the StoreFront server, you can also configure the site to offer users with older clientsthe option to upgrade to the version on the server. To configure deployment of Receiver forWindows and Receiver for Mac, you run Windows PowerShell scripts and edit the siteconfiguration file.
Note: These changes cannot be reverted. Make a copy of the default setting to refer to.The StoreFront and PowerShell consoles cannot be open at the same time. Always closethe StoreFront admin console before using the PowerShell console to administer yourStoreFront configuration. Likewise, close all instances of PowerShell before opening theStoreFront console.
Important: In multiple server deployments, use only one server at a time to makechanges to the configuration of the server group. Ensure that the Citrix StoreFrontmanagement console is not running on any of the other servers in the deployment. Oncecomplete, propagate your configuration changes to the server group so that the otherservers in the deployment are updated.
1. Copy the Receiver for Windows and Receiver for Mac installation files to \ReceiverClients\Windows\ and \Receiver Clients\Mac\ directories, respectively, in the StoreFrontinstallation, which is typically located at C:\Program Files\Citrix\Receiver StoreFront\.
You also have the option to copy Citrix Receiver installation files to the server wheninstalling StoreFront at a command prompt. For more information, see To installStoreFront at a command prompt.
2. Using an account with local administrator permissions, start Windows PowerShell and,at a command prompt, type the following commands to update StoreFront with theCitrix Receiver installation file names.
& "installationlocation\Scripts\UpdateWindowsReceiverLocation.ps1" -ClientLocation "Windows\filename.exe"
& "installationlocation\Scripts\UpdateMacOSReceiverLocation.ps1" -ClientLocation "Mac\filename.dmg"
Where installationlocation is the directory in which StoreFront is installed, typicallyC:\Program Files\Citrix\Receiver StoreFront\, and filename is the name of the CitrixReceiver installation file.
3. On the StoreFront server, use a text editor to open the web.config file for the Receiverfor Web site, which is typically located in theC:\inetpub\wwwroot\Citrix\storenameWeb\ directory, where storename is the namespecified for the store when it was created.
4. Locate the following element in the file.
<pluginAssistant ... upgradeAtLogin="false">
5. Set the value of the upgradeAtLogin attribute to true to offer users with older clientsthe option to upgrade to the versions available on the server.
To make Citrix Receiver installation files available on the server
159
160
To disable detection and deployment ofCitrix Receiver
By default, when a user accesses a Receiver for Web site from a computer running Windowsor Mac OS X, the site attempts to determine whether Citrix Receiver is installed on theuser's device. If Citrix Receiver cannot be detected, the user is prompted to download andinstall the appropriate Citrix Receiver for their platform from the Citrix website. To disabledetection and deployment of Receiver for Windows and Receiver for Mac for the Receiverfor Web site, you edit the site configuration file.
Important: In multiple server deployments, use only one server at a time to makechanges to the configuration of the server group. Ensure that the Citrix StoreFrontmanagement console is not running on any of the other servers in the deployment. Oncecomplete, propagate your configuration changes to the server group so that the otherservers in the deployment are updated.
1. Use a text editor to open the web.config file for the Receiver for Web site, which istypically located in the C:\inetpub\wwwroot\Citrix\storenameWeb\ directory, wherestorename is the name specified for the store when it was created.
2. Locate the following element in the file.
<pluginAssistant enabled="true" ... >
3. Change the value of the enabled attribute to false to disable detection and deploymentof Citrix Receiver for the site.
161
To configure workspace control
Workspace control lets applications follow users as they move between devices. Thisenables, for example, clinicians in hospitals to move from workstation to workstationwithout having to restart their applications on each device. Workspace control is enabledby default for Receiver for Web sites. To disable or configure workspace control, you editthe site configuration file.
Important: In multiple server deployments, use only one server at a time to makechanges to the configuration of the server group. Ensure that the Citrix StoreFrontmanagement console is not running on any of the other servers in the deployment. Oncecomplete, propagate your configuration changes to the server group so that the otherservers in the deployment are updated.
1. Use a text editor to open the web.config file for the Receiver for Web site, which istypically located in the C:\inetpub\wwwroot\Citrix\storenameWeb\ directory, wherestorename is the name specified for the store when it was created.
2. Locate the following element in the file.
<workspaceControl enabled="true" autoReconnectAtLogon="true" logoffAction="disconnect" showReconnectButton="false" showDisconnectButton="false" />
3. Change the value of the enabled attribute to false to disable workspace control for thesite. Set the value of the autoReconnectAtLogon attribute to false to prevent automaticreconnection of users to any applications that they left running. To automatically shutdown users' applications when they log off from the site, set the value of thelogoffAction attribute to terminate. Set logoffAction to none to leave users' applicationsrunning and active when they log off from the site.
By default, autoReconnectAtLogon is set to true and logoffAction is set to disconnect.This configuration enables a user to log on to a site, start their applications, then log onto the same site using a different device and have those resources automaticallytransferred to the new device. All the applications that the user starts from a particularsite are left running but are automatically disconnected when the user logs off fromthat site, provided that the same browser instance is used to log on, start theresources, and log off. If there is only one desktop available for a user on a Receiver forWeb site that is configured to start single desktops automatically when the user logs on,that user's applications are not reconnected, even if the autoReconnectAtLogonattribute is set to true.
Disable automatic reconnection of applications at logon to enable users to choosewhether they want their applications to follow them from device to device. If youdisable automatic reconnection of applications at logon, ensure that the Connect link isenabled so that users can manually reconnect to applications that they left running.
4. Change the value of the showReconnectButton attribute to true to display on the sitethe Connect link, which enables users to manually reconnect to applications that theyleft running. Set the value of the showDisconnectButton attribute to true to display theDisconnect link, which enables users to manually disconnect from applications without

shutting them down.
By default, the Connect and Disconnect links do not appear on sites. Enable the linksand disable automatic reconnection of applications at logon to enable users to choosewhether they want their applications to follow them from device to device.
To configure workspace control
162
163
To stop offering provisioning files to users
By default, Receiver for Web sites offer provisioning files that enable users to configureCitrix Receiver automatically for the associated store. The provisioning files containconnection details for the store that provides the resources on the site, including details ofany NetScaler Gateway deployments and beacons configured for the store. To stop offeringCitrix Receiver provisioning files to users, you edit the site configuration file.
Important: In multiple server deployments, use only one server at a time to makechanges to the configuration of the server group. Ensure that the Citrix StoreFrontmanagement console is not running on any of the other servers in the deployment. Oncecomplete, propagate your configuration changes to the server group so that the otherservers in the deployment are updated.
1. Use a text editor to open the web.config file for the Receiver for Web site, which istypically located in the C:\inetpub\wwwroot\Citrix\storenameWeb\ directory, wherestorename is the name specified for the store when it was created.
2. Locate the following element in the file.
<receiverConfiguration enabled="true" ... />
3. Change the value of the enabled attribute to false to remove from the site the optionfor users to download a provisioning file.
164
To configure Receiver for HTML5 use ofbrowser tabs
By default, Receiver for HTML5 starts desktops and applications in a new browser tab.However, when users start resources from shortcuts using Receiver for HTML5, the desktopor application replaces the Receiver for Web site in the existing browser tab rather thanappearing in a new tab. To configure Receiver for HTML5 so that resources are alwaysstarted in the same tab as the Receiver for Web site, you edit the site configuration file.
Important: In multiple server deployments, use only one server at a time to makechanges to the configuration of the server group. Ensure that the Citrix StoreFrontmanagement console is not running on any of the other servers in the deployment. Oncecomplete, propagate your configuration changes to the server group so that the otherservers in the deployment are updated.
1. Use a text editor to open the web.config file for the Receiver for Web site, which istypically located in the C:\inetpub\wwwroot\Citrix\storenameWeb\ directory, wherestorename is the name specified for the store when it was created.
2. Locate the following element in the file.
<html5 ... singleTabLaunch="false" />
3. Change the value of the singleTabLaunch attribute to true to start desktops andapplications with Receiver for HTML5 in the same browser tab as the Receiver for Website instead of opening a new tab.

165
To configure store time-out duration andretry attempts
By default, requests from a Receiver for Web site to the associated store time out after oneminute. The store is considered unavailable after two unsuccessful communicationattempts. To change these settings, you edit the site configuration file.
Important: In multiple server deployments, use only one server at a time to makechanges to the configuration of the server group. Ensure that the Citrix StoreFrontmanagement console is not running on any of the other servers in the deployment. Oncecomplete, propagate your configuration changes to the server group so that the otherservers in the deployment are updated.
1. Use a text editor to open the web.config file for the Receiver for Web site, which istypically located in the C:\inetpub\wwwroot\Citrix\storenameWeb\ directory, wherestorename is the name specified for the store when it was created.
2. Locate the following element in the file.
<communication attempts="2" timeout="00:01:00">
3. Change the value of the attempts attribute to the set the number of unsuccessfulcommunication attempts before the store is considered to be unavailable. Use thetimeout attribute to set the time limit in hours, minutes, and seconds for a responsefrom the store.
166
To configure session duration
Once authenticated, users can, by default, access XenDesktop, XenApp, or VDI-in-a-Boxresources for up to eight hours without needing to log on again. By default, user sessions onReceiver for Web sites time out after 20 minutes of inactivity. When a session times out,users can continue to use any desktops or applications that are already running, but mustlog on again to access Receiver for Web site functions such as subscribing to applications.To change these settings, you edit the site configuration file.
Important: In multiple server deployments, use only one server at a time to makechanges to the configuration of the server group. Ensure that the Citrix StoreFrontmanagement console is not running on any of the other servers in the deployment. Oncecomplete, propagate your configuration changes to the server group so that the otherservers in the deployment are updated.
1. Use a text editor to open the web.config file for the Receiver for Web site, which istypically located in the C:\inetpub\wwwroot\Citrix\storenameWeb\ directory, wherestorename is the name specified for the store when it was created.
2. Locate the following element in the file.
<authentication tokenLifeTime="08:00:00" ... />
3. Change the value of the tokenLifeTime attribute to set the time in hours, minutes, andseconds for which users, once authenticated to XenDesktop, XenApp, or VDI-in-a-Boxcan continue to use resources provided by that deployment.
4. Locate the following element in the file.
<sessionState timeout="20" />
5. Use the timeout attribute to set the time in minutes for which a Receiver for Web sitesession can remain idle before the user is required to log on again to access the site.
167
Configure Desktop Appliance sites
The tasks below describe how to create, remove, and modify Desktop Appliance sites. Tocreate or remove sites, you execute Windows PowerShell commands. Changes to DesktopAppliance site settings are made by editing the site configuration files.
Important: In multiple server deployments, use only one server at a time to makechanges to the configuration of the server group. Ensure that the Citrix StoreFrontmanagement console is not running on any of the other servers in the deployment. Oncecomplete, propagate your configuration changes to the server group so that the otherservers in the deployment are updated.
Note: The StoreFront and PowerShell consoles cannot be open at the same time. Alwaysclose the StoreFront admin console before using the PowerShell console to administeryour StoreFront configuration. Likewise, close all instances of PowerShell before openingthe StoreFront console.
To create or remove Desktop Appliance sitesOnly a single store can be accessed through each Desktop Appliance site. You can create astore containing all the resources you want to make available to users withnon-domain-joined desktop appliances. Alternatively, create separate stores, each with aDesktop Appliance site, and configure your users' desktop appliances to connect to theappropriate site.
1. Use an account with local administrator permissions to start Windows PowerShell and,at a command prompt, type the following command to import the StoreFront modules.
& "installationlocation\Scripts\ImportModules.ps1"
Where installationlocation is the directory in which StoreFront is installed, typicallyC:\Program Files\Citrix\Receiver StoreFront\.
2. To create a new Desktop Appliance site, type the following command.
Install-DSDesktopAppliance -FriendlyName sitename -SiteId iisid -VirtualPath sitepath -UseHttps {$False | $True} -StoreUrl storeaddress [-EnableMultiDesktop {$False | $True}] [-EnableExplicit {$True | $False}] [-EnableSmartCard {$False | $True}] [-EnableEmbeddedSmartCardSSO {$False | $True}]
Where sitename is a name that helps you to identify your Desktop Appliance site. Foriisid, specify the numerical ID of the Microsoft Internet Information Services (IIS) sitehosting StoreFront, which can be obtained from the Internet Information Services (IIS)Manager console. Replace sitepath with the relative path at which the site should becreated in IIS, for example, /Citrix/DesktopAppliance. Note that Desktop Appliance siteURLs are case sensitive.
Indicate whether StoreFront is configured for HTTPS by setting -UseHttps to theappropriate value.
To specify the absolute URL of the store service used by the Desktop ApplianceConnector site, use StoreUrl storeaddress. This value is displayed for the Store summaryin the administration console.
By default, when a user logs on to a Desktop Appliance site, the first desktop availableto the user starts automatically. To configure your new Desktop Appliance site toenable users to choose between multiple desktops, if available, set -EnableMultiDesktopto $True.
Explicit authentication is enabled by default for new sites. You can disable explicitauthentication by setting the -EnableExplicit argument to $False. Enable smart cardauthentication by setting -EnableSmartCard to $True. To enable pass-through withsmart card authentication, you must set both -EnableSmartCard and-EnableEmbeddedSmartCardSSO to $True. If you enable explicit and either smart cardor pass-through with smart card authentication, users are initially prompted to log onwith a smart card, but can fall back to explicit authentication if they experience anyissues with their smart cards.
The optional arguments configure settings that can also be modified after the DesktopAppliance site has been created by editing the site configuration file.
Example:
Create a Desktop Appliance Connector site at virtual path /Citrix/DesktopAppliance1 inthe default IIS web site.
Install-DSDesktopAppliance `
-FriendlyName DesktopAppliance1 `
-SiteId 1 `
-VirtualPath /Citrix/DesktopAppliance1 `
-UseHttps $false `
-StoreUrl https://serverName/Citrix/Store `
-EnableMultiDesktop $true `
-EnableExplicit $true `
-EnableSmartCard $true `
-EnableEmbeddedSmartCardSSO $false
3. To remove an existing Desktop Appliance site, type the following command.
Remove-DSDesktopAppliance -SiteId iisid -VirtualPath sitepath
Where iisid is the numerical ID of the IIS site hosting StoreFront and sitepath is therelative path of the Desktop Appliance site in IIS, for example,/Citrix/DesktopAppliance.
4. To list the Desktop Appliance sites currently available from your StoreFrontdeployment, type the following command.
Configure Desktop Appliance sites
168

Get-DSDesktopAppliancesSummary
To configure user authenticationDesktop Appliance sites support explicit, smart card, and pass-through with smart cardauthentication. Explicit authentication is enabled by default. If you enable explicit andeither smart card or pass-through with smart card authentication, the default behaviorinitially prompts users to log on with a smart card. Users who experience issues with theirsmart cards are given the option of entering explicit credentials. If you configure IIS torequire client certificates for HTTPS connections to all StoreFront URLs, users cannot fallback to explicit authentication if they cannot use their smart cards. To configure theauthentication methods for a Desktop Appliance site, you edit the site configuration file.
1. Use a text editor to open the web.config file for the Desktop Appliance site, which istypically located in the C:\inetpub\wwwroot\Citrix\storenameDesktopAppliancedirectory, where storename is the name specified for the store when it was created.
2. Locate the following element in the file.
<explicitForms enabled="true" />
3. Change the value of the enabled attribute to false to disable explicit authentication forthe site.
4. Locate the following element in the file.
<certificate enabled="false" useEmbeddedSmartcardSso="false" embeddedSmartcardSsoPinTimeout="00:00:20" />
5. Set the value of the enabled attribute to true to enable smart card authentication. Toenable pass-through with smart card authentication, you must also set the value of theuseEmbeddedSmartcardSso attribute to true. Use theembeddedSmartcardSsoPinTimeout attribute to set the time in hours, minutes, andseconds for which the PIN entry screen is displayed before it times out. When the PINentry screen times out, users are returned to the logon screen and must remove andreinsert their smart cards to access the PIN entry screen again. The time-out period isset to 20 seconds by default.
To enable users to choose between multiple desktopsBy default, when a user logs on to a Desktop Appliance site, the first desktop (inalphabetical order) available to the user in the store for which the site is configured startsautomatically. If you provide users with access to multiple desktops in a store, you canconfigure the Desktop Appliance site to display the available desktops so users can choosewhich one to access. To change these settings, you edit the site configuration file.
1. Use a text editor to open the web.config file for the Desktop Appliance site, which istypically located in the C:\inetpub\wwwroot\Citrix\storenameDesktopAppliancedirectory, where storename is the name specified for the store when it was created.
Configure Desktop Appliance sites
169
2. Locate the following element in the file.
<resources showMultiDesktop="false" />
3. Change the value of the showMultiDesktop attribute to true to enable users to see andselect from all the desktops available to them in the store when they log on to theDesktop Appliance site.
Configure Desktop Appliance sites
170
171
Configure authentication for XenAppServices URLs
XenApp Services URLs enable users of domain-joined desktop appliances and repurposed PCsrunning the Citrix Desktop Lock, along with users who have older Citrix clients that cannotbe upgraded, to access stores. When you create a new store, the XenApp Services URL isenabled by default. The XenApp Services URL for a store has the formhttp[s]://serveraddress/Citrix/storename/PNAgent/config.xml, where serveraddress is thefully qualified domain name of the server or load balancing environment for your StoreFrontdeployment and storename is the name specified for the store when it was created.
XenApp Services URLs support explicit, domain pass-through, and pass-through with smartcard authentication. Explicit authentication is enabled by default. You can change theauthentication method, but only one authentication method can be configured for eachXenApp Services URL. To enable multiple authentication methods, create separate stores,each with a XenApp Services URL, for each authentication method. To change theauthentication method for a XenApp Services URL, you run a Windows PowerShell script.
Note: The StoreFront and PowerShell consoles cannot be open at the same time. Alwaysclose the StoreFront admin console before using the PowerShell console to administeryour StoreFront configuration. Likewise, close all instances of PowerShell before openingthe StoreFront console.
Important: In multiple server deployments, use only one server at a time to makechanges to the configuration of the server group. Ensure that the Citrix StoreFrontmanagement console is not running on any of the other servers in the deployment. Oncecomplete, propagate your configuration changes to the server group so that the otherservers in the deployment are updated.
1. Use an account with local administrator permissions to start Windows PowerShell and,at a command prompt, enter one of the following commands to configure the userauthentication method for users accessing the store through the XenApp Services URL.
& "installationlocation\Scripts\EnablePnaForStore.ps1" –SiteId iisid –ResourcesVirtualPath storepath –LogonMethod {prompt | sson | smartcard_sson}
Where installationlocation is the directory in which StoreFront is installed, typicallyC:\Program Files\Citrix\Receiver StoreFront\. For iisid, specify the numerical ID of theMicrosoft Internet Information Services (IIS) site hosting StoreFront, which can beobtained from the Internet Information Services (IIS) Manager console. Replacestorepath with the relative path to the store in IIS, for example, /Citrix/Store. Toenable explicit authentication, set the -LogonMethod argument to prompt. For domainpass-through, use sson and for pass-through with smart card authentication, set theargument to smartcard_sson.

172
Configuring Resource Filtering
This topic explains how to filter enumeration resources based on resource type andkeywords. You can use this type of filtering in conjunction with the more advancedcustomization offered by the Store Customization SDK. Using this SDK, you can controlwhich apps and desktops are displayed to users, modify access conditions, and adjustlaunch parameters. For more information, see the Store Customization SDK.
Note: The StoreFront and PowerShell consoles cannot be open at the same time. Alwaysclose the StoreFront admin console before using the PowerShell console to administeryour StoreFront configuration. Likewise, close all instances of PowerShell before openingthe StoreFront console.
Configure filteringConfigure the filter using PowerShell cmdlets defined within the StoresModule. Use thefollowing PowerShell snippet to load the required modules:
$dsInstallProp = Get-ItemProperty ` -Path HKLM:\SOFTWARE\Citrix\DeliveryServicesManagement -Name InstallDir $dsInstallDir = $dsInstallProp.InstallDir & $dsInstallDir\..\Scripts\ImportModules.ps1
Filter by typeUse this to filter the resource enumeration by resource type. This is an inclusive filter,meaning it removes any resources that are not of the specified types from the resourceenumeration result. Use the following cmdlets:
Set-DSResourceFilterType: Sets up enumeration filtering based on resource types.
Get-DSResourceFilterType: Gets the list of resource types that Storefront is allowed toreturn in enumeration.
Note: Resource types are applied before keywords.
Filter by keywordsUse this to filter resources based on keywords, such as resources derived from XenApp,XenDesktop or VDI-in-a-Box. Keywords are generated from mark-up in the description fieldof the corresponding resource.

The filter can operate either in inclusive or exclusive mode, but not both. The inclusivefilter allows enumeration of resources matching the configured keywords and removes nonmatching resources from the enumeration. The exclusive filter removes resources matchingthe configured keywords from the enumeration. Use the following cmdlets:
Set-DSResourceFilterKeyword: Sets up enumeration filtering based on resource keywords.
Get-DSResourceFilterKeyword: Gets the list of filter keywords.
The following keywords are reserved and must not be used for filtering:
• Auto
• Mandatory
ExamplesThis command will set filtering to exclude workflow resources from enumeration:
Set-DSResourceFilterKeyword -SiteId 1 -VirtualPath "/Citrix/Store" -ExcludeKeywords @("WFS")
This example will set allowed resource types to applications only:
Set-DSResourceFilterType -SiteId 1 -VirtualPath "/Citrix/Store" -IncludeTypes @("Applications")
Configuring Resource Filtering
173

174
Secure your StoreFront deployment
This topic highlights areas that may have an impact on system security when deploying andconfiguring StoreFront.
Certificates in StoreFrontServer certificates are used for machine identification and transport security in StoreFront.If you decide to enable ICA file signing, StoreFront can also use certificates to digitally signICA files.
Authentication services and stores each require certificates for token management.StoreFront generates a self-signed certificate when an authentication service or store iscreated. Self-signed certificates generated by StoreFront should not be used for any otherpurpose.
To enable email-based account discovery for users installing Citrix Receiver on a device forthe first time, you must install a valid server certificate on the StoreFront server. The fullchain to the root certificate must also be valid. For the best user experience, install acertificate with a Subject or Subject Alternative Name entry of discoverReceiver.domain,where domain is the Microsoft Active Directory domain containing your users' emailaccounts. Although you can use a wildcard certificate for the domain containing your users'email accounts, you must first ensure that the deployment of such certificates is permittedby your corporate security policy. Other certificates for the domain containing your users'email accounts can also be used, but users will see a certificate warning dialog box whenCitrix Receiver first connects to the StoreFront server. Email-based account discoverycannot be used with any other certificate identities. For more information, see Configureemail-based account discovery.
If your users configure their accounts by entering store URLs directly into Citrix Receiverand do not use email-based account discovery, the certificate on the StoreFront serverneed only be valid for that server and have a valid chain to the root certificate.
StoreFront communicationsIn a production environment, Citrix recommends using the Internet Protocol security (IPsec)or HTTPS protocols to secure data passing between StoreFront and your servers. IPsec is aset of standard extensions to the Internet Protocol that provides authenticated andencrypted communications with data integrity and replay protection. Because IPsec is anetwork-layer protocol set, higher level protocols can use it without modification. HTTPSuses the Secure Sockets Layer (SSL) and Transport Layer Security (TLS) protocols to providestrong data encryption.
The SSL Relay can be used to secure data traffic between StoreFront and XenApp servers.The SSL Relay is a default component of XenApp that performs host authentication and dataencryption.
Citrix recommends securing communications between StoreFront and users' devices usingNetScaler Gateway and HTTPS. To use HTTPS, StoreFront requires that the MicrosoftInternet Information Services (IIS) instance hosting the authentication service andassociated stores is configured for HTTPS. In the absence of the appropriate IISconfiguration, StoreFront uses HTTP for communications. Citrix strongly recommends thatyou do not enable unsecured user connections to StoreFront in a production environment.
Note: SSL 2.0 is enabled by default in IIS. As this protocol is now deprecated, Citrixrecommends disabling SSL 2.0 on StoreFront servers. For more information aboutdisabling protocols in IIS, see http://support.microsoft.com/kb/187498.
StoreFront security separationIf you deploy any web applications in the same web domain (domain name and port) asStoreFront, then any security risks in those web applications could potentially reduce thesecurity of your StoreFront deployment. Where a greater degree of security separation isrequired, Citrix recommends that you deploy StoreFront in a separate web domain.
ICA file signingStoreFront provides the option to digitally sign ICA files using a specified certificate on theserver so that versions of Citrix Receiver that support this feature can verify that the fileoriginates from a trusted source. ICA files can be signed using any hash algorithm supportedby the operating system running on the StoreFront server, including SHA-1 and SHA-256. Formore information, see To enable ICA file signing.
User change passwordYou can enable Receiver for Web site users logging on with Active Directory domaincredentials to change their passwords, either at any time or only when they have expired.However, this exposes sensitive security functions to anyone who can access any of thestores that use the authentication service. If your organization has a security policy thatreserves user password change functions for internal use only, ensure that none of thestores are accessible from outside your corporate network. When you create theauthentication service, the default configuration prevents Receiver for Web site users fromchanging their passwords, even if they have expired. For more information, see Optimizethe user experience.
Secure
175
176
Troubleshoot StoreFront
When StoreFront is installed or uninstalled, the following log files are created by theStoreFront installer in the C:\Windows\Temp\ directory. The file names reflect thecomponents that created them and include time stamps.
• Citrix-DeliveryServicesRoleManager-*.log—Created when StoreFront is installedinteractively.
• Citrix-DeliveryServicesSetupConsole-*.log—Created when StoreFront is installed silentlyand when StoreFront is uninstalled, either interactively or silently.
• CitrixMsi-CitrixStoreFront-x64-*.log—Created when StoreFront is installed anduninstalled, either interactively or silently.
StoreFront supports Windows event logging for the authentication service, stores, andReceiver for Web sites. Any events that are generated are written to the StoreFrontapplication log, which can be viewed using Event Viewer under either Application andServices Logs > Citrix Delivery Services or Windows Logs > Application. You can control thenumber of duplicate log entries for a single event by editing the configuration files for theauthentication service, stores, and Receiver for Web sites.
The Citrix StoreFront management console automatically records tracing information. Bydefault, tracing for other operations is disabled and must be enabled manually. Logscreated by Windows PowerShell commands are stored in the \Admin\logs\ directory of theStoreFront installation, typically located at C:\Program Files\Citrix\Receiver StoreFront\.The log file names contain command actions and subjects, along with time stamps that canbe used to differentiate command sequences.
Important: In multiple server deployments, use only one server at a time to makechanges to the configuration of the server group. Ensure that the Citrix StoreFrontmanagement console is not running on any of the other servers in the deployment. Oncecomplete, propagate your configuration changes to the server group so that the otherservers in the deployment are updated.

To configure log throttling1. Use a text editor to open the web.config file for the authentication service, store, or
Receiver for Web site, which are typically located in theC:\inetpub\wwwroot\Citrix\Authentication\, C:\inetpub\wwwroot\Citrix\storename\,and C:\inetpub\wwwroot\Citrix\storenameWeb\ directories, respectively, wherestorename is the name specified for the store when it was created.
2. Locate the following element in the file.
<logger duplicateInterval="00:01:00" duplicateLimit="10">
By default, StoreFront is configured to limit the number of duplicate log entries to 10per minute.
3. Change the value of the duplicateInterval attribute to the set the time period in hours,minutes, and seconds over which duplicate log entries are monitored. Use theduplicateLimit attribute to set the number of duplicate entries that must be loggedwithin the specified time interval to trigger log throttling.
When log throttling is triggered, a warning message is logged to indicate that furtheridentical log entries will be suppressed. Once the time limit elapses, normal loggingresumes and an informational message is logged indicating that duplicate log entries are nolonger being suppressed.
To enable tracingCaution: The StoreFront and PowerShell consoles cannot be open at the same time.Always close the StoreFront admin console before using the PowerShell console toadminister your StoreFront configuration. Likewise, close all instances of the PowerShellbefore opening the StoreFront console.
1. Use an account with local administrator permissions to start Windows PowerShell and,at a command prompt, type the following commands and restart the server to enabletracing.
Add-PSSnapin Citrix.DeliveryServices.Framework.Commands
Set-DSTraceLevel -All -TraceLevel Warning
Allowed values for -TraceLevel are, in increasing levels of tracing detail: Off, Error,Warning, Info, Verbose.
StoreFront automatically captures Error trace messages. Due to the large amount ofdata that can potentially be generated, tracing may significantly impact theperformance of StoreFront, so it is recommended that the Info or Verbose levels are notused unless specifically required for troubleshooting.
2. To disable tracing, type the following commands and restart the server.
Add-PSSnapin Citrix.DeliveryServices.Framework.Commands
Set-DSTraceLevel -All -TraceLevel Off
Troubleshoot
177

When tracing is enabled, tracing information is written in the \Admin\Trace\ directory ofthe StoreFront installation located at C:\Program Files\Citrix\Receiver StoreFront\.
Troubleshoot
178


![StoreFront 3 - Citrix Docs · If the Citrix SCOM Management Pack Agent service is installed on the StoreFront server, StoreFront cannot upgrade. [#DNA-34792] On upgrade, StoreFront](https://img.dokumen.tips/doc/110x75/60ea15540160bf6e9274e47a/storefront-3-citrix-docs-if-the-citrix-scom-management-pack-agent-service-is-installed.jpg)