Embed Size (px)
Citation preview
Stop-Motion
Ithink too many people take puppets for granted. Stop and think for a moment about how surreal and amazing the concept of a puppet is. It resemblesa person or an animal but has no life of its own. It is simply an inanimate object, a lifeless lump of material. But when a real person manipulates itsomehow, it brings forth the illusion of life. Puppets have been with us since ancient times, and, for me, they have always been a fascination in one
form or another. Having grown up in the late 1970s through the ’80s, Jim Henson’s Muppets were a constant source of entertainment. I vividly rememberseeing them on display at the Detroit Institute of Arts in 1981, and seeing live puppet performances from different world traditions there as well. In elemen-tary school, we had a puppeteer who brought his marionette plays to the gymnasium every year, starring a dragon named Applesauce. Since I had toy pup-pets of my own, I knew how they were operated, yet at the same time I believed they were alive. Another obsession of mine from growing up in the ’80swere the animatronic animal rock bands at places like Chuck E. Cheese’s and Showbiz Pizza Place. These also seemed to be alive, but they were not operated by live puppeteers. Instead, they were programmed by a computer synced with audio tapes behind the stage, delivering a performance that hadbeen premeditated to repeat itself. In all of these various forms, the same illusion was being achieved: The puppets had anima, but their animators werenowhere to be seen, hidden from view, or absent entirely.
In stop-motion animation, the same illusion of life is achieved in a different dimension of time. The animator is touching the puppet and making it move,but his work is not seen by the audience in real time. It exists only between the frames that flash before our eyes. A stop-motion puppet performance is acombination of premeditated planning and improvisation by the animator, in a thought process that takes several hours of our time, and condenses it tomere seconds of screen time. Because of the amount of control offered to the stop-motion animator over what can be achieved in this time dimensionbetween frames, there is a wider spectrum of possibilities for naturalistic movement compared with most other forms of puppetry. A stop-motion puppet,for instance, can walk with a more realistic sense of weight, which is more difficult to achieve with a marionette. That does not necessarily lessen the chal-lenges involved, nor does anything possible in stop-motion make other puppet art forms inferior. As always, story has priority over technique when it comesto reaching your audience.
Whether a puppet animator is moving a hand puppet, marionette, stop-motion clay figure, or a realistic creature like the kind seen in the Jim Henson/FrankOz film The Dark Crystal (1982), there will always be obstacles to overcome in making the performance believable. Working with puppets in any way
129
7. Building Puppets
Building PuppetsChapter 7
StopAnimation-07 6/11/06 10:10 PM Page 129
The Art of Stop-Motion Animation
130
The
Art
of S
top-
Mot
ion
Anim
atio
nalways requires much creative problem solving. For this reason, the design of the puppet in appearance and construction is vital to how effective it will lookbefore an audience. There are thousands of materials, methods, and techniques that can be used when it comes to making stop-motion puppets, and it willalways take much experimentation and trial and error to get them working. As you attempt this, be humbled by the words of Thomas Edison, who said, “Ihave not failed. I’ve just found 10,000 ways that won’t work.” There is not necessarily any right or wrong when it comes to building puppets; there is onlywhat works and what doesn’t work as well. Even professional puppet builders with years of experience come across obstacles and problems, and throughtheir experience, they find which methods work better than others. Through experimenting with different techniques and materials, animators and puppetbuilders find personal preferences they continue to work with. One of the neatest things about stop-motion is the opportunity to throw things together withwhatever you have easy access to in your home or school. This applies to building sets as well as puppets. It is often referred to as the MacGyver method offilmmaking. (For younger readers who missed out on 1980s television, MacGyver was a kind of intellectual action hero who made weapons and traps out ofwhatever materials he happened to find around him.) All aspects of stop-motion filmmaking are a constant challenge in problem solving, and sometimesthe best solutions are found by the seat of your pants.
This chapter will help you design your own characters and build them into puppets to be animated in stop-motion, based on what has worked well for meand others in the field. I will cover several different methods for making puppets so that you can choose which method will work best for the kind of char-acters you want to create.
Character DesignThe main difference between stop-motion puppets and other kinds is that they have an armature inside. An armature acts as the skeleton of the puppet and must be built so that it can hold its position without slipping for each frame captured. A stop-motion puppet must also be built in a way that will pre-vent it from falling over or breaking during a shoot. To prevent mishaps such as these, your puppet should be as lightweight and durable as possible. Withall of these points to remember, the most important principle is that your puppets must be designed based on what they will be doing, and what kindsof movements will be required of them. It is the simple rule of form following function. What do your characters do? Will they be walking or jumping, orwill they only be seen from the waist up? Will they speak or express their feelings solely through body language? Will they need to hold a prop in their hand?Your story or overall purpose for animating will be the ultimate factor in how your character is designed and built.
To design a character, you must first be familiar with what design actually means. Design really boils down to communication of an idea that is beingrelayed—in this case, to the audience watching your character move on-screen. Most animated characters are designed based on a set of symbols andclichés based on reality but exaggerated to emphasize certain aspects of their personality. The most basic symbols used to communicate to the audienceabout a character are the shapes of the mouth: If it is curved upward, the character is happy; if curved downward, the character is sad. Adding to thesesymbols would be the position of the eyebrows, indicating whether a character is worried, angry, or devious (see Figure 7.1).
These symbols go all the way back to the first scribbles we all made as children, so they will always be recognized by our subconscious mind. However,these symbolic facial expressions can be used by any character depending on his mood, so other symbols must be employed to suggest more about whothat character is.
StopAnimation-07 6/11/06 10:10 PM Page 130
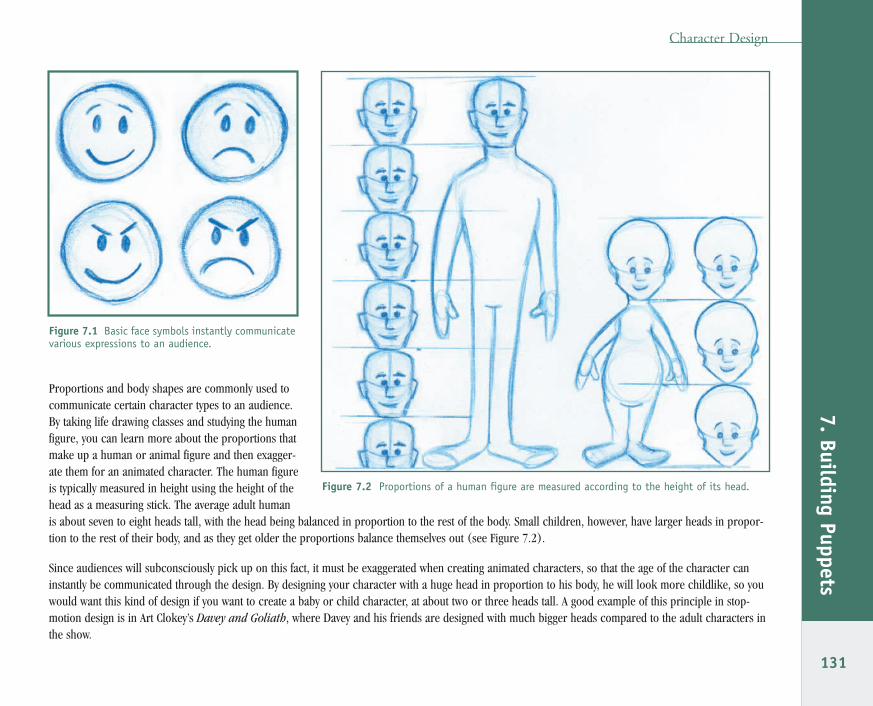
Proportions and body shapes are commonly used tocommunicate certain character types to an audience.By taking life drawing classes and studying the humanfigure, you can learn more about the proportions thatmake up a human or animal figure and then exagger-ate them for an animated character. The human figureis typically measured in height using the height of thehead as a measuring stick. The average adult humanis about seven to eight heads tall, with the head being balanced in proportion to the rest of the body. Small children, however, have larger heads in propor-tion to the rest of their body, and as they get older the proportions balance themselves out (see Figure 7.2).
Since audiences will subconsciously pick up on this fact, it must be exaggerated when creating animated characters, so that the age of the character caninstantly be communicated through the design. By designing your character with a huge head in proportion to his body, he will look more childlike, so youwould want this kind of design if you want to create a baby or child character, at about two or three heads tall. A good example of this principle in stop-motion design is in Art Clokey’s Davey and Goliath, where Davey and his friends are designed with much bigger heads compared to the adult characters inthe show.
Character Design
131
7. Building Puppets
Figure 7.1 Basic face symbols instantly communicatevarious expressions to an audience.
Figure 7.2 Proportions of a human figure are measured according to the height of its head.
StopAnimation-07 6/11/06 10:11 PM Page 131
The Art of Stop-Motion Animation
132
The
Art
of S
top-
Mot
ion
Anim
atio
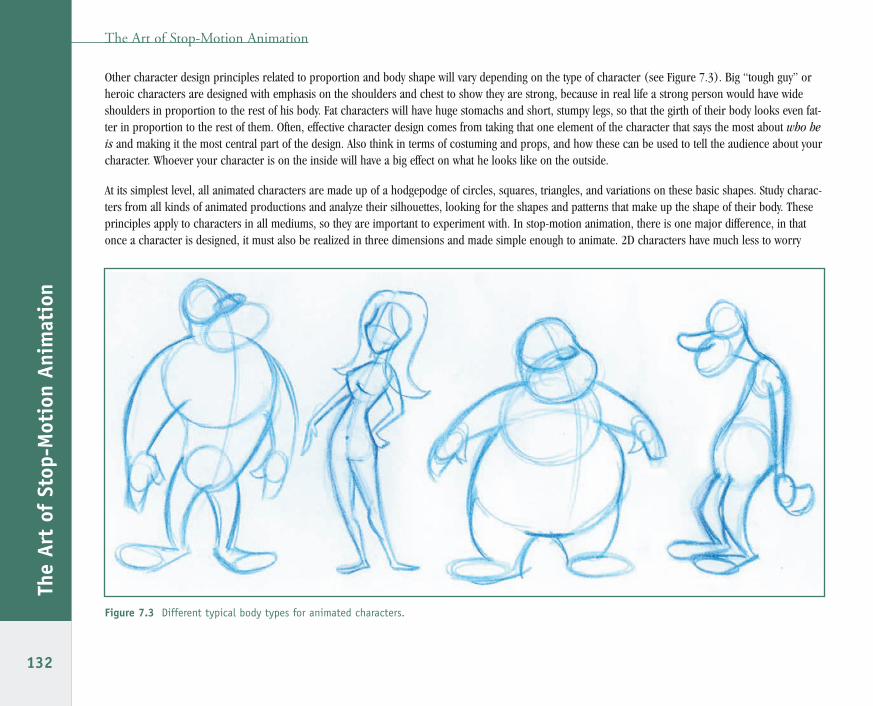
nOther character design principles related to proportion and body shape will vary depending on the type of character (see Figure 7.3). Big “tough guy” orheroic characters are designed with emphasis on the shoulders and chest to show they are strong, because in real life a strong person would have wideshoulders in proportion to the rest of his body. Fat characters will have huge stomachs and short, stumpy legs, so that the girth of their body looks even fat-ter in proportion to the rest of them. Often, effective character design comes from taking that one element of the character that says the most about who heis and making it the most central part of the design. Also think in terms of costuming and props, and how these can be used to tell the audience about yourcharacter. Whoever your character is on the inside will have a big effect on what he looks like on the outside.
At its simplest level, all animated characters are made up of a hodgepodge of circles, squares, triangles, and variations on these basic shapes. Study charac-ters from all kinds of animated productions and analyze their silhouettes, looking for the shapes and patterns that make up the shape of their body. Theseprinciples apply to characters in all mediums, so they are important to experiment with. In stop-motion animation, there is one major difference, in thatonce a character is designed, it must also be realized in three dimensions and made simple enough to animate. 2D characters have much less to worry
Figure 7.3 Different typical body types for animated characters.
StopAnimation-07 6/11/06 10:11 PM Page 132
about in terms of gravity, for instance, since they are not necessarily enslaved to it. A character with a big head and chest, but with thin legs and tiny feet,might work as a drawing, but problems could arise if the same character were made into a puppet, because it could become very top-heavy, making it difficult to maintain its balance. In this case, it would definitely need to be extremely light and be built with strong support in its feet to balance it. Yourdesigns might need to be modified to make them suitable for stop-motion. One way to test this would be to draw your character in different poses, or, bet-ter yet, make a tiny sculpture of your puppet in solid clay and try posing it into a few different positions to get a feel for how it will work in 3D. Imagine anyproblems you foresee with working with it as a larger scale puppet, and plan accordingly.
Again, I must emphasize that your design will depend on what your character does in your animation. If your character must reach for an object behind orabove him, make sure his arms are long enough to do so. If he is to be walking, make sure his feet are not too big or too small in proportion to his body.Puppets designed mainly for action shots like walking or jumping will need more emphasis placed on the construction of their body. For puppets that willhave a stronger focus in character animation, the eyes and hands will most often be the most important element. The eyes are the first thing the viewer willgravitate toward when looking at your character, so make sure they are placed well on the face to bring the viewer into them. Study the eyes of differentstop-motion characters and think about how important they are to the overall design. Eyes are especially crucial to mute characters, such as Nick Park’sGromit, who makes all of his expressions using his eyes and brow. Hands are also very important for establishing character when posing and speaking, asmany of us typically gesture with our hands when we speak. One of the best animations to study for how the eyes and hands work together with characterdesign and dialogue is in Creature Comforts, both the original film and the series.
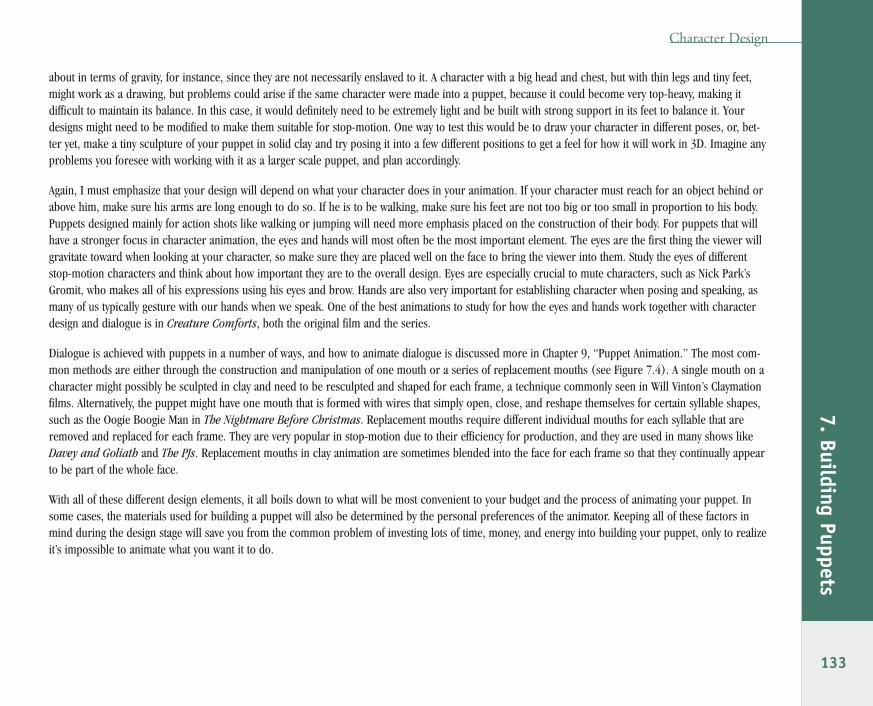
Dialogue is achieved with puppets in a number of ways, and how to animate dialogue is discussed more in Chapter 9, “Puppet Animation.” The most com-mon methods are either through the construction and manipulation of one mouth or a series of replacement mouths (see Figure 7.4). A single mouth on acharacter might possibly be sculpted in clay and need to be resculpted and shaped for each frame, a technique commonly seen in Will Vinton’s Claymationfilms. Alternatively, the puppet might have one mouth that is formed with wires that simply open, close, and reshape themselves for certain syllable shapes,such as the Oogie Boogie Man in The Nightmare Before Christmas. Replacement mouths require different individual mouths for each syllable that areremoved and replaced for each frame. They are very popular in stop-motion due to their efficiency for production, and they are used in many shows likeDavey and Goliath and The PJs. Replacement mouths in clay animation are sometimes blended into the face for each frame so that they continually appearto be part of the whole face.
With all of these different design elements, it all boils down to what will be most convenient to your budget and the process of animating your puppet. Insome cases, the materials used for building a puppet will also be determined by the personal preferences of the animator. Keeping all of these factors inmind during the design stage will save you from the common problem of investing lots of time, money, and energy into building your puppet, only to realizeit’s impossible to animate what you want it to do.
Character Design
133
7. Building Puppets
StopAnimation-07 6/11/06 10:11 PM Page 133
The Art of Stop-Motion Animation
134
The
Art
of S
top-
Mot
ion
Anim
atio
n
Figure 7.4 Replacement mouths and puppet by Darren Lee.
StopAnimation-07 6/11/06 10:11 PM Page 134
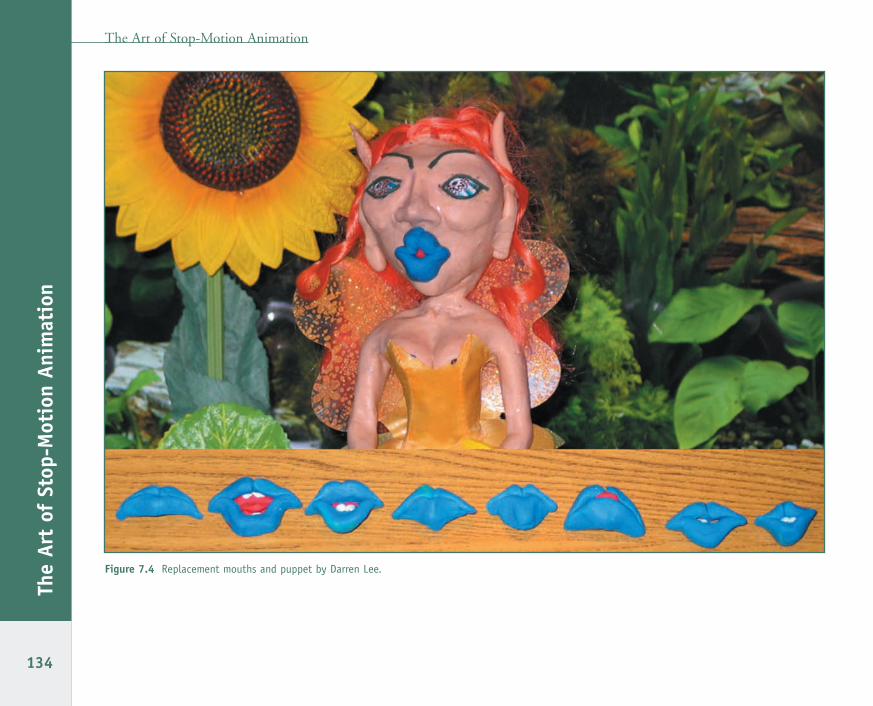
Evolution of a Character:Hamish McFleaIt is very common for characters to evolve as youwork with them. You might start with an initial sketchof an idea and have it go off completely in anotherdirection, which is good, because that is typically howthe best ideas come about. As an example, I thought Iwould show some of the process behind a character Ideveloped for my unrealized student film Bad News.The original film idea was about a news report con-cerning a doomsday cult’s prediction of an alienClockwork Monkey coming from outer space todestroy the world. (I have always been simultaneouslyterrified and fascinated with clockwork monkeysbanging cymbals, and I figured if anything came todestroy us, that would be it!) I thought it would befunny to have a Scottish news reporter talking about iton location, since I do have some Scottish heritage,and because I love Scottish accents and thought itwould be fun to animate. So, with these rough ideasin mind, I just started sketching ideas for a characterthat would ultimately be created as a stop-motionpuppet.
My initial concept for the news reporter, who I namedHamish, was to make him human, so I started draw-ing him in different poses I imagined for the anima-tion. His personality was that of a very nervous,dim-witted character who half-believed the rumors ofthe alien monkey, so I drew him in poses suggestingpanic and fear (see Figure 7.5).
Evolution of a Character: Hamish McFlea
135
7. Building Puppets
Figure 7.5 The first sketches of Hamish explore his personality.
StopAnimation-07 6/11/06 10:11 PM Page 135
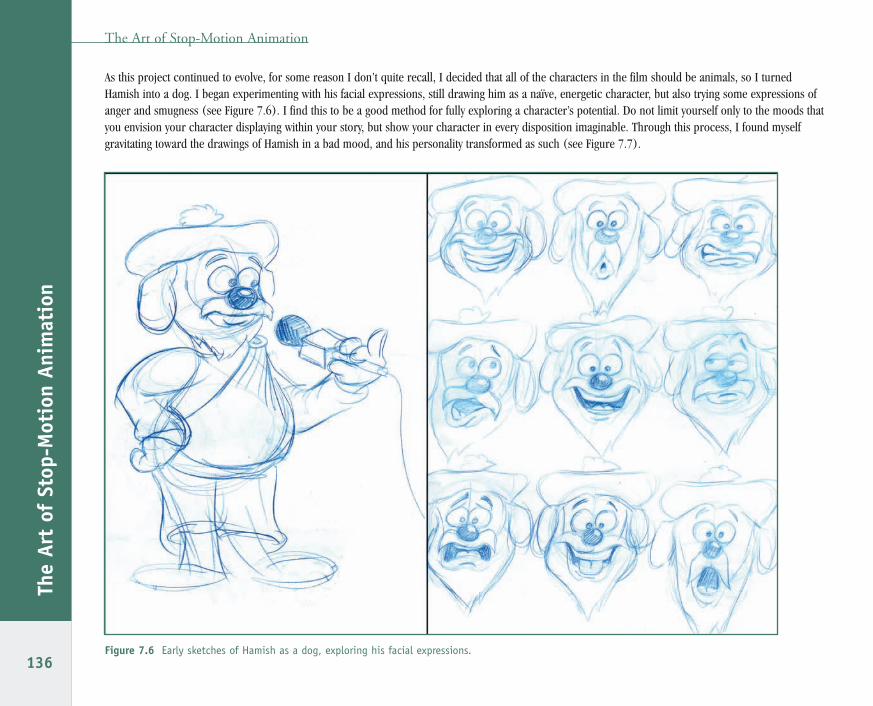
As this project continued to evolve, for some reason I don’t quite recall, I decided that all of the characters in the film should be animals, so I turnedHamish into a dog. I began experimenting with his facial expressions, still drawing him as a naïve, energetic character, but also trying some expressions ofanger and smugness (see Figure 7.6). I find this to be a good method for fully exploring a character’s potential. Do not limit yourself only to the moods thatyou envision your character displaying within your story, but show your character in every disposition imaginable. Through this process, I found myselfgravitating toward the drawings of Hamish in a bad mood, and his personality transformed as such (see Figure 7.7).
The Art of Stop-Motion Animation
136
The
Art
of S
top-
Mot
ion
Anim
atio
n
Figure 7.6 Early sketches of Hamish as a dog, exploring his facial expressions.
StopAnimation-07 6/11/06 10:11 PM Page 136
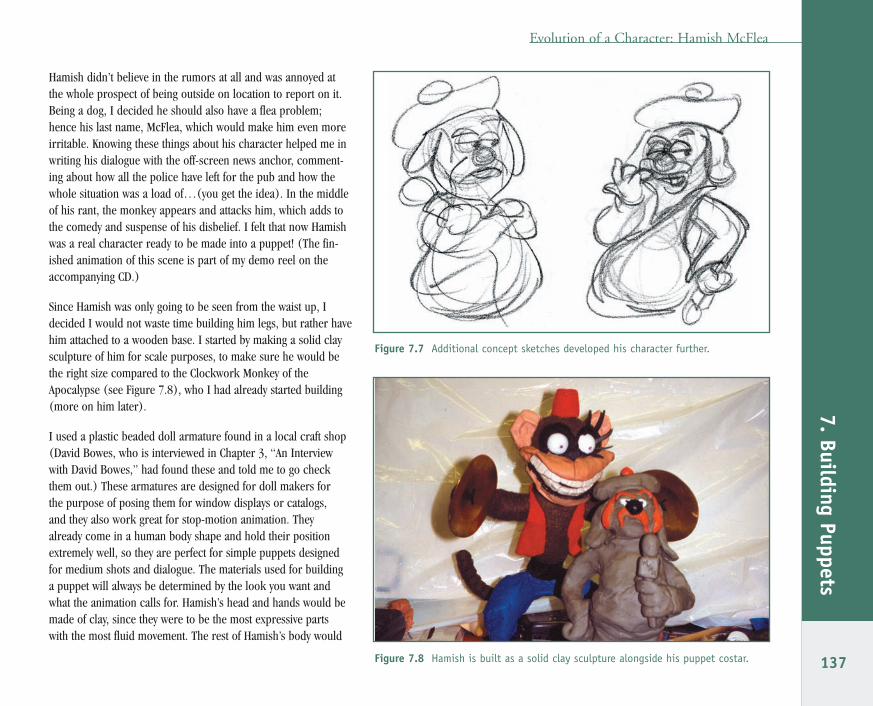
Hamish didn’t believe in the rumors at all and was annoyed atthe whole prospect of being outside on location to report on it.Being a dog, I decided he should also have a flea problem;hence his last name, McFlea, which would make him even moreirritable. Knowing these things about his character helped me inwriting his dialogue with the off-screen news anchor, comment-ing about how all the police have left for the pub and how thewhole situation was a load of…(you get the idea). In the middleof his rant, the monkey appears and attacks him, which adds tothe comedy and suspense of his disbelief. I felt that now Hamishwas a real character ready to be made into a puppet! (The fin-ished animation of this scene is part of my demo reel on theaccompanying CD.)
Since Hamish was only going to be seen from the waist up, Idecided I would not waste time building him legs, but rather havehim attached to a wooden base. I started by making a solid claysculpture of him for scale purposes, to make sure he would bethe right size compared to the Clockwork Monkey of theApocalypse (see Figure 7.8), who I had already started building(more on him later).
I used a plastic beaded doll armature found in a local craft shop(David Bowes, who is interviewed in Chapter 3, “An Interviewwith David Bowes,” had found these and told me to go checkthem out.) These armatures are designed for doll makers forthe purpose of posing them for window displays or catalogs,and they also work great for stop-motion animation. Theyalready come in a human body shape and hold their positionextremely well, so they are perfect for simple puppets designedfor medium shots and dialogue. The materials used for buildinga puppet will always be determined by the look you want andwhat the animation calls for. Hamish’s head and hands would bemade of clay, since they were to be the most expressive partswith the most fluid movement. The rest of Hamish’s body would
Evolution of a Character: Hamish McFlea
137
7. Building Puppets
Figure 7.7 Additional concept sketches developed his character further.
Figure 7.8 Hamish is built as a solid clay sculpture alongside his puppet costar.
StopAnimation-07 6/11/06 10:11 PM Page 137
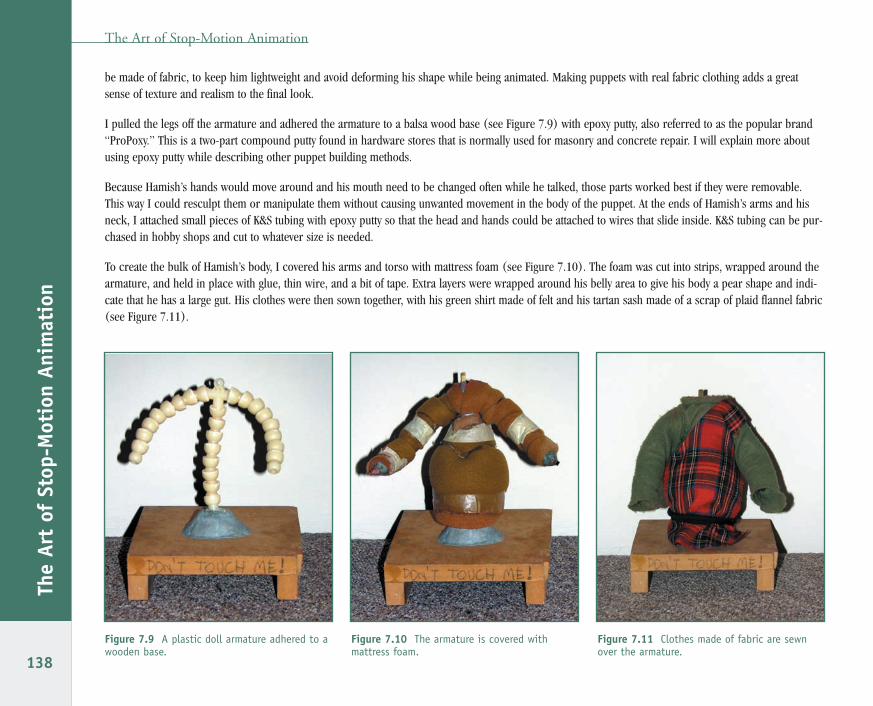
be made of fabric, to keep him lightweight and avoid deforming his shape while being animated. Making puppets with real fabric clothing adds a greatsense of texture and realism to the final look.
I pulled the legs off the armature and adhered the armature to a balsa wood base (see Figure 7.9) with epoxy putty, also referred to as the popular brand“ProPoxy.” This is a two-part compound putty found in hardware stores that is normally used for masonry and concrete repair. I will explain more aboutusing epoxy putty while describing other puppet building methods.
Because Hamish’s hands would move around and his mouth need to be changed often while he talked, those parts worked best if they were removable.This way I could resculpt them or manipulate them without causing unwanted movement in the body of the puppet. At the ends of Hamish’s arms and hisneck, I attached small pieces of K&S tubing with epoxy putty so that the head and hands could be attached to wires that slide inside. K&S tubing can be pur-chased in hobby shops and cut to whatever size is needed.
To create the bulk of Hamish’s body, I covered his arms and torso with mattress foam (see Figure 7.10). The foam was cut into strips, wrapped around thearmature, and held in place with glue, thin wire, and a bit of tape. Extra layers were wrapped around his belly area to give his body a pear shape and indi-cate that he has a large gut. His clothes were then sown together, with his green shirt made of felt and his tartan sash made of a scrap of plaid flannel fabric(see Figure 7.11).
The Art of Stop-Motion Animation
138
The
Art
of S
top-
Mot
ion
Anim
atio
n
Figure 7.9 A plastic doll armature adhered to awooden base.
Figure 7.10 The armature is covered withmattress foam.
Figure 7.11 Clothes made of fabric are sewnover the armature.
StopAnimation-07 6/11/06 10:11 PM Page 138
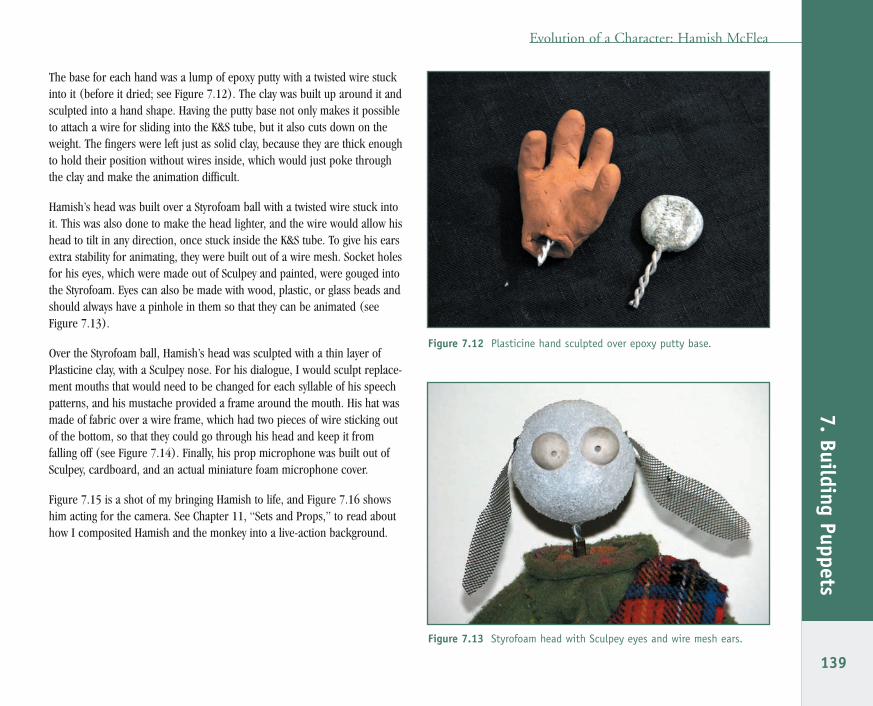
The base for each hand was a lump of epoxy putty with a twisted wire stuckinto it (before it dried; see Figure 7.12). The clay was built up around it andsculpted into a hand shape. Having the putty base not only makes it possibleto attach a wire for sliding into the K&S tube, but it also cuts down on theweight. The fingers were left just as solid clay, because they are thick enoughto hold their position without wires inside, which would just poke throughthe clay and make the animation difficult.
Hamish’s head was built over a Styrofoam ball with a twisted wire stuck intoit. This was also done to make the head lighter, and the wire would allow hishead to tilt in any direction, once stuck inside the K&S tube. To give his earsextra stability for animating, they were built out of a wire mesh. Socket holesfor his eyes, which were made out of Sculpey and painted, were gouged intothe Styrofoam. Eyes can also be made with wood, plastic, or glass beads andshould always have a pinhole in them so that they can be animated (seeFigure 7.13).
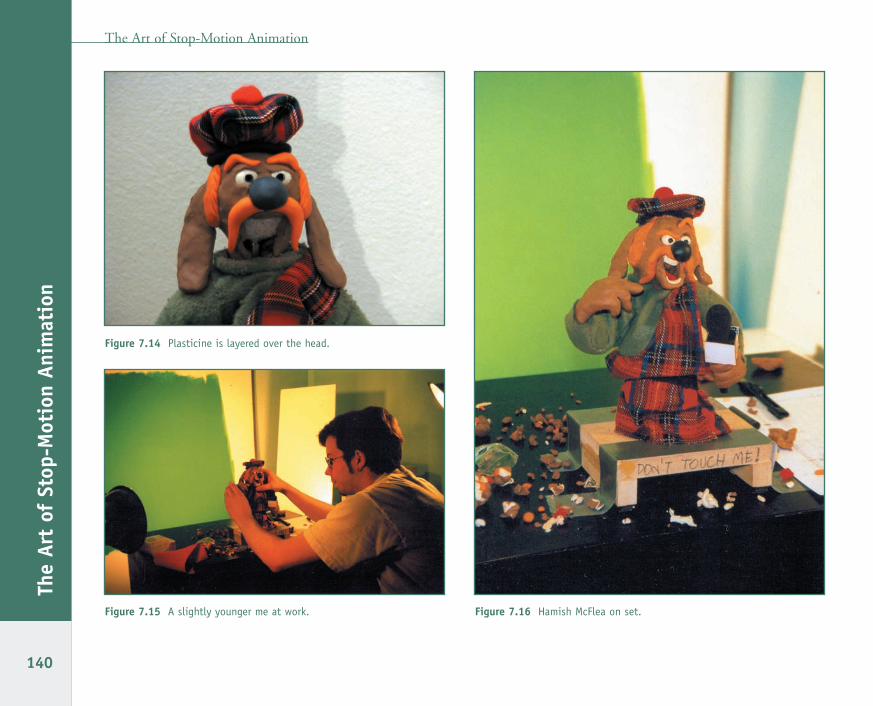
Over the Styrofoam ball, Hamish’s head was sculpted with a thin layer ofPlasticine clay, with a Sculpey nose. For his dialogue, I would sculpt replace-ment mouths that would need to be changed for each syllable of his speechpatterns, and his mustache provided a frame around the mouth. His hat wasmade of fabric over a wire frame, which had two pieces of wire sticking outof the bottom, so that they could go through his head and keep it fromfalling off (see Figure 7.14). Finally, his prop microphone was built out ofSculpey, cardboard, and an actual miniature foam microphone cover.
Figure 7.15 is a shot of my bringing Hamish to life, and Figure 7.16 showshim acting for the camera. See Chapter 11, “Sets and Props,” to read abouthow I composited Hamish and the monkey into a live-action background.
Evolution of a Character: Hamish McFlea
139
7. Building Puppets
Figure 7.12 Plasticine hand sculpted over epoxy putty base.
Figure 7.13 Styrofoam head with Sculpey eyes and wire mesh ears.
StopAnimation-07 6/11/06 10:11 PM Page 139
The Art of Stop-Motion Animation
140
The
Art
of S
top-
Mot
ion
Anim
atio
n
Figure 7.14 Plasticine is layered over the head.
Figure 7.16 Hamish McFlea on set.Figure 7.15 A slightly younger me at work.
StopAnimation-07 6/11/06 10:11 PM Page 140

Other Characters with Doll ArmaturesThe plastic doll armature (see Figure 7.17) is a fantastic tool for creating a very durable puppet that will last you a long time, and these armatures havegrown to be a favorite tool of mine. Surprisingly, they are not very popular or widely distributed (at least no longer here in Vancouver). The local craftstores that used to carry them where I live stopped selling them, so I ended up buying them in bulk from the original distributor. They cost only a few dol-lars a piece, and different versions of them can also be ordered from a few distributors on the Internet. They have always been extremely popular and con-venient in teaching my stop-motion course over the years, already made and ready to be dressed and animated, so they are great for kids as well. For newanimators, doll armatures are particularly suitable, because they eliminate the extra step of making an armature from scratch, so that the focus can imme-diately be on just animating. Unlike wire armatures, which run the risk of breaking during animation, the plastic beads can be poppedback together again if they come apart. Although doll armatures comepremade as a body shape, they can also be cannibalized for extra partssuch as tails, tentacles, or other appendages. You can also shortentheir arms or legs for more stocky characters (see Figure 7.18, built
Other Characters with Doll Armatures
141
7. Building Puppets
Figure 7.17 Plastic beaded doll armatures. Figure 7.18 Leprechaun puppet by Nicole Tremblay.
StopAnimation-07 6/11/06 10:12 PM Page 141
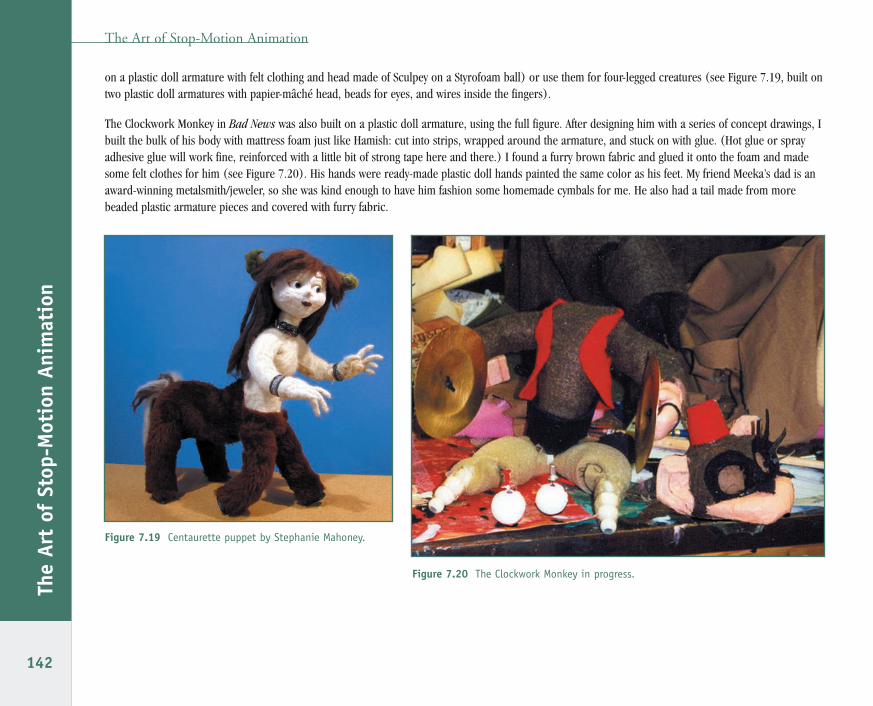
on a plastic doll armature with felt clothing and head made of Sculpey on a Styrofoam ball) or use them for four-legged creatures (see Figure 7.19, built ontwo plastic doll armatures with papier-mâché head, beads for eyes, and wires inside the fingers).
The Clockwork Monkey in Bad News was also built on a plastic doll armature, using the full figure. After designing him with a series of concept drawings, Ibuilt the bulk of his body with mattress foam just like Hamish: cut into strips, wrapped around the armature, and stuck on with glue. (Hot glue or sprayadhesive glue will work fine, reinforced with a little bit of strong tape here and there.) I found a furry brown fabric and glued it onto the foam and madesome felt clothes for him (see Figure 7.20). His hands were ready-made plastic doll hands painted the same color as his feet. My friend Meeka’s dad is anaward-winning metalsmith/jeweler, so she was kind enough to have him fashion some homemade cymbals for me. He also had a tail made from morebeaded plastic armature pieces and covered with furry fabric.
The Art of Stop-Motion Animation
142
The
Art
of S
top-
Mot
ion
Anim
atio
n
Figure 7.19 Centaurette puppet by Stephanie Mahoney.
Figure 7.20 The Clockwork Monkey in progress.
StopAnimation-07 6/11/06 10:12 PM Page 142
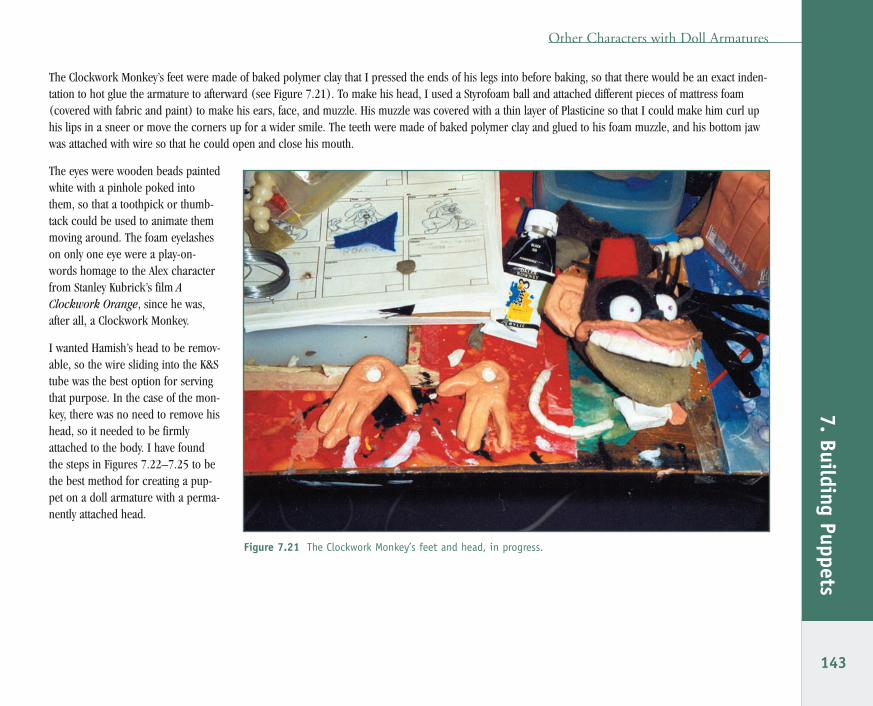
The Clockwork Monkey’s feet were made of baked polymer clay that I pressed the ends of his legs into before baking, so that there would be an exact inden-tation to hot glue the armature to afterward (see Figure 7.21). To make his head, I used a Styrofoam ball and attached different pieces of mattress foam(covered with fabric and paint) to make his ears, face, and muzzle. His muzzle was covered with a thin layer of Plasticine so that I could make him curl uphis lips in a sneer or move the corners up for a wider smile. The teeth were made of baked polymer clay and glued to his foam muzzle, and his bottom jawwas attached with wire so that he could open and close his mouth.
The eyes were wooden beads paintedwhite with a pinhole poked intothem, so that a toothpick or thumb-tack could be used to animate themmoving around. The foam eyelasheson only one eye were a play-on-words homage to the Alex characterfrom Stanley Kubrick’s film AClockwork Orange, since he was,after all, a Clockwork Monkey.
I wanted Hamish’s head to be remov-able, so the wire sliding into the K&Stube was the best option for servingthat purpose. In the case of the mon-key, there was no need to remove hishead, so it needed to be firmlyattached to the body. I have foundthe steps in Figures 7.22–7.25 to bethe best method for creating a pup-pet on a doll armature with a perma-nently attached head.
Other Characters with Doll Armatures
143
7. Building Puppets
Figure 7.21 The Clockwork Monkey’s feet and head, in progress.
StopAnimation-07 6/11/06 10:12 PM Page 143
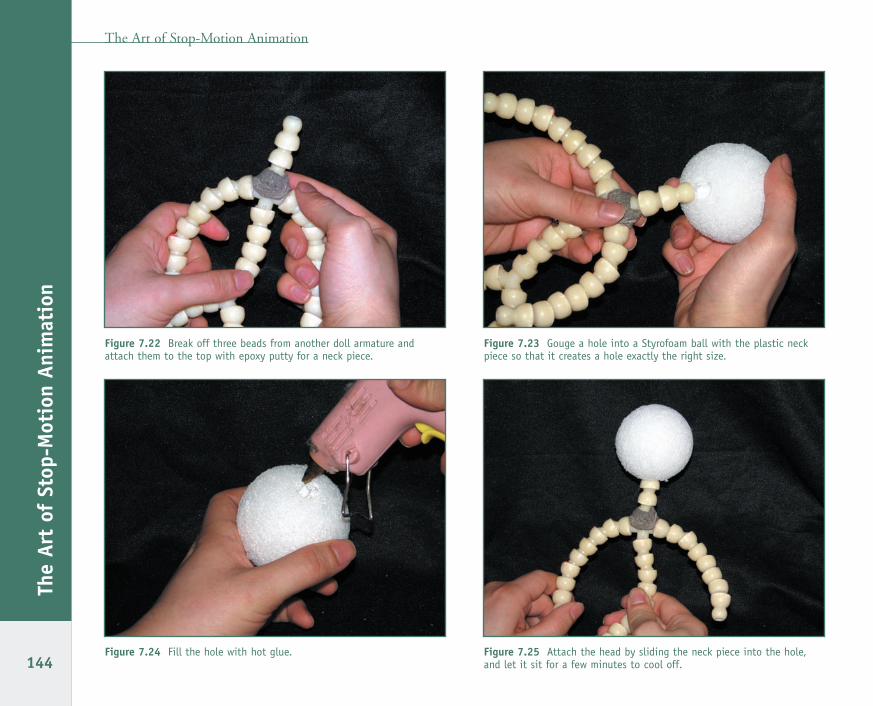
Figure 7.24 Fill the hole with hot glue. Figure 7.25 Attach the head by sliding the neck piece into the hole,and let it sit for a few minutes to cool off.
The Art of Stop-Motion Animation
144
The
Art
of S
top-
Mot
ion
Anim
atio
n
Figure 7.22 Break off three beads from another doll armature andattach them to the top with epoxy putty for a neck piece.
Figure 7.23 Gouge a hole into a Styrofoam ball with the plastic neckpiece so that it creates a hole exactly the right size.
StopAnimation-07 6/11/06 10:12 PM Page 144
Other Characters with Doll Armatures
145
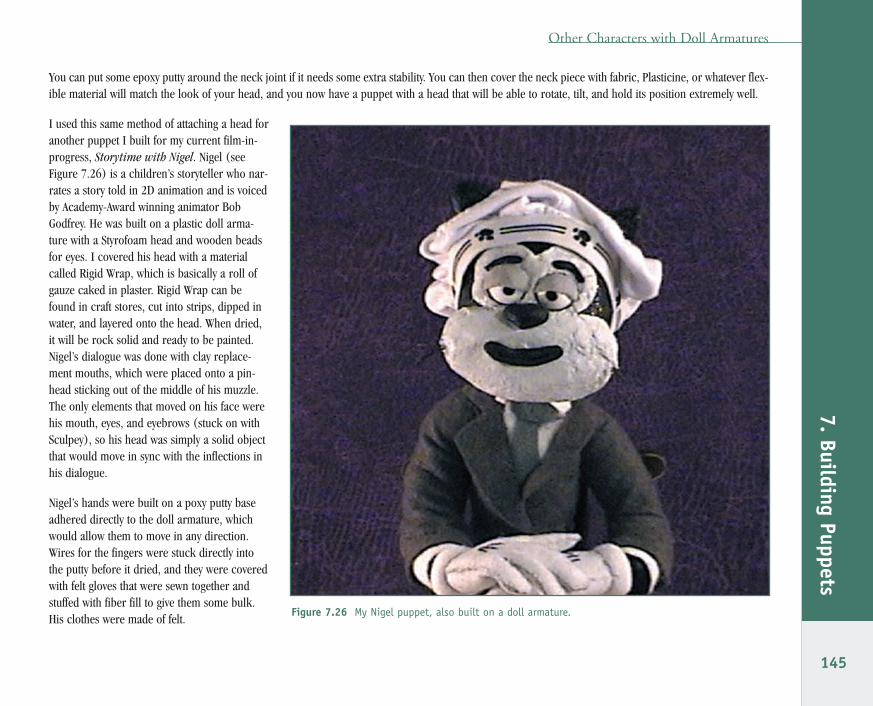
7. Building PuppetsYou can put some epoxy putty around the neck joint if it needs some extra stability. You can then cover the neck piece with fabric, Plasticine, or whatever flex-ible material will match the look of your head, and you now have a puppet with a head that will be able to rotate, tilt, and hold its position extremely well.
I used this same method of attaching a head foranother puppet I built for my current film-in-progress, Storytime with Nigel. Nigel (seeFigure 7.26) is a children’s storyteller who nar-rates a story told in 2D animation and is voicedby Academy-Award winning animator BobGodfrey. He was built on a plastic doll arma-ture with a Styrofoam head and wooden beadsfor eyes. I covered his head with a materialcalled Rigid Wrap, which is basically a roll ofgauze caked in plaster. Rigid Wrap can befound in craft stores, cut into strips, dipped inwater, and layered onto the head. When dried,it will be rock solid and ready to be painted.Nigel’s dialogue was done with clay replace-ment mouths, which were placed onto a pin-head sticking out of the middle of his muzzle.The only elements that moved on his face werehis mouth, eyes, and eyebrows (stuck on withSculpey), so his head was simply a solid objectthat would move in sync with the inflections inhis dialogue.
Nigel’s hands were built on a poxy putty baseadhered directly to the doll armature, whichwould allow them to move in any direction.Wires for the fingers were stuck directly intothe putty before it dried, and they were coveredwith felt gloves that were sewn together andstuffed with fiber fill to give them some bulk.His clothes were made of felt.
Figure 7.26 My Nigel puppet, also built on a doll armature.
StopAnimation-07 6/11/06 10:12 PM Page 145

All of these puppets were built with the plastic doll armaturesbecause they proved to be the best kind of armatures for the sizeneeded and suited themselves well to the design. These methods maynot necessarily be as convenient for other character designs. Theimportant point here is that the puppets were designed based onwhat would be required of them to perform in front of the camera,which was mainly dialogue or simple character animation from thewaist up. I would highly recommend getting your hands on a fewarmatures like this for your first puppet experiments. Here are a fewresources, and you can always Google search for more or scope outyour local craft store:
� www.varietydistributors.com. This is where I tracked downthe armatures that stopped being distributed in Vancouver craftstores, and I began buying in bulk for my students. They maynot have many more in stock but still may be worth contactingto find out. The item number is 17130.
� www.modularhose.com. This new site sells the beaded arma-ture pieces that can be used to custom-build a doll armature.For an example of the armature design on their old site, go tothe “Loc-Line Doll Armature” link in the “Workshop” sectionunder the Library at StopMotionWorks.com.
� www.miniworlddolls.com/TS9Armature.htm. This is a sitefrom which to buy plastic doll armatures, in different sizes anddesign styles.
� www.crawforddesigns.net/acces.html. This is another sitefrom which to buy plastic doll armatures.
Ball-and-Socket ArmaturesIn studio productions, the most popular kind of armature is the ball-and-socket (see Figures 7.27 and 7.28), whose use goes all the wayback to the original King Kong. Ball-and-socket armatures were alsoused by Ray Harryhausen and Phil Tippett, and for the puppets infilms like The Nightmare Before Christmas and Wallace and
The Art of Stop-Motion Animation
146
The
Art
of S
top-
Mot
ion
Anim
atio
n
Figure 7.27 A complex ball-and-socket armature for a fantasy creature in RayHarryhausen-esque tradition. (Copyright Stop Motion Works.)
StopAnimation-07 6/11/06 10:12 PM Page 146
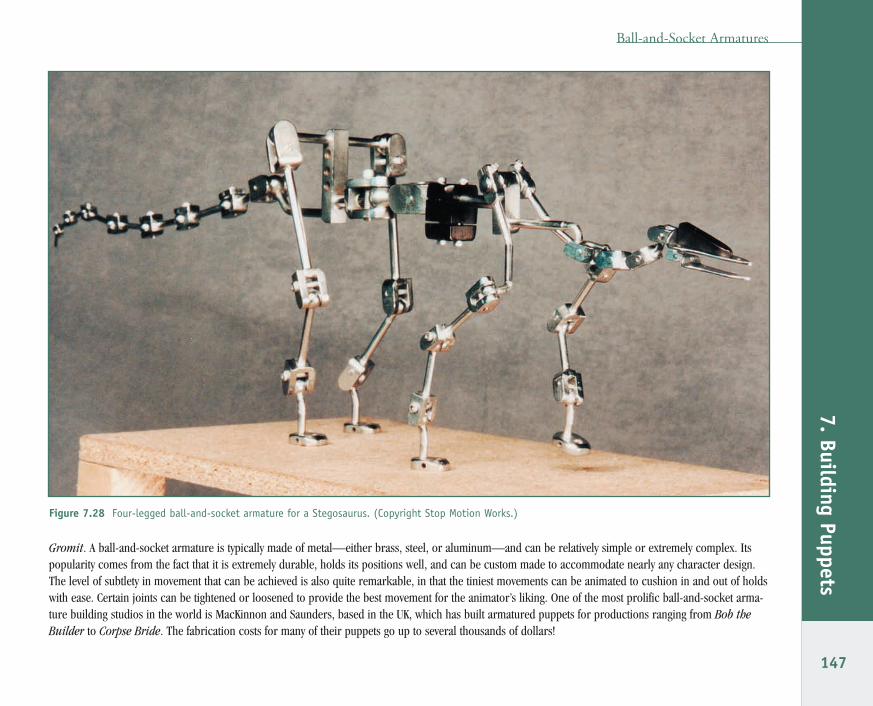
Gromit. A ball-and-socket armature is typically made of metal—either brass, steel, or aluminum—and can be relatively simple or extremely complex. Itspopularity comes from the fact that it is extremely durable, holds its positions well, and can be custom made to accommodate nearly any character design.The level of subtlety in movement that can be achieved is also quite remarkable, in that the tiniest movements can be animated to cushion in and out of holdswith ease. Certain joints can be tightened or loosened to provide the best movement for the animator’s liking. One of the most prolific ball-and-socket arma-ture building studios in the world is MacKinnon and Saunders, based in the UK, which has built armatured puppets for productions ranging from Bob theBuilder to Corpse Bride. The fabrication costs for many of their puppets go up to several thousands of dollars!
Ball-and-Socket Armatures
147
7. Building Puppets
Figure 7.28 Four-legged ball-and-socket armature for a Stegosaurus. (Copyright Stop Motion Works.)
StopAnimation-07 6/11/06 10:12 PM Page 147
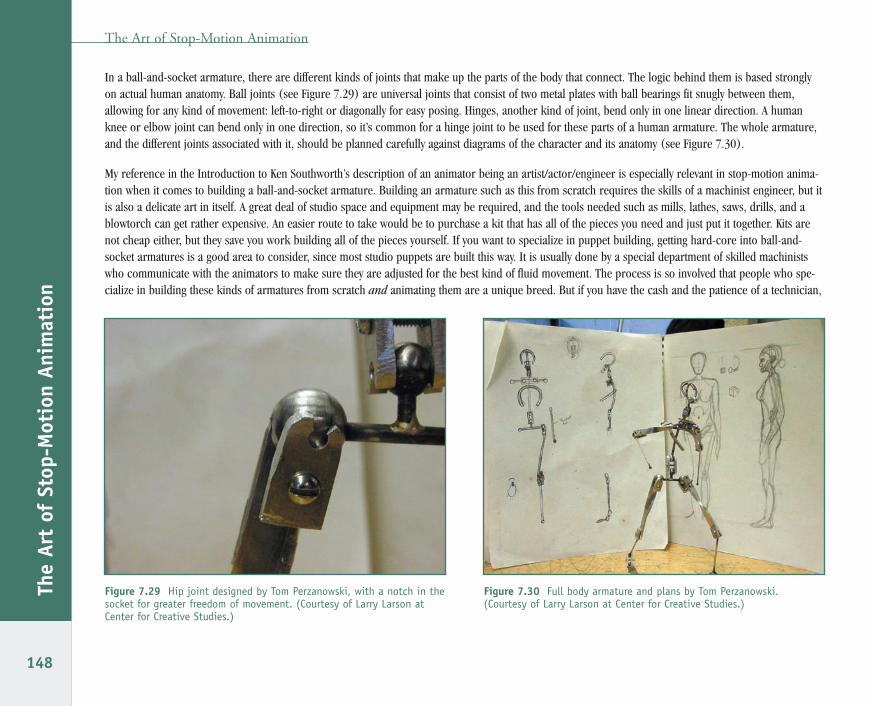
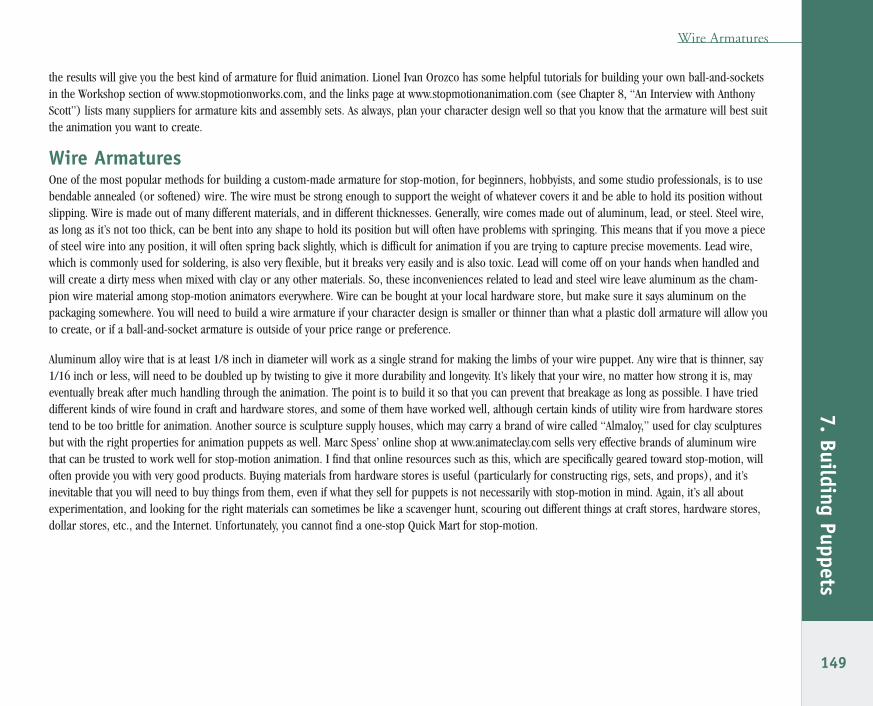
In a ball-and-socket armature, there are different kinds of joints that make up the parts of the body that connect. The logic behind them is based stronglyon actual human anatomy. Ball joints (see Figure 7.29) are universal joints that consist of two metal plates with ball bearings fit snugly between them,allowing for any kind of movement: left-to-right or diagonally for easy posing. Hinges, another kind of joint, bend only in one linear direction. A humanknee or elbow joint can bend only in one direction, so it’s common for a hinge joint to be used for these parts of a human armature. The whole armature,and the different joints associated with it, should be planned carefully against diagrams of the character and its anatomy (see Figure 7.30).
My reference in the Introduction to Ken Southworth’s description of an animator being an artist/actor/engineer is especially relevant in stop-motion anima-tion when it comes to building a ball-and-socket armature. Building an armature such as this from scratch requires the skills of a machinist engineer, but itis also a delicate art in itself. A great deal of studio space and equipment may be required, and the tools needed such as mills, lathes, saws, drills, and ablowtorch can get rather expensive. An easier route to take would be to purchase a kit that has all of the pieces you need and just put it together. Kits arenot cheap either, but they save you work building all of the pieces yourself. If you want to specialize in puppet building, getting hard-core into ball-and-socket armatures is a good area to consider, since most studio puppets are built this way. It is usually done by a special department of skilled machinistswho communicate with the animators to make sure they are adjusted for the best kind of fluid movement. The process is so involved that people who spe-cialize in building these kinds of armatures from scratch and animating them are a unique breed. But if you have the cash and the patience of a technician,
The Art of Stop-Motion Animation
148
The
Art
of S
top-
Mot
ion
Anim
atio
n
Figure 7.29 Hip joint designed by Tom Perzanowski, with a notch in thesocket for greater freedom of movement. (Courtesy of Larry Larson atCenter for Creative Studies.)
Figure 7.30 Full body armature and plans by Tom Perzanowski.(Courtesy of Larry Larson at Center for Creative Studies.)
StopAnimation-07 6/11/06 10:12 PM Page 148
the results will give you the best kind of armature for fluid animation. Lionel Ivan Orozco has some helpful tutorials for building your own ball-and-socketsin the Workshop section of www.stopmotionworks.com, and the links page at www.stopmotionanimation.com (see Chapter 8, “An Interview with AnthonyScott”) lists many suppliers for armature kits and assembly sets. As always, plan your character design well so that you know that the armature will best suitthe animation you want to create.
Wire ArmaturesOne of the most popular methods for building a custom-made armature for stop-motion, for beginners, hobbyists, and some studio professionals, is to usebendable annealed (or softened) wire. The wire must be strong enough to support the weight of whatever covers it and be able to hold its position withoutslipping. Wire is made out of many different materials, and in different thicknesses. Generally, wire comes made out of aluminum, lead, or steel. Steel wire,as long as it’s not too thick, can be bent into any shape to hold its position but will often have problems with springing. This means that if you move a pieceof steel wire into any position, it will often spring back slightly, which is difficult for animation if you are trying to capture precise movements. Lead wire,which is commonly used for soldering, is also very flexible, but it breaks very easily and is also toxic. Lead will come off on your hands when handled andwill create a dirty mess when mixed with clay or any other materials. So, these inconveniences related to lead and steel wire leave aluminum as the cham-pion wire material among stop-motion animators everywhere. Wire can be bought at your local hardware store, but make sure it says aluminum on thepackaging somewhere. You will need to build a wire armature if your character design is smaller or thinner than what a plastic doll armature will allow youto create, or if a ball-and-socket armature is outside of your price range or preference.
Aluminum alloy wire that is at least 1/8 inch in diameter will work as a single strand for making the limbs of your wire puppet. Any wire that is thinner, say1/16 inch or less, will need to be doubled up by twisting to give it more durability and longevity. It’s likely that your wire, no matter how strong it is, mayeventually break after much handling through the animation. The point is to build it so that you can prevent that breakage as long as possible. I have trieddifferent kinds of wire found in craft and hardware stores, and some of them have worked well, although certain kinds of utility wire from hardware storestend to be too brittle for animation. Another source is sculpture supply houses, which may carry a brand of wire called “Almaloy,” used for clay sculpturesbut with the right properties for animation puppets as well. Marc Spess’ online shop at www.animateclay.com sells very effective brands of aluminum wirethat can be trusted to work well for stop-motion animation. I find that online resources such as this, which are specifically geared toward stop-motion, willoften provide you with very good products. Buying materials from hardware stores is useful (particularly for constructing rigs, sets, and props), and it’sinevitable that you will need to buy things from them, even if what they sell for puppets is not necessarily with stop-motion in mind. Again, it’s all aboutexperimentation, and looking for the right materials can sometimes be like a scavenger hunt, scouring out different things at craft stores, hardware stores,dollar stores, etc., and the Internet. Unfortunately, you cannot find a one-stop Quick Mart for stop-motion.
Wire Armatures
149
7. Building Puppets
StopAnimation-07 6/11/06 10:12 PM Page 149
Building a Simple Wire PuppetLet’s build a basic human puppet from scratch! There is no ready-made armature in this case, so in a sense, you are creating something out of nothing,which is a creative privilege. Be proud! These steps demonstrate how to build a character out of simple, cheap materials.
Start by making a drawing of your character standing straight up in a generic position. This drawing will be used for scale purposes and to make sure youbuild your armature with the right proportions. Make your drawing roughly the right height you want your puppet to be. A few millimeters here and therewon’t matter; it’s there as a guide. In this case, the puppet is going to be about 8 to 9 inches tall, which is a good size to work with.
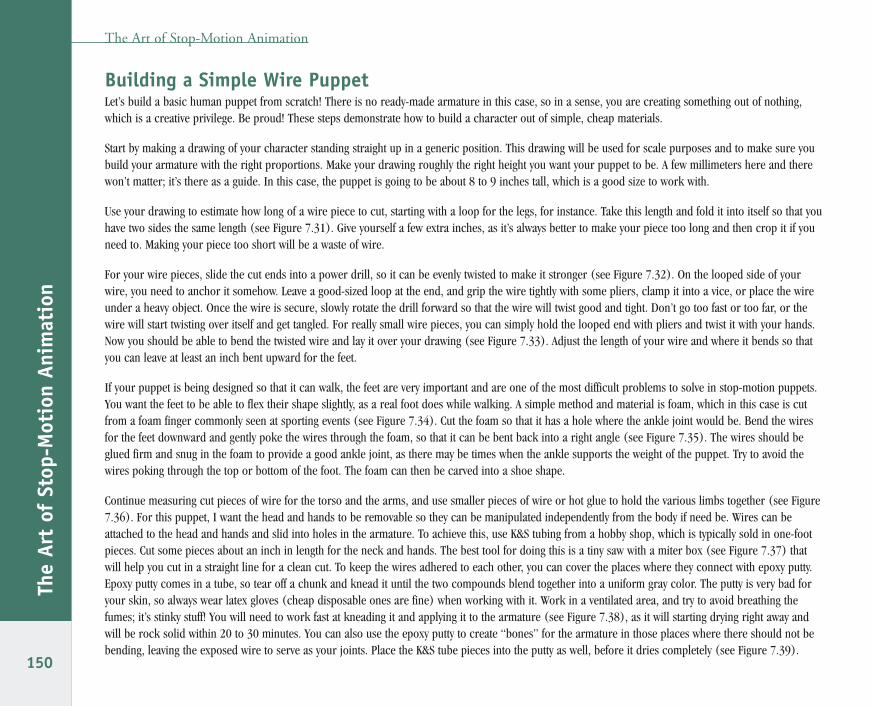
Use your drawing to estimate how long of a wire piece to cut, starting with a loop for the legs, for instance. Take this length and fold it into itself so that youhave two sides the same length (see Figure 7.31). Give yourself a few extra inches, as it’s always better to make your piece too long and then crop it if youneed to. Making your piece too short will be a waste of wire.
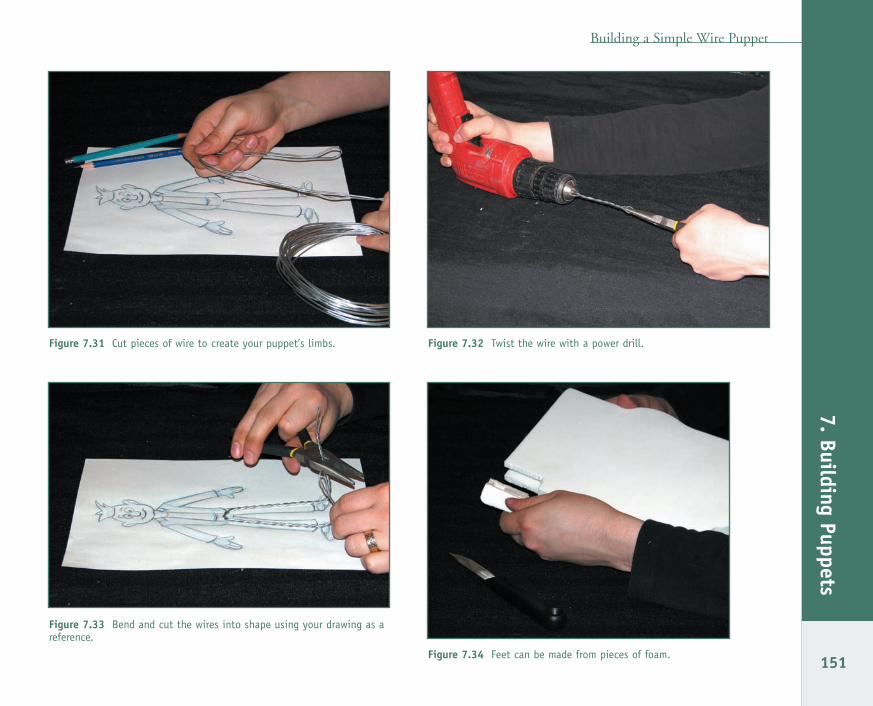
For your wire pieces, slide the cut ends into a power drill, so it can be evenly twisted to make it stronger (see Figure 7.32). On the looped side of yourwire, you need to anchor it somehow. Leave a good-sized loop at the end, and grip the wire tightly with some pliers, clamp it into a vice, or place the wireunder a heavy object. Once the wire is secure, slowly rotate the drill forward so that the wire will twist good and tight. Don’t go too fast or too far, or thewire will start twisting over itself and get tangled. For really small wire pieces, you can simply hold the looped end with pliers and twist it with your hands.Now you should be able to bend the twisted wire and lay it over your drawing (see Figure 7.33). Adjust the length of your wire and where it bends so thatyou can leave at least an inch bent upward for the feet.
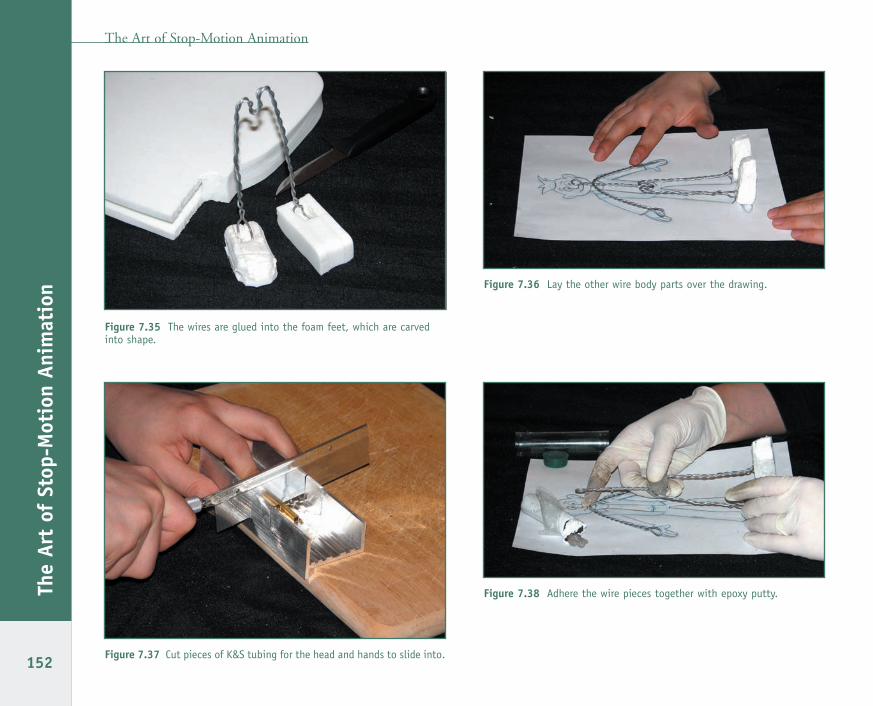
If your puppet is being designed so that it can walk, the feet are very important and are one of the most difficult problems to solve in stop-motion puppets.You want the feet to be able to flex their shape slightly, as a real foot does while walking. A simple method and material is foam, which in this case is cutfrom a foam finger commonly seen at sporting events (see Figure 7.34). Cut the foam so that it has a hole where the ankle joint would be. Bend the wiresfor the feet downward and gently poke the wires through the foam, so that it can be bent back into a right angle (see Figure 7.35). The wires should beglued firm and snug in the foam to provide a good ankle joint, as there may be times when the ankle supports the weight of the puppet. Try to avoid thewires poking through the top or bottom of the foot. The foam can then be carved into a shoe shape.
Continue measuring cut pieces of wire for the torso and the arms, and use smaller pieces of wire or hot glue to hold the various limbs together (see Figure7.36). For this puppet, I want the head and hands to be removable so they can be manipulated independently from the body if need be. Wires can beattached to the head and hands and slid into holes in the armature. To achieve this, use K&S tubing from a hobby shop, which is typically sold in one-footpieces. Cut some pieces about an inch in length for the neck and hands. The best tool for doing this is a tiny saw with a miter box (see Figure 7.37) thatwill help you cut in a straight line for a clean cut. To keep the wires adhered to each other, you can cover the places where they connect with epoxy putty.Epoxy putty comes in a tube, so tear off a chunk and knead it until the two compounds blend together into a uniform gray color. The putty is very bad foryour skin, so always wear latex gloves (cheap disposable ones are fine) when working with it. Work in a ventilated area, and try to avoid breathing thefumes; it’s stinky stuff! You will need to work fast at kneading it and applying it to the armature (see Figure 7.38), as it will starting drying right away andwill be rock solid within 20 to 30 minutes. You can also use the epoxy putty to create “bones” for the armature in those places where there should not bebending, leaving the exposed wire to serve as your joints. Place the K&S tube pieces into the putty as well, before it dries completely (see Figure 7.39).
The Art of Stop-Motion Animation
150
The
Art
of S
top-
Mot
ion
Anim
atio
n
StopAnimation-07 6/11/06 10:12 PM Page 150
Building a Simple Wire Puppet
151
7. Building Puppets
Figure 7.31 Cut pieces of wire to create your puppet’s limbs. Figure 7.32 Twist the wire with a power drill.
Figure 7.33 Bend and cut the wires into shape using your drawing as areference.
Figure 7.34 Feet can be made from pieces of foam.
StopAnimation-07 6/11/06 10:12 PM Page 151
The Art of Stop-Motion Animation
152
The
Art
of S
top-
Mot
ion
Anim
atio
n
Figure 7.35 The wires are glued into the foam feet, which are carvedinto shape.
Figure 7.36 Lay the other wire body parts over the drawing.
Figure 7.37 Cut pieces of K&S tubing for the head and hands to slide into.
Figure 7.38 Adhere the wire pieces together with epoxy putty.
StopAnimation-07 6/11/06 10:13 PM Page 152

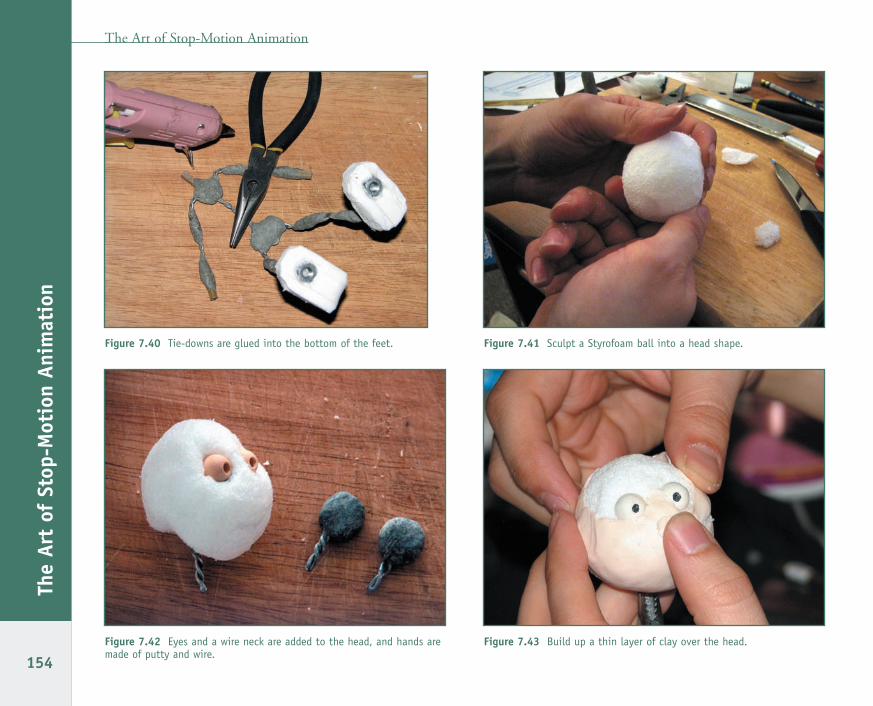
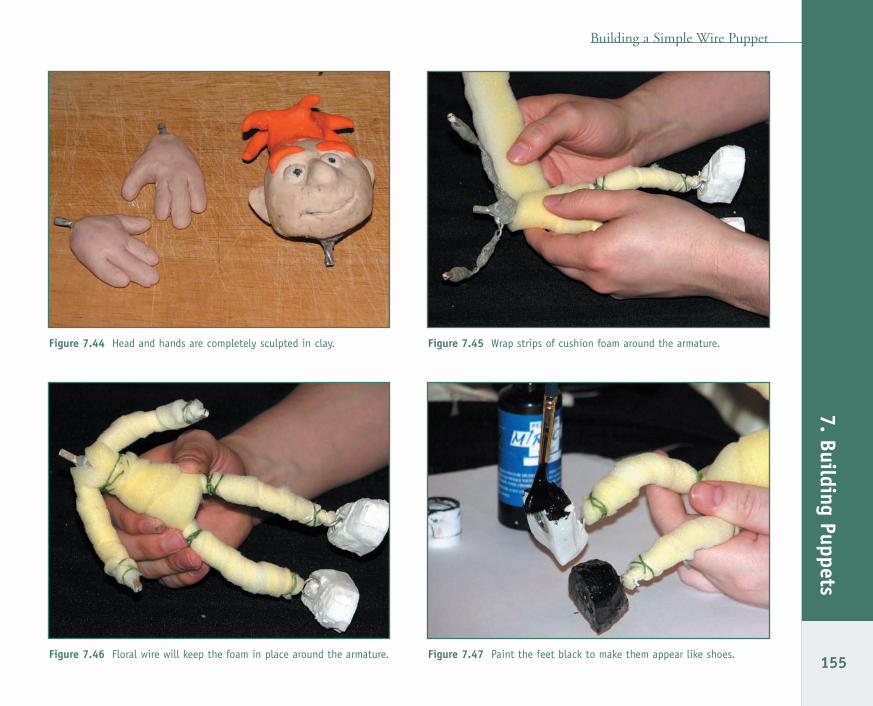
The puppet’s feet, especially if it will be standing orwalking full-figure on camera, will need tie-downsbuilt into them. Tie-downs allow the feet to be firmlyanchored to the ground and prevent the puppet fromfalling over. Carve holes into the foam feet and super-glue nuts into them, making sure they are flush withthe bottom surface of each foot (see Figure 7.40).When animating, bolts can be screwed through holesin the set, up into the nuts in the feet. More on this inChapter 9. The head and hands can be sculpted outof clay, but to use solid clay would make the puppettoo top-heavy, so it should be built around somethinglightweight. A Styrofoam ball can be sculpted itself bypressing it into a head-like shape (see Figure 7.41).Eyes are gouged into the Styrofoam, and a twistedpiece of wire is stuck into the head where the neckjoint should be. Use epoxy putty to firmly attach thewire to the head. The base for the hands is a piece ofepoxy putty built around a twisted wire (see Figure7.42). Begin layering thin pieces of clay onto thefoam head, lining it up directly with the eyes. Thenadd additional facial features, keeping in mind thatyou want to avoid weighing down your puppet withtoo much clay. Build clay around the hands, leavingthe fingers as solid clay (see Figures 7.43–7.44).
To build the bulk, or “muscles,” of your puppet, cutstrips of mattress/cushion foam (found at craft storesor specialty foam shops) and wrap them around yourarmature. The foam can be held in place by wrappingand twisting pieces of floral wire around it (seeFigures 7.45–7.46). The foam should be wrappedaround tightly enough to allow the armature’s joints to be able to bend. The feet can be painted black (see Figure 7.47), or any other color you wish.
Building a Simple Wire Puppet
153
7. Building Puppets
Figure 7.39 The final armature with all of its epoxy bones.
StopAnimation-07 6/11/06 10:13 PM Page 153
The Art of Stop-Motion Animation
154
The
Art
of S
top-
Mot
ion
Anim
atio
n
Figure 7.40 Tie-downs are glued into the bottom of the feet. Figure 7.41 Sculpt a Styrofoam ball into a head shape.
Figure 7.42 Eyes and a wire neck are added to the head, and hands aremade of putty and wire.
Figure 7.43 Build up a thin layer of clay over the head.
StopAnimation-07 6/11/06 10:13 PM Page 154
Building a Simple Wire Puppet
155
7. Building Puppets
Figure 7.44 Head and hands are completely sculpted in clay. Figure 7.45 Wrap strips of cushion foam around the armature.
Figure 7.46 Floral wire will keep the foam in place around the armature. Figure 7.47 Paint the feet black to make them appear like shoes.
StopAnimation-07 6/11/06 10:13 PM Page 155
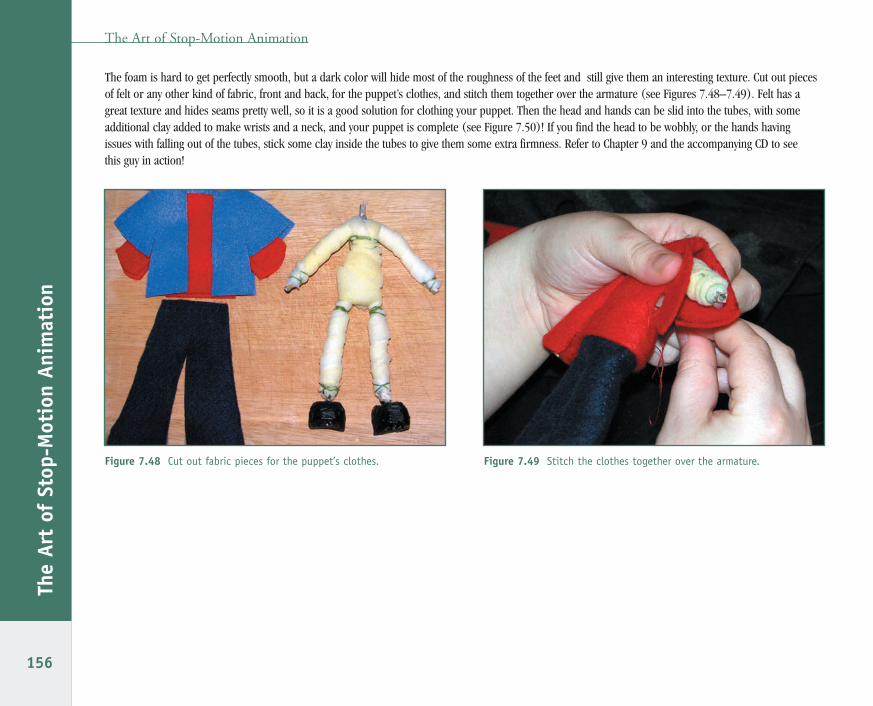
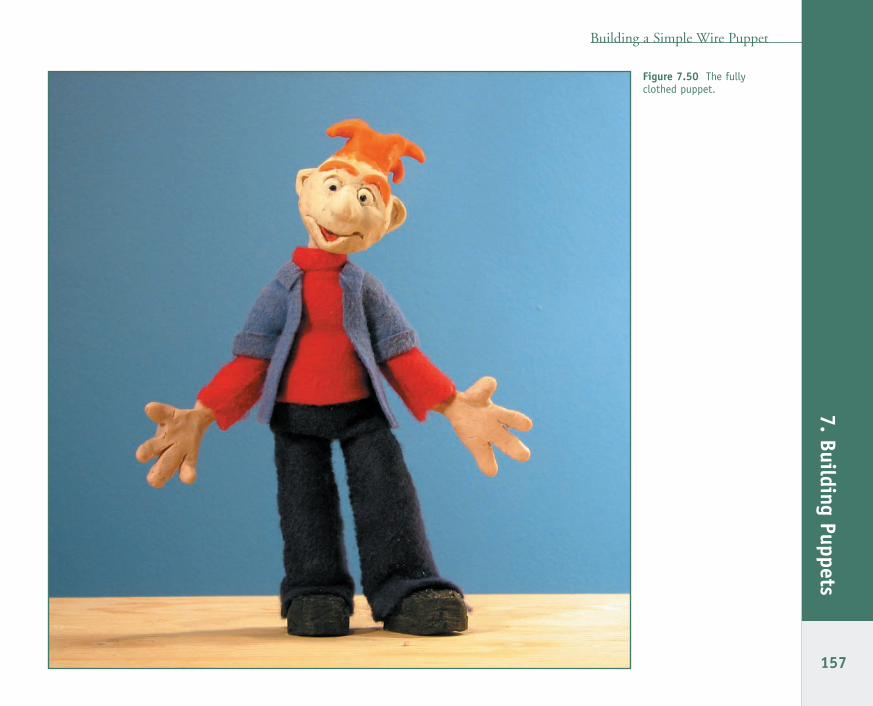
The foam is hard to get perfectly smooth, but a dark color will hide most of the roughness of the feet and still give them an interesting texture. Cut out piecesof felt or any other kind of fabric, front and back, for the puppet’s clothes, and stitch them together over the armature (see Figures 7.48–7.49). Felt has agreat texture and hides seams pretty well, so it is a good solution for clothing your puppet. Then the head and hands can be slid into the tubes, with someadditional clay added to make wrists and a neck, and your puppet is complete (see Figure 7.50)! If you find the head to be wobbly, or the hands having issues with falling out of the tubes, stick some clay inside the tubes to give them some extra firmness. Refer to Chapter 9 and the accompanying CD to see this guy in action!
The Art of Stop-Motion Animation
156
The
Art
of S
top-
Mot
ion
Anim
atio
n
Figure 7.48 Cut out fabric pieces for the puppet’s clothes. Figure 7.49 Stitch the clothes together over the armature.
StopAnimation-07 6/11/06 10:13 PM Page 156
Building a Simple Wire Puppet
157
7. Building PuppetsFigure 7.50 The fullyclothed puppet.
StopAnimation-07 6/11/06 10:13 PM Page 157

Molds and Foam Latex MethodsFor student films, independent projects, or commercials, most puppets are a one-shot deal that are built once, animated once, and then moved on to theRetirement Home for Stop-Motion Puppets. For a stop-motion studio production, lots of puppets are needed, often several different copies of the samecharacter (see Figure 7.51). A feature film or television series might have many different scenes with the same characters being animated on separate setsat the same time. This is part of the reason why creating puppets with molds is very popular in the industry. The technique ensures that any puppets createdas duplicates or back-up versions (in case an armature breaks) will look the same, so that the character’s appearance does not change throughout theshow. Another common practice is to create the same puppet in different scales—large-scale for close-ups and tiny versions for extreme long shots. Nomatter which scale, the only way to guarantee that a puppet will look exactly the same twice is to use molds of one kind or another. Since many stop-motionhopefuls look to the big-budget productions to learn about how these films are made, there is a common misconception that this is the only way to makepuppets. As you have seen in this chapteralready, it is not the only way, but for studioproductions, it usually works best.Independent filmmakers can use these tech-niques, too, of course, but a word of cautionto the beginner: It is an extremely time-consuming and expensive method that mustbe learned through a lot of trial and error toget right. Many different skills are involved,and to do it conveniently, you should have adedicated studio space for it. Much of theprocess is messy and deals with poisonousmaterials, so I would not recommendattempting it in your kitchen or anyplaceelse with food around. Adequate ventilationis a must, because the molds are typicallyfilled with foam latex, which is toxic andextremely potent. If you want to specialize inpuppet building, I encourage you to do yourresearch and get yourself equipped to try it,and after much experimentation and persist-ence you will find it rewarding. But if youhave a limited budget and want a quicker fixfor making a puppet, I would suggest usingone of the other simple methods in thischapter.
The Art of Stop-Motion Animation
158
The
Art
of S
top-
Mot
ion
Anim
atio
n
Figure 7.51 Painting duplicate puppet heads. (Courtesy of Zung Studio.)
StopAnimation-07 6/11/06 10:13 PM Page 158
Molds and Foam Latex Methods
159
7. Building PuppetsThe advantage of making a foam latex puppet from a mold is that you can create a puppet with an outside surface that will not flutter or lose its shape whentouched during animation. If a puppet’s arm, for instance, is covered in clay, then it may squish and lose its shape after many nudges by the animator andwill need to be constantly resculpted. If the arm is covered in fabric, there is the possibility that the texture or any loose edges will flutter in the resultinganimation. With a foam latex covering, the arm can be squeezed tightly but will then spring back to its original shape. The latex can be painted so that it has an appearance similar to clay, so it is commonly used in clay animation for parts of the puppet that will have less movement. The head and hands/armsmay be made of Plasticine clay, but the torso and legs are foam latex, and the two materials work together for a seamless appearance. It is also a popularalternative to clay because it keeps down the weight of the puppet. Aardman Animations, makers of Wallace and Gromit, uses this technique for many oftheir puppets.
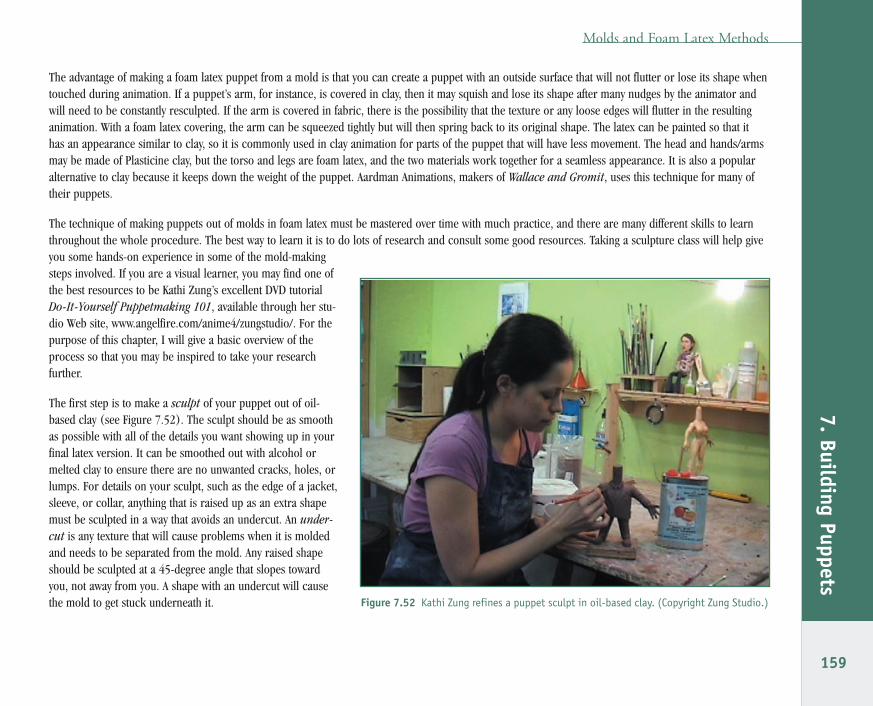
The technique of making puppets out of molds in foam latex must be mastered over time with much practice, and there are many different skills to learnthroughout the whole procedure. The best way to learn it is to do lots of research and consult some good resources. Taking a sculpture class will help giveyou some hands-on experience in some of the mold-makingsteps involved. If you are a visual learner, you may find one ofthe best resources to be Kathi Zung’s excellent DVD tutorialDo-It-Yourself Puppetmaking 101, available through her stu-dio Web site, www.angelfire.com/anime4/zungstudio/. For thepurpose of this chapter, I will give a basic overview of theprocess so that you may be inspired to take your research further.
The first step is to make a sculpt of your puppet out of oil-based clay (see Figure 7.52). The sculpt should be as smoothas possible with all of the details you want showing up in yourfinal latex version. It can be smoothed out with alcohol ormelted clay to ensure there are no unwanted cracks, holes, orlumps. For details on your sculpt, such as the edge of a jacket,sleeve, or collar, anything that is raised up as an extra shapemust be sculpted in a way that avoids an undercut. An under-cut is any texture that will cause problems when it is moldedand needs to be separated from the mold. Any raised shapeshould be sculpted at a 45-degree angle that slopes towardyou, not away from you. A shape with an undercut will causethe mold to get stuck underneath it. Figure 7.52 Kathi Zung refines a puppet sculpt in oil-based clay. (Copyright Zung Studio.)
StopAnimation-07 6/11/06 10:13 PM Page 159
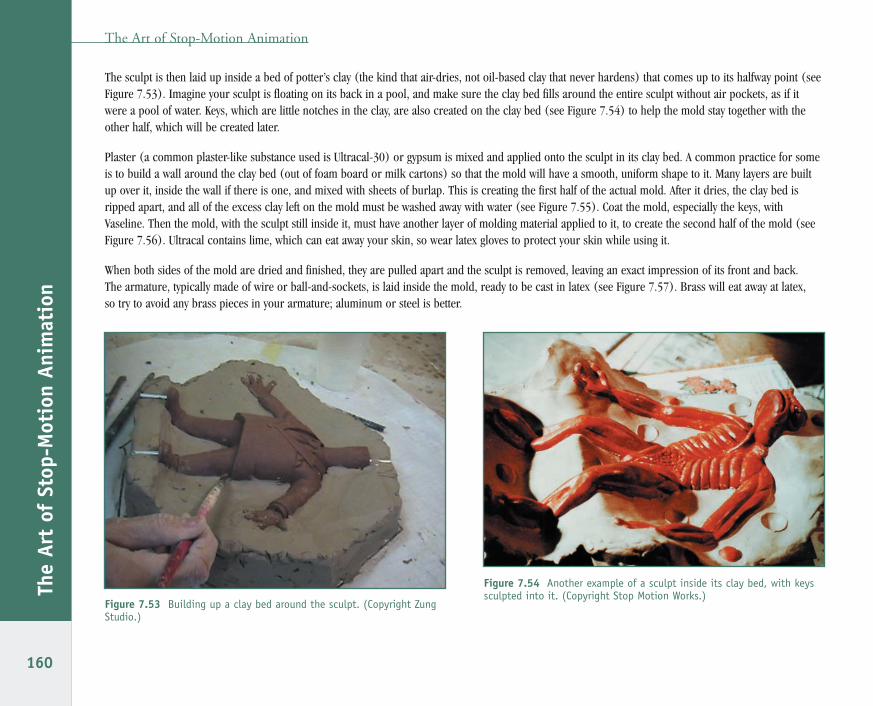
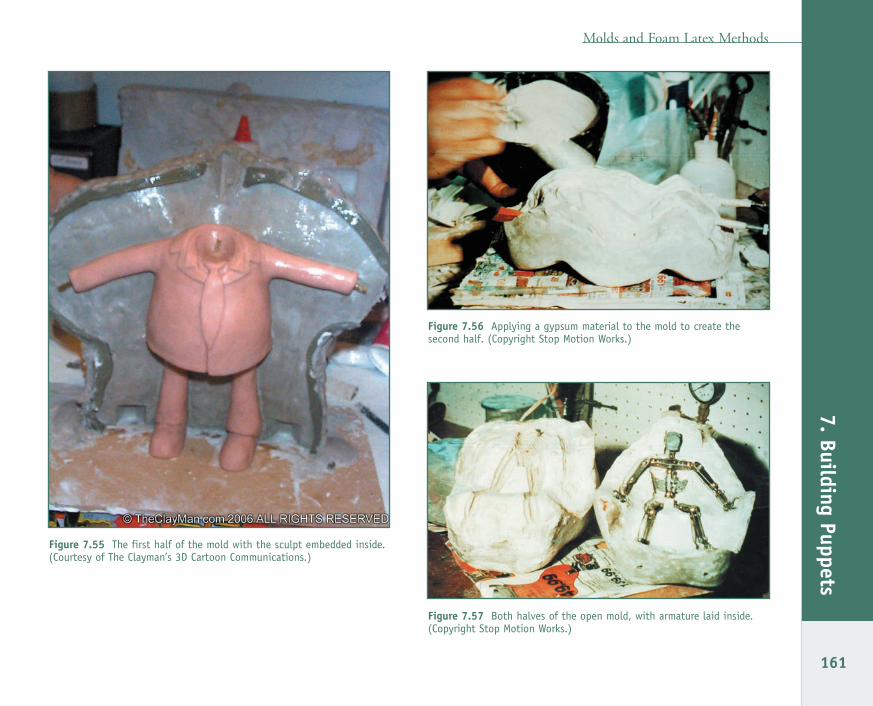
The sculpt is then laid up inside a bed of potter’s clay (the kind that air-dries, not oil-based clay that never hardens) that comes up to its halfway point (seeFigure 7.53). Imagine your sculpt is floating on its back in a pool, and make sure the clay bed fills around the entire sculpt without air pockets, as if itwere a pool of water. Keys, which are little notches in the clay, are also created on the clay bed (see Figure 7.54) to help the mold stay together with theother half, which will be created later.
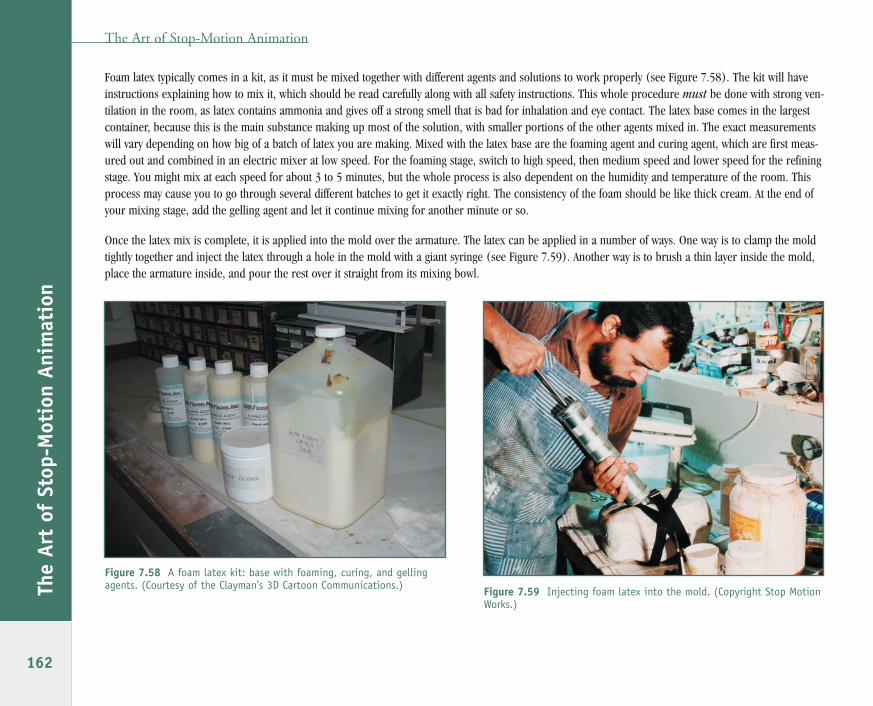
Plaster (a common plaster-like substance used is Ultracal-30) or gypsum is mixed and applied onto the sculpt in its clay bed. A common practice for someis to build a wall around the clay bed (out of foam board or milk cartons) so that the mold will have a smooth, uniform shape to it. Many layers are builtup over it, inside the wall if there is one, and mixed with sheets of burlap. This is creating the first half of the actual mold. After it dries, the clay bed isripped apart, and all of the excess clay left on the mold must be washed away with water (see Figure 7.55). Coat the mold, especially the keys, withVaseline. Then the mold, with the sculpt still inside it, must have another layer of molding material applied to it, to create the second half of the mold (seeFigure 7.56). Ultracal contains lime, which can eat away your skin, so wear latex gloves to protect your skin while using it.
When both sides of the mold are dried and finished, they are pulled apart and the sculpt is removed, leaving an exact impression of its front and back. The armature, typically made of wire or ball-and-sockets, is laid inside the mold, ready to be cast in latex (see Figure 7.57). Brass will eat away at latex, so try to avoid any brass pieces in your armature; aluminum or steel is better.
The Art of Stop-Motion Animation
160
The
Art
of S
top-
Mot
ion
Anim
atio
n
Figure 7.53 Building up a clay bed around the sculpt. (Copyright ZungStudio.)
Figure 7.54 Another example of a sculpt inside its clay bed, with keyssculpted into it. (Copyright Stop Motion Works.)
StopAnimation-07 6/11/06 10:13 PM Page 160
Molds and Foam Latex Methods
161
7. Building Puppets
Figure 7.55 The first half of the mold with the sculpt embedded inside.(Courtesy of The Clayman’s 3D Cartoon Communications.)
Figure 7.56 Applying a gypsum material to the mold to create thesecond half. (Copyright Stop Motion Works.)
Figure 7.57 Both halves of the open mold, with armature laid inside.(Copyright Stop Motion Works.)
StopAnimation-07 6/11/06 10:13 PM Page 161
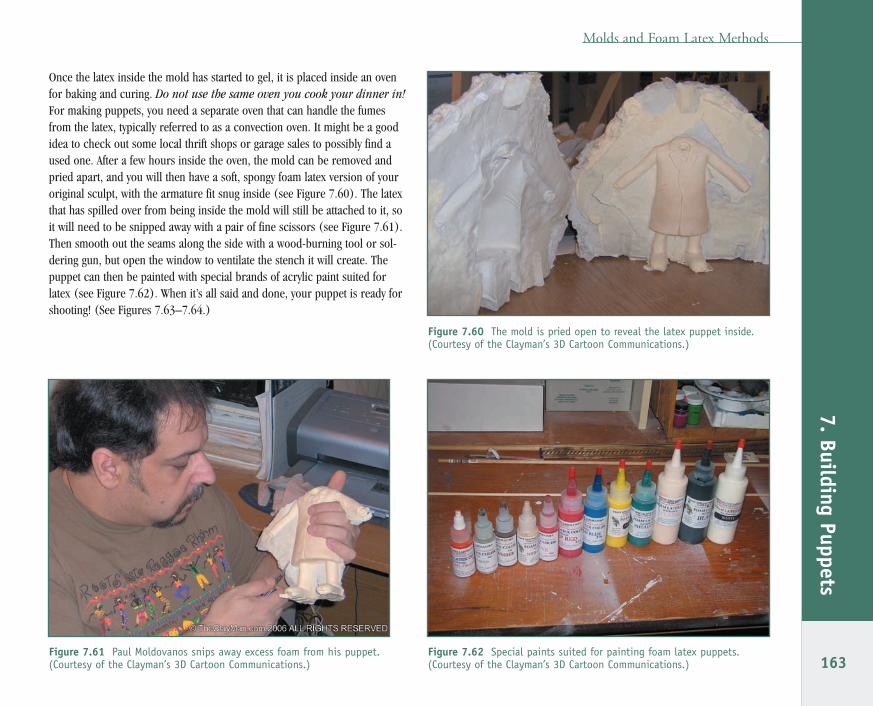
Foam latex typically comes in a kit, as it must be mixed together with different agents and solutions to work properly (see Figure 7.58). The kit will haveinstructions explaining how to mix it, which should be read carefully along with all safety instructions. This whole procedure must be done with strong ven-tilation in the room, as latex contains ammonia and gives off a strong smell that is bad for inhalation and eye contact. The latex base comes in the largestcontainer, because this is the main substance making up most of the solution, with smaller portions of the other agents mixed in. The exact measurementswill vary depending on how big of a batch of latex you are making. Mixed with the latex base are the foaming agent and curing agent, which are first meas-ured out and combined in an electric mixer at low speed. For the foaming stage, switch to high speed, then medium speed and lower speed for the refiningstage. You might mix at each speed for about 3 to 5 minutes, but the whole process is also dependent on the humidity and temperature of the room. Thisprocess may cause you to go through several different batches to get it exactly right. The consistency of the foam should be like thick cream. At the end ofyour mixing stage, add the gelling agent and let it continue mixing for another minute or so.
Once the latex mix is complete, it is applied into the mold over the armature. The latex can be applied in a number of ways. One way is to clamp the moldtightly together and inject the latex through a hole in the mold with a giant syringe (see Figure 7.59). Another way is to brush a thin layer inside the mold,place the armature inside, and pour the rest over it straight from its mixing bowl.
The Art of Stop-Motion Animation
162
The
Art
of S
top-
Mot
ion
Anim
atio
n
Figure 7.58 A foam latex kit: base with foaming, curing, and gellingagents. (Courtesy of the Clayman’s 3D Cartoon Communications.) Figure 7.59 Injecting foam latex into the mold. (Copyright Stop Motion
Works.)
StopAnimation-07 6/11/06 10:13 PM Page 162
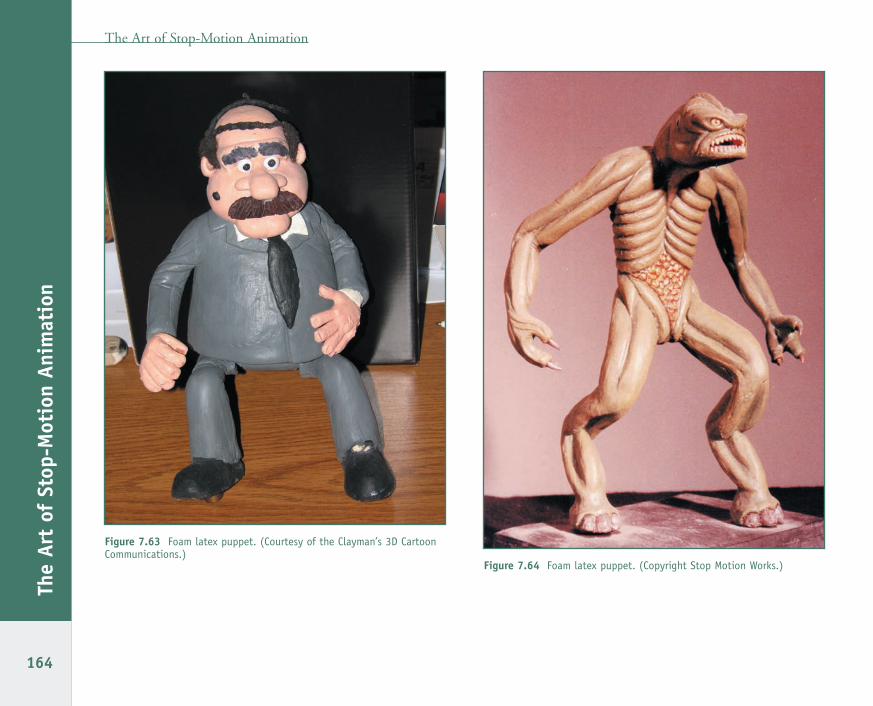
Once the latex inside the mold has started to gel, it is placed inside an ovenfor baking and curing. Do not use the same oven you cook your dinner in!For making puppets, you need a separate oven that can handle the fumesfrom the latex, typically referred to as a convection oven. It might be a goodidea to check out some local thrift shops or garage sales to possibly find aused one. After a few hours inside the oven, the mold can be removed andpried apart, and you will then have a soft, spongy foam latex version of youroriginal sculpt, with the armature fit snug inside (see Figure 7.60). The latexthat has spilled over from being inside the mold will still be attached to it, soit will need to be snipped away with a pair of fine scissors (see Figure 7.61).Then smooth out the seams along the side with a wood-burning tool or sol-dering gun, but open the window to ventilate the stench it will create. Thepuppet can then be painted with special brands of acrylic paint suited forlatex (see Figure 7.62). When it’s all said and done, your puppet is ready forshooting! (See Figures 7.63–7.64.)
Molds and Foam Latex Methods
163
7. Building Puppets
Figure 7.60 The mold is pried open to reveal the latex puppet inside.(Courtesy of the Clayman’s 3D Cartoon Communications.)
Figure 7.61 Paul Moldovanos snips away excess foam from his puppet.(Courtesy of the Clayman’s 3D Cartoon Communications.)
Figure 7.62 Special paints suited for painting foam latex puppets.(Courtesy of the Clayman’s 3D Cartoon Communications.)
StopAnimation-07 6/11/06 10:13 PM Page 163
The Art of Stop-Motion Animation
164
The
Art
of S
top-
Mot
ion
Anim
atio
n
Figure 7.63 Foam latex puppet. (Courtesy of the Clayman’s 3D CartoonCommunications.)
Figure 7.64 Foam latex puppet. (Copyright Stop Motion Works.)
StopAnimation-07 6/11/06 10:14 PM Page 164
Molds and Foam Latex Methods
165
7. Building Puppets
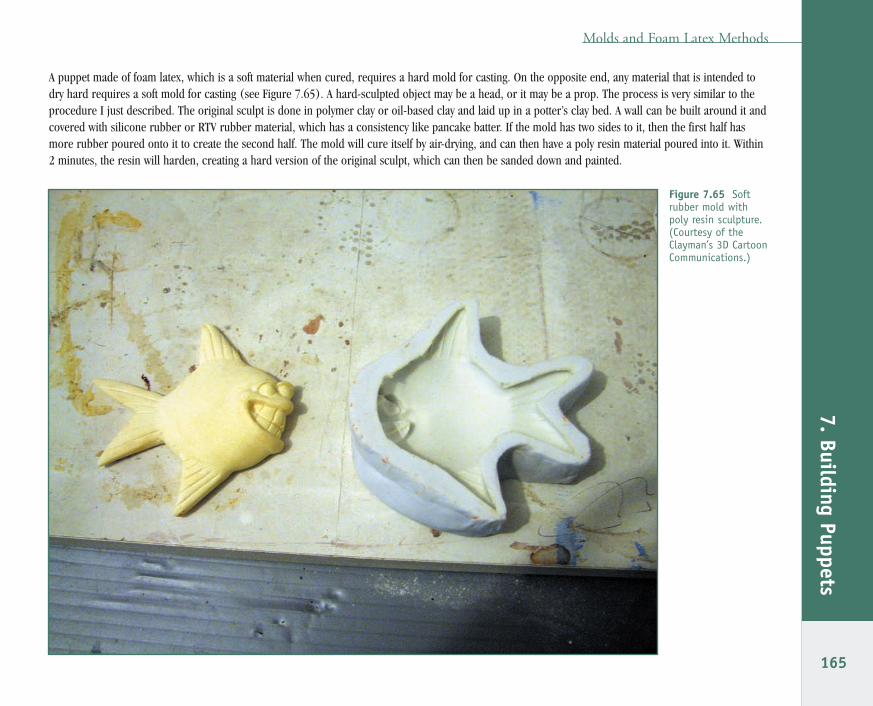
Figure 7.65 Softrubber mold withpoly resin sculpture.(Courtesy of theClayman’s 3D CartoonCommunications.)
A puppet made of foam latex, which is a soft material when cured, requires a hard mold for casting. On the opposite end, any material that is intended todry hard requires a soft mold for casting (see Figure 7.65). A hard-sculpted object may be a head, or it may be a prop. The process is very similar to theprocedure I just described. The original sculpt is done in polymer clay or oil-based clay and laid up in a potter’s clay bed. A wall can be built around it andcovered with silicone rubber or RTV rubber material, which has a consistency like pancake batter. If the mold has two sides to it, then the first half hasmore rubber poured onto it to create the second half. The mold will cure itself by air-drying, and can then have a poly resin material poured into it. Within2 minutes, the resin will harden, creating a hard version of the original sculpt, which can then be sanded down and painted.
StopAnimation-07 6/11/06 10:14 PM Page 165
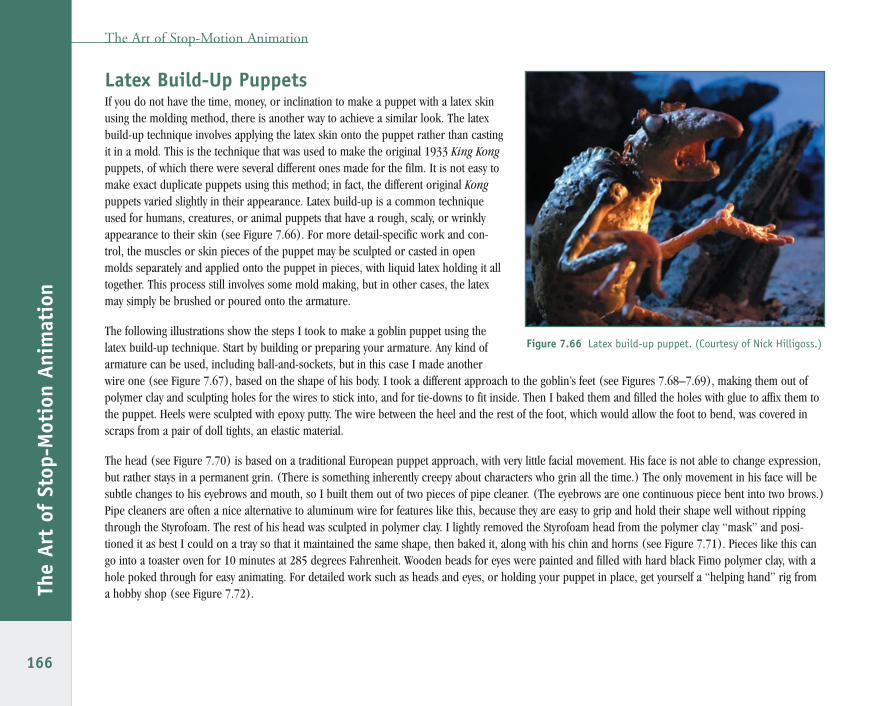
Latex Build-Up PuppetsIf you do not have the time, money, or inclination to make a puppet with a latex skinusing the molding method, there is another way to achieve a similar look. The latexbuild-up technique involves applying the latex skin onto the puppet rather than castingit in a mold. This is the technique that was used to make the original 1933 King Kongpuppets, of which there were several different ones made for the film. It is not easy tomake exact duplicate puppets using this method; in fact, the different original Kongpuppets varied slightly in their appearance. Latex build-up is a common techniqueused for humans, creatures, or animal puppets that have a rough, scaly, or wrinklyappearance to their skin (see Figure 7.66). For more detail-specific work and con-trol, the muscles or skin pieces of the puppet may be sculpted or casted in openmolds separately and applied onto the puppet in pieces, with liquid latex holding it alltogether. This process still involves some mold making, but in other cases, the latexmay simply be brushed or poured onto the armature.
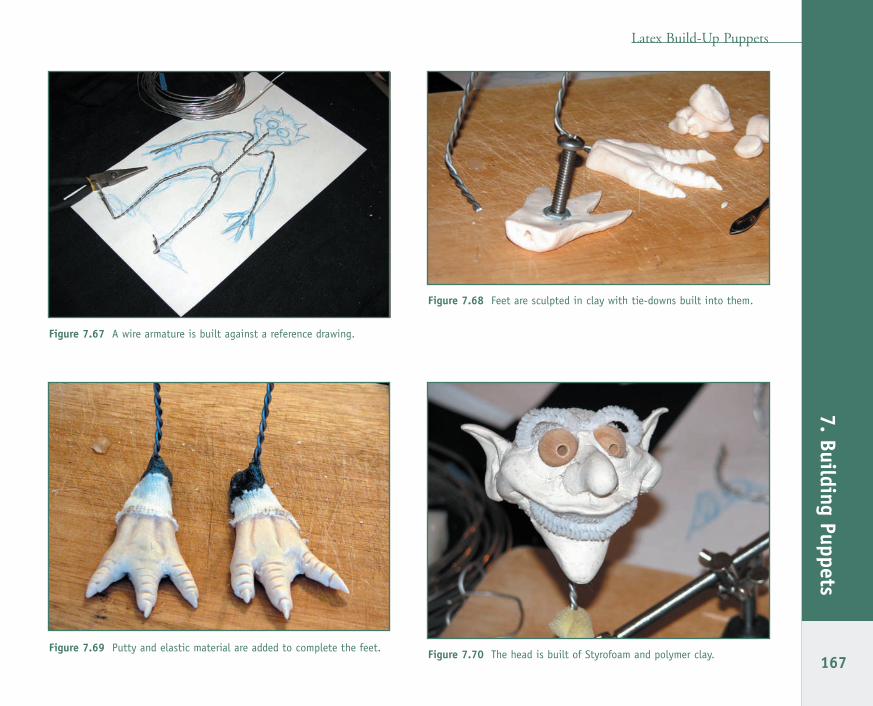
The following illustrations show the steps I took to make a goblin puppet using thelatex build-up technique. Start by building or preparing your armature. Any kind ofarmature can be used, including ball-and-sockets, but in this case I made anotherwire one (see Figure 7.67), based on the shape of his body. I took a different approach to the goblin’s feet (see Figures 7.68–7.69), making them out ofpolymer clay and sculpting holes for the wires to stick into, and for tie-downs to fit inside. Then I baked them and filled the holes with glue to affix them tothe puppet. Heels were sculpted with epoxy putty. The wire between the heel and the rest of the foot, which would allow the foot to bend, was covered inscraps from a pair of doll tights, an elastic material.
The head (see Figure 7.70) is based on a traditional European puppet approach, with very little facial movement. His face is not able to change expression,but rather stays in a permanent grin. (There is something inherently creepy about characters who grin all the time.) The only movement in his face will besubtle changes to his eyebrows and mouth, so I built them out of two pieces of pipe cleaner. (The eyebrows are one continuous piece bent into two brows.)Pipe cleaners are often a nice alternative to aluminum wire for features like this, because they are easy to grip and hold their shape well without rippingthrough the Styrofoam. The rest of his head was sculpted in polymer clay. I lightly removed the Styrofoam head from the polymer clay “mask” and posi-tioned it as best I could on a tray so that it maintained the same shape, then baked it, along with his chin and horns (see Figure 7.71). Pieces like this cango into a toaster oven for 10 minutes at 285 degrees Fahrenheit. Wooden beads for eyes were painted and filled with hard black Fimo polymer clay, with ahole poked through for easy animating. For detailed work such as heads and eyes, or holding your puppet in place, get yourself a “helping hand” rig froma hobby shop (see Figure 7.72).
The Art of Stop-Motion Animation
166
The
Art
of S
top-
Mot
ion
Anim
atio
n
Figure 7.66 Latex build-up puppet. (Courtesy of Nick Hilligoss.)
StopAnimation-07 6/11/06 10:14 PM Page 166
Latex Build-Up Puppets
167
7. Building Puppets
Figure 7.67 A wire armature is built against a reference drawing.
Figure 7.68 Feet are sculpted in clay with tie-downs built into them.
Figure 7.69 Putty and elastic material are added to complete the feet. Figure 7.70 The head is built of Styrofoam and polymer clay.
StopAnimation-07 6/11/06 10:14 PM Page 167
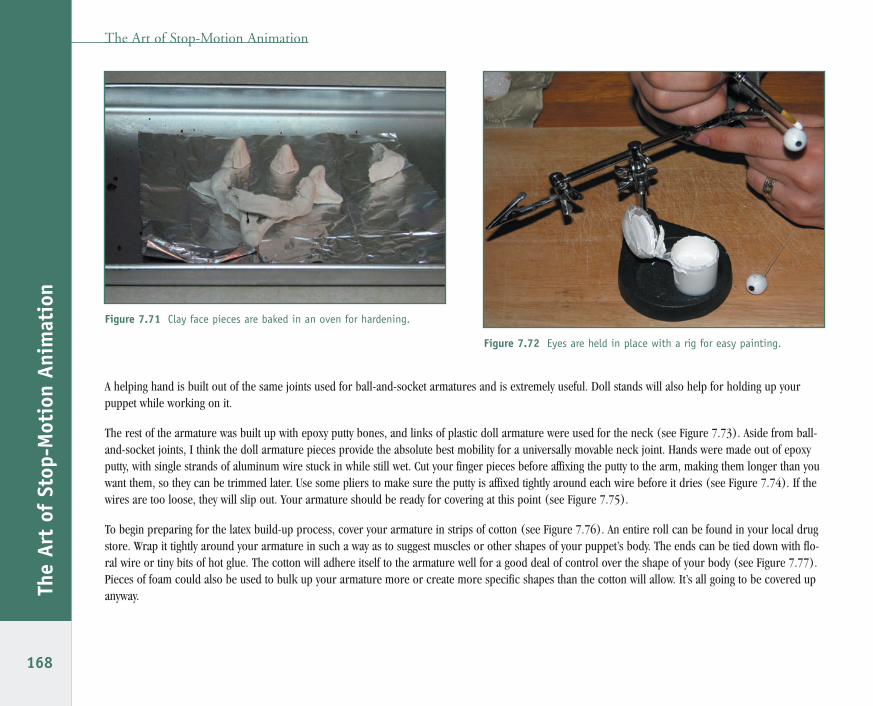
A helping hand is built out of the same joints used for ball-and-socket armatures and is extremely useful. Doll stands will also help for holding up yourpuppet while working on it.
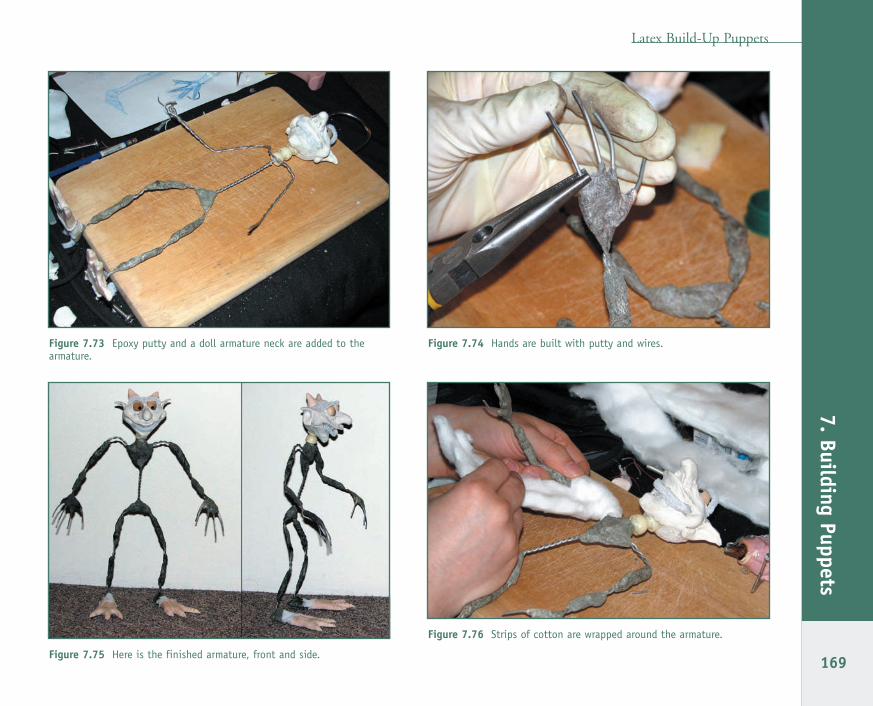
The rest of the armature was built up with epoxy putty bones, and links of plastic doll armature were used for the neck (see Figure 7.73). Aside from ball-and-socket joints, I think the doll armature pieces provide the absolute best mobility for a universally movable neck joint. Hands were made out of epoxyputty, with single strands of aluminum wire stuck in while still wet. Cut your finger pieces before affixing the putty to the arm, making them longer than youwant them, so they can be trimmed later. Use some pliers to make sure the putty is affixed tightly around each wire before it dries (see Figure 7.74). If thewires are too loose, they will slip out. Your armature should be ready for covering at this point (see Figure 7.75).
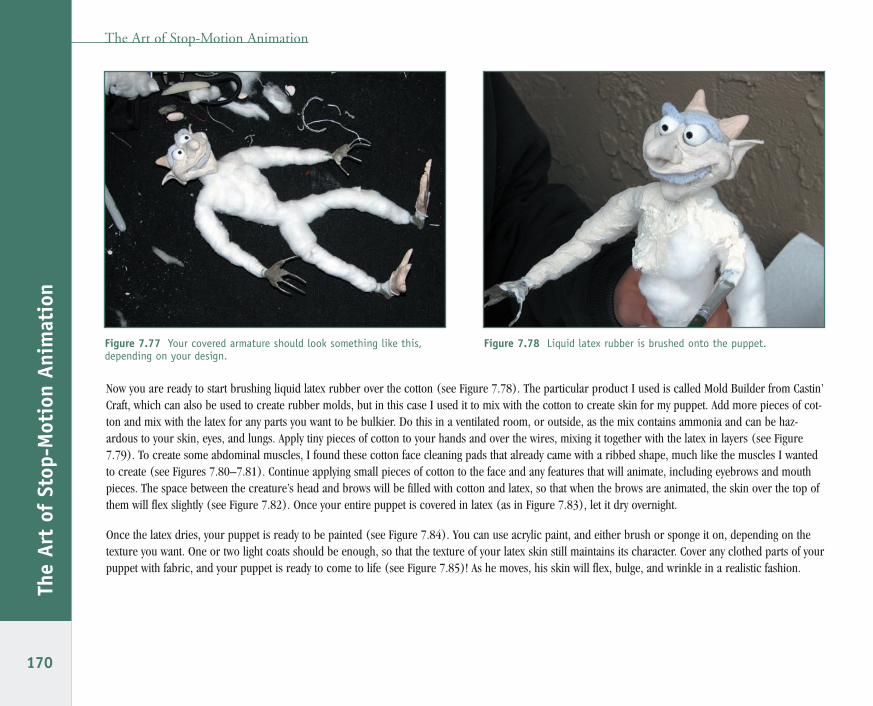
To begin preparing for the latex build-up process, cover your armature in strips of cotton (see Figure 7.76). An entire roll can be found in your local drugstore. Wrap it tightly around your armature in such a way as to suggest muscles or other shapes of your puppet’s body. The ends can be tied down with flo-ral wire or tiny bits of hot glue. The cotton will adhere itself to the armature well for a good deal of control over the shape of your body (see Figure 7.77).Pieces of foam could also be used to bulk up your armature more or create more specific shapes than the cotton will allow. It’s all going to be covered upanyway.
The Art of Stop-Motion Animation
168
The
Art
of S
top-
Mot
ion
Anim
atio
n
Figure 7.71 Clay face pieces are baked in an oven for hardening.
Figure 7.72 Eyes are held in place with a rig for easy painting.
StopAnimation-07 6/11/06 10:14 PM Page 168
Latex Build-Up Puppets
169
7. Building Puppets
Figure 7.73 Epoxy putty and a doll armature neck are added to thearmature.
Figure 7.74 Hands are built with putty and wires.
Figure 7.75 Here is the finished armature, front and side.
Figure 7.76 Strips of cotton are wrapped around the armature.
StopAnimation-07 6/11/06 10:14 PM Page 169
The Art of Stop-Motion Animation
170
The
Art
of S
top-
Mot
ion
Anim
atio
n
Figure 7.77 Your covered armature should look something like this,depending on your design.
Figure 7.78 Liquid latex rubber is brushed onto the puppet.
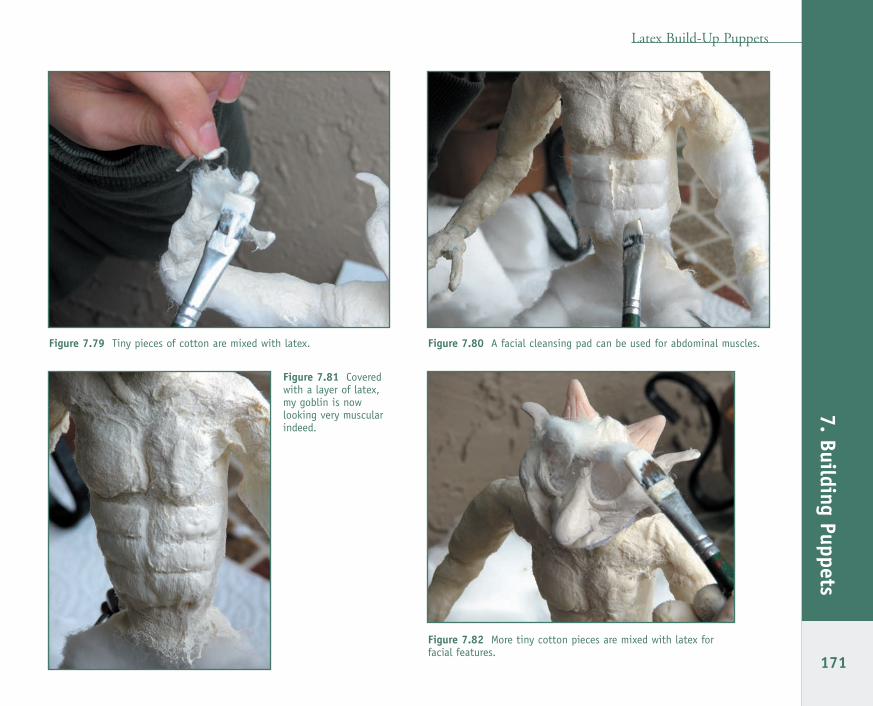
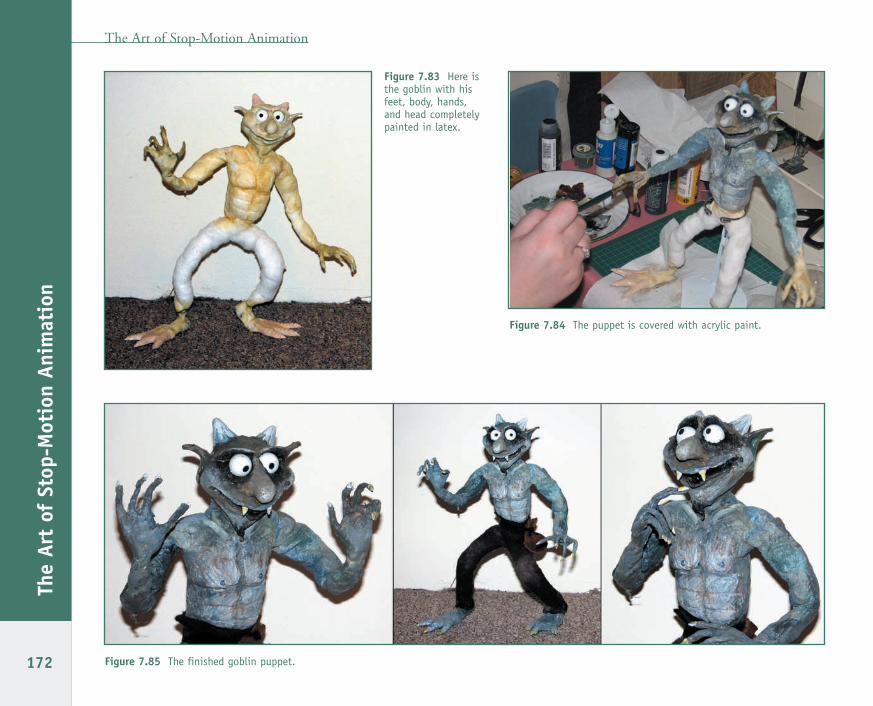
Now you are ready to start brushing liquid latex rubber over the cotton (see Figure 7.78). The particular product I used is called Mold Builder from Castin’Craft, which can also be used to create rubber molds, but in this case I used it to mix with the cotton to create skin for my puppet. Add more pieces of cot-ton and mix with the latex for any parts you want to be bulkier. Do this in a ventilated room, or outside, as the mix contains ammonia and can be haz-ardous to your skin, eyes, and lungs. Apply tiny pieces of cotton to your hands and over the wires, mixing it together with the latex in layers (see Figure7.79). To create some abdominal muscles, I found these cotton face cleaning pads that already came with a ribbed shape, much like the muscles I wantedto create (see Figures 7.80–7.81). Continue applying small pieces of cotton to the face and any features that will animate, including eyebrows and mouthpieces. The space between the creature’s head and brows will be filled with cotton and latex, so that when the brows are animated, the skin over the top ofthem will flex slightly (see Figure 7.82). Once your entire puppet is covered in latex (as in Figure 7.83), let it dry overnight.
Once the latex dries, your puppet is ready to be painted (see Figure 7.84). You can use acrylic paint, and either brush or sponge it on, depending on thetexture you want. One or two light coats should be enough, so that the texture of your latex skin still maintains its character. Cover any clothed parts of yourpuppet with fabric, and your puppet is ready to come to life (see Figure 7.85)! As he moves, his skin will flex, bulge, and wrinkle in a realistic fashion.
StopAnimation-07 6/11/06 10:14 PM Page 170
Latex Build-Up Puppets
171
7. Building Puppets
Figure 7.79 Tiny pieces of cotton are mixed with latex. Figure 7.80 A facial cleansing pad can be used for abdominal muscles.
Figure 7.81 Coveredwith a layer of latex,my goblin is nowlooking very muscularindeed.
Figure 7.82 More tiny cotton pieces are mixed with latex forfacial features.
StopAnimation-07 6/11/06 10:14 PM Page 171
The Art of Stop-Motion Animation
172
The
Art
of S
top-
Mot
ion
Anim
atio
nFigure 7.83 Here isthe goblin with hisfeet, body, hands,and head completelypainted in latex.
Figure 7.84 The puppet is covered with acrylic paint.
Figure 7.85 The finished goblin puppet.
StopAnimation-07 6/11/06 10:14 PM Page 172
Clay Puppets
173
7. Building Puppets
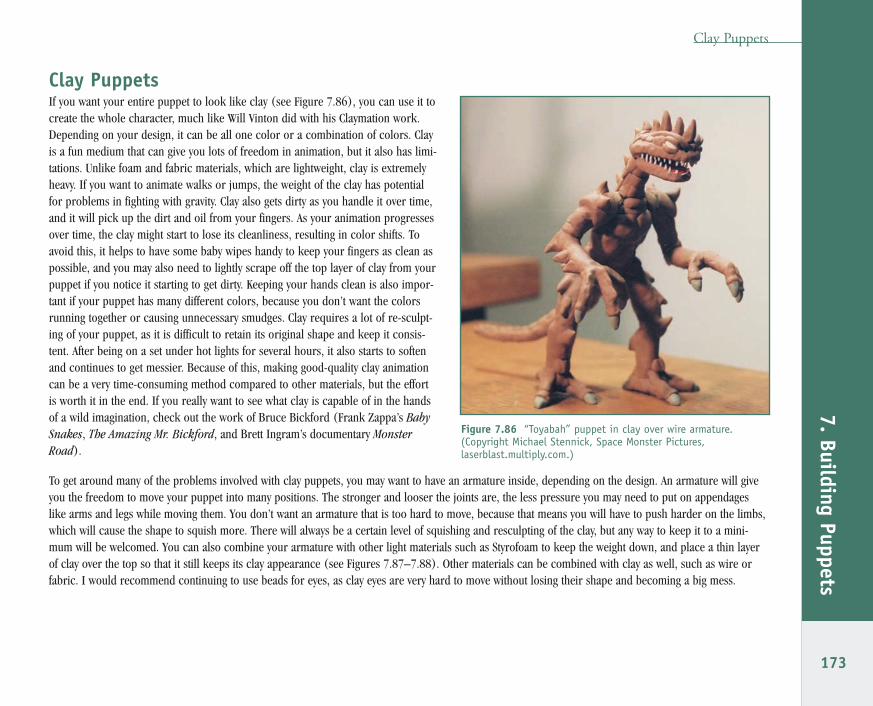
Clay PuppetsIf you want your entire puppet to look like clay (see Figure 7.86), you can use it tocreate the whole character, much like Will Vinton did with his Claymation work.Depending on your design, it can be all one color or a combination of colors. Clayis a fun medium that can give you lots of freedom in animation, but it also has limi-tations. Unlike foam and fabric materials, which are lightweight, clay is extremelyheavy. If you want to animate walks or jumps, the weight of the clay has potentialfor problems in fighting with gravity. Clay also gets dirty as you handle it over time,and it will pick up the dirt and oil from your fingers. As your animation progressesover time, the clay might start to lose its cleanliness, resulting in color shifts. Toavoid this, it helps to have some baby wipes handy to keep your fingers as clean aspossible, and you may also need to lightly scrape off the top layer of clay from yourpuppet if you notice it starting to get dirty. Keeping your hands clean is also impor-tant if your puppet has many different colors, because you don’t want the colorsrunning together or causing unnecessary smudges. Clay requires a lot of re-sculpt-ing of your puppet, as it is difficult to retain its original shape and keep it consis-tent. After being on a set under hot lights for several hours, it also starts to softenand continues to get messier. Because of this, making good-quality clay animationcan be a very time-consuming method compared to other materials, but the effortis worth it in the end. If you really want to see what clay is capable of in the handsof a wild imagination, check out the work of Bruce Bickford (Frank Zappa’s BabySnakes, The Amazing Mr. Bickford, and Brett Ingram’s documentary MonsterRoad).
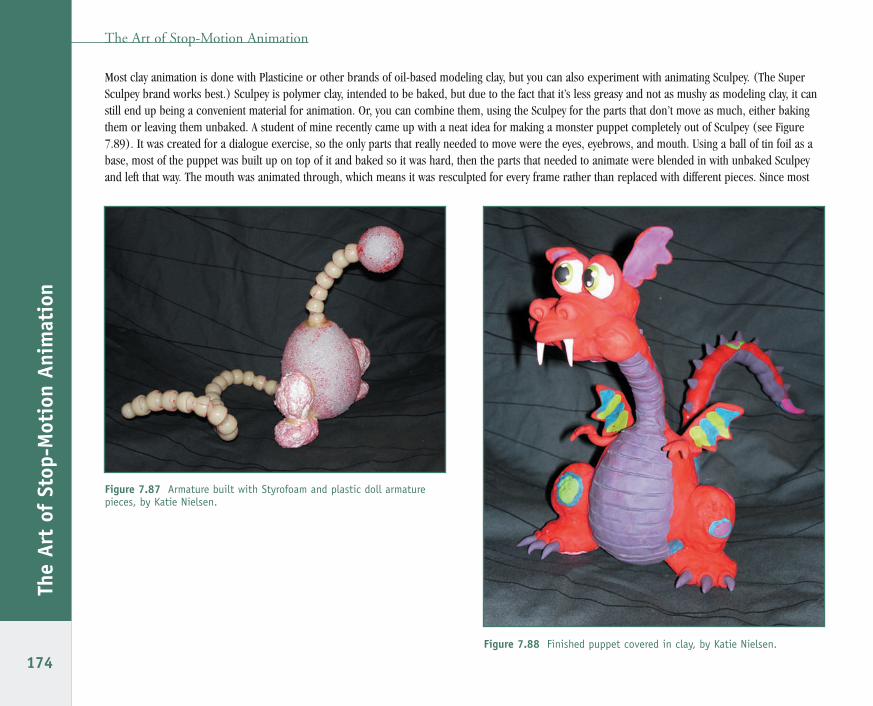
To get around many of the problems involved with clay puppets, you may want to have an armature inside, depending on the design. An armature will giveyou the freedom to move your puppet into many positions. The stronger and looser the joints are, the less pressure you may need to put on appendageslike arms and legs while moving them. You don’t want an armature that is too hard to move, because that means you will have to push harder on the limbs,which will cause the shape to squish more. There will always be a certain level of squishing and resculpting of the clay, but any way to keep it to a mini-mum will be welcomed. You can also combine your armature with other light materials such as Styrofoam to keep the weight down, and place a thin layerof clay over the top so that it still keeps its clay appearance (see Figures 7.87–7.88). Other materials can be combined with clay as well, such as wire orfabric. I would recommend continuing to use beads for eyes, as clay eyes are very hard to move without losing their shape and becoming a big mess.
Figure 7.86 “Toyabah” puppet in clay over wire armature.(Copyright Michael Stennick, Space Monster Pictures,laserblast.multiply.com.)
StopAnimation-07 6/11/06 10:14 PM Page 173
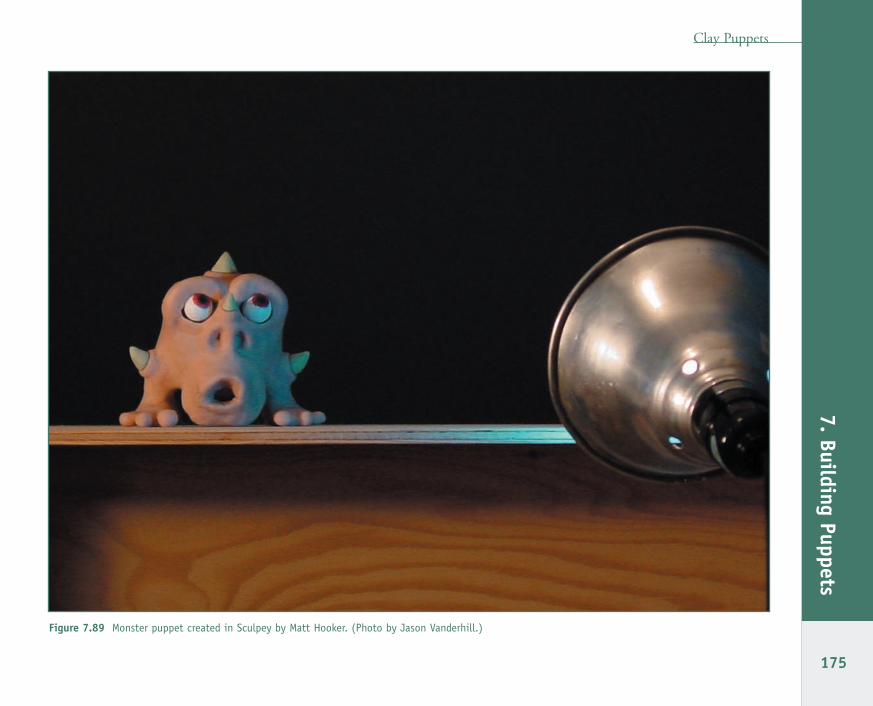
Most clay animation is done with Plasticine or other brands of oil-based modeling clay, but you can also experiment with animating Sculpey. (The SuperSculpey brand works best.) Sculpey is polymer clay, intended to be baked, but due to the fact that it’s less greasy and not as mushy as modeling clay, it canstill end up being a convenient material for animation. Or, you can combine them, using the Sculpey for the parts that don’t move as much, either bakingthem or leaving them unbaked. A student of mine recently came up with a neat idea for making a monster puppet completely out of Sculpey (see Figure7.89). It was created for a dialogue exercise, so the only parts that really needed to move were the eyes, eyebrows, and mouth. Using a ball of tin foil as abase, most of the puppet was built up on top of it and baked so it was hard, then the parts that needed to animate were blended in with unbaked Sculpeyand left that way. The mouth was animated through, which means it was resculpted for every frame rather than replaced with different pieces. Since most
The Art of Stop-Motion Animation
174
The
Art
of S
top-
Mot
ion
Anim
atio
n
Figure 7.88 Finished puppet covered in clay, by Katie Nielsen.
Figure 7.87 Armature built with Styrofoam and plastic doll armaturepieces, by Katie Nielsen.
StopAnimation-07 6/11/06 10:14 PM Page 174
Clay Puppets
175
7. Building Puppets
Figure 7.89 Monster puppet created in Sculpey by Matt Hooker. (Photo by Jason Vanderhill.)
StopAnimation-07 6/11/06 10:15 PM Page 175
of the puppet was baked solid, it prevented the snafu of getting nudged during the animation and causing unwanted jitters. It looked great in the end andwas relatively simple to animate.
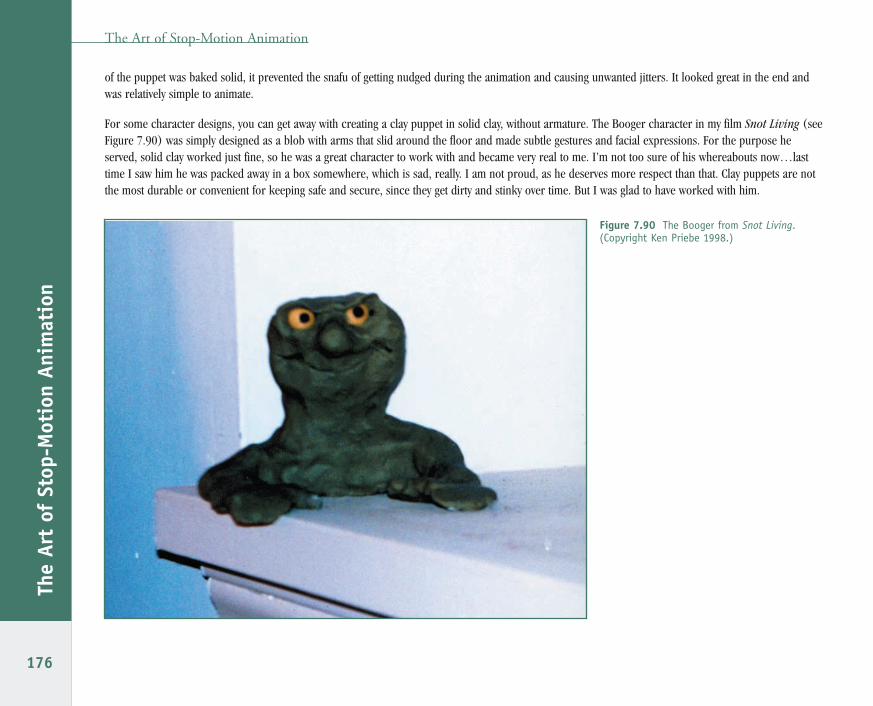
For some character designs, you can get away with creating a clay puppet in solid clay, without armature. The Booger character in my film Snot Living (seeFigure 7.90) was simply designed as a blob with arms that slid around the floor and made subtle gestures and facial expressions. For the purpose heserved, solid clay worked just fine, so he was a great character to work with and became very real to me. I’m not too sure of his whereabouts now…lasttime I saw him he was packed away in a box somewhere, which is sad, really. I am not proud, as he deserves more respect than that. Clay puppets are notthe most durable or convenient for keeping safe and secure, since they get dirty and stinky over time. But I was glad to have worked with him.
The Art of Stop-Motion Animation
176
The
Art
of S
top-
Mot
ion
Anim
atio
n
Figure 7.90 The Booger from Snot Living.(Copyright Ken Priebe 1998.)
StopAnimation-07 6/11/06 10:15 PM Page 176
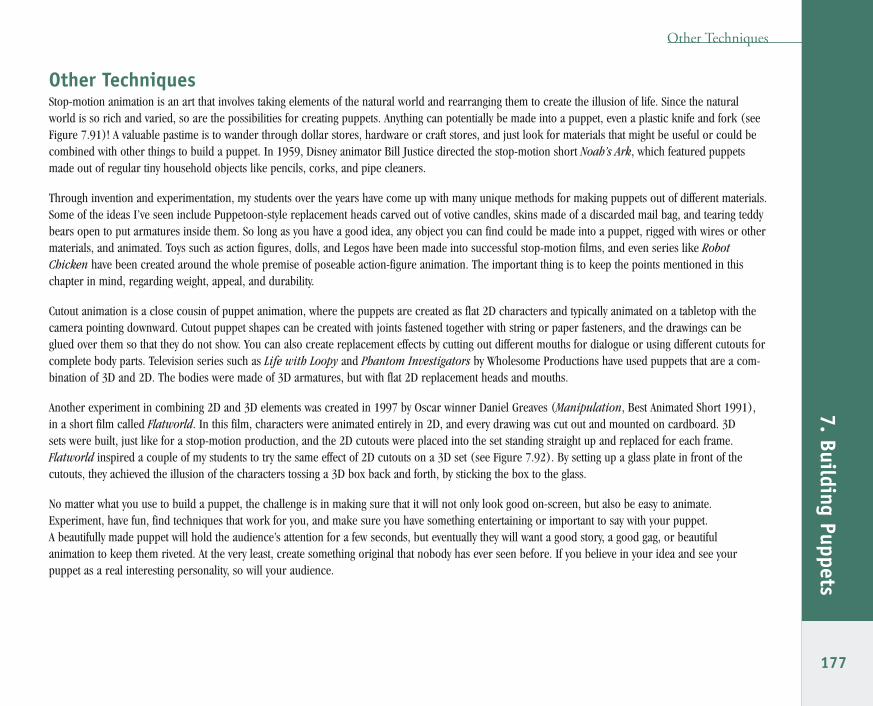
Other TechniquesStop-motion animation is an art that involves taking elements of the natural world and rearranging them to create the illusion of life. Since the naturalworld is so rich and varied, so are the possibilities for creating puppets. Anything can potentially be made into a puppet, even a plastic knife and fork (seeFigure 7.91)! A valuable pastime is to wander through dollar stores, hardware or craft stores, and just look for materials that might be useful or could becombined with other things to build a puppet. In 1959, Disney animator Bill Justice directed the stop-motion short Noah’s Ark, which featured puppetsmade out of regular tiny household objects like pencils, corks, and pipe cleaners.
Through invention and experimentation, my students over the years have come up with many unique methods for making puppets out of different materials.Some of the ideas I’ve seen include Puppetoon-style replacement heads carved out of votive candles, skins made of a discarded mail bag, and tearing teddybears open to put armatures inside them. So long as you have a good idea, any object you can find could be made into a puppet, rigged with wires or othermaterials, and animated. Toys such as action figures, dolls, and Legos have been made into successful stop-motion films, and even series like RobotChicken have been created around the whole premise of poseable action-figure animation. The important thing is to keep the points mentioned in thischapter in mind, regarding weight, appeal, and durability.
Cutout animation is a close cousin of puppet animation, where the puppets are created as flat 2D characters and typically animated on a tabletop with thecamera pointing downward. Cutout puppet shapes can be created with joints fastened together with string or paper fasteners, and the drawings can beglued over them so that they do not show. You can also create replacement effects by cutting out different mouths for dialogue or using different cutouts forcomplete body parts. Television series such as Life with Loopy and Phantom Investigators by Wholesome Productions have used puppets that are a com-bination of 3D and 2D. The bodies were made of 3D armatures, but with flat 2D replacement heads and mouths.
Another experiment in combining 2D and 3D elements was created in 1997 by Oscar winner Daniel Greaves (Manipulation, Best Animated Short 1991), in a short film called Flatworld. In this film, characters were animated entirely in 2D, and every drawing was cut out and mounted on cardboard. 3D sets were built, just like for a stop-motion production, and the 2D cutouts were placed into the set standing straight up and replaced for each frame.Flatworld inspired a couple of my students to try the same effect of 2D cutouts on a 3D set (see Figure 7.92). By setting up a glass plate in front of thecutouts, they achieved the illusion of the characters tossing a 3D box back and forth, by sticking the box to the glass.
No matter what you use to build a puppet, the challenge is in making sure that it will not only look good on-screen, but also be easy to animate.Experiment, have fun, find techniques that work for you, and make sure you have something entertaining or important to say with your puppet. A beautifully made puppet will hold the audience’s attention for a few seconds, but eventually they will want a good story, a good gag, or beautiful animation to keep them riveted. At the very least, create something original that nobody has ever seen before. If you believe in your idea and see your puppet as a real interesting personality, so will your audience.
Other Techniques
177
7. Building Puppets
StopAnimation-07 6/11/06 10:15 PM Page 177
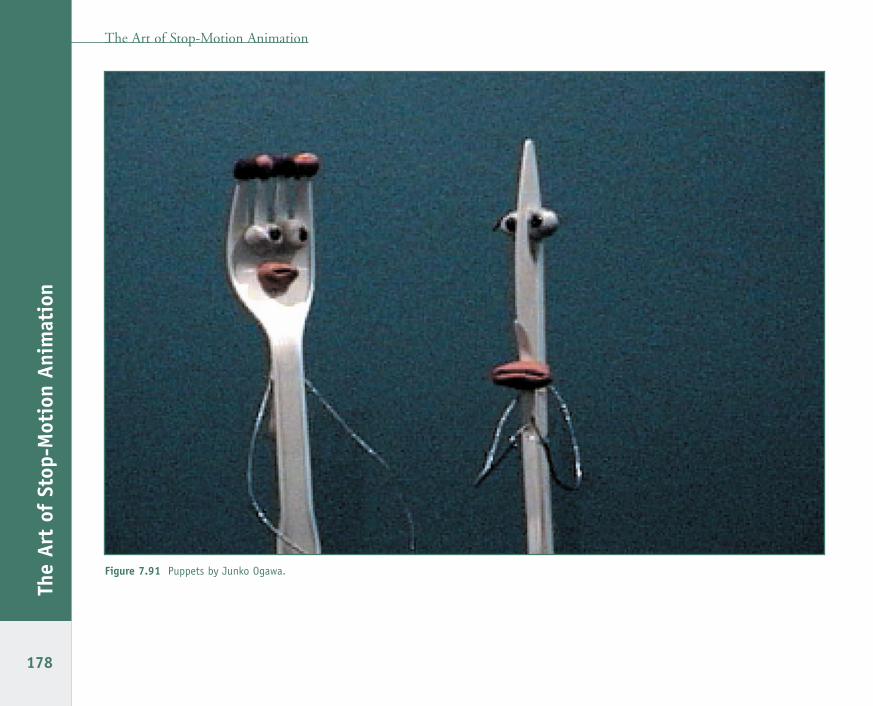
The Art of Stop-Motion Animation
178
The
Art
of S
top-
Mot
ion
Anim
atio
n
Figure 7.91 Puppets by Junko Ogawa.
StopAnimation-07 6/11/06 10:15 PM Page 178

Other Techniques
179
7. Building PuppetsFigure 7.92 2D cutout puppets by Dharmali Patel and Yatindranath Shinde.
StopAnimation-07 6/11/06 10:15 PM Page 179

StopAnimation-07 6/11/06 10:15 PM Page 180