Embed Size (px)
Citation preview

April 20, 21, 22 & 23 | Toronto Congress Centre
Step-By-Step Digital Ordering
User Guide

April 20, 21, 22 & 23 | Toronto Congress Centre
Digital Order Guide Hierarchy
It is important to understand how the Digital Order Guide is organized. Below is a hierarchy to
help you understand the structure of this online tool:
Catalogs: The Showcase360 Digital Order Guide has different catalogs, represented by blue icons. These catalogs represent different departments and categories including: President Address, Showdollars catalog, Booth Directory, Showcase Highlights, Store Planning, Private Label, OTC, Health & Beauty, Store Planning, General Merchandise, Cosmetics, Food & Confection, Marketing, Operations, Merchandising, Pharmacy, Showcase Training, and Gifts).
Sections (Complete Catalogue): Within each section you will find a complete Catalogue tile, this will allow you to view all vendors from one screen
Sections: Within each of these catalogs you will find a list of vendors to select from List View: After selecting a section, you will be able to view a variety of products and promotions offered
by a particular vendor. Majority of your ordering will take place within this view. Item View: To zoom into a particular product contained within the list view, you can enter the Item View.
This view will allow you to see product details one item at a time.
Let’s Take a Closer Look at the List View (Main View) The List View can contain four areas:
1. Sell Sheets (preview only) 2. Pre-Pack Templates (preview only) 3. Bundles/Pre-packs 4. Open Stock
*Not all sections will contain Sell Sheets, Pre-pack templates, Bundles and/or Prepacks Below is an overview of this main ordering window in more details, as most of your time will be spent within this view.
Review & Resources

April 20, 21, 22 & 23 | Toronto Congress Centre
An Overview of the Ordering Window List View
A- TITLE BAR
Back to Sections: this button allows you to go back to the vendor list for the current catalog. Catalogs: This drop down menu allows you to toggle between different catalogs within this order guide.
Sections: This drop down menu allows you to toggle between different sections within the catalog you are in.
View All Orders & Show Dollars: This button takes you to your cart with a comprehensive order overview.
Help: this button brings up instructions on how to use the order guide, find videos and documentation.
Search For Bar: allows you to find a particular product by GTIN, MCK#, or description, within the section you are in.
View Order: this button allows you to view all the items you have selected within the current catalog.
B- ITEM INFORMATION
Potential Show Dollar: this dollar amount represents how many Showdollars you can earn for each unit purchased.
C- ORDER INFORMATION
Shipping Date: This number represents the Year/Month/Day that the product will ship.
Order Qty: This field is where you will type the quantity of the product you would like to purchase.
Previous Year Order Qty: This orange number represents the number of units purchased last year at Showcase.
Total $: Total cost of product(s) based on quantity entered. Blue indicates you have matched/exceeded last year’s order. Red indicates the quantities purchased are less than the previous year.
Previous Year Total $: Total cost of product(s) based on quantity entered last year.
Show $ Earned: Total dollars earned based on quantity entered.
2

April 20, 21, 22 & 23 | Toronto Congress Centre
- Go to the online ordering website: http://showcase.remotecatalog.com/login.php - Enter in your Customer Code & Password on the login screen
- Click the Login button
NOTE: - Your Customer Code is the same as your pharmacy account number
DT Stores: DT Number (6 Digits) RRX Stores: JDE Number (6 digits beginning with 400) MSP Stores: 6 digit store number (050 with your 3 digit store number)
- Your Password is your store postal code (six digits with no spaces)
Log-in
1
Step-by-Step Digital Ordering User Guide
Before you begin placing your Showcase360 order, please make sure you are using a Google Chrome
internet browser for an optimal user experience. If you do not have Google Chrome on your work
station, refer to the How to Download Google Chrome & How to Change your Resolution
documents.
How to Log-in to the Digital Ordering Guide
1- Log-in

April 20, 21, 22 & 23 | Toronto Congress Centre
- Upon login you will be prompted to change your password - After the initial change you can update your password at any time using the ‘Change
Password’ button located on the menu
- Autostar stores will be prompted to acknowledge the use of POS data - After completing the form, the owner will receive a confirmation code which will need to be
entered - If the owner is not available to provide the confirmation code you can select later to skip the
prompt
NOTE: - This prompt will appear every time the store logs in, until the process has been
completed
Changing your Password
POS Data Confirmation – Autostar Stores ONLY
1- Change your
password
1.1 – POS Data
confirmation
A – Store Owner Name & Email B - Front Shop Owner & Email

April 20, 21, 22 & 23 | Toronto Congress Centre
- Click on Browse Catalog or Start a New Order, on the left of the Welcome Screen - Select a Catalog Icon according to the department/category you would like to view on the
catalog screen - Select a Section by clicking the applicable Vendor Logo from the section screen
NOTE: Some sections only contain information for viewing with no items to order.
HINT: If you know the exact product to order, use the Search all feature on the top right corner
HINT:
You can view all vendor sections at the same time by clicking the Complete Catalog tile
How to Start Your Order
2 – Place Order
Place Order
2

April 20, 21, 22 & 23 | Toronto Congress Centre
- Sell sheets & Prepack Templates appear at the top of the vendor section when applicable - Click on Sell Sheet or Pre-Pack Template Image within the list view - Click on the Backward (<) and Forward (>) arrows to go to the next Sell Sheet/Pre-Pack
Template. NOTES:
All Sell Sheets are indicated with a (+SST) and all Pre-Pack Templates are indicated with a (+PPK) in the McK Code/GTIN Column
These two sections contain images for preview only. (There are no order quantities associated with these two sections)
You can Print Pre-Pack Templates by clicking on the Print Icon in the top right corner of Google Chrome.
- From the Bundle/Pre-Pack area, double click on the Image, to enter into the Item View this view will allow you to see all the times contained within the bundle/pre-pack
- Enter an order quantity, in the Order field associated with the correct Shipping Date. - Click the (<) and (>) arrows on the sides in the Item View to go to the next bundle or product. - Click Component List on the bottom left of the Item View screen, to access the Component
List. - Click the Close button to return to the Item View NOTE: - You cannot break bundles apart. (i.e if you have ordered 10 units of atoma ASA and this product
is also part of a bundle, you cannot reduce to the quantity to zero when editing your order). - If you are a Multi-Store owner please refer to How to Place Orders for Multi-Stores found in
the resource section of this guide. -
How to Review Sell Sheets & Pre-Pack Templates
How to Order Bundles & Pre-Packs
2.1 – Reviewing Sell Sheets
2.2 – Ordering Bundles

April 20, 21, 22 & 23 | Toronto Congress Centre
- From the Open Stock area, enter an order quantity, in the Order Qty field associated with the correct Shipping Date. NOTES:
If your order quantity is less than the previous year, the Total $ will appear in Red If your order quantity is the same or greater than the previous year, the Total $ will
appear in Blue. If you are a Multi-Store owner please refer to How to Place Orders for Multi-Stores
found in the resource section of this guide.
- From the List View screen, click the ‘View all orders & Showdollars’ button to review your current order within the current catalog.
- You can adjust order quantities, in the grey Order Qty field associated with the applicable Shipping Dates.
NOTE: - The Total $ and Show dollars will adjust as you make changes to the order quantities - When reviewing your order, you will notice items from last year appear on this list. If you have
not placed additional orders for this item, the quantities will appear as zero, and will not be added to the Total$ amount (See image below).
How to Order Open Stock
How to Review & Adjust Current Orders Within the Current Catalog
2.3 –Ordering
Open Stock
3.1– Review & Adjust Orders
(Current Catalog)
3
Review & Adjust Order

April 20, 21, 22 & 23 | Toronto Congress Centre
- From the List View screen, click the View All Orders & Show Dollars button to review your comprehensive Showcase360 order.
- You can adjust order quantities in the grey Order Qty field associated with the applicable Shipping Dates (which appear in text above the order qty field)
- Click Resume Ordering button, in the top left, to take you back to the List View within a section. NOTES: - The Grey Bar provides you with a summary of your order (# Units, Total Cost, Total Show $) - The Total $ will adjust as you make changes to the order quantities - Last year’s items that were ordered and have not been ordered this year will appear with zero
quantities.
- You can use the filtering options to review your Showcase360 orders o Click the Filter By Vendor drop down menu, to sort your order by vendor o Click the Filter By Ship Date drop down menu, to sort your order by ship date
How to Review & Adjust All Orders & Show Dollars
How to Filter All Orders & Show Dollars by Vendor & Ship Date
3.2– Review & Adjust Orders
(Overall Order)
3.3–Filtering Orders
April 20, 21, 22 & 23 | Toronto Congress Centre
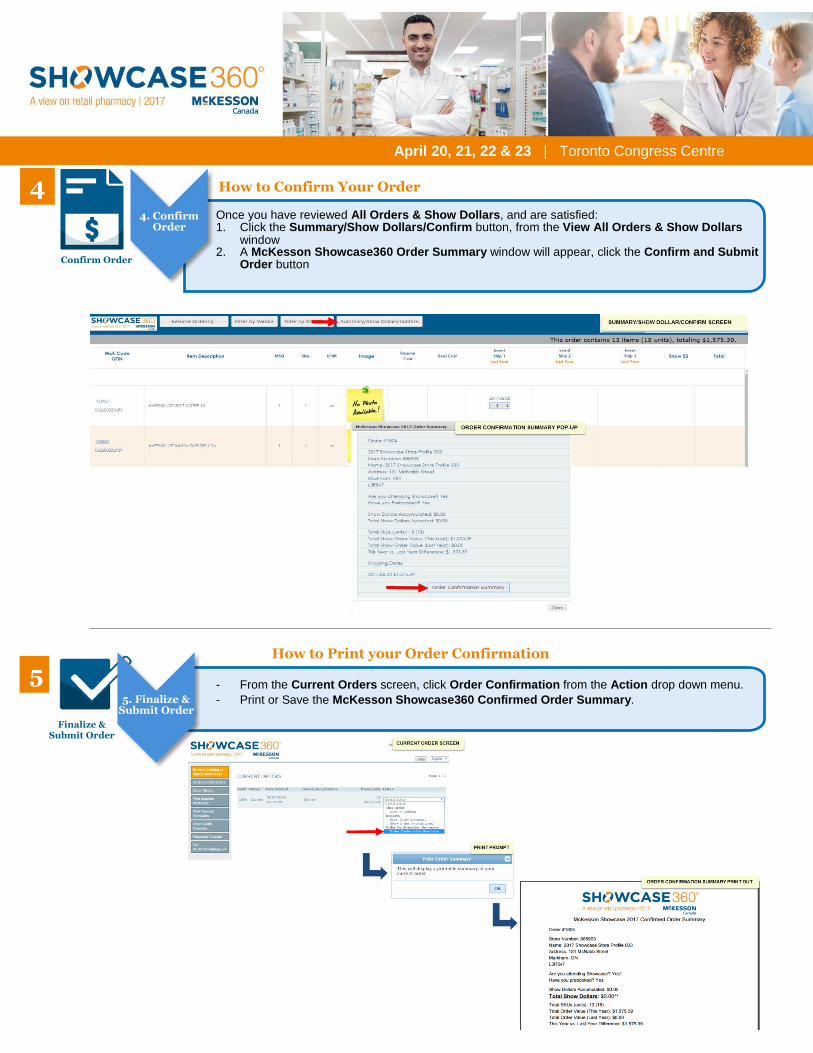
Once you have reviewed All Orders & Show Dollars, and are satisfied: 1. Click the Summary/Show Dollars/Confirm button, from the View All Orders & Show Dollars
window 2. A McKesson Showcase360 Order Summary window will appear, click the Confirm and Submit
Order button
- From the Current Orders screen, click Order Confirmation from the Action drop down menu.
- Print or Save the McKesson Showcase360 Confirmed Order Summary.
How to Confirm Your Order
How to Print your Order Confirmation
4. Confirm Order
Confirm Order
4
Finalize & Submit Order
5
5. Finalize & Submit Order

April 20, 21, 22 & 23 | Toronto Congress Centre
- From the Current Orders screen, click the drop down button to view reporting options o Excel Order Summary – opens your order in an excel file. You can view all order
information and view bonus showdollars issued on tab 2 of the excel workbook. o Show Order (with Pictures) – Select the ship dates you wish to view from the pop-up box,
Click “Print” & a PDF report will generate with images and barcodes for all items ordered in the specified time frame
Order Reports & Supporting Documents
Order Reports
6 6. Order report
options
April 20, 21, 22 & 23 | Toronto Congress Centre
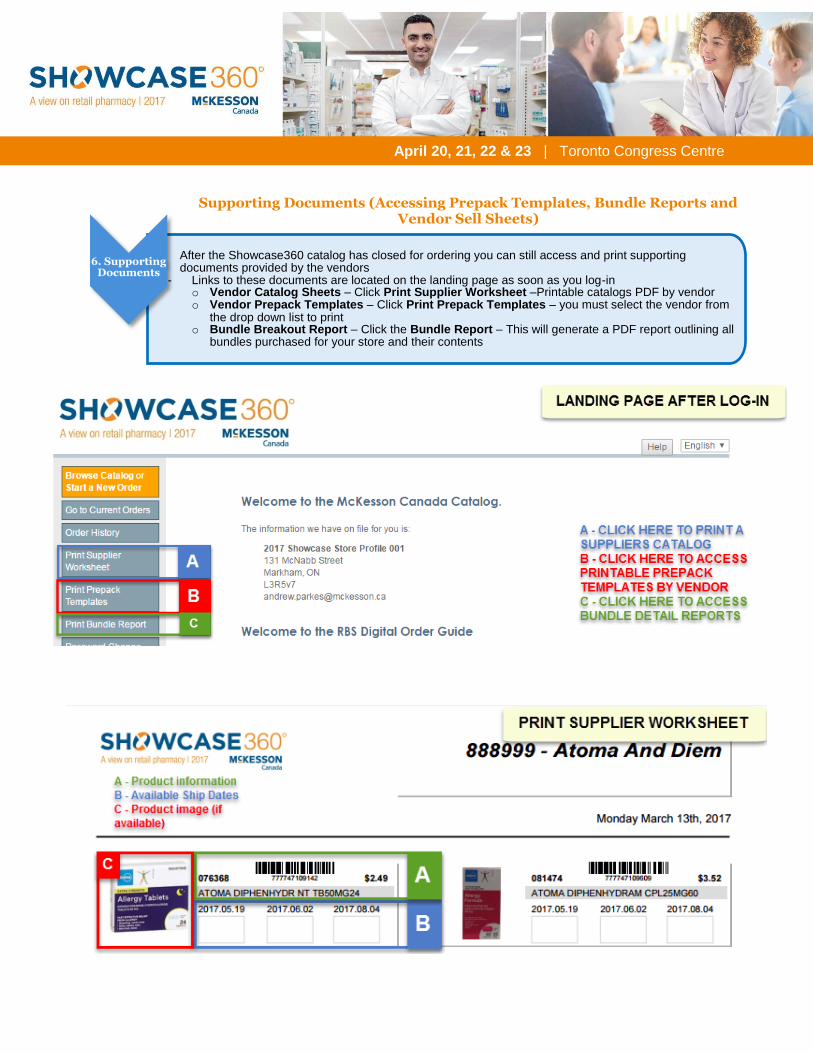
After the Showcase360 catalog has closed for ordering you can still access and print supporting documents provided by the vendors
- Links to these documents are located on the landing page as soon as you log-in o Vendor Catalog Sheets – Click Print Supplier Worksheet –Printable catalogs PDF by vendor o Vendor Prepack Templates – Click Print Prepack Templates – you must select the vendor from
the drop down list to print o Bundle Breakout Report – Click the Bundle Report – This will generate a PDF report outlining all
bundles purchased for your store and their contents
Supporting Documents (Accessing Prepack Templates, Bundle Reports and
Vendor Sell Sheets)
6. Supporting
Documents

April 20, 21, 22 & 23 | Toronto Congress Centre
After the Showcase360 catalog has closed for ordering you can still access and print supporting documents provided by the vendors
- Links to these documents are located on the landing page as soon as you log-in o Vendor Catalog Sheets – Click Print Supplier Worksheet –Printable catalogs PDF by vendor o Vendor Prepack Templates – Click Print Prepack Templates – you must select the vendor from
the drop down list to print o Bundle Breakout Report – Click the Bundle Report – This will generate a PDF report outlining all
bundles purchased for your store and their contents
Supporting Documents Continued (Accessing Prepack Templates, Bundle Reports and Vendor Sell Sheets)
6. Supporting Documents

April 20, 21, 22 & 23 | Toronto Congress Centre
How to Place Orders for Multi-Store Owners To help elevate some of the work required when ordering for Multi-Stores, we have developed an intuitive function that allows a buyer or multiple buyers to order for all their stores, select a group of stores, even order for one store at a time with a simple click of a button.
Ordering Bundles and Open Stock Items To order a bundle or a particular item from the open stock section for more than one store, follow the steps below:
- Double click on the Image, to enter into the Item View. This view will allow you to see all the times contained
within a bundle/pre-pack, or product information for a particular item. - When in Item View, a Multiple Order Entry pop-up screen will appear with all stores associated to this account - Select all applicable stores you would like to order for by placing a checkmark beside each store name
There are multiple ways to increment quantities:
- Increment in Batches: Click the large blue button with a date to add one product to all the stores selected. - Increment by Store: Click the add button to add one quantity to a particular store - Manually input Order Qty: Click inside the grey field and type QTY of the number of items you would like to
purchase for a store.
NOTE: - While you have the ability to order for multiple stores at a time, it’s important to note that each store will need to
individually complete the Confirm Order and Finalize & Submit steps.
2 2

April 20, 21, 22 & 23 | Toronto Congress Centre
How to Earn & Redeem Show Dollars
There are multiple ways a Pharmacy can earn Show Dollars from a vendor:
1) NEW
Earn Show Dollars by Item –You will notice that in some vendor sections, there is a Show Dollar associated
with some items. This can either be awarded by ($ or %).
2) NEW
Earn Show Dollars by Bundles – You will notice that some vendor bundles/pre-packs have Show Dollars
associated with them. (Example: Buy one bundle get $25 Show Dollars)
3) Bonus Show Dollars Earned: Some vendors may offer bonus show dollars based on the total amount ordered
from their store. These special deals may be highlighted within the Sell Sheets in the vendor’s section. Please be
sure to visit each vendor’s booth to get these bonus show dollars allocated to your store.
When Will My Show Dollars be Applied?
Show dollars will be applied to your account once you visit the Show Dollars booth and the clerk has scanned in
your badge.
Note: If you are not attending Showcase360, you will not be able to redeem any Showdollars that have accumulated for
your order. You must attend Showcase360 to redeem Show Dollars.
POTENTIAL SHOW $
2

April 20, 21, 22 & 23 | Toronto Congress Centre
How to Access Order History
For your convenience we have moved your store’s order history information from last year’s Showcase to the order history tab so you can reference.
To Locate Your Order History Go to Order History, from the main Welcome Screen
Click on Ship Starts, in the table header to sort the Shipping dates
Click on a Ship date to select a particular order, the Order Detail screen will appear
o NOTE: All items in this view will not have Showdollars associated at an item level as this is a new
feature this year. The vendor column will have a “v” representing a vendor placed the order, as a default.
Click on Print this Order, in right margin to access the Order Summary Screen o The Order Summary Screen contains products images
Click on the Diskette icon to save the Order Summary, from the top right floating bar OR
Click on the Printer icon to print the Order Summary, from the top right floating bar
2