Embed Size (px)
Citation preview

User Guide
Start-up Guide for Users

2
RingCentral Office@Hand from AT&T | Start-up Guide for Users | Table of Contents
Get Help ................................................................................................. 13
Settings > My Inbound .............................................. 14User Details ...........................................................................................14
Phones and Numbers Screen ............................................................. 15
Add Direct Number/Add Phone .................................................................15
Download/Activate Apps ............................................................................15
Setting and Managing Presence ................................................................16
Call Screening .......................................................................................18
Setting up Call Screening ...........................................................................18
Call Blocking ..................................................................................................19
Call Handling ........................................................................................ 20
Advanced Call Handling: Rules .................................................................. 22
Call Flip ........................................................................................................... 25
Messages and Notifications .............................................................. 26
Notifications ................................................................................................. 26
Advance Notification Options .................................................................. 27
Table of Contents
Welcome to RingCentral Office@Hand from AT&T ........................................................................4The Overview Page ...................................................... 5Messages ................................................................................................ 6
Activity Log ............................................................................................. 6
Call Recording – Important Legal Requirement ...................................... 7
On-Demand Call Recording ....................................................................... 7
Automatic Call Recording ............................................................................ 7
Contacts .................................................................................................. 8
My Inbound ...................................................................................................... 9
My Outbound .................................................................................................. 9
Tools ........................................................................................................10
Resources > Online Support ...................................................................... 10
Quick Links .............................................................................................10
DND (Do Not Disturb) .........................................................................10
Conference Calling ..............................................................................11
RingOut .................................................................................................. 12
FaxOut .................................................................................................... 13

3
RingCentral Office@Hand from AT&T | Start-up Guide for Users | Table of Contents
Settings > My Outbound ......................................... 28Caller ID ................................................................................................. 28
Fax Settings .......................................................................................... 29
Setting a Default Fax Cover Sheet ............................................................ 29
Email Address That Can Send Faxes ........................................................ 29
Omitting the Cover Sheet When Email Subject is Blank .......................30
Sending Faxes ...................................................................................... 30
Faxing using FaxOut ...................................................................................30
Faxing using the Softphone .......................................................................30
Faxing via Email .............................................................................................31
Faxing via the Softphone .............................................................................31
RingMe Click-to-Call ........................................................................... 32
The RingCentral Office@Hand from AT&T Softphone .............................................. 34
Downloading the RingCentral Softphone .............................................. 34
Using the Softphone ................................................................................... 36
Office@Hand App for SalesForce.com ............. 38The RingCentral Office@Hand from AT&T Smartphone Mobile App ........................................ 39Download the RingCentral Office@Hand from AT&T Smartphone Mobile App ................................................. 39
Office@Hand Support Home Page ....................40

4
RingCentral Office@Hand from AT&T | Start-up Guide for Users | Welcome
Welcome to RingCentral Office@Hand from AT&TWelcome to RingCentral Office@Hand from AT&T, the #1 cloud-based phone system for your business.
As a new Office@Hand user, you’ve received an email with instructions to activate your account, select a password, and create security settings.
When you log in for the first time after you activate your account, you will be prompted to complete the Express Setup. Express Setup is designed to help you configure your basic system settings in just minutes.
Use this guide to customizing your personal phone system settings through your Office@Hand online account.
This guide includes information for both Premium Users (who have desktop IP phones) and for Virtual Users (who do not use desktop IP phones). A Premium User has a desktop computer IP phone and can receive and make RingCentral calls from all devices, including desk phone, mobile app on smartphone, and desktop computer Softphone. A Virtual User does not have a desktop phone, can receive RingCentral calls on the desktop computer Softphone and smartphone mobile app, but can only make outbound calls using the RingOut feature on the desktop Softphone or smartphone mobile app, or the VoIP feature on the smartphone mobile app.
A separate User Guide to the Office@Hand Mobile App for smartphones describes the features that allow you to access most of these same functions.

5
RingCentral Office@Hand from AT&T | Start-up Guide for Users | Overview
The Overview PageManaging your account is done online, through your browser.
Log into your Online Account at https://service-officeathand.att.com using your main RingCentral phone number and password.
The Overview page is your account home page. It shows your recent voicemail and faxes, recent in/outbound calls, plus your account status and announcements. Let’s take a look at the tabs across the top of this page and how to use them. Some features are described in more detail later in this document.

6
RingCentral Office@Hand from AT&T | Start-up Guide for Users | Overview
MessagesWhen you click the Messages menu item, the popup screen that appears contains your messaging Inbox, Outbox, Sent Items, and Deleted Items folders, and your Recordings. You can review and manage your messages from this page.
Your voicemail and fax messages are stored here for 30 days. Under Messages, you can:
• Review inbound and outbound callers
• Listen to voicemail
• View faxes
• Save voicemail and received faxes to disk
• Forward messages and faxes by email
• Click on a caller’s number to call them back
• Delete and undelete items
• Block callers
Activity LogThe Activity Log provides customized reports on inbound and (for Premium users) outbound calls and faxes.
Select the time period, type of call, inbound or outbound, blocked calls, or recorded calls. If you use RingMe for marketing, the Activity Log can show you the URL for RingMe calls you receive, so you can track the effectiveness of specific marketing campaigns.
You can save reports to disk and download them into a spreadsheet for analysis. You can have the activity log delivered to an email address daily, weekly, or monthly on specified days.

7
RingCentral Office@Hand from AT&T | Start-up Guide for Users | Overview
Call Recording – Important Legal RequirementCall Recording is a simple but useful feature that makes it easy for RingCentral users to record calls they make or receive.
Certain state and federal call recording laws apply to the use of this call recording feature by you and all users associated with your account. In some states, you and each user associated with your account is required to obtain consent from all parties to record a phone call. By using the RingCentral call recording feature, you and each user associated with your account are required and must agree to maintain compliance with all applicable state and federal laws and regulations.
On behalf of your organization, you agree to notify all users associated with your account of their obligation to comply with all applicable state and federal laws and regulations.
You and each user associated with your account understand and agree that each of you are solely liable for compliance of such laws and regulations, and under no circumstances shall RingCentral or AT&T be responsible or held liable for such compliance.
On-Demand Call Recording You can record a phone call by pressing *9 while you are on the call. Press *9 again to end recording.
Your call recordings are stored in the Activity Log. You can listen to them there, or download them.
Automatic Call RecordingIf your Administrator has activated Automatic Call Recording for incoming calls to your extensions, you will get an email letting you know. Once recordings are activated, an announcement will automatically play to incoming callers letting them know that their call is being recorded.
If your Administrator has activated Automatic Call Recording for outgoing calls for your extensions, you will get an email letting you know. However, no automated announcement is played when you call others; as noted above, it is your obligation to let those you call know that the call is being recorded.
You will receive email letting you know when Automatic Call Recording is activated, or deactivated, for your extensions.
You can view, listen to, and download recordings made of your calls by the Automatic Call Recording system by visiting your Call Log. Recorded calls are stored in the cloud for 60 days; to retain recordings longer, download and save them to your computer system.

8
RingCentral Office@Hand from AT&T | Start-up Guide for Users | Overview
ContactsYou have two Contacts list: Company contacts, and your Personal contacts. You will use these lists when sending messages, texts, faxes, and emails from Office@Hand.
You can add to your Personal Contacts list by importing from Microsoft Office, or from a comma-separated variable (CSV) text data file. You can also add contacts manually, as in the form shown below.

9
RingCentral Office@Hand from AT&T | Start-up Guide for Users | Overview
SettingsSettings is where you will find most of the customization features of your Office@Hand account.
My InboundThe My Inbound menu offers you many settings and customizations. Here is a summary; for details, see Settings > My Inbound.
• Define your own user details, including name, email, and phone number.
• Define call-screening rules and specifics for your personal number, including on-hold music and personal greetings.
• Specify the number of rings before the caller is sent to voicemail, as well as the sequence of phones that will ring when calls arrive.
My Outbound
Caller IDDefine the Caller ID customers will see when you call them. Your outgoing Caller ID can reflect a business name, a local number exchange, a toll-free number, or a blocked Caller ID. See Caller ID Fax Settings.
Choose a template for fax cover sheets here. You can also choose specific email addresses that can to send faxes via email through the Office@Hand system. See Fax Settings.

10
RingCentral Office@Hand from AT&T | Start-up Guide for Users | Overview
ToolsThis section on the online site main menu allows you to obtain the latest tools to enhance your productivity and customize your service to suit the way you work. Details are below; here is a summary.
Mobile AppsDownload the mobile app for select smartphones to take your Office@Hand service on the go.
SoftphoneUse the Softphone application to control your calls from your PC. Answer or screen incoming calls, send to voice mail, transfer, disconnect, or monitor voice messages as they are being left and pick up the ones you want to talk to. Premium users can make outbound calls through their Softphone.
RingMeThe RingMe button gives you the ability to be contacted from your web site or email signature with a simple click.
Resources > Online SupportAccess the Office@Hand Support page at http://support-officeathand.att.com/ to review features, search the Knowledge Base, answer questions, and learn more about what your system can do. You can also contact our support team from this page.
Quick LinksOn all but the Overview screen on the online site there is a Quick Links dropdown menu on the right that shows these shortcuts to most-used functions. The Administrator sees both Administrator and User links; Users see only the User links.
• User
• My Greeting & Call Screening
• My Call Handling Rules
• My Voicemail
• My Caller ID
• My After Hours Settings
These features are described in detail elsewhere in this document.
DND (Do Not Disturb) On the upper right of every page of your online account is small button labeled DND, or Do Not Disturb. When set to DND Off it is green, and means that you will take all incoming calls.
Click DND to toggle Do Not Disturb to one of its two other settings. When DND On is orange, it is set to Do not accept department calls and callers from the user’s department go to voicemail. When DND ON is red, it is set to Do not accept any calls, and all callers are sent to voicemail.

11
RingCentral Office@Hand from AT&T | Start-up Guide for Users | Overview
Conference Calling Conference Calling is available on Office@Hand Premium User Plans.
An Office@Hand account uses a single conference bridge phone number; as a user, you get your own individual host and participant access code, so you can hold conference calls whenever you want, wherever you are.
You can host a conference with up to 1000 attendees, using your desktop IP phone while in the office, or the Softphone from your desktop computer, or the Office@Hand mobile app while on the go.
An Invite feature lets you send email invitations with the dial-in information to participants with just one click. As host, you can mute participants, get caller counts, record conferences, and more.
Find your conference number, host code and participants code at the top of most screens when you are logged into the Web site.
To join a conference you are hosting, call the Conference number and enter your Host number at the prompt.
To join a conference hosted by someone else, call the Conference number and enter the Participant code at the prompt.
To invite participants to your conference, click the word Invite at the top of the Web screen. This brings up your default email program and starts an email message with the default Subject line “Details for conference call dial-in” and a standard message that includes the call-in information your guests will need. Edit the Subject and message as needed, enter your invitees in the To: line, and send the email invite containing the dial-in information.
The main conference number is available in the U.S. In addition, in-country dial-in numbers are available for use in over 30 countries.
For additional information including touch-tones to use for control during the conference, and a list of international dial-in phone numbers please visit this page: Conference Calling Touch-Tone Commands and International Dial-In Numbers.

12
RingCentral Office@Hand from AT&T | Start-up Guide for Users | Overview
RingOut The RingOut icon appears near the top-right of every online page on your account. Using RingOut lets you make calls from your Office@Hand account from the Softphone on your PC or Macintosh computer. (It is also a feature in the mobile apps.) Click on the RingOut icon to bring up this pop-up menu.
RingOut works from your desktop computer by first calling your number, then when you answer, calling the other party and connecting you. In this way, you are able to make a phone call from a non-telephone device like your computer, managed through your Office@Hand system. In addition, your RingCentral Caller ID shows up on the recipient’s phone.
• In this menu, in the Call to line enter or select the number you wish to call.
• In the line Current Location enter your phone number.
• Click Call. The system first calls you. When you answer, it then calls the other number.
• Prompt me to press 1 before connecting the call is pre-checked: When the system calls you, you hear “Please press 1 to connect.” This protects you in case you enter the wrong number as your own phone, or if your voicemail picks up too quickly.
NOTE: 911 emergency service is not available through the RingOut system.

13
RingCentral Office@Hand from AT&T | Start-up Guide for Users | Overview
FaxOutFaxOut makes it easy to send a fax from your desktop computer without needing a fax machine. Click the FaxOut icon and fill in the simple form with recipient and cover sheet information, and attach a document which will be converted into a fax automatically. A wide variety of standard document types are recognized by FaxOut. Send the fax immediately, or schedule it for later delivery.
Get HelpClick > Get Help on the top right of the screen on your online account to access a comprehensive set of knowledge-based articles on every aspect and feature of Office@Hand.
14
RingCentral Office@Hand from AT&T | Start-up Guide for Users | Settings > My Inbound
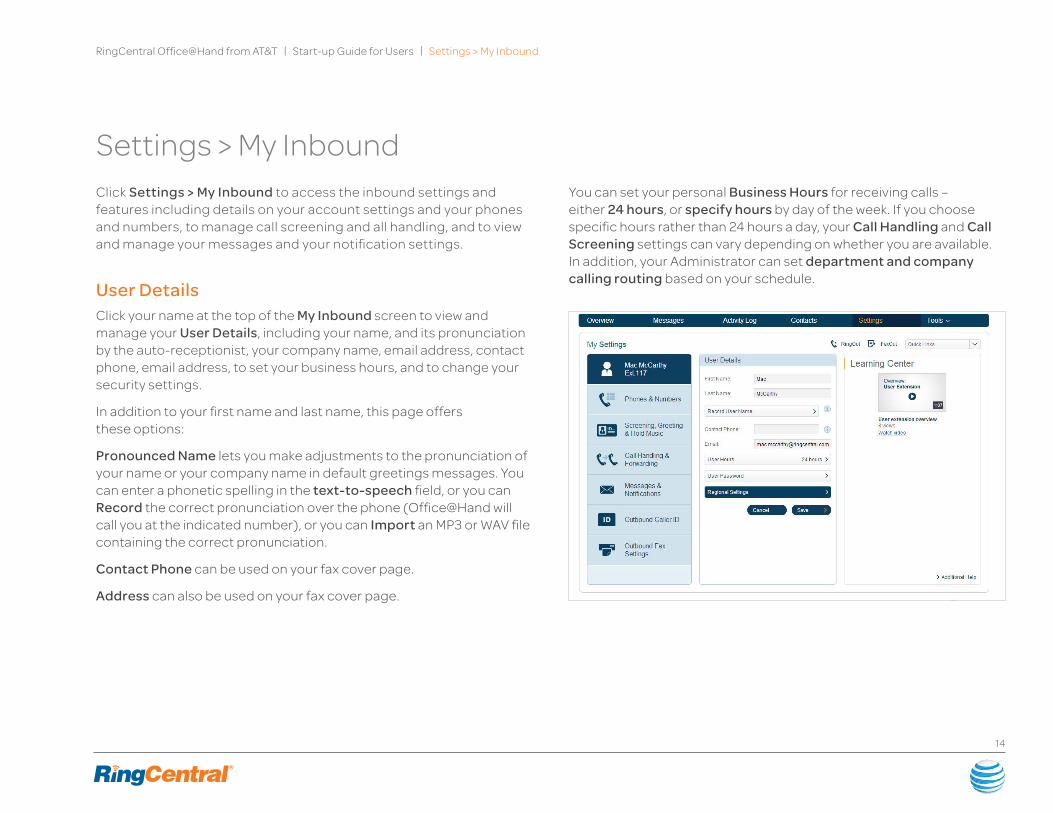
Settings > My InboundClick Settings > My Inbound to access the inbound settings and features including details on your account settings and your phones and numbers, to manage call screening and all handling, and to view and manage your messages and your notification settings.
User DetailsClick your name at the top of the My Inbound screen to view and manage your User Details, including your name, and its pronunciation by the auto-receptionist, your company name, email address, contact phone, email address, to set your business hours, and to change your security settings.
In addition to your first name and last name, this page offers these options:
Pronounced Name lets you make adjustments to the pronunciation of your name or your company name in default greetings messages. You can enter a phonetic spelling in the text-to-speech field, or you can Record the correct pronunciation over the phone (Office@Hand will call you at the indicated number), or you can Import an MP3 or WAV file containing the correct pronunciation.
Contact Phone can be used on your fax cover page.
Address can also be used on your fax cover page.
You can set your personal Business Hours for receiving calls – either 24 hours, or specify hours by day of the week. If you choose specific hours rather than 24 hours a day, your Call Handling and Call Screening settings can vary depending on whether you are available. In addition, your Administrator can set department and company calling routing based on your schedule.

15
RingCentral Office@Hand from AT&T | Start-up Guide for Users | Settings > My Inbound
Phones and Numbers ScreenThe Phones and Numbers screen on the online account lists your Direct Numbers, if any (you may have only an extension from your company number, if that is how your User account has been set up). It also lists your IP desk Phones, if any. And it lets you set your Presence permissions, and set up Presence on your Desktop IP phone if it is Presence-capable.
Add Direct Number/Add PhoneOnly Administrators can add phones or Direct Numbers to a user’s account. As a user, clicking these buttons will pop up a message to contact your Administrator.
Download/Activate AppsClicking this button gives you the opportunity to download and activate the RingCentral Office@Hand from AT&T Softphone, a feature-filled phone that runs on your desktop computer, and to download the Office@Hand mobile app for iPhone or Android smartphones. See Softphone for details on downloading and activation that application, and The RingCentral Office@Hand from AT&T Smartphone Mobile App for details on downloading and installing those apps to your smartphone.

16
RingCentral Office@Hand from AT&T | Start-up Guide for Users | Settings > My Inbound
Setting and Managing PresencePresence is a feature of select RingCentral Office@Hand desktop IP phones that lets other users see whether your number is in use – whether you are on a call on your desktop IP phonee (for Premium users), Softphone, or smartphone. It can be handy to let your colleagues know if you are on the line or on hold, before trying to call you or to forwarding a call. Presence also lets you designate colleagues who can answer your phones for you if you are not available.
Presence status is displayed as labeled lights on Presence-capable desktop IP phones of Premium users. (For those who need to monitor Presence for many devices, add-on hardware (“sidecars”) are available that add more monitoring lights to their desktop IP phone.)
Admins and Premium users can select specific users they wish to monitor for Presence; and each user can give or withhold permission to be monitored.
To manage Presence, go to Settings > My Inbound > Phones and Number. Click the Presence bar towards the bottom of the right-hand panel.
In the Presence panel that appears, Premium users who have Presence-capable desktop IP phones can click Appearance to see a list of users in the system. The first two users on this list are you yourself. Click the Select bar to choose users you wish to monitor for their Presence status. (To cancel monitoring, click the trash icon to the right of that user.)
Premium users can monitor as many fellow users as their desktop IP phone is capable of displaying for Presence. A two-light desktop IP phone won’t have Presence-monitoring capability. A four-light desktop IP phone can monitor two users (the first two lights are dedicated to the user of that phone). Available desktop IP phones offer up to a dozen monitoring lights; sidecars can add dozens more.
The names of users you are monitoring are displayed on your desktop IP phone. To see an approximation of what your desktop IP phone will look like with Presence monitoring enabled, click Preview on Phone, then select one of your desktop IP phones to preview line appearance on the phone and on sidecars if any are installed. Note that Presence detects calls to numbers/extensions. No matter which actual device the call is sent to, the system detects that the number/extension is ringing, active, or on hold.

17
RingCentral Office@Hand from AT&T | Start-up Guide for Users | Settings > My Inbound
Users, both Premium and Virtual, can also give permission for others to see their Presence status. Go to your Presence panel as described above and click the Permissions tab. Then choose On or Off under Allow other users to see my presence.
You can also choose to allow specific users to answer your calls for you. Note that Presence detects calls to numbers/extensions. No matter which actual device the call is sent to, the system detects that the number/extension is ringing, active, or on hold.

18
RingCentral Office@Hand from AT&T | Start-up Guide for Users | Settings > My Inbound
Call ScreeningRingCentral makes it easy to screen calls by prompting callers to announce their name. You can screen out callers who are not on your list of contacts and/or those calls that come in without caller ID.
To activate Call Screening, first check the following settings in Call Handling.
From the Main Menu select Settings > My Extension Settings > Call Handling.
Choose the Business Hours tab (if present).
Scroll down and click the Call Information bar.
For Call Screening to work, as described below, first set Play announcement before connecting to Always.
Click Save (in the upper-right corner – not Done in the lower left). Then click Cancel from the Call Handling page.
Setting up Call Screening Now you are ready to set up Call Screening
Click My Inbound, then Call Screening.
1. Select the tab Business Hours or the tab After Hours if they are present.
2. Turn on Personal Greetings if you wish, then accept the default greeting (“Thank you for calling John Smith”) or record or import a custom message by following the prompts.
3. Set Call Screening to On or Off. Call screening prompts callers for their names before connecting the call. You can choose to prompt the caller to say their name before connecting if the call has no Caller ID; or if the caller is not on the user’s contact list; or Always.
4. Choose a Connect Prompt, if you wish, that plays when your caller is being connected. You can accept the default message (“Please hold while I try to connect you”), or record or upload a custom message. (Smartphone apps don’t have the Connect Prompt option.)
5. Choose Music while connecting and choose the style of music to be played while the caller is being connected.
6. Now set On-hold music if you wish callers to hear music while on hold, and choose the style of music to play.
7. Click Save.

19
RingCentral Office@Hand from AT&T | Start-up Guide for Users | Settings > My Inbound
Call BlockingFollow these instructions to block calls, faxes or both with no caller ID, or to create a list of numbers you’d like to block. When a caller with a blocked number tries to call, the caller will hear a message that their call cannot be accepted.
1. From the Phone System screen, click Users.
2. Choose the user you want to edit.
3. Click Call Screening.
4. Scroll down and click the Blocked Numbers bar.
5. Tap Blocked Numbers.
6. Select Block specific calls and faxes, then enter a number or area code under Specific numbers and area codes, and click Block. You can repeat this, entering numbers/area codes and clicking Block, until you’ve entered all the numbers/area codes you wish to block.
7. Or you can select Block all calls.
8. If you have selected to block calls in this section, now select the message to be played by clicking the bar labeled Callers will hear…
9. You can choose Block calls and faxes with no Caller ID and select Calls and/or Faxes. Then select the message such callers will hear.
10. You can also Block calls from Pay Phones, and select the message such callers will hear.

20
RingCentral Office@Hand from AT&T | Start-up Guide for Users | Settings > My Inbound
Call HandlingUse the Call Handling menus to set how incoming calls will be handled during business hours as well as after hours, to forward calls to one or more phones including your Softphone and your mobile app, and to manage the Call Flip feature.
With Office@Hand, you can set up call-forwarding rules, adding up to four forwarding numbers for simultaneous or sequential ringing. When a call comes in, you can have it ring one phone for a certain number of rings, then automatically forward to another phone, or have it ring on several phones at the same time.
1. From Settings > My Inbound, click Call Handling.
2. For Business Hours tab (and then for After Hours), under How to handle calls during business hours, click Ring My Existing Numbers.

21
RingCentral Office@Hand from AT&T | Start-up Guide for Users | Settings > My Inbound
3. This expands the menu to list your RingCentral numbers. You can add numbers here, up to four total. The menu suggests Work and Other; you can enter any valid phone number here. Enter numbers with extensions by putting an asterisk between: [number] * [extension]. (The system will dial the number, pause, then dial the extension. ) For each number, in the Active column turn set the phone On (numbers can be turned on and off as needed), and select how many Rings for that number before moving the call to the next number. Use the up and down carets to change the order.
4. Click Forward to other user’s phones to select others in your RingCentral phone system to receive your forwarded calls. These are then added to your call list, where they can also be reordered and turned on or off.
5. Fine-tune these selections by choosing to have numbers ring Sequentially (one after another—when the first number is not answered after the designated number of rings, the call forwards to the next number on your list), or ring Simultaneously. You can also Group several numbers so they will ring at the same time before moving on to the next number or group of numbers.
6. You can set call handling separately for Business Hours and for After Hours if you have set up business hours.
7. You can your incoming calls also displayed on your computer’s Office@Hand Softphone and/or to your smartphone app (for Android only), if you have these installed, before the call is forwarded to the other numbers on your Call Handling list. The Softphone has several call-controller functions you might find useful. (See the detailed discussion of the Softphone later in this document.)
a. Turn your Notify my Softphone and Smartphone setting On.
b. Set the number of Softphone rings. There are 5-6 seconds between rings; setting this to four or five rings will give you time to take advantage of Softphone call-answering features (such as reply with a message, screen voicemail, or forward call to a number of your choice), if you wish, before the call is forwarded.
9. Click Save when done.
NOTE: On the After Hours tab, if you select Unconditional call forwarding, all calls received during your After Hours will bypass voicemail, greetings, and the Softphone, and be forwarded directly to the number you provided in that tab.

22
RingCentral Office@Hand from AT&T | Start-up Guide for Users | Settings > My Inbound
Advanced Call Handling: RulesSet up special Named Rules for handling particular kinds of calls, such as calls coming in during specific time periods, or to specific numbers. Use this feature, for example, to handling incoming calls during a seasonal promotion that sends customers to a specific number, where they can be forwarded to specific people, given a special announcement, or sent to a particular voicemail box. Create as many rules as you wish, and turn these rules on and off as needed.
In the Call Handling settings panel click the word Advanced, to the right of the area where the Business Hours/After Hours tabs are (if business hours are set, otherwise Advanced displays in this area by itself).
Advanced Call Handling lets you create specific additional rules for that user extension or department extension based on date and/or time of call, or Caller ID, or the number called. These rules override your regular call-handling rules for that extension.
1. Click Advanced.
2. Click Learn more advanced call handling, if desired.
3. Click Add Rule.
4. Give your rule a name, then select the conditions: Date and/or Time the call comes in; the Caller ID; or the Called Number.
5. Click Next.
6. If you selected Date and/or Time as your rule condition, now select a Weekly Schedule, with specific times for each day if you wish. Or select Specific Date Range.

23
RingCentral Office@Hand from AT&T | Start-up Guide for Users | Settings > My Inbound
7. If you selected Caller ID for this rule, you can enter one or more phone numbers, or choose names from your Contact List, or enter area codes or other partial numbers.
8. If you selected Called Number, select the number to which the rule will be applied: The choices will be the Main Number, the Auto-Receptionist for the department, and your number.
9. Click Next and choose when to apply the rule: during Business hours, After Hours, or Always.
10. Click Next.

24
RingCentral Office@Hand from AT&T | Start-up Guide for Users | Settings > My Inbound
11. Select the action to take when incoming calls match this rule:
a. Forward Calls: Then set custom Call Screening, Call Forwarding, or Messages handling for these calls.
b. Take Messages Only to send callers to voicemail. You can choose to take messages or not, and can customize the voicemail greeting.
c. Play Announcement Only and then end the call.
d. Unconditional Forwarding, which immediately forwards the call to a number you then select, bypassing any other call handling, including greetings, call screening, voicemail, and Softphone.
e. Click Done.
12. You can edit, turn on and off, or delete any of these Rules by clicking Advanced, then clicking on the Rule, and making desired changes on the screen that follows.

25
RingCentral Office@Hand from AT&T | Start-up Guide for Users | Settings > My Inbound
Call FlipOffice@Hand Call Flip lets you transfer live conversations from one device to another quickly and easily. Flip a call from your Desktop IP phone (Premium users) to your mobile phone on your way out of the office. Or flip a mobile call to your home phone once you’ve finished your commute. Simply dial two numbers and Flip.
To manage your Flip numbers of any user, go to Settings > My Inbound > Call Handling. Towards the bottom of Call Handling, find and click the Call Flip bar. You will see a list of your numbers and devices assigned to you in your Office@Hand account, including desktop IP phones, cell phones, and the Softphone if installed, with a Flip number beside each. The arrows let you move a device up or down to change its assigned number.
To add numbers to a Call Flip list
1. Go to Settings > My Inbound > Call Handling.
2. Click the line Ring my existing phone numbers. The list of numbers on your account appears.
3. Type in any additional phone numbers you want to use for Call Flip. Click On and check the box next to each device you want to appear on the Call Flip list.
4. Click Save.
5. Now go back to the Call Handling panel and click Call Flip, at the bottom of the panel.
6. You will now see on the Flip list the phones you selected.
7. You can change the order (and the assigned Flip numbers) to suit.
NOTE: If you don’t see the new numbers on your Call Flip list, go back and repeat these steps, being sure to check the box next to each number you wish to add to the Call Flip list.

26
RingCentral Office@Hand from AT&T | Start-up Guide for Users | Settings > My Inbound
To use Call FlipWhen you are on a phone call, press the asterisk key ( * ) and a digit corresponding to the device to which it is assigned, and the call is transferred immediately to that device. For example, if you have the number 2 assigned to your home phone, clicking *2 while you are on a call will instantly transfer the call to your home phone. Call Flip makes it easy and convenient to flip calls from device to device as you move about.
Messages and Notifications This menu lets you send callers directly to voicemail. Notifications will send you alerts of voicemail or faxes received.
You can have your calls sent immediately to voicemail, either during Business Hours (if, say, you are in a meeting) or After Hours. Callers will receive a message that their call has been forwarded to voicemail, or you can record your own custom message.
1. From Settings > My Inbound click Messages & Notifications.
2. If you set your Business Hours to 24 hours you will see the screen above. If you set Business Hours and After Hours, the screen will include a Business Hours tab and an After Hours tab, and you will make the next selection for each tab.
3. Click Yes to have your calls sent to voicemail. Click the Voicemail Greeting and accept the Default message, or click Custom and follow the instructions to record your own greeting with your computer microphone, or overyour phone, or by uploading a file from your computer.
4. Click No to have your calls handled by your other call-handling rules.
Notifications1. From Settings > My Inbound click
Messages & Notifications.
2. At the bottom of the middle panel, click Notifications.
3. In the window that pops up, choose what alerts you wish to receive: Notifications, by email or text message, or voicemail or faxes you have received, of missed calls, or of fax transmission results. Then choose how to receive them: By email, and/or by text message.

27
RingCentral Office@Hand from AT&T | Start-up Guide for Users | Settings > My Inbound
Advance Notification Options Tap Advanced Notifications, which offers additional options for each type of notification (faxes, voicemail, missed calls, etc.).
• You can specify a different email address and text address. To receive each type of notification.
• You can mark messages and faxes in your Web Inbox as ‘read’ after they are sent as notification attachments.
• You can send voicemail and fax notifications with or without the voicemail or fax attached.

28
RingCentral Office@Hand from AT&T | Start-up Guide for Users | Settings > My Outbound
Settings > My OutboundThe My Outbound user screen offers two settings: For Caller ID and Fax Settings.
Caller IDYou can set the Caller ID that will display to others when you make calls using various devices.
1. Click Settings > My Outbound.
2. Click Caller ID.
3. As a Premium User, you will see entries for your RingCentral Desktop IP phones, as well as a list of calling feature names.
4. As a Virtual User, you do not have RingCentral Desktop IP phones, so you will see only the entries under Feature Name, which lists other ways to make calls from your RingCentral account: RingOut, RingMe, Call Flip, and Fax Number.
In each case, the default selection is your main number: This is the Caller ID people will see when you call them. For each phone or feature, you can instead select as your Caller ID from that phone or feature one of your other numbers, if you have additional numbers on your account.
NOTE: Some call recipients may not accept calls from toll-free numbers or numbers that block their Caller ID – in such cases, Office@Hand will substitute one of your local numbers so the call will go through.

29
RingCentral Office@Hand from AT&T | Start-up Guide for Users | Settings > My Outbound
Fax SettingsYour Office@Hand number can automatically receive faxes as well as voice calls. Inbound faxes are stored in the Messages tab on their RingCentral online account.
Setting a Default Fax Cover SheetA cover sheet is attached to each fax you send through Office@Hand. To select the style or look of your cover sheet, go to Settings > My Outbound > Fax Settings, click Cover Page. From the drop-down list, preview available cover pages, select the cover page you want, and click Save. The variable information on the cover page will be filled in during the fax-sending process.
Email Address That Can Send FaxesIn Settings > My Outbound > Fax Settings click Faxes Sent via Email. Under Email addresses permitted to send faxes add, one by one, email addresses in addition to the one on your Office@Hand account, from which you may wish to send faxes through Office@Hand. Emails might include alternate company email accounts or various personal accounts. You can have up to five such email accounts listed.

30
RingCentral Office@Hand from AT&T | Start-up Guide for Users | Settings > My Outbound
Omitting the Cover Sheet When Email Subject is BlankThe fax cover page uses the addressee, sender, and fax number of the email to fill out your fax cover sheet. At Settings > My Outbound > Fax Settings > Faxes Sent via Email is the option to omit the cover page when you leave the subject line blank.
When a user sends a fax via Office@Hand, the system checks the email address of the sender, and sends the fax if it is on this approved list. See Sending faxes via email, below, for details.
Sending FaxesHere are three ways to send a fax using Office@Hand, without needing a fax machine.
Faxing using FaxOut From any page on your Office@Hand online account, click the FaxOut icon located in the upper right corner. Fill in the form with recipient’s fax number and cover page information, and Attach or Scan a document, which will automatically be converted into a fax.
A wide variety of standard document types, including word processing and spreadsheet and PDF documents, are recognized by FaxOut. Send faxes to individuals by entering their fax number, or choosing individuals from your Contacts list. Choose Groups to send the fax to each member of the group for whom you have a fax number listed.
Faxing using the SoftphoneOpen your computer desktop Softphone and click the icon for Create and send a fax, fill in the form with recipient’s fax number and cover page information, and attach or scan a document, which will automatically be converted into a fax.

31
RingCentral Office@Hand from AT&T | Start-up Guide for Users | Settings > My Outbound
Faxing via EmailIf your Administrator has added your email address to the list of emails permitted to send faxes via email, then you will be able to send faxes by emailing them as attachments to an Office@Hand email address that automatically converts the attachments into fax format and send them to the fax number specified.
1. Attach to an email the document you wish to fax.
2. The text in the Subject Line of the email will be added to the cover sheet. (If no subject line text is included, the cover sheet will be omitted.)
3. Send the email to the recipient’s 10-digit fax number to the email address att.rcfax.com.
For example, to send a document to the fax number 1-510-555-1212, you would use this email address: [email protected]
Faxing via the SoftphoneThe desktop Office@Hand Softphone can send faxes from your desktop computer. See the next page for instructions.

32
RingCentral Office@Hand from AT&T | Start-up Guide for Users | Settings > My Outbound
RingMe Click-to-CallRingMe generates code you can embed in a Web page to display a “RingMe” button. Visitors can click this button to call your Office@Hand phone, thus making it easy for potential customers to contact your business by phone.
The RingMe code can also be placed in email signatures, online ads, or any online document. Your Office@Hand call logs will identify RingMe as the call source, for convenience in managing and evaluating your RingMe placements.
Find the RingMe feature under Tools on the right side of the Web site toolbar.
On the RingMe Options page, select which of your extensions will receive the call – if you have more than one extension assigned to you, you can select one.
Next, click Select a button style and, on the pop-up window, choose to create a Text Hyperlink, or choose one of the 30 RingMe large or small buttons to be displayed. You can also select a background color (in shades of gray) for the button. Click Save.
Check Use SSL mode to use this security feature, which encrypts the information sent over the Internet when the button is clicked by a customer.

33
RingCentral Office@Hand from AT&T | Start-up Guide for Users | Settings > My Outbound
Check Require caller to enter security image confirmation code to generate a security box that requires the user to type in a code displayed in an image; this will reduce spam calls generated by robot programs.
Preview and test by clicking the RingMe words or button. The popup is what your customers will see when they click the RingMe text or button: It asks for the customer’s phone number, how long to wait before calling, a Code from Image data-entry box if you checked the security-image option, and a green Call button.
In order to generate a call that is free to the customer, the Office@Hand system first calls the customer and, when the customer answers, then calls the Office@Hand number or extension. Since Office@Hand is calling the customer, the customer incurs no charge.
Close the test window.
Under the label <HTML> you will find the code that has been generated based on your choices. By default, the code uses JavaScript; you can optionally choose to have it generated without JavaScript, or to use a URL hyperlink, in case the site in which you are placing the code has technical issues with the other choices.
Now highlight and copy the generated code. Embed this code in the source to your chosen Web site page, or place it in your email signature block, or put it in any digital document.
Inbound calls received from RingMe will follow call-handling rules for that extension. Call logs for that extension will show the URL of the page hosting the RingMe link.

34
RingCentral Office@Hand from AT&T | Start-up Guide for Users | Softphone
34
The RingCentral Office@Hand from AT&T SoftphoneThe RingCentral Softphone is a custom call-controller application for desktop or laptop computers that gives access to all the Office@Hand phone features. Users can make and answer calls through the Softphone and the computer’s microphone and speakers or headset They can send and receive faxes, access their contact list, listen to voicemail, screen calls and voicemail while it is being left, transfer calls, speed dial numbers, and manage some settings.
*Outbound calling feature is available to Premium users only.
The RingCentral Softphone supports Windows XP, Windows Vista, & Windows 7, and also Mac OS 10.5X Leopard or newer on the Macintosh.
Downloading the RingCentral Softphone 1. Log into your Office@Hand account.
2. Click Tools in the menu bar, and select Softphone.
3. On the left, under Download, click Download for PC or Download for the Mac. The system may recognize your computer type and offer you the appropriate version automatically.)4. When you have completed the installation, fill out your credentials in the authentic dialog box and click OK.
5. Open the Softphone to explore and use its features.

35
RingCentral Office@Hand from AT&T | Start-up Guide for Users | Softphone
35
You will also find the Softphone download under Settings > My Inbound > Phones and Numbers. Click the Download/Activate Apps button.
This displays a window that offers several choices, including downloading the mobile apps for smartphone. Click Download New Softphone and install.
Then return to this menu and click Activate Existing Softphone. You are asked to Select SmartPhone to Activate – since you can only install one Softphone at a time, there will only be one choice, usually in the form of a code corresponding to your computer’s internal name. Select this, then fill out the E911 Registered Location information form that appears. (E911 registration is legally required; your service will not be activated until this information is provided.) When you finish, the Confirmation message will tell you to restart the Softphone. It will now be activated and you will be able to receive and place voice calls.
NOTE: Outbound calling from the Softphone is a feature available only to Premium users. Virtual users can receive incoming calls but not make outgoing calls using the Softphone.

36
RingCentral Office@Hand from AT&T | Start-up Guide for Users | Softphone
36
Using the SoftphoneThe Softphone main screen has a dial pad for making phone calls, and, across the top, icons for its main features, which are:
Messages – clicking this displays your Inbox, Sent Messages, Recent Calls, etc. You can also display selected messages on the Softphone screen itself by clicking the word Messages just below the icon.
The phone icon with the checkmark displays a pop-up with our recent messages.
Clicking the phone icon with the square block of lines opens a window showing your online call log.
Clicking the icon that looks like a piece of paper with a curled edge opens the dialog for creating and sending a fax.
The rightmost icon, a boxed list, opens your online account in a browser window.
There are also icons about limited Emergency 911 service, turning Do Not Disturb (DND) on or off, and a quick link to showing all messages, and the Overview list.
Clicking the Menu button at the top left of the Softphone brings up a menu of functions you can perform with your Softphone.

37
RingCentral Office@Hand from AT&T | Start-up Guide for Users | Softphone
37
Sending a Fax via the Office@Hand Softphone
On the Softphone, tap the fourth icon from the left, which looks like a strip of paper with a curl on one corner (hovering over it brings up the label Create and send a fax). Or tap the Softphone menu (on the top bar, the three lines and caret) and select Send Fax.
The first time you use this feature, fill out the Personal Information Setup. Provide a Fax Station Identifier, which tells recipients where the fax came from – use your Office@Hand fax number or other number of your choice; you can also enter identifying information such as your company name. Click Finish.
Fill out the Internet Fax form that now appears, providing one or more fax numbers (directly or choosing from your contact list), cover-page information, and choose a document to fax – you can Attach the document from your computer, or Scan it in. (The document-to-fax converter recognizes dozens of file formats.) Send the fax immediately, or schedule it for later. Additional options can be found under the Options > Faxes menu.

38
RingCentral Office@Hand from AT&T | Start-up Guide for Users | Office@Hand App for SalesForce.com
Office@Hand App for SalesForce.comThe RingCentral App for Salesforce.com is available to the Office@Hand Premium User Plan subscribers who are also subscribers to Salesforce.com.
The RingCentral Office@Hand App for Salesforce.com provides seamless integration between Salesforce.com and your RingCentral services to enable improved customer retention, agent productivity, and advanced business processes.
The app runs in your Salesforce account, and uses your RingCentral Softphone for dialing and call handling. You can call contacts from within Salesforce by simply clicking on their phone number.
For incoming calls, the app automatically brings up the matching contact record. You can log notes during or after the call, and work multiple interactions on separate tabs.
Detailed reporting on calls is also available within Salesforce.
The Office@Hand Softphone must be installed and running on the user desktop.
Your Salesforce System Administrator will need to set up the Salesforce instance before it can communicate with the App. Detailed instructions for the System Administrator can be found in the Office@Hand App for Salesforce.com Administrator Guide.
To Download and Install the Office@Hand App for Salesforce.com
1. Download the RingCentral App for Salesforce from Tools menu of RingCentral account online, or from Salesforce AppExchange.
2. The App installation process will restart the RingCentral Softphone.
3. If the RingCentral Softphone does not restart automatically, exit the Softphone manually and restart it for the configurations to take effect.
4. Login to Salesforce.com through your browser and notice the RingCentral App for Salesforce login form in the left navigation sidebar.
NOTE: If the left navigation sidebar is hidden, you may need to pull it out.
6. If you see a Connect CTI Adaptor button, refresh the page.
See the Office@Hand App for Salesforce.com User Guide for detailed information on using the App.

39
RingCentral Office@Hand from AT&T | Start-up Guide for Users | Support Home Page
The RingCentral Office@Hand from AT&T Smartphone Mobile App Using the Office@Hand mobile app, the Administrator can configure and manage the entire RingCentral phone system settings from a smartphone, performing virtually all the same functions available to you through the Web browser interface to your online account.
Office@Hand Users can manage their own phones using the app. They can take business anywhere, using the app to make and receive calls using VoIP, change settings, and get notifications of active calls, voicemails and faxes.
Download the RingCentral Office@Hand from AT&T Smartphone Mobile AppTo download the RingCentral App for your smartphone, visit your select smartphone’s* store and search for and download Office@Hand.
Once installed, log in using your RingCentral number and password.
See the RingCentral Office@Hand Mobile Guide for Users for details on the use of the smartphone app to use and manage your Office@Hand system.
* Smartphone apps are available for select smartphones. See att.com/officeathand for the list of certified devices.

40
RingCentral Office@Hand from AT&T | Start-up Guide for Users | Support Home Page
Office@Hand Support Home PageThe Office@Hand Support Home page at http://support-officeathand.att.com/ has support on the most popular topics, the Knowledge Base, tutorial videos, additional user guides, and Support department contact information.
RC_V1.0_020413 | © 2013 AT&T Intellectual Property. All Rights Reserved. AT&T and the AT&T logo are trademarks of AT&T Intellectual Property. Ringcentral and Ringcentral logo are trademarks of Ringcentral, Inc.