Embed Size (px)
Citation preview

SP31 Mult i -Channel ProcessorUser Guide

ISP31 MULTI-CHANNEL PROCESSOR USER GUIDE
PREFACE
Copyright and acknowledgements
Copyright © 2003 Primare Systems AB. All rights reserved.
Primare Systems ABRenvägen 1SE-352 45 VäxjöSweden
Issue: SP31
The information in this guide is believed to be correct asof the date of publication. However, our policy is one ofcontinuous development and so the information is subjectto change without notice, and does not represent acommitment on the part of Primare Systems AB.
Primare is a trademark of Primare Systems AB. Manufac-tured under license from Dolby Laboratories “Dolby”,“Pro Logic”, and the double-D symbol are trademarks ofDolby Laboratories. Confidential Unpublished Works.Copyright 1992-1997 Dolby Laboratories, Inc. All rightsreserved. LaserDisc is a trademark of Pioneer ElectricCorp. All other product names are trademarks or regis-tered trademarks of their respective owners.
FCC Warning: This equipment generates and can radiateradio frequency energy and if not installed and usedcorrectly in accordance with our instructions may causeinterference to radio communications or radio andtelevision reception. It has been type-tested and complieswith the limits set out in Subpart J, Part 15 of FCC rulesfor a Class B computing device. These limits are intendedto provide reasonable protection against such interferencein home installations.
EEC: This product has been designed and type-tested tocomply with the limits set out in EN55013 andEN55020.
This guide was produced by Condesign Ljungby AB.www.condesign.se
200349

IISP31 MULTI-CHANNEL PROCESSOR USER GUIDE
IIISP31 MULTI-CHANNEL PROCESSOR USER GUIDE
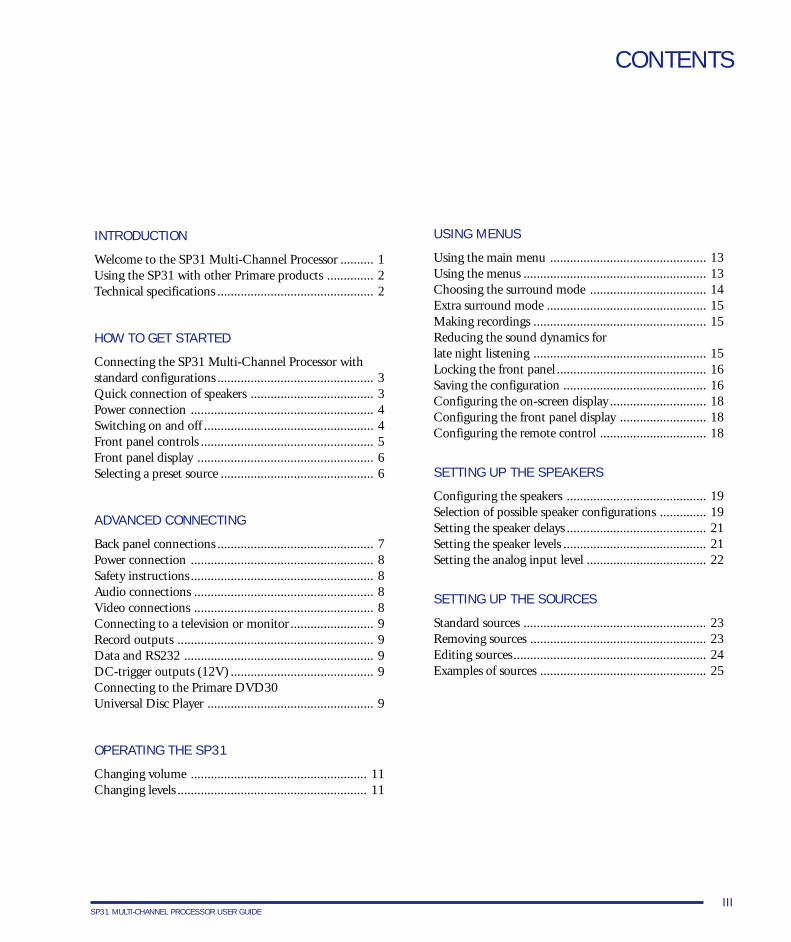
CONTENTS
INTRODUCTION
Welcome to the SP31 Multi-Channel Processor .......... 1Using the SP31 with other Primare products .............. 2Technical specifications ............................................... 2
HOW TO GET STARTED
Connecting the SP31 Multi-Channel Processor withstandard configurations ............................................... 3Quick connection of speakers ..................................... 3Power connection ....................................................... 4Switching on and off ................................................... 4Front panel controls .................................................... 5Front panel display ..................................................... 6Selecting a preset source .............................................. 6
ADVANCED CONNECTING
Back panel connections ............................................... 7Power connection ....................................................... 8Safety instructions ....................................................... 8Audio connections ...................................................... 8Video connections ...................................................... 8Connecting to a television or monitor ......................... 9Record outputs ........................................................... 9Data and RS232 ......................................................... 9DC-trigger outputs (12V) ........................................... 9Connecting to the Primare DVD30Universal Disc Player .................................................. 9
OPERATING THE SP31
Changing volume ..................................................... 11Changing levels ......................................................... 11
USING MENUS
Using the main menu ............................................... 13Using the menus ....................................................... 13Choosing the surround mode ................................... 14Extra surround mode ................................................ 15Making recordings .................................................... 15Reducing the sound dynamics forlate night listening .................................................... 15Locking the front panel ............................................. 16Saving the configuration ........................................... 16Configuring the on-screen display ............................. 18Configuring the front panel display .......................... 18Configuring the remote control ................................ 18
SETTING UP THE SPEAKERS
Configuring the speakers .......................................... 19Selection of possible speaker configurations .............. 19Setting the speaker delays .......................................... 21Setting the speaker levels ........................................... 21Setting the analog input level .................................... 22
SETTING UP THE SOURCES
Standard sources ....................................................... 23Removing sources ..................................................... 23Editing sources .......................................................... 24Examples of sources .................................................. 25

IVSP31 MULTI-CHANNEL PROCESSOR USER GUIDE
CONTENTS
1SP31 MULTI-CHANNEL PROCESSOR USER GUIDE
INTRODUCTIONWelcome to the new Primare SP31 Multi-ChannelProcessor! This chapter introduces you to its keyfeatures, and explains how you can take advantageof its potent flexibility to create a system perfectlytuned to your requirements.
Welcome to the SP31 Multi-Channel Processor
For the new SP31, Primare has enhanced a design classicto deliver even greater fidelity, flexibility and reliability toaficionados of multi-channel music and lovers of themovie genre. By virtue of its upgraded electronic design,the SP31 widens the audio and video spectrum stillfurther to provide ever more accurate sound quality,stunningly lifelike pictures and a more vivid contrast withlesser processors.
It offers a class-beating combination of innovative DSPengineering, peerless performance, versatile connectivity,superior control and ease of use.
Proprietary Processing
The SP31uses proprietary DSP circuitry developed byPrimare, to provide a far more convincing multi-channelsound stage than the standard off-the-shelf circuits used inmany other surround processors. It provides up to192kHz/24 bit processing to accommodate all the currentmulti-channel audio formats and future surround en-hancements.
Flexible range of inputs
The SP31 provides a comprehensive range of inputsdesigned to cater for virtually any combination of sources.The range includes: seven analogue RCA inputs, oneanalogue XLR input, five coaxial digital inputs, twoTOSlink optical digital inputs, and one AES/EBU digitalinput.
Video switching
Up to nine audio-video sources may be controlled throughtwo component video inputs, three S-Video inputs andfour composite video inputs.
Digital Surround Processing
The SP31 can decode multi-channel sources encoded inDolby Pro Logic, Dolby Digital, or DTS formats toprovide eight discrete output channels for up to eightloudspeakers in a surround system. A wide range ofprocessing options will allow the user to match two-channel or multi-channel music and movie sound to itsideal mode. Modes available include Dolby Pro Logic II,Dolby Digital 5.1, DTS Neo:6, DTS 5.1, DTS ES 6.1,DTS ES 6.1 Discrete and Primares own“Surround EX 7.1”.
Multi-channel analog input
In addition to the processing of encoded multi-channelsources, the SP31 provides a discrete eight-channelanalogue input for a DVD audio or SACD player thatprovides a multi-channel output.
Flexible configuration
The SP31 is fully configurable from either the front panelor remote control. By using a range of easy to follow on-screen menus, your preferred combination of sources andoutputs may be configured quickly and easily to providesimple, user-friendly operation. The SP31 is supplied witha factory set-up to accommodate a standard set of sourcesconforming to the most usual combination of inputs andoutputs, but these may be modified and enhancedaccording to your taste and system characteristics.
2SP31 MULTI-CHANNEL PROCESSOR USER GUIDE
INTRODUCTION
Using the SP31 with otherPrimare productsAlthough the SP31 is flexible enough to optimise theperformance of virtually any other system component, it isthe perfect partner for other Primare products, includingthe Primare Power Amplifiers and the new PrimareDVD30 DVD player. When using the SP31 with aPrimare DVD player, both units may be controlled fromthe same RC keypad to provide the ultimate in controland operational simplicity.
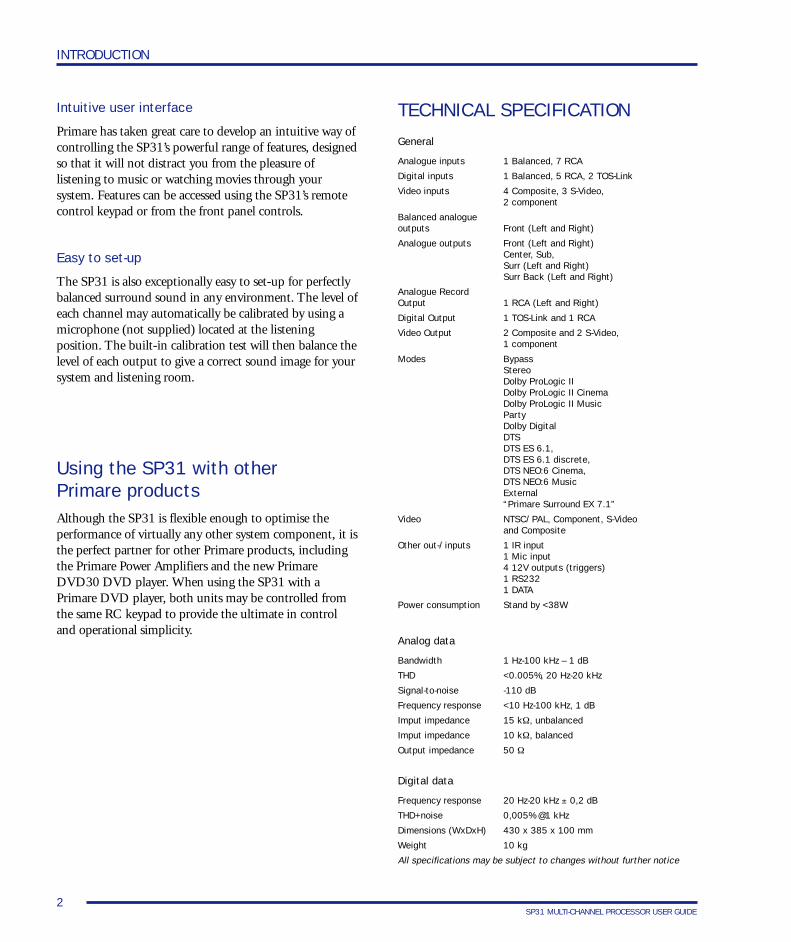
TECHNICAL SPECIFICATION
General
Analogue inputs 1 Balanced, 7 RCA
Digital inputs 1 Balanced, 5 RCA, 2 TOS-Link
Video inputs 4 Composite, 3 S-Video,2 component
Balanced analogueoutputs Front (Left and Right)
Analogue outputs Front (Left and Right)Center, Sub,Surr (Left and Right)Surr Back (Left and Right)
Analogue RecordOutput 1 RCA (Left and Right)
Digital Output 1 TOS-Link and 1 RCA
Video Output 2 Composite and 2 S-Video,1 component
Modes BypassStereoDolby ProLogic IIDolby ProLogic II CinemaDolby ProLogic II MusicPartyDolby DigitalDTSDTS ES 6.1,DTS ES 6.1 discrete,DTS NEO:6 Cinema,DTS NEO:6 MusicExternal“Primare Surround EX 7.1”
Video NTSC/PAL, Component, S-Videoand Composite
Other out-/inputs 1 IR input1 Mic input4 12V outputs (triggers)1 RS2321 DATA
Power consumption Stand by <38W
Analog data
Bandwidth 1 Hz-100 kHz – 1 dB
THD <0.005%, 20 Hz-20 kHz
Signal-to-noise -110 dB
Frequency response <10 Hz-100 kHz, 1 dB
Imput impedance 15 kΩ, unbalanced
Imput impedance 10 kΩ, balanced
Output impedance 50 Ω
Digital data
Frequency response 20 Hz-20 kHz ± 0,2 dB
THD+noise 0,005% @1 kHz
Dimensions (WxDxH) 430 x 385 x 100 mm
Weight 10 kg
All specifications may be subject to changes without further notice
Intuitive user interface
Primare has taken great care to develop an intuitive way ofcontrolling the SP31’s powerful range of features, designedso that it will not distract you from the pleasure oflistening to music or watching movies through yoursystem. Features can be accessed using the SP31’s remotecontrol keypad or from the front panel controls.
Easy to set-up
The SP31 is also exceptionally easy to set-up for perfectlybalanced surround sound in any environment. The level ofeach channel may automatically be calibrated by using amicrophone (not supplied) located at the listeningposition. The built-in calibration test will then balance thelevel of each output to give a correct sound image for yoursystem and listening room.
3SP31 MULTI-CHANNEL PROCESSOR USER GUIDE
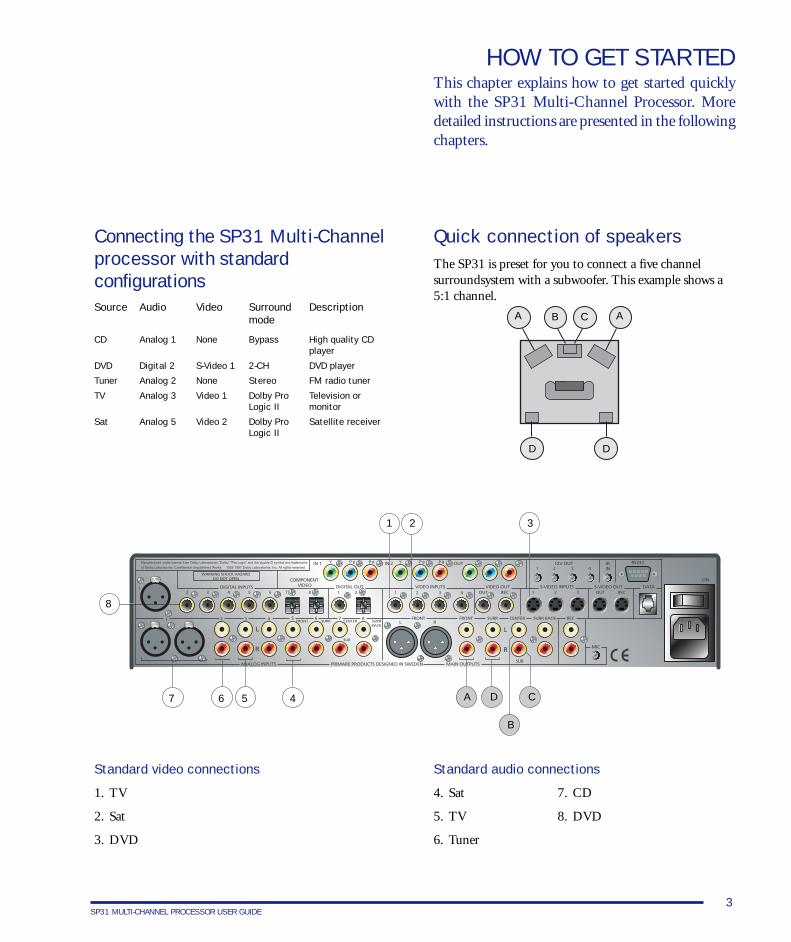
HOW TO GET STARTEDThis chapter explains how to get started quicklywith the SP31 Multi-Channel Processor. Moredetailed instructions are presented in the followingchapters.
Connecting the SP31 Multi-Channelprocessor with standardconfigurationsSource Audio Video Surround Description
mode
CD Analog 1 None Bypass High quality CDplayer
DVD Digital 2 S-Video 1 2-CH DVD player
Tuner Analog 2 None Stereo FM radio tuner
TV Analog 3 Video 1 Dolby Pro Television orLogic II monitor
Sat Analog 5 Video 2 Dolby Pro Satellite receiverLogic II
Standard audio connections
4. Sat
5. TV
6. Tuner
Standard video connections
1. TV
2. Sat
3. DVD
Quick connection of speakersThe SP31 is preset for you to connect a five channelsurroundsystem with a subwoofer. This example shows a5:1 channel.
7. CD
8. DVD
A B C
D D
1 2 3
4567
8
A
A
D
B
C
4SP31 MULTI-CHANNEL PROCESSOR USER GUIDE
HOW TO GET STARTED
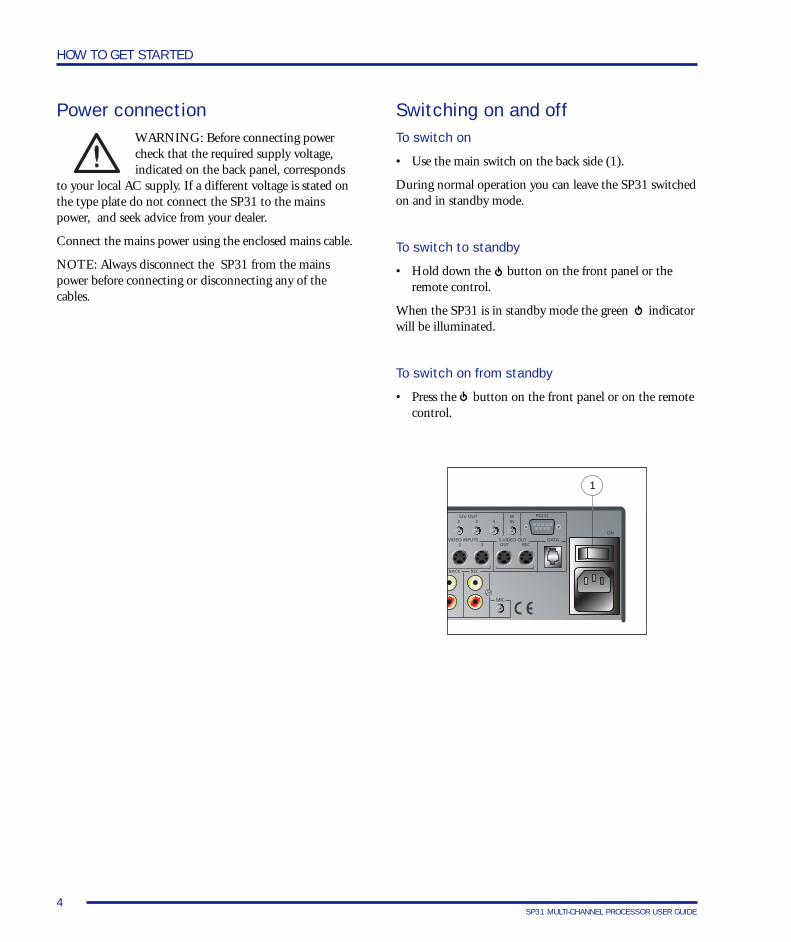
Switching on and offTo switch on
• Use the main switch on the back side (1).
During normal operation you can leave the SP31 switchedon and in standby mode.
To switch to standby
• Hold down the button on the front panel or theremote control.
When the SP31 is in standby mode the green indicatorwill be illuminated.
To switch on from standby
• Press the button on the front panel or on the remotecontrol.
Power connectionWARNING: Before connecting powercheck that the required supply voltage,indicated on the back panel, corresponds
to your local AC supply. If a different voltage is stated onthe type plate do not connect the SP31 to the mainspower, and seek advice from your dealer.
Connect the mains power using the enclosed mains cable.
NOTE: Always disconnect the SP31 from the mainspower before connecting or disconnecting any of thecables.
1
5SP31 MULTI-CHANNEL PROCESSOR USER GUIDE
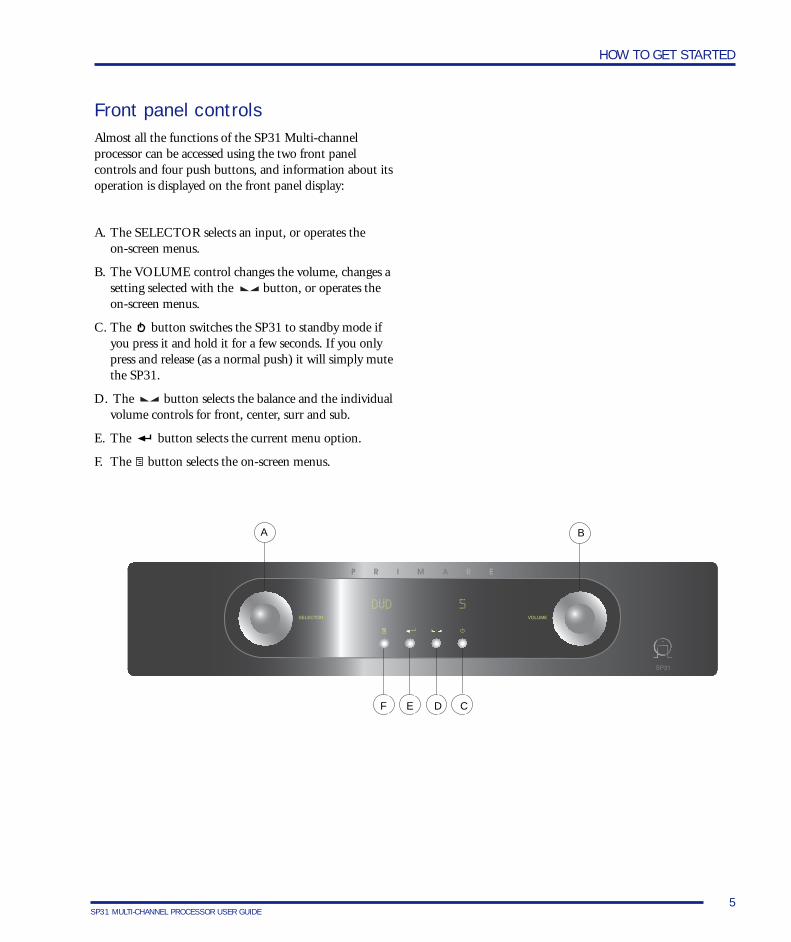
Front panel controlsAlmost all the functions of the SP31 Multi-channelprocessor can be accessed using the two front panelcontrols and four push buttons, and information about itsoperation is displayed on the front panel display:
A. The SELECTOR selects an input, or operates theon-screen menus.
B. The VOLUME control changes the volume, changes asetting selected with the button, or operates theon-screen menus.
C. The button switches the SP31 to standby mode ifyou press it and hold it for a few seconds. If you onlypress and release (as a normal push) it will simply mutethe SP31.
D. The button selects the balance and the individualvolume controls for front, center, surr and sub.
E. The button selects the current menu option.
F. The button selects the on-screen menus.
HOW TO GET STARTED
A B
E D CF
6SP31 MULTI-CHANNEL PROCESSOR USER GUIDE
HOW TO GET STARTED
Selecting a preset sourceThe SP31 Multi-Channel Processor allows you to defineup to 15 sources. Each source can use one of the eightdigital and eight or five plus one external analog input,and any source can be combined with one of the videoinputs.
These five sources shown below are a selection of standardpreset sources.
Source Audio Video Surround Descriptionmode
CD Analog 1 None Bypass High quality CDplayer
DVD Digital 2 S-Video 1 2-CH DVD player
Tuner Analog 2 None Stereo FM radio tuner
TV Analog 3 Video 1 Dolby Pro Television orLogic II monitor
Sat Analog 5 Video 2 Dolby Pro Satellite receiver
Logic II
To select a source
• Turn the SELECTOR control on the front panel untilthe name of the source is shown on the front paneldisplay.
For example:
• Alternatively, press the or buttons on the remotecontrol to step between sources.
You will find more details about what the SP31 Multi-Channel Processor provides in the following chapters.
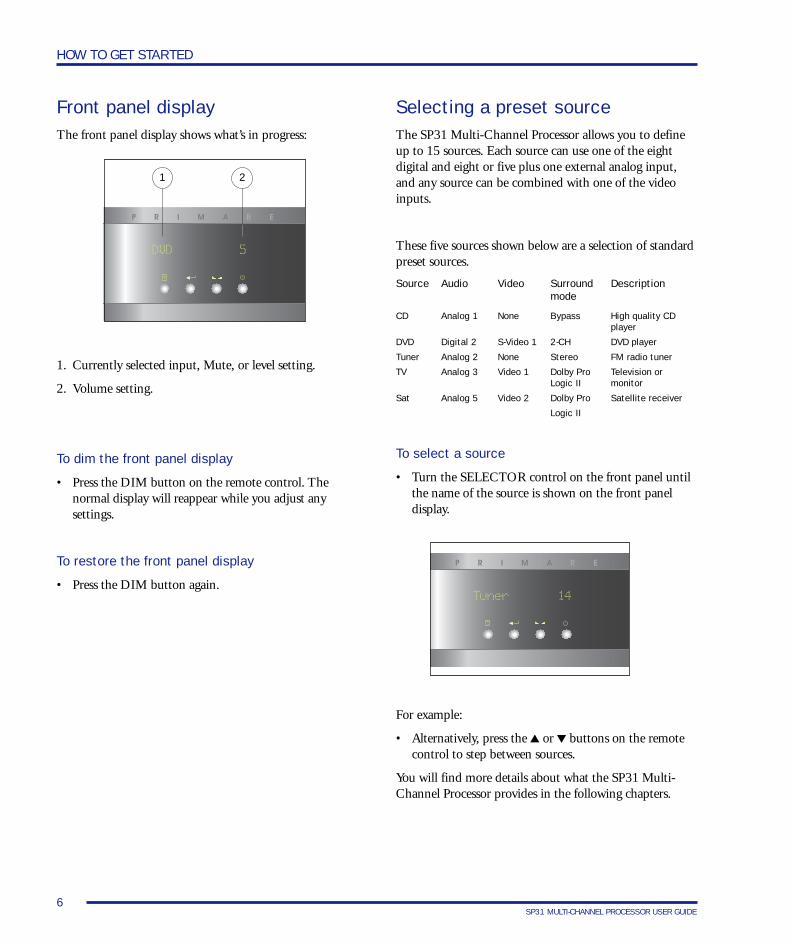
Front panel displayThe front panel display shows what’s in progress:
1. Currently selected input, Mute, or level setting.
2. Volume setting.
To dim the front panel display
• Press the DIM button on the remote control. Thenormal display will reappear while you adjust anysettings.
To restore the front panel display
• Press the DIM button again.
1 2
7SP31 MULTI-CHANNEL PROCESSOR USER GUIDE
ADVANCED CONNECTINGThis chapter explains the fully possibilities of howto connect the SP31 to the other components inyour system.
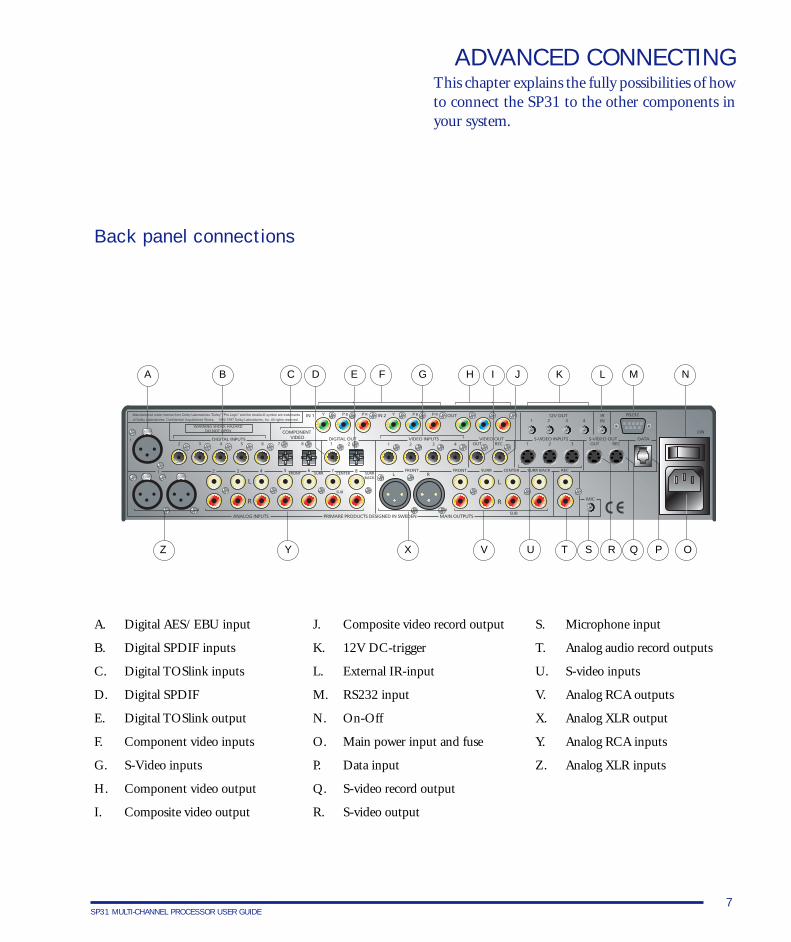
Back panel connections
A. Digital AES/ EBU input
B. Digital SPDIF inputs
C. Digital TOSlink inputs
D. Digital SPDIF
E. Digital TOSlink output
F. Component video inputs
G. S-Video inputs
H. Component video output
I. Composite video output
C D E F G H I J KA B L M
OPQRSUVXYZ
N
J. Composite video record output
K. 12V DC-trigger
L. External IR-input
M. RS232 input
N. On-Off
O. Main power input and fuse
P. Data input
Q. S-video record output
R. S-video output
T
S. Microphone input
T. Analog audio record outputs
U. S-video inputs
V. Analog RCA outputs
X. Analog XLR output
Y. Analog RCA inputs
Z. Analog XLR inputs
8SP31 MULTI-CHANNEL PROCESSOR USER GUIDE
ADVANCED CONNECTING
Power connectionWarning! Before connecting power check thatthe required supply voltage, indicated on theback panel, corresponds to your local AC
supply. If different voltage is stated on the type plate donot connect the SP31 to the mains power. You then haveto seek advice from your dealer.
Connecting the mains power using the enclosed mainscable.
Always disconnect the SP31 from the mains power beforeconnecting or disconnecting any of the cables.
Safety instructionsTo prevent fire or shock hazard, do not expose thisappliance to dripping or splashing. No objects filled withliquids, such as vases, should be placed on the SP31.
If you want to build in the SP31 you need to be sure toallow space of at least 20 cm behind, 10 cm on both sidesand 30 cm above the top panel of the unit. This is toprevent fire or damage. You also have to make sure thatthe main switch is accessable.
Audio connectionsAudio outputs
The SP31 Multi-Channel Processor provides one pair ofanalog XLR outputs and four pair of analog RCA outputs.The main outputs provide eight discrete analog audiooutputs for connecting to the power amplifiers andloudspeakers in the surround system.
Audio inputs
The SP31 provides a total of 13 or 16 audio inputs, eightdigital and eight or four plus one external analog. Becausethe SP31 is configurable, you have total flexibility aboutwhich digital input you use for each of your digitalsources, and which analog input you use for each of youranalog sources. In addition, you can optionally use fourpairs of analog inputs for a single, multi-channel source,such as DVD-A or SACD, called external.
The SP31 is supplied with a suggested set of sourcesalready set up, and you may choose to leave the inputsassigned in this way. However, if you prefer, you canreassign the inputs to sources in any way you prefer to suitthe equipment in your system, and the way you would liketo wire it up.
The SP31 provides one AES/EBU digital input, fivecoaxial SPDIF digital inputs, and two optical TOS-Linkdigital inputs.
The analog inputs that are provided are one XLR, sevenRCA’s or three RCA’s plus one external (RCA).
Video connectionsThe SP31 provides a choice of either component,S-Video, or composite video connections. If your sourceor monitor provides a choice of video connections werecommend using the component or S-Video connections,as these provide higher quality. However, we recommendyou first connect up and calibrate your system using thecomposite connection.
Video inputs
The SP31 provides two component video, threeS-Video, and four composite video inputs.
Video outputs
The SP31 provides one component video, one S-Video,and one composite video output. The on-screen display isonly provided on the S-Video and composite outputs.
9SP31 MULTI-CHANNEL PROCESSOR USER GUIDE
ADVANCED CONNECTING
Connecting to a television ormonitorConnect the appropriate output to your television ormonitor. If you are using video sources of more than onetype you may need to make a connection from each videooutput to your monitor as the SP31 only performsconversion from S-Video to composite.
If your television includes a tuner output you can use theSP31 to perform switching between the television tunerand your other video sources such as DVD or Laser Disc.In this case connect the television tuner output to thevideo input corresponding to your TV source. If yourtelevision does not provide a tuner output you will need toswitch the television between its internal tuner and theexternal video input.
Record outputsThe SP31 provides two digital record outputs, one opticalTOSlink output and one coaxial SPDIF.
Note that no D/A or A/D conversion is carried out. Onlydigital sources may be recorded from the digital outputs.Only analog sources may be recorded from the analogoutputs.
For connection to analog record outputs the SP31provides one pair of audio outputs, one component video,one S-video output and one composite.
Data and RS232The DATA input allows you to connect the SP31 to anexternal interface. The RS232 port will allow you toconnect to a home automation installation system. It willalso allow for authorized personnel to connect to the SP31for service and future upgrades.
DC-trigger outputs (12 V)The DC-trigger output allows you to control surroundequipment like home installations via the menu-option.
Connecting to thePrimare DVD30 Universal DIscplayerThe Primare DVD30 Universal Disc Player is an idealsource for use with the Primare SP31, to give superbquality video and 5.1 channel digital or analog surround.
• Connect the S-Video or component output(recommended), or composite output, from the DVDplayer to an appropriate video input on the SP31.
• Connect the digital audio output from the DVD playerto digital input 2 on the SP31 or use the digitalAES/EBU connection (recommended).

10SP31 MULTI-CHANNEL PROCESSOR USER GUIDE
ADVANCED CONNECTING
11SP31 MULTI-CHANNEL PROCESSOR USER GUIDE
Changing the volumeThe SP31 allows you to vary the volume from 0 (silence)to 99 (maximum volume), where each stepis equivalent to 0.5dB.
To change the volume
• Rotate the VOLUME control on the front panel, orpress the + or - buttons on the remote control.
To mute the sound
• Press the MUTE button on the remote control orshortly press the standby button on the front panel.
To restore the sound to its original volume
• Press the MUTE button again.
The sound is also restored to its original volume if youincrease or decrease the volume.
Changing levelsYou can independently change the balance, center level,side levels, rear levels, and subwoofer level to alter thebalance of sound in your surround system. Changing thebalance alters the level of both the left and right mainloudspeakers to shift the position of the stereo image,keeping the overall level of the sound the same. The otheradjustments change the level of the correspondingspeaker(s) without affecting the remaining speakers in thesurround system.
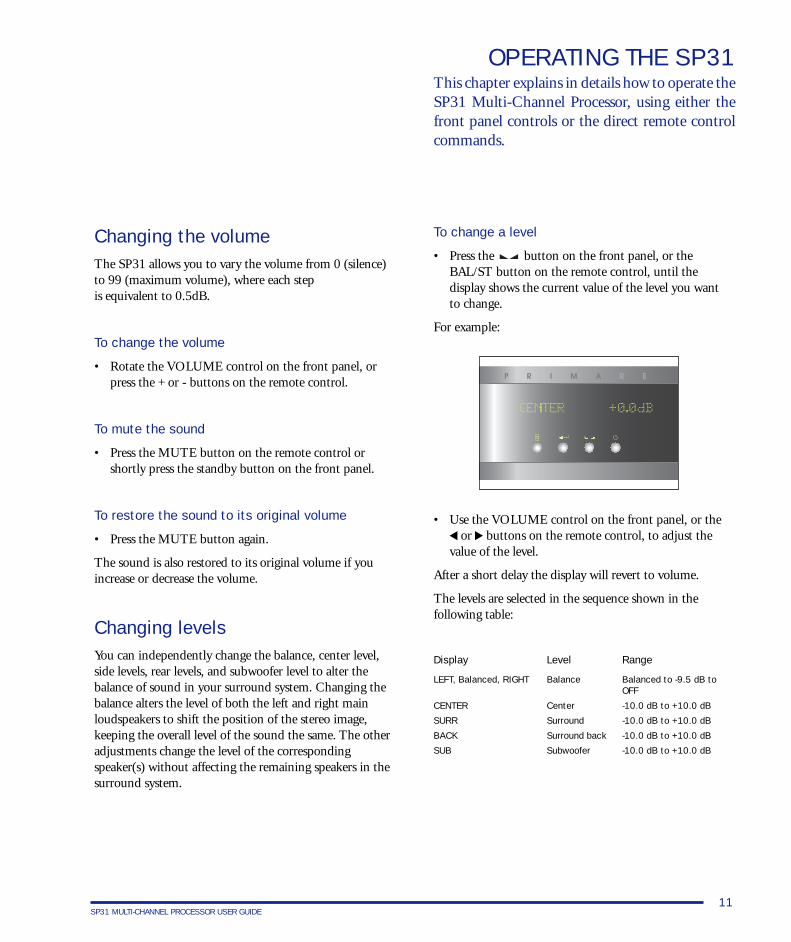
To change a level
• Press the button on the front panel, or theBAL/ST button on the remote control, until thedisplay shows the current value of the level you wantto change.
For example:
OPERATING THE SP31This chapter explains in details how to operate theSP31 Multi-Channel Processor, using either thefront panel controls or the direct remote controlcommands.
• Use the VOLUME control on the front panel, or the or buttons on the remote control, to adjust the
value of the level.
After a short delay the display will revert to volume.
The levels are selected in the sequence shown in thefollowing table:
Display Level Range
LEFT, Balanced, RIGHT Balance Balanced to -9.5 dB toOFF
CENTER Center -10.0 dB to +10.0 dB
SURR Surround -10.0 dB to +10.0 dB
BACK Surround back -10.0 dB to +10.0 dB
SUB Subwoofer -10.0 dB to +10.0 dB

12SP31 MULTI-CHANNEL PROCESSOR USER GUIDE
OPERATING THE SP31
13SP31 MULTI-CHANNEL PROCESSOR USER GUIDE
USING MENUSThis chapter explains how to use the menus, howto save and recall configurations. It also explainshow to change surround mode.
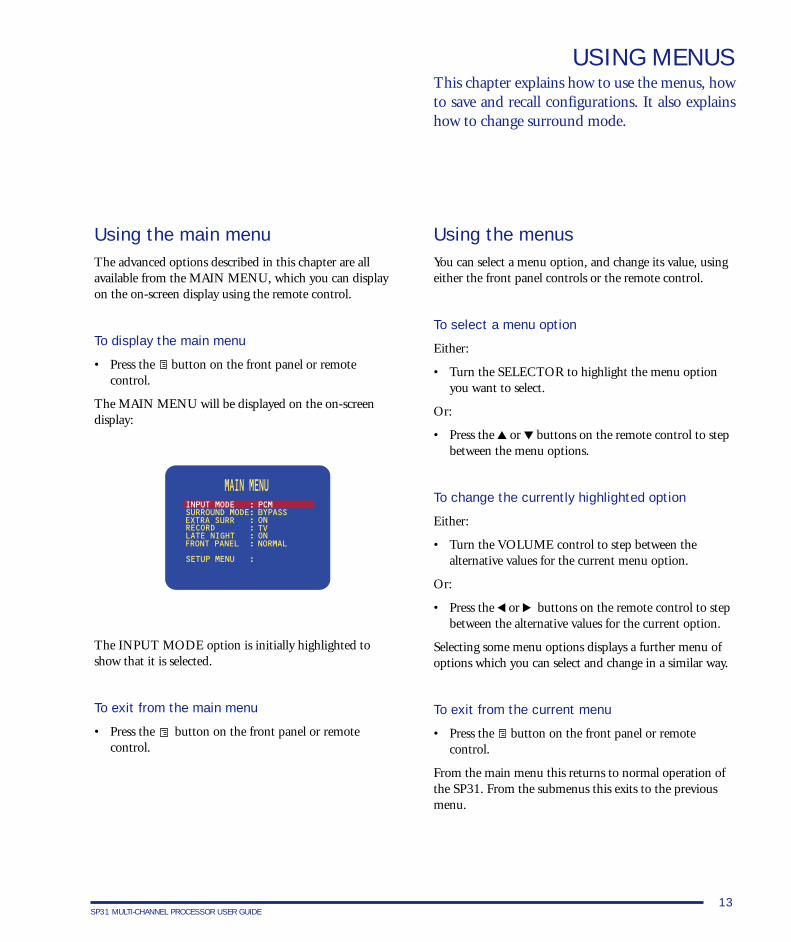
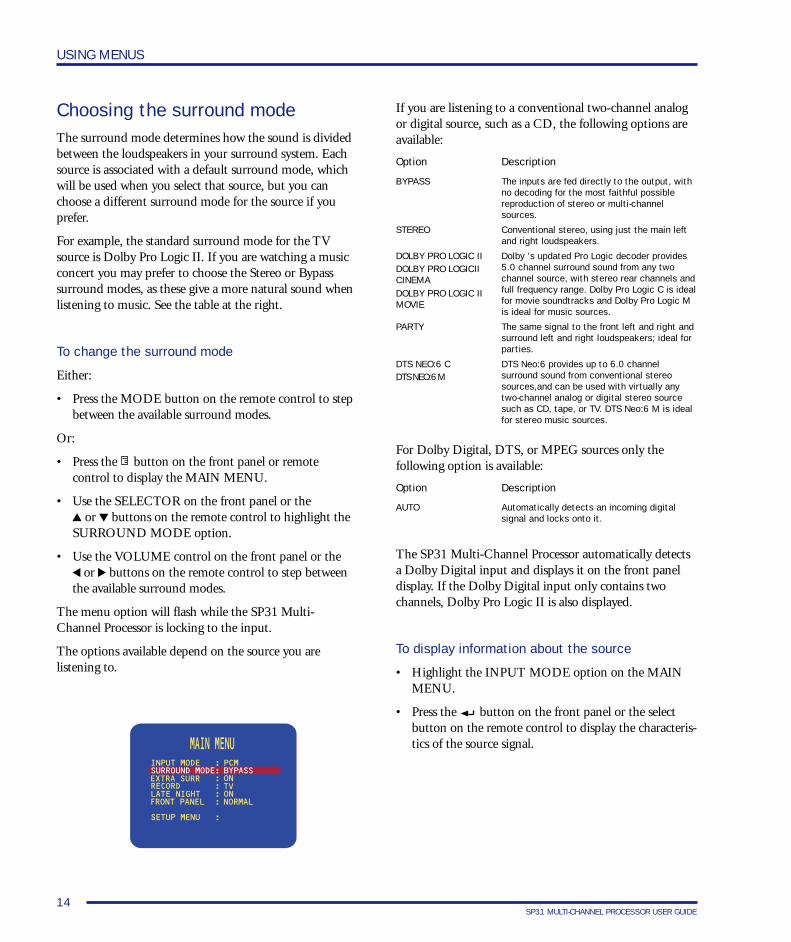
Using the main menuThe advanced options described in this chapter are allavailable from the MAIN MENU, which you can displayon the on-screen display using the remote control.
To display the main menu
• Press the button on the front panel or remotecontrol.
The MAIN MENU will be displayed on the on-screendisplay:
The INPUT MODE option is initially highlighted toshow that it is selected.
To exit from the main menu
• Press the button on the front panel or remotecontrol.
Using the menusYou can select a menu option, and change its value, usingeither the front panel controls or the remote control.
To select a menu option
Either:
• Turn the SELECTOR to highlight the menu optionyou want to select.
Or:
• Press the or buttons on the remote control to stepbetween the menu options.
To change the currently highlighted option
Either:
• Turn the VOLUME control to step between thealternative values for the current menu option.
Or:
• Press the or buttons on the remote control to stepbetween the alternative values for the current option.
Selecting some menu options displays a further menu ofoptions which you can select and change in a similar way.
To exit from the current menu
• Press the button on the front panel or remotecontrol.
From the main menu this returns to normal operation ofthe SP31. From the submenus this exits to the previousmenu.
14SP31 MULTI-CHANNEL PROCESSOR USER GUIDE
USING MENUS
Choosing the surround modeThe surround mode determines how the sound is dividedbetween the loudspeakers in your surround system. Eachsource is associated with a default surround mode, whichwill be used when you select that source, but you canchoose a different surround mode for the source if youprefer.
For example, the standard surround mode for the TVsource is Dolby Pro Logic II. If you are watching a musicconcert you may prefer to choose the Stereo or Bypasssurround modes, as these give a more natural sound whenlistening to music. See the table at the right.
To change the surround mode
Either:
• Press the MODE button on the remote control to stepbetween the available surround modes.
Or:
• Press the button on the front panel or remotecontrol to display the MAIN MENU.
• Use the SELECTOR on the front panel or the or buttons on the remote control to highlight the
SURROUND MODE option.
• Use the VOLUME control on the front panel or the or buttons on the remote control to step between
the available surround modes.
The menu option will flash while the SP31 Multi-Channel Processor is locking to the input.
The options available depend on the source you arelistening to.
If you are listening to a conventional two-channel analogor digital source, such as a CD, the following options areavailable:
Option Description
BYPASS The inputs are fed directly to the output, withno decoding for the most faithful possiblereproduction of stereo or multi-channelsources.
STEREO Conventional stereo, using just the main leftand right loudspeakers.
DOLBY PRO LOGIC II Dolby ’s updated Pro Logic decoder provides5.0 channel surround sound from any twochannel source, with stereo rear channels andfull frequency range. Dolby Pro Logic C is idealfor movie soundtracks and Dolby Pro Logic Mis ideal for music sources.
PARTY The same signal to the front left and right andsurround left and right loudspeakers; ideal forparties.
DTS NEO:6 C DTS Neo:6 provides up to 6.0 channelsurround sound from conventional stereosources,and can be used with virtually anytwo-channel analog or digital stereo sourcesuch as CD, tape, or TV. DTS Neo:6 M is idealfor stereo music sources.
For Dolby Digital, DTS, or MPEG sources only thefollowing option is available:
Option Description
AUTO Automatically detects an incoming digitalsignal and locks onto it.
The SP31 Multi-Channel Processor automatically detectsa Dolby Digital input and displays it on the front paneldisplay. If the Dolby Digital input only contains twochannels, Dolby Pro Logic II is also displayed.
To display information about the source
• Highlight the INPUT MODE option on the MAINMENU.
• Press the button on the front panel or the selectbutton on the remote control to display the characteris-tics of the source signal.
DTS NEO:6 M
DOLBY PRO LOGICIICINEMADOLBY PRO LOGIC IIMOVIE
15SP31 MULTI-CHANNEL PROCESSOR USER GUIDE
USING MENUS
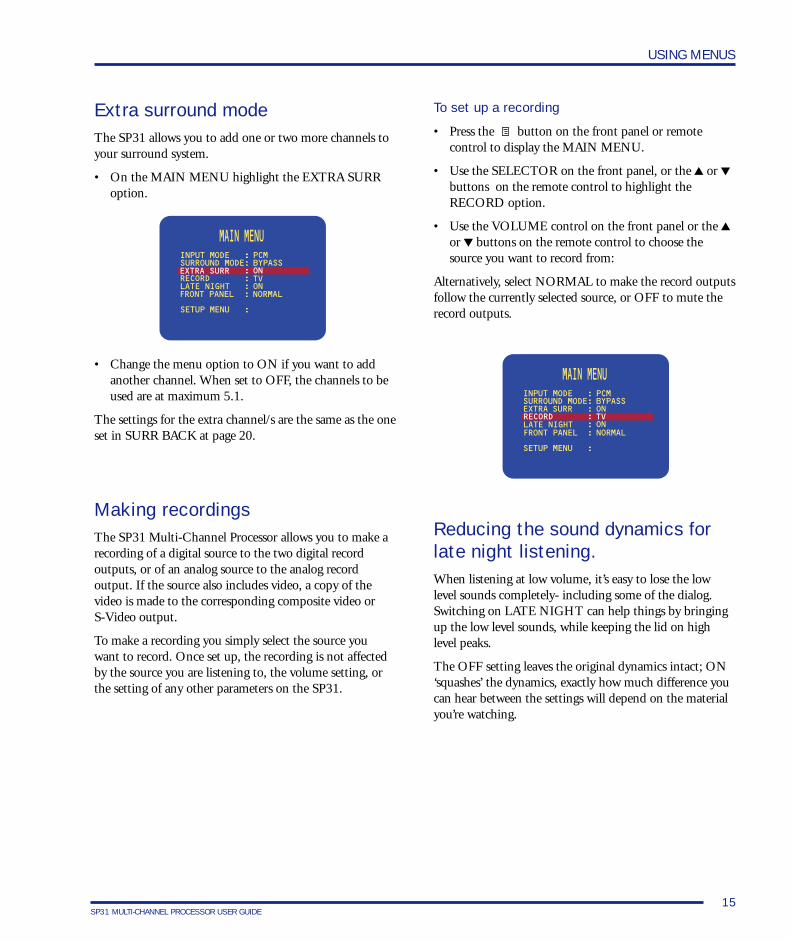
Extra surround modeThe SP31 allows you to add one or two more channels toyour surround system.
• On the MAIN MENU highlight the EXTRA SURRoption.
Making recordingsThe SP31 Multi-Channel Processor allows you to make arecording of a digital source to the two digital recordoutputs, or of an analog source to the analog recordoutput. If the source also includes video, a copy of thevideo is made to the corresponding composite video orS-Video output.
To make a recording you simply select the source youwant to record. Once set up, the recording is not affectedby the source you are listening to, the volume setting, orthe setting of any other parameters on the SP31.
Reducing the sound dynamics forlate night listening.When listening at low volume, it’s easy to lose the lowlevel sounds completely- including some of the dialog.Switching on LATE NIGHT can help things by bringingup the low level sounds, while keeping the lid on highlevel peaks.
The OFF setting leaves the original dynamics intact; ON‘squashes’ the dynamics, exactly how much difference youcan hear between the settings will depend on the materialyou’re watching.
To set up a recording
• Press the button on the front panel or remotecontrol to display the MAIN MENU.
• Use the SELECTOR on the front panel, or the or buttons on the remote control to highlight theRECORD option.
• Use the VOLUME control on the front panel or the or buttons on the remote control to choose thesource you want to record from:
Alternatively, select NORMAL to make the record outputsfollow the currently selected source, or OFF to mute therecord outputs.
• Change the menu option to ON if you want to addanother channel. When set to OFF, the channels to beused are at maximum 5.1.
The settings for the extra channel/s are the same as the oneset in SURR BACK at page 20.
16SP31 MULTI-CHANNEL PROCESSOR USER GUIDE
Saving the configurationOnce you have defined your own custom set of inputs,and have calibrated the speaker settings and other configu-ration options to suit your own requirements, you shouldsave your settings permanently in the SP31. You can thenreturn to your saved settings at any time using theRECALL SETTINGS option to undo any subsequentconfiguration changes.
If the SP31 was set up for you by an installer, the installerwill have saved a set of installer settings. You can alsoreturn the SP31 to these settings using the RECALLINSTALLER SETTINGS option.
Finally a RECALL FACTORY SETTINGS option isprovided, to return the SP31 to the default factorysettings.
After saving or recalling settings always wait at least 10seconds before switching off the unit using the mainswitch.
To save your settings
• Highlight MEMORY in the SETUP MENU and pressthe SELECT button on the front panel or remotecontrol to select it.
The MEMORY MENU will be displayed:
• Highlight SAVE SETTINGS and press the SELECTbutton on the front panel or remote control to select it.
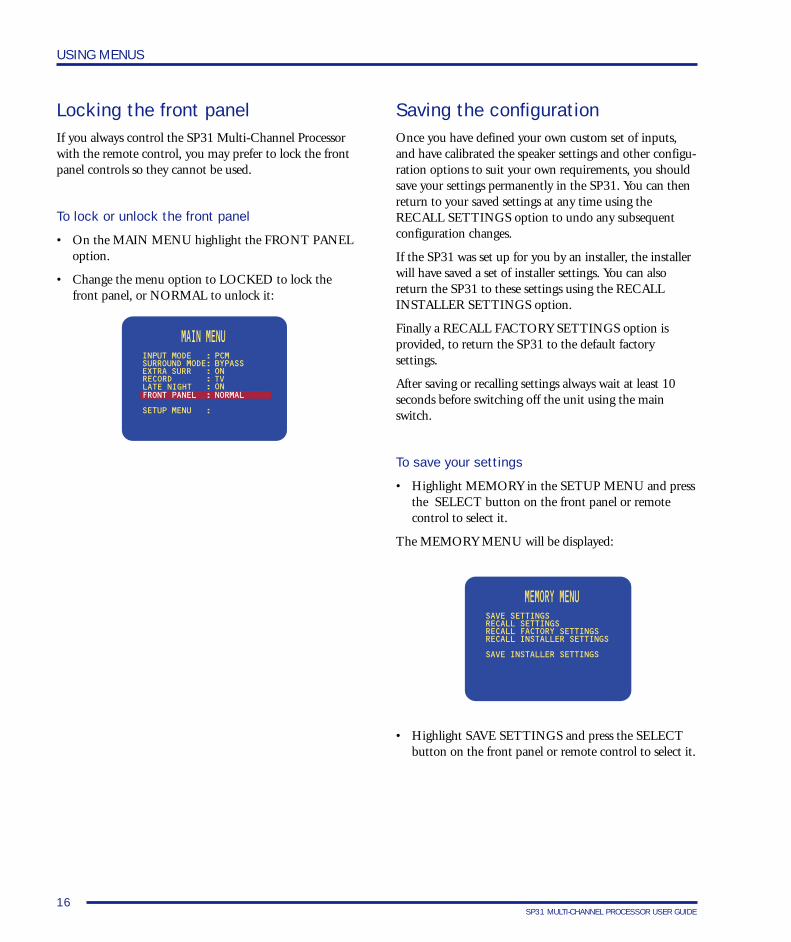
Locking the front panelIf you always control the SP31 Multi-Channel Processorwith the remote control, you may prefer to lock the frontpanel controls so they cannot be used.
To lock or unlock the front panel
• On the MAIN MENU highlight the FRONT PANELoption.
• Change the menu option to LOCKED to lock thefront panel, or NORMAL to unlock it:
USING MENUS
17SP31 MULTI-CHANNEL PROCESSOR USER GUIDE
After a short delay a message will confirm that the settingshave been saved:
• Wait 10 seconds to allow the settings to be completelystored.
• Press the button on the front panel or remotecontrol to return to the MEMORY MENU.
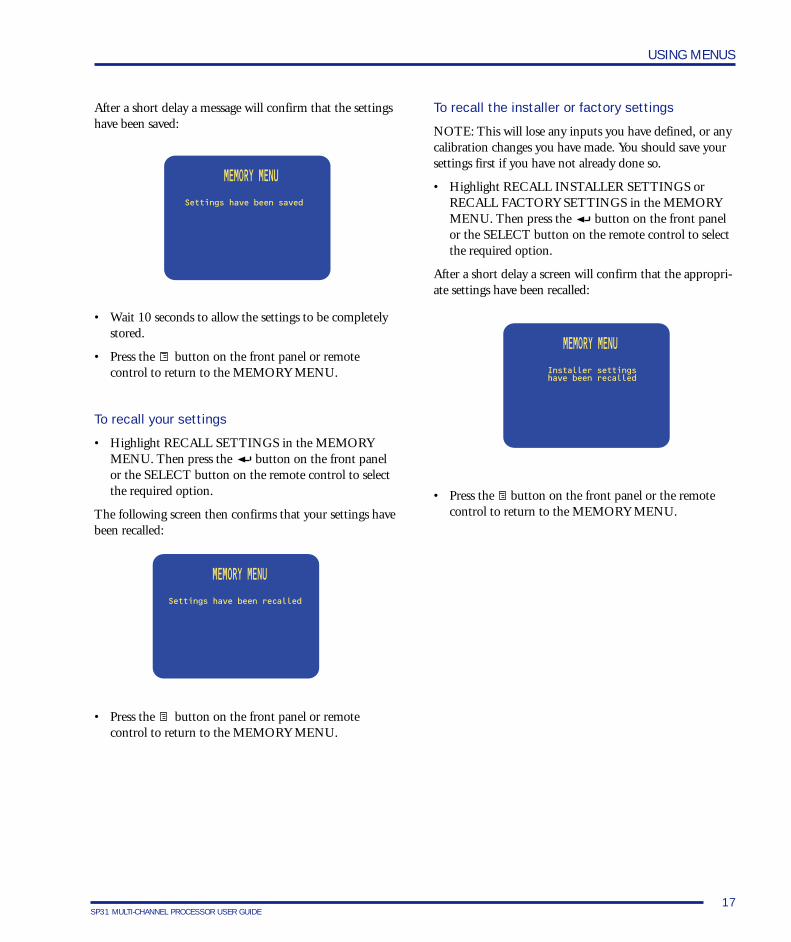
To recall your settings
• Highlight RECALL SETTINGS in the MEMORYMENU. Then press the button on the front panelor the SELECT button on the remote control to selectthe required option.
The following screen then confirms that your settings havebeen recalled:
To recall the installer or factory settings
NOTE: This will lose any inputs you have defined, or anycalibration changes you have made. You should save yoursettings first if you have not already done so.
• Highlight RECALL INSTALLER SETTINGS orRECALL FACTORY SETTINGS in the MEMORYMENU. Then press the button on the front panelor the SELECT button on the remote control to selectthe required option.
After a short delay a screen will confirm that the appropri-ate settings have been recalled:
• Press the button on the front panel or remotecontrol to return to the MEMORY MENU.
• Press the button on the front panel or the remotecontrol to return to the MEMORY MENU.
USING MENUS
18SP31 MULTI-CHANNEL PROCESSOR USER GUIDE
USING MENUS
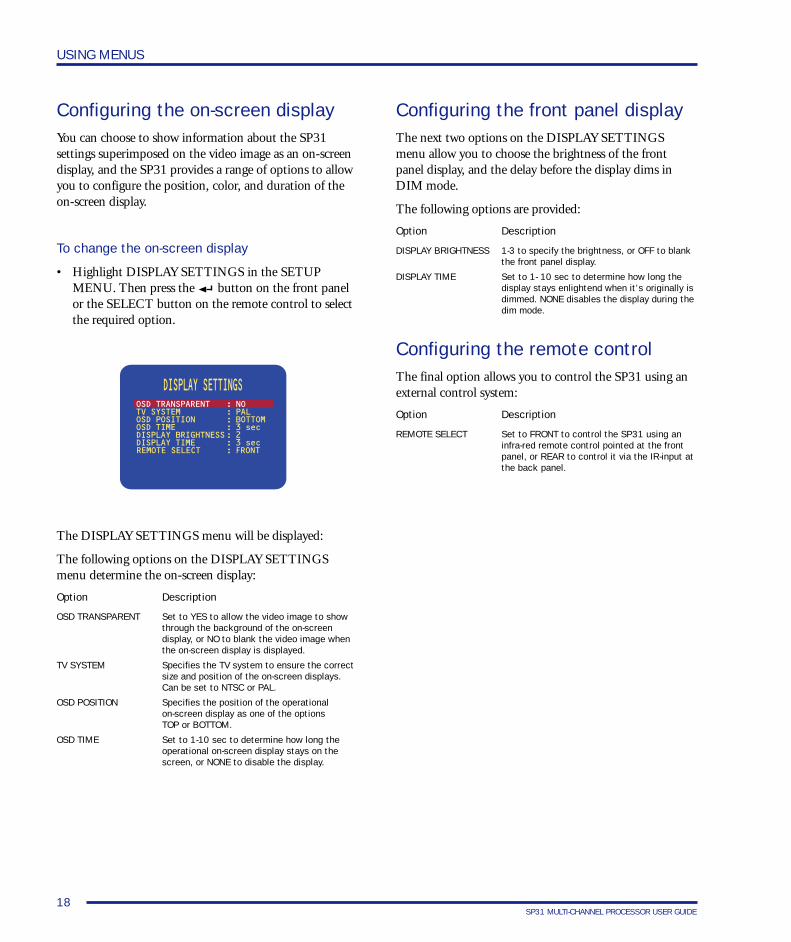
Configuring the on-screen displayYou can choose to show information about the SP31settings superimposed on the video image as an on-screendisplay, and the SP31 provides a range of options to allowyou to configure the position, color, and duration of theon-screen display.
To change the on-screen display
• Highlight DISPLAY SETTINGS in the SETUPMENU. Then press the button on the front panelor the SELECT button on the remote control to selectthe required option.
Configuring the front panel displayThe next two options on the DISPLAY SETTINGSmenu allow you to choose the brightness of the frontpanel display, and the delay before the display dims inDIM mode.
The following options are provided:
Option Description
DISPLAY BRIGHTNESS 1-3 to specify the brightness, or OFF to blankthe front panel display.
DISPLAY TIME Set to 1- 10 sec to determine how long thedisplay stays enlightend when it’s originally isdimmed. NONE disables the display during thedim mode.
The DISPLAY SETTINGS menu will be displayed:
The following options on the DISPLAY SETTINGSmenu determine the on-screen display:
Option Description
OSD TRANSPARENT Set to YES to allow the video image to showthrough the background of the on-screendisplay, or NO to blank the video image whenthe on-screen display is displayed.
TV SYSTEM Specifies the TV system to ensure the correctsize and position of the on-screen displays.Can be set to NTSC or PAL.
OSD POSITION Specifies the position of the operationalon-screen display as one of the optionsTOP or BOTTOM.
OSD TIME Set to 1-10 sec to determine how long theoperational on-screen display stays on thescreen, or NONE to disable the display.
Configuring the remote controlThe final option allows you to control the SP31 using anexternal control system:
Option Description
REMOTE SELECT Set to FRONT to control the SP31 using aninfra-red remote control pointed at the frontpanel, or REAR to control it via the IR-input atthe back panel.
19SP31 MULTI-CHANNEL PROCESSOR USER GUIDE
SETTING UP THE SPEAKERSThis chapter explains how to set up the speakers,levels, and delays for the best possible sound withyour surround sound configuration
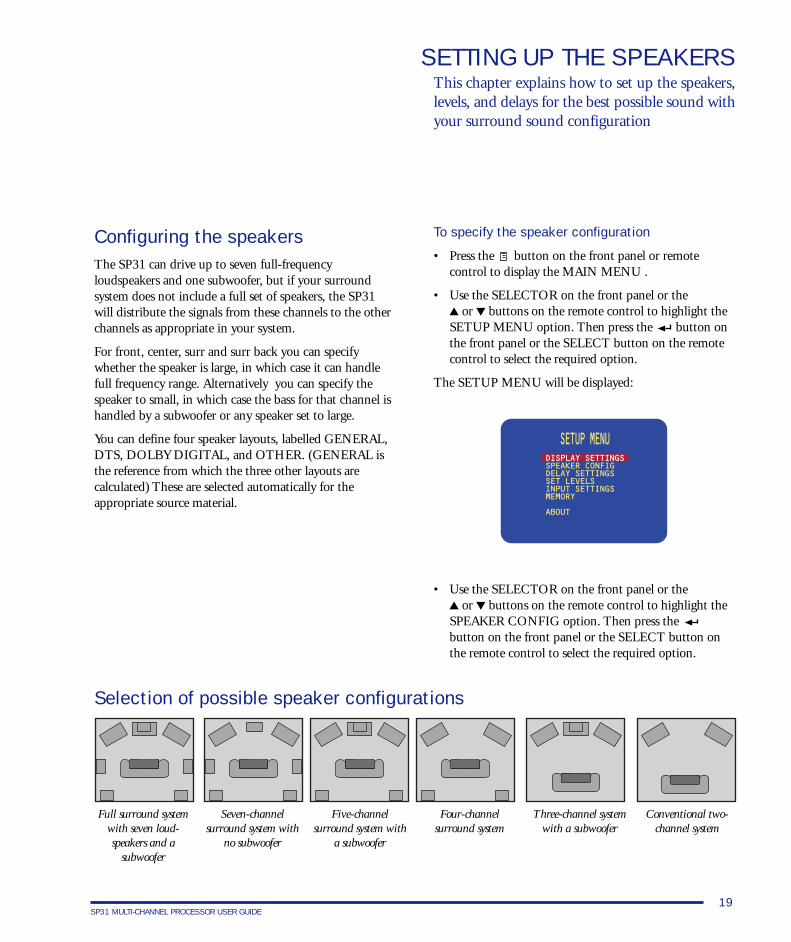
Configuring the speakersThe SP31 can drive up to seven full-frequencyloudspeakers and one subwoofer, but if your surroundsystem does not include a full set of speakers, the SP31will distribute the signals from these channels to the otherchannels as appropriate in your system.
For front, center, surr and surr back you can specifywhether the speaker is large, in which case it can handlefull frequency range. Alternatively you can specify thespeaker to small, in which case the bass for that channel ishandled by a subwoofer or any speaker set to large.
You can define four speaker layouts, labelled GENERAL,DTS, DOLBY DIGITAL, and OTHER. (GENERAL isthe reference from which the three other layouts arecalculated) These are selected automatically for theappropriate source material.
To specify the speaker configuration
• Press the button on the front panel or remotecontrol to display the MAIN MENU .
• Use the SELECTOR on the front panel or the or buttons on the remote control to highlight the
SETUP MENU option. Then press the button onthe front panel or the SELECT button on the remotecontrol to select the required option.
The SETUP MENU will be displayed:
Seven-channelsurround system with
no subwoofer
Five-channelsurround system with
a subwoofer
Four-channelsurround system
Three-channel systemwith a subwoofer
Conventional two-channel system
• Use the SELECTOR on the front panel or the or buttons on the remote control to highlight the
SPEAKER CONFIG option. Then press thebutton on the front panel or the SELECT button onthe remote control to select the required option.
Selection of possible speaker configurations
Full surround systemwith seven loud-speakers and a
subwoofer
20SP31 MULTI-CHANNEL PROCESSOR USER GUIDE
SETTING UP THE SPEAKERS
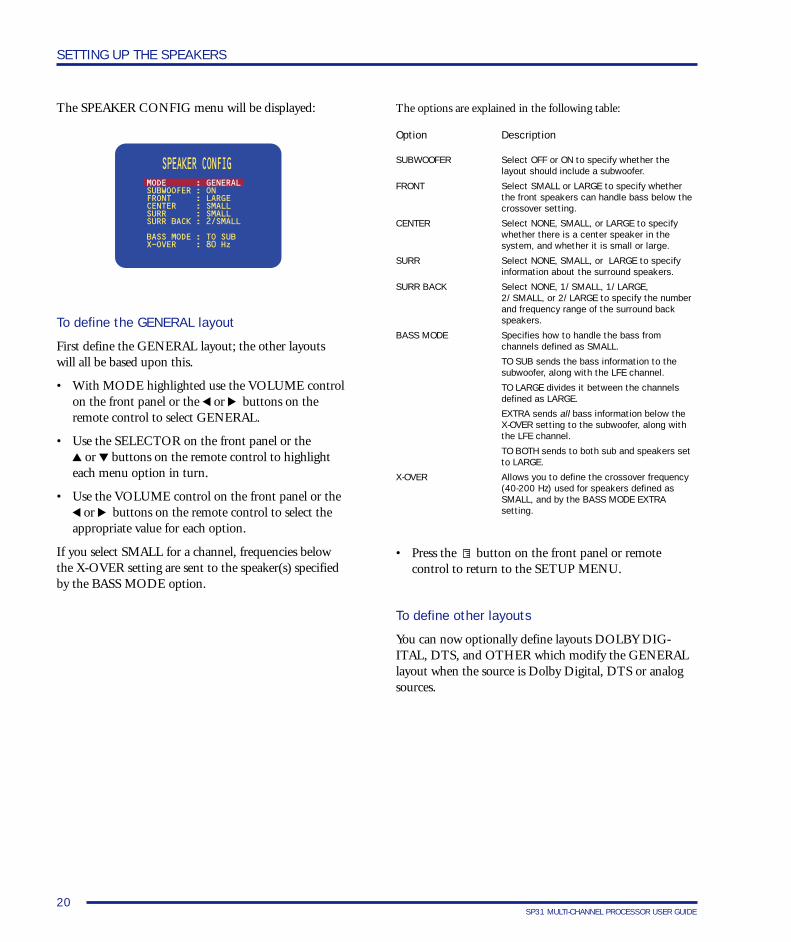
The SPEAKER CONFIG menu will be displayed:
To define the GENERAL layout
First define the GENERAL layout; the other layoutswill all be based upon this.
• With MODE highlighted use the VOLUME controlon the front panel or the or buttons on theremote control to select GENERAL.
• Use the SELECTOR on the front panel or the or buttons on the remote control to highlight
each menu option in turn.
• Use the VOLUME control on the front panel or the or buttons on the remote control to select the
appropriate value for each option.
If you select SMALL for a channel, frequencies belowthe X-OVER setting are sent to the speaker(s) specifiedby the BASS MODE option.
The options are explained in the following table:
Option Description
SUBWOOFER Select OFF or ON to specify whether thelayout should include a subwoofer.
FRONT Select SMALL or LARGE to specify whetherthe front speakers can handle bass below thecrossover setting.
CENTER Select NONE, SMALL, or LARGE to specifywhether there is a center speaker in thesystem, and whether it is small or large.
SURR Select NONE, SMALL, or LARGE to specifyinformation about the surround speakers.
SURR BACK Select NONE, 1/SMALL, 1/LARGE,2/SMALL, or 2/LARGE to specify the numberand frequency range of the surround backspeakers.
BASS MODE Specifies how to handle the bass fromchannels defined as SMALL.
TO SUB sends the bass information to thesubwoofer, along with the LFE channel.
TO LARGE divides it between the channelsdefined as LARGE.
EXTRA sends all bass information below theX-OVER setting to the subwoofer, along withthe LFE channel.
TO BOTH sends to both sub and speakers setto LARGE.
X-OVER Allows you to define the crossover frequency(40-200 Hz) used for speakers defined asSMALL, and by the BASS MODE EXTRAsetting.
• Press the button on the front panel or remotecontrol to return to the SETUP MENU.
To define other layouts
You can now optionally define layouts DOLBY DIG-ITAL, DTS, and OTHER which modify the GENERALlayout when the source is Dolby Digital, DTS or analogsources.
21SP31 MULTI-CHANNEL PROCESSOR USER GUIDE
SETTING UP THE SPEAKERS
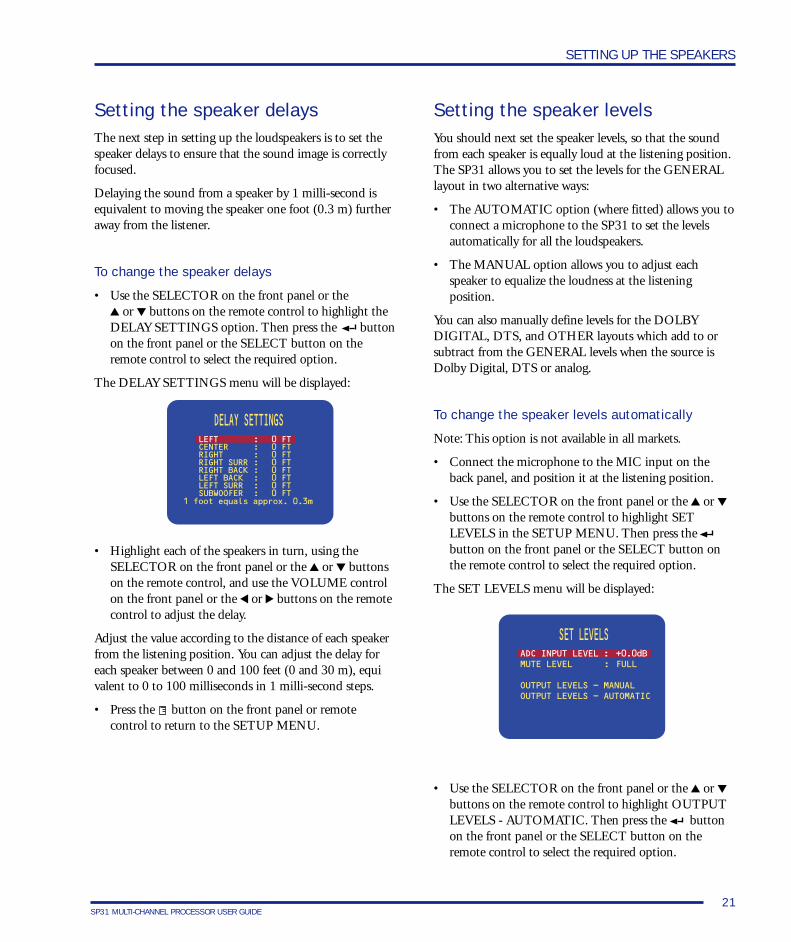
Setting the speaker levelsYou should next set the speaker levels, so that the soundfrom each speaker is equally loud at the listening position.The SP31 allows you to set the levels for the GENERALlayout in two alternative ways:
• The AUTOMATIC option (where fitted) allows you toconnect a microphone to the SP31 to set the levelsautomatically for all the loudspeakers.
• The MANUAL option allows you to adjust eachspeaker to equalize the loudness at the listeningposition.
You can also manually define levels for the DOLBYDIGITAL, DTS, and OTHER layouts which add to orsubtract from the GENERAL levels when the source isDolby Digital, DTS or analog.
To change the speaker levels automatically
Note: This option is not available in all markets.
• Connect the microphone to the MIC input on theback panel, and position it at the listening position.
• Use the SELECTOR on the front panel or the or buttons on the remote control to highlight SETLEVELS in the SETUP MENU. Then press thebutton on the front panel or the SELECT button onthe remote control to select the required option.
The SET LEVELS menu will be displayed:
• Use the SELECTOR on the front panel or the or buttons on the remote control to highlight OUTPUTLEVELS - AUTOMATIC. Then press the buttonon the front panel or the SELECT button on theremote control to select the required option.
• Highlight each of the speakers in turn, using theSELECTOR on the front panel or the or buttonson the remote control, and use the VOLUME controlon the front panel or the or buttons on the remotecontrol to adjust the delay.
Adjust the value according to the distance of each speakerfrom the listening position. You can adjust the delay foreach speaker between 0 and 100 feet (0 and 30 m), equivalent to 0 to 100 milliseconds in 1 milli-second steps.
• Press the button on the front panel or remotecontrol to return to the SETUP MENU.
Setting the speaker delaysThe next step in setting up the loudspeakers is to set thespeaker delays to ensure that the sound image is correctlyfocused.
Delaying the sound from a speaker by 1 milli-second isequivalent to moving the speaker one foot (0.3 m) furtheraway from the listener.
To change the speaker delays
• Use the SELECTOR on the front panel or the or buttons on the remote control to highlight the
DELAY SETTINGS option. Then press the buttonon the front panel or the SELECT button on theremote control to select the required option.
The DELAY SETTINGS menu will be displayed:
22SP31 MULTI-CHANNEL PROCESSOR USER GUIDE
SETTING UP THE SPEAKERS
Setting the analog input levelThe SP31 allows you to adjust the input level to theanalog-to-digital converter to achieve the best possiblesignal-to-noise ratio.
If the ADC input level is set too high clipping will occuron loud signals, causing distortion. The SP31 detects thisand displays a SET ADC warning on the front panel andon-screen displays.
To adjust the ADC input level
• Select an analog input.
• Use the SELECTOR on the front panel or the or buttons on the remote control to highlight
ADC INPUT LEVEL. Then press the button onthe front panel or the SELECT button on the remotecontrol to select the required option.
• Use the VOLUME CONTROLS on the front panel orthe or buttons on the remote control to reduce thelevel until the SET ADC warning stops flashing on theloudest passages.
• Press the button on the front panel or remotecontrol to return to the SETUP MENU.
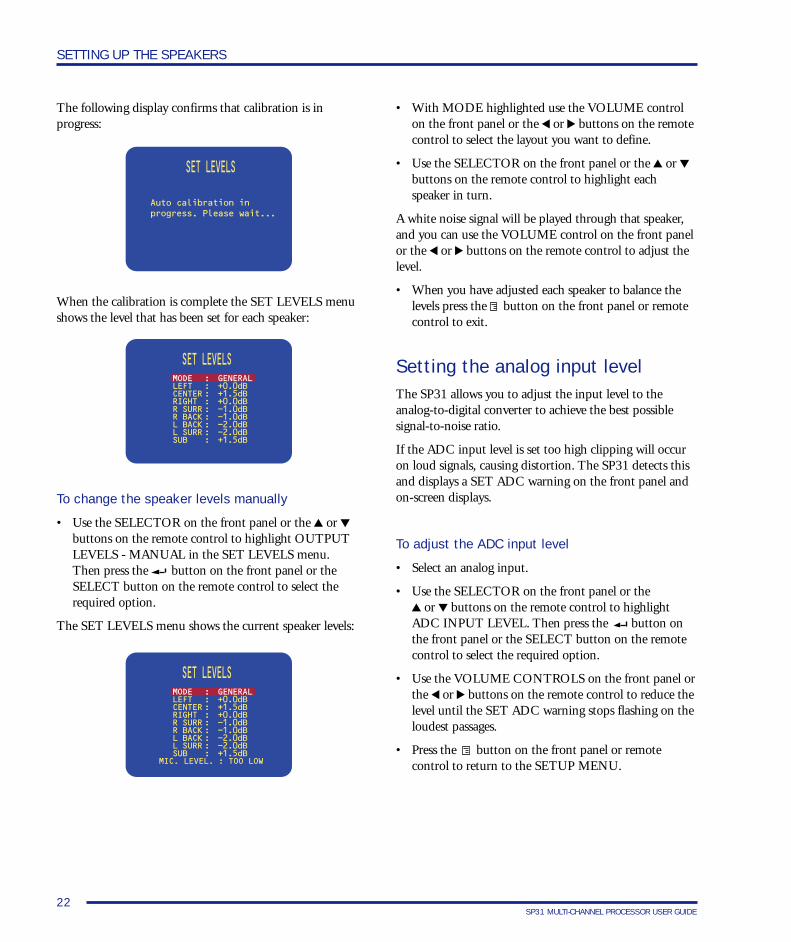
The following display confirms that calibration is inprogress:
When the calibration is complete the SET LEVELS menushows the level that has been set for each speaker:
To change the speaker levels manually
• Use the SELECTOR on the front panel or the or buttons on the remote control to highlight OUTPUTLEVELS - MANUAL in the SET LEVELS menu.Then press the button on the front panel or theSELECT button on the remote control to select therequired option.
The SET LEVELS menu shows the current speaker levels:
• With MODE highlighted use the VOLUME controlon the front panel or the or buttons on the remotecontrol to select the layout you want to define.
• Use the SELECTOR on the front panel or the or buttons on the remote control to highlight eachspeaker in turn.
A white noise signal will be played through that speaker,and you can use the VOLUME control on the front panelor the or buttons on the remote control to adjust thelevel.
• When you have adjusted each speaker to balance thelevels press the button on the front panel or remotecontrol to exit.
23SP31 MULTI-CHANNEL PROCESSOR USER GUIDE
SETTING UP THE SOURCESThis chapter gives details of the standard inputsthat are defined when the SP31 is first supplied.It then explains how to modify the standard inputs,or define new inputs, to give you total flexibilityin the way you set up the SP31 in your ownsystem.
Standard sourcesThe SP31 Multi-channel Processor allows you to defineup to 15 sources, referred to as INPUT 1 to INPUT 15.Each source can use one of the four digital and eightanalog inputs, and any source can be combined with oneof the video inputs. Alternatively, a multi-channel sourcecan be defined using the dedicated eight-channel externalinput. This feature limits the analog inputs to a total offive.
The SP31 Multi-channel Processor is supplied with thestandard sources shown in the table below already defined:
Source Audio Video Surround Descriptionmode
CD Analog 1 None Bypass High qualityCD player
DVD Digital 2 S-Video 1 2-CH DVD player
TapeD Digital 3 None 2-CH Digital taperecorder orminidisc player
Laser Digital 7 S-Video 2 Dolby Pro LaserDisc playerLogic II
Tuner Analog 2 None Stereo FM radio tuner
TV Analog 3 Video 1 Dolby Pro Television orLogic II monitor
TapeA Analog 4 None Stereo Analog tape output
Sat Analog 5 Video 2 Dolby Pro Satellite receiverLogic II
For each source you can define:
• A name for the source, to identify it on the front paneldisplay.
• The analog or digital audio input used for the source.
• The video input used for the source, if the sourceincludes video.
• The standard surround mode used for the source.
• For analog sources, an offset to balance the loudnesswhen switching between sources.
If this standard set of sources meets your requirements,you will get excellent results by using them, and you canignore the remainder of this chapter.
If these standard sources meet all your requirements, butinclude additional sources that you do not need, you maylike to remove the unused sources to avoid having to steppast them when selecting sources from the front panel orremote control. To do this, see the next section, Removingsources.
Finally, you may prefer to create your own set of sources tosuit the particular requirements of your system. To do thisyou should read all the remaining sections in this chapter.
Removing sourcesEvery source can be enabled or disabled. If a source isenabled it will appear in the sequence of sources when youselect sources using the SELECTOR on the front panel orthe or buttons on the remote control. If a source isdisabled it cannot be selected, but the settings are retainedin case you want to enable the source again at a later date.
24SP31 MULTI-CHANNEL PROCESSOR USER GUIDE
SETTING UP THE SOURCES
To disable or enable sources
• Use the SELECTOR on the front panel orthe or buttons on the remote control to highlightINPUT SETTINGS on the SETUP MENU. Thenpress the button on the front panel or the SELECTbutton on the remote control to select the requiredoption.
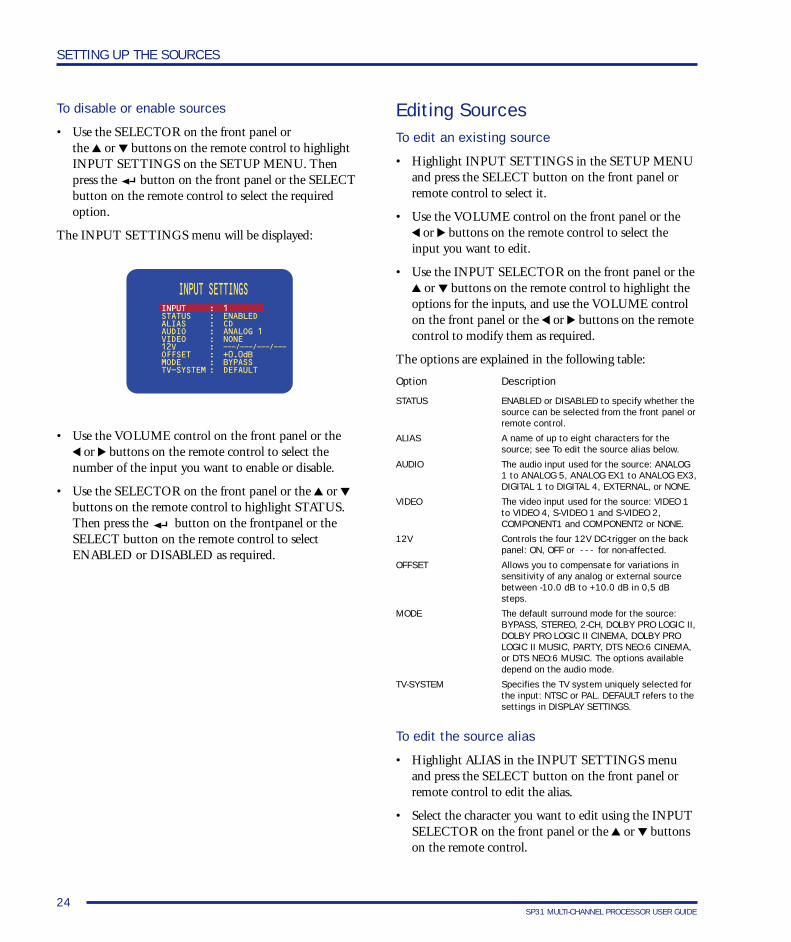
The INPUT SETTINGS menu will be displayed:
Editing SourcesTo edit an existing source
• Highlight INPUT SETTINGS in the SETUP MENUand press the SELECT button on the front panel orremote control to select it.
• Use the VOLUME control on the front panel or the or buttons on the remote control to select the
input you want to edit.
• Use the INPUT SELECTOR on the front panel or the or buttons on the remote control to highlight the
options for the inputs, and use the VOLUME controlon the front panel or the or buttons on the remotecontrol to modify them as required.
The options are explained in the following table:
Option Description
STATUS ENABLED or DISABLED to specify whether thesource can be selected from the front panel orremote control.
ALIAS A name of up to eight characters for thesource; see To edit the source alias below.
AUDIO The audio input used for the source: ANALOG1 to ANALOG 5, ANALOG EX1 to ANALOG EX3,DIGITAL 1 to DIGITAL 4, EXTERNAL, or NONE.
VIDEO The video input used for the source: VIDEO 1to VIDEO 4, S-VIDEO 1 and S-VIDEO 2,COMPONENT1 and COMPONENT2 or NONE.
12V Controls the four 12V DC-trigger on the backpanel: ON, OFF or - - - for non-affected.
OFFSET Allows you to compensate for variations insensitivity of any analog or external sourcebetween -10.0 dB to +10.0 dB in 0,5 dBsteps.
MODE The default surround mode for the source:BYPASS, STEREO, 2-CH, DOLBY PRO LOGIC II,DOLBY PRO LOGIC II CINEMA, DOLBY PROLOGIC II MUSIC, PARTY, DTS NEO:6 CINEMA,or DTS NEO:6 MUSIC. The options availabledepend on the audio mode.
TV-SYSTEM Specifies the TV system uniquely selected forthe input: NTSC or PAL. DEFAULT refers to thesettings in DISPLAY SETTINGS.
To edit the source alias
• Highlight ALIAS in the INPUT SETTINGS menuand press the SELECT button on the front panel orremote control to edit the alias.
• Select the character you want to edit using the INPUTSELECTOR on the front panel or the or buttonson the remote control.
• Use the VOLUME control on the front panel or the or buttons on the remote control to select the
number of the input you want to enable or disable.
• Use the SELECTOR on the front panel or the or buttons on the remote control to highlight STATUS.Then press the button on the frontpanel or theSELECT button on the remote control to selectENABLED or DISABLED as required.
25SP31 MULTI-CHANNEL PROCESSOR USER GUIDE
SETTING UP THE SOURCES
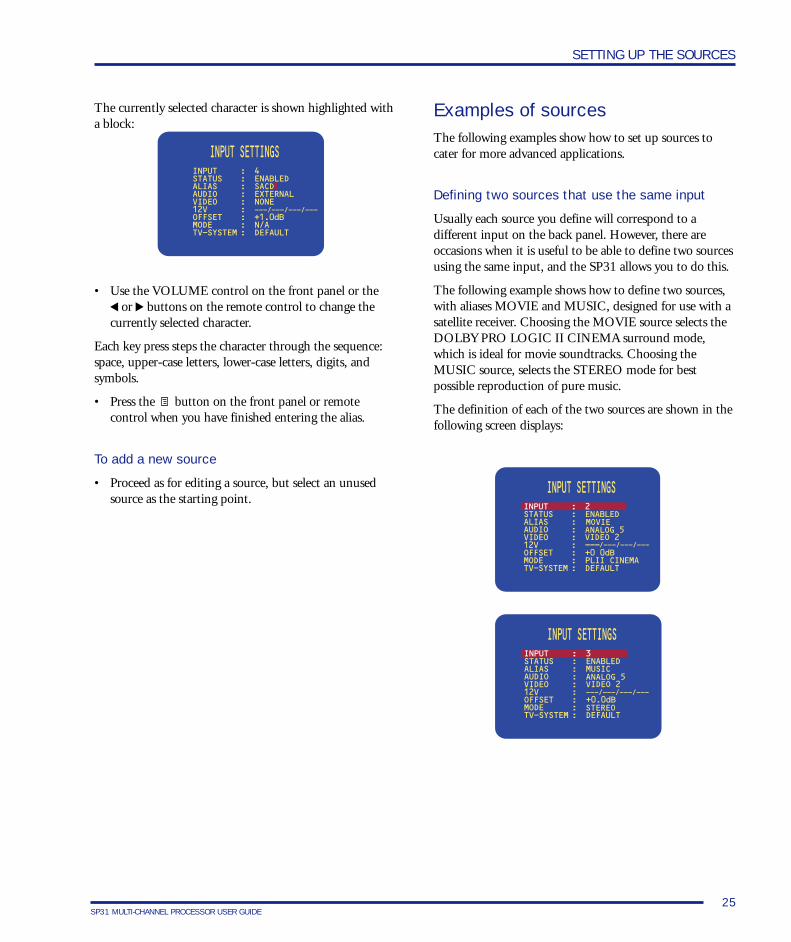
The currently selected character is shown highlighted witha block:
• Use the VOLUME control on the front panel or the or buttons on the remote control to change the
currently selected character.
Each key press steps the character through the sequence:space, upper-case letters, lower-case letters, digits, andsymbols.
• Press the button on the front panel or remotecontrol when you have finished entering the alias.
To add a new source
• Proceed as for editing a source, but select an unusedsource as the starting point.
Examples of sourcesThe following examples show how to set up sources tocater for more advanced applications.
Defining two sources that use the same input
Usually each source you define will correspond to adifferent input on the back panel. However, there areoccasions when it is useful to be able to define two sourcesusing the same input, and the SP31 allows you to do this.
The following example shows how to define two sources,with aliases MOVIE and MUSIC, designed for use with asatellite receiver. Choosing the MOVIE source selects theDOLBY PRO LOGIC II CINEMA surround mode,which is ideal for movie soundtracks. Choosing theMUSIC source, selects the STEREO mode for bestpossible reproduction of pure music.
The definition of each of the two sources are shown in thefollowing screen displays:
26SP31 MULTI-CHANNEL PROCESSOR USER GUIDE
SETTING UP THE SOURCES
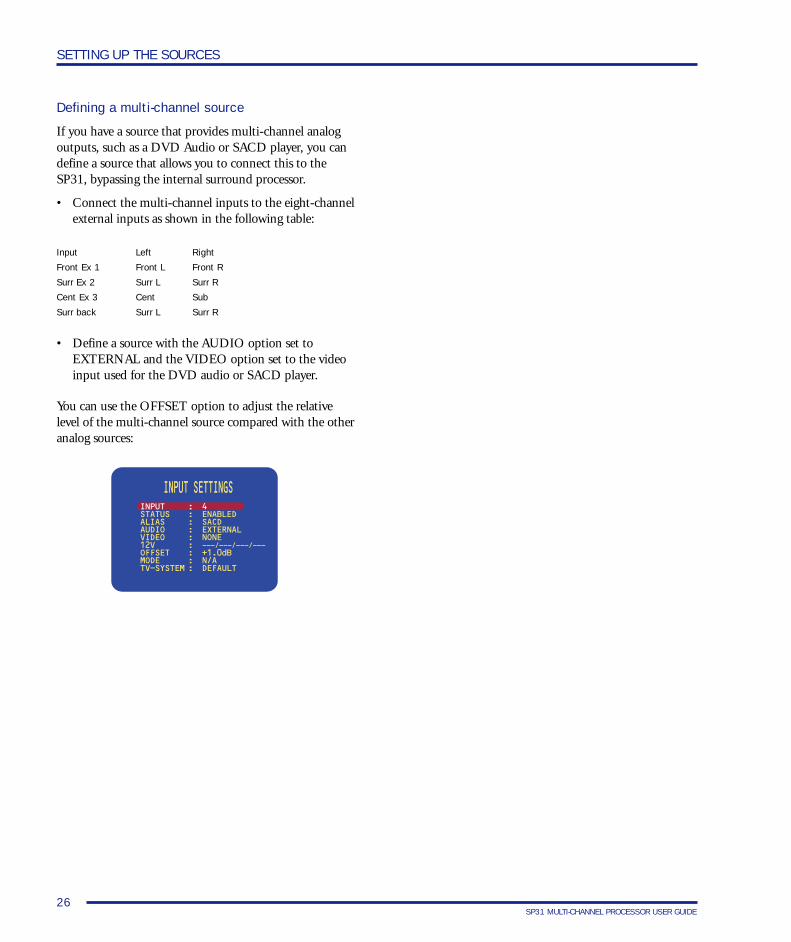
• Define a source with the AUDIO option set toEXTERNAL and the VIDEO option set to the videoinput used for the DVD audio or SACD player.
Input Left Right
Front Ex 1 Front L Front R
Surr Ex 2 Surr L Surr R
Cent Ex 3 Cent Sub
Surr back Surr L Surr R
You can use the OFFSET option to adjust the relativelevel of the multi-channel source compared with the otheranalog sources:
Defining a multi-channel source
If you have a source that provides multi-channel analogoutputs, such as a DVD Audio or SACD player, you candefine a source that allows you to connect this to theSP31, bypassing the internal surround processor.
• Connect the multi-channel inputs to the eight-channelexternal inputs as shown in the following table: