Embed Size (px)
DESCRIPTION
Soil based growing guide for a novice grower
Citation preview

Indoor Soil Based Growing Guide for the Novice ………………………………………………………………………………………………………………
Table of Contents
Stages of Growth – 2 -Germination - 2
-Vegetative Growth – 3 -Flowering – 5
Harvesting – 7
Sexing your Plants – 8
Lighting Needed for Growth – 9
Fertilizers for Various Stages – 11
Soil – 12
Cloning – 12
Plant Moisture and Heat Stress – 14
Solution Burn – 16
Nutrient Problems and Plant Cures – 16
Hermaphrodites - 29

STAGES OF GROWTH AND LIGHTING NEEDS
-Germination- most of you will start from seed, although ill cover both seed and clone.. Bag seeds are what
most of us began with and is the best way to start.. **your first grow will be a learning
experience, full of trial and error... you are more than likely not going to yield a 1/4 lb plant...
things will happen and you might lose one or all of your plants... its happened to us all.. We all
have been through the stresses before... the best advice I can give you is to start with a few
plants.. Maybe 3 to 5.. use bag seeds to learn on.. and make the first grow as simple as
possible.. ** choose seeds that are dark and don’t crush when you squeeze them... those are
2 easy ways to tell if a seed is mature.. there are 2 basic ways to germinate seeds; paper
towel to medium and straight from medium... with the paper towel method you simply
moisten down a paper towel and fold it in half.. make sure its well moistened, but not soaking
wet... place the seed(s) down and fold the paper towel over them... this next part is my
personal suggestion, and not required, but place the paper towel/seeds in a zip lock bag and
seal... this will keep moisture in there longer in case it takes a little longer for the seeds to
germinate, so you don’t have to worry about re wetting it all the time.. if you want to you can
just put the paper towel/seeds on a plate and just moisten it as needed.. either way you need
to keep it in dark, warm place... once the seeds have popped out a tap root gently, and I cant
stress how important GENTLY is right now, move the seed(s) to their germination medium,
with the tap root pointing down into the medium, about 1/4'' to 1/2" deep.. tweezers are very
helpful for moving the taproots, just be GENTLE.... if you are planning on going straight from
medium, you will benefit from soaking the seeds in room temp water for 12 to 24 hours before
placing into the medium.. this will allow water to penetrate into the seed and kick start the
germination process... after the soak place into medium of choice, again about 1/4" to 1/2"
deep... the seed will right its self in the medium, so you don’t have to worry about the way
you plant it... you do not need to keep any kind of lighting going until you see a sprout break
the surface of whichever medium you are choosing... after which you do need light.. the
lighting should be on a 24/0 cycle, and the need is very little.. a typical 4' 2 bulb shop light is
plenty of light to get you through until you transplant into your vegetative growth medium...
once you see roots popping out of your starter cubes, or growth slows/stops (if using soil) its
time to transplant..
- seeds need a constant supply of moisture to germinate.. make sure that whatever
germination medium you choose you keep moist...
- during germination/rooting you want warm temps (mid 80s is good) and high humidity (90%
to 100%)
- you can keep your germinating seeds in a humidity dome until they sprout to help retain
moisture in the medium
- placing a heating pad under your germinating seeds will help them to sprout quicker
- using soil mist the top of it to keep it from drying out..
- germination can be as quick as 2 to 3 days, or take as long as 10 to 14... if after 14 days
you don’t see your seeds pushing through the top of the medium it’s likely the seed is not
viable and you can safely call it a loss...
ok I think that pretty much covers seeds.. now onto clones.. I’m going to cover how to take a
cutting as well as rooting it.. they pretty much go hand in hand so it just makes sense.. first to
take a cutting, make sure you have a nice healthy mature plant (will cover how to tell plant
maturity in the veg growth section).. cutting can be as small as 4 inches or as big as a foot+...
the size of the cutting is up to you.. but take a cutting that works in relation to the type of
grow and size of the grow area... obviously 1 foot tall clones wont fit into a pc grow, and it
makes little sense to take tiny clones if planning to veg them out when you can take larger
ones and have that much size already on your clones.. to take the cutting you will need a
sharp cutting utensil such as a razor or exacto knife, some rubbing alcohol for sterilization,
cloning gel or powder, humidity dome, and rooting medium... once you have the plant chosen
and the cloning supplies around its time to begin.. start out by dipping the blade into the
alcohol to clean it.. carefully make a 45 degree cut at the base of the branch you want to use
as a clone... make the cut as smooth as you can... once you have the cutting off the plant
remove the bottom 1/2 to 3/4 of foliage completely, and cut the remaining large fan leave
fingers in half width wise... what you should end up with is a stem with a few small sub

branches and a few fan leaves that are cut down... after you have removed the excess foliage,
gently scrap the bottom 1/2" to 1" of outer flesh away from the stem, exposing the moist
inner flesh.. now cut up the middle of the stem at the bottom as high as you scrapped... so
the bottom should have exposed flesh and be split up the middle... take the split part and
submerge into the cloning gel or powder, taking care to cover the exposed area well.. once
covered place into rooting medium.. same rules apply to the clones rooting medium as seeds..
keep moist but not wet... the only difference is it is much better to keep the cutting in a
humidity dome the first couple days than not.. since the cutting wont have roots it has no way
to absorb moisture and relies on the moisture you give it or the moisture in the air to get what
it needs to survive... the humidity dome helps ensure there is enough moisture that it doesn’t
dry out until it starts cutting roots... usually after a couple days you can remove the dome... if
you choose not to use a dome, make sure to mist your cuttings down a couple times a day...
you may also choose to do a bubbler style cloner... more on that later...
-Vegetative Growth-
so your seeds have all sprout, roots popping out of the rooting cubes, cutting slowed or
stopped growing in the Dixie cup, and your ready to transplant into a larger pot and begin
growing your plants out to the size you want them... you are ready to start vegetative
growth... the procedure for transplanting is pretty much the same across the board... take
your now rooted plant and place into the growing pot of choice, and back fill with grow
medium of choice... now obviously you need to fill the pot up with some of the grow medium
before adding your sprout and back filling... I will go over different grow mediums and growing
containers more in depth later...
anytime you transplant you will shock the plant.. the amount of shock will depend on the
amount of "abuse" the roots incure... the less you can move the roots around the better...
when back filling take time to do to easy.. the more gentle you are to the roots the faster
growth will return to normal... but be prepared for growth to stop for up to a week..
sometimes it just takes a while to recover for transplants... its best if you can transplant into
the final pot the first time.. but you can transplant into larger pots more than once with little
affect in the end..
vegetative growth is basically the time between when you transplant your plant to start
growing and the time you switch to a 12/12 light cycle.. the plant must receive between 18
and 24 hours of light to maintain proper vegetative growth... any light cycle that has 18 to 24
hours of light will work... 18/6, 19/5, 20/4, 21/3, 22/2, 23/1, and 24/0 will all grow your plant
out vegetatively.. there are many arguments as to what light cycle works best and helps yield
the most in the end... i'm not going to put my input in only because its just my opinion and is
very debatable.. I will say this... experiment over time with different ones to see what gets
you the results you want... if you are happy with what you get then that is all that matters...
keep whatever cycle you choose the same throughout the entire veg growth stage though...
messing around with it can stress your plant...
plants that are vegging uses the blues in the color spectrum... anything from 5000k to 6500k
will work... these are known as cool bulbs or daylight bulbs in you are looking at CFLs or MH if
you are using HID lighting.. if using HID lighting, you can use hps bulbs throughout the entire
grow with success if you choose.. many companies are now producing "enhanced spectrum"
hps bulbs, that contain something like 20% more blues... this means they are even more
affective during veg growth... this can save you some money on buying additional bulbs.. if
you are hell bent on using MH during veg and hps to flower, I would recommend using dual
ballast or purchasing digital ballast that will support both bulb types.. also it is possible to use
a mh bulb in an hps ballast without any problems as long as the mh bulb is less than or equal
to the wattage of the hps ballast... this may shorten the life of your mh bulb.. but it does
work...
this is also the stage where will begin using nutes, maybe... I say maybe for a couple reasons,
and it really just has to do with soil grows... if you build up a good soil mix there is a chance
that the soil will have enough nutes in it to get you through veg growth without needing to use
many nutes or any at all in some cases.. if you plan on using soil to grow its worth the
investment to buy good quality soil... fox farm and ocean forest are among some of the best...
if you cant find them, buy the most expensive soil you find wherever you end up purchasing it
from.. you get what you pay for... I will go more into that later.. there are some signs to know
you need to add nutes are yellowing of the leaves and slowed/stopped growth... the yellowing
is a sign of a nitrogen deficiency, and will go into it more later... the slowed/stopped growth is
another good sign it needs some food... assuming the pot is the right size.. a good rule of
thumb is 1 gallon for every 1 foot you plan on your plant being at the end of the run.. it
should more than likely be around the 2nd or 3rd week of vegetative growth when you start
using nutes.. start out with a 1/4 strength application.. meaning use 1/4 of the total amount
of nutes they recommend... you need to gradually wean your plant onto the nutes... adding to
much too soon can burn and possibly kill your plants.. not to mention the headache of having
to flush and having to sit back and just watch it happen.. after the first feeding or two you can
gradually start to increase the amount to half strength, then full strength... take note of your
plant and how it reacts to the nutes though.. she will tell you if it’s too much.. also a good
practice is to only feed every other watering... this will ensure that your plant uses all the
available nutes before you feed more... this will help reduce salt build ups and help maintain
soil ph... if you are growing in a hydroponics setup that will be different of course.. you'll want
to follow the same idea about gradually increasing the nute strength.. but you obviously need
to use nutes all the time.. the type of nutes you use will be up to you and how much you want
to put into it.. you can order anything over the internet so everything is always available..
maybe not with the ease of running to Wal-Mart or something.. but you can get hold of any
nutes you want... there are 1, 2, and 3 part systems.. 1 part is the "all-in-one'' style nutes
such as miracle grow and Scotts.. they can be used with success but take more care to use..
you have to really be careful how much you apply because you have no control over any
ratios.. and since some nutes get used faster than others you can run into problems with
these... 2 parts have a veg and bloom formula and contain all the macro and micro nutes you
need for these stages.. these are better than 1 part systems because they are more tailored to
the specific stage of growth you are in... 3 part systems have a veg, bloom, and "boost"
formula.. the boost is used throughout the entire grow, while the veg and bloom are used
during their specific stages... these are best if you want to custom blend your nutes or want to
better control ratios... there are liquid or dry.. some work in different applications also.. more
on that later.. either way you choose they all work... always be looking out for signs of nute
burn when you do start feeding... nutes are one area where more often than not less ends up
being more...
during this time is also when you want to do any pruning, should you so choose to... this
includes LST (which should be done from the beginning), topping, FIMing, super cropping,
lollipopping, ect.. I will cover these later.. some can be successfully done during the early
stages of flowering, but it is not good practice to do during flowering... stressing during
flowering increases will lessen your harvest.. try to plan things to have whatever pruning you
so choose to do done 1 week before flowering to give the plant time to heal itself...
you ideally want temps in the mid 70's and humidity in the 40% to 60% range.. you can run
warmer temps with success as long as a couple things are done... first you must have good air
movement and exchange, you must have a plenty of fresh air available to the plants, or if a
fresh air intake is not possible you will need to supplement co2.. I will explain more about
each of these later on..
vegetative growth times will vary.. you want to allow your plant to grow to maturity.. a
mature plant will yield better and have more potent buds than one that is immature... there
are 2 ways to tell when your plant has reaches maturity.. the first is the appearance of
alternating nodes... a young plant will produce branches in pairs.. by that I mean everywhere
a branch comes out on one side of the stem, another appears exactly opposite of it.. once a
plant has reached maturity the branches will alternate appearance up the stem.. once you see
this you will know it has reached maturity and are ready to flower... this usually takes around
4 weeks of vegetative growth to achieve... you may also choose to wait until you see
preflowers.. preflowers will show you the sex of the plant before you begin flowering.. which
means you can remove males before risking pollination of females.. the only thing is this
can/will take longer than the appearance of alternating nodes.. this can cause problems if you
don’t have the vertical space to flower taller plants.. you may have to induce flowering at the
appearance of the alternating nodes to keep plants to a manageable size and just watch
closely for males.. if you have plenty of space you may choose to veg your plant out more to
get a larger yield off of it.. the larger the plant the more it yields and the larger the buds.. this
will also depend on the lighting you have.. there is no point in growing a 6 ft tall plant using a
400w hps that won’t penetrate deep into the plant... use space and flowering lighting to help
determine over all veg times.. clones that are cut from a mature female and rooted do not
need to have any veg time at all... they are ready to go into flower the moment they are
rooted and transplanted... this is what is done in sog grows where there are more plants that
are smaller... keep in mind also that your plant can double to triple in size during flowering
depending on strain.. a 1 ft tall plant going into flowering could end up being 3 ft tall at the
end... this will also be a determining factor as to when to induce flowering...
-FLOWERING-
you've germenated your seeds, grew out your tree, and are ready to produce some buds.. to
induce flowering you must cut back the amount of light to 12 hours and give them 12 hours of
dark... different strains have different critical photoperiods.. some can start flowering with a
14/10 cycle, and some only need a 10/14 cycle to successfully flower... unless you know for
sure what the needs of your plant is it is best to stay with a 12/12 cycle.. this will ensure that
no matter what your plant will flower... you are more than welcome to experiment with your
light cycle, but don’t expect any different results.. actually you can adversely affect the plant
and lessen your yield... stick with the regular 12/12 cycle.. why fix what isn’t broken..
during flowering your plant will use the red/orange light spectrum.. these are in the 2000k to
3000k (approx) ratings for bulbs, warm color temp with floros, or hps with HID lighting... it
takes lighter to flower than it does to veg.. hps lamps or floros like these
http://www.wormsway.com/detail.aspx?...ku=SSB104&AC=0 are best to use for flowering..
you can still have success using other lights.. just remember it will take more during the
flowering stage than it did to grow the plant..
if you are using mixed seeds expect anywhere from 7 to 21 days before knowing sex..
sometimes it can take longer.. just be patient.. you are looking for to white hairs at the
internodes.. that is a female.. if you start seeing small clusters of little green grapes, those are
male pollen sacs, and you want to remove that plant as soon as possible... don’t do anything
until you know for sure what it is... if you aren’t sure post pics on RIU and ask for help... you
may also get a hermie.. these will show both female and male traits.. removing the pollen sacs
on these will ensure they do not pollinate themselves or any other surrounding females...
flowering takes about 2 weeks to start setting in.. in which time you will start noticing bud
sites all over your plants.. they will appear as light green, almost yellow spots, all over your
females.. each of these is where a bud will form.. they will start out as small popcorn sized
nugs and fill in over the length of the flowering... it will take several weeks before they start to
resemble a normal bud... but once they start filling they will rapidly start looking more and
more "normal"... the buds will fill out and swell the most the last few weeks of flowering as
they are ripening..
you can onset flowering and speed it up a little by giving your girls 24 to 36 hours of straight
dark before going into the 12/12 cycle... this helps let the plant know that without a doubt it is
time to start producing flowers.. it helps slow and stop the production of veg hormones and
helps kick start the production of flowering hormones.. it also helps speed sexing up by up to
a week... some claim this increases the chance of getting hermies... I personally have done it
and don’t believe it affects anything at all other than flowering time.. try it on one or two of
your plants and start the other straight into 12/12.. see if there is a difference between the
2...
make sure to keep the room sealed up nice and dark during the dark cycle.. light leaks can
cause prolonged flowering, and enough light can revert your plant back to veg growth... take
time and care to cover all light leaks in your grow room prior to flowering...
as always you want to take care introducing nutes to your plant... you'll want to wait until you
start seeing bud sites before starting flowering nutes alone.. in between starting flowering and
that time you may lessen the amount of veg nutes and start introducing bloom nutes.. a 1/4
strength application of each will ensure the plant gets some of all the nutes it needs during the
transition... with hydroponics you may choose to flush your system with a cleaner, such as
flora clean, to remove salt build up.. but again you want to wean your plant off of veg nutes
and onto bloom nutes... switching without some kind of flush and slight transition can cause
nute burn..
the flowering cycle itself will vary greatly from strain to strain.. some will get done in 6
weeks.. some will take 12+ weeks... indicas will flower quicker than sativas.. there are so
many crosses out there though that 8 to 10 weeks is a good guess at how long it will take to
flower.. there is no way to tell for sure how long it will take.. just be patient and watch the
clock tick away...
also during flowering be prepared for your leaves to yellow and fall off... unless your bloom
nutes have small amounts of nitrogen in them your leaves will yellow... as the plant
progresses and gets further to being ripe the large fan leaves will start raining of your plant..
don’t go pulling leaves off though.. let them fall off.. remove ones that have fallen and are
stuck in the plants branches...
some strains will smell more pungent than others... odors and odor strength will vary from
strain to strain as well.. always be prepared for a skunk, that way you can handle whatever
your plant throws off..
pistils will die and be replenished throughout the flower cycle.. don’t stress if your plant spits
out some red hairs here and there.. they will be replaced with bright white ones within a few
days.. if you spray your plant or bump the buds it can make them turn red also...
your temps should stay cooler during flowering than veg... this is the time when you really
want to strive to have temps in the low 70s... but again, if you have good air circulation and
movement you will be ok... also humidity needs to be lower.. too much humidity can lead to
bud rot and mold/mildew... a dehumidifier my be needed if air flow is not great... hotter air
will hold more moisture, which means higher humidities.. so if you are growing in a warmer
room with little air exchange humidity could be high, so a dehumidifier may be needed in that
instance..
trichrome production will also vary from strain.. some will be heavily frosted, and some will
have few.. they will start appearing at different times too.. there is no specific week you
should see them.. so don’t stress about how long it takes to see them or start thinking there is
something wrong with your plant..
-HARVEST-
Now for the pay off section to your grow... you hopefully have a few beautiful girls with big
buds just calling your name... but the question arises of when to chop... the answer is it all
depends on the stone you want... first off get the idea that the pistils will tell you much.. there
are some things the pistils will tell you, but i'm not there yet.. the tricks are what will tell the
story... during the life of tricks they will go from clear, to milky, to amber... you don’t want
clear that’s for sure.. the first stone you can achieve is a good head high.. this is achieved by
harvesting early into the ambering of the tricks... when around 10% of the tricks have gone
from milky to amber this is the high you will get... harvesting at around 50/50 will introduce a
nice body high with it... and the further into ambering you go the more "couch lock" the affect
will be.. now if you are looking to get the absolute most out of you buds, which will end up
being a knock you on your ass high, you need to pay attention to not only the tricks but the
pistils... as the plant ripens the pistils will eventually change from white to red/orange... they
will also start receding into the bud... once they are receding into the bud you know you are at
about the point where you have flowered her completely out and she has nothing left.. you
can over ripen your buds.. it is possible.. so once you start seeing the pistils start receding
inwards you knows it’s close to time to start chopping.. but you also know that you have
gotten as much out of the plant as you possibly can, both yield and potency wise...
you'll want to flush your plant before harvest also.. some growers say you don’t have to.. it’s
debatable.. the idea behind flushing is to remove all the salts and nutes from the plant and
making sure the plant has used up everything it has... unflushed plants can taste chemically
from nutes still in them.. try both ways and see what you like best... flushing is easy though...
you start out running 2x the amount of water as the volume of the pot through the pot.. so a
5 gallon pot would get 10 gallons of water ran through it.. then the next 1 or 2 watering just
use plain water.. your plant will be fine without nutes during this time.. you can use molasses
throughout the flush to continue feeding a little something to your plants if you choose.. ill get
more into molasses later... whether you choose to flush or not to, you should try to plan it out
so that when you chop your plants down it is on a day you need to water... this will speed the
drying since the plant is low on water already.. chopping is best done right before or as close
to lights on as possible.. this will keep the roots from pushing anything up into the plant prior
to harvest... two common questions I hear asked are "should I boil the roots? so and so said it
will help push the THC out" and "I heard you hang them upside down to let THC run out of the
stem"... neither of which are true.. boiling the roots is just stupid... and hanging the plants is
for convenience...
trimming is easiest when you do prior to drying... start out by removing all the large fan
leaves from the plant.. you can keep these and use for honey oil later if you want.. you have
two choices when it comes to attacking the trimming of your plant... whether you are going to
hang the entire plant or just branches.. it’s easiest to do branches individually.. it’s hard to
move around larger plants.. start out by removing the branch from the main stem.. I like
starting at the bottom and working up... take a sharp pair of trimming prunes begin trimming
all the leafs around the buds flush with the buds themselves.. try to trim over something to
save the trimmings for hash or cannabutter later... also if you can look from the bottom of the
stem and see a leaf stem in the bud, cut the leaf off.. basically you want to trim the bud up as
nice as you want it to be...
once you have trimmed up the buds on the branches its time to hang them.. you can use
anything to secure them to whatever you plan on hanging them from.. make sure to leave
enough room at the bottom of the stem to attach something too... hang them in a medium
humidity room... 50 to 60 percent works well... this is assuming you have adequate ventilation
and air movement.. the slower the buds dry and cure the better the final product.. so if you
can dry them slowly in a more humid room it helps get the most out of the dry.. but higher
humidities can cause bud rot, mold, and mildew if air movement and ventilation is low... so
keep in mind that the lower the air movement the lower the humidity should be.. you will want
to keep some sort of fan going to keep air moving of some sort... you also will want to make
sure you leave breathing room between the branches when you hang them.. warmer temps
and lower humidity will still give you good results in the end.. don’t get me wrong.. but a
slower process will give you amazing results... lastly if you cant hang the buds you can use a
large screen from a picture window for instance as a drying rack.. you still want air movement
in the room though... drying usually will take 5 to 7 days... you'll know your ready to start
curing when the stems snap, but aren’t brittle...
mason jars are the best thing to cure in... they are cheap and easily available.. curing evens
out the remaining moisture in the buds and helps further develop flavor.. a good cure can be
the difference of good bud that tastes and smells like hay or good bud that tastes divine and
smells like a skunk.... to cure fill up the jar with buds you have trimmed from the stems after
drying.. don’t pack the jar full.. you want breathing room in them.. 1/2 to 3/4 full is about all
you want... keep them sealed tightly... open them a few times a day to allow the air inside to
be replaced with fresh air, then seal back up.. this takes about another 5 to 7 days, but is
WELL worth the wait..
so that is the basic growing process.. now to touch more in depth on a few areas...
you’re ready to start planning you’re grow.. first thing to do is to choose a location... is it
going to be indoor or outdoor?? here are some things to consider when choosing where to
grow.. -Sexing your plants-
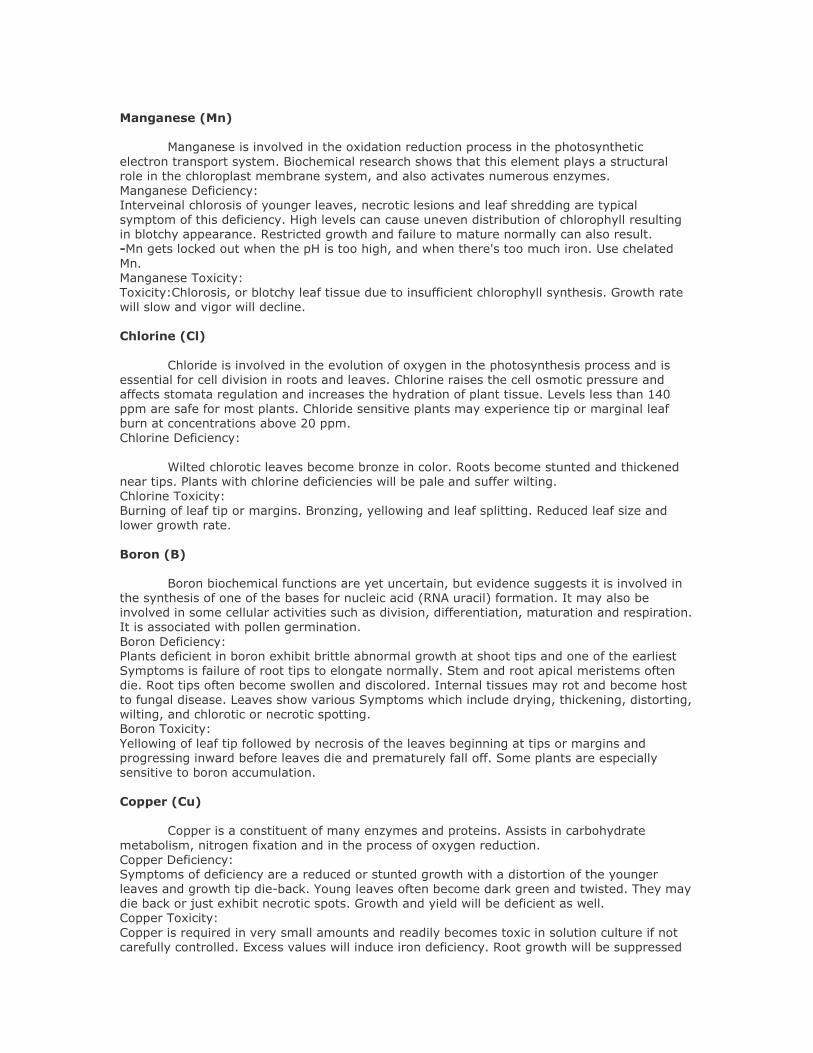
To find out if its male or female you will have to flower the plant. To flower the plant
you need to put it in 12 hrs of light and 12 hrs of complete darkness. After a week to ten days
you will start seeing the flower. Males will have little pollen balls that look like a bunch of
grapes. The female will have a little tear drop bud with two white hairs coming out of it.
You want to kill the males. They do not produce bud. Only pollen. You dont want the pollen to
get on the female flowers or it will produce seeds. You pretty much have a 50/50 chance of
having a male/ female.
Its simple to tell...
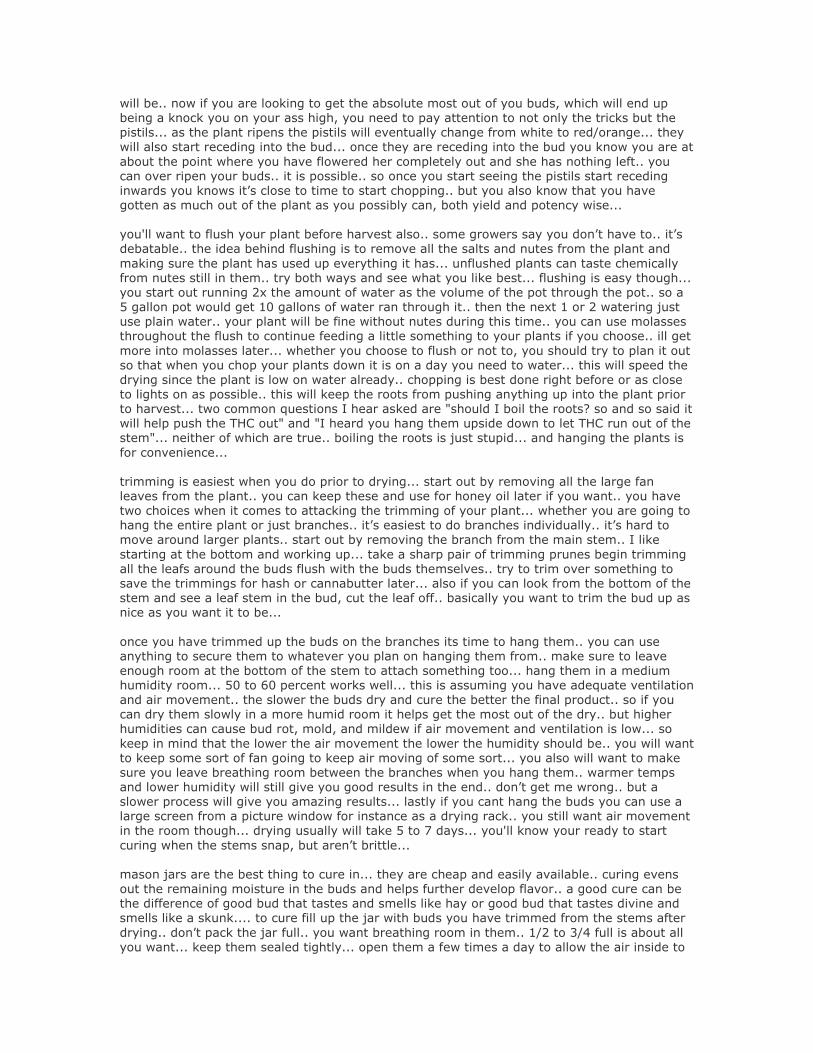
-The males have balls. If you look close to where your buds would form you will see a bunch
of tiny balls growing, usually hanging down or sideways.
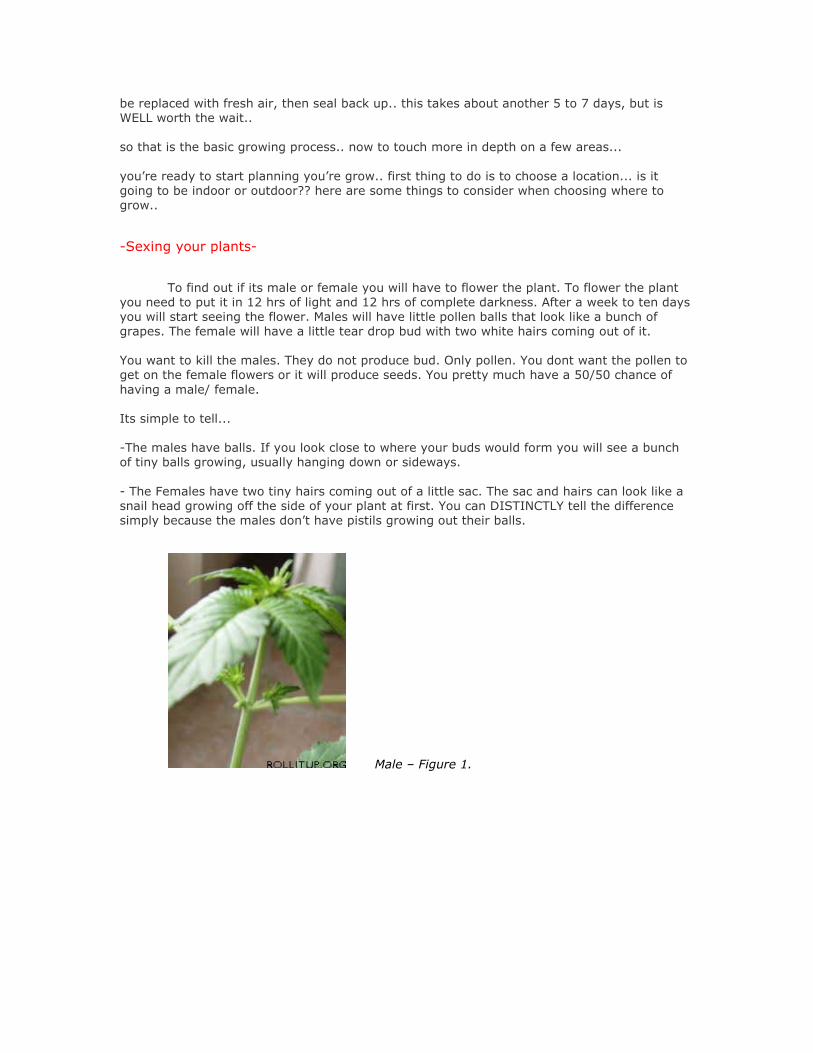
- The Females have two tiny hairs coming out of a little sac. The sac and hairs can look like a
snail head growing off the side of your plant at first. You can DISTINCTLY tell the difference
simply because the males don’t have pistils growing out their balls.
Male – Figure 1.
Female – Figure 2. LIGHTING
Color rating- Measured in Kelvin (K). The higher the number, the more bluish the light.
4000K-7000K is mostly on the blue side of the spectrum, while 3000K and under goes from a
white spectrum, to a redder spectrum.
6500K or higher for vegetative stage, Blue light promotes closer node sites and thicker foliage
and branch development.
2700K or below for Flowering Cycle, Red light in the spectrum promotes denser bud clusters
and overall growth of the flowers.
How much light is needed?
The minimum amount of light required by marijuana plants is around 3000 lumens per square
foot. However, it's not 100% accurate, since although you may have a 10,000 lumen light, the
amount of light that reaches the plant varies with the distance between the light and plants,
and reflectivity of the grow box. The ideal amount is somewhere around 7000-10,000
lumens/sqft, and as long as the plants do not burn, as much light can be used as you want.
(*note, the sun produces about 10,000 lumens/sqft, on a sunny summer day).
Determining lumens for your grow area:
Determine the square footage of your area (example in a 4 foot by 4 foot area, there is 16
square feet)
If you have a 1000 watt High Pressure Sodium, that produces (approx.) 107,000 lumens.
Divide this by 16 (your square footage) 107,000 / 16 = 6687 lumens per square foot.
So just divide the total amount of Lumens, by the total amount of Sq ft, and that’s your
lumens per square foot.
How far away from my plants do the lights go?
The lights in your grow room should be as close as possible to the plants without burning
them. There is no such thing as too much, unless there is sufficient heat to dry out and burn
the leaves. A good rule is to put your hand under the light, if its too hot for your hand,
chances are that the plants will be too, so move the light up until your hand feels more
comfortable. For seedlings and clones, I keep them a little further away from the light,
because they are very susceptible to burning and drying out, at these stages.
Efficiency is very important when choosing a type of light. The wattage is not the most
important thing, as you can see below, different types of light produce different amounts of
lumens per watt. A 300 watt incandescent will produce about 5100 lumens. While a 300 watt
Metal Halide (just an example, they do not come in 300 watts), will produce 27,000 lumens.
Obviously far more efficient for growing, while still using the same amount of electricity.

Approximate light production:
Incandescent: 17 lumens/watt
Mercury vapor: 45-50 lumens/watt
Fluorescents: 60-70 lumens/watt
Metal halide: 90 lumens/watt
High pressure sodium: 107 lumens/watt
Incandescent lights: Incandescent are the most popular type of lights in the world. They
may come advertised as incandescent, tungsten, quartz, halogen, or simply standard. The
important thing about incandescent is they suck.
There are some incandescent which are sold as 'grow lights.' They usually have a blue coating
and usually come in 60W and 120W sizes. While they may seem like a good choice to new
growers, they are next to useless; they produce some light at a usable spectrum, but only
have about a 5% efficiency and generate more heat than usable light. Most of us have these
in our homes right now. Don't use them for growing, instead opt for a Compact Fluorescent as
a cheaper but more efficient alternative.
Fluorescent lights: Fluorescents are a lot more useful than incandescent. Their efficient
enough, and cheaper than HID lights. Compact fluorescent tubes are popular with growers
because of their good output to size ratio. Compared to standard 4' tubes, compact
fluorescent bulbs are smaller, and more can fit into a given area. Fluorescents are good for
small grows on a tight budget, and for novice growers, since they do not require any special
sort of wiring or understanding of the necessary bulbs for a given fixture, and are very widely
available.
Fluorescent lights come in many different Kelvin ratings; often the spectrums are labeled on
packaging as being 'cool white' or 'warm white.' Cool white is bluer, and is good for the
vegetative stages of growth, and warm white light is more orange or reddish, and is best for
the flowering stage.
If you are going to go with fluorescents for your system stick with T5HO lamps, they output
48% more light than T-10 and use almost 65% less power.
High Intensity Discharge (HID) Lighting Systems:
Mercury Vapor (MV)
Mercury vapor lights are not the most efficient light for growing. They are very bright, and
relatively cheap. They do emit light at the wavelengths necessary to support your plants
growth, but not nearly as good as a MH or Hps light. Much of the light emitted by MV lights is
bluish-white. Street lighting is what most MV lighting is used for.
Metal Halide (MH)
Metal halide lighting systems are optimal for use in the vegetative phase of growing. They
emit mostly blue light, which encourages vigorous growth of foliage. They are very efficient,
but can get rather expensive to start with; fluorescents may seem more appealing because of
their lower price, and they are not much different when compared on a lumen-to-lumen cost
level. These lights can be used through-out the grow, but will most likely result in light, fluffy
buds.
High Pressure Sodium (HPS)
High pressure sodium lights emit mostly orange, yellow, and red spectrum light, which is
perfect for the flowering stage of the plants growth. They are (in my opinion) the most
efficient type of light available for any application. HPS lights can be used through-out the
entire grow. They produce denser and usually larger buds than any other light.
HPS lights are generally a little more expensive than MH systems of similar wattage. They are
more commonly used by experienced growers because of their ability to produce tighter buds,
higher lumen-output-per-watt, and will produce from start to finish.

Fertilizer
I would recommend using Fox Farm organic nutrients, the whole lineup is about 100
bucks, and is well worth the investment. Start your plants off at half strength and work up to
full dose to prevent nute burn. http://foxfarmfertilizer.com/soilfeed.pdf for the fox farm feed
schedule.
If you want to go cheap get something that’s 10-10-10 or close to that. Be careful as
to how much fert you give them as they are prone to nute-lock if you’re not cautious on the
amounts your giving them. Always try to stay with liquid or water soluble, organic if you can,
ferts and stay away from time release or extended release nutrients for your plant.
If you are in soil, forget all the fancy stuff. Here's some good ferts for you:
For vegging use: Peter's "Jack's Classic" 20-20-20.
For flowering use: Peter's "Jack's Classic Blossom Booster 10-30-20.
Here's where to order: http://www.jacksclassic.com/
Use these at only 1/4 strength throughout your grow and you will have beautiful plants
producing great buds.
Fox Farm Liquid Nutrient Trio Soil Formula—Big Bloom®, Grow Big® and Tiger Bloom
- The Right Juice for the Right Use! http://botanical.com/hydro/nutrients/foxfarm.html?gclid=CNbBifi3_pwCFQ4MDQodPkq-0A
Pay attention to the soil, and be wary of existing nutes. I tend to stay away from the
pre-fertilized soil, with soil price is quality, and quality of the growth medium matters.
Plants tend to need less nitrogen and more phosphorus and Potassium in the flowering
cycle. Where as they need about equal amounts in the vegging stage.
Soil–
There’s not much to picking out the right kind of soil. Keep it simple and light, price
does matter, with soil you get what you pay for. The soil\growth medium must be firm yet
aerated so new air can enter. Not much on this part, experiment and figure out what works for
you. I use a mixture of soil, sphagnum moss, and perelite, mixed 3 parts soil, 3 parts
sphagnum moss, and 1 part perelite.
Cloning -
Clones are easy to make. And they are the exact genetics as their mother. I keep 8
mother plants and grow them about 3-4 feet. Large enough so I can take 50 or so clones from
each mother. Moms wont ever bud cause we keep them in the grow (18 hours of light) room.
Sorry I had to throw that in real quick.
Cloning is very easy to do, alot of differant techniques are out there, bubblers,
powders, soil to many really to mention. However this method is by far the easiest out there.
The only thing you need is water, a little bit of light, and the little piece of plant you want to
root. The example shown below is of 3 cuttings that I have already taken and would like to
root them. The first one with the two leaves and one single growing tip, we will call this (R).
THe next one has four nodes on it, as well as a couple larger leaves, we will call this (O). The
third piece is taller and has 7 nodes and a couple more well sized leaves on it, we will call this
one (L). S=R O=M L=L
Along with the regular way of cloning, after you cut you will right away dip the clone in water
for about 25 seconds, make sure you tweak it to get rid of any air bubbles that could be
around. Now here comes the fun part, normally you would remove it dip it in powder and stick
it in a rocwool cube. This time you will be leaving it in water untill the cutting has roots and is
strong enough to support itself. Make sure the cup is not clear and cannot see light through it,
this way the roots wont be damaged.
Now we have finished the hard part, the most critical part is the light that these will receive,
again many differant oppinions here but this is what works for me and it works 100/100 so
why would i change take the cuttings and sit them on a window sill that is not in direct
sunlight. You probbly want to make sure its slightly shady. Just make sure they get 12 on 12
off or approx. The important thing is no direct sunlight or artificial light on them.
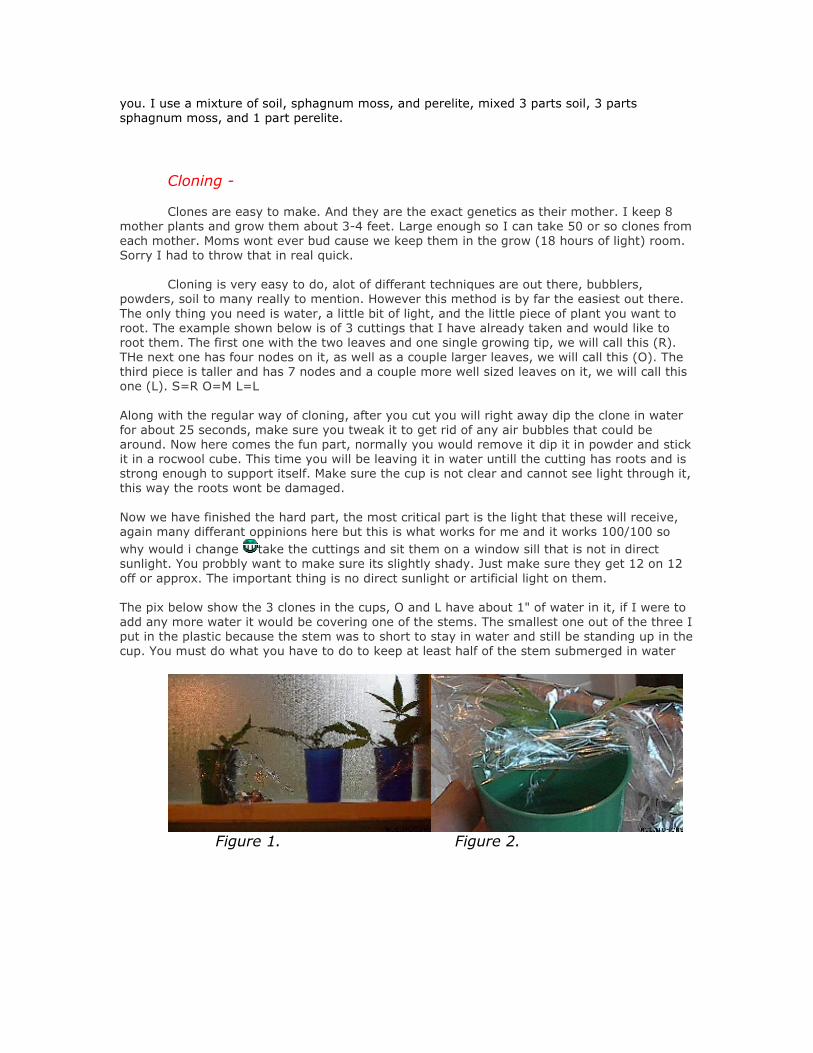
The pix below show the 3 clones in the cups, O and L have about 1" of water in it, if I were to
add any more water it would be covering one of the stems. The smallest one out of the three I
put in the plastic because the stem was to short to stay in water and still be standing up in the
cup. You must do what you have to do to keep at least half of the stem submerged in water
Figure 1. Figure 2.

Figure 3 Figure 4
Figure 5
PLANT MOISTURE STRESS - symptoms and solutions (revised Jan. 12, 2009)
Quite often I hear groans from folks having leaf problems -> “Help, my leaves are
cupping and the leaf edges are turning brown!”, or, “My plant's leaf tips are curling down and
turning black ....what's wrong?” Unless insect damage has occurred or the plant is suffering
from a severe case of calcium deficiency, the plant is trying to tell you that it is water
stressed. It's hard to tell *exactly* what the culprit is, and unfortunately the “solution” the
grower chooses many times is not the right one. A mis-diagnosis only serves to make matters
worse by promoting further decline. I’ll try to cover some of the more common causes that
can induce these common symptoms and try to offer a few simple solutions. The ultimate and
correct solution is in the hands of the grower.
1. Over-fertilizing - the most common cause of leaf cupping aka leaf margin rolling,
leaf margin burn, and leaf tip curl/burn is the overzealous use of too much plant food in
relationship to factors such as plant size, vigor and rate of growth. The first unit of a plant to
show moisture stress is the leaf at its margins and/or tips, reflected by margin rolling
(cupping) or burning. Sometimes copper colored necrotic spots show in the leaf also. A hard,
crispy feel to the leaf frequently occurs as well, as opposed to a soft and cool feel of a happy
leaf. When you have a high concentration of salts in solution (or in the root medium)
compared to lower salinity levels found in the plant’s tissue, water is actually drawn out of the
plant across the root gradient in order to fix the ppm imbalance. IOW, this is a natural,
osmotic response that serves to equalize salinity levels on both sides of the root’s epidermal
gradient. Back off on the amount and/or frequency of plant food. Too much plant food can also
burn the roots, especially the sensitive root tips and hairs, which then creates another set of
problems such as nutrient deficiencies. A note for the bio folks - as soil dries, the
concentration of the remaining salts rises further exacerbating the problem. Leach (flush) your
pots once in a while to get rid of excess salts.
2. High Heat - the plant is losing water via its leaves faster than what can be replaced
by the root system. The leaf responds by leaf margin cupping or rolling (up or down) in order
to conserve moisture. A good example is reflected by the appearance of broad-bladed turf
grass on a hot summer day, high noon, with low soil moisture levels - the leaf blade will roll in
and the grass will take on a dull, grayish-green appearance. Upon sunrise when moisture
levels have returned to normal, the leaf blade will be flat. Lower the heat and concentrate on
developing a large, robust root system by practicing sound plant culture. An efficient and
effective root system will go a long way to prevent heat induced leaf desiccation and leaf
margin curling by supplying sufficient moisture for good plant health. One short episode of
high heat is enough to permanently destroy leaf tissue and cause a general decline in the
leaves affected, which often occurs to leaves found at the top of the plant located near HID
lamps. The damaged leaf (usually) does not recover, no matter what you do. Bummer in the
summer. One can only look to new growth for indications that the problem has been
corrected.
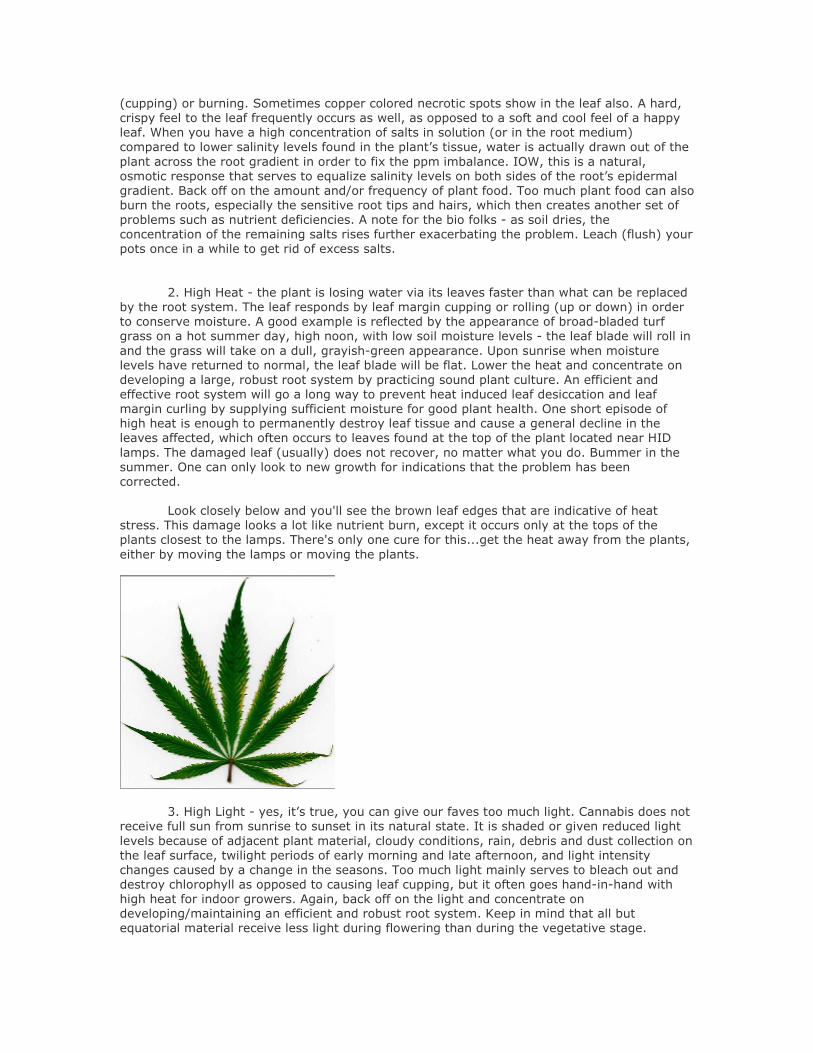
Look closely below and you'll see the brown leaf edges that are indicative of heat
stress. This damage looks a lot like nutrient burn, except it occurs only at the tops of the
plants closest to the lamps. There's only one cure for this...get the heat away from the plants,
either by moving the lamps or moving the plants.
3. High Light - yes, it’s true, you can give our faves too much light. Cannabis does not
receive full sun from sunrise to sunset in its natural state. It is shaded or given reduced light
levels because of adjacent plant material, cloudy conditions, rain, debris and dust collection on
the leaf surface, twilight periods of early morning and late afternoon, and light intensity
changes caused by a change in the seasons. Too much light mainly serves to bleach out and
destroy chlorophyll as opposed to causing leaf cupping, but it often goes hand-in-hand with
high heat for indoor growers. Again, back off on the light and concentrate on
developing/maintaining an efficient and robust root system. Keep in mind that all but
equatorial material receive less light during flowering than during the vegetative stage.
4. Overwatering - this practice only serves to weaken the root system by depriving the
roots of proper gas exchange. IOW, the roots are not getting enough oxygen which creates an
anerobic condition causing root decline and root rot with the end result showing up as leaf
stress, stunted growth, and in severe cases, death. <gasp!> Alot of times folks think the plant
is not getting enough plant food (which it can't under such adverse conditions), they add more
nutes for a "curative", and just add insult to injury.
5. Underwatering - not only is the plant now stressed due to a low supply of adequate
moisture, but carbohydrate production has been greatly compromised (screwed up). Step up
the watering frequency, and if need be, organic growers may need to soak the pot from the
bottom up until moisture levels reach an even consistency throughout the medium especially
with mixes that are heavy in peat. If severe, a little surfactant (liquid Ivory dish soap) added
to the drench will help return the organics back to a normal moisture retentive state. If the
pot feels light to the lift - it’s time to water. Don’t wait until the soil pulls away from the sides
of the pot or leaves droop before you water.
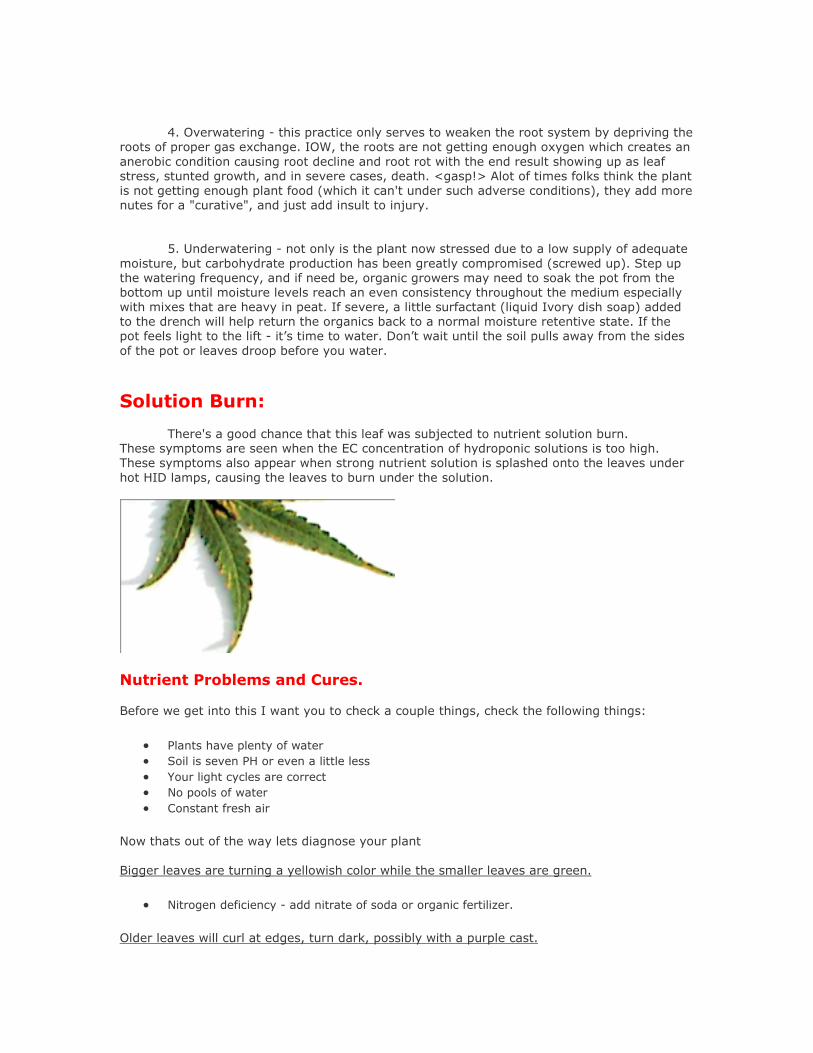
Solution Burn:
There's a good chance that this leaf was subjected to nutrient solution burn.
These symptoms are seen when the EC concentration of hydroponic solutions is too high.
These symptoms also appear when strong nutrient solution is splashed onto the leaves under
hot HID lamps, causing the leaves to burn under the solution.
Nutrient Problems and Cures.
Before we get into this I want you to check a couple things, check the following things:
• Plants have plenty of water
• Soil is seven PH or even a little less
• Your light cycles are correct
• No pools of water
• Constant fresh air
Now thats out of the way lets diagnose your plant
Bigger leaves are turning a yellowish color while the smaller leaves are green.
• Nitrogen deficiency - add nitrate of soda or organic fertilizer.
Older leaves will curl at edges, turn dark, possibly with a purple cast.
• Phosphorous deficiency - add commercial phosphate.
Mature leaves develop a yellowish cast to least veinal areas.
• Magnesium deficiency - add commercial fertilizer with a magnesium content.
Mature leaves turn yellow and then become spotted with edge areas
turning dark gray.
• Potassium deficiency - add muriate of potash.
Cracked stems, no healthy support tissue.
• Boron deficiency -add any plant food containing boron.
Small wrinkled leaves with yellowish vein systems.
• Zinc deficiency - add commercial plant food containing zinc.
Young leaves become deformed, possibly yellowing.
• Molybedum deficiency - use any plant food with a bit of molybdenum in it.
Figure 1
Figure 2
Many hydroponic gardeners see this problem. It's the beginning of nutrient burn. It
indicates that the plants have all the nutrients they can possibly use, and there's a slight
excess. Back off the concentration of the nutrient solution just a touch, and the problem
should disappear. Note that if the plants never get any worse than this leaf (figure 3), then
the plants are probably just fine. Figure 4 is definitely an over-fert problem. The high level of
nutrients accumulates in the leaves and causes them to dry out and burn up as shown here.
You must flush with clear, clean water immediately to allow the roots to recover, and prevent
further damage. Now find the cause of the high nutrient levels.
Figure 3 (left) and Figure 4 (right)
Over Watering:
The plants in figure 5 were on a continous drip system, where nutrient solution is
constantly being pumped into the medium. This tends to keep the entire root system
completely saturated. A better way would be to periodically feed the plants, say for 1/2 hour
every 2-3 hours. This would give the roots a chance to get needed air to them, and prevent
root rot and other problems.
Don't be throw off by the fact that the plants in figure 5 are sitting in still water, this is
actually an H2O2 solution used to try and correct the problem. Adding an airstone to the tub
would also help add O2 to the solution.
Figure 5
pH Fluctuation:
Both of these leaves in figure 6 and figure 7 are from the same plant. It could be over
fertilization, but more likely it is due to the pH being off. Too high or too low a pH can lock up
nutrients in the form of undisolvable salts and compounds, some of which are actually toxic to
the plants. What then happens is the grower then tries to supplement the plants diet by
adding more fertilizers, throwing off the pH even more and locking up even more nutrients.
This type of problem is seen more often in soil mixes, where inconsistent mixing of the
medium's components leads to "hot" spots.
Figure 6 (left) and Figure 7 (right)
Ozone Damage:
Ozone damage typically found near the generator. Although a rare problem, symptoms
generally appear as a Mg deficiency, but the symptoms are localized to immediately around
the generator.
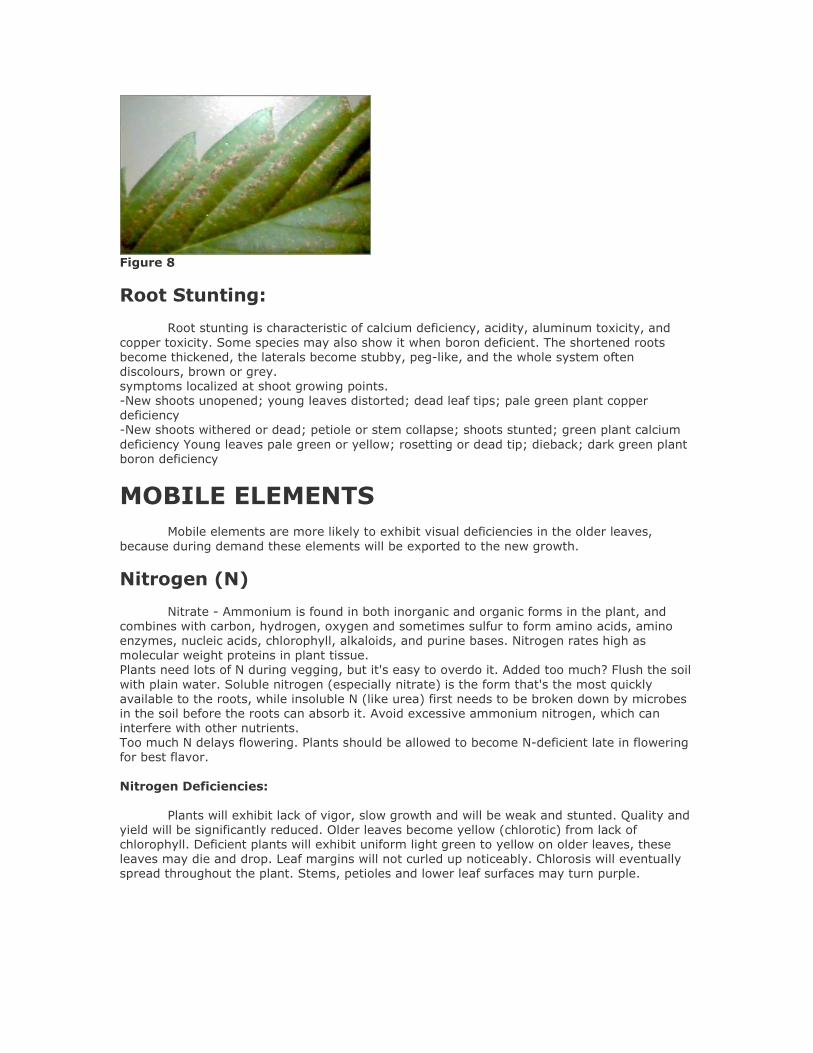
Figure 8
Root Stunting:
Root stunting is characteristic of calcium deficiency, acidity, aluminum toxicity, and
copper toxicity. Some species may also show it when boron deficient. The shortened roots
become thickened, the laterals become stubby, peg-like, and the whole system often
discolours, brown or grey.
symptoms localized at shoot growing points.
-New shoots unopened; young leaves distorted; dead leaf tips; pale green plant copper
deficiency
-New shoots withered or dead; petiole or stem collapse; shoots stunted; green plant calcium
deficiency Young leaves pale green or yellow; rosetting or dead tip; dieback; dark green plant
boron deficiency
MOBILE ELEMENTS
Mobile elements are more likely to exhibit visual deficiencies in the older leaves,
because during demand these elements will be exported to the new growth.
Nitrogen (N)
Nitrate - Ammonium is found in both inorganic and organic forms in the plant, and
combines with carbon, hydrogen, oxygen and sometimes sulfur to form amino acids, amino
enzymes, nucleic acids, chlorophyll, alkaloids, and purine bases. Nitrogen rates high as
molecular weight proteins in plant tissue.
Plants need lots of N during vegging, but it's easy to overdo it. Added too much? Flush the soil
with plain water. Soluble nitrogen (especially nitrate) is the form that's the most quickly
available to the roots, while insoluble N (like urea) first needs to be broken down by microbes
in the soil before the roots can absorb it. Avoid excessive ammonium nitrogen, which can
interfere with other nutrients.
Too much N delays flowering. Plants should be allowed to become N-deficient late in flowering
for best flavor.
Nitrogen Deficiencies:
Plants will exhibit lack of vigor, slow growth and will be weak and stunted. Quality and
yield will be significantly reduced. Older leaves become yellow (chlorotic) from lack of
chlorophyll. Deficient plants will exhibit uniform light green to yellow on older leaves, these
leaves may die and drop. Leaf margins will not curled up noticeably. Chlorosis will eventually
spread throughout the plant. Stems, petioles and lower leaf surfaces may turn purple.
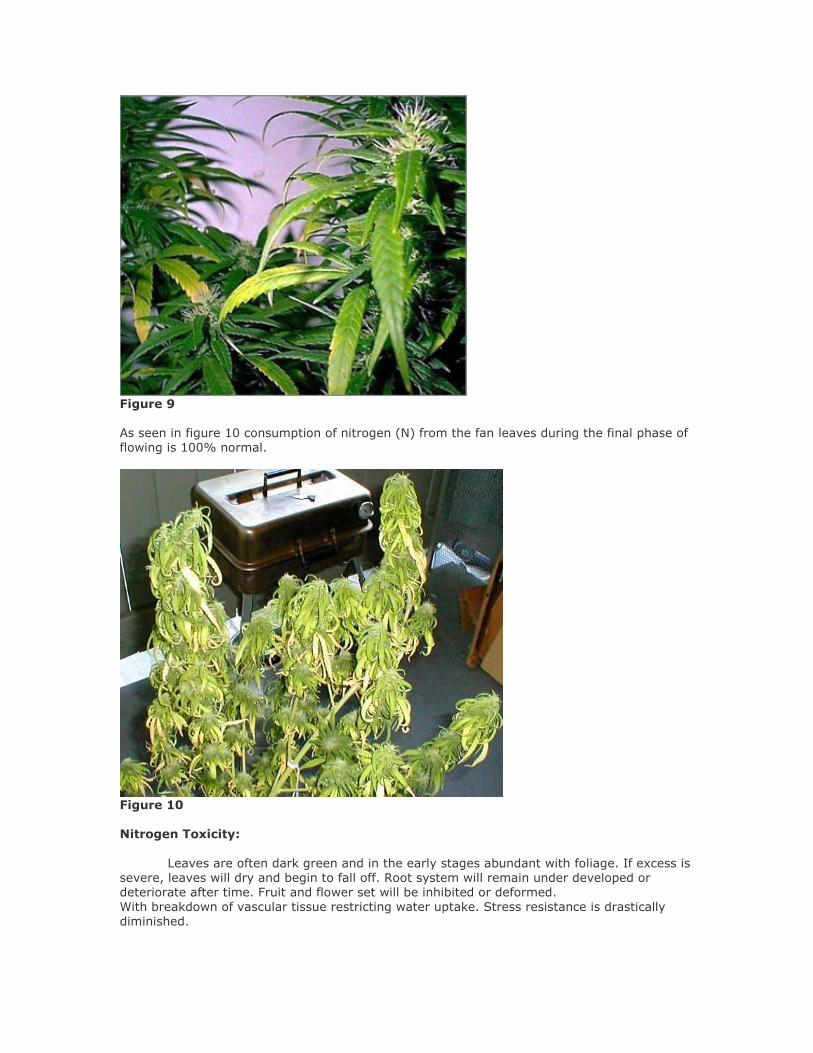
Figure 9
As seen in figure 10 consumption of nitrogen (N) from the fan leaves during the final phase of
flowing is 100% normal.
Figure 10
Nitrogen Toxicity:
Leaves are often dark green and in the early stages abundant with foliage. If excess is
severe, leaves will dry and begin to fall off. Root system will remain under developed or
deteriorate after time. Fruit and flower set will be inhibited or deformed.
With breakdown of vascular tissue restricting water uptake. Stress resistance is drastically
diminished.
Phosphorus (P)
Phosphorus is a component of certain enzymes and proteins, adenosine triphosphate
(ATP), ribonucleic acids (RNA), deoxyribonucleic acids (DNA) and phytin. ATP is involved in
various energy transfer reactions, and RNA and DNA are components of genetic information.
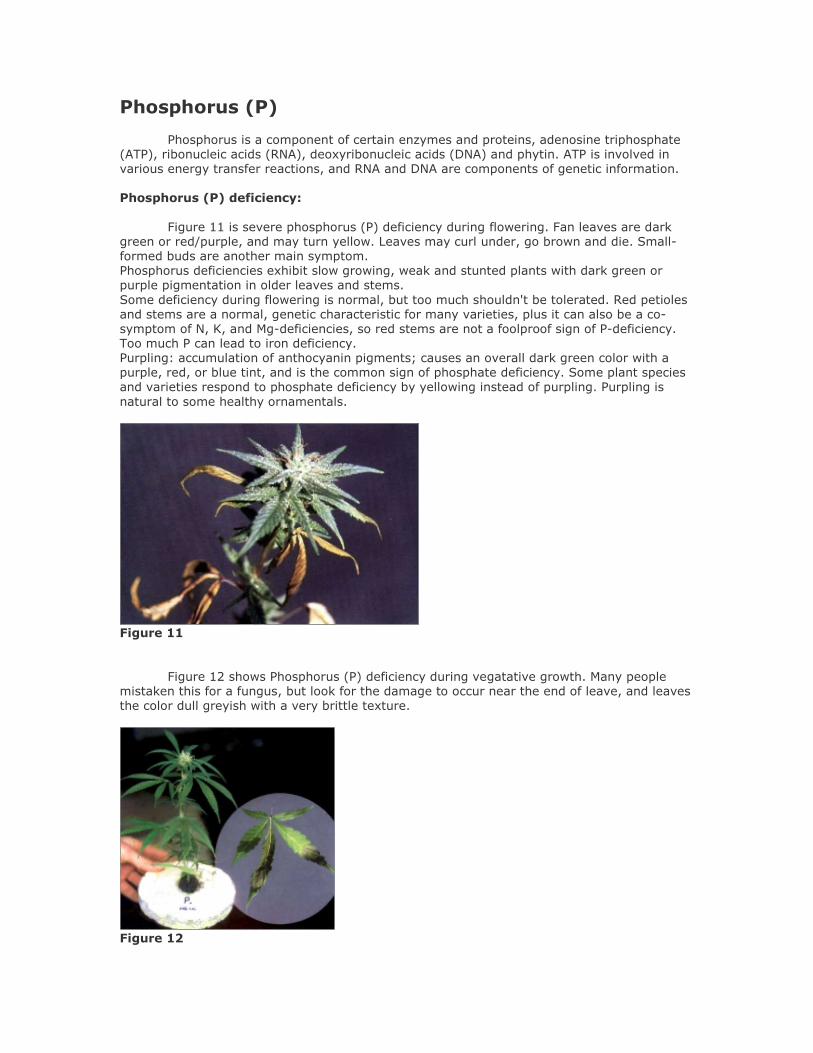
Phosphorus (P) deficiency:
Figure 11 is severe phosphorus (P) deficiency during flowering. Fan leaves are dark
green or red/purple, and may turn yellow. Leaves may curl under, go brown and die. Small-
formed buds are another main symptom.
Phosphorus deficiencies exhibit slow growing, weak and stunted plants with dark green or
purple pigmentation in older leaves and stems.
Some deficiency during flowering is normal, but too much shouldn't be tolerated. Red petioles
and stems are a normal, genetic characteristic for many varieties, plus it can also be a co-
symptom of N, K, and Mg-deficiencies, so red stems are not a foolproof sign of P-deficiency.
Too much P can lead to iron deficiency.
Purpling: accumulation of anthocyanin pigments; causes an overall dark green color with a
purple, red, or blue tint, and is the common sign of phosphate deficiency. Some plant species
and varieties respond to phosphate deficiency by yellowing instead of purpling. Purpling is
natural to some healthy ornamentals.
Figure 11
Figure 12 shows Phosphorus (P) deficiency during vegatative growth. Many people
mistaken this for a fungus, but look for the damage to occur near the end of leave, and leaves
the color dull greyish with a very brittle texture.
Figure 12
Phosphorus (P) Toxicity:
This condition is rare and usually buffered by pH limitations. Excess phosphorus can
interfere with the availability and stability of copper and zinc.
Potassium (K)
Potassium is involved in maintaining the water status of the plant and the
tugor pressure of it's cells and the opening and closing of the stomata. Potassium is required
in the accumulation and translocation of carbohydrates. Lack of potassium will reduce yield
and quality.
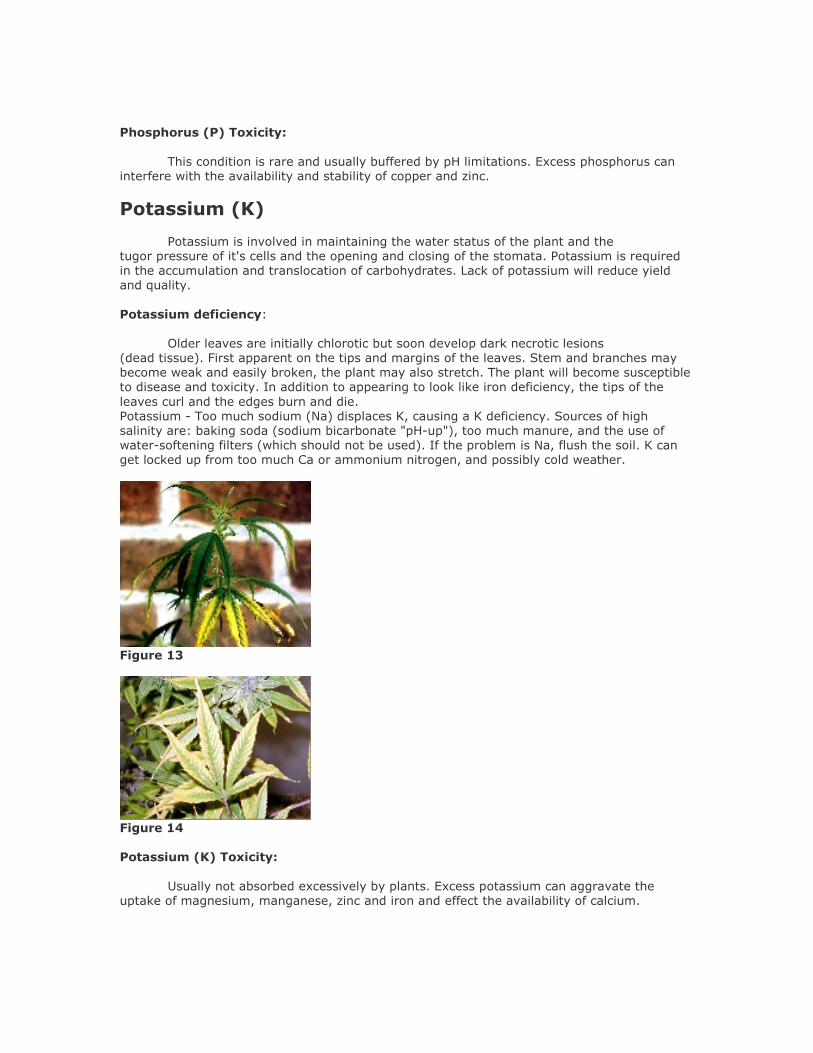
Potassium deficiency:
Older leaves are initially chlorotic but soon develop dark necrotic lesions
(dead tissue). First apparent on the tips and margins of the leaves. Stem and branches may
become weak and easily broken, the plant may also stretch. The plant will become susceptible
to disease and toxicity. In addition to appearing to look like iron deficiency, the tips of the
leaves curl and the edges burn and die.
Potassium - Too much sodium (Na) displaces K, causing a K deficiency. Sources of high
salinity are: baking soda (sodium bicarbonate "pH-up"), too much manure, and the use of
water-softening filters (which should not be used). If the problem is Na, flush the soil. K can
get locked up from too much Ca or ammonium nitrogen, and possibly cold weather.
Figure 13
Figure 14
Potassium (K) Toxicity:
Usually not absorbed excessively by plants. Excess potassium can aggravate the
uptake of magnesium, manganese, zinc and iron and effect the availability of calcium.
Magnesium (Mg)
Magnesium is a component of the chlorophyll molecule and serves as a cofactor in
most enzymes.
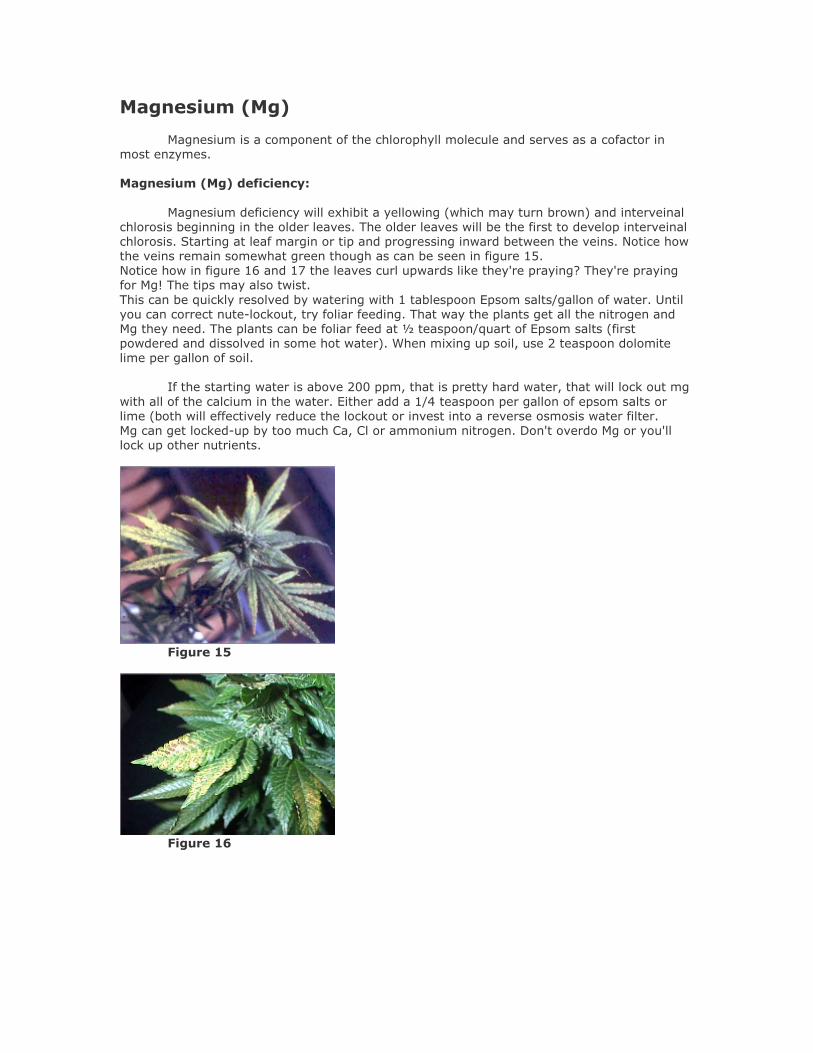
Magnesium (Mg) deficiency:
Magnesium deficiency will exhibit a yellowing (which may turn brown) and interveinal
chlorosis beginning in the older leaves. The older leaves will be the first to develop interveinal
chlorosis. Starting at leaf margin or tip and progressing inward between the veins. Notice how
the veins remain somewhat green though as can be seen in figure 15.
Notice how in figure 16 and 17 the leaves curl upwards like they're praying? They're praying
for Mg! The tips may also twist.
This can be quickly resolved by watering with 1 tablespoon Epsom salts/gallon of water. Until
you can correct nute-lockout, try foliar feeding. That way the plants get all the nitrogen and
Mg they need. The plants can be foliar feed at ½ teaspoon/quart of Epsom salts (first
powdered and dissolved in some hot water). When mixing up soil, use 2 teaspoon dolomite
lime per gallon of soil.
If the starting water is above 200 ppm, that is pretty hard water, that will lock out mg
with all of the calcium in the water. Either add a 1/4 teaspoon per gallon of epsom salts or
lime (both will effectively reduce the lockout or invest into a reverse osmosis water filter.
Mg can get locked-up by too much Ca, Cl or ammonium nitrogen. Don't overdo Mg or you'll
lock up other nutrients.
Figure 15
Figure 16
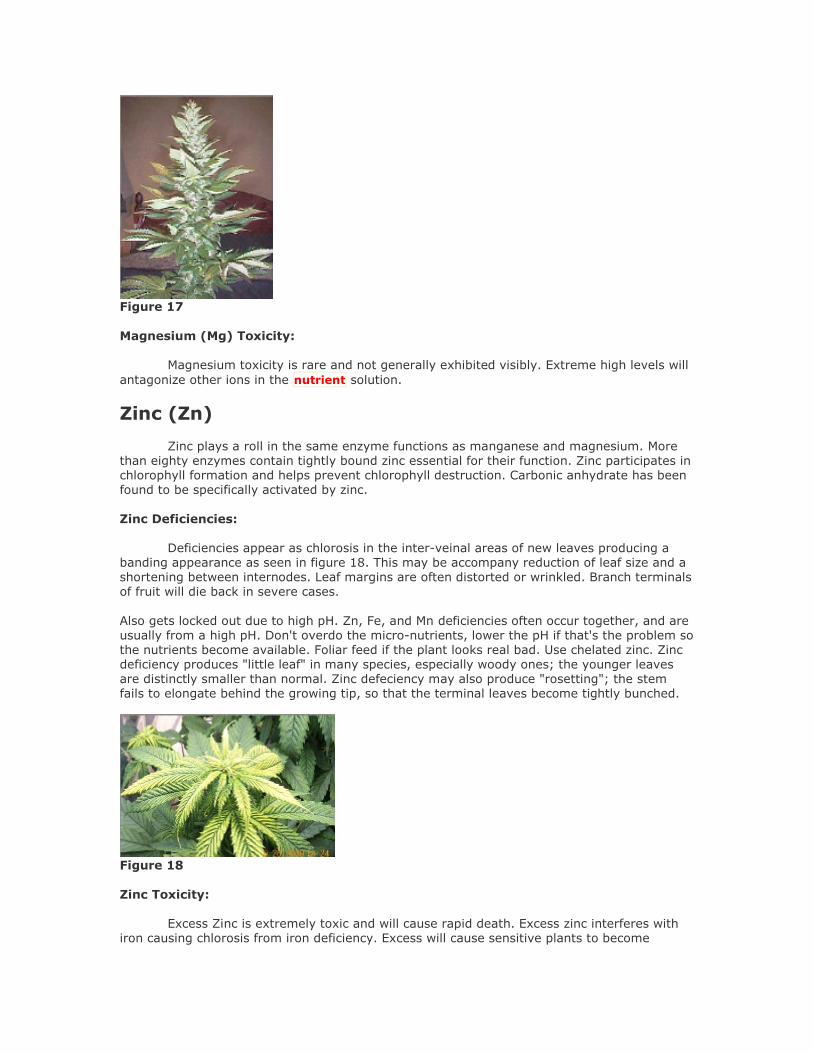
Figure 17
Magnesium (Mg) Toxicity:
Magnesium toxicity is rare and not generally exhibited visibly. Extreme high levels will
antagonize other ions in the nutrient solution.
Zinc (Zn)
Zinc plays a roll in the same enzyme functions as manganese and magnesium. More
than eighty enzymes contain tightly bound zinc essential for their function. Zinc participates in
chlorophyll formation and helps prevent chlorophyll destruction. Carbonic anhydrate has been
found to be specifically activated by zinc.
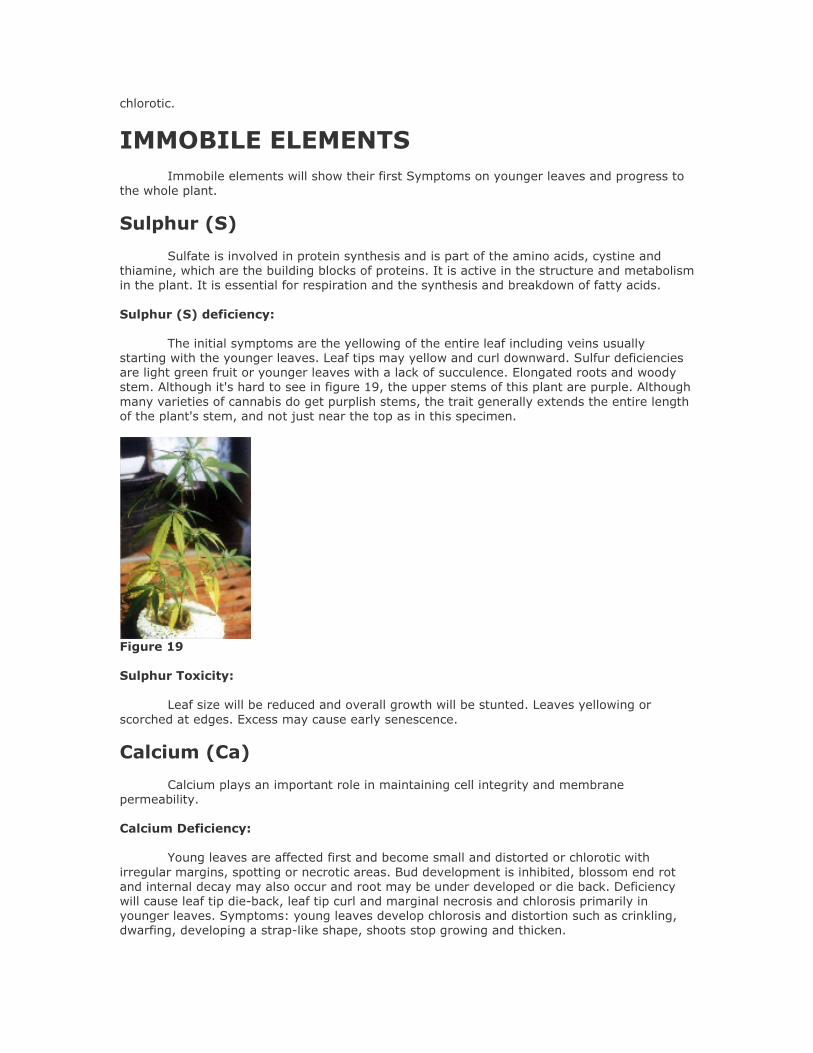
Zinc Deficiencies:
Deficiencies appear as chlorosis in the inter-veinal areas of new leaves producing a
banding appearance as seen in figure 18. This may be accompany reduction of leaf size and a
shortening between internodes. Leaf margins are often distorted or wrinkled. Branch terminals
of fruit will die back in severe cases.
Also gets locked out due to high pH. Zn, Fe, and Mn deficiencies often occur together, and are
usually from a high pH. Don't overdo the micro-nutrients, lower the pH if that's the problem so
the nutrients become available. Foliar feed if the plant looks real bad. Use chelated zinc. Zinc
deficiency produces "little leaf" in many species, especially woody ones; the younger leaves
are distinctly smaller than normal. Zinc defeciency may also produce "rosetting"; the stem
fails to elongate behind the growing tip, so that the terminal leaves become tightly bunched.
Figure 18
Zinc Toxicity:
Excess Zinc is extremely toxic and will cause rapid death. Excess zinc interferes with
iron causing chlorosis from iron deficiency. Excess will cause sensitive plants to become
chlorotic.
IMMOBILE ELEMENTS
Immobile elements will show their first Symptoms on younger leaves and progress to
the whole plant.
Sulphur (S)
Sulfate is involved in protein synthesis and is part of the amino acids, cystine and
thiamine, which are the building blocks of proteins. It is active in the structure and metabolism
in the plant. It is essential for respiration and the synthesis and breakdown of fatty acids.
Sulphur (S) deficiency:
The initial symptoms are the yellowing of the entire leaf including veins usually
starting with the younger leaves. Leaf tips may yellow and curl downward. Sulfur deficiencies
are light green fruit or younger leaves with a lack of succulence. Elongated roots and woody
stem. Although it's hard to see in figure 19, the upper stems of this plant are purple. Although
many varieties of cannabis do get purplish stems, the trait generally extends the entire length
of the plant's stem, and not just near the top as in this specimen.
Figure 19
Sulphur Toxicity:
Leaf size will be reduced and overall growth will be stunted. Leaves yellowing or
scorched at edges. Excess may cause early senescence.
Calcium (Ca)
Calcium plays an important role in maintaining cell integrity and membrane
permeability.
Calcium Deficiency:
Young leaves are affected first and become small and distorted or chlorotic with
irregular margins, spotting or necrotic areas. Bud development is inhibited, blossom end rot
and internal decay may also occur and root may be under developed or die back. Deficiency
will cause leaf tip die-back, leaf tip curl and marginal necrosis and chlorosis primarily in
younger leaves. Symptoms: young leaves develop chlorosis and distortion such as crinkling,
dwarfing, developing a strap-like shape, shoots stop growing and thicken.
Calcium Toxicity:
Difficult to distinguish visually. May precipitate with sulfur in solution and cause
clouding or residue in tank. Excess calcium may produce deficiencies in magnesium and
potassium.
Iron (Fe)
Iron is an important component of plant enzyme systems for electron transport to
carry electrons during photosynthesis and terminal respiration. It is a catalyst for chlorophyll
production and is required for nitrate and sulfate reduction and assimilation.
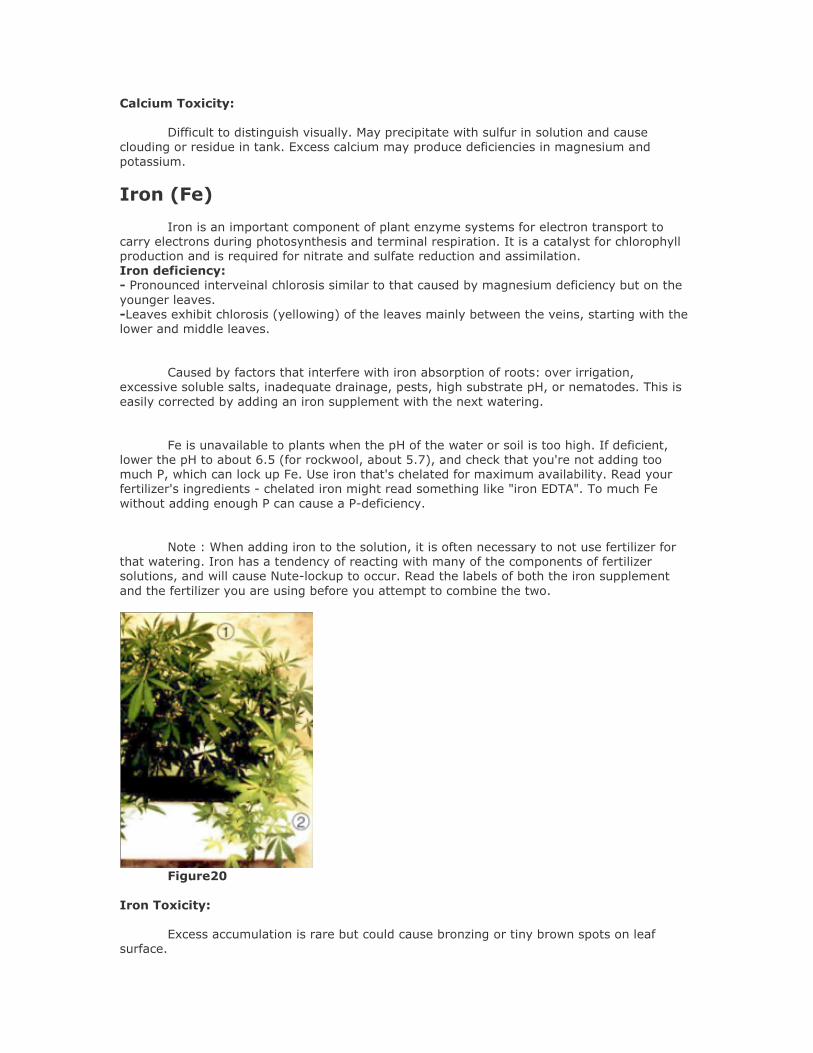
Iron deficiency:
- Pronounced interveinal chlorosis similar to that caused by magnesium deficiency but on the
younger leaves.
-Leaves exhibit chlorosis (yellowing) of the leaves mainly between the veins, starting with the
lower and middle leaves.
Caused by factors that interfere with iron absorption of roots: over irrigation,
excessive soluble salts, inadequate drainage, pests, high substrate pH, or nematodes. This is
easily corrected by adding an iron supplement with the next watering.
Fe is unavailable to plants when the pH of the water or soil is too high. If deficient,
lower the pH to about 6.5 (for rockwool, about 5.7), and check that you're not adding too
much P, which can lock up Fe. Use iron that's chelated for maximum availability. Read your
fertilizer's ingredients - chelated iron might read something like "iron EDTA". To much Fe
without adding enough P can cause a P-deficiency.
Note : When adding iron to the solution, it is often necessary to not use fertilizer for
that watering. Iron has a tendency of reacting with many of the components of fertilizer
solutions, and will cause Nute-lockup to occur. Read the labels of both the iron supplement
and the fertilizer you are using before you attempt to combine the two.
Figure20
Iron Toxicity:
Excess accumulation is rare but could cause bronzing or tiny brown spots on leaf
surface.
Manganese (Mn)
Manganese is involved in the oxidation reduction process in the photosynthetic
electron transport system. Biochemical research shows that this element plays a structural
role in the chloroplast membrane system, and also activates numerous enzymes.
Manganese Deficiency:
Interveinal chlorosis of younger leaves, necrotic lesions and leaf shredding are typical
symptom of this deficiency. High levels can cause uneven distribution of chlorophyll resulting
in blotchy appearance. Restricted growth and failure to mature normally can also result.
-Mn gets locked out when the pH is too high, and when there's too much iron. Use chelated
Mn.
Manganese Toxicity:
Toxicity:Chlorosis, or blotchy leaf tissue due to insufficient chlorophyll synthesis. Growth rate
will slow and vigor will decline.
Chlorine (Cl)
Chloride is involved in the evolution of oxygen in the photosynthesis process and is
essential for cell division in roots and leaves. Chlorine raises the cell osmotic pressure and
affects stomata regulation and increases the hydration of plant tissue. Levels less than 140
ppm are safe for most plants. Chloride sensitive plants may experience tip or marginal leaf
burn at concentrations above 20 ppm.
Chlorine Deficiency:
Wilted chlorotic leaves become bronze in color. Roots become stunted and thickened
near tips. Plants with chlorine deficiencies will be pale and suffer wilting.
Chlorine Toxicity:
Burning of leaf tip or margins. Bronzing, yellowing and leaf splitting. Reduced leaf size and
lower growth rate.
Boron (B)
Boron biochemical functions are yet uncertain, but evidence suggests it is involved in
the synthesis of one of the bases for nucleic acid (RNA uracil) formation. It may also be
involved in some cellular activities such as division, differentiation, maturation and respiration.
It is associated with pollen germination.
Boron Deficiency:
Plants deficient in boron exhibit brittle abnormal growth at shoot tips and one of the earliest
Symptoms is failure of root tips to elongate normally. Stem and root apical meristems often
die. Root tips often become swollen and discolored. Internal tissues may rot and become host
to fungal disease. Leaves show various Symptoms which include drying, thickening, distorting,
wilting, and chlorotic or necrotic spotting.
Boron Toxicity:
Yellowing of leaf tip followed by necrosis of the leaves beginning at tips or margins and
progressing inward before leaves die and prematurely fall off. Some plants are especially
sensitive to boron accumulation.
Copper (Cu)
Copper is a constituent of many enzymes and proteins. Assists in carbohydrate
metabolism, nitrogen fixation and in the process of oxygen reduction.
Copper Deficiency:
Symptoms of deficiency are a reduced or stunted growth with a distortion of the younger
leaves and growth tip die-back. Young leaves often become dark green and twisted. They may
die back or just exhibit necrotic spots. Growth and yield will be deficient as well.
Copper Toxicity:
Copper is required in very small amounts and readily becomes toxic in solution culture if not
carefully controlled. Excess values will induce iron deficiency. Root growth will be suppressed
followed by Symptoms of iron chlorosis, stunting, reduced branching, abnormal darkening and
thickening of roots.
Molybdenum (Mo)
Molybdenum is a component of two major enzyme systems involved in the nitrate
reeducates, this is the process of conversion of nitrate to ammonium.
Molybdenum Deficiencies:
Often interveinal chlorosis which occurs first on older leaves, then progressing to the entire
plant. Developing severely twisted younger leaves which eventually die. Molybdenum
deficiencies frequently resemble nitrogen, with older leaves chlorotic with rolled margins and
stunted growth.
Molybdenum Toxicity:
Excess may cause discoloration of leaves depending on plant species. This condition is rare but
could occur from accumulation by continuous application. Used by the plant in very small
quantities. Excess mostly usually does not effect the plant, however the consumption of high
levels by grazing animals can pose problems so she might not be too good to smoke.
Sodium (Na)
Sodium seems to encourage crop yields and in specific cases it acts as an antidoting
agent against various toxic salts. It may act as a partial substitute for potassium deficiencies.
Excess may cause plant toxicity or induce deficiencies of other elements. If sodium
predominates in the solution calcium and magnesium may be affected.
Silicon (Si)
Silicon usually exists in solution as silicic acid and is absorbed in this form. It
accumulates as hydrated amorphous silica most abundantly in walls of epidermal cells, but
also in primary and secondary walls of other cells. It is largely available in soils and is found in
water as well. Inadequate amounts of silicon can reduce tomato yields as much as 50%, cause
new leaves to be deformed and inhibit fruit set. At this time toxicity Symptoms are
undetermined.
Cobalt (Co)
Cobalt is essential to many beneficial bacteria that are involved in nitrogen fixation of
legumes. It is a component of vitamin B12 which is essential to most animals and possibly in
plants. Reports suggest that it may be involved with enzymes needed to form aromatic
compounds. Otherwise, it is not understood fully as to its benefit to plant growth, but it is
considered essential to some animal health issues.

Hermaphrodite
Figure 1
A hermaphrodite, or hermie, is a plant of one sex that develops the sexual organs of
the other sex. Most commonly, a flowering female plant will develop staminate flowers, though
the reverse is also true. Primarily male hermaphrodites are not as well recognized only
because few growers let their males reach a point of flowering where the pistillate would be
expressed.
Hermaphrodites are generally viewed with disfavor. First, they will release pollen and ruin a
sinsemelia crop, pollinating themselves and all of the other females in the room. Second, the
resulting seeds are worthless, because hermaphrodite parents tend to pass on the tendency to
their offspring.
Please note that occassionally specious staminate flowers will appear in the last days of
flowering of a female plant. These do not drop pollen and their appearance is not considered
evidence of deleterious hermaphroditism.
Here's an image of a hermaphrodite, specifically a female plant with staminate flowers.
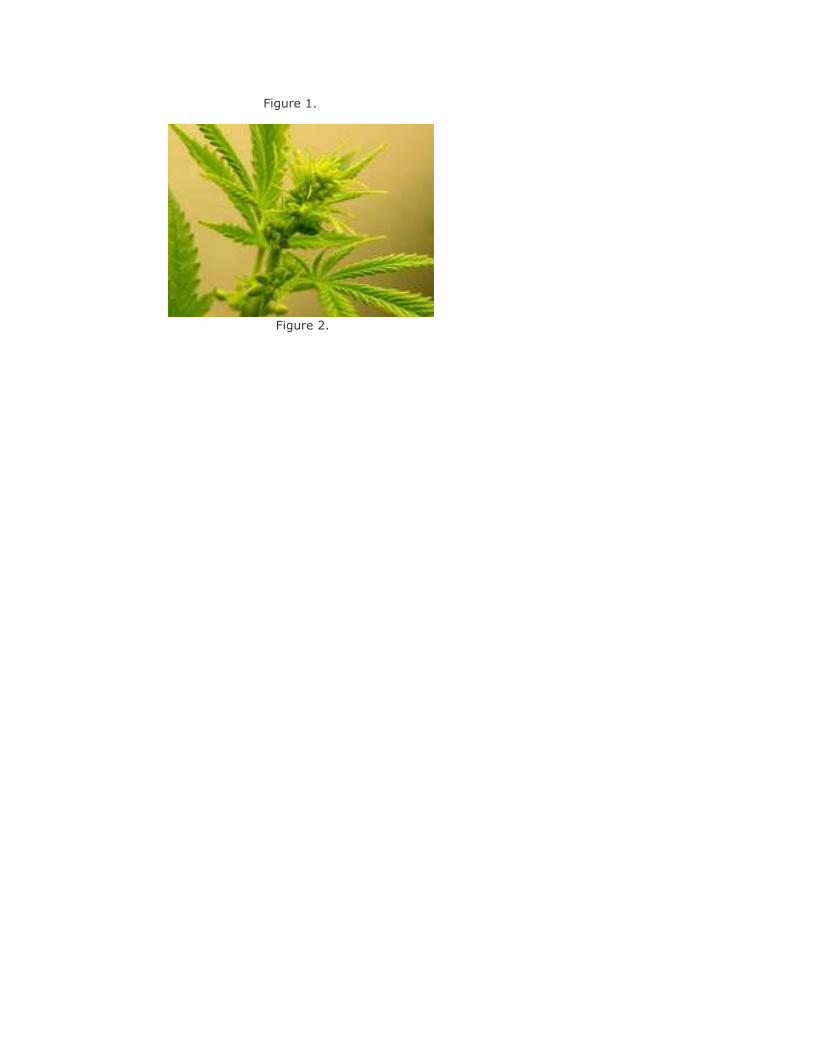
Figure 1.
Figure 2.