Embed Size (px)
Citation preview
Snort Installation Manual
for Red Hat Enterprise 4.0
Snort on BASE
Installed on Red Hat Enterprise Linux ES 4.0 Update 3
September 2006 Version 2.10
Bruce A. Westbrook
Table of Contents
Introduction:................................................................................................................................ 1 Acknowledgments: ..................................................................................................................... 2 Comments or Corrections: .......................................................................................................... 2 Revisions:.................................................................................................................................... 3 Other important reading:............................................................................................................. 5 Conceptual Topology:................................................................................................................. 6 Systems Requirements ................................................................................................................ 7 Install, Update and Secure Red Hat ............................................................................................ 8
Installing and Configuring Red Hat Enterprise ...................................................................... 8 Update the System ................................................................................................................ 10 System Tweaking and Hardening ......................................................................................... 11
Install and Configure Snort Console......................................................................................... 17 Copy Snort Installation Files ................................................................................................ 17 Install and Configure Prerequisites....................................................................................... 19 Install Snort........................................................................................................................... 21 Snort Startup Options............................................................................................................ 24 Setup MySQL Database........................................................................................................ 24 Test Snort .............................................................................................................................. 28 Install Prerequisites for BASE.............................................................................................. 30 Install BASE ......................................................................................................................... 30 Secure Apache ...................................................................................................................... 32 Install Prerequisite for Webmin ............................................................................................ 34 Install and Configure Webmin.............................................................................................. 35 Install and Automate PigSentry ............................................................................................ 36 Setup MySQL Database Dump and Backup......................................................................... 36 Update Snort Rules Automagically Using Oinkmaster ........................................................ 37 Watching the Watcher........................................................................................................... 39 Final Check ........................................................................................................................... 40
Adding Sensors ......................................................................................................................... 41 Install, Secure and Update Red Hat ...................................................................................... 41 Copy Snort Installation Files ................................................................................................ 42 Install Snort........................................................................................................................... 42 Snort Startup Options............................................................................................................ 45 MySQL User for Sensor ....................................................................................................... 46 IPTables Rule on Sensor....................................................................................................... 47 Test Snort .............................................................................................................................. 47 Install Prerequisite for Webmin ............................................................................................ 48 Install and Configure Webmin.............................................................................................. 49 Install and Automate PigSentry ............................................................................................ 50 Update Snort Rules Automagically Using Oinkmaster ........................................................ 50 Watching the Watcher........................................................................................................... 52
Final Sensor Tuning.................................................................................................................. 53 Filtering Rules:...................................................................................................................... 54

BPF Filters: ........................................................................................................................... 55
Snort Installation Manual
Page 1
Snort Installation Manual v2.10
Snort on BASE
Installed on Red Hat Linux Enterprise ES v4.0 Update 3
v1.0 - Created by Patrick S. Harper, CISSP MCSE
v2.10 - Updated by Bruce A. Westbrook, CISSP MCSE CCNA
Introduction: This document originated from Patrick S. Harper (http://www.InternetSecurityGuru.com), when a friend of his asked him to put together this procedure so that he could install Snort and Acid. It is pretty straightforward and can be used by both the Linux/Snort newbie, as well as the advanced guru who just needs to get this deployed. This is a “How in the hell do I get this installed and working” guide, including a security lockdown of your snort box(es). The purpose of this guide is to document the installation and configuration of a complete Snort implementation, based originally on Patrick’s document for Snort 2.0.4 and Red Hat 9.0. This guide contains all the necessary information for installing and securing your Snort IDS infrastructure, as well as add-ons for managing and keeping tabs on your Snort installation. This document will walk through how to install a stand alone Snort server (good for consultant laptop sensors or SOHO sensors). Following that there will be a section for adding additional sensors that log back to your first Snort server (known as the Snort Console). The information in this guide was written for implementing Snort 2.6.0 using Red Hat Enterprise Linux. You may find some discrepancies if you are installing different versions of Snort or using different versions of Linux. While this guide can be used by the Linux/Snort newbie, it was written with the assumption that you understand what Snort is and have a basic understanding of Linux. This includes editing files, making directories, and understanding general *nix commands. This guide also explains some details on using and configuring Snort, although not in great detail. Links on where to obtain additional information can be found in the “Other Important Reading.”
Snort Installation Manual
Page 2
Acknowledgments: My thanks first goes to Patrick S. Harper for the original document from which I forked this document. Thanks to Steven J. Scott and his documents “Snort Installation Manual – Snort, MySQL and ACID on Redhat 7.3” and “Snort Enterprise Implementation – Snort, MySQL, SnortCenter and ACID on Redhat 9.0” where I was able to understand and create the sections pertinent to making Webmin work with the Snort plugin. Thanks to SANS for their excellent guide, “Securing Linux – A Survival Guide for Linux Security”, Center for Internet Security for their “Linux Benchmark” guide, and to MicroSolved Inc. (www.microsolved.com) for their review of this document from a security perspective. Thanks to Terry Crow for his review and expert editing of the original final draft. Thanks to the entire Information Technology group at Corporate One FCU for their feedback, much of which was included into the final original document. Comments or Corrections: Corrections should be submitted to Bruce Westbrook, [email protected]. Flames go to /dev/null The latest version of this document and the files mentioned herein can be found at:
http://www.thewestbrooks.com/downloads
Snort Installation Manual
Page 3
Revisions: v2.10 – Revised Release – Bruce A. Westbrook
• Updated to Red Hat Enterprise Linux ES v4.0 Update 3 • Updated from Snort v2.4.3 to Snort v2.6.0 • Minor corrections throughout document
v2.00 – Revised Release – Bruce A. Westbrook
• Updated from Snort v2.3.3 to Snort v2.4.3 • Updated from ACID to BASE (a fork of ACID) • Revised as a more “down and dirty” quick install of snort to get you up and
running • Removed tons of extraneous information that was unnecessary for a quick
install guide • Reformatted to include the use of my familiar procedures template • Revised to use rpm based install instead of compiling everything from source
in order to speed up deployment • Removed Aanval
v1.60 – Revised Release – July 2004 – Bruce A. Westbrook
• Revised to be used with Red Hat Enterprise Linux 3.0 – Update 2 • Added Aanval, a new reporting tool
v1.52 – Revised Release – December 2003 – Bruce A. Westbrook
• Added script (test.sh) to check that snort is running, and alerts if it is not • Added content and script (gooink) on obtaining, testing and updating Snort
rules v1.51 – Revised Release – December 2003 – Bruce A. Westbrook:
• Added the BPF filter section to the configuration file • Added the BPF filter tweaking section • Updated version for Snort from 2.0.2 to 2.1.0 • Updated version for Apache from 2.0.47 to 2.0.48 • Updated version for MySQL from 4.015 to 4.017 • Revised various instructions for clarification
v1.5 – Revised Release – September 2003 – Bruce A. Westbrook:
• Fixed the MySQL user rights • Revised various instructions for clarification • Revised various syntax strings for better use • Updated versions of Snort, Apache, MySQL, and PHP • Updated snort rules installation • Addition of OpenSSL instructions to fix vulnerabilities • Addition of the Webmin instructions (from Steven J. Scott)
Snort Installation Manual
Page 4
• Addition of installation instructions of separate snort-console and snort-sensors (original document provided only single box)
• Addition of the .htaccess instructions to secure Apache • Addition of MySQL database backup instructions • Addition of promiscuous mode instructions on secondary NIC for the snort-
sensors • Addition of script troubleshooting instructions • Addition of Pigsentry instructions for real-time alerting • Addition of NTP setup for clock synching • Addition of system tweaking and system hardening procedures (thanks to
SANS and CIS for much of this information (80%), and thanks to too many misc. sources, myself included, for the other 20%)
• Split the installation instructions to encompass separate Snort Console and Snort Sensors
v1.0 – Initial Release - by Patrick S. Harper – reflects recommendations to draft versions and
input from Nick Oliver.
Snort Installation Manual
Page 5
Other important reading: Snort Home Page http://www.snort.org/ Snort FAQ http://www.snort.org/docs/faq.html Snort Users Manual http://www.snort.org/docs/writing_rules/ Snort-Setup for Statistics http://www.linuxdoc.org/HOWTO/Snort-Statistics-HOWTO/ Snort CVS tree http://cvs.sourceforge.net/cgi-bin/viewcvs.cgi/snort/snort/ Usenet Groups
Snort-announce http://lists.sourceforge.net/mailman/listinfo/snort-announce Snort-users http://lists.sourceforge.net/mailman/listinfo/snort-users Snort-sigs http://lists.sourceforge.net/mailman/listinfo/snort-sigs Snort-devel http://lists.sourceforge.net/mailman/listinfo/snort-devel Snort-cvsinfo http://lists.sourceforge.net/mailman/listinfo/snort-cvsinfo
BASE Home Page http://secureideas.sourceforge.net/index.php PHP Home Page http://www.php.net MySQL Home Page http://www.mysql.com/ Fedora Linux Home Page http://fedora.redhat.com/ Nessus Vulnerability Scanner http://www.nessus.org/ NMAP http://www.nmap.org/ Linux, Clocks, and Time http://www.linuxsa.org.au/tips/time.html Incidents.org http://www.incidents.org/ Putty http://www.chiark.greenend.org.uk/~sgtatham/putty Patrick S. Harper’s website http://www.internetsecurityguru.com The Snort Drinking Game http://www.theadamsfamily.net/~erek/snort/drinking_game.txt

Snort Installation Manual
Page 6
Conceptual Topology: There are six primary software packages that produce this topology. The Apache web server, MySQL database server, Webmin, BASE, Pigsentry, and of course Snort. This topology assumes you will be running a combined sensor, database and BASE console. To use multiple sensors or separate your sensor from your database and BASE console, you will still install the first combined Snort box, and then follow the instructions for installing additional sensors that log back to your first box. MySQL Server MySQL is a SQL based database server for a variety of platforms and is the most supported platform for storing Snort alerts. All of the IDS alerts that are triggered from our sensor will be stored in a MySQL database. Snort Snort is a lightweight network intrusion detection system, capable of performing real-time traffic analysis and packet logging on IP networks. This is the software package that is used to gather information from the network. Apache Web Server This is the web server of choice for the majority of websites that are accessed on the Internet. The sole purpose of Apache is for hosting BASE. Basic Analysis and Security Engine (BASE) BASE provides a web front-end to query and analyze the alerts coming from our Snort IDS system. This is where all the sensor information is consolidated for viewing. Webmin Webmin is a package for managing your signatures and snort configuration files via a web-based GUI. While SnortCenter used to be the preferred method for managing multiple sensors, it currently has bugs that is preventing it from working properly with new Snort 2.0 rules. SnortCenter is a console that is web-based with agents installed on each sensors communicating via SSL. This eliminates the need to update each sensor directly and track signature changes. In its’ place I’ve developed scripts for updates as well as utilizing Webmin. Pigsentry Pig Sentry is a lightweight script which is run against a Snort alert log. BASE is very nice for after the fact perusal and historical reporting, but not for up-to-the minute information. Pig Sentry is for real-time alerts, without getting spammed. It is intended for a high volume of alerts (the site it was implemented for sees 200,000 to 300,000 alerts a day). The way Pig Sentry works is it maintains a state table of recent alerts. It will send a notice if there is a new alert, or if there is an increase in the general trend or pattern of existing alerts. The trend notification is fairly configurable. It also expires alerts after there has been no activity with them for a while.
Snort Installation Manual
Page 7
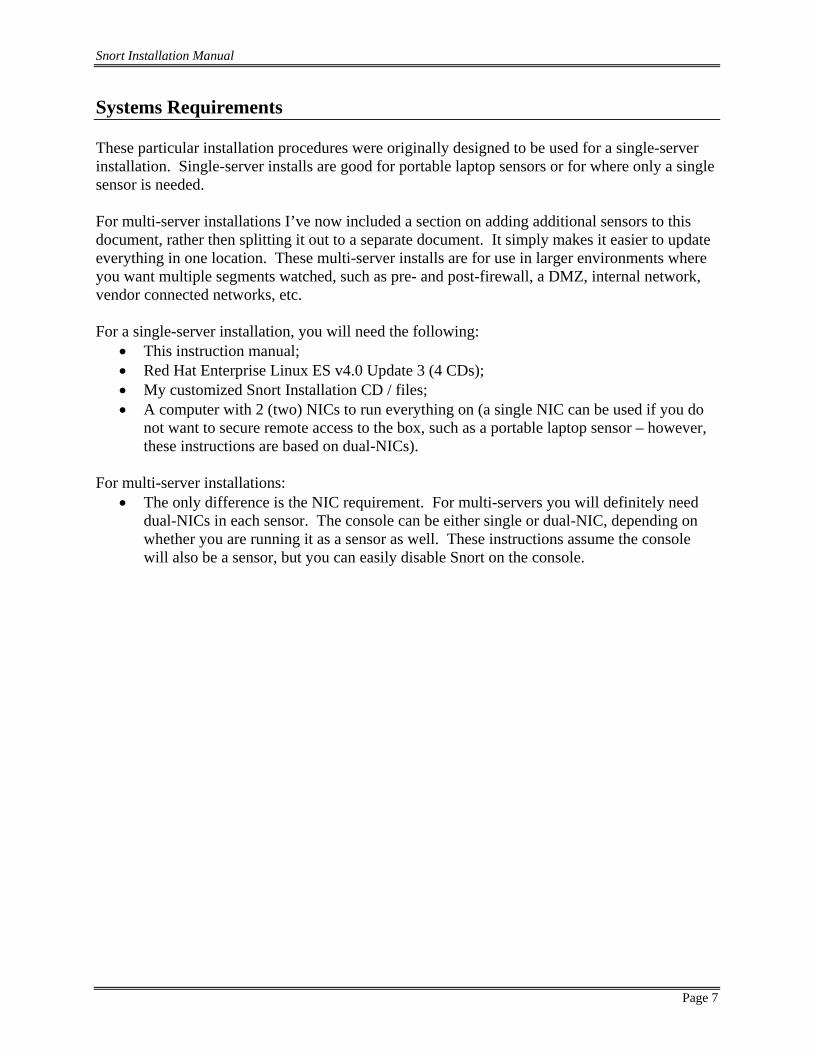
Systems Requirements These particular installation procedures were originally designed to be used for a single-server installation. Single-server installs are good for portable laptop sensors or for where only a single sensor is needed. For multi-server installations I’ve now included a section on adding additional sensors to this document, rather then splitting it out to a separate document. It simply makes it easier to update everything in one location. These multi-server installs are for use in larger environments where you want multiple segments watched, such as pre- and post-firewall, a DMZ, internal network, vendor connected networks, etc. For a single-server installation, you will need the following:
• This instruction manual; • Red Hat Enterprise Linux ES v4.0 Update 3 (4 CDs); • My customized Snort Installation CD / files; • A computer with 2 (two) NICs to run everything on (a single NIC can be used if you do
not want to secure remote access to the box, such as a portable laptop sensor – however, these instructions are based on dual-NICs).
For multi-server installations:
• The only difference is the NIC requirement. For multi-servers you will definitely need dual-NICs in each sensor. The console can be either single or dual-NIC, depending on whether you are running it as a sensor as well. These instructions assume the console will also be a sensor, but you can easily disable Snort on the console.
Snort Installation Manual
Page 8
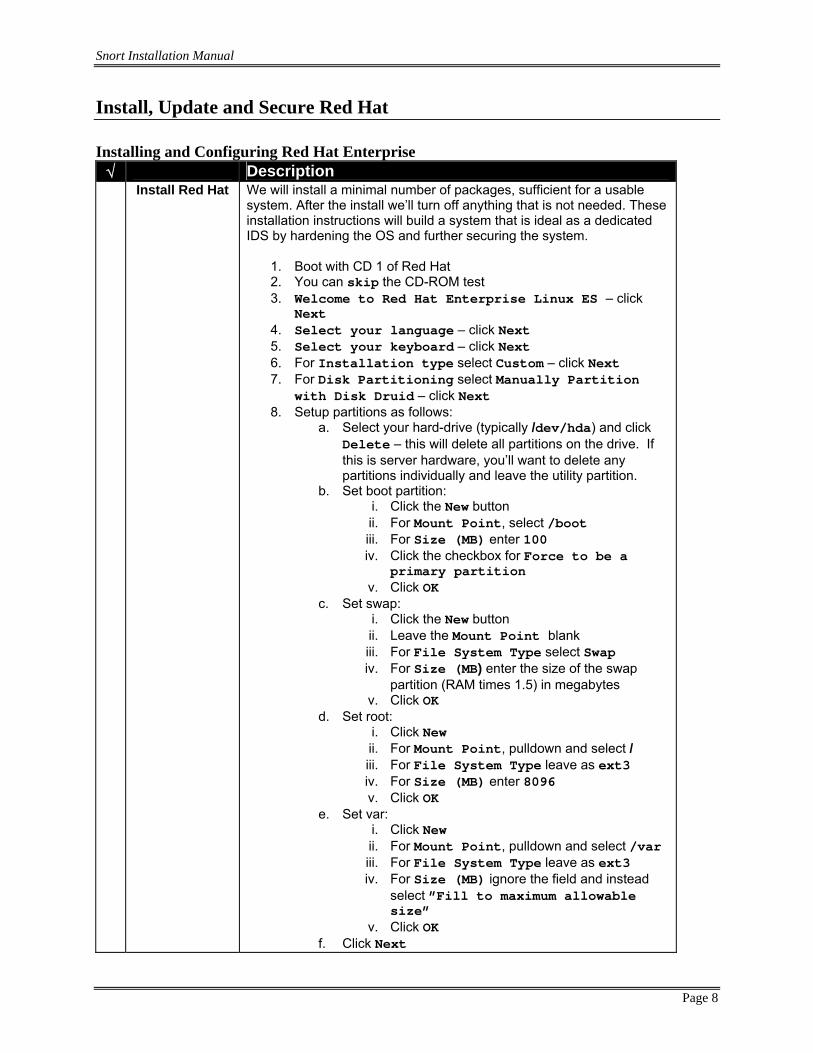
Install, Update and Secure Red Hat Installing and Configuring Red Hat Enterprise
√ Description Install Red Hat We will install a minimal number of packages, sufficient for a usable
system. After the install we’ll turn off anything that is not needed. These installation instructions will build a system that is ideal as a dedicated IDS by hardening the OS and further securing the system.
1. Boot with CD 1 of Red Hat 2. You can skip the CD-ROM test 3. Welcome to Red Hat Enterprise Linux ES – click
Next 4. Select your language – click Next 5. Select your keyboard – click Next 6. For Installation type select Custom – click Next 7. For Disk Partitioning select Manually Partition
with Disk Druid – click Next 8. Setup partitions as follows:
a. Select your hard-drive (typically /dev/hda) and click Delete – this will delete all partitions on the drive. If this is server hardware, you’ll want to delete any partitions individually and leave the utility partition.
b. Set boot partition: i. Click the New button ii. For Mount Point, select /boot iii. For Size (MB) enter 100 iv. Click the checkbox for Force to be a
primary partition v. Click OK
c. Set swap: i. Click the New button ii. Leave the Mount Point blank iii. For File System Type select Swap iv. For Size (MB) enter the size of the swap
partition (RAM times 1.5) in megabytes v. Click OK
d. Set root: i. Click New ii. For Mount Point, pulldown and select / iii. For File System Type leave as ext3 iv. For Size (MB) enter 8096 v. Click OK
e. Set var: i. Click New ii. For Mount Point, pulldown and select /var iii. For File System Type leave as ext3 iv. For Size (MB) ignore the field and instead
select ”Fill to maximum allowable size”
v. Click OK f. Click Next
Snort Installation Manual
Page 9
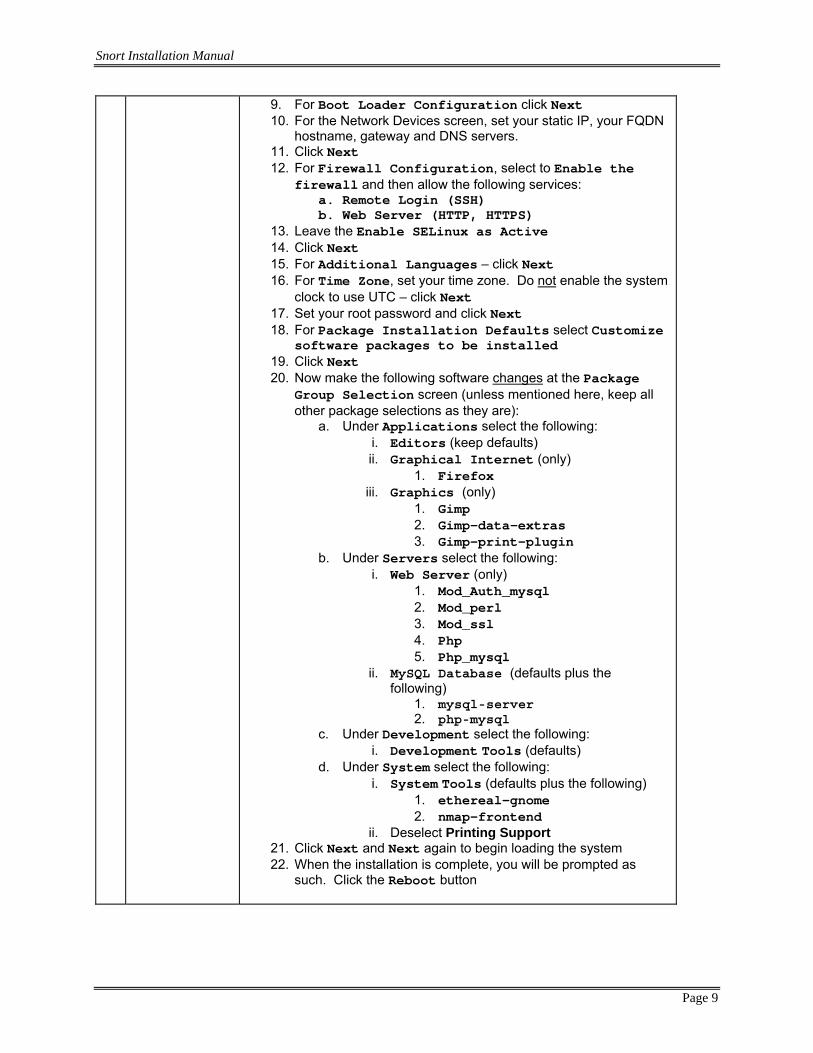
9. For Boot Loader Configuration click Next 10. For the Network Devices screen, set your static IP, your FQDN
hostname, gateway and DNS servers. 11. Click Next 12. For Firewall Configuration, select to Enable the
firewall and then allow the following services: a. Remote Login (SSH) b. Web Server (HTTP, HTTPS)
13. Leave the Enable SELinux as Active 14. Click Next 15. For Additional Languages – click Next 16. For Time Zone, set your time zone. Do not enable the system
clock to use UTC – click Next 17. Set your root password and click Next 18. For Package Installation Defaults select Customize
software packages to be installed 19. Click Next 20. Now make the following software changes at the Package
Group Selection screen (unless mentioned here, keep all other package selections as they are):
a. Under Applications select the following: i. Editors (keep defaults) ii. Graphical Internet (only)
1. Firefox iii. Graphics (only)
1. Gimp 2. Gimp-data-extras 3. Gimp-print-plugin
b. Under Servers select the following: i. Web Server (only)
1. Mod_Auth_mysql 2. Mod_perl 3. Mod_ssl 4. Php 5. Php_mysql
ii. MySQL Database (defaults plus the following)
1. mysql-server 2. php-mysql
c. Under Development select the following: i. Development Tools (defaults)
d. Under System select the following: i. System Tools (defaults plus the following)
1. ethereal-gnome 2. nmap-frontend
ii. Deselect Printing Support 21. Click Next and Next again to begin loading the system 22. When the installation is complete, you will be prompted as
such. Click the Reboot button
Snort Installation Manual
Page 10
Post-
installation Wizard
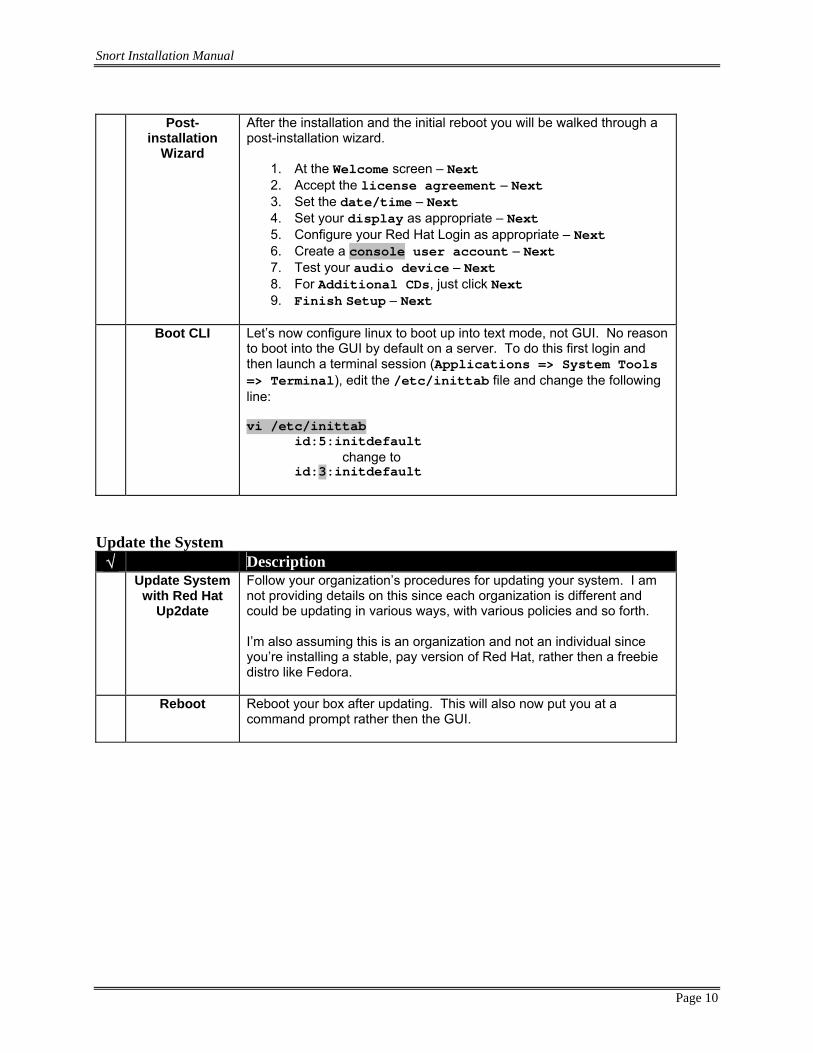
After the installation and the initial reboot you will be walked through a post-installation wizard.
1. At the Welcome screen – Next 2. Accept the license agreement – Next 3. Set the date/time – Next 4. Set your display as appropriate – Next 5. Configure your Red Hat Login as appropriate – Next 6. Create a console user account – Next 7. Test your audio device – Next 8. For Additional CDs, just click Next 9. Finish Setup – Next
Boot CLI Let’s now configure linux to boot up into text mode, not GUI. No reason
to boot into the GUI by default on a server. To do this first login and then launch a terminal session (Applications => System Tools => Terminal), edit the /etc/inittab file and change the following line: vi /etc/inittab
id:5:initdefault change to id:3:initdefault
Update the System
√ Description Update System
with Red Hat Up2date
Follow your organization’s procedures for updating your system. I am not providing details on this since each organization is different and could be updating in various ways, with various policies and so forth. I’m also assuming this is an organization and not an individual since you’re installing a stable, pay version of Red Hat, rather then a freebie distro like Fedora.
Reboot Reboot your box after updating. This will also now put you at a command prompt rather then the GUI.
Snort Installation Manual
Page 11
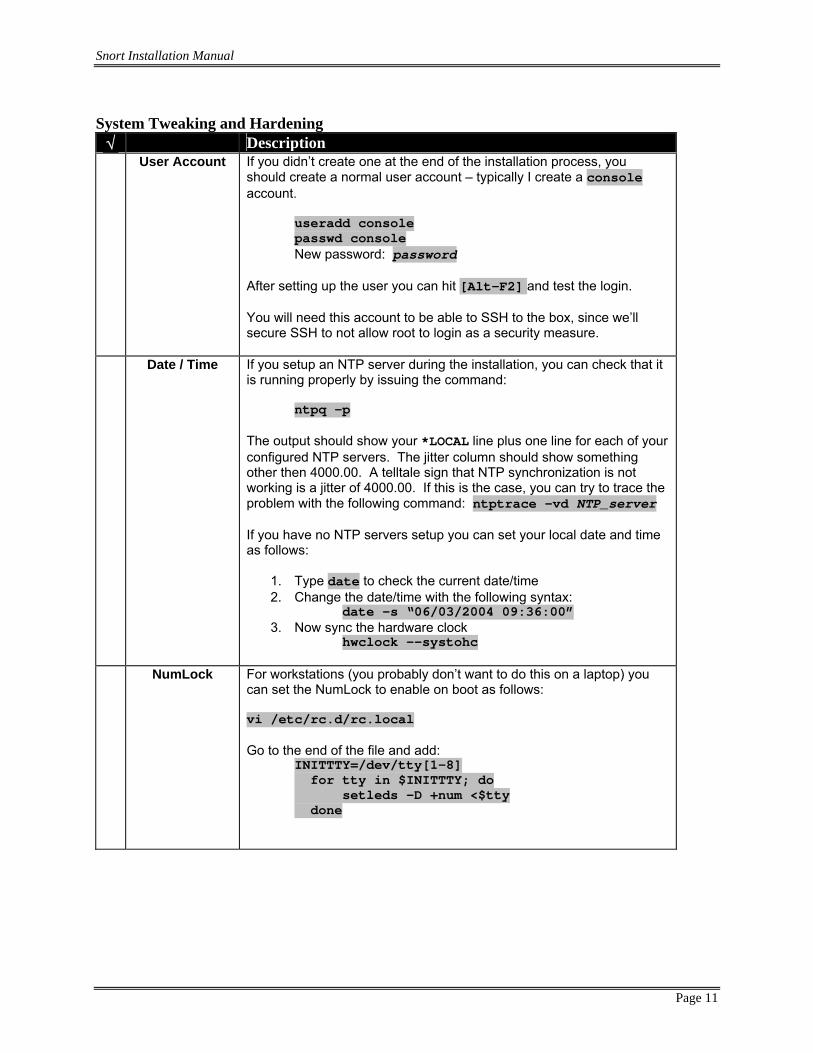
System Tweaking and Hardening
√ Description User Account If you didn’t create one at the end of the installation process, you
should create a normal user account – typically I create a console account.
useradd console passwd console New password: password
After setting up the user you can hit [Alt-F2] and test the login. You will need this account to be able to SSH to the box, since we’ll secure SSH to not allow root to login as a security measure.
Date / Time If you setup an NTP server during the installation, you can check that it is running properly by issuing the command:
ntpq –p The output should show your *LOCAL line plus one line for each of your configured NTP servers. The jitter column should show something other then 4000.00. A telltale sign that NTP synchronization is not working is a jitter of 4000.00. If this is the case, you can try to trace the problem with the following command: ntptrace –vd NTP_server If you have no NTP servers setup you can set your local date and time as follows:
1. Type date to check the current date/time 2. Change the date/time with the following syntax:
date –s “06/03/2004 09:36:00” 3. Now sync the hardware clock
hwclock --systohc
NumLock For workstations (you probably don’t want to do this on a laptop) you can set the NumLock to enable on boot as follows: vi /etc/rc.d/rc.local
Go to the end of the file and add:
INITTTY=/dev/tty[1-8] for tty in $INITTTY; do setleds –D +num <$tty done
Snort Installation Manual
Page 12
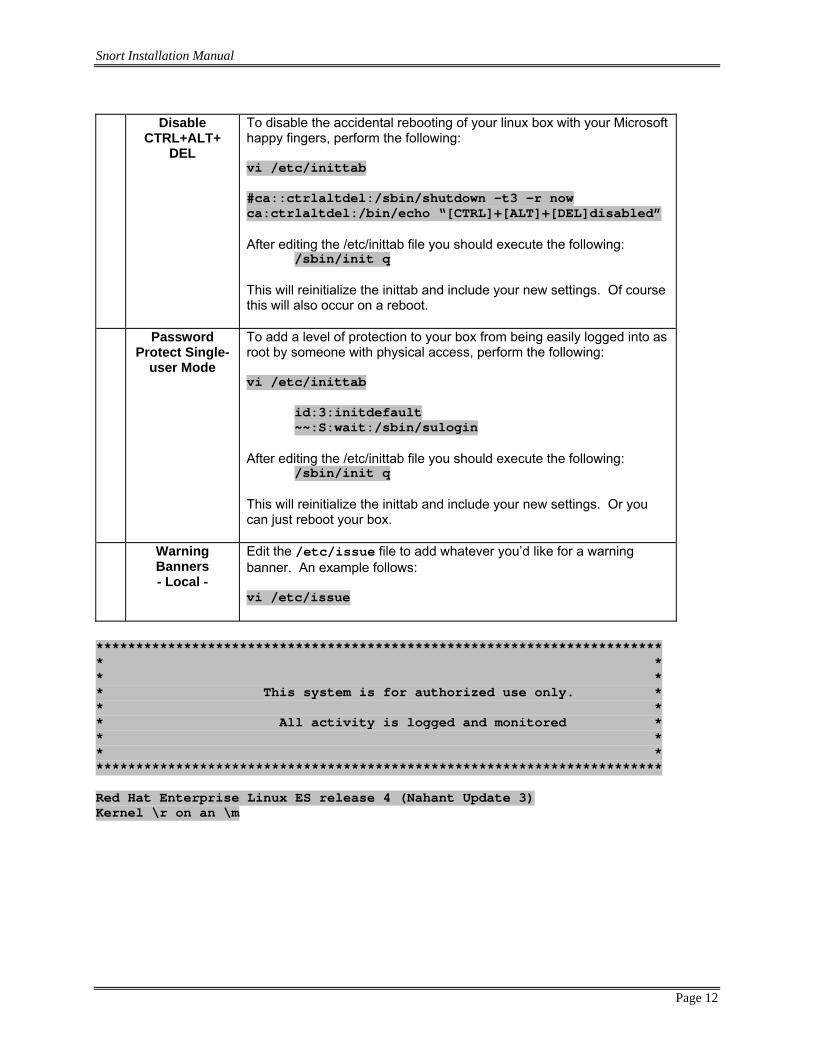
Disable
CTRL+ALT+ DEL
To disable the accidental rebooting of your linux box with your Microsoft happy fingers, perform the following: vi /etc/inittab
#ca::ctrlaltdel:/sbin/shutdown –t3 –r now ca:ctrlaltdel:/bin/echo “[CTRL]+[ALT]+[DEL]disabled” After editing the /etc/inittab file you should execute the following:
/sbin/init q This will reinitialize the inittab and include your new settings. Of course this will also occur on a reboot.
Password Protect Single-
user Mode
To add a level of protection to your box from being easily logged into as root by someone with physical access, perform the following: vi /etc/inittab
id:3:initdefault ~~:S:wait:/sbin/sulogin
After editing the /etc/inittab file you should execute the following:
/sbin/init q This will reinitialize the inittab and include your new settings. Or you can just reboot your box.
Warning Banners - Local -
Edit the /etc/issue file to add whatever you’d like for a warning banner. An example follows: vi /etc/issue
*********************************************************************** * * * * * This system is for authorized use only. * * * * All activity is logged and monitored * * * * * *********************************************************************** Red Hat Enterprise Linux ES release 4 (Nahant Update 3) Kernel \r on an \m
Snort Installation Manual
Page 13
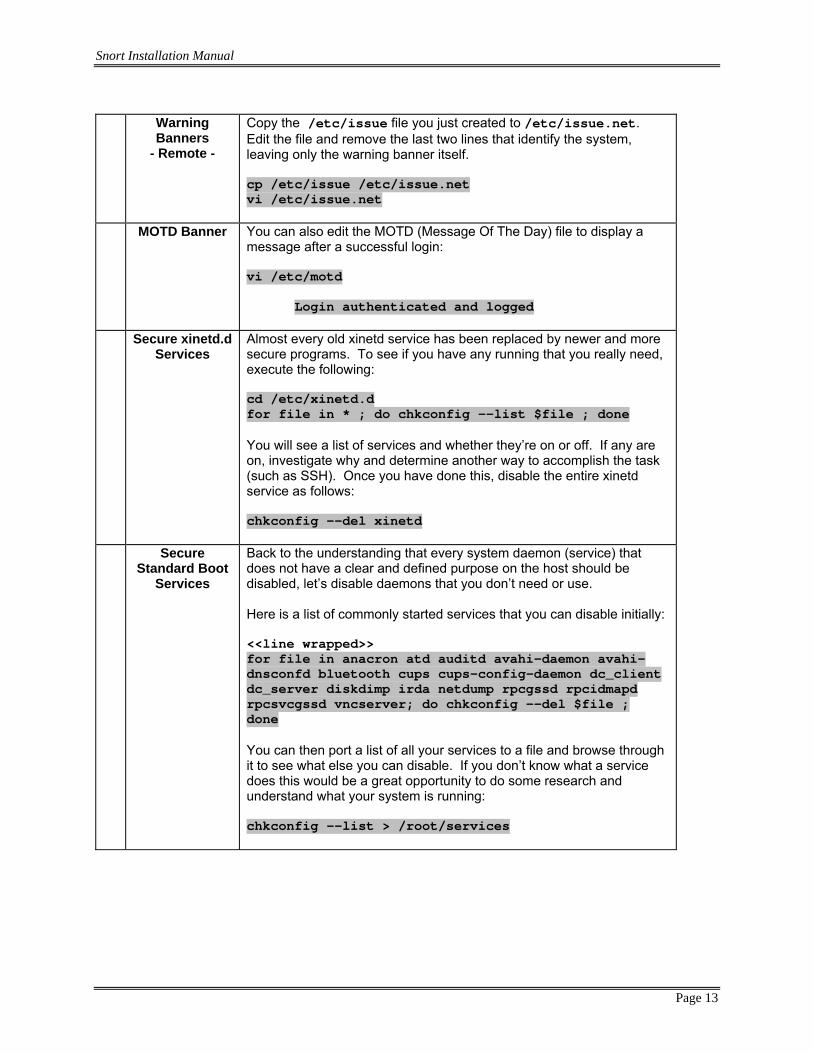
Warning
Banners - Remote -
Copy the /etc/issue file you just created to /etc/issue.net. Edit the file and remove the last two lines that identify the system, leaving only the warning banner itself. cp /etc/issue /etc/issue.net vi /etc/issue.net
MOTD Banner You can also edit the MOTD (Message Of The Day) file to display a message after a successful login: vi /etc/motd
Login authenticated and logged
Secure xinetd.d Services
Almost every old xinetd service has been replaced by newer and more secure programs. To see if you have any running that you really need, execute the following: cd /etc/xinetd.d for file in * ; do chkconfig --list $file ; done You will see a list of services and whether they’re on or off. If any are on, investigate why and determine another way to accomplish the task (such as SSH). Once you have done this, disable the entire xinetd service as follows: chkconfig --del xinetd
Secure Standard Boot
Services
Back to the understanding that every system daemon (service) that does not have a clear and defined purpose on the host should be disabled, let’s disable daemons that you don’t need or use. Here is a list of commonly started services that you can disable initially: <<line wrapped>> for file in anacron atd auditd avahi-daemon avahi-dnsconfd bluetooth cups cups-config-daemon dc_client dc_server diskdimp irda netdump rpcgssd rpcidmapd rpcsvcgssd vncserver; do chkconfig --del $file ; done You can then port a list of all your services to a file and browse through it to see what else you can disable. If you don’t know what a service does this would be a great opportunity to do some research and understand what your system is running: chkconfig --list > /root/services
Snort Installation Manual
Page 14
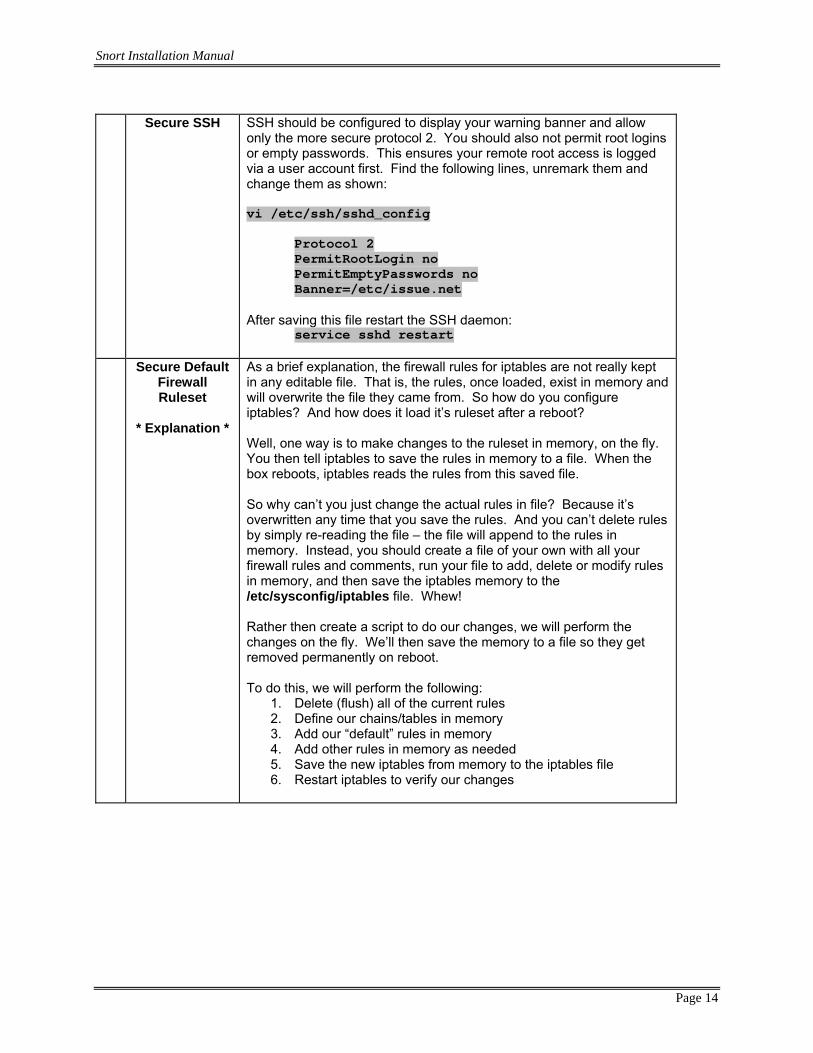
Secure SSH SSH should be configured to display your warning banner and allow
only the more secure protocol 2. You should also not permit root logins or empty passwords. This ensures your remote root access is logged via a user account first. Find the following lines, unremark them and change them as shown: vi /etc/ssh/sshd_config
Protocol 2 PermitRootLogin no PermitEmptyPasswords no Banner=/etc/issue.net
After saving this file restart the SSH daemon:
service sshd restart
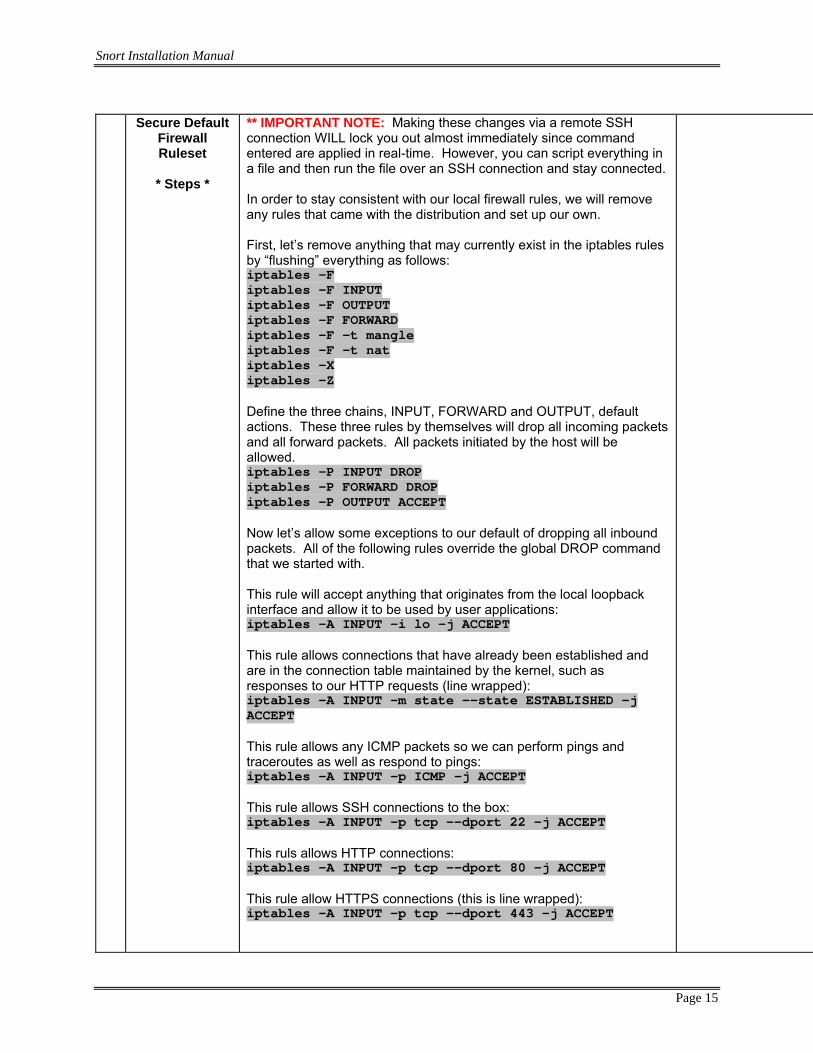
Secure Default Firewall Ruleset
* Explanation *
As a brief explanation, the firewall rules for iptables are not really kept in any editable file. That is, the rules, once loaded, exist in memory and will overwrite the file they came from. So how do you configure iptables? And how does it load it’s ruleset after a reboot? Well, one way is to make changes to the ruleset in memory, on the fly. You then tell iptables to save the rules in memory to a file. When the box reboots, iptables reads the rules from this saved file. So why can’t you just change the actual rules in file? Because it’s overwritten any time that you save the rules. And you can’t delete rules by simply re-reading the file – the file will append to the rules in memory. Instead, you should create a file of your own with all your firewall rules and comments, run your file to add, delete or modify rules in memory, and then save the iptables memory to the /etc/sysconfig/iptables file. Whew! Rather then create a script to do our changes, we will perform the changes on the fly. We’ll then save the memory to a file so they get removed permanently on reboot. To do this, we will perform the following:
1. Delete (flush) all of the current rules 2. Define our chains/tables in memory 3. Add our “default” rules in memory 4. Add other rules in memory as needed 5. Save the new iptables from memory to the iptables file 6. Restart iptables to verify our changes
Snort Installation Manual
Page 15
Secure Default
Firewall Ruleset
* Steps *
** IMPORTANT NOTE: Making these changes via a remote SSH connection WILL lock you out almost immediately since command entered are applied in real-time. However, you can script everything in a file and then run the file over an SSH connection and stay connected. In order to stay consistent with our local firewall rules, we will remove any rules that came with the distribution and set up our own. First, let’s remove anything that may currently exist in the iptables rules by “flushing” everything as follows: iptables -F iptables –F INPUT iptables –F OUTPUT iptables –F FORWARD iptables –F –t mangle iptables –F –t nat iptables –X iptables –Z Define the three chains, INPUT, FORWARD and OUTPUT, default actions. These three rules by themselves will drop all incoming packets and all forward packets. All packets initiated by the host will be allowed. iptables –P INPUT DROP iptables –P FORWARD DROP iptables –P OUTPUT ACCEPT Now let’s allow some exceptions to our default of dropping all inbound packets. All of the following rules override the global DROP command that we started with. This rule will accept anything that originates from the local loopback interface and allow it to be used by user applications: iptables -A INPUT -i lo -j ACCEPT This rule allows connections that have already been established and are in the connection table maintained by the kernel, such as responses to our HTTP requests (line wrapped): iptables -A INPUT -m state --state ESTABLISHED -j ACCEPT This rule allows any ICMP packets so we can perform pings and traceroutes as well as respond to pings: iptables -A INPUT –p ICMP –j ACCEPT This rule allows SSH connections to the box: iptables -A INPUT -p tcp --dport 22 –j ACCEPT
This ruls allows HTTP connections: iptables -A INPUT -p tcp --dport 80 –j ACCEPT This rule allow HTTPS connections (this is line wrapped): iptables -A INPUT -p tcp --dport 443 –j ACCEPT
Snort Installation Manual
Page 16
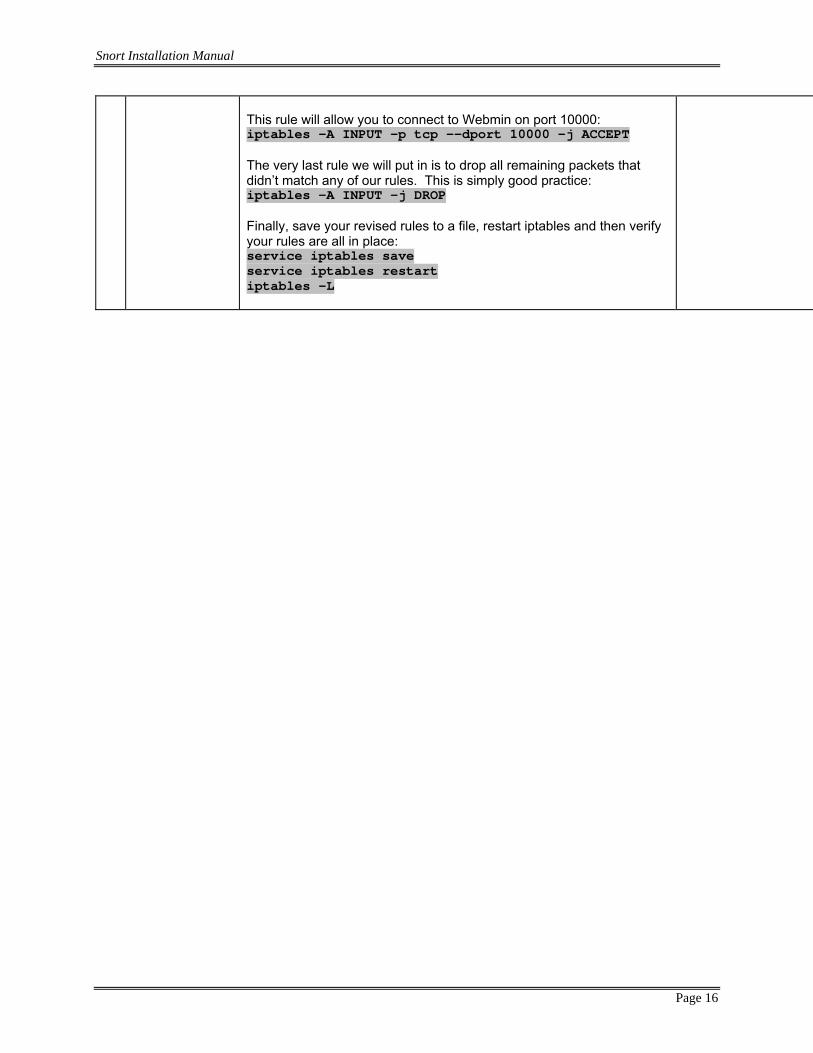
This rule will allow you to connect to Webmin on port 10000: iptables –A INPUT –p tcp --dport 10000 –j ACCEPT The very last rule we will put in is to drop all remaining packets that didn’t match any of our rules. This is simply good practice: iptables –A INPUT –j DROP Finally, save your revised rules to a file, restart iptables and then verify your rules are all in place: service iptables save service iptables restart iptables -L
Snort Installation Manual
Page 17
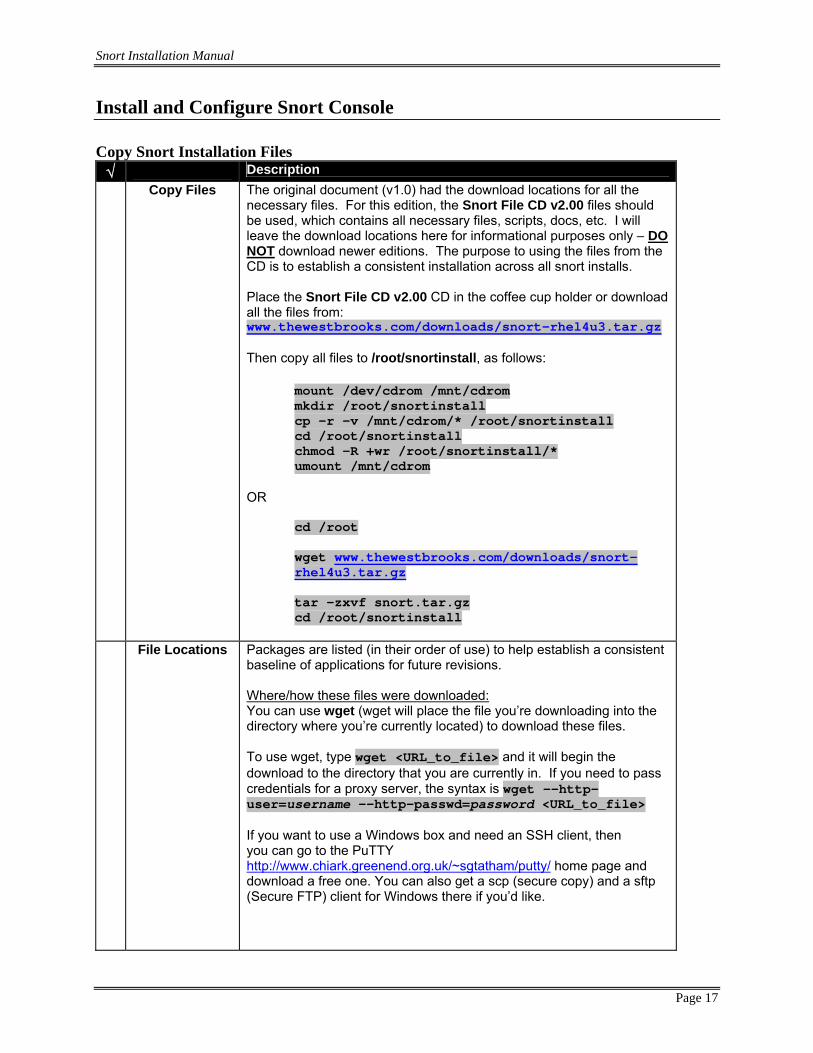
Install and Configure Snort Console Copy Snort Installation Files
√ Description Copy Files The original document (v1.0) had the download locations for all the
necessary files. For this edition, the Snort File CD v2.00 files should be used, which contains all necessary files, scripts, docs, etc. I will leave the download locations here for informational purposes only – DO NOT download newer editions. The purpose to using the files from the CD is to establish a consistent installation across all snort installs. Place the Snort File CD v2.00 CD in the coffee cup holder or download all the files from: www.thewestbrooks.com/downloads/snort-rhel4u3.tar.gz Then copy all files to /root/snortinstall, as follows:
mount /dev/cdrom /mnt/cdrom mkdir /root/snortinstall cp –r -v /mnt/cdrom/* /root/snortinstall cd /root/snortinstall chmod –R +wr /root/snortinstall/* umount /mnt/cdrom
OR
cd /root wget www.thewestbrooks.com/downloads/snort-rhel4u3.tar.gz tar –zxvf snort.tar.gz cd /root/snortinstall
File Locations Packages are listed (in their order of use) to help establish a consistent
baseline of applications for future revisions. Where/how these files were downloaded: You can use wget (wget will place the file you’re downloading into the directory where you’re currently located) to download these files. To use wget, type wget <URL_to_file> and it will begin the download to the directory that you are currently in. If you need to pass credentials for a proxy server, the syntax is wget --http-user=username --http-passwd=password <URL_to_file> If you want to use a Windows box and need an SSH client, then you can go to the PuTTY http://www.chiark.greenend.org.uk/~sgtatham/putty/ home page and download a free one. You can also get a scp (secure copy) and a sftp (Secure FTP) client for Windows there if you’d like.
Snort Installation Manual
Page 18
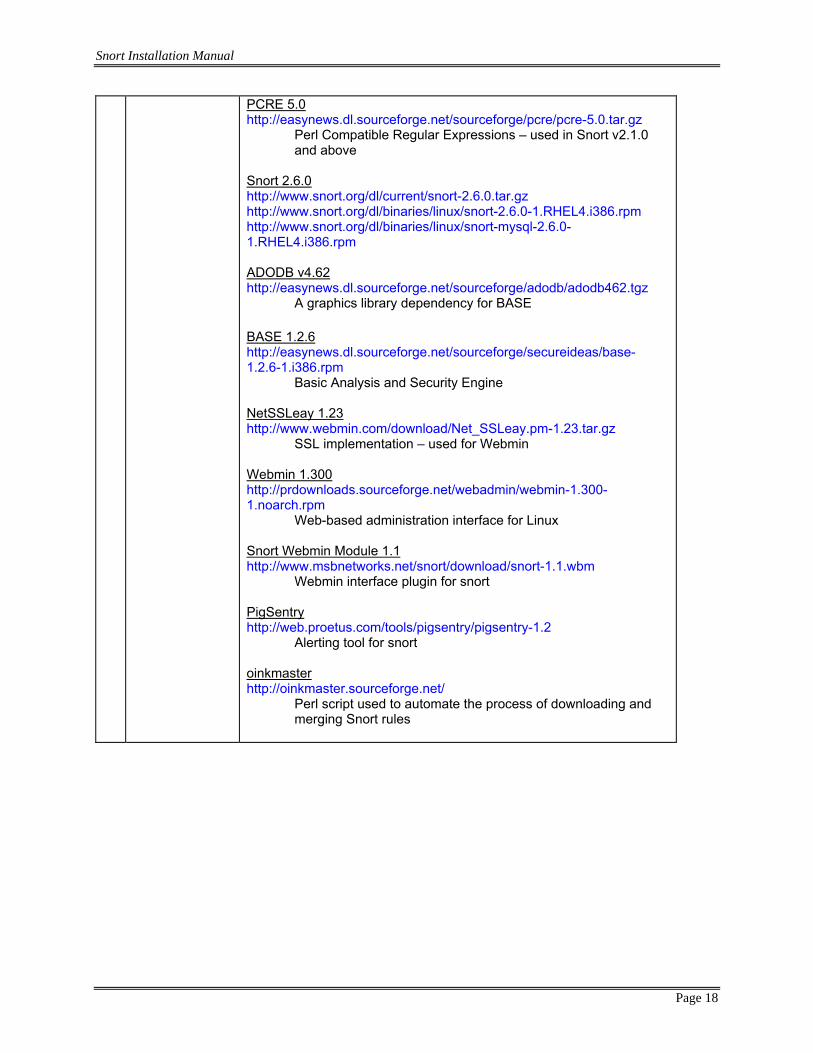
PCRE 5.0 http://easynews.dl.sourceforge.net/sourceforge/pcre/pcre-5.0.tar.gz
Perl Compatible Regular Expressions – used in Snort v2.1.0 and above Snort 2.6.0 http://www.snort.org/dl/current/snort-2.6.0.tar.gz http://www.snort.org/dl/binaries/linux/snort-2.6.0-1.RHEL4.i386.rpm http://www.snort.org/dl/binaries/linux/snort-mysql-2.6.0-1.RHEL4.i386.rpm ADODB v4.62 http://easynews.dl.sourceforge.net/sourceforge/adodb/adodb462.tgz
A graphics library dependency for BASE BASE 1.2.6 http://easynews.dl.sourceforge.net/sourceforge/secureideas/base-1.2.6-1.i386.rpm
Basic Analysis and Security Engine NetSSLeay 1.23 http://www.webmin.com/download/Net_SSLeay.pm-1.23.tar.gz
SSL implementation – used for Webmin Webmin 1.300 http://prdownloads.sourceforge.net/webadmin/webmin-1.300-1.noarch.rpm
Web-based administration interface for Linux Snort Webmin Module 1.1 http://www.msbnetworks.net/snort/download/snort-1.1.wbm
Webmin interface plugin for snort PigSentry http://web.proetus.com/tools/pigsentry/pigsentry-1.2
Alerting tool for snort oinkmaster http://oinkmaster.sourceforge.net/
Perl script used to automate the process of downloading and merging Snort rules
Snort Installation Manual
Page 19
Install and Configure Prerequisites √ Description Login If you are not logged in as root, then you will need to su to root
(su - will load the environmental variables of root). Go to your download directory (/root/snortinstall) and start with the following procedures.
Start Services chkconfig httpd on chkconfig mysqld on service httpd start service mysqld start
If a message appears stating httpd: could not determine the servers fully qualified domain name, using 127.0.0.1 for ServerName when you start apache (httpd) then you need to edit the /etc/hosts to add the FQDN of the server (i.e. host_name.domain_name).
Install PCRE tar –zxvf pcre-5.0.tar.gz cd pcre-5.0 ./configure make make install cd ..
Test Apache and Verify PHP Functionality
This procedure will test your default install of the Apache web server in /var/www/. This is the default installation location for Red Hat. This method will also test the PHP module.
To test the PHP install, create a file called phptest.php in the /var/www/html directory.
vi /var/www/html/phptest.php Place the following line in the file:
<?php phpinfo(); ?> Now use a web browser (either use lynx locally, startx and use Firefox, or use another PC and browse to the snort IP address) to look at the file http://localhost/testphp.php. It should give you info on your system, Apache, and PHP. If it fails, then troubleshoot the failure notification – remember, google is your friend! ☺ If you would like another PHP test and a cool little tool, try the Network Query Tool from http://shat.net/php/nqt/nqt.php.txt: cp /root/snortinstall/scripts/nqt.php /var/www/html Open the nqt.php file in a browser. It will look like the following:
Snort Installation Manual
Page 20
Configure SSL
for Apache Let’s first create a new server certificate so it displays the server name and is setup to last longer then one year: Create the SSL certificates:
mkdir /var/www/certs cd /var/www/certs openssl genrsa -out server.key 1024 <<line wrapped>> openssl req -new -key server.key -x509 -out server.crt –days 1095 Answer the various certificate questions.
Edit your ssl.conf file to point to the cert you just created:
vi /etc/httpd/conf.d/ssl.conf Locate the Server Certificate section. Change the SSLCertificateFile path to:
/var/www/certs/server.crt …and now locate the Server Private Key section right underneath. Change the SSLCertificateKeyFile path to: /var/www/certs/server.key
Now configure Apache to only allow SSL connections. In our case this will be easy, since we don’t want to listen on port 80 at all – no rewrites, not redirection, nada. We’ll simply turn off listening on port 80 all together. Edit your httpd.conf files, vi /etc/httpd/conf/httpd.conf, and locate the line Listen 80. Simply remark it out with a #, so it looks like this:
#Listen 80 Save and exit the file, then restart Apache.
service httpd restart
Snort Installation Manual
Page 21
Reconfigure
Firewall We should now disable unencrypted HTTP access to the server through the firewall. If you configured your iptables firewall based on your own organizations procedures, then you should know how to remove port 80 access in iptables. Otherwise, based on our previous configuration within these procedures, simply execute the following to remove the HTTP rule: iptables –D INPUT –p tcp –dport 80 – j ACCEPT Then save your changes restart iptables and then verify your rule is gone: service iptables save service iptables restart iptables -vnL You should only see port 22 and port 443 allowed through (other then local and established traffic, of course). Now open a browser and go to the server via HTTP://. You should get a “no connection” error as if the server doesn’t exist. Now use HTTPS:// and you should be prompted for authentication. Done!
Install Snort
√ Description Install Snort cd /root/snortinstall
mkdir /etc/snort mkdir /var/snort mkdir /var/log/snort rpm –ivh snort-2.6.0-1.RHEL4.i386.rpm rpm –ivh snort-mysql-2.6.0-1.RHEL4.i386.rpm
Install Rules We will use some pretty old rules to get snort up and running, but we’ll
be updating the rules to the most current set in a later step. This is due to the registration process that we’ll go through when we setup Oinkmaster. <<line wrapped>> tar –zxvf snortules-snapshot-CURRENT.tar.gz –C /etc/snort
Snort Installation Manual
Page 22
Modify
snort.conf Now let’s modify our configuration file to reflect our network and needs: vi /etc/snort/snort.conf Change the internal network variable:
var HOME_NET 10.2.2.0/24 (make this whatever your internal or DMZ network is). For multiple networks, the syntax is: [10.2.2.0/24,192.168.1.0/24]
Change the external network to mean everything except the internal networks defined above:
var EXTERNAL_NET !$HOME_NET
Comment out the rule path variable with a # sign (Webmin cannot read the $RULE_PATH variable – it takes it literally):
#var RULE_PATH /etc/snort/rules
Locate the database section and tell Snort to log to the mysql database (make sure this is all on one line). The password you create here you will need in a later step when setting up the Snort database:
<<one big line wrap>> output database: log, mysql, user=snort password=your_password sensor_name=machine_name dbname=snort host=localhost
Remove all the $RULE_PATH variables from rule paths at the end of the file and replace it with rules. Use the Find/Replace method as follows (type exactly as shown): :%s@include $RULE_PATH@include rules@g
This should change all the rule paths from:
include $RULE_PATH/bad-traffic.rules to this:
include rules/bad-traffic.rules Save and close the file.

Snort Installation Manual
Page 23
Multiple Web
Ports If you need to scan multiple ports for web hosts (say that you’re running not only a public webserver on port 80, but also a server on port 8080 – you do not need to include HTTPS ports here like 443), then you need to use the following ugly hack. Snort (still) does not support port lists, so we’ll have to run the web-rules once using the default of port 80, then re-define the HTTP_PORTS variable and run the web-rules again. Do this again for each additional port you may have. vi /etc/snort/snort.conf
Page down to the bottom of the configuration file, where the rules are located. Find the group of rules that begin with web-cgi.rules. Now after the original 7 or so rule lines, change the HTTP_PORTS variable to your other web port, then copy and paste the same 7 or so rules again. You can repeat this as many times as necessary. For instance:
include rules/web-cgi.rules include rules/web-coldfusion.rules include rules/web-iis.rules include rules/web-frontpage.rules include rules/web-misc.rules include rules/web-client.rules include rules/web-php.rules #UGLY HACK for multiple HTTP ports – port 8080 var HTTP_PORTS 8080 include rules/web-cgi.rules include rules/web-coldfusion.rules include rules/web-iis.rules include rules/web-frontpage.rules include rules/web-misc.rules include rules/web-client.rules include rules/web-php.rules #UGLY HACK for multiple HTTP ports – port 8181 var HTTP_PORTS 8181 include rules/web-cgi.rules include rules/web-coldfusion.rules include rules/web-iis.rules include rules/web-frontpage.rules include rules/web-misc.rules include rules/web-client.rules include rules/web-php.rules
…and so on. Save and close the file.
Snort Installation Manual
Page 24
Snort Startup Options √ Description
Edit Startup Options
Let’s set our startup options for Snort. The startup configuration file allows us to place various options within a file that we would in the past typically have put in the snort startup command. Open the startup configuration file for editing: vi /etc/sysconfig/snort Interface: If you are using two interfaces, one for management and the other for Snort, ensure that the INTERFACE=ethx line is the Snort interface.
INTERFACE=eth? Alert Mode: When using BASE and/or PigSentry, the alertmode must be changed from the default fast to full. This ensures we log the full packet header information.
ALERTMODE=full BPF Filter The last section in this startup file has the Berkley Packet Filter file information. There may be times when you want to apply a filter in order to not alert on certain hosts and/or ports. Uncomment the BPFFILE=/etc/snort/bpf_file line and change it as follows:
BPFFILE=/etc/snort/filters.bpf Save and close the file. Now, we need to create the filters.bpf file, or snort won’t be able to start up. We don’t need to actually have any filters yet, we just need to create an empty file. Do this with the touch command:
touch /etc/snort/filters.bpf
Setup MySQL Database
√ Description Instructions Throughout the MySQL instruction, I will put a line with mysql> in front
of it so you will see what the output should be. Also note that in MySQL, a semi-colon ; character is mandatory at the end of each input line – if you forget it, just type the ; on the next line by itself.
Snort Installation Manual
Page 25
Create
Database Let’s login to mysql (no password needed to start with) and set our local root password. Note that the root user in MySQL is not the same as the linux local root user.
mysql mysql>SET PASSWORD FOR root@localhost=PASSWORD('new_password'); >Query OK, 0 rows affected (0.25 sec) mysql>CREATE DATABASE snort; >Query OK, 2 rows affected (0.01 sec) mysql>EXIT
Delete Anonymous
Logins
Now let’s log back in with the password you just set: mysql -p Let’s make sure we don’t have other root users or unwanted users:
mysql>CONNECT mysql; >Current database: mysql mysql>SELECT user,host FROM user;
You will see something like this: +-------+---------------+ | user | host | +-------+---------------+ | | localhost | | root | localhost | +-------+---------------+ 2 rows in set (0.00 sec) Uhoh! As seen above, mysql by default has blank user accounts – this means anyone (anonymous) can login. Let’s fix this:
mysql>DELETE FROM user WHERE user=””; >Query OK, 2 rows affected (0.09 sec) mysql>DELETE FROM db WHERE user=””; >Query OK, 2 rows affected (0.10 sec) mysql>FLUSH PRIVILEGES; >Query OK, 2 rows affected (0.10 sec) mysql>SELECT user,host FROM user;
You should now see something like this: +-------+---------------+ | user | host | +-------+---------------+ | root | localhost | +-------+---------------+ 1 rows in set (0.00 sec) Yeah! No anonymous users now.
Snort Installation Manual
Page 26
Delete Test
Database Let’s see what databases we have in our server:
mysql>SHOW DATABASES; +------------+ | Database | +------------+ | mysql | | snort | | test | +------------+ 3 rows in set (0.00 sec) Egads! What’s this? A test database? Hmmmm – not such a good thing to have on a production system. Let’s delete the default test database that’s installed by MySQL:
DROP DATABASE test; Now check to see that the test database is gone:
mysql>SHOW DATABASES; +------------+ | Database | +------------+ | mysql | | snort | +------------+ 2 rows in set (0.00 sec) You should now only see two databases, mysql and snort.
mysql>EXIT >Bye
Snort Installation Manual
Page 27
Setup Snort
Database Now the database tables need to be set up. The setup scripts should be located in your /usr/share/doc/snort-2.6.0/schemas directory, however, at the time of this document the Snort RPM was not populating this directory with scripts – they are missing. So we’ll need to download the source file and get the scripts out of that instead. I’ve already done that and placed the database schema in the ./snortinstall/scripts directory.
cd /root/snortinstall/scripts Now execute the command to create the MySQL tables:
mysql -p < create_mysql snort >Enter password:
Now you need to check and make sure that the snort DB was created correctly:
mysql –p >Enter password:
Ok, next let’s make sure the tables are all there as well:
mysql>USE snort >Database changed mysql>SHOW TABLES;
+------------------+ | Tables_in_snort | +------------------+ | data | | detail | | encoding | | event | | icmphdr | | iphdr | | opt | | reference | | reference_system | | schema | | sensor | | sig_class | | sig_reference | | signature | | tcphdr | | udphdr | +------------------+ 16 rows in set (0.00 sec)
Snort Installation Manual
Page 28
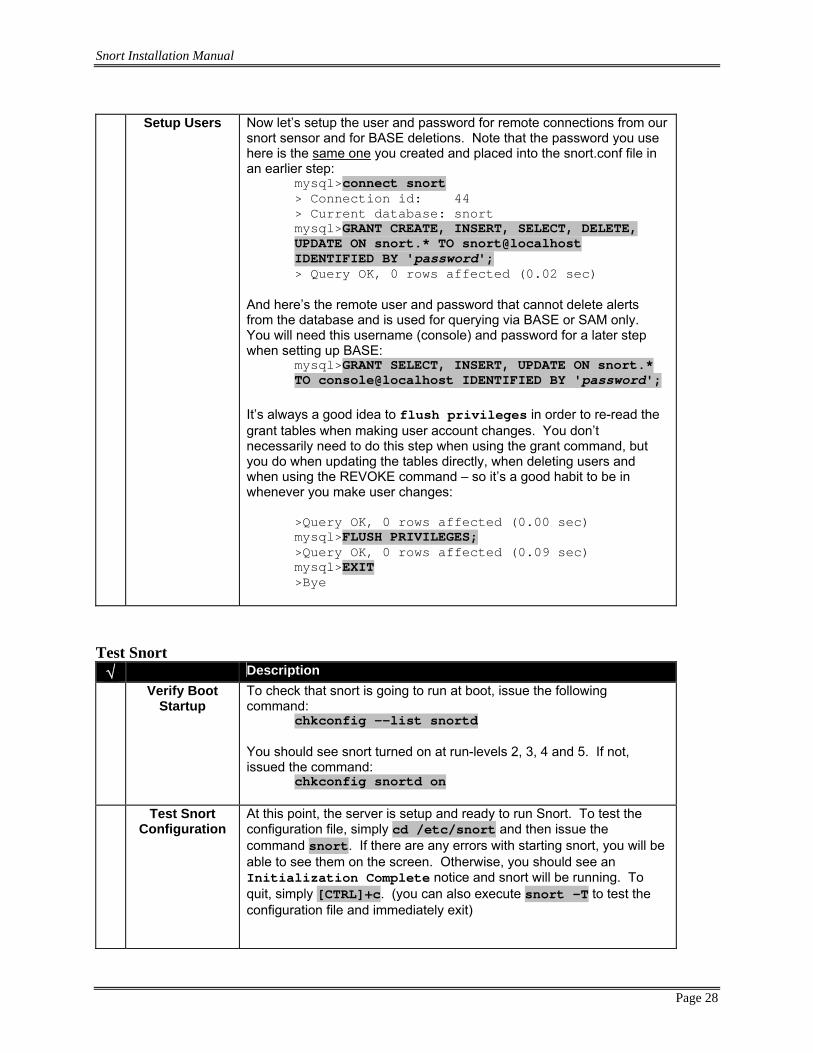
Setup Users Now let’s setup the user and password for remote connections from our
snort sensor and for BASE deletions. Note that the password you use here is the same one you created and placed into the snort.conf file in an earlier step:
mysql>connect snort > Connection id: 44 > Current database: snort mysql>GRANT CREATE, INSERT, SELECT, DELETE, UPDATE ON snort.* TO snort@localhost IDENTIFIED BY 'password'; > Query OK, 0 rows affected (0.02 sec)
And here’s the remote user and password that cannot delete alerts from the database and is used for querying via BASE or SAM only. You will need this username (console) and password for a later step when setting up BASE:
mysql>GRANT SELECT, INSERT, UPDATE ON snort.* TO console@localhost IDENTIFIED BY 'password';
It’s always a good idea to flush privileges in order to re-read the grant tables when making user account changes. You don’t necessarily need to do this step when using the grant command, but you do when updating the tables directly, when deleting users and when using the REVOKE command – so it’s a good habit to be in whenever you make user changes:
>Query OK, 0 rows affected (0.00 sec) mysql>FLUSH PRIVILEGES; >Query OK, 0 rows affected (0.09 sec) mysql>EXIT >Bye
Test Snort
√ Description Verify Boot
Startup To check that snort is going to run at boot, issue the following command:
chkconfig --list snortd You should see snort turned on at run-levels 2, 3, 4 and 5. If not, issued the command:
chkconfig snortd on
Test Snort Configuration
At this point, the server is setup and ready to run Snort. To test the configuration file, simply cd /etc/snort and then issue the command snort. If there are any errors with starting snort, you will be able to see them on the screen. Otherwise, you should see an Initialization Complete notice and snort will be running. To quit, simply [CTRL]+c. (you can also execute snort –T to test the configuration file and immediately exit)

Snort Installation Manual
Page 29
If snort runs successfully, then delete the alert file that you created – because snort will not have access to the file you created just now running it manually while logged in as root.
rm –rf /var/log/snort/alert If there are errors, begin troubleshooting. Google is your friend! ☺
Test Snort Startup Script
If you configuration file works, then let’s test Snort with the startup configuration file. To do this issue the command: service snortd start. Now check to see if snort stayed up after you launched it: service snortd status If it’s running, great! But if you see something like snort dead but subsys locked, then you have an issue. If you get any errors, first make sure you deleted the /var/log/snort/alert file that you created when you manually ran snort for the first time. If you look at the file and see that it’s owned by root, delete it and try running snort again. If you still get errors, then troubleshoot your /etc/sysconfig/snort file. Something you may find useful is to launch snort manually using all of the settings from the /etc/sysconfig/snort file. For instance, to test the alert mode with your configuration file, execute: snort –A full –c /etc/snort/snort.conf and see if there are errors. You can do this for all the settings in the startup script to see where the error is. Otherwise, if you have snort running successfully, go ahead and stop it: service snortd stop
Snort Installation Manual
Page 30
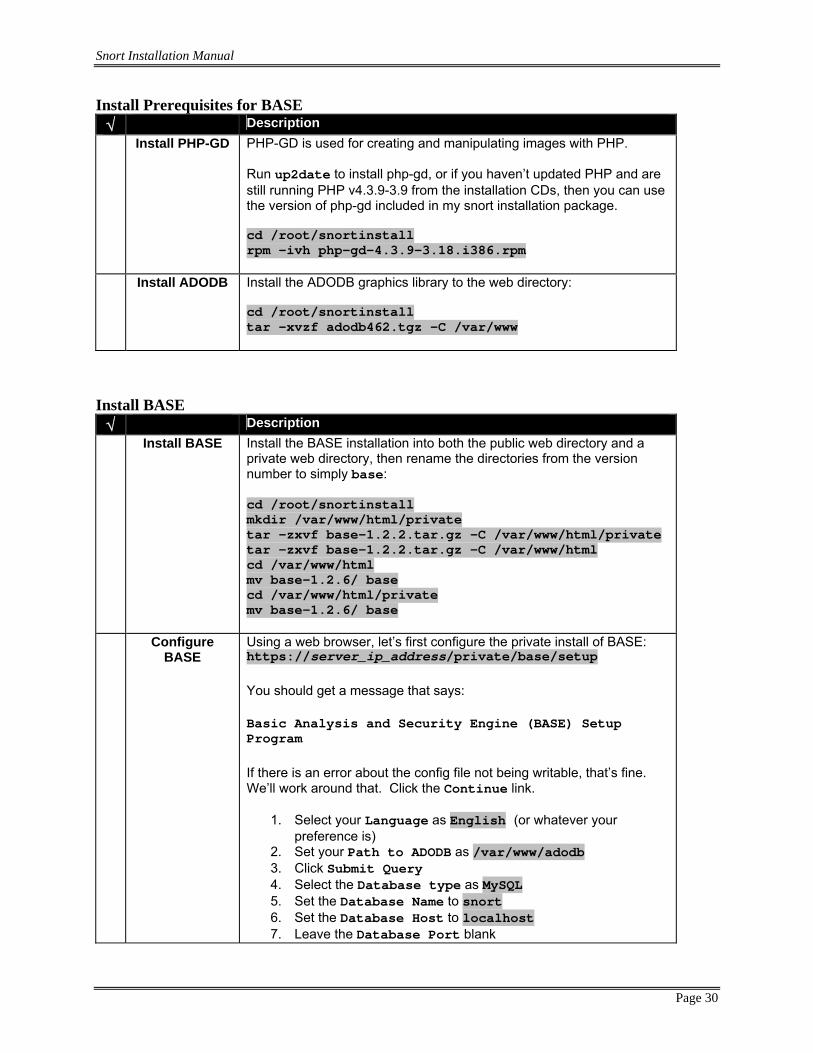
Install Prerequisites for BASE √ Description Install PHP-GD PHP-GD is used for creating and manipulating images with PHP.
Run up2date to install php-gd, or if you haven’t updated PHP and are still running PHP v4.3.9-3.9 from the installation CDs, then you can use the version of php-gd included in my snort installation package. cd /root/snortinstall rpm –ivh php-gd-4.3.9-3.18.i386.rpm
Install ADODB Install the ADODB graphics library to the web directory: cd /root/snortinstall tar -xvzf adodb462.tgz –C /var/www
Install BASE
√ Description Install BASE Install the BASE installation into both the public web directory and a
private web directory, then rename the directories from the version number to simply base: cd /root/snortinstall mkdir /var/www/html/private tar -zxvf base-1.2.2.tar.gz –C /var/www/html/private tar -zxvf base-1.2.2.tar.gz –C /var/www/html cd /var/www/html mv base-1.2.6/ base cd /var/www/html/private mv base-1.2.6/ base
Configure BASE
Using a web browser, let’s first configure the private install of BASE: https://server_ip_address/private/base/setup You should get a message that says: Basic Analysis and Security Engine (BASE) Setup Program If there is an error about the config file not being writable, that’s fine. We’ll work around that. Click the Continue link.
1. Select your Language as English (or whatever your preference is)
2. Set your Path to ADODB as /var/www/adodb 3. Click Submit Query 4. Select the Database type as MySQL 5. Set the Database Name to snort 6. Set the Database Host to localhost 7. Leave the Database Port blank
Snort Installation Manual
Page 31
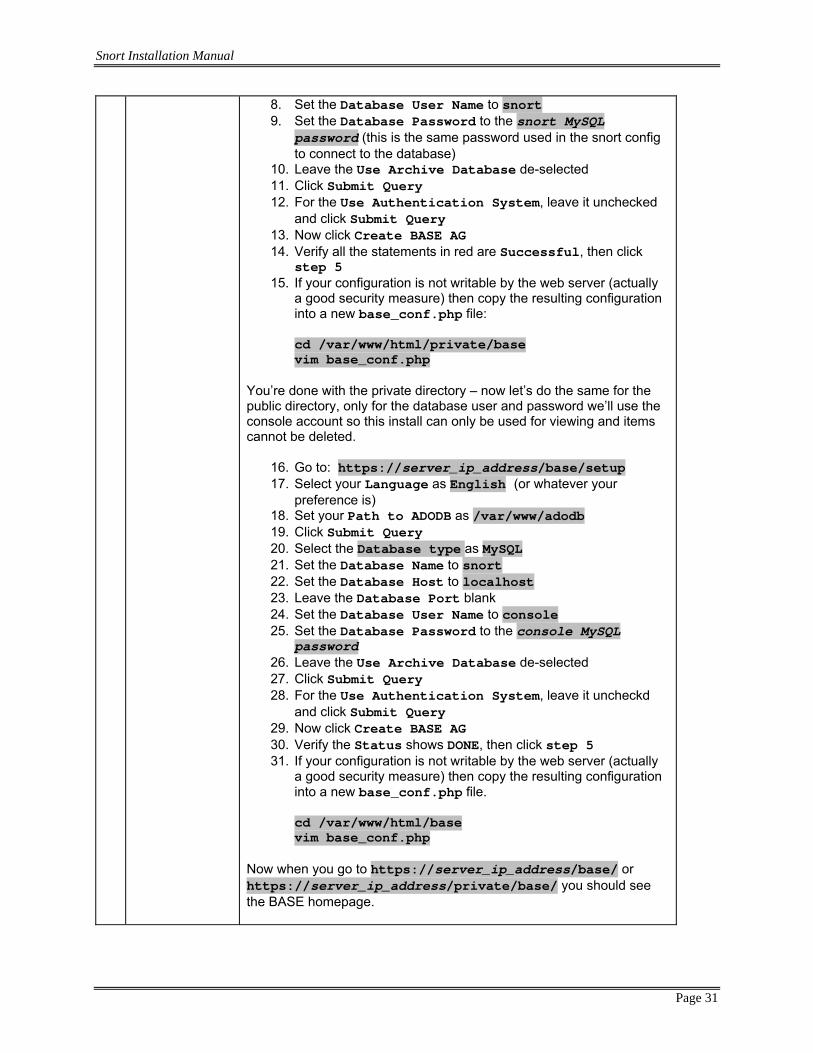
8. Set the Database User Name to snort 9. Set the Database Password to the snort MySQL
password (this is the same password used in the snort config to connect to the database)
10. Leave the Use Archive Database de-selected 11. Click Submit Query 12. For the Use Authentication System, leave it unchecked
and click Submit Query 13. Now click Create BASE AG 14. Verify all the statements in red are Successful, then click
step 5 15. If your configuration is not writable by the web server (actually
a good security measure) then copy the resulting configuration into a new base_conf.php file: cd /var/www/html/private/base vim base_conf.php
You’re done with the private directory – now let’s do the same for the public directory, only for the database user and password we’ll use the console account so this install can only be used for viewing and items cannot be deleted.
16. Go to: https://server_ip_address/base/setup 17. Select your Language as English (or whatever your
preference is) 18. Set your Path to ADODB as /var/www/adodb 19. Click Submit Query 20. Select the Database type as MySQL 21. Set the Database Name to snort 22. Set the Database Host to localhost 23. Leave the Database Port blank 24. Set the Database User Name to console 25. Set the Database Password to the console MySQL
password 26. Leave the Use Archive Database de-selected 27. Click Submit Query 28. For the Use Authentication System, leave it uncheckd
and click Submit Query 29. Now click Create BASE AG 30. Verify the Status shows DONE, then click step 5 31. If your configuration is not writable by the web server (actually
a good security measure) then copy the resulting configuration into a new base_conf.php file. cd /var/www/html/base vim base_conf.php
Now when you go to https://server_ip_address/base/ or https://server_ip_address/private/base/ you should see the BASE homepage.
Snort Installation Manual
Page 32
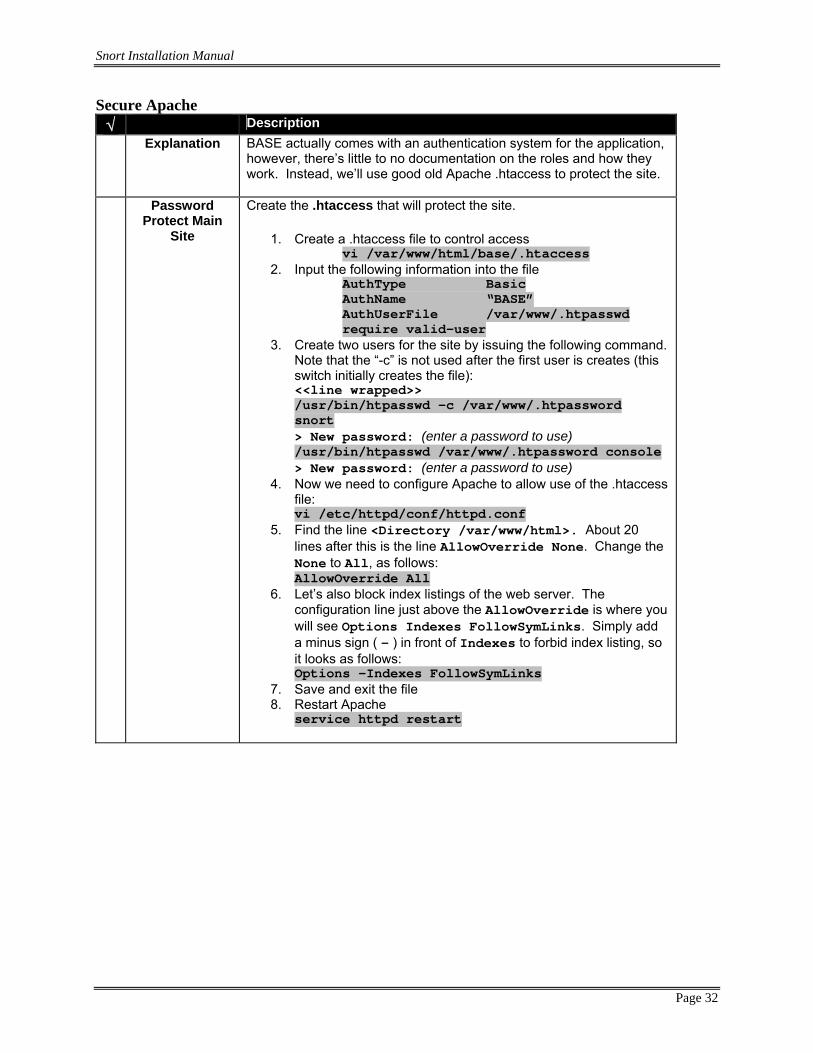
Secure Apache √ Description Explanation BASE actually comes with an authentication system for the application,
however, there’s little to no documentation on the roles and how they work. Instead, we’ll use good old Apache .htaccess to protect the site.
Password Protect Main
Site
Create the .htaccess that will protect the site.
1. Create a .htaccess file to control access vi /var/www/html/base/.htaccess
2. Input the following information into the file AuthType Basic AuthName “BASE” AuthUserFile /var/www/.htpasswd require valid-user
3. Create two users for the site by issuing the following command. Note that the “-c” is not used after the first user is creates (this switch initially creates the file): <<line wrapped>> /usr/bin/htpasswd –c /var/www/.htpassword snort > New password: (enter a password to use) /usr/bin/htpasswd /var/www/.htpassword console > New password: (enter a password to use)
4. Now we need to configure Apache to allow use of the .htaccess file: vi /etc/httpd/conf/httpd.conf
5. Find the line <Directory /var/www/html>. About 20 lines after this is the line AllowOverride None. Change the None to All, as follows: AllowOverride All
6. Let’s also block index listings of the web server. The configuration line just above the AllowOverride is where you will see Options Indexes FollowSymLinks. Simply add a minus sign ( - ) in front of Indexes to forbid index listing, so it looks as follows: Options –Indexes FollowSymLinks
7. Save and exit the file 8. Restart Apache
service httpd restart
Snort Installation Manual
Page 33
Password
Protect Private BASE Directory
Now we’ll secure the private directory where BASE has access to make deletions from the snort database. For this directory, we will only allow the snort user to login. <<line wrapped>> /usr/bin/htpasswd –c /var/www/.htpasswd-private snort >New password: (use the same snort password as for the main site) Now, for you’re learning pleasure, let’s protect the private directory using the actual httpd.conf file rather then a .htaccess file. Edit the /etc/httpd/conf/httpd.conf file: vi /etc/httpd/conf/httpd.conf Locate the section the section shown below:
<Directory /> Options FollowSymLinks AllowOverride None </Directory>
…and now add the following right below it: <Directory "/var/www/html/private”> AuthType Basic AuthName "Private BASE" AuthUserFile /var/www/.htpasswd-private require valid-user </Directory>
Save and close the file. Now restart the Apache web server:
service httpd restart
Test Authentication
Using a browser or lynx, first go to: https://server_ip_address/base/ Are you prompted for credentials? Good! Try both sets – first the snort username & password, then close your browser (to clear the session authentication) and then try the console username & password. Next, go to https://server_ip_address/private/base/ When prompted for credentials use your snort username & password. We did not setup a console account for this private area where things can be deleted.
Snort Installation Manual
Page 34
Remove
Default Page Apache has a default index page that will be processed if you do not have an index page in the root directory. We really don’t want to display this default page, so to remove this perform the following steps: cd /etc/httpd/conf.d mv welcome.conf welcome.orig service httpd restart You could also redirect the root to your public BASE install by placing an index.html file in the /var/www/html directory with the following content in the file: vi /var/www/html/index.html <meta http-equiv="REFRESH" content="0; URL=base/">
Install Prerequisite for Webmin
√ Description Install
NetSSLeay
cd /root/snortinstall tar –zxvf Net_SSLeay.pm-1.23.tar.gz cd Net_SSLeay.pm-1.23 unset LANG ./Makefile.PL –t
If you get an error stating:
Warning: I could not locate your pod2man program. Please make sure,your pod2man program is in your PATH before you execute'make'
…then the unset LANG command did not work correctly. Try it again. Now, install it:
make install Test the install to ensure it works properly:
perl –e ‘use Net::SSLeay’ If there were no errors returned, then SSL has been setup properly for Webmin.
cd ..
Snort Installation Manual
Page 35
Install and Configure Webmin √ Description Install Webmin
cd /root/snortinstall rpm –ivh webmin-1.300-1.noarch.rpm If there’s an error “cannot Identify OS”, that is likely due to the /etc/issue being changed and this newer OS not being recognized. To work around this, add the line “Red Hat Linux release 9 (Shrike)” right before the Red Hat line in the /etc/issue file temporarily and run the rpm again. When the install completes remove the line. You should now be able to log (using root) into the Webmin console via a browser to https://server_ip_address:10000
Configure
Snort Plugin 1. Open a browser and go to: https://snort_server:10000 2. Login as root 3. Select the Webmin Configuration icon 4. Select the Webmin Modules icon 5. Install the module from a local file
a. /root/snortinstall/snort-1.1.wbm b. Click Install module
6. Select Servers icon from the TOP of the web page 7. Select the Snort IDS Admin icon (it looks like a pig) 8. Select the Module Config tab in the left hand corner (if it
doesn’t come up automatically) 9. Set the configuration to match the following (lines are
wrapped):
Full path to Snort executable (with options) =
/usr/sbin/snort –o -i eth1 –d –D –C –c /etc/snort/snort.conf
Full path to Snort configuration file =
/etc/snort/snort.conf
Full path to Snort rule files directory =
/etc/snort
Full path to Snort PID file =
/var/run/snort_eth1.pid
Command to start Snort (optional) =
/etc/rc.d/init.d/ snortd start
URL to ACID (optional) =
When finished, click the Save button and you’re done!
Snort Installation Manual
Page 36
Install and Automate PigSentry √ Description Install
PigSentry PigSentry is perl script that runs against the Snort alert log. It is used for real-time alerts, with a stable table of recent alerts to reduce the possibility of spamming yourself with emails. It will send a notice if there is a new alert, or if there is an increase in the general trend or pattern of existing alerts. To install PigSentry, we’ll simply copy the perl script and initiate the proper startup script.
<<line wrapped>> cp /root/snortinstall/scripts/pigsentry-1.2.pl /usr/local/bin/pigsentry <<line wrapped>> cp /root/snortinstall/scripts/gopigsentry /etc/rc.d/init.d chmod 755 /etc/rc.d/init.d/gopigsentry chkconfig –-add gopigsentry
Configure
PigSentry Now edit the /etc/init.d/gopigsentry file to change the email address as necessary: vi /etc/init.d/gopigsentry Locate the your_email@your_domain.TLD entry and change it to your email address. Save and close the file.
Setup MySQL Database Dump and Backup
√ Description MySQL Dump The MySQL snort database should be backed up in order to ensure the
integrity of the data. As an example I’ve created a simple script that will backup, zip and copy a zipped copy of your MySQL snort database to a Windows server. It archives the prior 5 days worth of backups as well. Edit this, use it or don’t use it as you see fit for your needs. To configure the nightly backup, perform the following:
<<line wrapped>> cp /root/snortinstall/scripts/mysql_backup /usr/local/bin
Edit the /usr/local/bin/mysql_backup file and modify the six variables under the VARIABLES section. vi /usr/local/bin/mysql_backup
Then edit the crontab file and add the following line to run it every night: crontab –e
15 23 * * * /usr/local/bin/mysql_backup
Snort Installation Manual
Page 37
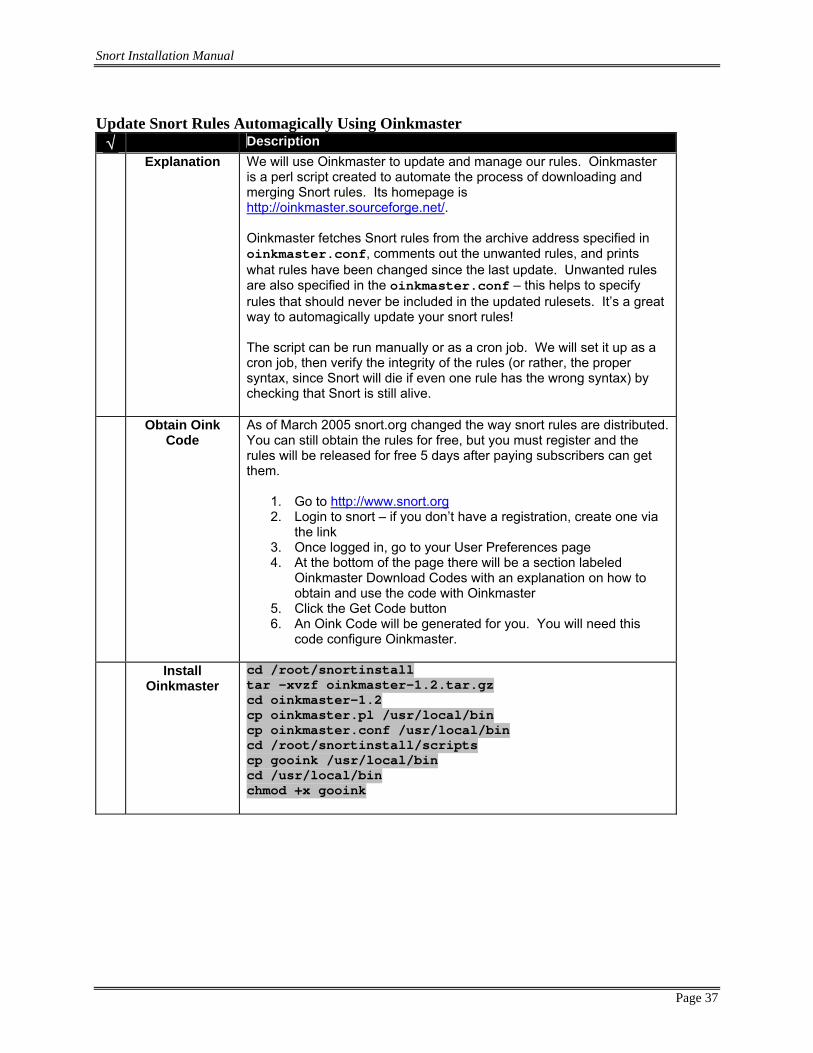
Update Snort Rules Automagically Using Oinkmaster
√ Description Explanation We will use Oinkmaster to update and manage our rules. Oinkmaster
is a perl script created to automate the process of downloading and merging Snort rules. Its homepage is http://oinkmaster.sourceforge.net/. Oinkmaster fetches Snort rules from the archive address specified in oinkmaster.conf, comments out the unwanted rules, and prints what rules have been changed since the last update. Unwanted rules are also specified in the oinkmaster.conf – this helps to specify rules that should never be included in the updated rulesets. It’s a great way to automagically update your snort rules! The script can be run manually or as a cron job. We will set it up as a cron job, then verify the integrity of the rules (or rather, the proper syntax, since Snort will die if even one rule has the wrong syntax) by checking that Snort is still alive.
Obtain Oink Code
As of March 2005 snort.org changed the way snort rules are distributed. You can still obtain the rules for free, but you must register and the rules will be released for free 5 days after paying subscribers can get them.
1. Go to http://www.snort.org 2. Login to snort – if you don’t have a registration, create one via
the link 3. Once logged in, go to your User Preferences page 4. At the bottom of the page there will be a section labeled
Oinkmaster Download Codes with an explanation on how to obtain and use the code with Oinkmaster
5. Click the Get Code button 6. An Oink Code will be generated for you. You will need this
code configure Oinkmaster.
Install Oinkmaster
cd /root/snortinstall tar –xvzf oinkmaster-1.2.tar.gz cd oinkmaster-1.2 cp oinkmaster.pl /usr/local/bin cp oinkmaster.conf /usr/local/bin cd /root/snortinstall/scripts cp gooink /usr/local/bin cd /usr/local/bin chmod +x gooink
Snort Installation Manual
Page 38
Configure
Oinkmaster vi oinkmaster.conf First, under the General options section, locate the Example for Snort-current and unremark the url line below it that looks like this: url = http://www.snort.org/pub-bin/oinkmaster.cgi/<oinkcode>/snortrules-snapshot-CURRENT.tar.gz Replace the <oinkcode> with the Oink Code you were given when you registered at snort.org so it then looks like this (using an example oinkcode): url = http://www.snort.org/pub-bin/oinkmaster.cgi/5a08f649c16a278e1012e1c84bdc8fab9a70e2a4/snortrules-snapshot-CURRENT.tar.gz Finally, if there are any rules that you know you want disabled and not re-enabled from a new download, include them at the bottom of the file under disablesid – see the config file for syntax. Save and close the file.
Configure gooink Script
The gooink script will fire off oinkmaster.pl to update your rules and test your rules, firing off an email to you for each phase. It will also email you a list of the rules so you can verify that they did indeed update from the timestamp. To set your email address, edit the /usr/local/bin/gooink script and set the EMAIL variable from your_email@your_domain.TLD to your real email address. vi /usr/local/bin/gooink
Setup Cron Job Setup the cron job to perform the updates: crontab –e
00 12 * * * /usr/local/bin/gooink
Create Backup Directory
and Test
Finally, create a new directory for the rules to be backed up to: mkdir /etc/snort/old-rules Oh, and you probably want to test it. Check your /etc/snort/rules directory for the current date on the rule files, then run /usr/local/bin/gooink and verify they changed.
Snort Installation Manual
Page 39
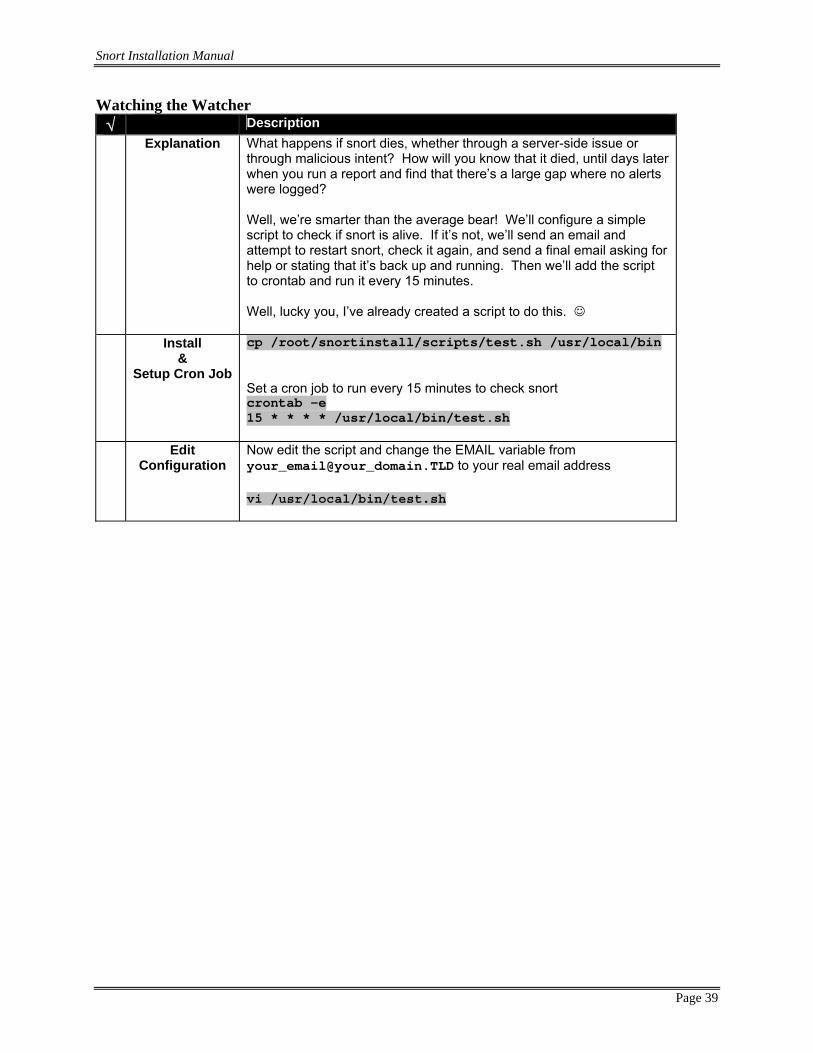
Watching the Watcher √ Description Explanation What happens if snort dies, whether through a server-side issue or
through malicious intent? How will you know that it died, until days later when you run a report and find that there’s a large gap where no alerts were logged? Well, we’re smarter than the average bear! We’ll configure a simple script to check if snort is alive. If it’s not, we’ll send an email and attempt to restart snort, check it again, and send a final email asking for help or stating that it’s back up and running. Then we’ll add the script to crontab and run it every 15 minutes. Well, lucky you, I’ve already created a script to do this. ☺
Install &
Setup Cron Job
cp /root/snortinstall/scripts/test.sh /usr/local/bin Set a cron job to run every 15 minutes to check snort crontab –e 15 * * * * /usr/local/bin/test.sh
Edit Configuration
Now edit the script and change the EMAIL variable from your_email@your_domain.TLD to your real email address vi /usr/local/bin/test.sh
Snort Installation Manual
Page 40
Final Check √ Description Explanation Reboot your system and watch the boot process to make sure
everything starts. When it comes up you can check to see if the various processes are running by issuing the command ps –ef |grep service, where the service can be the process you’re looking for, like mysql, httpd, snort, etc. To check all our important services at once, issue the following command: <<line wrapped>> ps –ef | grep httpd && ps –ef | grep mysql && ps –ef | grep snort Remember that you can always check snort itself by running it in interactive mode. If there are any errors with snort it will tell you immediately. Simply CD to the /etc/snort directory and run snort.
Attack! Now it’s time to test your new snort box end to end. Use a scanner such as Nessus (http://www.nessus.org) and run it against the snort sensor box. Check BASE when you’re done and it should have a bunch of alerts. If not, let the troubleshooting fun begin! Congratulations, you did it! You now have a fully functional IDS running and logging to a database and being viewed through a PHP script running on Apache. Good work and happy Snorting! ☺
Snort Installation Manual
Page 41
Adding Sensors Install, Secure and Update Red Hat
√ Description Install To add sensors, build and secure your linux boxes following the steps
in the Install, Secure and Update Red Hat section, with the following caveats: During the package selection, make the following changes:
• Do not select the Web Server • For MySQL Database, accept only the defaults. We need
only the client installed, not the server.
Secure For the security steps, do not open the ports for HTTP, HTTPS or Webmin. In other words, only do the following – for brevity’s sake, no explanations are given as they exist in the beginning of this document already: iptables -F iptables –F INPUT iptables –F OUTPUT iptables –F FORWARD iptables –F –t mangle iptables –F –t nat iptables –X iptables –Z iptables –P INPUT DROP iptables –P FORWARD DROP iptables –P OUTPUT ACCEPT iptables -A INPUT -i lo -j ACCEPT iptables -A INPUT -m state --state ESTABLISHED -j ACCEPT iptables -A INPUT –p ICMP –j ACCEPT iptables -A INPUT -p tcp --dport 22 –j ACCEPT iptables -A INPUT -p tcp --dport 10000 –j ACCEPT
iptables –A INPUT –j DROP service iptables save service iptables restart iptables -L
Snort Installation Manual
Page 42
Copy Snort Installation Files √ Description Copy Files Place the Snort File CD v2.00 CD in the coffee cup holder or download
all the files from: www.thewestbrooks.com/downloads/snort-rhel4u3.tar.gz Then copy all files to /root/snortinstall, as follows:
mount /dev/cdrom /mnt/cdrom mkdir /root/snortinstall cp –r -v /mnt/cdrom/* /root/snortinstall cd /root/snortinstall chmod –R +wr /root/snortinstall/* umount /mnt/cdrom
OR
cd /root wget www.thewestbrooks.com/downloads/snort-rhel4u3.tar.gz tar –zxvf snort.tar.gz cd /root/snortinstall
Install PCRE tar –zxvf pcre-5.0.tar.gz
cd pcre-5.0 ./configure make make install cd ..
Install Snort
√ Description Install Snort cd /root/snortinstall
mkdir /etc/snort mkdir /var/snort mkdir /var/log/snort rpm –ivh snort-2.6.0-1.RHEL4.i386.rpm rpm –ivh snort-mysql-2.6.0-1.RHEL4.i386.rpm
Install Rules We will use some pretty old rules to get snort up and running, but we’ll
be updating the rules to the most current set in a later step. This is due to the registration process that we’ll go through when we setup Oinkmaster. <<line wrapped>> tar –zxvf snortules-snapshot-CURRENT.tar.gz –C /etc/snort
Snort Installation Manual
Page 43
Modify
snort.conf Now let’s modify our configuration file to reflect our network and needs: vi /etc/snort/snort.conf Change the internal network variable:
var HOME_NET 10.2.2.0/24 (make this whatever your internal or DMZ network is). For multiple networks, the syntax is: [10.2.2.0/24,192.168.1.0/24]
Change the external network to mean everything except the internal networks defined above:
var EXTERNAL_NET !$HOME_NET
Comment out the rule path variable with a # sign (Webmin cannot read the $RULE_PATH variable – it takes it literally):
#var RULE_PATH /etc/snort/rules
Locate the database section and tell Snort to log to the mysql database (make sure this is all on one line). The host is the Snort Console you’ve already built, and the password is the one you already use on your Snort Console box. The sensor_name should be something distinctive to this particular sensor so you can correlate reports properly – for instance, DMZ, Console, Vendor, Outside, etc.
<<one big line wrap>> output database: log, mysql, user=snort password=your_password sensor_name=machine_name dbname=snort host=console_IP_address
Remove all the $RULE_PATH variables from rule paths at the end of the file and replace it with rules. Use the Find/Replace method as follows (type exactly as shown): :%s@include $RULE_PATH@include rules@g
This should change all the rule paths from:
include $RULE_PATH/bad-traffic.rules to this:
include rules/bad-traffic.rules Save and close the file.
Snort Installation Manual
Page 44
Multiple Web
Ports If you need to scan multiple ports for web hosts (say that you’re running not only a public webserver on port 80, but also a server on port 8080 – you do not need to include HTTPS ports here like 443), then you need to use the following ugly hack. Snort (still) does not support port lists, so we’ll have to run the web-rules once using the default of port 80, then re-define the HTTP_PORTS variable and run the web-rules again. Do this again for each additional port you may have. vi /etc/snort/snort.conf
Page down to the bottom of the configuration file, where the rules are located. Find the group of rules that begin with web-cgi.rules. Now after the original 7 or so rule lines, change the HTTP_PORTS variable to your other web port, then copy and paste the same 7 or so rules again. You can repeat this as many times as necessary. For instance:
include rules/web-cgi.rules include rules/web-coldfusion.rules include rules/web-iis.rules include rules/web-frontpage.rules include rules/web-misc.rules include rules/web-client.rules include rules/web-php.rules #UGLY HACK for multiple HTTP ports – port 8080 var HTTP_PORTS 8080 include rules/web-cgi.rules include rules/web-coldfusion.rules include rules/web-iis.rules include rules/web-frontpage.rules include rules/web-misc.rules include rules/web-client.rules include rules/web-php.rules #UGLY HACK for multiple HTTP ports – port 8181 var HTTP_PORTS 8181 include rules/web-cgi.rules include rules/web-coldfusion.rules include rules/web-iis.rules include rules/web-frontpage.rules include rules/web-misc.rules include rules/web-client.rules include rules/web-php.rules
…and so on. Save and close the file.
Snort Installation Manual
Page 45
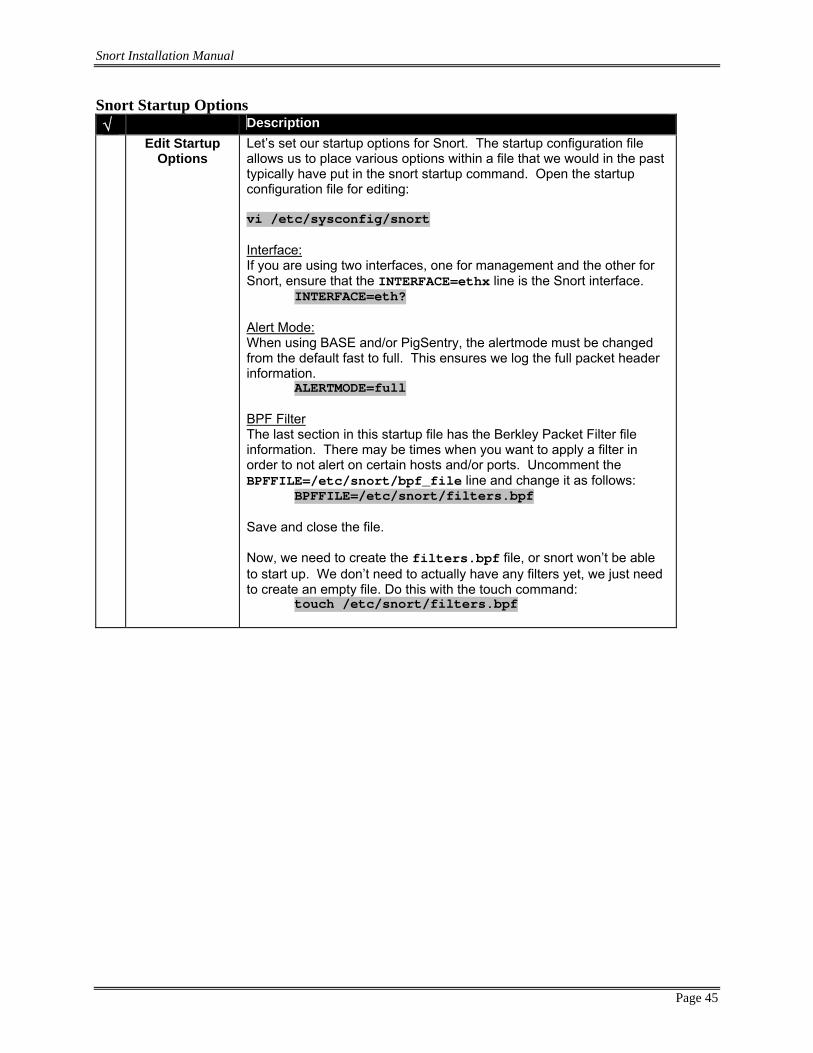
Snort Startup Options √ Description
Edit Startup Options
Let’s set our startup options for Snort. The startup configuration file allows us to place various options within a file that we would in the past typically have put in the snort startup command. Open the startup configuration file for editing: vi /etc/sysconfig/snort Interface: If you are using two interfaces, one for management and the other for Snort, ensure that the INTERFACE=ethx line is the Snort interface.
INTERFACE=eth? Alert Mode: When using BASE and/or PigSentry, the alertmode must be changed from the default fast to full. This ensures we log the full packet header information.
ALERTMODE=full BPF Filter The last section in this startup file has the Berkley Packet Filter file information. There may be times when you want to apply a filter in order to not alert on certain hosts and/or ports. Uncomment the BPFFILE=/etc/snort/bpf_file line and change it as follows:
BPFFILE=/etc/snort/filters.bpf Save and close the file. Now, we need to create the filters.bpf file, or snort won’t be able to start up. We don’t need to actually have any filters yet, we just need to create an empty file. Do this with the touch command:
touch /etc/snort/filters.bpf
Snort Installation Manual
Page 46
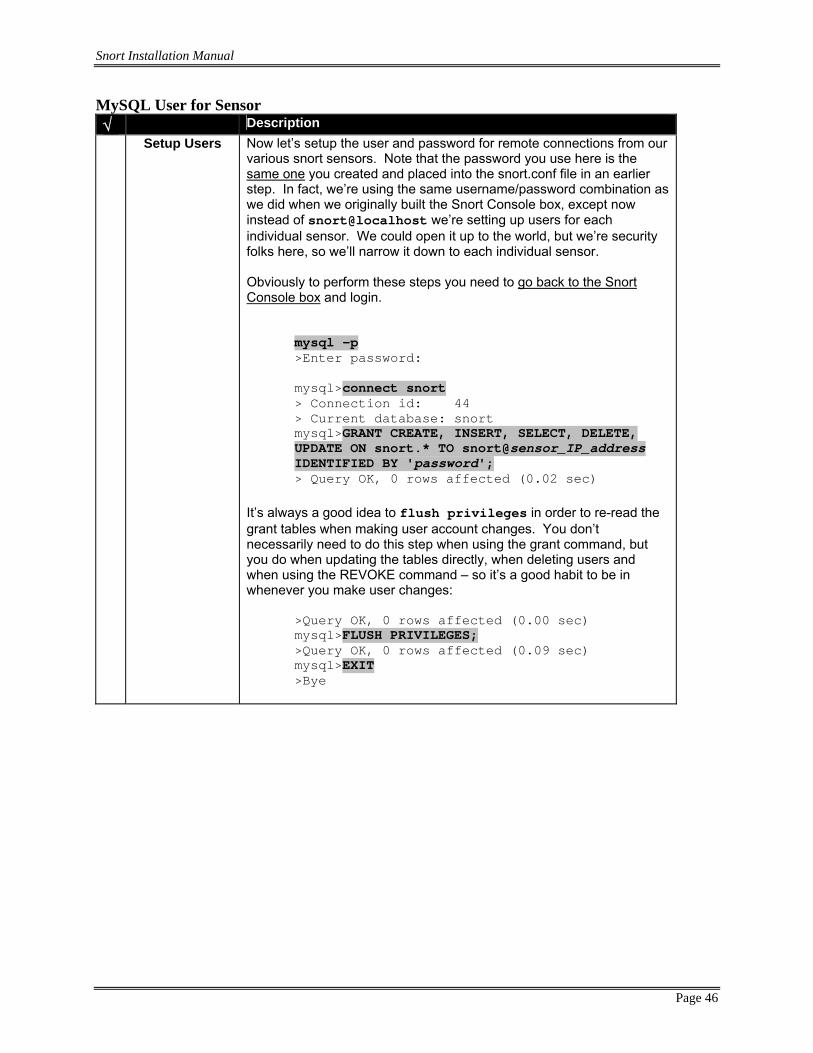
MySQL User for Sensor √ Description
Setup Users Now let’s setup the user and password for remote connections from our various snort sensors. Note that the password you use here is the same one you created and placed into the snort.conf file in an earlier step. In fact, we’re using the same username/password combination as we did when we originally built the Snort Console box, except now instead of snort@localhost we’re setting up users for each individual sensor. We could open it up to the world, but we’re security folks here, so we’ll narrow it down to each individual sensor. Obviously to perform these steps you need to go back to the Snort Console box and login.
mysql –p >Enter password:
mysql>connect snort > Connection id: 44 > Current database: snort mysql>GRANT CREATE, INSERT, SELECT, DELETE, UPDATE ON snort.* TO snort@sensor_IP_address IDENTIFIED BY 'password'; > Query OK, 0 rows affected (0.02 sec)
It’s always a good idea to flush privileges in order to re-read the grant tables when making user account changes. You don’t necessarily need to do this step when using the grant command, but you do when updating the tables directly, when deleting users and when using the REVOKE command – so it’s a good habit to be in whenever you make user changes:
>Query OK, 0 rows affected (0.00 sec) mysql>FLUSH PRIVILEGES; >Query OK, 0 rows affected (0.09 sec) mysql>EXIT >Bye
Snort Installation Manual
Page 47
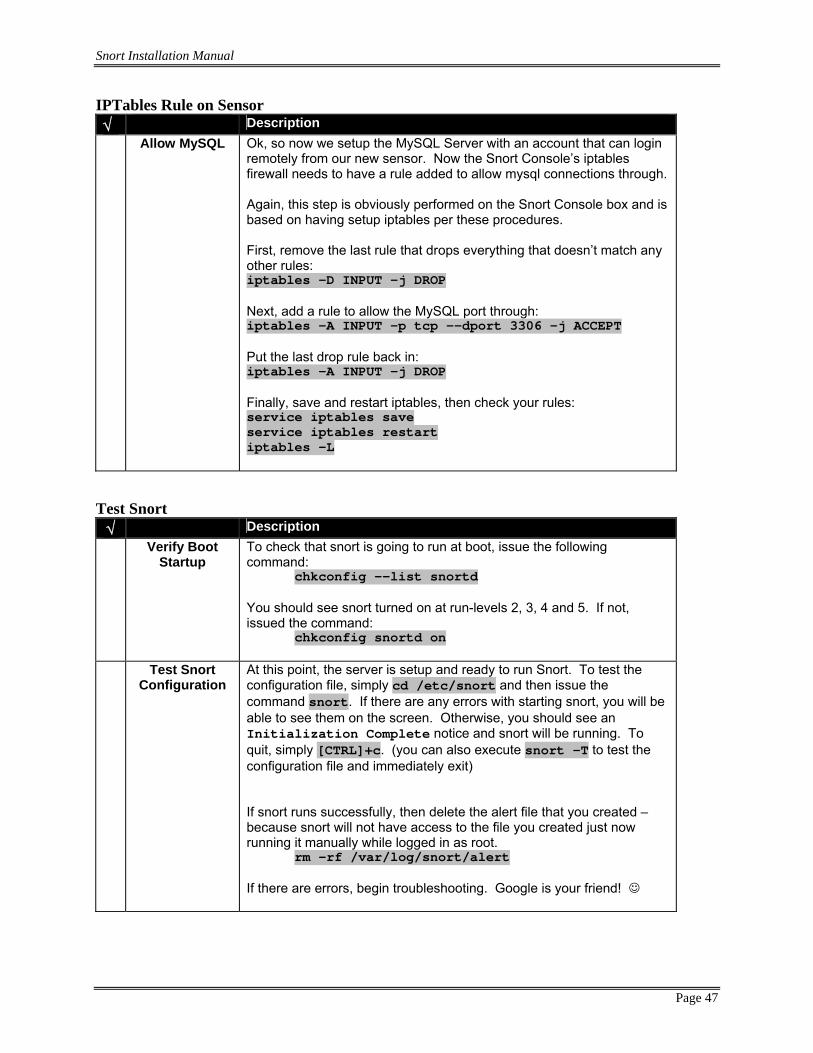
IPTables Rule on Sensor √ Description
Allow MySQL Ok, so now we setup the MySQL Server with an account that can login remotely from our new sensor. Now the Snort Console’s iptables firewall needs to have a rule added to allow mysql connections through. Again, this step is obviously performed on the Snort Console box and is based on having setup iptables per these procedures. First, remove the last rule that drops everything that doesn’t match any other rules: iptables –D INPUT –j DROP Next, add a rule to allow the MySQL port through: iptables –A INPUT –p tcp --dport 3306 –j ACCEPT Put the last drop rule back in: iptables –A INPUT –j DROP Finally, save and restart iptables, then check your rules: service iptables save service iptables restart iptables -L
Test Snort
√ Description Verify Boot
Startup To check that snort is going to run at boot, issue the following command:
chkconfig --list snortd You should see snort turned on at run-levels 2, 3, 4 and 5. If not, issued the command:
chkconfig snortd on
Test Snort Configuration
At this point, the server is setup and ready to run Snort. To test the configuration file, simply cd /etc/snort and then issue the command snort. If there are any errors with starting snort, you will be able to see them on the screen. Otherwise, you should see an Initialization Complete notice and snort will be running. To quit, simply [CTRL]+c. (you can also execute snort –T to test the configuration file and immediately exit) If snort runs successfully, then delete the alert file that you created – because snort will not have access to the file you created just now running it manually while logged in as root.
rm –rf /var/log/snort/alert If there are errors, begin troubleshooting. Google is your friend! ☺
Snort Installation Manual
Page 48
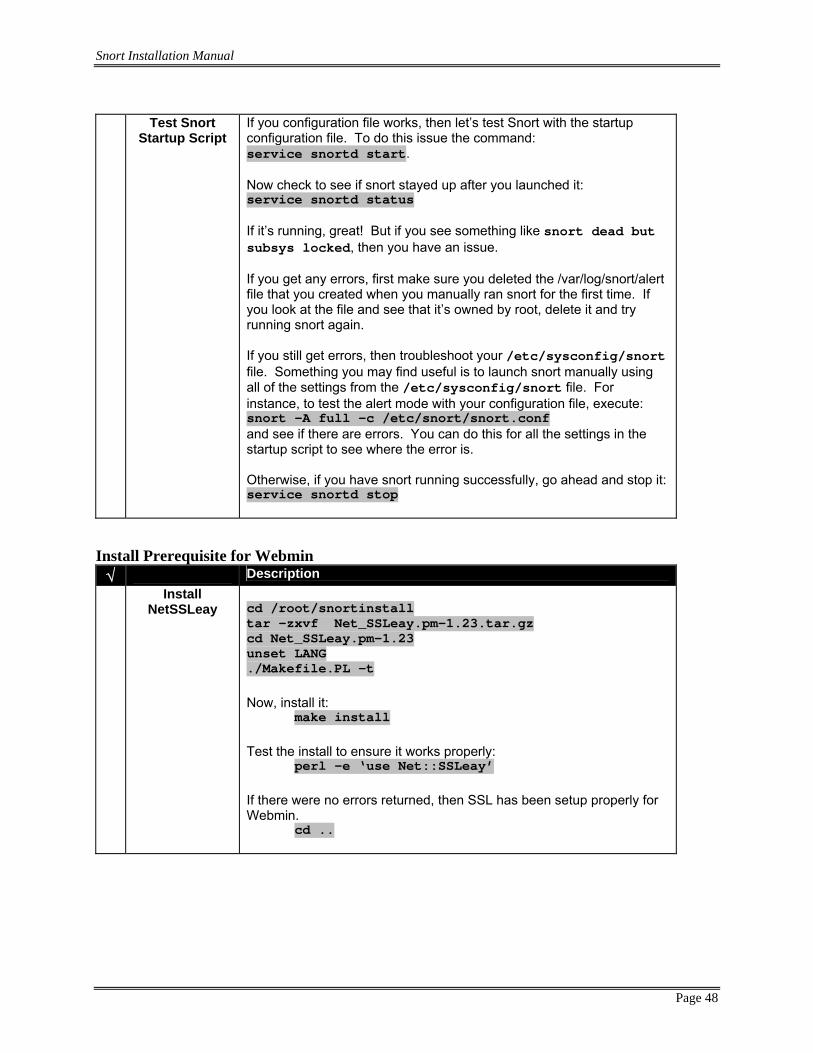
Test Snort
Startup Script If you configuration file works, then let’s test Snort with the startup configuration file. To do this issue the command: service snortd start. Now check to see if snort stayed up after you launched it: service snortd status If it’s running, great! But if you see something like snort dead but subsys locked, then you have an issue. If you get any errors, first make sure you deleted the /var/log/snort/alert file that you created when you manually ran snort for the first time. If you look at the file and see that it’s owned by root, delete it and try running snort again. If you still get errors, then troubleshoot your /etc/sysconfig/snort file. Something you may find useful is to launch snort manually using all of the settings from the /etc/sysconfig/snort file. For instance, to test the alert mode with your configuration file, execute: snort –A full –c /etc/snort/snort.conf and see if there are errors. You can do this for all the settings in the startup script to see where the error is. Otherwise, if you have snort running successfully, go ahead and stop it: service snortd stop
Install Prerequisite for Webmin
√ Description Install
NetSSLeay
cd /root/snortinstall tar –zxvf Net_SSLeay.pm-1.23.tar.gz cd Net_SSLeay.pm-1.23 unset LANG ./Makefile.PL –t
Now, install it:
make install Test the install to ensure it works properly:
perl –e ‘use Net::SSLeay’ If there were no errors returned, then SSL has been setup properly for Webmin.
cd ..
Snort Installation Manual
Page 49
Install and Configure Webmin √ Description Install Webmin
cd /root/snortinstall rpm –ivh webmin-1.300-1.noarch.rpm You should now be able to log (using root) into the Webmin console via a browser to https://server_ip_address:10000
Configure
Snort Plugin 1. Open a browser and go to: https://snort_server:10000 2. Login as root 3. Select the Webmin Configuration icon 4. Select the Webmin Modules icon 5. Install the module from a local file
a. /root/snortinstall/snort-1.1.wbm b. Click Install module
6. Select Servers icon from the TOP of the web page 7. Select the Snort IDS Admin icon (it looks like a pig) 8. Select the Module Config tab in the left hand corner (if it
doesn’t come up automatically) 9. Set the configuration to match the following (lines are
wrapped):
Full path to Snort executable (with options) =
/usr/sbin/snort –o -i eth1 –d –D –C –c /etc/snort/snort.conf
Full path to Snort configuration file =
/etc/snort/snort.conf
Full path to Snort rule files directory =
/etc/snort
Full path to Snort PID file =
/var/run/snort_eth1.pid
Command to start Snort (optional) =
/etc/rc.d/init.d/ snortd start
URL to ACID (optional) =
When finished, click the Save button and you’re done!
Snort Installation Manual
Page 50
Install and Automate PigSentry √ Description Install
PigSentry PigSentry is perl script that runs against the Snort alert log. It is used for real-time alerts, with a stable table of recent alerts to reduce the possibility of spamming yourself with emails. It will send a notice if there is a new alert, or if there is an increase in the general trend or pattern of existing alerts. To install PigSentry, we’ll simply copy the perl script and initiate the proper startup script.
<<line wrapped>> cp /root/snortinstall/scripts/pigsentry-1.2.pl /usr/local/bin/pigsentry <<line wrapped>> cp /root/snortinstall/scripts/gopigsentry /etc/rc.d/init.d chmod 755 /etc/rc.d/init.d/gopigsentry chkconfig –-add gopigsentry
Configure
PigSentry Now edit the /etc/init.d/gopigsentry file to change the email address as necessary: vi /etc/init.d/gopigsentry Locate the your_email@your_domain.TLD entry and change it to your email address. Save and close the file.
Update Snort Rules Automagically Using Oinkmaster
√ Description Install
Oinkmaster cd /root/snortinstall tar –xvzf oinkmaster-1.2.tar.gz cd oinkmaster-1.2 cp oinkmaster.pl /usr/local/bin cp oinkmaster.conf /usr/local/bin cd /root/snortinstall/scripts cp gooink /usr/local/bin cd /usr/local/bin chmod +x gooink
Snort Installation Manual
Page 51
Configure
Oinkmaster vi oinkmaster.conf First, under the General options section, locate the Example for Snort-current and unremark the url line below it that looks like this: url = http://www.snort.org/pub-bin/oinkmaster.cgi/<oinkcode>/snortrules-snapshot-CURRENT.tar.gz Replace the <oinkcode> with the Oink Code you were given when you registered at snort.org so it then looks like this (using an example oinkcode): url = http://www.snort.org/pub-bin/oinkmaster.cgi/5a08f649c16a278e1012e1c84bdc8fab9a70e2a4/snortrules-snapshot-CURRENT.tar.gz Finally, if there are any rules that you know you want disabled and not re-enabled from a new download, include them at the bottom of the file under disablesid – see the config file for syntax. Save and close the file.
Configure gooink Script
The gooink script will fire off oinkmaster.pl to update your rules and test your rules, firing off an email to you for each phase. It will also email you a list of the rules so you can verify that they did indeed update from the timestamp. To set your email address, edit the /usr/local/bin/gooink script and set the EMAIL variable from your_email@your_domain.TLD to your real email address. vi /usr/local/bin/gooink
Setup Cron Job Setup the cron job to perform the updates – note that you need to stagger the times for all your sensors, as the code only allows you to pull updates once every X (not sure what X is, but it’s minutes, not hours). I suggest setting your sensors about 1 hour apart. The syntax for the time is: MIN(0-59) HOUR(0-23) DAY_OF_MONTH(1-31) MONTH(1-12) DAY_OF_WEEK(0-6 where 0=Sunday) Command to be executed crontab –e
00 01 * * * /usr/local/bin/gooink
Create Backup Directory
and Test
Finally, create a new directory for the rules to be backed up to: mkdir /etc/snort/old-rules Oh, and you probably want to test it. Check your /etc/snort/rules directory for the current date on the rule files, then run /usr/local/bin/gooink and verify they changed.
Snort Installation Manual
Page 52
Watching the Watcher √ Description Install
& Setup Cron Job
cp /root/snortinstall/scripts/test.sh /usr/local/bin Set a cron job to run every 15 minutes to check snort crontab –e 15 * * * * /usr/local/bin/test.sh
Edit Configuration
Now edit the script and change the EMAIL variable from your_email@your_domain.TLD to your real email address vi /usr/local/bin/test.sh
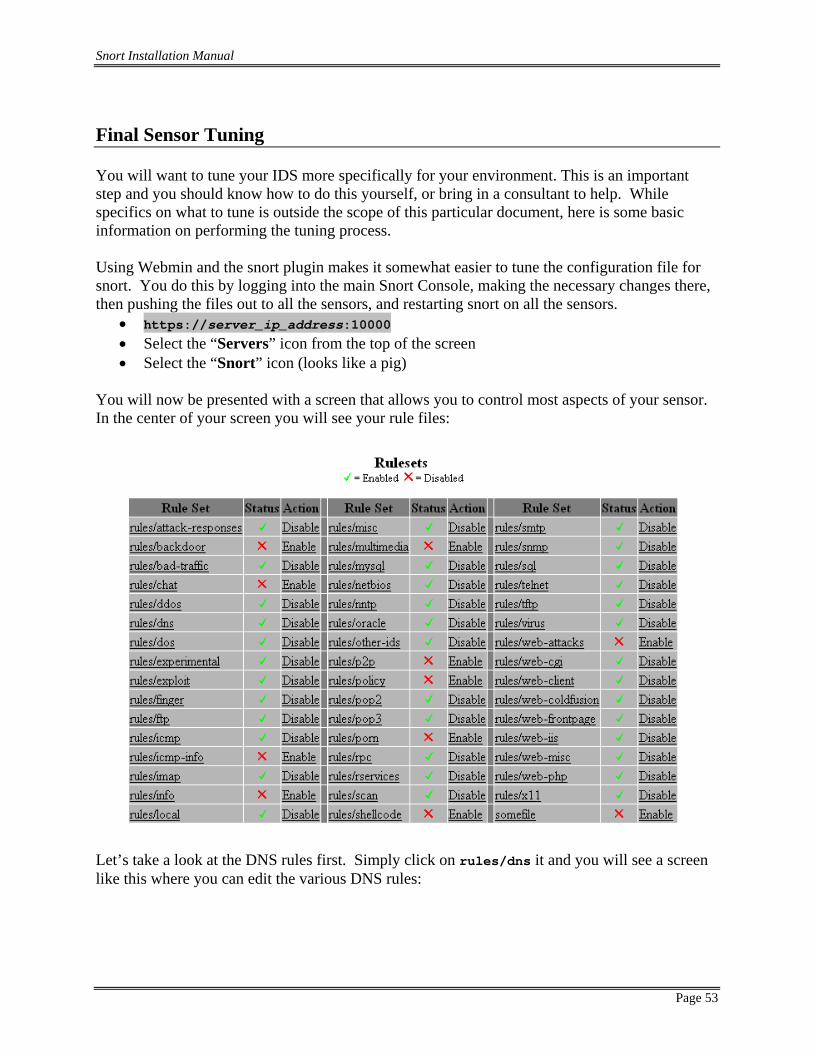
Snort Installation Manual
Page 53
Final Sensor Tuning You will want to tune your IDS more specifically for your environment. This is an important step and you should know how to do this yourself, or bring in a consultant to help. While specifics on what to tune is outside the scope of this particular document, here is some basic information on performing the tuning process. Using Webmin and the snort plugin makes it somewhat easier to tune the configuration file for snort. You do this by logging into the main Snort Console, making the necessary changes there, then pushing the files out to all the sensors, and restarting snort on all the sensors.
• https://server_ip_address:10000 • Select the “Servers” icon from the top of the screen • Select the “Snort” icon (looks like a pig)
You will now be presented with a screen that allows you to control most aspects of your sensor. In the center of your screen you will see your rule files:
Let’s take a look at the DNS rules first. Simply click on rules/dns it and you will see a screen like this where you can edit the various DNS rules:
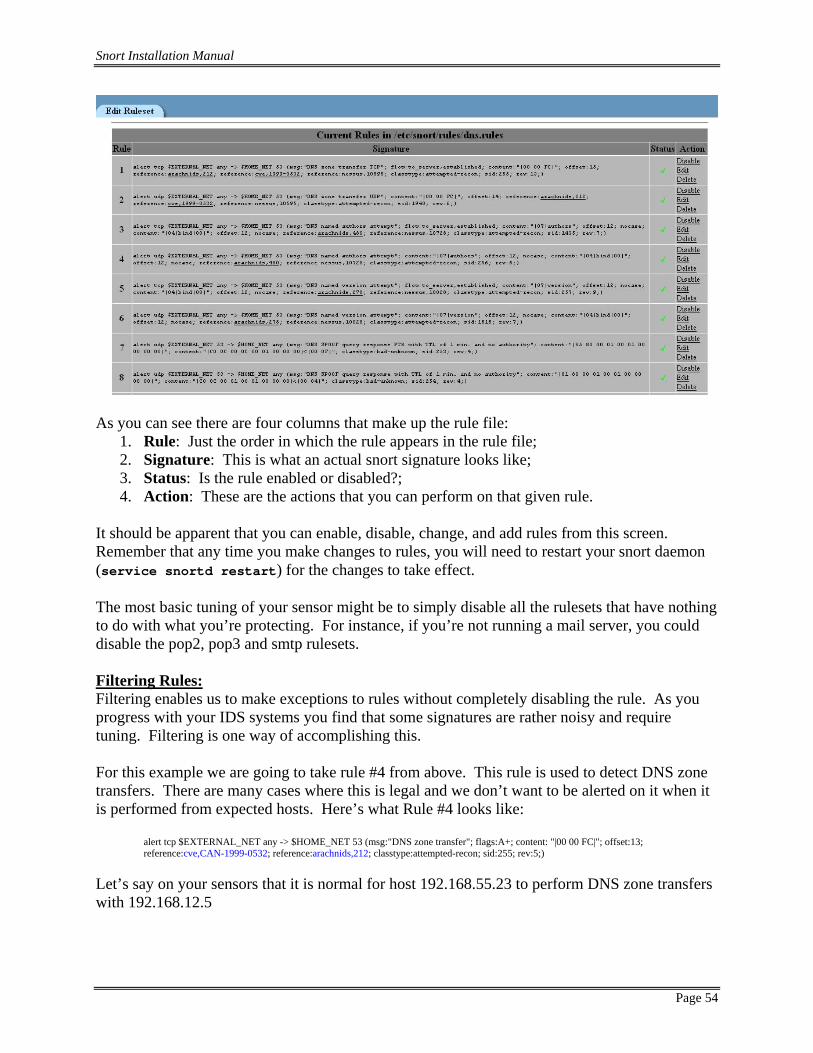
Snort Installation Manual
Page 54
As you can see there are four columns that make up the rule file:
1. Rule: Just the order in which the rule appears in the rule file; 2. Signature: This is what an actual snort signature looks like; 3. Status: Is the rule enabled or disabled?; 4. Action: These are the actions that you can perform on that given rule.
It should be apparent that you can enable, disable, change, and add rules from this screen. Remember that any time you make changes to rules, you will need to restart your snort daemon (service snortd restart) for the changes to take effect. The most basic tuning of your sensor might be to simply disable all the rulesets that have nothing to do with what you’re protecting. For instance, if you’re not running a mail server, you could disable the pop2, pop3 and smtp rulesets. Filtering Rules: Filtering enables us to make exceptions to rules without completely disabling the rule. As you progress with your IDS systems you find that some signatures are rather noisy and require tuning. Filtering is one way of accomplishing this. For this example we are going to take rule #4 from above. This rule is used to detect DNS zone transfers. There are many cases where this is legal and we don’t want to be alerted on it when it is performed from expected hosts. Here’s what Rule #4 looks like:
alert tcp $EXTERNAL_NET any -> $HOME_NET 53 (msg:"DNS zone transfer"; flags:A+; content: "|00 00 FC|"; offset:13; reference:cve,CAN-1999-0532; reference:arachnids,212; classtype:attempted-recon; sid:255; rev:5;)
Let’s say on your sensors that it is normal for host 192.168.55.23 to perform DNS zone transfers with 192.168.12.5
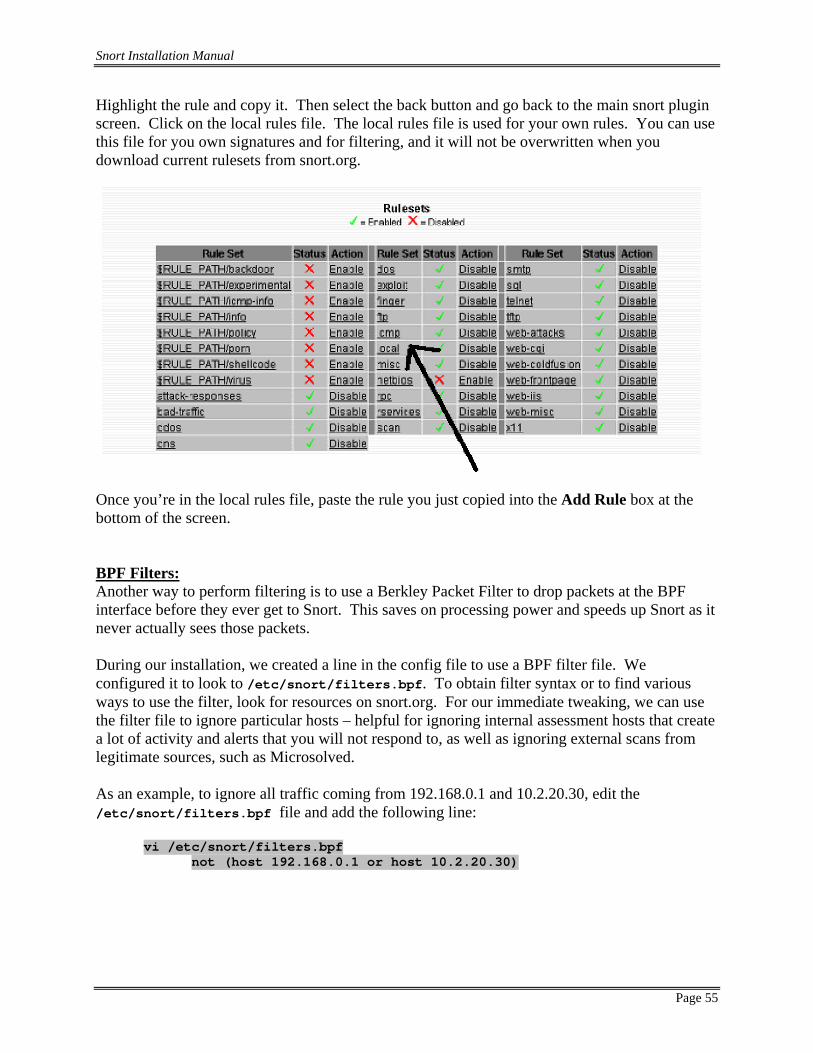
Snort Installation Manual
Page 55
Highlight the rule and copy it. Then select the back button and go back to the main snort plugin screen. Click on the local rules file. The local rules file is used for your own rules. You can use this file for you own signatures and for filtering, and it will not be overwritten when you download current rulesets from snort.org.
Once you’re in the local rules file, paste the rule you just copied into the Add Rule box at the bottom of the screen. BPF Filters: Another way to perform filtering is to use a Berkley Packet Filter to drop packets at the BPF interface before they ever get to Snort. This saves on processing power and speeds up Snort as it never actually sees those packets. During our installation, we created a line in the config file to use a BPF filter file. We configured it to look to /etc/snort/filters.bpf. To obtain filter syntax or to find various ways to use the filter, look for resources on snort.org. For our immediate tweaking, we can use the filter file to ignore particular hosts – helpful for ignoring internal assessment hosts that create a lot of activity and alerts that you will not respond to, as well as ignoring external scans from legitimate sources, such as Microsolved. As an example, to ignore all traffic coming from 192.168.0.1 and 10.2.20.30, edit the /etc/snort/filters.bpf file and add the following line:
vi /etc/snort/filters.bpf not (host 192.168.0.1 or host 10.2.20.30)

Snort Installation Manual
Page 56
Here is another example using multiple filters in the filters.bpf file: not (host xxx.xxx.79.243 or host xxx.xxx.81.38 or host xxx.xxx.79.246) and not (src host xxx.xxx.101.240 and dst host xxx.xxx.179.58) and not (src host xxx.xxx.25.101 and dst port 21) and not ((src host xxx.xxx.101.233 and src port 1521) and dst host xxx.xxx.179.95) and not (src host xxx.xxx.2.102 and dst port 161) and not ((src host xxx.xxx.179.70) and (dst host xxx.xxx.239.50 and dst port 135))