Embed Size (px)
DESCRIPTION
Step-by-step guide to setting up your new tyre pressure monitoring device. This manual covers STP116 and STP188 devices in English. To purchase visit www.snooper.co.uk
Citation preview
User manual
Tyre Pressure Monitoring System
STP116 • STP188
2 • UK
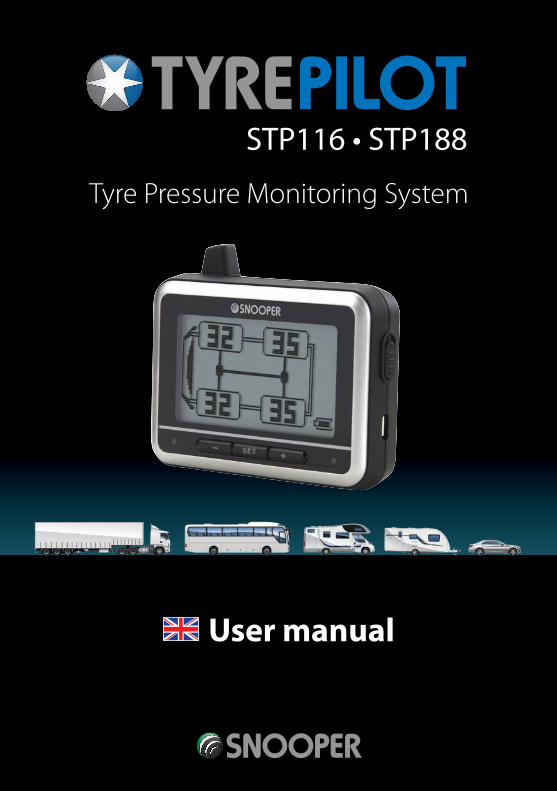
BatteryReplacement Tool
Sensor WaterproofRubber Seal (Spare)
In-Vehicle Charger
Hex Wrench
What’s IncludedStandalone display
●● Wireless LCD display unit
●● Built-in rechargeable lithium battery
●● Auto backlight
●● Selectable vehicle configuration
●● Configurable high/low pressure warnings
●● Configurable temperature warnings
●● Visual and audible alerts
●● Selectable pressure units
Sensors
●● Up to 116 PSI or 188 PSI sensor depending on product purchased.
●● Easy-fit valve cap sensor.
●● Water/weather resistant
●● Long life replaceable battery
●● Fast leak alert
●● Individually coded sensors
●● Anti-theft design
116 PSI Sensors
188 PSI Sensors
Sensor Installation Tool
3 • UK
Getting Started
Charging the Tyre Pilot display monitor
The Tyre Pilot display includes a built-in rechargeable lithium battery that will last around 60 hours in normal use. To charge, connect the small USB plug on the end of the car charger to the USB socket on the side of the Tyre Pilot display. Then, plug the other end of the vehicle charger in to the cigarette lighter socket in your vehicle.
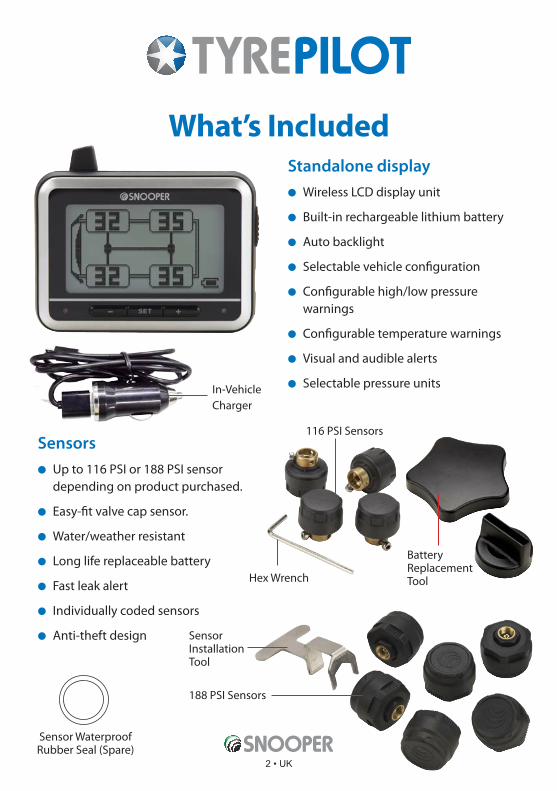
Mounting the Tyre Pilot display monitor
Tyre Pilot can be mounted on the windscreen bracket provided if you require a constant view of your tyre pressure and temperature levels. Alternatively, you can choose to simply leave the monitor in the vehicle somewhere convenient, but out of sight and rely on the audible alerts to get your attention in the event of any issues.
To mount the windscreen bracket, choose a suitable location on the windscreen which enables you to easily read the display, without taking your eyes from the road ahead when driving. Be sure to mount the display so that it does not obscure your view of the road and so that the power cable does not interfere with the controls of the vehicle if it is connected whilst charging the monitor’s built-in battery.
4 • UK
Setting up your vehicle and pairing the sensors with the Tyre Pilot display monitor
Selecting vehicle type:
Snooper Tyre Pilot has been designed to be used on a range of different vehicles, including cars, caravans, motorhomes, trucks, buses, coaches and trailers and will also monitor your spare wheel.
Tyre Pilot has been designed to monitor the following configurations:
●● Single vehicle up to 4 wheels
●● Single vehicle up to 10 wheels
●● Trailer up to 12 wheels
●● Spare tyre x 1
●● Single vehicle up to 4 wheels + spare tyre
●● Single vehicle up to 4 wheels + trailer up to 12 wheels
●● Single vehicle up to 10 wheels + spare tyre
●● Single vehicle up to 10 wheels + trailer up to 12 wheels
Begin by selecting your vehicle type as follows:
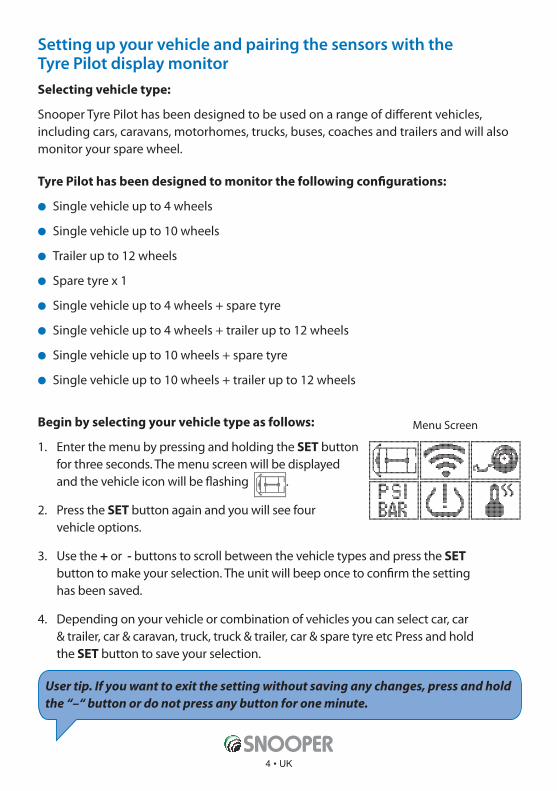
1. Enter the menu by pressing and holding the SET button for three seconds. The menu screen will be displayed and the vehicle icon will be flashing .
2. Press the SET button again and you will see four vehicle options.
3. Use the + or - buttons to scroll between the vehicle types and press the SET button to make your selection. The unit will beep once to confirm the setting has been saved.
4. Depending on your vehicle or combination of vehicles you can select car, car & trailer, car & caravan, truck, truck & trailer, car & spare tyre etc Press and hold the SET button to save your selection.
User tip. If you want to exit the setting without saving any changes, press and hold the “–“ button or do not press any button for one minute.
Menu Screen
5 • UK
How to pair the sensors with the Tyre Pilot display
There are two options available for pairing sensors to the monitor: LF pairing or Inflation pairing.
Pairing your sensors by LF
1. Press and hold the SET button to enter the menu.
2. Use the + or – button to select the LF Pairing icon . The vehicle combination you selected previously will be displayed.
3. One of the tyre icons displayed will flash indicating that it is ready to pair. Place the sensor you want to use for that wheel close to the bottom of the monitor, and press the SET button once. The red LED light will flash quickly indicating it is ready to pair. The sensor will send its ID code to the monitor automatically. The unit will beep to confirm the sensor has been paired successfully. To save the setting, press and hold the SET button until the unit display.
4. Once successfully paired, attach the sensor to the valve of the appropriate wheel.
5. To continue pairing the rest of the sensors, use the + or - buttons to scroll to the other tyres required and repeat steps 3 and 4.
User tip. Please ensure that you keep the others sensors at least 1m away from the display to ensure that the correct sensor is paired and regularly save any changes.
Instructions on attaching and securing the sensor to the valve can be found later on in this manual.
Note: If no buttons are pressed and there is no activity for one minute, the unit will exit the pairing mode without saving any changes. Please remember to save any changes to ensure they are not lost.
Pairing your sensors by Inflation
1. Press and hold the SET button to enter the menu.
2. Use the + or – button to scroll to the Inflation pairing icon and press the SET button to select. The vehicle combination you selected previously will be displayed.
6 • UK
3. One of the tyre icons displayed will flash indicating that it is ready to pair. Attach the sensor you wish to use for that tyre on the appropriate tyre valve. The device will beep once to confirm the sensor has paired successfully and the tyre pressure will automatically be displayed. Press and hold the SET button to save the setting.
4. To continue pairing the rest of the sensors, use the + or - buttons to scroll to the other tyres required and repeat step 3.
5. After you have successfully paired all your sensors, press and hold the SET button to save your settings and exit the pairing mode.
User tip. Instructions on attaching and securing the sensor to the valve can be found later on in this manual.
Note: If no buttons are pressed and there is no activity for one minute, the unit will exit the pairing mode without saving any changes. Please remember to save any changes to ensure they are not lost.
Selecting pressure and temperature units
1. Press and hold the SET button to enter the menu.
2. Use the + or – buttons to scroll to the PSI/BAR icon and press the SET button to select.
3. Use the + or – buttons to switch between PSI or BAR and press the SET button to select.
4. Next, use the + or – buttons to switch between F or C and press the SET button to select.
5. To save your settings, press and hold the SET button. The unit will beep once to confirm your selection.
User tip. If you want to exit the setting without saving any changes, press and hold the “–“ button or do not press any button for one minute.
7 • UK
Selecting your high pressure and low pressure limits
Follow these instructions to select at which high or low pressure limits you would like
your Snooper Tyre Pilot to alert.
1. Press and hold the SET button to enter the menu.
2. Use the + or – buttons to scroll to the Low Pressure icon and press the SET button to select.
3. Two numbers are displayed for each axle. The upper number indicates the pressure the tyre needs to exceed to trigger an alert. The lower number indicates the pressure the tyre needs to drop below to trigger an alert.
4. Press the SET button to scroll through the upper and lower values of each axle and use the + and – buttons to adjust the values as appropriate. Ignore any axles not used.
5. Once you have adjusted the upper and lower pressures for each axle, press and hold the SET button. The unit will beep once to confirm it has saved your selection.
User tip. Ensure the upper pressure value is higher than the lower pressure value and do not set the upper value higher than the upper value of the sensors you are fitting. Up to 116 PSI or 188 PSI depending on the package purchased.
If you want to exit the setting without saving any changes, press and hold the “–“ button or do not press any button for one minute.
High temperature alert settings
1. Press and hold the SET button to enter the menu.
2. Use the + or – buttons to scroll to the High Temperature icon and press the SET button to select.
3. Use the + and – buttons to adjust the High Temperature limit to the value you require.
4. Press and hold the SET button to save your selection. The unit will beep once to confirm your settings have been saved successfully.
User tip. If you want to exit the setting without saving any changes, press and hold the “–“ button or do not press any button for one minute
8 • UK
Monitor display in Standby mode
Pressure display
The monitor will display the pressure of the tyres on your vehicle successfully paired with the sensors. If you have a combination of vehicles configured eg a car and caravan or truck and trailer, the monitor will switch between the two, at ten second intervals.
Temperature display
The Tyre Pilot monitor will automatically show your vehicle’s tyre pressures. If you would like to view Temperature at any time, press the SET button once.
Alert patterns
Sensors successfully paired with the Tyre Pilot display will automatically send pressure and temperature readings to the monitor every 5 minutes. If the pressure data received by the monitor is over or under the pressure values selected, or if the tyre temperature exceeds the temperature value you have selected, the device will provide an immediate alert as follows:
1. The device will emit an audible beep.
2. The red LED light on the monitor will flash
3. The corresponding icon for either pressure or temperature will appear on the display and flash.
4. The icon representing the tyre that is experiencing the issue and the pressure or temperature value of that tyre will flash.
5. Cancel the audible alert at any time by pressing any button on the display.
User tip. The red light and tyre icon will continue to flash until the correct pressure or temperature has been restored or the device powered off.
Monitor - Low Battery Alert
The monitor includes a built-in lithium rechargeable battery. Fully charged, the battery will last for around 60 hours. The battery indicator on the display will keep you informed of the current battery level status and will flash when in need of recharging.
9 • UK
Sensor - Low Battery Alert
Each sensor contains a battery. When the battery capacity in the sensor becomes too low, the sensor will send a message to the display. The display will beep and the red led will flash. At the same time the tyre icon that the sensor is attached too will flash along with the low battery icon to indicate that the battery in the sensor needs to be replaced. Press any button to cancel the alarm.
User tip. The red light and tyre icon will continue to flash until the battery in the sensor has been replaced or the device powered off.
Other Functions
Monitor Sleep Mode
If the vehicle does not move for 10 minutes, the monitor will enter sleep mode to save power. The display will turn off and will stop receiving sensor data. The monitor will automatically return to standby mode if it senses any movement or if you press any buttons. Pressing any button or touch the monitor will enter standby mode again. The monitor will also return to standby mode when it detects movement.
Auto Backlight and Brightness
The Tyre Pilot monitor includes a built-in light sensor. The backlight will illuminate the display whenever the display is switched on by movement or by pressing a button and based on the level of light at your location. The brightness of the backlight will change depending on the brightness of the ambient light surrounding it.
User tip: You can also manually adjust the level of the Auto Backlight. Wait for the backlight to come on and then use the ‘-‘ button to scroll through the brightness options. Choose between Bright, Medium and Off.
10 • UK
Deleting a sensor ID code
If you move a sensor from one tyre to another or to a different vehicle, it is recommended to delete the sensor ID from the monitor and to re-pair it repeating the inflation or LF pairing mode outlined previously in this user manual.
Deleting a sensor paired using LF
1. Press and hold the SET button to enter the menu.
2. Select the LF Pairing icon. Use the + or – buttons to locate the sensor you wish to delete.
3. Press and hold the + button until the monitor beeps confirming that the sensor ID has successfully been deleted.
Deleting a sensor paired using Inflation
1. Press and hold the SET button to enter the menu.
2. Select the Inflation Pairing icon. Use the + or – buttons to locate the sensor you wish to delete.
3. Press and hold the + button until the monitor beeps confirming that the sensor ID has successfully been deleted.

11 • UK
screw
Installing 116 PSI sensors
1. Unscrew the tyre valve cap and replace with the tyre sensor.
2. Use the wrench provided to tighten the screw for added security.
User tip: Please keep the wrench in a safe place for when you next need it.
Replacing the sensor battery
1. Use the hex wrench provided to remove the anti-theft screw and remove the sensor from the tyre valve.
2. Use the battery replacement tool to unscrew the sensor cap.
Do not over tighten to prevent possible damage to the sensor.
Hex Wrench
Do not over tighten the security screw to avoid damaging the thread on the tyre valve.
12 • UK
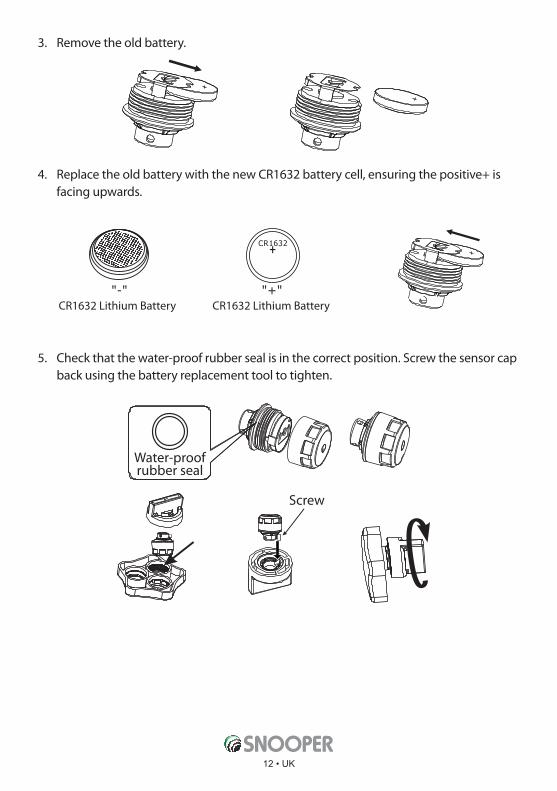
CR1632
"-" " " +CR1632 Lithium Battery CR1632 Lithium Battery
3. Remove the old battery.
4. Replace the old battery with the new CR1632 battery cell, ensuring the positive+ is facing upwards.
5. Check that the water-proof rubber seal is in the correct position. Screw the sensor cap back using the battery replacement tool to tighten.
Water-proof rubber seal
Screw
13 • UK
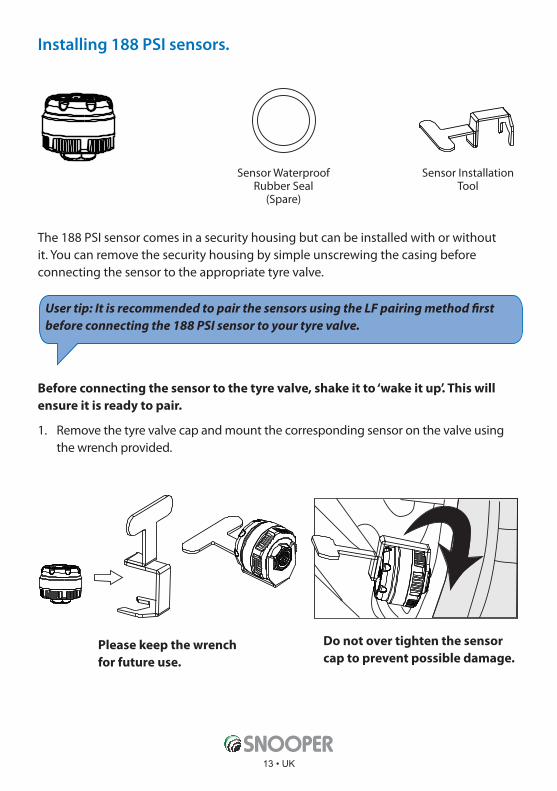
Installing 188 PSI sensors.
The 188 PSI sensor comes in a security housing but can be installed with or without it. You can remove the security housing by simple unscrewing the casing before connecting the sensor to the appropriate tyre valve.
User tip: It is recommended to pair the sensors using the LF pairing method first before connecting the 188 PSI sensor to your tyre valve.
Before connecting the sensor to the tyre valve, shake it to ‘wake it up’. This will ensure it is ready to pair.
1. Remove the tyre valve cap and mount the corresponding sensor on the valve using the wrench provided.
Sensor Waterproof Rubber Seal
(Spare)
Sensor Installation Tool
Do not over tighten the sensor cap to prevent possible damage.
Please keep the wrench for future use.
14 • UK
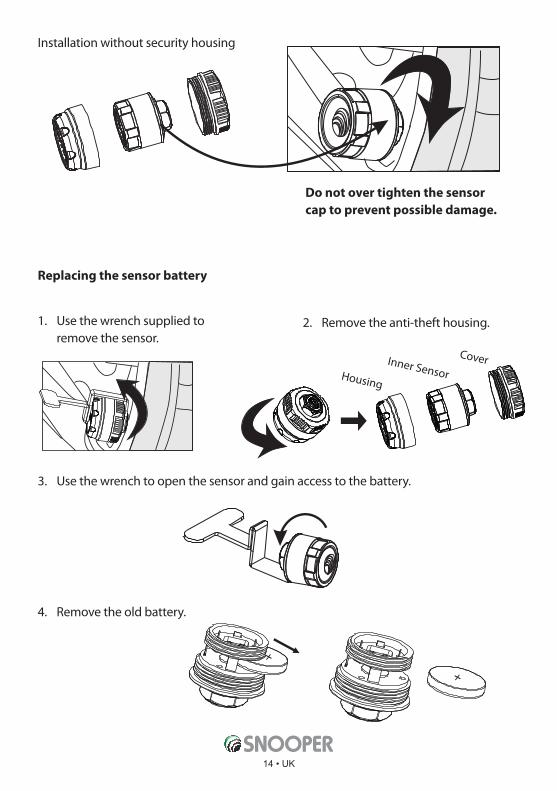
Housing
Inner Sensor
Cover
Replacing the sensor battery
1. Use the wrench supplied to remove the sensor.
3. Use the wrench to open the sensor and gain access to the battery.
4. Remove the old battery.
2. Remove the anti-theft housing.
Installation without security housing
Do not over tighten the sensor cap to prevent possible damage.
15 • UK
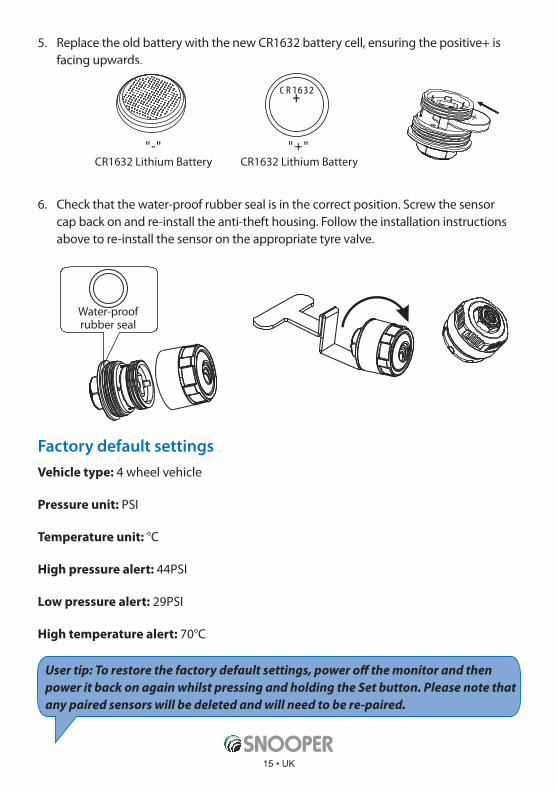
5. Replace the old battery with the new CR1632 battery cell, ensuring the positive+ is facing upwards.
6. Check that the water-proof rubber seal is in the correct position. Screw the sensor cap back on and re-install the anti-theft housing. Follow the installation instructions above to re-install the sensor on the appropriate tyre valve.
Factory default settings
Vehicle type: 4 wheel vehicle
Pressure unit: PSI
Temperature unit: °C
High pressure alert: 44PSI
Low pressure alert: 29PSI
High temperature alert: 70°C
User tip: To restore the factory default settings, power off the monitor and then power it back on again whilst pressing and holding the Set button. Please note that any paired sensors will be deleted and will need to be re-paired.
"-" " " +CR1632 Lithium Battery CR1632 Lithium Battery
Water-proof rubber seal

16 • UK
Specifications
MonitorOperational Temperature -20°C~+80°C
Storage Temperature -30°C~+85°C
Charger Input Voltage DC5V
Frequency 433.92MHz
Size 65 x 90 x 23.5mm
Weight 90 grams
Sensor (0-116PSI) Operational Temperature -40°C~+80°C
Storage Temperature -40°C~+85°C
Pressure Range 0-8Bar, 0-116PSI
Pressure Accuracy ±1.5PSI (0.1Bar)
Temperature Accuracy ±3°C
Transmission Power <10dBm
Frequency 433.92MHz
Battery Life 1~2years (CR1632)
Weight 12 grams
Size Diameter 21mm Height 21mm
Sensor (0-188PSI) :Operational Temperature -40°C~+80°C
Storage Temperature -40°C~+85°C
Pressure Range 0-13Bar, 0-188PSI
Pressure Accuracy ±1.5PSI (0.1Bar)
Temperature Accuracy ±3°C
Transmission Power <10dBm
Frequency 433.92MHz
Battery Life 1~2years (CR1632)
Weight 19 grams
Size without anti theft housing Diameter 21mm Height 21mm
Size with anti theft housing Diameter 28mm Height 24mm
17 • UK
Service under warrantyTyre Pilot comes with a standard 12 month manufacturer’s warranty. If, for some reason your unit requires service under warranty return Tyre Pilot by special delivery and in suitable packaging to:
The Returns Dept., Performance Products Limited, Cleaver House, Sarus Court, Manor Park, Runcorn WA7 1UL
Enclose the following information: (a) Your name, address and a full description of the problem. (b) A telephone number where you can be reached during business hours. (c) Serial number of your unit. (d) Proof of Purchase
PLEASE NOTE: We cannot process any warranty claims unless proof of purchase is provided. Please retain your receipt as a precaution.
Full terms and conditions of warranty are available on request.
Disposal of Old Electrical & Electronic EquipmentThis symbol on a product or its packaging indicates that this product shall not be treated as household waste. It should be handed over to an applicable collection point for the recycling of electrical equipment.
By ensuring that this product is disposed of correctly you will help/prevent potential negative impact on the environment. The recycling of materials will help to conserve natural resources.
For further details about recycling please contact your local civic office or the shop where it was originally purchased.
Disposing of the Battery Please check with your local waste management service authority regarding regulations for the safe disposal of the battery. The battery should never be placed in municipal waste. Use a battery disposal facility if available.

A wholly owned subsidiary of Cobra Electronics UK Ltdwww.snooper.co.uk snooperuk @snooperuk SnooperUK