Embed Size (px)
Citation preview

SMS Tutorials Mesh Editing
Page 1 of 14 © Aquaveo 2014
SMS 11.2 Tutorial
Mesh Editing
Objectives
This tutorial lesson teaches manual mesh generation and editing techniques that can be performed
using SMS. It should be noted that manual methods are NOT recommended. Automated mesh
generation is preferred both for mesh generation as well as mesh revision to ensure the mesh
generation can be replicated and preserved. For minor edits, and for historical support, this tutorial
gives a brief introduction to tools in SMS that are useful for editing a mesh.
Prerequisites • None
Requirements • Mesh Module
Time • 20–35 minutes
v. 11.2
SMS Tutorials Mesh Editing
Page 2 of 14 © Aquaveo 2014
1 Importing Topographic Data ............................................................................................... 2 2 Triangulating the Nodes ....................................................................................................... 3 3 Deleting Outer Elements ....................................................................................................... 4
3.1 Deleting Thin Triangles .................................................................................................. 4 4 Merging Triangles ................................................................................................................. 5 5 Editing Individual Elements ................................................................................................. 6
5.1 Using the Split/Merge Tool ............................................................................................. 7 5.2 Using the Swap Edge Tool .............................................................................................. 8 5.3 Renumbering the Mesh ................................................................................................. 10 5.4 Changing the Contour Options ..................................................................................... 10 5.5 Checking the Mesh Quality ........................................................................................... 11
6 Saving the Mesh ................................................................................................................... 14 7 Conclusion ........................................................................................................................... 14
1 Importing Topographic Data
A mesh can be generated directly from topographic data points. Normally these points
are not spaced in a way that would result in a useful mesh, so this type of data is more
commonly used to create a scatter set, or “TIN”.
However, for illustration of the mesh editing tools, this tutorial will use a
preconditioned set of points contained in an XYZ file. This file defines a point on each
row of the file with an X, Y, and Z coordinate. A file of this type may also contain one
or more header rows defining the contents of the file, source of the data, or identifying
the intent of each column. This type of file can be opened by SMS.
To open an XYZ file:
1. First check that the default mesh model has been set to a quadratic mesh
model. To do this:
a. Go to Edit | Preferences… to bring up the SMS Preferences dialog.
b. Select the Defaults tab and check that the Default 2D Mesh Model is
set to “TABS”. Click OK when done. After this tutorial, the user may
change the default mesh model if desired using these same steps.
Users may want to go through this tutorial using a linear mesh model,
such as ADCIRC or FESWMS.
2. Select File | Open, to bring up the Open dialog.
3. Navigate to the tutorial\SMS_MeshEditing\data files directory.
4. Select the file “poway1.xyz.”
5. Click Open to bring up the File Import Wizard.
6. In Step 1 of the Import Wizard, check the Space option, then click Next >.
7. Change the SMS data type to “Mesh”, uncheck the Triangulate data option,
and make sure the column headings for the three data columns show a
mapping of “X”, “Y” and “Z”, respectively, in the Type row of the File preview
section. Click Finish to import the data points.
The data points from the file are converted to mesh nodes. From the File Import
Wizard, a user can open any columnar data into SMS. See the SMS Online Help for

SMS Tutorials Mesh Editing
Page 3 of 14 © Aquaveo 2014
more information on the File Import Wizard. The data points created from
“poway1.xyz” are shown in Figure 1.
If the data points are not visible:
1. Select the Display | Display Options command.
2. Select the “2D Mesh” option from the list on the left, and make sure that
Nodes is toggled on. Click OK when done.
Figure 1 The poway1.xyz data points
2 Triangulating the Nodes
After nodes have been created, elements or cells are required to build a mesh. Elements
connect the nodes to define the extents of the flow area. SMS provides numerous
automatic mesh generation techniques. This section will review a very simple
technique, triangulation.
If the Triangulate data option had not been unchecked in the File Import Wizard, this
step would have been done automatically when the file was imported. The file would
then have looked like Figure 2 when it was opened.
To create a triangulated mesh from the data points, do the following:
1. Click on the “Mesh Data” folder to make it active.
2. Select Elements | Triangulate.
When SMS triangulates data points, it creates either quadratic triangles or linear
triangles from the mesh nodes. Different numerical models support different types of
elements. RMA2 and FESWMS support quadratic elements, while ADCIRC, SRH-2D,
and CGWAVE support only linear elements.
After the nodes are triangulated, the mesh will look like that in Figure 2. It may or may
not have midside nodes, depending on whether the elements are linear or quadratic.
Quadratic elements usually will have them, and linear elements usually will not.

SMS Tutorials Mesh Editing
Page 4 of 14 © Aquaveo 2014
Figure 2 The results of triangulating the "poway1.xyz" data
3 Deleting Outer Elements
The triangulation process always creates elements outside the real mesh boundaries.
For this tutorial, the mesh should be in the shape of a rotated S, so any elements
outside of this boundary must be deleted. Do as follows to remove these elements:
1. Select the Select Element tool in the Toolbox.
2. Click on an element outside the rotated S shape to select it.
3. Select another element by holding the Shift key and clicking on it.
4. Select Edit | Delete or press the Delete key to remove the selected
elements.
5. Click Yes at the prompt to confirm the deletion.
It is tedious to individually select every element that needs to be deleted. SMS
provides a method to help select groups of adjacent elements by doing the following:
1. Hold the Ctrl key and click and drag a line through some elements to select
them. Be careful to only select elements outside the S shape.
2. Select Edit | Delete or press the Delete key to remove the selected elements.
3. Click Yes at the prompt to confirm the deletion.
4. Finish deleting elements that are outside the boundaries of the S shape.
3.1 Deleting Thin Triangles
It is not uncommon for the triangulation process to create very thin triangular elements
outside the desired mesh boundary. The three corner nodes of thin triangles are almost
collinear and the elements may be too thin to see or select. If these are not deleted,
numerical errors in the model solution can result.
SMS provides a way to define what is meant by “thin triangle” using the aspect ratio

SMS Tutorials Mesh Editing
Page 5 of 14 © Aquaveo 2014
element. The element “aspect ratio” is the ratio of the element width to its height.
Perfect equilateral triangles have an aspect ratio of 1.0 while that of thin triangles is
much less. To define the element aspect ratio, do the following:
1. Select Elements | Options to bring up the Element Options dialog.
2. Set the aspect ratio in the Select thin triangle aspect ratio box to “0.1”.
Triangular elements with an aspect ratio less than this are considered to be thin
triangles.
3. Leave the rest of the dialog alone and c lick the OK button.
The best aspect ratio to use for selecting thin triangles depends on the mesh. For
this mesh, the distribution of nodes is rather uniform, so a large aspect ratio will
suffice. After this value is set, SMS can check for and select thin triangles. To delete
any remaining thin triangles, follow these steps:
4. Select Elements | Select Thin Triangles. The lower right portion of the Status
Bar in the Graphics Window shows how many elements became selected due
to this operation, along with the total area of the selected elements. There may
be quite a few elements selected.
5. Select Edit | Delete or press the Delete key.
6. Click Yes to confirm the deletions.
The mesh should now look similar to Figure 3.
Figure 3 The poway1 mesh after deleting excess triangles
4 Merging Triangles
The mesh is composed entirely of triangles. Both ADCIRC and CGWAVE support
only triangles. If using one of these models, the user may skip this section of this
tutorial.
Using quadrilateral elements can reduce the number of elements required for a
simulation and speed up analysis when using RMA2, RMA10, FESWMS, or HIVEL
because of the following:
A quadrilateral element covers more area than a triangular element.
A quadrilateral can maintain good interior angles (90 degrees) and still have
high resolution in one direction. This makes these elements more numerically
stable.

SMS Tutorials Mesh Editing
Page 6 of 14 © Aquaveo 2014
SMS can automatically merge a pair of triangles into a quadrilateral. Before merging
triangles, the Merge triangles feature angle should be set. To do this, follow these
steps:
1. Select Elements | Options to bring up the Element Options dialog.
2. Enter a value of “55.0” in the Merge triangles feature angle field. (The default
value is 65.0.) Two triangles may be merged if all angles of the resulting
quadrilateral are greater than the value specified.
3. Leave the other options alone and click the OK button.
Numeric solvers are more stable and accurate when quadrilateral elements are
rectangular and triangular elements are equilateral. Although it is not practical for a
mesh to exist entirely of these perfect shapes, the elements should approach these
shapes as close as possible. For this reason, SMS merges triangles in an iterative
manner.
First, it merges elements using the angle criterion of 90°. Then, the angle criterion is
decreased by a number of steps to the feature angle specified. Slowly decreasing the
feature angle and testing all triangles against this specified angle will form the best-
shaped elements.
SMS can merge the triangles in either a selected portion of elements or all elements. In
order to merge triangles in the entire mesh, no elements should be selected. Do the
following to merge triangular elements into quadrilateral elements:
1. Select Elements | Merge Triangles.
2. Since no elements are selected, the user will be prompted to merge all
triangles. Click the Yes button at this prompt.
With most meshes, as is the case for this example, not all triangles will be merged. The
mesh will appear as in Figure 4 after SMS merges the triangles.
5 Editing Individual Elements
After triangulating the nodes, deleting elements outside the boundaries, and merging
triangles, the mesh often needs further manipulation to add model stability. For a main
river channel such as this model, lines of elements should run parallel to the mesh
boundary. This is especially important in cases where a portion of the mesh may
Figure 4 The poway1 mesh after merging triangles
SMS Tutorials Mesh Editing
Page 7 of 14 © Aquaveo 2014
become dry so that the mesh will dry parallel to the boundary.
Two of the tools in SMS used for manipulating individual elements are the
Split/Merge tool and Swap Edge tool. With the Split/Merge tool, two adjacent
triangular elements can be merged into a quadrilateral element or a single quadrilateral
element can be split into two triangular elements. With the Swap Edge tool, the
common edge of two adjacent triangular elements can be swapped.
See the SMS Online Help for a better description of these tools.
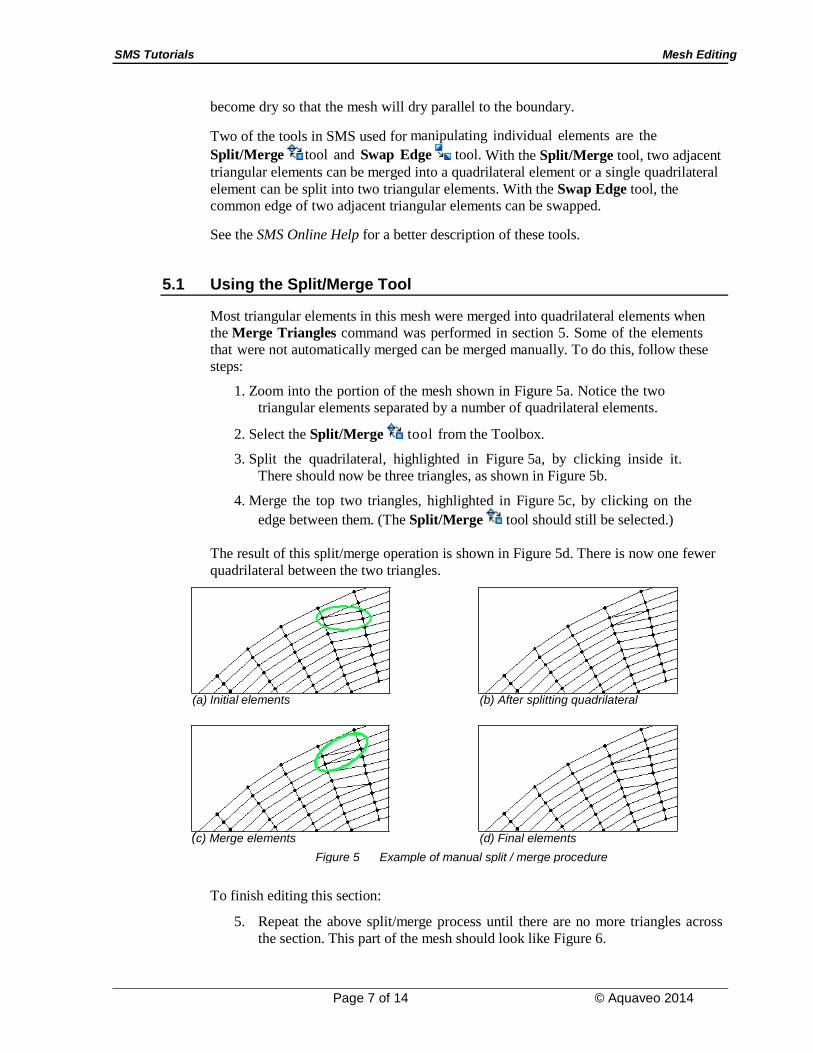
5.1 Using the Split/Merge Tool
Most triangular elements in this mesh were merged into quadrilateral elements when
the Merge Triangles command was performed in section 5. Some of the elements
that were not automatically merged can be merged manually. To do this, follow these
steps:
1. Zoom into the portion of the mesh shown in Figure 5a. Notice the two
triangular elements separated by a number of quadrilateral elements.
2. Select the Split/Merge tool from the Toolbox.
3. Split the quadrilateral, highlighted in Figure 5a, by clicking inside it.
There should now be three triangles, as shown in Figure 5b.
4. Merge the top two triangles, highlighted in Figure 5c, by clicking on the
edge between them. (The Split/Merge tool should still be selected.)
The result of this split/merge operation is shown in Figure 5d. There is now one fewer
quadrilateral between the two triangles.
(a) Initial elements (b) After splitting quadrilateral
(c) Merge elements (d) Final elements
To finish editing this section:
5. Repeat the above split/merge process until there are no more triangles across
the section. This part of the mesh should look like Figure 6.
Figure 5 Example of manual split / merge procedure

SMS Tutorials Mesh Editing
Page 8 of 14 © Aquaveo 2014
5.2 Using the Swap Edge Tool
The common edge between two triangles can be swapped. The best way to understand
this is to think of the two triangles as a quadrilateral, and the common edge between
them is a diagonal of the quadrilateral. By swapping this common edge, it changes to
be along the opposite diagonal of the quadrilateral. If this edge is clicked again, it
returns back to its original state. This can be seen in Figure 7.
One place in this mesh requires the use of the Swap Edge tool as well as the
Split/Merge tool to be able to merge the triangles. This is located toward the
middle of the mesh, at the constriction. The easiest way to find this location is to set
the window boundaries to the correct location by following these steps:
1. Select Display | View | View Options ….
2. In the Display Options dialog, select to use the Specify width with height
dependent on aspect ratio option (this will disable the Bottom (min. Y) field).
3. Enter these values:
Top (maxY) = “9567”
Left (min X) = “25164”
Right (max X) = “25577”
4. When done, click the OK button.
The user should now be able to see the portion of the mesh shown in Figure 8. In this
part of the mesh, there are two triangles that need to be merged together, separated by
a single quadrilateral.
To do this:
Figure 6 The mesh section after merging triangles
Figure 7 The Swap Edge technique

SMS Tutorials Mesh Editing
Page 9 of 14 © Aquaveo 2014
1. Choose the Split/Merge tool from the Toolbox.
2. Click inside the quadrilateral, highlighted in Figure 8a, that separates the two
triangles. The quadrilateral gets split as shown in Figure 8b. However, the
new edge was not created in the direction necessary to merge the outer
triangles.
3. Choose the Swap Edge tool from the Toolbox. Click only once, directly
on the edge that was just created inside the quadrilateral. The edge will swap
to the other diagonal of the quadrilateral. This result is shown in Figure 8c.
4. Once again choose the Split/Merge tool from the Toolbox.
5. Merge the top two triangles to form one quadrilateral by clicking on the line
between the triangles.
6. Then merge the bottom two triangles to form another quadrilateral by clicking
on the line between the triangles. The result is shown in Figure 8d.
(a) The original elements (b) Elements after splitting quad
(c) Elements after swapping edge (d) Final quadrilateral elements
Although this operation appears simple, it is one that takes some time to get used to
performing. Most people do not get through this without making a mistake.
However, after the user understands this operation, it is easier to use. The Split/Merge
and Swap Edge tools are useful for manually adjusting small areas of the mesh.
Since the Split/Merge and Swap Edge tools are often used together, the user
can use the opposite tool that is selected by holding down the Shift key.
7. Continue to merge triangles in the areas that the user is able to do so. Not all
of the triangles can be merged. When finished, there should be only six
triangles left in the finite element mesh. It should look like the image shown in
Figure 9.
Figure 8 Example of manual swapping procedure

SMS Tutorials Mesh Editing
Page 10 of 14 © Aquaveo 2014
5.3 Renumbering the Mesh
Any process which edits a mesh, such as those performed in the previous few sections,
causes the node and element ordering to become disorganized. This random mesh ordering
decreases the order and efficiency of the matrices required by the analysis codes.
Renumbering the mesh restores a good mesh ordering, making it more efficient to run the
analysis.
To renumber this mesh, follow these steps:
1. Choose Nodes | Renumber.
2. SMS will bring up a dialog reporting the bandwidth before renumbering and the
bandwidth after renumbering. Lower bandwidths make the solution process more
efficient and should always be done before running a model. Click OK to start the
renumbering process.
When SMS is finished renumbering the mesh, the display will refresh. Remember that
adding and deleting nodes or elements changes the mesh order. It is important that
renumbering be the last step of the mesh editing process. Editing a mesh invalidates any
solution files that have previously been saved. (Solution files are discussed in later
tutorials.)
5.4 Changing the Contour Options
When the mesh is created, contour lines are drawn to connect points of equal elevation.
By default, these contours are displayed as constant green lines. The contour display can
be changed using the Contour Options dialog. It is always a good idea to look at a color
contour map after a new mesh has been created. This helps the user better visualize the
bathymetry of the model.
Figure 9 The finite element mesh after merging triangles
Figure 10 The position of the nodestring for renumbering

SMS Tutorials Mesh Editing
Page 11 of 14 © Aquaveo 2014
Do the following to set the color fill contours:
1. Choose Data | Contour Options to bring up the Display Options dialog.
2. On the 2D Mesh tab, turn on the Contours option and turn off the Nodes option.
3. Select the Contours tab then set the Contour method as “Color Fill”.
4. Click the OK button to close the display options.
The display will refresh with color-filled contours such as those shown in Figure 11.
In this plot, the user can see that there are two pits in the river, while both banks are
the highest part. If the contours are displaying red in the pits and blue along the banks, the
user can reverse the color ramp to match that of Figure 11 by doing the following:
1. Choose Data | Contour Options to bring up the Contours tab of the Display
Options dialog
2. Select the Color Ramp button to bring up the Color Options dialog.
3. Click the Reverse button at the bottom of the Color Options dialog.
4. Click OK to close the Color Options dialog then OK again to exit the Display
Options dialog.
For more examples of how to work with display and contour options in SMS, see SMS
Online Help.
5.5 Checking the Mesh Quality
Another important thing to check with a newly created mesh is the element quality. SMS
looks at various things when checking this. Do as follows to turn on the mesh quality:
1. Select Display | Display Options to bring up the Display Options dialog again.
2. Select the 2D Mesh tab if it is not already selected.
3. Turn off the Contours option then turn on the Mesh quality option.
4. Click OK to close the dialog.
Figure 11 Elevation contours of the poway1 mesh
SMS Tutorials Mesh Editing
Page 12 of 14 © Aquaveo 2014
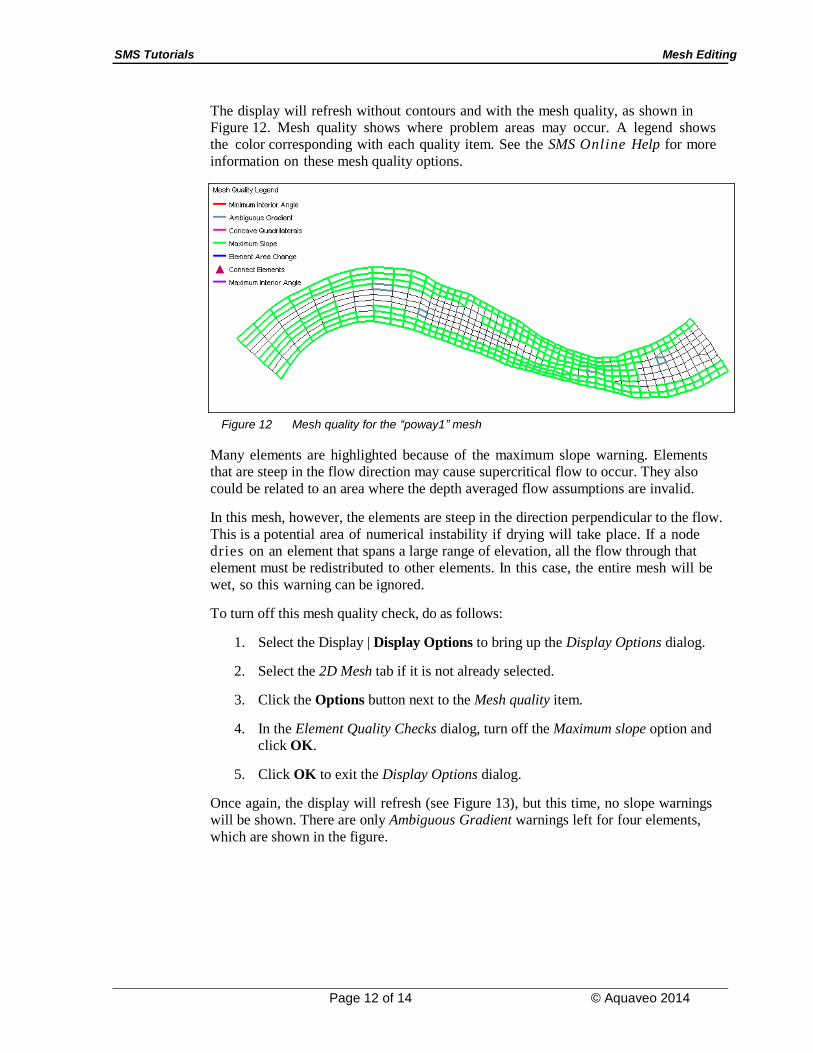
The display will refresh without contours and with the mesh quality, as shown in
Figure 12. Mesh quality shows where problem areas may occur. A legend shows
the color corresponding with each quality item. See the SMS Online Help for more
information on these mesh quality options.
Many elements are highlighted because of the maximum slope warning. Elements
that are steep in the flow direction may cause supercritical flow to occur. They also
could be related to an area where the depth averaged flow assumptions are invalid.
In this mesh, however, the elements are steep in the direction perpendicular to the flow.
This is a potential area of numerical instability if drying will take place. If a node
dries on an element that spans a large range of elevation, all the flow through that
element must be redistributed to other elements. In this case, the entire mesh will be
wet, so this warning can be ignored.
To turn off this mesh quality check, do as follows:
1. Select the Display | Display Options to bring up the Display Options dialog.
2. Select the 2D Mesh tab if it is not already selected.
3. Click the Options button next to the Mesh quality item.
4. In the Element Quality Checks dialog, turn off the Maximum slope option and
click OK.
5. Click OK to exit the Display Options dialog.
Once again, the display will refresh (see Figure 13), but this time, no slope warnings
will be shown. There are only Ambiguous Gradient warnings left for four elements,
which are shown in the figure.
Figure 12 Mesh quality for the “poway1” mesh

SMS Tutorials Mesh Editing
Page 13 of 14 © Aquaveo 2014
If the ambiguous gradient is very small, it can be ignored because the surface is really
almost planar. This is the case with the two ambiguous gradients on the left and the
rightmost case. Ambiguous gradient cases with a larger variation in elevation, such as the
one in the middle of this case, should just be split into two triangular elements using the
Split/Merge tool.
The ambiguous gradients can be examined by selecting the nodes on the corners of the
elements using the Select Mesh Node tool and viewing the elevation of these nodes.
After making these modifications, the user does not need to worry about the element
quality warnings. The following three things should be done (in no particular order):
Turn off the display of mesh quality checks. The user is done looking at the mesh
quality, so this should be turned off to make the screen less cluttered.
1. Select the Display | Display Options command to bring up the Display
Options dialog.
2. Go to the 2D Mesh tab, uncheck the Mesh quality option then click OK.
Turn on the display of color- filled contours to check that the adjustments just
made did not create unusual contours such as a spike or a pit in the mesh. When
editing nodal elevation values, it is always important to check the contours. If
unusual contours result, the user may want to put things back the way they were
and make some different changes.
1. Select the Display | Display Options command to bring up the Display
Options dialog.
2. Go to the 2D Mesh tab and turn on the Contours option.
3. Click on the Contours tab.
4. Under Contour method, make sure “Color Fill” is selected, then click OK.
When finished making changes, if there are any unusual contours, do the
following:
Figure 13 Mesh Quality without the Maximum Slope quality check

SMS Tutorials Mesh Editing
Page 14 of 14 © Aquaveo 2014
1. Select the Display | Display Options command to bring up the Display
Options dialog.
2. In the 2D Mesh tab, turn off the Contours option and turn on the Nodes
option the click OK.
Refer to the SMS Online Help for additional information on working with contours.
Renumber the mesh. Remember, whenever the user adjusts the mesh (e.g.,
splitting a quadrilateral into triangles, merging triangles into a quadrilateral,
inserting a new node), it should be renumbered. If the user only modifies elevation
values, then it is not necessary to renumber.
1. Choose Nodes | Renumber.
2. Click OK to close the dialog.
6 Saving the Mesh
If SMS is registered, then the mesh can be saved. This mesh will not be used in other
tutorials, so saving it is not required.
If desired, do the following to save the mesh:
1. Select File | Save As.
2. In the Save As dialog, make sure the Save as type is set to “Project Files (*.sms)”.
3. Enter the name “poway1.”
4. Click the Save button.
7 Conclusion
This concludes the SMS Mesh Editing tutorial. Although not every option was discussed,
the user should be familiar with many of the tools that SMS provides for mesh editing. The
user may continue to experiment with the SMS interface or may quit the program.