Embed Size (px)
Citation preview

User GuideP
RO
DU
CT
O
VE
RV
IE
W
Office Settingsand Administration
Copyright © 2008, E-Z Data, Inc.
All Rights Reserved.
No part of this documentation may be copied, reproduced, or translated in any form without the prior written consent of E-Z Data, Inc.
All product names are trademarks of their respective manufacturers or organizations.
918 E. Green Street
Pasadena, CA 91106
Web: www.ezdata.com
Telephone: (626) 585-3505
Fax: (626) 440-9097
U.S. toll-free fax: (800) 779-3123
SmartOffice® v6 – Office Setup and Administration Guide Revised: 06-03-08
Table of Contents
Introduction ..................................................................................................................................... 1
Prerequisites .................................................................................................................................... 1
SmartOffice® System Requirements .............................................................................................. 2
Configuring the Office .................................................................................................................... 4
Office Settings – Detail ........................................................................................................... 5
Office Settings – Licenses ....................................................................................................... 8
Office Settings – Department/Team Hierarchy ....................................................................... 9
Office Settings – Default User Preferences ............................................................................. 9
User Preferences ............................................................................................................. 10
Calendar Options ............................................................................................................ 12
Activity Options ............................................................................................................. 14
Policies/Investments ....................................................................................................... 18
Correspondence Options ................................................................................................ 19
Time Zone ...................................................................................................................... 23
Office Settings – Office Letter Printing Options ................................................................... 24
Office Settings – SmartPad/New Contact/E-mail Posting .................................................... 25
Office Settings – Global Proxy ............................................................................................. 27
Office Settings – Disclaimers ................................................................................................ 28
Office Security .............................................................................................................................. 29
Contact Assignment .............................................................................................................. 29
Proxy/Department Hierarchy ................................................................................................ 29
Private Records ..................................................................................................................... 30
User Groups .......................................................................................................................... 30
Super User ............................................................................................................................. 30
Office Security Example: Daniel Odell Agency ................................................................... 31
Summary ............................................................................................................................... 31
Assigning User Rights and Licenses ............................................................................................. 32
User Rights ............................................................................................................................ 32
SmartOffice® v6 – Office Setup and Administration Guide
Administrator User ......................................................................................................... 32
Viewing User Accounts and Reviewing User Rights ..................................................... 33
User Rights Templates .......................................................................................................... 49
Creating a User Rights Template .................................................................................... 49
Copying User Rights Templates ..................................................................................... 50
User Setup ..................................................................................................................................... 51
Creating Users ....................................................................................................................... 51
Passwords .............................................................................................................................. 52
Resetting a User’s Password .......................................................................................... 52
Changing the Current User’s Password .......................................................................... 53
Configuring User Account Settings ...................................................................................... 54
User Account Settings – Detail ...................................................................................... 54
User Account Settings – User Rights ............................................................................. 57
User Account Settings – Permissions ............................................................................. 58
Department/Team Hierarchy and Proxies ..................................................................................... 59
Creating a Department Hierarchy .......................................................................................... 59
Creating Proxies Individually ................................................................................................ 61
Proxy: Whose data this User can see .............................................................................. 61
Proxy: Who can see this User’s data .............................................................................. 61
Creating User Groups .................................................................................................................... 62
Posting Outlook E-mail to SmartOffice ........................................................................................ 64
Preparing to Use SmartMail .................................................................................................. 64
Installing SmartMail .............................................................................................................. 65
Sending and Posting Messages from within SmartOffice ..................................................... 66
Using the E-mail Link from a Contact ........................................................................... 66
Using the Compose E-mail Feature ................................................................................ 67
Posting Previously Sent/Received Messages from Outlook ................................................. 68
Training Options ............................................................................................................................ 69
When Should Training Begin? .............................................................................................. 69
Training Delivery Methods ................................................................................................... 70
SmartOffice® v6 – Office Setup and Administration Guide
Online Training Videos .................................................................................................. 70
Live Web-Based Training .............................................................................................. 70
On-Site Training ............................................................................................................. 71
Technical Support .......................................................................................................................... 72
Named Support Contacts ....................................................................................................... 72
Additional Resources ............................................................................................................ 72
User List Worksheet ...................................................................................................................... 73
SmartOffice® v6 – Office Setup and Administration Guide

SmartOffice® v6 – Office Setup and Administration Guide
Introduction
This guide addresses many of the questions a SmartOffice administrator may have about configuring the office. The SmartOffice administrator ensures that the SmartOffice implementation goes smoothly and that the office is up and running as quickly as possible.
For questions not addressed in this guide, see Technical Support on page 72 for information about contacting E-Z Data.
Prerequisites
Before performing office setup, the administrator should read the SmartOffice Getting Started Guide, which contains information about the following:
• Software requirements (also included in this guide)
• Logging in to and out of SmartOffice
• Adding SmartOffice to the Internet Explorer Favorites list
• Navigating in SmartOffice
• Installing SmartOffice Utilities (necessary for posting e-mail messages, exporting to Excel, and generating letters with Microsoft Word)
• Creating letters
• Generating e-mail messages
• Specifying user preferences
• Accessing training and support resources
The SmartOffice Getting Started Guide should be distributed to and read by each member of the office who will be accessing SmartOffice.
SmartOffice® v6 – Office Settings and Administration Guide Page 1
SmartOffice® System Requirements
Note: System requirements are subject to change. The most current SmartOffice System Requirements document can be found on the E-Z Data Web site at: www.ezdata.com/support/SO60_UserGuides/SO_system_requirements.pdf
To ensure acceptable performance of SmartOffice, the system requirements listed in this document must be met or exceeded. These requirements are based on a combination of software design and field performance tests. Computers configured to exceed these minimum requirements may further enhance the overall performance of SmartOffice.
All Microsoft system updates can be downloaded from Microsoft’s Web site at www.update.microsoft.com/windowsupdate/v6/.
• Microsoft® Windows®
o Windows XP (with Service Pack 2); or Windows Vista® (with Service Pack 1); 32-bit only; 64-bit not supported
• Memory (RAM)
o 1 GB for Windows XP
o 2 GB for Windows Vista
• Microsoft® Internet Explorer®
o Version 7.0 (recommended) with all updates installed. Version 7.0 required for all SmartLink integrations, including Laser App, PaperClip, Quik! Forms, Dymo label printing, etc.
o Version 6 with all updates installed is satisfactory for integration with Microsoft® Word®, Outlook®, and Excel®, as well as PDF export.
o Note: Although SmartOffice 6 has been tested on Internet Explorer 6, more testing has occurred on Internet Explorer 7. For this and many other reasons, E-Z Data strongly recommends that users run SmartOffice 6 on Internet Explorer 7.
SmartOffice® v6 – Office Setup and Administration Guide Page 2
• Microsoft Office®
o Microsoft Word 2007 or 2003 with the latest updates (required for Word integration)
o Microsoft Excel 2007 or 2003 with the latest updates (required for exporting and printing the Excel files produced by SmartOffice)
o Microsoft Outlook 2007 or 2003 with the latest updates (required for Outlook e-mail posting and Calendar/Contact synchronization)
o The latest Office updates can be downloaded at office.microsoft.com/en-us/downloads/maincatalog.aspx
o Note: While SmartOffice 5 worked with versions of Microsoft Office below 2003, due to major changes in the Office 2007 product, E-Z Data is unable to support integrations between SmartOffice and Microsoft Office versions prior to Office 2003.
• Lotus® Notes®
o Version 6.5.1 or later (required for Notes integration)
o Additional Lotus Notes Template changes are required for e-mail posting to work correctly with SmartOffice v6. Please review the SmartOffice v6 - Lotus Notes 7 Server Setup Guide and discuss this with your Lotus Notes administrator.
• Adobe® Reader®
o Version 6 or later (required for viewing and printing the PDF files produced by SmartOffice). Download Adobe Reader at www.adobe.com/products/acrobat/readstep2.html
• Contact Information
o Technical Support: (626) 585-3515 or [email protected]
SmartOffice® v6 – Office Settings and Administration Guide Page 3
Configuring the Office
SmartOffice can be easily customized to meet the unique requirements of any business. This section explains how to specify default office settings, as well as default preferences for new users added to the office.
Note: Only a user with a User Rights/Licenses Administrator right can change office information. By default, the admin user created by E-Z Data for the office has these rights.
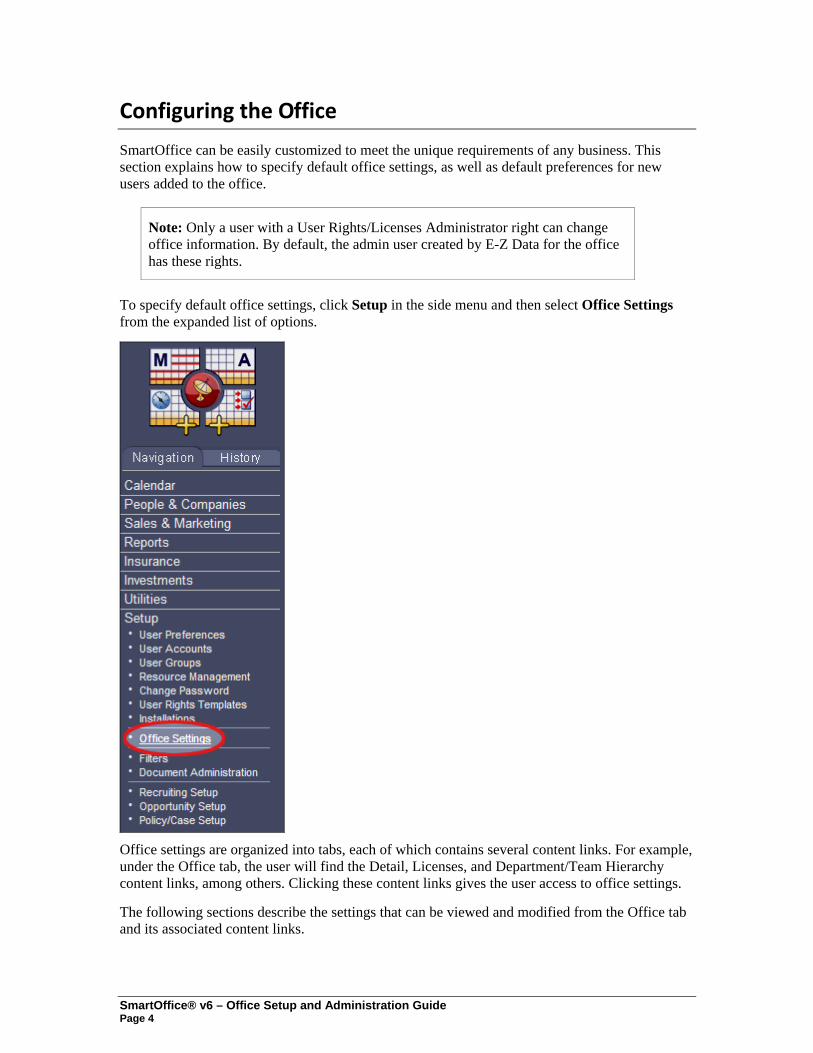
To specify default office settings, click Setup in the side menu and then select Office Settings from the expanded list of options.
Office settings are organized into tabs, each of which contains several content links. For example, under the Office tab, the user will find the Detail, Licenses, and Department/Team Hierarchy content links, among others. Clicking these content links gives the user access to office settings.
The following sections describe the settings that can be viewed and modified from the Office tab and its associated content links.
SmartOffice® v6 – Office Setup and Administration Guide Page 4
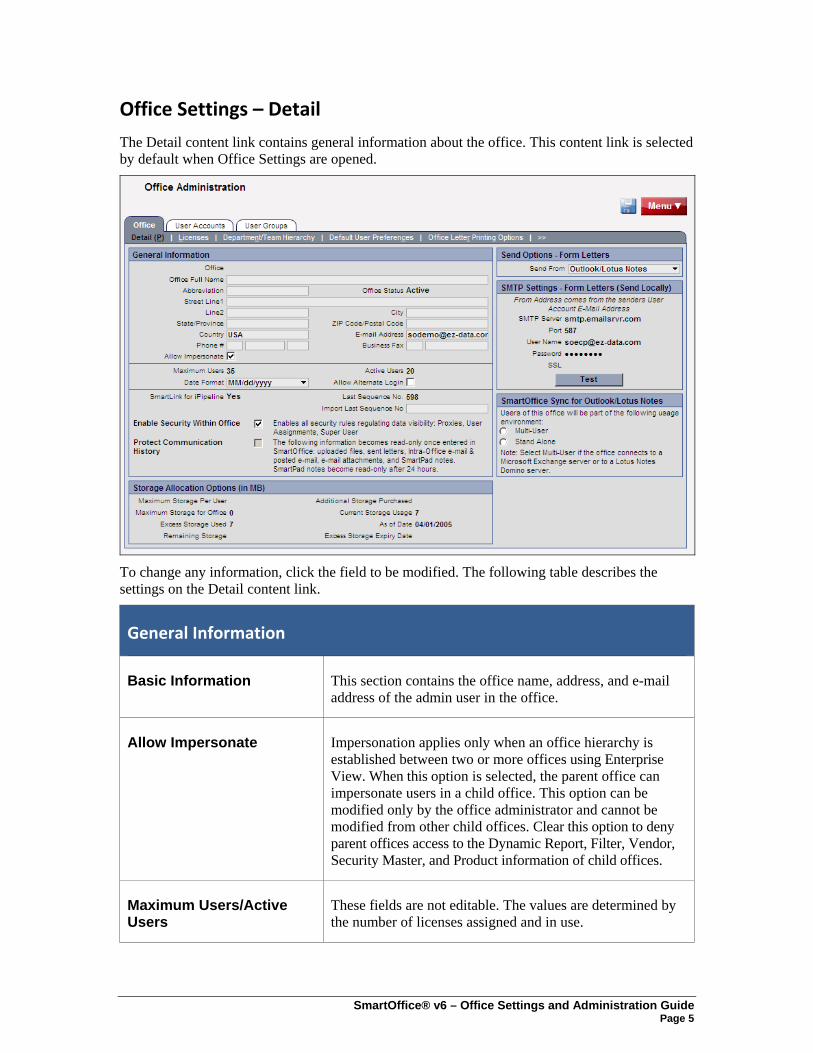
Office Settings – Detail
The Detail content link contains general information about the office. This content link is selected by default when Office Settings are opened.
To change any information, click the field to be modified. The following table describes the settings on the Detail content link.
General Information
Basic Information This section contains the office name, address, and e-mail address of the admin user in the office.
Allow Impersonate Impersonation applies only when an office hierarchy is established between two or more offices using Enterprise View. When this option is selected, the parent office can impersonate users in a child office. This option can be modified only by the office administrator and cannot be modified from other child offices. Clear this option to deny parent offices access to the Dynamic Report, Filter, Vendor, Security Master, and Product information of child offices.
Maximum Users/Active Users
These fields are not editable. The values are determined by the number of licenses assigned and in use.
SmartOffice® v6 – Office Settings and Administration Guide Page 5
Date Format Enter the preferred date format for the office. Individual users may select another date format option through their user preferences; however, that will not affect the default option specified here.
Allow Alternate Login This field is not editable. This option is available only for offices that have created customized applications to work with SmartOffice.
SmartLink for iPipeline This option is editable only by E-Z Data, SmartLink for iPipeline enables different carriers’ product, product availability, guideline requirements, forms, and other data to be downloaded into SmartOffice automatically.
Last Sequence No and Import Last Sequence No.
These are read-only fields internally used by SmartOffice for the SmartLink for iPipeline function.
Enable Security Within Office
Important: To restrict certain users in the office from viewing specific contact information, select the Enable Security Within Office option. To enable all users in the office to view all contact data without restriction, clear this option. (Office security is explained in more detail on page 29.)
Protect Communication History
When this option is selected, the following information becomes read-only once entered in SmartOffice: uploaded files, sent letters, intra-office and posted e-mail, e-mail attachments, and SmartPad notes. SmartPad notes become read-only after 24 hours.
Storage Allocation Options (in MB)
Note: The information in these fields can be changed only by an E-Z Data administrator.
Maximum Storage Per User
The maximum allowed disk space per user.
Maximum Storage Per Office
This value is the Maximum Storage Per User multiplied by the Maximum Users.
SmartOffice® v6 – Office Setup and Administration Guide Page 6
Excess Storage Used Excess storage space currently used by the office.
Remaining Storage Storage space remaining for the office.
Additional Storage Purchased
Storage purchased in addition to what has been allocated by default.
Current Storage Usage Current disk space usage for the office.
As of Date Date when storage space options were last updated.
Excess Storage Expiry Date
Renewal date for additional storage space. If not renewed by this date, the office will become read-only.
Send Options – Form Letters
Send From E-Z Data recommends that the default option in this drop-down list (Send from SmartOffice) be kept.
SMTP Settings – Form Letters (Send Locally)
SMTP Server, Port, User Name, Password, SSL
These fields are pre-configured and are not editable when the recommended option (Send from SmartOffice) is selected from the Send From drop-down list.
SmartOffice Sync for Outlook/Lotus Notes
Users of this office will be part of the following usage environment
Select the office’s user environment (Multi-User or Stand Alone) to ensure the appropriate synching of activities between Outlook/Lotus Notes and SmartOffice. (This applies if users have installed SmartOffice Sync for Outlook/Lotus Notes.)
If Multi-User is selected, activities will sync to a user’s calendar only if that user is the activity’s Primary Participant. The activity will not sync to other participant’s calendars until the Primary Participant synchronizes the activity and sends invitations to the other participants.
If Stand Alone is selected, all activities in which the user is a participant are synchronized to the user’s calendar.
SmartOffice® v6 – Office Settings and Administration Guide Page 7
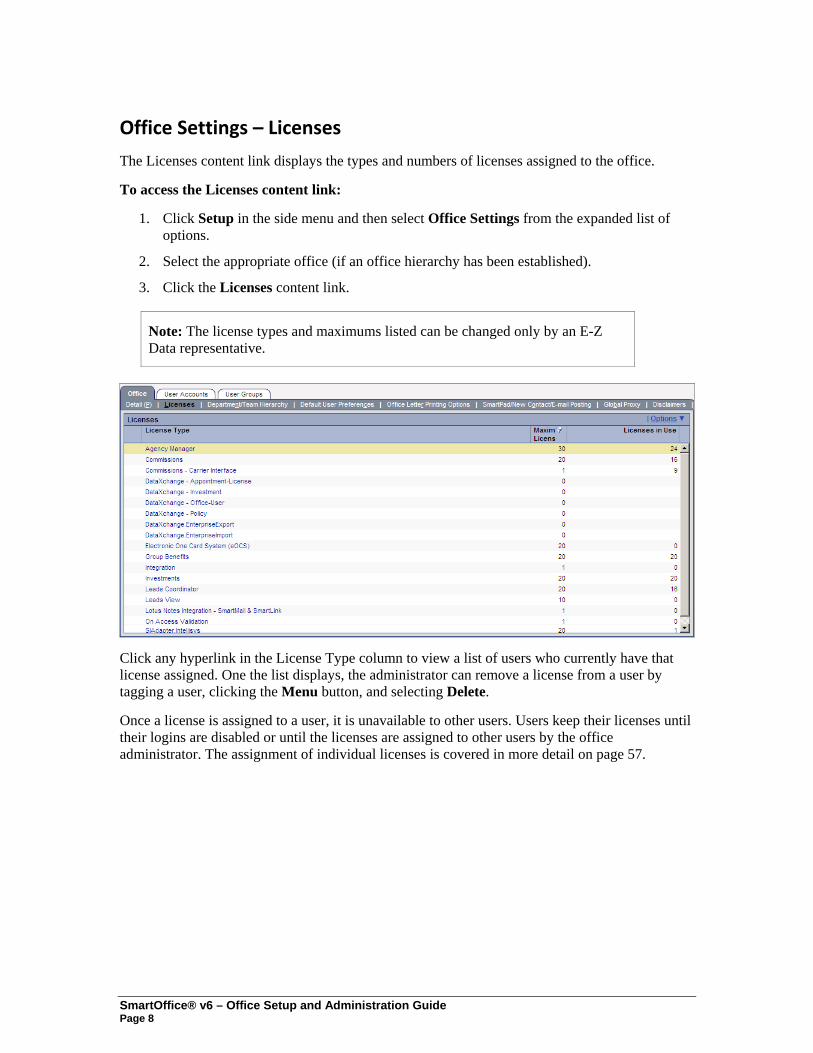
Office Settings – Licenses
The Licenses content link displays the types and numbers of licenses assigned to the office.
To access the Licenses content link:
1. Click Setup in the side menu and then select Office Settings from the expanded list of options.
2. Select the appropriate office (if an office hierarchy has been established).
3. Click the Licenses content link.
Note: The license types and maximums listed can be changed only by an E-Z Data representative.
Click any hyperlink in the License Type column to view a list of users who currently have that license assigned. One the list displays, the administrator can remove a license from a user by tagging a user, clicking the Menu button, and selecting Delete.
Once a license is assigned to a user, it is unavailable to other users. Users keep their licenses until their logins are disabled or until the licenses are assigned to other users by the office administrator. The assignment of individual licenses is covered in more detail on page 57.
SmartOffice® v6 – Office Setup and Administration Guide Page 8
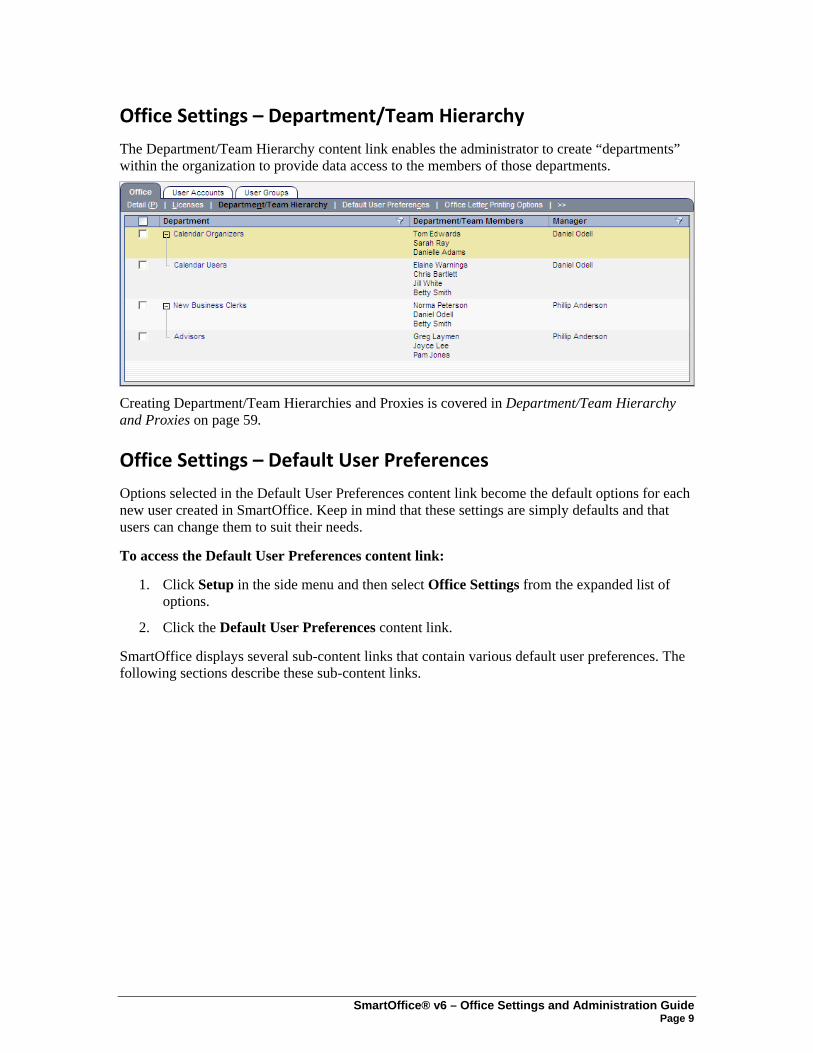
Office Settings – Department/Team Hierarchy
The Department/Team Hierarchy content link enables the administrator to create “departments” within the organization to provide data access to the members of those departments.
Creating Department/Team Hierarchies and Proxies is covered in Department/Team Hierarchy and Proxies on page 59.
Office Settings – Default User Preferences
Options selected in the Default User Preferences content link become the default options for each new user created in SmartOffice. Keep in mind that these settings are simply defaults and that users can change them to suit their needs.
To access the Default User Preferences content link:
1. Click Setup in the side menu and then select Office Settings from the expanded list of options.
2. Click the Default User Preferences content link.
SmartOffice displays several sub-content links that contain various default user preferences. The following sections describe these sub-content links.
SmartOffice® v6 – Office Settings and Administration Guide Page 9

User Preferences
The User Preferences sub-content link contains miscellaneous user default values.
The following table describes the settings on the User Preferences sub-content link.
Default Settings
Default Area Code This is the areas code that is automatically populated when the user adds a phone number.
Default Country Code This is the country code that is automatically populated when the user adds a phone number. Enter a 1 in this field for the United States.
Default Enterprise View Mode If Enterprise View is enabled, specify whether the user’s default view should include records for all the offices in the office hierarchy or only those records in the current office.
Date Format To specify a date format for users that is different from the format set for the office, select a format from the drop-down list. If this field is left blank, users will use the default office date format.
SmartOffice® v6 – Office Setup and Administration Guide Page 10
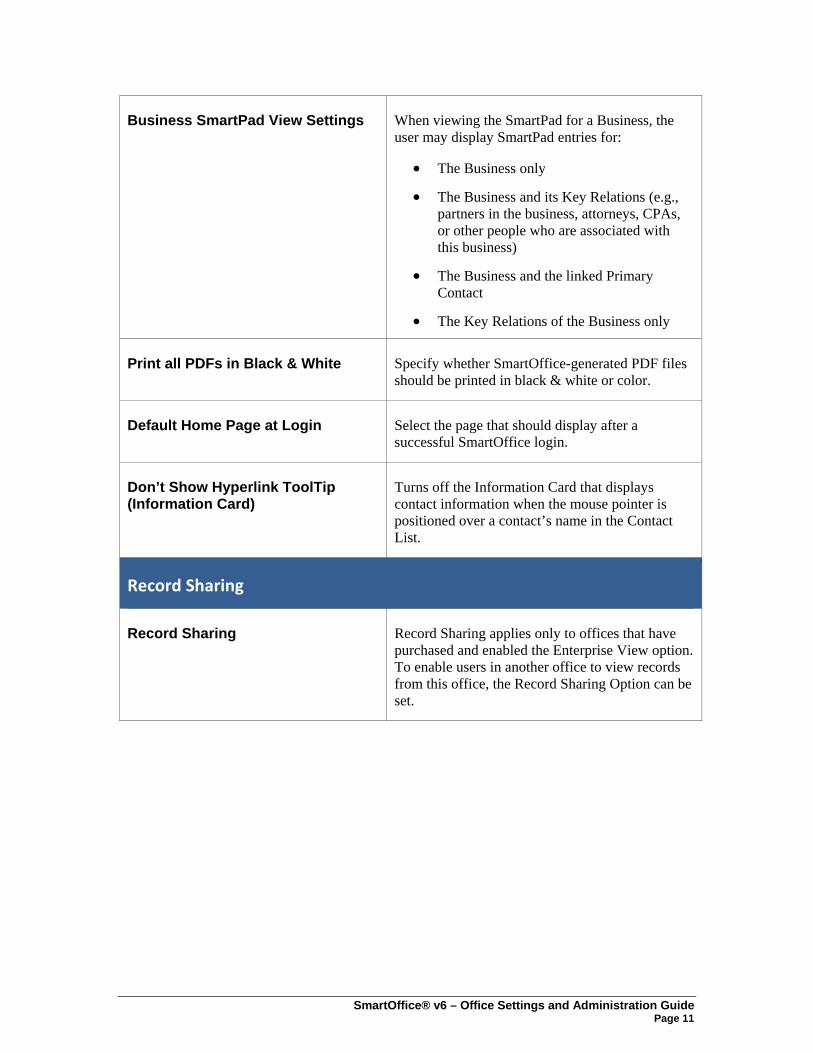
Business SmartPad View Settings When viewing the SmartPad for a Business, the user may display SmartPad entries for:
• The Business only
• The Business and its Key Relations (e.g., partners in the business, attorneys, CPAs, or other people who are associated with this business)
• The Business and the linked Primary Contact
• The Key Relations of the Business only
Print all PDFs in Black & White Specify whether SmartOffice-generated PDF files should be printed in black & white or color.
Default Home Page at Login Select the page that should display after a successful SmartOffice login.
Don’t Show Hyperlink ToolTip (Information Card)
Turns off the Information Card that displays contact information when the mouse pointer is positioned over a contact’s name in the Contact List.
Record Sharing
Record Sharing Record Sharing applies only to offices that have purchased and enabled the Enterprise View option. To enable users in another office to view records from this office, the Record Sharing Option can be set.
SmartOffice® v6 – Office Settings and Administration Guide Page 11
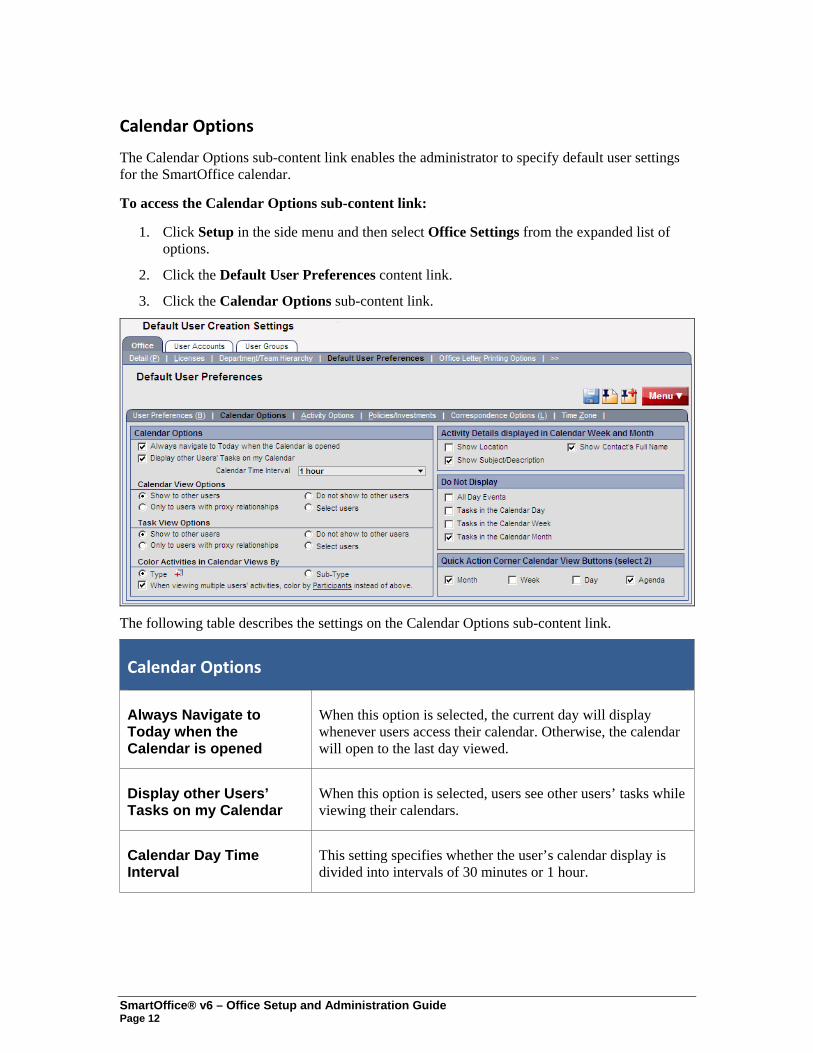
Calendar Options
The Calendar Options sub-content link enables the administrator to specify default user settings for the SmartOffice calendar.
To access the Calendar Options sub-content link:
1. Click Setup in the side menu and then select Office Settings from the expanded list of options.
2. Click the Default User Preferences content link.
3. Click the Calendar Options sub-content link.
The following table describes the settings on the Calendar Options sub-content link.
Calendar Options
Always Navigate to Today when the Calendar is opened
When this option is selected, the current day will display whenever users access their calendar. Otherwise, the calendar will open to the last day viewed.
Display other Users’ Tasks on my Calendar
When this option is selected, users see other users’ tasks while viewing their calendars.
Calendar Day Time Interval
This setting specifies whether the user’s calendar display is divided into intervals of 30 minutes or 1 hour.
SmartOffice® v6 – Office Setup and Administration Guide Page 12
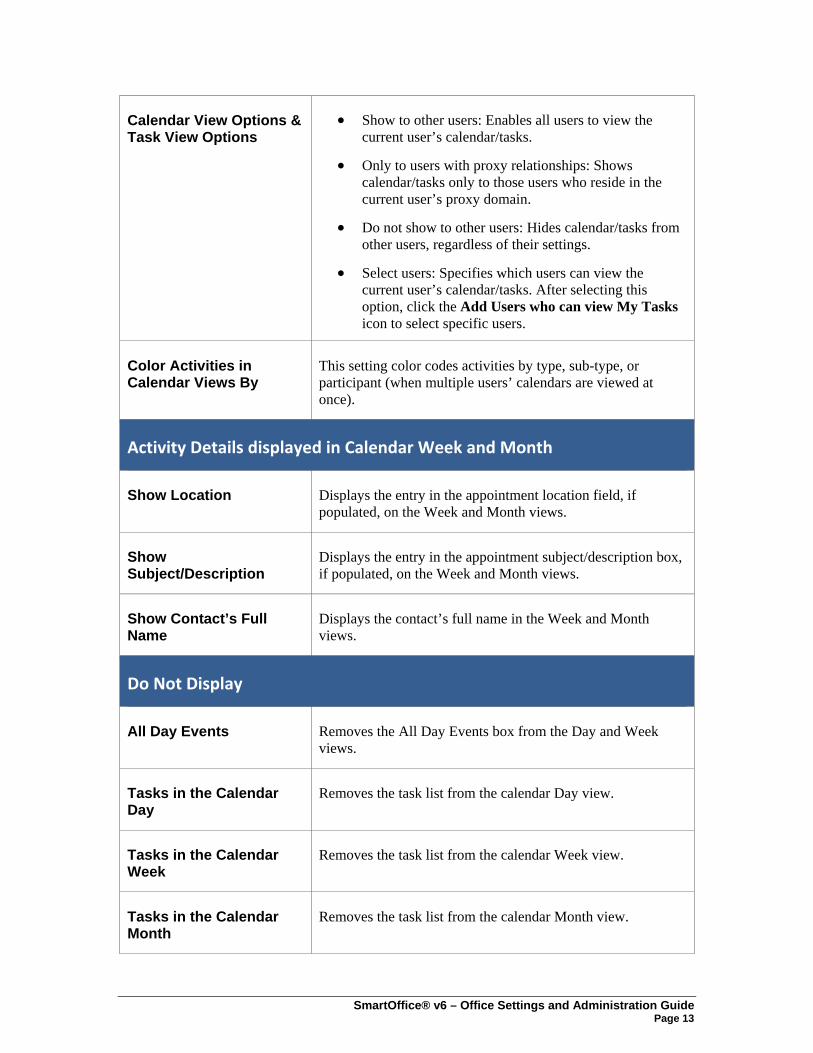
Calendar View Options & Task View Options
• Show to other users: Enables all users to view the current user’s calendar/tasks.
• Only to users with proxy relationships: Shows calendar/tasks only to those users who reside in the current user’s proxy domain.
• Do not show to other users: Hides calendar/tasks from other users, regardless of their settings.
• Select users: Specifies which users can view the current user’s calendar/tasks. After selecting this option, click the Add Users who can view My Tasks icon to select specific users.
Color Activities in Calendar Views By
This setting color codes activities by type, sub-type, or participant (when multiple users’ calendars are viewed at once).
Activity Details displayed in Calendar Week and Month
Show Location Displays the entry in the appointment location field, if populated, on the Week and Month views.
Show Subject/Description
Displays the entry in the appointment subject/description box, if populated, on the Week and Month views.
Show Contact’s Full Name
Displays the contact’s full name in the Week and Month views.
Do Not Display
All Day Events Removes the All Day Events box from the Day and Week views.
Tasks in the Calendar Day
Removes the task list from the calendar Day view.
Tasks in the Calendar Week
Removes the task list from the calendar Week view.
Tasks in the Calendar Month
Removes the task list from the calendar Month view.
SmartOffice® v6 – Office Settings and Administration Guide Page 13

Quick Action Corner Calendar View Buttons (select 2)
Month, Week, Day, Agenda
Select two default calendar views for users to access from the Quick Action Corner in the upper left corner of SmartOffice.
Activity Options
The Activity Options sub-content link contains default settings for activities in the SmartOffice calendar.
To access the Activity Options sub-content link:
1. Click Setup in the side menu and then select Office Settings from the expanded list of options.
2. Click the Default User Preferences content link.
3. Click the Activity Options sub-content link.
SmartOffice® v6 – Office Setup and Administration Guide Page 14
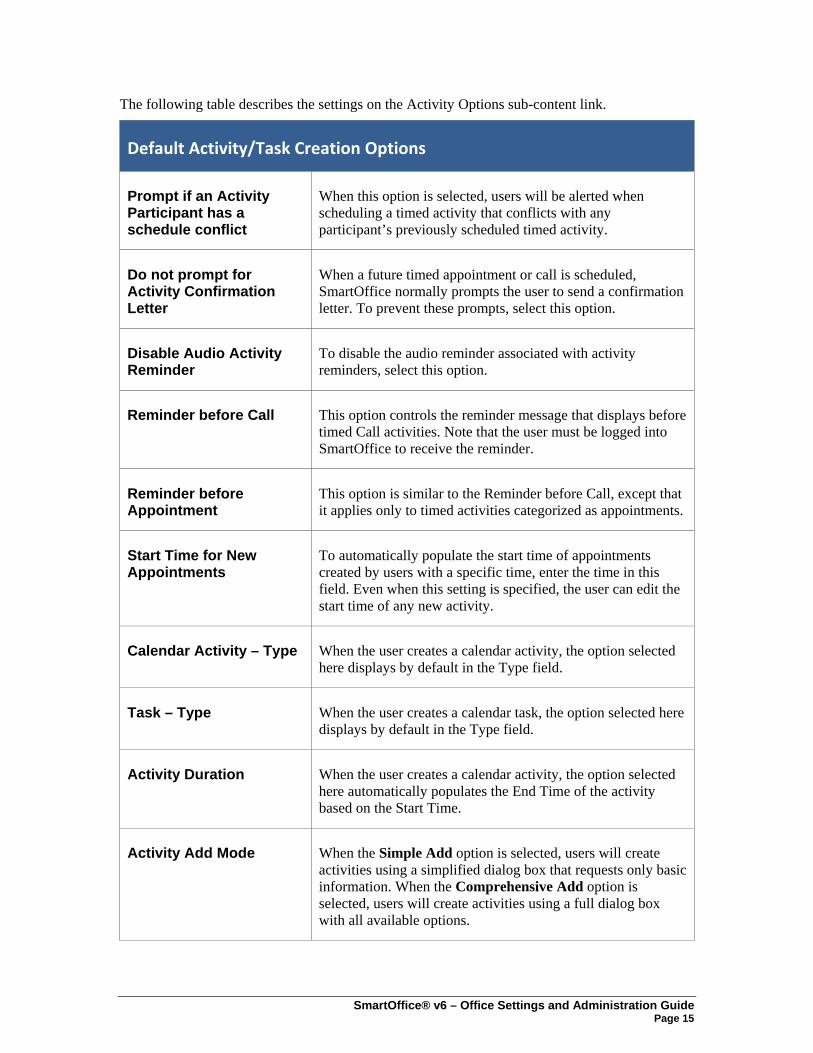
The following table describes the settings on the Activity Options sub-content link.
Default Activity/Task Creation Options
Prompt if an Activity Participant has a schedule conflict
When this option is selected, users will be alerted when scheduling a timed activity that conflicts with any participant’s previously scheduled timed activity.
Do not prompt for Activity Confirmation Letter
When a future timed appointment or call is scheduled, SmartOffice normally prompts the user to send a confirmation letter. To prevent these prompts, select this option.
Disable Audio Activity Reminder
To disable the audio reminder associated with activity reminders, select this option.
Reminder before Call This option controls the reminder message that displays before timed Call activities. Note that the user must be logged into SmartOffice to receive the reminder.
Reminder before Appointment
This option is similar to the Reminder before Call, except that it applies only to timed activities categorized as appointments.
Start Time for New Appointments
To automatically populate the start time of appointments created by users with a specific time, enter the time in this field. Even when this setting is specified, the user can edit the start time of any new activity.
Calendar Activity – Type When the user creates a calendar activity, the option selected here displays by default in the Type field.
Task – Type When the user creates a calendar task, the option selected here displays by default in the Type field.
Activity Duration When the user creates a calendar activity, the option selected here automatically populates the End Time of the activity based on the Start Time.
Activity Add Mode When the Simple Add option is selected, users will create activities using a simplified dialog box that requests only basic information. When the Comprehensive Add option is selected, users will create activities using a full dialog box with all available options.
SmartOffice® v6 – Office Settings and Administration Guide Page 15

Default Activity/Task Participants
These options specify the default participant(s) when an activity/task is created:
• Current User: Only the user creating the activity/task is included as a participant.
• Primary Advisor: Only the primary advisor of the contact associated with the activity is included as a participant.
• Primary Advisor and Current User: Both the user creating the activity/task and the primary advisor for the contact associated with the activity are included as participants.
Task AutoMove / Unfinished Activities
Days This drop-down list indicates how many days in the past SmartOffice should look for unfinished tasks that need to be moved to the current day upon login. Select a range that takes into account vacations and other time away from the office. For example, if vacations are typically two weeks, select at least 14 days.
Task types to be moved forward
Specify the task types to be moved forward. If a task type is not selected, no tasks of that type will be moved automatically.
• The Call option moves active untimed Call activities to the current day.
• The Personal option moves active untimed Personal activities to the current day.
• The Appointment option moves active untimed Appointments to the current day.
• The Meeting option moves active untimed Meetings to the current day.
• The To Do option moves active untimed To Do activities to the current day.
• The Project option moves active untimed Projects to the current day.
SmartOffice® v6 – Office Setup and Administration Guide Page 16
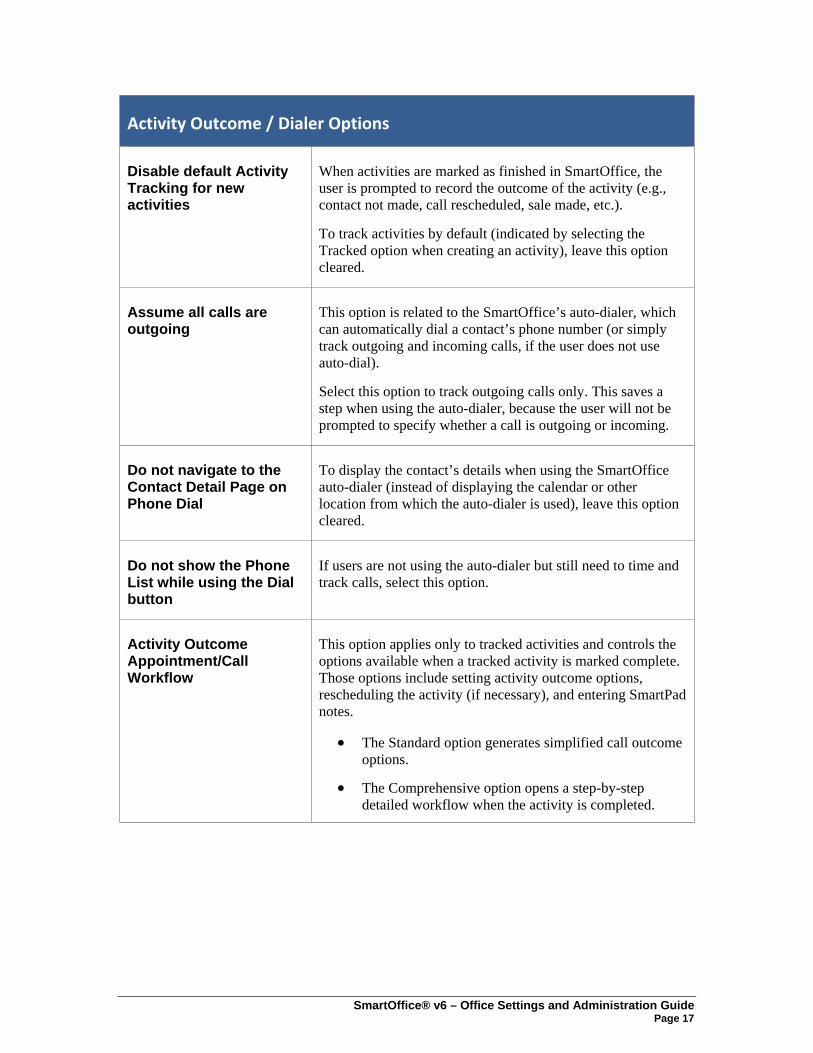
Activity Outcome / Dialer Options
Disable default Activity Tracking for new activities
When activities are marked as finished in SmartOffice, the user is prompted to record the outcome of the activity (e.g., contact not made, call rescheduled, sale made, etc.).
To track activities by default (indicated by selecting the Tracked option when creating an activity), leave this option cleared.
Assume all calls are outgoing
This option is related to the SmartOffice’s auto-dialer, which can automatically dial a contact’s phone number (or simply track outgoing and incoming calls, if the user does not use auto-dial).
Select this option to track outgoing calls only. This saves a step when using the auto-dialer, because the user will not be prompted to specify whether a call is outgoing or incoming.
Do not navigate to the Contact Detail Page on Phone Dial
To display the contact’s details when using the SmartOffice auto-dialer (instead of displaying the calendar or other location from which the auto-dialer is used), leave this option cleared.
Do not show the Phone List while using the Dial button
If users are not using the auto-dialer but still need to time and track calls, select this option.
Activity Outcome Appointment/Call Workflow
This option applies only to tracked activities and controls the options available when a tracked activity is marked complete. Those options include setting activity outcome options, rescheduling the activity (if necessary), and entering SmartPad notes.
• The Standard option generates simplified call outcome options.
• The Comprehensive option opens a step-by-step detailed workflow when the activity is completed.
SmartOffice® v6 – Office Settings and Administration Guide Page 17
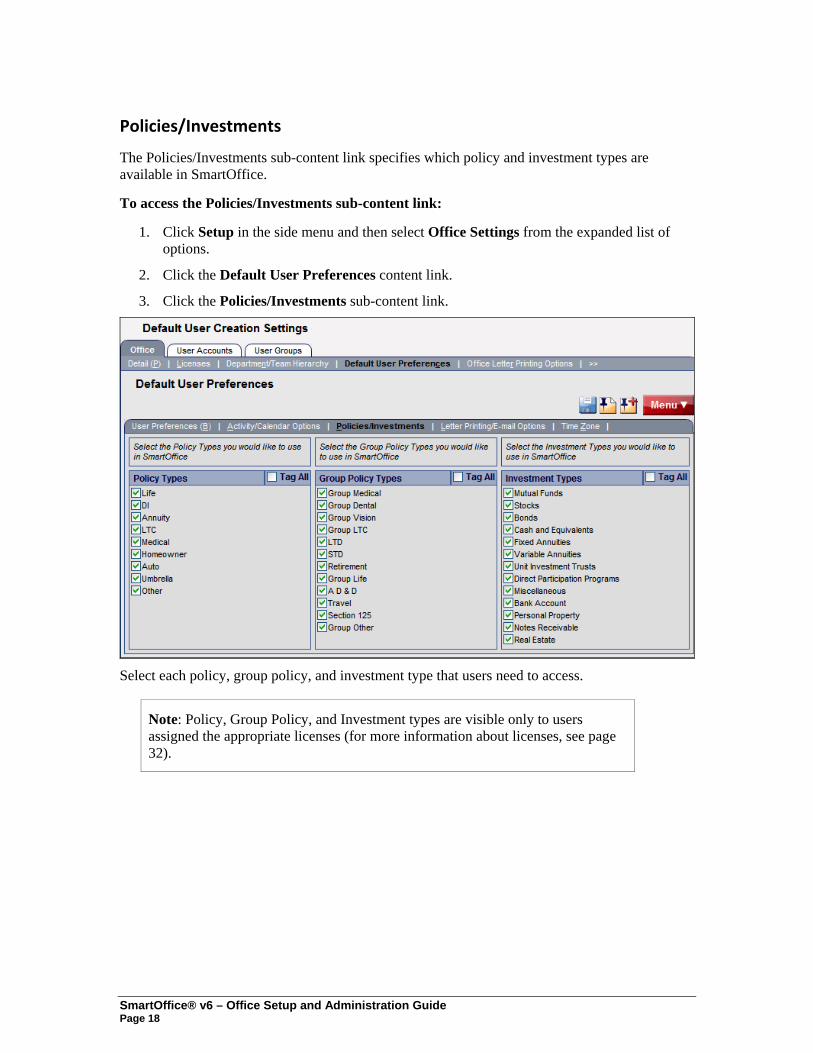
Policies/Investments
The Policies/Investments sub-content link specifies which policy and investment types are available in SmartOffice.
To access the Policies/Investments sub-content link:
1. Click Setup in the side menu and then select Office Settings from the expanded list of options.
2. Click the Default User Preferences content link.
3. Click the Policies/Investments sub-content link.
Select each policy, group policy, and investment type that users need to access.
Note: Policy, Group Policy, and Investment types are visible only to users assigned the appropriate licenses (for more information about licenses, see page 32).
SmartOffice® v6 – Office Setup and Administration Guide Page 18
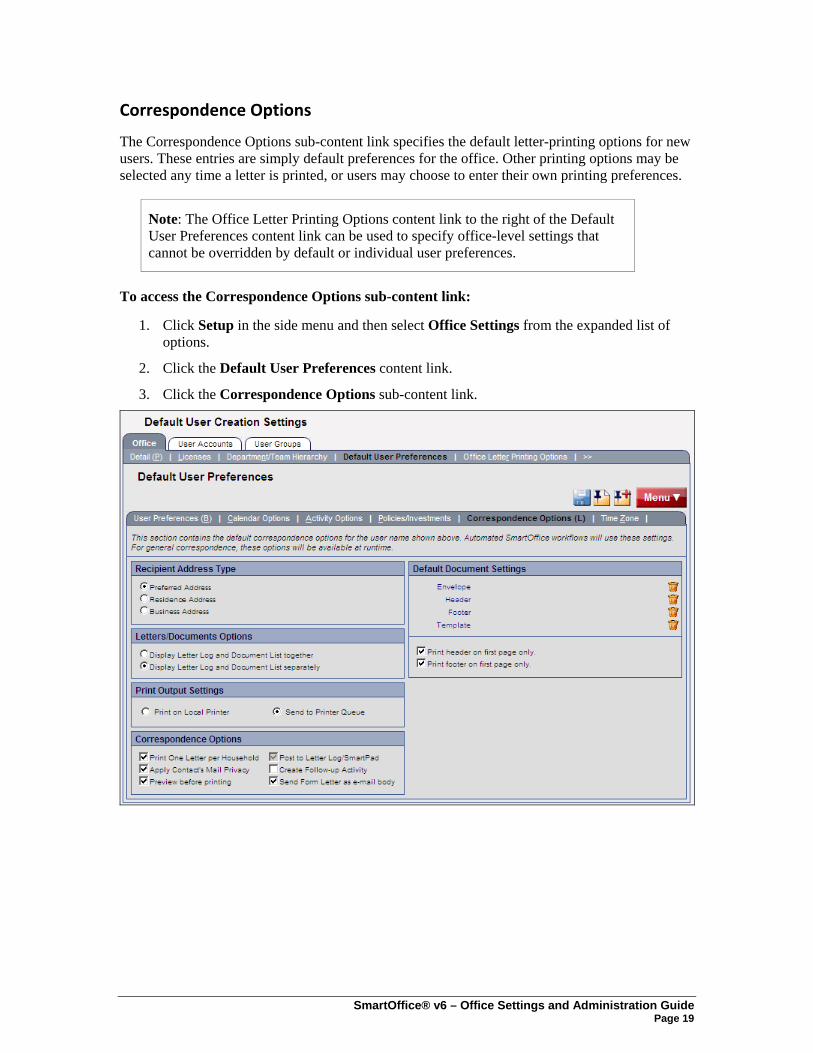
Correspondence Options
The Correspondence Options sub-content link specifies the default letter-printing options for new users. These entries are simply default preferences for the office. Other printing options may be selected any time a letter is printed, or users may choose to enter their own printing preferences.
Note: The Office Letter Printing Options content link to the right of the Default User Preferences content link can be used to specify office-level settings that cannot be overridden by default or individual user preferences.
To access the Correspondence Options sub-content link:
1. Click Setup in the side menu and then select Office Settings from the expanded list of options.
2. Click the Default User Preferences content link.
3. Click the Correspondence Options sub-content link.
SmartOffice® v6 – Office Settings and Administration Guide Page 19
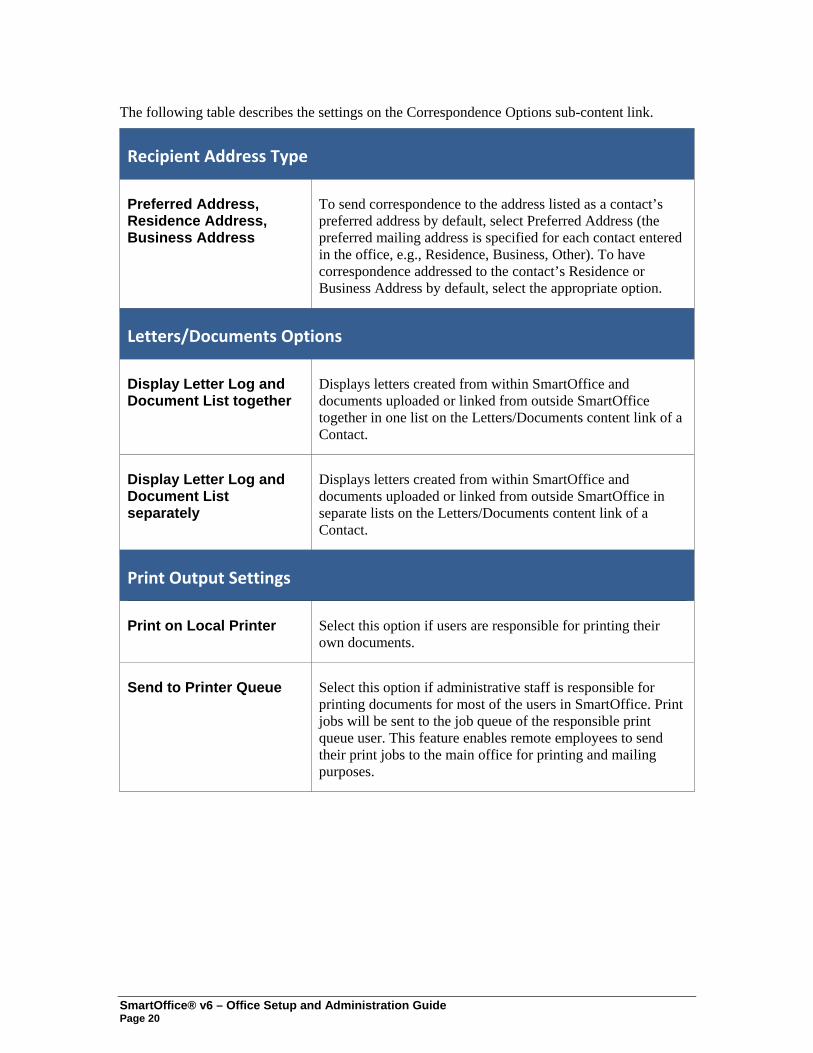
The following table describes the settings on the Correspondence Options sub-content link.
Recipient Address Type
Preferred Address, Residence Address, Business Address
To send correspondence to the address listed as a contact’s preferred address by default, select Preferred Address (the preferred mailing address is specified for each contact entered in the office, e.g., Residence, Business, Other). To have correspondence addressed to the contact’s Residence or Business Address by default, select the appropriate option.
Letters/Documents Options
Display Letter Log and Document List together
Displays letters created from within SmartOffice and documents uploaded or linked from outside SmartOffice together in one list on the Letters/Documents content link of a Contact.
Display Letter Log and Document List separately
Displays letters created from within SmartOffice and documents uploaded or linked from outside SmartOffice in separate lists on the Letters/Documents content link of a Contact.
Print Output Settings
Print on Local Printer Select this option if users are responsible for printing their own documents.
Send to Printer Queue Select this option if administrative staff is responsible for printing documents for most of the users in SmartOffice. Print jobs will be sent to the job queue of the responsible print queue user. This feature enables remote employees to send their print jobs to the main office for printing and mailing purposes.
SmartOffice® v6 – Office Setup and Administration Guide Page 20

Correspondence Options
Print One Letter per Household
Ensures that only one letter will be sent to a household if more than one member of a household is selected when printing mass correspondence. Correspondence will be addressed to the contact specified as the head of household unless a salutation for the household is defined on the contact’s Household tab.
Apply Contact’s Mail Privacy
Displays an alert when a contact has requested not to be contacted using the selected method of correspondence.
Preview before printing Automatically expands merge codes and opens a print preview before sending the document to the local printer or SmartOffice printer queue.
Post to Letter Log/SmartPad
Saves all letters and envelopes generated and printed from SmartOffice to each selected contact’s Letter Log, and posts an entry to the SmartPad noting that the document was printed.
Create Follow-up Activity Prompts the user to create a follow-up activity for every letter sent from SmartOffice.
Send Form Letter as e-mail body
Inserts the text of the form letter in the body of the e-mail message as opposed to sending the letter as an e-mail attachment.
SmartOffice® v6 – Office Settings and Administration Guide Page 21
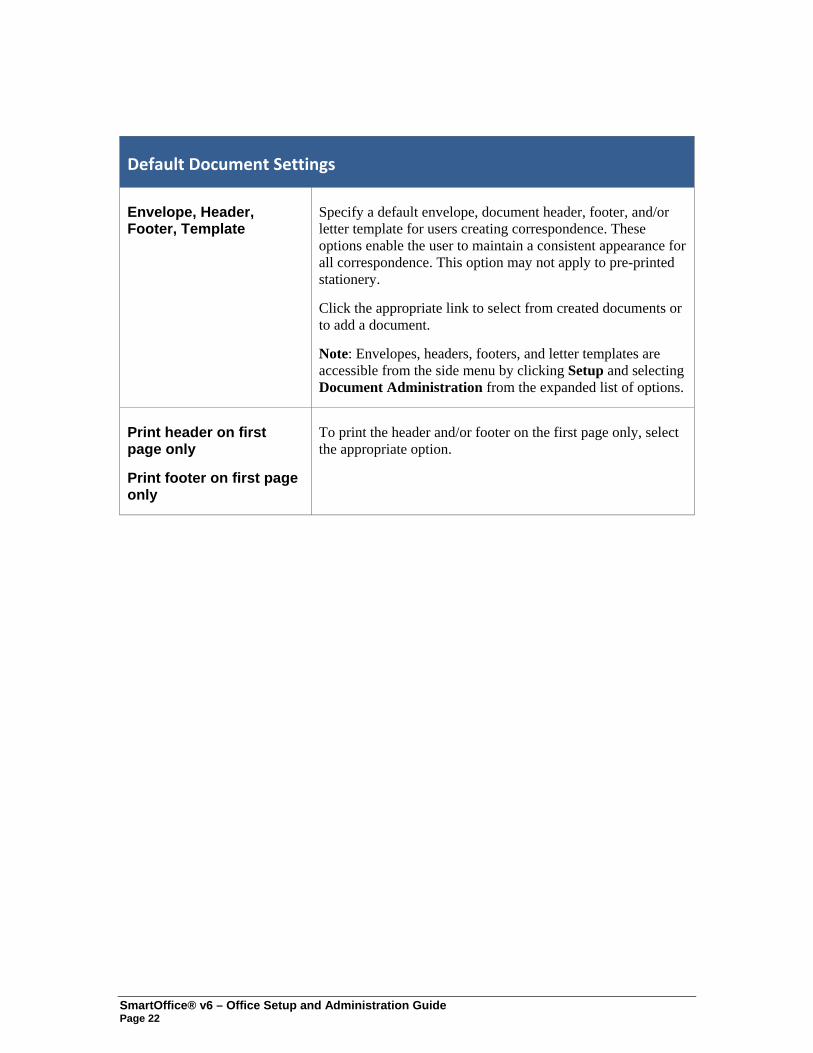
Default Document Settings
Envelope, Header, Footer, Template
Specify a default envelope, document header, footer, and/or letter template for users creating correspondence. These options enable the user to maintain a consistent appearance for all correspondence. This option may not apply to pre-printed stationery.
Click the appropriate link to select from created documents or to add a document.
Note: Envelopes, headers, footers, and letter templates are accessible from the side menu by clicking Setup and selecting Document Administration from the expanded list of options.
Print header on first page only
Print footer on first page only
To print the header and/or footer on the first page only, select the appropriate option.
SmartOffice® v6 – Office Setup and Administration Guide Page 22
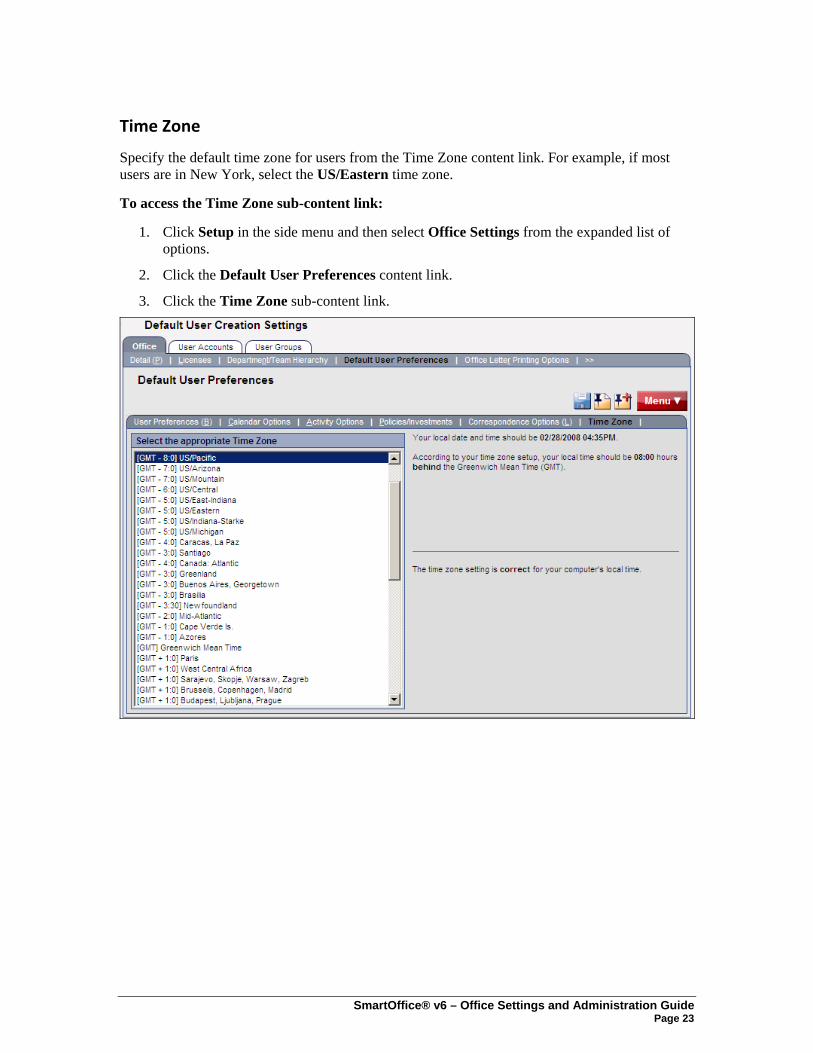
Time Zone
Specify the default time zone for users from the Time Zone content link. For example, if most users are in New York, select the US/Eastern time zone.
To access the Time Zone sub-content link:
1. Click Setup in the side menu and then select Office Settings from the expanded list of options.
2. Click the Default User Preferences content link.
3. Click the Time Zone sub-content link.
SmartOffice® v6 – Office Settings and Administration Guide Page 23
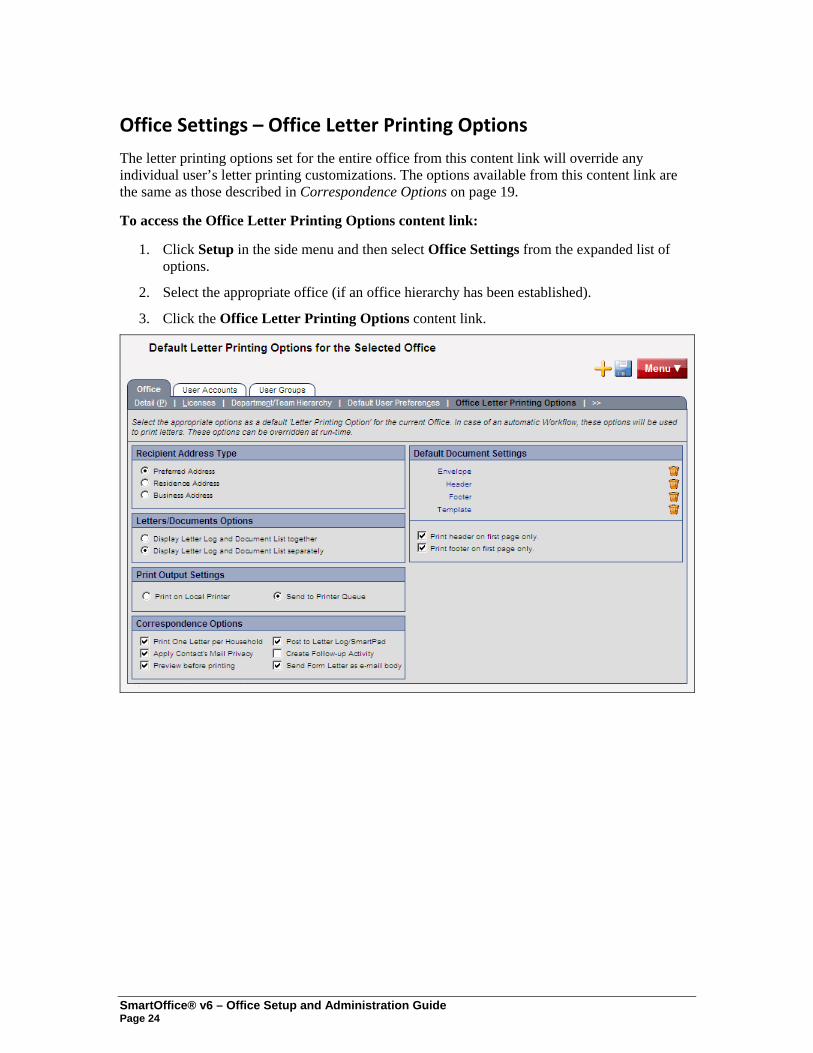
Office Settings – Office Letter Printing Options
The letter printing options set for the entire office from this content link will override any individual user’s letter printing customizations. The options available from this content link are the same as those described in Correspondence Options on page 19.
To access the Office Letter Printing Options content link:
1. Click Setup in the side menu and then select Office Settings from the expanded list of options.
2. Select the appropriate office (if an office hierarchy has been established).
3. Click the Office Letter Printing Options content link.
SmartOffice® v6 – Office Setup and Administration Guide Page 24
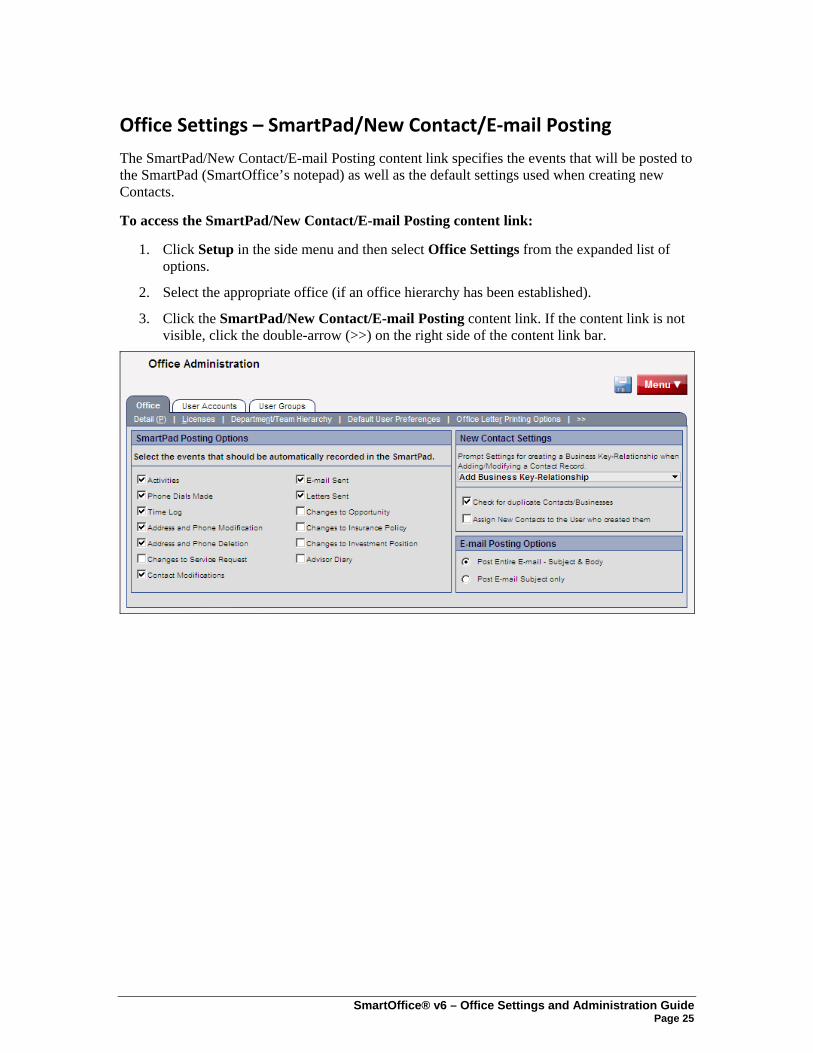
Office Settings – SmartPad/New Contact/E‐mail Posting
The SmartPad/New Contact/E-mail Posting content link specifies the events that will be posted to the SmartPad (SmartOffice’s notepad) as well as the default settings used when creating new Contacts.
To access the SmartPad/New Contact/E-mail Posting content link:
1. Click Setup in the side menu and then select Office Settings from the expanded list of options.
2. Select the appropriate office (if an office hierarchy has been established).
3. Click the SmartPad/New Contact/E-mail Posting content link. If the content link is not visible, click the double-arrow (>>) on the right side of the content link bar.
SmartOffice® v6 – Office Settings and Administration Guide Page 25
The following table describes the settings on the SmartPad/New Contact/E-mail Posting content link.
SmartPad Posting Options
Activities
Phone Dials Made
Time Log
Address and Phone Modification
Address and Phone Deletion
Changes to Service Request
Contact Modifications
E-mail Sent
Letters Sent
Changes to Opportunity
Changes to Insurance Policy
Changes to Investment Position
Advisor Diary
The SmartPad is a chronological file or “smart” notepad that keeps track of actions related to each contact. Select the SmartOffice actions/events that should result in an entry being posted automatically to the SmartPad.
New Contact Settings
Prompt Settings for creating a Business Key-Relationship when Adding/Modifying a Contact Record
When adding or modifying a Contact in SmartOffice, a user may link the Contact to a previously created Business (using the Lookup button on the Employer field). This enables the user to quickly change the business address and business phone number for all records linked to a business. Choose the appropriate option:
• Add Business Key Relationship
• Ask Before Adding Business Key Relationship
• Don’t Add Business Key Relationship
SmartOffice® v6 – Office Setup and Administration Guide Page 26

Check for duplicate Contacts/Businesses
When this option is selected, a warning displays if a user is creating a Contact or Business that already exists in the office.
Assign New Contacts to the User who created them
When this option is selected, each new Contact is assigned to the user who created it. This can have significant implications depending on how office security is configured. See Office Security on page 29 before selecting this option.
If this option is not selected, the user will be prompted while creating a Contact to assign the Contact to one, selected, or all SmartOffice users.
Note: Select this option if there is only one user in the office.
E‐mail Posting Options
Post Entire E-mail – Subject & Body
Post E-mail Subject only
This setting determines whether an entire e-mail message (subject and body) or only the subject is posted to the SmartPad.
Office Settings – Global Proxy
The Global Proxy content link displays a list of proxies created in SmartOffice. Proxies specify which other users’ data a user can see. The Global Proxy List is for informational purposes and cannot be edited.
For more information, see Proxy: Whose data this User can see on page 61.
SmartOffice® v6 – Office Settings and Administration Guide Page 27
To access the Global Proxy content link:
1. Click Setup in the side menu and then select Office Settings from the expanded list of options.
2. Select the appropriate office (if an office hierarchy has been established).
3. Click the Global Proxy content link. If the content link is not visible, click the double-arrow (>>) on the right side of the content link bar.
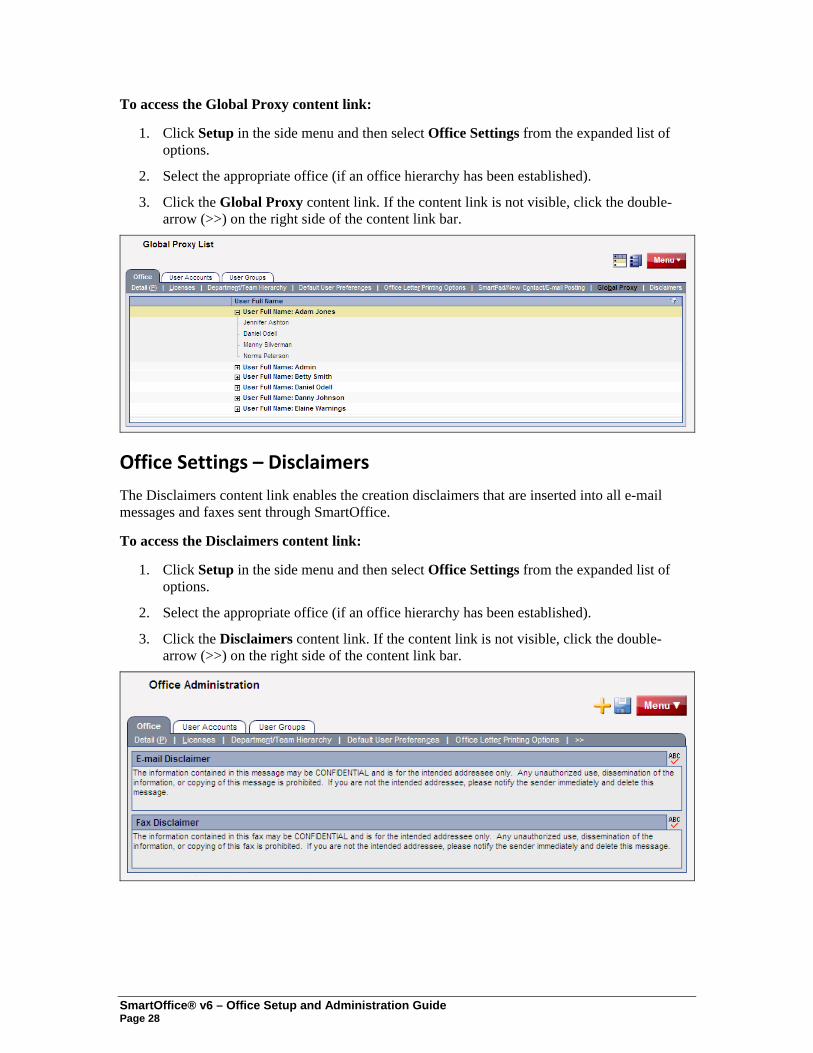
Office Settings – Disclaimers
The Disclaimers content link enables the creation disclaimers that are inserted into all e-mail messages and faxes sent through SmartOffice.
To access the Disclaimers content link:
1. Click Setup in the side menu and then select Office Settings from the expanded list of options.
2. Select the appropriate office (if an office hierarchy has been established).
3. Click the Disclaimers content link. If the content link is not visible, click the double-arrow (>>) on the right side of the content link bar.
SmartOffice® v6 – Office Setup and Administration Guide Page 28
Office Security
Understanding data security in SmartOffice is important to configuring the office so that it meets a business’ requirements.
This section provides information that addresses common issues such as these:
• How an advisor can prevent other advisors in the office from accessing his or her data while still enabling an assistant to view that data.
• Whether one Contact can be shared with multiple producers.
• How a user can hide private data from others.
• Whether it is possible to create a group of users who have access to the same data (e.g., when new business reps and clerical staff are responsible for servicing the clients and prospects for all producers).
Note: Office security can be turned off for offices containing only one user. It can also be turned off for offices containing multiple users if there is no need to prevent all users from being able to view all data.
To turn off office security, from the SmartOffice side menu, click Setup and then select Office Settings from the expanded list of options. On the Detail content link, clear the Enable Security Within Office option and save the changes. Then skip to Assigning User Rights and Licenses on page 32.
Contact Assignment
In SmartOffice, Contacts can be assigned to one, several, or all users in the office. Contacts that are not assigned to any user are accessible to all users in the office.
Contacts can be assigned individually using the User Assignments section on the contact’s Add’l Personal content link. Contacts can also be mass-assigned from the Contact List by clicking the Menu button, selecting Advanced Options, and then selecting the Mass User Assignment option.
Proxy/Department Hierarchy
In SmartOffice, proxy rights give a user authority to view Contacts assigned to one or more other users. For example, new business clerks or assistants who work for multiple producers must proxy for those producers to view Contacts assigned to those producers.
Proxies can be created manually or by using the Department/Team Hierarchy graphical user interface (see Department/Team Hierarchy and Proxies on page 59).
SmartOffice® v6 – Office Settings and Administration Guide Page 29
Private Records
A user can designate certain Contacts as private so that no one except that user can access them. When designating a Contact as private, the user can still enable one or more other users to view the Contact.
Note: To mark a Contact as private, a user must have the Record Privatization user right enabled (see Assigning User Rights and Licenses on page 32).
User Groups
A User Group is a collection of users that functions like a single user for the purposes of assigning contacts and creating activities. A User Group can be used to assign contacts to several users without having to assign them to each user individually. For example, if users Karen, Daniel, and Roberta are in a User Group called Phil’s Group, all three users will be able to view Contacts assigned to Phil’s Group.
Once User Groups are established, granting access to a specific set of Contacts is as easy as adding a user to the applicable group. Likewise, restricting access to a set of contacts can be accomplished by removing a user from the applicable User Group.
Adding a user to a User Group does not grant that user proxy access to the other members of the group. In the example above, if Karen has Contacts assigned just to her, Daniel and Roberta would not be able to view those Contacts unless they were set up as proxies for Karen.
In addition, if one member of a group marks a contact as private, the other members cannot see the contact.
This topic is covered in detail in Creating User Groups on page 62.
Super User
Someone designated as a Super User can view all Contacts in the office, regardless of assignment (except for private Contacts for which they have not been granted access), User Group membership, or proxy status. (For more information about Super Users, see Configuring User Account Settings on page 54.)
SmartOffice® v6 – Office Setup and Administration Guide Page 30
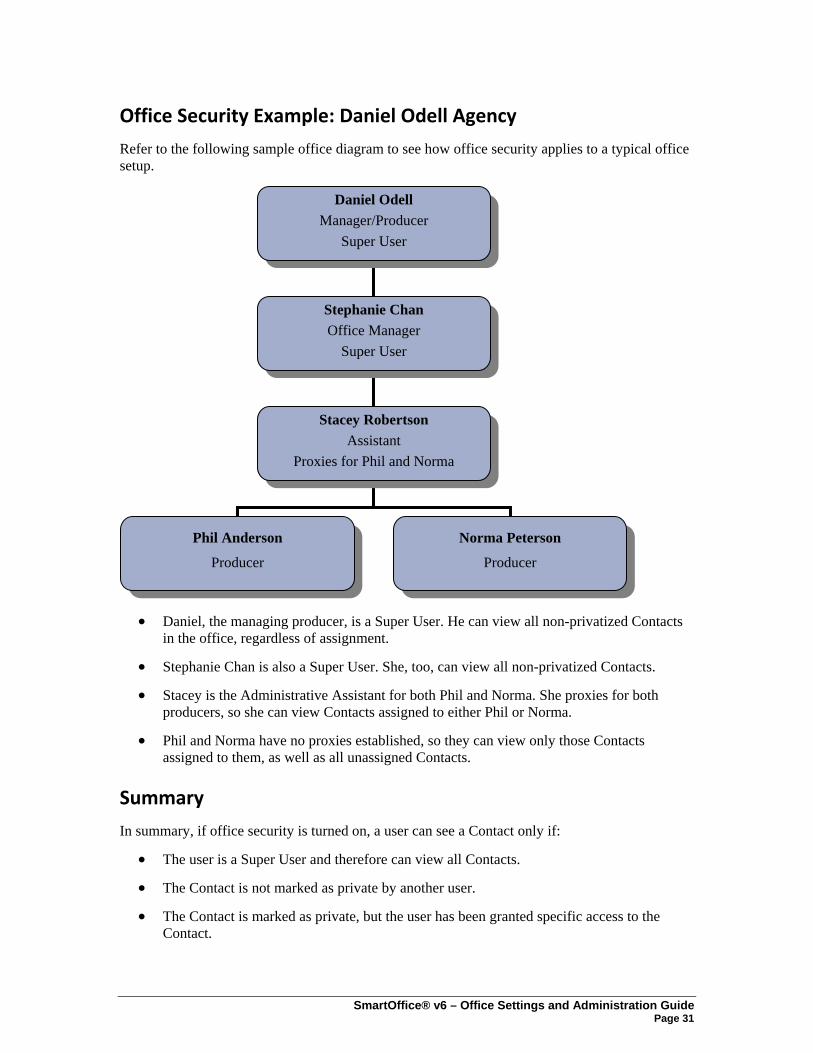
Office Security Example: Daniel Odell Agency
Refer to the following sample office diagram to see how office security applies to a typical office setup.
Daniel Odell Manager/Producer
Super User
Stephanie Chan Office Manager
Super User
Stacey Robertson Assistant
Proxies for Phil and Norma
Phil Anderson
Producer
Norma Peterson
Producer
• Daniel, the managing producer, is a Super User. He can view all non-privatized Contacts in the office, regardless of assignment.
• Stephanie Chan is also a Super User. She, too, can view all non-privatized Contacts.
• Stacey is the Administrative Assistant for both Phil and Norma. She proxies for both producers, so she can view Contacts assigned to either Phil or Norma.
• Phil and Norma have no proxies established, so they can view only those Contacts assigned to them, as well as all unassigned Contacts.
Summary
In summary, if office security is turned on, a user can see a Contact only if:
• The user is a Super User and therefore can view all Contacts.
• The Contact is not marked as private by another user.
• The Contact is marked as private, but the user has been granted specific access to the Contact.
SmartOffice® v6 – Office Settings and Administration Guide Page 31
• The Contact is assigned to the user.
• The Contact is assigned to the user’s User Group.
• The Contact is not assigned to any user.
• The Contact is assigned to another user for whom the user proxies (through Department Hierarchy or individual proxy setup).
Assigning User Rights and Licenses Access to SmartOffice features and functions is based on the assignment of user rights and licenses. This is a very important part of proper office setup.
This section includes the following information:
• Enabling a user to view data but not modify or delete it.
• Restricting a user from creating letters.
• Defining who can create users.
• Defining who can create proxies for other users.
User Rights
Every user must be assigned user rights to perform certain functions within an office. Each user right is explained in this section. Before creating users, become familiar with these rights, and then create/modify user rights templates (i.e., groups of user rights) to be applied to each new user.
Administrator User
When E-Z Data creates an office, an administrator user is created. This user has full rights to create additional users, assign user rights and licenses, and create user groups. The login information for the administrator will arrive by e-mail. Make sure to change the password for this user and keep it confidential.
SmartOffice® v6 – Office Setup and Administration Guide Page 32
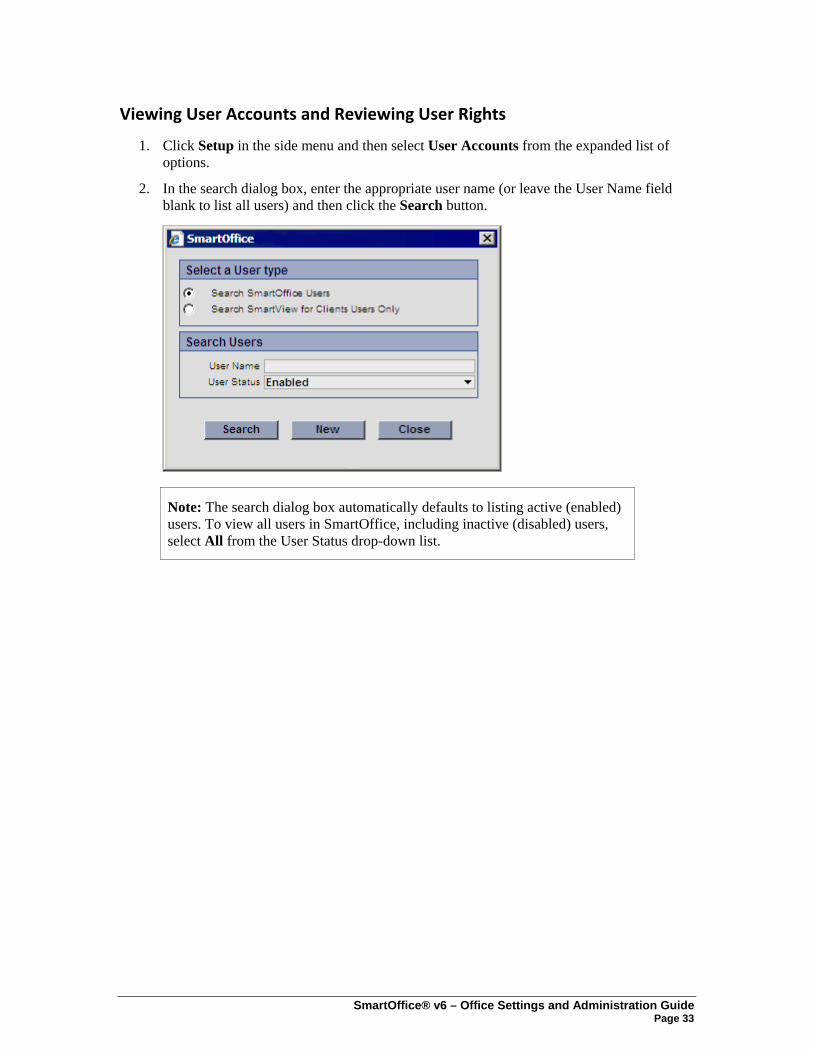
Viewing User Accounts and Reviewing User Rights
1. Click Setup in the side menu and then select User Accounts from the expanded list of options.
2. In the search dialog box, enter the appropriate user name (or leave the User Name field blank to list all users) and then click the Search button.
Note: The search dialog box automatically defaults to listing active (enabled) users. To view all users in SmartOffice, including inactive (disabled) users, select All from the User Status drop-down list.
SmartOffice® v6 – Office Settings and Administration Guide Page 33
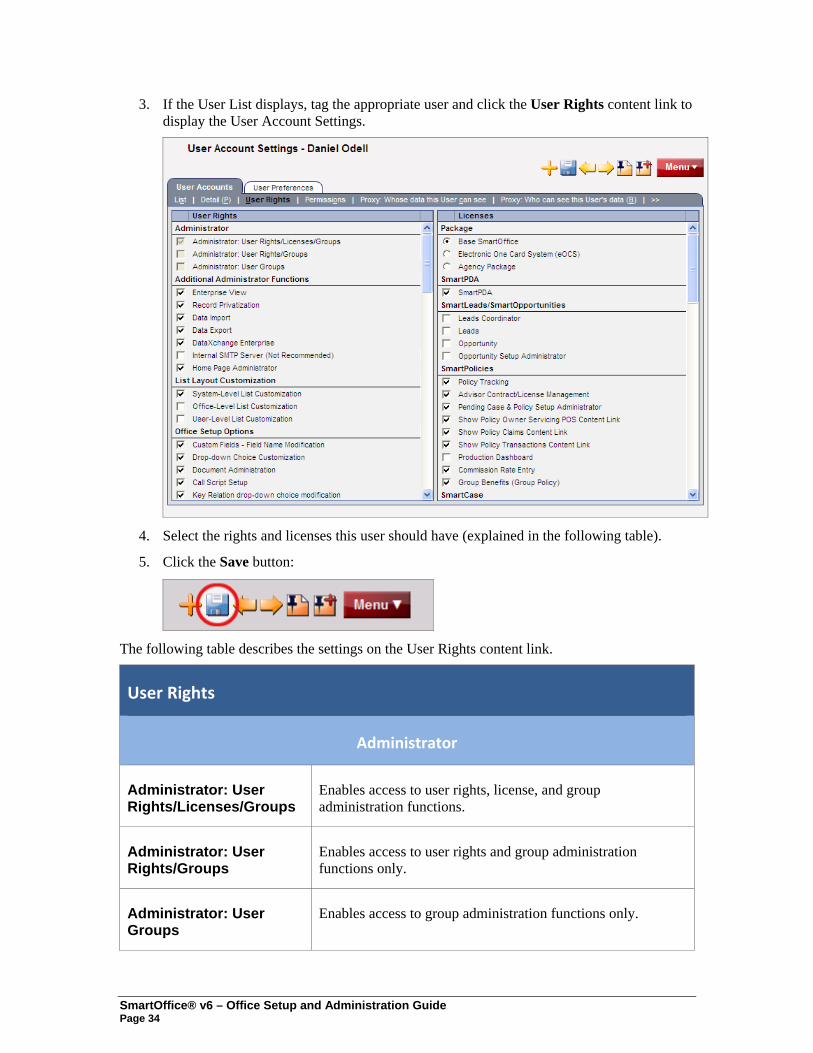
3. If the User List displays, tag the appropriate user and click the User Rights content link to display the User Account Settings.
4. Select the rights and licenses this user should have (explained in the following table).
5. Click the Save button:
The following table describes the settings on the User Rights content link.
User Rights
Administrator
Administrator: User Rights/Licenses/Groups
Enables access to user rights, license, and group administration functions.
Administrator: User Rights/Groups
Enables access to user rights and group administration functions only.
Administrator: User Groups
Enables access to group administration functions only.
SmartOffice® v6 – Office Setup and Administration Guide Page 34
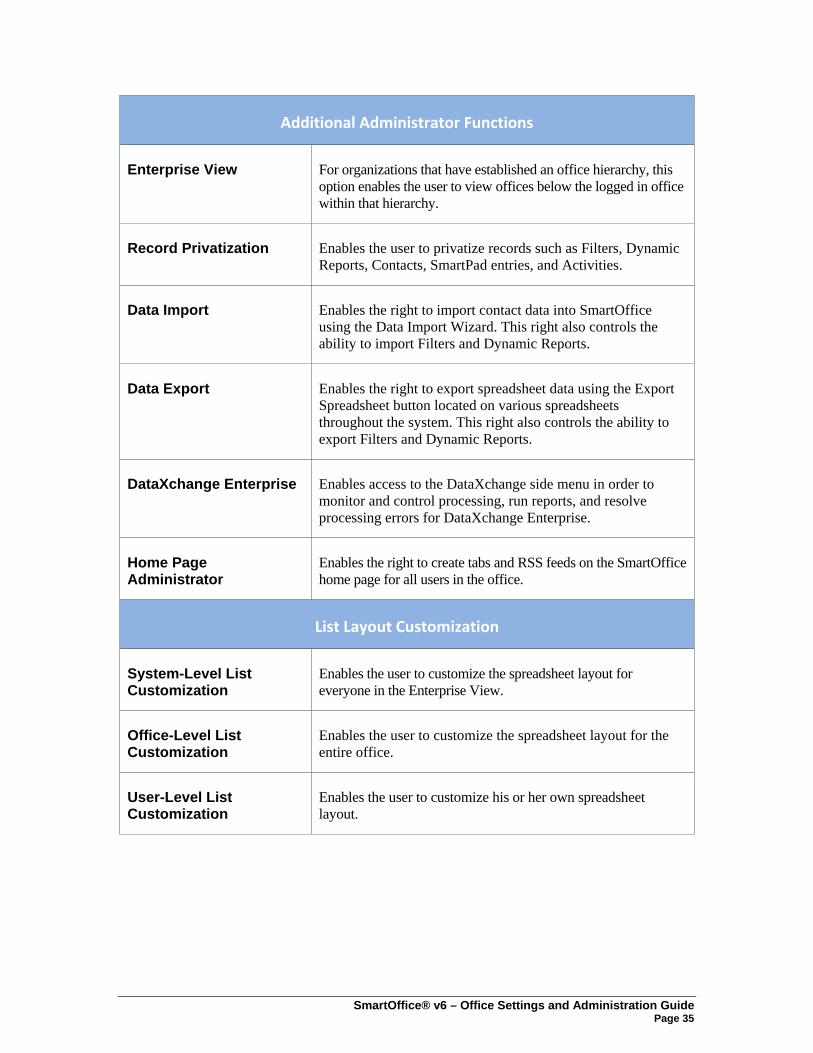
Additional Administrator Functions
Enterprise View For organizations that have established an office hierarchy, this option enables the user to view offices below the logged in office within that hierarchy.
Record Privatization Enables the user to privatize records such as Filters, Dynamic Reports, Contacts, SmartPad entries, and Activities.
Data Import Enables the right to import contact data into SmartOffice using the Data Import Wizard. This right also controls the ability to import Filters and Dynamic Reports.
Data Export Enables the right to export spreadsheet data using the Export Spreadsheet button located on various spreadsheets throughout the system. This right also controls the ability to export Filters and Dynamic Reports.
DataXchange Enterprise Enables access to the DataXchange side menu in order to monitor and control processing, run reports, and resolve processing errors for DataXchange Enterprise.
Home Page Administrator
Enables the right to create tabs and RSS feeds on the SmartOffice home page for all users in the office.
List Layout Customization
System-Level List Customization
Enables the user to customize the spreadsheet layout for everyone in the Enterprise View.
Office-Level List Customization
Enables the user to customize the spreadsheet layout for the entire office.
User-Level List Customization
Enables the user to customize his or her own spreadsheet layout.
SmartOffice® v6 – Office Settings and Administration Guide Page 35
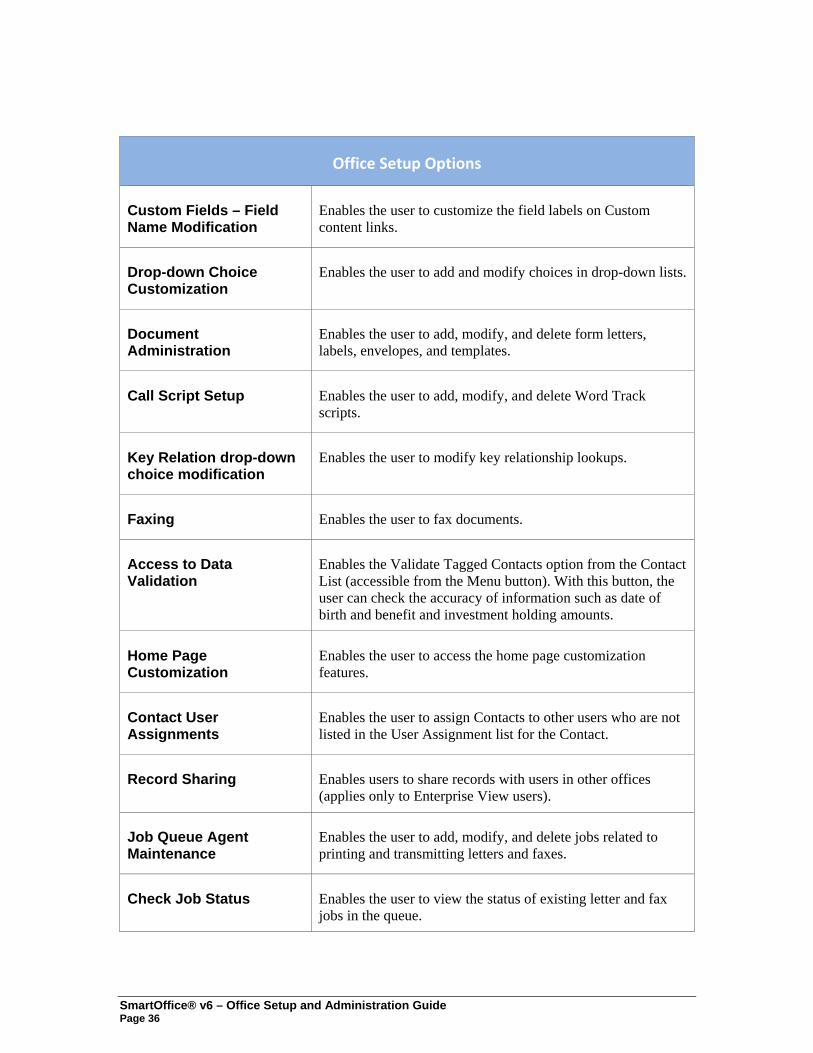
Office Setup Options
Custom Fields – Field Name Modification
Enables the user to customize the field labels on Custom content links.
Drop-down Choice Customization
Enables the user to add and modify choices in drop-down lists.
Document Administration
Enables the user to add, modify, and delete form letters, labels, envelopes, and templates.
Call Script Setup Enables the user to add, modify, and delete Word Track scripts.
Key Relation drop-down choice modification
Enables the user to modify key relationship lookups.
Faxing Enables the user to fax documents.
Access to Data Validation
Enables the Validate Tagged Contacts option from the Contact List (accessible from the Menu button). With this button, the user can check the accuracy of information such as date of birth and benefit and investment holding amounts.
Home Page Customization
Enables the user to access the home page customization features.
Contact User Assignments
Enables the user to assign Contacts to other users who are not listed in the User Assignment list for the Contact.
Record Sharing Enables users to share records with users in other offices (applies only to Enterprise View users).
Job Queue Agent Maintenance
Enables the user to add, modify, and delete jobs related to printing and transmitting letters and faxes.
Check Job Status Enables the user to view the status of existing letter and fax jobs in the queue.
SmartOffice® v6 – Office Setup and Administration Guide Page 36
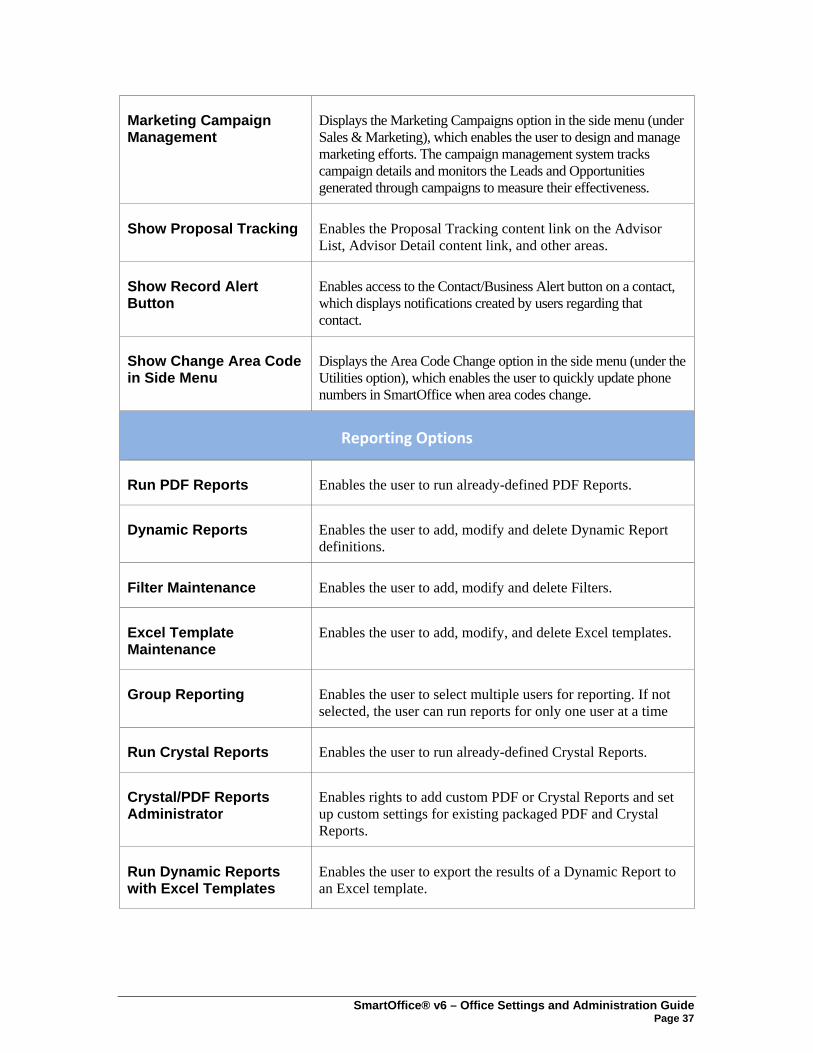
Marketing Campaign Management
Displays the Marketing Campaigns option in the side menu (under Sales & Marketing), which enables the user to design and manage marketing efforts. The campaign management system tracks campaign details and monitors the Leads and Opportunities generated through campaigns to measure their effectiveness.
Show Proposal Tracking Enables the Proposal Tracking content link on the Advisor List, Advisor Detail content link, and other areas.
Show Record Alert Button
Enables access to the Contact/Business Alert button on a contact, which displays notifications created by users regarding that contact.
Show Change Area Code in Side Menu
Displays the Area Code Change option in the side menu (under the Utilities option), which enables the user to quickly update phone numbers in SmartOffice when area codes change.
Reporting Options
Run PDF Reports Enables the user to run already-defined PDF Reports.
Dynamic Reports Enables the user to add, modify and delete Dynamic Report definitions.
Filter Maintenance Enables the user to add, modify and delete Filters.
Excel Template Maintenance
Enables the user to add, modify, and delete Excel templates.
Group Reporting Enables the user to select multiple users for reporting. If not selected, the user can run reports for only one user at a time
Run Crystal Reports Enables the user to run already-defined Crystal Reports.
Crystal/PDF Reports Administrator
Enables rights to add custom PDF or Crystal Reports and set up custom settings for existing packaged PDF and Crystal Reports.
Run Dynamic Reports with Excel Templates
Enables the user to export the results of a Dynamic Report to an Excel template.
SmartOffice® v6 – Office Settings and Administration Guide Page 37
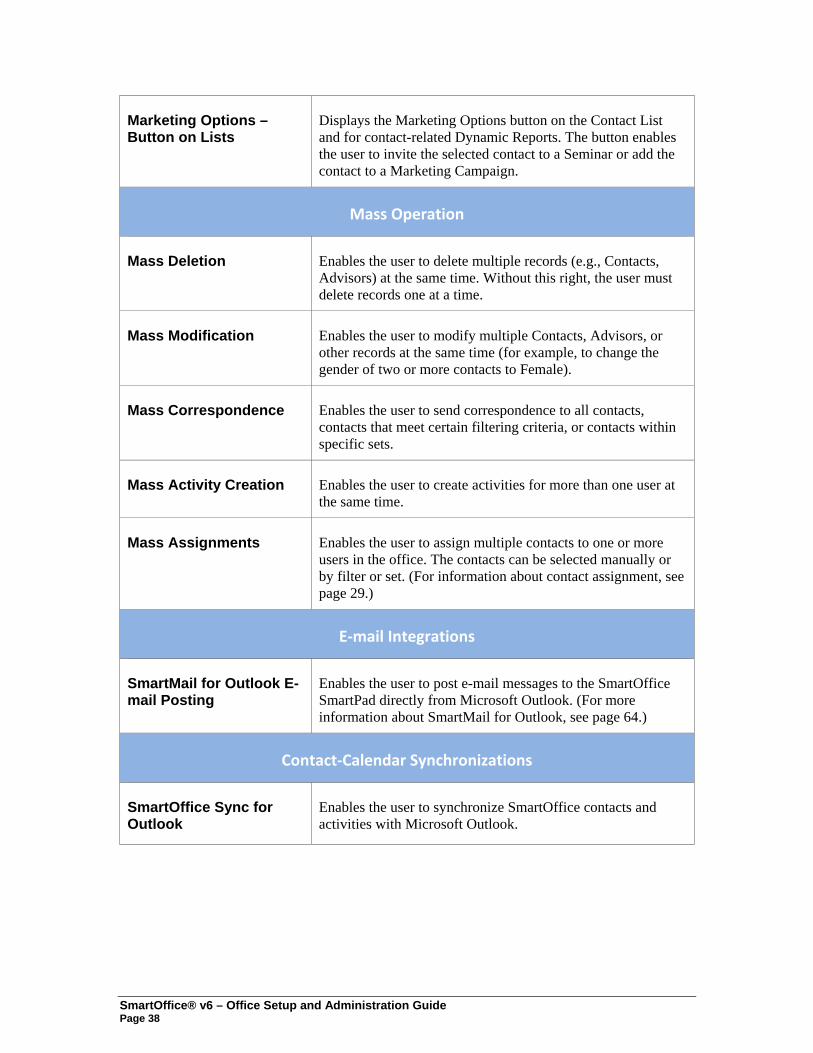
Marketing Options – Button on Lists
Displays the Marketing Options button on the Contact List and for contact-related Dynamic Reports. The button enables the user to invite the selected contact to a Seminar or add the contact to a Marketing Campaign.
Mass Operation
Mass Deletion Enables the user to delete multiple records (e.g., Contacts, Advisors) at the same time. Without this right, the user must delete records one at a time.
Mass Modification Enables the user to modify multiple Contacts, Advisors, or other records at the same time (for example, to change the gender of two or more contacts to Female).
Mass Correspondence Enables the user to send correspondence to all contacts, contacts that meet certain filtering criteria, or contacts within specific sets.
Mass Activity Creation Enables the user to create activities for more than one user at the same time.
Mass Assignments Enables the user to assign multiple contacts to one or more users in the office. The contacts can be selected manually or by filter or set. (For information about contact assignment, see page 29.)
E‐mail Integrations
SmartMail for Outlook E-mail Posting
Enables the user to post e-mail messages to the SmartOffice SmartPad directly from Microsoft Outlook. (For more information about SmartMail for Outlook, see page 64.)
Contact‐Calendar Synchronizations
SmartOffice Sync for Outlook
Enables the user to synchronize SmartOffice contacts and activities with Microsoft Outlook.
SmartOffice® v6 – Office Setup and Administration Guide Page 38
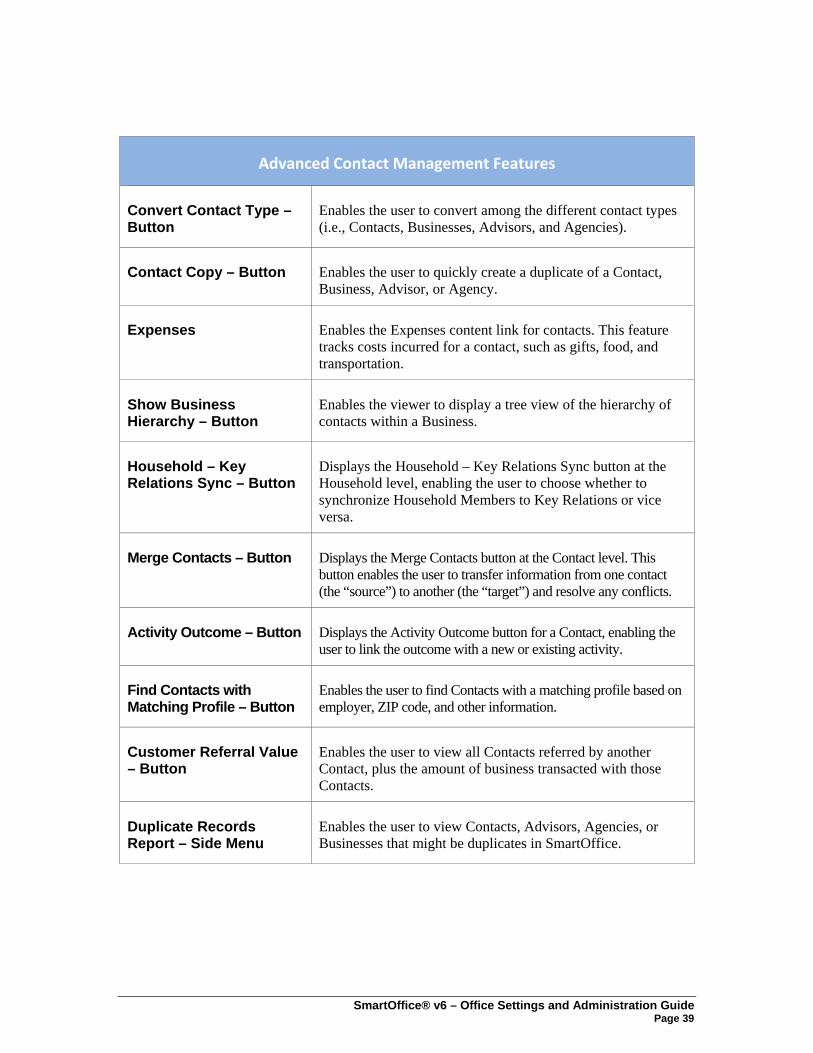
Advanced Contact Management Features
Convert Contact Type – Button
Enables the user to convert among the different contact types (i.e., Contacts, Businesses, Advisors, and Agencies).
Contact Copy – Button Enables the user to quickly create a duplicate of a Contact, Business, Advisor, or Agency.
Expenses Enables the Expenses content link for contacts. This feature tracks costs incurred for a contact, such as gifts, food, and transportation.
Show Business Hierarchy – Button
Enables the viewer to display a tree view of the hierarchy of contacts within a Business.
Household – Key Relations Sync – Button
Displays the Household – Key Relations Sync button at the Household level, enabling the user to choose whether to synchronize Household Members to Key Relations or vice versa.
Merge Contacts – Button Displays the Merge Contacts button at the Contact level. This button enables the user to transfer information from one contact (the “source”) to another (the “target”) and resolve any conflicts.
Activity Outcome – Button Displays the Activity Outcome button for a Contact, enabling the user to link the outcome with a new or existing activity.
Find Contacts with Matching Profile – Button
Enables the user to find Contacts with a matching profile based on employer, ZIP code, and other information.
Customer Referral Value – Button
Enables the user to view all Contacts referred by another Contact, plus the amount of business transacted with those Contacts.
Duplicate Records Report – Side Menu
Enables the user to view Contacts, Advisors, Agencies, or Businesses that might be duplicates in SmartOffice.
SmartOffice® v6 – Office Settings and Administration Guide Page 39
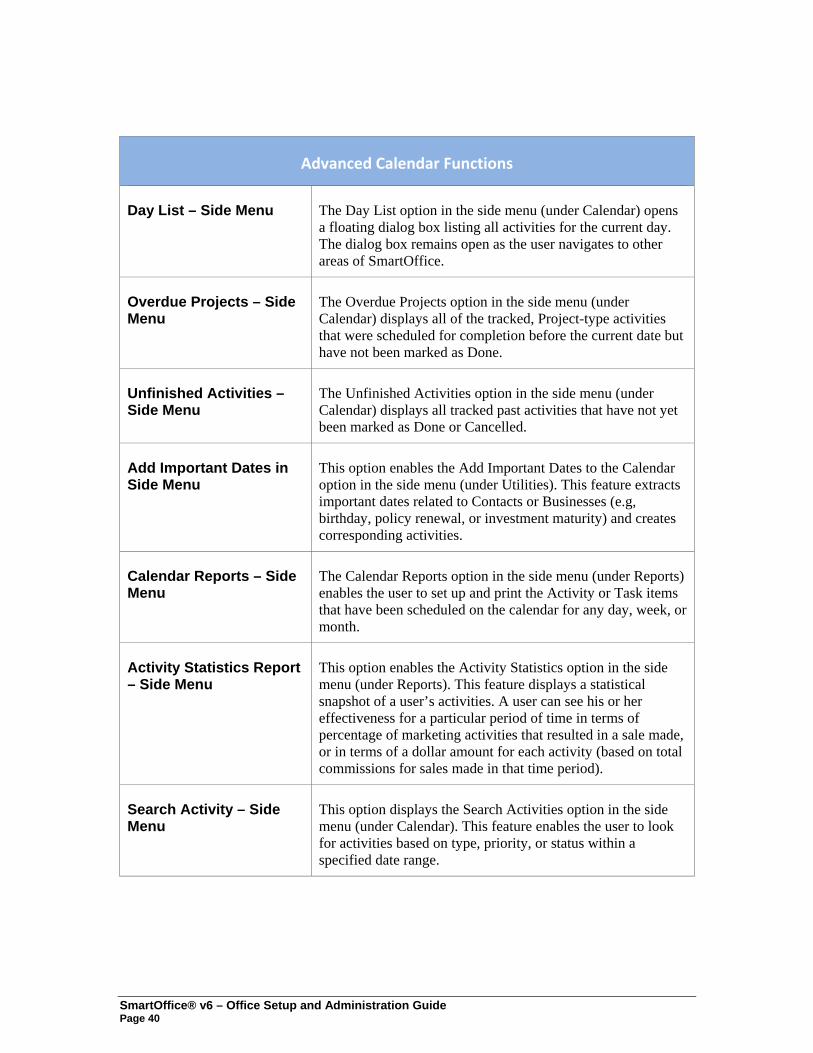
Advanced Calendar Functions
Day List – Side Menu The Day List option in the side menu (under Calendar) opens a floating dialog box listing all activities for the current day. The dialog box remains open as the user navigates to other areas of SmartOffice.
Overdue Projects – Side Menu
The Overdue Projects option in the side menu (under Calendar) displays all of the tracked, Project-type activities that were scheduled for completion before the current date but have not been marked as Done.
Unfinished Activities – Side Menu
The Unfinished Activities option in the side menu (under Calendar) displays all tracked past activities that have not yet been marked as Done or Cancelled.
Add Important Dates in Side Menu
This option enables the Add Important Dates to the Calendar option in the side menu (under Utilities). This feature extracts important dates related to Contacts or Businesses (e.g, birthday, policy renewal, or investment maturity) and creates corresponding activities.
Calendar Reports – Side Menu
The Calendar Reports option in the side menu (under Reports) enables the user to set up and print the Activity or Task items that have been scheduled on the calendar for any day, week, or month.
Activity Statistics Report – Side Menu
This option enables the Activity Statistics option in the side menu (under Reports). This feature displays a statistical snapshot of a user’s activities. A user can see his or her effectiveness for a particular period of time in terms of percentage of marketing activities that resulted in a sale made, or in terms of a dollar amount for each activity (based on total commissions for sales made in that time period).
Search Activity – Side Menu
This option displays the Search Activities option in the side menu (under Calendar). This feature enables the user to look for activities based on type, priority, or status within a specified date range.
SmartOffice® v6 – Office Setup and Administration Guide Page 40

Advanced Advisor Management Features
Broker Dealer – Button Enables the Broker Dealer button on the Advisor Personal content link, enabling the user to view or add NASD information for an Advisor.
Advisor/Contract Hierarchy – Buttons
Enables the Advisor Hierarchy and Contract Hierarchy buttons on the Advisor List.
The Advisor Hierarchy button opens a floating dialog box displaying a hierarchical view of an Advisor in relation to any associated advisors.
The Contract Hierarchy button opens a floating dialog box displaying the list of contracts for an advisor and a hierarchical view of those contracts, enabling easy navigation to other contracts within the hierarchy.
These floating dialog boxes remain open while the user navigates to other areas of SmartOffice.
Product Marketing – Button
Enables the Product Marketing option from the Advisor Personal content link. Product Marketing enables the user to manually track the percentage of a certain line of business that an advisor would sell. The user can then market specific products to that advisor based on those percentages.
Advisor Policy Statistics – Button
Enables the Advisor Policy Statistics button on the Advisor Personal content link. This feature lists the individual and group policies associated with the Advisor, as well as premium and benefit information for each policy.
Advisor Reassignment – Button
Enables the Advisor Reassignment button on the Advisor List. This feature lists all of the contacts and holdings assigned to an advisor, making it possible to reassign those contacts and holdings to one or more other advisors.
Advisor Merge – Button Displays the Advisor/Agency Merge button on the Advisor Personal content link and the Advisor List. This button enables the user to transfer information from one Advisor or Agency (the “source”) to another (the “target”) and to resolve any conflicts.
SmartOffice® v6 – Office Settings and Administration Guide Page 41
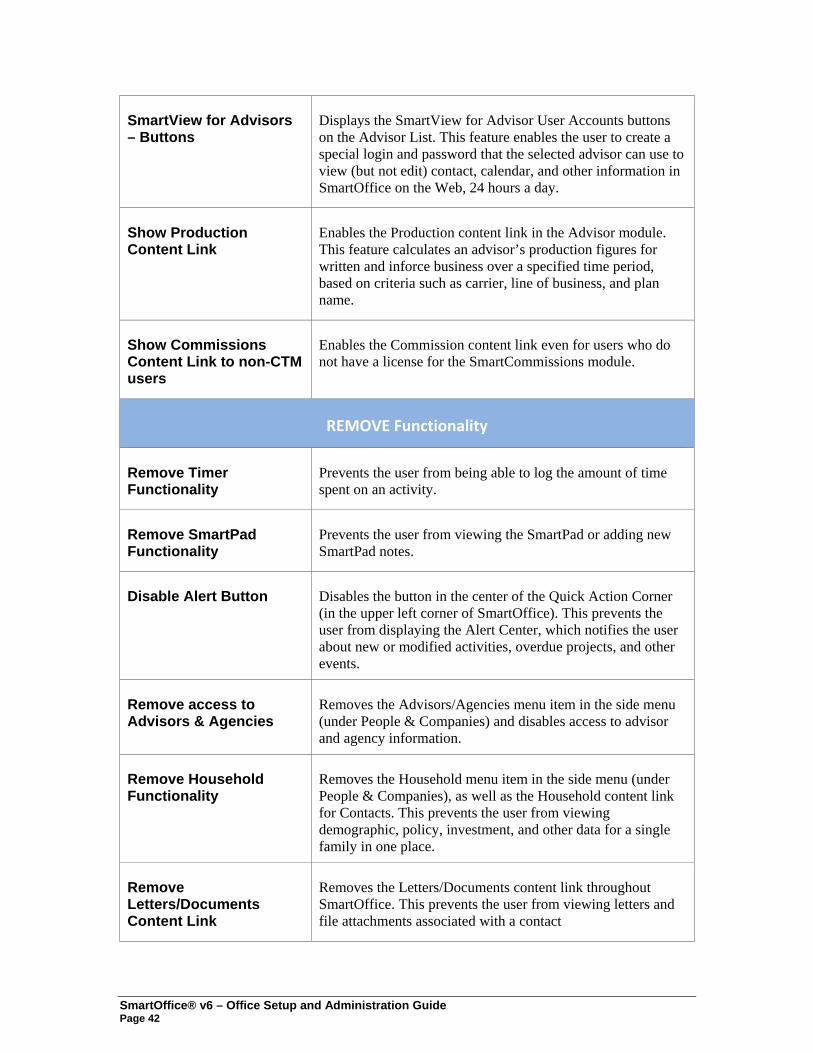
SmartView for Advisors – Buttons
Displays the SmartView for Advisor User Accounts buttons on the Advisor List. This feature enables the user to create a special login and password that the selected advisor can use to view (but not edit) contact, calendar, and other information in SmartOffice on the Web, 24 hours a day.
Show Production Content Link
Enables the Production content link in the Advisor module. This feature calculates an advisor’s production figures for written and inforce business over a specified time period, based on criteria such as carrier, line of business, and plan name.
Show Commissions Content Link to non-CTM users
Enables the Commission content link even for users who do not have a license for the SmartCommissions module.
REMOVE Functionality
Remove Timer Functionality
Prevents the user from being able to log the amount of time spent on an activity.
Remove SmartPad Functionality
Prevents the user from viewing the SmartPad or adding new SmartPad notes.
Disable Alert Button Disables the button in the center of the Quick Action Corner (in the upper left corner of SmartOffice). This prevents the user from displaying the Alert Center, which notifies the user about new or modified activities, overdue projects, and other events.
Remove access to Advisors & Agencies
Removes the Advisors/Agencies menu item in the side menu (under People & Companies) and disables access to advisor and agency information.
Remove Household Functionality
Removes the Household menu item in the side menu (under People & Companies), as well as the Household content link for Contacts. This prevents the user from viewing demographic, policy, investment, and other data for a single family in one place.
Remove Letters/Documents Content Link
Removes the Letters/Documents content link throughout SmartOffice. This prevents the user from viewing letters and file attachments associated with a contact
SmartOffice® v6 – Office Setup and Administration Guide Page 42
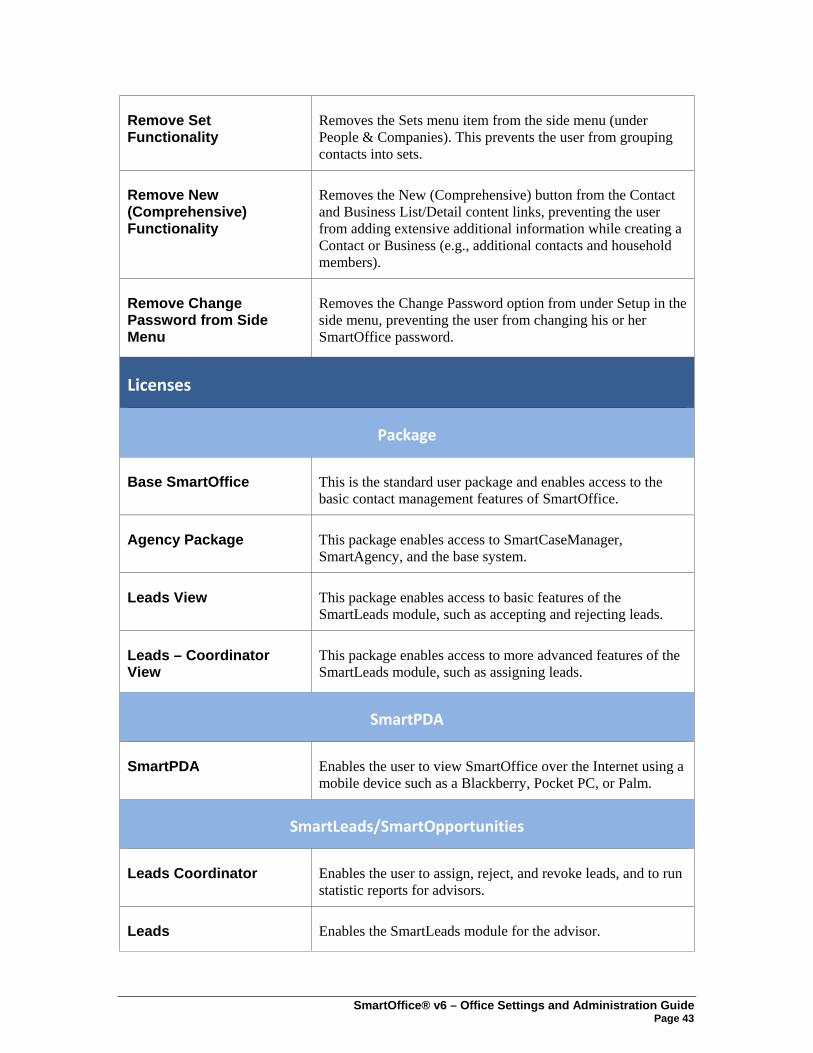
Remove Set Functionality
Removes the Sets menu item from the side menu (under People & Companies). This prevents the user from grouping contacts into sets.
Remove New (Comprehensive) Functionality
Removes the New (Comprehensive) button from the Contact and Business List/Detail content links, preventing the user from adding extensive additional information while creating a Contact or Business (e.g., additional contacts and household members).
Remove Change Password from Side Menu
Removes the Change Password option from under Setup in the side menu, preventing the user from changing his or her SmartOffice password.
Licenses
Package
Base SmartOffice This is the standard user package and enables access to the basic contact management features of SmartOffice.
Agency Package This package enables access to SmartCaseManager, SmartAgency, and the base system.
Leads View This package enables access to basic features of the SmartLeads module, such as accepting and rejecting leads.
Leads – Coordinator View
This package enables access to more advanced features of the SmartLeads module, such as assigning leads.
SmartPDA
SmartPDA Enables the user to view SmartOffice over the Internet using a mobile device such as a Blackberry, Pocket PC, or Palm.
SmartLeads/SmartOpportunities
Leads Coordinator Enables the user to assign, reject, and revoke leads, and to run statistic reports for advisors.
Leads Enables the SmartLeads module for the advisor.
SmartOffice® v6 – Office Settings and Administration Guide Page 43
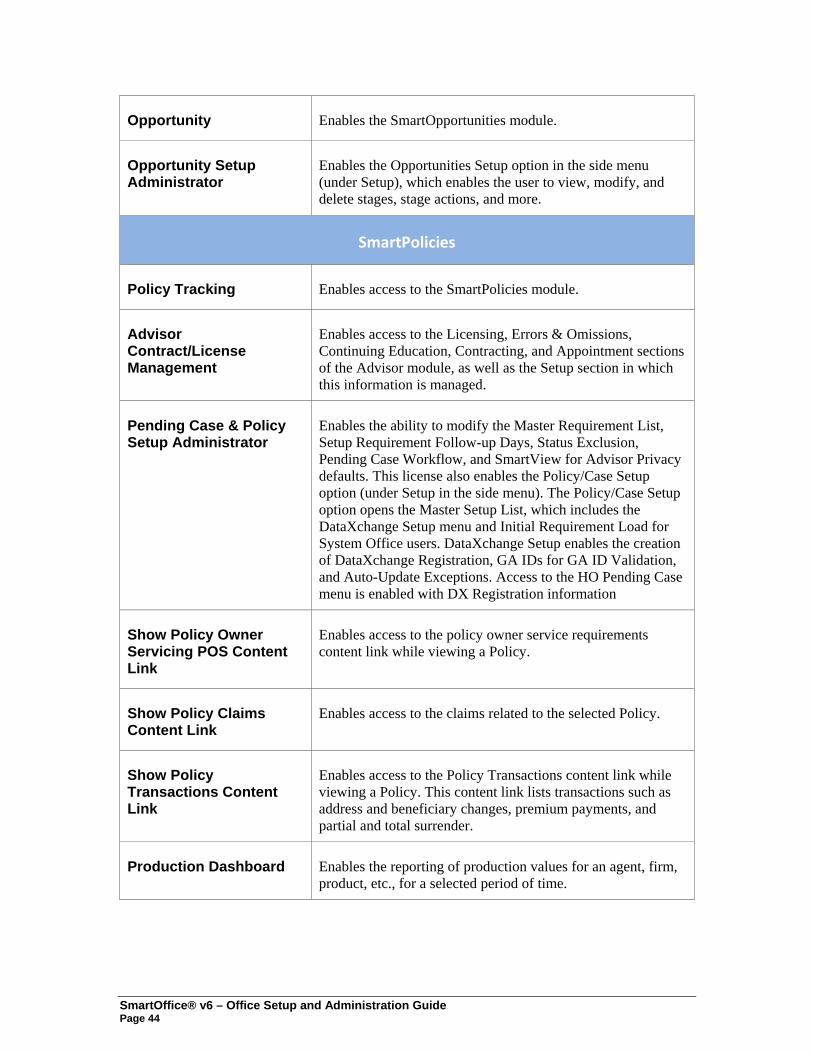
Opportunity Enables the SmartOpportunities module.
Opportunity Setup Administrator
Enables the Opportunities Setup option in the side menu (under Setup), which enables the user to view, modify, and delete stages, stage actions, and more.
SmartPolicies
Policy Tracking Enables access to the SmartPolicies module.
Advisor Contract/License Management
Enables access to the Licensing, Errors & Omissions, Continuing Education, Contracting, and Appointment sections of the Advisor module, as well as the Setup section in which this information is managed.
Pending Case & Policy Setup Administrator
Enables the ability to modify the Master Requirement List, Setup Requirement Follow-up Days, Status Exclusion, Pending Case Workflow, and SmartView for Advisor Privacy defaults. This license also enables the Policy/Case Setup option (under Setup in the side menu). The Policy/Case Setup option opens the Master Setup List, which includes the DataXchange Setup menu and Initial Requirement Load for System Office users. DataXchange Setup enables the creation of DataXchange Registration, GA IDs for GA ID Validation, and Auto-Update Exceptions. Access to the HO Pending Case menu is enabled with DX Registration information
Show Policy Owner Servicing POS Content Link
Enables access to the policy owner service requirements content link while viewing a Policy.
Show Policy Claims Content Link
Enables access to the claims related to the selected Policy.
Show Policy Transactions Content Link
Enables access to the Policy Transactions content link while viewing a Policy. This content link lists transactions such as address and beneficiary changes, premium payments, and partial and total surrender.
Production Dashboard Enables the reporting of production values for an agent, firm, product, etc., for a selected period of time.
SmartOffice® v6 – Office Setup and Administration Guide Page 44
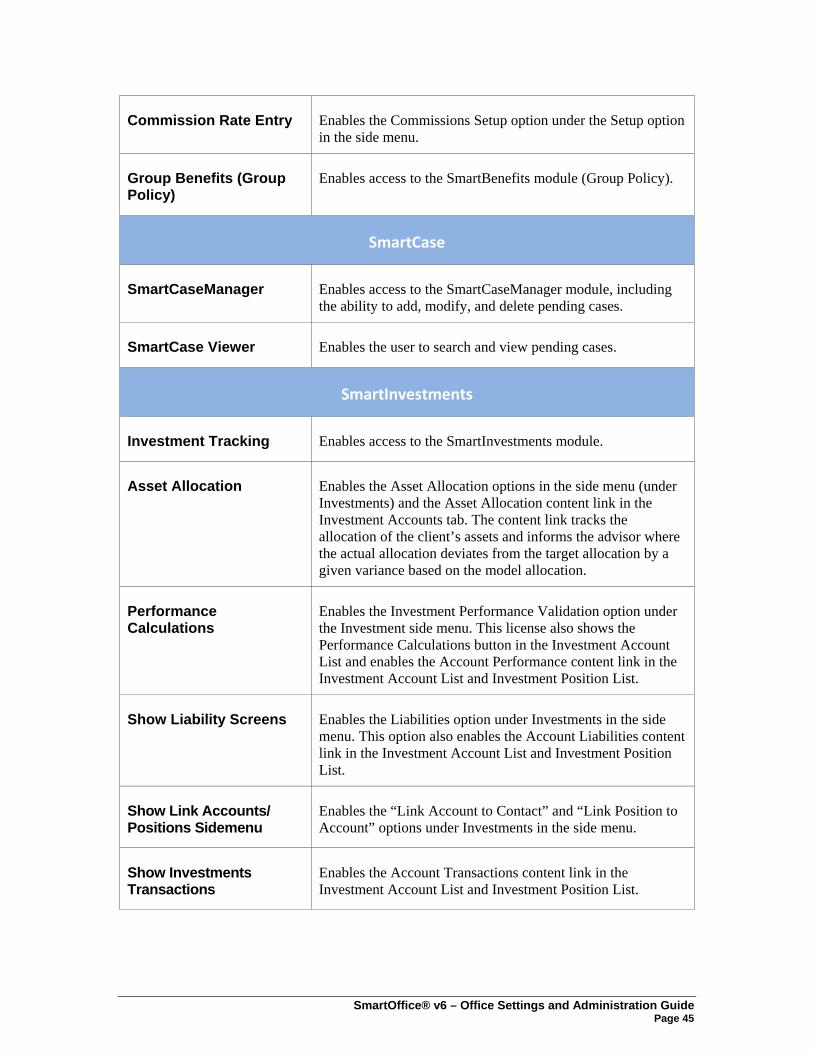
Commission Rate Entry Enables the Commissions Setup option under the Setup option in the side menu.
Group Benefits (Group Policy)
Enables access to the SmartBenefits module (Group Policy).
SmartCase
SmartCaseManager Enables access to the SmartCaseManager module, including the ability to add, modify, and delete pending cases.
SmartCase Viewer Enables the user to search and view pending cases.
SmartInvestments
Investment Tracking Enables access to the SmartInvestments module.
Asset Allocation Enables the Asset Allocation options in the side menu (under Investments) and the Asset Allocation content link in the Investment Accounts tab. The content link tracks the allocation of the client’s assets and informs the advisor where the actual allocation deviates from the target allocation by a given variance based on the model allocation.
Performance Calculations
Enables the Investment Performance Validation option under the Investment side menu. This license also shows the Performance Calculations button in the Investment Account List and enables the Account Performance content link in the Investment Account List and Investment Position List.
Show Liability Screens Enables the Liabilities option under Investments in the side menu. This option also enables the Account Liabilities content link in the Investment Account List and Investment Position List.
Show Link Accounts/ Positions Sidemenu
Enables the “Link Account to Contact” and “Link Position to Account” options under Investments in the side menu.
Show Investments Transactions
Enables the Account Transactions content link in the Investment Account List and Investment Position List.
SmartOffice® v6 – Office Settings and Administration Guide Page 45

Show Investment Position History
Enables the Account Positions tab in the Investment Account List and the Position History content link in the Investment Position List.
DataXchange Online Services
Process HO Pending Case Status Information
Enables access to the HO Pending Cases menu item in the side menu (under Insurance), which the user can click to search for pending case updates downloaded from carriers through SmartOffice.
Import Log Enables access to the Import Log menu item in the side menu (under Utilities), which displays a record of pending case downloads that have occurred.
SmartLink for iPipeline Enables the SmartLink for iPipeline menu item in the side menu (under Insurance). The user can then process automatic feeds from iPipeline, which provides carrier information such as related standard plans, forms, underwriting guidelines, and underwriting requirements.
Mobile Solutions
SmartOffice Mobile PC module
Enables access to SmartOffice Mobile PC, a program for laptop users. The program enables users to download information from SmartOffice, view and modify the data while offline, and then upload their changes to SmartOffice the next time they are connected.
SmartOffice Mobile for PDA module
Enables SmartOffice Mobile for PDA, an application that can be installed on either a Palm or Pocket PC device. This application is used to sync SmartOffice contact information to the PDA.
SmartOffice® v6 – Office Setup and Administration Guide Page 46
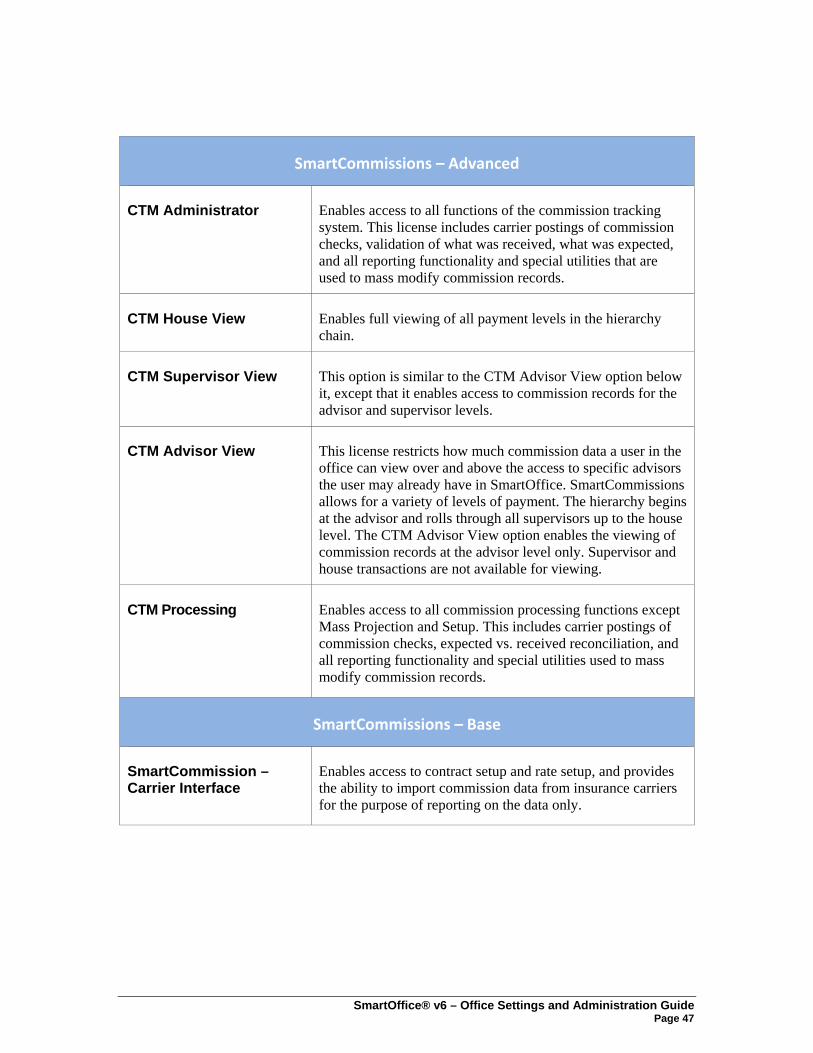
SmartCommissions – Advanced
CTM Administrator Enables access to all functions of the commission tracking system. This license includes carrier postings of commission checks, validation of what was received, what was expected, and all reporting functionality and special utilities that are used to mass modify commission records.
CTM House View Enables full viewing of all payment levels in the hierarchy chain.
CTM Supervisor View This option is similar to the CTM Advisor View option below it, except that it enables access to commission records for the advisor and supervisor levels.
CTM Advisor View This license restricts how much commission data a user in the office can view over and above the access to specific advisors the user may already have in SmartOffice. SmartCommissions allows for a variety of levels of payment. The hierarchy begins at the advisor and rolls through all supervisors up to the house level. The CTM Advisor View option enables the viewing of commission records at the advisor level only. Supervisor and house transactions are not available for viewing.
CTM Processing Enables access to all commission processing functions except Mass Projection and Setup. This includes carrier postings of commission checks, expected vs. received reconciliation, and all reporting functionality and special utilities used to mass modify commission records.
SmartCommissions – Base
SmartCommission – Carrier Interface
Enables access to contract setup and rate setup, and provides the ability to import commission data from insurance carriers for the purpose of reporting on the data only.
SmartOffice® v6 – Office Settings and Administration Guide Page 47
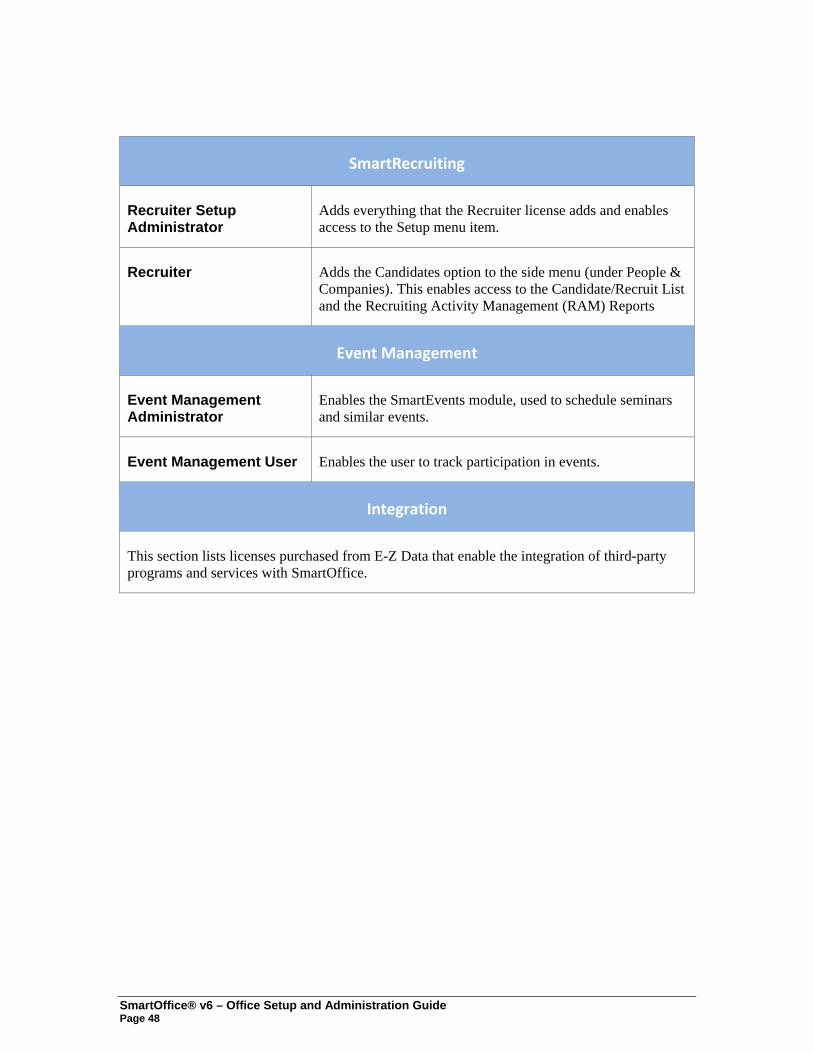
SmartRecruiting
Recruiter Setup Administrator
Adds everything that the Recruiter license adds and enables access to the Setup menu item.
Recruiter Adds the Candidates option to the side menu (under People & Companies). This enables access to the Candidate/Recruit List and the Recruiting Activity Management (RAM) Reports
Event Management
Event Management Administrator
Enables the SmartEvents module, used to schedule seminars and similar events.
Event Management User Enables the user to track participation in events.
Integration
This section lists licenses purchased from E-Z Data that enable the integration of third-party programs and services with SmartOffice.
SmartOffice® v6 – Office Setup and Administration Guide Page 48
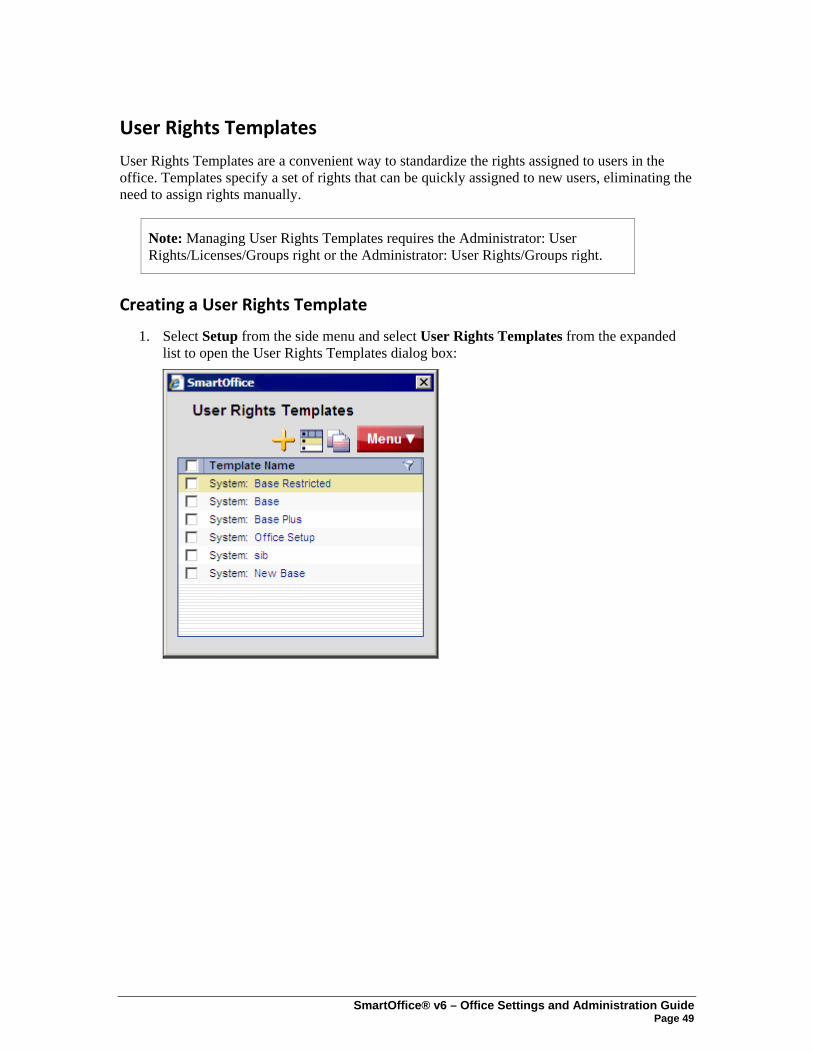
User Rights Templates
User Rights Templates are a convenient way to standardize the rights assigned to users in the office. Templates specify a set of rights that can be quickly assigned to new users, eliminating the need to assign rights manually.
Note: Managing User Rights Templates requires the Administrator: User Rights/Licenses/Groups right or the Administrator: User Rights/Groups right.
Creating a User Rights Template
1. Select Setup from the side menu and select User Rights Templates from the expanded list to open the User Rights Templates dialog box:
SmartOffice® v6 – Office Settings and Administration Guide Page 49

2. Click the New button to open the template creation dialog box:
3. In the Template Name field, enter a name for the new template.
4. Select the appropriate user rights for the new template.
Note: Only user rights, not licenses, can be specified in a User Rights Template. Licenses are assigned during user creation (see page 51).
5. Click the OK button.
Copying User Rights Templates
User Rights Templates can be copied to quickly create additional User Rights Templates based on an existing template.
1. Click Setup from the side menu and select User Rights Templates.
2. In the User Rights Templates dialog box, tag the template to be copied.
3. Click the Copy User Rights Template button.
4. In the Template Name field, enter a name for the new template.
5. Make the appropriate changes to the selected user rights.
6. Click the OK button.
SmartOffice® v6 – Office Setup and Administration Guide Page 50
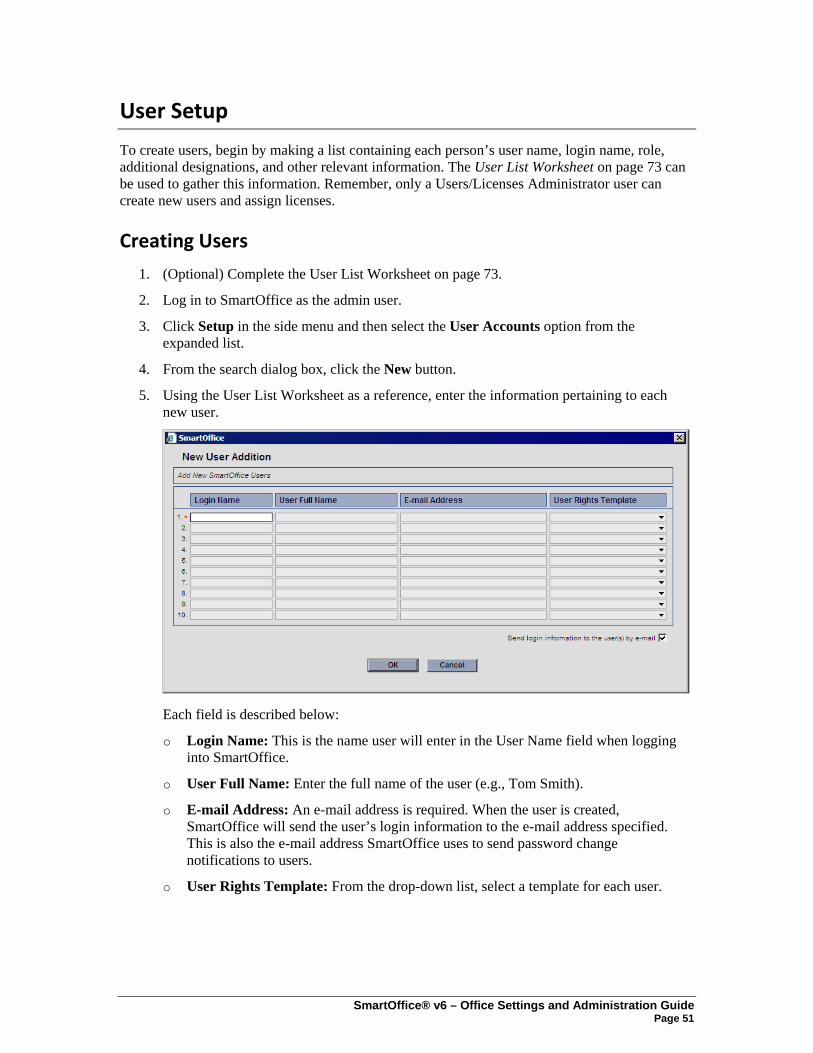
User Setup
To create users, begin by making a list containing each person’s user name, login name, role, additional designations, and other relevant information. The User List Worksheet on page 73 can be used to gather this information. Remember, only a Users/Licenses Administrator user can create new users and assign licenses.
Creating Users
1. (Optional) Complete the User List Worksheet on page 73.
2. Log in to SmartOffice as the admin user.
3. Click Setup in the side menu and then select the User Accounts option from the expanded list.
4. From the search dialog box, click the New button.
5. Using the User List Worksheet as a reference, enter the information pertaining to each new user.
Each field is described below:
o Login Name: This is the name user will enter in the User Name field when logging into SmartOffice.
o User Full Name: Enter the full name of the user (e.g., Tom Smith).
o E-mail Address: An e-mail address is required. When the user is created, SmartOffice will send the user’s login information to the e-mail address specified. This is also the e-mail address SmartOffice uses to send password change notifications to users.
o User Rights Template: From the drop-down list, select a template for each user.
SmartOffice® v6 – Office Settings and Administration Guide Page 51
6. (Optional) Select the Send login information to the user(s) by e-mail option to send each new user an e-mail message containing a temporary password for logging into SmartOffice for the first time. A user is not enabled until the first successful login.
7. Click the OK button to create the users.
Passwords
The admin user can reset any user’s password. Resetting a password creates a temporary password that the user can enter to log in to SmartOffice. Once logged in, the user is prompted to create a new, permanent password.
In addition, users can change their own passwords at any time. The following sections describe both procedures.
Resetting a User’s Password
1. Log in to SmartOffice as the admin user.
2. Click Setup in the side menu and then select the User Accounts option from the expanded list.
3. Enter a User Name (or leave the User Name field blank to list all users) and then click the Search button.
4. If the User List displays, tag the applicable user.
5. Click the Menu button and select Reset Password.
SmartOffice® v6 – Office Setup and Administration Guide Page 52
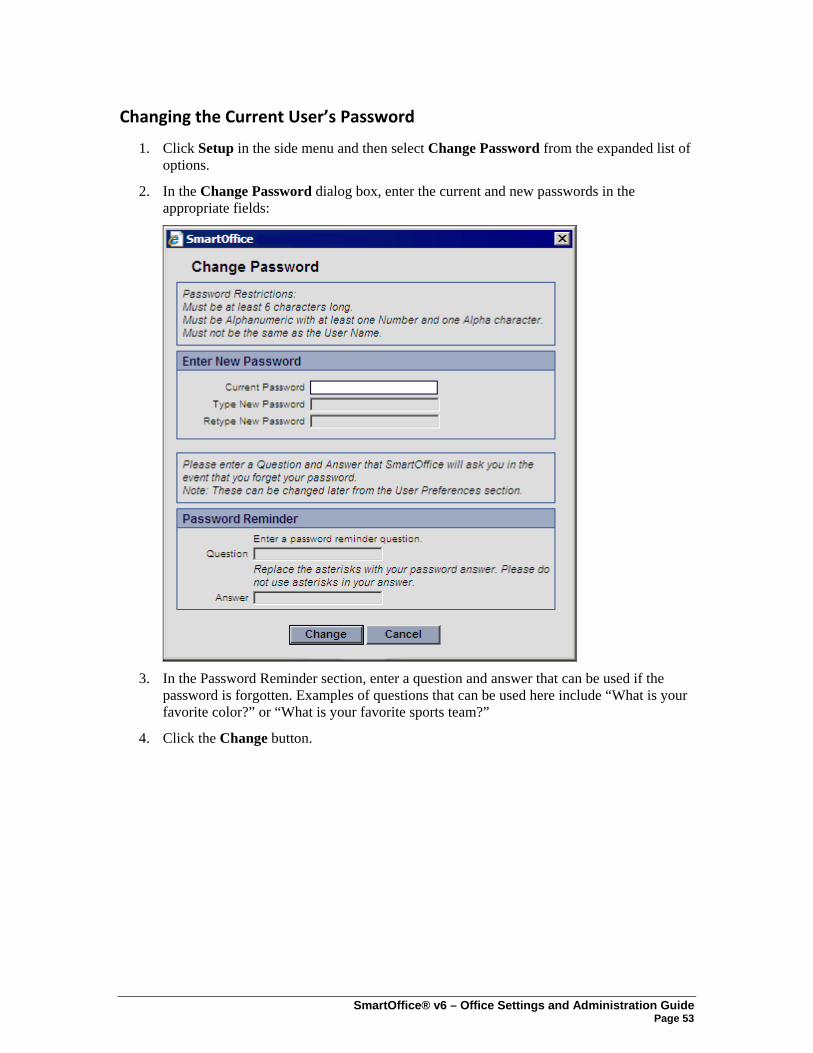
Changing the Current User’s Password
1. Click Setup in the side menu and then select Change Password from the expanded list of options.
2. In the Change Password dialog box, enter the current and new passwords in the appropriate fields:
3. In the Password Reminder section, enter a question and answer that can be used if the
password is forgotten. Examples of questions that can be used here include “What is your favorite color?” or “What is your favorite sports team?”
4. Click the Change button.
SmartOffice® v6 – Office Settings and Administration Guide Page 53
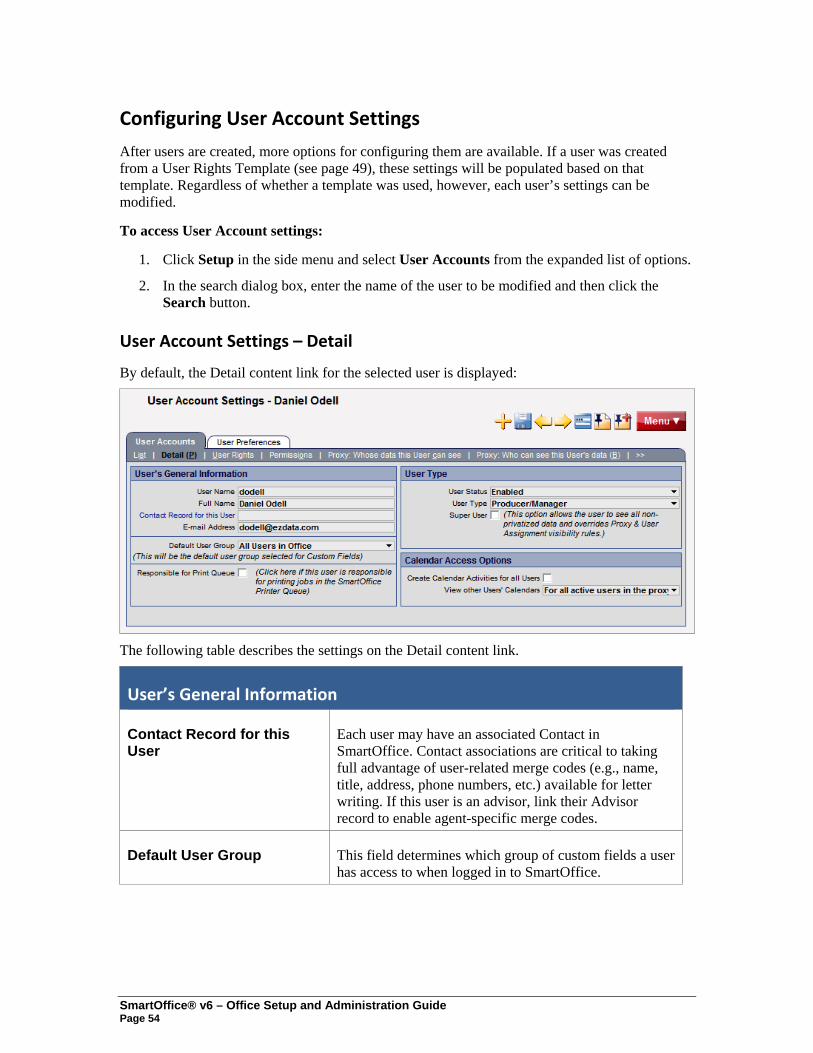
Configuring User Account Settings
After users are created, more options for configuring them are available. If a user was created from a User Rights Template (see page 49), these settings will be populated based on that template. Regardless of whether a template was used, however, each user’s settings can be modified.
To access User Account settings:
1. Click Setup in the side menu and select User Accounts from the expanded list of options.
2. In the search dialog box, enter the name of the user to be modified and then click the Search button.
User Account Settings – Detail
By default, the Detail content link for the selected user is displayed:
The following table describes the settings on the Detail content link.
User’s General Information
Contact Record for this User
Each user may have an associated Contact in SmartOffice. Contact associations are critical to taking full advantage of user-related merge codes (e.g., name, title, address, phone numbers, etc.) available for letter writing. If this user is an advisor, link their Advisor record to enable agent-specific merge codes.
Default User Group This field determines which group of custom fields a user has access to when logged in to SmartOffice.
SmartOffice® v6 – Office Setup and Administration Guide Page 54

Responsible for Print Queue
If this user is responsible for printing for the office, select this option and then select a printer from the SmartOffice Printer Queue drop-down list that displays. When users in the office select Print on Printer Queue as the letter output option, the print job is sent to the Job Queue of this user. The user responsible for the print queue is alerted that there is a job in the queue and can then process the job.
This feature is especially useful for remote or traveling employees who do not have access to a printer or to letterhead.
User Type
User Status There are three user statuses in SmartOffice: Enabled, Disabled, and Temporary Password. The status is set to Temporary Password when a user is created or a user’s password is reset. The status changes to Enabled once the user has logged in.
Users cannot be deleted from SmartOffice, as their notes, activities, etc. would also be deleted. If an employee has left the company or is no longer accessing SmartOffice, change the user status to Disabled. Disabled users cannot log in to SmartOffice.
User Type Make sure to specify Producer/Manager for all advisors so advisor merge codes will be used for letters.
Super User A user designated as a Super User bypasses all proxies and assignments in SmartOffice and can see everyone’s data regardless of assignment, except for private records to which the user has not been granted access. When a Super User logs in, it is as if no security has been established in the office; therefore, this role is generally reserved for the office manager.
If another user is designated as a proxy for a Super User, that user will also be able to see all records in the office.
Calendar Access Options
Create Calendar Activities for all Users
Select this option to enable the user to schedule calendar activities for all users in the office, even if this user does not proxy for any other users. This option does not give the user access to another user’s Contacts; it simply enables the user to schedule activities for other users.
SmartOffice® v6 – Office Settings and Administration Guide Page 55
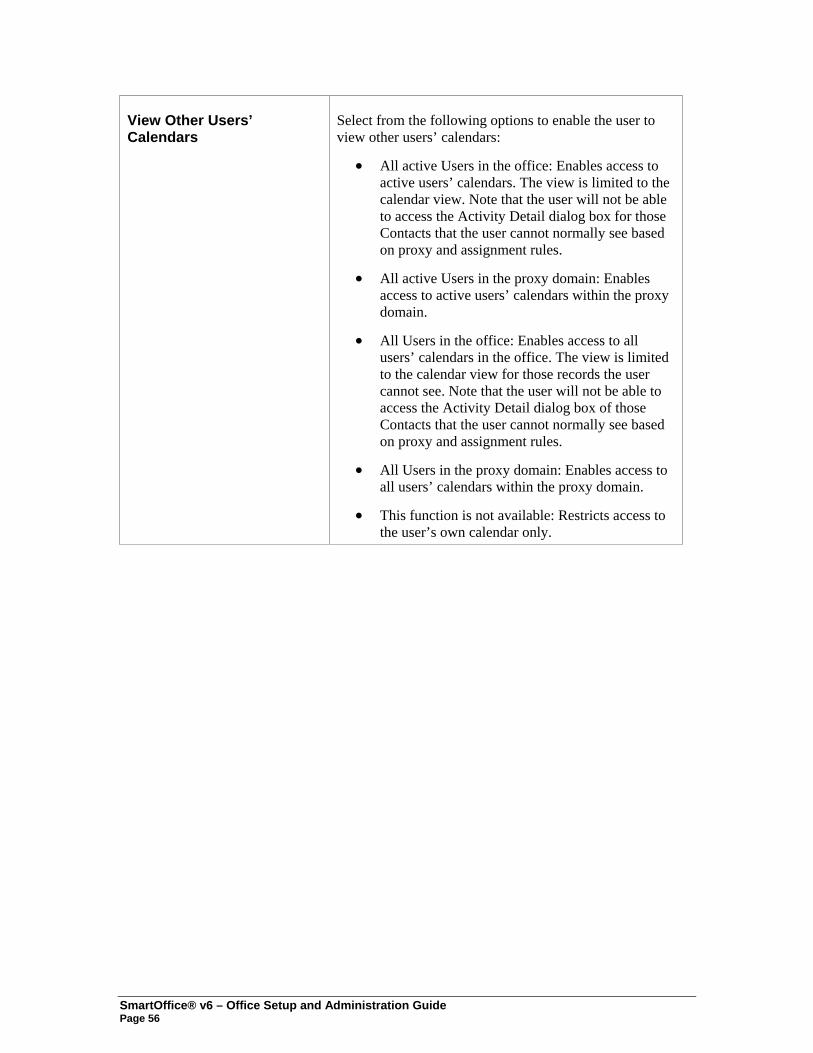
View Other Users’ Calendars
Select from the following options to enable the user to view other users’ calendars:
• All active Users in the office: Enables access to active users’ calendars. The view is limited to the calendar view. Note that the user will not be able to access the Activity Detail dialog box for those Contacts that the user cannot normally see based on proxy and assignment rules.
• All active Users in the proxy domain: Enables access to active users’ calendars within the proxy domain.
• All Users in the office: Enables access to all users’ calendars in the office. The view is limited to the calendar view for those records the user cannot see. Note that the user will not be able to access the Activity Detail dialog box of those Contacts that the user cannot normally see based on proxy and assignment rules.
• All Users in the proxy domain: Enables access to all users’ calendars within the proxy domain.
• This function is not available: Restricts access to the user’s own calendar only.
SmartOffice® v6 – Office Setup and Administration Guide Page 56
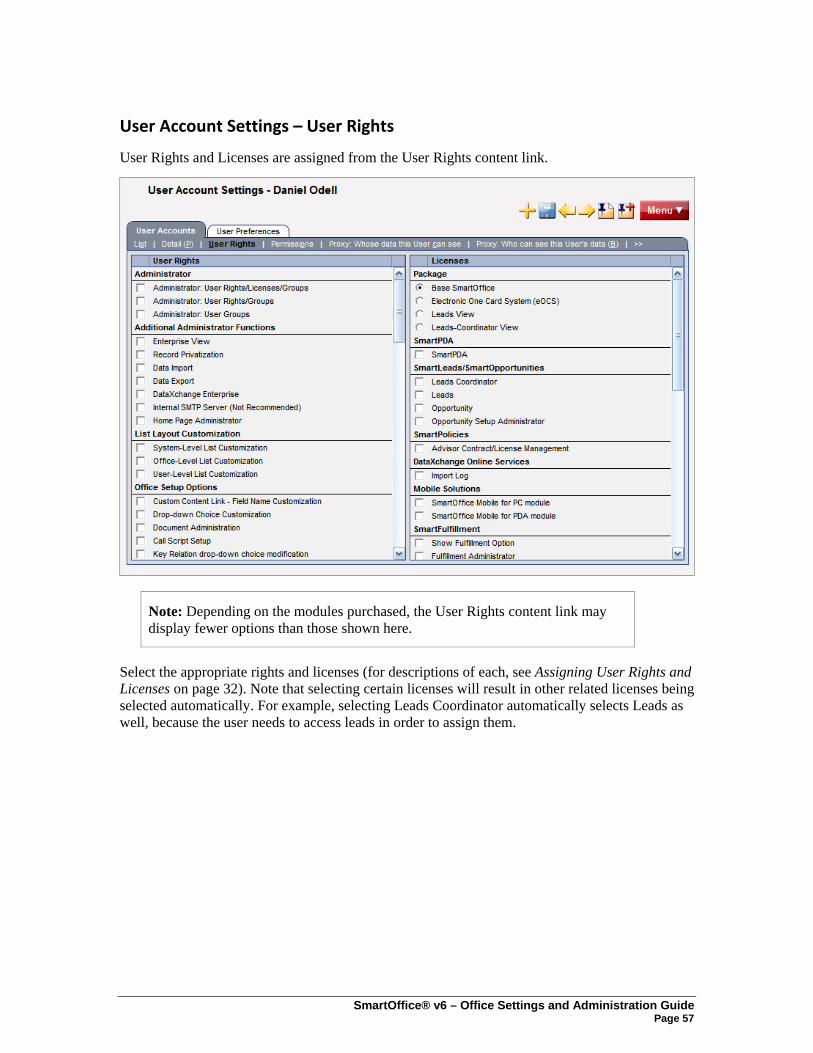
User Account Settings – User Rights
User Rights and Licenses are assigned from the User Rights content link.
Note: Depending on the modules purchased, the User Rights content link may display fewer options than those shown here.
Select the appropriate rights and licenses (for descriptions of each, see Assigning User Rights and Licenses on page 32). Note that selecting certain licenses will result in other related licenses being selected automatically. For example, selecting Leads Coordinator automatically selects Leads as well, because the user needs to access leads in order to assign them.
SmartOffice® v6 – Office Settings and Administration Guide Page 57
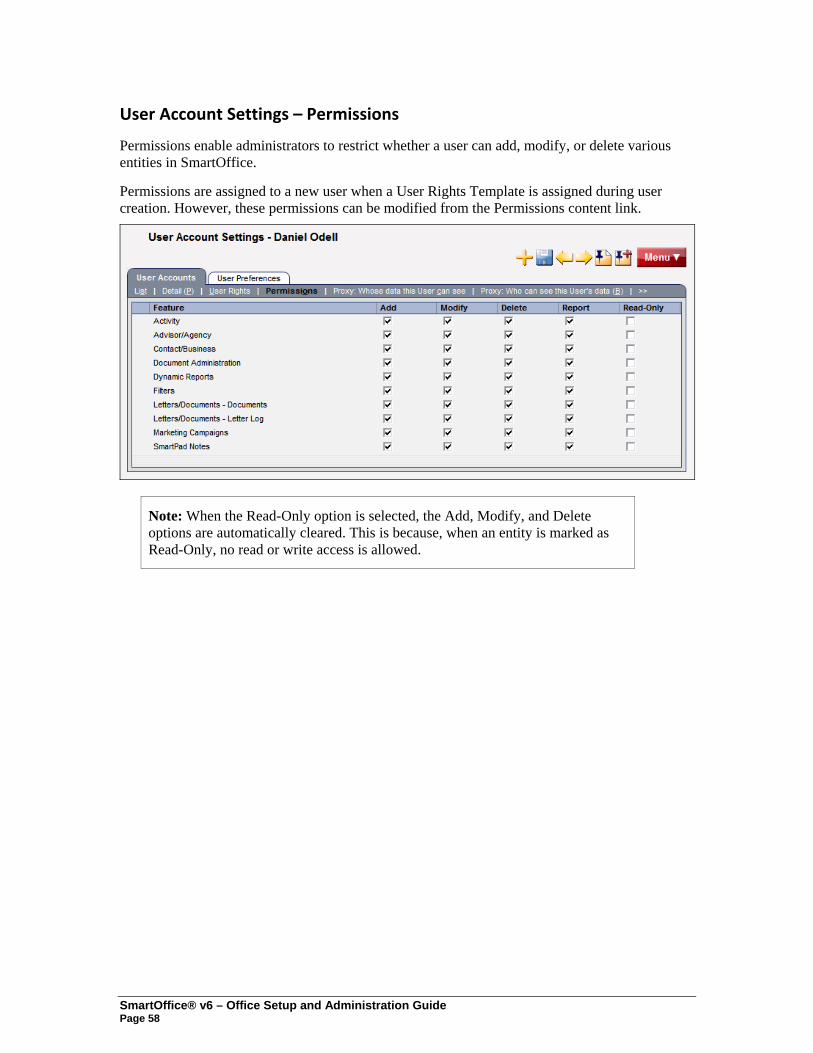
User Account Settings – Permissions
Permissions enable administrators to restrict whether a user can add, modify, or delete various entities in SmartOffice.
Permissions are assigned to a new user when a User Rights Template is assigned during user creation. However, these permissions can be modified from the Permissions content link.
Note: When the Read-Only option is selected, the Add, Modify, and Delete options are automatically cleared. This is because, when an entity is marked as Read-Only, no read or write access is allowed.
SmartOffice® v6 – Office Setup and Administration Guide Page 58
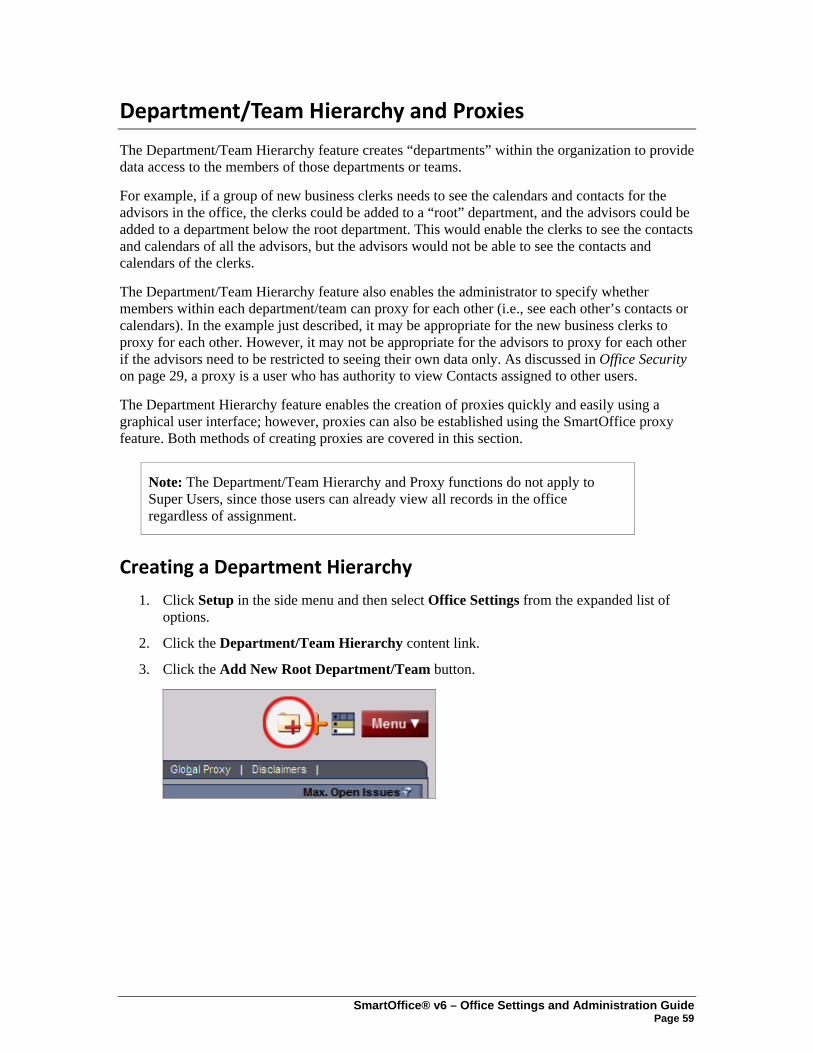
Department/Team Hierarchy and Proxies
The Department/Team Hierarchy feature creates “departments” within the organization to provide data access to the members of those departments or teams.
For example, if a group of new business clerks needs to see the calendars and contacts for the advisors in the office, the clerks could be added to a “root” department, and the advisors could be added to a department below the root department. This would enable the clerks to see the contacts and calendars of all the advisors, but the advisors would not be able to see the contacts and calendars of the clerks.
The Department/Team Hierarchy feature also enables the administrator to specify whether members within each department/team can proxy for each other (i.e., see each other’s contacts or calendars). In the example just described, it may be appropriate for the new business clerks to proxy for each other. However, it may not be appropriate for the advisors to proxy for each other if the advisors need to be restricted to seeing their own data only. As discussed in Office Security on page 29, a proxy is a user who has authority to view Contacts assigned to other users.
The Department Hierarchy feature enables the creation of proxies quickly and easily using a graphical user interface; however, proxies can also be established using the SmartOffice proxy feature. Both methods of creating proxies are covered in this section.
Note: The Department/Team Hierarchy and Proxy functions do not apply to Super Users, since those users can already view all records in the office regardless of assignment.
Creating a Department Hierarchy
1. Click Setup in the side menu and then select Office Settings from the expanded list of options.
2. Click the Department/Team Hierarchy content link.
3. Click the Add New Root Department/Team button.
SmartOffice® v6 – Office Settings and Administration Guide Page 59
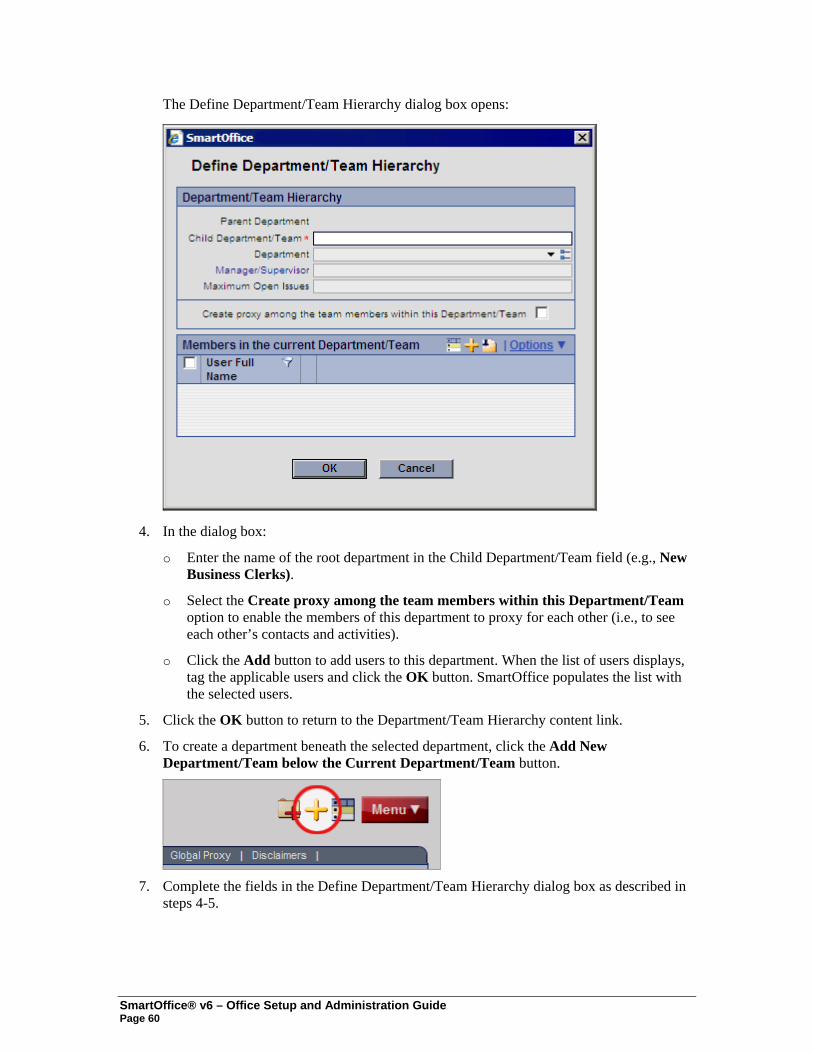
The Define Department/Team Hierarchy dialog box opens:
4. In the dialog box:
o Enter the name of the root department in the Child Department/Team field (e.g., New Business Clerks).
o Select the Create proxy among the team members within this Department/Team option to enable the members of this department to proxy for each other (i.e., to see each other’s contacts and activities).
o Click the Add button to add users to this department. When the list of users displays, tag the applicable users and click the OK button. SmartOffice populates the list with the selected users.
5. Click the OK button to return to the Department/Team Hierarchy content link.
6. To create a department beneath the selected department, click the Add New Department/Team below the Current Department/Team button.
7. Complete the fields in the Define Department/Team Hierarchy dialog box as described in
steps 4-5.
SmartOffice® v6 – Office Setup and Administration Guide Page 60

8. When finished creating departments, click the Menu button and select the Create User/Proxy using Department/User Hierarchy Definition option to create the proxies according to the department definition.
9. When asked whether to delete all manually created proxies before creating the new proxies, click Yes to delete any existing proxies, or No to retain existing proxies.
10. When a confirmation message indicates that the proxies were created successfully, click the OK button.
Creating Proxies Individually
To create proxies individually, or to check existing proxies, use the SmartOffice proxy setting as follows:
1. Click Setup from the side menu and then select User Accounts from the expanded list of options.
2. Enter a user name (or leave all fields blank to display all users) and then click the Search button.
3. If more than one result is found, tag the applicable user in the User List.
4. Click either the Proxy: Whose data this User can see content link or the Proxy: Who can see this User's data content link, as described in the following sections.
Proxy: Whose data this User can see
The Contacts that a user can view are listed on this content link. The user’s own name is listed here as well, so that the user is able to see contacts and activities assigned to him or her).
To enable this user to proxy for another user or users:
1. Click the New button to display a list of users.
2. Tag each user whose contacts and activities should be seen by the current user.
3. Click the OK button.
Note: To view proxies for all users at once, access the Global Proxy List from Office Settings (see page 27).
Proxy: Who can see this User’s data
This content link lists the users who are currently proxying for this user (i.e., users who can view this user’s data). Proxy assignments cannot be changed from this content link; to make changes, use the Department/Team Hierarchy content link (see page 59) or the Proxy: Whose data this User can see content link described in the previous section.
SmartOffice® v6 – Office Settings and Administration Guide Page 61
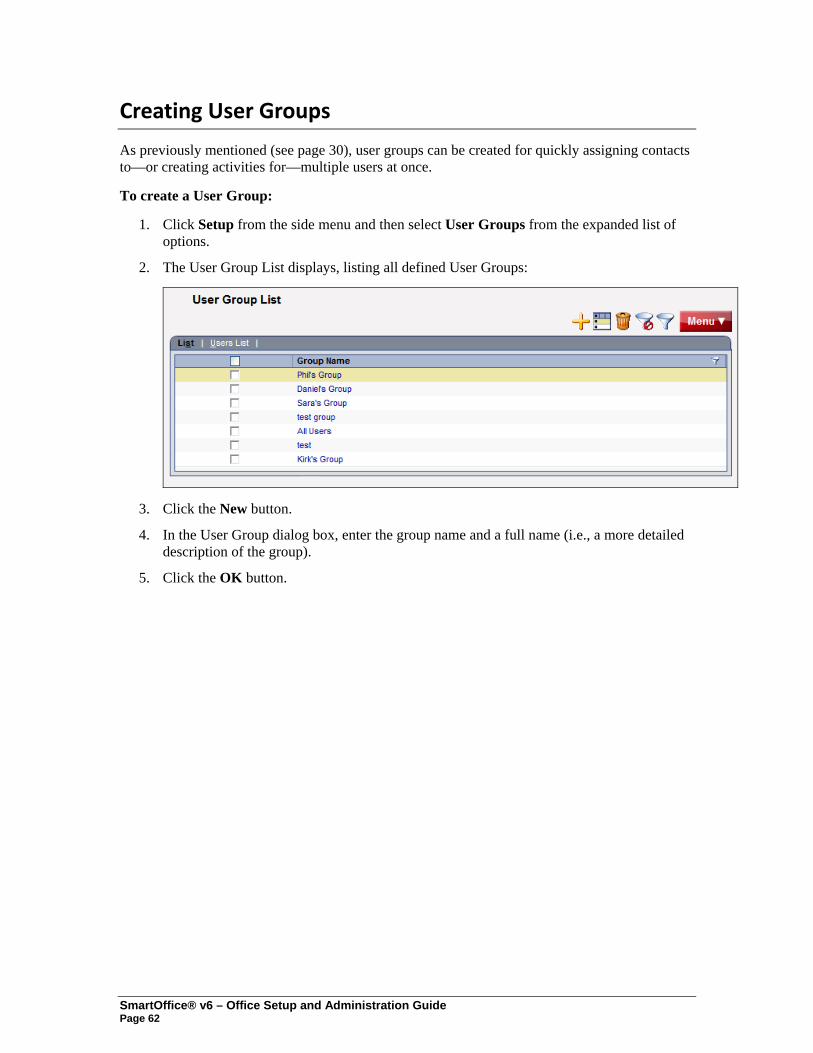
Creating User Groups
As previously mentioned (see page 30), user groups can be created for quickly assigning contacts to—or creating activities for—multiple users at once.
To create a User Group:
1. Click Setup from the side menu and then select User Groups from the expanded list of options.
2. The User Group List displays, listing all defined User Groups:
3. Click the New button.
4. In the User Group dialog box, enter the group name and a full name (i.e., a more detailed description of the group).
5. Click the OK button.
SmartOffice® v6 – Office Setup and Administration Guide Page 62
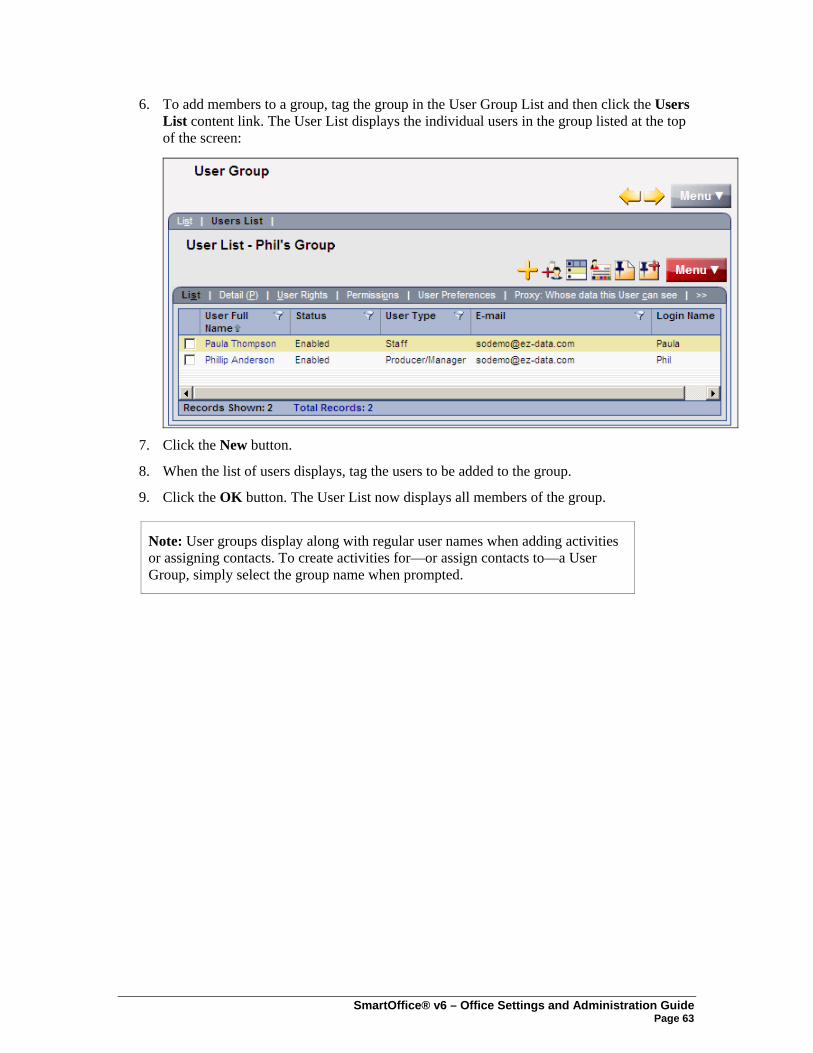
6. To add members to a group, tag the group in the User Group List and then click the Users List content link. The User List displays the individual users in the group listed at the top of the screen:
7. Click the New button.
8. When the list of users displays, tag the users to be added to the group.
9. Click the OK button. The User List now displays all members of the group.
Note: User groups display along with regular user names when adding activities or assigning contacts. To create activities for—or assign contacts to—a User Group, simply select the group name when prompted.
SmartOffice® v6 – Office Settings and Administration Guide Page 63

Posting Outlook E‐mail to SmartOffice
SmartMail for Outlook enables the user to post Outlook e-mail messages, both sent and received, to the SmartPad (notepad) of the appropriate Contact(s) in SmartOffice, eliminating the need to cut and paste e-mail text.
Note: SmartMail for Outlook requires Microsoft Outlook 2003 or higher. If Outlook is not already configured to send and receive e-mail, contact the organization’s Internet Service Provider (ISP) or IT support team for assistance.
Preparing to Use SmartMail
To check whether Microsoft Outlook is installed and configured correctly for SmartMail, follow these steps:
1. In the Internet Explorer Web browser, click the Tools menu and then select Internet Options.
2. Click the Programs tab and ensure that Microsoft Office Outlook is selected from the E-mail drop-down list.
3. Click the OK button.
4. Log in to SmartOffice as an admin user.
5. From the side menu, click Setup and then select User Accounts from the expanded list of options.
6. In the search dialog box, enter a User Name and click the Search button.
7. If a list of user names displays, tag the appropriate user name.
8. Click the User Rights content link.
9. In the User Rights section on the left, under E-mail Integrations, select the SmartMail for Outlook E-mail Posting option (it may be necessary to scroll down the list to see this option).
SmartOffice® v6 – Office Setup and Administration Guide Page 64
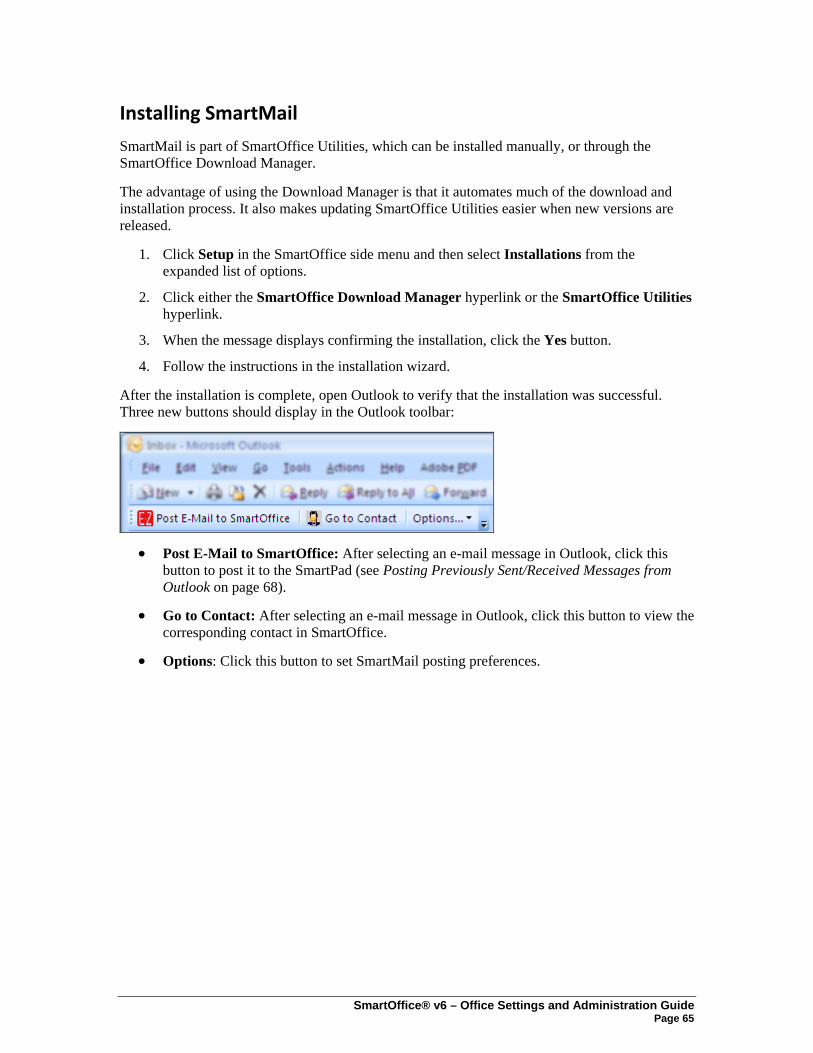
Installing SmartMail
SmartMail is part of SmartOffice Utilities, which can be installed manually, or through the SmartOffice Download Manager.
The advantage of using the Download Manager is that it automates much of the download and installation process. It also makes updating SmartOffice Utilities easier when new versions are released.
1. Click Setup in the SmartOffice side menu and then select Installations from the expanded list of options.
2. Click either the SmartOffice Download Manager hyperlink or the SmartOffice Utilities hyperlink.
3. When the message displays confirming the installation, click the Yes button.
4. Follow the instructions in the installation wizard.
After the installation is complete, open Outlook to verify that the installation was successful. Three new buttons should display in the Outlook toolbar:
• Post E-Mail to SmartOffice: After selecting an e-mail message in Outlook, click this button to post it to the SmartPad (see Posting Previously Sent/Received Messages from Outlook on page 68).
• Go to Contact: After selecting an e-mail message in Outlook, click this button to view the corresponding contact in SmartOffice.
• Options: Click this button to set SmartMail posting preferences.
SmartOffice® v6 – Office Settings and Administration Guide Page 65
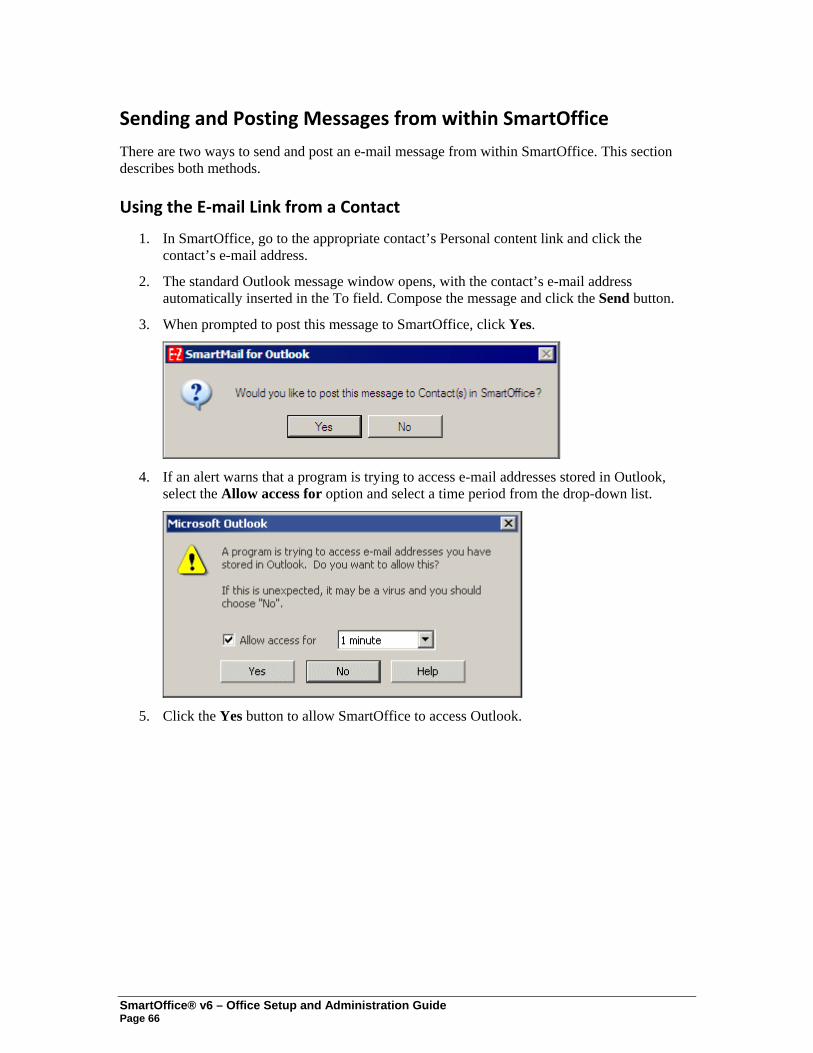
Sending and Posting Messages from within SmartOffice
There are two ways to send and post an e-mail message from within SmartOffice. This section describes both methods.
Using the E‐mail Link from a Contact
1. In SmartOffice, go to the appropriate contact’s Personal content link and click the contact’s e-mail address.
2. The standard Outlook message window opens, with the contact’s e-mail address automatically inserted in the To field. Compose the message and click the Send button.
3. When prompted to post this message to SmartOffice, click Yes.
4. If an alert warns that a program is trying to access e-mail addresses stored in Outlook,
select the Allow access for option and select a time period from the drop-down list.
5. Click the Yes button to allow SmartOffice to access Outlook.
SmartOffice® v6 – Office Setup and Administration Guide Page 66
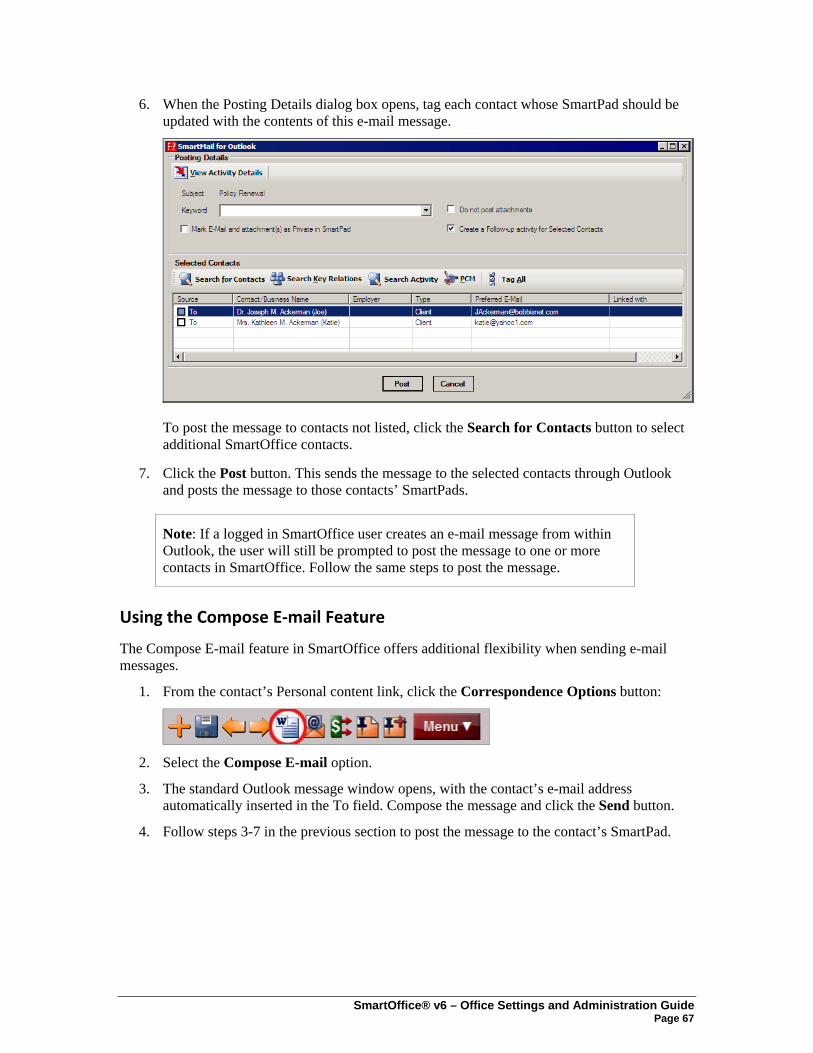
6. When the Posting Details dialog box opens, tag each contact whose SmartPad should be updated with the contents of this e-mail message.
To post the message to contacts not listed, click the Search for Contacts button to select additional SmartOffice contacts.
7. Click the Post button. This sends the message to the selected contacts through Outlook and posts the message to those contacts’ SmartPads.
Note: If a logged in SmartOffice user creates an e-mail message from within Outlook, the user will still be prompted to post the message to one or more contacts in SmartOffice. Follow the same steps to post the message.
Using the Compose E‐mail Feature
The Compose E-mail feature in SmartOffice offers additional flexibility when sending e-mail messages.
1. From the contact’s Personal content link, click the Correspondence Options button:
2. Select the Compose E-mail option.
3. The standard Outlook message window opens, with the contact’s e-mail address automatically inserted in the To field. Compose the message and click the Send button.
4. Follow steps 3-7 in the previous section to post the message to the contact’s SmartPad.
SmartOffice® v6 – Office Settings and Administration Guide Page 67
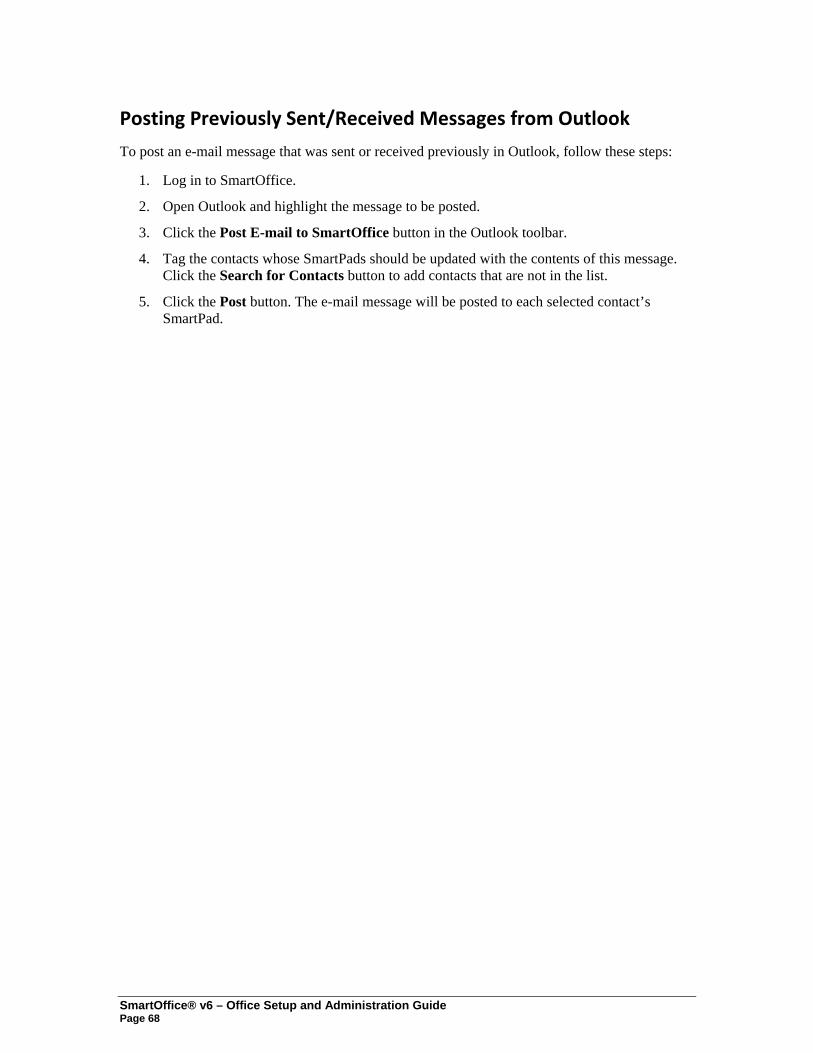
Posting Previously Sent/Received Messages from Outlook
To post an e-mail message that was sent or received previously in Outlook, follow these steps:
1. Log in to SmartOffice.
2. Open Outlook and highlight the message to be posted.
3. Click the Post E-mail to SmartOffice button in the Outlook toolbar.
4. Tag the contacts whose SmartPads should be updated with the contents of this message. Click the Search for Contacts button to add contacts that are not in the list.
5. Click the Post button. The e-mail message will be posted to each selected contact’s SmartPad.
SmartOffice® v6 – Office Setup and Administration Guide Page 68
Training Options
Successful businesspeople know that even the best tool in the world provides value only if it is used properly.
To reap the rewards of using a tool as robust and broad in scope as SmartOffice, careful attention must be given to learning proper use of the system. Ensuring that staff members receive the training they need to effectively perform their job functions is essential.
While it is impossible to apply a cookie-cutter approach to developing any training plan, there are certain core SmartOffice components that all trainees need to be familiar with prior to moving on to more advanced topics. These foundation topics include:
• SmartOffice Orientation: How to navigate SmartOffice, access additional resources, select contacts, view data (notes, letters, activities, policies, etc.), and mine data for marketing purposes.
• Contact Management: How to view and edit contact information, customize field choices, add contacts to a set, establish key relationships, use advanced selection options, and run contact reports.
• Activity Management: How to navigate through the calendar views, change view preferences, create activities, view other users’ activities, create recurring activities, produce activity reports, move unfinished activities forward automatically, and post important dates to the calendar.
• Contact Correspondence: How to use Microsoft Word to create individual letters, form letters, envelopes, and labels; use merge codes to insert database information into letters; produce mass mailings; use templates to save time; and import Word documents.
• Data Mining: How to select specific records for inclusion in reports and mailings, save selection criteria (filters) for use in reports and sets, create sets of contacts, add and remove set members, create and run dynamic reports, and drop report results into other marketing areas of SmartOffice.
More advanced topics and module courses may be added following these core classes to meet the unique needs of the organization.
When Should Training Begin?
Training should begin as soon as E-Z Data has created an office for the organization and the administrator has completed office and user setup as described in this guide.
If data is being converted from another system, training should begin as soon as that data has been submitted for trial conversion. Once the trial conversion is completed, there will be a 10-day User Acceptance Testing (UAT) period during which the organization must review the converted data for accuracy and completeness. This review will be difficult to carry out in a timely manner if users are not already familiar with the system.
After signing off on the UAT, the organization resubmits the data for final conversion. Once converted, the data is loaded into the organization’s SmartOffice office and is ready for use. By completing training prior to this time, all users will be up and running quickly.
SmartOffice® v6 – Office Settings and Administration Guide Page 69
Training Delivery Methods
E-Z Data’s training delivery methods include online training videos, live Web-based training, and on-site training. Each option is explained in greater detail below.
Online Training Videos
E-Z Data offers a comprehensive series of online video training courses that are available at no charge. Unlike other vendors’ products, SmartOffice is specifically designed for insurance and financial services professionals, so the concepts presented in the classes are relevant and meaningful and can be directly applied to a business’ practice.
Each course is broken down into a series of lessons and Fast Classes. Lessons cover the fundamentals of SmartOffice, while Fast Classes offer training on advanced tools and functionality not covered in the basic lessons. Every other week, a new Fast Class arrives by e-mail. Each Fast Class is generally less than 10 minutes long.
Combined, the lessons and Fast Classes provide comprehensive “nuts and bolts” training and make it possible to:
• “Attend” training classes anywhere there is an Internet connection.
• View entire classes or specific lessons.
• See real time examples of SmartOffice functionality.
• Train new staff members quickly and easily with no scheduling conflicts.
• Take advantage of Fast Class sessions to learn specific SmartOffice functionality.
E-Z Data recommends that all SmartOffice users view all of the online videos as a prerequisite to using SmartOffice or scheduling Web-based or live training. To access these videos:
1. Log in to SmartOffice.
2. Position the mouse pointer over the Help/Training hyperlink in the upper right corner and then select Training from the expanded list of options.
3. Click either the Training Movies or Fast Classes hyperlink.
Live Web‐Based Training
Live Web-based training is a cost-effective, personalized training solution that combines the benefits of interacting with an E-Z Data instructor with the convenience of the Internet.
Web-based training sessions are generally used as a supplement to the online training videos or on-site sessions and often involve module-specific or advanced functionality training. Typically, Web-based training is delivered in 1- to 1½-hour blocks, and scheduling is very flexible.
The live Web-based session rate is $200/hour and applies to preparation time for customized sessions as well as actual instruction time. Training can be carried out using the customer’s Web meeting and audio conferencing facilities or E-Z Data’s facilities. E-Z Data’s facilities are limited to 5 attendees plus the instructor.
SmartOffice® v6 – Office Setup and Administration Guide Page 70
For businesses with sufficient Web and audio conferencing facilities of their own, this is an extremely easy and cost-effective way to offer valuable training to staff.
On‐Site Training
An E-Z Data trainer can conduct a group training session at the customer site for all staff members. The benefit of this type of training is that all team members can be trained at one time and can benefit from the collaboration and one-on-one interaction that naturally occurs in this type of environment. Because the training takes place in a meeting room or computer lab, staff members are free from routine distractions (phone calls, e-mail, etc.) and can completely focus on the material presented.
E-Z Data instructors bring a wealth of experience and provide lab-based instruction that enables participants to walk through a number of real-life scenarios. Through hands-on exercises, course participants develop a significant comfort level with SmartOffice components and features.
Customers may also elect to send one or more staff members for training at E-Z Data’s Pasadena, California, headquarters. One benefit of this approach is that staff members will receive more individualized, intensive training than is possible with a larger group. In addition, product experts can be brought in to assist with advanced topics, if necessary. After completing their training, those staff members can then serve as in-house E-Z Data solution experts for the organization and serve as invaluable resources to the success of the organization’s project.
On-site training rates are $1500/day ($600 travel day fee), plus airfare, hotel, meals, and other expenses.
For more information, or to schedule a training session, contact Marlon Urias, Manager, Training Services at (626) 585-3505 ext. 7312 or [email protected].
SmartOffice® v6 – Office Settings and Administration Guide Page 71
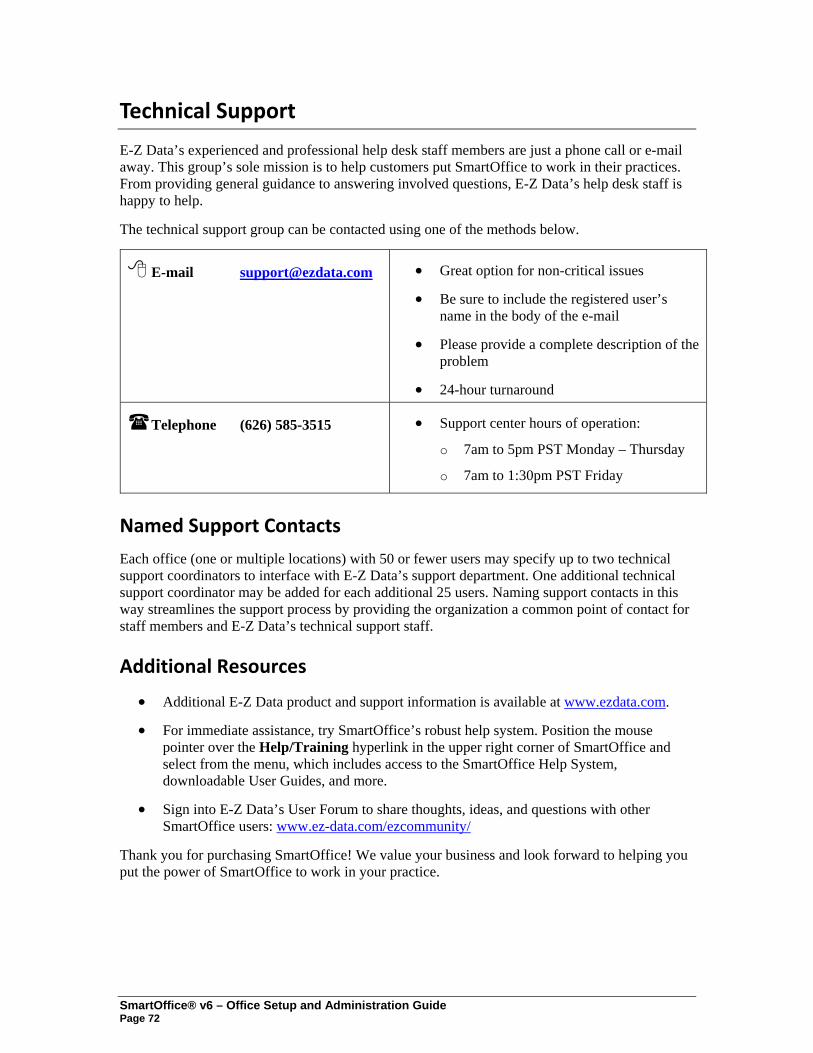
SmartOffice® v6 – Office Setup and Administration Guide Page 72
Technical Support
E-Z Data’s experienced and professional help desk staff members are just a phone call or e-mail away. This group’s sole mission is to help customers put SmartOffice to work in their practices. From providing general guidance to answering involved questions, E-Z Data’s help desk staff is happy to help.
The technical support group can be contacted using one of the methods below.
E-mail [email protected]
• Great option for non-critical issues
• Be sure to include the registered user’s name in the body of the e-mail
• Please provide a complete description of the problem
• 24-hour turnaround
Telephone (626) 585-3515 • Support center hours of operation:
o 7am to 5pm PST Monday – Thursday
o 7am to 1:30pm PST Friday
Named Support Contacts
Each office (one or multiple locations) with 50 or fewer users may specify up to two technical support coordinators to interface with E-Z Data’s support department. One additional technical support coordinator may be added for each additional 25 users. Naming support contacts in this way streamlines the support process by providing the organization a common point of contact for staff members and E-Z Data’s technical support staff.
Additional Resources
• Additional E-Z Data product and support information is available at www.ezdata.com.
• For immediate assistance, try SmartOffice’s robust help system. Position the mouse pointer over the Help/Training hyperlink in the upper right corner of SmartOffice and select from the menu, which includes access to the SmartOffice Help System, downloadable User Guides, and more.
• Sign into E-Z Data’s User Forum to share thoughts, ideas, and questions with other SmartOffice users: www.ez-data.com/ezcommunity/
Thank you for purchasing SmartOffice! We value your business and look forward to helping you put the power of SmartOffice to work in your practice.
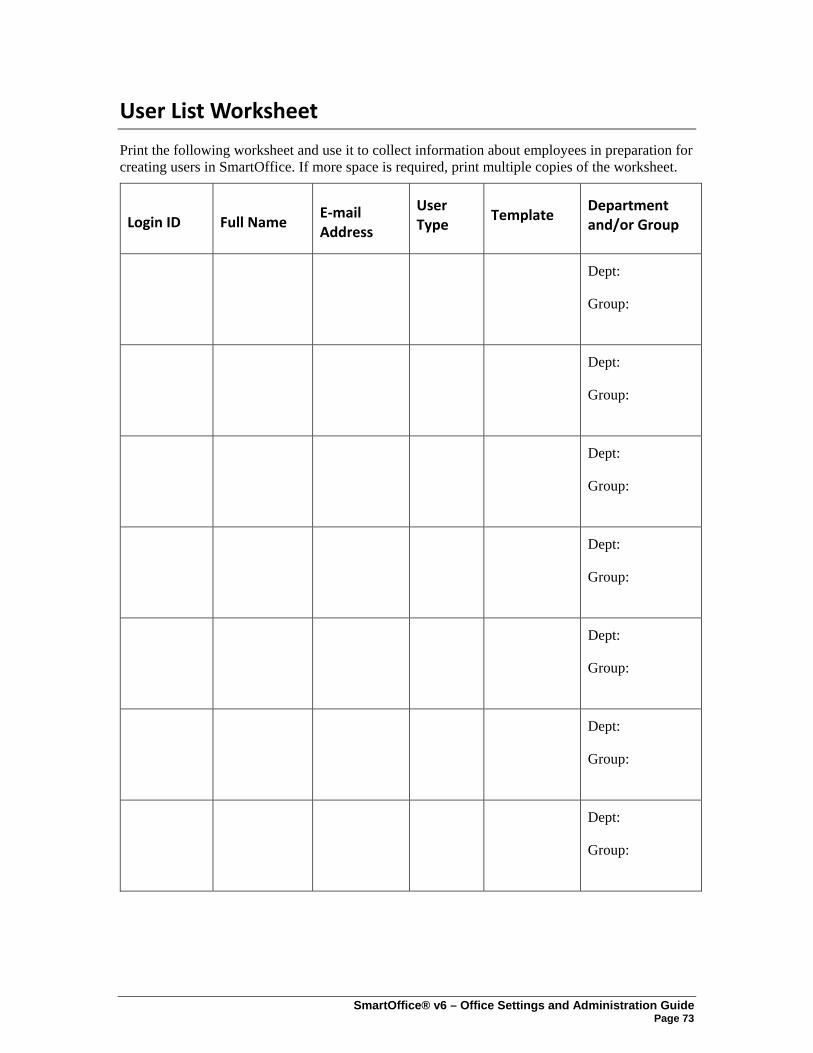
SmartOffice® v6 – Office Settings and Administration Guide Page 73
User List Worksheet
Print the following worksheet and use it to collect information about employees in preparation for creating users in SmartOffice. If more space is required, print multiple copies of the worksheet.
Login ID Full Name E‐mail Address
User Type
Template Department and/or Group
Dept:
Group:
Dept:
Group:
Dept:
Group:
Dept:
Group:
Dept:
Group:
Dept:
Group:
Dept:
Group: