Embed Size (px)
Citation preview

Skybox Vulnerability Control
User’s Guide
8.5.600
Revision: 11
Proprietary and Confidential to Skybox Security. © 2017 Skybox Security, Inc. All rights reserved.
Due to continued product development, the information contained in this document may change without notice. The information and intellectual property contained herein are confidential and remain the exclusive intellectual property of Skybox Security. If you find any problems in the documentation, please report them to us in writing. Skybox Security does not warrant that this document is error-free.
No part of this publication may be reproduced, stored in a retrieval system, or transmitted in any form or by any means—electronic, mechanical, photocopying, recording, or otherwise—without the prior written permission of Skybox Security.
Skybox®, Skybox® Security, Skybox Firewall Assurance, Skybox Network Assurance, Skybox Vulnerability Control, Skybox Threat Manager, Skybox Change Manager, Skybox Appliance 5500/6000/7000/8000, and the Skybox Security logo are either registered trademarks or trademarks of Skybox Security, Inc., in the United States and/or other countries. All other trademarks are the property of their respective owners.
Contact information
Contact Skybox using the form on our website or by emailing [email protected]
Customers and partners can contact Skybox technical support via the Skybox support portal

Skybox version 8.5.600 3
Intended audience .................................................................................... 8 How this manual is organized ..................................................................... 8 Related documentation .............................................................................. 8 Technical support ..................................................................................... 9
Overview of Skybox Vulnerability Control .................................................. 10 Skybox platform ..................................................................................... 10 About Skybox Vulnerability Control ........................................................... 12 Vulnerability Control process .................................................................... 14 About the Skybox Vulnerability Dictionary.................................................. 14 Basic architecture ................................................................................... 14
Part I: Threat-Centric Vulnerability Management ........................................ 15
Overview of Threat-Centric Vulnerability Management ................................ 16 About Threat-Centric Vulnerability Management .................................... 16 Workflow for Threat-Centric Vulnerability Management ........................... 17
Discovery .............................................................................................. 18 Updating the Vulnerability Dictionary ................................................... 18 Obtaining asset and vulnerability occurrence data .................................. 19 Discovery Center ............................................................................... 24 Adding organizational hierarchy (Business Units) ................................... 25
Prioritization .......................................................................................... 30 Prioritization Center ........................................................................... 31 Using the Prioritization Center ............................................................. 32 Security metrics ................................................................................ 33 Understanding the security metrics information ..................................... 35
Remediation .......................................................................................... 39 About remediation levels .................................................................... 39 Remediation Center ........................................................................... 40 Suggested workflow for remediation .................................................... 41 Creating tickets for remediation ........................................................... 41
Customizing the security metrics .............................................................. 42 About security metrics in Skybox ......................................................... 42 Initial customization ........................................................................... 42 Security Metric properties ................................................................... 44 Additional customization ..................................................................... 46
Contents

Skybox Vulnerability Control User’s Guide
Skybox version 8.5.600 4
Continuous usage................................................................................... 47 Security Metric triggers ...................................................................... 47 Recalculating the security metrics ........................................................ 48
Part II: Exposure ................................................................................... 49
Overview of the Exposure feature ............................................................ 50 Introduction to exposure .................................................................... 50 Automated IT security modeling .......................................................... 51 Attack simulation and visualization ...................................................... 52 Business impact analysis and risk metrics ............................................. 53 Regulation compliance ....................................................................... 54 Risk exposure management workflow ................................................... 54
Building the model ................................................................................. 56 Building the network topology ............................................................. 56
Validating the model ............................................................................... 66 Overview of validating the model ......................................................... 66 Best practices for model validation ....................................................... 68 Model validation tasks and analyses ..................................................... 69 Access Analyzer test queries ............................................................... 76 Network Map visualization .................................................................. 77 Task error messages .......................................................................... 78 Item counts ...................................................................................... 79 Creating Perimeter Clouds automatically ............................................... 79 Validating the setup for attack simulation ............................................. 79
Network visualization (maps) ................................................................... 81 Network Map ..................................................................................... 81 Creating and saving dedicated maps .................................................... 82 Navigating the Network Map ............................................................... 83 Map Groups ...................................................................................... 85
Adding Threat Origins ............................................................................. 88 Threat Origins overview ...................................................................... 88 Threat Origin types ............................................................................ 88 Threat Origin Categories ..................................................................... 89 Defining Threat Origins ...................................................................... 90 Disabling and enabling Threat Origins .................................................. 93
Using Business Asset Groups for risk metrics ............................................. 94 Business Impacts and Regulations ....................................................... 94 Adding dependency rules .................................................................... 96 Explicit dependency rules ................................................................... 97 Implicit dependency ........................................................................... 98
Simulating attacks ................................................................................. 99 Attack simulation ............................................................................... 99 Understanding Skybox risk ............................................................... 100

Contents
Skybox version 8.5.600 5
Viewing risk .................................................................................... 100
Identifying the critical issues ................................................................. 101 Workflow ........................................................................................ 101 Reviewing the directly exposed vulnerability occurrences ...................... 102 Reviewing the Threat Origins ............................................................ 103 Reviewing the Business Asset Groups ................................................. 104 Reviewing attacks ............................................................................ 105 Checking whether the problem is access-related .................................. 106
Remediation ........................................................................................ 108 Marking vulnerability occurrences as ignored ...................................... 108 Mitigating critical vulnerability occurrences ......................................... 109 Creating tickets manually ................................................................. 109 Updating the model after fixing vulnerability occurrences ..................... 117 Using the What If model to test changes ............................................ 117
Continuous risk management ................................................................ 119 Attack simulation for continuous risk management .............................. 119 Monitoring the risk status ................................................................. 119 Automating tickets ........................................................................... 120 Tickets and workflow ........................................................................ 122 Model maintenance .......................................................................... 126
Part III: Continuous usage .................................................................... 127
Using tasks for automation .................................................................... 128 Task sequences ............................................................................... 128 Scheduling tasks and task sequences ................................................. 131 Task groups .................................................................................... 132 Monitoring task results ..................................................................... 132
Reports ............................................................................................... 134 Reports overview ............................................................................. 134 Security Metric reports ..................................................................... 135 Risks reports ................................................................................... 135 FISMA/NIST and Risk Assessment reports .......................................... 136 PCI DSS reports .............................................................................. 136 Tickets reports ................................................................................ 136 Vulnerability Management reports ..................................................... 137 Vulnerabilities reports ...................................................................... 137 Exporting data to CSV files ............................................................... 139 Exporting vulnerability occurrence data to Qualys format ...................... 140
Model maintenance .............................................................................. 141 Updating the model ......................................................................... 141 General maintenance ....................................................................... 144

Skybox Vulnerability Control User’s Guide
Skybox version 8.5.600 6
Part IV: Advanced topics ....................................................................... 147
Advanced modeling scenarios ................................................................ 148 Modeling VPNs ................................................................................ 148 Modeling L2 networks ...................................................................... 152 Mapping overlapping networks .......................................................... 157 Virtual routers ................................................................................. 160 Virtual firewalls ............................................................................... 161 Virtualization and clouds ................................................................... 161 Clusters .......................................................................................... 164 Modeling multi-homed assets ............................................................ 164 Merging data ................................................................................... 166 Using clouds as Threat Origins .......................................................... 172 Advanced dependency rules .............................................................. 173
Additional information about exposure .................................................... 175 About attack simulation .................................................................... 175 About risk ....................................................................................... 177 Risk profiles .................................................................................... 181 Risk factors ..................................................................................... 182 PCI DSS support in Skybox Vulnerability Control ................................. 182
Skybox analyses .................................................................................. 184 Analyses overview ........................................................................... 184 Risk analyses .................................................................................. 185 Predefined risk analyses ................................................................... 186 Creating an analysis ......................................................................... 187
Access Analyzer ................................................................................... 188 Creating new queries ....................................................................... 188 Access Analyzer output .................................................................... 195
Modifying security metric properties ....................................................... 203 Calculation of scores for VLI security metrics ...................................... 203 Calculation of scores for RLI security metrics ...................................... 204 Impact levels .................................................................................. 206 Additional security metrics properties ................................................. 207
Skybox Vulnerability Dictionary .............................................................. 208 Skybox Vulnerability Dictionary information ........................................ 208 CVE compliance ............................................................................... 210
IPS support in Skybox .......................................................................... 212 IPS Dictionary ................................................................................. 212 Working with IPS in Skybox .............................................................. 212
Optimization ........................................................................................ 230 Performance considerations .............................................................. 230 Optimizing Access Analyzer analysis .................................................. 231

Contents
Skybox version 8.5.600 7
Part V: Deployment .............................................................................. 233
Planning deployment ............................................................................ 234 Deployment plan ............................................................................. 234 Deployment team ............................................................................ 235
Phases of deployment ........................................................................... 236
Preparing data for Skybox ..................................................................... 237 Information requirements ................................................................. 237 Preparing a list of network devices ..................................................... 237 Defining the data collection strategy .................................................. 238 Preparing scanning information ......................................................... 239 Preparing the data ........................................................................... 240 Modeling unsupported devices ........................................................... 240
Starting deployment ............................................................................. 241 First phase of deployment ................................................................. 241

Skybox version 8.5.600 8
Preface
Intended audience The Skybox Vulnerability Control User’s Guide explains how to work with Skybox Vulnerability Control. Use this document in conjunction with:
› Skybox Installation and Administration Guide, which explains Skybox installation, and various configuration and maintenance tasks
› Skybox Vulnerability Control Getting Started Guide, which explains how to use the various features of Skybox Vulnerability Control using predefined data
The intended audience is any user of Skybox Vulnerability Control.
How this manual is organized This manual includes the following parts:
› Overview of Skybox Vulnerability Control (on page 10) › Security Metrics feature (on page 15) › Exposure feature (on page 49) › Continuous usage (on page 127) › Advanced topics (on page 147) › Deployment (on page 233)
Related documentation The following documentation is available for Skybox Vulnerability Control:
› Skybox Vulnerability Control Getting Started Guide
Other Skybox documentation includes:
› Skybox Installation and Administration Guide › Skybox Reference Guide › Skybox Developer’s Guide › Skybox Release Notes › Skybox Change Manager User’s Guide › Skybox Threat Manager User’s Guide
The entire documentation set (in PDF format) is available here
You can access a comprehensive Help file from any location in the Skybox Manager by using the Help menu or by pressing F1.
Preface
Skybox version 8.5.600 9
Technical support You can contact Skybox using the form on our website or by emailing [email protected]
Customers and partners can contact Skybox technical support via the Skybox support portal
When opening a case, you need the following information:
› Your contact information (telephone number and email address) › Skybox version and build numbers › Platform (Windows or Linux) › Problem description › Any documentation or relevant logs
You can compress logs before attaching them by using the Pack Logs tool (see Packing log files for technical support, in the Skybox Installation and Administration Guide).

Skybox version 8.5.600 10
Chapter 1
This chapter is an overview of Skybox Vulnerability Control.
In this chapter
Skybox platform ................................................................. 10
About Skybox Vulnerability Control ....................................... 12
Vulnerability Control process ................................................ 14
About the Skybox Vulnerability Dictionary .............................. 14
Basic architecture ............................................................... 14
Skybox platform Skybox™ Security arms security professionals with the broadest platform of solutions for security operations, analytics and reporting. By integrating with more than 100 networking and security technologies organizations are already, the Skybox Security Suite merges data silos into a dynamic network model of your organization’s attack surface, giving comprehensive visibility of public, private and hybrid IT environments. Skybox provides the context needed for informed action, combining attack vector analytics and threat-centric vulnerability intelligence to continuously assess vulnerabilities in your environment and correlate them with exploits in the wild. This makes the accurate prioritization and mitigation of imminent threats a systematic process, decreasing the attack surface and enabling swift response to exposures that truly put your organization at risk.
Overview of Skybox Vulnerability Control

Chapter 1 Overview of Skybox Vulnerability Control
Skybox version 8.5.600 11
Skybox arms security leaders with a comprehensive cybersecurity management platform to address the security challenges of large, complex networks. The Skybox Security Suite breaks down data silos to build a dynamic network model that gives complete visibility of an organization’s attack surface and the context needed for informed action across physical, multi-cloud and industrial networks. We leverage data by integrating with 120 security technologies, using analytics, automation and advanced threat intelligence from the Skybox Research Lab to continuously analyze vulnerabilities in your environment and correlate them with exploits in the wild. This makes the prioritization and mitigation of imminent threats an efficient and systematic process, decreasing the attack surface and enabling swift response to exposures that truly put your organization at risk. Our award-winning solutions automate as much as 90 percent of manual processes and are used by the world’s most security-conscious enterprises and government agencies, including Forbes Global 2000 companies. For more information visit the Skybox Security website

Skybox Vulnerability Control User’s Guide
Skybox version 8.5.600 12
The Skybox Security Suite includes:
› Skybox Vulnerability Control: Powers threat-centric vulnerability management by correlating intelligence on vulnerabilities in your environment, the surrounding network and security controls and exploits in the wild focusing remediation on your most critical threats
› Skybox Threat Manager: Consolidates threat intelligence sources and prioritizes advisories in the context of your attack surface, automatically analyzing the potential impact of a threat and providing remediation guidance
› Skybox Firewall Assurance: Brings multi-vendor firewall environments into a single view and continuously monitors policy compliance, optimizes firewall rule sets and finds attack vectors that others miss
› Skybox Network Assurance: Analyzes hybrid environments end to end across physical, virtual and cloud – even operational technology – networks, illuminating complex security zones, access paths and policy compliance violations
› Skybox Change Manager: Ends risky changes with network-aware planning and risk assessments, making firewall changes a secure, consistent process with customizable workflows and automation
› Skybox Horizon: Visualizes an organization’s unique attack surface and indicators of exposure (IOEs), giving threat-centric insight to critical risks, visibility across an entire organization or down to a single access rule and metrics to track risk reduction over time
The products share common services, including modeling, simulation, analytics, reporting, and automated workflow management.
About Skybox Vulnerability Control Vulnerability Control harnesses total attack surface visibility and threat-centric vulnerability intelligence to spot vulnerabilities that are most likely to be used in an attack against your organization. Eliminate risks 100-times faster than traditional scanning and manual analysis with on-demand vulnerability discovery, threat-centric prioritization and remediation guidance based on the context of your attack surface and threats in the wild. Reduce false positives to near-zero levels, streamline workflows, optimize gradual risk reduction and respond to imminent threats within hours—not days.
› Finds vulnerability exposures and exploitable attack vectors on-demand with intelligence on exploits in the wild
› Prioritizes vulnerabilities based on threats and the risk imposed to your network
› Detects vulnerabilities on network devices and ‘unscannable’ systems › Targets imminent threats for immediate response and systematically reduces
potential threats with context-aware remediation guidance
Chapter 1 Overview of Skybox Vulnerability Control
Skybox version 8.5.600 13
Highlights
› On-demand vulnerability assessments
• Combines data from vulnerability scanners, patch management systems and endpoint agents—including those running in virtual and cloud environments—with scanless assessments from Skybox Vulnerability Detector
• Discovers vulnerabilities on network and security devices and in traditionally "unscannable" zones, including virtual and cloud environments
• Uses network and security control context to identify exposed vulnerabilities
› Threat-centric vulnerability intelligence and exposure analysis
• Identifies exposed vulnerabilities using the network model, attack vector analytics and multi–step attack simulations
• Discovers potential attack scenarios and detects bypassed or compromised security measures
• Highlights vulnerabilities with exploits available, involved in active attack campaigns or distributed on the dark web
• Improves change management by evaluating proposed changes for new vulnerability exposures
› Prioritization in the context of threats and your attack surface
• Puts exposed vulnerabilities and those most likely to be exploited at the top of your priorities list
• Analyzes attack vectors in the context of the network, mitigating controls and Skybox Research Lab investigations of the current threat landscape
• Prioritizes imminent threats for immediate remediation and identifies potential threats for ongoing, gradual risk reduction
› Same-day imminent threat response
• Recommends best remediation actions to eliminate imminent threats in hours, instead of days
• Optimizes gradual risk reduction to systematically reduce the attack surface and ensure potential threats don’t escalate
• Tracks remediation progress and closure
• Measures remediation effectiveness with customized risk metrics
› Integrates with Skybox Threat Manager to prioritize vital threats and updated risk alerts
For information about Skybox Threat Manager, see Skybox Threat Manager Getting Started Guide and Skybox Threat Manager User’s Guide.
› Comprehensive device support
Refer to the Skybox website for a list of supported devices

Skybox Vulnerability Control User’s Guide
Skybox version 8.5.600 14
Vulnerability Control process The main Vulnerability Control process, Threat-Centric Vulnerability Management, is:
1 Discover: Gather and assess information about assets, network topology, security controls, and vulnerabilities in your environment, including physical, virtual, and cloud networks.
2 Prioritize: Correlate vulnerability data with exploit availability and use. Analyze potential attack paths and business impacts to prioritize remediation according to imminent and potential threats.
3 Remediate: Apply patches or use IPS signatures, access rules, segmentation, and so on to block attack paths. Address imminent threats first and deal with potential threats over time.
4 Track: Track progress and analyze trends to find areas that need more attention or resources. Monitor remaining vulnerabilities for changes in exposure or use in the wild.
If desired, you can get further information by analyzing your network for exposure to threats using the following steps:
1 Import network devices to get the topology (if this was not already done).
2 Define the potential threats.
3 Analyze the exposure of the network to these threats.
About the Skybox Vulnerability Dictionary The Skybox Vulnerability Dictionary consolidates vulnerability data for more than 1000 products that are used extensively in enterprise network environments, including servers and desktop operating systems, business and desktop applications, databases, runtime frameworks, networking hardware and software, and security software. This data selection is tailored to Skybox Security’s enterprise customers, according to the most relevant products and their corresponding vulnerabilities for a large enterprise network.
The Skybox Vulnerability Dictionary currently supports more than 68,000 vulnerabilities. The Skybox Vulnerability Dictionary is a result of information collected from leading public and private security data sources, and built as a superset of vulnerabilities. As a state-of-the-art vulnerability database, it is CVE compliant and implements CVSS v2 and v3 standards.
Basic architecture The Skybox platform consists of a 3-tiered architecture with a centralized server (Skybox Server), data collectors (Skybox Collectors), and a user interface (Skybox Manager). Skybox can be scaled easily to suit the complexity and size of any infrastructure.
For additional information, see the Skybox architecture topic in the Skybox Installation and Administration Guide.
This part explains how to work with Threat-Centric Vulnerability Management.
Part I: Threat-Centric Vulnerability Management

Skybox version 8.5.600 16
Chapter 2
This chapter provides an overview of Threat-Centric Vulnerability Management.
In this chapter
About Threat-Centric Vulnerability Management ..................... 16
Workflow for Threat-Centric Vulnerability Management ............ 17
ABOUT THREAT-CENTRIC VULNERABILITY MANAGEMENT Vulnerability Control uses a variety of factors to prioritize vulnerabilities—from baseline information such as security advisories and CVSS scores, to the unique context of your network, security controls, and business, to Skybox™ Research Lab intelligence on the current threat landscape.
Skybox correlates this vast and diverse data set to divide vulnerabilities in your environment into 2 main categories—those that pose a potential threat to your organization and those that pose an imminent threat. Vulnerability Control streamlines management of potential threats’ gradual risk reduction, and monitors changes in the threat landscape to ensure such threats don’t escalate. Imminent threats are prioritized for immediate remediation.
Overview of Threat-Centric Vulnerability Management

Chapter 2 Overview of Threat-Centric Vulnerability Management
Skybox version 8.5.600 17
Threat information is filtered by security metrics, which are risk indicators based on vulnerability occurrences. The default view takes into account all types of vulnerabilities, but you can view data for a specific set of vulnerabilities, including Microsoft, Adobe, and web-browser related. Threat-Centric Vulnerability Management enables you to assess the current security and vulnerability status of your organization, track trends, and identify key contributors to poor performance.
WORKFLOW FOR THREAT-CENTRIC VULNERABILITY MANAGEMENT The following is the basic workflow for Vulnerability Control.
1 Discover
a. Collect data (see page 19) about the assets in your model. This data includes information about vulnerability occurrences on all the collected assets.
b. Look at the Discovery Center (see page 24) to understand the security of your inventory.
c. Organize the assets (see page 25) into Business Units to make it easier to understand the security status of different parts of the organization.
2 Prioritize
a. Analyze the data (click ). This correlates the vulnerability data with exploit availability and use.
b. In the Prioritization Center (see page 30), see how the organization is affected by exposure to different vulnerabilities, how likely it is to be exploited by malware and ransomware, and to determine the order in which vulnerability occurrences should be fixed.
3 Remediate
• Apply patches or use IPS signatures, access rules, segmentation, and so on to block attack paths. Address imminent threats first and deal with potential threats over time.
In some organizations, the Skybox user is responsible for either creating tickets (see page 41) for the most urgent issues or exporting the relevant data to CSV (see page 139). In others, another department is responsible for remediation, and the user implementing this workflow is responsible for making sure that remediation (see page 39) proceeds at an acceptable speed.
4 Track
• Use the Remediation Center (see page 39) to track progress and analyze trends, to find areas that need more attention or resources. Monitor remaining vulnerabilities for changes in exposure or use in the wild.
Repeat the whole cycle on a regular basis to keep your organization’s security status up-to-date.

Skybox version 8.5.600 18
Chapter 3
When you start using Skybox Vulnerability Control, the 1st step is to discover what your organization includes: which assets and products, and (consequentially) which vulnerabilities; and how the assets are organized.
You do this by connecting to the organization’s repositories, management servers and scanners, and importing their data to Skybox. The import process creates the Skybox model (referred to as the model), which is a normalized database stored as a CMDB.
We recommend that you start with a small part of your network—not more than 1000 assets (hosts), understand how Skybox works, and then expand your model to the rest of the network.
Important: Before collecting data from your organization’s network the 1st time, the model must be empty. If you loaded the demo model for tutorial purposes, you must clear it (File > Models > Reset Model).
In this chapter
Updating the Vulnerability Dictionary ..................................... 18
Obtaining asset and vulnerability occurrence data ................... 19
Discovery Center ................................................................ 24
Adding organizational hierarchy (Business Units) .................... 25
UPDATING THE VULNERABILITY DICTIONARY The Skybox Vulnerability Dictionary contains information about Vulnerability Definitions. Skybox uses the Vulnerability Dictionary to normalize vulnerability occurrences found by scanners, adding all the relevant information—including description, cross-references from various sources, and external URLs—to the model.
Skybox includes the most up-to-date Vulnerability Dictionary at the time of release, but new updates are issued periodically. If the Vulnerability Dictionary is more than a week old, update it before importing vulnerability data or doing any other work with vulnerabilities.
To check the date and version of the Vulnerability Dictionary
› Select File > Dictionary > Show Dictionary Info.
Discovery
Chapter 3 Discovery
Skybox version 8.5.600 19
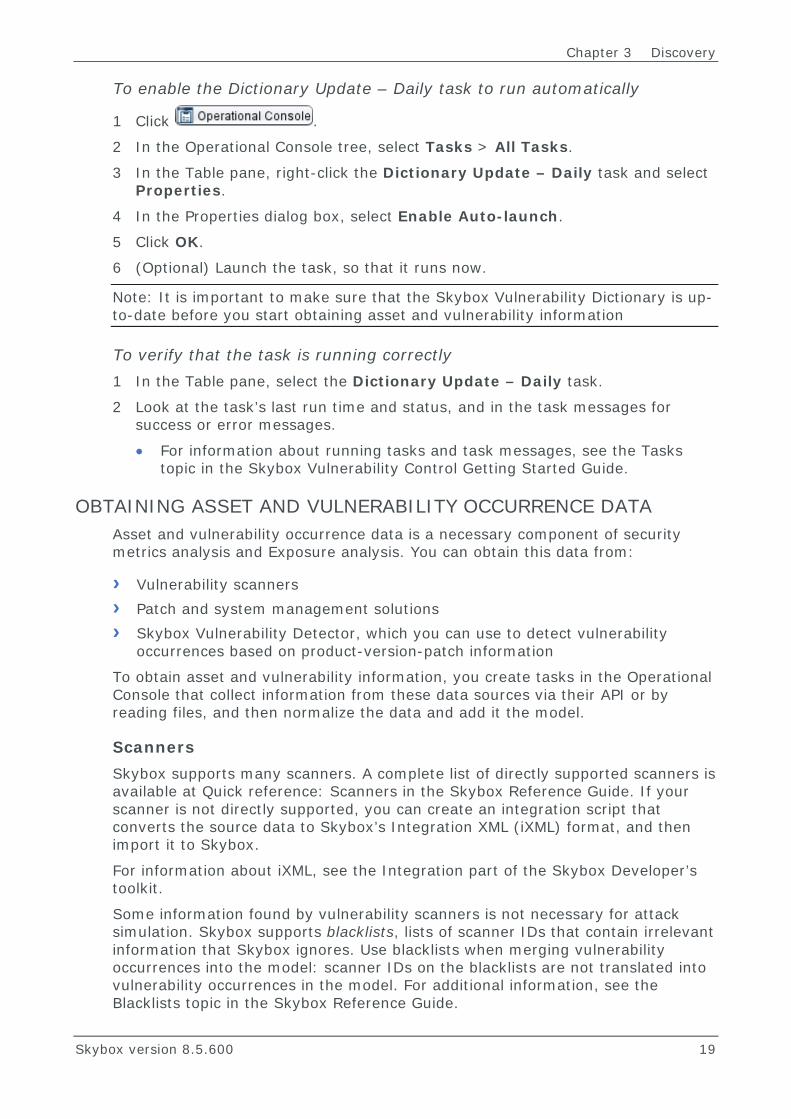
To enable the Dictionary Update – Daily task to run automatically
1 Click .
2 In the Operational Console tree, select Tasks > All Tasks.
3 In the Table pane, right-click the Dictionary Update – Daily task and select Properties.
4 In the Properties dialog box, select Enable Auto-launch.
5 Click OK.
6 (Optional) Launch the task, so that it runs now.
Note: It is important to make sure that the Skybox Vulnerability Dictionary is up-to-date before you start obtaining asset and vulnerability information
To verify that the task is running correctly 1 In the Table pane, select the Dictionary Update – Daily task.
2 Look at the task’s last run time and status, and in the task messages for success or error messages.
• For information about running tasks and task messages, see the Tasks topic in the Skybox Vulnerability Control Getting Started Guide.
OBTAINING ASSET AND VULNERABILITY OCCURRENCE DATA Asset and vulnerability occurrence data is a necessary component of security metrics analysis and Exposure analysis. You can obtain this data from:
› Vulnerability scanners › Patch and system management solutions › Skybox Vulnerability Detector, which you can use to detect vulnerability
occurrences based on product-version-patch information
To obtain asset and vulnerability information, you create tasks in the Operational Console that collect information from these data sources via their API or by reading files, and then normalize the data and add it the model.
Scanners Skybox supports many scanners. A complete list of directly supported scanners is available at Quick reference: Scanners in the Skybox Reference Guide. If your scanner is not directly supported, you can create an integration script that converts the source data to Skybox’s Integration XML (iXML) format, and then import it to Skybox.
For information about iXML, see the Integration part of the Skybox Developer’s toolkit.
Some information found by vulnerability scanners is not necessary for attack simulation. Skybox supports blacklists, lists of scanner IDs that contain irrelevant information that Skybox ignores. Use blacklists when merging vulnerability occurrences into the model: scanner IDs on the blacklists are not translated into vulnerability occurrences in the model. For additional information, see the Blacklists topic in the Skybox Reference Guide.

Skybox Vulnerability Control User’s Guide
Skybox version 8.5.600 20
Skybox Vulnerability Detector If there is no vulnerability occurrences data (for example, if no scanners are available), but your organization has an asset repository, you can use Skybox Vulnerability Detector to obtain vulnerability occurrences. Vulnerability Detector deducts vulnerability occurrences on assets, thereby creating vulnerability occurrences in the model. For additional information, see Detecting assets and vulnerability occurrences (on page 21).
Workflow for importing a Qualys vulnerability scan When imported into Skybox, vulnerability scans provide information about the assets and services in your organization, including their vulnerability occurrences. If the scan includes assets that are not already part of the model, they are added to the model. The following explains how to import a Qualys vulnerability scan.
To import a Qualys vulnerability scan 1 In the Operational Console tree, select the Tasks node.
2 Click .
3 Type a Name for the task.
4 In the Task Type field, select Scanners – Qualys Collection.

Chapter 3 Discovery
Skybox version 8.5.600 21
• For information about properties of the task, see the Qualys QualysGuard collection tasks topic in the Skybox Reference Guide.
5 Fill in Username and Password.
6 Define the Network Scope—the assets and container entities in the model to include in the task.
When the collection data is imported, only data from the specified locations and network is merged with the existing model. If the network scope is empty, all collected data is merged.
7 The Recency field specifies how many days back to search for scans. To obtain the most recent scan, type a value in this field according to how often scans are run. For example, if scans are run daily, a value of 1 finds yesterday’s scan. If scans are run on a weekly basis, a value of 7 finds the most recent scan.
8 Click Launch.
9 Verify that the task finished successfully:
a. Select the task in the Table pane of the All Tasks node.
b. Check that the value of the Exit Code is Success.
If the task failed, look in the Messages tab of the Details pane for information about what went wrong. This tab displays a log of the task; you can view the errors there to understand the problem. For example, a necessary file was deleted for some reason or moved to a different location.
10 Close the Operational Console.
11 Check the results of the import:
a. Open the Vulnerability Control workspace.
b. Navigate to Analyses > Public Analyses > Vulnerabilities.
c. Right-click the New Vulnerability Occurrences folder and select New > Analysis.
d. Type a Name for the analysis.
e. Fill in the following fields:
— Scan Time
— (Advanced tab) Discovery Method=QUALYS
Detecting assets and vulnerability occurrences Asset data is imported directly from patch management and asset management systems to Skybox using tasks. After the asset data is imported, you must run an additional Analysis – Vulnerability Detector task. These tasks infer the vulnerability occurrences from service banners imported as part of the asset data.
The supported management systems are:
› Microsoft SCCM (see page 22) (with or without additional information from Microsoft Active Directory)
› Red Hat Satellite (see page 22)

Skybox Vulnerability Control User’s Guide
Skybox version 8.5.600 22
Detecting assets and vulnerability occurrences using Microsoft SCCM data The following is a typical workflow for detecting assets and vulnerability occurrences using data imported from Microsoft SCCM.
Workflow for detecting assets and vulnerability occurrences using SCCM data 1 (Optional) Import information from Active Directory to obtain your
organization’s hierarchy. For additional information, see the Importing Microsoft Active Directory data section in the Skybox Reference Guide.
Note: If hierarchy information is not imported from Active Directory, you must add it manually (see page 25).
2 View the imported Business Units, and Business Asset Groups in the Model workspace; select Business Units & Asset Groups. When you select a Business Asset Group in the tree, you can see its assets in the workspace.
3 Run an Asset Management – SCCM Collection task to obtain asset information. For additional information, see the Microsoft SCCM section in the Skybox Reference Guide.
4 View the imported assets in the Model workspace: Model Analyses > New Entities > New Assets, or in any other relevant analysis.
5 View the products (services) of all newly imported assets by selecting an asset and then selecting the Services tab in the Details pane.
Note: You can create operational analyses of type Services in the Model Analyses tree and, for example, set the value of the Discovery Method field to SCCM. However, this analysis does not display the services for each asset separately.
Until this point, there are assets with products, but no vulnerability occurrences.
6 Run an Analysis – Vulnerability Detector task. Make sure that the value of the Service Source field in the task is set to SCCM.
• For information about these tasks, see the Vulnerability detection tasks: patch data topic in the Skybox Reference Guide.
7 View the created vulnerability occurrences in any vulnerability occurrences analysis (for example, Vulnerability Control > Prioritization Center > Analyses > Public Analyses > Vulnerabilities > New Vulnerability Occurrences in the Vulnerability Control workspace).
The Discovery Method field of a vulnerability occurrence created by this task is Vulnerability Detector. You can display the Created Time field in the Table pane to make sure that you are looking at vulnerability occurrences from the correct run of the task.
Detecting assets and vulnerability occurrences using Red Hat Satellite data The following is a typical workflow for detecting assets and vulnerability occurrences using data imported from Red Hat Satellite.

Chapter 3 Discovery
Skybox version 8.5.600 23
Workflow for detecting assets and vulnerability occurrences using Red Hat Satellite data 1 Run an Asset Management – Red Hat Satellite task to obtain asset
information. For additional information, see the Red Hat Satellite section in the Skybox Reference Guide.
2 View the imported assets in the Model workspace: Model Analyses > New Entities > New Assets, or in any other relevant analysis.
3 View the products (services) of all newly imported assets by selecting an asset and then viewing the Services tab in the Details pane.
Note: You can create operational analyses of type Services in the Model Analyses tree and, for example, set the value of the Discovery Method field to Satellite. However, this analysis does not display the services for each asset separately.
Until this point, there are assets with products, but no vulnerability occurrences.
4 Run an Analysis – Vulnerability Detector task. Make sure that the value of the Service Source field in the task is set to SATELLITE.
• For information about these tasks, see the Vulnerability detection tasks: patch data topic in the Skybox Reference Guide.
5 View the created vulnerability occurrences in any vulnerability occurrences analysis (for example, Vulnerability Control > Prioritization Center > Analyses > Public Analyses > Vulnerabilities > New Vulnerability Occurrences in the Vulnerability Control workspace).
The Discovery Method field of a vulnerability occurrence created by this task is Vulnerability Detector. You can display the Created Time field in the Table pane to make sure that you are looking at vulnerability occurrences from the correct run of the task.
Continuous detection Run the Vulnerability Detector on a frequent basis to obtain and analyze updated vulnerability data. For example, you can include it in a task sequence with either Asset Management – SCCM Collection or Asset Management – Red Hat Satellite Collection tasks.
After you run the task, you can see the average age of vulnerability occurrences (and other relevant information) in the Discovery Center.
Detecting vulnerability occurrences from previously existing scans Skybox can discover recently published Microsoft Vulnerability Definitions on assets based on previously existing scans. This is useful after updates are made to a vulnerability source—for example, after ‘Patch Tuesday’—but the existing scans are fairly recent. Scanning is intrusive and resource-intensive; using the Vulnerability Detector task is neither.
Note: Currently, only Qualys QualysGuard and McAfee Vulnerability Manager (Foundstone) authenticated scans are supported by this task.

Skybox Vulnerability Control User’s Guide
Skybox version 8.5.600 24
To detect vulnerability occurrences from a previously existing scan 1 Run an Analysis – Vulnerability Detector for Scanners task.
• For information about these tasks, see the Vulnerability detection tasks: scan data topic in the Skybox Reference Guide.
2 View the new vulnerability occurrences in the relevant analyses or via the Discovery Center.
Vulnerability occurrences in the model When a vulnerability occurrence is found by a scanner or by any other means, Skybox uses the Skybox Vulnerability Dictionary to formally model the vulnerability occurrence in the model. The following information is displayed for each vulnerability occurrence:
› Exploitability: Exploitability is taken from the Vulnerability Dictionary. It specifies the level of exploitability, which can be ‘no exploit’, ‘exploit available’ (meaning there are published exploits), or ‘exploited in the wild’ (meaning that the published exploits—malware or ransomware—are currently being used by threat actors in the wild).
› Severity: Severity is taken from the CVSS base score, as listed in the Vulnerability Dictionary.
› CVSS information: The Vulnerability Dictionary provides CVSS information for the base and temporal vector of each vulnerability occurrence.
CVSS information enables users to analyze the impact of a vulnerability occurrence, including how it can be exploited (for example, locally or remotely, with or without authentication) and its possible impact in terms of CIA (confidentiality, integrity, and availability).
› Commonality: Commonality is generated by the Vulnerability Dictionary. It specifies how frequently attackers exploit vulnerability occurrences of this Vulnerability Definition.
› Life-cycle status: Skybox assigns an initial status of Found to each vulnerability occurrence detected. Later, this can be changed by Skybox or by a user to Ignored or Fixed. Attack simulation uses only vulnerability occurrences with the Found status.
When you run attack simulation, the exposure level of each vulnerability occurrence in the model is analyzed. The exposure level states how many steps a Threat Origin needs to access the vulnerability occurrence; direct exposure means that there are Threat Origins that can reach the vulnerability occurrence in only 1 step.
DISCOVERY CENTER The Discovery Center provides a high-level view of the information Skybox has about the assets and vulnerability occurrences in the model. At the top of the page, you can see:
› The number of vulnerability occurrences in your organization (that is, in the parts of the organization that are modeled) and their average age
› The number of Vulnerability Definitions

Chapter 3 Discovery
Skybox version 8.5.600 25
› The number of assets in your organization, including those that were not scanned recently
The various charts and tables in the rest of the page provide a high-level view of the inventory of your organization, showing you how the organization looks from a Skybox point of view.
When you start using Skybox, use this inventory to check that all the information that you expect is included in the model, and that, for example, you did not miss a location or a critical network. As you continue to work with Skybox, you can view assets from various perspectives in the inventory; you can see, for example, how many assets are up-to-date and how many are overdue.
ADDING ORGANIZATIONAL HIERARCHY (BUSINESS UNITS) This section explains how to add Business Units and Business Asset Groups to the model.
Including information about your organization’s hierarchy (Business Units and Business Asset Groups) to the model enables Skybox to present the inventory and findings in a logical way for your organization. You add this information after the network and security information is collected for your model. We recommend that you start with a 1st phase consisting of about 5 Business Asset Groups.
You can add the organizational hierarchy manually or by using a tool (for example, Active Directory). For information about importing Active Directory data, see the Importing Microsoft Active Directory data section in the Skybox Reference Guide.

Skybox Vulnerability Control User’s Guide
Skybox version 8.5.600 26
Note: When defining your organization’s hierarchy, use names that match your organization. Create a naming convention that is understandable and meets your organization’s requirements. This makes the 1st stage of definition easier, and makes it easier to maintain the names and to add new names when necessary.
Business Units Business Units enable you to group Business Asset Groups into a hierarchy for management purposes. This is especially useful for large organizations.
When you create analyses and reports, you can use the Business Units to organize (aggregate or filter) the results. You can compare the risk levels of different Business Units.
Defining Business Units
To define a Business Unit 1 Do either of the following:
• In the Model tree, select the Business Units & Asset Groups node.
• To make the new Business Unit part of an existing Business Unit, select the parent Business Unit.
2 Right-click the node and select New > Business Unit.
3 Fill in the fields and click OK.
• Members (other Business Units and Business Asset Groups) are optional when creating the Business Unit but you must fill them in later.
• Selecting an owner is optional.
Managing Business Units After you create a Business Unit, you can create a hierarchy by creating Business Asset Groups or other Business Units inside the 1st one, or by attaching existing Business Asset Groups or Business Units to the 1st one. You can also detach Business Asset Groups or Business Units from a parent Business Unit.

Chapter 3 Discovery
Skybox version 8.5.600 27
To attach a Business Asset Group or a Business Unit to another Business Unit 1 In the Model tree, locate the Business Asset Group or Business Unit that is to
become a part of another Business Unit.
2 Right-click the Business Asset Group or Business Unit and select Attach to Business Unit.
3 Select the parent Business Unit:
• If the parent Business Unit exists, select it and click OK.
• To make this entity part of a new Business Unit:
a. Select the position in the tree where you want the new (parent) Business Unit.
b. Click New.
c. In the New Business Unit dialog box, fill in the fields.
The entity that you are attaching becomes a child of the new parent Business Unit and you can add other member entities using the Members field.
d. Click OK.
The new Business Unit is created in the selected position in the tree and the selected entity becomes a child node, as do any other member entities selected in step c.
To detach a Business Asset Group or Business Unit from a Business Unit
› In the Model tree, right-click the Business Asset Group or Business Unit and select Detach from Business Unit.
If the Business Asset Group or Business Unit is attached to more than 1 Business Unit, make sure that you locate the correct instance (that is, you are detaching it from the correct Business Unit).

Skybox Vulnerability Control User’s Guide
Skybox version 8.5.600 28
Note: If a Business Asset Group is no longer attached to any Business Units, it is moved to the bottom of the Business Units & Asset Groups node in the Model tree.
Business Asset Groups A Business Asset Group is a group of assets that serve a common business purpose. Use Business Asset Groups to model your organization according to functions provided by your IT infrastructure.
A Business Asset Group can either contain a specific group of assets or it can have a list of criteria (for example, “all firewalls in the Boston network”, “all assets with Windows OS”, or “all assets with a certain tag”).
You can use tasks of type Model – Integrity to continuously update Business Asset Groups with all the assets that match their criteria. This ensures that the scope of each Business Asset Group stays synchronized with changes in your organization’s network. For additional information, see How Business Asset Groups are updated (on page 29).
To add a Business Asset Group 1 In the Model tree, select the Business Unit to which you want the Business
Asset Group to belong. If you did not create the Business Unit yet, select the Business Units & Asset Groups node.
2 Right-click the node and select New > Business Asset Group.
3 In the New Business Asset Group dialog box:
a. Type a Name for the Business Asset Group.
b. Click the Browse button next to the Members field to select the members of the Business Asset Group.
1. Using the various properties, define which assets are to be members of this Business Asset Group. You can select specific networks or assets, and properties that the assets must have to belong to this group. For example, all assets whose name starts with FW_ or all assets that have a specific service, operating system, or product.
For additional information, see the Business Asset Group members topic in the Skybox Reference Guide.
2. Click Preview at any point to see which assets are included according to the current definition.
3. Click OK to save the definition.
c. (Optional) Select an Owner for this Business Asset Group.
d. Click OK.
Skybox selects the assets to include in this Business Asset Group based on your definition. The Business Asset Group is added in the Model tree under its parent node.
For information about all the properties of Business Asset Groups, see the Business Asset Groups section in the Skybox Reference Guide.

Chapter 3 Discovery
Skybox version 8.5.600 29
How Business Asset Groups are updated Business Asset Groups are updated by tasks of type Model – Integrity. We recommend that you run this task every time import tasks are run, as they might change the composition of the Business Asset Groups.
You can run the update on an ad hoc basis by right-clicking the Business Units & Asset Groups node and selecting Calculate Asset Group members.
If Business Asset Groups in the model were not updated in a relatively long time (the default value is 30 days), a warning message is shown.
Other ways of adding organizational hierarchy information You can add new information about your organization’s hierarchy to the model in the following ways:
› Import an iXML model
Retrieve hierarchy information from various proprietary sources of information (for example, a customized asset database). Scripts convert the proprietary information into a format (iXML) that Skybox can import.
• For information about iXML, see the Integration part of the Skybox Developer’s Guide.
› Import a Skybox model (in XML or encrypted XML format)
Importing a model adds the new model’s entities to the current model. In this manner, you can join several partial models representing different sections of your organization’s network into a single model.
Note: The imported models can include Threat Origins.

Skybox version 8.5.600 30
Chapter 4
Skybox used exposure and exploitability to prioritize vulnerabilities by their threat level. Imminent threats (for example, exposed vulnerabilities and those that are exploited in the wild) should be remediated promptly, while potential threats (for example, exploit available and no exploit) should be remediated in a “business as usual” time frame.
› Exposed vulnerabilities are those that are one or two steps away from a Threat Origin (location of potential attackers).
› Exploitable vulnerabilities are those that can be targeted by malware, ransomware, exploit kits, and threat actors. “Exploited in the wild” refers to vulnerabilities already being targeted in the wild. “Exploit available” means that there are published exploits available for the vulnerabilities, but they are not yet being used.
Prioritization can be done on a regular (daily) basis using Analysis – Security Metrics tasks or, as needed, by clicking . During analysis, Skybox analyzes each vulnerability occurrence on each Business Unit and Business Asset Group for exposure to threats and exploitability. It then assigns risk levels and scores that are specific for your organization. Scores can range from 0 to 100, where 0 is the least critical—there are no vulnerability occurrences—and 100 is the most critical.
In this chapter
Prioritization Center ............................................................ 31
Using the Prioritization Center .............................................. 32
Security metrics ................................................................. 33
Understanding the security metrics information ...................... 35
Prioritization

Chapter 4 Prioritization
Skybox version 8.5.600 31
PRIORITIZATION CENTER The left-hand side of the Prioritization Center overview page displays the Risk by Threat Levels chart.
Vulnerabilities that are exposed to a Threat Origin and those that are exploited in the wild are considered imminent threats and should be fixed first. Those for which exploits are available but have not been used and those for which no exploits exist are considered potential threats.
The right-hand side of the page provides further information about the selected layer of the graph on the left. You can see how this layer (in the above example, Exploited in the Wild) is split across the organization, and how many assets are involved in each one. The Top Vulnerability Definitions by Contribution list shows which Vulnerability Definitions contribute the most risk. These are the Vulnerability Definitions that should be fixed first.

Skybox Vulnerability Control User’s Guide
Skybox version 8.5.600 32
You can use the links on the right-hand side to drill down to information about a specific subunit or Vulnerability Definition.
Note: You can also view the prioritization using reports of type Security Metrics (see page 135).
USING THE PRIORITIZATION CENTER When you view the Prioritization Center for any part of the organization, the Summary tab is similar to the Priority Center overview page.
The other pages include:
› Exposure: A list of all exposed vulnerability occurrences in this part of the organization
› Exploitability: A list of all the vulnerability occurrences in this part of the organization grouped by their exploitability level
› All Security Metrics: A list of all the supported security metrics for your organization, with information about how each one of them impacts this part of the organization
Chapter 4 Prioritization
Skybox version 8.5.600 33
Security metrics measure the security status of your organization based on the selected set of Vulnerability Definitions or security bulletins. The more critical unhandled vulnerability occurrences or missing security bulletins that you have, the higher the score.
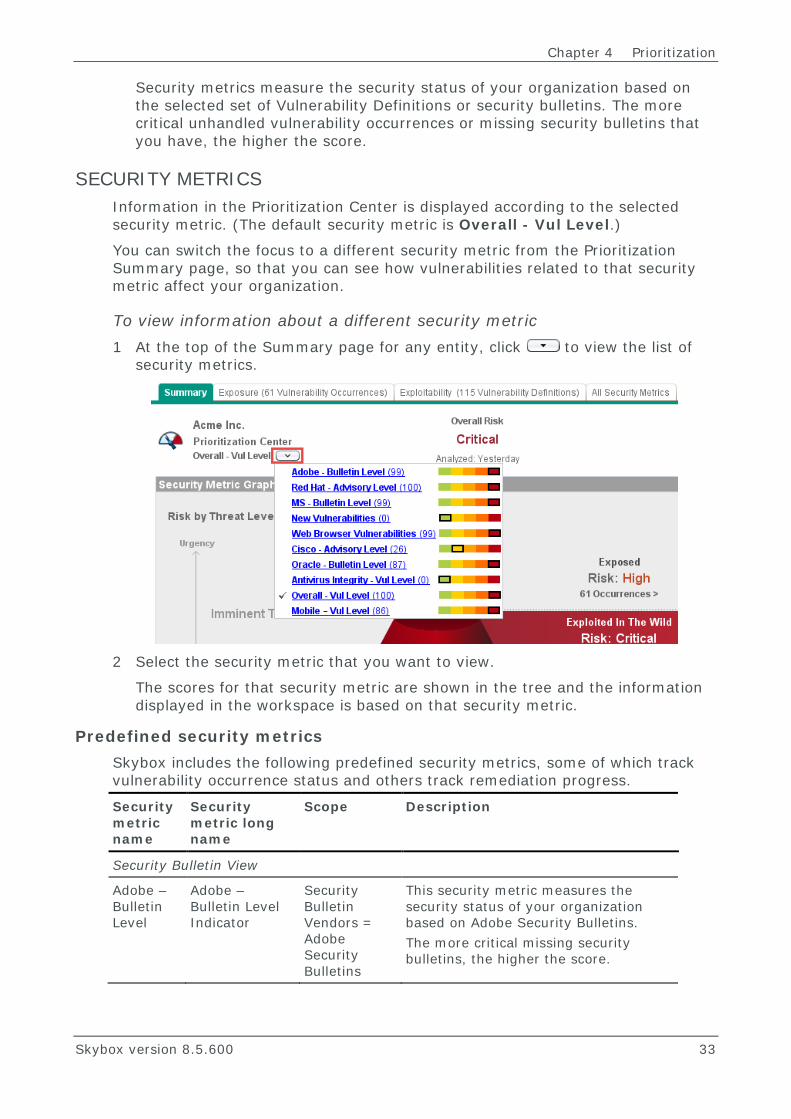
SECURITY METRICS Information in the Prioritization Center is displayed according to the selected security metric. (The default security metric is Overall - Vul Level.)
You can switch the focus to a different security metric from the Prioritization Summary page, so that you can see how vulnerabilities related to that security metric affect your organization.
To view information about a different security metric 1 At the top of the Summary page for any entity, click to view the list of
security metrics.
2 Select the security metric that you want to view.
The scores for that security metric are shown in the tree and the information displayed in the workspace is based on that security metric.
Predefined security metrics Skybox includes the following predefined security metrics, some of which track vulnerability occurrence status and others track remediation progress.
Security metric name
Security metric long name
Scope Description
Security Bulletin View
Adobe – Bulletin Level
Adobe – Bulletin Level Indicator
Security Bulletin Vendors = Adobe Security Bulletins
This security metric measures the security status of your organization based on Adobe Security Bulletins. The more critical missing security bulletins, the higher the score.

Skybox Vulnerability Control User’s Guide
Skybox version 8.5.600 34
Security metric name
Security metric long name
Scope Description
Cisco – Advisory Level
Cisco Security Advisories – Vulnerability Level Indicator
Security Bulletin Vendors = Cisco Security Advisory
This security metric measures your organization’s remediation performance of Cisco Security Advisories. The more critical missing security advisories, the higher the score.
MS – Bulletin Level
Microsoft Security Bulletins – Vulnerability Level Indicator
Security Bulletin Vendors = Microsoft Security Bulletins
This security metric measures the security status of your organization based on Microsoft Security Bulletins. The more critical missing security bulletins, the higher the score.
Oracle – Bulletin Level
Oracle – Vulnerability Level Indicator
Security Bulletin Vendors = Oracle Security Bulletins
This security metric measures the security status of your organization based Oracle Security Bulletins. The more critical missing security bulletins, the higher the score.
Red Hat – Advisory Level
Red Hat Security Advisories – Vulnerability Level Indicator
Security Bulletin Vendors = Red Hat Security Advisory
This security metric measures the security status of your organization based on Red Hat Security Advisories. The more critical missing security advisories, the higher the score.
Security View
Antivirus Integrity – Vul Level
Antivirus Integrity – Vulnerability Level Indicator
Custom = Anti-Virus Integrity
This security metric measures the security status of your organization based on the alerts (vulnerability occurrences) on antivirus applications. The more unhandled critical alerts (vulnerability occurrences) that you have on antivirus applications, the higher the score.
Mobile – Vul Level
Mobile Devices Alerts – Vulnerability Level Indicator
Custom = Mobile device – Vulnerabilities
This security metric measures the security status of your organization based on the alerts (vulnerability occurrences) on any of the following mobile devices: • Apple • Android • Blackberry
The more unhandled critical alerts (vulnerability occurrences) that you have on mobile devices, the higher the score.

Chapter 4 Prioritization
Skybox version 8.5.600 35
Security metric name
Security metric long name
Scope Description
New Vulnerabilities
New Vulnerabilities (Last 30 Days) – Vulnerability Level Indicator
Custom = New Vulnerabilities – last 30 days
This security metric measures the security status of your organization based on the Vulnerability Definitions that were published in the last 30 days. The more unhandled new critical vulnerability occurrences that you have, the higher the score.
Overall – Vul Level
Vulnerability Level Indicator
Any This security metric measures the security status of your organization based on its vulnerability occurrences. The more critical vulnerability occurrences that you have, the higher the score.
Web Browser Vulnerabilities
Web Browser Alerts – Vulnerability Level Indicator
Custom = Web Browsers
This security metric measures the security status of your organization based on the alerts (vulnerability occurrences) on any of the following browsers: • Microsoft Internet Explorer • Mozilla Firefox • Google Chrome • Apple Safari
The more unhandled critical alerts (vulnerability occurrences) that you have on web browsers, the higher the score.
UNDERSTANDING THE SECURITY METRICS INFORMATION When you understand which factors contributed the most to a unit’s security metric score, you can more easily decide how to proceed.
The right half of the Prioritization Center summary page is divided into several sections, each of which provides a different way to understand the information:
› Top subunits
Top subunits can be displayed as a chart or as a table. Click to view as a chart or to view as a table.
The chart shows the contribution of the selected unit’s subunits to the unit’s total security metrics score.
• The color of each entity corresponds to its risk level.
• The height of each subunit represents the size (in number of assets) of the subunit relative to the other subunits.
• The chart displays up to 5 subunits. If there are more, the 5 largest are displayed.
The table shows the risk level of the top 3 subunits and how much each one contributes to the score of the parent entity.
Double-click a subunit in to drill down to the summary page for that entity.

Skybox Vulnerability Control User’s Guide
Skybox version 8.5.600 36
› Top Vulnerability Definitions or Security Bulletins
This table contains a list of the 5 Vulnerability Definitions or Security Bulletins (depending on which security metric is used) with the greatest contribution towards a unit’s security metrics score. Drill down to the individual vulnerability occurrences to see additional information.
Note: For Microsoft Security Bulletins, you can view information about bulletin supersedence. For additional information, see Superseding Security Bulletins (on page 38).
› Trends
If enough information was collected to create security metrics trend graphs, you can view the trends of a specific unit to track remediation progress relative to earlier security metrics scores of that unit.
Start by looking at the Top Subunits and to try and identify factors with a high contribution to the unit’s security metrics.
If you lower the security metrics scores of these factors (that is, fix whatever is causing the security metric to be high), the security metrics score of the parent unit is decreased by a significant amount.
› If you find units with a high contribution to the security metrics score of the parent unit, you can use the top-down approach to search for the cause.
Note that some units can have high security metrics scores, but not contribute significantly to the security metrics score of their parent unit. Fixing such units is usually not a high priority, as even a significant lowering of their security metrics scores does not have much impact on the security metrics score of the parent unit.
› If you find Vulnerability Definitions with a high contribution to the security metrics score, you can start the process of mitigating their vulnerability occurrences (for example, by creating tickets).
Properties of security metrics The following are the main properties that define security metrics:
Type
› Vulnerability Level Indicators: These security metrics measure the security status of your organization (or a part thereof) based on the status of its vulnerability occurrences or missing security bulletins. The more critical vulnerability occurrences or critical security bulletins in your organization, the higher the score.
Vulnerability Level Indicators measure the rate of vulnerability occurrences residing on assets in a group of assets. In simple terms, the rate is the average number of vulnerability occurrences per asset.

Chapter 4 Prioritization
Skybox version 8.5.600 37
› Remediation Latency Indicators: These security metrics measure the remediation performance of your organization. The more time it takes to fix the critical vulnerability occurrences or missing security updates, the higher the score.
Remediation Latency Indicators measure the rate of overdue vulnerability occurrences:
• The Remediation Latency Indicator score for an asset represents the number of overdue (or relatively old) vulnerability occurrences residing on the asset, where each vulnerability occurrence is weighted. The weighting is calculated from the remediation priority of the vulnerability occurrence and its delay; high-priority vulnerability occurrences with a large delay have the highest weight.
• The Remediation Latency Indicator score for a group of assets (Business Asset Group or Business Unit), is the average of the Remediation Latency Indicator score of each asset in the group.
Use the Remediation Latency Indicator metric to identify entities (vulnerability occurrences or groups of assets) whose remediation latency is relatively high and to examine trends of remediation latency.
View
› Security View: Shows the status of vulnerability occurrences in your organization.
› Security Bulletin View: Shows the status of applying security bulletins from vendor-based catalogs and the prioritization of the security bulletins that have not been applied. Whenever possible, results are displayed in terms of security bulletins, each of which is usually correlated to multiple Vulnerability Definitions. Vulnerability occurrences that are not part of a security bulletins are displayed independently.
Scope The scope defines which Vulnerability Definitions are used in each security metric. This can include all Vulnerability Definitions, only Vulnerability Definitions or security bulletins from specific vendor-based catalogs, or a custom-defined set. You can exclude specific groups of Vulnerability Definitions or products.
The following security bulletin vendors are supported:
› Adobe › Apple › Cisco › Google › Microsoft › Mozilla › Oracle › Red Hat
Skybox Vulnerability Control User’s Guide
Skybox version 8.5.600 38
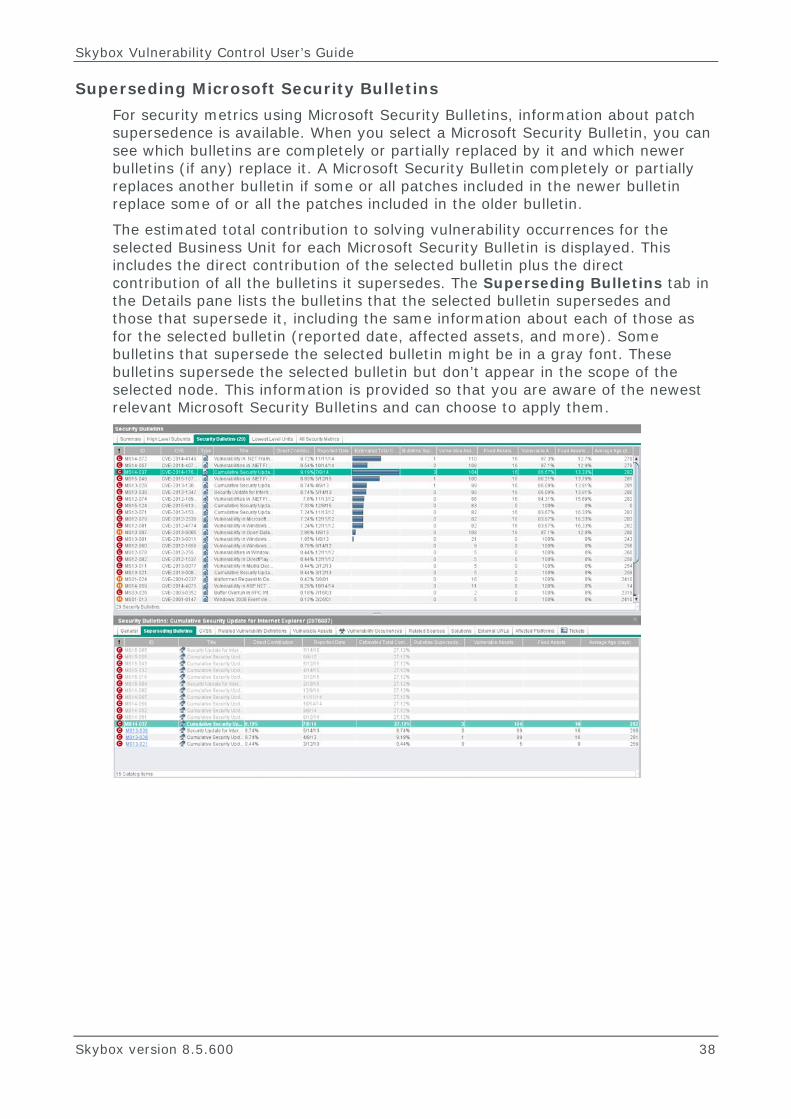
Superseding Microsoft Security Bulletins For security metrics using Microsoft Security Bulletins, information about patch supersedence is available. When you select a Microsoft Security Bulletin, you can see which bulletins are completely or partially replaced by it and which newer bulletins (if any) replace it. A Microsoft Security Bulletin completely or partially replaces another bulletin if some or all patches included in the newer bulletin replace some of or all the patches included in the older bulletin.
The estimated total contribution to solving vulnerability occurrences for the selected Business Unit for each Microsoft Security Bulletin is displayed. This includes the direct contribution of the selected bulletin plus the direct contribution of all the bulletins it supersedes. The Superseding Bulletins tab in the Details pane lists the bulletins that the selected bulletin supersedes and those that supersede it, including the same information about each of those as for the selected bulletin (reported date, affected assets, and more). Some bulletins that supersede the selected bulletin might be in a gray font. These bulletins supersede the selected bulletin but don’t appear in the scope of the selected node. This information is provided so that you are aware of the newest relevant Microsoft Security Bulletins and can choose to apply them.

Skybox version 8.5.600 39
Chapter 5
After viewing the Prioritization Center, you understand what needs fixing and can start remediation.
Use the Remediation Center (see page 40) to track the remediation status of the organization, including the numbers of found vulnerability occurrences and fixed vulnerability occurrences in each part of the organization, and to understand how remediation is progressing over time.
You can remediate with or without using Skybox. Some organizations create Skybox tickets on Vulnerability Definitions (see page 41) and assign them to specific users for detailed tracking.
In this chapter
About remediation levels ..................................................... 39
Remediation Center ............................................................ 40
Suggested workflow for remediation ..................................... 41
Creating tickets for remediation ............................................ 41
ABOUT REMEDIATION LEVELS Skybox monitors remediation levels according to the desired remediation pace of your organization for each security metric. For example, critical Microsoft Security Bulletins might be given an SLA of 20 days: that is, all critical Microsoft vulnerability occurrences should be fixed within 20 days; critical Adobe Security Bulletins might be given an SLA of 30 days.
Vulnerability occurrences that still have time to be fixed are in SLA. After that, they are out of SLA with various delay levels. For example, if the SLA for critical vulnerability occurrences in the selected security metric is 30 days, a vulnerability occurrence is in minor delay if it is not fixed within 60 days, in medium delay within 90 days, and in major delay after that.
By default, the SLAs for each security metric are:
› Critical vulnerability occurrences: 30 days to fix › High vulnerability occurrences: 60 days to fix › Medium vulnerability occurrences: 90 days to fix › Low and Info vulnerability occurrences: No SLA
You can:
› Change SLAs per security metric, depending on which are the most urgent security metrics for your organization
Remediation
Skybox Vulnerability Control User’s Guide
Skybox version 8.5.600 40
› Change the SLAs for security metrics if you prefer different values
For information about changing the SLAs of a single security metric, see Defining the SLA per severity level (on page 43). You can change the default SLAs in Tools > Options > Server Options > Vulnerability Control.
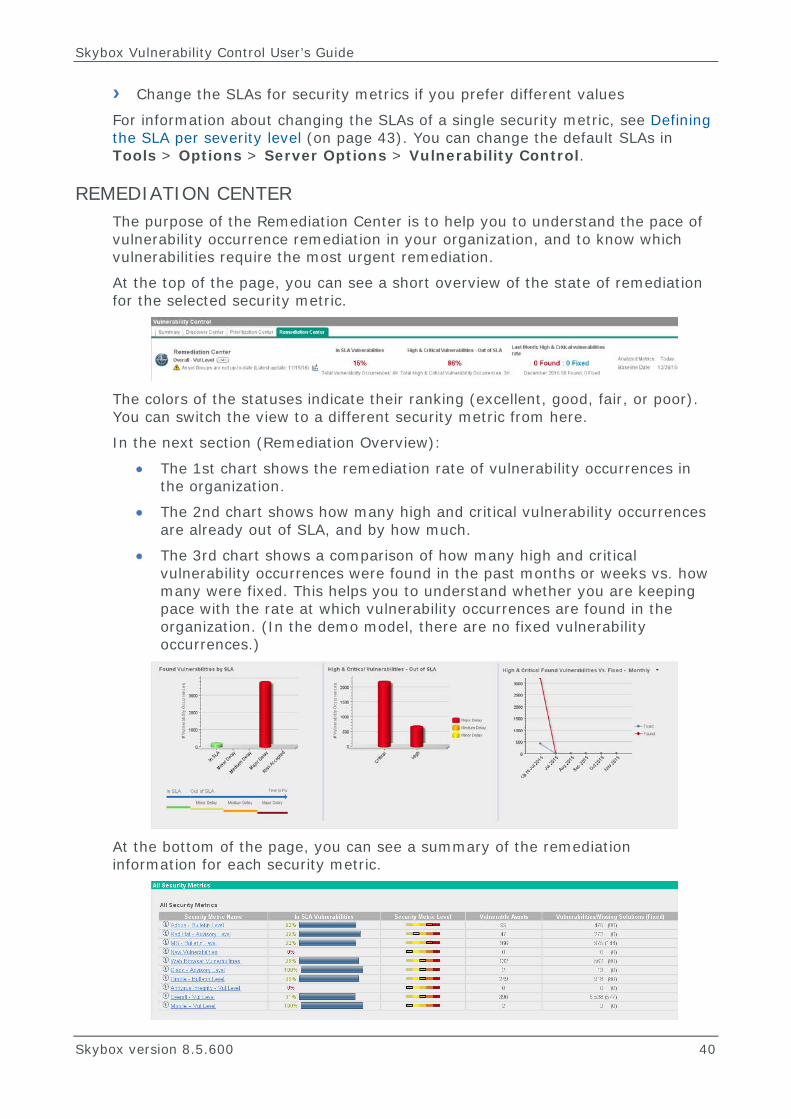
REMEDIATION CENTER The purpose of the Remediation Center is to help you to understand the pace of vulnerability occurrence remediation in your organization, and to know which vulnerabilities require the most urgent remediation.
At the top of the page, you can see a short overview of the state of remediation for the selected security metric.
The colors of the statuses indicate their ranking (excellent, good, fair, or poor). You can switch the view to a different security metric from here.
In the next section (Remediation Overview):
• The 1st chart shows the remediation rate of vulnerability occurrences in the organization.
• The 2nd chart shows how many high and critical vulnerability occurrences are already out of SLA, and by how much.
• The 3rd chart shows a comparison of how many high and critical vulnerability occurrences were found in the past months or weeks vs. how many were fixed. This helps you to understand whether you are keeping pace with the rate at which vulnerability occurrences are found in the organization. (In the demo model, there are no fixed vulnerability occurrences.)
At the bottom of the page, you can see a summary of the remediation information for each security metric.

Chapter 5 Remediation
Skybox version 8.5.600 41
The main column is In SLA Vulnerabilities, where you can see which security metrics have a low percentage of vulnerability occurrences that are in SLA.
SUGGESTED WORKFLOW FOR REMEDIATION The following is a suggested workflow for remediation:
1 Above the tree, select Remediation Center.
2 In the tree, click the Security Metrics node.
3 Decide which technology you want to explore and select its security metric.
4 The 1st chart (Found Vulnerabilities by SLA) gives you an idea of the scope of the delay in vulnerability occurrences that need fixing.
5 The 2nd chart enables you to focus on the high and critical vulnerability occurrences with the most delay.
6 Click in the area of the chart that you want to see (for example, Critical > Major Delay); this brings you to a list of the relevant Vulnerability Definitions in the Vulnerability Definitions / Security Bulletins tab.
7 You can look at the Vulnerability Definitions, see how many vulnerability occurrences each Vulnerability Definition has, and determine those that most need fixing. If your organization remediates using Skybox tickets, you can open tickets as necessary.
CREATING TICKETS FOR REMEDIATION In some organizations, tickets are used to handle the remediation process. You can create tickets on either Vulnerability Definitions or security bulletins. You can create tickets on each Vulnerability Definition or security bulletin, so that you can have separate tickets for the same Vulnerability Definition or security bulletin in different settings.
To create a ticket
› Right-click the Vulnerability Definition or security bulletin in the Table pane and select Create Ticket.
A threat alert ticket is created.
The scope of these tickets depends on what you selected in the Security Metrics tree when creating the ticket. For example, if a ticket is created on a security bulletin when the Europe Operations Business Unit is selected in the tree, the Network Scope of the ticket includes only this Business Unit.
When you close a ticket for a Vulnerability Definition or security bulletin, its related vulnerability occurrences are marked as Fixed.
For additional information about the ticket workflow, see Tickets and workflow (on page 122).

Skybox version 8.5.600 42
Chapter 6
The security metrics scores are intended to provide information about the security status of your organization. Because security status is determined by your organization’s policy and other factors, you might need to modify various properties that are used in displaying and calculating the security metrics scores.
You can customize the predefined security metrics and you can add additional security metrics as necessary. Each security metric is managed separately.
To manage the security metrics, right-click the main node in the Security Metric tree and select Manage Security Metrics.
In this chapter
About security metrics in Skybox .......................................... 42
Initial customization ............................................................ 42
Security Metric properties .................................................... 44
Additional customization ...................................................... 46
ABOUT SECURITY METRICS IN SKYBOX Skybox uses security metrics to measure the security status of your organization. Skybox includes predefined security metrics, which you can customize, and enables you to create new security metrics.
Some security metrics in Skybox measure the status of vulnerability occurrences in your organization. Other security metrics measure the status of applying security bulletins from specific vendor-based catalogs.
INITIAL CUSTOMIZATION The default values for security metrics display properties and calculation values are usually adequate as a starting point. We recommend that you do only minimal customization—if any—before the 1st analysis of security metrics.
In some cases, it might be necessary to change some of the following to match your organization’s naming conventions and SLAs:
› The names (long and short) of the security metrics › The security metric scale of some security metrics (see Changing the security
metrics scale (on page 43)) › The SLA per severity level (SLAs are used in the remediation process) (see
Defining the SLA per severity level (on page 43))
Customizing the security metrics

Chapter 6 Customizing the security metrics
Skybox version 8.5.600 43
To customize a security metric 1 Right-click the Vulnerability Control node and select Manage Security
Metrics.
2 In the Manage Security Metrics dialog box, select the security metric to be customized and click Modify.
3 Make the necessary changes and click OK.
The Security Metric properties (on page 44) topic includes information about all the properties.
Note: After making any changes a security metric, make sure to reanalyze (click Analyze on the toolbar).
Changing the security metrics scale By default, the security metrics scale includes 5 levels, which map the number of found vulnerability occurrences (or missing security bulletins) to a 0-100 score, a named level, and a color scheme similar to that used in Skybox for risk levels.
The default values for all VLI-type security metrics are listed in the following table, where each High-level vulnerability occurrence is worth 0.3 of a Critical-level vulnerability occurrence, and each Medium-level vulnerability occurrence is worth 0.03 of a Critical-level vulnerability occurrence.
Number of critical-equivalent vulnerability occurrences or missing security bulletins
VLI score Level name Color
0 to 0.5 0 to 20 Very Low 0.5 to 2 20 to 40 Low 2 to 4 40 to 60 Medium 4 to 6 60 to 80 High 6 to 1,000,000 80 to 100 Critical
You might need to:
› Change the number of critical vulnerability occurrences or critical missing security bulletins
› Delete levels to match your SLA
Note: If you delete levels, you might also need to change other information about the remaining levels according to your organization’s SLAs and naming conventions.
› Change the level names
For additional information, see Security Metric properties (on page 44).
Defining the SLA per severity level You can define the SLA time for each severity level of a security metric. The SLA time specifies the expected number of days for the remediation of vulnerability occurrences, based on the SLA.
The default SLA times are:

Skybox Vulnerability Control User’s Guide
Skybox version 8.5.600 44
› Critical: 30 days › High: 60 days › Medium: 90 days › Low: None › Info: None
SECURITY METRIC PROPERTIES All security metrics have the same properties. These properties are described in the following table.
Property Description
Basic tab
Enable Specifies whether this security metric is visible to users.
Highlight in summary page
Specifies whether this security metric is visible in the Vulnerability Control Summary page. Note: Up to 3 security metrics at a time can be highlighted in the Vulnerability Control Summary page.
Short Name An abbreviation for the name of this security metric. The Short Name is used in the GUI and in Security Metric reports.
Long Name The full name of this security metric. The Long Name is used in Security Metric reports.
Description A description of the security metric.
Type The general type of the security metric: • Vulnerability Level Indicator: Measures the security
status of your organization based on its vulnerability occurrences or on the update level of security bulletins. The more critical vulnerability occurrences or critical missing security bulletins that you have, the higher the score.
• Remediation Latency Indicator: Measures the remediation performance of your organization. The more time it takes you to fix the critical vulnerability occurrences, the higher the score.
Scope: Any Specifies that the scope of this security metric is all Vulnerability Definitions and all catalogs of security bulletins.
Scope: Security Bulletin Vendors
Specifies that the scope of this security metric is defined by security bulletin vendors. When you use vendors, entries are displayed as missing security bulletins.
Scope: Custom Specifies that the scope of this security metric is defined by a customized set of Vulnerability Definitions and security bulletins. There are several predefined sets: • Anti-Virus Integrity • Mobile devices – Vulnerabilities • New Vulnerabilities – last 3 months • Oracle Vulnerabilities • Web Browsers
To edit the existing Vulnerability Definition sets or to
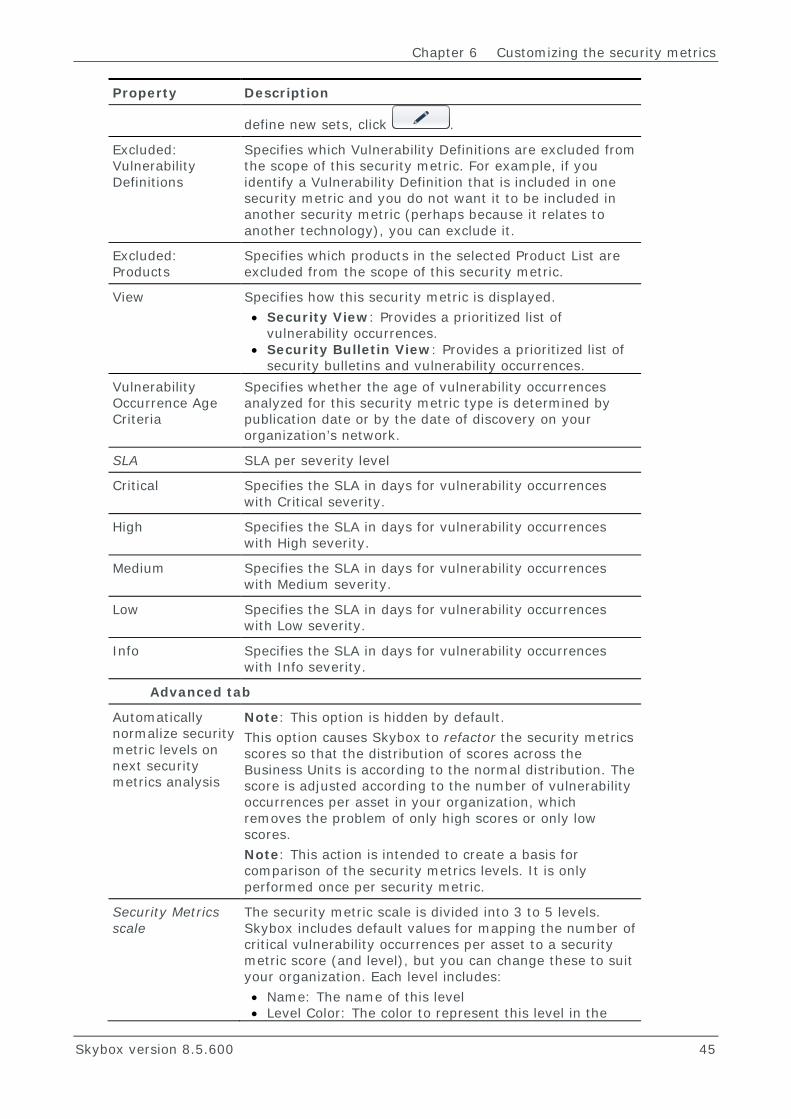
Chapter 6 Customizing the security metrics
Skybox version 8.5.600 45
Property Description
define new sets, click .
Excluded: Vulnerability Definitions
Specifies which Vulnerability Definitions are excluded from the scope of this security metric. For example, if you identify a Vulnerability Definition that is included in one security metric and you do not want it to be included in another security metric (perhaps because it relates to another technology), you can exclude it.
Excluded: Products
Specifies which products in the selected Product List are excluded from the scope of this security metric.
View Specifies how this security metric is displayed. • Security View: Provides a prioritized list of
vulnerability occurrences. • Security Bulletin View: Provides a prioritized list of
security bulletins and vulnerability occurrences. Vulnerability Occurrence Age Criteria
Specifies whether the age of vulnerability occurrences analyzed for this security metric type is determined by publication date or by the date of discovery on your organization’s network.
SLA SLA per severity level
Critical Specifies the SLA in days for vulnerability occurrences with Critical severity.
High Specifies the SLA in days for vulnerability occurrences with High severity.
Medium Specifies the SLA in days for vulnerability occurrences with Medium severity.
Low Specifies the SLA in days for vulnerability occurrences with Low severity.
Info Specifies the SLA in days for vulnerability occurrences with Info severity.
Advanced tab
Automatically normalize security metric levels on next security metrics analysis
Note: This option is hidden by default. This option causes Skybox to refactor the security metrics scores so that the distribution of scores across the Business Units is according to the normal distribution. The score is adjusted according to the number of vulnerability occurrences per asset in your organization, which removes the problem of only high scores or only low scores. Note: This action is intended to create a basis for comparison of the security metrics levels. It is only performed once per security metric.
Security Metrics scale
The security metric scale is divided into 3 to 5 levels. Skybox includes default values for mapping the number of critical vulnerability occurrences per asset to a security metric score (and level), but you can change these to suit your organization. Each level includes: • Name: The name of this level • Level Color: The color to represent this level in the

Skybox Vulnerability Control User’s Guide
Skybox version 8.5.600 46
Property Description GUI (using RGB values)
• Value (Upper Bound): The highest number of critical vulnerability occurrences in this level
• Score (Upper Bound): The highest score for this level (from 0-100)
The lowest level in the security metric scale.
The 2nd-lowest level in the security metric scale.
The middle level in the security metric scale.
The 2nd-to-highest level in the security metric scale.
The highest level in the security metric scale.
For the default values of each predefined security metric, see Predefined security metrics (on page 33).
ADDITIONAL CUSTOMIZATION Because security status is determined by various properties, you might need to make additional changes to the security metric scales. For example, both the size of your organization and the number of vulnerability occurrences or missing security bulletins that is acceptable influence the mapping. In some organizations, 2 critical vulnerability occurrences on an asset is unacceptable, while in others 2 critical vulnerability occurrences on an asset is acceptable and 4 or 5 critical vulnerability occurrences on an asset is unacceptable.
For a table of the security metrics properties, see Security Metric properties (on page 44).
For detailed information about the scale values, how the calculation is done, and advanced security metric properties that are not configurable in the GUI, see Modifying security metric properties (on page 203).

Skybox version 8.5.600 47
Chapter 7
You can automate Skybox by setting up the necessary tasks to run on a regular basis (see Using tasks for automation (on page 128)).
You can set up many processes in Skybox to run automatically, including:
› Model updates (on page 141) › Recalculation of the security metrics scores (on page 48) › Notifications of changes to security metrics scores (on page 47) › Reports (documented in the Skybox Reference Guide) › General maintenance of the model (on page 144) (including saving and
loading backup versions)
In this chapter
Security Metric triggers ....................................................... 47
Recalculating the security metrics ......................................... 48
SECURITY METRIC TRIGGERS A Security Metric trigger is a rule that defines the conditions under which new security metric (email) notifications are created. For example, “Notify the owner of the Corporate Services unit whenever the security metrics score of that unit becomes greater than Medium.”
Notifications for security metrics events are created (based on the triggers) when Analysis – Security Metrics tasks are run.
Setting up Security Metric triggers Admins can set up triggers to send email notifications when security metric levels change.
To create a trigger 1 Select Tools > Administrative Tools > Triggers.
2 In the Skybox Admin window, right-click the Triggers node and select New Trigger.
3 In the New Trigger dialog box, select Security Metric as the Trigger Type.
4 Fill in the fields according to the table in the Security Metric trigger properties topic in the Skybox Reference Guide.
5 Click OK.
When Analysis – Security Metrics tasks are run, the triggers are checked, and email notifications are sent according to your definition.
Continuous usage

Skybox Vulnerability Control User’s Guide
Skybox version 8.5.600 48
Note: Triggers can be disabled and re-enabled by right-clicking the trigger.
RECALCULATING THE SECURITY METRICS Security metric scores are sensitive to changes in the model. The following actions might affect security metrics scores:
› Data import or collection › Skybox Vulnerability Dictionary update › Aging (running a Model – Outdated task) › Running an Analysis – Vulnerability Detector task › User changes to the model (for example, deleting, adding, or modifying
vulnerability occurrences or assets)
You can recalculate security metrics scores manually after any of these changes or you can schedule an Analysis – Security Metrics task to run as part of a task sequence after tasks that might affect the security metrics scores. As part of the security metrics analysis task, alerts can be sent to users when the security metric levels change. For additional information about these tasks, see the Security Metrics calculation tasks topic in the Skybox Reference Guide.
The RLI scores for critical vulnerability occurrences increase over time—recalculate the RLI on a regular basis regardless of whether any other changes were made. You can do this manually or by scheduling an Analysis – Security Metrics task to run on a regular basis.

This part explains how to work with the Exposure feature of Skybox Vulnerability Control.
Part II: Exposure

Skybox version 8.5.600 50
Chapter 8
This chapter explains how Exposure works in Skybox.
In this chapter
Introduction to exposure ..................................................... 50
Automated IT security modeling ........................................... 51
Attack simulation and visualization ........................................ 52
Business impact analysis and risk metrics .............................. 53
Regulation compliance ......................................................... 54
Risk exposure management workflow .................................... 54
INTRODUCTION TO EXPOSURE Exposure is a main feature of Skybox Vulnerability Control. You can see overview information in the Exposure summary page.
The exposure-related information displayed on this page includes the direct vulnerability occurrences (vulnerability occurrences that are 1 or 2 steps away from any Threat Origin) and the Threat Origins that pose the most danger to your organization.
Overview of the Exposure feature

Chapter 8 Overview of the Exposure feature
Skybox version 8.5.600 51
The page displays information about critical exposure in your organization; you can drill down to get additional information. The information displayed on this page includes the direct vulnerability occurrences (vulnerability occurrences that are 1 or 2 steps away from any Threat Origin) and the Threat Origins that pose the most danger to your organization. You can view additional information about Threat Origin and Business Asset Groups using the tabs at the top of the Summary page.
AUTOMATED IT SECURITY MODELING To identify, quantify, and mitigate security exposure, Skybox Vulnerability Control builds a model—a virtual map representing the security risk profile of your organization. The model consists of:
› Threat profiles › Network access information › Vulnerability occurrence data › Business Asset Group classification
All 4 components are required to analyze business impacts completely and accurately.
Skybox Vulnerability Control uses the open collection architecture of the Skybox platform. Information is collected by scheduling regular data collection tasks that continuously provide the model with up-to-date information about changes to the network infrastructure.
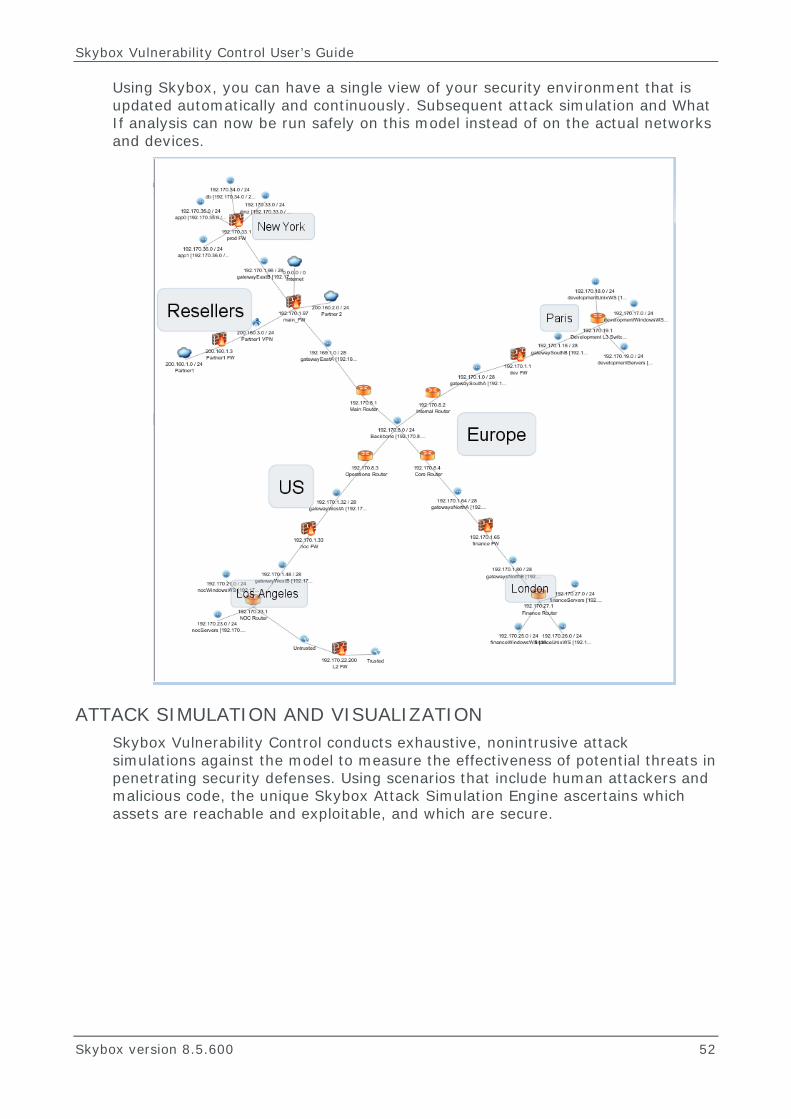
Skybox Vulnerability Control User’s Guide
Skybox version 8.5.600 52
Using Skybox, you can have a single view of your security environment that is updated automatically and continuously. Subsequent attack simulation and What If analysis can now be run safely on this model instead of on the actual networks and devices.
ATTACK SIMULATION AND VISUALIZATION Skybox Vulnerability Control conducts exhaustive, nonintrusive attack simulations against the model to measure the effectiveness of potential threats in penetrating security defenses. Using scenarios that include human attackers and malicious code, the unique Skybox Attack Simulation Engine ascertains which assets are reachable and exploitable, and which are secure.

Chapter 8 Overview of the Exposure feature
Skybox version 8.5.600 53
An Attack Map provides a visual, step-by-step analysis of attacks, based on simulations of possible attack paths. Skybox Vulnerability Control graphically illustrates the multi-step path an attacker can take, identifying the specific vulnerability occurrences exploited and the network traversed for each exploitable path.
This analysis enables IT departments to identify the top few percent of exploitable vulnerability occurrences that make up the primary risks to critical assets. Working from this analysis, security and IT professionals can focus on critical exposures proactively, as soon as they appear and reduce the time to remediation from weeks to hours.
BUSINESS IMPACT ANALYSIS AND RISK METRICS Based on the results of attack simulation, Skybox Vulnerability Control analyzes the potential business impacts on assets in terms of potential breaches in confidentiality, integrity, and availability (CIA). Attack simulation computes the likelihood of attacks. Skybox Vulnerability Control then calculates business and compliance risks by analyzing asset values and attack probabilities. To provide the most useful analysis, you can import business-impact rules and regulation compliance classifications from asset management databases or other predefined sources.

Skybox Vulnerability Control User’s Guide
Skybox version 8.5.600 54
Risk metrics are calculated for every Business Asset Group. Metrics are consolidated for individual Business Units and for the organization overall. Managers can view the results of the risk analysis in reports built on flexible report templates. Working from these reports, they can select the most effective remediation processes to reduce critical risk exposure.
REGULATION COMPLIANCE Security professionals can classify Business Asset Groups according to specific regulations to continuously monitor the risks facing regulated assets. Your organization can choose from predefined Regulation templates, including SOX, HIPAA, FISMA, FIPS 199/200, and NIST. Compliance officers or risk managers can also specify Regulation templates for their own industry. Using these classifications, Skybox Vulnerability Control can analyze compliance risks and generate executive and auditor reports.
RISK EXPOSURE MANAGEMENT WORKFLOW Before you can use Skybox to manage risk exposure, you must build a model (see Building the model (on page 56)).

Chapter 8 Overview of the Exposure feature
Skybox version 8.5.600 55
To manage risk exposure 1 Simulate attacks (see page 99) by running an Analysis – Exposure task (for
example, the predefined Analyze – Simulate Attacks task). This task simulates all scenarios for attacking your organization’s network from the specified Threat Origins and uses this information to compute risk levels and possible attacks. The derived data is stored in the Skybox model.
2 Review the results of the simulation by looking at the Exposure Summary page.
3 Use the summary information and the Attack Explorer to identify the cause or causes of the most critical risk (see page 101) to your organization.
4 Reduce your risk (see page 108) by mitigating critical vulnerability occurrences and faulty access.
5 Generate reports as necessary (see Reports (on page 134)). For example, you can generate reports to:
• Show the current risk on all or specific parts of your organization
• List the vulnerability occurrences on a specific scope, with or without detailed information and suggested solutions
• List tickets issued for mitigation
• List a specific set of tickets (for example, those that are open but have passed their due date)
Implement this process after the model is built and whenever significant updates are made to the model.
Note: Risk Exposure Analysis is performed in the Exposure workspace and the Exposure tree.

Skybox version 8.5.600 56
Chapter 9
In this chapter, it is assumed that your organizational model already includes the following:
› Assets and vulnerability occurrences (for more information, see Updating the Vulnerability Dictionary (on page 18) and Obtaining asset and vulnerability occurrence data (see page 19))
› An organizational hierarchy of Business Units and Business Asset Groups (for more information, see Adding organizational hierarchy (see page 25))
This chapter focuses on the additional information that Exposure requires, including networks, gateway devices, clouds, and locations.
BUILDING THE NETWORK TOPOLOGY The network topology consists of networks and the gateways that connect them.
To build the network topology, create and run tasks for collecting and importing data from the network devices that you specified in Preparing a list of network devices (on page 237).
To build the network topology
1 Click .
2 In the Operational Console tree, select the Tasks node.
3 For each set of devices that you want to import, create a task to import their configuration:
Click .
— For information about importing device data offline, see the File import tasks chapter in the Skybox Reference Guide.
— For information about device-specific online collection tasks, see the Tasks part of the Skybox Reference Guide.
4 After you run each task, check that it succeeded:
a. In the Operational Console, open Tasks > All Tasks.
b. In the Table pane, locate the task and check that the value of the task’s Exit Code is Success.
If a task fails, check the Messages tab of the Details pane for information about what went wrong.
5 Verify that the import is correct and complete:
a. In the Model tree select the correct node for the imported devices.
Building the model

Chapter 9 Building the model
Skybox version 8.5.600 57
b. To confirm that the import succeeded:
— For a new device (a device imported for the 1st time), check whether the imported device is now part of the list in the Table pane.
— For an existing device, check that the modification time of the device is the time of the current import, not that of a previous import.
c. Check that the network interfaces were imported correctly: right-click the device in the Table pane and select Firewall Map. You can see all the network interfaces and the networks to which they are connected.
Close the map when you are finished.
d. If the device has routing rules:
1. Right-click the device and select Routing Rules. Check that the routing rules were imported (that is, Skybox contains a list of routing rules for this device.)
2. Use a sample routing rule to confirm that it was imported correctly: take a routing rule that exists on the device and try to find its logical match in the routing rules in Skybox.
Note: A correctly imported set of routing rules (or access rules) logically matches the set of rules on the device. However, some individual rules might not be modeled in the same way that they are in the device.
e. If the device has access rules:
1. Right-click the device and select Access Rules. Confirm that the access rules were imported.
2. Take an access rule that exists on the device and try to find its logical match in the access rules in Skybox.
f. On the toolbar, click . Make sure that the imported device is visible and that it is correctly connected.

Skybox Vulnerability Control User’s Guide
Skybox version 8.5.600 58
6 (Recommended—especially for large networks) Create locations (see page 58). Locations group networks and simplify how you see the model in Skybox.
Locations A large organization can include hundreds of networks. Locations are container entities that create a hierarchic structure for networks in your organization, to make it easier to navigate and view the network structure.
A location can include networks and sublocations. For example, a Europe location might contain specific networks and London and Paris locations. These locations, in turn, might each include sublocations or networks.
Define locations manually in the Model workspace and then add networks or additional locations to them.
Note: You can create locations using Skybox’s Integration XML (iXML). For information about iXML, see the Integration part of the Skybox Developer’s Guide.
If you are working with a large network, define a location for each physical location that you discover and add to it the networks discovered in that network segment. A location can be a very broad grouping (for example, Europe) or a much more local grouping (for example, IT Room or 2nd Floor).
For a gateway device to be contained in a location, all its networks must be in that location. If even 1 network belongs to another location (or is not associated with any location), the gateway device appears on the map even when all locations are collapsed. We recommend that you include gateway devices that are internal to a location as part of the location; do not include gateway devices that connect 2 or more locations in a location.
To add a location 1 In the tree, expand the Locations & Networks node and locate the desired
parent node for the new location.
If the new location belongs at the top level, select the Locations & Networks node as the parent node.

Chapter 9 Building the model
Skybox version 8.5.600 59
2 Right-click the parent node and select New > Location.
3 Type a Location Name for the new location.
Location names must be unique throughout the model. The characters “/” and “\” cannot be used as part of a location name.
4 (Optional) Click the Browse button next to the Members field to specify the location’s members.
Note: If you define the location before you discover the topology, you cannot select members for the location.
5 (For a specific Skybox user to receive notifications about entities in this location) Click the Browse button next to the Owner field to specify the location’s owner from all authorized Skybox users.

Skybox Vulnerability Control User’s Guide
Skybox version 8.5.600 60
To add an existing network or location to a location 1 In the tree, right-click the network or location to add to an existing location
and select Move to Location or Attach to Location.
2 Do either of the following:
• Select the parent location for the selected entity and click OK.
• To make this entity part of a new location:
a. Select the position in the tree where you want the new (parent) Business Unit.
b. In the New field (which contains a list of parent types), click Location.
c. In the New Location dialog box, type a name and other relevant information.
The entity that you are attaching becomes a child of the new parent location; you can add other locations and networks using the Members field.
Note: Repeat steps b and c to create a hierarchy of locations. The entity that you attach becomes a child of the last selected location in the tree.
For example, you have a network named Operations Center and it belongs in Miami, but there is no location named Miami. The 1st time that you click New, create a location named US. Inside the new US location, create a location named Florida and inside the new Florida location, a location named Miami. The Operations Center network becomes a member of the Miami location.
d. Click OK.
The new location is created in the selected position in the tree and the selected entity becomes a child node, as do any members selected in step d.

Chapter 9 Building the model
Skybox version 8.5.600 61
Clouds Clouds model areas missing in the model so that you can analyze access between the surrounding areas or to and from the missing areas.
Clouds are special network objects that represent networks that are connected to the model but are not modeled completely (for example, the internet, partners, or parts of your organization’s network that are not modeled). Any network over which your organization has no control or for which it cannot obtain device configurations and scan data should be modeled as a cloud.
There are 2 types of clouds:
› Perimeter Clouds: Perimeter Clouds (commonly referred to as clouds) represent networks or areas in your network at the perimeter of the network (for example, partner networks and the internet).
One or more network interfaces can be connected to the same Perimeter Cloud, but Perimeter Clouds don’t include routing abilities—2 devices connected to the same Perimeter Cloud are connected in the Network Map but access queries (using the Access Analyzer) are blocked. Access queries that include a Perimeter Cloud always end in the cloud.
› Connecting Clouds: Connecting Clouds represent missing areas in the middle of your organization’s network. These might be parts of your network for which you cannot obtain data or Multiprotocol Label Switching (MPLS) networks between various parts of your organization’s network.
Unlike Perimeter Clouds, Connecting Clouds have routing abilities. Two or more network interfaces can be connected to the same cloud—they are connected in the Network Map (via the Connecting Cloud), and access queries work between the devices connected to the Connecting Cloud.
Perimeter Clouds (on page 61) are usually user-defined, but can be created automatically as part of model validation.
Connecting Clouds (on page 63) are always user-defined.
For information about cloud properties, see the Clouds section in the Skybox Reference Guide.
Creating and editing Perimeter Clouds You can create Perimeter Clouds manually or automatically.
Creating Perimeter Clouds manually The easiest way to create a Perimeter Cloud is to define an existing network as a Perimeter Cloud. However, this is not sufficient when the Perimeter Cloud represents an area outside the boundaries of your organization’s network.
When you create a Perimeter Cloud that is not based on an existing network, include and exclude IP addresses for the network that you are configuring. The following are some examples of IP addresses to include or exclude:
› If you are configuring an internet cloud, exclude the IANA reserved addresses (click Private in the Network Properties dialog box).
› If you are configuring a public network, you must exclude public IP addresses used by your organization. Failure to do so might produce erroneous results in access analysis queries due to spoofed access.

Skybox Vulnerability Control User’s Guide
Skybox version 8.5.600 62
If you know the specific IP addresses for the Perimeter Cloud, configure them in the Cloud Addresses tab.
To define a network as a Perimeter Cloud 1 In the Model tree, expand the Locations & Networks node and locate the
network that you wish to define as a cloud.
2 Right-click the network and select Define Network as Cloud.
Note: If the cloud is connected to multiple networks, set the IP Address and Mask fields to 0.0.0.0 / 0.0.0.0.
To create a Perimeter Cloud 1 In the Model tree, expand the Locations & Networks node and locate the
parent node for the cloud.
If the cloud belongs at the top level, the parent node is the Locations & Networks node.
2 Right-click the parent node and select New > Perimeter Cloud.
• For information about the properties of Perimeter Clouds, see the Perimeter Clouds topic in the Skybox Reference Guide.
3 In the New Perimeter Cloud dialog box:
a. Type a Name for the cloud.
b. Set the IP Address and Mask fields to 0.0.0.0 / 0.0.0.0.
This enables the cloud to be connected to network interfaces of multiple devices. (A cloud’s IP address has no influence on access analysis; use the Cloud Addresses tab to define the scope of the cloud.)
c. Specify the scope of the cloud using the 2 panes in the Cloud Addresses tab:
— Include: A list of IP address ranges to include in the scope of the cloud.
— Exclude: A list of IP addresses to be excluded from the scope of the cloud specified in the Include pane.
d. In the Routable from Cloud tab, define the IP address ranges that are permitted as destination addresses when access is checked from this cloud. These destination address ranges are used for all queries starting at the cloud in attack simulation and the Access Analyzer.
— Include: A list of IP address ranges to use as destination addresses from this cloud.
— Exclude: A list of IP address ranges to be excluded from the destination address ranges.
e. Click OK.
Creating Perimeter Clouds automatically Creating Perimeter Clouds automatically should only be done after the model is as complete as possible, as a step in model validation. For information, see Creating Perimeter Clouds automatically (on page 79).
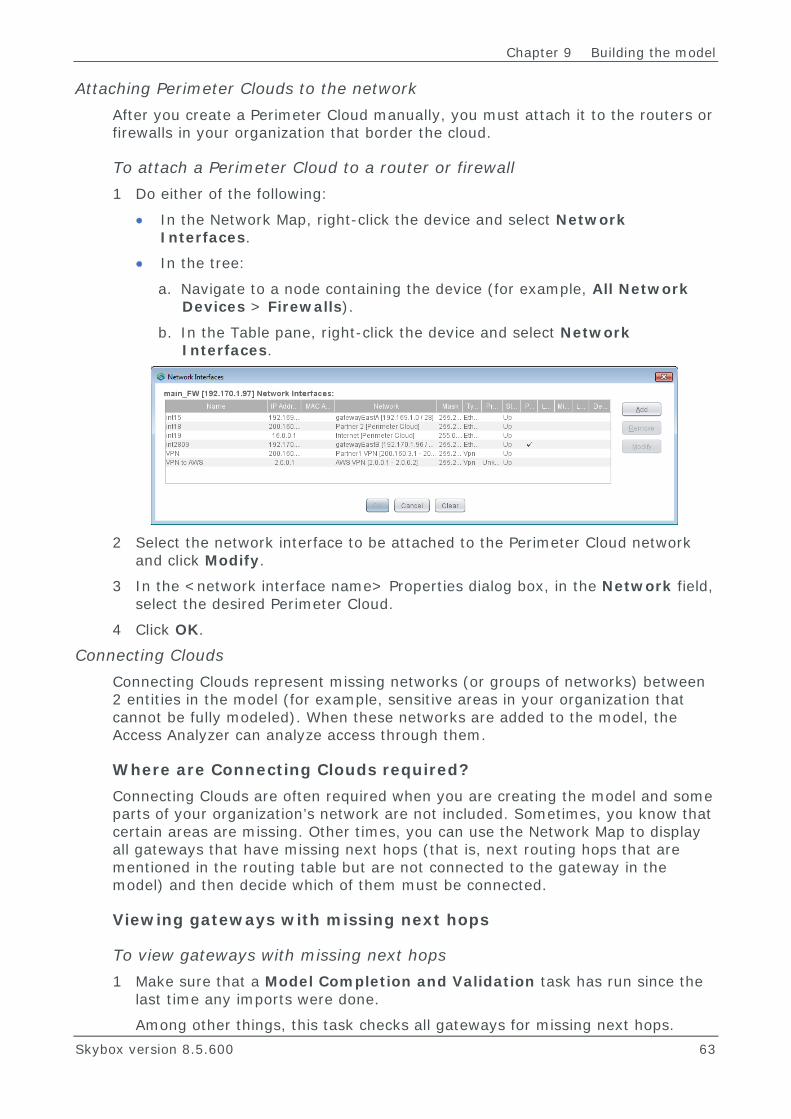
Chapter 9 Building the model
Skybox version 8.5.600 63
Attaching Perimeter Clouds to the network After you create a Perimeter Cloud manually, you must attach it to the routers or firewalls in your organization that border the cloud.
To attach a Perimeter Cloud to a router or firewall 1 Do either of the following:
• In the Network Map, right-click the device and select Network Interfaces.
• In the tree:
a. Navigate to a node containing the device (for example, All Network Devices > Firewalls).
b. In the Table pane, right-click the device and select Network Interfaces.
2 Select the network interface to be attached to the Perimeter Cloud network
and click Modify.
3 In the <network interface name> Properties dialog box, in the Network field, select the desired Perimeter Cloud.
4 Click OK.
Connecting Clouds Connecting Clouds represent missing networks (or groups of networks) between 2 entities in the model (for example, sensitive areas in your organization that cannot be fully modeled). When these networks are added to the model, the Access Analyzer can analyze access through them.
Where are Connecting Clouds required? Connecting Clouds are often required when you are creating the model and some parts of your organization’s network are not included. Sometimes, you know that certain areas are missing. Other times, you can use the Network Map to display all gateways that have missing next hops (that is, next routing hops that are mentioned in the routing table but are not connected to the gateway in the model) and then decide which of them must be connected.
Viewing gateways with missing next hops
To view gateways with missing next hops 1 Make sure that a Model Completion and Validation task has run since the
last time any imports were done.
Among other things, this task checks all gateways for missing next hops.

Skybox Vulnerability Control User’s Guide
Skybox version 8.5.600 64
2 Open the Network Map. If necessary, open the map that displays the part of the model on which you want to focus.
3 In the Highlight pane, select Has Missing Next Hops.
All gateways with missing next hops are highlighted. When you mouse over a gateway, you can see a list of its missing next hops.
Creating Connecting Clouds The easiest way to create a Connecting Cloud is to select 2 (or more) gateways and networks in the map that should be connected and then create a Connecting Cloud from them. Or you can select 2 gateways, networks, or network interfaces in the Table pane and create the Connecting Cloud from there.
To create a Connecting Cloud 1 Select the gateways or networks in the map that are missing connections
between them.
2 Right-click and select Connect via Cloud.
• For information about the properties of Connecting Clouds, see the Connecting Clouds topic in the Skybox Reference Guide.
3 In the Connect Networks via Cloud wizard, type a Name for the new cloud and click Next.
4 In the top pane, review the list of gateways and networks.
• If every item in the list includes a network, click Finish to create the cloud from the specified networks.
• Otherwise (if there are gateways with unspecified networks): for each such gateway, select the network interface of the network to use to connect to the cloud.
The following fields might be helpful in deciding which network interface to use:
— The Missing Neighbors field shows which of the network interfaces has missing neighbors.
— The Potential Match field specifies whether the network interface is a good match for the new connection.
When you select a network interface for the gateway, the network to which that network interface is connected appears next to the gateway in the top pane.
5 Repeat step 4 for each gateway that has unspecified networks.
6 Click Finish to create the cloud from the specified networks.
Adding additional connections You can add gateways and networks to an existing cloud.

Chapter 9 Building the model
Skybox version 8.5.600 65
To add entities to a Connecting Cloud 1 Select the desired gateways and networks; right-click and select Connect via
Cloud.
2 In the Connect Networks via Cloud wizard:
a. Select Existing Connecting Cloud, select the desired cloud, and click Next.
b. In the top pane, review the list of gateways and networks.
c. For each gateway with unspecified networks, select the network interface of the network to use to connect to the cloud.
The following fields might be helpful in deciding which network interface to use:
— Missing Neighbors shows which of the network interfaces has missing neighbors.
— Potential Match specifies whether the network interface is a good match for the new connection.
When you select a network interface for the gateway, the network to which that network interface is connected appears next to the gateway in the top pane.
d. Repeat steps a-c until every item in the list includes a network.
e. Click Finish to add the selected entities to the selected cloud.

Skybox version 8.5.600 66
Chapter 10
Model Validation is a process to verify that the model is complete and correct.
In this chapter
Overview of validating the model .......................................... 66
Best practices for model validation ........................................ 68
Model validation tasks and analyses ...................................... 69
Access Analyzer test queries ................................................ 76
Network Map visualization .................................................... 77
Task error messages ........................................................... 78
Item counts ....................................................................... 79
Creating Perimeter Clouds automatically ................................ 79
Validating the setup for attack simulation .............................. 79
OVERVIEW OF VALIDATING THE MODEL Model Validation is a process to verify that the model meets the following 2 criteria:
› Completeness: There are no missing elements in the model. › Correctness: The model reflects the actual network (for example: the
topology was correctly interpreted; external clouds are connected to the correct interfaces).
Inconsistencies can occur because data is collected using different methods. For example, routing rules on a gateway might point to a non-existent router, indicating that data collection was incomplete; you must add the missing device to the model.
If the model is not accurate, performance, accuracy, and usability suffer. An invalid model causes accuracy issues in the following Skybox analyses:
› Access Analyzer › Access Policy Analysis › Network Map › Access Compliance › Path Analysis (in Change Manager) › Attack Simulation (in Vulnerability Control)
Validate the model:
Validating the model
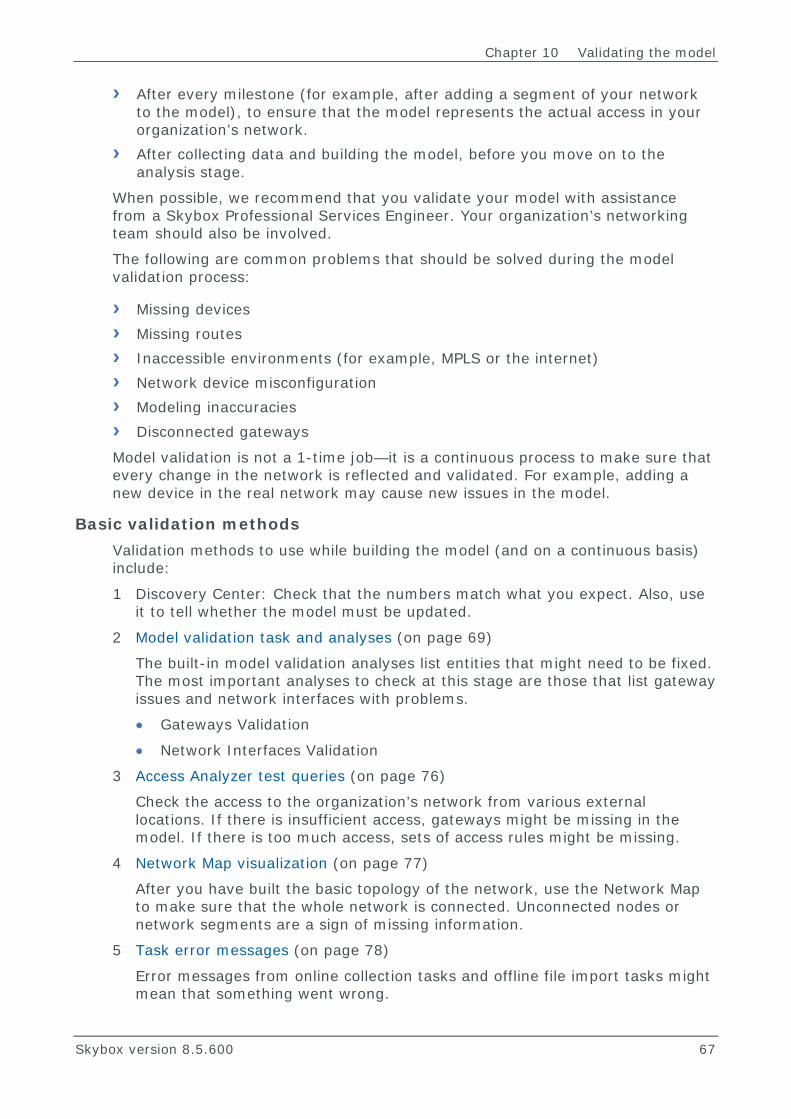
Chapter 10 Validating the model
Skybox version 8.5.600 67
› After every milestone (for example, after adding a segment of your network to the model), to ensure that the model represents the actual access in your organization’s network.
› After collecting data and building the model, before you move on to the analysis stage.
When possible, we recommend that you validate your model with assistance from a Skybox Professional Services Engineer. Your organization’s networking team should also be involved.
The following are common problems that should be solved during the model validation process:
› Missing devices › Missing routes › Inaccessible environments (for example, MPLS or the internet) › Network device misconfiguration › Modeling inaccuracies › Disconnected gateways
Model validation is not a 1-time job—it is a continuous process to make sure that every change in the network is reflected and validated. For example, adding a new device in the real network may cause new issues in the model.
Basic validation methods Validation methods to use while building the model (and on a continuous basis) include:
1 Discovery Center: Check that the numbers match what you expect. Also, use it to tell whether the model must be updated.
2 Model validation task and analyses (on page 69)
The built-in model validation analyses list entities that might need to be fixed. The most important analyses to check at this stage are those that list gateway issues and network interfaces with problems.
• Gateways Validation
• Network Interfaces Validation
3 Access Analyzer test queries (on page 76)
Check the access to the organization’s network from various external locations. If there is insufficient access, gateways might be missing in the model. If there is too much access, sets of access rules might be missing.
4 Network Map visualization (on page 77)
After you have built the basic topology of the network, use the Network Map to make sure that the whole network is connected. Unconnected nodes or network segments are a sign of missing information.
5 Task error messages (on page 78)
Error messages from online collection tasks and offline file import tasks might mean that something went wrong.

Skybox Vulnerability Control User’s Guide
Skybox version 8.5.600 68
6 Item counts (on page 79)
Check that the number of assets added to the model is what you expected, and that the element names and types look right.
These methods are explained in more detail in the following sections.
BEST PRACTICES FOR MODEL VALIDATION The following are suggested best practices in the model validation process:
1 Inventory comparison: Compare the model’s assets and networks with information from other systems, including asset management systems, configuration management systems, and IP Address Management (IPAM) systems.
2 Use networking resources: People that know the network well and can identify issues quickly.
3 Concentrate on completing the model before checking the model’s accuracy. Tests with Access Analyzer can work, but only after having all the network devices in the model. An incomplete model leads to inaccuracy.
4 Complete the model as much as you can before you launch a Model – Completion and Validation task that includes actions that change the model (for example, converting perimeter networks to clouds).
5 Look at missing neighbors of network interfaces to find missing devices in the model before looking at other issues.
Identify the missing neighbors that are out of your network. This can be done by looking at their IP addresses and comparing them to the internal IP addresses or IP address ranges that are used in your organization. An IP address that is out of the internal ranges might indicate 3rd-party connections, MPLS networks managed by external providers, or that the missing device is managed by an ISP (for internet connections).
Such missing neighbors can be identified and converted to Perimeter Clouds (internet or 3rd party) or assigned to Connecting Clouds (MPLS).
6 Use naming conventions: Skybox uses specific naming conventions for clouds. When Skybox identifies a cloud or a network, we recommend that you change its name to match the naming conventions of your organization. This enables you to distinguish clouds in the model that were recently created by Skybox (which require review and validation) from those that were created previously and were already validated.
7 Use Mark as viewed to ignore model validation issues that were acknowledged.
8 Create analyses: Create new model analyses to split the information and get a better understanding of what is happening. For example, you could filter the list of duplicate network interfaces (or any other specific model validation issue) by creating an analysis of duplicate network interfaces that were not marked as viewed.4

Chapter 10 Validating the model
Skybox version 8.5.600 69
9 Use the Skybox model to gain knowledge of the network/device. Use the routing table or addresses behind interfaces, to identify networks that are behind a specific interface and to understand the context of the device. For example, an interface with ABI that includes many IP addresses but does not include any internal IP addresses is configured to be the default gateway interface. This may indicate that the interface is connected to the internet.
10 Most organizations have defined processes to decommission network devices or to install new devices in their network. Make sure that, as part of this process, the team responsible for maintaining Skybox is aware of network changes and applies them to the Skybox model (for example, delete decommissioned devices and associated tasks, add a task to collect newly installed devices).
11 After finishing the model validation during deployment, we strongly recommended that you review and remediate new issues at least once a week (depending on the size of the model). There are analyses for new assets and interfaces in the model that should be reviewed.
MODEL VALIDATION TASKS AND ANALYSES The built-in model validation analyses list entities that might need to be fixed. The most important analyses to check at this stage are those that list gateway issues and network interfaces with problems.
The Model Validation task creates model validation issues on 2 levels: gateways and network interfaces. Model validation issues that are created by the Model Validation task, are listed under Model Analyses > Model Validation.
Validating gateways The following sections explain how to validate gateways in the model.
Disconnected gateways
Diagnosis Standalone devices that are not connected to any other devices in the model appear as ‘islands’ in the Network Map.
If no network interfaces of a device are connected to any other network device, it is a disconnected gateway.
Unless the gateway has no routing rules (which can be identified using the Gateways with no Routing Rules analysis), at least one network interface of a disconnected gateway has a missing neighbor.
In most cases, disconnected gateways are addressed when fixing other issues (using the Network Interfaces Validation analyses).
Possible root causes and their solutions
Root Cause Solution
Missing device in the model (next hop)
Collect or import the missing neighbor.
Device not mapped to Connecting Cloud
Map the relevant network interface to a Connecting Cloud.

Skybox Vulnerability Control User’s Guide
Skybox version 8.5.600 70
Root Cause Solution
Decommissioned device Delete the gateway from the model. Add the gateway to the collection task’s exclude list.
Overlapping networks • Fix the device configuration – configure the network interface subnet mask, and re-collect or re-import the device to Skybox.
• Assign the network interface in Skybox to the correct network (affects the Skybox model only).
Firewalls with no access rules
Diagnosis There are assets of type Firewall in the Skybox model that have no access rules—the list of access rules is empty. A normal firewall in a production network should have at least 1 rule (explicit Deny rule).
Possible root causes and their solutions
Root Cause Solution
Import or collection issue Check the import or collection task messages for errors. Make sure that the access rules are in the configuration in Skybox.
Firewall has no access rules (for example, a new firewall or firewall not configured)
Check with the firewall administrator if this is correct. Can be ignored if acknowledged by the firewall administrator.
Gateways with no routing rules
Diagnosis There are network devices in the Skybox model with no routing rules—the list of routing rules is empty. Normal network devices in production with routing abilities should have at least 1 rule. Gateways with no routing rules cause speculation (inaccurate results and poor performance) in access analysis and inaccurate Access Compliance results.
Possible root causes and their solutions
Root Cause Solution
Collection issue The device was collected by a Skybox Collector using an online collection task
• Check the collection task messages for errors. Check the configuration in Skybox and make sure that the routing rules file is there.
• Check the Routing Table Collection command in the task’s Advanced tab.
• Check that you have authorization to run the command with the task’s credentials.
After fixing, re-collect the device.
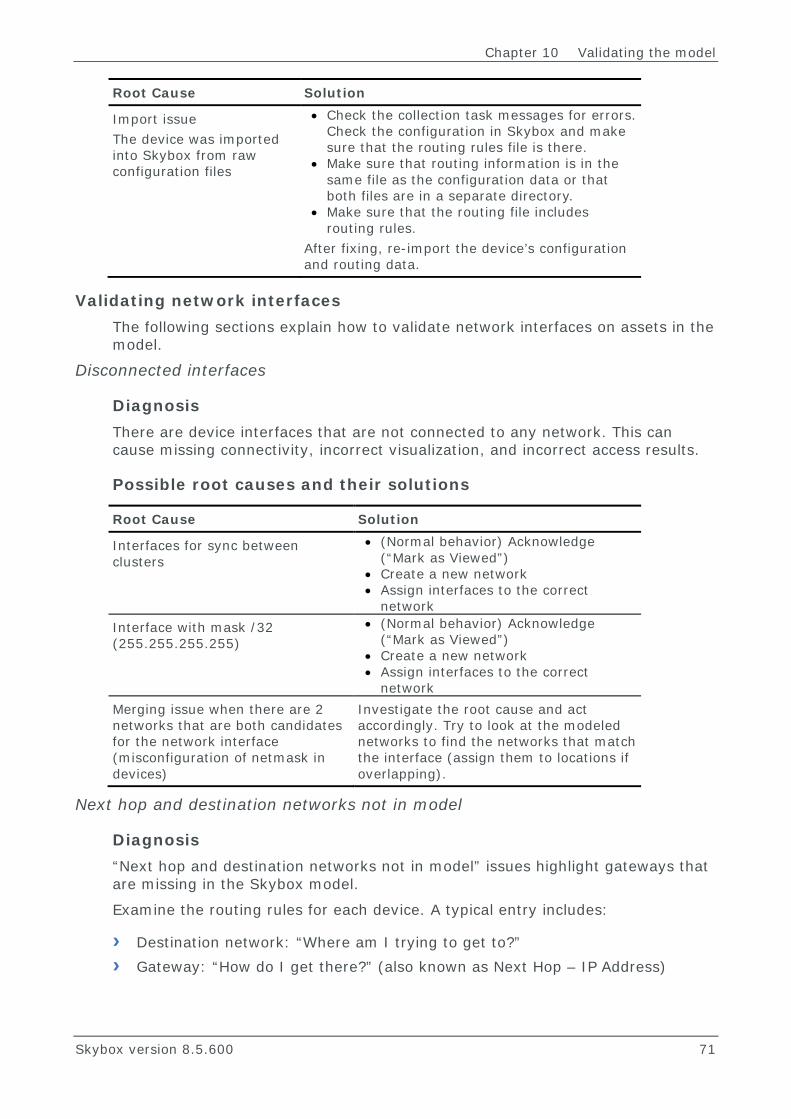
Chapter 10 Validating the model
Skybox version 8.5.600 71
Root Cause Solution
Import issue The device was imported into Skybox from raw configuration files
• Check the collection task messages for errors. Check the configuration in Skybox and make sure that the routing rules file is there.
• Make sure that routing information is in the same file as the configuration data or that both files are in a separate directory.
• Make sure that the routing file includes routing rules.
After fixing, re-import the device’s configuration and routing data.
Validating network interfaces The following sections explain how to validate network interfaces on assets in the model.
Disconnected interfaces
Diagnosis There are device interfaces that are not connected to any network. This can cause missing connectivity, incorrect visualization, and incorrect access results.
Possible root causes and their solutions
Root Cause Solution
Interfaces for sync between clusters
• (Normal behavior) Acknowledge (“Mark as Viewed”)
• Create a new network • Assign interfaces to the correct
network Interface with mask /32 (255.255.255.255)
• (Normal behavior) Acknowledge (“Mark as Viewed”)
• Create a new network • Assign interfaces to the correct
network Merging issue when there are 2 networks that are both candidates for the network interface (misconfiguration of netmask in devices)
Investigate the root cause and act accordingly. Try to look at the modeled networks to find the networks that match the interface (assign them to locations if overlapping).
Next hop and destination networks not in model
Diagnosis “Next hop and destination networks not in model” issues highlight gateways that are missing in the Skybox model.
Examine the routing rules for each device. A typical entry includes:
› Destination network: “Where am I trying to get to?” › Gateway: “How do I get there?” (also known as Next Hop – IP Address)
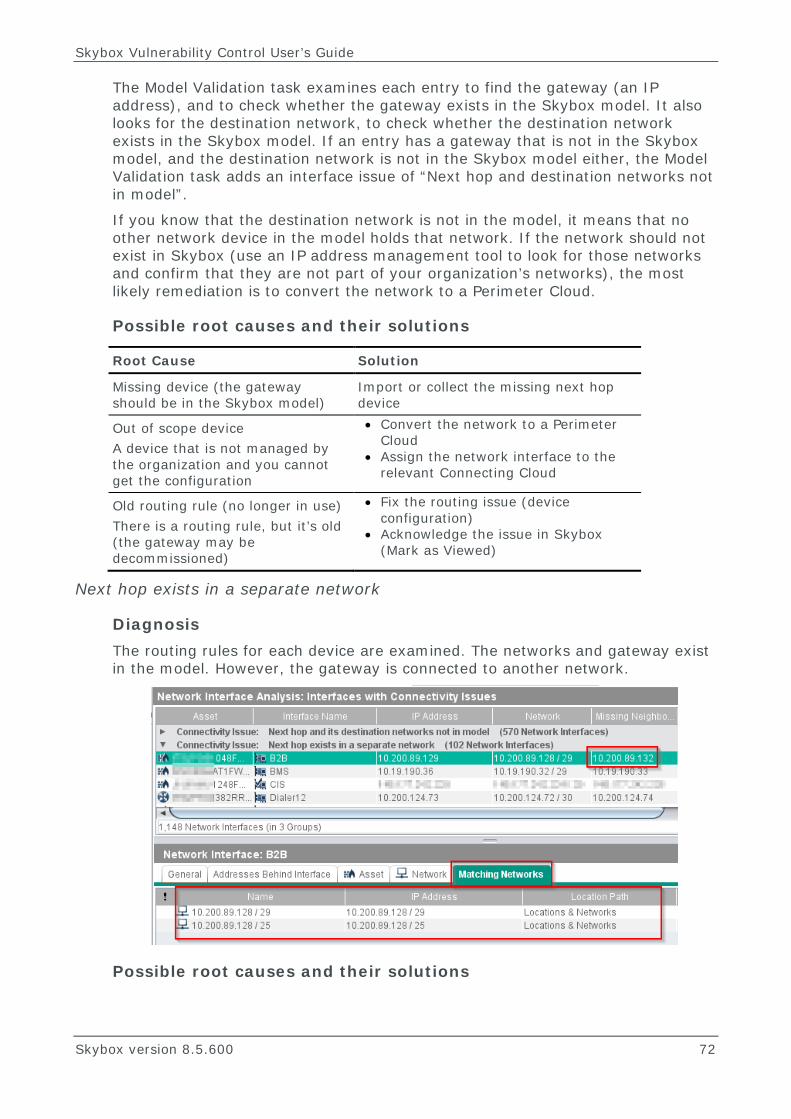
Skybox Vulnerability Control User’s Guide
Skybox version 8.5.600 72
The Model Validation task examines each entry to find the gateway (an IP address), and to check whether the gateway exists in the Skybox model. It also looks for the destination network, to check whether the destination network exists in the Skybox model. If an entry has a gateway that is not in the Skybox model, and the destination network is not in the Skybox model either, the Model Validation task adds an interface issue of “Next hop and destination networks not in model”.
If you know that the destination network is not in the model, it means that no other network device in the model holds that network. If the network should not exist in Skybox (use an IP address management tool to look for those networks and confirm that they are not part of your organization’s networks), the most likely remediation is to convert the network to a Perimeter Cloud.
Possible root causes and their solutions
Root Cause Solution
Missing device (the gateway should be in the Skybox model)
Import or collect the missing next hop device
Out of scope device A device that is not managed by the organization and you cannot get the configuration
• Convert the network to a Perimeter Cloud
• Assign the network interface to the relevant Connecting Cloud
Old routing rule (no longer in use) There is a routing rule, but it’s old (the gateway may be decommissioned)
• Fix the routing issue (device configuration)
• Acknowledge the issue in Skybox (Mark as Viewed)
Next hop exists in a separate network
Diagnosis The routing rules for each device are examined. The networks and gateway exist in the model. However, the gateway is connected to another network.
Possible root causes and their solutions

Chapter 10 Validating the model
Skybox version 8.5.600 73
Root Cause Solution
Network devices can be misconfigured (different netmask assignments) and still work in real life
Fix the network device’s configuration (assign the same netmask for interfaces). Determine which network contains the gateway and then open the interface properties and assign the correct network (this is applicable for Skybox only and has no impact on the network device).
Potential matching network for interface assigned to cloud
Diagnosis An interface is connected to a cloud but has a missing next hop that appears in another network of the model.
Possible root causes and their solutions
Root Cause Solution
The Model Validation task created the cloud before importing the missing next hop
Assign the interface to the regular network instead of the cloud.
The interface is locked to the cloud Unlock the interface from the cloud. Assign the interface to the regular network.

Skybox Vulnerability Control User’s Guide
Skybox version 8.5.600 74
VPN or tunnel end point is missing
Diagnosis In a VPN or tunnel interface with peer-to-peer configuration, 1 peer exists in the Skybox model as part of the asset or interface that has the issue, but the other peer doesn’t exist in the Skybox model.
This issue should be treated as a “Missing next hop” issue. A missing peer points to a missing interface on a device that is missing in the model.
Possible root causes and their solutions
Root Cause Solution
Missing device The missing peer is part of an in-scope network device that does not exist in the Skybox model
Import or collect the missing device
Out of scope device The missing peer is part of a network device that does not exist in the Skybox model and the device is out of scope
Convert the device to a Perimeter Cloud

Chapter 10 Validating the model
Skybox version 8.5.600 75
Root Cause Solution
Old VPN or tunnel configuration The VPN or tunnel is configured on the device, but the other peer doesn’t exist as it was decommissioned
Fix the device configuration Delete the network assignment from the network interface and lock it Acknowledge (Mark as Viewed)
Duplicated network device
Diagnosis There is an interface that is part of a duplicate network device. The Model Validation task checks duplication of devices based on name and network interfaces. If 2 (or more) devices have the same name and the same interface configurations, interfaces that are part of the duplicate devices have this issue.
Possible root causes and their solutions
Root Cause Solution
Merging issue Skybox didn’t merge the devices
Consult with Skybox Support. You must identify differences between the devices. Merge manually.
Duplicated IP address in network
Diagnosis There are 2 or more interfaces with the same IP addresses in the same network entity. In normal network behavior, there should be no duplicate IP addresses in the same network (except for virtual addresses and interfaces). An organization can have overlapping IP addresses, but these should be configured in the Skybox model as 2 different networks, each in a different location.
Possible root causes and their solutions
Root Cause Solution
An old network device An old interface entry in Skybox
Delete the asset from the model. Exclude the asset from the task, using the collection task’s exclude list.
A merging issue in assets with the same interface that creates the same interface twice (or more) in the same network
Consult with Skybox PS / Support. You must identify differences between the devices. Merge manually.
Overlapping networks Overlapping networks exist in the real network, but their locations were not specified
Create locations and move the overlapping networks to different locations. Assign each network interface to a different network entity (in a different location).

Skybox Vulnerability Control User’s Guide
Skybox version 8.5.600 76
Overlapping networks
Diagnosis There are 2 (or more) overlapping networks, meaning that 1 network is covered by another. This causes connectivity issues (2 devices that should be connected are not).
Possible root causes and remediation
Root Cause Solution
Network devices can be misconfigured (different netmask assignments)
Determine which network contains the gateway Fix the network device configuration (assigning the same netmask for interfaces) Open the interface properties and assign the correct network (applicable in Skybox only – has no impact on the network device)
ACCESS ANALYZER TEST QUERIES Check the access to the organization’s network from various external locations. If there is insufficient access, gateways or network segments might be missing in the model. If there is too much access, sets of access rules might be missing.
This is done by creating ‘real world’ queries and results (5 to 10 samples) in the Access Analyzer.
Test queries can include:
› A spectrum of test types › Internet inbound › User environment to internet › User environment to user environment › Customer and network specific

Chapter 10 Validating the model
Skybox version 8.5.600 77
Start with simple queries and progress to more complex.
NETWORK MAP VISUALIZATION Skybox creates a map of all the interconnections in your network named the Network Map. After you have built the basic topology of the network, use the Network Map to make sure that the whole network is connected. Unconnected nodes or network segments are a sign of missing information. Try to search for ‘islands’—parts of the networks that are disconnected.
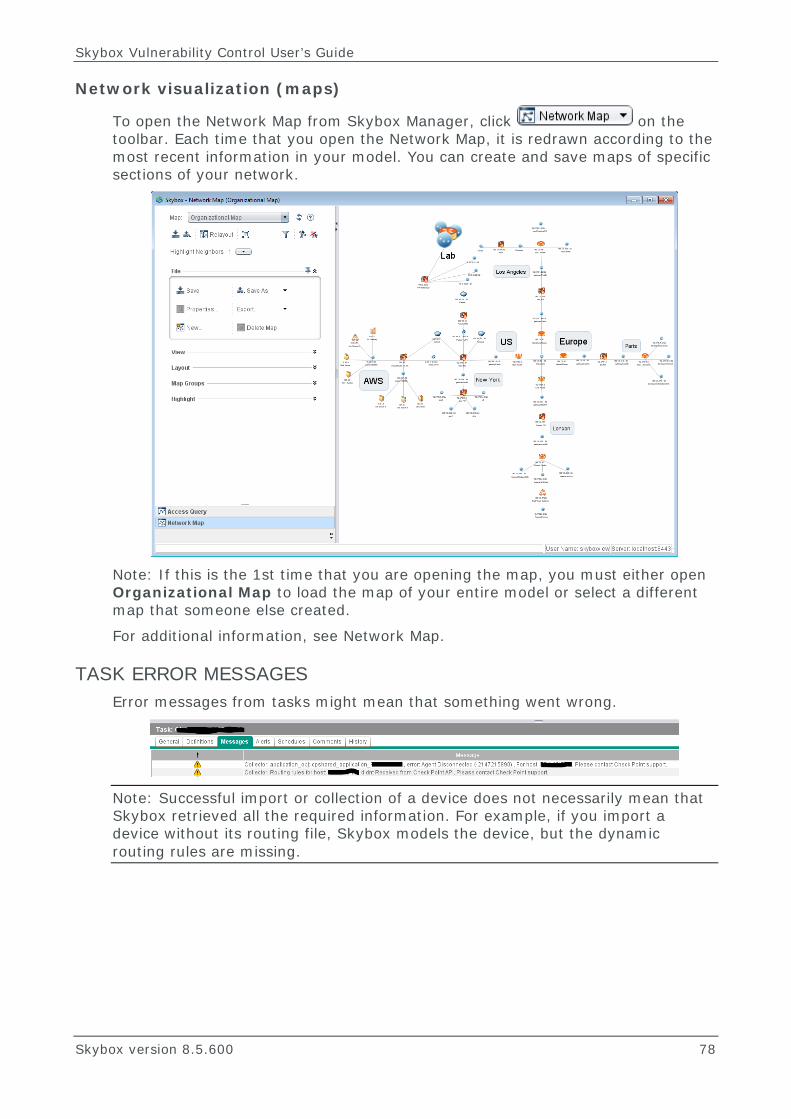
Skybox Vulnerability Control User’s Guide
Skybox version 8.5.600 78
Network visualization (maps)
To open the Network Map from Skybox Manager, click on the toolbar. Each time that you open the Network Map, it is redrawn according to the most recent information in your model. You can create and save maps of specific sections of your network.
Note: If this is the 1st time that you are opening the map, you must either open Organizational Map to load the map of your entire model or select a different map that someone else created.
For additional information, see Network Map.
TASK ERROR MESSAGES Error messages from tasks might mean that something went wrong.
Note: Successful import or collection of a device does not necessarily mean that Skybox retrieved all the required information. For example, if you import a device without its routing file, Skybox models the device, but the dynamic routing rules are missing.

Chapter 10 Validating the model
Skybox version 8.5.600 79
ITEM COUNTS Check that the number of assets added to the model is what you expected, and that the element names and types look right.
CREATING PERIMETER CLOUDS AUTOMATICALLY Model – Completion and Validation tasks can create Perimeter Clouds automatically; this completes the model with clouds, and fixes missing parts of the model. This feature is disabled in the Model Validation task; we recommend that you enable it only after you are sure that all devices are in the model, so as not to create unnecessary Perimeter Clouds.
The task converts perimeter networks to Perimeter Clouds in the following cases:
› A VPN or tunnel network, peer-to-peer, for which 1 peer is missing.
In this case, Skybox changes the name to %PEER1-IP%_%PEER2-IP%.
› A regular network that is a perimeter network. A perimeter network is a network with 1 or more missing next hops.
In this case, Skybox changes the name to Accessible Via %LIST-OF-MISSING-NEXT-HOPS-FROM-THE-SAME-INTERFACE% or leaves the Perimeter Cloud name as the network name.
Running the Model Validation task with automatic creation of Perimeter Clouds fixes the following model validation issues:
› Next hop not in model › Next hop and its destination network not in model › VPN or tunnel end-point is missing
The Model Validation task cannot always complete the whole model. In some cases, Skybox cannot complete the model or create Perimeter Clouds automatically. For example:
› Skybox cannot create a Perimeter Cloud for a perimeter network that is configured on a device that is not in the model
› A device without routing information: missing next hop analysis is based on routing rules; if these don’t exist, Skybox cannot convert networks to clouds
For additional information, see the Model completion and validation tasks topic in the Skybox Reference Guide.
VALIDATING THE SETUP FOR ATTACK SIMULATION Skybox attack simulation produces accurate results only if attack locations are defined throughout the network. Define a Threat Origin for every external link from which an attack might originate.

Skybox Vulnerability Control User’s Guide
Skybox version 8.5.600 80
Attack simulation is also dependent on the definition of important internal resources. Every server that provides a revenue or productivity function should be a member of a Business Asset Group and at least 1 Business Impact should be associated with every Business Asset Group.
Manual verification is the only method available for checking the configuration of Business Asset Groups and Business Impacts.
To validate the business information 1 Compare the list of Business Asset Groups in the model with the list provided
during the deployment-planning phase.
2 Compare the model with access rules:
a. Look through the firewall rulebase that protects the server networks.
b. For each specific inbound service rule, verify the importance of the service.
c. In the model, check that the service’s asset belongs to a Business Asset Group.
3 Most organizations maintain separate networks for servers. Examine the server networks:
a. Check that all members of the server network are providing services.
b. Check that every server is inactive, unimportant, or part of a Business Asset Group.

Skybox version 8.5.600 81
Chapter 11
After the model is built, Skybox creates a map of all the interconnections: the Network Map.
This chapter describes the Network Map.
In this chapter
Network Map ...................................................................... 81
Creating and saving dedicated maps ..................................... 82
Navigating the Network Map ................................................ 83
Map Groups ....................................................................... 85
NETWORK MAP
To open the Network Map from Skybox Manager, click on the toolbar. Each time that you open the Network Map, it is redrawn according to the most recent information in your model. You can create and save maps of specific sections of your network.
Note: If this is the 1st time that you are opening the map, you must either open Organizational Map to load the map of your entire model or select a different map that someone else created.
Network visualization (maps)
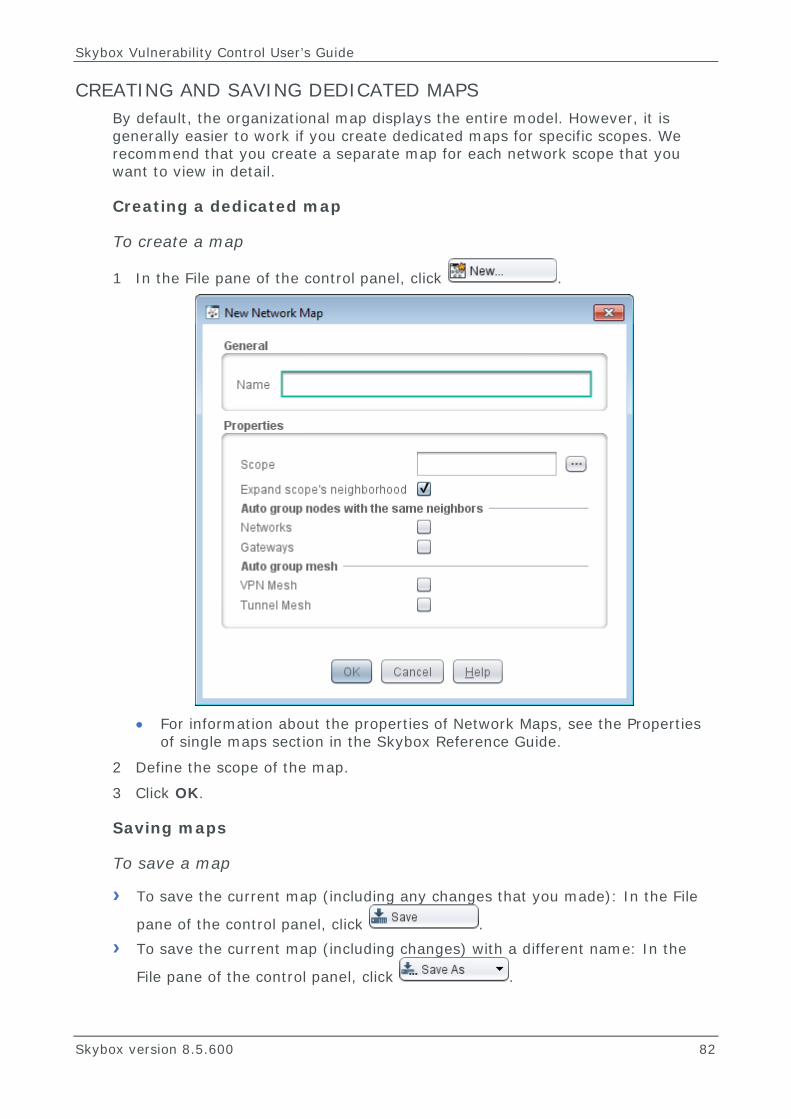
Skybox Vulnerability Control User’s Guide
Skybox version 8.5.600 82
CREATING AND SAVING DEDICATED MAPS By default, the organizational map displays the entire model. However, it is generally easier to work if you create dedicated maps for specific scopes. We recommend that you create a separate map for each network scope that you want to view in detail.
Creating a dedicated map
To create a map
1 In the File pane of the control panel, click .
• For information about the properties of Network Maps, see the Properties
of single maps section in the Skybox Reference Guide.
2 Define the scope of the map.
3 Click OK.
Saving maps
To save a map
› To save the current map (including any changes that you made): In the File
pane of the control panel, click . › To save the current map (including changes) with a different name: In the
File pane of the control panel, click .

Chapter 11 Network visualization (maps)
Skybox version 8.5.600 83
Viewing changes to the map Changes to the model that occur while the Network Map window is open are not automatically reflected in the map. If you know that changes were made, click
at the top of the control panel. You are prompted to save all unsaved maps, the map definitions from the Server are refreshed, and the selected map is reloaded to the Map pane.
NAVIGATING THE NETWORK MAP Navigation of the Network Map is done using the control panel.
Map layout Skybox lays out the nodes of the selected map. You can:
› Select and move nodes of the map to make the map easier for you to work with.
› Click . Skybox redraws the map using the same calculation formula. This is useful if you changed the display somewhat (for example, if you created map groups or hidden some nodes). The results might be easier for you to use.
If you did not change the display, or if relayout does not make the map easier for you to use, tune the layout properties using the Layout pane
( ) to change the values used in the calculation formula. For additional information, see the Layout properties topic in the Skybox Reference Guide.

Skybox Vulnerability Control User’s Guide
Skybox version 8.5.600 84
› Click . Skybox redraws the map to fit the current size of the window. › Select anywhere inside the white space of the map and scroll to resize the
map, or move the mouse to reposition the map in the window.
Highlighting parts of the map Skybox can highlight specific nodes or sets of nodes in the map to help you to understand your organization’s network. Highlighting is temporary: when you change maps or save a map, all highlighting is turned off.
› Highlighting neighbors: By default, when you select a node in the map, the node is highlighted, and its immediate neighbors are also highlighted, in a lighter color than the selected node. This makes it easier to see the context of the selected node. You can change the number of neighbors highlighted each time by changing the value of the property.
Note: The value of this property is saved with the map.
› Highlighting different types of nodes: Use the Highlight pane to specify types of nodes to highlight in the map (automatically, not by selection). For example, you can highlight all Perimeter Clouds, a specific location, or nodes that have missing next hops. Each type of node is highlighted in a different color; you can select more than 1 node type to highlight at the same time.
Filtering the map You can filter the map to display only specific nodes. To display the filter pane, click in the control panel.
Note: Use Ctrl-F to display the filter pane, and Esc (in the Show field or in the white space of the Map pane) to close it.
› Show: Select nodes in the map by typing in the (full or partial) name or IP address of the desired nodes. Only these nodes (and their neighbors) are displayed.
You can use the characters ? and * for standard pattern matching in the filter, and you can use the following regular expression syntaxes:
• ^X: Specifies an expression (X) that appears at the beginning of the name or IP address
• X$: Specifies an expression (X) that appears at the end of the name or IP address
• [xyz]: Specifies a single character that is either x, y, or z
• [^abc]: Specifies a single character that is anything except a, b, or c
› Show Only Highlighted: Filters the map to display only highlighted nodes. › Regular Mouse Mode: Specifies that when you select nodes in the map,
the selected nodes and their neighbors are highlighted.

Chapter 11 Network visualization (maps)
Skybox version 8.5.600 85
› Focus: Specifies that when you select nodes in the map, only those nodes and their neighbors (within a radius of Neighbors Distance) are displayed. All other nodes in the map are hidden.
› Extend: Specifies that when you select nodes in the map, the map expands (if parts of it are hidden) by adding all neighbors of the selected node up to a radius of Neighbors Distance.
› Display All Nodes: Restores all hidden nodes to the map but keeps the current magnification (so that some nodes might not be visible in the display).
Note: This button clears all highlighting.
Exporting maps You can export maps as graphic files or Visio files.
› Export image: Saves the visible portion of the map as a graphic to the directory specified in the Export dialog box.
Note: You can change the resolution of the saved image in the Export dialog box for easier viewing outside of Skybox.
› Export to Visio: Exports the visible portion of the map as a Microsoft Visio drawing file (*.VDX) so that non-Skybox users can view or print the map.
Note: VDX is a standard XML drawing format supported by Visio.
For additional information about the control panel and the filter pane, see the Network Map control panel topic in the Skybox Reference Guide.
MAP GROUPS A Map Group ( ) represents a region or area in the network. Map Groups can include gateways, networks, and other Map Groups. Normally, map group members are topologically related, so that a collapsed group makes sense.
Defining Map Groups reduces the complexity of the model in the Network Map and provides better orientation in large networks. Each Map Group can be highlighted in a different color, enabling you to easily see which entities belong to which groups. You can collapse a Map Group so that only a representative node is displayed in the map.
Map Groups are stored globally in the model; creating or changing a Map Group in 1 map affects all other maps that contain that Map Group.
Map Group scopes Each Map Group has a set of defining members (usually the group’s gateways) and additional members. The additional members are the neighbor nodes of the defining member nodes that all their neighbors appear in the scope.
The defining member nodes are specified by the user. The additional member nodes are completed by Skybox. This makes the Map Group definition more compact and eliminates the need to explicitly attach newly discovered networks to any Map Group; newly discovered networks are added to the Map Groups of their gateway neighbors.

Skybox Vulnerability Control User’s Guide
Skybox version 8.5.600 86
Creating Map Groups Before defining new Map Groups:
› Set the Highlight mode of Map Groups to All (in the Map Group pane, in the Highlight field, select All).
This highlights each existing Map Group in a separate color, and highlights new groups in different colors as they are created.
› Set the Highlight Neighbor distance (at the top of the Control Panel) to 0.
This prevents highlighting neighbor nodes when selecting nodes for a Map Group.
To create a new Map Group 1 Select the set of nodes that define the scope of the Map Group.
Nodes (gateways and networks, but not Perimeter Clouds) whose neighbors all appear in the scope of the Map Group are automatically added to the group as members—it is usually sufficient to select a set of gateway nodes as the defining members. It is only necessary to select network nodes explicitly if they should be part of the group but some neighbor gateways are not part of the group.
2 Right-click in the selection and select New Map Group.
3 In the Map Group dialog box:
a. Type a Name for the group.
b. (Optional) Change the highlight color of the group.
c. If you want the group displayed in collapsed form after it is created, select Collapse.
d. Click OK to create the Map Group.
Note: Map Groups have labels; use the View pane of the Control Panel to toggle whether these labels are displayed.
Map Group hierarchies To create a hierarchy of Map Groups, you can work top-down (for example, by creating a Paris Map Group when a Europe Map Group already exists) or bottom-up (for example, by creating a Europe Map Group when Paris and London Map Groups already exist).
To create a Map Group inside an existing Map Group 1 Select the nodes of the existing Map Group to include in the new Map Group.
2 Right-click in the selection and select New Map Group.
To create a new Map Group that contains existing Map Groups 1 Select the labels of the existing Map Groups (and other gateway or network
nodes as necessary).
2 Right-click in the selection and select New Map Group.

Chapter 11 Network visualization (maps)
Skybox version 8.5.600 87
To view the hierarchy of Map Groups 1 Right-click a node in the map and select Attach to Map Group.
2 In the Attach to Map Group dialog box, view the Map Group hierarchy and then click Cancel to close the dialog box (without attaching anything).
Working with Map Groups The following commands in the Map Groups pane of the Control panel are useful when working with Map Groups:
› Highlight All: Highlights each Map Group in a different color › Collapse All / Expand All: Collapse or expand all Map Groups. Collapse
replaces the members of a map group by a representative node.
The following commands on the shortcut menu are useful when editing Map Groups:
› Collapse Map Group: Right-click a member of the Map Group or the group’s label, and select Collapse Map Group.
› Expand Map Group: To display all the member of a collapsed Map Group, right-click the node representing the Map Group and select Expand Map Group.
To attach nodes to a Map Group 1 Select a set of nodes or labels of Map Groups to be attached to another Map
Group.
2 Right-click in the selection and select Attach to Map Group.
3 Specify the target Map Group in the dialog box. The selected nodes or Map Groups are detached from previous Map Groups that they were attached to (if any) and are attached to the selected target Map Group.
To detach nodes from a Map Group 1 Select a set of nodes or labels of Map Groups to be detached from the Map
Groups to which they are currently attached.
2 Right-click in the selection and select Detach from Map Group.
To delete a Map Group 1 Select a Map Group (by selecting either the Map Group’s collapsed node or its
label).
2 Right-click the selection and select Delete Map Group.
Note: This command deletes the map group definition. It deletes neither the member nodes of the map group nor any subgroups of the selected group.

Skybox version 8.5.600 88
Chapter 12
A Threat Origin is a potential starting point for an attack.
This chapter explains Threat Origins and how to add them to the model.
In this chapter
Threat Origins overview ....................................................... 88
Threat Origin types ............................................................. 88
Threat Origin Categories ...................................................... 89
Defining Threat Origins ........................................................ 90
Disabling and enabling Threat Origins .................................... 93
THREAT ORIGINS OVERVIEW Threat Origins are specified by defining the network entities (assets, networks, or locations) where an attacker or worm could be located. They are indicated in Skybox by .
The following are typical locations for Threat Origins:
› Perimeter Clouds
• For information about how to define Perimeter Clouds, see Creating and editing Perimeter Clouds (on page 61).
› Locations where you expect mobile devices to be connected › Points inside your organization that you suspect could be the source of an
internal attack › Locations in which security is limited (for example, DMZ networks or
workstation networks (which are prone to infection via email))
To enable effective risk analysis of your organization’s network, you must specify the Threat Origins that seem most probable for your organization.
Note: As stated in First phase (on page 241), we recommend that you start with a 1st phase consisting of 1 or 2 threats.
Attack simulation tests all scenarios for attacking the network starting from the Threat Origins defined in the model and it uses this information to analyze risk.
THREAT ORIGIN TYPES There are 2 basic types of Threat Origins: Human and Worm.
Adding Threat Origins

Chapter 12 Adding Threat Origins
Skybox version 8.5.600 89
Human Threat Origins Properties of human Threat Origins include the estimated skill level of the attackers and the attacker’s privilege on the attacking computer.
For example, for human Threat Origins from the internet, you assume the existence of highly skilled attackers, but for some human Threat Origins inside your organization, you assume that the attackers are less skilled. The skill level is taken into account when analyzing the likelihood of successful attacks and the risks imposed by these attacks.
You can specify which Business Asset Groups a human Threat Origin can attack. When defining a Business Asset Group, you can define the human Threat Origins that you expect might attack it. By default, human Threat Origins attack all Business Asset Groups.
Worm Threat Origins A worm Threat Origin can include worms from the Skybox Vulnerability Dictionary. Worms are assumed to attack any asset in their path (unless prevented by a firewall), so it is not necessary to define relevant Business Asset Groups.
THREAT ORIGIN CATEGORIES Threat Origins are classified into Threat Origin Categories, so that they can be grouped when risk is displayed or reported. For example, you can show risk for, or generate a report about, all Threat Origins that originate outside your organization (usually named External Threats).
To view risk from specific threats in an analysis or a report, add those threats to a Threat Origin Category and select that category to filter the analysis or report.
Skybox includes 5 Threat Origin Categories with the following default names:
› External Threats › Internal Threats › Worm Threats › B2B Threats › Other Threats
Note: The Other Threats category is disabled by default. You can enable it if you need an additional category.
A Threat Origin can belong to more than 1 category. For example, a human attacker from the internet could be classified as external and B2B. You can create analyses that return only Threat Origins in specific categories.
Managing Threat Origin Categories
Note: Only Admins can manage Threat Origin Categories.

Skybox Vulnerability Control User’s Guide
Skybox version 8.5.600 90
Renaming Threat Origin Categories Although you cannot define additional categories, you can tune the existing categories to suit your organization by renaming them. For example, you can change 2 of the Threat Origin Categories to Internet and Competitors, and define each Threat Origin accordingly.
To rename a Threat Origin Category 1 In the Threat Origin Categories folder of the Model tree, right-click the
desired category and select Rename.
2 Type a new name for the category.
The new name is used wherever this Threat Origin Category is mentioned (for example, in the column names of specific analyses, the Risk Profile tab of Business Units, Business Asset Groups, and vulnerability occurrences, and the filtering fields of analyses and reports about Threat Origins).
Enabling and disabling Threat Origin Categories You can enable or disable Threat Origin Categories as necessary.
To enable or disable a Threat Origin Category
› In the Threat Origin Categories folder of the Model tree, right-click the desired category and select Enable or Disable.
Note: Enabling or disabling a Threat Origin Category does not affect the status of Threat Origins in that category. Threat Origins are always accessible from the All Threat Origins node of the Model tree. However, you can only view the risk from Threat Origins in a category as part of the total risk for that category.
DEFINING THREAT ORIGINS When defining a Threat Origin, remember that a Threat Origin does not attack itself. That is, Skybox does not analyze attacks between assets or networks that are part of the same Threat Origin—if you define a Threat Origin with several locations, Skybox does not analyze attacks between the assets or networks in those locations.
As a large number of Threat Origins can make it harder to understand the risk, use a small number of Threat Origins.

Chapter 12 Adding Threat Origins
Skybox version 8.5.600 91
Defining human Threat Origins
To define a human Threat Origin 1 In the Model tree, expand the Threat Origin Categories node.
2 Right-click All Threat Origins and select New > Human Threat Origin.
• For information about the properties of Threat Origins, see the Threat
Origins section in the Skybox Reference Guide.
3 Type a name for the Threat Origin.
4 Click the Browse button next to the Threat Location field to define the location of the Threat Origin.
5 Select the required Threat Origin Categories.
6 Specify Attacker Skill and Likelihood to Attack.
Note: It is important to specify the likelihood in a way that differentiates between more probable and less probable attack sources.
7 Click OK.
The Threat Origin is saved. You can see it in the Table pane when you select the relevant Threat Origin Category node in the Model tree.
Properties in the Advanced tab include:
› Attacker Privilege (you can change this from Root to User). › Business Asset Groups: By default, each Threat Origin can attack all
Business Asset Groups. If there are Business Asset Groups that this Threat Origin does not attack, configure the Threat Origin so that Skybox ignores them during risk analysis:

Skybox Vulnerability Control User’s Guide
Skybox version 8.5.600 92
• Select all such Business Asset Groups in the Analyze for risk field and
click to move them to the Ignore field.
› Cloud source addresses: Risk for Threat Origins is usually assigned an equal value from all types of source IP addresses. In some cases, the risk for attacks from wide address ranges and the risk for attacks from specific addresses is different; for information about handling this issue, see Using clouds as Threat Origins (on page 172).
You can usually leave the default values for these properties.
Defining worm Threat Origins
To define a worm Threat Origin 1 In the Model tree, expand the Threat Origin Categories node.
2 Right-click All Threat Origins and select New > Worm Threat Origin.
• For information about the properties of Threat Origins, see the Threat
Origins section in the Skybox Reference Guide.
3 Type a name for the Threat Origin.
4 Specify:
• Threat Location
Chapter 12 Adding Threat Origins
Skybox version 8.5.600 93
• Threat Origin Categories
• Likelihood to Attack
Note: It is important to specify the likelihood in a way that differentiates between more probable and less probable attack sources.
5 Select the type of worm represented by this Threat Origin.
6 Specify whether Skybox is to select all worms of this type (Automatic Worm Selection) or whether to select worms manually (Manual Worm Selection).
7 If you specified Manual Worm Selection in the previous step, use the Available and Selected fields to select specific worms for the Threat Origin.
8 To specify whether to include worm risk as part of the total risk to your organization, click Worm Settings.
Note: You can access the Worm Settings properties at other times (select Tools > Options > Server Options > Worm Settings).
9 Click OK.
The Threat Origin is saved. You can see it in the Table pane when you select the relevant Threat Origin Category node in the Model tree.
Modify the values of properties of cloud Threat Origins in the Advanced tab. Risk for cloud Threat Origins is usually assigned a value equal to that from all types of source IP addresses. In some cases, the risk for attacks from wide address ranges and from specific addresses is different; for information about handling this issue, see Using clouds as Threat Origins (on page 172).
DISABLING AND ENABLING THREAT ORIGINS By default, Threat Origins are enabled.
Disabling Threat Origins can be useful in the following circumstances:
› If (while building the model) not all firewalls are included in the model, the Threat Origins have access to large parts of the network. This can slow down attack simulation and might also mean that Skybox shows very high risk on all Business Asset Groups (some of which would not be accessible if the firewalls were included). Disabling Threat Origins speeds up attack simulation and cuts down on the amount of risk displayed.
› To evaluate the risk from a specific Threat Origin, you can disable the others.
To disable or enable a Threat Origin
› In the Table pane, right-click the Threat Origin and select Disable or Enable.
Disabled Threat Origins are displayed with a grayed-out icon ( ) instead of a regular icon ( ).

Skybox version 8.5.600 94
Chapter 13
As defined in Business Asset Groups (on page 28), a Business Asset Group is a group of assets that serve a common business purpose.
To use Business Asset Groups for risk metrics, the following additional information is required:
› Threat Origins that might attack this Business Asset Group › Damages from Business Impacts and Regulations that would be caused to
your organization if the Business Asset Group suffers a loss of confidentiality, integrity, or availability
› Dependency rules that define how the assets in the Business Asset Group interact with each other or with other assets and nodes
In this chapter
Business Impacts and Regulations ......................................... 94
Adding dependency rules ..................................................... 96
Explicit dependency rules ..................................................... 97
Implicit dependency ............................................................ 98
BUSINESS IMPACTS AND REGULATIONS An impact is a way of measuring the loss on a Business Asset Group. Impacts involve damage to Business Asset Groups in the following ways:
› In the form of a Business Impact (for example, mission-critical damage or low-level financial damage)
› As a compromise to a security regulation with which organizations must comply (for example, SOX or GLBA).
Skybox uses Business Impacts and Regulations to calculate the risk on the Business Asset Group. You define them separately and attach them to Business Asset Groups.
Note: By default, Skybox ignores the impact level for security metrics analysis.
Skybox comes with predefined Business Impact and Regulation templates, and predefined Business Impacts and Regulations for the most common Business Impacts and Regulations. Use the templates as the basis for creating new Business Impacts and Regulations to suit your organization’s requirements.
Using Business Asset Groups for risk metrics

Chapter 13 Using Business Asset Groups for risk metrics
Skybox version 8.5.600 95
Adding new Business Impacts and Regulations You can add Business Impacts and Regulations directly from a Business Asset Group using the New button or you can add them from Tools > Administrative Tools > Business Impacts (or Regulations). You must specify the Loss Type, Damage Level, and attached Business Asset Groups.
Only Admins can create new Business Impacts and Regulations.
Best practice for working with Business Impacts Use different Business Impacts for different types of loss or at least to differentiate between confidentiality and integrity versus availability. If you do not find an appropriate Business Impact (or Regulation) for a specific Business Asset Group, add a Business Impact (or ask an Admin to do it for you).
Attaching Business Impacts and Regulations to Business Asset Groups The following instructions explain how to attach a Business Impact or Regulation to a Business Asset Group.
To attach Business Impacts or Regulations to a Business Asset Group 1 Expand the Business Units & Asset Groups node of the Model tree and
navigate to the Back End Payment System Business Asset Group.
2 Right-click the Business Asset Group and select Properties.
3 In the Back End Payment System Properties dialog box click the Business Impacts tab or, to attach Regulations, click the Regulations tab.
4 Select the check box next to each Business Impact that is to be attached to
the Business Asset Group.

Skybox Vulnerability Control User’s Guide
Skybox version 8.5.600 96
5 You can change the Damage of a Business Impact for this Business Asset Group:
a. Click the Browse button next to the relevant Damage.
b. In the Damage dialog box do either of the following:
— Change the Level by selecting a different value from the drop-down list.
Levels are mapped internally to specific monetary values for risk analysis.
— Click Rate and type the damage in monetary units.
Rates need not be exact values, but they should indicate the approximate magnitude of the damage.
c. Click OK.
6 Click OK.
To detach Business Impacts or Regulations from a Business Asset Group 1 Expand the Business Units & Asset Groups node of the Model tree and
navigate to the Business Asset Group.
2 Right-click the Business Asset Group and select Properties.
3 In the <Business Asset Group name> Properties dialog box:
a. Click the Business Impacts tab or, to detach Regulations, click the Regulations tab.
b. Clear the check box next to each Business Impact or Regulation that is to be detached from the Business Asset Group.
c. Click OK.
ADDING DEPENDENCY RULES The security of a Business Asset Group depends on the security of its members. It can also depend on the security of infrastructure servers and on the security of other assets.
Dependency rules enable you to define these dependencies and specify how attacks on assets affect the security of the Business Asset Groups. Dependency rules are used by the Skybox Attack Simulation Engine (exposure analysis) when computing the effects of an attack.
Dependency rules relate to the type of security loss. For example, an availability loss of a DNS server might imply an availability loss for a Business Asset Group; a confidentiality loss of a database server usually implies a confidentiality loss for the application that uses that database.
Skybox has 2 types of dependency rules:
› Explicit dependency rules (see page 97) › Implicit dependency rules (see page 98)

Chapter 13 Using Business Asset Groups for risk metrics
Skybox version 8.5.600 97
Viewing dependency rules You can view dependency rules directly from the Model tree (Dependency Rules node).
By default, only explicit dependency rules are listed.
To view implicit dependency rules 1 Select Tools > Options > Manager Options > Risks Configuration.
2 Select Show Implicit Dependency Rules.
EXPLICIT DEPENDENCY RULES Explicit dependency rules express dependency when:
› The security of a Business Asset Group depends on the security of its members in a way that is not covered by the implicit dependency
› A Business Asset Group depends on an infrastructure server that is not a member of the Business Asset Group
An explicit dependency rule specifies how security loss on a set of specified assets affects the security loss on another set of assets or Business Asset Groups. Dependency rules relate to the type of the security loss (confidentiality, integrity, or availability) and to the type of the dependency:
› At Least One: A security loss suffered by any of the specified assets affects the destinations.
› All: Only a security loss suffered by all specified assets affects the destinations.
For suggestions about how to use explicit dependency rules, see Explicit dependency rules (advanced) (on page 173).

Skybox Vulnerability Control User’s Guide
Skybox version 8.5.600 98
To define a dependency rule 1 In the Model tree, right-click Dependency Rules and select New
Dependency Rule.
2 Type a Name for the dependency rule and, optionally, a description in the
User Comments field.
3 In the Cause pane, use the Loss Type, On, and Network Entities fields to describe the cause of the possible damage (for example, an Integrity or Availability loss on All the web servers in your system).
4 In the Effect pane, use the same fields to describe the effect of the possible damage (for example, an Availability loss on a payment system).
IMPLICIT DEPENDENCY An implicit dependency defines how the security of a Business Asset Group depends on the security of its member assets. By default, an implicit dependency specifies that:
› A security loss of any type (confidentiality, integrity, or availability) on a member implies the same type of security loss on the Business Asset Group
› An integrity loss on a member implies an availability and confidentiality security loss on the Business Asset Group
The dependency is created when you assign assets to a Business Asset Group.
For information about changing implicit dependency, see Advanced dependency rules (on page 173).

Skybox version 8.5.600 99
Chapter 14
Attack simulation simulates an attack on your organization’s network from a set of Threat Origins and analyzes the results.
This chapter explains how to run attack simulation and how to understand the results.
In this chapter
Attack simulation ................................................................ 99
Understanding Skybox risk .................................................. 100
Viewing risk ...................................................................... 100
ATTACK SIMULATION Attack simulation simulates all attack scenarios for attacking your organization’s network from a set of specified Threat Origins and analyzes the results. The derived data is stored in the Skybox database.
An attack scenario represents a set of actions that an attacker can execute from a specified starting point towards a specified destination, given the specific context of your organization’s network: firewall and router configurations, network topology, and existing vulnerability occurrences.
Attack simulation examines the ability of potential attackers to attack your organization’s network and assets. Because the attack simulation is invoked on a model of your organization’s network, it can initiate attacks from every Threat Origin, trying all possible attack paths without causing any load or damage to the network.
Attack simulation is launched using the Analyze – Exposure task.
You can run this task manually, after you have built or made changes to the model (including changing the status of a vulnerability occurrence to Fixed) or you can schedule it. Changes to the risk of an entity or exposure of vulnerability occurrences are only reflected in the analyses after attack simulation is run.
Note: Attack simulation involves heavy computations. The task can run for minutes or even hours, depending on the size and complexity of the network. For large, complex networks, schedule this task at off hours.
For information about scheduling tasks, see Scheduling tasks and task sequences (on page 131).
To run attack simulation manually
› Select Tasks > Analyze – Exposure.
Simulating attacks

Skybox Vulnerability Control User’s Guide
Skybox version 8.5.600 100
UNDERSTANDING SKYBOX RISK Attack simulation provides information about possible attacks against the organization’s network, taking into account the network access constraints and the specific behavior of each vulnerability occurrence. Risk analysis assesses the likelihood of these attacks and the potential damage that they can cause.
As part of attack simulation, Skybox calculates risk for:
› Business Asset Groups and Business Units › Business Impacts and Regulations › Vulnerability occurrences › Attacks › Threat Origins
For information about the calculation of risk, see About risk (on page 177).
VIEWING RISK You can view risk information in several ways, including:
› On the Exposure Summary page:
• In the Direct Vulnerability Occurrences by Risk graph
• In the Threat Origins by Risk table
› From any table in the Exposure area where the risk column is always in the table
› Risk profiles (see page 181): The major components that contribute to the risk for a selected entity
› Risk factors (see page 182): How the combination of a source (Threat Origin), a destination (Business Asset Group or asset), and a Business Impact or Regulation (explaining the potential loss from the risk factor) can affect the selected entity.
› The Attack Explorer (see page 105): Information about the assets, services, and vulnerability occurrences in the system, in the context of specific attacks
› Risks reports (see page 135): Information about high-risk entities of a specific type
› Risk analyses (see page 185): Risk for all entities that meet the analysis criteria—for example, one analysis lists all critical vulnerability occurrences and another lists all critical Business Units

Skybox version 8.5.600 101
Chapter 15
After attacks are simulated, the Exposure Summary page highlights the critical exposure issues, including the vulnerability occurrences that are most likely to be exploited and the Threat Origins that have the highest risk. You can drill down from this page to find additional information about each issue.
In this chapter
Workflow .......................................................................... 101
Reviewing the directly exposed vulnerability occurrences ........ 102
Reviewing the Threat Origins ............................................... 103
Reviewing the Business Asset Groups ................................... 104
Reviewing attacks .............................................................. 105
Checking whether the problem is access-related .................... 106
WORKFLOW The basic workflow to identify the critical issues is:
1 Review the exposed vulnerability occurrences to see whether a limited set of high-risk vulnerability occurrences are enabling most of the attacks.
2 Review the list of high-risk Threat Origins to see whether there are specific
Threat Origins that seem to be causing a great deal of the risk.
Note: The order of these 2 steps is not important; they are different starting points for locating the critical issues. If you find the critical issues with the 1st step, you might not need to use the other.
Identifying the critical issues

Skybox Vulnerability Control User’s Guide
Skybox version 8.5.600 102
3 If there are no indications that specific threats or vulnerability occurrences are causing high risk, check the Business Asset Groups (see page 104). You can also check whether the problem is caused by access-related issues (for example, an access rule that is letting in too much traffic (see page 106)).
REVIEWING THE DIRECTLY EXPOSED VULNERABILITY OCCURRENCES
Directly exposed vulnerability occurrences are those that are 1 step away from a Threat Origin.
To review the directly exposed vulnerability occurrences 1 The Vulnerability Occurrences by Threat graph (on the Prioritization
Center page and on the Exposure Summary page) shows the numbers of directly exposed and 2nd-step vulnerability occurrences for each Threat Origin. Click a link in the graph to view the vulnerability occurrences.
2 In the list, select a vulnerability occurrence to view additional information in
the Details pane.
3 The Direct Vulnerability Occurrences by Risk graph (on the Summary pages) shows the number of direct vulnerability occurrences for each risk or severity level. Select a specific Threat Origin to view the number of direct vulnerability occurrences for each risk or severity level, and then click a link in the graph to view the vulnerability occurrences.
4 Expand the group of critical or high-risk vulnerability occurrences (if there are any) to view the problematic vulnerability occurrences.

Chapter 15 Identifying the critical issues
Skybox version 8.5.600 103
5 In either of these graphs, you can change the filter to include only direct vulnerability occurrences or 2nd-step vulnerability occurrences.
6 Select a vulnerability occurrence in the table and view additional information about it in the Details pane.
Each tab contains a different type of information about the vulnerability occurrence. Some information relates specifically to this vulnerability occurrence (for example, the asset and service on which the vulnerability occurrence is found) and some is general information about the Vulnerability Definition (for example, the CVSS metrics and known solutions for this Vulnerability Definition).
7 Do either of the following:
• Mitigate the high-risk vulnerability occurrences by opening tickets on them (see page 109).
• Drill down into individual high-risk vulnerability occurrences using the Attack Explorer.
Obviously, the vulnerability occurrences must be mitigated, but this step might give you additional information to help in your choice of solutions for them.
Note: You can open vulnerability occurrence tickets from the Attack Explorer.
REVIEWING THE THREAT ORIGINS High risk on a small number of Threat Origins indicates that these Threat Origins might be the major cause of risk for your organization.
To review the Threat Origins 1 The Top 3 Threat Origins table (on the Prioritization Center and Exposure
Summary pages) shows risk levels and numbers of vulnerability occurrences for the 3 Threat Origins that put your organization at the highest risk. Click a link to view more details about a Threat Origin.
2 The Attacks tab is displayed in the Table pane. You can see all the attacks that this Threat Origin can perpetrate on your organization.
3 Select the attack with the highest risk.
4 Right-click the attack and select Attack Explorer.
The Attack Explorer opens with the selected attack displayed visually in the Map pane. You can see how many steps it takes to get from the Threat Origin to the destination Business Asset Group and a topological overview of the attack.
5 Look at the width of the arrows in the attack.
A wide arrow means that there are many ways to perform the step. If the arrow of 1 step is much wider than the others, this often indicates a root cause that is enabling the access. The cause can be:
• Entities that need patching or other remediation (for example, risky services, a Vulnerability Definition, or a group of assets that need updating).
Skybox Vulnerability Control User’s Guide
Skybox version 8.5.600 104
• An access issue (usually, this is a firewall that is permitting too much access).
6 Select the widest arrow and check the statistics in the Information pane, to check whether anything looks odd.
For example, a relatively large number of vulnerability occurrences but a small number of Vulnerability Definitions or ports could mean that patching the affected services would greatly reduce the risk on your network.
After you identify the problem, create a ticket (see page 109).
REVIEWING THE BUSINESS ASSET GROUPS High risk on a small number of Business Asset Groups might indicate that these Business Asset Groups are the major cause of risk for your organization.
To review the Business Asset Groups 1 In the tree, select the Exposure node.
2 In the workspace, click the Business Asset Groups tab.
For each Business Asset Group in the table, you can see its risk, and how many assets and vulnerability occurrences it has. Note that the vulnerability occurrence count includes all vulnerability occurrences found on any asset of the Business Asset Group, not only the directly exposed vulnerability occurrences.
3 In the Table pane, select the Business Asset Group with the highest risk.
4 In the Details pane, click the Attacks tab.
5 Select the attack with the highest risk.
6 Right-click the attack and select Attack Explorer.
The Attack Explorer opens with the selected attack displayed visually in the Map pane. You can see how many steps it takes to get from the Threat Origin to the destination Business Asset Group and a topological overview of the attack.
7 Look at the width of the arrows in the attack.
A wide arrow means that there are many ways to perform the step. If the arrow of 1 step is much wider than the others, this often indicates a root cause that is enabling the access. The cause can be:
• Entities that you should patch or otherwise remediate (for example, risky services, a Vulnerability Definition, or a group of assets that need updating).
• An access issue (usually, this is a firewall that is permitting too much access).
8 Select the widest arrow and check the statistics in the Information pane, to check whether anything looks odd.
For example, a relatively large number of vulnerability occurrences but a small number of Vulnerability Definitions or ports could mean that patching the affected services would greatly reduce the risk on your network.
After you identify the problems, create a ticket (see page 109).

Chapter 15 Identifying the critical issues
Skybox version 8.5.600 105
REVIEWING ATTACKS The Attack Explorer presents information about the assets, services, and vulnerability occurrences in the system, in the context of specific attacks. Use the Attack Explorer to:
› View potential attacks › Drill down into the causes of potential attacks › Define strategies to block potential attacks › Create tickets
Note: The Attack Explorer does not display any results until you run attack simulation (exposure analysis) at least once on the model that you are using. The information displayed in the Attack Map is based on the analyses made during attack simulation. If you changed information that might affect the analyses, rerun attack simulation before using the Attack Explorer.
The Attack Explorer consists of 3 panes:
› Information: Initially, the left-hand pane contains information about the entity on which you opened the Attack Explorer. When you select an entity in the Map pane, information about that entity is displayed. There are additional options in this pane that enable you to drill down into the information.
› Map: The upper-right pane contains an Attack Map for the selected attack (or other selected entity).
› Vulnerability occurrences: In the lower-right pane, select the vulnerability occurrences for which to create tickets.
To open the Attack Explorer 1 In the Exposure workspace, navigate to the entity to view in the Attack
Explorer:
• Threat Origin
• Business Asset Group
• Vulnerability occurrence
• Attack
Note: Especially in large models, it is often most useful to open the Attack Explorer on an asset, vulnerability occurrence, or attack. Otherwise, it might be difficult to read the large amount of data displayed in the Map pane.
2 Open the Attack Explorer:
• Select the entity and then click at the top of the table (if available; for example, for Threat Origins or Business Asset Groups).
• Right-click the entity and select Advanced > Attack Explorer.
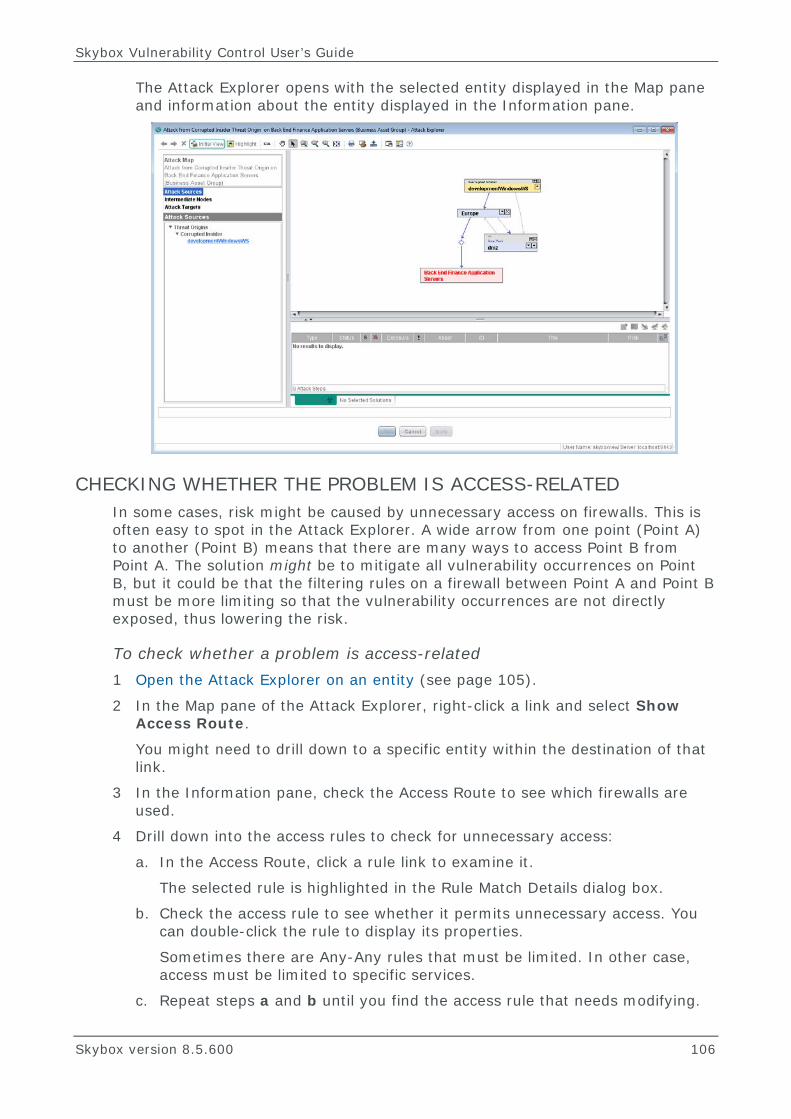
Skybox Vulnerability Control User’s Guide
Skybox version 8.5.600 106
The Attack Explorer opens with the selected entity displayed in the Map pane and information about the entity displayed in the Information pane.
CHECKING WHETHER THE PROBLEM IS ACCESS-RELATED In some cases, risk might be caused by unnecessary access on firewalls. This is often easy to spot in the Attack Explorer. A wide arrow from one point (Point A) to another (Point B) means that there are many ways to access Point B from Point A. The solution might be to mitigate all vulnerability occurrences on Point B, but it could be that the filtering rules on a firewall between Point A and Point B must be more limiting so that the vulnerability occurrences are not directly exposed, thus lowering the risk.
To check whether a problem is access-related 1 Open the Attack Explorer on an entity (see page 105).
2 In the Map pane of the Attack Explorer, right-click a link and select Show Access Route.
You might need to drill down to a specific entity within the destination of that link.
3 In the Information pane, check the Access Route to see which firewalls are used.
4 Drill down into the access rules to check for unnecessary access:
a. In the Access Route, click a rule link to examine it.
The selected rule is highlighted in the Rule Match Details dialog box.
b. Check the access rule to see whether it permits unnecessary access. You can double-click the rule to display its properties.
Sometimes there are Any-Any rules that must be limited. In other case, access must be limited to specific services.
c. Repeat steps a and b until you find the access rule that needs modifying.

Chapter 15 Identifying the critical issues
Skybox version 8.5.600 107
5 (Optional) Use the What If model (see page 117) to check whether restricting access by modifying the access rule has the desired effect (fewer attacks using the same attack path).
6 Create a ticket (see page 109) on a vulnerability occurrence on Point B that is affected by this access rule. Typically, in the Possible Solutions field, select Block or User-Defined. You can explain the problem in the User Comments field.
Skybox version 8.5.600 108
Chapter 16
After you find an important issue, you can start the remediation process by issuing the necessary tickets.
If a vulnerability occurrence seems irrelevant, you can mark it as Ignored. Ignored vulnerability occurrences are not checked for exposure, so the results of exposure analysis are cleaner.
In this chapter
Marking vulnerability occurrences as ignored ......................... 108
Mitigating critical vulnerability occurrences............................ 109
Creating tickets manually ................................................... 109
Updating the model after fixing vulnerability occurrences ........ 117
Using the What If model to test changes ............................... 117
MARKING VULNERABILITY OCCURRENCES AS IGNORED If a vulnerability occurrence that is causing risk in the model meets any of the following qualifications, you can specify not to use the vulnerability occurrence during risk analysis:
› Your organization is aware of the vulnerability occurrence’s risk, but has decided to accept this risk for whatever reasons
› Your organization has decided that the vulnerability occurrence is not important in risk analysis
› The vulnerability occurrence does not exist (that is, incomplete scanner information caused Skybox to mistakenly define a service as vulnerable)
To specify that a vulnerability occurrence not be used during risk analysis, mark it as ignored.
Note: To see changes in the risk values after marking vulnerability occurrences as ignored, rerun the Analyze – Exposure task.
To mark a vulnerability occurrence as ignored from the Attack Explorer 1 Select the vulnerability occurrence in the Vulnerabilities pane.
2 Click the appropriate icon:
• : Mark as ignored because the vulnerability occurrence does not exist
• : Mark as ignored because the vulnerability occurrence is not important
Remediation

Chapter 16 Remediation
Skybox version 8.5.600 109
• : Mark as ignored because the risk of the vulnerability occurrence is accepted by your organization
3 Click Apply to save the new vulnerability occurrence status to the model.
To mark a vulnerability occurrence as ignored from the Manager 1 Select the vulnerability occurrence in the Table pane or in the Details pane.
2 Right-click the vulnerability occurrence and select Change Status.
3 In the Change Status to field, select Ignored and then click OK.
4 Select the reason for ignoring the vulnerability occurrence and click OK.
MITIGATING CRITICAL VULNERABILITY OCCURRENCES After you validate a vulnerability occurrence and decide that it is important, you have a better idea what type of fix is required. You can mitigate critical vulnerability occurrences by:
› Patching or upgrading the vulnerable service › Deleting the vulnerable service if it is not required on the vulnerable asset › Changing access on the firewalls so that the vulnerability occurrence is not
accessible
In most organizations, especially large ones, the people who identify the critical issues are not the same as those who fix the issues. In Skybox, the 1st step of mitigation is to assign tickets to the appropriate staff members to make them aware of the problem. A ticket can include a suggested solution of how to fix the problem (for example, a specific patch to apply).
CREATING TICKETS MANUALLY Tickets in Skybox represent action items that must be implemented in your organization’s network.
When you ascertain the critical issues, you can create tickets and assign them to the relevant staff members.
Ticket types You can create tickets for:
› Vulnerability occurrences
Vulnerability occurrence tickets are vulnerability occurrence-specific. They can include a proposed solution for remediating the vulnerability occurrence.
› Vulnerability Definitions
Threat alert tickets are not vulnerability occurrence-specific. The scope of a threat alert ticket can include all vulnerability occurrences of a specific Vulnerability Definition or a specific group of vulnerability occurrences, or multiple Vulnerability Definitions. Threat alert tickets can include proposed solutions for remediation.
› Business Asset Groups

Skybox Vulnerability Control User’s Guide
Skybox version 8.5.600 110
Business Asset Group tickets indicate that the risk of the specified Business Asset Group is too high. These tickets are less useful for specific issues and are usually used as alerts.
Each ticket is assigned to an owner (someone who is responsible for making sure that the action item is implemented); you can assign each ticket a due date so that you can track its status. Select an owner from the relevant team: in most organizations, the IT Systems team is responsible for solutions involving specific vulnerability occurrences (for example, patches and upgrades), while the Network Operations team is responsible for access-related solutions (for example, fixing access rules).
Note: Tickets can only be assigned to Skybox users.
You can set up ticket phases, which define different steps for remediation (see the Defining ticket phases topic in the Skybox Reference Guide).
Creating tickets
To create a ticket from the Manager window
› In the Table pane, right-click the selected entity and then select Create Ticket or Create Threat Alert Ticket.
For information about creating:
• A single vulnerability occurrence, see Creating tickets for a single vulnerability occurrence (on page 111)
You can create a threat alert ticket for the vulnerability occurrence’s Vulnerability Definition; when a patch is created that solves vulnerability occurrences of a Vulnerability Definition, you can use a single vulnerability occurrence to create a threat alert ticket that covers all vulnerability occurrences of that Vulnerability Definition (see Creating threat alert tickets (on page 114)).
• Multiple vulnerability occurrences, see Creating threat alert tickets (on page 114)
• A set of separate vulnerability occurrence tickets, see Creating sets of tickets for multiple vulnerability occurrences (on page 116)
For information about creating tickets from the Attack Explorer, see Creating vulnerability occurrence tickets in the Attack Explorer (on page 112).
Note: Tickets can be created automatically using tasks (see Automating tickets (on page 120)).
Viewing tickets After a ticket is created, you can view it and manage it from the Tickets tree.

Chapter 16 Remediation
Skybox version 8.5.600 111
Creating tickets for a single vulnerability occurrence
To create a ticket for a single vulnerability occurrence 1 In the Tree pane, open a vulnerability occurrences analysis for which the
results in the Table pane are vulnerability occurrences.
2 In the Table pane, right-click the vulnerability occurrence for which you are creating a ticket and select Create Ticket.
3 Fill in the fields according to the table in the Vulnerability occurrence ticket
properties topic in the Skybox Reference Guide.
Some fields have default values and others are optional, but you must select an owner for the ticket.
4 To recommend a solution to the ticket owner:
a. Click the Solutions tab.
Solutions from the Skybox Vulnerability Dictionary are listed; the list might also include custom solutions prepared in your organization.
b. Select a solution or click Add Custom to specify a custom solution.
The ticket is created and added to the list of new tickets for the selected owner.

Skybox Vulnerability Control User’s Guide
Skybox version 8.5.600 112
Creating vulnerability occurrence tickets in the Attack Explorer
To create vulnerability occurrence tickets in the Attack Explorer 1 In the Map pane, find a set of links such that by blocking them all you block
the attacks on the Business Asset Group.
For example, if you are most concerned about a specific Threat Origin, find the set of links that blocks all attacks from that Threat Origin.
2 Examine the entry (or exit) vulnerability occurrences associated with these links.
The entry vulnerability occurrences associated with a link are vulnerability occurrences in the link’s destination that can be exploited directly from the link’s source.
The exit vulnerability occurrences associated with a link are vulnerability occurrences in the link’s source whose exploitation enables access to the link’s destination in an attack.
• To list a link’s entry vulnerability occurrences in the Vulnerability Occurrences pane, double-click the link in the Map pane or right-click the link in the Map pane and select List Entry Vulnerability Occurrences.
• To list a link’s exit vulnerability occurrences in the Vulnerability Occurrences pane, right-click the link in the Map pane and select List Exit Vulnerability Occurrences.
The selected vulnerability occurrences appear in the Vulnerability Occurrences pane, in the Attack Steps tab. Vulnerability occurrences that have vulnerability occurrence tickets are listed, but you cannot select them. As they already have tickets you cannot create new tickets for them in the Attack Explorer, but you can create new tickets for them manually (see page 109).
Tip: To view the Access Route of a specific link, right-click the link and select Explain Access.
3 Block each link by marking its entry or exit vulnerability occurrences as To be Solved (see page 113).
4 Review the To be Solved vulnerability occurrences and create tickets (see page 113).
At this point, the requests for new tickets exist only in the Attack Explorer.
5 Click OK to save your remediation decisions (assigned tickets, and vulnerability occurrences marked as Ignored) to the Skybox database.
A separate ticket is created for each of the selected vulnerability occurrences.

Chapter 16 Remediation
Skybox version 8.5.600 113
Example In the following Attack Map, blocking any of: (a) links 1, 3, and 4; (b) links 2, 3, and 4; or (c) link 5, blocks the possible attacks on the selected Business Asset Group (named Finance Application).
Marking vulnerability occurrences
To mark vulnerability occurrences as To be Solved
› In the Vulnerability Occurrences pane, mark each vulnerability occurrence as To be Solved by selecting its S check box.
After vulnerability occurrences are marked as To be Solved, nodes that can no longer participate in attacks become gray in the upper pane, representing the ‘after fix’ situation.
Creating tickets You can create tickets for a single set of entry or exit vulnerability occurrences directly from the Vulnerabilities pane and go on to the next set of vulnerability occurrences. Or, in each set, select the vulnerability occurrences to use to create tickets and click the Selected Solutions tab to display the To be Solved vulnerability occurrences.
Note: Every time that you select a link in the Map pane and list its vulnerability occurrences, the selected vulnerability occurrences overwrite the previous vulnerability occurrences in the Vulnerabilities tab of the Vulnerabilities and solutions pane. However, the Selected Solutions tab contains an aggregation of all vulnerability occurrences marked as To be Solved until the link is selected.
To review vulnerability occurrences and create tickets 1 In the Vulnerability Occurrences pane (in the Attack Steps tab or Selected
Solutions tab), display the To be Solved vulnerability occurrences.
2 Select vulnerability occurrences for which you want to assign a ticket with the same solution (or with no suggested solution) to a specific owner.
Note: When assigning a ticket, either recommend a specific solution or leave the solution to the assigned owner.

Skybox Vulnerability Control User’s Guide
Skybox version 8.5.600 114
3 Click .
• For information about the ticket fields, see the Vulnerability occurrence ticket properties topic in the Skybox Reference Guide.
4 Fill in the fields of the ticket.
• If you are creating tickets for several vulnerability occurrences, type a string in the Title Prefix field. This is prepended to the vulnerability occurrence name and location to create the title of the vulnerability occurrence ticket.
• In the User Comments field, explain to the ticket owner how to mitigate the vulnerability occurrences.
5 Click OK to create the ticket.
Note: Tickets created in the Attack Explorer are not added to the model until you click Apply (or click OK close the Attack Explorer).
6 Repeat steps 2 through 7 until all necessary tickets are created.
7 Save your changes:
• Click Apply to save the tickets (and vulnerability occurrences that you marked for ignoring) without closing the Attack Explorer.
• Click OK to save your changes and close the Attack Explorer.
Creating threat alert tickets You can create threat alert tickets in different ways to meet specific needs:
› You can create a ticket for a Vulnerability Definition rather than a specific vulnerability occurrence. For example, if a new security patch is released for a specific Vulnerability Definition, you could create a threat alert ticket rather than creating a ticket for each single vulnerability occurrence.
› You can create a threat alert ticket for specific vulnerability occurrences of the Vulnerability Definition (for example, all vulnerability occurrences of that Vulnerability Definition in London).
› You can create a threat alert ticket for a group of Vulnerability Definitions so that they will all be handled in a single ticket
To create a ticket for all vulnerability occurrences of a Vulnerability Definition 1 In the Vulnerability Control tree, select Prioritization Center > Analyses >
Public Analyses > Vulnerabilities, and then select an analysis that displays Vulnerability Definitions (for example, Miscellaneous > Vulnerabilities by Definition or Dictionary > Vulnerability Dictionary).
2 In the Table pane, right-click the Vulnerability Definition for which you are creating a ticket and select Create Ticket.
3 In the New Threat Alert Ticket dialog box:
a. Fill in the fields according to the table in the Threat alert ticket properties topic in the Skybox Reference Guide.
The default Network Scope for the new ticket is all vulnerability occurrences of the selected Vulnerability Definition.

Chapter 16 Remediation
Skybox version 8.5.600 115
b. To recommend a solution for the vulnerability occurrences:
1. Click the Solutions tab.
Solutions from the Skybox Vulnerability Dictionary are listed; the list might also include custom solutions prepared in your organization.
2. Select a solution or click Add Custom to specify a custom solution.
c. Click OK.
The ticket is created and added to the list of new tickets for the selected owner.
To create a threat alert ticket for specific vulnerability occurrences 1 In the Vulnerability Control tree, open a vulnerability occurrence analysis
(under Prioritization Center > Analyses > Public Analyses > Vulnerabilities) for which the results in the Table pane are vulnerability occurrences (rather than Vulnerability Definitions).
2 In the Table pane, select vulnerability occurrences of the threat alert for which you are creating the ticket.
3 Right-click the vulnerability occurrences and select Create Threat Alert Ticket.
4 In the New Threat Alert Ticket dialog box:
a. Fill in the fields according to the table in the Threat alert ticket properties topic in the Skybox Reference Guide.
The selected vulnerability occurrences are the default Network Scope for the new ticket.
b. To recommend a solution for the vulnerability occurrences:
1. Click the Solutions tab.
Solutions from the Skybox Vulnerability Dictionary are listed; the list might also include custom solutions prepared in your organization.
2. Select a solution or click Add Custom to specify a custom solution.
You can add multiple custom solutions.
c. Click OK.
The ticket is created and added to the list of new tickets for the selected owner.
To create a threat alert ticket for multiple Vulnerability Definitions 1 Open a list of Vulnerability Definitions from anywhere in Vulnerability Control
or Threat Manager.
2 In the Table pane, select the Vulnerability Definitions that you want to manage together.
3 Right-click the Vulnerability Definitions and select Create Ticket.
The name of the ticket includes the SBV IDs of all the included Vulnerability Definitions.

Skybox Vulnerability Control User’s Guide
Skybox version 8.5.600 116
4 Continue as in the previous procedures. In the Solutions tab, all the solutions for the selected Vulnerability Definitions are included. They are labelled according to their Vulnerability Definition, and you can select as many as necessary and add custom solutions.
Note: These tickets can only be created for Vulnerability Definitions, not Security Bulletins.
Creating sets of tickets for multiple vulnerability occurrences You can select multiple vulnerability occurrences and create separate but similar tickets for each vulnerability occurrence. The ticket names all have the same prefix (which you specify), followed by the name of the Vulnerability Definition and the IP address of its asset.
Note: This is not the same as creating a single threat alert ticket for multiple vulnerability occurrences of the same Vulnerability Definition (see Creating threat alert tickets (on page 114)).
Each set of tickets that you create has a single owner. If you want a ticket to have a different owner, define it separately. For example, if Joe is responsible for vulnerability occurrences of a specific Vulnerability Definition in one part of your network and Jane is responsible for similar vulnerability occurrences in another part of your network, you define a set of tickets for Joe and a different set for Jane, even if there is no other reason to split these vulnerability occurrences.
To create a set of tickets for multiple vulnerability occurrences 1 In the Tree pane do either of the following:
• Select the Vulnerability Occurrences node of the Model tree.
• Open a vulnerability occurrences analysis for which the results in the Table pane are vulnerability occurrences (rather than Vulnerability Definitions).
The Table pane displays the relevant vulnerability occurrences.
2 In the Table pane, sort the list of vulnerability occurrences to make it easier to select a specific set of them.
3 Select the vulnerability occurrences. Right-click in the selection and select Create Ticket.
In the New Vulnerability Occurrence Ticket dialog box, the field label Title is replaced by Title Prefix. The title of each ticket consists of the prefix that you type here, followed by the name of the Vulnerability Definition and the IP address of its asset. (In the preceding example, you could use the prefix Jane for one set and Joe for the other set.)
4 Fill in the fields according to the table in the Vulnerability occurrence ticket properties topic in the Skybox Reference Guide.
5 To recommend a specific solution to the owner for all the vulnerability occurrences:
a. Click the Solutions tab.
Solutions from the Skybox Vulnerability Dictionary are listed; the list might also include custom solutions prepared in your organization.
b. Select a solution or click Add Custom to specify a custom solution.

Chapter 16 Remediation
Skybox version 8.5.600 117
6 Click OK.
The tickets are created and added to the list of new tickets for the selected owner.
UPDATING THE MODEL AFTER FIXING VULNERABILITY OCCURRENCES
When a vulnerability occurrence is fixed in the actual network, you must update the model to reflect the new life-cycle status of the vulnerability occurrence and attack simulation run on the new data. Otherwise, the analysis is no longer accurate.
There are various ways to update the model:
› Wait for the next scanner task to detect the changes. › Run a selective scan to detect or verify whether vulnerability occurrences
marked as Fixed are fixed. › Manually mark vulnerability occurrences as Fixed in the model based on
approval from staff members. This is useful if no offline file import or online collection of network data is planned in the near future.
To mark a vulnerability occurrence as Fixed 1 Find the vulnerability occurrence in the Table pane of an analysis (or the
Vulnerability Occurrences node of the Model tree).
2 Right-click the vulnerability occurrence and select Change Status.
3 Change the status to Fixed and click OK.
4 In the confirmation dialog box, select a fixed status (I’m sure the vulnerability occurrence was fixed or The vulnerability occurrence was probably fixed) and click OK.
If you select The vulnerability occurrence was probably fixed, the vulnerability occurrence is checked during the next vulnerability occurrence scan (which changes the status to Found if the vulnerability occurrence is rediscovered). Until then, it is considered Fixed and is not used for attack simulation.
USING THE WHAT IF MODEL TO TEST CHANGES Skybox supports a What If model, where you can simulate the effect of solutions before applying them to your organization’s network. Use this model to test planned changes to architecture or to firewall and router configurations. You can simulate the changes to your system and then check the potential effects on your system without making the changes. You can analyze potential risks due to the changes without causing any harm to your system; the changes you make to the What If model do not affect the Live model or your organization’s network.
To use the What If model for testing 1 Open the What If model:
• If you have a What If model:
— Select What If from the drop-down list on the toolbar.

Skybox Vulnerability Control User’s Guide
Skybox version 8.5.600 118
• If you do not have a What If model:
a. Select File > Models > Create Model.
b. In the dialog box, select Live as the Source Model, What If as the Target Model, and select Switch to target model after creation.
c. Click OK.
This copies the current Live model to the What If model and switches to the What If model.
2 Make changes to the What If model.
3 Run the Analyze – Exposure task on the What If model.
4 Check the analyses to see that you get the desired results and then recommend that these network or security changes are made in your organization’s network. If the changes relate to vulnerability occurrences or Business Asset Groups, switch to the Live model and open the appropriate tickets there.
5 You can return to the Live model at any time to view the current security situation in your network. Skybox saves the current situation of the What If model until you create a new What If model.

Skybox version 8.5.600 119
Chapter 17
This chapter explains how to use Skybox on a proactive (continuous and automated) basis to ensure the continued security of your organization’s network, rather than checking and securing the system on a reactive basis every several months.
The benefits of continuous risk management are:
› A shorter window of exposure to new Vulnerability Definitions and worms › A continuous view of the security status of your organization’s network › A small effort every day or week, compared to a large project on a quarterly
or semiannual basis
In this chapter
Attack simulation for continuous risk management ................. 119
Monitoring the risk status ................................................... 119
Automating tickets ............................................................. 120
Tickets and workflow .......................................................... 122
Model maintenance ............................................................ 126
ATTACK SIMULATION FOR CONTINUOUS RISK MANAGEMENT Run the Analyze – Exposure task:
› After new data is added to the model, so that the new data influences the risk › After other changes to the model (for example, Dictionary updates or aging)
Include this task in every task sequence that involves changes to the model, after the tasks that make changes.
MONITORING THE RISK STATUS When new data is added to the model, you can monitor the current risk status using any of the following methods:
› Review risk metrics to identify current security problems in the organization’s network
You can view risk metrics from the Exposure Summary page or from any other Exposure page where risk is displayed
› View risk trends as a way of understanding current changes to the organization’s network in a broader context
Continuous risk management
Skybox Vulnerability Control User’s Guide
Skybox version 8.5.600 120
You can view risk trends for vulnerability occurrences in the Trend of Direct Vulnerability Occurrences graph on the Exposure Summary page. For Threat Origins, the Top 3 Threat Origins table includes the delta values for direct and 2nd-step vulnerability occurrences from the current number of vulnerability occurrences to the previous number (from the last time that exposure was analyzed).
› Check whether new assets or services were added to the organization’s network
› Check whether new vulnerability occurrences were detected
Checking for new entities New assets can be added to the organization’s network, new services can be added on any asset, and new vulnerability occurrences might be detected on these new assets and services, and on existing assets.
If these entities cause high risk or if the vulnerability occurrences are directly exposed, they affect the exposure results. Skybox provides analyses that enable you to ascertain quickly whether new entities were added to the system and to view additional information about them.
Use the following analyses to identify new entities:
› In the Model Analyses > New Entities node of the Model tree:
• New Assets: Recently discovered assets
• Assets with New Services: Existing assets with newly discovered services
› In Vulnerability Control > Prioritization Center > Analyses > Public Analyses > Vulnerabilities > New Vulnerability Occurrences:
• New Vulnerability Occurrences: Recently discovered vulnerability occurrences
• Uncataloged Vulnerability Occurrences: Vulnerability occurrences detected by scanners but not yet modeled in Skybox
Note: Keeping your Skybox Vulnerability Dictionary up-to-date usually eliminates most uncataloged vulnerability occurrences.
You can add new analyses or change existing analyses. For example, to see what changed in several major locations separately, make copies of the relevant analysis, change their names, and change the network scope.
AUTOMATING TICKETS This section explains how to set up and use automated ticketing in Skybox.
Note: You can integrate Skybox with other ticketing systems (see the Tickets API chapter in the Skybox Developer’s Guide or contact Skybox technical support (see page 9)).
Setting up ticket automation This section explains how to set up policies for automatic ticket creation.
Chapter 17 Continuous risk management
Skybox version 8.5.600 121
A policy defines the conditions under which new tickets of a specific ticket type are created automatically. Tickets are not created on a continuous basis whenever the conditions of a policy are met, but only when a Tickets – Auto Generation task is run.
The following predefined policies are included as part of the Skybox installation:
› New Direct Externally Exposed vulnerability occurrences: Creates tickets for new directly exposed vulnerability occurrences and for existing vulnerability occurrences that have become directly exposed.
› New High/Critical Vulnerability Definitions: Creates tickets for new high or critical severity threat alerts.
› (Disabled) Vulnerability Definitions Subject to Worm Attacks: Creates tickets for Vulnerability Definitions that have many vulnerability occurrences in the organization’s network. These Vulnerability Definitions are prone to exploitation by attackers and worms.
You can use these policies as is or edit them, and you can create new policies to meet the needs of your organization.
Creating policies A policy includes filters for the entities for which tickets are to be created. A ticket is created for an entity only if it matches every filter. Policies also include information about the ticket itself: who the owner will be, and how the ticket’s priority is to be defined.
To create a policy 1 Select Tools > Administrative Tools > Policies.
2 On the toolbar of the Skybox Admin window, click , and select the type of policy that you want to create (threat alert or vulnerability occurrence).
3 In the dialog box, fill in the fields.
• For property definitions of threat alert policies, see the Threat alerts policies topic in the Skybox Reference Guide.
• For property definitions of vulnerability occurrence policies, see the Vulnerability occurrences policies topic in the Skybox Reference Guide.
4 Click OK.
The new policy is added to the list of policies.
Creating tickets from policies Usually, tickets are created from policies using Tickets – Auto Generation tasks. By default, these tasks create tickets for all policies. However, you can create separate tasks for each policy type if that is helpful to your organization.
Each time that you create tickets (using a ticket task or manually for a specific policy), Skybox:
› Evaluates all relevant policies › Creates new tickets

Skybox Vulnerability Control User’s Guide
Skybox version 8.5.600 122
We recommend that you create tickets automatically each time changes are made to the model. For example, each time devices are updated or a vulnerability detection task is run, you can schedule a ticket creation task for the policy that checks for new directly exposed vulnerability occurrence
For information about task sequences, see Using tasks for automation (on page 128).
To create tickets manually from a policy 1 Select Tools > Administrative Tools > Policies to open the Skybox Admin
window.
2 In the Table pane, right-click the policy to run and select Generate Tickets.
Skybox searches the model to see whether there are any entities that meet the policy requirements. If there are, it creates a ticket for each entity.
TICKETS AND WORKFLOW Tickets in Skybox represent action items that must be implemented in your organization’s network. They can be created manually or from policies that are configured to create tickets for entities on which specified thresholds are reached.
Managing Skybox tickets is a way of ensuring that all security issues found by Skybox are resolved properly and within the designated time frame.
Note: You can set up ticket phases, which define different steps for remediation (see the Defining ticket phases topic in the Skybox Reference Guide).
Monitoring tickets To make sure that all tickets are handled properly, monitor the status of tickets.
Verifying that tickets are being acted on You can check the status of tickets using:
› Tickets reports (for example, the Overdue Tickets – Details report). › Tickets analyses (for example, the All Tickets > Open Tickets > In
Progress analysis).
Overdue tickets have a status of New or In Progress but have passed their assigned due date. You can contact the ticket owners to find out why they did not handle the ticket.
Because the ticketing workflow provides a history of compliance to security requirements, you should update the status of tickets to reflect the status of the solutions applied.
Working with tickets Existing tickets can be:
› Viewed › Assigned to different owners › Edited

Chapter 17 Continuous risk management
Skybox version 8.5.600 123
› Changed to a different status › Closed
To view and handle individual tickets, select the ticketed entity in the appropriate workspace and access the ticket in the Tickets tab of the Details pane. You can also access them in the Tickets workspace.
You view and handle groups of tickets in the Tickets workspace. For example, to view all tickets created within the past week, use the Public Tickets > All Tickets > Open Tickets > New analysis.
Viewing tickets Folders in the Tickets tree contain analyses related to tickets.
The top-level nodes of the Tickets tree are:
› Public Ticket Analyses: Contains the tickets analyses available to everyone who logs in to the Manager.
• The All Tickets folder contains tickets in the system distributed by status.
• The My Tickets folder contains only tickets that are owned by the logged-in user.
› Private Ticket Analyses: Contains analyses that are not visible to other users of the system. Use this folder to create your own tickets analyses.
You can view additional properties of a specific ticket:
› Select the ticket in the Table pane and view the information in the Details pane.
› Double-click the ticket in the Table pane to open it.
Searching for tickets You can search for tickets without creating an analysis for them. The search is based on a match between a text string and 1 or more of the following ticket fields:
› Title › ID › User Comments › Status › Priority › Owner › Solution Name

Skybox Vulnerability Control User’s Guide
Skybox version 8.5.600 124
To search for tickets
1 With the Ticket workspace open, click (on the toolbar).
2 In the Search panel, type a string in the Find What field.
3 In the Look In field, select the ticket field in which to search for the string.
4 Click .
Tickets that include the search string in the specified field are listed in the Table pane.
Changing ticket statuses Skybox supports the following predefined ticket statuses:
› New: This is the default status for all newly created tickets. › In Progress: The owner has seen the ticket and is in the process of handling
it. › Ignored: The ticket is not important and the owner has chosen to ignore it.
This status is used, for example, if the vulnerability occurrence for which the ticket was created is a false positive.
› Rejected: While the problem for which the ticket was issued does exist, the solution is not relevant or cannot be applied. This can happen, for example, if the suggested solution is to change a specific access rule to block access, but changing that rule also blocks access to an important application.
› Resolved: The problem was handled by its user, but the fix is not verified. › Closed: The task was completed and verified. This is the final ticket status.
Admins can add up to 5 custom ticket statuses in Skybox, (see the Custom Ticket Statuses topic in the Skybox Installation and Administration Guide).
Except for automatically created tickets, which are closed when their conditions are no longer met, ticket status does not change automatically. It must be changed manually by the ticket owner or by an Admin.
To change the status of a ticket 1 Find an analysis containing the ticket.
2 In the Table pane, right-click the ticket and select Change Status.
3 In the dialog box, select the new status for the ticket and then click OK.
The status of the ticket changes. Although the ticket might no longer match the current analysis (for example, a ticket whose status was changed from New to In Progress no longer matches the criteria of the New analysis), it is listed in the old analysis until you refresh the screen or navigate from the current analysis.
Note: Changing the status of a vulnerability occurrence ticket to Resolved or Closed changes the status of the vulnerability occurrence in the model to Fixed and the vulnerability occurrence is no longer used for attack simulation (see Closing vulnerability occurrence tickets (on page 125)).

Chapter 17 Continuous risk management
Skybox version 8.5.600 125
Closing tickets You close a ticket by changing its status to Closed. When you close a vulnerability occurrence ticket, the status of the vulnerability occurrence changes in the model. For additional information, see Closing vulnerability occurrence tickets (on page 125).
When you delete a policy, you are asked whether to close all tickets created by the policy or leave them unchanged.
Important: When you finish working with a ticket, close it; if you delete a ticket, you lose the history of the problem that caused the ticket.
Closing vulnerability occurrence tickets In general, tickets affect entities in the model only when the ticket owner implements the changes. However, some changes to the status of a vulnerability occurrence ticket affect the vulnerability occurrence for which the ticket was opened.
Note: Admins can configure Skybox so that closing a ticket does not affect the vulnerability occurrence.
› When you manually change the status of a vulnerability occurrence ticket to Resolved, the status of the vulnerability occurrence changes to Fixed.
These vulnerability occurrences are checked during the next scan to confirm that they are fixed.
› When you manually close a vulnerability occurrence ticket, the status of the vulnerability occurrence changes to Fixed.
Fixed vulnerability occurrences are not used for attack simulation.
If you select a solution for a vulnerability occurrence ticket, when you close the ticket the model changes according to the solution that you selected:
› Upgrade: The service version found by the scanner is overwritten with the version provided in the solution.
› Patch: The patch is recorded as applied on the asset. › Remove: The service is marked as down.
For example, if the selected solution is to upgrade the service on which the vulnerability occurrence is found, the service is upgraded on the asset in the model.
Tickets that are closed automatically do not change the model or affect the vulnerability occurrences for which they were created.
Managing tickets analyses You can edit or copy analyses in the Tickets tree to meet your requirements, you can create analyses from scratch, and delete analyses that are not relevant.
You can sort the results of a tickets analysis by various properties, including status, priority, ticket type, and ticket owner. You can display additional columns of information (for example, operating system, service, or the policy that created the ticket) or hide columns to focus on specific aspects of the analysis.

Skybox Vulnerability Control User’s Guide
Skybox version 8.5.600 126
Note: Users can create and edit analyses only in the Private Ticket Analyses folder.
When working with ticket phases, you can create a separate analysis for each phase.
MODEL MAINTENANCE You can automate the process of maintaining and updating the model, including:
› Model updates › Data monitoring › General maintenance (for example, saving and loading backup versions of the
model)
For additional information, see Model maintenance (on page 141).
You can schedule reports to run on an automated basis and sent to the desired recipients (see the Automating reports topic in the Skybox Reference Guide).
This part explains how to work with Skybox Vulnerability Control on a continuous basis.
Part III: Continuous usage

Skybox version 8.5.600 128
Chapter 18
Scheduled tasks and task sequences can be used in Skybox to automate various processes, including data updates, model maintenance, and reports.
This chapter explains how to work with task sequences and how to schedule tasks and task sequences. For information about using tasks and about each specific task, see the Tasks part of the Skybox Reference Guide.
Note: Only Admins and Users can work with tasks. Admins can work with all tasks; Users can work with a limited range of tasks, including tasks that generate reports and CSV files, tasks that create tickets, and tasks that analyze data.
In this chapter
Task sequences ................................................................. 128
Scheduling tasks and task sequences ................................... 131
Task groups ...................................................................... 132
Monitoring task results ....................................................... 132
TASK SEQUENCES You can define task sequences, where each task in the sequence runs as soon as a previous task ends. This is useful when you often want to run a set of tasks in a specific order.
You can use separate task sequences for different purposes (for example, data collection and maintenance), different parts of the system, and different frequencies.
A task sequence can include task groups. The tasks in a task group are run in parallel.
For information about tasks, see the Tasks part of the Skybox Reference Guide.
Creating task sequences You create a task sequence by creating an ordered set of tasks where each task in the sequence depends on the outcome of another task. If the outcome of the previous task (the triggering task) is not what you specified, the next task is not launched. For example, you can make the Analyze – Simulate Attacks task dependent on a full scan completing with a status of Success: if the full scan completes with any errors that prevent it from having the Success status, the Analyze – Simulate Attacks task is not launched.
Subsequent tasks that depend on a task that was not launched are also not launched. If, in the previous example, the Generate Risks Details Report task is the next task in the sequence and it is scheduled to run after the Analyze – Simulate Attacks task completes, it does not run.
Using tasks for automation

Chapter 18 Using tasks for automation
Skybox version 8.5.600 129
To create a task sequence
1 On the Operational Console toolbar, click .
2 Type a Name for the sequence.
3 Keep Basic selected as the type of task sequence, and click Next.
4 In the Sequence Tasks pane, click Add.
5 In the Add Task dialog box, select a task to add to the sequence and click OK.
The task is added as the 1st task in the task sequence.
6 Add additional tasks to the task sequence:
Note: A task can only be used once per task sequence. However, you can use different tasks of the same type in a task sequence.

Skybox Vulnerability Control User’s Guide
Skybox version 8.5.600 130
a. Click Add.
The Add Task dialog box now includes additional fields to create a dependency on a previous task.
b. Select a task to add to the sequence.
A dependency is created so that this task runs after the previous task finishes with any of the specified exit codes.
c. To change the triggering task, select a different task in the Depends on Task field.
d. To change the exit codes of the triggering task, click the Browse button next to the Depends on Exit Codes field.
If the triggering task ends with a different exit code, the dependent task is not triggered.
e. Click OK.
7 Click OK.
The new dependency is added to the sequence for this task.
Creating similar task sequences After a task sequence for a set of tasks is created, you can use it as a template for similar task sequences: Right-click the task sequence and select Create Task Sequence Like.

Chapter 18 Using tasks for automation
Skybox version 8.5.600 131
Viewing and editing task sequences
To view task sequences 1 In the Operational Console tree, select Tasks > Task Sequences.
2 Select a task sequence.
Tasks in the sequence are listed in the Table pane and general information or messages from the last run of the selected task in the Details pane.
Editing task sequences You can add tasks to and remove tasks from a sequence and change the order of the tasks in the sequence and the exit conditions for the triggering task.
To edit a task sequence
› Right-click the task sequence in the tree and select Properties.
SCHEDULING TASKS AND TASK SEQUENCES You can define a task or a task sequence so that it runs at scheduled times (for example, on Sundays at 5 p.m. and Wednesdays at 4 a.m., on the 15th and 28th of every month, or every 15 minutes). Although tasks and sequences are usually scheduled to run on the Live model, you can schedule them to run on any model.
To schedule a task or task sequence 1 Navigate to the task or sequence in the Operational Console tree.
2 Right-click the task or sequence and select Properties.
3 In the <Task name> Properties dialog box, click the Schedule tab.
4 For each schedule (for example, the 1st of every month or every Sunday):
a. Click Add.
b. Select a time slice and fill in the corresponding fields.

Skybox Vulnerability Control User’s Guide
Skybox version 8.5.600 132
c. If the task is to run a limited number of times, select End after and type the number of times that you want the task to run.
d. If necessary, in the Model field, change the model on which the task runs.
e. Click OK.
The new schedule is added to the list of schedules for this task.
5 Click OK.
Note: If auto-launch is not enabled for a task, it does not run on its specified schedules. However, it does run as part of a task sequence.
To view scheduled tasks and sequences
› In the Operational Console tree, select Tasks > Schedules.
Defined schedules are listed in the Table pane and the scheduled entities are listed in separate tabs (Tasks and Sequences) in the Details pane.
TASK GROUPS You can group a set of tasks together so that you can run them as part of a task sequence (see page 128).
When you create a task group, Skybox creates a separate folder for it, where you can view and edit the list of tasks in the group.
Note: You can only run a whole task group as part of a task sequence. Otherwise, you must launch or schedule each task separately. When run as part of a task sequence, the tasks in a task group run in parallel.
To create a task group 1 On the Operational Console tree, right-click Task Groups.
2 In the New Task Group dialog box:
a. Type a name for the group.
b. In the User Comments field, type a description of the group.
c. To select tasks to include in this group, click the Browse button next to the Tasks field.
d. Click OK.
A folder for this group is added under the Task Groups node.
MONITORING TASK RESULTS
Task messages After running a task, you can check the task results to make sure that the outcome is what you expected. For example, after updating firewall configurations (using tasks), check the task results to confirm that all data was properly imported into Skybox. Check for failed tasks; if a task failed, find out why it failed, make the necessary changes, and rerun the update task for the failed firewall.

Chapter 18 Using tasks for automation
Skybox version 8.5.600 133
You can see a list of tasks that failed in the Operational Console window, at Tasks > Failed Tasks. For each task, you can see the messages from the task’s most recent run.
Task alerts You can set up Skybox to send email alerts to various users for failed tasks. You can configure global settings and also configure specific settings in the task properties of a specific task. By default, tasks alerts are sent for each task that runs. However, if you do not want task alerts sent for a specific task, you can disable them in the task properties.
To configure global task alerts 1 Select Tools > Options > Server Options > Task Settings > Task Alert
Settings.
2 Do any of the following in the Email to field:
• Type the email addresses to which alerts are to be sent.
Multiple addresses must be comma-separated, with no space between the comma and the following address.
• Click the Browse button; select Skybox users who are to receive alerts and add the external email addresses of other desired recipients.
All alerts are sent to each specified recipient.
3 Modify the following as necessary:
• Email on: The exit codes on which to send task alerts.
• Messages Count: The maximum number of messages from the failed task to include in the task alert.
4 Click OK.

Skybox version 8.5.600 134
Chapter 19
Reports in Skybox are detailed accounts of specific data in the model.
This chapter describes the report types available in Skybox Vulnerability Control.
In this chapter
Reports overview ............................................................... 134
Security Metric reports ....................................................... 135
Risks reports ..................................................................... 135
FISMA/NIST and Risk Assessment reports ............................. 136
PCI DSS reports ................................................................ 136
Tickets reports .................................................................. 136
Vulnerability Management reports ........................................ 137
Vulnerabilities reports ........................................................ 137
Exporting data to CSV files .................................................. 139
Exporting vulnerability occurrence data to Qualys format ........ 140
REPORTS OVERVIEW Reports in Skybox are detailed accounts of specific data in the model (for example, high-risk entities, firewall changes, overdue tickets, or top 10 entities). You can schedule reports to run at specific times and to be sent to specified Skybox users.
You can generate reports in standard report formats (PDF, HTML, and RTF). Some types of reports are saved in CSV format. CSV files can be used by 3rd-party applications for additional processing.
There are several ways to work with reports:
› Generate reports as you are working:
• Right-click an entity in the Tree pane
• Save the current table in CSV format
› Schedule report generation via tasks (including Report – Auto Generation tasks and various CSV export tasks)
› View (and generate) reports in the Reports workspace, and customize their content
Reports

Chapter 19 Reports
Skybox version 8.5.600 135
SECURITY METRIC REPORTS Security Metric reports contain security metrics information for the selected security metric type (VLI or RLI) and information about:
› The contribution of Vulnerability Definitions to the security metrics › The contribution of subunits to the security metrics scores › Trends
These reports are usually used for reviewing security metrics in a specific unit. To avoid information overload, Security Metric reports can show data about a single unit only or about a unit and its child subunits (1 level down).
To generate a Security Metric report, specify the scope (that is, the units to include in the report) and select the security metric type of the report.
For additional information about Security Metric reports, see the Security Metric reports topic in the Skybox Reference Guide.
RISKS REPORTS Risks reports can contain information about any of the following, depending on the scope of the report:
› The Business Units with the highest potential risk of being compromised. › The Business Asset Groups with the highest potential risk of being
compromised by attacks and vulnerability occurrences. › The Regulations and Business Impacts with the highest potential risk of
being compromised. › The Threat Origins in your network that impose the highest potential risk on
high-value Business Asset Groups.
These reports are usually used to highlight the Business Asset Groups with the highest risk and to provide the risk factors that caused the risk on these Business Asset Groups.
For additional information about risks reports, see the Risks reports topic in the Skybox Reference Guide.
Predefined risks reports Skybox includes the following predefined risks report definitions:
› Risks – Details: Presents details of the top entities of each selected entity type. Entities with no risk are not included in the report. Risks are displayed qualitatively (on a scale of Very Low to Critical).
› Risks – Overview: Presents an overview of the top entities of each selected type. Entities with no risk are not included in the report. Risks are displayed qualitatively (on a scale of Very Low to Critical).
› Regulation Compliance Risk – Details: Presents information about the top Regulations that are at risk of being compromised. It includes detailed explanations of how the risk of each entity is calculated.

Skybox Vulnerability Control User’s Guide
Skybox version 8.5.600 136
FISMA/NIST AND RISK ASSESSMENT REPORTS FISMA/NIST reports and Risk Assessment reports present information about systems, threat statements, risk assessment, and actions with milestones. These reports are used to meet FISMA risk reporting requirements.
The 2 types of reports are the same, except that FISMA Risk Management reports use US Government nomenclature, while Risk Assessment reports use standard nomenclature.
Note: The text fields in the Properties dialog box for Risk Assessment reports and FISMA Risk Management reports contain placeholder text that you should change before generating these reports for the 1st time. The information in these fields is used in the introductory section of the report.
For additional information about these reports, see the FISMA/NIST reports and Risk Assessment reports topics in the Skybox Reference Guide.
PCI DSS REPORTS PCI DSS reports present information about vulnerability occurrences found on system components, including Business Asset Groups, networks, and network devices. The vulnerability occurrences are listed as action items according to their exposure.
These reports are usually used to show compliance with PCI DSS Requirement 6.1 (6.2 in PCI DSS v3.2).
Note: The text in the Introductory Text field in the Properties dialog box that defines this report is used as the introduction to the report. By default, it contains text that explains how the report demonstrates compliance with PCI DSS Requirement 6.1. If you use the report for other purposes (for example, to show compliance with a different standard), change this text before generating these reports.
For additional information about PCI DSS reports, see the PCI DSS reports topic in the Skybox Reference Guide.
Predefined PCI DSS report Skybox includes the following predefined PCI DSS report definitions:
› PCI DSS – Requirement 6.1: Presents vulnerabilities in your organization’s network as action items in accordance with PCI DSS Requirement 6.1.
TICKETS REPORTS Tickets reports contain summary and detailed information about tickets.
› Overview tickets reports are usually used to review and monitor ticket progress, and to see which tasks are assigned to who.
› Detailed tickets reports are usually used to implement the changes specified in the tickets.
Tickets reports show the status, priority, and assigned owner of tickets that meet the report criteria. You can filter these reports according to many different properties.

Chapter 19 Reports
Skybox version 8.5.600 137
For additional information about tickets reports, see the Tickets reports topic in the Skybox Reference Guide.
Predefined tickets reports Skybox includes the following predefined tickets report definitions:
› Open Tickets – Overview: Presents an overview of open Skybox tickets, including the priority, status, and owner for each ticket. The tickets are grouped by priority.
› Open Tickets – Details: Presents detailed information about all open Skybox tickets. The tickets are grouped by Priority.
› Overdue Tickets – Details: Presents detailed information about all Skybox tickets that are past their due dates, including the status, priority, and owner for each ticket. The tickets are grouped by owner.
VULNERABILITY MANAGEMENT REPORTS Vulnerability Management reports are high-level reports that provide an overview of the vulnerability and risk management process that is similar to the overview that you can see in the Vulnerability Control workspace. These reports contain information about:
› Discovery: The age and status of vulnerability occurrences and assets (including an indication of overdue assets)
› Analytics: security metrics that need remediation and exposed vulnerability occurrences
You can decide to include only discovery or only analytics information.
For additional information about Vulnerability Management reports, see the Vulnerability Management reports topic in the Skybox Reference Guide.
VULNERABILITIES REPORTS Vulnerabilities reports are technical reports that contain summary and detailed information about vulnerability occurrences found in the model.
Use these reports to review the vulnerability occurrences in a specific network segment or location, to filter exposed vulnerability occurrences, to show vulnerability occurrences with a specified severity level, or to show vulnerability occurrences that impose the highest risk on your organization. The reports can include trends in vulnerability occurrence statistics.
› In Overview reports, you can see counts of vulnerability occurrences that meet the report criteria. You can group the vulnerability occurrences by operating system, location, Business Units and Business Asset Groups that they affect, and Vulnerability Definitions (also known as threat alerts).
› In Detailed reports, you can see all information about each vulnerability occurrence that meets the report criteria.
› In reports that provide Details & Solutions, you can see all information about each vulnerability occurrence and known solutions for mitigating that vulnerability occurrence.

Skybox Vulnerability Control User’s Guide
Skybox version 8.5.600 138
For additional information about vulnerabilities reports, see the Vulnerabilities reports topic in the Skybox Reference Guide.
Limiting the scope of vulnerabilities reports We recommend that you define vulnerabilities reports with limited scopes to avoid excessively long reports. By default, reports involving vulnerability occurrences are limited to 5000 vulnerability occurrences for Overview reports and 1000 vulnerability occurrences for Details (or Details & Solutions) reports—for detailed reports, Skybox does all analyses based on the first 1000 vulnerability occurrences it finds that match the report definition criteria. The detailed information in a detailed report is limited to the first 50 vulnerability occurrences.
You can limit the scope of vulnerabilities reports by changing any of the following properties of the definition on which they are based:
› The scope of the network to include in these reports › The type of operating systems to include in these reports › Any of the vulnerability occurrence properties, including:
• Imposed risk
• Status
• Severity
• Commonality
• Vulnerability Definition
• Scan time
To change the scope of a vulnerabilities report definition 1 Right-click the report definition name in the Tree pane and select Properties.
2 Make the desired scope changes.
• For information about the properties of vulnerabilities reports, see the Vulnerabilities reports topic in the Skybox Reference Guide.
3 Click OK to save the information and close the Properties dialog box.
Note: An Admin can change the maximum number of vulnerability occurrences to include in reports. This is not usually recommended.
Predefined vulnerabilities report definitions Skybox includes the following predefined vulnerabilities report definitions:
› Vulnerabilities – Details: Presents detailed information about the vulnerability occurrences in the model.
› Vulnerabilities – Overview: Presents an overview of the vulnerability occurrences in the model.
› Vulnerabilities – Solutions: Presents detailed information about the vulnerability occurrences in the model and suggested solutions for each vulnerability occurrence.
Chapter 19 Reports
Skybox version 8.5.600 139
EXPORTING DATA TO CSV FILES You can export much of the information available in Skybox in CSV format. The CSV files can then be opened with an application for additional processing.
There are 3 ways to export Skybox data to CSV:
› Via the Tree pane › By selecting the table › Using tasks
To export information about an entity in the Tree pane to a CSV file 1 Select an entity in the Tree pane.
2 Right-click the entity.
Usually, there is either a Reports submenu with CSV reports available or an Export to CSV option.
3 Select the relevant option.
To export a table to CSV that cannot be exported using this method (for example, a table in the Details pane), use the following instructions.
To export a table to a CSV file 1 Display a table in the Table pane or in a tab of the Details pane.
For example, to save a list of the Vulnerability Definitions that contribute to the security metrics score of a Business Unit, select the Business Unit in the tree, and then click the Vulnerability Definitions tab in the workspace.
2 To save specific columns only, make sure that the columns to be saved are displayed in the table and that the other columns are hidden.
• To display or hide columns, right-click in the header row of the table, select Customize Current View, and then select or clear columns.
3 Select any row in the table.
This focuses the Save operation on the selected table.
4 From the File menu, select Export Table to CSV.
5 In the Save dialog box, navigate to the desired location and click Save.
Using tasks to export data to CSV files Some model data can be exported to CSV using tasks. This is especially useful if you want to export the data on a regular basis. The following CSV tasks are available for Skybox Vulnerability Control:
› CSV – Security Metrics Export › CSV – Analysis Export
Information about these tasks is available in the Skybox Reference Guide.
Skybox Vulnerability Control User’s Guide
Skybox version 8.5.600 140
EXPORTING VULNERABILITY OCCURRENCE DATA TO QUALYS FORMAT
Vulnerability occurrence analyses (lists of vulnerability occurrences) can be exported to XML files in Qualys format for integration with SIEM solutions.
To export an analysis to Qualys format
› Right-click the name of the analysis in the tree and select Export to XML – Vulnerability Occurrences.
To create a Qualys vulnerability occurrence export task for a specific analysis 1 Create an XML Vulnerability Occurrence (Qualys Format) Export task.
• For information about the task properties, see the Qualys format XML vulnerability occurrences export tasks topic in the Skybox Reference Guide.
2 Use the Analysis Definition field to select the analysis for which you want to create the task.
3 (Optional) Change properties of the task (including the directory where the files are saved).
Each time the task is run, the table is saved to a file named <analysis name>_<date>--<time>.xml in the selected directory.

Skybox version 8.5.600 141
Chapter 20
Model maintenance includes:
› Automating tasks for updating the model › Confirming that the offline file import and online collection tasks ran
successfully › Validating the model to check for missing or incorrect information › Deleting entities that are no longer required › General maintenance procedures, including updating the Skybox Vulnerability
Dictionary and saving the model
In this chapter
Updating the model ............................................................ 141
General maintenance ......................................................... 144
UPDATING THE MODEL This section explains various activities that you must do to keep the model up-to-date.
Automating data collection Run online collection and offline file import tasks for all devices according to the schedule at which each individual device is updated.
› For information about scheduling tasks, see Scheduling tasks and task sequences (on page 131).
› For information about the properties of tasks, see the sections relating to the tasks in the Tasks part of the Skybox Reference Guide.
Vulnerability occurrence maintenance This section explains how to maintain vulnerability occurrences in the model.
Vulnerability occurrence life cycle Every vulnerability occurrence has a life-cycle status, from the time it is found by a scanner and merged into the model, or created by a user until it is finally deleted by the system or by a user. The value of the life-cycle status changes according to user decisions, merges of new scanning results, and ticket processing.
Internal life-cycle statuses include:
Model maintenance

Skybox Vulnerability Control User’s Guide
Skybox version 8.5.600 142
› System status: Computed by Skybox. System status is affected by system algorithms, which also take user decisions into account.
› User-defined status: Assigned by a user. User status is affected only by direct user decisions about the vulnerability occurrence.
The displayed life-cycle status is a value derived from the internal status. Possible values are:
› Found: The vulnerability occurrence exists in the model › Ignored: The vulnerability occurrence exists in the model but is to be
ignored › Fixed: The vulnerability occurrence exists in the model, but was fixed
Attack simulation and reports use only vulnerability occurrences whose displayed life-cycle status is Found.
Initial vulnerability occurrence life-cycle statuses When data is imported, all detected vulnerability occurrences are assigned the internal life-cycle status Found by system, which is equivalent to a displayed life-cycle status of Found.
During the merging process, another internal status, Suspected False Positive, might be assigned to some vulnerability occurrences. This occurs when there is a mismatch between the asset and the vulnerability occurrence’s existence preconditions. For example, if a scanner decides (based on the Windows registry) that a vulnerability occurrence exists for the Microsoft IIS HTTP service, but Skybox does not find any HTTP ports open on the asset, Skybox changes the status of that vulnerability occurrence to Suspected False Positive.
Suspected False Positive is equivalent to a displayed life-cycle status of Ignored. Vulnerability occurrences marked as Suspected False Positive are not used in attack simulation.
For additional information about suspected false positives, see False positive reduction (on page 143).
User-defined statuses Users can change the status of any vulnerability occurrence. A user might decide to ignore a vulnerability occurrence (not use it in attack simulation) for any of the following reasons:
› It is not very important (no impact) › It does not exist (false positive) › Its risk is acceptable
Vulnerability occurrence aging Scanned vulnerability occurrences go through a process of aging. If the life-cycle status of a scanned vulnerability occurrence has not changed in a specified number of days, the vulnerability occurrence receives a system status of Not Found. After another specified number of days, it is deleted. If a vulnerability occurrence is rediscovered, it is assigned a system status of Found. For additional information, see Deleting outdated entities (on page 143).

Chapter 20 Model maintenance
Skybox version 8.5.600 143
False positive reduction
False positive reduction is relevant only when working with Skybox Vulnerability Control.
The False Positive Reduction task checks the model for vulnerability occurrences that might not be exploitable because they do not match their assigned service well enough. The task changes the life-cycle status of these vulnerability occurrences to False Positive. False positive vulnerability occurrences are not used in attack simulation.
For example, a vulnerability occurrence is detected on an asset running Microsoft IIS. If the False Positive Reduction task decides (based on the Skybox Vulnerability Dictionary) that this Vulnerability Definition exists only on version 5.1 of IIS HTTP, but the asset on which the vulnerability occurrence is found uses version 5.0, the vulnerability occurrence would be marked as a false positive.
The task also checks for patches that fix the detected vulnerability occurrences. If a patch is found on an asset and it is specified in the Vulnerability Dictionary as a patch that mitigates a vulnerability occurrence found on the asset, the life-cycle status of the vulnerability occurrence is set to Fixed and it is not used in attack simulation.
Run the task at the following times:
› After adding new data to the model › After updating the Vulnerability Dictionary
For information about the properties of this task, see the False positive reduction tasks topic in the Skybox Reference Guide.
Deleting outdated entities Network entities (assets, services, vulnerability occurrences, and network interfaces) are added to the model during online collection and offline file import. These entities can become outdated or no longer used as the model is updated, but they remain in the model until they are specifically deleted. For example, a fixed vulnerability occurrence has its status changed to Fixed, but it is not deleted from the model even though it is no longer used for risk analysis.
Model – Outdated Removal tasks delete network entities that were not updated recently from the model. When the task runs, it compares the scan time of each entity with the current date and time to establish the entity’s age. Entities of a specified age are marked as Down and older entities (of a different specified age) are deleted from the model.
The predefined Model – Outdated Removal task is named Model – Remove Outdated. Run this task on a regular basis to keep the model ‘clean’.
The task does the following for each network in the model:
1 Decides whether to check the network for outdated entities:
• If a network was not scanned in the last <n> days (where <n> is the value set in the task), it is not checked by this task for outdated entities.
• If a network was scanned in the last <n> days, it is checked by this task for outdated entities.

Skybox Vulnerability Control User’s Guide
Skybox version 8.5.600 144
Note: You can configure networks and assets so that they are not checked for outdated entities, see Using the Do Not Outdate option (on page 144).
Manually created networks (or networks created by iXML import) are usually not updated on a regular basis so should not be aged and outdated.
2 For networks that are checked, calculates the age of each entity in the network, changes the status of entities of the specified age to Down (or Not Found, in the case of vulnerability occurrences), and deletes older entities from the model. If all network interfaces of an asset are deleted (due to aging), the asset is also deleted from the model.
You can check which entities are aged by this task by selecting the Dry Run property in the Advanced tab. In a dry run, a list of entities that would be aged by the task is written to the log file but the entities are not aged.
You can run the task but exclude all gateway devices (and their services, vulnerability occurrences, and network interfaces) from the aging process using the Exclude Gateways property in the Advanced tab.
For information about the properties of this task, see the Delete outdated entities tasks topic in the Skybox Reference Guide.
Using the Do Not Outdate option Use the Do Not Outdate option in the Properties dialog box of a selected network (or Perimeter Cloud) or asset so that it is not checked for outdated entities.
› When an asset is excluded from the aging process, the asset’s network interfaces, services, and vulnerability occurrences are not aged.
› When a network is excluded from the aging process, the network’s assets (together with their network interfaces, services, and vulnerability occurrences) are not aged.
Important: Mark entities created manually or by iXML import to protect them from aging, as these entities are usually not scanned or reimported.
GENERAL MAINTENANCE This section describes general maintenance tasks.
Updating your Vulnerability Dictionary Skybox Security releases an updated version of the Skybox Vulnerability Dictionary on a weekly basis, with additional versions released within 1 business day of important Vulnerability Definition releases—we recommend that you check for Dictionary updates daily.
There are 2 ways to update the Vulnerability Dictionary:
› (Recommended) Use the predefined Dictionary Update – Daily task, which takes the most up-to-date Vulnerability Dictionary from the Skybox Dictionary Server. You can schedule the task.
› Download the Vulnerability Dictionary from http://dictionary.skyboxsecurity.com/dictionary/8.0.0/LatestDictionary.sbd.

Chapter 20 Model maintenance
Skybox version 8.5.600 145
Note: The Skybox Vulnerability Dictionary can only be updated by Admins.
For instructions about updating the Vulnerability Dictionary, see the Dictionary updates chapter in the Skybox Installation and Administration Guide.
Model integrity You must update the following associations between entities in the model on a regular basis:
› Business Asset Groups and their members › Threat alert tickets and networks
Use the predefined Model Integrity task to update these associations. When the task runs:
› For each Business Asset Group, it creates an association between the assets that currently meet the Business Asset Group’s membership criteria and the Business Asset Group.
› For each threat alert ticket created for a network scope (rather than for specific vulnerability occurrences of the Vulnerability Definition), it translates the network scopes for those tickets into assets, so that all vulnerability occurrences of the Vulnerability Definition that match the ticket can be associated with the ticket.
Run this task after you update the model, before running attack simulation or security metrics analysis tasks.
Note: If your model does not include any Business Asset Groups that contain networks and you do not have any threat alert tickets for specific network scopes, there is no reason to run this task.
Validating the model when working on a continuous basis You can set up updates to Skybox to run on a continuous and automated basis, as discussed in Updating the model (on page 141). However, you must monitor the update process on a regular basis to make sure that all tasks succeeded and that all data was successfully imported.
Validate the model after each new set of information is added, by making some manual checks as a way of verifying the correctness and completeness of the model. For example:
› View the model in the Network Map to make sure that there are no unconnected networks or nodes.
› In the Model Analyses node of the Model tree, check the New Entities analyses if you expect that new entities were added to the model. Also check the appropriate model validation analyses (on page 69).
› Check that the item counts for the model (File > Model Properties) are not significantly different from actual numbers of items in your organization’s network.
For additional information about model validation, see Validating the model (on page 66).

Skybox Vulnerability Control User’s Guide
Skybox version 8.5.600 146
Backing up the model The model is backed up to a file in XML or encrypted XML format. You can load backed-up versions and use them for analyses in the What If or Forensics model.
Note: Only Admins can back up and load data.
When backing up and loading the model, the data is divided into 4 components. Make sure that you back up or load the correct components. For additional information, see the Backing up and loading the model topic in the Skybox Installation and Administration Guide.

This part includes advanced topics, including advanced modeling scenarios, modeling IPS devices, using the Access Analyzer, modifying security metric properties, optimizing performance, and tuning issues.
Part IV: Advanced topics

Skybox version 8.5.600 148
Chapter 21
This chapter explains how to model entities that need additional configuration.
In this chapter
Modeling VPNs ................................................................... 148
Modeling L2 networks ......................................................... 152
Mapping overlapping networks ............................................ 157
Virtual routers ................................................................... 160
Virtual firewalls.................................................................. 161
Virtualization and clouds ..................................................... 161
Clusters ............................................................................ 164
Modeling multi-homed assets .............................................. 164
Merging data ..................................................................... 166
Using clouds as Threat Origins ............................................. 172
Advanced dependency rules ................................................ 173
MODELING VPNS A VPN is a private network that uses a public network to connect remote sites or users.
There are 2 types of VPNs:
› Site to Site: Connects multiple sites over a public network. › Remote Access: Connects single users to a LAN from various remote locations
Skybox supports Site to Site VPNs and models them as a direct link between the participating gateways. This link is represented as a special tunnel network. VPN configuration details are represented by VPN units on each gateway. A VPN unit includes ‘protected’ networks and services, and an interface that connects the gateway to the secure VPN.
Creating VPNs You can create VPNs in Skybox using online collection or offline file import tasks or manually, as described in this section.
Advanced modeling scenarios

Chapter 21 Advanced modeling scenarios
Skybox version 8.5.600 149
Automated modeling When a VPN is created by online collection or offline file import, the configuration of the gateways provides all the information necessary to create the tunnel network and the VPN units, including the interfaces that connect the VPN units to the tunnel network.
Skybox supports online collection and offline file import of VPN information for the following devices:
› Check Point VPN-1 › Cisco IOS firewalls › Cisco PIX/ASA/FWSM firewalls › Juniper Networks NetScreen firewalls
You can model VPN information for other devices manually using the Skybox Manager or using Skybox’s Integration XML (iXML) format. For information about iXML, see the Integration part of the Skybox Developer’s Guide.
Usually, VPNs are imported as a tunnel of type VpnTunnel with a network interface of type Vpn. For VPNs from specific vendors, the tunnel can be of type Tunnel and the network interface of type Tunnel.
Note: This issue is vendor-dependent; both configurations model the VPN equally well.
Manual modeling When creating a VPN manually, use the VpnTunnel tunnel type and the Vpn interface type.
There are 3 steps to creating a VPN:
1 Create the (VPN) tunnel network: Each endpoint of the tunnel is the IP address of a connected gateway (see Creating VPN tunnels (on page 149))
2 Create a VPN unit for each of the 2 gateways that are connected by the VPN tunnel: Connect the VPN interface of each VPN unit to the (VPN) tunnel network created in the previous step (see Creating VPN units (on page 150))
3 Create access rules on each gateway, which specify that data travels over the VPN tunnel: In the VPN pane of each access rule, specify which VPN unit to use (see Creating access rules for the VPN (on page 151))
When any part of the VPN is updated using a task, the manually created entities and connections are preserved.
Creating VPN tunnels When modeling a VPN manually, you start by creating the VPN tunnel. Afterwards, you connect the gateways to the tunnel via their network interfaces. For information about VPN tunnels, see Creating VPN units (on page 150).

Skybox Vulnerability Control User’s Guide
Skybox version 8.5.600 150
To create a VPN tunnel 1 In the Locations & Networks node of the Model tree, right-click the parent
node for the tunnel. The parent node can be a specific location in the hierarchy or the Locations & Networks node.
2 Select New > Network.
• For information about network properties, see the Networks topic in the Skybox Reference Guide.
3 In the New Network dialog box, fill in the fields of the tunnel network:
• Ignore the values in the IP Address and Mask fields; these fields are not used for tunnel networks.
• In the Type field, select Secure VPN or Tunnel. If you are not sure which to select, use Secure VPN.
Note: The type of the tunnel and the type of the network interface must match (either Tunnel/Tunnel or Secure VPN/Secure VPN).
• In the Endpoint 1 and Endpoint 2 fields, type the IP addresses of the connected gateways.
4 Click OK.
Creating VPN units You create a VPN unit by:
› Defining which networks and services (in your organization’s network) are protected by the VPN
› Selecting or creating the interface that connects the gateway of the VPN to the tunnel network
To create a VPN unit 1 Right-click a gateway of the tunnel and select Manage VPNs.
2 In the Manage Host VPNs dialog box, click Add.
3 In the New VPN dialog box, fill in the fields according to the following table. If there is no appropriate network interface for the VPN unit, create a new interface:
a. Click New.
b. In the New Network Interface dialog box, fill in the fields.
Type of network interface:
— For tunnels modeled using the Secure VPN type, select Secure VPN as the Type of the network interface.
— For tunnels modeled using the Tunnel type, select Tunnel as the Type of the network interface.
Note: This issue is vendor-specific. Both configurations model VPN tunnels equally well.
Network:
— In the Network field select the tunnel network to which the VPN unit is connected.

Chapter 21 Advanced modeling scenarios
Skybox version 8.5.600 151
— If the tunnel network was not created, leave the value of the Network field as None until you create the tunnel network and then set the value of this field to be the newly created tunnel network. For instructions, see Connecting VPN gateways to the tunnel network (on page 151).
For information about network interface properties, see the Network interfaces topic in the Skybox Reference Guide.
c. Click OK.
VPN unit properties are described in the following table.
Name Description
Name The name of the VPN unit
Original Text The name of the original object from which this unit was created.
My Domain The networks protected by this gateway.
Peer Domain The networks protected by the endpoint gateway. Only packets with networks that match these domains can pass thought the VPN tunnel. Note: This field is referred to as the encryption domain in Check Point terminology and the proxy in Cisco terminology.
Services The protected services.
Network Interface The network interface that connects the VPN unit to the tunnel network.
Connecting VPN gateways to the tunnel network If the VPN units were created before the tunnel network, connect each VPN gateway to the tunnel network.
To connect a VPN gateway to the tunnel network 1 In the Table pane, select the gateway.
2 In the Details pane, click the Network Interfaces tab.
Note: If necessary, click to display the Network Interfaces tab.
3 Right-click the VPN interface and select Properties.
4 In the Network field of the <Network interface> Properties dialog box, select the tunnel network.
5 Click OK.
Creating access rules for the VPN After you create the VPN, create an access rule on each gateway that specifies that data is permitted to pass over the VPN.
Skybox Vulnerability Control User’s Guide
Skybox version 8.5.600 152
To create an access rule 1 Right-click the gateway and select Access Rules.
2 In the Access Control List Editor, click New to create an access rule
3 Fill in the fields in the New Access Rule dialog box according to how the data behaves in the actual device (for a description of each field, see the Access rule properties topic in the Skybox Reference Guide).
a. In the VPN Usage field, select:
— Specific (to send the data via a specific VPN unit)
— Any (to send the data over any VPN unit of this gateway)
b. If you selected Specific in the VPN Usage field, click the Browse button next to the Specific field and select a VPN unit.
4 Click OK.
5 If necessary, move the new access rule to its correct location in relationship to the other rules using Move Up, Move Down, and Move To. If you created the rule in the wrong rule chain, click Move To Other Chain to move it to the correct chain.
6 Click OK.
MODELING L2 NETWORKS L3 routers, firewalls, load balancers, and proxies control traffic between different parts of your organization’s network and between your organization’s network and the outside world.
L2 gateways (bridges, switches, and transparent firewalls) add additional segmentation or protection to a network. In Skybox, L2 gateways are only modeled when they affect network accessibility by splitting networks into segments.
L2 gateways are modeled in Skybox in almost the same way as L3 gateways, except that an L2 gateway is marked as Layer 2 and must have an L2 network interface. Access rules for L2 gateways are the same as those for regular (L3) gateways.
L2 network interfaces are similar to regular (L3) network interfaces, with the following differences:
› No IP address is required: the value 0.0.0.0 represents the IP address. › Because an L2 interface has no IP address, it must be connected to a
segment, rather than to a network.
After the L2 gateway device is created, you divide the network into segments and attach the network interface of the L2 device to the segments.

Chapter 21 Advanced modeling scenarios
Skybox version 8.5.600 153
The following figures illustrate the difference between a regular (L3) network and an L2 network.
Creating L2 devices You can create L2 devices using online collection tasks, offline file import tasks, or manually.
You create an L2 device manually in the same way that you create a regular (L3) device, except that you must:

Skybox Vulnerability Control User’s Guide
Skybox version 8.5.600 154
› Select Layer 2. › Create L2 network interfaces for the device. Each L2 network interface
connects the device to a network segment. The L2 device might have L3 network interfaces.
If the device configuration data is collected from a device or imported from a file, Layer 2 is selected automatically. The L2 network interfaces are created but they are not attached to the network; you must attach the interfaces to the network (and segment the network) manually. If the device has L3 network interfaces, these interfaces are automatically attached to the network because they have IP addresses.
Segmenting networks In Skybox, a network segment is a portion of an IP network that is physically separated from other parts of the network by an L2 gateway device. You must create network segments manually: 1 segment for each part of the network that is behind a different network interface of the device. Afterwards, you must assign each asset in the network and each network interface of the L2 device to the appropriate segment.
Note: You can segment the network and assign the L2 network interfaces using Skybox’s Integration XML (iXML). For information about iXML, see the Integration part of the Skybox Developer’s Guide.
Creating network segments Usually, an L2 device splits a network into 2 segments. However, it can split a network into multiple segments or split multiple networks. You must create each segment manually in the model. As you create the segments, you assign the appropriate assets in the network to the segment via their network interfaces.
To create a network segment 1 In the Model tree, right-click the network to be segmented and select
Manage Segments.

Chapter 21 Advanced modeling scenarios
Skybox version 8.5.600 155
2 Click Add.
3 Type a Name for the segment.
4 You can define the IP address ranges for the segment.
5 In the Available field, you can see the network interfaces of all assets in this network.
For each asset that is in the segment, select the relevant network interface in
the Available field and click to move it to the Selected field.

Skybox Vulnerability Control User’s Guide
Skybox version 8.5.600 156
6 Click OK.
In the Tree pane, the network contains the segments that you created and an Unsegmented Assets node.
Assets that are not assigned to a segment in the segmented network are displayed when you select the Unsegmented Assets node.
Repeat this process for each segment that you need. Each asset now belongs to a network segment. If the L2 device has a management (L3) network interface, the L3 interface should not belong to either of the segments. The L2 device is listed in every segment, and it is also listed in the Unsegmented Assets node because of the L3 network interface.
Note: When a network segment is deleted, all assets (according to their network interfaces) that are part of that segment become unsegmented assets in the network.
Configuring the L2 network interfaces After the network is segmented, assign the L2 network interfaces of the L2 device to the appropriate segments.

Chapter 21 Advanced modeling scenarios
Skybox version 8.5.600 157
To assign an L2 network interface to a network segment 1 Select the L2 device in the Table pane.
2 In the Network Interfaces tab of the Details pane, select the interface to be connected and open its Properties dialog box.
3 In the Network field, select the network segment to which the interface is attached.
4 Click OK.
If this L2 device is updated using a task, the connection between the L2 interfaces and their network segments is preserved.
MAPPING OVERLAPPING NETWORKS Overlapping networks are networks that have identical or overlapping IP addresses and subnets. These networks are usually located in different parts of your organization, separated by firewalls or routers.
These networks are discovered or collected as part of the topology. For Skybox to distinguish between 2 overlapping networks, define locations so that you can assign each such network to a unique location. As new data from these networks is imported into Skybox, the locations ensure that the networks are kept separate.

Skybox Vulnerability Control User’s Guide
Skybox version 8.5.600 158
Importing overlapping networks Before importing network information:
› If there are no overlapping networks, you do not need to make any special preparations before importing new information.
› If you know that overlapping networks exist:
1. Make sure that each overlapping network is in a unique location; you can add locations to the model before importing the data.
— For information about defining unique locations in Skybox, see Defining unique locations for overlapping networks (on page 159).
2. Create a definition file for an Import – Advanced task. This file must contain location hints for each overlapping network (see Adding location hints to the definition file (on page 159)).
› If overlapping networks are identified after the model is built, these networks are merged in the model and might include assets from both overlapping networks. Delete these networks manually from the model, create an input file with location hints, and import the data again.
Merging overlapping networks When a network is imported with a location hint, Skybox attempts to find an identical network under the same location as the specified location hint. The following outcomes are possible:
If... Then...
An identical network was found under the same location
The newly imported network is merged with the existing network in the base model
No identical network was found A new network is created in the specified location
Identical networks were found Note: This can happen when the location hint is not clear enough. For example, if there are identical networks in the US/New York location and the US/Boston location, and the location hint is “[US]”.
A warning message is issued and the network is not created
When a network is imported without a location hint, the following outcomes are possible:
If... Then...
If there are no identical networks The new network is created as usual
If there is 1 identical network in the model
The new network is merged into the base
If there are 2 (or more) identical networks under different locations
The merger cannot solve the conflict; a warning message is issued and the network is not created

Chapter 21 Advanced modeling scenarios
Skybox version 8.5.600 159
When a network cannot be merged for any of the preceding reasons, no new network is created (and no existing network is changed).
Assets that are part of overlapping networks are handled in a similar manner. If there are identical assets under different locations, the merger cannot solve the conflict and the asset is not imported.
Defining unique locations for overlapping networks To work with overlapping networks in Skybox, you must define a unique location for each network within the model.
Note: Location names must be unique throughout the model even when there are no overlapping networks.
Overlapping networks cannot exist in 2 locations when 1 location is a direct descendant of the other in the Locations & Networks tree.
For example, in the hierarchy in the following figure:
› Floor1 and Floor2 might hold overlapping networks but Floor1 and Commonwealth cannot, because Floor1 is a direct descendant of Commonwealth.
› Overlapping networks can exist under US and Europe but not under US and Boston.
Adding location hints to the definition file
To add overlapping networks to the model 1 Create a definition file for an Import – Advanced task.
For additional information, see the Definition file for advanced file import tasks topic in the Skybox Reference Guide.
2 Add location hints to the definition file.
Each line that imports an overlapping network must have the following format:
<import format type> <source file | directory>[ <location hint>]

Skybox Vulnerability Control User’s Guide
Skybox version 8.5.600 160
Note: The square brackets ([ and ]) are part of the format of the line; they do not mean that an element is optional.
For possible values for <import format type>, see the Data formats for file import tasks topic in the Skybox Reference Guide.
For example: NMAP_XML c:\sample\result.xml [London\Bakers] PIX_CONF c:\sample\file.cfg [Paris]
You can use “\” and “/” as delimiters in the location hint.
To preserve whitespace in location names, place the location inside double quotation marks. For example:
• PIX_CONF c:\sample\file.cfg [North America/New York]: The location is read as NorthAmerica >> NewYork
• PIX_CONF c:\sample\file.cfg ["North America/New York"]: The location is read as North America >> New York
3 Using an Import – Advanced task, import the overlapping networks into the model.
If the location does not exist in the model, it is created during the file import.
Note: For overlapping networks, the files to be imported using the Import – Advanced task must be on the Server computer. Location hints are not identified when the task is run on the Collector computer.
VIRTUAL ROUTERS Virtual routing is a technology that enables multiple instances of a routing table on the same asset at the same time. Each network interface is associated with a single virtual router.
When data packets arrive through a specific interface, the asset uses the routing table associated with that interface to route the packets. Packets arriving from different interfaces can take different paths to the same destination. Because each router is independent, the same or overlapping IP addresses can be used without conflicting with each other.
In Skybox, each virtual router is modeled as a section in the asset’s routing table. Virtual routers are supported for a variety of devices including Juniper Networks Junos routers and firewalls, and Palo Alto Networks firewalls.

Chapter 21 Advanced modeling scenarios
Skybox version 8.5.600 161
VIRTUAL FIREWALLS Most vendors offer virtual firewalls, which can run multiple firewalls on a single physical device. Each virtual firewall is associated with (inherits) some network interfaces from the physical device but has a separate ACL and routing table defined for it.
In Skybox, virtual firewalls are modeled as separate firewalls with their respective configurations.
All virtual firewalls derived from the same physical device share a common prefix in their names so that you can easily identify them in the model; for example, if the system is named Alex, the virtual firewalls are named Alex:vsys1, Alex:vsys2, and so on. Skybox also creates an asset group with the name of the system and the virtual firewalls are part of this asset group.
In Skybox, virtual firewalls are supported for a variety of firewalls, including Check Point VSX, Fortinet VDOM, and Palo Alto Networks.
VIRTUALIZATION AND CLOUDS Skybox supports virtual domains for modeling software-defined networking (SDN). Virtual domains can be modeled in Skybox and access analysis can be performed. The model tree (Virtual Domains folder) shows virtual domains and their security tags, as well as security groups. The relevant Access Policy rules of each security tag can be viewed on the security tag itself and each virtual asset shows its entire Access Policy as derived from its security tags.
The supported connectors are Amazon Web Services, VMware NSX, and Microsoft Azure.
› Data from Amazon Web Services data centers can be collected using Cloud & Virtualization – Amazon Web Services Collection tasks.
› Data from VMware NSX Manager servers can be collected using Cloud & Virtualization – NSX and vSphere Collection tasks.
› Data from Microsoft Azure servers can be collected using Cloud & Virtualization – Azure Collection tasks.
More information about these tasks can be found in the Cloud and virtualization tasks chapter in the Skybox Reference Guide.
The following table shows the mapping between entities and their names in Skybox, Azure, and AWS.
Skybox Azure AWS
Asset VM Ec2
Virtual Domain VNET VPC
Security Tag Network Security Group Security Group
Network Subnet Subnet
LB Rules Load Balancer Load Balancer

Skybox Vulnerability Control User’s Guide
Skybox version 8.5.600 162
Skybox Azure AWS
ACL Network Security Group Network ACL
NAT Rule Public IP Elastic IP
VRF Routing Table Route Table
VPN Express Route (not yet supported by Skybox)
DirectConnect
› In NSX, Virtual Domains are called Tenants. › Security Tags are Access Policy templates used for 1 or more assets
Security Tags are modeled as Asset Groups of type Tag that also have access rules.
› Security Groups are collections of assets
Security Groups are modeled as Asset Groups of type Security Group.
Note: Virtual Domains, Security Tags, and Security Groups cannot be created or edited manually, but you can add comments to them or change their owners.
When you select a virtual domain in the tree, you can see its security tags and security groups, or its assets in the Table pane. When you select a security tag or security group, you can see its assets in the Table pane.

Chapter 21 Advanced modeling scenarios
Skybox version 8.5.600 163
You can see the access rules of a security tag by right-clicking it and selecting Access Rules.
You can also see the access rules of each virtual asset. The access rules of a virtual asset are the access rules from each of its security tags.
The properties of a virtual asset include all the properties of a regular (non-virtual) asset, plus its virtualization environment: the virtual domain, security tags, and security groups to which it belongs.
Note: Virtual assets cannot be created manually, but they can be edited and deleted. Their virtualization information, however, cannot be changed.

Skybox Vulnerability Control User’s Guide
Skybox version 8.5.600 164
CLUSTERS
Cisco HSRP clusters 2 or more Cisco routers can form a cluster and communicate using HSRP protocol. The redundancy works by declaring a virtual IP address that is always connected to a router in the cluster. Another router in the cluster takes over the virtual IP address if the 1st router fails. Skybox models these virtual IP addresses as virtual network interfaces with the naming convention of standby_n (starting at standby_0).
In Skybox, 2 routers belong to the same cluster if they have a virtual interface connected to the same network, with the same name and same IP address. These routers are supposed to have the same access rules for each shared virtual interface.
Check Point clusters Skybox adds members of a Check Point cluster to an asset group of type Cluster, with the cluster name as the name of the asset group. The shared IP addresses in the cluster are modeled as virtual interfaces in each cluster member.
Other clusters Skybox adds members of a NetScreen, Junos, Cisco ASA, Cisco FWSM, Palo Alto, or FortiGate cluster to an asset group of type Cluster, with the cluster name as the name of the asset group.
MODELING MULTI-HOMED ASSETS A multi-homed asset is an asset that is connected to more than 1 network via multiple network interfaces. Unlike gateways, multi-homed assets do not forward packets between the networks to which they are connected. Typically, there is a management network and 1 or more other networks (for example, production).
In Skybox, a multi-homed asset is a regular non-forwarding asset (generally of type Asset, Workstation, or Server), which has multiple network interfaces. Because the asset is connected to multiple networks, you can see it in each network to which it is connected. In the Network Map, each multi-homed asset appears in all networks to which it is connected.
When multi-homed assets are scanned using a network scanner or vulnerability scanner, they are usually seen from one side only—only one network interface is detected and the asset is added to the model as a regular (single-interface) asset. When scanned as part of another network, another side (network interface) is detected; however, no connection between the 2 IP addresses can be made. Network scans do not usually provide enough information to connect 2 IP addresses into a multi-homed asset.
If multi-homed assets are not modeled correctly, the attack simulation results might not be accurate because Skybox cannot show attack steps between the networks that are connected to this asset.
To model a multi-homed asset correctly, you must inform Skybox that the asset has several network interfaces. You do this by defining multi-homed assets in iXML and importing them into the model. Skybox then merges the previously created separate assets into the multi-homed assets.

Chapter 21 Advanced modeling scenarios
Skybox version 8.5.600 165
Note: Importing a subsequent vulnerabilities scan updates the multi-homed assets without disassembling them.
To merge multi-homed assets 1 Create a list of all multi-homed assets in iXML format, where each of the
multi-homed assets is defined as an <asset> element with an IP address and multiple <interface> elements.
Note: Base the iXML file on an existing list of such assets and their network interfaces.
For additional information, see the <asset> element topic in the Skybox Developer’s Guide.
For help in creating this list, contact Skybox Professional Services.
2 Import this list to Skybox using any offline file import task.
The merger locates every ‘piece’ of each asset and connects them together into multi-homed assets.
If a multi-homed asset is modeled as described, subsequent data imports are merged correctly with the multi-homed asset. If there are problems with subsequent data imports, see Troubleshooting multi-homed assets (on page 165).
Troubleshooting multi-homed assets As stated in the preceding section (on page 164), multi-homed asset definitions are not changed by subsequent imports. However, there can be cases of data conflict. For example, if:
› Several assets share the same IP address › A newly imported asset does not exactly match an existing asset
This section explains how Skybox processes these situations.
Note: If you end up with multiple assets, but there is actually only a single asset, you can merge the assets manually (see page 171).
Assets with more than 1 candidate in the model When you import a multi-homed asset and there are 2 or more similar assets in the model, Skybox tries to find the best match for the incoming asset by finding the (existing) asset that has the greatest number of matching interfaces (same IP address).
For example, there are 2 assets in the model:
› Asset X with IP 1 and IP 2 › Asset Y with IP 1 and IP 3
A new asset named Asset Z is imported, with IP 1 and IP 3. Skybox tries to find the asset with the greatest number of matching IP addresses and Asset Z is merged with Asset Y.

Skybox Vulnerability Control User’s Guide
Skybox version 8.5.600 166
A new asset named Asset A is imported, with IP 1 and IP 4. In this case, there is not enough information to decide between Asset X and Asset Y for the merge; Asset A is added to the model as a new asset but is not merged with either existing asset.
Assets with 1 candidate asset in the model If there is only 1 candidate asset in the model with an interface that has the same IP address as the incoming asset, Skybox uses a specific formula to determine whether the incoming asset matches the existing asset (and should be merged with it) or whether to add the incoming asset to the model as a new asset.
Skybox does the following to determine whether the assets match:
1 Count the number of matching interfaces (of the asset in the model and the incoming asset)
2 Divide by the number of relevant interfaces in the asset that is in the model.
• If this number is larger than the heuristics threshold, the assets are merged.
• If this number is smaller than the heuristics threshold, the assets are not merged.
The value of the heuristics threshold is set by the com.skybox.view.logic.discovery.ModelsMerger.multi_home_heuristics_threshold property. This property is in <Skybox_Home>\server\conf\sb_common.properties on the Server machine and in <Skybox_Home>\collector\conf\sb_common.properties on the Collector machine.
The default value of the heuristics threshold is 0.5.
› If an asset that should merge does not merge, decrease the value of the heuristics threshold.
› If an asset merges when it should not, increase the value of the heuristics threshold.
MERGING DATA All data that is imported, collected, discovered, or scanned into the model goes through a process named merging, which refines the data and merges the information into the current model. Only data that is added to the model manually does not go through this process.
When new data is retrieved for Skybox, it is collected into an update model. This data is normalized into the format in which it is stored in Skybox (see Normalizing the network information (on page 167)) and merged into the base model (usually the Live model) on a per-entity basis using the following process:

Chapter 21 Advanced modeling scenarios
Skybox version 8.5.600 167
1 Identify the entity in the base model (see Identifying entities in the base model (on page 168)). If the entity is new (does not exist in the base model), the 2nd step is skipped and the entity is added to the base model.
2 Merge the entity’s data from the update model to the base model (see Merging entities (on page 168)).
You should understand when data will be merged and what criteria are used for merging each type of entity, so that you know which new data will be accepted into the model and which will be discarded. Usually, merging is a transparent process; sometimes you must prepare the model to enable merging to proceed correctly.
Normalizing the network information Skybox does the following to normalize the update model:
› Network status: If the network status is UNKNOWN, it is set to UP. If the interface type is unknown and it is a Loopback interface, its type is set to LOOPBACK; otherwise, the interface type is set to ETHERNET.
› Discovery method for assets, and for access and routing rules: If the discovery method is null, it is set to UNKNOWN.
› Scan time for assets and services: If the scan time of an asset or a service is null, it is set to the current time.
› Network interfaces for devices and assets:
• Every interface is attached to the correct network
• Access rules that are attached only to empty interfaces are deleted
• Empty (0.0.0.0) interfaces are deleted
• Assets that do not have any interface that can be primary are deleted
Note: When an entity is deleted from the update model, it is not used in the merger at all, because it does not match the qualifying criteria.
• If a network interface has no name, Skybox generates a name of the form “nif<n>”
› Routing rule gateways:
• If a routing rule has a zero gateway (0.0.0.0) and other non-zero gateways, the zero gateway is deleted
• If a routing rule does not have any gateways, a zero gateway is added
› Assets:
• If an asset has no name, Skybox generates a name of the form “host<n>”)
• If an asset has duplicate services, the duplicates are deleted
After the data in the update model is normalized, the following resolutions are performed:
› Patch identification: Each patch is assigned to a service product (using product banner matching)
Skybox Vulnerability Control User’s Guide
Skybox version 8.5.600 168
› Asset type deduction: The type of each asset is deduced from the services running on the asset
› OS fingerprints translation: The operating system banner is matched to the appropriate service definition
› Product banner translation: Service banners are analyzed to find a match in the Skybox Vulnerability Dictionary
› Product catalog ID resolution: Product catalog IDs are resolved using the Skybox Vulnerability Dictionary
› Vulnerability occurrence matching:
• Some vulnerability occurrences are discovered indirectly by scanners and then assigned incorrectly. For example, a scanner grabs information about an asset’s services via SNMP and assigns the vulnerability occurrences found to SNMP; these vulnerability occurrences must be matched to the correct service.
• Some scanners do not report which service is vulnerable, rather they provide 2 separate lists—all vulnerability occurrences found on the asset and all services found on the asset. In this case, the link between services and vulnerability occurrences must be created.
Identifying entities in the base model Each type of entity has different criteria for identification. For example:
› Most types of networks are identified by their IP address and mask. › Assets are identified by their network interfaces.
When importing a new asset, the merger ascertains whether the asset exists in the model by looking for an asset with a network interface with the same IP address that is not of type Virtual, Loopback, Tunnel, or LoadBalancer.
› Services on the same asset are identified by their ports.
If it is established that an entity in the update model is new (does not exist in the base model), it is added directly to the base model, without going through the final step (entity merge).
Merging entities If an entity in the update model exists in the base model, there are 2 ways to merge the data:
› The information in the 2 models is combined › The information in the base model is replaced by the information in the
update model
Although the methods for merging each entity type are different, the main criteria for the merge are:
› Reliability of source
For example, imported gateway configurations are considered the most reliable source. Data retrieved from SNMP is considered more reliable than data retrieved by a network scan because it usually contains more detailed information about service and network configuration of the asset.

Chapter 21 Advanced modeling scenarios
Skybox version 8.5.600 169
If the source of the base model’s data is more reliable (more accurate and more complete) than the source of the update data, either no data is merged or only new information from the update model is merged.
Note: The properties in the discovery properties (Server & Collector) section of <Skybox_Home>\<component>\conf\sb_common.properties (where <component> can be server or collector) define the order of source reliability for different entities.
› Time
Newer data is preferred to older data. Time is measured according to the Scan Time timestamp.
› Completeness
Some data is better than none.
If the data in the update model for a specific entity is older, less reliable, or less complete than the data in the base model, the data from the update model is discarded and the entity in the base model is not changed.
Merging assets The following types of network interfaces are used to identify assets:
› NAT › Ethernet › WLAN › TokenRing › PPP › Slip › Other › Serial › Tunnel
Network interfaces of types Virtual, Loopback, and LoadBalancer are not used for identification.
Note: When importing asset information, an asset that has different (dynamic) IP addresses in the 2 models is not merged. To ensure that all asset data is merged, use the Merge assets by WINS name field in the offline file import and online collection tasks. If you select this option, the merger looks for identical WINS names for merged assets and, if not found, falls back to comparing IP addresses.
When Skybox decides that an asset in the base model and an asset in the update model are the same asset, all elements of the asset are merged, including:
› Network interfaces › Routing rules › Access rules

Skybox Vulnerability Control User’s Guide
Skybox version 8.5.600 170
› Services › Vulnerability occurrences
Each element is merged separately, based on reliability, time, and completeness (see Merging entities (on page 168)).
Network interfaces In general, interfaces are merged according to reliability and time. If the discovery method in the update model uses CONFIG or SNMP, which are considered the most reliable sources, the interfaces in the update model overwrite those in the base model. Otherwise, the new interfaces are merged with those in the base model.
Note: When working with routers, the default behavior of the merge is to disconnect manually connected network interfaces. To prevent this, ensure that
the Network field of the network interface is Locked ( ) before the routers are updated.
Routing rules When merging routing rules, only the whole routing table is considered; individual routing rules are not merged separately. Routing tables are merged according to reliability and time.
› If the routing table in the update model is more reliable or newer, it overwrites the routing table in the base model.
› If the base asset does not have a routing table, the routing table of the asset in the update model is merged.
Access rules When merging access rules, only ACLs are considered; individual access rules are not merged separately. ACLs are merged according to reliability and time.
If the ACL in the update model asset is more reliable or newer, its access rules overwrite those in the base model. If the base asset does not have any access rules, the access rules of the asset in the update model are used.
Services When merging the services of 2 assets, the merger adds new services that do not appear in the base asset and merges the data of services that do exist in the base model.
When merging services, the vulnerability occurrences attached to the service are also merged.
Vulnerability occurrences New vulnerability occurrences on the updated asset’s services are added to the base model. If a vulnerability occurrence already exists in the base model, the vulnerability occurrence data is merged.

Chapter 21 Advanced modeling scenarios
Skybox version 8.5.600 171
Merging assets manually In rare cases, Skybox cannot identify that a scanned asset is the same as an existing asset; Skybox creates a new asset in the model. This usually occurs in the following situations:
› An existing asset is renamed: If Skybox cannot verify that the new asset matches the existing asset with the previous name, it creates a new asset with the new name.
› An asset is scanned at different times by different interfaces: On the original scan, this asset was created in the model with 1 IP address. On a subsequent scan it was identified with a different IP address, and a separate asset is created. In fact, it is 1 asset with 2 IP addresses.
If you see that an existing asset was merged incorrectly, you can merge it manually.
To merge 2 assets manually 1 Display both assets in the workspace. For example, if they are both firewalls,
use the All Network Devices > Firewalls node.
2 Select both assets, right-click, and select Merge to Single Asset.
The asset with the older modification date is selected as primary, and the secondary asset is merged with it in the standard way (see page 169).
Merging networks Regular and link networks are identified by their IP address and mask.
Some types of networks have slightly different rules for identification because a single IP address and mask cannot identify them.
› Tunnel networks and Secure VPNs are identified by the IP addresses of their endpoints.
• For information about tunnel properties, see the Networks topic in the Skybox Reference Guide.
› Connecting Clouds are identified by their name. › Perimeter Clouds are identified by their IP address and network mask. If
necessary, the cloud name is also used.
The following rules are applied when merging networks:
› New networks are added directly to the base model. › If the network in the base model contains the updated network, the network
is not added. › Network segments are merged in the context of their networks. Network
segments are identified by their network and their name.
Note: When merging networks, the scan time and the discovery method are ignored.

Skybox Vulnerability Control User’s Guide
Skybox version 8.5.600 172
Skybox handles networks that have identical or overlapping addresses or masks using a different method, so that the networks are not accidentally merged. For information about how overlapping networks are merged, see Merging overlapping networks (on page 158).
Merging link networks when each part is in a separate location A link network is a network whose only assets are gateways (routers and firewalls) that connect networks. If a link network consists of gateways that are in 2 different locations and were imported with different location hints, the merger assigns each part of the link network to its own location as a separate (but incomplete) network and does not know how to connect them. In effect, overlapping networks are created instead of a single network.
Manual action is required when merging link networks.
To merge a link network 1 Manually delete all duplicate overlapping link networks.
2 Move the remaining network to the parent location.
If the network has no parent location, move it to the root location.
3 Run the import again.
USING CLOUDS AS THREAT ORIGINS Possible access from Threat Origins to Business Asset Groups and assets is translated by the attack simulator into attacks and risk. Under normal circumstances, when clouds are used as Threat Origins, the risk is not affected by the number of source IP addresses in the cloud that can initiate the attack; an attack that is possible from any internet address and an attack that is possible from 1 specific internet address are assigned the same risk. However, this might not be the desired effect.
You can differentiate between these 2 types of attacks in 2 different ways:
› You can configure Threat Origins that are located in clouds so that during attack simulation, Skybox assigns a lower risk for a small number of source IP addresses and a higher risk for a large number of source addresses.
› You can create 2 Threat Origins for a single cloud, one that develops attacks that are possible from wide ranges of source IP addresses of the cloud and the other that develops attacks that are possible only from specific addresses (that is, from small address ranges). The 1st Threat Origin (wide address ranges) is typically assigned a relatively high likelihood; the 2nd Threat Origin (specific addresses only) is typically assigned a lower likelihood. By defining 2 Threat Origins, you can view separately attacks that are possible from a wide range of source addresses and the attacks that are possible only from several specific addresses (for example, IP addresses permitted for secure protocols over the internet). If you then assign each Threat Origin to a different Threat Origin Category, the exposure and risk for each can be completely separate.

Chapter 21 Advanced modeling scenarios
Skybox version 8.5.600 173
To define how to use cloud addresses to use for a specific Threat Origin 1 In the Table pane, right-click the Threat Origin and select Properties.
2 In the Advanced tab, select the type of cloud IP address ranges to use in an attack from this Threat Origin: All addresses, Wide address ranges, or Specific addresses only.
3 If you selected All addresses and you want attacks from specific IP addresses to be given a lower risk than those from wide address ranges, select Lower likelihood for attacks from specific addresses.
ADVANCED DEPENDENCY RULES This section explains how advanced dependency rules work in Skybox.
Implicit dependencies By default, implicit dependency specifies that both:
› A security loss of any type (confidentiality, integrity, or availability) on a Business Asset Group member implies the same type of security loss on the Business Asset Group
› An integrity loss on a Business Asset Group member implies an availability and confidentiality security loss on the Business Asset Group
An implicit dependency is created when you assign assets to a Business Asset Group. However, you can change the dependency between the Business Asset Group and its assets to:
› Simple: A security loss of any type (confidentiality, integrity, or availability) on a member implies the same type of security loss on the Business Asset Group.
› None: This method of describing the dependency is not sufficient and you prefer to specify (using explicit dependency rules) how a security loss on each of the Business Asset Group members affects the Business Asset Group.
To change the implicit dependency of a Business Asset Group 1 In the Business Units & Asset Groups folder of the Model tree, navigate to
the desired Business Asset Group.
2 Right-click the Business Asset Group and select Properties.
3 In the <Business Asset Group name> Properties dialog box, set Member Dependency.
If you change the value to None, define explicit dependency rules for each Business Asset Group (see page 97).
4 Click OK.
Explicit dependency rules You can use explicit dependency rules for several purposes:
› To define a dependency of Business Asset Groups on infrastructure elements
For example, when an e-business application depends on the DNS server
› To define dependencies between Business Asset Groups

Skybox Vulnerability Control User’s Guide
Skybox version 8.5.600 174
For example, when the availability of one Business Asset Group depends on the availability of another Business Asset Group
› To define dependencies between assets (or between assets and Business Asset Groups)
For example, to express that the confidentiality loss of a sensitive server potentially compromises a different server in your organization
› To define explicit dependency rules for each asset, if 1 implicit dependency rule does not match all assets on a Business Asset Group
You can use simple dependency rules to create complex dependency situations. For example:
› Z depends on Y. › Y depends on W and X. › Based on these 2 rules, a security loss on X indirectly causes a security loss
on Z.
To create explicit dependency rules
› In the Model tree, right-click the Dependency Rules node and select New Dependency Rule.

Skybox version 8.5.600 175
Chapter 22
This chapter presents advanced information about exposure in Skybox.
In this chapter
About attack simulation ...................................................... 175
About risk ......................................................................... 177
Risk profiles ...................................................................... 181
Risk factors ....................................................................... 182
PCI DSS support in Skybox Vulnerability Control .................... 182
ABOUT ATTACK SIMULATION This section presents advanced information about attack simulation.
Data used for attack simulation Data for simulation is collected from the model and includes:
› Network and routing information
• Network interfaces
• Routing rules
• NAT rules
• Access rules
› Business information
• Business Impact rules relating to confidentiality, integrity, and availability
• Regulations assigned to each Business Asset Group
› Vulnerability occurrences
Note: Only vulnerability occurrences with status Found are used in attack simulation. Vulnerability occurrences with status Ignored or Fixed are not used.
Output of attack simulation The output of attack simulation is:
Additional information about exposure

Skybox Vulnerability Control User’s Guide
Skybox version 8.5.600 176
› An attack graph, which captures all possible attacks scenarios on your network to the specified Business Asset Groups. Use the Attack Explorer to view maps for selected entities in the model, based on the attack graph.
› Risk levels for Business Asset Groups according to the likelihood of their being attacked and the impact of these attacks.
› Imposed risk levels for Threat Origins and vulnerability occurrences. › Exposure levels for vulnerability occurrences, including:
• Direct: Vulnerability occurrences that a Threat Origin can exploit in a single step
• Indirect: Vulnerability occurrences that a Threat Origin can exploit, but only in more than 1 step
• Protected: Vulnerability occurrences that cannot be accessed by an attacker because they are protected by an IPS device
• Potential: Vulnerability occurrences that have an accessible service, but might not be accessible because of other exploit conditions that cannot be guaranteed (for example, authentication might be required)
• Inaccessible: Vulnerability occurrences that cannot be accessed by an attacker (for example, the vulnerable service is disabled or the vulnerability occurrence is blocked by a firewall).
• Excluded: Vulnerability occurrences excluded from attack simulation. (Attack simulation excludes vulnerability occurrences with the following statuses: False Positive, Fixed, or Ignored.)
• Unknown: Vulnerability occurrences with unknown exposure. The exploit conditions of these vulnerability occurrences are irrelevant for attack simulation (for example, a browser weakness that might cause damage to a workstation if its user surfs to a hostile website).
› A list of attacks. An attack is a high-level representation of attack scenarios. Each attack has a single Threat Origin and a single destination, which are the starting and ending points of the attack scenarios that it represents. The destination can be an asset or a Business Asset Group.
The Attack Explorer is based on the attack graph and enables you to understand the steps taken in specific attacks. Skybox’s summary graphs and tables, analyses, and reports about exposure are also based on the output of attack simulation.
Attack simulation from clouds Sometimes, access from clouds is permitted for a small number of source IP addresses. This access is permitted for management purposes or for providing specified services for specific users (for example, IP addresses that are permitted for secure protocols over the internet).
When such a cloud is used as a Threat Origin, the possible access from these IP addresses is translated by the attack simulator into attacks and risk. When using the default settings for Threat Origins, the risk is not affected by the number of source IP addresses that can initiate the attack; an attack that is possible from any IP address and an attack that is possible from a specific address are assigned the same risk.

Chapter 22 Additional information about exposure
Skybox version 8.5.600 177
You can configure Threat Origins located in clouds so that during attack simulation, Skybox assigns a lower risk for a small number of source IP addresses and a higher risk for a large number of source addresses.
For additional information, see Using clouds as Threat Origins (on page 172).
ABOUT RISK This section presents advanced information about risk on various entities, including the information that is used to calculate the risk and various options for displaying the risk values.
Risk formula
Note: This section describes the risk formula for a Business Asset Group—risk for most other entities is based on the risk to the Business Asset Groups.
The risk for a Business Asset Group depends on 2 factors: the likelihood of successfully attacking the Business Asset Group and the potential damage that caused by the security loss. Formally, Risk = Impact * Likelihood.
Impact The impact of a security loss is part of the user input to the security model. The impact can be a Business Impact or a Regulation (a compromise to a security-related regulation) and includes damage rules for each type of security loss (confidentiality, integrity, and availability), associating with the loss type an estimation of the potential damage. You can specify the damage as an explicit monetary value or as a level on a 5-level scale (very low, low, medium, high, critical), where each level represents a monetary value indicating the magnitude of the damage.
Likelihood of attack The likelihood of an attack causing damage to a Business Asset Group is calculated separately for each of the impact rules of the Business Asset Group.
To compute the likelihood of causing the damage specified by an impact rule on a Business Asset Group, the system examines every attack path from the Threat Origins that can cause the security loss specified by the impact rule (for example, an availability loss of the Business Asset Group). Each of these attack paths starts at a Threat Origin and includes a sequence of attack steps that can cause the security loss. An attack step is either the exploitation of a vulnerability occurrence or the ‘legitimate’ usage of a service. The computation of the attack path likelihood takes into account:
› The likelihood that an attack will be initiated from the Threat Origin (as estimated by the user who defined the Threat Origin)
› The number of attack steps in the attack path › The likelihood of success of each of the attack steps
The likelihood of successfully exploiting a vulnerability occurrence is calculated using the following factors:
• The difficulty of exploiting the vulnerability occurrence. Greater difficulty leads to a lower success probability. The exploitation difficulty is a

Skybox Vulnerability Control User’s Guide
Skybox version 8.5.600 178
property of each Vulnerability Definition in the Skybox Vulnerability Dictionary.
• The skill of the attacker (as estimated by the definer of the Threat Origin). A higher skill level has a higher probability of success.
• The commonness of the vulnerability occurrence. A Vulnerability Definition that is known to be popular among hackers has a higher success probability.
Computing the likelihood of an attack path involves multiplying the Threat Origin likelihood by the probabilities of the attack steps along the attack path.
When a damage specified by a Business Impact or Regulation can be caused by more than 1 attack path, the likelihood of causing the damage is set as the likelihood of the most probable attack path (the path with the highest likelihood).
How risk is defined for each type of entity
Business Asset Groups A Business Asset Group might be at risk because of attack paths leading to exploitable vulnerability occurrences that reside on the Business Asset Group’s assets or on assets on which the Business Asset Group depends. The risk for a Business Asset Group is the maximum of all risks of attack on that Business Asset Group.
In the risk formula (Risk = Impact * Likelihood), the impact for a Business Asset Group is derived from the Business Impacts and Regulations configured for that Business Asset Group. The likelihood to attack a Business Asset Group is considered very low if no possible attacks are found. If attacks are possible, the likelihood depends on the difficulty of the attacks (for example, the number of attacks steps and the existence of tools for exploiting the vulnerability occurrences).
Business Units Risk for a Business Unit is the aggregated risk (sum) of attack for all Business Asset Groups of the Business Unit.
Business Impacts and Regulations Risk for a Business Impact or Regulation is the risk to the Business Impact or Regulation based on the risk of its Business Asset Groups. The risk is calculated by aggregating the risks of the Business Asset Groups affected by this Impact.
Threat Origins Risk for a Threat Origin is the risk that the Threat Origin poses to your organization due to its ability to exploit vulnerability occurrences and attack Business Asset Groups.
The risk (imposed risk) is the sum of all risks imposed by the selected Threat Origin on all Business Asset Groups configured in the system.
Note: A Threat Origin can impose a risk on a Business Asset Group only if an attack path leads from the Threat Origin to the Business Asset Group.

Chapter 22 Additional information about exposure
Skybox version 8.5.600 179
Attacks Risk for an attack is the risk that a specific Threat Origin poses to a specific Business Asset Group. Each attack consists of a source Threat Origin and a destination Business Asset Group or asset. Factors that make up the attack risk include the different ways to attack the destination from the source (the attack scenarios), the likelihood that these attack scenarios might be used, and the different damages that the attack scenarios can cause.
Vulnerability occurrences Risk for a vulnerability occurrence (or a Vulnerability Definition) is the risk that the vulnerability occurrence poses to your organization because it has the potential to be exploited to damage Business Asset Groups.
Each vulnerability occurrence is assigned an imposed risk derived from 2 factors:
› Risk imposed because the vulnerability occurrence participates in attacks › Risk imposed because the vulnerability occurrences exist on assets, even
though there are no attack paths that can be exploited
The combination of these 2 factors is the total risk of the vulnerability occurrence.
Note: Even vulnerability occurrences that not are located on an asset of a Business Asset Group pose a risk, if they can be used as part of an attack on the Business Asset Group.
The imposed risk creates a differentiation between vulnerability occurrences:
› Exposed vulnerability occurrences (directly or indirectly) that do not lead to security loss of Business Asset Groups are usually assigned a very low risk.
› Vulnerability occurrences that are exposed and can lead to damage are assigned a high risk, based on the involved damage values and the likelihood of achieving these damages.
For example, one vulnerability occurrence is directly exposed to a specific Threat Origin, but its imposed risk is very limited because it does not lead to a subsequent attack on a major IT asset; another vulnerability occurrence has a high imposed risk because it can be used to attack a payment system. Both vulnerability occurrences have high severity (the attacker can use them to achieve control), but the consequences of achieving control are different in the 2 cases.

Skybox Vulnerability Control User’s Guide
Skybox version 8.5.600 180
Display of risk values Risk values in Skybox are usually displayed as levels (undefined, very low, low, medium, high, or critical), using a color scale.
Instead of displaying the risk values as levels, you can display them:
› As monetary values
Note: Monetary risk values are approximate values that enable comparison between risks of different entities at a higher resolution than is possible with levels or scores. They are not meant to represent actual monetary values.

Chapter 22 Additional information about exposure
Skybox version 8.5.600 181
› Using a score of 0-100
Note: Admins can modify the mapping between levels or scores and monetary values to match your organization’s range of damage values.
You specify how risk values are displayed in the Options dialog box (select Tools > Options > Manager Options > Risks Configuration, and set the value of the Risk Value Style property).
RISK PROFILES The risk profile for an entity shows the major components that contribute to the risk for that entity.
You can view risk profiles for:
› Business Units and Business Asset Groups › Business Impacts and Regulations › Vulnerability occurrences
To view the risk profile for an entity
› Select the entity in the Table pane and click the Risk Profile tab in the Details pane.
Risk for Business Units and Business Asset Groups is caused by attacks from Threat Origins. The risk profile of a Business Unit or a Business Asset Group shows the risk from all sources (that is, the total risk), followed by the specific risk from each Threat Origin Category.
Risk for Business Impacts and Regulations is caused by Business Asset Groups that are affected by the Business Impact or Regulation. The risk profile of a Business Impact or Regulation shows the risk from all sources, followed by the specific risk from each Business Asset Group.
The risk profile of a vulnerability occurrence shows:
› The Business Asset Groups (and Business Units) that the vulnerability occurrence could be used to attack.
› The risk from each Threat Origin Category that could be used to exploit the vulnerability occurrence.

Skybox Vulnerability Control User’s Guide
Skybox version 8.5.600 182
RISK FACTORS A risk factor is a single risk either to an entity or imposed by an entity. In general, risk for entities is calculated by computing the maximum risk from all risk factors for the entity. Each risk factor involves a source (Threat Origin), a destination (Business Asset Group or asset), and a Business Impact or Regulation that explains the potential loss from the risk factor. Risk factors are an advanced property of the following entities:
› Business Units › Business Asset Groups › Threat Origins › Attacks
To view the risk factors for an entity
› Select the entity in the Table pane and click the Risk Factors tab in the Details pane.
Note: If necessary, click to view the Risk Factors tab.
In this example, the Source of the 1st risk factor is Internet Hacker, the Target is Back End Finance Application Servers, the Business Impact Name is Financial Information Confidentiality, and it is high risk. The source and destination of some other risk factors are the same as the 1st one, but, because the Business Impact is different for each of these, the risk is different.
PCI DSS SUPPORT IN SKYBOX VULNERABILITY CONTROL Skybox Vulnerability Control supports PCI DSS Requirement 6.1 (6.2 in PCI DSS v3.2): “Ensure that all system components and software have the latest vendor-supplied security patches installed. Install critical security patches within one month of release.”
Skybox’s PCI DSS Requirement 6.1 report shows how the network for which the report is issued meets this requirement using compensating controls.
The report includes the following sections:

Chapter 22 Additional information about exposure
Skybox version 8.5.600 183
› Introduction: Describes the requirement, including the compensating controls form. This text follows PCI DSS, Appendix C: Compensating Controls Worksheet.
› System Components: Lists the scope of the report (which Business Asset Groups, networks, and network devices are included).
› Vulnerabilities: Lists the vulnerability occurrences that must be remediated for the network to become compliant with this standard.
› Host Lists: Lists the individual assets in the scope of the report and states whether they are compliant (that is, have no direct, indirect, or unknown vulnerability occurrences) with this standard.
For additional information about this report, see PCI DSS reports (on page 136).
For information about defining these reports, see the PCI DSS reports topic in the Skybox Reference Guide.

Skybox version 8.5.600 184
Chapter 23
A Skybox analysis is a query about entities in your network.
This chapter describes predefined risk analyses and explains how to create new analyses.
In this chapter
Analyses overview ............................................................. 184
Risk analyses .................................................................... 185
Predefined risk analyses ..................................................... 186
Creating an analysis ........................................................... 187
ANALYSES OVERVIEW A Skybox analysis is a query about a specific type of entity in your network. Every time that you select an analysis, Skybox checks all entities of the selected type to see whether they meet the specified criteria. Entities that meet all the criteria specified in the analysis are listed in the Table pane.
Skybox includes various predefined analyses for common issues; you can create custom analyses to suit your requirements.
Skybox analyses

Chapter 23 Skybox analyses
Skybox version 8.5.600 185
The Exposure workspace includes an Analyses node, which you can use to view information about the following types of entities: attacks, Business Asset Groups, Business Units, assets, locations, networks, Business Impacts, Regulations, Threat Origins, vulnerability occurrences, Vulnerability Definitions, and worms. The analyses in this workspace are mostly intended to show risk.
There are also analyses in other workspaces. For example, the Model workspace includes analyses related to the model (for example, an analysis that lists all assets in the model that are mail servers) and analyses that provide validation information about entities in the model (for example, firewalls with no access rules).
RISK ANALYSES Skybox includes predefined risk analyses for all entities that are affected by risk, including attacks, Business Asset Groups, Business Units, vulnerability occurrences, Threat Origins, and Regulations and Business Impacts.
The predefined risk analyses show risk for all entities of their type. You can modify predefined analyses or you can create analyses that, for example, focus on specific network scopes or only show risk higher than a specific level.
Each risk analysis shows information about the entities that match the analysis criteria and their associated risk. The information varies according to the type of entity. For example, Business Impacts by Risk shows the name and loss types specified for each Business Impact, while Threat Origins by Risk shows attacker information, including location, likelihood to attack, skill, and initial privilege on the attacking computer.

Skybox Vulnerability Control User’s Guide
Skybox version 8.5.600 186
PREDEFINED RISK ANALYSES Skybox includes the following predefined risk analyses:
› Business Asset Groups by Risk: This analysis displays your organization’s Business Asset Groups with associated risk information.
The risk for a Business Asset Group is the maximum of all risks of attack on the Business Asset Group.
› Vulnerability Occurrences – High Risk: This analysis displays vulnerability occurrences with High and Critical imposed risk. Information about each vulnerability occurrence includes the severity and exposure, CVE ID, status, title, asset, service, age, whether a ticket is open on the vulnerability occurrence, and the imposed risk.
There are other analyses that display information about vulnerability occurrences (for example, the Vulnerabilities > By Exposure analyses).
› Threat Origins by Risk: This analysis displays Threat Origins with information about their imposed risk.
The risk for a Threat Origin is the sum of all risks imposed by that Threat Origin on all Business Asset Groups configured in the system.
› Business Units by Risk: This analysis displays Business Units with associated risk information.
The risk for a Business Unit is the aggregated risk for all Business Asset Groups of the Business Unit.
› Business Impacts by Risk and Regulations by Risk: These analyses display the risk for Business Impacts and Regulations and the type of loss involved (confidentiality, integrity, and availability).
› Attacks – High Risk: An attack consists of a Threat Origin and a destination (Business Asset Group or asset). This analysis displays the Threat Origin, destination, risk, and step count—the number of steps it would take for the Threat Origin to attack the destination.
The risk for an attack is the risk that the source Threat Origin poses to the destination Business Asset Group. No risk is displayed for attacks on assets.
› Vulnerability Definitions – High Risk: This analysis displays Vulnerability Definitions with High and Critical imposed risk. A Vulnerability Definition has high risk if any of its vulnerability occurrences in the model have high risk. Information about each Vulnerability Definition includes a list of its vulnerability occurrences in the model, with their risks.
The risk for a Business Impact or Regulation is the aggregation of the risks associated with that Business Impact or Regulation on the individual Business Asset Groups.

Chapter 23 Skybox analyses
Skybox version 8.5.600 187
CREATING AN ANALYSIS You create analyses to view sets of related data that are not otherwise available. For example, you might want to see all high-risk vulnerability occurrences on assets that belong to a specific network, all assets or locations that have vulnerability occurrences, or all Business Asset Groups that have at least a specific number of assets and a specific risk level.
To create an analysis in the Vulnerability Control workspace 1 In the tree, right-click Prioritization Center > Analyses > Private
Analyses and then select New > Analysis.
2 Type a Name for the analysis.
3 Select the analysis type.
The Properties pane of the dialog box changes to display the relevant fields for the selected analysis type.
4 Fill in the fields.
5 Click OK.
The analysis is created.
Sometimes, when you create a new analysis, the table in which it is displayed is missing information that you want to see. You can display additional columns in the table.
To display additional columns in a table 1 With the newly created analysis open, right-click in the header row of the
Table pane and select Customize Current View.
2 In the Customize Current View dialog box, select the information that you want to see and click OK.
A new column with this information is added to the right-hand side of the table. You can drag the column header to a more convenient location in the table.

Skybox Vulnerability Control User’s Guide
Skybox version 8.5.600 188
Chapter 24
The Access Analyzer analyzes access in the network, taking into account access rules, routing rules, assets, and services.
You can use the Access Analyzer for many purposes, including verifying network connectivity and network security in existing scenarios (Live) and test scenarios (What If), and for troubleshooting the network.
This chapter explains how to use the Access Analyzer.
In this chapter
Creating new queries ......................................................... 188
Access Analyzer output ....................................................... 195
CREATING NEW QUERIES The Access Analyzer works by answering queries about access within your organization’s network.
Use the Access Query pane to create queries. It contains input fields (including source, destination, and specific access properties) that tell the Access Analyzer the access that you want it to verify and the additional factors to consider in the analysis.
To define a query
1 Open the Access Analyzer: click on the toolbar.
Access Analyzer

Chapter 24 Access Analyzer
Skybox version 8.5.600 189
2 Define the source and the destination (see page 189).
Note: You must give a value to at least 1 of Source and Destination (that is, at least 1 of them must not be Any).
• For information about these and other query fields, see the Access Analyzer query fields topic in the Skybox Reference Guide.
3 (For advanced users) To configure additional settings, click next to Advanced.
Note: Queries created in the Access Analyzer are intended for 1-time use only. A query cannot be reused if you create a different query or close the Access Analyzer.
To analyze a query
› After filling the query fields, click .
The Access Analyzer analyzes access between the source and the destination. The results of the analysis are displayed in the results tree.
Note: If you change the values of any query fields after analyzing the query, reanalyze the query for the changes to take effect.
Defining the source and the destination The source and destination of access queries are defined by their scope and the services on which access is verified. The destination can have other defining information (see page 193).
Defining the scope The scope of the source specifies the source points for access analysis; the scope of the destination specifies the destination points for access analysis.
Either scope can include:
› Simple entities (for example, assets or networks) › Container entities (for example, locations, asset groups, or Business Asset
Groups) › A mixture of simple entities and container entities › The value Any:
• Use this value in the source when analyzing which source points can access a specific destination.
• Use this value in the destination when analyzing which destinations can be reached from the specified source point.

Skybox Vulnerability Control User’s Guide
Skybox version 8.5.600 190
To use the Source and Destination Scope dialog box 1 Click the Browse button next to a Scope field.
The default scope for source and destination is Any. You must define a specific scope for at least 1 of them; Skybox does not verify access from Any to Any.
2 Define the source and destination scopes (as explained in the following procedures).
3 Click OK.
To define the source scope 1 To use specific entities in the source scope: In the Available Entities field,
select all entities that are part of the scope and click to move them to the Selected Source field.
Note: When querying from a network or a location containing networks, access is analyzed using the IP address ranges of the networks rather than each asset within the networks. To analyze access using routing rules or access rules on specific assets, select the assets rather than selecting the networks containing the assets.
2 To use IP address ranges in the source scope:
a. Click IP Ranges (in the Source area).
b. Specify IP addresses:

Chapter 24 Access Analyzer
Skybox version 8.5.600 191
— Type an IP address range (or single IP address) directly in the Use IP Ranges field
— Click the Browse button next to the Use IP Ranges field to select IP address ranges
c. If you are using a single IP address or IP address range and you want to include the entity to which the IP address range belongs, click Find Networks. Select a matching network and click Select.
When you select an entity and specify alternate IP address ranges, the analysis starts from the selected entities, but the alternate IP addresses are used instead of the entity’s IP addresses.
Note: If you specify IP address ranges without selecting a Source entity, you must select at least 1 entity in Destination Scope. In this case, the specified IP addresses are used as source addresses for analyzing access to the selected Destination entity.
To define the destination scope 1 To use specific entities in the destination scope: In the Available Entities
field, select all entities that are part of the scope and click to move them to the Selected Destination field.
2 To use IP address ranges in the destination scope:
a. Click IP Ranges (in the Destination area).
b. Specify IP addresses:
— Type an IP address range (or single IP address) directly in the Use IP Ranges field
— Click the Browse button next to the Use IP Ranges field to select IP address ranges
c. If you are using a single IP address or IP address range and you want to include the entity to which the IP address range belongs, click Find Networks. Select a matching network and click Select.
Defining the services By default, access between the source and destination is verified on all available services. However, you can specify specific services on which access is verified for the source or the destination. When specific services are specified, access is verified only on those services, rather than on all available services.
To specify specific services through which access is checked 1 (To specify services for the source) Click in the Source area.
The Services field appears in the dialog box.
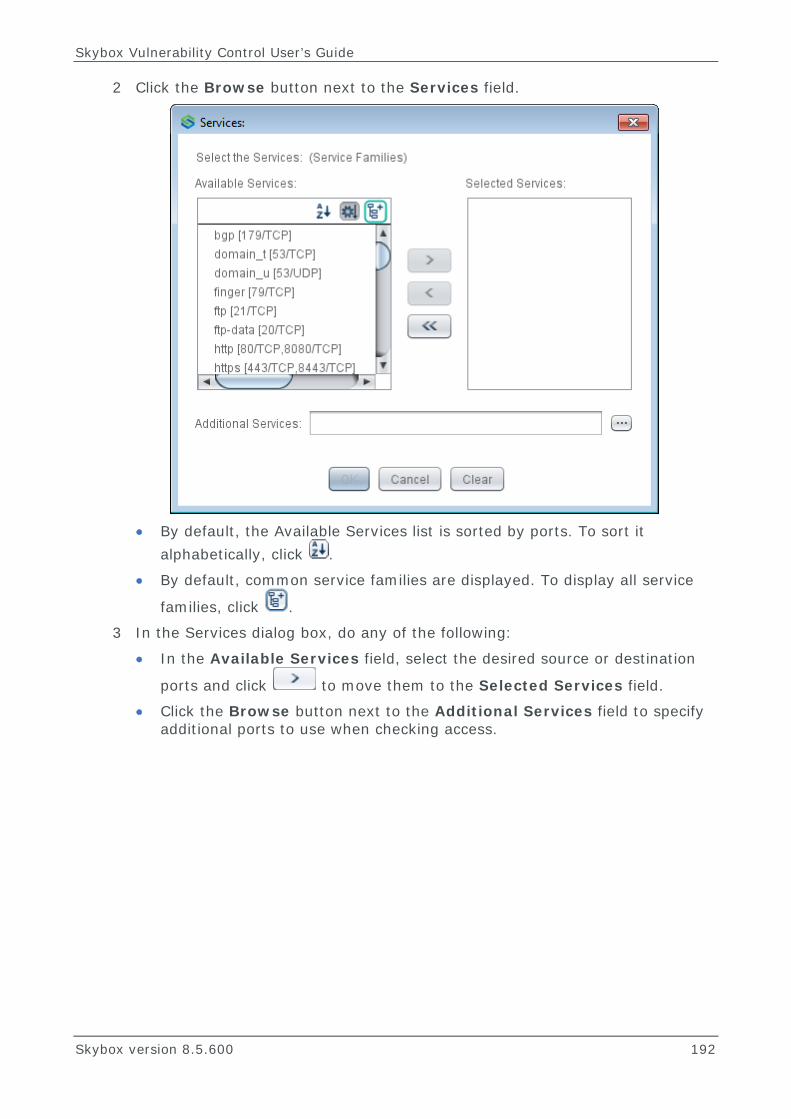
Skybox Vulnerability Control User’s Guide
Skybox version 8.5.600 192
2 Click the Browse button next to the Services field.
• By default, the Available Services list is sorted by ports. To sort it
alphabetically, click .
• By default, common service families are displayed. To display all service
families, click .
3 In the Services dialog box, do any of the following:
• In the Available Services field, select the desired source or destination
ports and click to move them to the Selected Services field.
• Click the Browse button next to the Additional Services field to specify additional ports to use when checking access.

Chapter 24 Access Analyzer
Skybox version 8.5.600 193
4 Click OK.
5 To use all services except those selected, select NOT.
Additional destination options Usually, you use the destination Scope field to define the destination scope—a collection of assets or networks that should be reachable by all packets. You can define a Sending To scope, consisting of IP address ranges. All IP addresses in the ranges that you specify in the IP Ranges field are used as destination addresses at the beginning of the access analysis, before network addresses are translated. Services specified in the related Services field are handled similarly.
Note: When you define Sending To properties, the destination Scope and Services fields are referred to as the Arriving At scope and services.
For example, you select Internet as the source Scope, you do not select a destination Scope, and you set the destination IP Ranges field to 1.2.3.40-1.2.3.50. This query means “What networks, assets, and services are reached if a packet with a destination in the IP address range 1.2.3.40 to 1.2.3.50 is sent from the internet?”
If you select Arriving At entities and Sending To ranges, access is analyzed using the selected IP address ranges, but only the selected entities are displayed (that is, the selected entities filter the results).
To use the additional destination options 1 In the Access Query pane, click to expand the Destination area.
The original destination scope and services are now shown in the Arriving At area and another area, Sending To, opens in the dialog box.
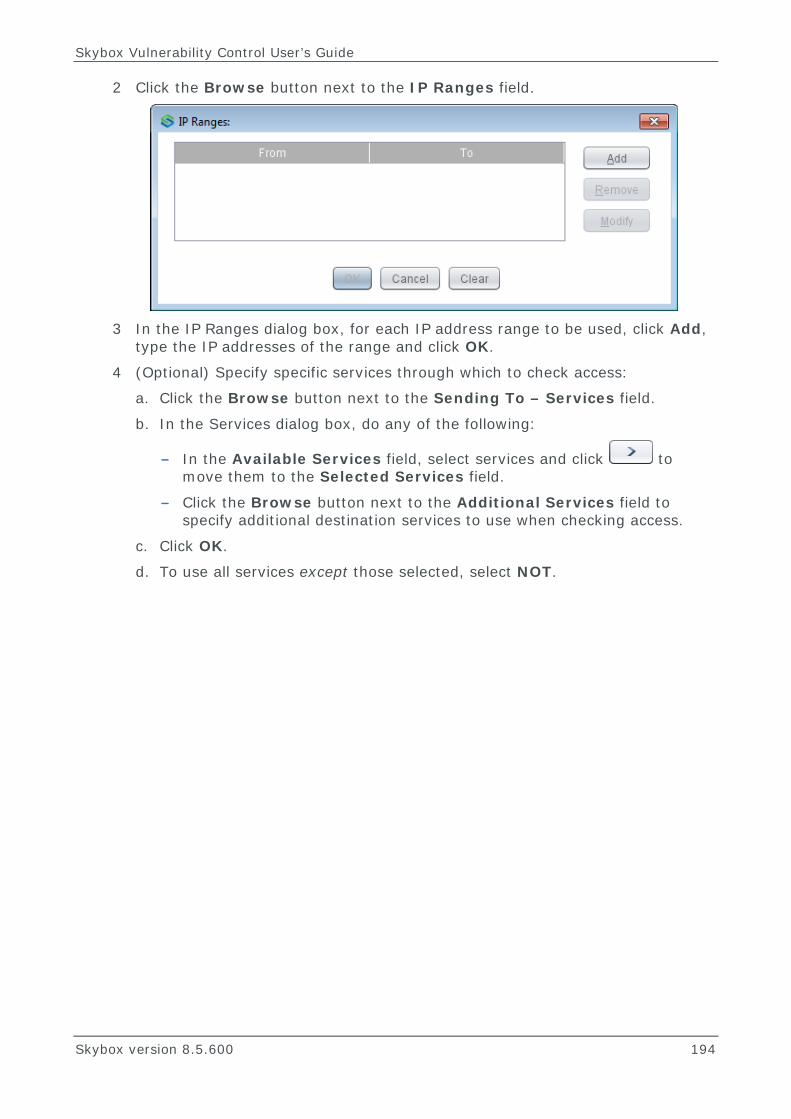
Skybox Vulnerability Control User’s Guide
Skybox version 8.5.600 194
2 Click the Browse button next to the IP Ranges field.
3 In the IP Ranges dialog box, for each IP address range to be used, click Add,
type the IP addresses of the range and click OK.
4 (Optional) Specify specific services through which to check access:
a. Click the Browse button next to the Sending To – Services field.
b. In the Services dialog box, do any of the following:
— In the Available Services field, select services and click to move them to the Selected Services field.
— Click the Browse button next to the Additional Services field to specify additional destination services to use when checking access.
c. Click OK.
d. To use all services except those selected, select NOT.

Chapter 24 Access Analyzer
Skybox version 8.5.600 195
ACCESS ANALYZER OUTPUT The results of the analysis are displayed as a tree in the Results pane (top-right) of the Access Analyzer. Use the display filters (see page 195) at the top of the pane to specify how the results are displayed in the tree. Detailed information for specific access routes is displayed in the Access Route pane (bottom right).
Display filters The toolbar at the top of the Results pane contains the following display filters:
› Show: The type of entities to display:
• Accessible Destinations: The accessible destinations when using the specified services
• Blocked Destinations: The destinations for which there are blocked routes from the source when using the specified services
• Sources Accessing the Destination: The assets that can access the selected destination when using the specified services
• Blocked Sources: The assets for which there are blocked routes to the destination when using the specified services
Note: When blocked sources or destinations are displayed in the results tree, all names in the tree are italicized.
› Group by: Specifies whether to group the entities displayed in the results tree by their services or by their network interfaces.
› Authentication:
• No: Non-authenticated traffic

Skybox Vulnerability Control User’s Guide
Skybox version 8.5.600 196
• Yes: Authenticated traffic
• N/A (Both): Authenticated and non-authenticated traffic
› Entities:
• Model Entities Only: Assets and services that are part of the current model. When these existing entities are hidden, only the IP address and port ranges are shown.
• Possible IP Ranges: All IP addresses and port ranges that are exposed by firewall access rules, even if they do not exist in the model.
› Show / Hide locations: Specifies whether to group networks into locations.
› Save Results:
• Save Results as XML: Saves the currently displayed access results as an XML file.
• Save Results as CSV: Saves the currently displayed access results as a CSV file.
• Save Route as HTML: Saves the selected access route as an HTML file.
› : Specifies whether to include the reply route when an Access Route is displayed.
Understanding the results Most of the analyses of the Access Analyzer involve connectivity or security.
› Connectivity queries ascertain whether there is a connection between 2 points in your organization and to understand the route between them.
If there is connectivity between the 2 points, the Results pane shows the assets and services that can be connected, and the Details pane shows how the connection is made. If there is no connectivity, a message to that effect appears in Results pane.
› Security queries verify access restrictions applied in your organization.
For a security query, the accessible results should contain only the assets and services that are permitted to be exposed. If additional assets are present in the results, these assets can also open a connection to the Destination entity.
For example, to check that no developers have access to finance information (that is, to computers in the Finance Department), analyze access from R&D to the Finance Department (Source = R&D, Destination = Finance Department). If the accessible results are empty, there is no access (which is what you want). If there are any results, there is undesired access; check the Details pane to find the access path, so that you can fix the problem.
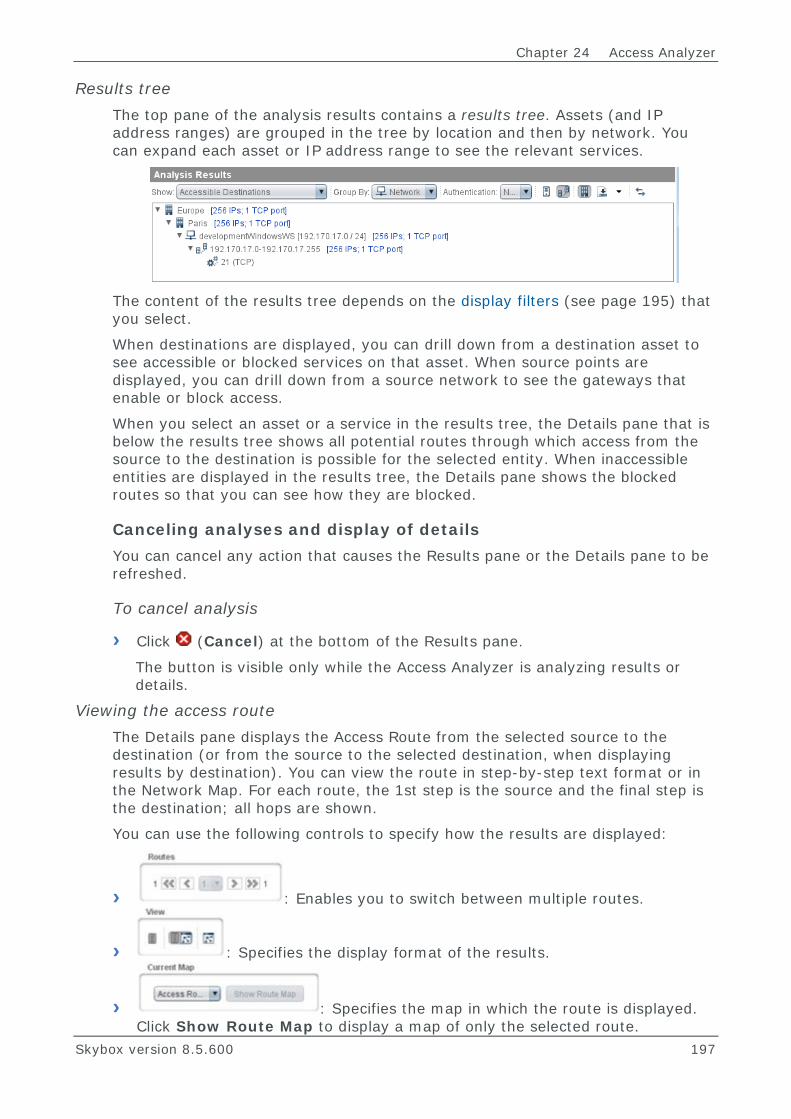
Chapter 24 Access Analyzer
Skybox version 8.5.600 197
Results tree The top pane of the analysis results contains a results tree. Assets (and IP address ranges) are grouped in the tree by location and then by network. You can expand each asset or IP address range to see the relevant services.
The content of the results tree depends on the display filters (see page 195) that you select.
When destinations are displayed, you can drill down from a destination asset to see accessible or blocked services on that asset. When source points are displayed, you can drill down from a source network to see the gateways that enable or block access.
When you select an asset or a service in the results tree, the Details pane that is below the results tree shows all potential routes through which access from the source to the destination is possible for the selected entity. When inaccessible entities are displayed in the results tree, the Details pane shows the blocked routes so that you can see how they are blocked.
Canceling analyses and display of details You can cancel any action that causes the Results pane or the Details pane to be refreshed.
To cancel analysis
› Click (Cancel) at the bottom of the Results pane.
The button is visible only while the Access Analyzer is analyzing results or details.
Viewing the access route The Details pane displays the Access Route from the selected source to the destination (or from the source to the selected destination, when displaying results by destination). You can view the route in step-by-step text format or in the Network Map. For each route, the 1st step is the source and the final step is the destination; all hops are shown.
You can use the following controls to specify how the results are displayed:
› : Enables you to switch between multiple routes.
› : Specifies the display format of the results.
› : Specifies the map in which the route is displayed. Click Show Route Map to display a map of only the selected route.

Skybox Vulnerability Control User’s Guide
Skybox version 8.5.600 198
Note: When you switch to a map other than the route map, highlighting of the currently selected route is lost. Switch to a different route or a different result to view the route in the Map pane.
› : Opens the properties of the route map so that you can change the settings.
Viewing the Access Route in text format The following is an example of an access route displayed in text format.
For each route, the source and destination are listed in full outside the table. The table lists the exact route taken.
› The 1st step is the source point.
If the source point is a subset of the source specified in the Source field, the source IP address ranges are listed.
› Intermediary steps show gateways passed on the way, with their access rules and address translation rules (if any).
Chapter 24 Access Analyzer
Skybox version 8.5.600 199
Rules are shown with their direction, rule number, ruleset name and rule action. Each intermediary step includes an inbound rule and an outbound rule. Click the link in a rule to open the Access Control List Editor, where you can view or change the rule easily.
When access goes through a VPN tunnel, Encrypted is listed in the step, as well as information about the VPN tunnel.
› The last point is the destination, including asset name and IP address.
For information about inaccessible routes, see Inaccessible entities (on page 199).
Inaccessible entities In some cases, the Access Analyzer shows that there is no access from the source to the destination. (This might or might not be the desired outcome of access analysis.)
There are 2 basic reasons why a network or asset is inaccessible:
› The route is blocked: An access rule denies access between the source and the destination (this is the most common reason).
› The route is broken: No routing exists from the source to the destination.
Use Show Blocked Sources or Show Blocked Destinations to discover why there is no access.
Blocked routes When routes between the source and destination are blocked, the Access Route lists all hops from the source to the point where the route is blocked. The last entry in the table shows what is blocking the route—usually an access rule on a firewall. The full destination is listed after the table, as in all access routes.

Skybox Vulnerability Control User’s Guide
Skybox version 8.5.600 200
In the following example, the route between the Development network and the Finance Servers was checked for access and no access was found. To see where the access is blocked, use Show Blocked Destinations.
The Access Route shows that access is denied (blocked) by the finance FW firewall and that the specific rule used is access rule 6.
Broken routes When an entity is inaccessible for routing reasons (for example, some routers are missing in the model), the route is not blocked, but rather broken (incomplete). This can happen when:
› The source knows the destination by a different name or IP address (because of NAT rules).
› The model is incomplete and gateways that connect between the source and the destination are missing.
› Routing rules are missing in gateways between the source and the destination.
› There is a route to a null (black hole) in a gateway between the source and the destination.
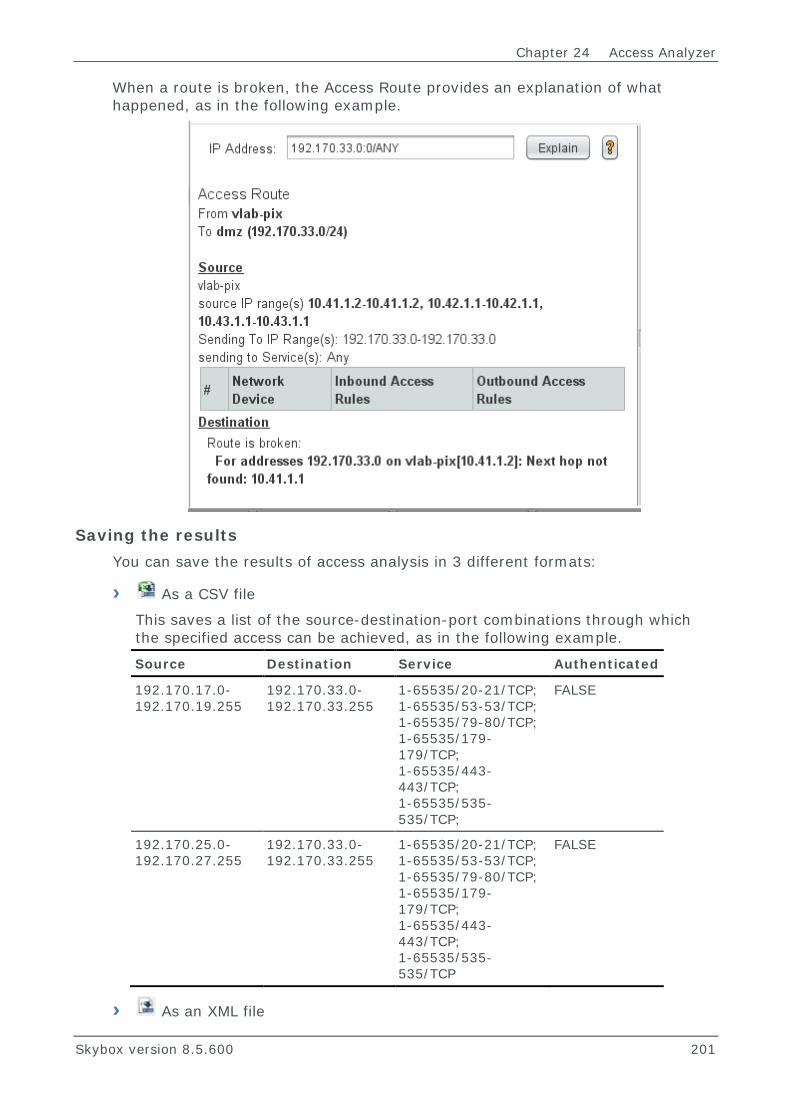
Chapter 24 Access Analyzer
Skybox version 8.5.600 201
When a route is broken, the Access Route provides an explanation of what happened, as in the following example.
Saving the results You can save the results of access analysis in 3 different formats:
› As a CSV file
This saves a list of the source-destination-port combinations through which the specified access can be achieved, as in the following example.
Source Destination Service Authenticated
192.170.17.0-192.170.19.255
192.170.33.0-192.170.33.255
1-65535/20-21/TCP; 1-65535/53-53/TCP; 1-65535/79-80/TCP; 1-65535/179-179/TCP; 1-65535/443-443/TCP; 1-65535/535-535/TCP;
FALSE
192.170.25.0-192.170.27.255
192.170.33.0-192.170.33.255
1-65535/20-21/TCP; 1-65535/53-53/TCP; 1-65535/79-80/TCP; 1-65535/179-179/TCP; 1-65535/443-443/TCP; 1-65535/535-535/TCP
FALSE
› As an XML file

Skybox Vulnerability Control User’s Guide
Skybox version 8.5.600 202
This saves the results tree as an XML file, as in the following example. - <ExplainTree> - <Location name="US"> - <Location name="New York"> - <Network name="dmz [192.170.33.0 / 24]" count_description="256 IPs;6 TCP/UDP ports"> - <IpRange name="192.170.33.0-192.170.33.255" count_description="256 IPs; 6 TCP/UDP ports"> <PortRange name="21 (TCP)" count_description="0 IPs" /> <PortRange name="25 (TCP)" count_description="0 IPs" /> <PortRange name="53 (TCP)" count_description="0 IPs" /> <PortRange name="80 (TCP)" count_description="0 IPs" /> <PortRange name="443 (TCP)" count_description="0 IPs" /> <PortRange name="53 (UDP)" count_description="0 IPs" /> </IpRange> </Network> </Location> </Location> </ExplainTree>
› A specific route as an HTML file
This saves the route displayed in the Details pane as an HTML file, as in the following example.

Skybox version 8.5.600 203
Chapter 25
You can modify the default values of many security metrics properties to suit your requirements. This chapter explains:
› How the security metrics analysis is done. › The properties that might need changing and how to change them. You
access standard properties from the GUI, while advanced properties are only accessible in a file under the Skybox directory.
In this chapter
Calculation of scores for VLI security metrics ......................... 203
Calculation of scores for RLI security metrics ......................... 204
Impact levels .................................................................... 206
Additional security metrics properties ................................... 207
CALCULATION OF SCORES FOR VLI SECURITY METRICS The Vulnerability Level Indicator (VLI) measures the rate of vulnerability occurrences residing on assets in a group of assets (for example, a Business Asset Group or Business Unit). The rate is the weighted average number of vulnerability occurrences per asset.
› vli_weight(v) = severity_weight(v)
The severity weight is a configurable numeric value associated with the different severity levels; the default values are: Critical=1, High=0.3, Medium=0.03, and Low=0 (ignored). For example, 3 high-severity and 3 medium-severity vulnerability occurrences on an asset are considered as 1 critical equivalent vulnerability occurrence.
The VLI value of an asset is obtained by adding together the weights of all vulnerability occurrences on that asset. The VLI value is then mapped to a score between 0 and 100 and to a level. You can configure the score mappings for each security metric separately from the Manage Security Metrics dialog box.
The VLI value for a group of assets is the average vli_weight per asset.
VLI calculation for a sample Business Asset Group A sample Business Asset Group consisting of 5 assets with their associated vulnerability occurrence counts is shown in the following table.
Modifying security metric properties

Skybox Vulnerability Control User’s Guide
Skybox version 8.5.600 204
Asset Critical occurrences
High occurrences
Medium occurrences
Total occurrences on asset
asset1 2 3 14 3.32
asset2 1 4 8 2.44
asset3 0 1 6 0.48
asset4 3 4 11 4.53
asset5 1 3 13 2.29
Average per asset
1.4 3 10.4 2.612
The VLI value for this Business Asset Group (that is, the average number of critical-equivalent vulnerability occurrences per asset) is approximately 2.6. When this VLI value is mapped to a VLI score, the VLI score is approximately 46 (which corresponds to the medium level and to the color ).
For additional information about the mapping, see Initial customization (on page 42).
Note: You can include the value of Business Impacts and Regulations in the vulnerability occurrence weight formula. For additional information, see Additional security metrics properties (on page 207).
CALCULATION OF SCORES FOR RLI SECURITY METRICS The Remediation Latency Indicator (RLI) measures the rate of over-due vulnerability occurrences on an asset, based on remediation SLA criteria.
The RLI score for an asset indicates the number of over-due or relatively old vulnerability occurrences found on the asset, where each vulnerability occurrence is weighted by a penalty. This penalty considers the remediation priority of the vulnerability occurrence and its delay; high priority vulnerability occurrences that have long delays are assigned the highest weight.
The RLI score for a Business Asset Group is the average of the RLI scores for all the assets in the Business Asset Group.
Use the RLI metric to identify hot-spots whose remediation latency is relatively high; you can examine trends in remediation by how quickly the vulnerability occurrences are being fixed.
Some property values used for the RLI calculation (Vulnerability Occurrence age and SLA time) are defined per security metric in the Security Metric Properties dialog box.
The properties in the following table are defined globally for all Remediation Latency Indicator-type security metrics, and are located in <Skybox_Home>\server\conf\sb_server.properties
Property Definition In properties file as…
Remediation Priority
The importance of remediating vulnerability occurrences of this severity level, where:
KPI_NO_HOST_IMPACT_VUL_SEVERITY_PRIORITIES The default value is P1,P2,P3,NA,NA
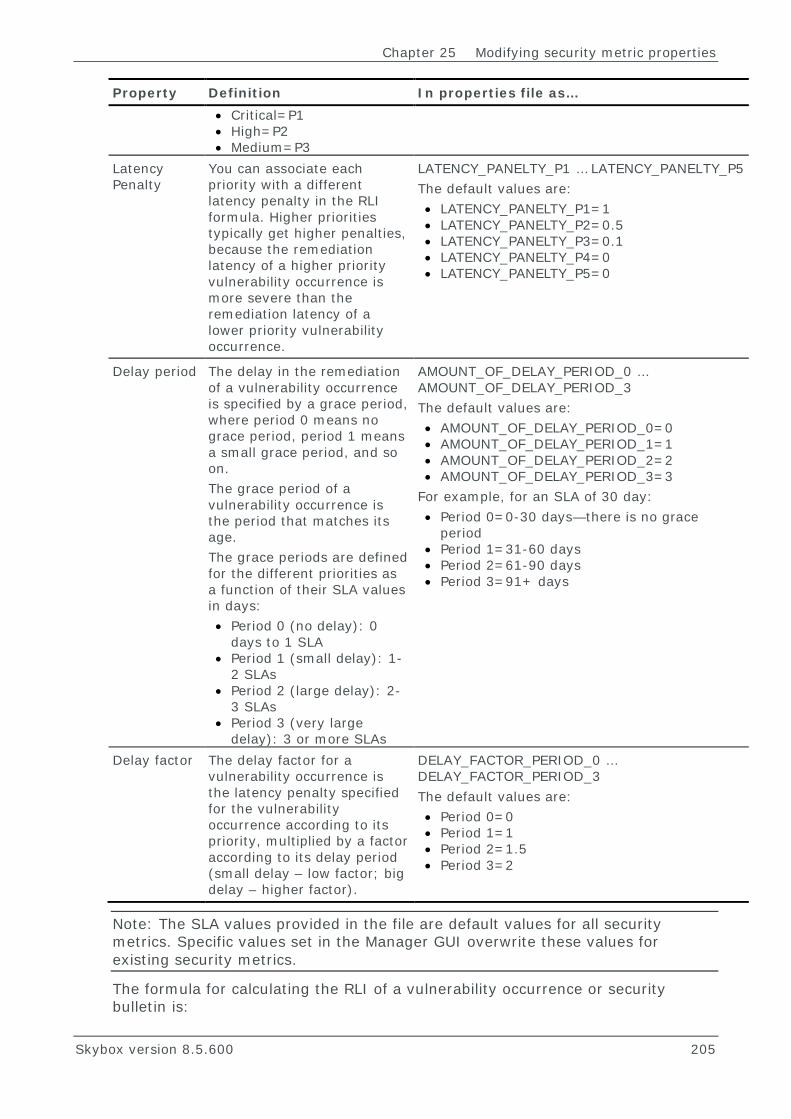
Chapter 25 Modifying security metric properties
Skybox version 8.5.600 205
Property Definition In properties file as… • Critical=P1 • High=P2 • Medium=P3
Latency Penalty
You can associate each priority with a different latency penalty in the RLI formula. Higher priorities typically get higher penalties, because the remediation latency of a higher priority vulnerability occurrence is more severe than the remediation latency of a lower priority vulnerability occurrence.
LATENCY_PANELTY_P1 … LATENCY_PANELTY_P5 The default values are: • LATENCY_PANELTY_P1=1 • LATENCY_PANELTY_P2=0.5 • LATENCY_PANELTY_P3=0.1 • LATENCY_PANELTY_P4=0 • LATENCY_PANELTY_P5=0
Delay period The delay in the remediation of a vulnerability occurrence is specified by a grace period, where period 0 means no grace period, period 1 means a small grace period, and so on. The grace period of a vulnerability occurrence is the period that matches its age. The grace periods are defined for the different priorities as a function of their SLA values in days: • Period 0 (no delay): 0
days to 1 SLA • Period 1 (small delay): 1-
2 SLAs • Period 2 (large delay): 2-
3 SLAs • Period 3 (very large
delay): 3 or more SLAs
AMOUNT_OF_DELAY_PERIOD_0 … AMOUNT_OF_DELAY_PERIOD_3 The default values are: • AMOUNT_OF_DELAY_PERIOD_0=0 • AMOUNT_OF_DELAY_PERIOD_1=1 • AMOUNT_OF_DELAY_PERIOD_2=2 • AMOUNT_OF_DELAY_PERIOD_3=3
For example, for an SLA of 30 day: • Period 0=0-30 days—there is no grace
period • Period 1=31-60 days • Period 2=61-90 days • Period 3=91+ days
Delay factor The delay factor for a vulnerability occurrence is the latency penalty specified for the vulnerability occurrence according to its priority, multiplied by a factor according to its delay period (small delay – low factor; big delay – higher factor).
DELAY_FACTOR_PERIOD_0 … DELAY_FACTOR_PERIOD_3 The default values are: • Period 0=0 • Period 1=1 • Period 2=1.5 • Period 3=2
Note: The SLA values provided in the file are default values for all security metrics. Specific values set in the Manager GUI overwrite these values for existing security metrics.
The formula for calculating the RLI of a vulnerability occurrence or security bulletin is:

Skybox Vulnerability Control User’s Guide
Skybox version 8.5.600 206
rli_weight(v) = latency_penalty(priority(v)) * delay_factor(delay_period(v))
Examples For example, if Critical Microsoft Security Bulletins must be addressed in 14 days according to your SLA, you must change the Critical SLA in the MS-RLI security metric to 14. If High Importance Microsoft Security Bulletins must be addressed in 42 days, you must change the High SLA in the MS-RLI security metric to 42.
IMPACT LEVELS The asset impact weight is an optional weight. When considered, it is determined by Business Impacts and Regulations. Business Impacts and Regulations specify (for Business Asset Groups and groups of assets) the expected impact level (Very Low to Very High) in case of security loss. DMZ assets and critical servers are typically associated with High or Critical Business Impacts and Regulations, while desktops are usually associated with Very Low or Low Business Impacts and Regulations. Each impact level is mapped to a (configurable) numeric weight. That weight (asset_impact_weight) is then used in computing the vulnerability occurrence weight together with the severity, so that the vulnerability occurrence weight formula is:
› vli_weight(v) = severity_weight(v) * asset_impact_weight(h)

Chapter 25 Modifying security metric properties
Skybox version 8.5.600 207
By default, Skybox does not consider impact levels for security metrics analysis. For the security metrics analysis to include the impact levels, you must:
1 Specify the impact levels.
Note: When working with Exposure, this step is done as part of building the model. If you are working only with security metrics, see Business Impacts and Regulations (on page 94).
2 Depending on whether the impact levels are for VLI or RLI, set the KPI_VLI_USE_HOST_IMPACT_FACTOR and KPI_RLI_USE_HOST_IMPACT_FACTOR properties in <Skybox_Home>\server\conf\sb_server.properties to true.
ADDITIONAL SECURITY METRICS PROPERTIES The values of the security metrics properties are in the kpi calculation properties section of <Skybox_Home>\server\conf\sb_server.properties
The properties in the following table might be useful in setting up the behavior of the security metrics.
Property Default value
Description
KPI_SEVERITY_THRESHOLD
Medium The minimum severity of vulnerability occurrences to include in the security metrics analyses.
KPI_SEVERITY_FACTOR_FOR_<level>_VULNERABILITY
The weight of the different vulnerability occurrence severities in security metrics analyses.
KPI_VLI_USE_HOST_IMPACT
false Specifies whether to use the impact factor of assets (that belong to Business Asset Groups that have Business Impacts or Regulations) in VLI analyses. Note: If this property is set to true, the values of the KPI_HOST_IMPACT_ properties might need modifying.
KPI_RLI_USE_HOST_IMPACT_FACTOR
false Specifies whether to use the impact factor of assets (that belong to Business Asset Groups that have Business Impacts or Regulations) in RLI analyses. Note: If this property is set to true, the values of the properties in the relevant only for RLI section of this file might need modifying.
After changing the value of any of these properties, you must restart the Server for the changes to take effect.

Skybox version 8.5.600 208
Chapter 26
The Skybox Vulnerability Dictionary contains an extensive list of vulnerabilities published on daily basis, consolidated from tens of data sources. It contains both descriptive information of each Vulnerability Definition as well as structured information that enables Skybox analytics.
In this chapter
Skybox Vulnerability Dictionary information .......................... 208
CVE compliance ................................................................. 210
SKYBOX VULNERABILITY DICTIONARY INFORMATION The information for each Vulnerability Definition in the Vulnerability Dictionary includes:
› SBV ID: Identification number assigned by Skybox › Existence preconditions: Services that must exist on an asset for an
occurrence of the Vulnerability Definition to exist › Exploitation preconditions: Preconditions for exploiting an occurrence of the
Vulnerability Definition › Exploitation effects: Achievements an attacker could gain from a successful
exploitation of an occurrence of the Vulnerability Definition › Attributes: Various attributes that might affect the likelihood of a successful
exploitation of an occurrence of the Vulnerability Definition, including:
• Difficulty: An estimated difficulty level for exploiting occurrences of the Vulnerability Definition. The difficulty of exploiting a vulnerability occurrence is largely dependent on the existence or nonexistence of known exploit code for exploiting the Vulnerability Definition, or a detailed description of how to exploit it.
• Commonality: An indication of how frequently attackers exploit this Vulnerability Definition.
SBV ID In the Vulnerability Dictionary, each Vulnerability Definition is defined on a single service; if similar Vulnerability Definitions exist on several services, they are usually defined as different Vulnerability Definitions with different ID numbers.
Note: If a Vulnerability Definition is defined on several services with the same ID by CVE and various scanners, the Vulnerability Dictionary also defines it as a single Vulnerability Definition with a single ID.
Skybox Vulnerability Dictionary

Chapter 26 Skybox Vulnerability Dictionary
Skybox version 8.5.600 209
Exploitation preconditions Exploitation preconditions define 2 values:
› The access that the attacker must have to exploit occurrences of the Vulnerability Definition
› The authentication required on the attacked service: Whether the attacker must pass the service authentication requirement to exploit occurrences of the Vulnerability Definition
The following are examples of exploitation preconditions:
› Remote Access without Authentication: The attacker has remote access to the service on which the vulnerability occurrence resides and no authentication is required to successfully exploit the vulnerability occurrence. Most attackers can gain access to most vulnerable services.
› Local Access with Authentication: The attacker has some type of local control over the vulnerable asset. This precondition is typical for vulnerability occurrences that enable privilege escalation on an attacked asset.
The remote access precondition has several variations that you should model. For example, for some DoS attacks, it is sufficient for the attacker to have a 1-way UDP connection to the vulnerable service. The limited requirement for 1-way access in this case could enable an attacker to create spoofing attacks that succeed in passing through firewalls and arrive at the vulnerability occurrence because of its spoofed source IP address.
Exploitation effects Exploitation effects formally describe the achievements that an attacker could gain from successful exploitation of a vulnerability occurrence. Achievements include:
› DoS: The attacker could cause a denial of service to the attacked services on the asset.
› User Control: The attacker could gain user (non-root) control on the attacked asset.
› Root Control: The attacker could gain root control on the attacked asset. › File System Read: The attacker could read arbitrary files residing on the file
system of the attacked asset. › Information Leakage: The attacker could cause various types of information
leakage, including leakage of user names, passwords, and source code.
During attack simulation, a vulnerability occurrence can be exploited only if all its preconditions are matched. In a multi-step attack, achievements gained by exploiting a vulnerability occurrence help to fulfill the preconditions of the next vulnerability occurrence.
The Vulnerability Dictionary is continuously updated by the Skybox research lab. It models all new Vulnerability Definitions as they are released and updates existing Vulnerability Definitions throughout their life cycle.
Admins can configure the Vulnerability Dictionary for automatic updates to keep your security model up-to-date.

Skybox Vulnerability Control User’s Guide
Skybox version 8.5.600 210
Severity The severity of a vulnerability occurrence in Skybox is based on the CVSS (Common Vulnerability Scoring System) base score, a standard rating system for vulnerabilities (from 1 to 10). The values for the CVSS fields are filled using the exploitation preconditions and exploitation effects of the Vulnerability Definition. If any of this information is not available in the Vulnerability Dictionary, the severity is set using an average of CVSS or severity values from external sources. Skybox supports CVSS version 2.
The CVSS base score is also translated to a scale (Critical, High, Medium, Low, or Information), and the severity is displayed in Skybox as a scale value followed by the actual score.
External databases The Vulnerability Dictionary also supports most common external vulnerability databases. For each Vulnerability Definition in the Vulnerability Dictionary that also appears in external vulnerability databases, Skybox can display the names and IDs of the Vulnerability Definition in the external databases. The following vulnerability databases are supported:
› Adobe › CVE › Cisco PSIRT › McAfee Vulnerability Manager (Foundstone) › IBM ISS › Microsoft Security Bulletins › nCircle › Nessus › Oracle › OVAL › Qualys › Retina › SecurityFocus (BID) › Rapid7
CVE COMPLIANCE Common Vulnerabilities and Exposures (CVE®) is a dictionary of common names (that is, CVE identifiers) for publicly known information security Vulnerability Definitions. CVE is the industry standard for vulnerability and exposure names. CVE’s common identifiers make it easier to share data across separate network security databases and tools, and provide a baseline for evaluating the coverage of an organization’s security tools.
When information from Skybox’s external sources incorporates CVE identifiers for Vulnerability Definitions, this information is added to the information in the Skybox Vulnerability Dictionary. CVE updates are also incorporated into the Vulnerability Dictionary as they are released.
Chapter 26 Skybox Vulnerability Dictionary
Skybox version 8.5.600 211
To ensure CVE compliance, the Vulnerability Dictionary includes a single Vulnerability Definition (that is, a single SBV ID) for every CVE ID. The SBV ID can include IDs from scanners and other dictionaries (for example, Security Focus). There are Vulnerability Definitions that do not exist in CVE: if a vulnerability occurrence of any of these Vulnerability Definitions is reported by a scanner that is supported by Skybox, it is assigned an SBV ID. If a CVE ID is assigned to any of these Vulnerability Definitions later, the CVE ID is then added to the Vulnerability Definition’s data in the Vulnerability Dictionary.

Skybox version 8.5.600 212
Chapter 27
This chapter explains how to model and use intrusion prevention system (IPS) devices in Skybox.
IPS devices reduce the risk of cyberattacks. In Skybox, you can represent IPS devices in the network model and the effect of these IPS devices in the model is used when simulating potential attacks.
Currently, Skybox directly supports the following IPS devices:
› IBM Proventia G Appliance › Trend Micro TippingPoint › Palo Alto Networks (firewalls with IPS capacity)
You can model other devices manually or using Skybox’s Integration XML (iXML) format.
In this chapter
IPS Dictionary ................................................................... 212
Working with IPS in Skybox ................................................ 212
IPS DICTIONARY The IPS rules (issue IDs) of supported IPS devices are included in the Skybox Vulnerability Dictionary. The rules are modeled by associating each rule with the Vulnerability Definitions that it handles.
Note: Only signature rules that handle specific Vulnerability Definitions are modeled. Rules that identify and handle more general packet anomalies are currently not modeled.
Dictionary updates include updates of vendor IPS rule definitions.
WORKING WITH IPS IN SKYBOX This section explains how to:
› Add supported IPS devices to your model › Validate supported IPS devices › View and manage IPS devices in Skybox › Simulate the effects of IPS devices › Add other types of IPS devices to your model › Use Skybox to test What If scenarios involving IPS devices
IPS support in Skybox
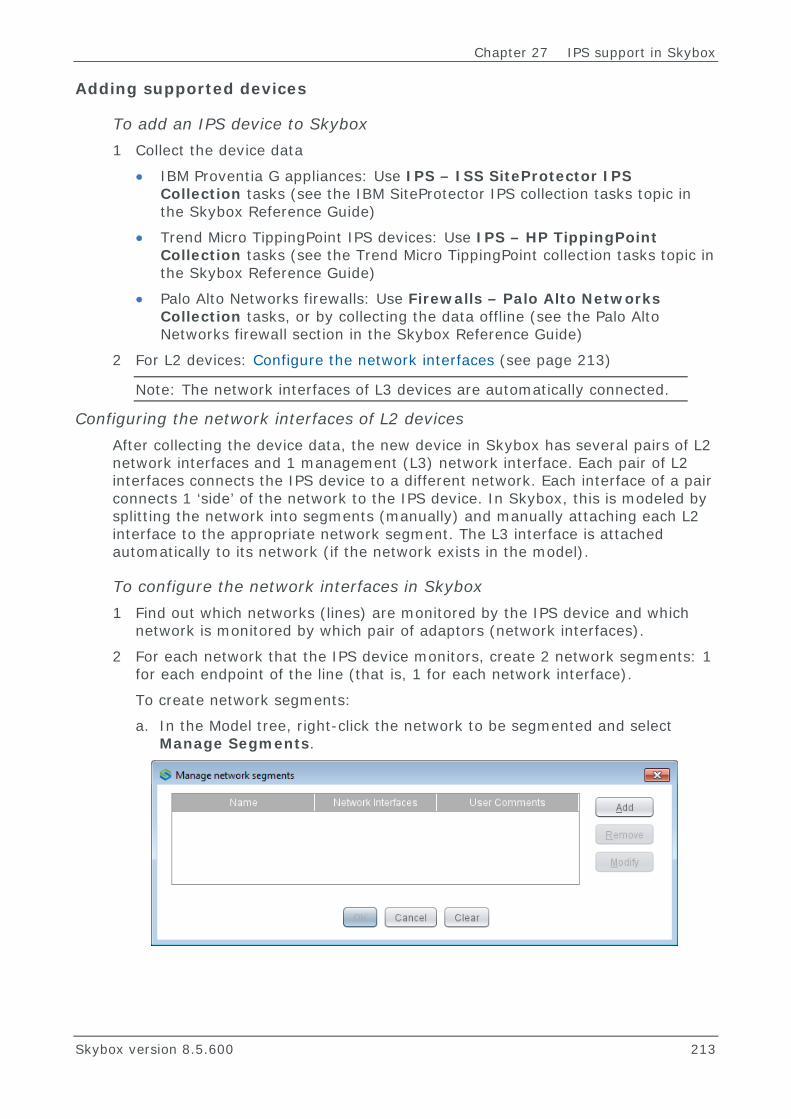
Chapter 27 IPS support in Skybox
Skybox version 8.5.600 213
Adding supported devices
To add an IPS device to Skybox 1 Collect the device data
• IBM Proventia G appliances: Use IPS – ISS SiteProtector IPS Collection tasks (see the IBM SiteProtector IPS collection tasks topic in the Skybox Reference Guide)
• Trend Micro TippingPoint IPS devices: Use IPS – HP TippingPoint Collection tasks (see the Trend Micro TippingPoint collection tasks topic in the Skybox Reference Guide)
• Palo Alto Networks firewalls: Use Firewalls – Palo Alto Networks Collection tasks, or by collecting the data offline (see the Palo Alto Networks firewall section in the Skybox Reference Guide)
2 For L2 devices: Configure the network interfaces (see page 213)
Note: The network interfaces of L3 devices are automatically connected.
Configuring the network interfaces of L2 devices After collecting the device data, the new device in Skybox has several pairs of L2 network interfaces and 1 management (L3) network interface. Each pair of L2 interfaces connects the IPS device to a different network. Each interface of a pair connects 1 ‘side’ of the network to the IPS device. In Skybox, this is modeled by splitting the network into segments (manually) and manually attaching each L2 interface to the appropriate network segment. The L3 interface is attached automatically to its network (if the network exists in the model).
To configure the network interfaces in Skybox 1 Find out which networks (lines) are monitored by the IPS device and which
network is monitored by which pair of adaptors (network interfaces).
2 For each network that the IPS device monitors, create 2 network segments: 1 for each endpoint of the line (that is, 1 for each network interface).
To create network segments:
a. In the Model tree, right-click the network to be segmented and select Manage Segments.

Skybox Vulnerability Control User’s Guide
Skybox version 8.5.600 214
b. Click Add.
c. Type a Name for the segment and click OK.
d. Repeat steps b and c for the 2nd segment.
3 Assign each necessary L2 interface to its corresponding network segment:
a. In the tree, select All Network Devices > IPS Devices.
b. In the Table pane, select the IPS device.

Chapter 27 IPS support in Skybox
Skybox version 8.5.600 215
c. In the Network Interfaces tab of the Details pane, right-click the interface to be connected and select Properties.
d. In the Network field, select the network segment to which to attach the
interface.
e. Click OK.
When this IPS device is updated using the task, the connection between the L2 interfaces and their network segments is created automatically.
Terminology for working with IPS devices Skybox works with devices from many vendors and does not use vendor-specific terminology when modeling the devices. However, since the terms can be confusing, Skybox terminology for IPS is mapped to IBM (Proventia G) and Trend Micro (TippingPoint) terminology in the following table.
Skybox term IBM term Trend Micro TippingPoint term
Asset of type IPS with Firewall Type set to TippingPoint or ISS Proventia
Proventia G appliance TippingPoint device
IPS rule group Protection domain Profile
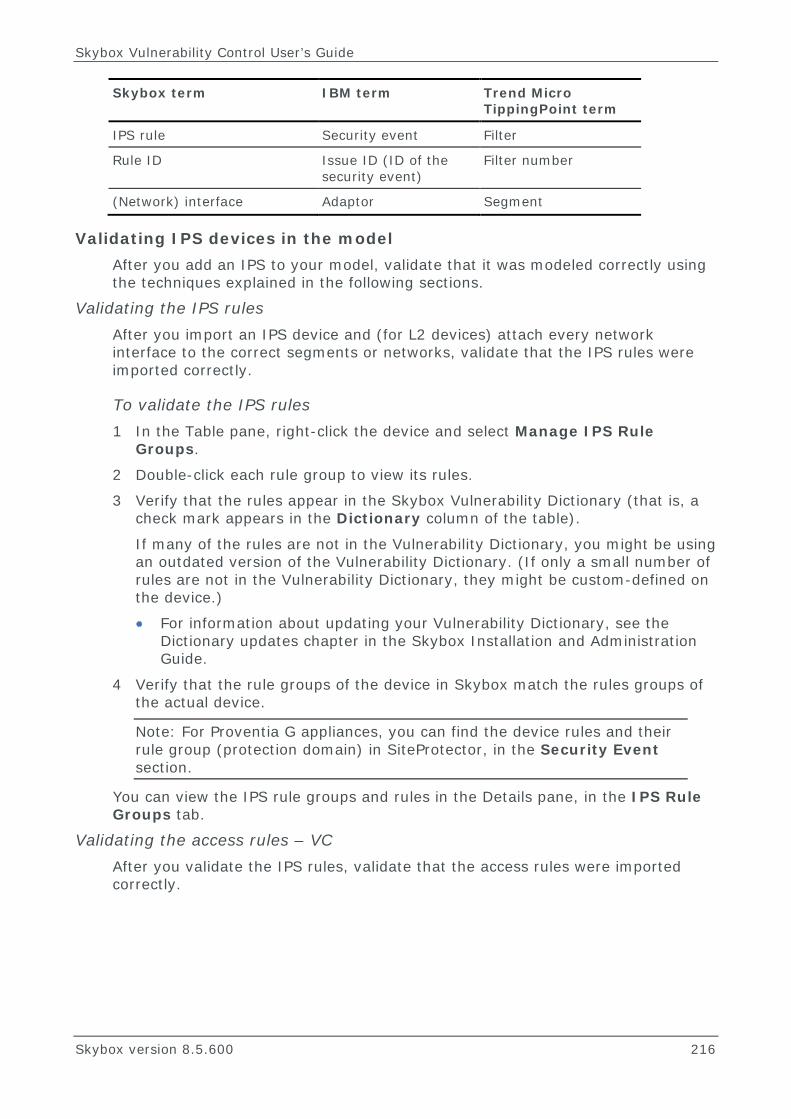
Skybox Vulnerability Control User’s Guide
Skybox version 8.5.600 216
Skybox term IBM term Trend Micro TippingPoint term
IPS rule Security event Filter
Rule ID Issue ID (ID of the security event)
Filter number
(Network) interface Adaptor Segment
Validating IPS devices in the model After you add an IPS to your model, validate that it was modeled correctly using the techniques explained in the following sections.
Validating the IPS rules After you import an IPS device and (for L2 devices) attach every network interface to the correct segments or networks, validate that the IPS rules were imported correctly.
To validate the IPS rules 1 In the Table pane, right-click the device and select Manage IPS Rule
Groups.
2 Double-click each rule group to view its rules.
3 Verify that the rules appear in the Skybox Vulnerability Dictionary (that is, a check mark appears in the Dictionary column of the table).
If many of the rules are not in the Vulnerability Dictionary, you might be using an outdated version of the Vulnerability Dictionary. (If only a small number of rules are not in the Vulnerability Dictionary, they might be custom-defined on the device.)
• For information about updating your Vulnerability Dictionary, see the Dictionary updates chapter in the Skybox Installation and Administration Guide.
4 Verify that the rule groups of the device in Skybox match the rules groups of the actual device.
Note: For Proventia G appliances, you can find the device rules and their rule group (protection domain) in SiteProtector, in the Security Event section.
You can view the IPS rule groups and rules in the Details pane, in the IPS Rule Groups tab.
Validating the access rules – VC After you validate the IPS rules, validate that the access rules were imported correctly.

Chapter 27 IPS support in Skybox
Skybox version 8.5.600 217
To validate the access rules 1 In the Table pane, right-click the device and select Access Rules.
2 In the Access Control List Editor, verify that there are 2 rule chains: ACCESS and IPS.
3 Verify that access rules in the ACCESS chain do not permit packets to move between different lines (networks) that are monitored by the IPS or between the management (L3) interface and the L2 interfaces.
Note: For supported devices, these rules are created during the import and should be checked briefly. However, this step is very important for devices defined using the GUI or iXML.
4 Verify that the (IPS) access rules in the IPS chain contain references to IPS rule groups.
Verifying the effects of the IPS device When an attack path attempts to goes through an IPS device, it is prevented (or has a lower probability of success) if it matches a preventing IPS rule.
After verifying that the IPS device was imported correctly, verify that Skybox correctly simulates the effect of the IPS device on the risk levels of your network.
Vulnerability occurrences that become inaccessible as a result of IPS prevention rules are assigned the Protected exposure status (rather than Inaccessible).
Note: There is no special status to indicate whether a vulnerability occurrence became indirectly exposed as the result of an IPS prevention rule or an access rule on a non-IPS gateway, or whether a vulnerability occurrence is partially prevented by IPS devices (from some of the Threat Origins or in some of the access routes).
To verify the effects of the IPS device 1 Enable the IPS device (in the Table pane, right-click the device and select
Enable IPS).
2 Run the Analyze – Exposure task.
In the Analyses tree (Public Analyses > Vulnerabilities > By Exposure > Protected), check whether any exposed vulnerability occurrences (of the Vulnerability Definitions that the IPS device is configured to prevent) became Protected or Indirect.
Note: Sometimes, the IPS is supposed to protect a vulnerability occurrence from only 1 Threat Origin or 1 Threat Origin Category. The following procedure explains how to check this.
3 As an additional check, disable the IPS device (right-click the device and select Disable IPS), simulate attacks again, and check whether the exposure status of the relevant vulnerability occurrences changes back to Exposed.

Skybox Vulnerability Control User’s Guide
Skybox version 8.5.600 218
Verifying the effects of an IPS device against a threat If the IPS device is supposed to protect against 1 Threat Origin Category only, the vulnerability occurrences that it blocks can be vulnerable to other Threat Origin Categories and they do not have the Protected exposure. However, you can check the exposure of these vulnerability occurrences to the specific Threat Origin Category.
To verify the effects of the IPS device against a single Threat Origin Category 1 Open a vulnerability occurrences analysis that contains the vulnerability
occurrences to be blocked by the IPS device.
2 Add the <Category name> – Exposure field to the displayed columns for this table (right-click in the header row of the table and select Customize Current View).
3 Check whether the status of the desired vulnerability occurrences in the new column is Protected.
Note: If there are several Threat Origins in the Threat Origin Category and you are not interested in all of them, temporarily disable the irrelevant Threat Origins, rerun the attack simulation and repeat steps 1 through 3.
Viewing and managing IPS devices in Skybox The Model tree (All Network Devices > IPS Devices) contains a list of all IPS devices in the model. IPS devices are modeled using:
› IPS rules and rule groups › IPS access rules, which define the scope of each rule group
Note: Firewalls with supported IPS capability (for example, Palo Alto Networks firewalls) are listed in All Network Devices > Firewalls.
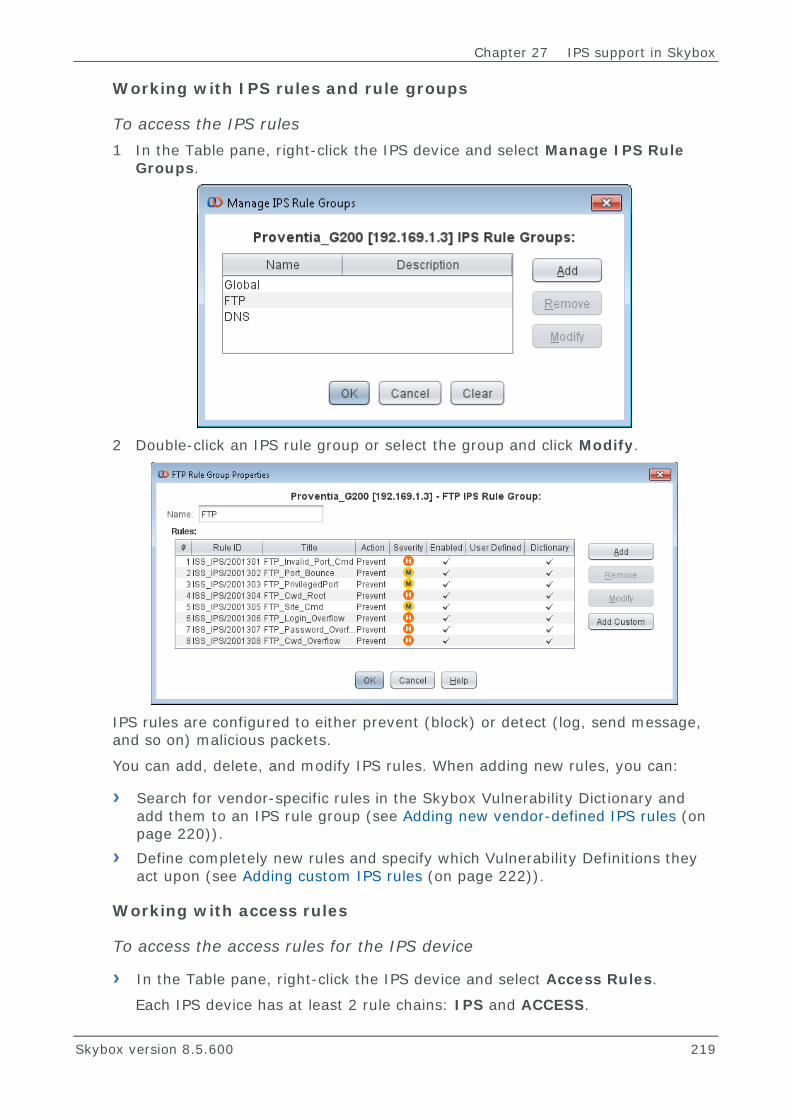
Chapter 27 IPS support in Skybox
Skybox version 8.5.600 219
Working with IPS rules and rule groups
To access the IPS rules 1 In the Table pane, right-click the IPS device and select Manage IPS Rule
Groups.
2 Double-click an IPS rule group or select the group and click Modify.
IPS rules are configured to either prevent (block) or detect (log, send message, and so on) malicious packets.
You can add, delete, and modify IPS rules. When adding new rules, you can:
› Search for vendor-specific rules in the Skybox Vulnerability Dictionary and add them to an IPS rule group (see Adding new vendor-defined IPS rules (on page 220)).
› Define completely new rules and specify which Vulnerability Definitions they act upon (see Adding custom IPS rules (on page 222)).
Working with access rules
To access the access rules for the IPS device
› In the Table pane, right-click the IPS device and select Access Rules.
Each IPS device has at least 2 rule chains: IPS and ACCESS.

Skybox Vulnerability Control User’s Guide
Skybox version 8.5.600 220
• In the IPS chain, each access rule relates to a specific rule group (in Proventia, each rule group represents a protection domain). The rules are of type IPS. There are usually 2 rules for each rule group: 1 inbound and 1 outbound.
IPS access rules include the regular scope properties (source, destination, and network interfaces) and a reference to an IPS rule group of the device.
• The ACCESS chain can include rules created by Skybox or by a user to ensure the correct flow of packets through the device, and access rules imported from the device (if it has filtering capabilities).
Note: For Proventia G appliances, access rules are currently not imported from the device. The rules in the ACCESS chain are created according to the configuration of the device. They ensure the correct flow of data packets through the device: preventing packets from moving between L3 and L2 interfaces and between different lines (networks) monitored by the device.
For additional information about working with access rules, see the Access Control List Editor chapter in the Skybox Reference Guide.
Adding new vendor-defined IPS rules You can add any vendor-defined rule that is included in the Skybox Vulnerability Dictionary to an IPS rule group.
Note: Vendor-defined rules that you add must match the device type.

Chapter 27 IPS support in Skybox
Skybox version 8.5.600 221
To add vendor-defined rules to an IPS rule group 1 In the Rule Group Properties dialog box, click Add.
2 Specify search criteria in the Search Criteria pane. You can search for rules
using:
• A string in the rule title
• The vendor rule ID
The string at the beginning of the Vendor Rule ID field is based on the vendor vulnerability database used by the device. For IBM Proventia G appliances, the string is ISS_IPS/.
• Vulnerability Definitions
3 To search for rules that handle a specific Vulnerability Definition, click the Browse button next to the Vulnerability Definition field.
Use the Vulnerability Definition Finder dialog box to select the Vulnerability Definitions to block.
4 Click Search.
The results of the search appear in the Search Results field.
5 Select rules in the Search Results field and click to move them to the Selected Rules field.
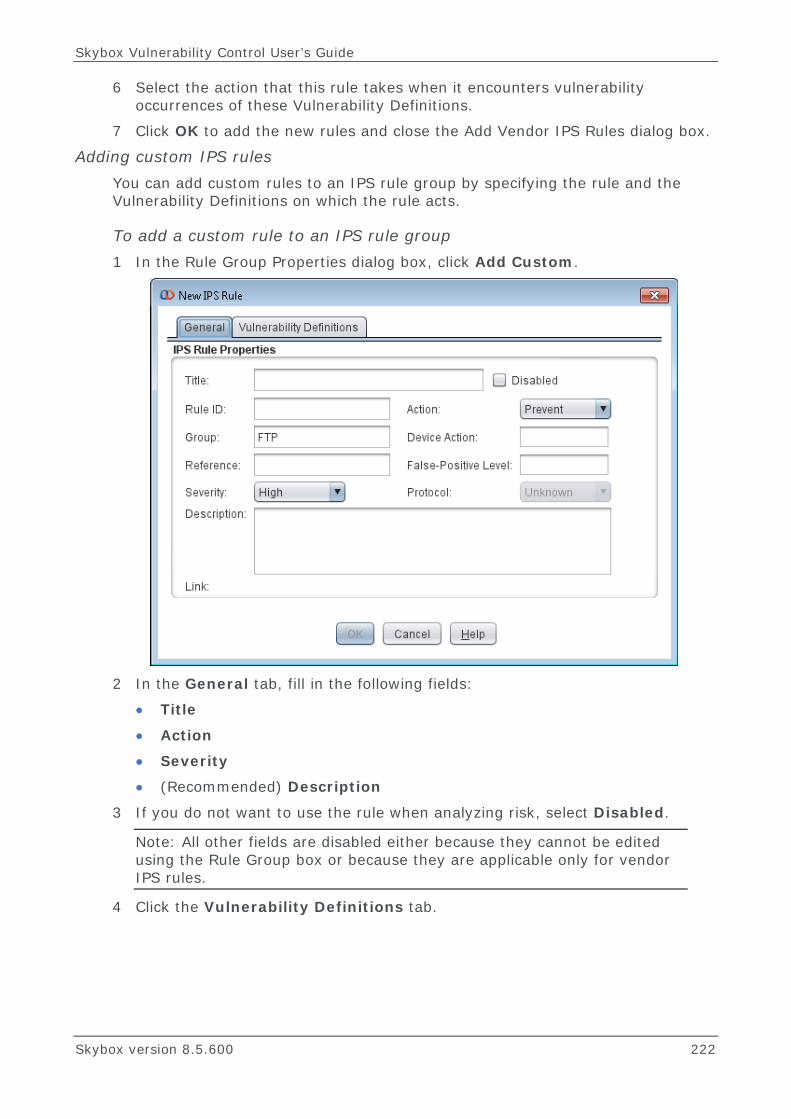
Skybox Vulnerability Control User’s Guide
Skybox version 8.5.600 222
6 Select the action that this rule takes when it encounters vulnerability occurrences of these Vulnerability Definitions.
7 Click OK to add the new rules and close the Add Vendor IPS Rules dialog box.
Adding custom IPS rules You can add custom rules to an IPS rule group by specifying the rule and the Vulnerability Definitions on which the rule acts.
To add a custom rule to an IPS rule group 1 In the Rule Group Properties dialog box, click Add Custom.
2 In the General tab, fill in the following fields:
• Title
• Action
• Severity
• (Recommended) Description
3 If you do not want to use the rule when analyzing risk, select Disabled.
Note: All other fields are disabled either because they cannot be edited using the Rule Group box or because they are applicable only for vendor IPS rules.
4 Click the Vulnerability Definitions tab.
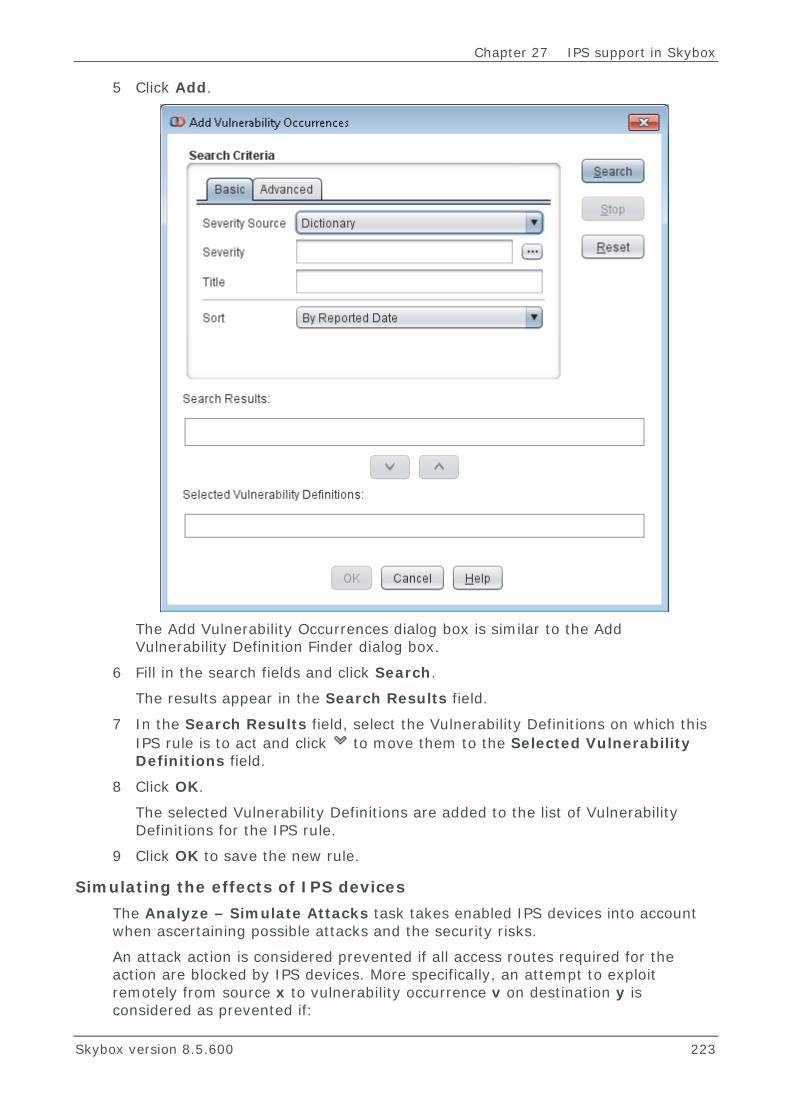
Chapter 27 IPS support in Skybox
Skybox version 8.5.600 223
5 Click Add.
The Add Vulnerability Occurrences dialog box is similar to the Add Vulnerability Definition Finder dialog box.
6 Fill in the search fields and click Search.
The results appear in the Search Results field.
7 In the Search Results field, select the Vulnerability Definitions on which this IPS rule is to act and click to move them to the Selected Vulnerability Definitions field.
8 Click OK.
The selected Vulnerability Definitions are added to the list of Vulnerability Definitions for the IPS rule.
9 Click OK to save the new rule.
Simulating the effects of IPS devices The Analyze – Simulate Attacks task takes enabled IPS devices into account when ascertaining possible attacks and the security risks.
An attack action is considered prevented if all access routes required for the action are blocked by IPS devices. More specifically, an attempt to exploit remotely from source x to vulnerability occurrence v on destination y is considered as prevented if:

Skybox Vulnerability Control User’s Guide
Skybox version 8.5.600 224
› The access route from the source to the destination necessarily passes through an IPS device
› The device is configured to block attack attempts on vulnerability occurrence v (for sources and destinations that include x and y)
Note: Only IPS prevention rules are used in attack simulation. Detection rules are not used.
Vulnerability occurrences that become inaccessible as a result of IPS prevention rules are assigned the Protected exposure status (rather than Inaccessible). For additional information about the effects of IPS devices on vulnerability occurrences and risk, see Verifying the effects of the IPS device (on page 217).
To simulate the effects of IPS devices 1 Enable all IPS devices that you are using in attack simulation.
(To enable an IPS device, right-click the device and select Enable IPS.)
2 Run the Analyze – Exposure task.
Additional ways to model IPS devices You can model IPS devices that are not supported directly by Skybox using the GUI or iXML.
To define an IPS device 1 Create an IPS device in the model.
2 Assign the network interfaces of the IPS device to network segments in the model.
3 Create IPS rule groups with the appropriate rules.
4 Create IPS access rules.
5 Create any other necessary access rules.
Defining IPS devices using the GUI You can define IPS devices manually using the Skybox GUI. You can use this method to define IPS devices that are directly supported by Skybox as well as IPS devices that are not currently supported (custom devices).
Creating an IPS device in the model An IPS device is modeled as an asset of type IPS.
To create an IPS device 1 In the Model tree, expand All Network Devices.
2 Right-click IPS Devices and select New IPS.
3 In the New Asset dialog box:
a. Type a Name for the IPS device.
b. Select the device type:
— For IBM Proventia appliances: In the Firewall Type field, select ISS Proventia.
Chapter 27 IPS support in Skybox
Skybox version 8.5.600 225
— For Trend Micro TippingPoint devices: In the Firewall Type field, select TippingPoint.
— For custom devices: In the Firewall Type field, select Custom.
c. Provide values for other fields:
— Select Layer 2.
— In the Network Interfaces field, define the device’s network interfaces.
— (Recommended) Select values for the Operating System and Platform fields.
— The values in all other fields do not need to be changed.
d. Click OK.
Configuring the network interfaces After you add the device to the model, you must assign the network interfaces in the model to the correct networks.
To configure the network interfaces 1 Find out which networks (lines) are monitored by the IPS device and which
network is monitored by which pair of adaptors (network interfaces).
2 For each network that the IPS device monitors, create 2 network segments: 1 for each endpoint of the line (that is, 1 for each network interface).
3 Assign each L2 interface to its corresponding network segment.
For more detailed instructions, see Configuring the network interfaces (on page 213).
Creating IPS rule groups In Skybox, each IPS rule group monitors a different type of event. Each rule in the group specifies 1 type of event to block.
To create an IPS rule group and IPS rules 1 In the Table pane, right-click the device and select Manage IPS Rule
Groups.
2 In the Manage Host IPS Rule Groups dialog box, click Add.
3 In the New IPS Rule Group dialog box:
a. Type a Name for the rule group.
b. Add IPS rules as necessary:
— To add custom rules (for all types of IPS devices), see Adding custom IPS rules (on page 222).
— To add vendor-defined rules (for IBM Proventia appliances), see Adding new vendor-defined IPS rules (on page 220).
Creating access rules An IPS device requires access rules of (at least) 2 types:

Skybox Vulnerability Control User’s Guide
Skybox version 8.5.600 226
› IPS: Access rules that define the scope of the IPS rule group
There must be at least 1 IPS access rule for each IPS rule group, or 1 for inbound traffic and 1 for outbound traffic. The action of these access rules must be IPS.
› ACCESS: Access rules that define the movement of packets in the device.
Define rules so that packets cannot move between different lines (networks) that are monitored by the IPS device nor between the management (L3) interface and the L2 interfaces.
For additional information about access rules, see the Access Control List Editor chapter in the Skybox Reference Guide.
Order of applying IPS access rules in IPS devices The IPS access rules in a rule chain are applied in either of 2 ways, depending on the predefined behavior of the device:
› Use all rules that match the data. This is the method that is usually used for IPS access rules.
› Use (only) the 1st rule that matches the data. This is the method used for access-related access rules but it is not often used for IPS access rules.
For supported IPS device types, the method used is according to the behavior on the device and cannot be changed.
For device types that are not directly supported (that is, devices whose Firewall Type is set to Custom), Use all rules that match the data method is used by default.

Chapter 27 IPS support in Skybox
Skybox version 8.5.600 227
To change the method of applying IPS access rules for a custom IPS device 1 Open the Properties dialog box for the device.
2 Click the Browse button next to the Firewall Type field (where Custom is selected).
3 In the ACL Management dialog box, in the Applied IPS Rules field, select a
behavior:
• First matching scope
• Any matching scope
Defining IPS devices using iXML Skybox supports definition of IPS devices using the iXML file format. You can use iXML to define IPS rule groups, IPS rules and the Vulnerability Definitions they handle, and IPS access rules that define the scope of the IPS rule groups and then import the iXML file into the model.
You can create iXML files manually or by using Perl scripts to translate the mapping and configuration files of unsupported IPS devices to iXML.
To model IPS devices using iXML, see the following in the Skybox Developer’s Guide:
› iXML elements: For general information about iXML elements › Example of iXML code for an IPS device: For an example iXML code for an IPS
device › AddIpsRuleGroup method: For information about Perl API methods for
supporting IPS devices

Skybox Vulnerability Control User’s Guide
Skybox version 8.5.600 228
Testing the effects of an IPS device using Skybox You can experiment with different IPS device setups in your network using the What If model.
Testing new IPS devices You can use Skybox to simulate the effects of an IPS device at a location in your network to establish whether an IPS device at that location would improve network security.
After you add the device, you can create custom rules (or add vendor-defined rules from the Skybox Vulnerability Dictionary) that handle the problem that you are addressing (for example, critical web server Vulnerability Definitions). You can then check whether the IPS device lowers the risk and risk of attack on the network.
To test a new IPS device 1 If you do not have a What If model: Select File > Models > Create Model.
2 In the Source Model field, select Live.
3 In the Target Model field, select What If.
4 Select Switch to target model after creation.
This copies the current Live model to the What If model and switches to the What If model.
5 Add the IPS device to the What If model using any of the following methods:
• An online collection task (see page 213)
• The GUI (see page 224)
• iXML (see page 227)
6 Run an Analysis – Exposure task to simulate attacks.
7 Check the results of the attack simulation (see page 217).
Testing enhanced coverage of an IPS device If an IPS device has limited coverage of Vulnerability Definitions in Prevention mode, you can explore the effects of adding rules to cover additional Vulnerability Definitions.
You can create custom rules (or add vendor-defined rules from the Skybox Vulnerability Dictionary) that handle the problem that you are addressing (for example, critical web server Vulnerability Definitions). You can then check whether the new rules lower the exposure of the Vulnerability Definitions and the risk of attack on the network.
To test enhanced coverage of an IPS device 1 Switch to the What If model:
• If you have a What If model:
a. Select the IPS device in the Live model.
b. Right-click the device and select Advanced > Copy To > What If.
c. Switch to the What If model.

Chapter 27 IPS support in Skybox
Skybox version 8.5.600 229
This copies the IPS device to your What If model.
• If you do not have a What If model:
a. Select File > Models > Create Model.
b. In the dialog box, select Live as the Source Model, What If as the Target Model, and select Switch to target model after creation.
c. Click OK.
This copies the current Live model (including the IPS device) to the What If model and switches to the What If model.
2 In the IPS device in the What If model, create the necessary custom rules (see page 222). For IBM Proventia appliances, you can add vendor-defined rules (see page 220).
3 Simulate attacks.
4 Check the results of the attack simulation (see page 217).

Skybox version 8.5.600 230
Chapter 28
This chapter explains how to optimize attack simulation and access analysis, which are resource-intensive operations.
In this chapter
Performance considerations ................................................ 230
Optimizing Access Analyzer analysis ..................................... 231
PERFORMANCE CONSIDERATIONS Simulating attacks is a resource-intensive operation. This section discusses some performance considerations that you must be aware of when running attack simulation and the Access Analyzer.
Performance considerations can be grouped into the following categories:
› Model size and complexity › Routing rule issues › Hardware issues
Model size and complexity
› Attack simulation performance is affected by the size and complexity of the model. The more assets, access rules, and vulnerability occurrences that there are in the model, the longer it takes to run attack simulation. (This does not mean that you should not model your organization’s whole network, but that you should be aware that as the size of the model grows—for example, during the building stages—attack simulation takes longer to run.)
› The number of Threat Origins affects performance; the system might suffer performance degradation when using more than several tens of Threat Origins.
To cut down the number of Threat Origins, consider grouping several starting points into a single Threat Origin. For example, multiple connections to the internet can be represented as 1 Threat Origin on the internet cloud. You can include multiple networks or clouds in a single Threat Origin.
› Setting the Simulate Full IP Spoofing option of the Analyze – Simulate Attacks task (or whatever Analysis – Exposure task that you use) to true greatly slows performance.
Optimization
Chapter 28 Optimization
Skybox version 8.5.600 231
Routing rule issues Attack simulation works faster when routing rules are collected from the devices than when they are imported from configuration files, as configuration files do not include dynamic routing rules. When the Access Analyzer identifies that routing rules are missing, it assumes that packets to unspecified destinations are forwarded to each neighbor of a router; this increases the calculation time of the Access Analyzer (and of attack simulation) and creates false positives. When there are routing rules, the Access Analyzer knows the router’s neighbors to which packets are forwarded.
Hardware issues Attack simulation can consume a significant amount of memory on the Server (depending on the size and complexity of the model). To improve performance, make sure that:
› You are using the recommended hardware setup for your project size (see the Server system requirements topic in the Skybox Installation and Administration Guide)
› Your server is properly configured for Skybox
Attack simulation performance benefits from multiprocessors on the Server computer.
Note: If you get an Out of Memory warning, attack simulation does not run.
Performance considerations for the Access Analyzer The Access Analyzer is not as resource-intensive as attack simulation, but it can be somewhat slow, especially for multiple sources and destinations. Performance considerations that affect attack simulation also affect the Access Analyzer, except the number of vulnerability occurrences (the Access Analyzer does not work with vulnerability occurrences). Setting the Explain Route option of the Access Analyzer to false might improve performance somewhat, but it means that the Access Analyzer only checks if access exists, without any explanation.
OPTIMIZING ACCESS ANALYZER ANALYSIS Access Analyzer analysis is a resource-intensive computational process. It analyzes access routes between the specified source and destination, based on network topology, access and routing rules, address translation, and port translation.
Analyses involving a single source asset or network and a single destination asset or network take the least time. An analysis might take longer when:
› Source or Destination has a value of Any › IP address spoofing is used › No routing rules exist in the model › The source or the destination contains groups of networks or assets › Routing rules are completely ignored (Ignore All Routing Rules) or partially
ignored (Use Dynamic Routing Rules)

Skybox Vulnerability Control User’s Guide
Skybox version 8.5.600 232
Note: When routing rules are not used (because they are ignored or because they do not exist), the analysis results might be less accurate.
For large organization networks, this analysis can take some time, because of the large number of assets, networks and gateways involved. The analysis is also affected by the number of access and address translation rules and by the size of routing tables.

This part explains how to plan a deployment of Skybox and prepare the necessary data for the model. It also explains the recommended phases of deployment.
Note: All the information in this part is relevant when planning a model to use with the Exposure feature of Skybox Vulnerability Control. Some of the information is not relevant when working with the Security Metrics feature only.
Part V: Deployment

Skybox version 8.5.600 234
Chapter 29
Before you begin deployment on a large network, create a deployment plan and put together a deployment team from all departments involved in the project. Then you need to prepare the data.
In this chapter
Deployment plan ............................................................... 234
Deployment team .............................................................. 235
DEPLOYMENT PLAN Before you begin deploying Skybox on a large network, create a deployment plan. This plan should include:
› The deployment team
A list of the people who should be involved in the deployment project, their contact information, and the time required from them. For additional information, see Deployment team (on page 235).
› A scope for the deployment
The parts of the network and the Business Units that the deployment is to cover.
› The network data required for deploying Skybox
1. Understand the structure of your network, by using network diagrams and interviewing network administrators.
2. Prepare the network data for Skybox, including scan results, network diagrams, firewall configuration files, and so on. For additional information, see Preparing data for Skybox (on page 237).
› A project timeline
If this is a large deployment, we recommend that you divide it into phases, where each phase has a clear value-adding milestone as its endpoint. For additional information, see Phases of deployment (on page 236).
› The hardware required for deploying Skybox
This includes a dedicated host for the Skybox Server and, probably, hosts for the Skybox Collector nodes (not necessarily dedicated). For additional information, see the Server system requirements topic in the Skybox Installation and Administration Guide.
Planning deployment

Chapter 29 Planning deployment
Skybox version 8.5.600 235
For small networks, a complete plan is not crucial, but greatly facilitates the deployment. At a minimum, a plan for a small network should include the deployment team and the scope of deployment, as much network data as possible, and at least 1 dedicated host for Skybox.
Skybox Professional Services personnel, certified resellers, and implementation partners are trained to assist you in building a deployment plan. For information about contacting Skybox, see Technical support (on page 9).
DEPLOYMENT TEAM Deploying Skybox in a large organization might involve people from several departments, sometimes from different business units.
Obtaining the support and cooperation of these people is important for a quick and successful deployment of Skybox; you should involve them from the early stages of deployment.
Some of these people will use the product directly, some will receive output (reports and alerts), and some will only provide required information. Those who will use the product might benefit from training. To set up training sessions, contact Skybox Professional Services.

Skybox version 8.5.600 236
Chapter 30
When deploying Skybox in a large organization, it is useful to divide the project into phases and to define clear milestones for each phase in both of the following dimensions:
› Organizational
Complete deployment for a single business unit or division and then continue to the next.
› Geographical
Complete deployment for a specific site or location and then continue to the next.
These dimensions are not mutually exclusive and they can sometimes be used in parallel.
Phases of deployment

Skybox version 8.5.600 237
Chapter 31
This chapter explains what data is required for Skybox and how to prepare it.
In this chapter
Information requirements ................................................... 237
Preparing a list of network devices ....................................... 237
Defining the data collection strategy .................................... 238
Preparing scanning information ........................................... 239
Preparing the data ............................................................. 240
Modeling unsupported devices ............................................. 240
INFORMATION REQUIREMENTS Obtaining all required information is a crucial part of Skybox deployment. The required information includes:
› Network information, including basic architecture and which networks host the production servers
› Firewall and router information (for example, the credentials required to access the firewalls and routers, the Skybox Collector to use, and whether collection is online or by file import)
› Scanning information (for example, which scanners are used and how often the networks are scanned)
› Business information, including a list of the most important Business Asset Groups
The more information that you have ready in advance, the faster your deployment project will go. However, you do not need to wait until you have all the information to start the deployment; additional information can be discovered during the deployment project.
The following sections provide details about preparing the necessary information.
PREPARING A LIST OF NETWORK DEVICES When you decide on the scope of the network to include in the model, you must obtain data about each network device in the selected scope.
Preparing data for Skybox

Skybox Vulnerability Control User’s Guide
Skybox version 8.5.600 238
Prepare a list of the network devices in the scope, including all firewalls, routers, and other L3 devices, and all filtering devices (L2 or L3). The following is an example list.
Supported data sources The Skybox platform is compatible with many data sources. The following is a list of some of the most common:
› Firewalls
• Check Point FireWall-1 NG and NGX
• Check Point Provider-1
• Cisco PIX/ASA/FWSM
› Routers
• Cisco IOS (router)
› Vulnerability scanners (for importing vulnerability occurrence information)
• BeyondTrust Retina
• McAfee Vulnerability Manager (Foundstone)
• IBM Internet Scanner
• Tripwire (nCircle) IP360
Refer to the Skybox website for a list of supported devices.
DEFINING THE DATA COLLECTION STRATEGY You must define a collection strategy for each network device to be modeled. Refer to the Skybox website for a list of supported devices to discover which network devices are directly supported by Skybox. Mark devices that are not supported directly; each device must be modeled separately (see Modeling unsupported devices (on page 240)).
Skybox supports the following methods of retrieving data from directly supported devices:
› Offline file import: Obtain the data from files written by the device. The files might be stored in a repository or they might be stored elsewhere. The data files are imported to Skybox using an offline file import task.
› Online collection: Obtain the data directly from the device or the device management system. You create a task in Skybox, which instructs the Skybox Collector to retrieve the necessary data from the device. This data is then added to the model.
Chapter 31 Preparing data for Skybox
Skybox version 8.5.600 239
The primary reasons for selecting one strategy over the other are the presence of a data repository, device accessibility, and the rate of changes to the device.
Offline file import is usually used for:
› Devices whose information is stored in a repository.
If your organization has a repository that contains the necessary data for specific devices, you can import data from the repository into Skybox.
› Devices that cannot be accessed easily by a Skybox Collector.
Note: If the device is in a segmented network, the alternative is to install an additional Skybox Collector in that network segment.
› Devices for which you do not have the necessary access permissions retrieving the configuration and routing data.
› Devices managed by a team that does not permit you continuous access. › Infrequently updated devices.
For infrequently updated devices, you might be able to receive an alert (reminder) and then import the data manually rather than including them in the automated collection.
Online collection is usually used for:
› Devices that are easily accessible and whose configuration and routing information is not stored in a central repository.
› Devices managed by management servers that are supported by Skybox. › Frequently updated devices.
PREPARING SCANNING INFORMATION Scanning information is necessary to build the model. It provides information about assets and services, and information about the vulnerability occurrences that exist on scanned assets. Assets are not scanned by Skybox, but rather by external sources.
Skybox scanner tasks add scan data to the model. Refer to the Skybox website for a list of supported devices.
The following types of scanning decisions in your organization affect Skybox:
› Are the networks scanned regularly? How often? › Using which scanners? › What level of scanning is used? › Who is responsible for running network scans?
Plan the collection of scan data for Skybox according to the answers to these questions.
Important: Skybox requires unrestricted scanning output (that is, output with a minimum of control devices blocking the route between the scanner and the scanned assets). Skybox later analyses permitted and blocked access. To achieve unrestricted scans, you might need to install additional scanning agents in your network.
Skybox Vulnerability Control User’s Guide
Skybox version 8.5.600 240
PREPARING THE DATA For each network device that is to be imported, ascertain which files Skybox requires to model the device and make sure that these files are available. For example, for a Cisco router, Skybox requires the output of the show running-config and show ip route vrf * commands, stored in separate files. For detailed information, see the Data formats for file import tasks topic in the Skybox Reference Guide.
Devices whose data is actively collected might require advanced preparation. For detailed information, see the section about the relevant device in the Tasks part of the Skybox Reference Guide.
MODELING UNSUPPORTED DEVICES You can model devices that are not directly supported by Skybox in the following ways:
› Create a script to translate the device configuration to Skybox’s Integration XML (iXML) format and import the device data.
• For information about iXML, see the Integration part of the Skybox Developer’s Guide.
• Contact Skybox Professional Services if you need help creating the script.
› Model the device manually in Skybox.
This is the simplest method to use if you have only a few devices that are not directly supported. However, if changes are made to any of these devices, you must update them manually in Skybox.

Skybox version 8.5.600 241
Chapter 32
However you divide the network, we recommend that you start the deployment with a 1st phase of a relatively small number of nodes (approximately 100 to 1000). Select a complete network environment of approximately this size and import the environment.
FIRST PHASE OF DEPLOYMENT The following is a basic workflow for the 1st phase when working with Exposure:
1 Add network information.
Collect the network information for this phase offline, using Skybox offline file import tasks (Import – Directory (for supported devices) and Import – Basic are the simplest). Before you run these tasks, make sure that the necessary data for each device is stored in the correct location.
• For information about importing the network environment, see Building the network topology (on page 56).
• For information about preparing the data for each device, see the relevant section in the Tasks part of the Skybox Reference Guide.
2 Add security information (see page 18).
The model must include asset and vulnerability occurrence information to analyze risk and attacks.
3 Validate the model (see page 66).
After the network and security information of the specified scope is included in the model, the information must be checked for correctness.
4 Set up the Business Unit hierarchy (see page 25).
The 1st phase of adding business information should include 3 to 5 top Business Asset Groups.
5 Add Threat Origins (see page 88).
The 1st phase should include 1 or 2 major threats (the internet is already included as a threat): we recommend that you start with external threats rather than threats that are inside your organization and begin by defining the threats that pose the greatest risk.
6 Simulate attacks (see page 99) (to provide exposure information).
7 Identify critical issues (see page 101).
8 Mitigate critical risks (see page 108).
When you finish this phase, you will have a better idea how Skybox works with your network and how to use it to lower risk. At this point, you can plan the scope of additional phases of deployment and prepare Skybox to work in a more automated manner.
Starting deployment