Embed Size (px)
DESCRIPTION
Istruzioni su come costruire un sistema economico per tagliare polistirolo
Citation preview
114 Make: Volume 16
PROJECTS: STYRO CUTTER makezine.com/16/styrocutter
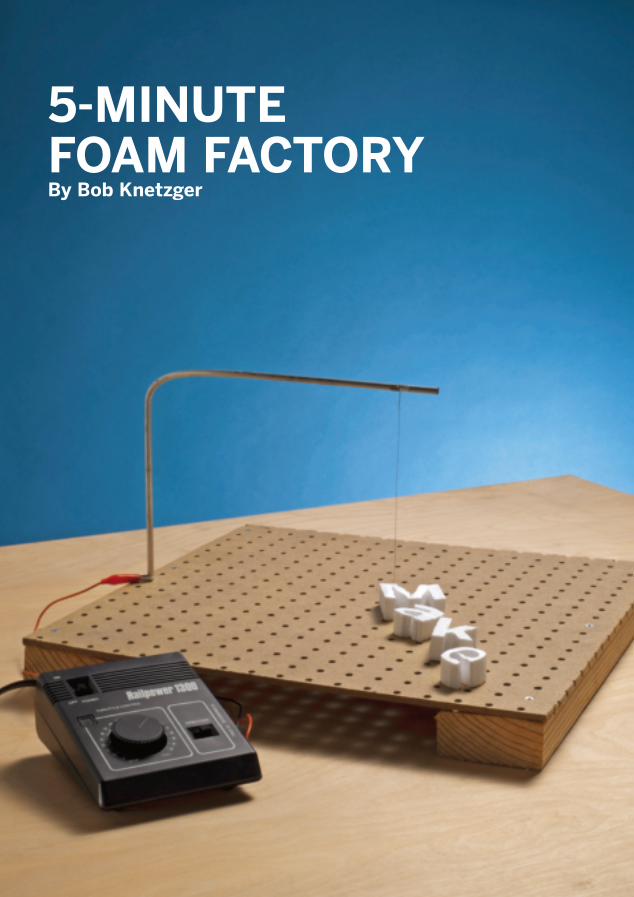
5-MINUTE FOAM FACTORY By Bob Knetzger
M_114-121_Styro_F1.indd 114M_114-121_Styro_F1.indd 114 10/20/08 3:05:58 PM10/20/08 3:05:58 PM
115Make:
Ph
otog
rap
h b
y G
arry
McL
eod
Bob Knetzger ([email protected]) is an inventor/designer with 30 years’ experience making fun stuff. He’s created educational software, video and board games, and all kinds of toys from high-tech electronics down to “free inside!” cereal box premiums.
Set up: p.117 Make it: p.118 Use it: p.121
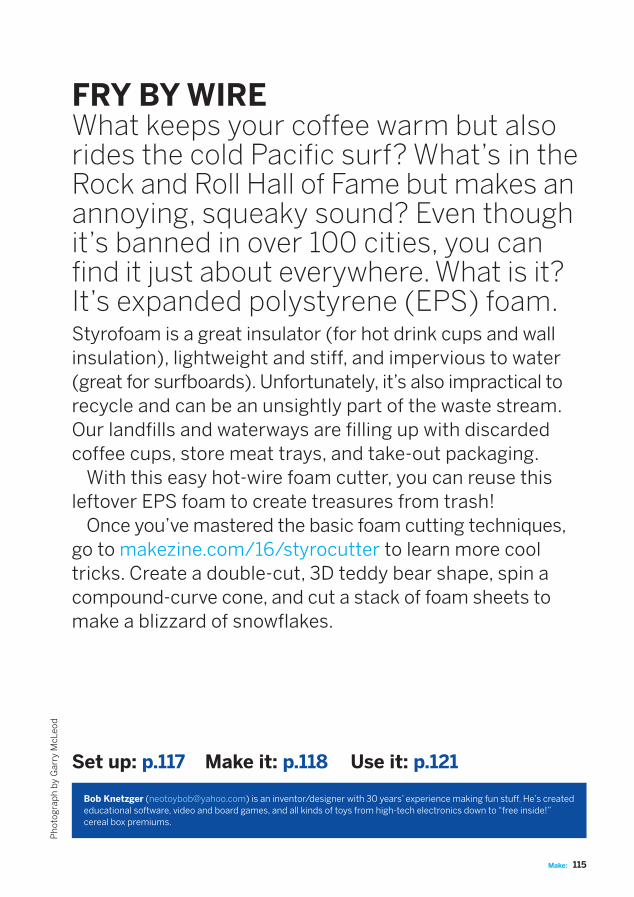
FRY BY WIREWhat keeps your coffee warm but also rides the cold Pacific surf? What’s in the Rock and Roll Hall of Fame but makes an annoying, squeaky sound? Even though it’s banned in over 100 cities, you can find it just about everywhere. What is it? It’s expanded polystyrene (EPS) foam.Styrofoam is a great insulator (for hot drink cups and wall insulation), lightweight and stiff, and impervious to water (great for surfboards). Unfortunately, it’s also impractical to recycle and can be an unsightly part of the waste stream. Our landfills and waterways are filling up with discarded coffee cups, store meat trays, and take-out packaging. With this easy hot-wire foam cutter, you can reuse this leftover EPS foam to create treasures from trash! Once you’ve mastered the basic foam cutting techniques, go to makezine.com/16/styrocutter to learn more cool tricks. Create a double-cut, 3D teddy bear shape, spin a compound-curve cone, and cut a stack of foam sheets to make a blizzard of snowflakes.
M_114-121_Styro_F1.indd 115M_114-121_Styro_F1.indd 115 10/22/08 2:30:34 PM10/22/08 2:30:34 PM
Illu
stra
tion
by
Bill
Oet
inge
r
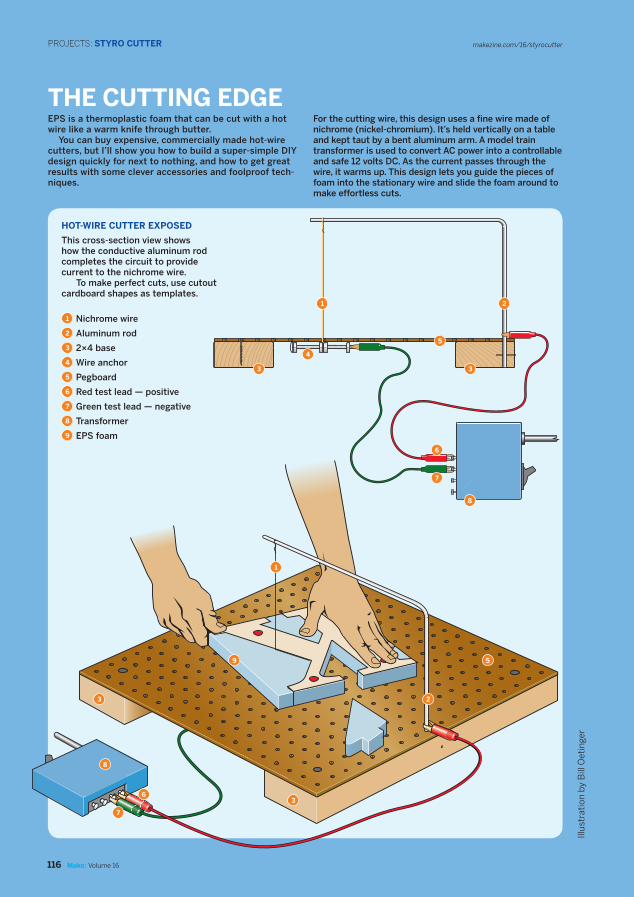
THE CUTTING EDGEEPS is a thermoplastic foam that can be cut with a hot wire like a warm knife through butter. You can buy expensive, commercially made hot-wire cutters, but I’ll show you how to build a super-simple DIY design quickly for next to nothing, and how to get great results with some clever accessories and foolproof tech-niques.
For the cutting wire, this design uses a fine wire made of nichrome (nickel-chromium). It’s held vertically on a table and kept taut by a bent aluminum arm. A model train transformer is used to convert AC power into a controllable and safe 12 volts DC. As the current passes through the wire, it warms up. This design lets you guide the pieces of foam into the stationary wire and slide the foam around to make effortless cuts.
Make: Volume 16116
makezine.com/16/styrocutterPROJECTS: STYRO CUTTER
HOT-WIRE CUTTER EXPOSED
This cross-section view shows how the conductive aluminum rod completes the circuit to provide current to the nichrome wire. To make perfect cuts, use cutout cardboard shapes as templates.
1 Nichrome wire
2 Aluminum rod
3 2×4 base
4 Wire anchor
5 Pegboard
6 Red test lead — positive
7 Green test lead — negative
8 Transformer
9 EPS foam
4
7
8
6
1
5
3 3
2
9 5
3
3
2
8
7
6
1
M_114-121_Styro_F1.indd 116M_114-121_Styro_F1.indd 116 10/23/08 10:57:28 AM10/23/08 10:57:28 AM
117Make:
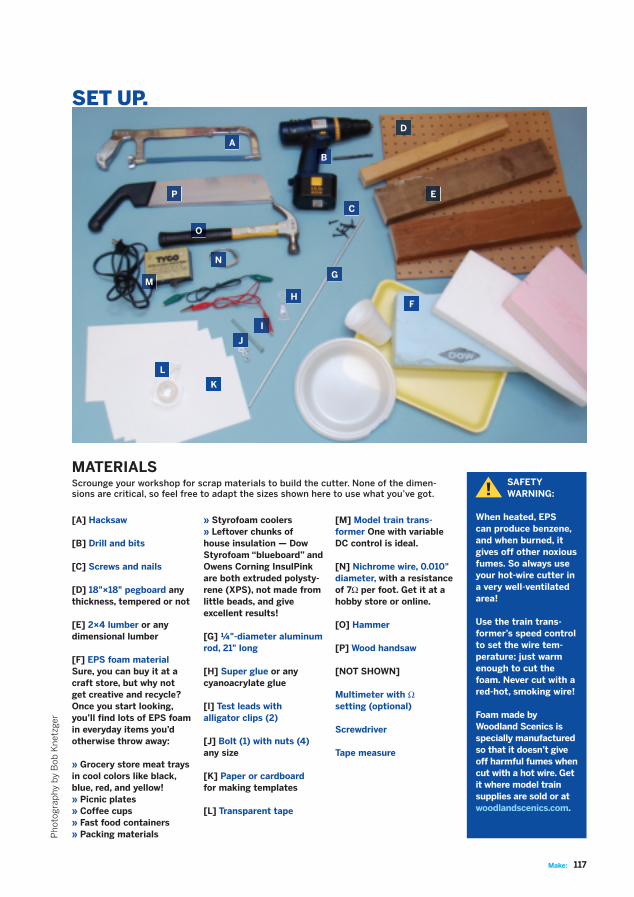
SET UP.
[A] Hacksaw
[B] Drill and bits
[C] Screws and nails
[D] 18"×18" pegboard any thickness, tempered or not
[E] 2×4 lumber or any dimensional lumber
[F] EPS foam materialSure, you can buy it at a craft store, but why not get creative and recycle? Once you start looking, you’ll find lots of EPS foam in everyday items you’d otherwise throw away:
» Grocery store meat trays in cool colors like black, blue, red, and yellow!» Picnic plates» Coffee cups» Fast food containers» Packing materialsP
hot
ogra
phy
by
Bob
Kn
etzg
er
A
B
C
D
E
F
G
H
I
J
K
L
M
N
O
P
Scrounge your workshop for scrap materials to build the cutter. None of the dimen-sions are critical, so feel free to adapt the sizes shown here to use what you’ve got.
MATERIALS
» Styrofoam coolers» Leftover chunks of house insulation — Dow Styrofoam “blueboard” and Owens Corning InsulPink are both extruded polysty-rene (XPS), not made from little beads, and give excellent results!
[G] ¼"-diameter aluminum rod, 21" long
[H] Super glue or any cyanoacrylate glue
[I] Test leads with alligator clips (2)
[J] Bolt (1) with nuts (4) any size
[K] Paper or cardboardfor making templates
[L] Transparent tape
SAFETY WARNING:
When heated, EPS can produce benzene, and when burned, it gives off other noxious fumes. So always use your hot-wire cutter in a very well-ventilated area!
Use the train trans-former’s speed control to set the wire tem-perature: just warm enough to cut the foam. Never cut with a red-hot, smoking wire!
Foam made by Woodland Scenics is specially manufactured so that it doesn’t give off harmful fumes when cut with a hot wire. Get it where model train supplies are sold or at woodlandscenics.com.
!
[M] Model train trans-former One with variable DC control is ideal.
[N] Nichrome wire, 0.010" diameter, with a resistance of 7Ω per foot. Get it at a hobby store or online.
[O] Hammer
[P] Wood handsaw
[NOT SHOWN]
Multimeter with Ω setting (optional)
Screwdriver
Tape measure
M_114-121_Styro_F1.indd 117M_114-121_Styro_F1.indd 117 10/22/08 2:31:07 PM10/22/08 2:31:07 PM
118 Make: Volume 16
PROJECTS: STYRO CUTTER makezine.com/16/styrocutter
BUILD YOUR STYRO CUTTER
START>>
MAKE IT.
1. MAKE THE CUTTER BASE
Time: 1 Hour Complexity: Easy
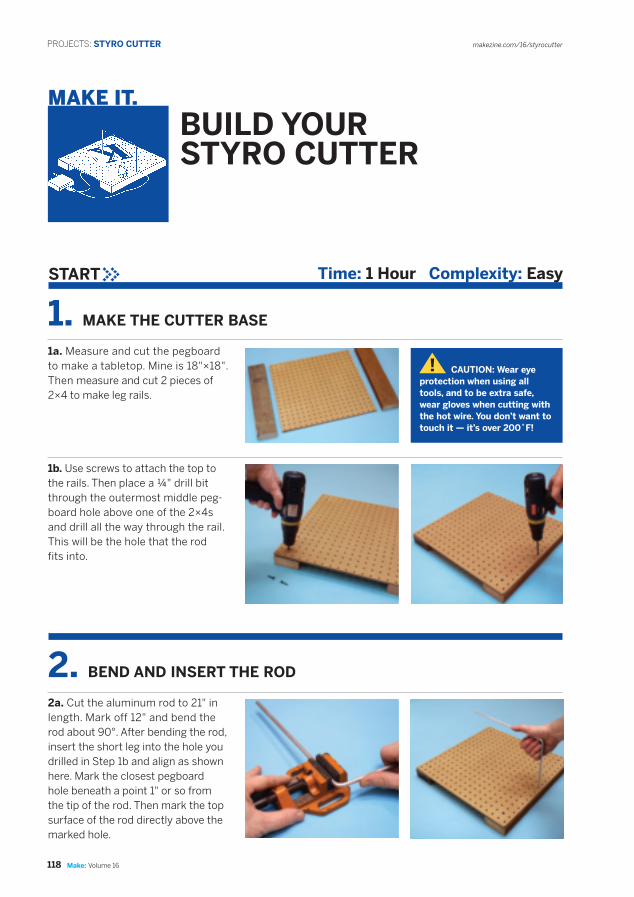
1a. Measure and cut the pegboard to make a tabletop. Mine is 18"×18". Then measure and cut 2 pieces of 2×4 to make leg rails.
2a. Cut the aluminum rod to 21" in length. Mark off 12" and bend the rod about 90°. After bending the rod, insert the short leg into the hole you drilled in Step 1b and align as shown here. Mark the closest pegboard hole beneath a point 1" or so from the tip of the rod. Then mark the top surface of the rod directly above the marked hole.
1b. Use screws to attach the top to the rails. Then place a ¼" drill bit through the outermost middle peg-board hole above one of the 2×4s and drill all the way through the rail. This will be the hole that the rod fits into.
2. BEND AND INSERT THE ROD
CAUTION: Wear eye protection when using all tools, and to be extra safe, wear gloves when cutting with the hot wire. You don’t want to touch it — it’s over 200˚F!
!
M_114-121_Styro_F1.indd 118M_114-121_Styro_F1.indd 118 10/21/08 2:52:58 PM10/21/08 2:52:58 PM

119Make:
3. MAKE AND ATTACH THE CUTTING WIRE
3a. Thread 2 nuts onto the bolt. Wrap, then tie the nichrome wire around the bolt, and add the remaining 2 nuts. Tighten the 2 nuts in the middle to pinch the wire.
3c. Thread the nichrome wire through the marked hole in the pegboard (from Step 2a) and pull it up vertically. Press the tip of the rod down slightly and hold it there. (You want a little springy tension to keep the wire taut.) At the same time, make a loop in the wire so that the tip of the loop just reaches the deflected rod. Hold that loop and tie it off in a simple overhand knot.
3b. Align the nuts so that they all lie flat. Put a drop of super glue on them to lock them tight.
2b. Use the hacksaw to make a shallow notch across the top of the rod where it’s marked.
2c. Insert the rod and drill a small 5" pilot hole through the rail and into and through the aluminum rod. Drive a nail into the hole and through the rod. This prevents the rod from swiveling in its hole as you cut in different directions.
As you press the rod down, slip the loop over the rod and into the notch. Let go. The gentle spring forceof the rod should make the wire taut. If it’s too loose, shorten the wire by tying another knot. Trim any stray ends.
M_114-121_Styro_F1.indd 119M_114-121_Styro_F1.indd 119 10/20/08 3:07:25 PM10/20/08 3:07:25 PM
120 Make: Volume 16
PROJECTS: STYRO CUTTER makezine.com/16/styrocutter
4. CHECK THE CIRCUIT
5. POWER UP!
Remember your high school physics about electricity?Voltage equals current times resistance: V = I * R
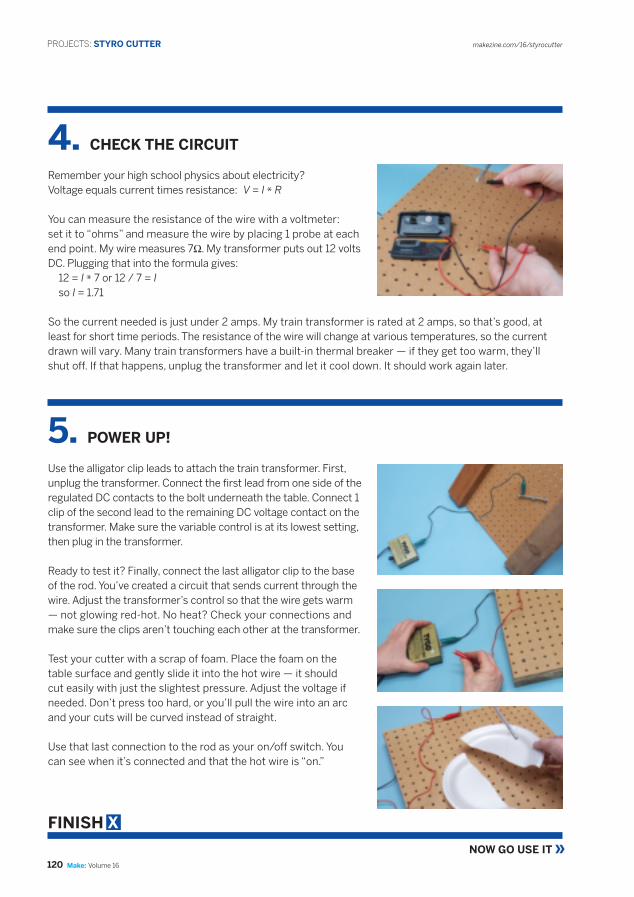
You can measure the resistance of the wire with a voltmeter: set it to “ohms” and measure the wire by placing 1 probe at each end point. My wire measures 7Ω. My transformer puts out 12 volts DC. Plugging that into the formula gives: 12 = I * 7 or 12 / 7 = I so I = 1.71
Use the alligator clip leads to attach the train transformer. First, unplug the transformer. Connect the first lead from one side of the regulated DC contacts to the bolt underneath the table. Connect 1 clip of the second lead to the remaining DC voltage contact on the transformer. Make sure the variable control is at its lowest setting, then plug in the transformer.
Ready to test it? Finally, connect the last alligator clip to the base of the rod. You’ve created a circuit that sends current through the wire. Adjust the transformer’s control so that the wire gets warm — not glowing red-hot. No heat? Check your connections and make sure the clips aren’t touching each other at the transformer.
Test your cutter with a scrap of foam. Place the foam on thetable surface and gently slide it into the hot wire — it should cut easily with just the slightest pressure. Adjust the voltage if needed. Don’t press too hard, or you’ll pull the wire into an arc and your cuts will be curved instead of straight. Use that last connection to the rod as your on/off switch. You can see when it’s connected and that the hot wire is “on.”
FINISH X
NOW GO USE IT »
So the current needed is just under 2 amps. My train transformer is rated at 2 amps, so that’s good, at least for short time periods. The resistance of the wire will change at various temperatures, so the current drawn will vary. Many train transformers have a built-in thermal breaker — if they get too warm, they’ll shut off. If that happens, unplug the transformer and let it cool down. It should work again later.
M_114-121_Styro_F1.indd 120M_114-121_Styro_F1.indd 120 10/20/08 3:07:48 PM10/20/08 3:07:48 PM
121Make:
START CUTTING!
USE IT.
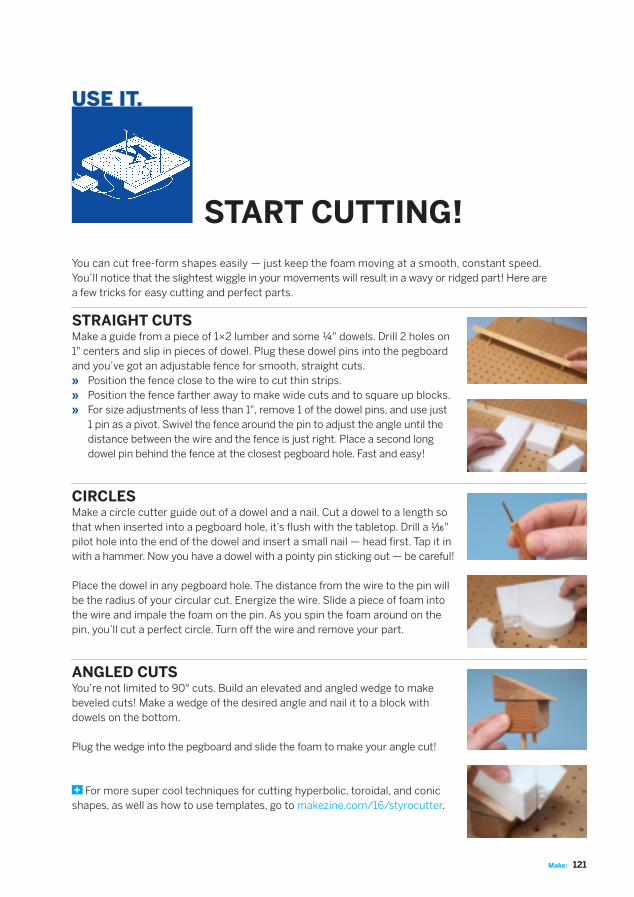
STRAIGHT CUTS Make a guide from a piece of 1×2 lumber and some ¼" dowels. Drill 2 holes on 1" centers and slip in pieces of dowel. Plug these dowel pins into the pegboard and you’ve got an adjustable fence for smooth, straight cuts.» Position the fence close to the wire to cut thin strips.» Position the fence farther away to make wide cuts and to square up blocks. » For size adjustments of less than 1", remove 1 of the dowel pins, and use just
1 pin as a pivot. Swivel the fence around the pin to adjust the angle until the distance between the wire and the fence is just right. Place a second long dowel pin behind the fence at the closest pegboard hole. Fast and easy!
CIRCLESMake a circle cutter guide out of a dowel and a nail. Cut a dowel to a length so that when inserted into a pegboard hole, it’s flush with the tabletop. Drill a 5" pilot hole into the end of the dowel and insert a small nail — head first. Tap it in with a hammer. Now you have a dowel with a pointy pin sticking out — be careful!
Place the dowel in any pegboard hole. The distance from the wire to the pin will be the radius of your circular cut. Energize the wire. Slide a piece of foam into the wire and impale the foam on the pin. As you spin the foam around on the pin, you’ll cut a perfect circle. Turn off the wire and remove your part.
ANGLED CUTSYou’re not limited to 90° cuts. Build an elevated and angled wedge to make beveled cuts! Make a wedge of the desired angle and nail it to a block with dowels on the bottom.
Plug the wedge into the pegboard and slide the foam to make your angle cut!
For more super cool techniques for cutting hyperbolic, toroidal, and conic shapes, as well as how to use templates, go to makezine.com/16/styrocutter.
You can cut free-form shapes easily — just keep the foam moving at a smooth, constant speed.You’ll notice that the slightest wiggle in your movements will result in a wavy or ridged part! Here area few tricks for easy cutting and perfect parts.
M_114-121_Styro_F1.indd 121M_114-121_Styro_F1.indd 121 10/20/08 3:08:05 PM10/20/08 3:08:05 PM


![Comune di Pettinengo · La raccolta differenziata porta a porta è il modo ... - piccoli imballaggi in polistirolo ... Pettinengo differenziata Regole 2014.ppt [modalità compatibilità]](https://img.dokumen.tips/doc/110x75/5c6655d009d3f230488bf546/comune-di-la-raccolta-differenziata-porta-a-porta-e-il-modo-piccoli-imballaggi.jpg)