Embed Size (px)
Citation preview

Hands-On Lab
Silverlight 4 – Data Validation, Binding, DataForm and DataGrid Features
Data Validation, Binding, DataForm and DataGrid Features
Contents
Introduction .................................................................................................................................................. 3
Exercise 1 – Getting Started .......................................................................................................................... 4
Task 1 – Reshaping a DataGrid Column .................................................................................................. 4
Task 2 – DataGrid Grouping Support...................................................................................................... 5
Exercise 2 –Binding & Validation Features ..................................................................................................... 8
Task 1 – Binding to Dependency Properties ........................................................................................... 8
Task 2 – Using Fallback Values & String formatting .............................................................................. 14
Task 3– Validating with IDataErrorInfo................................................................................................. 16
Conclusion .................................................................................................................................................. 22
Data Validation, Binding, DataForm and DataGrid Features
Introduction
Silverlight 4 offers many new improvements for building data-entry based applications. Among the new
features, Silverlight 4 enhances the Binding mechanism with the new abilities to bind to Dependency
Properties, use the IDataErrorInfo interface to report validation errors, format data without writing
Converter classes and more. Silverlight 4 also enhances the capabilities of the CollectionViewSource class
with the ability to perform grouping over bound data and display that data source within a DataGrid in a
grouped manner.
In this lab we'll learn how to build a data-entry application which uses DataGrids and data forms with the
help of Bindings and Validations.
Estimated completion time for this lab is 60 minutes.
Data Validation, Binding, DataForm and DataGrid Features
Exercise 1 – Getting Started
The goal of this exercise is to familiarize the student with the existing starter application and enhance it with
new features (DataGrid Column width settings, and grouping support).
1. Start Visual Studio 2010
2. On the File menu click Open Project/Solution…
a. Alternatively, from Visual Studio Start Page click “Open Project…”
3. At “Open Project” dialog navigate to the Lab installation folder
4. Navigate to “EmployeeManager\Source\Ex01\begin” folder
5. Click “EmployeeManager.sln” file and the click “Open” button
6. Take some time to familiarize yourself with the Starter application
a. Points of interest here are:
Employee.cs
EmployeesManager.cs
MainPage.xaml
MainPage.xaml.cs (nested under MainPage.xaml in the Solution Explorer)
7. Set the EmployeeManager.Web project as the startup project, by right clicking the project in the
Solution Explorer and selecting “Set as Startup Project”
8. Press F5 or click Debug Start Debugging to Run the application
9. Use the application to familiarize yourself with it. When finished close the browser window.
Task 1 – Reshaping a DataGrid Column
1. If you have not opened the Starter project please open it now (see previous section for detailed
instructions).
2. Open the file "MainPage.xaml" (double click on filename in the Solution Explorer)
3. Locate the DataGrid control name "dg" and change the "AutoGenerateColumns" attribute to
"False" and the "IsReadOnly" attribute to "True"
XAML
<DataControls:DataGrid x:Name="dg" ItemsSource="{Binding}"
Margin="3" IsReadOnly="True"
AutoGenerateColumns="False" HeadersVisibility="Column">
</DataControls:DataGrid>
Data Validation, Binding, DataForm and DataGrid Features
4. Now let's set the columns we want to display and set their size. Add the following XAML nested
inside the DataGrid's XAML: Place cursor in source code press "space bar" to engage intellisense
XAML
<DataControls:DataGrid.Columns>
<DataControls:DataGridTextColumn Binding="{Binding FirstName}"
Header="First Name" />
<DataControls:DataGridTextColumn Binding="{Binding LastName}"
Header="Last Name" />
</DataControls:DataGrid.Columns>
5. Compile and run the application. You'll see that the columns are not spread across the entire
width of the browser. Close the browser and return to Visual Studio.
6. Add the "Width" property to the each of the DataGridTextColumn elements you've added, and
set their width to "0.4*" (40% width) and "0.6*" (60%) respectively. The code should look as
follows:
XAML
<DataControls:DataGridTextColumn Binding="{Binding FirstName}"
Header="First Name" Width="0.4*" />
<DataControls:DataGridTextColumn Binding="{Binding LastName}"
Header="Last Name" Width="0.6*" />
7. Compile and run the application. Now the columns cover the entire width of the control.
Task 2 – DataGrid Grouping Support
1. If the Lab application is running, please stop it now.
2. To support grouping in the DataGrid, we'll need to change the data source to a more flexible
data source – CollectionViewSource. This class was introduced in Silverlight 3, but in Silverlight 4
it has added the capability to group data. Open the file "MainPage.xaml", and add the following
XAML to the UserControl Resources element:
XAML
<CollectionViewSource x:Key="employeeManagerEmployeesViewSource"
Source="{Binding Path=Employees,
3. Source={StaticResource employeeManagerViewSource}}" />
4. Locate the Grid named "LayoutRoot" and change the "DataContext" attribute to the following
Binding (replace the existing "DataContext" attribute).
XAML
DataContext="{StaticResource employeeManagerEmployeesViewSource}"
5. Now that we can use the CollectionViewSource to group data, we'll need to add some operation
buttons to the application. First of all, we need to change the layout of our application. Add the
following column and row definitions to the "LayoutRoot" Grid.
Data Validation, Binding, DataForm and DataGrid Features
XAML
<Grid.ColumnDefinitions>
<ColumnDefinition Width="400"/>
<ColumnDefinition Width="*"/>
</Grid.ColumnDefinitions>
<Grid.RowDefinitions>
<RowDefinition Height="*"/>
<RowDefinition Height="Auto"/>
</Grid.RowDefinitions>
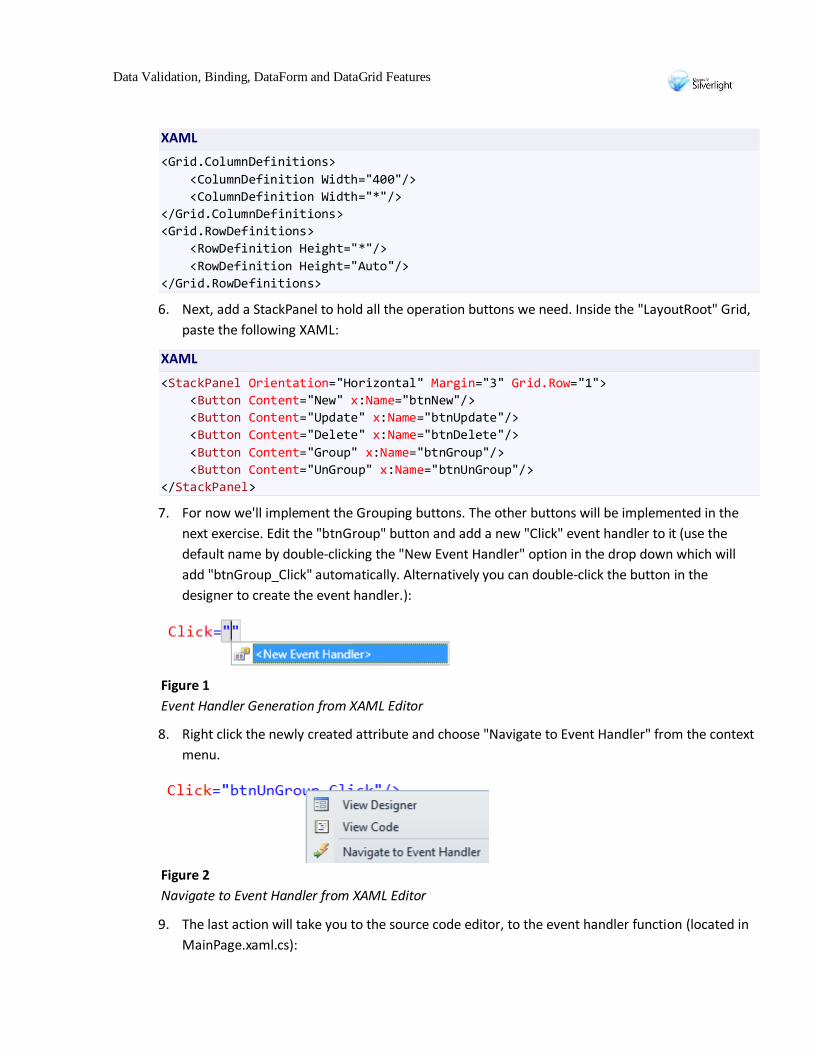
6. Next, add a StackPanel to hold all the operation buttons we need. Inside the "LayoutRoot" Grid,
paste the following XAML:
XAML
<StackPanel Orientation="Horizontal" Margin="3" Grid.Row="1">
<Button Content="New" x:Name="btnNew"/>
<Button Content="Update" x:Name="btnUpdate"/>
<Button Content="Delete" x:Name="btnDelete"/>
<Button Content="Group" x:Name="btnGroup"/>
<Button Content="UnGroup" x:Name="btnUnGroup"/>
</StackPanel>
7. For now we'll implement the Grouping buttons. The other buttons will be implemented in the
next exercise. Edit the "btnGroup" button and add a new "Click" event handler to it (use the
default name by double-clicking the "New Event Handler" option in the drop down which will
add "btnGroup_Click" automatically. Alternatively you can double-click the button in the
designer to create the event handler.):
Figure 1
Event Handler Generation from XAML Editor
8. Right click the newly created attribute and choose "Navigate to Event Handler" from the context
menu.
Figure 2
Navigate to Event Handler from XAML Editor
9. The last action will take you to the source code editor, to the event handler function (located in
MainPage.xaml.cs):
Data Validation, Binding, DataForm and DataGrid Features
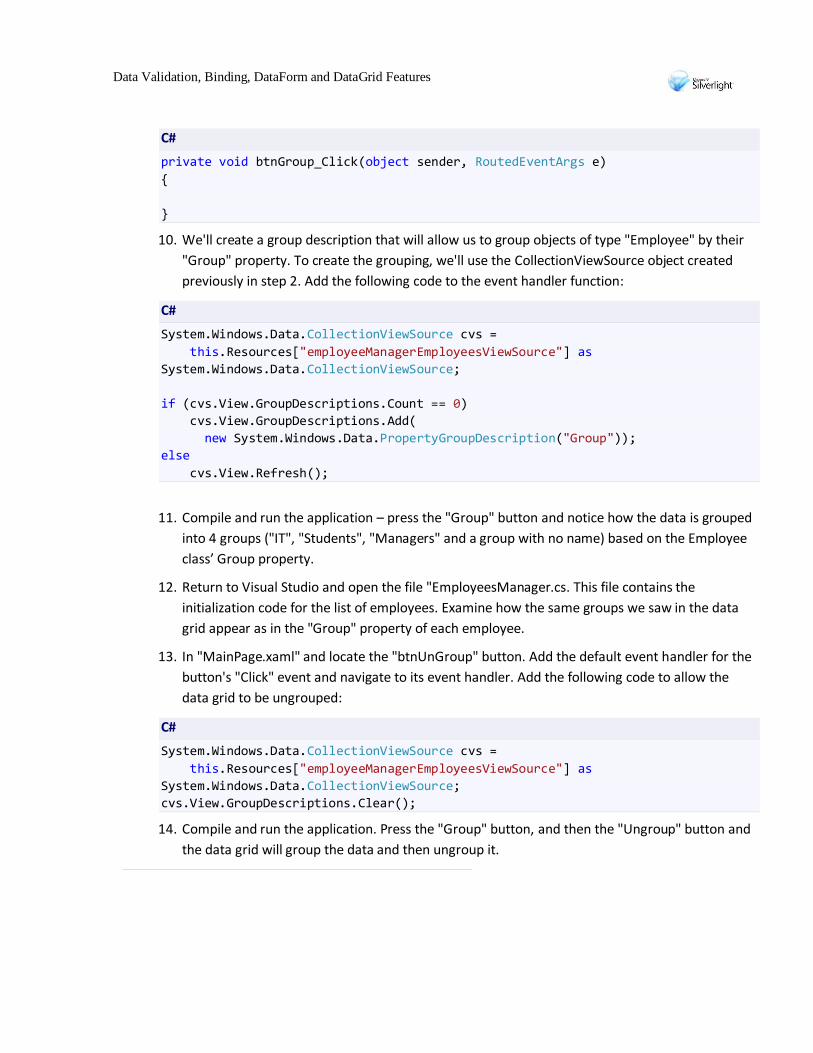
C#
private void btnGroup_Click(object sender, RoutedEventArgs e)
{
}
10. We'll create a group description that will allow us to group objects of type "Employee" by their
"Group" property. To create the grouping, we'll use the CollectionViewSource object created
previously in step 2. Add the following code to the event handler function:
C#
System.Windows.Data.CollectionViewSource cvs =
this.Resources["employeeManagerEmployeesViewSource"] as
System.Windows.Data.CollectionViewSource;
if (cvs.View.GroupDescriptions.Count == 0)
cvs.View.GroupDescriptions.Add(
new System.Windows.Data.PropertyGroupDescription("Group"));
else
cvs.View.Refresh();
11. Compile and run the application – press the "Group" button and notice how the data is grouped
into 4 groups ("IT", "Students", "Managers" and a group with no name) based on the Employee
class’ Group property.
12. Return to Visual Studio and open the file "EmployeesManager.cs. This file contains the
initialization code for the list of employees. Examine how the same groups we saw in the data
grid appear as in the "Group" property of each employee.
13. In "MainPage.xaml" and locate the "btnUnGroup" button. Add the default event handler for the
button's "Click" event and navigate to its event handler. Add the following code to allow the
data grid to be ungrouped:
C#
System.Windows.Data.CollectionViewSource cvs =
this.Resources["employeeManagerEmployeesViewSource"] as
System.Windows.Data.CollectionViewSource;
cvs.View.GroupDescriptions.Clear();
14. Compile and run the application. Press the "Group" button, and then the "Ungroup" button and
the data grid will group the data and then ungroup it.
Data Validation, Binding, DataForm and DataGrid Features
Exercise 2 –Binding & Validation Features
The goal of this exercise is to familiarize the student with the new Binding & Validation features in Silverlight
4. Silverlight 4 allows you to change how data is formatted without having to implement and apply an
IValueConverter. Additionally, you can decide what to do when binding fails to return data and choose how
to validate data more easily.
In the previous exercise, we removed some of the columns displayed in the DataGrid. In order to see the
employees' complete information, we'll add a simple form view to the application, which will show the
employee's properties for the selected employee in the DataGrid.
You can continue building on your work from Exercise 1. If you had problems with Exercise 1, you can
navigate to “EmployeeManager\Source\Ex02\begin” folder and open the “EmployeeManager.sln” to
continue.
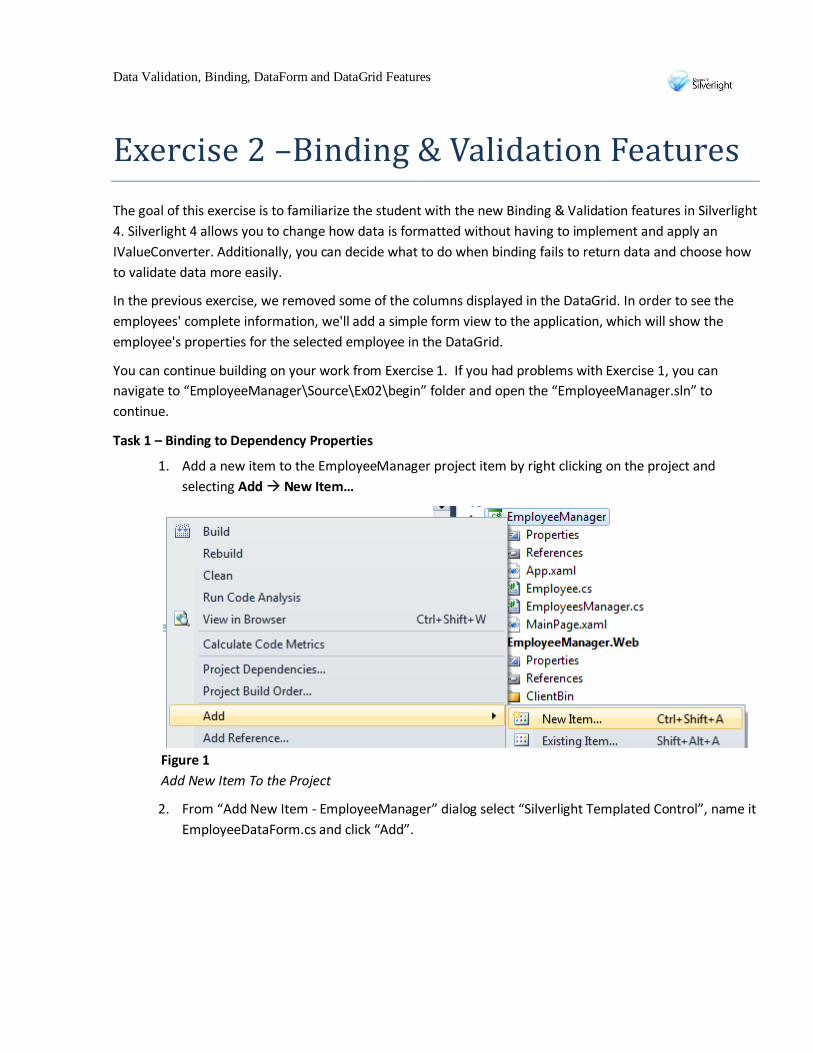
Task 1 – Binding to Dependency Properties
1. Add a new item to the EmployeeManager project item by right clicking on the project and
selecting Add New Item…
Figure 1
Add New Item To the Project
2. From “Add New Item - EmployeeManager” dialog select “Silverlight Templated Control”, name it
EmployeeDataForm.cs and click “Add”.
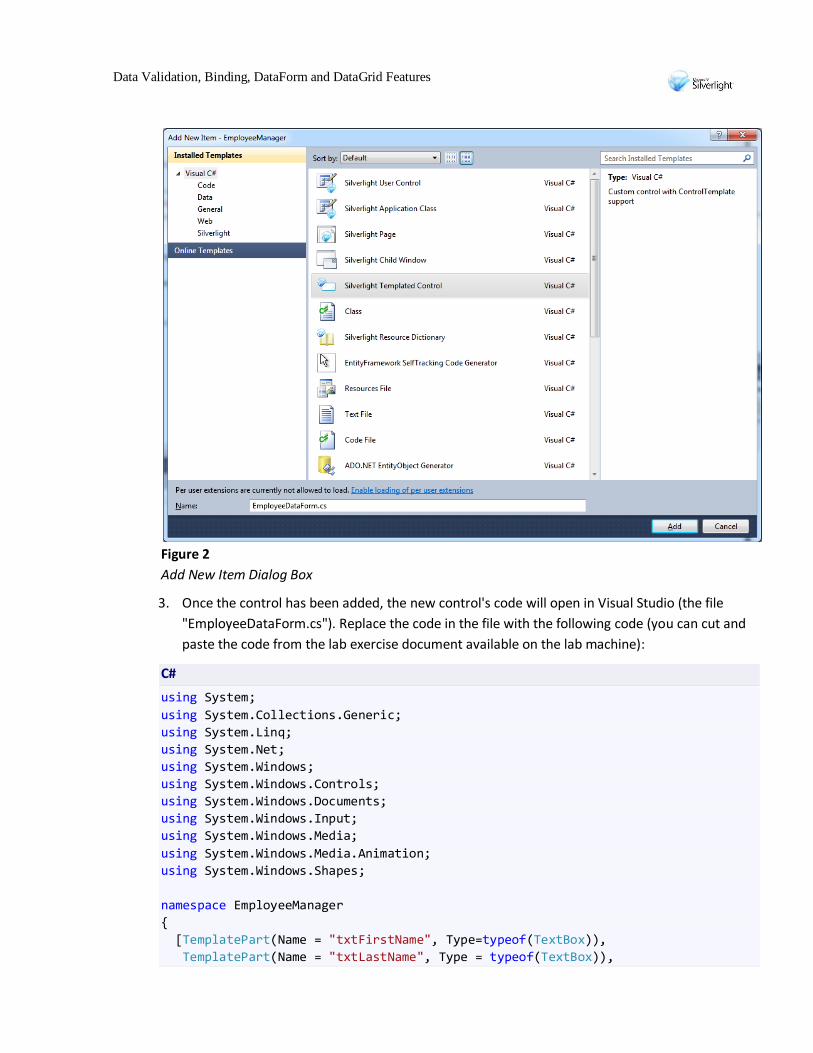
Data Validation, Binding, DataForm and DataGrid Features
Figure 2
Add New Item Dialog Box
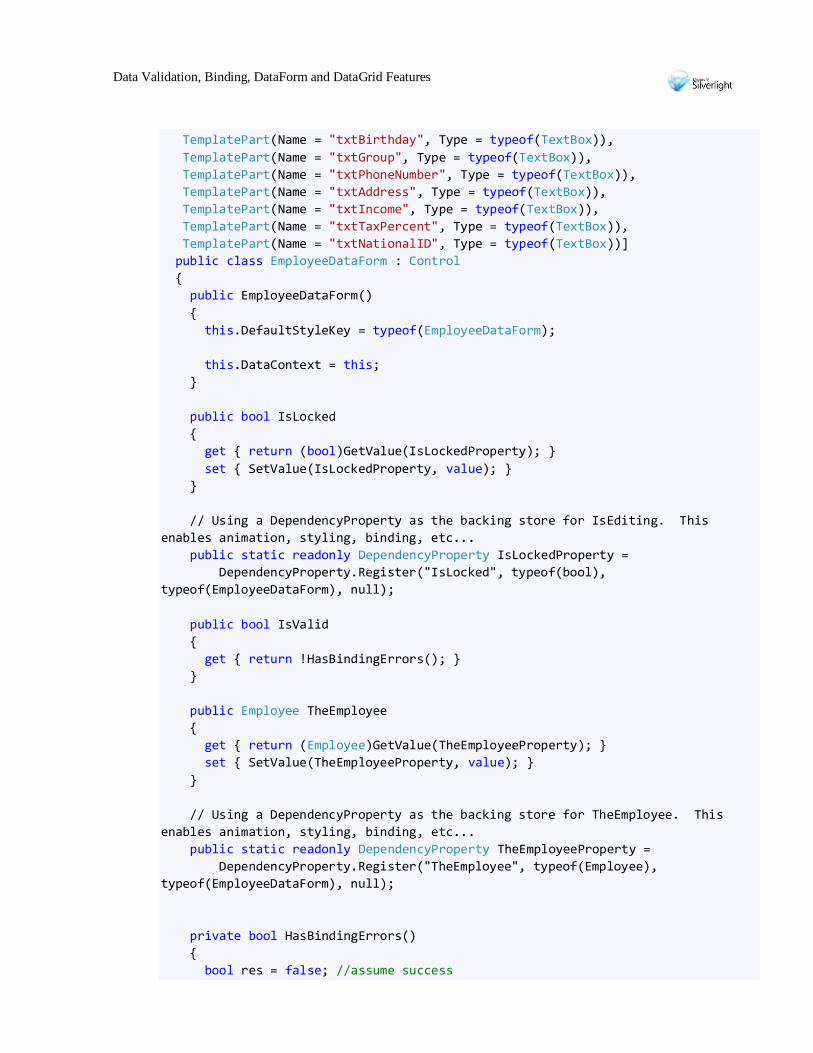
3. Once the control has been added, the new control's code will open in Visual Studio (the file
"EmployeeDataForm.cs"). Replace the code in the file with the following code (you can cut and
paste the code from the lab exercise document available on the lab machine):
C#
using System;
using System.Collections.Generic;
using System.Linq;
using System.Net;
using System.Windows;
using System.Windows.Controls;
using System.Windows.Documents;
using System.Windows.Input;
using System.Windows.Media;
using System.Windows.Media.Animation;
using System.Windows.Shapes;
namespace EmployeeManager
{
[TemplatePart(Name = "txtFirstName", Type=typeof(TextBox)),
TemplatePart(Name = "txtLastName", Type = typeof(TextBox)),
Data Validation, Binding, DataForm and DataGrid Features
TemplatePart(Name = "txtBirthday", Type = typeof(TextBox)),
TemplatePart(Name = "txtGroup", Type = typeof(TextBox)),
TemplatePart(Name = "txtPhoneNumber", Type = typeof(TextBox)),
TemplatePart(Name = "txtAddress", Type = typeof(TextBox)),
TemplatePart(Name = "txtIncome", Type = typeof(TextBox)),
TemplatePart(Name = "txtTaxPercent", Type = typeof(TextBox)),
TemplatePart(Name = "txtNationalID", Type = typeof(TextBox))]
public class EmployeeDataForm : Control
{
public EmployeeDataForm()
{
this.DefaultStyleKey = typeof(EmployeeDataForm);
this.DataContext = this;
}
public bool IsLocked
{
get { return (bool)GetValue(IsLockedProperty); }
set { SetValue(IsLockedProperty, value); }
}
// Using a DependencyProperty as the backing store for IsEditing. This
enables animation, styling, binding, etc...
public static readonly DependencyProperty IsLockedProperty =
DependencyProperty.Register("IsLocked", typeof(bool),
typeof(EmployeeDataForm), null);
public bool IsValid
{
get { return !HasBindingErrors(); }
}
public Employee TheEmployee
{
get { return (Employee)GetValue(TheEmployeeProperty); }
set { SetValue(TheEmployeeProperty, value); }
}
// Using a DependencyProperty as the backing store for TheEmployee. This
enables animation, styling, binding, etc...
public static readonly DependencyProperty TheEmployeeProperty =
DependencyProperty.Register("TheEmployee", typeof(Employee),
typeof(EmployeeDataForm), null);
private bool HasBindingErrors()
{
bool res = false; //assume success
Data Validation, Binding, DataForm and DataGrid Features
res |= Validation.GetHasError(GetTemplateChild("txtFirstName"));
res |= Validation.GetHasError(GetTemplateChild("txtLastName"));
res |= Validation.GetHasError(GetTemplateChild("txtBirthday"));
res |= Validation.GetHasError(GetTemplateChild("txtGroup"));
res |= Validation.GetHasError(GetTemplateChild("txtPhoneNumber"));
res |= Validation.GetHasError(GetTemplateChild("txtAddress"));
res |= Validation.GetHasError(GetTemplateChild("txtIncome"));
res |= Validation.GetHasError(GetTemplateChild("txtTaxPercent"));
res |= Validation.GetHasError(GetTemplateChild("txtNationalID"));
return res;
}
}
}
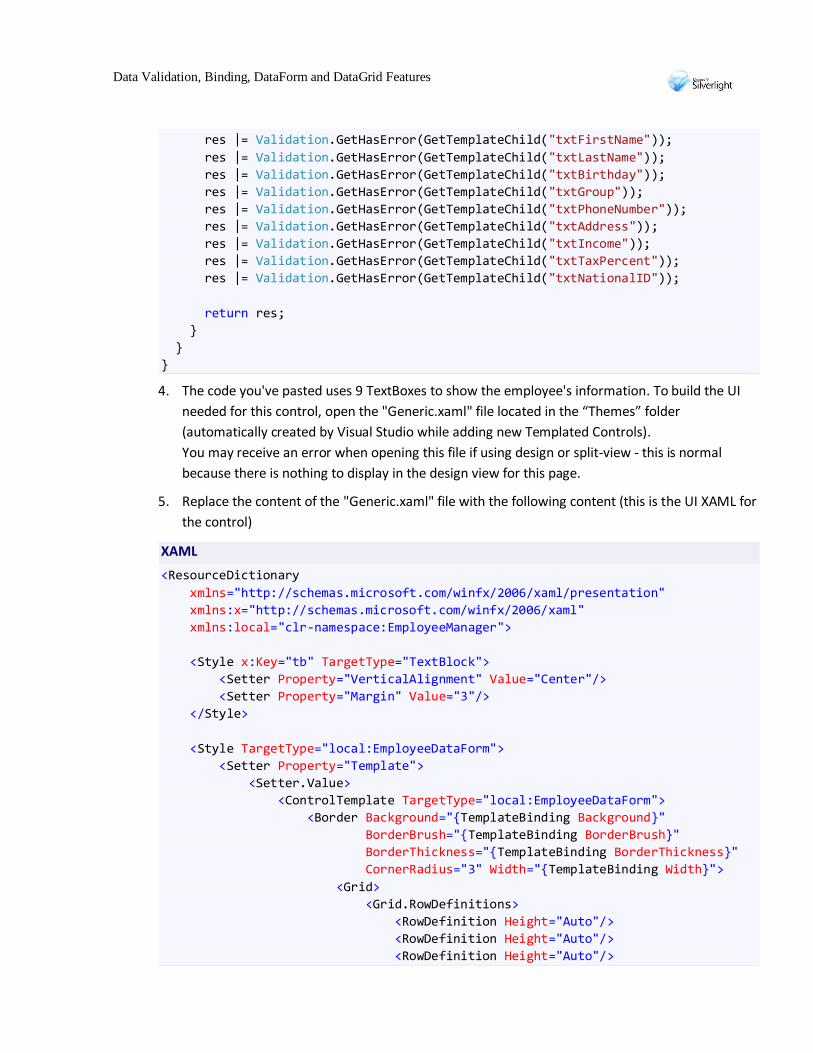
4. The code you've pasted uses 9 TextBoxes to show the employee's information. To build the UI
needed for this control, open the "Generic.xaml" file located in the “Themes” folder
(automatically created by Visual Studio while adding new Templated Controls).
You may receive an error when opening this file if using design or split-view - this is normal
because there is nothing to display in the design view for this page.
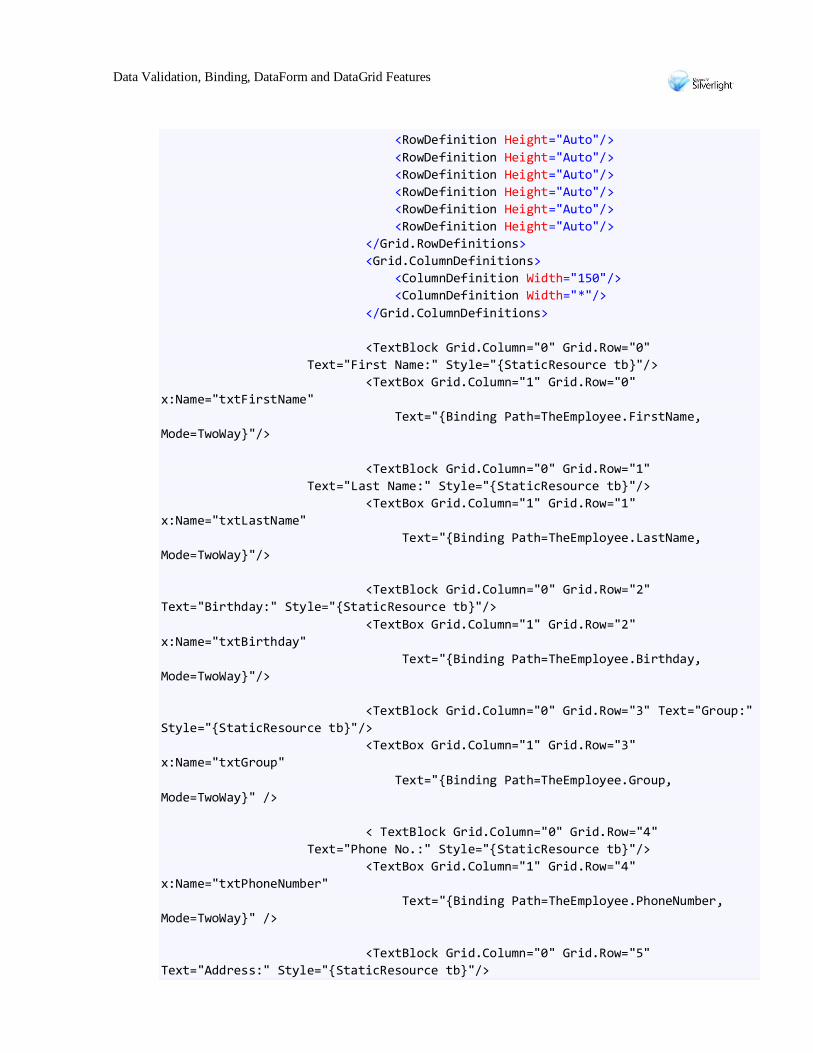
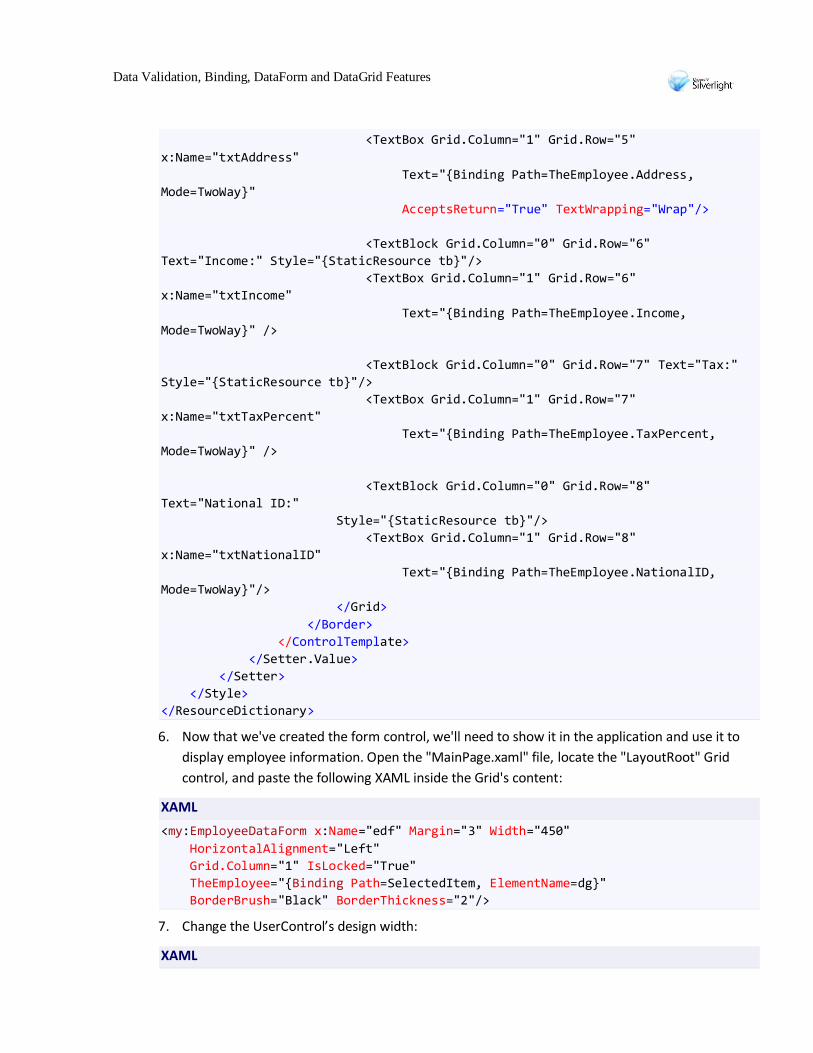
5. Replace the content of the "Generic.xaml" file with the following content (this is the UI XAML for
the control)
XAML
<ResourceDictionary
xmlns="http://schemas.microsoft.com/winfx/2006/xaml/presentation"
xmlns:x="http://schemas.microsoft.com/winfx/2006/xaml"
xmlns:local="clr-namespace:EmployeeManager">
<Style x:Key="tb" TargetType="TextBlock">
<Setter Property="VerticalAlignment" Value="Center"/>
<Setter Property="Margin" Value="3"/>
</Style>
<Style TargetType="local:EmployeeDataForm">
<Setter Property="Template">
<Setter.Value>
<ControlTemplate TargetType="local:EmployeeDataForm">
<Border Background="{TemplateBinding Background}"
BorderBrush="{TemplateBinding BorderBrush}"
BorderThickness="{TemplateBinding BorderThickness}"
CornerRadius="3" Width="{TemplateBinding Width}">
<Grid>
<Grid.RowDefinitions>
<RowDefinition Height="Auto"/>
<RowDefinition Height="Auto"/>
<RowDefinition Height="Auto"/>
Data Validation, Binding, DataForm and DataGrid Features
<RowDefinition Height="Auto"/>
<RowDefinition Height="Auto"/>
<RowDefinition Height="Auto"/>
<RowDefinition Height="Auto"/>
<RowDefinition Height="Auto"/>
<RowDefinition Height="Auto"/>
</Grid.RowDefinitions>
<Grid.ColumnDefinitions>
<ColumnDefinition Width="150"/>
<ColumnDefinition Width="*"/>
</Grid.ColumnDefinitions>
<TextBlock Grid.Column="0" Grid.Row="0"
Text="First Name:" Style="{StaticResource tb}"/>
<TextBox Grid.Column="1" Grid.Row="0"
x:Name="txtFirstName"
Text="{Binding Path=TheEmployee.FirstName,
Mode=TwoWay}"/>
<TextBlock Grid.Column="0" Grid.Row="1"
Text="Last Name:" Style="{StaticResource tb}"/>
<TextBox Grid.Column="1" Grid.Row="1"
x:Name="txtLastName"
Text="{Binding Path=TheEmployee.LastName,
Mode=TwoWay}"/>
<TextBlock Grid.Column="0" Grid.Row="2"
Text="Birthday:" Style="{StaticResource tb}"/>
<TextBox Grid.Column="1" Grid.Row="2"
x:Name="txtBirthday"
Text="{Binding Path=TheEmployee.Birthday,
Mode=TwoWay}"/>
<TextBlock Grid.Column="0" Grid.Row="3" Text="Group:"
Style="{StaticResource tb}"/>
<TextBox Grid.Column="1" Grid.Row="3"
x:Name="txtGroup"
Text="{Binding Path=TheEmployee.Group,
Mode=TwoWay}" />
< TextBlock Grid.Column="0" Grid.Row="4"
Text="Phone No.:" Style="{StaticResource tb}"/>
<TextBox Grid.Column="1" Grid.Row="4"
x:Name="txtPhoneNumber"
Text="{Binding Path=TheEmployee.PhoneNumber,
Mode=TwoWay}" />
<TextBlock Grid.Column="0" Grid.Row="5"
Text="Address:" Style="{StaticResource tb}"/>
Data Validation, Binding, DataForm and DataGrid Features
<TextBox Grid.Column="1" Grid.Row="5"
x:Name="txtAddress"
Text="{Binding Path=TheEmployee.Address,
Mode=TwoWay}"
AcceptsReturn="True" TextWrapping="Wrap"/>
<TextBlock Grid.Column="0" Grid.Row="6"
Text="Income:" Style="{StaticResource tb}"/>
<TextBox Grid.Column="1" Grid.Row="6"
x:Name="txtIncome"
Text="{Binding Path=TheEmployee.Income,
Mode=TwoWay}" />
<TextBlock Grid.Column="0" Grid.Row="7" Text="Tax:"
Style="{StaticResource tb}"/>
<TextBox Grid.Column="1" Grid.Row="7"
x:Name="txtTaxPercent"
Text="{Binding Path=TheEmployee.TaxPercent,
Mode=TwoWay}" />
<TextBlock Grid.Column="0" Grid.Row="8"
Text="National ID:"
Style="{StaticResource tb}"/>
<TextBox Grid.Column="1" Grid.Row="8"
x:Name="txtNationalID"
Text="{Binding Path=TheEmployee.NationalID,
Mode=TwoWay}"/>
</Grid>
</Border>
</ControlTemplate>
</Setter.Value>
</Setter>
</Style>
</ResourceDictionary>
6. Now that we've created the form control, we'll need to show it in the application and use it to
display employee information. Open the "MainPage.xaml" file, locate the "LayoutRoot" Grid
control, and paste the following XAML inside the Grid's content:
XAML
<my:EmployeeDataForm x:Name="edf" Margin="3" Width="450"
HorizontalAlignment="Left"
Grid.Column="1" IsLocked="True"
TheEmployee="{Binding Path=SelectedItem, ElementName=dg}"
BorderBrush="Black" BorderThickness="2"/>
7. Change the UserControl’s design width:
XAML
Data Validation, Binding, DataForm and DataGrid Features
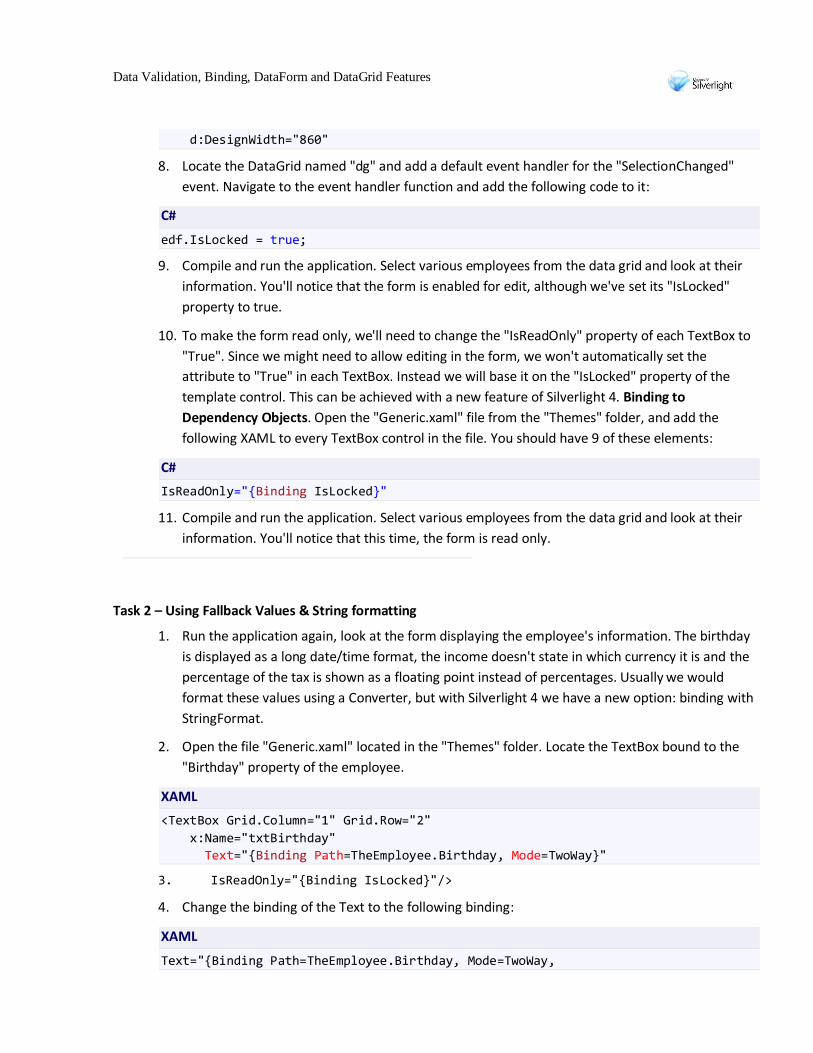
d:DesignWidth="860"
8. Locate the DataGrid named "dg" and add a default event handler for the "SelectionChanged"
event. Navigate to the event handler function and add the following code to it:
C#
edf.IsLocked = true;
9. Compile and run the application. Select various employees from the data grid and look at their
information. You'll notice that the form is enabled for edit, although we've set its "IsLocked"
property to true.
10. To make the form read only, we'll need to change the "IsReadOnly" property of each TextBox to
"True". Since we might need to allow editing in the form, we won't automatically set the
attribute to "True" in each TextBox. Instead we will base it on the "IsLocked" property of the
template control. This can be achieved with a new feature of Silverlight 4. Binding to
Dependency Objects. Open the "Generic.xaml" file from the "Themes" folder, and add the
following XAML to every TextBox control in the file. You should have 9 of these elements:
C#
IsReadOnly="{Binding IsLocked}"
11. Compile and run the application. Select various employees from the data grid and look at their
information. You'll notice that this time, the form is read only.
Task 2 – Using Fallback Values & String formatting
1. Run the application again, look at the form displaying the employee's information. The birthday
is displayed as a long date/time format, the income doesn't state in which currency it is and the
percentage of the tax is shown as a floating point instead of percentages. Usually we would
format these values using a Converter, but with Silverlight 4 we have a new option: binding with
StringFormat.
2. Open the file "Generic.xaml" located in the "Themes" folder. Locate the TextBox bound to the
"Birthday" property of the employee.
XAML
<TextBox Grid.Column="1" Grid.Row="2"
x:Name="txtBirthday"
Text="{Binding Path=TheEmployee.Birthday, Mode=TwoWay}"
3. IsReadOnly="{Binding IsLocked}"/>
4. Change the binding of the Text to the following binding:
XAML
Text="{Binding Path=TheEmployee.Birthday, Mode=TwoWay,
Data Validation, Binding, DataForm and DataGrid Features
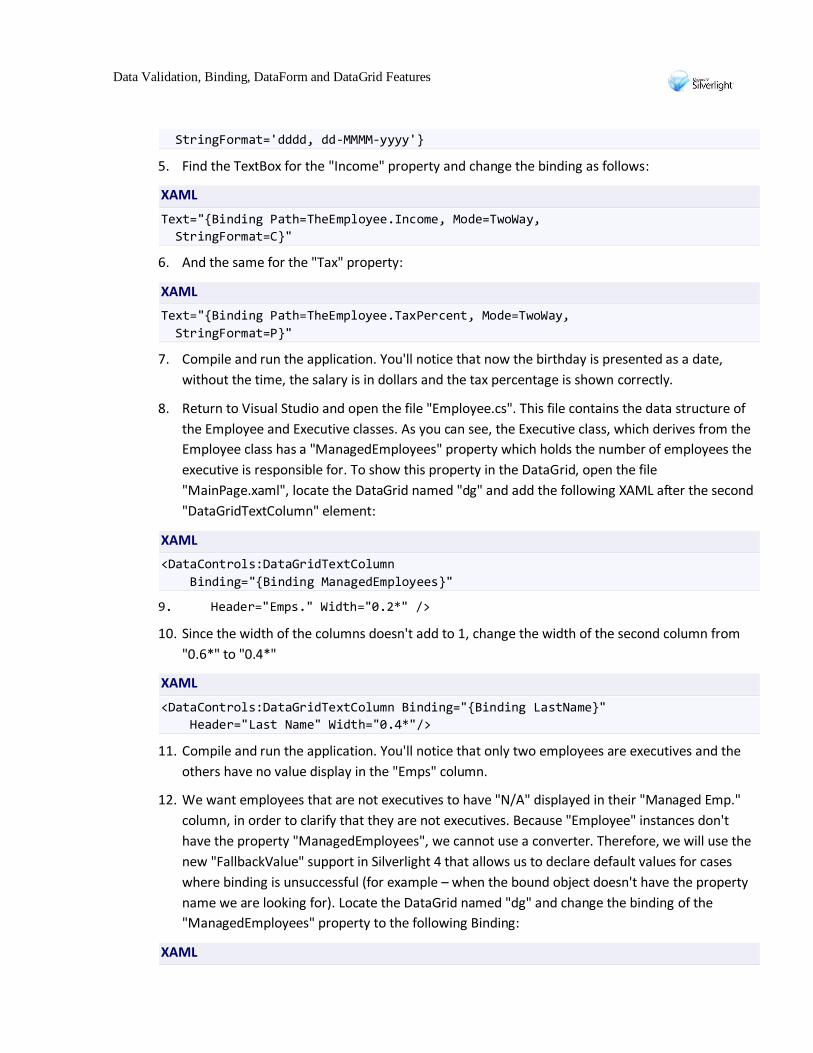
StringFormat='dddd, dd-MMMM-yyyy'}
5. Find the TextBox for the "Income" property and change the binding as follows:
XAML
Text="{Binding Path=TheEmployee.Income, Mode=TwoWay,
StringFormat=C}"
6. And the same for the "Tax" property:
XAML
Text="{Binding Path=TheEmployee.TaxPercent, Mode=TwoWay,
StringFormat=P}"
7. Compile and run the application. You'll notice that now the birthday is presented as a date,
without the time, the salary is in dollars and the tax percentage is shown correctly.
8. Return to Visual Studio and open the file "Employee.cs". This file contains the data structure of
the Employee and Executive classes. As you can see, the Executive class, which derives from the
Employee class has a "ManagedEmployees" property which holds the number of employees the
executive is responsible for. To show this property in the DataGrid, open the file
"MainPage.xaml", locate the DataGrid named "dg" and add the following XAML after the second
"DataGridTextColumn" element:
XAML
<DataControls:DataGridTextColumn
Binding="{Binding ManagedEmployees}"
9. Header="Emps." Width="0.2*" />
10. Since the width of the columns doesn't add to 1, change the width of the second column from
"0.6*" to "0.4*"
XAML
<DataControls:DataGridTextColumn Binding="{Binding LastName}"
Header="Last Name" Width="0.4*"/>
11. Compile and run the application. You'll notice that only two employees are executives and the
others have no value display in the "Emps" column.
12. We want employees that are not executives to have "N/A" displayed in their "Managed Emp."
column, in order to clarify that they are not executives. Because "Employee" instances don't
have the property "ManagedEmployees", we cannot use a converter. Therefore, we will use the
new "FallbackValue" support in Silverlight 4 that allows us to declare default values for cases
where binding is unsuccessful (for example – when the bound object doesn't have the property
name we are looking for). Locate the DataGrid named "dg" and change the binding of the
"ManagedEmployees" property to the following Binding:
XAML
Data Validation, Binding, DataForm and DataGrid Features
Binding="{Binding ManagedEmployees, FallbackValue=N/A}"
13. Compile and run the application. This time you'll notice that all the employees which are not
executives have the value "N/A" (not-available).
Task 3– Validating with IDataErrorInfo
1. Now that we can display the employees' information, we'll add some editing support starting
with Update. For updating we only need to unlock the form control. Open the file
"MainPage.xaml" and locate the button named "btnUpdate". Add a default event handler for
the button's "Click" event and navigate to the event handler function. Add the following code to
the function:
C#
edf.IsLocked = false;
2. Next, we'll add delete support. Open the file "MainPage.xaml" and locate the button named
"btnDelete". Add a default event handler for the button's "Click" event and navigate to the
event handler function. Add the following code to the function:
C#
EmployeesManager em = this.Resources["employeeManagerViewSource"]
as EmployeesManager;
em.Employees.Remove(dg.SelectedItem as Employee);
3. Compile and run the application. Try to update and delete an employee from the list.
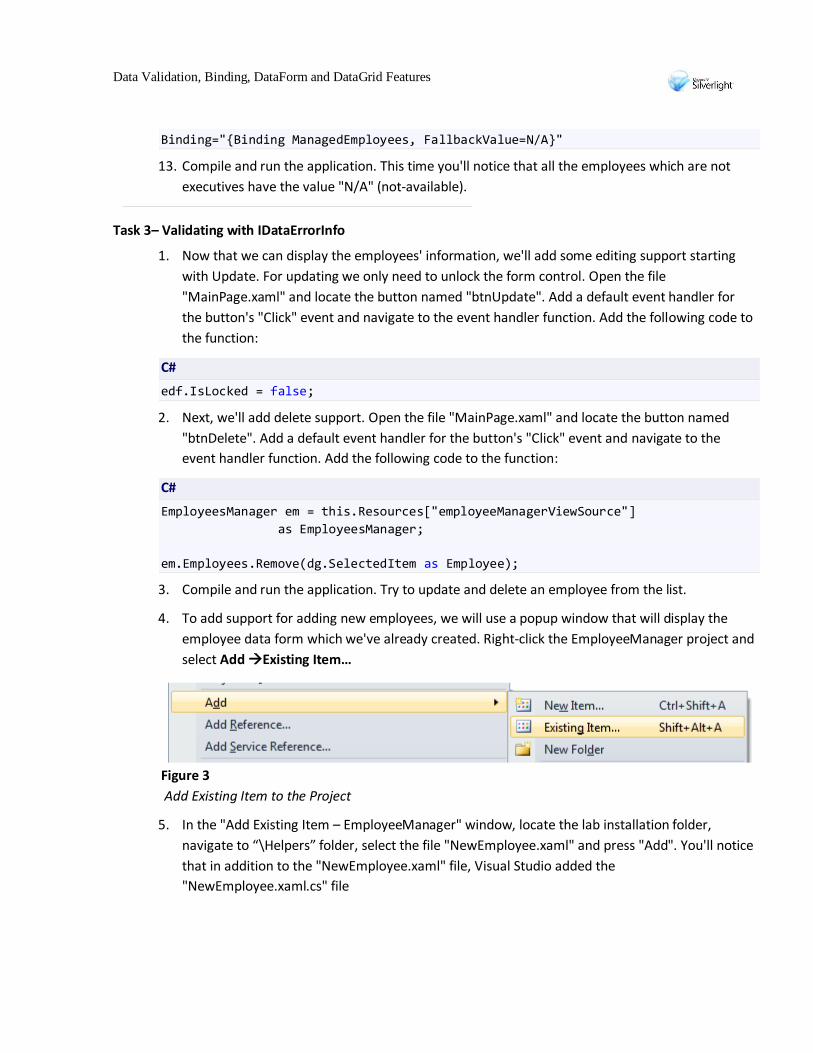
4. To add support for adding new employees, we will use a popup window that will display the
employee data form which we've already created. Right-click the EmployeeManager project and
select Add Existing Item…
Figure 3
Add Existing Item to the Project
5. In the "Add Existing Item – EmployeeManager" window, locate the lab installation folder,
navigate to “\Helpers” folder, select the file "NewEmployee.xaml" and press "Add". You'll notice
that in addition to the "NewEmployee.xaml" file, Visual Studio added the
"NewEmployee.xaml.cs" file
Data Validation, Binding, DataForm and DataGrid Features
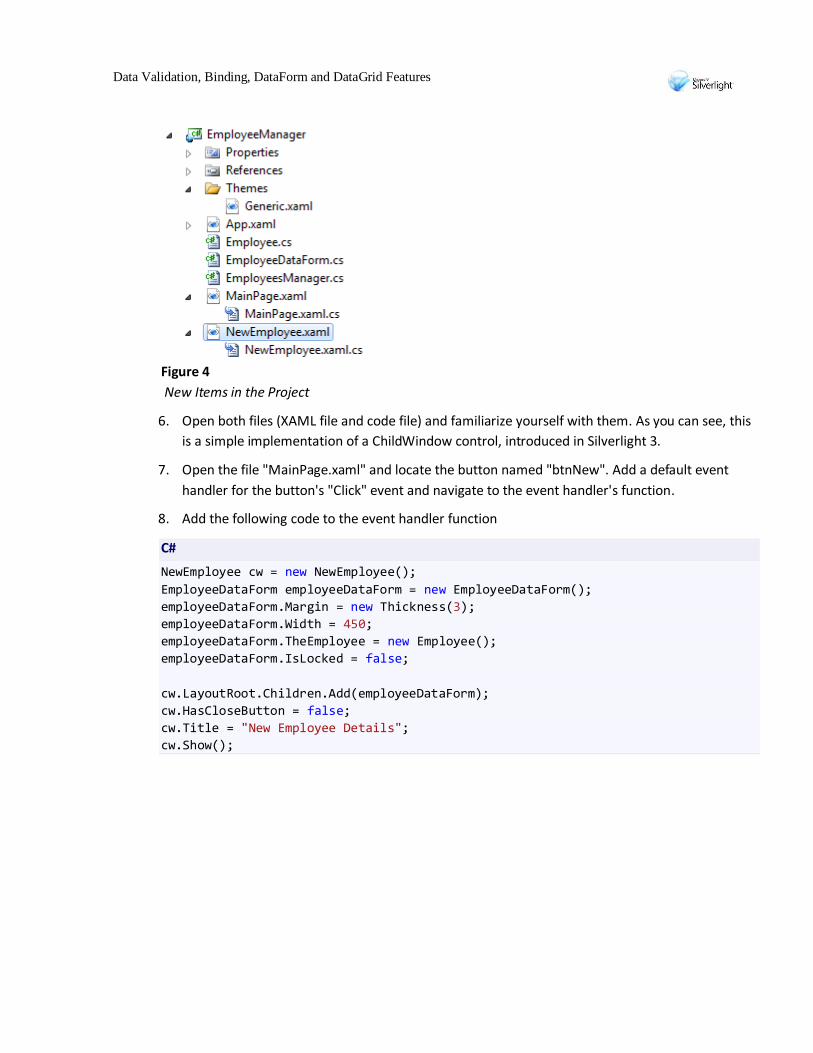
Figure 4
New Items in the Project
6. Open both files (XAML file and code file) and familiarize yourself with them. As you can see, this
is a simple implementation of a ChildWindow control, introduced in Silverlight 3.
7. Open the file "MainPage.xaml" and locate the button named "btnNew". Add a default event
handler for the button's "Click" event and navigate to the event handler's function.
8. Add the following code to the event handler function
C#
NewEmployee cw = new NewEmployee();
EmployeeDataForm employeeDataForm = new EmployeeDataForm();
employeeDataForm.Margin = new Thickness(3);
employeeDataForm.Width = 450;
employeeDataForm.TheEmployee = new Employee();
employeeDataForm.IsLocked = false;
cw.LayoutRoot.Children.Add(employeeDataForm);
cw.HasCloseButton = false;
cw.Title = "New Employee Details";
cw.Show();
Data Validation, Binding, DataForm and DataGrid Features
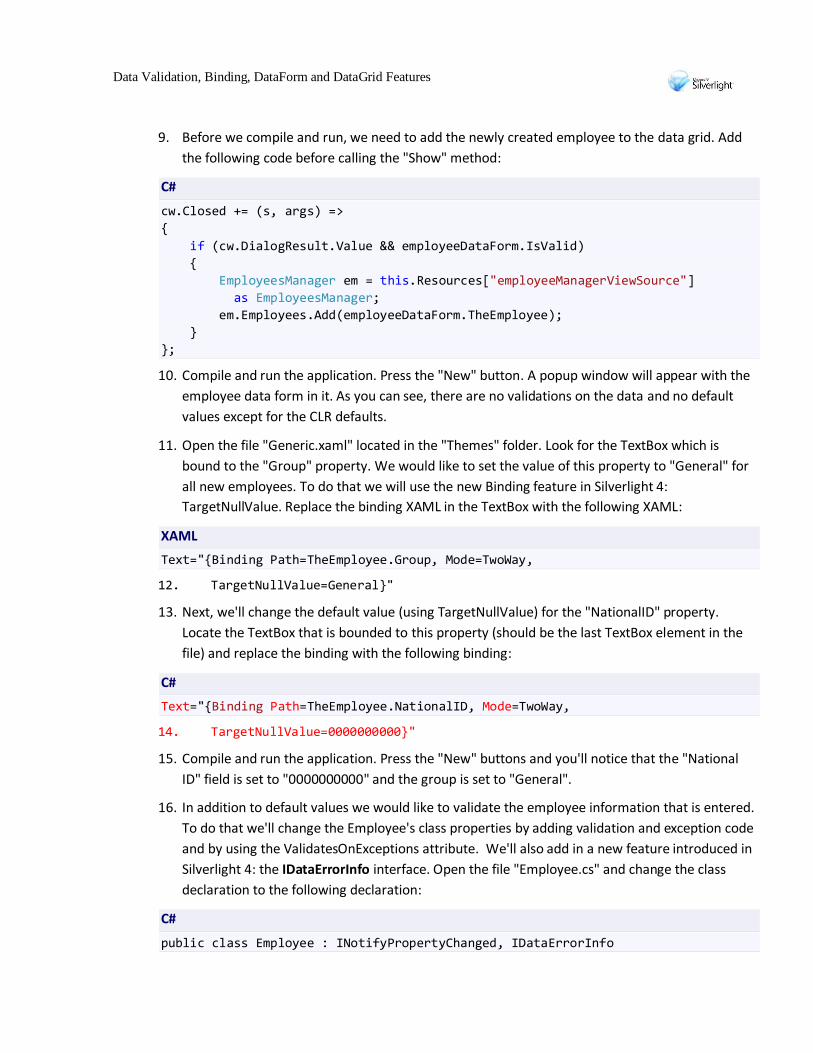
9. Before we compile and run, we need to add the newly created employee to the data grid. Add
the following code before calling the "Show" method:
C#
cw.Closed += (s, args) =>
{
if (cw.DialogResult.Value && employeeDataForm.IsValid)
{
EmployeesManager em = this.Resources["employeeManagerViewSource"]
as EmployeesManager;
em.Employees.Add(employeeDataForm.TheEmployee);
}
};
10. Compile and run the application. Press the "New" button. A popup window will appear with the
employee data form in it. As you can see, there are no validations on the data and no default
values except for the CLR defaults.
11. Open the file "Generic.xaml" located in the "Themes" folder. Look for the TextBox which is
bound to the "Group" property. We would like to set the value of this property to "General" for
all new employees. To do that we will use the new Binding feature in Silverlight 4:
TargetNullValue. Replace the binding XAML in the TextBox with the following XAML:
XAML
Text="{Binding Path=TheEmployee.Group, Mode=TwoWay,
12. TargetNullValue=General}"
13. Next, we'll change the default value (using TargetNullValue) for the "NationalID" property.
Locate the TextBox that is bounded to this property (should be the last TextBox element in the
file) and replace the binding with the following binding:
C#
Text="{Binding Path=TheEmployee.NationalID, Mode=TwoWay,
14. TargetNullValue=0000000000}"
15. Compile and run the application. Press the "New" buttons and you'll notice that the "National
ID" field is set to "0000000000" and the group is set to "General".
16. In addition to default values we would like to validate the employee information that is entered.
To do that we'll change the Employee's class properties by adding validation and exception code
and by using the ValidatesOnExceptions attribute. We'll also add in a new feature introduced in
Silverlight 4: the IDataErrorInfo interface. Open the file "Employee.cs" and change the class
declaration to the following declaration:
C#
public class Employee : INotifyPropertyChanged, IDataErrorInfo
Data Validation, Binding, DataForm and DataGrid Features
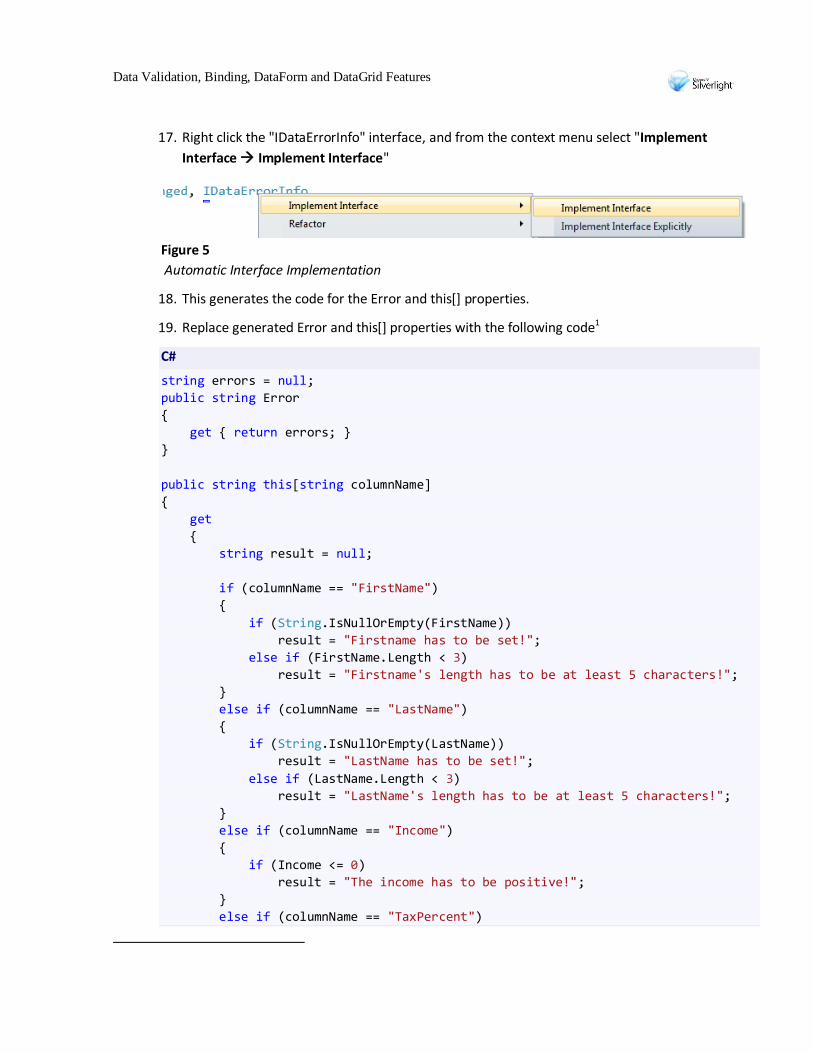
17. Right click the "IDataErrorInfo" interface, and from the context menu select "Implement
Interface Implement Interface"
Figure 5
Automatic Interface Implementation
18. This generates the code for the Error and this[] properties.
19. Replace generated Error and this[] properties with the following code1
C#
string errors = null;
public string Error
{
get { return errors; }
}
public string this[string columnName]
{
get
{
string result = null;
if (columnName == "FirstName")
{
if (String.IsNullOrEmpty(FirstName))
result = "Firstname has to be set!";
else if (FirstName.Length < 3)
result = "Firstname's length has to be at least 5 characters!";
}
else if (columnName == "LastName")
{
if (String.IsNullOrEmpty(LastName))
result = "LastName has to be set!";
else if (LastName.Length < 3)
result = "LastName's length has to be at least 5 characters!";
}
else if (columnName == "Income")
{
if (Income <= 0)
result = "The income has to be positive!";
}
else if (columnName == "TaxPercent")
Data Validation, Binding, DataForm and DataGrid Features
{
if (TaxPercent <= 0)
result = "The tax has to be positive!";
else if (TaxPercent >= 1)
TaxPercent /= 100;
}
else if (columnName == "NationalID")
{
if (null != NationalID)
if (NationalID.Length < 10 || NationalID.Length > 12)
result = "National ID is wrong!";
}
return result;
}
}
20. Now that we have implemented the IDataErrorInfo interface, we can tell the various bindings to
check for validation errors. Open the file "Generic.xaml" located in the "Themes" folder. Find the
TextBox which is bound to the "FirstName" property (it should be the first TextBox) and replace
its binding to the following:
XAML
21. Text="{Binding Path=TheEmployee.FirstName, Mode=TwoWay,
ValidatesOnDataErrors=True}
22. Find the TextBox for the "LastName" property and change the binding to:
XAML
23. Text="{Binding Path=TheEmployee.LastName, Mode=TwoWay,
ValidatesOnDataErrors=True}"
24. Find the TextBox for the "Income" property and change the binding to:
XAML
Text="{Binding Path=TheEmployee.Income, Mode=TwoWay,
25. StringFormat=C, ValidatesOnDataErrors=True}"
26. Find the TextBox for the "TaxPercent" property and change the binding to:
XAML
Text="{Binding Path=TheEmployee.TaxPercent, Mode=TwoWay,
27. StringFormat=P, ValidatesOnDataErrors=True}"
28. Find the TextBox for the " NationalID" property – change the binding to:
XAML
Text="{Binding Path=TheEmployee.NationalID, Mode=TwoWay,
29. ValidatesOnDataErrors=True}"

Data Validation, Binding, DataForm and DataGrid Features
30. All that is left is to verify the employee's information when we input a new employee. Open the
file "MainPage.xaml.cs" and locate the event handler function "btnNew_Click". Add the
following code before the "Show" method:
C#
cw.Closing += (s, args) =>
{
if (!employeeDataForm.IsValid && cw.DialogResult.Value)
{
MessageBox.Show("Some of field values are not valid.\nPlease fix all
marked fields and try again");
args.Cancel = true;
}
};
31. Compile and run the application. Press the "New" button. Examine the different validation
messages you get (note that you may need to remove the % character when entering the
Tax Percent value in order for it to validate). Try to add an employee without fulfilling all the
validation requirements.

Data Validation, Binding, DataForm and DataGrid Features
Conclusion
In this lab you learned how to build a data-oriented application that utilizes the new capabilities of the
DataGrid control and the new binding support and validation support offered by Silverlight 4.


![Datagrid: Infraestructura de computación en malla para ...52.0.140.184/typo43/fileadmin/Revista_99/Tres.pdf60 Sistemas DataGrid: un grid orientado a datos El proyecto DataGrid [6]](https://img.dokumen.tips/doc/110x75/5e0da9233f14eb44dd370690/datagrid-infraestructura-de-computacin-en-malla-para-520140184typo43fileadminrevista99trespdf60.jpg)