Embed Size (px)
Citation preview
CALL: 800.593.2680WEB: edcoproducts.com VIDEO: edcotv.com
SIDING INSTALLATION GUIDE
SIDING • METAL ROOFING • SOFFIT & FASCIA • RAINWARE • TRIM COIL • ACCESSORIES
2 Copyright © 3/1/2014
STEEL SIDING, ACCESSORIES & EQUIPMENT
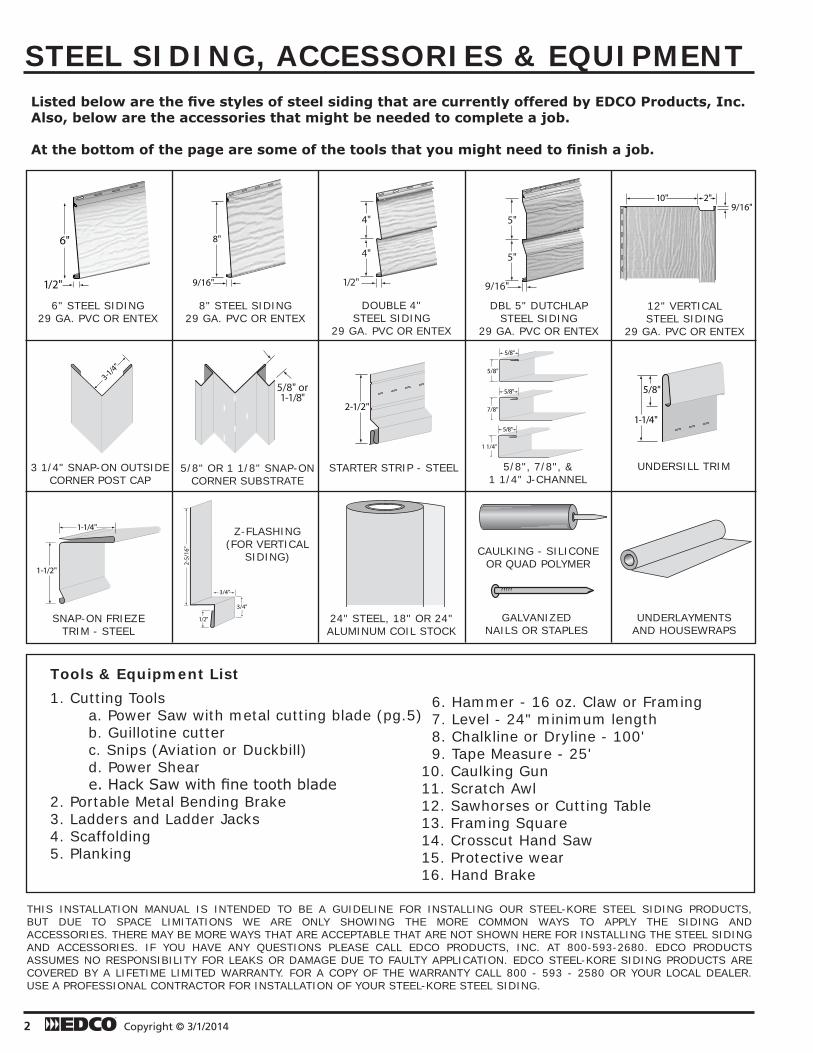
Tools & Equipment List1. Cutting Tools a. Power Saw with metal cutting blade (pg.5) b. Guillotine cutter c. Snips (Aviation or Duckbill) d. Power Shear e.HackSawwithfinetoothblade2. Portable Metal Bending Brake3. Ladders and Ladder Jacks4. Scaffolding5. Planking
6. Hammer - 16 oz. Claw or Framing 7. Level - 24" minimum length 8. Chalkline or Dryline - 100' 9. Tape Measure - 25'10. Caulking Gun11. Scratch Awl12. Sawhorses or Cutting Table13. Framing Square14. Crosscut Hand Saw 15. Protective wear16. Hand Brake
Listed below are the five styles of steel siding that are currently offered by EDCO Products, Inc. Also, below are the accessories that might be needed to complete a job.
At the bottom of the page are some of the tools that you might need to finish a job.
4"
4"
1/2"
2-1/2"
10" 2"9/16"
9/16"
5"
5"
6"
1/2"
8"
9/16"
3-1/4"
5/8"
7/8"
5/8"
1 1/4"
5/8"
5/8"
5/8"
1-1/4"
1-1/2"
1-1/4"
8" STEEL SIDING 29 GA. PVC OR ENTEX
6" STEEL SIDING 29 GA. PVC OR ENTEX
DOUBLE 4" STEEL SIDING
29 GA. PVC OR ENTEX
DBL 5" DUTCHLAP STEEL SIDING
29 GA. PVC OR ENTEX
12" VERTICAL STEEL SIDING
29 GA. PVC OR ENTEX
3 1/4" SNAP-ON OUTSIDE CORNER POST CAP
5/8" OR 1 1/8" SNAP-ON CORNER SUBSTRATE
5/8", 7/8", & 1 1/4" J-CHANNEL
UNDERSILL TRIMSTARTER STRIP - STEEL
SNAP-ON FRIEZE TRIM - STEEL
24" STEEL, 18" OR 24" ALUMINUM COIL STOCK
CAULKING - SILICONE OR QUAD POLYMER
GALVANIZED NAILS OR STAPLES
UNDERLAYMENTS AND HOUSEWRAPS
5/8" or1-1/8"
1/2"
2-5/
16"
3/4"
3/4"
Z-FLASHING(FOR VERTICAL
SIDING)
THIS INSTALLATION MANUAL IS INTENDED TO BE A GUIDELINE FOR INSTALLING OUR STEEL-KORE STEEL SIDING PRODUCTS, BUT DUE TO SPACE LIMITATIONS WE ARE ONLY SHOWING THE MORE COMMON WAYS TO APPLY THE SIDING AND ACCESSORIES. THERE MAY BE MORE WAYS THAT ARE ACCEPTABLE THAT ARE NOT SHOWN HERE FOR INSTALLING THE STEEL SIDING AND ACCESSORIES. IF YOU HAVE ANY QUESTIONS PLEASE CALL EDCO PRODUCTS, INC. AT 800-593-2680. EDCO PRODUCTS ASSUMES NO RESPONSIBILITY FOR LEAKS OR DAMAGE DUE TO FAULTY APPLICATION. EDCO STEEL-KORE SIDING PRODUCTS ARE COVERED BY A LIFETIME LIMITED WARRANTY. FOR A COPY OF THE WARRANTY CALL 800 - 593 - 2580 OR YOUR LOCAL DEALER. USE A PROFESSIONAL CONTRACTOR FOR INSTALLATION OF YOUR STEEL-KORE STEEL SIDING.
SURFACE PREPARATION
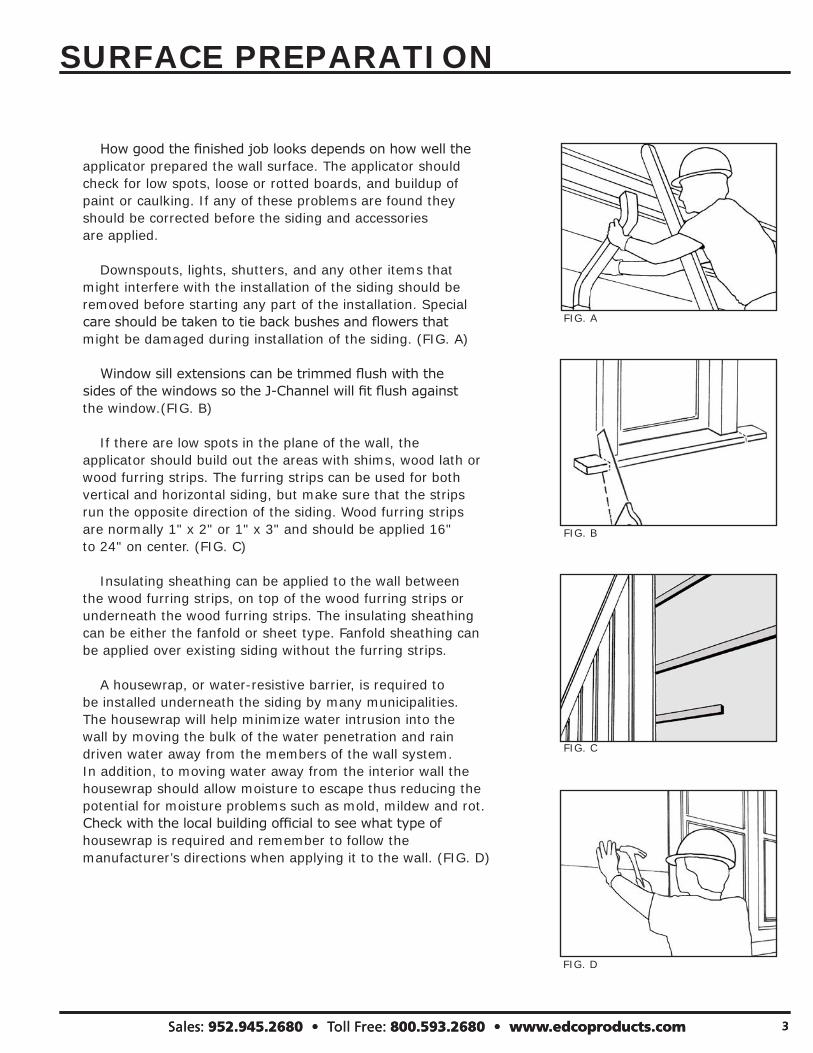
Howgoodthefinishedjoblooksdependsonhowwelltheapplicator prepared the wall surface. The applicator should check for low spots, loose or rotted boards, and buildup of paint or caulking. If any of these problems are found they should be corrected before the siding and accessories are applied.
Downspouts, lights, shutters, and any other items that might interfere with the installation of the siding should be removed before starting any part of the installation. Special careshouldbetakentotiebackbushesandflowersthat might be damaged during installation of the siding. (FIG. A)
Windowsillextensionscanbetrimmedflushwiththe sidesofthewindowssotheJ-Channelwillfitflushagainst the window.(FIG. B)
If there are low spots in the plane of the wall, the applicator should build out the areas with shims, wood lath or wood furring strips. The furring strips can be used for both vertical and horizontal siding, but make sure that the strips run the opposite direction of the siding. Wood furring strips are normally 1" x 2" or 1" x 3" and should be applied 16" to 24" on center. (FIG. C)
Insulating sheathing can be applied to the wall between the wood furring strips, on top of the wood furring strips or underneath the wood furring strips. The insulating sheathing can be either the fanfold or sheet type. Fanfold sheathing can be applied over existing siding without the furring strips.
A housewrap, or water-resistive barrier, is required to be installed underneath the siding by many municipalities. The housewrap will help minimize water intrusion into the wall by moving the bulk of the water penetration and rain driven water away from the members of the wall system. In addition, to moving water away from the interior wall the housewrap should allow moisture to escape thus reducing the potential for moisture problems such as mold, mildew and rot. Checkwiththelocalbuildingofficialtoseewhattypeof housewrap is required and remember to follow the manufacturer’s directions when applying it to the wall. (FIG. D)
3 Sales: 952.945.2680 • Toll Free: 800.593.2680 • www.edcoproducts.com 3 Sales: 952.945.2680 • Toll Free: 800.593.2680 • www.edcoproducts.com
FIG. A
FIG. B
FIG. C
FIG. D
STARTER STRIP AND CORNERS
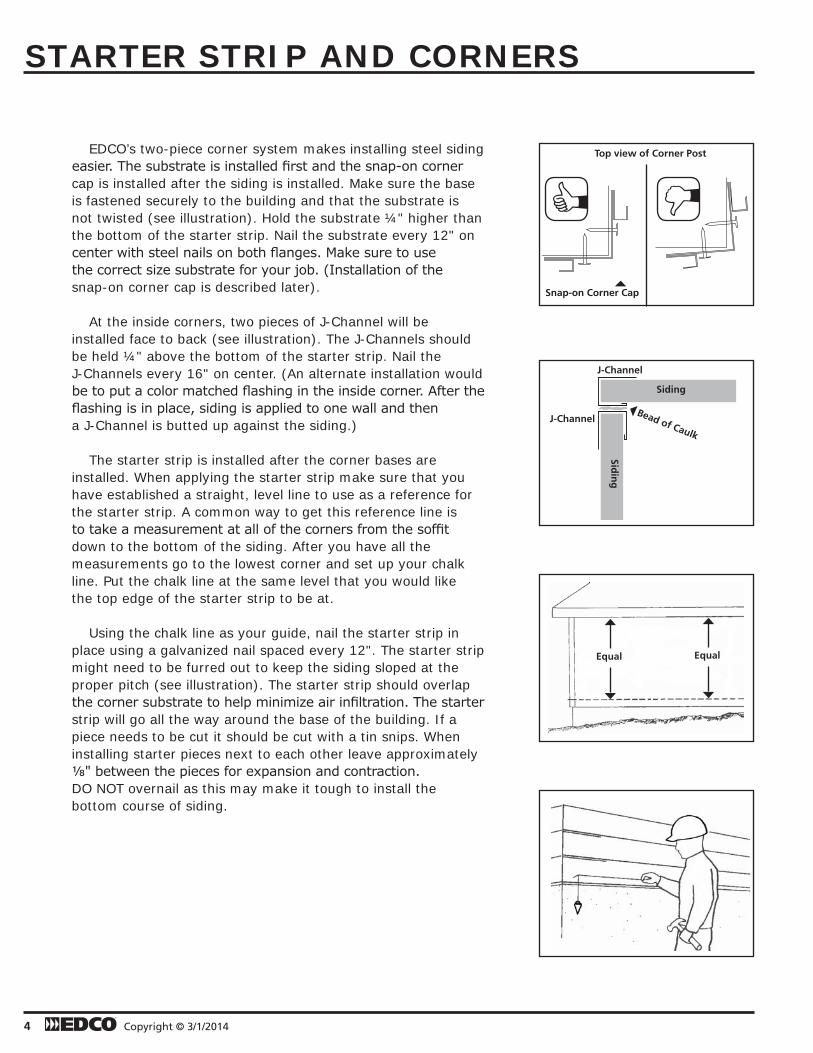
EDCO’s two-piece corner system makes installing steel siding easier.Thesubstrateisinstalledfirstandthesnap-oncornercap is installed after the siding is installed. Make sure the base is fastened securely to the building and that the substrate is not twisted (see illustration). Hold the substrate ¼" higher than the bottom of the starter strip. Nail the substrate every 12" on centerwithsteelnailsonbothflanges.Makesuretouse thecorrectsizesubstrateforyourjob.(Installationofthe snap-on corner cap is described later).
At the inside corners, two pieces of J-Channel will be installed face to back (see illustration). The J-Channels should be held ¼" above the bottom of the starter strip. Nail the J-Channels every 16" on center. (An alternate installation would betoputacolormatchedflashingintheinsidecorner.Aftertheflashingisinplace,sidingisappliedtoonewallandthen a J-Channel is butted up against the siding.)
The starter strip is installed after the corner bases are installed. When applying the starter strip make sure that you have established a straight, level line to use as a reference for the starter strip. A common way to get this reference line is totakeameasurementatallofthecornersfromthesoffit down to the bottom of the siding. After you have all the measurements go to the lowest corner and set up your chalk line. Put the chalk line at the same level that you would like the top edge of the starter strip to be at.
Using the chalk line as your guide, nail the starter strip in place using a galvanized nail spaced every 12". The starter strip might need to be furred out to keep the siding sloped at the proper pitch (see illustration). The starter strip should overlap thecornersubstratetohelpminimizeairinfiltration.Thestarterstrip will go all the way around the base of the building. If a piece needs to be cut it should be cut with a tin snips. When installing starter pieces next to each other leave approximately ⅛"betweenthepiecesforexpansionandcontraction. DO NOT overnail as this may make it tough to install the bottom course of siding.
Bead of Caulk
J-Channel
Siding
Sidin
g
J-Channel
Top view of Corner Post
Equal Equal
Snap-on Corner Cap
4 Copyright © 3/1/2014
CUTTING PANELS
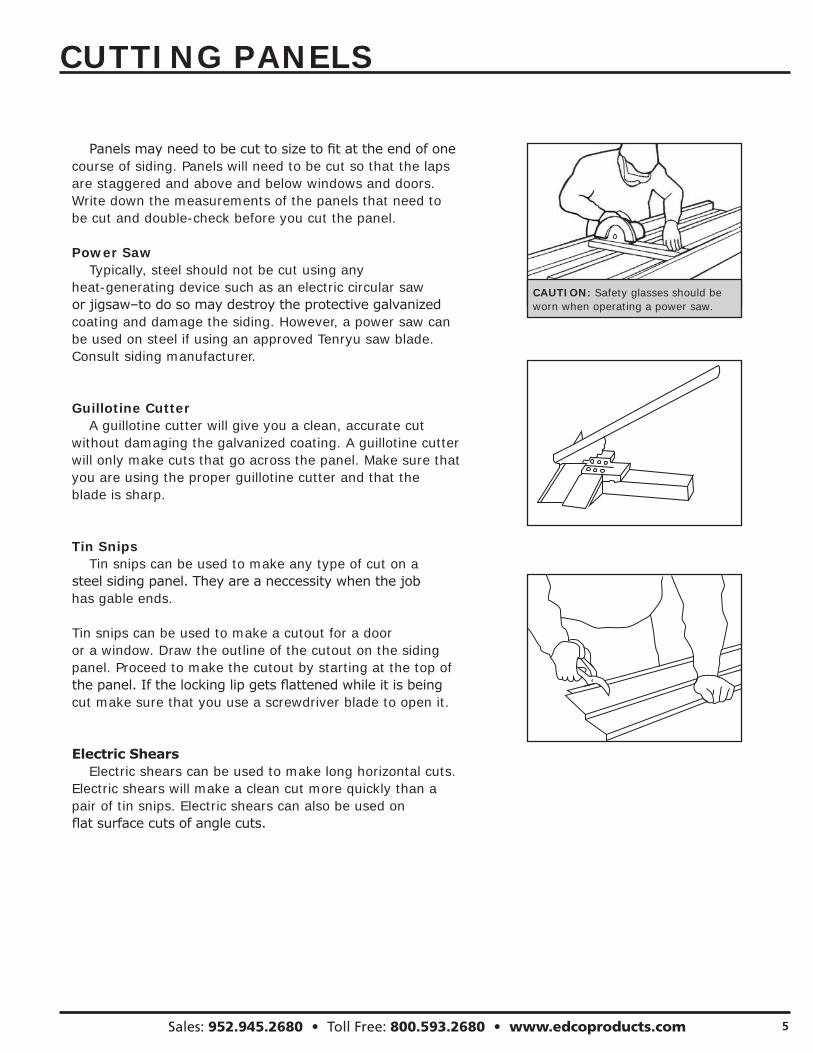
Panelsmayneedtobecuttosizetofitattheendofonecourse of siding. Panels will need to be cut so that the laps are staggered and above and below windows and doors. Write down the measurements of the panels that need to be cut and double-check before you cut the panel.
Power Saw Typically, steel should not be cut using any heat-generating device such as an electric circular saw orjigsaw–todosomaydestroytheprotectivegalvanized coating and damage the siding. However, a power saw can be used on steel if using an approved Tenryu saw blade. Consult siding manufacturer.
Guillotine Cutter A guillotine cutter will give you a clean, accurate cut without damaging the galvanized coating. A guillotine cutter will only make cuts that go across the panel. Make sure that you are using the proper guillotine cutter and that the blade is sharp.
Tin Snips Tin snips can be used to make any type of cut on a steelsidingpanel.Theyareaneccessitywhenthejob has gable ends.
Tin snips can be used to make a cutout for a door or a window. Draw the outline of the cutout on the siding panel. Proceed to make the cutout by starting at the top of thepanel.Ifthelockinglipgetsflattenedwhileitisbeingcut make sure that you use a screwdriver blade to open it.
Electric Shears Electric shears can be used to make long horizontal cuts. Electric shears will make a clean cut more quickly than a pair of tin snips. Electric shears can also be used on flatsurfacecutsofanglecuts.
CAUTION: Safety glasses should be worn when operating a power saw.
5 Sales: 952.945.2680 • Toll Free: 800.593.2680 • www.edcoproducts.com

TRIMMING WINDOWS AND DOORS
J-Channel is used around the windows and doors to receive thesiding.J-Channelisafinishedproductandallexposedcutsand folds should be neat and clean. J-Channel is used at the bottom of the window and on the sides of the window.
The J-Channel for underneath the windows will be installedfirstandtheJ-Channelshouldbecut1¼"wider thanthewindowsill.NotchtheJ-Channel⅝"onbothends.Thenotchedflapswillbefoldedupagainstthesidesofthewindows. Nail the channel 16" on center with a galvanized siding nail.
The side J-Channel is installed next and should be cut square at the top whether you are going to mitre cut or wrap the bottom of the window side J-Channel. If you are going to mitrecuttheJ-Channel,thesideJ-Channelshouldbecut⅝"longer than the window side. If you are going to wrap the bottom of the J-Channel cut it 1 ¼" longer than the window side.
After cutting the J-Channel for the side of the window notch thepieceatthebottomsothatthechannelflapcanbefoldedunderthewindowsill.Cutthefaceat45˚ifyouaremiteringthe J-Channel. Nail the channel in place with galvanized nails spaced at 16" on center. Bend the face around the bottom J-Channel if you are wrapping the J-Channels together.
Thetopofthewindowshouldbeflashedwithapre-madeor custom bent Drip Cap. Cut the Drip Cap 1 ½" longer than the width of the window. Notch both ends of the drip cap in ¾" fortheflapthatwillbebentdownintotheJ-Channelontheside of the windows.
NOTE: ASSURE THAT ALL PENETRATIONS THROUGH THE UNDERLAYMENT AND/OR HOUSEWRAP ARE PROPERLY SEALED IN ACCORDANCE WITH LOCAL BUILDING CODES.
J-Channel
J-Channel
Bend
Cut Width of Nail Flange
Flashing
6 Copyright © 3/1/2014
INSTALLING STEEL SIDING
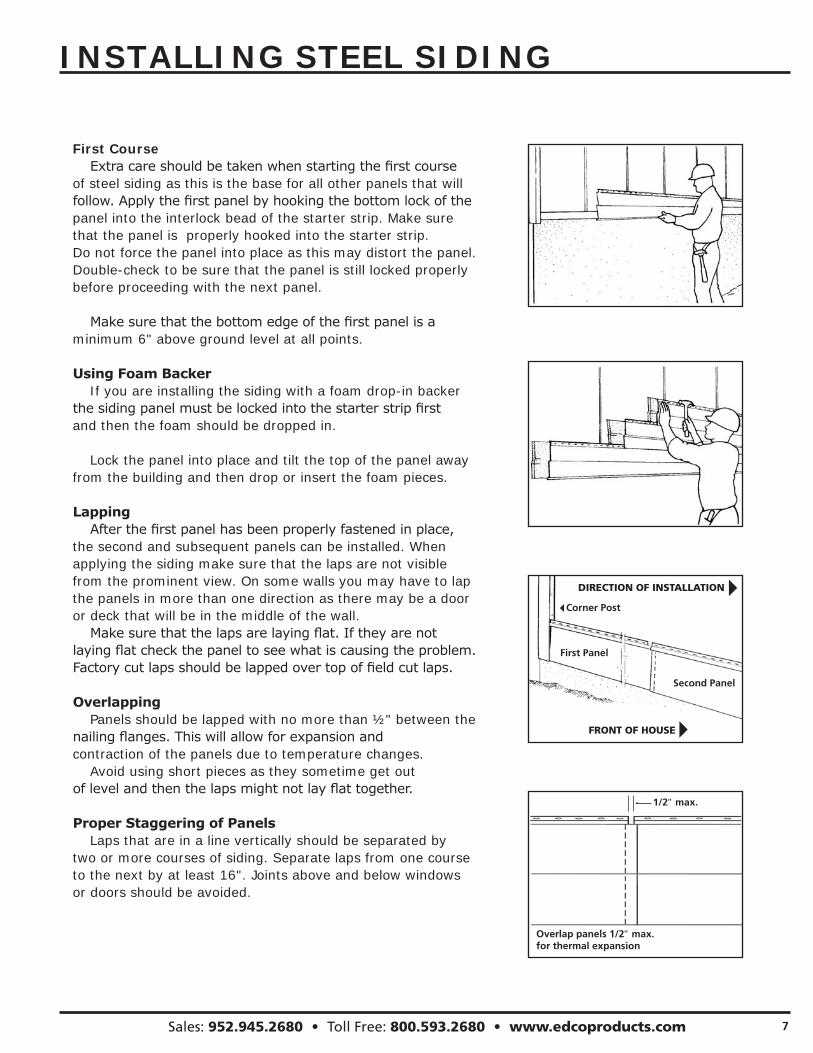
First Course Extracareshouldbetakenwhenstartingthefirstcourseof steel siding as this is the base for all other panels that will follow.Applythefirstpanelbyhookingthebottomlockofthepanel into the interlock bead of the starter strip. Make sure that the panel is properly hooked into the starter strip. Do not force the panel into place as this may distort the panel. Double-check to be sure that the panel is still locked properly before proceeding with the next panel.
Makesurethatthebottomedgeofthefirstpanelisa minimum 6" above ground level at all points.
Using Foam Backer If you are installing the siding with a foam drop-in backer thesidingpanelmustbelockedintothestarterstripfirst and then the foam should be dropped in.
Lock the panel into place and tilt the top of the panel away from the building and then drop or insert the foam pieces.
Lapping Afterthefirstpanelhasbeenproperlyfastenedinplace,the second and subsequent panels can be installed. When applying the siding make sure that the laps are not visible from the prominent view. On some walls you may have to lap the panels in more than one direction as there may be a door or deck that will be in the middle of the wall. Makesurethatthelapsarelayingflat.Iftheyarenot layingflatcheckthepaneltoseewhatiscausingtheproblem.Factorycutlapsshouldbelappedovertopoffieldcutlaps.
Overlapping Panels should be lapped with no more than ½" between the nailingflanges.Thiswillallowforexpansionand contraction of the panels due to temperature changes. Avoid using short pieces as they sometime get out oflevelandthenthelapsmightnotlayflattogether.
Proper Staggering of Panels Laps that are in a line vertically should be separated by two or more courses of siding. Separate laps from one course to the next by at least 16". Joints above and below windows or doors should be avoided.
DIRECTION OF INSTALLATION
Corner Post
First Panel
Second Panel
FRONT OF HOUSE
Overlap panels 1/2" max. for thermal expansion
1/2" max.
7 Sales: 952.945.2680 • Toll Free: 800.593.2680 • www.edcoproducts.com
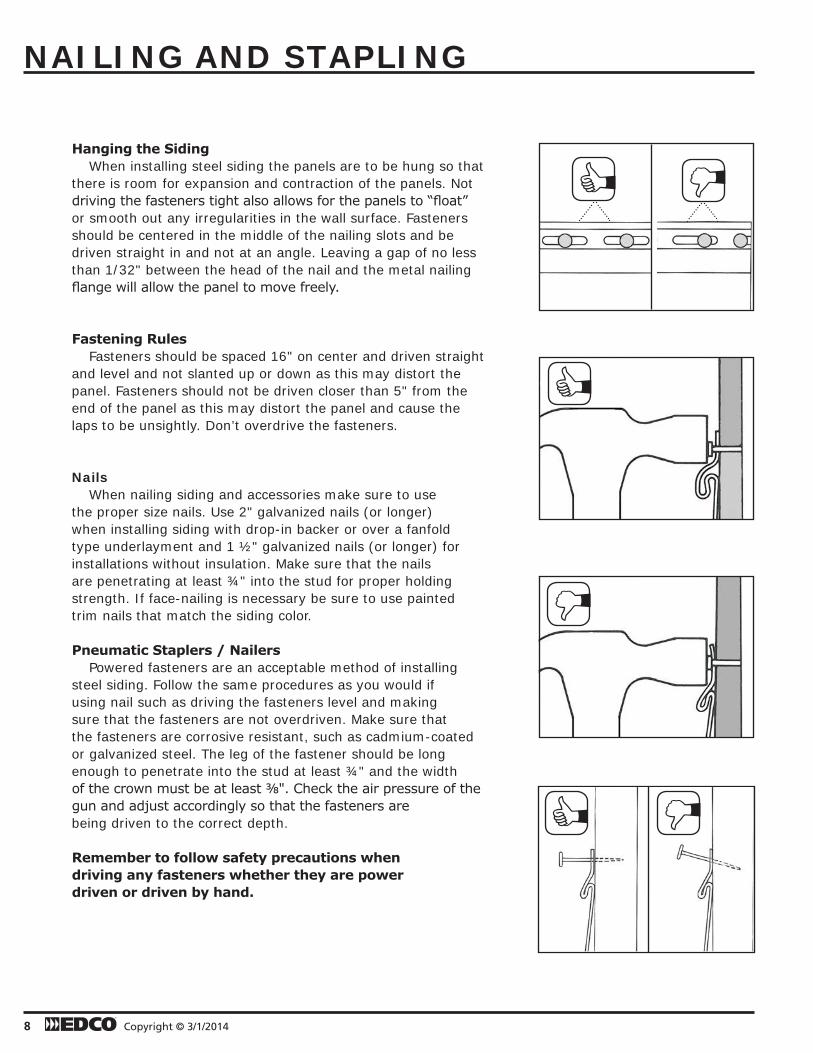
Hanging the Siding When installing steel siding the panels are to be hung so that there is room for expansion and contraction of the panels. Not drivingthefastenerstightalsoallowsforthepanelsto“float”or smooth out any irregularities in the wall surface. Fasteners should be centered in the middle of the nailing slots and be driven straight in and not at an angle. Leaving a gap of no less than 1/32" between the head of the nail and the metal nailing flangewillallowthepaneltomovefreely.
Fastening Rules Fasteners should be spaced 16" on center and driven straight and level and not slanted up or down as this may distort the panel. Fasteners should not be driven closer than 5" from the end of the panel as this may distort the panel and cause the laps to be unsightly. Don’t overdrive the fasteners.
Nails When nailing siding and accessories make sure to use the proper size nails. Use 2" galvanized nails (or longer) when installing siding with drop-in backer or over a fanfold type underlayment and 1 ½" galvanized nails (or longer) for installations without insulation. Make sure that the nails are penetrating at least ¾" into the stud for proper holding strength. If face-nailing is necessary be sure to use painted trim nails that match the siding color.
Pneumatic Staplers / Nailers Powered fasteners are an acceptable method of installing steel siding. Follow the same procedures as you would if using nail such as driving the fasteners level and making sure that the fasteners are not overdriven. Make sure that the fasteners are corrosive resistant, such as cadmium-coated or galvanized steel. The leg of the fastener should be long enough to penetrate into the stud at least ¾" and the width ofthecrownmustbeatleast⅜".Checktheairpressureofthegunandadjustaccordinglysothatthefastenersare being driven to the correct depth.
Remember to follow safety precautions when driving any fasteners whether they are power driven or driven by hand.
NAILING AND STAPLING
8 Copyright © 3/1/2014
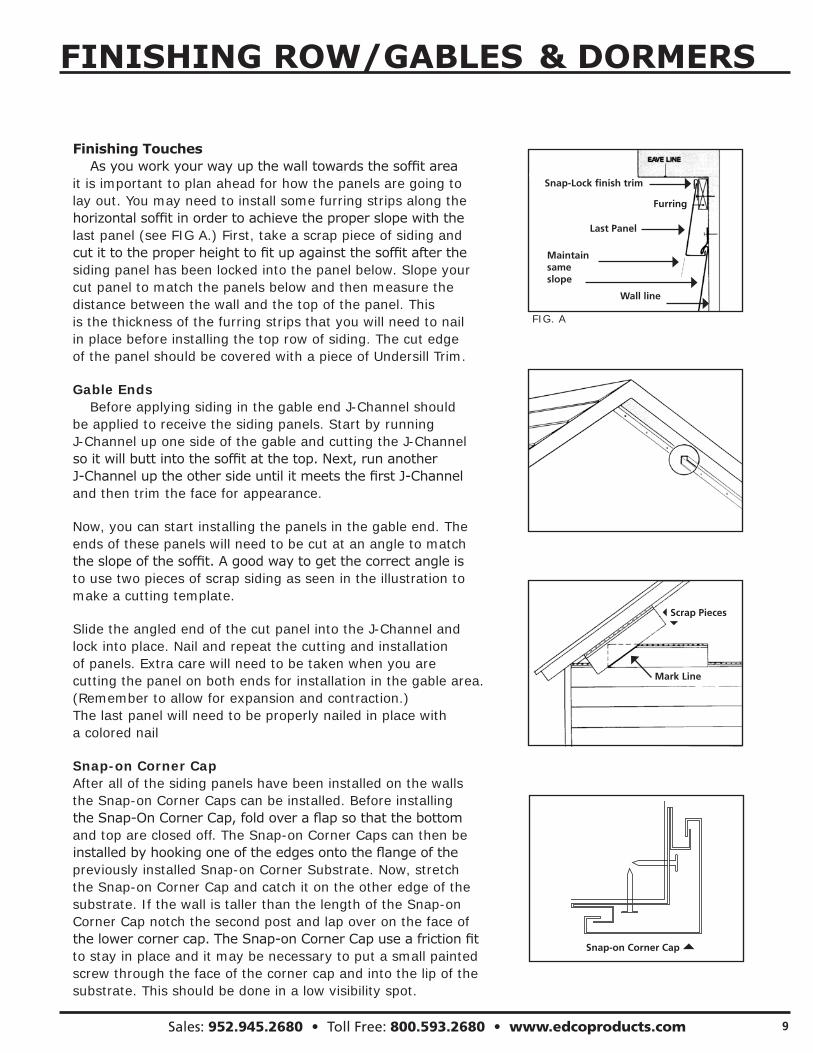
Finishing Touches Asyouworkyourwayupthewalltowardsthesoffitareait is important to plan ahead for how the panels are going to lay out. You may need to install some furring strips along the horizontalsoffitinordertoachievetheproperslopewiththelast panel (see FIG A.) First, take a scrap piece of siding and cutittotheproperheighttofitupagainstthesoffitafterthesiding panel has been locked into the panel below. Slope your cut panel to match the panels below and then measure the distance between the wall and the top of the panel. This is the thickness of the furring strips that you will need to nail in place before installing the top row of siding. The cut edge of the panel should be covered with a piece of Undersill Trim.
Gable Ends Before applying siding in the gable end J-Channel should be applied to receive the siding panels. Start by running J-Channel up one side of the gable and cutting the J-Channel soitwillbuttintothesoffitatthetop.Next,runanother J-ChanneluptheothersideuntilitmeetsthefirstJ-Channeland then trim the face for appearance.
Now, you can start installing the panels in the gable end. The ends of these panels will need to be cut at an angle to match theslopeofthesoffit.Agoodwaytogetthecorrectangleisto use two pieces of scrap siding as seen in the illustration to make a cutting template.
Slide the angled end of the cut panel into the J-Channel and lock into place. Nail and repeat the cutting and installation of panels. Extra care will need to be taken when you are cutting the panel on both ends for installation in the gable area. (Remember to allow for expansion and contraction.) The last panel will need to be properly nailed in place with a colored nail
Snap-on Corner CapAfter all of the siding panels have been installed on the walls the Snap-on Corner Caps can be installed. Before installing theSnap-OnCornerCap,foldoveraflapsothatthebottomand top are closed off. The Snap-on Corner Caps can then be installedbyhookingoneoftheedgesontotheflangeofthepreviously installed Snap-on Corner Substrate. Now, stretch the Snap-on Corner Cap and catch it on the other edge of the substrate. If the wall is taller than the length of the Snap-on Corner Cap notch the second post and lap over on the face of thelowercornercap.TheSnap-onCornerCapuseafrictionfitto stay in place and it may be necessary to put a small painted screw through the face of the corner cap and into the lip of the substrate. This should be done in a low visibility spot.
FINISHING ROW/GABLES & DORMERS
Scrap Pieces
Mark Line
Snap-Lock finish trim
Furring
Last Panel
Maintain same slope
Wall line
Snap-on Corner Cap
9 Sales: 952.945.2680 • Toll Free: 800.593.2680 • www.edcoproducts.com
FIG. A
VERTICAL SIDING
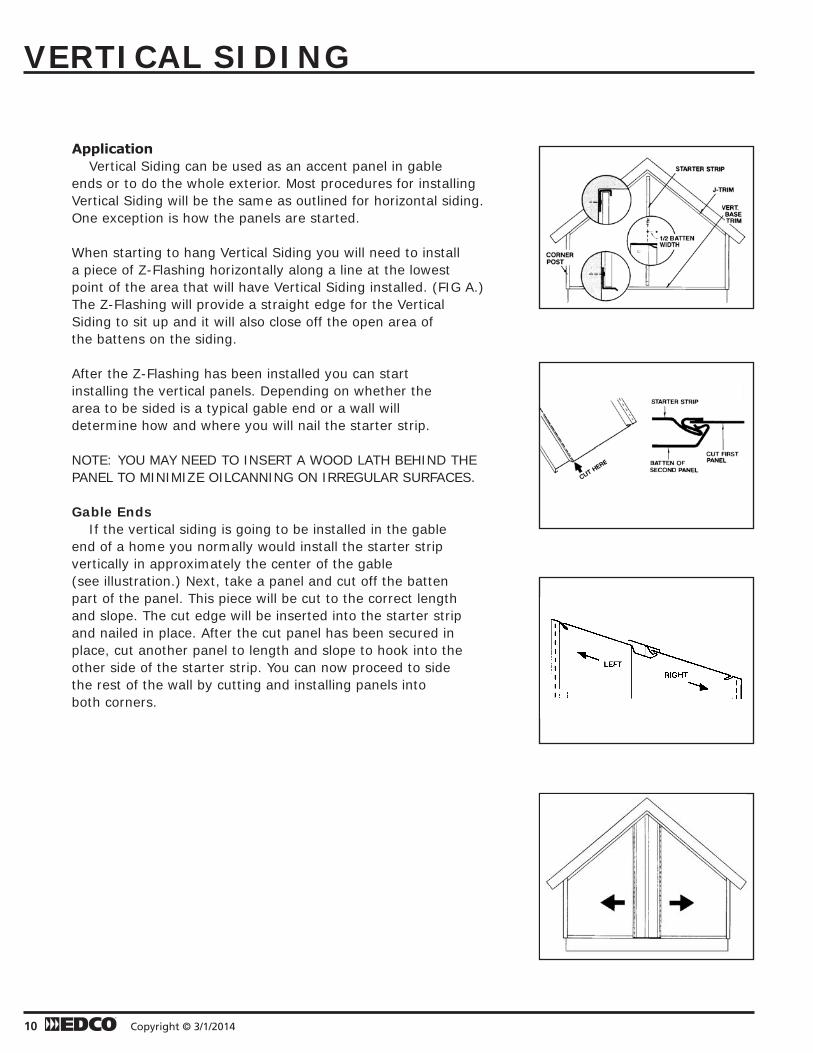
Application Vertical Siding can be used as an accent panel in gable ends or to do the whole exterior. Most procedures for installing Vertical Siding will be the same as outlined for horizontal siding. One exception is how the panels are started.
When starting to hang Vertical Siding you will need to install a piece of Z-Flashing horizontally along a line at the lowest point of the area that will have Vertical Siding installed. (FIG A.) The Z-Flashing will provide a straight edge for the Vertical Siding to sit up and it will also close off the open area of the battens on the siding.
After the Z-Flashing has been installed you can start installing the vertical panels. Depending on whether the area to be sided is a typical gable end or a wall will determine how and where you will nail the starter strip.
NOTE: YOU MAY NEED TO INSERT A WOOD LATH BEHIND THE PANEL TO MINIMIZE OILCANNING ON IRREGULAR SURFACES. Gable Ends If the vertical siding is going to be installed in the gable end of a home you normally would install the starter strip vertically in approximately the center of the gable (see illustration.) Next, take a panel and cut off the batten part of the panel. This piece will be cut to the correct length and slope. The cut edge will be inserted into the starter strip and nailed in place. After the cut panel has been secured in place, cut another panel to length and slope to hook into the other side of the starter strip. You can now proceed to side the rest of the wall by cutting and installing panels into both corners.
10 Copyright © 3/1/2014
VERTICAL SIDING
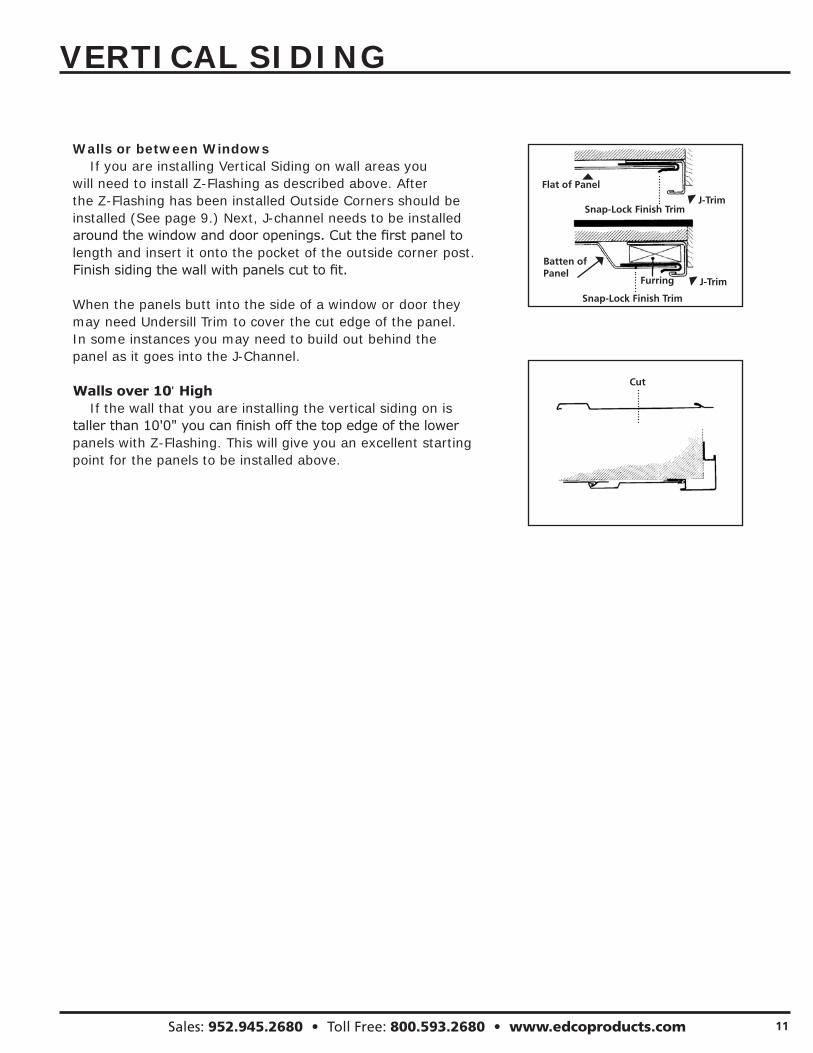
Walls or between Windows If you are installing Vertical Siding on wall areas you will need to install Z-Flashing as described above. After the Z-Flashing has been installed Outside Corners should be installed (See page 9.) Next, J-channel needs to be installed aroundthewindowanddooropenings.Cutthefirstpaneltolength and insert it onto the pocket of the outside corner post. Finishsidingthewallwithpanelscuttofit.
When the panels butt into the side of a window or door they may need Undersill Trim to cover the cut edge of the panel. In some instances you may need to build out behind the panel as it goes into the J-Channel.
Walls over 10' High If the wall that you are installing the vertical siding on is tallerthan10'0"youcanfinishoffthetopedgeofthelowerpanels with Z-Flashing. This will give you an excellent starting point for the panels to be installed above.
Cut
Flat of Panel
J-TrimSnap-Lock Finish Trim
Snap-Lock Finish Trim
Batten of Panel
Furring J-Trim
11 Sales: 952.945.2680 • Toll Free: 800.593.2680 • www.edcoproducts.com
8700 Excelsior Blvd Hopkins, MN 55343
PH: 952.945.2680TF: 800.593.2680FX: 952.938.9244
EMAIL: [email protected]
0000-000 03/14
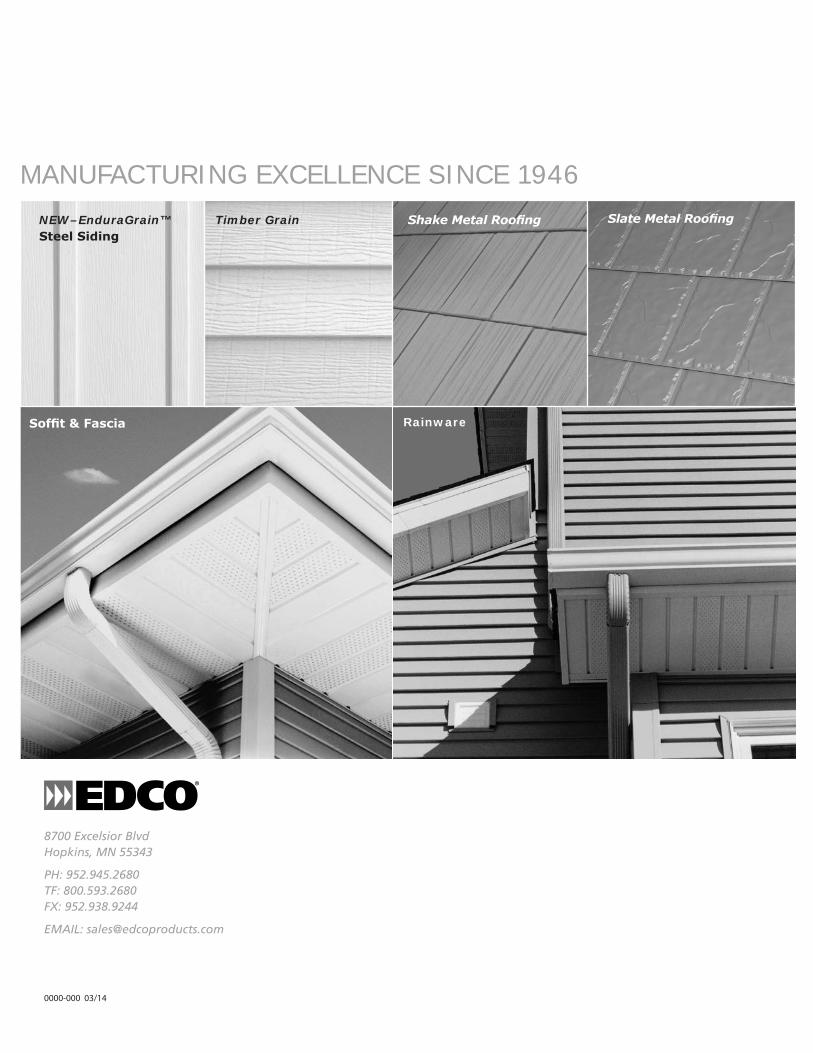
MANUFACTURING EXCELLENCE SINCE 1946Timber GrainNEW–EnduraGrain™
Steel SidingShake Metal Roofing
Soffit & Fascia Rainware
Slate Metal Roofing