Embed Size (px)
Citation preview
© 2017, Kronos Incorporated or a related company. All rights reserved. 21
Workforce Timekeeper
Scheduling Staff for Specific Periods

© 2017, Kronos Incorporated or a related company. All rights reserved. 22
Workforce Timekeeper
Assigning Base Schedules
The Schedule Planner Widget
Workforce Timekeeper includes Schedule Planner, a powerful scheduling tool that helps you schedule worked and non-worked hours. The Schedule Planner presents a timeline view of employee schedules for a defined time period.
Tool bar
The toolbar is located along the top of the schedule grid and displays various viewing options and action buttons.
Tool bar
Control the schedule display, save date, refresh data, or access the Quick Actions tool bar.
Context Selector
Set options for the time period and group of employees.
Schedule grid
Review schedule data and perform tasks on existing data. The information in the grid will vary depending on the selected viewing option.

© 2017, Kronos Incorporated or a related company. All rights reserved. 23
Workforce Timekeeper
Quick Actions
Quick Actions are one-click shortcuts that you can use to complete multi-step, common tasks. Using Quick Action shortcuts can reduce time spent on data entry as well as reduce data entry errors.
When you select the Quick Actions icon from the too bar, the icon moves from left to right to reveal the Quick Action options.
Quick Action How to use
Insert Shift Transfer Click Insert Shift Transfer, select the transfer job or location, and select the shift in the schedule.
Insert Shift Template Click Insert Shift Template, select the template, and select the applicable date cells.
Comment Click Comment and select the applicable comment. Select the applicable shift or pay code to attach the comment.
Pay Code Click Pay Code and select the applicable category and pay code. Select the applicable shifts to apply the pay code to.
Copy/Paste Click Copy/paste and select the applicable shift to copy. Select the applicable date cell to paste the data.
Delete Click Delete and click the applicable shifts, pay codes, or accruals.
Lock/Unlock Click Lock/Unlock and then click an unlocked shift to lock it, or click a locked shift to unlock it.
Viewing Options and Action Buttons
Select the icons in the Tool Bar to adjust the view of the data or to perform actions on the data.
Menu item How to use
Employee data views Employee schedule data can be viewed by employee, by group, or by employment terms. Select the view from the View menu located in the Action bar to change the view of the data that is presented.
By Employee: Alphabetical list of employees and their day-by-day schedules.
By Group: List of employees and their schedule groups. Employees not in a group are listed first as “Ungrouped Employees.”
By Employment Terms: List of employees organized by employment terms. Employment terms are legal contracts between employer and employees regarding the number of hours and specific schedule to be worked.
Column Selection Select available columns to add or remove from the grid. Your options may include Totals, Department, and Job.

© 2017, Kronos Incorporated or a related company. All rights reserved. 24
Workforce Timekeeper
Menu item How to use
Visibility Filter You have the option to show or hide information that is available to you, like: Shift time, pay code name, accrual name, assigned shifts, pay codes, scheduled accrual amounts, and holidays.
Select All Click this icon to select all of the items within the schedule.
Schedule views There are three different schedule views available within Scheduler Planner to help you to view and perform actions on schedule data. Available views are Gantt view, Tabular view, and minimized view.
Sorting Click the icon to sort data within columns.
Tools Click the icon to Manage employee schedule request periods.
Refresh the schedule Click icon to revert back to the last save. Click Yes to discard unsaved changes and click No to save changes (and then click Save).
View Comments Click the icon to view comment information associated with schedule data
Share Using the share feature, data can be printed or exported from the Scheduler Planner to an excel file.
Gantt View
The Gantt view can be used while viewing data by employee, by job, or by schedule group. To access the Gantt view, click Gantt view in the Actions bar.
The following table describes the Gantt view indicators and their functions.
Indicator Indicator Image Description
Orange highlights and vertical line
Displays the current date and time
Employee lines that are shaded gray
Indicates inactive employees
Red exclamation within cell
At least one violation has a severity of No Save
Orange exclamation within cell
At least one violation has a warning severity
Yellow exclamation within cell
At least one violation has an informational severity
Blue cells
Indicates assigned shifts
© 2017, Kronos Incorporated or a related company. All rights reserved. 25
Workforce Timekeeper
Indicator Indicator Image Description
Green cells
Indicates that a pay code is being used
Purple cells
Indicates that accruals are being used
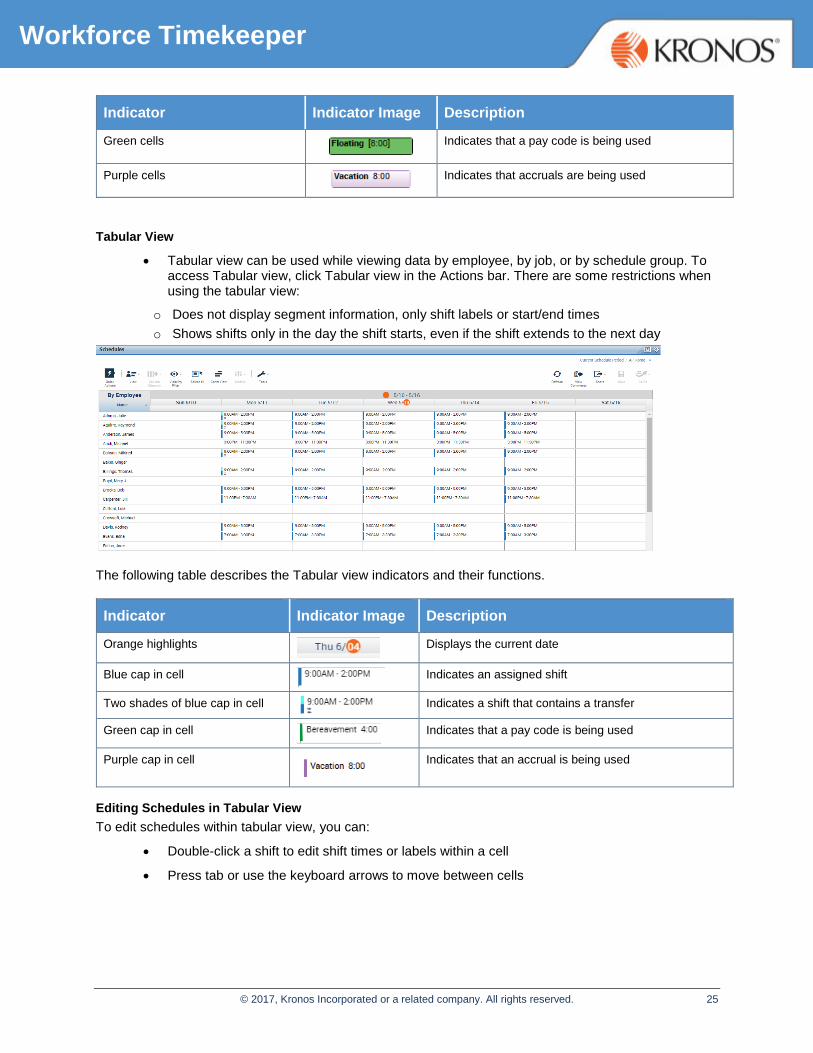
Tabular View
Tabular view can be used while viewing data by employee, by job, or by schedule group. To access Tabular view, click Tabular view in the Actions bar. There are some restrictions when using the tabular view:
o Does not display segment information, only shift labels or start/end times
o Shows shifts only in the day the shift starts, even if the shift extends to the next day
The following table describes the Tabular view indicators and their functions.
Indicator Indicator Image Description
Orange highlights
Displays the current date
Blue cap in cell
Indicates an assigned shift
Two shades of blue cap in cell
Indicates a shift that contains a transfer
Green cap in cell
Indicates that a pay code is being used
Purple cap in cell
Indicates that an accrual is being used
Editing Schedules in Tabular View
To edit schedules within tabular view, you can:
Double-click a shift to edit shift times or labels within a cell
Press tab or use the keyboard arrows to move between cells

© 2017, Kronos Incorporated or a related company. All rights reserved. 26
Workforce Timekeeper
Minimized View
When you minimize the Schedule Planner widget, it continues to show basic schedule information while another widget is open in the primary view.
Call Outs
Call outs contain static information about items within the Schedule Planner. Call outs can also contain action buttons to help you perform tasks.
To view a call out, right click on the applicable cell.
Day/Week Schedule Viewing Options
Schedule views can be adjusted so that you are viewing schedule details for a specific day, or specific timeframe.
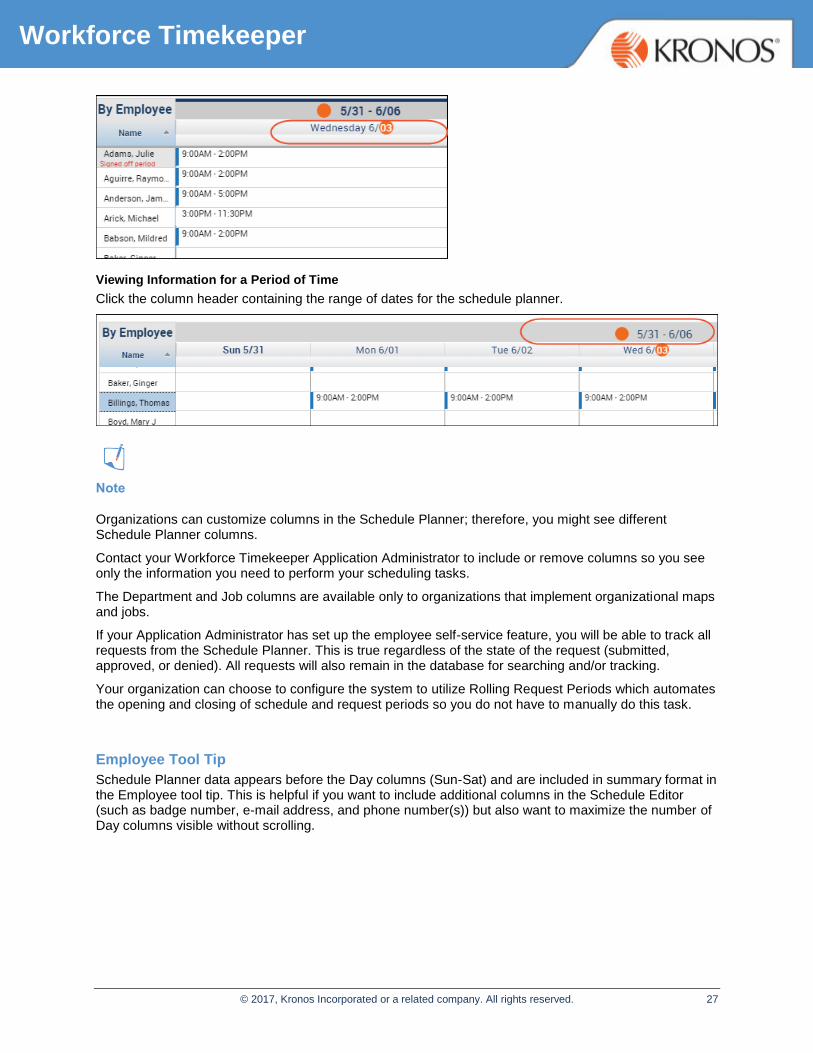
Viewing Information for a Day
Click the column header of the applicable date to switch the schedule planner view so that you are viewing schedule information for a specific day.
Static Data
Action buttons
© 2017, Kronos Incorporated or a related company. All rights reserved. 27
Workforce Timekeeper
Viewing Information for a Period of Time
Click the column header containing the range of dates for the schedule planner.
Note
Organizations can customize columns in the Schedule Planner; therefore, you might see different Schedule Planner columns.
Contact your Workforce Timekeeper Application Administrator to include or remove columns so you see only the information you need to perform your scheduling tasks.
The Department and Job columns are available only to organizations that implement organizational maps and jobs.
If your Application Administrator has set up the employee self-service feature, you will be able to track all requests from the Schedule Planner. This is true regardless of the state of the request (submitted, approved, or denied). All requests will also remain in the database for searching and/or tracking.
Your organization can choose to configure the system to utilize Rolling Request Periods which automates the opening and closing of schedule and request periods so you do not have to manually do this task.
Employee Tool Tip
Schedule Planner data appears before the Day columns (Sun-Sat) and are included in summary format in the Employee tool tip. This is helpful if you want to include additional columns in the Schedule Editor (such as badge number, e-mail address, and phone number(s)) but also want to maximize the number of Day columns visible without scrolling.
© 2017, Kronos Incorporated or a related company. All rights reserved. 28
Workforce Timekeeper
Schedule Patterns
What is a Schedule Pattern?
A schedule pattern is:
A group of shifts that repeat over a specified time period
Includes a start and end date
Controls the shift assignments for employees
Facilitates exception-based tracking of time and enforcement of restrictions and rounding rules
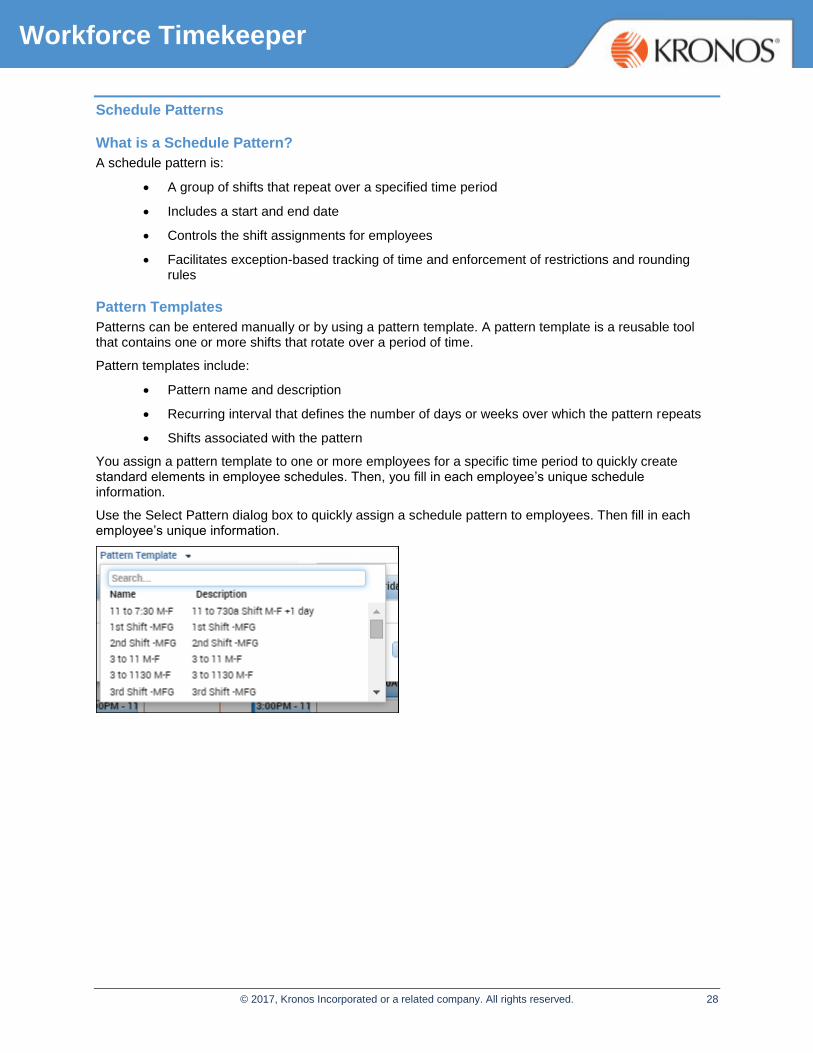
Pattern Templates
Patterns can be entered manually or by using a pattern template. A pattern template is a reusable tool that contains one or more shifts that rotate over a period of time.
Pattern templates include:
Pattern name and description
Recurring interval that defines the number of days or weeks over which the pattern repeats
Shifts associated with the pattern
You assign a pattern template to one or more employees for a specific time period to quickly create standard elements in employee schedules. Then, you fill in each employee’s unique schedule information.
Use the Select Pattern dialog box to quickly assign a schedule pattern to employees. Then fill in each employee’s unique information.

© 2017, Kronos Incorporated or a related company. All rights reserved. 29
Workforce Timekeeper
Assigning Schedule Patterns
When a new employee is added to Workforce Timekeeper, you can also assign a schedule pattern to the employee. If it does not exist, a pattern might need to be added to an employee’s record.
Using the Pattern Editor
If your organization uses schedule patterns, you might occasionally need to add a new pattern or change an existing pattern. Use the Pattern Editor to add, modify, and delete assigned schedule patterns. The following illustration shows a sample Pattern Editor for an employee with an assigned pattern. Notice that the employee is scheduled to work from 9:00 A.M. to 5:00 P.M. Monday through Friday.
Modifying Schedule Patterns
You might determine that an existing pattern is not exactly what you need. The following illustration shows an example in the Pattern Editor with a shift change in Friday’s cell. Notice the color change in Friday’s cell that indicates that the shift designation is different from the original schedule pattern assignment.

© 2017, Kronos Incorporated or a related company. All rights reserved. 30
Workforce Timekeeper
Note
Use the Pattern Editor or Shift Editor to modify the schedule pattern.
Assigning a Schedule Pattern
1. From Schedule Planner, right-click the applicable employee’s name.
2. Click Schedule Pattern.
3. Verify the Anchor date.
4. In the Start Date field, enter the start date of the pattern.
5. In the End Date field, enter the date the pattern should end, or select Forever if there is no end date.
6. In the Define Pattern for field, enter the number of weeks or days you are defining the pattern for.
7. Select the corresponding option from either Week(s) or Date(s).
8. From the Pattern Template drop-down list, select the applicable pattern.
9. Verify that the template populates the calendar grid, and click Apply.
10. Click OK.
11. Verify that the pattern has populated the Scheduler Planner grid.
12. Click Save.
© 2017, Kronos Incorporated or a related company. All rights reserved. 31
Workforce Timekeeper
Scheduling Staff to Meet Workload Requirements
Modifying Shift Assignments
If you have employees that work similar hours during each schedule period, you can assign schedule patterns to those employees so their schedules repeat every schedule period.
However, employees might occasionally need to work alternative shifts.
Shift Assignment Tasks
Enter an “X” beside the task you need to perform in your organization.
Task I need to perform this task
Add a shift
Edit a shift
Delete a shift
Restore a shift
Note
If you delete a shift that is part of a pattern, the shift can later be restored, however, it can only be restored to the last saved pattern for the employees.
Adding a Shift by Typing in a Cell
1. In the Schedule Planner, using the Context Selector, ensure that the group of employees you want, and the time period in which you want to add a shift, are displayed.
2. Click a date cell for an employee.
3. In the cell, enter the start and end times of the shift separated by a hyphen, and then press the Tab key.
For example, enter 9a-530p and then press the Tab key.
4. Click Save.
Note that you can enter time using either 12-hour or 24-hour time formats. For example, you can enter 8:00 A.M. to 5:00 P.M. as 0800-1700 or as 8a-5p.
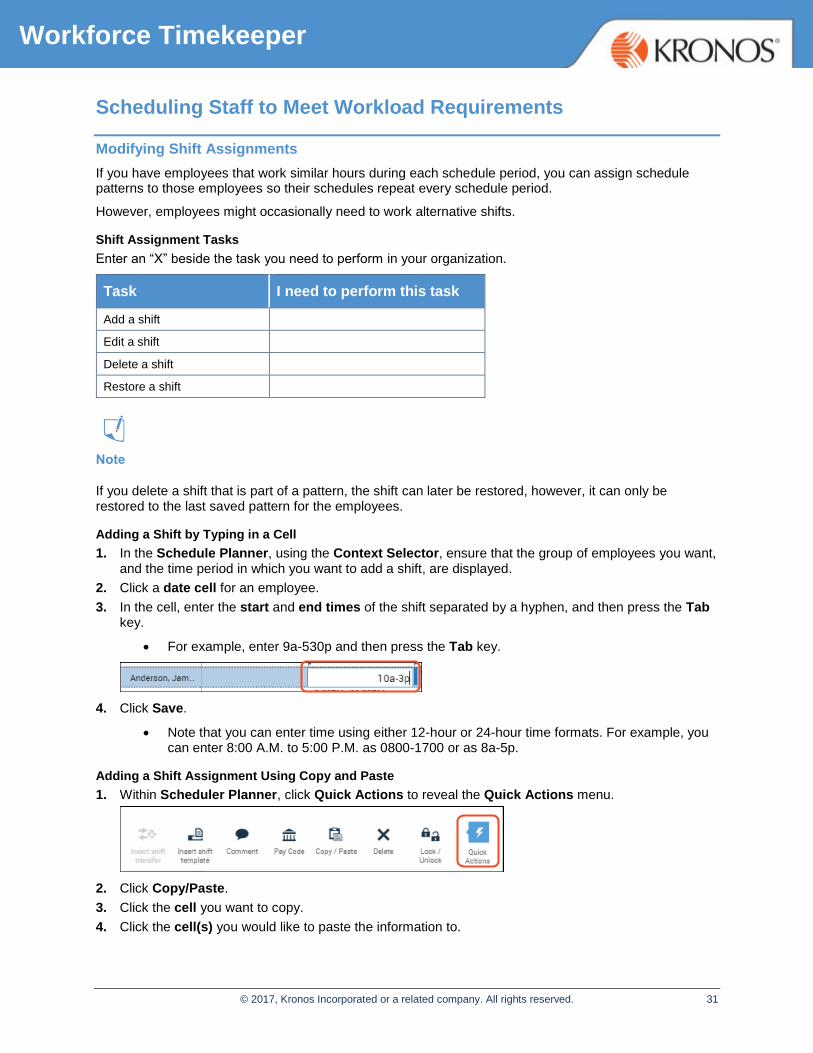
Adding a Shift Assignment Using Copy and Paste
1. Within Scheduler Planner, click Quick Actions to reveal the Quick Actions menu.
2. Click Copy/Paste.
3. Click the cell you want to copy.
4. Click the cell(s) you would like to paste the information to.
© 2017, Kronos Incorporated or a related company. All rights reserved. 32
Workforce Timekeeper
5. Click the Copy/Paste function again to turn the feature off.
6. Click Save.
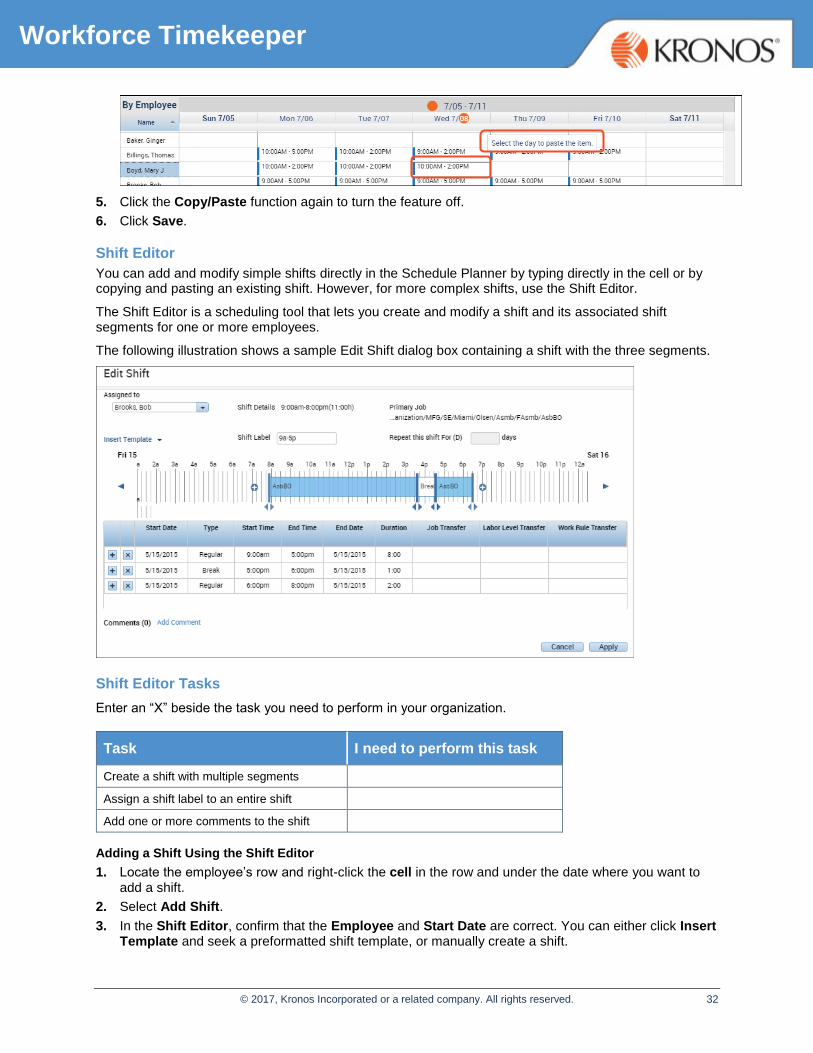
Shift Editor
You can add and modify simple shifts directly in the Schedule Planner by typing directly in the cell or by copying and pasting an existing shift. However, for more complex shifts, use the Shift Editor.
The Shift Editor is a scheduling tool that lets you create and modify a shift and its associated shift segments for one or more employees.
The following illustration shows a sample Edit Shift dialog box containing a shift with the three segments.
Shift Editor Tasks
Enter an “X” beside the task you need to perform in your organization.
Task I need to perform this task
Create a shift with multiple segments
Assign a shift label to an entire shift
Add one or more comments to the shift
Adding a Shift Using the Shift Editor
1. Locate the employee’s row and right-click the cell in the row and under the date where you want to add a shift.
2. Select Add Shift.
3. In the Shift Editor, confirm that the Employee and Start Date are correct. You can either click Insert Template and seek a preformatted shift template, or manually create a shift.
© 2017, Kronos Incorporated or a related company. All rights reserved. 33
Workforce Timekeeper
4. To manually enter a shift, select a shift type from the Type drop-down list, and enter a Start Time and End Time.
5. If the shift contains multiple segments, click + to add a row and repeat steps 4 and 5 as necessary.
6. Confirm that the date in the End Date field is correct. If the shift segment crosses a day divide, change the shift’s end date to the following day.
7. In the Repeat this shift for field, enter the number of consecutive days you want to schedule this shift.
8. Click Apply and then click Save.
Scheduling Non-Worked Hours Using the Pay Code Editor
Non-worked Hours Overview
Although employees are scheduled to specific work hours each week, events occur that cause employees to miss time. Employees might communicate this missed time to their managers in advance, allowing managers to make appropriate changes to the scheduled workforce.
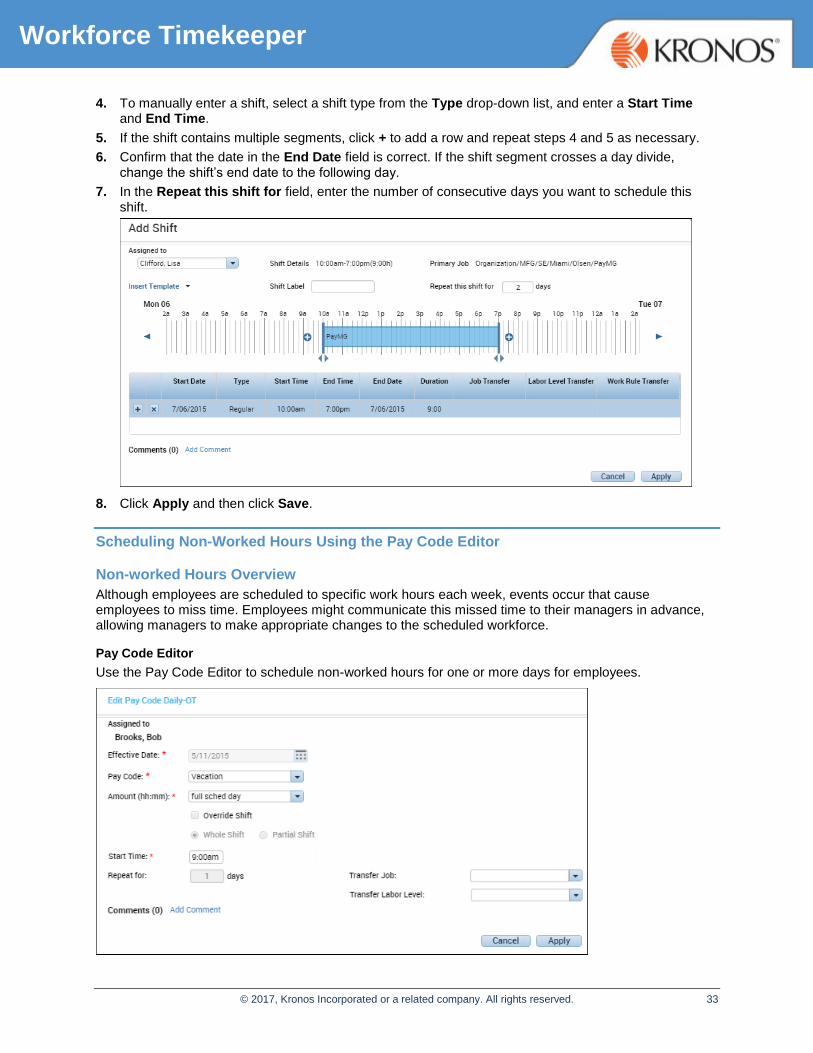
Pay Code Editor
Use the Pay Code Editor to schedule non-worked hours for one or more days for employees.
© 2017, Kronos Incorporated or a related company. All rights reserved. 34
Workforce Timekeeper
Accessing the Pay Code Editor
You can access the Pay Code Editor from any of the following:
Schedule Planner
Detail Genie
Roll-up Genie
KnowledgePass
If you are a Workforce Leave manager with access to KnowledgePass, refer to the Editing Leave in a Timecard or Schedule job aid for additional information.
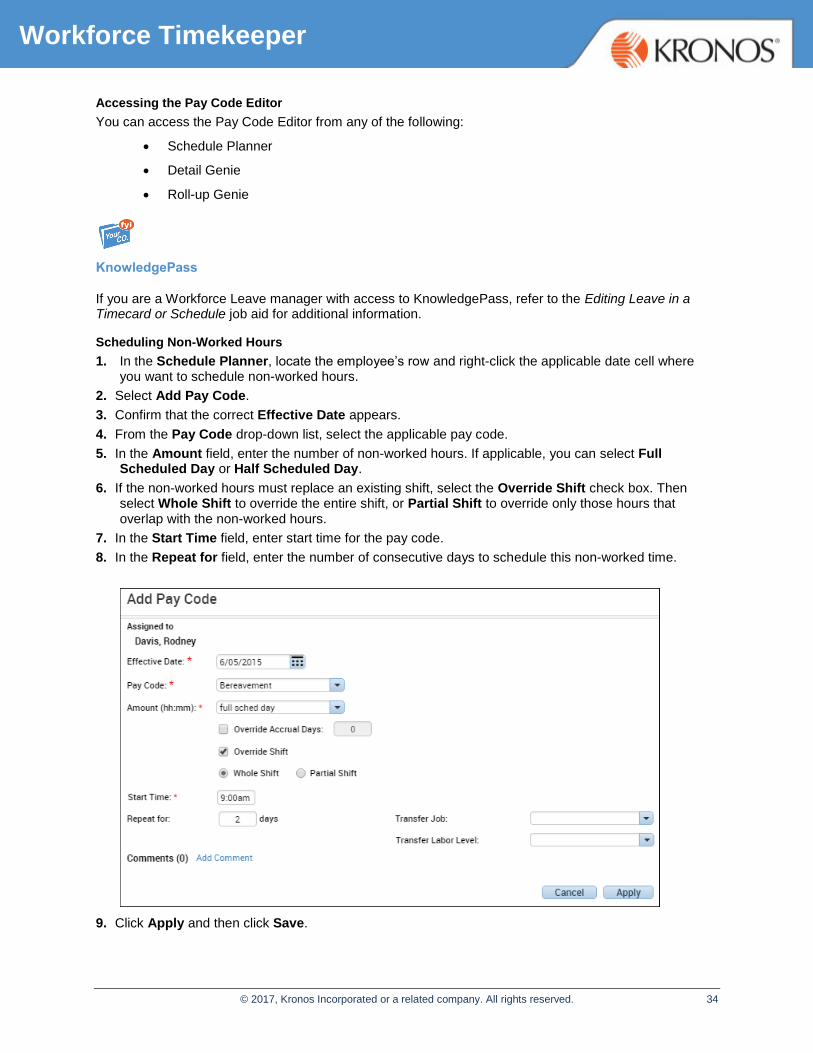
Scheduling Non-Worked Hours
1. In the Schedule Planner, locate the employee’s row and right-click the applicable date cell where you want to schedule non-worked hours.
2. Select Add Pay Code.
3. Confirm that the correct Effective Date appears.
4. From the Pay Code drop-down list, select the applicable pay code.
5. In the Amount field, enter the number of non-worked hours. If applicable, you can select Full Scheduled Day or Half Scheduled Day.
6. If the non-worked hours must replace an existing shift, select the Override Shift check box. Then select Whole Shift to override the entire shift, or Partial Shift to override only those hours that overlap with the non-worked hours.
7. In the Start Time field, enter start time for the pay code.
8. In the Repeat for field, enter the number of consecutive days to schedule this non-worked time.
9. Click Apply and then click Save.

© 2017, Kronos Incorporated or a related company. All rights reserved. 60
Workforce Timekeeper
Scheduling Staff for Specific Periods

© 2017, Kronos Incorporated or a related company. All rights reserved. 61
Workforce Timekeeper
Adding and Removing Employees from Schedule Groups
Adding Employees to a Schedule Group
1. In the Schedule Planner, click View > By Schedule Group.
2. Using the Context Selector, select the applicable group and time period.
3. Select the employees you want to add.
4. With the ctrl button still pressed, right-click one of the selected names and select Add to Group.
5. In the Add to Group dialog box, select a group from the Schedule Group drop-down list.
6. Enter or select a Start Date and an End Date for the schedule group assignment.
7. If the schedule group that you selected allows schedule inheritance, select the check box to remove the employees from their other schedule inheritance groups for the date range.
8. Click Apply.
Removing Employees from a Schedule Group
1. In the Schedule Planner, click View > By Schedule Group.
2. Using the Context Selector, select the applicable group and time period.
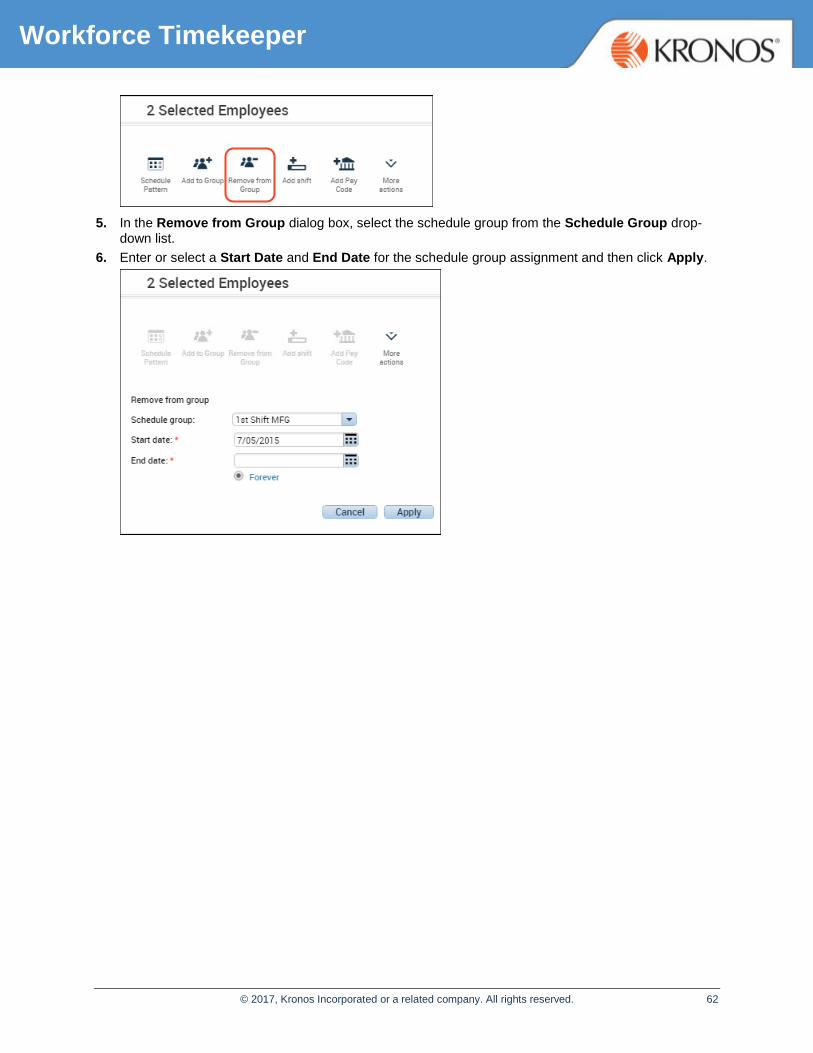
3. Select the employees you want to remove.
4. Select Group > Remove from Group.
© 2017, Kronos Incorporated or a related company. All rights reserved. 62
Workforce Timekeeper
5. In the Remove from Group dialog box, select the schedule group from the Schedule Group drop-down list.
6. Enter or select a Start Date and End Date for the schedule group assignment and then click Apply.
© 2017, Kronos Incorporated or a related company. All rights reserved. 63
Workforce Timekeeper
Scheduling Staff to Meet Workload Requirements
Managing Group Schedules
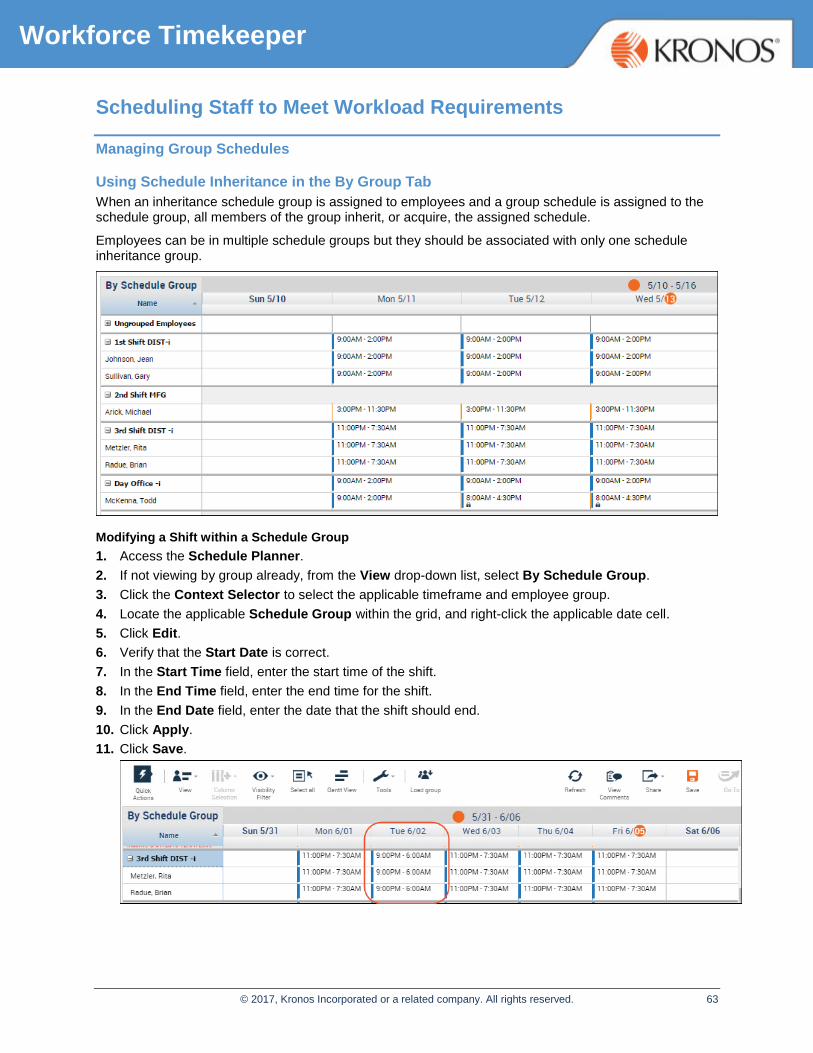
Using Schedule Inheritance in the By Group Tab
When an inheritance schedule group is assigned to employees and a group schedule is assigned to the schedule group, all members of the group inherit, or acquire, the assigned schedule.
Employees can be in multiple schedule groups but they should be associated with only one schedule inheritance group.
Modifying a Shift within a Schedule Group
1. Access the Schedule Planner.
2. If not viewing by group already, from the View drop-down list, select By Schedule Group.
3. Click the Context Selector to select the applicable timeframe and employee group.
4. Locate the applicable Schedule Group within the grid, and right-click the applicable date cell.
5. Click Edit.
6. Verify that the Start Date is correct.
7. In the Start Time field, enter the start time of the shift.
8. In the End Time field, enter the end time for the shift.
9. In the End Date field, enter the date that the shift should end.
10. Click Apply.
11. Click Save.
© 2017, Kronos Incorporated or a related company. All rights reserved. 64
Workforce Timekeeper
Ad hoc Shifts
If you manually edit a shift for an employee that is part of a schedule group, the shift becomes an ad hoc shift. Therefore, its link to the inherited schedule is lost. The shift’s association with the group scheduled shift cannot be restored, even if the modified shift is deleted.
The following illustration shows the gold-colored visual indicator that appears in the cell with an ad hoc shift.
Making Group Edits Using Genies
From any Workforce Timekeeper Genie, you can make the following group edits:
Add or replace a shift
Insert transfer
Append a pay code
Add or delete a pattern
Lock/unlock days
Add/remove from group
Pay From Schedule
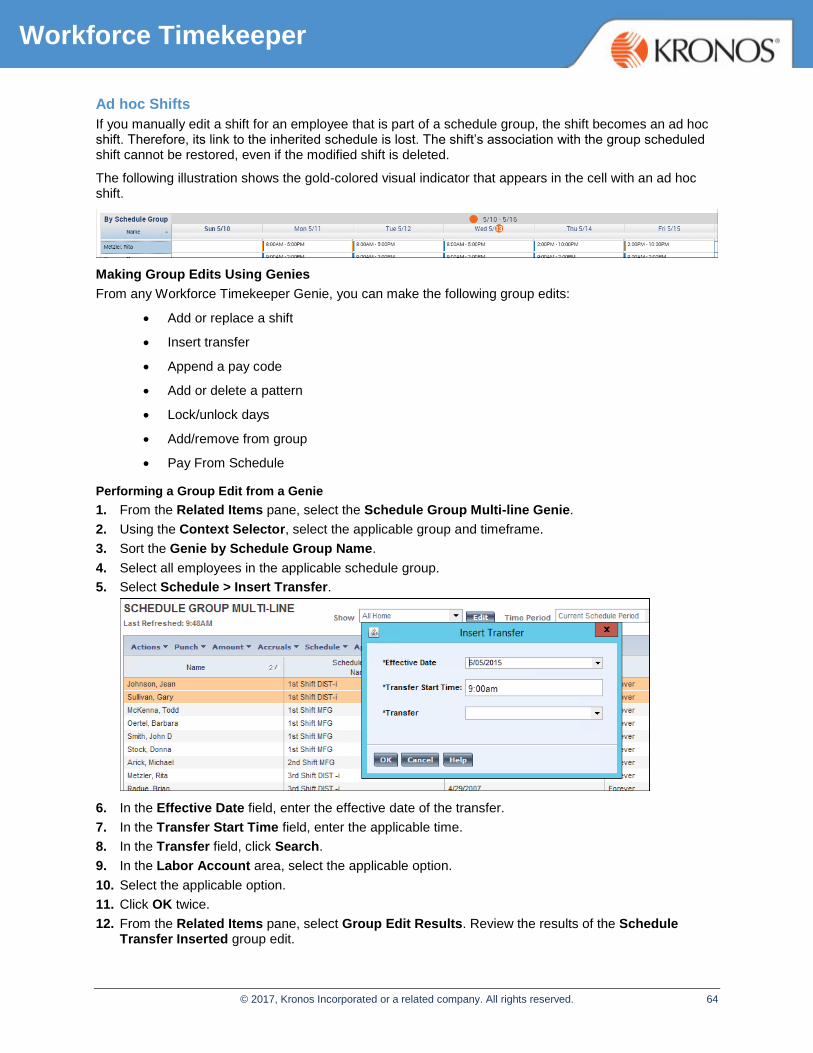
Performing a Group Edit from a Genie
1. From the Related Items pane, select the Schedule Group Multi-line Genie.
2. Using the Context Selector, select the applicable group and timeframe.
3. Sort the Genie by Schedule Group Name.
4. Select all employees in the applicable schedule group.
5. Select Schedule > Insert Transfer.
6. In the Effective Date field, enter the effective date of the transfer.
7. In the Transfer Start Time field, enter the applicable time.
8. In the Transfer field, click Search.
9. In the Labor Account area, select the applicable option.
10. Select the applicable option.
11. Click OK twice.
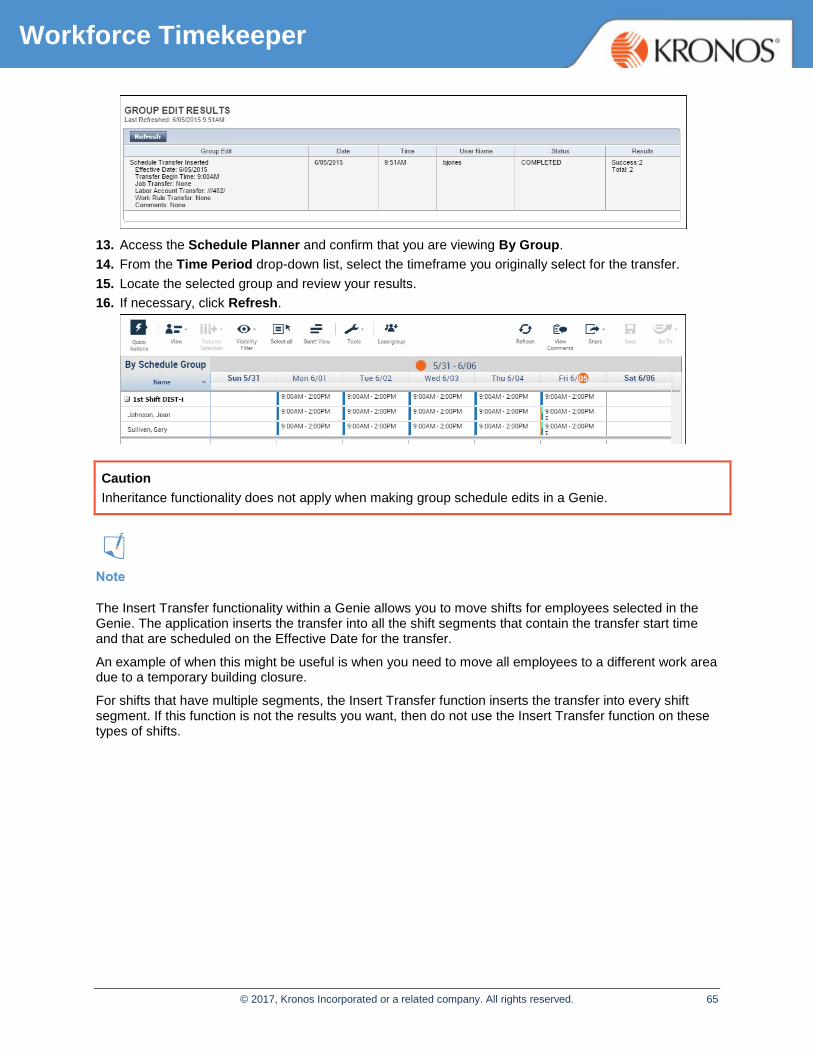
12. From the Related Items pane, select Group Edit Results. Review the results of the Schedule Transfer Inserted group edit.
© 2017, Kronos Incorporated or a related company. All rights reserved. 65
Workforce Timekeeper
13. Access the Schedule Planner and confirm that you are viewing By Group.
14. From the Time Period drop-down list, select the timeframe you originally select for the transfer.
15. Locate the selected group and review your results.
16. If necessary, click Refresh.
Caution
Inheritance functionality does not apply when making group schedule edits in a Genie.
Note
The Insert Transfer functionality within a Genie allows you to move shifts for employees selected in the Genie. The application inserts the transfer into all the shift segments that contain the transfer start time and that are scheduled on the Effective Date for the transfer.
An example of when this might be useful is when you need to move all employees to a different work area due to a temporary building closure.
For shifts that have multiple segments, the Insert Transfer function inserts the transfer into every shift segment. If this function is not the results you want, then do not use the Insert Transfer function on these types of shifts.

© 2017, Kronos Incorporated or a related company. All rights reserved. 66
Workforce Timekeeper
Paying Employees from Schedules
Using the Pay from Schedule Feature
Workforce Timekeeper can be configured to pre-populate employee timecards automatically with the scheduled hours based on their schedules. Paying employees from their schedules lets you pre-populate their timecards with scheduling data, letting you pay employees the exact amount of their scheduled worked hours.
This functionality is useful for employees who do not need to punch in every day but track their hours on an exception basis.
When to use Pay from Schedule
Employee Type Pay From Schedule use
Project or salaried Pre-populate timecards with scheduled hours on a regular basis so that timecard edits are only needed for exceptions to scheduled times.
Hourly Pre-populate timecards with scheduled hours on a temporary basis when needed, for example, if an employee temporarily won’t have access to record worked time, or payroll needs to be processed before the end of the pay period because of a holiday.
Paying from Schedule
1. Select a Genie from the Genie widget.
2. Using the Context Selector, select the applicable group and time period.
3. Select an employee.
4. From the menu options, select Schedule > Add Pay From Schedule.
© 2017, Kronos Incorporated or a related company. All rights reserved. 67
Workforce Timekeeper
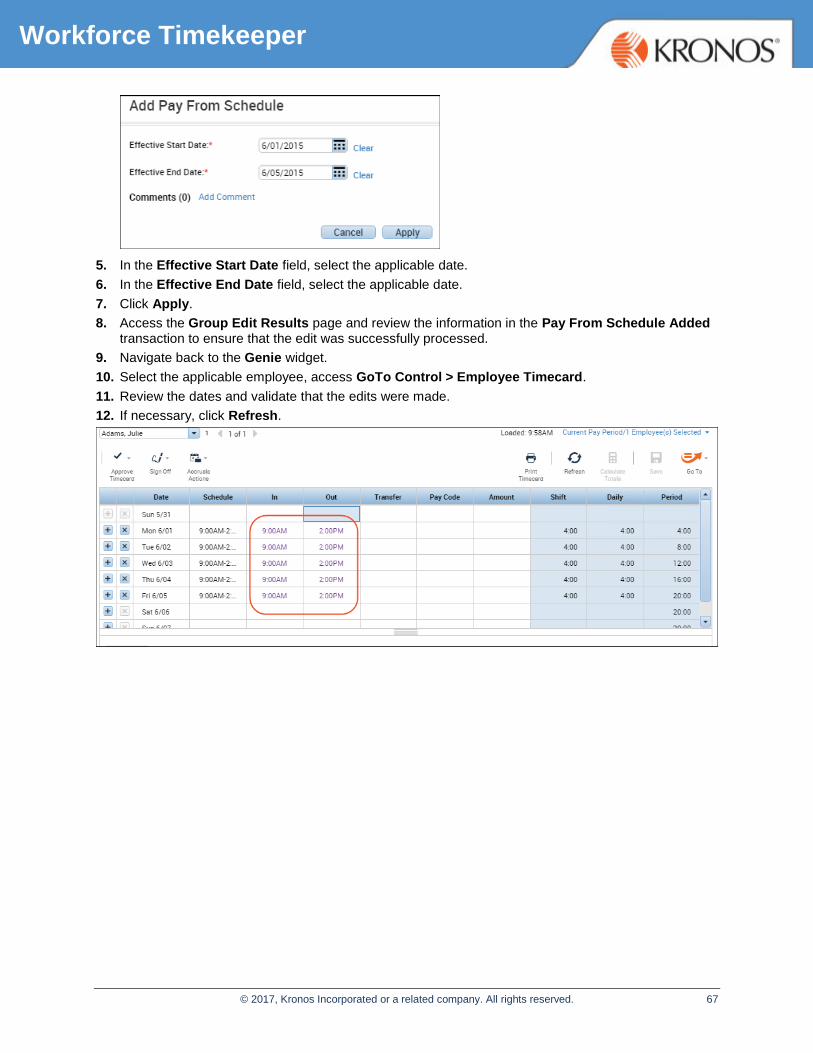
5. In the Effective Start Date field, select the applicable date.
6. In the Effective End Date field, select the applicable date.
7. Click Apply.
8. Access the Group Edit Results page and review the information in the Pay From Schedule Added transaction to ensure that the edit was successfully processed.
9. Navigate back to the Genie widget.
10. Select the applicable employee, access GoTo Control > Employee Timecard.
11. Review the dates and validate that the edits were made.
12. If necessary, click Refresh.

© 2017, Kronos Incorporated or a related company. All rights reserved. 68
Workforce Timekeeper
Scheduling Labor and Work Rule transfers
Scheduling Transfers and Off Shifts
About Shift Transfers
During a normal workday, Workforce Timekeeper uses the default work rule to calculate employee worked and non-worked hours, and then charges the hours to the assigned primary labor accounts and jobs.
On occasion, you might need employees to perform other jobs or work in other cost centers for which they are qualified. In this situation, you can schedule a transfer to have employee hours calculated differently.
You can schedule a transfer for:
An entire shift
A portion of a shift
Transfer Types
Transfer type Description
Labor account Transfers shift hours to an alternate labor account in your accounting structure.
You can transfer hours to one or more labor levels in a labor account.
Job Transfers hours to an alternate job in your organization. Each job has a specific path in your organizational map; therefore, Workforce Timekeeper specifies the entire job path when you perform a job transfer, ensuring that you track the transferred hours to a valid job.
Work rule Transfers hours to an alternate work rule so that those hours are calculated differently. Work rules identify details such as how punches round, what types of overtime an employee can earn, and which pay codes track what types of hours.
Sample Shift Transfer Tool Tip
The following illustration shows one type of transfer indicator (x), and the tool tip describing the transfer.
Tip
You can hold your mouse over a shift transfer entry in the Schedule Editor to display a tool tip with the complete transfer information.
© 2017, Kronos Incorporated or a related company. All rights reserved. 69
Workforce Timekeeper
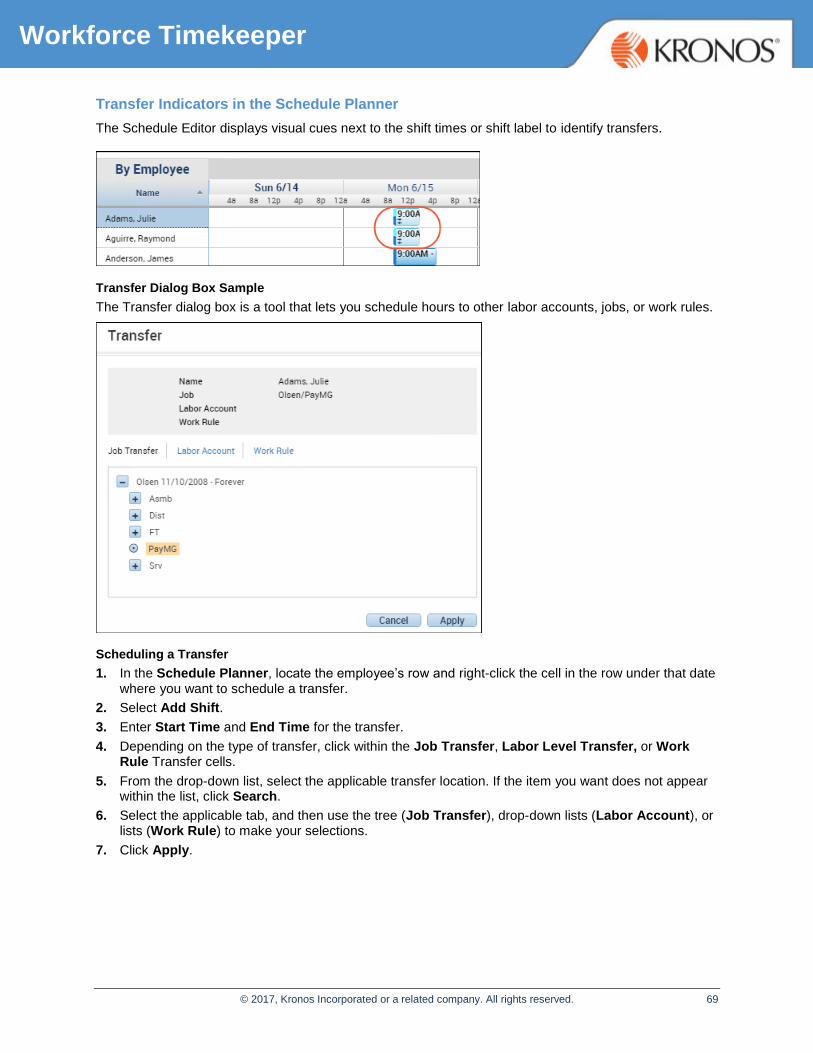
Transfer Indicators in the Schedule Planner
The Schedule Editor displays visual cues next to the shift times or shift label to identify transfers.
Transfer Dialog Box Sample
The Transfer dialog box is a tool that lets you schedule hours to other labor accounts, jobs, or work rules.
Scheduling a Transfer
1. In the Schedule Planner, locate the employee’s row and right-click the cell in the row under that date where you want to schedule a transfer.
2. Select Add Shift.
3. Enter Start Time and End Time for the transfer.
4. Depending on the type of transfer, click within the Job Transfer, Labor Level Transfer, or Work Rule Transfer cells.
5. From the drop-down list, select the applicable transfer location. If the item you want does not appear within the list, click Search.
6. Select the applicable tab, and then use the tree (Job Transfer), drop-down lists (Labor Account), or lists (Work Rule) to make your selections.
7. Click Apply.

© 2017, Kronos Incorporated or a related company. All rights reserved. 70
Workforce Timekeeper
8. Confirm that the date in the End Date field is correct. If the shift segment crosses a day divide, change the shift’s end date to the following day.
9. In the Repeat this shift for field, enter the number of consecutive days to repeat the transfer.
10. Click Apply and then click Save.
© 2017, Kronos Incorporated or a related company. All rights reserved. 71
Workforce Timekeeper
Monitoring Timecards to Facilitate Payroll Processing
© 2017, Kronos Incorporated or a related company. All rights reserved. 72
Workforce Timekeeper
Reviewing Notifications of Time Data
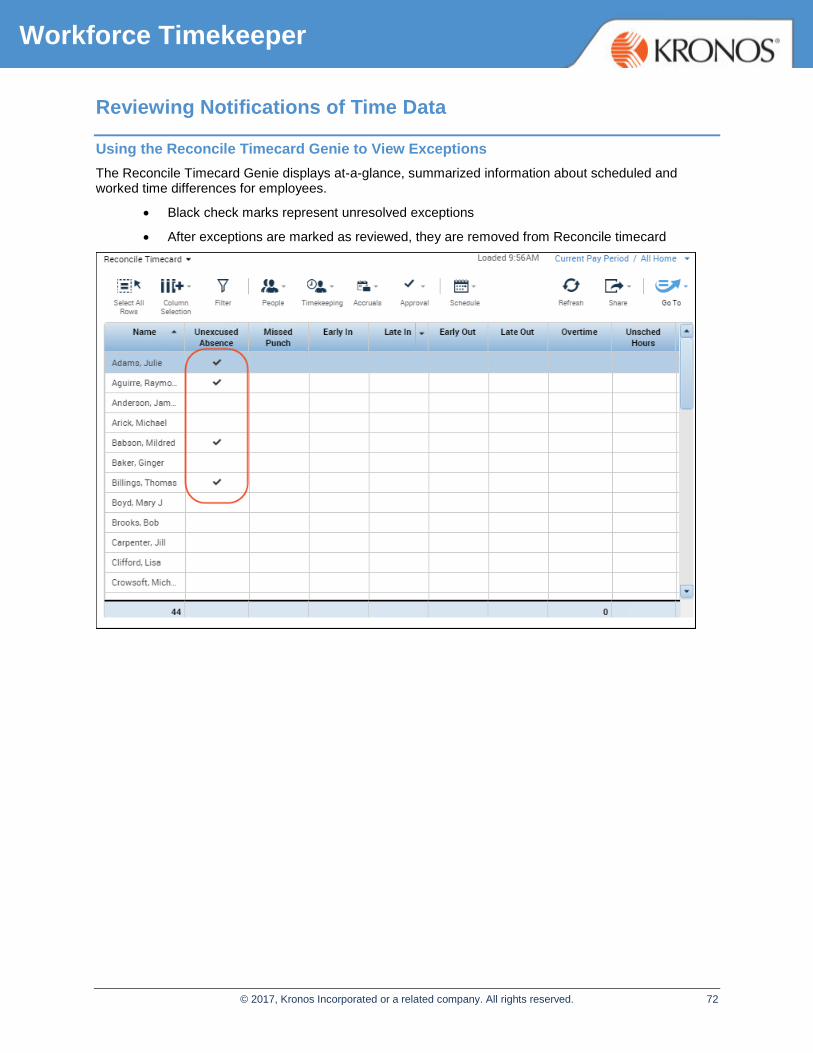
Using the Reconcile Timecard Genie to View Exceptions
The Reconcile Timecard Genie displays at-a-glance, summarized information about scheduled and worked time differences for employees.
Black check marks represent unresolved exceptions
After exceptions are marked as reviewed, they are removed from Reconcile timecard
© 2017, Kronos Incorporated or a related company. All rights reserved. 73
Workforce Timekeeper
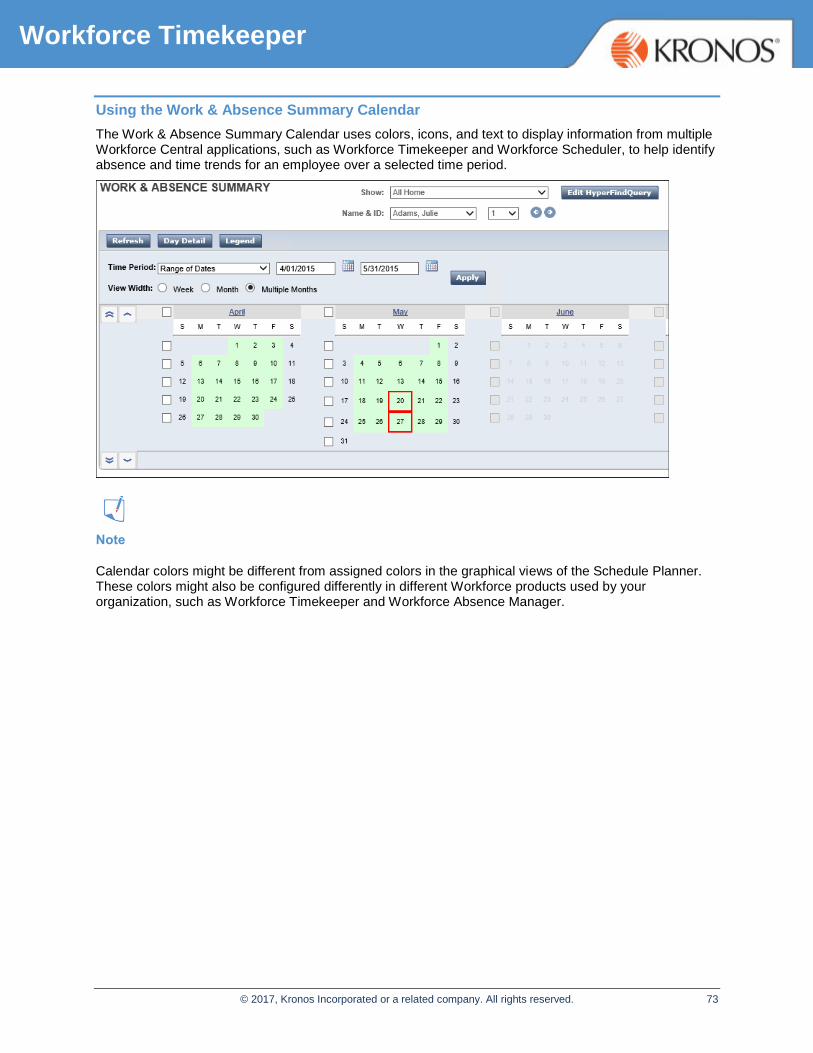
Using the Work & Absence Summary Calendar
The Work & Absence Summary Calendar uses colors, icons, and text to display information from multiple Workforce Central applications, such as Workforce Timekeeper and Workforce Scheduler, to help identify absence and time trends for an employee over a selected time period.
Note
Calendar colors might be different from assigned colors in the graphical views of the Schedule Planner. These colors might also be configured differently in different Workforce products used by your organization, such as Workforce Timekeeper and Workforce Absence Manager.

© 2017, Kronos Incorporated or a related company. All rights reserved. 74
Workforce Timekeeper
Resolving Exceptions in the Exceptions Widget
Justifying an Employee’s Missing Time
Missing time is any instance of time that employees have missed when they were scheduled to work. In Europe, many organizations need to ensure that employees are working a target number of hours per day, week, month, or year. To help European organizations comply with labor laws that govern target hours, missing time exceptions can be automatically resolved with paid or unpaid duration pay codes.
To understand how this process works, imagine that your organization auto-resolves missing time exceptions. Your employee left work two hours early last Tuesday. Here are the steps that must be followed by both you and your employee to accurately account for missed time.
Justifying Missed Time
1. The employee reviews the timecard. In the timecard, the employee must justify any exception that has a Missing Time pay code. The employee selects the Out punch, selects Punch > Justify Exception. The employee selects a justification from the list and submits the timecard for manager approval.
2. As the manager, when you review the Summary page in the Exceptions widget, this employee appears with an Early Out Missing Time exception.
3. You can review the employee’s reason for the missing time, and either confirm the justification, change to another justification, or use a combination of justifications.
4. You then mark the exception as reviewed and approve the time data.