Embed Size (px)
Citation preview

800 East 96th Street, Indianapolis, Indiana, 46240 USA
in 24HoursMichael Moncur
JavaScript
TeachYourselfTeachYourself

Sams Teach Yourself JavaScript in 24 HoursCopyright 2007 by Sams Publishing
All rights reserved. No part of this book shall be reproduced, stored in aretrieval system, or transmitted by any means, electronic, mechanical,photocopying, recording, or otherwise, without written permission fromthe publisher. No patent liability is assumed with respect to the use ofthe information contained herein. Although every precaution has beentaken in the preparation of this book, the publisher and author assumeno responsibility for errors or omissions. Nor is any liability assumed fordamages resulting from the use of the information contained herein.
International Standard Book Number: 0-672-32879-8
Library of Congress Catalog Card Number: 2005909315
Printed in the United States of America
First Printing: July 2006
09 08 07 06 4 3 2 1
TrademarksAll terms mentioned in this book that are known to be trademarks orservice marks have been appropriately capitalized. Sams Publishingcannot attest to the accuracy of this information. Use of a term in thisbook should not be regarded as affecting the validity of any trademarkor service mark.
Warning and DisclaimerEvery effort has been made to make this book as complete and as accu-rate as possible, but no warranty or fitness is implied. The informationprovided is on an “as is” basis. The author and the publisher shall haveneither liability nor responsibility to any person or entity with respect toany loss or damages arising from the information contained in thisbook.
Bulk SalesSams Publishing offers excellent discounts on this book when ordered inquantity for bulk purchases or special sales. For more information,please contact
U.S. Corporate and Government [email protected]
For sales outside of the U.S., please contact
International [email protected]
Acquisitions EditorBetsy Brown
Development EditorSonglin Qiu
Managing EditorPatrick Kanouse
Senior Project EditorMatthew Purcell
Copy EditorJessica McCarty
IndexerTim Wright
ProofreaderCarla Lewis
Technical EditorJim O’Donnell
Publishing CoordinatorVanessa Evans
Book DesignerGary Adair
Page LayoutTnT Design, Inc.

Contents at a GlanceIntroduction. . . . . . . . . . . . . . . . . . . . . . . . . . . . . . . . . . . . . . . . . . . . . . . . . . . . . . . . . . . . . . . . . . . . . . . . . . . . . . . . 1
Part I: Introducing the Concept of Web Scripting and the JavaScript Language
HOUR 1 Understanding JavaScript . . . . . . . . . . . . . . . . . . . . . . . . . . . . . . . . . . . . . . . . . . . . . . . . . . . . . . . . . . . . . . 7
2 Creating Simple Scripts . . . . . . . . . . . . . . . . . . . . . . . . . . . . . . . . . . . . . . . . . . . . . . . . . . . . . . . . . . . . . . . 23
3 Getting Started with JavaScript Programming . . . . . . . . . . . . . . . . . . . . . . . . . . . . . . . . . 37
4 Working with the Document Object Model (DOM) . . . . . . . . . . . . . . . . . . . . . . . . . . . 49
Part II: Learning JavaScript Basics
HOUR 5 Using Variables, Strings, and Arrays . . . . . . . . . . . . . . . . . . . . . . . . . . . . . . . . . . . . . . . . . . . . . . 63
6 Using Functions and Objects . . . . . . . . . . . . . . . . . . . . . . . . . . . . . . . . . . . . . . . . . . . . . . . . . . . . . . . . 85
7 Controlling Flow with Conditions and Loops . . . . . . . . . . . . . . . . . . . . . . . . . . . . . . . . . 101
8 Using Built-in Functions and Libraries . . . . . . . . . . . . . . . . . . . . . . . . . . . . . . . . . . . . . . . . . 121
Part III: Learning More About the DOM
HOUR 9 Responding to Events . . . . . . . . . . . . . . . . . . . . . . . . . . . . . . . . . . . . . . . . . . . . . . . . . . . . . . . . . . . . . . . . 139
10 Using Windows and Frames . . . . . . . . . . . . . . . . . . . . . . . . . . . . . . . . . . . . . . . . . . . . . . . . . . . . . . . 157
11 Getting Data with Forms . . . . . . . . . . . . . . . . . . . . . . . . . . . . . . . . . . . . . . . . . . . . . . . . . . . . . . . . . . . 173
12 Working with Style Sheets . . . . . . . . . . . . . . . . . . . . . . . . . . . . . . . . . . . . . . . . . . . . . . . . . . . . . . . . . . 191
13 Using the W3C DOM . . . . . . . . . . . . . . . . . . . . . . . . . . . . . . . . . . . . . . . . . . . . . . . . . . . . . . . . . . . . . . . . 207
14 Using Advanced DOM Features. . . . . . . . . . . . . . . . . . . . . . . . . . . . . . . . . . . . . . . . . . . . . . . . . . . 219
Part IV: Working with Advanced JavaScript Features
HOUR 15 Unobtrusive Scripting . . . . . . . . . . . . . . . . . . . . . . . . . . . . . . . . . . . . . . . . . . . . . . . . . . . . . . . . . . . . . . . . 235
16 Debugging JavaScript Applications. . . . . . . . . . . . . . . . . . . . . . . . . . . . . . . . . . . . . . . . . . . . . . 255
17 AJAX: Remote Scripting . . . . . . . . . . . . . . . . . . . . . . . . . . . . . . . . . . . . . . . . . . . . . . . . . . . . . . . . . . . . . 273
18 Greasemonkey: Enhancing the Web with JavaScript . . . . . . . . . . . . . . . . . . . . . . . 293
Part V: Building Multimedia Applications with JavaScript
HOUR 19 Using Graphics and Animation . . . . . . . . . . . . . . . . . . . . . . . . . . . . . . . . . . . . . . . . . . . . . . . . . . 313
20 Working with Sound and Plug-ins . . . . . . . . . . . . . . . . . . . . . . . . . . . . . . . . . . . . . . . . . . . . . . . 329

Part VI: Creating Complex Scripts
HOUR 21 Building JavaScript Drop-down Menus . . . . . . . . . . . . . . . . . . . . . . . . . . . . . . . . . . . . . . . . . 345
22 Creating a JavaScript Game . . . . . . . . . . . . . . . . . . . . . . . . . . . . . . . . . . . . . . . . . . . . . . . . . . . . . . . 359
23 Creating JavaScript Applications . . . . . . . . . . . . . . . . . . . . . . . . . . . . . . . . . . . . . . . . . . . . . . . . . 377
24 Your Future with JavaScript . . . . . . . . . . . . . . . . . . . . . . . . . . . . . . . . . . . . . . . . . . . . . . . . . . . . . . . . 393
Part VII: Appendixes
A Other JavaScript Resources . . . . . . . . . . . . . . . . . . . . . . . . . . . . . . . . . . . . . . . . . . . . . . . . . . . . . . . . . 409
B Tools for JavaScript Developers . . . . . . . . . . . . . . . . . . . . . . . . . . . . . . . . . . . . . . . . . . . . . . . . . . . 411
C Glossary. . . . . . . . . . . . . . . . . . . . . . . . . . . . . . . . . . . . . . . . . . . . . . . . . . . . . . . . . . . . . . . . . . . . . . . . . . . . . . . . . . 415
D JavaScript Quick Reference . . . . . . . . . . . . . . . . . . . . . . . . . . . . . . . . . . . . . . . . . . . . . . . . . . . . . . . . . 419
E DOM Quick Reference . . . . . . . . . . . . . . . . . . . . . . . . . . . . . . . . . . . . . . . . . . . . . . . . . . . . . . . . . . . . . . . 427
Index . . . . . . . . . . . . . . . . . . . . . . . . . . . . . . . . . . . . . . . . . . . . . . . . . . . . . . . . . . . . . . . . . . . . . . . . . . . . . . . . . . . . . 433

Table of Contents
Part I: Introducing the Concept of Web Scripting and the JavaScriptLanguage
HOUR 1: Understanding JavaScript 7
Learning Web Scripting Basics . . . . . . . . . . . . . . . . . . . . . . . . . . . . . . . . . . . . . . . . . . . . . . . . . . . . . . . . . . . . . . . . 7
How JavaScript Fits into a Web Page . . . . . . . . . . . . . . . . . . . . . . . . . . . . . . . . . . . . . . . . . . . . . . . . . . . . . . . . 9
Browsers and JavaScript . . . . . . . . . . . . . . . . . . . . . . . . . . . . . . . . . . . . . . . . . . . . . . . . . . . . . . . . . . . . . . . . . . . . . . . . 12
Specifying JavaScript Versions . . . . . . . . . . . . . . . . . . . . . . . . . . . . . . . . . . . . . . . . . . . . . . . . . . . . . . . . . . . . . . . . 15
JavaScript Beyond the Browser . . . . . . . . . . . . . . . . . . . . . . . . . . . . . . . . . . . . . . . . . . . . . . . . . . . . . . . . . . . . . . 16
Exploring JavaScript’s Capabilities . . . . . . . . . . . . . . . . . . . . . . . . . . . . . . . . . . . . . . . . . . . . . . . . . . . . . . . . . . 16
Alternatives to JavaScript . . . . . . . . . . . . . . . . . . . . . . . . . . . . . . . . . . . . . . . . . . . . . . . . . . . . . . . . . . . . . . . . . . . . . . 17
HOUR 2: Creating Simple Scripts 23
Tools for Scripting . . . . . . . . . . . . . . . . . . . . . . . . . . . . . . . . . . . . . . . . . . . . . . . . . . . . . . . . . . . . . . . . . . . . . . . . . . . . . . . . 23
Displaying Time with JavaScript . . . . . . . . . . . . . . . . . . . . . . . . . . . . . . . . . . . . . . . . . . . . . . . . . . . . . . . . . . . . 25
Beginning the Script . . . . . . . . . . . . . . . . . . . . . . . . . . . . . . . . . . . . . . . . . . . . . . . . . . . . . . . . . . . . . . . . . . . . . . . . . . . . 26
Adding JavaScript Statements . . . . . . . . . . . . . . . . . . . . . . . . . . . . . . . . . . . . . . . . . . . . . . . . . . . . . . . . . . . . . . . . 26
Creating Output . . . . . . . . . . . . . . . . . . . . . . . . . . . . . . . . . . . . . . . . . . . . . . . . . . . . . . . . . . . . . . . . . . . . . . . . . . . . . . . . . . 27
Adding the Script to a Web Page . . . . . . . . . . . . . . . . . . . . . . . . . . . . . . . . . . . . . . . . . . . . . . . . . . . . . . . . . . . . 28
Testing the Script . . . . . . . . . . . . . . . . . . . . . . . . . . . . . . . . . . . . . . . . . . . . . . . . . . . . . . . . . . . . . . . . . . . . . . . . . . . . . . . . 29
HOUR 3: Getting Started with JavaScript Programming 37
Basic Concepts . . . . . . . . . . . . . . . . . . . . . . . . . . . . . . . . . . . . . . . . . . . . . . . . . . . . . . . . . . . . . . . . . . . . . . . . . . . . . . . . . . . . 37
JavaScript Syntax Rules . . . . . . . . . . . . . . . . . . . . . . . . . . . . . . . . . . . . . . . . . . . . . . . . . . . . . . . . . . . . . . . . . . . . . . . . 42
Using Comments . . . . . . . . . . . . . . . . . . . . . . . . . . . . . . . . . . . . . . . . . . . . . . . . . . . . . . . . . . . . . . . . . . . . . . . . . . . . . . . . 43
Best Practices for JavaScript . . . . . . . . . . . . . . . . . . . . . . . . . . . . . . . . . . . . . . . . . . . . . . . . . . . . . . . . . . . . . . . . . . 44
HOUR 4: Working with the Document Object Model (DOM) 49
Understanding the Document Object Model (DOM) . . . . . . . . . . . . . . . . . . . . . . . . . . . . . . . . . . 49
Using Window Objects . . . . . . . . . . . . . . . . . . . . . . . . . . . . . . . . . . . . . . . . . . . . . . . . . . . . . . . . . . . . . . . . . . . . . . . . . . 51
Working with Web Documents . . . . . . . . . . . . . . . . . . . . . . . . . . . . . . . . . . . . . . . . . . . . . . . . . . . . . . . . . . . . . . 52
Accessing Browser History . . . . . . . . . . . . . . . . . . . . . . . . . . . . . . . . . . . . . . . . . . . . . . . . . . . . . . . . . . . . . . . . . . . . 55
Working with the Location Object . . . . . . . . . . . . . . . . . . . . . . . . . . . . . . . . . . . . . . . . . . . . . . . . . . . . . . . . . . 55

Part II: Learning JavaScript Basics
HOUR 5: Using Variables, Strings, and Arrays 63
Using Variables . . . . . . . . . . . . . . . . . . . . . . . . . . . . . . . . . . . . . . . . . . . . . . . . . . . . . . . . . . . . . . . . . . . . . . . . . . . . . . . . . . 63
Understanding Expressions and Operators . . . . . . . . . . . . . . . . . . . . . . . . . . . . . . . . . . . . . . . . . . . . . . 67
Data Types in JavaScript . . . . . . . . . . . . . . . . . . . . . . . . . . . . . . . . . . . . . . . . . . . . . . . . . . . . . . . . . . . . . . . . . . . . . . 68
Converting Between Data Types . . . . . . . . . . . . . . . . . . . . . . . . . . . . . . . . . . . . . . . . . . . . . . . . . . . . . . . . . . . . 69
Using String Objects . . . . . . . . . . . . . . . . . . . . . . . . . . . . . . . . . . . . . . . . . . . . . . . . . . . . . . . . . . . . . . . . . . . . . . . . . . . . 70
Working with Substrings . . . . . . . . . . . . . . . . . . . . . . . . . . . . . . . . . . . . . . . . . . . . . . . . . . . . . . . . . . . . . . . . . . . . . . 74
Using Numeric Arrays . . . . . . . . . . . . . . . . . . . . . . . . . . . . . . . . . . . . . . . . . . . . . . . . . . . . . . . . . . . . . . . . . . . . . . . . . . 76
Using String Arrays . . . . . . . . . . . . . . . . . . . . . . . . . . . . . . . . . . . . . . . . . . . . . . . . . . . . . . . . . . . . . . . . . . . . . . . . . . . . . . 77
Sorting a Numeric Array . . . . . . . . . . . . . . . . . . . . . . . . . . . . . . . . . . . . . . . . . . . . . . . . . . . . . . . . . . . . . . . . . . . . . . 79
HOUR 6: Using Functions and Objects 85
Using Functions . . . . . . . . . . . . . . . . . . . . . . . . . . . . . . . . . . . . . . . . . . . . . . . . . . . . . . . . . . . . . . . . . . . . . . . . . . . . . . . . . . 85
Introducing Objects . . . . . . . . . . . . . . . . . . . . . . . . . . . . . . . . . . . . . . . . . . . . . . . . . . . . . . . . . . . . . . . . . . . . . . . . . . . . . . 90
Using Objects to Simplify Scripting . . . . . . . . . . . . . . . . . . . . . . . . . . . . . . . . . . . . . . . . . . . . . . . . . . . . . . . . 91
Extending Built-in Objects . . . . . . . . . . . . . . . . . . . . . . . . . . . . . . . . . . . . . . . . . . . . . . . . . . . . . . . . . . . . . . . . . . . . 94
HOUR 7: Controlling Flow with Conditions and Loops 101
The if Statement . . . . . . . . . . . . . . . . . . . . . . . . . . . . . . . . . . . . . . . . . . . . . . . . . . . . . . . . . . . . . . . . . . . . . . . . . . . . . . . . 102
Using Shorthand Conditional Expressions . . . . . . . . . . . . . . . . . . . . . . . . . . . . . . . . . . . . . . . . . . . . . . 105
Testing Multiple Conditions with If and Else . . . . . . . . . . . . . . . . . . . . . . . . . . . . . . . . . . . . . . . . . . 105
Using Multiple Conditions with switch . . . . . . . . . . . . . . . . . . . . . . . . . . . . . . . . . . . . . . . . . . . . . . . . . . 107
Using for Loops . . . . . . . . . . . . . . . . . . . . . . . . . . . . . . . . . . . . . . . . . . . . . . . . . . . . . . . . . . . . . . . . . . . . . . . . . . . . . . . . . . 109
Using While Loops . . . . . . . . . . . . . . . . . . . . . . . . . . . . . . . . . . . . . . . . . . . . . . . . . . . . . . . . . . . . . . . . . . . . . . . . . . . . 111
Using Do…While Loops . . . . . . . . . . . . . . . . . . . . . . . . . . . . . . . . . . . . . . . . . . . . . . . . . . . . . . . . . . . . . . . . . . . . . . 112
Working with Loops. . . . . . . . . . . . . . . . . . . . . . . . . . . . . . . . . . . . . . . . . . . . . . . . . . . . . . . . . . . . . . . . . . . . . . . . . . . . 112
Looping Through Object Properties . . . . . . . . . . . . . . . . . . . . . . . . . . . . . . . . . . . . . . . . . . . . . . . . . . . . . . 114
HOUR 8: Using Built-in Functions and Libraries 121
Using the Math Object . . . . . . . . . . . . . . . . . . . . . . . . . . . . . . . . . . . . . . . . . . . . . . . . . . . . . . . . . . . . . . . . . . . . . . . . 121
Working with Math Functions . . . . . . . . . . . . . . . . . . . . . . . . . . . . . . . . . . . . . . . . . . . . . . . . . . . . . . . . . . . . . . 123
Using the with Keyword . . . . . . . . . . . . . . . . . . . . . . . . . . . . . . . . . . . . . . . . . . . . . . . . . . . . . . . . . . . . . . . . . . . . . . 125
vi
Sams Teach Yourself JavaScript in 24 Hours

Working with Dates . . . . . . . . . . . . . . . . . . . . . . . . . . . . . . . . . . . . . . . . . . . . . . . . . . . . . . . . . . . . . . . . . . . . . . . . . . . . 126
Using Third-Party Libraries . . . . . . . . . . . . . . . . . . . . . . . . . . . . . . . . . . . . . . . . . . . . . . . . . . . . . . . . . . . . . . . . . . 128
Other Libraries . . . . . . . . . . . . . . . . . . . . . . . . . . . . . . . . . . . . . . . . . . . . . . . . . . . . . . . . . . . . . . . . . . . . . . . . . . . . . . . . . . 130
Part III: Learning More About the DOM
HOUR 9: Responding to Events 139
Understanding Event Handlers . . . . . . . . . . . . . . . . . . . . . . . . . . . . . . . . . . . . . . . . . . . . . . . . . . . . . . . . . . . . 139
Using Mouse Events . . . . . . . . . . . . . . . . . . . . . . . . . . . . . . . . . . . . . . . . . . . . . . . . . . . . . . . . . . . . . . . . . . . . . . . . . . . . 144
Using Keyboard Events . . . . . . . . . . . . . . . . . . . . . . . . . . . . . . . . . . . . . . . . . . . . . . . . . . . . . . . . . . . . . . . . . . . . . . . . 149
Using the onLoad and onUnload Events . . . . . . . . . . . . . . . . . . . . . . . . . . . . . . . . . . . . . . . . . . . . . . . . 151
HOUR 10: Using Windows and Frames 157
Controlling Windows with Objects . . . . . . . . . . . . . . . . . . . . . . . . . . . . . . . . . . . . . . . . . . . . . . . . . . . . . . . . 157
Moving and Resizing Windows . . . . . . . . . . . . . . . . . . . . . . . . . . . . . . . . . . . . . . . . . . . . . . . . . . . . . . . . . . . . 160
Using Timeouts . . . . . . . . . . . . . . . . . . . . . . . . . . . . . . . . . . . . . . . . . . . . . . . . . . . . . . . . . . . . . . . . . . . . . . . . . . . . . . . . . . 162
Displaying Dialog Boxes . . . . . . . . . . . . . . . . . . . . . . . . . . . . . . . . . . . . . . . . . . . . . . . . . . . . . . . . . . . . . . . . . . . . 164
Working with Frames . . . . . . . . . . . . . . . . . . . . . . . . . . . . . . . . . . . . . . . . . . . . . . . . . . . . . . . . . . . . . . . . . . . . . . . . . . 166
HOUR 11: Getting Data with Forms 173
The Basics of HTML Forms . . . . . . . . . . . . . . . . . . . . . . . . . . . . . . . . . . . . . . . . . . . . . . . . . . . . . . . . . . . . . . . . . . 173
Using the Form Object with JavaScript . . . . . . . . . . . . . . . . . . . . . . . . . . . . . . . . . . . . . . . . . . . . . . . . . . 174
Scripting Form Elements . . . . . . . . . . . . . . . . . . . . . . . . . . . . . . . . . . . . . . . . . . . . . . . . . . . . . . . . . . . . . . . . . . . . . . 176
Displaying Data from a Form . . . . . . . . . . . . . . . . . . . . . . . . . . . . . . . . . . . . . . . . . . . . . . . . . . . . . . . . . . . . . . 182
Sending Form Results by Email . . . . . . . . . . . . . . . . . . . . . . . . . . . . . . . . . . . . . . . . . . . . . . . . . . . . . . . . . . . . 184
HOUR 12: Working with Style Sheets 191
Style and Substance . . . . . . . . . . . . . . . . . . . . . . . . . . . . . . . . . . . . . . . . . . . . . . . . . . . . . . . . . . . . . . . . . . . . . . . . . . . . 191
Defining and Using CSS Styles . . . . . . . . . . . . . . . . . . . . . . . . . . . . . . . . . . . . . . . . . . . . . . . . . . . . . . . . . . . . . . 192
Using CSS Properties . . . . . . . . . . . . . . . . . . . . . . . . . . . . . . . . . . . . . . . . . . . . . . . . . . . . . . . . . . . . . . . . . . . . . . . . . . 195
Creating a Simple Style Sheet . . . . . . . . . . . . . . . . . . . . . . . . . . . . . . . . . . . . . . . . . . . . . . . . . . . . . . . . . . . . . . 198
Using External Style Sheets . . . . . . . . . . . . . . . . . . . . . . . . . . . . . . . . . . . . . . . . . . . . . . . . . . . . . . . . . . . . . . . . . . 200
Controlling Styles with JavaScript . . . . . . . . . . . . . . . . . . . . . . . . . . . . . . . . . . . . . . . . . . . . . . . . . . . . . . . . 201
Contents
vii

HOUR 13: Using the W.3C DOM 207
The DOM and Dynamic HTML . . . . . . . . . . . . . . . . . . . . . . . . . . . . . . . . . . . . . . . . . . . . . . . . . . . . . . . . . . . . 207
Understanding DOM Structure . . . . . . . . . . . . . . . . . . . . . . . . . . . . . . . . . . . . . . . . . . . . . . . . . . . . . . . . . . . . 208
Creating Positionable Elements (Layers) . . . . . . . . . . . . . . . . . . . . . . . . . . . . . . . . . . . . . . . . . . . . . . . . 210
HOUR 14: Using Advanced DOM Features 219
Working with DOM Nodes . . . . . . . . . . . . . . . . . . . . . . . . . . . . . . . . . . . . . . . . . . . . . . . . . . . . . . . . . . . . . . . . . . 219
Hiding and Showing Objects . . . . . . . . . . . . . . . . . . . . . . . . . . . . . . . . . . . . . . . . . . . . . . . . . . . . . . . . . . . . . . . . 222
Modifying Text Within a Page . . . . . . . . . . . . . . . . . . . . . . . . . . . . . . . . . . . . . . . . . . . . . . . . . . . . . . . . . . . . . . 223
Adding Text to a Page . . . . . . . . . . . . . . . . . . . . . . . . . . . . . . . . . . . . . . . . . . . . . . . . . . . . . . . . . . . . . . . . . . . . . . . . 225
Part IV: Working with Advanced JavaScript Features
HOUR 15: Unobtrusive Scripting 235
Scripting Best Practices . . . . . . . . . . . . . . . . . . . . . . . . . . . . . . . . . . . . . . . . . . . . . . . . . . . . . . . . . . . . . . . . . . . . . . . . 235
Reading Browser Information . . . . . . . . . . . . . . . . . . . . . . . . . . . . . . . . . . . . . . . . . . . . . . . . . . . . . . . . . . . . . . 242
Cross-Browser Scripting . . . . . . . . . . . . . . . . . . . . . . . . . . . . . . . . . . . . . . . . . . . . . . . . . . . . . . . . . . . . . . . . . . . . . . 245
Supporting Non-JavaScript Browsers . . . . . . . . . . . . . . . . . . . . . . . . . . . . . . . . . . . . . . . . . . . . . . . . . . . . . . 247
HOUR 16: Debugging JavaScript Applications 255
Avoiding Bugs . . . . . . . . . . . . . . . . . . . . . . . . . . . . . . . . . . . . . . . . . . . . . . . . . . . . . . . . . . . . . . . . . . . . . . . . . . . . . . . . . . 255
Basic Debugging Tools . . . . . . . . . . . . . . . . . . . . . . . . . . . . . . . . . . . . . . . . . . . . . . . . . . . . . . . . . . . . . . . . . . . . . . . . 258
Creating Error Handlers . . . . . . . . . . . . . . . . . . . . . . . . . . . . . . . . . . . . . . . . . . . . . . . . . . . . . . . . . . . . . . . . . . . . . . 260
Advanced Debugging Tools. . . . . . . . . . . . . . . . . . . . . . . . . . . . . . . . . . . . . . . . . . . . . . . . . . . . . . . . . . . . . . . . . . 263
HOUR 17: AJAX: Remote Scripting 273
Introducing AJAX . . . . . . . . . . . . . . . . . . . . . . . . . . . . . . . . . . . . . . . . . . . . . . . . . . . . . . . . . . . . . . . . . . . . . . . . . . . . . . 273
Using XMLHttpRequest . . . . . . . . . . . . . . . . . . . . . . . . . . . . . . . . . . . . . . . . . . . . . . . . . . . . . . . . . . . . . . . . . . . . . . 277
Creating a Simple AJAX Library . . . . . . . . . . . . . . . . . . . . . . . . . . . . . . . . . . . . . . . . . . . . . . . . . . . . . . . . . . 279
Creating an AJAX Quiz Using the Library . . . . . . . . . . . . . . . . . . . . . . . . . . . . . . . . . . . . . . . . . . . . . . 280
Debugging AJAX Applications. . . . . . . . . . . . . . . . . . . . . . . . . . . . . . . . . . . . . . . . . . . . . . . . . . . . . . . . . . . . . . 285
HOUR 18: Greasemonkey: Enhancing the Web with JavaScript 293
Introducing Greasemonkey . . . . . . . . . . . . . . . . . . . . . . . . . . . . . . . . . . . . . . . . . . . . . . . . . . . . . . . . . . . . . . . . . . 293
Working with User Scripts . . . . . . . . . . . . . . . . . . . . . . . . . . . . . . . . . . . . . . . . . . . . . . . . . . . . . . . . . . . . . . . . . . . . 296
Creating Your Own User Scripts . . . . . . . . . . . . . . . . . . . . . . . . . . . . . . . . . . . . . . . . . . . . . . . . . . . . . . . . . . . . 299
viii
Sams Teach Yourself JavaScript in 24 Hours

Part V: Building Multimedia Applications with JavaScript
HOUR 19: Using Graphics and Animation 313
Using Dynamic Images . . . . . . . . . . . . . . . . . . . . . . . . . . . . . . . . . . . . . . . . . . . . . . . . . . . . . . . . . . . . . . . . . . . . . . 313
Creating Rollovers . . . . . . . . . . . . . . . . . . . . . . . . . . . . . . . . . . . . . . . . . . . . . . . . . . . . . . . . . . . . . . . . . . . . . . . . . . . . . . 315
A Simple JavaScript Slideshow . . . . . . . . . . . . . . . . . . . . . . . . . . . . . . . . . . . . . . . . . . . . . . . . . . . . . . . . . . . . . . 319
HOUR 20: Working with Sound and Plug-Ins 329
Introducing Plug-Ins . . . . . . . . . . . . . . . . . . . . . . . . . . . . . . . . . . . . . . . . . . . . . . . . . . . . . . . . . . . . . . . . . . . . . . . . . . 329
JavaScript and Flash . . . . . . . . . . . . . . . . . . . . . . . . . . . . . . . . . . . . . . . . . . . . . . . . . . . . . . . . . . . . . . . . . . . . . . . . . . 332
Playing Sounds with JavaScript . . . . . . . . . . . . . . . . . . . . . . . . . . . . . . . . . . . . . . . . . . . . . . . . . . . . . . . . . . . . 333
Testing Sounds in JavaScript . . . . . . . . . . . . . . . . . . . . . . . . . . . . . . . . . . . . . . . . . . . . . . . . . . . . . . . . . . . . . . . . 336
Part VI: Creating Complex Scripts
HOUR 21: Building JavaScript Drop-Down Menus 345
Designing Drop-Down Menus . . . . . . . . . . . . . . . . . . . . . . . . . . . . . . . . . . . . . . . . . . . . . . . . . . . . . . . . . . . . . . 345
Scripting Drop-Down Menu Behavior . . . . . . . . . . . . . . . . . . . . . . . . . . . . . . . . . . . . . . . . . . . . . . . . . . . . 350
HOUR 22: Creating a JavaScript Game 359
About the Game . . . . . . . . . . . . . . . . . . . . . . . . . . . . . . . . . . . . . . . . . . . . . . . . . . . . . . . . . . . . . . . . . . . . . . . . . . . . . . . . 359
Creating the HTML Document. . . . . . . . . . . . . . . . . . . . . . . . . . . . . . . . . . . . . . . . . . . . . . . . . . . . . . . . . . . . . . 361
Creating the Script . . . . . . . . . . . . . . . . . . . . . . . . . . . . . . . . . . . . . . . . . . . . . . . . . . . . . . . . . . . . . . . . . . . . . . . . . . . . 363
Adding Style with CSS . . . . . . . . . . . . . . . . . . . . . . . . . . . . . . . . . . . . . . . . . . . . . . . . . . . . . . . . . . . . . . . . . . . . . . . . 368
HOUR 23: Creating JavaScript Applications 377
Creating a Scrolling Window. . . . . . . . . . . . . . . . . . . . . . . . . . . . . . . . . . . . . . . . . . . . . . . . . . . . . . . . . . . . . . . . 377
Style Sheet Switching with JavaScript . . . . . . . . . . . . . . . . . . . . . . . . . . . . . . . . . . . . . . . . . . . . . . . . . . . . 380
HOUR 24: Your Future with JavaScript 393
Learning Advanced JavaScript Techniques . . . . . . . . . . . . . . . . . . . . . . . . . . . . . . . . . . . . . . . . . . . . 393
Future Web Technologies . . . . . . . . . . . . . . . . . . . . . . . . . . . . . . . . . . . . . . . . . . . . . . . . . . . . . . . . . . . . . . . . . . . . 394
Planning for the Future . . . . . . . . . . . . . . . . . . . . . . . . . . . . . . . . . . . . . . . . . . . . . . . . . . . . . . . . . . . . . . . . . . . . . . 397
Moving on to Other Languages . . . . . . . . . . . . . . . . . . . . . . . . . . . . . . . . . . . . . . . . . . . . . . . . . . . . . . . . . . . . 398
Contents
ix

Part VII: Appendixes
APPENDIX A: Other JavaScript Resources 409
Other Books . . . . . . . . . . . . . . . . . . . . . . . . . . . . . . . . . . . . . . . . . . . . . . . . . . . . . . . . . . . . . . . . . . . . . . . . . . . . . . . . . . . . . . 409
JavaScript Websites . . . . . . . . . . . . . . . . . . . . . . . . . . . . . . . . . . . . . . . . . . . . . . . . . . . . . . . . . . . . . . . . . . . . . . . . . . . . 409
Web Development Sites . . . . . . . . . . . . . . . . . . . . . . . . . . . . . . . . . . . . . . . . . . . . . . . . . . . . . . . . . . . . . . . . . . . . . . 410
This Book’s Website . . . . . . . . . . . . . . . . . . . . . . . . . . . . . . . . . . . . . . . . . . . . . . . . . . . . . . . . . . . . . . . . . . . . . . . . . . . . 410
APPENDIX B: Tools for JavaScript Developers 411
HTML and Text Editors . . . . . . . . . . . . . . . . . . . . . . . . . . . . . . . . . . . . . . . . . . . . . . . . . . . . . . . . . . . . . . . . . . . . . . . . 411
HTML Validators . . . . . . . . . . . . . . . . . . . . . . . . . . . . . . . . . . . . . . . . . . . . . . . . . . . . . . . . . . . . . . . . . . . . . . . . . . . . . . . . 413
Debugging Tools . . . . . . . . . . . . . . . . . . . . . . . . . . . . . . . . . . . . . . . . . . . . . . . . . . . . . . . . . . . . . . . . . . . . . . . . . . . . . . . . 413
APPENDIX C: Glossary 415
APPENDIX D: JavaScript Quick Reference 419
Built-in Objects . . . . . . . . . . . . . . . . . . . . . . . . . . . . . . . . . . . . . . . . . . . . . . . . . . . . . . . . . . . . . . . . . . . . . . . . . . . . . . . . . . 419
Creating and Customizing Objects . . . . . . . . . . . . . . . . . . . . . . . . . . . . . . . . . . . . . . . . . . . . . . . . . . . . . . . . 423
JavaScript Statements . . . . . . . . . . . . . . . . . . . . . . . . . . . . . . . . . . . . . . . . . . . . . . . . . . . . . . . . . . . . . . . . . . . . . . . . 424
JavaScript Built-in Functions . . . . . . . . . . . . . . . . . . . . . . . . . . . . . . . . . . . . . . . . . . . . . . . . . . . . . . . . . . . . . . . . 426
APPENDIX E: DOM Quick Reference 427
DOM Level 0 . . . . . . . . . . . . . . . . . . . . . . . . . . . . . . . . . . . . . . . . . . . . . . . . . . . . . . . . . . . . . . . . . . . . . . . . . . . . . . . . . . . . 427
DOM Level 1 . . . . . . . . . . . . . . . . . . . . . . . . . . . . . . . . . . . . . . . . . . . . . . . . . . . . . . . . . . . . . . . . . . . . . . . . . . . . . . . . . . . . 429
Index . . . . . . . . . . . . . . . . . . . . . . . . . . . . . . . . . . . . . . . . . . . . . . . . . . . . . . . . . . . . . . . . . . . . . . . . . . . . . . . . . . . . . . . . . . . . . . 433

About the AuthorMichael Moncur is a freelance webmaster and author. He runs a network of websites,
including the Web’s oldest site about famous quotations, online since 1994. He wrote Sams
Teach Yourself DHTML in 24 Hours, and has also written several bestselling books about net-
working, certification programs, and databases. He lives with his wife in Salt Lake City,
Utah.
DedicationTo my family, and especially Laura. Thanks for all your love and support.
AcknowledgmentsI’d like to thank everyone at Sams for their help with this book, and for the opportunity to
write it. In particular, Betsy Brown got this edition started and kept it moving. Songlin Qiu
managed the development of the book. Project editor Matt Purcell handled the editing
process, and the copy editor, Jessica McCarty, saved me from many embarrassing errors.
The technical reviewer, Jim O’Donnell, painstakingly tested the scripts and helped keep the
writing grounded in reality.
I am grateful to everyone involved with previous editions of this book, including Scott
Meyers, David Mayhew, Sean Medlock, Susan Hobbs, Michelle Wyner, Jeff Schultz, Amy
Patton, George Nedeff, and Phil Karras. I’d also like to thank Neil Salkind and the rest of
the team at Studio B for their help throughout this project.
Finally, personal thanks go to my wife, Laura; my parents, Gary and Susan Moncur; the
rest of the family; and my friends, particularly Chuck Perkins, Matt Strebe, Cory Storm,
Robert Parsons, Dylan Winslow, Ray Jones, Tyson Jensen, Curt Siffert, Richard Easlick, and
Henry J. Tillman. I couldn’t have done it without your support.

We Want to Hear from You!As the reader of this book, you are our most important critic and commentator. We value
your opinion and want to know what we’re doing right, what we could do better, what
areas you’d like to see us publish in, and any other words of wisdom you’re willing to pass
our way.
You can email or write me directly to let me know what you did or didn’t like about this
book—as well as what we can do to make our books stronger.
Please note that I cannot help you with technical problems related to the topic of this book, and
that due to the high volume of mail I receive, I might not be able to reply to every message.
When you write, please be sure to include this book’s title and author as well as your name
and phone or email address. I will carefully review your comments and share them with the
author and editors who worked on the book.
Email: [email protected]
Mail: Mark Taber
Associate Publisher
Sams Publishing
800 East 96th Street
Indianapolis, IN 46240 USA
Reader ServicesVisit our website and register this book at www.samspublishing.com/register for convenient
access to any updates, downloads, or errata that might be available for this book.
xii
Sams Teach Yourself JavaScript in 24 Hours

Introduction
The World Wide Web began as a simple repository for information, but it has grown into
much more—it entertains, teaches, advertises, and communicates. As the Web has evolved,
the tools have also evolved. Simple markup tools such as HTML have been joined by true
programming languages—including JavaScript.
Now don’t let the word “programming” scare you. For many, the term conjures up images of
long nights staring at the screen, trying to remember which sequence of punctuation marks
will produce the effect you need. (Don’t get me wrong—some of us enjoy that sort of thing.)
Although JavaScript is programming, it’s a very simple language. As a matter of fact, if you
haven’t programmed before, it makes a great introduction to programming. It requires very
little knowledge to start programming with JavaScript—you’ll write your first program in
Hour 2, “Creating Simple Scripts.”
If you can create a web page with HTML, you can easily use JavaScript to improve a page.
JavaScript programs can range from a single line to a full-scale application. In this book,
you’ll start with simple scripts, and proceed to complex applications, such as a card game.
You’ll also explore some of the most recent uses of JavaScript, such as AJAX remote scripting.
If you’ve spent much time developing pages for the Web, you know that the Web is con-
stantly changing, and it can be hard to keep up with the latest languages and tools. This
book will help you add JavaScript to your web development toolbox, and I think you’ll
enjoy learning it.
JavaScript and Web StandardsWhen JavaScript first appeared in browsers, it had rather limited capabilities, and
JavaScript programmers have always pushed the envelope to take maximum advantage of
what the language was capable of. Unfortunately, this resulted in some bad practices, such
as scripts that only worked in one browser, and JavaScript gained a bit of a bad reputation.
Now, thanks to wide browser support for standards established by the W3C (World Wide
Web Consortium) and new technologies such as AJAX, JavaScript’s future is looking brighter
than ever, and a new, more responsible style of scripting is gaining favor. Unobtrusive
scripting focuses on adding interactive features while keeping the HTML simple and
standards-compliant.

Throughout this book, you’ll learn the best practices for using JavaScript responsibly and fol-
lowing web standards. All of the examples in this book avoid browser-specific techniques in
favor of standard techniques, and all of the examples will work in most modern browsers.
How to Use This BookThis book is divided into 24 lessons. Each covers a single JavaScript topic, and should take
about an hour to complete. The lessons start with the basics of JavaScript, and continue
with more advanced topics. You can study an hour a day, or whatever pace suits you. (If
you choose to forego sleep and do your studying in a single 24-hour period, you might have
what it takes to be a computer book author.)
Organization of This BookThis book is divided into six parts, each focusing on one area of JavaScript:
. Part I, “Introducing the Concept of Web Scripting and the JavaScript Language,”
introduces JavaScript, describes how it fits in with other languages, and explains the
basic language features of JavaScript. It also introduces the DOM (Document Object
Model), which connects JavaScript to web documents.
. Part II, “Learning JavaScript Basics,” covers the fundamentals of the JavaScript lan-
guage: variables, functions, objects, loops and conditions, and built-in functions.
You’ll also learn about third-party libraries that add functionality to JavaScript.
. Part III, “Learning More About the DOM,” digs deeper into the DOM objects you’ll use
in nearly every JavaScript program. It covers events, windows, and web forms. You’ll
also learn about CSS style sheets, and the DOM features that enable you to change
styles. Finally, you’ll learn about the W3C DOM, which enables you to modify any
part of a page using JavaScript.
. Part IV, “Working with Advanced JavaScript Features,” begins with a look at unobtrusive
scripting techniques to keep JavaScript from intruding on the functionality and validity
of HTML documents. You’ll also learn how to debug JavaScript applications, and finally
take a look at two cutting-edge JavaScript features: AJAX and Greasemonkey.
. Part V, “Building Multimedia Applications with JavaScript,” describes JavaScript’s fea-
tures for working with graphics, animation, sound, and browser plug-ins.
. Part VI, “Creating Complex Scripts,” focuses on helping you create complete
JavaScript applications. You’ll learn how to create drop-down menus, a card game
written in JavaScript, and other examples. In the last hour, you’ll learn about what’s
in store for JavaScript and what other languages you might want to learn next.
2
Sams Teach Yourself JavaScript in 24 Hours
▼
Conventions Used in This BookThis book contains special elements as described by the following:
These boxes highlight information that can make your JavaScript programming more efficient and effective.
These boxes provide additional information related to material you justread.
These boxes focus your attention on problems or side effects that canoccur in specific situations.
A special monospace font is used on programming-related terms and language.
Try It YourselfThe Try It Yourself section at the end of each chapter guides you through the process of
creating your own script or applying the techniques learned throughout the hour. This
will help you create practical applications of JavaScript based on what you’ve learned.
Q&A, Quiz, and ExercisesAt the end of each hour’s lesson, you’ll find three final sections. Q&A answers a few of the
most common questions about the hour’s topic. The Quiz tests your knowledge of the skills
you learned in that hour, and the Exercises offer ways for you to gain more experience with
the techniques the hour covers.
This Book’s WebsiteBecause JavaScript and the Web are constantly changing, you’ll need to stay up-to-date
after reading this book. This book’s website includes the latest updates as well as download-
able versions of the listings and graphics for the examples used in this book. To access the
book’s website, register your book at http://www.samspublishing.com/register.
Introduction
3
Did youKnow?
By theWay
WatchOut!
▲

The Author’s WebsiteThe author of this book, Michael Moncur, maintains a website about JavaScript at
http://www.jsworkshop.com/. There you’ll find regular updates on the JavaScript language
and the DOM, links to script examples, and detailed tutorial articles.
If you have questions or comments about this book, have noticed an error, or have
trouble getting one of the scripts to work, you can also reach the author by email at
[email protected]. (Please check the website first to see if your question has been
answered.)
4
Sams Teach Yourself JavaScript in 24 Hours
PART I:
Introducing the Concept ofWeb scripting and theJavaScript Language
HOUR 1 Understanding JavaScript 7
HOUR 2 Creating Simple Scripts 23
HOUR 3 Getting Started with JavaScript Programming 37
HOUR 4 Working with the Document Object Model (DOM) 49

This page intentionally left blank

HOUR 1
Understanding JavaScript
What You’ll Learn in This Hour:. What web scripting is and what it’s good for. How scripting and programming are different (and similar). What JavaScript is and where it came from. How to include JavaScript commands in a web page. How different browsers handle JavaScript. What JavaScript can do for your web pages. How to choose between JavaScript and alternative languages
The World Wide Web (WWW) began as a text-only medium—the first browsers didn’t even
support images within web pages. Although it’s still not quite ready to give television a
run for its money, the Web has come a long way since then.
Today’s websites can include a wealth of features: graphics, sounds, animation, video, and
occasionally useful content. Web scripting languages, such as JavaScript, are one of the
easiest ways to spice up a web page and to interact with users in new ways.
The first hour of this book introduces the concept of web scripting and the JavaScript lan-
guage. It also describes how JavaScript fits in with other web languages.
Learning Web Scripting BasicsIn the world of science fiction movies (and many other movies that have no excuse), com-
puters are often seen obeying commands in English. Although this might indeed happen
in the near future, computers currently find it easier to understand languages such as
BASIC, C, and Java.
If you know how to use HTML (Hypertext Markup Language) to create a web document,
you’ve already worked with one computer language. You use HTML tags to describe how
8 HOUR 1: Understanding JavaScript
you want your document formatted, and the browser obeys your commands and
shows the formatted document to the user.
Because HTML is a simple text markup language, it can’t respond to the user, make
decisions, or automate repetitive tasks. Interactive tasks such as these require a more
sophisticated language: a programming language, or a scripting language.
Although many programming languages are complex, scripting languages are gen-
erally simple. They have a simple syntax, can perform tasks with a minimum of
commands, and are easy to learn. Web scripting languages enable you to combine
scripting with HTML to create interactive web pages.
Scripts and ProgramsA movie or a play follows a script—a list of actions (or lines) for the actors to per-
form. A web script provides the same type of instructions for the web browser. A
script in JavaScript can range from a single line to a full-scale application. (In either
case, JavaScript scripts usually run within a browser.)
Is JavaScript a scripting language or a programming language? It depends on whoyou ask. We’ll refer to scripting throughout this book, but feel free to includeJavaScript programming on your résumé after you’ve finished this book.
Some programming languages must be compiled, or translated, into machine code
before they can be executed. JavaScript, on the other hand, is an interpreted lan-
guage: The browser executes each line of script as it comes to it.
There is one main advantage to interpreted languages: Writing or changing a script
is very simple. Changing a JavaScript script is as easy as changing a typical HTML
document, and the change is enacted as soon as you reload the document in the
browser.
Interpreted languages have their disadvantages—they can’t execute really quickly,so they’re not ideally suited for complicated work, such as graphics. Also, theyrequire the interpreter (in JavaScript’s case, usually a browser) in order to work.
Introducing JavaScriptJavaScript was developed by Netscape Communications Corporation, the maker of
the Netscape web browser. JavaScript was the first web scripting language to be sup-
ported by browsers, and it is still by far the most popular.
By theWay
By theWay
How JavaScript Fits into a Web Page 9
A bit of history: JavaScript was originally called LiveScript and was first introducedin Netscape Navigator 2.0 in 1995. It was soon renamed JavaScript to indicate amarketing relationship with Sun’s Java language.
JavaScript is almost as easy to learn as HTML, and it can be included directly in
HTML documents. Here are a few of the things you can do with JavaScript:
. Display messages to the user as part of a web page, in the browser’s status
line, or in alert boxes
. Validate the contents of a form and make calculations (for example, an order
form can automatically display a running total as you enter item quantities)
. Animate images or create images that change when you move the mouse over
them
. Create ad banners that interact with the user, rather than simply displaying a
graphic
. Detect the browser in use or its features and perform advanced functions only
on browsers that support them
. Detect installed plug-ins and notify the user if a plug-in is required
. Modify all or part of a web page without requiring the user to reload it
. Display or interact with data retrieved from a remote server
You can do all this and more with JavaScript, including creating entire applications.
We’ll explore the uses of JavaScript throughout this book.
How JavaScript Fits into a Web PageAs you hopefully already know, HTML is the language you use to create web docu-
ments. To refresh your memory, Listing 1.1 shows a short but sadly typical web
document.
LISTING 1.1 A Simple HTML Document<html><head><title>Our Home Page</title></head><body><h1>The American Eggplant Society</h1><p>Welcome to our Web page. Unfortunately,it’s still under construction.</p></body></html>
By theWay
10 HOUR 1: Understanding JavaScript
This document consists of a header within the <head> tags and the body of the page
within the <body> tags. To add JavaScript to a page, you’ll use a similar tag:
<script>.
The <script> tag tag>>tells the browser to start treating the text as a script, and
the closing </script> tag tells the browser to return to HTML mode. In most cases,
you can’t use JavaScript statements in an HTML document except within <script>
tags. The exception is event handlers, described later in this hour.
JavaScript and HTMLUsing the <script> tag>>tag, you can add a short script (in this case, just one line)
to a web document, as shown in Listing 1.2.
If you want to try this example in a browser but don’t want to type it, the HTMLdocument is available on this book’s website (as are all of the other listings).
LISTING 1.2 A Simple HTML Document with a Simple Script<html><head><title>Our Home Page</title></head><body><h1>The American Eggplant Society</h1><p>Welcome to our Web page. Unfortunately,it’s still under construction.We last worked on it on this date:<script language=”JavaScript” type=”text/javascript”>document.write(document.lastModified);</script></p></body></html>
JavaScript’s document.write statement, which you’ll learn more about later, sends
output as part of the web document. In this case, it displays the modification date of
the document.
Notice that the <script> tag in Listing 1.2 includes the parametertype=”text/javascript”. This specifies the scripting language to the browser.You can also specify a JavaScript version, as you’ll learn later in this hour.
In this example, we placed the script within the body of the HTML document. There
are actually four different places where you might use scripts:
Did youKnow?
By theWay
How JavaScript Fits into a Web Page 11
. In the body of the page—In this case, the script’s output is displayed as part of
the HTML document when the browser loads the page.
. In the header of the page between the <head> tags—Scripts in the header
don’t immediately affect the HTML document, but can be referred to by other
scripts. The header is often used for functions—groups of JavaScript statements
that can be used as a single unit. You will learn more about functions in Hour
3, “Getting Started with JavaScript Programming.”
. Within an HTML tag, such as <body> or <form>—This is called an event han-
dler and enables the script to work with HTML elements. When using JavaScript
in event handlers, you don’t need to use the <script> tag. You’ll learn more
about event handlers in Hour 3.
. In a separate file entirely—JavaScript supports the use of files with the .js
extension containing scripts; these can be included by specifying a file in the
<script> tag.
Using Separate JavaScript FilesWhen you create more complicated scripts, you’ll quickly find your HTML documents
become large and confusing. To avoid this, you can use one or more external JavaScript
files. These are files with the .js extension that contain JavaScript statements.
External scripts are supported by all modern browsers. To use an external script, you
specify its filename in the <script> tag:
<script language=”JavaScript” type=”text/javascript” src=”filename.js”></script>
Because you’ll be placing the JavaScript statements in a separate file, you don’t need
anything between the opening and closing <script> tags—in fact, anything between
them will be ignored by the browser.
You can create the .js file using a text editor. It should contain one or more
JavaScript commands, and only JavaScript—don’t include <script> tags, other
HTML tags, or HTML comments. Save the .js file in the same directory as the HTML
documents that refer to it. See the Try It Yourself section of Hour 2 for an example of
separate HTML and script files.
External JavaScript files have a distinct advantage: You can link to the same .jsfile from two or more HTML documents. Because the browser stores this file in itscache, this can reduce the time it takes your web pages to display.
Did youKnow?

12 HOUR 1: Understanding JavaScript
EventsMany of the useful things you can do with JavaScript involve interacting with the
user, and that means responding to events—for example, a link or a button being
clicked. You can define event handlers within HTML tags to tell the browser how to
respond to an event. For example, Listing 1.3 defines a button that displays a mes-
sage when clicked.
LISTING 1.3 A Simple Event Handler<html><head><title>Event Test</title></head><body><h1>Event Test</h1><button onclick=”alert(‘You clicked the button.’)”></body></html>
In Hour 9, “Responding to Events,” you’ll learn more about JavaScript’s event model
and creating simple and complex event handlers.
You can also use an external script to define event handlers. This is a good prac-tice because it lets you keep all of your JavaScript in one place, rather than scat-tered across the HTML document. See Hour 9 for details.
Browsers and JavaScriptLike HTML, JavaScript requires a web browser to be displayed, and different browsers
may display it differently. Unlike HTML, the results of a browser incompatibility
with JavaScript are more drastic: Rather than simply displaying your text incorrect-
ly, the script may not execute at all, may display an error message, or may even
crash the browser.
We’ll take a quick look at the way different browsers—and different versions of the
same browser—treat JavaScript in the following sections.
The DOM (Document Object Model)Let’s start with one reason you shouldn’t have to think too much about different
browsers. Almost everything you do with JavaScript involves working with the
Document Object Model (DOM)—a standardized set of objects that represent a web
document.
By theWay
Browsers and JavaScript 13
The DOM includes objects that enable you to work with all aspects of the current
document. For example, you can read the value the user types in a form field, or the
filename of the current page.
The DOM is defined by the W3C (World Wide Web Consortium) and the latest
browsers support DOM levels 1 and 2, which enable you to control all parts of a web
page with JavaScript.
Early versions of the DOM only allowed JavaScript to manipulate certain parts of apage—such as form elements and links. The new DOM enables you to work withevery element defined in HTML.
Internet ExplorerMicrosoft’s Internet Explorer (IE) browser was a latecomer to the Internet, but has
now become the most popular browser. The latest versions of IE support most of
JavaScript 1.5 and the W3C DOM.
At this writing, IE 6.0 is the latest released version, and IE 7.0 is in beta. Although
most of the examples in this book will work in IE 5.0 and later, I recommend testing
your scripts with the latest browsers.
Netscape and FirefoxNetscape, which for a time made the Web’s most popular browser, established the
Mozilla Foundation to maintain an open-source version of the browser. This led to
the Mozilla browser and more recently, Firefox, a streamlined browser based on the
Mozilla engine.
Firefox has recently begun to challenge Microsoft’s browser dominance, with an esti-
mated 10% of web users. That might not sound like many, but ignoring Firefox
means ignoring at least 10% of your audience, and on many sites the percentage is
much higher.
Firefox is available for Windows, Macintosh, and Linux platforms and is free, open-
source software. You can download Firefox from the Mozilla website at
http://www.mozilla.org/.
At this writing, the current version of Firefox is 1.5. Most of the scripts in this book will
work with Firefox 1.0 or later, as well as versions 6 and 7 of the Netscape browser.
Did youKnow?
14 HOUR 1: Understanding JavaScript
Netscape 4.0 and Internet Explorer 4.0 supported incompatible versions ofDynamic HTML (DHTML)—an attempt to overcome the limits of the current DOM.The new W3C DOM eliminates the need for these proprietary models, and you cannow write standard code that will work on most modern browsers.
Other BrowsersAlthough Internet Explorer and Firefox are the most popular browsers, there are
many other browsers. Here are two less-common browsers you’ll probably hear
about:
. Safari, Apple’s browser, is included with MacOS and is the default browser on
most Macintosh computers.
. Opera, from Opera Software, is an alternative browser notable for its support
of many platforms, including mobile phones. The latest version of Opera, 8.0,
supports the W3C DOM and JavaScript 1.5, and should work with most scripts
in this book.
There are many other browsers out there, but you don’t need to know all of themto create working scripts—as long as you follow the standards, your scripts willwork on browsers that support JavaScript almost every time. This book will focuson teaching standards-based scripting that will work in all modern browsers.
Versions of JavaScriptThe JavaScript language has evolved since its original release in Netscape 2.0. There
have been several versions of JavaScript:
. JavaScript 1.0, the original version, is supported by Netscape 2.0 and Internet
Explorer 3.0.
. JavaScript 1.1 is supported by Netscape 3.0 and mostly supported by Internet
Explorer 4.0.
. JavaScript 1.2 is supported by Netscape 4.0 and partially supported by Internet
Explorer 4.0.
. JavaScript 1.3 is supported by Netscape 4.5 and Internet Explorer 5.0 and 6.0.
. JavaScript 1.5 is partially supported by Internet Explorer 6.0, and supported by
Netscape 6.0 and Firefox 1.0.
. JavaScript 1.6 is currently supported by Firefox 1.5.
By theWay
Did youKnow?
Specifying JavaScript Versions 15
Each of these versions is an improvement over the previous version and includes a
number of new features. With rare exception, browsers that support the new version
will also support scripts written for earlier versions.
The European Computer Manufacturing Association (ECMA) has finalized the ECMA-
262 specification for ECMAScript, a standardized version of JavaScript. JavaScript 1.3
follows the ECMA-262 standard, and JavaScript 1.5 follows ECMA-262 revision 3.
Another language you might hear of is JScript. This is how Microsoft refers to itsimplementation of JavaScript, which is generally compatible with the standard version.
The Mozilla Foundation, the open-source offshoot of Netscape that develops the
Firefox browser, is also working with ECMA on JavaScript 2.0, a future version that
will correspond with the fourth edition of the ECMAScript standard. JavaScript 2.0
will improve upon earlier versions with a more modular approach, better object sup-
port, and features to make JavaScript useful as a general-purpose scripting language
as well as a web language.
Specifying JavaScript VersionsAs mentioned earlier in this hour, you can specify a version of JavaScript in the
<script> tag. For example, this tag specifies JavaScript version 1.3:
<script language=”JavaScript1.3” type=”text/javascript”>
There are two ways of specifying the JavaScript language in the <script> tag. The
old method uses the language attribute, and the new method recommended by the
HTML 4.0 specification uses the type attribute. To maintain compatibility with older
browsers, you can use both attributes.
When you specify a version number in the language attribute, this allows your script
to execute only if the browser supports the version you specified or a later version.
When the <script> tag doesn’t specify a version number, all browsers that support
JavaScript will run the script. Because most of the JavaScript language has remained
the same since version 1.0, you will rarely need to worry about JavaScript versions.
In most cases, you shouldn’t specify a JavaScript version at all. This allows yourscript to run on all of the browsers that support JavaScript. You should only speci-fy a particular version when your script uses features unique to a specific version.
By theWay
Did youKnow?
16 HOUR 1: Understanding JavaScript
JavaScript Beyond the BrowserAlthough JavaScript programs traditionally run within a web browser, and web-
based JavaScript is the focus of this book, JavaScript is becoming increasingly popu-
lar in other applications. Here are a few examples:
. Adobe Dreamweaver and Flash, used for web applications and multimedia,
can be extended with JavaScript.
. Several server-side versions of JavaScript are available. These run within a web
server rather than a browser.
. Microsoft’s Windows Scripting Host (WSH) supports JScript, Microsoft’s imple-
mentation of JavaScript, as a general-purpose scripting language for
Windows. Unfortunately, the most popular applications developed for WSH so
far have been email viruses.
. Microsoft’s Common Language Runtime (CLR), part of the .NET framework,
supports JavaScript.
Along with these examples, many of the changes in the upcoming JavaScript 2.0
are designed to make it more suitable as a general-purpose scripting language.
Exploring JavaScript’s CapabilitiesIf you’ve spent any time browsing the Web, you’ve undoubtedly seen lots of exam-
ples of JavaScript in action. Here are some brief descriptions of typical applications
for JavaScript, all of which you’ll explore further, later in this book.
Improving NavigationSome of the most common uses of JavaScript are in navigation systems for websites.
You can use JavaScript to create a navigation tool—for example, a drop-down menu
to select the next page to read, or a submenu that pops up when you hover over a
navigation link.
When it’s done right, this kind of JavaScript interactivity can make a site easier to
use, while remaining usable for browsers that don’t support JavaScript.
Validating FormsForm validation is another common use of JavaScript. A simple script can read val-
ues the user types into a form and make sure they’re in the right format, such as
with ZIP Codes or phone numbers. This allows users to notice common errors and
Alternatives to JavaScript 17
fix them without waiting for a response from the web server. You’ll learn how to
write form validation scripts in Hour 11, “Getting Data with Forms.”
Special EffectsOne of the earliest and most annoying uses of JavaScript was to create attention-get-
ting special effects—for example, scrolling a message in the browser’s status line or
flashing the background color of a page.
These techniques have fortunately fallen out of style, but thanks to the W3C DOM
and the latest browsers, some more impressive effects are possible with JavaScript—
for example, creating objects that can be dragged and dropped on a page, or creat-
ing fading transitions between images in a slideshow.
Remote Scripting (AJAX)For a long time, the biggest limitation of JavaScript was that there was no way for it
to communicate with a web server. For example, you could use it to verify that a
phone number had the right number of digits, but not to look up the user’s location
in a database based on the number.
Now that some of JavaScript’s advanced features are supported by most browsers,
this is no longer the case. Your scripts can get data from a server without loading a
page, or send data back to be saved. These features are collectively known as AJAX
(Asynchronous JavaScript And XML), or remote scripting. You’ll learn how to develop
AJAX scripts in Hour 17, “AJAX: Remote Scripting.”
You’ve seen AJAX in action if you’ve used Google’s Gmail mail application, or recent
versions of Yahoo! Mail or Microsoft Hotmail. All of these use remote scripting to
present you with a responsive user interface that works with a server in the back-
ground.
Alternatives to JavaScriptJavaScript is not the only language used on the Web, and in some cases, it may not
be the right tool for the job. Other languages, such as Java, can do some things bet-
ter than JavaScript. In the following sections, we’ll look at a few other commonly
used web languages and their advantages.
JavaJava is a programming language developed by Sun Microsystems that can be used
to create applets, or programs that execute within a web page.
18 HOUR 1: Understanding JavaScript
Java is a compiled language, but the compiler produces code for a virtual machine
rather than a real computer. The virtual machine is a set of rules for bytecodes and
their meanings, with capabilities that fit well into the scope of a web browser.
The virtual machine code is then interpreted by a web browser. This allows the same
Java applet to execute the same way on PCs, Macintoshes, and UNIX machines, and
on different browsers.
Java is also a densely populated island in Indonesia and a slang term for coffee.This has resulted in a widespread invasion of coffee-related terms in computer literature.
At this point, we need to make one thing clear: Java is a fine language, but you
won’t be learning it in this book. Although their names and some of their com-
mands are similar, JavaScript and Java are entirely different languages.
ActiveXActiveX is a specification developed by Microsoft that enables ordinary Windows
programs to be run within a web page. ActiveX programs can be written in lan-
guages such as Visual C++ and Visual Basic, and they are compiled before being
placed on the web server.
ActiveX applications, called controls, are downloaded and executed by the web
browser, like Java applets. Unlike Java applets, controls can be installed permanent-
ly when they are downloaded, eliminating the need to download them again.
ActiveX’s main advantage is that it can do just about anything. This can also be a
disadvantage: Several enterprising programmers have already used ActiveX to bring
exciting new capabilities to web pages, such as “the web page that turns off your
computer” and “the web page that formats your disk drive.”
Fortunately, ActiveX includes a signature feature that identifies the source of the con-
trol and prevents controls from being modified. Although this won’t prevent a control
from damaging your system, you can specify which sources of controls you trust.
ActiveX has two main disadvantages: First, it isn’t as easy to program as a scripting
language or Java. Second, ActiveX is proprietary—it works only in Microsoft Internet
Explorer, and only under Windows platforms.
VBScriptVBScript, sometimes known as Visual Basic Scripting Edition, is Microsoft’s answer to
JavaScript. Just as JavaScript’s syntax is loosely based on Java, VBScript’s syntax is
By theWay
Alternatives to JavaScript 19
loosely based on Microsoft Visual Basic, a popular programming language for
Windows machines.
Like JavaScript, VBScript is a simple scripting language, and you can include
VBScript statements within an HTML document. VBScript can work with the DOM in
the same way as JavaScript. To begin a VBScript script, you use the <script LAN-
GUAGE=”VBScript”> tag.
VBScript can do many of the same things as JavaScript, and it even looks similar in
some cases. It has two main advantages:
. For those who already know Visual Basic, it may be easier to learn than
JavaScript.
. It is closely integrated with ActiveX, Microsoft’s standard for web-embedded
applications.
VBScript’s main disadvantage is that it is supported only by Microsoft Internet
Explorer. JavaScript, on the other hand, is supported by Netscape, Internet Explorer,
and several other browsers. JavaScript is a much more popular language, and you
can see it in use all over the Web.
CGI and Server-Side ScriptingCGI (Common Gateway Interface) is not really a language, but a specification that
enables programs to run on web servers. CGI programs can be written in any num-
ber of languages, including Perl, C, and Visual Basic.
Along with traditional CGI, scripting languages such as Microsoft’s Active Server
Pages, Java Server Pages, Cold Fusion, and PHP are often used on web servers. A
server-side implementation of JavaScript is also available.
Server-side programs are heavily used on the Web. Almost every time you type infor-
mation into a form and press a button to send it to a website, the data is processed
by a server-side application.
The main difference between JavaScript and server-side languages is that JavaScript
applications execute on the client (the web browser) and server-side applications
execute on the web server. The main disadvantage of this approach is that, because
the data must be sent to the web server and back, response time might be slow.
On the other hand, CGI can do things JavaScript can’t do. In particular, it can read
and write files on the server and interact with other server components, such as
databases. Although a client-side JavaScript program can read information from a
form and then manipulate it, it can’t store the data on the web server.
20 HOUR 1: Understanding JavaScript
JavaScript is often used in conjunction with server-side languages. In its simplest
form, this means JavaScript handles client-side chores such as form validation,
whereas a server-side language receives data and stores it in a database. Using
AJAX, this interaction can be instantaneous and does not even require loading a
new page.
CGI and server-side programming are outside the focus of this book. You canlearn more about these technologies with other Sams books, including TeachYourself CGI Programming in 24 Hours, Teach Yourself Perl in 24 Hours, and TeachYourself PHP in 24 Hours. See Appendix A, “Other JavaScript Resources,” for moresources of information.
SummaryDuring this hour, you’ve learned what web scripting is and what JavaScript is.
You’ve also learned how to insert a script into an HTML document or refer to an
external JavaScript file, what sorts of things JavaScript can do, and how JavaScript
differs from other web languages.
If you’re waiting for some real JavaScript code, look no further. The next hour,
“Creating Simple Scripts,” guides you through the process of creating several work-
ing JavaScript examples. You’ll also learn about the tools you’ll need to work with
JavaScript.
Q&AQ. Do I need to test my JavaScript on more than one browser?
A. In an ideal world, any script you write that follows the standards for
JavaScript will work in all browsers, and 90% of the time that’s true in the real
world. But browsers do have their quirks, and you should test your scripts on
Internet Explorer and Firefox at a minimum.
Q. If I plan to learn Java or CGI anyway, will I have any use for JavaScript?
A. Certainly. JavaScript is the ideal tool for many applications, such as form vali-
dation. Although Java and CGI have their uses, they can’t do all that
JavaScript can do.
Q. Are there browsers out there that don’t support JavaScript?
A. Yes. A few niche browsers, such as text-based browsers and tools for blind
users, have partial JavaScript support or no support. Mobile phone browsers
Did youKnow?
Quiz Answers 21
often support little or no JavaScript. Finally, many users of Internet Explorer or
Firefox have JavaScript support turned off, and some corporate firewalls and
ad-blocking software block JavaScript. Hour 2 describes how to account for
browsers that don’t support JavaScript.
Quiz QuestionsTest your knowledge of JavaScript by answering the following questions:
1. Why do JavaScript and Java have similar names?
a. JavaScript is a stripped-down version of Java.
b. Netscape’s marketing department wanted them to sound related.
c. They both originated on the island of Java.
2. When a user views a page containing a JavaScript program, which machine
actually executes the script?
a. The user’s machine running a web browser
b. The web server
c. A central machine deep within Netscape’s corporate offices
3. Which of the following languages is supported by both Microsoft Internet
Explorer and Netscape?
a. VBScript
b. ActiveX
c. JavaScript
Quiz Answers1. b. Although some of the syntax is similar, JavaScript got its Java-based name
mostly because of a marketing relationship.
2. a. JavaScript programs execute on the web browser. (There is actually a server-
side version of JavaScript, but that’s another story.)
3. c. JavaScript is supported by both Netscape and Internet Explorer, although
the implementations are not identical.
22 HOUR 1: Understanding JavaScript
ExercisesIf you want to learn a bit about JavaScript or check out the latest developments
before you proceed with the next hour, perform these activities:
. Visit this book’s website to check for news about JavaScript and updates to the
scripts in this book.
. View some of the examples on this book’s website to see JavaScript in action.

HOUR 2
Creating Simple Scripts
What You’ll Learn in This Hour:. The software tools you will need to create and test scripts. Beginning and ending scripts. Formatting JavaScript statements. How a script can display a result. Including a script within a web document. Testing a script using browsers. Modifying a script. Dealing with errors in scripts. Moving scripts into separate files
As you learned in Hour 1, “Understanding JavaScript,” JavaScript is a scripting language
for web pages. You can include JavaScript commands directly in the HTML document, and
the script will be executed when the page is viewed in a browser.
During this hour, you will create a simple script, edit it, and test it using a web browser.
Along the way you’ll learn the basic tasks involved in creating and using scripts.
Tools for ScriptingUnlike many programming languages, you won’t need any special software to create
JavaScript scripts. In fact, you probably already have everything you need.
Text EditorsThe first tool you’ll need to work with JavaScript is a text editor. JavaScript scripts are
stored in simple text files, usually as part of HTML documents. Any editor that can store
ASCII text files will work.
24 HOUR 2: Creating Simple Scripts
You can choose from a wide range of editors, from simple text editors to word
processors. If you don’t have a favorite editor already, a simple editor is most likely
included with your computer. For Windows computers, the Notepad accessory will
work just fine.
If you use a word processor to create JavaScript programs, be sure you save thefiles as ASCII text rather than as word processing documents. Otherwise, thebrowser might not recognize them.
A variety of dedicated HTML editors is also available and will work with JavaScript.
In fact, many include features specifically for JavaScript—for example, color-coding
the various JavaScript statements to indicate their purposes, or even creating simple
scripts automatically.
For Windows computers, here are a few recommended editors:
. HomeSite—An excellent HTML editor that includes JavaScript support. HomeSite
is included as part of Adobe Dreamweaver and is also available separately.
. Microsoft FrontPage 2003—Microsoft’s visual HTML editor. The Script Builder
component enables you to easily create simple scripts.
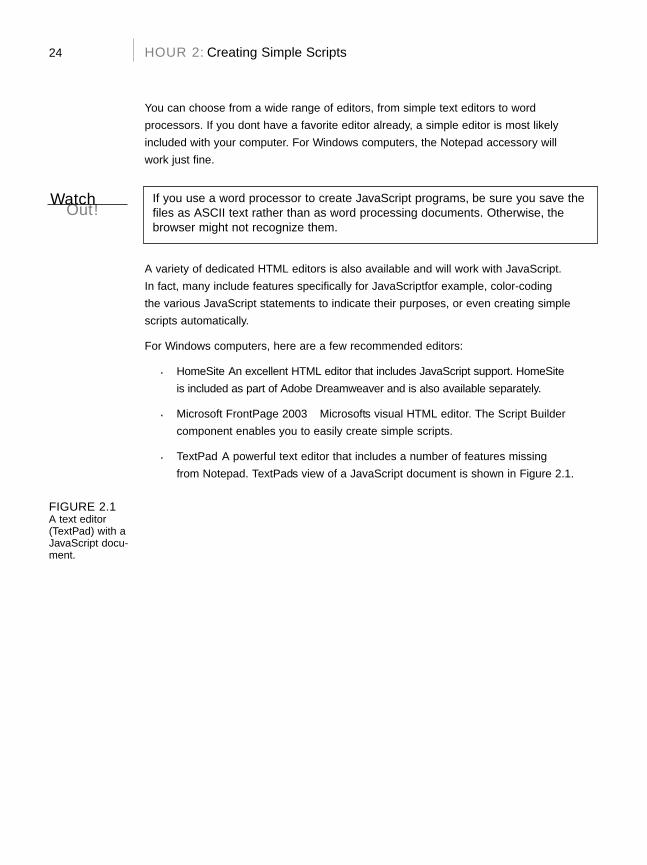
. TextPad—A powerful text editor that includes a number of features missing
from Notepad. TextPad’s view of a JavaScript document is shown in Figure 2.1.
WatchOut!
FIGURE 2.1A text editor(TextPad) with aJavaScript docu-ment.
Displaying Time with JavaScript 25
The following editors are available for both Windows and Macintosh:
. Adobe Dreamweaver—A visually oriented editor that works with HTML,
JavaScript, and Macromedia’s Flash plug-in.
. Adobe GoLive—A visual and HTML editor that also includes features for
designing and organizing the structure of large sites.
Additionally for the Macintosh, BBEdit, TextWrangler, and Alpha are good HTML
editors that you can use to create web pages and scripts.
Appendix B, “Tools for JavaScript Developers,” includes web addresses to down-load these and other HTML and JavaScript editors.
BrowsersYou’ll need two other things to work with JavaScript: a web browser and a computer
to run it on. Because this book covers new features introduced up to JavaScript 1.5
and the latest W3C DOM, I recommend that you use the latest version of Mozilla
Firefox or Microsoft Internet Explorer. See the Mozilla (http://www.mozilla.com) or
Microsoft (http://www.microsoft.com) website to download a copy.
At a minimum, you should have Firefox 1.0, Netscape 7.0, or Internet Explorer 6.0
or later. Although Netscape 4.x and Internet Explorer 4 will run many of the scripts
in this book, they don’t support a lot of the latest features you’ll learn about.
You can choose whichever browser you like for your web browsing, but for develop-
ing JavaScript you should have more than one browser—at a minimum, Firefox and
Internet Explorer. This will allow you to test your scripts in the common browsers
users will employ on your site.
If you plan on making your scripts available over the Internet, you’ll also need aweb server, or access to one. However, you can use most of the JavaScript exam-ples in this book directly from your computer’s hard disk.
Displaying Time with JavaScriptOne common and easy use for JavaScript is to display dates and times. Because
JavaScript runs on the browser, the times it displays will be in the user’s current time
zone. However, you can also use JavaScript to calculate “universal” (UTC) time.
By theWay
By theWay
26 HOUR 2: Creating Simple Scripts
UTC stands for Universal Time (Coordinated), and is the atomic time standardbased on the old GMT (Greenwich Mean Time) standard. This is the time at thePrime Meridian, which runs through Greenwich, London, England.
As a basic introduction to JavaScript, you will now create a simple script that displays
the current time and the UTC time within a web page.
Beginning the ScriptYour script, like most JavaScript programs, begins with the HTML <script> tag. As
you learned in Hour 1, you use the <script> and </script> tags to enclose a script
within the HTML document.
Remember to include only valid JavaScript statements between the starting andending <script> tags. If the browser finds anything but valid JavaScript state-ments within the <script> tags, it will display a JavaScript error message.
To begin creating the script, open your favorite text editor and type the beginning
and ending <script> tags as shown.
<script LANGUAGE=”JavaScript” type=”text/javascript”></script>
Because this script does not use any of the new features of JavaScript 1.1 or later,
you won’t need to specify a version number in the <script> tag. This script should
work with all browsers going back to Netscape 2.0 or Internet Explorer 3.0.
Adding JavaScript StatementsYour script now needs to determine the local and UTC times, and then display them
to the browser. Fortunately, all of the hard parts, such as converting between date
formats, are built in to the JavaScript interpreter.
Storing Data in VariablesTo begin the script, you will use a variable to store the current date. You will learnmore about variables in Hour 5, “Using Variables, Strings, and Arrays.” A variable isa container that can hold a value—a number, some text, or in this case, a date.
To start writing the script, add the following line after the first <script> tag. Be sureto use the same combination of capital and lowercase letters in your version becauseJavaScript commands and variable names are case sensitive.
now = new Date();
By theWay
WatchOut!
Creating Output 27
This statement creates a variable called now and stores the current date and time in
it. This statement and the others you will use in this script use JavaScript’s built-in
Date object, which enables you to conveniently handle dates and times. You’ll learn
more about working with dates in Hour 8, “Using Built-in Functions and Libraries.”
Notice the semicolon at the end of the previous statement. This tells the browserthat it has reached the end of a statement. Semicolons are optional, but using themhelps you avoid some common errors. We’ll use them throughout this book for clarity.
Calculating the ResultsInternally, JavaScript stores dates as the number of milliseconds since January 1,
1970. Fortunately, JavaScript includes a number of functions to convert dates and
times in various ways, so you don’t have to figure out how to convert milliseconds to
day, date, and time.
To continue your script, add the following two statements before the final </script>
tag:
localtime = now.toString();utctime = now.toGMTString();
These statements create two new variables: localtime, containing the current time
and date in a nice readable format, and utctime, containing the UTC equivalent.
The localtime and utctime variables store a piece of text, such as January 1,2001 12:00 PM. In programming parlance, a piece of text is called a string. Youwill learn more about strings in Hour 5.
Creating OutputYou now have two variables—localtime and utctime—which contain the results
we want from our script. Of course, these variables don’t do us much good unless we
can see them. JavaScript includes a number of ways to display information, and one
of the simplest is the document.write statement.
The document.write statement displays a text string, a number, or anything else
you throw at it. Because your JavaScript program will be used within a web page,
the output will be displayed as part of the page. To display the result, add these
statements before the final </script> tag:
document.write(“<b>Local time:</b> “ + localtime + “<br>”);document.write(“<b>UTC time:</b> “ + utctime);
By theWay
By theWay
28 HOUR 2: Creating Simple Scripts
These statements tell the browser to add some text to the web page containing your
script. The output will include some brief strings introducing the results, and the
contents of the localtime and utctime variables.
Notice the HTML tags, such as <b>, within the quotation marks—because
JavaScript’s output appears within a web page, it needs to be formatted using
HTML. The <br> tag in the first line ensures that the two times will be displayed on
separate lines.
Notice the plus signs (+) used between the text and variables in the previousstatements. In this case, it tells the browser to combine the values into one stringof text. If you use the plus sign between two numbers, they are added together.
Adding the Script to a Web PageYou should now have a complete script that calculates a result and displays it. Your
listing should match Listing 2.1.
LISTING 2.1 The Complete Date and Time Script<script language=”JavaScript” type=”text/javascript”>now = new Date();localtime = now.toString();utctime = now.toGMTString();document.write(“<b>Local time:</b> “ + localtime + “<BR>”);document.write(“<b>UTC time:</b> “ + utctime);</script>
To use your script, you’ll need to add it to an HTML document. In its most basic
form, the HTML document should include opening and closing <html> tags, <head>
tags, and <body> tags.
If you add these tags to the document containing your script along with a descrip-
tive heading, you should end up with something like Listing 2.2.
LISTING 2.2 The Date and Time Script in an HTML Document<html><head><title>Displaying Times and Dates</title></head><body><h1>Current Date and Time</h1><p><script language=”JavaScript” type=”text/javascript”>now = new Date();localtime = now.toString();utctime = now.toGMTString();document.write(“<b>Local time:</b> “ + localtime + “<BR>”);
By theWay
Testing the Script 29
document.write(“<b>UTC time:</b> “ + utctime);</script></p></body></html>
Now that you have a complete HTML document, save it with the .htm or .html
extension.
Notepad and other Windows text editors might try to be helpful and add the .txtextension to your script. Be sure your saved file has the correct extension.
Testing the ScriptTo test your script, you simply need to load the HTML document you created in a
web browser. Start Netscape or Internet Explorer and select Open from the File
menu. Click the Choose File or Browse button, and then find your HTML file. After
you’ve selected it, click the Open button to view the page.
If you typed the script correctly, your browser should display the result of the script,
as shown in Figure 2.2. (Of course, your result won’t be the same as mine, but it
should be the same as the setting of your computer’s clock.)
A note about Internet Explorer 6.0 and above: Depending on your security settings,
the script might not execute, and a yellow highlighted bar on the top of the browser
might display a security warning. In this case, click the yellow bar and select Allow
Blocked Content to allow your script to run. (This happens because the default secu-
rity settings allow JavaScript in online documents, but not in local files.)
By theWay
FIGURE 2.2Firefox displaysthe results ofthe Date andTime script.
You can download the HTML document for this hour from this book’s website. Ifthe version you type doesn’t work, try downloading the online version.
Did youKnow?
30 HOUR 2: Creating Simple Scripts
Modifying the ScriptAlthough the current script does indeed display the current date and time, its display
isn’t nearly as attractive as the clock on your wall or desk. To remedy that, you can
use some additional JavaScript features and a bit of HTML to display a large clock.
To display a large clock, we need the hours, minutes, and seconds in separate vari-
ables. Once again, JavaScript has built-in functions to do most of the work:
hours = now.getHours();mins = now.getMinutes();secs = now.getSeconds();
These statements load the hours, mins, and secs variables with the components of
the time using JavaScript’s built-in date functions.
After the hours, minutes, and seconds are in separate variables, you can create doc-
ument.write statements to display them:
document.write(“<h1>”);document.write(hours + “:” + mins + “:” + secs);document.write(“</h1>”);
The first statement displays an HTML <h1> header tag to display the clock in a large
typeface. The second statement displays the hours, mins, and secs variables, sepa-
rated by colons, and the third adds the closing </h1> tag.
You can add the preceding statements to the original date and time script to add the
large clock display. Listing 2.3 shows the complete modified version of the script.
LISTING 2.3 The Date and Time Script with Large Clock Display<html><head><title>Displaying Times and Dates</title></head><body><h1>Current Date and Time</h1><p><script language=”JavaScript”>now = new Date();localtime = now.toString();utctime = now.toGMTString();document.write(“<b>Local time:</b> “ + localtime + “<BR>”);document.write(“<b>UTC time:</b> “ + utctime);hours = now.getHours();mins = now.getMinutes();secs = now.getSeconds();document.write(“<h1>”);document.write(hours + “:” + mins + “:” + secs);document.write(“</h1>”);</script></p></body></html>
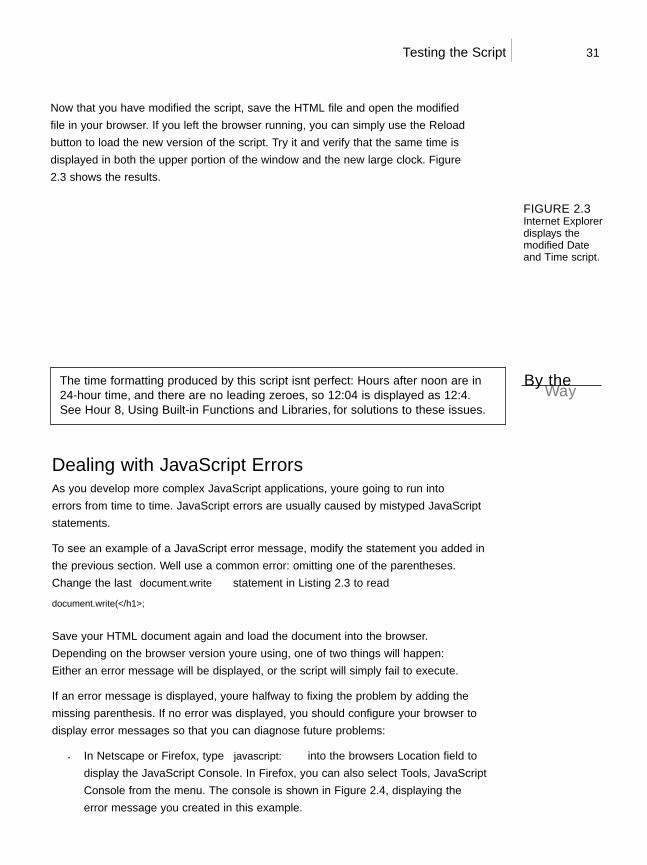
Testing the Script 31
Now that you have modified the script, save the HTML file and open the modified
file in your browser. If you left the browser running, you can simply use the Reload
button to load the new version of the script. Try it and verify that the same time is
displayed in both the upper portion of the window and the new large clock. Figure
2.3 shows the results.
FIGURE 2.3Internet Explorerdisplays themodified Dateand Time script.
The time formatting produced by this script isn’t perfect: Hours after noon are in24-hour time, and there are no leading zeroes, so 12:04 is displayed as 12:4.See Hour 8, “Using Built-in Functions and Libraries,” for solutions to these issues.
Dealing with JavaScript ErrorsAs you develop more complex JavaScript applications, you’re going to run into
errors from time to time. JavaScript errors are usually caused by mistyped JavaScript
statements.
To see an example of a JavaScript error message, modify the statement you added in
the previous section. We’ll use a common error: omitting one of the parentheses.
Change the last document.write statement in Listing 2.3 to read
document.write(“</h1>”;
Save your HTML document again and load the document into the browser.
Depending on the browser version you’re using, one of two things will happen:
Either an error message will be displayed, or the script will simply fail to execute.
If an error message is displayed, you’re halfway to fixing the problem by adding the
missing parenthesis. If no error was displayed, you should configure your browser to
display error messages so that you can diagnose future problems:
. In Netscape or Firefox, type javascript: into the browser’s Location field to
display the JavaScript Console. In Firefox, you can also select Tools, JavaScript
Console from the menu. The console is shown in Figure 2.4, displaying the
error message you created in this example.
By theWay
▼
32 HOUR 2: Creating Simple Scripts
. In Internet Explorer, select Tools, Internet Options. On the Advanced page,
uncheck the Disable Script Debugging box and check the Display a
Notification About Every Script Error box. (If this is disabled, a yellow icon in
the status bar will still notify you of errors.)
Notice the field at the top of the JavaScript Console. This enables you to type aJavaScript statement, which will be executed immediately. This is a handy way totest JavaScript’s features.
By theWay
FIGURE 2.4Firefox’sJavaScriptConsole dis-plays an errormessage.
The error we get in this case is missing ) after argument list (Firefox) or
Expected ‘)’ (Internet Explorer), which turns out to be exactly the problem. Be
warned, however, that error messages aren’t always this enlightening.
While Internet Explorer displays error dialog boxes for each error, Firefox’s
JavaScript Console displays a single list of errors and allows you to test commands.
For this reason, you might find it useful to install Firefox for debugging and testing
JavaScript, even if Internet Explorer is your primary browser.
As you develop larger JavaScript applications, finding and fixing errors becomesmore important. You’ll learn more about dealing with JavaScript errors in Hour 16,“Debugging JavaScript Applications.”
Try It Yourself
Using a Separate JavaScript FileAlthough simple scripts like this one can be embedded in an HTML file, as in the
previous example, it’s good practice to separate the HTML and JavaScript by using a
separate JavaScript file. This has a few advantages:
. Browsers with JavaScript disabled, or older browsers that don’t support it, will
ignore the script.
Did youKnow?
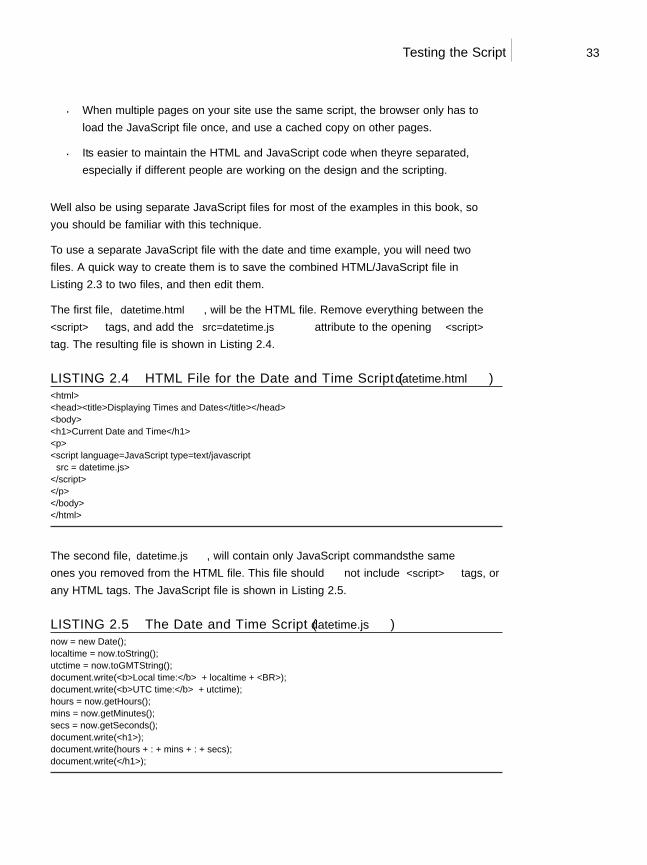
Testing the Script 33
. When multiple pages on your site use the same script, the browser only has to
load the JavaScript file once, and use a cached copy on other pages.
. It’s easier to maintain the HTML and JavaScript code when they’re separated,
especially if different people are working on the design and the scripting.
We’ll also be using separate JavaScript files for most of the examples in this book, so
you should be familiar with this technique.
To use a separate JavaScript file with the date and time example, you will need two
files. A quick way to create them is to save the combined HTML/JavaScript file in
Listing 2.3 to two files, and then edit them.
The first file, datetime.html, will be the HTML file. Remove everything between the
<script> tags, and add the src=”datetime.js” attribute to the opening <script>
tag. The resulting file is shown in Listing 2.4.
LISTING 2.4 HTML File for the Date and Time Script (datetime.html)<html><head><title>Displaying Times and Dates</title></head><body><h1>Current Date and Time</h1><p><script language=”JavaScript” type=”text/javascript”src = “datetime.js”></script></p></body></html>
The second file, datetime.js, will contain only JavaScript commands—the same
ones you removed from the HTML file. This file should not include <script> tags, or
any HTML tags. The JavaScript file is shown in Listing 2.5.
LISTING 2.5 The Date and Time Script (datetime.js)now = new Date();localtime = now.toString();utctime = now.toGMTString();document.write(“<b>Local time:</b> “ + localtime + “<BR>”);document.write(“<b>UTC time:</b> “ + utctime);hours = now.getHours();mins = now.getMinutes();secs = now.getSeconds();document.write(“<h1>”);document.write(hours + “:” + mins + “:” + secs);document.write(“</h1>”);
34 HOUR 2: Creating Simple Scripts
If Internet Explorer displays a warning message in a yellow bar at the top of thebrowser window instead of executing your script, simply click the bar and selectAllow Blocked Content.
As you create larger scripts, you’ll find it far less confusing to keep the HTML and
JavaScript in separate files. The next hour discusses this and other best practices for
JavaScript.
SummaryDuring this hour, you wrote a simple JavaScript program and tested it using a
browser. You learned about the tools you need to work with JavaScript—basically, an
editor and a browser. You also learned how to modify and test scripts, and what
happens when a JavaScript program runs into an error. Finally, you learned how to
use scripts in separate JavaScript files.
In the process of writing this script, you have used some of JavaScript’s basic fea-
tures: variables, the document.write statement, and functions for working with
dates and times.
Now that you’ve learned a bit of JavaScript syntax, you’re ready to learn more of
the details. You’ll do that in Hour 3, “Getting Started with JavaScript Programming.”
Q&AQ. Why do I need more than one browser to test scripts? Won’t JavaScript
behave the same way on both browsers?
A. Although JavaScript is standardized, the browsers don’t interpret it in exactly
the same way. Your script might have minor flaws that have no effect in one
browser but cause an error in another. Also, as you move on to more
advanced features of JavaScript, you’ll need to deal with browsers in different
ways, as described in Hour 15, “Unobtrusive Scripting,” and you’ll need to test
each one.
Q. When I try to run my script, the browser displays the actual script in thebrowser window instead of executing it. What did I do wrong?
By theWay
▲
Quiz Questions 35
A. This is most likely caused by one of three errors. First, you might be missing
the beginning or ending <script> tags. Check them, and verify that the first
reads <script LANGUAGE=”JavaScript” type=”text/javascript”>. Second,
your file might have been saved with a .txt extension, causing the browser to
treat it as a text file. Rename it to .htm or .html to fix the problem. Third,
make sure your browser supports JavaScript, and that it is not disabled in the
Preferences dialog.
Q. Why are the <b> and <br> tags allowed in the statements to print the time?I thought HTML tags weren’t allowed within the <script> tags.
A. Because this particular tag is inside quotation marks, it’s considered a valid part
of the script. The script’s output, including any HTML tags, is interpreted and
displayed by the browser. You can use other HTML tags within quotation marks
to add formatting, such as the <h1> tags we added for the large clock display.
Quiz QuestionsTest your knowledge of JavaScript by answering the following questions:
1. What software do you use to create and edit JavaScript programs?
a. A browser
b. A text editor
c. A pencil and a piece of paper
2. What are variables used for in JavaScript programs?
a. Storing numbers, dates, or other values
b. Varying randomly
c. Causing high school algebra flashbacks
3. What should appear at the very end of a JavaScript script embedded in an
HTML file?
a. The <script LANGUAGE=”JavaScript”> tag
b. The </script> tag
c. The END statement
36 HOUR 2: Creating Simple Scripts
Quiz Answers1. b. Any text editor can be used to create scripts. You can also use a word
processor if you’re careful to save the document as a text file with the .html
or .htm extension.
2. a. Variables are used to store numbers, dates, or other values.
3. b. Your script should end with the </script> tag.
ExercisesTo further your knowledge of JavaScript, perform the following exercises:
. Add a millisecond field to the large clock. You can use the getMilliseconds
function, which works just like getSeconds but returns milliseconds.
. Modify the script to display the time, including milliseconds, twice. Notice
whether any time passes between the two time displays when you load the
page.

HOUR 3
Getting Started withJavaScript Programming
What You’ll Learn in This Hour:. Organizing scripts using functions. What objects are and how JavaScript uses them. How JavaScript can respond to events. An introduction to conditional statements and loops. How browsers execute scripts in the proper order. Syntax rules for avoiding JavaScript errors. Adding comments to document your JavaScript code
You’ve reached the halfway point of Part I of this book. In the first couple of hours, you’ve
learned what JavaScript is, learned the variety of things JavaScript can do, and created a
simple script.
In this hour, you’ll learn a few basic concepts and script components that you’ll use in just
about every script you write. This will prepare you for the remaining hours of this book, in
which you’ll explore specific JavaScript functions and features.
Basic ConceptsThere are a few basic concepts and terms you’ll run into throughout this book. In the fol-
lowing sections, you’ll learn about the basic building blocks of JavaScript.
38 HOUR 3: Getting Started with JavaScript Programming
StatementsStatements are the basic units of a JavaScript program. A statement is a section of
code that performs a single action. For example, the following three statements are
from the date and time example in Hour 2, “Creating Simple Scripts”:
hours = now.getHours();mins = now.getMinutes();secs = now.getSeconds();
Although a statement is typically a single line of JavaScript, this is not a rule—it’s
possible to break a statement across multiple lines, or to include more than one
statement in a single line.
A semicolon marks the end of a statement. You can also omit the semicolon if you
start a new line after the statement. If you combine statements into a single line,
you must use semicolons to separate them.
Combining Tasks with FunctionsIn the basic scripts you’ve examined so far, you’ve seen some JavaScript statements
that have a section in parentheses, like this:
document.write(“Testing.”);
This is an example of a function. Functions provide a simple way to handle a task,
such as adding output to a web page. JavaScript includes a wide variety of built-in
functions, which you will learn about throughout this book. A statement that uses a
function, as in the preceding example, is referred to as a function call.
Functions take parameters (the expression inside the parentheses) to tell them what
to do. Additionally, a function can return a value to a waiting variable. For exam-
ple, the following function call prompts the user for a response and stores it in the
text variable:
text = prompt(“Enter some text.”)
You can also create your own functions. This is useful for two main reasons: First,
you can separate logical portions of your script to make it easier to understand.
Second, and more importantly, you can use the function several times or with differ-
ent data to avoid repeating script statements.
You will learn how to define, call, and return values from your own functions inHour 6, “Using Functions and Objects.”
By theWay
Basic Concepts 39
VariablesIn Hour 2, you learned that variables are containers that can store a number, a
string of text, or another value. For example, the following statement creates a vari-
able called fred and assigns it the value 27:
var fred = 27;
JavaScript variables can contain numbers, text strings, and other values. You’ll learn
more about them in Hour 5, “Using Variables, Strings, and Arrays.”
Understanding ObjectsJavaScript also supports objects. Like variables, objects can store data—but they can
store two or more pieces of data at once.
The items of data stored in an object are called the properties of the object. For
example, you could use objects to store information about people such as in an
address book. The properties of each person object might include a name, an
address, and a telephone number.
JavaScript uses periods to separate object names and property names. For example,
for a person object called Bob, the properties might include Bob.address and
Bob.phone.
Objects can also include methods. These are functions that work with the object’s
data. For example, our person object for the address book might include a dis-
play() method to display the person’s information. In JavaScript terminology, the
statement Bob.display() would display Bob’s details.
The document.write function we discussed earlier this hour is actually thewrite method of the document object. You will learn more about this object inHour 4, “Working with the Document Object Model (DOM).”
Don’t worry if this sounds confusing—you’ll be exploring objects in much more
detail later in this book. For now, you just need to know the basics. JavaScript sup-
ports three kinds of objects:
. Built-in objects are built in to the JavaScript language. You’ve already encoun-
tered one of these, Date, in Hour 2. Other built-in objects include Array and
String, which you’ll explore in Hour 5, and Math, which is explained in Hour
8, “Using Built-in Functions and Libraries.”
. DOM (Document Object Model) objects represent various components of the
browser and the current HTML document. For example, the alert() function
By theWay
40 HOUR 3: Getting Started with JavaScript Programming
you used earlier in this hour is actually a method of the window object. You’ll
explore these in more detail in Hour 4.
. Custom objects are objects you create yourself. For example, you could create a
person object, as in the examples in this section. You’ll learn to use custom
objects in Hour 6.
ConditionalsAlthough event handlers notify your script when something happens, you might
want to check certain conditions yourself. For example, did the user enter a valid
email address?
JavaScript supports conditional statements, which enable you to answer questions like
this. A typical conditional uses the if statement, as in this example:
if (count==1) alert(“The countdown has reached 1.”);
This compares the variable count with the constant 1, and displays an alert mes-
sage to the user if they are the same. You will use conditional statements like this in
most of your scripts.
You’ll learn more about conditionals in Hour 7, “Controlling Flow with Conditionsand Loops.”
LoopsAnother useful feature of JavaScript—and most other programming languages—is
the capability to create loops, or groups of statements that repeat a certain number
of times. For example, these statements display the same alert 10 times, greatly
annoying the user:
for (i=1; i<=10; i++) {Alert(“Yes, it’s yet another alert!”);
}
The for statement is one of several statements JavaScript uses for loops. This is the
sort of thing computers are supposed to be good at: performing repetitive tasks. You
will use loops in many of your scripts, in much more useful ways than this example.
Loops are covered in detail in Hour 7.
By theWay
By theWay
Basic Concepts 41
Event HandlersAs mentioned in Hour 1, “Understanding JavaScript,” not all scripts are located
within <script> tags. You can also use scripts as event handlers. Although this might
sound like a complex programming term, it actually means exactly what it says:
Event handlers are scripts that handle events.
In real life, an event is something that happens to you. For example, the things you
write on your calendar are events: “Dentist appointment” or “Fred’s birthday.” You
also encounter unscheduled events in your life: for example, a traffic ticket, an IRS
audit, or an unexpected visit from relatives.
Whether events are scheduled or unscheduled, you probably have normal ways of
handling them. Your event handlers might include things such as When Fred’s birth-
day arrives, send him a present or When relatives visit unexpectedly, turn out the lights and
pretend nobody is home.
Event handlers in JavaScript are similar: They tell the browser what to do when a
certain event occurs. The events JavaScript deals with aren’t as exciting as the ones
you deal with—they include such events as When the mouse button clicks and When
this page is finished loading. Nevertheless, they’re a very useful part of JavaScript.
Many JavaScript events (such as mouse clicks) are caused by the user. Rather than
doing things in a set order, your script can respond to the user’s actions. Other
events don’t involve the user directly—for example, an event is triggered when an
HTML document finishes loading.
Each event handler is associated with a particular browser object, and you can spec-
ify the event handler in the tag that defines the object. For example, images and
text links have an event, onMouseOver, that happens when the mouse pointer
moves over the object. Here is a typical HTML image tag with an event handler:
<img src=”button.gif” onMouseOver=”highlight();”>
You specify the event handler as an attribute to the HTML tag and include the
JavaScript statement to handle the event within the quotation marks. This is an
ideal use for functions because function names are short and to the point and can
refer to a whole series of statements.
See the Try It Yourself section at the end of this hour for a complete example of an
event handler within an HTML document.
You can also define event handlers within JavaScript without using HTML attrib-utes. You’ll learn this technique, and more about event handlers, in Hour 9,“Responding to Events.”
By theWay
42 HOUR 3: Getting Started with JavaScript Programming
Which Script Runs First?You can actually have several scripts within a web document: one or more sets of
<script> tags, external JavaScript files, and any number of event handlers. With all
of these scripts, you might wonder how the browser knows which to execute first.
Fortunately, this is done in a logical fashion:
. Sets of <script> tags within the <head> section of an HTML document are
handled first, whether they include embedded code or refer to a JavaScript file.
Because these scripts cannot create output in the web page, it’s a good place to
define functions for use later.
. Sets of <script> tags within the <body> section of the HTML document are
executed after those in the <head> section, while the web page loads and dis-
plays. If there is more than one script in the body, they are executed in order.
. Event handlers are executed when their events happen. For example, the
onLoad event handler is executed when the body of a web page loads. Because
the <head> section is loaded before any events, you can define functions there
and use them in event handlers.
JavaScript Syntax RulesJavaScript is a simple language, but you do need to be careful to use its syntax—the
rules that define how you use the language—correctly. The rest of this book covers
many aspects of JavaScript syntax, but there are a few basic rules you should under-
stand to avoid errors.
Case SensitivityAlmost everything in JavaScript is case sensitive: you cannot use lowercase and capi-
tal letters interchangeably. Here are a few general rules:
. JavaScript keywords, such as for and if, are always lowercase.
. Built-in objects such as Math and Date are capitalized.
. DOM object names are usually lowercase, but their methods are often a com-
bination of capitals and lowercase. Usually capitals are used for all but the
first word, as in toLowerCase and getElementById.
When in doubt, follow the exact case used in this book or another JavaScript refer-
ence. If you use the wrong case, the browser will usually display an error message.
Using Comments 43
Variable, Object, and Function NamesWhen you define your own variables, objects, or functions, you can choose their
names. Names can include uppercase letters, lowercase letters, numbers, and the
underscore (_) character. Names must begin with a letter or underscore.
You can choose whether to use capitals or lowercase in your variable names, but
remember that JavaScript is case sensitive: score, Score, and SCORE would be consid-
ered three different variables. Be sure to use the same name each time you refer to a
variable.
Reserved WordsOne more rule for variable names—they must not be reserved words. These include the
words that make up the JavaScript language, such as if and for, DOM object names
such as window and document, and built-in object names such as Math and Date. A com-
plete list of reserved words is included in Appendix D, “JavaScript Quick Reference.”
SpacingBlank space (known as whitespace by programmers) is ignored by JavaScript. You can
include spaces and tabs within a line, or blank lines, without causing an error. Blank
space often makes the script more readable.
Using CommentsJavaScript comments enable you to include documentation within your script. This
will be useful if someone else tries to understand the script, or even if you try to
understand it after a long break. To include comments in a JavaScript program, begin
a line with two slashes, as in this example:
//this is a comment.
You can also begin a comment with two slashes in the middle of a line, which is use-
ful for documenting a script. In this case, everything on the line after the slashes is
treated as a comment and ignored by the browser. For example,
a = a + 1; // add one to the value of a
JavaScript also supports C-style comments, which begin with /* and end with */.
These comments can extend across more than one line, as the following example
demonstrates:
/*This script includes a varietyof features, including this comment. */
44 HOUR 3: Getting Started with JavaScript Programming
Because JavaScript statements within a comment are ignored, C-style comments are
often used for commenting out sections of code. If you have some lines of JavaScript
that you want to temporarily take out of the picture while you debug a script, you
can add /* at the beginning of the section and */ at the end.
Because these comments are part of JavaScript syntax, they are only valid inside<script> tags or within an external JavaScript file.
Best Practices for JavaScriptYou should now be familiar with the basic rules for writing valid JavaScript. Along
with following the rules, it’s also a good idea to follow best practices. The following
practices may not be required, but you’ll save yourself and others some headaches if
you follow them.
. Use comments liberally—These make your code easier for others to under-
stand, and also easier for you to understand when you edit them later. They
are also useful for marking the major divisions of a script.
. Use a semicolon at the end of each statement, and only use one statement
per line—This will make your scripts easier to debug.
. Use separate JavaScript files whenever possible—This separates JavaScript
from HTML and makes debugging easier, and also encourages you to write
modular scripts that can be reused.
. Avoid being browser-specific—As you learn more about JavaScript, you’ll
learn some features that only work in one browser. Avoid them unless
absolutely necessary, and always test your code in more than one browser.
. Keep JavaScript optional—Don’t use JavaScript to perform an essential func-
tion on your site—for example, the primary navigation links. Whenever possi-
ble, users without JavaScript should be able to use your site, although it may
not be quite as attractive or convenient. This strategy is known as progressive
enhancement.
There are many more best practices involving more advanced aspects of JavaScript.
These are covered in detail in Hour 15, “Unobtrusive Scripting.”
By theWay
▼
Best Practices for JavaScript 45
Try It Yourself
Using an Event HandlerTo conclude this hour, here’s a simple example of an event handler. This will
demonstrate how you set up an event, which you’ll use throughout this book, and
how JavaScript works without <script> tags. Listing 3.1 shows an HTML document
that includes a simple event handler.
LISTING 3.1 An HTML Document with a Simple Event Handler<html><head><title>Event Handler Example</title></head><body><h1>Event Handler Example</h1><p><a href=”http://www.jsworkshop.com/”onClick=”alert(‘Aha! An Event!’);”>Click this link</a>to test an event handler.</p></body></html>
The event handler is defined with the following onClick attribute within the <a> tag
that defines a link:
onClick=”alert(‘Aha! An Event!’);”
This event handler uses the built-in alert() function to display a message when
you click on the link. In more complex scripts, you will usually define your own
function to act as an event handler. Figure 3.1 shows this example in action.
You’ll use other event handlers similar to this in the next hour, and events will be
covered in more detail in Hour 9.
Notice that after you click the OK button on the alert, the browser follows the linkdefined in the <a> tag. Your event handler could also stop the browser from fol-lowing the link, as described in Hour 9.
Did youKnow?
46 HOUR 3: Getting Started with JavaScript Programming
SummaryDuring this hour, you’ve been introduced to several components of JavaScript pro-
gramming and syntax: functions, objects, event handlers, conditions, and loops. You
also learned how to use JavaScript comments to make your script easier to read, and
looked at a simple example of an event handler.
In the next hour, you’ll look at the Document Object Model (DOM) and learn how
you can use the objects within the DOM to work with web pages and interact with
users.
Q&AQ. I’ve heard the term object-oriented applied to languages such as C++ and
Java. If JavaScript supports objects, is it an object-oriented language?
A. Yes, although it might not fit some people’s strict definitions. JavaScript objects
do not support all of the features that languages such as C++ and Java support,
although the latest versions of JavaScript have added more object-oriented
features.
Q. Having several scripts that execute at different times seems confusing. Whywould I want to use event handlers?
▲
FIGURE 3.1The browser dis-plays an alertwhen you clickthe link.
Quiz Questions 47
A. Event handlers are the ideal way (and in JavaScript, the only way) to handle
gadgets within the web page, such as buttons, check boxes, and text fields. It’s
actually more convenient to handle them this way. Rather than writing a
script that sits and waits for a button to be pushed, you can simply create an
event handler and let the browser do the waiting for you.
Q. Some examples in other books suggest enclosing scripts in HTML comments(<!-- and -->) to hide the script from older browsers. Is this necessary?
A. This technique was only necessary for supporting very old browsers, such as
Netscape 2.0. I no longer recommend this because all modern browsers handle
JavaScript correctly. If you are still concerned about non-JavaScript browsers,
the best way to hide your script is to use an external JavaScript file, as
described in Hour 2.
Quiz QuestionsTest your knowledge of JavaScript by answering the following questions:
1. A script that executes when the user clicks the mouse button is an example of
what?
a. An object
b. An event handler
c. An impossibility
2. Which of the following are capabilities of functions in JavaScript?
a. Accept parameters
b. Return a value
c. Both of the above
3. Which of the following is executed first by a browser?
a. A script in the <head> section
b. A script in the <body> section
c. An event handler for a button
48 HOUR 3: Getting Started with JavaScript Programming
Quiz Answers1. b. A script that executes when the user clicks the mouse button is an event
handler.
2. c. Functions can accept both parameters and return values.
3. a. Scripts defined in the <head> section of an HTML document are executed
first by the browser.
ExercisesTo further explore the JavaScript features you learned about in this hour, you can
perform the following exercises:
. Examine the Date and Time script you created in Hour 2 and find any exam-
ples of functions and objects being used.
. Add JavaScript comments to the Date and Time script to make it more clear
what each line does. Verify that the script still runs properly.

HOUR 4
Working with the DocumentObject Model (DOM)
What You’ll Learn in This Hour:. How to access the various objects in the DOM. Working with windows using the window object. Working with web documents using the document object. Using objects for links and anchors. Using the location object to work with URLs. Creating JavaScript-based Back and Forward buttons
You’ve reached the end of Part I. In this hour, you’ll be introduced to one of the mostimportant tools you’ll use with JavaScript: the Document Object Model (DOM), which letsyour scripts manipulate web pages, windows, and documents.
Without the DOM, JavaScript would be just another scripting language—with the DOM, itbecomes a powerful tool for making pages dynamic. This hour will introduce the idea ofthe DOM and some of the objects you’ll use most often.
Understanding the Document ObjectModel (DOM)One advantage that JavaScript has over basic HTML is that scripts can manipulate theweb document and its contents. Your script can load a new page into the browser, workwith parts of the browser window and document, open new windows, and even modifytext within the page dynamically.
To work with the browser and documents, JavaScript uses a hierarchy of parent and childobjects called the Document Object Model (DOM). These objects are organized into a tree-like structure, and represent all of the content and components of a web document.

50 HOUR 4: Working with the Document Object Model (DOM)
The DOM is not part of the JavaScript language—rather, it’s an API (applicationprogramming interface) built in to the browser. While the DOM is most often usedwith JavaScript, it can also be used by other languages, such as VBScript andJava.
The objects in the DOM have properties—variables that describe the web page or
document, and methods—functions that enable you to work with parts of the web
page.
When you refer to an object, you use the parent object name followed by the child
object name or names, separated by periods. For example, JavaScript stores objects
to represent images in a document as children of the document object. The following
refers to the image9 object, a child of the document object, which is a child of the
window object:
window.document.image9
The window object is the parent object for all of the objects we will be looking at in
this hour. Figure 4.1 shows this section of the DOM object hierarchy and a variety of
its objects.
By theWay
FIGURE 4.1The DOM objecthierarchy. document
history
links[ ]
anchors[ ]
images[ ]
forms[ ]
DOM Level 1Objects
formelements
location
window(parent, frames[ ],
self, top)
This diagram only includes the basic browser objects that will be covered in thishour. These are actually a small part of the DOM, which you’ll learn more about inPart III, “Learning More About the DOM.”
History of the DOMStarting with the introduction of JavaScript 1.0 in Netscape 2.0, browsers have includ-
ed objects that represent parts of a web document and other browser features.
However, there was never a true standard. While both Netscape and Microsoft Internet
By theWay
Using window Objects 51
Explorer included many of the same objects, there was no guarantee that the same
objects would work the same way in both browsers, let alone in less common browsers.
The bad news is that there are still differences between the browsers—but here’s the
good news. Since the release of Netscape 3.0 and Internet Explorer 4.0, all of the
basic objects (those covered in this hour) are supported in much the same way in
both browsers. With more recent browser releases, a much more advanced DOM is
supported.
DOM LevelsThe W3C (World Wide Web Consortium) developed the DOM level 1 recommenda-
tion. This is a standard that defines not only basic objects, but an entire set of
objects that encompass all parts of an HTML document. A level 2 DOM standard
has also been released, and level 3 is under development.
Netscape 4 and Internet Explorer 4 supported their own DOMs that allowed more
control over documents, but weren’t standardized. Fortunately, starting with Internet
Explorer 5 and Netscape 6, both support the W3C DOM, so you can support both
browsers with simple, standards-compliant code. All of today’s current browsers sup-
port the W3C DOM.
The basic object hierarchy described in this hour is informally referred to as DOM
level 0, and the objects are included in the DOM level 1 standard. You’ll learn how
to use the W3C DOM to work with any part of a web document later in this book.
The W3C DOM allows you to modify a web page in real time after it has loaded.You’ll learn how to do this in Part III.
Using window ObjectsAt the top of the browser object hierarchy is the window object, which represents a
browser window. You’ve already used at least one method of the window object: the
window.alert() method, or simply alert(), displays a message in an alert box.
There can be several window objects at a time, each representing an open browser
window. Frames are also represented by window objects. You’ll learn more about
windows and frames in Hour 10, “Using Windows and Frames.”
Layers, which enable you to include, modify, and position dynamic content within aweb document, are also similar to window objects. These are explained in Hour13, “Using the W3C DOM.”
Did youKnow?
By theWay
52 HOUR 4: Working with the Document Object Model (DOM)
Working with Web DocumentsThe document object represents a web document, or page. Web documents are dis-
played within browser windows, so it shouldn’t surprise you to learn that the docu-
ment object is a child of the window object.
Because the window object always represents the current window (the one containing
the script), you can use window.document to refer to the current document. You can
also simply refer to document, which automatically refers to the current window.
You’ve already used the document.write method to display text within a web doc-ument. The examples in earlier hours only used a single window and document,so it was unnecessary to use window.document.write—but this longer syntaxwould have worked equally well.
If multiple windows or frames are in use, there might be several window objects,
each with its own document object. To use one of these document objects, you use
the name of the window and the name of the document.
In the following sections, you will look at some of the properties and methods of the
document object that will be useful in your scripting.
Getting Information About the DocumentSeveral properties of the document object include information about the current doc-
ument in general:
. document.URL specifies the document’s URL. This is a simple text field. You
can’t change this property. If you need to send the user to a different location,
use the window.location object, described later in this hour.
. document.title lists the title of the current page, defined by the HTML
<title> tag.
. document.referrer is the URL of the page the user was viewing prior to the
current page—usually, the page with a link to the current page.
. document.lastModified is the date the document was last modified. This
date is sent from the server along with the page.
. document.bgColor and document.fgColor are the background and fore-
ground (text) colors for the document, corresponding to the BGCOLOR and TEXT
attributes of the <body> tag.
By theWay
Working with Web Documents 53
. document.linkColor, document.alinkColor, and document.vlinkColor
are the colors for links within the document. These correspond to the LINK,
ALINK, and VLINK attributes of the <body> tag.
. document.cookie enables you to read or set a cookie for the document. See
http://www.jsworkshop.com/cookies.html for information about cookies.
As an example of a document property, Listing 4.1 shows a short HTML document
that displays its last modified date using JavaScript.
LISTING 4.1 Displaying the Last Modified Date<html><head><title>Test Document</title></head><body><p>This page was last modified on:<script language=”JavaScript” type=”text/javascript”>document.write(document.lastModified);</script></p></body></html>
This can tell the user when the page was last changed. If you use JavaScript, youdon’t have to remember to update the date each time you modify the page. (Youcould also use the script to always print the current date instead of the last modifieddate, but that would be cheating.)
You might find that the document.lastModified property doesn’t work on yourweb pages, or returns the wrong value. The date is received from the web server,and some servers do not maintain modification dates correctly.
Writing Text in a DocumentThe simplest document object methods are also the ones you will use most often. Infact, you’ve used one of them already. The document.write method prints text aspart of the HTML page in a document window. This statement is used whenever youneed to include output in a web page.
An alternative statement, document.writeln, also prints text, but it also includes anewline (\n) character at the end. This is handy when you want your text to be thelast thing on the line.
Bear in mind that the newline character is displayed as a space by the browser,except inside a <pre> container. You will need to use the <br> tag if you want anactual line break.
By theWay
WatchOut!
54 HOUR 4: Working with the Document Object Model (DOM)
You can use these methods only within the body of the web page, so they will be
executed when the page loads. You can’t use these methods to add to a page that
has already loaded without reloading it.
You can also directly modify the text of a web page on newer browsers using thefeatures of the new DOM. You’ll learn these techniques in Hour 14.
The document.write method can be used within a <script> tag in the body of an
HTML document. You can also use it in a function, provided you include a call to
the function within the body of the document.
Using Links and AnchorsAnother child of the document object is the link object. Actually, there can be mul-
tiple link objects in a document. Each one includes information about a link to
another location or an anchor.
Anchors are named places in an HTML document that can be jumped to directly.You define them with a tag like this: <a name=”part2”>. You can then link tothem: <a href=”#part2”>.
You can access link objects with the links array. Each member of the array is one
of the link objects in the current page. A property of the array,
document.links.length, indicates the number of links in the page.
Each link object (or member of the links array) has a list of properties defining the
URL. The href property contains the entire URL, and other properties define portions
of it. These are the same properties as the location object, defined later in this hour.
You can refer to a property by indicating the link number and property name. For
example, the following statement assigns the entire URL of the first link to the vari-
able link1:
link1 = links[0].href;
The anchor objects are also children of the document object. Each anchor object rep-
resents an anchor in the current document—a particular location that can be
jumped to directly.
Like links, you can access anchors with an array: anchors. Each element of this
array is an anchor object. The document.anchors.length property gives you the
number of elements in the anchors array.
By theWay
Did youKnow?
Working with the location Object 55
Accessing Browser HistoryThe history object is another child (property) of the window object. This object
holds information about the URLs that have been visited before and after the cur-
rent one, and it includes methods to go to previous or next locations.
The history object has one property you can access:
. history.length keeps track of the length of the history list—in other words,
the number of different locations that the user has visited.
The history object has current, previous, and next properties that store URLsof documents in the history list. However, for security and privacy reasons, theseobjects are not normally accessible in today’s browsers.
The history object has three methods you can use to move through the history list:
. history.go() opens a URL from the history list. To use this method, specify a
positive or negative number in parentheses. For example, history.go(-2) is
equivalent to pressing the Back button twice.
. history.back() loads the previous URL in the history list—equivalent to
pressing the Back button.
. history.forward() loads the next URL in the history list, if available. This is
equivalent to pressing the Forward button.
You’ll use these methods in the Try It Yourself section at the end of this hour.
Working with the location ObjectA third child of the window object is the location object. This object stores informa-
tion about the current URL stored in the window. For example, the following state-
ment loads a URL into the current window:
window.location.href=”http://www.starlingtech.com”;
The href property used in this statement contains the entire URL of the window’s
current location. You can also access portions of the URL with various properties of
the location object. To explain these properties, consider the following URL:
http://www.jsworkshop.com:80/test.cgi?lines=1#anchor
By theWay
▼
56 HOUR 4: Working with the Document Object Model (DOM)
The following properties represent parts of the URL:
. location.protocol is the protocol part of the URL (http: in the example).
. location.hostname is the host name of the URL (www.jsworkshop.com in the
example).
. location.port is the port number of the URL (80 in the example).
. location.pathname is the filename part of the URL (test.cgi in the example).
. location.search is the query portion of the URL, if any (lines=1 in the
example). Queries are used mostly by CGI scripts.
. location.hash is the anchor name used in the URL, if any (#anchor in the
example).
The link object, introduced earlier this hour, also includes this list of properties for
accessing portions of the URL.
Although the location.href property usually contains the same URL as the document.URL property described earlier in this hour, you can’t change the document.URL property. Always use location.href to load a new page.
The location object has two methods:
. location.reload() reloads the current document. This is the same as the
Reload button on the browser’s toolbar. If you optionally include the true
parameter, it will ignore the browser’s cache and force a reload whether the
document has changed or not.
. location.replace() replaces the current location with a new one. This is
similar to setting the location object’s properties yourself. The difference is
that the replace method does not affect the browser’s history. In other words,
the Back button can’t be used to go to the previous location. This is useful for
splash screens or temporary pages that it would be useless to return to.
Try It Yourself
Creating Back and Forward ButtonsYou can use the back and forward methods of the history object to add your own
Back and Forward buttons to a web document. The browser already has Back and
Forward buttons, of course, but it’s occasionally useful to include your own links
that serve the same purpose.
By theWay
Working with the location Object 57
You will now create a script that displays Back and Forward buttons and use these
methods to navigate the browser. Here’s the code that will create the Back button:
<input type=”button”onClick=”history.back();” value=”<-- Back”>
The <input> tag defines a button labeled Back. The onClick event handler uses the
history.back() method to go to the previous page in history. The code for the
Forward button is similar:
<input type=”button”onClick=”history.forward();” value=”Forward -->”>
With these out of the way, you just need to build the rest of the HTML document.
Listing 4.2 shows the complete HTML document, and Figure 4.2 shows a browser’s
display of the document. After you load this document into a browser, visit other
URLs and make sure the Back and Forward buttons work.
LISTING 4.2 A Web Page That Uses JavaScript to Include Back andForward Buttons<html><head><title>Back and Forward Buttons</title></head><body><h1>Back and Forward Buttons</h1><p>This page allows you to go back or forward to pages in the history list.These should be equivalent to the back and forward arrow buttons in thebrowser’s toolbar.</p><p><input type=”button”
onClick=”history.back();” value=”<-- Back”><input type=”button”
onClick=”history.forward();” value=”Forward -->”></p></body></html>
FIGURE 4.2The Back andForward buttonsin InternetExplorer.
▲
58 HOUR 4: Working with the Document Object Model (DOM)
SummaryIn this hour, you’ve learned about the Document Object Model (DOM), JavaScript’s
hierarchy of web page objects. You’ve learned how you can use the document object
to work with documents, and used the history and location objects to control the
current URL displayed in the browser.
You should now have a basic understanding of the DOM and some of its objects—
you’ll learn about more of the objects throughout this book.
Congratulations! You’ve reached the end of Part I of this book. In Part II, you’ll get
back to learning the JavaScript language, starting with Hour 5, “Using Variables,
Strings, and Arrays.”
Q&AQ. I can use history and document instead of window.history and window.docu-
ment. Can I leave out the window object in other cases?
A. Yes. For example, you can use alert instead of window.alert to display a
message. The window object contains the current script, so it’s treated as a
default object. However, be warned that you shouldn’t omit the window
object’s name when you’re using frames, layers, or multiple windows, or in an
event handler.
Q. I used the document.lastModified method to display a modification date formy page, but it displays a date in 1970, or a date that I know is incorrect.What’s wrong?
A. This function depends on the server sending the last modified date of the doc-
ument to the browser. Some web servers don’t do this properly, or require spe-
cific file attributes in order for this to work.
Q. Can I change history entries, or prevent the user from using the Back andForward buttons?
A. You can’t change the history entries. You can’t prevent the use of the Back and
Forward buttons, but you can use the location.replace() method to load a
series of pages that don’t appear in the history. There are a few tricks for pre-
venting the Back button from working properly, but I don’t recommend
them—that’s the sort of thing that gives JavaScript a bad name.
Exercises 59
Quiz QuestionsTest your knowledge of JavaScript by answering the following questions:
1. Which of the following objects can be used to load a new URL into the browserwindow?
a. document.url
b. window.location
c. window.url
2. Which object contains the alert() method?
a. window
b. document
c. location
3. Which of the following DOM levels describes the objects described in this hour?
a. DOM level 0
b. DOM level 1
c. DOM level 2
Quiz Answers1. b. The window.location object can be used to send the browser to a new URL.
2. a. The window object contains the alert() method.
3. a. The objects described in this hour fall under the informal DOM level 0 spec-ification.
ExercisesTo further explore the JavaScript features you learned about in this hour, you canperform the following exercises:
. Modify the Back and Forward example in Listing 4.2 to include a Reload but-ton along with the Back and Forward buttons. (This button would trigger thelocation.reload() method.)
. Modify the Back and Forward example to display the current number of histo-ry entries.

This page intentionally left blank
PART II:
Learning JavaScript Basics
HOUR 5 Using Variables, Strings, and Arrays 63
HOUR 6 Using Functions and Objects 85
HOUR 7 Controlling Flow with Conditions and Loops 101
HOUR 8 Using Built-in Functions and Libraries 121

This page intentionally left blank

HOUR 5
Using Variables, Strings, andArrays
What You’ll Learn in This Hour:. Naming and declaring variables. Choosing whether to use local or global variables. Assigning values to variables. How to convert between different data types. Using variables and literals in expressions. How strings are stored in String objects. Creating and using String objects. Creating and using arrays of numbers and strings
Welcome to the beginning of Part II of this book. Now that you have learned some of the
fundamentals of JavaScript and the DOM, it’s time to dig into more details of the
JavaScript language.
In this hour, you’ll learn three tools for storing data in JavaScript: variables, which store
numbers or text; strings, which are special variables for working with text; and arrays,
which are multiple variables you can refer to by number.
Using VariablesUnless you skipped the first few hours of this book, you’ve already used a few variables.
You probably can also figure out how to use a few more without any help. Nevertheless,
there are some aspects of variables you haven’t learned yet. We will now look at some of
the details.
64 HOUR 5: Using Variables, Strings, and Arrays
Choosing Variable NamesVariables are named containers that can store data (for example, a number, a text
string, or an object). As you learned earlier in this book, each variable has a name.
There are specific rules you must follow when choosing a variable name:
. Variable names can include letters of the alphabet, both upper- and lowercase.
They can also include the digits 0–9 and the underscore (_) character.
. Variable names cannot include spaces or any other punctuation characters.
. The first character of the variable name must be either a letter or an underscore.
. Variable names are case sensitive—totalnum, Totalnum, and TotalNum are
separate variable names.
. There is no official limit on the length of variable names, but they must fit
within one line.
Using these rules, the following are examples of valid variable names:
total_number_of_fishLastInvoiceNumbertemp1a_var39
You can choose to use either friendly, easy-to-read names or completely crypticones. Do yourself a favor: use longer, friendly names whenever possible. Althoughyou might remember the difference between a, b, x, and x1 right now, you mightnot after a good night’s sleep.
Using Local and Global VariablesSome computer languages require you to declare a variable before you use it. JavaScript
includes the var keyword, which can be used to declare a variable. You can omit var in
many cases; the variable is still declared the first time you assign a value to it.
To understand where to declare a variable, you will need to understand the concept
of scope. A variable’s scope is the area of the script in which that variable can be
used. There are two types of variables:
. Global variables have the entire script (and other scripts in the same HTML doc-
ument) as their scope. They can be used anywhere, even within functions.
. Local variables have a single function as their scope. They can be used only
within the function they are created in.
By theWay
Using Variables 65
To create a global variable, you declare it in the main script, outside any functions.
You can use the var keyword to declare the variable, as in this example:
var students = 25;
This statement declares a variable called students and assigns it a value of 25. If
this statement is used outside functions, it creates a global variable. The var key-
word is optional in this case, so this statement is equivalent to the previous one:
students = 25;
Before you get in the habit of omitting the var keyword, be sure you understand
exactly when it’s required. It’s actually a good idea to always use the var keyword—
you’ll avoid errors and make your script easier to read, and it won’t usually cause
any trouble.
For the most part, the variables you’ve used in earlier hours of this book havebeen global.
A local variable belongs to a particular function. Any variable you declare with the
var keyword in a function is a local variable. Additionally, the variables in the func-
tion’s parameter list are always local variables.
To create a local variable within a function, you must use the var keyword. This
forces JavaScript to create a local variable, even if there is a global variable with the
same name.
You should now understand the difference between local and global variables. If
you’re still a bit confused, don’t worry—if you use the var keyword every time, you’ll
usually end up with the right type of variable.
Assigning Values to VariablesAs you learned in Hour 2, “Creating a Simple Script,” you can use the equal sign to
assign a value to a variable. For example, this statement assigns the value 40 to the
variable lines:
lines = 40;
You can use any expression to the right of the equal sign, including other variables.
You have used this syntax earlier to add one to a variable:
lines = lines + 1;
By theWay
66 HOUR 5: Using Variables, Strings, and Arrays
Because incrementing or decrementing variables is quite common, JavaScript
includes two types of shorthand for this syntax. The first is the += operator, which
enables you to create the following shorter version of the preceding example:
lines += 1;
Similarly, you can subtract a number from a variable using the -= operator:
lines -= 1;
If you still think that’s too much to type, JavaScript also includes the increment and
decrement operators, ++ and --. This statement adds one to the value of lines:
lines++;
Similarly, this statement subtracts one from the value of lines:
lines--;
You can alternately use the ++ or -- operators before a variable name, as in
++lines. However, these are not identical. The difference is when the increment or
decrement happens:
. If the operator is after the variable name, the increment or decrement hap-
pens after the current expression is evaluated.
. If the operator is before the variable name, the increment or decrement hap-
pens before the current expression is evaluated.
This difference is only an issue when you use the variable in an expression and
increment or decrement it in the same statement. As an example, suppose you have
assigned the lines variable the value 40. The following two statements have differ-
ent effects:
alert(lines++);alert(++lines);
The first statement displays an alert with the value 40, and then increments lines
to 41. The second statement first increments lines to 41, then displays an alert with
the value 41.
These operators are strictly for your convenience. If it makes more sense to youto stick to lines = lines + 1, do it—your script won’t suffer.
By theWay
Understanding Expressions and Operators 67
Understanding Expressions andOperatorsAn expression is a combination of variables and values that the JavaScript inter-
preter can evaluate to a single value. The characters that are used to combine these
values, such as + and /, are called operators.
Along with variables and constant values, you can also use calls to functions thatreturn results within an expression.
Using JavaScript OperatorsYou’ve already used some operators, such as the + sign (addition) and the increment
and decrement operators. Table 5.1 lists some of the most important operators you
can use in JavaScript expressions.
TABLE 5.1 Common JavaScript Operators
Operator Description Example
+ Concatenate (combine) strings message=”this is” + “ a test”;
+ Add result = 5 + 7;
- Subtract score = score - 1;
* Multiply total = quantity * price;
/ Divide average = sum / 4;
% Modulo (remainder) remainder = sum % 4;
++ Increment tries++;
-- Decrement total--;
Along with these, there are also many other operators used in conditional statements—
you’ll learn about these in Hour 7, “Controlling Flow with Conditions and Loops.”
Operator PrecedenceWhen you use more than one operator in an expression, JavaScript uses rules of
operator precedence to decide how to calculate the value. Table 5.1 lists the operators
from lowest to highest precedence, and operators with highest precedence are evalu-
ated first. For example, consider this statement:
result = 4 + 5 * 3;
Did youKnow?
68 HOUR 5: Using Variables, Strings, and Arrays
If you try to calculate this result, there are two ways to do it. You could multiply 5 *
3 first and then add 4 (result: 19) or add 4 + 5 first and then multiply by 3 (result:
27). JavaScript solves this dilemma by following the precedence rules: Because multi-
plication has a higher precedence than addition, it first multiplies 5 * 3 and then
adds 4, producing a result of 19.
If you’re familiar with any other programming languages, you’ll find that the opera-tors and precedence in JavaScript work, for the most part, the same way as thosein C, C++, and Java.
Sometimes operator precedence doesn’t produce the result you want. For example,
consider this statement:
result = a + b + c + d / 4;
This is an attempt to average four numbers by adding them all together and then
dividing by four. However, because JavaScript gives division a higher precedence
than addition, it will divide the d variable by 4 before adding the other numbers,
producing an incorrect result.
You can control precedence by using parentheses. Here’s the working statement to
calculate an average:
result = (a + b + c + d) / 4;
The parentheses ensure that the four variables are added first, and then the sum is
divided by four.
If you’re unsure about operator precedence, you can use parentheses to makesure things work the way you expect and to make your script more readable.
Data Types in JavaScriptIn some computer languages, you have to specify the type of data a variable will
store: for example, a number or a string. In JavaScript, you don’t need to specify a
data type in most cases. However, you should know the types of data JavaScript can
deal with.
These are the basic JavaScript data types:
. Numbers, such as 3, 25, or 1.4142138. JavaScript supports both integers and
floating-point numbers.
By theWay
Did youKnow?
Converting Between Data Types 69
. Boolean, or logical values. These can have one of two values: true or false.
These are useful for indicating whether a certain condition is true.
You’ll learn more about Boolean values, and about using conditions in JavaScript,in Hour 7.
. Strings, such as “I am a jelly doughnut”. These consist of one or more
characters of text. (Strictly speaking, these are String objects, which you’ll
learn about later in this hour.)
. The null value, represented by the keyword null. This is the value of an unde-
fined variable. For example, the statement document.write(fig) will result
in this value (and an error message) if the variable fig has not been previous-
ly used or defined.
Although JavaScript keeps track of the data type currently stored in each variable, it
doesn’t restrict you from changing types midstream. For example, suppose you
declared a variable by assigning it a value:
total = 31;
This statement declares a variable called total and assigns it the value of 31. This
is a numeric variable. Now suppose you changed the value of total:
total = “albatross”;
This assigns a string value to total, replacing the numeric value. JavaScript will not
display an error when this statement executes; it’s perfectly valid, although it’s prob-
ably not a very useful total.
Although this feature of JavaScript is convenient and powerful, it can also make iteasy to make a mistake. For example, if the total variable was later used in amathematical calculation, the result would be invalid—but JavaScript does notwarn you that you’ve made this mistake.
Converting Between Data TypesJavaScript handles conversions between data types for you whenever it can. For
example, you’ve already used statements like this:
document.write(“The total is “ + total);
By theWay
By theWay
70 HOUR 5: Using Variables, Strings, and Arrays
This statement prints out a message such as “The total is 40”. Because the doc-
ument.write function works with strings, the JavaScript interpreter automatically
converts any nonstrings in the expression (in this case, the value of total) to strings
before performing the function.
This works equally well with floating-point and Boolean values. However, there are
some situations where it won’t work. For example, the following statement will work
fine if the value of total is 40:
average = total / 3;
However, the total variable could also contain a string; in this case, the preceding
statement would result in an error.
In some situations, you might end up with a string containing a number, and need
to convert it to a regular numeric variable. JavaScript includes two functions for this
purpose:
. parseInt()—Converts a string to an integer number.
. parseFloat()—Converts a string to a floating-point number.
Both of these functions will read a number from the beginning of the string and
return a numeric version. For example, these statements convert the string “30
angry polar bears” to a number:
stringvar = “30 angry polar bears”;numvar = parseInt(stringvar);
After these statements execute, the numvar variable contains the number 30. The
nonnumeric portion of the string is ignored.
These functions look for a number of the appropriate type at the beginning of thestring. If a valid number is not found, the function will return the special valueNaN, meaning not a number.
Using String ObjectsYou’ve already used several strings during the first few hours of this book. Strings
store a group of text characters, and are named similarly to other variables. As a
simple example, this statement assigns the string This is a test to a string vari-
able called test:
test = “This is a test”;
By theWay
Using String Objects 71
Creating a String ObjectJavaScript stores strings as String objects. You usually don’t need to worry about
this, but it will explain some of the techniques for working with strings, which use
methods (built-in functions) of the String object.
There are two ways to create a new String object. The first is the one you’ve already
used, whereas the second uses object-oriented syntax. The following two statements
create the same string:
test = “This is a test”;test = new String(“This is a test”);
The second statement uses the new keyword, which you use to create objects. This
tells the browser to create a new String object containing the text This is a test,
and assigns it to the variable test.
Although you can create a string using object-oriented syntax, the standardJavaScript syntax is simpler, and there is no difference in the strings created bythese two methods.
Assigning a ValueYou can assign a value to a string in the same way as any other variable. Both of
the examples in the previous section assigned an initial value to the string. You can
also assign a value after the string has already been created. For example, the fol-
lowing statement replaces the contents of the test variable with a new string:
test = “This is only a test.”;
You can also use the concatenation operator (+) to combine the values of two strings.
Listing 5.1 shows a simple example of assigning and combining the values of strings.
LISTING 5.1 Assigning Values to Strings and Combining Them<html><head><title>String Test</title></head><body><h1>String Test</h1><script language=”JavaScript” type=”text/javascript”>;test1 = “This is a test. “;test2 = “This is only a test.”;both = test1 + test2;alert(both);</script></body></html>
By theWay
72 HOUR 5: Using Variables, Strings, and Arrays
This script assigns values to two string variables, test1 and test2, and then dis-
plays an alert with their combined value. If you load this HTML document in a
browser, your output should resemble Figure 5.1.
FIGURE 5.1The output ofthe string exam-ple script.
In addition to using the + operator to concatenate two strings, you can use the +=
operator to add text to a string. For example, this statement adds a period to the
current contents of the string sentence:
sentence += “.”;
The plus sign (+) is also used to add numbers in JavaScript. The browser knowswhether to use addition or concatenation based on the types of data you use withthe plus sign. If you use it between a number and a string, the number is convert-ed to a string and concatenated.
Calculating the String’s LengthFrom time to time, you might find it useful to know how many characters a string
variable contains. You can do this with the length property of String objects,
which you can use with any string. To use this property, type the string’s name fol-
lowed by .length.
By theWay
Using String Objects 73
For example, test.length refers to the length of the test string. Here is an exam-
ple of this property:
test = “This is a test.”;document.write(test.length);
The first statement assigns the string This is a test to the test variable. The sec-
ond statement displays the length of the string—in this case, 15 characters. The
length property is a read-only property, so you cannot assign a value to it to
change a string’s length.
Remember that although test refers to a string variable, the value oftest.length is a number and can be used in any numeric expression.
Converting the String’s CaseTwo methods of the String object enable you to convert the contents of a string to
all uppercase or all lowercase:
. toUpperCase()—Converts all characters in the string to uppercase.
. toLowerCase()—Converts all characters in the string to lowercase.
For example, the following statement displays the value of the test string variable
in lowercase:
document.write(test.toLowerCase());
Assuming that this variable contained the text This Is A Test, the result would
be the following string:
this is a test
Note that the statement doesn’t change the value of the text variable. These methods
return the upper- or lowercase version of the string, but they don’t change the string
itself. If you want to change the string’s value, you can use a statement like this:
test = test.toLowerCase();
Note that the syntax for these methods is similar to the length property intro-duced earlier. The difference is that methods always use parentheses, whereasproperties don’t. The toUpperCase and toLowerCase methods do not take anyparameters, but you still need to use the parentheses.
By theWay
By theWay
74 HOUR 5: Using Variables, Strings, and Arrays
Working with SubstringsSo far, you’ve worked with entire strings. JavaScript also enables you to work with
substrings, or portions of a string. You can use the substring method to retrieve a
portion of a string, or the charAt method to get a single character. These are
explained in the following sections.
Using Part of a StringThe substring method returns a string consisting of a portion of the original string
between two index values, which you must specify in parentheses. For example, the
following statement displays the fourth through sixth characters of the text string:
document.write(text.substring(3,6));
At this point, you’re probably wondering where the 3 and the 6 come from. There
are three things you need to understand about the index parameters:
. Indexing starts with 0 for the first character of the string, so the fourth charac-
ter is actually index 3.
. The second index is noninclusive. A second index of 6 includes up to index 5
(the sixth character).
. You can specify the two indexes in either order. The smaller one will be assumed
to be the first index. In the previous example, (6,3) would have produced the
same result. Of course, there is rarely a reason to use the reverse order.
As another example, suppose you defined a string called alpha to hold the alphabet:
alpha = “ABCDEFGHIJKLMNOPQRSTUVWXYZ”;
The following are examples of the substring() method using this string:
. alpha.substring(0,4) returns ABCD.
. alpha.substring(10,12) returns KL.
. alpha.substring(12,10) also returns KL. Because it’s smaller, 10 is used as
the first index.
. alpha.substring(6,7) returns G.
. alpha.substring(24,26) returns YZ.
. alpha.substring(0,26) returns the entire alphabet.
. alpha.substring(6,6) returns the null value, an empty string. This is true
whenever the two index values are the same.

Working with Substrings 75
Getting a Single CharacterThe charAt method is a simple way to grab a single character from a string. You
specify the character’s index, or position, in parentheses. The indexes begin at 0 for
the first character. Here are a few examples using the alpha string:
. alpha.charAt(0) returns A.
. alpha.charAt(12) returns M.
. alpha.charAt(25) returns Z.
. alpha.charAt(27) returns an empty string because there is no character at
that position.
Finding a SubstringAnother use for substrings is to find a string within another string. One way to do
this is with the indexOf method. To use this method, add indexOf to the string you
want to search, and specify the string to search for in the parentheses. This example
searches for “this” in the test string:
loc = test.indexOf(“this”);
As with most JavaScript methods and property names, indexOf is case sensitive.Make sure you type it exactly as shown here when you use it in scripts.
The value returned in the loc variable is an index into the string, similar to the first
index in the substring method. The first character of the string is index 0.
You can specify an optional second parameter to indicate the index value to begin
the search. For example, this statement searches for the word fish in the temp
string, starting with the 20th character:
location = temp.indexOf(“fish”,19);
One use for the second parameter is to search for multiple occurrences of astring. After finding the first occurrence, you search starting with that location forthe second one, and so on.
A second method, lastIndexOf(), works the same way, but finds the last occurrence
of the string. It searches the string backwards, starting with the last character. For
example, this statement finds the last occurrence of Fred in the names string:
location = names.lastIndexOf(“Fred”);
By theWay
By theWay

76 HOUR 5: Using Variables, Strings, and Arrays
As with indexOf(), you can specify a location to search from as the second parame-
ter. In this case, the string will be searched backward starting at that location.
Using Numeric ArraysAn array is a numbered group of data items that you can treat as a single unit. For
example, you might use an array called scores to store several scores for a game.
Arrays can contain strings, numbers, objects, or other types of data. Each item in an
array is called an element of the array.
Creating a Numeric ArrayUnlike most other types of JavaScript variables, you typically need to declare an
array before you use it. The following example creates an array with four elements:
scores = new Array(4);
To assign a value to the array, you use an index in brackets. Indexes begin with 0, so
the elements of the array in this example would be numbered 0 to 3. These state-
ments assign values to the four elements of the array:
scores[0] = 39;scores[1] = 40;scores[2] = 100;scores[3] = 49;
You can also declare an array and specify values for elements at the same time. This
statement creates the same scores array in a single line:
scores = new Array(39,40,100,49);
In JavaScript 1.2 and later, you can also use a shorthand syntax to declare an array
and specify its contents. The following statement is an alternative way to create the
scores array:
scores = [39,40,100,49];
Remember to use parentheses when declaring an array with the new keyword, asin a=new Array(3,4,5), and use brackets when declaring an array without new,as in a=[3,4,5]. Otherwise, you’ll run into JavaScript errors.
Did youKnow?
Using String Arrays 77
Understanding Array LengthLike strings, arrays have a length property. This tells you the number of elements in
the array. If you specified the length when creating the array, this value becomes the
length property’s value. For example, these statements would print the number 30:
scores = new Array(30);document.write(scores.length);
You can declare an array without a specific length, and change the length later by
assigning values to elements or changing the length property. For example, these
statements create a new array and assign values to two of its elements:
test = new Array();test[0]=21;test[5]=22;
In this example, because the largest index number assigned so far is 5, the array
has a length property of 6—remember, elements are numbered starting at 0.
Accessing Array ElementsYou can read the contents of an array using the same notation you used when
assigning values. For example, the following statements would display the values of
the first three elements of the scores array:
scoredisp = “Scores: “ + scores[0] + “,” + scores[1] + “,” + scores[2];document.write(scoredisp);
Looking at this example, you might imagine it would be inconvenient to display allthe elements of a large array. This is an ideal job for loops, which enable you toperform the same statements several times with different values. You’ll learn allabout loops in Hour 7.
Using String ArraysSo far, you’ve used arrays of numbers. JavaScript also allows you to use string arrays,
or arrays of strings. This is a powerful feature that enables you to work with a large
number of strings at the same time.
Did youKnow?

78 HOUR 5: Using Variables, Strings, and Arrays
Creating a String ArrayYou declare a string array in the same way as a numeric array—in fact, JavaScript
does not make a distinction between them:
names = new Array(30);
You can then assign string values to the array elements:
names[0] = “Henry J. Tillman”;names[1] = “Sherlock Holmes”;
As with numeric arrays, you can also specify a string array’s contents when you cre-
ate it. Either of the following statements would create the same string array as the
preceding example:
names = new Array(“Henry J. Tillman”, “Sherlock Holmes”);names = [“Henry J. Tillman”, “Sherlock Holmes”];
You can use string array elements anywhere you would use a string. You can even
use the string methods introduced earlier. For example, the following statement prints
the first five characters of the first element of the names array, resulting in Henry:
document.write(names[0].substring(0,5));
Splitting a StringJavaScript includes a string method called split, which splits a string into its com-
ponent parts. To use this method, specify the string to split and a character to divide
the parts:
test = “John Q. Public”;parts = test.split(“ “);
In this example, the test string contains the name John Q. Public. The split
method in the second statement splits the name string at each space, resulting in
three strings. These are stored in a string array called parts. After the example
statements execute, the elements of parts contain the following:
. parts[0] = “John”
. parts[1] = “Q.”
. parts[2] = “Public”
JavaScript also includes an array method, join, which performs the opposite func-
tion. This statement reassembles the parts array into a string:
fullname = parts.join(“ “);

Sorting a Numeric Array 79
The value in the parentheses specifies a character to separate the parts of the array.
In this case, a space is used, resulting in the final string John Q. Public. If you do
not specify a character, commas are used.
Sorting a String ArrayJavaScript also includes a sort method for arrays, which returns an alphabetically
sorted version of the array. For example, the following statements initialize an array
of four names and sort it:
names[0] = “Public, John Q.”;names[1] = “Tillman, Henry J.”;names[2] = “Bush, George W.”;names[3] = “Mouse, Mickey”;sortednames = names.sort();
The last statement sorts the names array and stores the result in a new array, sort-
ednames.
Sorting a Numeric ArrayBecause the sort method sorts alphabetically, it won’t work with a numeric array—
at least not the way you’d expect. If an array contains the numbers 4, 10, 30, and
200, for example, it would sort them as 10, 200, 30, 4—not even close. Fortunately,
there’s a solution: You can specify a function in the sort method’s parameters, and
that function will be used to compare the numbers. The following code sorts a
numeric array correctly:
function numcompare(a,b) {return a-b;
}nums = new Array(30, 10, 200, 4);sortednums = nums.sort(numcompare);
This example defines a simple function, numcompare, which subtracts the two num-
bers. After you specify this function in the sort method, the array is sorted in the
correct numeric order: 4, 10, 30, 200.
JavaScript expects the comparison function to return a negative number if abelongs before b, 0 if they are the same, or a positive number if a belongs after b.This is why a-b is all you need for the function to sort numerically.
By theWay
▼
80 HOUR 5: Using Variables, Strings, and Arrays
Try It Yourself
Sorting and Displaying NamesTo gain more experience working with JavaScript’s string and array features, youcan create a script that enables the user to enter a list of names, and displays the listin sorted form.
Because this will be a larger script, you will create separate HTML and JavaScriptfiles, as described in Hour 3, “Getting Started with JavaScript Programming.” First,the sort.html file will contain the HTML structure and form fields for the script towork with. Listing 5.2 shows the HTML document.
LISTING 5.2 The HTML Document for the Sorting Example<html><head><title>Array Sorting Example</title><script type=”text/javascript” language=”javascript” src=”sort.js”></script></head><body><h1>Sorting String Arrays</h1><p>Enter two or more names in the field below,and the sorted list of names will appear in thetext area.</p><form name=”theform”>Name:<input type=”text” name=”newname” size=”20”><input type=”button” name=”addname” value=”Add”onclick=”SortNames();”><br><h2>Sorted Names</h2><textarea cols=”60” rows=”10” name=”sorted”>The sorted names will appear here.</textarea></form></body></html>
Because the script will be in a separate document, the <script> tag in the header ofthis document uses the src attribute to include a JavaScript file called sort.js. Youwill create this file next.
This document defines a form named theform, a text field named newname, anaddname button, and a textarea named sorted. Your script will use these form fieldsas its user interface. Listing 5.3 shows the JavaScript file.
LISTING 5.3 The JavaScript File for the Sorting Example// initialize the counter and the arrayvar numnames=0;var names = new Array();function SortNames() {
Sorting a Numeric Array 81
// Get the name from the text fieldthename=document.theform.newname.value;// Add the name to the arraynames[numnames]=thename;// Increment the counternumnames++;// Sort the arraynames.sort();document.theform.sorted.value=names.join(“\n”);
}
The script begins by defining two variables with the var keyword: numnames will be acounter that increments as each name is added, and the names array will store thenames.
When you type a name into the text field and click the button, the onclick eventhandler calls the SortNames function. This function stores the text field value in avariable, thename, and then adds the name to the names array using numnames asthe index. It then increments numnames to prepare for the next name.
The final section of the script sorts the names and displays them. First, the sort()method is used to sort the names array. Next, the join() method is used to combinethe names, separating them with line breaks, and display them in the textarea.
To test the script, save it as sort.js, and then load the sort.html file you createdpreviously into a browser. You can then add some names and test the script. Figure5.2 shows the result after sorting several names.
FIGURE 5.2The output ofthe name-sort-ing example.
▲
LISTING 5.3 Continued
82 HOUR 5: Using Variables, Strings, and Arrays
SummaryDuring this hour, you’ve focused on variables and how JavaScript handles them.You’ve learned how to name variables, how to declare them, and the differencesbetween local and global variables. You also explored the data types supported byJavaScript and how to convert between them.
You also learned about JavaScript’s more complex variables, strings and arrays, andlooked at the features that enable you to perform operations on them, such as con-verting strings to uppercase or sorting arrays.
In the next hour, you’ll continue your JavaScript education by learning more abouttwo additional key features: functions and objects.
Q&AQ. What is the importance of the var keyword? Should I always use it to
declare variables?
A. You only need to use var to define a local variable in a function. However, if
you’re unsure at all, it’s always safe to use var. Using it consistently will help
you keep your scripts organized and error free.
Q. Is there any reason I would want to use the var keyword to create a localvariable with the same name as a global one?
A. Not on purpose. The main reason to use var is to avoid conflicts with global
variables you might not know about. For example, you might add a global
variable in the future, or you might add another script to the page that uses a
similar variable name. This is more of an issue with large, complex scripts.
Q. What good are Boolean variables?
A. Often in scripts you’ll need a variable to indicate whether something has hap-
pened—for example, whether a phone number the user has entered is in the
right format. Boolean variables are ideal for this; they’re also useful in work-
ing with conditions, as you’ll see in Hour 7.
Q. Can I store other types of data in an array? For example, can I have anarray of dates?
A. Absolutely. JavaScript allows you to store any data type in an array.
Q. What about two-dimensional arrays?
A. These are arrays with two indexes (such as columns and rows). JavaScript does
not directly support this type of array, but you can use objects to achieve the
same effect. You will learn more about objects in the next hour.
Quiz Questions 83
Quiz QuestionsTest your knowledge of JavaScript by answering the following questions:
1. Which of the following is not a valid JavaScript variable name?
a. 2names
b. first_and_last_names
c. FirstAndLast
2. If the statement var fig=2 appears in a function, which type of variable does
it declare?
a. A global variable
b. A local variable
c. A constant variable
3. If the string test contains the value The eagle has landed., what would be
the value of test.length?
a. 4
b. 21
c. The
4. Using the same example string, which of these statements would return the
word eagle?
a. test.substring(4,9)
b. test.substring(5,9)
c. test.substring(“eagle”)
5. What will be the result of the JavaScript expression 31 + “ angry polar
bears”?
a. An error message
b. 32
c. “31 angry polar bears”
84 HOUR 5: Using Variables, Strings, and Arrays
Quiz Answers1. a. 2names is an invalid JavaScript variable name because it begins with a
number. The others are valid, although they’re probably not ideal choices for
names.
2. b. Because the variable is declared in a function, it is a local variable. The var
keyword ensures that a local variable is created.
3. b. The length of the string is 21 characters.
4. a. The correct statement is test.substring(4,9). Remember that the indexes
start with 0, and that the second index is noninclusive.
5. c. JavaScript converts the whole expression to the string “31 angry polar
bears”. (No offense to polar bears, who are seldom angry and rarely seen in
groups this large.)
ExercisesTo further explore JavaScript variables, strings, and arrays, you can perform the fol-
lowing exercises:
. Modify the sorting example in Listing 5.3 to convert the names to all upper-
case before sorting and displaying them.
. Modify Listing 5.3 to display a numbered list of names in the textarea.

HOUR 6
Using Functions and Objects
What You’ll Learn in This Hour:. Defining and calling functions. Returning values from functions. Understanding JavaScript objects. Defining custom objects. Working with object properties and values. Defining and using object methods. Using objects to store data and related functions
In this hour, you’ll learn about two more key JavaScript concepts that you’ll use throughout
the rest of this book. First, you’ll learn the details of using functions, which enable you to
group any number of statements into a block. This is useful for repeating sections of code,
and you can also create functions that accept parameters and return values for later use.
Whereas functions enable you to group sections of code, objects enable you to group
data—you can use them to combine related data items and functions for working with
the data.
Using FunctionsThe scripts you’ve seen so far are simple lists of instructions. The browser begins with the
first statement after the <script> tag and follows each instruction in order until it reaches
the closing </script> tag (or encounters an error).
Although this is a straightforward approach for short scripts, it can be confusing to read a
longer script written in this fashion. To make it easier for you to organize your scripts,
JavaScript supports functions, which you learned about in Hour 3, “Getting Started with
JavaScript Programming.” In this section, you will learn how to define and use functions.
86 HOUR 6: Using Functions and Objects
Defining a FunctionFunctions are groups of JavaScript statements that can be treated as a single unit. To
use a function, you must first define it. Here is a simple example of a function defi-
nition:
function Greet() {alert(“Greetings.”);
}
This defines a function that displays an alert message to the user. This begins with
the function keyword. The function’s name is Greet. Notice the parentheses after
the function’s name. As you’ll learn next, the space between them is not always
empty.
The first and last lines of the function definition include braces ({ and }). You use
these to enclose all of the statements in the function. The browser uses the braces to
determine where the function begins and ends.
Between the braces, this particular function contains a single line. This uses the
built-in alert() function, which displays an alert message. The message will con-
tain the text “Greetings.”
Function names are case sensitive. If you define a function such as Greet() witha capital letter, be sure you use the identical name when you call the function.
Now, about those parentheses. The current Greet() function always does the same
thing: Each time you use it, it displays the same message. Although this avoids a bit
of typing, it doesn’t really provide much of an advantage.
To make your function more flexible, you can add parameters, also known as argu-
ments. These are variables that are received by the function each time it is called.
For example, you can add a parameter called who that tells the function the name
of the person to greet. Here is the modified Greet() function:
function Greet(who) {alert(“Greetings, “ + who);
}
Of course, to use this function, you should include it in an HTML document.
Traditionally, the best place for a function definition is within the <head> section of
the document. Because the statements in the <head> section are executed first, this
ensures that the function is defined before it is used.
Listing 6.1 shows the Greet() function embedded in the header section of an HTML
document.
By theWay
Using Functions 87
LISTING 6.1 The Greet() Function in an HTML Document<html><head><title>Functions</title><script language=”JavaScript” type=”text/javascript”>function Greet(who) {
alert(“Greetings, “ + who);}</script></head><body>This is the body of the page.</body></html>
As usual, you can download the listings for this hour or view them online at thisbook’s website.
Calling the FunctionYou have now defined a function and placed it in an HTML document. However, if
you load Listing 6.1 into a browser, you’ll notice that it does absolutely nothing.
This is because the function is defined—ready to be used—but we haven’t used it
yet.
Making use of a function is referred to as calling the function. To call a function, use
the function’s name as a statement in a script. You will need to include the paren-
theses and the values for the function’s parameters. For example, here’s a statement
that calls the Greet function:
Greet(“Fred”);
This tells the JavaScript interpreter to transfer control to the first statement in the
Greet function. It also passes the parameter “Fred” to the function. This value will
be assigned to the who variable inside the function.
Functions can have more than one parameter. To define a function with multipleparameters, list a variable name for each parameter, separated by commas. Tocall the function, specify values for each parameter separated by commas.
Listing 6.2 shows a complete HTML document that includes the function definition
and a second script in the body of the page that actually calls the function. To demon-
strate the usefulness of functions, we’ll call it twice to greet two different people.
By theWay
By theWay
88 HOUR 6: Using Functions and Objects
LISTING 6.2 The Complete Function Example<html><head><title>Functions</title><script language=”JavaScript” type=”text/javascript”>function Greet(who) {
alert(“Greetings, “ + who);}</script></head><body><h1>Function Example</h1><p>Prepare to be greeted twice.</p><script language=”JavaScript” type=”text/javascript”>Greet(“Fred”);Greet(“Ethel”);</script></body></html>>
This listing includes a second set of <script> tags in the body of the page. The sec-
ond script includes two function calls to the Greet function, each with a different
name.
Now that you have a script that actually does something, try loading it into a
browser. You should see something like Figure 6.1, which shows the Greeting script
running in Firefox.
FIGURE 6.1The output ofthe Greetingexample.
By theWay
Notice that the second alert message isn’t displayed until you press the OK but-ton on the first alert. This is because JavaScript processing is halted while alertsare displayed.
Returning a ValueThe function you just created displays a message to the user, but functions can also
return a value to the script that called them. This allows you to use functions to cal-
culate values. As an example, you can create a function that averages four numbers.
Using Functions 89
Your function should begin with the function keyword, the function’s name, and
the parameters it accepts. We will use the variable names a, b, c, and d for the four
numbers to average. Here is the first line of the function:
function Average(a,b,c,d) {
I’ve also included the opening brace ({) on the first line of the function. This is acommon style, but you can also place the brace on the next line, or on a line byitself.
Next, the function needs to calculate the average of the four parameters. You can
calculate this by adding them, and then dividing by the number of parameters (in
this case, 4). Thus, here is the next line of the function:
result = (a + b + c + d) / 4;
This statement creates a variable called result and calculates the result by adding
the four numbers, and then dividing by 4. (The parentheses are necessary to tell
JavaScript to perform the addition before the division.)
To send this result back to the script that called the function, you use the return
keyword. Here is the last part of the function:
return result;}
Listing 6.3 shows the complete Average() function in an HTML document. This
HTML document also includes a small script in the <body> section that calls the
Average() function and displays the result.
LISTING 6.3 The Average() Function in an HTML Document<html>_<head><title>Function Example</title><script language=”JavaScript” type=”text/javascript”>function Average(a,b,c,d) {result = (a + b + c + d) / 4;return result;}</script></head><body><p>The following is the result of the function call.</p><script LANGUAGE=”JavaScript” type=”text/javascript”>score = Average(3,4,5,6);document.write(“The average is: “ + score);</script>_</body></html>
By theWay
90 HOUR 6: Using Functions and Objects
You can use a variable with the function call, as shown in this listing. This state-
ment averages the numbers 3, 4, 5, and 6 and stores the result in a variable called
score:
score = Average(3,4,5,6);
You can also use the function call directly in an expression. For example, youcould use the alert statement to display the result of the function:alert(Average(1,2,3,4)) .
Introducing ObjectsIn the previous hour, you learned how to use variables to represent different kinds of
data in JavaScript. JavaScript also supports objects, a more complex kind of variable
that can store multiple data items and functions.
Although a variable can have only one value at a time, an object can contain mul-
tiple values, as well as functions for working with the values. This allows you to
group related data items and the functions that deal with them into a single object.
In this hour, you’ll learn how to define and use your own objects. You’ve already
worked with some objects:
. DOM objects—Allow your scripts to interact with web pages. You learned
about these in Hour 4, “Working with the Document Object Model (DOM).”
. Built-in objects—Include strings and arrays, which you learned about in Hour
5, “Using Variables, Strings, and Arrays.”
The syntax for working with all three types of objects—DOM objects, built-in objects,
and custom objects—is the same, so even if you don’t end up creating your own objects,
you should have a good understanding of JavaScript’s object terminology and syntax.
Creating ObjectsWhen you created an array in the previous hour, you used the following JavaScript
statement:
scores = new Array(4);
The new keyword tells the JavaScript interpreter to use a function—in this case, the
built-in Array function—to create an object. You’ll create a function for a custom
object later in this hour.
Did youKnow?
Using Objects to Simplify Scripting 91
Object Properties and ValuesEach object has one or more properties—essentially, variables that will be stored
within the object. For example, in Hour 4, you learned that the location.href
property gives you the URL of the current document. The href property is one of the
properties of the location object in the DOM.
You’ve also used the length property of String objects, as in the following example
from the previous hour:
test = “This is a test.”;document.write(test.length);
Like variables, each object property has a value. To read a property’s value, you sim-
ply include the object name and property name, separated by a period, in any
expression, as in test.length previously. You can change a property’s value using
the = operator, just like a variable. The following example sends the browser to a
new URL by changing the location.href property:
location.href=”http://www.jsworkshop.com/”;
An object can also be a property of another object. This is referred to as a childobject.
Understanding MethodsAlong with properties, each object can have one or more methods. These are func-tions that work with the object’s data. For example, the following JavaScript state-ment reloads the current document, as you learned in Hour 4:
location.reload();
When you use reload(), you’re using a method of the location object. Like normal
functions, methods can accept arguments in parentheses, and can return values.
Using Objects to Simplify ScriptingAlthough JavaScript’s variables and arrays are versatile ways to store data, some-times you need a more complicated structure. For example, suppose you are creat-ing a script to work with a business card database that contains names, addresses,and phone numbers for a variety of people.
If you were using regular variables, you would need several separate variables foreach person in the database: a name variable, an address variable, and so on. Thiswould be very confusing.
By theWay
92 HOUR 6: Using Functions and Objects
Arrays would improve things slightly. You could have a names array, an addresses
array, and a phone number array. Each person in the database would have an
entry in each array. This would be more convenient, but still not perfect.
With objects, you can make the variables that store the database as logical as busi-
ness cards. Each person is represented by a Card object, which has properties for
name, address, and phone number. You can even add methods to the object to dis-
play or work with the information.
In the following sections, you’ll use JavaScript to actually create the Card object and
its properties and methods. Later in this hour, you’ll use the Card object in a script
to display information for several members of the database.
Defining an ObjectThe first step in creating an object is to name it and its properties. We’ve already
decided to call the object a Card object. Each object will have the following proper-
ties:
. name
. address
. workphone
. homephone
The first step in using this object in a JavaScript program is to create a function to
make new Card objects. This function is called the constructor for an object. Here is
the constructor function for the Card object:
function Card(name,address,work,home) {this.name = name;this.address = address;this.workphone = work;this.homephone = home;
}
The constructor is a simple function that accepts parameters to initialize a new
object and assigns them to the corresponding properties. This function accepts sever-
al parameters from the statement that calls the function, and then assigns them as
properties of an object. Because the function is called Card, the object is the Card
object.
Notice the this keyword. You’ll use it anytime you create an object definition. Use
this to refer to the current object—the one that is being created by the function.
Using Objects to Simplify Scripting 93
Defining an Object MethodNext, you will create a method to work with the Card object. Because all Card
objects will have the same properties, it might be handy to have a function that
prints out the properties in a neat format. Let’s call this function PrintCard().
Your PrintCard() function will be used as a method for Card objects, so you don’t
need to ask for parameters. Instead, you can use the this keyword again to refer to the
current object’s properties. Here is a function definition for the PrintCard() function:
function PrintCard() {line1 = “Name: “ + this.name + “<br>\n”;line2 = “Address: “ + this.address + “<br>\n”;line3 = “Work Phone: “ + this.workphone + “<br>\n”;line4 = “Home Phone: “ + this.homephone + “<hr>\n”;document.write(line1, line2, line3, line4);
}
This function simply reads the properties from the current object (this), prints each
one with a caption, and skips to a new line.
You now have a function that prints a card, but it isn’t officially a method of the
Card object. The last thing you need to do is make PrintCard() part of the function
definition for Card objects. Here is the modified function definition:
function Card(name,address,work,home) {this.name = name;this.address = address;this.workphone = work;this.homephone = home;this.PrintCard = PrintCard;
}
The added statement looks just like another property definition, but it refers to the
PrintCard() function. This will work so long as the PrintCard() function is defined
with its own function definition. Methods are essentially properties that define a
function rather than a simple value.
The previous example uses lowercase names such as workphone for properties,and an uppercase name (PrintCard) for the method. You can use any case forproperty and method names, but this is one way to make it clear that PrintCardis a method rather than an ordinary property.
Creating an Object InstanceNow let’s use the object definition and method you just created. To use an object def-
inition, you create a new object. This is done with the new keyword. This is the same
keyword you’ve already used to create Date and Array objects.
Did youKnow?
94 HOUR 6: Using Functions and Objects
The following statement creates a new Card object called tom:
tom = new Card(“Tom Jones”, “123 Elm Street”, “555-1234”, “555-9876”);
As you can see, creating an object is easy. All you do is call the Card() function (theobject definition) and give it the required attributes, in the same order as the definition.
After this statement executes, a new object is created to hold Tom’s information. Thisis called an instance of the Card object. Just as there can be several string variablesin a program, there can be several instances of an object you define.
Rather than specify all the information for a card with the new keyword, you canassign them after the fact. For example, the following script creates an empty Cardobject called holmes, and then assigns its properties:
holmes = new Card();holmes.name = “Sherlock Holmes”;holmes.address = “221B Baker Street”;holmes.workphone = “555-2345”;holmes.homephone = “555-3456”;
After you’ve created an instance of the Card object using either of these methods,
you can use the PrintCard() method to display its information. For example, this
statement displays the properties of the tom card:
tom.PrintCard();
Extending Built-in ObjectsJavaScript includes a feature that enables you to extend the definitions of built-inobjects. For example, if you think the String object doesn’t quite fit your needs, youcan extend it, adding a new property or method. This might be very useful if youwere creating a large script that used many strings.
You can add both properties and methods to an existing object by using the proto-type keyword. (A prototype is another name for an object’s definition, or constructorfunction.) The prototype keyword enables you to change the definition of an objectoutside its constructor function.
As an example, let’s add a method to the String object definition. You will create amethod called heading, which converts a string into an HTML heading. The follow-ing statement defines a string called title:
title = “Fred’s Home Page”;
This statement would output the contents of the title string as an HTML level 1
heading:
document.write(title.heading(1));
▼
Extending Built-in Objects 95
Listing 6.4 adds a heading method to the String object definition that will display
the string as a heading, and then displays three headings using the method.
LISTING 6.4 Adding a Method to the String Object<html><head><title>Test of heading method</title></head><body><script LANGUAGE=”JavaScript” type=”text/javascript”>function addhead (level) {
html = “H” + level;text = this.toString();start = “<” + html + “>”;stop = “</” + html + “>”;return start + text + stop;
}String.prototype.heading = addhead;document.write (“This is a heading 1”.heading(1));document.write (“This is a heading 2”.heading(2));document.write (“This is a heading 3”.heading(3));</script></body></html>
First, you define the addhead() function, which will serve as the new string method. It
accepts a number to specify the heading level. The start and stop variables are used
to store the HTML “begin header” and “end header” tags, such as <h1> and </h1>.
After the function is defined, use the prototype keyword to add it as a method of
the String object. You can then use this method on any String object or, in fact,
any JavaScript string. This is demonstrated by the last three statements, which dis-
play quoted text strings as level 1, 2, and 3 headers.
Try It Yourself
Storing Data in ObjectsNow you’ve created a new object to store business cards and a method to print them
out. As a final demonstration of objects, properties, functions, and methods, you will
now use this object in a web page to display data for several cards.
Your script will need to include the function definition for PrintCard(), along with
the function definition for the Card object. You will then create three cards and print
them out in the body of the document. We will use separate HTML and JavaScript
files for this example. Listing 6.5 shows the complete script.
96 HOUR 6: Using Functions and Objects
LISTING 6.5 An Example Script That Uses the Card Object// define the functionsfunction PrintCard() {line1 = “<b>Name: </b>” + this.name + “<br>\n”;line2 = “<b>Address: </b>” + this.address + “<br>\n”;line3 = “<b>Work Phone: </b>” + this.workphone + “<br>\n”;line4 = “<b>Home Phone: </b>” + this.homephone + “<hr>\n”;document.write(line1, line2, line3, line4);}function Card(name,address,work,home) {
this.name = name;this.address = address;this.workphone = work;this.homephone = home;this.PrintCard = PrintCard;
}// Create the objectssue = new Card(“Sue Suthers”, “123 Elm Street”, “555-1234”, “555-9876”);phred = new Card(“Phred Madsen”, “233 Oak Lane”, “555-2222”, “555-4444”);henry = new Card(“Henry Tillman”, “233 Walnut Circle”, “555-1299”, “555-1344”);// And print themsue.PrintCard();phred.PrintCard();henry.PrintCard();
Notice that the PrintCard() function has been modified slightly to make things
look good with the captions in boldface. To use this script, save it as cardtest.js.
Next, you’ll need to include the script in a simple HTML document. Listing 6.6
shows the HTML document for this example.
LISTING 6.6 The HTML File for the Card Object Example<html><head><title>JavaScript Business Cards</title></head><body><h1>JavaScript Business Card Test</h1><p>Script begins here.</p><hr><script language=”JavaScript” type=”text/javascript”
src=”cardtest.js”></script><p>End of script.</p></body></html>
To test the script, save the HTML document in the same directory as the
cardtest.js file you created earlier, and then load the HTML document into a
browser. The browser’s display of this example is shown in Figure 6.2.
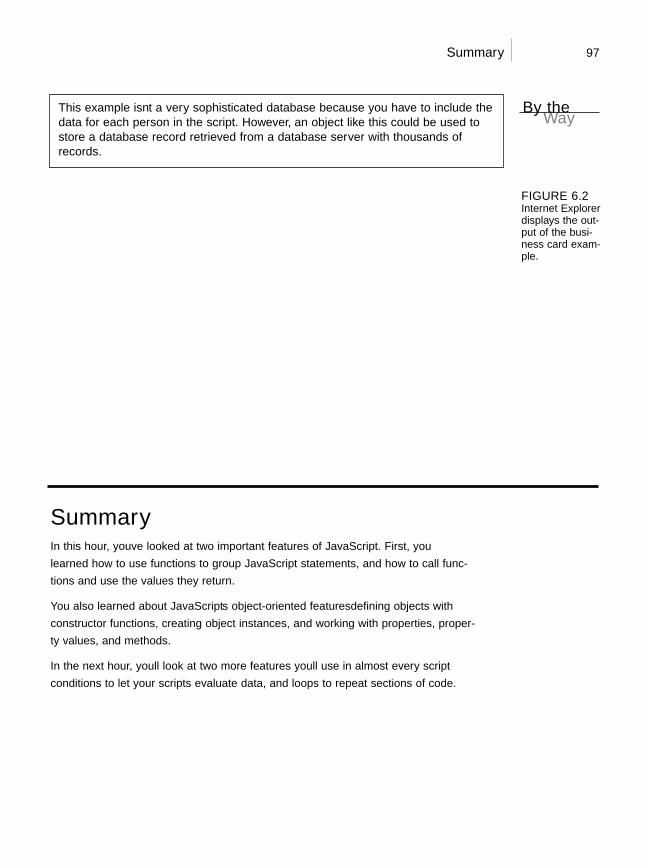
Summary 97
This example isn’t a very sophisticated database because you have to include thedata for each person in the script. However, an object like this could be used tostore a database record retrieved from a database server with thousands ofrecords.
By theWay
FIGURE 6.2Internet Explorerdisplays the out-put of the busi-ness card exam-ple.
SummaryIn this hour, you’ve looked at two important features of JavaScript. First, you
learned how to use functions to group JavaScript statements, and how to call func-
tions and use the values they return.
You also learned about JavaScript’s object-oriented features—defining objects with
constructor functions, creating object instances, and working with properties, proper-
ty values, and methods.
In the next hour, you’ll look at two more features you’ll use in almost every script—
conditions to let your scripts evaluate data, and loops to repeat sections of code.
▲
98 HOUR 6: Using Functions and Objects
Q&AQ. Many objects in JavaScript, such as DOM objects, include parent and child
objects. Can I include child objects in my custom object definitions?
A. Yes. Just create a constructor function for the child object, and then add a
property to the parent object that corresponds to it. For example, if you creat-
ed a Nicknames object to store several nicknames for a person in the card file
example, you could add it as a child object in the Card object’s constructor:
this.nick = new Nicknames();.
Q. Can I create an array of custom objects?
A. Yes. First, create the object definition as usual and define an array with the
required number of elements. Then assign a new object to each array element
(for example, cardarray[1] = new Card();). You can use a loop, described
in the next hour, to assign objects to an entire array at once.
Q. Can I modify all properties of objects?
A. With custom objects, yes—but this varies with built-in objects and DOM
objects. For example, you can use the length property to find the length of a
string, but it is a read-only property and cannot be modified.
Quiz QuestionsTest your knowledge of JavaScript by answering the following questions:
1. What JavaScript keyword is used to create an instance of an object?
a. object
b. new
c. instance
2. What is the meaning of the this keyword in JavaScript?
a. The current object.
b. The current script.
c. It has no meaning.
Exercises 99
3. What does the prototype keyword allow you to do in a script?
a. Change the syntax of JavaScript commands.
b. Modify the definitions of built-in objects.
c. Modify the user’s browser so only your scripts will work.
Quiz Answers1. b. The new keyword creates an object instance.
2. a. The this keyword refers to the current object.
3. b. The prototype keyword allows you to modify the definitions of built-in
objects.
ExercisesTo further explore the JavaScript features you learned about in this hour, you can
perform the following exercises:
. Modify the Greet() function to accept two parameters, who1 and who2, and to
include both names in a single greeting dialog. Modify Listing 6.2 to use a sin-
gle function call to the new function.
. Modify the definition of the Card object to include a property called email for
the person’s email address. Modify the PrintCard() function in Listing 6.5 to
include this property.

This page intentionally left blank

HOUR 7
Controlling Flow withConditions and Loops
What You’ll Learn in This Hour:. Testing variables with the if statement. Using various operators to compare values. Using logical operators to combine conditions. Using alternative conditions with else. Creating expressions with conditional operators. Testing for multiple conditions. Performing repeated statements with the for loop. Using while for a different type of loop. Using do...while loops. Creating infinite loops (and why you shouldn’t). Escaping from loops and continuing loops. Looping through an array’s properties
Statements in a JavaScript program generally execute in the order in which they appear,
one after the other. Because this isn’t always practical, most programming languages pro-
vide flow control statements that let you control the order in which code is executed.
Functions, which you learned about in the previous hour, are one type of flow control—
although a function might be defined first thing in your code, its statements can be exe-
cuted anywhere in the script.
In this hour, you’ll look at two other types of flow control in JavaScript: conditions, which
allow a choice of different options depending on a value, and loops, which allow repeti-
tive statements.
102 HOUR 7: Controlling Flow with Conditions and Loops
The if StatementOne of the most important features of a computer language is the capability to test
and compare values. This allows your scripts to behave differently based on the val-
ues of variables, or based on input from the user.
The if statement is the main conditional statement in JavaScript. This statement
means much the same in JavaScript as it does in English—for example, here is a
typical conditional statement in English:
If the phone rings, answer it.
This statement consists of two parts: a condition (If the phone rings) and an action
(answer it). The if statement in JavaScript works much the same way. Here is an
example of a basic if statement:
if (a == 1) window.alert(“Found a 1!”);
This statement includes a condition (if a equals 1) and an action (display a mes-
sage). This statement checks the variable a and, if it has a value of 1, displays an
alert message. Otherwise, it does nothing.
If you use an if statement like the preceding example, you can use a single state-
ment as the action. You can also use multiple statements for the action by enclosing
them in braces ({}), as shown here:
if (a == 1) {window.alert(“Found a 1!”);a = 0;
}
This block of statements checks the variable a once again. If it finds a value of 1, it
displays a message and sets a back to 0.
Conditional OperatorsThe action part of an if statement can include any of the JavaScript statements
you’ve already learned (and any others, for that matter), but the condition part of
the statement uses its own syntax. This is called a conditional expression.
A conditional expression usually includes two values to be compared (in the preced-
ing example, the values were a and 1). These values can be variables, constants, or
even expressions in themselves.
Either side of the conditional expression can be a variable, a constant, or anexpression. You can compare a variable and a value, or compare two variables.(You can compare two constants, but there’s usually no reason to.)
By theWay
The if Statement 103
Between the two values to be compared is a conditional operator. This operator tells
JavaScript how to compare the two values. For instance, the == operator is used to
test whether the two values are equal. A variety of conditional operators is available:
. == — Is equal to
. != — Is not equal to
. < — Is less than
. > — Is greater than
. >= — Is greater than or equal to
. <= — Is less than or equal to
Be sure not to confuse the equality operator (==) with the assignment operator(=), even though they both might be read as “equals.” Remember to use = whenassigning a value to a variable, and == when comparing values. Confusing thesetwo is one of the most common mistakes in JavaScript programming.
Combining Conditions with Logical OperatorsOften, you’ll want to check a variable for more than one possible value, or check
more than one variable at once. JavaScript includes logical operators, also known as
Boolean operators, for this purpose. For example, the following two statements
check different conditions and use the same action:
if (phone == “”) window.alert(“error!”);if (email == “”) window.alert(“error!”);
Using a logical operator, you can combine them into a single statement:
if (phone == “” || email == “”) window.alert(“Something’s Missing!”);
This statement uses the logical Or operator (||) to combine the conditions.
Translated to English, this would be, “If the phone number is blank or the email
address is blank, display an error message.”
An additional logical operator is the And operator, &&. Consider this statement:
if (phone == “” && email == “”) window.alert(“Both are Missing!”);
This statement uses && (And) instead of || (Or), so the error message will only be
displayed if both the email address and phone number variables are blank. (In this
particular case, Or is a better choice.)
By theWay
104 HOUR 7: Controlling Flow with Conditions and Loops
If the JavaScript interpreter discovers the answer to a conditional expressionbefore reaching the end, it does not evaluate the rest of the condition. For exam-ple, if the first of two conditions separated by the && operator is false, the secondis not evaluated. You can take advantage of this to improve the speed of yourscripts.
The third logical operator is the exclamation mark (!), which means Not. It can be
used to invert an expression—in other words, a true expression would become false,
and a false one would become true. For example, here’s a statement that uses the
Not operator:
if (!($phone == “”)) alert(“phone is OK”);
In this statement, the ! (Not) operator inverts the condition, so the action of the if
statement is executed only if the phone number variable is not blank. The extra
parentheses are necessary because all JavaScript conditions must be in parentheses.
You could also use the != (Not equal) operator to simplify this statement:
if ($phone != “”) alert(“phone is OK”);
As with the previous statement, this alerts you if the phone number field is not
blank.
The logical operators are powerful, but it’s easy to accidentally create an impossi-ble condition with them. For example, the condition (a < 10 && a > 20) mightlook correct at first glance. However, if you read it out loud, you get “If a is lessthan 10 and a is greater than 20”—an impossibility in our universe. In this case,Or (||) should have been used.
The else KeywordAn additional feature of the if statement is the else keyword. Much like its English
equivalent, else tells the JavaScript interpreter what to do if the condition isn’t true.
The following is a simple example of the else keyword in action:
if (a == 1) {alert(“Found a 1!”);a = 0;
}else {
alert(“Incorrect value: “ + a);}
This is a modified version of the previous example. This displays a message and
resets the variable a if the condition is met. If the condition is not met (if a is not 1),
a different message is displayed.
Did youKnow?
Did youKnow?

Testing Multiple Conditions with if and else 105
Like the if statement, else can be followed either by a single action statementor by a number of statements enclosed in braces.
Using Shorthand Conditional ExpressionsIn addition to the if statement, JavaScript provides a shorthand type of conditional
expression that you can use to make quick decisions. This uses a peculiar syntax that
is also found in other languages, such as C. A conditional expression looks like this:
variable = (condition) ? (true action) : (false action);
This assigns one of two values to the variable: one if the condition is true, and
another if it is false. Here is an example of a conditional expression:
value = (a == 1) ? 1 : 0;
This statement might look confusing, but it is equivalent to the following if statement:
if (a == 1)value = 1;
elsevalue = 0;
In other words, the value after the question mark (?) will be used if the condition is
true, and the value after the colon (:) will be used if the condition is false. The colon
represents the else portion of this statement and, like the else portion of the if
statement, is optional.
These shorthand expressions can be used anywhere JavaScript expects a value. They
provide an easy way to make simple decisions about values. As an example, here’s
an easy way to display a grammatically correct message about a variable:
document.write(“Found “ + counter + ((counter == 1) ? “ word.” : “ words.”));
This will print the message Found 1 word if the counter variable has a value of 1,
and Found 2 words if its value is 2 or greater. This is one of the most common uses
for a conditional expression.
Testing Multiple Conditions with if andelseYou can now create an example script using if and else. In Hour 2, “Creating
Simple Scripts,” you created a script that displays the current date and time.
This example will use conditions to display a greeting that depends on the time:
By theWay
106 HOUR 7: Controlling Flow with Conditions and Loops
“Good morning,” “Good Afternoon,” “Good Evening,” or “Good Day”. To accom-
plish this, you can use a combination of several if statements:
if (hours < 10) document.write(“Good morning.”);else if (hours >= 14 && hours <= 17) document.write(“Good afternoon.”);else if (hours >= 17) document.write(“Good evening.”);else document.write(“Good day.”);
The first statement checks the hours variable for a value less than 10—in other
words, it checks whether the current time is before 10:00 a.m. If so, it displays the
greeting “Good morning.”
The second statement checks whether the time is between 2:00 p.m. and 5:00 p.m.
and, if so, displays “Good afternoon.” This statement uses else if to indicate that
this condition will only be tested if the previous one failed—if it’s morning, there’s
no need to check whether it’s afternoon. Similarly, the third statement checks for
times after 5:00 p.m. and displays “Good evening.”
The final statement uses a simple else, meaning it will be executed if none of the
previous conditions matched. This covers the times between 10:00 a.m. and 2:00
p.m. (neglected by the other statements) and displays “Good day.”
The HTML FileTo try this example in a browser, you’ll need an HTML file. We will keep the
JavaScript code separate, so Listing 7.1 is the complete HTML file. Save it as
timegreet.html but don’t load it into the browser until you’ve prepared the
JavaScript file in the next section.
LISTING 7.1 The HTML File for the Time and Greeting Example<html><head><title>if statement example</title></head><body><h1>Current Date and Time</h1><p><script language=”JavaScript” type=”text/javascript”src = “timegreet.js”></script></p></body></html>
The JavaScript FileListing 7.2 shows the complete JavaScript file for the time greeting example. This uses
the built-in Date object functions to find the current date and store it in hours, mins,
Using Multiple Conditions with switch 107
and secs variables. Next, document.write statements display the current time, and
the if and else statements introduced earlier display an appropriate greeting.
LISTING 7.2 A Script to Display the Current Time and a Greeting// Get the current datenow = new Date();// Split into hours, minutes, secondshours = now.getHours();mins = now.getMinutes();secs = now.getSeconds();// Display the timedocument.write(“<h2>”);document.write(hours + “:” + mins + “:” + secs);document.write(“</h2>”);// Display a greetingdocument.write(“<p>”);if (hours < 10) document.write(“Good morning.”);else if (hours >= 14 && hours <= 17) document.write(“Good afternoon.”);else if (hours > 17) document.write(“Good evening.”);else document.write(“Good day.”);document.write(“</p>”);
To try this example, save this file as timegreet.js (or download it from this book’s
website) and then load the timegreet.html file into your browser. Figure 7.1 shows
the results of this script.
FIGURE 7.1The output ofthe time greet-ing example, asshown byInternetExplorer.
Using Multiple Conditions with switchIn the previous example, you used several if statements in a row to test for different
conditions. Here is another example of this technique:
if (button==”next”) window.location=”next.html”;else if (button==”previous”) window.location=”prev.html”;else if (button==”home”) window.location=”home.html”;else if (button==”back”) window.location=”menu.html”;
108 HOUR 7: Controlling Flow with Conditions and Loops
Although this is a compact way of doing things, this method can get messy if each
if statement has its own block of code with several statements. As an alternative,
JavaScript includes the switch statement, which enables you to combine several
tests of the same variable or expression into a single block of statements. The follow-
ing shows the same example converted to use switch:
switch(button) {case “next”:
window.location=”next.html”;break;
case “previous”:window.location=”prev.html”;break;
case “home”:window.location=”home.html”;break;
case “back”:window.location=”menu.html”;break;
default:window.alert(“Wrong button.”);
}
The switch statement has several components:
. The initial switch statement. This statement includes the value to test (in this
case, button) in parentheses.
. Braces ({ and }) enclose the contents of the switch statement, similar to a
function or an if statement.
. One or more case statements. Each of these statements specifies a value to
compare with the value specified in the switch statement. If the values
match, the statements after the case statement are executed. Otherwise, the
next case is tried.
. The break statement is used to end each case. This skips to the end of the
switch. If break is not included, statements in multiple cases might be exe-
cuted whether they match or not.
. Optionally, the default case can be included and followed by one or more
statements that are executed if none of the other cases were matched.
You can use multiple statements after each case statement within the switchstructure. You don’t need to enclose them in braces. If the case matches, theJavaScript interpreter executes statements until it encounters a break or the nextcase.
By theWay
Using for Loops 109
Using for LoopsLoops are useful any time you need a section of code to execute more than once.
The for keyword is the first tool to consider for creating loops. A for loop typically
uses a variable (called a counter or an index) to keep track of how many times the
loop has executed, and it stops when the counter reaches a certain number. A basic
for statement looks like this:
for (var = 1; var < 10; var++) {
There are three parameters to the for loop, separated by semicolons:
. The first parameter (var = 1 in the example) specifies a variable and assigns
an initial value to it. This is called the initial expression because it sets up the
initial state for the loop.
. The second parameter (var < 10 in the example) is a condition that must
remain true to keep the loop running. This is called the condition of the loop.
. The third parameter (var++ in the example) is a statement that executes with
each iteration of the loop. This is called the increment expression because it is
typically used to increment the counter. The increment expression executes at
the end of each loop iteration.
After the three parameters are specified, a left brace ({) is used to signal the begin-
ning of a block. A right brace (}) is used at the end of the block. All the statements
between the braces will be executed with each iteration of the loop.
The parameters for a for loop may sound a bit confusing, but once you’re used to
it, you’ll use for loops frequently. Here is a simple example of this type of loop:
for (i=0; i<10; i++) {document.write(“This is line “ + i + “<br>”);
}
These statements define a loop that uses the variable i, initializes it with the value
of zero, and loops as long as the value of i is less than 10. The increment expres-
sion, i++, adds one to the value of i with each iteration of the loop. Because this
happens at the end of the loop, the output will list the numbers zero through nine.
When a loop includes only a single statement between the braces, as in this exam-
ple, you can omit the braces if you want. The following statement defines the same
loop without braces:
for (i=0; i<10; i++)document.write(“This is line “ + i + “<br>”);
110 HOUR 7: Controlling Flow with Conditions and Loops
It’s a good style convention to use braces with all loops whether they contain onestatement or many. This makes it easy to add statements to the loop later withoutcausing syntax errors.
The loop in this example contains a document.write statement that will be repeat-
edly executed. To see just what this loop does, you can add it to a <script> section
of an HTML document as shown in Listing 7.3.
LISTING 7.3 A Loop Using the for Keyword<html><head><title>Using a for Loop</title></head><body><h1>”for” Loop Example</h1><p>The following is the output of the<b>for</b> loop:</p><script language=”JavaScript” type=”text/javascript”>for (i=1;i<10;i++) {
document.write(“This is line “ + i + “<br>”);}</script></body></html>
This example displays a message with the loop’s counter during each iteration. The
output of Listing 7.3 is shown in Figure 7.2.
Notice that the loop was only executed nine times. This is because the conditional is
i<10. When the counter (i) is incremented to 10, the expression is no longer true. If
you need the loop to count to 10, you can change the conditional; either i<=10 or
i<11 will work fine.
You might notice that the variable name i is often used as the counter in loops.This is a programming tradition that began with an ancient language called Forth.There’s no need for you to follow this tradition, but it is a good idea to use oneconsistent variable for counters. (To learn more about Forth, see the Forth InterestGroup’s website at www.forth.org.)
The structure of the for loop in JavaScript is based on Java, which in turn is based
on C. Although it is traditionally used to count from one number to another, you
can use just about any statement for the initialization, condition, and increment.
However, there’s usually a better way to do other types of loops with the while key-
word, described in the next section.
Did youKnow?
By theWay
Using while Loops 111
Using while LoopsAnother keyword for loops in JavaScript is while. Unlike for loops, while loops don’t
necessarily use a variable to count. Instead, they execute as long as a condition is
true. In fact, if the condition starts out as false, the statements won’t execute at all.
The while statement includes the condition in parentheses, and it is followed by a
block of statements within braces, just like a for loop. Here is a simple while loop:
while (total < 10) {n++;total += values[n];
}
This loop uses a counter, n, to iterate through the values array. Rather than stop-
ping at a certain count, however, it stops when the total of the values reaches 10.
You might have noticed that you could have done the same thing with a for loop:
for (n=0;total < 10; n++) {total += values[n];
}
As a matter of fact, the for loop is nothing more than a special kind of while loop
that handles an initialization and an increment for you. You can generally use
while for any loop. However, it’s best to choose whichever type of loop makes the
most sense for the job, or that takes the least amount of typing.
FIGURE 7.2The results ofthe for loopexample.
112 HOUR 7: Controlling Flow with Conditions and Loops
Using do…while LoopsJavaScript 1.2 introduced a third type of loop: the do…while loop. This type of loop
is similar to an ordinary while loop, with one difference: The condition is tested at
the end of the loop rather than the beginning. Here is a typical do…while loop:
do {n++;total += values[n];
}while (total < 10);
As you’ve probably noticed, this is basically an upside-down version of the previous
while example. There is one difference: With the do loop, the condition is tested at
the end of the loop. This means that the statements in the loop will always be exe-
cuted at least once, even if the condition is never true.
As with the for and while loops, the do loop can include a single statement with-out braces, or a number of statements enclosed in braces.
Working with LoopsAlthough you can use simple for and while loops for straightforward tasks, there
are some considerations you should make when using more complicated loops. In
the next sections, we’ll look at infinite loops and the break and continue state-
ments, which give you more control over your loops.
Creating an Infinite LoopThe for and while loops give you quite a bit of control over the loop. In some cases,
this can cause problems if you’re not careful. For example, look at the following
loop code:
while (i < 10) {n++;values[n] = 0;
}
There’s a mistake in this example. The condition of the while loop refers to the i
variable, but that variable doesn’t actually change during the loop. This creates an
infinite loop. The loop will continue executing until the user stops it, or until it gener-
ates an error of some kind.
Infinite loops can’t always be stopped by the user, except by quitting the browser—
and some loops can even prevent the browser from quitting, or cause a crash.
By theWay
Working with Loops 113
Obviously, infinite loops are something to avoid. They can also be difficult to spot
because JavaScript won’t give you an error that actually tells you there is an infinite
loop. Thus, each time you create a loop in a script, you should be careful to make
sure there’s a way out.
Depending on the browser version in use, an infinite loop might even make thebrowser stop responding to the user. Be sure you provide an escape route frominfinite loops, and save your script before you test it just in case.
Occasionally, you might want to create an infinite loop deliberately. This might
include situations when you want your program to execute until the user stops it, or
if you are providing an escape route with the break statement, which is introduced
in the next section. Here’s an easy way to create an infinite loop:
while (true) {
Because the value true is the conditional, this loop will always find its condition to
be true.
Escaping from a LoopThere is one way out of an infinite loop. You can use the break statement during a
loop to exit it immediately and continue with the first statement after the loop. Here
is a simple example of the use of break:
while (true) {n++;if (values[n] == 1) break;
}
Although the while statement is set up as an infinite loop, the if statement checks
the corresponding value of an array. If it finds a value of 1, it exits the loop.
When the JavaScript interpreter encounters a break statement, it skips the rest of the
loop and continues the script with the first statement after the right brace at the
loop’s end. You can use the break statement in any type of loop, whether infinite or
not. This provides an easy way to exit if an error occurs, or if another condition is
met.
Continuing a LoopOne more statement is available to help you control the execution of statements in
a loop. The continue statement skips the rest of the loop but, unlike break, it con-
tinues with the next iteration of the loop. Here is a simple example:
By theWay
▼
114 HOUR 7: Controlling Flow with Conditions and Loops
for (i=1; i<21; i++) {if (score[i]==0) continue;document.write(“Student number “,i, “ Score: “, score[i], “\n”);
}
This script uses a for loop to print out scores for 20 students, stored in the score
array. The if statement is used to check for scores with a value of 0. The script
assumes that a score of 0 means that the student didn’t take the test, so it continues
the loop without printing that score.
Looping Through Object PropertiesA third type of loop is available in JavaScript. The for…in loop is not as flexible as
an ordinary for or while loop. Instead, it is specifically designed to perform an
operation on each property of an object.
For example, the navigator object contains properties that describe the user’s
browser, as you’ll learn in Hour 15, “Unobtrusive Scripting.” You can use for…in to
display this object’s properties:
for (i in navigator) {document.write(“property: “ + i);document.write(“ value: “ + navigator[i] + “<br>”);
}
Like an ordinary for loop, this type of loop uses an index variable (i in the exam-
ple). For each iteration of the loop, the variable is set to the next property of the
object. This makes it easy when you need to check or modify each of an object’s
properties.
Try It Yourself
Working with Arrays and LoopsTo apply your knowledge of loops, you will now create a script that deals with
arrays using loops. As you progress through this script, try to imagine how difficult
it would be without JavaScript’s looping features.
This simple script will prompt the user for a series of names. After all of the names
have been entered, it will display the list of names in a numbered list. To begin the
script, initialize some variables:
names = new Array();i = 0;
Looping Through Object Properties 115
The names array will store the names the user enters. You don’t know how many
names will be entered, so you don’t need to specify a dimension for the array. The i
variable will be used as a counter in the loops.
Next, use the prompt statement to prompt the user for a series of names. Use a loop
to repeat the prompt for each name. You want the user to enter at least one name,
so a do loop is ideal:
do {next = prompt(“Enter the Next Name”, “”); if (next > “ “) names[i] = next;i = i + 1;}while (next > “ “);
If you’re interested in making your scripts as short as possible, remember thatyou could use the increment (++) operator to combine the i = i + 1 statementwith the previous statement: names[i++]=1.
This loop prompts for a string called next. If a name was entered and isn’t blank,
it’s stored as the next entry in the names array. The i counter is then incremented.
The loop repeats until the user doesn’t enter a name or clicks Cancel in the prompt
dialog.
Next, your script can display the number of names that was entered:
document.write(“<h2>” + (names.length) + “ names entered.</h2>”);
This statement displays the length property of the names array, surrounded by level
2 heading tags for emphasis.
Next, the script should display all the names in the order they were entered. Because
the names are in an array, the for…in loop is a good choice:
document.write(“<ol>”);for (i in names) {
document.write(“<li>” + names[i] + “<br>”);}document.write(“</ol>”);
Here you have a for…in loop that loops through the names array, assigning the
counter i to each index in turn. The script then prints the name with a <li> tag as
an item in an ordered list. Before and after the loop, the script prints beginning and
ending <ol> tags.
You now have everything you need for a working script. Listing 7.4 shows the HTML
file for this example, and Listing 7.5 shows the JavaScript file.
Did youKnow?
116 HOUR 7: Controlling Flow with Conditions and Loops
LISTING 7.4 A Script to Prompt for Names and Display Them (HTML)<html><head><title>Loops Example</title></head><body><h1>Loop Example</h1><p>Enter a series of names. I will thendisplay them in a nifty numbered list.</p><script language=”JavaScript” type=”text/javascript”src=”loops.js”></script></body></html>
LISTING 7.5 A Script to Prompt for Names and Display Them(JavaScript)// create the arraynames = new Array();i = 0;// loop and prompt for namesdo {
next = window.prompt(“Enter the Next Name”, “”); if (next > “ “) names[i] = next;i = i + 1;} while (next > “ “);
document.write(“<h2>” + (names.length) + “ names entered.</h2>”);// display all of the namesdocument.write(“<ol>”);for (i in names) {
document.write(“<li>” + names[i] + “<br>”);}document.write(“</ol>”);
To try this example, save the JavaScript file as loops.js and then load the HTML
document into a browser. You’ll be prompted for one name at a time. Enter several
names, and then click Cancel to indicate that you’re finished. Figure 7.3 shows what
the final results should look like in a browser.
Summary 117
SummaryIn this hour, you’ve learned two ways to control the flow of your scripts. First, you
learned how to use the if statement to evaluate conditional expressions and react
to them. You also learned a shorthand form of conditional expression using the ?
operator, and the switch statement for working with multiple conditions.
You also learned about JavaScript’s looping capabilities using for, while, and other
loops, and how to control loops further using the break and continue statements.
Lastly, you looked at the for…in loop for working with each property of an object.
In the next hour, you’ll look at JavaScript’s built-in functions, another essential tool
for creating your own scripts. You’ll also learn about third-party libraries that enable
you to create complex effects with simple scripts.
FIGURE 7.3The output ofthe namesexample, asshown byFirefox.
▲
118 HOUR 7: Controlling Flow with Conditions and Loops
Q&AQ. What happens if I compare two items of different data types (for example, a
number and a string) in a conditional expression?
A. The JavaScript interpreter does its best to make the values a common format
and compare them. In this case, it would convert them both to strings before
comparing. In JavaScript 1.3 and later, you can use the special equality opera-
tor === to compare two values and their types—using this operator, the
expression will be true only if the expressions have the same value and the
same data type.
Q. Why would I use switch if using if and else is just as simple?
A. Either one works, so it’s your choice. Personally, I find switch statements con-
fusing and prefer to use if. Your choice might also depend on what other pro-
gramming languages you’re familiar with because some support switch and
others don’t.
Q. Why don’t I get a friendly error message if I accidentally use = instead of ==?
A. In some cases, this will result in an error. However, the incorrect version often
appears to be a correct statement. For example, in the statement if (a=1),
the variable a will be assigned the value 1. The if statement is considered
true, and the value of a is lost.
Q. It seems like I could use a for loop to replace any of the other loop meth-ods (while, do, and so on). Why so many choices?
A. You’re right. In most cases, a for loop will work, and you can do all your
loops that way if you want. For that matter, you can use while to replace a
for loop. You can use whichever looping method makes the most sense for
your application.
Quiz QuestionsTest your knowledge of JavaScript conditions and loops by answering the following
questions.
1. Which of the following operators means “is not equal to” in JavaScript?
a. !
b. !=
c. <>
119Quiz Answers
2. What does the switch statement do?
a. Tests a variable for a number of different values
b. Turns a variable on or off
c. Makes ordinary if statements longer and more confusing
3. Which type of JavaScript loop checks the condition at the end of the loop?
a. for
b. while
c. do…while
4. Within a loop, what does the break statement do?
a. Crashes the browser
b. Starts the loop over
c. Escapes the loop entirely
5. The statement while (3==3) is an example of
a. A typographical error
b. An infinite loop
c. An illegal JavaScript statement
Quiz Answers1. b. The != operator means is not equal to.
2. a. The switch statement can test the same variable or expression for a num-
ber of different values.
3. c. The do…while loop uses a condition at the end of the loop.
4. c. The break statement escapes the loop.
5. b. Because the condition (3==3) will always be true, this statement creates an
infinite loop.
120 HOUR 7: Controlling Flow with Conditions and Loops
ExercisesTo further explore the JavaScript features you learned about in this hour, you can
perform the following exercises:
. Modify Listing 7.4 to sort the names in alphabetical order before displaying
them. You can use the sort method of the Array object, described in Hour 5,
“Using Variables, Strings, and Arrays.”
. Modify Listing 7.4 to prompt for exactly 10 names. What happens if you click
the Cancel button instead of entering a name?

HOUR 8
Using Built-in Functions andLibraries
What You’ll Learn in This Hour:. Using the Math object’s methods. Using the Date object to work with dates. Creating an application using JavaScript math functions. Using with to work with objects. How third-party libraries make scripting easier. Using third-party libraries in your scripts
You’ve nearly reached the end of Part II! In this hour, you’ll learn the basics of objects in
JavaScript and the details of using the Math and Date objects. You’ll also look at some
third-party libraries, which enable you to achieve amazing JavaScript effects with a few
lines of code.
Using the Math ObjectThe Math object is a built-in JavaScript object that includes math constants and functions.
You don’t need to create a Math object; it exists automatically in any JavaScript program.
The Math object’s properties represent mathematical constants, and its methods are math-
ematical functions.
Rounding and TruncatingThree of the most useful methods of the Math object enable you to round decimal values
up and down:
122 HOUR 8: Using Built-in Functions and Libraries
. Math.ceil() rounds a number up to the next integer.
. Math.floor() rounds a number down to the next integer.
. Math.round() rounds a number to the nearest integer.
All of these take the number to be rounded as their single parameter. You might
notice one thing missing: the capability to round to a decimal place, such as for dol-
lar amounts. Fortunately, you can easily simulate this. Here is a simple function
that rounds numbers to two decimal places:
function round(num) {return Math.round(num * 100) / 100;
}
This function multiplies the value by 100 to move the decimal, and then rounds the
number to the nearest integer. Finally, the value is divided by 100 to restore the deci-
mal to its original position.
Generating Random NumbersOne of the most commonly used methods of the Math object is the Math.random()
method, which generates a random number. This method doesn’t require any
parameters. The number it returns is a random decimal number between zero and
one.
You’ll usually want a random number between one and a value. You can do this
with a general-purpose random number function. The following is a function that
generates random numbers between one and the parameter you send it:
function rand(num) {return Math.floor(Math.random() * num) + 1;
}
This function multiplies a random number by the value specified in the num param-
eter, and then converts it to an integer between one and the number by using the
Math.floor() method.
Other Math FunctionsThe Math object includes many functions beyond those you’ve looked at here. For
example, Math.sin() and Math.cos() calculate sines and cosines. The Math object
also includes properties for various mathematical constants, such as Math.PI. See
Appendix D, “JavaScript Quick Reference,” for a complete list of math functions and
constants.
Working with Math Functions 123
Working with Math FunctionsThe Math.random() method generates a random number between 0 and 1.
However, it’s very difficult for a computer to generate a truly random number. (It’s
also hard for a human being to do so—that’s why dice were invented.)
Today’s computers do reasonably well at generating random numbers, but just how
good is JavaScript’s Math.random function? One way to test it is to generate many
random numbers and calculate the average of all of them.
In theory, the average should be somewhere near .5, halfway between 0 and 1. The
more random values you generate, the closer the average should get to this middle
ground.
As an example of the use of the Math object’s methods, you can create a script that
tests JavaScript’s random number function. To do this, you’ll generate 5,000 random
numbers and calculate their average.
Rather than typing it in, you can download and try this hour’s example at thisbook’s website.
In case you skipped Hour 7, “Controlling Flow with Conditions and Loops,” and are
getting out your calculator, don’t worry—you’ll use a loop to generate the random
numbers. You’ll be surprised how fast JavaScript can do this.
To begin your script, you will initialize a variable called total. This variable will
store a running total of all of the random values, so it’s important that it starts at 0:
total = 0;
Next, begin a loop that will execute 5,000 times. Use a for loop because you want it
to execute a fixed number of times:
for (i=1; i<=5000; i++) {
Within the loop, you will need to create a random number and add its value to
total. Here are the statements that do this and continue with the next iteration of
the loop:
num = Math.random();total += num;
}
Depending on the speed of your computer, it might take a few seconds to generate
those 5,000 random numbers. Just to be sure something is happening, the script will
display a status message after each 1,000 numbers:
Did youKnow?
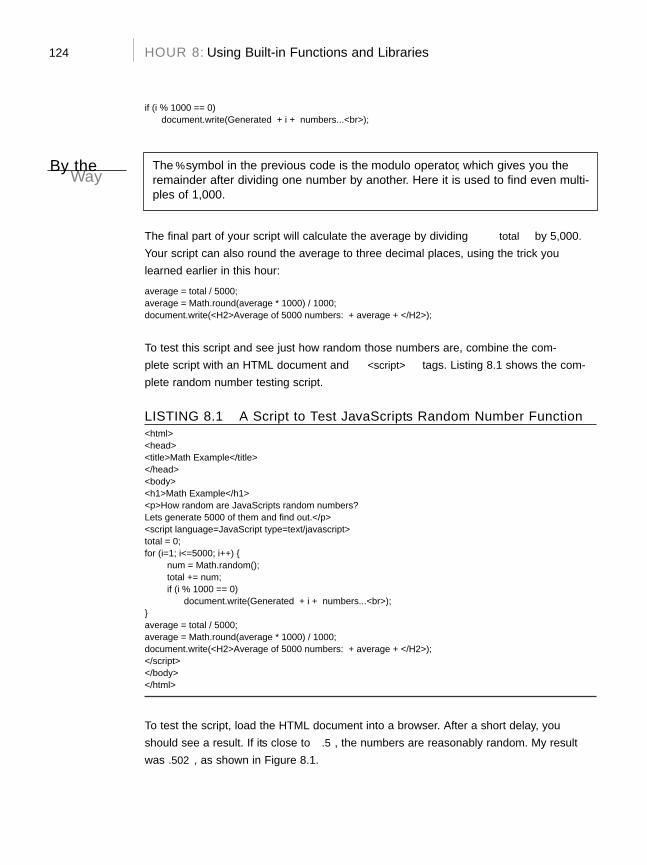
124 HOUR 8: Using Built-in Functions and Libraries
if (i % 1000 == 0)document.write(“Generated “ + i + “ numbers...<br>”);
The % symbol in the previous code is the modulo operator, which gives you theremainder after dividing one number by another. Here it is used to find even multi-ples of 1,000.
The final part of your script will calculate the average by dividing total by 5,000.
Your script can also round the average to three decimal places, using the trick you
learned earlier in this hour:
average = total / 5000;average = Math.round(average * 1000) / 1000;document.write(“<H2>Average of 5000 numbers: “ + average + “</H2>”);
To test this script and see just how random those numbers are, combine the com-
plete script with an HTML document and <script> tags. Listing 8.1 shows the com-
plete random number testing script.
LISTING 8.1 A Script to Test JavaScript’s Random Number Function<html><head><title>Math Example</title></head><body><h1>Math Example</h1><p>How random are JavaScript’s random numbers?Let’s generate 5000 of them and find out.</p><script language=”JavaScript” type=”text/javascript”>total = 0;for (i=1; i<=5000; i++) {
num = Math.random();total += num;if (i % 1000 == 0)
document.write(“Generated “ + i + “ numbers...<br>”);}average = total / 5000;average = Math.round(average * 1000) / 1000;document.write(“<H2>Average of 5000 numbers: “ + average + “</H2>”);</script></body></html>
To test the script, load the HTML document into a browser. After a short delay, you
should see a result. If it’s close to .5, the numbers are reasonably random. My result
was .502, as shown in Figure 8.1.
By theWay
Using the with Keyword 125
The average you’ve used here is called an arithmetic mean. This type of averageisn’t a perfect way to test randomness. Actually, all it tests is the distribution ofthe numbers above and below .5. For example, if the numbers turned out to be2,500 .4s and 2,500 .6s, the average would be a perfect .5—but they wouldn’tbe very random numbers. (Thankfully, JavaScript’s random numbers don’t havethis problem.)
By theWay
FIGURE 8.1The randomnumber testingscript in action.
Using the with KeywordThe with keyword is one you haven’t seen before. You can use it to make JavaScript
programming easier—or at least easier to type.
The with keyword specifies an object, and it is followed by a block of statements
enclosed in braces. For each statement in the block, any properties you mention
without specifying an object are assumed to be for that object.
As an example, suppose you have a string called lastname. You can use with to
perform string operations on it without specifying the name of the string every time:
with (lastname) {window.alert(“length of last name: “ + length);capname = toUpperCase();
}
In this example, the length property and the toUpperCase method refer to the
lastname string, although it is only specified once with the with keyword.
Obviously, the with keyword only saves a bit of typing in situations like this.
However, you might find it more useful when you’re dealing with a DOM object
throughout a large procedure, or when you are using a built-in object, such as the
Math object, repeatedly.
126 HOUR 8: Using Built-in Functions and Libraries
Working with DatesThe Date object is a built-in JavaScript object that enables you to conveniently work
with dates and times. You can create a Date object anytime you need to store a
date, and use the Date object’s methods to work with the date.
You encountered one example of a Date object in Hour 2, “Creating Simple Scripts,”
with the time/date script. The Date object has no properties. To set or obtain values
from a Date object, you must use the methods described in the next section.
JavaScript dates are stored as the number of milliseconds since midnight, January1, 1970. This date is called the epoch. Dates before 1970 weren’t allowed inearly versions, but are now represented by negative numbers.
Creating a Date ObjectYou can create a Date object using the new keyword. You can also optionally specify
the date to store in the object when you create it. You can use any of the following
formats:
birthday = new Date();birthday = new Date(“June 20, 2003 08:00:00”);birthday = new Date(6, 20, 2003);birthday = new Date(6, 20, 2003, 8, 0, 0);
You can choose any of these formats, depending on which values you wish to set. If
you use no parameters, as in the first example, the current date is stored in the object.
You can then set the values using the set methods, described in the next section.
Setting Date ValuesA variety of set methods enable you to set components of a Date object to values:
. setDate() sets the day of the month.
. setMonth() sets the month. JavaScript numbers the months from 0 to 11,
starting with January (0).
. setFullYear() sets the year.
. setTime() sets the time (and the date) by specifying the number of millisec-
onds since January 1, 1970.
. setHours(), setMinutes(), and setSeconds() set the time.
By theWay

Working with Dates 127
As an example, the following statement sets the year of a Date object called holi-
day to 2003:
holiday.setFullYear(2003);
Reading Date ValuesYou can use the get methods to get values from a Date object. This is the only way
to obtain these values, because they are not available as properties. Here are the
available get methods for dates:
. getDate() gets the day of the month.
. getMonth() gets the month.
. getFullYear() gets the year.
. getTime() gets the time (and the date) as the number of milliseconds since
January 1, 1970.
. getHours(), getMinutes(), getSeconds(), and getMilliseconds() get the
components of the time.
Along with setFullYear and getFullYear, which require four-digit years,JavaScript includes setYear and getYear methods, which use two-digit year val-ues. You should always use the four-digit version to avoid Year 2000 issues.
Working with Time ZonesFinally, a few functions are available to help your Date objects work with local time
values and time zones:
. getTimeZoneOffset() gives you the local time zone’s offset from UTC
(Coordinated Universal Time, based on the old Greenwich Mean Time stan-
dard). In this case, local refers to the location of the browser. (Of course, this
only works if the user has set his or her system clock accurately.)
. toUTCString() converts the date object’s time value to text, using UTC. This
method was introduced in JavaScript 1.2 to replace the toGMTString method,
which still works but should be avoided.
. toLocalString() converts the date object’s time value to text, using local
time.
By theWay
128 HOUR 8: Using Built-in Functions and Libraries
Along with these basic functions, JavaScript 1.2 and later include UTC versions of
several of the functions described previously. These are identical to the regular com-
mands, but work with UTC instead of local time:
. getUTCDate() gets the day of the month in UTC time.
. getUTCDay() gets the day of the week in UTC time.
. getUTCFullYear() gets the four-digit year in UTC time.
. getUTCMonth() returns the month of the year in UTC time.
. getUTCHours(), getUTCMinutes(), getUTCSeconds(), and
getUTCMilliseconds() return the components of the time in UTC.
. setUTCDate(), setUTCFullYear(), setUTCMonth(), setUTCHours(),
setUTCMinutes(), setUTCSeconds(), and setUTCMilliseconds() set the
time in UTC.
Converting Between Date FormatsTwo special methods of the Date object allow you to convert between date formats.
Instead of using these methods with a Date object you created, you use them with
the built-in object Date itself. These include the following:
. Date.parse() converts a date string, such as June 20, 1996, to a Date
object (number of milliseconds since 1/1/1970).
. Date.UTC() does the opposite. It converts a Date object value (number of mil-
liseconds) to a UTC (GMT) time.
Using Third-Party LibrariesWhen you use JavaScript’s built-in Math and Date functions, JavaScript does most of
the work—you don’t have to figure out how to convert dates between formats or cal-
culate a cosine. Third-party libraries are not included with JavaScript, but they serve
a similar purpose—enabling you to do complicated things with only a small
amount of code.
Using one of these libraries is usually as simple as copying one or more files to your
site and including a <script> tag in your document to load the library. Several
popular JavaScript libraries are discussed in the following sections.
Using Third-Party Libraries 129
JavaScript libraries are a relatively new phenomenon, and new libraries areappearing regularly. See this book’s website for an updated list of libraries.
PrototypePrototype, created by Sam Stephenson, is a JavaScript library that simplifies tasks
such as working with DOM objects, dealing with data in forms, and remote scripting
(AJAX). By including a single prototype.js file in your document, you have access
to many improvements to basic JavaScript.
For example, you’ve used the document.getElementById method to obtain the
DOM object for an element within a web page. Prototype includes an improved ver-
sion of this in the $() function. Not only is it easier to type, but it is also more
sophisticated than the built-in function and supports multiple objects.
Adding Prototype to your pages requires only one file, prototype.js, and one
<script> tag:
<script type=”text/javascript” src=”prototype.js”> </script>
Prototype is free, open-source software. You can download it from its official web-site at http://prototype.conio.net. Prototype is also built into the Ruby on Railsframework for the server-side language Ruby—see http://www.rubyonrails.com/for more information.
Script.aculo.usBy the end of this book, you’ll learn to do some impressive things with JavaScript—
for example, animating an object within a page. The code for a task like this is
complex, but you can also include effects in your pages using a prebuilt library. This
enables you to use impressive effects with only a few lines of code.
Script.aculo.us by Thomas Fuchs is one such library. It includes functions to simplify
drag-and-drop tasks, such as rearranging lists of items. It also includes a number of
Combination Effects, which enable you to use highlighting and animated transi-
tions within your pages. For example, a new section of the page can be briefly high-
lighted in yellow to get the user’s attention, or a portion of the page can fade out or
slide off the screen.
After you’ve included the appropriate files, using effects is as easy as using any of
JavaScript’s built-in methods. For example, the following statements use
Script.aculo.us to fade out an element of the page with the id value test:
Did youKnow?
By theWay
130 HOUR 8: Using Built-in Functions and Libraries
obj = document.getElementById(“test”);new Effect.Fade(obj);
Script.aculo.us is built on the Prototype framework described in the previous section,
and includes all of the functions of Prototype, so you could also simplify this further
by using the $ function:
new Effect.Fade($(“test”));
You will create a script that demonstrates several Script.aculo.us effects in the TryIt Yourself section later this hour.
AJAX FrameworksAJAX (Asynchronous JavaScript and XML), also known as remote scripting, enables
JavaScript to communicate with a program running on the web server. This enables
JavaScript to do things that were traditionally not possible, such as dynamically load-
ing information from a database or storing data on a server without refreshing a page.
Unfortunately, AJAX requires some complex scripting, particularly because the
methods you use to communicate with the server vary depending on the browser in
use. Fortunately, many libraries have been created to fill the need for a simple way
to use AJAX.
The Prototype library, described previously, includes AJAX features. There are also
many dedicated AJAX libraries. One of the most popular is SAJAX (Simple AJAX),
an open-source toolkit that makes it easy to use AJAX to communicate with PHP,
Perl, and other languages from JavaScript. Visit the SAJAX website for details at
http://www.modernmethod.com/sajax.
See Hour 17, “AJAX: Remote Scripting,” for examples of remote scripting, with andwithout using third-party libraries.
Other LibrariesThere are many more JavaScript libraries out there, and more are appearing all of
the time as JavaScript is taken more seriously as an application language. Here are
some more libraries you might want to explore:
. Dojo (http://www.dojotoolkit.org/) is an open-source toolkit that adds power to
JavaScript to simplify building applications and user interfaces. It adds fea-
tures ranging from extra string and math functions to animation and AJAX.
Did youKnow?
By theWay
▼
Other Libraries 131
. The Yahoo! UI Library (http://developer.yahoo.net/yui/) was developed by
Yahoo! and made available to everyone under an open-source license. It
includes features for animation, DOM features, event management, and easy-
to-use user interface elements such as calendars and sliders.
. MochiKit (http://mochikit.com/) is a lightweight library that adds features for
working with the DOM, CSS colors, string formatting, and AJAX. It also sup-
ports a nice logging mechanism for debugging your scripts.
Try It Yourself
Adding Effects with a LibraryTo see how simple it is to use an external library, you will now create an example
script that includes the Script.aculo.us library and use event handlers to demon-
strate several of the available effects.
This example was created using version 1.5.1 of the Script.aculo.us library. Itshould work with later versions, but the library might have changed since this waswritten. If you have trouble, you might need to use this specific version.
Downloading the LibraryTo use the library, you will need to download it and copy the files you need to the
same folder where you will store your script. You can download the library from the
Script.aculo.us website at http://script.aculo.us/downloads.
The download is available as a Zip file. Inside the Zip file you will find a folder
called scriptaculous-js-x.x.x. You will need the following files from the folders
under this folder:
. prototype.js (the Prototype library) from the lib folder
. effects.js (the effects functions) from the src folder
Copy both of these files to a folder on your computer, and be sure to create your
demonstration script in the same folder.
The Script.aculo.us download includes many other files, and you can include theentire library if you intend to use all of its features. For this example, you onlyneed the two files described here.
WatchOut!
By theWay
132 HOUR 8: Using Built-in Functions and Libraries
Including the FilesTo add the library to your HTML document, simply use <script> tags to include
the two JavaScript files you copied from the download:
<script type=”text/javascript” src=”prototype.js”> </script><script type=”text/javascript” src=”effects.js”> </script>
If you include these statements as the first things in the <head> section of your docu-
ment, the library functions will be available to other scripts or event handlers any-
where in the page.
Using EffectsAfter you have included the library, you simply need to include a bit of JavaScript to
trigger the effects. We will use a section of the page wrapped in a <div> tag with the
id value test to demonstrate the effects. Each effect is triggered by a simple event
handler on a button. For example, this code defines the Fade Out button:
<input type=”button” value=”Fade Out”onClick=”new Effect.Fade($(‘test’))”>
This uses the $ function built into Prototype to obtain the object for the element with
the id value test, and then passes it to the Effect.Fade() function built into
Script.aculo.us.
This example will demonstrate six effects: Fade, Appear, SlideUp, SlideDown,Highlight, and Shake. There are more than 16 effects in the library, plus meth-ods for supporting Drag and Drop and other features. See http://script.aculo.usfor details.
Building the ScriptAfter you have included the libraries, you can combine them with event handlers
and some example text to create a complete demonstration of Script.aculo.us effects.
The complete HTML document for this example is shown in Listing 8.2.
LISTING 8.2 The Complete Library Effects Example<html><head><title>Testing script.aculo.us effects</title><script type=”text/javascript” src=”prototype.js”> </script><script type=”text/javascript” src=”effects.js”> </script></head><body”><h1>Testing script.aculo.us Effects</h1><form name=”form1”>
Did youKnow?

▲
Other Libraries 133
<input type=”button” value=”Fade Out”onClick=”new Effect.Fade($(‘test’))”>
<input type=”button” value=”Fade In”onClick=”new Effect.Appear($(‘test’))”>
<input type=”button” value=”Slide Up”onClick=”new Effect.SlideUp($(‘test’))”>
<input type=”button” value=”Slide Down”onClick=”new Effect.SlideDown($(‘test’))”>
<input type=”button” value=”Highlight”onClick=”new Effect.Highlight($(‘test’))”>
<input type=”button” value=”Shake”onClick=”new Effect.Shake($(‘test’))”>
</form><div id=”test”
style=”background-color:#CCC; margin:20px; padding:10px;”><h2>Testing Effects</h2><hr><p>This section of the document is within a <div> elementwith the <b>id</b> value <b>test</b>. The event handlers on thebuttons above send this object to the<a href=”http://script.aculo.us/”>script.aculo.us</a> libraryto perform effects. Click the buttons to see the effects.</p></div></body></html>
This document starts with two <script> tags to include the library’s files. The effects
are triggered by the event handlers defined for each of the six buttons. The <div> sec-
tion at the end defines the test element that will be used to demonstrate the effects.
To try this example, make sure the prototype.js and effects.js files from
Script.aculo.us are stored in the same folder as your script, and then load the HTML
file into a browser. The display should look like Figure 8.2, and you can use the six
buttons at the top of the page to trigger effects.
FIGURE 8.2The libraryeffects exampleas displayed byFirefox.
LISTING 8.2 Continued
134 HOUR 8: Using Built-in Functions and Libraries
SummaryIn this hour, you learned some specifics about the Math and Date objects built into
JavaScript, and learned more than you ever wanted to know about random num-
bers. You also learned how third-party libraries can simplify your scripting, and you
used a library to create special effects in a web page.
You’ve reached the end of Part II, which covered some basic building blocks of
JavaScript programs. In Part III, you’ll learn more about the Document Object
Model, which contains objects that refer to various parts of the browser window and
HTML document. This begins in Hour 9, “Responding to Events.”
Q&AQ. The random numbers are generated so quickly I can’t be sure it’s happening
at all. Is there a way to slow this process down?
A. Yes. If you add one or more form fields to the example and use them to dis-
play the data as it is generated, you’ll see a much slower result. It will still be
done within a couple of seconds on a fast computer, though.
Q. Can I use more than one third-party library in the same script?
A. Yes, in theory: If the libraries are well written and designed not to interfere
with each other, there should be no problem combining them. In practice, this
will depend on the libraries you need and how they were written.
Q. Can I build my own library to simplify scripting?
A. Yes, as you deal with more complicated scripts, you’ll find yourself using the
same functions over and over. You can combine them into a library for your
own use. This is as simple as creating a .js file.
Quiz QuestionsTest your knowledge of JavaScript libraries and built-in functions by answering the
following questions.
1. Which of the following objects cannot be used with the new keyword?
a. Date
b. Math
c. String
Exercises 135
2. How does JavaScript store dates in a Date object?
a. The number of milliseconds since January 1, 1970
b. The number of days since January 1, 1900
c. The number of seconds since Netscape’s public stock offering
3. What is the range of random numbers generated by the Math.random func-
tion?
a. Between 1 and 100
b. Between 1 and the number of milliseconds since January 1, 1970
c. Between 0 and 1
Quiz Answers1. b. The Math object is static; you can’t create a Math object.
2. a. Dates are stored as the number of milliseconds since January 1, 1970.
3. c. JavaScript’s random numbers are between 0 and 1.
ExercisesTo further explore the JavaScript features you learned about in this hour, you can
perform the following exercises:
. Modify the random number script in Listing 8.1 to run three times, calculating
a total of 15,000 random numbers, and display separate totals for each set of
5,000. (You’ll need to use another for loop that encloses most of the script.)
. Visit the Script.aculo.us page at http://script.aculo.us/ to find the complete list
of effects. Modify Listing 8.2 to add buttons for one or more additional effects.

This page intentionally left blank
PART III:
Learning More About the DOM
HOUR 9 Responding to Events 139
HOUR 10 Using Windows and Frames 157
HOUR 11 Getting Data with Forms 173
HOUR 12 Working with Style Sheets 191
HOUR 13 Using the W3C DOM 207
HOUR 14 Using Advanced DOM Features 219

This page intentionally left blank

HOUR 9
Responding to Events
What You’ll Learn in This Hour:. How event handlers work. How event handlers relate to objects. Creating an event handler. Testing an event handler. Detecting mouse actions. Detecting keyboard actions. Intercepting events with a special handler. Adding friendly link descriptions to a web page
In your experience with JavaScript so far, most of the scripts you’ve written have executed
in a calm, orderly fashion, moving from the first statement to the last.
In this hour, you’ll learn to use the wide variety of event handlers supported by JavaScript.
Rather than executing in order, scripts using event handlers can interact directly with the
user. You’ll use event handlers in just about every script you write in the rest of this book.
Understanding Event HandlersAs you learned in Hour 3, “Getting Started with JavaScript Programming,” JavaScript pro-
grams don’t have to execute in order. You also learned they can detect events and react to
them. Events are things that happen to the browser—the user clicking a button, the mouse
pointer moving, or a web page or image loading from the server.
A wide variety of events enable your scripts to respond to the mouse, the keyboard, and
other circumstances. Events are the key method JavaScript uses to make web documents
interactive.
140 HOUR 9: Responding to Events
The script that you use to detect and respond to an event is called an event handler.
Event handlers are among the most powerful features of JavaScript. Luckily, they’re
also among the easiest features to learn and use—often, a useful event handler
requires only a single statement.
Objects and EventsAs you learned in Hour 4, “Working with the Document Object Model (DOM),”
JavaScript uses a set of objects to store information about the various parts of a web
page—buttons, links, images, windows, and so on. An event can often happen in
more than one place (for example, the user could click any one of the links on the
page), so each event is associated with an object.
Each event has a name. For example, the onMouseOver event occurs when the mouse
pointer moves over an object on the page. When the pointer moves over a particular
link, the onMouseOver event is sent to that link’s event handler, if it has one.
Notice the strange capitalization on the onMouseOver keyword. This is the stan-dard notation for event handlers. The on is always lowercase, and each word inthe event name is capitalized.
Creating an Event HandlerYou don’t need the <script> tag to define an event handler. Instead, you can add
an event handler attribute to an individual HTML tag. For example, here is a link
that includes an onMouseOver event handler:
<a href=”http://www.jsworkshop.com/”onMouseOver=”window.alert(‘You moved over the link.’);”>
Click here</a>
Note that this is all one <a> tag, although it’s split into multiple lines. This specifies
a statement to be used as the onMouseOver event handler for the link. This state-
ment displays an alert message when the mouse moves over the link.
The previous example uses single quotation marks to surround the text. This is nec-essary in an event handler because double quotation marks are used to surroundthe event handler itself. (You can also use single quotation marks to surround theevent handler and double quotes within the script statements.)
By theWay
By theWay
Understanding Event Handlers 141
You can use JavaScript statements like the previous one in an event handler, but if
you need more than one statement, it’s a good idea to use a function instead. Just
define the function in the header of the document, and then call the function as the
event handler like this:
<a href=”#bottom” onMouseOver=”DoIt();”>Move the mouse over this link.</a>
This example calls a function called DoIt() when the user moves the mouse over
the link. Using a function is convenient because you can use longer, more readable
JavaScript routines as event handlers. You’ll use a longer function to handle events
in the “Try It Yourself: Adding Link Descriptions to a Web Page” section of this hour.
For simple event handlers, you can use two statements if you separate them witha semicolon. However, in most cases it’s easier to use a function to perform thestatements.
Defining Event Handlers with JavaScriptRather than specifying an event handler in an HTML document, you can use
JavaScript to assign a function as an event handler. This allows you to set event
handlers conditionally, turn them on and off, and change the function that handles
an event dynamically.
Setting up event handlers this way is also a good practice in general: It allows youto use an external JavaScript file to define the function and set up the event,keeping the JavaScript code completely separate from the HTML file.
To define an event handler in this way, you first define a function, and then assign
the function as an event handler. Event handlers are stored as properties of the doc-
ument object or another object that can receive an event. For example, these state-
ments define a function called mousealert(), and then assign it as the
onMouseDown event handler for the document:
function mousealert() {alert (“You clicked the mouse!”);
}document.onmousedown = mousealert;
You can use this technique to set up an event handler for any HTML element, but
an additional step is required: You must first find the object corresponding to the ele-
ment. To do this, use the document.getElementById() function. First, define an ele-
ment in the HTML document and specify an id attribute:
<a href=”http://www.google.com/” id=”link1”>
Did youKnow?
Did youKnow?
142 HOUR 9: Responding to Events
Next, in the JavaScript code, find the object and apply the event handler:
obj = document.getElementById(“link1”);obj.onclick = MyFunction;
You can do this for any object as long as you’ve defined it with a unique id attrib-
ute in the HTML file. Using this technique, you can easily assign the same function
to handle events for multiple objects without adding clutter to your HTML code. See
the “Try It Yourself” section in this hour for an example of this technique.
Supporting Multiple Event HandlersWhat if you want more than one thing to happen when you click on an element?
For example, suppose you want two functions called update and display to both
execute when a button is clicked. You can’t assign two functions to the onclick
property. One solution is to define a function that calls both functions:
function UpdateDisplay() {update();display();
}
This isn’t always the ideal way to do things. For example, if you’re using two third-
party scripts and both of them want to add an onLoad event to the page, there
should be a way to add both. The W3C DOM standard defines a function,
addEventListener, for this purpose. This function defines a listener for a particular
event and object, and you can add as many listener functions as you need.
Unfortunately, addEventListener is not supported by Internet Explorer (as of ver-
sions 6 and 7), so you have to use a different function, attachEvent, in that brows-
er. See Hour 15, “Unobtrusive Scripting,” for a function that combines these two for
a cross-browser event-adding script.
Using the event ObjectWhen an event occurs, you might need to know more about the event—for exam-
ple, for a keyboard event, you need to know which key was pressed. The DOM
includes an event object that provides this information.
To use the event object, you can pass it on to your event handler function. For
example, this statement defines an onKeyPress event that passes the event object
to a function:
<body onKeyPress=”getkey(event);”>
Understanding Event Handlers 143
You can then define your function to accept the event as a parameter:
function getkey(e) {...}
In Mozilla-based browsers (Firefox and Netscape), an event object is automatically
passed to the event handler function, so this will work even if you use JavaScript
rather than HTML to define an event handler. In Internet Explorer, the most recent
event is stored in the window.event object. The previous HTML example passes this
object to the event handler function. If you define the event handler with JavaScript,
this is not possible, so you need to use some code to find the correct object:
Function getkey(e) {if (!e) e=window.event;
...}
This checks whether the e variable is already defined. If not, it gets the
window.event object and stores it in e. This ensures that you have a valid event
object in any browser.
Unfortunately, while both Internet Explorer and Mozilla-based browsers support
event objects, they support different properties. One property that is the same in
both browsers is event.type, the type of event. This is simply the name of the
event, such as mouseover for an onMouseOver event, and keypress for an
onKeyPress event. The following sections list some additional useful properties for
each browser.
Internet Explorer event PropertiesThe following are some of the commonly used properties of the event object for
Internet Explorer 4.0 and later:
. event.button—The mouse button that was pressed. This value is 1 for the left
button and usually 2 for the right button.
. event.clientX—The x-coordinate (column, in pixels) where the event
occurred.
. event.clientY—The y-coordinate (row, in pixels) where the event occurred.
. event.altkey—A flag that indicates whether the Alt key was pressed during
the event.
. event.ctrlkey—Indicates whether the Ctrl key was pressed.
. event.shiftkey—Indicates whether the Shift key was pressed.
144 HOUR 9: Responding to Events
. event.keyCode—The key code (in Unicode) for the key that was pressed.
. event.srcElement—The object where the element occurred.
See the Try it Yourself section of this hour for an example that uses thesrcElement property and Mozilla’s target property for a cross-browser method ofdetermining the object for an event.
Netscape and Firefox event PropertiesThe following are some of the commonly used properties of the event object for
Netscape 4.0 and later:
. event.modifiers—Indicates which modifier keys (Shift, Ctrl, Alt, and so on)
were held down during the event. This value is an integer that combines bina-
ry values representing the different keys.
. event.pageX—The x-coordinate of the event within the web page.
. event.pageY—The y-coordinate of the event within the web page.
. event.which—The keycode for keyboard events (in Unicode), or the button
that was pressed for mouse events (It’s best to use the cross-browser button
property instead.)
. event.button—The mouse button that was pressed. This works just like
Internet Explorer except that the left button’s value is 0 and the right button’s
value is 2.
. event.target—The object where the element occurred.
The event.pageX and event.pageY properties are based on the top-left corner ofthe element where the event occurred, not always the exact position of the mousepointer.
Using Mouse EventsThe DOM includes a number of event handlers for detecting mouse actions. Your
script can detect the movement of the mouse pointer and when a button is clicked,
released, or both.
By theWay
By theWay
Using Mouse Events 145
Over and OutYou’ve already seen the first and most common event handler, onMouseOver. This
handler is called when the mouse pointer moves over a link or other object.
The onMouseOut handler is the opposite—it is called when the mouse pointer moves
out of the object’s border. Unless something strange happens, this always happens
sometime after the onMouseOver event is called.
This handler is particularly useful if your script has made a change when the point-
er moved over the object—for example, displaying a message in the status line or
changing an image. You can use an onMouseOut handler to undo the action when
the pointer moves away.
You’ll use both onMouseOver and onMouseOut handlers in the “Try it Yourself:
Adding Link Descriptions to a Web Page” section at the end of this hour.
One of the most common uses for the onMouseOver and onMouseOut event han-dlers is to create rollovers—images that change when the mouse moves overthem. You’ll learn how to create these in Hour 19, “Using Graphics andAnimation.”
Using the onMouseMove EventThe onMouseMove event occurs any time the mouse pointer moves. As you might
imagine, this happens quite often—the event can trigger hundreds of times as the
mouse pointer moves across a page.
Because of the large number of generated events, browsers don’t support the
onMouseMove event by default. To enable it for a page, you need to use event captur-
ing. This is similar to the dynamic events technique you learned earlier in this hour,
but requires an extra step for some older browsers.
The basic syntax to support this event, for both browsers, is to set a function as the
onMouseMove handler for the document or another object. For example, this state-
ment sets the onMouseMove handler for the document to a function called MoveHere,
which must be defined in the same page:
document.onMouseMove=MoveHere;
Additionally, older versions of Netscape require that you specifically enable the
event using the document.captureEvents method:
document.captureEvents(Event.MOUSEMOVE);
Did youKnow?
146 HOUR 9: Responding to Events
Ups and Downs (and Clicks)You can also use events to detect when the mouse button is clicked. The basic event
handler for this is onClick. This event handler is called when the mouse button is
clicked while positioned over the appropriate object.
The object in this case can be a link. It can also be a form element. You’ll learnmore about forms in Hour 11, “Getting Data with Forms.”
For example, you can use the following event handler to display an alert when a
link is clicked:
<a href=”http://www.jsworkshop.com/”onClick=”alert(‘You are about to leave this site.’);”>Click Here</a>
In this case, the onClick event handler runs before the linked page is loaded into
the browser. This is useful for making links conditional or displaying a disclaimer
before launching the linked page.
If your onClick event handler returns the false value, the link will not be followed.
For example, the following is a link that displays a confirmation dialog. If you click
Cancel, the link is not followed; if you click OK, the new page is loaded:
<a href=”http://www.jsworkshop.com/”onClick=”return(window.confirm(‘Are you sure?’));”>Click Here</a>
This example uses the return statement to enclose the event handler. This ensures
that the false value that is returned when the user clicks Cancel is returned from
the event handler, which prevents the link from being followed.
The onDblClick event handler is similar, but is only used if the user double-clicks
on an object. Because links usually require only a single click, you could use this to
make a link do two different things depending on the number of clicks. (Needless to
say, this could be confusing.) You can also detect double-clicks on images and other
objects.
To give you even more control of what happens when the mouse button is pressed,
two more events are included:
. onMouseDown is used when the user presses the mouse button.
. onMouseUp is used when the user releases the mouse button.
These two events are the two halves of a mouse click. If you want to detect an entire
click, use onClick. Use onMouseUp and onMouseDown to detect just one or the other.
By theWay
Using Mouse Events 147
To detect which mouse button is pressed, you can use the button property of the
event object. This property is assigned the value 0 or 1 for the left button, and 2 for
the right button. This property is assigned for onClick, onDblClick, onMouseUp,
and onMouseDown events.
Browsers don’t normally detect onClick or onDblClick events for the rightmouse button. If you want to detect the right button, onMouseDown is the mostreliable way.
As an example of these event handlers, you can create a script that displays infor-
mation about mouse button events and determines which button is pressed. Listing
9.1 shows the mouse event script.
LISTING 9.1 The JavaScript file for the mouse click example.function mousestatus(e) {
if (!e) e = window.event;btn = e.button;whichone = (btn < 2) ? “Left” : “Right”;message=e.type + “ : “ + whichone + “\n”;document.form1.info.value += message;
}obj=document.getElementById(“testlink”);obj.onmousedown = mousestatus;obj.onmouseup = mousestatus;obj.onclick = mousestatus;obj.ondblclick = mousestatus;
This script includes a function, mousestatus(), that detects mouse events. This
function uses the button property of the event object to determine which button
was pressed. It also uses the type property to display the type of event, since the
function will be used to handle multiple event types.
After the function, the script finds the object for a link with the id attribute
testlink and assigns its onmousedown, onmouseup, onclick, and ondblclick
events to the mousestatus function.
Save this script as click.js. Next, you will need an HTML document to work with
the script, shown in Listing 9.2.
LISTING 9.2 The HTML file for the mouse click example.<html><head><title>Mouse click test</title></head><body><h1>Mouse Click Test</h1>
WatchOut!

By theWay
148 HOUR 9: Responding to Events
<p>Click the mouse on the test link below. A message belowwill indicate which button was clicked.</p><h2><a href=”#” id=”testlink”>Test Link</a></h2><form name=”form1”><textarea rows=”10” cols=”70” name=”info”></textarea></form><script language=”javascript” type=”text/javascript”
src=”click.js”></script></body></html>
This file defines a test link with the id property testlink, which is used in the script
to assign event handlers. It also defines a form and a textarea used by the script to
display the events. To test this document, save it in the same folder as the JavaScript
file you created previously and load the HTML document into a browser. The results
are shown in Figure 9.1.
LISTING 9.2 Continued
FIGURE 9.1The mouse clickexample inaction.
Notice that a single click of the left mouse button triggers three events:onMouseDown, onMouseUp, and then onClick.
Using Keyboard Events 149
Using Keyboard EventsJavaScript can also detect keyboard actions. The main event handler for this pur-
pose is onKeyPress, which occurs when a key is pressed and released, or held down.
As with mouse buttons, you can detect the down and up parts of the keypress with
the onKeyDown and onKeyUp event handlers.
Of course, you might find it useful to know which key the user pressed. You can find
this out with the event object, which is sent to your event handler when the event
occurs. In Netscape and Firefox, the event.which property stores the ASCII charac-
ter code for the key that was pressed. In Internet Explorer, event.keyCode serves the
same purpose.
ASCII (American Standard Code for Information Interchange) is the standardnumeric code used by most computers to represent characters. It assigns thenumbers 0–128 to various characters—for example, the capital letters A throughZ are ASCII values 65 to 90.
Displaying Typed CharactersIf you’d rather deal with actual characters than key codes, you can use the
fromCharCode string method to convert them. This method converts a numeric ASCII
code to its corresponding string character. For example, the following statement con-
verts the event.which property to a character and stores it in the key variable:
Key = String.fromCharCode(event.which);
Because different browsers have different ways of returning the key code, displaying
keys browser independently is a bit harder. However, you can create a script that dis-
plays keys for either browser. The following function will display each key as it is
typed:
function DisplayKey(e) {// which key was pressed?if (e.keyCode) keycode=e.keyCode;
else keycode=e.which;character=String.fromCharCode(keycode);// find the object for the destination paragraphk = document.getElementById(“keys”);// add the character to the paragraphk.innerHTML += character;
}
By theWay
150 HOUR 9: Responding to Events
The DisplayKey() function receives the event object from the event handler and
stores it in the variable e. It checks whether the e.keyCode property exists, and
stores it in the keycode variable if present. Otherwise, it assumes the browser is
Netscape or Firefox and assigns keycode to the e.which property.
The remaining lines of the function convert the key code to a character and add it
to the paragraph in the document with the id attribute keys. Listing 9.3 shows a
complete example using this function.
The final lines in the DisplayKey() function use the getElementById() functionand the innerHTML attribute to display the keys you type within a paragraph onthe page. This technique is explained in Hour 13, “Using the W3C DOM.”
LISTING 9.3 Displaying Typed Characters<html><head><title>Displaying Keypresses</title><script language=”javascript” type=”text/javascript”>
function DisplayKey(e) {// which key was pressed?if (e.keyCode) keycode=e.keyCode;
else keycode=e.which;character=String.fromCharCode(keycode);// find the object for the destination paragraphk = document.getElementById(“keys”);// add the character to the paragraphk.innerHTML += character;
}</script></head><body onKeyPress=”DisplayKey(event);”><h1>Displaying Typed Characters</h1><p>This document includes a simple script that displays the keysyou type in the paragraph below. Type a few keys and try it. </p><p id=”keys”></p></body></html>
When you load this example into either Netscape or Internet Explorer, you can type
and see the characters you’ve typed appear in a paragraph of the document. Figure
9.2 shows this example in action in Firefox.
By theWay
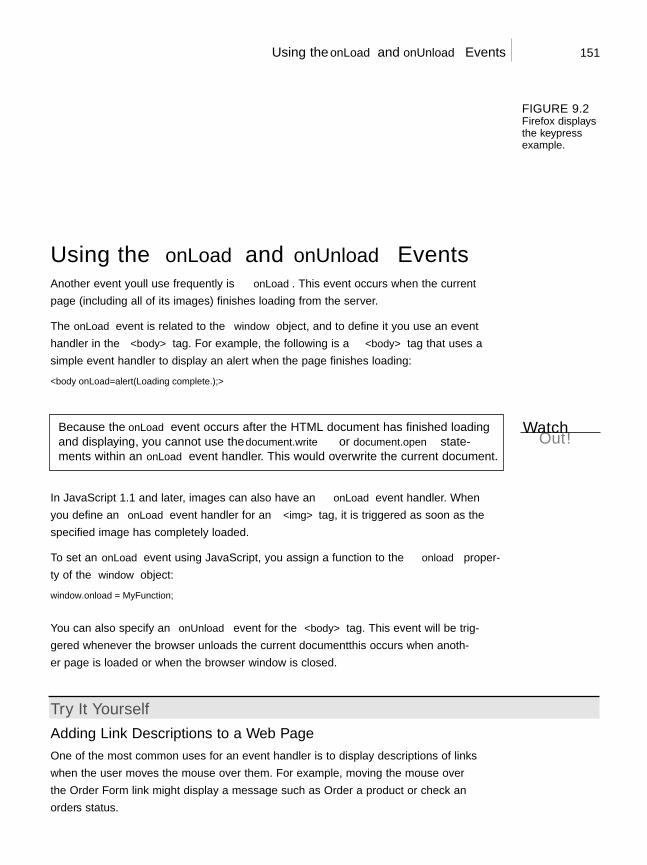
▼
Using the onLoad and onUnload Events 151
Using the onLoad and onUnload EventsAnother event you’ll use frequently is onLoad. This event occurs when the current
page (including all of its images) finishes loading from the server.
The onLoad event is related to the window object, and to define it you use an event
handler in the <body> tag. For example, the following is a <body> tag that uses a
simple event handler to display an alert when the page finishes loading:
<body onLoad=”alert(‘Loading complete.’);”>
Because the onLoad event occurs after the HTML document has finished loadingand displaying, you cannot use the document.write or document.open state-ments within an onLoad event handler. This would overwrite the current document.
In JavaScript 1.1 and later, images can also have an onLoad event handler. When
you define an onLoad event handler for an <img> tag, it is triggered as soon as the
specified image has completely loaded.
To set an onLoad event using JavaScript, you assign a function to the onload proper-
ty of the window object:
window.onload = MyFunction;
You can also specify an onUnload event for the <body> tag. This event will be trig-
gered whenever the browser unloads the current document—this occurs when anoth-
er page is loaded or when the browser window is closed.
Try It Yourself
Adding Link Descriptions to a Web PageOne of the most common uses for an event handler is to display descriptions of links
when the user moves the mouse over them. For example, moving the mouse over
the Order Form link might display a message such as “Order a product or check an
order’s status”.
FIGURE 9.2Firefox displaysthe keypressexample.
WatchOut!
152 HOUR 9: Responding to Events
Link descriptions like these are typically displayed with the onMouseOver event han-
dler. You will now create a script that displays messages in this manner and clears
the message using the onMouseOut event handler. You’ll use functions to simplify
the process.
This example uses the innerHTML property to display the descriptions within aheading on the page. See Hour 13 for a complete description of this property.
This will also be an example of defining event handlers entirely with JavaScript. The
HTML document, shown in Listing 9.4, does not include any <script> tags or event
handlers—the only thing it requires is some id attributes on the objects we will be
using in the script.
LISTING 9.4 The HTML Document for the Descriptive Links Example<html><head><title>Descriptive Links</title></head><body><h1>Descriptive Links</h1><p>Move the mouse pointer over one ofthese links to view a description:</p><ul><li><a href=”order.html” id=”order”>Order Form</a><li><a href=”email.html” id=”email”>Email</a><li><a href=”complain.html” id=”complain”>Complaint Department</a></ul><h2 id=”description”></h2><script language=”JavaScript” type=”text/javascript” src=”linkdesc.js”></script></body></html>
This document defines three links in a bulleted list. Each <a> tag is defined with an
id attribute for the script to use to attach an event handler. The <h2> tag with the
id value description, currently blank, will be used to display a description of each
link.
Notice that the <script> tag is below the content of the HTML document. Itwould not work at the top of the document because the objects the script usesare not yet defined. You can also deal with this issue by using an onLoad eventhandler instead of a simple script to set up the event handlers.
By theWay
By theWay
Using the onLoad and onUnload Events 153
The script will begin with a function to serve as the onMouseOver event handler for
the links:
function hover(e) {if (!e) var e = window.event;// which link was the mouse over?whichlink = (e.target) ? e.target.id : e.srcElement.id;// choose the appropriate descriptionif (whichlink==”order”) desc = “Order a product”;else if (whichlink==”email”) desc = “Send us a message”;else if (whichlink==”complain”) desc = “Insult us, our products, or our
families”;// display the description in the H2d = document.getElementById(“description”);d.innerHTML = desc;
}
The hover function uses the target or srcElement properties to find the target
object for the link, and then finds its id attribute. Three if statements evaluate the
id and choose an appropriate description. Finally, the script uses the
getElementById() method to find the <h2> tag that will display the descriptions,
and displays the description using the innerHTML property.
The conditional statement on the third line of the hover function checks whetherthe target property exists, and if not, it uses the srcElement property. This iscalled feature sensing—detecting whether the browser supports a feature—and isexplained further in Hour 15, “Unobtrusive Scripting.”
One more function will be required. The cleardesc() function will serve as the
onMouseOut event handler and clear the description when the mouse is no longer
over one of the links.
function cleardesc() {d = document.getElementById(“description”);d.innerHTML = “”;
}
Now that the functions are defined, you need to set them as the event handlers for
the links. Each link requires the following three lines of code:
orderlink = document.getElementById(“order”);orderlink.onmouseover=hover;orderlink.onmouseout=cleardesc;
After using getElementById() to find the object with the id attribute “order”, this
sets up the hover() and cleardesc() functions as its onMouseOver and onMouseOut
event handlers. This will need to be repeated for the other two links. Putting all of
this together, the complete JavaScript file for this example is shown in Listing 9.5.
Did youKnow?
154 HOUR 9: Responding to Events
LISTING 9.5 The JavaScript File for the Link Descriptions Examplefunction cleardesc() {
d = document.getElementById(“description”);d.innerHTML = “”;
}function hover(e) {
if (!e) var e = window.event;// which link was the mouse over?whichlink = (e.target) ? e.target.id : e.srcElement.id;// choose the appropriate descriptionif (whichlink==”order”) desc = “Order a product”;else if (whichlink==”email”) desc = “Send us a message”;else if (whichlink==”complain”) desc = “Insult us, our products, or our
families”;// display the description in the H2d = document.getElementById(“description”);d.innerHTML = desc;
}// Set up the event handlersorderlink = document.getElementById(“order”);orderlink.onmouseover=hover;orderlink.onmouseout=cleardesc;emaillink = document.getElementById(“email”);emaillink.onmouseover=hover;emaillink.onmouseout=cleardesc;complainlink = document.getElementById(“complain”);complainlink.onmouseover=hover;complainlink.onmouseout=cleardesc;
To test the script, store it as linkdesc.js in the same folder as the HTML document,
and load the HTML file into a browser; this script should work on any JavaScript-
capable browser. Internet Explorer’s display of the example is shown in Figure 9.3.
As usual, you can download the listings for this hour from this book’s website.Did youKnow?
FIGURE 9.3Internet Explorerdisplays thedescriptive linksexample.
▲
155Summary
SummaryIn this hour, you’ve learned to use events to detect mouse actions, keyboard actions,
and other events, such as the loading of the page. You can use event handlers to
perform a simple JavaScript statement when an event occurs, or to call a more com-
plicated function.
JavaScript includes a variety of other events. Many of these are related to forms,
which you’ll learn more about in Hour 11. Another useful event is onError, which
you can use to prevent error messages from displaying. This event is described in
Hour 16, “Debugging JavaScript Applications.”
In the next hour, you’ll continue learning about the objects in the DOM.
Specifically, Hour 10, “Using Windows and Frames,” looks at the objects associated
with windows, frames, and layers, and how they work with JavaScript.
Q&AQ. I noticed that the <img> tag in HTML can’t have onMouseOver or onClick
event handlers in some browsers. How can my scripts respond when themouse moves over an image?
A. The easiest way to do this is to make the image a link by surrounding it with
an <a> tag. You can include the BORDER=0 attribute to prevent the blue link
border from being displayed around the image.
Q. My image rollovers using onMouseOver work perfectly in Internet Explorer, butnot in Netscape. Why?
A. Re-read the previous answer, and check whether you’ve used an onMouseOver
event for an <img> tag. This is supported by Internet Explorer and Netscape 6,
but not by earlier versions of Netscape.
Q. What happens if I define both onKeyDown and onKeyPress event handlers?Will they both be called when a key is pressed?
A. The onKeyDown event handler is called first. If it returns true, the onKeyPress
event is called. Otherwise, no keypress event is generated.
Q. When I use the onLoad event, my event handler sometimes executes beforethe page is done loading, or before some of the graphics. Is there a betterway?
A. This is a bug in some older browsers. One solution is to add a slight delay to
your script using the setTimeout method. You’ll learn how to use this method
in Hour 10.
156 HOUR 6: Using Functions and Objects
Quiz QuestionsTest your knowledge of JavaScript events by answering the following questions.
1. Which of the following is the correct event handler to detect a mouse click ona link?
a. onMouseUp
b. onLink
c. onClick
2. When does the onLoad event handler for the <body> tag execute?
a. When an image is finished loading
b. When the entire page is finished loading
c. When the user attempts to load another page
3. Which of the following event object properties indicates which key waspressed for an onKeyPress event in Internet Explorer?
a. event.which
b. event.keyCode
c. event.onKeyPress
Quiz Answers1. c. The event handler for a mouse click is onClick.
2. b. The <body> tag’s onLoad handler executes when the page and all its imagesare finished loading.
3. b. In Internet Explorer, the event.keyCode property stores the character codefor each keypress.
ExercisesTo gain more experience using event handlers in JavaScript, try the following exercises:
. Add one or more additional links to the document in Listing 9.4. Add event han-dlers to the script in Listing 9.5 to display a unique description for each link.
. Modify Listing 9.5 to display a default welcome message whenever a descrip-tion isn’t being displayed. (Hint: You’ll need to include a statement to displaythe welcome message when the page loads. You’ll also need to change thecleardesc function to restore the welcome message.)

HOUR 10
Using Windows and Frames
What You’ll Learn in This Hour:. The window object hierarchy. Creating new windows with JavaScript. Delaying your script’s actions with timeouts. Displaying alerts, confirmations, and prompts. Using JavaScript to work with frames. Creating a JavaScript-based navigation frame
You should now have a basic understanding of the objects in the level 0 DOM, and the
events that can be used with each object.
In this hour, you’ll learn more about some of the most useful objects in the level 0 DOM—
browser windows and frames—and how JavaScript can work with them.
Controlling Windows with ObjectsIn Hour 4, “Working with the Document Object Model (DOM),” you learned that you can
use DOM objects to represent various parts of the browser window and the current HTML
document. You also learned that the history, document, and location objects are all
children of the window object.
In this hour, you’ll take a closer look at the window object itself. As you’ve probably
guessed by now, this means you’ll be dealing with browser windows. A variation of the
window object also enables you to work with frames, as you’ll see later in this hour.
The window object always refers to the current window (the one containing the script). The
self keyword is also a synonym for the current window. As you’ll learn in the next sec-
tions, you can have more than one window on the screen at the same time, and can refer
to them with different names.
158 HOUR 10: Using Windows and Frames
Properties of the window ObjectAlthough there is normally a single window object, there might be more than one if
you are using pop-up windows or frames. As you learned in Hour 4, the document,
history, and location objects are properties (or children) of the window object. In
addition to these, each window object has the following properties:
. window.closed—Indicates whether the window has been closed. This only
makes sense when working with multiple windows because the current win-
dow contains the script and cannot be closed without ending the script.
. window.defaultstatus and window.status—The default message for the
status line, and a temporary message to display on the status line. Some
recent browsers disable status line changes by default, so you might not be
able to use these.
. window.frames[]—An array of objects for frames, if the window contains them.
. window.name—The name specified for a frame, or for a window opened by a
script.
. window.opener—In a window opened by a script, this is a reference to the
window containing the script that opened it.
. window.parent—For a frame, a reference to the parent window containing
the frame.
. window.screen—A child object that stores information about the screen the
window is in—its resolution, color depth, and so on.
. window.self—A synonym for the current window object.
. window.top—A reference to the top-level window when frames are in use.
The properties of the window.screen object include height, width,availHeight, and availWidth (the available height and width rather than total),and colorDepth, which indicates the color support of the monitor: 8 for 8-bitcolor, 32 for 32-bit color, and so on.
Creating a New WindowOne of the most convenient uses for the window object is to create a new window.
You can do this to display a document—for example, a pop-up advertisement or the
instructions for a game—without clearing the current window. You can also create
windows for specific purposes, such as navigation windows.
By theWay
Controlling Windows with Objects 159
You can create a new browser window with the window.open() method. A typical
statement to open a new window looks like this:
WinObj=window.open(“URL”, “WindowName”, “Feature List”);
The following are the components of the window.open() statement:
. The WinObj variable is used to store the new window object. You can access
methods and properties of the new object by using this name.
. The first parameter of the window.open() method is a URL, which will be
loaded into the new window. If it’s left blank, no web page will be loaded. In
this case, you could use JavaScript to fill the window with content.
. The second parameter specifies a window name (here, WindowName). This is
assigned to the window object’s name property and is used to refer to the window.
. The third parameter is a list of optional features, separated by commas. You
can customize the new window by choosing whether to include the toolbar,
status line, and other features. This enables you to create a variety of “float-
ing” windows, which might look nothing like a typical browser window.
The features available in the third parameter of the window.open() method include
width and height, to set the size of the window in pixels, and several features that
can be set to either yes (1) or no (0): toolbar, location, directories, status,
menubar, scrollbars, and resizable. You can list only the features you want to
change from the default. This example creates a small window with no toolbar or
status line:
SmallWin = window.open(“”,”small”,”width=100,height=120,toolbar=0,status=0”);
Opening and Closing WindowsOf course, you can close windows as well. The window.close() method closes a
window. Browsers don’t normally allow you to close the main browser window with-
out the user’s permission; this method’s main purpose is for closing windows you
have created. For example, this statement closes a window called updatewindow:
updatewindow.close();
As another example, Listing 10.1 shows an HTML document that enables you to
open a small new window by pressing a button. You can then press another button
to close the new window. The third button attempts to close the current window.
Depending on your browser and its settings, this might or might not work. If it does
close the window, most browsers will ask for confirmation first.
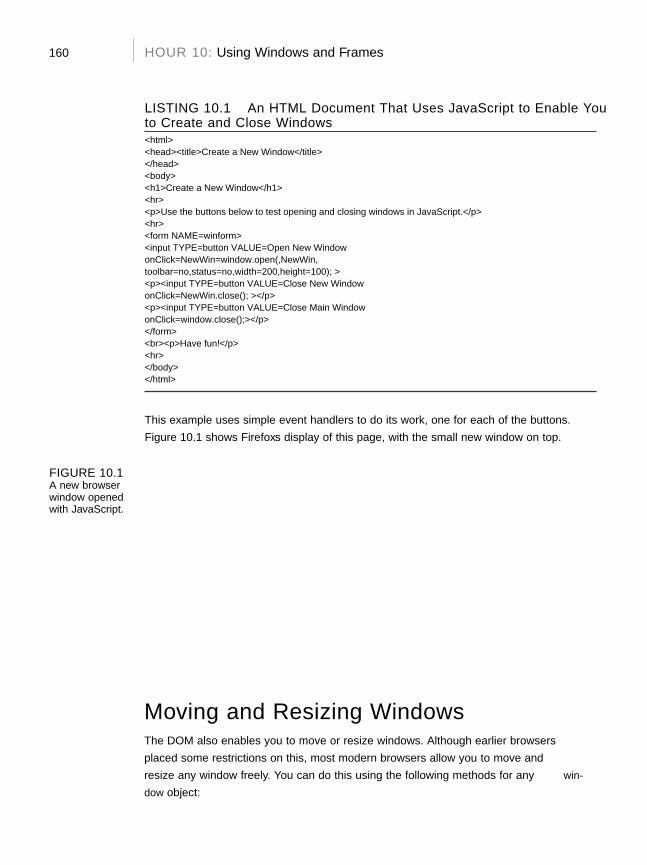
160 HOUR 10: Using Windows and Frames
LISTING 10.1 An HTML Document That Uses JavaScript to Enable Youto Create and Close Windows<html><head><title>Create a New Window</title></head><body><h1>Create a New Window</h1><hr><p>Use the buttons below to test opening and closing windows in JavaScript.</p><hr><form NAME=”winform”><input TYPE=”button” VALUE=”Open New Window”onClick=”NewWin=window.open(‘’,’NewWin’,‘toolbar=no,status=no,width=200,height=100’); “><p><input TYPE=”button” VALUE=”Close New Window”onClick=”NewWin.close();” ></p><p><input TYPE=”button” VALUE=”Close Main Window”onClick=”window.close();”></p></form><br><p>Have fun!</p><hr></body></html>
This example uses simple event handlers to do its work, one for each of the buttons.
Figure 10.1 shows Firefox’s display of this page, with the small new window on top.
FIGURE 10.1A new browserwindow openedwith JavaScript.
Moving and Resizing WindowsThe DOM also enables you to move or resize windows. Although earlier browsers
placed some restrictions on this, most modern browsers allow you to move and
resize any window freely. You can do this using the following methods for any win-
dow object:
Moving and Resizing Windows 161
. window.moveTo() moves the window to a new position. The parameters speci-
fy the x (column) and y (row) position.
. window.moveBy() moves the window relative to its current position. The x
and y parameters can be positive or negative, and are added to the current
values to reach the new position.
. window.resizeTo() resizes the window to the width and height specified as
parameters.
. window.resizeBy() resizes the window relative to its current size. The param-
eters are used to modify the current width and height.
As an example, Listing 10.2 shows an HTML document with a simple script that
enables you to resize or move the main window.
LISTING 10.2 Moving and Resizing the Current Window<html><head><title>Moving and resizing windows</title><script language=”javascript” type=”text/javascript”>
function DoIt() {if (document.form1.w.value && document.form1.h.value)
self.resizeTo(document.form1.w.value, document.form1.h.value);if (document.form1.x.value && document.form1.y.value)
self.moveTo(document.form1.x.value, document.form1.y.value);}
</script></head><body><h1>Moving and Resizing Windows</h1><form name=”form1”><b>Width:</b> <input type=”text” name=”w”><br><b>Height:</b> <input type=”text” name=”h”><br><b>X-position:</b> <input type=”text” name=”x”><br><b>Y-position:</b> <input type=”text” name=”y”><br><input type=”button” value=”Change Window” onClick=”DoIt();”></form></body></html>
In this example, the DoIt() function is called as an event handler when you click
the Change Window button. This function checks whether you have specified width
and height values. If you have, it uses the self.resizeTo() method to resize the
current window. Similarly, if you have specified x and y values, it uses
self.moveTo() to move the window.
Depending on their settings, some browsers might not allow your script to resize or
move the main window. In particular, Firefox can be configured to disallow it. You
162 HOUR 10: Using Windows and Frames
can enable it by selecting Tools, Options from the menu. Select the Content tab,
click the Advanced button next to the Enable JavaScript option, and enable the
Move or Resize Existing Windows option.
This is one of those JavaScript features you should think twice about beforeusing. These methods are best used for resizing or moving pop-up windows yourscript has generated—not as a way to force the user to use your preferred windowsize, which most users will find very annoying. You should also be aware thatbrowser settings may be configured to prevent resizing or moving windows, somake sure your script still works even without resizing.
Using TimeoutsSometimes the hardest thing to get a script to do is to do nothing at all—for a specif-
ic amount of time. Fortunately, JavaScript includes a built-in function to do this. The
window.setTimeout method enables you to specify a time delay and a command
that will execute after the delay passes.
Timeouts don’t actually make the browser stop what it’s doing. Although the state-ment you specify in the setTimeout method won’t be executed until the delaypasses, the browser will continue to do other things while it waits (for example,acting on event handlers).
You begin a timeout with a call to the setTimeout() method, which has two param-
eters. The first is a JavaScript statement, or group of statements, enclosed in quotes.
The second parameter is the time to wait in milliseconds (thousandths of seconds).
For example, the following statement displays an alert dialog box after 10 seconds:
ident=window.setTimeout(“alert(‘Time’s up!’)”,10000);
Like event handlers, timeouts use a JavaScript statement within quotation marks.Make sure that you use a single quote (apostrophe) on each side of each stringwithin the statement, as shown in the preceding example.
A variable (ident in this example) stores an identifier for the timeout. This enables
you to set multiple timeouts, each with its own identifier. Before a timeout has
elapsed, you can stop it with the clearTimeout() method, specifying the identifier
of the timeout to stop:
window.clearTimeout(ident);
WatchOut!
By theWay
WatchOut!
Using Timeouts 163
Updating a Page with TimeoutsNormally, a timeout only happens once because the statement you specify in the
setTimeout() method statement is only executed once. But often, you’ll want your
statement to execute over and over. For example, your script might be updating a
clock or a countdown and need to execute once per second.
You can make a timeout repeat by issuing the setTimeout() method call again in
the function called by the timeout. Listing 10.3 shows an HTML document that
demonstrates a repeating timeout.
LISTING 10.3 Using Timeouts to Update a Page Every Two Seconds<html><head><title>Timeout Example</title><script language=”javascript” type=”text/javascript”>var counter = 0;// call Update function in 2 seconds after first loadID=window.setTimeout(“Update();”,2000);function Update() {
counter++;document.form1.input1.value=”The counter is now at “ + counter;
// set another timeout for the next countID=window.setTimeout(“Update();”,2000);
}</script></head><body><h1>Timeout Example</h1><hr><p>The text value below is being updated every two seconds.Press the RESET button to restart the count, or the STOP button to stop it.</p><hr><form NAME=”form1”><input TYPE=”text” NAME=”input1” SIZE=”40”><br><input TYPE=”button” VALUE=”RESET” onClick=”counter = 0;”><br><input TYPE=”button” VALUE=”STOP” onClick=”window.clearTimeout(ID);”></form><hr></body></html>
This program displays a message in a text field every two seconds, including a
counter that increments each time. You can use the Reset button to start the count
over and the Stop button to stop the counting.
This script calls the setTimeout() method when the page loads, and again at each
update. The Update() function performs the update, adding one to the counter and
setting the next timeout. The Reset button sets the counter to zero, and the Stop but-
ton demonstrates the clearTimeout() method. Figure 10.2 shows Internet Explorer’s
display of the timeout example after the counter has been running for a while.
164 HOUR 10: Using Windows and Frames
This example and the next one use buttons, which are a simple example of whatyou can do with HTML forms and JavaScript. You’ll learn much more about formsin Hour 11, “Getting Data with Forms.”
Displaying Dialog BoxesThe window object includes three methods that are useful for displaying messages
and interacting with the user. You’ve already used these in some of your scripts.
Here’s a summary:
. window.alert(message) displays an alert dialog box, shown in Figure 10.3.
This dialog box simply gives the user a message.
. window.confirm(message) displays a confirmation dialog box. This displays
a message and includes OK and Cancel buttons. This method returns true if
OK is pressed and false if Cancel is pressed. A confirmation is displayed in
Figure 10.4.
. window.prompt(message,default) displays a message and prompts the user
for input. It returns the text entered by the user. If the user does not enter any-
thing, the default value is used.
FIGURE 10.2The output ofthe timeoutexample.
By theWay
Displaying Dialog Boxes 165
To use the confirm() and prompt() methods, use a variable to receive the user’s
response. For example, this statement displays a prompt and stores the text the user
enters in the text variable:
text = window.prompt(“Enter some text”,”Default value”);
You can usually omit the window object when referring to these methods becauseit is the default context of a script (for example, alert(“text”)).
Creating a Script to Display Dialog BoxesAs a further illustration of these types of dialog boxes, Listing 10.4 shows an HTML
document that uses buttons and event handlers to enable you to test dialog boxes.
LISTING 10.4 An HTML Document That Uses JavaScript to DisplayAlerts, Confirmations, and Prompts<html><head><title>Alerts, Confirmations, and Prompts</title></head><body><h1>Alerts, Confirmations, and Prompts</h1><hr>Use the buttons below to test dialogs in JavaScript.<hr><form NAME=”winform”><p><input TYPE=”button” VALUE=”Display an Alert”onClick=”window.alert(‘This is a test alert.’); “></p><p><input TYPE=”button” VALUE=”Display a Confirmation”onClick=”window.confirm(‘Would you like to confirm?’);”></p><p><input TYPE=”button” VALUE=”Display a Prompt”onClick=”window.prompt(‘Enter some Text:’,’This is the default value’);”></p></form><br>Have fun!<hr></body></html>
FIGURE 10.3A JavaScriptalert dialog boxdisplays a mes-sage.
FIGURE 10.4A JavaScriptconfirm dialogbox asks forconfirmation.
Did youKnow?
166 HOUR 10: Using Windows and Frames
This document displays three buttons, and each one uses an event handler to dis-
play one of the dialog boxes.
Figure 10.5 shows the script in Listing 10.4 in action. The prompt dialog box is cur-
rently displayed and shows the default value.
FIGURE 10.5The dialog boxexample’s out-put, including aprompt dialogbox.
Working with FramesBrowsers also support frames, which enable you to divide the browser window into
multiple panes. Each frame can contain a separate URL or the output of a script.
Using JavaScript Objects for FramesWhen a window contains multiple frames, each frame is represented in JavaScript
by a frame object. This object is equivalent to a window object, but it is used for
dealing specifically with that frame. The frame object’s name is the same as the
NAME attribute you give it in the <frame> tag.
Remember the window and self keywords, which refer to the current window?
When you are using frames, these keywords refer to the current frame instead.
Another keyword, parent, enables you to refer to the main window.
Each frame object in a window is a child of the parent window object. Suppose you
define a set of frames using the following HTML:
<frameset ROWS=”*,*” COLS=”*,*”><frame NAME=”topleft” SRC=”topleft.htm”><frame NAME=”topright” SRC=”topright.htm”><frame NAME=”bottomleft” SRC=”botleft.htm”><frame NAME=”bottomright” SRC=”botright.htm”></frameset>
▼
Working with Frames 167
This simply divides the window into quarters. If you have a JavaScript program in
the topleft.htm file, it would refer to the other windows as parent.topright, par-
ent.bottomleft, and so on. The keywords window and self would refer to the
topleft frame.
If you use nested framesets, things are a bit more complicated. window still repre-sents the current frame, parent represents the frameset containing the currentframe, and top represents the main frameset that contains all the others.
The frames ArrayRather than referring to frames in a document by name, you can use the frames
array. This array stores information about each of the frames in the document. The
frames are indexed starting with zero and beginning with the first <frame> tag in
the frameset document.
For example, you could refer to the frames defined in the previous example using
array references:
. parent.frames[0] is equivalent to the topleft frame.
. parent.frames[1] is equivalent to the topright frame.
. parent.frames[2] is equivalent to the bottomleft frame.
. parent.frames[3] is equivalent to the bottomright frame.
You can refer to a frame using either method interchangeably, and depending on
your application, you should use the most convenient method. For example, a docu-
ment with 10 frames would probably be easier to use by number, but a simple two-
frame document is easier to use if the frames have meaningful names.
Try it Yourself
Using Frames with JavaScriptAs a simple example of addressing frames using JavaScript, you will now create an
HTML document that divides the window into four frames, and a document with a
script for the top-left corner frame. Buttons in the top-left frame will trigger
JavaScript event handlers that display text in the other frames.
To begin, you will need a frameset document. Listing 10.5 shows a simple HTML
document to divide the window into four frames.
By theWay
168 HOUR 10: Using Windows and Frames
LISTING 10.5 An HTML Document That Divides the Window into FourFrames<frameset ROWS=”*,*” COLS=”*,*”><frame NAME=”top_left” SRC=”topleft.html”><frame NAME=”top_right” SRC=””><frame NAME=”bottom_left” SRC=””><frame NAME=”bottom_right” SRC=””></frameset>
The first frame defined here, top_left, to will contain an HTML document and a
simple script. Listing 10.6 shows the HTML and JavaScript code for the top-left frame.
LISTING 10.6 The HTML and JavaScript for the Frame Example<html><head><title>Frame Test</title><script language=”javascript” type=”text/javascript”>function FillFrame(framename) {
// Find the object for the frametheframe=parent[framename];// Open and clear the frame’s documenttheframe.document.open();// Create some outputtheframe.document.write(“<h1>JavaScript Output</h1>”);theframe.document.write(“<p>This text is in the “);theframe.document.write(framename + “ frame.</p>”);
}</script></head><body><h1>Frame Test</h1><form name=”form1”><input type=”button” value=”Top right”onClick=”FillFrame(‘top_right’);”><input type=”button” value=”Bottom left”onClick=”FillFrame(‘bottom_left’);”><input type=”button” id=”js” value=”Bottom right”onClick=”FillFrame(‘bottom_right’);”></form></body></html>
This document defines three buttons with event handlers that call the FillFrame()
function with a parameter for the frame name. The function finds the correct child
of the parent window object for the specified frame, uses document.open to create a
new document in the frame, and uses document.write to display text in the frame.
To try this example, save Listing 10.6 as topleft.html in the same folder as the
frameset document from Listing 10.5, and load Listing 10.5 into a browser. Figure
10.6 shows the result of this example after all three buttons have been clicked.
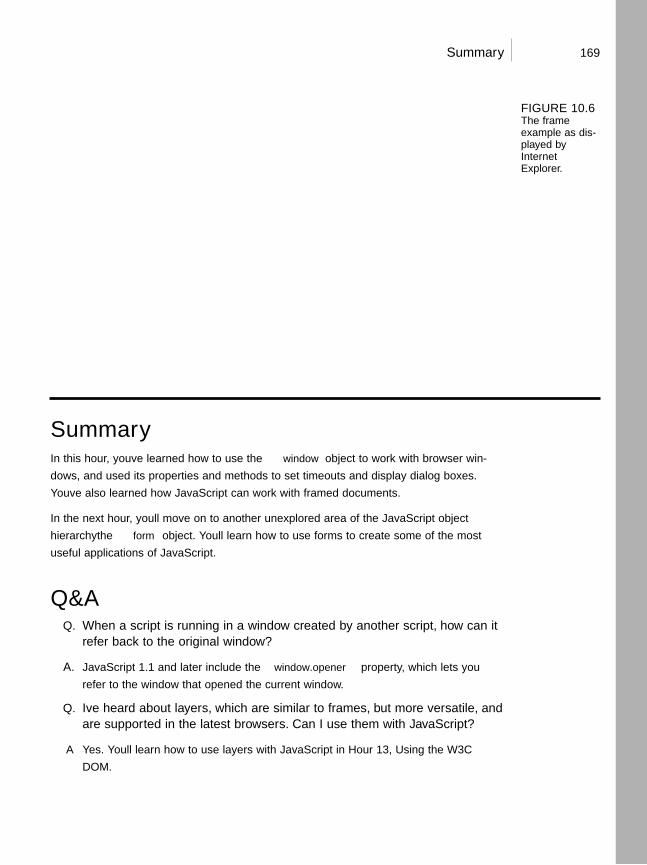
Summary 169
SummaryIn this hour, you’ve learned how to use the window object to work with browser win-
dows, and used its properties and methods to set timeouts and display dialog boxes.
You’ve also learned how JavaScript can work with framed documents.
In the next hour, you’ll move on to another unexplored area of the JavaScript object
hierarchy—the form object. You’ll learn how to use forms to create some of the most
useful applications of JavaScript.
Q&AQ. When a script is running in a window created by another script, how can it
refer back to the original window?
A. JavaScript 1.1 and later include the window.opener property, which lets you
refer to the window that opened the current window.
Q. I’ve heard about layers, which are similar to frames, but more versatile, andare supported in the latest browsers. Can I use them with JavaScript?
A Yes. You’ll learn how to use layers with JavaScript in Hour 13, “Using the W3C
DOM.”
FIGURE 10.6The frameexample as dis-played byInternetExplorer.
▲
170 HOUR 10: Using Windows and Frames
Q. How can I update two frames at once when the user clicks on a single link?
A. You can do this by using an event handler, as in Listing 10.6, and including
two statements to load URLs into different frames.
Quiz QuestionsTest your knowledge of the DOM’s window features by answering the following
questions.
1. Which of the following methods displays a dialog box with OK and Cancel
buttons, and waits for a response?
a. window.alert
b. window.confirm
c. window.prompt
2. What does the window.setTimeout method do?
a. Executes a JavaScript statement after a delay
b. Locks up the browser for the specified amount of time
c. Sets the amount of time before the browser exits automatically
3. You’re working with a document that contains three frames with the names
first, second, and third. If a script in the second frame needs to refer to the
first frame, what is the correct syntax?
a. window.first
b. parent.first
c. frames.first
Quiz Answers1. b. The window.confirm method displays a dialog box with OK and Cancel
buttons.
2. a. The window.setTimeout method executes a JavaScript statement after a
delay.
3. b. The script in the second frame would use parent.first to refer to the first
frame.
Exercises 171
ExercisesIf you want to study the window object and its properties and methods further, per-
form these exercises:
. Return to the date/time script you created in Hour 2, “Creating Simple
Scripts.” This script only displays the date and time once when the page is
loaded. Using timeouts, you can modify the script to reload automatically
every second or two and display a “live” clock. (Use the location.reload()
method, described in Hour 4.)
. Modify the examples in Listings 10.5 and 10.6 to use three horizontal frames
instead of four frames in a grid. Change the buttons to make it clear which
frame they will affect.

This page intentionally left blank

HOUR 11
Getting Data with Forms
What You’ll Learn in This Hour:. Understanding HTML forms. Creating a form. Using the form object to work with forms. How form elements are represented by JavaScript. Getting data from a form. Sending form results by email. Validating a form with JavaScript
In this hour, you’ll explore one of the most powerful uses for JavaScript: working with
HTML forms. You can use JavaScript to make a form more interactive, validate data the
user enters, and enter data based on other data.
The Basics of HTML FormsForms are among the most useful features of the HTML language. As you’ll learn during
this hour, adding JavaScript to forms can make them more interactive and provide a
number of useful features. The first step in creating an interactive form is to create the
HTML form itself.
Defining a FormAn HTML form begins with the <form> tag. This tag indicates that a form is beginning,
and it enables form elements to be used. The <form> tag includes several attributes:
. name is simply a name for the form. You can use forms without giving them names,
but you’ll need to assign a name to a form in order to easily use it with JavaScript.
174 HOUR 11: Getting Data with Forms
. method is either GET or POST; these are the two ways the data can be sent to
the server.
. action is the CGI script that the form data will be sent to when submitted.
You can also use the mailto: action to send the form’s results to an email
address, as described later in this hour.
. enctype is the MIME type the form’s data will be encoded with. This is usually
not necessary; see the “Sending Form Results by Email” section of this hour for
an example that requires it.
For example, here is a <form> tag for a form named Order. This form uses the GET
method and sends its data to a CGI script called order.cgi in the same directory as
the web page itself:
<form name=”Order” method=”GET” action=”order.cgi”>
For a form that will be processed entirely by JavaScript (such as a calculator or an
interactive game), the method and action attributes are not needed. You can use a
simple <form> tag that names the form:
<form name=”calcform”>
The <form> tag is followed by one or more form elements. These are the data fields
in the form, such as text fields, buttons, and check boxes. In the next section, you’ll
learn how JavaScript assigns objects to each of the form elements.
Using the form Object with JavaScriptEach form in your HTML page is represented in JavaScript by a form object, which
has the same name as the NAME attribute in the <form> tag you used to define it.
Alternatively, you can use the forms array to refer to forms. This array includes an
item for each form element, indexed starting with 0. For example, if the first form in
a document has the name form1, you can refer to it in one of two ways:
document.form1document.forms[0]
The form Object’s PropertiesAlong with the elements, each form object also has a list of properties, most of
which are defined by the corresponding <form> tag. You can also set these from
within JavaScript. They include the following:
Using the form Object with JavaScript 175
. action is the form’s action attribute, or the program to which the form data
will be submitted.
. encoding is the MIME type of the form, specified with the enctype attribute. In
most cases, this is not needed. See the “Sending Form Results by Email” section
of this hour for an example of its use.
. length is the number of elements in the form. You cannot change this property.
. method is the method used to submit the form, either GET or POST. This deter-
mines the data format used to send the form result to a CGI script, and does
not affect JavaScript.
. target specifies the window in which the result of the form (from the CGI
script) will be displayed. Normally, this is done in the main window, replacing
the form itself, but you can use this attribute to work with pop-up windows or
frames.
Submitting and Resetting FormsThe form object has two methods, submit() and reset(). You can use these meth-
ods to submit the data or reset the form yourself, without requiring the user to press
a button. One reason for this is to submit the form when the user clicks an image or
performs another action that would not usually submit the form.
If you use the submit() method to send data to a server or by email, mostbrowsers will prompt the user to verify that he or she wants to submit the informa-tion. There’s no way to do this behind the user’s back.
Detecting Form EventsThe form object has two event handlers, onSubmit and onReset. You can specify a
group of JavaScript statements or a function call for these events within the <form>
tag that defines the form.
If you specify a statement or a function for the onSubmit event, the statement is
called before the data is submitted to the CGI script. You can prevent the submission
from happening by returning a value of false from the onSubmit event handler. If
the statement returns true, the data will be submitted. In the same fashion, you
can prevent a Reset button from working with an onReset event handler.
WatchOut!
176 HOUR 11: Getting Data with Forms
Scripting Form ElementsThe most important property of the form object is the elements array, which con-
tains an object for each of the form elements. You can refer to an element by its own
name or by its index in the array. For example, the following two expressions both
refer to the first element in the order form, the name1 text field:
document.order.elements[0]document.order.name1
Both forms and elements can be referred to by their own names or as indices inthe forms and elements arrays. For clarity, the examples in this hour use individ-ual form and element names rather than array references. You’ll also find it easierto use names in your own scripts.
If you do refer to forms and elements as arrays, you can use the length property to
determine the number of objects in the array: document.forms.length is the num-
ber of forms in a document, and document.form1.elements.length is the number
of elements in the form1 form.
You can also access form elements using the W3C DOM. In this case, you use an id
attribute on the form element in the HTML document, and use the
document.getElementById() method to find the object for the form. For example,
this statement finds the object for the text field called firstname and stores it in the
fn variable:
fn = document.getElementById(“firstname”);
This allows you to quickly access a form element without first finding the form
object. You can assign an id to the <form> tag and find the corresponding object if
you need to work with the form’s properties and methods.
See Hour 13, “Using the W3C DOM,” for details on thedocument.getElementById() method.
Text FieldsProbably the most commonly used form elements are text fields. You can use them to
prompt for a name, an address, or any information. With JavaScript, you can display
text in the field automatically. The following is an example of a simple text field:
<input type=”TEXT” name=”text1” value=”hello” SIZE=”30”>
By theWay
Did youKnow?
Scripting Form Elements 177
This defines a text field called text1. The field is given a default value of “hello”
and allows up to 30 characters to be entered. JavaScript treats this field as a text
object with the name text1.
Text fields are the simplest to work with in JavaScript. Each text object has the fol-
lowing properties:
. name is the name given to the field. This is also used as the object name.
. defaultValue is the default value and corresponds to the VALUE attribute.
This is a read-only property.
. value is the current value. This starts out the same as the default value, but
can be changed, either by the user or by JavaScript functions.
When you work with text fields, most of the time you will use the value attribute to
read the value the user has entered or to change the value. For example, the follow-
ing statement changes the value of a text field called username in the order form to
“John Q. User”:
document.order.username.value = “John Q. User”
Text AreasText areas are defined with their own tag, <textarea>, and are represented by the
textarea object. There is one major difference between a text area and a text field:
Text areas enable the user to enter more than just one line of information. Here is
an example of a text area definition:
<textarea name=”text1” rows=”2” cols=”70”>This is the content of the TEXTAREA tag.</textarea>
This HTML defines a text area called text1, with two rows and 70 columns avail-
able for text. In JavaScript, this would be represented by a text area object called
text1 under the form object.
The text between the opening and closing <textarea> tags is used as the initial
value for the text area. You can include line breaks within the default value with the
special character \n.
Working with Text in FormsThe text and textarea objects also have a few methods you can use:
. focus() sets the focus to the field. This positions the cursor in the field and
makes it the current field.
178 HOUR 11: Getting Data with Forms
. blur() is the opposite; it removes the focus from the field.
. select() selects the text in the field, just as a user can do with the mouse. All
of the text is selected; there is no way to select part of the text.
You can also use event handlers to detect when the value of a text field changes. The
text and textarea objects support the following event handlers:
. The onFocus event happens when the text field gains focus.
. The onBlur event happens when the text field loses focus.
. The onChange event happens when the user changes the text in the field and
then moves out of it.
. The onSelect event happens when the user selects some or all of the text in
the field. Unfortunately, there’s no way to tell exactly which part of the text
was selected. (If the text is selected with the select() method described previ-
ously, this event is not triggered.)
If used, these event handlers should be included in the <input> tag declaration. For
example, the following is a text field including an onChange event that displays an
alert:
<input type=”TEXT” name=”text1” onChange=”window.alert(‘Changed.’);”>
ButtonsOne of the most useful types of form element is a button. Buttons use the <input>
tag and can use one of three different types:
. type=SUBMIT is a Submit button. This button causes the data in the form fields
to be sent to the CGI script.
. type=RESET is a Reset button. This button sets all the form fields back to their
default value, or blank.
. type=BUTTON is a generic button. This button performs no action on its own,
but you can assign it one using a JavaScript event handler.
All three types of buttons include a name attribute to identify the button and a value
attribute that indicates the text to display on the button’s face. A few buttons were used
in the examples in Hour 10, “Using Windows and Frames.” As another example, the
following defines a Submit button with the name sub1 and the value “Click Here”:
<input type=”SUBMIT” name=”sub1” value=”Click Here”>

Scripting Form Elements 179
If the user presses a Submit or a Reset button, you can detect it with the onSubmit or
onReset event handlers, described earlier in this hour. For generic buttons, you can
use an onClick event handler.
Check BoxesA check box is a form element that looks like a small box. Clicking on the check
box switches between the checked and unchecked states, which is useful for indicat-
ing Yes or No choices in your forms. You can use the <input> tag to define a check
box. Here is a simple example:
<input type=”CHECKBOX” name=”check1” value=”Yes” checked>
Again, this gives a name to the form element. The value attribute assigns a mean-
ing to the check box; this is a value that is returned to the server if the box is
checked. The default value is “on.” The checked attribute can be included to make
the box checked by default.
A check box is simple: It has only two states. Nevertheless, the checkbox object in
JavaScript has four different properties:
. name is the name of the check box, and also the object name.
. value is the “true” value for the check box—usually on. This value is used by
server-side programs to indicate whether the check box was checked. In
JavaScript, you should use the checked property instead.
. defaultChecked is the default status of the check box, assigned by the
checked attribute in HTML.
. checked is the current value. This is a Boolean value: true for checked and
false for unchecked.
To manipulate the check box or use its value, you use the checked property. For
example, this statement turns on a check box called same in the order form:
document.order.same.checked = true;
The check box has a single method, click(). This method simulates a click on the
box. It also has a single event, onClick, which occurs whenever the check box is
clicked. This happens whether the box was turned on or off, so you’ll need to exam-
ine the checked property to see what happened.
180 HOUR 11: Getting Data with Forms
Radio ButtonsAnother element for decisions is the radio button, using the <input> tag’s RADIO
type. Radio buttons are also known as option buttons. These are similar to check
boxes, but they exist in groups and only one button can be checked in each group.
They are used for a multiple-choice or “one of many” input. Here’s an example of a
group of radio buttons:
<input type=”RADIO” name=”radio1” value=”Option1” checked> Option 1<input type=”RADIO” name=”radio1” value=”Option2”> Option 2<input type=”RADIO” name=”radio1” value=”Option3”> Option 3
These statements define a group of three radio buttons. The name attribute is the
same for all three (which is what makes them a group). The value attribute is the
value passed to a script or a CGI program to indicate which button is selected—be
sure you assign a different value to each button.
Radio buttons are named for their similarity to the buttons on old pushbuttonradios. Those buttons used a mechanical arrangement so that when you pushedone button in, the others popped out.
As for scripting, radio buttons are similar to check boxes, except that an entire
group of them shares a single name and a single object. You can refer to the follow-
ing properties of the radio object:
. name is the name common to the radio buttons.
. length is the number of radio buttons in the group.
To access the individual buttons, you treat the radio object as an array. The buttons
are indexed, starting with 0. Each individual button has the following properties:
. value is the value assigned to the button. (This is used by the server.)
. defaultChecked indicates the value of the checked attribute and the default
state of the button.
. checked is the current state.
For example, you can check the first radio button in the radio1 group on the form1
form with this statement:
document.form1.radio1[0].checked = true;
However, if you do this, be sure you set the other values to false as needed. This is not
done automatically. You can use the click() method to do both of these in one step.
By theWay
Scripting Form Elements 181
Like a check box, radio buttons have a click() method and an onClick event han-
dler. Each radio button can have a separate statement for this event.
You can have more than one group of radio buttons on a page, and they will actindependently. Assign a separate name attribute value to each group.
Drop-Down ListsA final form element is also useful for multiple-choice selections. The <select>
HTML tag is used to define a selection list, or a drop-down list of text items. The fol-
lowing is an example of a selection list:
<select name=”select1” SIZE=40><option value=”choice1” SELECTED>This is the first choice.<option value=”choice2”>This is the second choice.<option value=”choice3”>This is the third choice.</select>
Each of the <option> tags defines one of the possible choices. The value attribute is
the name that is returned to the program, and the text outside the <option> tag is
displayed as the text of the option.
An optional attribute to the <select> tag, multiple, can be specified to allow mul-
tiple items to be selected. Browsers usually display a single-selection <select> as a
drop-down list and a multiple-selection list as a scrollable list.
The object for selection lists is the select object. The object itself has the following
properties:
. name is the name of the selection list.
. length is the number of options in the list.
. options is the array of options. Each selectable option has an entry in this array.
. selectedIndex returns the index value of the currently selected item. You can
use this to check the value easily. In a multiple-selection list, this indicates the
first selected item.
The options array has a single property of its own, length, which indicates the
number of selections. In addition, each item in the options array has the following
properties:
. index is the index into the array.
. defaultSelected indicates the state of the selected attribute.
Did youKnow?
182 HOUR 11: Getting Data with Forms
. selected is the current state of the option. Setting this property to true selects
the option. The user can select multiple options if the multiple attribute is
included in the <select> tag.
. name is the value of the name attribute. This is used by the server.
. text is the text that is displayed in the option.
The select object has two methods—blur() and focus()—which perform the
same purposes as the corresponding methods for text objects. The event handlers
are onBlur, onFocus, and onChange, also similar to other objects.
You can change selection lists dynamically—for example, choosing a product inone list could control which options are available in another list. You can also addand delete options from the list.
Reading the value of a selected item is a two-step process. You first use the
selectedIndex property, and then use the value property to find the value of the
selected choice. Here’s an example:
ind = document.navform.choice.selectedIndex;val = document.navform.choice.options[ind].value;
This uses the ind variable to store the selected index, and then assigns the val vari-
able to the value of the selected choice. Things are a bit more complicated with a
multiple selection: You have to test each option’s selected attribute separately.
Displaying Data from a FormAs a simple example of using forms, Listing 11.1 shows a form with name, address,
and phone number fields, as well as a JavaScript function that displays the data
from the form in a pop-up window.
LISTING 11.1 A Form That Displays Data in a Pop-up Window<html><head><title>Form Example</title><script language=”JavaScript” type=”text/javascript”>function display() {
DispWin = window.open(‘’,’NewWin’,
By theWay
Displaying Data from a Form 183
‘toolbar=no,status=no,width=300,height=200’)message = “<ul><li><b>NAME: </b>” + document.form1.yourname.value;message += “<li><b>ADDRESS: </b>” + document.form1.address.value;message += “<li><b>PHONE: </b>” + document.form1.phone.value + “</ul>”;DispWin.document.write(message);
}</script></head><body><h1>Form Example</h1>Enter the following information. When you press the Display button,the data you entered will be displayed in a pop-up window.<form name=”form1”><p><b>Name:</b> <input type=”TEXT” size=”20” name=”yourname”></p><p><b>Address:</b> <input type=”TEXT” size=”30” name=”address”></p><p><b>Phone: </b> <input type=”TEXT” size=”15” name=”phone”></p><p><input type=”BUTTON” value=”Display” onClick=”display();”></p></form></body></html>
Here is a breakdown of how this HTML document and script work:
. The <script> section in the document’s header defines a function called dis-
play() that opens a new window (as described in Hour 10) and displays the
information from the form.
. The <form> tag begins the form. Because this form is handled entirely by
JavaScript, no form action or method is needed.
. The <input> tags define the form’s three fields: yourname, address, and
phone. The last <input> tag defines the Display button, which is set to run the
display() function.
As usual, you can download the listings for this hour from this book’s website.
Figure 11.1 shows this form in action. The Display button has been pressed, and the
pop-up window shows the results.
LISTING 11.1 Continued
Did youKnow?
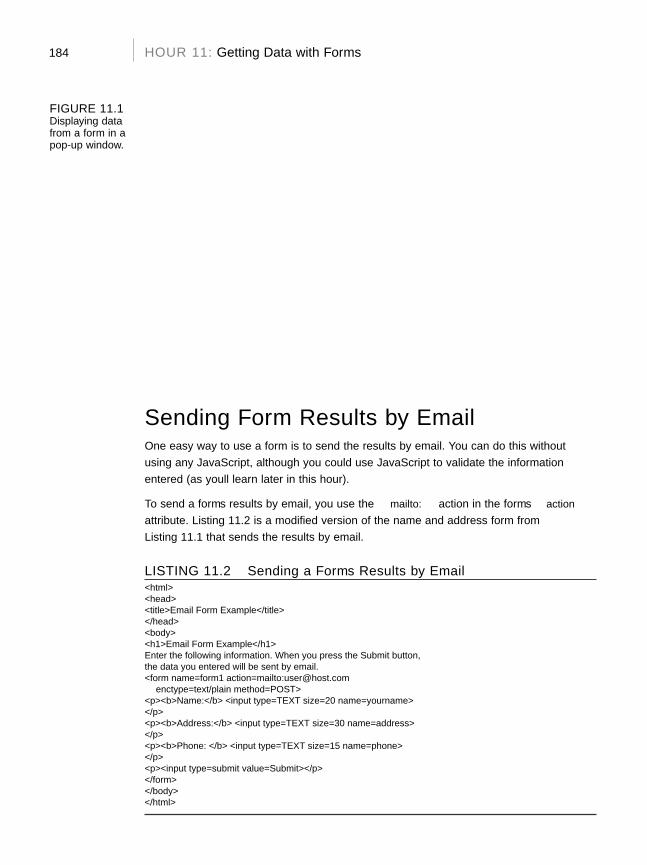
184 HOUR 11: Getting Data with Forms
Sending Form Results by EmailOne easy way to use a form is to send the results by email. You can do this withoutusing any JavaScript, although you could use JavaScript to validate the informationentered (as you’ll learn later in this hour).
To send a form’s results by email, you use the mailto: action in the form’s actionattribute. Listing 11.2 is a modified version of the name and address form fromListing 11.1 that sends the results by email.
LISTING 11.2 Sending a Form’s Results by Email<html><head><title>Email Form Example</title></head><body><h1>Email Form Example</h1>Enter the following information. When you press the Submit button,the data you entered will be sent by email.<form name=”form1” action=”mailto:[email protected]”enctype=”text/plain” method=”POST”>
<p><b>Name:</b> <input type=”TEXT” size=”20” name=”yourname”></p><p><b>Address:</b> <input type=”TEXT” size=”30” name=”address”></p><p><b>Phone: </b> <input type=”TEXT” size=”15” name=”phone”></p><p><input type=”submit” value=”Submit”></p></form></body></html>
FIGURE 11.1Displaying datafrom a form in apop-up window.
▼
Sending Form Results by Email 185
To use this form, change [email protected] in the action attribute of the <form> tag
to your email address. Notice the enctype=text/plain attribute in the <form> tag.
This ensures that the information in the email message will be in a readable plain-
text format rather than encoded.
Although this provides a quick and dirty way of retrieving data from a form, the dis-
advantage of this technique is that it is highly browser dependent. Whether it will
work for each user of your page depends on the configuration of his or her browser
and email client.
Because this technique does not consistently work on all browsers, I don’t recom-mend you use it. For a more reliable way of sending form results, you can use aCGI form-to-email gateway. Several free CGI scripts and services are available.You’ll find links to them on this book’s website.
Try It Yourself
Validating a FormOne of JavaScript’s most useful purposes is validating forms. This means using a
script to verify that the information entered is valid—for example, that no fields are
blank and that the data is in the right format.
You can use JavaScript to validate a form whether it’s submitted by email or to a
CGI script, or is simply used by a script. Listing 11.3 is a version of the name and
address form that includes validation.
LISTING 11.3 A Form with a Validation Script<html><head><title>Form Example</title><script language=”JavaScript” type=”text/javascript”>function validate() {
if (document.form1.yourname.value.length < 1) {alert(“Please enter your full name.”);return false;
}if (document.form1.address.value.length < 3) {
alert(“Please enter your address.”);return false;
}if (document.form1.phone.value.length < 3) {
alert(“Please enter your phone number.”);return false;
}return true;
}
WatchOut!
186 HOUR 11: Getting Data with Forms
</script></head><body><h1>Form Example</h1><p>Enter the following information. When you press the Submit button,the data you entered will be validated, then sent by email.</p><form name=”form1” action=”mailto:[email protected]” enctype=”text/plain”method=”POST” onSubmit=”return validate();”><p><b>Name:</b> <input type=”TEXT” size=”20” name=”yourname”></p><p><b>Address:</b> <input type=”TEXT” size=”30” name=”address”></p><p><b>Phone: </b> <input type=”TEXT” size=”15” name=”phone”></p><p><input type=”SUBMIT” value=”Submit”></p></form></body></html>
This form uses a function called validate() to check the data in each of the form
fields. Each if statement in this function checks a field’s length. If the field is long
enough to be valid, the form can be submitted; otherwise, the submission is stopped
and an alert message is displayed.
The validation in this script is basic—you could go further and ensure that thephone field contains only numbers, and the right amount of digits, by usingJavaScript’s string features described in Hour 5, “Using Variables, Strings, andArrays.”
This form is set up to send its results by email, as in Listing 11.2. If you wish to use
this feature, be sure to read the information about email forms earlier in this hour
and change [email protected] to your desired email address.
The <form> tag uses an onSubmit event handler to call the validate() function.
The return keyword ensures that the value returned by validate() will determine
whether the form is submitted.
You can also use the onChange event handler in each form field to call a valida-tion routine. This allows the field to be validated before the Submit button ispressed.
Figure 11.2 shows this script in action, as displayed by Firefox. The form has been
filled out except for the name, and a dialog box indicates that the name needs to be
entered.
LISTING 11.3 Continued
By theWay
Did youKnow?
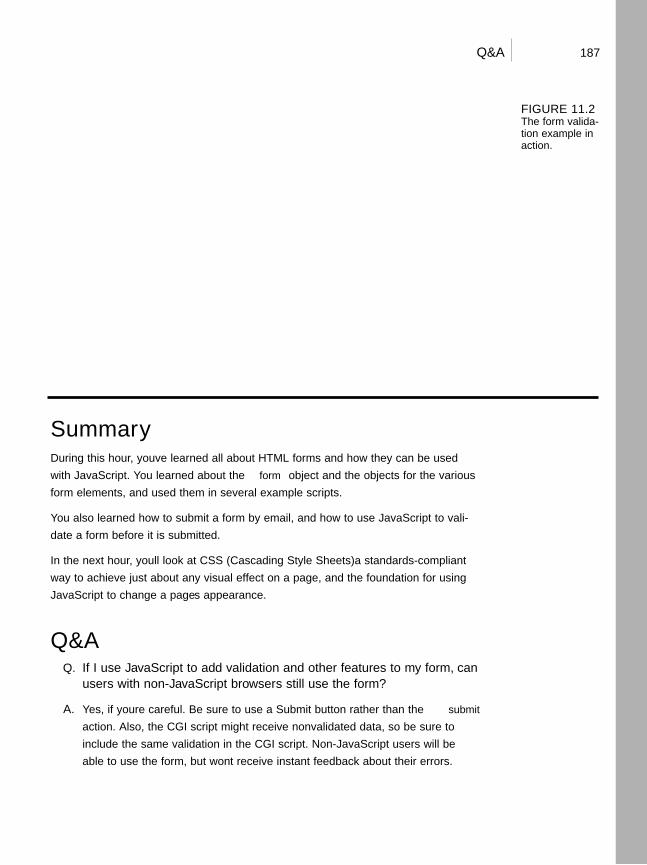
187Q&A
SummaryDuring this hour, you’ve learned all about HTML forms and how they can be used
with JavaScript. You learned about the form object and the objects for the various
form elements, and used them in several example scripts.
You also learned how to submit a form by email, and how to use JavaScript to vali-
date a form before it is submitted.
In the next hour, you’ll look at CSS (Cascading Style Sheets)—a standards-compliant
way to achieve just about any visual effect on a page, and the foundation for using
JavaScript to change a page’s appearance.
Q&AQ. If I use JavaScript to add validation and other features to my form, can
users with non-JavaScript browsers still use the form?
A. Yes, if you’re careful. Be sure to use a Submit button rather than the submit
action. Also, the CGI script might receive nonvalidated data, so be sure to
include the same validation in the CGI script. Non-JavaScript users will be
able to use the form, but won’t receive instant feedback about their errors.
FIGURE 11.2The form valida-tion example inaction.
▲
188 HOUR 11: Getting Data with Forms
Q. Can I add new form elements on the fly or change them—for example,change a text box into a password field?
A. Not in the traditional way described in this hour. However, you can change
any aspect of a page, including adding, removing, or changing form ele-
ments, using the W3C DOM. See Hour 13 for details.
Q. Is there any way to create a large number of text fields without dealing withdifferent names for all of them?
A. Yes. If you use the same name for several elements in the form, their objects
will form an array. For example, if you defined 20 text fields with the name
member, you could refer to them as member[0] through member[19]. This also
works with other types of form elements.
Q. Is there a way to place the cursor on a particular field when the form isloaded, or after my validation routine displays an error message?
A. Yes. You can use the field’s focus() method to send the cursor there. To do this
when the page loads, you can use the onLoad method in the <body> tag.
However, there is no way to place the cursor in a particular position within
the field.
Quiz QuestionsTest your knowledge of JavaScript and forms by answering the following questions.
1. Which of these attributes of a <form> tag determines where the data will be
sent?
a. action
b. method
c. name
2. Where do you place the onSubmit event handler to validate a form?
a. In the <body> tag
b. In the <form> tag
c. In the <input> tag for the Submit button
189Exercises
3. What can JavaScript do with forms that a CGI script can’t?
a. Cause all sorts of problems
b. Give the user instant feedback about errors
c. Submit the data to a server
Quiz Answers1. a. The action attribute determines where the data is sent.
2. b. You place the onSubmit event handler in the <form> tag.
3. b. JavaScript can validate a form and let the user know about errors immedi-
ately, without waiting for a response from a server.
ExercisesTo further explore the JavaScript features you learned about in this hour, you can
perform the following exercises:
. Change the validate function in Listing 11.3 so that after a message is dis-
played indicating that a field is wrong, the cursor is moved to that field. (Use
the focus() method for the appropriate form element.)
. Add a text field to the form in Listing 11.3 for an email address. Add a feature
to the validate function that verifies that the email address is at least five
characters and that it contains the @ symbol.

This page intentionally left blank

HOUR 12
Working with Style Sheets
What You’ll Learn in This Hour:. Why style sheets are needed. How to define Cascading Style Sheets (CSS). How to use a style sheet in a document. Using an external style sheet file. Using JavaScript to change styles dynamically
This hour begins with an introduction to style sheets, which you can use to take more con-
trol over how the browser displays your document. You can also use JavaScript with style
sheets to change the appearance of a page dynamically.
Style and SubstanceIf you’ve ever tried to make a really good-looking web page, you’ve probably encountered
some problems. First of all, HTML doesn’t give you very much control over a page’s
appearance. For example, you can’t change the amount of space between words—in fact,
you can’t even use two spaces between words because they’ll be converted to a single
space.
Second, even when you do your best to make a perfect-looking document using HTML,
you will find that it doesn’t necessarily display the same way on all browsers—or even on
different computers running the same browser.
The reason for these problems is simple: HTML was never meant to handle such things as
layout, justification, and spacing. HTML deals with a document’s structure—in other
words, how the document is divided into paragraphs, headings, lists, and other elements.
This isn’t a bad thing. In fact, it’s one of the most powerful features of HTML. You only
define the structure of the document, so it can be displayed in all sorts of different ways
192 HOUR 12: Working with Style Sheets
without changing its meaning. For example, a well-written HTML document can be
displayed in Netscape, Firefox, or Internet Explorer, which generally treat elements
the same way—there is a space between paragraphs, headings are in big, bold text,
and so on.
Because HTML only defines the structure, the same document can be displayed in a
text-based browser, such as Lynx. In this case, the different elements will be dis-
played differently, but you can still tell which text is a heading, which is a list, and
so on.
Text-based browsers aren’t the only alternative way of displaying HTML. Browsersdesigned for the blind can read a web page using a speech synthesizer, with differ-ent voices or sounds that indicate the different elements.
As you should now understand, HTML is very good at its job—defining a document’s
structure. Not surprisingly, using this language to try to control the document’s pres-
entation will only drive you crazy.
Fortunately, the World Wide Web Consortium (W3C) realized that web authors need
to control the layout and presentation of documents. This resulted in the Cascading
Style Sheets (CSS) standard.
CSS adds a number of features to standard HTML to control style and appearance.
More importantly, it does this without affecting HTML’s capability to describe docu-
ment structures. Although style sheets still won’t make your document look 100%
identical on all browsers and all platforms, it is certainly a step in the right direction.
Let’s look at a real-world example. If you’re browsing the Web with a CSS-supported
browser and come across a page that uses CSS, you’ll see the document exactly as it
was intended. You can also turn off your browser’s support for style sheets if you’d
rather view all the pages in the same consistent way.
Using CSS and simplifying HTML markup is also helpful in making pages compati-ble with the various tiny browsers used on mobile phones.
Defining and Using CSS StylesYou can define a CSS style sheet within an HTML document using the <style> tag.
The opening <style> tag specifies the type of style sheet—CSS is currently the only
valid type—and begins a list of styles to apply to the document. The </style> tag
ends the style sheet. Here’s a simple example:
By theWay
Did youKnow?
Defining and Using CSS Styles 193
<style type=”text/css”>H1 {color: blue;}
</style>
Because the style sheet definition itself doesn’t create any output on the page, you
should place the <style> tags in the <head> section of the HTML document.
You can only use style sheet rules within the <style> tags. HTML tags are notvalid within a style sheet.
Creating RulesEach element within the <style> tags is called a rule. To create a rule, you specify
the HTML elements that it will affect, as well as a list of properties and values that
control the appearance of those elements. We’ll look at the properties in the next
section.
As a simple example, the following style sheet contains a single rule. All Level 1
headings are blue:
<style type=”text/css”>H1 {color: blue;}
</style>
Each rule includes three components:
. A selector (H1 in the example) describing which HTML tags will be affected
. One or more property names (color in the example)
. A value for each property name (blue in the example)
Each rule uses braces to surround the list of properties and values, and a semicolon
after each value. The semicolon is optional if you are only specifying one property
and value.
You can specify multiple HTML tags for the selector, as well as multiple properties
and values. For example, the following style sheet specifies that all headings are
blue, italic, and centered:
<style type=”text/css”>H1,H2,H3,H4,H5,H6 {color: blue;
font-style: italic;text-align: center; }
</style>
WatchOut!
194 HOUR 12: Working with Style Sheets
If you make a rule that sets the style of the <body> tag, it will affect the entiredocument. This becomes the default rule for the document, but you can override itwith the styles of elements within the body of the page.
Setting Styles for Specific ElementsRather than setting the style for all elements of a certain type, you can specify a
style for an individual element only. For example, the following HTML tag repre-
sents a Level 1 heading colored red:
<h1 style=”color: red; text-align: center;”>This is a red heading.</h1>
This is called an inline style because it’s specified in the HTML tag itself. You don’t need
to use <style> tags with this type of style. If you have used both, inline style rules
override rules in a style sheet—for example, if the preceding tag appeared in a docu-
ment that sets H1 headings to be blue in a style sheet, the heading would still be red.
Using id AttributesYou can also create a rule within a style sheet that will only apply to a certain ele-
ment. The id attribute of an HTML tag enables you to assign a unique identifier to
that element. For example, this tag defines a paragraph with the id attribute intro:
<p id=”intro”>This is a paragraph</p>
After you’ve assigned this attribute to the tag, you can include rules for it as part of a
style sheet. CSS uses the pound sign (#) to indicate that a rule applies to a specific id.
For example, the following style sheet sets the intro paragraph to be red in color:
<style type=”text/css”>#intro {color: red;}
</style>
An id value should define a single element in a page. Most browsers will enableyou to define more than one element with the same id value, but this is not validand will not work consistently. It’s best to use classes, as described in the nextsection, when you need to apply the same styles to multiple elements.
Using ClassesAlthough the id attribute is useful, you can only use each unique id value with a
single HTML tag. If you need to apply the same style to several tags, you can use the
class attribute instead. For example, this HTML tag defines a paragraph in a class
called smallprint:
By theWay
WatchOut!

Using CSS Properties 195
<p class=”smallprint”>This is the small print</p>
To refer to a class within a style sheet, you use a period followed by the class name.
Here is a style sheet that defines styles for the smallprint class:
<style type=”text/css”>.smallprint {color: black;
font-size: 10px; }</style>
You can use a class on any number of elements within a page. You can alsodefine multiple classes for an element, separated by spaces: class=”smallprintbold”. When you do this, the CSS rules for all of the classes will be applied tothe element.
Using CSS PropertiesCSS supports a wide variety of properties, such as color and text-align, in the pre-
vious example. The following sections list some of the most useful CSS properties for
aligning text, changing colors, working with fonts, and setting margins and borders.
This is only an introduction to CSS, and there are many properties beyond thoselisted here. For more details about CSS, consult one of the web resources orbooks listed in Appendix A, “Other JavaScript Resources.”
Aligning TextOne of the most useful features of style sheets is the capability to change the spac-
ing and alignment of text. Most of these features aren’t available using standard
HTML. You can use the following properties to change the alignment and spacing of
text:
. letter-spacing—Specifies the spacing between letters.
. text-decoration—Enables you to create lines over, under, or through the
text, or to choose blinking text. The value can be none (default), underline,
overline, line-through, or blink. Blinking text is, thankfully, unsupported
by most browsers.
. vertical-align—Enables you to move the element up or down to align with
other elements on the same line. The value can be baseline, sub, super, top,
text-top, middle, text-bottom, and bottom.
By theWay
Did youKnow?
196 HOUR 12: Working with Style Sheets
. text-align—Specifies the justification of text. This can be left, right, cen-
ter, or justify.
. text-transform—Changes the capitalization of text. capitalize makes the
first letter of each word uppercase; uppercase makes all letters uppercase; and
lowercase makes all letters lowercase.
. text-indent—Enables you to specify the amount of indentation for para-
graphs and other elements.
. line-height—Enables you to specify the distance between the top of one line
of text and the top of the next.
Changing Colors and Background ImagesYou can also use style sheets to gain more control over the colors and background
images used on your web page. CSS includes the following properties for this pur-
pose:
. color—Specifies the color of the text within an element. This is useful for
emphasizing text or for using a specific color scheme for the document. You
can specify a named color (for example, red) or red, green, and blue values to
define a specific color (for example, #0522A5).
. background-color—Specifies the background color of an element. By setting
this value, you can make paragraphs, table cells, and other elements with
unique background colors. As with color, you can specify a color name or
numeric color.
. background-image—Specifies the URL for an image to be used as the back-
ground for the element. This is specified with the keyword url and a URL in
parentheses, as in url(/back.gif).
. background-repeat—Specifies whether the background image is repeated
(tiled). The image can be repeated horizontally, vertically, or both.
. background-attachment—Controls whether the background image scrolls
when you scroll through the document. fixed means that the background
image stays still while the document scrolls; scroll means the image scrolls
with the document (like background images on normal web documents).
. background-position—Enables you to offset the position of the background
image.
. background—Provides a quick way to set all of the background elements in
this list. You can specify all of the attributes in a single background rule.
Using CSS Properties 197
The basic list of colors supported by most browsers for the color and background-color properties includes aqua, black, blue, fuchsia, gray, green, lime, maroon,navy, olive, orange, purple, red, silver, teal, white, and yellow.
Working with FontsStyle sheets also enable you to control the fonts used on the web document and howthey are displayed. You can use the following properties to control fonts:
. font-family—Specifies the name of a font, such as arial or helvetica, touse with the element. Because not all users have the same fonts installed, youcan list several fonts. The CSS specification also supports several generic fontfamilies that are guaranteed to be available: serif, sans-serif, cursive,fantasy, and monospace.
. font-style—Specifies the style of a font, such as normal, italic, or oblique.
. font-variant—This value is normal for normal text, and small-caps to dis-play lowercase letters as small capitals.
. font-weight—Enables you to specify the weight of text: normal or bold. Youcan also specify a numeric font weight for a specific amount of boldness.
. font-size—The point size of the font.
. font—This is a quick way to set all the font properties in this list. You can listall the values in a single font rule.
Margins and BordersLast but not least, you can use style sheets to control the general layout of thepage. The following properties affect margins, borders, and the width and height ofelements on the web page:
. margin-top, margin-bottom, margin-left, margin-right—Specify themargins of the element. You can specify the margins as an exact number oras a percentage of the page’s width.
. margin—Allows you to specify a single value for all four of the margins.
. width—Specifies the width of an element, such as an image.
. height—Specifies the height of an element.
. float—Enables the text to flow around an element. This is particularly usefulwith images or tables.
. clear—Specifies that the text should stop flowing around a floating image.
Did youKnow?
198 HOUR 12: Working with Style Sheets
Along with these features, CSS style sheets enable you to create sections of thedocument that can be positioned independently. This feature is described in Hour13, “Using the W3C DOM.”
Units for Style SheetsStyle sheet properties support a wide variety of units, or types of values you can spec-
ify. Most properties that accept a numeric value support the following types of units:
. px—Pixels (for example, 15px). Pixels are the smallest addressable units on a
computer screen or other device. In some devices with non-typical resolutions
(for example, handheld computers) the browser might rescale this value to fit
the device.
. pt—Points (for example, 10pt). Points are a standard unit for font size. The
size of text of a specified point size varies depending on the monitor resolu-
tion. Points are equal to 1/72 of an inch.
. ex— Approximate height of the letter x in the current font (for example,
1.2ex).
. em—Approximate width of the letter m in the current font (for example,
1.5em). This is usually equal to the font-size property for the current ele-
ment.
. %—Percentage of the containing object’s value (for example, 150%).
Which unit you choose to use is generally a matter of convenience. Point sizes are
commonly used for fonts, pixel units for the size and position of layers or other
objects, and so on.
Creating a Simple Style SheetAs an example of CSS, you can now create a web page that uses a wide variety of
styles:
. For the entire body, the text is blue.
. Paragraphs are centered and have a wide margin on either side.
. Level 1, 2, and 3 headings are red.
. Bullet lists are boldface and green by default.
Did youKnow?
Creating a Simple Style Sheet 199
The following is the CSS style sheet to define these properties, using the <style>
tags:
<style type=”text/css”>BODY {color: blue}P {text-align: center;
margin-left:20%;margin-right:20%}
H1, H2, H3 {color: red}UL {color: green;
font-weight: bold}</style>
Here’s a rundown of how this style sheet works:
. The <style> tags enclose the style sheet.
. The BODY section sets the page body’s default text color to blue.
. The P section defines the style for paragraphs.
. The H1, H2, H3 section defines the style for heading tags.
. The UL section defines a style for bullet lists.
To show how this style sheet works, Listing 12.1 shows a document that includes this
style sheet and a few examples of overriding styles for particular elements. Figure
12.1 shows Internet Explorer’s display of this example.
LISTING 12.1 An Example of a Document Using CSS Style Sheets<html><head><title>Style Sheet Example</title><style type=”text/css”>BODY {color: blue}P {text-align: center;
margin-left:20%;margin-right:20%}
H1, H2, H3 {color: red}UL {color: green;
font-weight: bold}</style></head><body><h1>Welcome to this page</h1><p>The above heading is red, since we specified that H1-H3 headingsare red. This paragraph is blue, which is the default color forthe entire body. It’s also centered and has 20% margins, which wespecified as the default for paragraphs.</p><p style=”color:black”>This paragraph has black text, because it overridesthe default color in the paragraph tag. We didn’t override the centering,so this paragraph is also centered.</p><ul>
200 HOUR 12: Working with Style Sheets
<li>This is a bullet list.<li>It’s green and bold, because we specified those defaults for bullet lists.<li style=”color:red”>This item is red, overriding the default.<li>This item is back to normal.</ul><p>This is another paragraph with the default paragraph style.</p></body></html>
Remember that you can download the code for this listing from this book’s web-site.
LISTING 12.1 Continued
Did youKnow?
FIGURE 12.1The style sheetexample as dis-played byInternetExplorer.
Using External Style SheetsThe preceding example only changes a few aspects of the HTML document’s appear-
ance, but it adds about 10 lines to its length. If you were trying to make a very styl-
ish page and had defined new styles for all of the attributes, you would end up with
a very long and complicated document.
For this reason, you can use a CSS style sheet from a separate file in your document.
This makes your document short and to the point. More importantly, it enables you
to define a single style sheet and use it to control the appearance of all of the pages
on your site.
Controlling Styles with JavaScript 201
Linking to External Style SheetsYou can refer to an external CSS file by using the <link> tag in the <head> section
of one or more HTML documents:
<link rel=”stylesheet” type=”text/css” href=”style.css”>
This tag refers to an external CSS style sheet stored in the style.css file.
Using external style sheets is a good practice because it separates content(HTML), presentation (CSS), and behavior (JavaScript). See Hour 15, “UnobtrusiveScripting,” for more information on best practices.
Creating External .css FilesAfter you’ve linked to an external .css file, you need to create the file itself. The
external style sheet is a simple text file that you can create with the same editor you
use for HTML documents.
The .css file should contain a list of CSS rules, in the same format you would use
between <style> tags. However, the file should not include <style> tags or any
other HTML tags. Here is what the styles from the previous example would look like
as an external style sheet:
BODY {color: blue}P {text-align: center;
margin-left:20%;margin-right:20%}
H1, H2, H3 {color: red}UL {color: green;
font-weight: bold}
Controlling Styles with JavaScriptThe new W3C DOM (Document Object Model) makes it easy for JavaScript applica-
tions to control the styles on a page. Whether or not you use style sheets, you can
use JavaScript to modify the style of any element on a page.
As you learned in Hour 4, “Working with the Document Object Model (DOM),” the
DOM enables you to access the entire HTML document and all of its elements as script-
able objects. You can change any object’s style by modifying its style object properties.
The names and values of objects under the style object are the same as you’ve
learned in this hour. For example, you can change an element’s color by modifying
its style.color attribute:
element.style.color=”blue”;
By theWay
▼
202 HOUR 12: Working with Style Sheets
Here, element represents the object for an element. There are many ways of finding
an element’s corresponding object, which you will learn about in detail in Hour 13.
In the meantime, an easy way to find an element’s object is to assign an identifier
to it with the id attribute. The following statement creates an <h1> element with the
identifier “head1”:
<h1 id = “head1”>This is a heading</h1>
Now that you’ve assigned an identifier, you can use the getElementById() method
to find the DOM object for the element:
element = document.getElementById(“head1”);
You can also use a shortcut to set styles and avoid the use of a variable by directly
working with the getElementbyId() method:
document.getElementById(“head1”).style.color=”blue”;
This statement combines the preceding examples by directly assigning the blue color
style to the head1 element of the page. You’ll use this technique to create a dynamic
page in the following Try It Yourself section.
Try It Yourself
Creating Dynamic StylesUsing the DOM style objects, you can create a page that enables you to directly con-
trol the colors used in the page’s text. To begin with, you will need a form with
which to select colors. You can use <select> tags to allow a color choice:
<select name=”heading” onChange=”changehead();”><option value=”black”>Black</option><option value=”red”>Red</option><option value=”blue”>Blue</option><option value=”green”>Green</option><option value=”yellow”>Yellow</option>
</select>
If you are unsure of the syntax used in forms, you might want to review Hour 11,“Getting Data with Forms.”
Notice that this <select> definition uses onChange attributes in the <select> tags
to call two functions, changehead() and changebody(), when their respective selec-
tion changes.
By theWay
Controlling Styles with JavaScript 203
Combining two of these selections with some basic HTML results in the complete
HTML document shown in Listing 12.2.
LISTING 12.2 The HTML File for the Dynamic Styles Example<html><head><title>Controlling Styles with JavaScript</title><script language=”Javascript” type=”text/javascript”
src=”styles.js”></script></head><body><h1 id=”head1”>Controlling Styles with JavaScript</h1><hr><p id=”p1”>Select the color for paragraphs and headings using the form below.The colors you specified will be dynamically changed in this document.The change occurs as soon as you change the value of either of thedrop-down lists in the form.</p><form name=”form1”><b>Heading color: </b><select name=”heading” onChange=”changehead();”>
<option value=”black”>Black</option><option value=”red”>Red</option><option value=”blue”>Blue</option><option value=”green”>Green</option><option value=”yellow”>Yellow</option>
</select><br><b>Body text color: </b><select name=”body” onChange=”changebody();”>
<option value=”black”>Black</option><option value=”red”>Red</option><option value=”blue”>Blue</option><option value=”green”>Green</option><option value=”yellow”>Yellow</option>
</select></form></body></html>
Notice that the <h1> tag has an id attribute of “head1”, and the <p> tag has an id
of “p1”. These are the values the script will use in the getElementById() function.
The <script> tag in the <head> section links the document to the styles.js script,
which you will create next.
Save your HTML file as styles.html. You can test it in a browser now, but the
dynamic features will not work until you create the JavaScript file containing the
script functions. Listing 12.3 shows the JavaScript code for this example.
204 HOUR 12: Working with Style Sheets
LISTING 12.3 The JavaScript File for the Dynamic Styles Examplefunction changehead() {i = document.form1.heading.selectedIndex;headcolor = document.form1.heading.options[i].value;document.getElementById(“head1”).style.color = headcolor;
}function changebody() {i = document.form1.body.selectedIndex;doccolor = document.form1.body.options[i].value;document.getElementById(“p1”).style.color = doccolor;
}
This script first defines the changehead() function. This reads the index for the cur-
rently selected heading color, and then reads the color value for the index. This
function uses the getElementById() method described in the previous section to
change the color. The changebody() function uses the same syntax to change the
body color.
Store your JavaScript file as styles.js, and be sure it is in the same folder as the
HTML document you saved from Listing 12.2.
To test the dynamic styles script, load Listing 12.2 (styles.html) into the browser.
Select the colors, and notice the immediate change in the heading or body of the
page. Figure 12.2 shows a typical display of this document after the colors have
been changed.
FIGURE 12.2The dynamicstyles examplein action.
SummaryIn this hour, you’ve used style sheets to control the appearance of web documents.
You’ve learned the CSS syntax for creating style sheets, and used JavaScript to con-
trol the styles of a document.
In the next hour, you will move on to Dynamic HTML (DHTML) using layers and
other features of the W3C DOM.
▲
Q&A 205
Q&AQ. What’s the difference between changing the appearance of text with tradi-
tional tags, such as <b> and <i>, and using a style sheet?
A. Functionally, there is no difference. In principle, though, the HTML should
define the structure of the document, and CSS should define the presentation.
Q. What happens if two style sheets affect the same text?
A. The CSS specification is designed to allow style sheets to overlap, or cascade.
Thus, you can specify a style for the body of the document and override it for
specific elements, such as headings and paragraphs. You can even go one step
further and override the style for one particular instance of an element. CSS
has a set of rules governing which styles have precedence over others,
although you might find that different browsers interpret CSS differently when
you have many overlapping styles.
Q. With CSS in one separate file and JavaScript in another, doesn’t web devel-opment get confusing?
A. Yes, this can make a simple page unnecessarily complex. However, as you
build more complex pages, you’ll find it very helpful to have three separate
files. This lets you deal with the content and structure (HTML), presentation
(CSS), and behavior (JavaScript) separately.
Q. What if users don’t like the styles I use in my pages?
A. This is another distinct advantage style sheets have over browser-specific tags.
With the latest browsers, users can choose a default style sheet of their own
and override any properties they want.
Quiz QuestionsTest your knowledge of style sheets and JavaScript by answering the following
questions.
1. Which of the following tags is the correct way to begin a CSS style sheet?
a. <style>
b. <style type=”text/css”>
c. <style rel=”css”>
206 HOUR 12: Working with Style Sheets
2. Why isn’t the normal HTML language very good at defining layout and pres-
entation?
a. Because it was designed by programmers.
b. Because magazines feared the competition.
c. Because its main purpose is to define document structure.
3. Which feature of new browsers allows you to use JavaScript statements to
change styles?
a. HTML 4.0
b. The DOM
c. CSS 2.0
Quiz Answers1. b. You begin a CSS style sheet with the tag <style type=”text/css”>.
2. c. HTML is primarily intended to describe the structure of documents.
3. b. The DOM (Document Object Model) enables you to change styles using
JavaScript.
ExercisesIf you want to gain more experience using CSS style sheets, try the following
exercise:
. Modify Listing 12.2 to include an <h2> tag with a subheading. Add a form ele-
ment to select this tag’s color, and a corresponding changeh2 function in the
script.
. Now that Listing 12.2 has three different changeable elements, there is quite a
bit of repetition in the script. Create a single ChangeColor function that takes a
parameter for the element to change, and modify the onChange event handlers
to send the appropriate element id value as a parameter to this function.

HOUR 13
Using the W3C DOM
What You’ll Learn in This Hour:. How the W3C DOM standard makes dynamic pages easier. How the DOM’s objects are structured. Understanding nodes, parents, children, and siblings. Creating positionable layers. Using CSS’s positioning properties. Controlling positioning with JavaScript
Throughout this book, you’ve learned about the DOM (Document Object Model),
JavaScript’s way of referencing objects within web documents. In the last hour, you
learned to modify style sheet properties on the fly using JavaScript.
During this hour, you’ll learn more about how the DOM represents the objects that make
up a web document, and how to use DOM objects to move objects within a page.
The DOM and Dynamic HTMLDue to the basic DOM of older browsers, JavaScript could only have a limited effect on a
page. There were certain elements, such as forms and images, that you could control with
JavaScript, but if you wanted to do something more complex—such as adding or remov-
ing several paragraphs, making a form appear out of nowhere, or displaying data
dynamically within text—you were out of luck.
To escape this limitation, browser manufacturers created Dynamic HTML, or DHTML—an
extended DOM that allowed JavaScript to manipulate more of a page. Unfortunately, this
was still limiting—you had to work with certain defined parts of the page called layers
rather than having complete control over the page.
208 HOUR 13: Using the W3C DOM
Worse yet, Microsoft and Netscape created completely different and incompatible
versions of DHTML, which led to some complicated and unreliable scripting.
Fortunately, you won’t have to learn about those incompatible versions of DHTML
because the W3C DOM has made them unnecessary. Although browsers still
aren’t perfectly interchangeable, today’s browsers support enough of the standard
DOM to enable you to fully control the content of pages without much concern over
browser issues. In this hour and the next hour, you’ll create several examples of
DOM scripts that will work fine in all modern browsers.
There are still browser issues, of course. Hour 15, “Unobtrusive Scripting,” willshow you how to deal with browser differences and how to minimize your chancesof running into problems with new browsers.
Understanding DOM StructureIn Hour 4, “Working with the Document Object Model (DOM),” you learned about
how some of the most important DOM objects are organized: The window object
contains the document object, and so on. Although these objects were the only ones
available in older browsers, the new DOM adds objects under the document object
for every element of a page.
To better understand this concept, let’s look at the simple HTML document in Listing
13.1. This document has the usual <head> and <body> sections, a heading, and a
single paragraph of text.
LISTING 13.1 A Simple HTML Document<html><head><title>A simple HTML Document</title></head><body><h1>This is a Heading</h1><p>This is a paragraph</p></body></html>
Like all HTML documents, this one is composed of various containers and their con-
tents. The <html> tags form a container that includes the entire document, the
<body> tags contain the body of the page, and so on.
In the DOM, each container within the page and its contents are represented by an
object. The objects are organized into a tree-like structure, with the document object
By theWay

Understanding DOM Structure 209
itself at the root of the tree, and individual elements such as the heading and para-
graph of text at the leaves of the tree. Figure 13.1 shows a diagram of these relation-
ships.
In the following sections, you will examine the structure of the DOM more closely.
document
html
head
“A simpleHTML Document”
“This isa Heading”
“This isa paragraph”
title h1 p
body
FIGURE 13.1How the DOMrepresents anHTML docu-ment.
Don’t worry if this tree structure confuses you; you can do almost anything by sim-ply assigning IDs to elements and referring to them. This is the method used inearlier hours of this book, as well as in the Try It Yourself section of this hour. InHour 14, “Using Advanced DOM Features,” you will look at more complicated exam-ples that require you to understand the way objects are organized in the DOM.
NodesEach container or element in the document is called a node in the DOM. In the
example in Figure 13.1, each of the objects in boxes is a node, and the lines repre-
sent the relationships between the nodes.
You will often need to refer to individual nodes in scripts. You can do this by assign-
ing an ID, or by navigating the tree using the relationships between the nodes.
Parents and ChildrenAs you learned earlier in this book, each JavaScript object can have a parent—an
object that contains it—and can also have children—objects that it contains. The
DOM uses the same terminology.
In Figure 13.1, the document object is the parent object for the remaining objects,
and does not have a parent itself. The html object is the parent of the head and
body objects, and the h1 and p objects are children of the body object.
By theWay
210 HOUR 13: Using the W3C DOM
Text nodes work a bit differently. The actual text in the paragraph is a node in itself,
and is a child of the p object. Similarly, the text within the <h1> tags is a child of the
h1 object.
In Hour 14, you will learn methods of referring to objects by their parent and childrelationships, as well as ways of adding and removing nodes from the document.
SiblingsThe DOM also uses another term for organization of objects: siblings. As you might
expect, this refers to objects that have the same parent—in other words, objects at
the same level in the DOM object tree.
In Figure 13.1, the h1 and p objects are siblings: Both are children of the body
object. Similarly, the head and body objects are siblings under the html object.
Creating Positionable Elements(Layers)Using the W3C DOM, you can control any element in a web page, such as a para-
graph or an image. You can change an element’s style, as you learned in the previ-
ous hour. You can also use the DOM to change the position, visibility, and other
attributes of the element.
Before the W3C DOM and CSS2 standards, you could only reposition layers, special
groups of elements defined with a proprietary tag. Although you can now position
any element, it’s still useful to work with groups of elements in many cases.
You can effectively create a layer, or a group of HTML objects that can be controlled
as a group, using the <div> or <span> tags.
The <div> and <span> tags are part of the HTML 3.0 standard. <span> definesan arbitrary section of the HTML document, and does not specify any formattingfor the text it contains. <div> is similar, but includes a line break before and afterits contents.
To create a layer with <div>, enclose the content of the layer between the two divi-
sion tags and specify the layer’s properties in the style attribute of the <div> tag.
Here’s a simple example:
<div id=”layer1” style=”position:absolute; left:100; top:100”><p>This is the content of the layer.</p></div>
By theWay
By theWay
Creating Positionable Elements (Layers) 211
This code defines a layer with the name layer1. This is a moveable layer positioned
100 pixels down and 100 pixels to the right of the upper-left corner of the browser
window. You’ll learn more details about the positioning properties in the next sec-
tion.
As with all CSS properties, you can specify the position property and other layerproperties in a <style> block, in an external style sheet, or in the style attributeof an HTML tag. You can also control these properties using JavaScript, asdescribed later in this hour.
Setting Object Position and SizeYou can use various properties in the style attribute of the <div> tag when you
define a layer to set its position, visibility, and other features. The following proper-
ties control the object’s position and size:
. position is the main positioning attribute and can affect the following prop-
erties. The position property can have one of three values:
. static defines items that are laid out in normal HTML fashion, and
cannot be moved. This is the default.
. absolute specifies that an item will be positioned using coordinates you
specify.
. relative defines an item that is offset a certain amount from the stat-
ic position, where the element would normally have been laid out with-
in the HTML page.
. left and top specify offsets for the position of the item. For absolute position-
ing, this is relative to the main browser window or a containing item. For rela-
tive positioning, it’s relative to the usual static position.
. right and bottom are an alternative way to specify the position of the item.
You can use these when you need to align the object’s right or bottom edge.
. width and height are similar to the standard HTML width and height attrib-
utes and specify a width and height for the item.
. z-index specifies how items overlap. Normally indexes start with 1 and go up
with each layer added “on top” of the page. By changing this value, you can
specify which item is on top.
Did youKnow?
212 HOUR 13: Using the W3C DOM
Properties such as left and top work in pixels by default. You can also use anyof the units described in the previous hour: px, pt, ex, em, or percentages.
Setting Overflow PropertiesSometimes the content inside a layer is larger than the size the layer can display.
Two properties affect how the layer is displayed in this case:
. overflow indicates whether the content of an element is cut off at the edges of
the element, or whether a scroll bar allows viewing the rest of the item. Values
include visible to display content outside the element; hidden to hide the
clipped content; scroll to display scroll bars; auto to let the browser decide
whether to display scroll bars; or inherit to use a parent object’s setting.
. clip specifies the clipping rectangle for an item. Only the portion of the item
inside this rectangle is displayed. Normally this is the same as the element’s
dimensions, but you can define an offset inside the element here.
Using Visibility PropertiesAlong with positioning objects, you can use CSS positioning to control whether the
objects are visible at all, and how the document is formatted around them. These
properties control how objects are displayed:
. display specifies whether an item is displayed in the browser. A value of
“none” hides the object. Other values include block to display the object pre-
ceded and followed by line breaks, inline to display it without line breaks,
and list-item to display it as part of a list.
. visibility specifies whether an item is visible. Values include visible
(default), hidden, and inherit. A value of inherit means the item inherits
the visibility of any item it appears within (such as a table or a paragraph).
The difference between display and visibility is that objects set to display:
none will not be displayed at all, and the page will be laid out as if the element was-
n’t there. Objects set to visibility: hidden will still be included in the layout of
the page, but as empty space.
Setting Background and Border PropertiesYou can use the following properties to set the color and background image for a
layer or other object and control whether borders are displayed:
By theWay
Creating Positionable Elements (Layers) 213
. background-color specifies the color for the background of any text in the
layer.
. background-image specifies a background image for any text in the layer.
. border-width sets the width of the border for all four sides. This can be a
numeric value or the keywords thin, medium, or thick.
. border-style sets the style of border. Values include none (default), dotted,
dashed, solid, double, groove, ridge, inset, or outset.
. border-color sets the color of the border. As with other color properties, this
can be a named color such as blue or an RGB color such as #FF03A5.
Controlling Positioning with JavaScriptAs you learned in the previous hour, you can control the style attributes for an
object with the attributes of the object’s style property. You can control the position-
ing attributes listed in the previous section the same way.
Suppose you have created a layer with the following <div> tags:
<div id=”layer1” style=”position:absolute; left:100; top:100”><p>This is the content of the layer.</p></div>
To move this layer up or down within the page using JavaScript, you can change its
style.top attribute. For example, the following statements move the layer 100 pix-
els down from its original position:
var obj = document.getElementById(“layer1”);obj.style.top=200;
The document.getElementById() method returns the object corresponding to the
layer’s <div> tag, and the second statement sets the object’s top positioning proper-
ty to 200. As you learned in the previous hour, you can also combine these two
statements:
document.getElementById(“layer1”).style.top = 200;
This simply sets the style.top property for the layer without assigning a variable to
the layer’s object. You will use this technique in this hour’s Try It Yourself section.
Some CSS properties, such as text-indent and border-color, have hyphens intheir names. When you use these properties in JavaScript, you combine thehyphenated sections and use a capital letter: textIndent and borderColor.
By theWay
▼
214 HOUR 13: Using the W3C DOM
Try It Yourself
Creating a Movable Layer As an example of positioning an element with JavaScript, you can now create an
HTML document that defines a layer, and combine it with a script to allow the layer
to be moved, hidden, or shown using buttons. Listing 13.2 shows the HTML docu-
ment that defines the buttons and the layer.
LISTING 13.2 The HTML Document for the Movable Layer Example<html><head><title>Positioning Elements with JavaScript</title><script language=”javascript” type=”text/javascript”
src=”position.js”></script><style>#square {
position:absolute;top: 150;left: 100;width: 200;height: 200;border: 2px solid black;padding: 10px;background-color: #E0E0E0;
}</style></head><body><h1>Positioning Elements</h1><hr><form name=”form1”><input type=”button” name=”left” value=”<- Left”
onClick=”pos(-1,0);”><input type=”button” name=”right” value=”Right ->”
onClick=”pos(1,0);”><input type=”button” name=”up” value=”Up”
onClick=”pos(0,-1);”><input type=”button” name=”down” value=”Down”
onClick=”pos(0,1);”><input type=”button” name=”hide” value=”Hide”
onClick=”hideSquare();”><input type=”button” name=”show” value=”Show”
onClick=”showSquare();”></form><hr><div id=”square”><p>This square is an absolutely positionedlayer that you can move using the buttons above.</p></div></body></html>
Creating Positionable Elements (Layers) 215
In addition to some basic HTML, this document consists of the following:
. The <script> tag in the header reads a script called position.js, which you
will create later in this section.
. The <style> section is a brief style sheet that defines the properties for the
movable layer. It sets the position property to absolute to indicate that it
can be positioned at an exact location, sets the initial position in the top and
left properties, and sets border and background-color properties to make
the layer clearly visible.
. The <input> tags within the <form> section define six buttons: four to move
the layer left, right, up, or down, and two to control whether it is visible or
hidden.
. The <div> section defines the layer itself. The id attribute is set to the value
“square”. This id is used in the style sheet to refer to the layer, and will also
be used in your script.
Type this document (or download it from this book’s website) and save it. If you load
it into a browser, you should see the buttons and the “square” layer, but the but-
tons won’t do anything yet. The script in Listing 13.3 adds the action to the HTML.
LISTING 13.3 The Script for the Movable Layer Examplevar x=100,y=150;function pos(dx,dy) {
if (!document.getElementById) return;x += 10*dx;y += 10*dy;obj = document.getElementById(“square”);obj.style.top=y;obj.style.left=x;
}function hideSquare() {
if (!document.getElementById) return;obj = document.getElementById(“square”);obj.style.display=”none”;
}function showSquare() {
if (!document.getElementById) return;obj = document.getElementById(“square”);obj.style.display=”block”;
}
The var statement at the beginning of the script defines two variables, x and y, that
will store the current position of the layer. The pos function is called by the event
handlers for all four of the movement buttons.

216 HOUR 13: Using the W3C DOM
The parameters of the pos() function, dx and dy, tell the script how the layer
should move: If dx is negative, a number will be subtracted from x, moving the
layer to the left. If dx is positive, a number will be added to x, moving the layer to
the right. Similarly, dy indicates whether to move up or down.
The pos() function begins by making sure the getElementById() function is sup-
ported, so it won’t attempt to run in older browsers. It then multiplies dx and dy by
10 (to make the movement more obvious) and applies them to x and y. Finally, it
sets the top and left properties to the new position, moving the layer.
Two more functions, hideSquare() and showsquare(), hide or show the layer by
setting its display property to “none” (hidden) or “block” (shown).
To use this script, save it as position.js and then load the HTML document,
Listing 13.2, into your browser. Figure 13.2 shows this script in action.
FIGURE 13.2The movablelayer example inInternetExplorer.
By assigning values to the layer’s positioning properties repeatedly rather than ateach click of a button, you can produce an animation effect. See Hour 19, “UsingGraphics and Animation,” for an example of this technique.
By theWay
▲
Quiz Questions 217
SummaryIn this hour, you’ve learned a bit more about the structure of DOM objects that
make up a page, how to use HTML and CSS to define a positionable layer, and how
you can use positioning properties dynamically with JavaScript.
Layers are only a simple aspect of what you can do to a page with the W3C DOM.
In the next hour, you’ll learn how to manipulate the DOM tree to add elements,
remove elements, and dynamically change the text within a page.
Q&AQ. What happens when my web page includes multiple HTML documents, such
as when frames are used?
A. In this case, each window or frame has its own document object that stores the
elements of the HTML document it contains.
Q. If the DOM allows any object to be dynamically changed, why does the posi-tioning example need to use <div> tags to define a layer?
A. The example could just as easily move a heading, or a paragraph. The layer
is just a convenient way to group objects and to create a square object with a
border.
Q. Exactly which browsers support positioning elements with the DOM?
A. Support for the W3C DOM first appeared in Internet Explorer 5.0 and
Netscape 5.0, although it was buggy. Current browsers, such as Internet
Explorer 6 and 7, Firefox 1.x, and Opera 7 and 8, have solid and consistent
DOM support.
Quiz QuestionsTest your knowledge of the W3C DOM by answering the following questions.
1. Which of the following tags is used to create a layer?
a. <layer>
b. <div>
c. <style>
218 HOUR 13: Using the W3C DOM
2. Which property controls an element’s left-to-right position?
a. left
b. width
c. lrpos
3. Which of the following CSS rules would create a heading that is not currently
visible in the page?
a. h1 {visibility: invisible;}
b. h1 {display: none;}
c. h1 {style: invisible;}
Quiz Answers1. b. The <div> tag can be used to create positionable layers.
2. a. The left property controls an element’s left-to-right position.
3. b. The none value for the display property makes it invisible. The visibili-
ty property could also be used, but its possible values are visible or hidden.
ExercisesIf you want to gain more experience using the W3C DOM, try the following exercises:
. Modify the positioning example in Listings 13.2 and 13.3 to move the square
one pixel at a time rather than ten at a time.
. Modify the positioning example to eliminate the <div> layer and move a
paragraph element instead. You will need to move the id attribute to the
paragraph.

HOUR 14
Using Advanced DOMFeatures
What You’ll Learn in This Hour:. Using the properties of DOM nodes. Understanding DOM node methods. Hiding and showing objects within a page. Modifying text within a page. Adding text to a page. Creating a dynamic navigation tree
During this hour, you will take a closer look at the objects in the DOM, and the properties
and methods you can use to control them. You will also explore several examples of
dynamic HTML pages using these DOM features.
Working with DOM NodesAs you learned in Hour 13, “Using the W3C DOM,” the DOM organizes objects within a
web page into a tree-like structure. Each node (object) in this tree can be accessed in
JavaScript. In the next sections you will learn how you can use the properties and meth-
ods of nodes to manage them.
The following sections only describe the most important properties andmethods of nodes, and those that are supported by current browsers.For a complete list of available properties, see the W3C’s DOM specifi-cation at http://www.w3.org/TR/DOM-Level-2/.
By theWay
220 HOUR 14: Using Advanced DOM Features
Basic Node PropertiesYou have already used the style property of nodes to change their style sheet val-
ues. Each node also has a number of basic properties that you can examine or set.
These include the following:
. nodeName is the name of the node (not the ID). For nodes based on HTML
tags, such as <p> or <body>, the name is the tag name: P or BODY. For the doc-
ument node, the name is a special code: #document. Similarly, text nodes
have the name #text.
. nodeType is an integer describing the node’s type: 1 for normal HTML tags, 3
for text nodes, and 9 for the document node.
. nodeValue is the actual text contained within a text node. This property is not
valid for other types of nodes.
. innerHTML is the HTML content of any node. You can assign a value including
HTML tags to this property and change the DOM child objects for a node
dynamically.
The innerHTML property is not a part of the W3C DOM specification. However, it issupported by the major browsers, and is often the easiest way to change contentin a page. You can also accomplish this in a more standard way by deleting andcreating nodes, as described later in this hour.
Node Relationship PropertiesIn addition to the basic properties described previously, each node has a number of
properties that describe its relation to other nodes. These include the following:
. firstChild is the first child object for a node. For nodes that contain text,
such as h1 or p, the text node containing the actual text is the first child.
. lastChild is the node’s last child object.
. childNodes is an array that includes all of a node’s child nodes. You can use
a loop with this array to work with all the nodes under a given node.
. previousSibling is the sibling (node at the same level) previous to the cur-
rent node.
. nextSibling is the sibling after the current node.
By theWay
Working with DOM Nodes 221
Remember that, like all JavaScript objects and properties, the node properties andfunctions described here are case sensitive. Be sure you type them exactly asshown.
Document MethodsThe document node itself has several methods you might find useful. You have
already used one of these, getElementById(), to refer to DOM objects by their ID
properties. The document node’s methods include the following:
. getElementById(id) returns the element with the specified id attribute.
. getElementsByTagName(tag) returns an array of all of the elements with a
specified tag name. You can use the wildcard * to return an array containing
all the nodes in the document.
. createTextNode(text) creates a new text node containing the specified text,
which you can then add to the document.
. createElement(tag) creates a new HTML element for the specified tag. As
with createTextNode, you need to add the element to the document after cre-
ating it. You can assign content within the element by changing its child
objects or the innerHTML property.
Node MethodsEach node within a page has a number of methods available. Which of these are
valid depends on the node’s position in the page, and whether it has parent or child
nodes. These include the following:
. appendChild(new) appends the specified new node after all of the object’s
existing nodes.
. insertBefore(new, old) inserts the specified new child node before the spec-
ified old child node, which must already exist.
. replaceChild(new, old) replaces the specified old child node with a new
node.
. removeChild(node) removes a child node from the object’s set of children.
. hasChildNodes() returns a Boolean value of true if the object has one or
more child nodes, or false if it has none.
. cloneNode() creates a copy of an existing node. If a parameter of true is sup-
plied, the copy will also include any child nodes of the original node.
WatchOut!
222 HOUR 14: Using Advanced DOM Features
Hiding and Showing ObjectsWe will now move on to a number of real-world examples using the DOM objects to
manipulate web pages. As a simple example, you can create a script that hides or
shows objects within a page.
As you learned in Hour 13, objects have a visibility style property that specifies
whether they are currently visible within the page:
Object.style.visibility=”hidden”; // hides an objectObject.style.visibility=”visible”; // shows an object
Using this property, you can create a script that hides or shows objects in either
browser. Listing 14.1 shows the HTML document for a script that allows two head-
ings to be shown or hidden.
LISTING 14.1 Hiding and Showing Objects<html><head><title>Hiding and Showing Objects</title><script language=”Javascript” type=”text/javascript”>function ShowHide() {
if (!document.getElementById) return;var head1 = document.getElementById(“head1”);var head2 = document.getElementById(“head2”);var showhead1 = document.form1.head1.checked;var showhead2 = document.form1.head2.checked;head1.style.visibility=(showhead1) ? “visible” : “hidden”;head2.style.visibility=(showhead2) ? “visible” : “hidden”;
}</script></head><body><h1 ID=”head1”>This is the first heading</h1><h1 ID=”head2”>This is the second heading</h1><p>Using the W3C DOM, you can choosewhether to show or hide the headings onthis page using the checkboxes below.</p><form name=”form1”><input type=”checkbox” name=”head1”
checked onClick=”ShowHide();”><b>Show first heading</b><br><input type=”checkbox” name=”head2”
checked onClick=”ShowHide();”><b>Show second heading</b><br></form></body></html>
The <h1> tags in this document define headings with the identifiers head1 and
head2. The <form> section defines a form with two check boxes, one for each of the
Modifying Text Within a Page 223
headings. When a check box is modified, the onClick method is used to call the
ShowHide() function.
This function is defined within the <script> statements in the header. The function
assigns the head1 and head2 variables to the objects for the headings, using the
getElementById() method. Next, it assigns the showhead1 and showhead2 vari-
ables to the contents of the check boxes. Finally, the function uses the style.visi-
bility attributes to set the visibility of the headings.
The lines that set the visibility property might look a bit strange. The ? and :characters create conditional expressions, a shorthand way of handling if state-ments. To review conditional expressions, see Hour 7, “Controlling Flow withConditions and Loops.”
Figure 14.1 shows this example in action in Internet Explorer. In the figure, the sec-
ond heading’s check box has been unchecked, so only the first heading is visible.
Did youKnow?
FIGURE 14.1The text hid-ing/showingexample inInternetExplorer.
Modifying Text Within a PageNext, you can create a simple script to modify the contents of a heading within a
web page. As you learned earlier this hour, the nodeValue property of a text node
contains its actual text, and the text node for a heading is a child of that heading.
Thus, the syntax to change the text of a heading with the identifier head1 would be
Var head1 = document.getElementById(“head1”);Head1.firstChild.nodeValue = “New Text Here”;
This assigns the variable head1 to the heading’s object. The firstChild property
returns the text node that is the only child of the heading, and its nodeValue prop-
erty contains the heading text.
Using this technique, it’s easy to create a page that allows the heading to be changed
dynamically. Listing 14.2 shows the complete HTML document for this script.
224 HOUR 14: Using Advanced DOM Features
LISTING 14.2 The Complete Text-Modifying Example<html><head><title>Dynamic Text in JavaScript</title><script language=”Javascript” type=”text/javascript”>function ChangeTitle() {
if (!document.getElementById) return;var newtitle = document.form1.newtitle.value;var head1 = document.getElementById(“head1”);head1.firstChild.nodeValue=newtitle;
}</script></head><body><h1 ID=”head1”>Dynamic Text in JavaScript</h1><p>Using the W3C DOM, you can dynamicallychange the heading at the top of thispage. Enter a new title and click theChange button.</p><form name=”form1”><input type=”text” name=”newtitle” size=”25”><input type=”button” value=”Change!”onClick=”ChangeTitle();”>
</form></body></html>
This example defines a form that allows the user to enter a new heading for the
page. Pressing the button calls the ChangeTitle() function, defined in the header.
This function gets the value the user entered in the form, and changes the heading’s
value to the new text.
Figure 14.2 shows this page in action in Internet Explorer after a new title has been
entered and the Change button has been clicked.
FIGURE 14.2The heading-changing exam-ple in action.
Adding Text to a Page 225
Adding Text to a PageNext, you can create a script that actually adds text to a page. To do this, you must
first create a new text node. This statement creates a new text node with the text
“this is a test”:
var node=document.createTextNode(“this is a test”);
Next, you can add this node to the document. To do this, you use the appendChild
method. The text can be added to any element that can contain text, but we will
use a paragraph. The following statement adds the text node defined previously to
the paragraph with the identifier p1:
document.getElementById(“p1”).appendChild(node);
Listing 14.3 shows the HTML document for a complete example that uses this tech-
nique, using a form to allow the user to specify text to add to the page.
LISTING 14.3 Adding Text to a Page<html><head><title>Adding to a page</title><script language=”Javascript” type=”text/javascript”>function AddText() {
if (!document.getElementById) return;var sentence=document.form1.sentence.value;var node=document.createTextNode(“ “ + sentence);document.getElementById(“p1”).appendChild(node);document.form1.sentence.value=””;
}</script></head><body><h1>Create Your Own Content</h1><p id=”p1”>Using the W3C DOM, you can dynamicallyadd sentences to this paragraph. Type a sentenceand click the Add button.</p><form name=”form1”><input type=”text” name=”sentence” size=”65”><input type=”button” value=”Add” onClick=”AddText();”></form></body></html>
In this example, the <p> section defines the paragraph that will hold the added text.
The <form> section defines a form with a text field called sentence, and an Add
button, which calls the AddText() function. This function is defined in the header.
▼
226 HOUR 14: Using Advanced DOM Features
The AddText() function first assigns the sentence variable to the text typed in the
text field. Next, it creates a new text node containing the sentence, and appends the
new text node to the paragraph.
Load this document into a browser to test it, and try adding several sentences by
typing them and clicking the Add button. Figure 14.3 shows Firefox’s display of this
document after several sentences have been added to the paragraph.
FIGURE 14.3Firefox showsthe text-addingexample.
Try It Yourself
Creating a Navigation TreeOne common use of JavaScript and the DOM is to create a dynamic tree-like navi-
gation system for a site, with sections that can be expanded and collapsed.
Although this is unnecessary for small sites, it’s a good way to organize what may
be hundreds of links for a larger site. To further experiment with the techniques you
learned about in this hour, you can create a simple navigation tree using the DOM.
To begin, you will need an HTML document that defines the content of the naviga-
tion tree, shown in Listing 14.4.
LISTING 14.4 The HTML for the Navigation Tree Example<html><head><title>Creating a Navigation Tree</title><style>
A {text-decoration: none;}#productsmenu,#supportmenu,#contactmenu {display: none;margin-left: 2em;
}</style></head><body><h1>Navigation Tree Example</h1><p>The navigation tree below allows you to expand andcollapse items.</p><ul><li><a id=”products” href=”#”>[+] Products</a>
Adding Text to a Page 227
<ul ID=”productsmenu”><li><a href=”prodlist.html”>Product List</a></li><li><a href=”order.html”>Order Form</a></li><li><a href=”pricelist.html”>Price List</a></li>
</ul></li><li><a id=”support” href=”#”>[+] Support</a><ul id=”supportmenu”>
<li><a href=”sforum.html”>Support Forum</a></li><li><a href=”scontact.html”>Contact Support</a></li>
</ul></li><li><a ID=”contact” href=”#”>[+] Contact Us</a><ul id=”contactmenu”>
<li><a href=”contact1.html”>Service Department</a></li><li><a href=”contact2.html”>Sales Department</a></li>
</ul></li></ul><script language=”javascript” type=”text/javascript”
src=”tree.js”></script></body></html>
In this document, the links are laid out as a nested list using <ul> and <li> tags.
Using a standard list like this rather than <div> tags has two benefits: First, the
browser formats the tree as a list with bullets automatically. Second, it supports
older browsers—even a browser that does not support CSS or JavaScript will load
and display the list correctly. It won’t have the dynamic features, but the links will
still work.
The tree has three main nodes: Products, Support, and Contact Us. Each one has a
link you can click to display or hide the links in that section. The id attribute has
been used on each <a> tag so the script can attach an event handler to it. Each node
also has a submenu defined with <ul> and <li> tags. An id attribute is also used
on the <ul> tag so the script can hide or display the list.
The <script> tag at the end of the document includes the script you will create
next. The tag is placed after the body of the page so that the script can add event
handlers to elements in the page.
The <style> block at the beginning of the document adds some formatting to the
links, and uses the display: none attribute to initially hide the submenus. They
will be revealed by the script when the link is clicked.
The script for this example is shown in Listing 14.5.
LISTING 14.4 Continued
228 HOUR 14: Using Advanced DOM Features
LISTING 14.5 The JavaScript File for the Navigation Tree Examplefunction Toggle(e) {
// Don’t try this in old browsersif (!document.getElementById) return;// Get the event objectif (!e) var e = window.event;// Which link was clicked?whichlink = (e.target) ? e.target.id : e.srcElement.id;// get the menu objectobj=document.getElementById(whichlink+”menu”);// Is the menu visible?visible=(obj.style.display==”block”)// Get the key object (the link itself)key=document.getElementById(whichlink);// Get the name (Products, Contact, etc.)keyname = key.firstChild.nodeValue.substring(3);if (visible) {// hide the menuobj.style.display=”none”;key.firstChild.nodeValue = “[+]” + keyname;
} else {// show the menuobj.style.display=”block”;key.firstChild.nodeValue = “[-]” + keyname;
}}document.getElementById(“products”).onclick=Toggle;document.getElementById(“support”).onclick=Toggle;document.getElementById(“contact”).onclick=Toggle;
The Toggle() function shows or hides a menu. It first determines which of the links
triggered the event, and then uses the link’s id attribute to find the objects for the
menu and for the link itself. If the menu is currently visible, it is hidden, and if it is
currently hidden, it is revealed. The appropriate symbol [+] or [-] is added to the
link name and displayed by modifying the text node’s nodeValue attribute.
The last three lines of the script assign the Toggle() function as the onClick event
handler for the three top-level links of the tree.
To use this script, save it as tree.js in the same folder as the HTML document you
created previously, and load the HTML file into a browser. Figure 14.4 shows the
example in action after all three nodes of the tree have been expanded.
To add items to the navigation tree, add links to the HTML file. If you add a newsubmenu, you need to assign an id attribute to the link, use the same word plusmenu as the id of the menu, and assign its onclick event to the Toggle() func-tion at the end of the script.
Did youKnow?
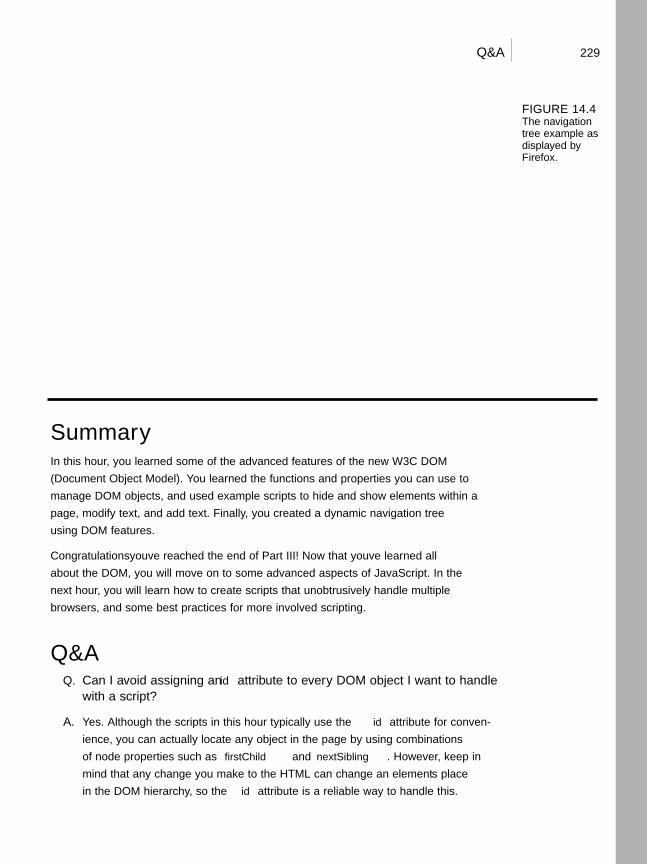
Q&A 229
SummaryIn this hour, you learned some of the advanced features of the new W3C DOM
(Document Object Model). You learned the functions and properties you can use to
manage DOM objects, and used example scripts to hide and show elements within a
page, modify text, and add text. Finally, you created a dynamic navigation tree
using DOM features.
Congratulations—you’ve reached the end of Part III! Now that you’ve learned all
about the DOM, you will move on to some advanced aspects of JavaScript. In the
next hour, you will learn how to create scripts that unobtrusively handle multiple
browsers, and some best practices for more involved scripting.
Q&AQ. Can I avoid assigning an id attribute to every DOM object I want to handle
with a script?
A. Yes. Although the scripts in this hour typically use the id attribute for conven-
ience, you can actually locate any object in the page by using combinations
of node properties such as firstChild and nextSibling. However, keep in
mind that any change you make to the HTML can change an element’s place
in the DOM hierarchy, so the id attribute is a reliable way to handle this.
FIGURE 14.4The navigationtree example asdisplayed byFirefox.
▲
230 HOUR 14: Using Advanced DOM Features
Q. Can I include HTML tags, such as <b>, in the new text I assign to a textnode?
A. Text nodes are limited to text if you use the nodeValue attribute. However, the
innerHTML property does not have this limitation and can be used to insert
any HTML.
Q. Is there a reference that specifies which DOM properties and methods workin which browser versions?
A. Yes, several websites are available that keep up-to-date lists of browser fea-
tures. Some of these are listed in Appendix A, “Other JavaScript Resources.”
Quiz QuestionsTest your knowledge of the DOM by answering the following questions.
1. If para1 is the DOM object for a paragraph, what is the correct syntax to
change the text within the paragraph to “New Text”?
a. para1.value=”New Text”;
b. para1.firstChild.nodeValue=”New Text”;
c. para1.nodeValue=”New Text”;
2. Which of the following DOM objects never has a parent node?
a. body
b. div
c. document
3. Which of the following is the correct syntax to get the DOM object for a head-
ing with the identifier head1?
a. document.getElementById(“head1”)
b. document.GetElementByID(“head1”)
c. document.getElementsById(“head1”)

231Exercises
Quiz Answers1. b. The actual text is the nodeValue attribute of the text node, which is a child
of the paragraph node.
2. c. The document object is the root of the DOM object tree, and has no parent
object.
3. a. getElementById has a lowercase g at the beginning, and a lowercase d at
the end, contrary to what you might know about normal English grammar.
ExercisesIf you want to gain more experience using the advanced DOM features you learned
in this hour, try the following exercise:
. Add a third check box to Listing 14.1 to allow the paragraph of text to be
shown or hidden. You will need to add an id attribute to the <p> tag, add a
check box to the form, and add the appropriate lines to the script.
. Add a fourth node to the navigation tree in Listing 14.4, and make the appro-
priate changes to the script in Listing 14.5 to make the new section of the tree
expand and collapse correctly.

This page intentionally left blank
PART IV:
Working with AdvancedJavaScript Features
HOUR 15 Unobtrusive Scripting 235
HOUR 16 Debugging JavaScript Applications 255
HOUR 17 AJAX: Remote Scripting 273
HOUR 18 Greasemonkey: Enhancing the Web with JavaScript 293

This page intentionally left blank

HOUR 15
Unobtrusive Scripting
What You’ll Learn in This Hour:. Best practices for creating unobtrusive scripts. Separating content, presentation, and behavior. Following web standards to create cross-browser scripts. Reading and displaying browser information. Using feature sensing to avoid errors. Supporting non-JavaScript browsers
You have now learned enough JavaScript to create some complex effects—and potentially
to create some complex problems. In Part IV, you will learn about some of JavaScript’s
more advanced features, and learn how to avoid problems as you progress to longer and
more complicated scripts.
In this hour, you’ll learn some guidelines for creating scripts and pages that are easy to
maintain, easy to use, and follow web standards. This is known as unobtrusive scripting:
Scripts add features without getting in the way of the user, the developer maintaining the
code, or the designer building the layout of the site. You’ll also learn how to make sure
your scripts will work in multiple browsers, and won’t stop working when a new browser
comes along.
Scripting Best PracticesAs you start to develop more complex scripts, it’s important to know some scripting best
practices. These are guidelines for using JavaScript that more experienced programmers
have learned the hard way. Here are a few of the benefits of following these best practices:
. Your code will be readable and easy to maintain, whether you’re turning the page
over to someone else or just trying to remember what you did a year ago.
236 HOUR 15: Unobtrusive Scripting
. You’ll create code that follows standards, and won’t be crippled by a new ver-
sion of a particular browser.
. You’ll create pages that work even without JavaScript.
. It will be easy to adapt code you create for one site to another site or project.
. Your users will thank you for creating a site that is easy to use, and easy to fix
when things go wrong.
Whether you’re writing an entire AJAX web application or simply enhancing a page
with a three-line script, it’s useful to know some of the concepts that are regularly
considered by those who write complex scripts for a living. The following sections
introduce some of these best practices.
Content, Presentation, and BehaviorWhen you create a web page, or especially an entire site or application, you’re deal-
ing with three key areas: content, presentation, and behavior.
. Content consists of the words that a visitor can read on your pages. You create
the content as text, and mark it up with HTML to define different classes of
content—headings, paragraphs, links, and so on.
. Presentation is the appearance and layout of the words on each page—text for-
matting, fonts, colors, and graphics. Although it was common in the early
days of the Web to create the presentation using HTML only, you can now use
Cascading Style Sheets (CSS) to define the presentation.
. Behavior is what happens when you interact with a page—items that highlight
when you move over them, forms you can submit, and so on. This is where
JavaScript comes in, along with server-side languages such as PHP.
It’s a good idea to keep these three areas in mind, especially as you create larger sites.
Ideally, you want to keep content, presentation, and behavior separated as much as
possible. One good way to do this is to create an external CSS file for the presentation
and an external JavaScript file for the behavior, and link them to the HTML document.
Keeping things separated like this makes it easier to maintain a large site—if you
need to change the color of the headings, for example, you can make a quick edit to
the CSS file without having to look through all of the HTML markup to find the
right place to edit. It also makes it easy for you to reuse the same CSS and JavaScript
on multiple pages of a site. Last, but not least, this will encourage you to use each
language where its strengths lie, making your job easier.
Scripting Best Practices 237
Progressive EnhancementOne of the old buzzwords of web design was graceful degradation. The idea was thatyou could build a site that used all of the bells and whistles of the latest browsers, aslong as it would “gracefully degrade” to work on older browsers. This mostly meanttesting on a few older browsers and hoping it worked, and there was always the pos-sibility of problems in browsers that didn’t support the latest features.
Ironically, you might expect browsers that lack the latest features to be older, lesspopular ones, but some of the biggest problems are with brand-new browsers—thoseincluded with mobile phones and other new devices, all of which are primitive com-pared to the latest browsers running on computers.
One new approach to web design that addresses this problem is known as progressiveenhancement. The idea is to keep the HTML documents as simple as possible, sothey’ll definitely work in even the most primitive browsers. After you’ve tested thatand made sure the basic functionality is there, you can add features that make thesite easier to use or better looking for those with new browsers.
If you add these features unobtrusively, they have little chance of preventing the sitefrom working in its primitive HTML form. Here are some guidelines for progressiveenhancement:
. Enhance the presentation by adding rules to a separate CSS file. Try to avoidusing HTML markup strictly for presentation, such as <b> for boldface or<blockquote> for an indented section.
. Enhance behavior by adding scripts to an external JavaScript file.
. Add events without using inline event handlers, as described in Hour 9,“Responding to Events,” and later in this hour.
. Use feature sensing, described later this hour, to ensure that JavaScript codeonly executes on browsers that support the features it requires.
The term progressive enhancement first appeared in a presentation and article onthis topic by Steve Champeon. The original article, along with many more webdesign articles, is available on his company’s website at http://hesketh.com/.
Adding Event HandlersIn Hour 9, you learned that there is more than one way to set up an event handler.
The simplest way is to add them directly to an HTML tag. For example, this <body>
tag has an event handler that calls a function called Startup.
<body onLoad=”Startup();”>
By theWay
238 HOUR 15: Unobtrusive Scripting
This method still works, but it does mean putting JavaScript code in the HTML page,
which means you haven’t fully separated content and behavior. To keep things
entirely separate, you can set up the event handler in the JavaScript file instead,
using syntax like this:
window.onload=Startup;
Right now, this is usually the best way to set up events: It keeps JavaScript out of the
HTML file, and it works in all browsers since Netscape 4 and Internet Explorer 4.
However, it does have one problem: You can’t attach more than one event to the
same element of a page. For example, you can’t have two different onLoad event
handlers that both execute when the page loads.
When you’re the only one writing scripts, this is no big deal—you can combine the
two into one function. But when you’re trying to use two or three third-party scripts
on a page, and all of them want to add an onLoad event handler to the body, you
have a problem.
The W3C Event ModelTo solve this problem and standardize event handling, the W3C created an event
model as part of the DOM level 2 standard. This uses a method, addEventListener(),
to attach a handler to any event on any element. For example, the following uses the
W3C model to set up the same onLoad event handler as the previous examples:
window.addEventListener(‘load’, Startup, false);
The first parameter of addEventListener() is the event name without the on
prefix—load, click, mouseover, and so on. The second parameter specifies the
function to handle the event, and the third is an advanced flag that indicates how
multiple events should be handled. (false works for most purposes.)
Any number of functions can be attached to an event in this way. Because one
event handler doesn’t replace another, you use a separate function,
removeEventListener(), which uses the same parameters:
window.removeEventListener(‘load’, Startup, false);
The problem with the W3C model is that Internet Explorer (as of versions 6 and 7)
doesn’t support it. Instead, it supports a proprietary method, attachEvent(), which
does much the same thing. Here’s the Startup event handler defined Microsoft-style:
window.attachEvent(‘onload’, Startup);
The attachEvent() method has two parameters. The first is the event, with the on
prefix—onload, onclick, onmouseover, and so on. The second is the function that
Scripting Best Practices 239
will handle the event. Internet Explorer also supports a detachEvent() method with
the same parameters for removing an event handler.
Attaching Events the Cross-Browser WayAs you can see, attaching events in this new way is complex and will require differ-
ent code for different browsers. In most cases, you’re better off using the traditional
method to attach events, and that method is used in most of this book’s examples.
However, if you really need to support multiple event handlers, you can use some if
statements to use either the W3C method or Microsoft’s method. For example, the
following code adds the ClickMe() function as an event for the element with the id
attribute btn:
obj = document.getElementById(“btn”);if (obj.addEventListener) {
obj.addEventListener(‘click’,ClickMe,false);} else if (obj.attachEvent) {
obj.attachEvent(‘onclick’,ClickMe);} else {
obj.onclick=ClickMe;}
This checks for the addEventListener() method, and uses it if it’s found.
Otherwise, it checks for the attachEvent() method, and uses that. If neither is
found, it uses the traditional method to attach the event handler. This technique is
called feature sensing and is explained in detail later this hour.
Many universal functions are available to compensate for the lack of a consistent
way to attach events. If you are using a third-party library, there’s a good chance it
includes an event function that can simplify this process for you.
The Yahoo! UI Library includes an event-handling function that can attach events inany browser, attach the same event handler to many objects at once, and other nicefeatures. See http://developer.yahoo.net/yui/ for details, and see Hour 8, “UsingBuilt-in Functions and Libraries,” for information about using third-party libraries.
Web Standards: Avoid Being Browser SpecificThe Web was built on standards, such as the HTML standard developed by the W3C.
Now there are a lot of standards involved with JavaScript—CSS, the W3C DOM, and
the ECMAScript standard that defines JavaScript’s syntax.
Right now, both Microsoft and the Mozilla Project are improving their browsers’ sup-
port for web standards, but there are always going to be some browser-specific,
nonstandard features, and some parts of the newest standards won’t be consistently
supported between browsers.
Did youKnow?
240 HOUR 15: Unobtrusive Scripting
Although it’s perfectly fine to test your code in multiple browsers and do whatever it
takes to get it working, it’s a good idea to follow the standards rather than browser-
specific techniques when you can. This ensures that your code will work on future
browsers that improve their standards support, whereas browser-specific features
might disappear in new versions.
One reason to make sure you follow standards is that your pages can be betterinterpreted by search engines, which often helps your site get search traffic.Separating content, presentation, and behavior is also good for search enginesbecause they can focus on the HTML content of your site without having to skipover JavaScript or CSS.
Documenting Your CodeAs you create more complex scripts, don’t forget to include comments in your code
to document what it does, especially when some of the code seems confusing or is
difficult to get working. It’s also a good idea to document all of the data structures
and variables, and function arguments used in a larger script.
Comments are a good way to organize code, and will help you work on the script in
the future. If you’re doing this for a living, you’ll definitely need to use comments so
that others can work on your code as easily as you can.
UsabilityWhile you’re adding cool features to your site, don’t forget about usability—making
things as easy, logical, and convenient as possible for users of your site. Although
there are many books and websites devoted to usability information, a bit of com-
mon sense goes a long way.
For example, suppose you use a drop-down list as the only way to navigate between
pages of your site. This is a common use for JavaScript, and it works well, but is it
usable? Try comparing it to a simple set of links across the top of a page.
. The list of links lets you see at a glance what the site contains; the drop-down
list requires you to click to see the same list.
. Users expect links and can spot them quickly—a drop-down list is more likely
to be part of a form than a navigation tool, and thus won’t be the first thing
they look for when they want to navigate your site.
. Navigating with a link takes a single click—navigating with the drop-down
list takes at least two clicks.
By theWay
Scripting Best Practices 241
Remember to consider the user’s point of view whenever you add JavaScript to a site,
and be sure you’re making the site easier to use—or at least not harder to use. Also
make sure the site is easy to use even without JavaScript.
Design PatternsIf you learn more about usability, you’ll undoubtedly see design patterns mentioned.
This is a computer science term meaning “an optimal solution to a common prob-
lem.” In web development, design patterns are ways of designing and implementing
part of a site that webmasters run into over and over.
For example, if you have a site that displays multiple pages of data, you’ll have
“Next Page” and “Previous Page” links, and perhaps numeric links for each page.
This is a common design pattern—a problem many web designers have had to
solve, and one with a generally agreed-upon solution. Other common web design
patterns include a login form, a search engine, or a list of navigation links for a site.
Of course, you can be completely original and make a search engine, a shopping
cart, or a login form that looks nothing like any other, but unless you have a way of
making them even easier to use, you’re better off following the pattern, and giving
your users an experience that matches their expectations.
Although you can find some common design patterns just by browsing sites similar
to yours and noticing how they solved particular problems, there are also sites that
specialize in documenting these patterns, and they’re a good place to start if you
need ideas on how to make your site work.
The Yahoo! Developer Network documents a variety of design patterns used ontheir network of sites, many of which are implemented using JavaScript:http://developer.yahoo.net/ypatterns/.
AccessibilityOne final aspect of usability to consider is accessibility—making your site as accessi-
ble as possible for all users, including the disabled. For example, blind users might
use a text-reading program to read your site, which will ignore images and most
scripts. More than just good manners, accessibility is mandated by law in some
countries.
The subject of accessibility is complex, but you can get most of the way there by fol-
lowing the philosophy of progressive enhancement: Keep the HTML as simple as
possible, keep JavaScript and CSS separate, and make JavaScript an enhancement
rather than a requirement for using your site.
Did youKnow?
242 HOUR 15: Unobtrusive Scripting
Reading Browser InformationIn Hour 4, “Working with the Document Object Model (DOM),” you learned about
the various objects (such as window and document) that represent portions of the
browser window and the current web document. JavaScript also includes an object
called navigator that you can use to read information about the user’s browser.
The navigator object isn’t part of the DOM, so you can refer to it directly. It
includes a number of properties, each of which tells you something about the brows-
er. These include the following:
. navigator.appCodeName is the browser’s internal code name, usually
Mozilla.
. navigator.appName is the browser’s name, usually Netscape or Microsoft
Internet Explorer.
. navigator.appVersion is the version of the browser being used—for example,
4.0(Win95;I).
. navigator.userAgent is the user-agent header, a string that the browser
sends to the web server when requesting a web page. It includes the entire ver-
sion information—for example, Mozilla/4.0(Win95;I).
. navigator.language is the language (such as English or Spanish) of the
browser. This is stored as a code, such as “en_US” for U.S. English. This proper-
ty is supported only by Netscape and Firefox.
. navigator.platform is the computer platform of the current browser. This is
a short string, such as Win16, Win32, or MacPPC. You can use this to enable
any platform-specific features—for example, ActiveX components.
As you might have guessed, the navigator object is named after NetscapeNavigator, the browser that originally supported JavaScript. Fortunately, this objectis also supported by Internet Explorer and most other recent browsers.
Displaying Browser InformationAs an example of how to read the navigator object’s properties, Listing 15.1 shows
a script that displays a list of the properties and their values for the current browser.
By theWay
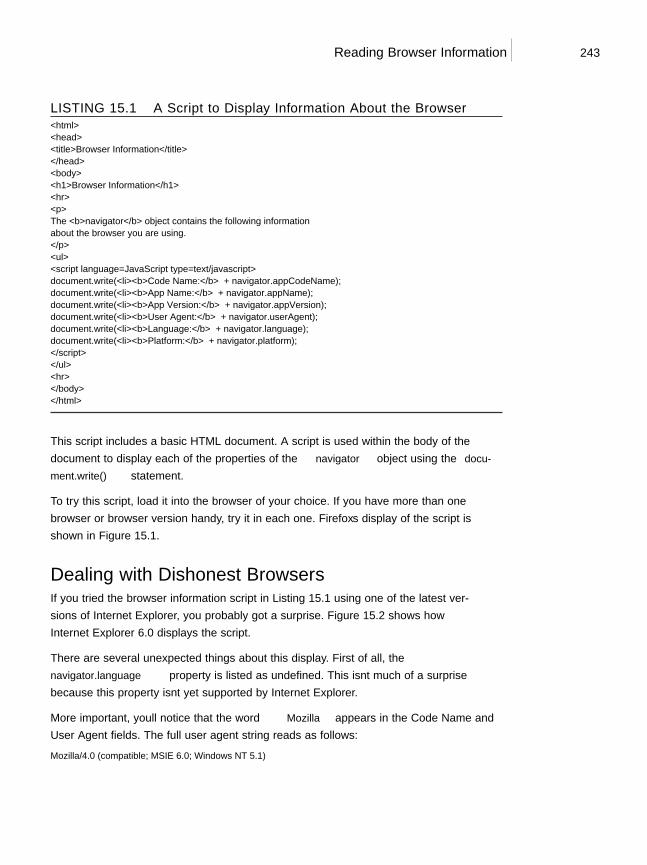
Reading Browser Information 243
LISTING 15.1 A Script to Display Information About the Browser<html><head><title>Browser Information</title></head><body><h1>Browser Information</h1><hr><p>The <b>navigator</b> object contains the following informationabout the browser you are using.</p><ul><script language=”JavaScript” type=”text/javascript”>document.write(“<li><b>Code Name:</b> “ + navigator.appCodeName);document.write(“<li><b>App Name:</b> “ + navigator.appName);document.write(“<li><b>App Version:</b> “ + navigator.appVersion);document.write(“<li><b>User Agent:</b> “ + navigator.userAgent);document.write(“<li><b>Language:</b> “ + navigator.language);document.write(“<li><b>Platform:</b> “ + navigator.platform);</script></ul><hr></body></html>
This script includes a basic HTML document. A script is used within the body of the
document to display each of the properties of the navigator object using the docu-
ment.write() statement.
To try this script, load it into the browser of your choice. If you have more than one
browser or browser version handy, try it in each one. Firefox’s display of the script is
shown in Figure 15.1.
Dealing with Dishonest BrowsersIf you tried the browser information script in Listing 15.1 using one of the latest ver-
sions of Internet Explorer, you probably got a surprise. Figure 15.2 shows how
Internet Explorer 6.0 displays the script.
There are several unexpected things about this display. First of all, the
navigator.language property is listed as undefined. This isn’t much of a surprise
because this property isn’t yet supported by Internet Explorer.
More important, you’ll notice that the word Mozilla appears in the Code Name and
User Agent fields. The full user agent string reads as follows:
Mozilla/4.0 (compatible; MSIE 6.0; Windows NT 5.1)

244 HOUR 15: Unobtrusive Scripting
Believe it or not, Microsoft did have a good reason for this. At the height of thebrowser wars, about the time Netscape 3.0 and IE 3.0 came out, it was becomingcommon to see “Netscape only” pages. Some webmasters who used features such asframes and JavaScript set their servers to turn away browsers without Mozilla intheir user agent string. The problem with this was that most of these features werealso supported by Internet Explorer.
FIGURE 15.1Firefox displaysthe browserinformationscript.
FIGURE 15.2Internet Explorerdisplays thebrowser infor-mation script.
Cross-Browser Scripting 245
Microsoft solved this problem in IE 4.0 by making IE’s user agent read Mozilla, with
the word compatible in parentheses. This allows IE users to view those pages, but
still includes enough details to tell web servers which browser is in use.
You’ve probably already noticed the other problem with Internet Explorer 6.0’s user
agent string: the portion reading Mozilla/4.0. Not only is IE claiming to be
Netscape, but it’s also masquerading as version 4.0. Why?
As it turns out, this was another effort by Microsoft to stay one step ahead of the brows-
er wars, although this one doesn’t make quite as much sense. Because poorly written
scripts were checking specifically for “Mozilla/4” for dynamic HTML pages, Microsoft
was concerned that its 5.0 version would fail to run these pages. Since changing it now
would only create more confusion, this tradition continues with IE 6.0.
Microsoft isn’t alone in confusing browser IDs. Netscape version 6 displays a useragent string beginning with Mozilla/5, and an app version of 5.0. (Netscape 5.0was Netscape’s open-source browser, code named Mozilla, which formed the foun-dation of Netscape 6 and Firefox.)
Although these are two interesting episodes in the annals of the browser wars, what
does all this mean to you? Well, you’ll need to be careful when your scripts are try-
ing to differentiate between IE and Netscape, and between different versions. You’ll
need to check for specific combinations instead of merely checking the
navigator.appVersion value. Fortunately, there’s a better way to handle this, as
you’ll learn in the next section.
Cross-Browser ScriptingIf all of those details about detecting different browser versions seem confusing,
here’s some good news—in most cases, you can write cross-browser scripts without
referring to the navigator object at all. This is not only easier, it’s better, because
browser-checking code is often confused by new browser versions, and has to be
updated each time a new browser is released.
Feature SensingChecking browser versions is sometimes called browser sensing. The better way of
dealing with multiple browsers is called feature sensing. In feature sensing, rather
than checking for a specific browser, you check for a specific feature. For example,
suppose your script needs to use the document.getElementById() function. You can
begin a script with an if statement that checks for the existence of this function:
By theWay
246 HOUR 15: Unobtrusive Scripting
if (document.getElementById) {// do stuff
}
If the getElementById function exists, the block of code between the brackets will
be executed. Another common way to use feature sensing is at the beginning of a
function that will make use of a feature:
function changeText() {if (!document.getElementById) return;// the rest of the function executes if the feature is supported
}
If this looks familiar, it’s because it’s been used in several previous examples in this
book. For example, most of the code listings in Hour 14, “Using Advanced DOM
Features,” make use of feature sensing to prevent errors in browsers that don’t sup-
port the W3C DOM.
You don’t need to check for every feature before you use it—for example, there’s not
much point in verifying that the window object exists in most cases. You can also
assume that the existence of one feature means others are supported: If
getElementById() is supported, chances are the rest of the W3C DOM functions
are supported.
Feature sensing is a very reliable method of keeping your JavaScript unobtrusive—if
a browser supports the feature, it works, and if the browser doesn’t, your script stays
out of the way. It’s also much easier than trying to keep track of hundreds of differ-
ent browser versions and what they support.
Feature sensing is also handy when working with third-party libraries, as discussedin Hour 8. You can check for the existence of an object or a function belonging tothe library to verify that the library file has been loaded before your script uses itsfeatures.
Dealing with Browser QuirksSo, if feature sensing is better than browser sensing, why do you still need to know
about the navigator object? There’s one situation where it still comes in handy,
although if you’re lucky you won’t find yourself in that situation.
As you develop a complex script and test it in multiple browsers, you might run
across a situation where your perfectly standard code works as it should in one
browser, and fails to work in another. Assuming you’ve eliminated the possibility of
a problem with your script, you’ve probably run into a browser bug, or a difference
in features between browsers at the very least. Here are some tips for this situation:
By theWay
Supporting Non-JavaScript Browsers 247
. Double-check for a bug in your own code. See Hour 16, “Debugging JavaScript
Applications,” for debugging tips.
. Search the Web to see if others have run into the same bug. Often you’ll find
that someone else has already found a workaround.
. Try a different approach to the code, and you might sidestep the bug.
. If the problem is that a feature is missing in one browser, use feature sensing
to check for that feature.
. When all else fails, use the navigator object to detect a particular browser
and substitute some code that works in that browser. This should be your last
resort.
Peter-Paul Koch’s QuirksMode, www.quirksmode.org, is a good place to start whenyou’re looking for specific information about browser bugs.
Supporting Non-JavaScript BrowsersSome visitors to your site will be using browsers that don’t support JavaScript at all.
These aren’t just a few holdouts using ancient browsers—actually, there are more
non-JavaScript browsers than you might think:
. Both Internet Explorer and Firefox include an option to turn off JavaScript,
and some users do so. More often, the browser might have been set up by their
ISP or employer with JavaScript turned off by default, usually in a misguided
attempt to increase security.
. Some corporate firewalls and personal antivirus software block JavaScript.
. Some ad-blocking software mistakenly prevents scripts from working even if
they aren’t related to advertising.
. More and more mobile phones are coming with web browsers these days, and
most of these support little to no JavaScript.
. Some disabled users use special-purpose browsers or text-only browsers that
might not support JavaScript.
As you can see, it would be foolish to assume that all of your visitors will support
JavaScript. Two techniques you can use to make sure these users can still use the site
are discussed in the following sections.
Did youKnow?
248 HOUR 15: Unobtrusive Scripting
Search engines are another “browser” that will visit your site frequently, and theyusually don’t pay any attention to JavaScript. If you want search engines to fullyindex your site, it’s critical that you avoid making JavaScript a requirement to navi-gate the site.
Using the <noscript> TagOne way to be friendly to non-JavaScript browsers is to use the <noscript> tag.
Supported in most modern browsers, this tag displays a message to non-JavaScript
browsers. Browsers that support JavaScript ignore the text between the <noscript>
tags, whereas others display it. Here is a simple example:
<noscript>This page requires JavaScript. You can either switch to a browserthat supports JavaScript, turn your browser’s script support on,or switch to the <a href=”nojs.html”>Non-JavaScript</a> version ofthis page.</noscript>
Although this works, the trouble is that <noscript> is not consistently supported by
all browsers that support JavaScript. An alternative that avoids <noscript> is to
send users with JavaScript support to another page. This can be accomplished with a
single JavaScript statement:
<script language=”JavaScript” type=”text/javascript”>window.location=”JavaScript.html”;</script>
This script redirects the user to a different page. If the browser doesn’t support
JavaScript, of course, the script won’t be executed, and the rest of the page can dis-
play a warning message to explain the situation.
Keeping JavaScript OptionalAlthough you can detect JavaScript browsers and display a message to the rest, the
best choice is to simply make your scripts unobtrusive. Use JavaScript to enhance
rather than as an essential feature, keep JavaScript in separate files, assign event
handlers in the JavaScript file rather than in the HTML, and browsers that don’t
support JavaScript will simply ignore your script.
In those rare cases where you absolutely need JavaScript—for example, an AJAX
application or a JavaScript game—you can warn users that JavaScript is required.
However, it’s a good idea to offer an alternative JavaScript-free way to use your site,
especially if it’s an e-commerce or business site that your business relies on. Don’t
turn away customers with lazy programming.
By theWay
Supporting Non-JavaScript Browsers 249
One place you should definitely not require JavaScript is in the navigation of your
site. Although you can create drop-down menus and other fancy navigation tools
using JavaScript, they prevent users’ non-JavaScript browsers from viewing all of
your site’s pages. They also prevent search engines from viewing the entire site, com-
promising your chances of getting search traffic.
Google’s Gmail application (mail.google.com), one of the most well-known uses ofAJAX, requires JavaScript for its elegant interface. However, Google offers a BasicHTML View that can be used without JavaScript. This allows them to support olderbrowsers and mobile phones without compromising the user experience for thosewith modern browsers.
Avoiding ErrorsIf you’ve made sure JavaScript is only an enhancement to your site, rather than a
requirement, those with browsers that don’t support JavaScript for whatever reason
will still be able to navigate your site. One last thing to worry about: It’s possible for
JavaScript to cause an error, or confuse these browsers into displaying your page
incorrectly.
This is a particular concern with browsers that partially support JavaScript, such as
mobile phone browsers. They might interpret a <script> tag and start the script,
but might not support the full JavaScript language or DOM. Here are some guide-
lines for avoiding errors:
. Use a separate JavaScript file for all scripts. This is the best way to guarantee
that the browser will ignore your script completely if it does not have
JavaScript support.
. Use feature sensing whenever your script tries to use the newer DOM features,
such as document.getElementById().
. Test your pages with your browser’s JavaScript support turned off. Make sure
nothing looks strange, and make sure you can still navigate the site.
The developer’s toolbars for Firefox and Internet Explorer include a convenient wayto turn off JavaScript for testing. See Hour 16 for details.
By theWay
Did youKnow?
▼
250 HOUR 15: Unobtrusive Scripting
Try It Yourself
Creating an Unobtrusive ScriptAs an example of unobtrusive scripting, you can create a script that adds function-
ality to a page with JavaScript without compromising its performance in older
browsers. In this example, you will create a script that creates graphic check boxes
as an alternative to regular check boxes.
Note: See Hour 11, “Getting Data with Forms,” for the basics of working withforms in JavaScript.
Let’s start with the final result: Figure 15.3 shows this example as it appears in
Firefox. The first check box is an ordinary HTML one, and the second is a graphic
check box managed by JavaScript.
By theWay
FIGURE 15.3The graphiccheck boxexample inaction.
The graphic check box is just a larger graphic that you can click on to display the
checked or unchecked version of the graphic. Although this could just be a simple
JavaScript simulation that acts like a check box, it’s a bit more sophisticated. Take a
look at the HTML for this example in Listing 15.2.
LISTING 15.2 The HTML File for the Graphic Check box Example<html><head><title>Graphic Checkboxes</title></head><body><h1>Graphic Checkbox Example</h1><form name=”form1”><p><input type = “checkbox” name=”check1” id=”check1”>An ordinary checkbox.</p><p><input type = “checkbox” name=”check2” id=”check2”>
Supporting Non-JavaScript Browsers 251
A graphic checkbox, created with unobtrusive JavaScript.</p></form><script language=”JavaScript” type=”text/javascript”
src=”checkbox.js”></script></body></html>
If you look closely at the HTML, you’ll see that the two check boxes are defined in
exactly the same way with the standard <input> tag. Rather than substitute for a
check box, this script actually replaces the regular check box with the graphic ver-
sion. The script for this example is shown in Listing 15.3.
LISTING 15.3 The JavaScript File for the Graphic Check box Examplefunction graphicBox(box) {
// be unobtrusiveif (!document.getElementById) return;// find the object and its parentobj = document.getElementById(box);parentobj = obj.parentNode;// hide the regular checkboxobj.style.visibility = “hidden”;// create the image element and set its onclick eventimg = document.createElement(“IMG”);img.onclick = Toggle;img.src = “unchecked.gif”;// save the checkbox id within the image IDimg.id = “img” + box;// display the graphic checkboxparentobj.insertBefore(img,obj);
}function Toggle(e) {
if (!e) var e=window.event;// find the image IDimg = (e.target) ? e.target : e.srcElement;// find the checkbox by removing “img” from the image IDcheckid = img.id.substring(3);checkbox = document.getElementById(checkid);// “click” the checkboxcheckbox.click();// display the right image for the clicked or unclicked stateif (checkbox.checked) file = “checked.gif”;
else file=”unchecked.gif”;img.src=file;
}//replace the second checkbox with a graphicgraphicBox(“check2”);
LISTING 15.2 Continued
252 HOUR 15: Unobtrusive Scripting
This script has three main components:
. The graphicBox() function converts a regular check box to a graphic one. It
starts by hiding the existing check box by changing its style.visibility
property, and then creates a new image node containing the unchecked.gif
graphic and inserts it into the DOM next to the original check box. (These
DOM features were described in the previous hour.) It gives the image an id
attribute containing the text img plus the check box’s id attribute to make it
easier to find the check box later.
. The Toggle() function is specified by graphicBox() as the event handler for
the new image’s onClick event. This function removes img from the image’s
id attribute to find the id of the real check box. It executes the click()
method on the check box, toggling its value. Finally, it changes the image to
unchecked.gif or checked.gif depending on the state of the real check box.
. The last line of the script file runs the graphicBox() function to replace the
second check box with the id attribute check2.
Using this technique has three important advantages. First, it’s an unobtrusive
script. The HTML has been kept simple, and browsers that don’t support JavaScript
will display the ordinary check box. Second, because the real check box is still on
the page but hidden, it will work correctly when the form is submitted to a server-
side script. Last but not least, you can use it to create any number of graphic check
boxes simply by defining regular ones in the HTML file and adding a call to
graphicBox() to transform each one.
See Hour 19, “Using Graphics and Animation,” for details on the image manipula-tion features used in this example.
To try this example, save the JavaScript file as checkbox.js, and be sure the HTML
file is in the same folder. You’ll also need two graphics the same size,
unchecked.gif and checked.gif, in the same folder. You can download all of the
files you need for this example from this book’s website.
SummaryIn this hour, you’ve learned many guidelines for creating scripts that work in as
many browsers as possible, and learned how to avoid errors and headaches when
working with different browsers. Most important, you learned how you can use
JavaScript while keeping your pages small, efficient, and valid with web standards.
By theWay
▲
Quiz Questions 253
In the next hour, you’ll learn about another thing you’ll run into frequently when
working with more advanced scripts: bugs. Hour 16 shows you how to avoid com-
mon JavaScript errors, and how to use debugging tools and techniques to find and
fix errors when they happen.
Q&AQ. Is it possible to create 100% unobtrusive JavaScript that can enhance a
page without causing any trouble for anyone?
A. Not quite. For example, the unobtrusive script in the Try It Yourself section ofthis hour is close—it will work in the latest browsers, and the regular checkbox will display and work fine in even ancient browsers. However, it can stillfail if someone with a modern browser has images turned off: The script willhide the check box because JavaScript is supported, but the image won’t bethere. This is a rare circumstance, but it’s an example of how any feature youadd can potentially cause a problem for some small percentage of your users.
Q. Can I detect the user’s email address using the navigator object or anothertechnique?
A. No, there is no reliable way to detect users’ email addresses using JavaScript.(If there was, you would get hundreds of advertisements in your mailboxevery day from companies that detected your address as you browsed theirpages.) You can use a signed script to obtain the user’s email address, but thisrequires the user’s permission and only works in some versions of Netscape.
Q. Are there browsers besides Firefox, Netscape, and Internet Explorer thatsupport JavaScript?
A. Yes. Opera is a multiplatform browser that supports JavaScript and the W3CDOM. Apple’s Safari browser for Macintosh also supports JavaScript. It’salways best to support all browsers if you can, and to focus on web standardsrather than particular browsers.
Quiz QuestionsTest your knowledge of unobtrusive scripting by answering the following questions.
1. Which of the following is the best place to put JavaScript code?
a. Right in the HTML document
b. In a separate JavaScript file
c. In a CSS file
254 HOUR 15: Unobtrusive Scripting
2. Which of the following is something you can’t do with JavaScript?
a. Send browsers that don’t support a feature to a different page
b. Send users of Internet Explorer to a different page
c. Send users of non-JavaScript browsers to a different page
3. Which of the following is the best way to define an event handler that works
in all modern browsers?
a. <body onLoad=”MyFunction()”>
b. window.onload=MyFunction;
c. window.attachEvent(‘load’,MyFunction,false);
Quiz Answers1. b. The best place for JavaScript is in a separate JavaScript file.
2. c. You can’t use JavaScript to send users of non-JavaScript browsers to a differ-
ent page because the script won’t be executed at all.
3. b. The code window.onload=MyFunction; defines an event handler in all
modern browsers. This is better than using an inline event handler as in (a)
because it keeps JavaScript out of the HTML document. Option (c) uses the
W3C’s standard method, but does not work in Internet Explorer.
ExercisesIf you want to gain more experience creating cross-browser scripts, try the following
exercises:
. Add several check boxes to the HTML document in Listing 15.2, and add the
corresponding function calls to the script in Listing 15.3 to replace all of them
with graphic check boxes.
. Modify the script in Listing 15.3 to convert all check boxes with a class value
of graphic into graphic check boxes. You can use getElementsByTagName()
and then check each item for the right className property.

HOUR 16
Debugging JavaScriptApplications
What You’ll Learn in This Hour:. Using good programming practices to avoid bugs. Tips for debugging with the JavaScript console. Using alert messages and comments to debug scripts. Creating custom error handlers. Using advanced debugging tools. Debugging an actual script
As you move on to more advanced JavaScript applications in the remaining hours of thisbook, it’s important to know how to deal with problems in your scripts. In this hour, you’lllearn a few pointers on keeping your scripts bug-free, and you’ll look at the tools andtechniques you can use to find and eliminate bugs when they occur.
Avoiding BugsA bug is an error in a program that prevents it from doing what it should do. If you’vetried writing any scripts on your own, you’ve probably run into one or more bugs. If not,you will—no matter how careful you are.
Although you’ll undoubtedly run into a few bugs if you write a complex script, you canavoid many others by carefully writing and double-checking your script.
Using Good Programming PracticesThere’s not a single programmer out there whose programs always work the first time, with-
out any bugs. However, good programmers share a few habits that help them avoid some of
the more common bugs. Here are a few good habits you can develop to improve your scripts:
256 HOUR 16: Debugging JavaScript Applications
. Format your scripts neatly and try to keep them readable. Use consistent spac-
ing and variable names that mean something. It’s hard to determine what’s
wrong with a script when you can’t even remember what a particular line
does.
. Similarly, use JavaScript comments liberally to document your script. This will
help if you need to work on the script after you’ve forgotten the details of how
it works—or if someone else inherits the job.
. End all JavaScript statements with semicolons. Although this is optional, it
makes the script more readable. Additionally, it might help the browser to pro-
duce meaningful error messages.
. Declare all variables with the var keyword. This is optional in most cases, but
it will help make sure you really mean to create a new variable and will avoid
problems with variable scope.
. Divide complicated scripts logically into functions. This will make the script
easier to read, and it will also make it easy to pinpoint the cause of a problem.
. Write a large script in several phases and test the script at each phase before
adding more features. This way, you can avoid having several new errors
appear at once.
Avoiding Common MistakesAlong with following good scripting practices, you should also watch for common
mistakes in your scripts. Different people make different mistakes in JavaScript pro-
gramming, but the following sections explore some of the most common ones.
Syntax ErrorsA syntax error is an incorrect keyword, operator, punctuation mark, or other item in
a script. Most often, it’s caused by a typing error.
Typical syntax errors include mistyped commands, missing parentheses, and functions
with the wrong number of arguments. Syntax errors are usually obvious—both to you
when you look at the script and to the browser’s JavaScript interpreter when you load
the script. These errors usually result in an error message and can easily be corrected.
Assignment and EqualityOne of the most common syntax errors made by beginning JavaScript programmers
is confusing the assignment operator (=) with the equality operator (==). This can be
a hard error to spot because it might not result in an error message.
Avoiding Bugs 257
If you’re confused about which operator to use, follow this simple rule: Use = to
change the value of a variable, and use == to compare two values. Here’s an exam-
ple of a statement that confuses the two:
If (a = 5) alert(“found a five.”);
The statement looks logical enough, but a = 5 will actually assign the value 5 to
the a variable rather than compare the two. The browser usually detects this type of
error and displays an error message in the JavaScript console, but the opposite type
of error (using == when you mean =) may not be detected.
Local and Global VariablesAnother common mistake is confusing local and global variables, such as trying to
use the value of a variable that was declared in a function outside the function. If
you actually need to do this, you should either use a global variable or return a
value from the function.
Hour 5, “Using Variables, Strings, and Arrays,” describes the differences betweenlocal and global variables in detail.
Using Objects CorrectlyAnother common error is to refer to JavaScript objects incorrectly. It’s important touse the correct object names and to remember when to explicitly name the parent ofan object.
For example, you can usually refer to the window.alert() method as simplyalert(). However, there are some cases when you must use window.alert(), suchas in some event handlers. If you find that alert() or another method or propertyis not recognized by the browser, try specifying the window object.
Another common mistake is to assume that you can omit the document object’sname, such as using write() instead of document.write(). This won’t workbecause most scripts have a window object as their scope.
HTML ErrorsLast but not least, don’t forget that JavaScript isn’t the only language that can haveerrors. It’s easy to accidentally create an error in an HTML document—for example,forgetting to include a closing </table> tag, or even a closing </script> tag.
Although writing proper HTML is beyond the scope of this book, you should beaware that sometimes improper HTML can cause errors in your JavaScript. Whenyou experience bugs, be sure to double-check the HTML, especially the objects (suchas forms or images) that your script manipulates.
By theWay
258 HOUR 16: Debugging JavaScript Applications
Your script can also introduce HTML errors if it modifies the DOM, particularly if ituses the innerHTML property. Double-check HTML produced by a script to avoidthese problems.
Basic Debugging ToolsIf checking your script for common mistakes and obvious problems doesn’t fix
things, it’s time to start debugging. This is the process of finding errors in a program
and eliminating them. Some basic tools for debugging scripts are described in the
following sections.
Firefox’s JavaScript ConsoleThe first thing you should do if your script doesn’t work is check for error messages.
In Firefox and other Mozilla-based browsers, the messages are not displayed by
default, but are logged to the JavaScript console.
To access the console, type javascript: in the browser’s Location field or select
Tools, JavaScript Console from the menu. The console displays the last few error
messages that have occurred, as shown in Figure 16.1.
Along with reading the error messages, you can use the console to type a JavaScript
command or expression and see its results. This is useful if you need to make sure a
line of your script uses the correct syntax.
WatchOut!
FIGURE 16.1The JavaScriptconsole dis-plays recenterror messages.
Basic Debugging Tools 259
Displaying Error Messages in Internet ExplorerMicrosoft Internet Explorer 4.0 and later do not display JavaScript error messages by
default. This can make browsing poorly written pages a more pleasant experience,
but it can be frustrating to JavaScript programmers.
To enable the display of error messages in Internet Explorer, select Internet Options
from the Tools menu. Select the Advanced tab. In the list under Browsing, deselect
the Disable Script Debugging option and enable the Display a Notification About
Every Script Error option.
If you haven’t enabled the display of error messages, Internet Explorer still displays
an error icon on the status line when an error occurs. You can double-click this icon
to display the error message.
Alert MessagesIf you’re lucky, the error messages in the console will tell you how to fix your script.
However, your script might not generate any error messages at all—but still fail to
work correctly. In this case, the real debugging process begins.
One useful debugging technique is to add temporary statements to your script to let
you know what’s going on. For example, you can use an alert statement to display
the value of a variable. After you understand what’s happening to the variable, you
can figure out what’s wrong with the script.
You can also display debugging information in a separate browser window orframe. You can use document.write in some cases, but this only works when thedocument hasn’t finished loading yet and thus isn’t a reliable debugging tool.
Using CommentsWhen all else fails, you can use JavaScript comments to eliminate portions of your
script until the error goes away. If you do this carefully, you can pinpoint the place
where the error occurred.
You can use // to begin a single-line comment, or /* and */ around a section of
any length. Using comments to temporarily turn off statements in a program or a
script is called commenting out and is a common technique among programmers.
JavaScript comments were introduced and described in more detail in Hour 3,“Getting Started with JavaScript Programming.”
By theWay
By theWay
260 HOUR 16: Debugging JavaScript Applications
Other Debugging ToolsAlthough you can use alert messages and a little common sense to quickly find a
bug in a simple script, larger scripts can be difficult to debug. Here are a few tools
you might find useful as you develop and debug larger JavaScript applications:
. HTML validators can check your HTML documents to see if they meet the
HTML standard. The validation process can also help you find errors in
your HTML. The W3C has a validator online at http://validator.w3.org/.
. Mozilla’s JavaScript debugger enables you to set breakpoints, display variable
values, and perform other debugging tasks. You can download the debugger
at http://www.mozilla.org/projects/venkman/.
. Microsoft Script Debugger is similar, but works with Internet Explorer. It is
available at http://msdn.microsoft.com/library/en-us/sdbug/Html/sdbug_1.asp.
. Although text and HTML editors are good basic editing tools, they can also
help with debugging by displaying line numbers and using color codes to indi-
cate valid commands.
Appendix B, “Tools for JavaScript Developers,” includes links to HTML validators,editors, and other debugging tools.
Creating Error HandlersIn some cases, there may be times when an error message is unavoidable and, in a
large JavaScript application, errors are bound to happen. Your scripts can respond to
errors in a friendlier way using error handlers.
Using the onerror PropertyYou can set up an error handler by assigning a function to the onerror property of
the window object. When an error occurs in a script in the document, the browser
calls the function you specify instead of the normal error dialog. For example, these
statements set up a function that displays a simple message when an error occurs:
function errmsg(message,url,line) {alert(“There wasn’t an error. Nothing to see here.”);return true;
}window.onerror=errmsg;
Did youKnow?

Did youKnow?
Creating Error Handlers 261
These statements define a function, errmsg(), which handles errors by displaying a
simple dialog. The last statement assigns the errmsg() function to the
window.onerror property.
The return true; statement tells the browser that this function has handled the
error, and prevents the standard error dialog from being displayed. If you use return
false; instead, the standard error dialog will be displayed after your function exits.
You can’t define an onError event handler in HTML. You must define it using thewindow.onerror property as shown here.
Displaying Information About the ErrorWhen the browser calls your error-handling function, it passes three parameters: the
error message, the URL of the document where the error happened, and the line
number. The simple error handler in the previous example didn’t use these values.
You can create a more sophisticated handler that displays the information.
As usual, you can download this hour’s examples from this book’s website.
Listing 16.1 shows a complete example including an enhanced errmsg() function.
This version displays the error message, URL, and line number in a dialog box.
LISTING 16.1 Handling Errors with a JavaScript Function<html><head><title>Error handling test</title><script language=”JavaScript” type=”text/javascript”>function errmsg(message,url,line) {
amsg = “A JavaScript error has occurred. Please let us know about it.\n”;amsg += “Error Message: “ + message + “\n”;amsg += “URL: “ + url + “\n”;amsg += “Line #: “ + line;alert(amsg);return true;
}window.onerror=errmsg;</script></head><body><h1> Error handling test</h1><p>This page includes a JavaScript function to handle errors.Test it by clicking the button below.</p><form>
<input type=”button” value=”ERROR” onClick=”garble”></form></body></html>
By theWay
262 HOUR 16: Debugging JavaScript Applications
This example includes a button with a nonsensical event handler. To test the error
handler, click the button to generate an error. Figure 16.2 shows the example in
action in Internet Explorer with the alert message displayed.
FIGURE 16.2The error-han-dler example inaction.
If you try to use an error handler and still get system error messages, make surethere isn’t a syntax error in your error handler itself.
Using try and catchA more modern way of handling errors, supported by the latest browsers, is the tryand catch keywords. To use it, include the try keyword, then a block of code (with-in braces) that might cause an error, then the catch keyword, and a block of code tohandle the error:
try {DoThis();
} catch(err) {alert(err.description);
}
The try block of code always executes. If it generates an error, the catch block isexecuted. If there is no error, the catch block does not execute.
The error-handling code is passed an argument (err in the example) indicating thetype of error. This is an object with properties including name (the error name) anddescription (a description of the error).
Did youKnow?

Advanced Debugging Tools 263
Handling errors with try and catch is a good way to deal with browser-specificcode that might cause errors when run in the wrong browser. See the next hourfor an example that uses try and catch to create a cross-browser AJAX function.
Advanced Debugging ToolsAlthough it’s possible to get a simple script working with an alert message or two,
you might find some other tools useful as you build more complex scripts, and espe-
cially as you work with scripts that modify the DOM. The following are some useful
debugging tools available for Firefox and Internet Explorer.
Web Developer Toolbar (Firefox)The Web Developer Extension by Chris Pederick is an open-source extension for
Firefox and other Mozilla-based browsers. This extension adds a toolbar to the
browser with a variety of functions useful to developers. The following features are
useful for JavaScript in particular:
. Disable, JavaScript—Disables JavaScript, useful for making sure pages func-
tion on non-JavaScript browsers.
. Information, Display ID and Class Details—Displays the values of id and
class attributes for all of the elements in a page; useful for attaching event
handlers or CSS styles.
. Information, View JavaScript—Displays all of the scripts that affect the cur-
rent page, including those in external files.
. View Source, View Generated Source—Displays the HTML source of the cur-
rent page. Unlike the browser’s regular View Source function, this displays the
source after any scripts have acted upon it; useful for debugging scripts that
modify the DOM.
Along with these functions, the toolbar includes many useful tools for debugging
HTML and CSS, working with forms, and validating pages. To install it or for more
information, see its official site at http://chrispederick.com/work/webdeveloper/.
Developer Toolbar (Internet Explorer)Inspired by the Web Developer Extension for Firefox, Microsoft created a Developer
Toolbar for Internet Explorer. Currently in beta, the toolbar works with Internet
Explorer 6.0 or later. Here are some of its features useful for JavaScript programmers:
Did youKnow?
264 HOUR 16: Debugging JavaScript Applications
. View DOM—Allows you to browse the DOM of the current page and view
details of elements, similar to Firefox’s DOM Inspector. This feature is shown
in Figure 16.3.
. Disable, Script—Disables JavaScript, enabling you to test how your site works
without it.
. View, Class and ID Information—Displays id and class attribute values;
useful for attaching event handlers or CSS styles.
FIGURE 16.3The InternetExplorerDeveloperToolbar’s viewDOM feature.
To download the IE Developer Toolbar, go to http://www.microsoft.com/downloads/
and search for “Developer Toolbar.” The download is available for free and includes
an easy installer.
DOM Inspector (Firefox)The DOM Inspector is a tool built in to Firefox and other Mozilla-based browsers that
enables you to browse the DOM of a web page and view the attributes of elements.
You need to specifically select this feature at installation time, so you might need to
reinstall Firefox to gain access to this feature. To see if your copy includes the DOM
Inspector, open the Tools menu and check for a DOM Inspector menu item.
To use this tool, open the page you wish to inspect and then select Tools, DOM
Inspector. You can then browse the DOM by clicking the [+] symbols for each section
Advanced Debugging Tools 265
of the hierarchy. Select an item within the DOM tree to view its details in the right
section of the window. The DOM Inspector is shown in Figure 16.4.
FIGURE 16.4The DOMInspectoropened withinFirefox.
Viewing Generated SourceWhen your script modifies the DOM, the browser’s View Source feature only gives
you part of the picture—you see the source of the page when it was loaded, rather
than the source created by your script as it modified the page. To test scripts that
modify the DOM, you can view the generated source as modified by the script.
In Firefox, this feature is built in: If you select part of a page, right-click, and select
View Selection Source, you’ll see the generated source. You can also use the Tools
menu of the Web Developer Toolbar, discussed previously, to view the generated
source.
For Internet Explorer, you can use a bookmarklet—a short script stored as a browser
bookmark—to view the generated source in a window. This bookmarklet is available
at Jesse Ruderman’s site at http://www.squarefree.com/bookmarklets/.
JavaScript ShellSometimes it’s helpful to be able to simply type a few JavaScript commands to see
what they do, either to narrow down a bug or simply to remember the syntax of a
rarely used feature. The JavaScript Shell is a bookmarklet that opens a shell window
that lets you type JavaScript commands and shows the results.
▼
266 HOUR 16: Debugging JavaScript Applications
The shell opens in the context of the current document, so you can use it to explore
the DOM of a page or to test scripts you’re working on. This feature works only in
Firefox, but an online version of the shell without the context feature works in
Internet Explorer.
The JavaScript Shell is available from http://www.squarefree.com/bookmarklets/.
Try It Yourself
Debugging a ScriptYou should now have a good understanding of what can go wrong with JavaScript
programs and the tools you have available to diagnose these problems. You can
now try your hand at debugging a script.
Listing 16.2 shows a script I wrote to play the classic “Guess a Number” game. The
script picks a number between 1 and 100 and then allows the user 10 guesses. If a
guess is incorrect, it provides a hint as to whether the target number is higher or
lower.
This is a relatively simple script with a twist: It includes at least one bug and doesn’t
work at all in its present form.
LISTING 16.2 The Number-Guesser Script (Complete with Bugs)1 <html>2 <head>3 <title>Guess a Number</title>4 <script LANGUAGE=”JavaScript” type=”text/javascript”>5 var num = Math.random() * 100 + 1;6 var tries = 0;7 function Guess() {8 var g = document.form1.guess1.value;9 tries++;10 status = “Tries: “ + tries;11 if (g < num)12 document.form1.hint.value = “No, guess higher.”;13 if (g > num)14 document.form1.hint.value = “No, guess lower.”;15 if (g == num) {16 window.alert(“Correct! You guessed it in “ + tries + “ tries.”);17 location.reload();18 }19 if (tries == 10) {20 window.alert(“Sorry, time’s up. The number was: “ + num);21 location.reload();22 }23 }24 </script>25 </head>26 <body>

Advanced Debugging Tools 267
27 <h1>Guess a Number</h1>28 <hr>29 <p>I’m thinking of a number between 1 and 100. Try to guess30 it in less than 10 tries.</p>31 <form name=”form1”>32 <input type=”text” size=”25” name=”hint” value=”Enter your Guess.”>33 <br>34 <b>Guess:</b>35 <input type=”text” name=”guess1” size=”5”>36 <input type=”button” value=”Guess” onClick=”guess();”>37 </form>38 </body>39 </html>
Here’s a summary of how this script should work:
. The first line within the <script> section picks a random number and stores
it in the num variable.
. The Guess() function is defined in the header of the document. This function
is called each time the user enters a guess.
. Within the Guess() function, several if statements test the user’s guess. If it is
incorrect, a hint is displayed in the text box. If the guess is correct, the script
displays an alert message to congratulate the user.
Testing the ScriptTo test this program, load the HTML document into your browser. It appears to load
correctly and does not immediately cause any errors. However, when you enter a
guess and press the Guess button, a JavaScript error occurs.
According to the JavaScript console, the error message is this:
Line 36: guess is undefined
Internet Explorer’s error message refers to the same line number:
Line 36, character 1: Object expected
Fixing the ErrorAs the error message indicates, there must be something wrong with the function
call to the Guess() function in the event handler on line 36. The line in question
looks like this:
<input type=”button” value=”Guess” onClick=”guess();”>
LISTING 16.2 Continued
268 HOUR 16: Debugging JavaScript Applications
Upon further examination, you’ll notice that the first two lines of the function are as
follows (lines 7 and 8 of Listing 16.2):
function Guess() {var guess = document.form1.guess1.value;
Although this might look correct at first glance, there’s a problem here: guess() is
lowercase in the event handler, whereas the function definition uses a capitalized
Guess(). This is easy to fix. Simply change the function call in the event handler
from guess() to Guess(). The corrected line will look like this:
<input type=”button” value=”Guess” onClick=”Guess();”>
Testing AgainNow that you’ve fixed the error, try the script again. This time it loads without an
error, and you can enter a guess without an error. The hints about guessing higher
or lower are even displayed correctly.
However, to truly test the script, you’ll need to play the game all the way through.
When you do, you’ll discover that there’s still another problem in the script: You
can’t win, no matter how hard you try.
After your 10 guesses are up, an alert message informs you that you’ve lost the
game. Coincidentally, this alert message also tells you what’s wrong with the script.
Figure 16.5 shows how the browser window looks after a complete game, complete
with this dialog box.
FIGURE 16.5The numberguesser script’sdisplay after agame is fin-ished.
Advanced Debugging Tools 269
As you can see from the alert message, it’s no wonder you didn’t win: The random
number the computer picked includes more than 10 decimal places, and you’ve
been guessing integers. You could guess decimal numbers, but you’d need a whole
lot more than 10 guesses, and the game would start to lose its simplicity and charm.
To fix this problem, look at the statement at the beginning of the script that gener-
ates the random number:
var num = Math.random() * 100 + 1;
This uses the Math.random() method, which results in a random number between 0
and 1. The number is then multiplied and incremented to result in a number
between 1 and 100.
This statement does indeed produce a number between 1 and 100, but not an inte-
ger. To fix the problem, you can add the Math.floor() method to chop off the deci-
mal portion of the number. Here’s a corrected statement:
var num = Math.floor(Math.random() * 100) + 1;
To fix the script, make this change and then test it again. If you play a game or two,
you’ll find that it works just fine. Listing 16.3 shows the complete, debugged script.
LISTING 16.3 The Complete, Debugged Number-Guesser Script<html><head><title>Guess a Number</title><script LANGUAGE=”JavaScript” type=”text/javascript”>var num = Math.floor(Math.random() * 100) + 1;var tries = 0;function Guess() {var g = document.form1.guess1.value;tries++;status = “Tries: “ + tries;if (g < num)
document.form1.hint.value = “No, guess higher.”;if (g > num)
document.form1.hint.value = “No, guess lower.”;if (g == num) {
window.alert(“Correct! You guessed it in “ + tries + “ tries.”);location.reload();}
if (tries == 10) {window.alert(“Sorry, time’s up. The number was: “ + num);location.reload();}
}</script></head><body><h1>Guess a Number</h1><hr><p>I’m thinking of a number between 1 and 100. Try to guess
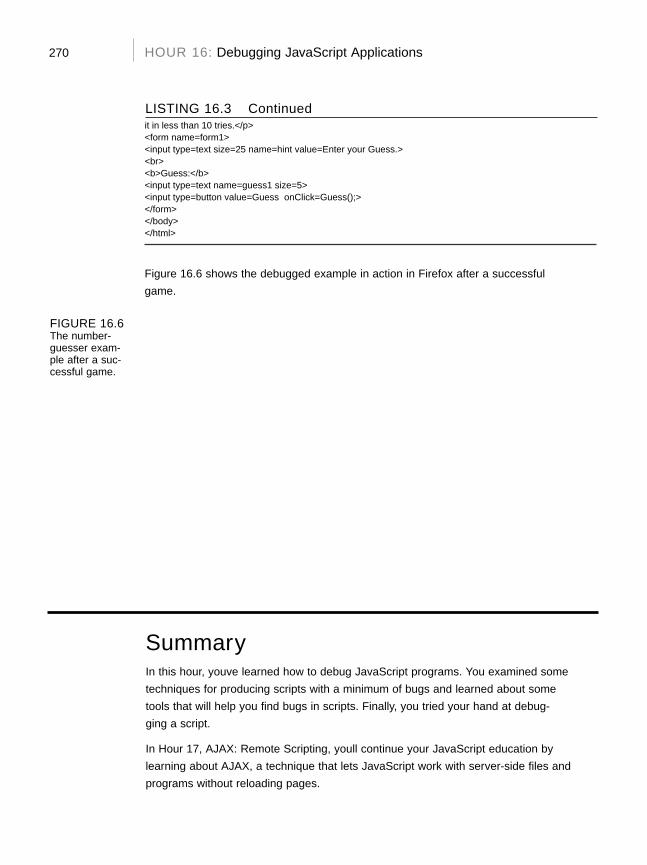
270 HOUR 16: Debugging JavaScript Applications
it in less than 10 tries.</p><form name=”form1”><input type=”text” size=”25” name=”hint” value=”Enter your Guess.”><br><b>Guess:</b><input type=”text” name=”guess1” size=”5”><input type=”button” value=”Guess” onClick=”Guess();”></form></body></html>
Figure 16.6 shows the debugged example in action in Firefox after a successful
game.
LISTING 16.3 Continued
FIGURE 16.6The number-guesser exam-ple after a suc-cessful game.
SummaryIn this hour, you’ve learned how to debug JavaScript programs. You examined some
techniques for producing scripts with a minimum of bugs and learned about some
tools that will help you find bugs in scripts. Finally, you tried your hand at debug-
ging a script.
In Hour 17, “AJAX: Remote Scripting,” you’ll continue your JavaScript education by
learning about AJAX, a technique that lets JavaScript work with server-side files and
programs without reloading pages.
▲
271Quiz Questions
Q&AQ. Why are some errors displayed after the script runs for a time, whereas
others are displayed when the script loads?
A. The JavaScript interpreter looks at scripts in the body or the heading of the
document, such as function definitions, when the page loads. Event handlers
aren’t checked until the event happens. Additionally, a statement might look
fine when the page loads, but will cause an error because of the value of a
variable it uses later.
Q. What is the purpose of the location.reload statements in the number-guesser script?
A. This is an easy way to start a new game because reloading the page reinitial-
izes the variables. This results in a new number being picked, and the default
“Guess a Number” message is displayed in the hint field.
Q. Which browser is best for developing and debugging scripts?
A. You may or may not agree, but I find that Firefox offers the best tools for
debugging scripts, such as the JavaScript console and the Web Developer
Toolbar. Regardless of your preferred browser, be sure to test your scripts in
multiple browsers to find any browser-specific issues they might have.
Quiz QuestionsTest your knowledge of debugging JavaScript by answering the following questions.
1. If you mistype a JavaScript keyword, which type of error is the result?
a. Syntax error
b. Function error
c. Pilot error
2. The process of dealing with errors in a script or a program is known as
a. Error detection
b. Frustration
c. Debugging
272 HOUR 16: Debugging JavaScript Applications
3. Which of the following is a useful technique when a script is not working but
does not generate an error message?
a. Rewriting from scratch
b. Removing <script> tags
c. Adding alert statements
Quiz Answers1. a. A syntax error can result from a mistyped JavaScript keyword.
2. c. Debugging is the process of finding and fixing errors in a program.
3. c. You can add alert statements to a script to display variables or the current
status of the script and aid in debugging.
ExercisesIf you want to gain more experience debugging scripts, try the following exercises:
. Although the number-guesser script in Listing 16.3 avoids JavaScript errors, it
is still vulnerable to user errors. Add a statement to verify that the user’s guess
is between 1 and 100. If it isn’t, display an alert message and make sure that
the guess doesn’t count toward the total of 10 guesses.
. Load Listing 16.2, the number-guesser script with bugs, into Mozilla’s
JavaScript Debugger or Microsoft’s Script Debugger. Try using the watch and
breakpoint features and see whether you find this to be an easier way to diag-
nose the problem.

HOUR 17
AJAX: Remote Scripting
What You’ll Learn in This Hour:. How AJAX enables JavaScript to communicate with server-side programs and
files. Using the XMLHttpRequest object’s properties and methods. Creating your own AJAX library. Using AJAX to read data from an XML file. Debugging AJAX applications. Using AJAX to communicate with a PHP program
Remote scripting, also known as AJAX, is a browser feature that enables JavaScript to
escape its client-side boundaries and work with files on a web server, or with server-side
programs. In this hour, you’ll learn how AJAX works and create two working examples.
Introducing AJAXTraditionally, one of the major limitations of JavaScript is that it couldn’t communicate
with a web server. For example, you could create a game in JavaScript, but keeping a list
of high scores stored on a server would require submitting a page to a server-side form.
One of the limitations of web pages in general was that getting data from the user to the
server, or from the server to the user, generally required a new page to be loaded and dis-
played.
AJAX (Asynchronous JavaScript and XML) is the answer to both of these problems. AJAX
refers to JavaScript’s capability to use a built-in object, XMLHttpRequest, to communicate
with a web server without submitting a form or loading a page. Although not part of the
DOM standard yet, this object is supported by Internet Explorer, Firefox, and other modern
browsers.
274 HOUR 17: AJAX: Remote Scripting
Although the term AJAX was coined in 2005, XMLHttpRequest has been supported
by browsers for years—it was developed by Microsoft and first appeared in Internet
Explorer 5. Nonetheless, it has only recently become a popular way of developing
applications because browsers that support it have become more common. Another
name for this technique is remote scripting.
The term AJAX first appeared in an online article by Jesse James Garrett ofAdaptive Path on February 18, 2005. It still appears here:http://adaptivepath.com/publications/essays/archives/000385.php
The JavaScript Client (Front End)JavaScript traditionally only has one way of communicating with a server—submitting
a form. Remote scripting allows for much more versatile communication with the serv-
er. The A in AJAX stands for asynchronous, which means that the browser (and the user)
isn’t left hanging while waiting for the server to respond. Here’s how a typical AJAX
request works:
1. The script creates an XMLHttpRequest object and sends it to the web server.
The script can continue after sending the request.
2. The server responds by sending the contents of a file, or the output of a server-
side program.
3. When the response arrives from the server, a JavaScript function is triggered to
act on the data.
4. Because the goal is a more responsive user interface, the script usually dis-
plays the data from the server using the DOM, eliminating the need for a
page refresh.
In practice, this happens quickly, but even with a slow server, it can still work. Also,
because the requests are asynchronous, more than one can be in progress at a time.
The Back EndThe part of an application that resides on the web server is known as the back end.
The simplest back end is a static file on the server—JavaScript can request the file
with XMLHttpRequest, and then read and act on its contents. More commonly, the
back end is a server-side program running in a language like PHP, Perl, or Ruby.
By theWay
Introducing AJAX 275
JavaScript can send data to a server-side program using GET or POST methods, the
same two ways an HTML form works. In a GET request, the data is encoded in the
URL that loads the program. In a POST request, it is sent separately, and can contain
more data.
XMLThe X in AJAX stands for XML (extensible markup language), the universal markup
language upon which the latest versions of HTML are built. A server-side file or pro-
gram can send data in XML format, and JavaScript can act on the data using its
methods for working with XML. These are similar to the DOM methods you’ve
already used—for example, you can use the getElementsByTagName() method to
find elements with a particular tag in the data.
Keep in mind that XML is just one way to send data, and not always the easiest. The
server could just as easily send plain text, which the script could display, or HTML,
which the script could insert into the page using the innerHTML property. Some pro-
grammers have even used server-side scripts to return data in JavaScript format,
which can be easily executed using the eval function.
JSON (JavaScript Object Notation) takes the idea of encoding data in JavaScriptand formalizes it. See http://www.json.org/ for details and code examples inmany languages.
Popular Examples of AJAXAlthough typical HTML and JavaScript is used to build web pages and sites, AJAX
techniques often result in web applications—web-based services that perform work for
the user. Here are a few well-known examples of AJAX:
. Google’s Gmail mail client (http://mail.google.com/) uses AJAX to make a
fast-responding email application. You can delete messages and perform other
tasks without waiting for a new page to load.
. Amazon.com uses AJAX for some functions. For example, if you click on one
of the Yes/No voting buttons for a product comment, it sends your vote to the
server and a message appears next to the button thanking you, all without
loading a page.
. Digg (http://www.digg.com) is a site where users can submit news stories and
vote to determine which ones are displayed on the front page. The voting hap-
pens inside the page next to each story.
By theWay
276 HOUR 17: AJAX: Remote Scripting
These are just a few examples. Subtle bits of remote scripting are appearing all over
the Web, and you might not even notice them—you’ll just be annoyed a little bit
less often at waiting for a page to load.
Frameworks and LibrariesBecause remote scripting can be complicated, especially considering the browser dif-
ferences you’ll learn about later this hour, several frameworks and libraries have
been developed to simplify AJAX programming.
For starters, three of the libraries described earlier in this book, Dojo, Prototype, and
script.aculo.us, include functions to simplify remote scripting. There are also some
dedicated libraries for languages like PHP, Python, and Ruby.
Some libraries are designed to add server-side functions to JavaScript, whereas others
are designed to add JavaScript interactivity to a language like PHP. You’ll build a
simple library later this hour that will be used to handle the remote scripting func-
tions for this hour’s examples.
See this book’s website for an up-to-date list of AJAX libraries. See Hour 8, “UsingBuilt-in Functions and Libraries,” for information about using third-party librarieswith JavaScript.
Limitations of AJAXRemote scripting is a relatively new technology, so there are some things it can’t do,
and some things to watch out for. Here are some of the limitations and potential
problems of AJAX:
. The script and the XML data or server-side program it requests data from must
be on the same domain.
. Internet Explorer 5 and 6 use ActiveX to implement XMLHttpRequest.
Although the security settings allow this by default, users with different settings
might be unable to use AJAX. (Internet Explorer 7 does not have this problem.)
. Some older browsers and some less common browsers (such as mobile
browsers) don’t support XMLHttpRequest, so you can’t count on its availability
for all users.
. Requiring AJAX might compromise the accessibility of a site for disabled users.
. Users are accustomed to seeing a new page load each time they change some-
thing, so there might be a learning curve for them to understand an AJAX
application.
Did youKnow?
Using XMLHttpRequest 277
As with other advanced uses of JavaScript, the best approach is to be unobtrusive—
make sure there’s still a way to use the site without AJAX support if possible, and
use feature sensing to prevent errors on browsers that don’t support it. See Hour 15,
“Unobtrusive Scripting,” for details.
Using XMLHttpRequestYou will now take a look at how to use XMLHttpRequest to communicate with a
server. This might seem a bit complex, but the process is the same for any request.
Later, you will create a reusable code library to simplify this process.
Creating a RequestThe first step is to create an XMLHttpRequest object. To do this, you use the new key-
word, as with other JavaScript objects. The following statement creates a request
object in some browsers:
ajaxreq = new XMLHttpRequest();
The previous example works with Firefox, Mozilla, and Safari, and with Internet
Explorer 7, but not Internet Explorer 5 or 6. For those browsers, you have to use
ActiveX syntax:
ajaxreq = new ActiveXObject(“Microsoft.XMLHTTP”);
The library section later this hour demonstrates how to use the correct method
depending on the browser in use. In either case, the variable you use (ajaxreq in
the example) stores the XMLHttpRequest object. You’ll use the methods of this object
to open and send a request, as explained in the following sections.
Opening a URLThe open() method of the XMLHttpRequest object specifies the filename as well as
the method in which data will be sent to the server: GET or POST. These are the same
methods supported by web forms.
ajaxreq.open(“GET”,”filename”);
For the GET method, the data you send is included in the URL. For example, this
command opens the search.php program and sends the value “John” for the query
parameter:
ajaxreq.open(“GET”,”search.php?query=John”);

278 HOUR 17: AJAX: Remote Scripting
Sending the RequestYou use the send() method of the XMLHttpRequest object to send the request to the
server. If you are using the POST method, the data to send is the argument for
send(). For a GET request, you can use the null value instead:
ajaxreq.send(null);
Awaiting a ResponseAfter the request is sent, your script will continue without waiting for a result.
Because the result could come at any time, you can detect it with an event handler.
The XMLHttpRequest object has an onreadystatechange event handler for this pur-
pose. You can create a function to deal with the response and set it as the handler
for this event:
ajaxreq.onreadystatechange = MyFunc;
The request object has a property, readyState, that indicates its status, and this
event is triggered whenever the readyState property changes. The values of
readyState range from 0 for a new request to 4 for a complete request, so your
event handling function usually needs to watch for a value of 4.
Although the request is complete, it may not have been successful. The status
property is set to 200 if the request succeeded, or an error code if it failed. The
statusText property stores a text explanation of the error, or “OK” for success.
As usual with event handlers, be sure to specify the function name without paren-theses. With parentheses, you’re referring to the result of the function; withoutthem, you’re referring to the function itself.
Interpreting the Response DataWhen the readyState property reaches 4 and the request is complete, the data
returned from the server is available to your script in two properties: responseText
is the response in raw text form, and responseXML is the response as an XML object.
If the data was not in XML format, only the text property will be available.
JavaScript’s DOM methods are meant to work on XML, so you can use them with
the responseXML property. Later this hour, you’ll use the getElementsByTagName()
method to extract data from XML.
WatchOut!
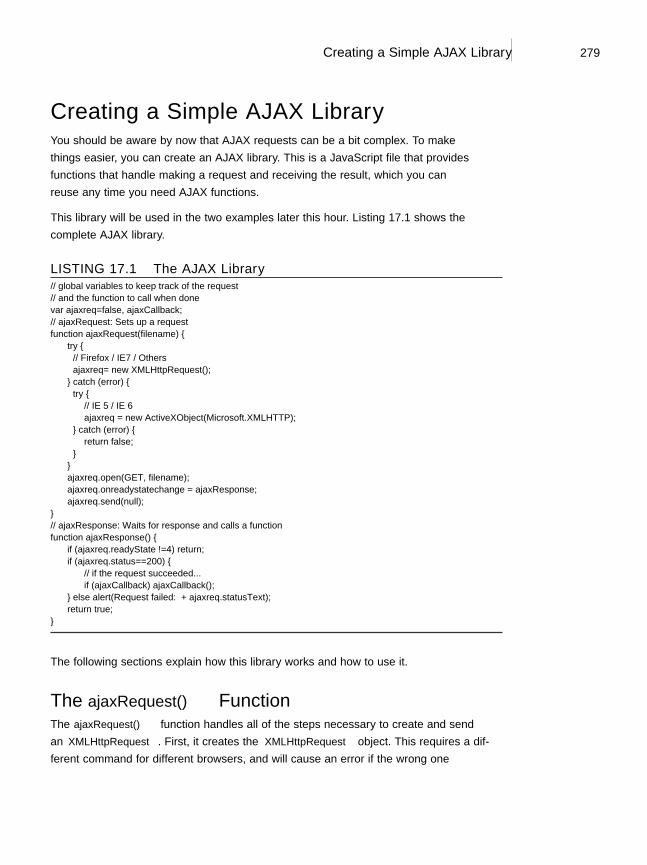
Creating a Simple AJAX Library 279
Creating a Simple AJAX LibraryYou should be aware by now that AJAX requests can be a bit complex. To make
things easier, you can create an AJAX library. This is a JavaScript file that provides
functions that handle making a request and receiving the result, which you can
reuse any time you need AJAX functions.
This library will be used in the two examples later this hour. Listing 17.1 shows the
complete AJAX library.
LISTING 17.1 The AJAX Library// global variables to keep track of the request// and the function to call when donevar ajaxreq=false, ajaxCallback;// ajaxRequest: Sets up a requestfunction ajaxRequest(filename) {
try {// Firefox / IE7 / Othersajaxreq= new XMLHttpRequest();} catch (error) {try {// IE 5 / IE 6ajaxreq = new ActiveXObject(“Microsoft.XMLHTTP”);
} catch (error) {return false;
}}ajaxreq.open(“GET”, filename);ajaxreq.onreadystatechange = ajaxResponse;ajaxreq.send(null);
}// ajaxResponse: Waits for response and calls a functionfunction ajaxResponse() {
if (ajaxreq.readyState !=4) return;if (ajaxreq.status==200) {
// if the request succeeded...if (ajaxCallback) ajaxCallback();
} else alert(“Request failed: “ + ajaxreq.statusText);return true;
}
The following sections explain how this library works and how to use it.
The ajaxRequest() FunctionThe ajaxRequest() function handles all of the steps necessary to create and send
an XMLHttpRequest. First, it creates the XMLHttpRequest object. This requires a dif-
ferent command for different browsers, and will cause an error if the wrong one
280 HOUR 17: AJAX: Remote Scripting
executes, so try and catch are used to create the request. First the standard method
is used, and if it causes an error, the ActiveX method is tried. If that also causes an
error, the ajaxreq variable is set to false to indicate that AJAX is unsupported.
The ajaxResponse() FunctionThe ajaxResponse() function is used as the onreadystatechange event handler.
This function first checks the readyState property for a value of 4. If it has a differ-
ent value, the function returns without doing anything.
Next, it checks the status property for a value of 200, which indicates the request
was successful. If so, it runs the function stored in the ajaxCallback variable. If not,
it displays the error message in an alert box.
Using the LibraryTo use this library, follow these steps:
1. Save the library file as ajax.js in the same folder as your HTML documents
and scripts.
2. Include the script in your document with a <script src> tag. It should be
included before any other scripts that use its features.
3. In your script, create a function to be called when the request is complete, and
set the ajaxCallback variable to the function.
4. Call the ajaxRequest() function. Its parameter is the filename of the server-
side program or file. (This library supports GET requests only, so you don’t
need to specify the method.)
5. Your function specified in ajaxCallback will be called when the request com-
pletes successfully, and the global variable ajaxreq will store the data in its
responseXML and responseText properties.
The two remaining examples in this hour make use of this library to create AJAX
applications.
Creating an AJAX Quiz Using theLibraryNow that you have a reusable AJAX library, you can use it to create JavaScript
applications that take advantage of remote scripting. This first example displays
quiz questions on a page and prompts you for the answers.
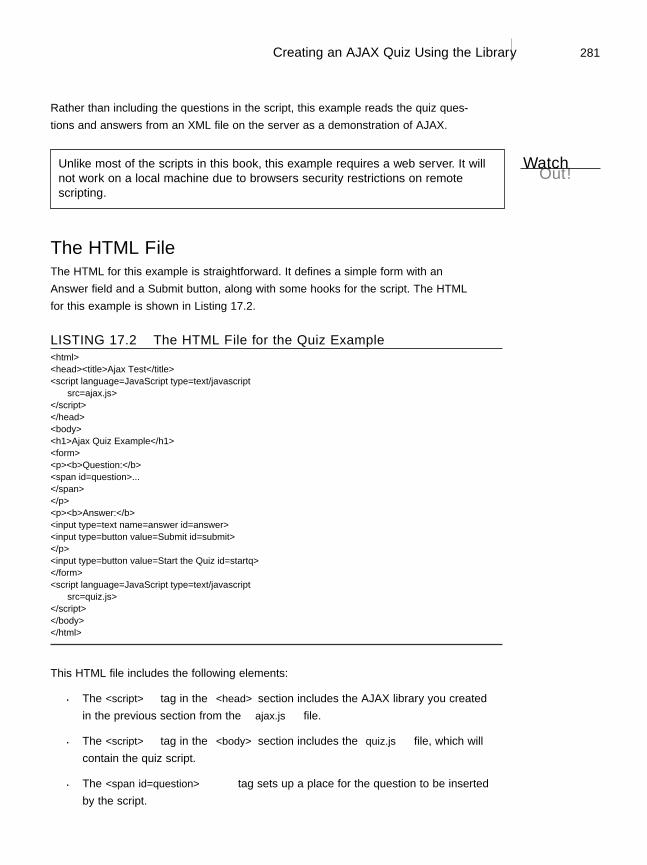
Creating an AJAX Quiz Using the Library 281
Rather than including the questions in the script, this example reads the quiz ques-
tions and answers from an XML file on the server as a demonstration of AJAX.
Unlike most of the scripts in this book, this example requires a web server. It willnot work on a local machine due to browsers’ security restrictions on remotescripting.
The HTML FileThe HTML for this example is straightforward. It defines a simple form with an
Answer field and a Submit button, along with some hooks for the script. The HTML
for this example is shown in Listing 17.2.
LISTING 17.2 The HTML File for the Quiz Example<html><head><title>Ajax Test</title><script language=”JavaScript” type=”text/javascript”
src=”ajax.js”></script></head><body><h1>Ajax Quiz Example</h1><form><p><b>Question:</b><span id=”question”>...</span></p><p><b>Answer:</b><input type=”text” name=”answer” id=”answer”><input type=”button” value=”Submit” id=”submit”></p><input type=”button” value=”Start the Quiz” id=”startq”></form><script language=”JavaScript” type=”text/javascript”
src=”quiz.js”></script></body></html>
This HTML file includes the following elements:
. The <script> tag in the <head> section includes the AJAX library you created
in the previous section from the ajax.js file.
. The <script> tag in the <body> section includes the quiz.js file, which will
contain the quiz script.
. The <span id=”question”> tag sets up a place for the question to be inserted
by the script.
WatchOut!
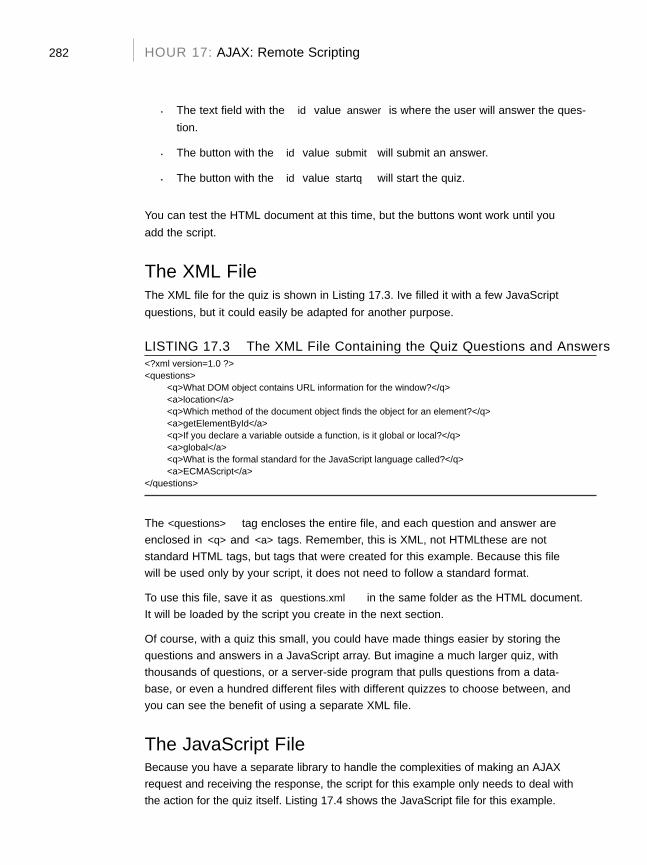
282 HOUR 17: AJAX: Remote Scripting
. The text field with the id value answer is where the user will answer the ques-
tion.
. The button with the id value submit will submit an answer.
. The button with the id value startq will start the quiz.
You can test the HTML document at this time, but the buttons won’t work until you
add the script.
The XML FileThe XML file for the quiz is shown in Listing 17.3. I’ve filled it with a few JavaScript
questions, but it could easily be adapted for another purpose.
LISTING 17.3 The XML File Containing the Quiz Questions and Answers<?xml version=”1.0” ?><questions>
<q>What DOM object contains URL information for the window?</q><a>location</a><q>Which method of the document object finds the object for an element?</q><a>getElementById</a><q>If you declare a variable outside a function, is it global or local?</q><a>global</a><q>What is the formal standard for the JavaScript language called?</q><a>ECMAScript</a>
</questions>
The <questions> tag encloses the entire file, and each question and answer areenclosed in <q> and <a> tags. Remember, this is XML, not HTML—these are notstandard HTML tags, but tags that were created for this example. Because this filewill be used only by your script, it does not need to follow a standard format.
To use this file, save it as questions.xml in the same folder as the HTML document.It will be loaded by the script you create in the next section.
Of course, with a quiz this small, you could have made things easier by storing thequestions and answers in a JavaScript array. But imagine a much larger quiz, withthousands of questions, or a server-side program that pulls questions from a data-base, or even a hundred different files with different quizzes to choose between, andyou can see the benefit of using a separate XML file.
The JavaScript FileBecause you have a separate library to handle the complexities of making an AJAXrequest and receiving the response, the script for this example only needs to deal withthe action for the quiz itself. Listing 17.4 shows the JavaScript file for this example.
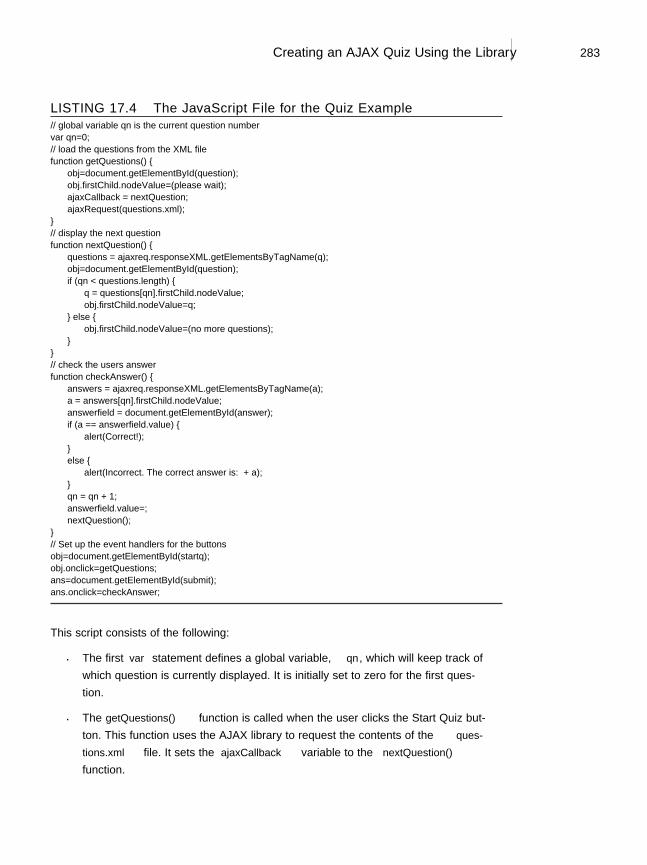
Creating an AJAX Quiz Using the Library 283
LISTING 17.4 The JavaScript File for the Quiz Example// global variable qn is the current question numbervar qn=0;// load the questions from the XML filefunction getQuestions() {
obj=document.getElementById(“question”);obj.firstChild.nodeValue=”(please wait)”;ajaxCallback = nextQuestion;ajaxRequest(“questions.xml”);
}// display the next questionfunction nextQuestion() {
questions = ajaxreq.responseXML.getElementsByTagName(“q”);obj=document.getElementById(“question”);if (qn < questions.length) {
q = questions[qn].firstChild.nodeValue;obj.firstChild.nodeValue=q;
} else {obj.firstChild.nodeValue=”(no more questions)”;
}}// check the user’s answerfunction checkAnswer() {
answers = ajaxreq.responseXML.getElementsByTagName(“a”);a = answers[qn].firstChild.nodeValue;answerfield = document.getElementById(“answer”);if (a == answerfield.value) {
alert(“Correct!”);}else {
alert(“Incorrect. The correct answer is: “ + a);}qn = qn + 1;answerfield.value=””;nextQuestion();
}// Set up the event handlers for the buttonsobj=document.getElementById(“startq”);obj.onclick=getQuestions;ans=document.getElementById(“submit”);ans.onclick=checkAnswer;
This script consists of the following:
. The first var statement defines a global variable, qn, which will keep track of
which question is currently displayed. It is initially set to zero for the first ques-
tion.
. The getQuestions() function is called when the user clicks the Start Quiz but-
ton. This function uses the AJAX library to request the contents of the ques-
tions.xml file. It sets the ajaxCallback variable to the nextQuestion()
function.
284 HOUR 17: AJAX: Remote Scripting
. The nextQuestion() function is called when the AJAX request is complete.
This function uses the getElementsByTagName() method on the responseXML
property to find all of the questions (<q> tags) and store them in the ques-
tions array.
. The checkAnswer() function is called when the user submits an answer. It
uses getElementsByTagName() to store the answers (<a> tags) in the answers
array, and then compares the answer for the current question with the user’s
answer and displays an alert indicating whether they were right or wrong.
. The script commands after this function set up two event handlers. One
attaches the getQuestions() function to the Start Quiz button to set up the
quiz; the other attaches the checkAnswer() function to the Submit button.
Testing the QuizTo try this example, you’ll need all four files in the same folder: ajax.js (the AJAX
library), quiz.js (the quiz functions), questions.xml (the questions), and the
HTML document. All but the HTML document need to have the correct filenames so
they will work correctly. Also remember that because it uses AJAX, this example
requires a web server.
Figure 17.1 shows the quiz in action. The second question has just been answered.
FIGURE 17.1The quiz exam-ple as displayedby InternetExplorer.
▼
Debugging AJAX Applications 285
This example should work on Internet Explorer 5–7, Mozilla 1.0 or later, any ver-sion of Firefox, or recent versions of Apple Safari. If you have trouble, try the lat-est Firefox.
Debugging AJAX ApplicationsDealing with remote scripting means working with several languages at once—
JavaScript, server-side languages such as PHP, XML, and of course HTML. Thus,
when you find an error, it can be difficult to track down. Here are some tips for
debugging AJAX applications:
. Be sure all filenames are correct, and that all files for your application are in
the same folder on the server.
. If you are using a server-side language, test it without the script: Load it in the
browser and make sure it works, and try passing variables to it in the URL and
checking the results.
. Check the statusText property for the results of your request—an alert mes-
sage is helpful here. It is often a clear message such as “File not found” that
might explain the problem.
. If you’re using a third-party AJAX library, check its documentation—many
libraries have built-in debugging features you can enable to examine what’s
going on.
Hour 16, “Debugging JavaScript Applications,” includes more information onJavaScript debugging in general and includes descriptions of some useful debug-ging tools.
Try It Yourself
Making a Live Search FormOne of the most impressive demonstrations of AJAX is live search: Whereas a normal
search form requires that you click a button and wait for a page to load to see the
results, a live search displays results within the page immediately as you type in the
search field. As you type letters or press the backspace key, the results are updated
instantly to make it easy to find the result you need.
By theWay
Did youKnow?
286 HOUR 17: AJAX: Remote Scripting
Using the AJAX library you created earlier, live search is not too hard to implement.
This example will use a PHP program on the server to provide the search results,
and can be easily adapted to any search application.
Once again, because it uses AJAX, this example requires a web server. You’ll alsoneed PHP version 3 or later, which is available on most servers.
The HTML FormThe HTML for this example simply defines a search field and leaves some room for
the dynamic results. The HTML document is shown in Listing 17.5.
LISTING 17.5 The HTML File for the Live Search Example<html><head><title>Live Search Ajax Example</title><script language=”javascript” type=”text/javascript”
src=”ajax.js”></script></head><body><h1>Live Search: Ajax Example</h1><form><p><b>Search for:</b> <input type=”text” size=”40” id=”searchlive”></p><div id=”results”><ul id=”list”><li>Results will display here.</li></ul></div></form><script language=”javascript” type=”text/javascript”
src=”search.js”></script></body></html>
This HTML document includes the following:
. The <script> tag in the <head> section includes the AJAX library, ajax.js.
. The <script> tag in the <body> section includes the search.js script, which
you’ll create next.
. The <input> element with the id value searchlive is where you’ll type your
search query.
WatchOut!
Debugging AJAX Applications 287
. The <div> element with the id value results will act as a container for the
dynamically fetched results. A bulleted list is created with a <ul> tag; this will
be replaced with a list of results when you start typing.
The PHP Back EndNext, you’ll need a server-side program to produce the search results. This PHP pro-
gram includes a list of names stored in an array. It will respond to a JavaScript
query with the names that match what the user has typed so far. The names will be
returned in XML format. For example, here is the output of the PHP program when
searching for “smith”:
<names><name>John Smith</name><name>Jane Smith</name></names>
Although the list of names is stored within the PHP program here for simplicity, in a
real application it would more likely be stored in a database—and this script could
easily be adapted to work with a database containing thousands of names. The PHP
program is shown in Listing 17.6.
LISTING 17.6 The PHP Code for the Live Search Example<?phpheader(“Content-type: text/xml”);
$names = array (“John Smith”, “John Jones”, “Jane Smith”, “Jane Tillman”,“Abraham Lincoln”, “Sally Johnson”, “Kilgore Trout”,“Bob Atkinson”,”Joe Cool”, “Dorothy Barnes”,“Elizabeth Carlson”, “Frank Dixon”, “Gertrude East”,“Harvey Frank”, “Inigo Montoya”, “Jeff Austin”,“Lynn Arlington”, “Michael Washington”, “Nancy West” );
if (!$query) $query=$_GET[‘query’];echo “<?xml version=\”1.0\” ?>\n”;echo “<names>\n”;while (list($k,$v)=each($names)) {
if (stristr($v,$query))echo “<name>$v</name>\n”;
}echo “</names>\n”;?>
This hour is too small to teach you PHP, but here’s a summary of how this program
works:
. The header statement sends a header indicating that the output is in XML for-
mat. This is required for XMLHttpRequest to correctly use the responseXML
property.
288 HOUR 17: AJAX: Remote Scripting
. The $names array stores the list of names. You can use a much longer list of
names without changing the rest of the code.
. The program looks for a GET variable called query and uses a loop to output
all of the names that match the query.
. Because PHP can be embedded in an HTML file, the <?php and ?> tags indi-
cate that the code between them should be interpreted as PHP.
The following books are good resources if you want to learn more on PHP quickly:. Sams Teach Yourself PHP in 10 Minutes; ISBN: 0672327627. Sams Teach Yourself PHP in 24 Hours; ISBN: 0672326191
Save the PHP program as search.php in the same folder as the HTML file. You can
test it by typing a query such as search.php?query=John in the browser’s URL field.
Use the View Source command to view the XML result.
The JavaScript Front EndFinally, the JavaScript for this example is shown in Listing 17.7.
LISTING 17.7 The JavaScript File for the Live Search Example// global variable to manage the timeoutvar t;// Start a timeout with each keypressfunction StartSearch() {
if (t) window.clearTimeout(t);t = window.setTimeout(“LiveSearch()”,200);
}// Perform the searchfunction LiveSearch() {
// assemble the PHP filenamequery = document.getElementById(“searchlive”).value;filename = “search.php?query=” + query;// DisplayResults will handle the Ajax responseajaxCallback = DisplayResults;// Send the Ajax requestajaxRequest(filename);
}// Display search resultsfunction DisplayResults() {
// remove old listul = document.getElementById(“list”);div = document.getElementById(“results”);div.removeChild(ul);// make a new listul = document.createElement(“UL”);ul.id=”list”;
Did youKnow?
Debugging AJAX Applications 289
names = ajaxreq.responseXML.getElementsByTagName(“name”);for (i = 0; i < names.length; i++) {
li = document.createElement(“LI”);name = names[i].firstChild.nodeValue;text = document.createTextNode(name);li.appendChild(text);ul.appendChild(li);
}if (names.length==0) {
li = document.createElement(“LI”);li.appendChild(document.createTextNode(“No results”));ul.appendChild(li);
}// display the new listdiv.appendChild(ul);
}// set up event handlerobj=document.getElementById(“searchlive”);obj.onkeydown = StartSearch;
This script includes the following components:
. A global variable, t, is defined. This will store a pointer to the timeout used
later in the script.
. The StartSearch() function is called when the user presses a key. This func-
tion uses setTimeout() to call the LiveSearch() function after a 200-mil-
lisecond delay. The delay is necessary so that the key the user types has time
to appear in the search field.
. The LiveSearch() function assembles a filename that combines search.php
with the query in the search field, and launches an AJAX request using the
library’s ajaxRequest() function.
. The DisplayResults() function is called when the AJAX request is complete.
It deletes the bulleted list from the <div id=”results”> section, and then
assembles a new list using the W3C DOM and the AJAX results. If there were
no results, it displays a “No results” message in the list.
. The final lines of the script set the StartSearch() function up as an event
handler for the onkeydown event of the search field.
Making It All WorkTo try this example, you’ll need three files on a web server: ajax.js (the library),
search.js (the search script), and the HTML file. Figure 17.2 shows this example in
action.
LISTING 17.7 Continued

290 HOUR 17: AJAX: Remote Scripting
SummaryIn this hour, you’ve learned how AJAX, otherwise known as remote scripting, can let
JavaScript communicate with a web server. You created a reusable AJAX library that
can be used to create any number of AJAX applications, and you created an exam-
ple using an XML file. Finally, you created a live search form using AJAX and PHP.
You’ve nearly reached the end of Part IV. In the next hour, you’ll learn about
Greasemonkey, a Firefox extension that enables you to use JavaScript to enhance
sites you visit, even those created by others.
Q&AQ. Why would I want to use POST instead of GET when making a request?
A. Although GET is easy to use, it is limited to about 255 characters. If you are
using a large amount of data, POST is the only way to send it to the server.
Q. What happens if the server is slow, or never responds to the request?
A. This is another reason you should use AJAX as an optional feature—whether
caused by the server or by the user’s connection, there will be times when a
request is slow to respond or never responds. In this case, the callback function
will be called late, or not at all. This can cause trouble with overlapping
requests: for example, in the live search example, an erratic server might
cause the responses for the first few characters typed to come in a few seconds
apart, confusing the user. You can remedy this by checking the readyState
property to make sure a request is not already in progress before you start
another one.
FIGURE 17.2The live searchexample as dis-played byFirefox.
▲

Quiz Questions 291
Q. In the live search example, why is the onkeydown event handler necessary?Wouldn’t the onchange event be easier to use?
A. Although onchange tells you when a form field has changed, it is not trig-
gered until the user moves on to a different field—it doesn’t work for “live”
search, so you have to watch for key presses instead. The onkeypress handler
would work, but in some browsers it doesn’t detect the Backspace key, and it’s
nice to have the search update when you backspace to shorten the query.
Quiz QuestionsTest your knowledge of AJAX by answering the following questions.
1. Which of the following is the A in AJAX?
a. Advanced
b. Asynchronous
c. Application
2. Which property of an XMLHttpRequest object indicates whether the request
was successful?
a. status
b. readyState
c. success
3. Which browsers require ActiveX for remote scripting?
a. Internet Explorer 5–7
b. Firefox 1.0–1.5
c. Internet Explorer 5–6
292 HOUR 17: AJAX: Remote Scripting
Quiz Answers1. b. AJAX stands for Asynchronous JavaScript and XML.
2. a. The status property indicates whether the request was successful;
readyState indicates whether the request is complete, but does not indicate
success.
3. c. Internet Explorer 5 and 6 require ActiveX. Internet Explorer 7 supports the
XMLHttpRequest object natively.
ExercisesIf you want to gain more experience with AJAX, try the following exercises:
. Build your own XML file of questions and answers on your favorite topic and
try it with the quiz example.
. Use the AJAX library to add an AJAX feature to your site, or create a simple
example of your own.

HOUR 18
Greasemonkey: Enhancing theWeb with JavaScript
What You’ll Learn in This Hour:. How Greasemonkey and user scripts can enhance your web browser. How to install and configure Greasemonkey in Firefox. Installing and managing user scripts. Creating your own user scripts. Defining metadata for scripts. Using the Greasemonkey API. Adding macros to web forms
One of the recent trends is that JavaScript is being used in new ways, both inside and out-
side web browsers. In this hour, you’ll look at Greasemonkey, a Firefox extension that
enables you to write scripts to modify the appearance and behavior of sites you visit. User
scripts can also work in Internet Explorer, Opera, and Safari with the right add-ons.
Introducing GreasemonkeySo far in this book, you’ve been using JavaScript to work on your own sites. In this hour,
you’ll take a break from that and learn about a way to use JavaScript on other people’s
sites. Greasemonkey is an extension for the Firefox browser that enables user scripts. These
are scripts that run as soon as you load a page and can make changes to the page’s DOM.
A user script can be designed to work on all web pages, or only to affect particular sites.
Here are some of the things user scripts can do:
. Change the appearance of one or more sites—colors, font size, and so on.
. Change the behavior of one or more sites with JavaScript.
294 HOUR 18: Greasemonkey: Enhancing the Web with JavaScript
. Fix a bug in a site before the site author does.
. Add a feature to your browser, such as text macros—see the Try It Yourself sec-
tion of this hour for an example.
As a simple example, a user script called Linkify is provided with Greasemonkey. It
affects all pages you visit and turns unlinked URLs into hyperlinks. In other words,
the script looks for any string that resembles a URL in the page, and if it finds a URL
that is not enclosed in an <a> tag, it modifies the DOM to add a link to the URL.
Greasemonkey scripts can range from simple ones such as Linkify to complex
scripts that add a feature to the browser, rearrange a site to make it more usable, or
eliminate annoying features of sites such as pop-up ads.
Keep in mind that Greasemonkey doesn’t do anything to the websites you visit—it
strictly affects your personal experience with the sites. In this way, it’s similar to
other browser customizations, such as personal style sheets and browser font set-
tings.
Greasemonkey was created in 2004 by Aaron Boodman. Its official site ishttp://greasemonkey.mozdev.org/. At this writing, the current version ofGreasemonkey is 0.6.4. The current developers are Aaron Boodman and JeremyDunck.
Installing Greasemonkey in FirefoxGreasemonkey works in Firefox for Windows, Macintosh, and Linux platforms. You
can install it by visiting the Greasemonkey site and running the installer. Start at
http://greasemonkey.mozdev.org/ and follow these steps:
1. Click the Install Greasemonkey link.
2. You will probably see a message in a yellow bar at the top of the window
warning you about installing software. Click the Edit Options button within
the yellow bar.
3. In the Allowed Sites dialog, shown in Figure 18.1, click the Allow button to
allow the current site to install software, and then click Close.
4. Click the Install link again, and then click the Install button in the Software
Installation dialog that appears.
5. Exit and restart Firefox. You should see a small monkey icon in the lower-right
hand corner of the browser window if the extension was successfully installed.
By theWay
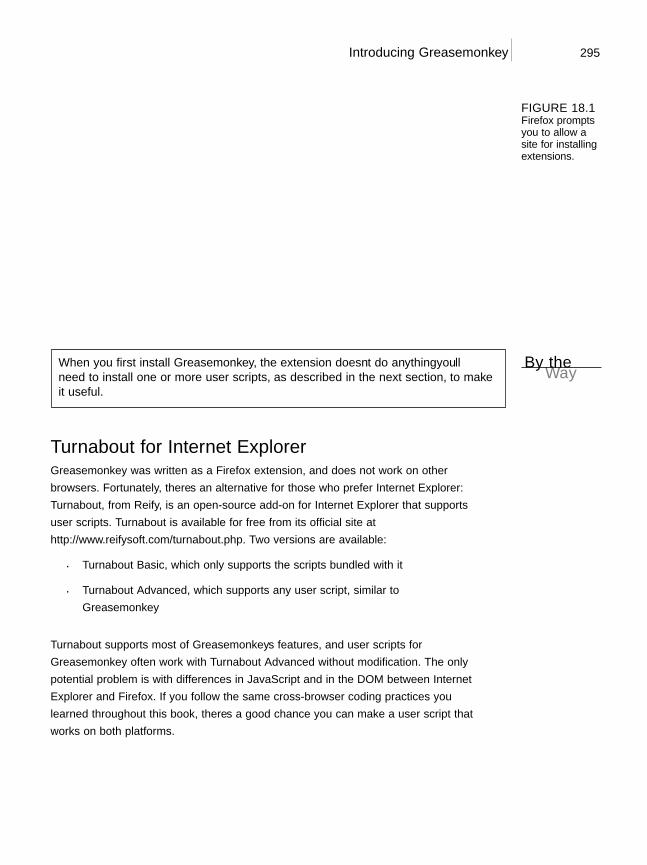
Introducing Greasemonkey 295
When you first install Greasemonkey, the extension doesn’t do anything—you’llneed to install one or more user scripts, as described in the next section, to makeit useful.
Turnabout for Internet ExplorerGreasemonkey was written as a Firefox extension, and does not work on other
browsers. Fortunately, there’s an alternative for those who prefer Internet Explorer:
Turnabout, from Reify, is an open-source add-on for Internet Explorer that supports
user scripts. Turnabout is available for free from its official site at
http://www.reifysoft.com/turnabout.php. Two versions are available:
. Turnabout Basic, which only supports the scripts bundled with it
. Turnabout Advanced, which supports any user script, similar to
Greasemonkey
Turnabout supports most of Greasemonkey’s features, and user scripts for
Greasemonkey often work with Turnabout Advanced without modification. The only
potential problem is with differences in JavaScript and in the DOM between Internet
Explorer and Firefox. If you follow the same cross-browser coding practices you
learned throughout this book, there’s a good chance you can make a user script that
works on both platforms.
FIGURE 18.1Firefox promptsyou to allow asite for installingextensions.
By theWay
296 HOUR 18: Greasemonkey: Enhancing the Web with JavaScript
Other BrowsersAlthough Greasemonkey itself is still relatively new software, user script features
have also appeared for other browsers. Along with Turnabout for IE, two other
browsers can support user scripts:
. Opera, the cross-platform browser from Opera Software ASA, has built-in sup-
port for user scripts, and supports Greasemonkey scripts in many cases. See
Opera’s site for details at http://www.opera.com/.
. Creammonkey is a beta add-on for Apple’s Safari browser to support user
scripts. You can find it at http://8-p.info/Creammonkey/.
User Script SecurityBefore you get into user scripting, a word of warning: Don’t install a script unless
you understand what it’s doing, or you’ve obtained it from a trustworthy source.
Although the Greasemonkey developers have spent a great deal of time eliminating
security holes, it’s still possible for a malicious script to cause you trouble—at the
very least, it could send information about which sites you visit to a third-party web-
site.
To minimize security risks, be sure you’re running the latest version of
Greasemonkey or Turnabout. Only enable scripts you are actively using, and limit
scripts you don’t trust to specific pages so they don’t run on every page you visit.
Working with User ScriptsUser scripts are a whole new way of working with JavaScript—rather than uploading
them for use on your website, you install them in the browser for your own personal
use. The following sections show you how to find useful scripts, and install and
manage them.
Finding ScriptsAnyone can write user scripts, and many people have. Greasemonkey sponsors a
directory of user scripts at http://userscripts.org/. There you can browse or search for
scripts, or submit scripts you’ve written.
The script archive has thousands of scripts available. Along with general-purpose
scripts, many of the scripts are designed to add features to—or remove annoying
features from—particular sites.
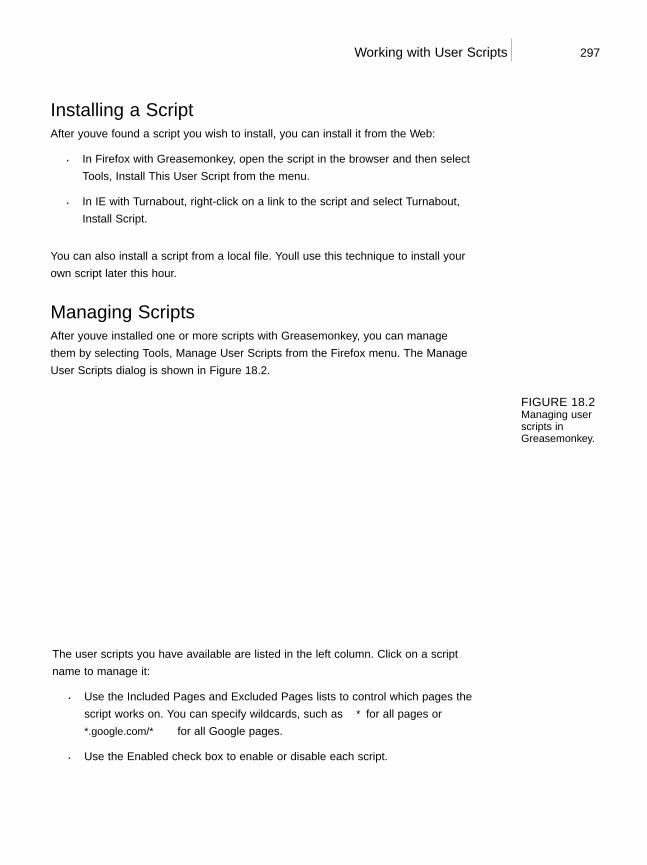
Working with User Scripts 297
Installing a ScriptAfter you’ve found a script you wish to install, you can install it from the Web:
. In Firefox with Greasemonkey, open the script in the browser and then select
Tools, Install This User Script from the menu.
. In IE with Turnabout, right-click on a link to the script and select Turnabout,
Install Script.
You can also install a script from a local file. You’ll use this technique to install your
own script later this hour.
Managing ScriptsAfter you’ve installed one or more scripts with Greasemonkey, you can manage
them by selecting Tools, Manage User Scripts from the Firefox menu. The Manage
User Scripts dialog is shown in Figure 18.2.
FIGURE 18.2Managing userscripts inGreasemonkey.
The user scripts you have available are listed in the left column. Click on a script
name to manage it:
. Use the Included Pages and Excluded Pages lists to control which pages the
script works on. You can specify wildcards, such as * for all pages or
*.google.com/* for all Google pages.
. Use the Enabled check box to enable or disable each script.
298 HOUR 18: Greasemonkey: Enhancing the Web with JavaScript
. Click the Uninstall button to remove a script.
. Click Edit to open a script in a text editor. When it is saved, it will immediate-
ly take effect on pages you load.
Turnabout for IE has a similar dialog. To access it, click the Reify button in the
Turnabout toolbar and select Options. The dialog is similar to Greasemonkey’s dia-
log, except that each script has a separate check box to enable or disable it. There is
also an Install Feature button that prompts you for a new script to install. The
Turnabout Options dialog is shown in Figure 18.3.
FIGURE 18.3The TurnaboutOptions dialog.
Testing User ScriptsIf you have a script enabled, it will be activated as soon as you load a page that
matches one of the Included Pages specified for the script. (The script is run after the
page is loaded, but before the onLoad event.) If you want to make sure
Greasemonkey is running, either try one of the scripts available for download, or
type in the simple script in the next section.
Activating and Deactivating Greasemonkey orTurnaboutSometimes you’ll want to turn off Greasemonkey altogether, especially if one of the
scripts you’ve installed is causing an error. To do this, right-click on the monkey icon
in the lower-right corner of the browser window and select the Enabled option to
deselect it. The monkey icon changes to a gray sad-faced monkey, and no user
scripts will be run at all. You can re-enable it at any time using the same option.
Creating Your Own User Scripts 299
With Turnabout for Internet Explorer, the procedure is similar: Click the Reify button
in the Turnabout toolbar, and select the Enable Turnabout option. The icon changes to
indicate that Turnabout is disabled. Choose Enable Turnabout again to re-enable it.
Creating Your Own User ScriptsYou’ve already learned most of what you need to know to create user scripts since
they’re written in JavaScript. In this section, you’ll create and test a simple script,
and look at some features you’ll use when creating more advanced scripts.
Creating a Simple User ScriptOne of the best uses for Greasemonkey is to solve annoyances with sites you visit.
For example, a site might use green text on an orange background. Although you
could contact the webmaster and beg for a color change, user scripting lets you deal
with the problem quickly yourself.
As a simple demonstration of user scripting, you can create a user script that
changes the text and background colors of paragraphs in sites you visit. Listing 18.1
shows this user script.
LISTING 18.1 A Simple User Script to Change Paragraph Colors// Change the color of each paragraphvar zParagraphs = document.getElementsByTagName(“p”);for (var i=0; i<zParagraphs.length; i++) {
zParagraphs[i].style.backgroundColor=”#000000”;zParagraphs[i].style.color=”#FFFFFF”;
}
This script uses the getElementsByTagName() DOM method to find all of the para-
graph tags in the current document and store their objects in the zParagraphs
array. The for loop iterates through the array and changes the style.color and
style.backgroundColor properties for each one.
Describing a User ScriptGreasemonkey supports metadata at the beginning of your script. These are JavaScript
comments that aren’t executed by the script, but provide information to Greasemonkey.
To use this feature, enclose your comments between // ==UserScript== and
// ==/UserScript comments.
The metadata section can contain any of the following directives. All of these are
optional, but using them will make your user script easier to install and use.
300 HOUR 18: Greasemonkey: Enhancing the Web with JavaScript
. @name—A short name for the script, displayed in Greasemonkey’s list of scripts
after installation.
. @namespace—An optional URL for the script author’s site. This is used as a
namespace for the script: Two scripts can have the same name as long as the
namespace is different.
. @description—A one-line description of the script’s purpose.
. @include—The URL of a site on which the script should be used. You can spec-
ify any number of URLs, each in its own @include line. You can also use the
wildcard * to run the script on all sites, or a partial URL with a wildcard to run
it on a group of sites.
. @exclude—The URL of a site on which the script should not be used. You can
specify a wildcard for @include and then exclude one or more sites that the
script is incompatible with. The @exclude directive can also use wildcards.
Listing 18.2 shows the color-changing example with a complete set of metadata
comments added at the top.
LISTING 18.2 The Color-Changing Script with Metadata Comments// ==UserScript==// @name WhiteOnBlack// @namespace http://www.jsworkshop.com/// @description Display paragraphs in white text on black// @include *// ==/UserScript==//// Change the color of each paragraphvar zParagraphs = document.getElementsByTagName(“p”);for (var i=0; i<zParagraphs.length; i++) {
zParagraphs[i].style.backgroundColor=”#000000”;zParagraphs[i].style.color=”#FFFFFF”;
}
Testing Your ScriptNow that you’ve added the metadata, installing your script is simple. Follow these
steps to install the script in Firefox:
1. Save the script file as colors.user.js. The filename must end in .user.js to
be recognized as a Greasemonkey script.
2. In Firefox, choose File, Open from the menu.
3. Select your script from the Open File dialog.

By theWay
Creating Your Own User Scripts 301
4. After the script is displayed in the browser, select Tools, Install This User Script.
5. An alert will display to inform you that the installation was successful. The
new user script is now running on all sites.
If you’re using Turnabout under Internet Explorer, click on the Turnabout toolbar
and select Options, and then click the Install Feature button. Select the script and
click Open to install it.
Both Greasemonkey and Turnabout for IE will use the metadata you specified to set
the script’s included pages, description, and other options when you install it.
After you’ve installed and enabled the script, any page you load will have its para-
graphs displayed in white text on a black background. For example, Figure 18.4
shows the user script’s effect on the Date and Time example from Hour 2, “Creating
Simple Scripts.” Because the date and time are within <p> tags, they are displayed in
white on black.
FIGURE 18.4The Date andTime examplealtered by thecolor-changinguser script.
You probably don’t want to make a change this drastic to all sites you visit.Instead, you can use @include to make this script affect only one or two siteswhose colors you find hard to read. Don’t forget that you can also change the colors in the script to your own preference.

302 HOUR 18: Greasemonkey: Enhancing the Web with JavaScript
Greasemonkey API FunctionsYou can use all of the DOM methods covered in this book to work with pages in user
scripts, along with JavaScript’s built-in functions. In addition to these,
Greasemonkey defines an API (Application Programmer’s Interface) with a few func-
tions that can be used exclusively in user scripts:
. GM_log(message, level)—Inserts a message into the JavaScript console. The
level parameter indicates the severity of the message: 0 for information, 1 for
a warning, and 2 for an error.
. GM_setValue(variable, value)—Sets a variable stored by Greasemonkey.
These variables are stored on the local machine. They are specific to the script
that set them, and can be used in the future by the same script. (These are
similar to cookies, but are not sent to a server.)
. GM_getValue(variable)—Retrieves a value previously set with GM_setValue.
. GM_registerMenuCommand(command, function)—Adds a command to the
browser menu. These commands appear under Tools, User Script Commands.
The command parameter is the name listed in the menu, and function is a
function in your script that the menu selection will activate.
. GM_xmlhttpRequest(details)—Requests a file from a remote server, similar
to the AJAX features described in Hour 17, “AJAX: Remote Scripting.” The
details parameter is an object that can contain a number of properties to
control the request. See the Greasemonkey documentation for all of the prop-
erties you can specify.
Turnabout for Internet Explorer also supports all of these API functions, so aside
from the usual browser differences, scripts that use these functions should work in
both browsers. Because Internet Explorer does not have a JavaScript console,
Turnabout includes its own console, available from the menu, where log messages
are displayed.
Creating a Site-Specific ScriptYou might want to use a user script to fix a problem or add a feature to a specific
site. In addition to using @include to specify the site’s URL, you’ll need to know
something about the site’s DOM.
You can use the DOM Inspector in Firefox (or the similar feature in Internet
Explorer’s developer toolbar) to browse the DOM for the site and find the objects you
want to work with. Depending on how they are marked up, you can access them
through the DOM:
Creating Your Own User Scripts 303
. If an element has an id attribute, you can simply use
document.getElementById() in your script to find its object.
. If a nearby element has an id defined, you can use DOM methods to find it—
for example, if the parent element has an id, you can use a method such as
firstChild() to find the object you need.
. If all else fails, you can use document.getElementsByTagName() to find all
objects of a certain type—for example, all paragraphs. If you need to refer to a
specific one, you can use a loop and check each one for a certain attribute.
See Hour 16, “Debugging JavaScript Applications,” for information about Firefox’sDOM Inspector and IE’s developer toolbar. See Hours 13, “Using the W3C DOM”and 14, “Using Advanced DOM Features,” for information about DOM methods.
As an example, Listing 18.3 shows a simple user script you could use as a site-specif-
ic script to automatically fill out certain fields in forms.
LISTING 18.3 A User Script to Fill Out Form Fields Automatically// ==UserScript==// @name AutoForm// @namespace http://www.jsworkshop.com/// @description Fills in forms automatically// @include *// ==/UserScript==// this function fills out form fields//var zTextFields = document.getElementsByTagName(“input”);for (var i=0; i<zTextFields.length; i++) {thefield=zTextFields[i].name;if (!thefield) thefield=zTextFields[i].id;// Set up your auto-fill values hereif (thefield == “yourname”) zTextFields[i].value=”Your Name Here”;if (thefield == “phone”) zTextFields[i].value=”(xxx) xxx-xxxx”;alert(“field:” + thefield + “ value: “ + zTextFields[i].value);
}
This script uses getElementsByTagName() to find all of the <input> elements in a doc-
ument, including text fields. It uses a for loop to examine each one. If it finds a field
with the name or id value “yourname” or “phone”, it inserts the appropriate value.
To test this script, save it as autoform.user.js and install the user script as
described earlier in this hour. To test it, load Listing 11.1 from Hour 11, “Getting
Data with Forms,” into the browser—it happens to have both of the field names the
script looks for. The yourname and phone fields will be automatically filled out, as
shown in Figure 18.5.
By theWay
304 HOUR 18: Greasemonkey: Enhancing the Web with JavaScript
To make it easy to test, Listing 18.3 doesn’t include specific sites in the @include
line. To make a true site-specific script, you would need to find out the field names
for a particular site, add if statements to the script to fill them out, and use
@include to make sure the script only runs on the site.
Debugging User ScriptsDebugging a user script is much like debugging a regular JavaScript program—
errors are displayed in the JavaScript Console in Firefox or in an error message in
Internet Explorer. Here are a few debugging tips:
. As with regular scripts, you can also use the alert() method to display infor-
mation about what’s going on in your script.
. The browser may display a line number with an error message, but when
you’re working with user scripts, these line numbers are meaningless—they
refer neither to lines in your user script nor to the page you’re currently view-
ing.
. Use the GM_log() method described earlier in this hour to log information
about your script, such as the contents of variables, to the JavaScript console.
. If you’re trying to write a cross-browser user script, watch for methods that are
browser specific. See Hour 15, “Unobtrusive Scripting,” for information about
cross-browser issues.
FIGURE 18.5The form-fillinguser script inaction.
▼
Creating Your Own User Scripts 305
. Watch for conflicts with any existing scripts on the page.
. If you’re using multiple user scripts, be sure they don’t conflict. Use unique
variable and function names in your scripts.
Most of the issues with user scripts are the same as for regular JavaScript. See Hour
16 for information on debugging tools, techniques, and common mistakes.
Try It Yourself
Creating a User ScriptNow that you’ve learned the basics of Greasemonkey, you can try a more complex—
and more useful—example of a user script.
If you spend much time on the Web, you’ll find yourself needing to fill out web
forms often, and you probably type certain things—such as your name or URL—into
forms over and over. The user script you create here will let you define macros for
use in any text area. When you type a macro keyword (a period followed by a code)
and then type another character, the macro keyword will be instantly replaced by
the text you’ve defined. For example, you can define a macro so that every time you
type .cu, it will expand into the text “See you later.”.
This script has been tested on Greasemonkey 0.6.4 for Firefox and TurnaboutAdvanced 0.31 b3 for Internet Explorer. Because browsers and extensions arealways changing, it might stop working at some point—see this book’s website forthe latest updates.
Listing 18.4 shows the text area macro user script.
LISTING 18.4 The Text Area Macro User Script// ==UserScript==// @name TextMacro// @namespace http://www.jsworkshop.com/// @description expands macros in text areas as you type// @include *// ==/UserScript==// this function handles the macro replacementsfunction textmacro(e) {
// define your macros herezmacros = [[“.mm”, “Michael Moncur”],[“.js”, “JavaScript”],[“.cu”, “See you later.”]
];if (!e) var e = window.event;
WatchOut!
306 HOUR 18: Greasemonkey: Enhancing the Web with JavaScript
// which textarea are we in?thisarea= (e.target) ? e.target : e.srcElement;// replace textfor (i=0; i<zmacros.length; i++) {
vv = thisarea.value;vv = vv.replace(zmacros[i][0],zmacros[i][1]);thisarea.value=vv;
}}// install the event handlersvar zTextAreas = document.getElementsByTagName(“textarea”);for (var i=0; i<zTextAreas.length; i++) {
if (zTextAreas[i].addEventListener)zTextAreas[i].addEventListener(“keydown”,textmacro,0);
else if (zTextAreas[i].attachEvent)zTextAreas[i].attachEvent(“onkeydown”,textmacro);
}
How It WorksThis user script begins with the usual comment metadata. The @include command
specifies a wildcard, *, so the script will work on all sites. The actual work is done in
the textmacro() function. This function begins by defining the macros that will be
available:
zmacros = [[“.mm”, “Michael Moncur”],[“.js”, “JavaScript”],[“.cu”, “See you later.”]
];
This example defines three macros using a two-dimensional array. To make the script
useful to you, define your own. You can have any number of macros—just add a
comma after the last macro line and add your items before the closing bracket.
Next, the function uses the target property to find the text area in which you’re
currently typing. Next, it uses a for loop to do a search and replace within the text
area’s value property for each of your macros.
The section of code after the textmacro() function sets up an event handler for
each text area. First, it uses getElementsByTagName() to find all of the text areas,
and then it uses a for loop to add an onkeydown event handler to each one.
To avoid conflicts with existing event handlers within web pages, this exampleuses the addEventListener() method to add the event handler. This methoddefines an event handler without overwriting existing events. In Internet Explorer, ituses the similar attachEvent() method. See Hour 15 for more information.
LISTING 18.4 Continued
By theWay
Q&A 307
Using This ScriptTo use this script, first make sure you’ve installed and enabled Greasemonkey as
described earlier this hour. Save the script as textmacro.user.js. You can then
install the user script.
After the script is installed, try loading any page with a text area. You should be
able to type a macro, such as .mm or .js, followed by another character such as a
space, within the text area and see it instantly expand into the correct text.
This script runs on all sites by default. If you only want the macros to work on cer-tain sites, you can change the @include directive to specify them. If the scriptcauses trouble on some sites, you can exclude them with @exclude.
SummaryIn this hour, you’ve learned how to use Greasemonkey—and its counterpart for
Internet Explorer, Turnabout—to enable user scripting in your browser. You’ve
learned how user scripts work and how to install and manage them. Finally, you
created two examples of functioning user scripts.
Congratulations! You’ve reached the end of Part IV of this book, and you’re well on
your way to becoming a JavaScript expert. In Part V, you’ll look at multimedia
applications of JavaScript—graphics, animation, sound, and working with plug-ins.
Hour 19, “Using Graphics and Animation,” starts by helping you move beyond
scripts that work with text.
Q&AQ. Is there any way to prevent users from using Greasemonkey while viewing
my site?
A. Because Greasemonkey only affects the user who installed it, it’s usually
harmless to allow it. If you still want to prevent its use, this is difficult but not
impossible, and varies with different versions of Greasemonkey. Search the
Web to find current solutions.
Q. What if I want to do something more sophisticated, such as modifyingFirefox’s menu?
A. This capability does not exist in Greasemonkey, but Firefox extensions are also
written in JavaScript. In fact, you can compile a user script into a Firefox exten-
sion and then add more advanced features. See http://www.letitblog.com/
greasemonkey-compiler/ for details.
Did youKnow?
▲
308 HOUR 18: Greasemonkey: Enhancing the Web with JavaScript
Q. What happens when a new version of Firefox or Internet Explorer isreleased?
A. Although I have faith in the Greasemonkey developers, there’s no guarantee
that this extension will work in future browser versions. If you’re concerned
about this, you might want to write your own Firefox extension instead.
Q. Are there limits to how much I can modify a page using Greasemonkey?
A. No—in fact, you can yank the entire content of the page’s DOM out and
replace it with HTML of your choosing using the innerHTML property. You’d
have to do quite a bit of work to make something as useful as the original
page, of course.
Quiz QuestionsTest your knowledge of Greasemonkey and user scripts by answering the following
questions.
1. Which of the following offers user scripting for Microsoft Internet Explorer?
a. Greasemonkey
b. Microsoft Live Scripting Toolbar
c. Turnabout
2. Which of the following is not a valid Greasemonkey API function?
a. GM_log()
b. GM_alert()
c. GM_setValue()
3. Which is the correct @include directive to run a script on both
www.google.com and google.com?
a. @include *.google.com
b. @include www.google.com.*
c. @include google.com
Exercises 309
Quiz Answers1. c. Turnabout is a user script add-on for Internet Explorer.
2. b. There is no GM_alert() method, although the standard alert() method will
work in a user script.
3. a. Using @include *.google.com will run the script on any page on any site
within the google.com domain.
ExercisesIf you want to gain more experience with user scripts, try the following exercises:
. Modify the color-changing user script in Listing 18.2 to use different colors, and
add another style attribute—for example, use style.fontSize to change the
font size.
. The color-changing example works on paragraphs, but text often appears in
other places, such as bullet lists. Modify Listing 18.2 to make the changes to
<li> tags as well as paragraphs.
. Currently, the macro example in the Try It Yourself section only works on text
inputs that use <textarea> tags. Modify the script in Listing 18.3 to work on
<input> tags also. (You’ll need to add a second call to getElementsByTagName()
and a loop to add the event handlers.)

This page intentionally left blank
PART V:
Building MultimediaApplications with JavaScript
HOUR 19 Using Graphics and Animation 313
HOUR 20 Working with Sound and Plug-ins 329

This page intentionally left blank

HOUR 19
Using Graphics and Animation
What You’ll Learn in This Hour:. Using JavaScript to swap images within a page. Using JavaScript rollovers. Using CSS rollovers. Creating an image slideshow. Adding animation to the slideshow
Welcome to Part V! So far, you’ve used JavaScript to work with text and forms in web
pages. In the next two hours, you’ll look at how JavaScript can work with graphics,
sounds, and plug-ins. This hour focuses on using JavaScript to manipulate graphics and
create animated displays.
Using Dynamic ImagesLong before the W3C DOM allowed JavaScript to change any part of a web page, a fea-
ture called dynamic images enabled you to swap one image for another with JavaScript.
This technique is still supported by current browsers, and is still the most convenient (and
compatible) way to work with images in JavaScript.
Working with image ObjectsYou can change images dynamically by using the image object associated with each one.
The traditional way to do this is with the document.images array. This array contains an
item for each of the images defined on the page. In the object hierarchy, each image
object is a child of the document object.
With the W3C DOM, you can also assign an id attribute to an image within the <img>
tag, and then use document.getElementById to find the object for that image. Each
image object has the following properties:
314 HOUR 19: Using Graphics and Animation
. complete is a flag that tells you whether the image has been completely
loaded. This is a Boolean value (true or false).
. height and width reflect the corresponding image attributes. This is for infor-
mation only; you can’t change an image’s size dynamically.
. hspace and vspace represent the corresponding image attributes, which
define the image’s placement on the page. Again, this is a read-only attribute.
. name is the image’s name. You can define this with the NAME attribute in the
image definition.
. src is the image’s source, or URL. You can change this value to change images
dynamically.
For most purposes, the src attribute is the only one you’ll use. The image object has
no methods. It does have three event handlers you can use:
. The onLoad event occurs when the image finishes loading. (Because the
onLoad event for the entire document is triggered when all images have fin-
ished loading, it’s usually a better choice.)
. The onAbort event occurs if the user aborts the page before the image is
loaded.
. The onError event occurs if the image file is not found or corrupt.
Although changing image sources works fine, you can also use the W3C DOM tocompletely remove or replace image objects, or insert new ones, just like anyother object.
Preloading ImagesYou can also create an independent image object. This enables you to specify an
image that will be loaded and placed in the cache, but will not be displayed on the
page.
This might sound useless, but it’s a great way to work with modem-speed connec-
tions. After you’ve preloaded an image, you can replace any of the images on the
page with that image—and because it’s already cached, the change happens
instantly. Even on a fast connection, this avoids flickering and makes animation
smoother.
By theWay
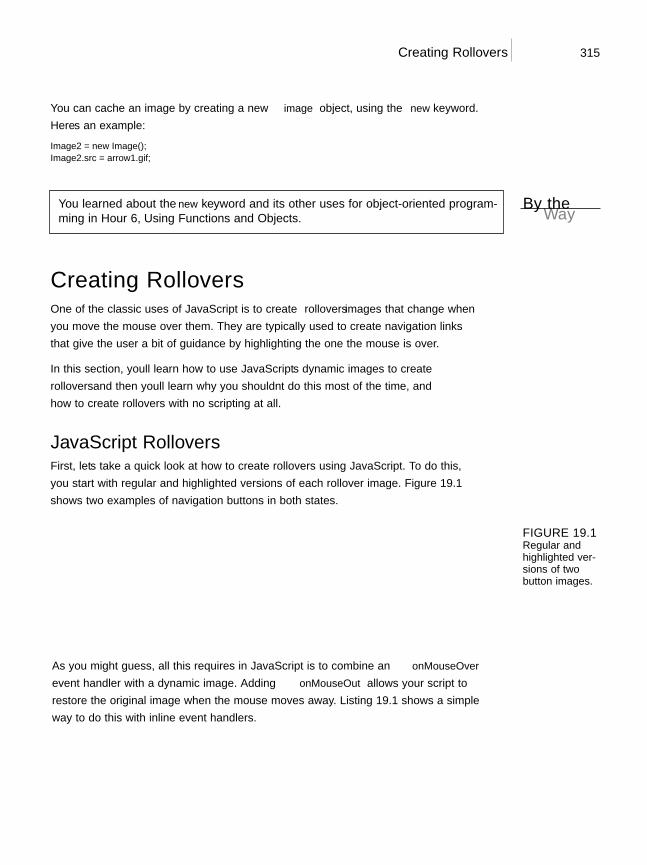
Creating Rollovers 315
You can cache an image by creating a new image object, using the new keyword.
Here’s an example:
Image2 = new Image();Image2.src = “arrow1.gif”;
You learned about the new keyword and its other uses for object-oriented program-ming in Hour 6, “Using Functions and Objects.”
Creating RolloversOne of the classic uses of JavaScript is to create rollovers—images that change when
you move the mouse over them. They are typically used to create navigation links
that give the user a bit of guidance by highlighting the one the mouse is over.
In this section, you’ll learn how to use JavaScript’s dynamic images to create
rollovers—and then you’ll learn why you shouldn’t do this most of the time, and
how to create rollovers with no scripting at all.
JavaScript RolloversFirst, let’s take a quick look at how to create rollovers using JavaScript. To do this,
you start with regular and highlighted versions of each rollover image. Figure 19.1
shows two examples of navigation buttons in both states.
By theWay
FIGURE 19.1Regular andhighlighted ver-sions of twobutton images.
As you might guess, all this requires in JavaScript is to combine an onMouseOver
event handler with a dynamic image. Adding onMouseOut allows your script to
restore the original image when the mouse moves away. Listing 19.1 shows a simple
way to do this with inline event handlers.
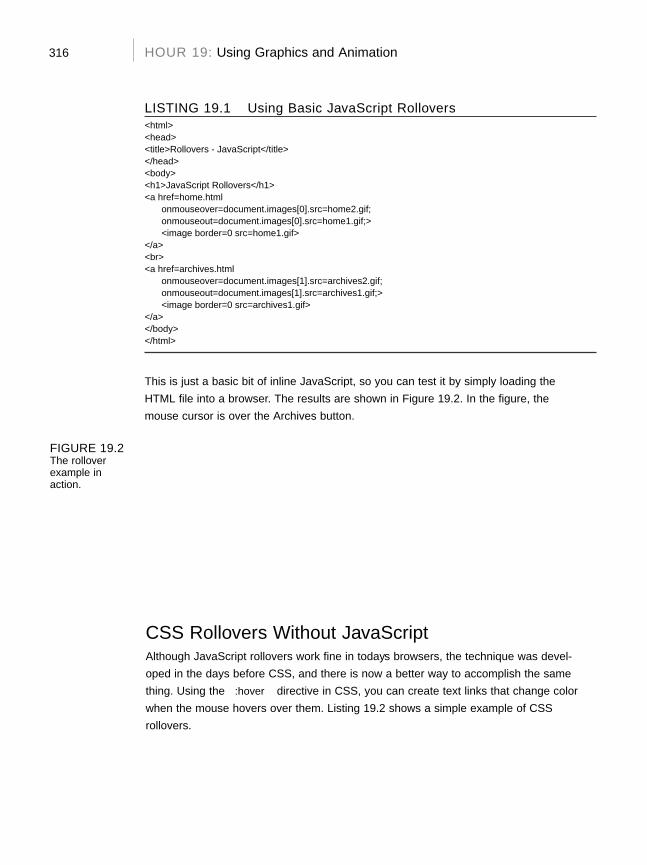
316 HOUR 19: Using Graphics and Animation
LISTING 19.1 Using Basic JavaScript Rollovers<html><head><title>Rollovers - JavaScript</title></head><body><h1>JavaScript Rollovers</h1><a href=”home.html”
onmouseover=”document.images[0].src=’home2.gif’;”onmouseout=”document.images[0].src=’home1.gif’;”><image border=”0” src=”home1.gif”>
</a><br><a href=”archives.html”
onmouseover=”document.images[1].src=’archives2.gif’;”onmouseout=”document.images[1].src=’archives1.gif’;”><image border=”0” src=”archives1.gif”>
</a></body></html>
This is just a basic bit of inline JavaScript, so you can test it by simply loading the
HTML file into a browser. The results are shown in Figure 19.2. In the figure, the
mouse cursor is over the Archives button.
FIGURE 19.2The rolloverexample inaction.
CSS Rollovers Without JavaScriptAlthough JavaScript rollovers work fine in today’s browsers, the technique was devel-
oped in the days before CSS, and there is now a better way to accomplish the same
thing. Using the :hover directive in CSS, you can create text links that change color
when the mouse hovers over them. Listing 19.2 shows a simple example of CSS
rollovers.
Creating Rollovers 317
LISTING 19.2 JavaScript-Free Rollovers with CSS<html><head><title>Rollovers - CSS</title><style>#home,#archives {
font-size: 30px;text-decoration: none;
}#home:hover, #archives:hover {
background-color: #AAAAAA;}</style></head><body><h1>JavaScript-Free Rollovers</h1><a id=”home” href=”home.html”><b>Home</b></a><br><a id=”archives” href=”archives.html”><b>Archives</b></a></body></html>
To try this example, simply load the HTML document into a browser. When you
move the mouse over the links, their background color changes from white to gray.
This example is shown in Figure 19.3.
FIGURE 19.3Simple CSS-onlyrollovers.
This isn’t as fancy as the JavaScript rollovers, but it has some advantages—first of all,
it doesn’t require JavaScript. Second, the links are actual text—this means they’ll work
even in text-based browsers, primitive mobile phone browsers, and voice-reading
browsers for the blind, although the rollover effects won’t work in these situations.
Third, the page loads faster, and you can add more links without creating graphics.
Graphic CSS RolloversSuppose you’re really attached to the nifty graphic look of the first rollover example.
Before you do something like that, take a look at Listing 19.3. This listing uses CSS
to implement graphic rollovers, which look and work exactly like Figure 19.2, with
no JavaScript.
318 HOUR 19: Using Graphics and Animation
LISTING 19.3 Graphic Rollovers with CSS<html><head><title>Rollovers - CSS</title><style>#home {
display: block;height: 60px;width: 126px;background-image: url(“home1.gif”);
}#home:hover {
background-image: url(“home2.gif”);}#archives {
display: block;height: 60px;width: 168px;background-image: url(“archives1.gif”);
}#archives:hover {
background-image: url(“archives2.gif”);}#home b, #archives b {
display: none;}</style></head><body><h1>JavaScript-Free Rollovers</h1><a id=”home” href=”home.html”><b>Home</b></a><br><a id=”archives” href=”archives.html”><b>Archives</b></a></body></html>
Here’s a summary of how the CSS works:
. The #home and #archives rules, which match the id attribute of the two
links, set their display attribute to block and the width and height attrib-
utes to allow the links to be as large as their corresponding graphics. They
then use the background-image property to display the unhighlighted graph-
ics (home1.gif and archives1.gif).
. The #home:hover and #archives:hover rules change the background images
to the highlighted versions (home2.gif and archives2.gif).
. The #home b and #archives b rule hides the text of the links within the <b>
tags. This prevents the text from appearing on top of the graphics.
A Simple JavaScript Slideshow 319
Notice that the HTML portion of this example is identical to the previous example,
and it will work exactly the same on text-based browsers and browsers with
JavaScript turned off. Users with modern browsers will see the graphic versions of
the links instead. This gives you the look of graphic rollovers without JavaScript,
and without compromising accessibility.
Another reason to use this type of rollover: Because the links are still in the HTMLas text, search engines see them as ordinary links, and can do a better job ofindexing your site. See Hour 15, “Unobtrusive Scripting,” for more information onaccessibility and search engine optimization.
A Simple JavaScript SlideshowSuppose you wanted to create a simple picture slideshow using JavaScript: The page
displays the first picture, and when you click on it the next picture replaces it. You
can continue to click and view all of the pictures in the slideshow. The obvious way
to do this is to change the .src attribute of an image object, and that will work
fine—but here you’ll take a look at a different approach that uses the W3C DOM to
make a more flexible slideshow.
The HTML FileFirst, you’ll need an HTML document that defines the page and where the images
will appear. Before you start on the scripting, take a look at the HTML file in Listing
19.4.
LISTING 19.4 The HTML File for the Slideshow<html><head><title>Image Slideshow Test</title>
<script language=”javascript” type=”text/javascript”src=”slideshow.js”>
</script></head><body><h1>Image Slideshow Test</h1><img class=”slide” src=”pic1.jpg” width=”400” height=”300”><img class=”slide” src=”pic2.jpg” width=”400” height=”300”><img class=”slide” src=”pic3.jpg” width=”400” height=”300”><img class=”slide” src=”pic4.jpg” width=”400” height=”300”><img class=”slide” src=”pic5.jpg” width=”400” height=”300”><p>Click the image to view the next slide.</p></body></html>
By theWay
320 HOUR 19: Using Graphics and Animation
You might notice something peculiar about this document: All five of the images are
included with <img> tags. If you load the document into a browser before you add
the JavaScript file, you’ll see all five images on the page at once.
The slideshow.js script is included with the <script> tag in the header. This script
will hide all but the first image, and allow the images to be shown one at a time.
This is an example of unobtrusive scripting—users without JavaScript can see the
images just fine, although they’ll have to scroll the page, and they’ll miss the nifty
slideshow feature.
Because the markup of this example uses ordinary <img> tags, we’ve used a special
class=”slide” attribute on the slide images. The script will check for this class to
determine which images belong to the slideshow because there’s a good chance
you’ll have other images on the page.
This is a flexible way to create a slideshow—you can change the order of the slides
simply by rearranging the HTML, and you can add more slides just by adding more
images with the right class value.
See Hour 15 for more information about keeping JavaScript unobtrusive andoptional.
The JavaScript FileThe script that brings the slideshow to life is shown in Listing 19.5. The script consists of
two basic functions: MakeSlideShow(), which rearranges the images into a slideshow,
and NextSlide(), which responds to a click and advances to the next image.
LISTING 19.5 The JavaScript File for the Slideshowvar numslides=0,currentslide=0;var slides = new Array();function MakeSlideShow() {
// find all images with the class “slide”imgs=document.getElementsByTagName(“img”);for (i=0; i<imgs.length; i++) {
if (imgs[i].className != “slide”) continue;slides[numslides]=imgs[i];// hide all but first imageif (numslides==0) {
imgs[i].style.display=”block”;} else {
imgs[i].style.display=”none”;}imgs[i].onclick=NextSlide;numslides++;
} // end for loop
By theWay
A Simple JavaScript Slideshow 321
} // end MakeSlideShow()function NextSlide() {
slides[currentslide].style.display=”none”;currentslide++;if (currentslide >= numslides) currentslide = 0;slides[currentslide].style.display=”block”;
}// create the slideshow when the page loadswindow.onload=MakeSlideShow;
Let’s take a look at how this script works:
. The first lines define three global variables: numslides to store the current
number of slides, currentslide to keep track of the current slide, and the
slides array to store the image objects for each slide.
. The MakeSlides() function starts by using getElementsByTagName() to find
all of the images on the page, and iterates through the array with a for loop.
The first if statement in the loop checks the className attribute of the
image, and if it does not belong to the slide class, the loop is continued with-
out any action.
. The next statements store the image in the slides array, and then check num-
slides for a value of zero, meaning the first image in the array. For the first
image, the display attribute is set to block; for all others, display is set to
none so that only one image is visible at a time.
. The final statements in the loop set the image’s onclick event handler to the
NextSlide() function and increment the numslides variable.
. The NextSlide() function first hides the current slide by setting its display
property to none. Next, it increments currentslide. The if statement resets
currentslide to zero when the last slide is clicked on. Finally, the new slide is
displayed by setting its display property to block.
. The final line of the script sets an onLoad event handler for the window to run
the MakeSlideShow() function. This rearranges the images into a slideshow as
soon as the page loads.
To test the script, save it as slideshow.js in the same folder as the HTML document
you created previously, and load the HTML document into a browser. Figure 19.4
shows the script in action with the first image displayed.
LISTING 19.5 Continued
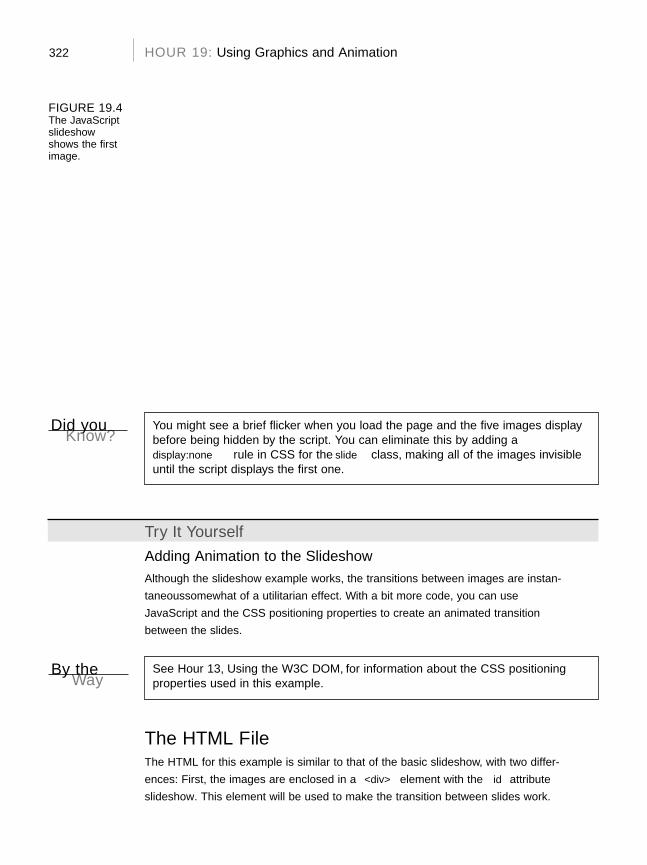
▼
322 HOUR 19: Using Graphics and Animation
You might see a brief flicker when you load the page and the five images displaybefore being hidden by the script. You can eliminate this by adding adisplay:none rule in CSS for the slide class, making all of the images invisibleuntil the script displays the first one.
Try It Yourself
Adding Animation to the SlideshowAlthough the slideshow example works, the transitions between images are instan-
taneous—somewhat of a utilitarian effect. With a bit more code, you can use
JavaScript and the CSS positioning properties to create an animated transition
between the slides.
See Hour 13, “Using the W3C DOM,” for information about the CSS positioningproperties used in this example.
The HTML FileThe HTML for this example is similar to that of the basic slideshow, with two differ-
ences: First, the images are enclosed in a <div> element with the id attribute
“slideshow”. This element will be used to make the transition between slides work.
FIGURE 19.4The JavaScriptslideshowshows the firstimage.
Did youKnow?
By theWay
A Simple JavaScript Slideshow 323
Second, a <link> tag in the header specifies a style sheet, slideshow2.css, because
this example will require some CSS styles. The HTML document is shown in Listing
19.6.
LISTING 19.6 The HTML File for the Animated Slideshow<html><head><title>Animated Slideshow Test</title>
<script language=”javascript” type=”text/javascript”src=”slideshow2.js”>
</script><link rel=”stylesheet” type=”text/css” href=”slideshow2.css”></head><body><h1>Animated Slideshow Test</h1><div id=”slideshow”><img class=”slide” src=”pic1.jpg” width=”400” height=”300”><img class=”slide” src=”pic2.jpg” width=”400” height=”300”><img class=”slide” src=”pic3.jpg” width=”400” height=”300”><img class=”slide” src=”pic4.jpg” width=”400” height=”300”><img class=”slide” src=”pic5.jpg” width=”400” height=”300”></div><p>Click the image to view the next slide.</p></body></html>
As before, if you load this document into a browser without the JavaScript or CSS
files, it will display all five images on the page.
The CSS FileYou’ll need a bit of CSS to set things up for the slideshow. The style sheet will set the
initial position of the images and set the positioning properties so that the anima-
tion will work. The CSS file for this example is shown in Listing 19.7. Save the file as
slideshow2.css in the same folder as the HTML document you created previously.
LISTING 19.7 The CSS File for the Animated Slideshowimg.slide {
position: absolute;left:0;top:0;
}#slideshow {
position: relative;overflow: hidden;width: 400;height: 300;
}
324 HOUR 19: Using Graphics and Animation
The #slideshow rule defines the styles for the <div> element that encloses the
images. The position: relative rule enables positioning for the element and its
children, while leaving it where it landed in the page by default. The overflow
property hides the part of an image that lies outside the <div>, so the new image
can “slide in” from the side. Finally, the width and height properties make the
<div> as large as the images so that the slideshow is always one size.
The img.slide rule sets up the styles for the images themselves. The position prop-
erty is set to absolute. In combination with the relative value on the <div>, this
means that the image is positioned relative to its parent. It is set to left: 0 and
top: 0, which positions each image at the upper-left corner of the <div>—to begin,
all of the images will be on top of each other, so only one will be visible.
Instead of using the display property, the animated slideshow will use the z-index
property (zIndex in JavaScript). This controls which of the overlapping images is
“on top.” To change slides, the script will set the new image to be on the top of the
stack and position it off the right edge of the <div>, and then gradually slide both
the old and new slides to the left until the new one is the only one visible.
The JavaScript FileNow that you have the HTML and CSS files, all that remains is the script. Listing
19.8 shows the JavaScript file for the animated slideshow.
LISTING 19.8 The JavaScript File for the Animated Slideshow// Global variablesvar numslides=0;var currentslide=0,oldslide=4;var x = 0;var slides = new Array();function MakeSlideShow() {
// find all images with the class “slide”imgs=document.getElementsByTagName(“img”);for (i=0; i<imgs.length; i++) {
if (imgs[i].className != “slide”) continue;slides[numslides]=imgs[i];// stack images with first slide on topif (numslides==0) {
imgs[i].style.zIndex=10;} else {
imgs[i].style.zIndex=0;}imgs[i].onclick=NextSlide;numslides++;
} // end for loop} // end MakeSlideShow()function NextSlide() {
// Set current slide to be under the new top slideslides[currentslide].style.zIndex=9;
A Simple JavaScript Slideshow 325
// Move older slide to the bottom of the stackslides[oldslide].style.zIndex=0;oldslide = currentslide;currentslide++;if (currentslide >= numslides) currentslide = 0;// start at the right edgeslides[currentslide].style.left=400;x=400; // Move the new slide to the topslides[currentslide].style.zIndex=10;AnimateSlide();
}function AnimateSlide() {
// Lower moves slower, higher moves fasterx = x - 25;slides[currentslide].style.left=x;// previous image moves off the left edge// (comment the next line for a different effect)slides[oldslide].style.left=x-400;// repeat until slide is at zero positionif (x > 0) window.setTimeout(“AnimateSlide();”,10);
}// create the slideshow when the page loadswindow.onload=MakeSlideShow;
Here’s how this script differs from the original slideshow script:
. An oldslide global variable has been added to keep track of the previousslide, so it can be moved out as the new slide moves in. Another global vari-able, x, will store the current horizontal position of the sliding image.
. Instead of using the display property, the MakeSlideShow() function sets thezIndex property to 10 for the first image and to zero for the others.
. The NextSlide() function works differently. First, it sets the current slide’szIndex property to 9, so it is the second one in the stack. (See the Did YouKnow? sidebar at the end of this section for the reason.) Next, it sets zIndex tozero for the old slide to move it to the bottom. It then assigns the oldslidevalue for next time, and increments the current slide as before.
. NextSlide() finishes by setting the new slide’s left property to 400, and thex variable to the same value. The slide will start off the right edge of the<div> and gradually become visible as it moves to the left. It then sets zIndexto 10 for the new slide to put it on top of the stack. Last, it calls the newAnimateSlide() function to make the transition.
. AnimateSlide() handles the animation. It starts by subtracting 25 from thevalue of x and setting the current slide’s left property to that value. It alsosets the position of the old slide 400 pixels to the left of the current one, so itslides out of the frame as the new one slides in.
LISTING 19.8 Continued
326 HOUR 19: Using Graphics and Animation
. The last line in AnimateSlide() checks x, and if it has not yet reached zero, it
uses setTimeout() to call itself after a brief (10 millisecond) delay. This func-
tion will be called repeatedly until the new slide reaches its final resting place
on the left side.
The reason for setting the old slide’s zIndex to 9 instead of 10 is to allow you totry a different transition effect. If you remove the slides[oldstyle].style.leftassignment in AnimateSlide(), the old slide will stay in one place while the newslide moves over it.
Putting It All TogetherTo try out the animated slideshow, make sure you have all three files in the same
folder: the HTML document, the style sheet (slideshow2.css), and the JavaScript
file (slideshow2.js). Load the HTML document into a browser; then click on the
image to advance the slideshow.
The AnimateSlide() function uses a lot of code, but on a reasonably fast machine,
the transition will be very fast, taking about half a second. If you want to slow it
down to see what’s going on, change the 25 value in AnimateSlide() to a lower
number—a value of 1 will make the transition extremely slow. Figure 19.5 shows the
slideshow in action, halfway between the first slide and the second.
Did youKnow?
FIGURE 19.5The animatedslideshow inaction.
▲
Summary 327
SummaryIn this hour, you learned some techniques for working with graphics in JavaScript.
You learned how to use dynamic images to create rollovers, and how to use CSS for
JavaScript-free rollovers. Finally, you created a script to turn any group of images on
a page into an animated slideshow.
In the next hour, you’ll look at how JavaScript works with plug-ins, particularly
Flash, and learn how to add sounds to your scripts.
Q&AQ. Isn’t it possible to make JavaScript rollovers unobtrusive?
A. Yes, you could use a separate JavaScript file and do JavaScript rollovers “the
right way.” You would still have image links instead of text links, but aside
from that it’s arguably no worse than CSS rollovers. JavaScript rollovers can
also go beyond what CSS can do—for example, the links could change in an
animated way rather than simply changing graphics.
Q. Can JavaScript work with any type of image?
A. Yes, JavaScript’s dynamic image features (and the W3C DOM features you
used in the slideshow) will work fine with GIF, JPG, and PNG (Portable
Network Graphics, the newest standard) images.
Q. Why doesn’t the slideshow example require preloading images for fast tran-sitions?
A. Because the images are all on the page in the HTML document, they are
loaded with the page, although the JavaScript immediately hides them. Thus,
they’re available instantly when the slideshow switches them.
Q. How do I speed up the transitions in the animated slideshow?
A. There are two ways: Either increase the amount subtracted from x, or reduce
the timeout in the setTimeout statement. Subtracting too much can make the
transition jerky, and timeouts below 10 aren’t handled well by browsers, so
experiment with your changes to reach the best compromise.
328 HOUR 19: Using Graphics and Animation
Quiz QuestionsTest your knowledge of JavaScript graphics by answering the following questions.
1. Which property of an image object stores the filename of the image?
a. href
b. filename
c. src
2. Which of the following languages cannot be used to implement rollovers?
a. HTML
b. CSS
c. JavaScript
3. If image1 is the object for an image on the page, which of the following wouldyou modify to change the image’s horizontal position?
a. image1.left
b. image1.style.left
c. image1.style.xPosition
Quiz Answers1. c. The src property of the image stores its filename.
2. a. You can create rollovers using JavaScript or CSS, but it can’t be done inplain HTML.
3. b. The style.left property controls the image’s horizontal position.
ExercisesIf you want to gain more experience working with graphics in JavaScript, try the fol-lowing exercises:
. Change the animated slideshow example to move the slides downwardinstead of right to left to make the transition. You’ll need to change thestyle.top property instead of style.left.
. Firefox and some other browsers support a CSS 3 property, style.opacity,which controls how opaque an element is, with a value of 100 being com-pletely opaque and a value of 0 being completely transparent. Try changingthe animated slideshow to fade the new slide in from 0 to 100 rather thanslide it in from right to left.

HOUR 20
Working with Sound and Plug-Ins
What You’ll Learn in This Hour:. How browser plug-ins work. How JavaScript works with plug-ins. Scripting objects in plug-ins. Integrating JavaScript and Flash. Testing JavaScript’s sound support. Creating an application using sounds
Browser plug-ins enable the browser to work with sounds, printer-ready documents, and
other formats instead of being limited to HTML. JavaScript can connect with some plug-
ins to add interactive features. In this hour, you’ll explore JavaScript’s plug-in support and
look specifically at playing sounds.
Introducing Plug-InsPlug-ins were introduced by Netscape in Navigator 3.0. Rather than adding support direct-
ly to the browser for media types such as formatted text, video, and audio, Netscape creat-
ed a modular architecture that allows programmers to write their own browser add-ons for
these features.
There are now hundreds of plug-ins available for Netscape, Firefox, and Internet Explorer.
Here are a few of the most popular:
. Macromedia’s Shockwave and Flash plug-ins support animation and video.
. Adobe’s Acrobat plug-in supports precisely formatted, cross-platform text.
330 HOUR 20: Working with Sound and Plug-Ins
. Apple’s QuickTime plug-in supports many audio and video formats.
. RealPlayer supports streaming audio and video.
Firefox and Internet Explorer use different plug-in formats and usually require dif-
ferent versions of a plug-in. Additionally, some plug-ins are available only for one
platform, such as Windows or Macintosh.
The <embed> and <object> TagsBrowsers support two tags for plug-ins, <embed> and <object>. The following is an
example of the <embed> tag that embeds a sound in a page:
<embed src=”sound.wav” autostart=”false” loop=”false”>
This example uses the sound.wav file. It sets two parameters: autostart controls
whether the sound automatically plays when the page loads, and loop controls
whether the sound repeats after it plays the first time. The parameters supported
depend on the plug-in being used.
A more standard tag, <object>, is part of the HTML 4.0 specification. Here’s the
same sound file using <object>:
<object type=”audio/x-wav” data=”sound.wav” width=”100” height=”50”><param name=”src” value=”sound.wav”><param name=”autostart” value=”false”>
</object>
Although <object> is a more standard way of embedding a file, most currentbrowsers still support <embed>, which works better in some cases. Always try yourpages that use plug-ins in different browsers to make sure they work.
Understanding MIME TypesMultipurpose Internet Mail Extensions types (MIME) is a standard for classifying dif-
ferent types of files and transmitting them over the Internet. The different types of
files are known as MIME types.
You’ve already worked with a few MIME types: HTML (MIME type text/html), text
(MIME type text/plain), and GIF images (MIME type image/gif). The <script>
tag also uses a MIME type to indicate the language: text/javascript. Although
web browsers don’t normally support many more than these types, external applica-
tions and plug-ins can provide support for additional types.
Did youKnow?

Introducing Plug-Ins 331
When a web server sends a document to a browser, it includes that document’s
MIME type in the header. If the browser supports that MIME type, it displays the file.
If not, you’re asked what to do with the file (such as when you click on a .zip or
.exe file to download it).
How JavaScript Works with Plug-InsSome plug-ins, such as the sound plug-ins you’ll use later this hour, support scripting
with JavaScript. Scripting plug-ins works just like scripting the DOM: You assign an id
attribute to the <embed> or <object> tag, and then use document.getElementById()
to find the object corresponding to the embedded item.
After you’ve found the object, what you can do with it depends on the file type and
the plug-in. For example, most sound plug-ins support a Play() method. Here’s an
example that finds an embedded sound with the id attribute sound1 and plays the
sound:
obj = document.getElementById(“sound1”);obj.Play();
Because plug-in methods are not part of the standard DOM, you’ll need to consult
the plug-in’s documentation to find out what methods are supported and what your
script can do with the embedded object.
Plug-In Feature SensingAny time you work with plug-ins, it’s important to remember that not all browsers
will have the needed plug-in installed. Although both Firefox and Internet Explorer
will attempt to notify users and let them know where to install the plug-in, expect-
ing users to install software just to view your site is a bit optimistic.
Instead, you should use feature sensing to use the plug-in only when it is supported.
For example, you could check for the Play() method like this:
if (obj.Play) {obj.Play();
} else alert(“Can’t Play.”);
A more sophisticated method that handles errors as well as feature sensing is pre-
sented later in this hour.
Feature sensing is the same technique you’ve used to make sure browsers sup-port the W3C DOM. See Hour 15, “Unobtrusive Scripting,” for information on fea-ture sensing.
By theWay
332 HOUR 20: Working with Sound and Plug-Ins
JavaScript and FlashAdobe (formerly Macromedia) Flash is the Web’s most popular format for movies
and interactive content that require a bit more graphical splendor than HTML and
JavaScript can provide. Flash’s programming language is similar to JavaScript, and
JavaScript can work with Flash.
ActionScriptIf you program scripts for a Flash movie, you use a language called ActionScript.
You may find that ActionScript has a strong similarity to JavaScript, and for good
reason—the version of ActionScript used in Flash 5.0 and later is based on the same
ECMAScript standard that specifies the syntax for JavaScript.
Although the language is the same, Flash programming is quite different from writ-
ing JavaScript for the Web—you are scripting Flash objects rather than working with
the DOM. However, you’ll find that the basic syntax of the language is the same,
which makes it easy for a JavaScript programmer to work with Flash when its capa-
bilities are needed.
JavaScript and Flash CommunicationJavaScript and Flash can communicate and work together. Adobe’s Flash/JavaScript
Integration Kit, available as a free download, enables JavaScript to call ActionScript
functions within Flash objects, and also enables Flash scripts to call JavaScript func-
tions within the page that contains them.
The Flash/JavaScript Integration Kit works best with Flash Player 6.0 or later,
although it also includes basic support for earlier versions of Flash. If you are devel-
oping a Flash application and need it to communicate with JavaScript, you can
download the kit from http://weblogs.macromedia.com/flashjavascript/.
If you’re using an existing Flash object, the author might have already set it up to
work with JavaScript, in which case it will have a list of methods available like other
plug-in objects.
Embedding Flash with JavaScriptOne other common use of JavaScript with Flash is to use JavaScript to generate the
<object> or <embed> tag to embed a Flash object. Although you could use HTML
directly, using JavaScript enables you to sidestep Internet Explorer’s warning dialog
that pops up whenever an embedded object is in use. JavaScript can also pass
parameters, such as the user’s screen size, to Flash by writing them into the <embed>
or <object> tag.
Playing Sounds with JavaScript 333
Microsoft added the warning dialog for embedded objects in response to a patentdispute. See the Try It Yourself section later this hour for an example that usesJavaScript to embed objects in a page and avoid this warning.
Playing Sounds with JavaScriptAlthough the W3C DOM has made advanced effects and applications possible in
JavaScript in a painless, cross-browser fashion, no standard has emerged to do the
same for JavaScript’s sound support. There are a few ways of making JavaScript play
sounds, and none of them work consistently in all browsers all of the time.
Nonetheless, with a bit of effort, you can play sounds in most browsers.
Because sound support in browsers is inconsistent, there’s no guarantee yoursounds will work for everyone. Be sure any sound you use in JavaScript applica-tions is optional and that the script still works even on browsers that won’t playthe sounds.
Sound FormatsThere are a wide variety of sound formats, usually identified by their file extensions.
The following are some of the most common sound formats on the Web:
. .au (Audio Unit)—The earliest sound format supported by browsers, and still
the most widely supported. Some browsers have built-in support for this for-
mat. In Firefox, the QuickTime plug-in supports .au files.
. .wav—The standard Windows sound format (usually played by Media Player
on Windows machines).
. .mp3—A compressed format for larger files, such as music. MP3 plug-ins are
not included with most browsers, but are often installed by users.
. .mid (MIDI)—Rather than audio, MIDI files store note information to re-cre-
ate a song using a standard set of instruments. Most computers support MIDI
music, although a browser plug-in might be required.
Any of these formats can be supported by most browsers, but unfortunately there is
no format that is universally supported. If you’re hoping as many visitors as possi-
ble will be able to hear your sounds, the best choice is .au if you’re using standard
audio plug-ins, or .mp3 if you’re using Flash.
Did youKnow?
By theWay
334 HOUR 20: Working with Sound and Plug-Ins
Sound-Playing Plug-InsBrowsers almost always require a plug-in to play sounds. Fortunately, sound plug-
ins are widely used and many of your site’s visitors already have one or more of
them installed. Here are the most common sound-playing plug-ins:
. QuickTime—Apple’s sound and video player, installed by default on
Macintosh systems. QuickTime plug-ins are also available for Internet
Explorer for Windows and for Firefox on Windows and Macintosh.
. Windows Media Player—Microsoft’s sound and video player, installed by
default on Windows systems.
. RealPlayer—A popular third-party plug-in for playing music and video, avail-
able from http:// www.real.com.
. Flash—Although the Flash plug-in doesn’t play standard embedded sounds,
Flash animations and movies can play sounds, as you’ll learn later in this
section.
Embedding SoundsThe following is a simple example of an <embed> tag to embed a sound in a page:
<embed id=”note_c1” src=”c1.au” width=”0” height=”0”autostart=”false” enablejavascript=”true”/>
This example works with the most common sound plug-ins. It specifies a source file-
name for the sound file (c1.au) and autostart=”false” to prevent the sound from
playing when the page loads. The enablejavascript parameter is required by
some plug-ins to allow scripting.
The width and height parameters set the size of the embedded player. If they are
not zero, the player will be visible with Play, Pause, and Stop buttons. Setting them
to zero hides the player, useful when you intend to control it strictly with JavaScript.
(A hidden parameter is supposed to hide the player, but this causes sounds not to
play in some browsers.)
Controlling Sounds with JavaScriptAfter you’ve embedded a sound—assuming a browser plug-in supports it—you can
use the following methods of the sound object to control the sound:
. Play() or DoPlay()—Starts playing the sound, and stops when the sound is
finished. DoPlay() is supported by RealPlayer, and Play() is supported by
most other sound plug-ins.
Playing Sounds with JavaScript 335
. Stop()—Stops the currently playing sound.
. Rewind()—Restarts the current sound at the beginning.
Depending on the audio plug-in in use, the methods supported might be different.Always use try and catch when attempting to control sounds to avoid errors.
Detecting Sound SupportBecause you can’t count on sounds being supported by all browsers, it’s a good prac-
tice to use try and catch to test the statements and display a message (or take
another appropriate action) if sounds are not supported:
try {sound.DoPlay();
} catch (e) {try {sound.Play();
} catch (e) {alert(“No sound support.”);
}}
This code first tries RealPlayer’s DoPlay() method. If that doesn’t work, it tries the
Play() method. If neither approach works, it displays an error message.
The try and catch keywords are used to test a risky statement, find out whetherit works, and suppress the browser’s usual error messages. See Hour 16,“Debugging JavaScript Applications” for more information.
Using FlashIf you are relying on sounds for an application, you might want to consider using
Flash. You can create a simple Flash object that loads sound files and allows
JavaScript to play them. This gives you scriptable sounds using one consistent plug-
in that works on most platforms.
Scott Schiller’s SoundManager provides an easy way to use Flash sounds from
JavaScript. SoundManager uses a Flash object to play MP3-formatted sounds you
specify in an XML file. After you’ve created the XML file and included
SoundManager using a <script> tag, you can use its methods to control the
sounds. More information and the download for SoundManager are available at
http://www.schillmania.com/projects/soundmanager/.
WatchOut!
By theWay
336 HOUR 20: Working with Sound and Plug-Ins
Testing Sounds in JavaScriptYou can now create a simple example that uses JavaScript to play a sound. Listing
20.1 shows an HTML document with an embedded script to play a sound when you
click a button.
LISTING 20.1 A Simple Example of Playing Sounds Using JavaScript<html><head><title>Sound Test</title><script language=”JavaScript” type=”text/javascript”>function PlaySound() {var sound = document.getElementById(“note_c1”);try {// RealPlayersound.DoPlay();
} catch (e) {try {// Windows Media / Quicktimesound.Play();
} catch (e) {alert(“No sound support.”);
}}
}</script></head><body><h1>Sound Test</h1><embed id=”note_c1” src=”c1.au” width=”0” height=”0”autostart=”false” enablejavascript=”true”/>
<input type=”button” value=”Play the Sound”onClick=”PlaySound()”>
</body></html>
To try the example, you’ll need a sound file: the c1.au file is available at this book’swebsite, or you can substitute the .au format sound of your choice. Load the docu-ment into a browser and click the button to play the sound.
If you don’t hear a sound, or if the “No sound support” message is displayed, trylooking at the JavaScript Console in Firefox or clicking the error icon in the lower-left corner of the window in Internet Explorer. You might need to install a plug-in toget it to work.
Internet Explorer might display an alert message when you load the page, as shownin Figure 20.1. Due to a patent dispute, Microsoft made their browser require you toclick on something in order for embedded objects to work. Although this is only aminor annoyance in this example, it’s possible to eliminate it by using JavaScript towrite the <embed> tag. The Try It Yourself section of this hour includes an exampleof this technique.
▼
Testing Sounds in JavaScript 337
Try It Yourself
Playing Music with the MouseAs an example of scripting multiple embedded objects, you can create a simple
demonstration that displays a piano keyboard and plays piano notes when you
click on the keys. This example requires an .au sound file for each key, which you
can download from this book’s website.
The HTML DocumentThe HTML file for this document includes a series of <div> tags that will act as the
black and white piano keys. A <link> tag is used to include a CSS file to style the
keys, and a <script> tag includes a script you’ll create later in this section. The
complete HTML document is shown in Listing 20.2.
LISTING 20.2 The HTML Document for the Piano Example<html><head><title>JavaScript Piano</title><link rel=”stylesheet” type=”text/css” href=”piano.css”></head><body><h1>JavaScript Piano</h1><div class=”white” id=”c1”> </div><div class=”black” id=”cs1”> </div><div class=”white” id=”d1”> </div>
FIGURE 20.1Internet Explorerwarns youbefore enablingan embeddedobject.
338 HOUR 20: Working with Sound and Plug-Ins
<div class=”black” id=”ds1”> </div><div class=”white” id=”e1”> </div><div class=”white” id=”f1”> </div><div class=”black” id=”fs1”> </div><div class=”white” id=”g1”> </div><div class=”black” id=”gs1”> </div><div class=”white” id=”a1”> </div><div class=”black” id=”as1”> </div><div class=”white” id=”b1”> </div><div class=”white” id=”c2”> </div><p style=”clear:left”>Click the piano keys above to play sounds.</p><script language=”javascript” type=”text/javascript”src=”piano.js”> </script>
</body></html>
Type this document or download it from this book’s website and store it in the same
folder as the sound files. You’ll also need the CSS and JavaScript files described in
the next sections.
The CSS Style SheetUsing CSS, you can make the browser display the series of <div> tags in the HTML
document as something resembling piano keys. Listing 20.3 shows the CSS file for
this example.
LISTING 20.3 The CSS File for the Piano Example.white {float: left;background-color: white;height: 300px;width: 30px;border: 2px solid black;
}.black {float: left;background-color: black;height: 225px;width: 25px;
}
This file defines two styles for the two classes used in the HTML document, white
and black. The float attribute makes the keys appear as a horizontal set of boxes.
The size of the keys is set using width and height attributes, and background-
color sets the colors to differentiate the keys.
LISTING 20.2 Continued
Testing Sounds in JavaScript 339
Playing the SoundsThe PlaySound() function will be called when a key is clicked to play a sound. The
first lines of this function detect which key was clicked and use the id attribute of
the key <div> element to construct the id attribute of the corresponding sound:
function PlaySound(e) {if (!e) var e = window.event;// which key was clicked?thiskey = (e.target) ? e.target: e.srcElement;var sound = document.getElementById(“note_” + thiskey.id);
The remainder of PlaySound() will attempt to play the piano note using the try
and catch routine described earlier in this hour.
Embedding the SoundsThis example will use JavaScript document.write() statements to write out an
<embed> tag for each note. Although this is a roundabout way of doing things, it
conveniently avoids Internet Explorer’s warning dialog about embedded objects,
which would otherwise pop up 13 times—once for each embedded sound. Here are
the lines that write an <embed> tag:
document.write(‘<embed id=”’ + ‘note_’ + divs[i].id + ‘“‘);document.write(‘ src=”’ + divs[i].id + ‘.au” width=”0” height=”0”’);document.write(‘ autostart=”false” enablejavascript=”true”>’);
The src attribute of the <embed> tag is set using the id attribute of each <div> ele-
ment to embed the corresponding sound file for each key.
Putting It All TogetherTo get the piano working, you can combine the techniques discussed previously with
a bit more JavaScript. Listing 20.4 shows the JavaScript file for this example.
LISTING 20.4 The JavaScript File for the Piano Examplefunction Setup() {if (!document.getElementById) return;// Set up event handlers and embed the soundsdivs = document.getElementsByTagName(“div”);for (i=0; i<divs.length; i++) {// embed the appropriate sound using document.writedocument.write(‘<embed id=”’ + ‘note_’ + divs[i].id + ‘“‘);document.write(‘ src=”’ + divs[i].id + ‘.au” width=”0” height=”0”’);document.write(‘ autostart=”false” enablejavascript=”true”>’);// set up the event handlerdivs[i].onclick = PlaySound;
}}

340 HOUR 20: Working with Sound and Plug-Ins
function PlaySound(e) {if (!e) var e = window.event;// which key was clicked?thiskey = (e.target) ? e.target: e.srcElement;var sound = document.getElementById(“note_” + thiskey.id);try {// RealPlayersound.DoPlay();
} catch (e) {try {// Windows Media / Quicktimesound.Play();
} catch (e) {alert(“No sound support.”);
}}
}// Run the setup routine when this script executesSetup();
The Setup() function executes when the script loads. Because the <script> tag
appears after the <div> elements in the HTML file, it can set event handlers for each
<div> and write out the <embed> tags. Setup() uses
document.getElementsByTagName and a for loop to do this for each of the keys.
To test the piano, make sure you have everything in one folder: The HTML docu-
ment, the CSS file (piano.css), the JavaScript file (piano.js), and all 13 sound files.
The complete example is shown in Figure 20.2.
LISTING 20.4 Continued
FIGURE 20.2The JavaScriptpiano examplein action.
Quiz Questions 341
SummaryIn this hour, you learned about browser plug-ins and how they work with
JavaScript. You also learned about JavaScript’s support for sound (or the lack there-
of) and how you can use JavaScript to detect and work with common sound-playing
plug-ins. Finally, you created a piano keyboard with audio using JavaScript.
Congratulations—you’ve reached the end of Part V of this book. In part VI, you’ll
apply your JavaScript knowledge to create some complex applications. This begins
in Hour 21, “Building JavaScript Drop-Down Menus.”
Q&AQ. Is there a way to list all of the plug-ins installed in the browser?
A. Yes. Type about:plugins to display a list of plug-ins installed in Netscape or
Firefox. These browsers also support a proprietary navigator.plugins object,
an array that contains information about each installed plug-in, which you
can access with JavaScript. Unfortunately, this is not a standard part of the
DOM and is not supported by other browsers.
Q. Can I add sounds to a site’s navigation bar or user interface?
A. Yes, this can be done using the techniques in this hour and onMouseOver or
onClick event handlers. However, given the inconsistency of sound support in
browsers, this is a lot of trouble for a feature that will probably annoy your
visitors anyway.
Q. Can the browser play more than one sound at the same time?
A. This ultimately depends on the audio plug-in, but none of the current ones
support playing more than one sound at a time.
Quiz QuestionsTest your knowledge of JavaScript’s sound and plug-in features by answering the fol-
lowing questions.
1. Which HTML tag is often used to include a plug-in object within a web page?
a. <sound>
b. <embed>
c. <plugin>
342 HOUR 20: Working with Sound and Plug-Ins
2. Which of the following is not a sound-playing plug-in?
a. RealPlayer
b. QuickTime
c. Acrobat
3. Which is the correct statement to play a sound?
a. sound.Go();
b. sound.Play();
c. sound.Submit();
Quiz Answers1. b. The <embed> tag embeds a plug-in object in a page.
2. c. The Acrobat plug-in displays PDF files.
3. b. The Play() method plays a sound.
ExercisesIf you want to gain more experience working with sounds in JavaScript, try the fol-
lowing exercises:
. Expand the piano keyboard in Listing 20.2 to include more notes. (Additional
sound files are available from this book’s website.) You should only need to
change the HTML file.
. Try adding one or more sounds to the animated slideshow in the previous
hour (refer to Listing 19.8). You can adapt the PlaySound() function from this
hour to play a specific sound as the slideshow advances.
PART VI:
Creating Complex Scripts
HOUR 21 Building JavaScript Drop-down Menus 345
HOUR 22 Creating a JavaScript Game 359
HOUR 23 Creating JavaScript Applications 377
HOUR 24 Your Future with JavaScript 393

This page intentionally left blank

HOUR 21
Building JavaScriptDrop-Down Menus
What You’ll Learn in This Hour:. How to create drop-down menus using JavaScript. Defining menus using bullet lists. Using CSS to lay out menus. Using JavaScript to display and hide submenus. Using CSS to improve the menu’s appearance
Welcome to Part VI! Now that you’ve spent some time learning both beginning and
advanced JavaScript techniques, it’s time to put them into action with some more compli-
cated examples. In this hour, you’ll use HTML, CSS, and JavaScript to create a drop-down
menu navigation system.
Designing Drop-Down MenusOne of the most common uses for JavaScript and the DOM is to create drop-down menus,
similar to those used in Windows and MacOS, as a navigation system for a page. Figure
21.1 shows a drop-down menu in action.
Why use drop-down menus? Ideally, you should use them when a website or web applica-
tion has too many options to conveniently fit on the page. Adding a drop-down menu to a
site with only a few pages will just make it more confusing to visitors.
Another potential problem with drop-down menus is that they traditionally require some
messy browser-specific code and some awkward HTML markup. Thanks to the now stan-
dard W3C DOM, you can create menus using simple markup and a script that works in
all modern browsers.

346 HOUR 21: Building JavaScript Drop-Down Menus
Creating the HTML Markup’There will always be browsers that don’t support drop-down menus correctly—in
particular, mobile phone browsers are unlikely to work with this script. You can
avoid problems with compatibility by making an unobtrusive script using standard
markup. The HTML document for this example, shown in Listing 21.1, uses bullet
lists (<ul> and <li> tags) to organize the links into menus.
LISTING 21.1 The HTML for the Drop-Down Menu<html><head><title>A DOM drop-down menu</title><link rel=”stylesheet” type=”text/css” href=”dropdown.css”><script language=”javascript” type=”text/javascript”
src=”dropdown.js”></script></head><body><h1>Menu Test</h1><ul id=”menu”><li class=”menu”><a href=”#”>Home</a></li><li class=”menu”><a href=”#”>Products</a>
<ul><li><a href=”#”>Sub-item 1</a></li><li><a href=”#”>Sub-item 2</a></li><li><a href=”#”>Item 3</a></li></ul>
</li><li class=”menu”><a href=”#”>Support</a>
<ul><li><a href=”#”>Sub-item 1</a></li><li><a href=”#”>Sub-item 2</a></li></ul>
</li><li class=”menu”><a href=”#”>Employment</a>
<ul><li><a href=”#”>Sub-item 1</a></li><li><a href=”#”>Sub-item 2</a></li></ul>
</li><li class=”menu”><a href=”#”>Contact Us</a>
<ul><li><a href=”#”>Sub-item 1</a></li><li><a href=”#”>Sub-item 2</a></li></ul>
</li></ul></body></html>
FIGURE 21.1A drop-downmenu.

Designing Drop-Down Menus 347
The top-level links (Home, Products, Support, Employment, and Contact Us) are for-
matted as a bullet list. Most of the links have subitems, listed in a nested bullet list.
These subitems will be displayed as drop-down menus using CSS formatting and
JavaScript.
Although you have not yet created the CSS or JavaScript for this example, you can
try the HTML document in a browser—it will be displayed as a simple bullet list, as
shown in Figure 21.2.
Notice the class and id attributes in the HTML—these will be used by the CSS and
JavaScript code to format the menu and add behavior. The main <ul> tag that
encloses the top-level items has an id attribute of menu, and each top-level item’s
<li> tag has the class attribute menu.
FIGURE 21.2Without format-ting, the linksdisplay as bulletlists.
The links in this example all link to a nonexistent URL, #. To use the menu on yoursite, you’ll need to replace them with actual links.
Laying Out the Menu with CSSAs you can see in Figure 21.2, the list of links doesn’t look much like a drop-down
menu yet. You can now use CSS to format the links to appear in the right format.
WatchOut!
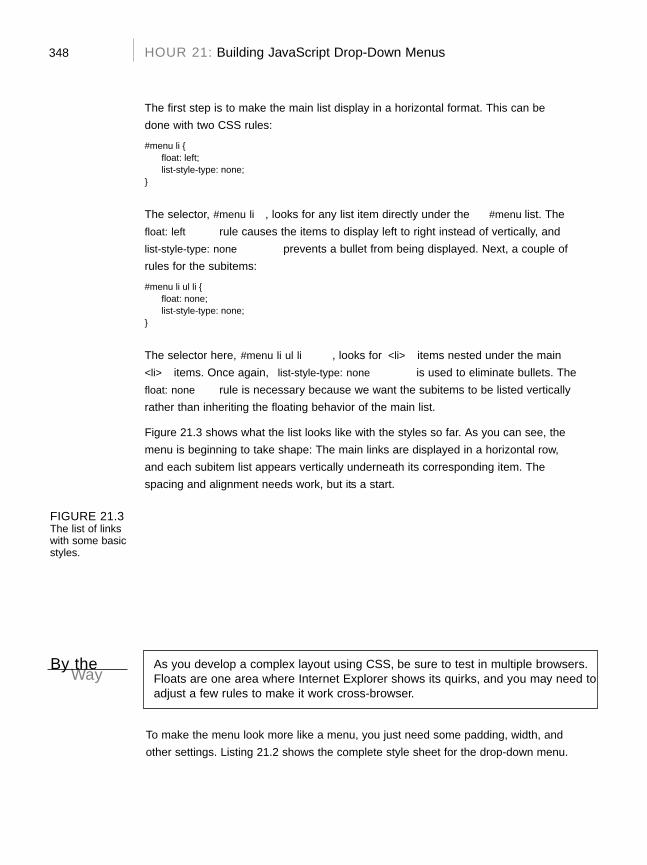
348 HOUR 21: Building JavaScript Drop-Down Menus
The first step is to make the main list display in a horizontal format. This can be
done with two CSS rules:
#menu li {float: left;list-style-type: none;
}
The selector, #menu li, looks for any list item directly under the #menu list. The
float: left rule causes the items to display left to right instead of vertically, and
list-style-type: none prevents a bullet from being displayed. Next, a couple of
rules for the subitems:
#menu li ul li {float: none;list-style-type: none;
}
The selector here, #menu li ul li, looks for <li> items nested under the main
<li> items. Once again, list-style-type: none is used to eliminate bullets. The
float: none rule is necessary because we want the subitems to be listed vertically
rather than inheriting the floating behavior of the main list.
Figure 21.3 shows what the list looks like with the styles so far. As you can see, the
menu is beginning to take shape: The main links are displayed in a horizontal row,
and each subitem list appears vertically underneath its corresponding item. The
spacing and alignment needs work, but it’s a start.
FIGURE 21.3The list of linkswith some basicstyles.
As you develop a complex layout using CSS, be sure to test in multiple browsers.Floats are one area where Internet Explorer shows its quirks, and you may need toadjust a few rules to make it work cross-browser.
To make the menu look more like a menu, you just need some padding, width, and
other settings. Listing 21.2 shows the complete style sheet for the drop-down menu.
By theWay
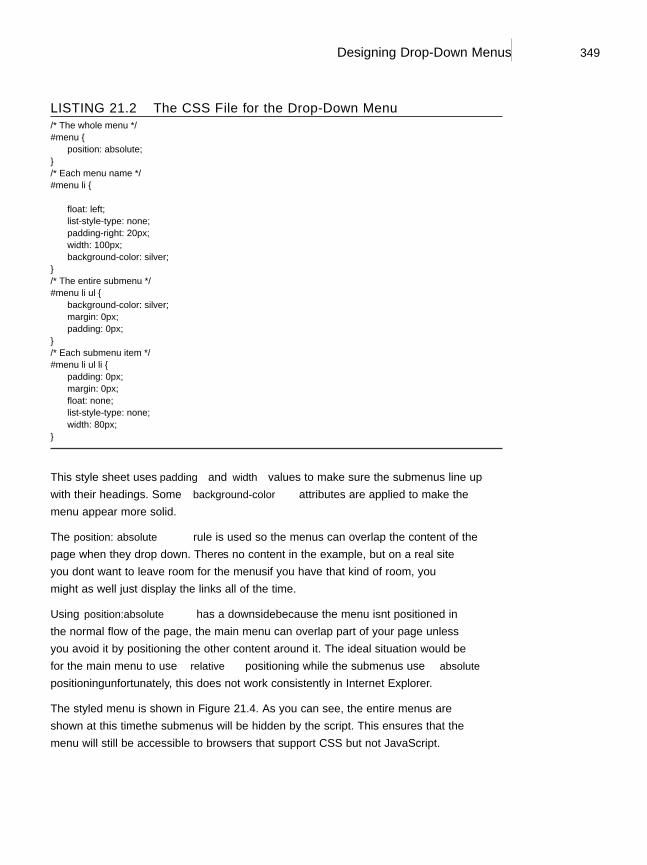
Designing Drop-Down Menus 349
LISTING 21.2 The CSS File for the Drop-Down Menu/* The whole menu */#menu {
position: absolute;}/* Each menu name */#menu li {
float: left;list-style-type: none;padding-right: 20px;width: 100px;background-color: silver;
}/* The entire submenu */#menu li ul {
background-color: silver;margin: 0px;padding: 0px;
}/* Each submenu item */#menu li ul li {
padding: 0px;margin: 0px;float: none;list-style-type: none;width: 80px;
}
This style sheet uses padding and width values to make sure the submenus line up
with their headings. Some background-color attributes are applied to make the
menu appear more solid.
The position: absolute rule is used so the menus can overlap the content of the
page when they drop down. There’s no content in the example, but on a real site
you don’t want to leave room for the menus—if you have that kind of room, you
might as well just display the links all of the time.
Using position:absolute has a downside—because the menu isn’t positioned in
the normal flow of the page, the main menu can overlap part of your page unless
you avoid it by positioning the other content around it. The ideal situation would be
for the main menu to use relative positioning while the submenus use absolute
positioning—unfortunately, this does not work consistently in Internet Explorer.
The styled menu is shown in Figure 21.4. As you can see, the entire menus are
shown at this time—the submenus will be hidden by the script. This ensures that the
menu will still be accessible to browsers that support CSS but not JavaScript.
350 HOUR 21: Building JavaScript Drop-Down Menus
When the script is added, the full menus will display for an instant before thescript hides them. If you find this annoying, you can add a display:none rule tothe CSS for the submenu <ul>. This eliminates the flicker, but makes the menuless useful to browsers without JavaScript support.
Scripting Drop-Down Menu BehaviorYou now have a list of links that looks like a drop-down menu. All you need now is
a script to make it act like one. Your script will set up the menu when the page
loads, and respond to event handlers to show and hide the submenus.
Setting Up the MenuThe SetupMenu() function will run when the page loads, and then configure the
drop-down menu. This mainly consists of hiding the submenus and configuring
some event handlers. The function will use a loop to look at all of the <li> elements
in the page, and if they have a class attribute of menu, they’re considered part of
the menu. The following lines set up the event handlers for the link and hide the
submenu:
thelink=findChild(items[i],”A”);thelink.onmouseover=ShowMenu;thelink.onmouseout=StartTimer;//is there a submenu?if (ul=findChild(items[i],”UL”)) {
ul.style.display=”none”;
The findChild() function is used twice here. This function will also be defined in
your script, and will return the first child item of a particular type it finds for an
object. In the preceding lines, it is used to find the link (<a> tag) under the list item,
and to find the nested list of subitems (<ul> tag). The style.display property is
used to hide each submenu.
FIGURE 21.4The menu withfull CSS styling.
By theWay
Scripting Drop-Down Menu Behavior 351
Showing a SubmenuThe ShowMenu() function will be called by the onmouseover event handler when
you move over a link. Here’s an excerpt from this function that handles showing the
submenu:
// find the submenu, if anyul = findChild(thislink,”UL”);if (!ul) return;ul.style.display=”block”;
Once again, findChild() is used to find the <ul> element under the current item,
and the display property is set to block to display the menu.
Hiding SubmenusThe logic for showing the submenus is simple—whenever the mouse pointer is over
a menu heading, the corresponding submenu is displayed. Hiding a submenu is a
bit more complicated—the menu needs to stay open while you select an item, but
get out of the way quickly when you’re not using it. The HideMenu() function will
accomplish this:
function HideMenu(thelink) {// find the submenu, if anyul = findChild(thelink,”UL”);if (!ul) return;ul.style.display=”none”;
}
One time you definitely want a menu to be hidden is when the user opens another
menu, so the ShowMenu() function will call HideMenu() to hide the previous menu.
You also want the menu to disappear if you move out of it, but a simple onmouse-
out event handler won’t work because the user could have moved off the menu
heading and into the submenu. Instead, the onmouseout event calls the
StartTimer() function:
function StartTimer() {t = window.setTimeout(“HideMenu(current)”,200);
}
This function sets a timeout to hide the menu in 200 milliseconds. If the user moves
over any of the submenu items during the delay, the timer is reset with the
ResetTimer() function:
function ResetTimer() {if (t) window.clearTimeout(t);
}
352 HOUR 21: Building JavaScript Drop-Down Menus
This function cancels the timeout using the clearTimeout() method, keeping the
menu on the screen until the onmouseout event starts the timer again. Finally, some
additional lines in the SetupMenu() function will set up event handlers to call
StartTimer() and ResetTimer() for each subitem:
for (j=0; j<ul.childNodes.length; j++) {ul.childNodes[j].onmouseover=ResetTimer;ul.childNodes[j].onmouseout=StartTimer;
}
Completing the ScriptYou can now combine all of the functions discussed above to create working drop-
down menus. The complete drop-down menu script is shown in Listing 21.3.
LISTING 21.3 The Complete JavaScript File for the Drop-Down Menus// global variables for timeout and for current menuvar t=false,current;function SetupMenu() {
if (!document.getElementsByTagName) return;items=document.getElementsByTagName(“li”);for (i=0; i<items.length; i++) {
if (items[i].className != “menu”) continue;//set up event handlersthelink=findChild(items[i],”A”);thelink.onmouseover=ShowMenu;thelink.onmouseout=StartTimer;//is there a submenu?if (ul=findChild(items[i],”UL”)) {
ul.style.display=”none”;for (j=0; j<ul.childNodes.length; j++) {
ul.childNodes[j].onmouseover=ResetTimer;ul.childNodes[j].onmouseout=StartTimer;
}}
}}// find the first child object of a particular typefunction findChild(obj,tag) {
cn = obj.childNodes;for (k=0; k<cn.length; k++) {if (cn[k].nodeName==tag) return cn[k];
}return false;
}function ShowMenu(e) {
if (!e) var e = window.event;// which link was the mouse over?thislink = (e.target) ? e.target: e.srcElement;ResetTimer();// hide the previous menu, if anyif (current) HideMenu(current);// we want the LI, not the link
Scripting Drop-Down Menu Behavior 353
thislink = thislink.parentNode;current=thislink;// find the submenu, if anyul = findChild(thislink,”UL”);if (!ul) return;ul.style.display=”block”;
}function HideMenu(thelink) {
// find the submenu, if anyul = findChild(thelink,”UL”);if (!ul) return;ul.style.display=”none”;
}function ResetTimer() {
if (t) window.clearTimeout(t);}function StartTimer() {
t = window.setTimeout(“HideMenu(current)”,200);}// Set up the menu when the page loadswindow.onload=SetupMenu;
Here’s a summary of how the script works from top to bottom:
. The first line defines two global variables: t stores a reference to the timeout
so that it can be canceled, and current is the object for the currently open
menu.
. The SetupMenu() function sets up event handlers to call ShowMenu(),
StartTimer(), and ResetTimer(), and hides the submenus.
. The findChild() function is used by several of the other functions to find a
child object.
. The ShowMenu() function shows a menu.
. The HideMenu() function hides a menu when the timeout expires.
. The StartTimer() and ResetTimer() functions manage the timeout dis-
cussed earlier.
. The final line of the script sets the window’s onload event handler to the
SetupMenu() function to set up the menu when the page loads.
To try the menu, first be sure you have all three files in the same folder: the HTML
document, the CSS file (dropdown.css), and the JavaScript file (dropdown.js). You
can then load the HTML document into a browser. Figure 21.5 shows the drop-down
menu in action.
LISTING 21.3 The Complete JavaScript File for the Drop-Down Menus/
▼
354 HOUR 21: Building JavaScript Drop-Down Menus
Try It Yourself
Enhancing the Menu with CSSAlthough the menu works as it is, the CSS could use some improvement. The menus
are not well delineated, and there are no rollover effects to let you know you’re mov-
ing over menu items. Also, to make a menu appear, you have to move the mouse
over the text of the menu name—for this menu to work like users expect, the entire
block that contains the menu name should be active.
An improved CSS style sheet can solve these problems. You might also want to add
more CSS rules to fine-tune its formatting. Here are some suggestions:
. Change the fonts and colors to match your site.
. Add an a:hover selector to make the subitems change color as you move over
them.
. Use border attributes to add borders around menus or subitems.
. Use margin attributes to add space between menu items.
Listing 21.4 shows a modified style sheet that makes the menu work as it should,
and implements several of these ideas to create a menu with a different style.
FIGURE 21.5The drop-downmenu in action.
Scripting Drop-Down Menu Behavior 355
LISTING 21.4 A Style Sheet for a Different Style of Menu/* The whole menu */#menu {
position: absolute;font-family: sans-serif;font-size: 100%;
}/* Each menu name */#menu li {
float: left;list-style-type: none;width: 102px;background-color: silver;border: 1px solid black;text-indent: 0px;margin-left: 3px;
}/* each main menu link */#menu li a {
color: black;text-decoration: none;width: 100%;display: block;
}#menu li a:hover {
color: white;}/* The entire submenu */#menu li ul {
background-color: silver;margin: 0px;padding: 0px;
}/* Each submenu item */#menu li ul li {
padding: 0px;margin: 0px;float: none;list-style-type: none;width: 100px;text-indent: 0px;border: none;
}#menu li ul li a{
color: black;text-decoration: none;
}#menu li ul li a:hover{
color: black;background-color: aqua;
}
356 HOUR 21: Building JavaScript Drop-Down Menus
This style sheet has the following features:
. A sans-serif font is used for a more modern appearance.
. Borders and margins are used to make the menu names appear as separate
boxes.
. An a:hover selector is used to make the menu names change color when the
mouse is over them.
. The width: 100% and display: block rules for the menu names make the
entire box active, not just the text.
. Another a:hover selector makes the submenu items change color when the
mouse is over them.
. The width: 100% rule for submenu items makes the entire width of the sub-
menu active, not just the text.
To use this style sheet, save it as dropdown2.css in the same folder as the HTML
document, and change the <link> tag in the HTML document to refer to the new
file. Figure 21.6 shows the drop-down menu with this style sheet.
FIGURE 21.6The drop-downmenu with analternative stylesheet.
By theWay
See Hour 12, “Working with Style Sheets,” for more information about using CSSstyles to format HTML elements.
▲
357Quiz Questions
SummaryIn this hour, you’ve developed a complete application that uses HTML, CSS, and
JavaScript to create drop-down menus for navigating a site. You learned how to cre-
ate a simple HTML document using nested lists, and how to use CSS to format it as
a horizontal menu with vertical drop-downs. You used JavaScript to make the drop-
down menu work. Finally, you created an alternative style sheet to give the menu a
different look.
In the next hour, you’ll create another complex JavaScript application—a card
game that uses JavaScript, images, and CSS to interact with the user.
Q&AQ. Can I make a vertical pop-out menu using the same script in Listing 21.3?
A. Yes. You’ll need a different style sheet that doesn’t use float for the menu
headings, but uses float:left for the submenu. The same script and HTML
document can be used with a vertical menu.
Q. Can I add some space before each menu heading?
A. Yes, but be aware that Internet Explorer has some bugs involving margins and
padding when float is in use. Be sure to test in multiple browsers.
Q. Which browsers support the drop-down menus?
A. The drop-down menus you created in this hour should work in Internet
Explorer 5.0 and later, Netscape 6.0 and later, and all versions of Firefox. Most
important, because it uses the standard W3C DOM, it should work in all stan-
dards-compliant browsers—but watch out for formatting quirks in different
browsers when you change the styles.
Quiz QuestionsTest your knowledge of the techniques used in this hour by answering the following
questions.
1. Which of the following CSS rules makes the menu horizontal instead of vertical?
a. float: left
b. position: absolute
c. orientation: horizontal

358 HOUR 21: Building JavaScript Drop-Down Menus
2. Which of the following CSS selectors refers to an <li> element directly under
the <ul> element with the id value menu?
a. #menu ul li
b. #menu li
c. ul #menu li
3. Which of the following is the correct command to cancel a timeout set with
the command t=window.timeout(“HideMenu(current)”,500);?
a. t = window.clearTimeout();
b. window.clearTimeout(t);
c. window.setTimeout(“HideMenu(current)”,0);
Quiz Answers1. a. The drop-down menu uses float:left to make a horizontal menu.
2. b. The correct selector is #menu li.
3. b. The correct command is window.clearTimeout(t).
ExercisesIf you want to gain more experience working with JavaScript drop-down menus, try
the following exercises:
. Change the drop-down menu to contain the appropriate links for your site, or
for an imaginary site. (You only need to change the HTML file, but each menu
item needs the class value of menu.)
. Modify the CSS file for the drop-down menu to use colors, borders, or other
attributes of your choice.

HOUR 22
Creating a JavaScript Game
What You’ll Learn in This Hour:. How to design a JavaScript Game. Creating game graphics. Laying out the game board in HTML. Using CSS to style the board. Creating gameplay scripts. Finalizing and testing the game
In this hour, you’ll look at another complex application of JavaScript: a Poker Solitaire
game that uses the W3C DOM, graphics, and some JavaScript logic to interact with the
user quickly and responsively.
About the GameAlthough it’s possible to create just about any game with JavaScript, a card game is a sim-
ple choice because the graphics are easy to create and the gameplay is relatively simple.
In this hour, you’ll create a Poker Solitaire game using HTML, JavaScript, and a bit of CSS.
How to PlayPoker Solitaire is played on a five by five board. The deck of cards is shuffled, and you
draw one card from the deck at a time and place it anywhere on the board. Your goal is to
make each column, row, and diagonal row form the best possible poker hand. For exam-
ple, in Figure 22.1, several cards have been placed on the board and the score for the com-
pleted column and row is shown.
360 HOUR 22: Creating a JavaScript Game
ScoringBecause there are no other players, the game will be scored. The script will calculate
the score for each column, row, and diagonal on the board, and combine them for a
total score. Points are awarded for poker hands, with more difficult (and less likely)
combinations scoring higher:
. Pair—1 point (Two cards of the same number and different suits)
. Two pair—2 points (Two pairs)
. Three of a kind—3 points (Three cards of the same number)
. Straight—4 points (Five cards in numeric sequence)
. Full house—8 points (One pair plus three of a kind)
. Four of a kind—25 points (All four cards of the same number)
. Flush—5 points (Five cards of the same suit)
. Straight flush—50 points (Five cards of the same suit, in sequence)
. Royal flush—250 points (10, Jack, Queen, King, and Ace of the same suit)
In the JavaScript version of the game, the score for each row or column will be dis-
played as you complete it, and the total score will be updated in real time as you
place each card on the board.
FIGURE 22.1Playing PokerSolitaire.
Creating the HTML Document 361
Creating GraphicsThis game will require some graphics—you’ll need 52 images, one for each card in a
standard deck. One more image, blank.gif, will be used to mark the spaces on the
board that don’t yet contain cards. You can download all of the graphics for the
game from this book’s website.
All of the graphics will be the same size, including the blank space image. The
board will consist entirely of blanks at the start of a game, and images will be
switched to the appropriate card when the user clicks to place a card. The images I
used in the example are all 53 × 68 pixels.
When you’re working with a large number of graphics, filenames become impor-
tant. It will make coding easier if you decide in advance on a naming scheme for
the images. In this case, the filenames will include a number for the card’s rank
(1–13, with 1 representing Ace, and 11, 12, and 13 representing Jack, Queen, and
King) and a letter for the suit. For example, the Seven of Hearts image would be
7h.gif, and the Queen of Spades would be 12s.gif.
Creating the HTML DocumentThe HTML document for the game is straightforward. In keeping with the unobtru-
sive scripting strategies you’ve learned in previous hours, it contains no JavaScript—
just a <script> tag that imports a script that will handle the game. Similarly, a sep-
arate CSS file will be used for styles. Listing 22.1 shows the HTML document.
LISTING 22.1 The HTML Document for the Poker Solitaire Game<html><head><title>Poker Solitaire</title><script language=”JavaScript” type=”text/javascript”
src=”pokersol.js”></script><link rel=”stylesheet” type=”text/css” href=”pokersol.css”></head><body><table><tr><td colspan=”2”><h1>Poker Solitaire</h1></td><td> <img id=”card1” src=”blank.gif” height=”68” width=”53”> </td><td> <img id=”card2” src=”blank.gif” height=”68” width=”53”> </td><td> <img id=”card3” src=”blank.gif” height=”68” width=”53”> </td><td> <img id=”card4” src=”blank.gif” height=”68” width=”53”> </td><td> <img id=”card5” src=”blank.gif” height=”68” width=”53”></td><td class=”score” id=”row0”> </td>
</tr><tr><td> <img id=”dcard” border=”0”
362 HOUR 22: Creating a JavaScript Game
src=”blank.gif” height=”68” width=”53”></td><td> </td><td> <img id=”card6” src=”blank.gif” height=”68” width=”53”></td><td> <img id=”card7” src=”blank.gif” height=”68” width=”53”></td><td> <img id=”card8” src=”blank.gif” height=”68” width=”53”></td><td> <img id=”card9” src=”blank.gif” height=”68” width=”53”></td><td> <img id=”card10” src=”blank.gif” height=”68” width=”53”></td><td class=”score” id=”row1”> </td>
</tr><tr><td valign=”top” id=”status”> Next Card</td><td> </td><td> <img id=”card11” src=”blank.gif” height=”68” width=”53”></td><td> <img id=”card12” src=”blank.gif” height=”68” width=”53”></td><td> <img id=”card13” src=”blank.gif” height=”68” width=”53”></td><td> <img id=”card14” src=”blank.gif” height=”68” width=”53”></td><td> <img id=”card15” src=”blank.gif” height=”68” width=”53”></td><td class=”score” id=”row2”> </td>
</tr><tr><td id=”total”> <b>Total Score:</b>
<div id=”totalscore”>0</div></td><td> </td><td> <img id=”card16” src=”blank.gif” height=”68” width=”53”></td><td> <img id=”card17” src=”blank.gif” height=”68” width=”53”></td><td> <img id=”card18” src=”blank.gif” height=”68” width=”53”></td><td> <img id=”card19” src=”blank.gif” height=”68” width=”53”></td><td> <img id=”card20” src=”blank.gif” height=”68” width=”53”></td><td class=”score” id=”row3”> </td>
</tr><tr><td> <a id=”newgame” href=”#”><b>Start Over</b></a></td><td> </td><td> <img id=”card21” border=0 src=”blank.gif” height=68 width=53></td><td> <img id=”card22” border=0 src=”blank.gif” height=68 width=53></td><td> <img id=”card23” border=0 src=”blank.gif” height=68 width=53></td><td> <img id=”card24” border=0 src=”blank.gif” height=68 width=53></td><td> <img id=”card25” border=0 src=”blank.gif” height=68 width=53></td><td class=”score” id=”row4”> </td>
</tr><tr><td> </td><td class=”score” id=”diag1”> </td><td class=”score” id=”col0”> </td><td class=”score” id=”col1”> </td><td class=”score” id=”col2”> </td><td class=”score” id=”col3”> </td><td class=”score” id=”col4”> </td><td class=”score” id=”diag2”> </td>
</table></body></html>
The game board is laid out using an HTML table. Although the game board is five
by five squares, the table contains eight columns and six rows. The leftmost column
LISTING 22.1 Continued
Creating the Script 363
will be used for displaying the next card and the score, as well as a Start Over link.
The remaining columns and rows will be used to display the score for each column
and row as they are filled with cards.
The 25 spaces on the board are given unique id values, card1 through card25.
These will be used by the script to determine which card the user clicks on, and also
to replace the appropriate image when a card is placed. The table cells for display-
ing scores are given the id values row0-4, col0-4, diag1, and diag2.
Save the HTML document in a folder, or download it from this book’s website. You
can load it into a browser to see the game layout, as shown in Figure 22.2. The
game won’t be playable until you add the script you’ll develop in the next section.
FIGURE 22.2The PokerSolitaire gamelayout.
Creating the ScriptBecause this is the longest script in this book, it will be easier to understand if you
look at some of its key functions before the entire script. The following sections dis-
cuss how the script will manage the game.
Using Objects to Store CardsBecause JavaScript is designed to work with numbers but not specifically with play-
ing cards, you can create a custom object to make it easier to manage the card
game. The following code is the constructor for a Card object:
364 HOUR 22: Creating a JavaScript Game
// make a filename for an image, given Card objectfunction fname() {
return this.num + this.suit + “.gif”;}// constructor for Card objectsfunction Card(num,suit) {
this.num = num;this.suit = suit;this.fname = fname;
}
Each Card object will represent a space on the board. It has two properties, num and
suit, and an fname() method that returns the filename for the graphic represent-
ing the card.
Setting Up the BoardAlong with the graphics on the screen, the board array will represent the game
board by storing 25 Card objects, one for each space. Here’s the code that will set up
the board:
// array for board contentsboard = new Array(26);for (i=1; i<26; i++) {
board[i] = new Card(0,”x”);obj=document.getElementById(“card”+i);obj.src = “blank.gif”;obj.onclick = PlaceCard;
}
The first line creates the board array. The for loop then sets up each space on the
board. First, it places a blank card in the array. Next, it finds the object for the corre-
sponding space on the screen. It makes sure blank.gif is displayed in each space,
and sets an event handler for onClick events to call the PlaceCard() function,
which will handle the user’s clicks on the board.
Shuffling the DeckThe deck array will be used to simulate a deck of cards. The following code fills the
array with Card objects:
deck = new Array(53);for (i=1; i<14; i++) {deck[i] = new Card(i,”c”);deck[i+13] = new Card(i,”h”);deck[i+26] = new Card(i,”s”);deck[i+39] = new Card(i,”d”);
}
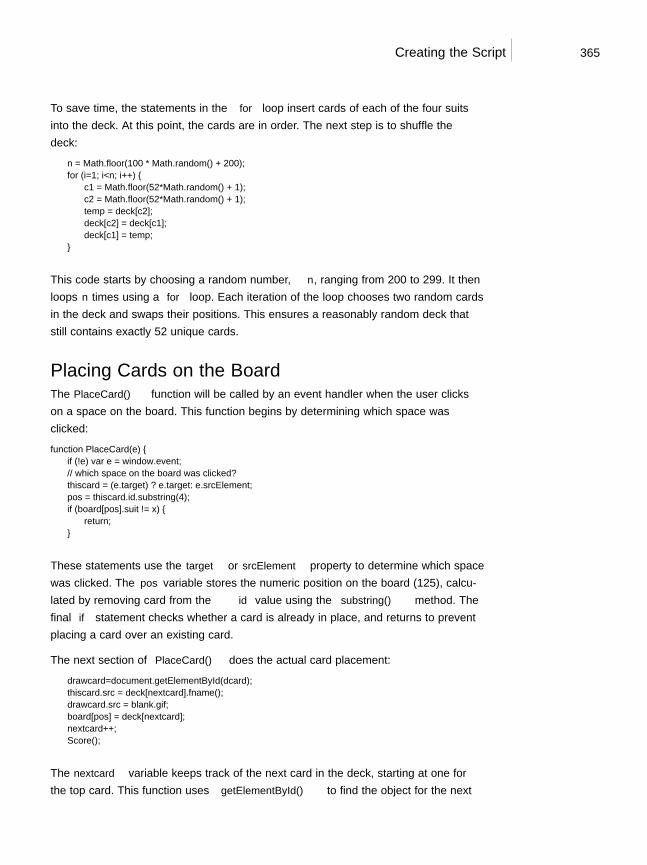
Creating the Script 365
To save time, the statements in the for loop insert cards of each of the four suits
into the deck. At this point, the cards are in order. The next step is to shuffle the
deck:
n = Math.floor(100 * Math.random() + 200);for (i=1; i<n; i++) {
c1 = Math.floor(52*Math.random() + 1);c2 = Math.floor(52*Math.random() + 1);temp = deck[c2];deck[c2] = deck[c1];deck[c1] = temp;
}
This code starts by choosing a random number, n, ranging from 200 to 299. It then
loops n times using a for loop. Each iteration of the loop chooses two random cards
in the deck and swaps their positions. This ensures a reasonably random deck that
still contains exactly 52 unique cards.
Placing Cards on the BoardThe PlaceCard() function will be called by an event handler when the user clicks
on a space on the board. This function begins by determining which space was
clicked:
function PlaceCard(e) {if (!e) var e = window.event;// which space on the board was clicked?thiscard = (e.target) ? e.target: e.srcElement;pos = thiscard.id.substring(4);if (board[pos].suit != “x”) {
return;}
These statements use the target or srcElement property to determine which space
was clicked. The pos variable stores the numeric position on the board (1–25), calcu-
lated by removing “card” from the id value using the substring() method. The
final if statement checks whether a card is already in place, and returns to prevent
placing a card over an existing card.
The next section of PlaceCard() does the actual card placement:
drawcard=document.getElementById(“dcard”);thiscard.src = deck[nextcard].fname();drawcard.src = “blank.gif”;board[pos] = deck[nextcard];nextcard++;Score();
The nextcard variable keeps track of the next card in the deck, starting at one for
the top card. This function uses getElementById() to find the object for the “next
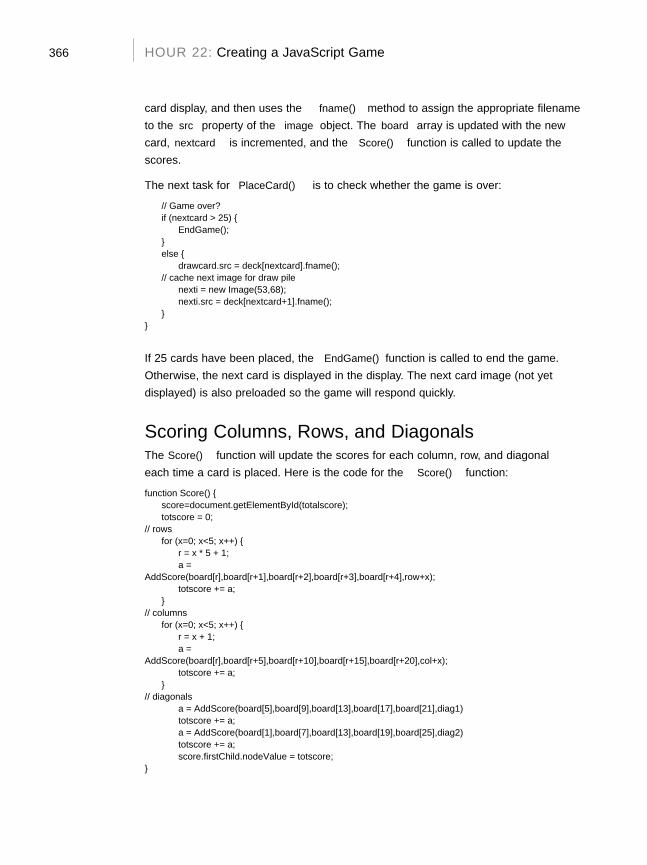
366 HOUR 22: Creating a JavaScript Game
card” display, and then uses the fname() method to assign the appropriate filename
to the src property of the image object. The board array is updated with the new
card, nextcard is incremented, and the Score() function is called to update the
scores.
The next task for PlaceCard() is to check whether the game is over:
// Game over?if (nextcard > 25) {
EndGame();}else {
drawcard.src = deck[nextcard].fname();// cache next image for draw pile
nexti = new Image(53,68);nexti.src = deck[nextcard+1].fname();
}}
If 25 cards have been placed, the EndGame() function is called to end the game.
Otherwise, the next card is displayed in the display. The next card image (not yet
displayed) is also preloaded so the game will respond quickly.
Scoring Columns, Rows, and DiagonalsThe Score() function will update the scores for each column, row, and diagonal
each time a card is placed. Here is the code for the Score() function:
function Score() {score=document.getElementById(“totalscore”);totscore = 0;
// rowsfor (x=0; x<5; x++) {
r = x * 5 + 1;a =
AddScore(board[r],board[r+1],board[r+2],board[r+3],board[r+4],”row”+x);totscore += a;
}// columns
for (x=0; x<5; x++) {r = x + 1;a =
AddScore(board[r],board[r+5],board[r+10],board[r+15],board[r+20],”col”+x);totscore += a;
}// diagonals
a = AddScore(board[5],board[9],board[13],board[17],board[21],”diag1”)totscore += a;a = AddScore(board[1],board[7],board[13],board[19],board[25],”diag2”)totscore += a;score.firstChild.nodeValue = totscore;
}
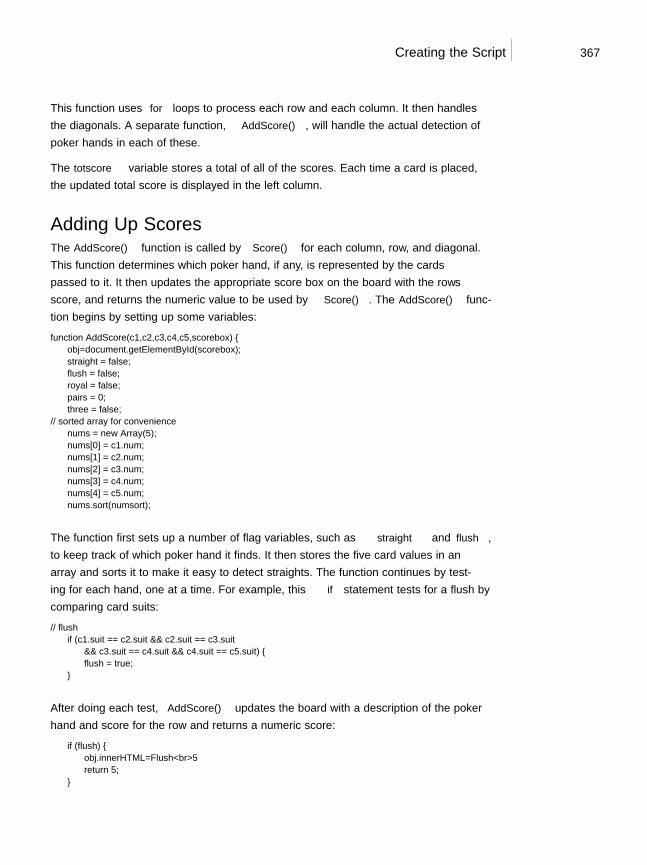
Creating the Script 367
This function uses for loops to process each row and each column. It then handles
the diagonals. A separate function, AddScore(), will handle the actual detection of
poker hands in each of these.
The totscore variable stores a total of all of the scores. Each time a card is placed,
the updated total score is displayed in the left column.
Adding Up ScoresThe AddScore() function is called by Score() for each column, row, and diagonal.
This function determines which poker hand, if any, is represented by the cards
passed to it. It then updates the appropriate score box on the board with the row’s
score, and returns the numeric value to be used by Score(). The AddScore() func-
tion begins by setting up some variables:
function AddScore(c1,c2,c3,c4,c5,scorebox) {obj=document.getElementById(scorebox);straight = false;flush = false;royal = false;pairs = 0;three = false;
// sorted array for conveniencenums = new Array(5);nums[0] = c1.num;nums[1] = c2.num;nums[2] = c3.num;nums[3] = c4.num;nums[4] = c5.num;nums.sort(numsort);
The function first sets up a number of flag variables, such as straight and flush,
to keep track of which poker hand it finds. It then stores the five card values in an
array and sorts it to make it easy to detect straights. The function continues by test-
ing for each hand, one at a time. For example, this if statement tests for a flush by
comparing card suits:
// flushif (c1.suit == c2.suit && c2.suit == c3.suit
&& c3.suit == c4.suit && c4.suit == c5.suit) {flush = true;
}
After doing each test, AddScore() updates the board with a description of the poker
hand and score for the row and returns a numeric score:
if (flush) {obj.innerHTML=”Flush<br>5”return 5;
}
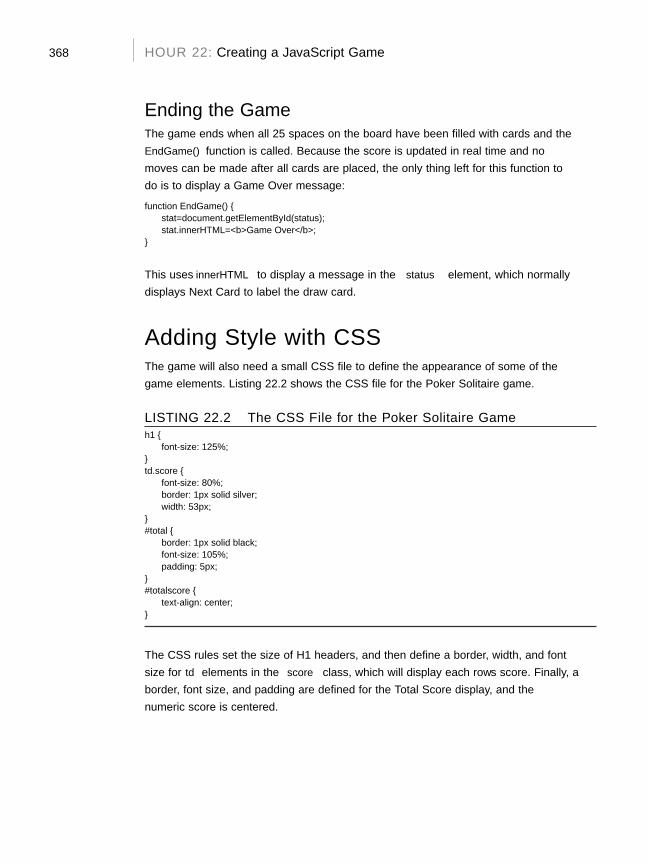
368 HOUR 22: Creating a JavaScript Game
Ending the GameThe game ends when all 25 spaces on the board have been filled with cards and the
EndGame() function is called. Because the score is updated in real time and no
moves can be made after all cards are placed, the only thing left for this function to
do is to display a “Game Over” message:
function EndGame() {stat=document.getElementById(“status”);stat.innerHTML=”<b>Game Over</b>”;
}
This uses innerHTML to display a message in the status element, which normally
displays “Next Card” to label the draw card.
Adding Style with CSSThe game will also need a small CSS file to define the appearance of some of the
game elements. Listing 22.2 shows the CSS file for the Poker Solitaire game.
LISTING 22.2 The CSS File for the Poker Solitaire Gameh1 {
font-size: 125%;}td.score {
font-size: 80%;border: 1px solid silver;width: 53px;
}#total {
border: 1px solid black;font-size: 105%;padding: 5px;
}#totalscore {
text-align: center;}
The CSS rules set the size of H1 headers, and then define a border, width, and font
size for td elements in the score class, which will display each row’s score. Finally, a
border, font size, and padding are defined for the “Total Score” display, and the
numeric score is centered.
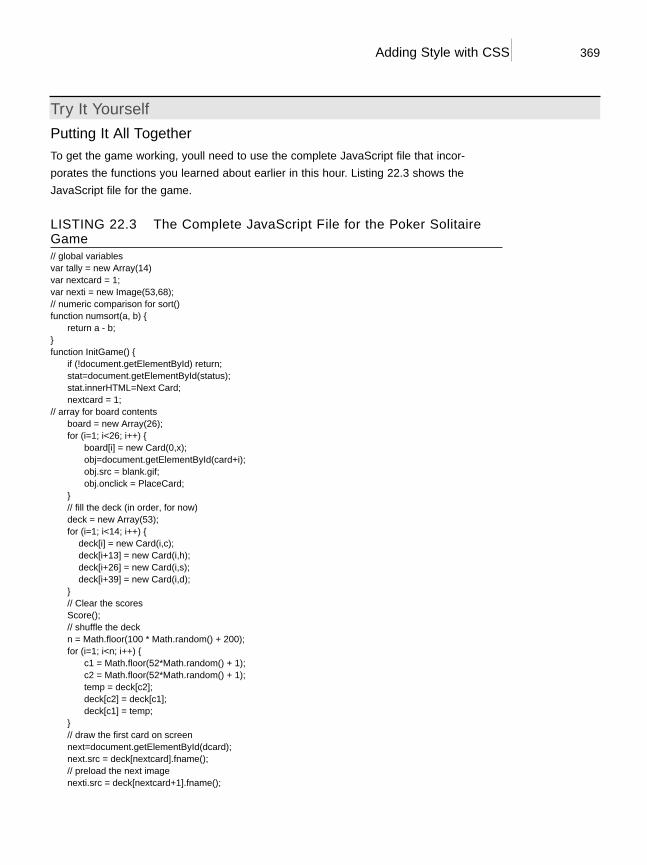
▼
Adding Style with CSS 369
Try It Yourself
Putting It All TogetherTo get the game working, you’ll need to use the complete JavaScript file that incor-
porates the functions you learned about earlier in this hour. Listing 22.3 shows the
JavaScript file for the game.
LISTING 22.3 The Complete JavaScript File for the Poker SolitaireGame// global variablesvar tally = new Array(14)var nextcard = 1;var nexti = new Image(53,68);// numeric comparison for sort()function numsort(a, b) {
return a - b;}function InitGame() {
if (!document.getElementById) return;stat=document.getElementById(“status”);stat.innerHTML=”Next Card”;nextcard = 1;
// array for board contentsboard = new Array(26);for (i=1; i<26; i++) {
board[i] = new Card(0,”x”);obj=document.getElementById(“card”+i);obj.src = “blank.gif”;obj.onclick = PlaceCard;
}// fill the deck (in order, for now) deck = new Array(53);for (i=1; i<14; i++) {deck[i] = new Card(i,”c”);deck[i+13] = new Card(i,”h”);deck[i+26] = new Card(i,”s”);deck[i+39] = new Card(i,”d”);
}// Clear the scoresScore();// shuffle the deckn = Math.floor(100 * Math.random() + 200);for (i=1; i<n; i++) {
c1 = Math.floor(52*Math.random() + 1);c2 = Math.floor(52*Math.random() + 1);temp = deck[c2];deck[c2] = deck[c1];deck[c1] = temp;
}// draw the first card on screennext=document.getElementById(“dcard”);next.src = deck[nextcard].fname();// preload the next imagenexti.src = deck[nextcard+1].fname();
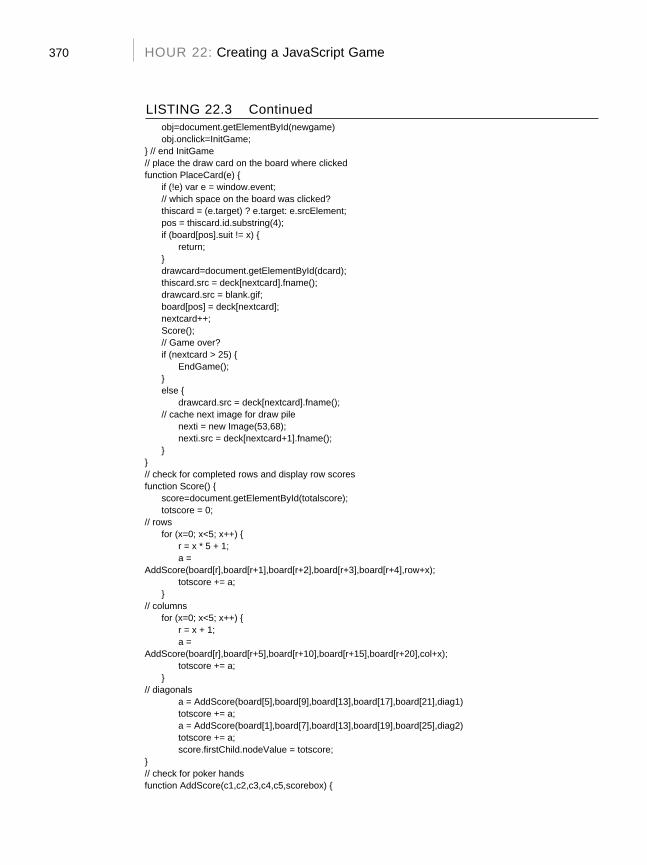
370 HOUR 22: Creating a JavaScript Game
obj=document.getElementById(“newgame”)obj.onclick=InitGame;
} // end InitGame// place the draw card on the board where clickedfunction PlaceCard(e) {
if (!e) var e = window.event;// which space on the board was clicked?thiscard = (e.target) ? e.target: e.srcElement;pos = thiscard.id.substring(4);if (board[pos].suit != “x”) {
return;}drawcard=document.getElementById(“dcard”);thiscard.src = deck[nextcard].fname();drawcard.src = “blank.gif”;board[pos] = deck[nextcard];nextcard++;Score();// Game over?if (nextcard > 25) {
EndGame();}else {
drawcard.src = deck[nextcard].fname();// cache next image for draw pile
nexti = new Image(53,68);nexti.src = deck[nextcard+1].fname();
}}// check for completed rows and display row scoresfunction Score() {
score=document.getElementById(“totalscore”);totscore = 0;
// rowsfor (x=0; x<5; x++) {
r = x * 5 + 1;a =
AddScore(board[r],board[r+1],board[r+2],board[r+3],board[r+4],”row”+x);totscore += a;
}// columns
for (x=0; x<5; x++) {r = x + 1;a =
AddScore(board[r],board[r+5],board[r+10],board[r+15],board[r+20],”col”+x);totscore += a;
}// diagonals
a = AddScore(board[5],board[9],board[13],board[17],board[21],”diag1”)totscore += a;a = AddScore(board[1],board[7],board[13],board[19],board[25],”diag2”)totscore += a;score.firstChild.nodeValue = totscore;
}// check for poker handsfunction AddScore(c1,c2,c3,c4,c5,scorebox) {
LISTING 22.3 Continued
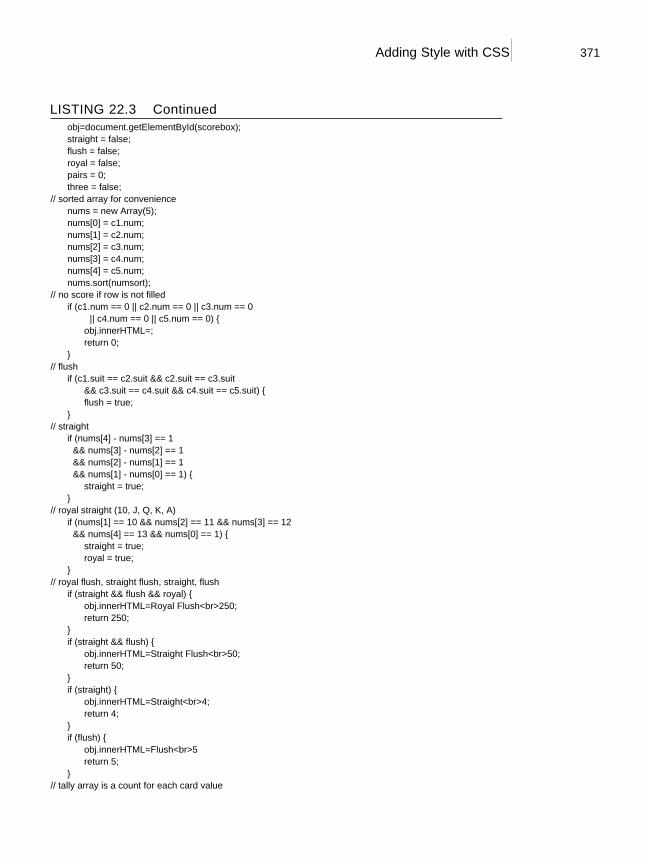
Adding Style with CSS 371
obj=document.getElementById(scorebox);straight = false;flush = false;royal = false;pairs = 0;three = false;
// sorted array for conveniencenums = new Array(5);nums[0] = c1.num;nums[1] = c2.num;nums[2] = c3.num;nums[3] = c4.num;nums[4] = c5.num;nums.sort(numsort);
// no score if row is not filledif (c1.num == 0 || c2.num == 0 || c3.num == 0
|| c4.num == 0 || c5.num == 0) {obj.innerHTML=””;return 0;
}// flush
if (c1.suit == c2.suit && c2.suit == c3.suit&& c3.suit == c4.suit && c4.suit == c5.suit) {flush = true;
}// straight
if (nums[4] - nums[3] == 1&& nums[3] - nums[2] == 1&& nums[2] - nums[1] == 1&& nums[1] - nums[0] == 1) {straight = true;
}// royal straight (10, J, Q, K, A)
if (nums[1] == 10 && nums[2] == 11 && nums[3] == 12&& nums[4] == 13 && nums[0] == 1) {straight = true;royal = true;
}// royal flush, straight flush, straight, flush
if (straight && flush && royal) {obj.innerHTML=”Royal Flush<br>250”;return 250;
}if (straight && flush) {
obj.innerHTML=”Straight Flush<br>50”;return 50;
}if (straight) {
obj.innerHTML=”Straight<br>4”;return 4;
}if (flush) {
obj.innerHTML=”Flush<br>5”return 5;
}// tally array is a count for each card value
LISTING 22.3 Continued
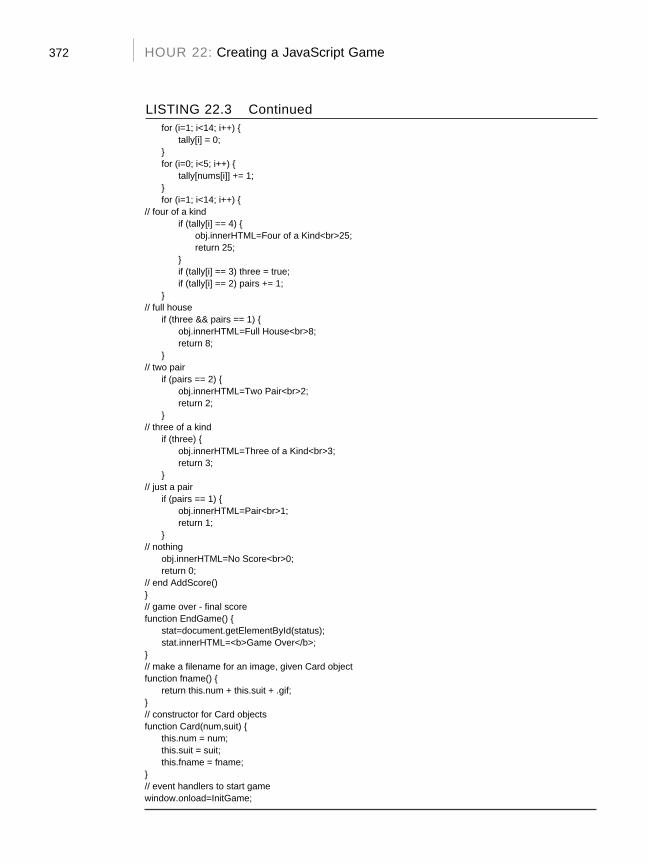
372 HOUR 22: Creating a JavaScript Game
for (i=1; i<14; i++) {tally[i] = 0;
}for (i=0; i<5; i++) {
tally[nums[i]] += 1;}for (i=1; i<14; i++) {
// four of a kindif (tally[i] == 4) {
obj.innerHTML=”Four of a Kind<br>25”;return 25;
}if (tally[i] == 3) three = true;if (tally[i] == 2) pairs += 1;
}// full house
if (three && pairs == 1) {obj.innerHTML=”Full House<br>8”;return 8;
}// two pair
if (pairs == 2) {obj.innerHTML=”Two Pair<br>2”;return 2;
}// three of a kind
if (three) {obj.innerHTML=”Three of a Kind<br>3”;return 3;
}// just a pair
if (pairs == 1) {obj.innerHTML=”Pair<br>1”;return 1;
}// nothing
obj.innerHTML=”No Score<br>0”;return 0;
// end AddScore()}// game over - final scorefunction EndGame() {
stat=document.getElementById(“status”);stat.innerHTML=”<b>Game Over</b>”;
}// make a filename for an image, given Card objectfunction fname() {
return this.num + this.suit + “.gif”;}// constructor for Card objectsfunction Card(num,suit) {
this.num = num;this.suit = suit;this.fname = fname;
}// event handlers to start gamewindow.onload=InitGame;
LISTING 22.3 Continued
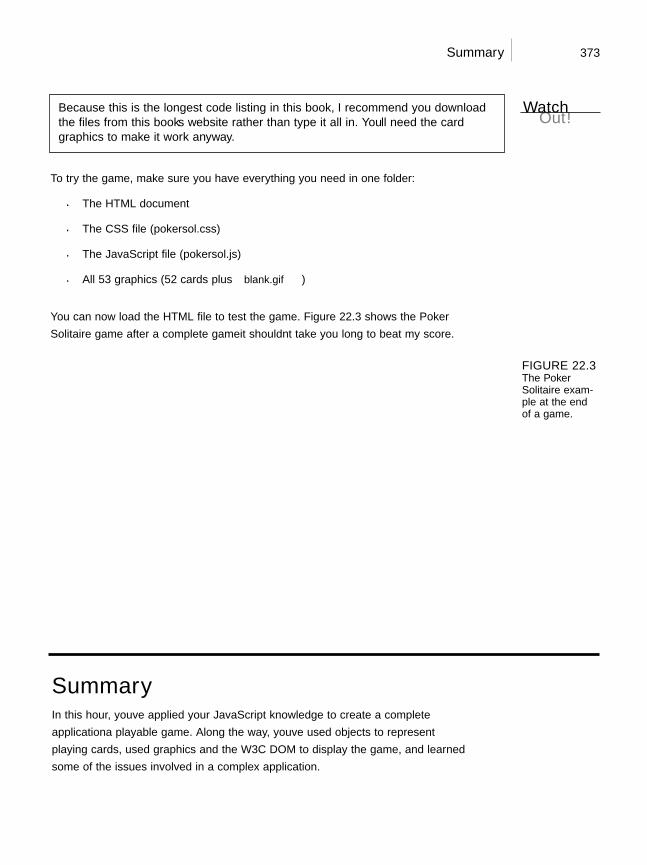
Summary 373
Because this is the longest code listing in this book, I recommend you downloadthe files from this book’s website rather than type it all in. You’ll need the cardgraphics to make it work anyway.
To try the game, make sure you have everything you need in one folder:
. The HTML document
. The CSS file (pokersol.css)
. The JavaScript file (pokersol.js)
. All 53 graphics (52 cards plus blank.gif)
You can now load the HTML file to test the game. Figure 22.3 shows the Poker
Solitaire game after a complete game—it shouldn’t take you long to beat my score.
WatchOut!
FIGURE 22.3The PokerSolitaire exam-ple at the endof a game.
SummaryIn this hour, you’ve applied your JavaScript knowledge to create a complete
application—a playable game. Along the way, you’ve used objects to represent
playing cards, used graphics and the W3C DOM to display the game, and learned
some of the issues involved in a complex application.
▲
374 HOUR 22: Creating a JavaScript Game
In the next hour, you’ll return to practical applications of JavaScript with some
advanced examples using the W3C DOM.
Q&AQ. Because the spaces on the board aren’t links, is there a way to make the
cursor indicate that they can be clicked on?
A. Yes. You can do this with an onMouseOver event handler that changes the
style.cursor property to pointer for the spaces on the board. You could also
use a rollover effect that changes the graphic, as demonstrated in Hour 19,
“Using Graphics and Animation.”
Q. Can I add images or other HTML to the page without messing up the script?
A. Yes. Because the game script works with id attributes rather than making any
assumptions about which image objects to change, it shouldn’t be affected by
anything you add to the page, unless you use a conflicting id value.
Q. What’s a good strategy for playing this game?
A. A simple approach is to dedicate each of the first four rows to a suit, so you
have very good odds of scoring a flush on each row. As you do this, try to
place cards where they’ll form pairs with cards in other columns.
Quiz QuestionsTest your knowledge of the JavaScript techniques you used in this hour by answering
the following questions.
1. Which property of an image object do you change to display a different
image?
a. href
b. src
c. fname
2. Which of the following statements converts the text “card21” to the number
21?
a. pos = thiscard.id.substring(4);
b. pos = thiscard.id.numValue;
c. pos = 1 * thiscard.id;
Exercises 375
3. Assuming Card objects have been defined as in this hour, which statement
creates a new Card object?
a. c = Card(12,”s”);
b. c = new Card(12,”s”);
c. var c (Card);
Quiz Answers1. b. You change the src property to display a different image.
2. a. The substring() method removes the first four letters of the string.
3. b. The new keyword is used to create a new instance of an object.
ExercisesIf you want to gain more experience creating games in JavaScript, try the following
exercises:
. Spend some time playing the game and see if you find any bugs in the script.
Notice how difficult it can be to fully test an application like this—you won’t
know for certain that it scores a royal flush correctly until you get one.
. Using the techniques described in Hour 19, try adding a rollover effect that
changes the blank.gif appearance when you move over a square where you
can drop the current card. Make sure the image does not change if there is
already a card placed on the space.

This page intentionally left blank

HOUR 23
Creating JavaScriptApplications
What You’ll Learn in This Hour:. Using the DOM to create a scrolling window. Switching between CSS style sheets using JavaScript. Using the DOM to create dynamic forms
You’ve learned quite a bit about JavaScript in the last 22 hours. In this hour, you’ll apply
this knowledge to create three quick, practical examples of JavaScript applications that
could be useful for just about any website.
Creating a Scrolling WindowOne of the most common, and the most unfortunate, early uses of JavaScript was for
scrolling messages, which crept across the browser’s status line giving you information one
letter at a time rather than making use of the whole page.
In this section, you’ll create a different kind of scrolling message. This one scrolls a large
block of text vertically within a window, similar to the credits at the end of a movie. This
type of scrolling message is easier to read, is standards compliant, and can include links
or other HTML features.
This example uses the same techniques as the animated slideshowin Hour 19, “Using Graphics and Animation.” The only difference isthat the animated text is only visible within a box, making it appear toscroll.
By theWay
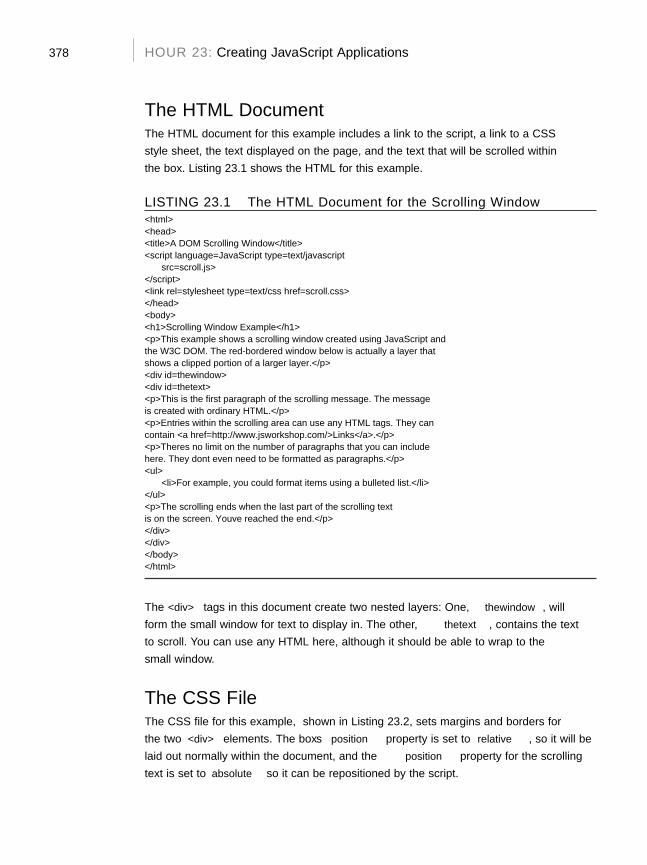
378 HOUR 23: Creating JavaScript Applications
The HTML DocumentThe HTML document for this example includes a link to the script, a link to a CSS
style sheet, the text displayed on the page, and the text that will be scrolled within
the box. Listing 23.1 shows the HTML for this example.
LISTING 23.1 The HTML Document for the Scrolling Window<html><head><title>A DOM Scrolling Window</title><script language=”JavaScript” type=”text/javascript”
src=”scroll.js”></script><link rel=”stylesheet” type=”text/css” href=”scroll.css”></head><body><h1>Scrolling Window Example</h1><p>This example shows a scrolling window created using JavaScript andthe W3C DOM. The red-bordered window below is actually a layer thatshows a clipped portion of a larger layer.</p><div id=”thewindow”><div id=”thetext”><p>This is the first paragraph of the scrolling message. The messageis created with ordinary HTML.</p><p>Entries within the scrolling area can use any HTML tags. They cancontain <a href=”http://www.jsworkshop.com/”>Links</a>.</p><p>There’s no limit on the number of paragraphs that you can includehere. They don’t even need to be formatted as paragraphs.</p><ul>
<li>For example, you could format items using a bulleted list.</li></ul><p>The scrolling ends when the last part of the scrolling textis on the screen. You’ve reached the end.</p></div></div></body></html>
The <div> tags in this document create two nested layers: One, thewindow, will
form the small window for text to display in. The other, thetext, contains the text
to scroll. You can use any HTML here, although it should be able to wrap to the
small window.
The CSS FileThe CSS file for this example, shown in Listing 23.2, sets margins and borders for
the two <div> elements. The box’s position property is set to relative, so it will be
laid out normally within the document, and the position property for the scrolling
text is set to absolute so it can be repositioned by the script.
Creating a Scrolling Window 379
LISTING 23.2 The CSS Style Sheet for the Scrolling Window#thewindow {
position:relative;width:180;height:150;overflow:hidden;border: 2px solid red;
}#thetext {
position: absolute;width: 170;left: 5;top: 100;
}
Because the text doesn’t all fit in the small window, you’ll only see part of it at a
time. The overflow property on the window layer prevents the rest of the content
from showing. Your script will manipulate the scrolling text’s style.top property to
move it relative to the window, creating a scrolling effect.
The text layer is actually 10 pixels narrower than the window layer. This, along withthe left property, creates a small margin of white space on either side of the win-dow, preventing any of the text from being obstructed.
The JavaScript FileThe JavaScript code for this example uses a function, Scroll(), that is called
repeatedly by a timeout. Listing 23.3 shows the JavaScript file for this example.
LISTING 23.3 The JavaScript File for the Scrolling Window// global variable for position of the scrolling windowvar pos=100;function Scroll() {if (!document.getElementById) return;obj=document.getElementById(“thetext”);pos -=1;if (pos < 0-obj.offsetHeight+130) return;obj.style.top=pos;window.setTimeout(“Scroll();”,30);
}// Start scrolling when the page loadswindow.onload = Scroll;
The first line defines a global variable, pos, to store the current scroll position. The
Scroll() function subtracts 1 from pos and checks its value. If the scrolling has
reached the end, the function exits; otherwise, it sets the object position and calls
the Scroll() function again using a timeout.
By theWay
380 HOUR 23: Creating JavaScript Applications
Notice the if statement at the beginning of the function. This is a simple exam-ple of feature sensing, described in Hour 15, “Unobtrusive Scripting”—if thebrowser doesn’t support the getElementById() method, the function exits ratherthan cause errors.
To try this example, make sure you have all three files in the same folder: the HTML
document, the CSS file (scroll.css), and the JavaScript file (scroll.js) and load
the HTML document into a browser. Figure 23.1 shows this example in action, after
the scrolling text has reached the end.
Did youKnow?
FIGURE 23.1The scrollingtext box exam-ple in action.
Style Sheet Switching with JavaScriptSuppose you want to offer your visitors a choice of different ways of viewing your
site—for example, a choice of large or small fonts, or different background colors.
Although you can use the style properties of elements within a page to make these
changes individually, it would take a lot of code to change a page between drastical-
ly different styles.
One alternative is to create two or more completely separate style sheets, and use
JavaScript to switch between them. This allows the user to have a large amount of
control over the site’s appearance without using a large and complex script.
Style Sheet Switching with JavaScript 381
Creating the HTML DocumentFirst, you can create a basic HTML document for the style-switching example. This
document will include a <script> tag for the script you’ll create later, as well as
links to two different style sheets. The HTML document for this example is shown in
Listing 23.4.
LISTING 23.4 The HTML Document for the Style-Switching Example<html><head><title>Style Sheet Example</title><link rel=”stylesheet” type=”text/css” href=”style1.css”><link rel=”stylesheet” type=”text/css” href=”style2.css” disabled><script language=”javascript” type=”text/javascript”
src=”styleswitch.js”></script></head><body><h1>multiple-choice styles</h1><p>This is a standard paragraph of text. Its font, margins,colors, justification, and other attributes depend on the stylesheet you select. This paragraph includes some text in<b>bold</b> and <i>italics</i>.</p><p>You can select one of three styles for this document:</p><ul><li><a href=”#” onclick=”Style(0,true);”>Style sheet # 1</a></li><li><a href=”#” onclick=”Style(1,true);”>Style sheet # 2</a></li><li><a href=”#” onclick=”Style(0,false);”>No style sheet</a></li></ul><p>These links call a short JavaScript function that enables oneof this document’s two linked external style sheets. You can editthe style sheets to style this document in two different ways,without changing any HTML.</p></body></html>
Although most of the document is just sample text to show off the styles of the dif-
ferent style sheets, it has several important components to make this technique
work:
. The <script> tag uses the src attribute to include a script, styleswitch.js.
. There are two <link> tags to attach two external style sheets, style1.css and
style2.css. The second tag includes the disabled attribute, so the document
will be styled using only style1.css by default.
. The three links within the <li> list items have event handlers that call the
Style() function to switch styles.
382 HOUR 23: Creating JavaScript Applications
Some browsers don’t correctly support the disabled attribute in HTML. The scriptyou create later will use JavaScript to disable the second style sheet by default toensure that only one style sheet is used, regardless of the browser.
Save the HTML document in a folder. You’ll be adding two style sheets and a script
file to the folder to complete the example. If you load the document into a browser
before creating the style sheets, it will be displayed without styles. Figure 23.2 shows
how the document looks with no styles applied.
By theWay
FIGURE 23.2The style-switchingexample dis-played withoutstyles.
Creating the First Style SheetNext, you can create the first of the two style sheets. Listing 23.5 shows the complete
style sheet style1.css.
LISTING 23.5 The First Style Sheet for the Style-Switching Example(style1.css)body {
font-family: Arial, Helvetica, sans-serif;font-size: 12pt;
}P {
margin-left: 10%;margin-right: 10%;text-align: justify;text-indent: 3%;
}
Style Sheet Switching with JavaScript 383
B { color: red; }I { color: DarkViolet; }H1 {
font-size: 300%;text-align: center;text-transform: capitalize;
}UL {
margin-left: 20%;margin-right: 20%;
}LI { margin-top: 10px;}
Save this style sheet as style1.css in the same folder as the HTML document. This
style sheet assigns some basic styles to the body, and to specific tags: <p>, <h1>, and
so on. Because this is the default style sheet, it will be used if you load the HTML
document now. Figure 23.3 shows the document as styled by this style sheet.
LISTING 23.5 Continued
FIGURE 23.3The style-switchingexample usingthe first stylesheet.
Creating the Second Style SheetThe second style sheet, style2.css, uses some more dramatic styles and is unlikely
to be suited to all viewers. This sheet is disabled by default. Listing 23.6 shows the
second style sheet.
384 HOUR 23: Creating JavaScript Applications
LISTING 23.6 The Second Style Sheet for the Style-Switching Example(style2.css)body {
font-family: Times, “Times New Roman”, sans-serif;font-size: 14pt;
}P {
margin-left: 20%;margin-right: 20%;text-align: left;text-indent: 0%;
}B {
color: black;background-color: aqua;
}I { color: red;}H1 {
font-size: 200%;text-align: right;text-transform: uppercase;
}UL {
margin-left: 30%;margin-right: 30%;background-color: yellow;
}LI { margin-top: 20px;}
Save this style sheet as style2.css in the same folder as the HTML document.
Creating the ScriptYou can use JavaScript to enable or disable style sheets. The <link> elements that
you used to attach the two style sheets to the HTML document are objects in the
DOM, and you can manipulate them using DOM methods. In this example, you
will use the getElementsByTagName() method to find all of the <link> elements,
and then enable one and disable the other. Listing 23.7 shows the complete
JavaScript file.
LISTING 23.7 The JavaScript File for the Style-Switching Example(styleswitch.js)function Style(n,enable) {if (!document.getElementsByTagName) return;links = document.getElementsByTagName(“link”);links[n].disabled=!enable;links[1-n].disabled=true;
}Style(0,true);
Style Sheet Switching with JavaScript 385
This script defines the Style() function, which accepts two parameters. The first, n,
specifies the style sheet to activate. The second parameter, enable, specifies whether
to enable the new style sheet (true) or to disable all style sheets (false). This fea-
ture is used by the No Style Sheet link.
This example uses getElementsByTagName, but you could also assign an idattribute to each <link> tag and then use document.getElementById to find theobject for each one individually.
The script enables (or disables, depending on the parameter) the chosen style sheet,
and always disables the other sheet. The last line of the script calls the Style()
function to select the first style sheet, just in case the browser doesn’t support the
disabled attribute.
To try the example, make sure you have all four files in the same folder: The HTML
document, the two style sheets (style1.css and style2.css), and the script file
(styleswitch.js). Load the HTML document into a browser and try clicking the
links to change styles. Figure 23.4 shows the document after the second style sheet
has been selected.
Did youKnow?
FIGURE 23.4The style-switchingexample withthe secondstyle sheetselected.
▼
386 HOUR 23: Creating JavaScript Applications
Try It Yourself
Creating a Dynamic FormIn Hour 11, “Getting Data with Forms,” you learned how JavaScript can work with
data from HTML forms, and change form elements. Using the W3C DOM, you can
take this one step further, creating a script that can add elements to a form or show
or hide sections of a form.
Creating the HTML DocumentListing 23.8 shows the HTML document for this example, which defines an order
form. The form will have two dynamic features: first, the Ship To address fields
aren’t shown unless they’re needed, and second, a button enables you to add addi-
tional item fields to the form.
LISTING 23.8 The HTML Document for the Dynamic Form Example<html><head><title>Dynamic Order Form</title><script language=”JavaScript” type=”text/javascript”
src=”dform.js”></script></head><body><h1>Order Form</h1><hr><form name=”form1”><b>Bill to:</b><br><b>Name:</b> <input type=”text” name=”customer” size=”20”><br><b>Address 1:</b> <input type=”text” name=”addr1” size=”20”><br><b>Address 2:</b> <input type=”text” name=”addr2” size=”20”><br><b>City:</b> <input type=”text” name=”city” size=”15”><b>State:</b> <input type=”text” name=”state” size=”4”><b>Zip:</b> <input type=”text” name=”zip” size=”9”><hr><b>Ship to:</b><br><input type=”radio” name=”shipopt” value=”same” checked onClick=”Show(0);”><b>Same Address</b><input type=”radio” name=”shipopt” value=”other” onClick=”Show(1);”><b>Other Address</b><div ID=”shipto” style=”display: none;”><br><b>Name:</b> <input type=”text” name=”shipname” size=”20”><br><b>Address 1:</b> <input type=”text” name=”shipaddr1” size=”20”><br><b>Address 2:</b> <input type=”text” name=”shipaddr2” size=”20”><br><b>City:</b> <input type=”text” name=”shipcity” size=”15”><b>State:</b> <input type=”text” name=”shipstate” size=”4”><b>Zip:</b> <input type=”text” name=”shipzip” size=”9”></div><hr><div ID=”items”><b>Qty:</b>
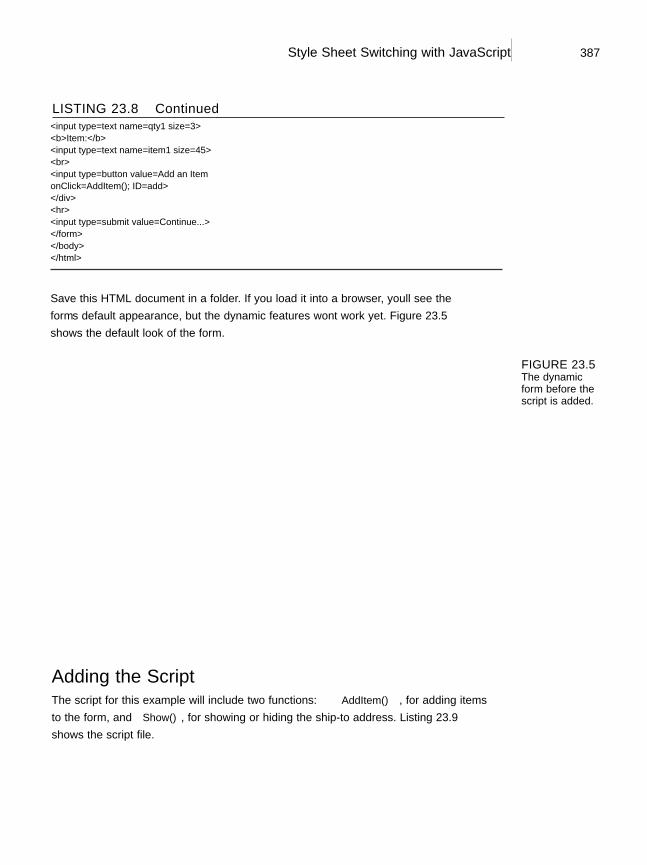
Style Sheet Switching with JavaScript 387
<input type=”text” name=”qty1” size=”3”><b>Item:</b><input type=”text” name=”item1” size=”45”><br><input type=”button” value=”Add an Item”onClick=”AddItem();” ID=”add”></div><hr><input type=”submit” value=”Continue...”></form></body></html>
Save this HTML document in a folder. If you load it into a browser, you’ll see the
form’s default appearance, but the dynamic features won’t work yet. Figure 23.5
shows the default look of the form.
LISTING 23.8 Continued
FIGURE 23.5The dynamicform before thescript is added.
Adding the ScriptThe script for this example will include two functions: AddItem(), for adding items
to the form, and Show(), for showing or hiding the ship-to address. Listing 23.9
shows the script file.
388 HOUR 23: Creating JavaScript Applications
LISTING 23.9 The JavaScript File for the Dynamic Form Example// global variablevar items=1;function AddItem() {if (!document.getElementById) return;// Add an item to the formdiv=document.getElementById(“items”);button=document.getElementById(“add”);items++;newitem=”<b>Qty: </b>”;newitem+=”<input type=\”text\” name=\”qty” + items;newitem+=”\” size=\”3\”> “;newitem+=”<b>Item: </b>”;newitem+=”<input type=\”text\” name=\”item” + items;newitem+=”\” size=\”45\”><br>”;newnode=document.createElement(“span”);newnode.innerHTML=newitem;div.insertBefore(newnode,button);
}function Show(a) {if (!document.getElementById) return;//Hide or show ship-to addressobj=document.getElementById(“shipto”);if (a) obj.style.display=”block”;else obj.style.display=”none”;
}
Here’s a breakdown of how this script works:
. The first line defines a global variable, items, to keep track of the number of
items. This is used to assign a unique name attribute to each <input> tag as
they are added.
. The AddItem() function adds additional Quantity and Item fields to the form
using the insertBefore() DOM method.
. The Show() function uses the style.display property to either show or hide
the section with the id value shipto.
To try the script, save it as dform.js (or download the files from this book’s website)
and load the HTML document into a browser. Figure 23.6 shows the document with
two additional item fields added and the ship-to address displayed.
Q&A 389
SummaryIn this hour, you put your knowledge of JavaScript and the DOM to work with three
examples: a scrolling text box, a page with user-selectable styles, and a dynamic form.
Each of these could serve as the basis for a much more sophisticated feature for a site.
Your 24-hour tour of JavaScript is nearly over. In the final hour of this book, you’ll
learn about the future of JavaScript, learn what other web languages and disciplines
you might want to learn next, and create one final code example.
Q&AQ. Can I make text scroll horizontally rather than vertically?
A. Yes, the scrolling text example could easily work horizontally by changing the
left property rather than the top property. However, this will be confusing
unless the text is designed for horizontal scrolling—a single line would work fine.
Q. Why don’t more sites use dynamic forms?
A. There are some usability and accessibility issues with a dynamic form—for
starters, if JavaScript is disabled, the form in this hour would be limited to
ordering a single item. You could compensate for this with some server-side
code to allow adding additional items (slowly), but it would be far more com-
plex than a simple form.
FIGURE 23.6The dynamicform in action.
▲

390 HOUR 23: Creating JavaScript Applications
Q. Can my script enable more than one style sheet at a time?
A. Yes, you can have any number of <link> tags for style sheets, and any or all
of them can be enabled. One obvious approach is to have one common style
sheet that is always enabled, and use the script to enable or disable additional
style sheets for user preferences.
Quiz QuestionsTest your knowledge of the DOM by answering the following questions.
1. In the scrolling-text example, which CSS rule prevents the scrolling text from
being visible outside the box?
a. overflow: hidden;
b. position: relative;
c. position: absolute;
2. Which property of a <link> element determines whether the style sheet affects
the document?
a. enabled
b. disabled
c. active
3. In the dynamic forms example, which DOM method is used to add additional
fields to the form?
a. insertAfter
b. addItem
c. insertBefore
Quiz Answers1. a. The overflow: hidden; rule prevents the text from being visible outside
the box.
2. b. The disabled property controls whether the style sheet affects the document.
3. c. The insertBefore method is used to add additional items before the Add
an Item button.
Exercises 391
ExercisesIf you want to gain more experience working with the techniques you explored in
this hour, try the following exercises:
. Create your own text for the scrolling text box, and try modifying the HTML
document (refer to Listing 23.1) to scroll your text.
. Create a third style sheet for the style-switching example, and modify the
HTML document and the script (refer to Listings 23.4 and 23.7) to allow
switching between three different style sheets.
. Right now, the dynamic forms example in Listings 23.8 and 23.9 will never
display the Ship To address if JavaScript is disabled. To improve the accessibili-
ty of the form, make the script hide the Ship To section rather than having it
hidden by default in the HTML document.

This page intentionally left blank

HOUR 24
Your Future with JavaScript
What You’ll Learn in This Hour:. Where to go to learn more about JavaScript. How future versions of JavaScript might affect your scripts. An introduction to XML (Extensible Markup Language). XHTML (Extensible Hypertext Markup Language). How to be sure you’re ready for future web technologies. How to move on to other web languages. Implementing drag-and-drop using JavaScript
You’ve reached the last hour of this book. In this final hour, you’ll find some ideas of
where to go next—whether you want to learn more about JavaScript or move on to other
languages and technologies. You’ll also learn some tips for future-proofing your scripts,
and you’ll create a drag-and-drop script as a final example.
Learning Advanced JavaScript TechniquesAlthough you’ve now learned all of the essentials of the JavaScript language, there is still
much to learn. JavaScript can be used to script environments other than the Web, and you
can move beyond simple scripts to develop entire applications that combine JavaScript
with server-side programming.
Here are some ways you can further your JavaScript education:
. See Appendix A, “Other JavaScript Resources,” for a list of JavaScript books and web
pages with further information.
. While the core JavaScript language is in place, be sure to follow the latest develop-
ments. The websites in Appendix A and this book’s site will let you know when
changes are on the way.
394 HOUR 24: Your Future with JavaScript
. Be sure to spend some time practicing the JavaScript techniques you’ve
learned throughout this book. You can use them to create much more com-
plex applications than those you’ve worked with so far.
One advanced technique that is becoming popular is AJAX (Asynchronous JavaScript
and XML), which allows JavaScript to communicate with a server without reloading
pages. You learned the basics of AJAX in Hour 17, “AJAX: Remote Scripting”.
Because this is one of the most exciting features of JavaScript, it’s a good one to learn
more about. Try using the AJAX library you created in Hour 17 to add remote script-
ing to a site, or explore the Web’s AJAX sites to learn more sophisticated techniques.
Future Web TechnologiesThe Web has changed dramatically in the last 10 years, and is continually chang-
ing. In the following sections, you will explore some of the upcoming—and already
developed—technologies that will affect your pages and scripts.
Future Versions of JavaScriptJavaScript has gone through several versions to reach its current one, 1.6.
Fortunately, the core language hasn’t changed much through these version changes,
and nearly all scripts written for older versions will work on the latest one.
The next version of JavaScript, 2.0, is currently being developed by the Mozilla
Foundation and ECMA. Version 2.0’s main change will be the addition of true
object-oriented features, such as classes and inheritance.
As with previous versions, 2.0 should be backward compatible with older versions.
To be sure your scripts will work under version 2.0, follow the standard language
features and do not rely on any undocumented or browser-specific features.
Future DOM VersionsCurrently, the W3C DOM level 1 is an official specification, whereas level 2 is only a
recommendation. Level 2 adds features such as event handling and better style
sheet support, and is already partially supported by the latest browsers.
Hour 15, “Unobtrusive Scripting,” introduces the event-handling features of DOMlevel 2, and describes how to implement the same techniques in Internet Explorer,which does not support them yet.
By theWay
Future Web Technologies 395
In the future, expect better browser support for the DOM, and less compatibility
issues between browsers.
XML (Extensible Markup Language)HTML was originally created as a language for the Web, and was based on an older
standard for documentation called SGML (Standard Generalized Markup Language).
HTML is a much-simplified version of SGML, specifically designed for web documents.
A relatively new language on the scene is XML (Extensible Markup Language). XML
is also a simplified version of SGML, but it isn’t nearly as simple as HTML. Although
HTML has a specific purpose, XML can be used for virtually any purpose.
The W3C (World Wide Web Consortium) developed XML, and has published aspecification to standardize the language.
Strictly speaking, XML isn’t a language in itself—there is no concise list of XML tags
because XML has no set list of tags. Instead, XML enables you to create your own
markup languages for whatever purpose you choose.
So what use is a language without any specific commands? Well, XML enables you
to define tags, similar to HTML tags, for any purpose. If you were storing recipes, for
example, you could create tags for ingredients, ingredient quantities, and instruc-
tions.
XML uses a DTD (Document Type Definition) to define the tags used in a particular
document. The DTD can be in a separate file or built into the document, and speci-
fies which tags are allowed, their attributes, and what they can contain.
XML is already in use today. Although it isn’t directly supported by web browsers,
you can use a program on the server to parse XML documents into HTML docu-
ments before sending them to the browser.
To return to the recipe example, an XML processor could convert each recipe into
HTML. The reason for doing this is simple: By changing the rules in the parser, you
could change the entire format of all of the recipes—a difficult task to perform man-
ually if you had thousands of recipes.
XHTML (Extensible Hypertext Markup Language)The HTML specification, at version 4.01, is still considered valid, but the W3C has
been working on the successor to HTML, XHTML, now at version 1.1. XHTML is a
reformulated version of HTML that fits the strict rules of XML and can be processed
with software designed to work with XML.
By theWay
396 HOUR 24: Your Future with JavaScript
In practice, XHTML looks very similar to HTML. Here are some of the most obvious
changes you will need to make to adapt a page to XHTML:
. All tags should be lowercase: <p>, <body>, and so forth.
. Most tags require closing tags: </p>, and so forth.
. For standalone tags that don’t enclose other elements, such as <img> and
<br>, a special syntax combines opening and closing tags with a slash before
the closing brace: <br/>.
. The document must follow strict rules of structure and tags must be nested cor-
rectly.
. A <!DOCTYPE> tag is required to specify the XML DTD used for the document.
The following specifies the XHTML Transitional DTD:
<!DOCTYPE html PUBLIC “-//W3C//DTD XHTML 1.0 Transitional//EN”“http://www.w3.org/TR/xhtml1/DTD/xhtml1-transitional.dtd”>
The transitional DTD allows some deprecated HTML tags, such as <center>, for
compatibility. There is also an XHTML Strict DTD that does not allow any deprecat-
ed tags.
Browser support for XHTML isn’t perfect, especially when it comes to the StrictDTD. It’s also difficult to meet XHTML’s strict validation requirements while dealingwith issues such as user-generated content and scripts. For these reasons, mostwebmasters use either XHTML Transitional or the still-valid HTML 4.01.
XSL (Extensible Stylesheet Language)XML documents focus strictly on the meaning of the tags—content—and ignore
presentation. The presentation of XML can be determined by creating an XSL
(Extensible Stylesheet Language) style sheet.
XSL is based on XML, but specifies presentation—parameters such as font size, mar-
gins, and table formatting—for an XML document. When you use an XML process-
ing program to create HTML output, it uses an XSL style sheet to determine the
HTML formatting of the output.
XSL documents are actually XML documents, using their own DTD that specifiesstyle sheet tags. XSL is a newer W3C specification.
By theWay
By theWay
Planning for the Future 397
Planning for the FutureIn the history of JavaScript, there has never been such a major change to the lan-
guage that a great number of scripts written using the older version have stopped
working. Nevertheless, many scripts have been crippled by new browser releases—
chiefly those that used browser-specific features.
The following sections offer some guidelines you can follow in writing scripts to
ensure that the impact of future JavaScript versions and browser releases will be
minimal.
Keeping Scripts CompatibleYears ago, Netscape and Microsoft introduced separate and incompatible versions of
DHTML (Dynamic HTML), which allowed scripts to modify any element of a page
for the first time. Early adopters jumped in to write many scripts, some of which you
can still find online today. These scripts made some serious mistakes:
. Browser detection was used to separately support browsers, or in some cases a
specific browser was required.
. Scripts were written to work around bugs in browsers, or sometimes even take
advantage of them.
. The process of writing scripts often involved trial and error rather than con-
sulting official documentation.
This messy scripting gave DHTML—and JavaScript—a bad name among serious pro-
grammers. Fortunately, the standardized W3C DOM has now replaced the propri-
etary browser DHTML features, and it’s easier than ever to create scripts the right
way—but as time goes by, there will undoubtedly be cutting-edge features that
aren’t quite standard.
One obvious example is AJAX (Asynchronous JavaScript and XML), which is only
now being developed as a standard by the W3C, despite working (in sometimes con-
fusingly different ways) in the major browsers.
There’s nothing wrong with using these cutting-edge features—but if you do, you
should be aware that you’re going to need to test the scripts on several different
browsers. You should use feature sensing rather than detecting (or expecting) partic-
ular browsers. Finally, you should be prepared to do a bit of rewriting when the
standard arrives.
398 HOUR 24: Your Future with JavaScript
Staying HTML CompliantOne trend as browsers advance is that newer browsers tend to do a better job of fol-
lowing the W3C standard for HTML—and, often, relying on it. This means that
although a page that uses completely standard HTML will likely work in future
browsers, one that uses browser-specific features or workarounds is bound to have
problems eventually.
In particular, the first release of Netscape 6.0 received many complaints about“breaking” previously working pages. In most cases, the page used bad HTML,and previous browsers happened to handle the error more gracefully.
To avoid these problems, try to use completely valid HTML whenever possible. This
means not only using standard tags and attributes, but following certain formatting
rules: For example, always using both opening and closing <p> tags, and enclosing
numbers for table widths and other parameters in quotation marks.
To be sure your documents follow the HTML standard, see Appendix B, “Tools for
JavaScript Developers,” for suggested HTML validation programs and services. These
will examine your document and point out any areas that do not comply with the
HTML standard.
Document EverythingLast but not least, be sure you understand everything your scripts are doing.
Document your scripts using comments, and particularly document any statements
that might look cryptic or are particularly hard to get working correctly.
If your scripts are properly documented, it will be a much easier process if you have
to modify them to be compatible with a future browser, JavaScript, or DOM version.
See Hour 15 for more tips on future-proofing your scripts by using unobtrusivescripting techniques.
Moving on to Other LanguagesAssuming you’ve spent the last 24 hours learning JavaScript to further your career
(or hobby) as a web developer, where will you go next? As you should know by now,
JavaScript can’t do everything, and there are many other languages that work on
the Web. Here are some you might want to explore:
By theWay
Did youKnow?
▼
Moving on to Other Languages 399
. Java is useful for more complex client-side programs. Although Java applets
aren’t as integrated with web pages as JavaScript, you can build applications
that go beyond JavaScript’s capabilities. Java’s syntax is similar to JavaScript,
although the language is more complicated. See http://java.sun.com/ for more
information.
. Flash is also a popular choice for more sophisticated client-side programs, and is
an especially good choice if you want to create games or applications that work
with video. Flash’s ActionScript is based on the same ECMAScript standard as
JavaScript, so you have a headstart. See http://www.adobe.com/products/flash/
flashpro/ for more information.
. Ruby is a relatively new server-side language that has taken the web develop-
ment world by storm, particularly thanks to the Ruby on Rails framework. Ruby
on Rails includes features for easily integrating JavaScript and AJAX features
into sites. See http://www.ruby-lang.org/en/ and http://www.rubyonrails.org/ for
details.
. PHP is the workhorse of server-side languages, and a popular choice for back-
end development, whether with basic HTML or JavaScript and AJAX front
ends. See http://www.php.net/ for details.
. Python is another popular server-side language, noted for its simple coding
style and the excellent libraries available for adapting it to various purposes.
See http://www.python.org/ for more information.
There are many other languages on the Web, but these are five popular choices. It’s
worth taking the time to learn a bit about these languages and others even if you
don’t plan on making them your primary development tool.
Try It Yourself
Creating Drag-and-Drop ObjectsJust to prove JavaScript can do many things beyond what you’ve learned so far, here
is a final example. Although desktop operating systems support drag-and-drop
actions (for example, moving a file into the trash can), web pages have traditionally
lacked this feature. Using JavaScript and the DOM, you can unobtrusively create
objects that the user can pick up, drag, and drop.
This is a simple implementation of drag-and-drop. Full-featured dragging and drop-ping leads to a very complex script. Fortunately, you can use JavaScript librariessuch as Script.aculo.us to add drag-and-drop to your pages without any scripting.See Hour 8, “Using Built-in Functions and Libraries,” for more details.
Did youKnow?
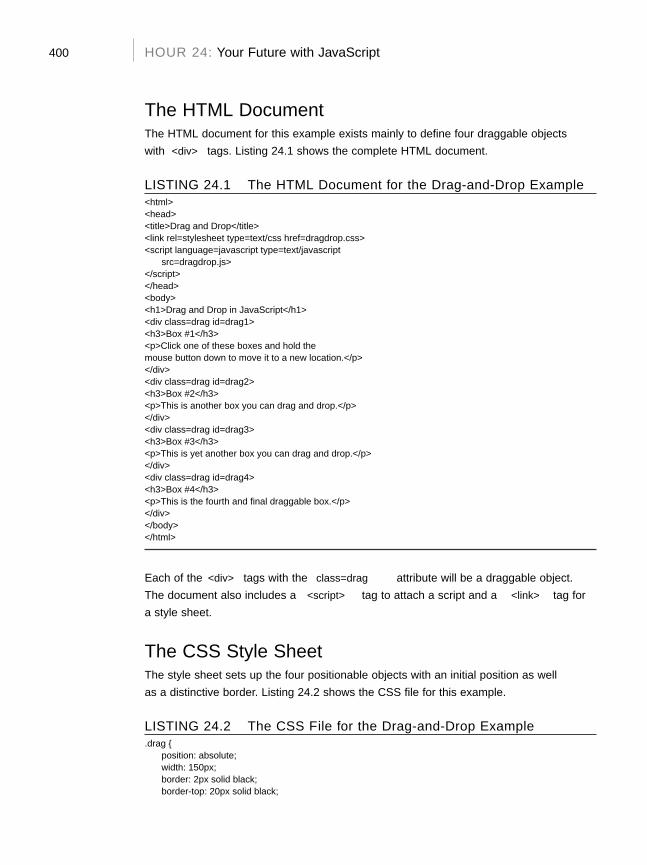
400 HOUR 24: Your Future with JavaScript
The HTML DocumentThe HTML document for this example exists mainly to define four draggable objects
with <div> tags. Listing 24.1 shows the complete HTML document.
LISTING 24.1 The HTML Document for the Drag-and-Drop Example<html><head><title>Drag and Drop</title><link rel=”stylesheet” type=”text/css” href=”dragdrop.css”><script language=”javascript” type=”text/javascript”
src=”dragdrop.js”></script></head><body><h1>Drag and Drop in JavaScript</h1><div class=”drag” id=”drag1”><h3>Box #1</h3><p>Click one of these boxes and hold themouse button down to move it to a new location.</p></div><div class=”drag” id=”drag2”><h3>Box #2</h3><p>This is another box you can drag and drop.</p></div><div class=”drag” id=”drag3”><h3>Box #3</h3><p>This is yet another box you can drag and drop.</p></div><div class=”drag” id=”drag4”><h3>Box #4</h3><p>This is the fourth and final draggable box.</p></div></body></html>
Each of the <div> tags with the class=”drag” attribute will be a draggable object.
The document also includes a <script> tag to attach a script and a <link> tag for
a style sheet.
The CSS Style SheetThe style sheet sets up the four positionable objects with an initial position as well
as a distinctive border. Listing 24.2 shows the CSS file for this example.
LISTING 24.2 The CSS File for the Drag-and-Drop Example.drag {
position: absolute;width: 150px;border: 2px solid black;border-top: 20px solid black;
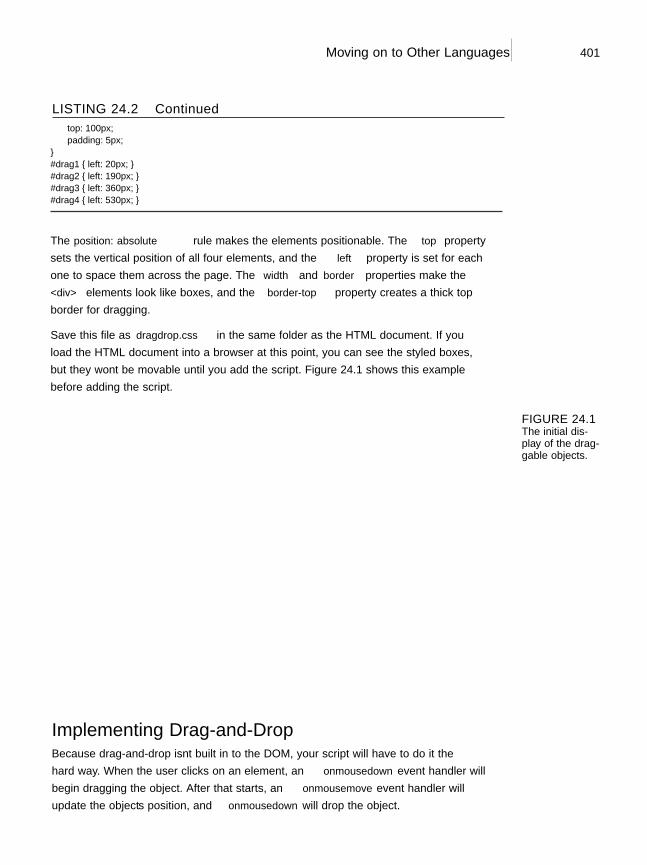
Moving on to Other Languages 401
top: 100px;padding: 5px;
}#drag1 { left: 20px; }#drag2 { left: 190px; }#drag3 { left: 360px; }#drag4 { left: 530px; }
The position: absolute rule makes the elements positionable. The top property
sets the vertical position of all four elements, and the left property is set for each
one to space them across the page. The width and border properties make the
<div> elements look like boxes, and the border-top property creates a thick top
border for dragging.
Save this file as dragdrop.css in the same folder as the HTML document. If you
load the HTML document into a browser at this point, you can see the styled boxes,
but they won’t be movable until you add the script. Figure 24.1 shows this example
before adding the script.
LISTING 24.2 Continued
FIGURE 24.1The initial dis-play of the drag-gable objects.
Implementing Drag-and-DropBecause drag-and-drop isn’t built in to the DOM, your script will have to do it the
hard way. When the user clicks on an element, an onmousedown event handler will
begin dragging the object. After that starts, an onmousemove event handler will
update the object’s position, and onmousedown will “drop” the object.
402 HOUR 24: Your Future with JavaScript
One tricky part is determining the mouse position in the onmousemove event han-
dler. This is stored as a property of the event object, but Netscape and Firefox use
the pageX and pageY properties, whereas Internet Explorer uses the clientX and
clientY properties. A series of if statements finds the x and y values, regardless of
the browser:
if (!e) var e = window.event;if (e.pageX) {x = e.pageX;y = e.pageY;
} else if (e.clientX) {x = e.clientX;y = e.clientY;
} else return;
See Hour 9, “Responding to Events,” for more information on event handlers andthe event object.
One more issue: Objects are positioned based on their top-left corner, but you can
click anywhere on the object with the mouse. This will result in a “jump” effect
when you pick up an object. The solution is to calculate an offset between the
mouse position and the object’s position:
dx = x - obj.offsetLeft;dy = y - obj.offsetTop;
When the object is moved, these offsets will be subtracted from the mouse position.
This way, the object is anchored to the mouse pointer wherever you click it, and does
not jump to a new position.
The JavaScript FileNow all you need is the JavaScript file to add the drag-and-drop feature to the docu-
ment. Listing 24.3 shows the complete script.
LISTING 24.3 The JavaScript File for the Drag-and-Drop Example// global variablesvar obj,x,y,dx,dy;// set up draggable elementsfunction Setup() {// exit if the browser doesn’t support the DOMif (!document.getElementsByTagName) return;divs = document.getElementsByTagName(“DIV”);for (i=0; i<divs.length; i++) {if (divs[i].className != “drag”) continue;// set event handler for each div with class=”drag”divs[i].onmousedown = Drag;
}
By theWay
Moving on to Other Languages 403
}function Drag(e) {// Start dragging an objectif (!e) var e = window.event;// which object was clicked?obj = (e.target) ? e.target: e.srcElement;obj.style.borderColor=”red”;// calculate object offsets from mouse positiondx = x - obj.offsetLeft;dy = y - obj.offsetTop;
}function Move(e) {// track mouse movementsif (!e) var e = window.event;if (e.pageX) {x = e.pageX;y = e.pageY;
} else if (e.clientX) {x = e.clientX;y = e.clientY;
} else return;if (obj) {obj.style.left = x - dx;obj.style.top = y - dy;
}}function Drop() {// let go!if (!obj) return;obj.style.borderColor=”black”;obj = false;
}// Detect mouse movementdocument.onmousemove = Move;// drop current object on mouse updocument.onmouseup = Drop;// Set up when the page loadswindow.onload = Setup;
Here’s a rundown of how this script works:
. The first line declares five global variables: obj to keep track of the current
object being dragged, x and y for the mouse position, and dx and dy for the
object’s offset from the mouse position.
. The Setup() function runs when the page loads. This function uses
getElementsByTagName to find all of the <div> elements in the page. For
each one with the class=”drag” attribute, it sets up an onmousedown event
handler to call the Drag() function.
. The Drag() function sets obj to the correct object, sets the object’s border color
to red to indicate it’s being dragged, and calculates the dx and dy offsets.
LISTING 24.3 Continued
404 HOUR 24: Your Future with JavaScript
. The Move() function is where the action happens. After calculating the mouse
pointer’s x and y position, it sets the object’s left and top properties to move
it to follow the mouse.
. The Drop() function ends the process by setting the object’s border color back
to black, and then setting obj to false, so mouse movements won’t move any
object.
. The final lines set some global event handlers: onmousemove to call the Move()
function, onmouseup to call the Drop() function, and onload to call Setup().
Save this file as dragdrop.js. To try the example, make sure you have all three files
in the same folder: the HTML document, the CSS file (dragdrop.css), and the
JavaScript file (dragdrop.js). Load the HTML document into a browser. Figure 24.2
shows the example after all four objects have been dragged to new positions.
FIGURE 24.2The drag-and-drop example inaction.
SummaryIn this hour, you’ve learned how the future of JavaScript and the Web might affect
your web pages and scripts, and learned some of the upcoming technologies that
might change the way you work with the Web. Finally, you learned how to create
drag-and-drop effects using JavaScript.
▲
Quiz Questions 405
Time’s up—you’ve reached the end of this book. I hope you’ve enjoyed spending 24
hours learning JavaScript, and that you’ll continue to learn more about it on your
own. See Appendix A for starting points to further your knowledge.
Q&AQ. Besides parsing documents into HTML, what other practical uses are there
for XML?
A. XML is a great way to store any type of marked-up text in a standardized way.
Developers of many software applications, including popular word processors,
are considering using XML-based files.
Q. In the drag-and-drop example, the objects overlap each other. Is there a wayto avoid this?
A. Yes, if you set a background-color property for the objects in the style sheet,
they won’t overlap. However, you’ll notice that sometimes you’re dragging the
current object behind the others. To avoid this, you can set the style.zIndex
property for the current object in the script to keep it on top.
Q. What if I have a JavaScript question that isn’t answered in this book?
A. Start with the resources in Appendix A. You should also stop by the author’s
website (www.jsworkshop.com) for a list of updates to the book, frequently
asked questions, and a forum where you can discuss JavaScript with the
author and other users.
Quiz QuestionsTest your knowledge of JavaScript’s future by answering the following questions.
1. Which of the following is the latest DOM recommendation from the W3C?
a. DOM 1.5
b. DOM level 1
c. DOM level 2
2. When should you use a new JavaScript feature?
a. Immediately
b. As soon as it’s supported by browsers
c. As soon as it’s part of a standard, and browsers that support it are wide-
ly available

406 HOUR 24: Your Future with JavaScript
3. Which of the following is an important way of making sure your scripts will
work with future browsers?
a. Follow HTML, JavaScript, and DOM standards.
b. Spend an hour a day downloading the newest browsers and testing your
scripts.
c. Wait until the very last browsers are released before writing any scripts.
Quiz Answers1. c. DOM level 2 is the latest W3C recommendation.
2. c. Wait until JavaScript features are standardized and widely available before
implementing them.
3. a. Following HTML, JavaScript, and DOM standards is an important way of
making sure your scripts will work with future browsers.
ExercisesIf you want to gain more experience working with JavaScript, try the following exer-
cises:
. Try adding another <div> element to the drag-and-drop example and make
the appropriate changes to the style sheet so it will respond correctly.
. Try changing the drag-and-drop example to move a different type of element,
such as paragraphs of text.
PART VII:
Appendixes
APPENDIX A Other JavaScript Resources 409
APPENDIX B Tools for JavaScript Developers 411
APPENDIX C Glossary 415
APPENDIX D JavaScript Quick Reference 419
APPENDIX E DOM Quick Reference 427

This page intentionally left blank

APPENDIX A
Other JavaScript Resources
Although you’ve learned a lot about JavaScript in 24 hours, there’s still a lot to know. If
you’d like to move on to advanced features of JavaScript or learn more, the resources list-
ed in this appendix will be helpful.
Other BooksThe following books, also from Sams.net, discuss JavaScript and DHTML in more detail:
. Sams Teach Yourself JavaScript in 21 Days by Jinjer Simon, Andrew Watt, JonathanWatt. ISBN 0672322978.
. JavaScript Unleashed, Fourth Edition by Jason D. Gilliam, R. Allen Wyke ISBN0672324318.
. JavaScript Developer’s Dictionary by Alexander J. Vincent. ISBN 0672322013.
. Sams Teach Yourself DHTML in 24 Hours by Michael Moncur. ISBN 0672323028.
JavaScript WebsitesThe following websites will help you learn more about JavaScript:
. The JavaScript Workshop is a weblog about JavaScript written by Michael Moncur,the author of this book. There you’ll find updates on the JavaScript language andthe DOM, as well as detailed tutorials on beginning and advanced tasks.
http://www.jsworkshop.com/
. The DOM Scripting Task Force, part of the Web Standards Project, works toward bet-ter use of standards in scripting, and has an informative weblog with the latest onJavaScript and DOM standards.
http://domscripting.webstandards.org/
. The Mozilla Project’s JavaScript section has information on the latest updates to theJavaScript language, as well as documentation, links to resources, and informationabout JavaScript implementations.
http://www.mozilla.org/js/

410 APPENDIX A: Other JavaScript Resources
Web Development SitesThe following sites have news and information about web technologies, including
JavaScript, XML, and the DOM, as well as basic HTML:
. The W3C (World Wide Web Consortium) is the definitive source for informa-
tion about the HTML and CSS standards.
http://www.w3.org/
. WebReference.com has information and articles about web technologies
ranging from Java to plug-ins.
http://www.webreference.com/
. Digital Web Magazine features regular online articles on everything from
JavaScript and web design to running a web business.
http://www.digital-web.com/
This Book’s WebsiteBe sure to register your book at www.samspublishing.com/register by entering this
book’s ISBN number. You’ll find updates to the book, information on new browsers
and new JavaScript features, and other useful resources there, as well as a place to
download all of this book’s examples and the files you will need to try them out.

APPENDIX B
Tools for JavaScriptDevelopers
One of the best things about JavaScript is that it requires no specialized tools—all you
need to start scripting is a web browser and a simple text editor. Nonetheless, tools are
available that will make scripting easier. Some of these are described in this appendix.
HTML and Text EditorsAlthough they aren’t specifically intended for scripting, a wide variety of HTML editors are
available. These allow you to easily create web documents, either by automating the
process of entering tags, or by presenting you with an environment for directly creating
styled text.
HomeSiteHomeSite, from Adobe, is a full-featured HTML editor. It is similar to a text editor, but
includes features to automatically add HTML tags, and to easily create complicated HTML
elements such as tables.
HomeSite also includes a number of JavaScript features, such as creating tags automati-
cally and coloring script commands to make them easy to follow.
A demo version of HomeSite is available for download from Macromedia’s site:
http://www.macromedia.com/software/homesite/
TopStyleTopStyle, from NewsGator Technologies, Inc., is a CSS and HTML editor written by Nick
Bradbury, who originally created HomeSite. It specializes in CSS editing and includes pow-
erful tools for editing style sheets, but it also works as an editor for HTML and JavaScript:
http://www.newsgator.com/
412 APPENDIX B: Tools for JavaScript Developers
FrontPageMicrosoft FrontPage is a popular WYSIWYG (What You See Is What You Get) HTML
editor that allows you to easily create HTML documents. The latest version,
FrontPage 2000, includes a component to create simple scripts automatically.
You can download FrontPage from Microsoft’s site:
http://www.microsoft.com/frontpage/
BBEditFor Macintosh users, BBEdit is a great HTML editor that also includes JavaScript fea-
tures. You can download it from Bare Bones Software’s website:
http://www.bbedit.com/
Text EditorsOften, a simple text editor is all you need to work on an HTML document or script.
Here are some editors that are available for download:
. TextPad, from Helios Software Solutions, is a Windows text editor intended as
a replacement for the basic Notepad accessory. It’s a fast, useful editor, and
also includes a number of features for working with HTML. TextPad is share-
ware, and a fully working version can be downloaded from its official site:
http://www.textpad.com/
. UltraEdit-32, from IDM Computer Solutions, is another good Windows text
editor, with support for hexadecimal editing for binary files as well as simple
text editing. The shareware version is available for download here:
http://www.ultraedit.com/
. SlickEdit, from MicroEdge, is a sophisticated programmer’s editor for Windows
and UNIX platforms:
http://www.slickedit.com/
. TextWrangler, from Bare Bones Software (the developers of BBEdit) is a text
editor for the Macintosh that works great for general text files, HTML, and
JavaScript:
http://www.barebones.com/products/textwrangler/
Debugging Tools 413
HTML ValidatorsWriting web pages that comply with the HTML specifications is one way to avoid
JavaScript errors, as well as to ensure that your pages will work with future browser
versions. Here are some automated ways of checking the HTML compliance of your
pages:
. CSE HTML Validator, from AI Internet Solutions, is an excellent standalone
utility for Windows that checks HTML documents against your choice of HTML
versions. It can also be integrated with HomeSite, TextPad, and several other
HTML and text editors. Although the Pro version of this product is commer-
cial, a Lite version is available for free download. Visit their website:
http://www.htmlvalidator.com/
. The W3C’s HTML Validation Service is a web-based HTML validator. Just enter
your URL, and it will be immediately checked for HTML compliance. Access
this service at this URL:
http://validator.w3.org/
. The WDG HTML Validator offers a different perspective, and is also an easy-to-
use web-based service. Access it at this URL:
http://www.htmlhelp.com/tools/validator/
Debugging ToolsYou might find the following tools useful in debugging your JavaScript applications:
. The Web Developer Extension for Firefox includes several helpful features for
debugging JavaScript and for analyzing pages. (See Hour 16, “Debugging
JavaScript Applications,” for more information.)
http://chrispederick.com/work/webdeveloper/
. The Mozilla project’s Venkman is a sophisticated debugger for JavaScript in
Mozilla or Firefox. Find out more here:
http://www.mozilla.org/projects/venkman/
. Microsoft Script Debugger works with JavaScript and VBScript in Internet
Explorer:
http://msdn.microsoft.com/library/en-us/sdbug/html/sdbug_1.asp

This page intentionally left blank

APPENDIX C
Glossary
The following are some terms relating to JavaScript and web development that are used
throughout this book. Although most of them are explained in the text of the book, this
section can serve as a useful quick reference while reading the book, or while reading
other sources of JavaScript information.
ActiveX A technology developed by Microsoft to allow components to be created, prima-
rily for Windows computers. ActiveX components, or controls, can be embedded in web
pages.
AJAX (Asynchronous JavaScript and XML) a combination of technologies that allows
JavaScript to send requests to a server, receive responses, and update sections of a page
without loading a new page.
anchor In HTML, a named location within a document, specified using the <a> tag.
Anchors can also act as links.
applet A Java program that is designed to be embedded in a web page.
argument A parameter that is passed to a function when it is called. Arguments are
specified within parentheses in the function call.
array A set of variables that can be referred to with the same name and a number,
called an index.
attribute A property value that can be defined within an HTML tag. Attributes specify
style, alignment, and other aspects of the element defined by the tag.
Boolean A type of variable that can store only two values: true and false.
browser sensing A scripting technique that detects the specific browser in use by clients
to provide compatibility for multiple browsers.
Cascading Style Sheets (CSS) The W3C’s standard for applying styles to HTML docu-
ments. CSS can control fonts, colors, margins, borders, and positioning.
concatenate The act of combining two strings into a single, longer string.
conditional A JavaScript statement that performs an action if a particular condition is
true, typically using the if statement.
debug The act of finding errors, or bugs, in a program or script.
416 APPENDIX C: Glossary
decrement To decrease the value of a variable by one. In JavaScript, this can be
done with the decrement operator, --.
deprecated A term the W3C applies to HTML tags or other items that are no
longer recommended for use, and may not be supported in the future. For example,
the <font> tag is deprecated in HTML 4.0 because style sheets can provide the same
capability.
Document Object Model (DOM) The set of objects that JavaScript can use to refer
to the browser window and portions of the HTML document. The W3C (World Wide
Web Consortium) DOM is a standardized version supported by the latest browsers,
and allows access to every object within a web page.
Dynamic HTML (DHTML) The combination of HTML, JavaScript, CSS, and the
DOM, which allows dynamic web pages to be created. DHTML is not a W3C stan-
dard or a version of HTML.
element A single member of an array, referred to with an index. In the DOM, an
element is a single node defined by an HTML tag.
event A condition, often the result of a user’s action, that can be detected by a
script.
event handler A JavaScript statement or function that will be executed when an
event occurs.
expression A combination of variables, constants, and operators that can be eval-
uated to a single value.
feature sensing A scripting technique that detects whether a feature, such as a
DOM method, is supported before using it to avoid browser incompatibilities.
function A group of JavaScript statements that can be referred to using a function
name and arguments.
global variable A variable that is available to all JavaScript code in a web page.
It is declared (first used) outside any function.
Greasemonkey An extension for the Firefox browser that allows user scripts to
modify the appearance and behavior of web pages.
Hypertext Markup Language (HTML) The language used in web documents.
JavaScript statements are not HTML, but can be included within an HTML docu-
ment.
increment To increase the value of a variable by one. In JavaScript, this is done
with the increment operator, ++.
scope 417
interpreter The browser component that interprets JavaScript statements and acts
on them.
Java An object-oriented language developed by Sun Microsystems. Java applets
can be embedded within a web page. JavaScript has similar syntax, but is not the
same as Java.
JavaScript A scripting language for web documents, loosely based on Java’s syn-
tax, developed by Netscape. JavaScript is now supported by the most popular
browsers.
layer An area of a web page that can be positioned and can overlap other sec-
tions in defined ways. Layers are also known as positionable elements.
local variable A variable that is available to only one function. It is declared (first
used) within the function.
loop A set of JavaScript statements that are executed a number of times, or until a
certain condition is met.
method A specialized type of function that can be stored in an object, and acts on
the object’s properties.
Navigator A browser developed by Netscape, and the first to support JavaScript.
node In the DOM, an individual container or element within a web document.
Each HTML tag defines a node.
object A type of variable that can store multiple values, called properties, and
functions, called methods.
operator A character used to divide variables or constants used in an expression.
parameter A variable sent to a function when it is called, also known as an argu-
ment.
progressive enhancement The approach of building a basic page that works on
all browsers, and then adding features such as scripting that will work on newer
browsers without compromising the basic functionality of the page.
property A variable that is stored as part of an object. Each object can have any
number of properties.
rule In CSS, an individual element of a style block that specifies the style for an
HTML tag, class, or identifier.
scope The part of a JavaScript program that a variable was declared in and is
available to.
418 APPENDIX C: Glossary
selector In a CSS rule, the first portion of the rule that specifies the HTML tag,
class, or identifier that the rule will affect.
statement A single line of a script or program.
string A group of text characters that can be stored in a variable.
tag In HTML, an individual element within a web document. HTML tags are con-
tained within angle brackets, as in <body> and <p>.
text node In the DOM, a node that stores a text value rather than an HTML ele-
ment. Nodes that contain text, such as paragraphs, have a text node as a child
node.
unobtrusive scripting A set of techniques that make JavaScript accessible and
avoid trouble with browsers by separating content, presentation, and behavior.
variable A container, referred to with a name, that can store a number, a string,
or an object.
VBScript A scripting language developed by Microsoft, with syntax based on
Visual Basic. VBScript is supported only by Microsoft Internet Explorer.
World Wide Web Consortium (W3C) An international organization that develops
and maintains the standards for HTML, CSS, and other key web technologies.
XHTML (Extensible Hypertext Markup Language) A new version of HTML
developed by the W3C. XHTML is similar to HTML, but conforms to the XML specifi-
cation.
XML (Extensible Markup Language) A generic language developed by the W3C
(World Wide Web Consortium) that allows the creation of standardized HTML-like
languages, using a DTD (Document Type Definition) to specify tags and attributes.

APPENDIX D
JavaScript Quick Reference
This appendix is a quick reference for the JavaScript language. It includes the built-in objectsand the objects in the basic object hierarchy, JavaScript statements, and built-in functions.
Built-in ObjectsThe following objects are built in to JavaScript. Some can be used to create objects of yourown; others can only be used as they are. Each is detailed in the following sections.
ArrayYou can create a new array object to define an array—a numbered list of variables.(Unlike other variables, arrays must be declared.) Use the new keyword to define an array,as in this example:
students = new Array(30)
Items in the array are indexed beginning with 0. Refer to items in the array with brackets:
fifth = students[4];
Arrays have a single property, length, which gives the current number of elements in thearray. They have the following methods:
. join quickly joins all of the array’s elements together, resulting in a string. The ele-ments are separated by commas, or by the separator you specify.
. reverse returns a reversed version of the array.
. sort returns a sorted version of the array. Normally this is an alphabetical sort;however, you can use a custom sort method by specifying a comparison routine.
StringAny string of characters in JavaScript is a string object. The following statement assigns avariable to a string value:
text = “This is a test.”
Because strings are objects, you can also create a new string with the new keyword:
text = new String(“This is a test.”);
420 APPENDIX D: JavaScript Quick Reference
String objects have a single property, length, which reflects the current length of thestring. There are a variety of methods available to work with strings:
. substring returns a portion of the string.
. toUpperCase converts all characters in the string to uppercase.
. toLowerCase converts all characters in the string to lowercase.
. indexOf finds an occurrence of a string within the string.
. lastIndexOf finds an occurrence of a string within the string, starting at theend of the string.
. link creates an HTML link using the string’s text.
. anchor creates an HTML anchor within the current page.
There are also a few methods that allow you to change a string’s appearance whenit appears in an HTML document:
. string.big displays big text using the <big> tag in HTML 3.0.
. string.blink displays blinking text using the <blink> tag in Netscape.
. string.bold displays bold text using the <b> tag.
. string.fixed displays fixed-font text using the <tt> tag.
. string.fontcolor displays the string in a colored font, equivalent to the<fontcolor> tag in Netscape.
. string.fontsize changes the font size using the <fontsize> tag inNetscape.
. string.italics displays the string in italics using the <i> tag.
. string.small displays the string in small letters using the <small> tag inHTML 3.0.
. string.strike displays the string in a strike-through font using the <strike>tag.
. string.sub displays subscript text, equivalent to the <sub> tag in HTML 3.0.
. string.sup displays superscript text, equivalent to the <sup> tag in HTML 3.0.
MathThe Math object is not a “real” object because you can’t use it to create your own
objects. A variety of mathematical constants are also available as properties of the
Math object:

Built-in Objects 421
. Math.E is the base of natural logarithms (approximately 2.718).
. Math.LN2 is the natural logarithm of two (approximately 0.693).
. Math.LN10 is the natural logarithm of 10 (approximately 2.302).
. Math.LOG2E is the base 2 logarithm of e (approximately 1.442).
. Math.LOG10E is the base 10 logarithm of e (approximately 0.434).
. Math.PI is the ratio of a circle’s circumference to its diameter (approximately
3.14159).
. Math.SQRT1_2 is the square root of one half (approximately 0.707).
. Math.SQRT2 is the square root of two (approximately 1.4142).
The methods of the Math object allow you to perform mathematical functions. The
methods are listed in the following categories.
Algebraic Functions. Math.acos calculates the arc cosine of a number in radians.
. Math.asin calculates the arc sine of a number.
. Math.atan calculates the arc tangent of a number.
. Math.cos calculates the cosine of a number.
. Math.sin returns the sine of a number.
. Math.tan calculates the tangent of a number.
Statistical and Logarithmic Functions. Math.exp returns e (the base of natural logarithms) raised to a power.
. Math.log returns the natural logarithm of a number.
. Math.max accepts two numbers and returns whichever is greater.
. Math.min accepts two numbers and returns the smaller of the two.
Basic Math and Rounding. Math.abs calculates the absolute value of a number.
. Math.ceil rounds a number up to the nearest integer.
. Math.floor rounds a number down to the nearest integer.
. Math.pow calculates one number to the power of another.
422 APPENDIX D: JavaScript Quick Reference
. Math.round rounds a number to the nearest integer.
. Math.sqrt calculates the square root of a number.
Random Numbers. Math.random returns a random number between 0 and 1.
DateThe Date object is a built-in JavaScript object that allows you to conveniently work
with dates and times. You can create a Date object any time you need to store a
date, and use the object’s methods to work with the date:
. setDate sets the day of the month.
. setMonth sets the month. JavaScript numbers the months from 0 to 11, start-
ing with January (0).
. setYear sets the year. SetFullYear is a four-digit, Y2K-compliant version.
. setTime sets the time (and the date) by specifying the number of milliseconds
since January 1, 1970.
. setHours, setMinutes, and setSeconds set the time.
. getDate gets the day of the month.
. getMonth gets the month.
. getYear gets the year.
. getTime gets the time (and the date) as the number of milliseconds since
January 1, 1970.
. getHours, getMinutes, and getSeconds get the time.
. getTimeZoneOffset gives you the local time zone’s offset from GMT.
. toGMTString converts the date object’s time value to text using GMT
(Greenwich Mean Time, also known as UTC).
. toLocalString converts the Date object’s time value to text using local time.
. Date.parse converts a date string, such as “June 20, 2003” to a Date object
(number of milliseconds since 1/1/1970).
. Date.UTC converts a Date object value (number of milliseconds) to a UTC
(GMT) time.
Creating and Customizing Objects 423
Creating and Customizing ObjectsThis is a brief summary of the keywords you can use to create your own objects and
customize existing objects. These are documented in detail in Hour 6, “Using
Functions and Objects.”
Creating ObjectsThere are three JavaScript keywords used to create and refer to objects:
. new is used to create a new object.
. this is used to refer to the current object. This can be used in an object’s con-
structor function or in an event handler.
. with makes an object the default for a group of statements. Properties without
complete object references will refer to this object.
To create a new object, you need an object constructor function. This simply assigns
values to the object’s properties using this:
function Name(first,last) {this.first = first;this.last = last;
}
You can then create a new object using new:
Fred = new Name(“Fred”,”Smith”);
Customizing ObjectsYou can add additional properties to an object you have created just by assigning
them:
Fred.middle = “Clarence”;
Properties you add this way apply only to that instance of the object, not to all
objects of the type. A more permanent approach is to use the prototype keyword,
which adds a property to an object’s prototype (definition). This means that any
future object of the type will include this property. You can include a default value:
Name.prototype.title = “Citizen”;
You can use this technique to add properties to the definitions of built-in objects as
well. For example, this statement adds a property called num to all existing and
future string objects, with a default value of 10:
string.prototype.num = 10;
424 APPENDIX D: JavaScript Quick Reference
JavaScript StatementsThis is an alphabetical listing of the statements available in JavaScript and their syntax.
CommentsComments are used to include a note within a JavaScript program, and are ignored
by the interpreter. There are two different types of comment syntax:
//this is a comment/* this is also a comment */
Only the second syntax can be used for multiple-line comments; the first must be
repeated on each line.
breakThis statement is used to break out of the current for or while loop. Control resumes
after the loop, as if it had finished.
continueThis statement continues a for or while loop without executing the rest of the loop.
Control resumes at the next iteration of the loop.
forThis statement defines a loop, usually to count from one number to another using
an index variable. In this example, the variable i counts from 1 to 9:
for (i=1;i<10;i++;) { statements }
for...inThis is a different type of loop, used to iterate through the properties of an object, or
the elements of an array. This statement loops through the properties of the Scores
object, using the variable x to hold each property in turn:
for (x in Scores) { statements }
functionThis statement defines a JavaScript function that can be used anywhere within the
current document. Functions can optionally return a value with the return state-
ment. This example defines a function to add two numbers and return the result:
JavaScript Statements 425
function add(n1,n2) {result = n1 + n2;return result;
}
if...elseThis is a conditional statement. If the condition is true, the statements after the if
statement are executed; otherwise, the statements after the else statement (if pres-
ent) are executed. This example prints a message stating whether a number is less
than or greater than 10:
if (a > 10) {document.write(“Greater than 10”);
}else {
document.write(“10 or less”);}
A shorthand method, known as the “hook and colon” conditional, can also be used
for these types of statements, where ? indicates the if portion and : indicates the
else portion. This statement is equivalent to the previous example:
document.write((a > 10) ? “Greater than 10” : “10 or less”);
Conditional statements are explained further in Hour 7, “Controlling Flow with
Conditions and Loops.”
returnThis statement ends a function, and optionally returns a value. The return state-
ment is necessary only if a value is returned.
varThis statement is used to declare a variable. If you use it within a function, the vari-
able is guaranteed to be local to that function. If you use it outside the function, the
variable is considered global. Here’s an example:
var students = 30;
Because JavaScript is a loosely typed language, you do not need to specify the type
when you declare the variable. A variable is also automatically declared the first
time you assign it a value:
students = 30;
426 APPENDIX D: JavaScript Quick Reference
Using var will help avoid conflicts between local and global variables. Note that
arrays are not considered ordinary JavaScript variables; they are objects. See Hour 5,
“Using Variables, Strings, and Arrays,” for details.
whileThe while statement defines a loop that iterates as long as a condition remains
true. This example waits until the value of a text field is “go”:
while (document.form1.text1.value != “go”) {statements }
JavaScript Built-in FunctionsThe functions in the following sections are built in to JavaScript, rather than being
methods of a particular object.
evalThis function evaluates a string as a JavaScript statement or expression, and either
executes it or returns the resulting value. In the following example, a function is
called using variables as an argument:
a = eval(“add(x,y);”);
eval is typically used to evaluate an expression or a statement entered by the user.
parseIntThis function finds an integer value at the beginning of a string and returns it. If
there is no number at the beginning of the string, “NaN” (not a number) is returned.
parseFloatFinds a floating-point value at the beginning of a string and returns it. If there is no
number at the beginning of the string, “NaN” (not a number) is returned.

APPENDIX E
DOM Quick Reference
This appendix presents a quick overview of the DOM objects available, including the basic
level 0 DOM and the W3C level 1 DOM.
DOM Level 0The level 0 DOM includes objects that represent the browser window, the current docu-
ment, and its contents. The following is a basic summary of level 0 DOM objects.
The level 0 DOM was an informal standard developed by Netscapewhen JavaScript was introduced. Its objects and properties are nowformalized in the W3C DOM level 1 recommendation.
windowThe window object represents the current browser window. If multiple windows are open or
frames are used, there might be more than one window object. These are given aliases to
distinguish them:
. self represents the current window, as does window. This is the window containing
the current JavaScript document.
. top is the window currently on top (active) on the screen.
. parent is the window that contains the current frame.
. The frames array contains the window object for each frame in a framed document.
The window object has three child objects:
. location stores the location (URL) of the document displayed in the window.
. document stores information about the current web page.
. history contains a list of sites visited before or after the current site in the window.
By theWay
428 APPENDIX E: DOM Quick Reference
locationThe location object contains information about the current URL being displayed by
the window. It has a set of properties to hold the different components of the URL:
. location.hash is the name of an anchor within the document, if specified.
. location.host is a combination of the host name and port.
. location.hostname specifies the host name.
. location.href is the entire URL.
. location.pathname is the directory to find the document on the host, and the
name of the file.
. location.port specifies the communication port.
. location.protocol is the protocol (or method) of the URL.
. location.query specifies a query string.
. location.target specifies the TARGET attribute of the link that was used to
reach the current location.
historyThe history object holds information about the URLs that have been visited before
and after the current one in the window, and includes methods to go to previous or
next locations:
. history.back goes back to the previous location.
. history.forward goes forward to the next location.
. history.go goes to a specified offset in the history list.
documentThe document object represents the current document in the window. It includes the
following child objects:
. document.forms is a collection with an element for each form in the document.
. document.links is a collection containing elements for each of the links in
the document.
. document.anchors is a collection with elements for each of the anchors in the
document.
DOM Level 1 429
. document.images contains an element for each of the images in the current
document.
. document.applets is a collection with references to each embedded Java
applet in the document.
navigatorThe navigator object includes information about the current browser version:
. appCodeName is the browser’s code name, usually “Mozilla.”
. appName is the browser’s full name.
. appVersion is the version number of the browser. (Example: “4.0(Win95;I).”)
. userAgent is the user-agent header, which is sent to the host when requestinga web page. It includes the entire version information, such as“Mozilla/4.5(Win95;I).”
. plugIns is a collection, which contains information about each currentlyavailable plug-in (Netscape and Firefox only).
. mimeTypes is a collection containing an element for each of the availableMIME types (Netscape and Firefox only).
DOM Level 1The level 1 DOM is the first cross-browser DOM standardized by the W3C. Its objects
are stored under the document object of the level 0 DOM.
Basic Node PropertiesEach object has certain common properties:
. nodeName is the name of the node (not the ID). The name is the tag name forHTML tag nodes, #document for the document node, and #text for text nodes.
. nodeType is a number describing the node’s type: 1 for HTML tags, 3 for textnodes, and 9 for the document.
. nodeValue is the text contained within a text node.
. innerHTML is the HTML contents of a container node.
. id is the value of the ID attribute for the node.
. classname is the value of the class attribute for the node.
430 APPENDIX E: DOM Quick Reference
Relationship PropertiesThe following properties describe an object’s relationship with others in the
hierarchy:
. firstChild is the first child node for the current node.
. lastChild is the last child object for the current node.
. childNodes is an array of all the child nodes under a node.
. previousSibling is the sibling before the current node.
. nextSibling is the sibling after the current node.
. parentNode is the object that contains the current node.
Offset PropertiesAlthough not part of the W3C DOM, both Netscape and Internet Explorer support
the following properties that provide information about a node’s position:
. offsetLeft is the distance from the left side of the browser window or con-
taining object to the left edge of the node object.
. offsetTop is the distance from the top of the browser window or containing
object to the top of the node object.
. offsetHeight is the height of the node object.
. offsetWidth is the width of the node object.
Style PropertiesThe style child object under each DOM object includes its style sheet properties.
These are based on attributes of a style attribute, <style> tag, or external style
sheet. See Hour 12, “Working with Style Sheets,” for details on these properties.
Node MethodsThe following methods are available for all DOM nodes:
. appendChild(node) adds a new child node to the node after all its existing
children.
. insertBefore(node,oldnode) inserts a new node before the specified existing
child node.
DOM Level 1 431
. replaceChild(node,oldnode) replaces the specified old child node with a
new node.
. removeChild(node) removes an existing child node.
. hasChildNodes() returns a Boolean value of true if the node has one or
more children, or false if it has none.
. cloneNode() returns a copy of the current node.
. getAttribute(attribute_name) gets the value of the attribute you specify
and stores it in a variable.
. setAttribute(attribute_name, value) sets the value of an attribute.
. removeAttribute(attribute_name) removes the attribute you specify.
. hasAttributes() simply returns true if the node has attributes, and false if
it has none.
Document Object Methods and PropertiesThe following are methods and properties of the document object:
. document.getElementById(ID) returns the element with the specified ID
attribute.
. document.getElementsByTagName(tag) returns an array of the elements
with the specified tag name. You can use the asterisk (*) as a wildcard to
return an array containing all of the nodes in the document.
. document.createElement(tag) creates a new element with the specified tag
name.
. document.createTextNode(text) creates a new text node containing the
specified text.
. document.documentElement is an object that represents the document itself,
and can be used to find information about the document.

This page intentionally left blank
Symbols&& (and operator), 103= (assignment operator), 103{} (braces), for loop syntax, 110== (equality operator), 103, 256++ (increment operator), 66, 115! (not operator), 104+= operator, 66— operator, 66|| (or operator), 103+ (plus sign), 28; (semicolon), 27, 38.au files, 333.css external files, creating, 201.is extension, 11.mid files, 333.mp3 files, 333.wav files, 333
Aabbreviating statements with
shorthand expressions, 105accessibility, 241accessing
array elements, 77JavaScript console
(FireFox), 258ActionScript, 332ActiveX, 18addEventListener() function, 142addEventListener() method, W3C
event model, 238-239adding
comments to scripts, 43-44,240, 259
event handlers to HTML tags,237-238
cross-browser method, 239items to navigation trees, 228Script.aculo.us library to
HTML document, 132scripts to HTML documents, 28temporary statements to
scripts, 259text to pages, 225-228
AddItem() function, 387AddScore() functions, 367AddText() function, 226
Adobe Dreamweaver, 25Adobe GoLive, 25AJAX (Asynchronous JavaScript and
XML), 17, 273applications, debugging, 285back end, 274client operation, requests, 274client/server processing,
XMLHttpRequest object,277-278
examples of, 275-276frameworks, 276libraries, 130, 276
ajaxRequest function, 279ajaxResponse
function, 280creating, 279-280
limitations of, 276-277live searches, 285
back end, 287-288front end, 288-289HTML file example, 286-287requirements for, 289
quizcreating, 280, 282-284testing, 284
ajaxRequest() function, 279ajaxResponse() function, 280alert messages, 259alert() function, 45anchor objects, 54And operator (&&), 103animated slideshows, creating,
322-326AnimateSlide() function, 326APIs (application programming
interfaces), Greasemonkeysupport for, 302
appendChild() method, 221applets, 17applications for JavaScript
improving navigation, 16remote scripting, 17special effects, 17validating forms, 16
applyingclasses to elements, 195styles to specific elements, 194
arguments, 86
Indexarrays, 76. See also string arrays
assigning values to, 76creating, 76declaring, 76elements, accessing, 77frame, 167-168length property, 77sorting, 79-81
ASCII (American Standard Code for InformationInterchange), 149
assigning valuesto arrays, 76to strings, 71-72to variables, 65-66
assignment and equality, 256assignment operator (=), 256attributes of form tag, 173audio file formats, 333avoiding
browser-specific scripting, 239common scripting
mistakes, 256HTML errors, 257assignment and
equality, 256confusing local and global
variables, 257improper object usage, 257syntax errors, 256
errors, 249-252
Bback button, creating, 56-57back end, 274
of AJAX live search example, 287-288
background images, CSSproperties, 196-197
background property (CSS), 196background-attachment property
(CSS), 196background-color property
(CSS), 196, 213background-image property
(CSS), 196, 213background-position property
(CSS), 196

background-repeat property(CSS), 196
behavior, separating from contentand presentation, 236
best practices, 44for unobtrusive scripting, 235
bookmarklets, 265JavaScript Shell, 265
Boolean operators, See logicaloperators
Boolean values, 69Boodman, Aaron, 294border-color property (CSS), 213border-style property (CSS), 213border-width property (CSS), 213borders, CSS properties, 197-198break statement, escaping from
infinite loops, 113browser sensing, 245-246browser-specific scripting,
avoiding, 239browsers
dialog boxes, displaying,164-165
graceful degradation, 237information about, displaying,
242-243for Internet Explorer 6.0,
243, 245non-JavaScript, 247
detecting, 248progressive enhancement, 237script compability, 397timeouts
enabling, 162repeating, 163
user script support, 296windows
closing, 159-160creating, 158-159resizing, 160
built-in objects, 39definitions, extending, 94-96Math object, 121-122
buttons, 178-179
Ccalculating
length of arrays, 77length of strings, 72
calling functions, 87-88case sensitivity, 42
of event handlers, 140catch keyword, error handling, 262CGI (Common Gateway
Interface), 19Champeon, Steve, 237changebody() function, 204changehead() function, 204charAT() method, 75check boxes, 179child objects, 91, 209childNodes property, 220classes, 195
applying to elements, 195clear property (CSS), 197cleardesc function, 153clearing timeouts, 162clearTimeout() method, 162client/server processing (AJAX),
XMLHttpRequest object,277-278
clip property (CSS), 212cloneNode() method, 221closing windows, 159-160CLR (Common Language
Runtime), 16color property (CSS), 196colors
CSS properties, 196-197selecting from forms, 202
combiningconditions, 103-104values of strings, 71
comments, 43-44adding to code, 240, 259
common scripting mistakesconfusing local and global
variables, 257HTML errors, 257improper object usage, 257
communication betweenJavaScript and Flash, 332
compatibility issuesof browsers and scripts, 397of drop-down menus, 346
conditional expressions, 102, 223conditional operators, 103conditional statements, 40conditions, combining, 103-104
constructor functions, 92containers, 208content, 236
separating from behavior andpresentation, 236
continue statement, 113controlling
operator precedence, 68sounds, 334styles, 201-204
controls, 18converting
ASCII code to string charac-ter, 149
case of strings, 73data types, 69-70date formats, 128
createElement() method, 221createTextNode() method, 221creating
AJAX libraries, 279-280ajaxResponse function,
280ajaxRequest function, 279
AJAX quiz, 280, 282-284arrays, 76back/forward buttons, 56-57Date objects, 126drag-and-drop objects, 399
CSS style sheet, 400-401HTML document, 400JavaScript file, 402-404
drop-down menus, 345CSS, fine-tuning, 354, 356example JavaScript file,
352-353dynamic forms, 385-388dynamic styles, 202-204error handlers, 260event handlers, 140external .css files, 201global variables, 65layers, 210-211local variables, 65loops
for, in loops, 115-116with do statement, 112with for statement, 109with while statement,
110-111movable layers, 214-215
434
background-repeat property (CSS)

navigation trees, 226-228objects, 90poker solitaire game script,
363-368rollovers, 315-316
without JavaScript, 316-317rules, 193scripts, required tools
browsers, 25text editors, 23-25
scrolling windows, 377-380separate JavaScript and HTML
files, 33-34site-specific user scripts,
302-304slideshows, 319-323, 325-326string arrays, 78string objects, 71stylesheets, 198-200user scripts, 299, 305-306windows, 158-159
cross-browser scripting, featuresensing, 245-246
cross-platform compatibility, ofdrop-down menu support, 346
CSS (Cascading Style Sheets), 192adding styles to poker
solitaire game, 368-372drop-down menu links,
formatting, 347-350fine-tuning for drop-down
menus, 354-356for drag-and-drop objects, 400-
401for scrolling window, 378-379graphic rollovers, 317-319hover directive, creating
rollovers, 316-317movable layers, creating,
214-215properties
background-color=, 213background-image, 213background images, 196-197border- color, 213border-style, 213border-width, 213borders, 197-198clip, 212 colors, 196-197
display, 212fonts, 197hyphenating, 213margins, 197-198overflow, 212text alignment, 195units of measurement, 198visibility, 212
rules, 194custom objects, 40
Ddata types, 68-69
converting between, 69-70date and time, displaying, 25-30
with large clock display,30-31
date formats, converting, 128Date objects, 27
creating, 126get methods, 127reading values, 127setting values, 126
Date.parse() method, 128Date.UTC() method, 128debugging
AJAX applications, 285user scripts, 266-267, 304
debugging tools, 259-260Firefox’s JavaScript Console,
258decimal numbers, rounding, 121declaring
arrays, 76variables, 64
decrementing variables, 66defining
event handlers, 140-142forms, 173-174functions, 86-87multiple classes for
elements, 195objects, 92
describing user scripts with meta-data, 299-300
design patterns, 241detecting
browser features, 245-246non-JavaScript browsers, 248sound support, 335
Developer Toolbar (InternetExplorer), 263-264
DHTML (dynamic HTML), 51, 207dialog boxes, displaying, 164-165display property (CSS), 212displaying
browser information, 242-243for Internet Explorer 6.0,
243-245date and time, 25-30
with large clock display,30-31
dialog boxes, 164-165error messages, 31, 259-261form data, 182-183generated source, 265link descriptions, 151-154submenus within drop-down
menus, 351typed characters, 150
do…while loops, creating, 112document node methods, 221document object, 52-53
methods, 53properties, 52
document.getElementById()method, 213
document.write statement, 10, 27documenting scripts, 398DoIt function, 161Dojo library, 130DOM (Document Object Model),
12, 49children, 209history of, 50layers, creating, 210level standards, 51methods, 50nodes
document node, methods,221
properties, 220relationship properties, 220
objects, 39document, 52-53hierarchy, 50positioning, 211window, 51
parents, 209
How can we make this index more useful? Email us at [email protected]
DOM (Document Object Model)
435

properties, 50siblings, 210structure, 208
DOM Inspector, 264DoPlay() method, 334downloading Script.aculo.us
library, 131Drag() function, 403drag-and-drop objects
creating, 399CSS style sheet, 400-401HTML document, 400JavaScript file, 402-404
Drop() function, 404drop-down lists, 181-182drop-down menus
compatibility issues, 346creating, 345, 352-353CSS, fine-tuning, 354, 356FindChild() function, 350links, formatting in CSS,
347-350SetupMenu() function, 350submenus
displaying, 351hiding, 351-352positioning, 349
DTD (Document Type Definition),395
Dunck, Jeremy, 294dynamic forms, creating, 385-388dynamic HTML, 150dynamic images, 313dynamic styles, creating, 202-204
EECMA (European Computer
Manufacturing Association), 15elements, 76
buttons, 178-179check boxes, 179drop-down lists, 181-182radio buttons, 180referring to as arrays, 176text areas, supported
methods, 176-178else keyword, 104
testing multiple conditions,105-107
em property (CSS), 198
emailing form results, 184-186embedding Flash with JavaScript,
332embedding sounds, 334enabling timeouts on browsers,
162EndGame() function, 368equality operator (==), 256error handlers
adding to HTML tags,237-239
catch keyword, 262creating, 260try keyword, 262
error messagesdisplaying, 259handling, 31
errorsavoiding, 249-252displaying information
about, 261fixing, 267
escaping from infinite loops, 113event handlers, 11, 41, 139. See also timeouts
case sensitivity, 140creating, 140defining, 140-142example of, 45for image object, 314multiple, executing, 142onClick, 146-148onLoad, 151onMouseDown, 146onMouseMove, 145onMouseOver, 145onMouseUp, 146parentheses, use of, 278syntax, 140W3C event model, 238-239
event object, 142-143properties, 143-144
events, 12onMouseOver, 140
evolution of JavaScript, 14ex property (CSS), 198examples
of AJAX, 275-276of for loops, 110
executing multiple event handlers, 142
expressions, 67operators, precedence rules,
67-68extending built-in object
definitions, 94-96external .css files, creating, 201external scripts, 11
Ffeature sensing, 153, 239,
245-246, 331findChild() function, configuring
drop-down menus, 350fine-tuning CSS for drop-down
menus, 354-356Firefox, 13
DOM Inspector, 264Greasemonkey extension.
See GreasemonkeyJavaScript console,
accessing, 258Web Developer Extension, 263
firstChild property, 220fixing errors in scripts, 267Flash, 399Flash/JavaScript Integration
Kit, 332float property (CSS), 197flow control, 101
if statement, 102conditional expressions,
102logical operators, 103-104
font property (CSS), 197font-family property (CSS), 197font-size property (CSS), 197font-style property (CSS), 197font-variant property (CSS), 197font-weight property (CSS), 197for loops, parameters, 109for statement, 40, 109
example of, 110for…in loops, 114
creating, 115-116form object
onReset event, 175onSubmit event, 175
formats of audio files, 333formatting drop-down menu link
in CSS, 347-350
436
DOM (Document Object Model)

formscolors, selecting, 202data, displaying, 182-183defining, 173-174elements
buttons, 178-179check boxes, 179drop-down lists, 181-182radio buttons, 180text areas, 177-178text fields, 176-178
referring to as arrays, 176results, emailing, 184-186submitting, 175validating, 16, 185-186
Forth programming language, 110forward button, creating, 56-57frame object, 166frames array, 167-168front end of AJAX live search
example, 288-289Fuchs, Thomas, 129functions, 11, 38, 85
addEventListener, 142AddItem(), 387AddScore(), 367AddText(), 226Alert(), 45AnimateSlide(), 326arguments, 86assigning as event handler, 141calling, 38, 87-88Changebody(), 204Changehead(), 204Cleardesc, 153constructor, 92defining, 86-87DisplayKey, 150Drag(), 403Drop(), 404EndGame(), 368GraphicBox, 252HideMenu(), 351HideSquare(), 216Hover(), 153local variables, creating, 65MakeSlideShow(), 320Move(), 404naming conventions, 43NextSlide(), 320
ParseFloat, 70PartInt(), 70Setup(), 340Show(), 387ShowHide(), 223ShowMenu(), 351showSquare(), 216Style(), 385Toggle(), 228, 252Update(), 163Validate(), 186values, returning, 88-89with multiple parameters,
defining, 87
GGarret, Jesse James, 274generated source, viewing, 265generating random numbers,
122-123example script, 123-125
get methods for dates, 127getElementById() method, 202,
216, 221getElementsByTagName() method,
221getTimeZoneOffset() function, 127getUTCDate() function, 128getUTCDay() function, 128getUTCFullYear() function, 128getUTCMonth() function, 128global variables, 64
confusing with local variables,257
Gmail, 249GMT (Greenwich Mean Time), 26Google Gmail, 249graceful degradation, 237graphic check box as unobtrusive
scripting technique, 250-252graphic rollovers, 317-319graphicBox() function, 252graphics, creating for poker
solitaire game, 361Greasemonkey
activating/deactivating, 298API functions, 302installing, 294metadata, 299-300
security issues, 296user scripts
installing, 297managing, 297-298creating, 299, 305-306debugging, 304locating, 296site-specific, creating,
302-304testing, 300-301text area macro user
script, 306-307
Hhandling JavaScript errors, 31hasChildNodes() method, 221headings, modifying, 223height property (CSS), 197HideMenu() function, 351hiding
objects, 222submenus within drop-down
menus, 351-352HideSquare() function, 216history.back() method, 55history.forward() method, 55history.go() method, 55history.length property, 55history object, 55history
of DOM, 50of JavaScript, 8
HomeSite, 24hover function, 153href property (window object), 55HTML
application compliance, 398documents for drag-and-drop
objects, 400editors, 24-25errors, avoiding, 257inline styles, 194layers, creating, 210-211tags
adding, 237-239event handlers, 41id attribute, 194
hyphenated CSS property names, 213
How can we make this index more useful? Email us at [email protected]
hyphenated CSS property names
437

Iid attribute of HTML tags, 194IE (Internet Explorer), 13
browser information,displaying, 243-245
Developer Toolbar, 263-264error messages, displaying,
259security settings, 29Turnabout, 295
if statement, 102conditional expressions,
102, 223logical operators, 103
And, 103else keyword, 104Not, 104Or, 103
testing multiple conditions,105
time and greeting example, 106-107
image objectevent handlers, 314properties, 314
imagespreloading, 314rollovers, creating, 315-317slideshows, transitioning
between, 322-326implementing drag-and-drop, 402incompatibility with web browsers,
12Increment operator (++), 115incrementing variables, 66IndexOf() method, 75-76infinite loops, 112
escaping from, 113initial expression, 109inline styles, 194innerHTML property, 220insertBefore() method, 221installing
Greasemonkey, 294user scripts, 297
instances, creating, 93Internet Explorer. See IEinterpreted languages, 8
J-KJava, 399JavaScript Shell, 265JavaScript-free rollovers, creating,
316-317join() method, 81JScript, 15JSON (JavaScript Object
Notation), 275
keyboard events, 149ASCII code, converting to
string character, 149DisplayKey function, 150
Koch, Peter-Paul, 247
Llarge clock display, adding to
time and date script, 30-31lastChild property, 220lastIndexOf() method, 75layers, 51, 207
creating, 210-211positioning, 213
length of arrays, calculating, 77length property, 72
of arrays, 77letter-spacing property (CSS), 195levels (DOM), 51libraries. See also third-party
librariesAJAX, creating, 279-280Script.aculo.us, library effects
example, 132-133Yahoo! UI Library, 131
limitations of AJAX, 276-277line-height property (CSS), 196link descriptions, displaying,
151-154link objects, 54linking to external stylesheets,
201live searches
performing, 285-289requirements for, 289
local variables, 64-65confusing with global
variables, 257localtime variable, 27locating
strings within strings, 75-76user scripts, 296
location object, 55-56location.reload() method, 56location.replace() method, 56logical operators, 103
And, 103Not, 104Or, 103
loops, 40continue statement, 113creating
with for statement, 109-110with while statement, 111
for…in, 114creating, 115-116
infinite, 112escaping from, 113
MMacintosh-based systems, HTML
editors, 25Macromedia Dreamweaver, 16maintaining optional JavaScript
code, 248-249MakeSlideShow() function, 320managing user scripts, 297-298margin property (CSS), 197-198Math object, 121-122Math.random method, 123-125messages
displaying in dialog boxes,164-165
scrolling, 377-380metadata, 299-300methods, 39, 91
CharAT(), 75ClearTimeout(), 162document.getElementById(),
213DoPlay(), 334GetElementById(), 202history.back(), 55history.forward(), 55history.go(), 55indexOf(), 75-76join(), 81LastIndexOf(), 75location.reload, 56location.replace(), 56
438
id attribute of HTML tags

Math.random, 123-125Play(), 334Reset(), 175Rewind(), 335SetTimeout, 162SetTimeout(), 163Sort(), 79-81Split(), 78-79Stop(), 335Submit(), 175Substring(), 74window.open(), 159
Microsoft Frontpage 2003, 24MIME (Multipurpose Internet Mail
Extensions), 330-331MochiKit library, 131modifying text, 223mouse
eventsonClick, 146-148onMouseDown, 146onMouseMove, 145onMouseOver, 145onMouseUp, 146
rollovers, creating, 315-317mousestatus function, 147movable layers, creating,
214-215Move() function, 404Mozilla Foundation, 13, 15multiple conditions, testing,
105-107multiple event handlers,
executing, 142multiple scripts, order of
operation, 42
Nnaming conventions, 43NaN (non a number), 70navigation, improving, 16navigation tools, creating
back/forward buttons, 56-57navigation trees, adding, 226-228navigator object, 242
properties, 242-243nested framesets, 167Netscape 4.0, event object
properties, 144
Netscape CommunicationsCorporation, 8
NextSibling property, 220NextSlide() function, 320NodeName property, 220nodes, 209NodeType property, 220NodeValue property, 220non-JavaScript browsers, 247
detecting, 248Not operator, 104null value, 69number-guesser script,
debugging, 266-270numeric arrays, sorting, 79-81
Oobject hierarchy (DOM), 50objects, 39, 90
built-in, 39definitions, extending, 94-96
child objects, 91creating, 90, 93defining, 92document, 52-53
methods, 53properties, 52
DOM, 39, 49event, 142-143
properties, 143-144for Netscape 4.0, 144forms, properties, 174-175frame, 166hiding/showing, 222improper usage, avoiding, 257instances, creating, 93location, 55-56methods, 39naming conventions, 43navigator, 242
properties, 242-243positioning, 211properties, 39, 91resizing, 211siblings, 210visibility property, 222window, 51
onClick event handler, 146-148onLoad event handler, 151
onMouseDown event handler, 146onMouseMove event handler, 145onMouseOver event handler, 140onMouseOver event handler, 145onMouseUp event handler, 146onReset event, 175onSubmit event, 175Opera, 14operators, 67
precedence rules, 67-68Or operator, 103overflow property (CSS), 212
Ppages, updating, 163parameters, 38parent objects, 209parentheses, event handler
syntax, 278parseFloat() function, 70parseInt() function, 70Pederick, Chris, 263performing live searches, 285
front end, 288-289back end, 287-288HTML file example, 286-287
PHP, 399piano keyboard script, 337-340Play() method, 334plug-ins, 329
feature sensing, 331sound, detecting, 335sound-playing, 334
plus sign (+), 28poker solitaire game, 369
CSS style, adding, 368-372graphics, creating, 361HTML document, creating,
361-363scoring, 360script, creating, 363-368
pop-up windows, displaying formdata in, 182
pos() function, 216positioning
objects, 211 submenus in drop-down
menus, 349preloading images, 314
How can we make this index more useful? Email us at [email protected]
preloading images
439

presentation, separating fromcontent and behavior, 236
PreviousSibling property, 220programming languages, Java, 17progressive enhancement, 237properties, 39, 91
of CSSclip, 212for background images,
196-197, 213for borders, 197-198, 213for colors, 196-197for fonts, 197for margins, 197-198for text alignment, 195for units of measurement,
198hyphenating, 213overflow, 212visibility, 212
of document object, 52of DOM nodes, 220of event object, 143-144of form object, 174-175of image object, 314of navigator object, 242-243of window object, 158of window.screen object, 158values, reading, 91
prototype keyword, 94Prototype third-party library, 129pt property (CSS), 198px property (CSS), 198Python, 399
QQuirksMode, 247quiz questions
creating in AJAX, 280, 282-284testing, 284
quotation marks, event handlersyntax, 140
Rradio buttons, 180random numbers, generating,
122-125recommended web browsers, 25relationship properties of DOM
nodes, 220
remote scripting, 17, 130, 274RemoveChild() method, 221repeating timeouts, 163ReplaceChild() method, 221requests, AJAX, 274required JavaScript, avoiding,
248-249requirements for AJAX live search
example, 289reserved words, 43Reset() method, 175resetting forms, 175resizing
objects, 211windows, 160
return keyword, 89returning
single character from strings, 75
UTC time, 128reusable AJAX libraries
ajaxResponse function, 280ajaxRequest function, 279creating, 279-280
Rewind() method, 335rollovers, 145
creating, 315-316without JavaScript,
316-317CSS graphic rollovers,
creating, 317-319rounding decimal numbers, 121Ruby, 399rules, creating, 193
SSafari, 14scope of variables, 64scoring for poker solitaire
game, 360Script.aculo.us library, 129-130
adding to HTML document,132
downloading, 131library effects example,
132-133scripting languages, 8
VBScript, 18
scripts, 8adding to HTML
documents, 28assignment and equality, 256commenting out, 43-44, 259common mistakes, avoiding,
256-257compatibility with browsers,
397creating, required tools,
23-25debugging, 266-267documenting, 398errors, fixing, 267event handlers, 41for displaying date and time,
creating, 26-31generating random numbers,
123-125incompatibility with web
browsers, 12order of operation, 42separating from HTML files,
33-34syntax errors, avoiding, 256testing, 267-269
scrolling windowcreating, 377-378CSS style sheet, 378-379JavaScript file, 379-380
security issues with user scripts, 296
security settings (IE 6.0), 29selecting
colors from forms, 202names for variables, 64
self keyword, 157separating
content, presentation, andbehavior, 236
JavaScript and HTML files,33-34
server-side scripting, 19SetTimeout() method, 162-163Setup() function, 340SetupMenu() function, configuring
drop-down menus, 350SGML (Standard Generalized
Markup Language), 395
440
presentation, separating from content and behavior

shorthand conditional expressions, 105
Show() function, 387ShowHide() function, 223showing objects, 222ShowMenu() function, 351ShowSquare() function, 216siblings, 210site-specific user scripts, creating,
302-304sizing objects, 211slideshows, creating, 319-326sort() method, 79-81sorting
numeric arrays, 79-81string arrays, 79
sound file formats, 333sound-playing plug-ins, 334SoundManager, 335sounds
controlling, 334embedding, 334piano keyboard script,
337-340testing, 336
special effects, 17specifying versions of JavaScript,
15Split() method, 78-79splitting strings, 78-79statements, 38
conditional, 40function calls, 38
Stephenson, Sam, 129Stop() method, 335string arrays, 77
creating, 78sorting, 79
strings, 27, 69-70assiging values to, 71-72case, converting, 73length of, calculating, 72length property, 72objects, creating, 71returning single character
from, 75splitting, 78-79substrings, locating, 75-76
structure of DOM, 208
style sheetsclasses, 195CSS. See CSSswitching between, 380-388
Style() function, 385styles
applying to specific elements, 194
controlling, 201-204style sheets
controlling styles, 201-204creating, 198-200CSS
adding styles to pokersolitaire game, 368-372
graphic rollovers, 317-319dynamic styles, creating,
202-204inline styles, 194linking to external, 201rules, 194
submenusdisplaying in drop-down
menus, 351hiding in drop-down menus,
351-352positioning in drop-down
menus, 349Submit() method, 175submitting forms, 175Substring() method, 74substrings, 74
index values, 74locating, 75-76
supported sound plug-ins,detecting, 335
switch statement, 108switching between style sheets,
380-388syntax
case sensitivity, 42comments, 43-44errors, avoiding, 256for event handlers, quotation
marks, 140for switch statement, 108naming conventions, 43reserved words, 43
Ttags
id attribute, 194script, specifying versions of
JavaScript, 15temporary statements, adding to
scripts, 259testing
AJAX quiz, 284date and time script, 29multiple conditions, 105
time and greeting example, 106-107
scripts, 267-269sounds, 336user scripts, 298-301
textadding to pages, 225-228alignment, CSS properties,
195modifying, 223scrolling, 377-380
text area macro user script,305-307
text areas, supported methods,177-178
text fields, 176-178text-align property (CSS), 196text-decoration property
(CSS), 195text-indent property (CSS), 196text-transform property
(CSS), 196TextPad, 24third-party libraries
AJAX frameworks, 130Prototype, 129Script.aculo.us, 129-130
time, displaying, 25-31time and greeting example,
106-107time zones, 127timeouts
clearing, 162enabling on browsers, 162repeating, 163
Toggle() function, 228, 252ToLocalString() function, 127
How can we make this index more useful? Email us at [email protected]
ToLocalString() function
441

ToLowerCase() method, 73ToUpperCase() method, 73ToUTCString() function, 127transitioning between slideshow
images, 322-326tree structure of DOM, 209try keyword, error handling, 262Turnabout, 295
activating/deactivating, 298API functions, 302Options dialog,
accessing, 298typed characters, displaying, 150
Uunits of measurement, CSS prop-
erties, 198unobtrusive scripting, 235, 320
best practices, 235errors, avoiding, 249-252feature sensing, 245-246maintaining optional
JavaScript code, 248-249Update() function, 163updating pages in browsers, 163usability, 240
accessibility, 241design patterns, 241
user scripts, 293creating, 299, 305-306debugging, 304describing, 299-300installing, 297locating, 296managing, 297-298security, 296site-specific scripts, creating,
302-304testing, 298-301text area macro user script,
306-307UTC (Universal Time
Coordinated), 26time values, returning, 128
utctime variable, 27
Vvalidate() function, 186validating forms, 185-186variables, 26, 39
arguments, 86assigning values to, 65-66declaring, 64decrementing, 66expressions, 67global, creating, 65incrementing, 66local, 65naming conventions, 43operators, 67
precedence rules, 67-68scope of, 64selecting names for, 64
VBScript, 18verifying date and time script, 29versions of JavaScript, 14-15vertical-align property (CSS), 195viewing
browser information, 242-243for Internet Explorer 6.0,
243-245error information, 261form data, 182-183generated source, 265
virtual machines, 18visibility property (CSS), 212, 222
WW3C (World Wide Web
Consortium), 13, 51DOM. See DOMevent model, 238-239
web browserscompatibility with
Javascript, 12Firefox, 13IE, 13Mozilla, 13Opera, 14Safari, 14user script support, 296
web designdesign patterns, 241graceful degradation, 237progressive enhancement, 237
Web Developer Extension, 263web pages
text, adding, 225-228text, modifying, 223
while loops, example of, 111whitespace, 43width property (CSS), 197window objects, 51, 157-158window.close() method, 159-160window.moveBy() method, 161window.moveTo() method, 161window.open() method, 159window.resizeBy() method, 161window.resizeTo() method, 161window.screen object,
properties, 158window.setTimeout method, 162windows
closing, 159-160creating, 158-159resizing, 160
Windows-based systems, HTMLeditors, 24-25
with keyword, 125WSH (Windows Scripting
Host), 16
X–ZXHTML (Extensible Hypertext
Markup Language), 395-396XML (Extensible MarkupLanguage), 395
AJAX. See AJAXXMLHttpRequest object, 277-278XSL (Extensible Stylesheet
Language), 396
Yahoo Developer Network, 241Yahoo! UI Library, 131, 239
442
ToLowerCase() method

info
rmit
.com
/onli
nebooks
Get your first 14 days FREE!InformIT Online Books is offering its members a 10-book subscription risk free
for 14 days. Visit http://www.informit.com/onlinebooks for details.
Wouldn’t it be greatif the world’s leading technical
publishers joined forces to deliver their best tech books in a common
digital reference platform?
They have. Introducing InformIT Online Books
powered by Safari.
■ Specific answers to specific questions.InformIT Online Books’ powerful search engine gives you
relevance-ranked results in a matter of seconds.
■ Immediate results.With InformIt Online Books, you can select the book you
want and view the chapter or section you need immediately.
■ Cut, paste, and annotate.Paste code to save time and eliminate typographical errors.
Make notes on the material you find useful and choose whether or not to share them with your workgroup.
■ Customized for your enterprise.Customize a library for you, your department, or your entire
organization. You pay only for what you need.


![[Joseph Schmuller] Sams Teach Yourself Uml in 24 H](https://img.dokumen.tips/doc/110x75/55cf9919550346d0339b9318/joseph-schmuller-sams-teach-yourself-uml-in-24-h.jpg)