Embed Size (px)
Citation preview
Salesforce CommunitiesManagers Guide
Salesforce, Winter ’16
@salesforcedocsLast updated: December 10, 2015

© Copyright 2000–2015 salesforce.com, inc. All rights reserved. Salesforce is a registered trademark of salesforce.com, inc.,as are other names and marks. Other marks appearing herein may be trademarks of their respective owners.
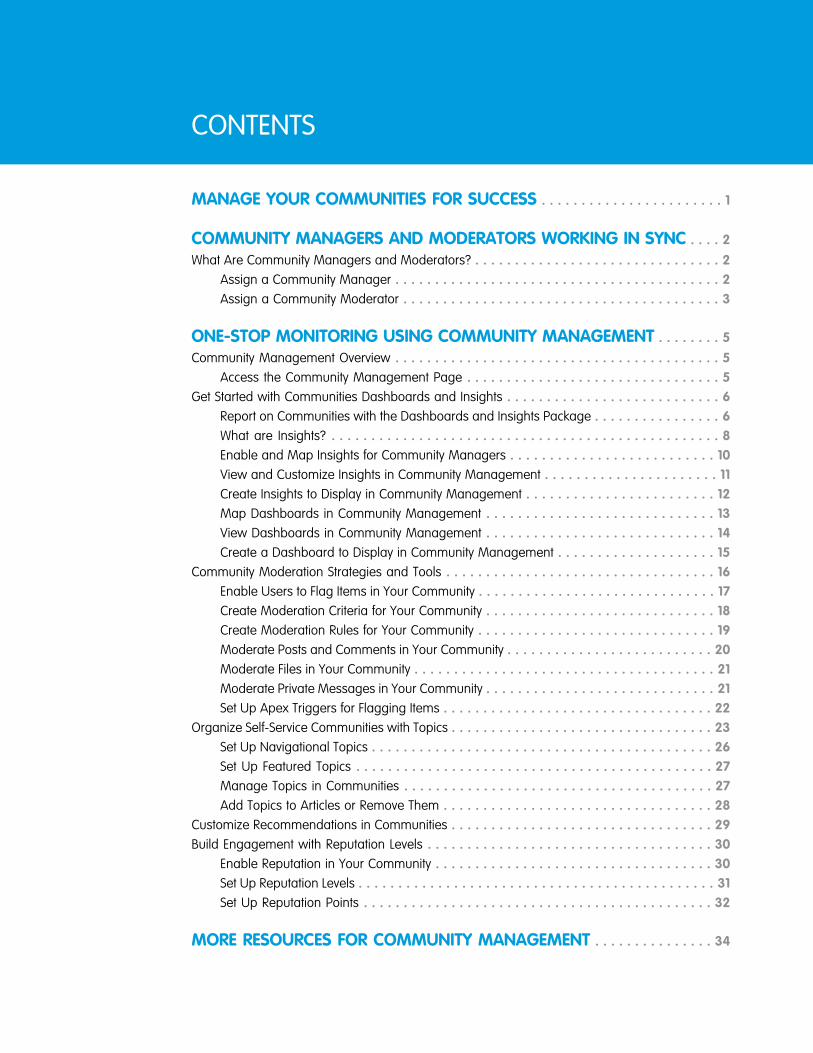
CONTENTS
MANAGE YOUR COMMUNITIES FOR SUCCESS . . . . . . . . . . . . . . . . . . . . . . . 1
COMMUNITY MANAGERS AND MODERATORS WORKING IN SYNC . . . . 2What Are Community Managers and Moderators? . . . . . . . . . . . . . . . . . . . . . . . . . . . . . . . 2
Assign a Community Manager . . . . . . . . . . . . . . . . . . . . . . . . . . . . . . . . . . . . . . . . . 2Assign a Community Moderator . . . . . . . . . . . . . . . . . . . . . . . . . . . . . . . . . . . . . . . . 3
ONE-STOP MONITORING USING COMMUNITY MANAGEMENT . . . . . . . . 5Community Management Overview . . . . . . . . . . . . . . . . . . . . . . . . . . . . . . . . . . . . . . . . . 5
Access the Community Management Page . . . . . . . . . . . . . . . . . . . . . . . . . . . . . . . . 5Get Started with Communities Dashboards and Insights . . . . . . . . . . . . . . . . . . . . . . . . . . . 6
Report on Communities with the Dashboards and Insights Package . . . . . . . . . . . . . . . . 6What are Insights? . . . . . . . . . . . . . . . . . . . . . . . . . . . . . . . . . . . . . . . . . . . . . . . . . 8Enable and Map Insights for Community Managers . . . . . . . . . . . . . . . . . . . . . . . . . . 10View and Customize Insights in Community Management . . . . . . . . . . . . . . . . . . . . . . 11Create Insights to Display in Community Management . . . . . . . . . . . . . . . . . . . . . . . . 12Map Dashboards in Community Management . . . . . . . . . . . . . . . . . . . . . . . . . . . . . 13View Dashboards in Community Management . . . . . . . . . . . . . . . . . . . . . . . . . . . . . 14Create a Dashboard to Display in Community Management . . . . . . . . . . . . . . . . . . . . 15
Community Moderation Strategies and Tools . . . . . . . . . . . . . . . . . . . . . . . . . . . . . . . . . . 16Enable Users to Flag Items in Your Community . . . . . . . . . . . . . . . . . . . . . . . . . . . . . . 17Create Moderation Criteria for Your Community . . . . . . . . . . . . . . . . . . . . . . . . . . . . . 18Create Moderation Rules for Your Community . . . . . . . . . . . . . . . . . . . . . . . . . . . . . . 19Moderate Posts and Comments in Your Community . . . . . . . . . . . . . . . . . . . . . . . . . . 20Moderate Files in Your Community . . . . . . . . . . . . . . . . . . . . . . . . . . . . . . . . . . . . . . 21Moderate Private Messages in Your Community . . . . . . . . . . . . . . . . . . . . . . . . . . . . . 21Set Up Apex Triggers for Flagging Items . . . . . . . . . . . . . . . . . . . . . . . . . . . . . . . . . . 22
Organize Self-Service Communities with Topics . . . . . . . . . . . . . . . . . . . . . . . . . . . . . . . . . 23Set Up Navigational Topics . . . . . . . . . . . . . . . . . . . . . . . . . . . . . . . . . . . . . . . . . . . 26Set Up Featured Topics . . . . . . . . . . . . . . . . . . . . . . . . . . . . . . . . . . . . . . . . . . . . . 27Manage Topics in Communities . . . . . . . . . . . . . . . . . . . . . . . . . . . . . . . . . . . . . . . 27Add Topics to Articles or Remove Them . . . . . . . . . . . . . . . . . . . . . . . . . . . . . . . . . . 28
Customize Recommendations in Communities . . . . . . . . . . . . . . . . . . . . . . . . . . . . . . . . . 29Build Engagement with Reputation Levels . . . . . . . . . . . . . . . . . . . . . . . . . . . . . . . . . . . . 30
Enable Reputation in Your Community . . . . . . . . . . . . . . . . . . . . . . . . . . . . . . . . . . . 30Set Up Reputation Levels . . . . . . . . . . . . . . . . . . . . . . . . . . . . . . . . . . . . . . . . . . . . . 31Set Up Reputation Points . . . . . . . . . . . . . . . . . . . . . . . . . . . . . . . . . . . . . . . . . . . . 32
MORE RESOURCES FOR COMMUNITY MANAGEMENT . . . . . . . . . . . . . . . 34
Community Management Resources . . . . . . . . . . . . . . . . . . . . . . . . . . . . . . . . . . . . . . . 34
INDEX . . . . . . . . . . . . . . . . . . . . . . . . . . . . . . . . . . . . . . . . . . . . . . . . . . . . . . . . . . . 35
Contents
MANAGE YOUR COMMUNITIES FOR SUCCESS
Monitoring and managing your community is the key to ensuring the community is a success.
This guide is intended to introduce you to the roles that help ensure a community is successful, and the tools that they can use to achievethat success.
Great communities don’t just happen; there are many people involved, from the designer to the implementer to the developer whoperforms customizations. But once a community is up and running, the community manager and moderator are crucial to making sureit succeeds. These two roles combined help to ensure that the community is:
• Active: Members are logging in regularly
• Engaged: Members feel motivated to actively participate on a regular basis
• Healthy: Member are posting, commenting, and sharing appropriate and helpful information. Inappropriate information or files areremoved.
1

COMMUNITY MANAGERS AND MODERATORS WORKINGIN SYNC
What Are Community Managers and Moderators?
Communities can thrive when community managers and moderators understand their unique roles and work together effectively.
A community manager and moderator should work hand-in-hand. They are partners and should support one another in fosteringengagement and harmony in the community. They may perform some of the same tasks, but each has unique contributions. While thecommunity manager is typically responsible for setting up the community and monitoring community engagement, the moderator istypically responsible for ensuring the community is a healthy environment and that members feel encouraged to be active and helpfulto each other.
It’s important to keep in mind that your community manager must be an employee of your organization, since they are dealing withsetup, reports, and other sensitive data. Moderators can be users from your internal organization or external users, but only internal userscan moderate from within Community Management. External users who are moderators can moderate within context of the community,such as directly in the Chatter feed.
Community ModeratorCommunity ManagerTask
Engage members by starting discussions inthe community
(Internal users only, with the necessarypermission)
Access Community Management
Set up reputation levels and point system
Review and act on flagged items
Assign a Community Manager
USER PERMISSIONS
To assign permission sets:• “Assign Permission Sets”
To assign a user as a community manager, simply give them the “Manage Communities” permission.
When you assign the “Manage Communities” permission to a user, they get access to all thecommunity management features in the Community Management. Keep in mind that the usermust be an employee of your organization; external users can’t be community managers.
1. From Setup, enter Permission Sets in the Quick Find box, then select PermissionSets, then click New.
2. Create a permission set that includes the “Manage Communities” permissions.
3. From Setup, enter Users in the Quick Find box, then select Users.
4. Find the user you want to be a community manager and add the permission set to their Permission Set Assignments related list.
The user can now manage the community through the Community Management.
2
Assign a Community Moderator
EDITIONS
Available in: SalesforceClassic
Available in:• Enterprise• Performance• Unlimited• Developer
USER PERMISSIONS
To assign permission sets:• “Assign Permission Sets”
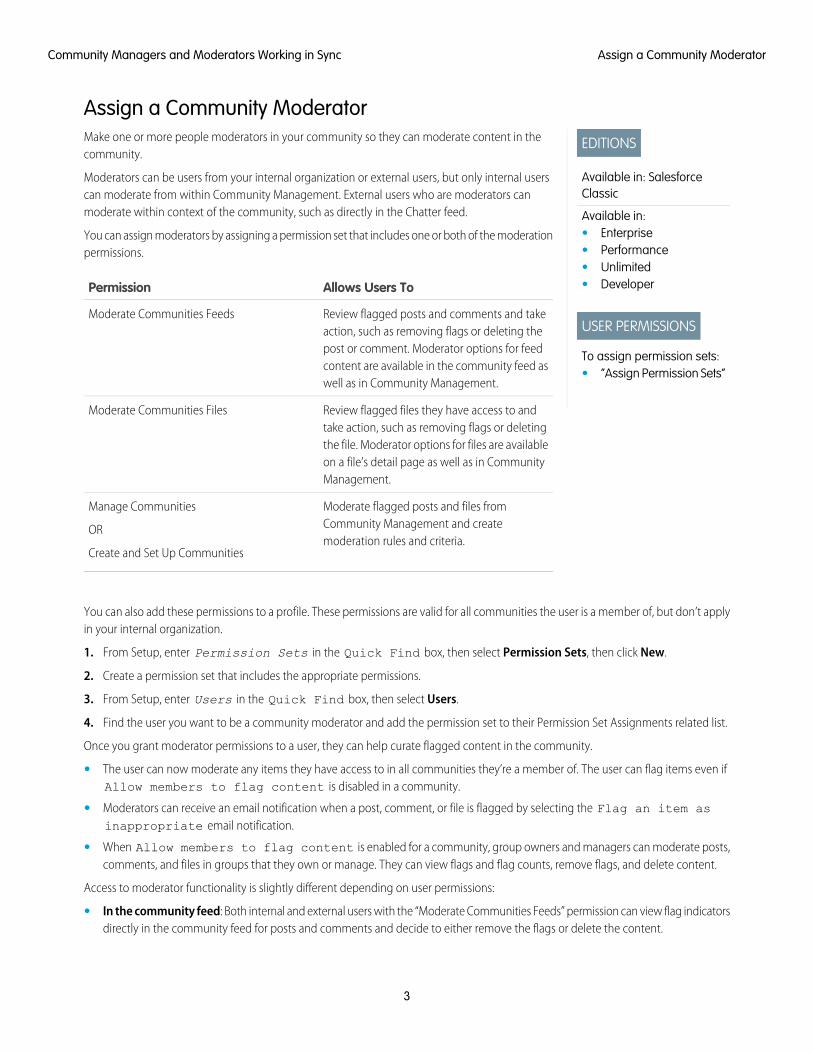
Make one or more people moderators in your community so they can moderate content in thecommunity.
Moderators can be users from your internal organization or external users, but only internal userscan moderate from within Community Management. External users who are moderators canmoderate within context of the community, such as directly in the Chatter feed.
You can assign moderators by assigning a permission set that includes one or both of the moderationpermissions.
Allows Users ToPermission
Review flagged posts and comments and takeaction, such as removing flags or deleting thepost or comment. Moderator options for feedcontent are available in the community feed aswell as in Community Management.
Moderate Communities Feeds
Review flagged files they have access to andtake action, such as removing flags or deleting
Moderate Communities Files
the file. Moderator options for files are availableon a file’s detail page as well as in CommunityManagement.
Moderate flagged posts and files fromCommunity Management and createmoderation rules and criteria.
Manage Communities
OR
Create and Set Up Communities
You can also add these permissions to a profile. These permissions are valid for all communities the user is a member of, but don’t applyin your internal organization.
1. From Setup, enter Permission Sets in the Quick Find box, then select Permission Sets, then click New.
2. Create a permission set that includes the appropriate permissions.
3. From Setup, enter Users in the Quick Find box, then select Users.
4. Find the user you want to be a community moderator and add the permission set to their Permission Set Assignments related list.
Once you grant moderator permissions to a user, they can help curate flagged content in the community.
• The user can now moderate any items they have access to in all communities they’re a member of. The user can flag items even ifAllow members to flag content is disabled in a community.
• Moderators can receive an email notification when a post, comment, or file is flagged by selecting the Flag an item asinappropriate email notification.
• When Allow members to flag content is enabled for a community, group owners and managers can moderate posts,comments, and files in groups that they own or manage. They can view flags and flag counts, remove flags, and delete content.
Access to moderator functionality is slightly different depending on user permissions:
• In the community feed: Both internal and external users with the “Moderate Communities Feeds” permission can view flag indicatorsdirectly in the community feed for posts and comments and decide to either remove the flags or delete the content.
3
Assign a Community ModeratorCommunity Managers and Moderators Working in Sync
• In Community Management: An internal user with the “Moderate Communities Feeds” and “Manage Communities” permissionscan review flagged content in the Moderation > Flagged Posts area in Community Management.
4
Assign a Community ModeratorCommunity Managers and Moderators Working in Sync
ONE-STOP MONITORING USING COMMUNITYMANAGEMENT
Community Management Overview
Community Management is a central place for setting up and managing your community. You can manage basic setup informationincluding membership and branding, dashboards, reputation levels and points, and topics.
Community Management gives community administrators, managers, and moderators a central place to monitor the health of theircommunity and its members.
Important: The options available in Community Management are based on your community template selection, permissions,and preferences. For example, if your community does not use topics, you will not see the Topics node. Some of the options inthe following list may not be applicable in your community. To display all nodes, go to Administration > Preferences and enableShow all settings in Community Management.
Access the Community Management Page
USER PERMISSIONS
To access CommunityManagement:
• “Manage Communities”OR “Create and Set UpCommunities”
• AND is a member of thecommunity whoseCommunityManagement pagethey’re trying to access
To customize administrationsettings or use CommunityBuilder:
• “Create and Set UpCommunities”
• AND is a member of thecommunity whoseCommunityManagement pagethey’re trying to access
Community administrators and managers use Community Management to monitor communityactivity, and set up other important management features.
To access the Community Management page, you must be logged in to the community.
1. From within the community, click in the global header.
Members of the community who have the “Create and Set Up Communities” permission canalso access Community Management from the All Communities page in organization setup.
2. Choose the part of the community you want to manage:
• Preview the community or access your community’s settings in the Community Builder,Force.com, or Site.com Studio from the Community Management menu in the globalheader.
• In Insights, you can view Insights reports and take action on activity in your community.
• In Dashboards, you can view community dashboards and reports.
• In Moderation, you can set up moderation rules and monitor flagged feed items.
• In Topics, you can manage navigational and featured topics.
• In Recommendations, you can set up custom recommendations to appear in yourcommunity.
• In Reputation, you can set up reputation levels and points.
• In Administration, you can customize your community properties, such as name,description, URL, status, and template. You can also update your community settings, suchas members, tabs, branding, login and registration, and emails.
Important: The options available in Community Management are based on your community template selection, permissions,and preferences. For example, if your community does not use topics, you will not see the Topics node. Some of the optionsin the following list may not be applicable in your community. To display all nodes, go to Administration > Preferencesand enable Show all settings in Community Management.
5
Get Started with Communities Dashboards and Insights
Dashboards in Community Management provide essential reports for managing your communities. Insights help you drill down to thesource of activity and take action.
Let us do the hard work for you!
1. Install the Salesforce Communities Dashboards package and get preconfigured dashboards and Insights.
2. Check out your new mapped pages. Click Dashboards and Insights in Community Management.
Don’t be afraid to customize the preconfigured dashboards and Insights to fit your community’s needs. You can edit the sourcereports or dashboards at any time.
Alternatively, create your own dashboards and Insights.
1. Create custom dashboards and custom Insights.
2. Map those dashboards and Insights in Community Management.
Report on Communities with the Dashboards and Insights Package
EDITIONS
Available in: SalesforceClassic
Available in:• Enterprise• Performance• Unlimited• Developer
USER PERMISSIONS
To install AppExchangepackages:• “Download
AppExchangePackages”
The Salesforce Communities Dashboards package gives community managers an essential starterset of dashboards and reports to keep tabs on activity and engagement directly in CommunityManagement.
Use the Salesforce Communities Dashboards package to:
• View the latest metrics and rapidly spot trends
• Determine how fast your community is growing
• Find out who your most engaged members are
• Discover which discussions people and groups are most excited about
• Identify areas in your community that need attention
• Drill down to the source of activity and take action with Insights reports
Note: The updated Winter ’16 version of the package, which includes preconfigured Insights,will be available shortly after the release. To use the preconfigured Insights reports, yourcommunity must use Chatter.
Install one of the following versions from the AppExchange:
• Salesforce Communities Dashboards (for Communities with Chatter)
• Salesforce Communities Dashboards (for Communities without Chatter)
Tip: For installation instructions, detailed information about the reports, and upgrade instructions, see Get Started with CommunitiesDashboards and Insights.
During installation, dashboard and report folders are automatically installed in your internal organization. You’ll also have the option togive your community managers access to the package contents so you don’t have to share the dashboard and report folders with themlater. If you have no previous Insights or dashboards mapped in Community Management, they are automatically mapped for you duringinstallation.
After the package is installed, you can access your new dashboards and reports alongside all your other Salesforce dashboards andreports. The dashboards and reports provided in the package are 100% customizable. Don’t be afraid to customize and change whatyou get in the package. You won’t hurt our feelings.
6
Get Started with Communities Dashboards and InsightsOne-Stop Monitoring Using Community Management
As newer versions of the package become available, you can upgrade your package by reinstalling it. If you customized any of the reportsand dashboards, fear not; your customizations are retained during upgrade.
RequiresChatter
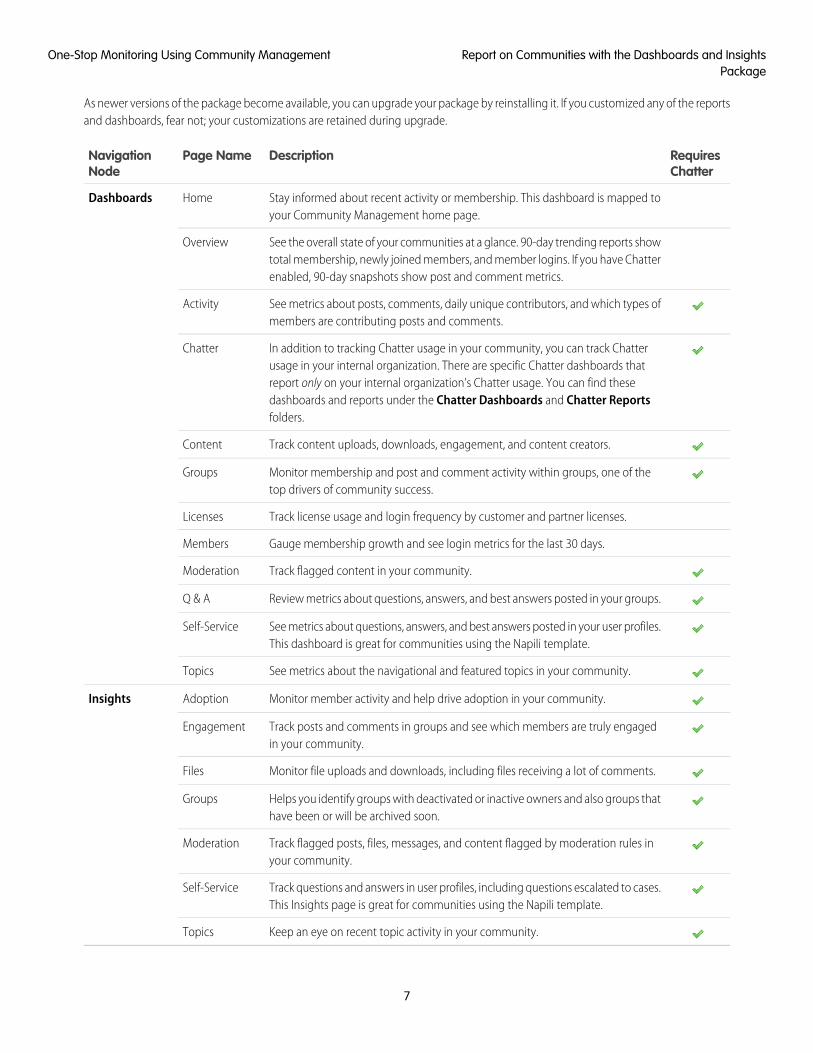
DescriptionPage NameNavigationNode
Stay informed about recent activity or membership. This dashboard is mapped toyour Community Management home page.
HomeDashboards
See the overall state of your communities at a glance. 90-day trending reports showtotal membership, newly joined members, and member logins. If you have Chatterenabled, 90-day snapshots show post and comment metrics.
Overview
See metrics about posts, comments, daily unique contributors, and which types ofmembers are contributing posts and comments.
Activity
In addition to tracking Chatter usage in your community, you can track Chatterusage in your internal organization. There are specific Chatter dashboards that
Chatter
report only on your internal organization’s Chatter usage. You can find thesedashboards and reports under the Chatter Dashboards and Chatter Reportsfolders.
Track content uploads, downloads, engagement, and content creators.Content
Monitor membership and post and comment activity within groups, one of thetop drivers of community success.
Groups
Track license usage and login frequency by customer and partner licenses.Licenses
Gauge membership growth and see login metrics for the last 30 days.Members
Track flagged content in your community.Moderation
Review metrics about questions, answers, and best answers posted in your groups.Q & A
See metrics about questions, answers, and best answers posted in your user profiles.This dashboard is great for communities using the Napili template.
Self-Service
See metrics about the navigational and featured topics in your community.Topics
Monitor member activity and help drive adoption in your community.AdoptionInsights
Track posts and comments in groups and see which members are truly engagedin your community.
Engagement
Monitor file uploads and downloads, including files receiving a lot of comments.Files
Helps you identify groups with deactivated or inactive owners and also groups thathave been or will be archived soon.
Groups
Track flagged posts, files, messages, and content flagged by moderation rules inyour community.
Moderation
Track questions and answers in user profiles, including questions escalated to cases.This Insights page is great for communities using the Napili template.
Self-Service
Keep an eye on recent topic activity in your community.Topics
7
Report on Communities with the Dashboards and InsightsPackage
One-Stop Monitoring Using Community Management
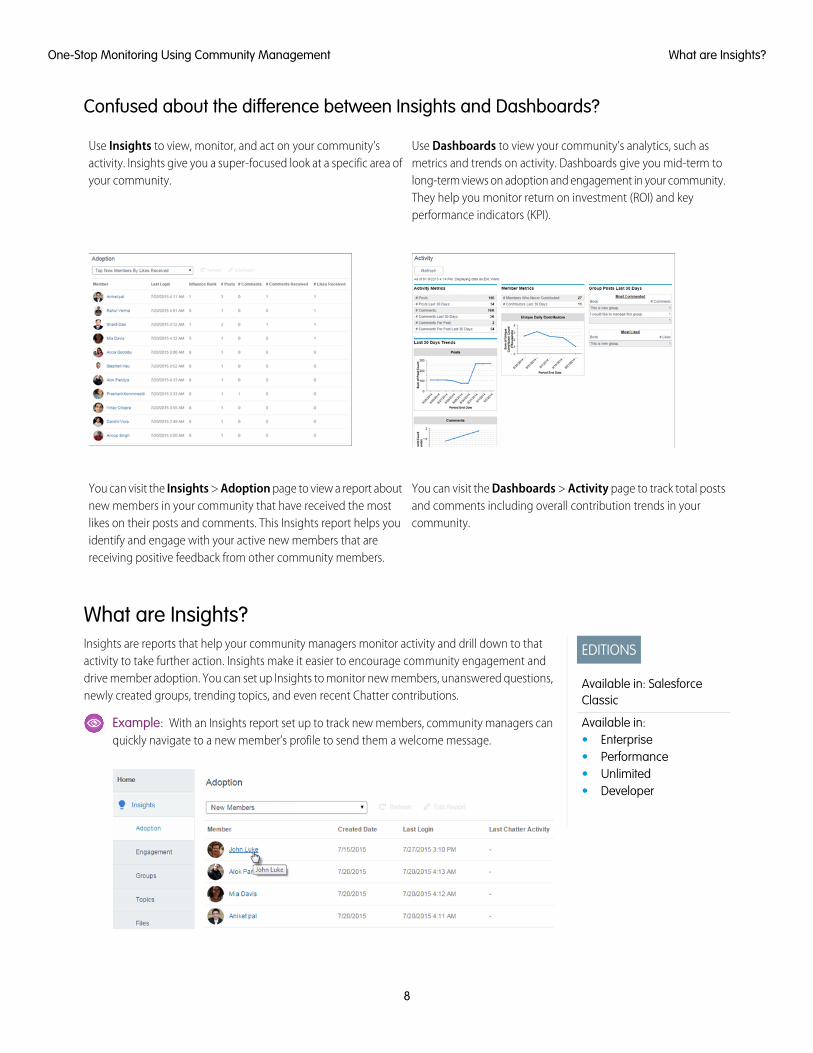
Confused about the difference between Insights and Dashboards?
Use Dashboards to view your community’s analytics, such asmetrics and trends on activity. Dashboards give you mid-term to
Use Insights to view, monitor, and act on your community’sactivity. Insights give you a super-focused look at a specific area ofyour community. long-term views on adoption and engagement in your community.
They help you monitor return on investment (ROI) and keyperformance indicators (KPI).
You can visit the Dashboards > Activity page to track total postsand comments including overall contribution trends in yourcommunity.
You can visit the Insights > Adoption page to view a report aboutnew members in your community that have received the mostlikes on their posts and comments. This Insights report helps youidentify and engage with your active new members that arereceiving positive feedback from other community members.
What are Insights?
EDITIONS
Available in: SalesforceClassic
Available in:• Enterprise• Performance• Unlimited• Developer
Insights are reports that help your community managers monitor activity and drill down to thatactivity to take further action. Insights make it easier to encourage community engagement anddrive member adoption. You can set up Insights to monitor new members, unanswered questions,newly created groups, trending topics, and even recent Chatter contributions.
Example: With an Insights report set up to track new members, community managers canquickly navigate to a new member’s profile to send them a welcome message.
8
What are Insights?One-Stop Monitoring Using Community Management

They can also access other reports about members directly from the Insights page using the drop-down menu.
Note: Let us do the setup work for you! Get out-of-the-box Insights in the Salesforce Communities Dashboards packageavailable for download from the AppExchange. To use the preconfigured Insights reports, your community must use Chatter.This package will be available shortly after the Winter ’16 release.
Insight reports provided in the package are 100% customizable. You can change the default Insights page names, reportfolder mappings, and even the Insights report columns and filters at any time. So don’t be afraid to customize or changewhat you get in the package. You won’t hurt our feelings.
9
What are Insights?One-Stop Monitoring Using Community Management
Enable and Map Insights for Community Managers
EDITIONS
Available in: SalesforceClassic
Available in:• Enterprise• Performance• Unlimited• Developer
USER PERMISSIONS
To map Insights inCommunity Management:• “Manage Communities”
OR “Create and Set UpCommunities”
AND
“Manage Reports inPublic Folders”
AND
Is a member of thecommunity whoseCommunityManagement pagethey’re trying to access
Community managers can use Insights to monitor recent activity and drill down to the source ofthat activity to take further action. To get up and running quickly, use preconfigured Insights froman AppExchange package. You can also create and map your own. Each community can have theirown Insights.
Insights pages map to report folders in your internal organization. All the reports included in thatfolder are displayed in the drop-down menu on the Insights page. Adding or removing an Insightsreport from the report folder in your internal organization updates the Insights page in CommunityManagement. On the Insights page, entity links are automatically created for report fields such asCreated By or Group Name.
Tip: Get out-of-the-box Insights in the Salesforce Communities Dashboards package availablefor download from the AppExchange. To use the preconfigured Insights reports, yourcommunity must use Chatter. This package will be available shortly after the Winter ’16 release.When you install the package, report folders are automatically installed in your internalorganization. If you have no previous Insights mapped, the package automatically maps themfor you. You can change the default mapping at any time.
Use the following steps to map or update your Insights in Community Management:
1. From within the community, click in the global header.
Members of the community who have the “Create and Set Up Communities” permission canalso access Community Management from the All Communities page in organization setup.
2. Click Insights > Settings.
3. Provide a name for each Insights page and then select the report folder you want to map tothe page.
You can have up to 10 Insights pages mapped in Community Management.
Make sure that you have shared the mapped report folder with your community managers orthey won’t be able to view the Insights reports.
4. Click Save.
Insights pages are visible to community managers when they expand the Insights section of Community Management.
Go check out your changes. Click Insights and then click each Insights page name. Use the drop-down menu to verify the reportsmapped to each page.
10
Enable and Map Insights for Community ManagersOne-Stop Monitoring Using Community Management
View and Customize Insights in Community Management
EDITIONS
Available in: SalesforceClassic
Available in:• Enterprise• Performance• Unlimited• Developer
USER PERMISSIONS
To view Insights inCommunity Management:• “Manage Communities”
OR “Create and Set UpCommunities”
AND
Is a member of thecommunity whoseCommunityManagement pagethey’re trying to access
To customize Insightsreports:• “Create and Customize
Reports”
Use Insights in Community Management to monitor recent activity and drill down to the sourceof that activity to take further action. Insights help you nurture and encourage engagement andadoption within your community.
On the Insights page, entity links are automatically created for report fields such as CreatedBy or Group Name. This link makes it easy for you to drill down to the source of activity andtake action.
1. From within the community, click in the global header.
Members of the community who have the “Create and Set Up Communities” permission canalso access Community Management from the All Communities page in organization setup.
2. Click Insights.
Note: Your administrator maps Insights pages. If the Insights section isn’t visible, theyhaven’t been mapped for your community.
Pages with mapped report folders appear when you expand the Insights section.
3. Click the Insights page you want to view.
4. Use the drop-down menu on the page to access more Insights reports.
5. Click Edit Report to customize an Insights report to fit your community needs. You can addor remove columns and update the report filters.
Be sure not to filter the report by Network ID to ensure that the report dynamically displaysdata for the community you view it from. Adding a Network ID filter causes the report to onlyshow data for the community with that Network ID, regardless of which community you viewit in.
Insights reports in Community Management are automatically refreshed when you access them.You can also click Refresh to force an update.
11
View and Customize Insights in Community ManagementOne-Stop Monitoring Using Community Management
Create Insights to Display in Community Management
EDITIONS
Available in: SalesforceClassic
Available in:• Enterprise• Performance• Unlimited• Developer
USER PERMISSIONS
To create custom reporttypes:• “Manage Custom Report
Types”
To create, edit, and deletereports:• “Create and Customize
Reports”
To create and share reportfolders:• “Manage Reports in
Public Folders”
You can create your own Insights to display in Community Management. We recommend that youcreate your Insights reports based on custom report types available for communities.
Tip: Get out-of-the-box Insights in the Salesforce Communities Dashboards package availablefor download from the AppExchange. To use the preconfigured Insights reports, yourcommunity must use Chatter. This package will be available shortly after the Winter ’16 release.
Use the following process to create Insights to display in Community Management:
1. Create custom report types based on the Networks object.
Reports based on the Networks object show community-specific information in CommunityManagement.
Note: You can create reports based on other objects and expose them in CommunityManagement. Just keep in mind that they will show data from across your organization,not just for the community in which you’re viewing the report.
• Select Networks as the primary object.
• Select a child object:
– Chatter Messages
– Feed Revisions
– Groups
– Network Audits
– Network Activity Daily Metrics
– Network Members
– Network Membership Daily Metrics
– Network Public Usage Daily Metrics
– Network Unique Contributor Daily Metrics
– Topic Assignments
– Topics
2. Use the custom report type to create an Insights report.
Insights reports are just like any other report, except they must also meet the following requirements:
• The report can only be a tabular-based report.
• The report must return 2,000 rows or less.
• The report can’t include pagination.
Be sure not to filter the report by Network ID to ensure that the report dynamically displays data for the community you view it from.Adding a Network ID filter causes the report to only show data for the community with that Network ID, regardless of which communityyou view it in.
3. Save the report to a new report folder that you’ll use for mapping.
We recommend that you create a separate report folder for each of your Insights pages. For example, create one report folder calledInsights Members and another called Insights Moderation.
12
Create Insights to Display in Community ManagementOne-Stop Monitoring Using Community Management

Insights pages map to report folders in your internal organization. All the reports included in that folder are displayed in the drop-downmenu on the Insights page. Adding or removing an Insights report from the report folder in your internal organization updates theInsights page in Community Management.
4. Share your Insights report folder with your community managers.
5. In Community Management, click Insights > Settings to map Insights pages.
When a community manager accesses Community Management, the Insights reports appear in the drop-down menu on the mappedInsights page.
Map Dashboards in Community Management
EDITIONS
Available in: SalesforceClassic
Available in:• Enterprise• Performance• Unlimited• Developer
USER PERMISSIONS
To map dashboards inCommunity Management:• “Create and Set Up
Communities” OR“Manage Communities”
AND
“Manage Dashboards inPublic Folders”
AND
Is a member of thecommunity whoseCommunityManagement pagethey’re trying to access.
Community managers can use dashboards to measure the success of their communities. Dashboardsprovide information on membership, logins, and activity.
You can choose to map any dashboard you have access to, but ensure that your communitymanagers have access as well.
Tip: Keep in mind that you can get preconfigured dashboards in the Salesforce CommunitiesDashboards package available for download on the AppExchange.
If the Salesforce Communities Dashboards package is installed in your organization, each of thedashboard pages has a default mapping to a dashboard from the package. You can overwrite thesevalues as needed.
Use the following steps to map or update your dashboards in Community Management:
1. From within the community, click in the global header.
Members of the community who have the “Create and Set Up Communities” permission canalso access Community Management from the All Communities page in organization setup.
2. Click Dashboards > Settings.
3. For each of the pages, select the dashboard you want to show to community managers.
The dashboard you map to Home displays on your Community Management Home page.
4. Click Save.
Dashboards are visible to community managers when they expand the Dashboards sectionor visit the home page in Community Management.
Verify the dashboard mappings by clicking Dashboards and then clicking each page name. If youmapped a dashboard to the Home page, check that out too.
13
Map Dashboards in Community ManagementOne-Stop Monitoring Using Community Management

View Dashboards in Community Management
EDITIONS
Available in: SalesforceClassic
Available in:• Enterprise• Performance• Unlimited• Developer
USER PERMISSIONS
To view dashboards inCommunity Management:• “Manage Communities”
OR
“Create and Set UpCommunities”
AND
Is a member of thecommunity whoseCommunityManagement pagethey’re trying to access.
Use the dashboards in Community Management to monitor the health of your community.
1. From within the community, click in the global header.
Members of the community who have the “Create and Set Up Communities” permission canalso access Community Management from the All Communities page in organization setup.
2. Click Dashboards.
Note: Your administrator maps the dashboards. If the Dashboards section isn’t visible,they haven’t been mapped for your community.
Pages that have dashboards mapped to them appear in the Dashboards section or on theHome page.
3. Click the dashboard page you want to view.The dashboard appears. For an immediate refresh of dashboard data, click Refresh.
4. Click on a dashboard to view the related report.
Be sure not to filter the report by Network ID to ensure that the report dynamically displaysdata for the community you view it from. Adding a Network ID filter causes the report to onlyshow data for the community with that Network ID, regardless of which community you viewit in.
Dashboards in Community Management are automatically refreshed every day. To see the latestdata, click Refresh. If you access the dashboard after it has been recently refreshed, the dashboarddisplays the globally cached data from the last refresh. If the dashboard has not been refreshed for24 hours, it’s refreshed automatically when you access it Community Management. External userswith super user access can refresh dashboards set up with “Run as specified user” and “Run aslogged-in user” up to 100 times daily per organization. Scheduled and automatic refreshes don’tcount against the limit. There is no refresh limit for internal users.
14
View Dashboards in Community ManagementOne-Stop Monitoring Using Community Management
Create a Dashboard to Display in Community Management
EDITIONS
Available in: SalesforceClassic
Available in:• Enterprise• Performance• Unlimited• Developer
USER PERMISSIONS
To create custom reporttypes:• “Manage Custom Report
Types”
To create, edit, and deletereports:• “Create and Customize
Reports”
To create and sharedashboards:• “Manage Dashboards in
Public Folders”
You can show any dashboard in Community Management. However, we recommend creatingthem based on custom report types available for communities.
Tip: Keep in mind that you can get preconfigured dashboards in the Salesforce CommunitiesDashboards package available for download on the AppExchange.
Use the following process to create dashboards to display in Community Management:
1. Create custom report types based on the Networks object.
Reports and dashboards that are based on the Networks object show community-specificinformation in Community Management.
Note: You can create dashboards based on other objects and expose them in CommunityManagement. Just keep in mind that they will show data from across your organization,not just for the community in which you’re viewing the dashboard.
• Select Networks as the primary object.
• Select a child object:
– Chatter Messages
– Feed Revisions
– Groups
– Network Audits
– Network Activity Daily Metrics
– Network Members
– Network Membership Daily Metrics
– Network Public Usage Daily Metrics
– Network Unique Contributor Daily Metrics
– Topic Assignments
– Topics
2. Use the custom report type to create a report.
Be sure not to filter the report by Network ID to ensure that the report dynamically displays data for the community you view it from.Adding a Network ID filter causes the report to only show data for the community with that Network ID, regardless of which communityyou view it in.
3. Create a dashboard with components. Select the report as your source type.
• Add a component for each report you want to include in your dashboard.
• Find your report on the Data Sources tab and add it to the component.
If you’re creating a dashboard for your Community Management Home page, keep these things in mind:
• Use a two-column dashboard with only metric components in the first column and only charts in the second column.
• In the first column, use up to six metric components. Using more than six causes the row to wrap.
• In the second column, you can include any number of charts. However, keep the number of reports to a minimum.
• Your dashboard must have a title.
4. Share the folder that you save your dashboard in with your community managers.
15
Create a Dashboard to Display in Community ManagementOne-Stop Monitoring Using Community Management
5. In Community Management, click Dashboards > Settings to map your dashboard.
When a community manager accesses Community Management, the dashboard appears under Dashboards. If you mapped a dashboardto the Home page, the dashboard appears there.
Dashboards in Community Management are automatically refreshed every day. To see the latest data, click Refresh. If you access thedashboard after it has been recently refreshed, the dashboard displays the globally cached data from the last refresh. If the dashboardhas not been refreshed for 24 hours, it’s refreshed automatically when you access it Community Management. External users with superuser access can refresh dashboards set up with “Run as specified user” and “Run as logged-in user” up to 100 times daily per organization.Scheduled and automatic refreshes don’t count against the limit. There is no refresh limit for internal users.
Community Moderation Strategies and Tools
Community moderation allows you to empower members of your community to monitor content and ensure that it is appropriate andrelevant.
Moderation is crucial for a community to thrive. You need active moderators who are willing to spend time ensuring that the membersand content in your community are appropriate and helpful. You also need to empower members to speak up when they view somethingas inappropriate or offensive.
With Communities
• Designate specific users as moderators so that they can closely monitor the community
• Allow members to flag posts, comments, files, and private messages that are inappropriate
• Allow moderators to review and act on flagged items, such as deleting a post, comment, or file
• Allow group owners and managers to moderate within their groups
• Create rules and criteria to automatically block, flag, or replace keywords in user-generated content, such as posts or comments
• Track flagging and moderation activity within your community
To report on moderation activity in your communities, either query the flagged content using the API or create a custom report typeusing Networks as the primary object and Network Audits as the secondary object. You can also install the SalesforceCommunities Dashboards package to view Insights reports that help you track moderated content in your community.
If you want to create custom advanced moderation logic for your community, you can create triggers that flag content. Custom triggersrun behind the scenes and don’t require you to allow your users to flag content.
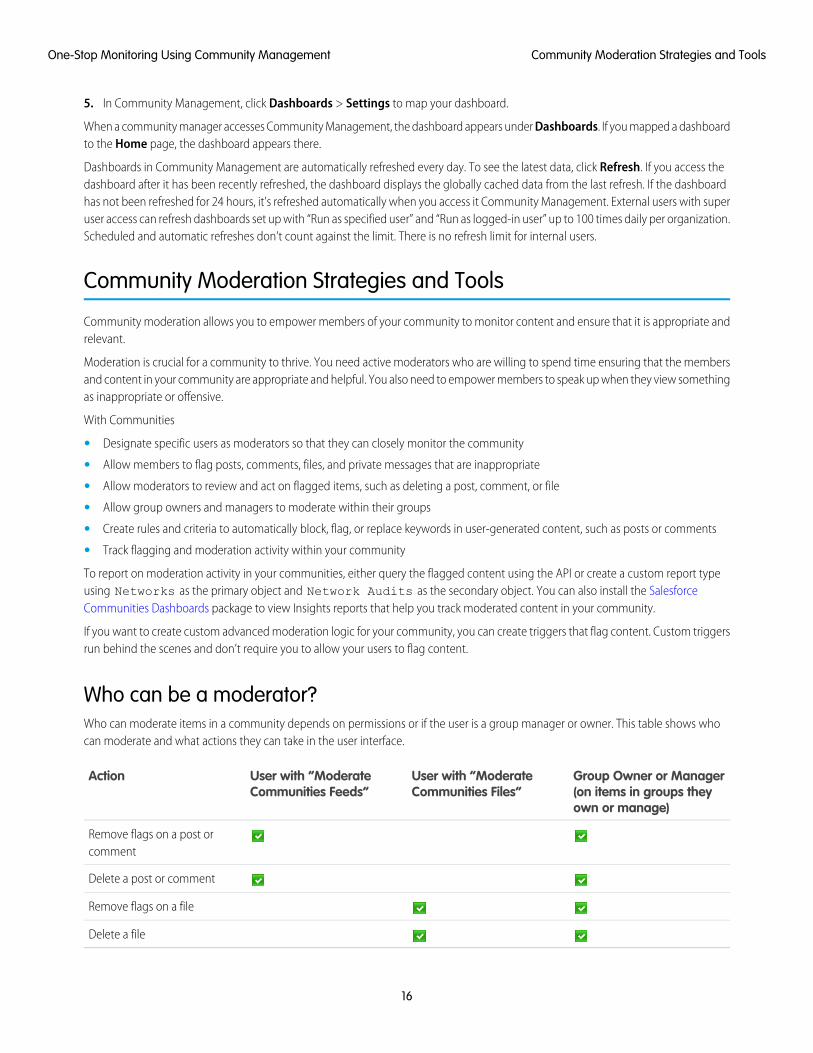
Who can be a moderator?Who can moderate items in a community depends on permissions or if the user is a group manager or owner. This table shows whocan moderate and what actions they can take in the user interface.
Group Owner or Manager(on items in groups theyown or manage)
User with “ModerateCommunities Files”
User with “ModerateCommunities Feeds”
Action
Remove flags on a post orcomment
Delete a post or comment
Remove flags on a file
Delete a file
16
Community Moderation Strategies and ToolsOne-Stop Monitoring Using Community Management
Enable Users to Flag Items in Your Community
EDITIONS
Available in: SalesforceClassic
Available in:• Enterprise• Performance• Unlimited• Developer
USER PERMISSIONS
To enable users in yourcommunity to flag items:• “Create and Set Up
Communities”
AND
Is a member of thecommunity whoseCommunityManagement pagethey’re trying to access.
Turn on flagging for your community to empower members to flag posts, comments, files, andprivate messages that they deem inappropriate.
Community moderation must be enabled for your organization before you can allow members toflag content in the user interface. If you don’t see the option to allow flagged content, contact youradministrator.
This setting isn’t required to flag or moderate items using the API.
Once an item is flagged, your community moderator can review it and take action. Remember thatmoderators can continue to flag items even if flagging is disabled for community members.
1. Access Community Management in either of the following ways.
• From the community, click in the global header.
• From Setup, enter All Communities in the Quick Find box, then select AllCommunities. Then click Manage next to the community name.
2. Click Administration > Preferences, then select Allow members to flag content.
3. Click Save.
With this setting enabled in a community:
• Members can flag posts, comments, and files using the Flag as inappropriate option.
• Members can flag private messages from within the community on their My Messages pagein Chatter. If a member has turned on email notification for messages, they can also flag themessage directly from their email. Members can only flag messages that are sent fromcommunities they are members of.
Note: Private messages can’t be flagged in partner or customer portals, your internal organization, or from Salesforce1.
• Group owners and managers can moderate groups they own or manage.
If you want to create custom advanced moderation logic for your community, you can create triggers that flag content. Custom triggersrun behind the scenes and don’t require you to allow your users to flag content.
If your community uses a Community Builder-based template you won’t see the Flagged Files node in Community Management evenif Allow members to flag content is enabled. To show the Flagged Files node, select Show all settings inCommunity Management from the Preferences page.
17
Enable Users to Flag Items in Your CommunityOne-Stop Monitoring Using Community Management
Create Moderation Criteria for Your Community
EDITIONS
Available in: SalesforceClassic
Available in:• Enterprise• Performance• Unlimited• Developer
USER PERMISSIONS
To view, create, edit, anddelete criteria:• “Manage Communities”
OR “Create and Set UpCommunities”
AND
Is a member of thecommunity whoseCommunityManagement pagethey’re trying to access.
Create criteria that defines offensive language or inappropriate content that you don’t want in yourcommunity. Criteria are used in rules to moderate user-generated content, such as posts andcomments.
Some things to keep in mind:
• Your organization can have up to 10 keyword list criteria. This limit is per organization, not percommunity.
• A keyword list can have up to 2,000 keywords.
• Capitalization and trailing punctuation are ignored when matching your keywords touser-generated content. For example, if your criteria includes BadWord, it’s matched whena user types BADWORD or badword.
• You can’t use the API to set up moderation criteria.
Set up criteria to use in your moderation rules:
1. From within the community, click in the global header.
Members of the community who have the “Create and Set Up Communities” permission canalso access Community Management from the All Communities page in organization setup.
2. Click Moderation > Criteria.
3. Click New.
4. Enter a name, unique name, and description for your criteria.
5. Click Save.
6. Update the keywords in your criteria.
To add keywords, click Add.
• Keywords can be up to 100 characters and can only include letters, numbers, or ampersands (&).
• Wildcard characters aren’t supported.
• Separate keywords with commas or line breaks.
• When adding keywords, you can copy and paste up to 32,000 characters at a time.
To delete keywords, select the keywords you want to remove, then click Delete.
A message indicates how many keywords were added or failed to add, and the number of duplicates that were ignored. If yourentire entry failed to save, review the keyword requirements and then submit again. Don’t worry about adding duplicates becausethey’re ignored.
To delete criteria, click Del from the Criteria page. If criteria is being used by a rule, you can’t delete it.
18
Create Moderation Criteria for Your CommunityOne-Stop Monitoring Using Community Management
Create Moderation Rules for Your Community
EDITIONS
Available in: SalesforceClassic
Available in:• Enterprise• Performance• Unlimited• Developer
USER PERMISSIONS
To view, create, edit, anddelete rules:• “Manage Communities”
OR “Create and Set UpCommunities”
AND
Is a member of thecommunity whoseCommunityManagement pagethey’re trying to access.
Create and modify rules for your community to moderate user-generated content. Each rule specifiesthe user-generated content the rule applies to, the criteria to enforce the rule on, and the moderationaction to take. You can create rules that block, flag, or replace user-generated content that containsoffensive language or inappropriate content.
If your community is using the Napili template, moderation rules apply to questions created byyour community members.
Some things to keep in mind:
• Your organization can have up to 10 rules. This limit is per organization, not per community.
• Each rule can have up to three criteria.
• Rules that block content run first, followed by rules that replace content, then rules that flagcontent. If two or more rules perform the same action, the oldest rule runs first.
• You can’t use the API to set up moderation rules.
Tip: Before creating a rule, make sure you've created criteria to use in that rule.
1. From within the community, click in the global header.
Members of the community who have the “Create and Set Up Communities” permission canalso access Community Management from the All Communities page in organization setup.
2. Click Moderation > Rules.
3. Click New.
4. Complete the following fields:
• Name—Enter a name for your rule.
• Unique Name—Enter a unique name for your rule. The unique name used by the API and managed packages.
• Description—Optionally, enter a description.
• Applies To—Specify which types of user-generated content this rule applies to. Posts and comments only apply to contentcreated in groups and user profiles.
• Criteria—Select the criteria to enforce this rule.
Important: If you activate a rule without specifying criteria, the rule either flags all posts and comments or prevents usersfrom creating posts and comments entirely. Yikes! Be careful.
• Moderation Action—Specify what you want to happen when the criteria is matched.
– Block prevents the content from being published.
– Replace publishes the content with the keywords replaced as asterisks. For example, BadWord becomes *******.
– Flag publishes the content and then automatically flags the content as inappropriate.
• Message for User—Specify the message that your user sees when their content is blocked. If you don’t specify a message,the user sees the standard message: “Looks like we found unacceptable content in your post or comment. Review your contentand make sure it complies with community etiquette.”
• Activate Rule—If selected, the rule is activated.
5. Click Save to apply your changes.
19
Create Moderation Rules for Your CommunityOne-Stop Monitoring Using Community Management
How and when do community moderation rules execute?Rules that block content run first, followed by rules that replace content, then rules that flag content. If two or more rules perform thesame action, the oldest rule runs first. Community moderation rules work with existing triggers. On the server, Salesforce executescommunity rules within the standard order of execution.
Rules that block content execute during system validation. Rules that block content ignore changes made by before triggers. Forexample, if a before trigger changes a feed post, a moderation rule that blocks content isn't aware of the changed content andexecutes on the original content.
Rules that replace content execute before database saves.
Rules that flag content execute after workflow rules.
Moderate Posts and Comments in Your Community
EDITIONS
Available in: SalesforceClassic
Available in:• Enterprise• Performance• Unlimited• Developer
USER PERMISSIONS
To view flagged items,remove flags, and deleteposts or comments:• “Moderate Communities
Feeds”
To view flagged content inCommunity Management,remove flags, and deleteposts or comments:• “Moderate Communities
Feeds”
AND
“Manage Communities”OR “Create and Set UpCommunities”
AND
Is a member of thecommunity whoseCommunityManagement pagethey’re trying to access.
Community moderators can review the Flagged Posts feed which contains a list of posts andcomments that members of the community have flagged as inappropriate and take action. If you’rea group owner or group manager, you can view flags and take action on items in your groups.
Flagged posts and comments have a small orange flag next to the post or comment date. Thenumber next to the flag indicates how many people have flagged the item. The moderator canreview each item and decide whether to take action.
A few things to bear in mind about flagged items:
• Moderators can only view and act on items they have access to.
• Within in group in a community, group owners or managers can moderate items in their groups,including viewing or removing flags and deleting posts, comments, or files if necessary. Theycan’t see the Flagged Posts feed in Community Management.
• If Allow members to flag content is disabled in a community, only moderatorscan flag items and view flagged items.
1. From within the community, click in the global header.
Members of the community who have the “Create and Set Up Communities” permission canalso access Community Management from the All Communities page in organization setup.
2. Click Moderation > Flagged Posts to view a feed of flagged posts and comments.
3. Click Delete or Remove Flags, depending on whether you agree that the post or commentis inappropriate and should be deleted or whether the post or comment was flagged in error.
4. Click OK.
Alternatively, you can moderate directly within context of your community by removing flags ordeleting content in the feed.
Tip: If you want to receive an email each time an item in your community is flagged, selectthe Flags an item as inappropriate checkbox on the Chatter Email Notifications page.
20
Moderate Posts and Comments in Your CommunityOne-Stop Monitoring Using Community Management
Moderate Files in Your Community
EDITIONS
Available in: SalesforceClassic
Available in:• Enterprise• Performance• Unlimited• Developer
USER PERMISSIONS
To view the file detail page,remove flags, and deletefiles:• “Moderate Communities
Files”
To view flagged files inCommunity Management,remove flags, and deletefiles:• “Moderate Communities
Files”
AND
“Manage Communities”OR “Create and Set UpCommunities”
AND
Is a member of thecommunity whoseCommunityManagement pagethey’re trying to access.
Community moderators can review and take action on the Flagged Files list, which contains a listof files that members of the community have flagged as inappropriate. Group owners or groupmanagers can view flags and take action on files in their groups.
Members of your community may post files that aren’t appropriate because they contain sensitiveinformation or content that may be offensive. Other members of the community can flag thesefiles for review. Flagged files have a small orange flag. The number next to the flag indicates howmany people have flagged the item.
Moderators can review and delete files in any community that they have access to.
Within a group in a community, group owners and managers can review and remove flags on filesin the groups they own and manage if Allow members to flag content is enabledfor their communities. If Allow members to flag content is disabled in a community,only moderators can flag items and view flagged items.
If your community uses a Community Builder-based template you won’t see the Flagged Filesnode in Community Management even if Allow members to flag content is enabled.To show the Flagged Files node, select Show all settings in CommunityManagement from the Preferences page.
1. From within the community, click in the global header.
Members of the community who have the “Create and Set Up Communities” permission canalso access Community Management from the All Communities page in organization setup.
2. Click Moderation > Flagged Files to view a list of flagged files.
3. From the Action column, select Remove Flags or Delete from the drop-down menu, dependingon whether you agree that the file is inappropriate and should be deleted or whether the filewas flagged in error.
You can click to preview the file without leaving the page.
4. If prompted, click OK.
Alternatively, you can moderate directly within context of your community by removing flags ordeleting content on the file detail page.
Tip: If you want to receive an email each time an item in your community is flagged, selectthe Flags an item as inappropriate checkbox on the Chatter Email Notifications page.
Moderate Private Messages in Your Community
EDITIONS
Available in: SalesforceClassic
Available in:• Enterprise• Performance• Unlimited• Developer
Community moderators and managers can review and act on a list of private Chatter messagesthat members of the community have flagged as inappropriate or as spam.
Important: Keep these limitations in mind:
• To view the content of a private message and delete it, you need the “Manage ChatterMessages” permission.
• To remove a flag from a private message, use the API.
• You can’t be flag private messages sent from communities that you aren’t a member ofor that haven’t turned on flagging for their users.
21
Moderate Files in Your CommunityOne-Stop Monitoring Using Community Management

• You can’t flag private messages in your internal organization, in Salesforce1, or in partner and customer portals.
There are a few ways you can monitor flagged messages in your communities:
• Get an out-of-the-box Insights report with the Salesforce Communities Dashboards package.
This Community Management Insights report will help you track trends and stay on top of private message spamming attacks inyour community. You can view who sent the message, when it was sent, and who flagged the message. Remember that you can’tview the contents of the private message, delete it, or remove the flag from Community Management. For detailed informationabout this package, see Report on Communities with the Dashboards and Insights Package.
• Create your own report.
First, create a custom report type using Networks as the primary object and Network Audits as the secondary object. Thencreate a report using your new custom report type and add a field filter for Audited Object Type set to equal ChatterMessage.
• Query the flagged messages from the API.
Tip: If you want to receive an email each time a private message in your community is flagged, select the Flags an item asinappropriate option on the Chatter Email Notifications page. To receive the email notifications, you also need the “ModerateCommunities Feeds” and “Manage Chatter Messages” permissions.
Set Up Apex Triggers for Flagging Items
EDITIONS
Available in: SalesforceClassic
Available in:• Enterprise• Performance• Unlimited• Developer
USER PERMISSIONS
To create triggers:• “Modify All Data”
Use triggers to create custom advanced moderation logic that automatically flags items in yourcommunity.
Tip: Did you know you can do this in the UI? Most communities don’t need custommoderation triggers. You can create moderation rules and criteria directly in CommunityManagement. For more information, see Create Moderation Rules for Your Community.
Using triggers to automatically flag items allows you to moderate your community behind thescenes. These flags are only visible to moderators. You can view flags on the Flagged Posts feedon the Community Management page, query for them in the API, or use custom report types tocreate reports on flagged items, people whose items are flagged most, and more.
Consider the following when creating triggers:
• Create Apex after insert triggers on either FeedItem, FeedComment, ChatterMessage, orContentDocument.
• Define criteria that when met creates a NetworkModeration (flag) record, with the FeedComment,FeedItem, ChatterMessage, or ContentDocument as the parent.
Example: This trigger automatically flags posts in your community that contain BadWord.
trigger autoflagBadWord on FeedItem (after insert) {for (FeedItem rec : trigger.new) {
if (!<CommunityId>.equals(rec.networkScope))continue;
if (rec.body.indexOf('BadWord') >= 0) {NetworkModeration nm = new NetworkModeration(entityId=rec.id,
visibility='ModeratorsOnly');insert(nm);
}
22
Set Up Apex Triggers for Flagging ItemsOne-Stop Monitoring Using Community Management
}}
A similar trigger on comments would look like this.
trigger autoflagBadWord on FeedComment (after insert) {for (FeedComment rec : trigger.new) {
if (!<CommunityId>.equals(rec.networkScope))continue;
if (rec.commentBody.indexOf('BadWord') >= 0) {NetworkModeration nm = new NetworkModeration(entityId=rec.id,
visibility='ModeratorsOnly');insert(nm);
}}
}
Organize Self-Service Communities with Topics
Topics are available in all communities. But when you set up a self-service community with the Napili template, you can use the CommunityManagement page to quickly guide members to key navigational and featured topics.
On the Community Management page, you choose navigational topics to provide a consistent map of your community, and featuredtopics to highlight current, popular conversations. In the community itself, member-created topics let users organize information foreach other, creating a personalized experience that boosts community engagement.
In a self-service community, the Napili template specifies the layout and design of navigational, featured, and member-created topics.Below are visual examples of each type in an active community.
Tip: To add navigational and featured topics to other types of communities, Apex developers can use theConnectApi.ManagedTopics class in a Visualforce page.
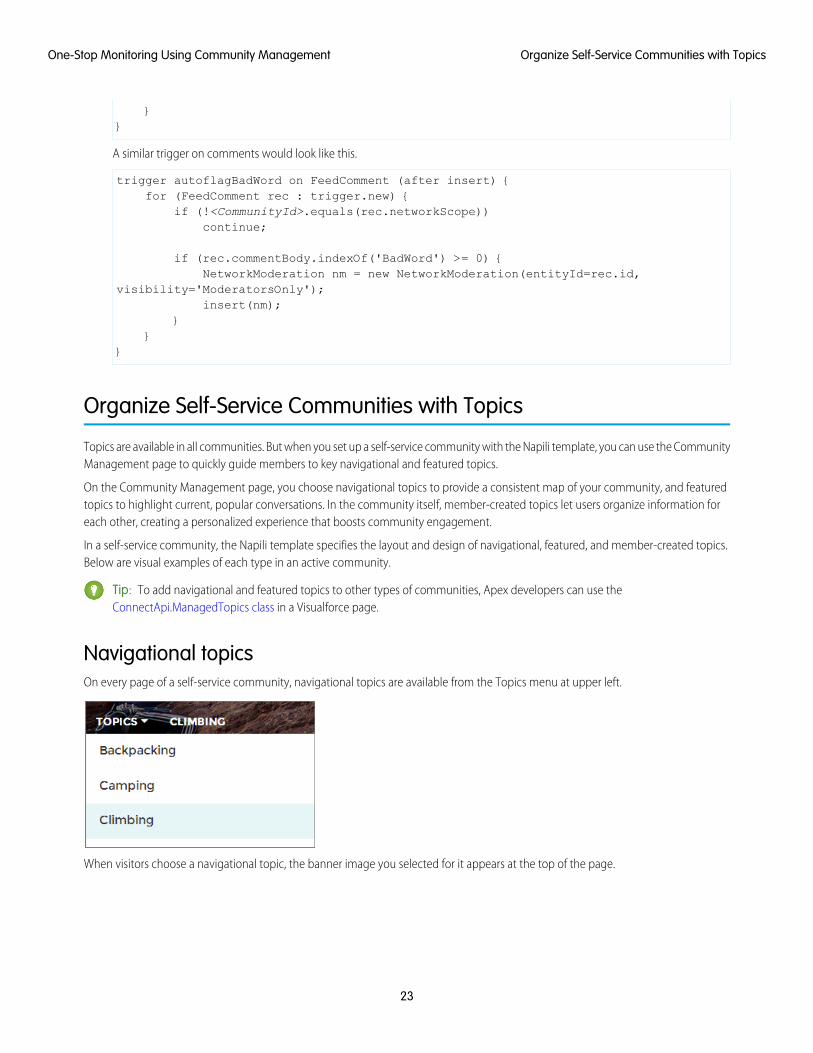
Navigational topicsOn every page of a self-service community, navigational topics are available from the Topics menu at upper left.
When visitors choose a navigational topic, the banner image you selected for it appears at the top of the page.
23
Organize Self-Service Communities with TopicsOne-Stop Monitoring Using Community Management
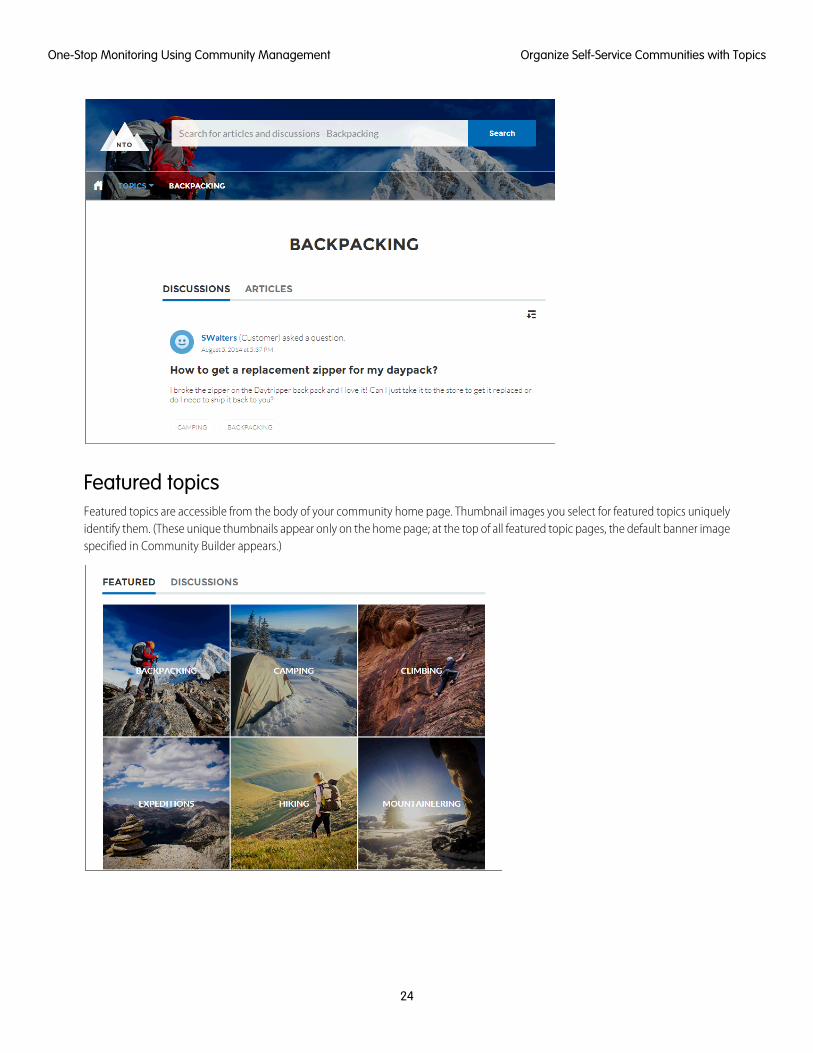
Featured topicsFeatured topics are accessible from the body of your community home page. Thumbnail images you select for featured topics uniquelyidentify them. (These unique thumbnails appear only on the home page; at the top of all featured topic pages, the default banner imagespecified in Community Builder appears.)
24
Organize Self-Service Communities with TopicsOne-Stop Monitoring Using Community Management
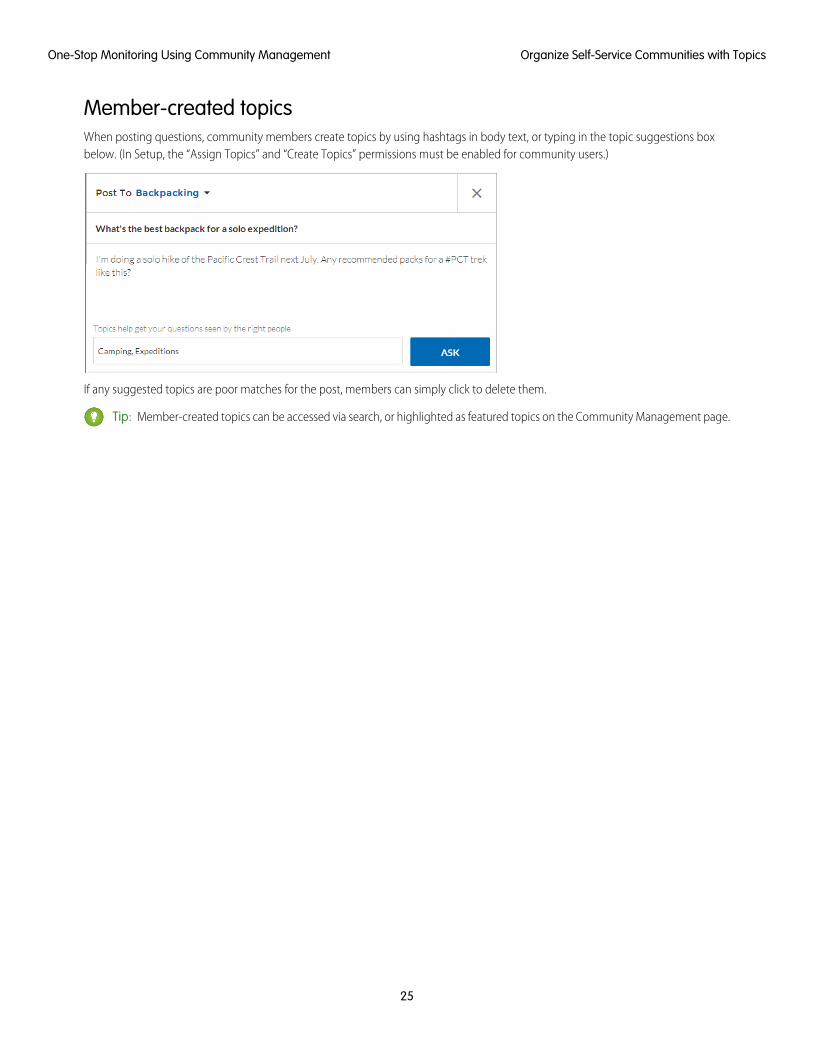
Member-created topicsWhen posting questions, community members create topics by using hashtags in body text, or typing in the topic suggestions boxbelow. (In Setup, the “Assign Topics” and “Create Topics” permissions must be enabled for community users.)
If any suggested topics are poor matches for the post, members can simply click to delete them.
Tip: Member-created topics can be accessed via search, or highlighted as featured topics on the Community Management page.
25
Organize Self-Service Communities with TopicsOne-Stop Monitoring Using Community Management
Set Up Navigational Topics
EDITIONS
Available in: SalesforceClassic
Available in:• Enterprise• Performance• Unlimited• Developer
USER PERMISSIONS
To access the CommunityManagement page:• “Manage Communities”
OR
“Create and Set UpCommunities”
AND
Is a member of thecommunity whoseCommunityManagement pagethey’re trying to access.
To set up navigationaltopics:• “Create Topics”
AND
“Edit Topics”
To add articles to topics:• “View Data Categories”
AND
“Read” on related articletypes
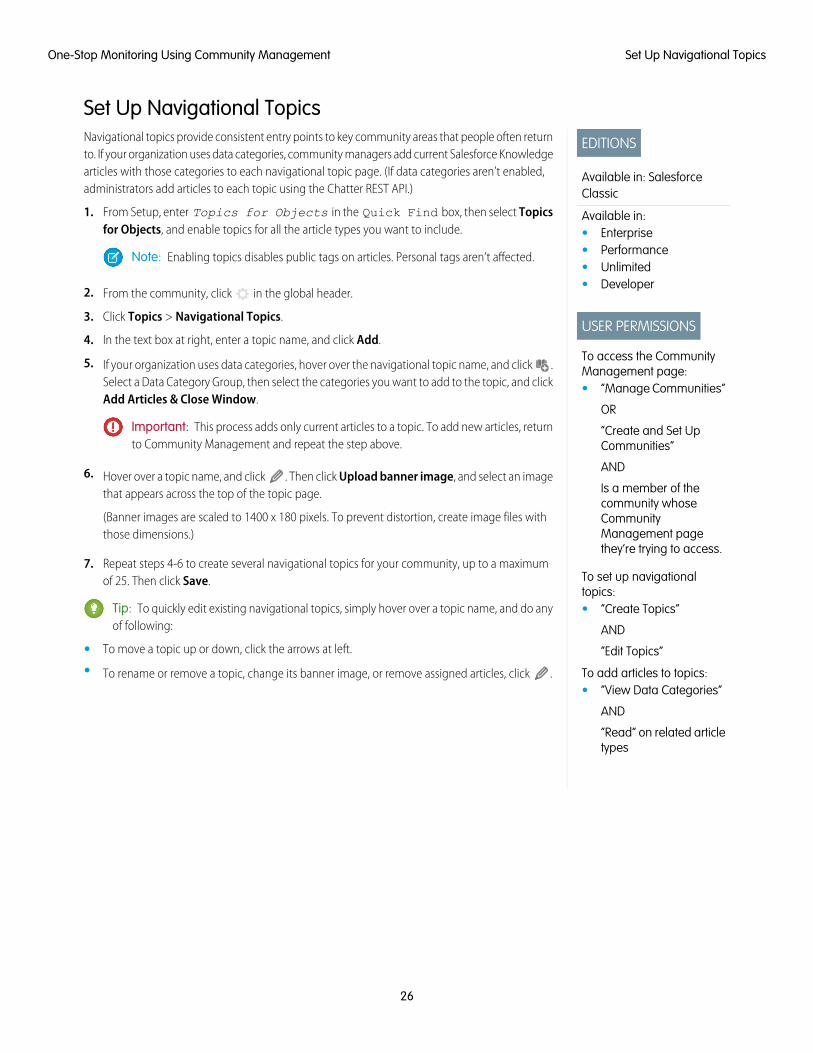
Navigational topics provide consistent entry points to key community areas that people often returnto. If your organization uses data categories, community managers add current Salesforce Knowledgearticles with those categories to each navigational topic page. (If data categories aren’t enabled,administrators add articles to each topic using the Chatter REST API.)
1. From Setup, enter Topics for Objects in the Quick Find box, then select Topicsfor Objects, and enable topics for all the article types you want to include.
Note: Enabling topics disables public tags on articles. Personal tags aren’t affected.
2. From the community, click in the global header.
3. Click Topics > Navigational Topics.
4. In the text box at right, enter a topic name, and click Add.
5. If your organization uses data categories, hover over the navigational topic name, and click .Select a Data Category Group, then select the categories you want to add to the topic, and clickAdd Articles & Close Window.
Important: This process adds only current articles to a topic. To add new articles, returnto Community Management and repeat the step above.
6. Hover over a topic name, and click . Then click Upload banner image, and select an imagethat appears across the top of the topic page.
(Banner images are scaled to 1400 x 180 pixels. To prevent distortion, create image files withthose dimensions.)
7. Repeat steps 4-6 to create several navigational topics for your community, up to a maximumof 25. Then click Save.
Tip: To quickly edit existing navigational topics, simply hover over a topic name, and do anyof following:
• To move a topic up or down, click the arrows at left.
• To rename or remove a topic, change its banner image, or remove assigned articles, click .
26
Set Up Navigational TopicsOne-Stop Monitoring Using Community Management
Set Up Featured Topics
EDITIONS
Available in: SalesforceClassic
Available in:• Enterprise• Performance• Unlimited• Developer
USER PERMISSIONS
To access the CommunityManagement page:• “Manage Communities”
OR
“Create and Set UpCommunities”
AND
Is a member of thecommunity whoseCommunityManagement pagethey’re trying to access.
To set up featured topics:• “Edit Topics”
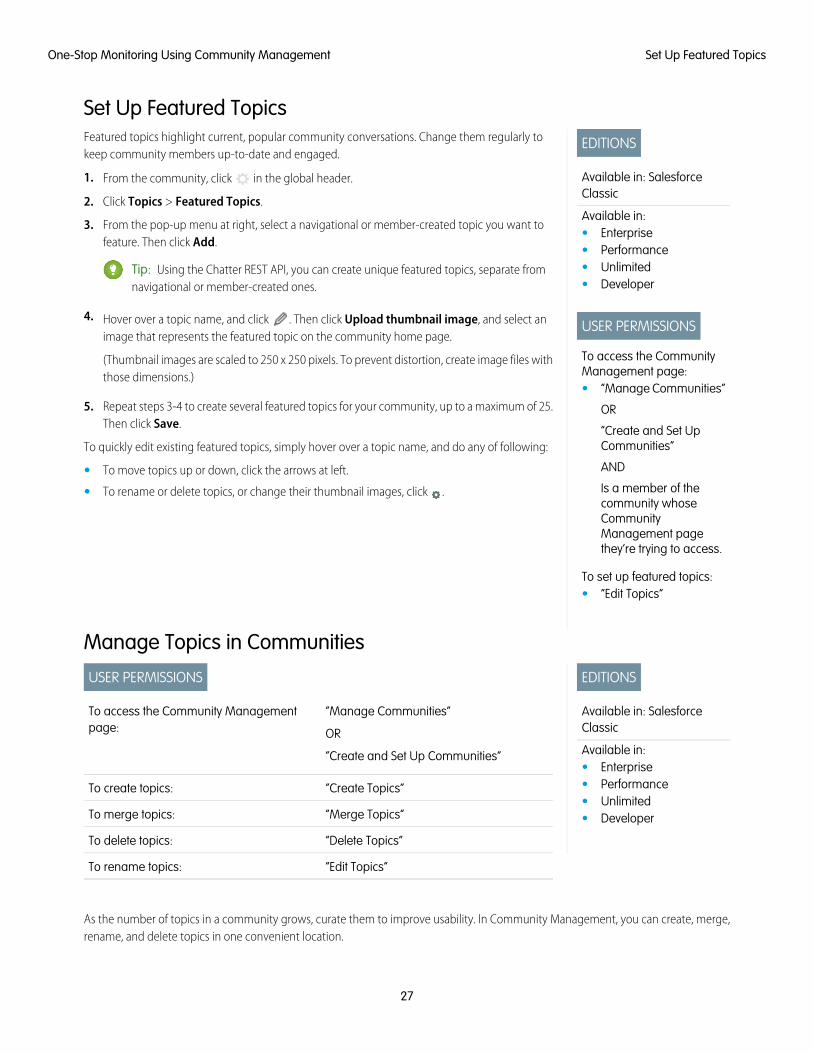
Featured topics highlight current, popular community conversations. Change them regularly tokeep community members up-to-date and engaged.
1. From the community, click in the global header.
2. Click Topics > Featured Topics.
3. From the pop-up menu at right, select a navigational or member-created topic you want tofeature. Then click Add.
Tip: Using the Chatter REST API, you can create unique featured topics, separate fromnavigational or member-created ones.
4. Hover over a topic name, and click . Then click Upload thumbnail image, and select animage that represents the featured topic on the community home page.
(Thumbnail images are scaled to 250 x 250 pixels. To prevent distortion, create image files withthose dimensions.)
5. Repeat steps 3-4 to create several featured topics for your community, up to a maximum of 25.Then click Save.
To quickly edit existing featured topics, simply hover over a topic name, and do any of following:
• To move topics up or down, click the arrows at left.
• To rename or delete topics, or change their thumbnail images, click .
Manage Topics in Communities
EDITIONS
Available in: SalesforceClassic
Available in:• Enterprise• Performance• Unlimited• Developer
USER PERMISSIONS
“Manage Communities”
OR
“Create and Set Up Communities”
To access the Community Managementpage:
“Create Topics”To create topics:
“Merge Topics”To merge topics:
“Delete Topics”To delete topics:
“Edit Topics”To rename topics:
As the number of topics in a community grows, curate them to improve usability. In Community Management, you can create, merge,rename, and delete topics in one convenient location.
27
Set Up Featured TopicsOne-Stop Monitoring Using Community Management
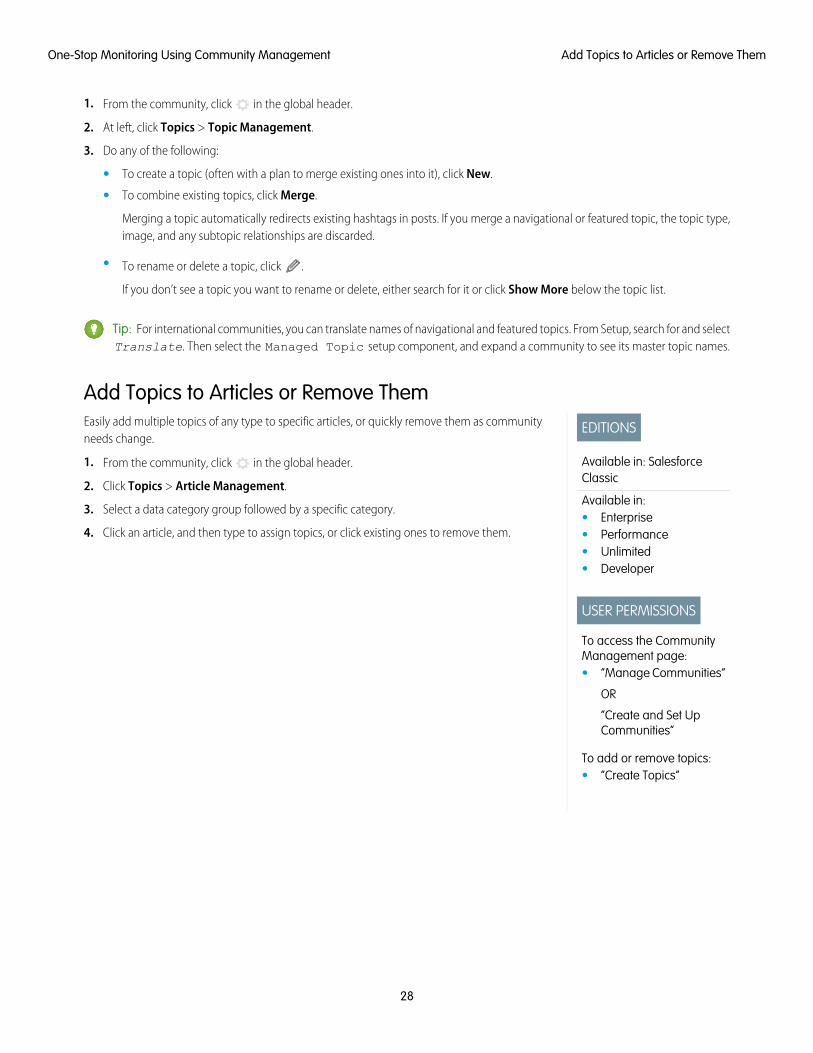
1. From the community, click in the global header.
2. At left, click Topics > Topic Management.
3. Do any of the following:
• To create a topic (often with a plan to merge existing ones into it), click New.
• To combine existing topics, click Merge.
Merging a topic automatically redirects existing hashtags in posts. If you merge a navigational or featured topic, the topic type,image, and any subtopic relationships are discarded.
• To rename or delete a topic, click .
If you don’t see a topic you want to rename or delete, either search for it or click Show More below the topic list.
Tip: For international communities, you can translate names of navigational and featured topics. From Setup, search for and selectTranslate. Then select the Managed Topic setup component, and expand a community to see its master topic names.
Add Topics to Articles or Remove Them
EDITIONS
Available in: SalesforceClassic
Available in:• Enterprise• Performance• Unlimited• Developer
USER PERMISSIONS
To access the CommunityManagement page:• “Manage Communities”
OR
“Create and Set UpCommunities”
To add or remove topics:• “Create Topics”
Easily add multiple topics of any type to specific articles, or quickly remove them as communityneeds change.
1. From the community, click in the global header.
2. Click Topics > Article Management.
3. Select a data category group followed by a specific category.
4. Click an article, and then type to assign topics, or click existing ones to remove them.
28
Add Topics to Articles or Remove ThemOne-Stop Monitoring Using Community Management
Customize Recommendations in Communities
EDITIONS
Available in: SalesforceClassic
Available in:• Enterprise• Performance• Unlimited• Developer
USER PERMISSIONS
To access the CommunityManagement page:• “Manage Communities”
OR
“Create and Set UpCommunities”
Create recommendations to drive engagement for your community, encouraging users to watchvideos, take trainings, and more. Edit these recommendations in Community Management, wherethey’re supported in feeds in the Salesforce1 mobile browser app and in any community using theSummer ’15 or later version of the Napili template.
1. Access Community Management in either of the following ways.
• From the community, click in the global header.
• From Setup, enter All Communities in the Quick Find box, then select AllCommunities. Then click Manage next to the community name.
2. Click Recommendations > Recommendations.
3. Click New.
4. Complete the following fields:
• Name—Enter a name for the recommendation in Community Management. This namedoesn’t appear in the community.
• Image—Click Upload Image to include an image with your recommendation.
• Title—Optionally, enter header text that appears above the image.
• Description—Enter detailed text that suggests what users can do.
• Button text—Enter a label for the button in the recommendation.
• https://—Enter the URL that the button opens.
• Enabled—If checked, this recommendation is active and appears in communities.
When disabled, recommendations that exist in feeds in the Salesforce1 mobile browser app are not removed, but no newrecommendations appear. In communities using the Summer ’15 or later version of the Napili template, disabled recommendationsno longer appear.
In the Salesforce1 mobile browser app, recommendations appear directly in the feed. In communities using the Summer ’15 or laterversion of the Napili template, recommendations appear by default on the right side of the home page. Recommendations don’t appearin other communities.
Tip: To remove an existing recommendation, in Community Management, click Recommendations > Recommendations,and click the recommendation name. At the bottom of the recommendation details, click Delete.
You can target audiences for your recommendations. To create and manage recommendation audiences in Winter ’16, use Chatter RESTAPI or ConnectApi.Recommendations in Apex.
29
Customize Recommendations in CommunitiesOne-Stop Monitoring Using Community Management
Build Engagement with Reputation Levels
Enable Reputation in Your Community
EDITIONS
Available in: SalesforceClassic
Available in:• Enterprise• Performance• Unlimited• Developer
USER PERMISSIONS
To edit Communitiessettings:• “Create and Set Up
Communities ”
AND
Is a member of thecommunity whoseCommunityManagement pagethey’re trying to access.
Enable reputation in your community so that members are recognized and rewarded forparticipating.
A powerful tool for a community manager is the ability to recognize individual members for theirparticipation, because community managers know that recognition and a little friendly competitionusually lead to more active members. Enabling reputation turns on a default point system and setof reputation levels in the community. A community manager can personalize labels and pointvalues from the Community Management page.
Members start to accrue points by performing the actions that have assigned point values. Oncethe member exceeds the top of the level’s point threshold, they move up a level. They, and othermembers of the community, see their reputation level on their profile and when hovering overtheir name. Total points also show on member’s profiles.
Note: When you enable Reputation, Chatter influence is removed from the Contributionsection on the profile page.
1. Access Community Management in either of the following ways.
• From the community, click in the global header.
• From Setup, enter All Communities in the Quick Find box, then select AllCommunities. Then click Manage next to the community name.
2. Click Administration > Preferences.
3. Select Enable setup and display of reputation levels, then click Save.
After you enabled reputation, a default point system and set of reputation levels is available on theCommunity Management page. The default reputation points are as follows:
PointsAction
Community Engagement
1Write a post
1Write a comment
5Receive a comment
1Like something
5Receive a like
1Share a post
5Someone shares your post
1
If your post contains more than one @mention, you get a pointfor each @mention.
Mention someone
30
Build Engagement with Reputation LevelsOne-Stop Monitoring Using Community Management
PointsAction
5Receive a mention
Questions and Answers
1Ask a question
5Answer a question
5Receive an answer
5Mark an answer as best
20Your answer is marked as best
Knowledge
5Endorsing someone for knowledge on a topic
20Being endorsed for knowledge on a topic
If your selected community template doesn’t have Chatter enabled, the Reputation node won’t appear in Community Management. Toshow the Reputation node, go to Administration > Preferences and select Show all settings in Community Management.
Set Up Reputation Levels
EDITIONS
Available in: SalesforceClassic
Available in:• Enterprise• Performance• Unlimited• Developer
USER PERMISSIONS
To update reputation levels:• “Manage Communities”
AND
Is a member of thecommunity whoseCommunityManagement pagethey’re trying to access.
Update the default reputation levels to meet your community’s needs and help motivate yourmembers.
When reputation is enabled for a community, 10 default levels are added. You can add or removelevels, give each level a name, and update the point range and image for each level.
Note: A community must have at least three reputation levels and can have up to 50.
1. From within the community, click in the global header.
Members of the community who have the “Create and Set Up Communities” permission canalso access Community Management from the All Communities page in organization setup.
2. Click Reputation > Reputation Levels.
From here you can:
• Upload your own image for each reputation level. Click the default image to browse to animage file and upload a new image.
Note: You can’t revert to the default reputation level images from the Salesforceuser interface. Use the Salesforce Chatter REST API to do this.
• Give each level a name, such as “Beginner,” “Intermediate,” and “Expert.” If you don’t assigna name, the default is used. For example, “Level 1,” “Level 2,” “Level 3.”
• Edit the point range for a level.
When you update the higher value of a level’s point range, the lower value for the nextlevel is automatically adjusted when you save.
• Add more levels by clicking Add a level, located underneath the list of levels.
31
Set Up Reputation LevelsOne-Stop Monitoring Using Community Management
• Remove a level by clicking next to the level.
3. Click Save to apply your changes.
You can now update the point system for the community. The point system determines how many points a user gets when they performcertain actions or when others recognize their contributions by commenting, liking, or sharing their posts. Reputation level increasesare posted to member feeds.
You can translate reputation level names so that international community members can view their reputation levels in the appropriatelanguage. In Translation Workbench, select the Reputation Level setup component and then expand the node next to yourcommunity.
Set Up Reputation Points
EDITIONS
Available in: SalesforceClassic
Available in:• Enterprise• Performance• Unlimited• Developer
USER PERMISSIONS
To update reputation points:• “Manage Communities”
AND
Is a member of thecommunity whoseCommunityManagement pagethey’re trying to access.
Set up a point system to reward users for participating in the community.
When reputation is enabled for a community, there is a default point system set up. When usersperform the actions with assigned point values, their total points increase and they start to movetowards the next reputation level.
Note: Only active users accrue points. For example, if an active user likes the post of aninactive user, the active user gets 1 point, but the inactive user does not get points.
The table shows the default events and points.
PointsAction
Community Engagement
1Write a post
1Write a comment
5Receive a comment
1Like something
5Receive a like
1Share a post
5Someone shares your post
1
If your post contains more than one @mention,you get a point for each @mention.
Mention someone
5Receive a mention
Questions and Answers
1Ask a question
5Answer a question
5Receive an answer
5Mark an answer as best
32
Set Up Reputation PointsOne-Stop Monitoring Using Community Management
PointsAction
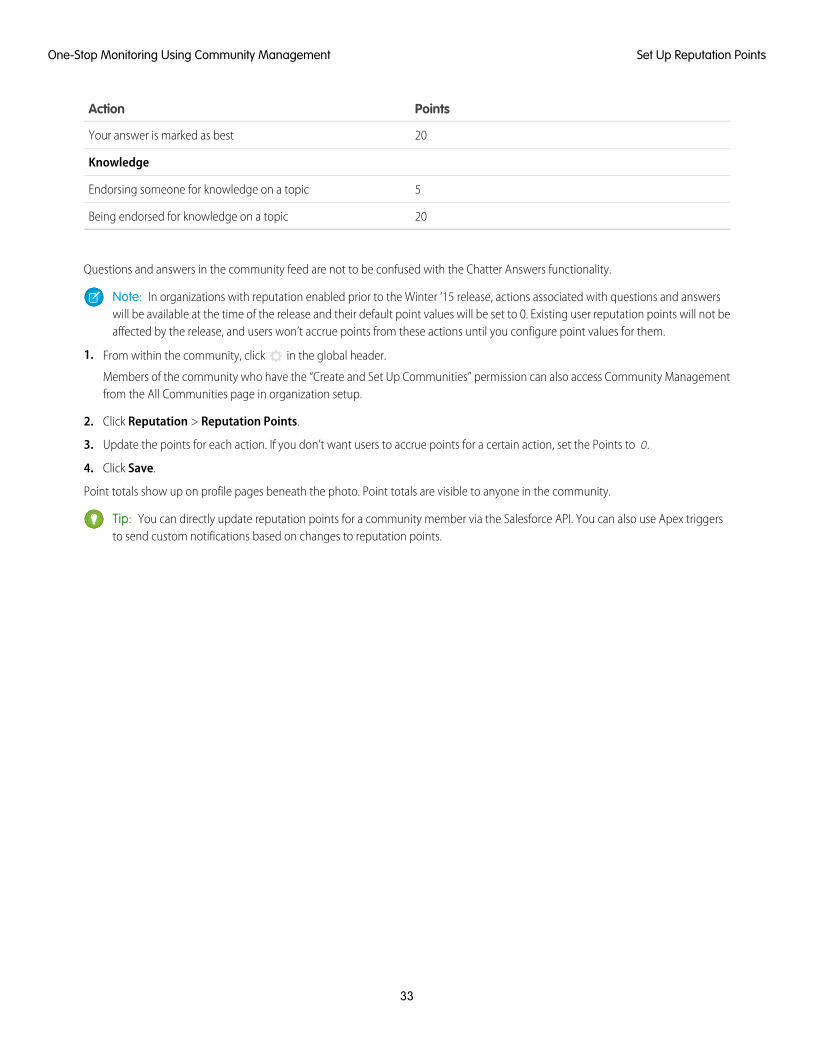
20Your answer is marked as best
Knowledge
5Endorsing someone for knowledge on a topic
20Being endorsed for knowledge on a topic
Questions and answers in the community feed are not to be confused with the Chatter Answers functionality.
Note: In organizations with reputation enabled prior to the Winter ’15 release, actions associated with questions and answerswill be available at the time of the release and their default point values will be set to 0. Existing user reputation points will not beaffected by the release, and users won’t accrue points from these actions until you configure point values for them.
1. From within the community, click in the global header.
Members of the community who have the “Create and Set Up Communities” permission can also access Community Managementfrom the All Communities page in organization setup.
2. Click Reputation > Reputation Points.
3. Update the points for each action. If you don’t want users to accrue points for a certain action, set the Points to 0.
4. Click Save.
Point totals show up on profile pages beneath the photo. Point totals are visible to anyone in the community.
Tip: You can directly update reputation points for a community member via the Salesforce API. You can also use Apex triggersto send custom notifications based on changes to reputation points.
33
Set Up Reputation PointsOne-Stop Monitoring Using Community Management
MORE RESOURCES FOR COMMUNITY MANAGEMENT
Community Management Resources
When you’re managing a community, every extra bit of information helps. Use these resources to assist you with your daily communitymanagement duties.
success.salesforce.comHave a question about Communities? Have a great idea about community management that Salesforce should implement? Knowa lot about communities and want to help others? Visit the Salesforce Success Community and start collaborating with other SalesforceCommunities users just like you! From the Salesforce Success Community you can ask questions and get answers, post ideas, viewhelp and training offerings, collaborate with other Salesforce users and more.
Engaging Your Customer (or Partner) CommunityA playbook that contains strategies and tips on how to grow engagement in your community.
34
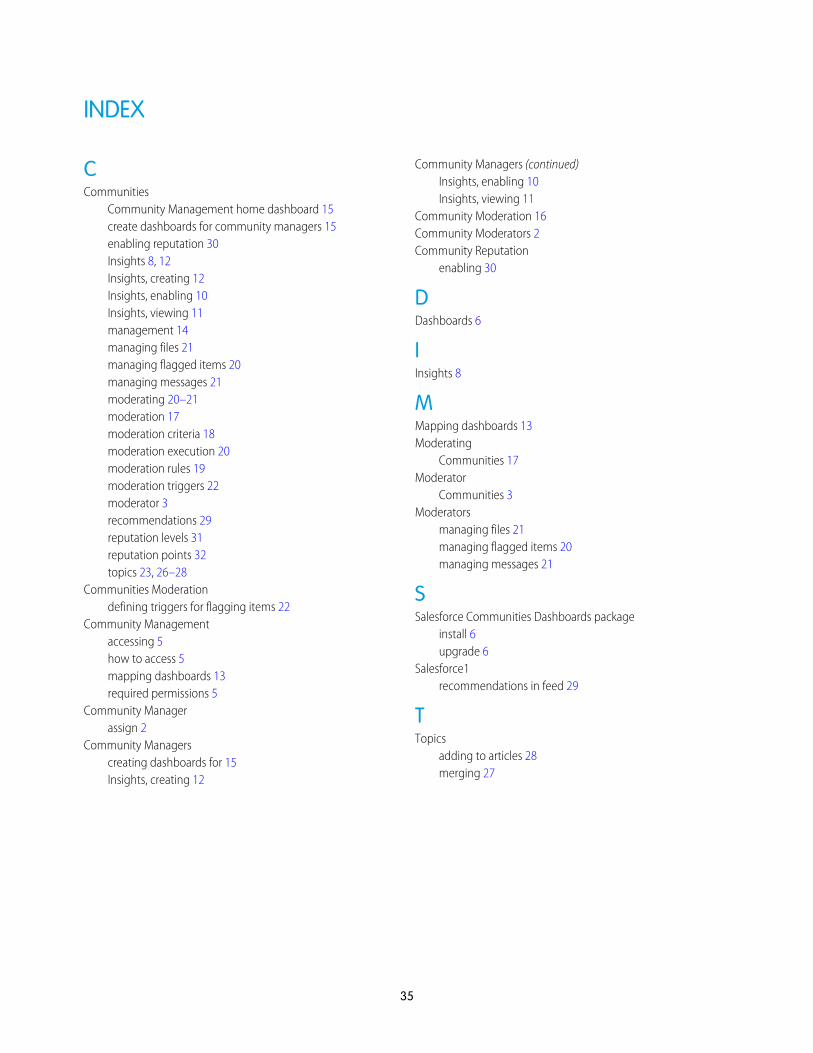
INDEX
CCommunities
Community Management home dashboard 15create dashboards for community managers 15enabling reputation 30Insights 8, 12Insights, creating 12Insights, enabling 10Insights, viewing 11management 14managing files 21managing flagged items 20managing messages 21moderating 20–21moderation 17moderation criteria 18moderation execution 20moderation rules 19moderation triggers 22moderator 3recommendations 29reputation levels 31reputation points 32topics 23, 26–28
Communities Moderationdefining triggers for flagging items 22
Community Managementaccessing 5how to access 5mapping dashboards 13required permissions 5
Community Managerassign 2
Community Managerscreating dashboards for 15Insights, creating 12
Community Managers (continued)Insights, enabling 10Insights, viewing 11
Community Moderation 16Community Moderators 2Community Reputation
enabling 30
DDashboards 6
IInsights 8
MMapping dashboards 13Moderating
Communities 17Moderator
Communities 3Moderators
managing files 21managing flagged items 20managing messages 21
SSalesforce Communities Dashboards package
install 6upgrade 6
Salesforce1recommendations in feed 29
TTopics
adding to articles 28merging 27
35