Embed Size (px)
Citation preview
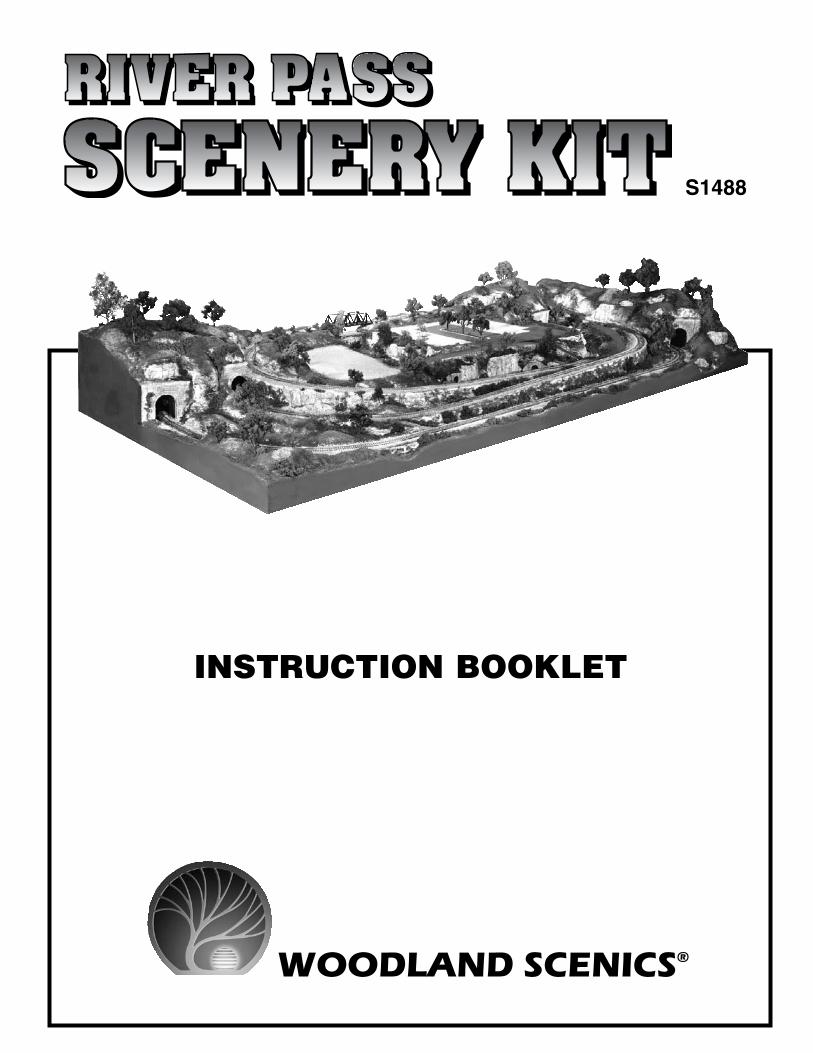
INSTRUCTION BOOKLET
WOODLAND SCENICS®
S1488

2
Contents
Introduction ............................................................................................................ 3
Kit Contents ............................................................................................................ 3
Additional Items ..................................................................................................... 4
Special Note ........................................................................................................... 4
Layout Overview ..................................................................................................... 4
Rocks, Tunnel Portals and Culverts ....................................................................... 5 Make Rock Castings ...................................................................................................... 5 Install Rock Castings .................................................................................................... 6 Color Rock Faces ........................................................................................................... 6 Color Tunnel Portals and Culverts ................................................................................ 6
Add Earth Undercoat .............................................................................................. 6
Add Road System ................................................................................................... 7
Build Roads and Streets ................................................................................................ 7 Add Curbs, Sidewalks and Foundations ....................................................................... 8
Track Area ............................................................................................................... 9 Ballast ........................................................................................................................... 9 Cover Your Tracks ......................................................................................................... 9
Landscaping .......................................................................................................... 10 Low Ground Cover ....................................................................................................... 11 Medium Ground Cover ................................................................................................. 11 High Ground Cover ....................................................................................................... 12
Water Areas .......................................................................................................... 13 Color Water Areas ........................................................................................................ 13 Add Items To Water Areas ........................................................................................... 13 Pour Water ................................................................................................................... 14 Add Effects and Waterfall ............................................................................................ 14
Finishing Touches ................................................................................................. 15 Detailing Your Layout .................................................................................................. 15 Additional Landscape Materials.................................................................................. 15 Flyspecking .................................................................................................................. 16 Paint The Sides Of Your Layout .................................................................................. 16
Add Buildings and Details ........................................................................................... 17
A Final Word .......................................................................................................... 18
Products ................................................................................................................ 19
3
Description Quantity
Earth Colors Liquid Pigment/Earth Undercoat . . . . . . . . . . . . . . 8 fl . oz .
Deciduous Tree Armatures . . . . . . . . . . . . . . . . . . . . . . . . . . . . . . . . . 44
Bushes/Light Green** . . . . . . . . . . . . . . . . . . . . . . . . . . . . . . . .54 cu . in .
Bushes/Medium Green** . . . . . . . . . . . . . . . . . . . . . . . . . . . .108 cu . in .
Bushes/Dark Green** . . . . . . . . . . . . . . . . . . . . . . . . . . . . . . .54 cu . in .
Clump-Foliage/Light Green** . . . . . . . . . . . . . . . . . . . . . . . . . .54 cu . in .
Clump-Foliage/Medium Green** . . . . . . . . . . . . . . . . . . . . . .151 cu . in .
Clump-Foliage/Dark Green** . . . . . . . . . . . . . . . . . . . . . . . . . .54 cu . in .
Realistic Water . . . . . . . . . . . . . . . . . . . . . . . . . . . . . . . . . . . . . .16 fl .oz .
Water Effects . . . . . . . . . . . . . . . . . . . . . . . . . . . . . . . . . . . . . . . 4 fl . oz .
Dead Fall . . . . . . . . . . . . . . . . . . . . . . . . . . . . . . . . . . . . . . . . . . . . 26 g .
Flowering Foliage/Yellow . . . . . . . . . . . . . . . . . . . . . . . . . . . . . .33 sq . ft .
Flowering Foliage/Purple . . . . . . . . . . . . . . . . . . . . . . . . . . . . . .33 sq . ft .
Poly Fiber . . . . . . . . . . . . . . . . . . . . . . . . . . . . . . . . . . . . . . . . . . 1 .36 g .
Field Grass/Harvest Gold . . . . . . . . . . . . . . . . . . . . . . . . . . . . . . . . 1 g .
Underbrush/Medium Green . . . . . . . . . . . . . . . . . . . . . . . . . . .54 cu . in .
Scenic Glue . . . . . . . . . . . . . . . . . . . . . . . . . . . . . . . . . . . . . . . . 8 fl . oz .
Craft Stick . . . . . . . . . . . . . . . . . . . . . . . . . . . . . . . . . . . . . . . . . . . . . . . 1
Fine-Leaf Foliage/Dark Green*** . . . . . . . . . . . . . . . . . . . . . . .75 cu . in .
Fine-Leaf Foliage/Medium Green*** . . . . . . . . . . . . . . . . . . . .75 cu . in .
Fine-Leaf Foliage/Light Green*** . . . . . . . . . . . . . . . . . . . . . . .75 cu . in .
Fine-Leaf Foliage/Dead*** . . . . . . . . . . . . . . . . . . . . . . . . . . . .75 cu . in .
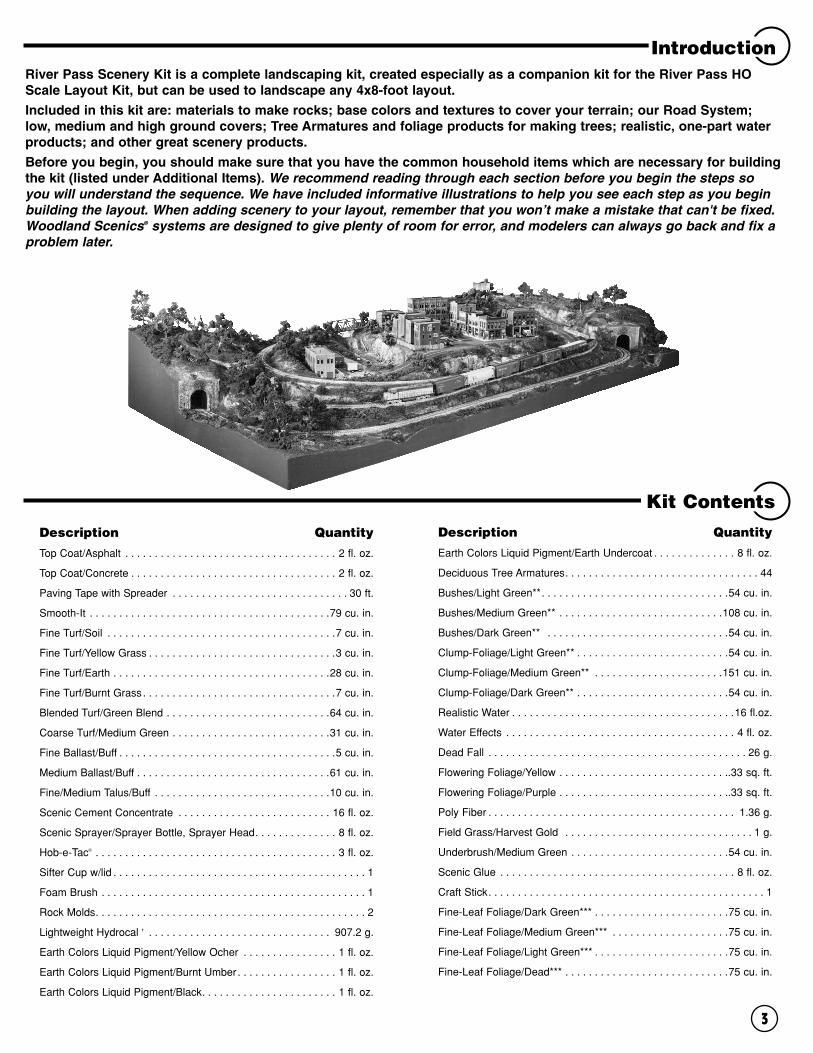
River Pass Scenery Kit is a complete landscaping kit, created especially as a companion kit for the River Pass HO Scale Layout Kit, but can be used to landscape any 4x8-foot layout.
Included in this kit are: materials to make rocks; base colors and textures to cover your terrain; our Road System; low, medium and high ground covers; Tree Armatures and foliage products for making trees; realistic, one-part water products; and other great scenery products.
Before you begin, you should make sure that you have the common household items which are necessary for building the kit (listed under Additional Items). We recommend reading through each section before you begin the steps so you will understand the sequence. We have included informative illustrations to help you see each step as you begin building the layout. When adding scenery to your layout, remember that you won’t make a mistake that can't be fixed. Woodland Scenics® systems are designed to give plenty of room for error, and modelers can always go back and fix a problem later.
Kit ContentsDescription Quantity
Top Coat/Asphalt . . . . . . . . . . . . . . . . . . . . . . . . . . . . . . . . . . . . 2 fl . oz .
Top Coat/Concrete . . . . . . . . . . . . . . . . . . . . . . . . . . . . . . . . . . . 2 fl . oz .
Paving Tape with Spreader . . . . . . . . . . . . . . . . . . . . . . . . . . . . . . 30 ft .
Smooth-It . . . . . . . . . . . . . . . . . . . . . . . . . . . . . . . . . . . . . . . . .79 cu . in .
Fine Turf/Soil . . . . . . . . . . . . . . . . . . . . . . . . . . . . . . . . . . . . . . .7 cu . in .
Fine Turf/Yellow Grass . . . . . . . . . . . . . . . . . . . . . . . . . . . . . . . .3 cu . in .
Fine Turf/Earth . . . . . . . . . . . . . . . . . . . . . . . . . . . . . . . . . . . . .28 cu . in .
Fine Turf/Burnt Grass . . . . . . . . . . . . . . . . . . . . . . . . . . . . . . . . .7 cu . in .
Blended Turf/Green Blend . . . . . . . . . . . . . . . . . . . . . . . . . . . .64 cu . in .
Coarse Turf/Medium Green . . . . . . . . . . . . . . . . . . . . . . . . . . .31 cu . in .
Fine Ballast/Buff . . . . . . . . . . . . . . . . . . . . . . . . . . . . . . . . . . . . .5 cu . in .
Medium Ballast/Buff . . . . . . . . . . . . . . . . . . . . . . . . . . . . . . . . .61 cu . in .
Fine/Medium Talus/Buff . . . . . . . . . . . . . . . . . . . . . . . . . . . . . .10 cu . in .
Scenic Cement Concentrate . . . . . . . . . . . . . . . . . . . . . . . . . . 16 fl . oz .
Scenic Sprayer/Sprayer Bottle, Sprayer Head . . . . . . . . . . . . . . 8 fl . oz .
Hob-e-Tac® . . . . . . . . . . . . . . . . . . . . . . . . . . . . . . . . . . . . . . . . . 3 fl . oz .
Sifter Cup w/lid . . . . . . . . . . . . . . . . . . . . . . . . . . . . . . . . . . . . . . . . . . . 1
Foam Brush . . . . . . . . . . . . . . . . . . . . . . . . . . . . . . . . . . . . . . . . . . . . . 1
Rock Molds . . . . . . . . . . . . . . . . . . . . . . . . . . . . . . . . . . . . . . . . . . . . . . 2
Lightweight Hydrocal ✝ . . . . . . . . . . . . . . . . . . . . . . . . . . . . . . . 907 .2 g .
Earth Colors Liquid Pigment/Yellow Ocher . . . . . . . . . . . . . . . . 1 fl . oz .
Earth Colors Liquid Pigment/Burnt Umber . . . . . . . . . . . . . . . . . 1 fl . oz .
Earth Colors Liquid Pigment/Black . . . . . . . . . . . . . . . . . . . . . . . 1 fl . oz .
Introduction

4
Place and color rocks. Paint Plaster Cloth with Earth Undercoat.
1.
Layout Overview
Use Road System to create realistic pavement and foundations.
2.
3. 4.
Apply low ground cover on surface of layout. Ballast track.
Finish layout by adding trees, bushes and grass. Paint the layout sides and add buildings.
Additional ItemsAdditional Items Needed But Not Included
Save a small portion of each product for special detailing and final touch up .
Scenic Cement FormulaMix three parts water to one part of Scenic Cement Concentrate . Use this formula and mix as needed when applying Scenic Cement .
We have written these instructions based on the assumption that you purchased the River Pass Layout Kit (ST1484) . If you are landscaping an existing layout, you can easily use this kit to add scenery, but you may need to modify it for your layout . We recommend starting at the beginning and following the instructions until you find a step you may have missed on your previous layout . Then proceed as instructed .
Special Note
• scissors
• newspaper
• liquid detergent
• measuring cup-16 oz.
• masking tape
• mixing bowl
• 120, 220 and 600-grit sandpaper
• sanding block
• cake pan or paint roller tray
• drinking straw or eyedropper
• paintbrush (approx. 2" wide)
• paintbrush (approx. 1/2" wide)
• 5 disposable cups-12 oz.
• tablespoon
• non-stick pan
• toothpicks
• straightedge, ruler or yardstick
• Foam Pencil (ST1431)
• Base paint (from River Pass Layout Kit ST1484) or dark latex paint
• Foam Knife (ST1433) or hobby knife

5
Make Rock CastingsA . Turn Lightweight Hydrocal carton sideways and shake back and forth for 30 seconds, rotating carton several times . Open carton and set aside 2 (8 ounce) cups to use later to attach rocks.B . Make a solution of “wet water” by mixing two drops of liquid dish soap with 1 cup of water in Scenic Sprayer .C . Spray the “wet water” inside molds and pour out excess . This will prevent air bubbles in the rock casting . Prop molds with paper wads, or cradle in a box of sand (Fig . 1) .D . Measure and pour 3 fluid ounces of water into a mixing bowl . Measure out 8 ounces of Lightweight Hydrocal and sift into water . Gently stir for 30 seconds . Fill molds 1/3 to 1/2 full with the mixture (Fig . 2) and tap the molds gently to dislodge bubbles . Allow to set for 30-40 minutes before removing from molds .E . By not filling molds full, this allows you to make several sets of rock castings . Because the rocks are thin, they will line the Pass Area (Fig . 3) and other places on the layout, where clearance problems could be an issue with thicker rock castings .F . You can make variations of the rock castings by cradling the molds at an angle and pouring the Lightweight Hydrocal into the mold . Or, you can pour into just a corner of the mold for another variation .G . Clean all utensils . Do not pour Hydrocal down the sink .
Items Needed
• Lightweight Hydrocal
• Mixing bowl
• Liquid detergent
• Craft stick
• Hobby knife
• Rock Molds
• Foam brush
• Tablespoon
• 2" paintbrush
• Scenic Sprayer
• 5 disposable cups-12 oz .
• Box of sand
• Measuring cup-16 oz .
Rocks, Tunnel Portals and Culverts
Fig. 1 Fig. 2
Pass Area
Rocks
Fig. 3

6
Color Rock FacesColoring the rock faces is easy and yields extremely realistic results . Mix each Earth Colors Liquid Pigment separately in adisposable cup .
A . Dilute Burnt Umber and Yellow Ocher Pigments by mixing 1/2 of each container with 1 cup of water (1 part pigment to 16 parts water) . Mix 1/4 contents of Black Pigment with 1 cup of water (1 part pigment to 32 parts water) . Do not mix pigments together. Stir all solutions thoroughly .B . If colors are too light when applied to rock face, add more pigment to the solution . If they are too dark, add more water .C . A technique called “leopard spotting” is used to apply pigments . To leopard spot castings, use foam brush to randomly dab Burnt Umber over 1/3 of rock face . Rinse foam brush and dab Yellow Ocher over a different 1/3 of the rock, leaving 1/3 white . Rinse foam brush again and apply Black Wash over entire rock to “tie” colors together (Fig . 6) .D . Save remaining mixtures of Black Wash and pigments for general touch up work, Tunnel Portals and Culverts .
Fig. 6
Earth Undercoat takes the whiteness from Plaster Cloth . It collects in the folds of the terrain creating a splotchy surface that provides a realistic appearance when covered by landscaping products .
A . Set aside 1 tablespoon of Earth Undercoat for the water area, which we will color later . In a mixing bowl, mix Earth Undercoat with 1 cup of water . Stir thoroughly .B . Brush mixture onto Plaster Cloth . Let excess run down terrain features to fill in crevices and low spots . Be careful to avoid colored rock faces .C . Cover all white Plaster Cloth surfaces in this manner . When applied, Earth Undercoat should be slightly translucent .
Add Earth Undercoat
Install Rock CastingsDecide on locations (Page, Fig . 3) and test fit rocks . Push in or cut Plaster Cloth so rocks will fit horizontally (Fig . 4) . Remember the rocks look more natural on a steep hillside with strata layers running horizontally .
A . Break castings into as many pieces as you wish . This provides variety and gives a natural look .B . Install rocks using the 2 cups of Lightweight Hydrocal you set aside earlier . Mix in small batches: 2 ounces of water to 5 ounces of Lightweight Hydrocal (1 ounce of water for every 2 1/2 ounces of Hydrocal) . Prepare mixture as before .C . Soak castings in water briefly and wet Plaster Cloth with a sponge or spray bottle in areas where rocks will be attached . D . Spread Lightweight Hydrocal on back of rock castings and press into place, keeping mixture off rock faces (Fig . 5) . Fill in any gaps around the rock castings with HydrocalE . Repeat for each rock face . Let rock castings dry at least 12 hours before coloring .
Fig. 5
Fig. 4
push or cut Plaster Cloth
Color Tunnel Portals and CulvertsUse the same “leopard spotting” technique that was used earlier on the rock faces, with the left over paint, to color the Tunnel Portals and Culverts . Cover all of the castings with the Black Wash, it will seep into the cracks and crevices to bring out the detail .
7
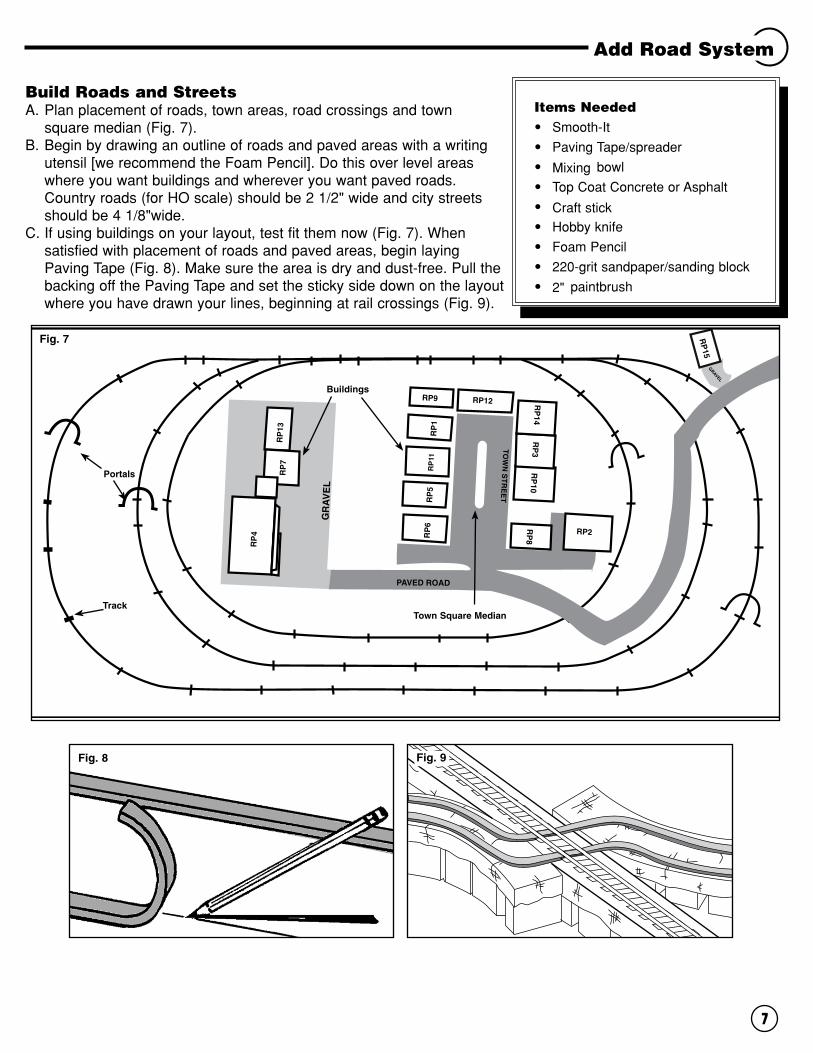
Add Road System
Build Roads and StreetsA . Plan placement of roads, town areas, road crossings and town square median (Fig . 7) .B . Begin by drawing an outline of roads and paved areas with a writing utensil [we recommend the Foam Pencil] . Do this over level areas where you want buildings and wherever you want paved roads . Country roads (for HO scale) should be 2 1/2" wide and city streets should be 4 1/8"wide.C . If using buildings on your layout, test fit them now (Fig . 7) . When satisfied with placement of roads and paved areas, begin laying Paving Tape (Fig . 8) . Make sure the area is dry and dust-free . Pull the backing off the Paving Tape and set the sticky side down on the layout where you have drawn your lines, beginning at rail crossings (Fig . 9) .
Items Needed
• Smooth-It
• Paving Tape/spreader
• Mixing bowl
• Top Coat Concrete or Asphalt
• Craft stick
• Hobby knife
• Foam Pencil
• 220-grit sandpaper/sanding block
• 2" paintbrush
GR
AV
EL
PAVED ROAD
GRAVEL
RP
10R
P3
RP
14R
P8
RP9
RP
7
RP
4
RP
13 RP
1R
P11
RP
5R
P6
RP12
RP2
RP
15
Fig. 7
Town Square Median
Buildings
Track
Portals
Fig. 9Fig. 8
8
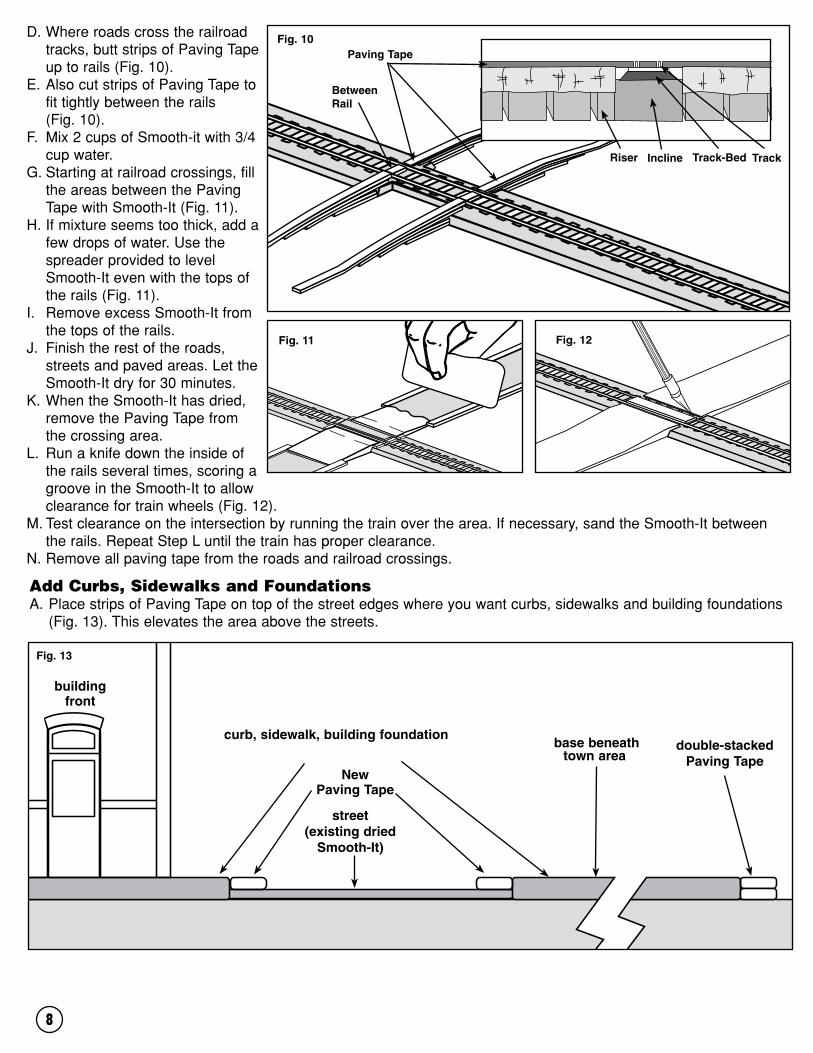
D . Where roads cross the railroad tracks, butt strips of Paving Tape up to rails (Fig . 10) .E . Also cut strips of Paving Tape to fit tightly between the rails (Fig . 10) .F . Mix 2 cups of Smooth-it with 3/4 cup water .G . Starting at railroad crossings, fill the areas between the Paving Tape with Smooth-It (Fig . 11) .H . If mixture seems too thick, add a few drops of water . Use the spreader provided to level Smooth-It even with the tops of the rails (Fig . 11) .I . Remove excess Smooth-It from the tops of the rails .J . Finish the rest of the roads, streets and paved areas . Let the Smooth-It dry for 30 minutes .K . When the Smooth-It has dried, remove the Paving Tape from the crossing area .L . Run a knife down the inside of the rails several times, scoring a groove in the Smooth-It to allow clearance for train wheels (Fig . 12) .M . Test clearance on the intersection by running the train over the area . If necessary, sand the Smooth-It between the rails . Repeat Step L until the train has proper clearance .N . Remove all paving tape from the roads and railroad crossings .
Add Curbs, Sidewalks and FoundationsA . Place strips of Paving Tape on top of the street edges where you want curbs, sidewalks and building foundations (Fig . 13) . This elevates the area above the streets .
Fig. 13
curb, sidewalk, building foundationdouble-stacked
Paving Tape base beneath
town areaNew
Paving Tape
street(existing dried
Smooth-It)
building front
Fig. 11
Fig. 10Paving Tape
BetweenRail
Riser Incline Track-Bed
Fig. 12
Track

9
B . Where curbs, sidewalks and building foundations are planned, stack two new strips of Paving Tape parallel with the outside edge of the street. Keep Paving Tape strips within 4" of the street edge, because spreader can only accommodate a four-inch strip .C . Mix Smooth-It and begin filling between all roads, streets, curbs and sidewalks . Use Spreader to smooth level with the top of the Paving Tape .D . Allow Smooth-It to dry 30 minutes, then remove all Paving Tape .E . If it is necessary to make the foundations wider, stack two strips of Paving Tape parallel with the edge . Mix and pour another batch of Smooth-It between the Paving Tape and the existing foundation .F . When Smooth-It is dry, remove tape and lightly sand with 220-grit sandpaper .G . Paint raised foundation surfaces and streets with Asphalt or Concrete Top Coat . We suggest using the Concrete Top Coat for foundation and sidewalk area and Asphalt for streets and roads .
BallastIn real life, Ballast is crushed rock laid in a railroad bed to give stability to ties and rails .
A. Use a 1/2" paintbrush to apply Scenic Cement onto the sides of the Track-Bed, careful not to get any on rails .B . Pour Ballast over track and ties, avoiding turnouts and switch machines (Fig . 14) . Make sure Track-Bed is completely covered .C. Brush off excess Ballast from ties and rails and spread evenly with 1/2" dry paintbrush (Fig. 15).D . Make sure Ballast is even with the ties for a realistic appearance .E . Use an eyedropper to apply Scenic Cement on all Ballast, carefully avoiding rails .F . Clean rails before running your trains . Use a sanding block with 600-grit sandpaper to keep rail surface clean .
Items Needed
• Ballast
• 600-grit sandpaper/ sanding block
• 1/2" paintbrush
• Scenic Sprayer
• Eyedropper
• Masking tape
• 2" paintbrush
• Scenic Cement Concentrate
• 1 disposable cup
Track Area
Fig. 15Fig. 14
Cover Your TracksIt is best to cover the train tracks with masking tape before moving on to the landscaping . This keeps dust, plaster, adhesives and landscaping materials off the track and prevents clean up later .

10
Riverbed Clump-Foliage Field GrassTreesTalusBallast
Fig. 17
After the Plaster Cloth has been painted with Earth Undercoat, rock faces are attached and colored, and the roads are built, it’s time to add landscaping (Fig . 16) . This process will add color, texture and realism to the layout . All the provided products can be used in any fashion and quantity you wish . Use the box photos and Fig . 17 as a guide . The following instructions serve mainly to guide you through the process . Feel free to add the materials in the quantity and manner that best match your theme . Any mistake can be easily repaired .
Landscaping
Fig. 16Items Needed
• Various Turfs
• Talus
• Tree Armatures
• Bushes/Underbrush
• Clump-Foliage
• Fine-Leaf Foliage
• Field Grass
• Hob-e-Tac®
• Scenic Glue
• Sifter cup
• Scissors
• Eyedropper or straw
• Wet water
• Scenic Cement Concentrate and sprayer

11
Coarse TurfThe Medium Green Coarse Turf provides texture variation and can indicate weeds, coarse grass and small plants .
A . Cut a corner of the Medium Green Coarse Turf bag and sprinkle it over desired areas . Avoid rock faces .B . When satisfied with landscaping appearance, mist all, including rock faces, with Scenic Cement to secure in place .
Medium Ground CoverTo add to the look of realistic landscape, add medium ground cover . This pro-vides the look of taller grasses and weeds . This step also includes Talus (rock debris) . At this point, landscaping items will begin to overlap to give a realistic look to the layout .
TalusTalus is rock debris, which collects beneath cliffs, around base of mountains, in erosion ruts and in front of rock faces . Note: Talus can be used along river banks for added realism. You may want to save a little for later use when doing the water area.
A . Turn bag of Talus upside down to mix rock sizes . Cut corner off bag and apply Talus . Be sure to add Talus below and around rock outcroppings and cliffs, in erosion areas, creek beds, around Tunnel Portals and drainage ditches .
B . Mix equal parts of Scenic Glue and water and a drop of liquid detergent to make glue flow . With a straw, or eyedropper, generously apply this mixture on Talus to attach it (Fig . 20) . Allow to dry, then apply another coat and allow it to dry .
Fig. 20
Low Ground CoverTo create a realistic landscape, add low ground cover . This includes adding the smallest plants, grasses and soil . Initially, use these products sparingly . Later, you may add more to cover up seams, exposed Plaster Cloth and other areas .
Sprinkle Blended TurfA . Spray a few square feet of terrain with a mist of Scenic Cement (Fig .18) .B . Sprinkle Green Blend Blended Turf over desired areas, allowing portions
of Earth Undercoat to be visible (Fig . 19) .
Fine TurfAfter applying Green Blend Blended Turf, add accent turf with a sifter cup, keeping in mind that Burnt and Yellow Grass Fine Turf indicate areas that do not get much water . Soil and Earth Fine Turf colors work well in gullies, drain-age ditches, stream-beds, trails or similar eroded surfaces . Remember to blend coverings . Fig. 19
Fig. 18

12
High Ground CoverBuild and Plant TreesThis kit contains deciduous trees .Clump-Foliage Trees A . Remove temporary bases from the Tree Armatures . Twist and bend the deciduous Armatures to a realistic three dimensional shape (Fig . 25) .B . Using the brush applicator, paint Hob-e-Tac® onto the branches of the Tree Armatures (Fig . 26) . Set in bases and wait until Hob-e-Tac® is clear and tacky (about 15 minutes) .C . Dip the deciduous Armatures into any of the three colors of Clump-Foliage for quick application (Fig . 27), or apply Clump-Foliage by hand . Spray completed trees with Scenic Cement to secure loose foliage .D . Sprinkle on Yellow Grass Fine Turf for highlighting (Fig . 28) .E . Lightly spray trees with Scenic Cement (Fig . 29) .
Bushes and UnderbrushThese products are used for creating bushes and shrubs . Bushes tend to grow in “family groups” of one color, so it is best to place like colors in separate bush or shrub arrangements .
A . Place Bushes and Underbrush to test appearance . When satisfied with placement, glue into place with Scenic Glue (Fig . 21 and 22) . B . Sprinkle on Yellow Grass Fine Turf for highlighting (Fig . 23) .C . Lightly spray with Scenic Cement (Fig . 24) .
Fig. 27Fig. 26Fig. 25
Fig. 29Fig. 28
Fig. 24Fig. 23
Fig. 22Fig. 21

13
Fig. 34
Add Items To Water AreasYou can add Dead Fall, Talus or other items into the water areas for a realistic effect (Fig . 34) . Dead Fall is a natu-ral, dried product, which models fresh-cut timber or dying, decaying wood . Add items to the water areas at this time using Realistic Water as an adhesive . Let them dry in place before adding Realistic Water .
Items Needed
• Dead Fall
• Realistic Water
• Water Effects
• 1/2" paintbrush
• Toothpicks
• Craft stick
• Non-stick pan
• Masking tape
Fig. 31
To install trees, poke a hole in the Plaster Cloth where the tree will be placed . Place a drop of Scenic Glue over the hole . Place the bottom pin in the hole (Fig . 32) .
Fig. 32
Fine-Leaf Foliage TreesA . Repeat Steps A and B under Clump-Foliage Trees .B . For Fine-Leaf Foliage trees, pick, cut or strip pieces off Fine-Leaf Foliage stems (Fig . 30) and press onto branches (Fig . 31) . Add Fine-Leaf Foliage until you are satisfied with the look and fullness of the tree . Use some for bushes, shrubs and saplings .C . Sprinkle on Yellow Grass Fine Turf for highlighting (Page 12, Fig . 28) .D . Lightly spray the tops of trees with Scenic Cement (Page 12, Fig . 29) .
Fig. 30
Water AreasColor Water AreasUse the Earth Colors Liquid Pigments left over from rock coloring and the remainder of the Earth Undercoat mixture, from painting the terrain base, to color the water areas .
A . Use the Black Wash in the area you want to simulate the deepest water, such as directly under the waterfall and in the center of the river .B . Mix a little of the Black Wash with the Earth Undercoat to create varying shades and to simulate shallower water . Also blend in Yellow Ocher and Burnt Umber along the river edge or other shallow areas (Fig . 33) .C . Let water area dry thoroughly .Note: Make sure not to get any Scenic Cement on water area.
Fig. 33

14
Pour WaterRealistic Water is a one-part product .
A . You will need to prevent the Realistic Water from running off the side of the layout . To do so, place a piece of masking tape large enough to catch the water on the side of the layout (Fig . 35) . After the water has dried, pull the tape off . B . Pour Realistic Water to a depth of no more than 1/8-inch in the prepared water area . To help coax Realistic Water into small areas, it can be gently pulled or pushed with a toothpick .C . Allow Realistic Water to dry until clear (approximately 24 hours) . At first it may have a milky appearance, but it will dry clear with time .
Add Effects and WaterfallWater Effects is a heavy-bodied, white product (that dries clear) which can be shaped into waterfalls, churning water, splashes and other water movements .
A . To make realistic-looking waterfalls, apply Water Effects on a non-stick surface (Fig . 36) . Spread the Water Effects to the length and width of the waterfall (Fig . 37), using a toothpick or craft stick . Allow to cure overnight .B . Peel the waterfall off the surface and apply a small amount of Water Effects to the back of the waterfall as an adhesive, then press it into place (Fig . 38) .C . Apply Water Effects directly on top of dried Realistic Water . Use a toothpick or craft stick to shape splashes, ripples and other water movements (Fig . 39) .
Fig. 39Fig. 38
Fig. 37Fig. 36 Completed Waterfall
Fig. 35Tape

15
Finishing Touches
Detailing Your LayoutPut more detail on your layout by adding finishing touches . Step back and take a critical look at the layout . Many modelers find that the more landscaping products they add to their layouts, the better . Adding Ballast to the shoulders of the roads, litter in the wooded areas, trash and debris along fence rows, bushes and shrubs around the foundations of buildings, can add realism to your layout .
Additional Landscape MaterialsFlowering FoliageFlowering Foliage models flowering vines, creeping ground cover and flowering fields . To use Flowering Foliage, tear off sections and stretch and pull the material in all directions until it is thin and lacy . To attach it, press the Flowering Foliage into place and spray Scenic Cement directly on the area .
Field GrassField Grass is a natural product which models living and dormant grasses on your layout . Plant scattered clumpson your layout for the most natural look . Before planting your Field Grass, pour a small amount of Hob-e-Tac® on ascrap piece of paper . Roll a small clump of Field Grass between your thumb and index finger . Cut the Field Grassto the appropriate length (Fig . 39) and place the cut end in the Hob-e-Tac® (Fig . 40) . Then place the cut end on thearea where you want your grass (Fig . 41) . You may need to hold it for a few seconds .
Poly FiberPoly Fiber can be stretched to a very thin, transparent product (Fig . 42) . It models delicate ground covering, such as crown vetch which has small stems and leaves that seem to float above the ground . Place on your layout (Fig . 43) . Highlight with Fine or Coarse Turf and spray with Scenic Cement to secure (Fig . 44) .
Fig. 41
Fig. 42 Fig. 43 Fig. 44
Fig. 40Fig. 39
Items Needed
• Disposable bowl or cup
• Base paint (from River Pass Layout Kit ST1484) or dark latex paint
• Paintbrush/paint roller
• 220-grit sandpaper
• Paper
• Sanding block
16
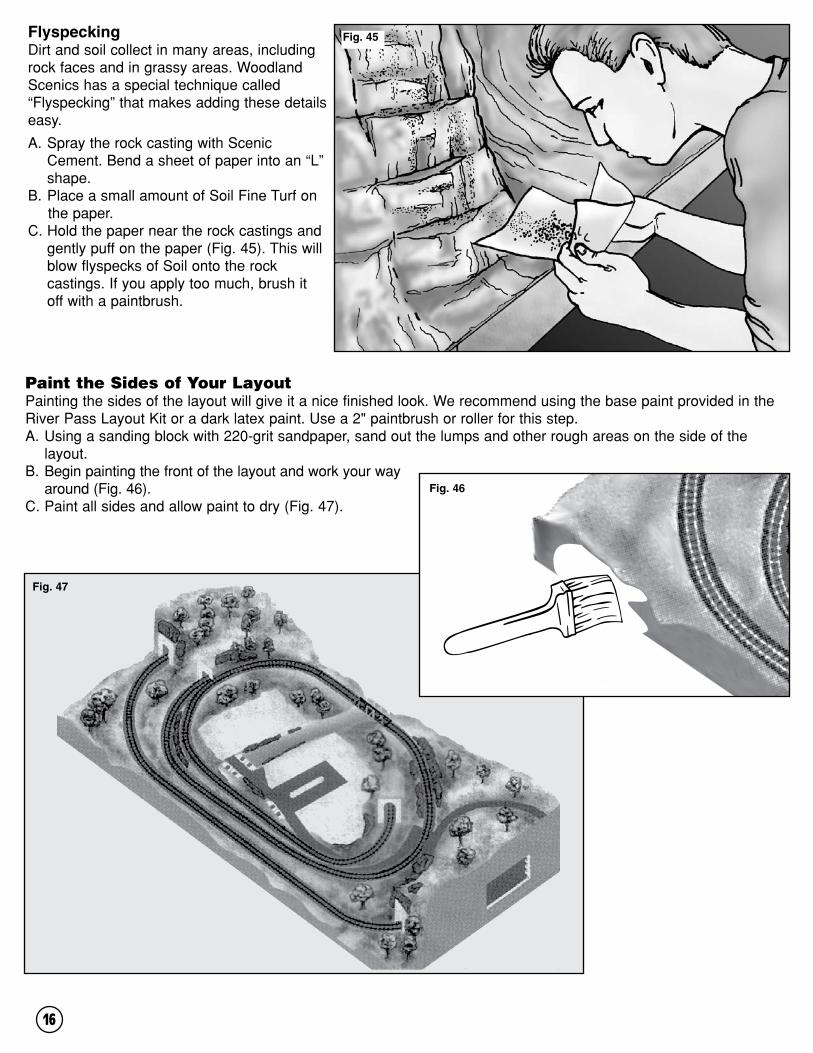
Paint the Sides of Your LayoutPainting the sides of the layout will give it a nice finished look . We recommend using the base paint provided in the River Pass Layout Kit or a dark latex paint. Use a 2" paintbrush or roller for this step.A . Using a sanding block with 220-grit sandpaper, sand out the lumps and other rough areas on the side of the layout .B . Begin painting the front of the layout and work your way around (Fig . 46) .C . Paint all sides and allow paint to dry (Fig . 47) .
Fig. 47
FlyspeckingDirt and soil collect in many areas, including rock faces and in grassy areas . Woodland Scenics has a special technique called “Flyspecking” that makes adding these details easy .
A . Spray the rock casting with Scenic Cement . Bend a sheet of paper into an “L” shape .B . Place a small amount of Soil Fine Turf on
the paper .C . Hold the paper near the rock castings and gently puff on the paper (Fig . 45) . This will blow flyspecks of Soil onto the rock castings . If you apply too much, brush it off with a paintbrush .
Fig. 45
Fig. 46

17
Add Buildings And DetailsNow that the layout is finished, and you have added your special touches and details, it is time to add buildings . If you have purchased the com-panion River Pass Building Kits (Fig . 48), you can follow our recommen-dations for setting the 15 buildings on the layout . Remember, any HO scale buildings may be used, but the River Pass Building Kit has been created especially for the River Pass HO scale layout .
Fig. 48

18
River Pass is the first complete layout kit offered in three separate kits .
River Pass Layout Kit #1 (ST1484) is a 4x8-foot light-weight SubTerrain base, which utilizes the foam compo-nents of the SubTerrain Lightweight Layout System® . Use Risers, Inclines, Profile Boards, Foam Sheets and Plaster Cloth to build the terrain contours . It also includes Track-Bed .River Pass Scenery Kit #2 (S1488) includes all the scen-ery material needed to completely landscape any 4x8-foot layout . It was designed for River Pass, but is adaptable for any scale . River Pass Building Kits #3 (S1487) is a collection of 15 HO scale building kits which are architecturally detailed and designed . There are over 200 detailed accessories and 110 colorful Dry Transfer Decals and 20 different signs and posters . You can purchase the River Pass Track Pack under our item #ST1184 or from Atlas Railroading Co . under their item #578 .
Grand Valley (ST1483) is a complete 4x8-foot HO scale lightweight layout kit . Even beginners will create model railroading scenery like a pro . It includes the SubTerrain Lightweight Layout System® components needed for cre-ating hills, mountains, valleys and other terrain contours; and it also contains all the landscaping products needed to cover the layout . Grand Valley requires no power tools and there’s no dusty mess to clean up . The track plan is printed right on the base .City & Industry Building Set (S1486) is a collection of 15 HO scale buildings which complements the Grand Valley layout . Included are more than 160 detailed accessories and 130 Dry Transfer Decals which add realistic details to every building and your layout . You can purchase the Grand Valley Track Pack under our item #ST1183 or from Atlas Railroading Co . under their item #589 .
Scenic Ridge® (ST1482) is a complete 3x6-foot N scale lightweight layout kit . It also includes Risers, Inclines, Profile Boards, Foam Sheets, Track-Bed and Plaster Cloth: all the components of the SubTerrain Lightweight Layout System® . The Scenic Ridge® layout can be assembled with no power tools, no dusty mess and no complicated calcu-lations . It is so easy, anyone can build this layout .Town and Factory Building Set (S1485) includes 13 architecturally designed and detailed N scale building kits with more than 70 detailed accessories and 60 Dry Transfer Decals . You will be able to build an entire down-town scene with a factory with easy-to-follow instruc-tions and illustrations . You can purchase the Scenic Ridge® Track Pack under our item #ST1182 or from Atlas Railroading Co . under their item #2588 .
A Final Word

19
Description Item No. Page
ROAD SYSTEM ITEMS
Paving Tape . . . . . . . . . . . . . . . . . . . . . . . . . . . . . . . . . . . . . . . .ST1455 7
Smooth-It . . . . . . . . . . . . . . . . . . . . . . . . . . . . . . . . . . . . . . . . . . . . .ST1452 8
Top Coat/Asphalt . . . . . . . . . . . . . . . . . . . . . . . . . . . . . . . . .ST1453 9
Top Coat/Concrete . . . . . . . . . . . . . . . . . . . . . . . . . . . . . .ST1454 9
LANDSCAPING SYSTEM ITEMS
Scenic Sprayer . . . . . . . . . . . . . . . . . . . . . . . . . . . . . . . . . . . . . . . .S192 5
Scenic Cement . . . . . . . . . . . . . . . . . . . . . . . . . . . . . . . . . . . . . . . .S191 8
Fine Ballast/Buff . . . . . . . . . . . . . . . . . . . . . . . . . . . . . . . . . . . . . . . .B73 9
Medium Ballast/Buff . . . . . . . . . . . . . . . . . . . . . . . . . . . . . . . . . . .B80 9
Scenic Glue . . . . . . . . . . . . . . . . . . . . . . . . . . . . . . . . . . . . . . . . . . . . .S190 1
Fine Turf/Soil . . . . . . . . . . . . . . . . . . . . . . . . . . . . . . . . . . . . . . . . . . . . . T41 11
Fine Turf/Yellow Grass . . . . . . . . . . . . . . . . . . . . . . . . . . . . . . T43 11
Fine Turf/Earth . . . . . . . . . . . . . . . . . . . . . . . . . . . . . . . . . . . . . . . . . . . T42 11
Fine Turf/Burnt Grass . . . . . . . . . . . . . . . . . . . . . . . . . . . . . . . . T44 11
Turf/Green Blend . . . . . . . . . . . . . . . . . . . . . . . . . . . . . . . . . . . . . . . T49 11
Coarse Turf/Medium Green . . . . . . . . . . . . . . . . . . . . . . . T64 11
Clump-Foliage/Light Green . . . . . . . . . . . . . . . . . . .FC682 12
Clump-Foliage/Medium Green . . . . . . . . . . . . . .FC683 12
Clump-Foliage/Dark Green . . . . . . . . . . . . . . . . . . .FC684 12
Bushes/Light Green . . . . . . . . . . . . . . . . . . . . . . . . . . . . . . .FC145 12
Bushes/Medium Green . . . . . . . . . . . . . . . . . . . . . . . . . .FC146 12
Bushes/Dark Green . . . . . . . . . . . . . . . . . . . . . . . . . . . . . . .FC147 12
Underbrush/Medium Green . . . . . . . . . . . . . . . . . . .FC136 12
44 Deciduous TreeArmatures 3/4-7" . . . . . .TR1101,TR1102,TR1103 12
Description Item No. Page
LANDSCAPING SYSTEM ITEMS
Hob-e-Tac® . . . . . . . . . . . . . . . . . . . . . . . . . . . . . . . . . . . . . . . . . . . . . . .S195 12
Fine-Leaf Foliage/Dark Green . . . . . . . . . . . . . . . F1130 13
Fine-Leaf Foliage/Medium Green . . . . . . . . . . F1131 13
Fine-Leaf Foliage/Light Green . . . . . . . . . . . . . F1132 13
Fine-Leaf Foliage/Dead . . . . . . . . . . . . . . . . . . . . . . . . . F1134 13
Dead Fall . . . . . . . . . . . . . . . . . . . . . . . . . . . . . . . . . . . . . . . . . . . . . . . . . . .S30 13
Realistic Water . . . . . . . . . . . . . . . . . . . . . . . . . . . . . . . . . . . . . .C1211 14
Water Effects . . . . . . . . . . . . . . . . . . . . . . . . . . . . . . . . . . . . . . . . .C1212 14
Field Grass/Harvest Gold . . . . . . . . . . . . . . . . . . . . FG172 15
Flowering Foliage/Yellow . . . . . . . . . . . . . . . . . . . . . . . . . F176 15
Flowering Foliage/Purple . . . . . . . . . . . . . . . . . . . . . . . . . F177 15
Poly Fiber . . . . . . . . . . . . . . . . . . . . . . . . . . . . . . . . . . . . . . . . . . . . . .FP178 15
TERRAIN SYSTEM ITEMS
Lightweight Hydrocal . . . . . . . . . . . . . . . . . . . . . . . . . . . . .C1201 5
Base Rock Mold . . . . . . . . . . . . . . . . . . . . . . . . . . . . . . . . . . . .C1243 5
Random Rock Mold . . . . . . . . . . . . . . . . . . . . . . . . . . . . . . .C1234 5
Earth Colors Liquid Pigment Black . . . . . . . . . . . . . . . . . . . . . . . . . . . . . . . . . . . . . . . . . . . . . . . . . . . . . .C1220 6
Earth Colors Liquid Pigment Burnt Umber . . . . . . . . . . . . . . . . . . . . . . . . . . . . . . . . . . . . . . . . .C1222 6
Earth Colors Liquid PigmentYellow Ocher . . . . . . . . . . . . . . . . . . . . . . . . . . . . . . . . . . . . . . . . .C1223 6
Earth Colors Liquid PigmentEarth Undercoat . . . . . . . . . . . . . . . . . . . . . . . . . . . . . . . . . . . .C1229 6
Fine Talus/Buff . . . . . . . . . . . . . . . . . . . . . . . . . . . . . . . . . . . . . . .C1270 11
Medium Talus/Buff . . . . . . . . . . . . . . . . . . . . . . . . . . . . . . . . .C1271 11
Products
If you desire additional products, refer to the list below for the Woodland Scenics® products that were used to construct the River Pass Scenery Kit .
For more information about the complete line of Woodland Scenics® products, go to your favorite hobby shop, call573-346-5555 or visit our Web site at www .woodlandscenics .com .

Woodland Scenics • PO Box 98 • Linn Creek, MO 65052 • www.woodlandscenics.com • Y9 • ©2002 OCO