Embed Size (px)
Citation preview

nrsc/ISRO RUSA Tutorial for State and Central Level Moderators v1.0
Page 1
06-May-2016
Introduction:
There are two levels in verifying the Field Data uploaded. First, the Field data collected are
verified by a state level moderator and then by a central level moderator.
Moderators of both the levels are entitled to verify the genuineness of the data before taking it to
the next level. Uploaded Field data will be publicized only when it is approved by moderators of both
levels. The Field information rejected by any of the moderators are treated as rejected and will not
be publicized.
The Field information accepted by a state level moderator will be received by central level
moderator for verification. The Field information approved by a central level moderator will be
available for public domain. The privilege of publicizing data has been given only to the central level
moderators.
Flow of Field Information from the Initial capture to the Public view:
1. 2 Level moderation is adopted (State level and Central level)
2. Points are classified into ‘Level-1 Accepted, Level-2 Accepted, Rejected, Yet to be
moderated)
3. Authorized users after login (before enabling moderation) can visualize all the Points
classified in to above mentioned 4 categories.
4. After Enabling moderation, State level user can visualize their State specific Field info:
1. Yet to be moderated points with options to Accept/Reject/Edit, these point are marked
in ‘Brown’ colour
2. After acceptance of any point it will be ‘Level-1 Accepted’ point marked in ‘Green’
colour, these can be visualized by checking ‘Accepted’ option.
3. After rejection of any point it will be ‘Rejected’ point marked in ‘Red’ colour, these can
be visualized by checking ‘Rejected’ option.
5. After Enabling moderation, Central level user can visualize all the Field info:
1. ‘Level-1 Accepted’ point will be made available for moderation, in this case of Second
level of moderation only these points will be considered for moderation marked in
‘Green’.
2. After acceptance of any point it will be ‘Level-2 Accepted’ point marked in ‘Blue’ colour,
these can be visualized by checking ‘Accepted’ option. These points will only be available
for Public view.
3. After rejection of any point it will be ‘Rejected’ point marked in ‘Red’ colour, these can
be visualized by checking ‘Rejected’ option.
nrsc/ISRO RUSA Tutorial for State and Central Level Moderators v1.0
Page 2
06-May-2016
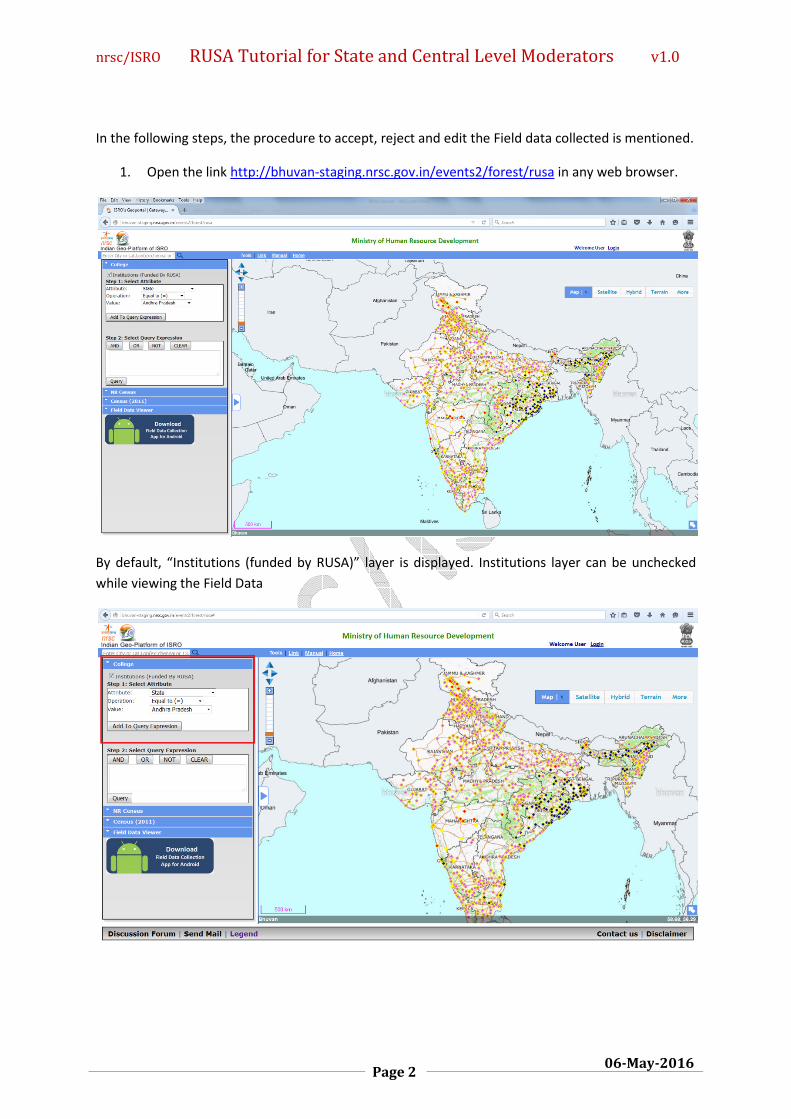
In the following steps, the procedure to accept, reject and edit the Field data collected is mentioned.
1. Open the link http://bhuvan-staging.nrsc.gov.in/events2/forest/rusa in any web browser.
By default, “Institutions (funded by RUSA)” layer is displayed. Institutions layer can be unchecked
while viewing the Field Data
nrsc/ISRO RUSA Tutorial for State and Central Level Moderators v1.0
Page 3
06-May-2016
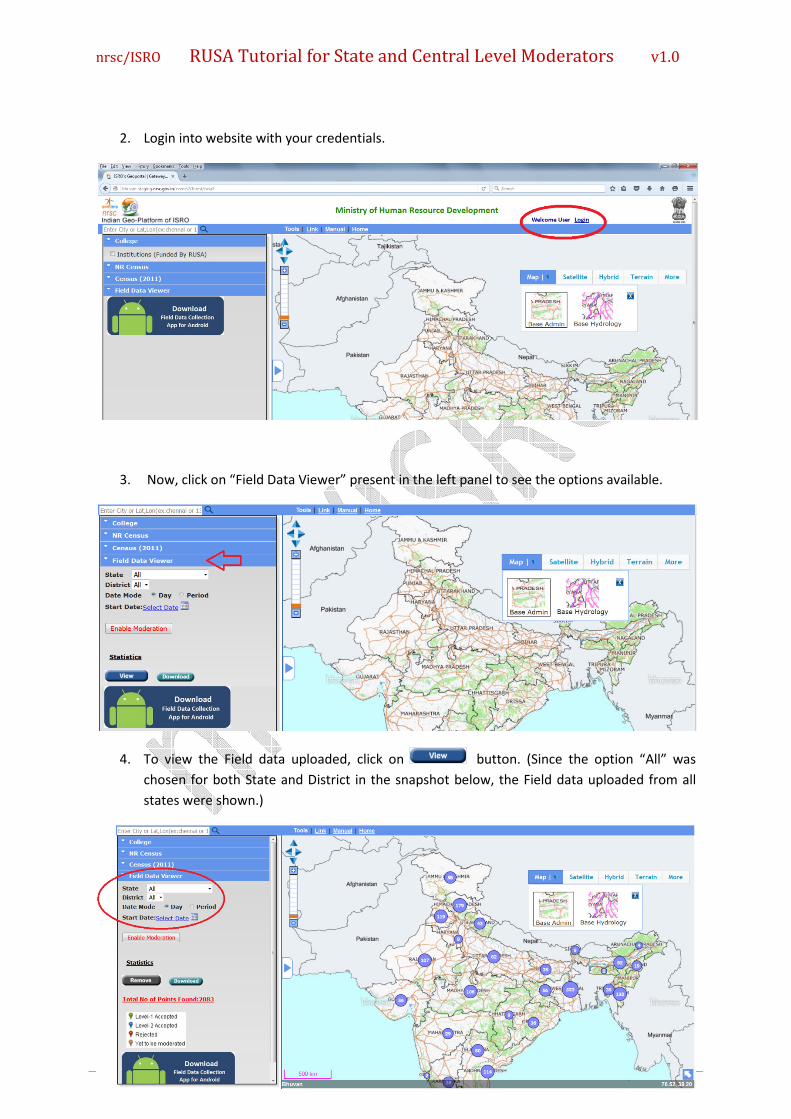
2. Login into website with your credentials.
3. Now, click on “Field Data Viewer” present in the left panel to see the options available.
4. To view the Field data uploaded, click on button. (Since the option “All” was
chosen for both State and District in the snapshot below, the Field data uploaded from all
states were shown.)
nrsc/ISRO RUSA Tutorial for State and Central Level Moderators v1.0
Page 4
06-May-2016
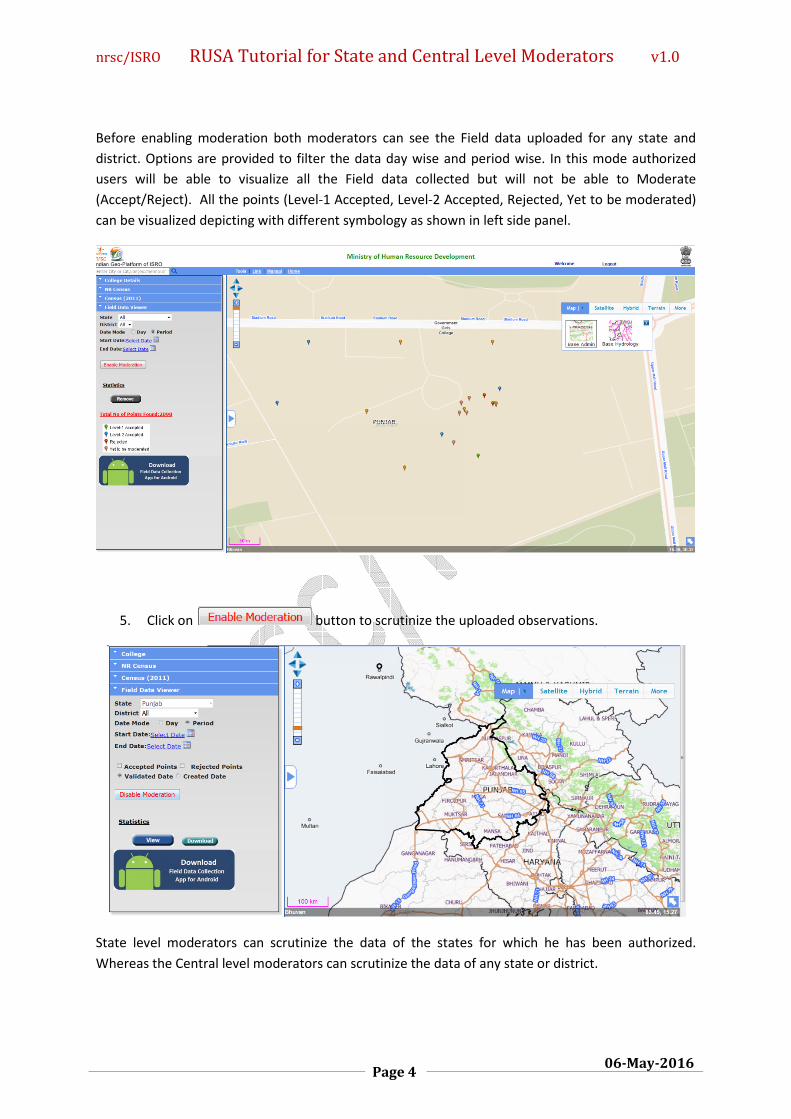
Before enabling moderation both moderators can see the Field data uploaded for any state and
district. Options are provided to filter the data day wise and period wise. In this mode authorized
users will be able to visualize all the Field data collected but will not be able to Moderate
(Accept/Reject). All the points (Level-1 Accepted, Level-2 Accepted, Rejected, Yet to be moderated)
can be visualized depicting with different symbology as shown in left side panel.
5. Click on button to scrutinize the uploaded observations.
State level moderators can scrutinize the data of the states for which he has been authorized.
Whereas the Central level moderators can scrutinize the data of any state or district.
nrsc/ISRO RUSA Tutorial for State and Central Level Moderators v1.0
Page 5
06-May-2016
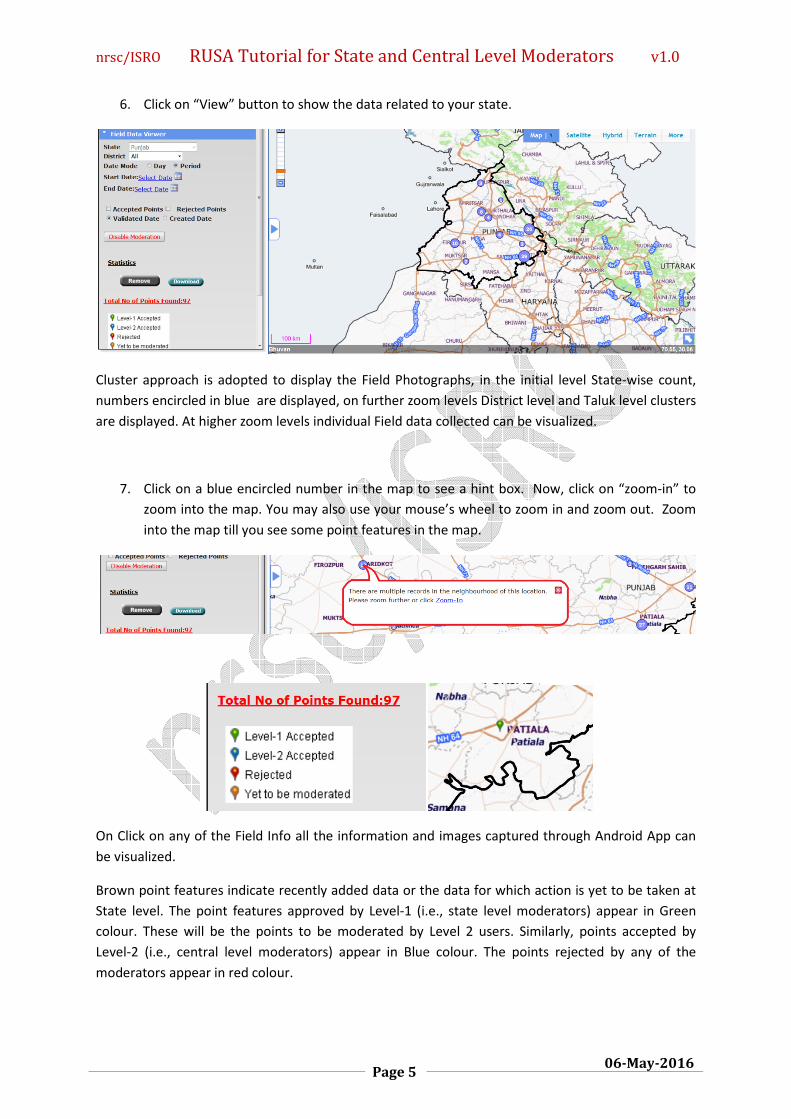
6. Click on “View” button to show the data related to your state.
Cluster approach is adopted to display the Field Photographs, in the initial level State-wise count,
numbers encircled in blue are displayed, on further zoom levels District level and Taluk level clusters
are displayed. At higher zoom levels individual Field data collected can be visualized.
7. Click on a blue encircled number in the map to see a hint box. Now, click on “zoom-in” to
zoom into the map. You may also use your mouse’s wheel to zoom in and zoom out. Zoom
into the map till you see some point features in the map.
On Click on any of the Field Info all the information and images captured through Android App can
be visualized.
Brown point features indicate recently added data or the data for which action is yet to be taken at
State level. The point features approved by Level-1 (i.e., state level moderators) appear in Green
colour. These will be the points to be moderated by Level 2 users. Similarly, points accepted by
Level-2 (i.e., central level moderators) appear in Blue colour. The points rejected by any of the
moderators appear in red colour.

nrsc/ISRO RUSA Tutorial for State and Central Level Moderators v1.0
Page 6
06-May-2016
8. To see all the accepted points:
Check the “Accepted Points” check box, and click on “View” button.
Similarly, check the “Rejected Points” checkbox to see the points which have been rejected.
9. To see yet to be moderated points and scrutinize:
Uncheck both the check boxes (i.e., Accepted Points and Rejected Points) and click on “view” button.
Yet to be moderated points are the points which need scrutiny.
nrsc/ISRO RUSA Tutorial for State and Central Level Moderators v1.0
Page 7
06-May-2016
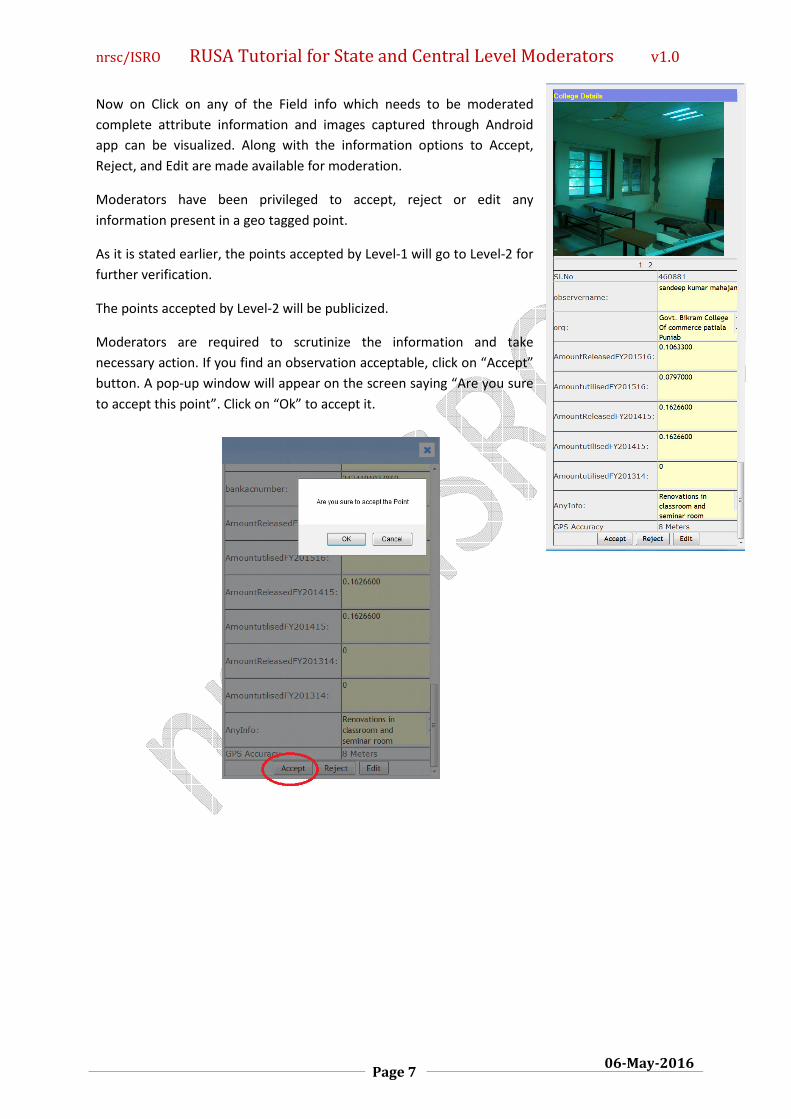
Now on Click on any of the Field info which needs to be moderated
complete attribute information and images captured through Android
app can be visualized. Along with the information options to Accept,
Reject, and Edit are made available for moderation.
Moderators have been privileged to accept, reject or edit any
information present in a geo tagged point.
As it is stated earlier, the points accepted by Level-1 will go to Level-2 for
further verification.
The points accepted by Level-2 will be publicized.
Moderators are required to scrutinize the information and take
necessary action. If you find an observation acceptable, click on “Accept”
button. A pop-up window will appear on the screen saying “Are you sure
to accept this point”. Click on “Ok” to accept it.

nrsc/ISRO RUSA Tutorial for State and Central Level Moderators v1.0
Page 8
06-May-2016
You may reject observations if you find them unsatisfactory. To reject observations, click on
“Reject”. Here, you will be asked to write the reason for rejecting the observation. After writing the
reason, click on “Reject” button. The status message that “Rejected Successfully” is acknowledged
on success.
Moderators are permitted to edit any observation if
information entered in it is inappropriate. The form
fields are activated on click on “Edit” button. After
editing them, click on “Save” button to save the edits.
nrsc/ISRO RUSA Tutorial for State and Central Level Moderators v1.0
Page 9
06-May-2016
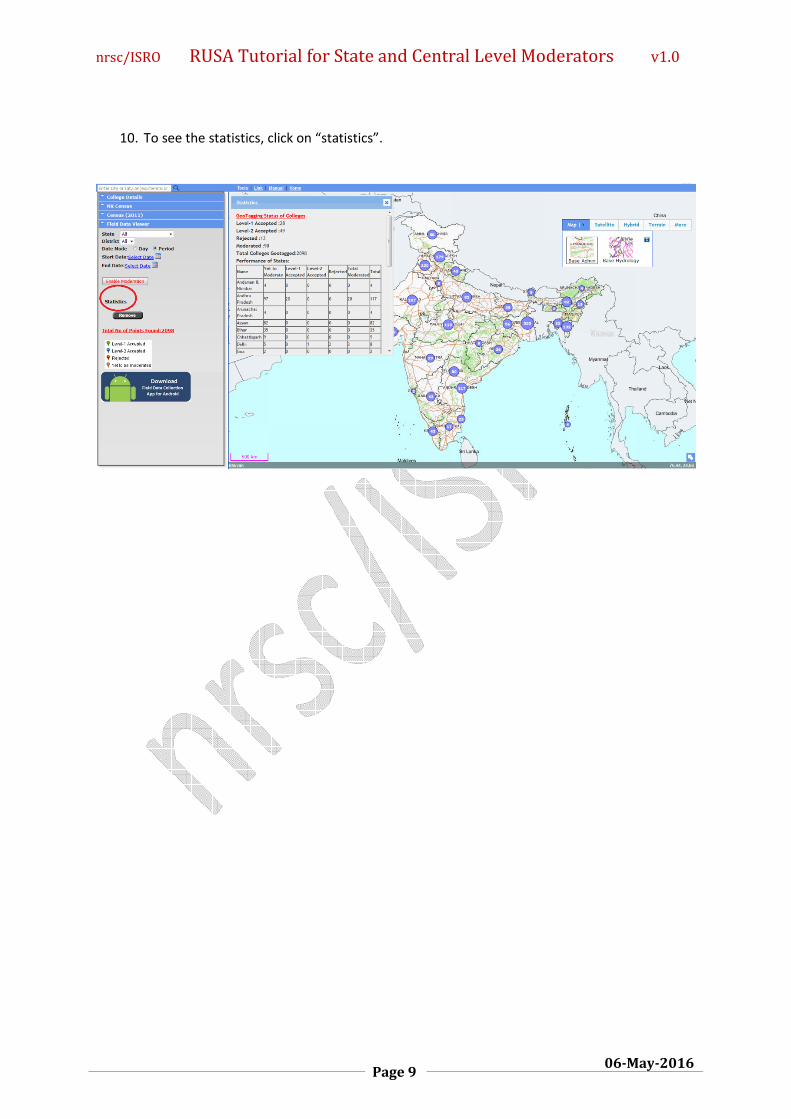
10. To see the statistics, click on “statistics”.