Embed Size (px)
Citation preview

Digital Wireless Headphone SystemRS 195
Instruction Manual

RS 195 | 1
Contents
Contents
Important safety information .......................................................................... 2
The RS 195 digital wireless headphone system ........................................... 5
Package includes ................................................................................................. 6
Product overview ................................................................................................ 7
Overview of the HDR 195 headphones ..................................................... 7
Overview of the TR 195 transmitter .......................................................... 8
Overview of LED indicators .......................................................................... 9
Putting the RS 195 into operation ................................................................ 12
Setting up the transmitter ......................................................................... 12
Connecting the transmitter to an audio source .................................... 13
Connecting the transmitter to an AC wall outlet .................................. 17
Inserting or replacing the rechargeable batteries ................................ 18
Charging the rechargeable batteries ....................................................... 19
Adjusting the headband ............................................................................ 20
Using your RS 195 headphone system ........................................................ 21
Switching your wireless headphone system on .................................... 21
Selecting an audio input ............................................................................. 22
Adjusting the volume ................................................................................. 22
Muting/unmuting the headphones ......................................................... 22
Adjusting the balance ................................................................................. 23
Activating/deactivating “personal hearing” ......................................... 24
“Personal hearing” – Selecting a hearing profile for hearing
enhancement ................................................................................................ 25
“Personal hearing” – Selecting additional sound
optimization options for speech or music listening ............................. 26
Pairing headphones to the transmitter .................................................. 27
Switching your wireless headphones off ................................................ 28
Cleaning and maintaining the RS 195 .......................................................... 29
Replacing the ear pads ............................................................................... 29
Troubleshooting ................................................................................................ 30
Sound problems ........................................................................................... 30
Other problems ............................................................................................ 31
Leaving the range of the transmitter ...................................................... 32
Clearing the pair settings on the headphones ....................................... 32
Specifications ..................................................................................................... 33
Manufacturer declarations .............................................................................. 34

Important safety information
2 | RS 195
Important safety information
� Read this instruction manual carefully and completely before using the
product.
� Always include this safety guide when passing the product on to third
parties.
� Do not use an obviously defective product.
Preventing damage to health and accidents
� Protect your hearing from high volume levels. Permanent
hearing damage may occur when headphones are used at
high volume levels for long periods of time. Sennheiser
headphones sound exceptionally good at low and medium
volume levels.
� Note that these headphones allow you to adjust a higher volume than
conventional headphones. This can cause hearing damage in persons
with healthy hearing and especially in children.
� Do not use the product in situations which require special attention
(e.g. in traffic or when performing skilled jobs).
� Keep the headphones at least 10 cm/3.94” from cardiac pacemakers or
implanted defibrillators. The headphones contain magnets that gener-
ate a magnetic field which could cause interference with cardiac pace-
makers and implanted defibrillators.
� Do not use the product near water and do not expose it to rain or mois-
ture to reduce the risk of fire or electric shock.
� Keep the product, accessories and packaging parts out of reach of chil-
dren and pets to prevent accidents and choking hazards.
� Use only power supply units provided by Sennheiser.
Preventing damage to the product and malfunctions
� Always keep the product dry and do not expose it to extreme tempera-
tures to avoid corrosion or deformation. The normal operating tem-
perature is from 0 to 40°C/32 to 104°F.
� Use the product with care and store it in a clean, dust-free environ-
ment.
� Do not use the product if it is obviously defective, if it has been dropped
or if liquids or objects have gotten inside the product. In this case, con-
tact a qualified specialist workshop or your Sennheiser service partner
to have the product checked.
� Switch the headphones off after use to conserve battery power.
Remove the batteries if the product will not be used for extended peri-
ods of time.
� Unplug the power supply unit from the AC wall outlet
– to completely disconnect the product from the power source,
– during lightning storms, or
– when unused for long periods of time.
� Ensure that the power supply unit is
– in a safe operating condition and easily accessible,
– properly plugged into the AC wall outlet,
– operated only within the permissible temperature range,
– not exposed to direct sunlight for longer periods of time in order to
prevent heat accumulation.

Important safety information
RS 195 | 3
� Do not place your headphones on a glass dummy head, chair armrest or
similar objects for long periods as this can widen the headband and
reduce the contact pressure of the headphones.
� Varnish or furniture polish may degrade the feet of the transmitter,
which could stain your furniture. You should therefore place the trans-
mitter on a non-slip pad to avoid potential staining of furniture.
� Do not operate the product near heat sources.
� Clean the product only with a soft, dry cloth.
� Use only attachments/accessories/spare parts supplied or recom-
mended by Sennheiser.
Intended use/Liability
This wireless headphone system is suitable for use with hi-fi systems, TV
sets, and home cinema systems and supports both analog and digital sig-
nals simultaneously.
This product is intended for private domestic use only. It is not suitable for
commercial use. This product is also not intended to be used with portable
audio devices.
It is considered improper use when this product is used for any application
not named in this instruction manual and the associated product guides.
Sennheiser does not accept liability for damage arising from abuse or mis-
use of this product and its attachments/accessories.

Important safety information
4 | RS 195
Safety instructions for standard/rechargeable batteries
WARNING
In extreme cases, the standard/rechargeable batteries may leak and may
cause the following hazards if abused or misused:
• explosion
• fire
• heat
• smoke/gas
Keep away from
children.
Do not heat above 70°C/158°F,
e.g. do not expose to sunlight
or throw into a fire.
Do not expose to
moisture.
When not using rechargeable
batteries for extended periods
of time, charge them regularly
(about every 3 months).
Do not mutilate or
dismantle.
When not using the product
for extended periods of time,
remove the standard/
rechargeable batteries.
Observe correct polarity. Use only rechargeable batteries
and chargers recommended by
Sennheiser.
Pack/store standard/
charged rechargeable
batteries so that the
terminals cannot
contact each other –
danger of shorting out/
fire hazard.
Do not continue using defective
standard/rechargeable
batteries and dispose of them
immediately
Switch battery-powered
products off after use.
Immediately remove standard/
rechargeable batteries from an
obviously defective product.
Charge rechargeable
batteries at ambient
temperatures between
10 and 40°C/50 and
104°F.
Dispose of standard/
rechargeable batteries at
special collection points or
return them to your specialist
dealer.
Do not charge standard
batteries.
Do not mix standard and
rechargeable batteries in the
battery compartments.
LR03
HR03

The RS 195 digital wireless headphone system
RS 195 | 5
The RS 195 digital wireless headphone system
The RS 195 is your personal hearing and ultimate audio companion, pro-
viding you with all of the unparalleled sound quality, ease of use and wear-
ing comfort that you expect from a Sennheiser product.
Whether you are watching television or listening to music, the RS 195
ensures that you won’t miss a thing: Highly innovative digital wireless
technology guarantees crystal clear signal transmission with low latency
even while you move from room to room, and the various listening modes
allow you to adapt the sound according to your individual needs and pref-
erences. With the RS 195 you’ll be able to hear the subtle nuances of dia-
logues and the slight details of your favorite music like never before.
And although these headphones deliver state-of-the-art performance,
their user-friendly design keeps things simple. The convenient controls
make it easy to take advantage of the host of features, and the ergonomic
design provides a comfortable fit, even after hours of listening.
Sennheiser’s RS 195: Personal and adaptable to your listening needs!
Features
• Closed, circumaural headphones with excellent digital wireless audio
transmission
• Exceptional digital audio clarity and transmission range of up to
100 m/328 ft (line of sight)
• Selectable hearing boost presets and an additional noise suppression
mode for clearer dialogues and superior speech intelligibility
• Or choose the music listening mode which reproduces music with an
increased dynamic range to preserve the sound image in the best pos-
sible way
• Supports analog and digital audio inputs and allows toggling between
the inputs
• Multi-purpose transmitter – also functions as “easy-charge“ cradle and
docking station
• Balance control for right/left volume adjustment
• Ergonomic design for enhanced wearing comfort
• 2-year warranty
DigitalAnalog

Package includes
6 | RS 195
Package includes
HDR 195 headphones
TR 195 transmitter
Power supply unit with multi-country adapters
(EU, UK, US, AU)
Low self-discharge NiMH rechargeable batteries, AAA size
Optical digital cable, 1.5 m
Stereo audio cable with 3.5 mm jack plugs, 2 m
Quick guide in 19 languages
Brief instruction manual in German, English and French
Safety guide in 19 languages
US
EU
UK AU
Quick Guide
Brief InstructionManual
Safety Guide
Safety Guide

Product overview
RS 195 | 7
Product overview
Overview of the HDR 195 headphones
1 Headband
2 Charging contacts
3 Ear pads
4 Ear cups/Battery compartments
5 Volume + button
6 Volume – button
7 MODE button
for personal hearing
8 HDR status LED
9 HDR power button
1
3
2
46 5
7
9
8

Product overview
8 | RS 195
Overview of the TR 195 transmitter
7
1
2
3
5
4
0
9
8
A
6
1 TR status LED
2 BAL control
for adjusting the balance
3 A-G rotary switch
for selecting the hearing profile
4 LEDs for personal hearing,
indicating the selected sound
optimization
5 MODE button
for personal hearing
6 Charge status LED
7 Charging contacts
8 DIGITAL OPTICAL IN Digital
optical audio input
9 AUDIO INPUT SELECTION switch,
for digital or analog audio input
selection
0 ANALOG 3.5 mm IN analog
audio input (3.5 mm jack)
A DC 9V 0.3A socket
for the power supply unit

Product overview
RS 195 | 9
Overview of LED indicators
The LED indicators on the headphones and on the transmitter indicate the
current operating state. If you are not using the headphones, the LED indi-
cators automatically dim after approx. 30 seconds to not disturb you.
LED indicators on the headphones
HDR status LED Meaning
The headphones are switched off.
The transmitter and headphones are
connected.
The transmitter and headphones are
connected and the rechargeable
batteries are almost empty.
The headphones are disconnected from
or cannot connect to the transmitter.
The headphones are disconnected from
or cannot connect to the transmitter and
the rechargeable batteries are almost
empty.
1s1s
1s1s

Product overview
10 | RS 195
LED indicators on the transmitter
After taking the headphones from the holder of the transmitter, the charge
status LED indicates the approximate operating time of the headphones:
1
2
3
1 Charge status LED Meaning
The transmitter is not charging.
The rechargeable batteries are being
charged.
The rechargeable batteries are fully charged.
A charging/battery fault has been detected.
Charge status LED Operating time Battery capacity
up to 4 hours 0-25%
approx. 4 to 9 hours 25-50%
approx. 9 to 14 hours 50-75%
approx. 14 to 18 hours 75-100%
2 Personal hearing LED Meaning
One of the hearing profiles A-G for hearing
enhancement is selected.
In addition to the selected hearing profile,
speech intelligibility is improved as annoying
noise is reduced.
The selected hearing profile reproduces music
with an increased dynamic to preserve the
sound image in the best possible way.
Product overview
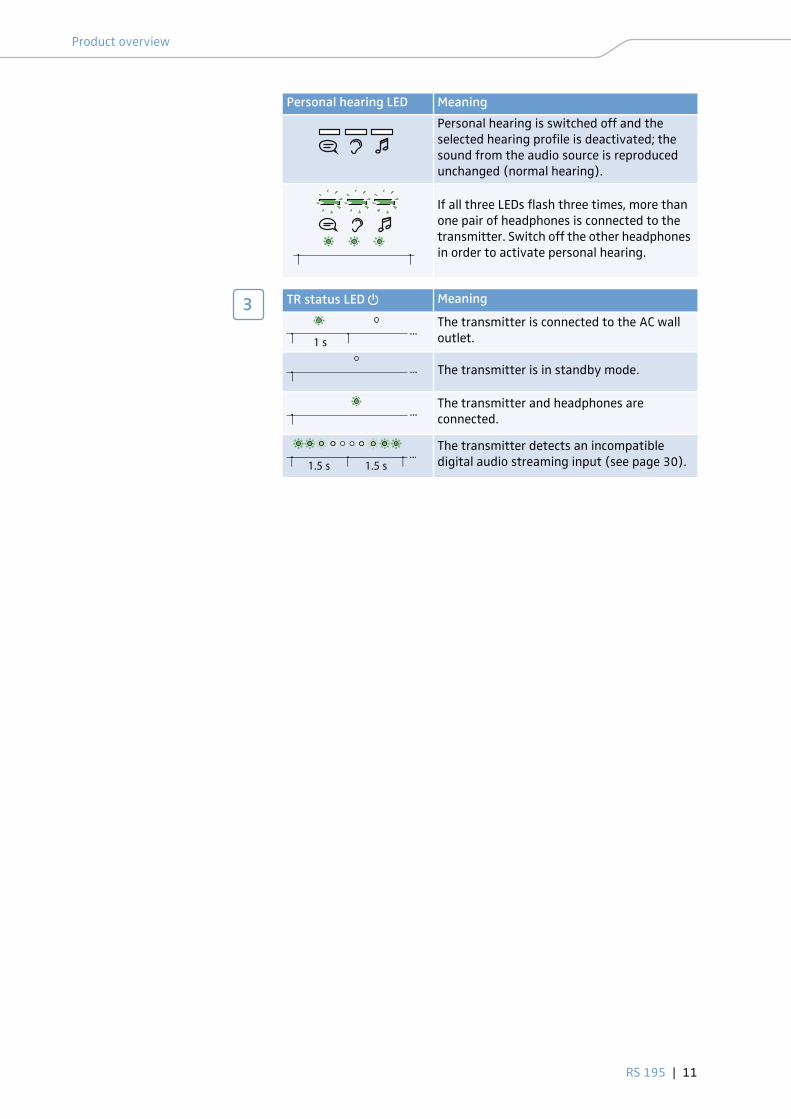
RS 195 | 11
Personal hearing is switched off and the
selected hearing profile is deactivated; the
sound from the audio source is reproduced
unchanged (normal hearing).
If all three LEDs flash three times, more than
one pair of headphones is connected to the
transmitter. Switch off the other headphones
in order to activate personal hearing.
Personal hearing LED Meaning
3 TR status LED Meaning
The transmitter is connected to the AC wall
outlet.
The transmitter is in standby mode.
The transmitter and headphones are
connected.
The transmitter detects an incompatible
digital audio streaming input (see page 30).
1 s
1.5 s1.5 s

Putting the RS 195 into operation
12 | RS 195
Putting the RS 195 into operation
Setting up the transmitter
� Choose a suitable place near your audio source.
� Separate the transmitter from other wireless devices in the room by at
least 50 cm/20” to avoid interference.
� Do not place the transmitter close to metal objects such as shelf bars,
reinforced concrete walls, etc. as this can decrease the transmission
range of the transmitter.
MODE
RL

Putting the RS 195 into operation
RS 195 | 13
Connecting the transmitter to an audio source
You can simultaneously connect 2 different audio sources (e.g. a TV and a
stereo hi-fi system) to the transmitter. The transmitter features a digital
as well as an analog audio input. If you connect 2 audio sources, you can
toggle between them using the AUDIO INPUT SELECTION switch (see
page 22).
� Switch your audio source off before connecting the transmitter.
� Check the connection options available for your audio source (audio
output, usually marked “OUT”).
� Select the corresponding connection cable and, if necessary, a suitable
adapter.
� Depending on the connection option selected, go to the respective
chapter and follow the instructions on how to connect the transmitter
to an audio source.
You can also refer to the beginner’s video guides on how to connect
your digital wireless headphone system to a TV at
www.sennheiser.com/how-to-videos.
Connection options available
for your audio sourceConnection cable Page
Optical (digital) Optical digital cable 14
3.5 mm or 6.3 mm/ ¼“
jack socket (analog)
Stereo audio cable;
in case of a 6.3 mm/ ¼“ jack
socket: with adapter 3.5 mm jack
socket to 6.3 mm/ ¼“ jack plug
(to be ordered separately)
15
RCA (analog)
Stereo audio cable with adapter
3.5 mm jack socket to 2 RCA plugs
(to be ordered separately)
16
You can purchase accessories and adapters from your local
Sennheiser partner.
A
B
C

Putting the RS 195 into operation
14 | RS 195
Connection option A: Optical (digital)
To achieve the best possible listening experience, we recommend that you
connect your RS 195 headphone system to your home cinema or hi-fi sys-
tem using the supplied optical digital cable.
Your wireless headphone system allows digital audio streaming using only
PCM audio output from devices connected through the optical digital input
DIGITAL OPTICAL IN. Refer to the sound menu or the instruction manual of
your device to change from another audio stream (e.g. Bitstream) to PCM.
� Switch your audio source off before connecting the transmitter.
� Pull off the clear protective caps from both plugs before connecting the
cable.
� Connect one end of the optical digital cable to the DIGITAL OPTICAL IN
input of the transmitter and the other end to the optical output of your
audio source.
A
Digital sound output PCM Bitstream
Sound menu*
*Sound menu may vary
Digital
OPTICAL OUT
OFF
Digital

Putting the RS 195 into operation
RS 195 | 15
Connection option B: 3.5 mm or 6.3 mm/¼“ jack socket (analog)
Some TV models mute the loudspeakers when you connect the transmitter
to the headphone socket. Check in the menu of your TV to see if the muting
function can be deactivated. Alternatively, connect the TV and the trans-
mitter using a different option (A or C).
� Switch your audio source off before connecting the transmitter.
� If necessary, connect the adapter 6.3 mm/¼“ jack plug onto the stereo
audio cable.
� Connect the stereo audio cable to the 3.5 mm jack socket of the trans-
mitter and to the headphone socket of your audio source.
B
Adjust the volume of the headphone socket on your audio source to
at least about the medium level.
*
PHONES
OFF
* Adapter not included
Analog
VOLUME
Putting the RS 195 into operation
16 | RS 195
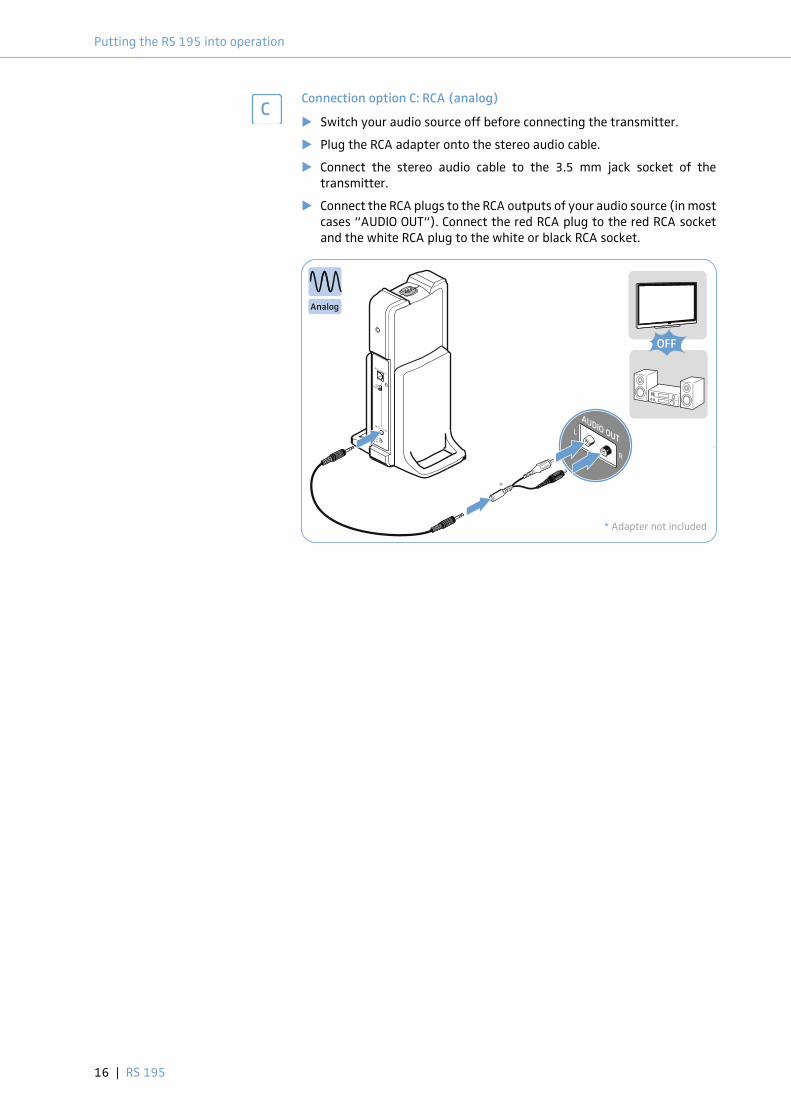
Connection option C: RCA (analog)
� Switch your audio source off before connecting the transmitter.
� Plug the RCA adapter onto the stereo audio cable.
� Connect the stereo audio cable to the 3.5 mm jack socket of the
transmitter.
� Connect the RCA plugs to the RCA outputs of your audio source (in most
cases “AUDIO OUT“). Connect the red RCA plug to the red RCA socket
and the white RCA plug to the white or black RCA socket.
C
AUDIO OUT
R
L
OFF
*
* Adapter not included
Analog

Putting the RS 195 into operation
RS 195 | 17
Connecting the transmitter to an AC wall outlet
1 Select a suitable country adapter and slide it onto the power supply
unit until it locks firmly in place.
2 Connect the power supply unit connector to the power input socket of
the transmitter.
3 Plug the power supply unit into an AC wall outlet.
The TR status LED lights up for a second. The transmitter is in
standby mode.
1
US
EU
UK
AU
3
2
STANDBY

Putting the RS 195 into operation
18 | RS 195
Inserting or replacing the rechargeable batteries
1 Lightly twist the ear pads counterclockwise until you overcome a slight
resistance.
2 Lift the ear pads off the ear cups to reveal the battery compartments.
3 Insert the rechargeable batteries into the compartments. To replace the
batteries, pull the batteries out of the compartments and insert the
new ones. Be sure to observe correct polarity when inserting the bat-
teries. Dispose of old batteries as special waste or return them to your
specialist dealer.
4 Hook the ear pads onto the ear cups. As you put back the ear pads,
observe the L (left) and R (right) markings on the rear of the ear pads.
5 Twist the ear pads clockwise until you hear a click sound. Ensure that
they are locked firmly onto the ear cups.
You can also power the headphones using standard batteries (AAA
size, 1.5 V). Note however, that standard batteries are not recharge-
able, and if you are using non-rechargeable batteries, you must not
place the headphones on the headphones holder.
1 2
3 4 5
NEW

Putting the RS 195 into operation
RS 195 | 19
Charging the rechargeable batteries
In general, a complete charging cycle takes about 8.5 hours. However,
before using the headphones for the first time, charge the rechargeable
batteries for at least 16 hours without interruption to optimize the perfor-
mance of the batteries.
When the rechargeable batteries are almost empty, the HDR status LED
turns red and you hear beeps in the headphones. The headphones switch
off after a few minutes.
� Place the headphones on the headphones holder of the transmitter.
You may place the headphones on either side provided that the
charging contacts of the headphones and the transmitter connect.
The headphones automatically switch off and the Charge status LED
on the transmitter lights up red. When the rechargeable batteries are
fully charged, the Charge status LED turns green.
CAUTION Danger of damage to the headphones!
If you insert non-rechargeable batteries into the battery
compartments, the batteries may leak during charging and
can damage your headphones.
� Do not place the headphones on the headphones holder if
you are using non-rechargeable batteries.
8.5h
When not in use, place the headphones on the headphones holder to
ensure that batteries are fully charged when needed. The transmit-
ter utilizes an intelligent battery charging technology that prevents
overcharging.
After taking the headphones from the holder of the transmitter, the
charge status LED indicates the approximate operating time of the
headphones (see page 10).
100%
HDR 195

Putting the RS 195 into operation
20 | RS 195
Adjusting the headband
For good sound quality and best possible wearing comfort, the headband
has to be adjusted to properly fit your head. The headphones feature an
adjustable headband with a snap-in locking mechanism for easy adjust-
ment.
� Wear the headphones so that the headband runs over the top of your
head. Observe the L (left) and R (right) markings on the outer head-
band when putting the headphones on.
� Adjust the length of the headband until
– your ears are comfortably covered by the ear pads,
– you feel even, gentle pressure around your ears,
– a snug fit of the headband on the head is ensured.
MODE
R
R

Using your RS 195 headphone system
RS 195 | 21
Using your RS 195 headphone system
Switching your wireless headphone system on
1 Switch your audio source on.
If you are using the headphone socket (see page 15) to connect to your
audio source, adjust the volume of the headphone socket on your audio
source (e.g. TV) to at least the medium level.
2 Push the AUDIO INPUT SELECTION switch up or down to select your
audio source (see page 22).
The status LED on the transmitter lights up green.
3 Press and hold the HDR power button for approx. 2 seconds to switch
the headphones on.
The transmitter in standby mode recognizes the active paired head-
phones and automatically transmits a signal. The status LEDs on the
transmitter and the headphones light up green.
WARNING
Danger due to high volume levels!
Listening at high volume levels can lead to permanent hearing
defects.
� Before putting the headphones on and before toggling between
your audio inputs, adjust the volume on the headphones to a
low level. Toggling between different inputs may cause an enor-
mous volume jumps that can damage your hearing.
� Do not expose yourself to high volume levels for long periods of
time.
VOLUME
If the headphones are brought outside the transmission range or if
there is no audio signal received from the transmitter for more than
5 minutes, the headphones switch off automatically.
2s
ONON
3
21
Digital
Analog
AUTO-ON

Using your RS 195 headphone system
22 | RS 195
Selecting an audio input
If both analog and digital audio inputs are connected to different audio
sources, the headphone system enables you to toggle between the two
inputs.
� Push the AUDIO INPUT SELECTION switch up to listen to an audio source
connected to the digital optical input (see page 14).
� Push the AUDIO INPUT SELECTION switch down to listen to an audio
source connected to the analog input (see page 15 and 16).
Adjusting the volume
� Press the Volume + button or the Volume – button repeatedly until the
volume is adjusted to the desired level. When the minimum or maxi-
mum volume setting is reached, you hear a beep in the headphones.
Muting/unmuting the headphones
� Press the HDR power button to mute the headphones.
� Press the HDR power button or any of the volume +/– buttons to
cancel the muting.
Digital
Analog
Vol Vol
If the headphones are muted for 15 minutes, the headphones
switch off automatically to save energy.
Using your RS 195 headphone system
RS 195 | 23
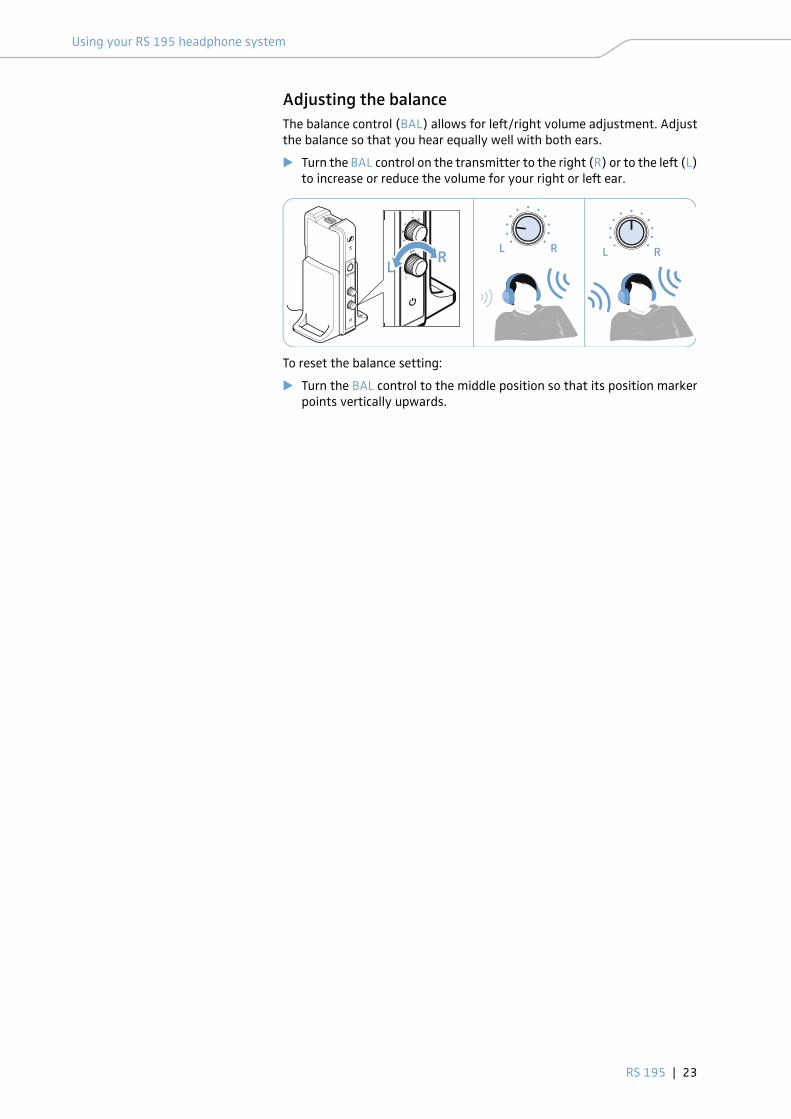
Adjusting the balance
The balance control (BAL) allows for left/right volume adjustment. Adjust
the balance so that you hear equally well with both ears.
� Turn the BAL control on the transmitter to the right (R) or to the left (L)
to increase or reduce the volume for your right or left ear.
To reset the balance setting:
� Turn the BAL control to the middle position so that its position marker
points vertically upwards.
RL
L R L R

Using your RS 195 headphone system
24 | RS 195
Activating/deactivating “personal hearing”
You can use your RS 195 in two different ways:
• as a hearing-enhancing headphone system (“personal hearing”)
• as a conventional headphone system (“normal hearing”)
With “personal hearing” activated, you can use the headphone system to
enhance your hearing. Different hearing profiles and additional sound
optimization options offer you a tailored hearing experience – perfectly
matching your personal preferences and hearing ability and allowing you
to not only improve speech intelligibility but also to enhance music
enjoyment.
To activate/deactivate “personal hearing”:
� Press the MODE button on the transmitter or on the headphones for
2 seconds.
2. Additional sound optimization
Normal hearingPersonal hearing
– hearing profile A-G
– for speech– for music
1. Personal hearing profile Conventional headphone system
OR
Personal hearing Display Meaning
activated One of the hearing profiles A-G
for hearing enhancement is
selected (see next chapter).
It might also be that one
of the LEDs indicating sound
optimization for speech or
music listening lights up
(see page 26).
deactivated No LED lights up;
“normal hearing” is activated

Using your RS 195 headphone system
RS 195 | 25
“Personal hearing” – Selecting a hearing profile for hearing enhancement
To select the personal hearing profile that best suits you, proceed as
follows:
1 Switch on your audio source and select a
program where speech is foregrounded.
This will facilitate the accurate adjust-
ment of the hearing profile.
2 Use the BAL control to adjust the bal-
ance (see page 23). This ensures that
each subsequently selected hearing
profile is perfectly matched to your left/
right balance setting.
3 Press the MODE button on the transmit-
ter or on the headphones for 2 seconds
to activate “personal hearing” (see pre-
vious chapter).
4 Press the MODE button on the transmit-
ter or on the headphones repeatedly
until only the LED lights up.
5 Use the rotary switch to select a hearing
profile A-G and test which of the hear-
ing profiles gives you the best sound
quality and helps you to hear best.
Your personal hearing profile is
adjusted.
We recommend that you repeat the selection of your personal hear-
ing profile from time to time.
ONON
RL
OR
OR

Using your RS 195 headphone system
26 | RS 195
“Personal hearing” – Selecting additional soundoptimization options for speech or music listening
Besides the hearing profiles A-G, you can select additional sound optimiza-
tion options for speech or music listening.
� Press the MODE button on the transmitter or on the headphones
repeatedly until the additional sound optimization option is activated.
OR
Additional sound
optimizationDisplay Meaning
none
One of the hearing profiles A-G
for hearing enhancement is
selected.
for speech
reproduction
In addition to the selected
hearing profile, speech
intelligibility is improved as
annoying noise is reduced.
for music
reproduction
The dynamic range of the
hearing profile is increased to
preserve the sound image in the
best possible way.

Using your RS 195 headphone system
RS 195 | 27
Pairing headphones to the transmitter
The headphones and the transmitter enclosed in this package have been
paired from the factory. The following procedure is only necessary if you
have cleared all pair settings from your wireless headphone system and
you want to revive the lost pairing, or if you want to pair another set of
headphones to the transmitter.
You can connect up to 2 paired headphones simultaneously with your
TR 195 transmitter. If more than one pair of HDR 195 headphones are con-
nected to the transmitter, you cannot make use of the personal hearing
profiles in order to improve the listening situation. The hearing profiles can
only be used with one pair of HDR 195 headphones.
� Place the headphones on the headphones holder of the transmitter for
a second.
The Charge status LED on the transmitter lights up red. The head-
phones are paired to the transmitter.
1s

Using your RS 195 headphone system
28 | RS 195
Switching your wireless headphones off
There are two ways to switch your wireless headphones off:
� Press and hold the HDR power button for approx. 2 seconds.
The headphones switch off. If no other pair of active wireless head-
phones is connected to the transmitter, the transmitter switches to
standby mode. All LEDs are off.
� Place the headphones on the headphones holder of the transmitter.
The headphones switch off and the charging process starts (see page 19).
If no other pair of active wireless headphones is connected to the
transmitter, the transmitter switches to standby mode.
A
OFF AUTO-STANDBY
2s
HDR 191
HDR 191
B
To disconnect the transmitter from the power source, unplug the
power supply unit from the AC wall outlet.
HDR 195
AUTO-STANDBY
OFF

Cleaning and maintaining the RS 195
RS 195 | 29
Cleaning and maintaining the RS 195
To clean the wireless headphone system:
� Switch your wireless headphone system off and disconnect the trans-
mitter from the AC wall outlet before cleaning.
� Clean the product only with a soft, dry cloth.
Replacing the ear pads
For reasons of hygiene, you should replace the ear pads from time to time.
Spare ear pads are available at your local Sennheiser partner.
1 Lightly twist the ear pads counterclockwise until you overcome a slight
resistance.
2 Lift the ear pads off the ear cups and dispose of them properly.
3 Hook the new ear pads onto the ear cups. Observe the L (left) and
R (right) markings on the rear of the ear pads.
4 Twist the ear pads clockwise until you hear a click sound. Ensure that
they are lock firmly onto the ear cups.
CAUTION
Liquids can damage the electronics of the product!
Liquids entering the housing of the product can cause a short-circuit and
damage the electronics.
� Keep all liquids far away from the product.
� Do not use any cleansing agents or solvents.
You can have the headband padding replaced by the repair service.
Please contact your Sennheiser partner.
3 421

Troubleshooting
30 | RS 195
Troubleshooting
Sound problems
Problem Possible cause Possible solutions Page
No sound
Headphones are switched off. Switch the headphones on. 21
No power connection.Check the connection of the power supply
unit.17
Headphones are muted. Deactivate the muting function. 22
Audio plug is not properly
connected.Check the audio plug connection. 13
Audio source is switched off. Switch the audio source on. –
Volume of the analog audio source is
either set to the minimum or is on
mute.
Increase the volume on the audio source
to at least a medium level/Deactivate the
muting function from the audio source.
–
Audio cable is defective. Replace the audio cable. –
Headphones are not correctly paired
with the transmitter (e.g. additional
headphones).
Pair the headphones with the transmitter
again.27
Wrong audio input is selected. Select the other audio input. 22
Digital audio connection uses
incompatible data transmission
settings.
Set the digital audio output of your
device/audio source to “PCM”, with a
sampling rate of max. 96 kHz (see the
instruction manual of your audio source).
–
Sound dropouts/
no sound
Headphones are out of the
transmitter’s range.
Reduce the distance between headphones
and transmitter.–
Signal is shielded.Remove obstacles between the
transmitter and headphones.–
There are interfering devices (e.g.
WLAN routers, Bluetooth devices or
microwaves) in the vicinity.
Change the position of the transmitter or
of the headphones.12
Ensure that the transmitter is separated
from other wireless devices by at least
50 cm/20”.
–
Sound is too low
Headphone volume is adjusted too
low.Increase the volume on the headphones. 22
Volume of the analog audio source is
adjusted too low.
Increase the volume on the analog audio
source to at least a medium level.–
Hear echoes and TV
tone when using
headphones
Some TVs can adjust a delay or
latency of the audio signal for the
digital audio output.
Check the audio output settings of your
TV and set the latency to “0”.–
Sound only on one
ear
Balance is misadjusted. Adjust the balance. 23
Audio cable is not properly
connected.Check the plug connection. 13
Audio cable is defective. Replace the audio cable. –
Troubleshooting
RS 195 | 31
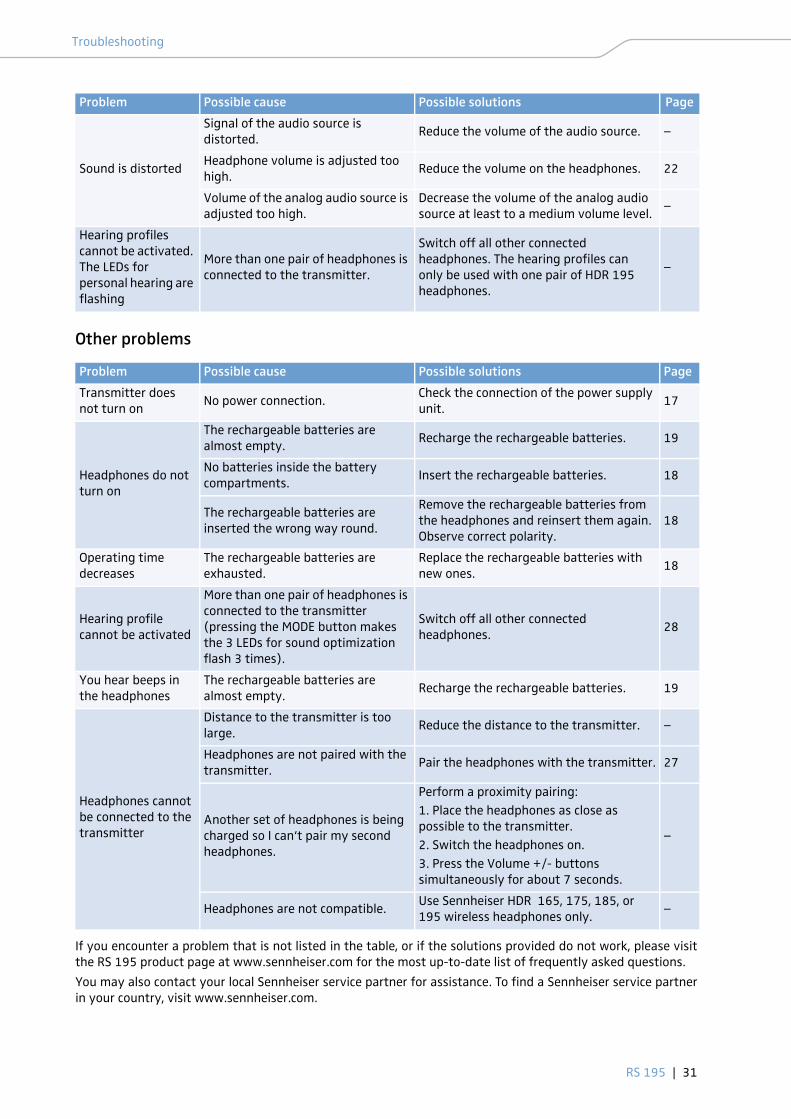
Other problems
If you encounter a problem that is not listed in the table, or if the solutions provided do not work, please visit
the RS 195 product page at www.sennheiser.com for the most up-to-date list of frequently asked questions.
You may also contact your local Sennheiser service partner for assistance. To find a Sennheiser service partner
in your country, visit www.sennheiser.com.
Sound is distorted
Signal of the audio source is
distorted.Reduce the volume of the audio source. –
Headphone volume is adjusted too
high.Reduce the volume on the headphones. 22
Volume of the analog audio source is
adjusted too high.
Decrease the volume of the analog audio
source at least to a medium volume level.–
Hearing profiles
cannot be activated.
The LEDs for
personal hearing are
flashing
More than one pair of headphones is
connected to the transmitter.
Switch off all other connected
headphones. The hearing profiles can
only be used with one pair of HDR 195
headphones.
–
Problem Possible cause Possible solutions Page
Problem Possible cause Possible solutions Page
Transmitter does
not turn onNo power connection.
Check the connection of the power supply
unit.17
Headphones do not
turn on
The rechargeable batteries are
almost empty.Recharge the rechargeable batteries. 19
No batteries inside the battery
compartments.Insert the rechargeable batteries. 18
The rechargeable batteries are
inserted the wrong way round.
Remove the rechargeable batteries from
the headphones and reinsert them again.
Observe correct polarity.
18
Operating time
decreases
The rechargeable batteries are
exhausted.
Replace the rechargeable batteries with
new ones.18
Hearing profile
cannot be activated
More than one pair of headphones is
connected to the transmitter
(pressing the MODE button makes
the 3 LEDs for sound optimization
flash 3 times).
Switch off all other connected
headphones.28
You hear beeps in
the headphones
The rechargeable batteries are
almost empty.Recharge the rechargeable batteries. 19
Headphones cannot
be connected to the
transmitter
Distance to the transmitter is too
large.Reduce the distance to the transmitter. –
Headphones are not paired with the
transmitter.Pair the headphones with the transmitter. 27
Another set of headphones is being
charged so I can‘t pair my second
headphones.
Perform a proximity pairing:
1. Place the headphones as close as
possible to the transmitter.
2. Switch the headphones on.
3. Press the Volume +/- buttons
simultaneously for about 7 seconds.
–
Headphones are not compatible.Use Sennheiser HDR 165, 175, 185, or
195 wireless headphones only.–

Troubleshooting
32 | RS 195
Leaving the range of the transmitter
The range of the transmitter largely depends on environmental conditions
such as wall thickness, wall composition etc. If the headphones leave the
range of the transmitter, the audio first cuts out occasionally until it finally
cuts out completely.
If you re-enter the transmission range within 5 minutes, the connection is
automatically re-established.
If you spend more than 5 minutes outside the transmission range, the
headphones switch off automatically.
Clearing the pair settings on the headphones
1 Press the Volume +/– buttons simultaneously and hold for 2 seconds.
The HDR status LED blinks red rapidly.
2 Press the HDR power button while continuously holding the
Volume +/– buttons. Release all the 3 buttons.
The HDR status LED lights up green or red, depending on the battery
condition, and starts blinking slowly. The pair settings on the head-
phones are cleared.
MODEMODEMODE
1 2
2s

Specifications
RS 195 | 33
Specifications
RS 195 headphone system
HDR 195 headphones
TR 195 transmitter
Sennheiser NT 9-3AW power supply unit
Carrier frequency 2.40 to 2.48 GHz
Modulation 8-FSK Digital
SNRAnalog input: typ. 85 dBA at 1 Vrms
Digital input: > 90 dBA
RF output power max. 10 dBm Class 1
Transmission range up to 100 m/328 ft line of sight
Max. number of
simultaneously connected
headphones
2
Temperature rangeOperation: 0°C to +40°C/32°F to 104°F
Storage: -25°C to +70°C/-13°F to 158°F
Relative humidityOperation: 10 to 80%, non condensing
Storage: 10 to 90%
Transducer principle circumaural, closed
Transducer system dynamic, neodymium magnets
Frequency response 17 Hz to 22 kHz
Max. SPL max. 117 dB at 1 kHz, 3% THD
THD < 0.5% at 1 kHz, 100 dB SPL
Operating time up to 18 hours
Charging time of
rechargeable batteries up to 8 hours 30 min
Power supply2 AAA size low self-discharge NiMH
rechargeable batteries, 1.2 V, 820 mAh
Weight (incl. batteries) approx. 340 g
Dimensions (W x H x D) approx. 17 cm x 20 cm x 9.5 cm
ConnectionsDigital: optical
Analog: 3.5 mm stereo jack socket
Power supply 9 V , 300 mA
Power consumption
Operation: typ. 4 W
Standby mode: ≤ 0.3 W (without
charging)
Dimensions (W x H x D) approx. 12.7 cm x 23.4 cm x 10.9 cm
Nominal input voltage 100–240 V~
Mains frequency 50–60 Hz
Nominal output voltage 9 V
Nominal output current 300 mA
Temperature rangeOperation: 0 °C to +40 °C
Storage: -40 °C to +85 °C
Relative humidityOperation: 0 to 90 %, non condensing
Storage: 0 bis 90 %

Manufacturer declarations
34 | RS 195
Manufacturer declarations
Warranty
Sennheiser electronic GmbH & Co. KG gives a warranty of 24 months on this
product.
For the current warranty conditions, please visit our website at
www.sennheiser.com or contact your Sennheiser partner.
FOR AUSTRALIA ONLY
Sennheiser goods come with guarantees that cannot be excluded under
the Australian Consumer Law. You are entitled to a replacement or refund
for a major failure and compensation for any other reasonably foreseeable
loss or damage. You are also entitled to have the goods repaired or
replaced if the goods fail to be of acceptable quality and the failure does
not amount to a major failure.
This warranty is in addition to other rights or remedies under law. Nothing
in this warranty excludes, limits or modifies any liability of Sennheiser
which is imposed by law, or limits or modifies any remedy available to the
consumer which is granted by law.
To make a claim under this warranty, contact Sennheiser Australia Pty Ltd,
Unit 3, 31 Gibbes Street Chatswood NSW 2067, Australia;
Phone: (02) 9910 6700, email: [email protected]
All expenses of claiming the warranty will be borne by the person making
the claim.
The Sennheiser International Warranty is provided by Sennheiser Australia
Pty Ltd (ABN 68 165 388 312), Unit 3, 31 Gibbes Street Chatswood NSW
2067, Australia.
In compliance with the following requirements
• WEEE Directive (2012/19/EU)
Please dispose of this product at the end of its operational life-
time by taking it to your local collection point or recycling center
for such equipment.
• Battery Directive (2013/56/EU)
The supplied standard/rechargeable batteries can be recycled.
Please dispose of them as special waste or return them to your
specialist dealer. In order to protect the environment, only dis-
pose of exhausted batteries.
CE Declaration of Conformity
• R&TTE Directive (1999/5/EC)
• EMC Directive (2014/30/EU)
• Low Voltage Directive (2014/35/EU)
• ErP Directive (2009/125/EC)
• RoHS Directive (2011/65/EU)
The CE Declaration of Conformity is available on our website at
www.sennheiser.com. Before putting devices into operation, please
observe the respective country-specific regulations!

Manufacturer declarations
RS 195 | 35
Statements regarding FCC and Industry Canada
This device complies with Part 15 of the FCC Rules and with RSS-210 of
Industry Canada. Operation is subject to the following two conditions:
(1) this device may not cause harmful interference, and (2) this device
must accept any interference received, including interference that may
cause undesired operation.
This equipment has been tested and found to comply with the limits for a
Class B digital device, pursuant to Part 15 of the FCC Rules. These limits are
designed to provide reasonable protection against harmful interference in
a residential installation. This equipment generates, uses and can radiate
radio frequency energy and, if not installed and used in accordance with
the instructions, may cause harmful interference to radio communications.
However, there is no guarantee that interference will not occur in a partic-
ular installation. If this equipment does cause harmful interference to
radio or television reception, which can be determined by turning the
equipment off and on, the user is encouraged to try to correct the inter-
ference by one or more of the following measures:
• Reorient or relocate the receiving antenna.
• Increase the separation between the equipment and receiver.
• Connect the equipment into an outlet on a circuit different from that to
which the receiver is connected.
• Consult the dealer or an experienced radio/TV technician for help.
CAN ICES-3 (B)/NMB-3(B)
RF Radiation Exposure Information
Since the radiated output power of this device is far below the FCC radio
frequency exposure limits, it is not subjected to routine RF exposure eval-
uation as per Section 2.1093 of the FCC rules.
Trademarks
Sennheiser is a registered trademark of Sennheiser electronic GmbH & Co. KG.
Other product and company names mentioned in this instruction manual may
be the trademarks or registered trademarks of their respective holders.
SENNHEISER Model No: RS 195
FCC Declaration of Conformity (DoC)
We, Sennheiser Electronic Corporation One Enterprise Drive • Old Lyme • CT 06371 • USA Tel: +1 (860) 434 9190 Fax: +1 (860) 434 1759
declare the above device comply with the requirements of Federal Communications Commission.
This device complies with Part 15 of the FCC rules. Operation is subjected to the following two conditions: 1) This device may not cause harmful interference, and 2) This device must accept any interference received, including interference that may cause undesired operation.
Responsible Party: Greg Beebe

Sennheiser electronic GmbH & Co. KG
Am Labor 1, 30900 Wedemark, Germany www.sennheiser.com
Publ. 03/16, A03